

Page 1
50C
MOTORCYCLE CAMERA &
COMMUNICATION SYSTEM
WITH MESH INTERCOM™
USER’S GUIDE
Version 1.1.2
ENGLISH
Page 2

TABLE OF CONTENTS
1. ABOUT THE 50C 8
1.1 Product Features 8
1.2 Product Details 9
1.3 Package Contents 10
2. INSTALLING THE HEADSET ON YOUR HELMET 11
2.1 Helmet Installation 11
2.1.1 Using the Gear Clamp Unit 11
2.1.2 Using the Clamp Unit 12
2.1.3 Using the Glued Surface Mounting Plate 13
2.2 Installing the Speakers 14
2.3 Installing the Microphone 15
2.3.1 Installing the Wired Boom Microphone 15
2.3.2 Installing the Wired Microphone 16
2.4 Adjust the Angle 18
2.4.1 Using the Gear Clamp Unit 18
2.4.2 Using the Clamp Unit 19
3. GETTING STARTED 20
3.1 Downloadable Sena Software 20
3.1.1 SENA MOTORCYCLES App 20
3.1.2 Sena Camera App 20
3.1.3 Sena Device Manager 21
3.2 Charging 21
3.3 Legend 22
3.4 Powering On and Off 23
3.5 Volume Adjustment 23
3.6 Checking the Battery Level 23
3.7 Low Battery Warning 23
Page 3

TABLE OF CONTENTS CONTINUED
4. CAMERA OPERATION 24
4.1 Camera On or Off 24
4.2 Camera Modes 24
4.3 Video Recording 25
4.4 Video Mode (Default: Normal Recording Mode) 26
4.4.1 Timelapse Video Mode 26
4.4.2 Loop Recording Mode 26
4.5 Taking Photos (Default: Normal Recording
Mode) 26
4.5.1 Single Shot Mode 26
4.5.2 Burst Shot Mode 26
4.6 Video Tagging 27
4.7 Formatting SD Card 27
4.8 Changing the Wi-Fi Channel (Default: 5 GHz) 28
5. PAIRING THE HEADSET WITH OTHER
BLUETOOTH DEVICES 29
5.1 Phone Pairing 29
5.1.1 Initially Pairing the 50C 29
5.1.2 Pairing When the 50C is Turned Off 30
5.1.3 Pairing When the 50C is Turned On 30
5.2 Second Mobile Phone Pairing - Second Mobile
Phone, GPS, and SR10 31
5.3 GPS Pairing 32
5.4 Advanced Selective Pairing: Hands-Free or
A2DP Stereo 32
5.4.1 Phone Selective Pairing - Hands-Free Profile 32
5.4.2 Media Selective Pairing - A2DP Profile 33
6. MOBILE PHONE USAGE 34
6.1 Making and Answering Calls 34
6.2 Siri and Google Assistant 34
Page 4

TABLE OF CONTENTS CONTINUED
6.3 Speed Dialing 35
6.3.1 Assigning Speed Dial Presets 35
6.3.2 Using Speed Dial Presets 35
7. STEREO MUSIC 36
7.1 Playing Music with Bluetooth Devices 36
7.2 Music Sharing 36
7.2.1 Bluetooth Intercom Music Sharing 37
7.2.2 Mesh Intercom Music Sharing 37
8. MESH INTERCOM 38
8.1 What is Mesh Intercom? 38
8.1.1 Open Mesh 39
8.1.2 Group Mesh 39
8.2 Starting Mesh Intercom 40
8.3 Using the Mesh in Open Mesh 40
8.3.1 Channel Setting (Default: channel 1) 40
8.4 Using Mesh in Group Mesh 41
8.4.1 Creating a Group Mesh 41
8.4.2 Joining an Existing Group Mesh 42
8.5 Enable/Disable Mic (Default: Enable) 43
8.6 Toggling Open Mesh/Group Mesh 43
8.7 Reset Mesh 43
9. BLUETOOTH INTERCOM 44
9.1 Intercom Pairing 44
9.1.1 Using the Smart Intercom Pairing (SIP) 44
9.1.2 Using the Button 45
9.2 Last-Come, First-Served 46
9.3 Two-Way Intercom 47
Page 5

TABLE OF CONTENTS CONTINUED
9.4 Multi-Way Intercom 48
9.4.1 Starting a Three-Way Intercom Conference 48
9.4.2 Starting a Four-Way Intercom Conference 49
9.4.3 Ending Multi-Way Intercom 49
9.5 Three-Way Conference Phone Call with
Intercom Users 50
9.6 Group Intercom 51
9.7 Mesh Intercom Conference with Bluetooth
Intercom Participant 51
10. UNIVERSAL INTERCOM 53
10.1 Universal Intercom Pairing 53
10.2 Two-Way Universal Intercom 53
10.3 Multi-Way Universal Intercom 54
10.3.1 Three-Way Universal Intercom 54
10.3.2 Four-Way Universal Intercom 55
10.4 Mesh Intercom Conference with Two-way
Universal Intercom Participant 56
11. USING THE FM RADIO 57
11.1 FM Radio On/Off 57
11.2 Seek and Save Radio Stations 57
11.3 Scan and Save Radio Stations 58
11.4 Temporary Station Preset 58
11.5 Navigating Preset Stations 59
12. VOICE COMMAND 60
Page 6

TABLE OF CONTENTS CONTINUED
13. FUNCTION PRIORITY AND FIRMWARE
UPGRADES 62
13.1 Function Priority 62
13.2 Firmware Upgrades 62
13.2.1 Using the WiFi Adapter 62
13.2.2 Using the Sena Device Manager 63
14. CONFIGURATION SETTING 64
14.1 Headset Configuration Menu 64
14.1.1 Delete All Pairings 64
14.1.2 Remote Control Pairing 64
14.2 Software Configuration Setting 65
14.2.1 Headset Language 65
14.2.2 Audio Equalizer (Default: Music Balance) 65
14.2.3 VOX Phone (Default: Enable) 65
14.2.4 VOX Intercom (Default: Disable) 66
14.2.5 VOX Sensitivity (Default: 3) 66
14.2.6 HD Intercom (Default: Enable) 66
14.2.7 HD Voice (Default: Enable) 67
14.2.8 Bluetooth Intercom Audio Multitasking
(Default: Disabled) 67
14.2.9 Intercom-Audio Overlay Sensitivity (Default: 3) 68
14.2.10 Audio Overlay Volume Management
(Default: Disable) 68
14.2.11 Smart Volume Control (Default: Disable) 68
14.2.12 Sidetone (Default: Disable) 68
14.2.13 Voice Prompt (Default: Enable) 68
14.2.14 RDS AF Setting (Default: Disable) 69
14.2.15 FM Station Guide (Default: Enable) 69
14.2.16 Advanced Noise Control™ (Default: Enable) 69
14.3 Camera Configuration Setting 69
14.3.1 Photo Mode (Default: Single Shot Mode) 69
14.3.2 Video Mode (Default: Normal Recording Mode) 69
14.3.3 Video Resolution (Default: 2160P/30fps) 70
14.3.4 Timelapse Interval (Default: 1 sec) 70
14.3.5 Video Microphone Gain (Default: Medium) 70
14.3.6 Date Caption (Default: Off) 70
Page 7

TABLE OF CONTENTS CONTINUED
14.3.7 Smart Audio Mix™ (Always On) 70
14.3.8 Auto Camera Sleep (Default: On) 70
14.3.9 Format SD Card 70
15. TROUBLESHOOTING 71
15.1 Fault Reset 71
15.2 Factory Reset 71
15.3 The Camera’s Warning 72
15.3.1 Memory is Full 72
15.3.2 No microSD Card 72
15.3.3 MicroSD Card Error 72
15.3.4 High Temperature 72
Page 8

1. ABOUT THE 50C
1.1 Product Features
Bluetooth® 5.0
UHD Camera Integrated
Mesh Intercom up to 2 km (1.2 mi)*
Intercom up to 1.6 km (1.0 mi)*
Four-Way Intercom
Smart Audio Mix™
Wi-Fi Enabled
Audio Multitasking™
* in open terrain
50C Motorcycle Camera & Communication System with Mesh Intercom™
| 8
Page 9
1 ABOUT THE 50C
1.2 Product Details
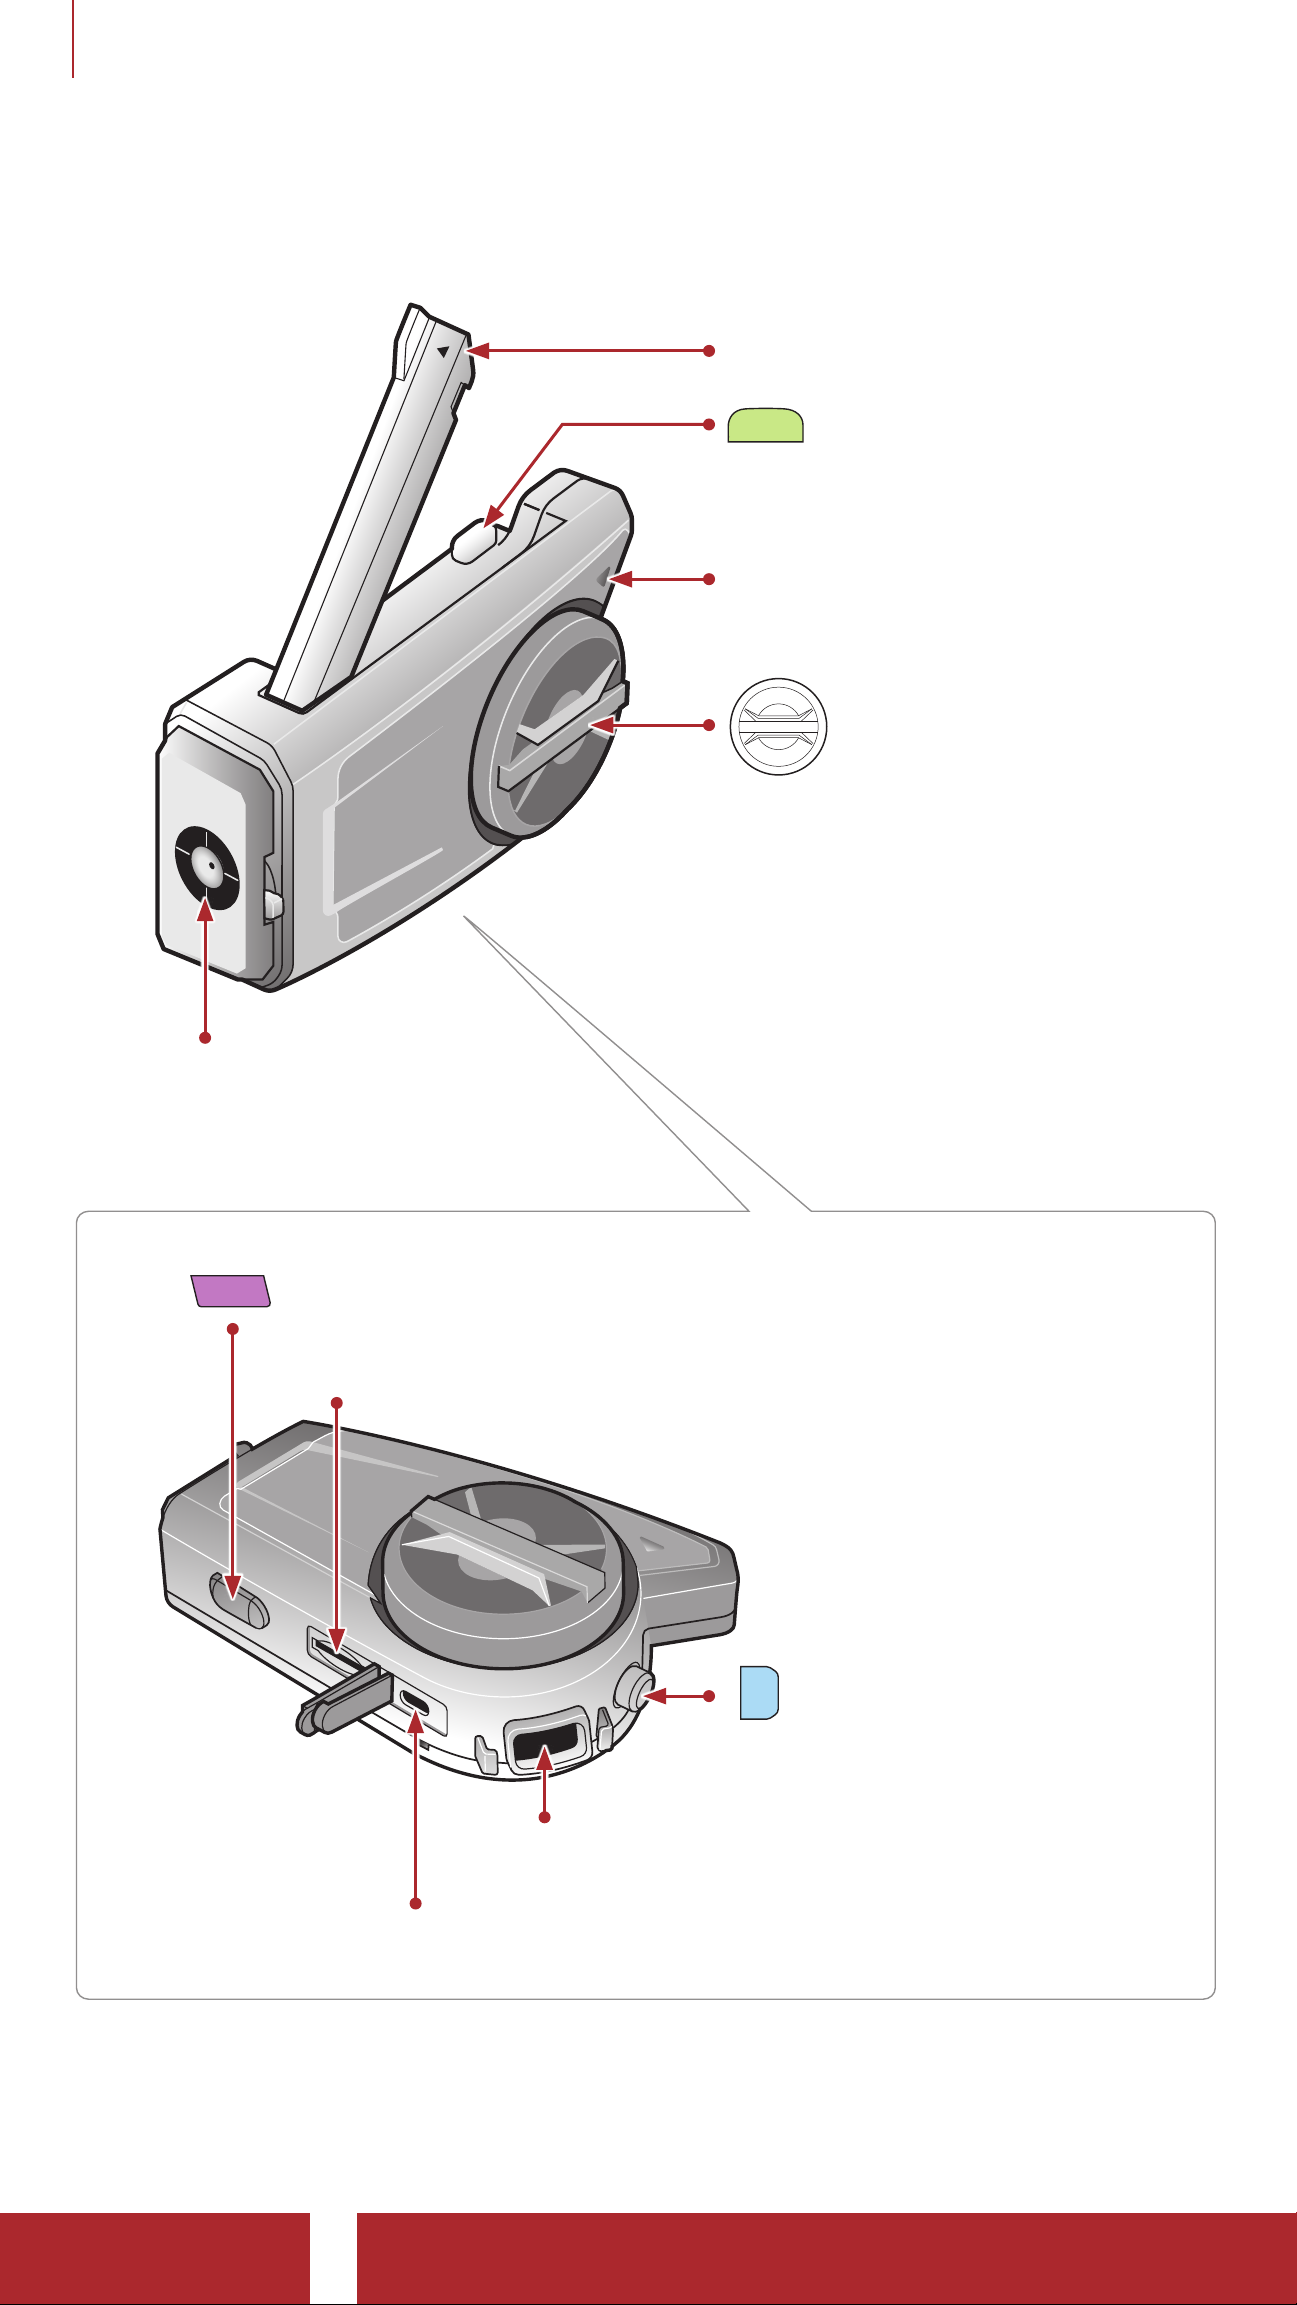
Mesh Antenna
M
Mesh Intercom Button
Status LED
Jog Dial
Lens
Field of view: 120 degrees
Aperture: F/2.4
C
Camera Button
MicroSD Card Slot
P
Phone Button
Speaker and Microphone Port
DC Power Charging & Firmware Upgrade Port
50C Motorcycle Camera & Communication System with Mesh Intercom™
| 9
Page 10
1 ABOUT THE 50C
1.3 Package Contents
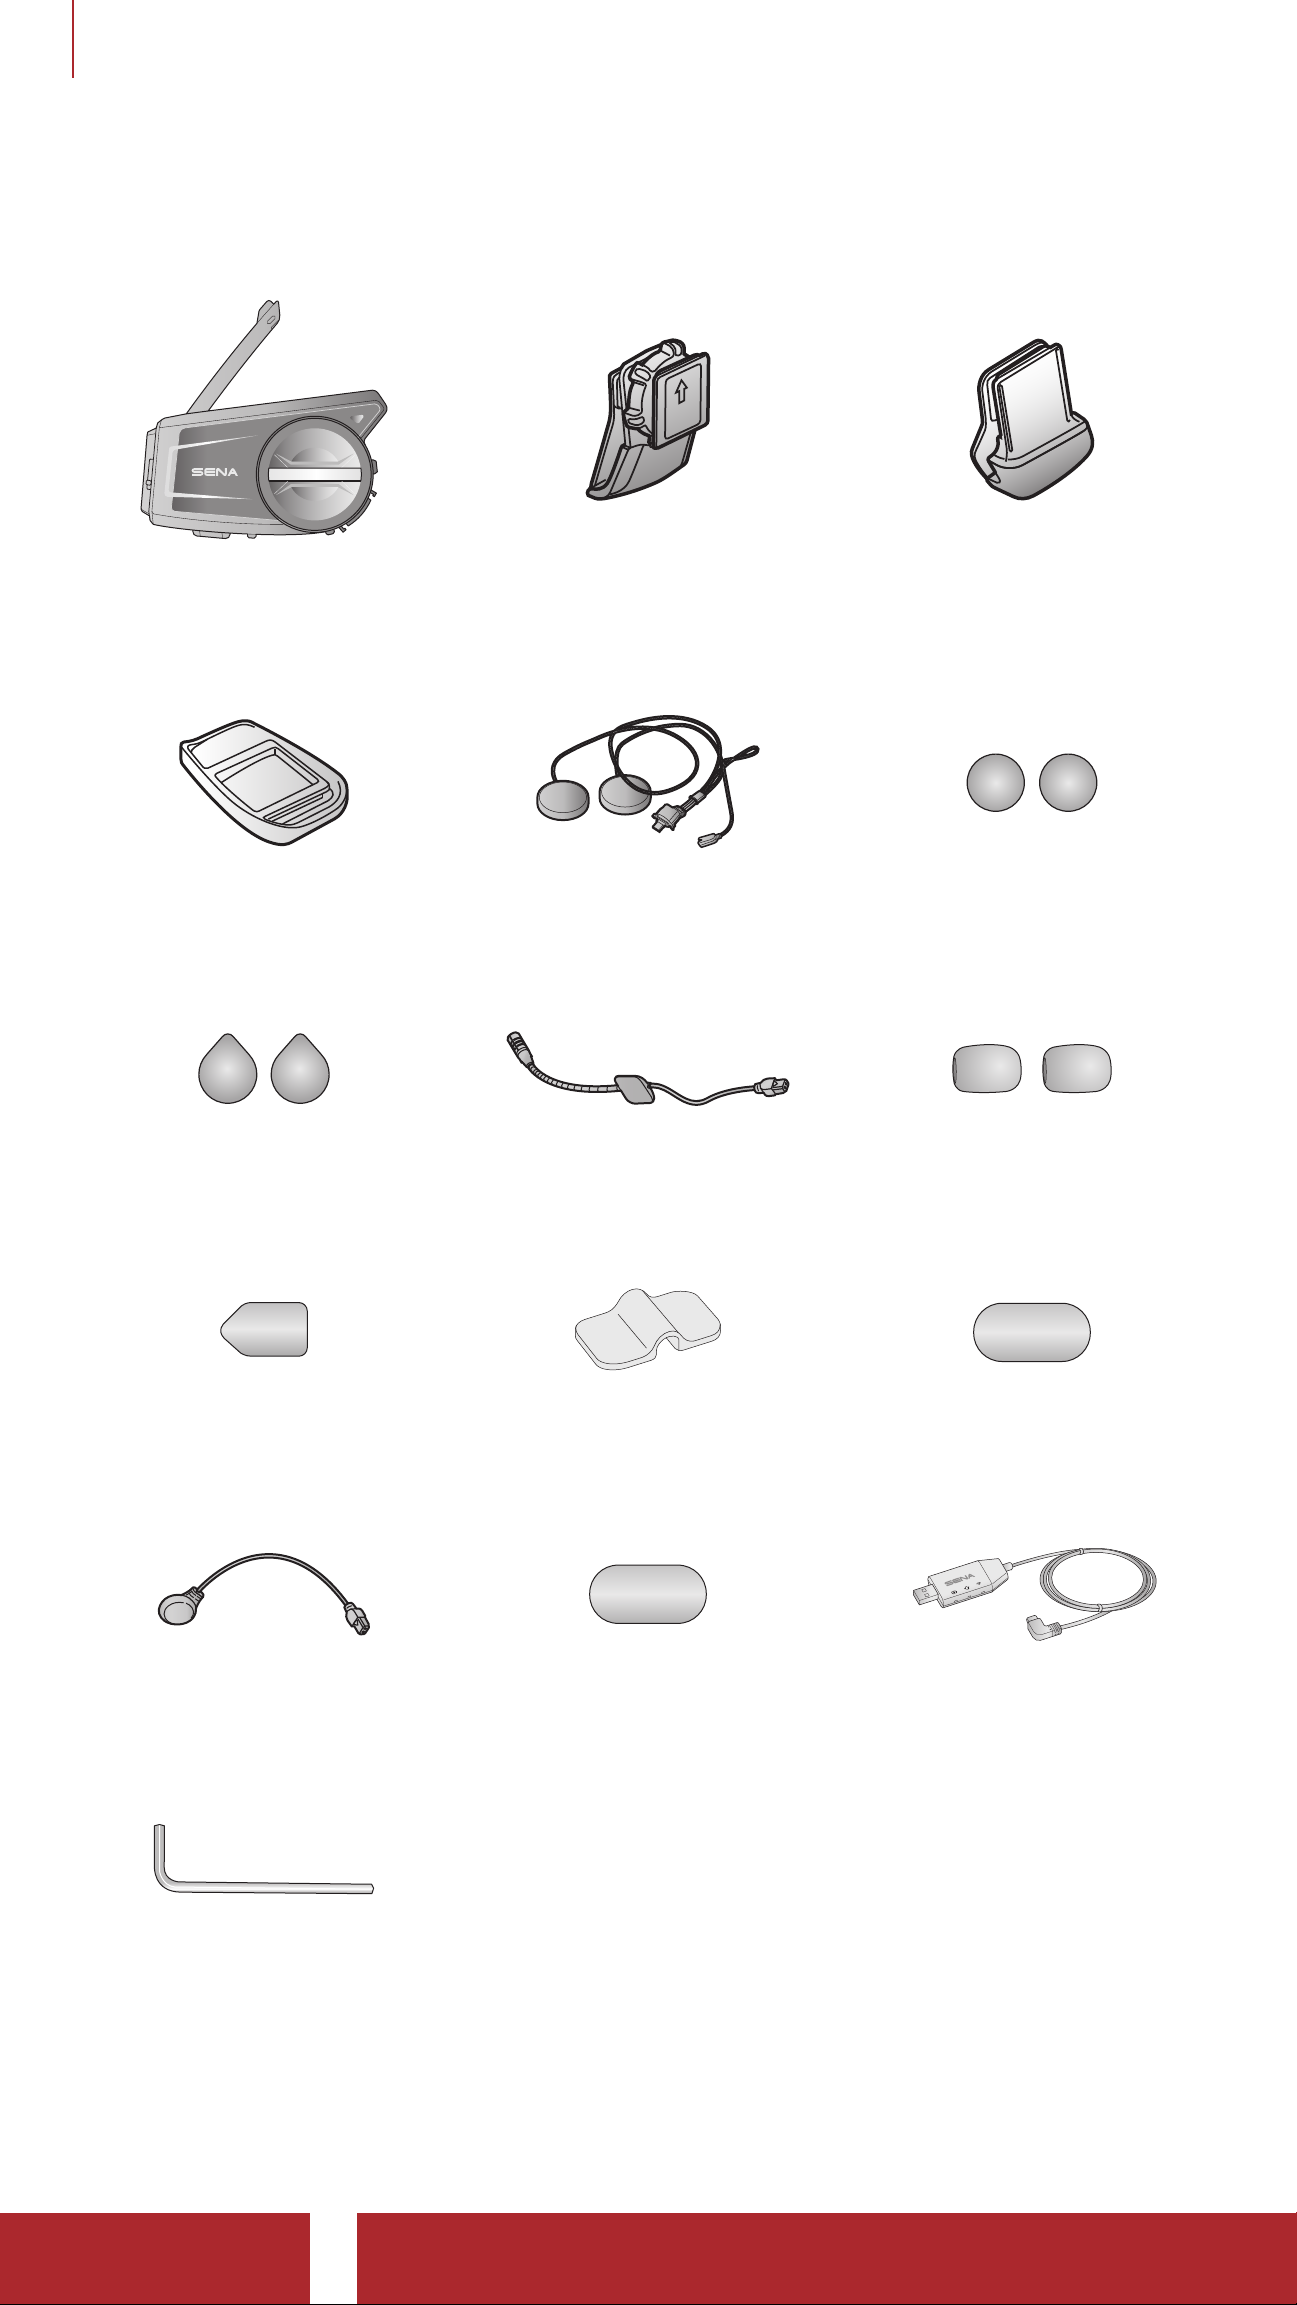
Headset Main Unit Gear Clamp Unit Clamp Unit
Glued Surface
Mounting Plate
Hook and Loop Fasteners
for Speakers (2)
Hook and Loop Fastener
for Boom Microphone
Speakers Speaker Pads (2)
Wired Boom
Microphone
Boom
Microphone Holder
Microphone
Sponges (2)
Hook and Loop
Fastener for Holder
Wired Microphone
Allen Wrench
Hook and Loop Fastener
WiFi Adapter
for Wired Microphone
50C Motorcycle Camera & Communication System with Mesh Intercom™
| 10
Page 11
2. INSTALLING THE HEADSET ON YOUR
HELMET
2.1 Helmet Installation
2.1.1 Using the Gear Clamp Unit
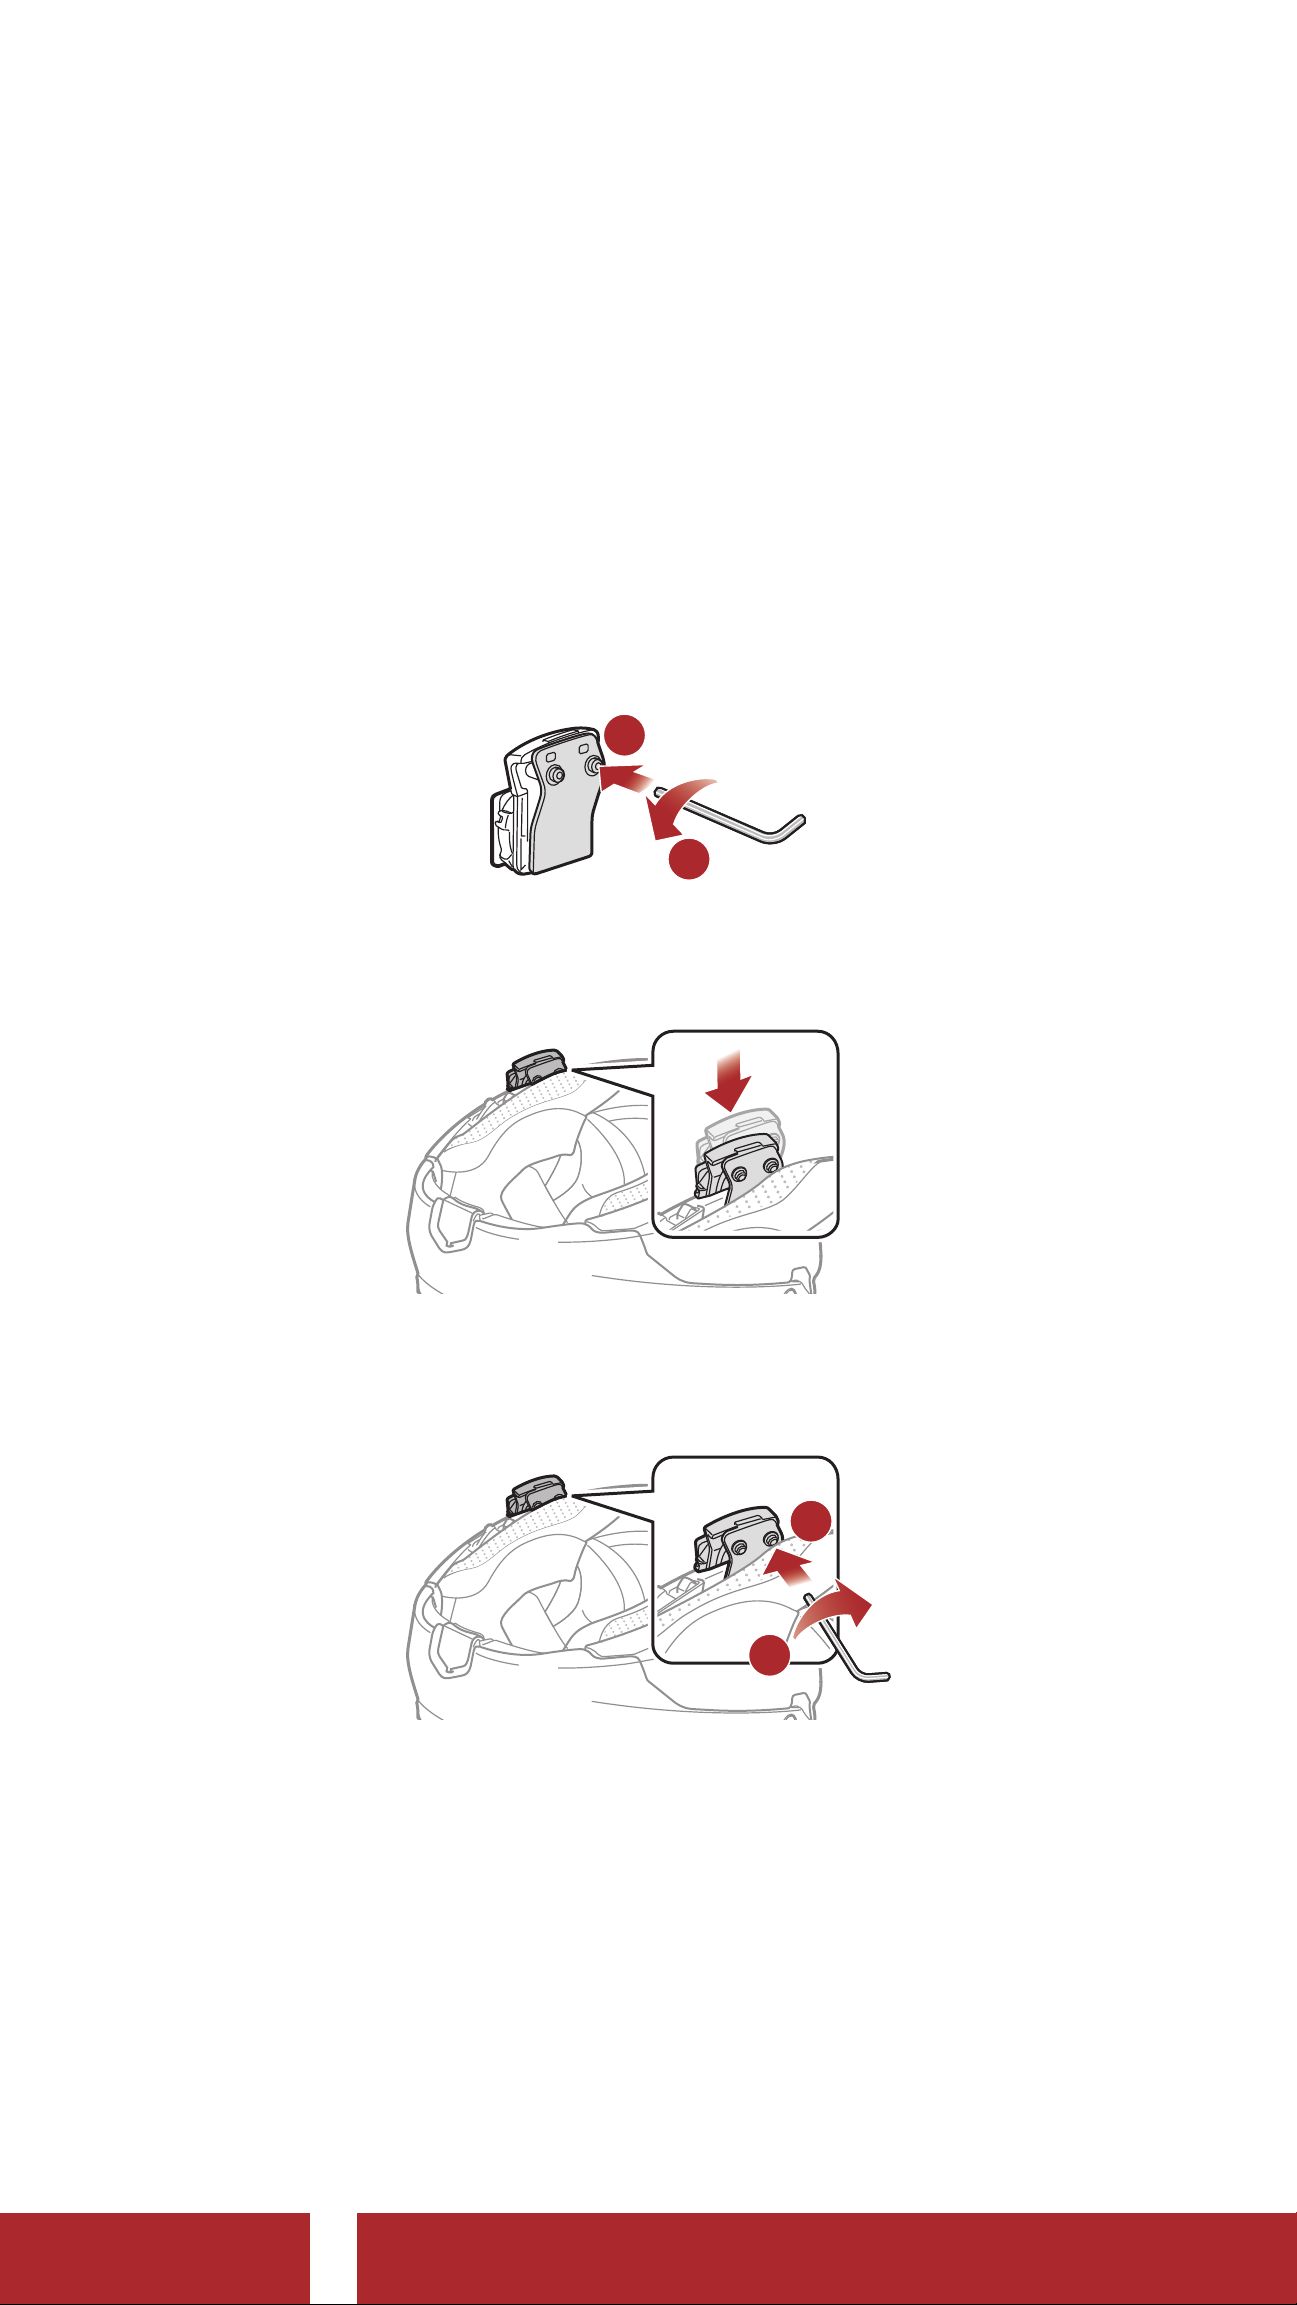
1. Loosen the two screws on the back plate of the clamp unit with the
included allen wrench.
1
2
2. Insert the back plate of the clamp unit between the internal padding
and external shell of the left side of the helmet.
3. Tighten the two screws until the clamp unit is fastened firmly to the
helmet.
2
1
50C Motorcycle Camera & Communication System with Mesh Intercom™
| 11
Page 12
2 INSTALLING THE HEADSET ON YOUR HELMET
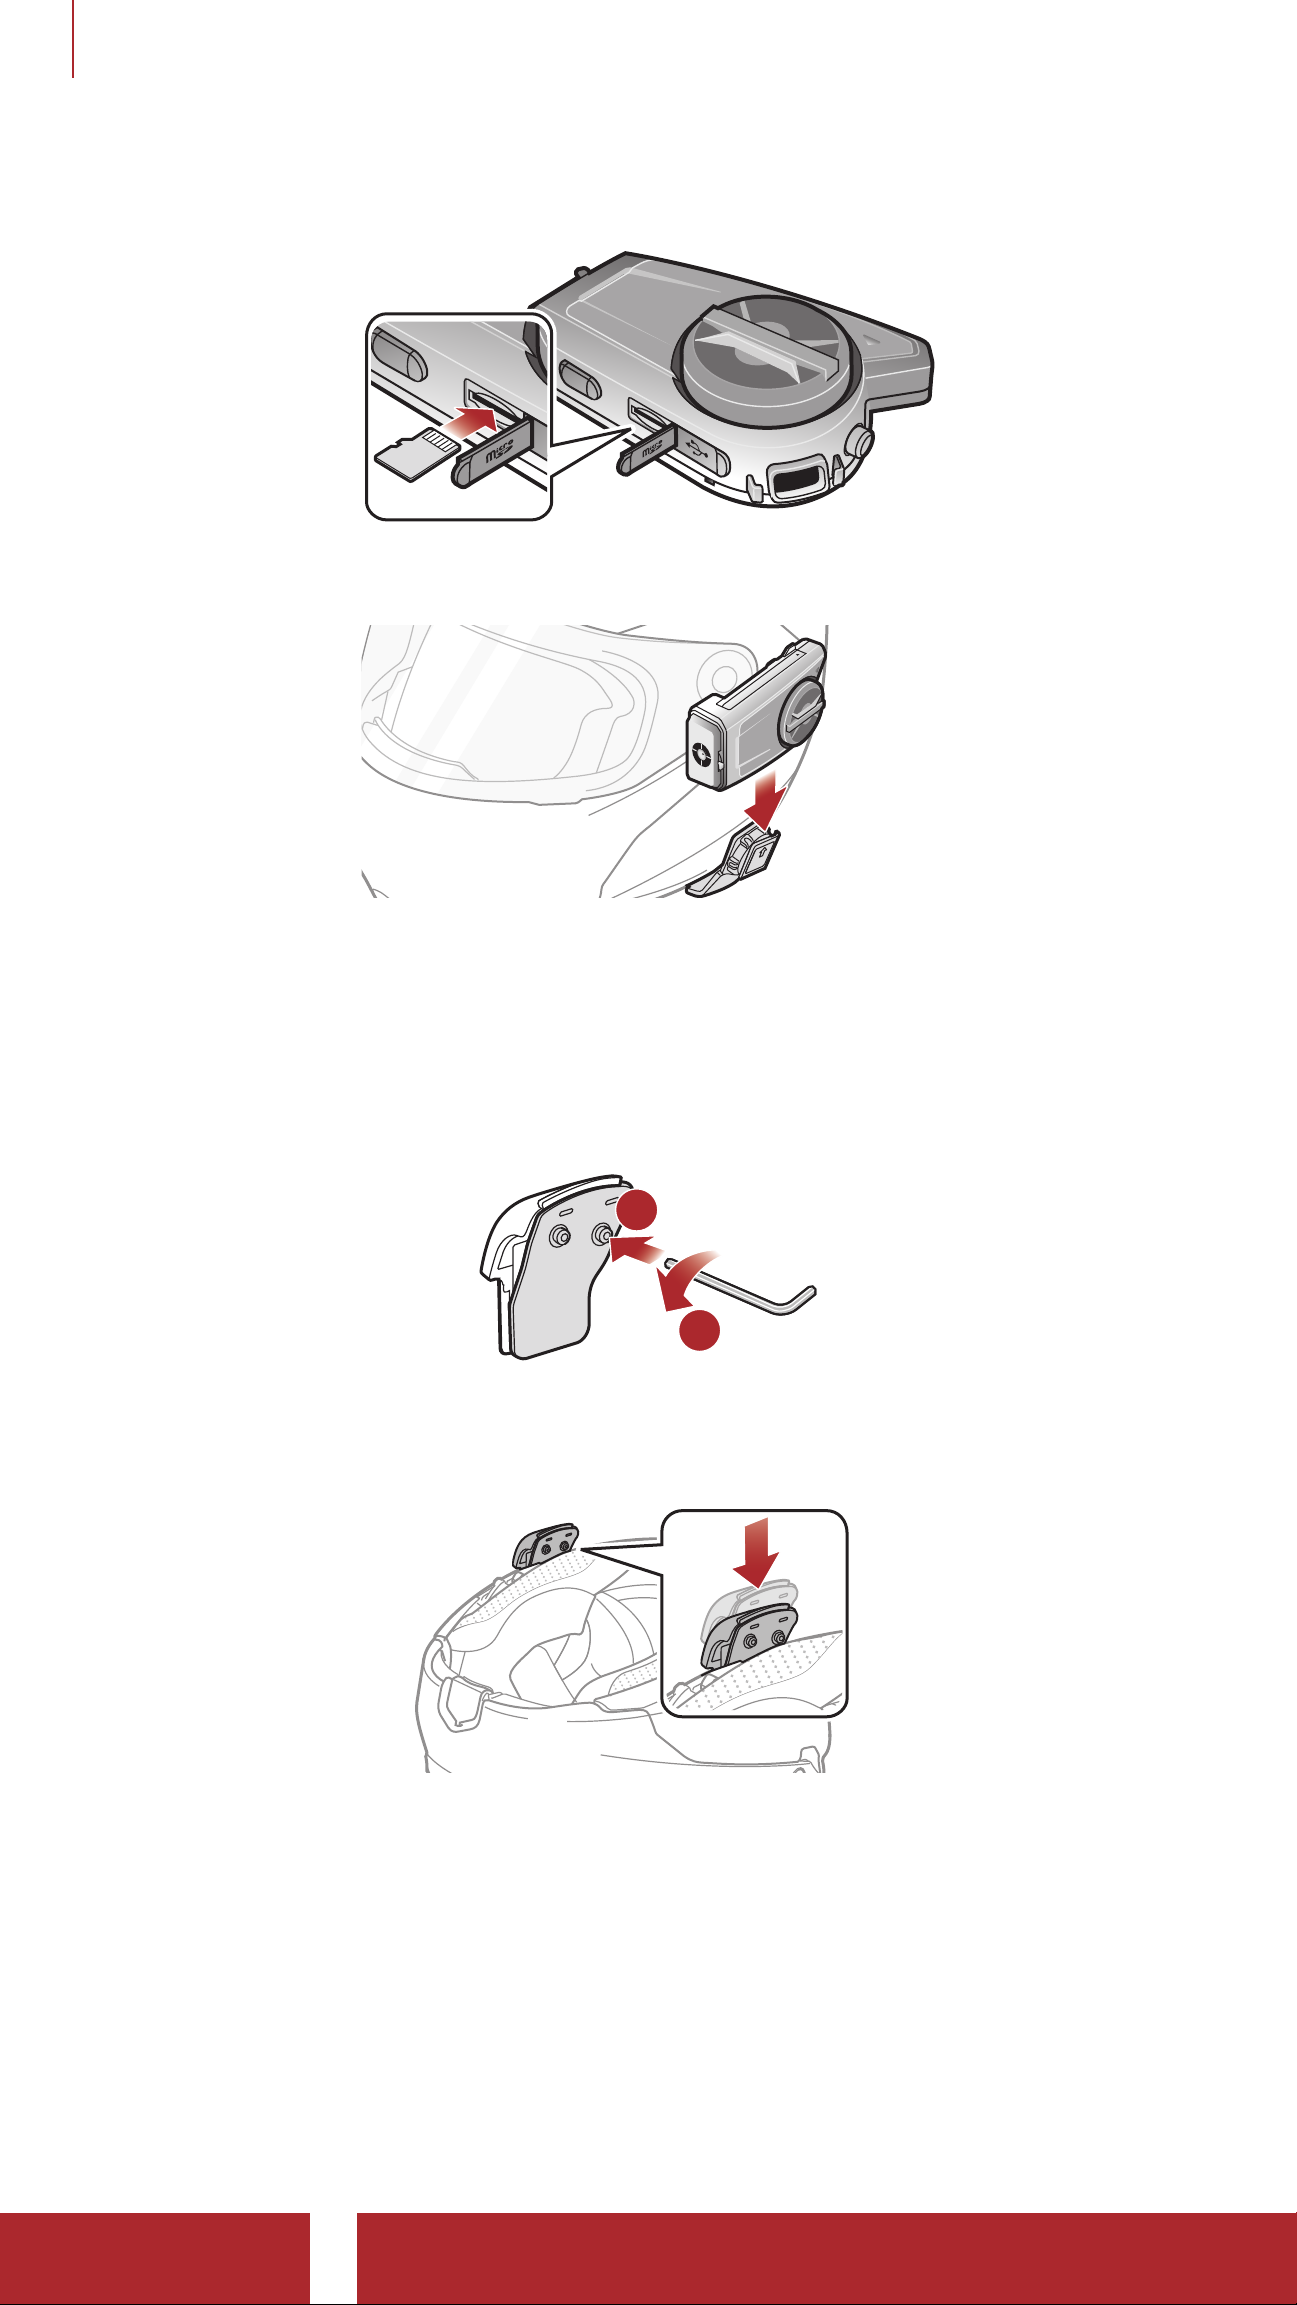
4. Insert a microSD card into the card slot to use the camera.
5. Attach the main unit to the clamp unit until you hear a click.
2.1.2 Using the Clamp Unit
1. Loosen the two screws on the back plate of the clamp unit with the
included allen wrench.
1
2
2. Insert the back plate of the clamp unit between the internal padding
and external shell of the left side of the helmet.
50C Motorcycle Camera & Communication System with Mesh Intercom™
| 12
Page 13
2 INSTALLING THE HEADSET ON YOUR HELMET
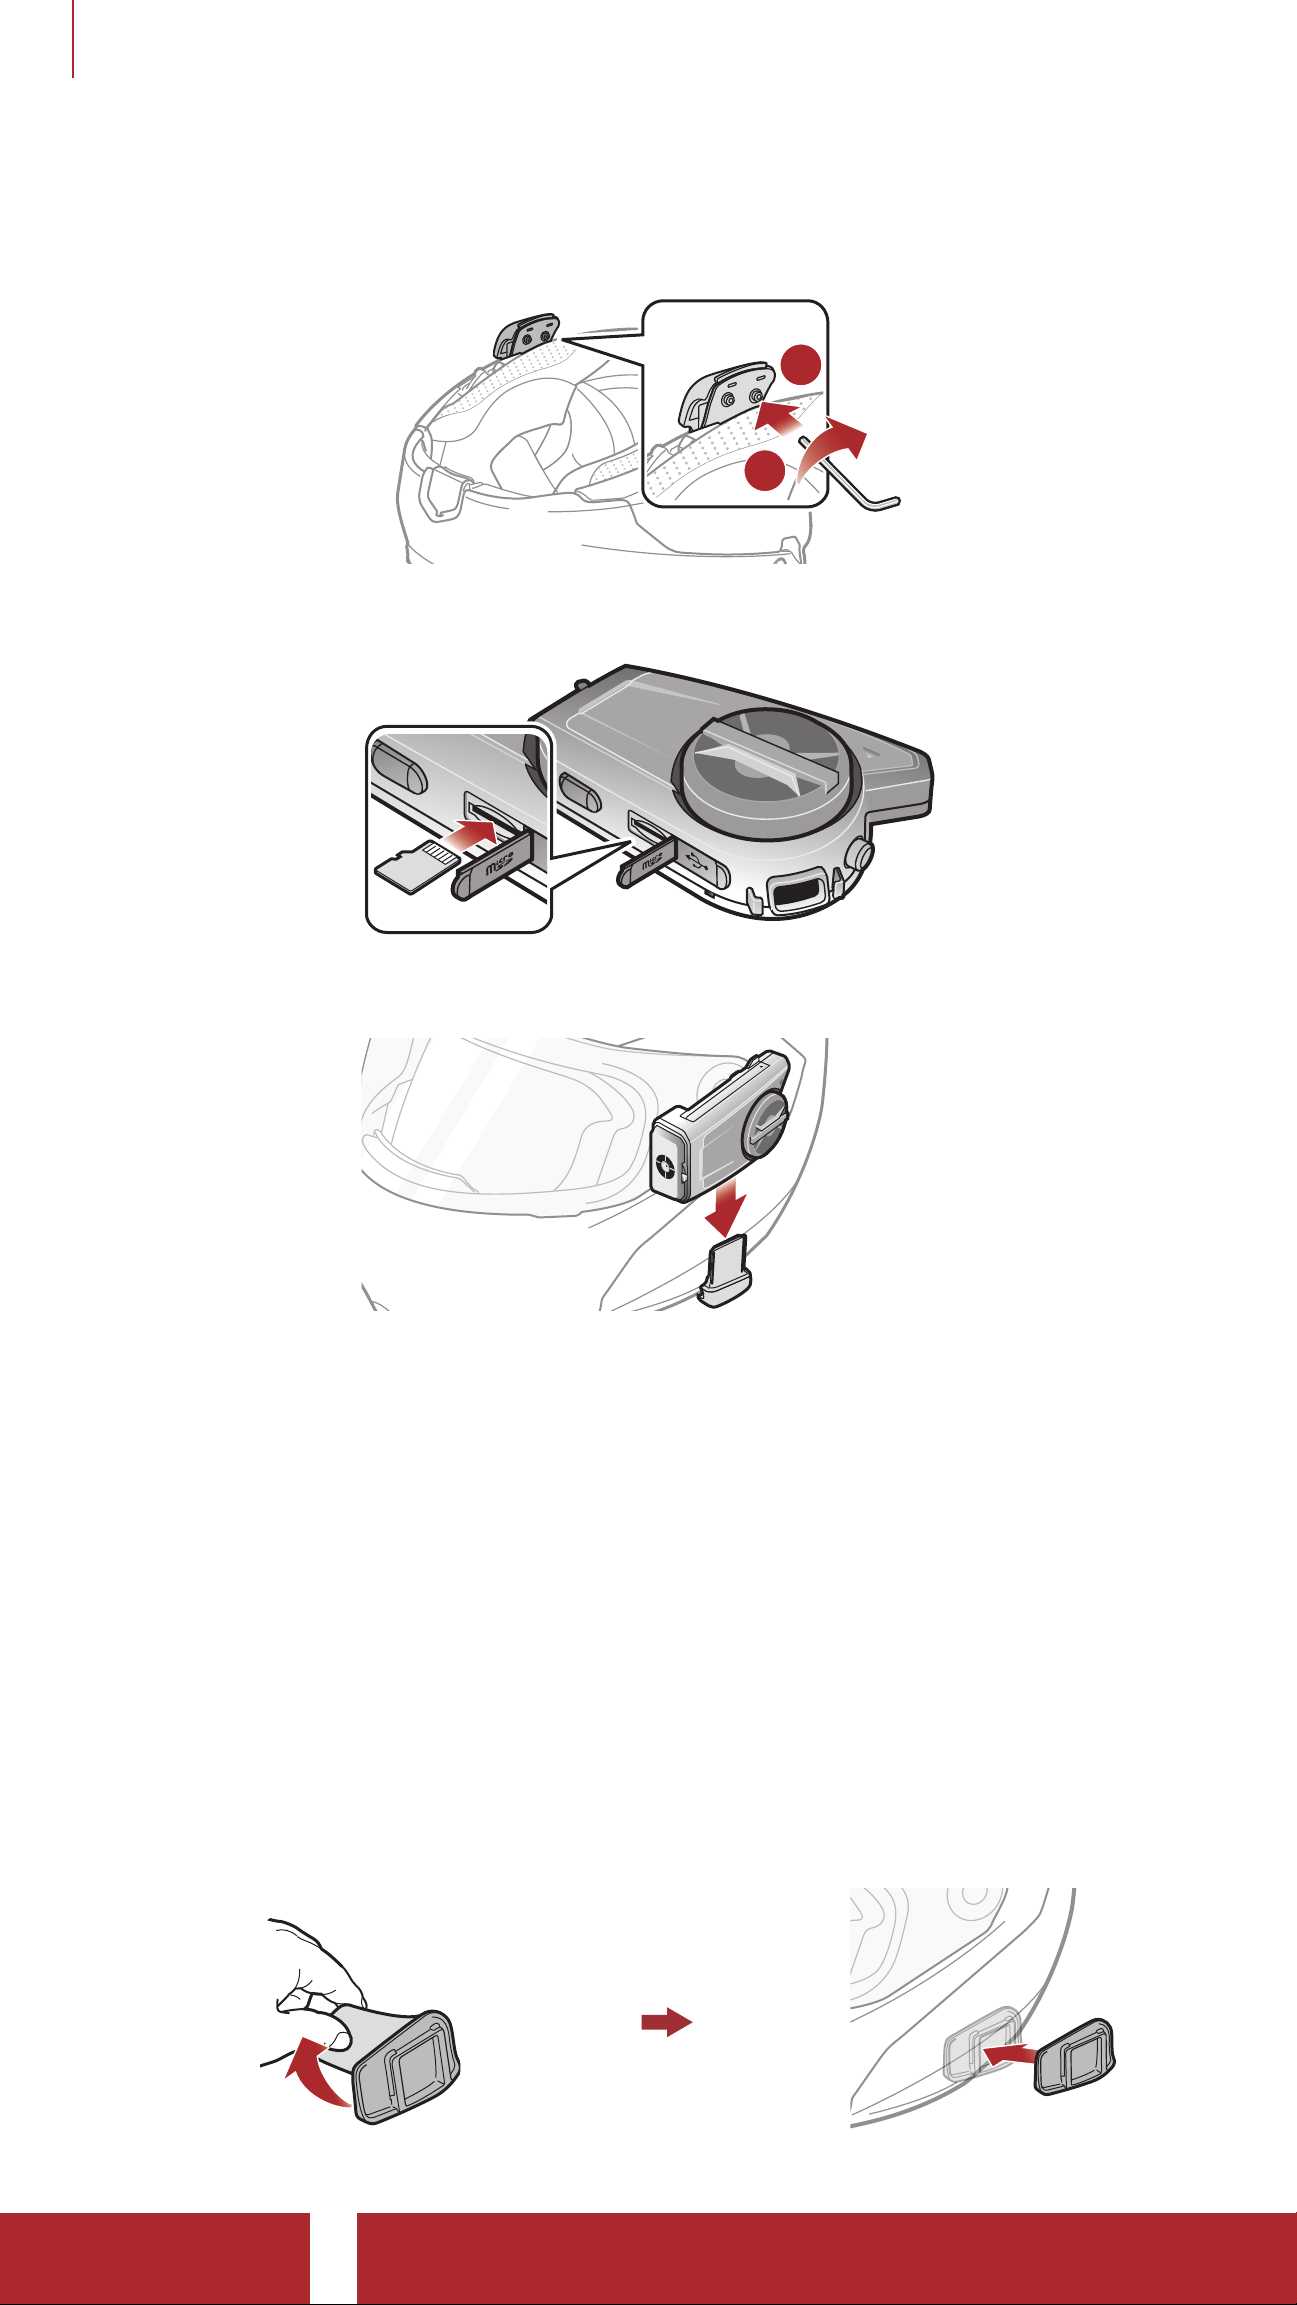
3. Tighten the two screws until the clamp unit is fastened firmly to the
helmet.
1
2
4. Insert a microSD card into the card slot to use the camera.
5. Attach the main unit to the clamp unit until you hear a click.
2.1.3 Using the Glued Surface Mounting Plate
If you cannot install the clamp unit on the helmet, you can use the glued
surface mounting plate to attach the clamp unit to the surface of the
helmet.
1. Clean the area on the left side of the helmet where you will attach
the glued surface mounting plate with a moistened towel and dry
thoroughly.
2. Peel off the cover of the adhesive tape of the glued surface mounting
plate and attach it to the helmet.
50C Motorcycle Camera & Communication System with Mesh Intercom™
| 13
Page 14
2 INSTALLING THE HEADSET ON YOUR HELMET
3. Make sure that the glued surface mounting plate sticks on the helmet
firmly. Maximum adhesion occurs after 24 hours.
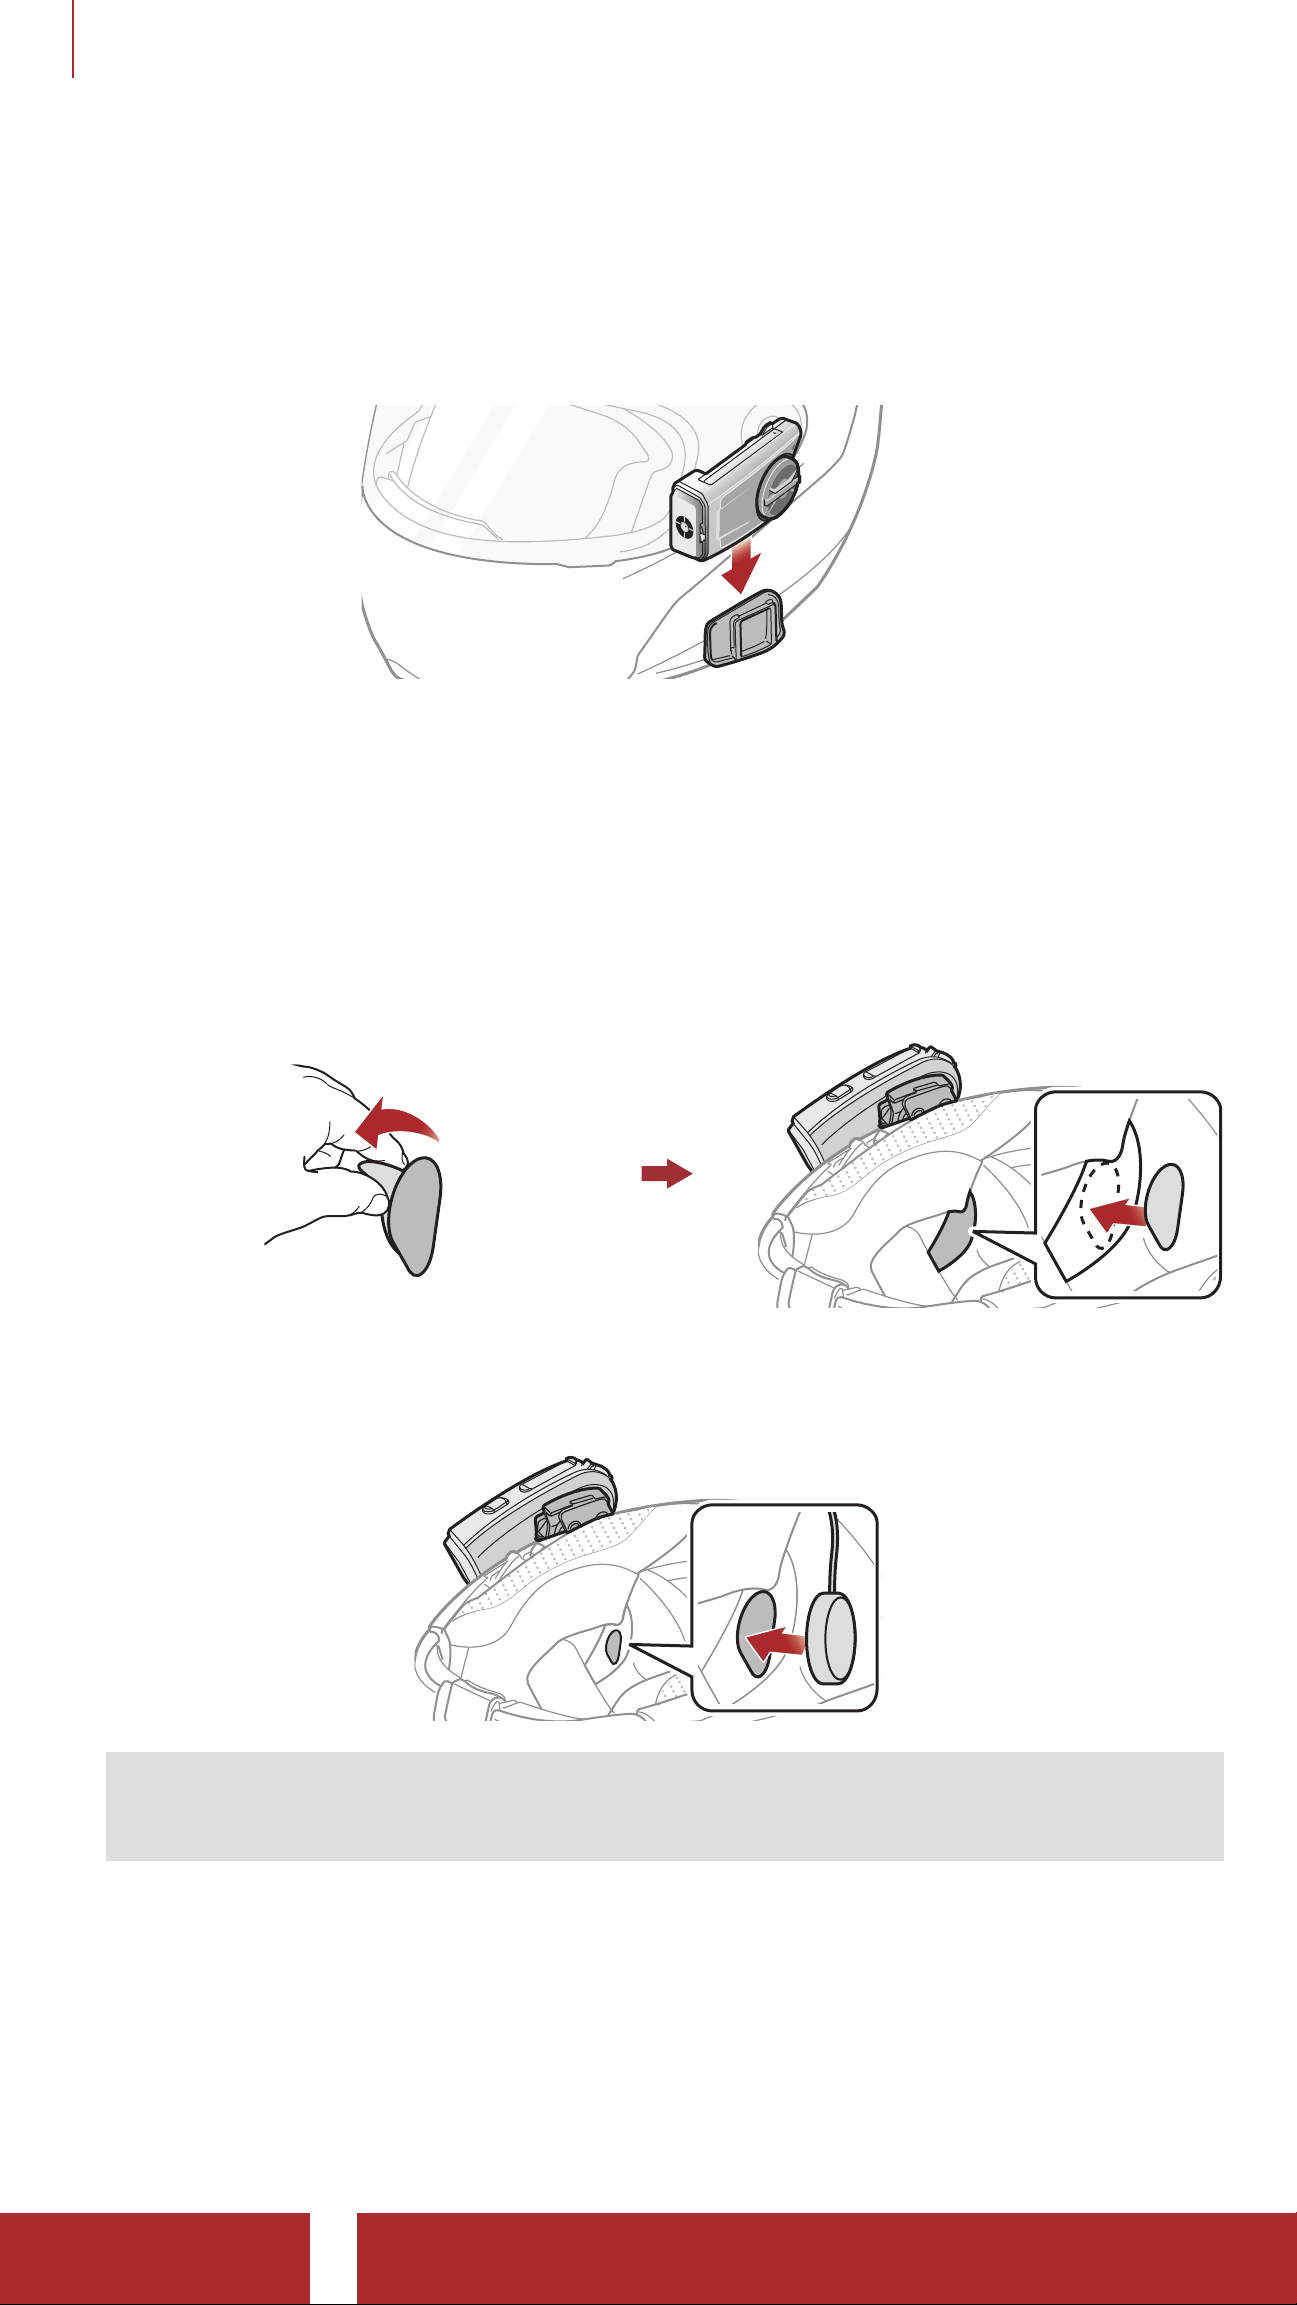
4. Attach the main unit to the glued surface mounting plate until you
hear a click.
2.2 Installing the Speakers
1. Peel off each cover of the hook and loop fasteners for speakers to
expose the adhesive surface. Then, attach the fasteners to the ear
pockets inside the helmet.
2. Attach the speakers to the hook and loop fasteners for speakers
inside the helmet.
Note: If the helmet has deep ear pockets, you can use the speaker
pads to bring the speakers closer to your ears.
50C Motorcycle Camera & Communication System with Mesh Intercom™
| 14
Page 15
2 INSTALLING THE HEADSET ON YOUR HELMET
2.3 Installing the Microphone
2.3.1 Installing the Wired Boom Microphone
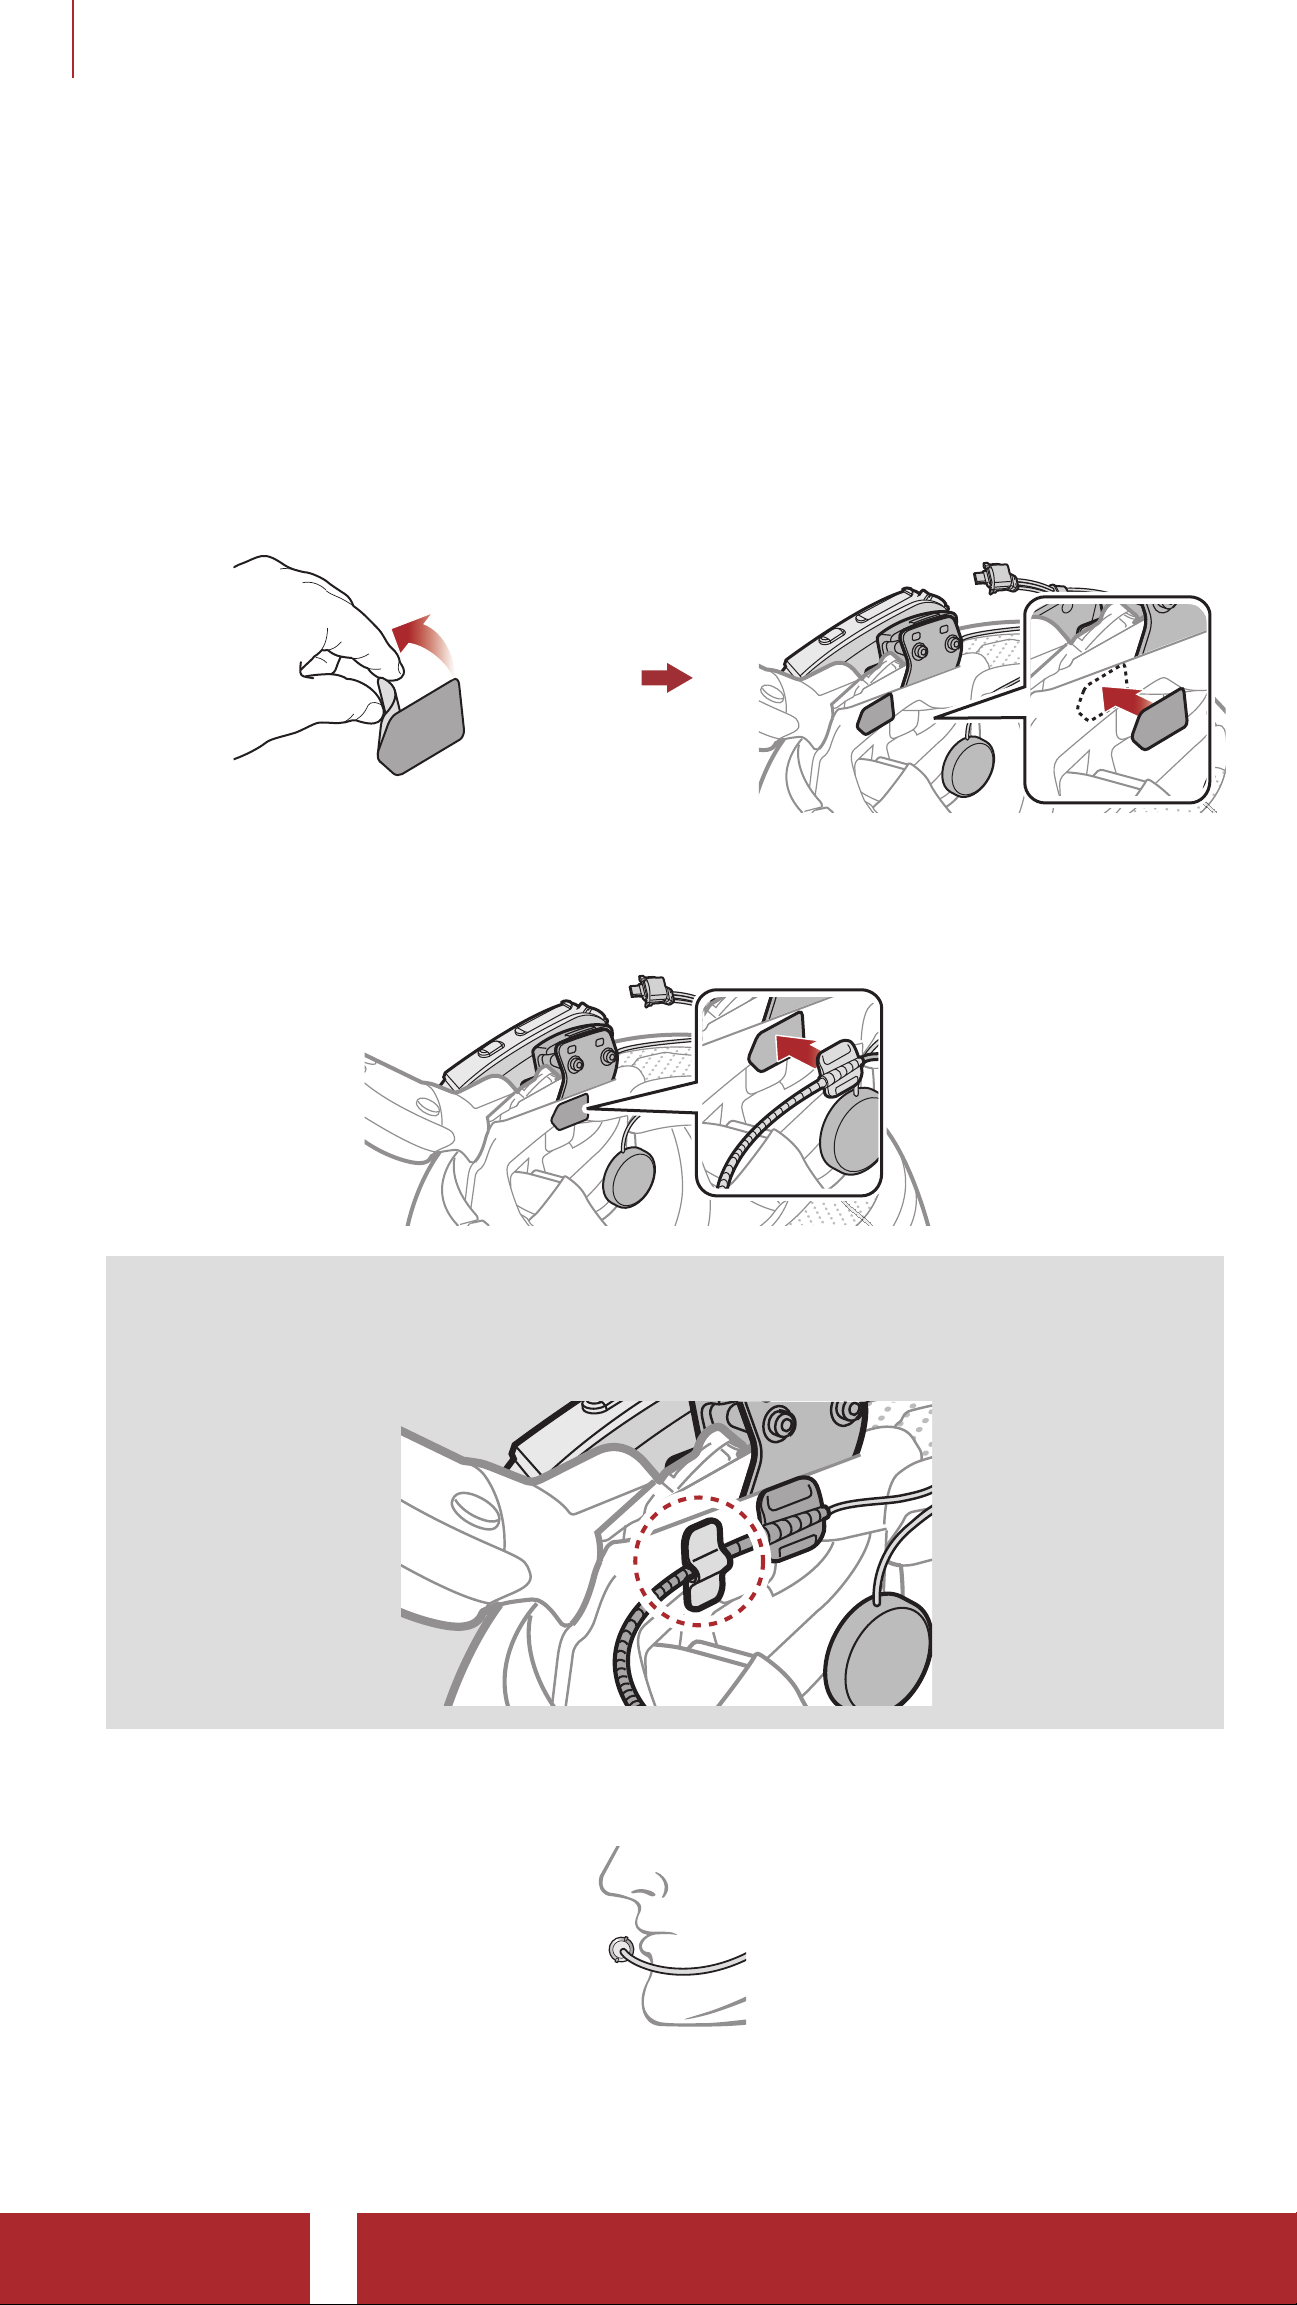
1. Peel off the cover of the hook and loop fastener for wired boom
microphone to expose the adhesive tape. Then, attach the hook and
loop fastener on the inside surface of the left external shell.
2. Attach the wired boom microphone’s mounting plate to the hook and
loop fastener.
Note: You can use the boom microphone holder after attaching
the hook and loop fastener for boom microphone holder on it to
ensure secure installation.
3. Position the microphone close to your mouth.
50C Motorcycle Camera & Communication System with Mesh Intercom™
| 15
Page 16
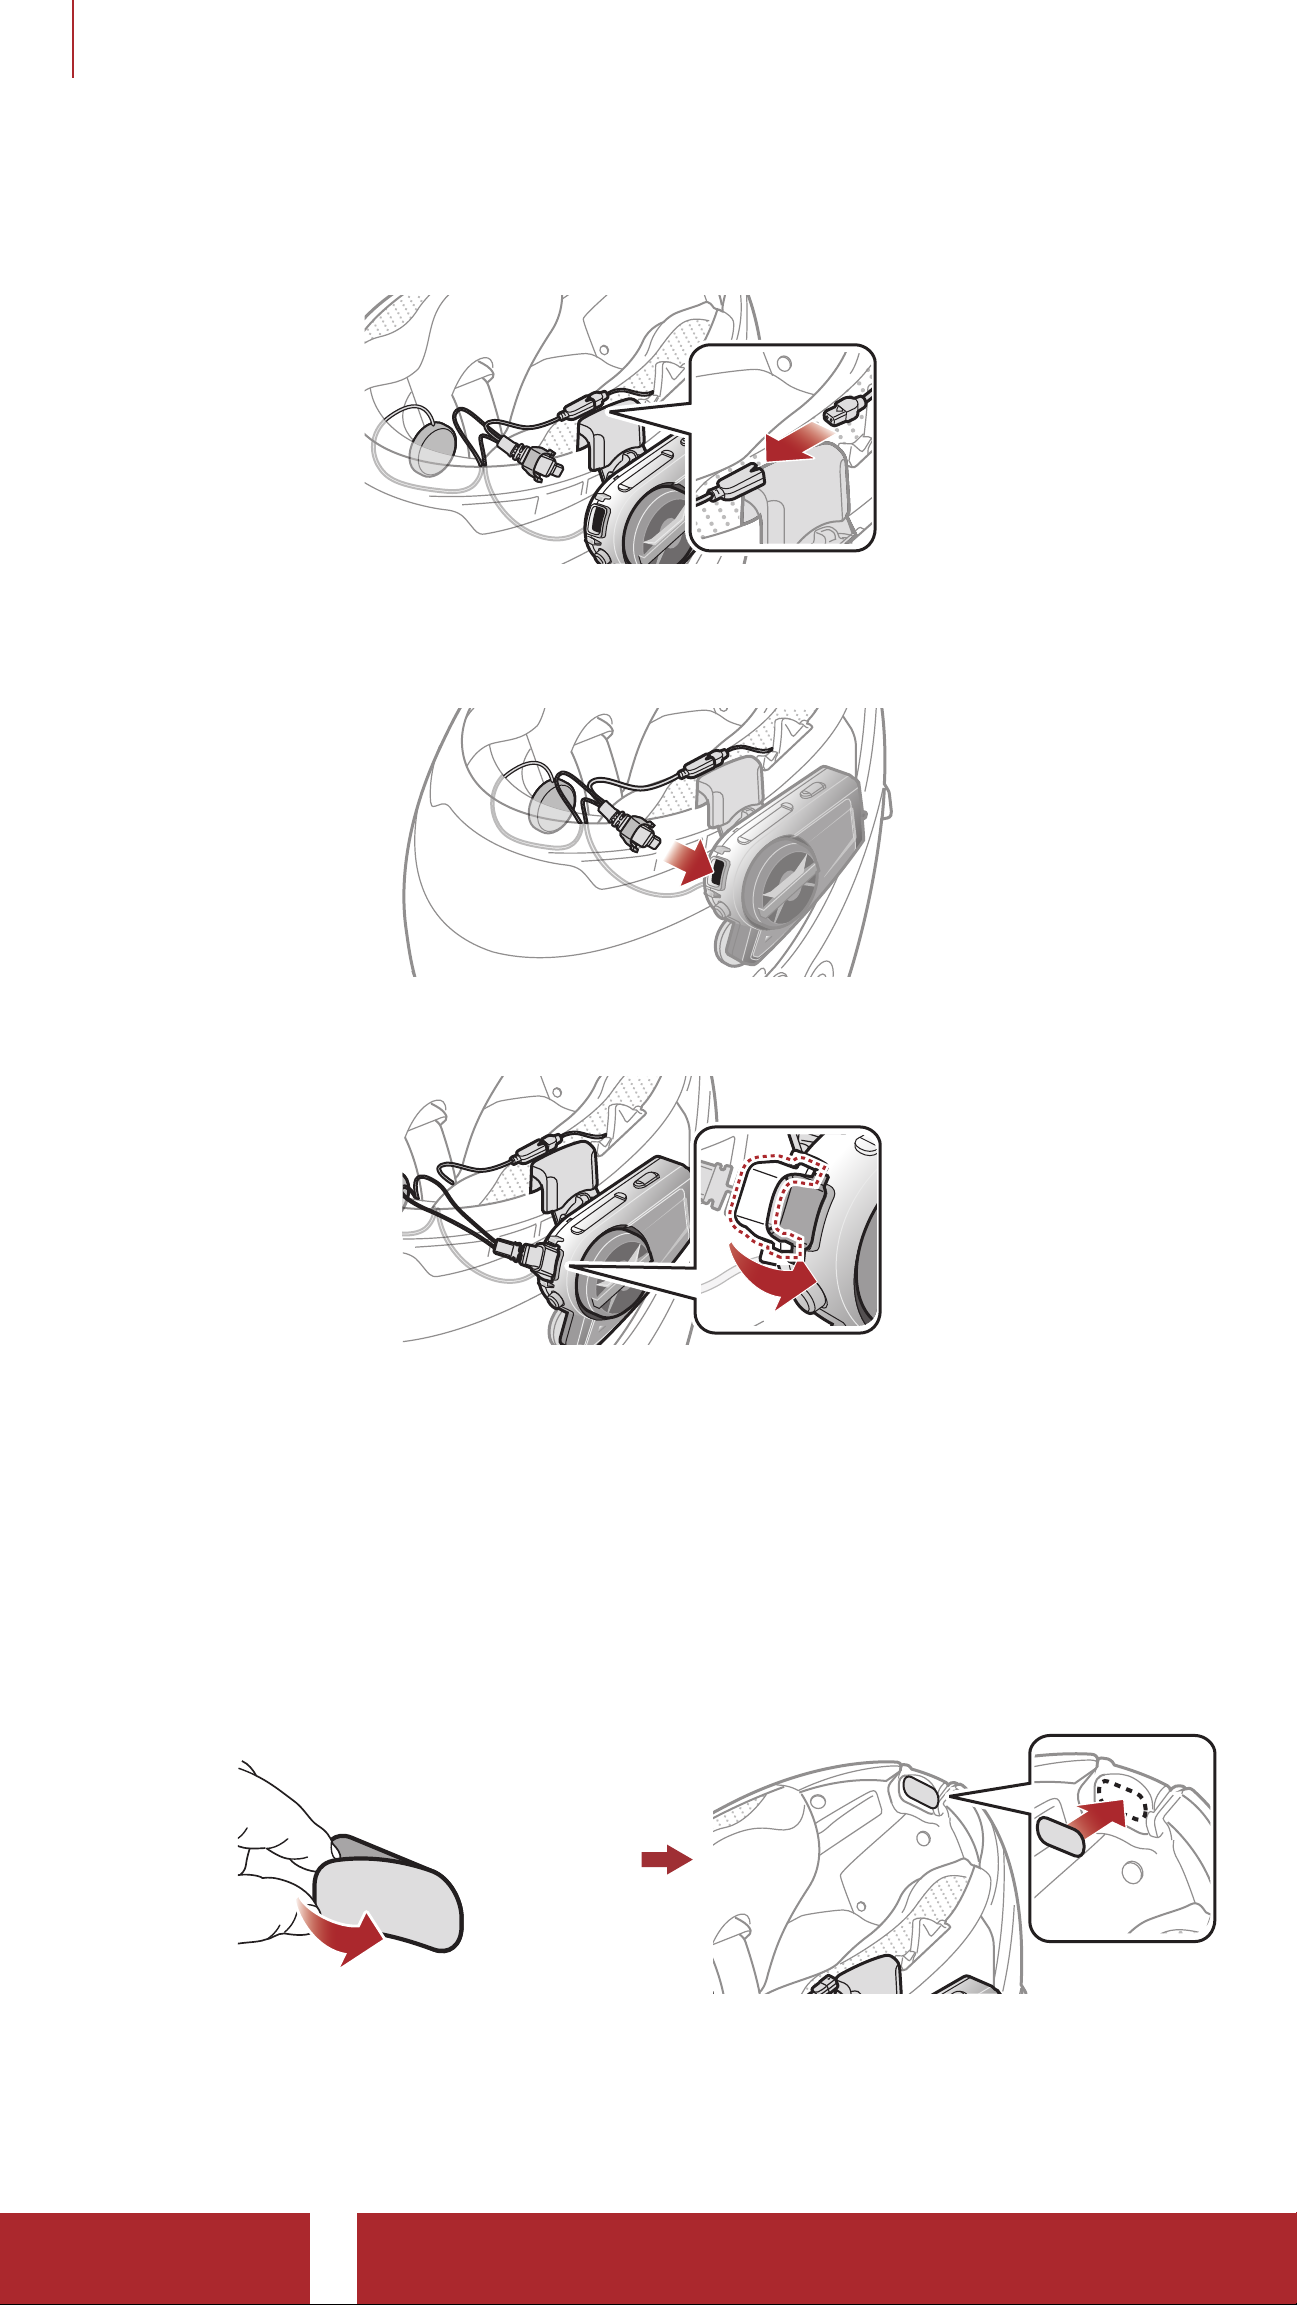
2 INSTALLING THE HEADSET ON YOUR HELMET
4. Align the arrows on the microphone and speaker cables and insert
the microphone cable into the microphone connector.
5. Insert the speaker cable into the speaker and microphone port to
connect it to the main unit.
6. Close the cover of the speaker cable to lock the cable to the port.
2.3.2 Installing the Wired Microphone
If you have a full face helmet, you can use the wired microphone.
1. Peel off the cover of the hook and loop fastener for wired microphone
to expose the adhesive tape. Then, attach the hook and loop fastener
on the inside of the helmet’s chin guard.
50C Motorcycle Camera & Communication System with Mesh Intercom™
| 16
Page 17
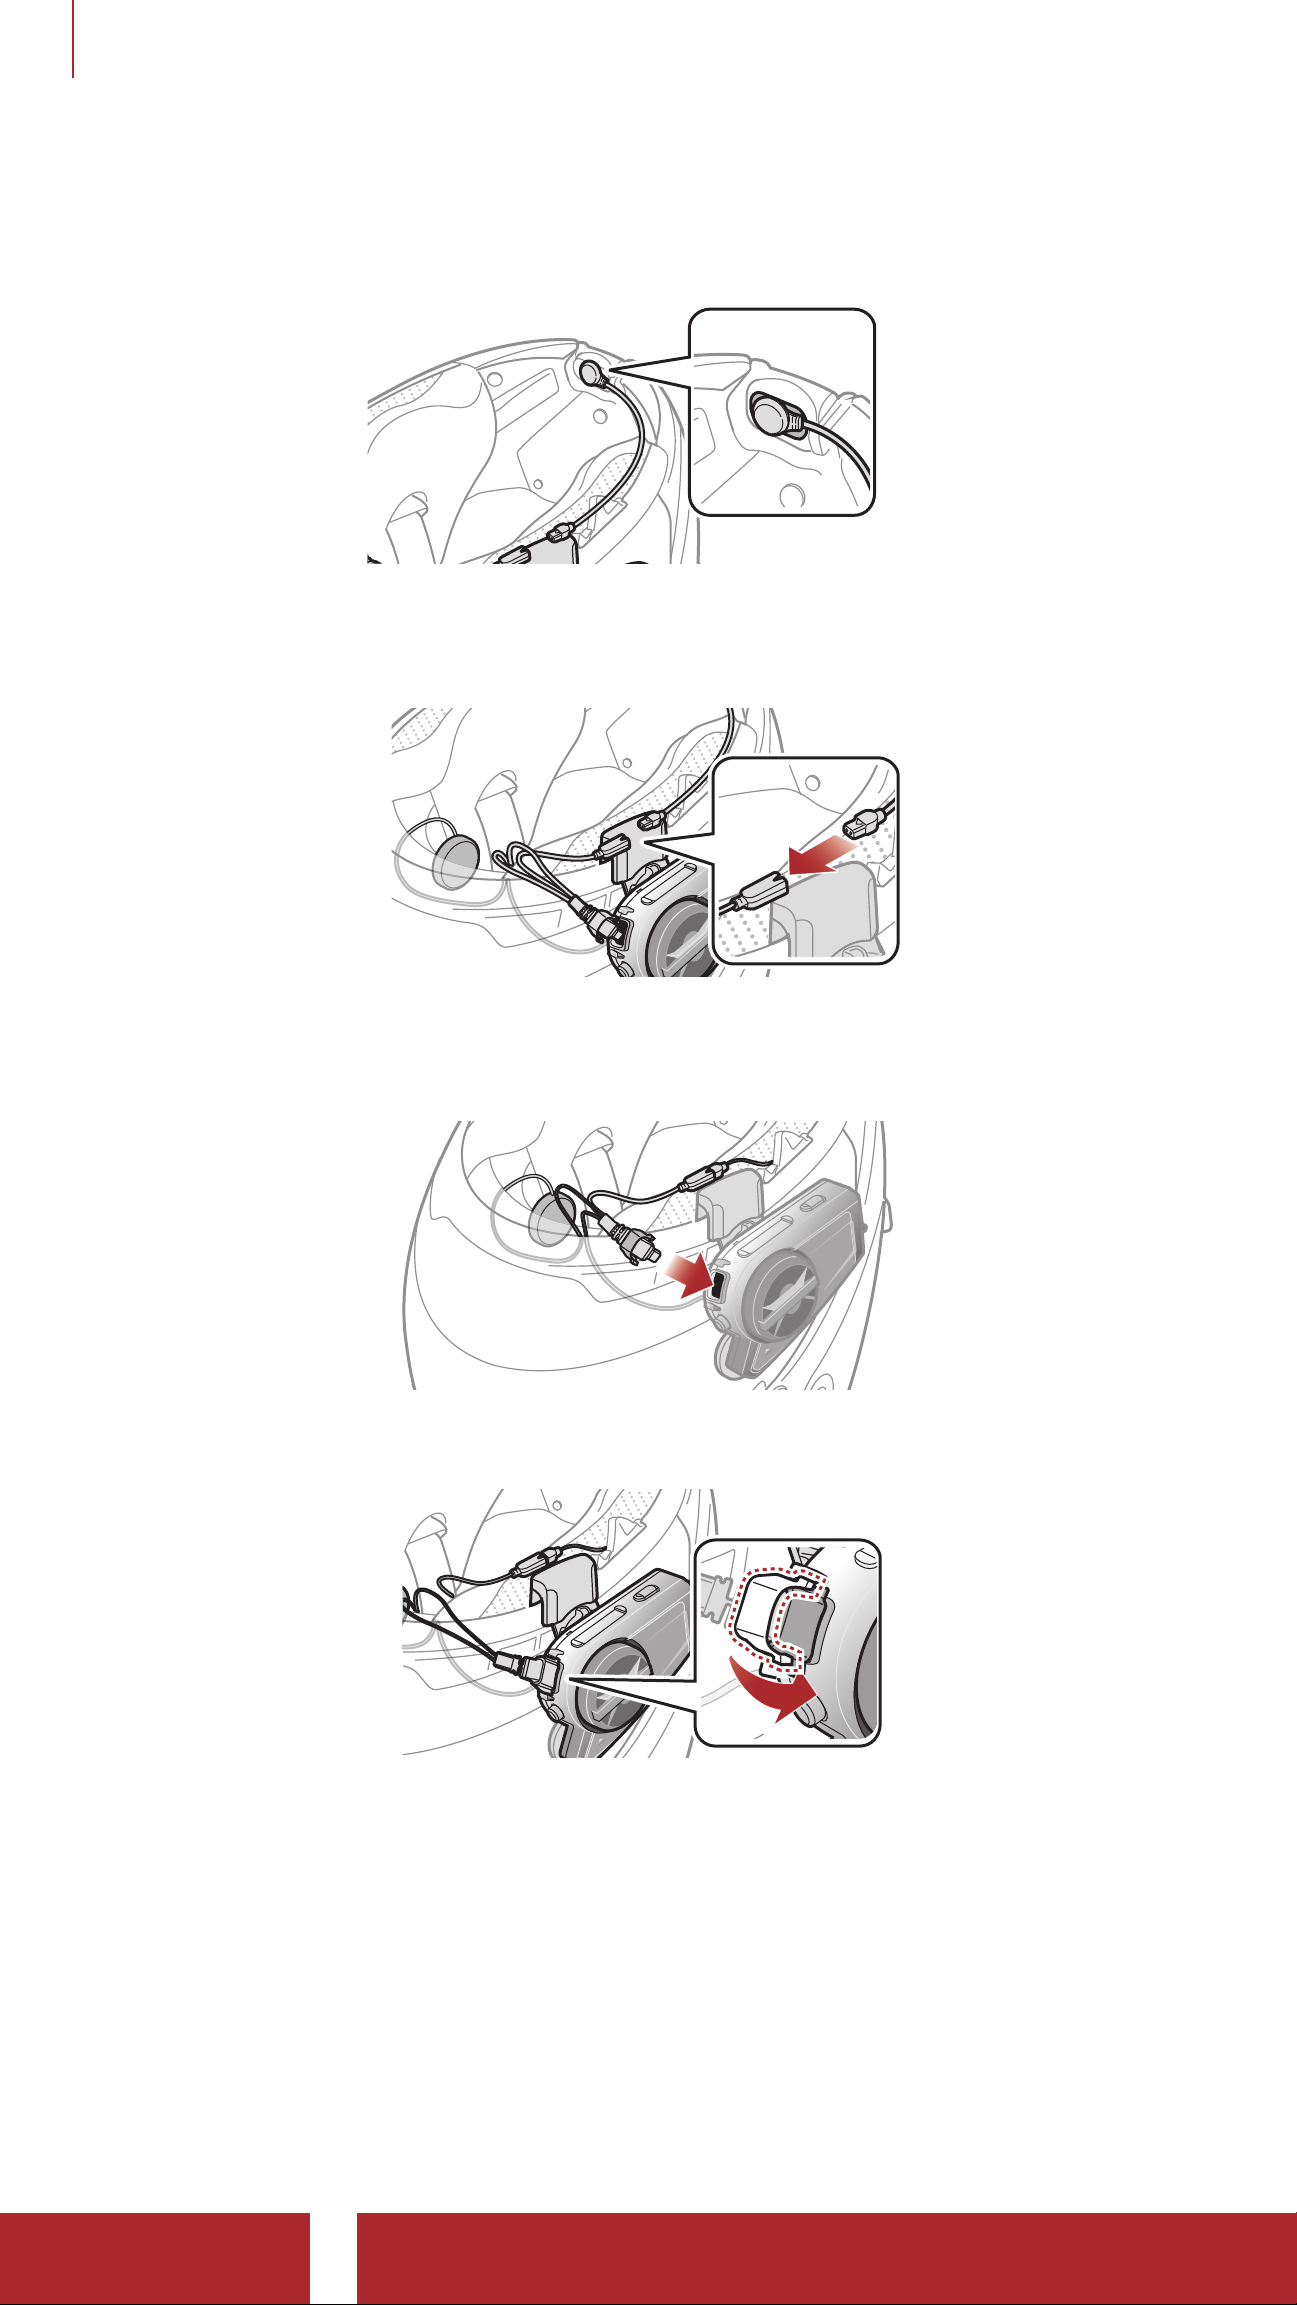
2 INSTALLING THE HEADSET ON YOUR HELMET
2. Attach the wired microphone to the hook and loop fastener for wired
microphone.
3. Align the arrows on the microphone and speaker cables and insert
the microphone cable into the microphone connector.
4. Insert the speaker cable into the speaker and microphone port to
connect it to the main unit.
5. Close the cover of the speaker cable to lock the cable to the port.
50C Motorcycle Camera & Communication System with Mesh Intercom™
| 17
Page 18
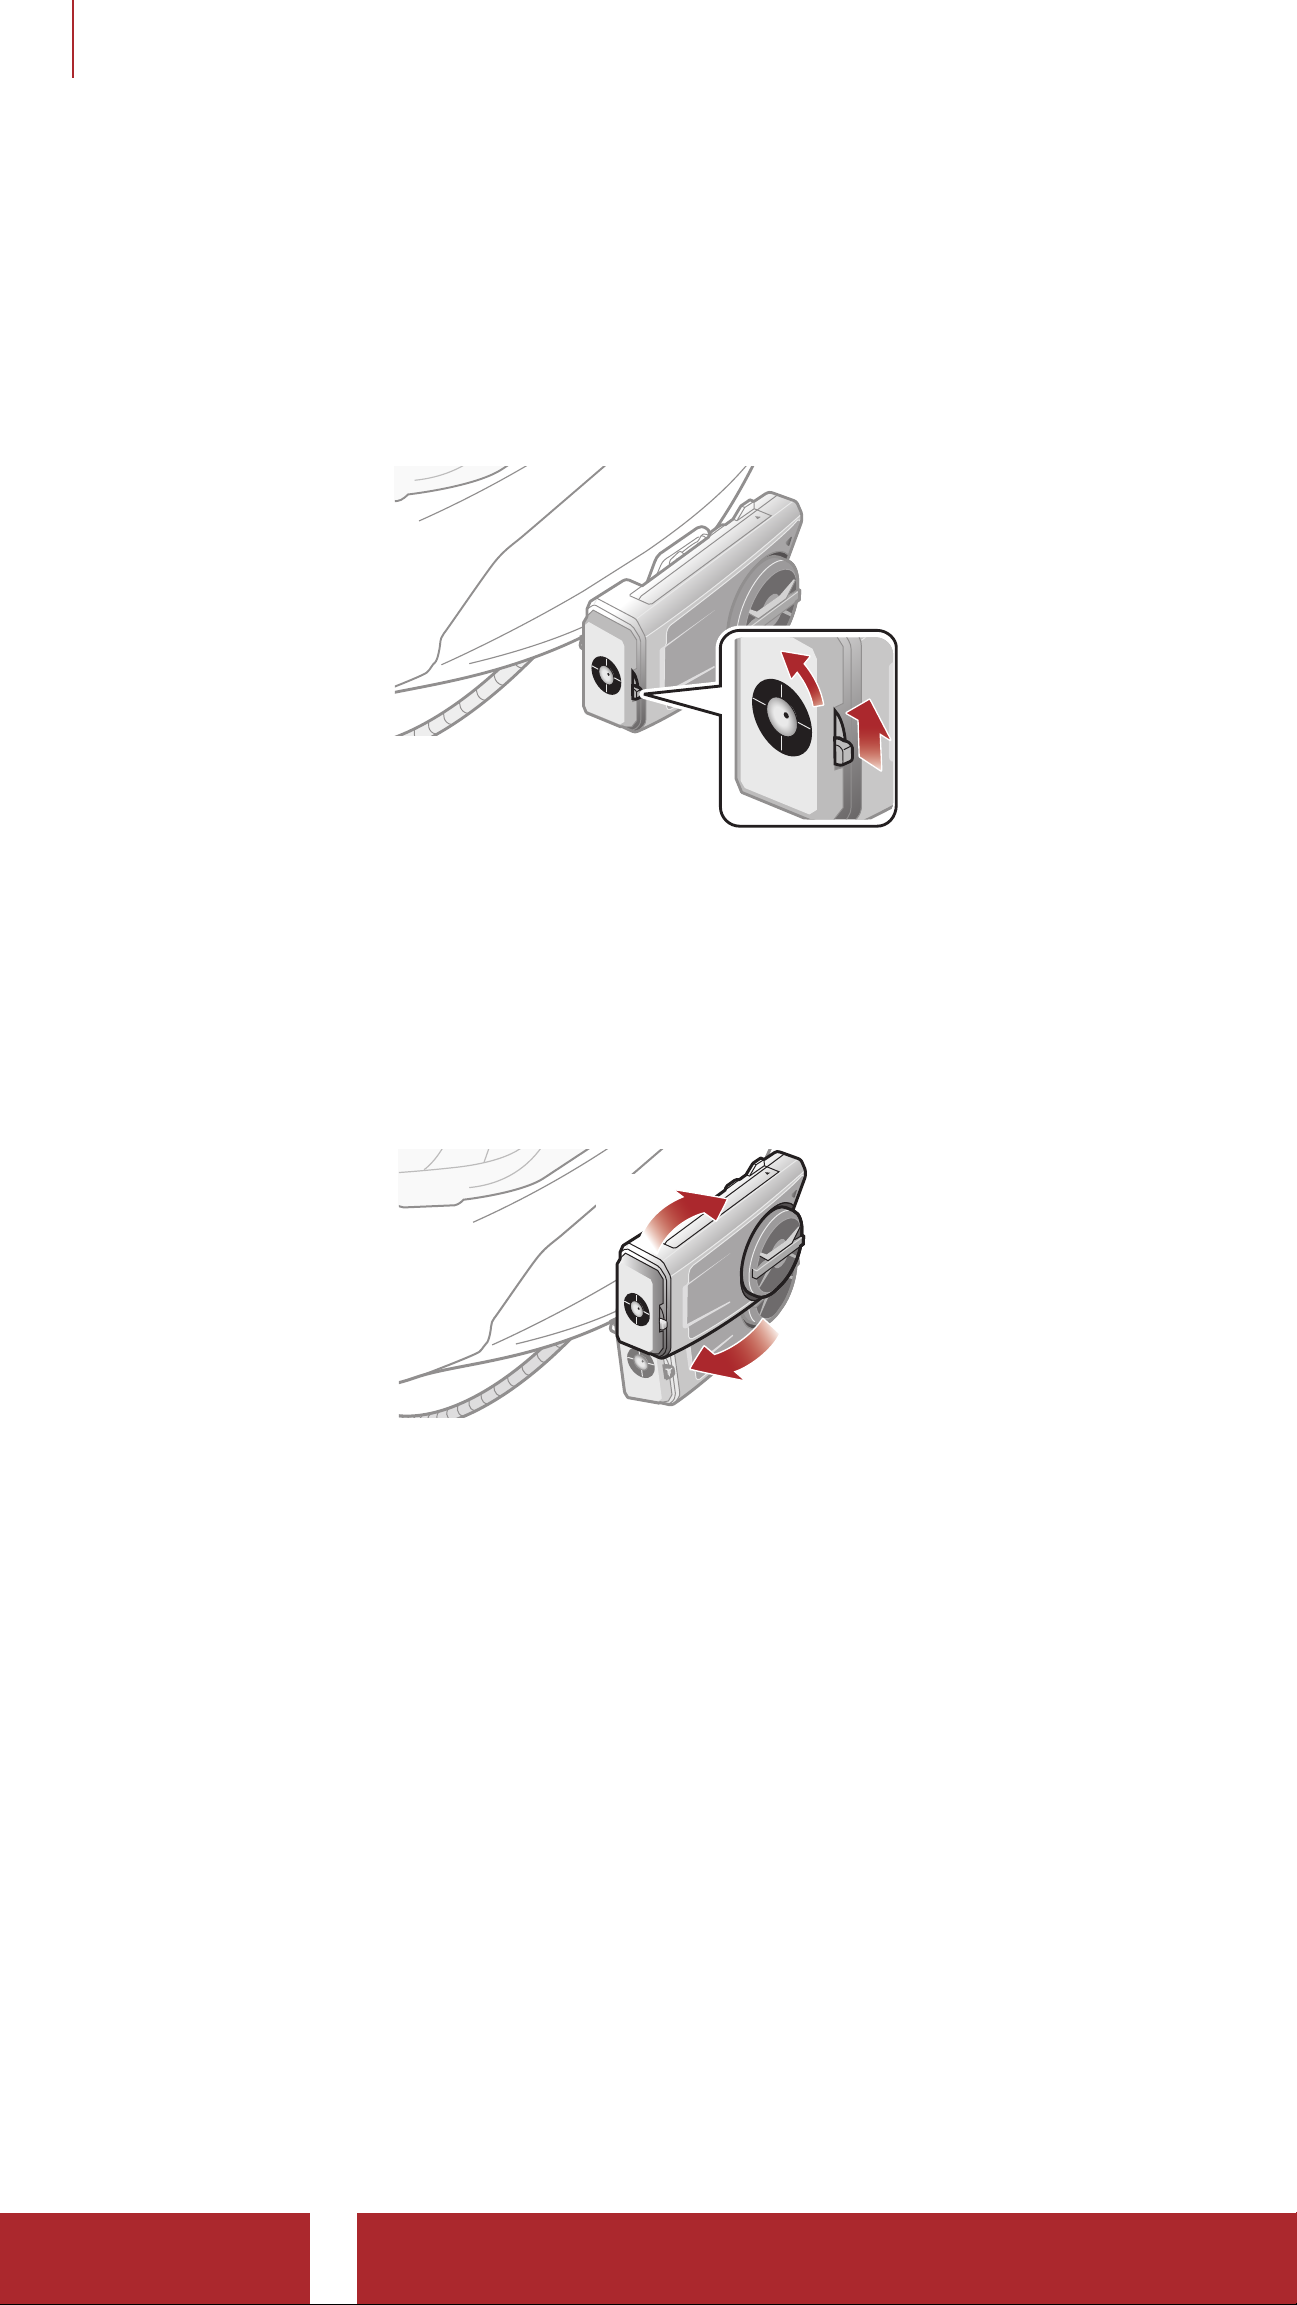
2 INSTALLING THE HEADSET ON YOUR HELMET
2.4 Adjust the Angle
You can adjust the angle for taking photos or recording videos.
You can rotate the horizontal angle by 30°. Rotate the lever next to the
lens to set the desired angle.
30°
2.4.1 Using the Gear Clamp Unit
You can rotate the vertical angle by 360°. Loosen the wheel next to the
main unit and rotate the main unit to set the desired angle. Tighten the
wheel to lock it into position.
360°
50C Motorcycle Camera & Communication System with Mesh Intercom™
| 18
Page 19
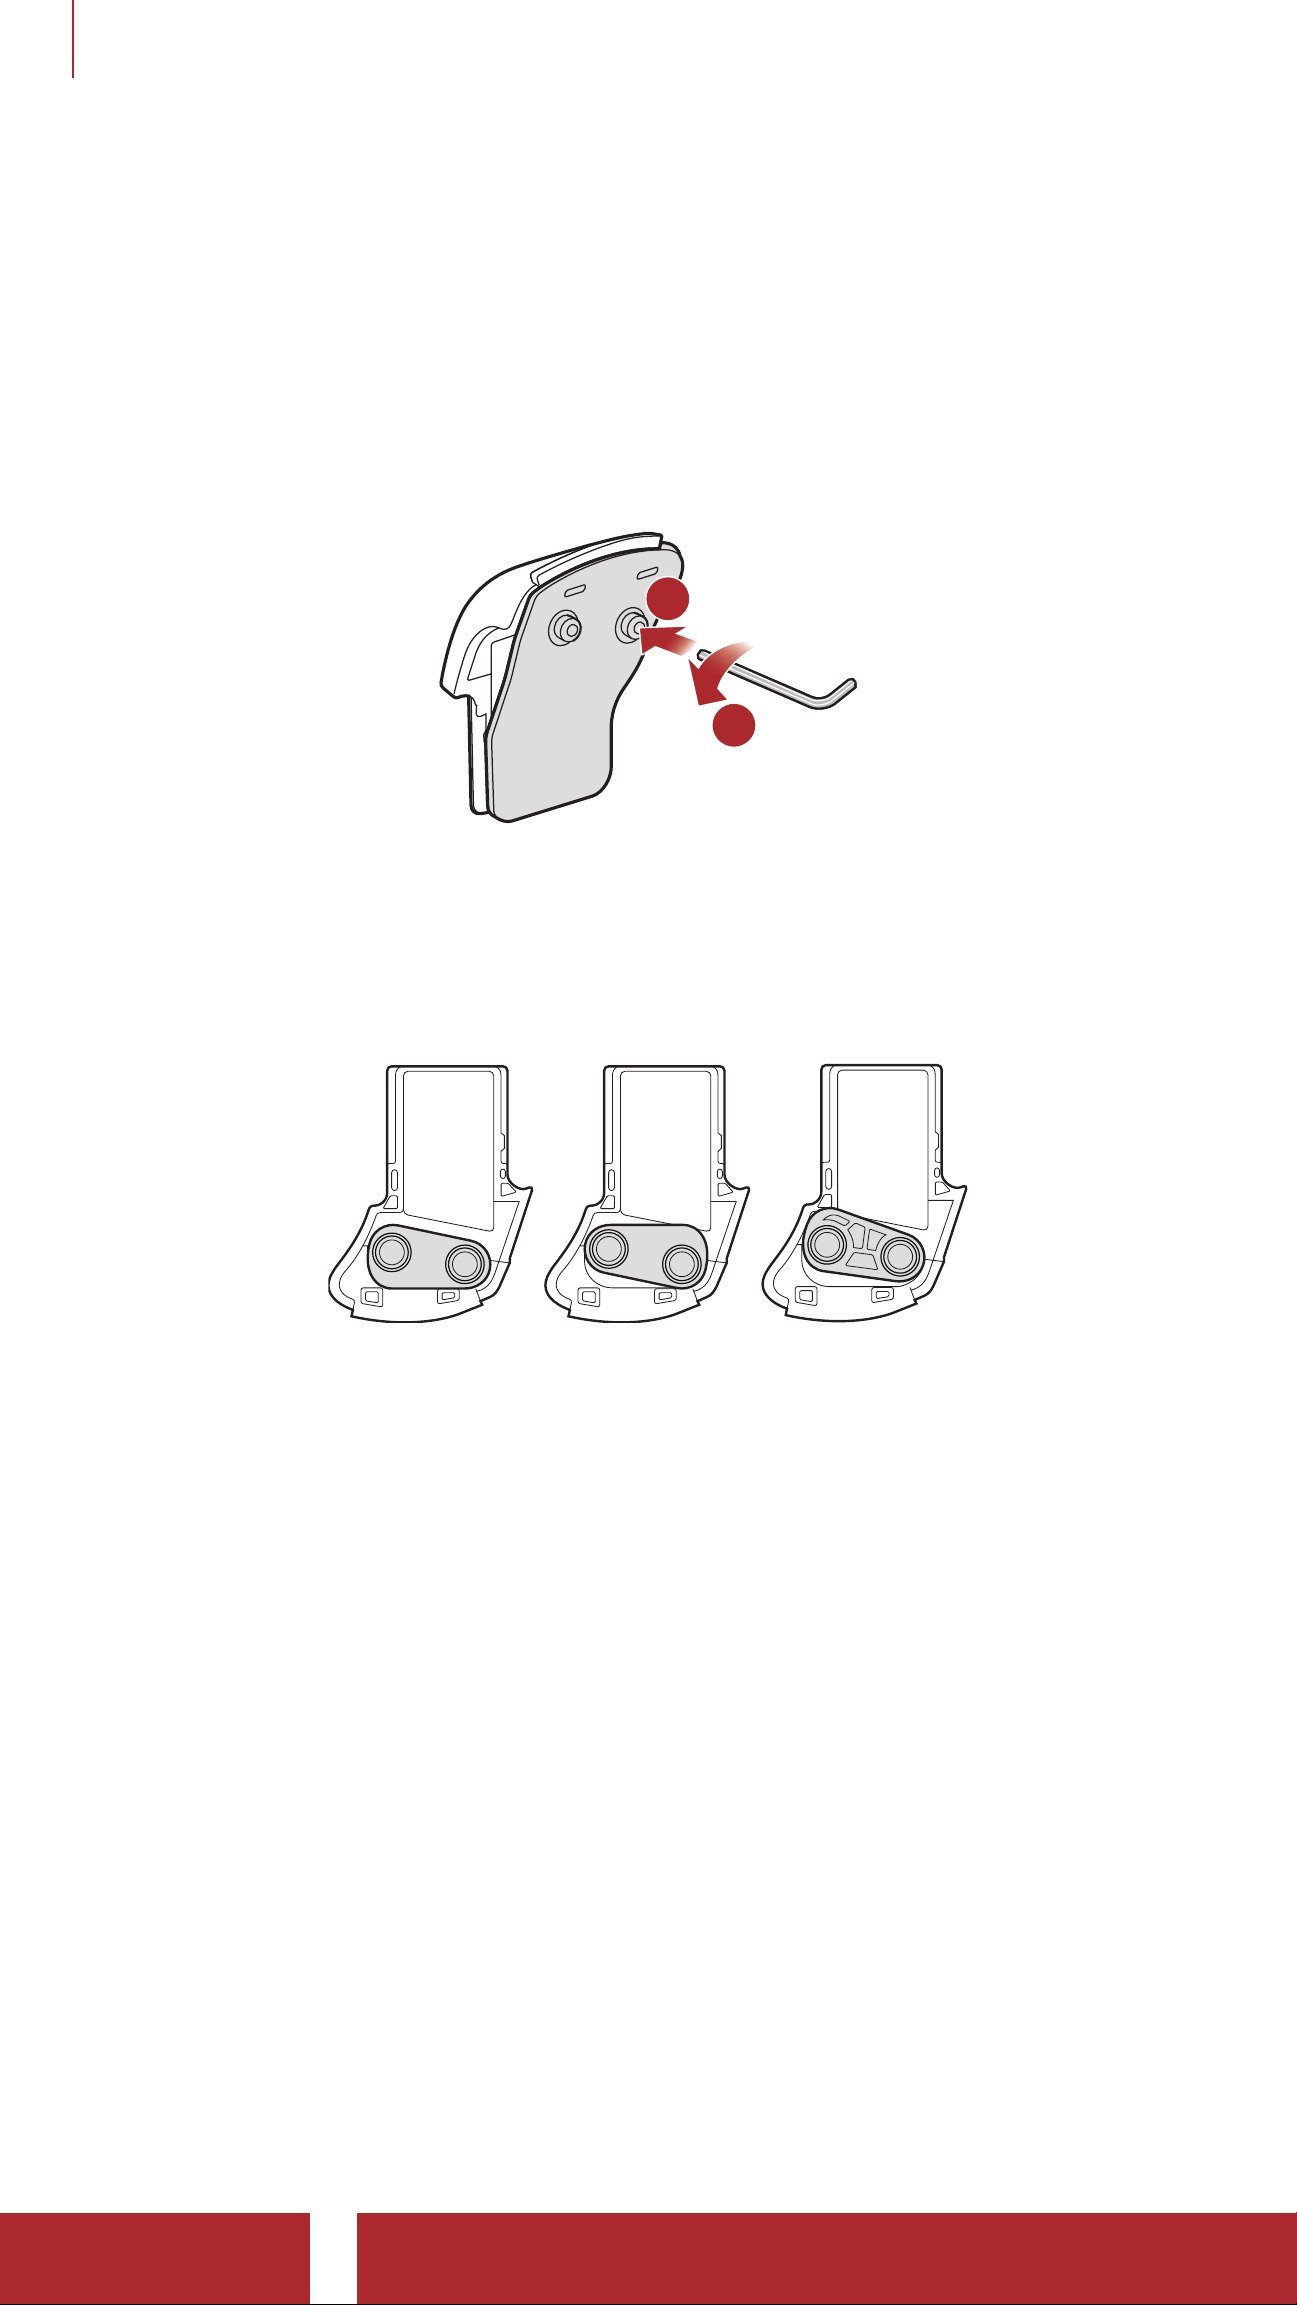
2 INSTALLING THE HEADSET ON YOUR HELMET
2.4.2 Using the Clamp Unit
You can change the vertical angle by 20° (Default), 8°, or 32°. The
vertical angle change shall be made before the clamp is mounted on
the helmet.
• Loosen the two screws on the back plate of the clamp unit with the
included allen wrench.
1
2
• Remove the angle plate and flip it up and down to make the angle
display “8°” visible. The vertical angle is changed to 8°.
• Remove the angle plate and turn it backwards to make the angle
display “32°” visible. The vertical angle is changed to 32°.
20°
8°
°
8
20°
32°
50C Motorcycle Camera & Communication System with Mesh Intercom™
| 19
Page 20

3. GETTING STARTED
3.1 Downloadable Sena Software
3.1.1 SENA MOTORCYCLES App
By simply pairing your phone with your headset, you can use the SENA
MOTORCYCLES App for quicker, easier set up and management.
SENA MOTORCYCLES
• Download the SENA MOTORCYCLES App on Google Play Store or
App Store.
3.1.2 Sena Camera App
You can see a live preview from the camera, manage recorded videos
as well as configure the video settings using the built-in Wi-Fi feature.
When the camera and the Sena Camera App are connected, the
camera is synchronized with the smartphone's date and time.
Sena Camera
• Download the Sena Camera App on
Google Play Store or App Store.
• Download the Sena Camera App on
Store
.
Google Play Store or App
Built-in Wi-Fi in the Headset
• IEEE 802.11 b/g/n/a
• Working distance: within 15 m
Note:
• When the camera is powered on, Wi-Fi is automatically powered
on and set to its default settings.
• Wi-Fi will automatically be terminated if:
–
You do not use Wi-Fi on the product for 3 minutes.
–
You do not use the Sena Camera App for 3 minutes.
• If you want to reactivate the Wi-Fi after it is terminated, you will
need to restart the camera.
50C Motorcycle Camera & Communication System with Mesh Intercom™
| 20
Page 21
3 GETTING STARTED
3.1.3 Sena Device Manager
The Sena Device Manager allows you to upgrade firmware and
configure settings directly from your PC.
Sena Device Manager
• Download the Sena Device Manager at sena.com.
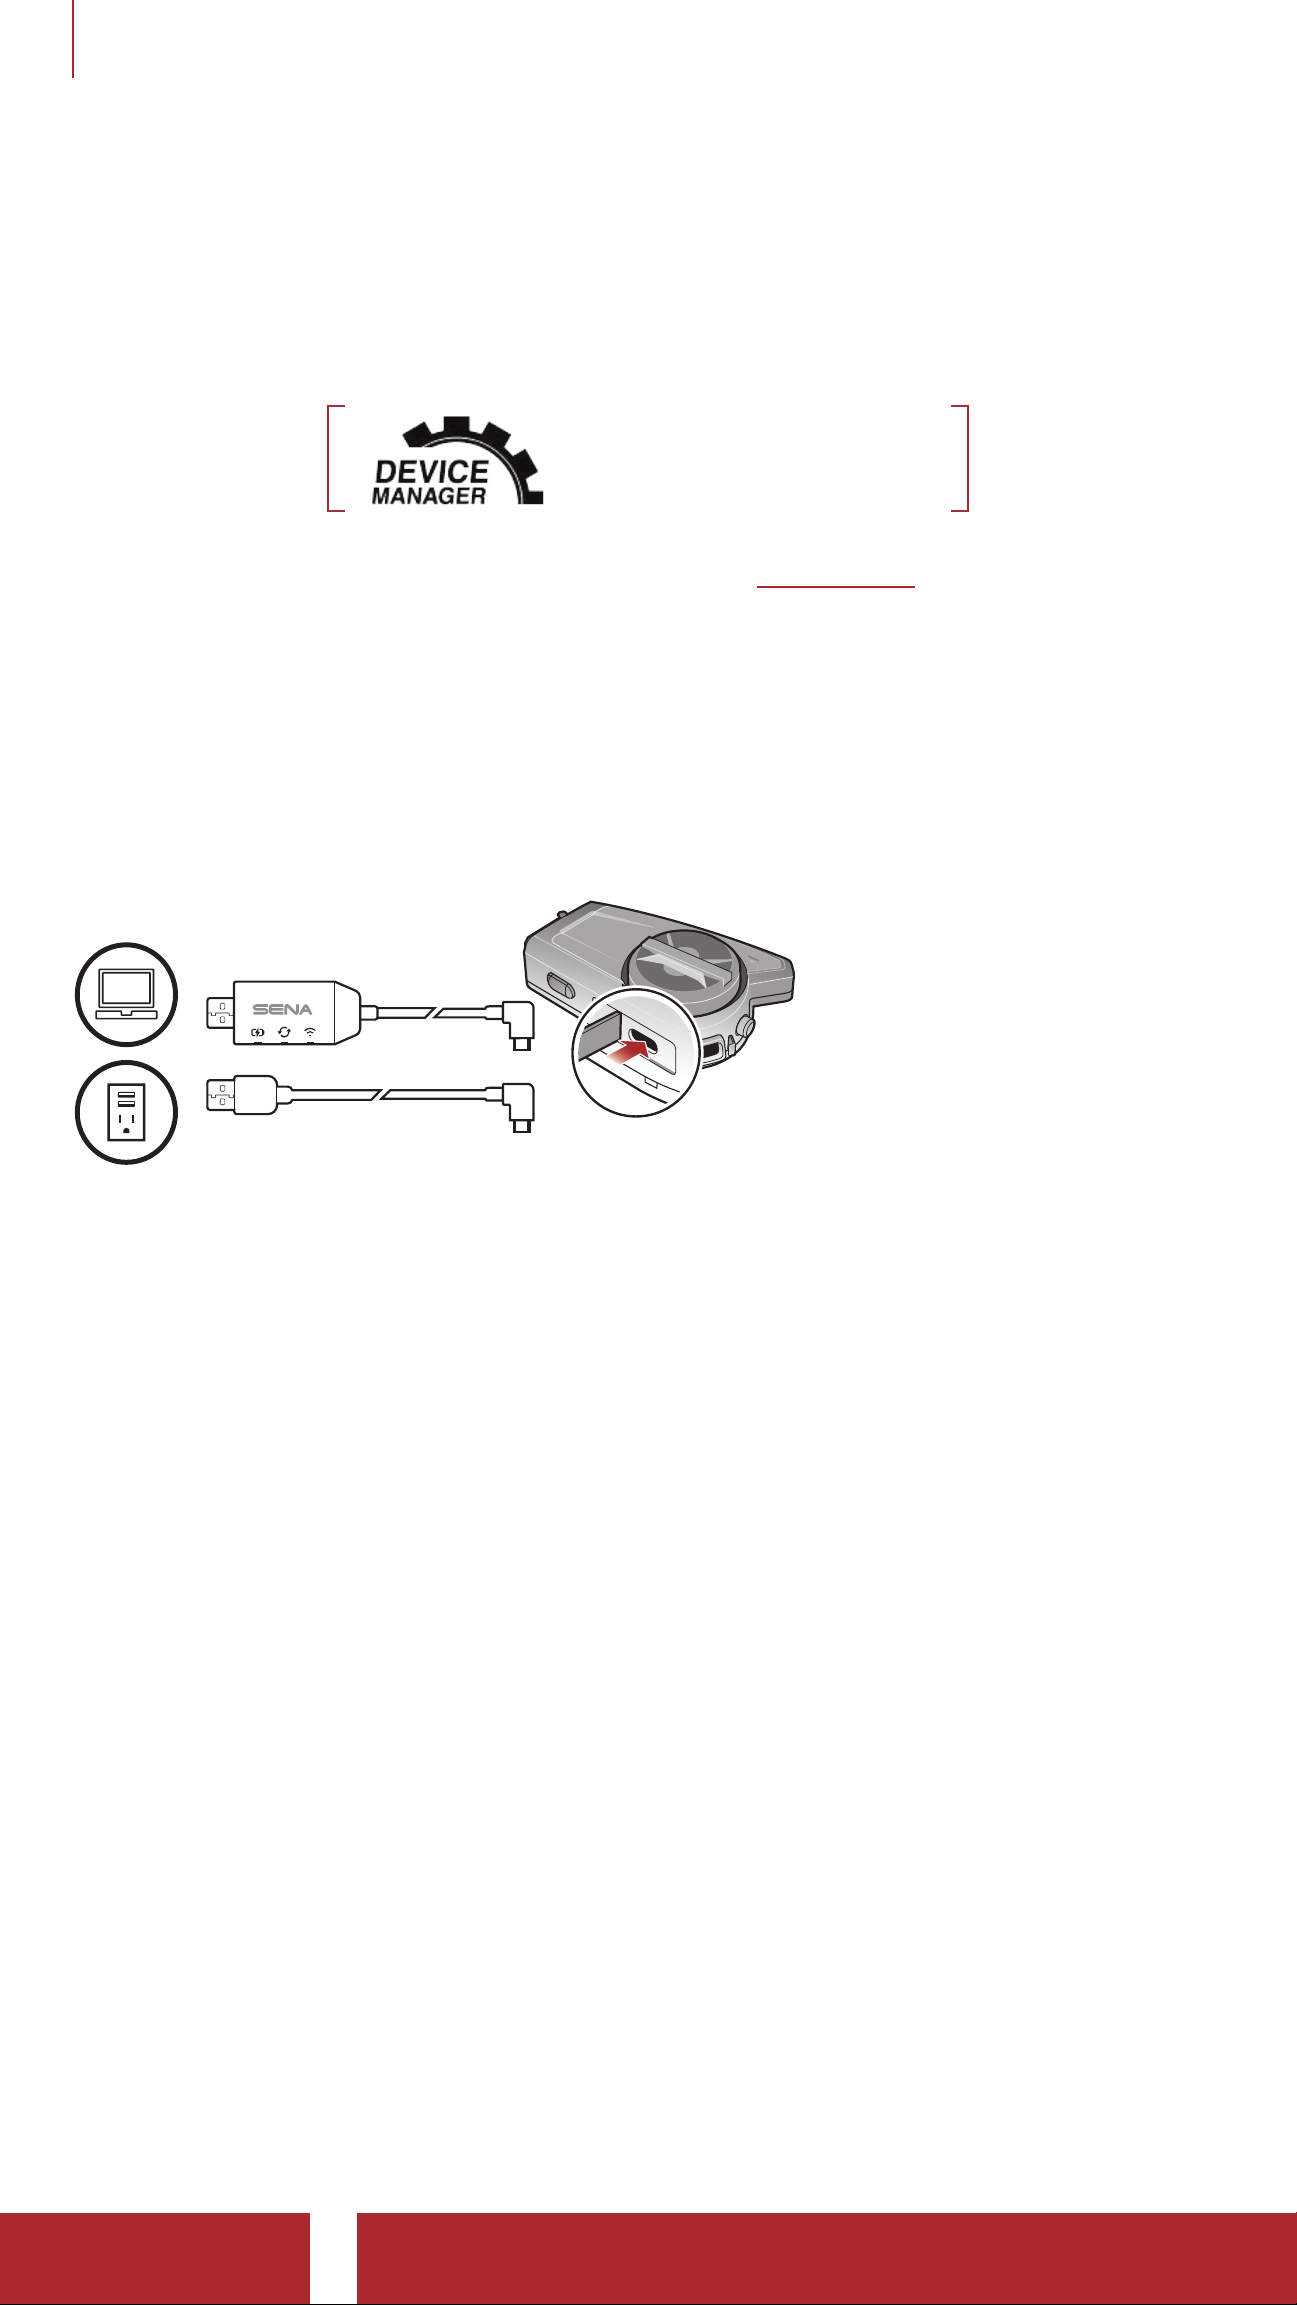
3.2 Charging
Charging the Headset
You can charge the
headset by connecting
the WiFi Adapter or
a USB Power & data
Cable (USB-C).
A USB Power & data
Cable (USB-C) is not
included in the package.
The headset will be fully charged in about 2.5 hours. (The charging time
may vary depending on the charging method.)
50C Motorcycle Camera & Communication System with Mesh Intercom™
| 21
Page 22
3 GETTING STARTED
Note:
• Any 3rd party USB charger can be used with Sena products if the
charger is approved by either the FCC, CE, IC, or other locally
approved agencies.
• Use of a non-approved charger may cause fire, explosion,
leakage, and other hazards which may also reduce the life time or
performance of the battery.
• The 50C is compatible with 5 V input USB-charged devices only.
• Using When Plugged Into a Power Source (USB-charging
adapter or Powerbank)
When you want to record long videos and time lapse events,
connect the 50C to a power source and then use it.
–
If you connect the 50C to the Powerbank while the camera is on,
the 50C will use the electricity stored in the Powerbank but the
battery will not charge.
–
If you connect the 50C to the Powerbank while the camera is off,
you can use the 50C while it charges.
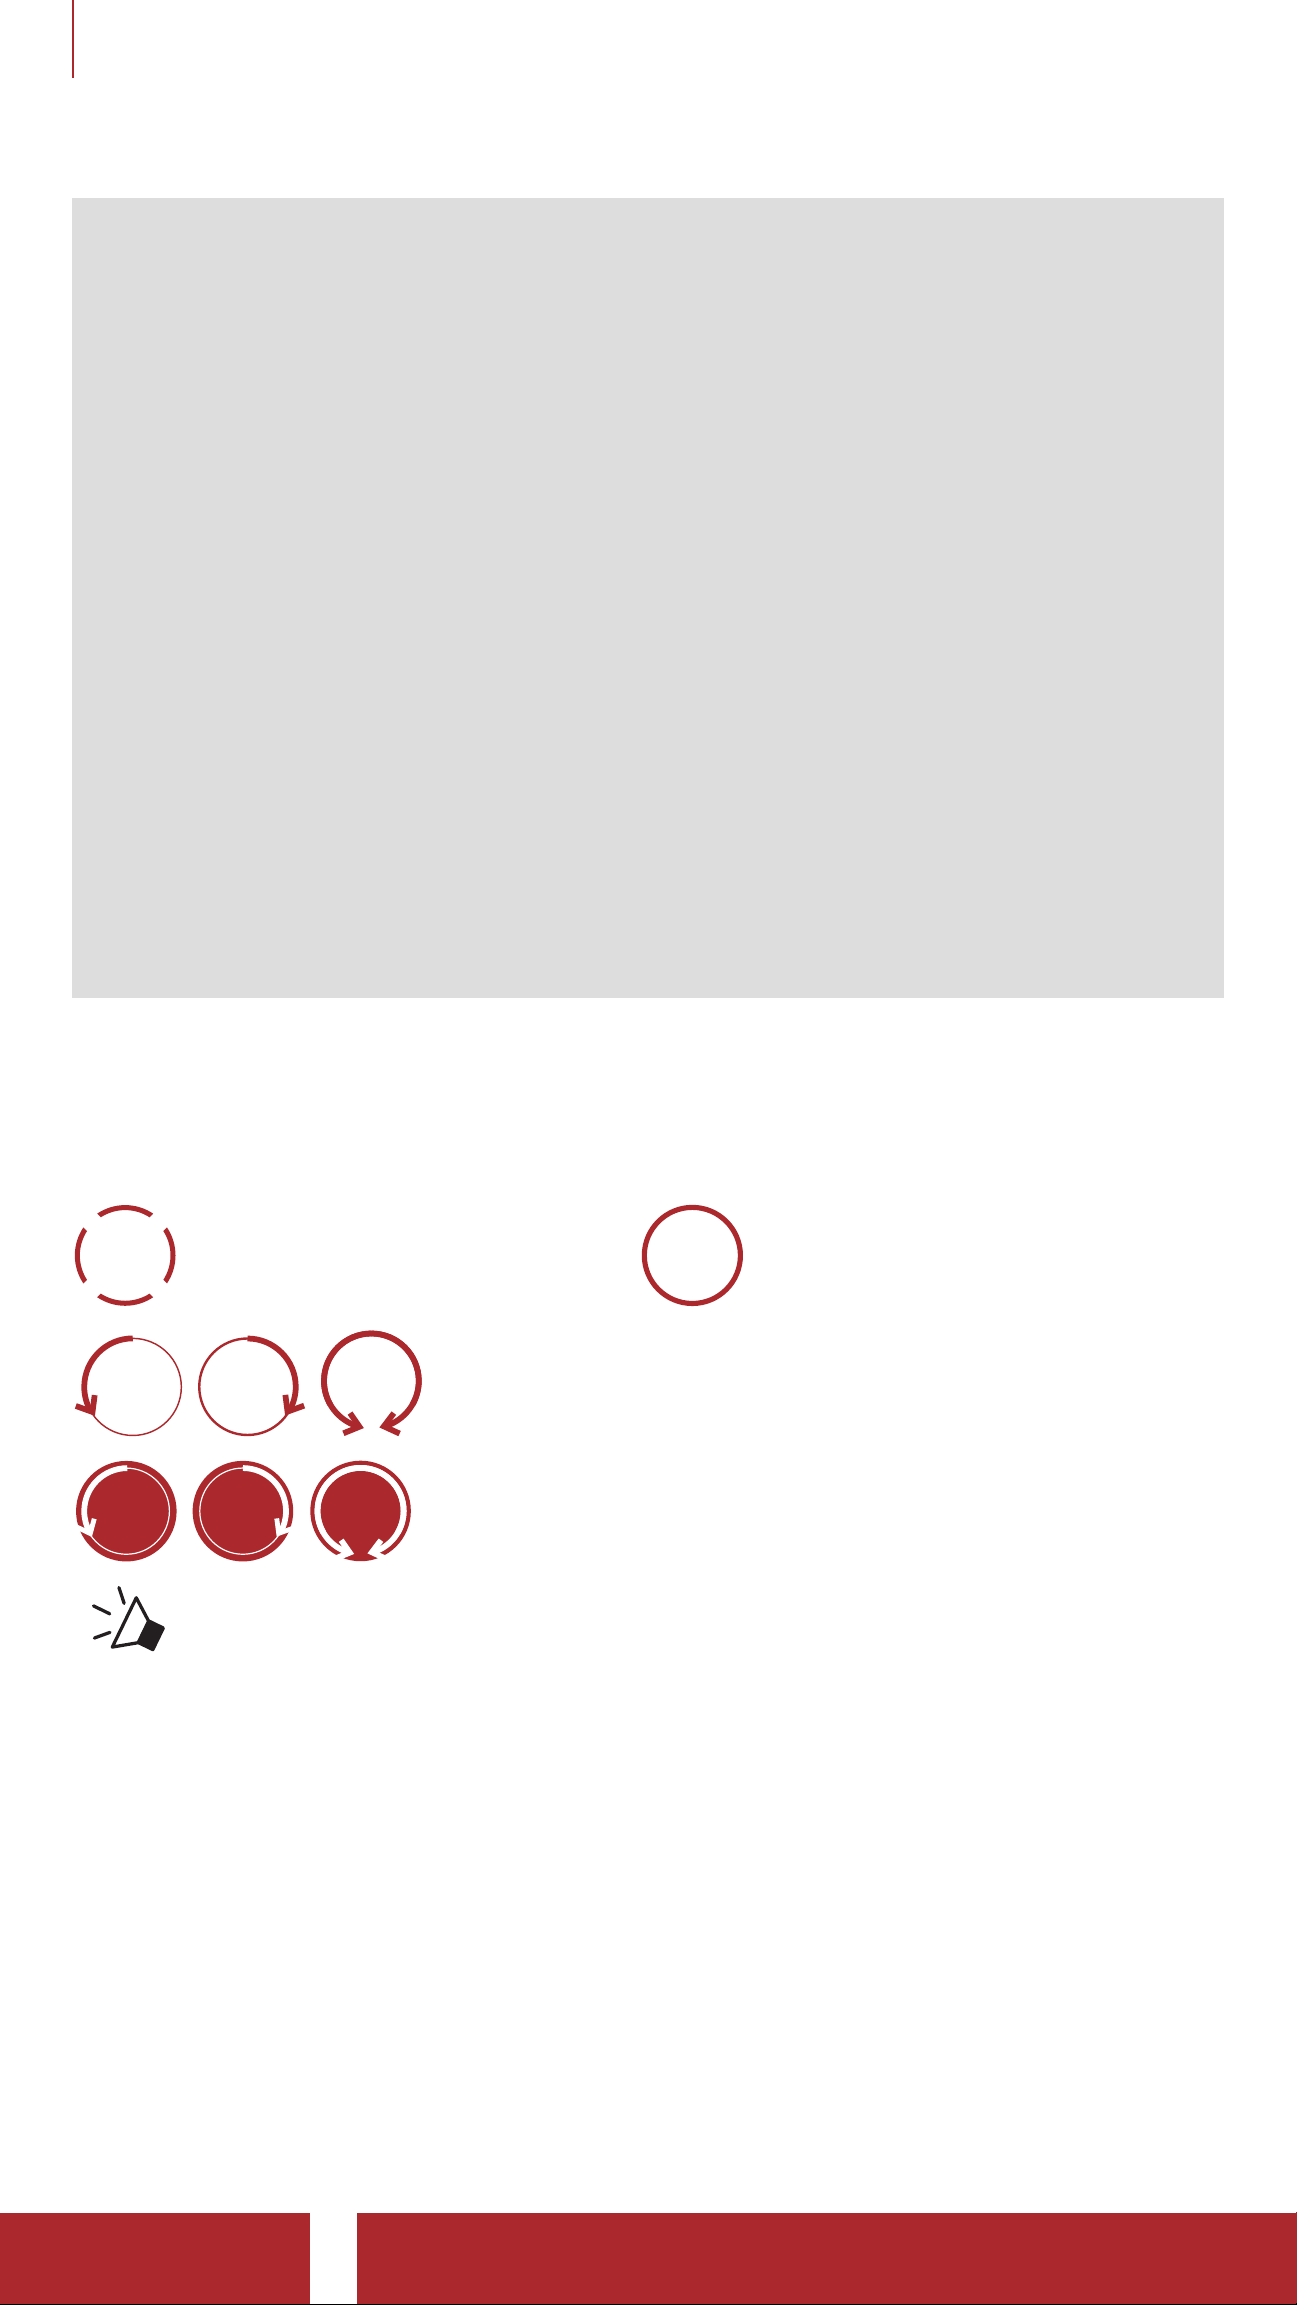
3.3 Legend
TAP
1x
Tap button/Jog Dial the
specified number of times
HOLD
10s
Press and Hold button/Jog
Dial for the specified amount
of time
ROTATE
L
ROTATE
L
ROTATE
R
ROTATE
R
“Hello”
ROTATE
ROTATE
Rotate Jog Dial clockwise (right) or
counterclockwise (left).
Rotate while Pressing Jog Dial clockwise (right) or
counterclockwise (left).
Audible prompt
50C Motorcycle Camera & Communication System with Mesh Intercom™
| 22
Page 23
3 GETTING STARTED
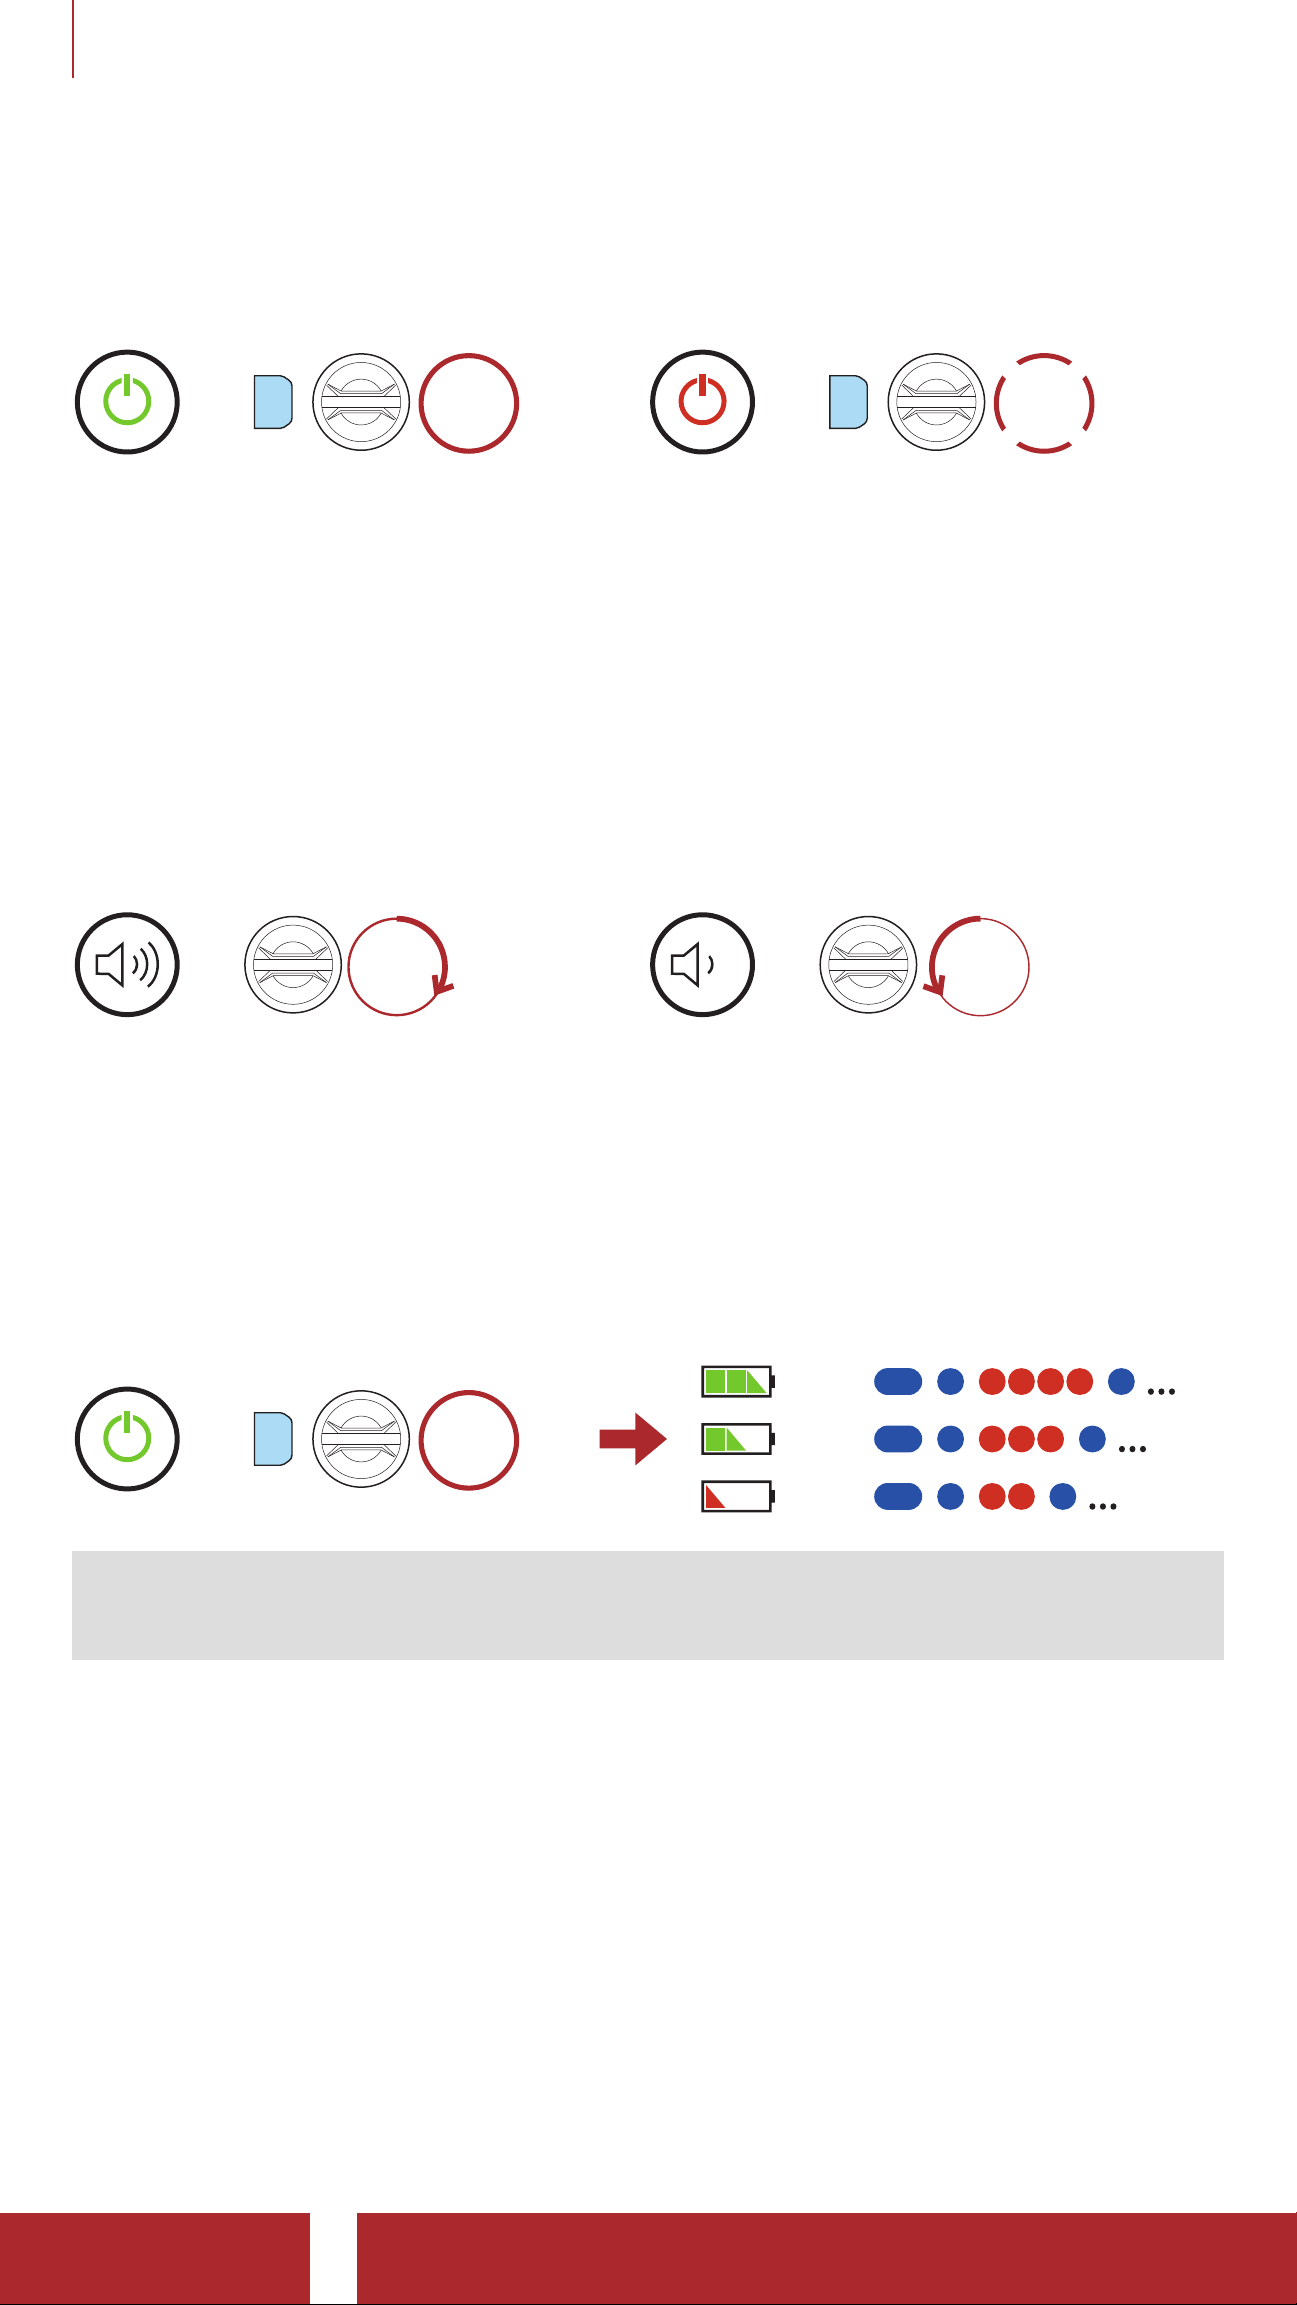
3.4 Powering On and Off
Powering On
=
P
HOLD
1s
Powering Off
=
P
TAP
1x
3.5 Volume Adjustment
You can raise or lower the volume by rotating the Jog Dial clockwise
or counterclockwise. Volume is set and maintained independently at
different levels for each audio source (i.e., phone, intercom), even when
the headset is rebooted.
Volume Up
Volume Down
=
ROTATE
=
R
3.6 Checking the Battery Level
Instructions are for when powering the headset on.
Powering On
=
HOLD
1s
=
=
P
=
ROTATE
L
Note: When the battery is low while in use, you will hear a voice
prompt saying “Low battery”.
3.7 Low Battery Warning
When the battery becomes low, you will hear a voice prompt, “Camera
off, battery low”. The camera function will shut down soon, but other
headset functions such as intercom will still be available for use. Then
when the battery becomes very low, the blinking blue LED in stand-by
mode turns to red and you will hear a voice prompt, “Low battery”.
The headset will automatically shut down soon after.
50C Motorcycle Camera & Communication System with Mesh Intercom™
| 23
Page 24
4. CAMERA OPERATION
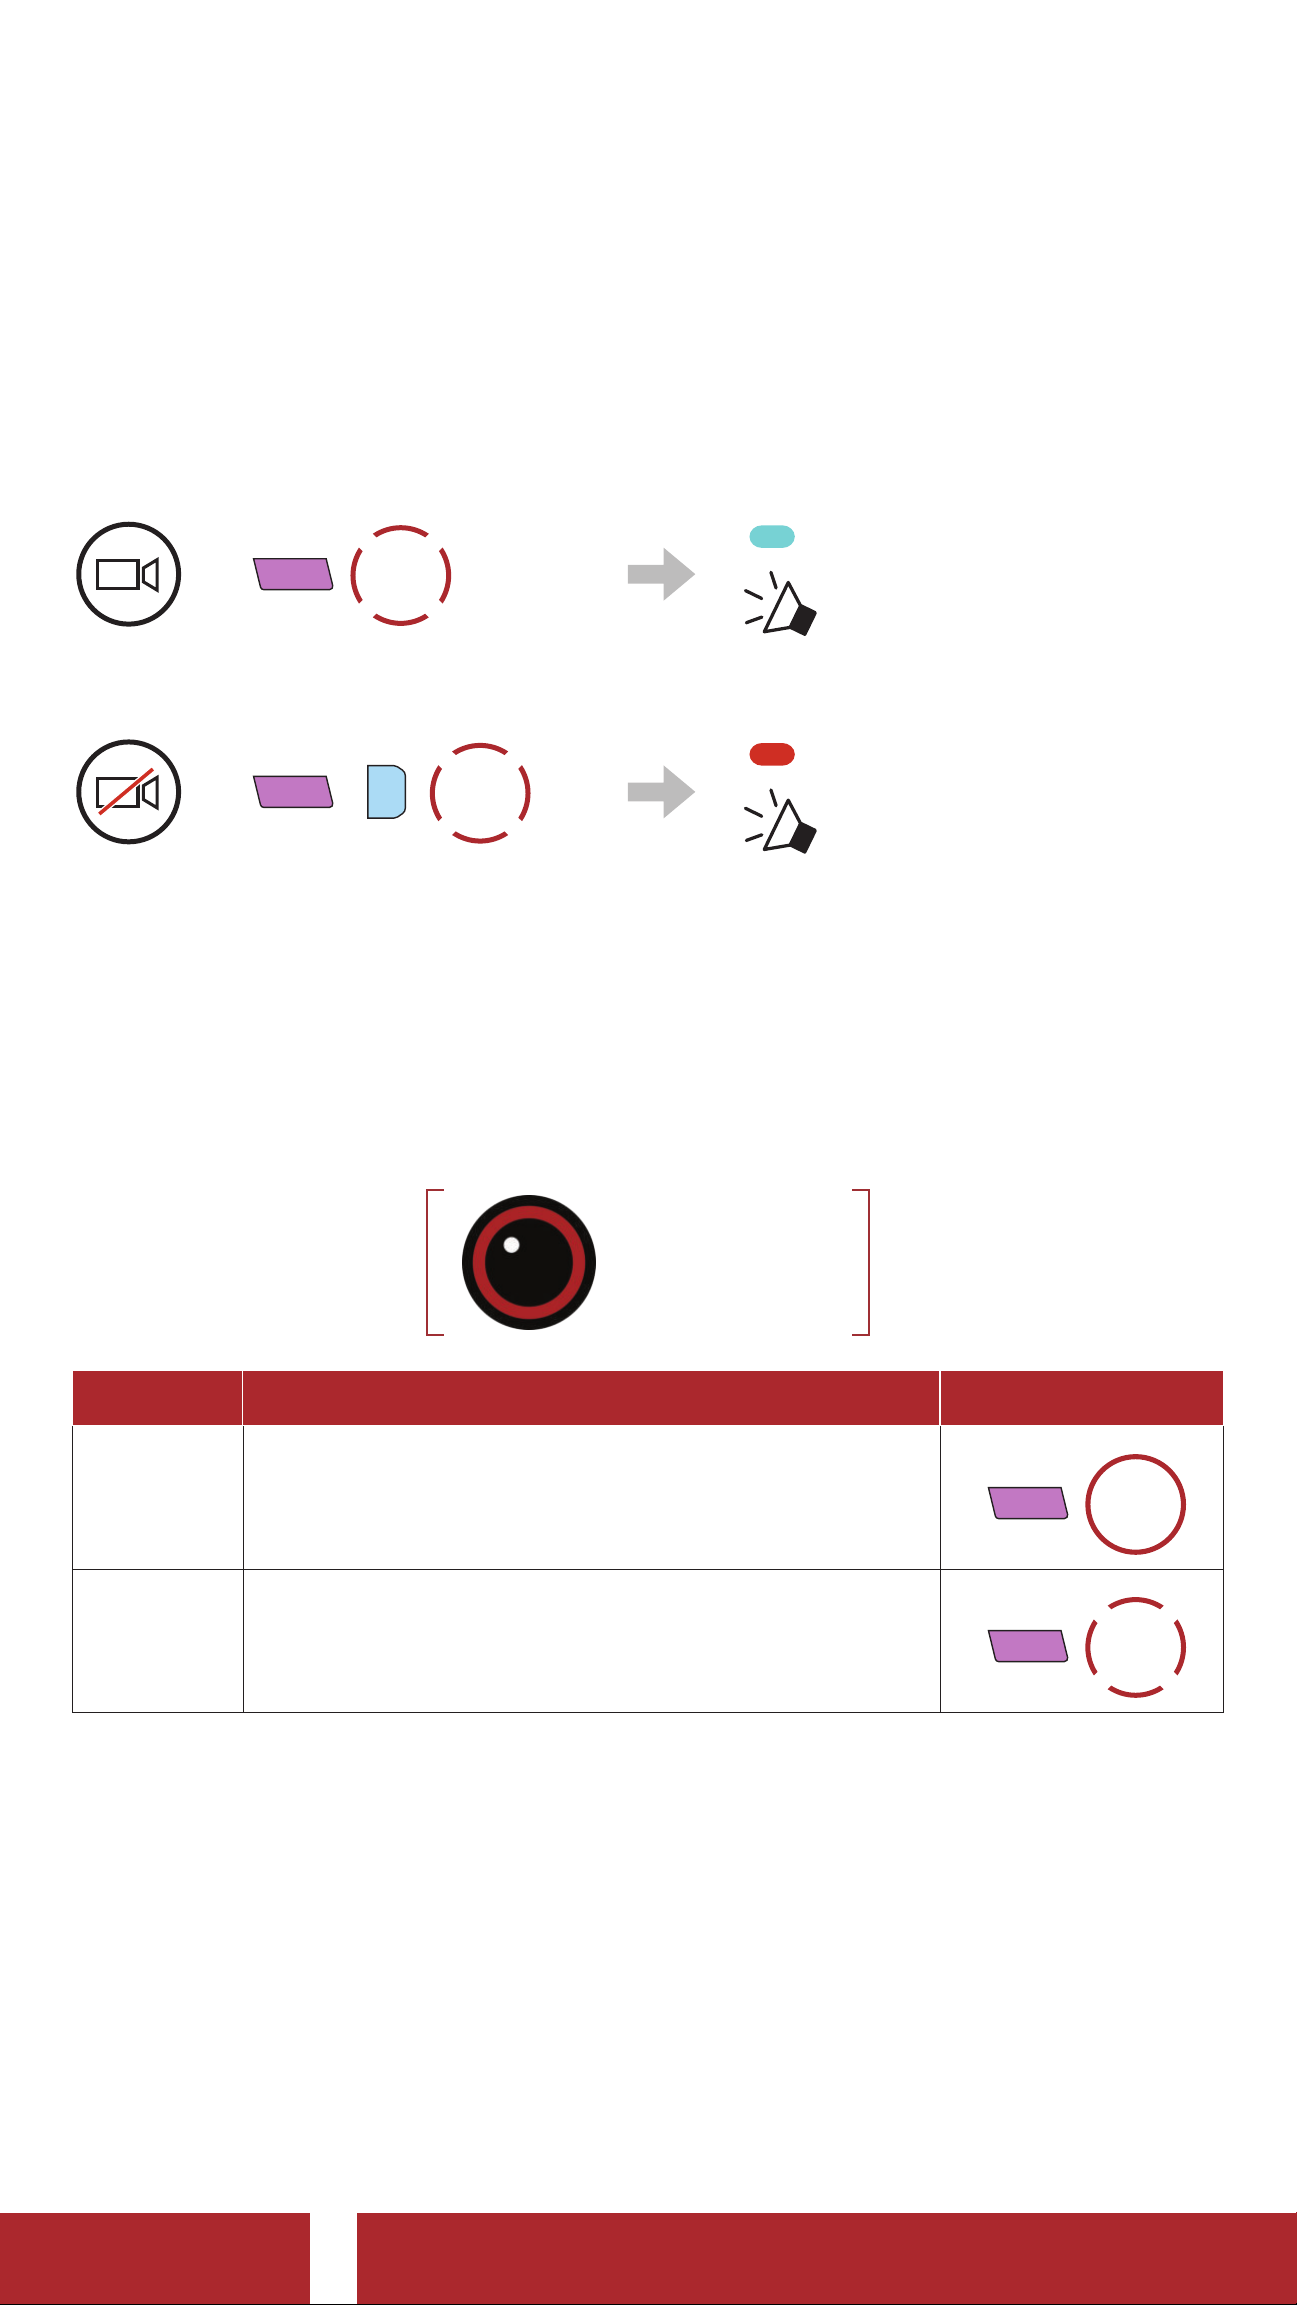
4.1 Camera On or Off
Camera On
TAP
1x
=
C
“Camera on”
Camera Off
TAP
1x
=
C
P
“Camera off”
4.2 Camera Modes
You can change the Video Mode setting and Photo Mode setting
through the Sena Camera App.
Sena Camera
Mode Application Button
Recode video
Video
(normal recording, timelapse, loop recording)
Capture a single photo (Single Shot) or
Photo
8 photos (Burst Shot)
C
HOLD
1s
TAP
C
1x
50C Motorcycle Camera & Communication System with Mesh Intercom™
| 24
Page 25
4 CAMERA OPERATION
C
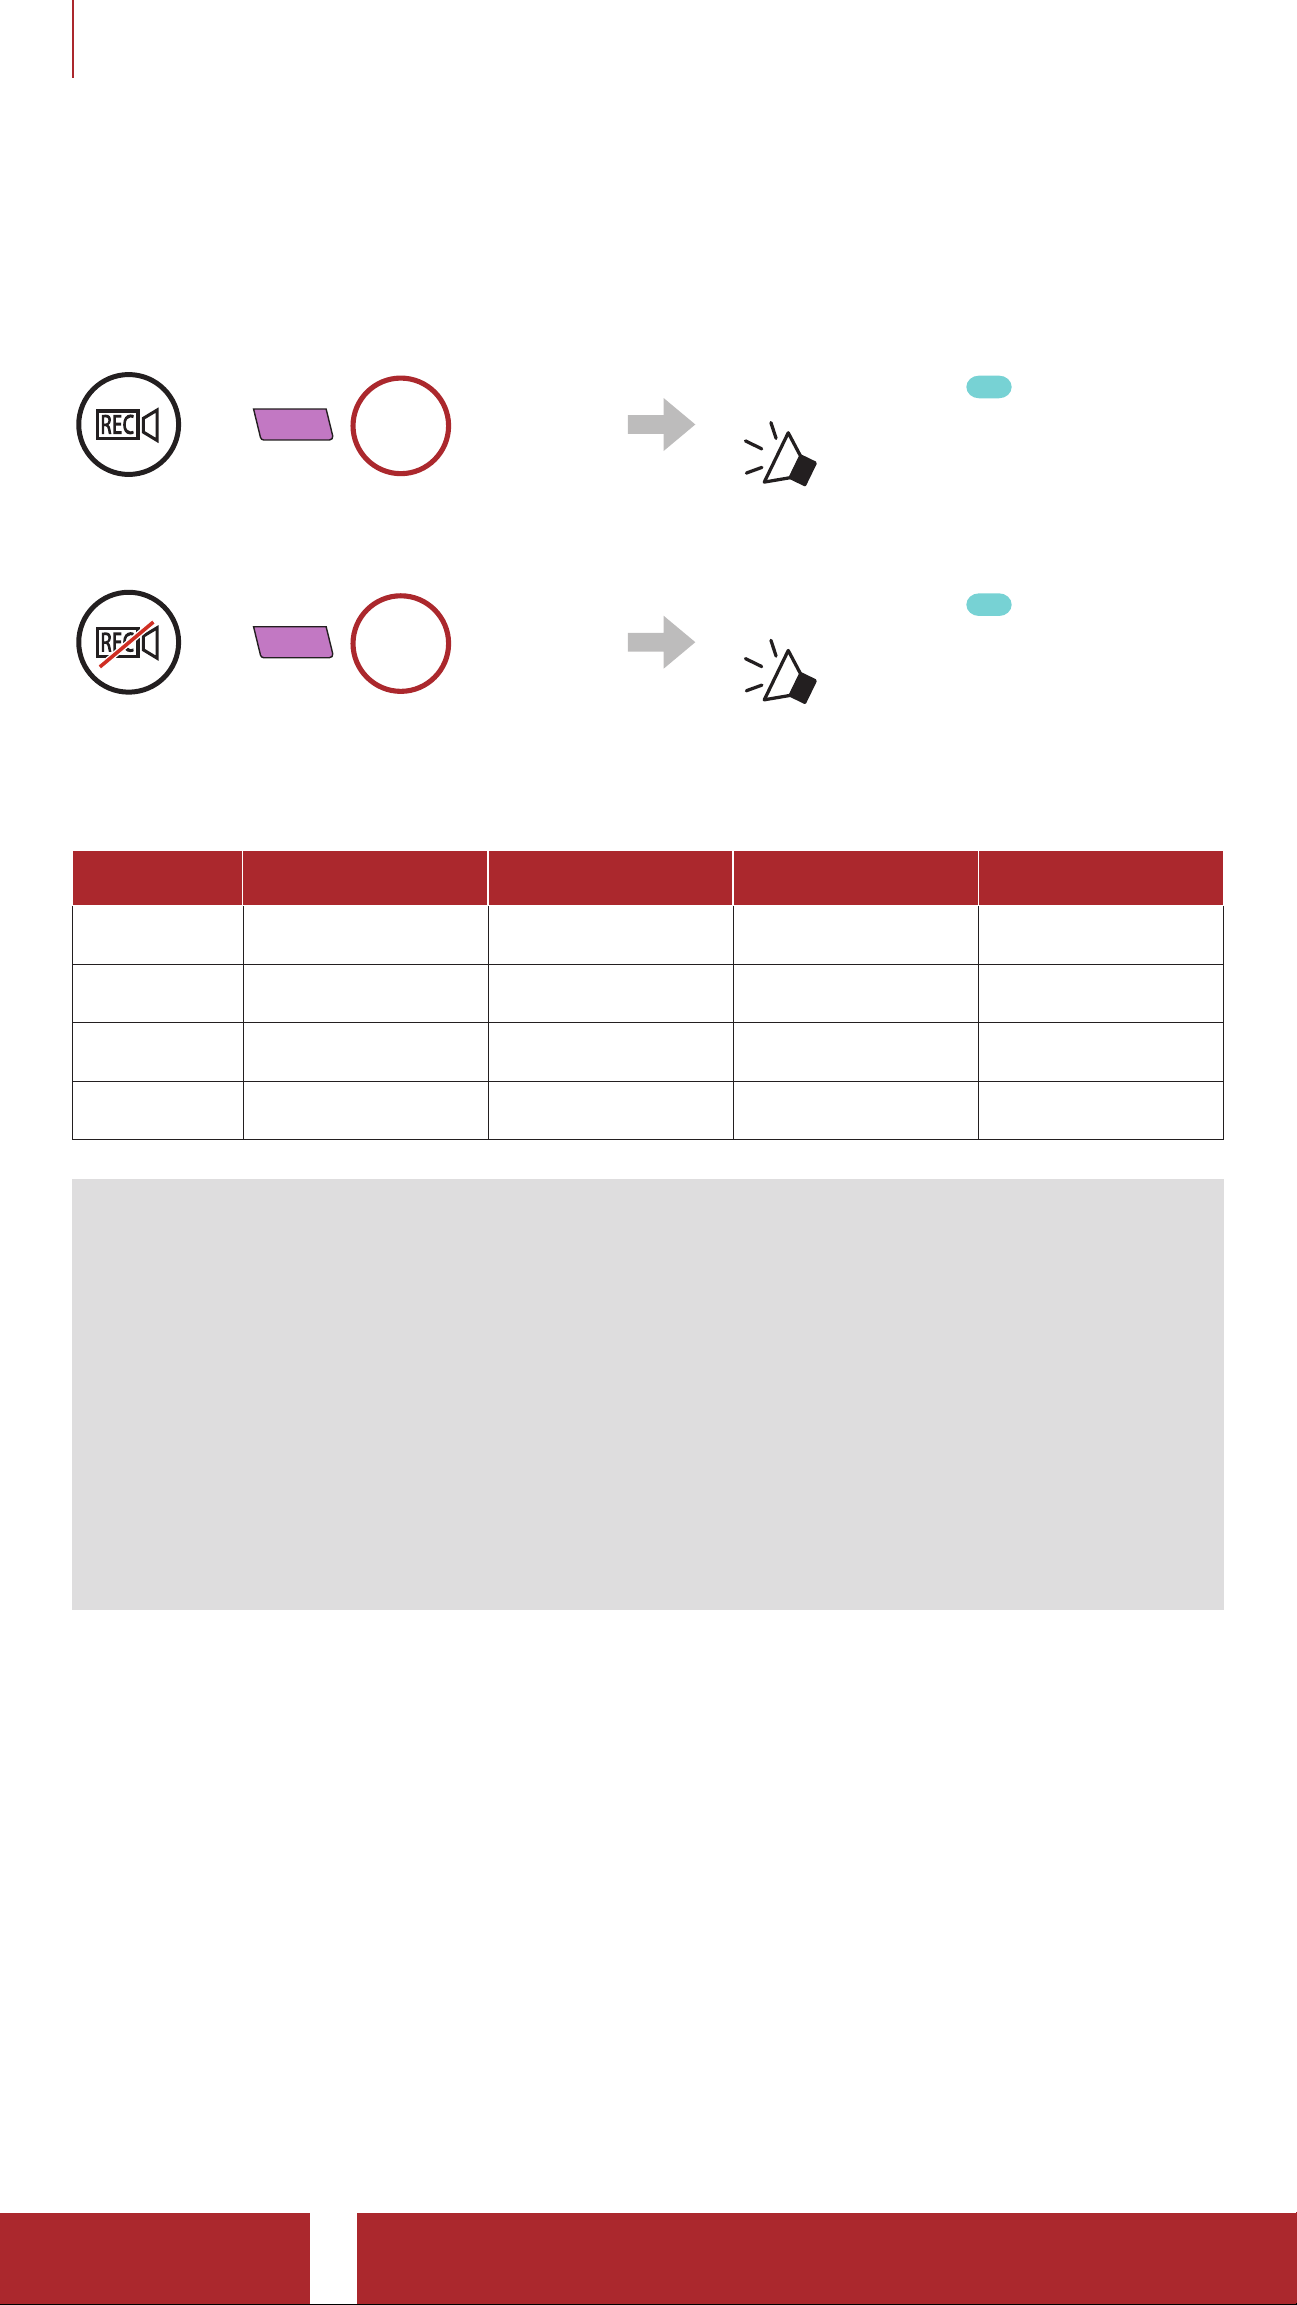
4.3 Video Recording
Start Recording
Blinking twice
=
C
HOLD
1s
“Recording”
Stop Recording
HOLD
Blinking twice
=
1s
“[Shutter sound]”
Below is a table of approximate video recording times to microSD card
size in specific resolutions and frame rates.
2160p/30fps 1440p/30fps 1080p/60fps 1080p/30fps
16 GB 33 min 1 h 05 min 1 h 24 min 1 h 52 min
32 GB 1 h 07 min 2 h 11 min 2 h 51 min 3 h 47 min
64 GB 2 h 15 min 4 h 25 min 5 h 44 min 7 h 38 min
128 GB 4 h 30 min 8 h 52 min 11 h 31 min 15 h 20 min
Note:
• MicroSD cards up to 128 GB are compatible. Using a U3 microSD
card is suggested. Your microSD card needs to be formatted using
the camera.
• The camera gives a warning and automatically stops recording
when the microSD card is full or the battery becomes low.
• The maximum size per video is limited to 4 GB. Therefore, when
the video reaches the 4 GB size limit during recording, it saves and
creates a new video to continue recording.
50C Motorcycle Camera & Communication System with Mesh Intercom™
| 25
Page 26
4 CAMERA OPERATION
C
4.4 Video Mode (Default: Normal Recording Mode)
4.4.1 Timelapse Video Mode
Timelapse video records series of photos at timed intervals and makes it
into a video.
4.4.2 Loop Recording Mode
Loop Recording mode continuously records videos to create footages
of assigned length of time (3 minutes). If the memory reaches maximum,
then the oldest footage will be deleted to store the most recent
footage.
4.5 Taking Photos (Default: Normal Recording Mode)
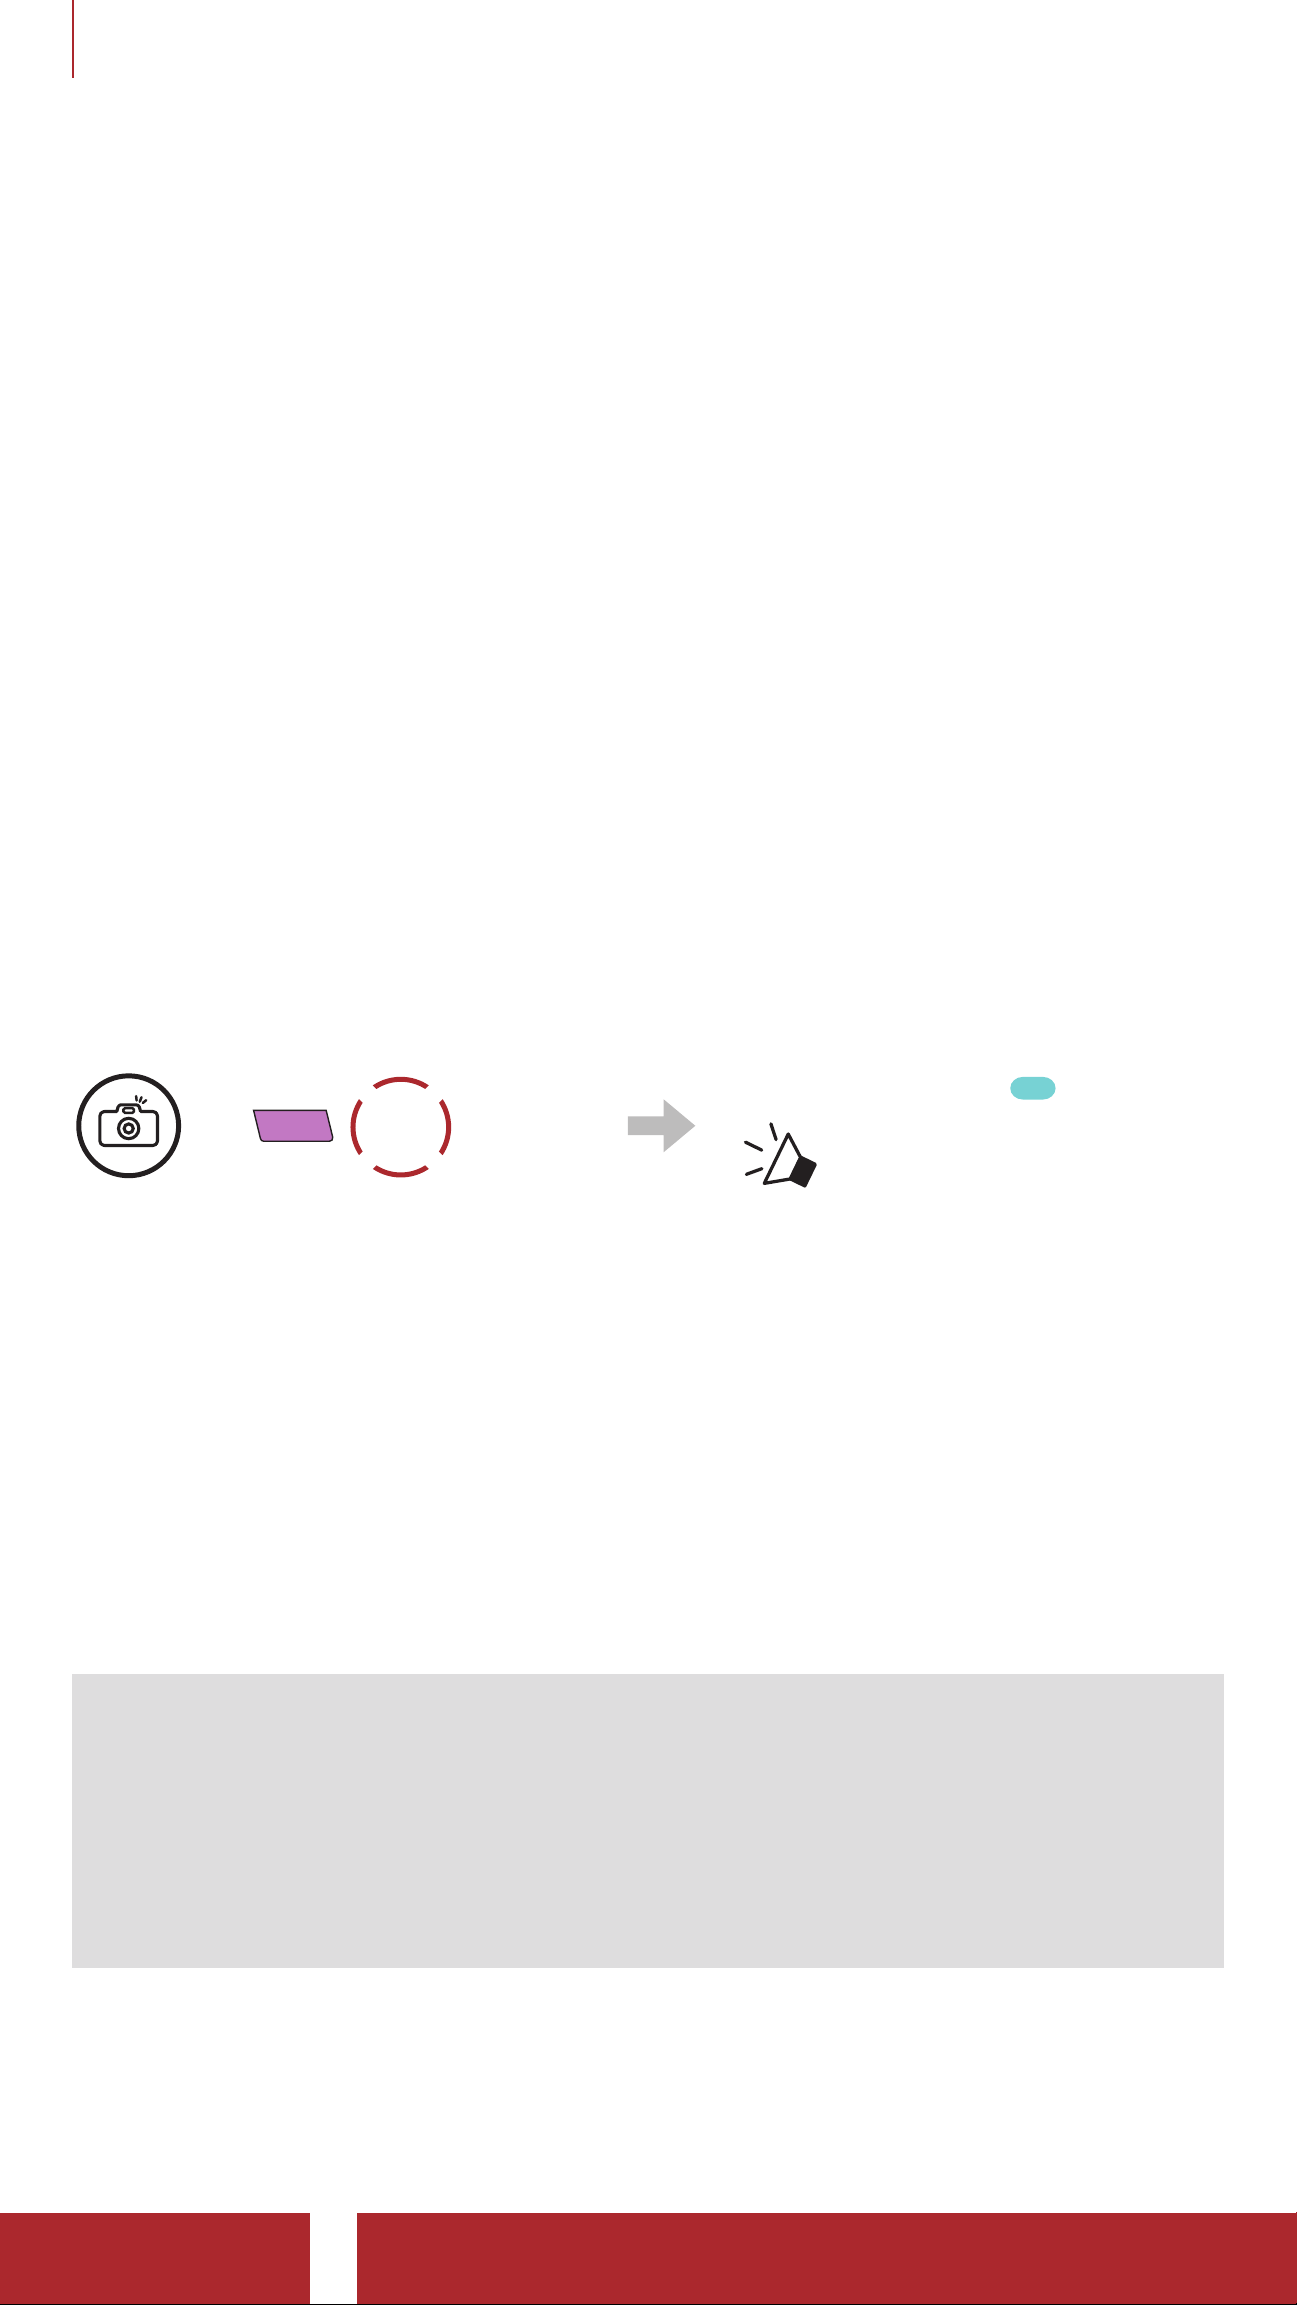
Take Photos
Blinking per shot
“[Shutter sound]”
=
TAP
1x
4.5.1 Single Shot Mode
Single Shot takes 1 photo.
4.5.2 Burst Shot Mode
Burst shot takes 8 photos. Tap the Camera Button to take multiple
photos.
Note:
• If you are recording in 2160p/30fps of video resolution, you cannot
take a photo.
• The camera resolution is fixed to 12MP. However, when you take
a photo during video recording, the photo resolution is fixed to
8.3MP.
50C Motorcycle Camera & Communication System with Mesh Intercom™
| 26
Page 27
4 CAMERA OPERATION
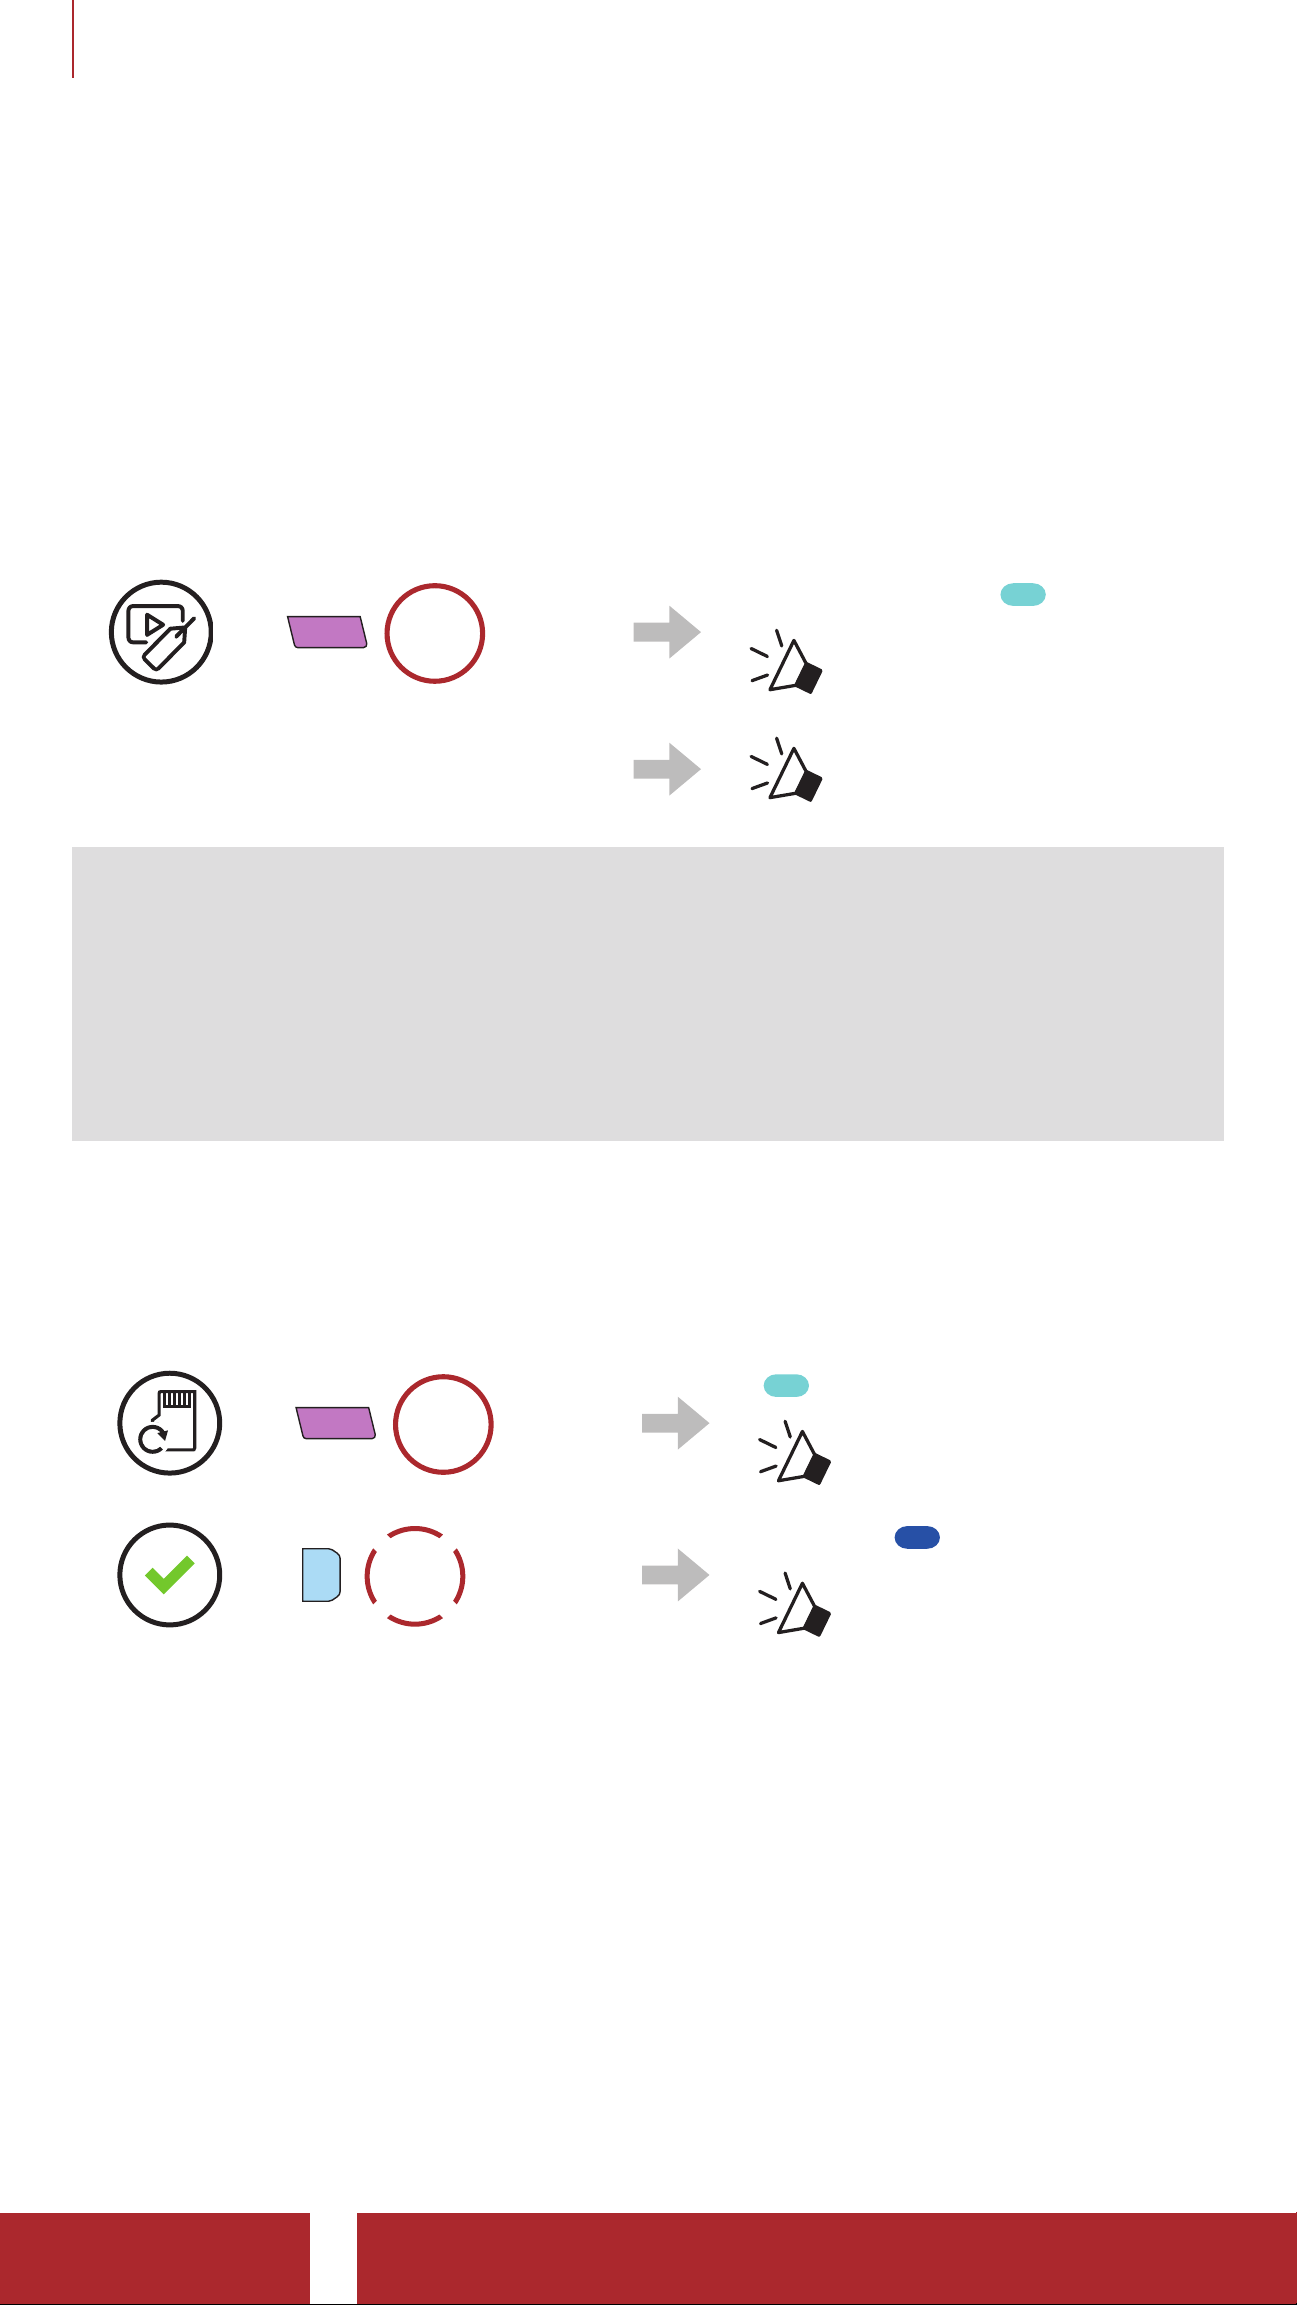
4.6 Video Tagging
Video Tagging allows the camera to record video continuously, but save
only the important events.
It creates video files of past, present, and future with each footage
having an assigned length of time (3 minutes).
1. When you encounter an event that is worth saving
Blinking 3 times
=
C
HOLD
3s
“Video tagging”
2. When Video Tagging is
“Tagging complete”
complete
Note:
• Video Tagging can be operated only in the Loop Recording mode.
In order for video files of past, present, and future to be saved,
Video Tagging must be started at least 3 minutes after Loop
Recording starts.
• Video Tagging recorded files are stored in EVENT folder.
4.7 Formatting SD Card
HOLD
5s
TAP
1x
1.
2.
=
=
C
P
“Format SD card”
Blinking
“ Format SD card
completed”
50C Motorcycle Camera & Communication System with Mesh Intercom™
| 27
Page 28

4 CAMERA OPERATION
C
4.8 Changing the Wi-Fi Channel (Default: 5 GHz)
HOLD
1.
2. Select 5 GHz or 2.4 GHz.
• 5 GHz
=
=
10s
TAP
1x
“WiFi channel”
Blinking twice
TAP
1x
Blinking twice
• 2.4 GHz
=
P
Note: IF YOUR SMARTPHONE OR REGION DOES NOT SUPPORT
5 GHz, YOU MUST CHANGE THE Wi-Fi CHANNEL TO 2.4 GHz.
50C Motorcycle Camera & Communication System with Mesh Intercom™
| 28
Page 29
5. PAIRING THE HEADSET WITH OTHER
BLUETOOTH DEVICES
When using the headset with other Bluetooth devices for the first time,
they will need to be “paired.” This enables them to recognize and
communicate with one another whenever they are within range.
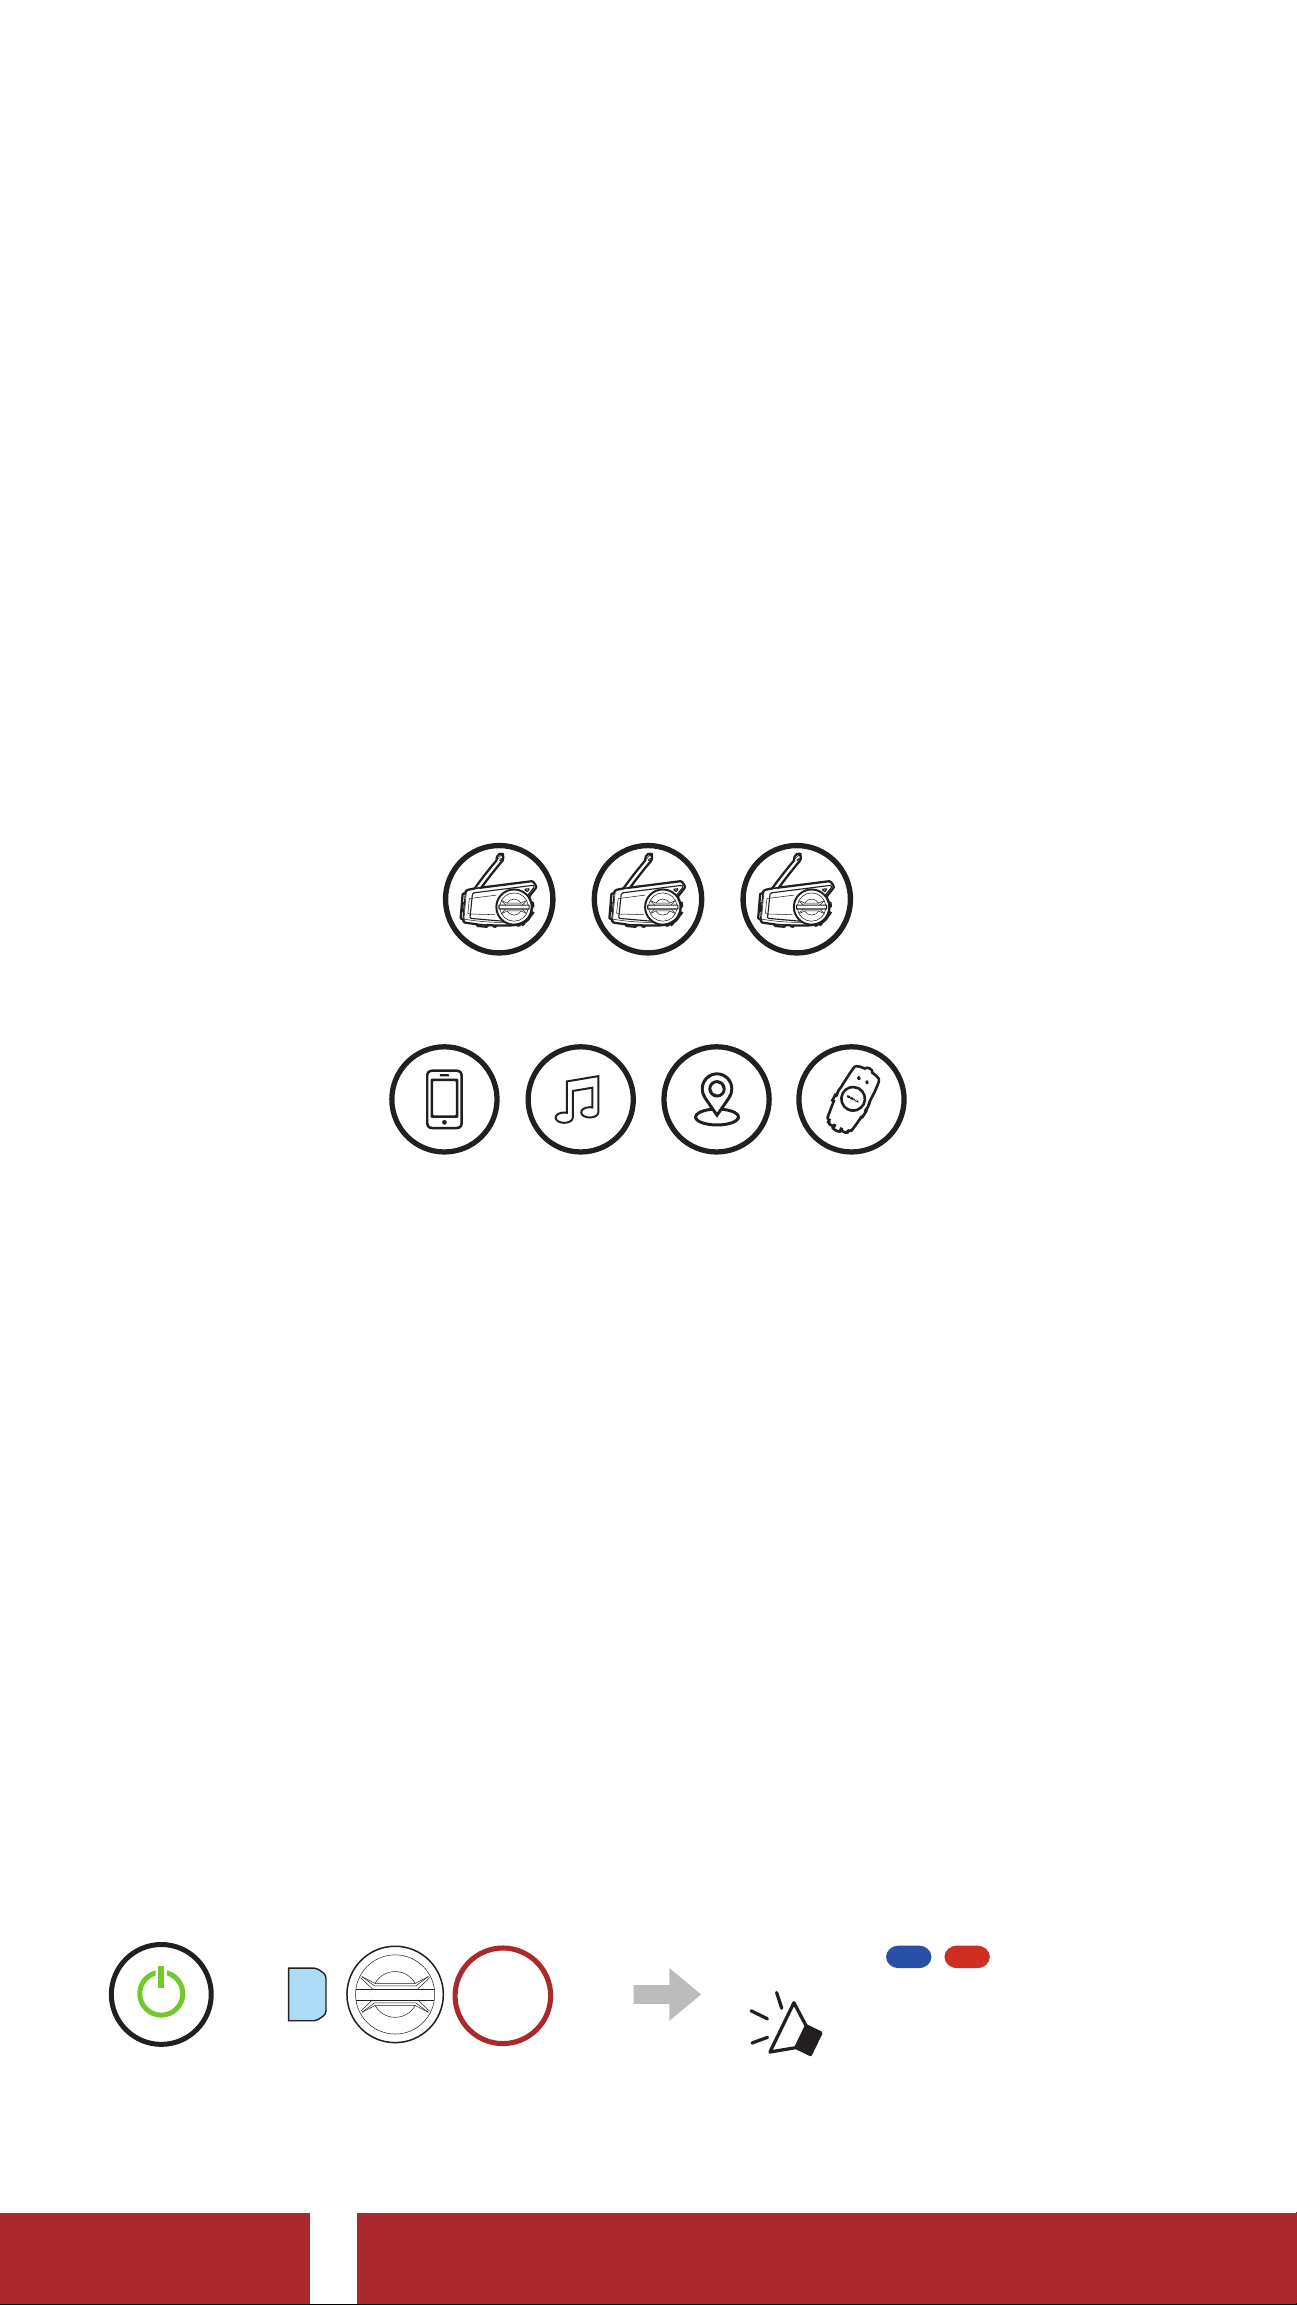
The headset can pair with multiple Bluetooth devices such as a mobile
phone, GPS, MP3 player or Sena SR10 Two-Way Radio Adapter via
Mobile Phone Pairing, Second Mobile Phone Pairing and GPS
Pairing. The headset can also be paired with up to three other Sena
headsets.
Pairs with up to Three Sena Headsets
Also Pairs with:
Mobile
Phone
MP3
Player
Devices
5.1 Phone Pairing
There are three ways to pair the phone.
GPS
Sena
SR10
5.1.1 Initially Pairing the 50C
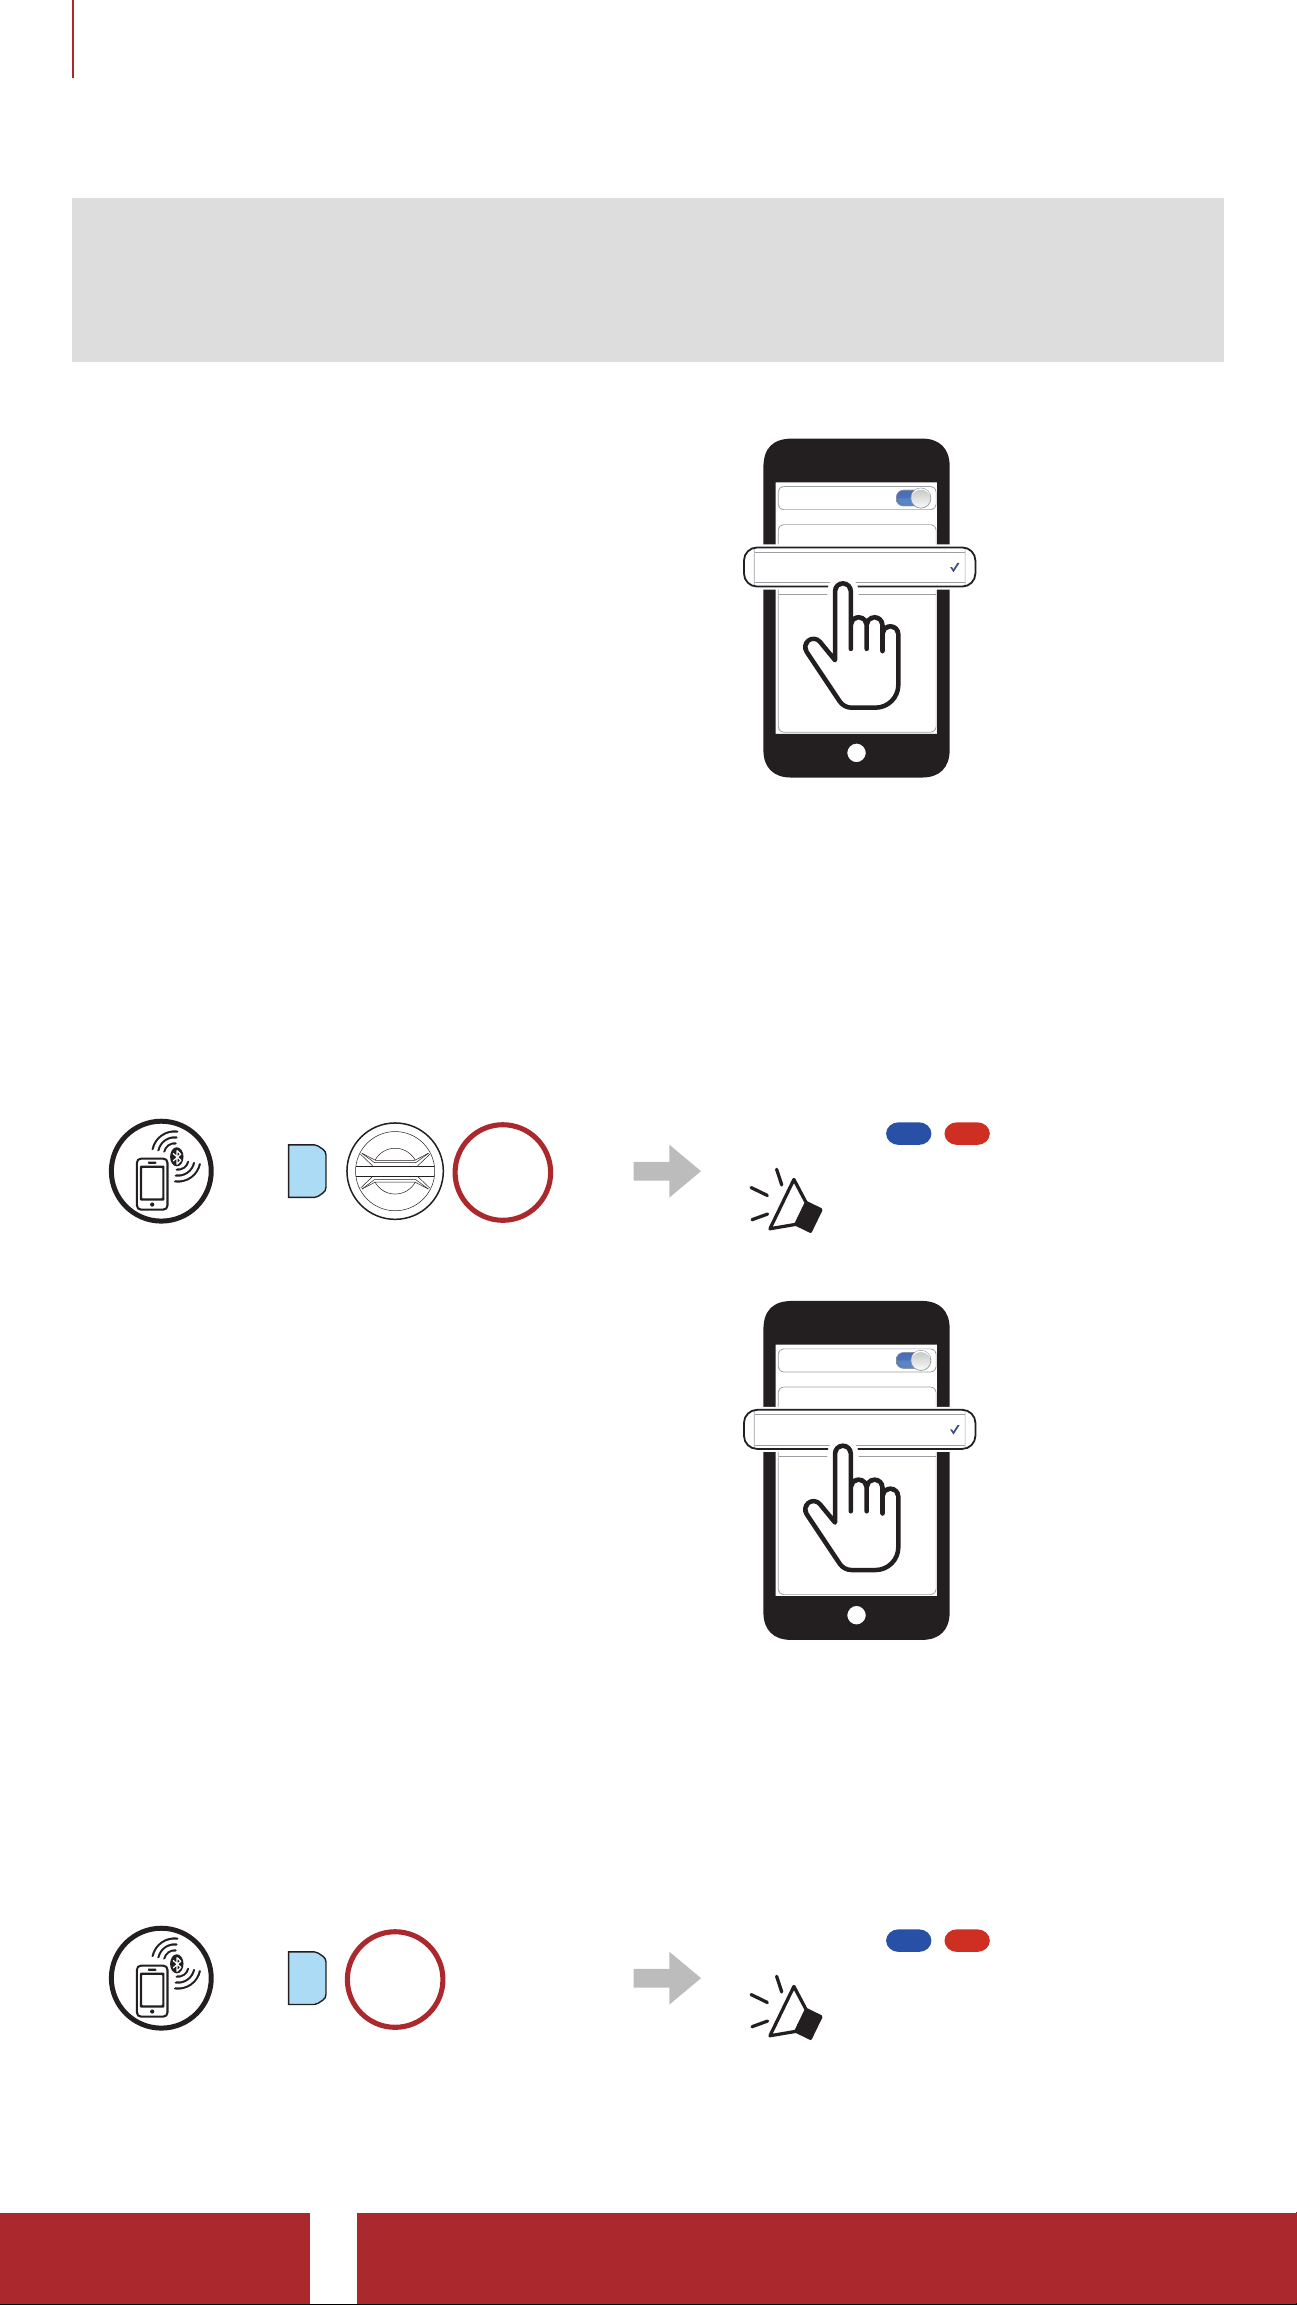
The headset will automatically enter the phone pairing mode when you
initially turn on the headset or in the following situation:
• Rebooting after executing Factory Reset; or
• Rebooting after executing Delete All Pairings.
1. Press and hold the Phone Button and the Jog Dial for 1 second.
Blinking
=
P
HOLD
1s
“Phone pairing”
50C Motorcycle Camera & Communication System with Mesh Intercom™
| 29
Page 30
5 PAIRING THE HEADSET WITH OTHER BLUETOOTH DEVICES
50C
50C
Note:
• The phone pairing mode lasts for 3 minutes.
• To cancel phone pairing, tap the Phone Button or Jog Dial.
2. Select 50C in the list of Bluetooth
devices detected. If your mobile
phone asks for a PIN, enter 0000.
Bluetooth
Pi
Device B
5.1. 2 Pairing When the 50C is Turned Off
1. While the headset is off, press and hold the Phone Button and the
Jog Dial until the LED flashes red and blue alternately and you hear a
voice prompt, “Phone pairing”.
=
P
HOLD
2. Select 50C in the list of Bluetooth
devices detected. If your mobile
phone asks for a PIN, enter 0000.
Blinking
“Phone pairing”
Bluetooth
Pi
Device B
5.1. 3 Pairing When the 50C is Turned On
1. While the headset is on, press and hold the Phone Button for
5 seconds.
Blinking
=
P
HOLD
5s
“Phone pairing”
50C Motorcycle Camera & Communication System with Mesh Intercom™
| 30
Page 31
5 PAIRING THE HEADSET WITH OTHER BLUETOOTH DEVICES
50C
50C
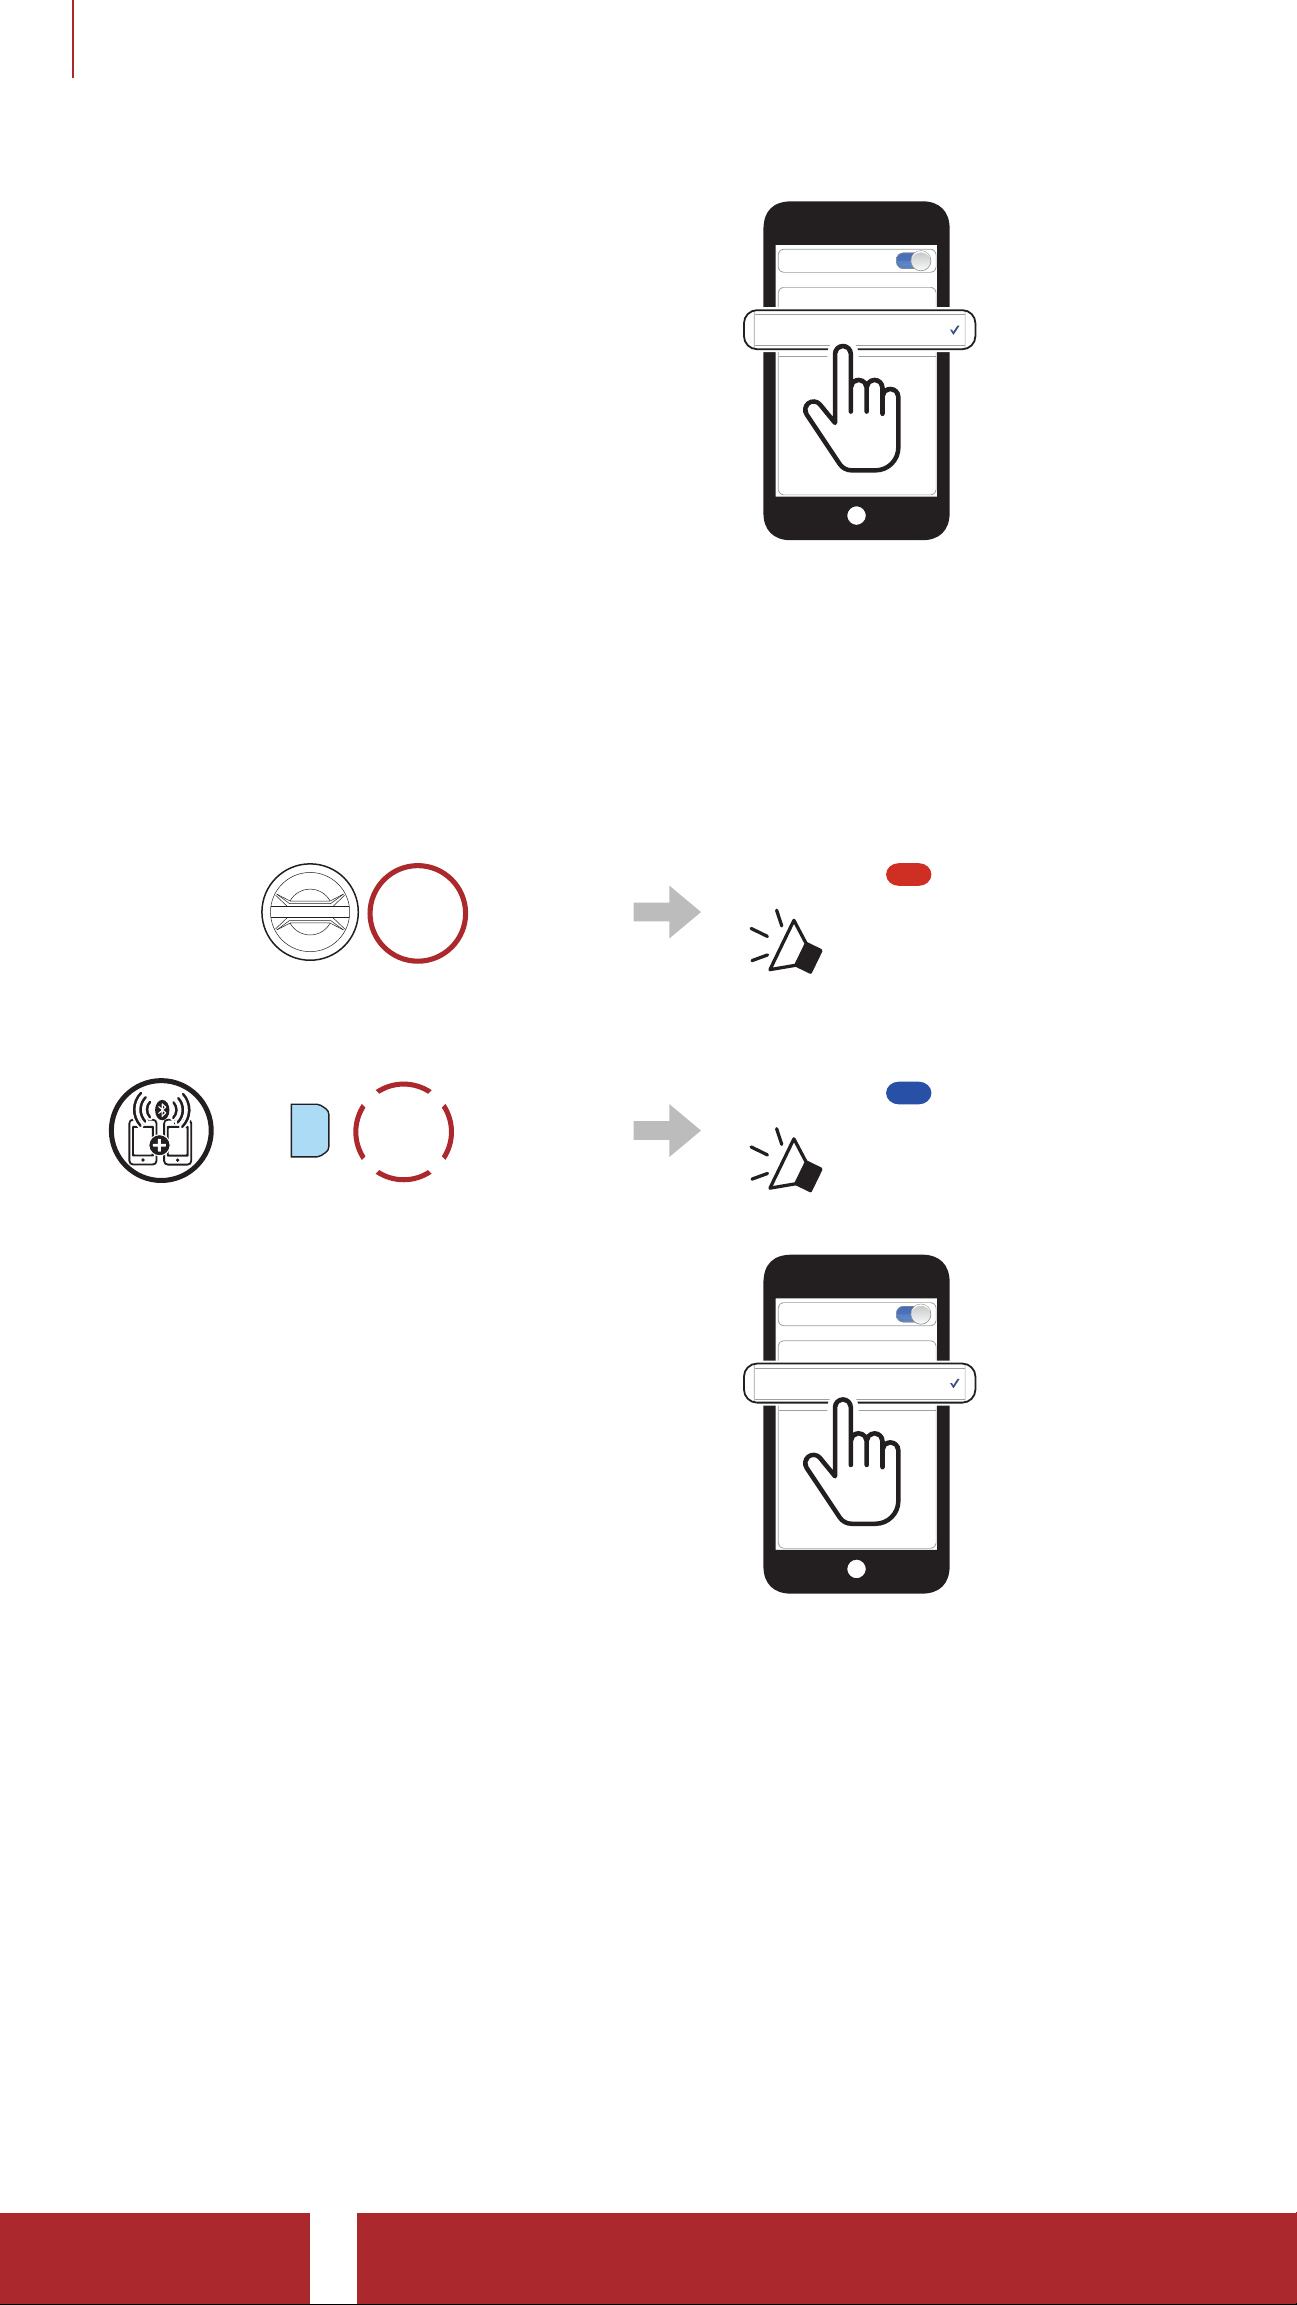
2. Select 50C in the list of Bluetooth
devices detected. If your mobile
phone asks for a PIN, enter 0000.
Bluetooth
Pi
Device B
5.2 Second Mobile Phone Pairing - Second Mobile
Phone, GPS, and SR10
1. Press and hold the Jog Dial for 5 seconds.
HOLD
5s
2. Tap the Phone Button.
=
P
3. Select 50C in the list of Bluetooth
devices detected. If your mobile
phone asks for a PIN, enter 0000.
TAP
1x
Blinking
“ Intercom pairing”
Blinking
“ Second mobile
phone pairing”
Bluetooth
Pi
Device B
50C Motorcycle Camera & Communication System with Mesh Intercom™
| 31
Page 32
5 PAIRING THE HEADSET WITH OTHER BLUETOOTH DEVICES
50C
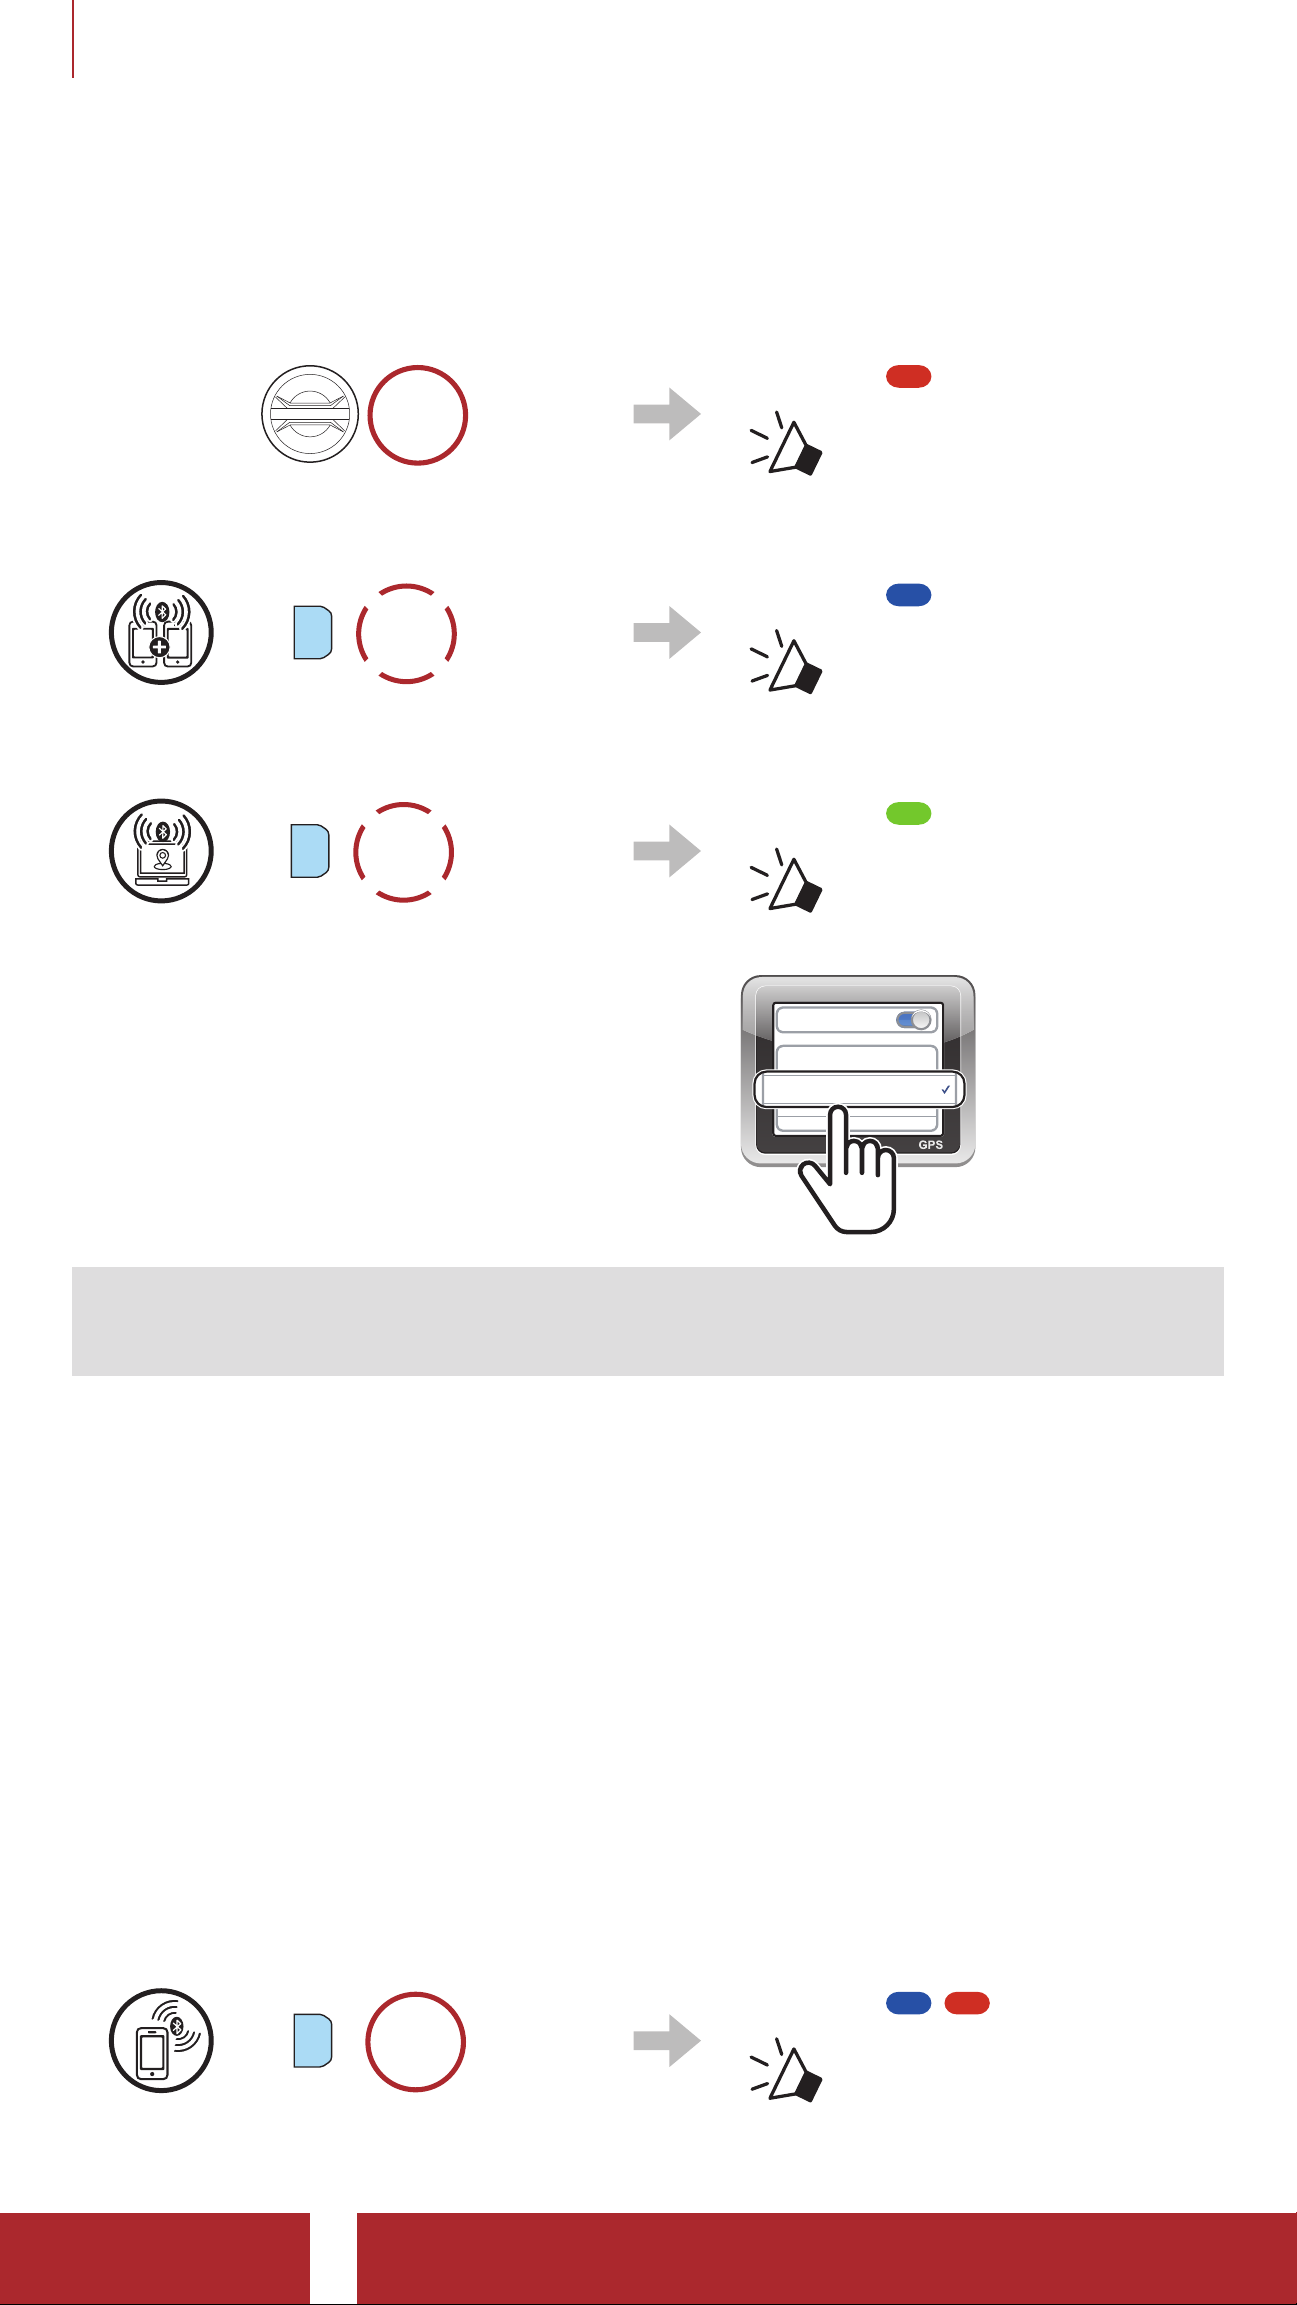
5.3 GPS Pairing
1. Press and hold the Jog Dial for 5 seconds.
HOLD
5s
2. Tap the Phone Button.
=
P
3. Tap the Phone Button.
=
P
TAP
1x
TAP
1x
Blinking
“ Intercom pairing”
Blinking
“ Second mobile
phone pairing”
Blinking
“ GPS pairing”
4. Select 50C in the list of devices
Bluetooth
detected. If your Bluetooth device
asks for a PIN, enter 0000.
Pi
Device B
Note: If you pair your GPS device via GPS Pairing, its instruction will
interrupt your Mesh Intercom conversations.
5.4 Advanced Selective Pairing: Hands-Free or A2DP
Stereo
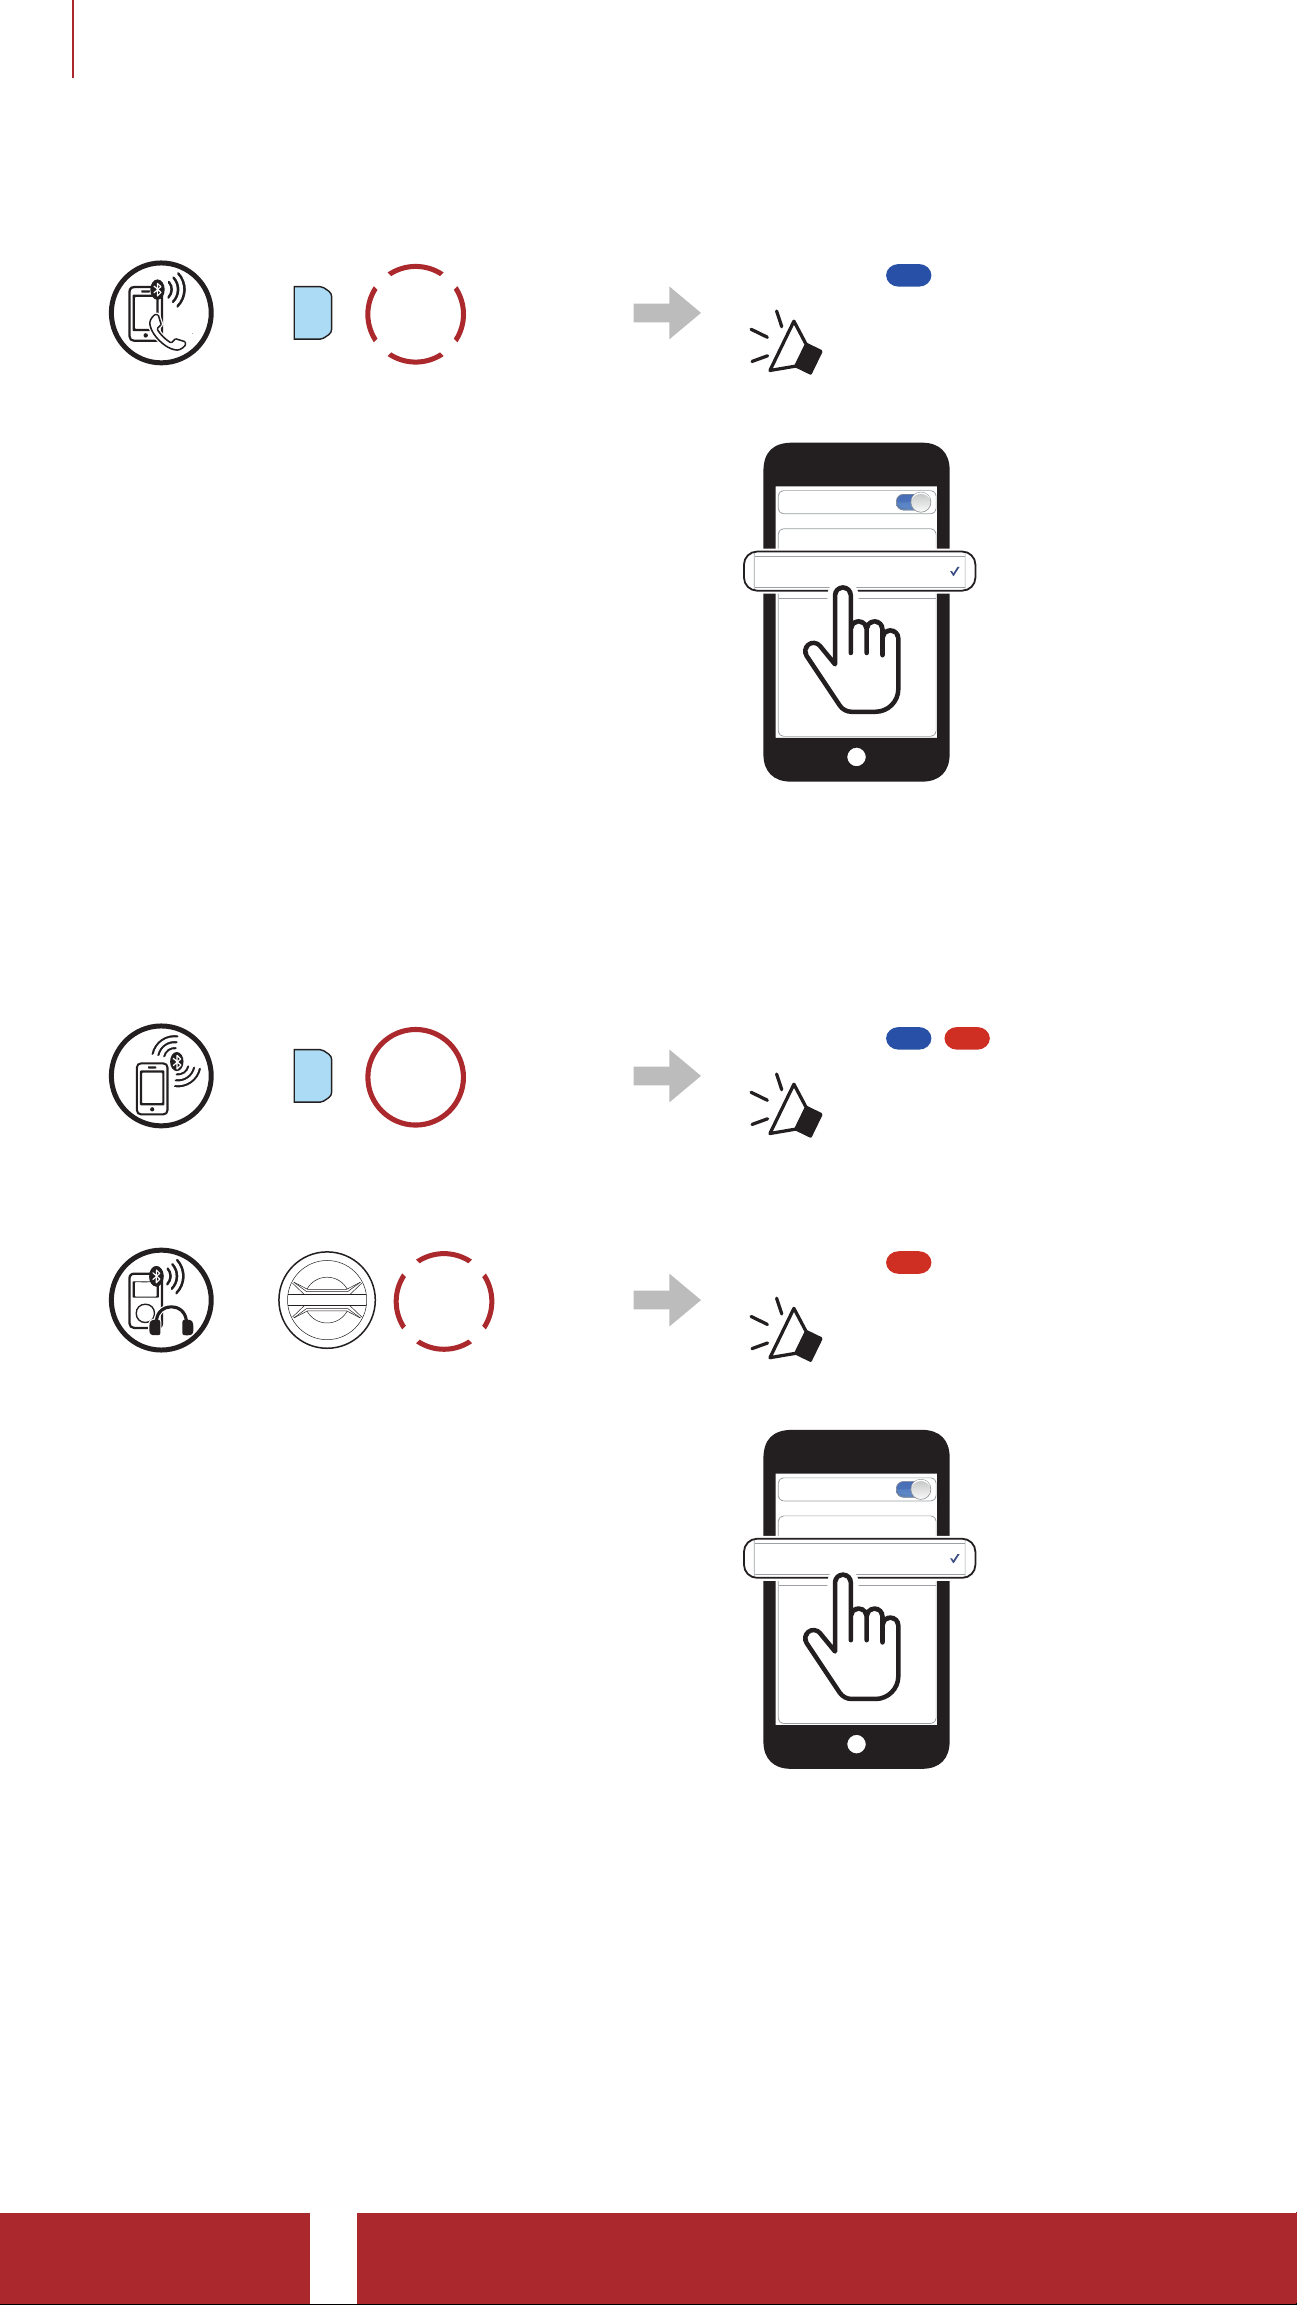
Phone Pairing allows the headset to establish two Bluetooth profiles:
Hands-Free or A2DP Stereo. Advanced Selective Pairing allows the
headset to separate the profiles to enable connection with two devices.
5.4.1 Phone Selective Pairing - Hands-Free Profile
1. Press and hold the Phone Button for 5 seconds.
Blinking
=
P
HOLD
5s
“ Phone pairing”
50C Motorcycle Camera & Communication System with Mesh Intercom™
| 32
Page 33
5 PAIRING THE HEADSET WITH OTHER BLUETOOTH DEVICES
50C
50C
2. Tap the Phone Button.
TAP
1x
=
P
3. Select 50C in the list of Bluetooth
devices detected. If your mobile
phone asks for a PIN, enter 0000.
Blinking
“ Phone selective
pairing”
Bluetooth
Pi
Device B
5.4.2 Media Selective Pairing - A2DP Profile
1. Press and hold the Phone Button for 5 seconds.
Blinking
=
P
HOLD
5s
“ Phone pairing”
2. Tap the Jog Dial.
TAP
=
1x
3. Select 50C in the list of Bluetooth
Blinking
“ Media selective
pairing”
devices detected. If your mobile
phone asks for a PIN, enter 0000.
Bluetooth
Pi
Device B
50C Motorcycle Camera & Communication System with Mesh Intercom™
| 33
Page 34
6. MOBILE PHONE USAGE
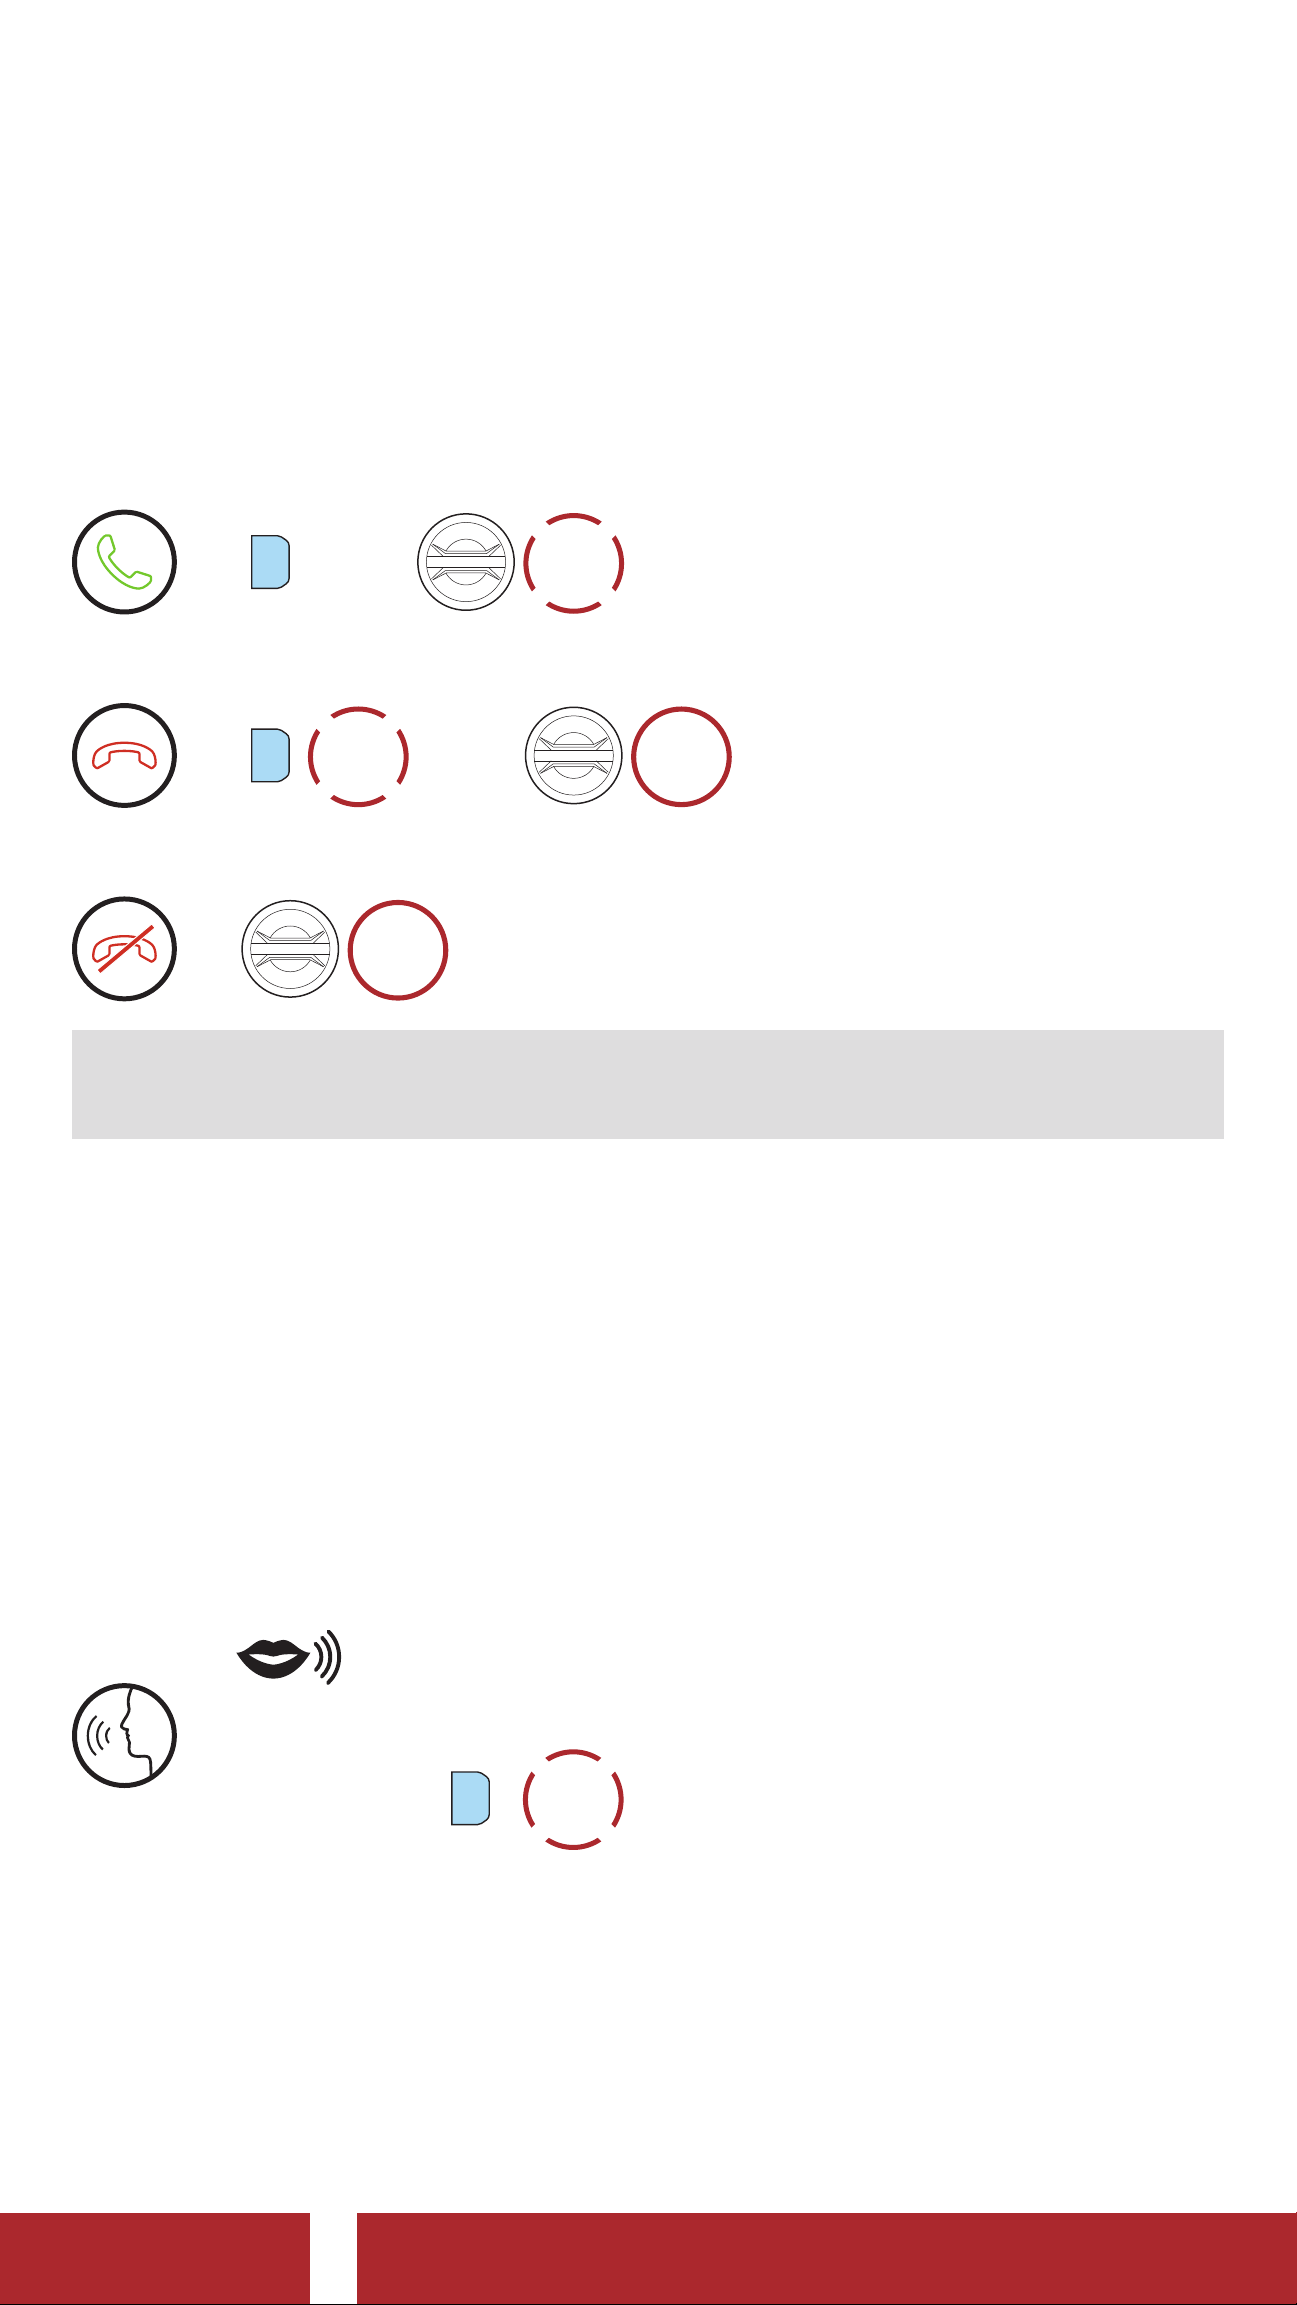
6.1 Making and Answering Calls
Answer a Call
TAP
1x
=
P
or
End a Call
HOLD
2s
=
P
TAP
or
1x
Reject a Call
HOLD
=
2s
Note: If you have a GPS device connected, you will not hear its voice
navigations during a phone call.
6.2 Siri and Google Assistant
The 50C supports the Siri and Google Assistant access directly.
You can activate the Siri or Google Assistant using the voice through
the headset’s microphone, a wake word will be used. This is a word or
groups of words such as “Hey Siri“ or “Hey Google”.
Activate the Siri or Google Assistant Installed on Your Smartphone
“ Hey Google” or “Hey Siri”
=
or
TAP
P
1x
50C Motorcycle Camera & Communication System with Mesh Intercom™
| 34
Page 35
6 MOBILE PHONE USAGE
6.3 Speed Dialing
6.3.1 Assigning Speed Dial Presets
Speed Dial Presets could be assigned in the settings menu, accessible
through the Sena Device Manager or the SENA MOTORCYCLES App.
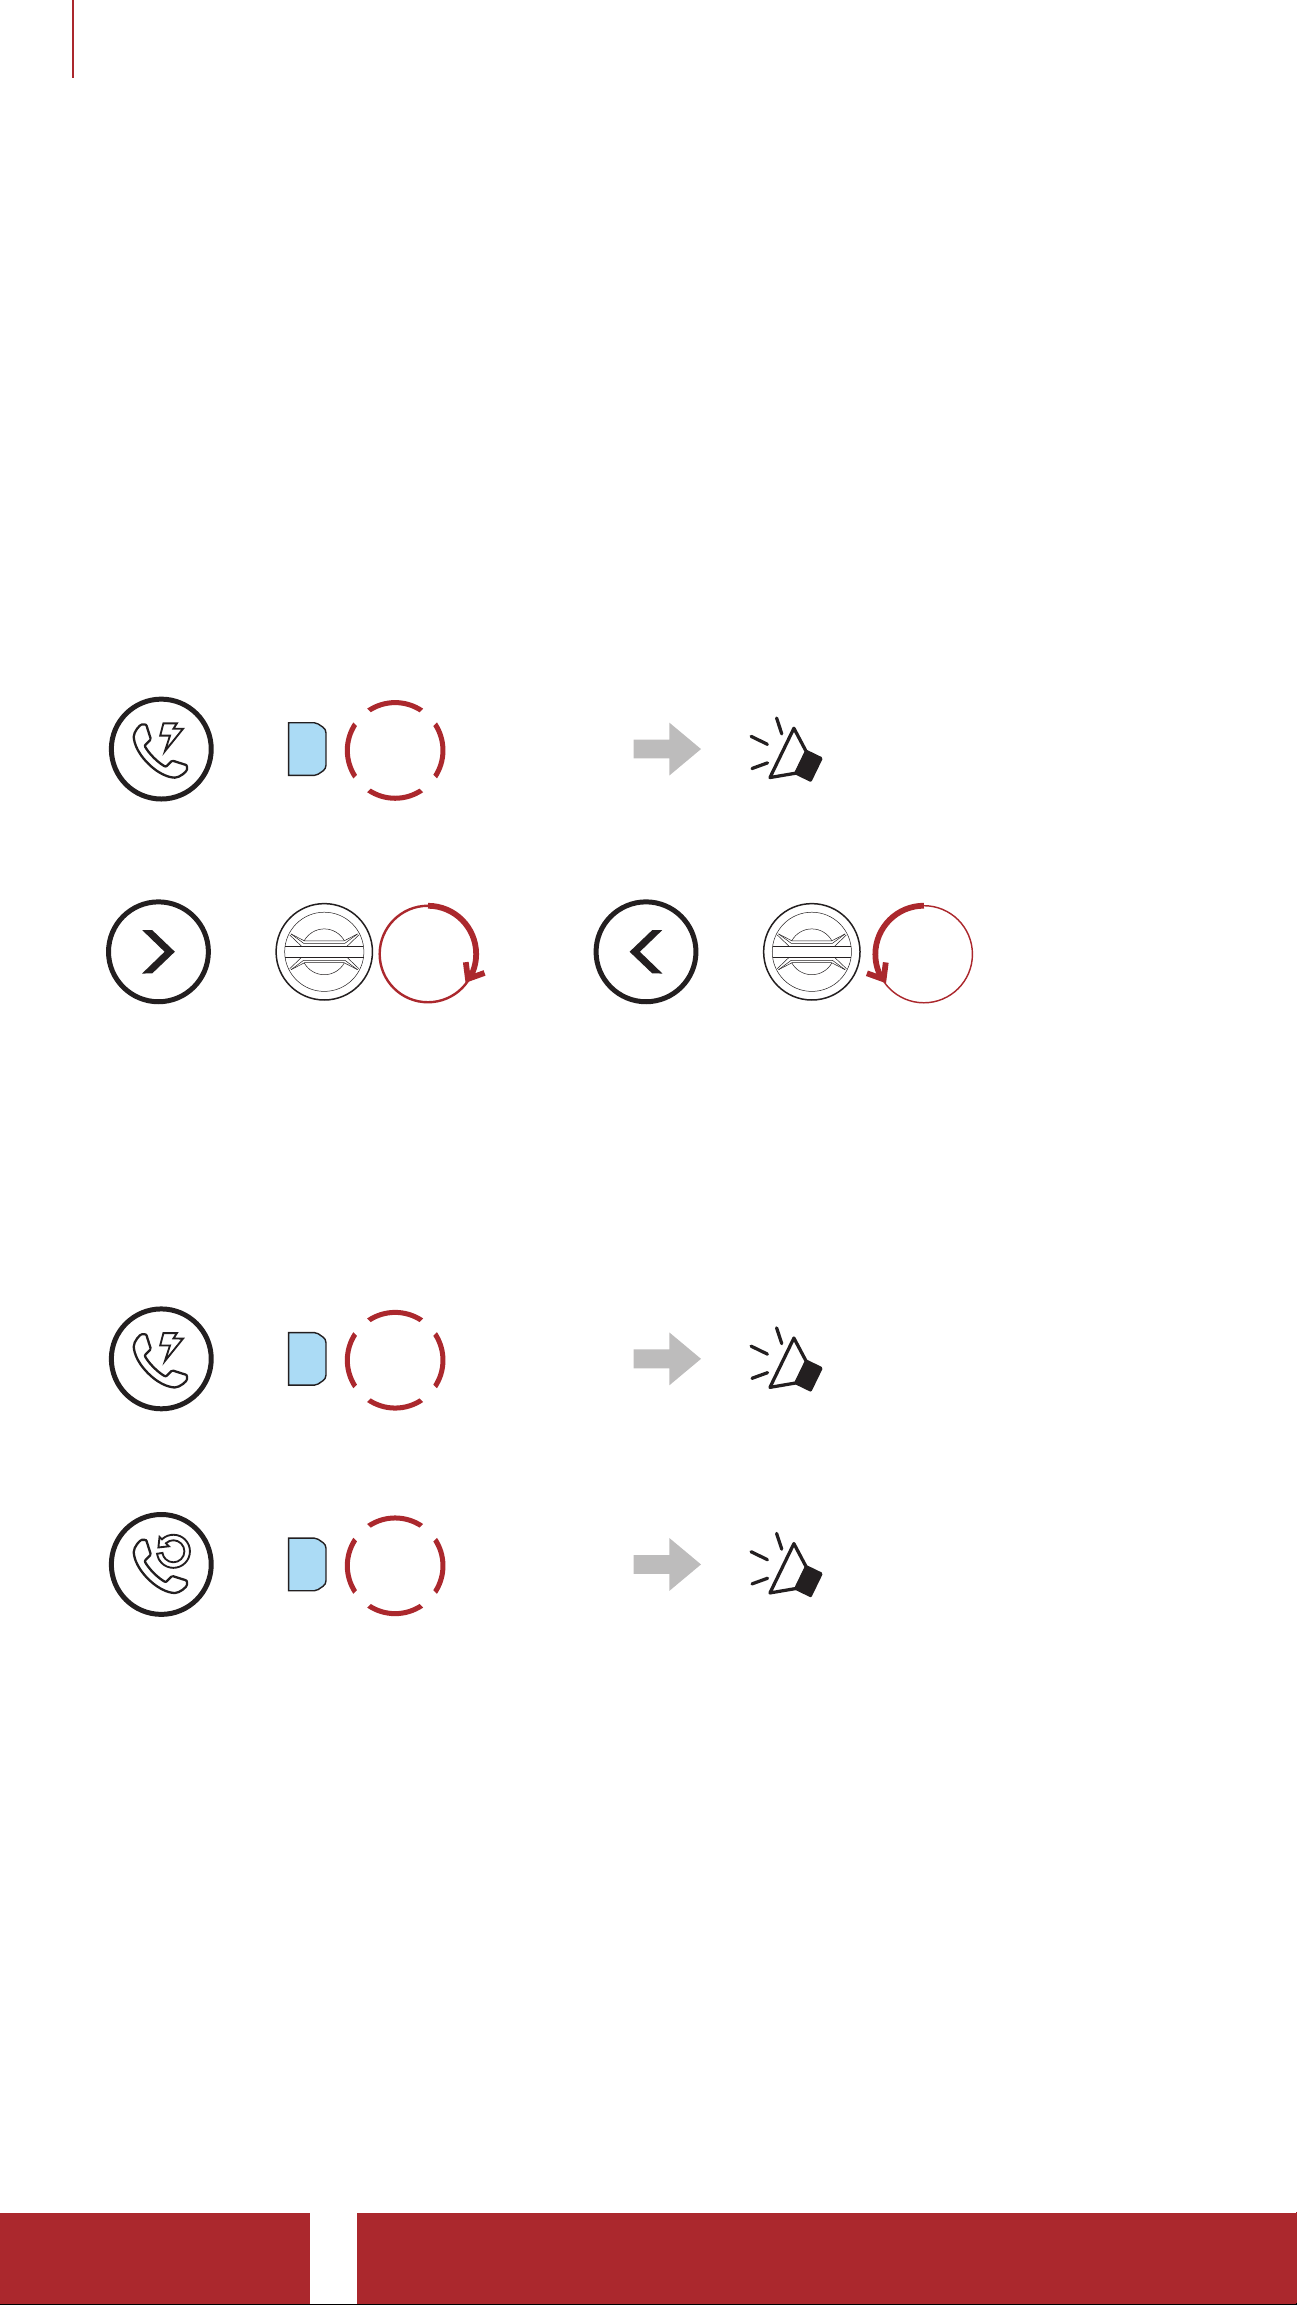
6.3.2 Using Speed Dial Presets
1. Enter into the Speed Dial menu.
TAP
2x
“ Speed dial”
=
P
2. Navigate forward or backward through Speed Dial Preset numbers.
=
ROTATE
R
(1) Last number redial
(2) Speed dial 1
or
=
(4) Speed dial 3
(5) Cancel
ROTATE
L
(3) Speed dial 2
3. Call one of your Speed Dial Presets numbers.
TAP
1x
=
P
4. Redial the last number called.
TAP
1x
=
P
“ Speed dial (#)”
“ Last number redial”
50C Motorcycle Camera & Communication System with Mesh Intercom™
| 35
Page 36

7. STEREO MUSIC
7.1 Playing Music with Bluetooth Devices
Play/Pause Music
HOLD
=
Track Forward/Backward
1s
=
ROTATE
R
or
=
ROTATE
L
7. 2 Music Sharing
You can start sharing music with one intercom friend using Bluetooth
stereo music during a two-way intercom conversation and one
participant of a Mesh. If you start sharing music while Bluetooth
intercom and Mesh Intercom are running at the same time, then music
shared during Bluetooth intercom will take priority over music shared
during Mesh Intercom.
Note:
• Both you and your intercom friend can remotely control music
playback such as track forward and track back.
• Music sharing will be paused when you are using your mobile
phone or listening to GPS instructions.
• Music sharing will be terminated if the headset starts a multi-way
intercom conference.
50C Motorcycle Camera & Communication System with Mesh Intercom™
| 36
Page 37
7 STEREO MUSIC
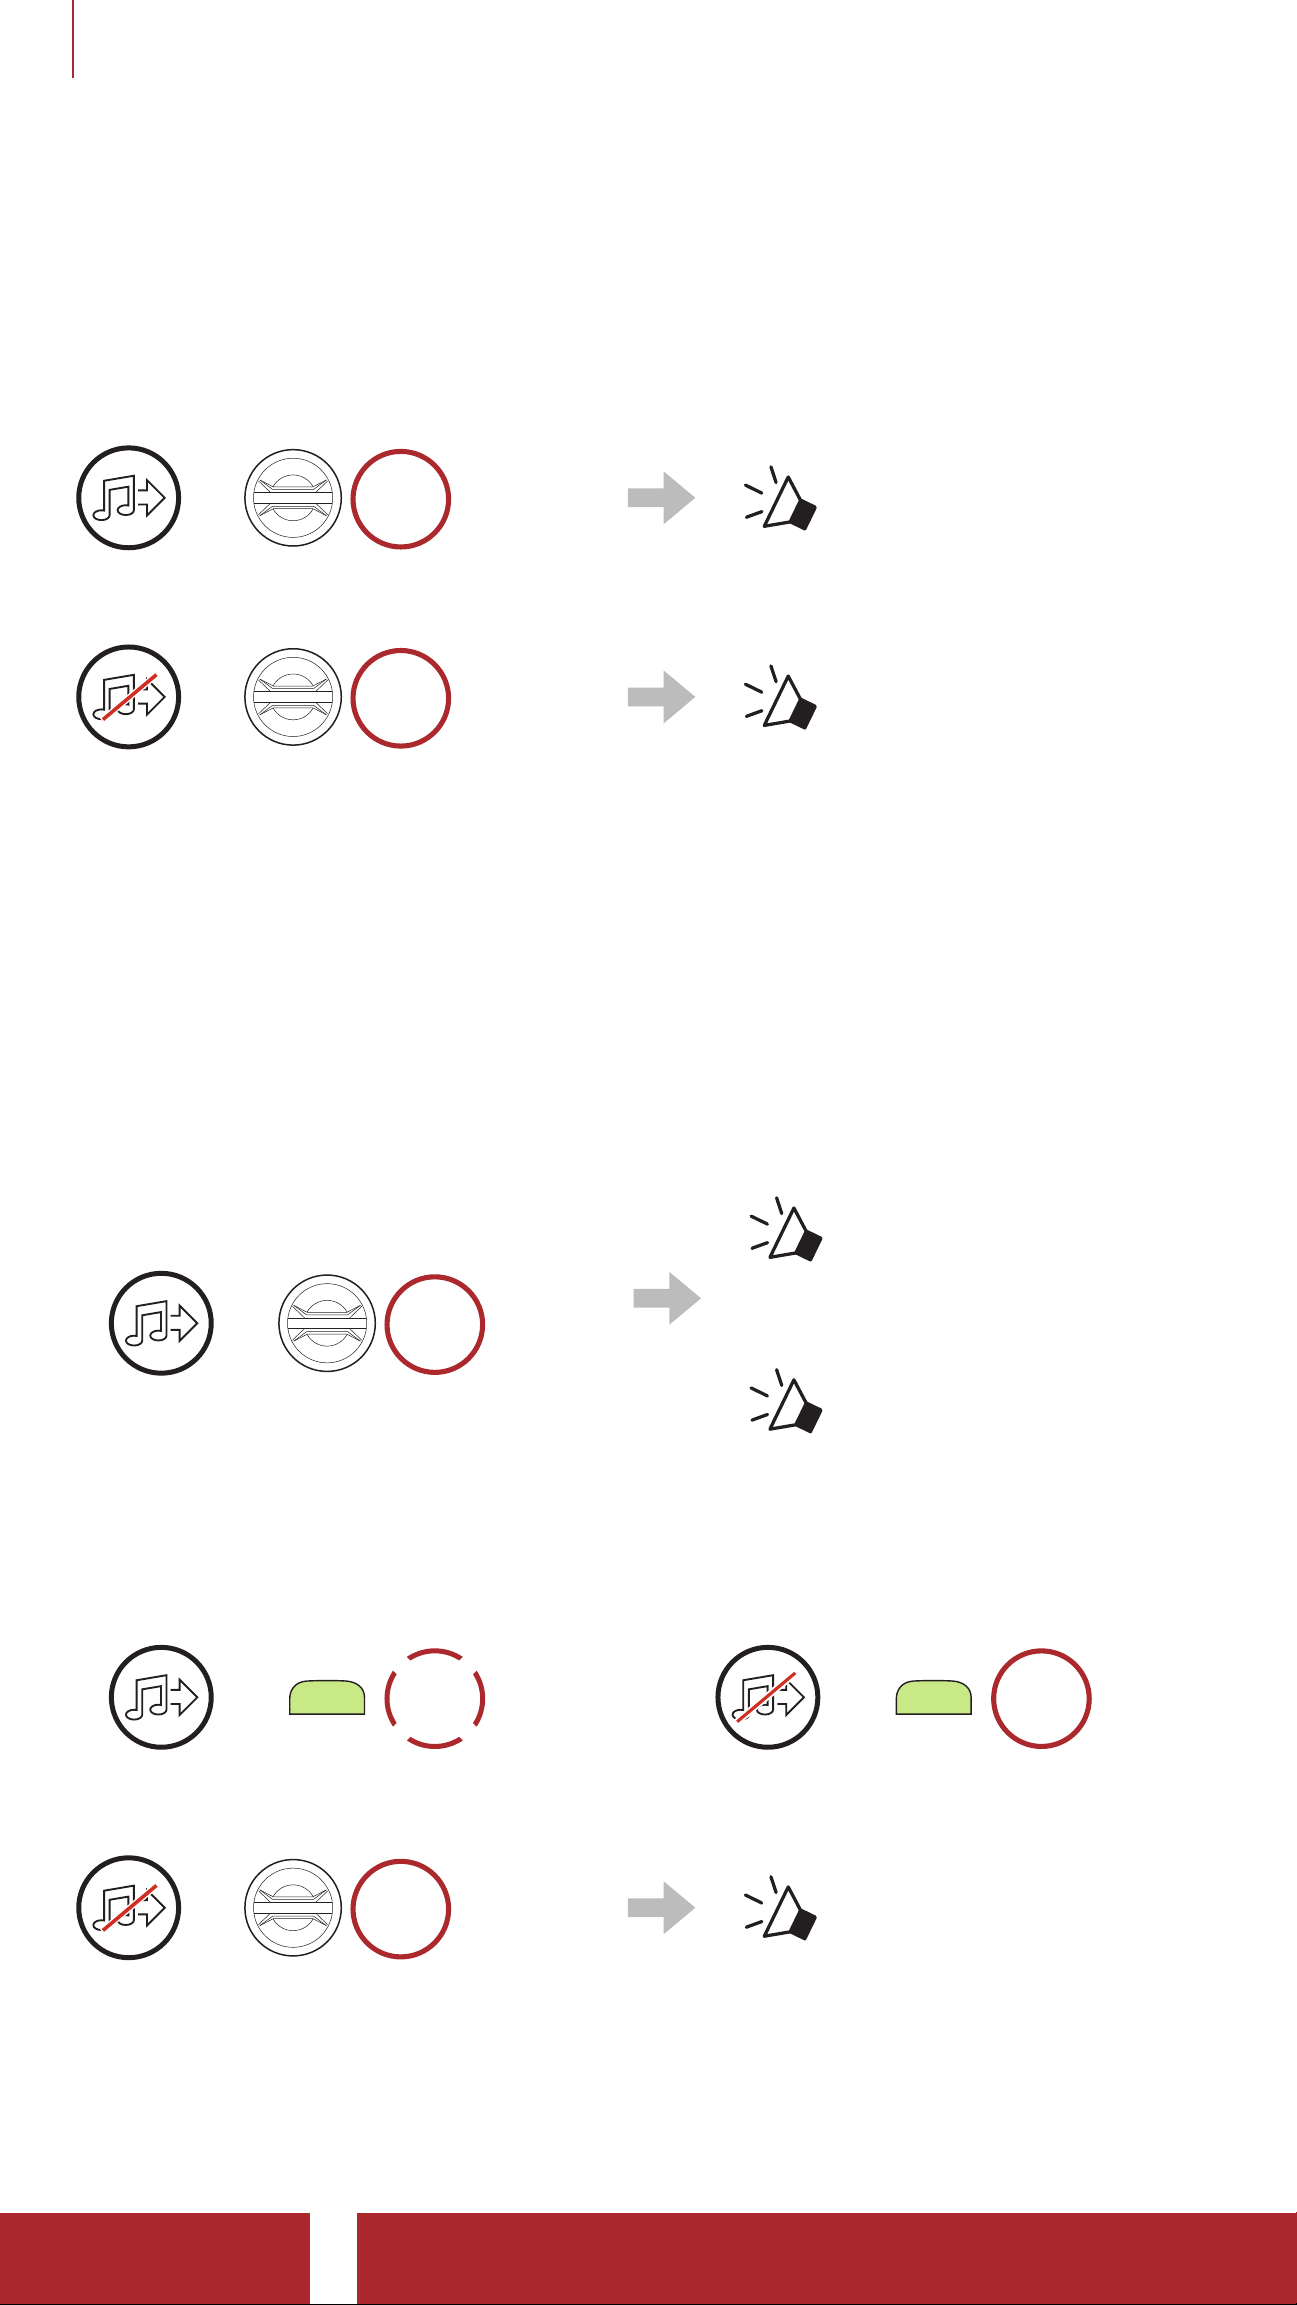
7. 2 .1 Bluetooth Intercom Music Sharing
You can start sharing the music with one intercom friend of a two-way
intercom conversation.
Start Sharing Music
HOLD
=
3s
Terminate Sharing Music
“Music sharing on”
HOLD
=
3s
“Music sharing off”
7.2.2 Mesh Intercom Music Sharing
You can start sharing music with one participant of a Mesh Intercom.
Start Sharing Music
1. The Creator will send a request message to participants connected
during Mesh Intercom.
[Creator]
[Creator]
“Music sharing on”
HOLD
=
[Participants]
3s
“ Would you like
to accept music
sharing?”
2. The Creator will share music with the first participant that accepts
the request.
[Participant] Accept
TAP
1x
=
M
Terminate Sharing Music
[Participant] Refuse
HOLD
=
M
1s
=
HOLD
3s
50C Motorcycle Camera & Communication System with Mesh Intercom™
“Music sharing off”
| 37
Page 38
8. MESH INTERCOM
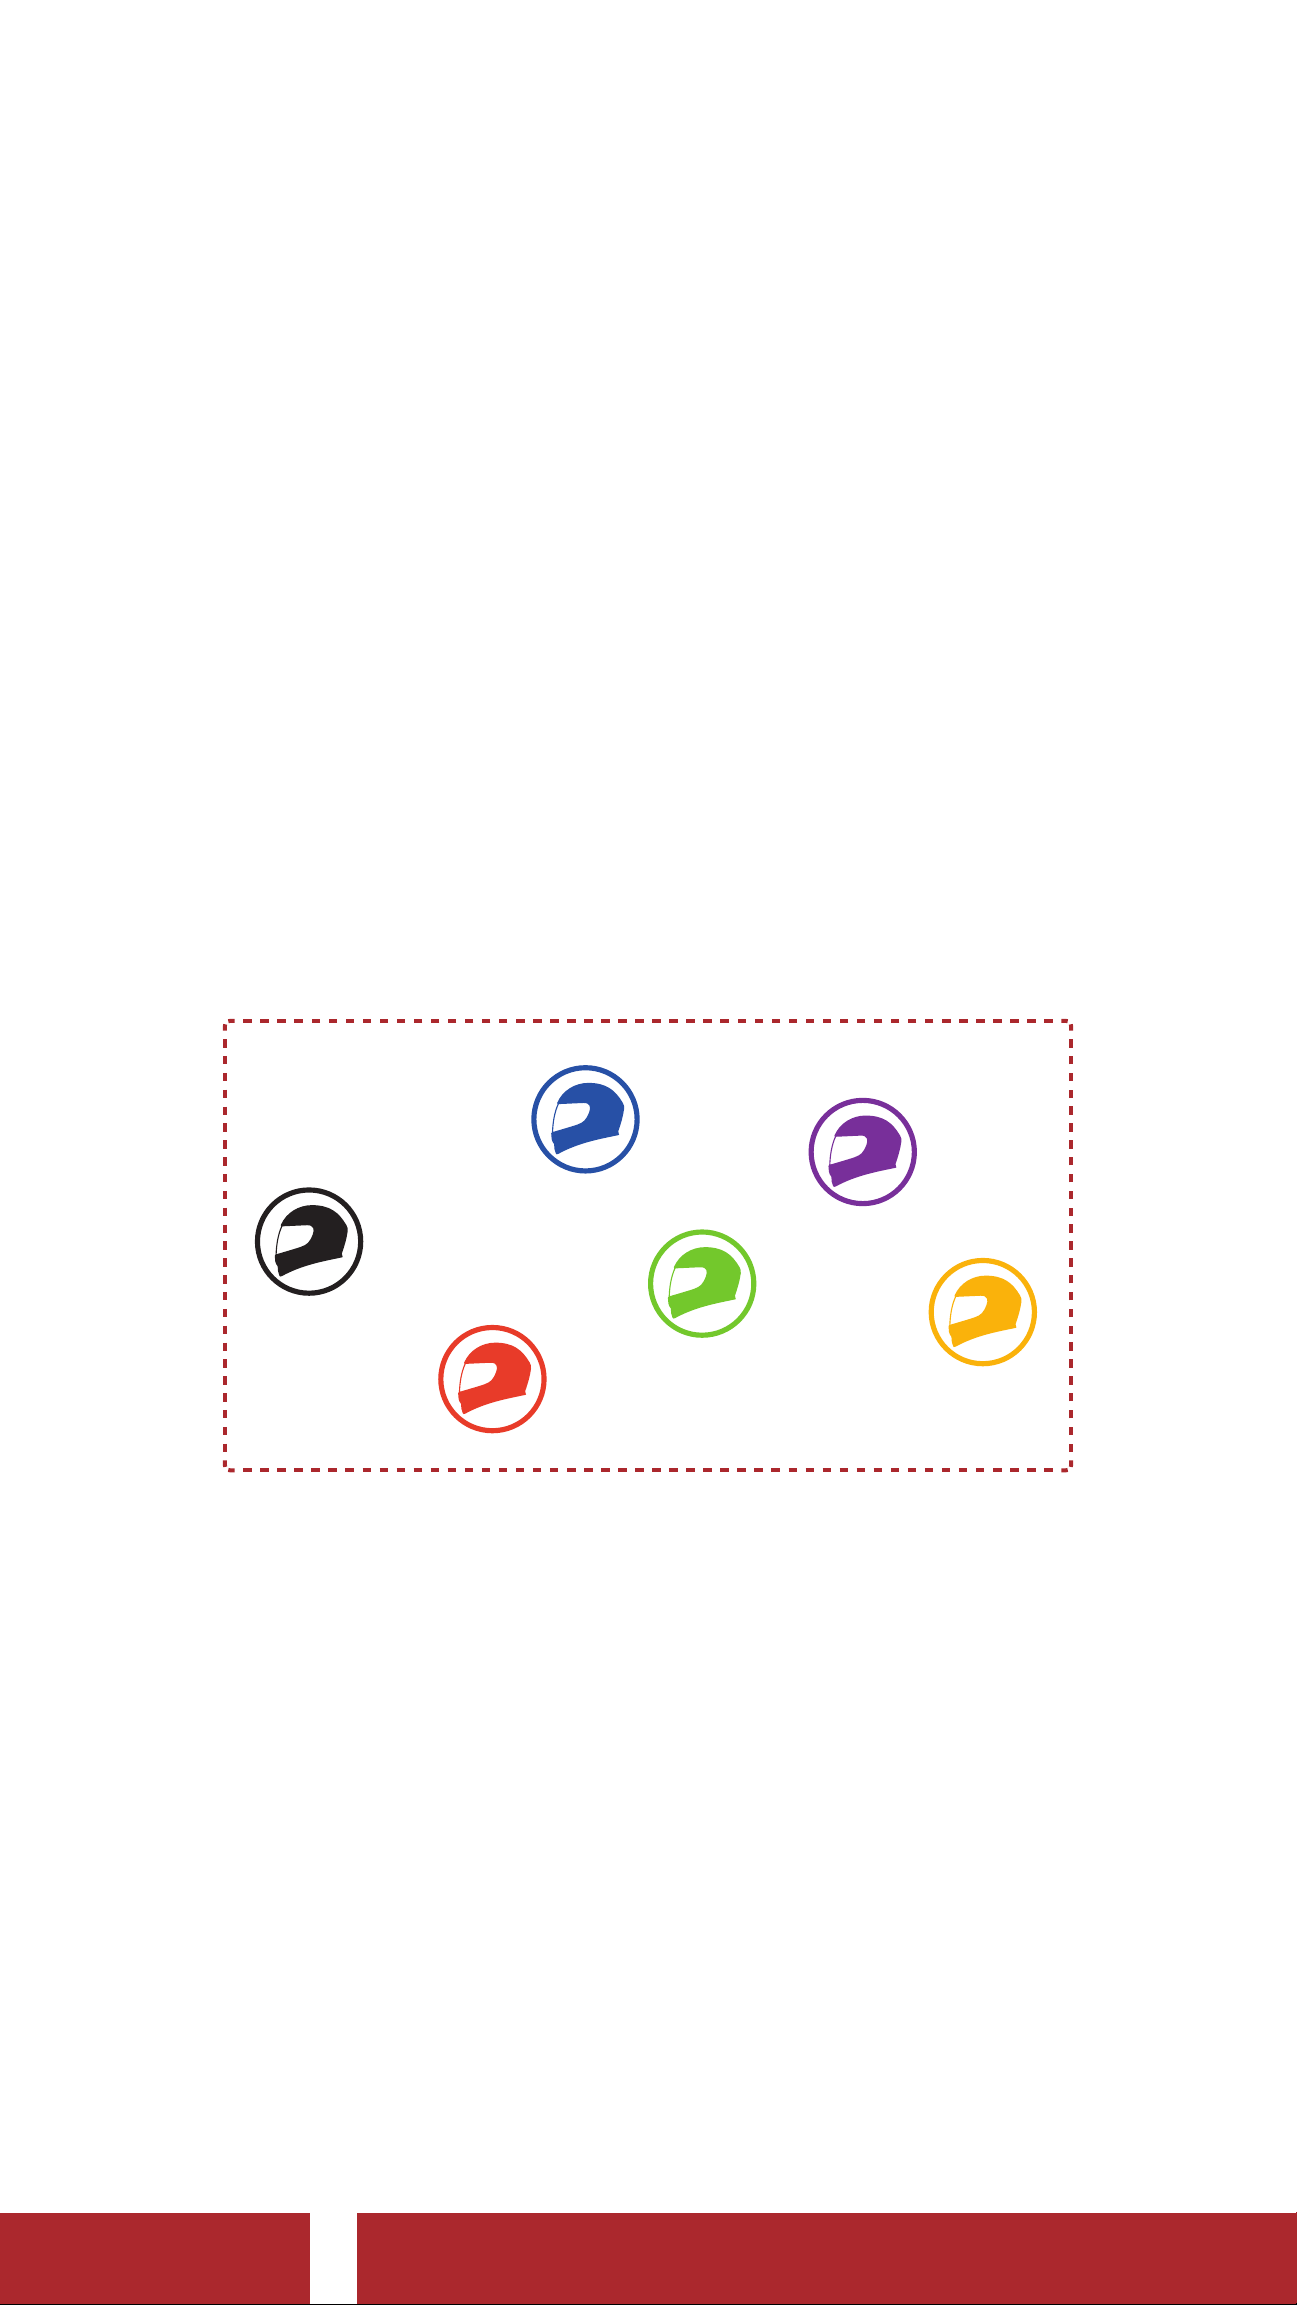
8.1 What is Mesh Intercom?
Mesh Intercom™ is a dynamic communication system created by Sena
that provides instant and effortless bike-to-bike communication without
a pre-grouping process. Mesh Intercom allows riders to connect and
communicate with nearby users without the need to pair each headset
together.
The working distance between each 50C in Mesh Intercom can be up
to 2 km (1.2 miles) in open terrain. In open terrain, the Mesh can be
extended up to 8 km (5 miles) between a minimum of six users. Within
the same channel in Open Mesh™ or the same private group in Group
Mesh™, six users can talk at the same time and enjoy the optimal
quality for their conversation.
Mesh Intercom
50C Motorcycle Camera & Communication System with Mesh Intercom™
| 38
Page 39
8 MESH INTERCOM
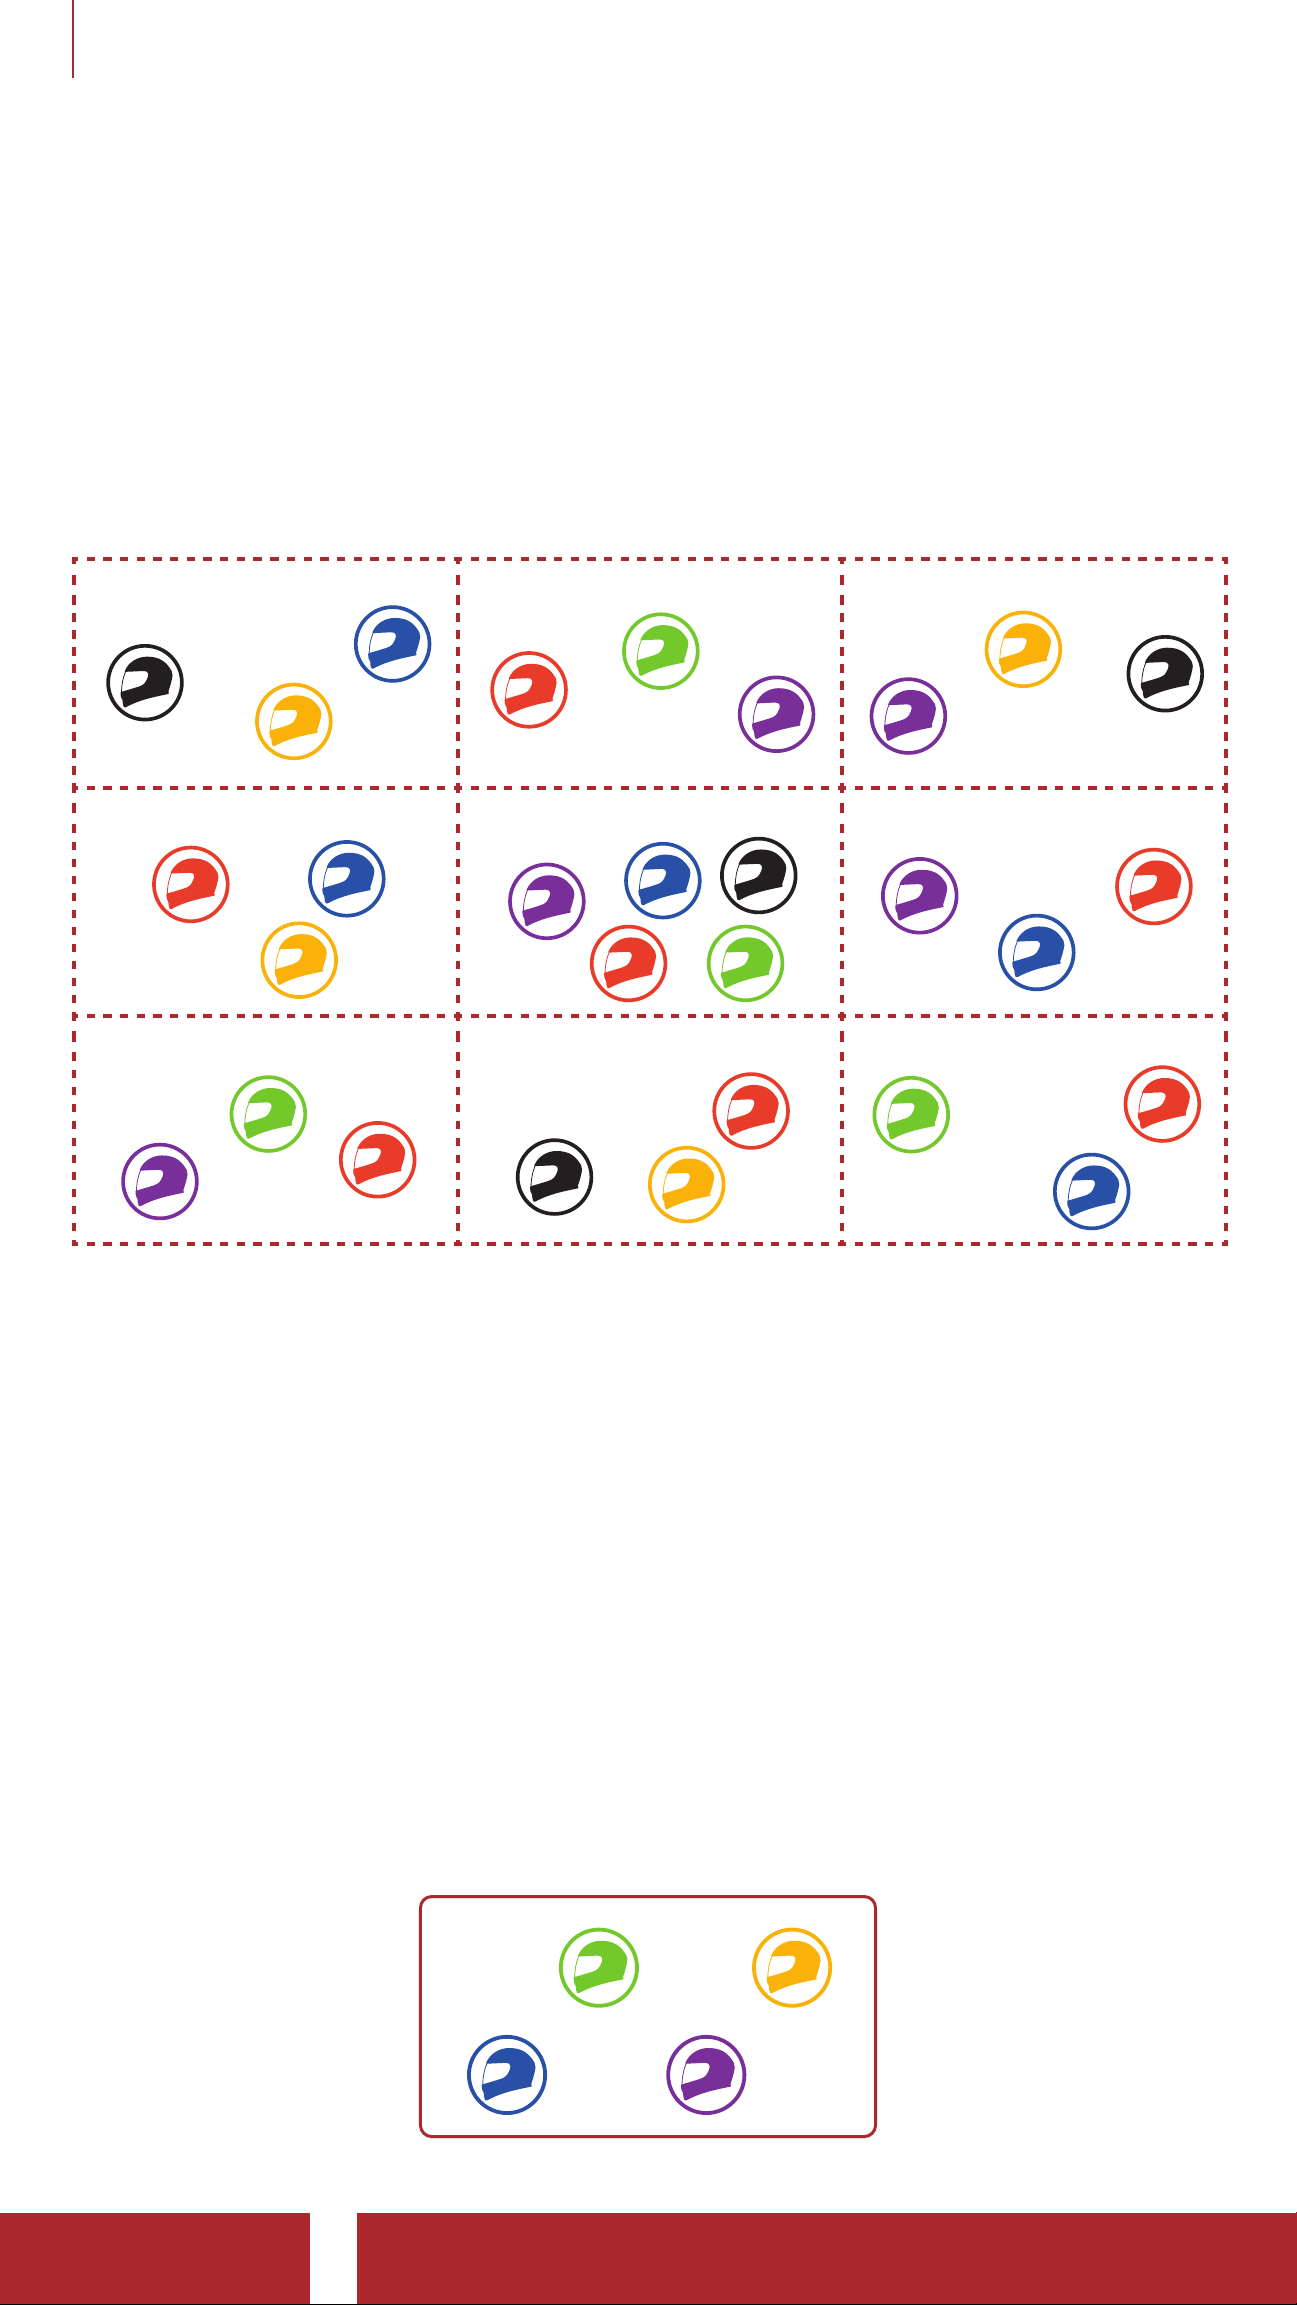
8.1.1 Open Mesh
Open Mesh is an open group intercom function. Users can freely
communicate with each other in the same Open Mesh channel and
select which channel (1-9) to use through the headset.
It can connect with a virtually unlimited number of users in each channel.
Open Mesh
Ch 1 Ch 2 Ch 3
Ch 4 Ch 5 Ch 6
Ch 7 Ch 8 Ch 9
8.1.2 Group Mesh
Group Mesh is a closed group intercom function that allows users to
join, leave, or rejoin a group intercom conversation without pairing each
headset. Users can freely communicate with each other in the same
private group in Group Mesh.
For closed intercom conversations using Mesh Intercom, a Group
Mesh needs to be created by the users. When users create a private
group in Group Mesh by Mesh Grouping, the headset automatically
switches from Open Mesh to Group Mesh. Up to 24 users can all be
connected in each private group.
Group Mesh
50C Motorcycle Camera & Communication System with Mesh Intercom™
| 39
Page 40
8 MESH INTERCOM
8.2 Starting Mesh Intercom
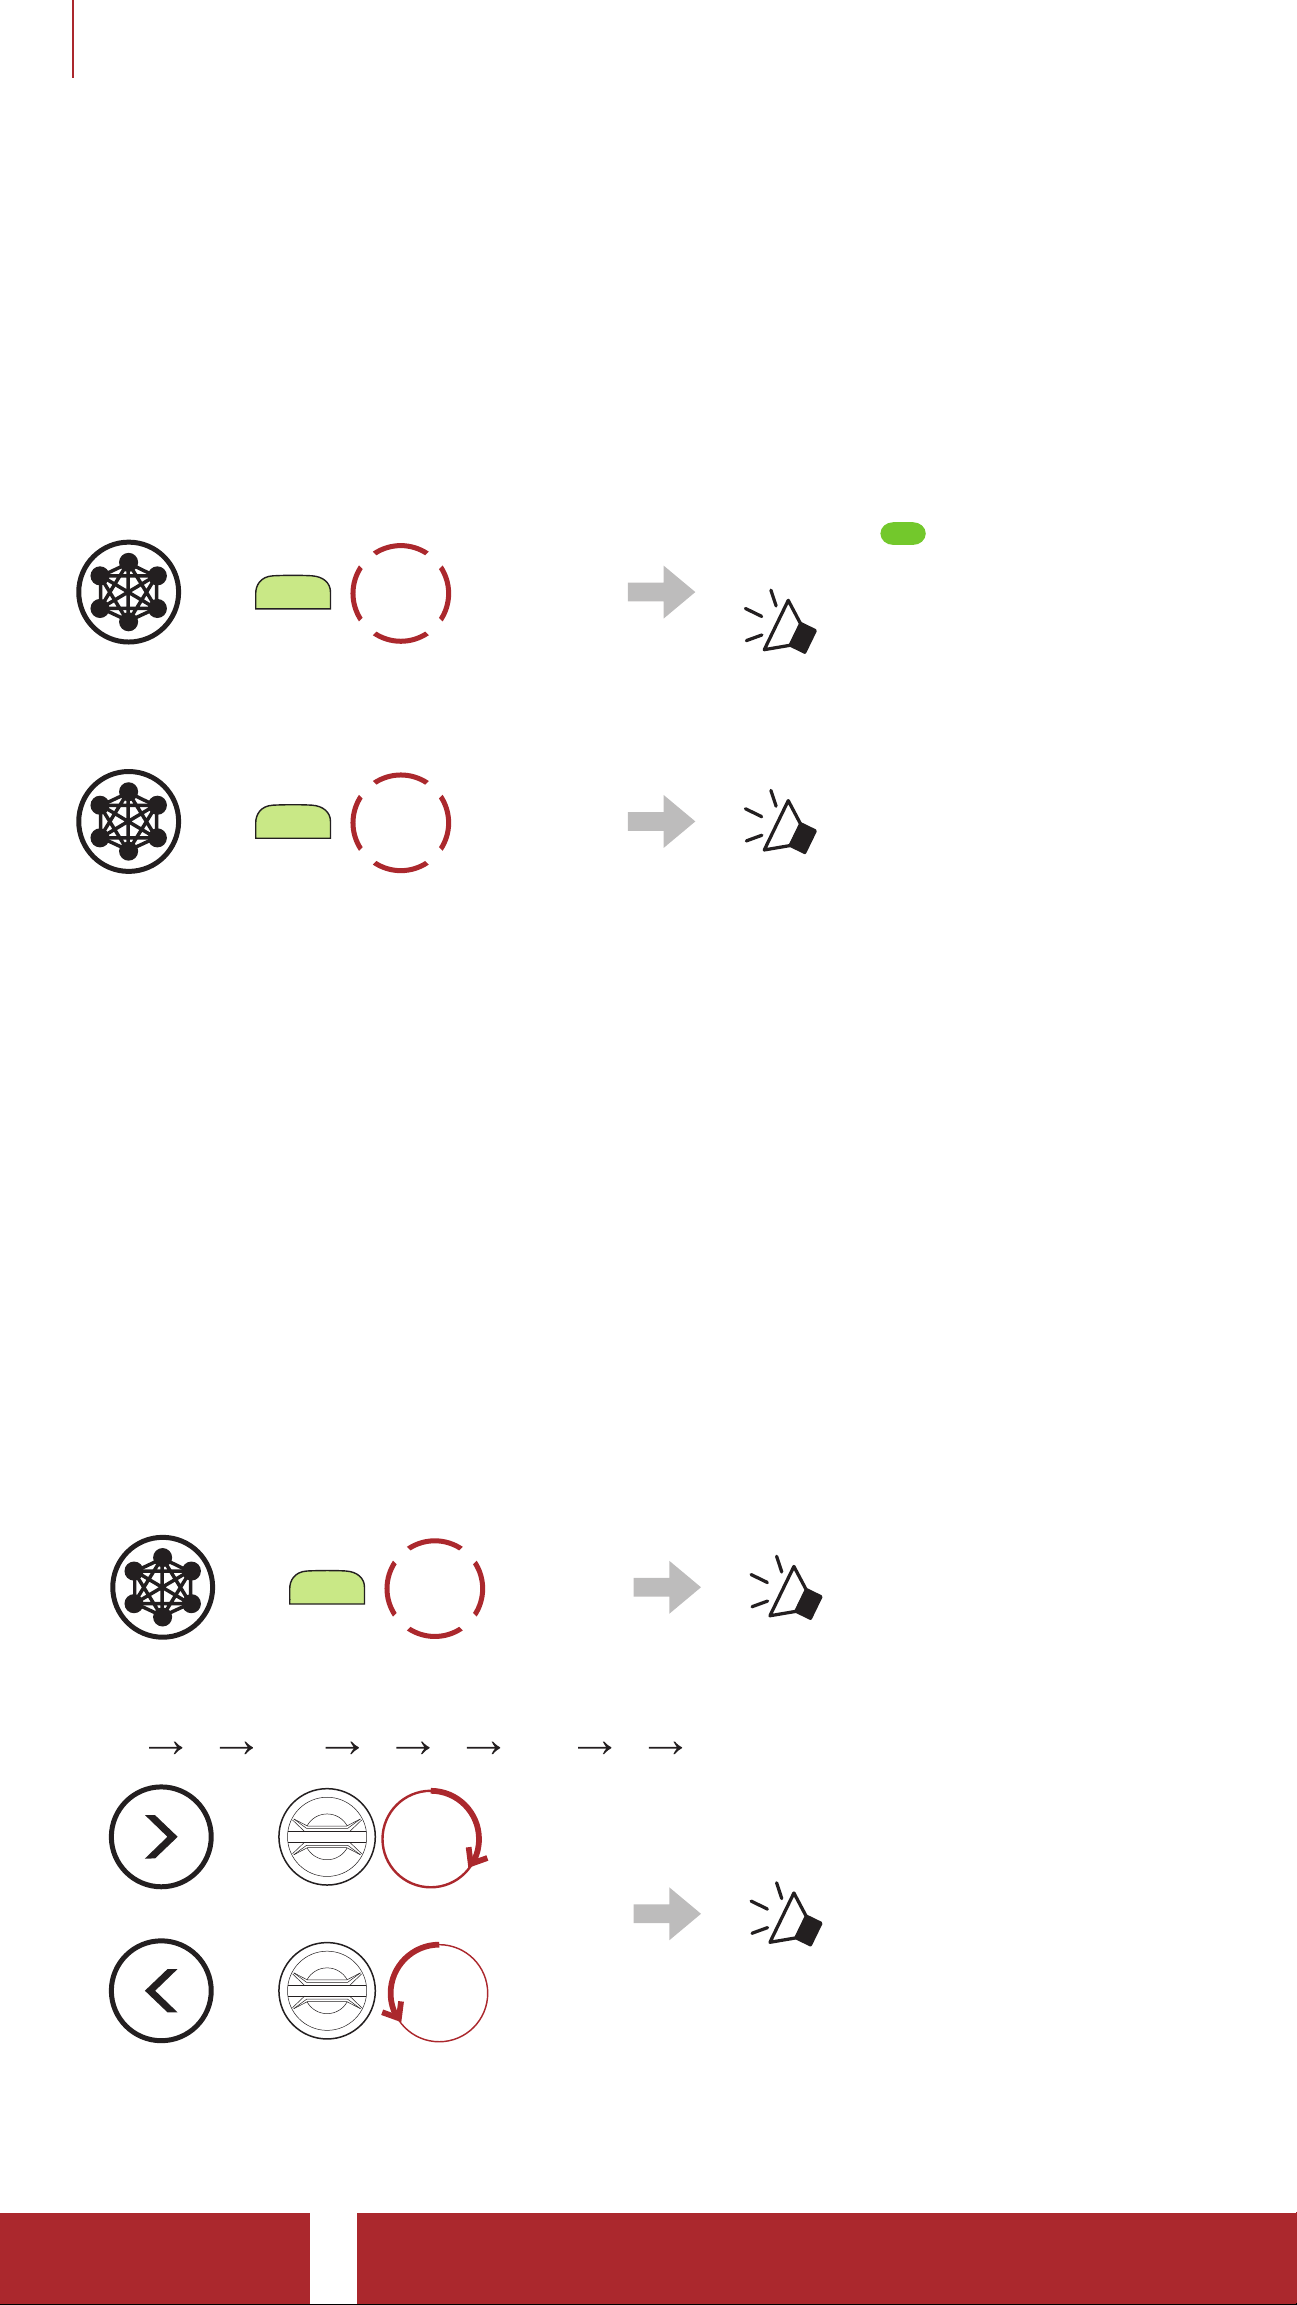
When Mesh Intercom is enabled, the 50C will automatically connect to
nearby 50C users and allow them to talk to each other by pressing the
Mesh Intercom Button.
Mesh Intercom On
Blinking
=
M
TAP
1x
“ Mesh intercom on,
Open Mesh,
channel 1”
Mesh Intercom Off
TAP
1x
“ Mesh intercom off”
=
M
8.3 Using the Mesh in Open Mesh
When Mesh Intercom is enabled, the headset will be in Open Mesh
(default: channel 1) initially.
8.3.1 Channel Setting (Default: channel 1)
If the Open Mesh communication experiences interference because
other groups are also using channel 1 (default), change the channel.
You can select from channels 1 to 9.
1. Double tap the Mesh Intercom Button.
=
M
2. Navigate between channels.
TAP
2x
“ Channel setting, 1”
(1
2 ••• 8 9 Exit 1 •••)
ROTATE
=
R
or
ROTATE
=
L
50C Motorcycle Camera & Communication System with Mesh Intercom™
“#”
| 40
Page 41
8 MESH INTERCOM
3. Save the channel.
=
TAP
1x
“ Channel is set,
channel #”
Note:
• Channel Setting always starts with channel 1.
• If you do not press any button for approximately 10 seconds in a
specific channel, the channel is automatically saved.
• The channel will be remembered even if you turn off the 50C.
• You can use the SENA MOTORCYCLES App to change the
channel.
8.4 Using Mesh in Group Mesh
8.4.1 Creating a Group Mesh
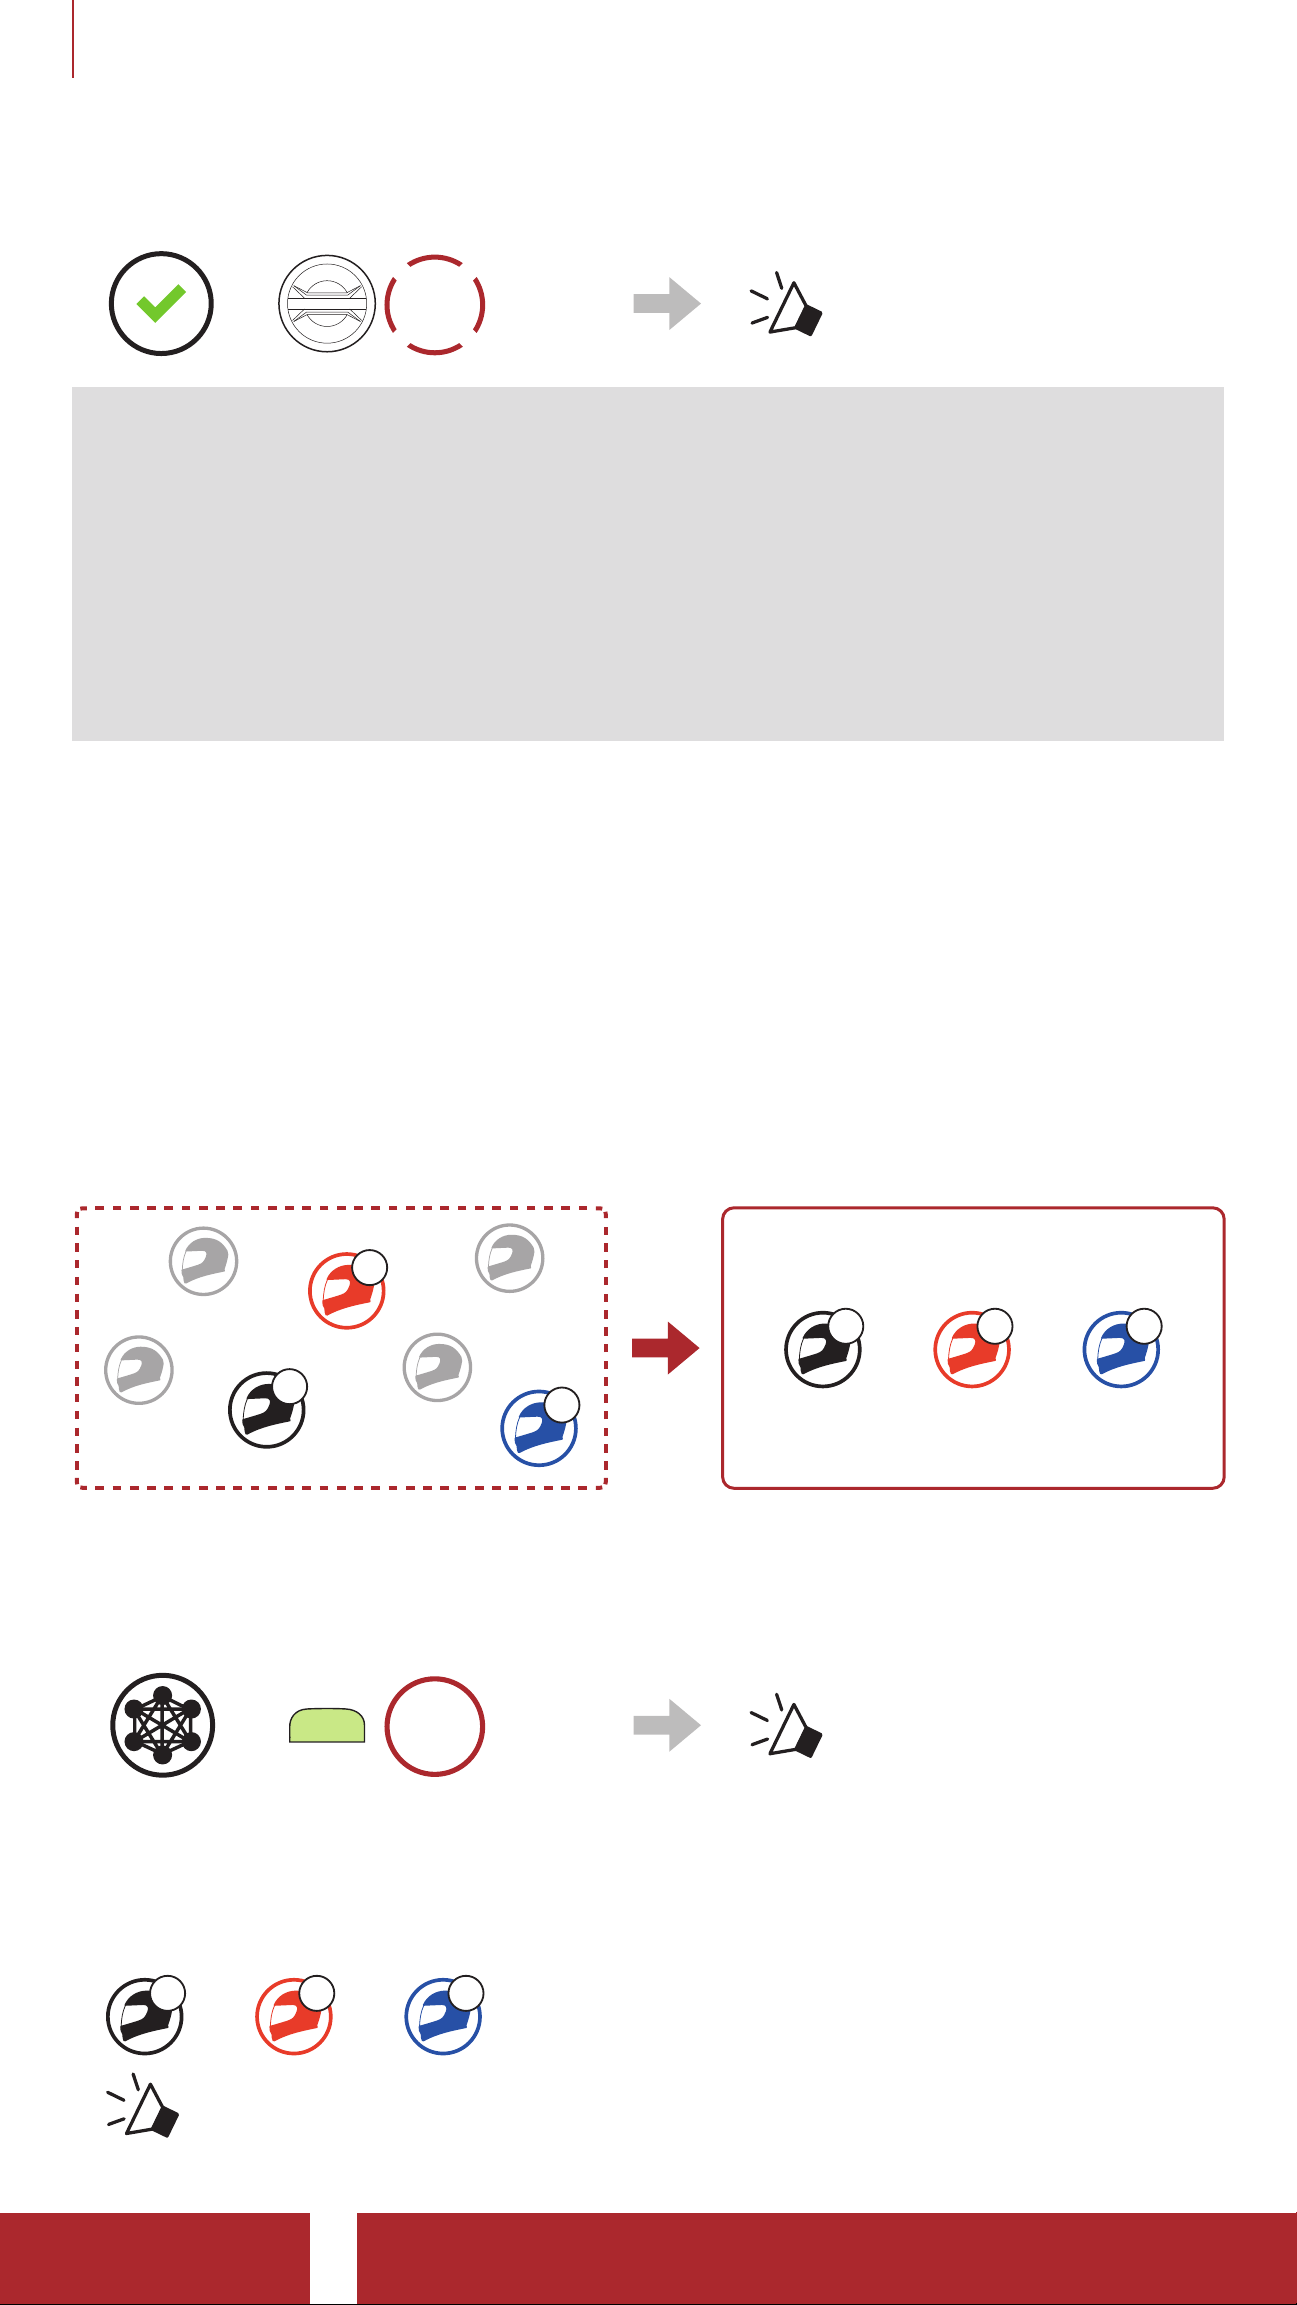
Creating a Group Mesh requires two or more Open Mesh users.
Open Mesh Group Mesh
B
You
You
C
B C
1. To enter Mesh Grouping to create a Group Mesh, press and hold
the Mesh Intercom Button for 5 seconds on the
C)
headsets.
HOLD
=
M
5s
2. When Mesh Grouping is completed, the
users (You, B and C) will
“ Mesh grouping”
users’ (You, B, and
hear a voice prompt on their headset as Open Mesh switches to
Group Mesh.
You
B C
“ Group Mesh”
50C Motorcycle Camera & Communication System with Mesh Intercom™
| 41
Page 42
8 MESH INTERCOM
Note:
• If the Mesh Grouping is not completed within 30 seconds, users
will hear a voice prompt, “Grouping failed”.
• If you want to cancel during the Mesh Grouping, tap the Mesh
Intercom Button.
8.4.2 Joining an Existing Group Mesh
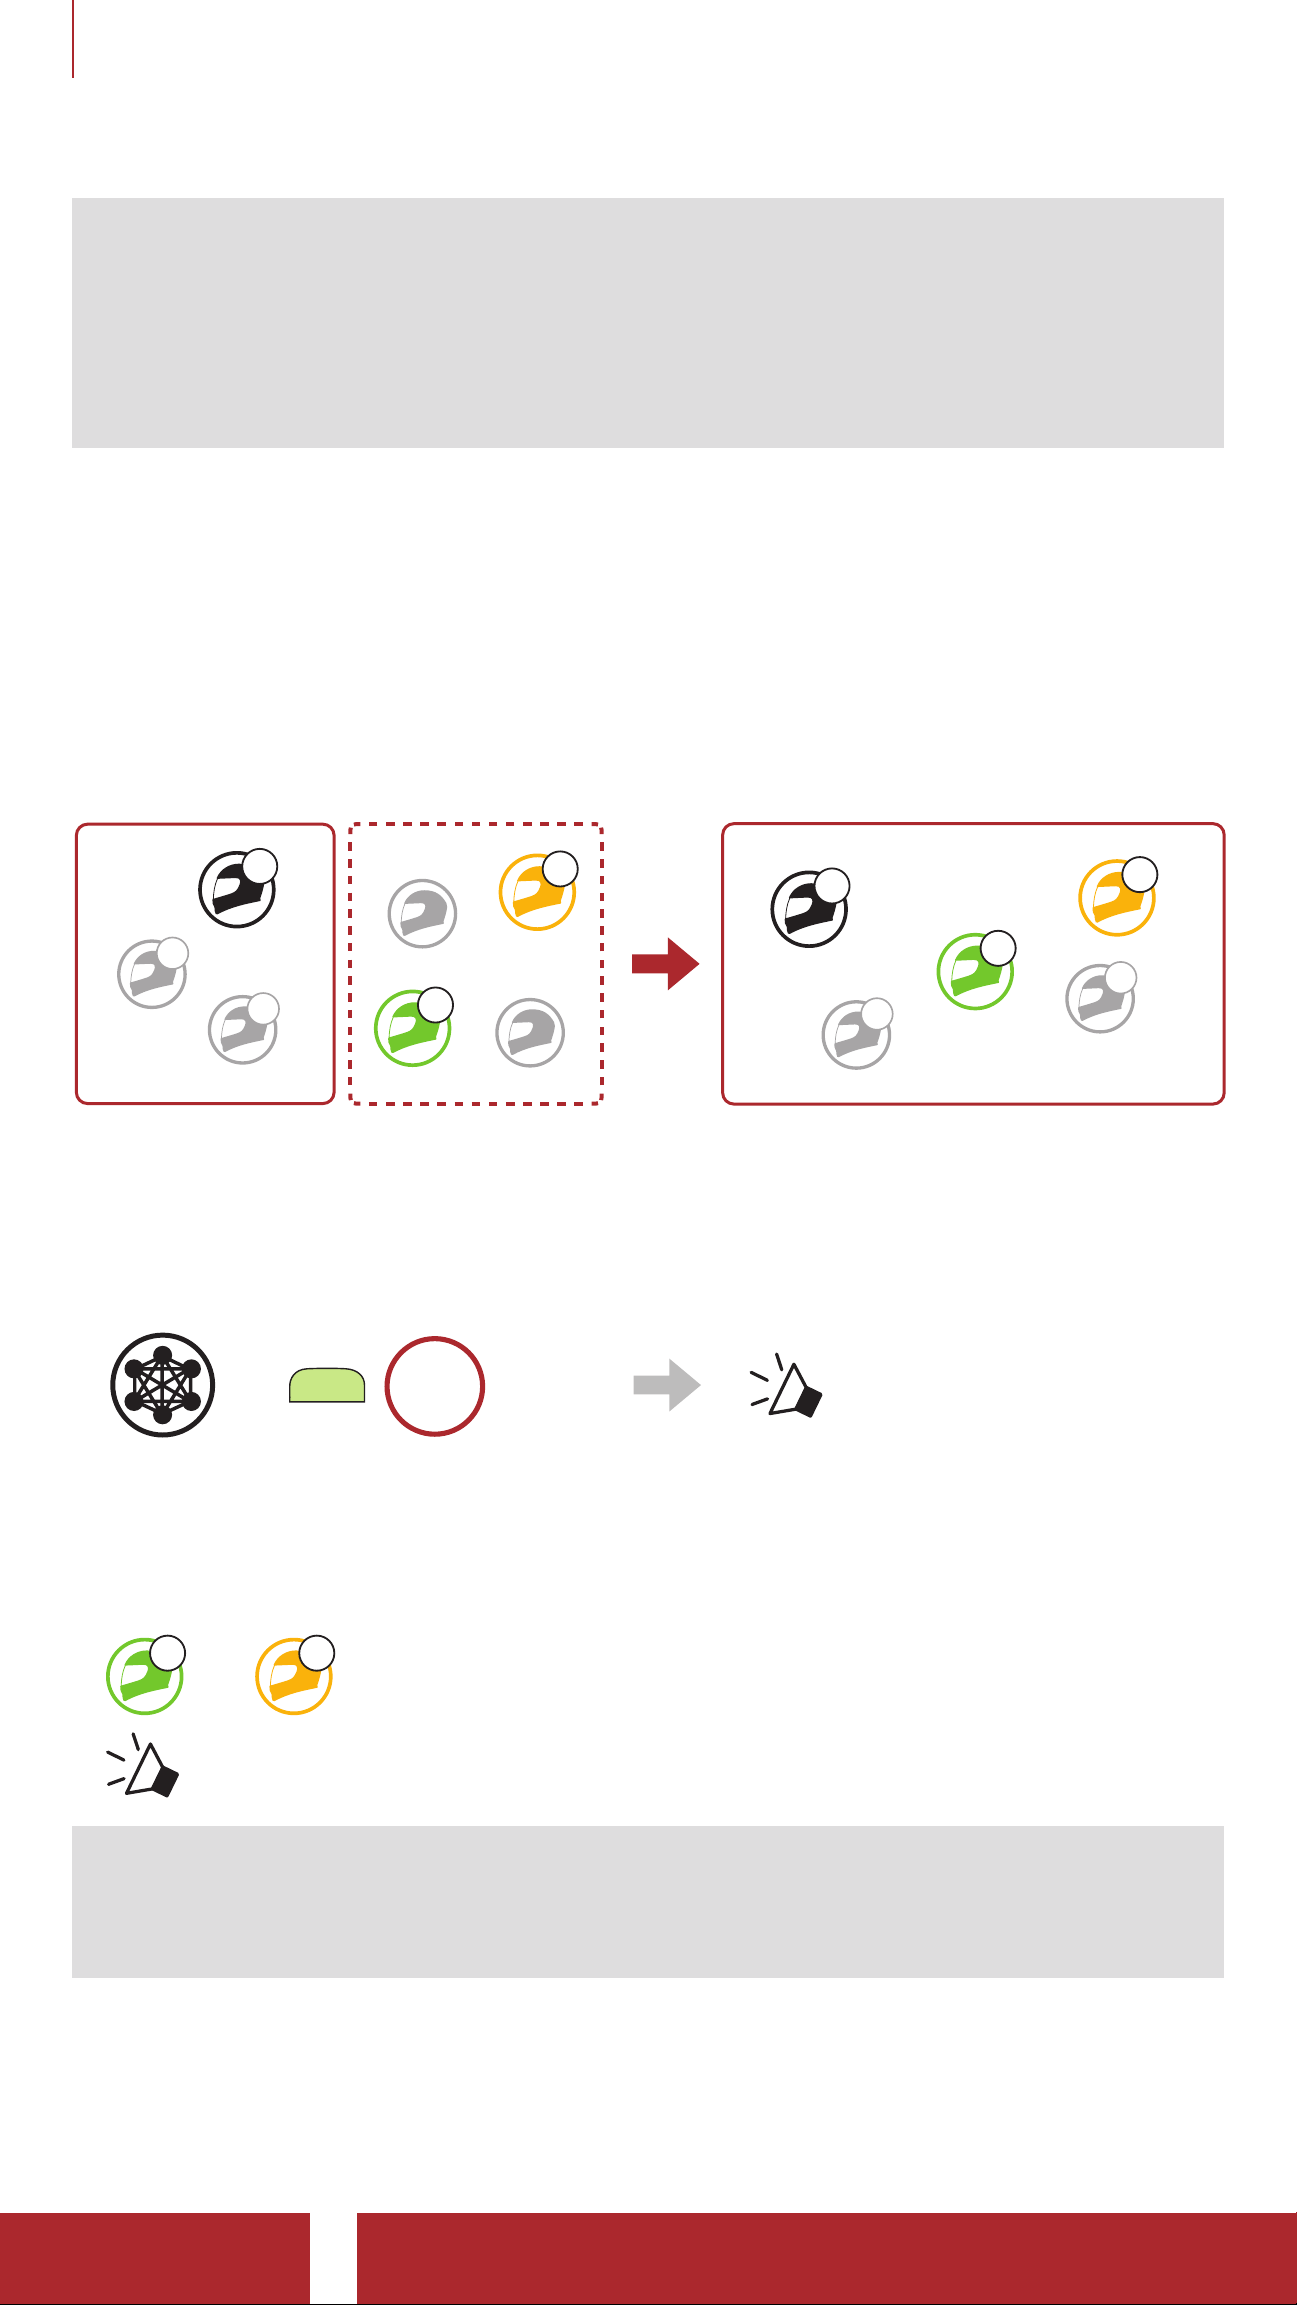
One of the current users in an Existing Group Mesh can allow new
users (one or more)
in Open Mesh to join the Existing Group Mesh.
Existing
Group Mesh Open Mesh Existing Group Mesh
You
B
C
D
F
You
D
B
F
C
1. To enter Mesh Grouping to join the Existing Group Mesh, press and
hold the Mesh Intercom Button for 5 seconds on the headsets of
one (You) of the current users in the Existing Group Mesh and the
new users (D and F) in Open Mesh.
=
M
2. When Mesh Grouping is completed, the
HOLD
5s
“ Mesh grouping”
new users (D and F) will
hear a voice prompt on their headset as Open Mesh switches to
Group Mesh.
FD
“ Group Mesh”
Note: If the Mesh Grouping is not completed within 30 seconds, the
current user (You) will hear a low tone double beep and the new users
(D and F) will hear a voice prompt, “Grouping failed”.
50C Motorcycle Camera & Communication System with Mesh Intercom™
| 42
Page 43
8 MESH INTERCOM
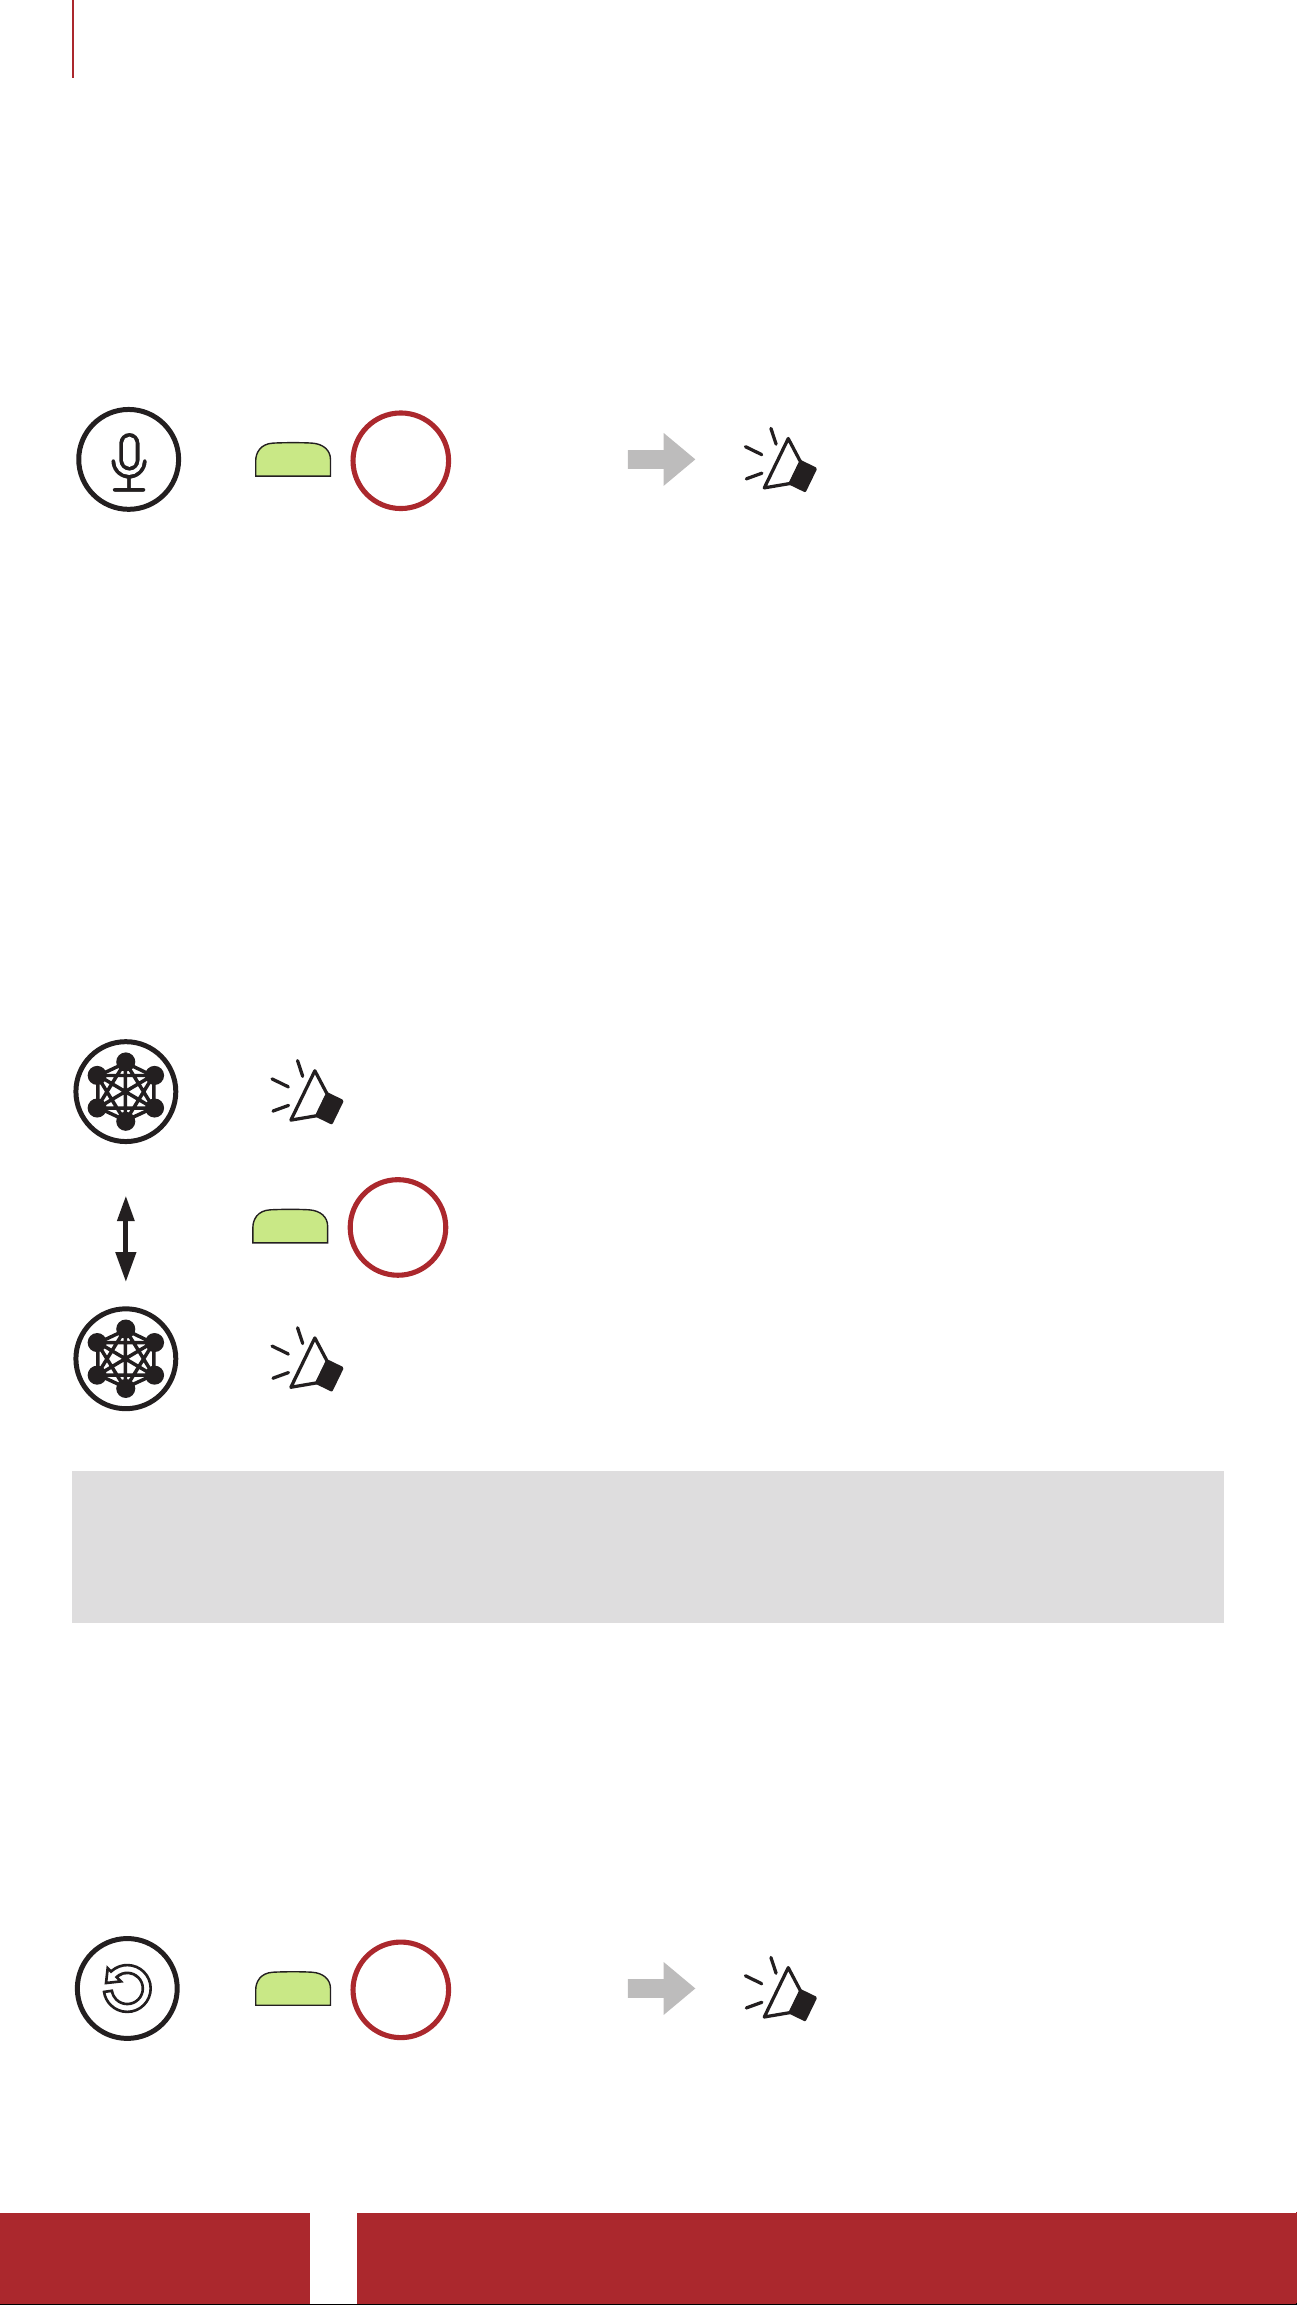
8.5 Enable/Disable Mic (Default: Enable)
Users can enable/disable the microphone when communicating in a
Mesh Intercom.
HOLD
1s
“Mic on” or “Mic off”
=
M
8.6 Toggling Open Mesh/Group Mesh
Users are able to toggle between Open Mesh and Group Mesh
without resetting the Mesh. This allows users to keep the Group Mesh
Network connection information while in Open Mesh.
Users can toggle to Group Mesh to communicate with participants from
the stored Group Mesh Network connection information.
Toggle Between Open Mesh and Group Mesh
“Open Mesh”
Open Mesh
HOLD
=
M
3s
“Group Mesh”
Group Mesh
Note: If you have never participated in Group Mesh, you cannot
toggle between Open Mesh and Group Mesh. You will hear a voice
prompt, “No group available”.
8.7 Reset Mesh
If a headset in an Open Mesh or Group Mesh resets the Mesh, it will
automatically return to Open Mesh (default: channel 1).
HOLD
8s
50C Motorcycle Camera & Communication System with Mesh Intercom™
“Reset Mesh”
| 43
=
M
Page 44
9. BLUETOOTH INTERCOM
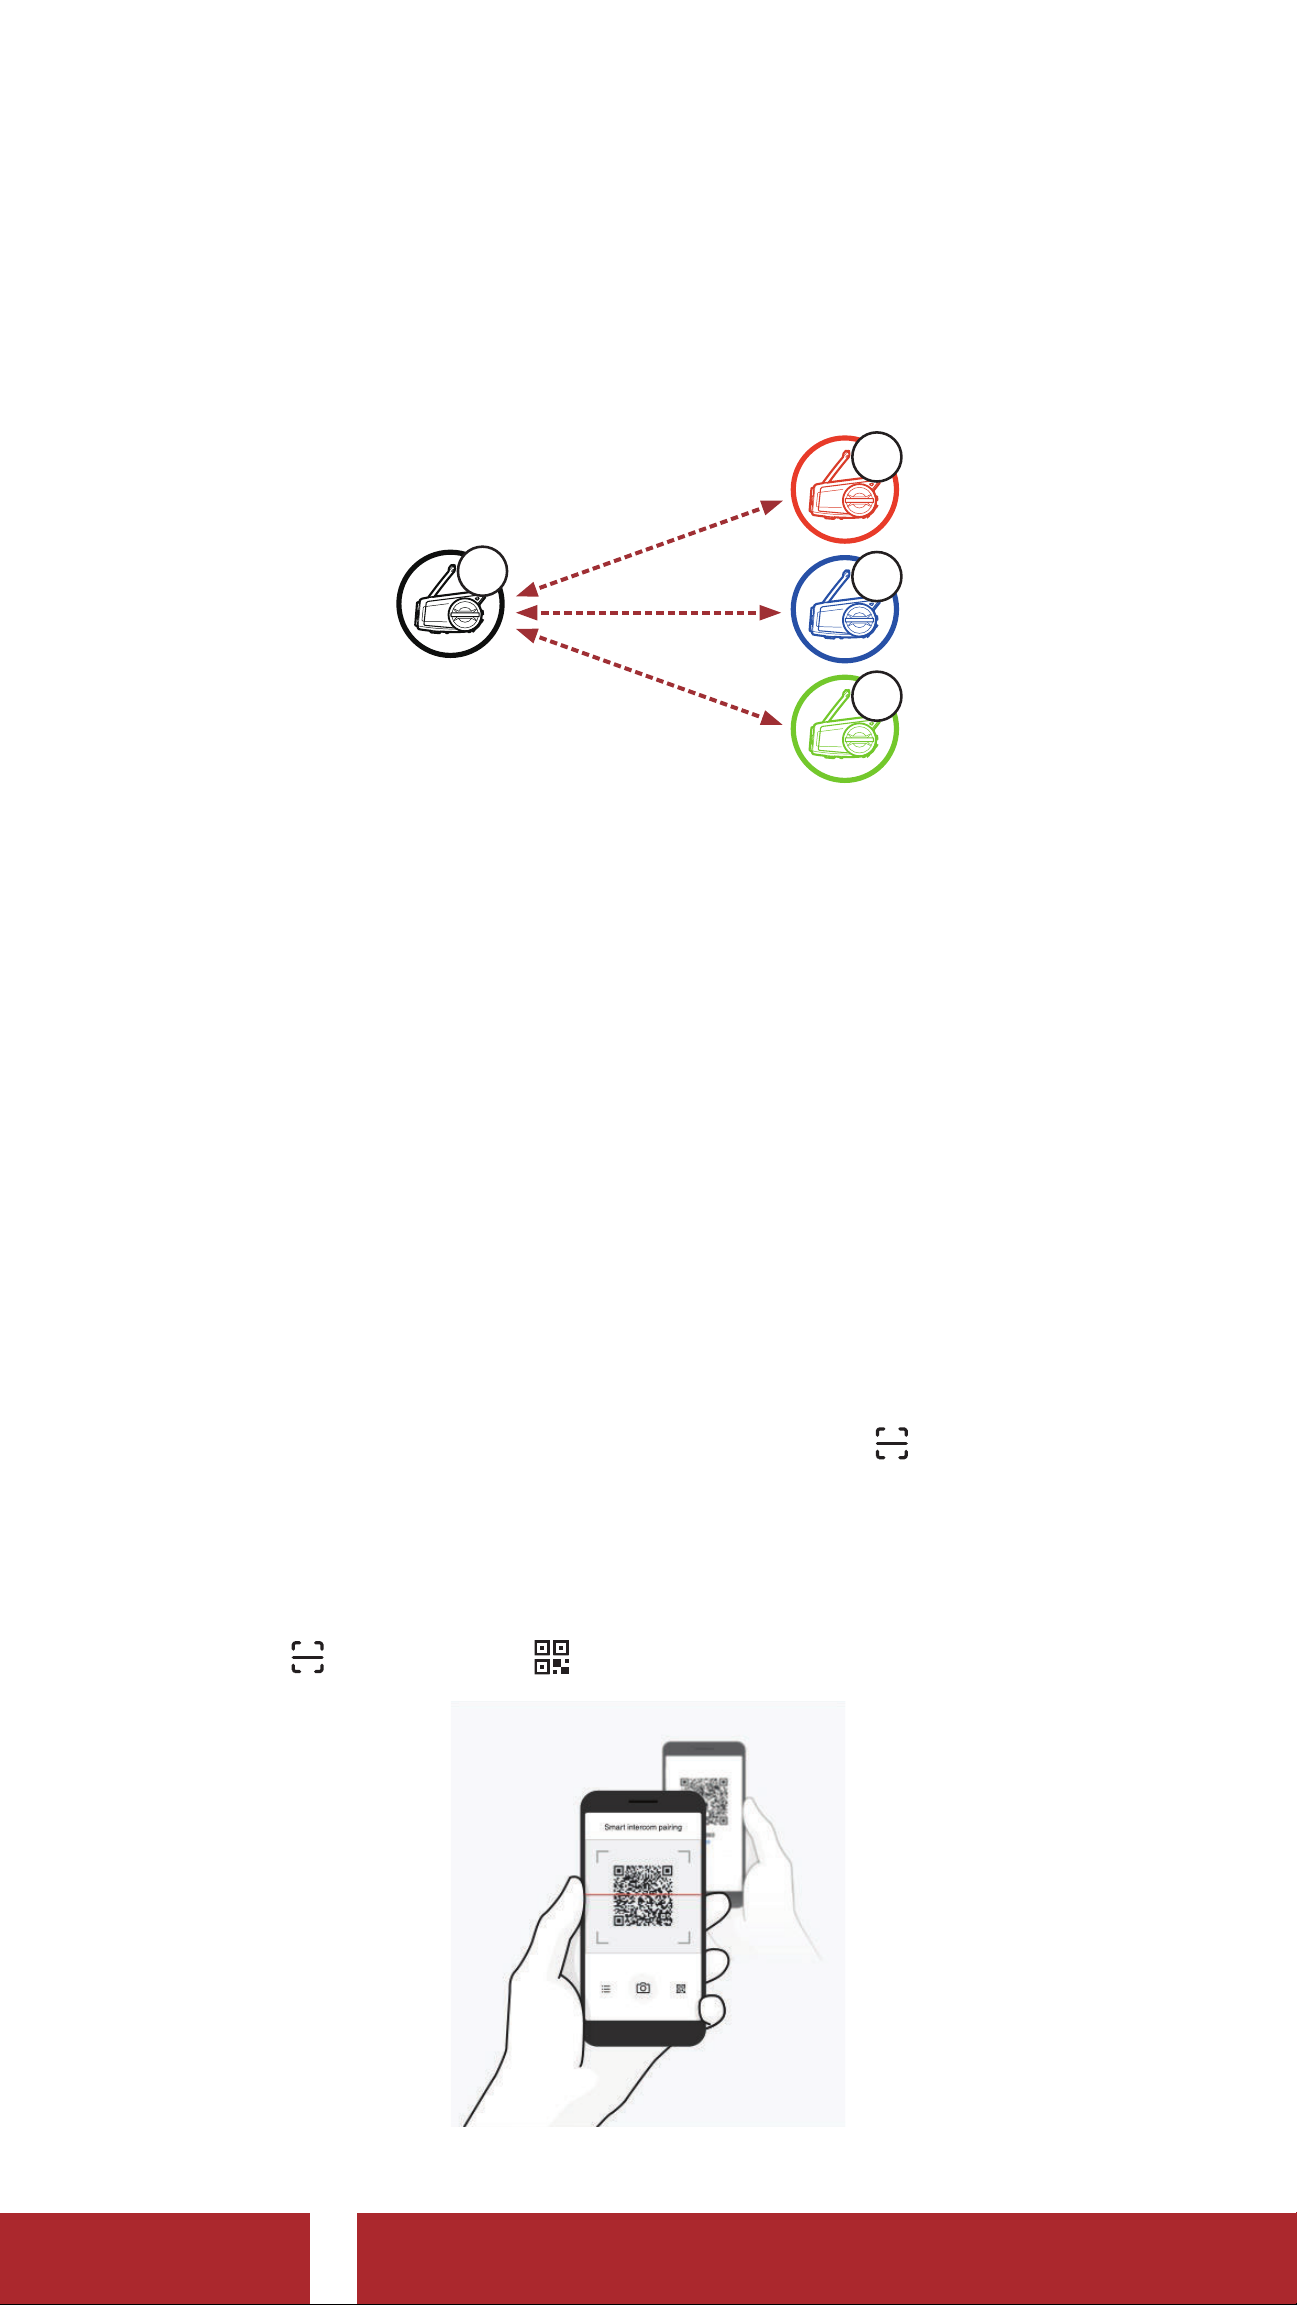
Up to three other people can be paired with the headset for Bluetooth
intercom conversations.
B
A
YOU
9.1 Intercom Pairing
There are two ways to pair the headset.
9.1.1 Using the Smart Intercom Pairing (SIP)
C
D
SIP allows you to quickly pair with your friends for intercom
communication by scanning the QR code on the SENA
MOTORCYCLES App without remembering the button operation.
1. Pair the mobile phone with the headset.
2. Open the
Smart Intercom Pairing Menu).
(
3. Scan the
SENA MOTORCYCLES App and tap
QR code displayed on your friend (B)’s mobile phone.
• Your friend (B) can display the QR code on the mobile phone by
tapping
> QR code ( ) on the SENA MOTORCYCLES App.
50C Motorcycle Camera & Communication System with Mesh Intercom™
| 44
Page 45
9 BLUETOOTH INTERCOM
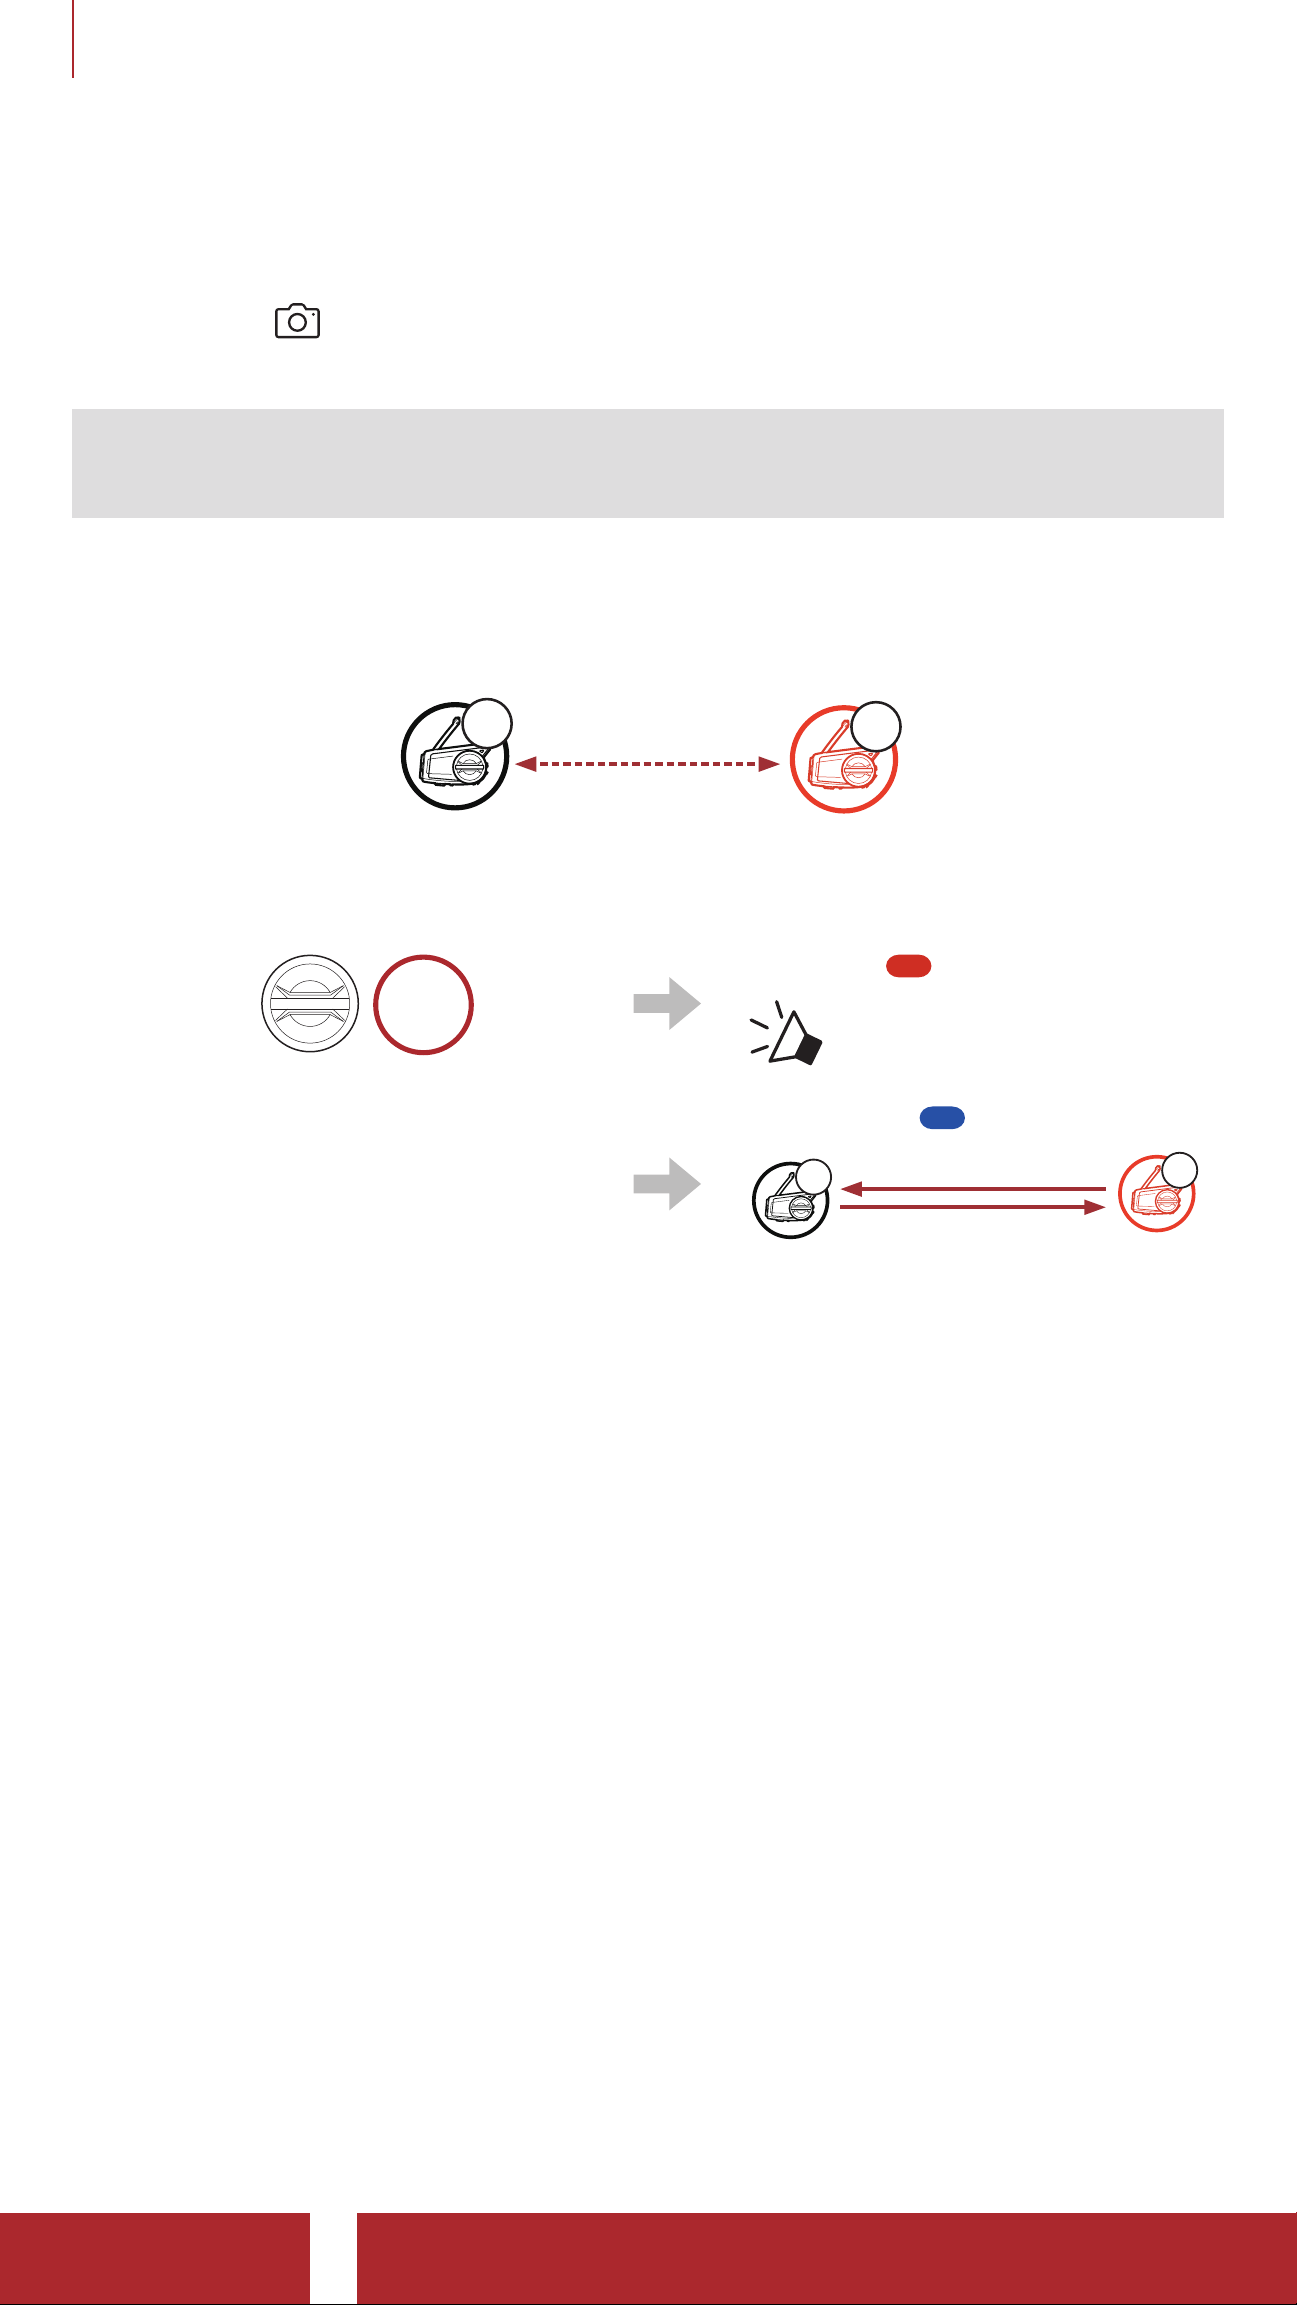
4. Tap Save and check that your friend (B) is paired with you (A)
correctly.
5. Tap Scan (
) and repeat steps 3-4 to pair with Intercom Friends (C)
and (D).
Note: The Smart Intercom Pairing (SIP) is not compatible with Sena
products that use Bluetooth 3.0 or below.
9.1. 2 Using the Button
A
YOU
1. The users (You, B) enter into Intercom Pairing.
B
HOLD
Blinking
5s
“ Intercom pairing”
Turns blue
2. The users‘ headsets will be
automatically paired.
3. Repeat the steps above to pair with other headsets (C and D).
A
YOU
B
50C Motorcycle Camera & Communication System with Mesh Intercom™
| 45
Page 46
9 BLUETOOTH INTERCOM
9.2 Last-Come, First-Served
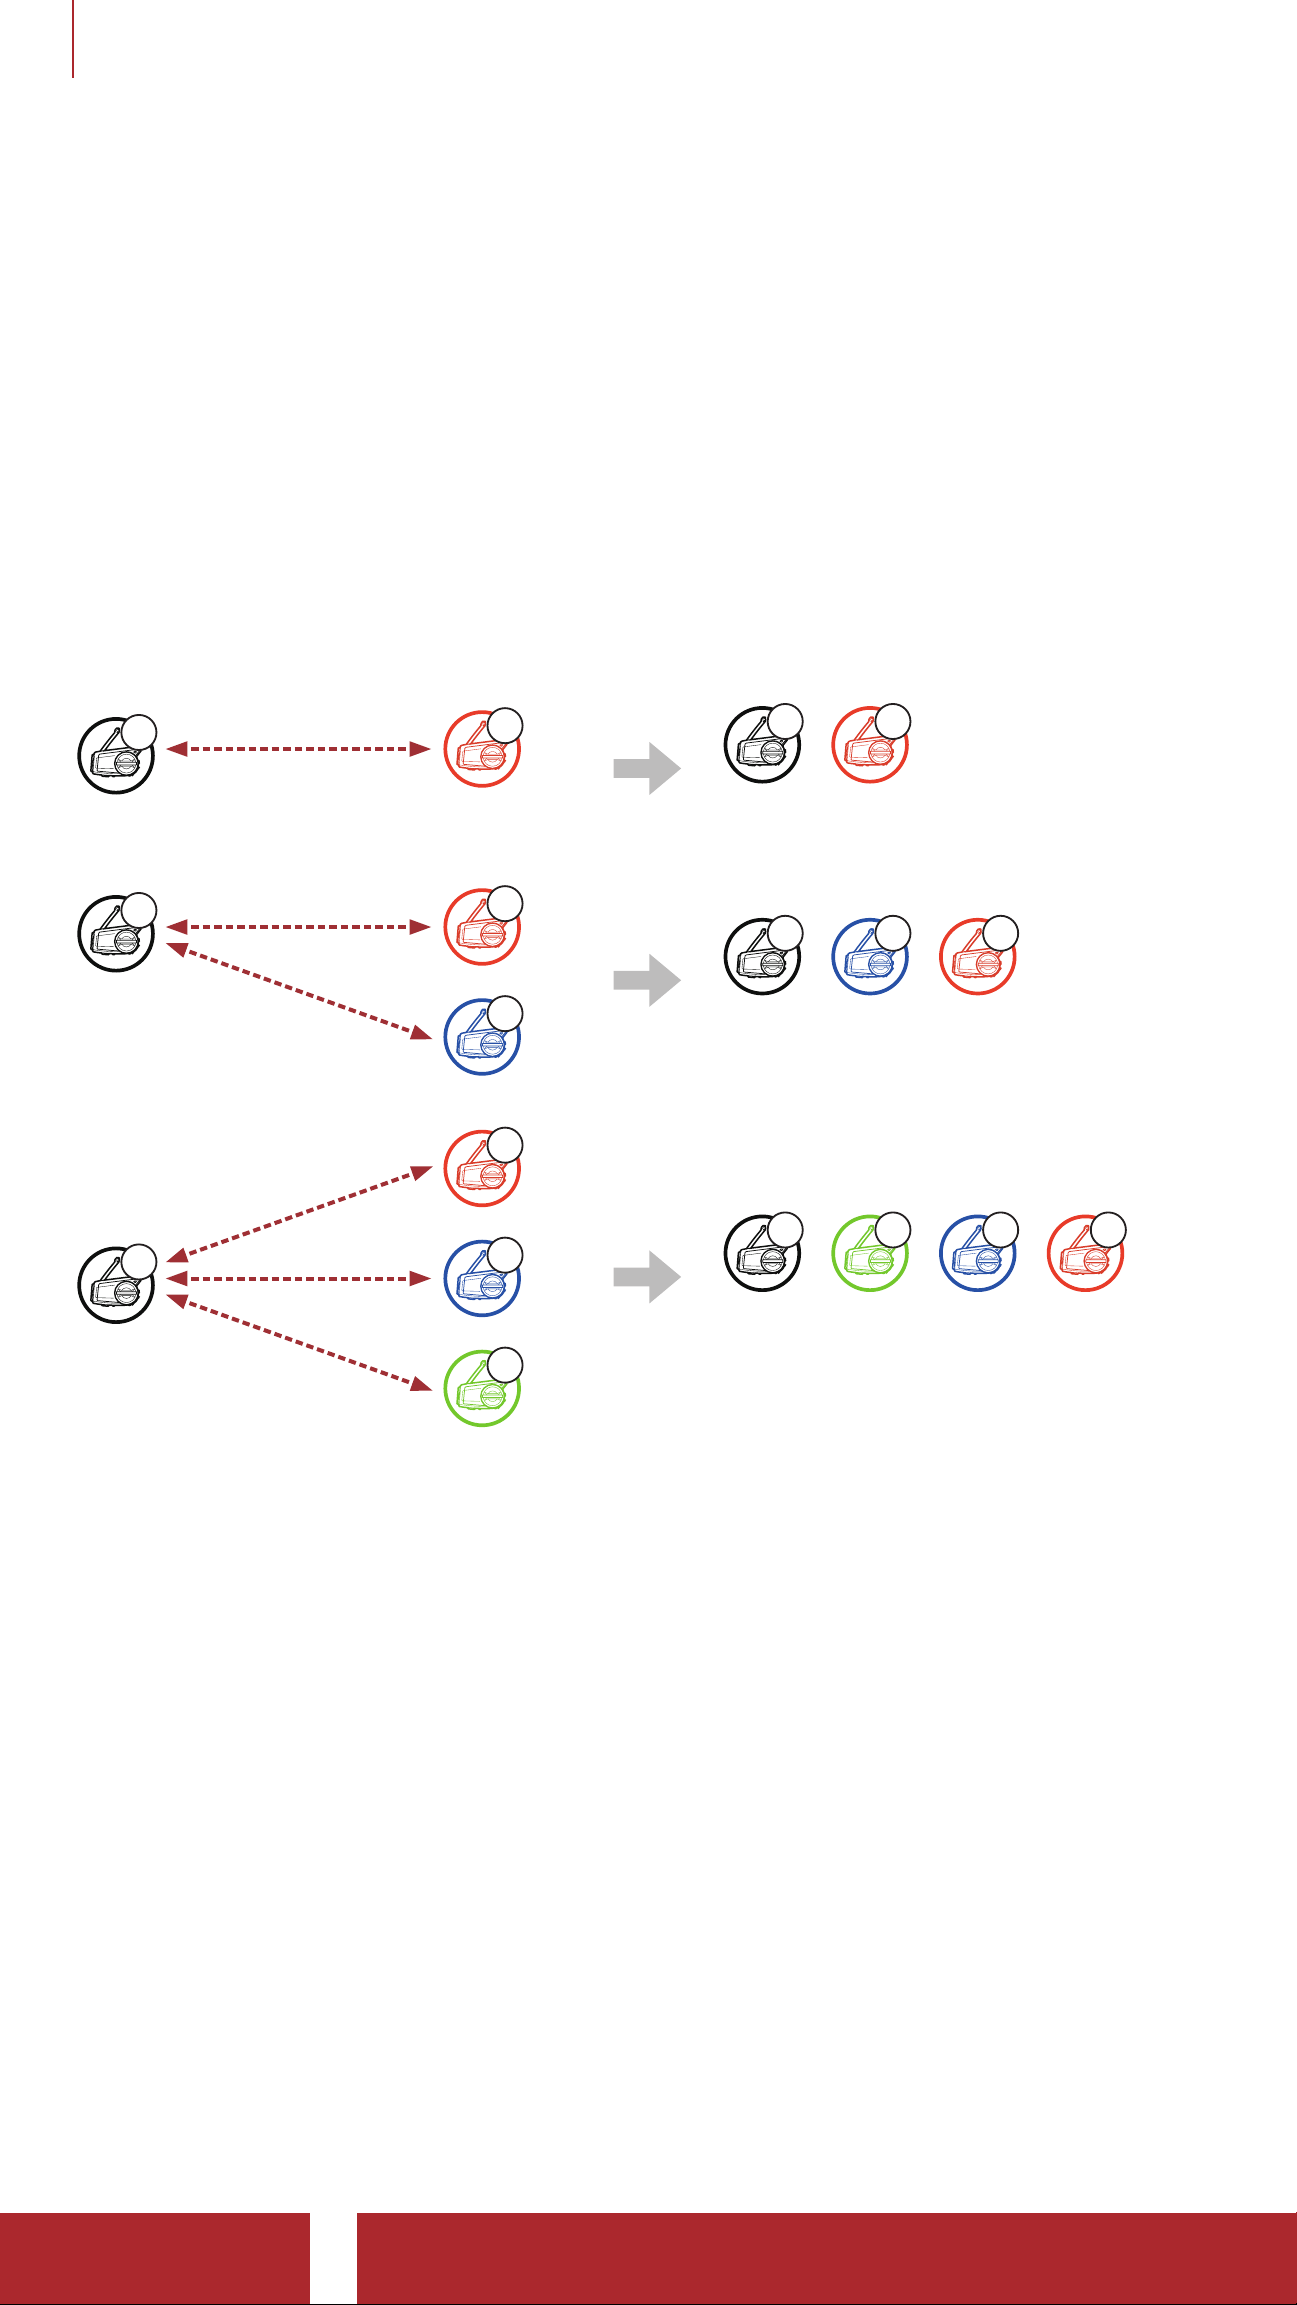
The intercom pairing queue is Last-Come, First-Served. If a headset
has multiple paired headsets for intercom conversations, the last paired
headset is set as the First Intercom Friend. For example, after the
pairing procedures listed above, headset (D) is the First Intercom
Friend of headset (A). Headset (C) is the Second Intercom Friend of
headset (A), and headset (B) is the Third Intercom Friend of headset
(A).
Intercom Pairing Order Last-Come, First-Served
A B
YOU
Intercom
Friend1
A C B
YOU
A
A
1
B
B
2
YOU
C
B
YOU
Intercom
Friend1
Intercom
Friend2
1
A D C B
A
2
C
YOU
3
YOU
D
Intercom
Friend1
Intercom
Friend2
Intercom
Friend3
50C Motorcycle Camera & Communication System with Mesh Intercom™
| 46
Page 47
9 BLUETOOTH INTERCOM
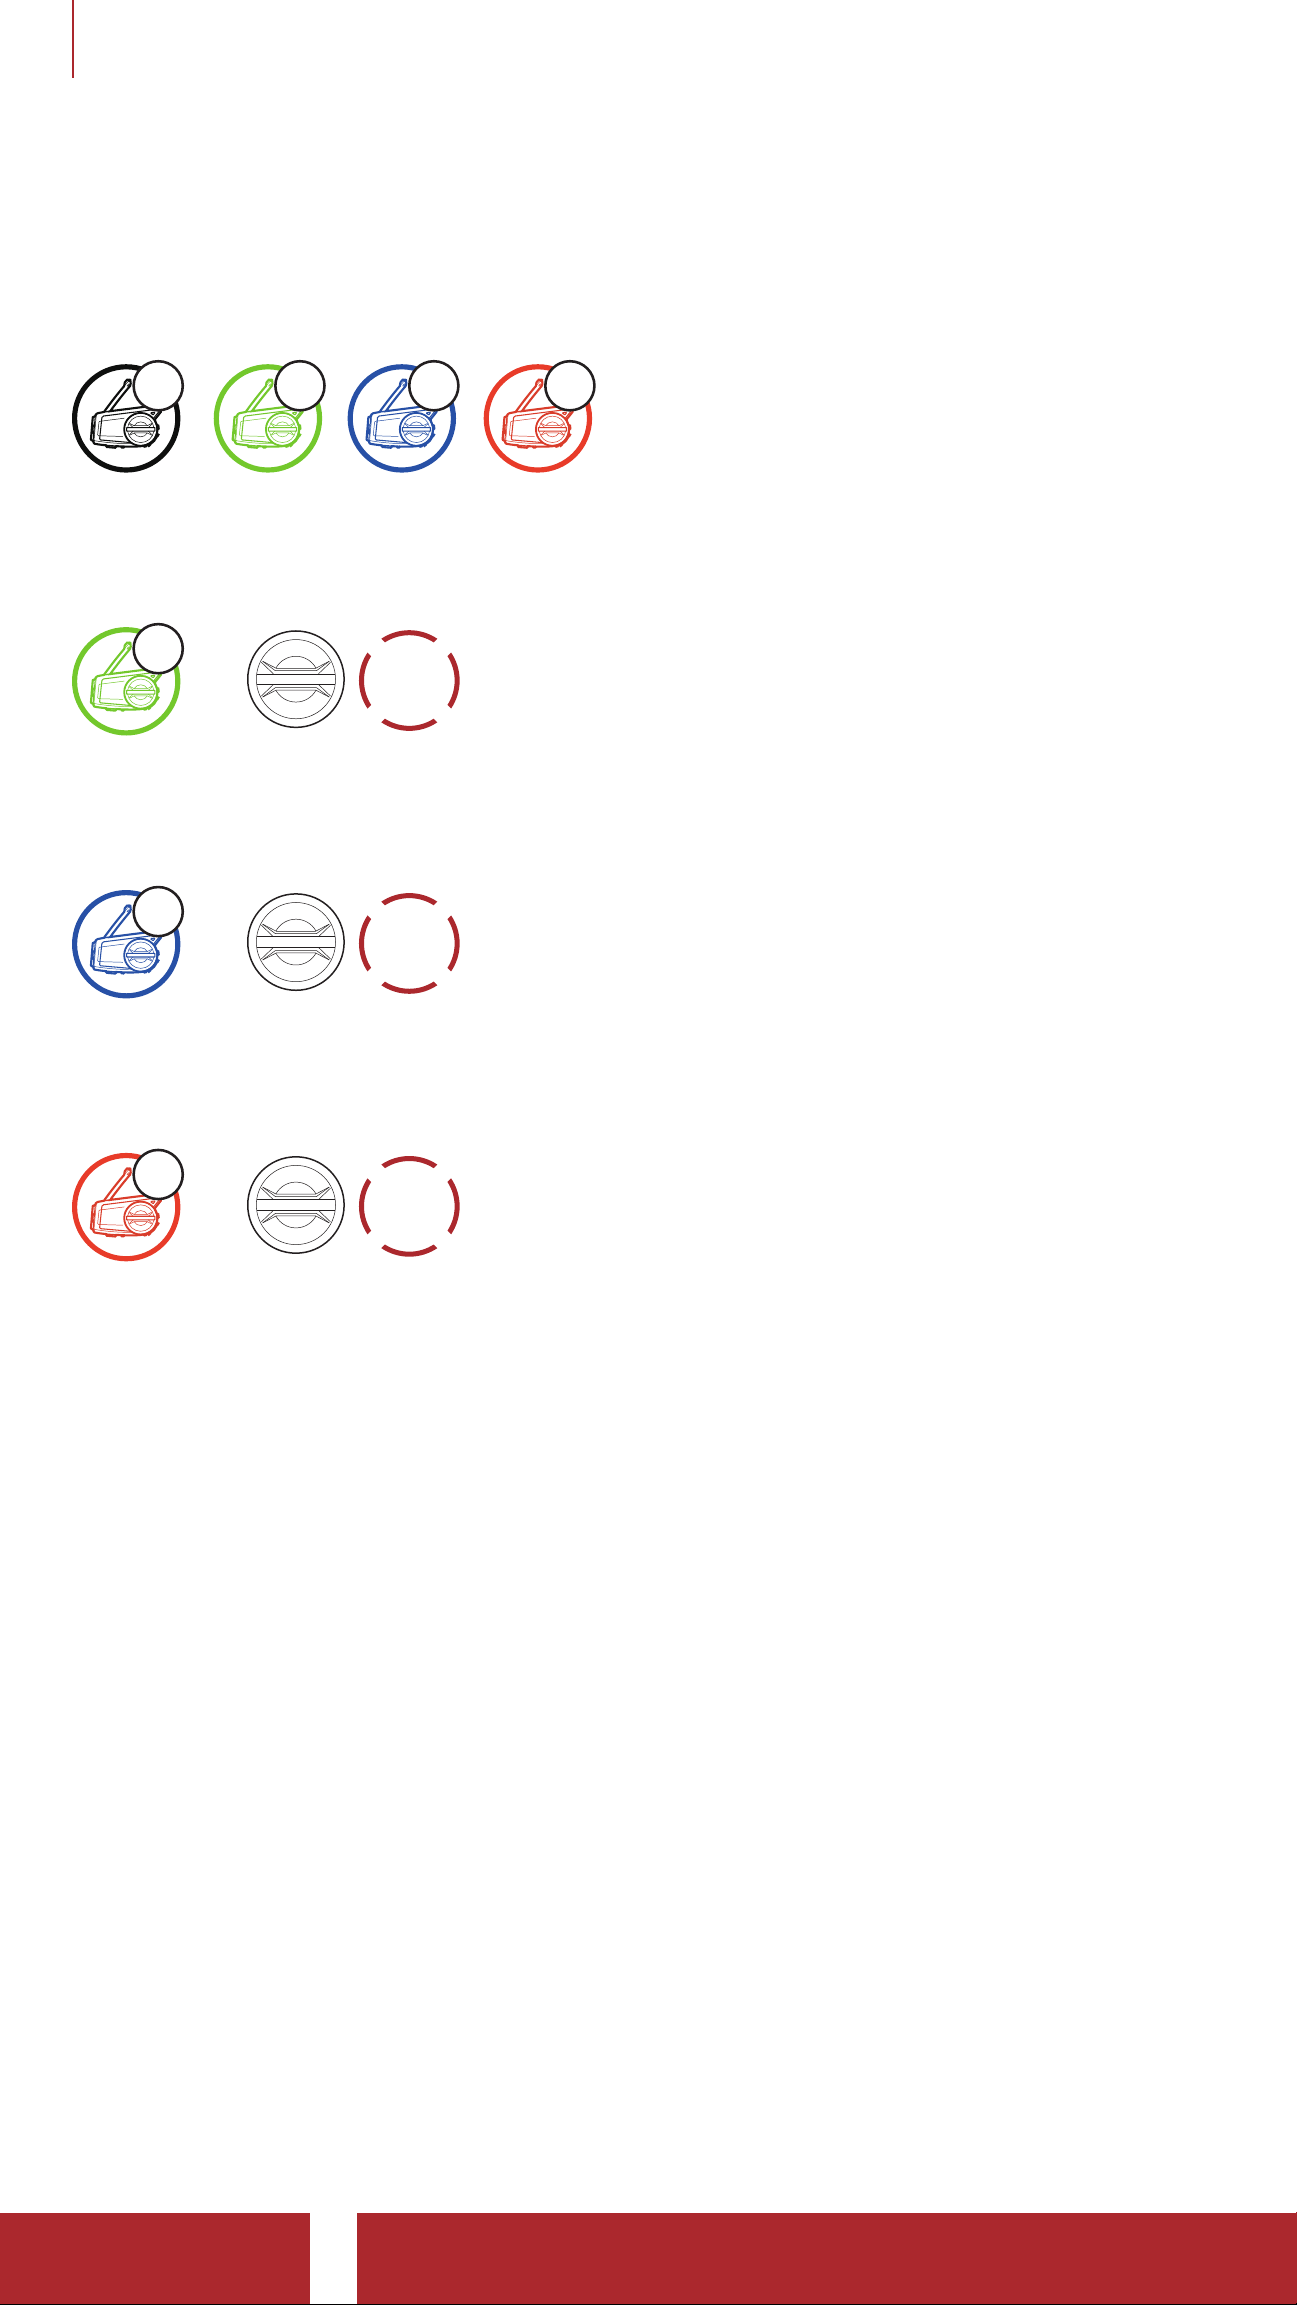
9.3 Two-Way Intercom
You can start or end an intercom conversation with an Intercom Friend.
D
C B
Intercom
Friend2
Intercom
Friend3
YOU
A
Intercom
Friend1
Start/End Conversation with the First Intercom Friend D
D
=
Intercom
Friend1
TAP
1x
Start/End Conversation with the Second Intercom Friend C
C
=
TAP
2x
Intercom
Friend2
Start/End Conversation with the Third Intercom Friend B
B
=
Intercom
Friend3
TAP
3x
50C Motorcycle Camera & Communication System with Mesh Intercom™
| 47
Page 48
9 BLUETOOTH INTERCOM
9.4 Multi-Way Intercom
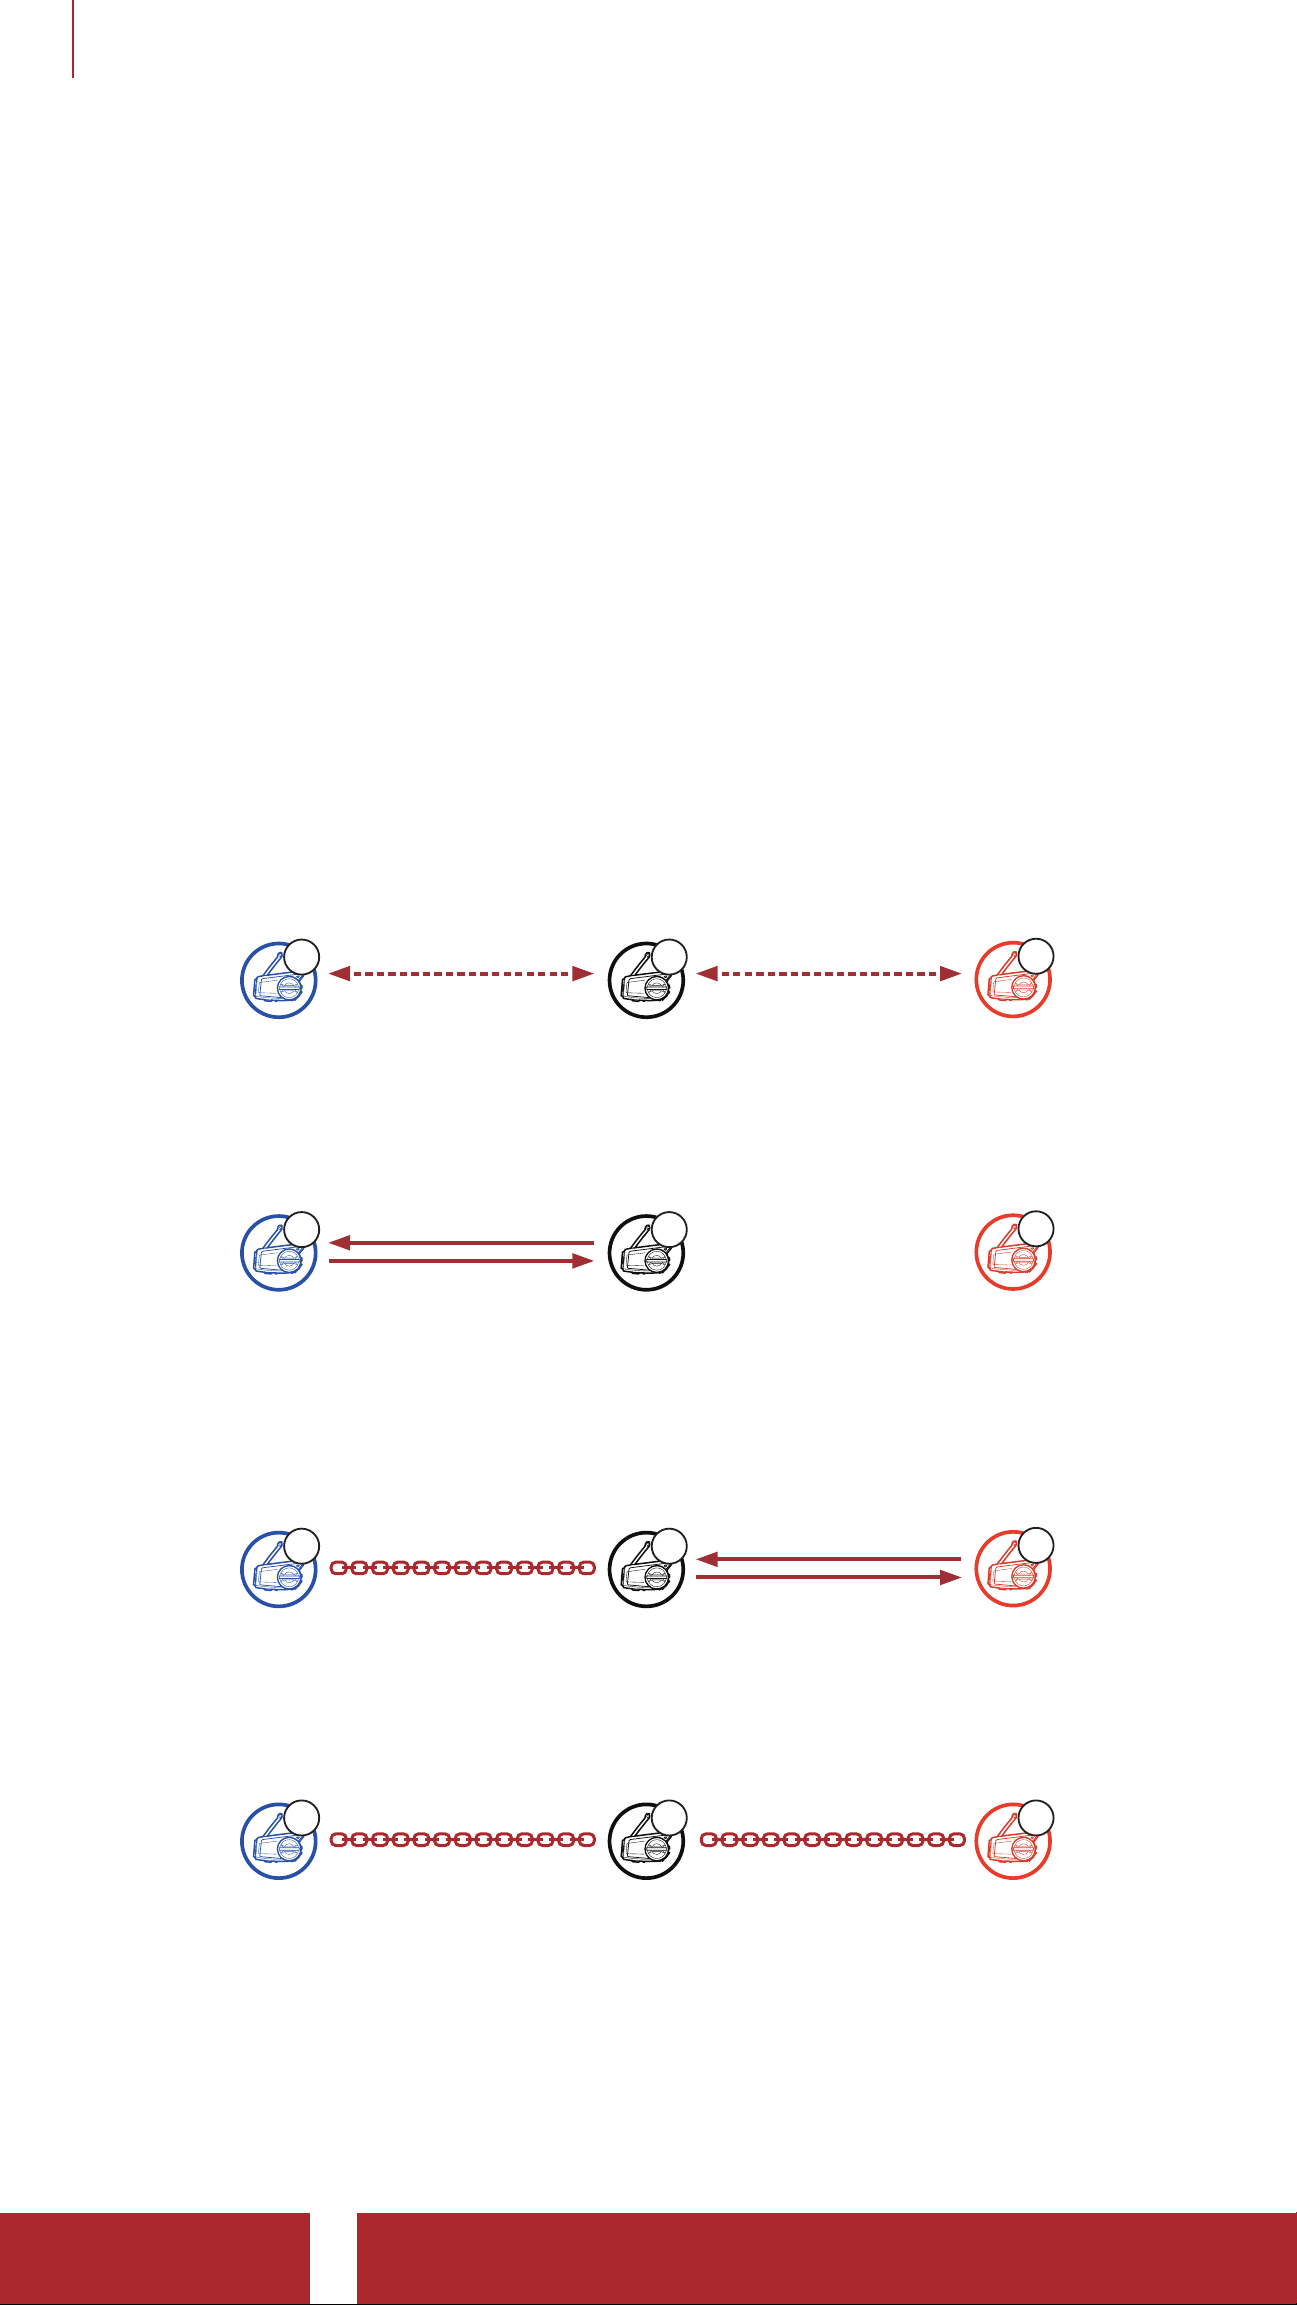
Multi-Way Intercom enables conference-call-style conversations with
up to three Intercom Friends at the same time. While Multi-Way
Intercom is in progress, the mobile phone connection is temporarily
disconnected. However, as soon as Multi-Way Intercom terminates, the
mobile phone connection will be reestablished.
9.4.1 Starting a Three-Way Intercom Conference
You (A) can have a Three-Way Intercom Conference with two other
Intercom Friends (B and C) by establishing two intercom connections
simultaneously.
1. You (A) need to be paired with two other Intercom Friends (B and
C) for the Three-Way Intercom Conference.
Friend1
AC
YOUIntercom
12
B
Intercom
Friend2
2. Start an intercom conversation with the First Intercom Friend (C) by
tapping the Jog Dial.
AC
B
YOUIntercom
Friend1
Intercom
Friend2
3. You (A) can call the Second Intercom Friend (B) by double tapping
the Jog Dial, or the Second Intercom Friend (B) may join the
intercom by making an intercom call to you (A).
AC
YOUIntercom
Friend1
B
Intercom
Friend2
4. Now you (A) and two Intercom Friends (B and C) are having a
Three-Way Intercom Conference.
AC B
Friend1
YOUIntercom
50C Motorcycle Camera & Communication System with Mesh Intercom™
Intercom
Friend2
| 48
Page 49
9 BLUETOOTH INTERCOM
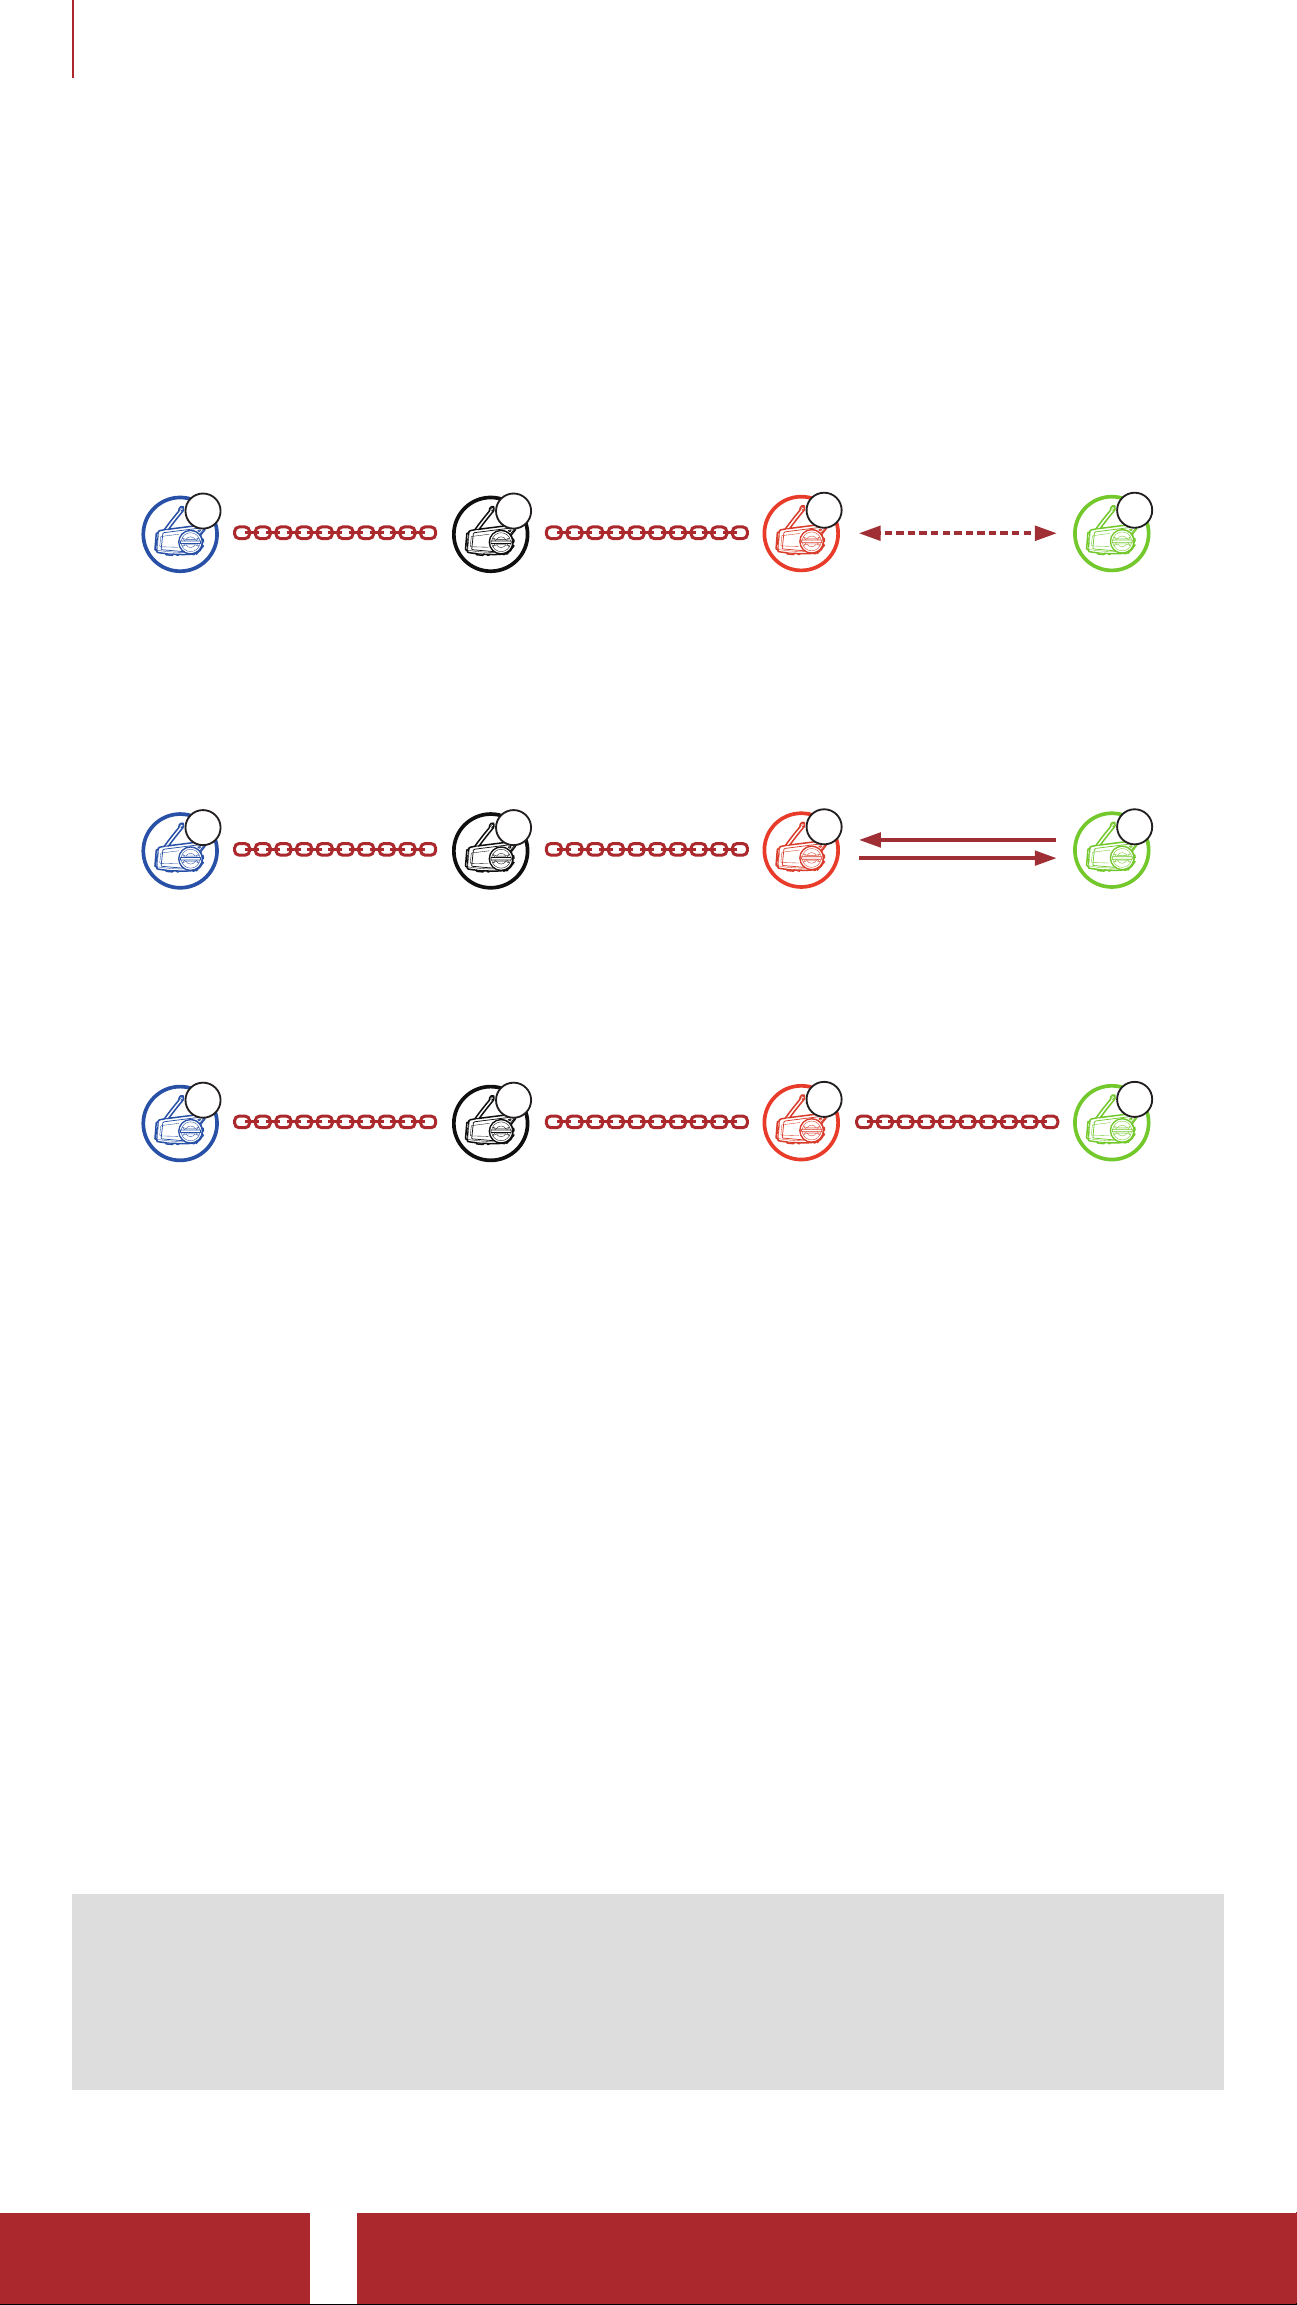
9.4.2 Starting a Four-Way Intercom Conference
With three Intercom Friends connected, a new participant (D) can
make it a Four-Way Intercom Conference by making an intercom call
to either (B) or (C).
1. Intercom friend (B) needs to be paired with a new participant (D).
C
Intercom
Friend1
YOU
A
Intercom
B
Participant
Friend2
D
2. Intercom friend (B) can call a new participant (D) by tapping the
Jog Dial, or a new participant (D) may join the intercom by making
an intercom call to Intercom friend (B).
C
Intercom
Friend1
YOU
A
Intercom
B
Participant
Friend2
D
3. Now you (A), two Intercom Friends (B and C), and a new
participant (D) are having a Four-Way Intercom Conference.
C
Intercom
Friend1
YOU
A
Intercom
B
Participant
Friend2
D
9.4.3 Ending Multi-Way Intercom
You can completely terminate the conference intercom or just
disconnect an intercom connection with one of your active Intercom
Friends.
Terminate All Intercom Connections
• Press and hold the Jog Dial for 1 second.
Disconnect the Intercom Connection with One of the Intercom
Friends
• Disconnect (C): Tap the Jog Dial.
• Disconnect (B) & (D): Double tap the Jog Dial.
Note: When you disconnect the second friend (B), you will be
disconnected with the third participant (D) as well. This is because
the third participant (D) is connected with you via the second friend
(B).
50C Motorcycle Camera & Communication System with Mesh Intercom™
| 49
Page 50
9 BLUETOOTH INTERCOM
9.5 Three-Way Conference Phone Call with
Intercom Users
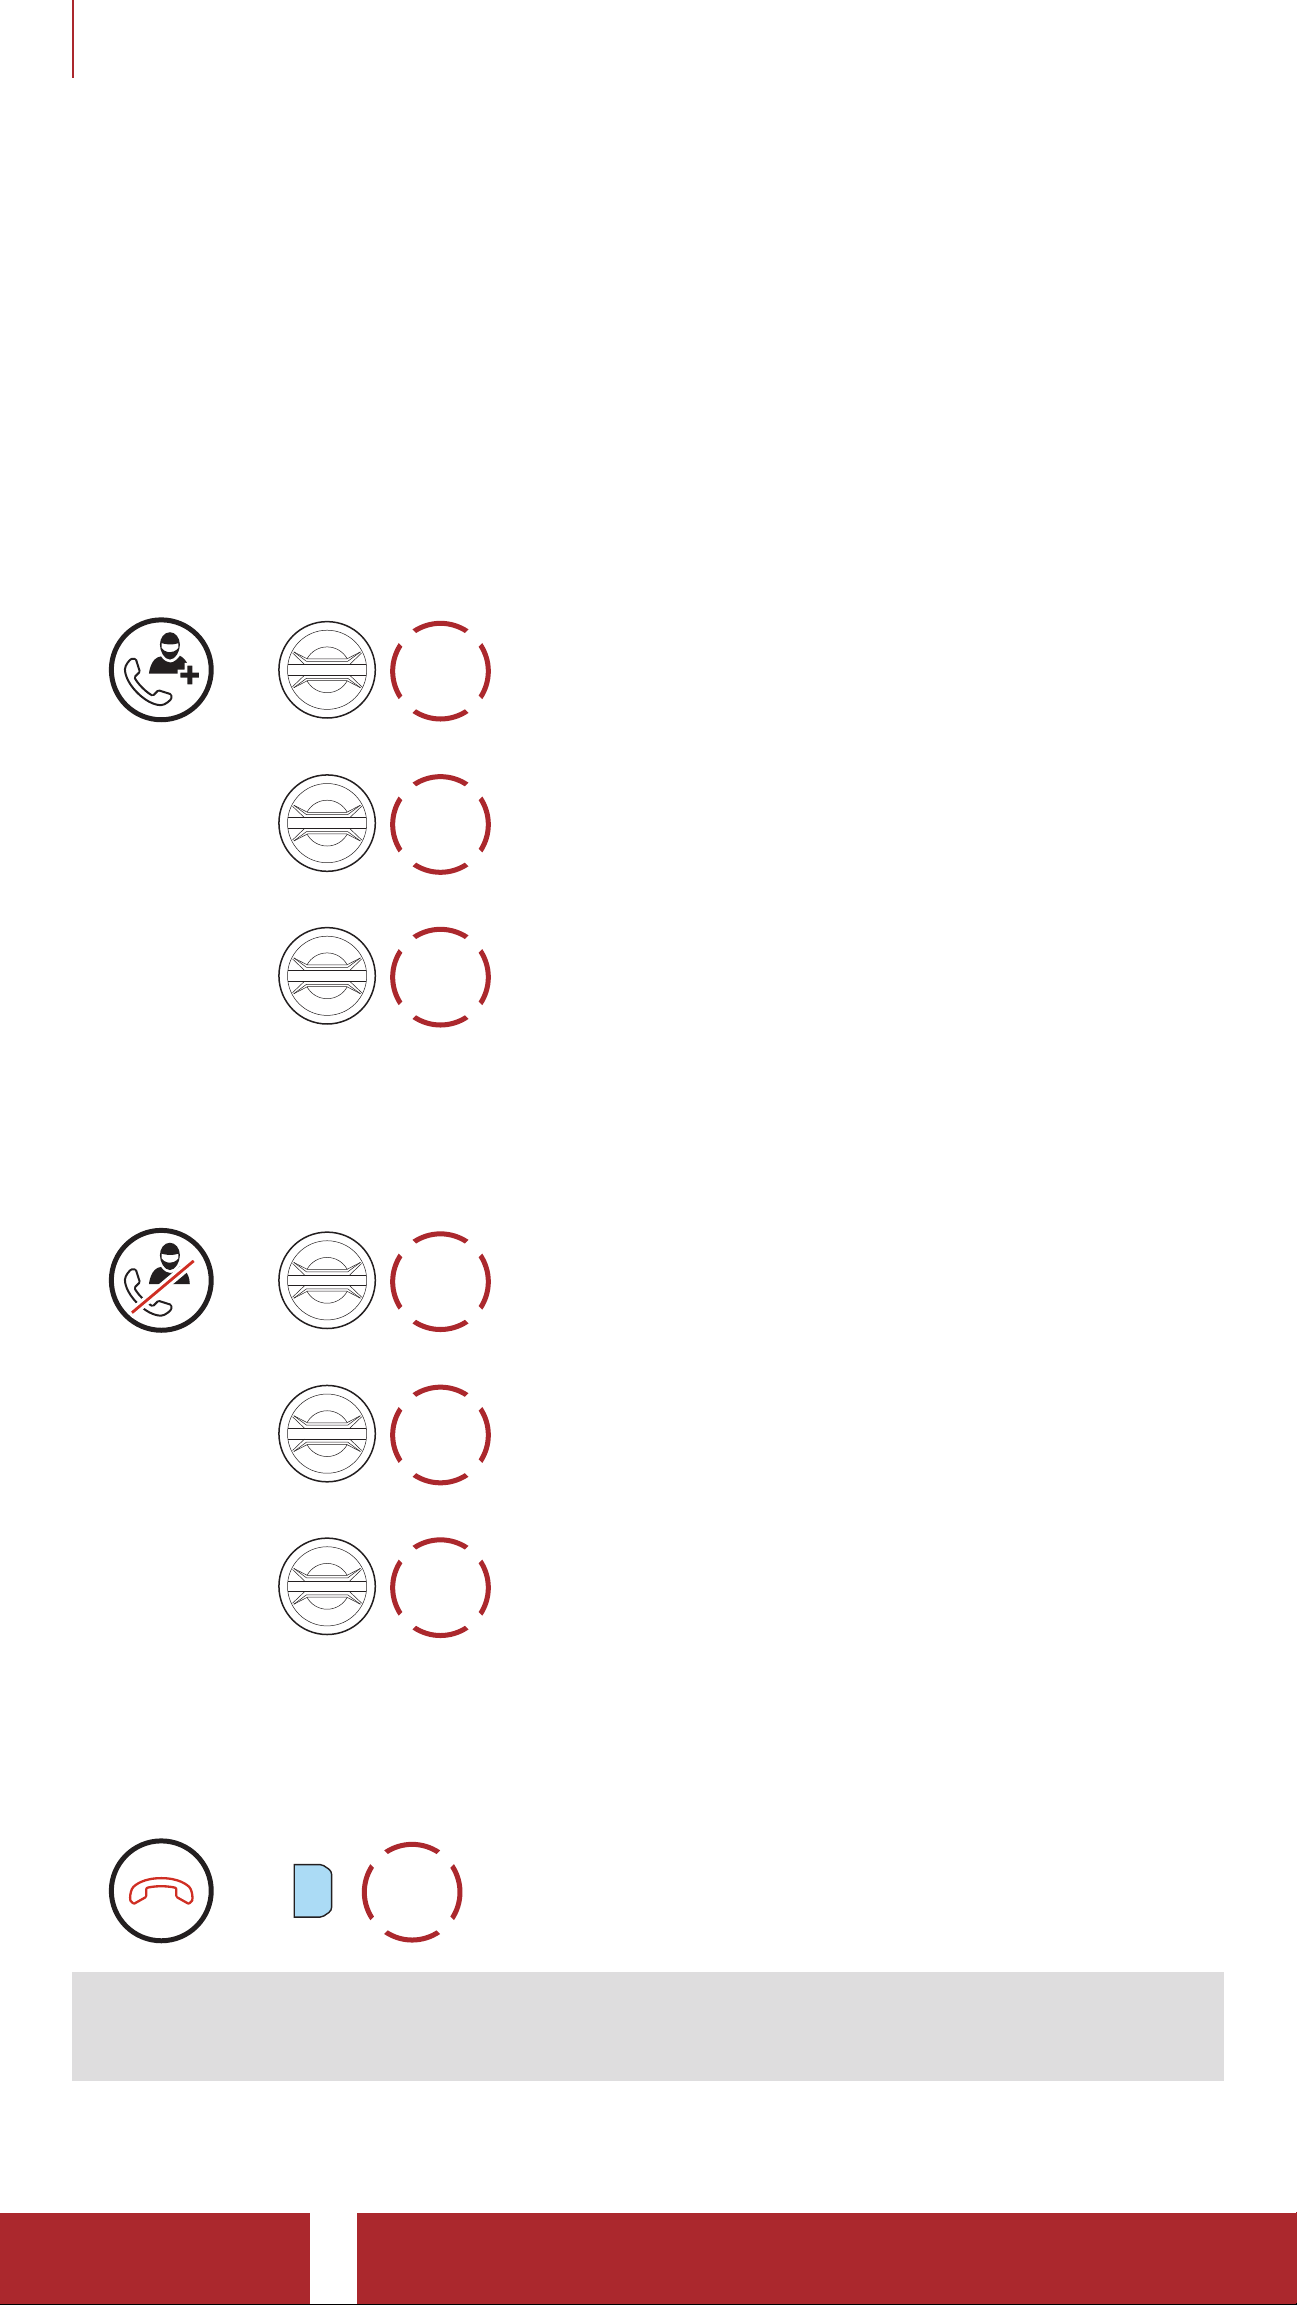
You can have a Three-Way Conference Phone Call by adding an
Intercom Friend to the mobile phone conversation.
1. During a mobile phone call, tap the Jog Dial once, twice or, three
times to invite one of your Intercom Friends to the conversation.
Invite an Intercom Friend into Phone Conference
TAP
=
1x
or
TAP
2x
or
TAP
3x
2. To disconnect the intercom during a conference phone call, tap the
Jog Dial once, twice or three times.
Disconnect an Intercom Friend from Conference
TAP
=
1x
or
TAP
2x
or
TAP
3x
3. To disconnect the mobile phone call during a conference phone call,
tap the Phone Button.
End Phone Call from Conference
TAP
1x
=
P
Note: When you have an incoming intercom call during a mobile
phone call, you will hear high tone double beeps.
50C Motorcycle Camera & Communication System with Mesh Intercom™
| 50
Page 51
9 BLUETOOTH INTERCOM
9.6 Group Intercom
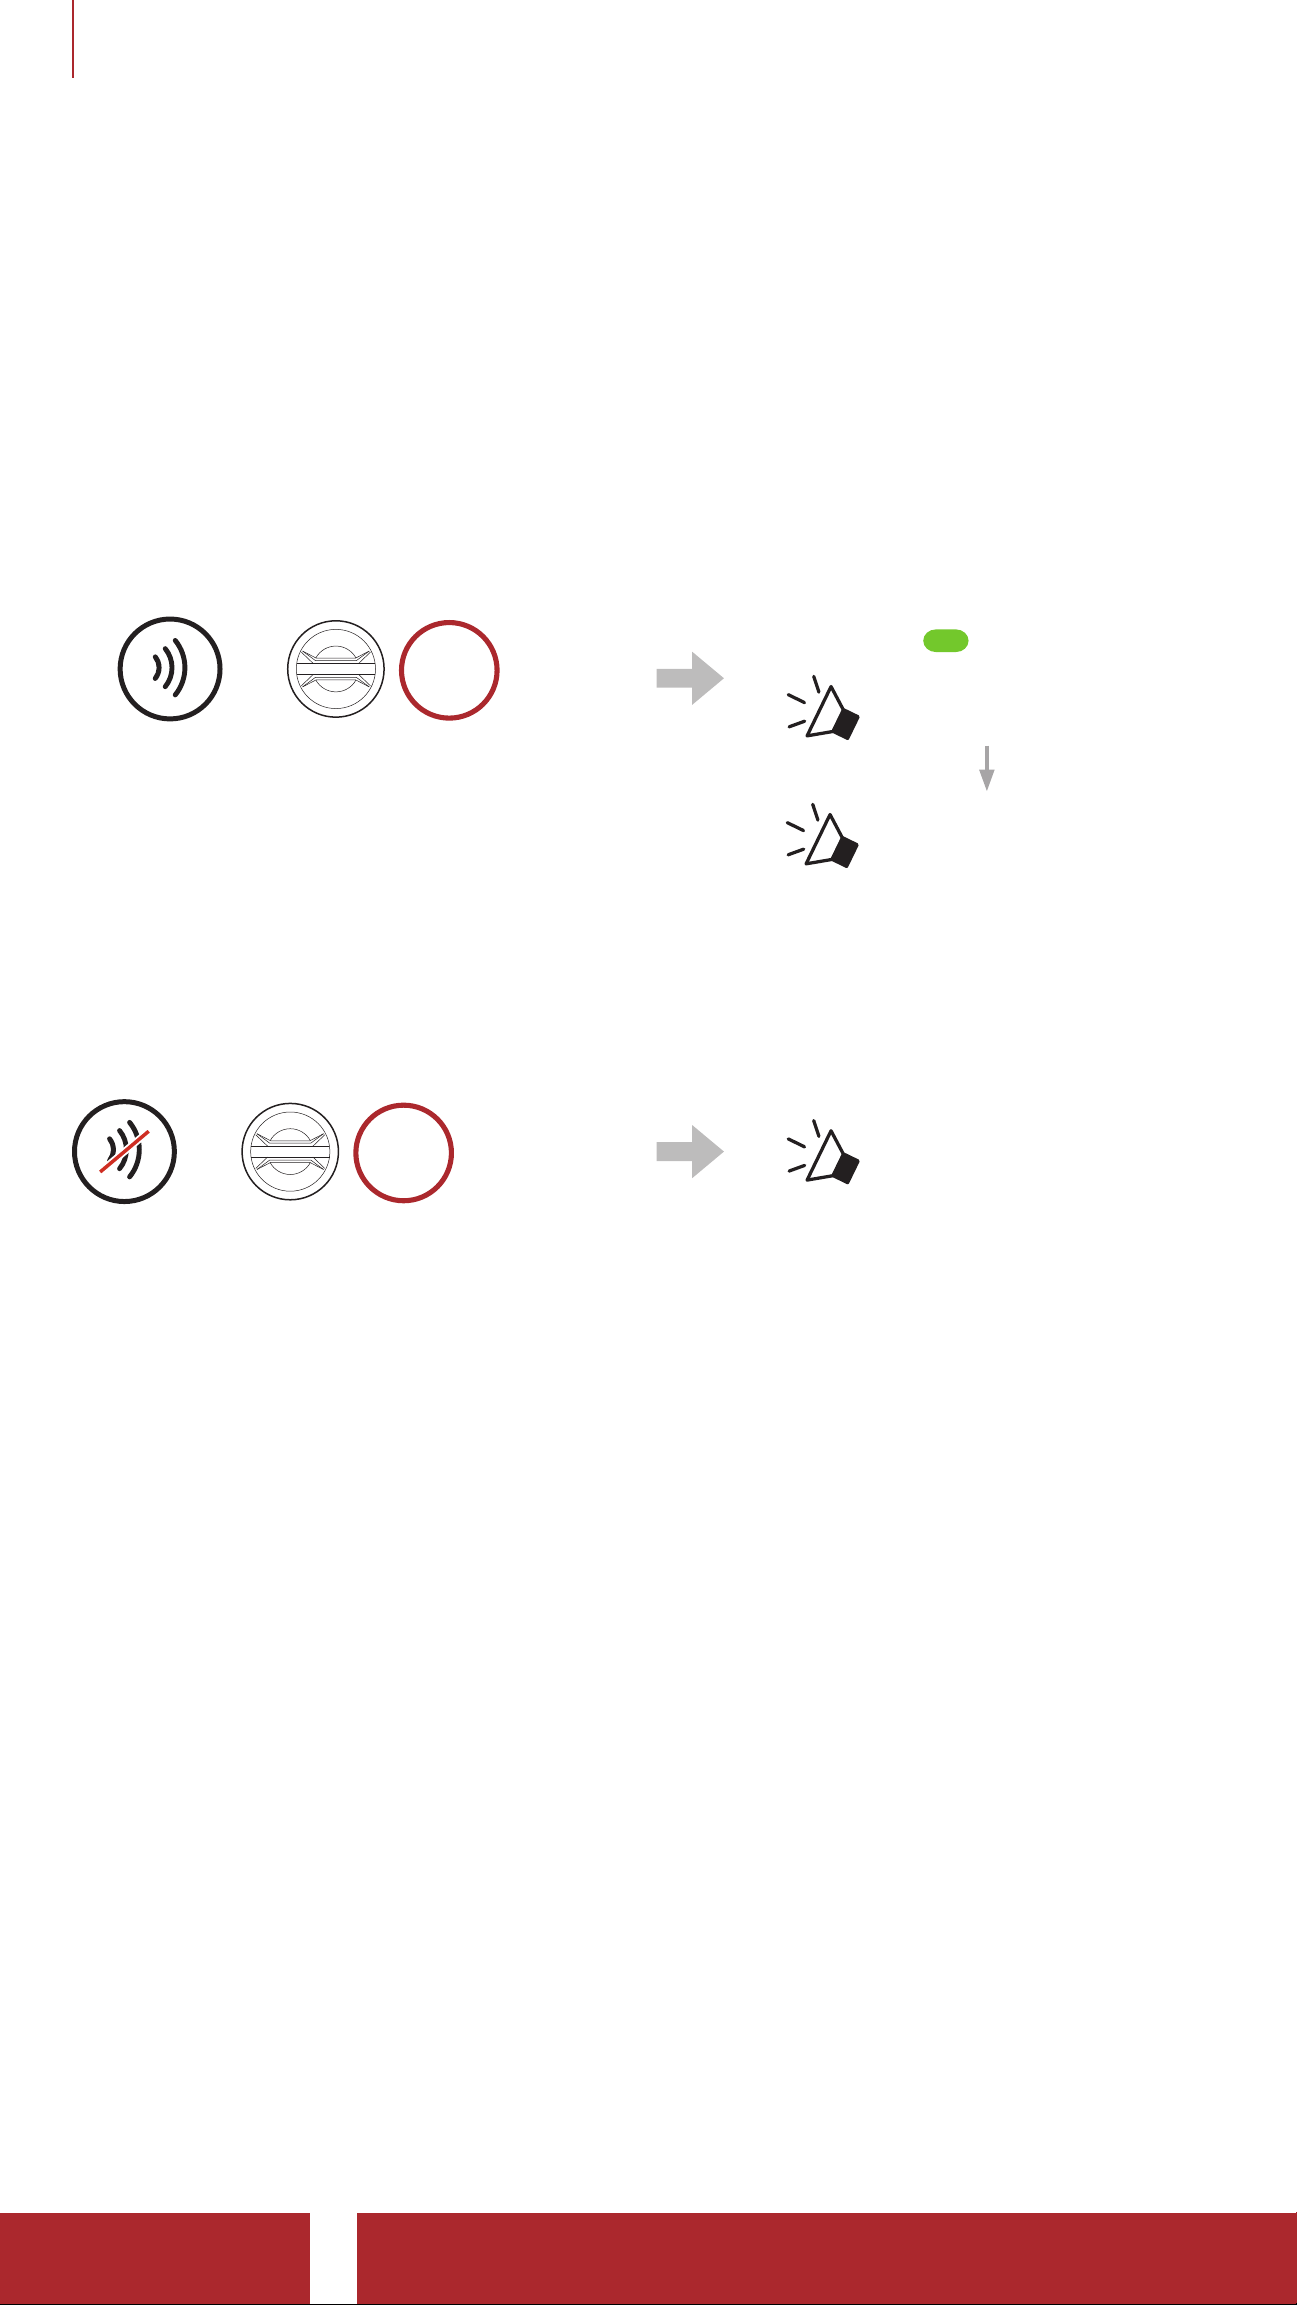
Group Intercom allows you to instantly create a Multi-Way Conference
Intercom with three of the most recently paired headsets.
To Start the Group Intercom
1. Go through intercom pairing with up to three headsets you want to
have Group Intercom with.
HOLD
2.
=
3s
Terminate Group Intercom
HOLD
=
1s
Blinking
“ Group intercom”
“ Group intercom
connected”
When all of the headsets
are connected together.
“ Group intercom
terminated”
9.7 Mesh Intercom Conference with Bluetooth
Intercom Participant
Users can use the existing Bluetooth intercom and Mesh Intercom
function at the same time. In this case, it is recommended to
communicate with other Sena headsets via Bluetooth intercom
connection and use Mesh Intercom between 50C headsets. A user who
is in Open Mesh or Group Mesh when using Mesh Intercom is able to
include up to 3 of their Bluetooth intercom friends. You can start a TwoWay Intercom conversation with one of your three Intercom Friends to
include them in the Mesh.
50C Motorcycle Camera & Communication System with Mesh Intercom™
| 51
Page 52
9 BLUETOOTH INTERCOM
Note:
• The audio quality will be reduced if a 50C connects to 2 or more
Bluetooth intercom friends while in Open Mesh or Group Mesh
when using Mesh Intercom.
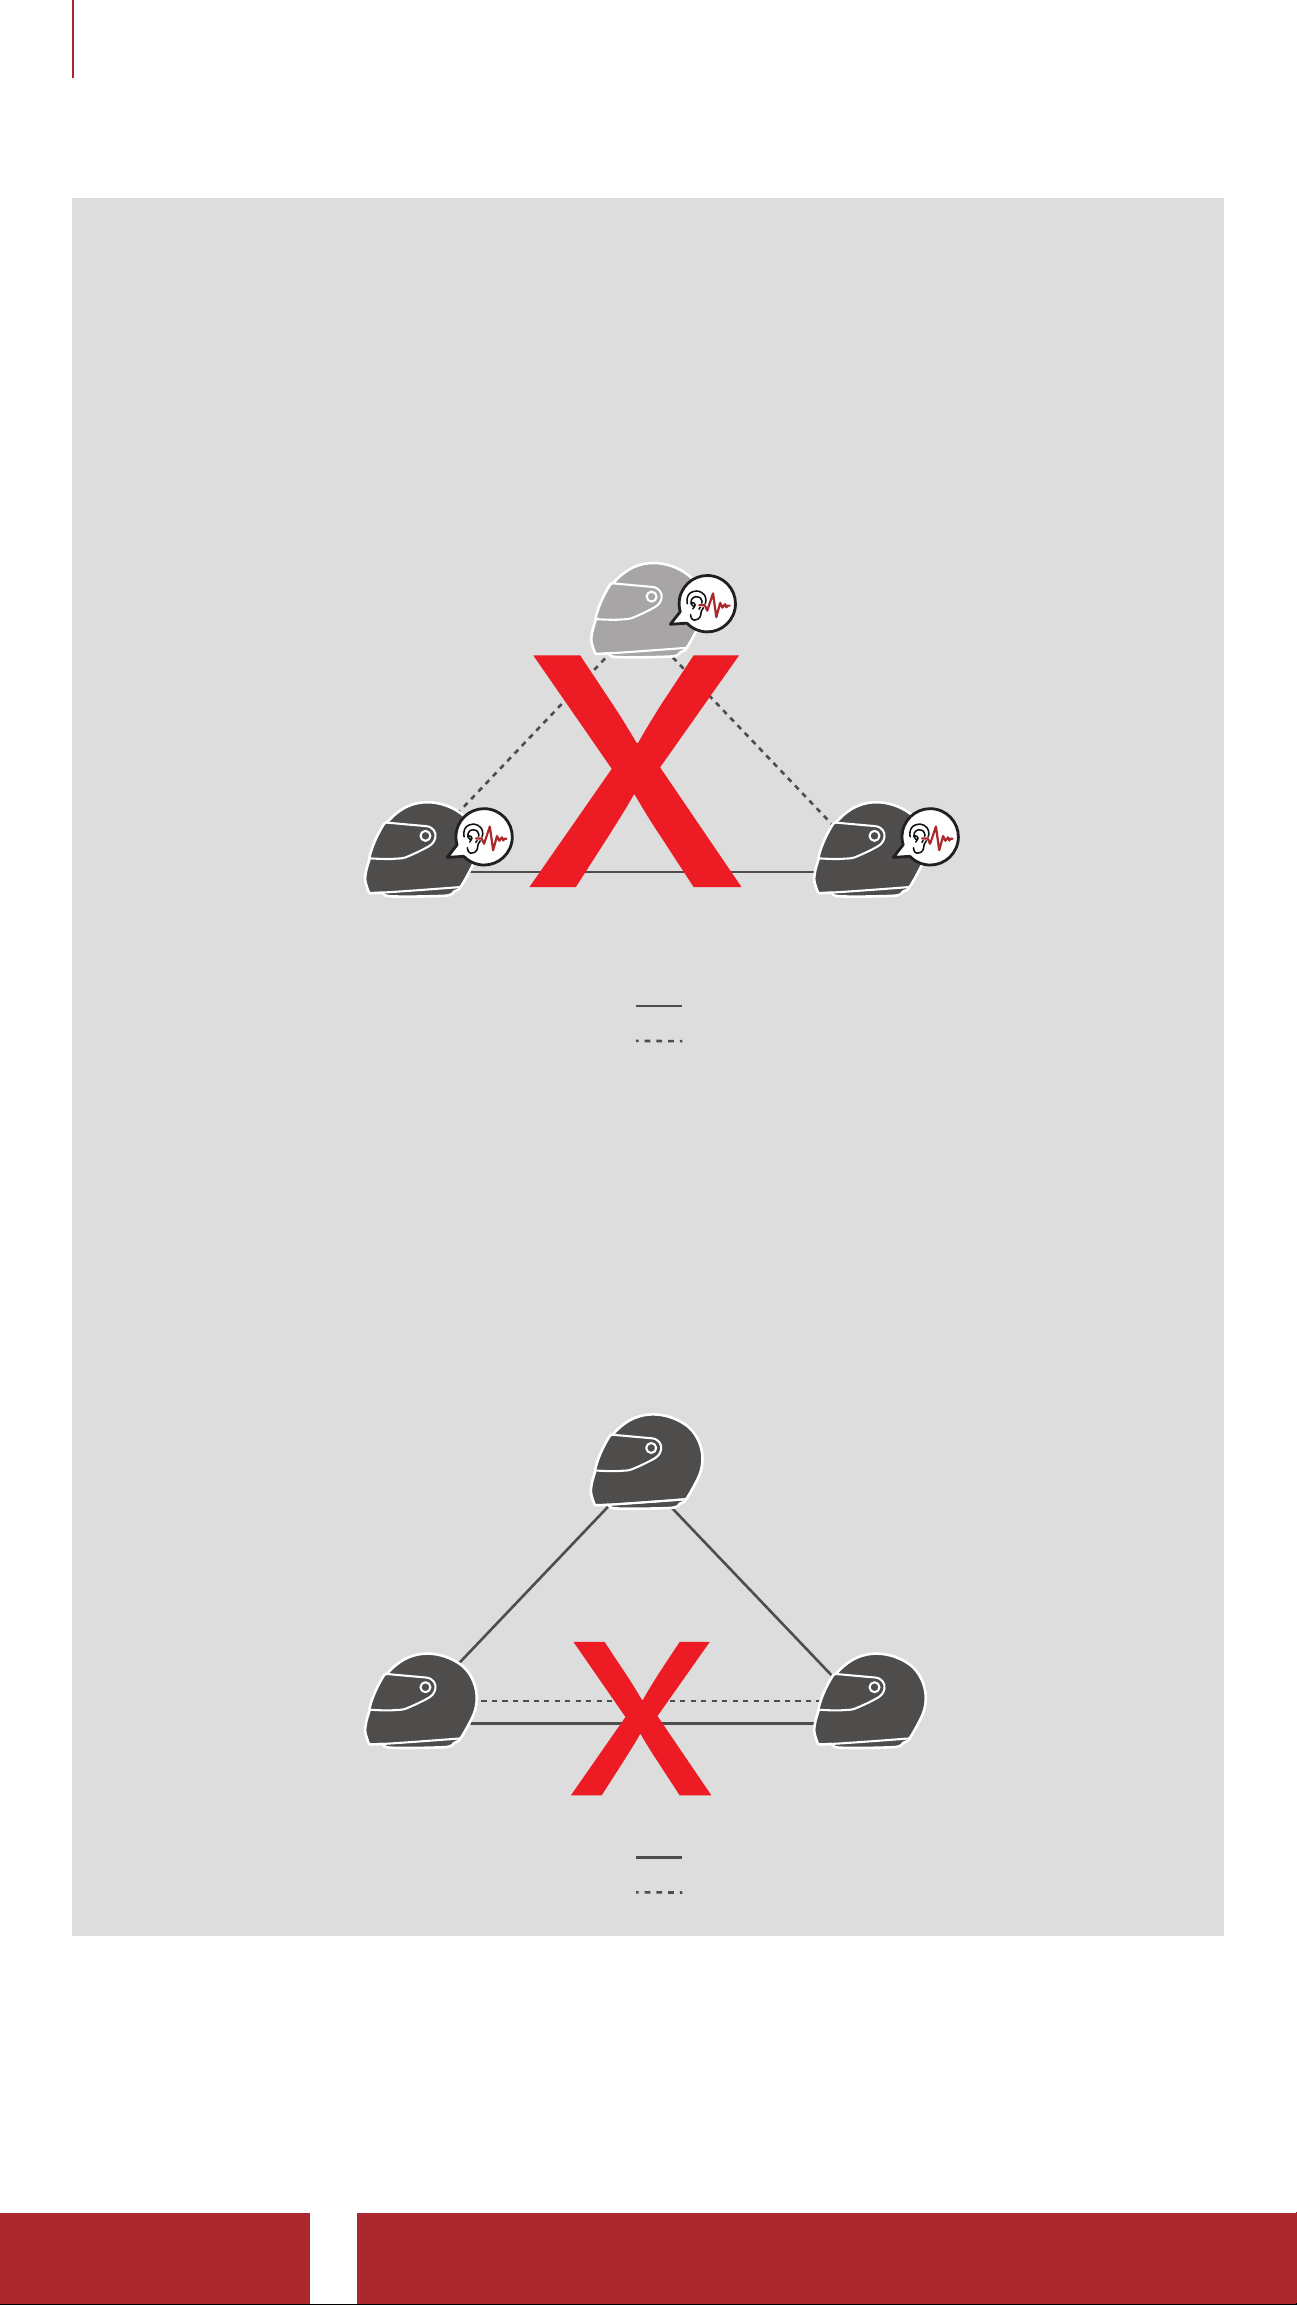
• If a closed loop is created, as shown below, each user will
experience severe noise issues. Sena recommends that a closed
loop not be created.
Sena Headset
50C 50C
Mesh Intercom
Bluetooth Intercom
• If Bluetooth intercom is accidentally turned on during Mesh
Intercom communication between 50C headsets, as shown below,
you will hear a voice prompt, “Mesh intercom disabled, Bluetooth
intercom connected” every 1 minute. If you turn off the Bluetooth
Intercom or turn off the Mesh Intercom, the voice prompt will no
longer come out.
50C
50C 50C
Mesh Intercom
Bluetooth Intercom
50C Motorcycle Camera & Communication System with Mesh Intercom™
| 52
Page 53
10. UNIVERSAL INTERCOM
Universal Intercom allows you to have intercom conversations with
users of non-Sena Bluetooth headsets. Non-Sena Bluetooth headset
can be connected to the Sena headset if they support the Bluetooth
Hands-Free Profile (HFP). You can pair the headset with only one
non-Sena headset at a time. The intercom distance depends on the
performance of the Bluetooth headset to which it’s connected. When a
non-Sena Bluetooth headset is paired with the headset while another
Bluetooth device is paired via Second Mobile Phone Pairing, it will be
disconnected.
10.1 Universal Intercom Pairing
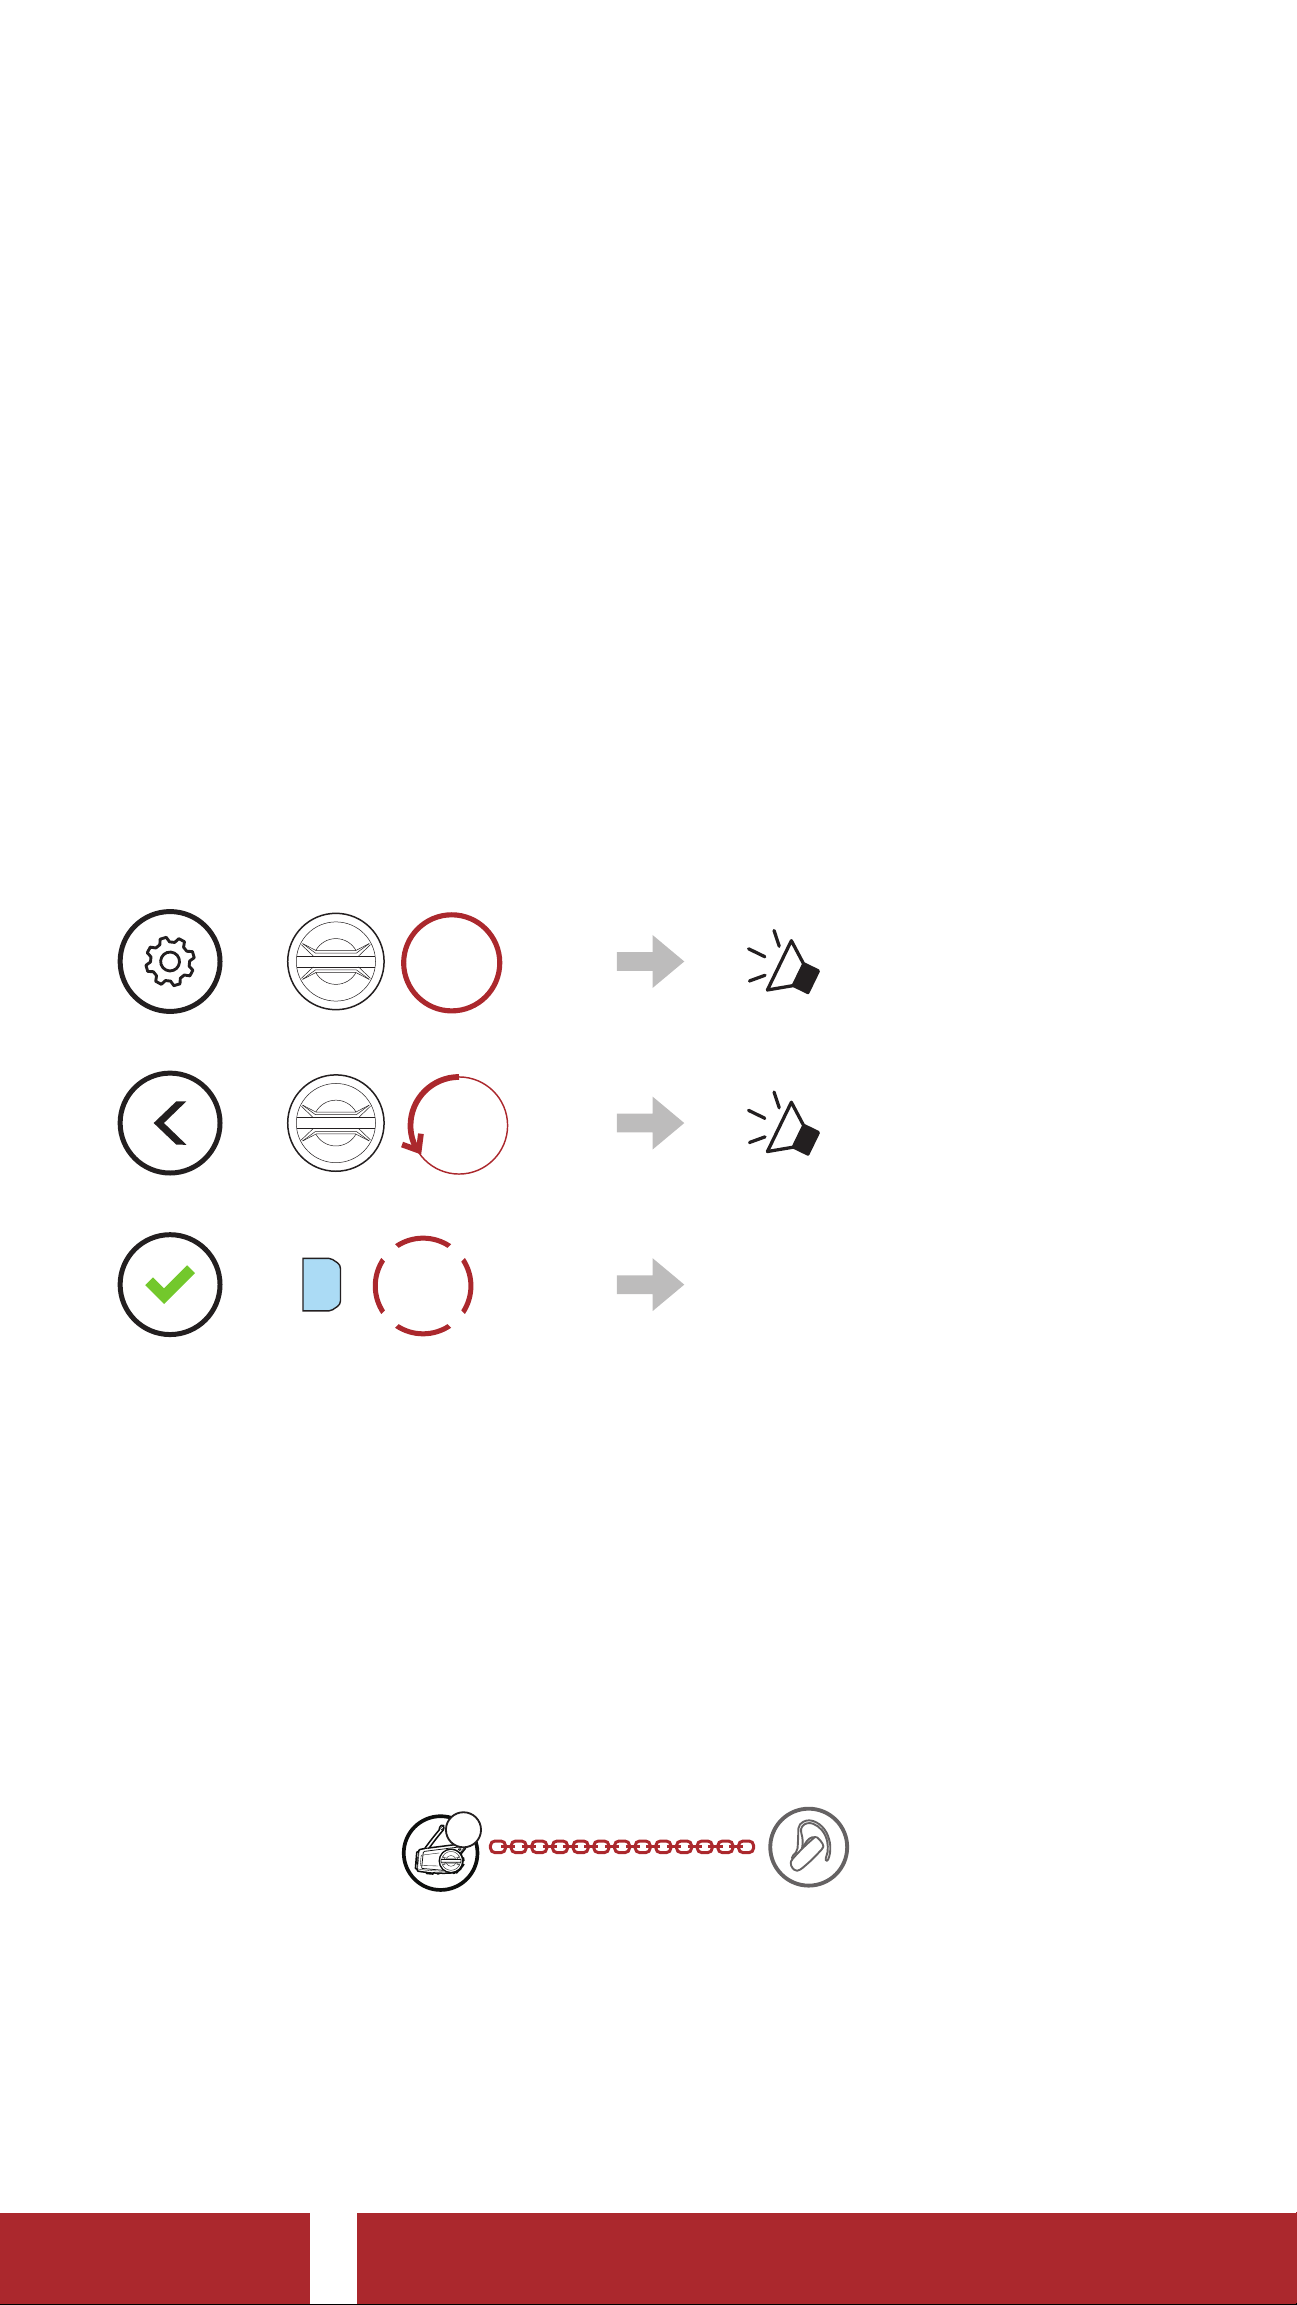
HOLD
1.
2.
3.
4. Put the non-Sena Bluetooth headset in Hands-free Pairing Mode. The
=
=
=
10s
ROTATE
L
P
TAP
1x
Enter into Universal
Intercom Pairing mode.
“ Configuration menu”
“ Universal intercom
pairing”
headset will automatically pair with a non-Sena Bluetooth headset.
10.2 Two-Way Universal Intercom
You can initiate the Universal Intercom connection with non-Sena
Bluetooth headsets using the same intercom connection method as you
would between other Sena headsets.
A
YOU
You may start/end a Two-Way Universal Intercom using the same way
Non-Sena
Headset
as you do in a normal Two-Way Intercom. Please refer to Section 9.3:
“Two-Way Intercom”.
50C Motorcycle Camera & Communication System with Mesh Intercom™
| 53
Page 54

10 UNIVERSAL INTERCOM
10.3 Multi-Way Universal Intercom
You can have Multi-Way Intercom communication with up to three
Intercom Friends using non-Sena headsets. Some non-Sena headsets
may not support Multi-Way Universal Intercom.
You may make the Multi-Way Universal Intercom call the same way as
a normal four-way intercom call.
You may start/end a Multi-Way Universal Intercom using the same way
as you do in a normal Multi-Way Intercom. Please refer to Section 9.4:
“Multi-Way Intercom”.
10.3.1 Three-Way Universal Intercom
You may make a Three-Way Universal Intercom connection with
two headsets and one non-Sena Bluetooth headset. If the intercom
connection is made, all headsets connected cannot use the mobile
phone call function since the connection between the headset and the
phone is disconnected temporarily. If you disconnect the intercom call,
the mobile phone connection is made again automatically so that you
can use a mobile phone call function.
1. You (A) need to be paired with a non-Sena Bluetooth headset (B) and
another headset (C) for the Three-Way Conference Intercom.
Non-Sena
Headset
YOU
A
12
CB
2. Start an intercom conversation with a non-Sena Bluetooth headset (B)
in your intercom group. For example, you (A) may start an intercom
conversation with non-Sena Bluetooth headset (B). The non-Sena
Bluetooth headset (B) may also start an intercom call with you (A).
CB
Non-Sena
Headset
A
YOU
3. The other headset (C) may join the intercom by making an intercom
call to you (A).
Non-Sena
Headset
A
YOU
50C Motorcycle Camera & Communication System with Mesh Intercom™
CB
| 54
Page 55
10 UNIVERSAL INTERCOM
4. Now you (A), non-Sena Bluetooth headset (B), and the other headset
(C) are having a Three-Way Conference Intercom.
CB
Non-Sena
Headset
A
YOU
10.3.2 Four-Way Universal Intercom
You may make the Four-Way Universal Intercom call the same way as a
normal Four-Way Intercom call.
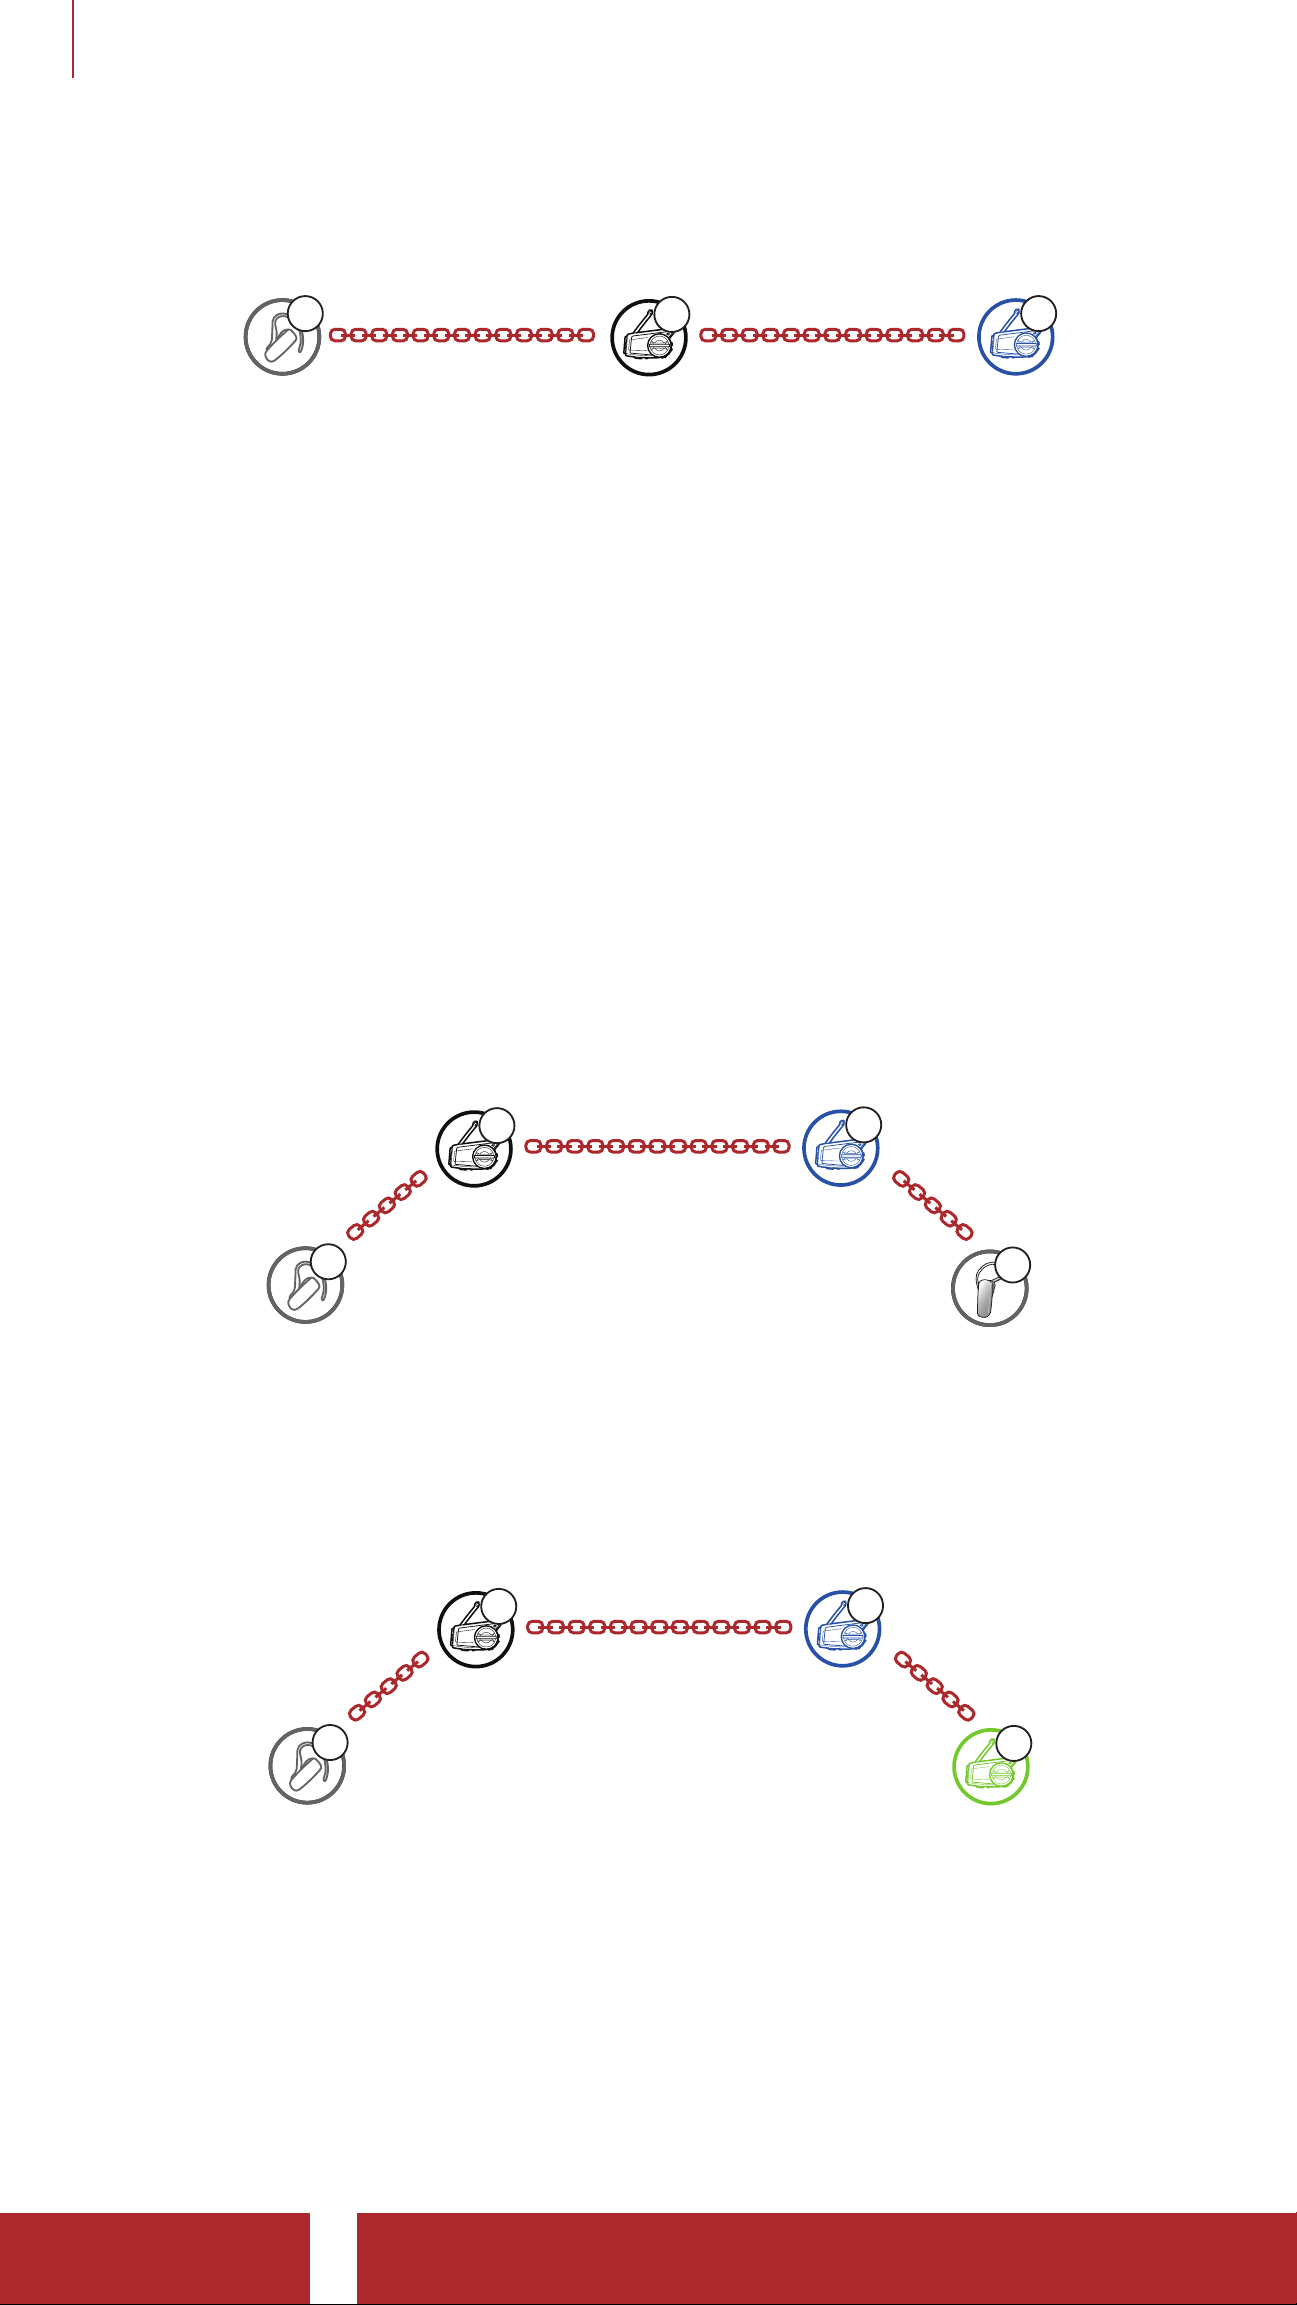
You may make a Four-Way Universal Intercom connection with a
couple of different configurations,
1) two headsets and two non-Sena Bluetooth headsets or
2) three headsets and one non-Sena Bluetooth headset.
Four-Way Universal Intercom Case 1
1) You (A), a non-Sena Bluetooth headset (B), another headset (C), and
a non-Sena Bluetooth headset (D).
A
YOU
B
Non-Sena
Headset
C
D
Non-Sena
Headset
Four-Way Universal Intercom Case 2
2) You (A), a non-Sena Bluetooth headset (B), and two other headsets
(C and D).
Non-Sena
Headset
A
YOU
B
C
D
50C Motorcycle Camera & Communication System with Mesh Intercom™
| 55
Page 56

10 UNIVERSAL INTERCOM
10.4 Mesh Intercom Conference with Two-way
Universal Intercom Participant
Users can use the existing Two-way Universal Intercom and Mesh
Intercom function at the same time. In this case, it is recommended to
communicate with non-Sena headset via Two-way Universal Intercom
connection and use Mesh Intercom between 50C headsets.
A user who is in Open Mesh or Group Mesh when using Mesh
Intercom is able to include one Universal Intercom friend. You can
start a Two-way Universal Intercom conversation with your Universal
Intercom Friend to include it in the Mesh.
50C Motorcycle Camera & Communication System with Mesh Intercom™
| 56
Page 57
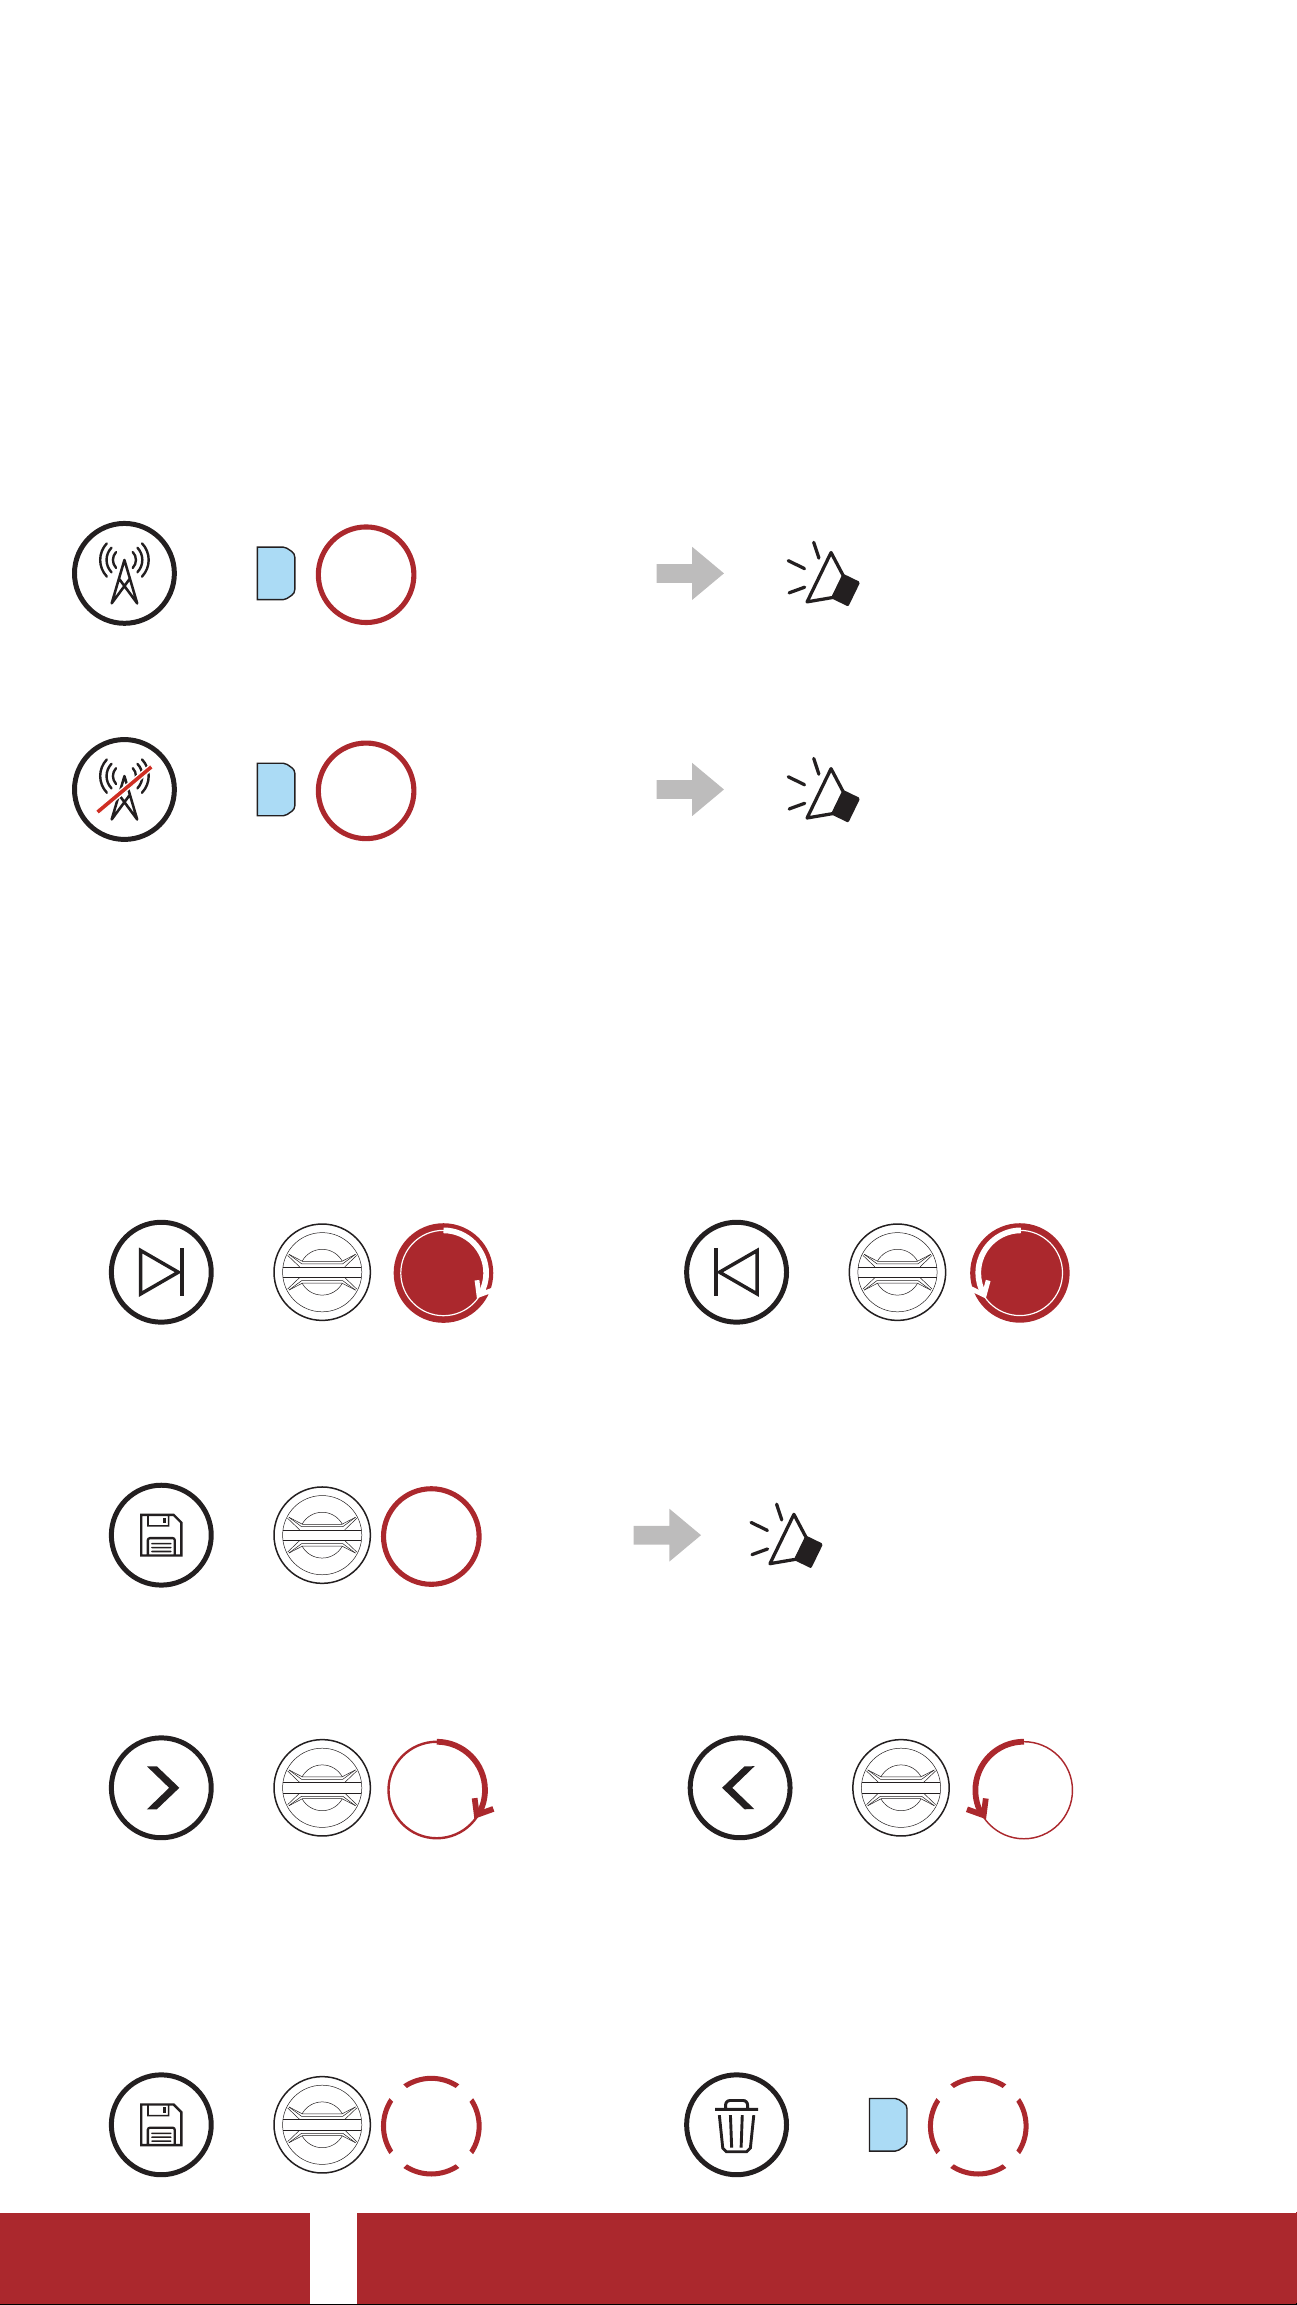
11. USING THE FM RADIO
11.1 FM Radio On/Off
FM Radio On
HOLD
=
P
1s
FM Radio Off
HOLD
=
P
1s
11. 2 Seek and Save Radio Stations
The “Seek” feature searches for radio stations.
“ FM on”
“FM off”
1. Search for radio stations.
Seek Stations Forward
ROTATE
=
R
Seek Stations Backward
ROTATE
=
L
2. Save the current station.
Enter Preset Selection Mode
HOLD
=
1s
“Preset (#)”
3. Navigate through the preset numbers that you want to store.
Navigate Forward/Backward Through Preset Stations
=
ROTATE
R
or
=
ROTATE
L
4. Save the station in the preset number you choose or delete the
station from memory.
Save Station to the
Preset Number
TAP
=
1x
50C Motorcycle Camera & Communication System with Mesh Intercom™
Delete Station from
Memory
TAP
1x
=
P
| 57
Page 58
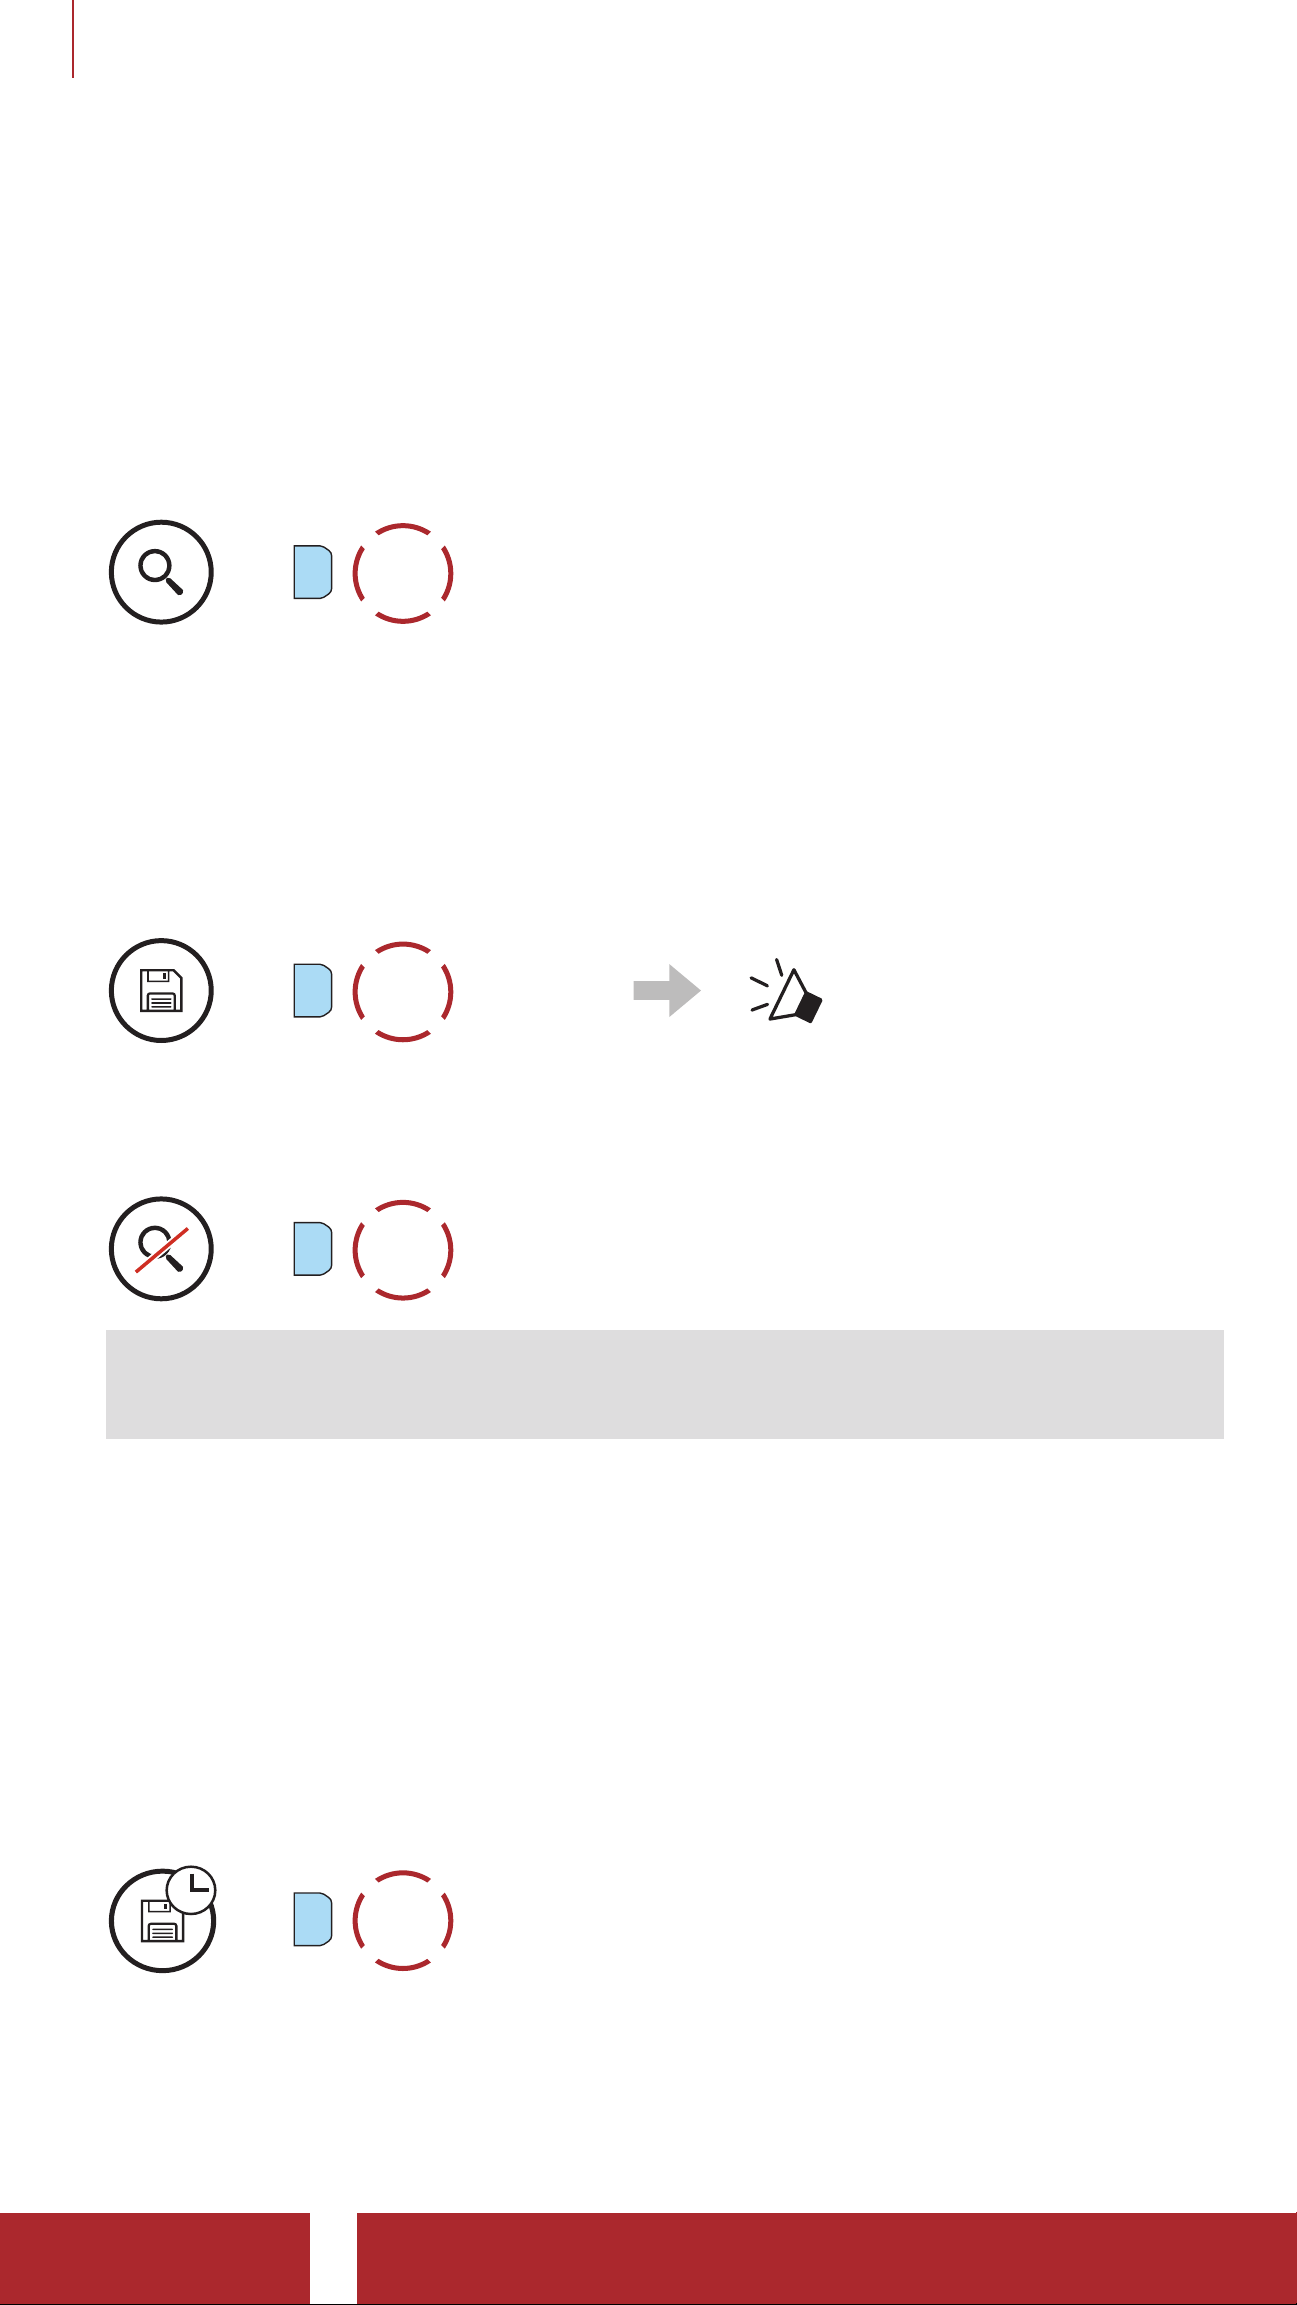
11 USING THE FM RADIO
11.3 Scan and Save Radio Stations
The “Scan” function automatically searches for radio stations, starting
with the current station’s frequency, then up from there.
1. Scan for stations.
Start Scanning
TAP
2x
=
P
2. The Sena tuner pauses at each station it finds for 8 seconds before
moving to the next.
3. Save the current station. The station will be saved as the next preset
number.
Save the Current Station
TAP
1x
“Save preset (#)”
=
P
4. Stop scanning.
Stop scanning
TAP
2x
=
P
Note: You can use the Sena Device Manager or the SENA
MOTORCYCLE App to save the preset stations.
11.4 Temporary Station Preset
The Temporary Preset feature automatically finds and saves the nearest
10 radio stations without changing your existing preset stations.
1. Automatically find and save 10 stations.
Temporary Stations
TAP
3x
=
P
2. The temporary preset stations will be cleared when the headset
reboots.
50C Motorcycle Camera & Communication System with Mesh Intercom™
| 58
Page 59

11 USING THE FM RADIO
11.5 Navigating Preset Stations
Using the methods above, up to 10 radio stations can be stored. You
can navigate through the saved stations.
Navigate through Preset Stations
=
P
TAP
1x
50C Motorcycle Camera & Communication System with Mesh Intercom™
| 59
Page 60

12. VOICE COMMAND
The Voice Command of the headset allows you to operate certain
operations by simply using your voice. You can control the headset
completely handsfree using the voice recognition. Multi-language
Voice Command supports English, French, German, Spanish, Italian,
Chinese, Japanese, and Russian.
Speak a Voice Command List
Mode Status Function Voice Command
Check battery “Hey Sena, Check Battery”
Volume Up “Hey Sena, Volume Up”
Standby/
Bluetooth
Intercom/
Mesh Intercom/
FM Radio/
Music
Standby/
Volume Down “Hey Sena, Volume Down”
Phone Pairing “Hey Sena, Phone Pairing”
Bluetooth Intercom Pairing “Hey Sena, Pairing Intercom”
Start/End each Bluetooth
Intercom
Turn on Camera “Hey Sena, Camera On”
Turn off Camera “Hey Sena, Camera Off”
Start Recording “Hey Sena, Recording”
Stop Recording “Hey Sena, Stop Recording”
Start Video Tagging “Hey Sena, Tag Video”
“Hey Sena, Intercom
[one, two, three]”
Bluetooth
Intercom/
FM Radio/
Music
Mesh Intercom
Standby/
Bluetooth
Intercom/
Turn on Mesh Intercom “Hey Sena, Mesh On”
Turn off Mesh Intercom “Hey Sena, Mesh Off”
Mesh Grouping “Hey Sena, Mesh Grouping”
Switch to Open Mesh “Hey Sena, Open Mesh”
Switch to Group Mesh “Hey Sena, Group Mesh”
End the Bluetooth intercom
“Hey Sena, End intercom”
and Mesh intercom
Play Music “Hey Sena, Play Music”
Mesh Intercom
50C Motorcycle Camera & Communication System with Mesh Intercom™
| 60
Page 61

12 VOICE COMMAND
Mode Status Function Voice Command
Standby/
Intercom/
Mesh Intercom/
Music
• FM - Next Preset
Music/
FM Radio
Music Pause Music “Hey Sena, Stop Music”
FM Radio Turn off FM Radio “Hey Sena, FM Radio Off”
Answer an Incoming Call “Answer”
Ignore an Incoming Call “Ignore”
• Music - Next Track
• FM - Previous Preset
• Music - Previous Track
Turn on FM radio ”Hey Sena, FM Radio On”
“Hey Sena, Next”
“Hey Sena, Previous”
Note:
• You can set a language to another language by using the Headset
Language feature on the SENA MOTORCYCLES App.
• If you set a language that does not support voice commands, the
voice command will work only with English commands.
• You can see the another language’s voice command list on the
SENA MOTORCYCLES App.
• Voice command performance may vary based on the
environmental conditions. To improve the performance, minimize
wind noise on the microphone by using a large microphone
sponge and closing the visor.
50C Motorcycle Camera & Communication System with Mesh Intercom™
| 61
Page 62

13. FUNCTION PRIORITY AND
FIRMWARE UPGRADES
13.1 Function Priority
The headset prioritizes connected devices in the following order:
(highest) Mobile phone
Mesh Intercom/Bluetooth Intercom
Music sharing via Bluetooth stereo
FM radio
(lowest) Bluetooth stereo music
A lower-priority function gets interrupted by a higher-priority function.
For example, stereo music will be interrupted by an Intercom
Conversation; an Intercom Conversation will be interrupted by an
incoming mobile phone call.
13.2 Firmware Upgrades
The headset supports firmware upgrades. There are two ways to
upgrade firmware.
13. 2.1 Using the WiFi Adapter
You can upgrade firmware using the WiFi Adapter.
You can automatically install any available firmware updates to your
headset via your wireless network.
Please refer to the WiFi Adapter Quick Start Guide included in the
package.
50C Motorcycle Camera & Communication System with Mesh Intercom™
| 62
Page 63

13 FUNCTION PRIORITY AND FIRMWARE UPGRADES
13.2.2 Using the Sena Device Manager
You can upgrade firmware using the Sena Device Manager.
The USB Power & Data Cable (USB-C) must be connected to your PC
to upgrade firmware using the Sena Device Manager.
Note:
• A USB Power & Data Cable (USB-C) is not included in the
package.
• Do not connect the WiFi Adapter to your PC to use the Sena
Device Manager.
Please visit sena.com to check for the latest software downloads.
Click Here to Visit sena.com
50C Motorcycle Camera & Communication System with Mesh Intercom™
| 63
Page 64
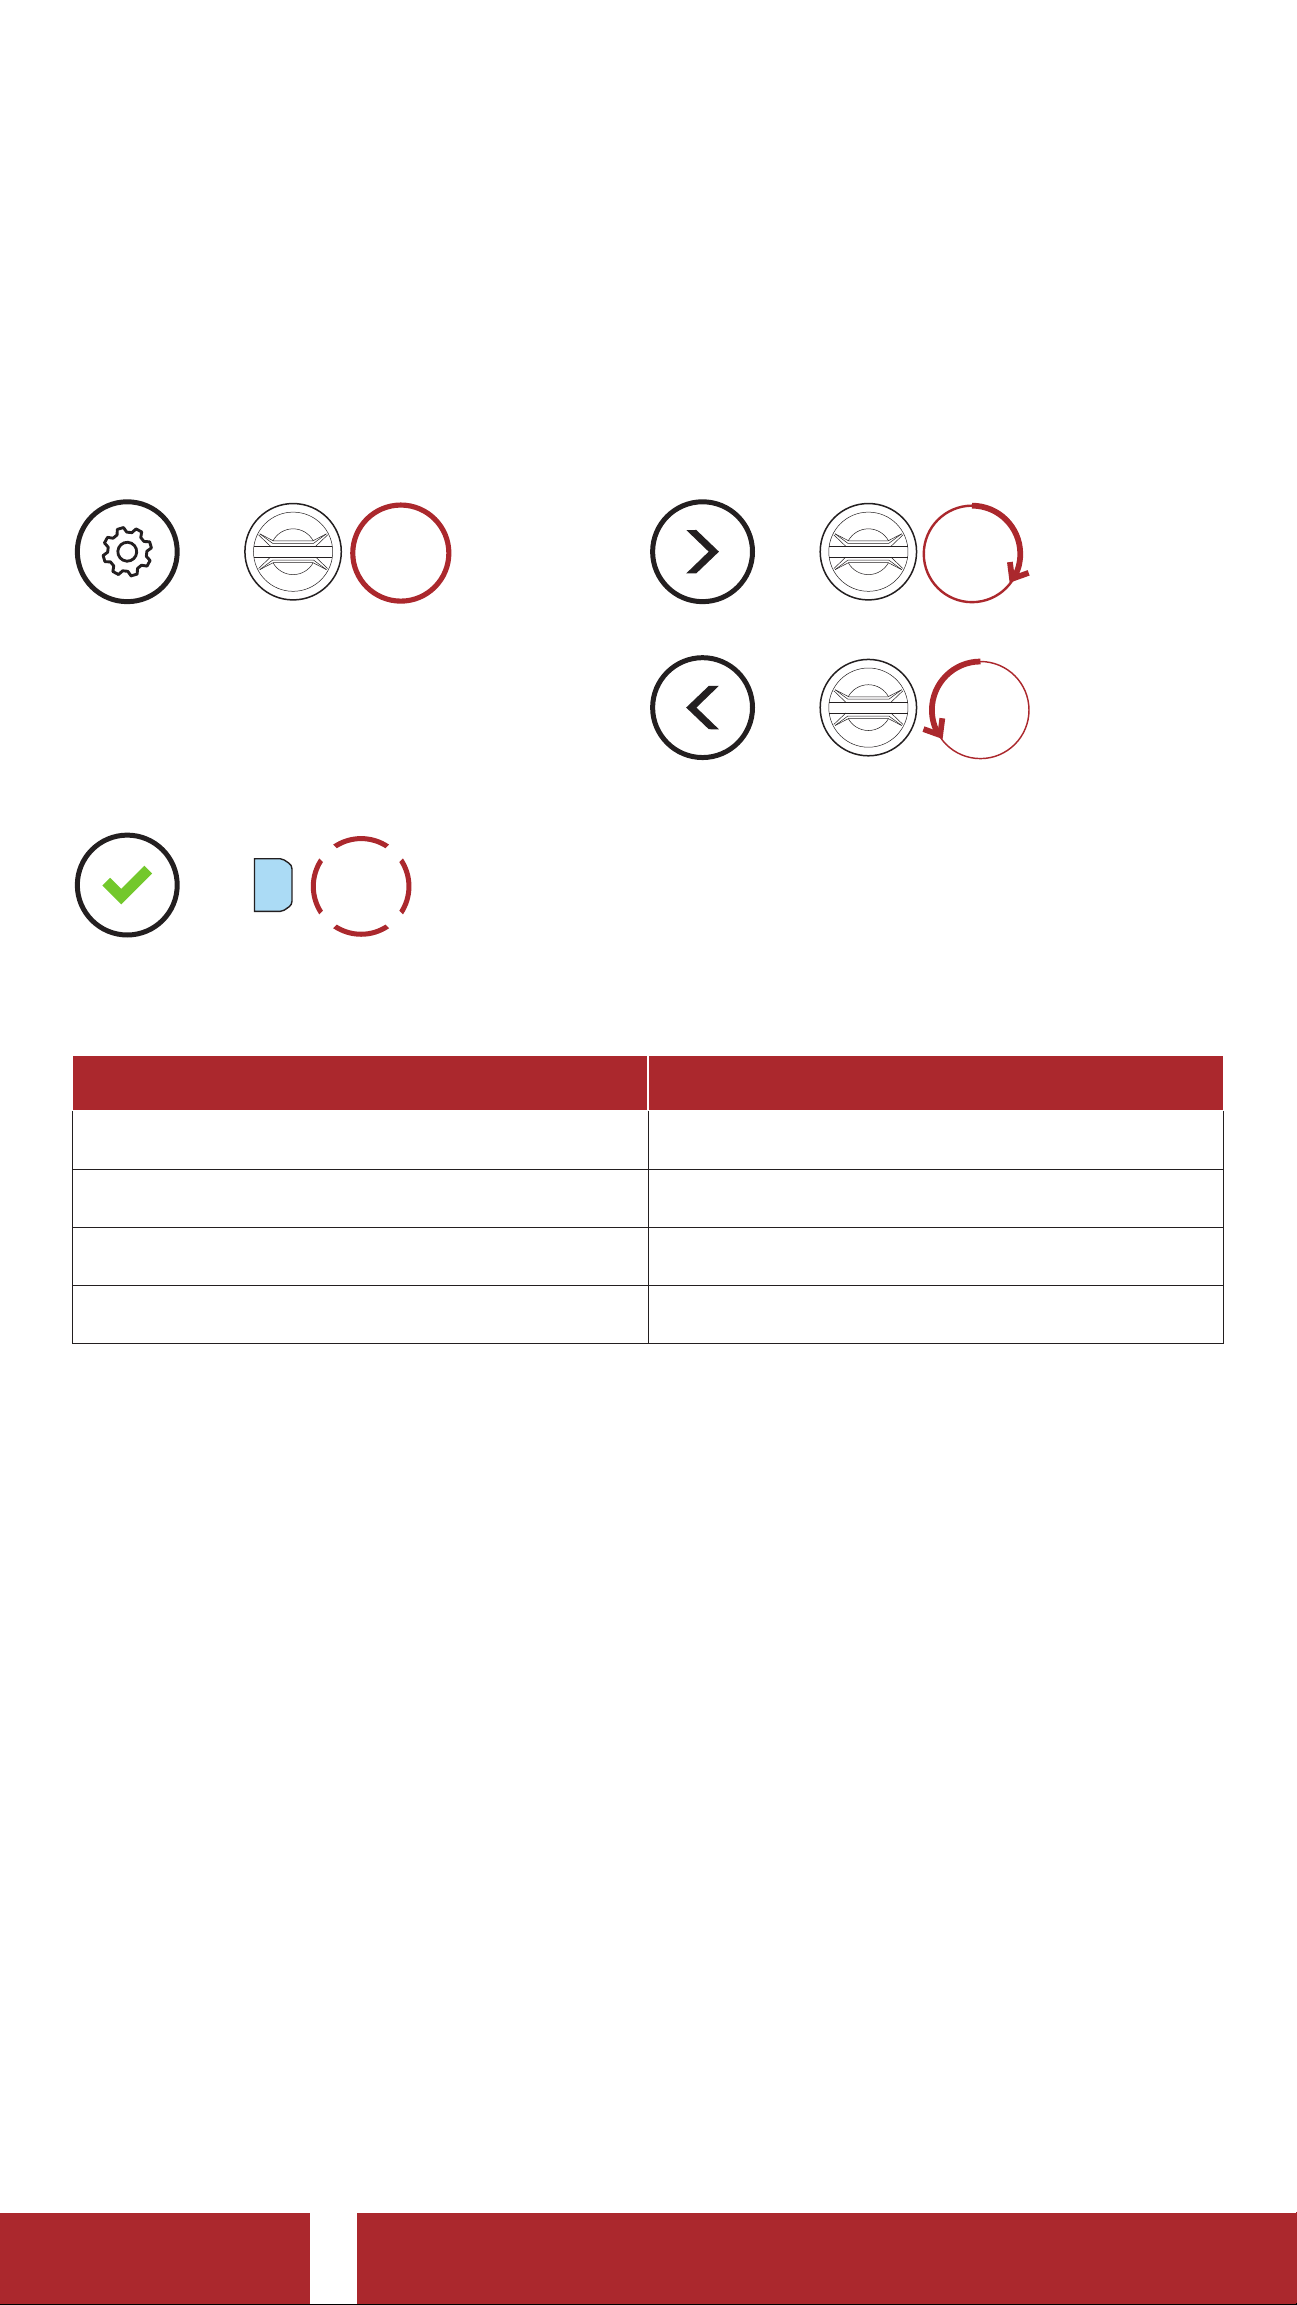
14. CONFIGURATION SETTING
14.1 Headset Configuration Menu
Access the Configuration Menu
HOLD
=
10s
Execute Menu Options
TAP
1x
Headset Configuration Menu
=
P
Navigate Between Menu Options
ROTATE
=
R
ROTATE
=
L
Voice Configuration Menu Tap the Phone Button
Delete All Pairings Execute
Remote Control Pairing Execute
Universal Intercom Pairing Execute
Exit Execute
14.1.1 Delete All Pairings
You can delete all Bluetooth pairing information of the headset.
14.1. 2 Remote Control Pairing
You can remotely control the headset using Sena Remote Control
devices (sold separately).
1. Turn on the headset and the Remote Control device.
2. Execute Remote Control Pairing.
3. Enter pairing mode in the Remote Control device. The headset will
automatically connect with the Remote Control device in pairing
mode.
50C Motorcycle Camera & Communication System with Mesh Intercom™
| 64
Page 65

14 CONFIGURATION SETTING
14.2 Software Configuration Setting
You can change the settings of the headset through the Sena Device
Manager or the SENA MOTORCYCLES App.
SENA MOTORCYCLES Sena Device Manager
14. 2.1 Headset Language
You can select the device language. The selected language is
maintained even when the headset is rebooted.
14.2.2 Audio Equalizer (Default: Music Balance)
Increase or decrease the decibel level of different frequency ranges of
audio.
• Music Balance will adjust frequency response that gives the most
natural balance between lows, mids, and highs.
• Music Enhanced will lower midrange frequencies slightly.
• Voice will increase midrange frequencies of the human voice and cut
environmental noise for better clarity with voice communication.
• Bass Boost will increase the bass range of audio (130 Hz and below).
• Treble Boost will increase the high range of audio (6 kHz and above).
14.2.3 VOX Phone (Default: Enable)
If this feature is enabled, you can answer incoming calls by voice. When
you hear a ringtone for an incoming call, you can answer the phone
by saying a word such as “Hello” loudly or by blowing air into the
microphone. VOX Phone is temporarily disabled if you are connected
to intercom. If this feature is disabled, you have to tap the Jog Dial or
the Phone Button to answer an incoming call.
50C Motorcycle Camera & Communication System with Mesh Intercom™
| 65
Page 66

14 CONFIGURATION SETTING
14.2.4 VOX Intercom (Default: Disable)
If this feature is enabled, you can initiate an intercom conversation
with the last connected intercom friend by voice. When you want
to start intercom, say a word such as “Hello” loudly or blow air into
the microphone. If you start an intercom conversation by voice, the
intercom terminates automatically when you and your intercom friend
remain silent for 20 seconds. However, if you manually start an intercom
conversation by tapping the Jog Dial, you have to terminate the
intercom conversation manually. However, if you start the intercom
by voice and end it manually by tapping the Jog Dial, you will not be
able to start intercom by voice temporarily. In this case, you have to
tap the Jog Dial to restart the intercom. This is to prevent repeated
unintentional intercom connections by strong wind noise. After
rebooting the headset, you can start intercom by voice again.
14.2.5 VOX Sensitivity (Default: 3)
VOX Sensitivity can be adjusted depending on your riding environment.
Level 5 is the highest sensitivity setting and level 1 is the lowest.
14.2.6 HD Intercom (Default: Enable)
HD Intercom enhances the two-way intercom audio from normal quality
to HD quality. HD Intercom will become temporarily disabled when you
enter into a multi-way intercom. If this feature is disabled, the two-way
intercom audio will change to normal quality.
Note:
• The intercom distance of HD Intercom is relatively shorter than
that of normal intercom.
• HD Intercom will become disabled temporarily when Bluetooth
Intercom Audio Multitasking is enabled.
50C Motorcycle Camera & Communication System with Mesh Intercom™
| 66
Page 67

14 CONFIGURATION SETTING
14.2.7 HD Voice (Default: Enable)
HD Voice allows you to communicate in high-definition during phone
calls. This feature increases the quality so that the audio will be crisp
and clear during phone call conversations. If this feature is enabled,
incoming phone calls will interrupt intercom conversations and audio
from the SR10 will not be heard during intercom conversations. Three-
Way Conference Phone Call with Intercom Participant will not be
available if HD Voice is enabled.
Note:
• Refer to the manufacturer of your Bluetooth device that will be
connected to the headset to see if it supports HD Voice.
• HD Voice is active only when Bluetooth Intercom Audio
Multitasking is disabled.
14.2.8 Bluetooth Intercom Audio Multitasking (Default: Disabled)
Audio Multitasking (Bluetooth Intercom Audio Multitasking and
Mesh Intercom Audio Multitasking) allows you to have an intercom
conversation while simultaneously listening to music, FM radio, or
GPS instructions. The overlaid audio is played in the background with
reduced volume whenever there is an intercom conversation and will
return to normal volume once the conversation is finished.
The Mesh Intercom Audio Multitasking feature is always on.
Note:
• For Bluetooth Intercom Audio Multitasking to work properly, you
need to power the headset off and on. Please restart the headset.
• Bluetooth Intercom Audio Multitasking will be activated during
two-way intercom conversations with a headset that also supports
this feature.
• Some GPS devices may not support this feature.
• The Audio Multitasking feature can be configured through the
Intercom-Audio Overlay Sensitivity and the Audio Overlay
Volume Management settings.
50C Motorcycle Camera & Communication System with Mesh Intercom™
| 67
Page 68

14 CONFIGURATION SETTING
14.2.9 Intercom-Audio Overlay Sensitivity (Default: 3)
The music, FM radio and GPS volume will be lowered to play in the
background if you talk over the intercom while the overlaid audio
is playing. You can adjust the intercom sensitivity to activate this
background audio mode. Level 1 has the lowest sensitivity and level 5
has the highest sensitivity.
Note: If your voice is not louder than the sensitivity of the selected
level, the overlaid audio will not be lowered.
14. 2.10 Audio Overlay Volume Management (Default: Disable)
The music, FM radio and GPS overlaid audio reduces in volume
whenever there is an ongoing intercom conversation. If Audio Overlay
Volume Management is enabled, the volume level of the overlaid
audio will not be reduced during an intercom conversation.
14. 2.11 Smart Volume Control (Default: Disable)
Enabling Smart Volume Control automatically changes the level of the
speaker volume based on the level of the environment noise. You can
enable it by setting the sensitivity to low, medium or high.
14. 2.12 Sidetone (Default: Disable)
Sidetone is audible feedback of your own voice. It helps you to naturally
speak at the correct level according to varying helmet noise conditions.
If this feature is enabled, you can hear what you are speaking during an
intercom conversation or a phone call.
14. 2.13 Voice Prompt (Default: Enable)
You can disable Voice Prompts by software configuration settings, but
the following voice prompts are always on.
- Headset configuration settings menu, battery level indicator, speed
dial, FM radio functions
50C Motorcycle Camera & Communication System with Mesh Intercom™
| 68
Page 69

14 CONFIGURATION SETTING
14.2.14 RDS AF Setting (Default: Disable)
Radio Data System (RDS) Alternative Frequency (AF) Setting allows
a receiver to re-tune to the second frequency location when the first
signal becomes too weak. With RDS AF enabled on the receiver, a radio
station with more than one frequency can be used.
14. 2.15 FM Station Guide (Default: Enable)
When FM Station Guide is enabled, FM station frequencies are given
by voice prompts as you select preset stations. When FM Station Guide
is disabled, the voice prompts on FM station frequencies will not be
given as you select preset stations.
14. 2.16 Advanced Noise Control™ (Default: Enable)
When Advanced Noise Control is enabled, the background noise
is reduced during an intercom conversation. When it is disabled, the
background noise is mixed with your voice during intercom.
14.3 Camera Configuration Setting
You can change the settings of the camera through the Sena Camera
App.
Sena Camera
14. 3.1 Photo Mode (Default: Single Shot Mode)
You can select the photo mode to be either Single Shot or Burst Shot.
Single Shot takes a single photo while Burst Shot takes 8 photos.
14.3.2 Video Mode (Default: Normal Recording Mode)
You can select the video mode to be Normal Recording Mode,
Timelapse Mode, or Loop Recording Mode. Timelapse Mode records
series of photos at timed intervals and makes it into a video. Loop
Recording Mode constantly records videos at timed intervals, replacing
old video files when memory is full.
50C Motorcycle Camera & Communication System with Mesh Intercom™
| 69
Page 70

14 CONFIGURATION SETTING
14.3.3 Video Resolution (Default: 2160P/30fps)
You can select the Video Resolution to be 2160P/30fps, 1440P/30fps,
1080P/60fps, 1080P/30fps, 1080P/60fps + EIS and 1080P/30fps+EIS.
Note: Electronic image stabilization (EIS) is an image enhancement
technique using electronic processing. EIS minimizes blurring and
compensates for camera shake.
14.3.4 Timelapse Interval (Default: 1 sec)
You can select the Timelapse Interval to be 1 second, 2 seconds,
5 seconds or 10 seconds.
14.3.5 Video Microphone Gain (Default: Medium)
You can select the Microphone Gain for video recording to be low,
medium, or high.
14.3.6 Date Caption (Default: Off)
You can record or hide Date Caption during video recording. If you
select on, the date caption will be displayed on top of your recorded
video. If you select off, the date caption will not be shown on your
recorded video.
14.3.7 Smart Audio Mix™ (Always On)
Smart Audio Mix allows you to record everything you hear through
your speakers as well as your voice during video recording. The function
that governs Smart Audio Mix is called Speaker Sound Recording.
14.3.8 Auto Camera Sleep (Default: On)
You can set the camera to automatically power off after 5 minutes of
inactivity. This feature does not work while charging the camera.
14.3.9 Format SD Card
SD card format will remove all files from a microSD card. When you use
a new card for the first time, always format it before using the camera.
50C Motorcycle Camera & Communication System with Mesh Intercom™
| 70
Page 71
15. TROUBLESHOOTING
Please visit sena.com for more troubleshooting information.
• Customer Support:
sena.com
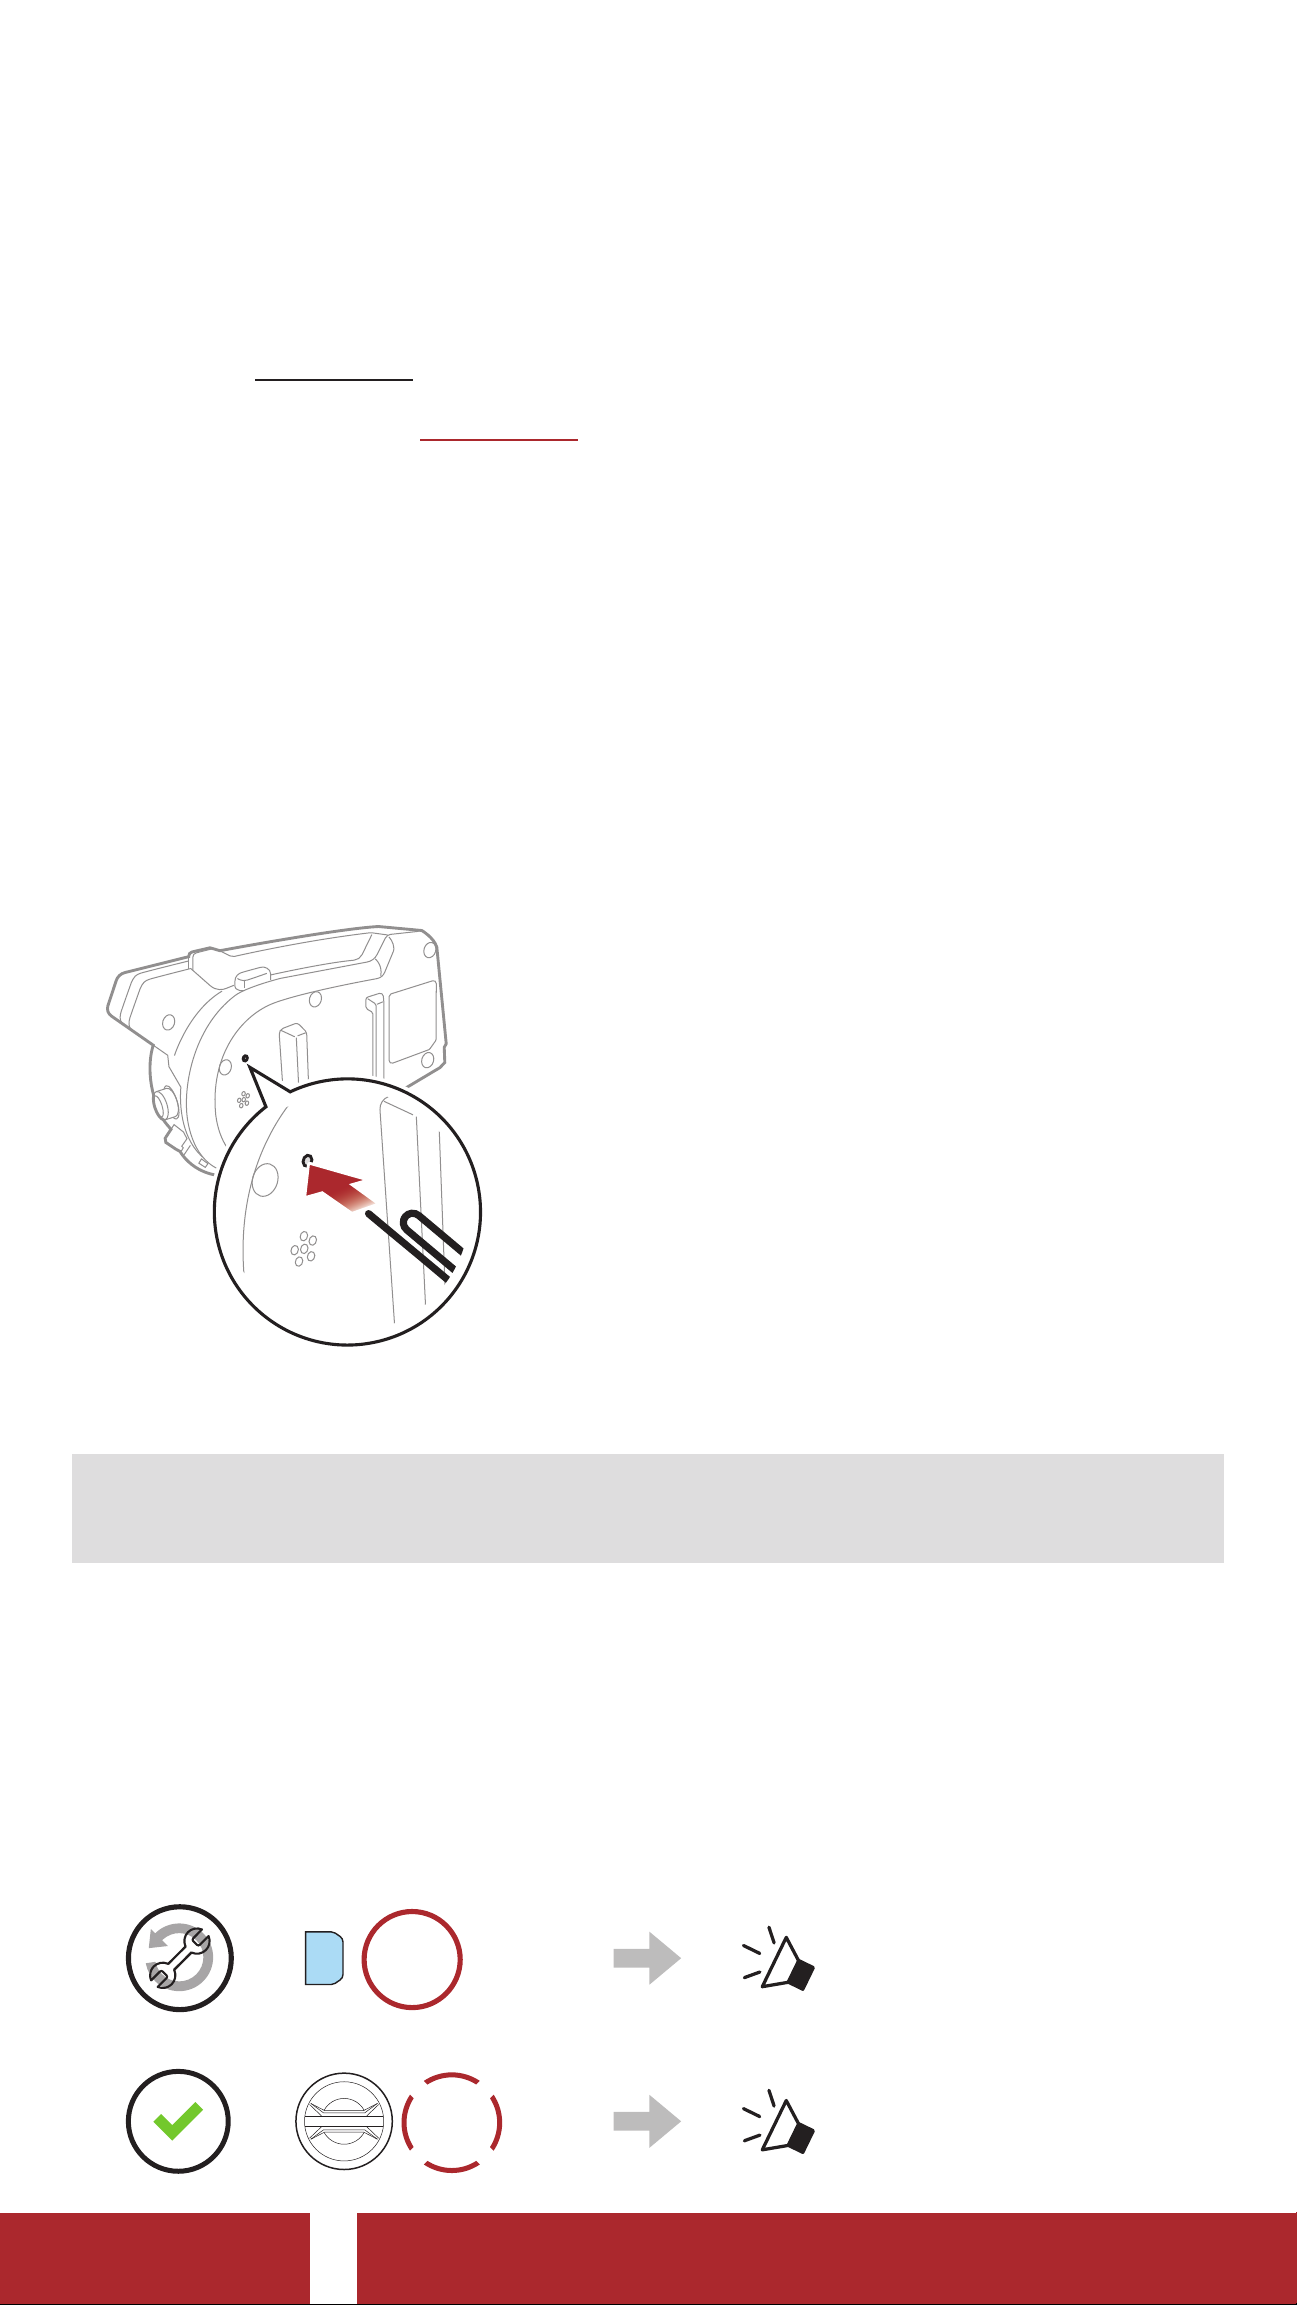
15.1 Fault Reset
When the headset is not working properly, you can easily reset the unit:
1. Locate the Pinhole Fault Reset Button at the back of the headset
main unit.
2. Gently insert a paperclip into the hole and tap the Pinhole Fault
Reset Button with light pressure.
3. The headset will shut down.
Note: Fault Reset will not restore the headset to factory default
settings.
15.2 Factory Reset
To erase all of your settings and start fresh, the headset can be restored
to factory default settings using the Factory Reset feature.
HOLD
10s
“Factory reset”
1.
=
P
2.
=
TAP
1x
50C Motorcycle Camera & Communication System with Mesh Intercom™
“ Headset reset,
good-bye”
| 71
Page 72
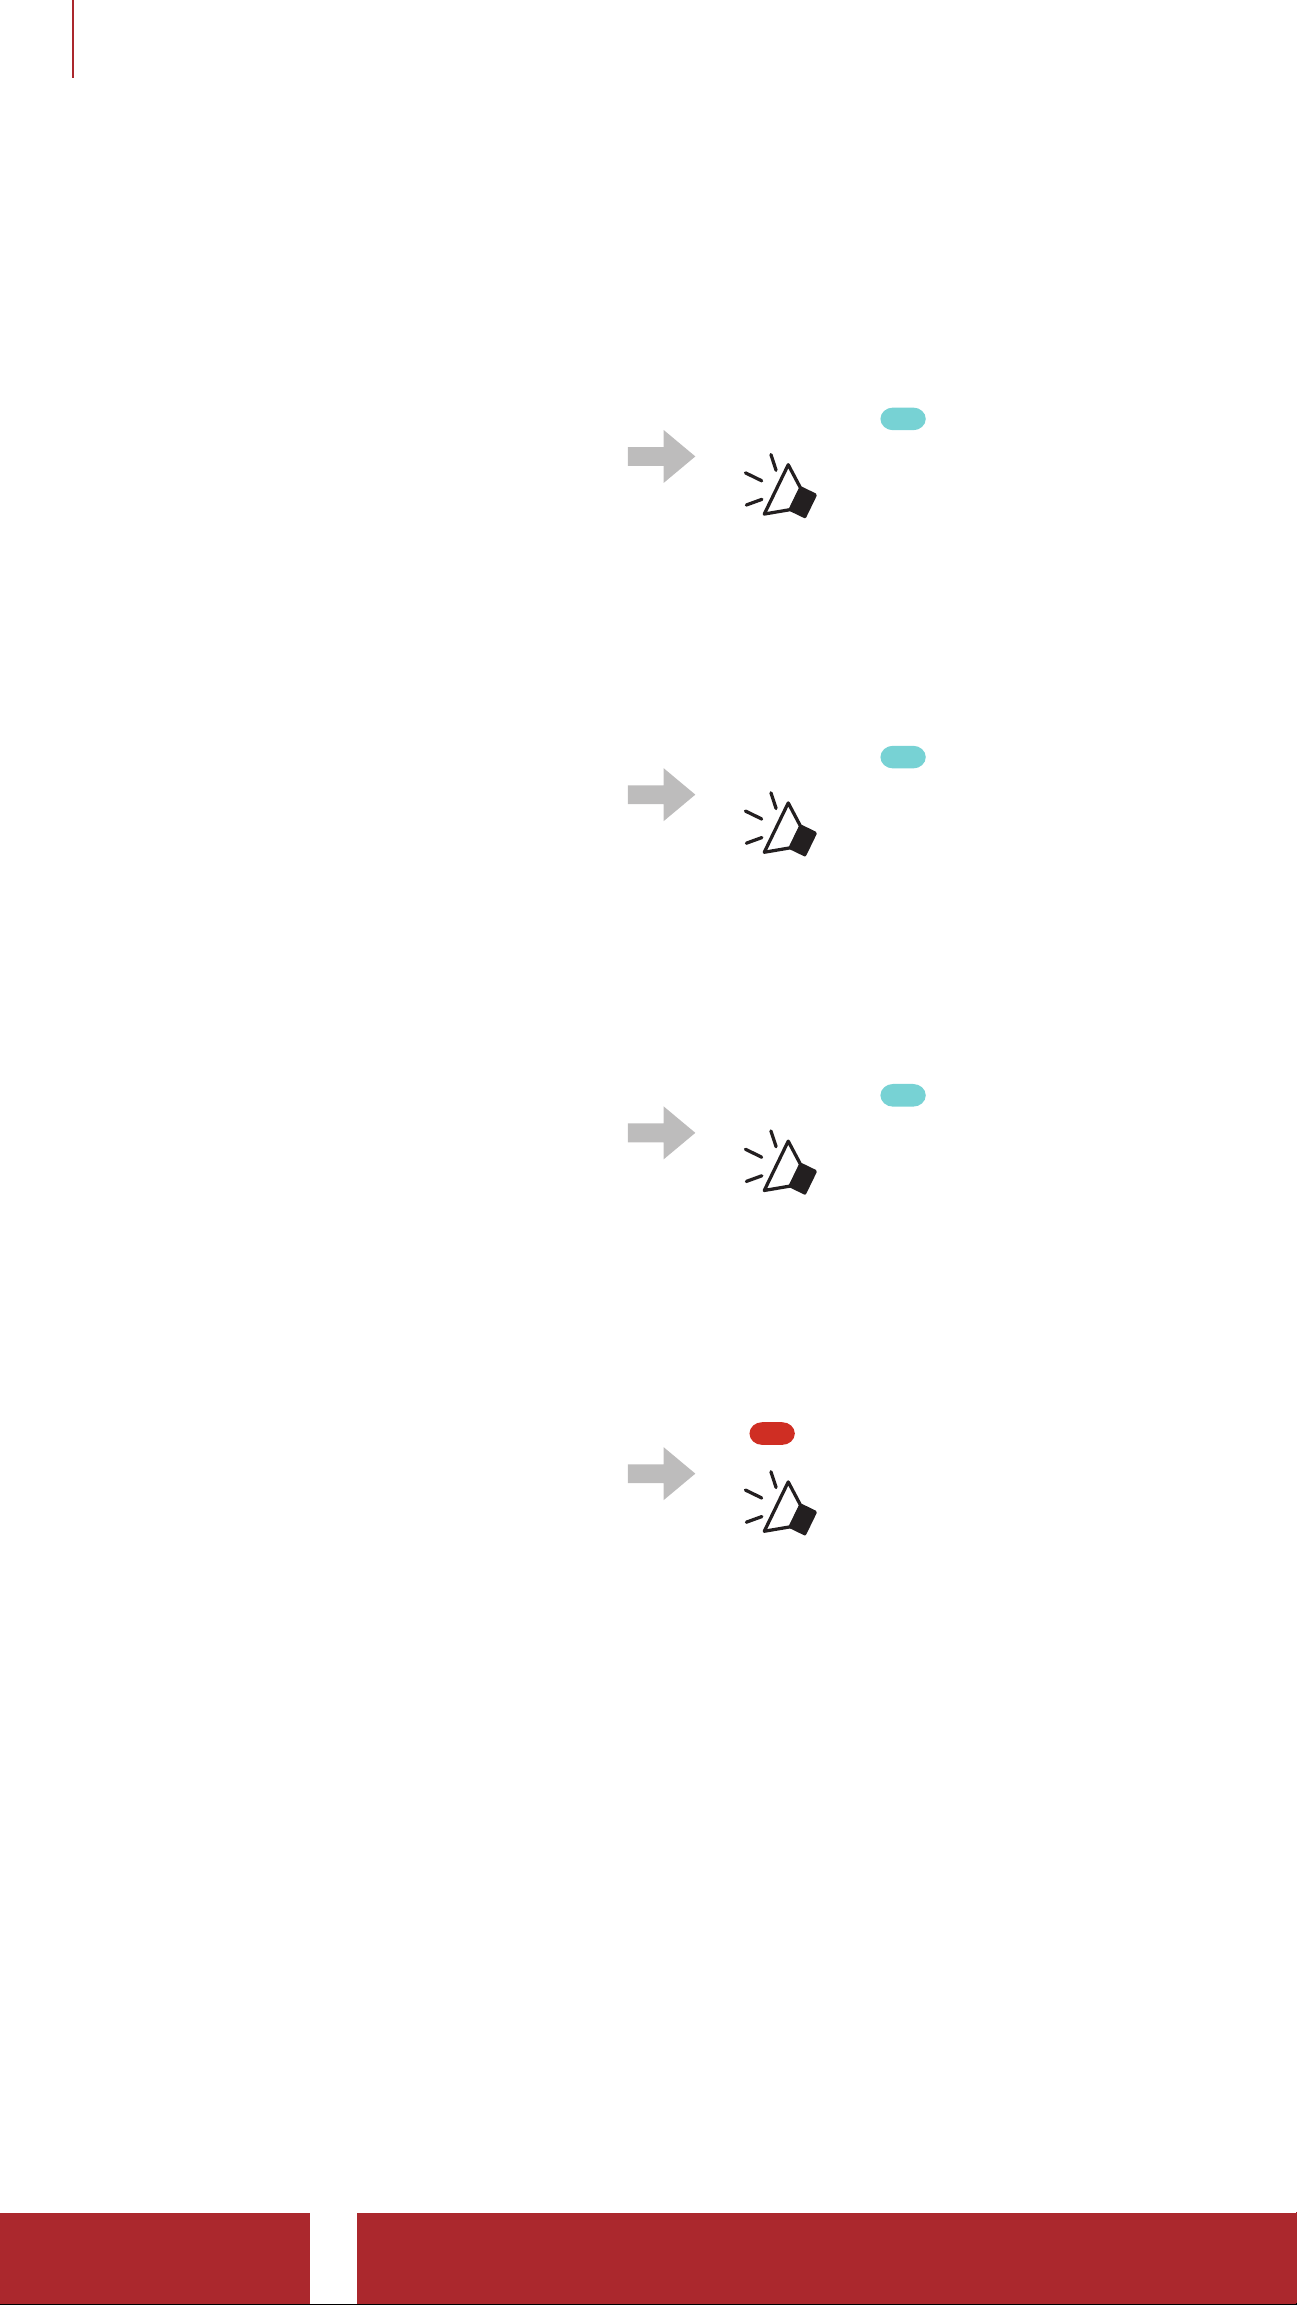
15 TROUBLESHOOTING
15.3 The Camera’s Warning
15.3.1 Memory is Full
When the memory is full
→
Please format the SD card.
Blinking
“Memory is full”
15.3.2 No microSD Card
If no microSD card is inserted in the
microSD card slot
→
Please insert the microSD card before use.
15.3.3 MicroSD Card Error
If an error occurs on the microSD
card
→
Please check the microSD card.
Blinking
“No SD card”
Blinking
“SD card error”
15.3.4 High Temperature
If the camera system becomes too
hot
→
Cool down the camera before further use.
“ High temperature
problem”
50C Motorcycle Camera & Communication System with Mesh Intercom™
| 72
Page 73

Copyright © 2022 Sena Technologies, Inc.
All rights reserved.
© 1998–2022 Sena Technologies, Inc. All rights reserved.
Sena Technologies, Inc. reserves the right to make any changes
and improvements to its product without providing prior notice.
Sena™ is a trademark of Sena Technologies, Inc. or its
subsidiaries in the USA and other countries. SF1™, SF2™, SF4™,
SFR™, SRL™, Momentum™, Momentum INC™, Momentum
Lite™, Momentum Pro™, Momentum INC Pro™, Momentum
EVO™, Cavalry™, Latitude SR™, Latitude SX™, Latitude S1™,
30K™, 33i™, 50S™, 50R™, 50C™, 5S™, 20S EVO™, 20S™,
10S™, 10C™, 10C PRO™, ProRide EVO™, 10C EVO™, 10U™,
10Upad™, 10R™, ACS10™, C1™, 3S™, 3S PLUS™, SMH5™,
SMH5-FM™, SMH5 MultiCom™, SMH10™, SMH10R™,
SPH10™, SPH10H-FM™, Savage™, Prism Tube WiFi™, Prism™,
Bluetooth Audio Pack for GoPro
®
, Impulse™, R1™, R1 EVO™, R1
EVO CS™, R2™, R2 EVO™, R2X™, M1™, M1 EVO™, RUMBA™,
RC1™, RC3™, RC4™, Stryker™, Handlebar Remote™, Wristband
Remote™, PowerPro Mount™, Powerbank™, FreeWire™,
WiFi Docking Station™, WiFi Sync Cable™, WiFi Adapter™,
+mesh™, +Mesh Universal™, MeshPort Blue™, MeshPort
Red™, MeshPort Black™, Econo™, OUTRUSH™, OUTRUSH
R™, OUTSTAR™, OUTSTAR S™, OUTFORCE™, OUTRIDE™,
EcoCom™, Parani A10™, Parani A20™, Parani M10™, pi™,
Snowtalk™, Snowtalk2™, SR10™, SR10i™, SM10™, SPIDER
RT1™, SPIDER ST1™, X1™, X1 Pro™, X1S™, Expand™, Expand
Boom™, Bluetooth Mic & Intercom™, Tufftalk™, Tufftalk Lite™,
Tufftalk M™ are trademarks of Sena Technologies, Inc. or its
subsidiaries. These trademarks may not be used without the
express permission of Sena.
GoPro
®
is a registered trademark of Woodman Labs of San
Mateo, California. Sena Technologies, Inc. (“Sena”) is not
affiliated with Woodman Labs, Inc. The Sena Bluetooth Pack
for GoPro® is an aftermarket accessory specially designed and
manufactured by Sena Technologies, Inc. for the GoPro® Hero3
and Hero4 allowing for Bluetooth capabilities.
The Bluetooth
®
word mark and logos are owned by the Bluetooth
SIG, Inc. and any use of such marks by Sena is under license.
iPhone® and iPod® touch are registered trademarks of Apple Inc.
Address: 152 Technology Drive Irvine, CA 92618
50C Motorcycle Camera & Communication System with Mesh Intercom™
| 73
 Loading...