

Page 1

m
SSH-8BLD-25
High
Lockstitch
For
Speed,
Heavy
Vertical
Needle,
Reverse
Single Needle,
Machine
Weight
Rotary
Large
Upper & Lower
Feed,
Operator's Guide
25
Material,
Hook,
inch
Feed,
Long
Arm
Page 2
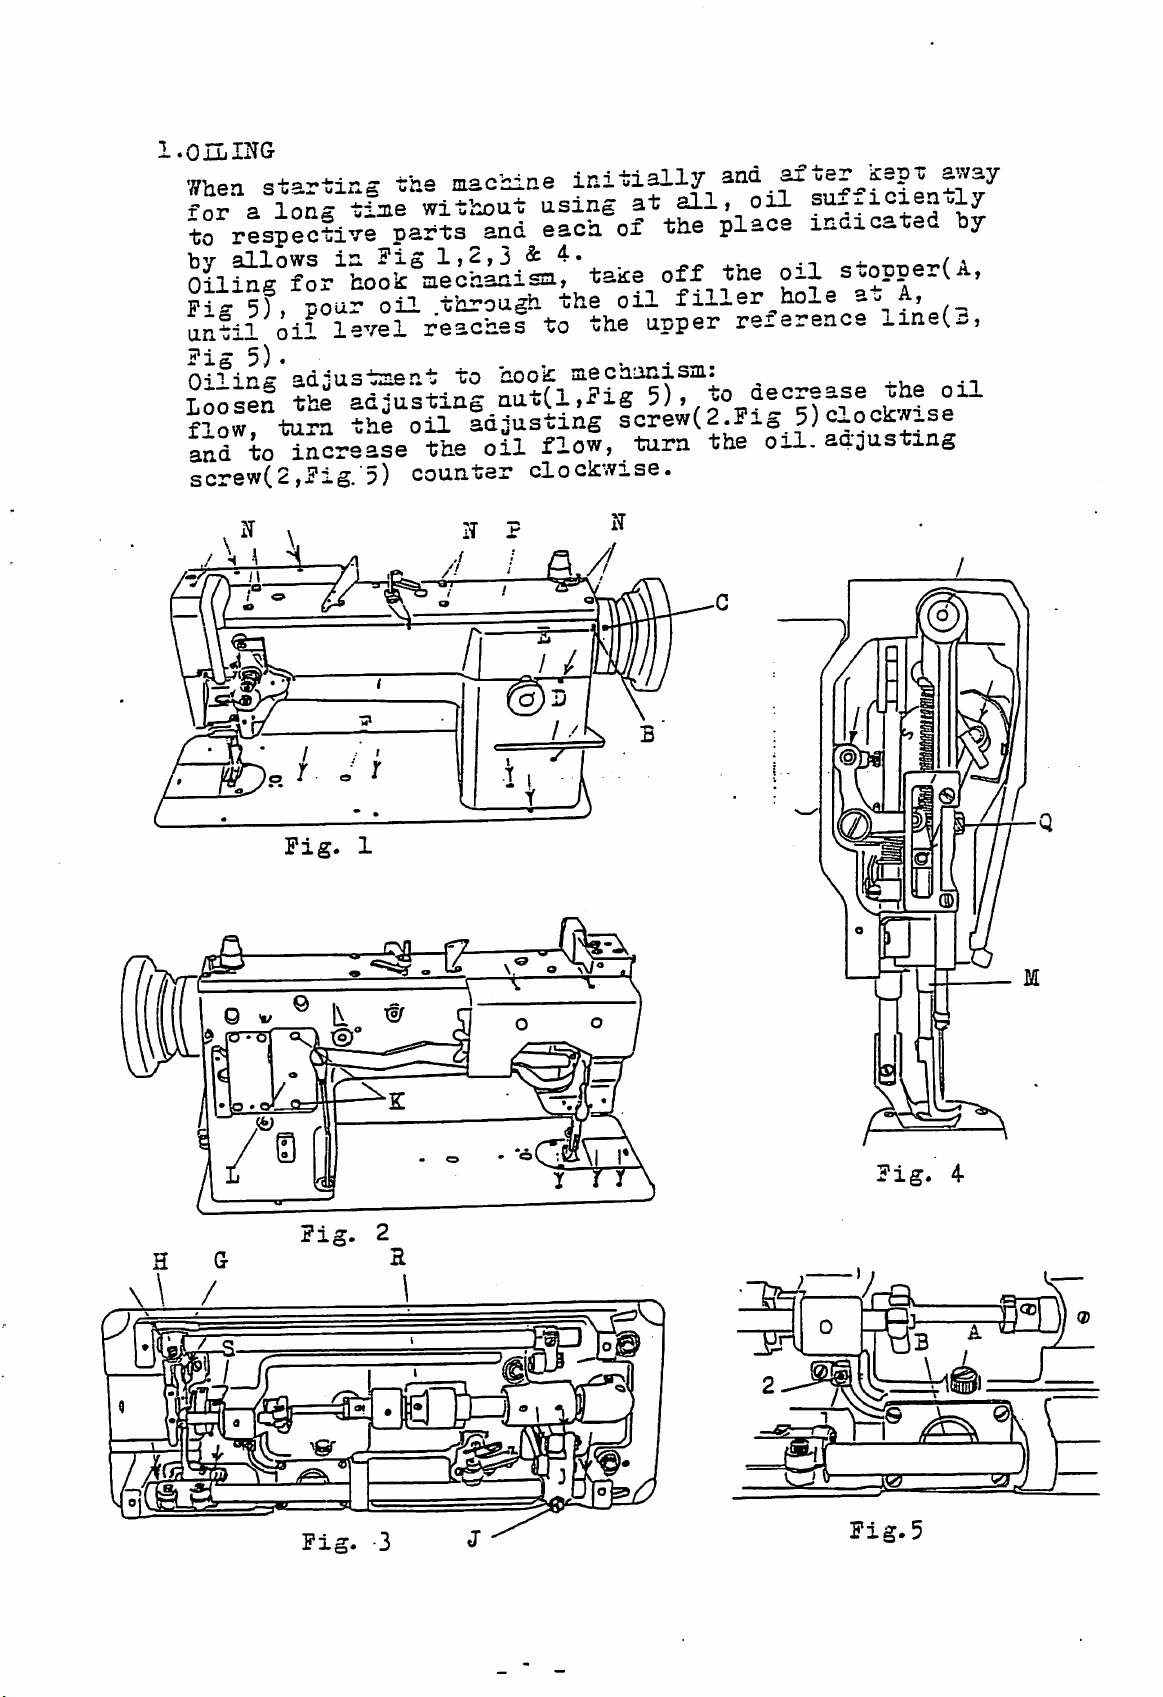
1.OILING
Wbea
•for
s-tartixag
a long
time
^rrtspeotive
by allows
Fig
5) .
0-iTirs
l™..;
screw(2,Fig.
in
adiustzieni:
ts:
fas
machine
without using
parts^and
Fig
1,2,3
to
<l»'o5l
5)
counter
IT ?
each
& 4.
hook:
mechanism:
flow,
clockivvise.
of
N
at
the
aim
all,
«»
oil
place
suj-^icienul/
inaicated
oU. oOSttotuig
by
-t
cri-5
Fig.
1
Fig.
4
Fig.
5
Page 3
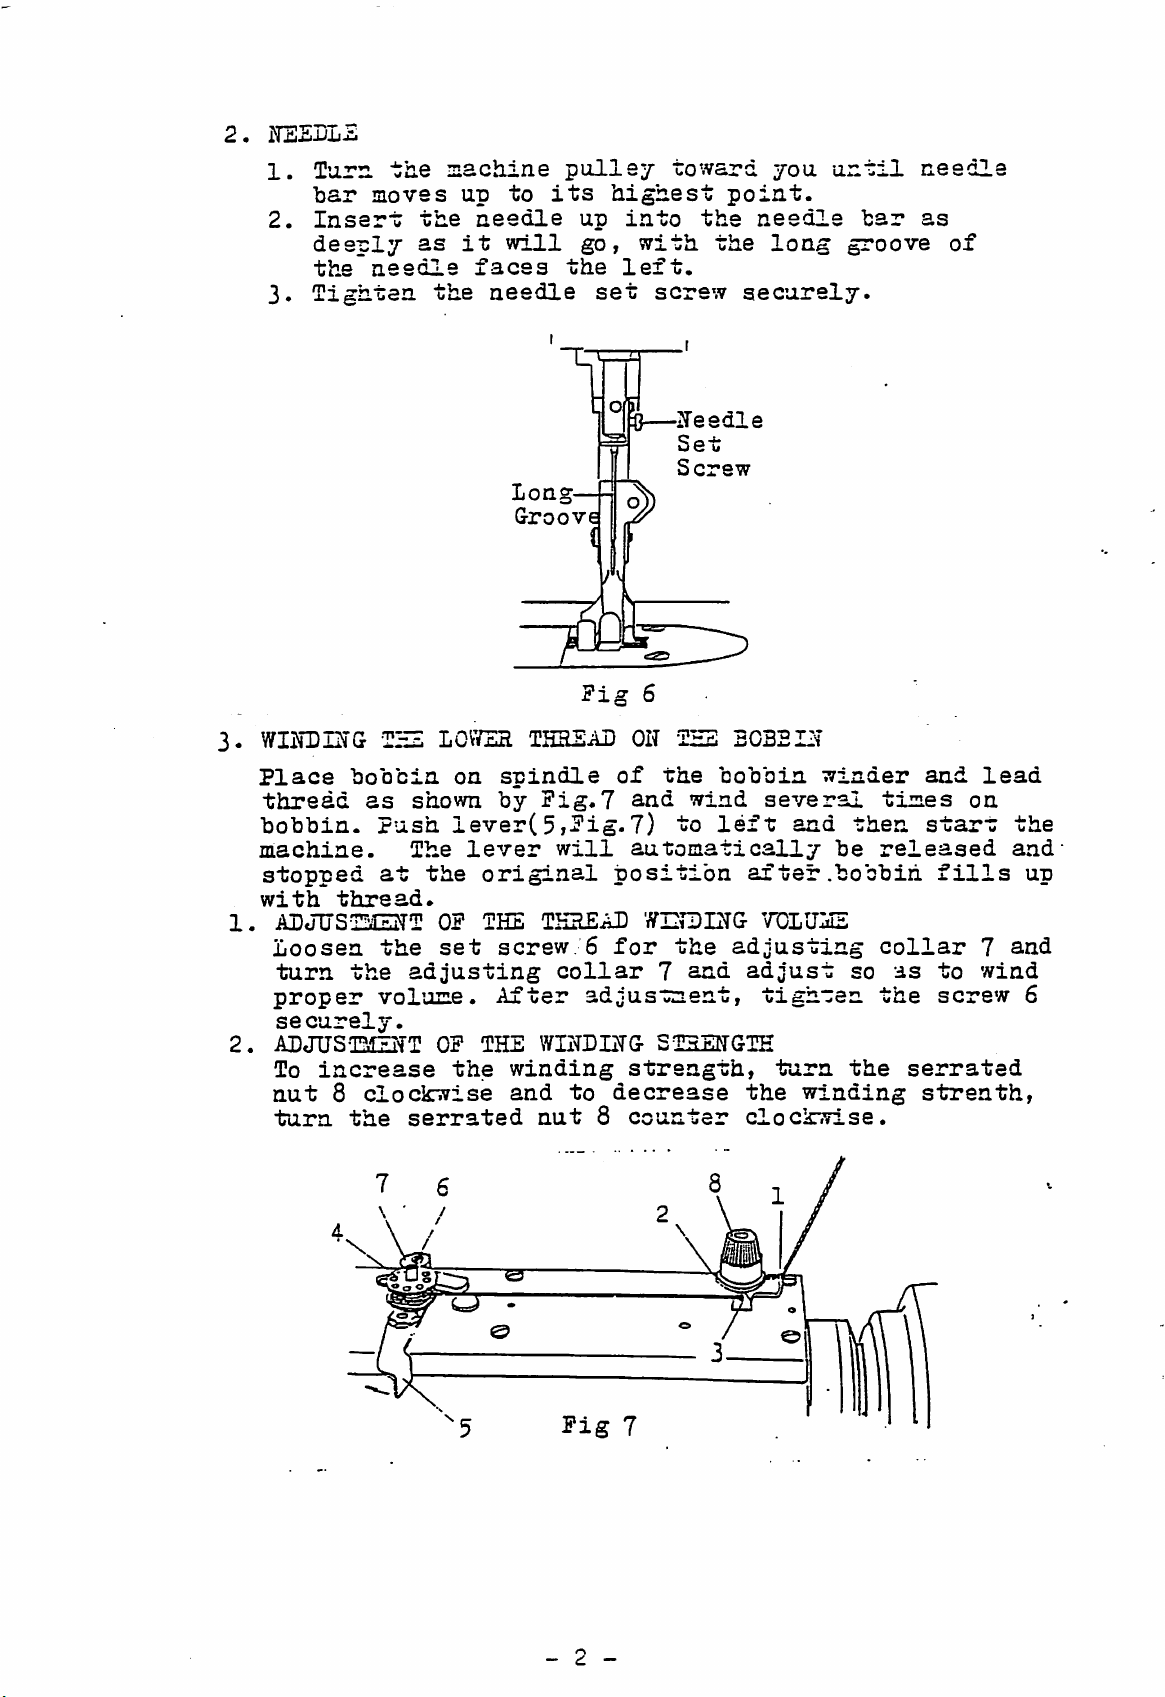
2.
ITSSI)I5
1.
Turn,
bar
2.
Insert
deeply
the"needle
3.
Tighten
the
moves
the
as
machine
up
needle
it
faces
the
to
will
needle
pull07
its
up
go,
the
highest
into
left.
set
o
toward
with
screw
—ITeedle
Set
Screw
point.
the
the
you
needle
long
securely.
until
bar
groove
needle
as
of
3.
WIlfDESG THi:
Place
thread
bobbin.
machine.
bobbin
as
Push
stopped
with
1.
ADJUSTMZJTT OP THE THHEAD
thread.
Loosen
turn
proper
se
the
volume.
cu''^ely.
2. ADJUS-l^fT
To
increase
nut
turn
8
cloclcwise
the
shown
The
at
the
the
adjusting
serrated
LOVTEH
on
lever(
lever
original
set
After
OP
THE
thje
Groove
r
THaSlH
spindle
by
Pig.7
5i^'ig.7)
will
screw.6
collar
WIOTIHG
winding
and
nut
^
'\f
ON
of
the
and
automatically
position
"ffHrDIHG
for
7
adjustment,
STHEHGTH
strength,
to
decrease
8
counter
'THE
wind
to
the
and
bobbin
several
left
and
after.bobbin
TDLULIE
adjusting
adjust
tighten
turn
the
clockwise.
winder
then
be
so
the
winding
and
times
start
released
fills
collar
as
to
the
screw
serrated
strenth,
lead
on
7
wind
the
and
up
and
6
rig
-
7
d.
—
Page 4
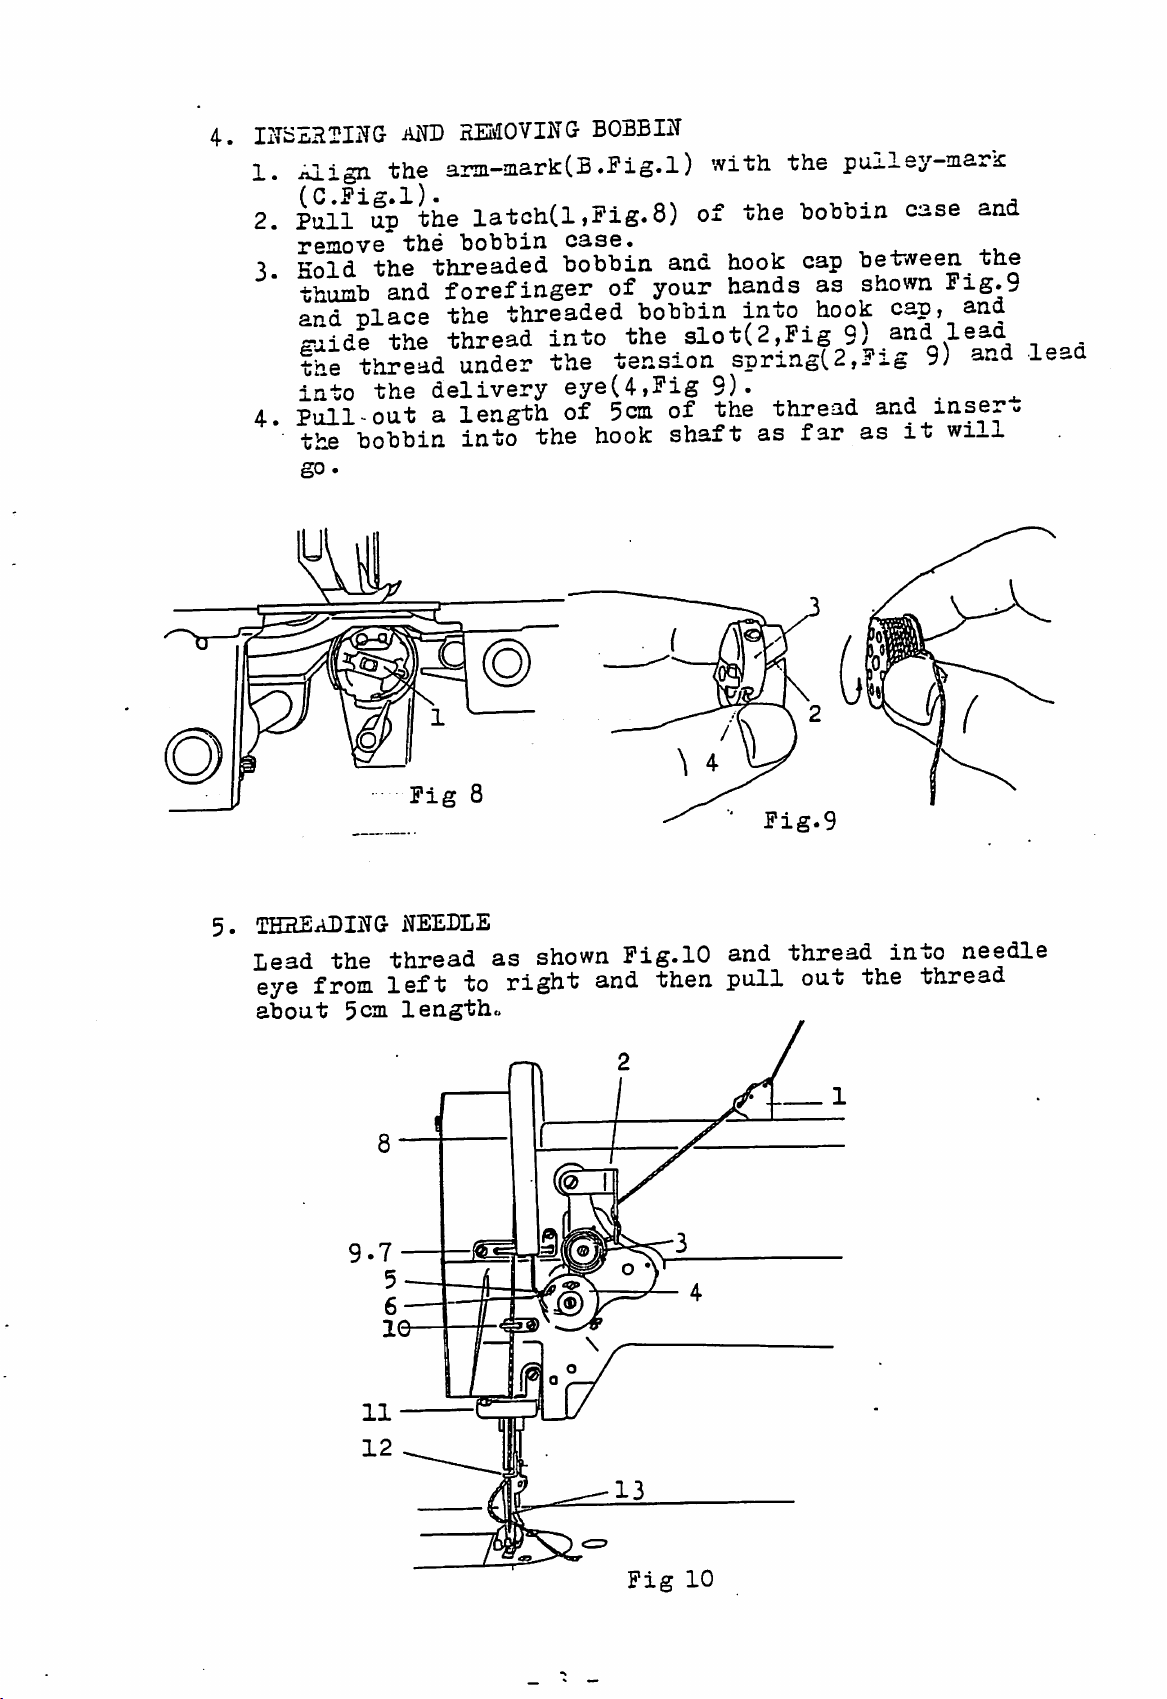
IITiZHTIilTG
4.
1.
2.
3-
4.
MD
^ign
(C.Pig.l).
Pull
remove
Hold
thumb
and
guide
the
up
the
and
place the threaded bobbin into
the
HEMOVIKG
arm-mark:(B
the
latch(l,Pig.8)
the
bobbin
threaded
forefinger
thread
BOBBIIT
_ _
.Pig.l)
,
case.
bobbin
of
into
and hook cap between
your hands as
the
slot(2,Pig
trie thread under the tension
into
Pull-out
the bobbin
go.
the
delivery
a
length
into
eye(4,Pig9).
of
5cm
the
hook
of
shaft
with
of
the
the
bobbin
hook
spring(2,?ig
the
thread
as
far
puiley-mark
case
shown
9)
-i'
cap.
and
PiS'9
1
lead
9)
and
and
...
and
inser.
as
it
will
and
the
lead
5.
Lead
thrsabiitg
the
eye
from
about
5cm
9.7
needle
thread
left
lengtho
to
as
right
fi
shown
Fig.lO
and
then
Pig.9
and
pull
thread
into
out the thread
needle
Pig
10
Page 5

6-
RSGULATIiS'G THHRAD
TSRiSIONS
7.
EEGOLATIIf(J
To
adjust
on
and
tension.
tension
turn
g|gaiG3ig3tfais—
PERFECT
TIGHT
TENSION
LOOSE
TENSION
TENSION
tension,
device
it(l,Figl2)
STITCHING
Fig
clockr.vise
OF
OF
NEEDLE
material
BOBBIN
NEEDLE
NEEDLE
THREAD
THREAD
THREAD
THREAD
11
0?
THE
UPPER
turn
the
counter-clockwise
(NEEDLE)
serrated
to
increase
THREAD
nut(l,Figl2)
tension
to
decrease
8.
regulating
The
lower
(l,Pig
the
thread
will
decrease
13).
TENisION
thread
Turning
tension,
it.
Fig
OF
tension
this
while
Fig
12
LOWER(BOBBIN)
is
controlled
screw
turning
1
13
clockwise
it
counter-clockwise
THREAD
by
the
will
screw
increase
- A -
Page 6

9.
ADJUSTMENT
Of
THE
THREAD
CONTROLLER.SPRING
Normally,
should
needle
pause
the
1
FOR
Loosen
(3»Fig
(For
s c r s w
2
TO
Loosen
(5,
Turn
lighten
turn
Tighten
adjustment.
hold
reaches
while
upper
MORE
the
14)to
less
AD^ST
the
Fig
the
it
the
thread
CONTROLLER
action,
THE
thread
slack:
to
raising
stop
screw(2,Fig
the
TENSION
serrated
of
the
of
through
ACTION
right
move
nut(4,
14).
tension
the
tension(to
stud(6.
counter-dockv/ise)
the
screw
and
controller
the
upper
materials,
the
needle
the
ON
for
more
it
to
OF
THE
Pig
Fig
strengthen
with
nut
upon
spring(l,Pig
thread
and
and
bobbin
THE
14),
THREAD:
move
action.
left).
SPRING:
14)
14)clockwise
and
the
screw
completion
until
it
should
passing
case.
the
Tighten
the
tension,
driver.
14)
the
of
stop
the
screw
to
of
10.
ADJUSTIVIENT
The
pressure
the
screw
To
increase
and
turn
OP
THE
of
in
the
the
it
counter-clockwise
PRESSURE
the
presser
hole(A,
pressure,
Pig
turn
ON
feet
15)
Fig
THE
the
to
14
MATERIAL
is
adjusted
with
screw
decrease
screw
clockwise
by
driver,
it.
Fig
15
- 5 -
Page 7

11.
REYEHSE
To
reverse
as
far
bTITCHING
stitching,
as
it
will.go.
press
down
the
lever(D,Pig
1)
12.
13.
adjustment
Turn
by
then
the
stitch
pressing
set
the:desired
ADJUSTMENT
FEET
Loosen
and
the
foot.
the
stud
feeding
Tighten
assembly
op
stitch
down
OP
THE
wing
presser
wing
length
the
LIPT
nut(l.
along
foot
nut
length
adjustable
lever(D,Pig
dial
OP
Pig.
the
and
upon
number
THE
16)
slot
push
completion
dial(E,Pig
1)
slightly,
just
ALTERNATING
and
-
Pig
16
move
move
down
above.
up
to
of
l),
PRESSER
the
link
to
lower
adjustment.
and
raise
this
14.
HOW
The
a
safety
If
clutch,
1.
2.
3.
4.
TO
RE-SET
sewing
clutch.
it
should
the
Depress
the
machine
a
safety
Hold
turning
make
the
an
then,
(3,
Pig
To
increase
(4,
Pig
stop
After
screw(4.
button(P,
turning
clutch
THE
hook
the
and
become
following
button(P,
and
clutch
clutch(Left,l,Pig
the
machine
half
stop
17)
17)
rotation
screw(4,Pig
of
the
clockwise
Pig
completion
Pig
1)
the
machine
mechanism
SaPETY
its
necessary
adjustments
turning
will
the
clutch(Left,l,
spring
17)
of
in
will
CLUTCH MECHiiNISM
mechanism
Pig
the
be
disengaged.
pulley
of
the
17)
tension,
and
1)
17)
to
are
to
re-engage
are
in
the
machine
by
by
your
clutch(Right,2,Pig
is
visible
turn
decrease
counter-clockwise.
the
adjustment,
the
bed
pulley
normally
plate
by
your
be
protected
the
req^uired.
bed
pulley
your
hand
plate
finger,
so
in
Pig
17).
the
it,
depress
of
the
hand,
re-engaged.
by
safety
of
stron^y,
"as
to
the
hole
stop
screw
turn
the
machine,
a
safety
17),
the
Pig
- 6 -
17
Page 8

15.
ADJUSTMZiJT
OP
THE
HEIGHT
OF
TRti
FEED
DOG
The maxinuiii
surface
To
adjust
Turn
needle
Loosen
adjust
or
lowering
Securely
of
adjustment.
the
of
machine
to
the
the
tighten
K
height
the
this
its
hell
height
the
needle
height:
lowest
crank
hell
VISMUVH-
of
pulley
of
the
the
feed
plate
so
point.
screw(G.
the
feeder
crank(H,
screw
1mm
is
as
upon
dog
from
normally
to
lower
Fig
Fig
hy
3)
raising
3).
completion
Fig
18
the
1mm.
the
and
16.
RELATIVE
PLATE
1.
Set
2.
Turn
feed
3*
Loosen
4.
Adjust
needle
hole
5.
Securely
POSITION
the
stitch
the
machine
dog
to
the
to
plate
on
the
tighten
its
screw(J.
he
32.1mm
to
feed
OF THE FEEDER TO THE NEEDLE
length
pulley
highest
the
dog.
the
32.1mii
to
Fig
from
center
screw.
minimum.
so
as
point.
3).
the
of
Fig
to
edge
the
19
raise
of
needle
the
the
- 7 -
Page 9

17.
THE
POSITION
HOLE OP THE PEEDER
1.
Loosen
cover(L,
2.
Loosen
3.
Holding
frameCM,
needle
on
the
Pi g
20).
4. Tighten
cover{L,
the
Pig
the
the
Pig
to
feed
the
Pig
OP
THE
screw(K,
^)•
screw(l,
hottom
4) move
the
dog and
screw(K,
2).
•s
NEEDLE
center
Pig
Pig
of
the
it
of
tighten
Pig
AIO
THE
NEEDLE
4) and remove
^
20;.
needle
so
as
the
needle
the
2) and
bar
to
put
screw(l,
close
hole
the
rock
the
the
18.
TIMING
It
on
is
mainted
When
reaches
dog
When
THE
is
important
its
downward
the
scarf
the
must
start.
adjustment
procedure to
21):
1.
Loosen
top cover(P,
2.
Normally
the
the
3. Turn
Imm
reverse
"turn,
both
the
camC3,
arm
the
up
from
the
the
NEEDLE
that
stroke
at
all
of
top
surface
is
change
screw(N,
Pig
put
shaft.
machine
stitching
Pig
its
cam(
needle
the
3,
WITH PEED
the
timing
and
times.
the
needle
of
required,
the
position-of
Pig
1).
reference
21) on
pulley
lowest
leverXD,
Pig
and_the
the
point
21)
Pig
DOG
the
the
1)
to
and
feeder
20
between
feed
on
the
feed
use
and
the
remove
line(2,
7
ditch(l,
place
and moving
Pig
1)
set
rest.
the
dog
movement
downward
dog,
following
the
cam(3,
Pig
Pig
the
needle
up
and
this
at
the
the
« \
21;
needle
_
stroke
feed
arm
or
21)
the
down,
the
?ig
x-
of
at
point
B
Pig
- 8 -
21
Page 10

19.
ADJUSTMENT
CONNECTION
OP
AND
THE
PEED
CLEAEANCE
PORK
COLLAR
BETWEEN
PEED
POfiKED
20.
1.
2.
Incorrect
of
feed
Pig
21)
overheating,
To
adjust
1.
To
increase
(6,
clockwise.
To
decrease
(7>
counter-clockwise.
2.
This
the
clearance.
TIMING
Set
the
pulley
about
should
At
hook
2mm
this
point
be'2.4mm,
point
to
If
and
0.1mm.
the
loosen
Turn
the
set
hook.
To
and
Pig
as
Please
the
Therefore,
adjustment.
the
center
screws
adjust
the
3) and. move
may
V
clearance
forked
will
this;
Pig
21)
Pig
machine
between
toward
be
ditch
21)
adjustment
stitch
from
at
time,
and
further
the
sewing
the
three
hook
of
and
the
needle
require.
note
keep
between
connection
bring
etc.
and
and
the
the
irregular
clearance,
turn
clearance,
turn
the
the
should
pulley
THE HOOK AND THE
length
you
and
its
the
center
normally,
upper
the
needle
hook
set
shaft
the
toward
to
when
lowest
of
the
end
clearance
hollow.should
should
screw(R,
to
align
needle.
re-check
clearance
hollow,
the
one
of
of
hook
the
Re-tighten
hook
the
shaft.
screw
loosen
two
the
the
and
stitch
loosen
screw(7,
loosen
screw(6.
be
done
you
minimum,
the
point,
needle.
measurement
of
the
not
the
Re-tighten
the
timing
between
to
the
screws
on
V
screws.
fork(4,
feed
to
NEEDLE
needle
the
needle
between
be
Pig
the
the
right
ditch
fork
length
with
get
turn
be
timed
3).
hook
of
two
is
Pig
the
Pig
the
Pig
turning
correct
the
bar
hook
between
eye
the
about
correctly,
point
the
the
hook
screws(S,
or
placed
during
21)
collar(5>
or
screw
21)
screw
21)
machine
raises
point
should
hook,
0.05
with
three
sewing
point
to
left
on
2.4mm
2mm
Pig
o
22
- S -
0.05-0.1mm
Pig
23
Page 11

21.
ABJUSTfiEEIi'I?OfBOBBIN
The
bobbin case opener
of the needle thread loop by
the bobbin case holder
movement of same. This
instant
opens
a clearance
on the bobbin case holder
retainer permitting the
(iT'^wn
1.
CLiAHifflCE
HOOE
1,
2
3. Tighten the screw(l,
2
POSITION
Place the
by "S" on V
3.
ADJUSTMENT
1.
2.
easilv
Loosen
Adlust
and
the opener by
releasing
or to the
clearance
shown
Turn
fig
the
through
BErffEEN
the
screw(l,
the
clearance
shaft
left
between
26 , „ o^n n
Of
TTTE
opener
one
of screw(3,
ditch
Of
OPERATION:
machine
THE
bushing(2,
as
of the
the pfoj'ection of
its
travel.
Press
make
the
the
opener to
right
side
on the bobbin case holder(6,
of
the
hook
retainer(5»
CASE
facilitates
creating
movement
the
OPENEH
,,
r,- ^
Pig
means
may
the
CAM:
pulley
hook:(4,-
the
clear^ce
OPENjiH
the
passage
slightly
a slighu
nudging
rotating
at
gap
and
needle
gap
•
AHE
2A>
between
between
the tab of the
thread
FHOJECTIOH
• . „
projection
notch
loop
of +
J?ig
be required.
two
parts
fig
24)
fig
hook:
until
24)
is
securely.
24)
which
shaft.
the
to the
The
standard
O.omm
is indicated
opener
fig.25) .extremely
« ^
projection
between
Fig
fig
25)
of hook and
25)
and
0.2mm
as
,
to
be
OP
ox
hooK
as
,
presses
on
the tao
shown
I'ig
3
24
This
screwCT,
adiustment
fig
can be done by
25).
Pig
0,2mm
25
loosening
0.8mm
Pig
the
26
-
10
-
Page 12

22.
TIMING
OF
THE
VIBHaTING
PllESSER
FOOT
This
pulley
foot,
the
feeder
to,
and
presoer
needle
To
adjust
and
adjust the rotating position of the
27)
and
tighten
is
the
normal
toward you,
the
vibrating
ealier
when
foot
point
this,
faster
the
timing
after
presoer
than the needle
the needle
should
has
leave
loft
loosen the
or
slower as
screws.
when
lowering the
foot
raines,
the
feeder
the
feeder.
two
may
turn
the
machine
presoer
should
point
tlie
reach
comes
vibrating
afber
the
sorews(l, Fig 2?)
carar2,
be
desired,
Fig
27
-
11
-
Page 13

SEIKO
Head
Office
Show
4
Osaka
Room
Branch
SEWING
:11-3,
Imado1-chome,
Telex:
2657148
:21-7,
:5-10,
Asakusa
Terada-cho
1-chome,
-i_-
MACHINE
Taito-ku,
SEIKOJTelefax:
2-chome,
n
Tokyo
Taito-ku,
TennojI-ku,
111,
Japan.
03-873-6596
Tokyo
111,
Osaka
OeaUa
CO.,
Cable:
Japan.
543,
Tel:
03-872-6173-4
SEIKOSEWMCO
Tel:
Japan.
JSDSn.
LTD.
03-872-6493
Tel:
06-779-7578
Tfil?
06-779-V578
(Export
TOKYO
Dept.)
 Loading...