

Page 1

Page 2
50
51
How to set the calendar …………………………………………………… 68
How to use the 24-hour hand …………………………………………… 71
■TIME DIFFERENCE ADJUSTMENT FUNCTION ………………… 72
How to use the time dierence adjustment function …………………… 72
List of time zone dierences in major regions of the world ………… 76
■CHRONOGRAPH ………………………………………………………… 78
How to use the chronograph (stopwatch) ………………………………… 80
Accumulated elapsed time measurement ………………………………… 82
■SPECIFICATIONS ……………………………………………………… 85
■REMARKS ON AFTER-SALES SERVICING ……………………… 86
■REMARKS ON REPLACEMENT PARTS …………………………… 87
■TO PRESERVE THE QUALITY OF YOUR WATCH ……………… 88
■TROUBLESHOOTING …………………………………………………… 96
CONTENTS
■CHARACTERISTICS …………………………………………………… 53
■NAMES OF THE PARTS AND THEIR FUNCTION ………………… 54
■SCREW LOCK TYPE CROWN AND BUTTON ……………………… 56
How to use the screw lock type crown …………………………………… 57
How to use the screw lock type button …………………………………… 59
■HOW TO WIND THE MAINSPRING …………………………………… 60
Guide for winding state of the mainspring ……………………………… 60
How to manually wind the mainspring by turning the crown …………… 61
■POWER RESERVE INDICATOR ……………………………………… 62
How to read the power reserve indicator ………………………………… 63
■HOW TO SET THE TIME AND CALENDAR ………………………… 64
How to set the time ………………………………………………………… 64
Tips for more accurate time setting ……………………………………… 67
52
53
■CHARACTERISTICS
Spring Drive, the unique mechanism made available only by SEI KO technology, ensure s
quartz accuracy while using the mainspring as its sole power source.
With Spri ng Drive as its basic st ru cture , t he Spring Drive Ch ronog raph features t he
world's rst center chronograph second hand which works in a per fectly smooth movement.
In addition to the self-winding mechanism, which use s the natural motion of the wearer's
arm as a power sou rce to wind its mainspring, the watch is equipped with the manual winding mechanism, which is convenient to wind the mainspring when you start using the watch.
The watch keeps working for approximately 72 hours (three days) when the mainspring is
fully wound.
The watch features the power reserve indicator to show the winding state of the mainspring.
The glide-motion small second hand that moves in a perfectly smooth movement is one of the
remarkable features of this watch.
The watch is also equipped with a 24-hour hand, oering a time dierence adjustment function, which works in conjunction with the calendar.
Spring Dr ive works by t he power provide d by the mainspring. Remember to check t he power reserve indicator a nd keep th e mainspring of the watch sucient ly wound while using the watch.
Refer to "POWER RE SERVE I NDICATOR" o n page 62 .
You are now the proud owner of a Grand Seiko watch.
Grand Seiko watches are designed and manufactured to operate with extremely high accuracy by taking advantage of
SEIKO's more than 100 years of experience in watchmaking
and the advanced technology that SEIKO can boast to the
world.
To preserve the highest quality of your Grand Seiko watch,
please read the instructions in this booklet carefully for its
proper use and care, and keep this booklet for ready reference.
※ For the details of the Spr ing Drive mechan ism, refer to the se parate volume "Spr ing Dr ive Handb ook".
CAUTION
Page 3
54
55
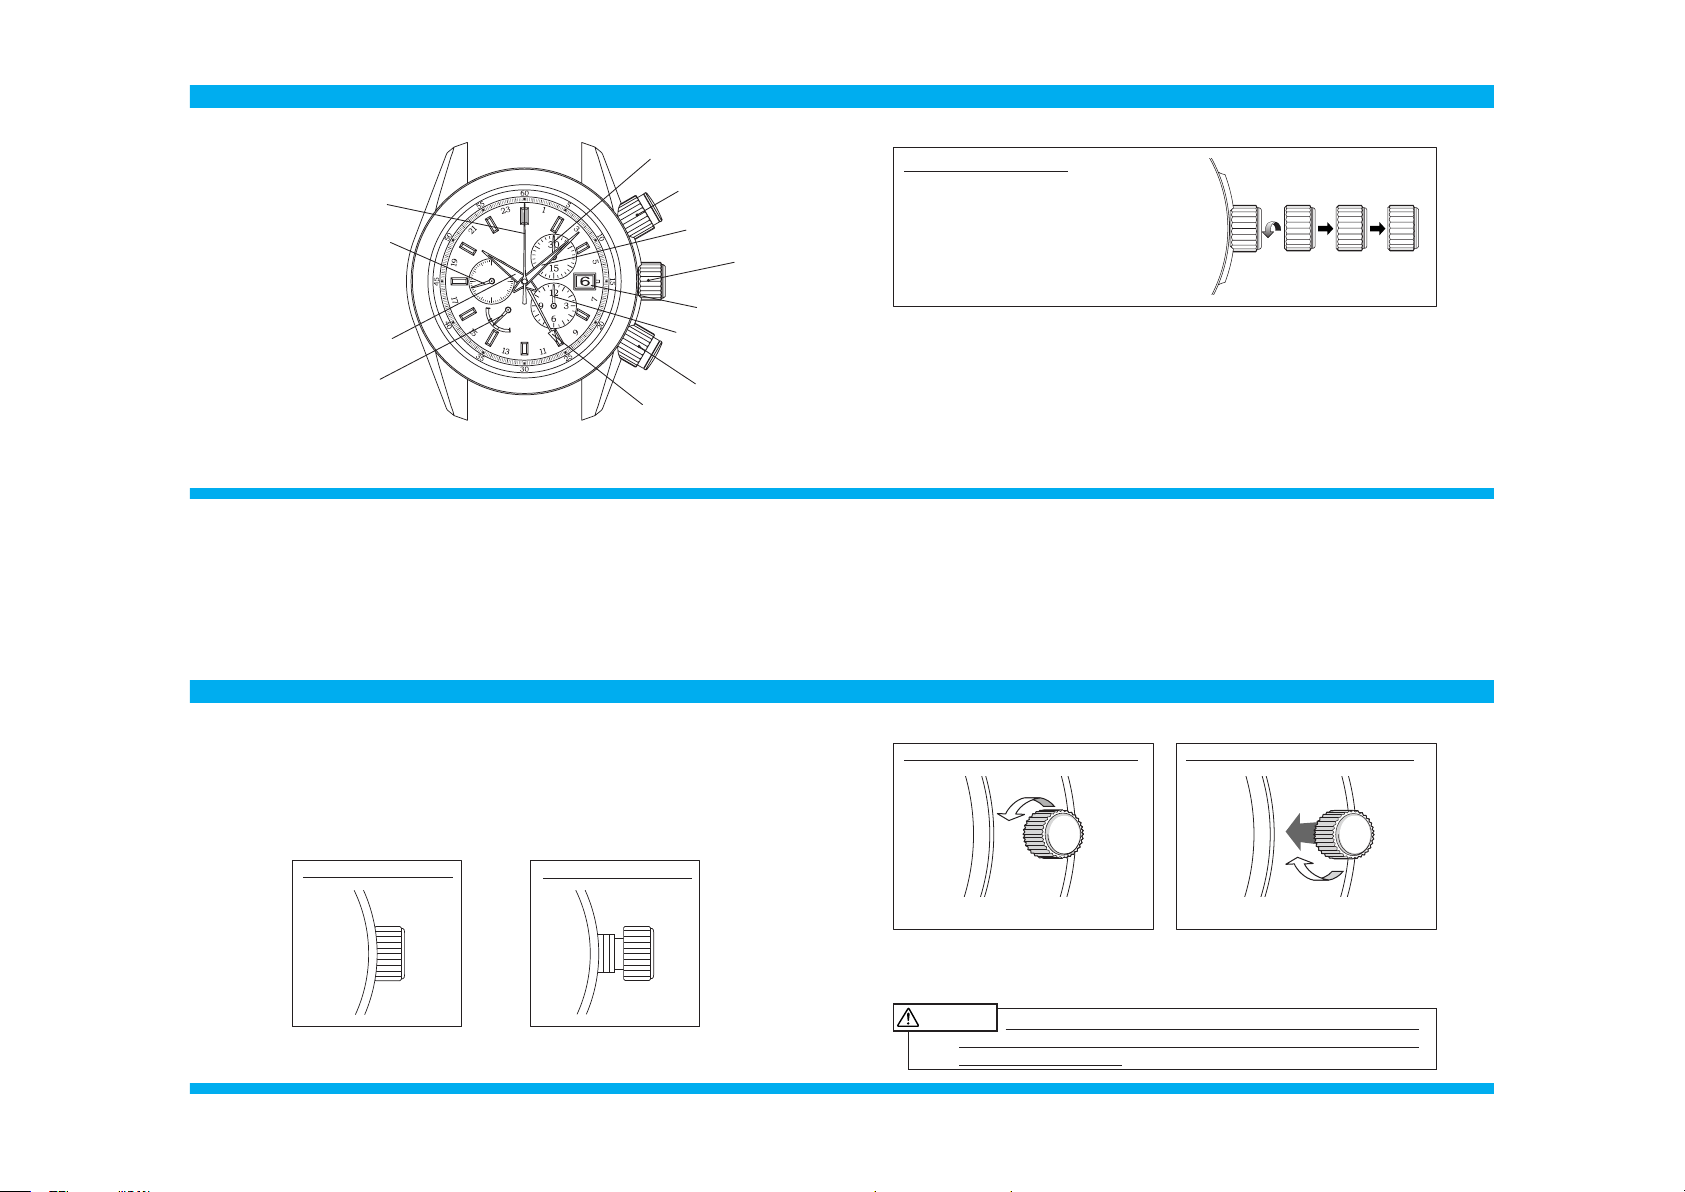
■NAMES OF THE PARTS AND THEIR FUNCTION
※ The orientation a nd design of the display may vary depending on the model.
※ Some models may have screw lock ty pe crown and button(s).
Refer to "SCREW LOCK TYPE CROWN AND BUT TON" on page 56.
●The mechanism of the crown
●Basic mechanism
Hour hand
Center chronog raph
second hand
Calendar
Crown
Small second hand
Power reserve
indicator
Chronograph
hour hand
Chronograph
minute ha nd
START/STOP
button
RESET
button
Minute hand
24-hour hand
Screw lock type crown
Before operating the screw lock type crown, it is necessary to unlock it.
In order to prevent any operational errors, once you have nished operating the crown, make
sure to relock it.
Refer to "SCREW LOCK TYPE CROWN" on the following page 56.
L 0 1 2
L: Screw lock type crown is at the locked position.
0: Screw lock type crown is at the unlocked position: the
mainspring can be manually wound.
1: Screw lock type crown is positioned for calendar set
-
ting. (time dierence adjustment.)
2: Screw lock type crown is positioned for time setting.
56
57
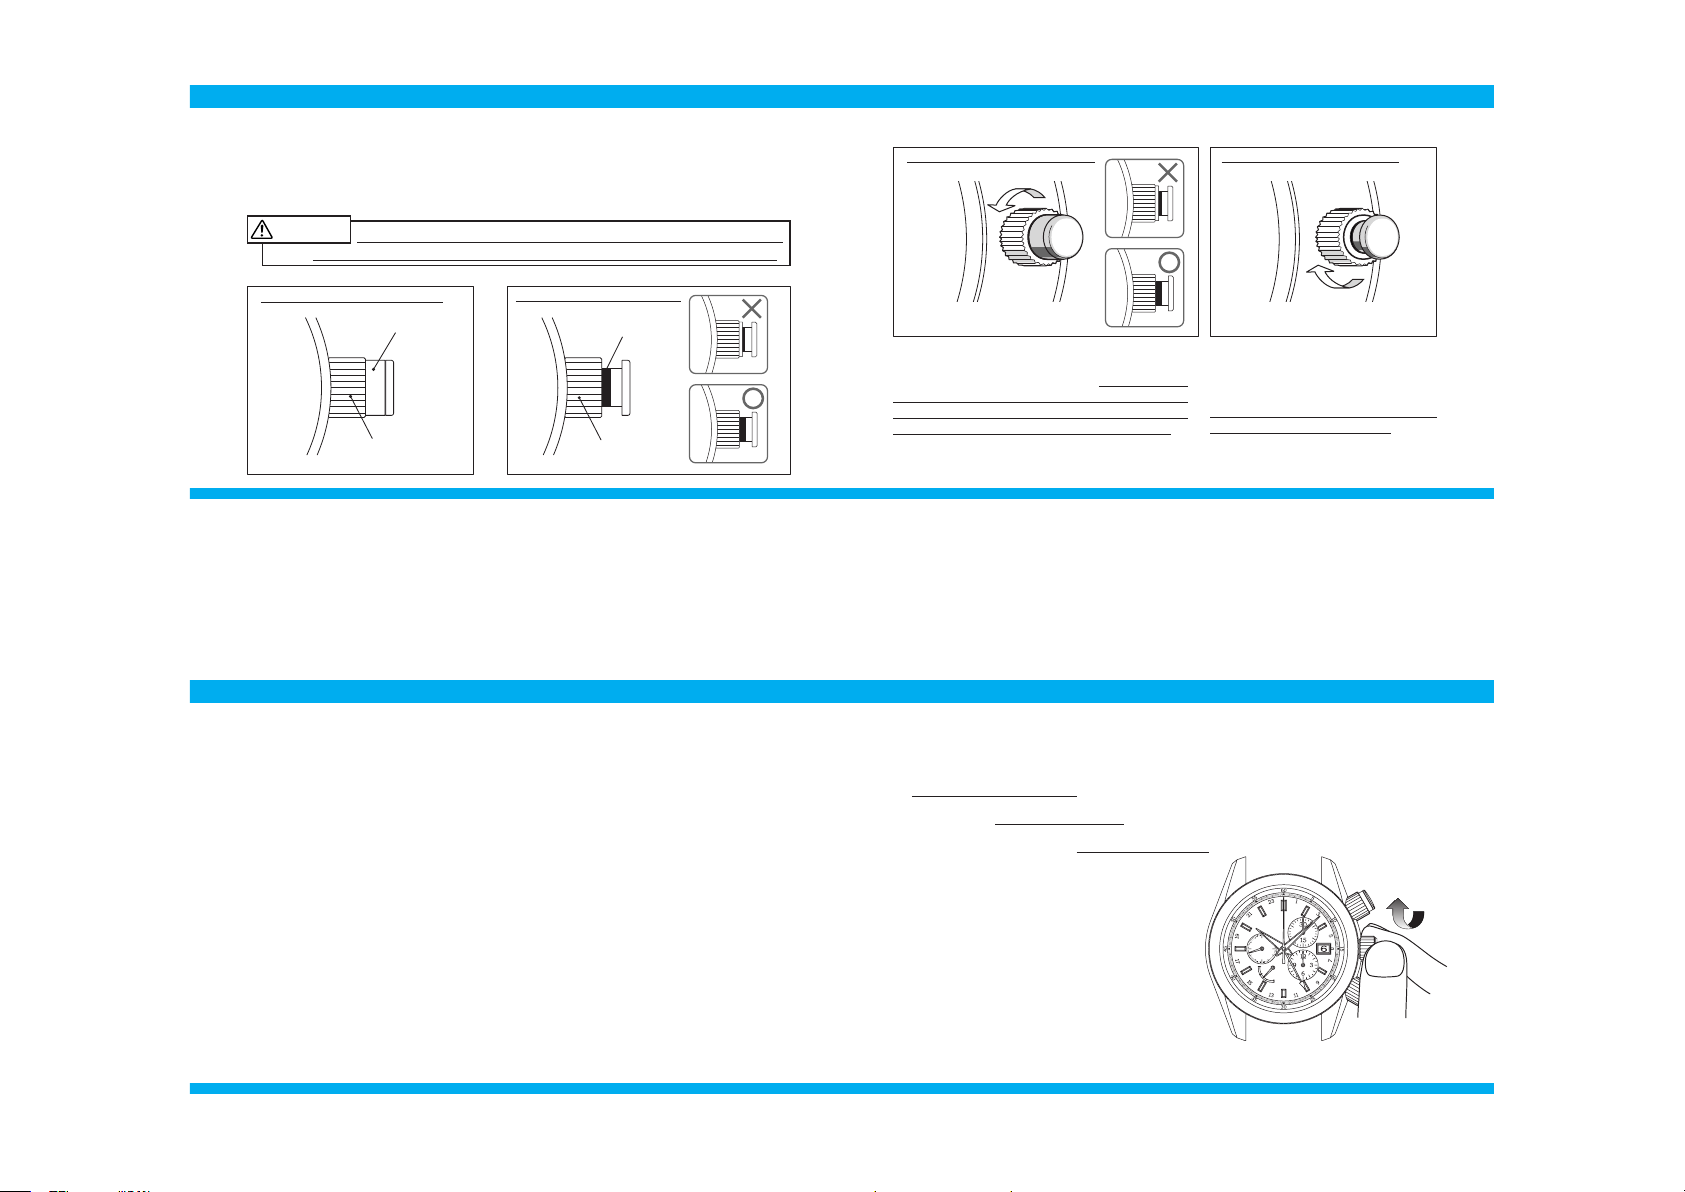
■SCREW LOCK TYPE CROWN AND BUTTON
●How to use the screw lock type crown
The watch features a screw-lock mechanism that can securely lock the crown and buttons to prevent any operational errors when they are not being operated.
How to unlock the screw lock type crown
How to lock the screw lock type crown
Turn the crown cou nt erclockwise
(downward) to unscrew it.
Now the crown can be operated.
To loosen
Turn the crown clockwise (upward)
while gently pressing it in toward
the watch body until it stops.
Screw lock t ype crow n is locked .
Screw lock type crown is unlocked.
※ Once the crown is unlocked, you can pull it out.
●Screw lock type crown
Turn the crown while pressing it in.
It is necessary to unlock the screw lock type crown before operating it.
Once you have nished operating the crown, make sure to relock it.
When locking the crown, turn it slowly with care, ensu ring that the
screw is properly engaged. Be careful not to forcibly push it in, as doing so
may damage the screw hole.
CAUTION
Page 4
58
59
Make sure that you turn the button ring all the way until it stops, even
after you can see the guide line. Failing to do so can cause operational failure.
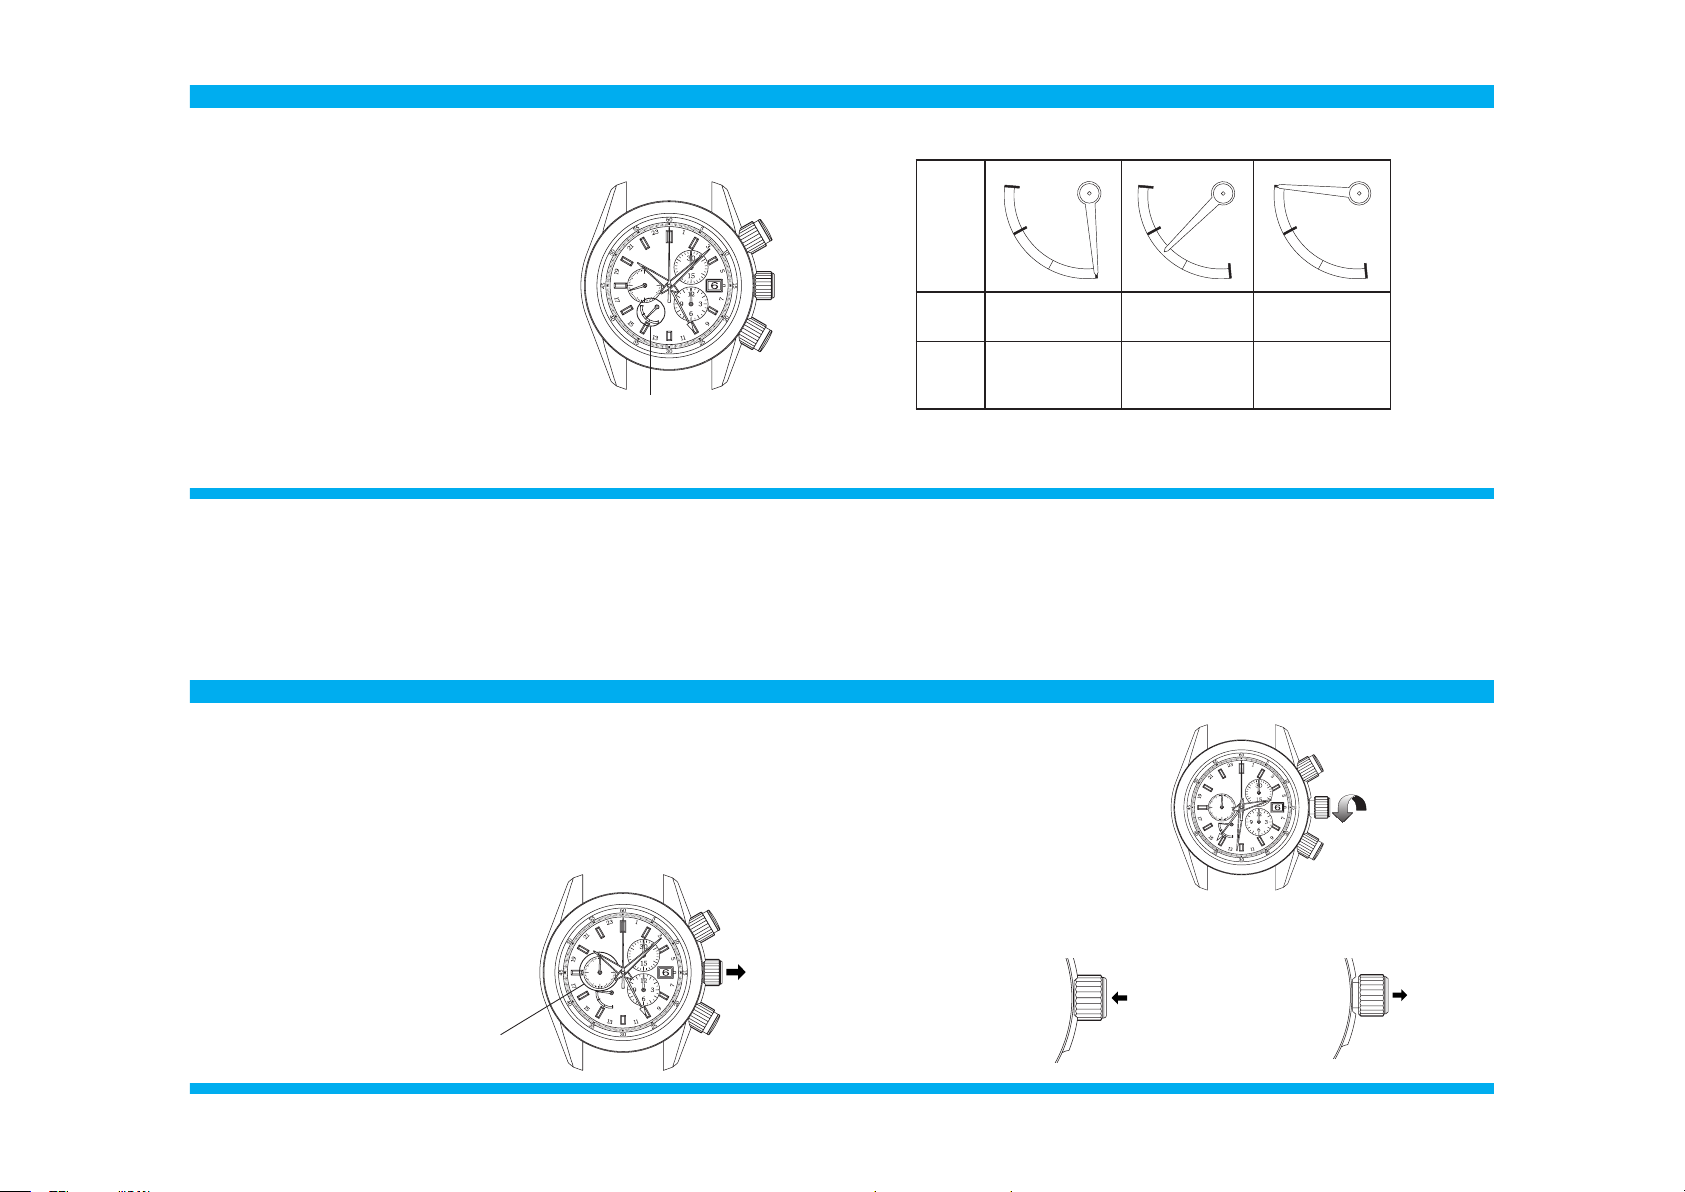
●How to use the screw lock type button
It is necessary to unlock the screw lock type button before operating it.
※ Turn the button all the way until the slide cover descends and the button ring can no longer be
turned. Once you fin ish tu rnin g the button completely, the butt on becomes fully unlocked.
How to unlo ck the scr ew lock ty pe button How to lock th e screw lock t ype but ton
Turn the button ring counterclockwise (downward) to lower the slide cover gradually.
Turn the button r in g furt her u ntil you c an
clearly see the guide line and the button ring
can no longer be turned. Now the screw lock
type button is unlocked and can be operated.
Turn the button ring clock wise (upward)
until it stops.
Now the screw lock type butt on is co mpletely locked.
Once you have nished operating the button, ma ke sure t hat you relock it.
Guide line
●Screw lock type button
Screw lock type button is locked.
Button ring Button ring
※Foreign particles a nd cont amination ca n cause operational failure of the screw and/or button(s).
Refer to "TO PRESERVE TH E QUALITY OF YOUR WATCH" on page 88.
Turn the button ring u ntil it stops. Turn the button ring until it stops.
Slide cover
CAUTION
Screw lock type button is unlocked.
To loosen
To fasten
60
61
■HOW TO WIND THE MAINSPRING
This watch is a self-winding watch equipped with a manual winding mechanism. When
the watch is worn on the wrist, the motion of the wearer's ar m winds the mainspring
of the watch.
When first using a stopped watch, it is recommended that you ma nua lly wind the
mainspring by turning the crown.
●How to manually wind the mainspring by turning the crown
In order to set the time and calendar after winding
the mainspring manually, do not relock the crown but
continue the procedures.
※ Refer to "How to set the time and calendar" on page 64.
※ The watch employs a dev ice to preve nt over wi ndi ng of the m ain spr ing . Onc e the mai nsprin g is f ully
wound, th e mai nsp ring slip s ins ide, diseng agi ng the windin g mec han ism . Whe n this hap pen s, you can
still t urn the crown w ithout d amag ing t he watch, however, ple ase refrai n from exces sive operation of the
mains pring.
※ Under a low-temperatu re co ndition (below 0℃), always keep at least one-sixth of the watch power shown
by the power re serve in dicator.
●Guide for winding state of the mainspring
Self-winding::
The mainspring of the watch is desig ned to b e fully wound when it is worn for twelve hours per day
for three to ve consecutive days.
Manua l winding:
Five fu ll rot ations of t he crown will provide the power to r un t he wat ch for approximately ten
hours .
Observe the power reserve indicator to check the level of the remai ning power.
Refer to "POWER RESERVE INDICATOR" on page 62.
1. Unlock the crown.
2. Slowly turn the crown clockwise (upward) to wind the mainspring with
extra care not to press it in. Wind the mainspring until the power reserve indicator shows a full-wound state. The small second hand starts
moving.
3. Once you nish winding the mainspring,
make sure you relock the crown.
※ Refer to "How to use the screw lock type crown" on page 57.
※ Refer to "How to read the power reserve indicator" on page 63.
Page 5
62
63
Power
Reserve
Indicator
Winding
state
of the
mains pring
Fully wound Half wound Unwound
Number
of hours
the watch
can run
Approximately 72
hours (3 days)
Approximately 36
hours (1.5 days)
The watch either
stops or is running
down.
■POWER RESERVE INDICATOR
※ The watch employs a dev ice to preve nt over wi ndi ng of the m ain spr ing . Onc e the mai nsprin g is f ully
wound, th e mai nsp ring slip s ins ide, diseng agi ng the windin g mec han ism . Whe n this hap pen s, you can
still t urn the crown w ithout d amag ing t he watch, however, ple ase refrai n from exces sive operation of the
mains pring.
Before removing the watch from your wrist,
obser ve the power reser ve ind icator to
check if the watch has stored enough power
to keep running until the next time you wear
it. If necessary, wind the mainspring. (To
prevent the watch from stopping, wind the
mainspring to store the excess power that
will allow the watch to run for extra time.)
●HOW TO READ THE POWER RESERVE INDICATOR
※ The cont inuous operable time of the watch m ay var y depending on actual use conditions, such as
the number of hour s you wear the watch or the extent of your movement while wea ring it.
※ In a case where you wear the watch for a short per iod of time, observe the power reser ve indica-
tor to check the level of the remaining power. If necessary, manua lly wind the mainspring.
Power reserve indicator
The power reserve indicator lets you know the winding state of the mainspring.
64
65
■HOW TO SET THE TIME AND CALENDAR
To set the time and calendar, set the 24-hour hand and minute hand rst,
and then set the hour hand and calendar.
●How to set the time
1. Make sure that the mainspring is suciently wound and the watch is working.
※ When setting the date a nd time, ensu re that the watch is working.
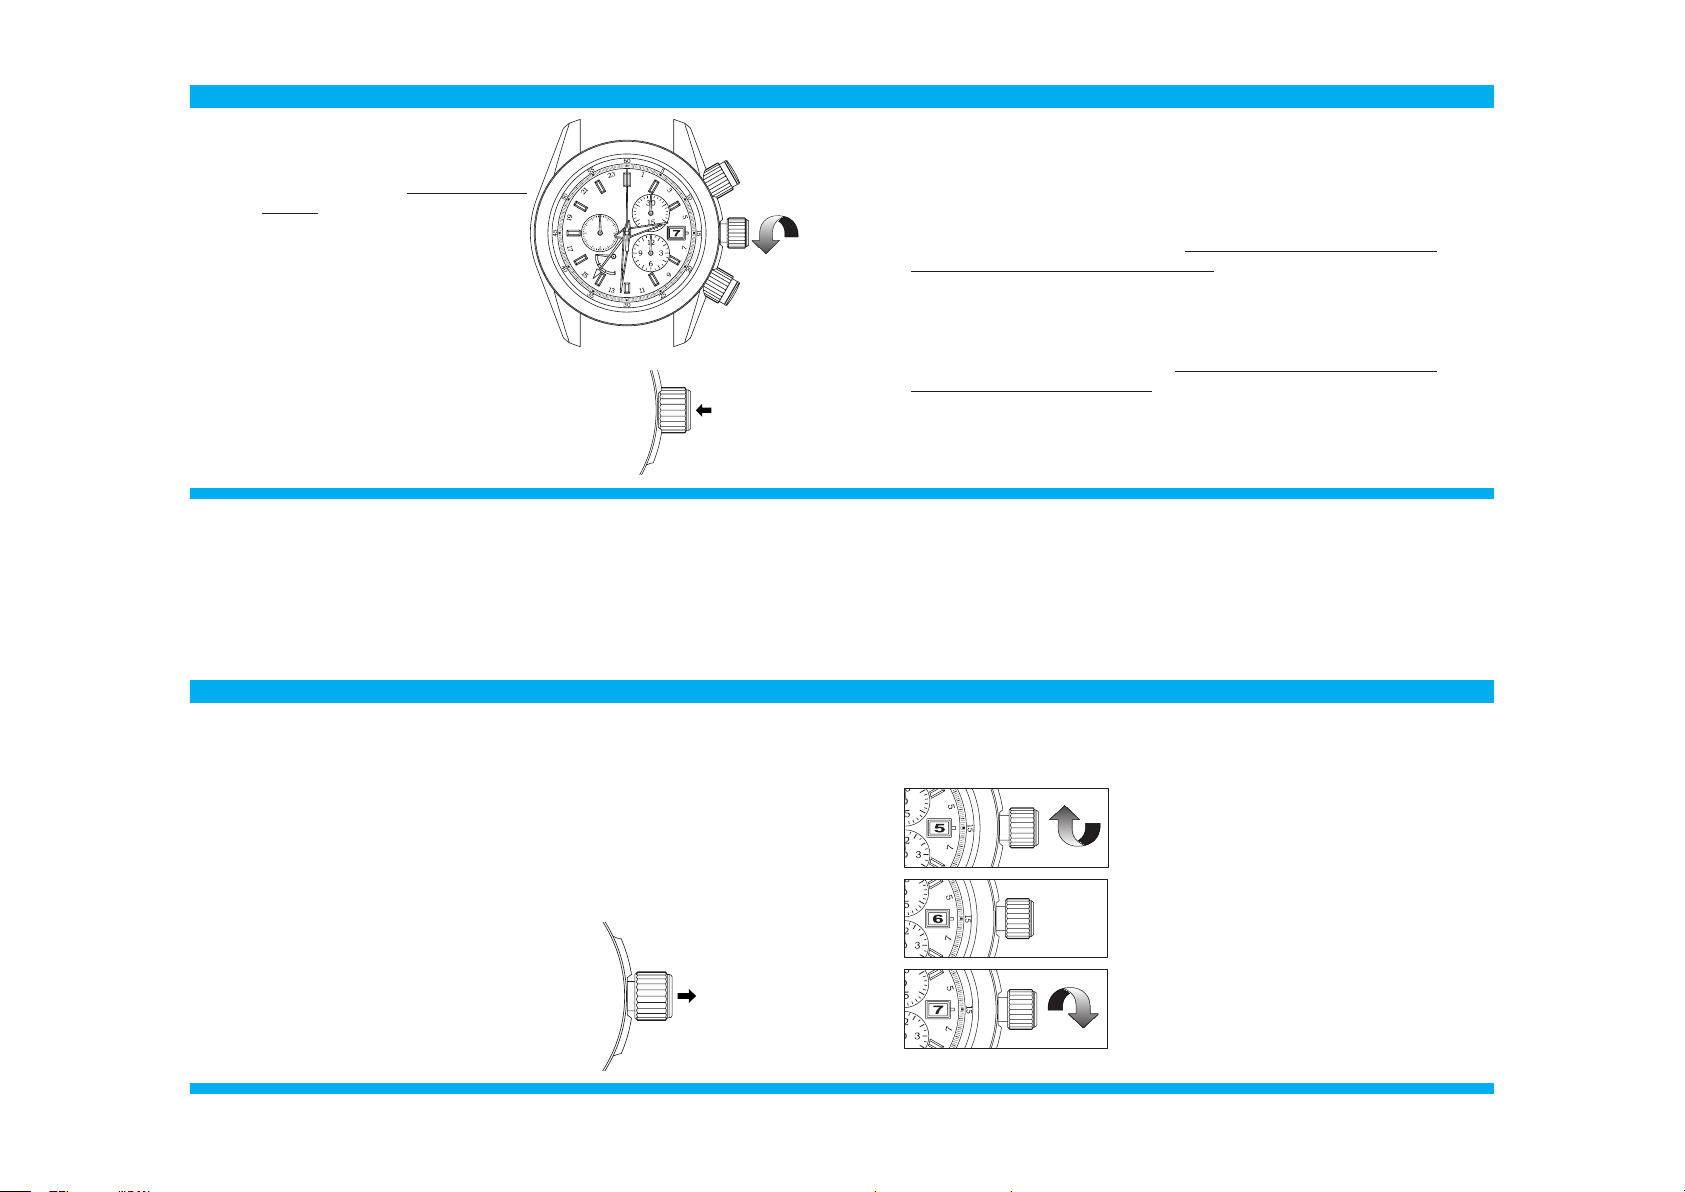
3. Pull out the crown to the second click
when the small second hand is pointing
at the " 0 " second position. The small
second hand will stop on the spot.
4. Turn the crown to rotate the 2 4-hour
hand and minute hand clockwise and set
them to the current time. While doing
so, set the minute hand a few minutes
behind the correct time, and then slowly
advance it to the desired time.
※ O nly the 24 -hou r and minute han ds are to be set rst.
Even if t he hour hand i s indic ating i ncorre ct time , or th e
date may be altered d ependi ng on the position of the hou r
hand , i t i s not nece ssa ry to make an a djust ment at thi s
stage.
2. Unlock the crown.
Refer to "How to use the screw lock type
crown" on page 57.
Pull the crown
out to the rst
click.
Small second hand is pointing at
the " 0 " second position.
Pull out the
crown to the
second click.
5. Push the crown back in simultaneously
with the time signal
.
※ T he setti ng of the 24 -hou r,
minute a nd smal l second
hands t o the current ti me
is now complet ed.
Push the crown back in simultaneously with the time signal.
6. To move on to the hour hand and calendar setting , pull the crow n out to
the rst click.
Set the
24-hour
hand and
minute hand
by rotating
them clockwise.
Page 6
66
67
8. Push the cr own bac k i n to co m plete the ti m e s e t ting.
Relock the crown.
Refer to "How to use the screw lock type crown" on page 57.
●Tips for more accurate time setting
Keep in mind the following points in order to set the time more accurately.
1. Before setting the time, wind the mainspring suciently.
(Ensure that the power reserve indicator is showing a full-wound state.)
2. When starting to use a watch after it stops, wind the mainspring sufciently. To set the time after that, wait for approximately 30 seconds
after the small second hand starts to move, then pull the crown out to the
second click.
3. The small second hand will stop moving while the crown is at the second
click. Do not stop the small second hand movement for longer than 30
minutes. If the stoppage of the small second hand movement exceeds 30
minutes, push the crown back in, and wait for at least 30 seconds after the
small second hand restarts moving, and then continue the time setting.
4. To set the time during any time between 9:00 P.M. and 1:00 A.M., temporarily set the hour hand back to 8:00 P.M., and then set the time.
(This procedure is required to ensure the proper engagement of the calen-
dar driving wheel.)
7. Tur n t he crown to s et t he hour h a nd .
While turning the crown, the moment the
date changes is midn ight. When set ting
the hour hand, be sure that AM/PM is set
correctly.
Adjust the calendar also at this point
if necessary.
※ The crown can be t urned in either direction
to adjust the date, however, it is recommended to turn the crown in the direction which
enables you to set the date w ith a smaller
adjustment.
※ Turn the cr ow n slowly, che ckin g that t he
hour hand moves in one-hour increments.
※ When adju st ing the hou r hand , the o th er
hands may move slightly. However, this is not
a malfunction.
68
69
●How to set the calendar
Two full rotations of the hour hand will change the date for one day.
The date advances one day by turning the hour hand two full rotations clockwise (for
24 hours), while the date is set back one day by turning the hour hand two full rotations counterclockwise.
Manual date adjustment is required on the rst day after a month that has less than
31 days: February, April, June, September and November.
1. Make sure that the mainspring is suciently wound and the watch is working.
※When setting the date and time, ensure that the watch is working.
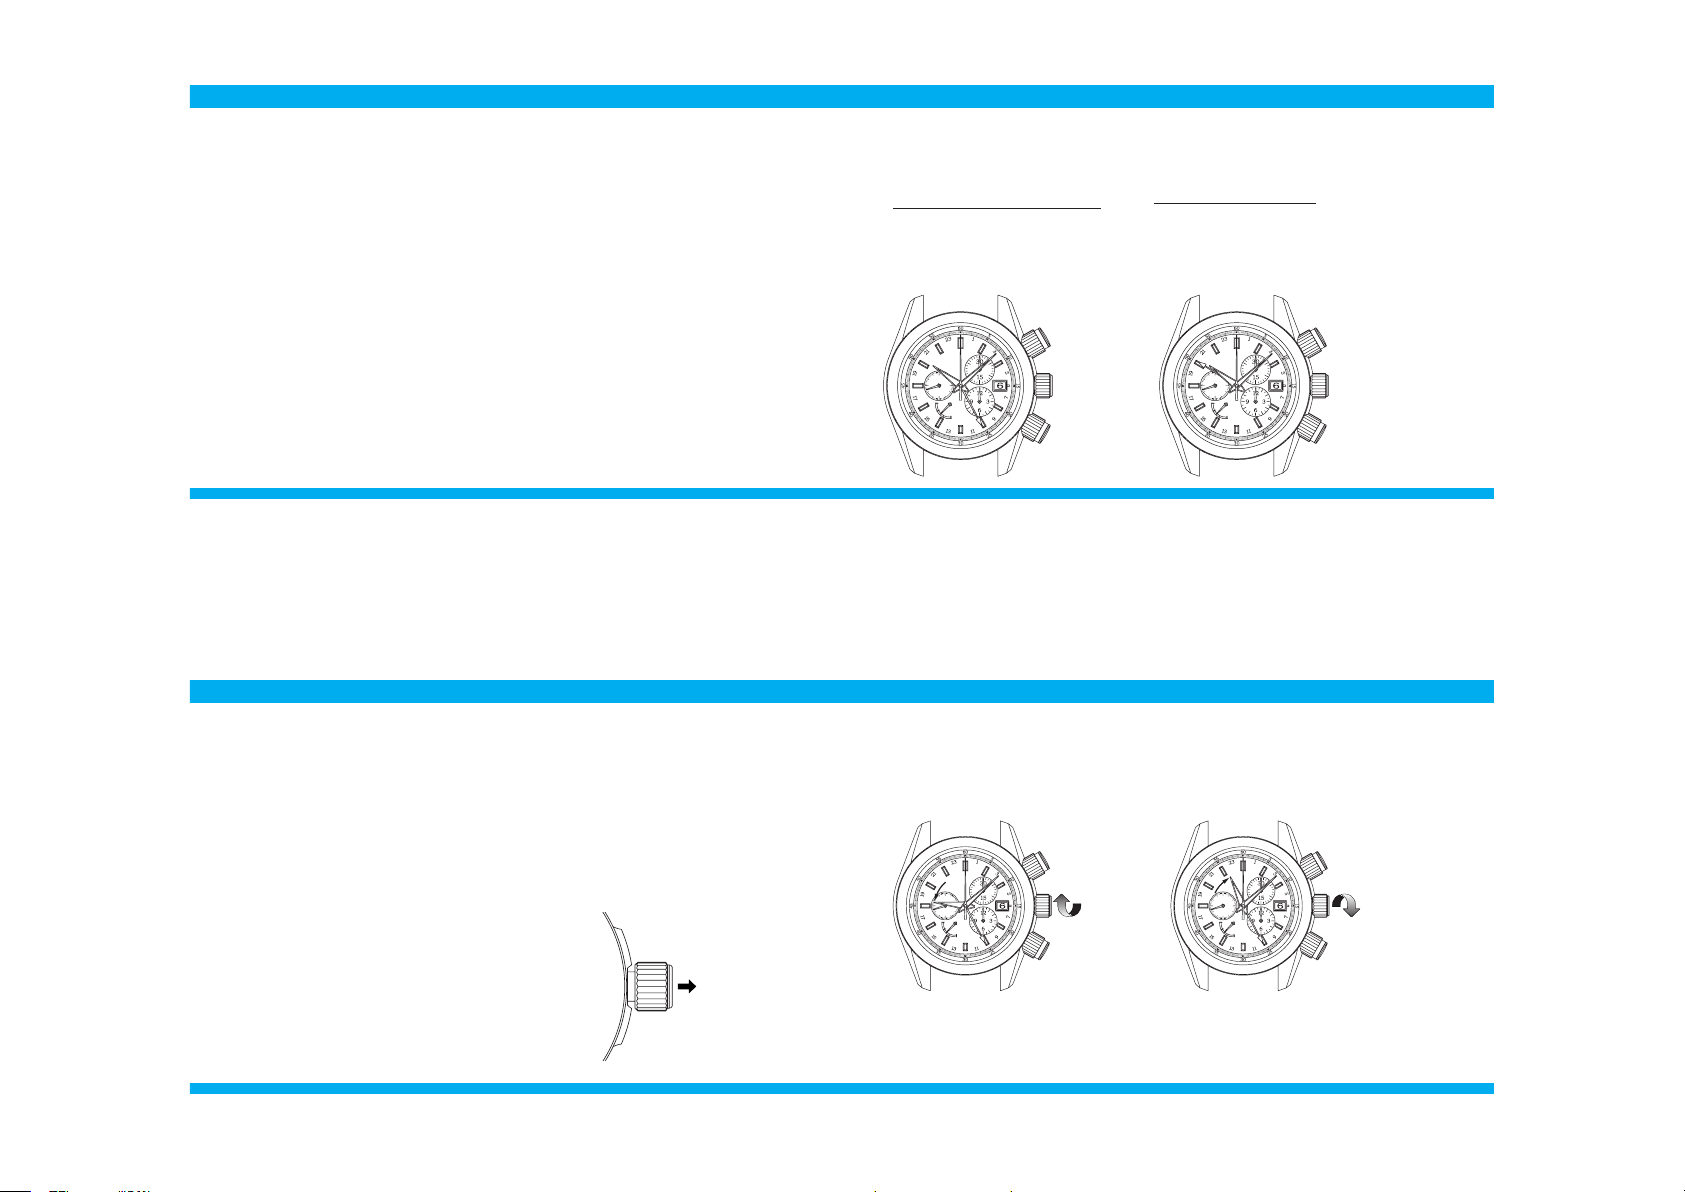
4. Each time the hour hand makes two full rotations by turning the crown, the date
is adjusted one day. While turning the crown, the moment the date changes is midnight. When setting the hour hand, be sure that AM/PM is set correctly.
3. Pull out the crown to the rst click.
Pull out the crown
to the rst click.
2. Unlock the crown.
Refer to "How to use the screw lock type
crown" on page 57.
※ The crown can be turned in either direction to
adjust the date, however, it is recommended to
turn the crown in the direction which enables you
to set the date with a smaller adjustment.
※ Tu rn the crown slowly.
※ When adjusting the hour hand, the other hands
may move slightly. However, this is not a malfunc-
tion.
Turn in g the crown clockw ise (upward): Each
time the hour hand makes two full rotations, the
date is set back one day.
Turning the crown counterclockwise (downward):
Each time the hour hand makes two full rotations, the date is advanced one day.
Before
date
adjustment
Page 7
70
71
5. Upon completion of setting, make sure that the time indicated is correct,
and then push the crown back in. The calendar setting is now completed.
Relock the crown.
Refer to "How to use the screw lock type crown" on page 57.
※ The calendar is designed to work in conjunction with the movement of the hour hand, therefore,
incorrect setting of AM/PM will cause the date to change at noon.
※ The crown can be turned in either direction to adjust the date, however, it is recommended to
turn the crown in the direction which enables you to set the date with a smaller adjustment.
※ Turn the crown slowly, checking that the hour hand moves in one-hour increments.
※ When adjusting the hour hand, the other hands may move slightly. However, this is not a mal
-
function.
●How to use the 24-hour hand
This watch has two dierent types of 24-hour hand usage.
<Type 1>
24-hour ha nd as an AM/ PM indicator
Simply usi ng the 24 -h our hand to show the
24-hour time as an AM/ PM indic ator.
(T h is is t he s tan dar d usa ge t y pe fo r the
24-hour ha nd.)
<Type 2>
24-hour hand as a dual time indicator
Using the time dierence adjustment function, set the 24 -hour
hand to indicate a time dierent from the time that the hour and
minute hand indicate, which is of a place in a dierent time zone
area with at least one hour of time dierence from where you are.
Refer to "How to use t he tim e diere nce adju stment funct ion"
on page 72 .
Both the hour
hand and the
24-hour hand are
indicating the
Japan time 10:00
A.M.
Hour hand: Japan
time 10:00 A.M
24-hour hand: New
York time 8:00
PM
72
73
■TIME DIFFERENCE ADJUSTMENT FUNCTION
For example, while traveling abroad and staying in a place with a di erent time from where you
live, you can conveniently s et the watch to indicate t he local time in the dierent time zone area
without st opping the watch.
The hour ha nd indicate s the time of the place where you cur rently are, while t he 24-hour ha nd in dicates the time of the place of origin.
The calendar works in conjunction with the movement of the hour ha nd. If the time dierence is
correctly adjusted, the watch displays the correct date of the place where you are st aying.
※ The c rown ca n be turne d in either dire ction to adjust the date , however, it is recomm ended t o tur n the crown in the
direction which en ables you to set the date with a sma ller adjustment.
※ Tu rn the crown slowly, checking t hat the hour hand move s in one-hour i ncrements.
※ While turning the crow n, the moment the d ate changes is m idnight.
※ When adjusting the hour ha nd, the other hand s may move slightly. However, this is not a malfunctio n.
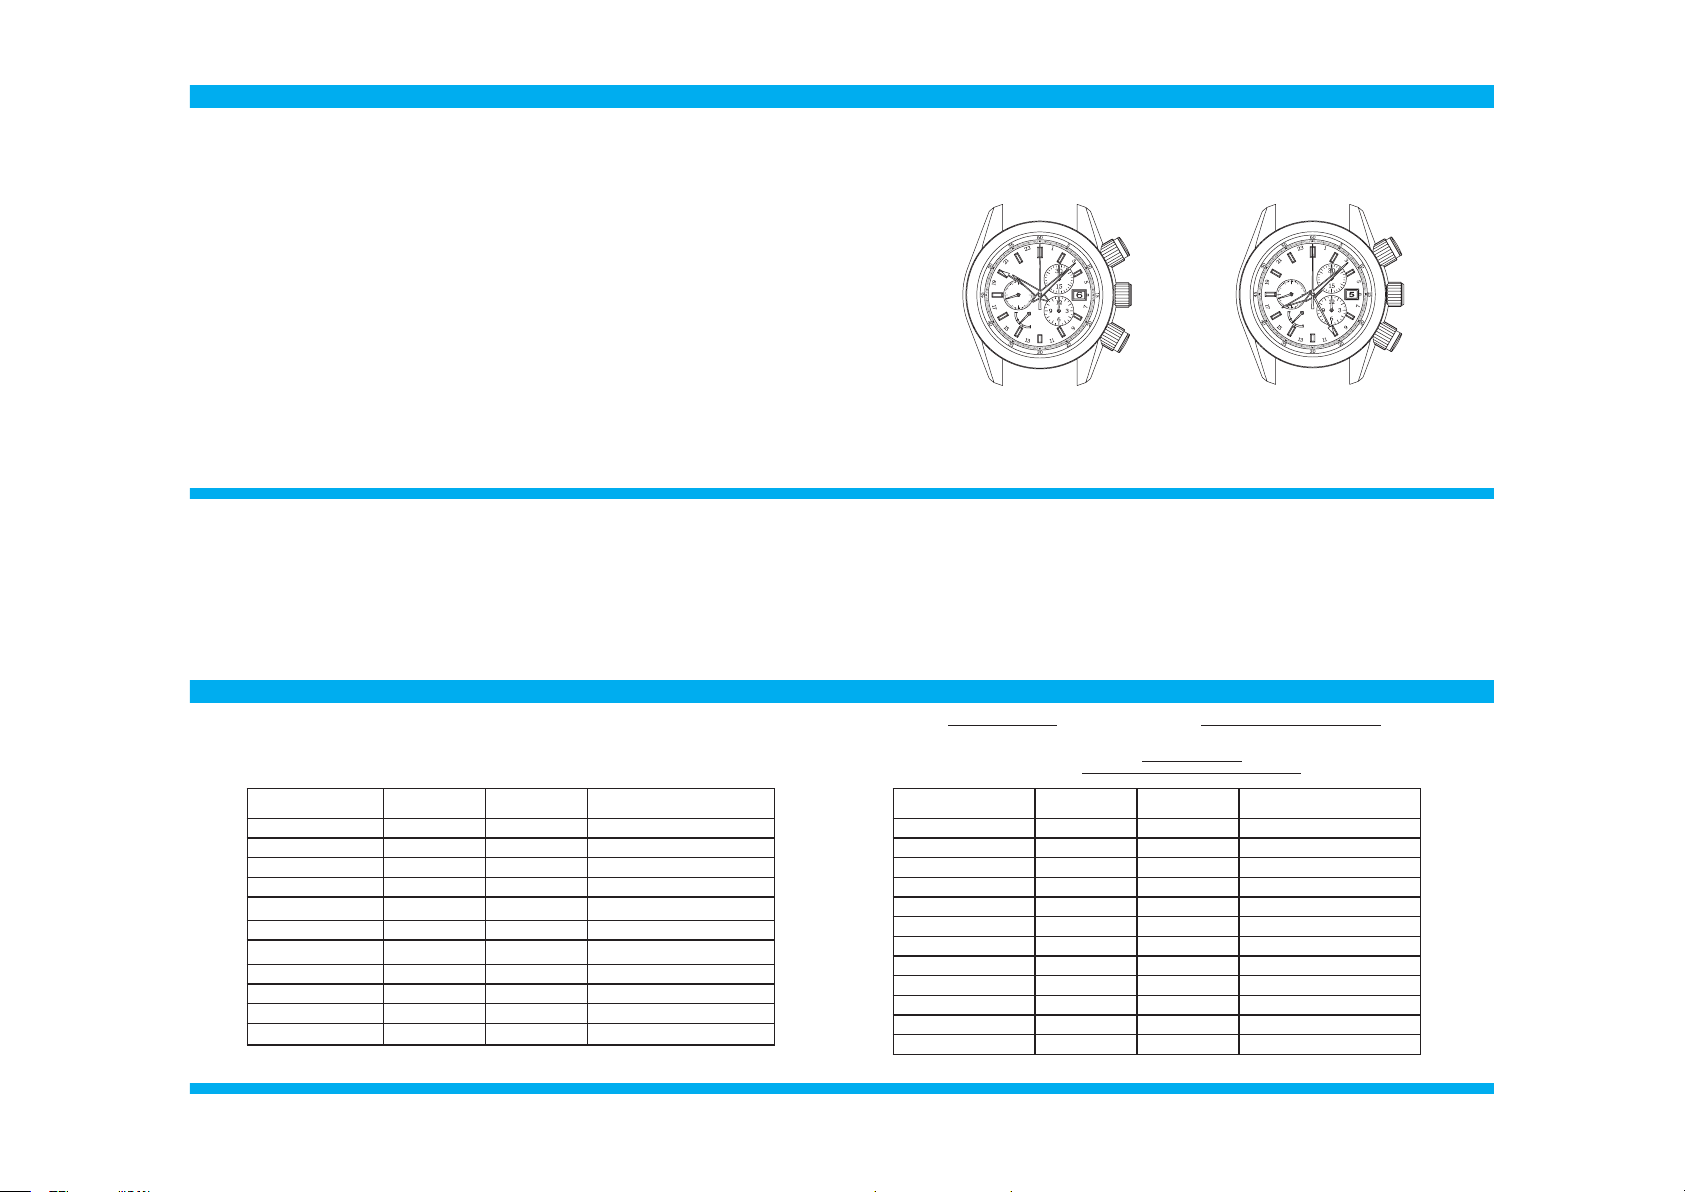
3. Pull out the crown to the rst click.
Pull out the crown to
the rst click.
2. Unlock the crown.
Refer to "How to use the screw lock type
crown" on page 57.
●How to use the time difference adjustment function
4. Turn the crown to set the hour hand to indicate the time of the place where you are
staying. Make sure that AM/PM is correctly set.
※ The calenda r is desig ned to work in conjunction w ith the movement of the hour ha nd,
therefore, incorrect setting of AM/PM will cau se the date to change at noon.
Refer to "List of time zone dierences in major regions of the world" on page 76.
Turning the
crown cloc kwise
(upward): T he
hour han d is set
back one hou r.
Turning the
crown cou nterclockwi se (downward): T he hour
hand is adv anced
one hour.
1. Make sure that the mainspring is suciently wound and the watch is working.
※ When setting the hou r hand to use the time dierence
adjustment function, ensure that the watch is working.
Page 8
74
75
5. Upon completion of setting, make sure that the time indicated is correct, and then
push the crown back in. The setting procedure is now completed. Relock the crown.
Refer to "How to use the screw lock type crown" on page 57.
If you set the time during any time between 9:00 P.M. and 1:00 A.M., temporarily set the hour
hand back to 8:00 P.M., and then set the time.
Example 1
Hour hand and calendar: Area A (Japan)
24-hour hand: Area B (New York)
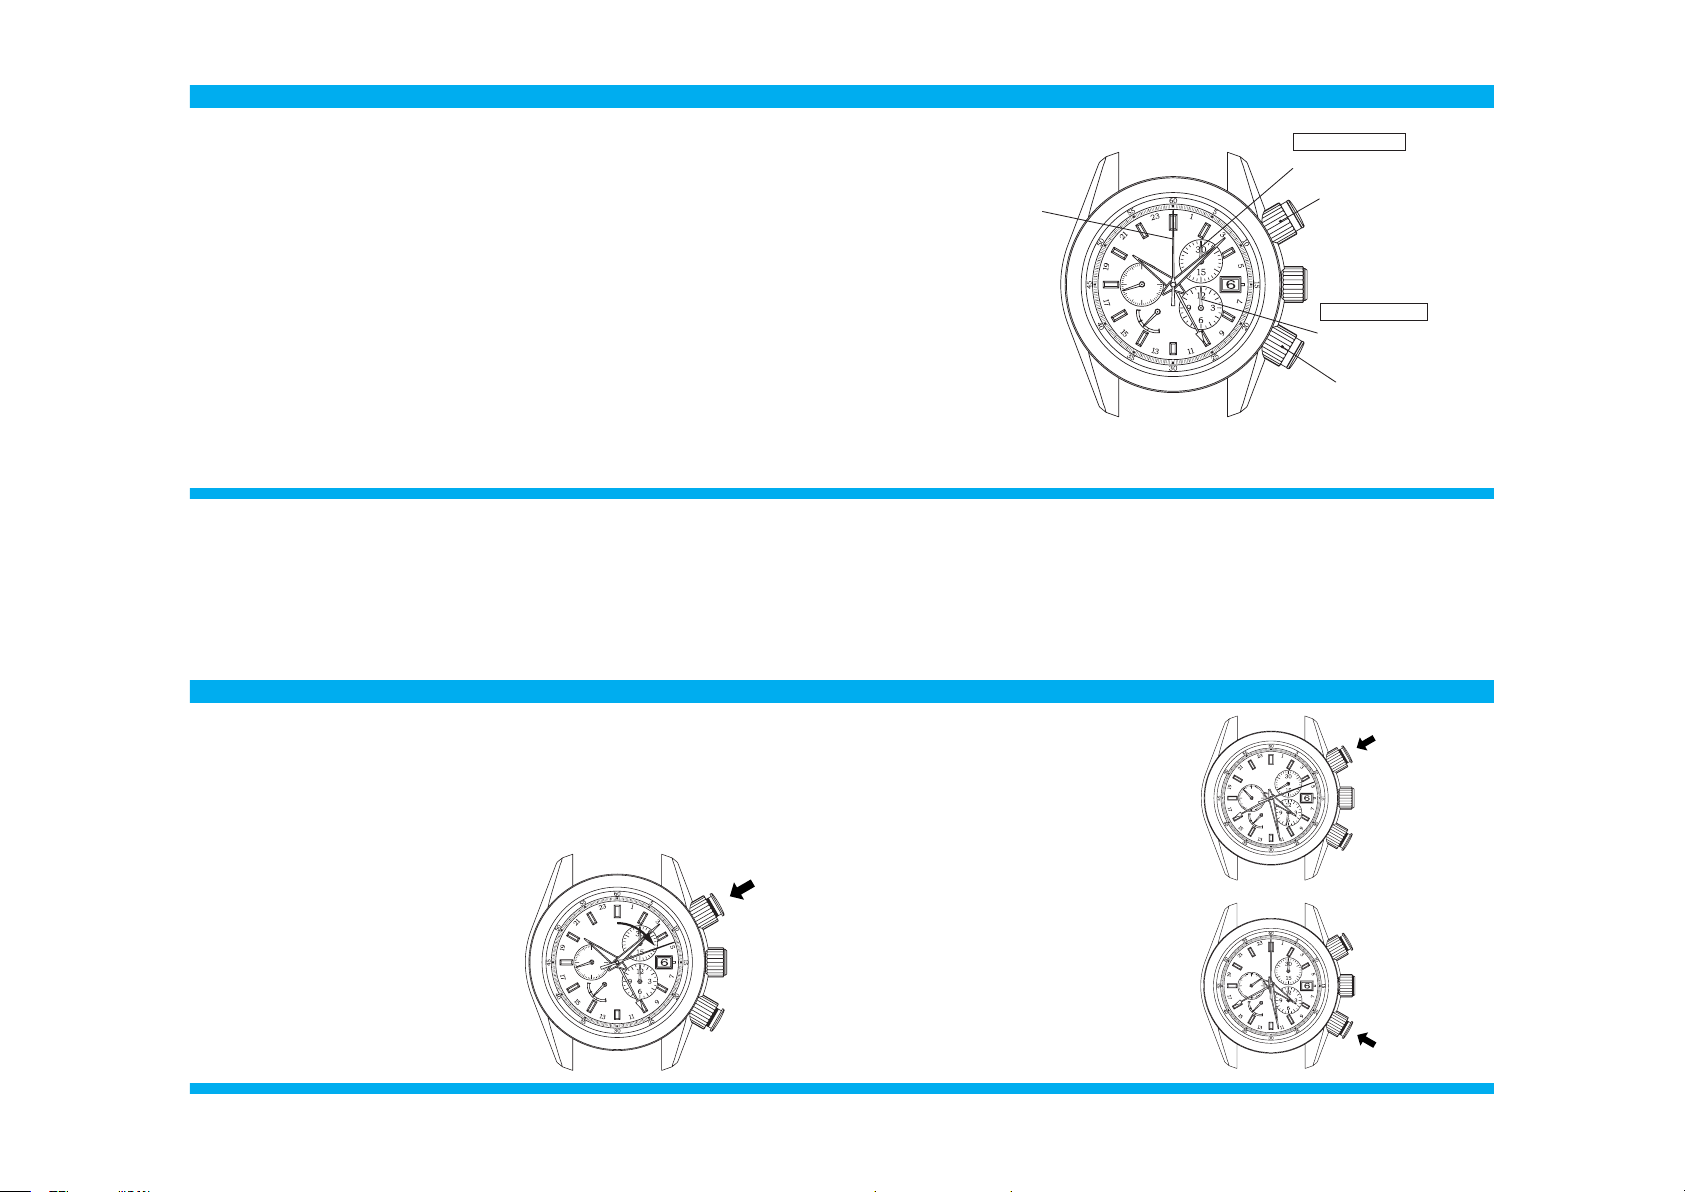
●Selectable display mode
With the time dierence adjustment function, the watch features a dual time display
which shows time in two dierent time zones. It oers two display modes which you
can select to suit your needs and preference.
Set the 24-hour hand rst, and then set the hour hand.
Example 2
Hour hand and calendar: Area B (New York)
24-hour hand: Area A (Japan)
76
77
Names of the cities
Time difference from
Japan
Time difference from
UTC
Other cities
Paris ★ - 8 hours + 1 hour Rome★, Amsterdam ★
London★ - 9 hours ± 0 Casablanca
Azores★ - 10 hours - 1 hour
Rio de Janeiro ★ - 12hours - 3 hours
Caracas - 13 hours - 4 hours Santiago★
New York ★ - 14 hours - 5 hours Washington ★, Montreal★
Chicago ★ - 15 hours - 6 hours Mexico City ★
Denver ★ - 16 hours - 7 hours Edmonton ★
Los Angels★ - 17 hours - 8 hours San Francisco ★
Anchorage ★ - 18 hours - 9 hours
Honolulu - 19 hours - 10 hours
Midway Islands - 20 hours - 11 hours
There are time zone differe nces base d on time offset s from C oordin ated Universa l Time (U TC), which h as
been internatio nally adopted. The world is divided into 24 ti me zones , and neig hbori ng time zones have a
one-h our ti me dif ference , so that they c orres pond t o the rotation of the earth which ma kes one full r otation
in 24 hours (1 day). In s ome reg ions of the world, daylig ht savin g time is individu ally obs erved.
Daylight saving time is a s ystem t hat adva nces t he offic ial local time by one hou r dur ing the summ er to ta ke
advanta ge of longer daylight hours.
●List of time zone differences in major regions of the world
The time differences and use of daylight saving time in each re gion a re subject to change acc ording
to the gover nments of the re spective count ries or region s.
Refer to "How to use the time dierence adjustment function" on page 72.
Names of the cities
Time difference from
Japan
Time difference from
UTC
Other cities
Wellington★ + 3 hours + 12 hours Fiji islands, Auckland ★
Nouméa + 2 hours + 11 hours Solomon Islands
Sydney ★ + 1 hours + 10 hours Guam, Khabarovsk ★
Tokyo ± 0 + 9 hours Seoul, Pingyang
Hong Kong - 1 hour + 8 hours Manila, Beijing, Singapore
Bangkok - 2 hours + 7 hours Jakarta
Dacca - 3 hours + 6 hours
Karachi - 4 hours + 5 hours Tashkend ★
Dubai - 5 hours + 4 hours
Moscow ★ - 6 hours + 3 hours Mecca, Nairobi
Cairo ★ - 7 hours + 2 hours Athens★ , Istanbul★
Region s marked w ith ★ use daylight saving time (as of January, 2007).
Page 9
78
79
●Names of the chronograph parts and their function
※ The orientation a nd design of the display may vary depending on the model.
※ Some models may have screw lock ty pe buttons.
Refer to "How to use the screw lock type button" page 59.
30-minite dial
12-hour dial
Center chronog raph
second hand
Chronograph
hour hand
Chronograph
minute ha nd
START/STOP
button
RESET button
■CHRONOGRAPH
A chronograph is a watch that has a stopwatch function in addition to a time
display function.
This watch features a stopwatch function which can measure up to 12 hours.
●Before using the stopwatch
1. Make sure that the mainspring is sufficiently wound. Ensure that the
power reserve indicator shows a full-wound state of the mainspring.
When using the stopwatch, ensure that the watch is working.
2. Make sure that the center chronograph second hand is pointing at the 0
position. If it is not pointing at the 0 position, press the RESET button.
* Be careful not to pull out the crown while the chronograph second hand is moving. The
chronograph second hand will be stopped in the middle of the measurement.
80
81
●How to use the chronograph (stopwatch function)
1. Make sure that the mainspring is sufficiently wound and the watch is
working.
2. If your watch has screw lock type buttons, unlock them.
Refer to "How to use the screw lock type button" on page 59.
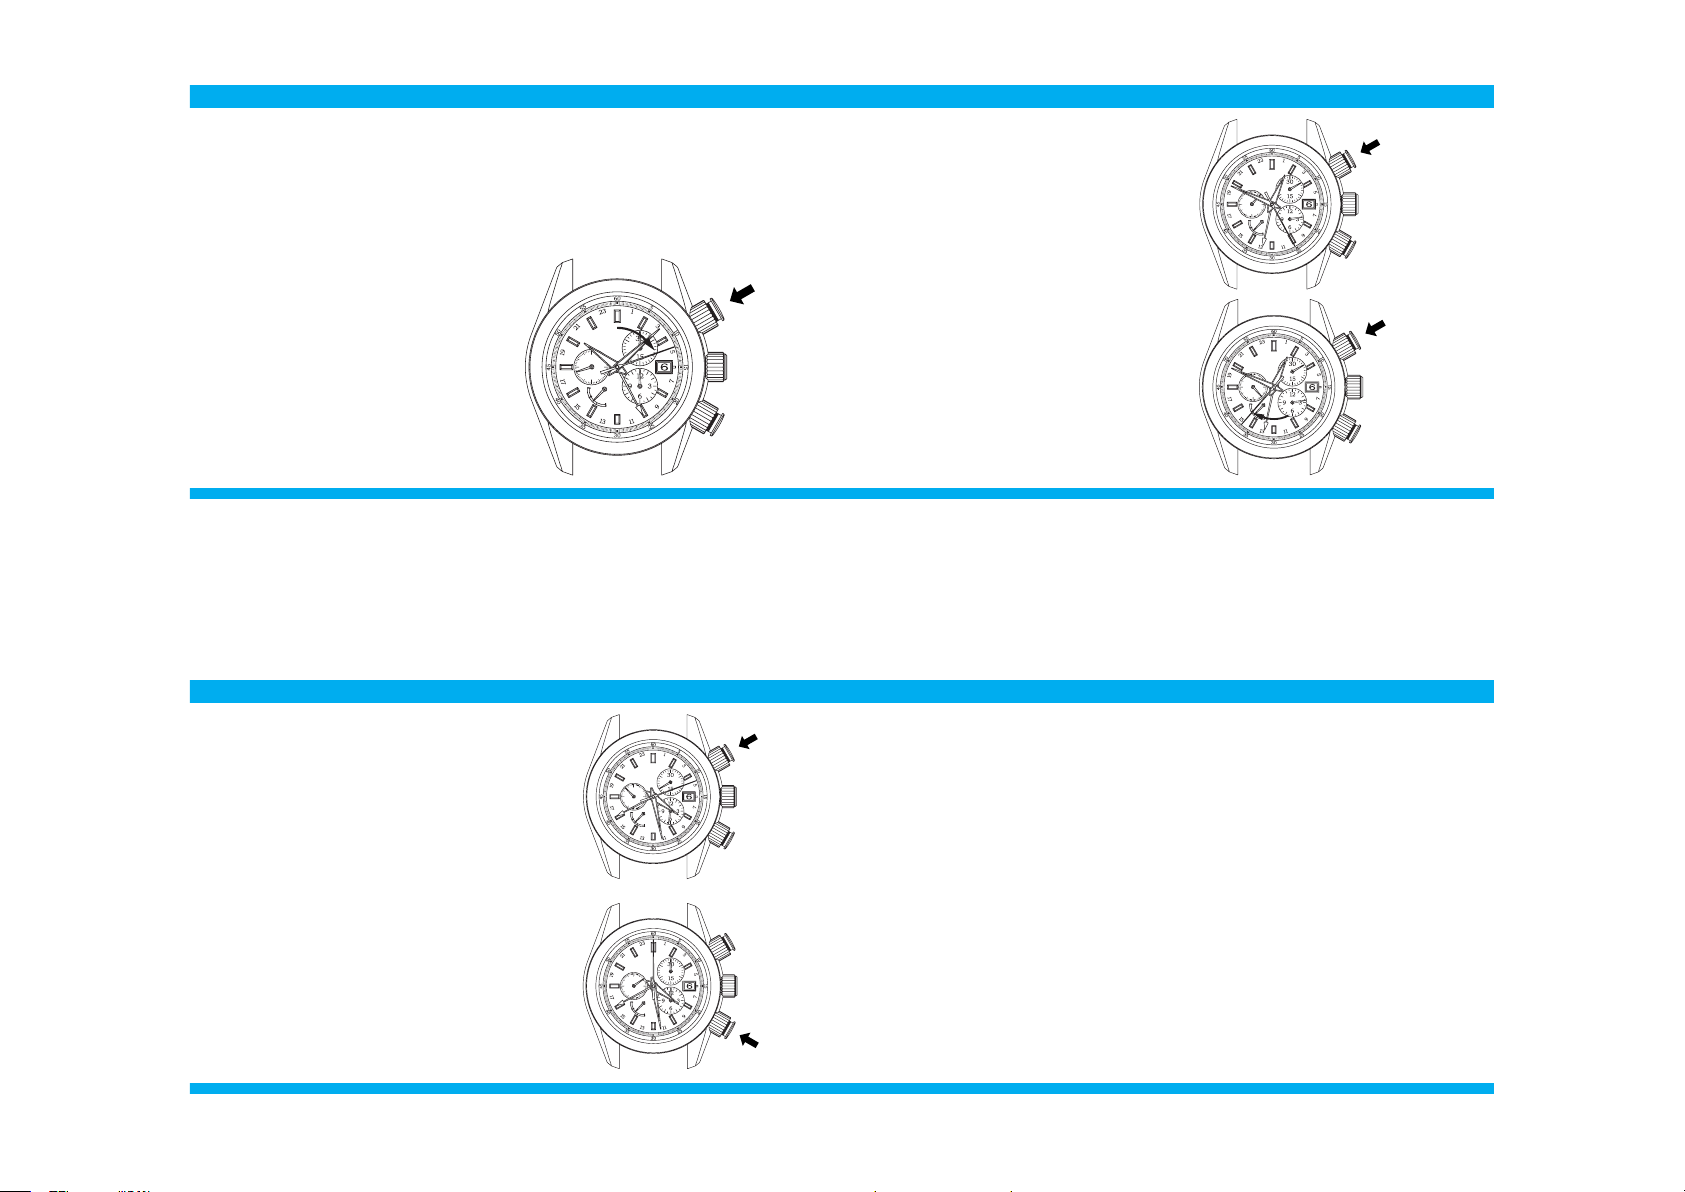
4. Stop measuring time.
At the moment you want to nish the measurement, press the START/STOP button
again to stop the chronograph hands.
Example: 6 hours 20 minutes 10 seconds and 8
5. Reset the chronograph hands.
After stopping the chronograph hand s,
press the RESET button to return all the
chronograph hands to the 0 position.
The ch ro no gr aph minute ha nd on th e 3 0 -m in ute
dial completes two full rotations in an hour. The
display o f t he 12 -h ou r d ia l w ill b e helpfu l a s a
rough indication to read the 30-minute dial.
3. Start measuring time.
Upon pressing of the START/STOP
button, the chronograph second hand
st arts mov i n g and the stopw atch
starts measuring time.
Page 10
82
83
●Accumulated elapsed time measurement
1. Make sure that the mainspring is sufficiently wound and the watch is
working.
2. If your watch has screw lock type buttons, unlock them.
Refer to "How to use the screw lock type button" on page 59.
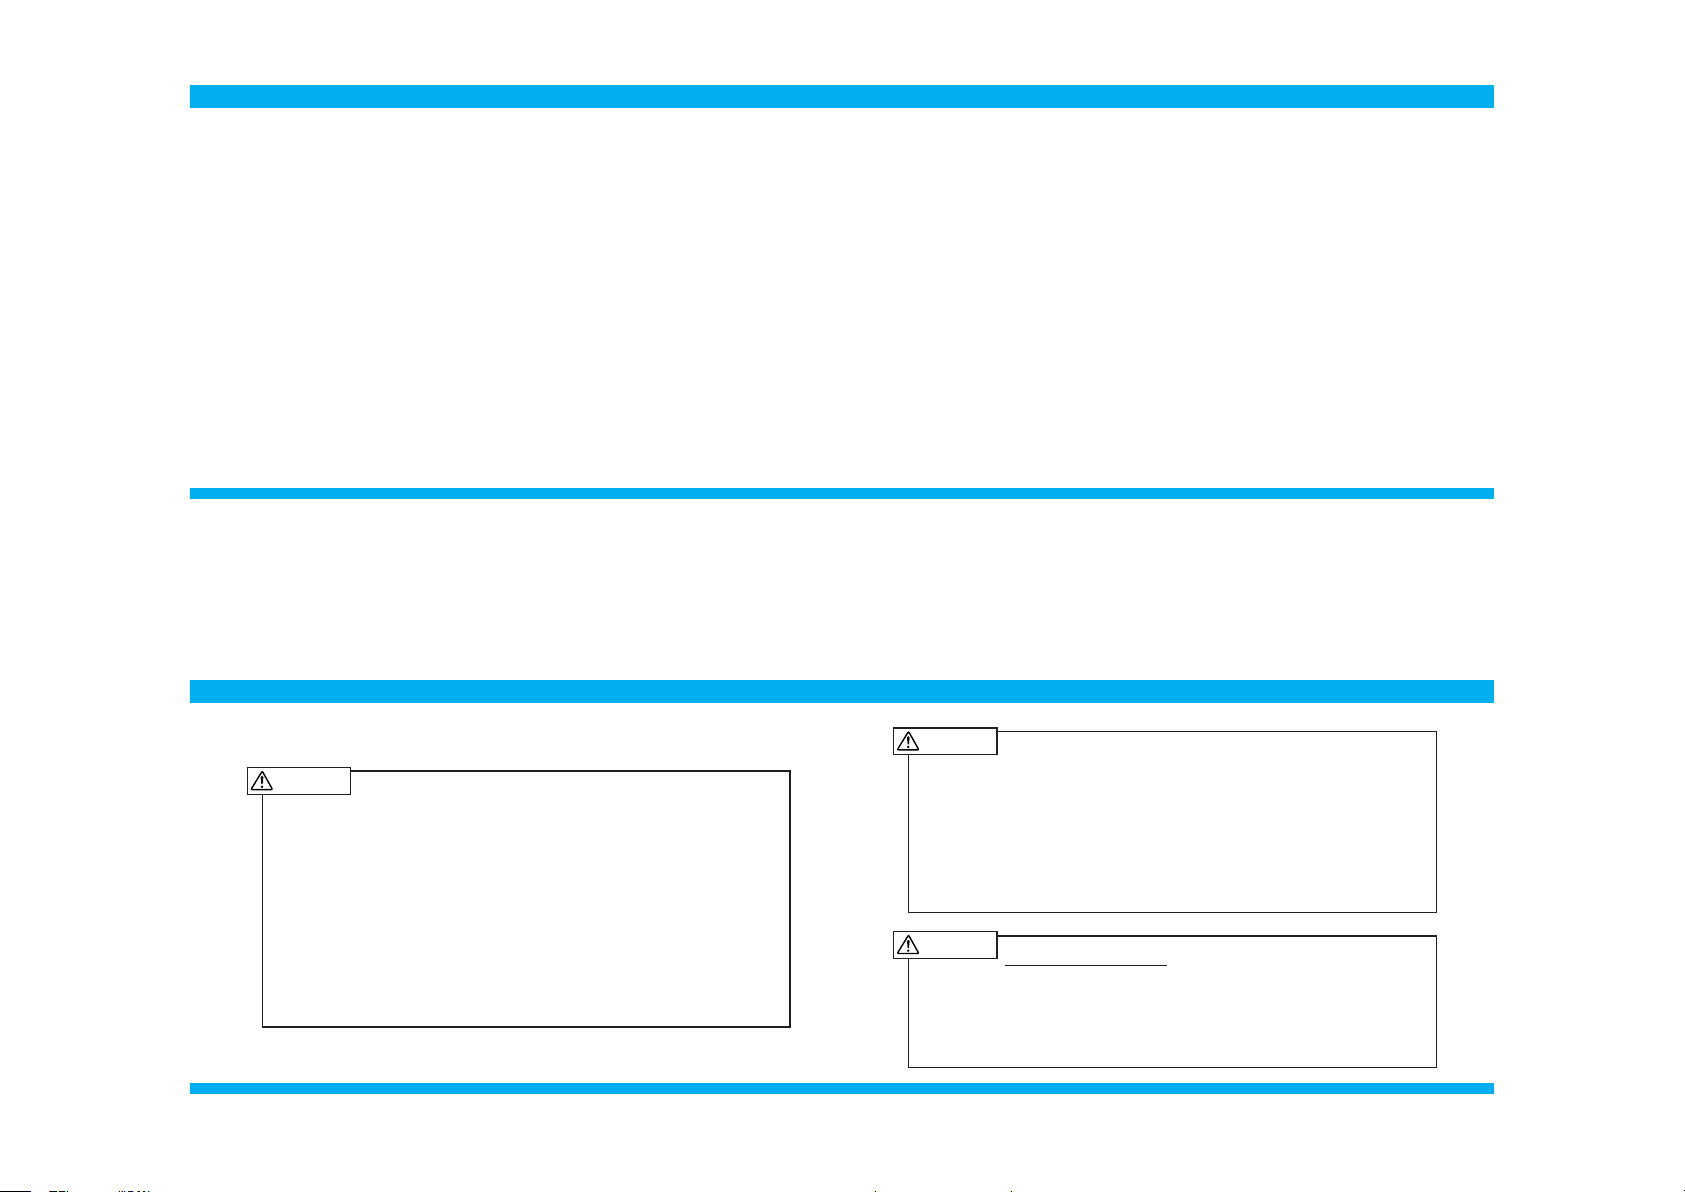
3. Start measuring time.
Upon pressing of the START/STOP
button, the chronograph second hand
st a rt s moving and the stopwatch
starts measuring time.
4. Stop measuring time.
At the moment you want to finish the
measurement, press the START/STOP
but ton agai n t o stop the chronog raph
hands. The measured time will be displayed.
5. Restart measuring time.
Upon pressing of the START/STOP button again, the chronograph hands restart
moving from the position they had previously stopped.
84
85
■SPECIFICATIONS
1. Features: 3 hands (hour, minute a nd sma ll second hands), 24 -hour hand, Calendar display,
Time difference adjustment function, Power reserve indicator, Stopwatch: Center chronograph second hand, Chronograph hour and minute hands
2. Frequency of crystal oscillator: 32 ,768 Hz
3. Loss/gain (monthly average): ± 15 seconds ( ± 1 second per day) (worn on your wrist at
normal temperature range between 5℃ a nd 35℃)
4. Operational temperature range: between -10℃ and +60℃
Under the low-temperature condition (below0 ℃), always keep at least one sixth of the
watch power shown by the power reserve indicator.
5. Driving System: Mainspr ing (Self-winding ty pe with manual winding function)
6. Hand movement: Glide-motion hands
7. Continuous operable time: Approx. 72 hours (Approx. 3 days) when the normal time dis-
play fu nction and stopwatch f unction are used. (If the power reser ve indicator shows the
power supplied by the mainspring is full before st arting the watch.) Depending on conditions of use, the continuous operable time may become shorter than the above.
8. IC ( Integrated Circuit):Oscillator, frequency divider, and spring drive control circuit (CMOS-IC): 1 piece
9. Number of jewels: 50 jewels
The specifications are subject to change without prior notice due to product improvements.
8. Reset the chronograph hands.
After stopping the chronograph hands, press the
RESET button to return all the chronograph hands
to the 0 position.
6. Stop measuring time.
At the moment you want to nish the measurement, press the START/STOP button again to
stop the chronograph hands. The measured time
displayed at this time will be the total of the
rst and the second measurement (accumulated
elapsed time).
7. Repeat measuring time cumulatively.
Step 5 and 6 above can be repeated as required.
As you repeat pressing of the START/STOP
button, the measurement will stop and restart
and each elapsed time measurement will be accumulated.
Page 11
86
87
■REMARKS ON REPLACEMENT PARTS
SEIKO makes it policy to usually keep a stock of spare parts for Grand
Seiko watches for 10 years. In principle, your watch can be reconditioned
within this period if used normally. (Replacement parts are those which are
essential to maintaining the functional integrity of the watch.)
The number of years that a watch is considered repairable may vary greatly
depending on the conditions under which it was used, and normal accuracy
may not be achieved in some cases. We recommend, therefore, that you
consult the retailer from whom the watch was purchased when having them
repair your watch.
The case, dial, hands, glass and bracelet, or parts may be replaced with
substitutes if the originals are not available.
For any other information, contact the retailer from whom your watch was
purchased or the "CUSTOMER SERVICE DEPARTMENT" of SEIKO
WATCH CORPORATION.
■REMARKS ON AFTER-SALES SERVICING
Your Grand Seiko watch was strictly checked and completely adjusted at
the factory to ensure its high accuracy. However, if your watch gets out of
order with the correct way of use as described in this instruction booklet
within the guarantee period, take your watch to the dealer from whom your
watch was purchased together with the certificate of guarantee. Repair and
adjustment will be made without charge.
The guarantee period is one year from the date of purchase. For the movement only, this guarantee period is extended to two years from the date of
purchase. More detailed guarantee coverage is provided in the certificate
of guarantee.
For repair services after the guarantee period has expired or for any other
information regarding the Grand Seiko, please contact the retailer from
whom your watch was pu rchased or the "CUSTOMER SERV ICE DEPARTMENT" of SEIKO WATCH CORPORATION.
88
89
RASH AND ALLERGY
Adjust the bracelet and band so that there will be a little clearance between the
bracelet or band and your wrist to avoid accumulation of perspiration.
If you are constitutionally predisposed to rash, the band may cause you to develop a
rash or an itch depending on your physical condition.
The possible cause of the rash are as follows:
1. Allergy to metals or leathers
2. Rust, dust or perspiration on the watch or band
If you develop any skin reactions, take off the watch and consult a doctor immediately.
■TO PRESERVE THE QUALITY OF YOUR WATCH
CARE OF YOUR WATCH
The case and bracelet touch the skin directly just as underwear.
If they are left dirty, the edge of sleeve may be stained with rust of those who have a
delicate skin may have a rash.
After removing the watch from your wrist, wipe perspiration or moisture with a soft
cloth. This will prevent the watch from being soiled, adding to the life of the gasket.
Do not clean the watch wi th chemicals (especially w ith organi c solvents such as
benzene, thinner, alcohol, detergent, etc.). Otherwise, the watch may be deteriorated.
LEATHER BAND
When removing moisture from a leather band, do not rub the band with the cloth as
they may discolor it or reduce its gloss. Be sure to blot up the moisture using a soft
dry cloth.
Please note that leather bands may become less durable when they are moistened.
METAL BRACELET
Clean the watch bracelet with a soft toothbrush dipped in water or soapy water.
CAUTION
CAUTION
WATER RESISTANCE
・ If your watch is 3 bar water resistant, do not use it in water.
・ If your watch is 5 bar water resistant, do not use it in any type of diving including
skin diving.
・ If your watch is 10 or 20 bar water resistant, do not use it in saturation diving or
scuba diving.
WARNING
Page 12
90
91
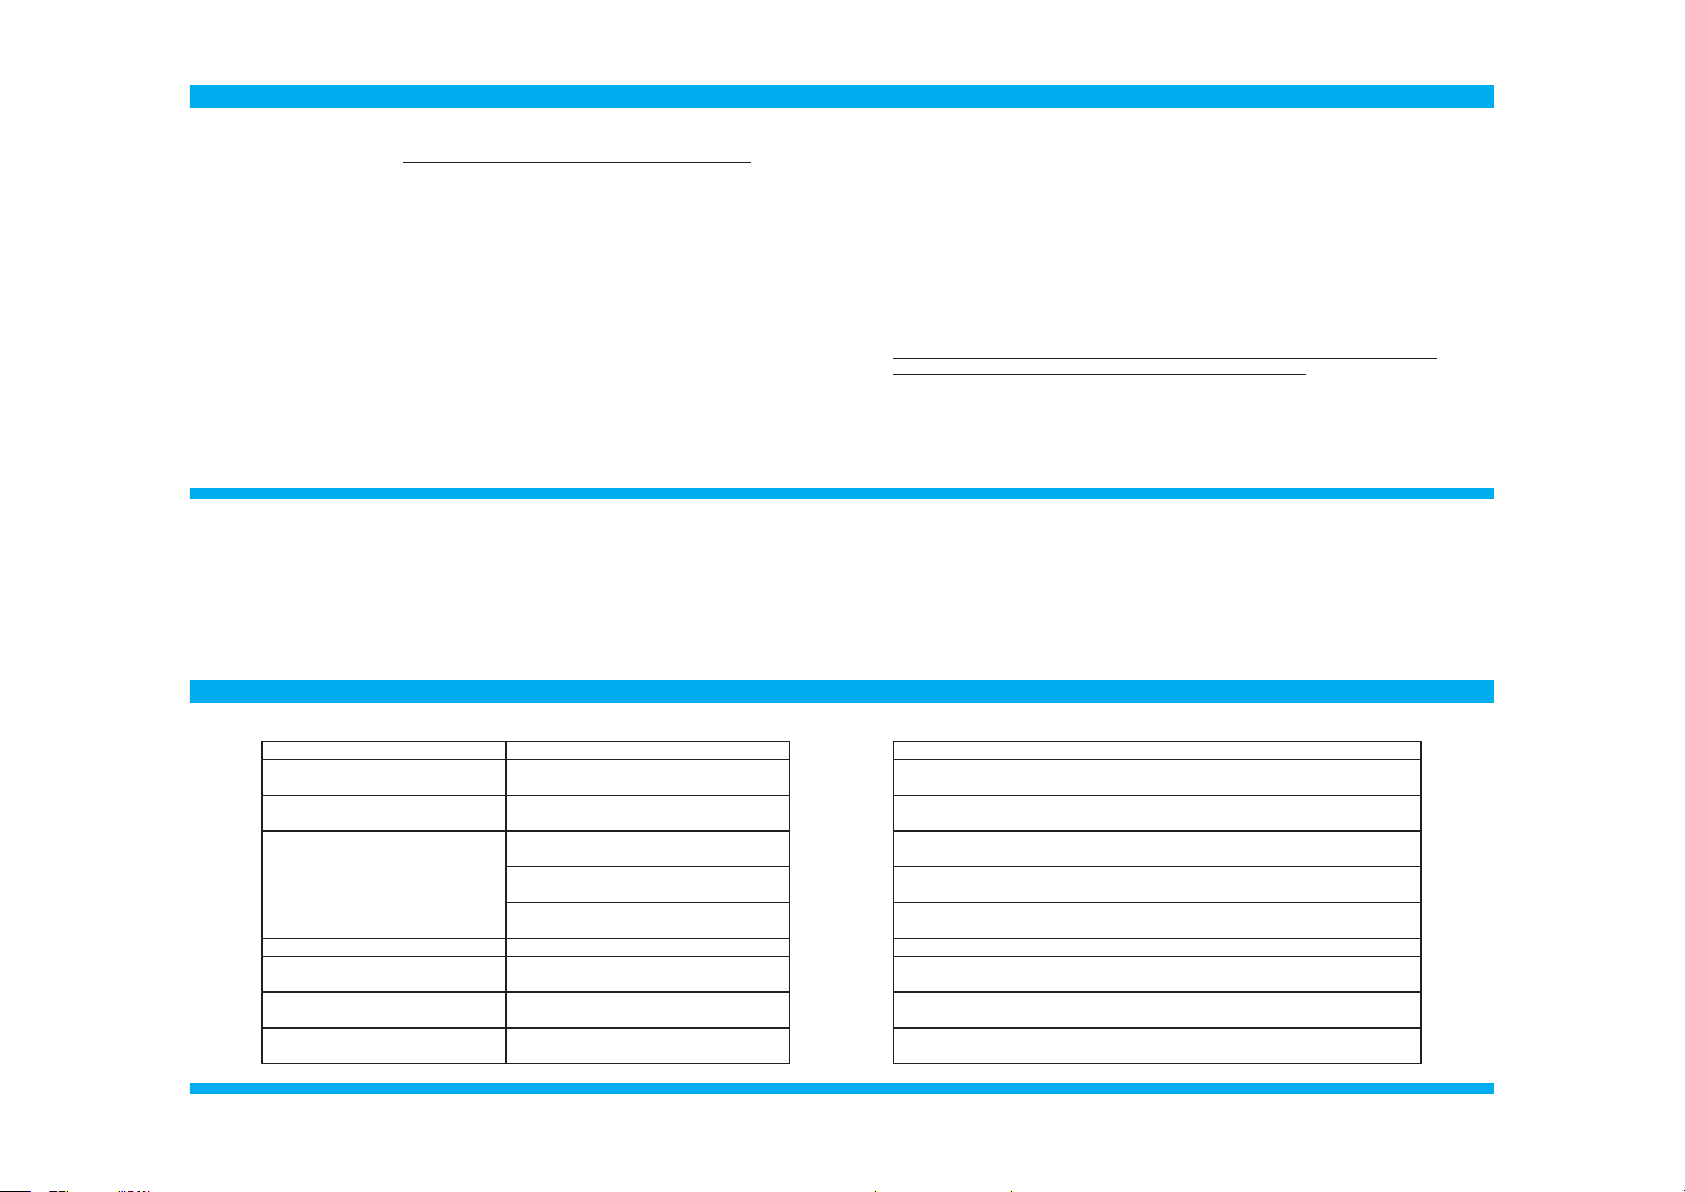
WATER RESISTANCE
・ Check the dial or case back of your watch for the water resist ant quality, and then see the
table below.
・ Do not tur n or pull out the crow n when the watch is wet, as water may get inside the watch .
Designedand
manufacturedtowithstand
accidentalcontactwith
watersuchassplashes
andrain.
Suitableforshallow
divingwithoutaheavy
breathingapparatus.
Genuinediving
usingheliumgas.
Suitableforswimming,yachting
andotheraquaticsportsaswellas
forworkscloselyassociatedwith
watersuchaskitchenwork,
wateningandfishing.
Condition
ofuse
Degree
ofwater
resistance
Nowaterresistance
Waterresistance
(3bar)
Waterresistance
(5bar)
Waterresistance
(10bar)
Waterresistance
(20bar)
Indicationforwater
resistance
a:
Indicationonthedia
l
b:Indicationonthe
caseback
WATERRESISTor
WATERRESIST5BAR
Noindication,or
WATERRESIST20BAR
WATERRESIST20BAR
Noindication,or
WATERRESIST10BAR
WATERRESIST10BAR
Noindication
Noindication
Noindication
WATERRESIST
Noindication
× ×
×
×
×
◯ ×
×
×
×
◯ ◯
×
×
×
◯ ◯
◯
×
×
◯ ◯
◯
×
×
a
b
a
b
a
b
a
b
a
b
Genuine
divingusing
scuba.
CAUTION
The case back shows the performance, caliber/case number of your watch
<Regular case back>
<See-through case back>
※ The above fig ures are examples. Both of them may be different from the figure on
the case back of your watch.
Caliber and Case
Number
The number to
identify the type
of your watch
Water resis-
tance
refer to Page
90.
Magnetic resis-
tance
refer
to Page 92.
92
93
Grand Seiko Spring Drive conforms to the Magnetic Resistance St andard ※ of JIS Clas s 1.
The watch has magnetic resist ance to maintain performance in most cases even where it is
brought close to (at least 5cm spaced from) equipment generating a magnetic field in normal
life. However, the movement part is mag netized when it encounters a st rong mag netic field,
thereby accuracy may go out of order. Pay attention so as not to bring the instrument close
to equipment ( health appliances, speakers, and mobile phones using a magnet) generating a
strong magnetic field within 5cm.
If the accuracy exceeds the accuracy target ra nge ( ± 15 seconds/month) during normal
usage due to magnetization, removal of ma gnetism and accuracy readjustment works are
charged regardless of the guarantee period.
●MAGNETIC RESISTANCE
Examples of common items that generate a magnetic field
●Magnetized items that may affect watches
Speaker of audio instruments, radios, earphones, mobile phone
Magnetic clips Magnetic accessories
Magnetic health equi pment (such
as magnetic plasters, magnetic pillows, magnetic back belts etc.)
Magnetic door seal of
refrigerator or furniture
Magnetic buckle of handbags or purses
Classication of
JIS antimag netic
watches
Certi ed level
of magnetic re-
sistance
Indication of
antimagnetism on
the cas e back
Antimagnetic qualit y
Class 1 480 0A/m
The watch ha s magneti c re sistance to
ma in tai n per form a nc e in m ost cas e s
where it is br ought clo se to (at least
5cm spaced from) equipment generating
a magnetic eld in normal life.
Page 13
94
95
Inspection and adjustment by disassembly and cleaning (overhaul) of this
watch will be performed by SEIKO. When you take the watch to the retailer from whom it was purchased, request that the watch be inspected and
overhauled by SEIKO.
We suggest that you have your watch checked by SEIKO every 3 to 4 years
for long-time use of your watch.
※ The movement of this watch has a structure that consistent pressure is applied on its pow-
er-transmitting wheels. To ensure these parts work together properly, periodic inspection
including cleaning of parts and movement, oiling, adjustment of accuracy, functional check
and replacement of worn parts is needed.
Inspection and adjustment by disassembly and cleaning (overhaul) within 3 to 4 years from the
date of purchase is highly recommended for long-time use of your watch.
Contact the retailer from whom the watch was purchased for inspection and adjustment by disassembly and cleaning (overhaul) of your watch. Make sure that the gasket and push pin will be
also replaced with new ones.
・ For any questions or concerns, contact the "CUSTOM ER SERVICE
DEPARTMENT" of SEIKO WATCH CORPORATION.
●Inspection and adjustment by disassembly and cleaning (overhaul)
・ If the watch is left in a temperature below − 10℃ or above + 60℃ for a
long time it may function improperly or stop operating.
・ Do not leave the watch in a place where it will be subjected to strong
magnetism (for example, near television sets, loudspeakers or magnetic
necklaces).
・ Do not leave the watch where there is strong vibration.
・ Do not leave the watch in a dusty place.
・ Do not expose the watch to gases or chemicals.
(Ex.: Organic solvents such as benzene and thinner, gasoline, nail polish,
cosmetic spray, detergent, adhesives, mercury, and iodine antiseptic solution.)
・ Do not leave the watch in close contact with hot spring water, or do not
keep it in a drawer having insecticides inside.
●PLACES TO KEEP YOUR WATCH
96
97
Solution
Wind th e ma insprin g an d re set th e ti me. W hile yo u ar e wea ring the watch o r when you take it o, check the r emaining p ower shown by the power r eserve ind icator and w ind the mai nspring i f necess ary.
Wear t he wat ch for an extende d pe riod of t ime, or w hen t aking o the watch, tur n th e crow n t o w ind the mainspring if t he remain ing power show n by the power res erve indic ator is not su cient for the nex t use.
Return t he watch to a nor mal temp erature so t hat it works accu rately as usu al, and t hen reset the time. The wat ch has bee n
adjusted so that it works ac curately when it is worn on your w rist under a nor mal temper ature rang e between 5℃ and 35 ℃ .
Correc t t his condit ion by mov ing and keeping th e wat ch away f rom the mag netic sour ce. If this action doe s not
correct t he cond ition, cont act the ret ailer fro m whom the wat ch was pur chased .
Reset t he tim e. I f the w atch doe s not r eturn to its norma l accu racy a fter re settin g the time, contact the ret ailer
from whom t he watch wa s purcha sed.
Contact t he retai ler from who m the watch wa s purcha sed.
If t he wa tch i s lef t at a temperat ure below 0℃ , it may stop if the power reser ve in dicator is showin g le ss t han
one-s ixth of the p ower reser ve. In su ch a case, t urn t he crown to w ind the ma inspr ing.
It take s severa l seco nds befo re the adjustm ent fu nction start s workin g. Set the ti me af ter the secon d hand moves
for approxim ately 30 se conds to s et the tim e correc tly.
Advance t he hour ha nds for 12 hou rs to cor rectly se t the time a nd date.
■TROUBLESHOOTING
Trouble Possible cau se
The watch st ops oper ating.
(The ch ronog raph hand s do not move.)
The power su pplied by the m ainspr ing has b een con sumed .
Even th ou gh you wear the watch ever y da y, the
power reser ve indic ator does n ot move up.
The watch is worn on your wrist only for a sh ort period of
time, or t he amou nt of arm movem ent is sma ll.
The watch t empora rily gain s or loses t ime.
The watch has been left in extr emely high or low tempera tures .
The watch has bee n left clos e to an o bjec t wit h a str ong
magnet ic eld.
You drop the watch , hit it again st a hard su rface, or we ar it while
playing act ive sport s. The wat ch is expo sed to st rong vibra tions.
The inn er surfac e of the gla ss is cloude d.
Moistu re has enter ed the watch b ecaus e the gasket h as deter iorated.
The wat ch stop s eve n thoug h th e po wer rese rve
indicat or is not showi ng "0."
The watch ha s been lef t at a temper ature below 0 ℃ .
Right after sta rtin g the watch, i t s eem s t hat the second
hand moves m ore quickly t han us ual when s etting t he time.
Whe n sta rti ng the w atch , it takes a little ti me bef ore the
adjustm ent funct ion star ts worki ng (this is not a m alfu nction).
The date ch anges d uring d aytime . AM/ PM is not corr ectly set .
Refer to "How t o manua lly wind th e mains pring by t urnin g the crow n" on page 61. Refer t o "How to s et the time" on p age 64.
※ In the event of any oth er problem , please contact th e retailer from whom the watch wa s purchased.
 Loading...