

Seiko SmartPad SP580,SmartPad User Manual
Seiko Instruments USA Inc.
2990 W. Lomita Blvd.
Torrance, CA 90505-5196
www.seikosmart.com
Seiko Instruments SmartPad User’s Guide page 1

Contents
Chapter 1:
Introduction ......................................................5
Welcome! ........................................................................ 5
How SmartPad Works..................................................... 5
SmartPad Features......................................................... 6
Ways to Use SmartPad................................................... 7
SmartPad Overview......................................................... 8
SmartPad Product Box Contents .................................. 10
System Requirements ................................................... 10
Chapter 2:
SmartPad Setup..............................................11
Battery Installation..........................................................1 1
SmartPad Software Installation ..................................... 12
Reassigning Front Panel Buttons.................................. 17
Attaching your Palm Organizer...................................... 18
Chapter 3:
Using SmartPad..............................................22
eMemo .......................................................................... 22
eAddress....................................................................... 30
eToDo ........................................................................... 38
eDatebook..................................................................... 45
Attaching Ink Notes to a Different Record..................... 52
Attaching Ink Notes to an E-mail Message.................... 55
Page 2

Chapter 4:
SmartPad Desktop Software..........................58
Starting the SmartPad Desktop Application ................... 58
Displaying an Ink Note Page ......................................... 60
Choosing Ink Width ....................................................... 61
Changing an Ink Note Category .................................... 61
Printing Your Ink Notes ................................................. 62
Exporting Ink Notes (Save As) ...................................... 64
Opening Other Ink Notes .............................................. 65
Finding Ink Note Files ................................................... 66
Zooming the Ink Note View ........................................... 68
Attaching an Ink Note to an E-Mail Message................. 69
Additional File Menu Commands ................................... 70
Preferences Menu......................................................... 70
T oolbar Buttons............................................................. 71
Chapter 5:
Reference ........................................................72
Replacing Ink Cartridges ............................................... 72
Replacing the SmartPen Battery ................................... 73
Troubleshooting............................................................. 75
Index......................................................................78
Seiko Instruments SmartPad User’s Guide page 3

Trademarks and Copyright
SmartPad and the SmartPad logo are trademarks of Seiko Instruments USA Inc.
Copyright © 2000, Seiko Instruments USA Inc.
All Rights Reserved. Seiko Instruments’ products contain certain trade secrets
and confidential and proprietary information. Use, reproduction, disclosure and
distribution by any means are prohibited, except pursuant to a written license
from Seiko Instruments USA Inc. Use of Copyright Notice is precautionary and
does not imply publication or disclosure. Other products and brand names may
be trademarks or registered trademarks of their respective owners.
Disclaimer and Limitation of Liability
Seiko Instruments USA Inc. assumes no responsibility for any damage or loss
resulting from the use of this product.
Seiko Instruments USA Inc. assumes no responsibility for any loss or claims by
third parties that may arise through the use of this software.
Seiko Instruments USA Inc. assumes no responsibility for any damage or loss
caused by deletion of data resulting from malfunction, dead batteries, or repair.
Be sure to make backup copies of all-important data on other media to protect
against data loss.
Important: Please read the Seiko Instruments USA Inc. End User Software
License Agreement before using the accompanying software program(s). Using
any of the software indicates that you accept the terms of the End User Software
License Agreement.
Restricted Rights Legend:
Use, duplication, or disclosure by the Government is subject as set forth in
subparagraph (c) (1) (ii) of the Rights in T echnical Data and Computer Software
clause at DFARS 52.227-7013.
Page 4

Chapter 1:
Introduction
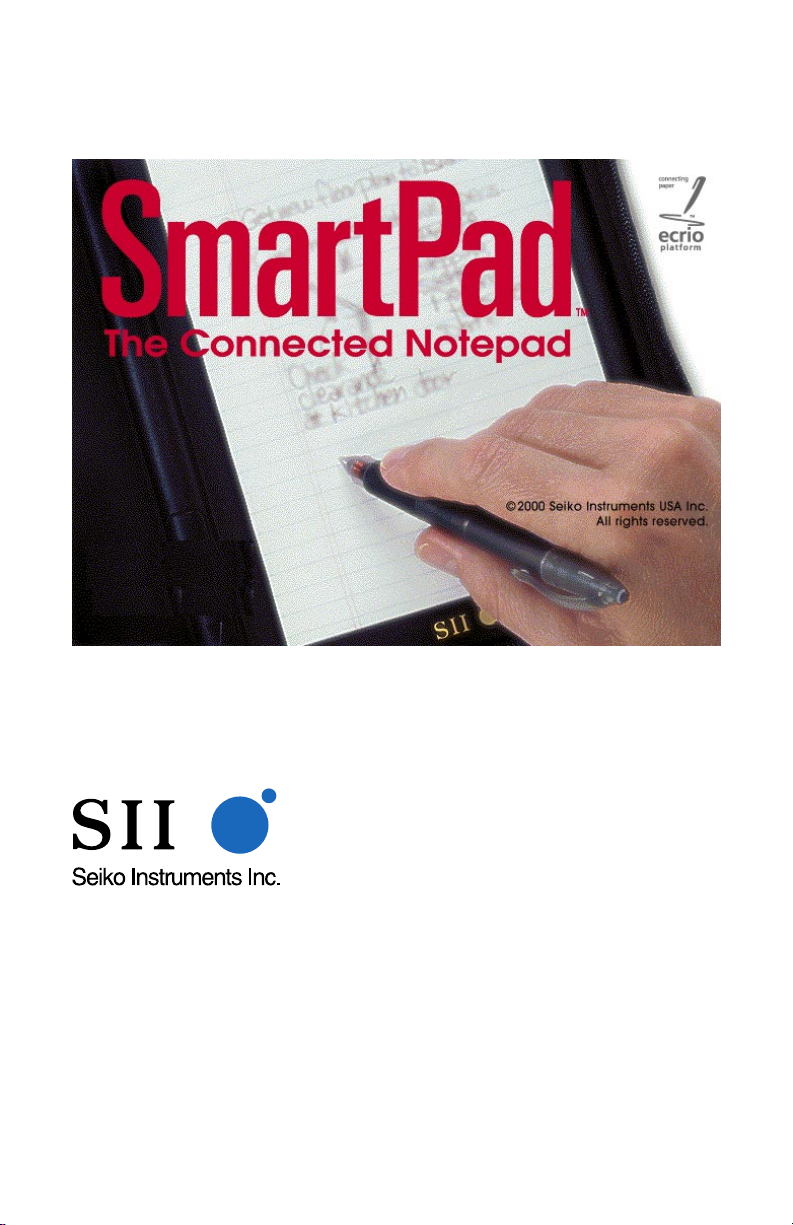
Welcome!
W elcome to SmartPad™, the Connected
Notepad! Using the supplied software, and an
ordinary paper writing pad, SmartPad automatically links to your Palm™ PDA organizer and
stores anything that you write directly into the
memory of the Palm unit. Whether you scribble
quick notes, draw diagrams or maps, or take extensive notes at meetings,
SmartPad enables you to instantly transfer and store the handwritten information
on your Palm organizer .
SmartPad consists of an electronic notepad, integrated into an elegant portfolio
that also stores and protects your Palm organizer . The paper notepad is a standard
5"x8" pad; refills are available at any stationery store. A special pen is provided,
and it automatically transmits whatever you write through SmartPad and into
your Palm organizer . For convenience, the opposite end of the pen contains a
stylus point for use with the Palm organizer .
How SmartPad Works
SmartPad Portfolio
Located beneath SmartPad’s paper pad is a special digitizer tablet that is sensitive
to the position of the SmartPen. As you write with the SmartPen on the paper
pad, the SmartPad reads the location of the pen tip and communicates its exact
location to your Palm organizer.
SmartPad Software in your Palm Connected organizer
The SmartPad software installed on your Palm organizer automatically recognizes the infrared data transmitted by SmartPad, and instantly creates a new Ink
Note file in any of the four SmartPad applications; To Do List, Memo, Date
Book, and Address. With MultiMail Pro™ software and a modem, you can email your Ink Notes directly from your Palm organizer .
Seiko Instruments SmartPad User’s Guide page 5

SmartPad Desktop software installed on your Windows PC
When you HotSync your Palm organizer with your Windows PC, all of your
SmartPad notes are automatically copied to the PC and saved for use by your
SmartPad desktop software. This software allows you to view, print, and even email your Ink Note file images from your PC.
SmartPad Features
Once you have installed the SmartPad software, SmartPad works instantly and
automatically to transfer your handwritten notes into your Palm organizer .
SmartPad features include:
n An easy user interface. Just touch the pen to the pad, and you’re automati-
cally storing your handwritten data!
n Each Ink Note can have up to 16 pages of handwritten data. With the Palm
organizer you can easily view the contents of each page, and make additions
as necessary.
n You can zoom to enlarge the view of the written notes on the Palm organizer,
and pan to move the position of the image on the screen. You can easily
zoom up to 4x magnification to view the smallest details of your handwritten
notes on the Palm organizer .
n SmartPad’s sleep mode integrates with the Palm or ganizer’s “auto-of f”
feature. If your Palm organizer is set for “auto-off after: 2 minutes” (and
you’re using the SmartPad), the Palm organizer will go into “sleep mode” to
conserve power after two minutes. However, the infrared communication
between SmartPad and your Palm organizer will remain active. Even though
the screen is blank, the Palm organizer will instantly awaken when you touch
the SmartPen to the pad, and you can continue taking notes. If you don’t use
your SmartPad for 30 minutes, the “sleep mode” will finally turn off the
infrared communications with the SmartPad and then completely turn off
your Palm organizer .
n SmartPad will automatically name an Ink Note file based upon the applica-
tion you’re currently using. You can also associate an Ink Note file with any
record in the selected application, or change the name of the Ink Note file.
n Ability to send a written Ink Note as an e-mail message. If you have a Palm
Modem™ connected to your Palm organizer, you can use an application such
as MultiMail Pro software to transmit your written notes as an e-mail
message.
Page 6

n Uses standard paper notepads, available in any stationery store. No special
paper supplies are required for the SmartPad.
n Easily confirm the status of the batteries that power the SmartPad.
n The SmartPad software includes eMemo, eT oDo, eAddress, and eDatebook.
These applications function the same as the standard applications on your
Palm organizer — they simply extend the function of these applications to
automatically work with SmartPad. You can attach an Ink Note to any file in
these four Palm organizer applications.
Ways to Use SmartPad
SmartPad can change the way you work with your Palm organizer, vastly expanding its capabilities with the effortless association of handwritten notes, diagrams,
maps — anything that you can draw with the SmartPen. The following are some
ideas for using SmartPad with your Palm organizer:
n If you attach an Ink Note to an event in the eDatebook application, the Ink
Note is associated with the date and time of the event — such as a meeting.
This means that you can use the SmartPad to take handwritten notes or
“meeting minutes,” and then easily find them, attached to the date and time of
the event.
n In the applications that support Categories (eAddress, eT oDo, and eMemo),
you can create Categories for the records that contain the Ink Notes you
create with SmartPad. This makes it easy to organize the data on your Palm
organizer, and makes it fast to find the Ink Notes that you want to review or
modify.
n The Ink Notes generated by SmartPad are separate from the regular Notes that
can be attached to records in your Palm organizer . This means that you can
attach text notes using Graffiti on your Palm organizer , and also attach Ink
Notes (for handwritten notes or drawings) with the SmartPad.
n SmartPad can automatically assign default names to new records. With the
eT oDo and eMemo applications, just start writing on the Notepad to create a
new record, with the date and time as the name for the record. With the
eAddress and eDatebook applications, you can start writing to create a new
Ink Note that can be attached to a record at a later time.
Seiko Instruments SmartPad User’s Guide page 7
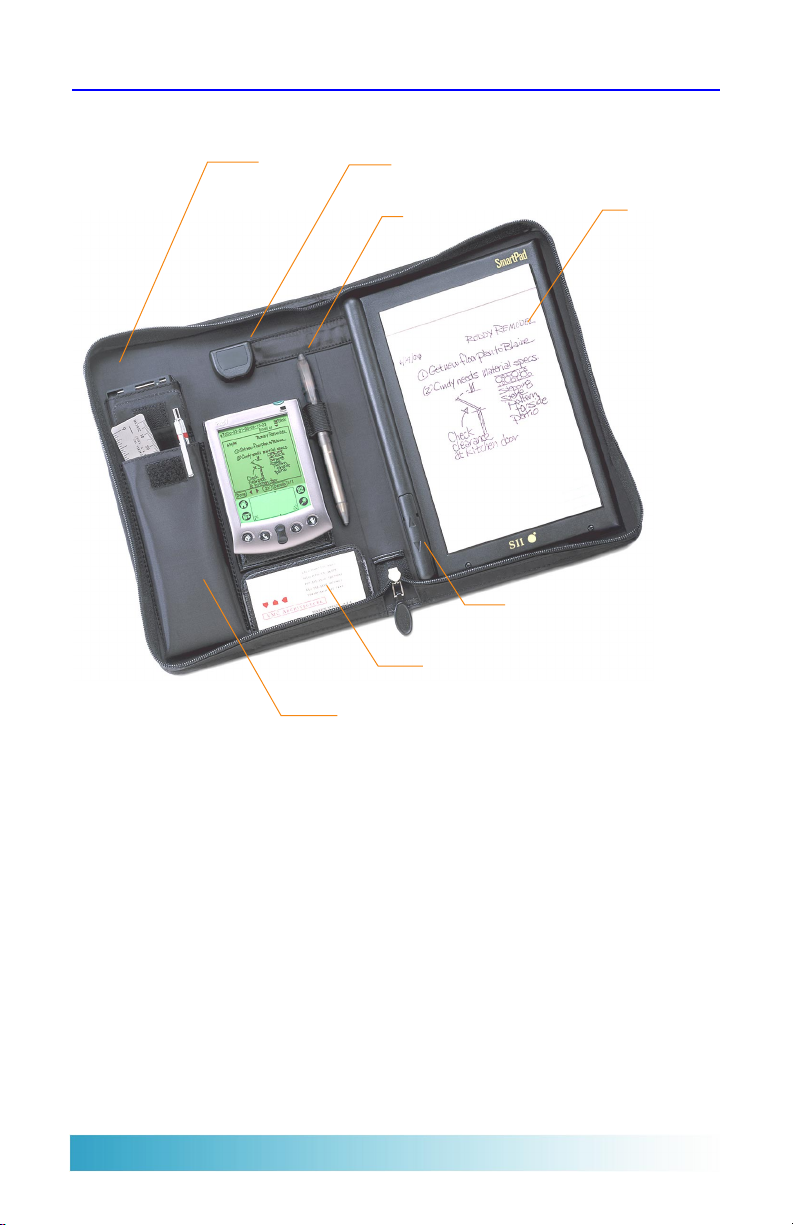
SmartPad Overview
The following diagram points out the SmartPad features:
Ink
Cartridges
Infrared Transmitter
SmartPen
Battery Compartment
Business Card Holder
Storage Pocket (for cell phone, etc.)
Notepad
Ink Cartridges
Your SmartPad uses the special SmartPen for writing on the Notepad. This
pocket contains spare ink cartridges for the SmartPen. Refer to the section
entitled Replacing Ink Cartridges for complete information about how to replace
the SmartPen’s ink cartridge.
Page 8

Infrared Transmitter
The infrared transmitter communicates information between SmartPad and the
Palm organizer . There must be a clear path between this infrared transmitter and
your Palm organizer . Do not store items in the area between the infrared transmitter and the Palm organizer .
SmartPen
This special SmartPen is used for writing on the Notepad. The SmartPen
contains a special transmitter that communicates with the SmartPad. The
SmartPen uses a AAAA battery that can be easily replaced. Refer to the section
entitled Replacing the Pen Battery for complete information about how to
replace this battery . The SmartPen also uses replaceable ink cartridges. Refer to
the section entitled Replacing Ink Cartridges for complete information about how
to replace the SmartPen’s ink cartridge.
Notepad
The Notepad is a standard 5x8 inch paper pad. Replacements for this pad are
available at stationery stores. No special paper is required for use with the
SmartPad. Any standard paper pad of the correct dimensions will work just fine
with SmartPad.
Battery Compartment
The battery compartment stores the batteries that are used to power the SmartPad.
A pair of standard AAA batteries are provided for the SmartPad portfolio. Before
you use SmartPad for the first time, you must install these batteries. Refer to the
section entitled Battery Installation for complete information about how to
install the batteries.
Business Card Holder
This pocket provides a convenient place to store your business cards.
Storage Pocket
The storage pocket can be used for anything that you want to carry along with
your SmartPad. Most users find it a convenient place to store a cell phone.
Seiko Instruments SmartPad User’s Guide page 9

SmartPad Product Box Contents
The shipping box for the SmartPad should contain the following items:
n SmartPad portfolio
n SmartPen (with one AAAA battery installed)
n SmartPen refill cartridges
n T wo (2) AAA batteries for the SmartPad portfolio
n Quick Start Guide
n Software CD-ROM.
If any of these items are missing, contact the reseller where you purchased the
SmartPad.
System Requirements
The following are minimum system requirements for SmartPad:
n Windows 95, Windows 98, Windows 2000, or Windows NT 4
n IBM PC (or compatible), equipped with a Pentium 166 MHz (or faster)
n 16 Mbytes of RAM
n 16 Mbytes of available hard disk storage
n VGA (or better) video card, and color monitor with at least 800x600
resolution (or better)
n CD-ROM drive
n Mouse
n Palm III series organizer or higher (not compatible with Palm or Palm Pro
that has been upgraded to Palm III)
n Palm OS 3.1 or higher.
Optional Equipment
n Modem for the Palm organizer (such as the Palm Modem)
n Windows compatible printer .
Page 10
Chapter 2:
SmartPad Setup
This chapter explains how to set up your SmartPad, and how to install the
software on both your desktop PC and your Palm organizer .
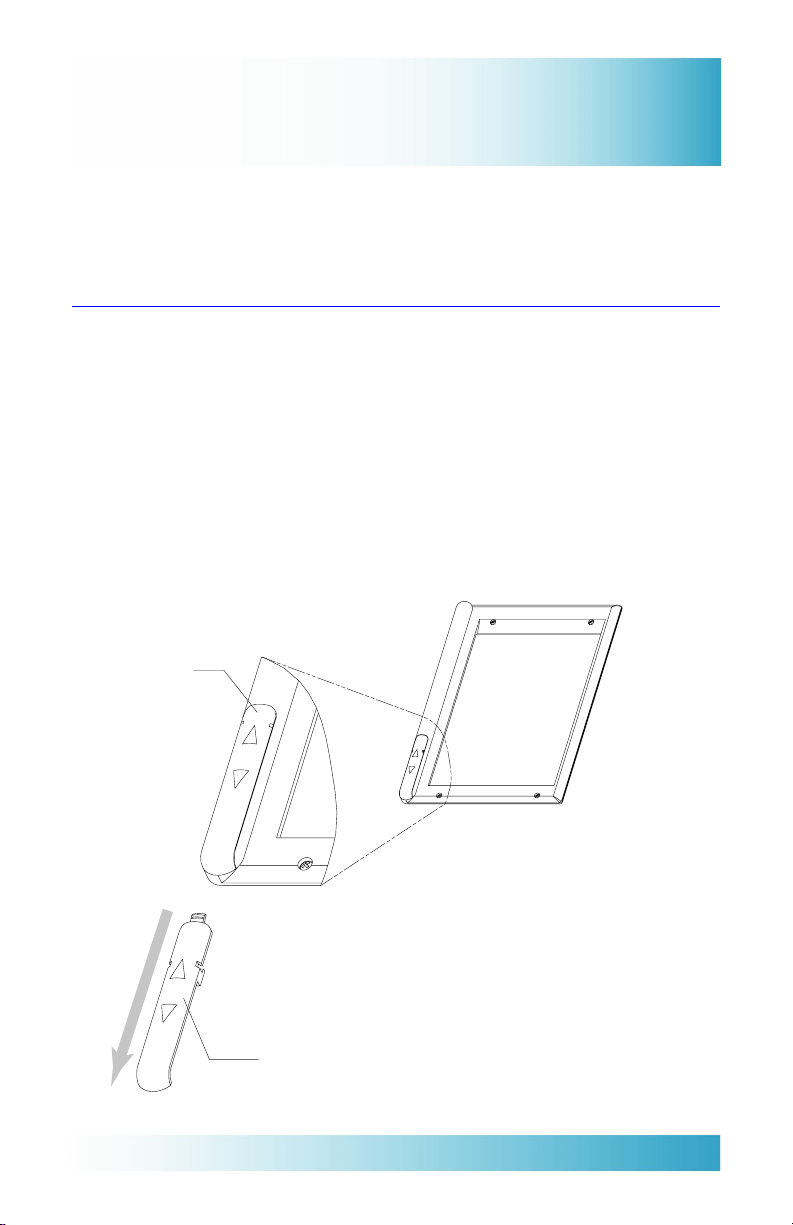
Battery Installation
Your SmartPad is supplied with 2 (two) AAA batteries. These batteries must be
installed before you can use SmartPad.
To install the batteries:
1. Remove the 2 (two) AAA batteries from the SmartPad package.
2. Remove the batteries from their protective wrapper.
3. The battery compartment has a cover, and is located to the left of the notepad
area of the SmartPad portfolio. Gently press down on the cover, and then
slide the cover off, as shown:
Press Down
Here
Remove Cover
Seiko Instruments SmartPad User’s Guide page 11
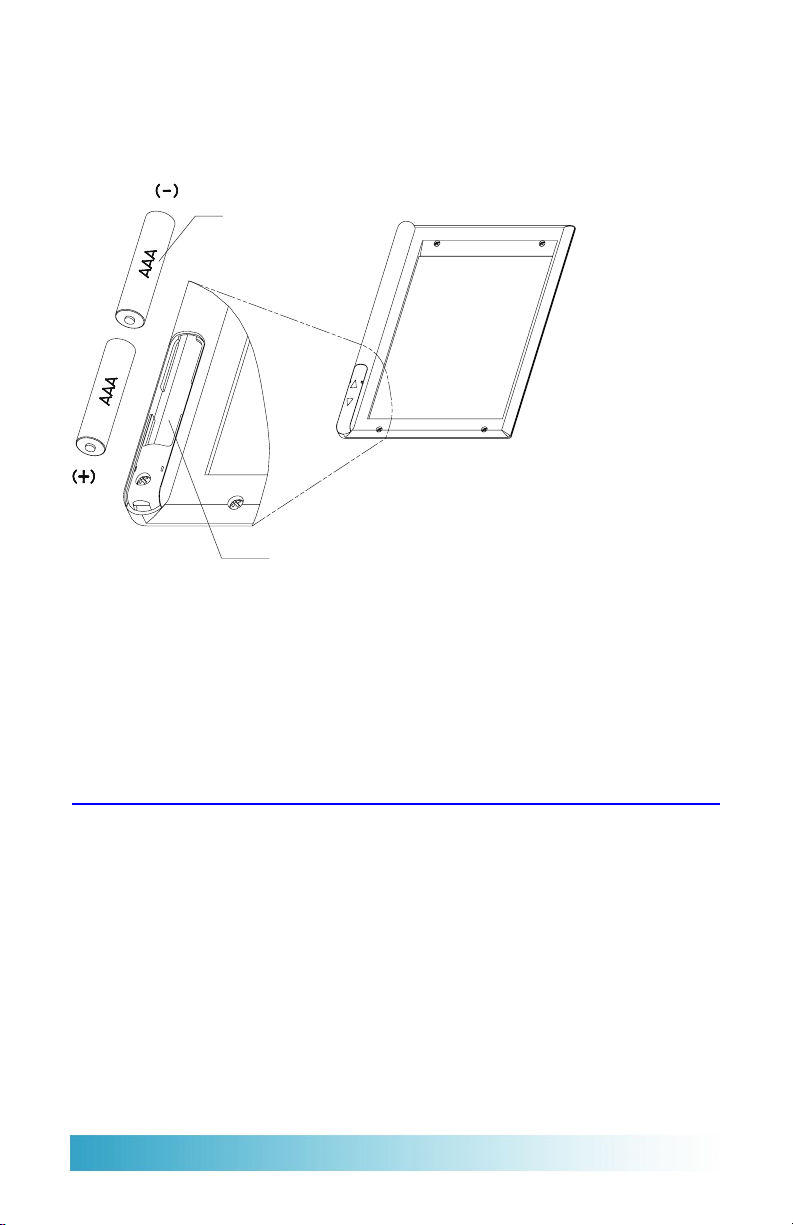
4. Insert the batteries into the battery compartment. Note the polarity of the
batteries: the positive end (+) of both batteries should point down toward the
lower edge of the SmartPad portfolio, as shown:
Install Batteries
Battery Compartment
5. Replace the battery cover, and slide it into place. When you have replaced it
correctly, the battery cover “clicks” into position.
Battery installation is complete, and you are ready to install the SmartPad desktop
software on your desktop PC.
SmartPad Software Installation
The next step is to install the SmartPad software on your Windows PC and your
Palm organizer . The W indows PC must be the same Windows computer that you
use to HotSync your Palm organizer .
To install the SmartPad software:
1. Begin by closing any applications you have running on your Windows PC.
You will restart your computer at the end of this procedure; so be sure to
close all important files or applications before you begin the installation.
Page 12
2. Load the SmartPad Software CD-ROM into your Windows PC. The Setup
program should start automatically.
If it does not, refer to the Quick Start Guide (supplied with SmartPad).
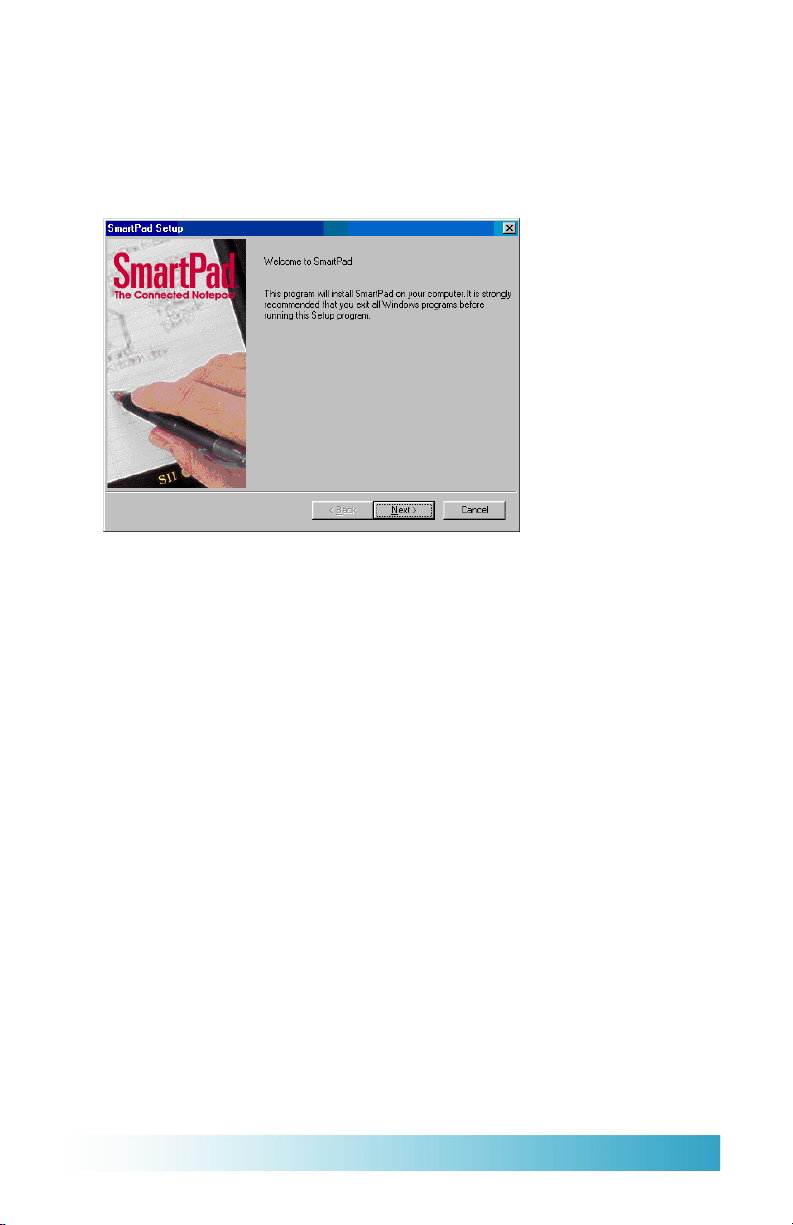
3. When the Setup program loads, the first installation screen appears, as shown:
Click Next to continue.
4. A screen detailing the SmartPad software license agreement appears. Review
the contents of the agreement. If you agree, click Y es to continue.
5. The Choose Application Location screen appears. The default location for
the SmartPad desktop software is c:\Program Files\SmartPad, and is recommended. If you want to choose a different location, click on the Browse
button and choose a different location. Otherwise, click Next to continue.
6. The Choose Ink Location screen appears. This defines the directory where the
“Ink Note” files will be stored (when transferred from your Palm organizer).
The default location for the Ink Note data is c:\SmartData, and is recommended. If you want to choose a different location, click Browse and choose
a different location. Otherwise, click Next to continue.
7. You are prompted to install the SmartPad Desktop software on your PC.
This screen displays the space required for the installation, and the space
available on the drive you selected in step #5, as shown:
Seiko Instruments SmartPad User’s Guide page 13
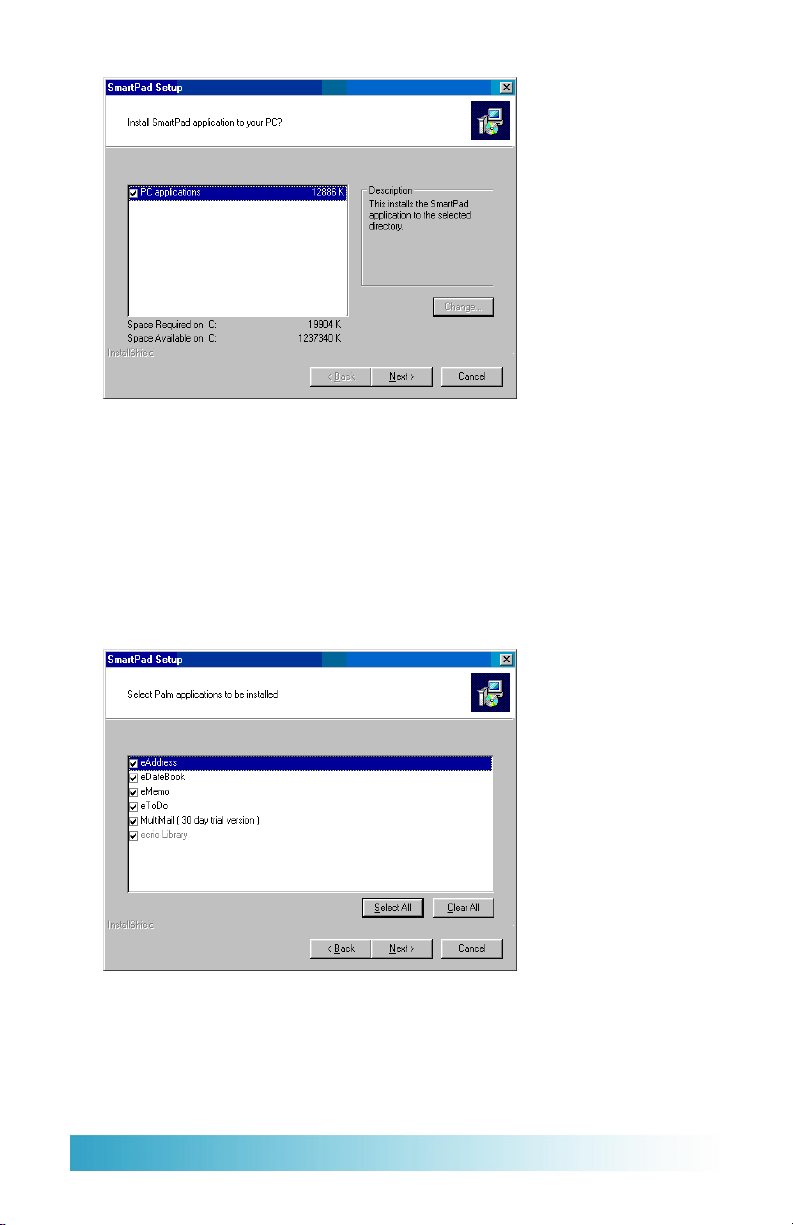
Click Next to continue.
8. The Select Palm Applications screen appears. This gives you the option of
choosing the applications that will be installed on your Palm organizer . This
option is useful when installing the SmartPad software onto a Palm organizer
with limited memory, or if you will only use SmartPad with one or two
applications on your Palm organizer .
By default, all applications are selected for installation, as shown:
Click Next to continue.
Page 14
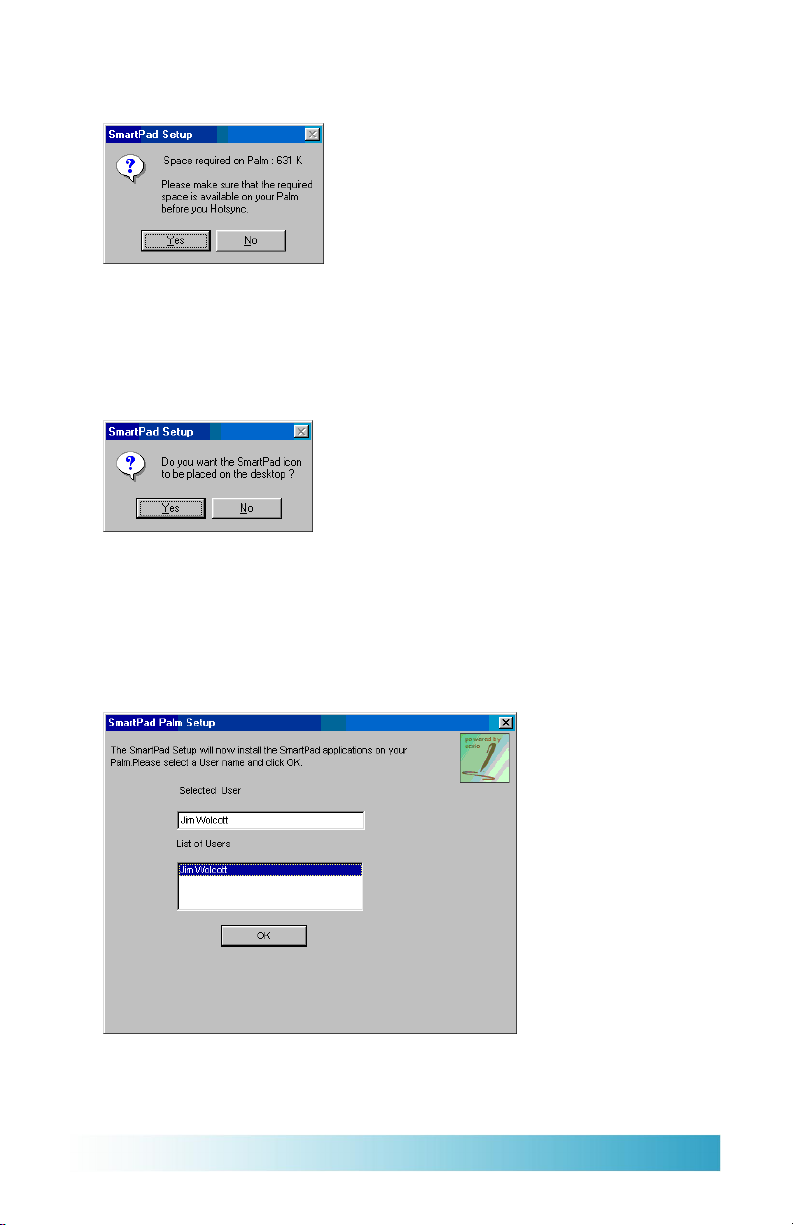
9. A prompt appears, showing the memory space required for the software
installation on your Palm organizer, as shown:
If you do not have this much space available on your Palm organizer, click
No to return to step #5. Otherwise, click Yes to continue.
10. A prompt appears, asking if you want a SmartPad shortcut icon placed on the
Windows desktop, as shown:
Based upon your own preference, click Yes or No to continue.
11. The SmartPad Palm Setup screen appears. If you have more than one Palm
organizer user associated with your Windows PC and its associated Palm
Desktop software, this screen enables you to choose the user for the
SmartPad software. Click to select the user, as shown:
Click OK to continue.
Seiko Instruments SmartPad User’s Guide page 15
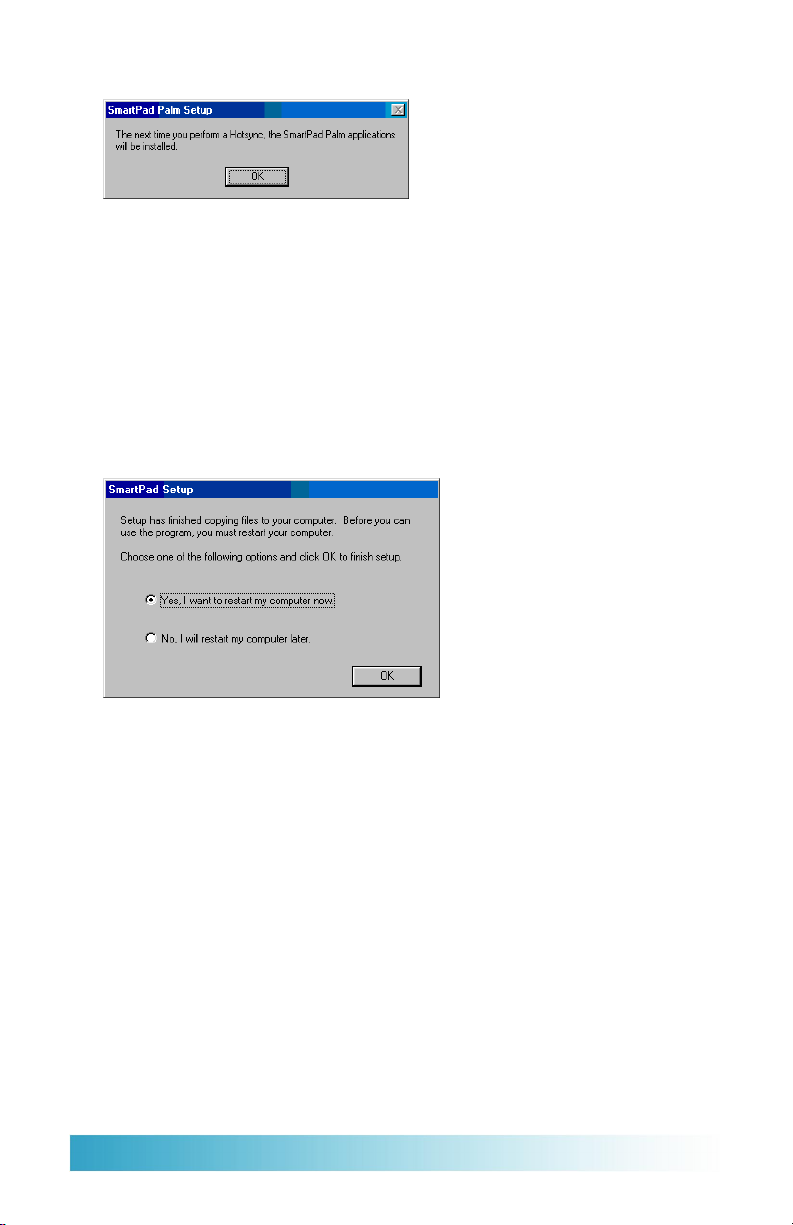
12. A dialog appears, as shown:
This shows that the SmartPad software will be installed on your Palm
organizer the next time you perform a HotSync operation. Click OK to
continue.
13. The Product Registration screen appears. Click Register Now to step
through the brief online registration procedure.
Or, click Register Later to register your SmartPad at a later time.
14. At this point, the SmartPad desktop software is installed on your Windows
PC. The SmartPad Setup software displays a Restart prompt, as shown:
Click to select “Y es, I want to restart my computer now,” and then click the
OK button.
15. When your computer restarts, place your Palm organizer in its cradle and
perform a HotSync operation. This will install the SmartPad software on
your Palm organizer ..
Software installation is complete, for both your desktop PC and your Palm
organizer . You may want to reassign the front panel buttons of your Palm
organizer so they automatically activate the SmartPad software, as described in
the following section.
Page 16

Reassigning Front Panel Buttons
Your Palm organizer has four application buttons on its front panel. These
buttons are used to start, and switch among the four standard Palm organizer
applications: DateBook, Address Book, T o Do List, and Memo Pad. Note that
these application buttons are the black push-buttons located along the lower edge
of your Palm organizer (don’t look for these buttons anywhere on the screen
display of your Palm organizer).
Once you have installed the special SmartPad versions of these applications, you
may want to reassign these application buttons so they activate the SmartPad
applications. By reassigning the application buttons, your Palm organizer will
use the extended SmartPad versions, which automatically recognize the
SmartPad.
Important: The only limitation for reassigning these buttons is for “beaming”
data between two Palm organizers. When sending or receiving data that is
“beamed” from another Palm organizer, the sender (and/or receiver) must have
different Palm applications activated.
For example, if you are using the SmartPad version of the Memo application
(eMemo), and someone attempts to “beam” their business card when running the
Memo application, the transfer may not complete successfully . In this case,
switch to a different SmartPad application, such as eAddress. Once you have
reassigned the front panel buttons (as described in the following procedure),
simply press a different front panel button to switch to a different application.
To reassign the application buttons on your Palm organizer:
1. Before you begin, be sure that you have taken the steps to install the
SmartPad software on your Palm organizer, and have performed a HotSync
operation. Refer to the section entitled SmartPad Software Installation for
the complete procedure.
2. Turn on your Palm organizer by pressing the Power button or any of the front
panel buttons.
3. T ap on the Applications (or Home) icon. The Applications screen appears.
4. T ap on the Prefs icon. (You may have to scroll down through the installed
applications to find the Prefs icon.)
5. T ap the upper-right of the Palm screen. When a pop-up menu appears, tap to
choose Buttons from this menu. The Buttons settings appear, as shown:
Seiko Instruments SmartPad User’s Guide page 17
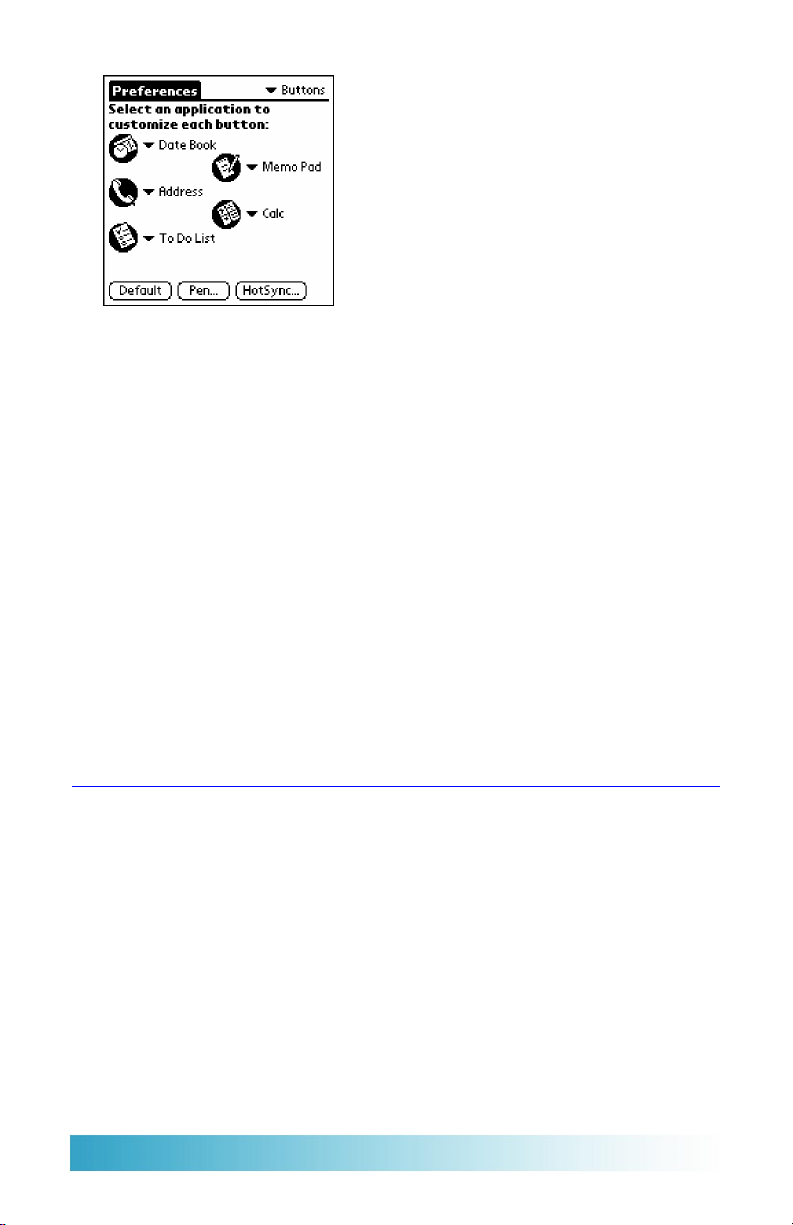
6. T ap the menu next to the Date Book icon. From the list of applications that
appears, tap to choose eDatebook.
7. T ap the menu next to the Address icon. From the list of applications that
appears, tap to choose eAddress.
8 T ap the menu next to the To Do List icon. From the list of applications that
appears, tap to choose eT oDo.
9. T ap the menu next to the Memo Pad icon. From the list of applications that
appears, tap to choose eMemo.
10. Press any Application button on your Palm organizer to save your button
assignments, and move directly to that application.
This procedure is complete. At this point, you can use any of the Application
buttons on your Palm organizer to directly activate the special SmartPad versions
of the applications.
Attaching your Palm Organizer
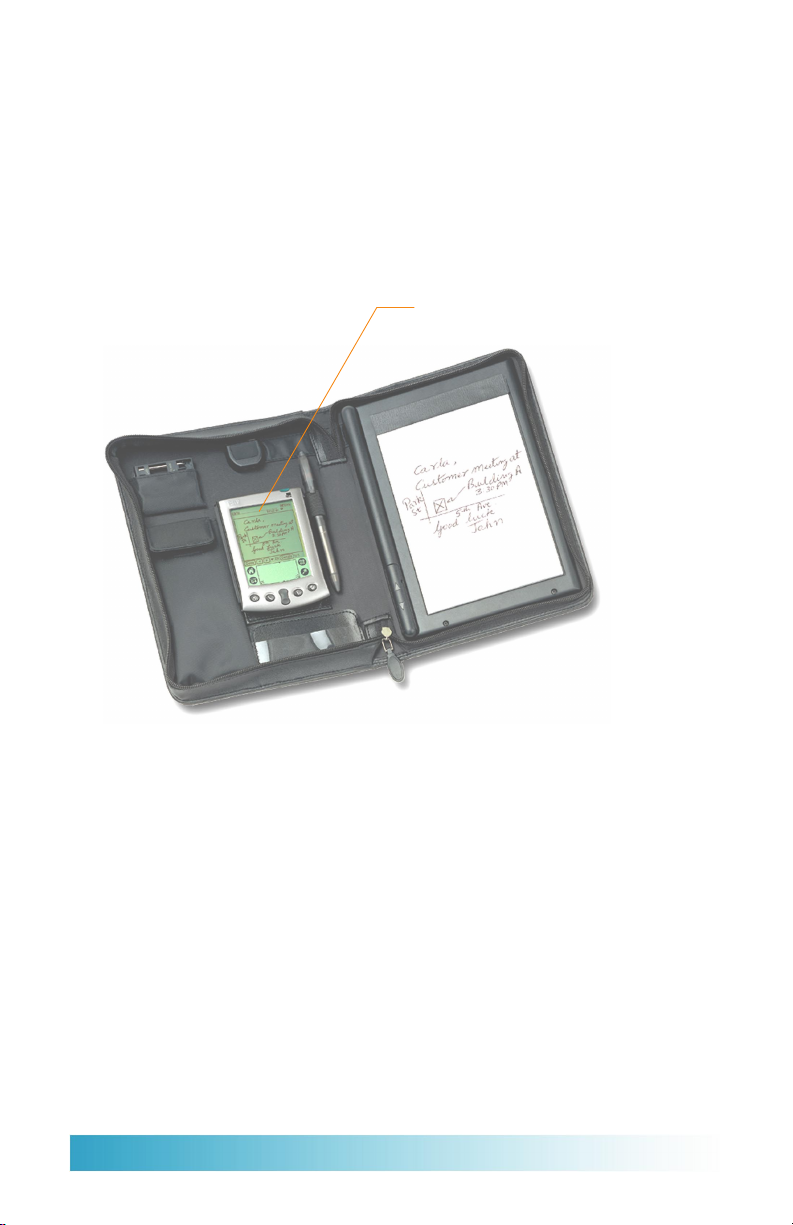
Your SmartPad portfolio has a special area designed to hold and store your Palm
organizer . In fact, your Palm or ganizer must be placed in this area, so its infrared
link can communicate with the SmartPad portfolio.
For the Palm III and VII series organizers, special self-adhesive strips are provided. When placed on the back of your Palm organizer, they firmly attach your
Palm organizer to the SmartPad portfolio. The adhesive strips are of the hookand-loop design, so you can easily remove your Palm organizer , and use it
separately from the SmartPad portfolio.
Page 18

For the Palm V series organizers, a pocket is provided in the same location. You
can slip the cover of a Palm V series organizer into this pocket, and it will be
correctly positioned to work with the SmartPad portfolio.
Attaching the Adhesive Strip for the Palm III and Palm VII Series
To attach the adhesive strip to the Palm III and Palm VII series organizers:
1. Locate the adhesive strip on the left side of the SmartPad portfolio. There is
a single white strip that covers a hook-and-loop fastener.
2. Carefully peel the adhesive strip away from the fastener. Be careful not to
peel the white adhesive backing off from the adhesive strip. Set the strip
aside for step #4.
3. Place your Palm organizer face-down on a suitable work surface.
4. Remove the white backing from the adhesive strip, and place it on the back of
your Palm III or Palm VII organizer, as shown:
Attach Strip
You may need to cut the adhesive strip so it does not cover the battery
compartment, or other features on the back panel of your Palm organizer .
Seiko Instruments SmartPad User’s Guide page 19
You may want to measure the back of your Palm organizer, so the strip will
align correctly when you place it into the SmartPad portfolio.
5. When you have positioned the strip, place your Palm organizer into the
SmartPad portfolio so that the hook-and-loop strip is firmly connected.
6. When your Palm organizer is correctly placed in the SmartPad portfolio, it
will appear similar to the following diagram:
Palm organizer placed
in SmartPad portfolio
This procedure is complete. The hook-and-loop fastener on the back of your
Palm organizer enables you to remove it at any time, and use it separately from
the SmartPad portfolio.
Page 20

Attaching your Palm V Series Organizer to the SmartPad portfolio
If you want to use a Palm V series organizer with the SmartPad portfolio, the
cover supplied with the organizer can be used to attach Palm organizer to the
SmartPad portfolio.
To attach your Palm V series organizer to the SmartPad portfolio:
1. Attach the cover to your Palm V series organizer . The cover fits into the side
channel of your organizer . If you are unsure about how to attach the cover to
your Palm organizer, refer to the Palm Handbook supplied with your Palm
organizer.
2. Carefully slide the cover under the pocket area of the SmartPad portfolio.
Work the cover into the pocket so that your Palm organizer is oriented as
shown in the previous diagram.
Seiko Instruments SmartPad User’s Guide page 21

Chapter 3:
Using SmartPad
This chapter explains how to use the SmartPad with your Palm organizer . For
each of the special SmartPad applications you’ve loaded onto your Palm organizer, this chapter explains how to:
n Create a new Ink Note
n Add pages to an Ink Note
n Zoom to view the contents of an Ink Note
n Associate an Ink Note with a different record on your Palm organizer
n Change the name of an Ink Note
n Send an Ink Note as an e-mail attachment.
You can also use your desktop PC to view, print and e-mail Ink Notes that you
create with your SmartPad. Information about how to use the SmartPad desktop
software appears in Chapter 4: SmartPad Desktop Software.
eMemo
The eMemo application functions the same way as the standard Memo Pad on
your Palm organizer . It contains extensions so that anything you create as a
handwritten note in your SmartPad is automatically saved as an Ink Note in your
Palm organizer .
As you work with eMemo, you’ll find that creating Ink Notes and attaching them
to Memo records is probably easier than creating regular text memos on your
Palm organizer . Any record that you create with the eMemo application can
contain both an Ink Note and regular text (as when using Graffiti on your Palm
organizer).
The following procedure steps through the creation of a new Ink Note and the
ways you can work with an Ink Note in the eMemo application.
Page 22
To create an Ink Note in the eMemo application:
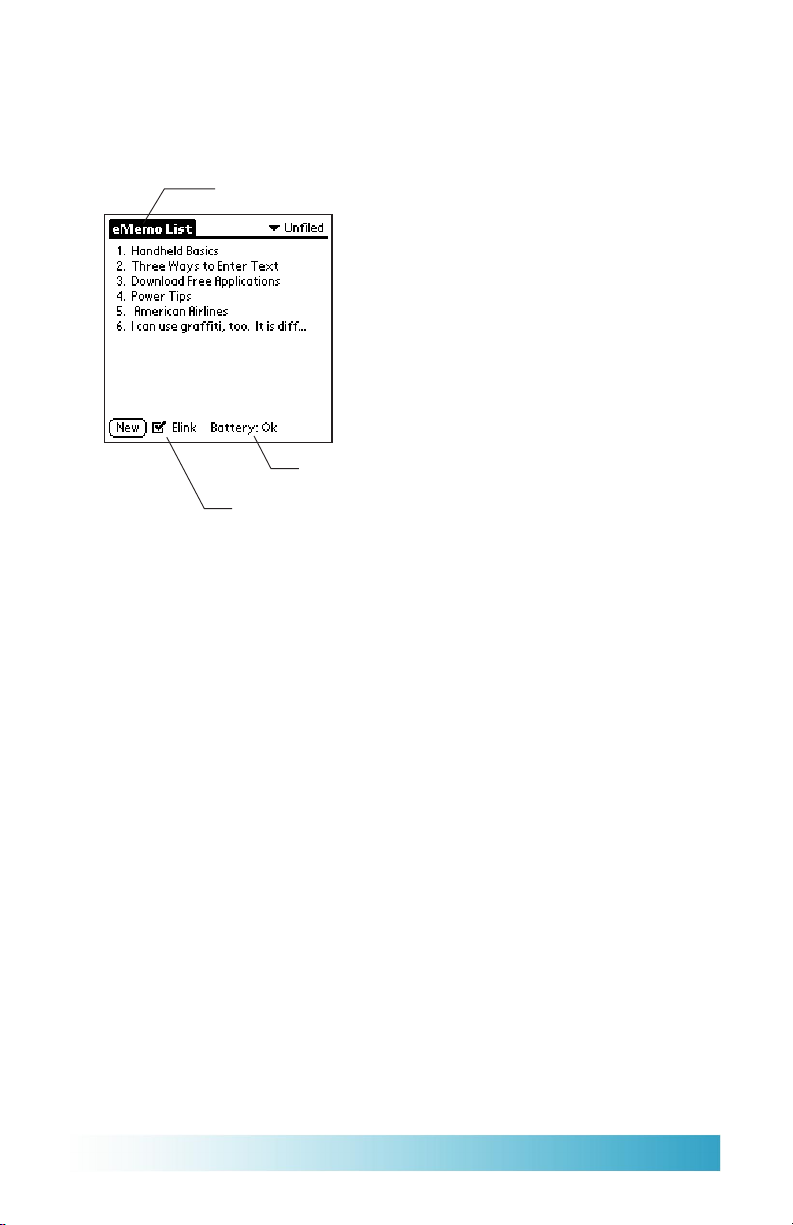
1. Press the Memo button on the front of your Palm organizer . If you have
programmed this button of your Palm organizer to start the eMemo application, eMemo appears on the screen, as shown:
eMemo Running
SmartPad Battery Okay
Linked to SmartPad
Note that the name “eMemo” appears at the top of the screen of your Palm
organizer . This shows that you are running the eMemo application, rather
than the standard Memo Pad supplied with your Palm organizer . If the name
“eMemo” does not appear at the top of the screen, you need to set the front
panel buttons to automatically launch the SmartPad software for the Palm
organizer . Refer to the section entitled Reassigning Front Panel Buttons that
appears in the previous chapter.
Note also that a small check-box named “Elink” appears at the bottom of the
screen. A check-mark in this box indicates that your Palm organizer is
communicating with SmartPad. The current condition of the batteries in
your SmartPad also appears on this line.
2. Create a new Ink Note. T o do this, use the SmartPen, and write the word
“Hello” on the paper pad of your SmartPad. Note that as soon as you touch
the Pen to the paper, the screen of your Palm organizer changes to record
your Ink Note, as shown:
Seiko Instruments SmartPad User’s Guide page 23
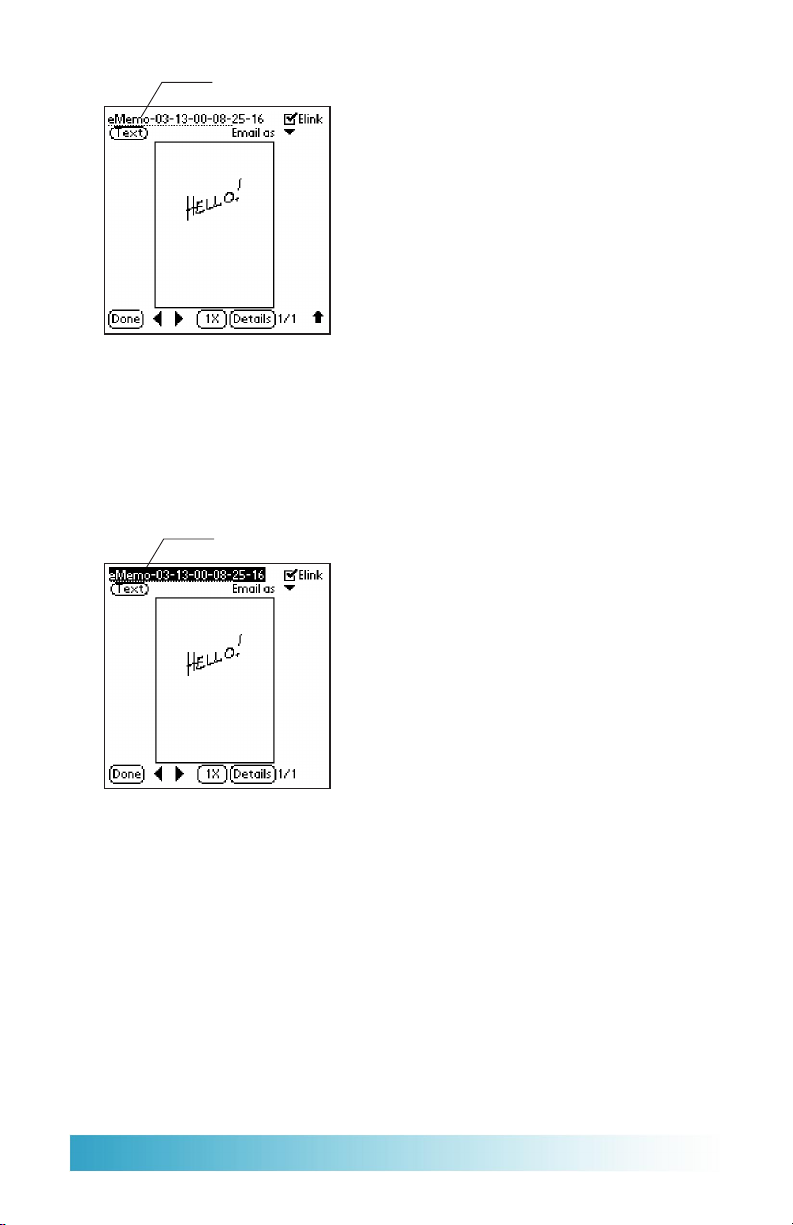
Default Name
The name for your new Ink Note appears at the top of the screen. The default
name is the current date and time. If you’re taking notes in a hurry , you don’t
have to worry about assigning a specific name; you can easily review your
notes based upon the date and time they were created.
3. Next, change the default name of your new Ink Note. Use the stylus, and drag
to select the default name of the Ink Note, as shown:
Drag stylus over Default name
Tip: The opposite end of the SmartPen contains a stylus tip that you can use
with your Palm organizer . You don’t have to switch between the SmartPen
and the Palm stylus to work with SmartPad!
Use the Graffiti writing area on your Palm organizer to write a new name for
the Ink Note. For this example procedure, name this Ink Note “my memo.”
Page 24
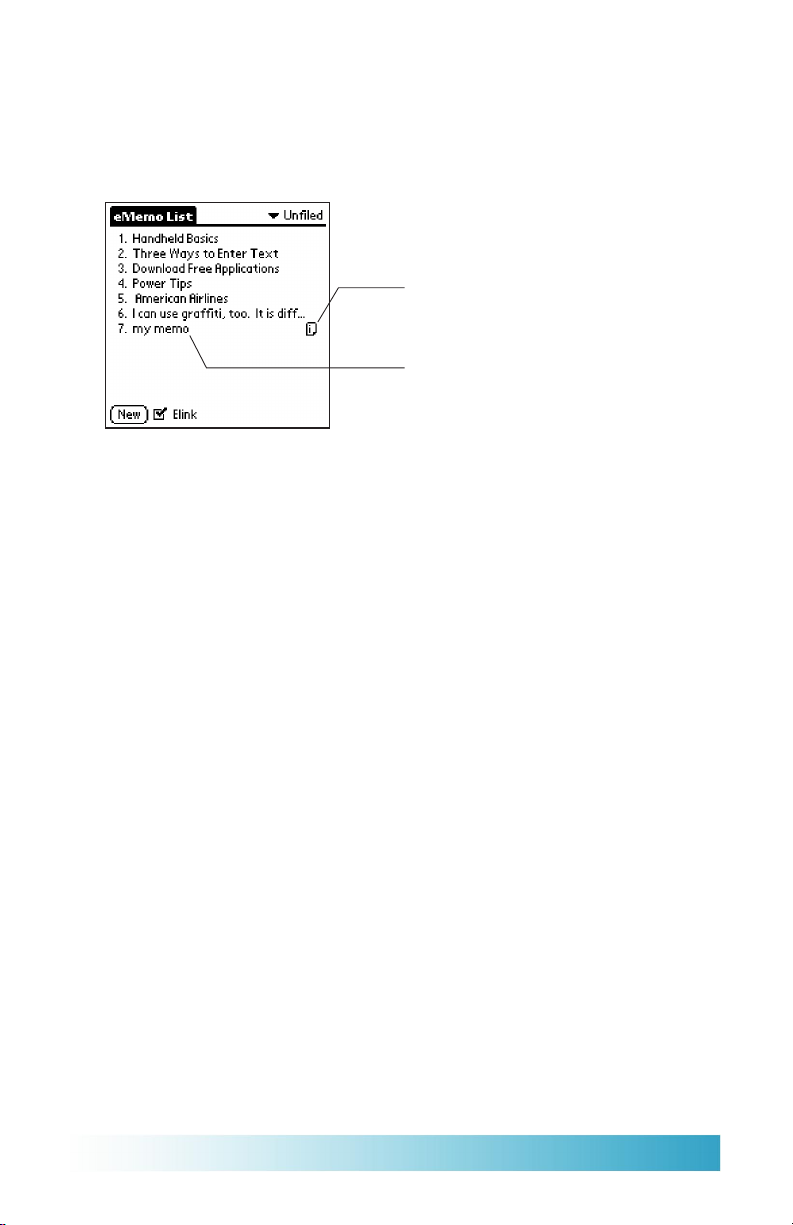
4. T ap Done. You are returned to the list view of the eMemo screen. Note that
a new Memo record has been created. And, as with all Ink Notes that you
create with the SmartPad, a special “Ink Note” icon appears in the line with
the file name. This shows that there is an Ink Note associated with the Memo
record, as shown:
Ink Note icon
New record with Ink Note
Adding to an Ink Note
Once you have created an Ink Note attached to a Memo record, you can go back
and review the Ink Note, or continue writing to add to the Ink Note.
To add more to an Ink Note:
1. In the list view of the eMemo application, find a Memo record with an
associated Ink Note. T ap the Ink Note icon for that record. The SmartPad Ink
screen appears.
2. Continue writing with the SmartPen on the paper pad. Any new information
that you write will automatically be recorded in the Ink Note.
3. T ap Done when you are finished adding to your Ink Note.
Note: If you switch to another Palm application (such as the Date Book)
before you tap Done, all of your handwritten information is still stored with
the Ink Note.
Seiko Instruments SmartPad User’s Guide page 25
 Loading...