

Seiko DPU-H245AP-A03A-E, DPU-H245AS-A03A-E, DPU-H245AS-B03A-E Instruction Manual
Thermal Printer
DPU−H245AP−A03A−E
DPU−H245AS−A03A−E
DPU−H245AS−B03A−E
Instruction Manual
This product complies with EU RoHS Directive(2002/95/EC).
Please refer to the page in Chinese for the information of the hazardous substances under China RoHS(Management
Methods for Controlling Pollution by Electronic Information Products).
INTRODUCTION
Thank you very much for your continued favor. Please read this manual attentively to let this equipment serve you for as
long as possible. Keep this manual carefully.
SAFETY PRECAUTIONS
The following symbols are used in this Instruction Manual in order to make use of the printer properly and prevent the
printer from being damaged.
Follow the instructions marked with the symbol.
WARNING
CAUTION
Symbol Examples
The symbol indicates caution(including danger and warning).
The example on the left indicates warning or caution.
The symbol indicates prohibition.
The example on the left means prohibition of disassembling.
The symbol indicates requirement or what must be done.
The example on the left means “pull the power plug out of the outlet.”
Failure to follow the guidelines marked with this symbol could result in severe
personal injury or death.
Failure to follow the guidelines marked with this symbol could result in minor
personal injury or product and/or peripheral damage.
WARNING
DO NOT use any AC adapter,AC cable or battery pack other than those specified.Doing so may cause fire
leading to serious accidents.
DO NOT use the printer and the AC adapter in countries where these items do not comply with the
regulations.
Doing so, we do not assure the safety of these products and you will be responsible for violation of
regulations.
DO NOT bend the power cable forcibly, or place heavy object on the cable because it might damage the
cable and cause fire or electric shock.If the power cable is damaged, discontinue use and replace it
immediately.
Never disassemble the printer, the battery pack, the AC adapter and the AC cable. Failure to follow this
instruction may cause overheating or burning of the printer or the AC adapter, or an electric shock, which
may lead to fires or accidents.
CAUTION
DO NOT drop any metallic objects or liquids, such as water or coffee, into the printer.
Never use the printer in a place of extreme humidity or any place where it can possibly be splashed by any
liquids. If any liquids get into the printer, it could lead to fire, electric shock, or other serious accidents.
Never touch the thermal head immediately after printing because it becomes very hot. Make sure that the
thermal head is cool before setting papers or cleaning the thermal head.
Be sure to hold the connector part of the power cable or interface cable when disconnecting the cable.
Pulling on the cable portion may cause it to fray and break.
POWER OFF the printer, unplug the power cable from the power outlet, and remove the battery pack in
any of the following cases:
◆The printer does not recover from an error.
◆Smoke, strange noise or smells erupt from the printer.
◆A piece of metal or any liquid touches the internal parts or slot of the printer.
Using the printer in any manner other than for which it was designed may cause accidents or fire.
WARNING
DO NOT throw the battery pack into fire and DO NOT heat it.
Doing so may cause explosion or fire leading to fire or injury.
DO NOT put the battery pack into water. Always keep it away from rain and water.
Doing so may cause liquid leakage leading to fire or electric shock.
DO NOT disassemble the battery pack.
Doing so may cause the battery pack to heat up and catch fire, leading to other serious accidents.
DO NOT short the battery pack terminals.
Doing so may lead to fire, electric shock, or personal injury.
DO NOT subject the battery pack to direct sunlight as in a car or high temperature.
Doing so may lead to fire or personal injury.
If any fluid from the battery pack gets in your eyes, immediately flush with water and seek medical
treatment from a trained doctor.
1.OPERATING PRECAUTIONS
Observe the following for safe and trouble-free operation:
Notes on use
• Do not drop or hit the printer.
• Turn off the power switch, and keep the AC adapter removed from the receptacle when the equipment is not used.
• For assistance with obtaining an exchange battery for this product in the USA, please contact:
E-mail: tpdrecycleinfo@siu-la.com
Seiko Instruments USA inc.
Thermal Printer Div.
Notes on treatment of thermal papers
• Store the papers in a dry, cool and dark place.
• Do not rub the papers with hard substance.
• Keep the papers away from organic solvent.
• Do not let the papers touched with vinyl chloride film, eraser or adhesive tapes for hours.
• Do not put the papers on diazo print or wet copy that is just copied.
• Use dedicated thermal papers only.
Notes on installation
• Install the printer on a level and stable surface.
• Avoid such places with:
Slanted surface, Strong vibration,
Direct sunlight, Full of dust, Corrosive gas,
Excessively high or low temperature
Precautions on discarding
• When discarding used the printer, discard them according to the disposal regulations and rules of each respective
district.
2.PREPARATION
2.1 Unpacking
Check whether a complete set is present:
• Main body 1 unit
• Thermal papers
• Instruction Manual
(Japanese 1, English 1, Chinese 1) 3 volumes
★ Orders for thermal papers will receive prompt attention by SII-related companies.
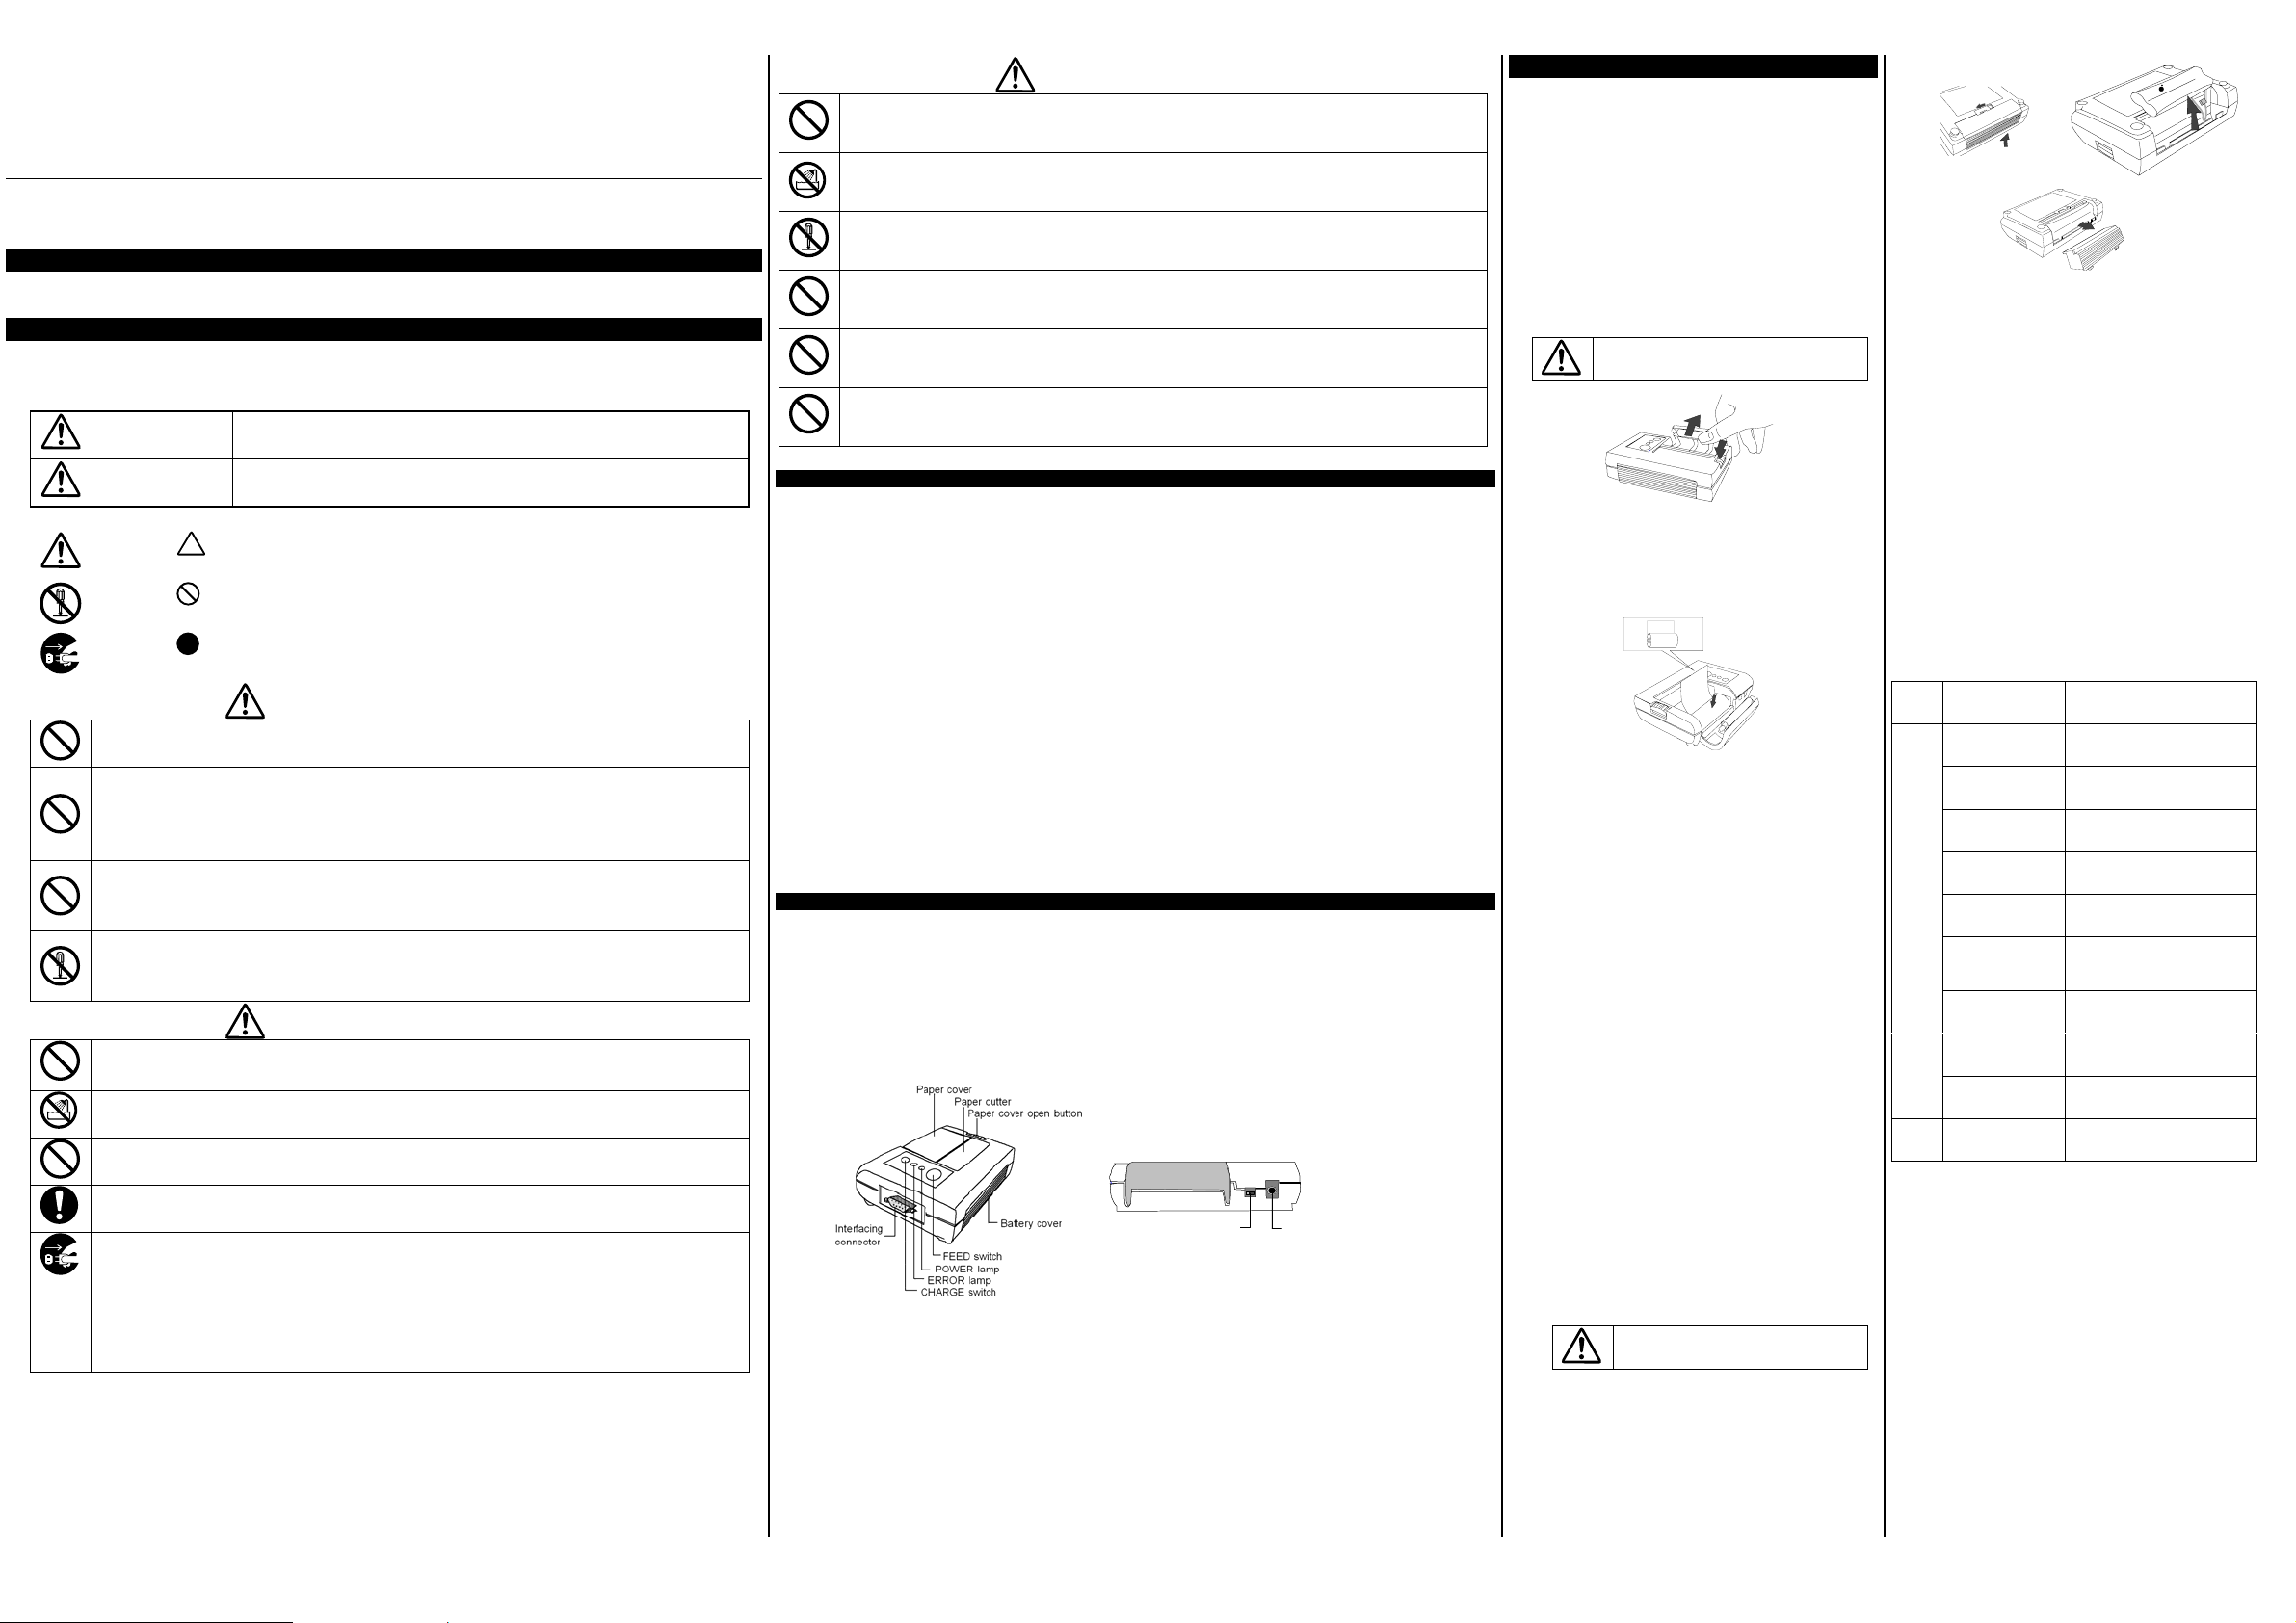
2.2 Components/part names
2.3 Operation panel
(1) Power switch
Slide switch for turning power ON/OFF
(2) FEED switch
The machine continues to feed papers when this switch is kept pressed.
(3) CHARGE switch
Pressing this switch for 3 sec with the AC adapter connected triggers charge to the battery pack.
(4) POWER lamp (green)
This lamp lights when the power is turned ON. It flashes when the capacity of the battery pack drops low.
(5) ERROR lamp (red)
When an error occurs, this lamp lights or flashes depending on the error content.
1 roll
Power switch
Power connector
3.OPERATION
3.1 Connecting AC adapter
①Turn the power switch OFF.
②Insert the DC plug of the AC adapter into the power
connector of the main body.
③Insert the AC adapter into the receptacle.
[Attention!]
Do not touch the tip end of the DC plug. Before
disconnecting the AC adapter, turn the power switch OFF,
and then disconnect the AC adapter and DC plug in this
order.
3.2 Setting papers
Opening paper cover
Press the paper cover open button, and pull the paper
cover up toward the rear of the main body with your
thumb.
Handle the paper cutter carefully not to cut
your hand.
Setting papers
① Open the paper cover.
② Set a paper roll as shown in the figure.
③ Close the paper cover by pressing the both end of the
cover, with the tip end of the paper emerging from the
printer.
3.3 Battery pack
Battery voltage is low with batteries that are just purchased
or long unused. Charge such batteries before use.
■ Battery charge
① Connect AC adapter.
② Turn the power switch ON.
③ Keep CHARGE switch pressed for 3 sec.
When charging starts, POWER lamp and ERROR
lamp start flashing each other.
[Attention!]
Observe the following to protect secondary battery
from performance drop:
• Charge battery in a 0 ~40 ℃ temperature range.
④ When charging completes, turn off the power switch
and disconnect the AC adapter.
(The charging time is about 12 hours.)
■ If battery voltage is consumed during print,
POWER lamp flashes.
You can print out remain data by using the AC adapter.
■ Notes on use
• When operation finishes, turn the power switch OFF.
• The batteries discharge themselves without using.
Charge long-unused batteries once per 3 months for
a long life.
■ Removing battery pack
① Remove the battery cover by sliding the slide switch
on rear of printer main body. (Use some thin hard one
when sliding the slide switch.)
Be careful not to hurt your hand when
handling the battery cover.
② Take out the battery pack, and then pull out the
connector.
③ Close the battery cover.
7
0
0
H
−
P
B
I
I
S
[CAUTION]
• Risk of explosion if battery is replaced by an incorrect
type.
• Attend to the direction of the battery pack when you set it.
• Dispose of used batteries according to the instructions
manual.
3.4 Maintenance
Wipe off the soiling on the printer surface with a dry soft
cloth or a cloth with a weak neutral detergent.
After that, wipe the printer with a dry cloth.
[Attention!]
• Do not use volatile chemical as thinner or benzene.
• Do not get printer’s inside wet with liquids such as water.
3.5 Error indication
When an error occurs, the ERROR lamp lights or flashes.
Lamps get as follows.
□ indicates that corresponding lamp lights for 0.5 sec, and
■ indicates that corresponding lamp extinguishes for 0.5 sec.
Power
switch
ON
OFF Power OFF
3.6 Test print
In the test print mode, characters printable with the printer
are output in regular width then in double width.
Turning power switch ON with FEED switch kept pressed
triggers the test print.
3.7 Hex dump
In hex dump mode, computer data is output in hexadecimal
numbers and characters.
Turning power switch ON with CHARGE switch kept pressed
sets the printer in hex dump print mode.
Status Lamp status
No error
(printable)
Error
(No paper)
Error
(Cover opened)
Error
(Battery low voltage)
Hardware error
Charging
(Initialstatus recovers
when charging
completes.)
Test print
Hex dump
print
Function
Set mode
POWER □□□□□□□□□□□□
ERROR ■■■■■■■■■■■■
POWER □□□□□□□□□□□□
ERROR □□■■□□■■□□■■
POWER □□□□□□□□□□□□
ERROR □□□□□□□□□□□□
POWER □□■■□□■■□□■■
ERROR □□□□□□□□□□□□
POWER □■□■□■□■□■□■
ERROR □■□■□■□■□■□■
POWER □■■■□■■■□■■■
ERROR ■■□■■■□■■■□■
POWER □□□□□□□□□□□□
ERROR □□□□□□□□□□□□
POWER □□□□□□□□□□□□
ERROR ■■■■■■■■■■■■
POWER □□□□□□□□□□□□
ERROR □□□□□□□□□□□□
POWER ■■■■■■■■■■■■
ERROR ■■■■■■■■■■■■
3.8 Function set
Printer function can be set with the operation switches.
Turning power switch ON with FEED and CHARGE
switches kept pressed sets the printer in Function Set
mode. When a message is printed out, press FEED switch
to answer YES and CHARGE switch to answer NO.
Set items
Command mode (Mode A, Mode B)
Character set (Japanese, graphic)
For serial type models, serial communication mode can
be changed as follows:
Bit length (8 bits, 7 bits)
Parity (No parity, odd, even)
Flow control (RTS/CTS, XON/XOFF)
Baud rate (150, 300, 600, 1200, 2400, 4800, 9600,
19200, 38400bps)
3.9 Connecting the Printer
• Select the correct interface cable for the type of
computer.
• Use a shielded cable no more than 2 meters long.
4.SPECIFICATIONS
4.1 General specifications
Print mode: Thermal line dot print
Data entry: (Note: Parallel type and Serial type apply to
different models.)
Parallel type
DPU-H245AP-A03A-E
Connector 14pin Amphenol
Data input: 8 bit parallel
Handshake: STROBE and BUSY
Serial type
DPU-H245AS-A03A-E
Connector 9pin D-SUB (Meter screw)
DPU-H245AS-B03A-E
Connector 9pin D-SUB (Inch screw)
Data input: RS-232C
(150bps~38400bps)
Data control: RTS/CTS, XON/XOFF
Max. printing speed: 50 mm/s max.
(when AC adapter is used)
Printing width/paper width
[Mode A] 41.5 mm/58 mm
[Mode B] 48 mm/58 mm
Outer dimensions (W×D×H excluding projections)
135mm×100mm×38mm
Mass: Approx. 390g
(Excluding AC adapter and roll paper)
Operating environment
Temperature: 0 to +40℃
Humidity: 30 to 80%RH (non-condensing)
Storage environment
Temperature: –20 to +55℃
Humidity: 20 to 85%RH (non-condensing)
(No more than a month)
Storage environment effects the rechargeable
battery’s life. Charge the battery once per 3
months for –20 to +45℃ of temperature, or
once per a month for +45 to +55℃ of temperature.
Thermal papers used
Paper width:58mm
Outer diameter of roll paper:25mm
Conformity of the regulations:
The product complies with the regulations of the
following countries.
Japan, USA, Canada, Countries of EU, China
Receive buffer: 512 bytes
Power supply:
External power supply Specified AC adapter
Product No.: PW-0903H-W2-E
Output: 9VDC, 4.0 A
Input: 100~240VAC (50/60Hz)
Internal power supply Specified NiMH battery
Product No.: BP-H007-E
The recycle mark on this battery is valid
only in Japan.
Specified AC cable for AC adapter
(The product complies with the regulations of the
following countries.)
Product No. : CB-JP02-11A-E (for Japan)
―――――――――――――――――――――――
S
I
I
Seiko Instruments Inc.
Print System Div.
1-8 Nakase Mihama-ku, Chiba-shi, Chiba 2618507, Japan
Telephone: +81-43-211-1106
Facsimile: +81-43-211-8037
Seiko Instruments USA Inc.
Thermal Printer Div.
2990. Lomita Blvd., Torrance, CA 90505, USA.
Telephone: +1-310-517-7778
Facsimile: +1-310-517-8154
Seiko Instruments GmbH
Siemensstrasse 9, D-63263 Neu-Isenburg,
Germany
Telephone: +49-6102-297-0
Facsimile: +49-6102-297-222
Seiko Instruments (H.K.) Ltd.
4-5/F, Wyler Center 2, 200 Tai Lin Pai Road,
Kwai Chung,
N.T., Kowloon, Hong Kong
Telephone: +852-2494-5160
Facsimile: +852-2424-0901
◎ Information in this document is subject to
change without prior notice due to remodeling.
(March.2010 U00090434206)
CB-US02-18A-E (for U.S.A.)
CB-CE02-18A-E (for EU)
CB-CH01-20A-E (for China)
NOTE: This equipment has been tested and found to comply with the limits
for a Class B digital device, pursuant to Part 15 of the FCC Rules. These
limits are designed to provide reasonable protection against harmful
interference in a residential installation. This equipment generates, uses
and can radiate radio frequency energy and, if not installed and used in
accordance with the instructions, may cause harmful interference to radio
communications. However, there is no guarantee that interference will not
occur in a particular installation. If this equipment does cause harmful
interference to radio or television reception, which can be determined by
turning the equipment off and on, the user is encouraged to try to correct
the interference by one or more of the following measures:
■ Reorient or relocate the receiving antenna.
■ Increase the separation between the equipment and receiver.
■ Connect the equipment into an outlet on a circuit different from that to
which the receiver is connected.
■ Consult the dealer or an experienced radio/TV technician for help.
Applicable EC Directives and Standards
Directives
Title
2004/108/EC EC Electromagnetic Compatibility Directive
2009/125/EC Directive on Eco-Design of Energy-related Products
Standards
EMI: EN55022
EN61000-3-2
EN61000-3-3
EMS: EN55024
For use in Turkey
Complies with Electrical and Electronic Equipment Directive.
Türkiye’ deki Kullanıcılar için
EEE Yönetmeliğine Uygundur.
Industry Canada (IC) compliance statement Operation is subject to the
following two conditions:
(1) this device may not cause interference, and
(2) this device must accept any interference, including interference that
may cause undesired operation of the device.
 Loading...