

Page 1
INSTRUCTIONS (P. 3)
INSTRUCTIONS (P. 24)
INSTRUCCIONES (P. 45)
BEDIENUNGSANLEITUNG (S. 66)
ISTRUZIONI (P. 87)
INSTRUÇÕES (P. 109)
用法説明 (130 頁)
Cal. 7T32
7T32
Page 2

English
2
You are now the proud owner of a SEIKO Analogue Quartz Watch Cal. 7T32. For best results,
please read the instructions in this booklet carefully before using your SEIKO Analogue Quartz
Watch. Please keep this manual handy for ready reference.
Vous voici l’heureux propriétaire d’une montre quartz analogique SEIKO Cal. 7T32. Pour obtenir
d’excellentes performances de cet article SEIKO, veuillez lire attentivement cette brochure que
vous conserverez pour toute référence ultérieure.
Enhorabuena por su adquisición de un reloj SEIKO analógico de cuarzo Cal. 7T32. Para óptimo
resultado, lea detenidamente las instrucciones de este folleto antes de usar el reloj. Guarde este
manual para consulta posterior.
Sie sind jetzt Besitzer einer SEIKO Analog-Quarzuhr Kal. 7T32. Bitte lesen Sie diese Bedienungsanleitung vor Verwendung der Uhr sorgfältig durch und heben Sie sie gut auf.
Siete ora in possesso di un orologio SEIKO Analogico al Quarzo Cal. 7T32. Per ottenere i migliori
possibili risultati dal Vostro orologio, leggere attentamente le istruzioni di questo manuale prima
di utilizzare il Vostro orologio SEIKO analogico al quarzo. Conservare poi il manuale stesso per
ogni qualsiasi eventuale futuro riferimento.
Você pode sentir-se orgulhoso de possuir um Relógio SEIKO Quartz Análogo Cal. 7T32. Para obter
os melhores resultados, leia atentamente as instruções contidas neste opúsculo antes de usar o
seu Relógio SEIKO Quartz Análogo. Queira conservar este manual para referências futuras.
Page 3

English
3
ENGLISH
CONTENTS
Page
FEATURES .................................................................................................................. 4
DISPLAY AND CROWNS/BUTTONS .......................................................................... 5
DATE SETTING ........................................................................................................... 6
TIME SETTING ............................................................................................................ 7
ALARM ....................................................................................................................... 8
STOPWATCH .............................................................................................................. 11
TACHYMETER ............................................................................................................ 14
ADJUSTING THE HAND POSITION ............................................................................ 16
RESETTING THE BUILT-IN IC ..................................................................................... 17
BATTERY LIFE INDICATOR ........................................................................................ 18
BATTERY CHANGE ..................................................................................................... 18
TO PRESERVE THE QUALITY OF YOUR WATCH ...................................................... 19
SPECIFICATIONS ........................................................................................................ 23
Page 4
English
4
SEIKO ANALOGUE QUARTZ
Cal. 7T32
FEATURES
TIME/CALENDAR STOPWATCH
●
Hour & minute hands with small
second hand
●
Date displayed in numerals
●
Measures up to 30 minutes in 1/5
second increments.
●
Can measure repeatedly up to 6
hours.
TACHYMETER
●
For models with tachymeter scale
ALARM
●
Can be set on a 12-hour basis
with small alarm hands.
Page 5
English
5
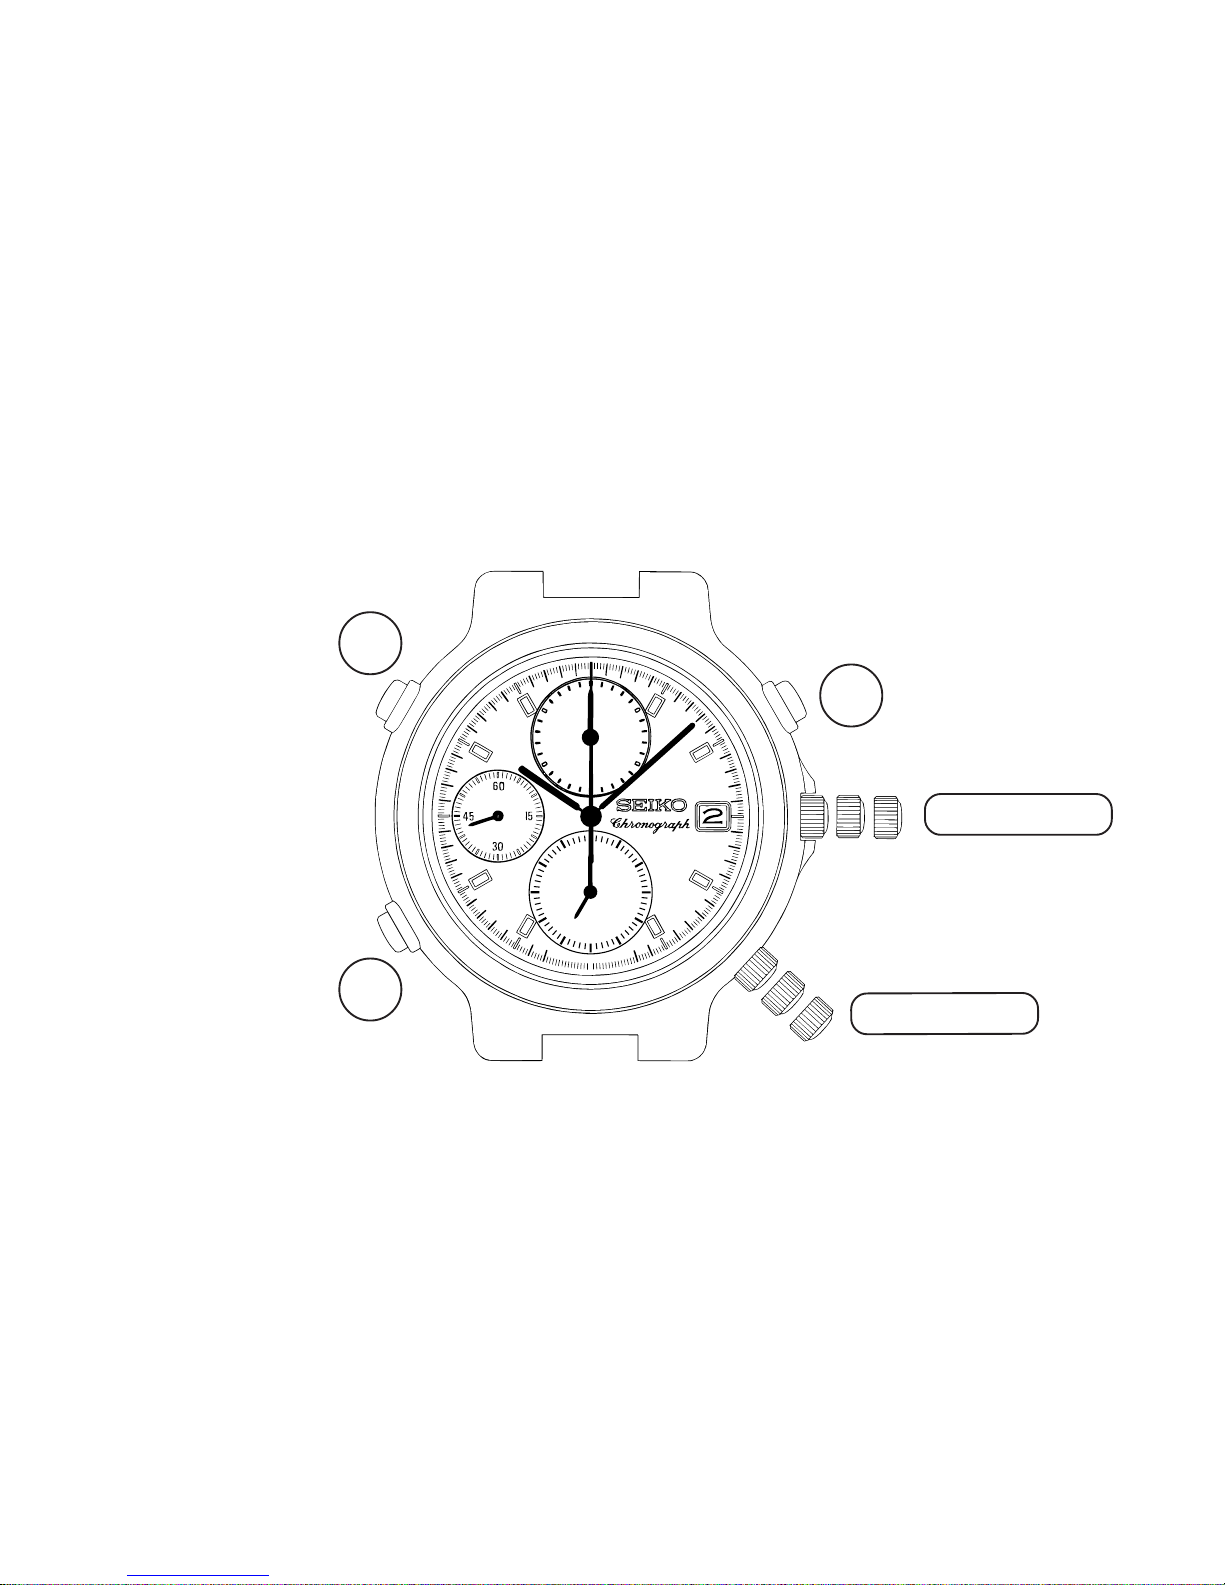
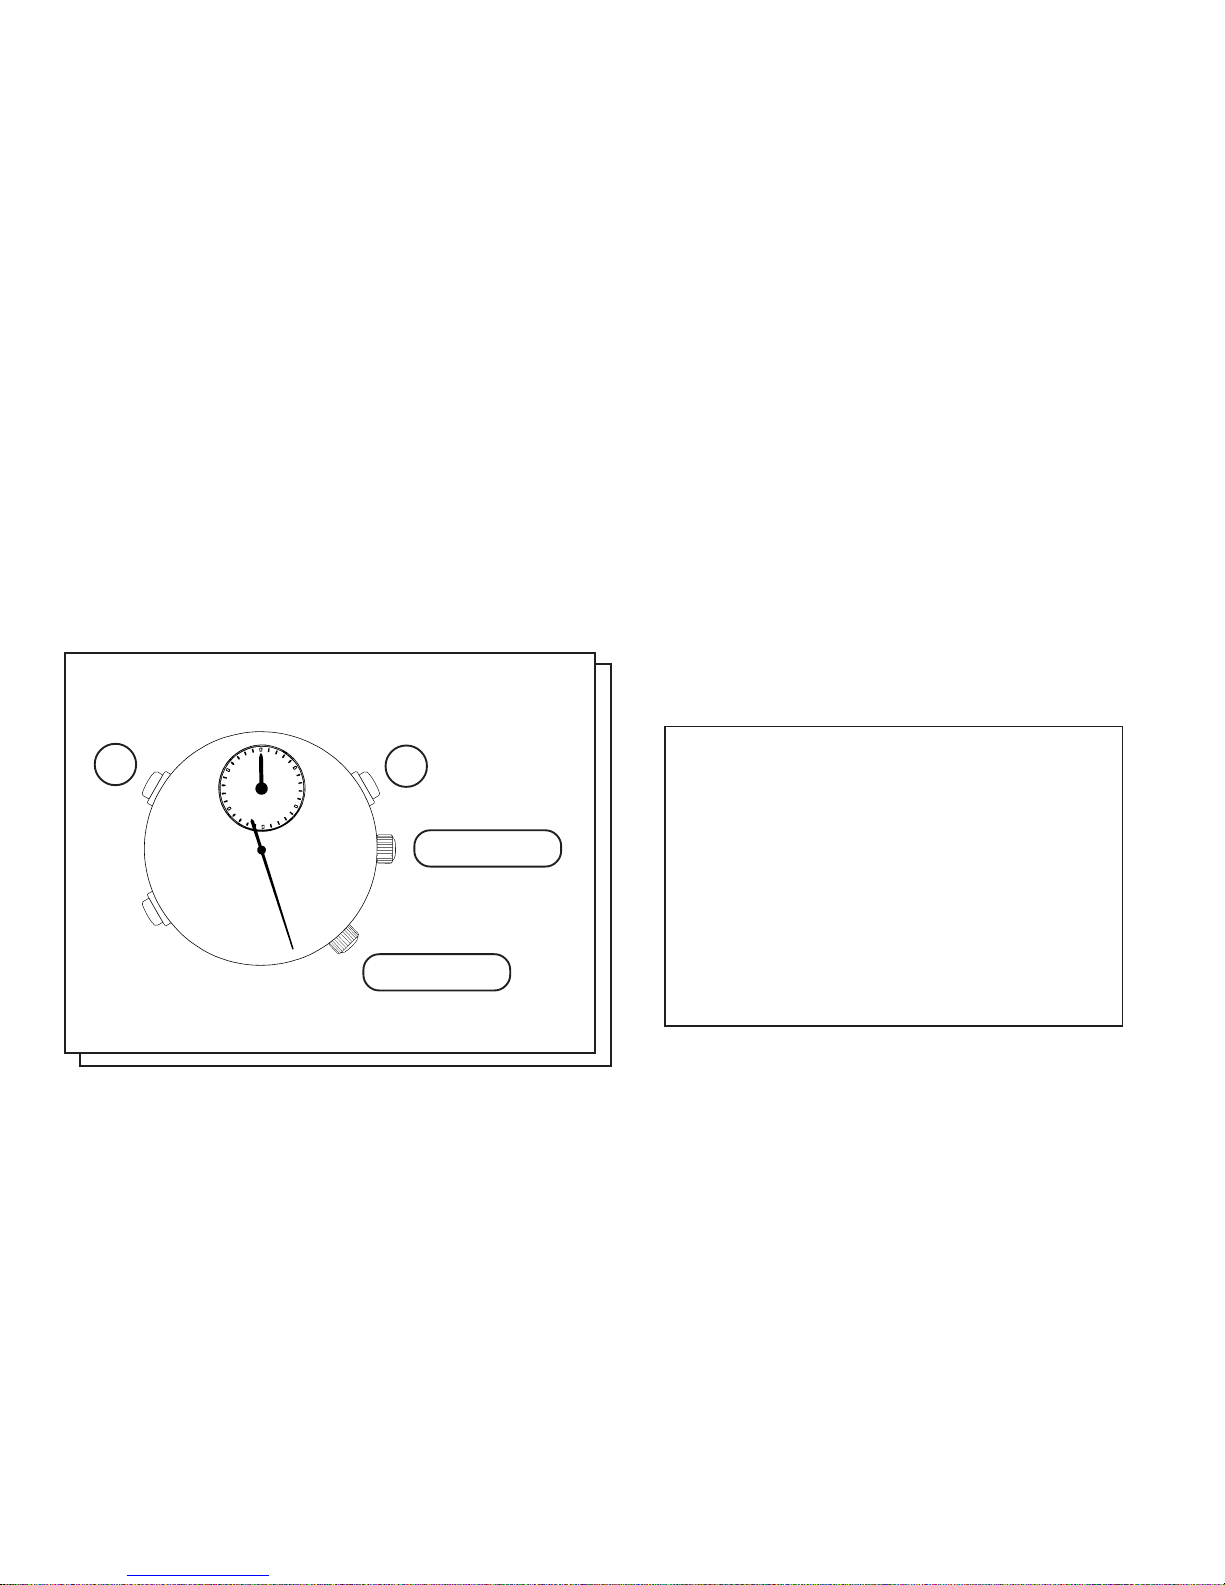
DISPLAY AND CROWNS/BUTTONS
There are three buttons and two crowns.
STOPWATCH 1/5 second handSTOPWATCH minute hand
Minute hand
(MAIN TIME)
ALARM
1
2
3
9
10
11
5
25
30
10
20
MIN
.
12
8
7
6
5
4
a b c
Hour hand
(MAIN TIME)
Second hand
(MAIN TIME)
a b c
ALARM hour hand ALARM minute hand
Date
a: Normal position b: First click c: Second click
B
C
A
CROWN 1
CROWN 2
Page 6
English
6
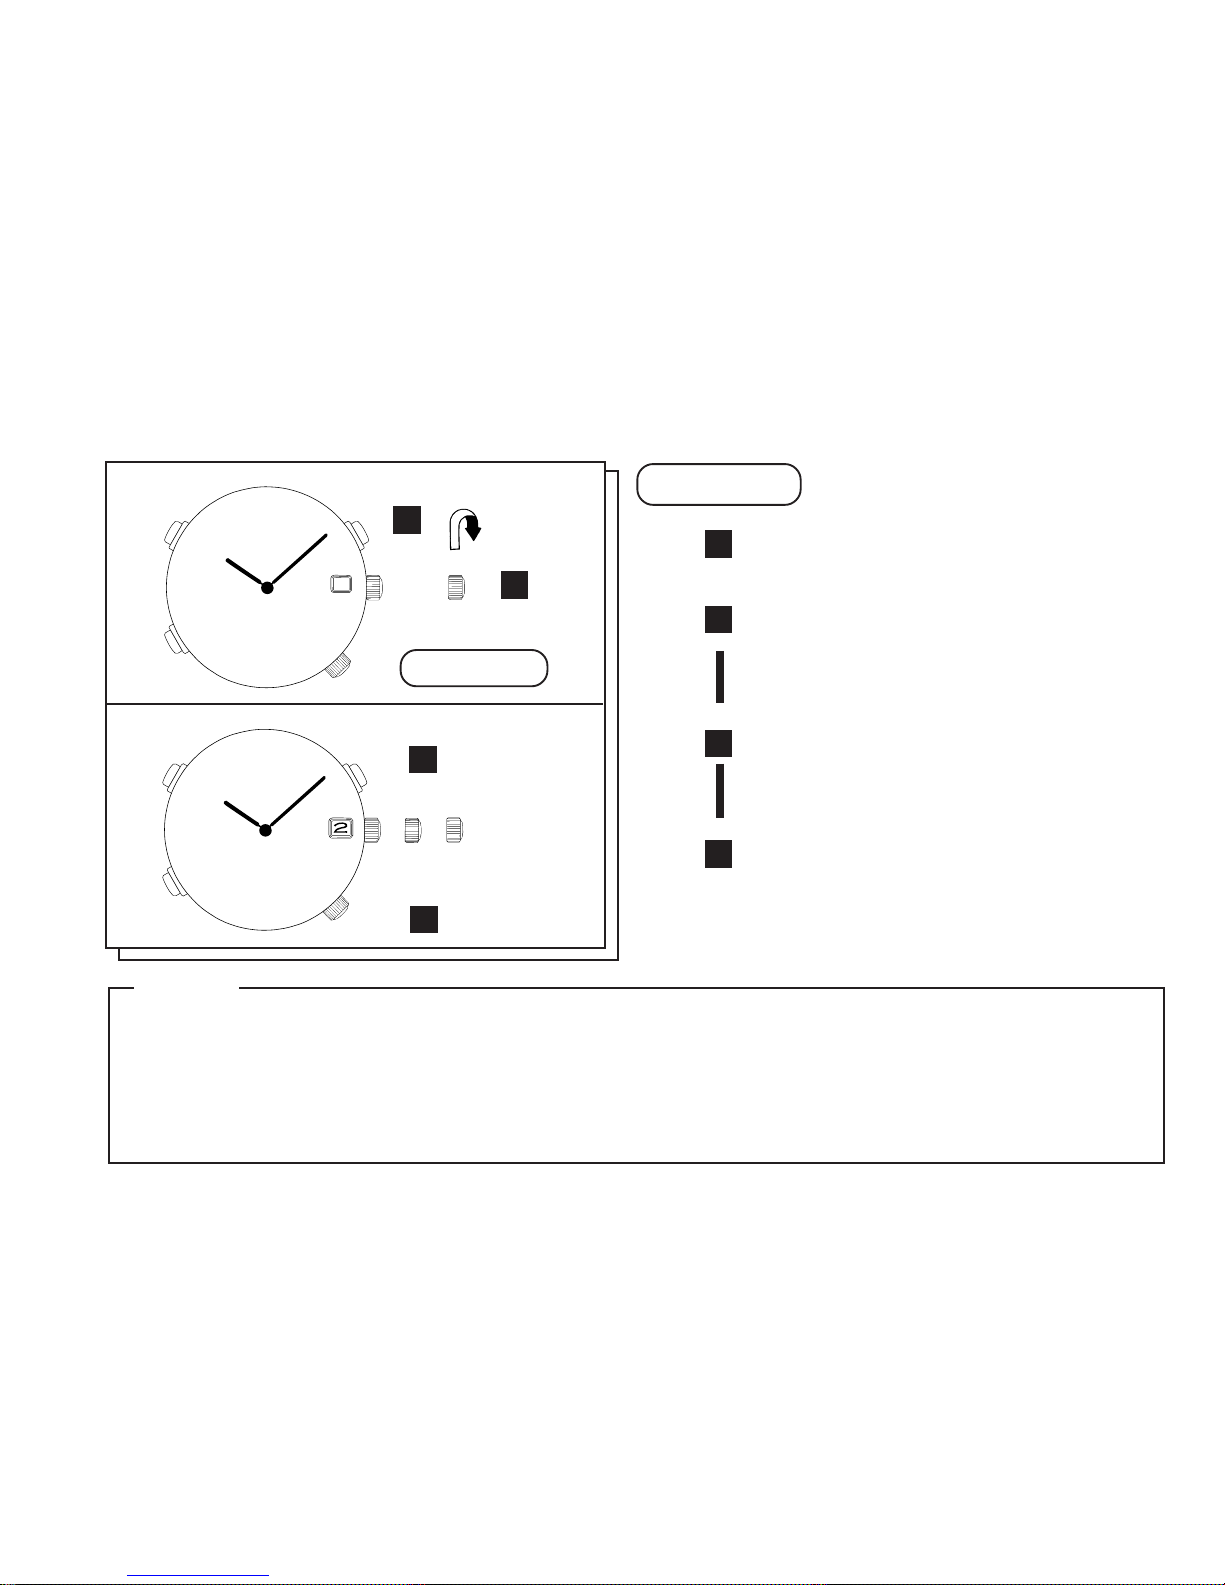
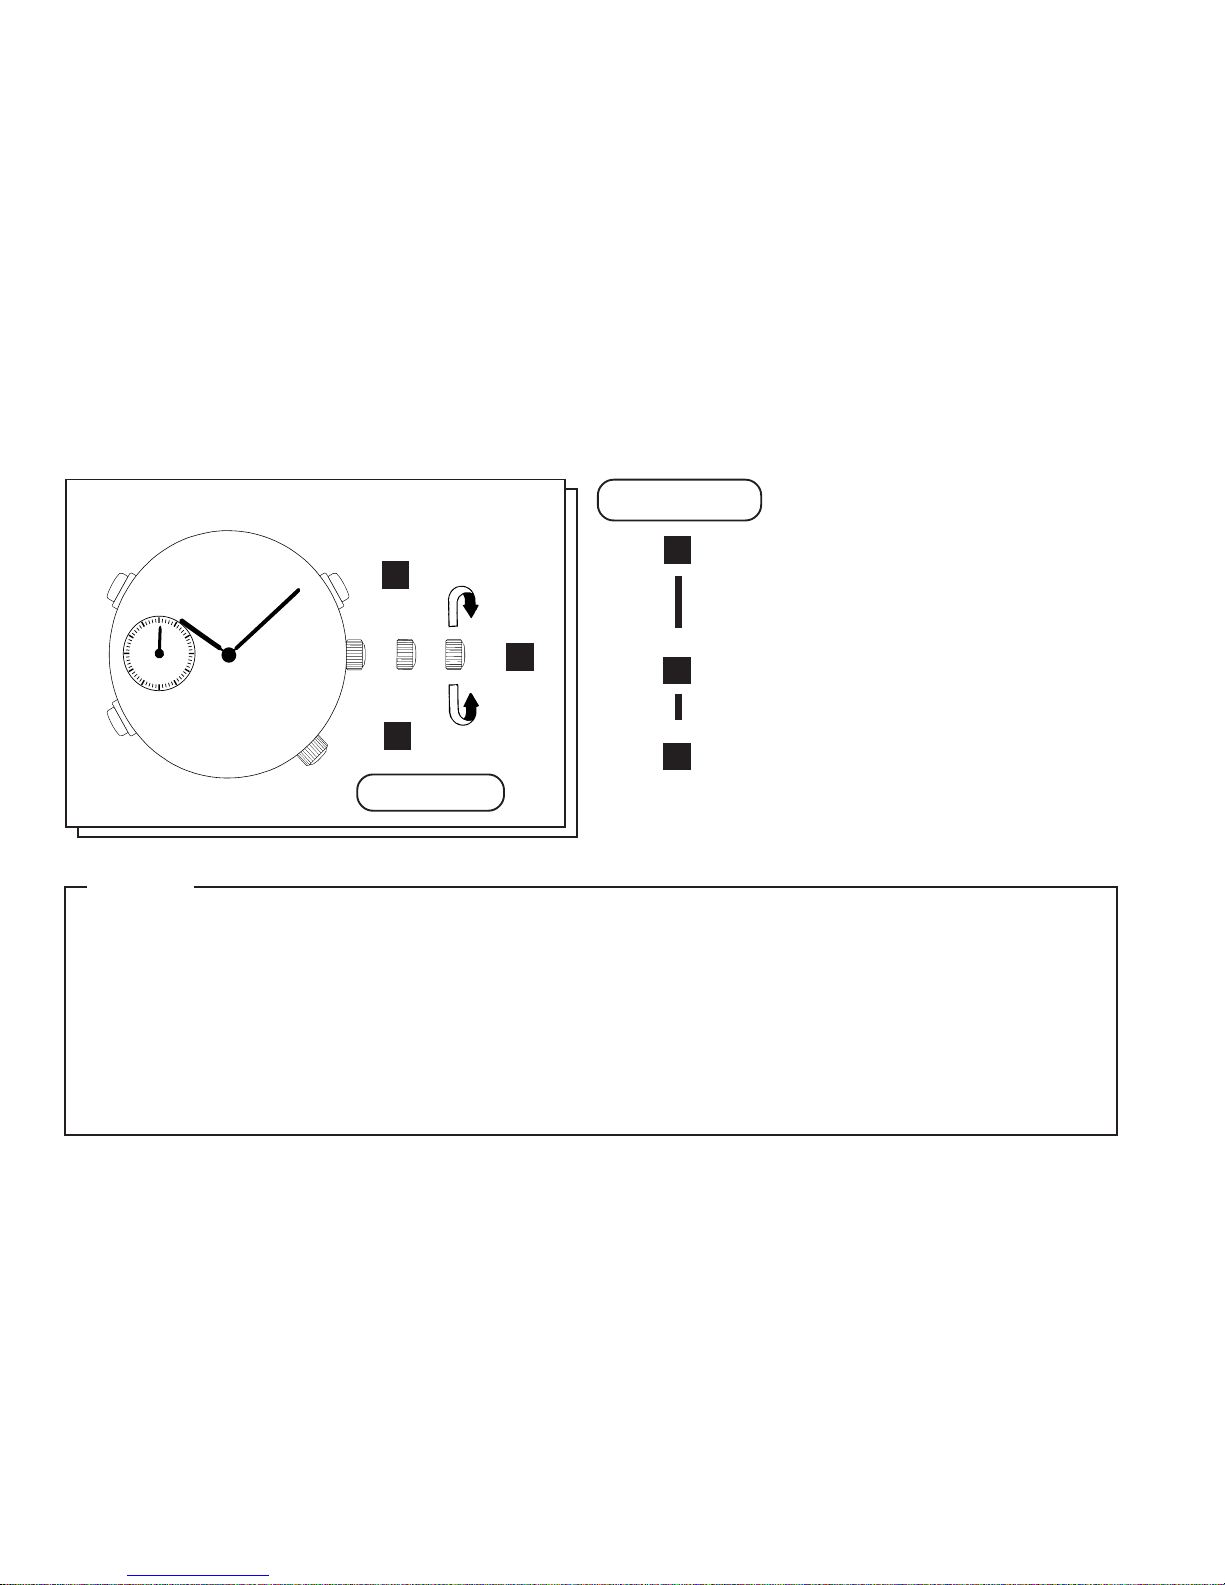
Pull out to
first click
.
Turn clockwise until the date for
the previous day appears.
Pull out to
second click
and turn
until the desired date appears.
Push back in to
normal position
.
1
2
3
4
▼
▼
▼
➡
➠
3
➠
4
Date
1 Do not set the date between 9:00 p.m. and 3:00 a.m. Otherwise, the date may not
change properly.
* If it is necessary to set the date during that time period, first change the time to any time outside
this period, set the date and then reset the correct time.
2 It is necessary to adjust the date at the end of February and 30-day months.
➠
DATE SETTING
1
2
1
NOTES
CROWN 1
CROWN 1
Page 7
English
7
Pull out to
second click
when
Second hand is at the 12 o’clock
position.
Turn to set Hour and Minute
hands.
Push back in to
normal position
in accordance with a time signal.
Minute hand
TIME SETTING
1 When setting Hour hand, check that AM/PM is correctly set.
* The watch is so designed that the date changes once in 24 hours. Turn the hands past the 12
o’clock marker to determine whether the watch is set for the A.M. or P.M. period. If the date
changes, the time is set for the A.M. period. If the date does not change, the time is set for
the P.M. period.
2 When setting Minute hand, advance it 4 to 5 minutes ahead of the desired time and
then turn it back to the exact minute.
Second hand
Hour hand
1
2
3
▼
▼
➠
1
15
30
45
60
➠
2
3
NOTES
CROWN 1
CROWN 1
Page 8
English
8
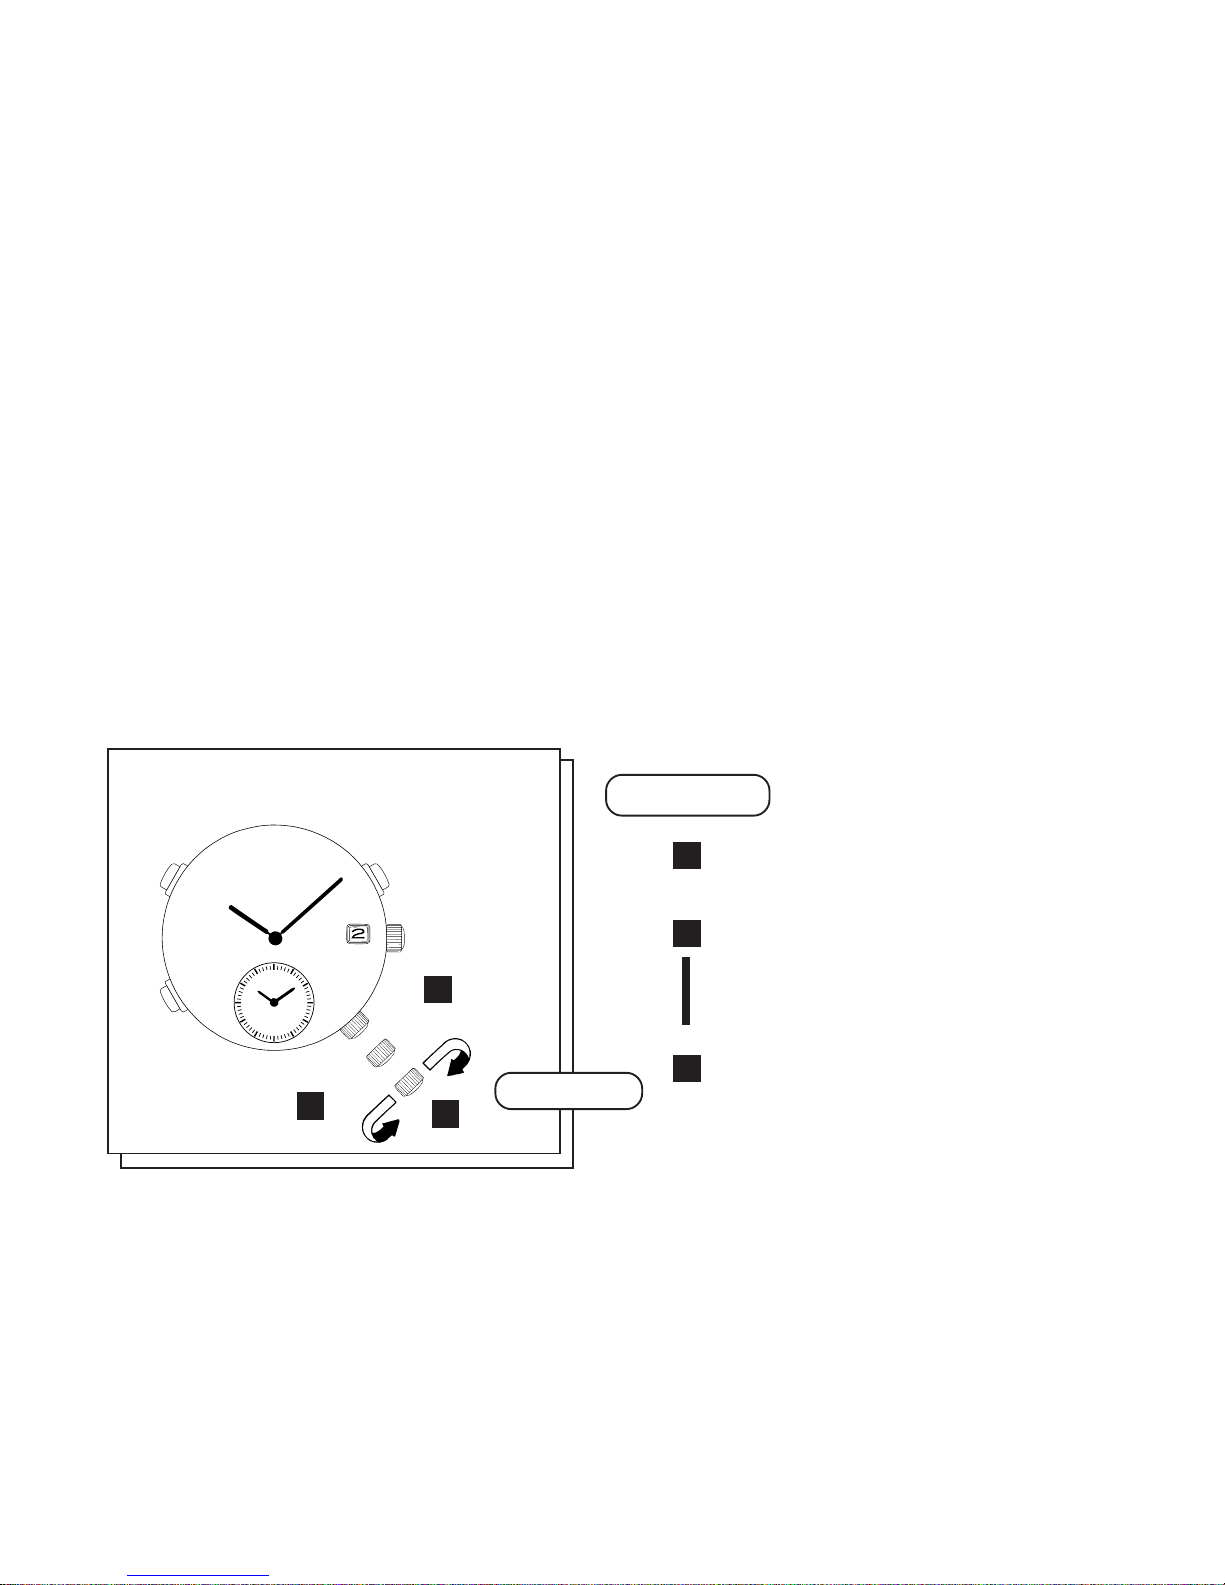
ALARM
● Alarm time is set on a 12-hour basis.
● ALARM hands move independently of MAIN TIME hands.
Minute hand
(MAIN TIME)
1
Pull out to
second click
.
Turn clockwise or counterclockwise
to set ALARM hands to the current
time (MAIN TIME).
Push back in to
normal position
.
2
3
▼
▼
▼
• After the main time is adjusted, follow the procedure below, and then set the
alarm.
*The following procedure is necessary only after the main time is adjusted.
1 Adjustment of ALARM hands
ALARM SETTING
ALARM
1
2
3
4
5
6
7
8
9
10
11
12
Hour hand
(MAIN TIME)
➠
1
ALARM
hour hand
➠
3
ALARM
minute hand
2
CROWN 2
CROWN 2
Page 9
English
9
2 Alarm time setting
▼
Press to set ALARM hands to
the desired alarm time.
▼
Push back in to
normal posi-
tion
.
Pull out to
first click
.
*Once ALARM hands are adjusted to the main time, alarm time setting can be made only by
following the procedure below.
ALARM
1
2
3
9
10
11
12
4
5
6
7
8
➠
➠
1 When setting ALARM minute hand to the current time in , advance it 4 to 5
minutes ahead of the desired time and then turn it back to the exact minute.
2 Alarm hands move quickly if Button C is kept pressed.
3 If CROWN 2 is pulled out to first click within 1 minute after being pushed back in
to normal position in
3
, the alarm sounds.
NOTES
CROWN 2
C
CROWN 2
C
CROWN 2
2
Page 10
English
10
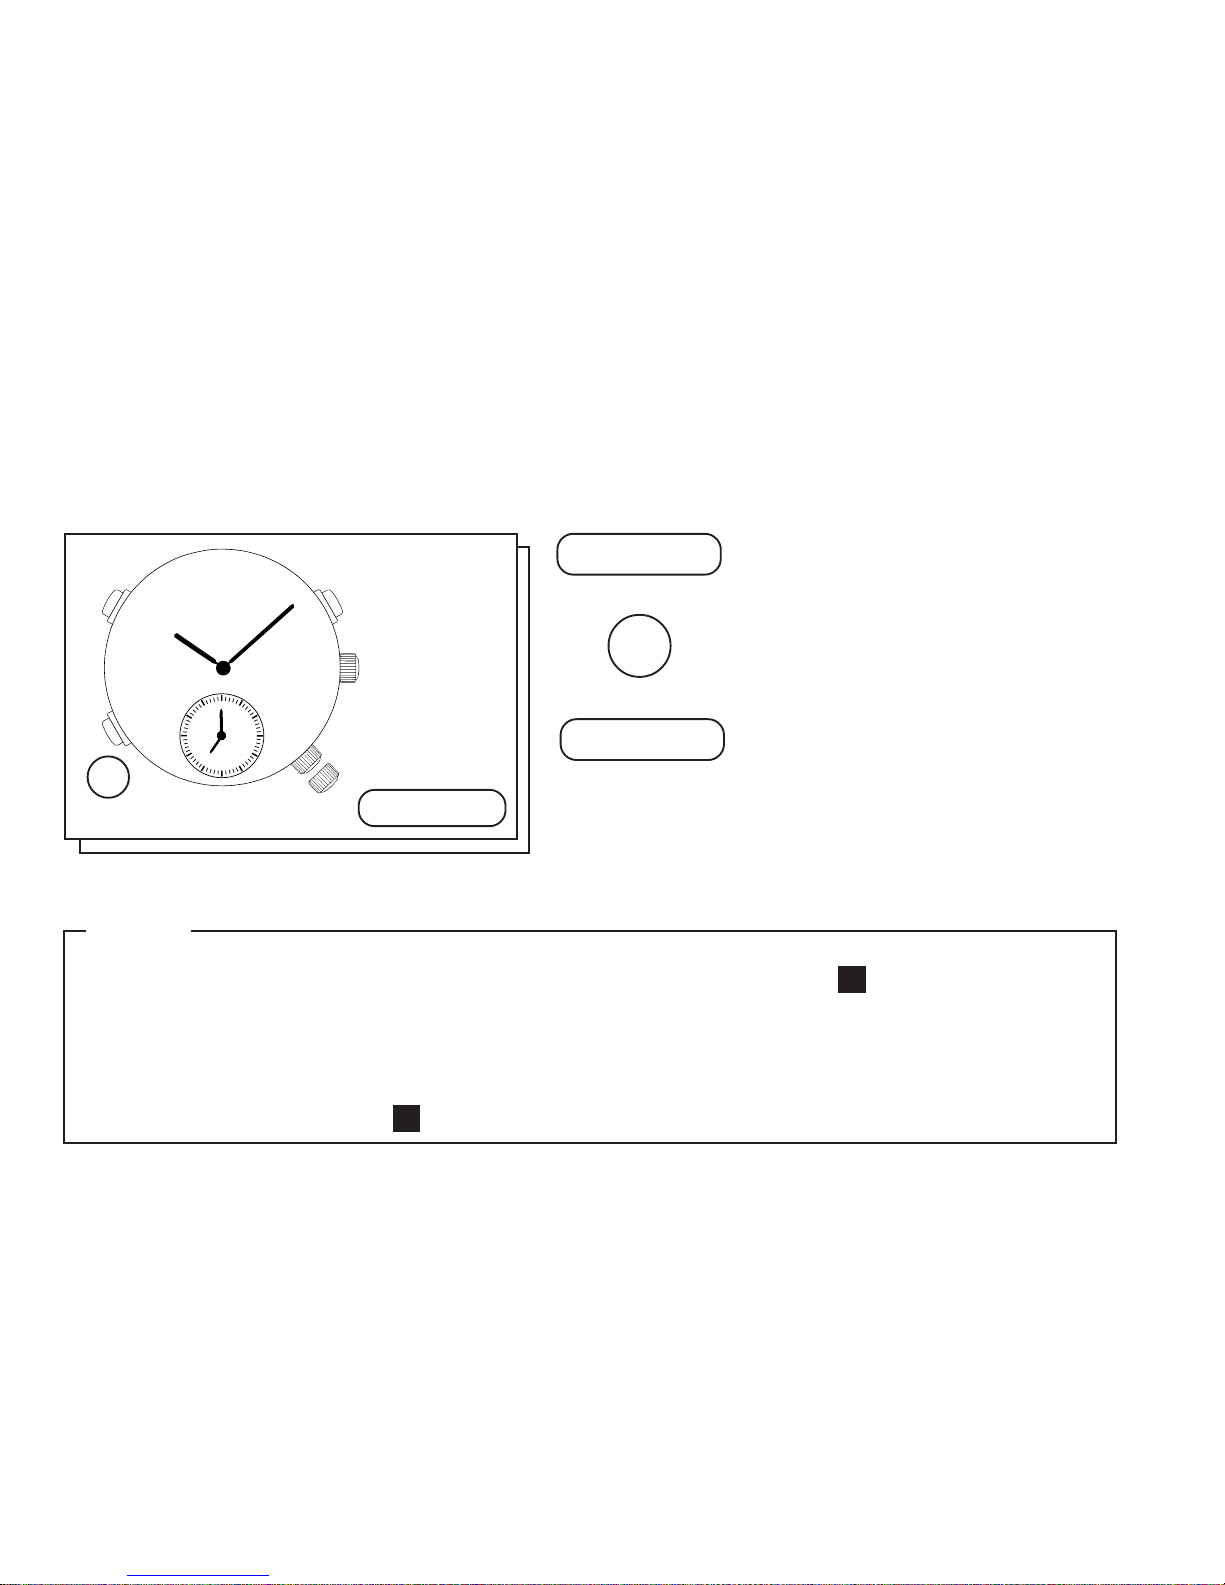
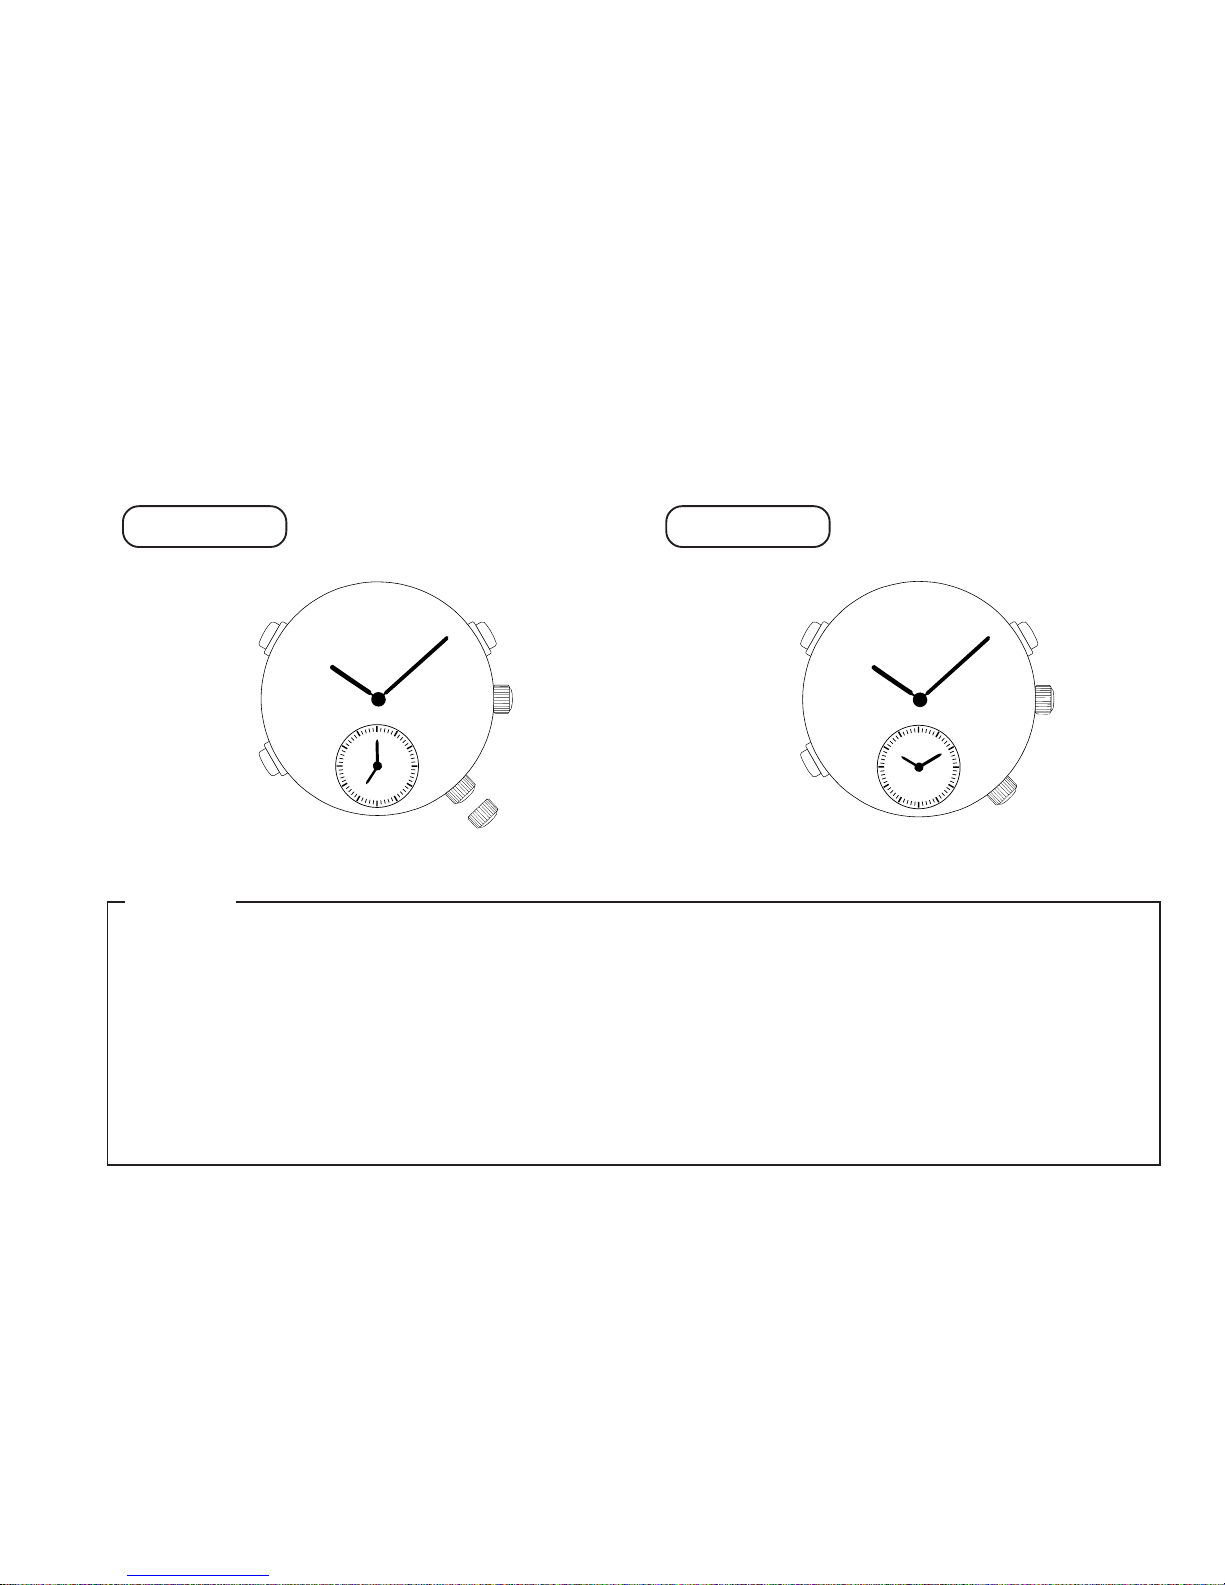
ALARM ENGAGEMENT/DISENGAGEMENT
• Alarm engagement • Alarm disengagement
Push back in to
normal
position
.
Pull out to
first click
.
Current time
1 Alarm rings at the designated time for 20 seconds.
* To stop it manually, press Button A, B or C, or push CROWN 2 back in to normal position.
2 If CROWN 2 is pulled out to second click, the designated alarm time is canceled
with a warning beep.
* In that case, set ALARM hands to MAIN TIME again, push CROWN 2 back in to normal position,
and then, pull it out to first click and set the desired alarm time again. However, if CROWN 2
is pushed back in to normal position before the warning beep stops, the designated alarm time
will not be canceled.
ALARM
1
2
3
9
10
11
12
4
5
6
7
8
➠
Designated
alarm time
ALARM
1
2
3
9
10
11
12
4
5
6
7
8
[Alarm engaged]
NOTES
➠
[Alarm disengaged]
CROWN 2CROWN 2
Page 11
English
11
● Stopwatch measures up to 30 minutes in 1/5 second increments.
● After 30 minutes, it will start counting again from “0” repeatedly up to 6 hours.
STOPWATCH
STOPWATCH
minute hand
•
Before using the stopwatch:
•
Check that CROWNS 1 and 2
are set at normal position.
•
Press Button B to reset STOP-
WATCH hands to “0” position.
* If the hands do not return to “0”
position, follow the procedure in
“ADJUSTING THE HAND POSITION” (page 16).
STOPWATCH OPERATION
STOPWATCH
1/5 second hand
MIN.
5
25
10
20
30
CROWN 1
CROWN 2
B
A
Page 12

English
12
1 Standard measurement
START STOP RESET
START
SPLIT
RELEASE
STOP
SPLIT
* Measurement and release of split time can be repeated by pressing Button B.
RESET
3 Split time measurement
2 Accumulated elapsed time measurement
START RESTART
STOP
STOP RESET
* Restart and stop of stopwatch can be repeated by pressing Button A.
AAB
A
BBAB
BA
A
AAAB
▼
▼
▼
○○○
▼
▼
▼
▼
▼
▼
○○○
▼
Page 13

English
13
START RESET
4 Measurement of two competitors
2ND
COMPETITOR
FINISHES
FINISH TIME
OF 1ST
COMPETITOR
FINISH TIME
OF 2ND
COMPETITOR
1 If CROWN 1 is pulled out to second click, STOPWATCH hands are reset to “0”
position.
2 If CROWN 2 is pulled out to first or second click, STOPWATCH hands are reset to
“0” position.
3 When stopwatch has been reset and Button A is pressed before the hands reach
“0” position, stopwatch still starts counting when Button A is pressed.
NOTES
A
BA B
B
▼
▼
▼
▼
Page 14

English
14
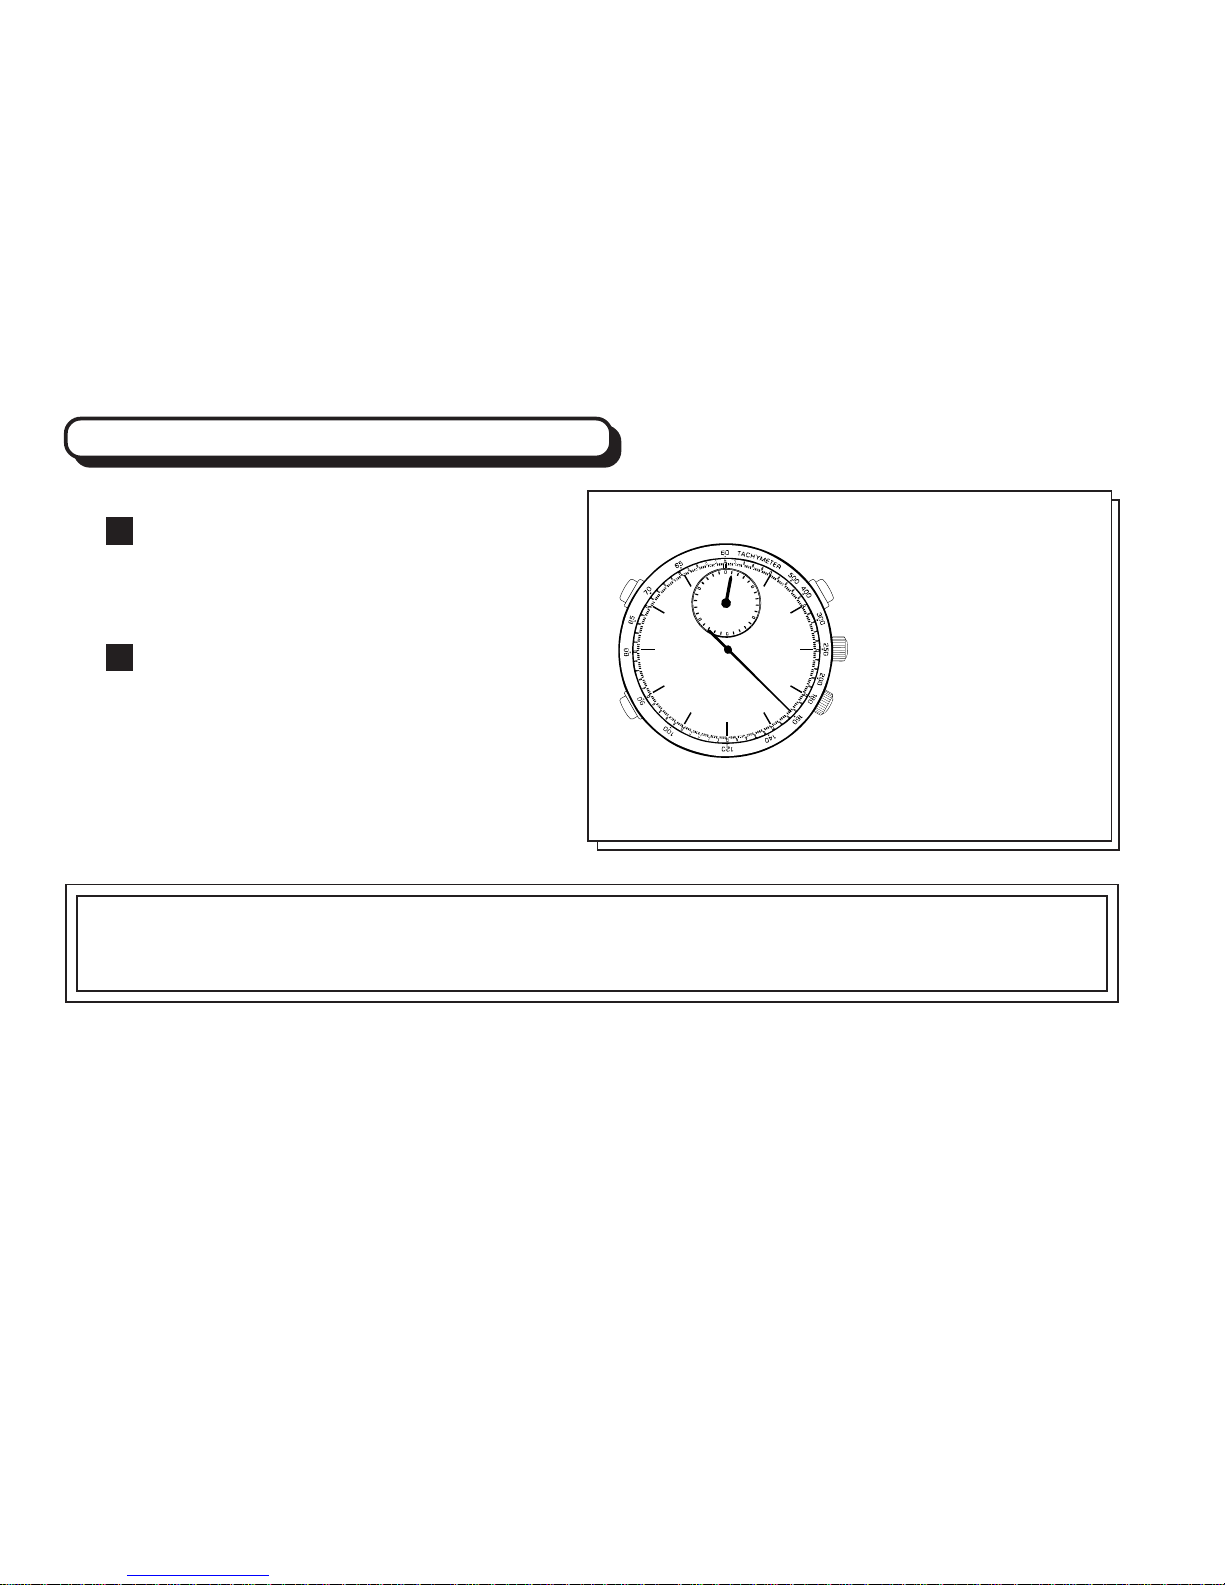
TACHYMETER
(for models with tachymeter scale on the dial)
* Tachymeter scale can be used only when the time required is less than 60 seconds.
Ex. 2: If the measuring distance is extended to 2 km or miles or shortened to 0.5 km or miles
and STOPWATCH second hand indicates “90” on tachymeter scale:
“90” (tachymeter scale figure) x 2 (km or mile) = 180 km/h or mph
“90” (tachymeter scale figure) x 0.5 (km or mile) = 45 km/h or mph
To measure the hourly average speed of a vehicle
Use the stopwatch to determine
how many seconds it takes to go
1 km or 1 mile.
1
Tachymeter scale indicated by
STOPWATCH second hand gives
the average speed per hour.
2
Ex. 1Ex. 1
STOPWATCH
second hand:
40 seconds
Tachymeter scale: “90”
“90” (tachymeter scale figure) x 1 (km or mile)
= 90 km/h or mph
MIN.
5
25
30
10
20
Page 15
English
15
To measure the hourly rate of operation
Use the stopwatch to measure
the time required to complete 1
job.
1
Tachymeter scale indicated by
STOPWATCH second hand gives
the average number of jobs accomplished per hour.
2
STOPWATCH
second hand:
20 seconds
Tachymeter scale: “180”
“180” (tachymeter scale figure) x 1 job
= 180 jobs/hour
Ex. 1Ex. 1
Ex. 2: If 15 jobs are completed in 20 seconds:
“180” (tachymeter scale figure) x 15 jobs = 2700 jobs/hour
MIN.
5
25
30
20
10
Page 16
English
16
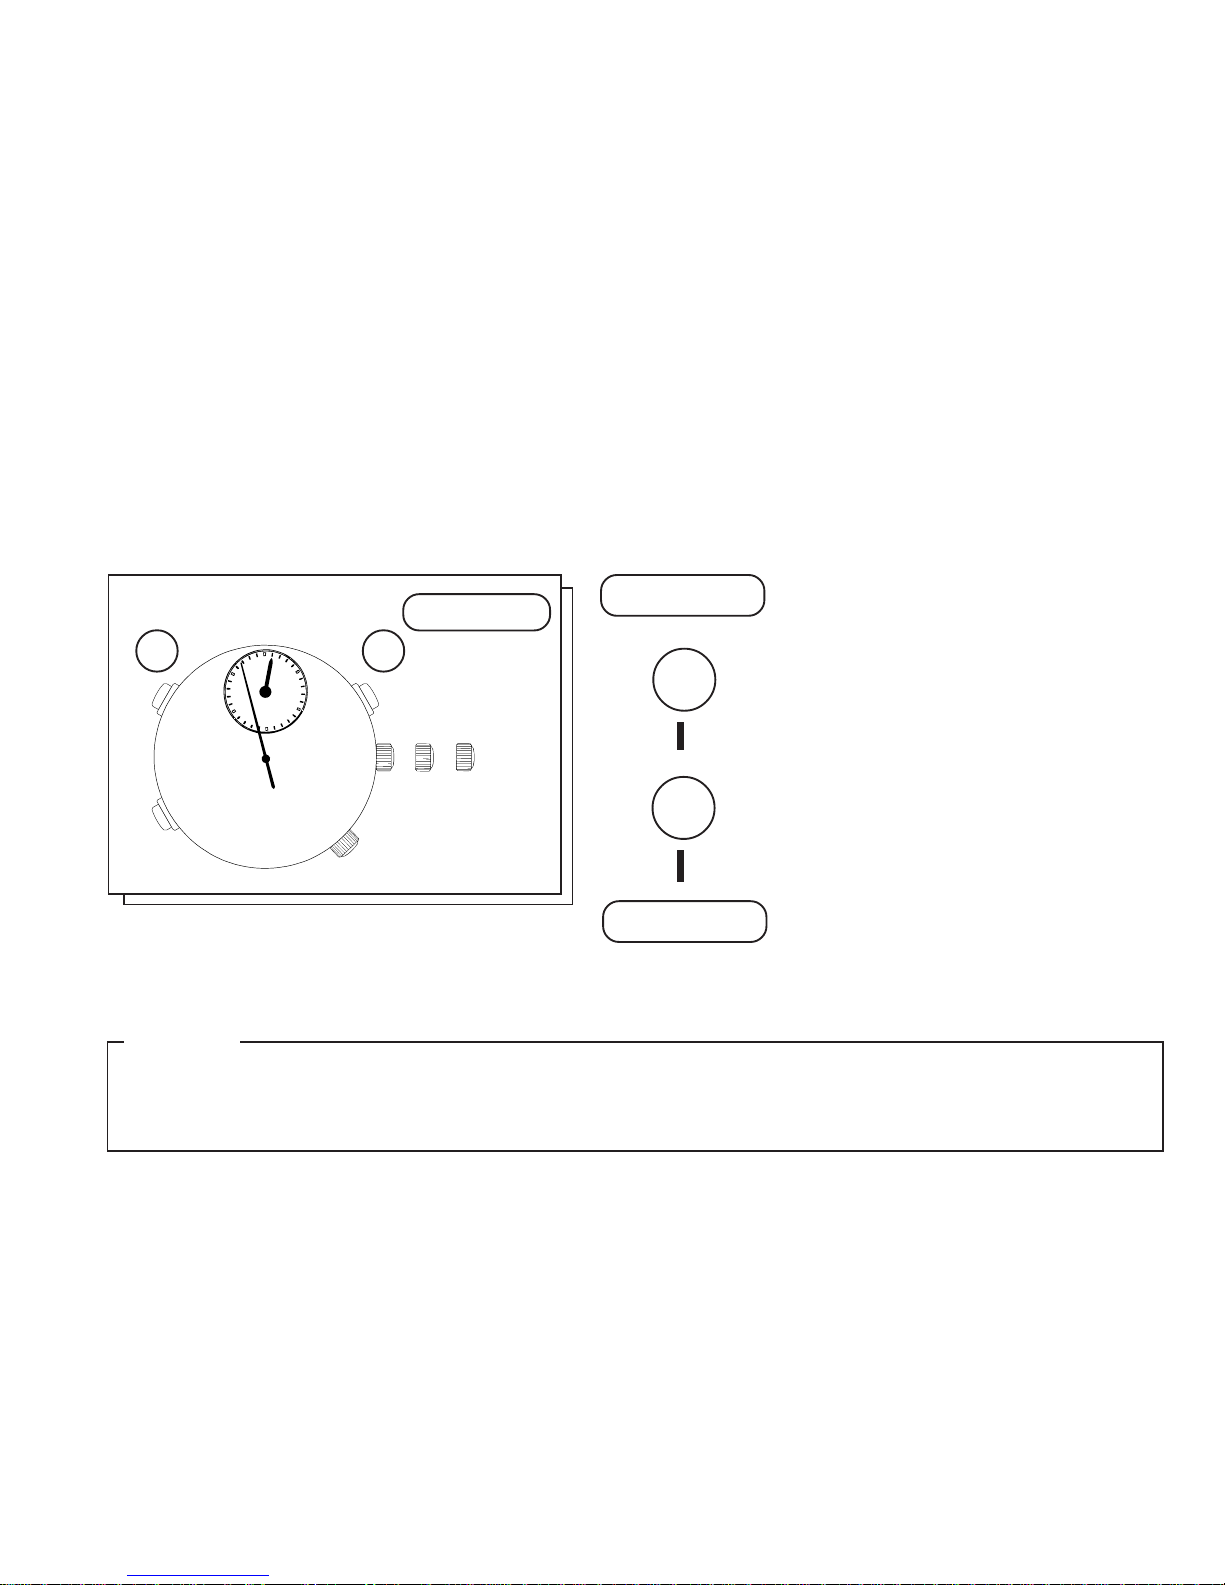
ADJUSTING THE HAND POSITION
▼
Pull out to
second click
.
Press repeatedly to reset
STOPWATCH minute hand to
the 12 o’clock position.
▼
Press repeatedly to reset
STOPWATCH second hand to
the 12 o’clock position.
▼
Push back in to
normal posi-
tion
.
● If STOPWATCH hands will not return to the 12 o’clock position when the stopwatch is
reset or when the battery is replaced with a new one, follow the procedure below.
1 Hands move quickly if the respective buttons are kept pressed.
2 After adjusting the hand position, set the main time.
MIN.
5
25
30
20
10
➠
➠
NOTES
CROWN 1
CROWN 1
A
BA
B
CROWN 1
Page 17
English
17
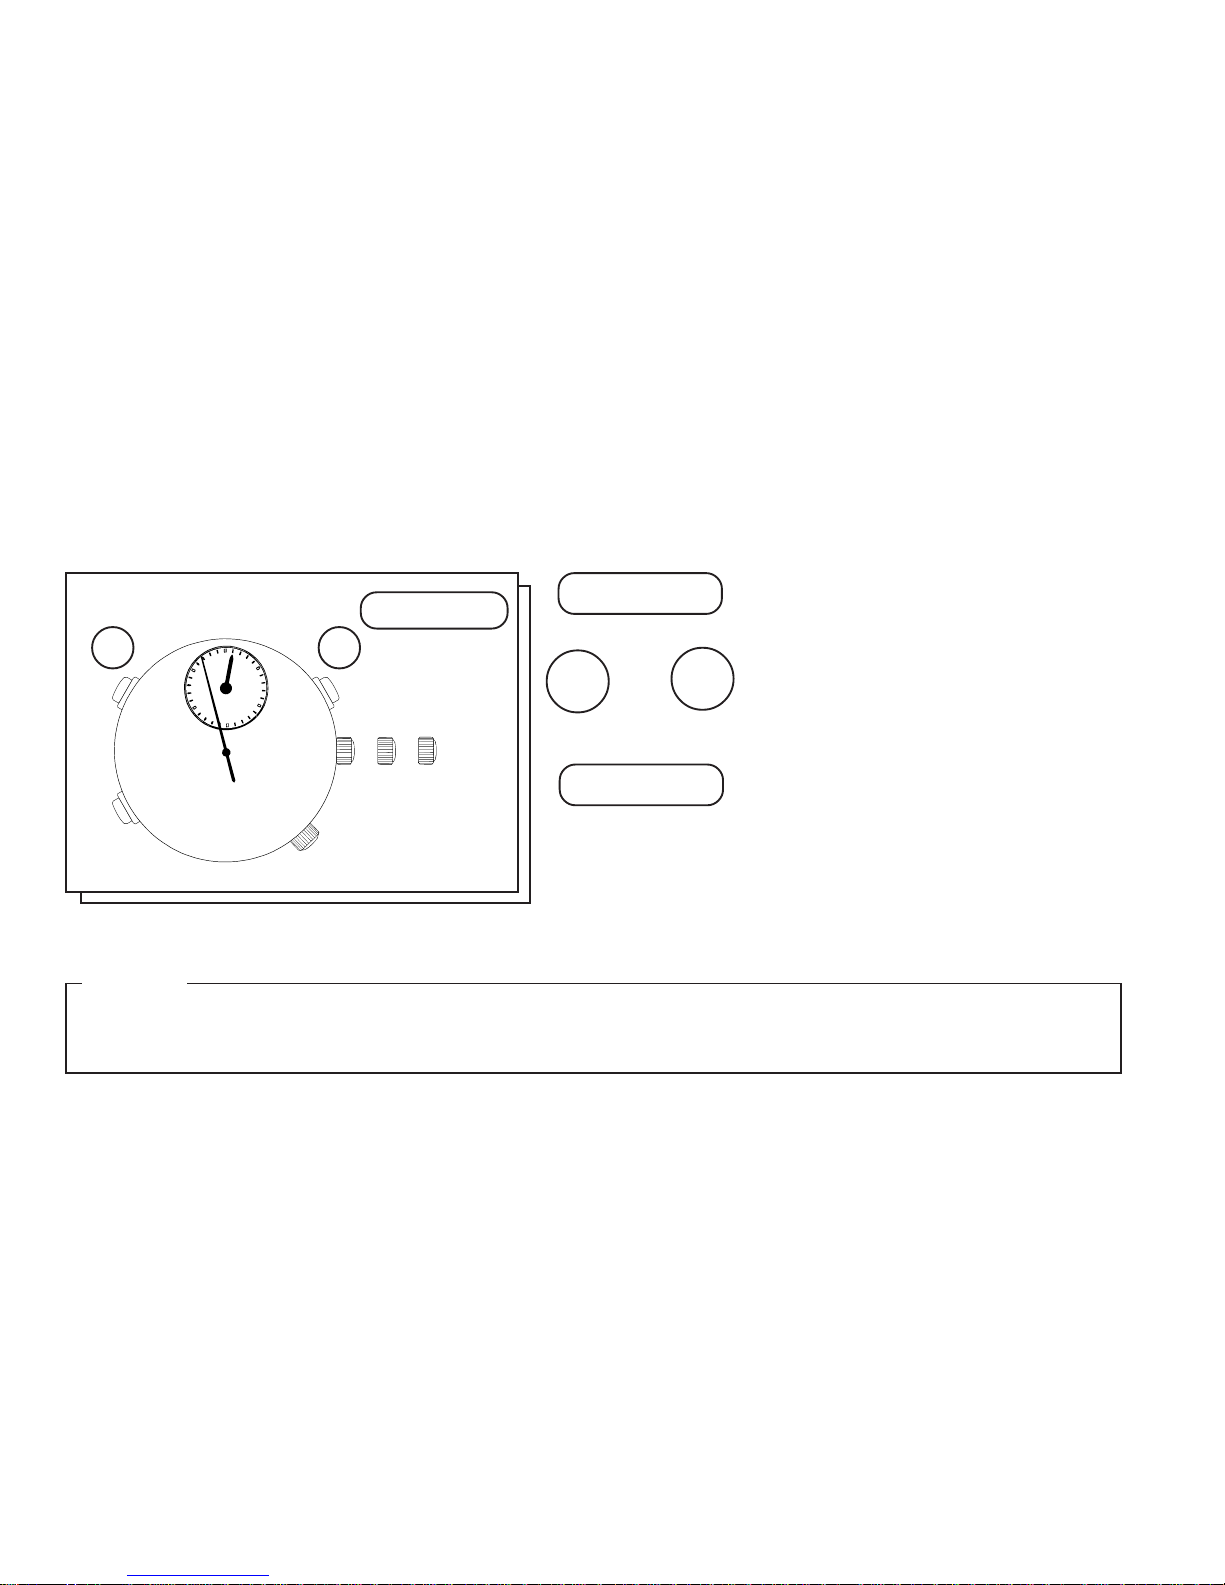
RESETTING THE BUILT-IN IC
● In case any of the hands should move improperly, follow the procedure below to adjust
the hand movement.
Pull out to
second click
.
AND Press simultaneously.
Push back in to
normal posi-
tion
.
▼
▼
5
25
30
10
20
MIN.
➠
➠
NOTE
Before using the watch again, be sure to adjust the position of STOPWATCH hands and
set the main time and alarm.
CROWN 1
CROWN 1
A
B
CROWN 1
BA
Page 18
English
18
BATTERY LIFE INDICATOR
CAUTION
Do not remove the battery from the watch. If it is necessary to take out the
battery, keep it out of the reach of children. If a child swallows it, consult a
doctor immediately.
● When the battery nears its end, the small second hand moves at two-second intervals
instead of normal one-second intervals to indicate that the battery needs to be replaced
with a new one.
* If the alarm is used while the second hand is moving at two-second intervals, the watch
may stop operating. Therefore, if you see the second hand moving at two-second intervals,
replace the battery with a new one as soon as possible.
BATTERY CHANGE
The miniature battery which powers your watch should last approximately
2 years. However, because the battery is inserted at the factory to check
the function and performance of the watch, its actual life once in your
possession may be less than the specified period. When the battery
expires, be sure to replace it as soon as possible to prevent any malfunction.
For battery replacement, we recommend that you contact an AUTHORIZED
SEIKO DEALER and request SEIKO SR927W battery.
2
Years
Page 19
English
19
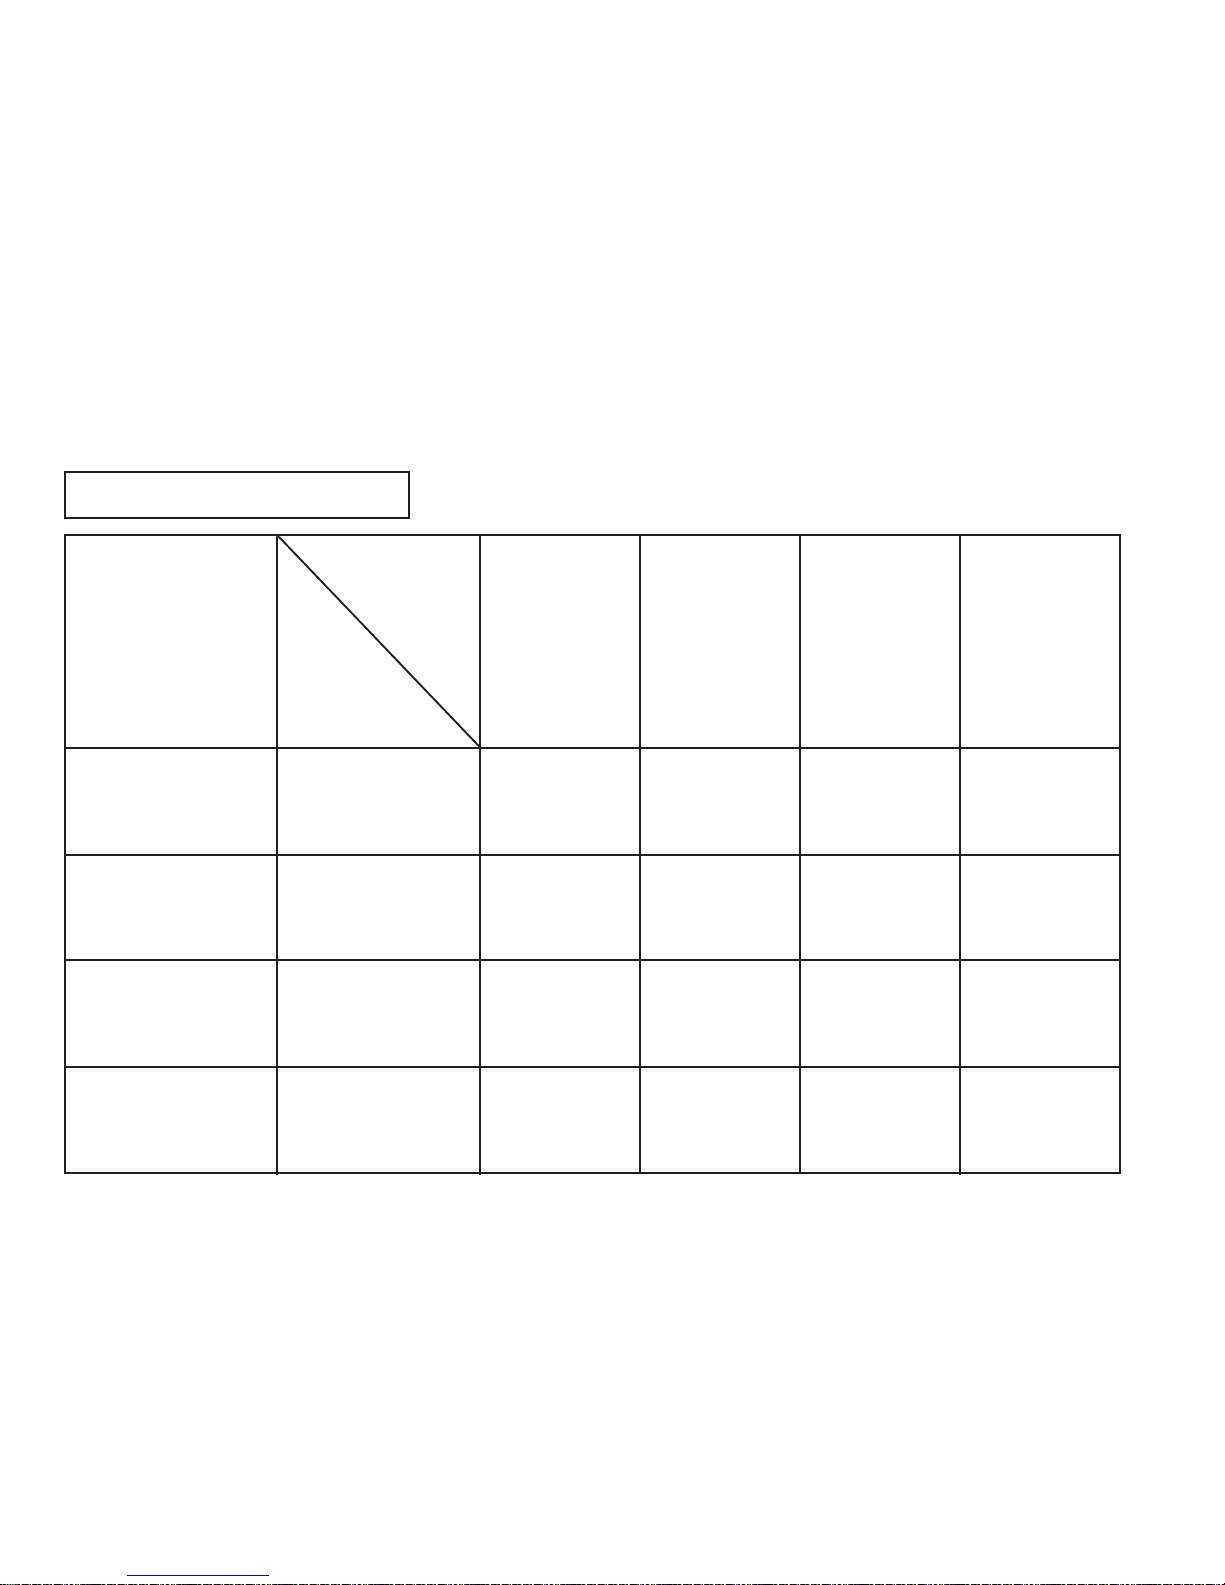
TO PRESERVE THE QUALITY OF YOUR WATCH
Condition
of use
WATER
RESISTANT
5 BAR
WATER
RESISTANT
No indication
Indication on
case back
Non-water
resistant
Degree
of water
resistance*
Accidental
contact with
water such
as rain and
splashes
Swimming,
yachting and
taking a
shower
No No No No
Yes No No No
Yes Yes No No
Yes Yes Yes No
WATER
RESISTANT
10/15/20 BAR
Scuba
diving**
and
saturation
diving
Taking a bath
and shallow
diving
■ WATER RESISTANCE
3 bar
5 bar
10/15/20 bar
Page 20
English
20
● Non-water resistant
• If the watch becomes wet, have it
checked by an AUTHORIZED SEIKO
DEALER or SERVICE CENTER.
● Water resistant 5/10/15/20 bar
• Before using in water, be sure the
crowns are pushed in completely.
• Do not operate the crowns and buttons
when the watch is wet or in water.
If used in sea water, rinse the watch in
fresh water and dry it completely.
5 bar WR
• When taking a shower with the water resistant 5
bar watch, or taking a bath with the water resistant
10, 15 or 20 bar watch, be sure to observe the
following:
* Do not operate the crowns or push the buttons
when the watch is wet with soapy water or
shampoo.
* If the watch is left in warm water, a slight time
loss or gain may be caused. This condition,
however, will be corrected when the watch
returns to normal temperature.
10/15/20
bar WR
* Pressure in bar is a test
pressure and should not be
considered as corresponding
to actual diving depth since
swimming movement tends
to increase the pressure at a
given depth. Care should
also be taken on diving into
water.
** We recommend that you
wear a SEIKO Diver’s Watch
for scuba diving.
Page 21
English
21
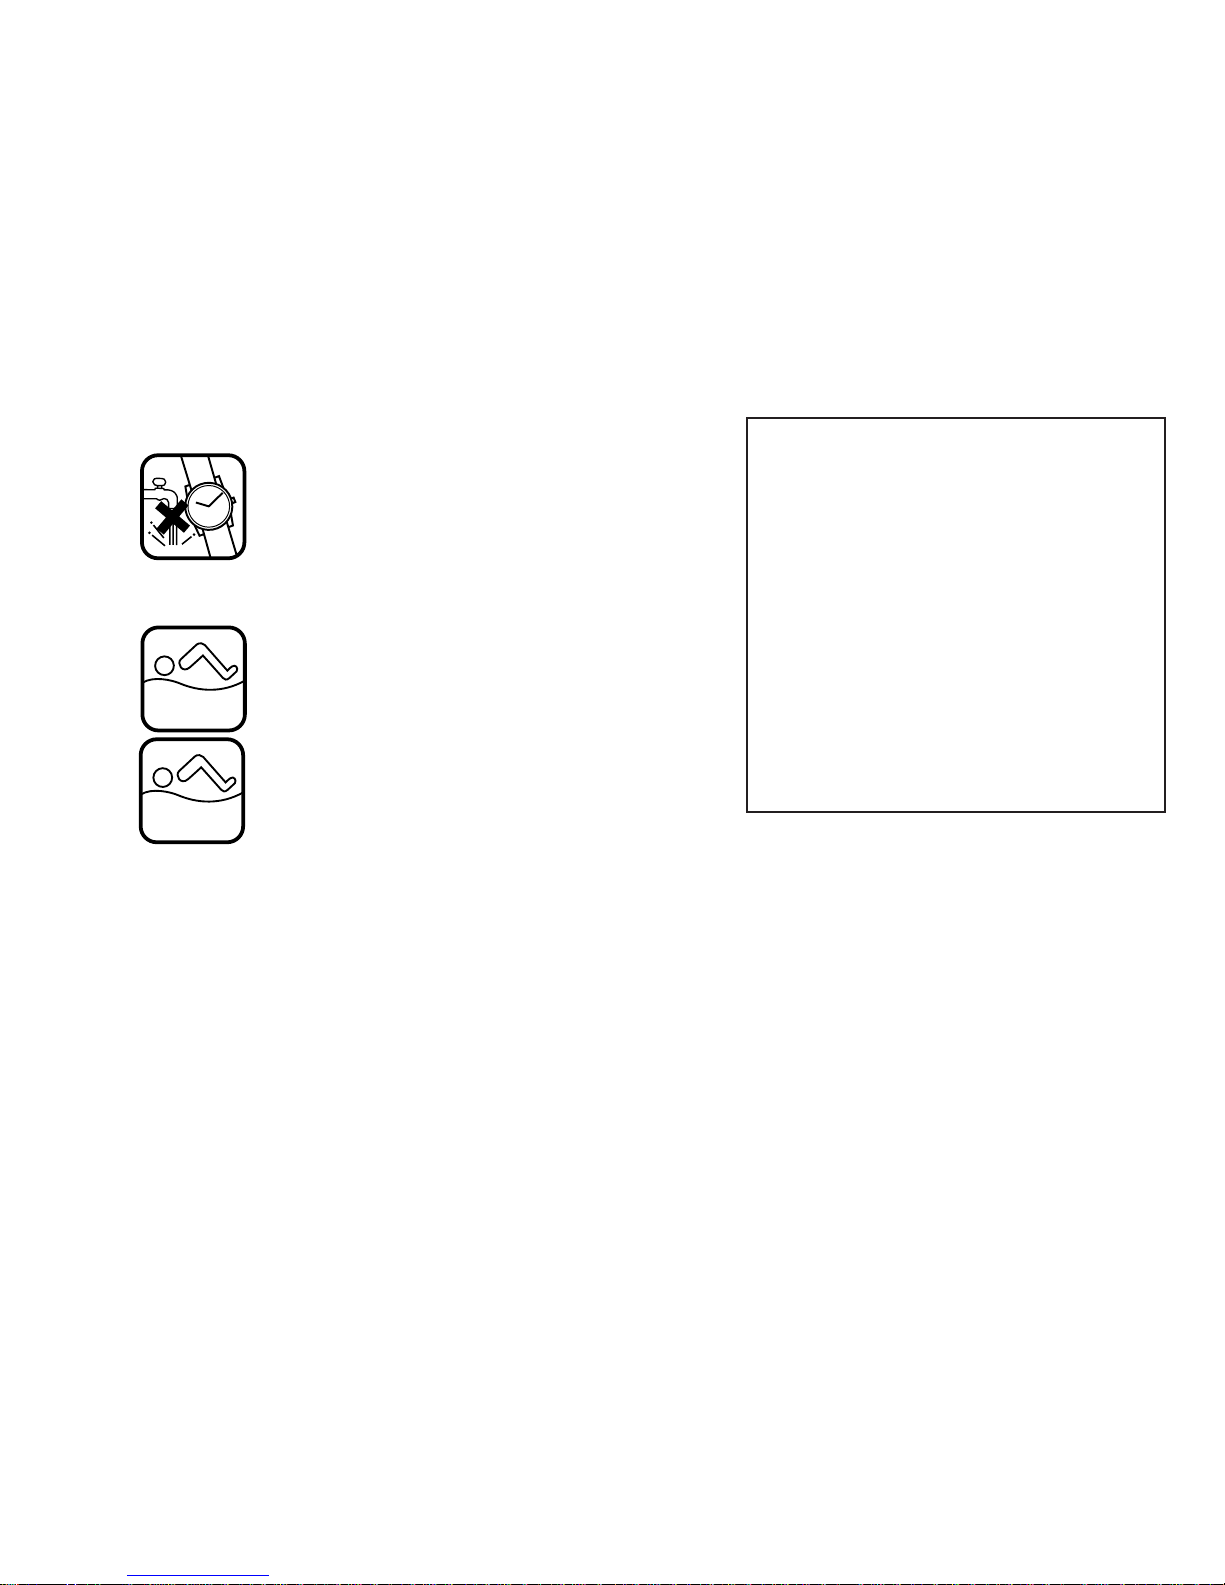
■ TEMPERATURES
Your watch works with stable
accuracy within a temperature
range of 5°C and 35°C (41°F
and 95°F).
Temperatures over 60°C (140°F) may cause
battery leakage or shorten the battery life.
Do not leave your watch in very low
temperatures below –10°C␣ (+14°F) for a
long time since the cold may cause a slight
time loss or gain.
However, the above conditions will be
corrected when the watch returns to
normal temperature.
+60°C
-10°C
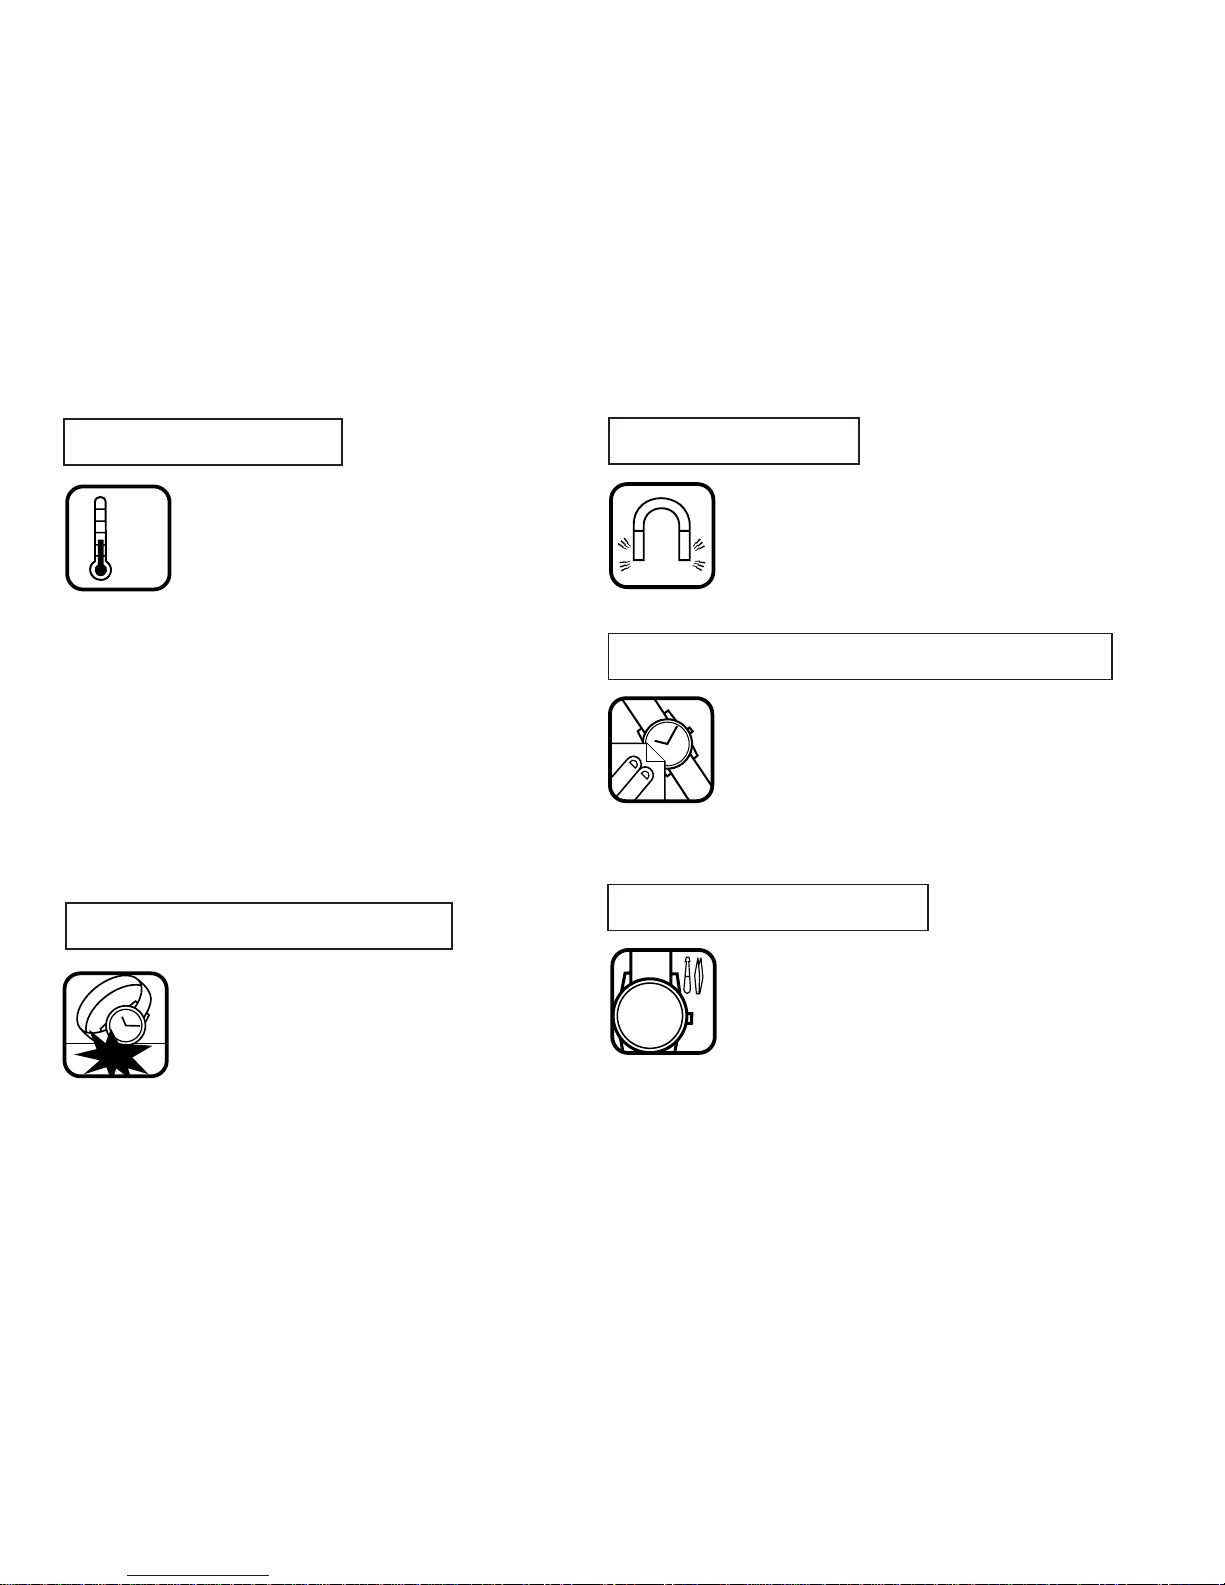
■ SHOCKS & VIBRATION
Light activities will not affect
your watch, but be careful not
to drop your watch or hit it
against hard surfaces, as this
may cause damage.
■ MAGNETISM
To prevent possible rusting of
the case and bracelet caused
by dust, moisture and
perspiration, wipe them
periodically with a soft dry cloth.
It is recommended that the
watch be checked once every
2 to 3 years. Have your watch
checked by an AUTHORIZED
SEIKO DEALER or SERVICE CENTER to
ensure that the case, crowns, buttons,
gasket and crystal seal remain intact.
Your watch will be adversely
affected by strong magnetism.
Keep it away from close contact
with magnetic objects.
N
S
■ CARE OF CASE AND BRACELET
■ PERIODIC CHECK
2 - 3
Years
Page 22
English
22
■ CHEMICALS
cosmetic spray, detergents, adhesives or
paints. Otherwise, the case, bracelet, etc.
may become discolored, deteriorated or
damaged.
Be careful not to expose the
watch to solvents (e.g., alcohol
and gasoline), mercury (i.e.,
from a broken thermometer),
■ PRECAUTION REGARDING
CASE BACK PROTECTIVE FILM
If your watch has a protective
film and/or a sticker on the case
back, be sure to peel them off
before using your watch.
Otherwise, perspiration getting in under
them may rust the case back.
Page 23

English
23
SPECIFICATIONS
1 Frequency of crystal oscillator................ 32,768 Hz (Hz = Hertz ... Cycles per second)
2 Loss/gain (monthly rate) ......................... Less than 15 seconds at normal temperature
range (5°C ~ 35°C) (41°F ~ 95°F)
3 Accuracy of alarm................................... ±1 minute
4 Operational temperature range .............. –10°C ~ +60°C (14°F ~ 140°F)
5 Driving system ....................................... Step motor, 4 pieces
6 Display system
Time ................................................. Three hands (Hour, minute and small second
hands)
Date .................................................. Displayed in numerals.
Stopwatch ........................................ Minute and 1/5 second hands
The stopwatch can measure up to 30 minutes
in 1/5 seconds.
Alarm ................................................ Small hour and minute hands
The alarm is set on a 12-hour basis.
7 Battery.................................................... SEIKO SR927W, 1 piece
8 IC (Integrated Circuit) ............................. C-MOS-LSI
* The specifications are subject to change without prior notice for product improvement.
Page 24
6766
Deutsch
Deutsch
SEIKO-ANALOG-QUARZUHR
Kal. 7T32
MERKMALE
UHRZEIT/KALENDER
STOPPUHR
●
Stunden- und Minutenzeiger
sowie kleiner Sekundenzeiger
●
Numerische Anzeige des Datums
●
Mißt bis zu 30 Minuten in Schritten
von 1/5 Sekunde
●
Kann die Messung bis zu 6 Stunden
wiederholen
GESCHWINDIGKEITSMESSER
●
Für Modelle mit Geschwindigkeitsmesser-Skala
ALARM
●
Kann bis zu 12 Stunden im Voraus
eingestellt werden, kleine Alarmzeiger
DEUTSCH
INHALT
Seite
MERKMALE ................................................................................................................ 67
ANZEIGE UND KRONEN/TASTEN .............................................................................. 68
EINSTELLEN DER DATUMS ....................................................................................... 69
EINSTELLEN DES UHRZEIT ....................................................................................... 70
ALARM ....................................................................................................................... 71
STOPPUHR ................................................................................................................. 74
GESCHWINDIGKEITSMESSER .................................................................................. 77
EINSTELLEN DER ZEIGERPOSITION ......................................................................... 79
RÜCKSTELLEN DER EINGEBAUTEN IC ..................................................................... 80
BATTERIEWARNANZEIGE ......................................................................................... 81
AUSWECHSELN DER BATTERIE ............................................................................... 81
ERHALTUNG DER QUALITÄT DER UHR ................................................................... 82
TECHNISCHE DATEN ................................................................................................. 86
Page 25

6968
Deutsch
Deutsch
EINSTELLEN DES DATUMS
ANZEIGE UND KRONEN/TASTEN
Die Uhr verfügt über drei Tasten und zwei Kronen.
STOPPUHR-1/5-Sekundenzeiger
STOPPUHR-Minutenzeiger
a b c
Stundenzeiger
Sekundenzeiger
a b c
ALARM-Stundenzeiger ALARM-Minutenzeiger
Datum
B
C
A
KRONE 1
KRONE 2
ALARM
1
2
3
9
10
11
5
2
5
30
10
20
M
IN
.
12
8
7
6
5
4
Minutenzeiger
a: Normalposition b: 1. Einrastposition c: 2. Einrastposition
Zur
1. Einrastposition
heraus-
ziehen.
KRONE 1
Im Uhrzeigersinn drehen, bis das
Datum des Vortags erscheint.
Zur
2. Einrastposition
herausziehen und drehen, bis das gewünschte Datum erscheint.
Zurück in die
Normalposition
drücken.
1
2
3
4
▼
▼
▼
➡
➠
KRONE 1
1
1
2
Datum
➠
3
➠
4
HINWEISE
1 Stellen Sie das Datum nicht zwischen 21:00 und 3:00 ein, weil es sonst vorkommen
kann, daß das Datum nicht richtig weiterrückt.
* Wenn das Datum in diesem Zeitabschnitt eingestellt werden muß, stellen Sie zunächst eine Uhrzeit
außerhalb dieses Zeitabschnitts ein, stellen Sie dann das Datum ein und stellen Sie zuletzt wieder
die richtige Uhrzeit ein.
2 Am Ende des Februars und am Ende von Monaten mit 30 Tagen ist es erforderlich,
das Datum einzustellen.
Page 26

7170
Deutsch
Deutsch
ALARM
Minutenzeiger
KRONE 2
1
Zur
2. Einrastposition
herausziehen.
Im oder entgegen dem Uhrzeigersinn drehen, um die Alarmzeiger
auf die Uhrzeit einzustellen.
Zurück in die
Normalposition
drücken.
2
3
▼
▼
▼
• Führen Sie nach dem Einstellen der Uhrzeit die nachstehende Bedienung aus
und stellen Sie danach die Alarmzeit ein.
* Die nachstehende Bedienung muß nur nach der Einstellung der Uhrzeit ausgeführt werden.
1Einstellen der Alarmzeiger
ALARM-EINSTELLUNG
Stundenzeiger
Zur
2. Einrastposition
herausziehen, wenn der Sekundenzeiger
sich an der 12-Uhr-Position befindet.
Drehen, um den Stunden- und
Minutenzeiger einzustellen.
Bei einem Zeitzeichen zurück in
die
Normalposition
drücken.
EINSTELLEN DER UHRZEIT
1
2
3
▼
▼
HINWEISE
1 Achten Sie bei der Einstellung des Stundenzeigers darauf, daß vor/nach Mittag richtig
eingestellt ist.
*Die Uhr ist so konstruiert, daß das Datum einmal in 24 Stunden weiterrückt. Sie können feststellen,
ob die Uhr auf vor oder nach Mittag eingestellt ist, indem Sie die Zeiger über die 12-Uhr-Position
drehen. Wenn das Datum weiterrückt, ist die Uhrzeit dann auf vor Mittag eingestellt. Wechselt
das Datum nicht, ist die Uhrzeit dann auf nach Mittag eingestellt.
2 Drehen Sie den Minutenzeiger bei der Einstellung um 4 bis 5 Minuten weiter und
dann zurück auf die genaue Minute.
Minutenzeiger
➠
1
15
30
45
60
➠
2
3
KRONE 1
Stundenzeiger
Sekundenzeiger
KRONE 1
● Die Alarmzeit kann bis zu 12 Stunden im Voraus eingestellt werden.
● Die Alarmzeiger laufen unabhängig von den Uhrzeitzeigern.
ALARM
1
2
3
4
5
6
7
8
9
10
11
12
➠
1
➠
3
KRONE 2
2
ALARMMinutenzeiger
ALARMSekundenzeiger
Page 27

7372
Deutsch
Deutsch
AKTIVIEREN/DEAKTIVIEREN DES ALARMS
2 Einstellen der Alarmzeit
KRONE 2
C
▼
Drücken, um die Alarmzeiger
auf die gewünschte Alarmzeit
einzustellen.
▼
KRONE 2
* Nach der Einstellung der Alarmzeiger auf die Uhrzeit läßt sich die Alarmzeit einfach mit der
nachstehenden Bedienung einstellen.
ALARM
1
2
3
9
10
1
1
12
4
5
6
7
8
C
➠
➠
KRONE 2
HINWEISE
1 Den ALARM-Minutenzeiger beim Einstellen in
um 4 bis 5 Minuten weiter und
dann zurück auf die genaue Minute drehen.
2 Die Alarmzeiger laufen schneller, wenn die Taste C gedrückt gehalten wird.
3 Wenn in
3
die KRONE 2 innerhalb einer Minute, nachdem sie zurück in die
Normalposition gedrückt wurde, zur 1. Einrastposition herausgezogen wird, ertönt
der Alarm.
Zur
1. Einrastposition
heraus-
ziehen.
Zurück in die
Normalposition
drücken.
2
• Aktivieren des Alarms • Deaktivieren des Alarms
KRONE 2
Zurück in die
Normal-
position
drücken.
KRONE 2
Zur
1. Einrastposition
herausziehen.
[Alarm aktiviert]
[Alarm deaktiviert]
Uhrzeit
ALARM
1
2
3
9
10
11
12
4
5
6
7
8
➠
eingestellte
Alarmzeit
ALARM
1
2
3
9
10
11
12
4
5
6
7
8
➠
1 Der Alarm ertönt zur eingestellten Zeit für 20 Sekunden.
* Zum Abstellen des Alarms betätigen Sie die Taste A, B oder C oder drücken Sie die KRONE 2 zurück
in die Normalposition.
2 Wenn die KRONE 2 zur 2. Einrastposition herausgezogen wird, wird die eingestellte
Alarmzeit mit einem Warnton gelöscht.
* In diesem Fall stellen Sie die Alarmzeiger wieder auf die Uhrzeit ein, drücken Sie die KRONE
2 zurück in die Normalposition und ziehen Sie sie anschließend zur 1. Einrastposition heraus
und stellen Sie die gewünschte Alarmzeit erneut ein. Falls die KRONE 2 jedoch zurück in die
Normalposition gedrückt wird, bevor der Warnton erzeugt wird, wird die eingestellte
Alarmzeit nicht gelöscht.
HINWEISE
Page 28

7574
Deutsch
Deutsch
1 Normale Messung
A
START
A
STOPPBRÜCKSTELLUNG
B
A
2 Aufaddierende Zeitmessung
A
A A A
START
FORTSETZUNG
STOPP
STOPP
○○
B
RÜCKSTELLUNG
* Fortsetzung und Stopp der Stoppuhr können durch Drücken der Taste A wiederholt
werden.
● Die Stoppuhr mißt bis zu 30 Minuten in Schritten von 1/5 Sekunde.
● Nach 30 Minuten fängt sie wieder bei “0” an zu messen, dies wird bis zu 6 Stunden
wiederholt.
STOPPUHR
STOPPUHRMinutenzeiger
STOPPUHR-1/5-
Sekundenzeiger
MIN.
5
2
5
1
0
20
30
KRONE 1
KRONE 2
B
A
BEDIENUNG DER STOPPUHR
•
Vor der Verwendung der Stopp-
uhr:
•
Vergewissern Sie sich, daß die
KRONEN 1 und 2 sich in der
Normalposition befinden.
•
Betätigen Sie die Taste B, um die
Stoppuhrzeiger auf die Position
“0” zurückzustellen.
* Falls die Zeiger nicht zur Position “0”
zurückkehren, führen Sie die
Bedienung unter “EINSTELLEN DER
ZEIGERPOSITION” (Seite 79) aus.
A
B B A
START
STOPP
○○
B
RÜCKSTELLUNG
3Zwischenzeitmessung
*Messung und Freigabe der Zwischenzeit können durch Drücken der Taste B
wiederholt werden.
ZWISCHENZEIT-
FREIGABE
ZWISCHEN-
ZEIT
Page 29

7776
Deutsch
Deutsch
GESCHWINDIGKEITSMESSER
(für Modelle mit Geschwindigkeitsmesserskala auf dem
Ziffernblatt)
A
B A B
START
B
4 Messung von zwei Wettbewerbern
ZIELDURCH-
GANG DES
2. WETT-
BEWERBERS
ENDZEIT DES
2. WETT-
BEWERBERS
1 Wenn die KRONE 1 zur 2. Einrastposition herausgezogen wird, werden die
Stoppuhrzeiger zur Position “0” zurückgestellt.
2Wenn die KRONE 2 zur 1. oder 2. Einrastposition herausgezogen wird, werden die
Stoppuhrzeiger zur Position “0” zurückgestellt.
3Wenn die Stoppuhr zurückgestellt wurde und die Taste A betätigt wird, bevor die
Zeiger die Position “0” erreichen, fängt die Stoppuhr noch an zu laufen, wenn die
Taste A betätigt wird.
HINWEISE
ENDZEIT DES
1. WETT-
BEWERBERS
RÜCK-
STELLUNG
Bsp. 1Bsp. 1
Stoppuhr-
Sekundenzeiger:
40 Sekunden
“90” (Wert auf Geschwindigkeitsmesserskala)
x 1 (km oder Meile) = 90 km/h oder Meilen/h
MIN.
5
2
5
30
1
0
2
0
Geschwindigkeits-
messerskala: “90”
Messen der stündlichen Durchschnittsgeschwindigkeit eines Fahrzeugs
Messen Sie mit der Stoppuhr,
wieviele Sekunden zum Zurücklegen von einem Kilometer oder
einer Meile benötigt werden.
1
Der Wert auf der Geschwindigkeitsmesserskala, auf den der
Stoppuhr-Sekundenzeiger weist,
gibt die
durchschnittliche
Stunden-
geschwindigkeit an.
2
* Die Geschwindigkeitsmesserskala kann nur verwendet werden, wenn die gemessene
Zeit weniger als 60 Sekunden beträgt.
Bsp. 2: Wenn die gemessene Strecke auf 2 km oder Meilen verlängert oder auf 0,5 km oder
Meilen verkürzt wird und der Stoppuhr-Sekundenzeiger auf “90” auf der
Geschwindigkeitsmesserskala weist:
Page 30

7978
Deutsch
Deutsch
EINSTELLEN DER ZEIGERPOSITION
● Sollten die Stoppuhrzeiger nicht zur 12-Uhr-Position zurückkehren, wenn die Stoppuhr
zurückgestellt oder die Batterie ausgewechselt wird, führen Sie die nachstehende
Bedienung aus.
Messen der stündlichen Rate eines Vorgangs
STOPPUHRSekundenzeiger:
20 Sekunden
Bsp. 1Bsp. 1
Bsp. 2: Wenn 15 Vorgänge in 20 Sekunden durchgeführt werden:
MIN.
5
25
30
20
10
“180” (Wert auf Geschwindigkeitsmesserskala) x
1 Vorgang = 180 Vorgänge pro Stunde
“180” (Wert auf Geschwindigkeitsmesserskala) x 15 Vorgänge = 2700 Vorgänge pro Stunde
“90” (Wert auf Geschwindigkeitsmesserskala) x 2 (km oder Meile) = 180 km/h oder Meilen/h
“90” (Wert auf Geschwindigkeitsmesserskala) x 0,5 (km oder Meile) = 45 km/h oder Meilen/h
Messen Sie mit der Stoppuhr die
Zeit, die zum Durchführen von
einem Vorgang erforderlich ist.
1
Der Wert auf der Geschwindigkeitsmesserskala, auf den der
STOPPUHR-Sekundenzeiger
weist, gibt die durchschnittliche
Anzahl von Vorgängen, die in
einer Stunde durchgeführt
werden, an.
2
Geschwindigkeitsmesserskala: “180”
KRONE 1
KRONE 1
B A
MIN.
5
25
30
20
10
➠
➠
Zur
2. Einrastposition
heraus-
ziehen.
A
Wiederholt betätigen, um den
STOPPUHR-Minutenzeiger
zur 12-Uhr-Position zurückzustellen.
▼
B
Wiederholt betätigen, um den
STOPPUHR-Sekundenzeiger
zur 12-Uhr-Position zurückzustellen.
▼
▼
KRONE 1
Zurück in die
Normalposition
drücken.
1 Die Zeiger laufen schnell, wenn die jeweilige Taste gedrückt gehalten wird.
2 Nach der Einstellung der Zeigerposition muß die Uhrzeit eingestellt werden.
HINWEISE
Page 31

8180
Deutsch
Deutsch
BATTERIEWARNANZEIGE
RÜCKSTELLEN DER EINGEBAUTEN IC
● Falls einer der Zeiger nicht einwandfrei laufen sollte, führen Sie die nachstehende
Bedienung aus, um die Zeigerbewegung einzustellen.
KRONE 1
Zur
2. Einrastposition
heraus-
ziehen.
KRONE 1
A
B
UND
Gleichzeitig betätigen.
KRONE 1
Zurück in die
Normalposition
drücken.
▼
▼
B A
5
25
30
10
20
MIN.
➠
➠
Vor der erneuten Verwendung der Uhr müssen die Position der Stoppuhrzeiger sowie
die Uhrzeit und der Alarm eingestellt werden.
HINWEIS
Die Miniaturbatterie zum Betrieb dieser Uhr weist eine Nutzungsdauer von
etwa 2 Jahren auf. Da die Batterie jedoch bereits ab Werk zur Überprüfung der
Funktion und Leistung der Uhr eingelegt wird, kann ihre Nutzungsdauer nach
dem Erwerb der Uhr weniger betragen. Wenn die Batterie entladen ist, sollte sie
so bald wie möglich ausgewechselt werden, um Fehlfunktionen zu vermeiden.
Wir empfehlen, daß Sie sich für den Batteriewechsel an einen AUTORISIERTEN
SEIKO-HÄNDLER wenden und die Batterie SEIKO SR927W verlangen.
● Wenn die Batterie fast entladen ist, bewegt sich der kleine Sekundenzeiger in Schritten
von zwei Sekunden anstelle einer Sekunde. Dann muß die Batterie gegen eine neue
ausgetauscht werden.
* Wenn der Alarm verwendet wird, während der kleine Sekundenzeiger sich in Schritten
von zwei Sekunden bewegt, ist es möglich, daß die Uhr stehenbleibt. Daher sollte die
Batterie so schnell wie möglich gegen eine neue ausgetauscht werden, wenn der kleine
Sekundenzeiger sich in Schritten von zwei Sekunden bewegt.
AUSWECHSELN DER BATTERIE
ZUR BEACHTUNG
Entnehmen Sie nicht die Batterie aus der Uhr. Falls die Batterie entnommen
werden muß, halten Sie sie außerhalb der Reichweite von Kindern. Wenn die
Batterie verschluckt wird, muß unverzüglich ein Arzt konsultiert werden.
2
Jahre
Page 32

8382
Deutsch
Deutsch
● Nicht wasserdicht
● Wasserdicht 5/10/15/20 bar
•
Bevor Sie eine Uhr im Wasser tragen,
überzeugen Sie sich, daß die Kronen
vollständig eingedrückt ist.
•
Betätigen Sie niemals die Kronen oder
Tasten, wenn die Uhr naß ist oder sich im
Wasser befindet.
Nach der Verwendung in Seewasser sollte
die Uhr gründlich gespült und vollständig
getrocknet werden.
5
bar WR
10/15/20
bar WR
*Der Druck in Bar ist ein
Prüfdruck und darf nicht
als Angabe der
tatsächlichen
Tauchtiefe angesehen
werden, da die
Schwimmbewegungen
den Druck in gegebener
Tiefe erhöhen. Vorsicht
ist auch bei Tauchen in
Wasser geboten.
** Für Gerätetauchen
empfehlen wir eine
SEIKO Taucheruhr.
ERHALTUNG DER QUALITÄT DER UHR
WATER
RESISTANT
5 BAR
WATER
RESISTANT
Keine Angabe
nicht
wasserdicht
Zufälliger
Kontakt mit
Wasser wie
Regen und
Spritzer
Schwimmen,
Segeln und
Duschen
nein nein nein nein
ja nein nein nein
ja ja nein nein
ja ja ja nein
WATER
RESISTANT
10/15/20 BAR
Tauchen mit
Atemgerät**
und
Sättigungs-
tauchen
Baden und
Tauchen in
flachem
Wasser
■ WASSERDICHTIGKEIT
3 Bar
5 Bar
10/15/20 Bar
Verwendungs-
bedingungen
Grad der
Wasserdichtigkeit*
Angabe auf
Gehäuserück-
wand
• Sollte die Uhr naß werden, empfehlen wir, die
Uhr von einem AUTORISIERTEN SEIKOHÄNDLER oder einer KUNDENDIENSTSTELLE
überprüfen zu lassen.
•
Beachten Sie die folgenden Hinweise, wenn Sie eine
für 5, 10, 15 oder 20 Bar wasserdichte Uhr unter der
Dusche oder im Bad tragen:
* Betätigen Sie niemals die Kronen oder Tasten, wenn
sich Seifenwasser oder Shampoo auf der Uhr befindet.
* In warmem Wasser kann die Uhr geringfügig vor- oder
nachgehen. Dieser Zustand wird jedoch korrigiert,
wenn die Uhr zur Normaltemperatur zurückkehrt.
Page 33

8584
Deutsch
Deutsch
■ TEMPERATUREN
■ STÖSSE UND VIBRATIONEN
+60°C
-10°C
Die Uhr läuft mit einer stabilen
Genauigkeit im Temperaturbereich zwischen 5°C und 35°C
(41°F und 95°F).
Temperaturen über 60°C (140°F) können
Auslaufen der Batterie oder eine Verkürzung
der Batterielebensdauer bewirken.
Die Uhr sollte nicht über längere Zeit sehr
niedrigen Temperaturen unter –10°C (+14°F)
ausgesetzt werden, da die Kälte ein
geringfügiges Vor- oder Nachgehen der Uhr
verursachen kann.
Die obigen Bedingungen werden jedoch
korrigiert, wenn die Uhr zur normalen
Temperatur zurückkehrt.
■ MAGNETISMUS
N
S
Die Funktion Ihrer Uhr wird
durch starken Magnetismus
beeinträchtigt. Schützen Sie sie
deshalb vor zu nahem Kontakt
mit magnetischen Objekten.
stände zu stoßen, da hierdurch Schaden an
der Uhr entstehen könnte.
Leichte Aktivitäten werden Ihrer
Uhr nicht schaden. Achten Sie
jedoch darauf, sie nicht fallen zu
lassen oder gegen harte Gegen-
■ PFLEGE VON GEHÄUSE UND
ARMBAND
Zur Verhinderung eines
möglichen Rostens des
Gehäuses und Armbandes
durch Staub, Feuchtigkeit und
Schweiß sollten diese Teile regelmäßig mit
einem trockenen Tuch abgewischt werden.
■ REGELMÄSSIGE ÜBERPRÜFUNG
DER UHR
Die Uhr sollte regelmäßig alle
2 bis 3 Jahre überprüft
werden. Lassen Sie die
Dichtungen an Gehäuse,
2 - 3
Jahre
Kronen, Tasten, und Uhrglas von einem
AUTORISIERTEN SEIKO-HÄNDLER oder
einer KUNDENDIENSTSTELLE
überprüfen.
Achten Sie darauf, Ihre Uhr
nicht mit Verdünnern (wie
Alkohol und Benzin),
Quecksilber (von einem zer-
■ CHEMIKALIEN
brochenen Thermometer), Kosmetiksprays,
synthetischen Waschmitteln, Klebstoffen
oder Farben zusammen zu bringen, da
sonst Gehäuse, Armband usw. sich
verfärben oder Schaden nehmen könnten.
Falls Ihre Uhr eine Schutzfolie
und/oder einen Aufkleber auf
der Gehäuserückseite aufweist,
entfernen Sie diese, bevor Sie
■ HINWEIS ZUR SCHUTZFOLIE AUF
DER GEHÄUSERÜCKSEITE
die Uhr tragen. Sonst kann Schweiß
darunter gelangen und zu einem Rosten
der Gehäuserückseite führen.
Page 34

86
Deutsch
TECHNISCHE DATEN
1 Frequenz des Kristallschwingers............ 32.768 Hz (Hz = Hertz = Schwingungen pro
Sekunde)
2 Verlust/Gewinn (monatlich) .................... unter 15 Sekunden bei normalen Tempera-
turen (5°C – 35°C) (41°F – 95°F)
3Genauigkeit des Alarms ......................... ±1 Minute
4 Betriebstemperatur ................................ –10°C – +60°C (14°F – 140°F)
5 Antriebssystem ...................................... 4 Schrittmotoren
6 Anzeigesystem
Uhrzeit .............................................. drei Zeiger (Stunden-, Minuten- und kleiner
Sekundenzeiger)
Datum ............................................... numerische Anzeige
Stoppuhr ........................................... Minuten- und 1/5-Sekundenzeiger
Die Stoppuhr kann bis zu 30 Minuten in 1/5
Sekunden messen.
Alarm ................................................ kleiner Stunden- und Minutenzeiger
Der Alarm kann bis zu 12 Stunden im Voraus
eingestellt werden.
7 Batterie................................................... 1 SEIKO SR927W
8 IC (integrierte Schaltung)........................ C-MOS-LSI
* Technische Änderungen zum Zweck der Produktverbesserung ohne vorherige Bekanntmachung
vorbehalten.
Page 35

2524
Français
Français
MONTRE SEIKO QUARTZ ANALOGIQUE
Cal. 7T32
CARACTERISTIQUES
HEURE/CALENDRIER
CHRONOGRAPHE
●
Aiguilles des heures et minutes
et petite trotteuse.
●
Date affichée par des chiffres
●
Mesure jusqu’à 30 minutes en
unités de 1/5e de seconde.
●
Une mesure répétée est possible
jusqu’à une durée de 6 heures
maximum.
TACHYMETRE
●
Pour modèles dotés d’une échelle
de tachymètre.
SONNERIE
●
Programmable en cycle de 12
heures par les petites aiguilles
de sonnerie.
FRANÇAIS
SOMMAIRE
Page
CARACTERISTIQUES ................................................................................................. 25
AFFICHAGE ET REMONTOIRS/BOUTONS ................................................................ 26
REGLAGE DE LA DATE .............................................................................................. 27
REGLAGE DE L’HEURE .............................................................................................. 28
SONNERIE .................................................................................................................. 29
CHRONOGRAPHE ...................................................................................................... 32
TACHYMETRE ............................................................................................................ 35
REGLAGE DE LA POSITION DES AIGUILLES ............................................................ 37
REINITIALISATION DU CI INCORPORE ..................................................................... 38
INDICATEUR DE CHARGE DE LA PILE ...................................................................... 39
REMPLACEMENT DE LA PILE ................................................................................... 39
POUR PRESERVER LA QUALITE DE LA MONTRE .................................................... 40
SPECIFICATIONS ........................................................................................................ 44
Page 36

2726
Français
Français
REGLAGE DE LA DATE
AFFICHAGE ET REMONTOIRS/BOUTONS
Trois boutons et deux remontoirs sont prévus.
Aiguille 1/5 seconde CHRONO
Aiguille des minutes CHRONO
Aiguille des minutes
(HEURE PRINCIPALE)
ALARM
1
2
3
9
10
11
5
2
5
30
10
20
M
IN
.
12
8
7
6
5
4
a b c
Aiguille des heures
(HEURE
PRINCIPALE)
Trotteuse
(HEURE
PRINCIPALE)
a b c
Date
Aiguille des minutes SONNERIE
Aiguille des heures SONNERIE
a: Position normale b: Premier déclic c: Second déclic
B
C
REMONTOIR 1
REMONTOIR 2
A
Retirez jusqu’au
premier déclic
.
Tournez dans le sens horaire
jusqu’à apparition de la date de
la veille.
Retirez jusqu’au
second déclic
et
tournez jusqu’à apparition de la
date souhaitée.
Repoussez en
position normale
.
1
2
3
4
▼
▼
▼
➡
➠
3
➠
4
Date
1 Ne réglez pas la date entre 9:00 du soir et 3:00 du matin, car elle ne changerait pas
correctement.
* S’il est nécessaire de la changer pendant cette période de la nuit, changez d’abord l’heure à une
période du jour, réglez la date, puis réajustez à l’heure exacte.
2 La date doit être ajustée à la fin de février et des mois de 30 jours.
➠
1
2
1
REMARQUES
REMONTOIR 1
REMONTOIR 1
Page 37

2928
Français
Français
SONNERIE
● L’heure de la sonnerie se règle en cycle de 12 heures.
● Les aiguilles de la SONNERIE tournent indépendamment de celles de l’HEURE
PRINCIPALE.
Retirez au
second déclic
quand la
trotteuse indique la position 12
heures.
Tournez les aiguilles des heures
et des minutes pour les ajuster.
Repoussez en
position normale
en accord avec un top horaire
officiel.
REGLAGE DE L’HEURE
Trotteuse
1
2
3
▼
▼
➠
1
15
30
45
60
➠
2
3
Aiguille des heures
Aiguille des minutes
REMARQUES
1 Lors du réglage de l’aiguille des heures, vérifiez que le réglage matin/soir (AM/PM)
est correct.
* La montre est ainsi conçue que l’heure change une fois en 24 heures. Tournez les aiguilles au-
delà de la position 12 heures pour savoir si la montre est réglée pour le matin ou l’après-midi.
Si la date change, la montre est réglée pour la période du matin. Elle l’est pour l’après-midi si
la date ne change pas.
2 Lors du réglage de l’aiguille des minutes, dépassez le moment souhaité de 4 à 5
minutes, puis revenez à la minute exacte.
1
Retirez au
second déclic
.
Repousser en
position normale
.
2
3
▼
▼
▼
ALARM
1
2
3
4
5
6
7
8
9
10
11
12
➠
1
➠
3
2
Aiguille des
minutes de
SONNERIE
Aiguille des
heures de
SONNERIE
Aiguille des heures
(HEURE PRINCIPALE)
Aiguille des minutes
(HEURE PRINCIPALE)
1 Ajustement des aiguilles de SONNERIE
REGLAGE DE LA SONNERIE
Tournez dans le sens horaire ou
anti-horaire pour ajuster les
aiguilles de SONNERIE à l’heure
actuelle (HEURE PRINCIPALE).
REMONTOIR 1
REMONTOIR 1
REMONTOIR 2
REMONTOIR 2
• Après que l’heure principale est ajustée, effectuez les démarches suivantes, puis
réglez la sonnerie.
* La procédure ci-après est nécessaire seulement après que l’heure principale est ajustée.
Page 38

3130
Français
Français
MISE EN/HORS SERVICE DE LA SONNERIE
• Mise hors service
• Mise en service
2 Programmation de l’heure de sonnerie
▼
Retirez au
premier déclic
.
* Une fois que les aiguilles de SONNERIE sont ajustées à l’heure principale, la programmation de
l’heure de sonnerie s’accomplit simplement par les démarches ci-après.
ALARM
1
2
3
9
10
1
1
12
4
5
6
7
8
➠
➠
REMARQUES
Appuyez pour programmer
les aiguilles de SONNERIE à
l’heure souhaitée pour la
sonnerie.
Repoussez en
position nor-
male
.
▼
1 Lors du réglage de l’aiguille des minutes de la SONNERIE en , dépassez la
minute souhaitée de 4 ou 5 minutes, puis revenez à la minute exacte.
2 Les aiguilles de la sonnerie tournent rapidement si le Bouton C est maintenu
enfoncé.
3 Si le REMONTOIR 2 est retiré au premier déclic en moins d’une minute après l’avoir
repoussé en position normale à la démarche 3 , la sonnerie retentit.
2
Repoussez en
position
normale
.
Retirez au
premier
déclic
.
Heure actuelle
ALARM
1
2
3
9
1
0
11
12
4
5
6
7
8
➠
ALARM
1
2
3
9
10
11
12
4
5
6
7
8
➠
[Sonnerie hors service][Sonnerie en service]
Moment désigné
pour sonnerie
REMARQUES
1 La sonnerie retentit pendant 20 secondes au moment programmé.
* Pour l’arrêter manuellement, appuyez sur le Bouton A, B ou C ou repoussez le REMONTOIR
2 en position normale.
2 Si le REMONTOIR 2 est retiré au second déclic, le moment désigné pour la
sonnerie est annulé avec un bip avertisseur.
* Dans ce cas, réglez les aiguilles de SONNERIE à nouveau à l’HEURE PRINCIPALE,
repoussez le REMONTOIR 2 en position normale, puis retirez-le au premier déclic et
programmez à nouveau le moment souhaité pour la sonnerie. Cependant, si le
REMONTOIR 2 est repoussé en position normale avant l’arrêt du bip avertisseur, le
moment programmé pour la sonnerie ne sera pas effacé.
C
C
REMONTOIR 2
REMONTOIR 2
REMONTOIR 2
REMONTOIR 2REMONTOIR 2
Page 39

3332
Français
Français
1 Chronométrage standard
3 Mesure du temps intermédiaire
MARCHE
ARRET
TEMPS
INTERMEDIAIRE
R.A.Z.
LIBERATION
TEMPS
INTERMEDIAIRE
○○
● Le chronographe mesure jusqu’à 30 minutes en unités de 1/5e de seconde.
● Après 30 minutes, la mesure recommence à “0” jusqu’à concurrence de 6 heures
maximum.
CHRONOGRAPHE
Aiguille des minutes
du CHRONO
UTILISATION DU CHRONOGRAPHE
MIN.
5
2
5
1
0
20
30
Aiguille 1/5 seconde
du CHRONO
•
Avant d’utiliser le chronographe:
•
Vérifiez que les REMONTOIRS
1 et 2 se trouvent en position
normale.
•
Appuyez sur le Bouton B pour
ramener les aiguilles du
CHRONO à la position “0”.
* Si les aiguilles ne reviennent pas à la
position ‘0”, effectuez les démarches sous “REGLAGE DE LA
POSITION DES AIGUILLES” (page
37).
* La mesure et la libération du temps intermédiaire peuvent être répétées par poussées
sur le Bouton B.
MARCHE
ARRET R.A.Z.
2 Mesure par accumulation du temps écoulé
○○
MARCHE
ARRET
ARRET
R.A.Z.
REMISE EN
MARCHE
* La remise en marche et l’arrêt peuvent être répétés par poussées sur le Bouton A.
A
BB A
B
REMONTOIR 1
REMONTOIR 2
B
A
A
AB
B
A
A
AA A
B
Page 40

3534
Français
Français
Utilisez le chronographe pour
déterminer combien de secondes
il faut pour parcourir 1 km ou 1
mile.
1
La valeur de l’échelle du tachymètre indiquée par la trotteuse
de CHRONO donne la vitesse
moyenne par heure.
2
Ex. 1Ex. 1
Trotteuse de
CHRONO:
40 secondes
MIN.
5
2
5
30
1
0
2
0
Echelle de
tachymètre: “90”
“90” (valeursur échelle de tachymètre) x 1 (km
ou mile) = 90 km/h ou mph
MARCHE
R.A.Z.
4 Mesure de deux concurrents
ARRIVEE 2e
CONCURRENT
TEMPS
D’ARRIVEE 1er
CONCURRENT
TEMPS
D’ARRIVEE 2e
CONCURRENT
1 Si le REMONTOIR 1 est retiré au second déclic, les aiguilles du CHRONO sont
ramenées à la position “0”.
2 Si le REMONTOIR 2 est retiré au premier ou au second déclic, les aiguilles du
CHRONO sont ramenées à la position “0”.
3 Quand le chronographe a été ramené à zéro et que le Bouton A est actionné avant
que les aiguilles n’arrivent à la position “0”, le chronographe commencera à
fonctionner quand le Bouton A sera actionné.
REMARQUES
“90” (valeur sur échelle de tachymètre) x 2 (km ou mile) = 180 km/h ou mph
“90” (valeur sur échelle de tachymètre) x 0,5 (km ou mile) = 45 km/h ou mph
Ex. 2: Si la distance mesurée est portée à 2 km (ou miles) ou est réduite à 0,5 km (ou mile)
et que la trotteuse du CHRONO indique “90” sur l’échelle de tachymètre:
* L’échelle de tachymètre est utilisable uniquement si la durée requise est inférieure à
60 secondes.
Pour mesurer la vitesse horaire moyenne d’un véhicule
TACHYMETRE
(pour les modèles munis d’une échelle de tachymètre sur
le cadran)
A
BA B
B
Page 41

3736
Français
Français
Retirez au
second déclic
.
MIN.
5
25
30
20
10
➠
➠
Pour mesurer la cadence horaire d’une tâche
Utilisez le chronographe pour
mesurer la durée requise pour
terminer une tâche.
1
La valeur de l’échelle du tachymètre indiquée par la trotteuse
de CHRONO donne le nombre
moyen de tâches accomplies par
heure.
2
Trotteuse de
CHRONO:
20 secondes
“180”
(valeur sur échelle de tachymètre)
x 1 tâche
= 180 tâches par heure
Ex. 1Ex. 1
Ex. 2: Si 15 tâches sont accomplies en 20 secondes:
“180” (valeur sur échelle de tachymètre) x 15 tâches = 2.700 tâches/heure
MIN.
5
2
5
30
20
1
0
Echelle de
tachymètre: “180”
● Si les aiguilles du CHRONO ne reviennent pas à la position 12 heures quand le
chronographe est réinitialisé ou quand la pile est remplacée par une neuve, effectuez
les démarches suivantes.
REGLAGE DE LA POSITION DES AIGUILLES
Appuyez de façon répétée
pour ramener l’aiguille des
minutes du CHRONO à la position 12 heures.
Appuyez de façon répétée
pour ramener la trotteuse du
CHRONO à la position 12
heures.
▼
▼
Repoussez en
position nor-
male
.
▼
1 Les aiguilles tournent rapidement si le bouton correspondant est maintenu enfoncé.
2 Après le réglage de la position des aiguilles, ajustez l’heure principale.
REMARQUES
REMONTOIR 1
BA
REMONTOIR 1
A
B
REMONTOIR 1
Page 42

3938
Français
Français
● Quand la pile est presque épuisée, la petite trotteuse se déplace à intervalles de deux
secondes au lieu des intervalles normaux d’une seconde afin de signaler que la pile
doit être remplacée par une neuve.
* Si la sonnerie est utilisée alors que la petite trotteuse se déplace à intervalles de deux
secondes, la montre risque de s’arrêter. Par conséquent, si l’on constate que la petite
trotteuse se déplace à intervalles de deux secondes, remplacer la pile le plus tôt possible.
REINITIALISATION DU CI INCORPORE
● Si une des aiguilles devait se déplacer de façon anormale, effectuez les démarches ciaprès pour ajuster le mouvement des aiguilles.
Retirez au
second déclic
.
ET
Appuyez simultanément.
Repoussez en
position nor-
male
.
▼
▼
5
25
30
10
20
MIN.
➠
➠
Avant d’utiliser à nouveau la montre, veillez à ajuster la position des aiguilles du
CHRONO et à régler l’heure principale et la sonnerie.
REMARQUE
REMONTOIR 1
ATTENTION
Ne retirez pas la pile hors de la montre. S’il est nécessaire de l’en extraire,
gardez-la hors de portée des enfants. En cas d’ingestion d’une pile, consultez
un médecin immédiatement.
INDICATEUR DE CHARGE DE LA PILE
REMPLACEMENT DE LA PILE
La pile miniaturisée qui alimente cette montre doit durer environ 2 ans.
Cependant, comme elle a été installée en usine pour vérifier le
fonctionnement et les performances de la montre, il se peut que son
autonomie, une fois la montre en votre possession, soit inférieure à la durée
spécifiée. Quand la pile est épuisée, faites-la remplacer le plus vite possible
pour éviter des erreurs. Pour remplacer la pile, nous conseillons de
s’adresser à un CONCESSIONNAIRE SEIKO AGREE et de demander
l’emploi d’une pile SEIKO SR927W.
2
Ans
A
B
BA
REMONTOIR 1
REMONTOIR 1
Page 43

4140
Français
Français
● Non étanche
* La pression en bars est une
pression d’essai et elle ne
doit pas être considérée
comme correspondant à la
profondeur réelle de
plongée car les mouvements en plongée ont
tendance à augmenter la
pression à une profondeur
donnée. Des précautions
doivent également être
prises lors de la plongée
dans l’eau.
** Pour ce genre de plongée,
nous recommandons
l’emploi de la montre de
plongée SEIKO.
POUR PRESERVER LA QUALITE DE LA MONTRE
Condition
d’emploi
WATER
RESISTANT
5 BAR
Indication au
dos du boîtier
Non Non Non Non
Oui Non Non Non
Oui Oui Non Non
WATER
RESISTANT
10/15/20 BAR
■ ETANCHEITE
Degré
d’étanchéité*
Contact
accidentel
avec eau,
tel que pluie
et
éclaboussures
Natation,
yachting et
douche
Bain et
plongée peu
profonde
Plongée
Scuba**
et plongée à
saturation
Non étanche
Pas d’indication
WATER
RESISTANT
Etanche à
10/15/20 bars
Oui
Oui
Oui
Non
Etanche à
3 bars
Etanche à
5 bars
• Si la montre a été mouillée, il est conseillé
de la faire vérifier par un
CONCESSIONNAIRE ou un CENTRE DE
SERVICE SEIKO AUTORISE.
● Etanchéité 5/10/15/20 bars
•
Avant d’utiliser dans l’eau, vérifiez que
les remontoirs sont repoussés à fond.
•
N’actionnez pas les remontoirs ou les
boutons quand la montre est mouillée
ou dans l’eau.
Si la montre a été utilisée dans de l’eau
de mer, rincez-la dans de l’eau douce et
séchez-la convenablement.
5
bar WR
10/15/20
bar WR
•
Si vous prenez une douche avec une montre étanche
à 5 bars ou un bain avec une montre étanche à 10,
15 ou 20 bars, veuillez observer ce qui suit:
*
N’actionner pas les remontoirs et ne pousser pas
sur les boutons quand la montre est mouillée avec
de l’eau savonneuse ou du shampoing.
*
Si la montre est laissée dans de l’eau chaude, un
léger décalage horaire peut se produire. Toutefois,
il sera corrigé lorsque la montre reviendra à une
température normale.
Page 44

4342
Français
Français
■ TEMPERATURES
La montre fonc-tionne avec une
grande précision dans une
plage de températures allant de
5 à 35°C (41 à 95°F).
+60°C
-10°C
■ CHOCS ET VIBRATION
De légères activités sportives
n’affecteront pas la montre.
Toutefois, on veillera à ne pas
la laisser tomber et à ne pas la
cogner contre des objets durs.
Une température supérieure à 60°C (140°F)
risque de provoquer un suintement de la
pile ou d’abréger son autonomie.
Ne pas laisser pendant longtemps la
montre sous une température inférieure à
–10°C (+14°F) car le froid peut provoquer
un léger décalage horaire, positif ou négatif.
Les situations ci-dessus disparaîtront en
replaçant la montre dans une température
normale.
■ MAGNETISME
Cette montre subira l’effet d’un
magnétisme puissant. Par
conséquent, ne pas l’approcher
d’objets magnétiques.
N
S
Pour éviter une oxydation
éventuelle du boîtier et du bracelet,
causée par de la poussière, de
l’humidité et la transpiration, les
frotter régulièrement à l’aide d’un linge doux
et sec.
■ VERIFICATION PERIODIQUE
Il est conseillé de faire vérifier la
montre tous les 2 à 3 ans. Confier
ce travail à un
CONCESSIONNAIRE ou un
2 - 3
Ans
■ SOIN DU BOITIER ET DU BRACELET
CENTRE DE SERVICE SEIKO AUTORISE pour
être sûr que le boîtier, les remontoirs, les
boutons, le joint et le verre soient en bon état.
■ PRODUITS CHIMIQUES
thermomètre brisé), à des produits
cosmétiques en atomiseur, détergents,
adhésifs ou peintures car le boîtier, le
bracelet ou autres pièces pourraient en être
décolorés ou endommagés.
Prendre garde à ne pas exposer
la montre à des solvants (tels
qu’alcool ou essence), à du
mercure (p.ex. d’un
■ PRECAUTION A PROPOS DE LA
PELLICULE DE PROTECTION A
L’ARRIERE DU BOITIER
Si votre montre est munie d’une
pellicule et/ou d’un adhésif
protecteur sur le dos de son
boîtier, veiller à l’enlever avant
d’utiliser la montre car la transpiration qui
pourrait s’y inflitrer risquerait de provoquer
une oxydation du dos du boîtier.
Page 45

44
Français
SPECIFICATIONS
1 Fréquence de l’oscillateur ...................... 32.768 Hz (Hertz = cycles par seconde)
2 Gain/perte (moyenne mensuelle) ........... Moins de 15 secondes dans la plage des
températures normales (de 5 à 35°C) (de 41 à
95°F)
3 Précision de sonnerie ............................. ±1 minute
4 Plage des températures d’utilisation ...... De –10 à +60°C (de 14 à 140°F)
5 Système de commande ......................... Moteur pas à pas, 4 pièces
6 Système d’affichage
Heure ................................................ Trois aiguilles (Heures, minutes et petite
trotteuse)
Date .................................................. Affichée par des chiffres
Chronographe ................................... Aiguilles des minutes et 1/5e de seconde.
Le chrono mesure jusqu’à 30 minutes en
unités de 1/5e de seconde.
Sonnerie ........................................... Petites aiguilles des heures et minutes.
La sonnerie est programmable en cycle de 12
heures.
7 Pile ......................................................... SEIKO SR927W, 1 pièce
8 Circuit intégré ......................................... Circuit C-MOS à haute intégration
* Spécifications sous réserve de changement sans préavis en raison d’améliorations éventuelles.
Page 46

Italiano
87
ITALIANO
INDICE
Pag.
CARATTERISTICHE .................................................................................................... 88
INDICAZIONI DEL QUADRANTE, CORONE E TASTI ................................................. 89
PREDISPOSIZIONE DELLA DATA .............................................................................. 90
PREDISPOSIZIONE DELL’ORA .................................................................................. 91
SUONERIA .................................................................................................................. 92
CRONOMETRO .......................................................................................................... 96
TACHIMETRO ............................................................................................................. 99
REGOLAZIONE DELLA POSIZIONE DELLE LANCETTE ............................................ 101
RIPRISTINO DEL CIRCUITO INTEGRATO INCORPORATO ....................................... 102
INDICAZIONE DELLA DURATA DELLA BATTERIA .................................................... 103
SOSTITUZIONE DELLA BATTERIA ............................................................................. 103
PER MANTENERE LA QUALITÀ DELL’OROLOGIO ................................................... 104
DATI TECNICI ............................................................................................................. 108
Page 47

Italiano
Italiano
88 89
OROLOGIO ANALOGICO SEIKO AL QUARZO
Cal. 7T32
INDICAZIONI DEL QUADRANTE, CORONE E TASTI
L’orologio dispone di tre tasti e di due corone, come indicato in figura.
CARATTERISTICHE
ORA E CALENDARIO
CRONOMETRO
●
Lancette delle ore e dei minuti,
e piccola lancetta dei secondi.
●
Data visualizzata in cifre
●
Può misurare sino a 30 minuti in
unità di quinti di secondo.
●
La misurazione può essere
ripetuta sino ad un massimo di 6
ore.
TACHIMETRO
●
Per i modelli dotati della scala
del tachimetro.
SUONERIA
●
Predisponibile sulla gamma delle
12 ore, per mezzo della piccola
lancetta della suoneria.
ALARM
1
2
3
9
10
11
5
2
5
30
10
20
M
IN
.
12
8
7
6
5
4
a b c
Lancetta delle ore
(ORA PRINCIPALE)
Lancetta dei
secondi
(ORA PRINCIPALE)
a b c
Data
B
C
A
CORONA 1
CORONA 2
Lancetta dei minuti del
CRONOMETRO
Lancetta dei quinti di secondo
del CRONOMETRO
Lancetta dei minuti
(ORA PRINCIPALE)
Lancetta delle ore per la
SUONERIA
Lancetta dei minuti
per la SUONERIA
a: Posizione normale b: Primo scatto c: Secondo scatto
Page 48

Italiano
Italiano
90 91
Estrarla sino al
secondo scatto
quando la lancetta dei secondi si
trova in corrispondenza delle ore
12.
PREDISPOSIZIONE DELL’ORA
1
➠
1
PREDISPOSIZIONE DELLA DATA
15
30
45
60
➠
2
3
CORONA 1
Lancetta dei minuti
CORONA 1
Lancetta delle ore
➡
➠
1
2
1
Data
➠
3
➠
4
Estrarla sino al
primo scatto
.
CORONA 1
1
2
▼
Ruotarla in senso orario sino a
quando compare la data del
giorno precedente quello che si
vuole predisporre.
Estrarla al
secondo scatto
e
ruotarla sino a quando compare
la data desiderata.
Rispingerla in dentro nella sua
posizione normale
.
3
4
▼
▼
NOTE
1 Non procedere alla regolazione della data fra le 21:00 e le 3:00 del mattino successivo. In
questo periodo di tempo il cambiamento potrebbe avvenire in modo irregolare.
* Qualora sia assolutamente necessario modificare la data in questo periodo di tempo, portare
anzitutto l’indicazione dell’ora al di fuori di questa gamma, procedere alla regolazione della data,
e ripristinare poi l’indicazione dell’ora alla sua posizione originale.
2 Per il mese di febbraio ed i mesi di 30 giorni la data deve essere regolata.
Lancetta dei secondi
CORONA 1
Ruotarla opportunamente per
predisporre le lancette delle ore e
dei minuti.
2
▼
Rispingerla in dentro nella sua
posizione normale
in concomi-
tanza con un segnale orario.
3
▼
NOTE
1 Per la regolazione della lancetta delle ore, controllare che le ore antimeridiane o
pomeridiane siano indicate correttamente.
* L’orologio è costruito in modo che la data cambi ogni 24 ore. Per verificare se le ore indicate
sono antimeridiane o pomeridiane, far oltrepassare alla lancetta delle ore l’indicazione delle
ore 12. Se la data cambia, le ore precedenti le ore 12 (in realtà mezzanotte) sono quelle della
sera, e quelle successive sono quelle del mattino dopo. Se la data non cambia, le 12 sono
mezzogiorno, le ore precedenti sono quelle del mattino, e le successive quelle del pomeriggio.
2 Per la predisposizione della lancetta dei minuti, farla avanzare di 4 o 5 minuti oltre
il minuto desiderato, e farla poi retrocedere sino all’esatta posizione voluta.
Page 49

Italiano
Italiano
92 93
SUONERIA
2 Predisposizione dell’ora della suoneria
CORONA 2
1
Estrarla sino al
secondo scatto
.
Ruotarla in senso orario o antiorario
sino a portare le lancette della SUONERIA in corrispondenza dell’ora del
momento (ORA PRINCIPALE).
2
3
▼
▼
▼
ALARM
1
2
3
4
5
6
7
8
9
10
11
12
➠
1
➠
3
CORONA 2
2
● La suoneria viene predisposta in modo da entrare in funzione ogni 12 ore.
● Le lancette della SUONERIA si spostano indipendentemente da quelle dell’ORA
PRINCIPALE.
Rispingerla in dentro nella sua
posizione normale
.
Lancetta dei
minuti
(SUONERIA)
Lancetta delle ore
(SUONERIA)
Lancetta dei minuti
(ORA PRINCIPALE)
Lancetta delle ore
(ORA PRINCIPALE)
• Terminata la regolazione dell’ora principale, eseguire la seguente procedura di
preparazione per la predisposizione dell’ora di entrata in funzione della suoneria.
*Questa procedura può essere eseguita solamente dopo aver predisposto l’ora principale.
1 Regolazione delle lancette della SUONERIA
PREDISPOSIZIONE DELLA SUONERIA
* Una volta regolate le lancette della SUONERIA in corrispondenza dell’ora principale, la
predisposizione dell’ora per la suoneria può essere effettuata solamente secondo la procedura
seguente.
CORONA 2
C
▼
Estrarla sino al
primo scatto
.
ALARM
1
2
3
9
1
0
11
12
4
5
6
7
8
C
➠
➠
CORONA 2
1 Per portare la lancetta dei minuti della SUONERIA in corrispondenza dell’ORA
PRINCIPALE, al precedente punto
, farla avanzare di 4 o 5 minuti oltre il punto
desiderato e farla poi retrocedere sino all’esatta posizione voluta.
2 Le lancette della suoneria si spostano rapidamente se si tiene premuto il Tasto C.
3 Al precedente punto
3
, estraendo la CORONA 2 sino al primo scatto entro 1 minuto
dall’averla rispinta in dentro nella sua posizione normale, la suoneria entra in funzione.
NOTE
Premerlo per portare le lancette della SUONERIA in
corrispondenza dell’ora
desiderata.
CORONA 2
Rispingerla in dentro nella sua
posizione normale
.
▼
2
Page 50

Italiano
Italiano
94 95
INSERIMENTO E DISINSERIMENTO DELLA SUONERIA
• Inserimento della suoneria • Disinserimento della suoneria
CORONA 2CORONA 2
Estrarla sino al
primo
scatto
.
Rispingerla in dentro nella
sua
posizione normale
.
Ora del
momento
ALARM
1
2
3
9
10
11
12
4
5
6
7
8
➠
[Suoneria disinserita]
ALARM
1
2
3
9
10
11
12
4
5
6
7
8
➠
[Suoneria inserita]
Ora designata
per l’entrata in
funzione della
suoneria
NOTE
*In tal caso, riportare di nuovo le lancette della SUONERIA in corrispondenza dell’ORA
PRINCIPALE, premere la CORONA 2 in dentro nella sua posizione normale, estrarla di
nuovo sino al primo scatto e predisporre nuovamente l’ora desiderata per l’entrata in
funzione della suoneria. Nel caso, però, in cui si riesca a rispingere in dentro la CORONA
2 nella sua posizione normale prima che il “bip” di avvertimento si interrompa, l’ora
designata per l’entrata in funzione della suoneria non viene cancellata.
1 La suoneria entra in funzione all’ora designata per 20 secondi.
* Per interrompere manualmente la suoneria prima della sua fine naturale, premere uno dei Tasti
A, B o C, o rispingere la CORONA 2 in dentro nella sua posizione normale.
2 Se la CORONA 2 viene estratta sino al secondo scatto, l’ora designata per l’entrata
in funzione della suoneria viene cancellata, con l’emissione di un segnale sonoro
“bip” di avvertimento.
Page 51

Italiano
Italiano
96 97
1 Misurazione normale del tempo
A
AVVIO
A
ARRESTOBAZZERAMENTO
A
B B A
AVVIO
RIPRESA
ARRESTO
TEMPO PARZIALE
○○
B
AZZERAMENTO
B
A
2 Misurazione del tempo totale in accumulazione
A
A A A
AVVIO
RIPRESA
ARRESTO
ARRESTO
○○
B
* La ripresa e l’arresto del cronometro possono essere effettuati ripetutamente
sempre agendo sul Tasto A.
3 Misurazione del tempo parziale
* La misurazione del tempo parziale e la ripresa della misurazione normale possono
essere ripetute sempre agendo sul Tasto B.
AZZERAMENTO
● Il cronometro può misurare sino a 30 minuti, in unità di quinti di secondo.
● Trascorsi i primi 30 minuti, la misurazione ricomincia di nuovo da “0”, e così di seguito
per sino ad un massimo di 6 ore.
CRONOMETRO
Lancetta dei minuti
del CRONOMETRO
MIN.
5
25
10
20
30
CORONA 1
B
A
•
Prima di utilizzare il cronometro:
•
Verificare che le CORONE 1 e 2
si trovino nella loro posizione
normale.
•
Premere il Tasto B per riportare
le lancette del CRONOMETRO
sulla posizione “0”.
* Se le lancette non ritornano sulla
posizione “0”, eseguire la procedura
descritta al paragrafo “REGOLAZIONE DELLA POSIZIONE DELLE
LANCETTE” (pag. 101).
FUNZIONAMENTO DEL CRONOMETRO
Lancetta dei quinti di
secondo del CRONOMETRO
CORONA 2
Page 52

Italiano
Italiano
98 99
TACHIMETRO
(per i modelli dotati di quadrante con scala tachimetrica)
* La scala del tachimetro può essere utilizzata solamente se il tempo necessario a coprire
una certa distanza è inferiore a 60 secondi.
Usare il cronometro per determi-
nare quanti secondi occorrono
per percorrere 1 km o 1 miglio.
1
La cifra della scala del tachimetro
indicata dalla lancetta dei secondi
del CRONOMETRO dà la velocità
media oraria.
2
Es. 1Es. 1
Lancetta dei
secondi del
CRONOMETRO:
40 secondi
Scala tachimetrica: “90”
“90” (cifra indicata sulla scala del tachimetro) x
1 km (o 1 miglio) = 90 km (o miglia) all’ora
MIN.
5
2
5
30
1
0
2
0
Misurazione della velocità media oraria di un veicolo
Es. 2: Nel caso in cui la distanza misurata venga estesa sino a 2 km (o miglia), o accorciata
a 0,5 km (o miglia):
“90” (cifra indicata sulla scala del tachimetro) x 2 km (o miglia) = 180 km (o miglia) all’ora
“90” (cifra indicata sulla scala del tachimetro) x 0,5 km (o miglia) = 45 km (o miglia) all’ora
A
B A B
AVVIO
B
AZZERA-
MENTO
IL 2 CONCOR-
RENTE TAGLIA
IL TRAGUARDO
TEMPO FINALE
DEL 1
CONCORRENTE
TEMPO FINALE
DEL 2
CONCORRENTE
1 Estraendo la CORONA 1 sino al secondo scatto, le lancette del CRONOMETRO
vengono riportate alla posizione “0”.
2 Estraendo la CORONA 2 sino al primo o al secondo scatto, le lancette del
CRONOMETRO vengono riportate alla posizione “0”.
3 Se il cronometro è stato riazzerato, e si preme il Tasto A prima che le lancette
abbiano raggiunto la posizione “0”, il cronometro riprende la misurazione dal
momento in cui è stato premuto il Tasto A.
NOTE
4 Misurazione dei tempi di due concorrenti
Page 53

Italiano
Italiano
100 101
REGOLAZIONE DELLA POSIZIONE DELLE LANCETTE
Misurazione della frequenza oraria di una certa operazione
Usare il cronometro per misurare
il tempo necessario a completare
un certo lavoro.
1
La cifra della scala del tachimetro
indicata dalla lancetta dei secondi
del CRONOMETRO dà il numero
medio di lavori completati in
un’ora.
2
Lancetta dei secondi
del CRONOMETRO:
20 secondi
Scala tachimetrica: “180”
Es. 1Es. 1
Es. 2: Nel caso in cui 15 lavori vengano completati in 20 secondi:
“180” (cifra indicata sulla scala del tachimetro) x 15 lavori = 2700 lavori all’ora
MIN.
5
2
5
30
20
1
0
“180” (cifra indicata sulla scala del tachimetro)
x 1 lavoro = 180 lavori all’ora
● Dopo ogni sostituzione della batteria, e nel caso in cui le lancette del CRONOMETRO
non ritornino alla posizione corrispondente alle ore 12 quando si riazzera il cronometro,
regolare la posizione delle lancette in base alla procedura seguente.
CORONA 1
▼
CORONA 1
A
B A
MIN.
5
25
30
20
10
➠
➠
Estrarla sino al
secondo
scatto
.
Premerlo ripetutamente sino
a quando la lancetta dei
minuti del CRONOMETRO
ritorna in corrispondenza
delle ore 12.
B
Premerlo ripetutamente sino
a quando la lancetta dei
secondi del CRONOMETRO
ritorna in corrispondenza
delle ore 12.
▼
Rispingerla in dentro nella sua
posizione normale
.
CORONA 1
▼
1 Tenendo premuti i rispettivi tasti le lancette si spostano rapidamente.
2 Terminata la regolazione della posizione delle lancette, procedere alla predisposizione
dell’ora principale.
NOTE
Page 54

Italiano
Italiano
102 103
INDICAZIONE DELLA DURATA DELLA BATTERIA
RIPRISTINO DEL CIRCUITO INTEGRATO INCORPORATO
● In caso di movimenti irregolari di una qualunque delle lancette eseguire la seguente
procedura di regolazione.
CORONA 1
CORONA 1
A
B
E
CORONA 1
Rispingerla in dentro nella sua
posizione normale
.
▼
▼
B A
5
25
30
10
20
MIN.
➠
➠
NOTA
Estrarla sino al
secondo
scatto
.
Premerli contemporaneamente.
Per poter usare di nuovo l’orologio, è necessario regolare nuovamente la posizione delle
lancette del CRONOMETRO e ripredisporre l’ora principale e l’ora per la suoneria.
SOSTITUZIONE DELLA BATTERIA
AVVERTENZA
Non togliere la batteria dall’orologio. Nel caso in cui tale operazione si
rendesse assolutamente necessaria, tenere la batteria lontana dalla portata
dei bambini. In caso di ingestione da parte dei bambini, rivolgersi
immediatamente ad un medico.
● Quando la batteria è prossima alla fine, la piccola lancetta dei secondi inizia a muoversi
ad intervalli di due secondi invece che a normale intervallo di un secondo per volta, ad
indicare che la batteria deve essere sostituita con una nuova.
* Se la suoneria viene utilizzata mentre la piccola lancetta dei secondi si sta spostando ad
intervalli di due secondi per volta, l’orologio potrebbe cessare di funzionare. Se si nota
pertanto questo movimento particolare della piccola lancetta dei secondi, è necessario
procedere quanto prima alla sostituzione della batteria.
La minibatteria che alimenta l’orologio dura circa 2 anni. Poiché, però, tale
batteria viene inserita in fabbrica per verificare il funzionamento e le
caratteristiche dell’orologio, la sua durata effettiva a partire dall’acquisto
dell’orologio potrebbe risultare inferiore al periodo specificato. Quando la
batteria si esaurisce, è necessario sostituirla al più presto possibile per
prevenire possibili disfunzioni dell’orologio. Per la sostituzione si consiglia di
rivolgersi ad un RIVENDITORE AUTORIZZATO SEIKO, chiedendo di utilizzare
solamente batterie del tipo SEIKO SR927W.
2
Anni
Page 55

Italiano
Italiano
104 105
● Non-impermeabilità
PER MANTENERE LA QUALITÀ DELL’OROLOGIO
Situazioni
di uso
WATER
RESISTANT
5 BAR
WATER
RESISTANT
Contatti
accidentali
con l’accqua,
quali pioggia
o schizzi
Nuoto, gite
in barca,
doccia
No No No No
Sì No No No
Sì Sì No No
Sì Sì Sì No
WATER
RESISTANT
10/15/20 BAR
Immersioni a
bassa
profondità
o a grande
profondità**
Bagni
in vasca, e
tuffi in
piscina
■ IMPERMEABILITÀ
5 bar
(5 metri)
3 bar
(3 metri)
Nessuna
indicazione
Non
impermeabile
Grado di
impermeabilità*
Indicazione
presente sul retro
della cassa
10, o 15 o 20 bar
(10, 15 o 20 metri)
* L’indicazione della
pressione in bar deve
essere considerata
nominale e non
corrisponde alla
effettiva profondità di
immersione poiché i
movimenti delle braccia
tendono ad aumentare
la pressione esercitata
sull’orologio ad una
certa profondità. Fare
anche attenzione all’uso
in caso di tuffi.
** In quest’ultimo caso si
consiglia l’uso di un
orologio SEIKO per uso
subacqueo.
• Se l’orologio è bagnato, si consiglia di farlo
controllare da un RIVENDITORE SEIKO
AUTORIZZATO o da un CENTRO DI
ASSISTENZA.
● Impermeabilità 5/10/15/20 bar
•
Prima di utilizzare in acqua gli orologi, verificare
che le corone siano completamente spinte in
dentro nella loro posizione normale.
•
Non utilizzare le corone e i tasti con l’orologio
bagnato, o in acqua.
Se l’orologio viene usato in acqua di mare,
lavarlo in acqua dolce dopo l’uso ed asciugarlo
accuratamente.
5
bar WR
10/15/20
bar WR
•
Nel caso in cui si faccia una doccia con l’orologio ad
impermeabilità da 5 bar, o si prenda un bagno con gli
orologi ad impermeabilità da 10, 15 o 20 bar, ricordare
quanto segue.
*
Non utilizzare le corone e non agire sui tasti se l’orologio
è bagnato con acqua insaponata o con shampoo.
*
Se l’orologio viene lasciato per qualche tempo in acqua
tiepida può verificarsi un leggero anticipo o ritardo
nell’indicazione del tempo. Tale situazione, però, ritorna
alla normalità non appena l’orologio viene riportato alla
normale temperatura ambiente.
Page 56

Italiano
Italiano
106 107
L’orologio funziona con stabile
precisione nella gamma di
temperature da 5° a 35° C.
Temperature superiori a 60°C
+60°C
-10°C
L’orologio subisce negativamente l’influenza di un forte
magnetismo. Evitare pertanto
di porlo vicino ad apparecchi
magnetici.
N
S
■ TEMPERATURE
possono causare perdite dalla batteria, o
abbreviarne la durata.
Non lasciare per lungo tempo l’orologio
esposto a temperature inferiori ai –10°C,
perché ciò potrebbe far leggermente
anticipare o ritardare l’orologio.
Tutti i problemi sopramenzionati, però,
scompaiono, non appena si riporta l’orologio
alla normale temperatura di funzionamento.
■ MAGNETISMO
L’attività sportiva, se moderata,
non comporta inconvenienti per
l’orologio. Tuttavia fare
attenzione a non lasciarlo cadere
e a non sottoporlo a urti violenti.
■ URTIE VIBRAZIONI
■ CURA DELLA CASSA E
DEL BRACCIALE
Con un panno morbido ed
asciutto, strofinare periodicamente la cassa ed il bracciale,
per prevenirne il possibile
arrugginimento, a causa di polvere, umidità
e sudore.
Si raccomanda di far controllare
l’orologio una volta ogni 2 o 3
anni. Farlo verificare da un
RIVENDITORE AUTORIZZATO
SEIKO o da un CENTRO DI ASSISTENZA,
per controllare che la cassa, le corone, i
tasti, la guarnizione ed il sigillo del cristallo
siano intatti.
■ CONTROLLI PERIODICI
2 - 3
Anni
vaporizzatori di cosmetici, detergenti, adesivi
o coloranti. Tutti questi agenti chimici
possono essere causa di decolorazione,
deterioramento o danni alla cassa, al
bracciale, e ad altre parti dell’orologio.
Fare attenzione ad evitare che
l’orologio venga in contatto con
solventi (quali alcool o benzina),
mercurio (da termometri rotti),
■ AGENTI CHIMICI
■ PRECAUZIONI PER LA PELLICOLA
CHE PROTEGGE IL RETRO DELLA
CASSA
Se sul retro dell’orologio vi è una
pellicola protettiva e/o
un’etichetta, ricordarsi di
toglierle prima di mettere
l’orologio al polso. In caso contrario, il
sudore che penetra sotto la pellicola o
l’etichetta rischia di far arrugginire la parte
posteriore della cassa.
Page 57

Italiano
108
DATI TECNICI
1 Frequenza del cristallo oscillatore .......... 32.768 Hz (Hz = Hertz, Cicli al secondo)
2 Anticipo o ritardo (media mensile).......... Deviazione inferiore a 15 secondi alla normale
gamma di temperature di funzionamento (da
5° a 35° C)
3 Precisione della suoneria........................ ± 1 minuto
4 Gamma di temperature utili per l’uso..... Da –10° a +60° C
5 Sistema di movimento ........................... 4 motori a passo
6 Sistema di visualizzazione
Ora .................................................... Tre lancette (ore e minuti e piccola lancetta dei
secondi)
Data .................................................. Visualizzata in cifre
Cronometro ...................................... Lancette dei minuti e dei quinti di secondo
Il cronometro può misurare sino a 30 minuti, in
unità di quinti di secondo.
Suoneria ........................................... Piccole lancette per le ore ed i minuti
La suoneria entra in funzione ogni 12 ore.
7 Batteria ................................................... Una batteria SEIKO SR927W
8 Circuito integrato (IC) ............................. Un circuito integrato del tipo C-MOS-LSI.
*I dati tecnici possono subire modifiche senza preavviso, per un continuo miglioramento del prodotto.
Page 58

Analoog quar ts horloge met
alarm, chronograaf en timer (voor Cal. 7T42)/SDW, SDX
(Cal 7T32, 7T42 en Spor ts 150 Cal. 7T32, 7T42)
Gebruiksaanwijzing
Daniël Pichotstraat 17-33 - 3115 JB Schiedam
Postbus 330 - 3100 AH Schiedam
Cal 7T32,/42 11-02-2002 15:08 Pagina 1
Page 59

Cal 7T32,/42 11-02-2002 15:08 Pagina 2
Page 60

1. De “herhaal”-functie van de timer.
Als de timer eenmaal is ingesteld, wordt de ingestelde tijd in het geheugen opgeslagen
en kan deze steeds opnieuw worden ingesteld.
h STOPWATCH
De stopwatch kan tijdmetingen verrichten in 1/5 seconden tot maximaal 30 minuten.
h VERKLIKKER LEVENSDUUR BATTERIJ
Het kleine secondenwijzertje beweegt met tussenpozen van twee seconden als de batterij
aan vevanging toe is.
h TACHYMETER
Sommige modellen zijn uitgerust met een tachymeter met een schaalverdeling op de wijzerplaat.
2
Cal 7T32,/42 11-02-2002 15:08 Pagina 3
Page 61

Cal 7T32,/42 11-02-2002 15:08 Pagina 4
Page 62

Cal 7T32,/42 11-02-2002 15:08 Pagina 5
Page 63

Cal 7T32,/42 11-02-2002 15:08 Pagina 6
Page 64

Cal 7T32,/42 11-02-2002 15:08 Pagina 7
Page 65

Cal 7T32,/42 11-02-2002 15:08 Pagina 8
Page 66

Cal 7T32,/42 11-02-2002 15:08 Pagina 9
Page 67

Cal 7T32,/42 11-02-2002 15:08 Pagina 10
Page 68

Cal 7T32,/42 11-02-2002 15:08 Pagina 11
Page 69

Cal 7T32,/42 11-02-2002 15:08 Pagina 12
Page 70

Cal 7T32,/42 11-02-2002 15:08 Pagina 13
Page 71

Cal 7T32,/42 11-02-2002 15:08 Pagina 14
Page 72

Cal 7T32,/42 11-02-2002 15:08 Pagina 15
Page 73

Cal 7T32,/42 11-02-2002 15:08 Pagina 16
Page 74

(2) HET METEN VAN DE VERRICHTINGSSNELHEID PER UUR
De tachymeter is van zeer veel nut bij het berekenen van de
doelmatigheid van de bedrijfsvoering in een fabriek of de
produktiesnelheid van een machine.
Voorbeeld 1)
Gebruik de stopwatch om de tijd op te nemen die het kost
om één taak uit te voeren. Als dit 20 seconden duur t, geeft
de secondenwijzer van de stopwatch “180” aan op de tachymeter-schaal.Dit betekent dat 180 taken in één uur kunnen worden uitgevoerd.
Voorbeeld 2)
Gebruik de stopwatch om vast te stellen hoeveel taken er in een bepaalde periode worden
uitgevoerd. Als 15 taken in 20 seconden worden uitgevoerd, vermenigvuldig dan “180”, het
cijfer op de tachymeter-schaal dat door de secondenwijzer van de stopwatch wordt aangegeven, met 15. Op die manier kunt u vaststellen dat 2.700 taken in één uur zullen worden uitgev oerd.
180 (Cijfer op de tachymeter-schaal bij de secondenstand) x 15 taken
= 2.700 taken per uur
16
(Cijfer op de tachymeter-schaal bij de 20 secondenstand) x 1 taak
= 180 taken
180
Cal 7T32,/42 11-02-2002 15:08 Pagina 17
Page 75

Cal 7T32,/42 11-02-2002 15:08 Pagina 18
Page 76

Cal 7T32,/42 11-02-2002 15:08 Pagina 19
Page 77

Cal 7T32,/42 11-02-2002 15:08 Pagina 20
Page 78

Cal 7T32,/42 11-02-2002 15:08 Pagina 21
Page 79

21
Cal 7T32,/42 11-02-2002 15:08 Pagina 22
 Loading...