

Page 1

INSTRUCTIONS (P. 3)
BEDIENUNGSANLEITUNG (S. 21)
INSTRUCTIONS (P. 39)
ISTRUZIONI (P. 57)
INSTRUCCIONES (P. 75)
INSTRUÇÕES (P. 93)
ИНСТРУКЦИИ (P. 111)
用法説明 (129頁 )
Cal. 7T04
Page 2

2
English
3
ENGLISH
CONTENTS
Page
SCREW LOCK TYPE CROWN ...................................................................................
5
SETTING THE TIME AND
ADJUSTING THE STOPWATCH HAND POSITION ...................................................
6
SETTING THE DATE ..................................................................................................
9
STOPWATCH ............................................................................................................. 10
SECURITY LOCK BUTTON OPERATION ...................................................................
13
TACHYMETER ........................................................................................................... 14
TELEMETER .............................................................................................................. 16
BATTERY CHANGE
.................................................................................................... 18
SPECIFICATIONS ...................................................................................................... 20
I
For the care of your watch, see “TO PRESERVE THE QUALITY OF YOUR
WATCH” in the attached Worldwide Guarantee and Instruction Booklet.
You are now the proud owner of a SEIKO Analogue Quartz Watch Cal. 7T04. For best results, please read
the instructions in this booklet carefully before using your SEIKO Analogue Quartz Watch. Please keep this
manual handy for ready reference.
Sie sind jetzt Besitzer einer SEIKO Analog-Quarzuhr Kal. 7T04. Bitte lesen Sie diese Bedienungsanleitung
vor Verwendung der Uhr sorgfältig durch und heben Sie sie gut auf.
Vous voici l’heureux propriétaire d’une montre quartz analogique SEIKO Cal. 7T04. Pour obtenir d’excellentes
performances de cet article SEIKO, veuillez lire attentivement cette brochure que vous conserverez pour toute
référence ultérieure.
Siete ora in possesso di un orologio SEIKO Analogico al Quarzo Cal. 7T04. Per ottenere i migliori possibili
risultati dal Vostro orologio, leggere attentamente le istruzioni di questo manuale prima di utilizzare il Vostro
orologio SEIKO analogico al quarzo. Conservare poi il manuale stesso per ogni qualsiasi eventuale futuro
riferimento.
Enhorabuena por su adquisición de un reloj SEIKO analógico de cuarzo Cal. 7T04. Para óptimo resultado,
lea detenidamente las instrucciones de este folleto antes de usar el reloj. Guarde este manual para consulta
posterior.
Você p ode sentir-se orgu lhoso de possu ir um Relógio SEIKO Quartz Análogo Cal . 7T04. Para obter os
melhores resultados, leia atentam ente as instruções contidas nes te opúsculo antes de usar o seu Relógio
SEIKO Quartz Análogo. Queira conservar este m anual para refer ências futuras.
Теперь Вы являетесь обладателем часов Аналоговые Кварцевые часы Калибра 7T04. Перед использованием их,
для достижения лучших результатов, пожалуйста, внимательно ознакомьтесь с данной инструкцией и обязательно
сохраните ее.
Page 3

4
English
5
English
CAL. 7T04
A
B
a b c
CROWN
Hour hand
Minute hand
STOPWATCH 1/5-second hand
STOPWATCH minute hand
n
TIME/CALENDAR
n
STOPWATCH
Measures up to 60 minutes in
1/5 second increments.
Sp lit ti me m e as ure men t is
available.
Small second hand
Big date calendar
a: Normal position
b: First click
c: Second click
* Some models may have a screw lock type crown. If your watch has a screw lock type crown, refer to
“ SCREW LOCK TYPE CROWN”.
SCREW LOCK TYPE CROWN
u
Some models may have a screw-l ock mechanism tha t can securely loc k
the crown by scr ew when t hey are not being operat ed.
u
Locking the crown will help to p revent any operational errors and enhance
the water resistant qualit y of the wa tch.
u
It is nec essary to unl ock the screw lock type crown before operating i t.
Once yo u have finis hed ope rating the crow n, make sure to relo ck it.
l
How to use the screw lock type crown
Keep the crown securely locked unless you nee d to operate it.
* When locking the crown, turn it slowly with care, ensuring that
the screw is properly engaged. Be careful not to forcibly push it in,
as doing so may damage the screw hole in the case.
[How to unlock the screw lock t ype crown]
Turn the crow n counterclockwise.
The crown is unlo cked an d can be operated.
[How to lock the screw lock type cro wn]
On ce you have finish ed opera ti ng the crow n, tur n it
cloc kwise while gently pres sing it in toward the watch
body until it stops.
24-hour, hour, minute, and
small
second hands
Big date calendar
24-hour hand
Page 4
6
English
7
English
SETTING THE TIME AND
ADJUSTING THE STOPWATCH HAND POSITION
Minute hand
Hour hand
CROWN
Pull out to second click when the small second hand is a t the 12 o'clock
position.
CROWN
Tur n to set the hou r an d
minute hands.
Small
second
hand
1. TIME SETTING
l
This watch is des igned so that the followin g adjustmen ts are all made with the c rown
at the second click position
:
1) time setting
2) stopwatch hand position adjustment
Once the crow n is pulled o ut to the se cond c lick , be s ure to check and a djust 1) and 2)
at the same time.
1. When the stopwatch is or has been measuring, if the crown is pulled out to the second click, it
will automatically reset the STOPWATCH hands to “0”.
2. The 24-hour hand moves correspondingly with the hour hand.
3. It is recommended that the hands be set to the time a few minutes ahead of the current time,
taking into consideration the time required to adjust the STOPWATCH hand position if necessary.
4. The moment the date changes is midnight. When setting the hour hand, make sure to check
that AM/PM is correctly set by using the 24 hour hand as an AM/PM indicator.
5. When setting the minute hand, first advance it 4 to 5 minutes ahead of the desired time and then
turn it back to the exact minute.
2. STOPWATCH HAND POSITION ADJUSTMENT
STOPWATCH minute
hand
B
t
t
A
Press for 2 sec onds or longer.
* S TOPWATCH m inute h and t urn s a ful l
circle.
Press repe atedl y to set STOP WATCH
minute hand to the
"0"
position.
STOPWATCH
1/5-second hand
A
B
I
If the STO PWATCH ha nds a re not in the "0 "
po si tio n, fo ll ow the pro ce du re be low to set
them to t he "0" positio n.
* The h and moves quickly if button B is
kept pressed.
24-hour
hand
Page 5

8
English
9
English
Press for 2 sec onds or longer.
B
Press repe atedly to set STOPWATCH
1/5-second hand to the
"0"
position.
t
* STOPWATCH 1/5-second hand turns a full
circle.
t
* The h and moves quickly if button B is
kept pressed.
CROWN
Push b ack in to normal positi on in
accordanc e with a time signal.
t
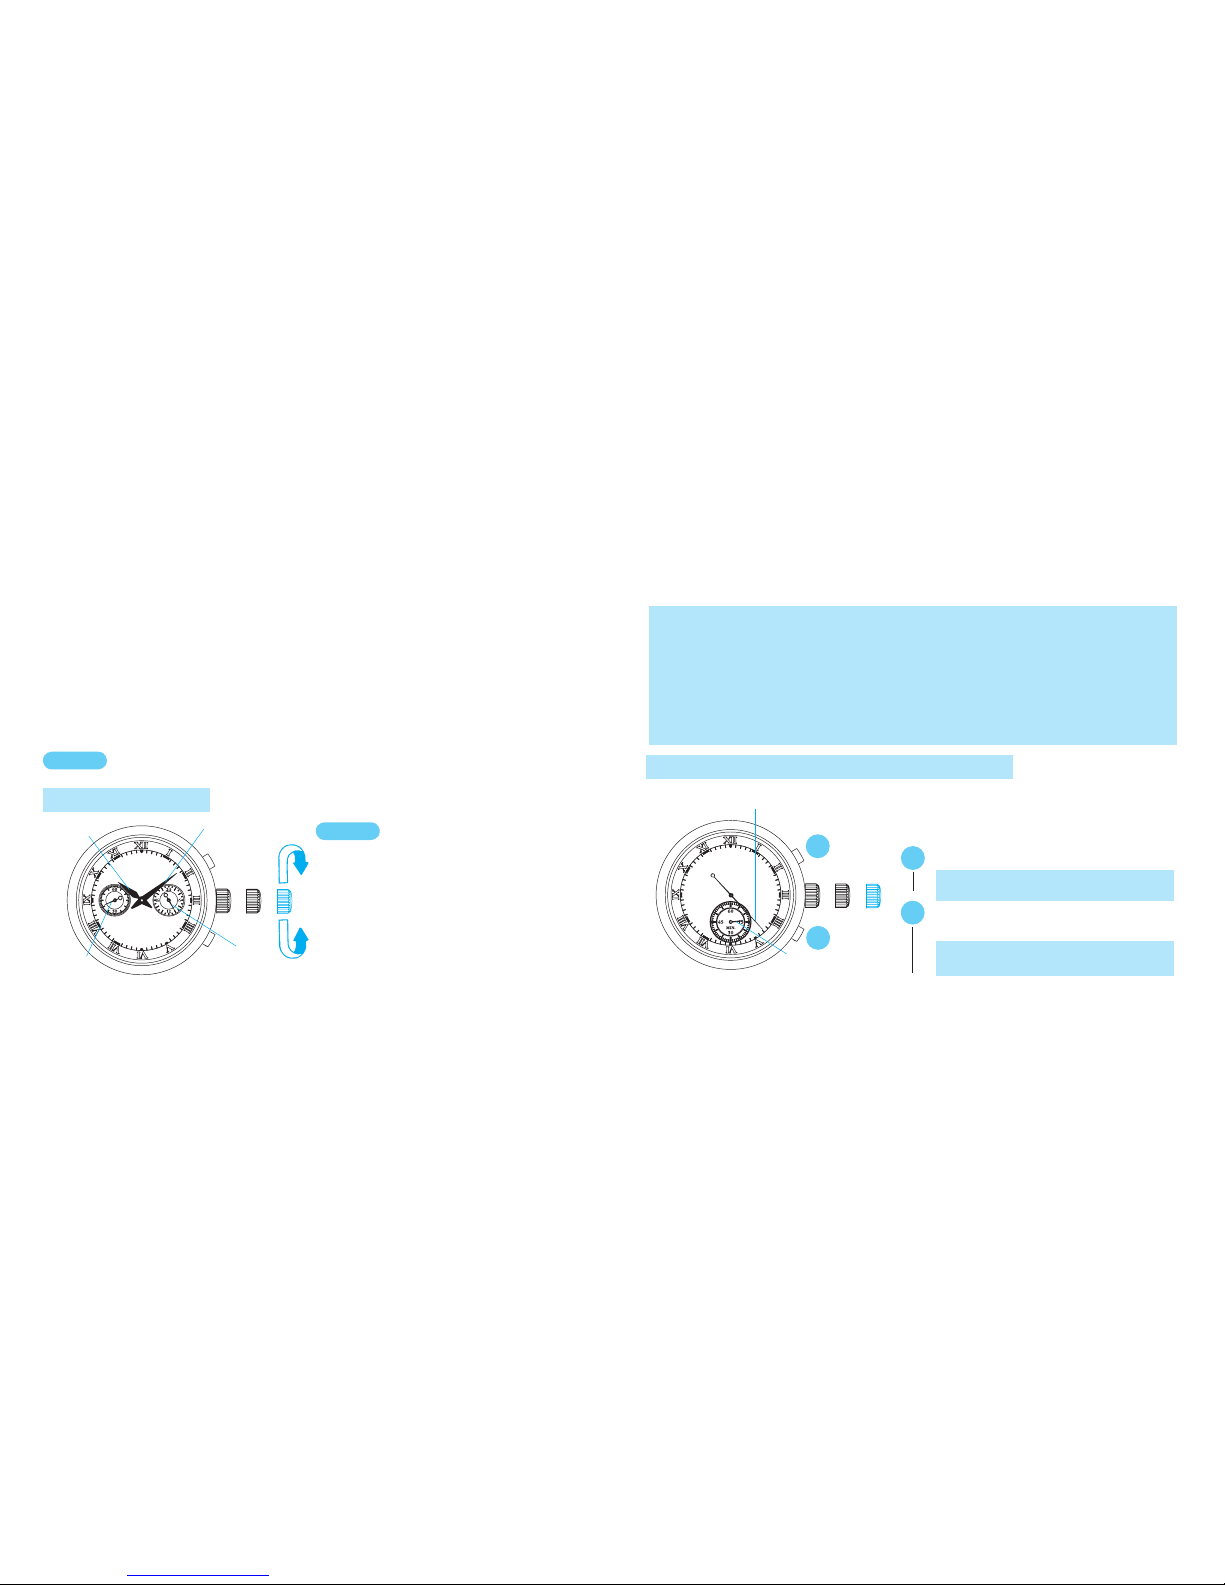
SETTING THE DATE
l
Befo re set ting the date, be sure to se t the time .
CROWN
Pull out to first click.
t
Turn clockwis e until the desired d ate
appears.
t
Push ba ck in to normal position.
Date
1. Date setting should always be carried out after the time is correctly set.
2. Turn the crown gently and slowly to set the date, especially when the tenth digit changes.
3. Manual date adjustment is required on the first day after a month that has less than 31 days:
February, April, June, September and November.
4. Do not set the date during any time between 9:00 P.M. and 1:00 A.M. Date setting during this
time period may cause failure of date change on the following day.
A
STOPWATCH minute
hand
STOPWATCH
1/5-second hand
A
B
Page 6

10
English
11
English
STOPWATCH
l
The st opwat ch can me asure up to 60 minu tes in 1/ 5-seco nd incr ement s.
l
Aft er 60 minu tes, i t will st art co unting a gain from "0" re peate dly up to 12 ho urs.
l
Split t ime measureme nt is available.
A
B
I
Before using th e stopw atch, b e sure to check th at the cr own is se t at the normal
positio n and that the STOP WATCH hands a re reset to the "0" posi tion.
STOPWATCH minute hand
STOPWATCH
1/5-second hand
* If the STOPWATCH hands do not return to the “0” position when the stopwatch is reset to “0”,
follow the procedure in “SETTING THE TIME AND ADJUSTING THE STOPWATCH HAND
POSITION”.
<How to reset the stopwatch>
While the STOPWATCH hands are moving
1. Press Button A to stop the stopwatch.
2. Press Button B to reset the stopwatch.
While the STOPWATCH hands are stopped
One of the following stopwatch operations has been made . Reset the stopwatch
accordingl y.
[When the stopwatch is stopped]
1. Press bu tton B to reset the stop watch.
[When the split time measurement is displayed while the stopwatch is
measuring]
1. Pres s button B to relea se the spl it time displ ay. The sto pwa tch h and s
move quickly, and then indic ate the m easurement in p rogre ss.
2. Press bu tton A to stop the stopwa tch.
3. Press bu tton B to reset the stop watch.
[When the split time measurement is displayed and the stopwatch is
stopped]
1. Pres s button B to relea se the spl it time displ ay. The sto pwa tch h and s
move quickly, and then stop.
2. Press bu tton B to reset the stop watch.
Page 7

12
English
13
English
Accumulated elapsed time measurement
A
START
A
STOP RESTART
t
t
A
STOP RESET
B
t
A
t
* Restart and stop of the stopwatch can be repeated by pressing button A.
Split time measurement
A
START SPLIT
t
t
A
STOP RESET
B
t
t
B
B
* Measurement and release of split time can be repeated by pressing button B.
SPLIT
RELEASE
Measurement of two competitors
A
START
t
t
B
RESET
B
t
t
B A
FINISH TIME
OF 1ST COM-
PETITOR
2ND COMPETI
-
TOR FINISHES
FINISH TIME
OF 2ND COM-
PETITOR
Standard measurement
A A B
t
t
START STOP RESET
SECURITY LOCK BUTTON OPERATION
(for models with security lock button)
Locking the push-button
- Turn Securit y Lock But ton clockwise u ntil you no lo nger feel the threads t urning.
- The button cannot b e pushed in.
Unlocking the push-button
- Turn Securi ty Lo ck But ton counter cloc kwis e until you no lo nger feel the thread s turning
.
- The button can be pushed in.
Locking
Unlocking
Locking
A
B
SECURITY LOCK OF PUSH-BUTTON A & B
Unlocking
Page 8

14
English
15
English
TACHYMETER
(for models with tachymeter scale on the dial)
l
Tachyme ter scale can be used only when the time re quired i s less than 60 se conds.
To measure the hourly average speed of a vehicle
U s e t h e s t o p w a t c h t o
determi ne how many sec onds
it take s to go 1 km or 1 mile.
1
Ta ch y met er sc a le indi c a te d
by STOPWATCH second hand
gi ve s the av er ag e spe e d per
hour.
2
Ex. 1
STOPWATCH
second hand:
40 seconds
Tachymeter scale:
"90"
“90” (tachymeter scale figure) x 1 (km or mile)
= 90 km/h or mph
Ex. 2: If the measuring distance is extended to 2 km or miles or shortened to 0.5 km or
miles and STOPWATCH second hand indicates “90” on tachymeter scale:
"90" (tachymeter scale figure) x 2 (km or mile) = 180 km/h or mph
"90" (tachymeter scale figure) x 0.5 (km or mile) = 45 km/h or mph
To measure the hourly rate of operation
Use the stopwat ch to measure
the time r equire d to complete 1
job.
1
Ta ch y met er sc a le indi c a te d
by STOPWATCH second hand
gi ves th e aver ag e numb er of
jobs accomplished p er hour.
2
Ex. 1
STOPWATCH
second hand:
20 seconds
Tachymeter scale: "180"
“180” (tachymeter scale figure) x 1 job
= 180 jobs/hour
Ex. 2: If 15 jobs are completed in 20 seconds:
"180" (tachymeter scale figure) x 15 jobs = 2700 jobs/hour
Page 9

16
English
17
English
TELEMETER
(for models with telemeter scale on the dial)
l
The telemeter c an provide a rough indication o f t he distance to the source of
light and sound.
l
The telemeter indicat es the dis tance from your locat ion to an ob ject that emits
bot h light and so und. For examp le, it c an ind ica te the d ist anc e to the p lac e
where lightning s truck by measuring the time elaps ed after you see a flash of
lightning until you hear the sound.
l
A flas h of lightning rea ches you almost immediately while the sound travels to
you at a spe ed of 0.33 km/second. The distance to t he s ource of the light and
sound c an be cal culated on the ba sis of this difference.
l
The telemeter scale is graduated so that the sound travels at a speed of 1 km in
3 seco nds.*
*Under the condition of temperature of 20° C(68° F)
CAUTION
The telemeter p rovides o nly a rough indicatio n of the dist anc e to the p lac e
whe re lig htning struc k, and t her efore, the indi cat ion cannot be used as the
guideline to avoid t he danger of lightning . It should also be noted that the
speed of the sound di ffe rs depending on the t emperatur e o f the atmos pher e
where it travels.
HOW TO USE THE TELEMETER
Before beginning, check tha t the sto pwatch has bee n rese t.
START
(Flash of light)
STOP
(Crash of thunder)
Press button A to start the
stopwatch as soon as you
see the light.
When you hear the sound,
press button A to stop the
stopwatch.
Read the telemeter scale
that the stopwatch second
hand points to.
Approx. 3 km
* Please note that the stopwatch second hand moves in 1/5 second increments and does not always
point exactly to the graduations of the telemeter scale. The telemeter scale can be used only when
the measured time is less than 60 seconds.
3
2
1
Page 10

18
English
19
English
BATTERY CHANGE
The min iat ure battery whi ch p owe rs y our watch sh oul d la st a ppr oxi mately 5 years. However, because the battery is inserted at the factory
to check the function and performance of the watch, its actual life once
in your p oss ession m ay be les s than th e specif ied period. Whe n the
battery expires, b e sure to replace it as soon as possible to prevent any
malfunction. For battery replacement, we recommend that you contact
an AUTHORIZED SEIKO DEALER and request SEIKO SR927SW
battery.
* If the stopwatch is used for more than 2 hours a day, the battery life may be less
than the specified period.
* After the battery is replaced with a new one, set the time/calendar and adjust the
stopwatch hand position.
l
Battery life indicator
Whe n the b at ter y ne ars its end, the small seco nd hand moves at two-s ec ond
inter vals instead of normal one -sec ond inte rval s. In th at case, have t he b att ery
repla ced wi th a new on e as soon a s possible.
* The watch remains accurate while the small second hand is moving at two-second intervals.
l
Do not remove the battery from the watch.
l
If it is necessary to take out the battery, keep it out of the reach of children.
If a child swallows it, consult a doctor immediately.
WARNING
l
Never short-circuit, heat or otherwise tamper with the battery, and never
expose it to fire. The battery may burst, become very hot or catch fire.
l
The battery is not rechargeable. Never attempt to recharge it, as this may
cause battery leakage or damage to the battery.
CAUTION
Page 11

20
English
SPECIFICATIONS
1 Frequency of crystal oscillator .................. 32,768 Hz (Hz = Hertz … Cycles per second)
2 Loss/gain (monthly rate) ........................... ±15 seconds at normal temperature range (between 5° C
and 35° C)
3 Operational temperature range ................. Between –10° C and +60° C
4 Driving system ........................................... Step motor, 3 pieces
5 Display system
Time/calendar........................................ 24-hour, hour, minute and small second hands
Date is displayed in numerals
Stopwatch ............................................ Stopwatch minute and 1/5-second hands
6 Battery ....................................................... SEIKO SR927SW, 1 piece
7 IC (Integrated Circuit) ................................ C-MOS-IC, 1 piece
* The specifications are subject to change without prior notice for product improvement.
 Loading...