

Page 1

1
PARTS CATALOGUE / TECHNICAL GUIDE
Cal. A860A
Cal. A861A
[SPECIFICATIONS]
Cal. No.
Item
A860A A861A
(x 1.0)The illustrations refer to Cal. A860A.
Module
Module size Outside diameter ø32.0 mm
31.6 mm between 3 o’clock and 9 o’clock sides
31.7 mm between 6 o’clock and 12 o’clock sides
–Casing diameter
Height 7.1 mm (Including the battery portion)
Display medium Nematic Liquid Crystal, FEM (Field Effect Mode)
Liquid crystal driving system
Multiplex driving system
Display system • Time display
• Stopwatch display (In 1/100 second increments for the first 20 minutes)
• Alarm display
Additional mechanism • Speaking function (Current time, stopwatch measurements, hourly
time signal, alarm time and selected digits to be adjusted)
• Battery life indicator
• Alarm test system
Loss/gain Monthly rate at normal temperature range: less than 20 seconds
Regulation system
Nil
Measuring gate by quartz tester Any gate can be used.
Battery SEIKO CR2025, Maxell CR2025, Sony CR2025, Matsushita CR2025,
Eveready ECR2025
Battery life is approximately 2 years.
Voltage: 3.0 V
Page 2

2
PARTS CATALOGUE
Cal. A860A, A861A
Disassembling procedures Figs. : 1 → 21
Reassembling procedures Figs. : 21 ← 1
Lubricating: Types of oil Oil quantity
Silicone oil 500,000 Normal quantity
➡➡
Please see the remarks on the following pages.
1 Case back screw
2 Case back
3 Case back gasket
4 Module
5 Spacer screw
6 Spacer
7 4580 009
Speaker block
8 Conductive plate for the side button
9 Conductive plate for the front button
Button B
Button A
Button C
Button spring clip
Button D
(Front button)
Page 3

3
PARTS CATALOGUE
Cal. A860A, A861A
110 151
Installing direction
indication sheet
➡➡
Please see the remarks on the following pages.
(Reversed battery guard)
(Reversed liquid crystal panel frame)
10 4225 435
Battery clamp
11 Battery
(See the front page.)
12 4245 280
Switch spring (A)
13 4408 068
Washer for switch spring (B)
14 4245 270
Switch spring (B)
15 4395 038
Battery guard
16 4270 371
Battery connection (-)
17 4003 190
Circuit block
18 4313 117
Connector
19 4246 087
Speaker lead
terminal
21 4512 033
Liquid crystal
panel frame
20 4510 355
Liquid crystal
panel
Page 4

4
TECHNICAL GUIDE
Cal. A860A, A861A
• The explanation here is only for the particular points of Cal. A860A and A861A.
• For the repairing, checking and measuring procedures, refer to the “TECHNICAL GUIDE, GENERAL
INSTRUCTIONS”.
I. STRUCTURE OF THE CIRCUIT BLOCK
Input terminal (+)
Crystal unit
Input terminal (–)
C-MOS-IC
II. REMARKS ON INSTALLING THE BATTERY
After the battery is replaced with a new one, or after the battery is re-installed following the repairing
procedures, be sure to follow either of the two methods below to reset the circuit.
• METHOD 1
To reset the circuit of a module:
Short-circuit the AC terminal of the circuit block and the
battery positive surface with conductive tweezers as
illustrated at right.
* When the circuit is reset , “AM 12:00 oo” is displayed as the seconds start counting immediately.
* After resetting the circuit, set the time. (See “HOW TO USE”.)
AC terminal
Tweezers
Battery (+) side
• METHOD 2
To reset the circuit of a complete watch:
Press and hold buttons “A”, “B”, “C” and “D” at the same
time for 2 to 3 seconds.
* The display will become blank, indicating that the circuit
is reset.
Button CButton B
Button D
Button A
Page 5
5
TECHNICAL GUIDE
Cal. A860A, A861A
Speaker lead
terminal
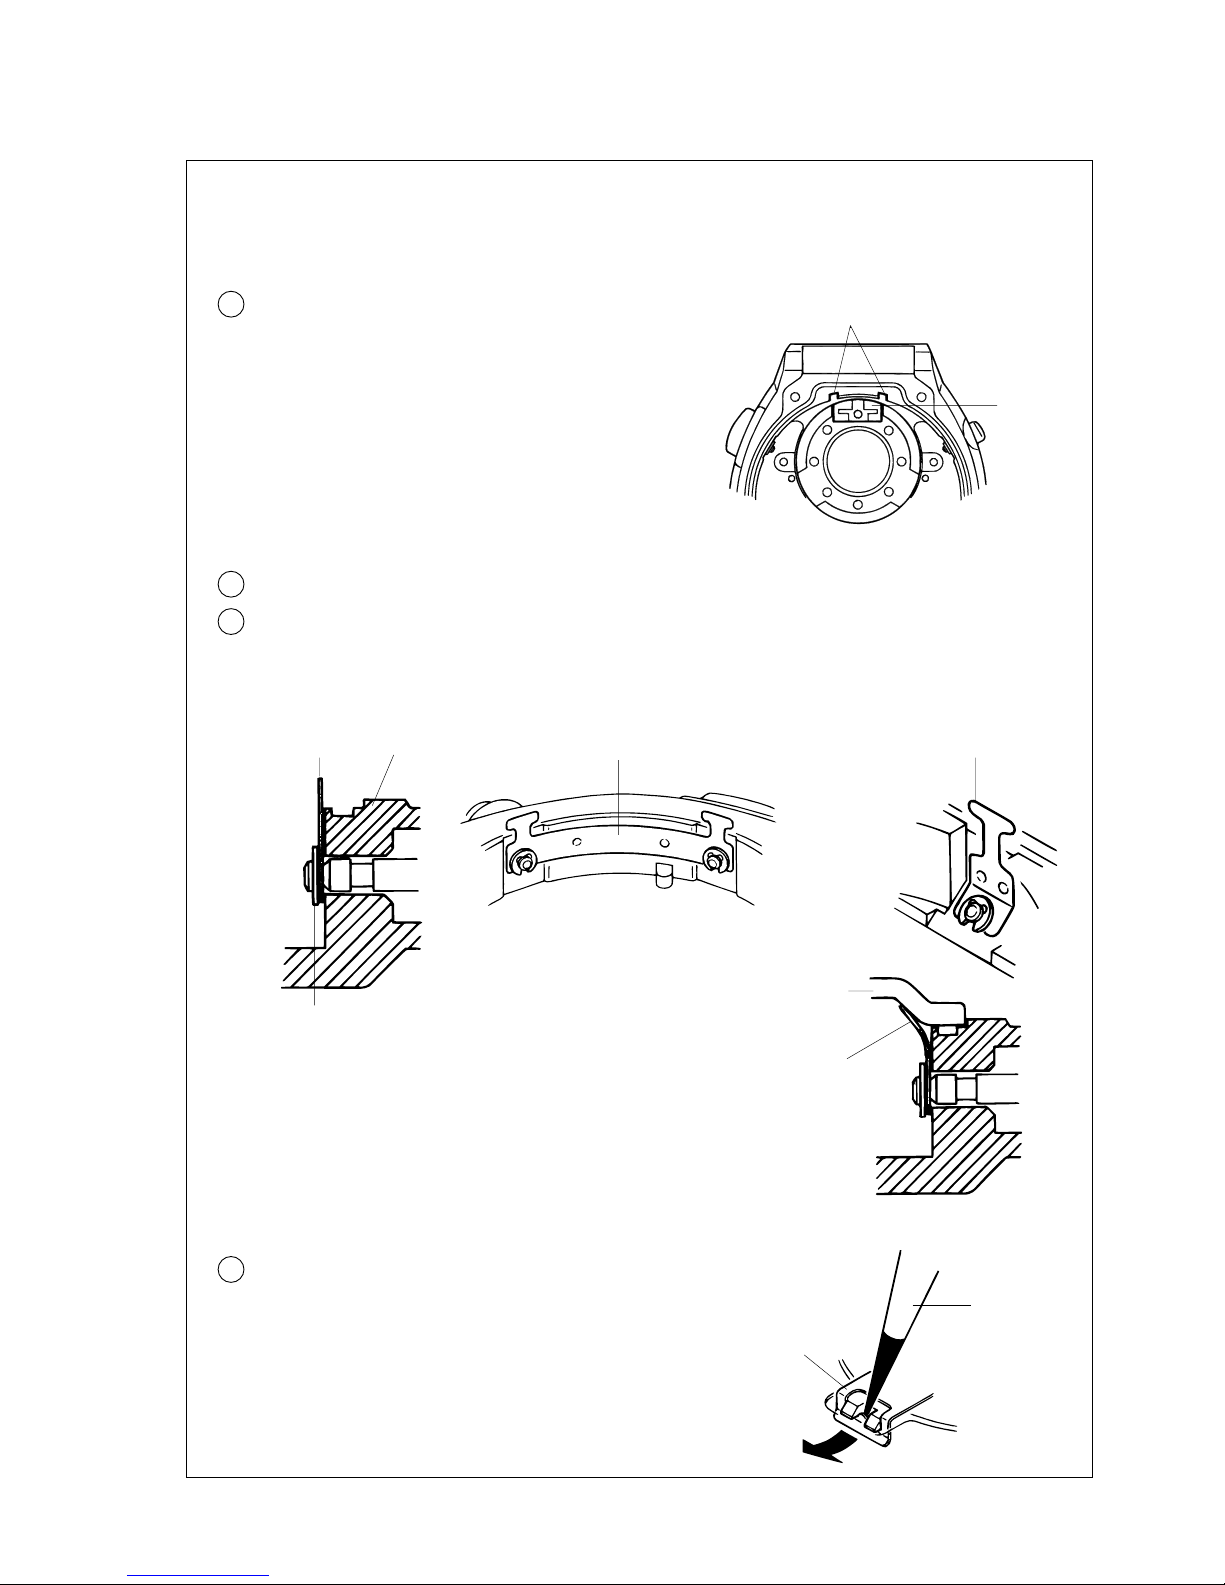
III. REMARKS ON DISASSEMBLING AND REASSEMBLING
Use the universal movement holder for disassembling and reassembling.
• How to install
Set the speaker block so that the speaker lead terminal
is positioned between the guide grooves of the case
as shown in the illustration at right.
Note: When installing the speaker block, take care not
to damage its transparent sound diaphram.
Guide groove
8 Conductive plate for the side button
9 Conductive plate for the front button
7 Speaker block
• How to install
• Insert the conductive plates for the side and front buttons into the gap between the button spring
clip and the case middle as shown in the illustrations below.
Conductive plate Case middle
Button spring clip
Conductive plate for the side button Conductive plate for the front button
Case back
Conductive plate
• When closing the case back, check that the
conductive plates are in contact with the case back,
being bent by it towards the center of the watch.
• In doing so, the case back may be hard to set in
position, as the conductive plates have a repelling
force when bent.
10 Battery clamp
• How to remove
Insert the tip of tweezers into the center of the hooking
portion of the battery clamp and pry it up toward the
direction of the arrow in the illustration at right to
remove it.
Tweezers
Battery clamp
Page 6
6
TECHNICAL GUIDE
Cal. A860A, A861A
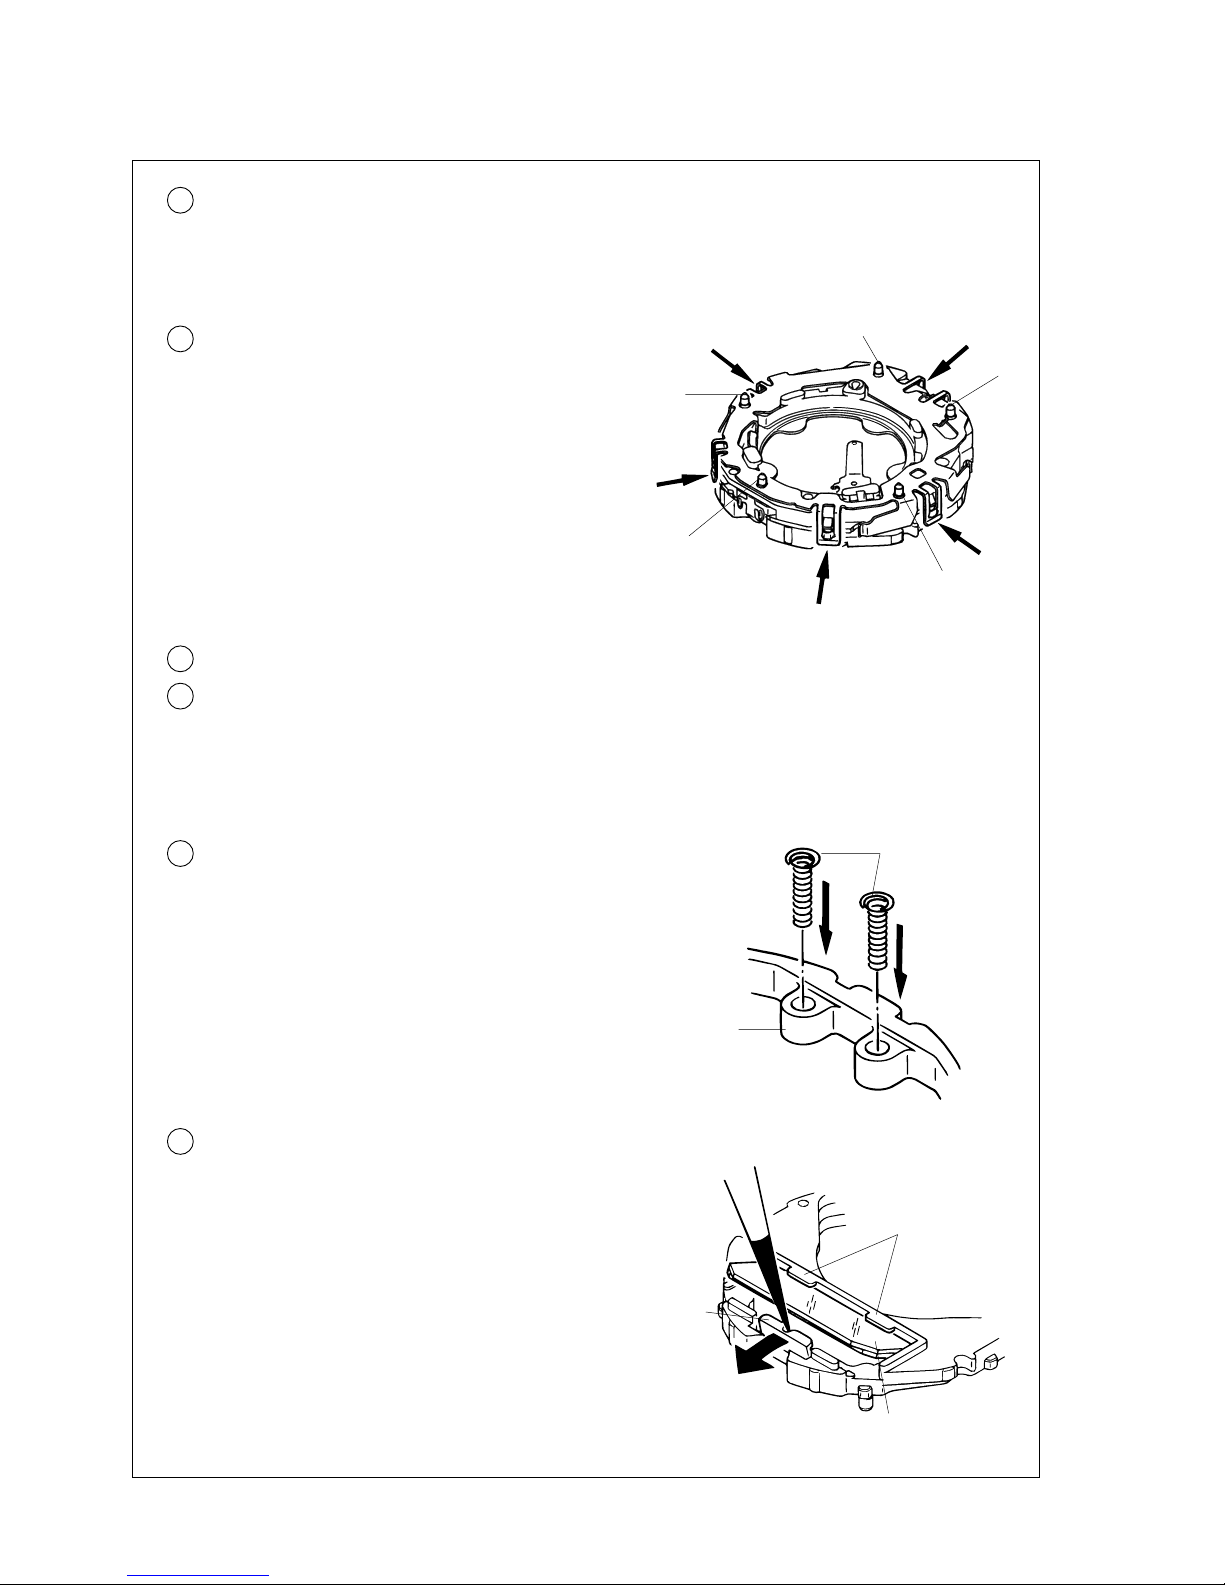
• Do not disassemble the switch spring (B) and its washer except when they need to be replaced.
• When installing the switch spring (B), take care not to set it in the wrong direction. (See the exploded
view on page 3.)
11 Battery
• How to install
Set the battery with its (-) side down.
12 Switch spring (A)
• How to remove
Release the five hooking portions of the switch spring
(A) indicated by the arrows in the illustration at right,
and then, lift it up to remove.
• How to install
Set the switch spring (A) to the guide posts “a”, “b”,
“c”, “d” and “e” in the illustration at right, and then,
have the five hooking portions of the switch spring
catch the module securely.
a
e
c
b
d
13 Washer for switch spring (B)
14 Switch spring (B)
• How to install
Set the end portion of smaller diameter to the guide
hole of the liquid crystal panel frame.
19 Speaker lead terminal
Liquid crystal
panel frame
Speaker lead terminal
20 Liquid crystal panel
• How to remove
Release the hooking portion of the liquid crystal panel
frame (“A” portion in the illustration at right) by
moving it in the direction of the arrow with the tip of
tweezers, and remove the liquid crystal panel.
• How to install
Slip the liquid crystal panel into the gap under “B”
portions of the liquid crystal panel frame, release “A”
portion by moving it in the direction of the arrow with
the tip of tweezers, and then, set the liquid crystal
panel.
“B” portion
“A” portion
Liquid crystal panel
Page 7
7
TECHNICAL GUIDE
Cal. A860A, A861A
IV. VALUE CHECKING
• Speaker block resistance
44 Ω ~ 84 Ω
• Current consumption
For the whole module : Less than 5.0 µA (with voltage supplied from a battery)
For the circuit block alone : Less than 4.0 µA (with voltage supplied from a battery)
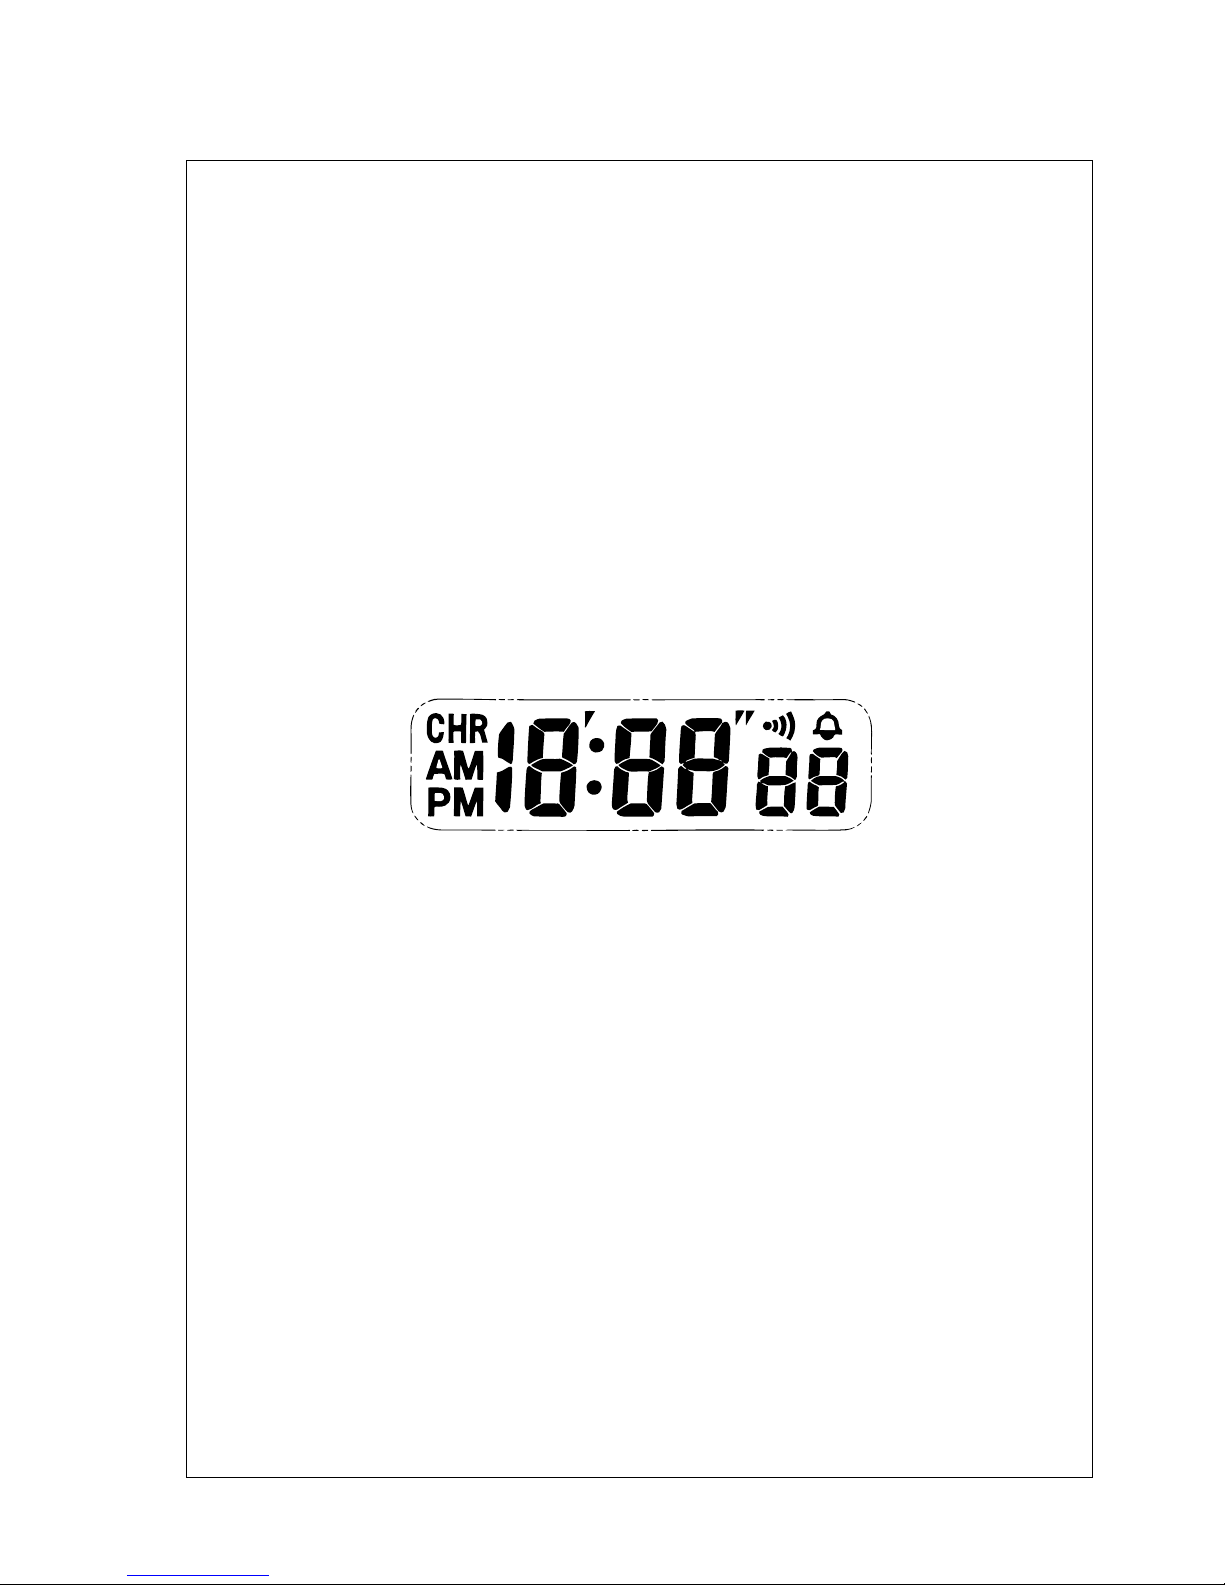
• All the segments lit up
How to light up all the segments
Press and hold button “B” for 2 to 3 seconds to show the TIME SETTING display, and then, press buttons
“C” and “D” at the same time to light up all the segments of the display.
With all the segments lit up, check for abnormal displays, etc.
[All the segments lit up]
• To return to the normal display, press button “A”, “B”, “C” or “D”. (The watch will return to the TIME
mode.)
• Time accuracy
1) Light up all the segments of the display, following the procedure above.
2) Place the watch on the microphone’s mark for placing the watch with the liquid crystal panel facing
the mark.
* If a stable measurement cannot be obtained, adjust the level by turning the level adjuster knob.
Page 8
8
HOW TO USE
Cal. A860A, A861A
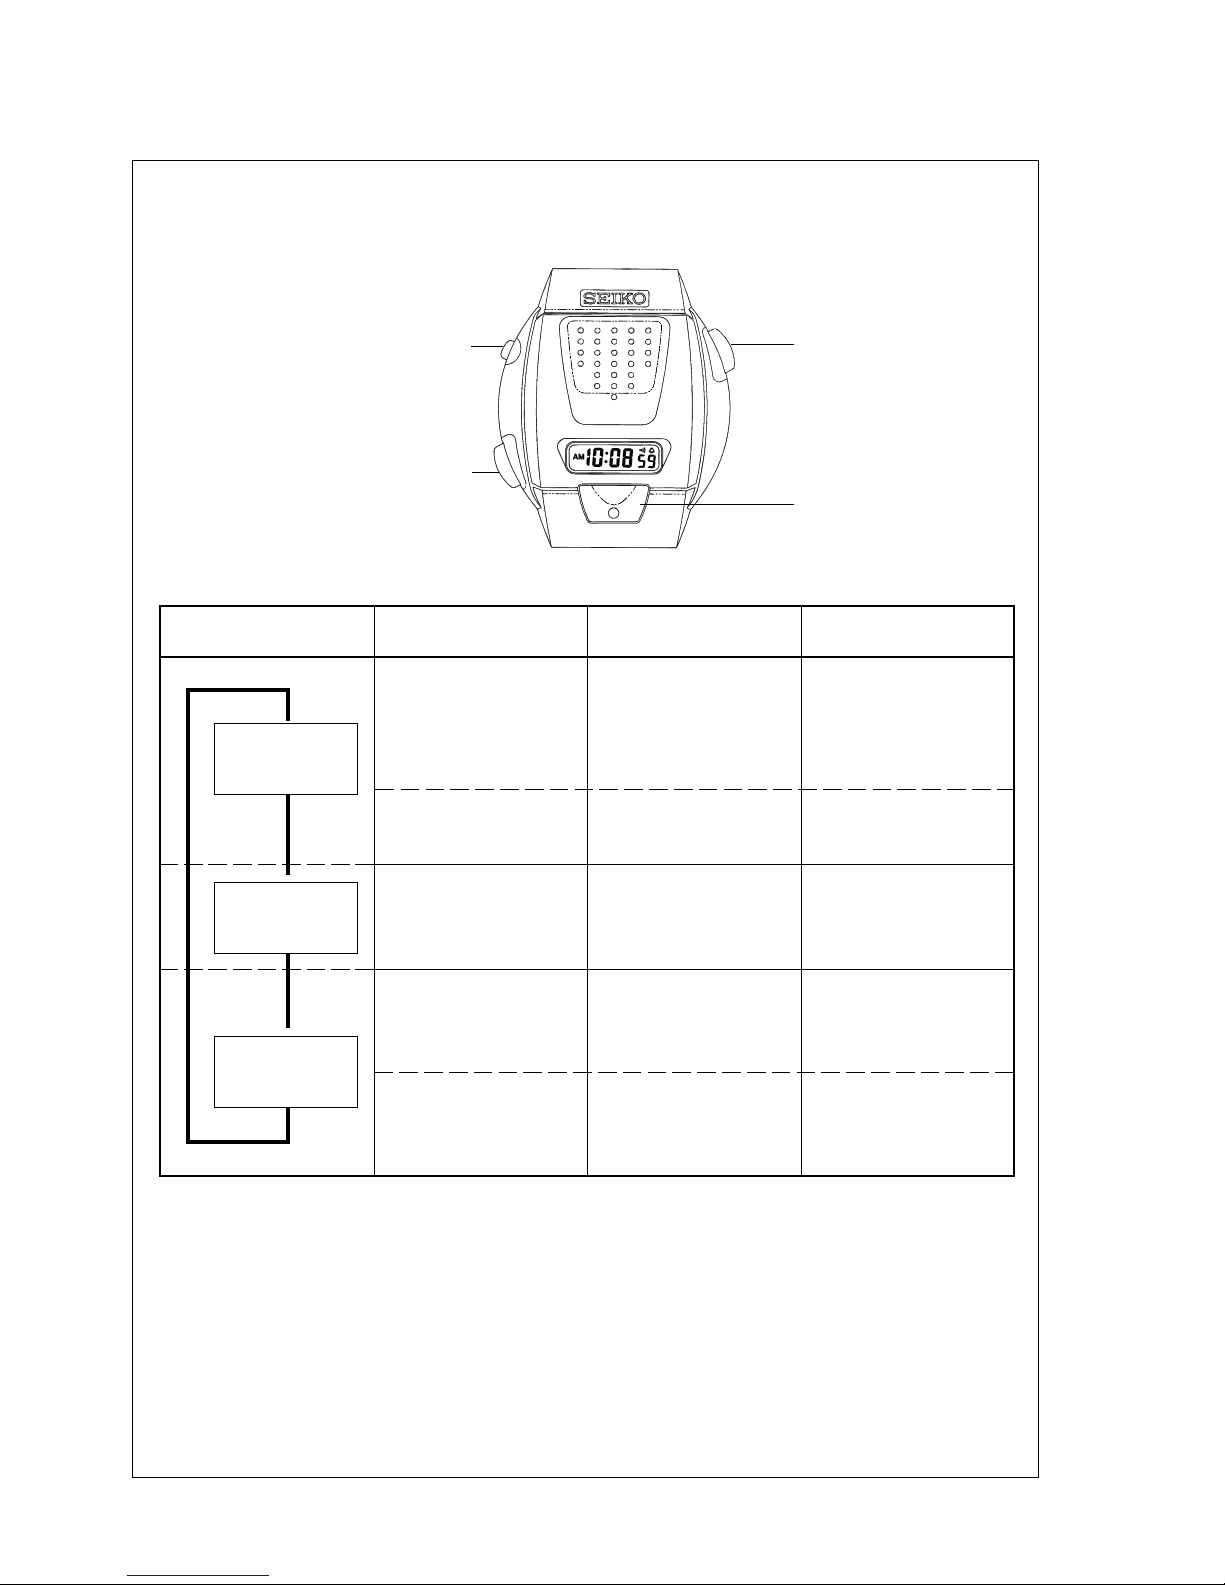
• The functions and operation of the buttons are listed below. For checking or repair of the watch, refer to
the table below for guidance.
Button C
Button D
(Speaking function)
Button B
Button A
(Changeover of modes)
Button C
Button B
TIME mode
ALARM mode
▼
▼
▼
(Not pressed)
STOPWATCH
mode
Button D
(Speaking button)
Button A
(Changeover of modes)
TIME SETTING function by
pressing for 2 to 3 seconds
Selection of the digits
(flashing) to be adjusted
Engagement/disengagement of the hourly time
signal
Engaged: Hourly time signal
mark is displayed.
Disengaged: Hourly time
signal mark is not displayed.
Resetting the stopwatch Start/stop of the stopwatch
(Not pressed)
Engagement/disengagement of the alarm
ALARM SETTING function
by pressing for 2 to 3
seconds
Selection of the digits
(flashing) to be adjusted
Announcement of the
current time by voice
Setting the seconds,
minutes and hour
Announcement of the
elapsed time by voice
Annoucement of the alarm
time or digits to be
adjusted, by voice
Hour and minute setting
* With each press of button “A”, the mode changes over in the above order.
* By pressing a button in each display, the function to be performed is announced by voice. (Speaking
function)
Page 9
9
HOW TO USE
Cal. A861A
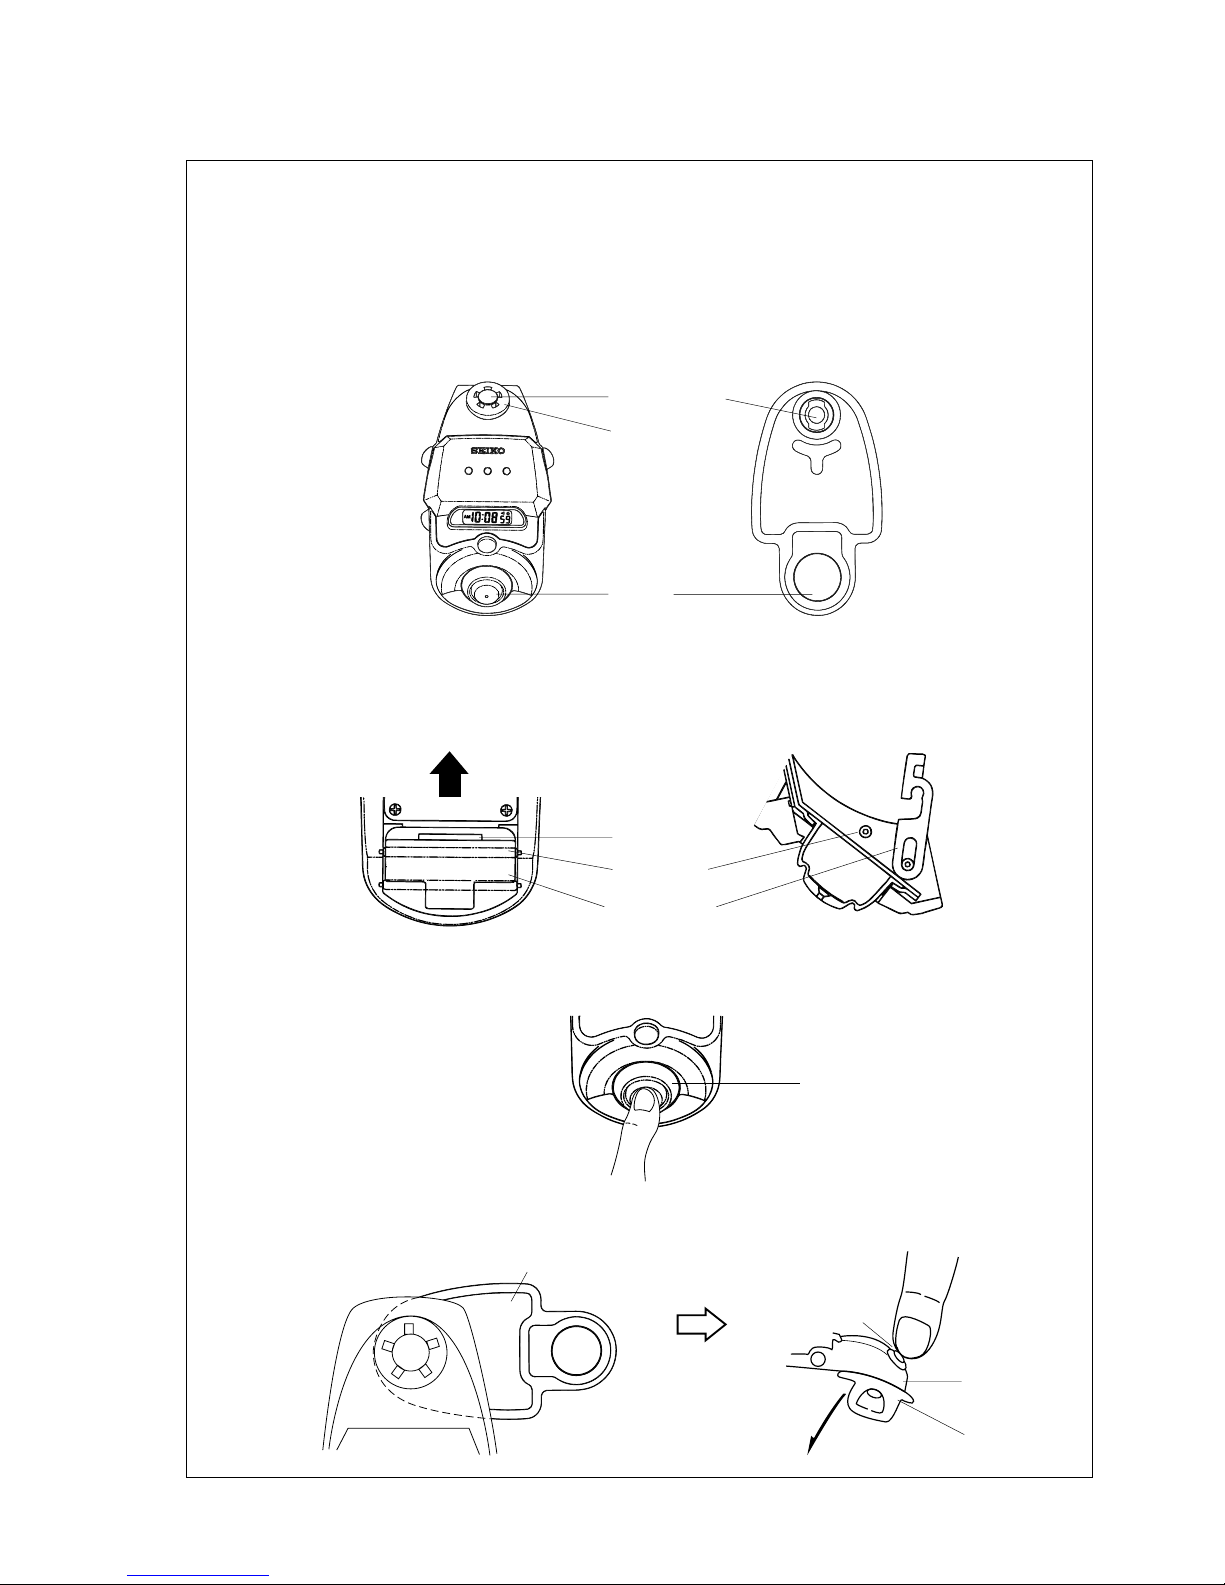
HOW TO REMOVE/ATTACH THE RING AND AIR CHAMBER (FOR CAL. A861A)
• Before removing the air chamber from the watch case or attaching it to the case for such purposes as
cleaning and replacement with a new one, be sure to push the air release button to let the air completely
out of it.
• Before replacing the battery with a new one, be sure to remove the air chamber from the watch case.
• Parts of the air chamber
Air release button
Ring
Air pump
Air chamber
1) Insert a coin or the like into the groove of the air pump support on the rear of the watch, and move it
toward 12 o’clock side to release it from the spring bar “A”. The support snaps out of its place.
Air pump
Groove
Spring bar “A”
Air pump support
[Cross-sectional view]
2) While squeezing the air pump with fingers, pull out the air chamber through the gap between the case
hole and spring bar “A”.
3) Turn the air chamber 90°. Then, push in the air release button to remove the air chamber from the case.
In doing so, the ring may also come off from the case, and therefore, hold it with a finger, taking care
not to lose it.
• How to remove
Air chamber
Air release button
Case
Air chamber
Page 10
10
HOW TO USE
Cal. A861A
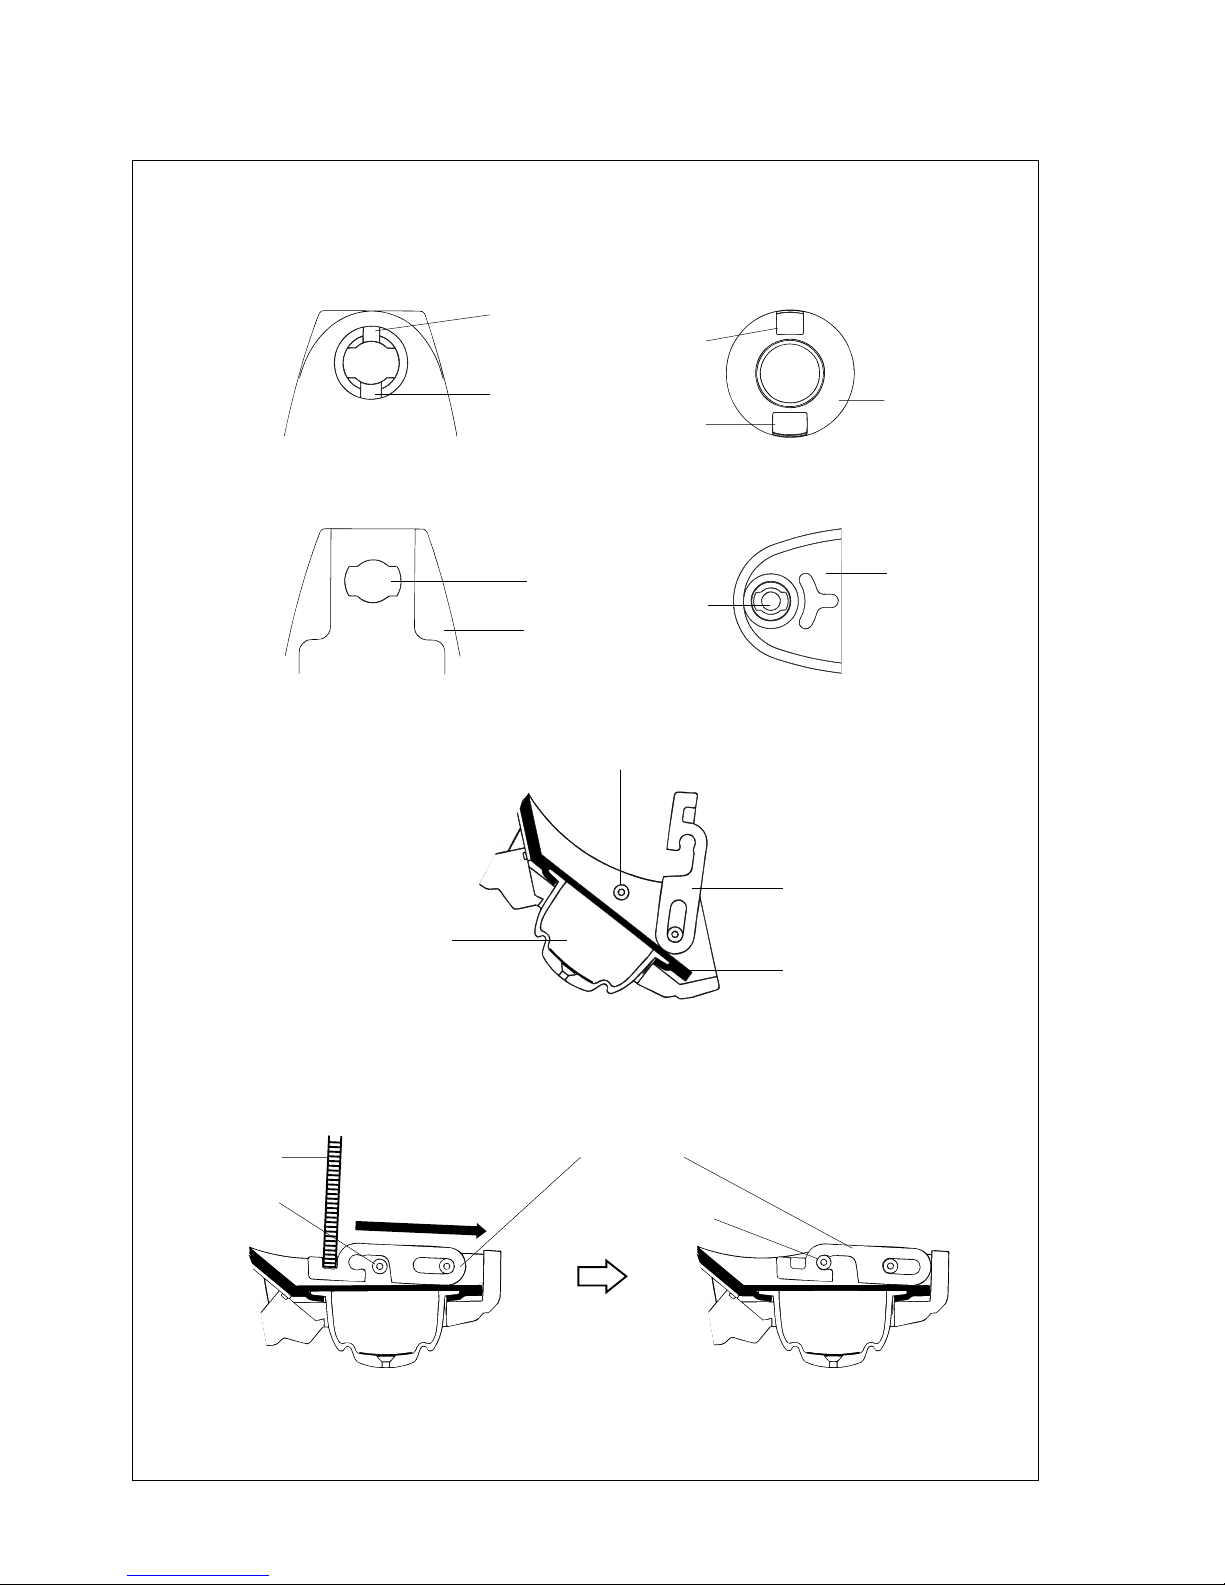
• How to attach
1) Set the ring at the 12 o’clock side of the case.
* The two protruding portions of the ring differ in size. Check that they are set to the hollows of the
corresponding sizes.
Ring (Rear side)
Smaller hollow
Smaller protruding portion
Larger protruding portion
Larger hollow
2) While holding the ring with a finger, turn the case over, set the air release button to the slot of the case,
and turn the air chamber 90° to fix the ring to the case.
Slot
Case
Air release button
Air chamber
3) Open the air pump support. Then, while squeezing the air pump with fingers, put the air chamber
through the gap between the spring bar “A” and case to set it in position.
Air chamber
Air pump support
[Cross-sectional view]
Spring bar “A”
Air pump
4) Have the hooking portion of the air pump support catch the spring bar “A” securely. To do so, insert
a coin or the like into the groove of the support and move it toward the 6 o’clock side until it snaps in
place.
[Cross-sectional view]
Coin
Spring bar “A”
Air pump support
Spring bar “A”
Page 11

Page 12

99-1 Printed in Japan
 Loading...