

Page 1

Cal. 8R28
INSTRUCTIONS (P. 3)
BEDIENUNGSANLEITUNG (S. 24 )
INSTRUCTIONS (P. 46)
ISTRUZIONI (P. 68)
INSTRUCCIONES (P. 90)
INSTRUÇÕES (P. 112)
(135 )
Page 2

You are now the proud owner of a SEIKO Automatic Chronograph Cal. 8R28. To ensure its optimum
歡迎購買精工 8R28 機型自動計時器。為保證在最佳狀態下操作手錶,請在使用手錶之前仔
細閱讀本手冊內的各項使用說明。並妥善保管本使用手冊以備今後參考。
performance, please read the instructions in this booklet carefully before using it. Please keep this
manual handy for ready reference.
Sie sind jetzt stolzer Besitzer eines SEIKO Chronografen Kal. 8R28. Lesen Sie diese Bedienungsanleitung
vor der Verwendung aufmerksam durch, um ihre optimale Nutzung zu gewährleisten. Heben Sie diese
Bedienungsanleitung gut auf, um jederzeit wieder nachlesen zu können.
Vous voici l'heureux propriétaire d'une chronomètre automatique SEIKO Cal. 8R28. Pour en obtenir des
performances optimales, veuillez lire attentivement cette brochure avant d'utiliser la montre. Conservez
ce manuel pour vous y référer en cas de besoin.
Grazie di aver acquistato questo nuovo Cronografo Automatico SEIKO Cal. 8R28. Per poter utilizzare l’
orologio al massimo delle sue prestazioni leggere attentamente questo manuale di istruzioni prima di
passare all’uso dell’orologio stesso, e conservarlo poi per qualsiasi eventuale futura consultazione.
Usted es ahora el orgulloso propietario de un Cronógrafo Automático de SEIKO Cal. 8R28. Para asegurar
el óptimo rendimiento de su reloj, sírvase leer cuidadosamente las instrucciones contenidas en este
manual antes de su uso. Guarde este manual en un lugar muy accesible para la rápida referencia.
Você poderá sentir-se orgulhoso de possuir um Cronógrafo Automático SEIKO Cal. 8R28. Para garantir
o seu excelente movimento, leia atentamente as instruções contidas neste opúsculo antes de usá-lo.
Conserve este manual para consultas futuras.
CONTENTS
Page
CHARACTERISTICS OF A MECHANICAL WATCH ...................................... 4
NAMES OF THE PARTS ................................................................................
HOW TO USE ...............................................................................................
HOW TO SET THE TIME AND DATE ............................................................
HOW TO USE THE STOPWATCH .................................................................
TO PRESERVE THE QUALITY OF YOUR WATCH ........................................
PLACES TO KEEP YOUR WATCH .................................................................
NOTES ON OVERHAUL ................................................................................
NOTES ON GUARANTEE AND REPAI
R ........................................................ 20
TROUBLESHOOTING ................................................................................... 20
ACCURACY OF MECHANICAL WATCHES ...................................................
SPECIFICATIONS .......................................................................................... 23
5
7
9
12
15
19
19
22
ENGLISH
3
Page 3
English
4
English
5
5
0
0
4
0
0
3
0
0
2
5
0
6
5
7
0
7
5
8
0
2
0
0
1
8
0
1
4
0
1
5
0
1
2
0
1
3
0
1
1
0
1
0
0
9
0
9
5
8
5
T
A
C
H
Y
M
E
T
E
R
T
A
C
H
Y
M
E
T
E
R
60
30
30
20 10
12
6
39
AUTOMATIC
6
CAL. 8R28
CHARACTERISTICS OF A MECHANICAL
WATCH
(self-winding type, automatic winding type)
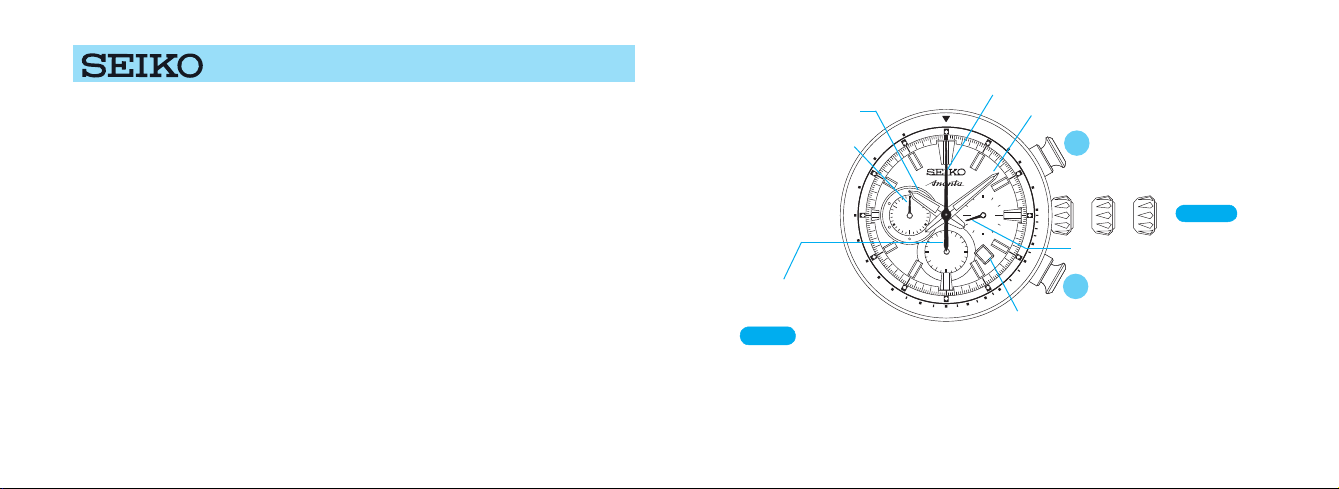
NAMES OF THE PARTS
Center stopwatch hand
Hour hand
Stopwatch minute hand
Minute hand
A
To START/STOP the stopwatch
● This mechanical watch operates using power obtained from a mainspring.
Calendar
a b c
Small second hand
To RESET the stopwatch
B
CROWN
● If the watch is completely stopped, manually turn the crown approximately 20 times
to wind up the mainspring to start the watch.
● While loss/gain of a quartz watch is indicated by a monthly or annual rate, accuracy
of a mechanical watch is normally indicated by a daily rate (loss/gain per day).
● Normal usage accuracy of a mechanical watch varies according to conditions of use
(time period that the watch is worn on the wrist, temperature environment, hand
movement, and winding state of the mainspring).
● When the watch is affected by strong magnetism, it temporarily gains or loses
time. If the watch encounters a strong magnetic field, the parts of the watch may
be magnetized. In this case, repairs such as removal of magnetism are required.
Contact the retailer from whom the watch was purchased.
Stopwatch hour hand
CROWN
a)
Normal position : winding up the mainspring (manual operation)
b)
First click position : date setting
c) Second click position : time setting
* The position or design of the displays may differ depending on the model.
Page 4
English
6
English
7
5
0
0
4
0
0
3
0
0
2
5
0
6
5
7
0
7
5
8
0
2
0
0
1
8
0
1
4
0
1
5
0
1
2
0
1
3
0
1
1
0
1
0
0
9
0
9
5
8
5
T
A
C
H
Y
M
E
T
E
R
T
A
C
H
Y
M
E
T
E
R
60
30
30
20 10
12
6
39
AUTOMATIC
6
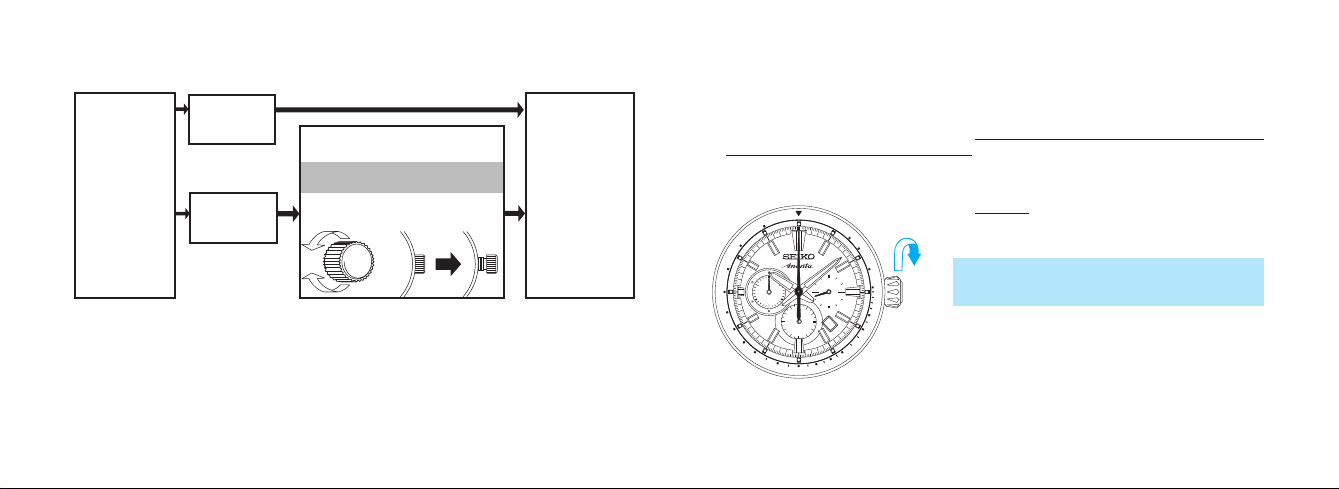
Check the type of the crown of your watch
Unscrew.
Screw up.
●
HOW TO USE
This watch is an automatic watch equipped with a manual winding mechanism.
Turn the
crown
clockwise.
* If your watch has a screw-lock crown, the crown will screw into the watch case for
added protection.
• After completing all settings of the watch, screw the crown in again by turning it
clockwise while pressing it.
• If the crown is too stiff to be screwed in, turn the crown counterclockwise once and
then give another try.
• Do not screw it in by force as it may damage the slots of the crown.
The crown
turns.
The crown
does not
turn.
The crown of your watch is
the screw lock type.*
To set the watch
Unscrew the crown by turning it
counterclockwise.
Go to
"HOW TO
USE"
• When the watch is worn on the wrist, the motion of the wearer's arm winds the
mainspring of the watch.
• If your watch is completely stopped,
the mainspring by turning the crown.
How to manually wind the mainspring by turning the crown
●
it is recommended that you manually wind
1. S l o wly turn t h e cr own clock wise (in
th e 1 2 o’clo c k dire cti on) to wind th e
mainspring.
* Tu rni ng the crown co unterc lockwise (the
6 o’cloc k d irection ) do es not win d the
mai nspring.
2. C onti n ue to turn th e crown un til the
mainspring is sufficiently wound. The small
second hand will start moving.
3. Set the time and date before putting the
watch on your wrist.
Page 5

English
8
English
9
* There is no need to turn the crown further when the mainspring is fully wound. But
5
0
0
4
0
0
3
0
0
2
5
0
6
5
7
0
7
5
8
0
2
0
0
1
8
0
1
4
0
1
5
0
1
2
0
1
3
0
1
1
0
1
0
0
9
0
9
5
8
5
T
A
C
H
Y
M
E
T
E
R
T
A
C
H
Y
M
E
T
E
R
60
30
5
the crown can be turned without damaging the watch mec hanism.
* Once the watch is wound up fully, it operates for about 45 hours. However, when
the stopwatch is used continuously for a certain period, the watch may not operate
for as long as 45 hours.
* If the watch is used without being wound up fully, g ain or loss of the watch may
result. To avoid this, wear the watch for more than 10 hours a day. If the watch
is used without being worn on the wrist (if it is used on the desk like a clock, for
example ), make sure to wind it up fully every day at a fixed time.
* If the watch has stopped with the mainspring unwound, winding the mainspring
with the crown will not start the watch immediately. This is because the mainspring
torque (force) is low at the beginning of its winding due to the characteristics of
mechanical watches. The small second hand starts to move when a certain degree
of strong torque is reached after the mainspring has been wound up. However,
swinging the watch from side to side to forc ibly turn the balance can start the watch
sooner.
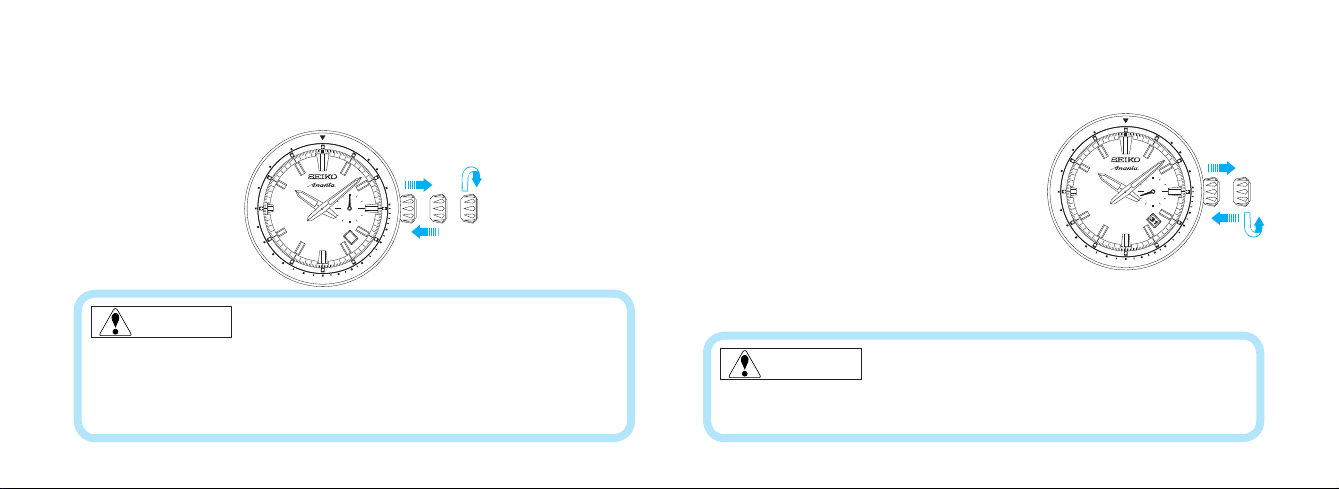
HOW TO SET THE TIME AND DATE
• Check that the watch is operating, and then set the time and date.
• The watch is provided with a date function and is designed so that the date changes
once every 24 hours. The date changes around 12 o’clock midnight. If AM/PM is
not properly set, the date will change around 12 o’clock noon.
1. Pull out the crown to the first click. (The small
second hand continues moving and the accuracy
of the watch is unimpaired.)
2. T he date ca n be set by tu rnin g the cro w n
counterclockwise. Turn it until the previous day’s
date appears.
Ex.) If today is the 6th of the month, first set the date to
”5” by turning the crown counterclockwise.
CAUTION
• Do not set the date between 8:00 p.m. and 2:00 a.m. If you do so, the date
may not change properly on the following day or malfunction of the watch
may occur.
Page 6
English
10
English
11
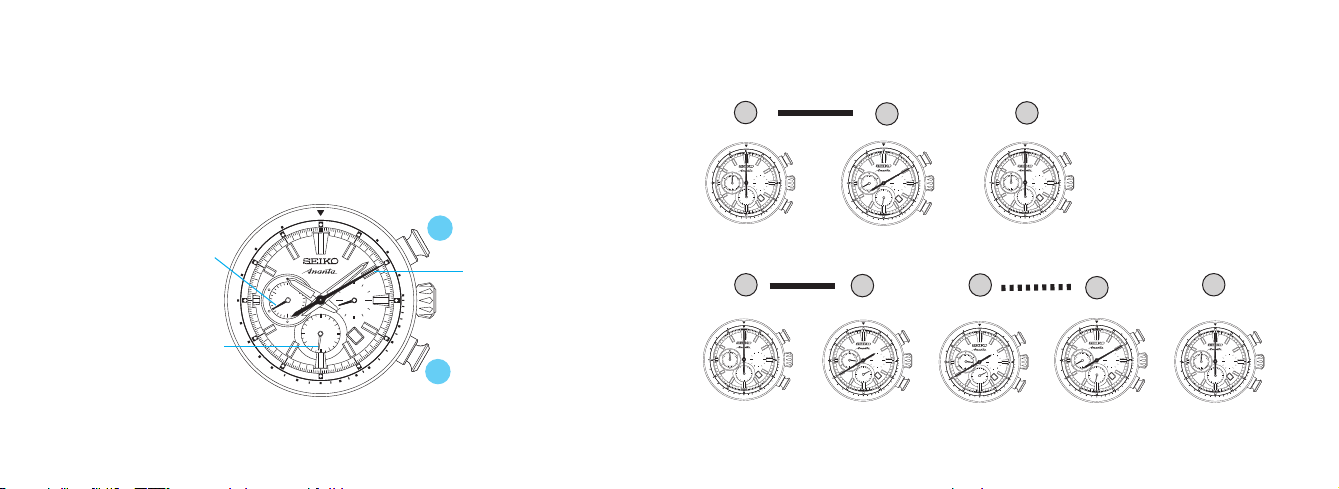
3. Pull out the crown to the second click when the small second hand is at the 12
5
0
0
4
0
0
3
0
0
2
5
0
6
5
7
0
7
5
8
0
2
0
0
1
8
0
1
4
0
1
5
0
1
2
0
1
3
0
1
1
0
1
0
0
9
0
9
5
8
5
T
A
C
H
Y
M
E
T
E
R
T
A
C
H
Y
M
E
T
E
R
60
30
6
5
0
0
4
0
0
3
0
0
2
5
0
6
5
7
0
7
5
8
0
2
0
0
1
8
0
1
4
0
1
5
0
1
2
0
1
3
0
1
1
0
1
0
0
9
0
9
5
8
5
T
A
C
H
Y
M
E
T
E
R
T
A
C
H
Y
M
E
T
E
R
60
30
o’clock position. (The small second hand stops on the spot.)
Turn the crown to advance the hands until the date changes to the next. The time
is now set for the a.m. period. Advance the hands to set the correct time.
4. Push the crown back in to the normal position in accordance with a time signal.
Date adjustment at the beginning of the month
●
It is necessary to adjust the date on the first day after a month that has less than 31
days.
Ex.) To adust the date in the a.m. period on the first
day of a month following a 30-day month.
1. The watch displays “31” instead of "1". Pull out
the crown to the first click.
2. Turn the crown to set the date to “1” and then
push the crown back in to the normal position.
CAUTION
• The mechanism of mechanical watches is different from that of quartz
watches.
When setting the time, make sure to turn back the minute hand a little behind
the desired time and then advance it to the exact time.
CAUTION
• Do not set the date between 8:00 p.m. and 2:00 a.m. If you do so, the date
may not change properly on the following day or malfunction of the watch
may occur.
Page 7
English
12
English
13
HOW TO USE THE STOPWATCH
5
0
0
4
0
0
3
0
0
2
5
0
6
5
7
0
7
5
8
0
2
0
0
1
8
0
1
4
0
1
5
0
1
2
0
1
3
0
1
1
0
1
0
0
9
0
9
5
8
5
T
A
C
H
Y
M
E
T
E
R
T
A
C
H
Y
M
E
T
E
R
60
30
30
20 10
12
6
39
AUTOMATIC
6
6 º 20’ 10”
2 º 8’ 40”
6 º 20’ 10”
A
A
A
B
A
A
B
A
5
0
0
4
0
0
3
0
0
2
5
0
6
5
7
0
7
5
8
0
2
0
0
1
8
0
1
4
0
1
5
0
1
2
0
1
3
0
1
1
0
1
0
0
9
0
9
5
8
5
T
A
C
H
Y
M
E
T
E
R
T
A
C
H
Y
M
E
T
E
R
60
30
30
20 10
12
6
39
AUTOMATIC
5
0
0
4
0
0
3
0
0
2
5
0
6
5
7
0
7
5
8
0
2
0
0
1
8
0
1
4
0
1
5
0
1
2
0
1
3
0
1
1
0
1
0
0
9
0
9
5
8
5
T
A
C
H
Y
M
E
T
E
R
T
A
C
H
Y
M
E
T
E
R
60
30
30
20 10
12
6
39
AUTOMATIC
5
0
0
4
0
0
3
0
0
2
5
0
6
5
7
0
7
5
8
0
2
0
0
1
8
0
1
4
0
1
5
0
1
2
0
1
3
0
1
1
0
1
0
0
9
0
9
5
8
5
T
A
C
H
Y
M
E
T
E
R
T
A
C
H
Y
M
E
T
E
R
60
30
30
20 10
12
6
39
AUTOMATIC
5
0
0
4
0
0
3
0
0
2
5
0
6
5
7
0
7
5
8
0
2
0
0
1
8
0
1
4
0
1
5
0
1
2
0
1
3
0
1
1
0
1
0
0
9
0
9
5
8
5
T
A
C
H
Y
M
E
T
E
R
T
A
C
H
Y
M
E
T
E
R
60
30
30
20 10
12
6
39
AUTOMATIC
5
0
0
4
0
0
3
0
0
2
5
0
6
5
7
0
7
5
8
0
2
0
0
1
8
0
1
4
0
1
5
0
1
2
0
1
3
0
1
1
0
1
0
0
9
0
9
5
8
5
T
A
C
H
Y
M
E
T
E
R
T
A
C
H
Y
M
E
T
E
R
60
30
30
20 10
12
6
39
AUTOMATIC
5
0
0
4
0
0
3
0
0
2
5
0
6
5
7
0
7
5
8
0
2
0
0
1
8
0
1
4
0
1
5
0
1
2
0
1
3
0
1
1
0
1
0
0
9
0
9
5
8
5
T
A
C
H
Y
M
E
T
E
R
T
A
C
H
Y
M
E
T
E
R
60
30
30
20 10
12
6
39
AUTOMATIC
5
0
0
4
0
0
3
0
0
2
5
0
6
5
7
0
7
5
8
0
2
0
0
1
8
0
1
4
0
1
5
0
1
2
0
1
3
0
1
1
0
1
0
0
9
0
9
5
8
5
T
A
C
H
Y
M
E
T
E
R
T
A
C
H
Y
M
E
T
E
R
60
30
30
20 10
12
6
39
AUTOMATIC
5
0
0
4
0
0
3
0
0
2
5
0
6
5
7
0
7
5
8
0
2
0
0
1
8
0
1
4
0
1
5
0
1
2
0
1
3
0
1
1
0
1
0
0
9
0
9
5
8
5
T
A
C
H
Y
M
E
T
E
R
T
A
C
H
Y
M
E
T
E
R
60
30
30
20 10
12
6
39
AUTOMATIC
<STANDARD MEASUREMENT>
START
STOP
RESET
<ACCUMULATED ELAPSED TIME MEASUREMENT>
START
STOP
RESTART
STOP
RESET
* Restart and stop can be repeated as many times as required
by pressing Button A.
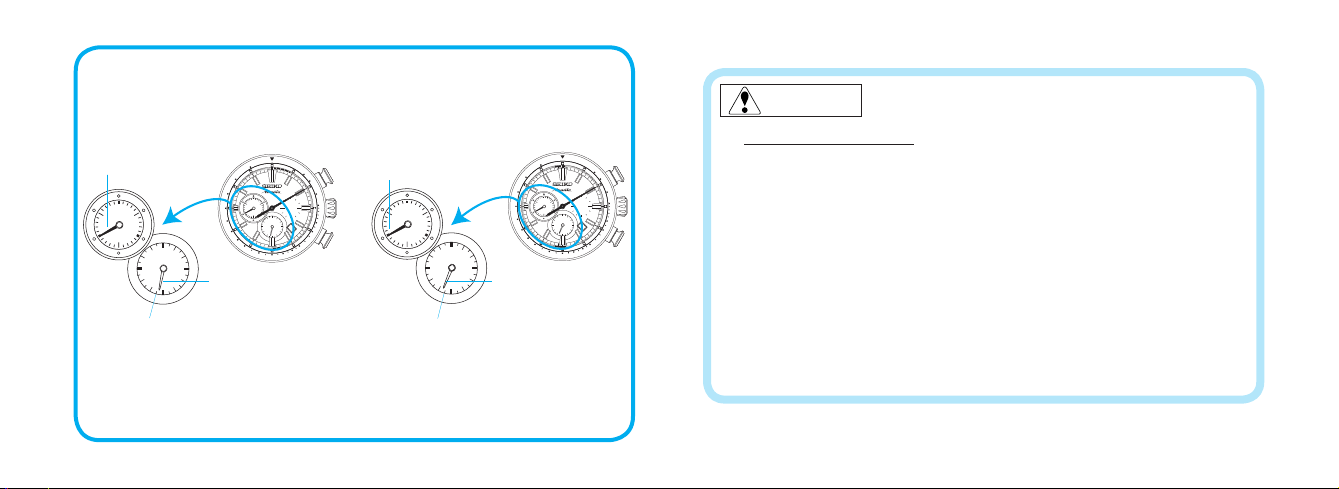
This watch features a stopwatch function which can measure up to 12 hours.
• A chronograph refers to a watch that has a stopwatch function in addition to a time
display function.
• Before using the stopwatch, make sure that the center stopwatch hand is pointing
at the 0 position. If it is not pointing at the 0 position, press the Button B to correct
the position of the center stopwatch hand.
• Before using the stopwatch, make sure that the mainspring is sufficiently wound.
Stopwatch minute hand
Stopwatch hour hand
Current time indication: 10 o’clock 8 minutes and 42 seconds
Stopwatch time indication: 6 hours 20 minutes and 10 seconds
STOPWATCH OPERATION
START/STOP
A
Center stopwatch hand
B
RESET
Page 8
English
14
English
15
How to read the stopwatch minute hand
5
0
0
4
0
0
3
0
0
2
5
0
6
5
7
0
7
5
8
0
2
0
0
1
8
0
1
4
0
1
5
0
1
2
0
1
3
0
1
1
0
1
0
0
9
0
9
5
8
5
T
A
C
H
Y
M
E
T
E
R
T
A
C
H
Y
M
E
T
E
R
60
30
30
20 10
12
6
39
AUTOMATIC
5
0
0
4
0
0
3
0
0
2
5
0
6
5
7
0
7
5
8
0
2
0
0
1
8
0
1
4
0
1
5
0
1
2
0
1
3
0
1
1
0
1
0
0
9
0
9
5
8
5
T
A
C
H
Y
M
E
T
E
R
T
A
C
H
Y
M
E
T
E
R
60
30
30
20 10
12
6
39
AUTOMATIC
30
20 10
12
6
39
30
20 10
12
6
39
The stopwatch minute hand completes a full rotation in 30 minutes. The correct
indication of the stopwatch minute hand is determined in connection with the
position of the stopwatch hour hand.
<Between 0 and 29 minutes>
Stopwatch minute hand
"20 min."
0.5 hour index
When the stopwatch hour hand is pointing at
a position before a short indic ation ( 0.5 hour
index), read the minutes the stopwatch minute
hand is indicating. In the case illustrated above,
the measured time should be read as "6 hours
20 minutes and 10 seconds."
Stopwatch hour hand
<Between 30 and 59 minutes>
Stopwatch minute hand
"50 min."
0.5 hour index
When the stopwatch hour hand is pointing at
a position after a short index (0.5 hour index),
30 minutes should be added to the minutes
that the stopwatch minute hand is indicating.
In the case illustrated above, the measured
time should be read as "6 hours 50 minutes
and 10 second s."
Stopwatch hour hand
TO PRESERVE THE QUALITY OF YOUR WATCH
CAUTION
● CARE OF YOUR WATCH
• The case and band touch the skin directly. Keep the case and band clean at
all times. This will help to extend the life of the watch and will reduce the
risk of skin irritations.
• When you take the watch off, wipe off moisture, sweat or soil with a soft
dry cloth as soon as possible. This will help to extend the life of the case,
band and gasket.
<Leather strap>
• Gently blot up the moisture using a soft dry cloth. Do not rub the leather,
as this may cause abrasions or discoloration.
<Metal bracelet>
• To keep the bracelet clean, use a soft toothbrush dipped in clean or soapy
water. Be careful not to get water on the case.
Page 9

English
16
English
17
5 bar WR
10/15/20
bar WR
CAUTION
RASH AND ALLERGIC REACTION
●
•
Adjust the band to allow a little clearance around your wrist to ensure proper
airflow.
• Prolonged and/or repeated contact with the band may cause skin irritation
or dermatitis for those susceptible.
• Possible causes of dermatitis
• Allergic reaction to metals or leathers
• Rust, contamination or perspiration accumulated on the watch case or
band.
• If you should develop any allergic symptoms or skin irritation, immediately
stop wearing the watch and seek medical attention.
WATER RESISTANCE
●
Non-water resistance
●
If ”WATER RESISTANT” is not inscribed on the case back,
your watch is not water resistant, and care should be taken
not to get it wet as water may damage the movement. If the
watch becomes wet, we suggest that you have it checked
by the retailer from whom the watch was purchased or your
SERVICE CENTER.
Water resistance (3 bar)
●
If ”WATER RESISTANT” is inscribed on the case back, your
watch is designed and manufactured to withstand up to 3 bar,
such as accidental contact with splashes of water or rain, but it
is not designed for wearing while swimming or diving.
Water resistance (5 bar)*
●
If ”WATER RESISTANT 5 BAR” is inscribed on the case back,
your watch is designed and manufactured to withstand up to 5
bar and is suitable for wearing while swimming, yachting and
taking a shower.
Water resistance (10 bar/15 bar/20 bar)*
●
If ”WATER RESISTANT 10 BAR”, ”WATER RESISTANT 15 BAR”
or ”WATER RESISTANT 20 BAR” is inscribed on the case back,
your watch is designed and manufactured to withstand up to
10 bar/15 bar/20 bar, respectively, and is suitable for wearing
while taking a bath or shallow diving, but not for scuba diving.
We recommend that you wear a SEIKO Diver’s watch while
* Before using a water resistant 5, 10, 15 or 20 bar watch in water, make sure
the crown is pushed in completely.
Do not operate the crown when the watch is wet or in water. If used in sea
water, rinse the watch in fresh water and dry it completely.
scuba diving.
Page 10

English
18
English
19
* When taking a shower while wearing a water resistant 5 bar watch, or taking
a bath while wearing a water resistant 10, 15 or 20 bar watch, make sure to
observe the following:
• Do not operate the crown when the watch is wet with soapy water or
shampoo.
• If the watch is left in warm water, a slight time loss or gain may be caused.
This condition, however, will be corrected when the watch returns to normal
temperature.
NOTE:
Pressure in bar is a test pressure and should not be considered as corresponding
to an actual diving depth since swimming movements tend to increase the
pressure at a given depth. Care should also be taken when diving with the
watch into water.
PRECAUTIONS ON WEARING YOUR WATCH
• Exercise care when you hold an infant or small child while wearing the
watch on your wrist, as the infant or child may be injured or develop an
allergic reaction caused by direct contact with the watch.
• Avoid undue shocks such as dropping or scratching against hard surfaces
or playing active sports, which may cause temporary malfunctions.
• There is a possibility of injury caused by wearing the watch on your wrist
especially if you fall down or bump into other people or objects.
PLACES TO KEEP YOUR WATCH
● Do not leave the watch in a place where the temperature drops below 5 °C (41° F)
or rises above 35 °C (95 °F) for a long time.
● Do not leave the watch in a place where it will be subjected to strong magnetism
(for example, near television sets, loudspeakers or magnetic necklaces) or static
electricity.
● Do not leave the watch where there are strong vibrations.
● Do not leave the watch in dusty places.
● Do not expose the watch to chemical substances or gases.
(Ex.: Organic solvents such as benzine and thinner, gasoline, nail polish, cosmetic
sprays, detergents, adhesives, mercury, and iodine antiseptic solution.)
● Do not leave the watch in close contact with hot spring water.
NOTES ON OVERHAUL
● The watch is a precision device with many moving parts lubricated with special
oils. If the parts run short of oil or get worn out, the watch may lose time or stop
operation. In such a case, have the watch overhauled.
Page 11

English
20
English
21
NOTES ON GUARANTEE AND REPAIR
● Please contact the retailer the watch was purchased from or SEIKO CUSTOMER
SERVICE CENTER for repair or overhaul.
● Within the guarantee period, please present the certificate of guarantee to receive
repair services.
● Guarantee coverage is provided in the certificate of guarantee. Please read carefully
and retain it.
TROUBLESHOOTING
Problem Possible causes Solutions
The watch stops
operating.
Even though you wear
the watch every day, it
soon stops operating.
The date changes at 12
o’clock noon.
The power supplied by
the mainspring has been
consumed.
The watch is worn on
your wrist only for a short
period of time, or the
amount of arm movement
is small.
AM/ PM is not prop erly set. Advance the hands by 12 hours.
Turn the crown or swing the watch
to wind it up. The watch will st art
operating. If the watch does not star t,
consult the retailer from whom the
watch was purchased.
Wear the watch for an ex tended
period of time, or when taking off the
watch, turn the crown to wind the
mainspring.
Problem Possible causes Solutions
The watch has been left
in extremely high or low
temperatures for a long time.
The watch was brought
into close contact with a
magne tic object.
The watch gains/loses
time temporarily.
The gla ss is blurred and
the blur persists for a
long time.
The stopwatch minute
hand and stopwatch
hour hand move while
you are setting the
watch to the current
time.
• For the solution of troubles other than listed above, contact the retailer from whom the watch was
purchased.
You dropped the watch, hit
it against a hard sur face or
wore it while playing active
spor ts. The watch was
exposed to strong vibrations.
The watch has not been
overhauled for more than
3 years.
Water got inside the watch
due to the deteriora tion of
the gasket, etc.
Time setting is done
while the stopwatch is
operating.
Normal accuracy will resume
when the watch returns to normal
temperature.
Normal accuracy will resume when the
watch is kept away from close cont act
with the magnetic source. If this
condition persists, consult the r etailer
from whom the watch was purchased.
Normal accuracy will not resume.
Consult the retailer from whom the
watch was purchased.
Consult the retailer from whom the
watch was purchased.
Consult the retailer from whom the
watch was purchased.
Push the crown back in to the normal
position. A nd then, stop and reset the
stopwatch. After that, if you wish to
set the time, follow the procedures in
“HOW TO SET THE T IME AND DATE”
section of this booklet.
Page 12

English
22
English
23
ACCURACY OF MECHANICAL WATCHES
● The accuracy of mechanical watches is indicated by the daily rates of one week or
so.
● The accuracy of mechanical watches may not fall within the specified range of
time accuracy because of loss/gain changes due to the conditions of use, such as
the length of time during which the watch is worn on the wrist, arm movement,
whether the mainspring is wound up fully or not, etc.
● The key components in mechanical watches are made of metals which expand or
contract depending on temperatures due to metal properties. This exerts an effect
on the accuracy of the watches. Mechanical watches tend to lose time at high
temperatures while they tend to gain time at low temperatures.
● In order to improve accuracy, it is important to regularly supply energy to the balance
that controls the speed of the gears. The driving force of the mainspring that powers
mechanical watches varies between when it is fully wound and immediately before
it is unwound. As the mainspring unwinds, the force weakens.
Relatively steady accuracy can be obtained by wearing the watch on the wrist
frequently for the self-winding type and winding up the mainspring fully everyday
at a fixed time to move it regularly for the wind-up mechanical type.
● When affected by strong external magnetism, a mechanical watch may loss/gain
time temporarily. The parts of the watch may become magnetized depending on
the extent of the effect. In such a case, consult the retailer from whom the watch
was purchased since the watch requires repair, including demagnetizing.
SPECIFICATIONS
1 Display system
Time /C alendar............................................. Hour, minute and small second hands
Date is displayed in numerals
Stopwatch ................................................... Measures up to 12 hours
Stopwatch hour, Stopwatch minute and Stopwatch
2 Vibrations per hour ............................................ 28,800
3 Loss/gain (daily rate) ........................................... Bet w een + 25 an d - 15 s ec o n d s a t norm al
4 Continuous operating time ............................... More than approx. 45 hours
5 Driving system ................................................... Autom ati c winding ty pe with manual w inding
6 Number of jewels .............................................. 34 jewels
• The accuracy above is factory adjusted.
• Due to the characteristics of mechanical watches, any actual daily rate may not fall within the range of
time accuracy specified above dependent on the conditions of use, such as the length of time during
which the watch is worn on the wrist, temperature, arm movement, and whether the mainspring is
wound up fully or not, etc.
second hands
temperature range (bet ween 5 °C and 35 °C or
between 41 °F and 95 ° F)
mechanism
 Loading...