

Seiko 8B92 Instructions Manual

I
NSTRUCTIONS (P. 3)
BEDIENUNGSANLEITUNG (S. 50)
INSTRUCTIONS (P. 99)
ISTRUZIONI (P. 147)
INSTRUCCIONES (P. 194)
( )
Cal. 8B92
• The instructions are also available on SEIKO website. For instructions in Portuguese, Russian and Arabic,
please visit the website below.
• As instruções estão também disponíveis no website SEIKO. Para as instruções em português, russo e
árabe, queira visitar o website abaixo indicado.
• The instructions are also available on SEIKO website. For instructions in Portuguese, Russian and Arabic,
please visit the website below.
http://www.seikowatches.com/support/ib/index.html
8B92E137.indd1 2016/05/0613:55

English
English
2 3
You are now the proud owner of a SEIKO Radio Sync Solar World Time Chronograph Cal.
8B92. For the best results, please read the instructions in this booklet carefully before using
the watch. Please keep this manual handy for ready reference.
Wir gratulieren Ihnen zum Kauf der SEIKO Analog-Quar zuhr mit Solarzelle Kal. 8B 92. Lesen
Sie diese Bedienungsanleitung vor der Ver wendung aufmerksam durch, um ihre optimale
Nutzu ng zu gewährl eisten . Heben Sie d iese Bed ienungsa nleitung g ut auf, um jed erzeit w ieder
nachlesen zu können.
Vous voici l’heureux propriétaire d’un Chronomètre solaire mondial radiopiloté SEIKO Cal.
8B92 . Pour en obtenir d es perfo rmances op timales, ve uillez lire at tentivem ent cet te brochure
avant d'utiliser la montre. Conservez ce manuel pour vous y référer en cas de besoin.
Grazie di aver acquistato questo orologio SEIKO Analogico al Quarzo, Solar Cal. 8B92. Per
poter utilizzare l’orologio al massimo delle sue pres tazioni leggere attentamente ques to
manuale di istruzioni prima di passare all’uso dell’orologio stesso, e conser varlo poi per
qualsiasi eventuale futura consultazione.
Es usted ahora el orgulloso propietario de un Cronógrafo Solar de Hora Mundial Radio
Sincronizado SEIKO, Cal. 8B92. Para los mejores resultados, por favor, lea cuidadosamente
las ins truccion es de este pan fleto antes u tilizar su Relo j SEIKO. Por favor, guard e este manual
en un lugar conveniente para su futura referencia.
Você pode agora sentir-se orgulhoso de possuir um Cronógrafo Hora Mundial Solar Rádio
Sincro nizado S EIKO Cal. 8 B92. Par a obter o s melhor es resu ltado s, leia at entam ente as in stru ções
contidas neste opúsculo antes de usá-lo. Conserve este manual para consultas futuras.
您已經驕傲的成為了精工錶(SEIKO)萬年曆太陽能電波錶 8B92 的擁有者。為能更有效
地利用本錶,使用本錶前,請仔細閱讀本手冊內的各項使用說明,並妥善保管本手冊,以便
今 後 參 考。
BEFORE USE
■
Make sure to keep the watch sufficiently charged
The wat ch oper ates while charg ing electricity by convert ing light received on the dial to
elec trical energy. It cannot proper ly oper ate unle ss the re maining e nergy i s suffi cient .
Place o r store in a location receiving li ght, etc., to su fficientl y charge elec tricity.
■To receive radio signals
The wat ch autom atically re ceives radio signals to ad just the time every day.
Automa tic rad io signal recep tion is carried out befo re two an d four o’clo ck during the
night.
During t his period of time, place the watch i n a locat ion that e asily receive s radio signals
witho ut weari ng it and do n ot move it.
8B92E137.indd3 2016/05/0613:55

English
5
ENGLISH
4
CONTENTS
Page
FEATURES ....................................................................................................................... 6
DISPL AY & BUTTONS ..................................................................................................... 8
SCREW LOCK TY PE CROWN ......................................................................................... 10
SET TING THE TIM E AND DATE BY RECEIVI NG A RAD IO SIGN AL ............................. 11
RADIO SIGNAL RECEPTION RANGE INDICATION ...................................................... 13
RECEPTION ENVIRONMENT ......................................................................................... 16
HOW TO CHE CK THE RECEPT ION STATUS.................................................................. 19
WORLD T IME FUNCTI ON .............................................................................................. 21
HOW TO SEL ECT THE T IME ZONE ................................................................................ 22
TIME ZONE DISPL AY AND TIME DIFFERENCE TA BLE ................................................ 24
HOW TO USE T HE STOPWATCH ................................................................................... 27
TACH YMET ER ................................................................................................................. 30
TELEMETER .....................................................................................................................32
HOW TO CH ARGE AN D START THE WATCH ............................................................... 34
OVERCHARGING PREV ENTION FUN CTION ................................................................ 35
GUIDEL INE OF CHARGING TIME / ACCURACY ........................................................... 36
ENERGY DEPLETION FOREWARNING FUNCTION ..................................................... 37
POWER S AVE FUNCTIO N .............................................................................................38
NOTE ON P OWER SUPPLY ............................................................................................ 39
HOW TO CONDUCT M ANUAL RECEP TION ................................................................. 40
WHEN A R ADIO SIGNA L CANNOT BE REC EIVED ....................................................... 42
HOW TO MA NUALLY SET THE T IME ....................................................................... 4 3
HOW TO MA NUALLY SET THE DATE ....................................................................... 45
PRELIMINARY POSITION ............................................................................................... 47
IMPROPER FUNCTION ................................................................................................... 55
TROUBLESHOOTING ...................................................................................................... 56
SPECIFICATIONS ............................................................................................................ 64
I
For the care of your watch, see “TO PRESERVE THE QUA LITY OF YOUR
WATCH” in the attached Worldwide Guarantee and Instruction Booklet.
8B92E137.indd4-5 2016/05/0613:55
English
English
6 7
n
WORLD TIME FUNCTION
• By selec ting a time zone, the watch can display the local time in the
selected time zone area.
n
RADIO SIGNAL RECEIVING FUNCTION
• This watch adjusts the time and the date precisely by automatically receiving
radio signals daily.
In addition, radio signals can be received with manual operation.
This watch can receive official standard radio signals from U.S.A., Germany,
China, and Japan (from 2 transmitting stations). The transmitting station for
receiving radio signals can be selected using world time function.
n
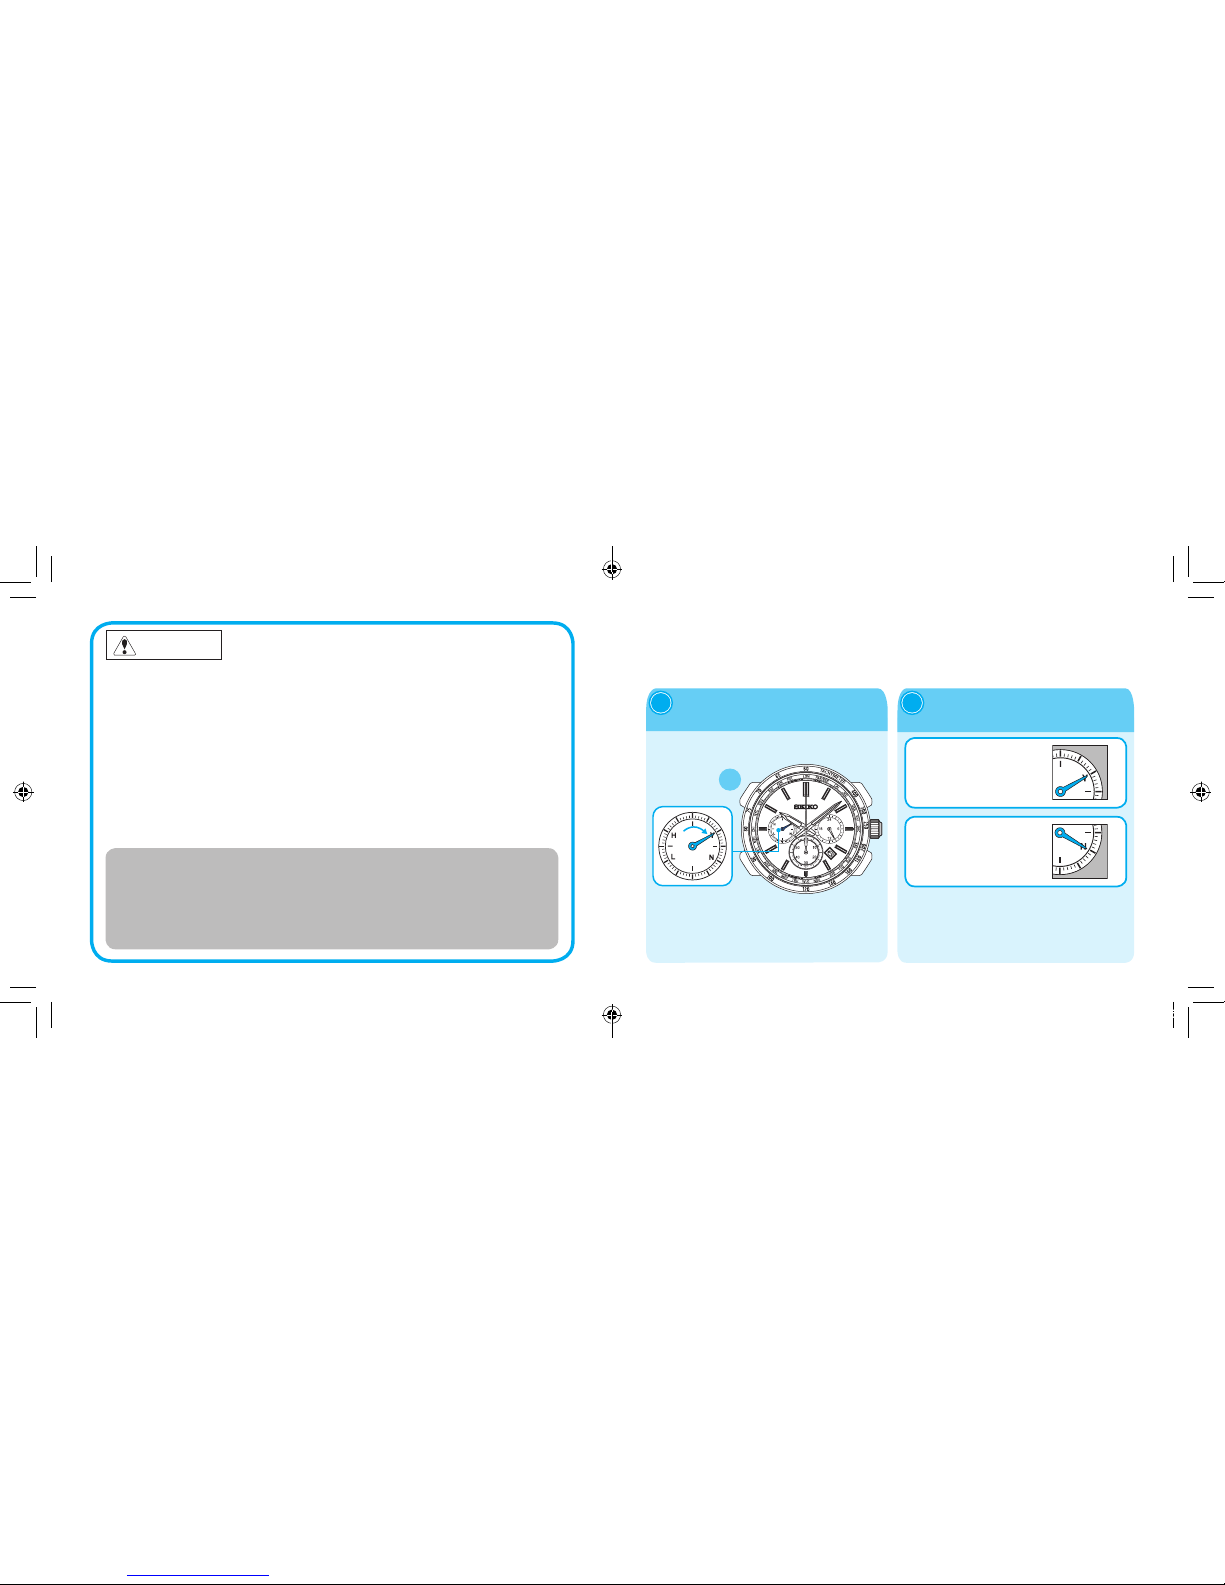
DISPLAY FUNCTION OF RADIO SIGNAL RECEPTION LEVEL
• Only when manual reception mode
n
STOPWATCH FUNCTION
• 60 minutes stopwatch in 1 /5-second increments.
• Split time measur ement on demand.
• W hen the me asurement rea ches 6 hours, the stopwa tch automatic ally stops
and is reset.
FEAT URES
n
DISPLAY FUNCTION OF RAD IO SIGNAL RECEP TION RESULTS
n
POWER ED BY LIGHT ENERGY
n
NO BATTERY CHANGE REQUIRED
n
LASTS FOR 6 MONTHS AF TER FULL CHARGE
n
ENERGY DEPLETION FOREWARNING FUNCTION
n
OVERCHARGING PREVENTION FUNCTION
n
POW ER SAVE FUNCTION
n
AUTOMATIC HAND POSITION ADJUSTMENT FUNCTION
8B92E137.indd6-7 2016/05/0613:55

English
English
8 9
DISPLAY & BUTTONS
Stopwatch 1/ 5-second hand
Hour hand
Tachymeter
Minute hand
a. Normal position
b. First click : calendar setting
(manually)
c. Second click : time setting,
hand position adjustment of
stopwatch
24 hour hand
a b c
D
C
◆
Display of Radio Wave Reception Level
Stopwatch minute hand Date
Second hand
H... High reception
level
50-second
position
L ... Low reception
level
40-second
position
N... Unable to
receive radio
signals
20-second
position
■
Second hand
B
A
◆
Displ ay of Radio Wave Re ception Re sult
[Checking the reception results]
Y ..... Reception Successful
(10-second position).
N .... Reception failed (20-second
position)
◆
Radio signal transmitting station display
◆
Time Zone Display
[Time zone selection]
City names
....... 25 regions around
the world
[Manual reception]
CROWN
Display ( countr y with radio
signal transmitting station)
Stopwatch 1/ 5-s econd hand
position
W / WW VB (U.S.A .) 43 second position
D / DCF77 (Germany) 3 second position
B / BPC (China) 21 second position
J / JJY (Japan) 23 second position
* Some models may not have a tachymeter.
* Indication on the bezel or positions of each item on the dial may vary depending on the
model (design).
* Each p osition of above displays may d iffer depending on the
watch.
8B92E137.indd8-9 2016/05/0613:55
English
English
10 11
SCREW LOCK TYPE CROWN
◆
Some models may have a screw-lo ck mechanism that can securely lock
the crown by screw when not in use.
◆
Locking the crown will help to prevent any operational errors and enhance
the water resis tant quality of the watch.
◆
It is necessary to unlock the screw lock type crown before using it. Once
you have finished using the crown, make sure to relock it.
l
How to use the screw lock type crown
Keep the crown securely locked unless you need to use it.
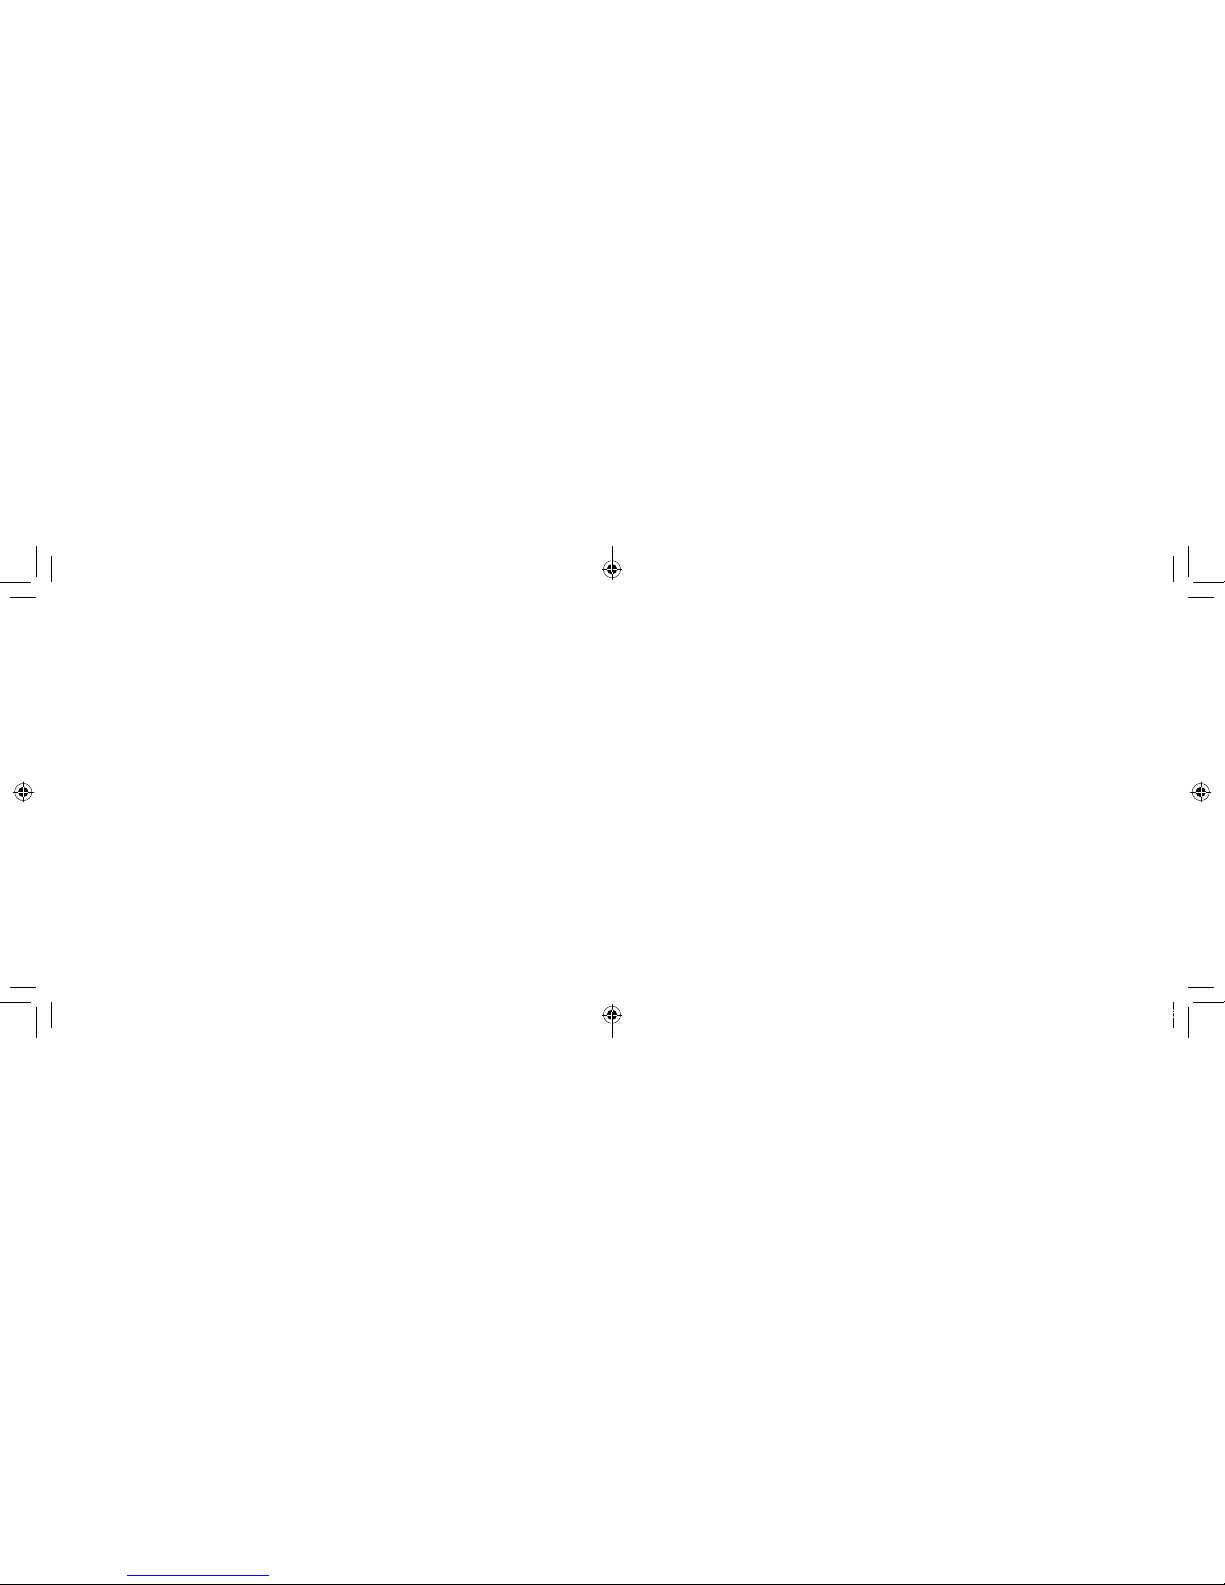
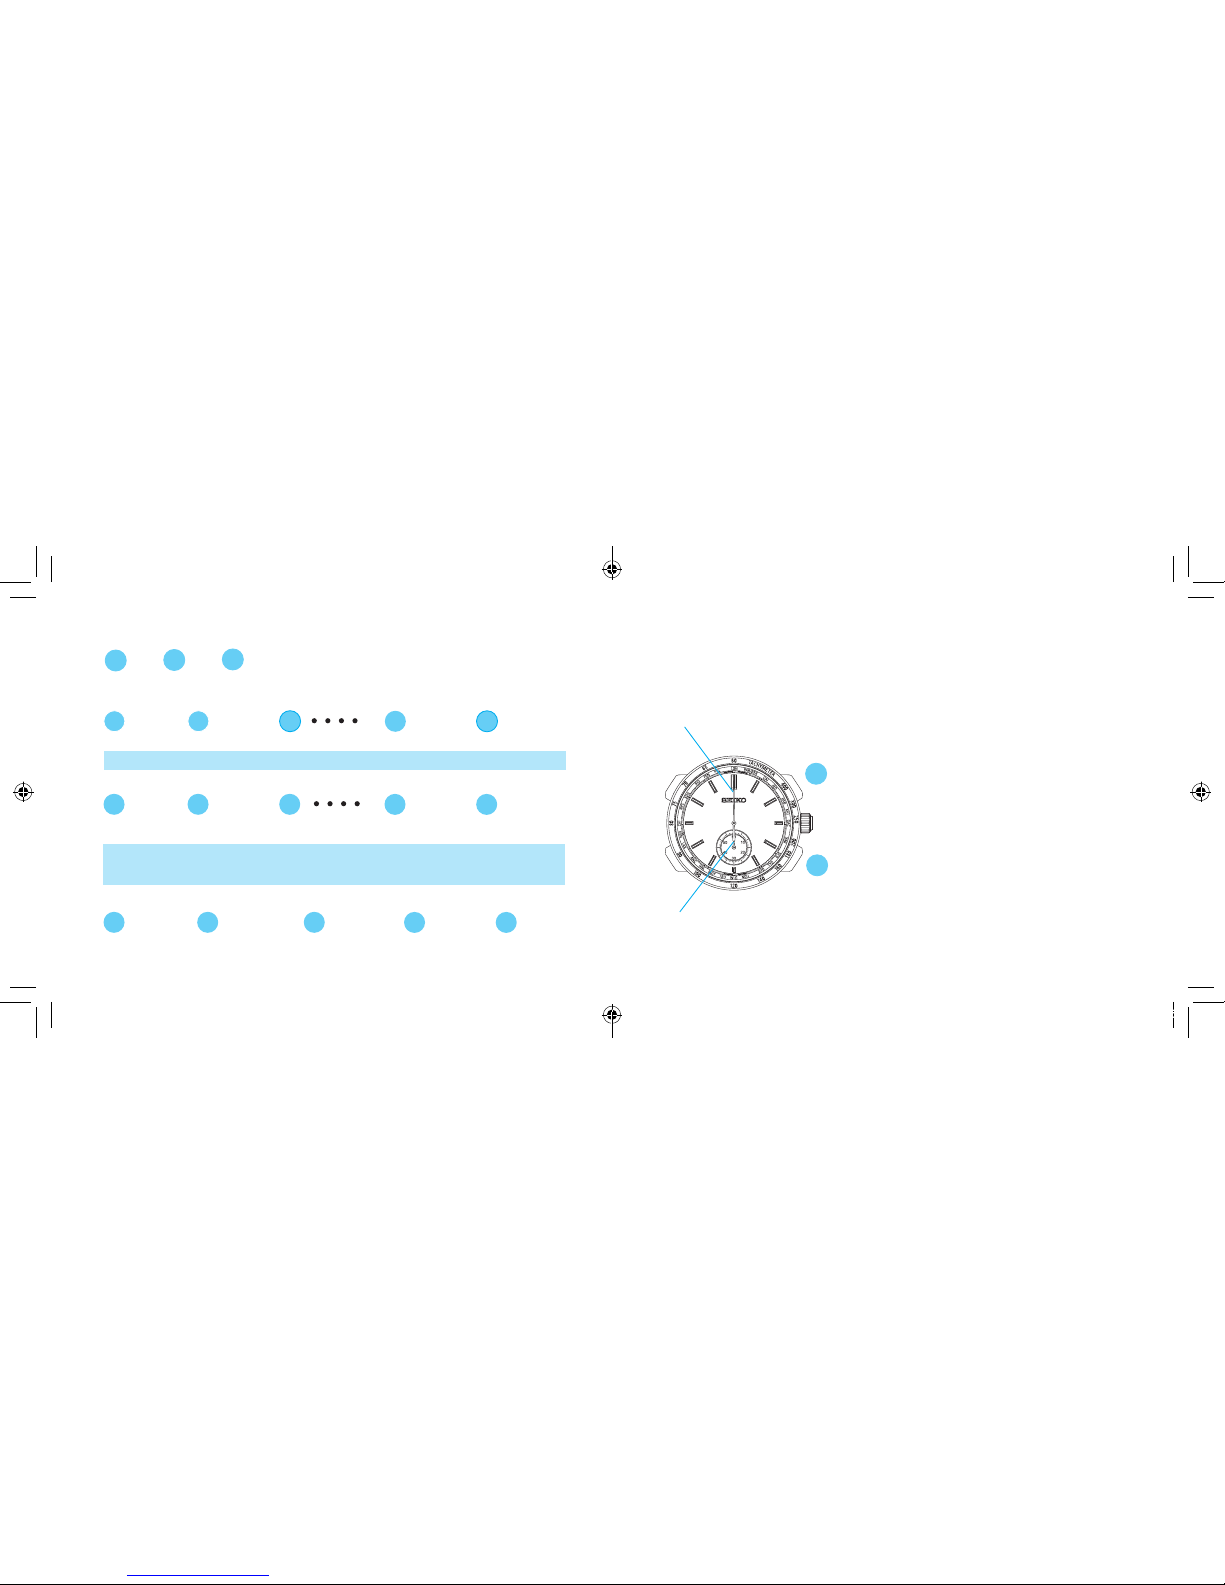
SETTING THE TIME AND DATE BY RECEIVING A RADIO SIGNAL
●
Mechanism of radio signal reception
The radio-controlled watch displays the precise time and date by automatically
receiving and synchronizing itself with the radio signal of an official standard
frequency.
Transmitting
Station
Cesium
Atomic Clock
Radio-controlled watch
Receiv e radio signalst hrough the
antenna inside the watch
↓
Analyze time information
↓
Display t he current time,
date and d ay
Official standard
frequency
Time signal transmitted by a standard frequency is based on a super accurate
“Cesium Atomic Clock” that may have a 1 second loss or gain p er one hundred
thousand years.
[How to unlock the screw lock type crown]
Turn the crown counterclockwise.
The crown is unlocked and can be used.
[How to lock the screw lock type crown]
Once you have finished using the crown, turn it
clockwise while gently pressing it in toward the watch
body until it stops.
• When locking the crown, tu rn it slowly with care, ensuring that the sc rew is properly engaged.
• Be careful not to forcibly push it in, as doing so may damage the screw hole in the case.
8B92E137.indd10-11 2016/05/0613:55
English
English
12 13
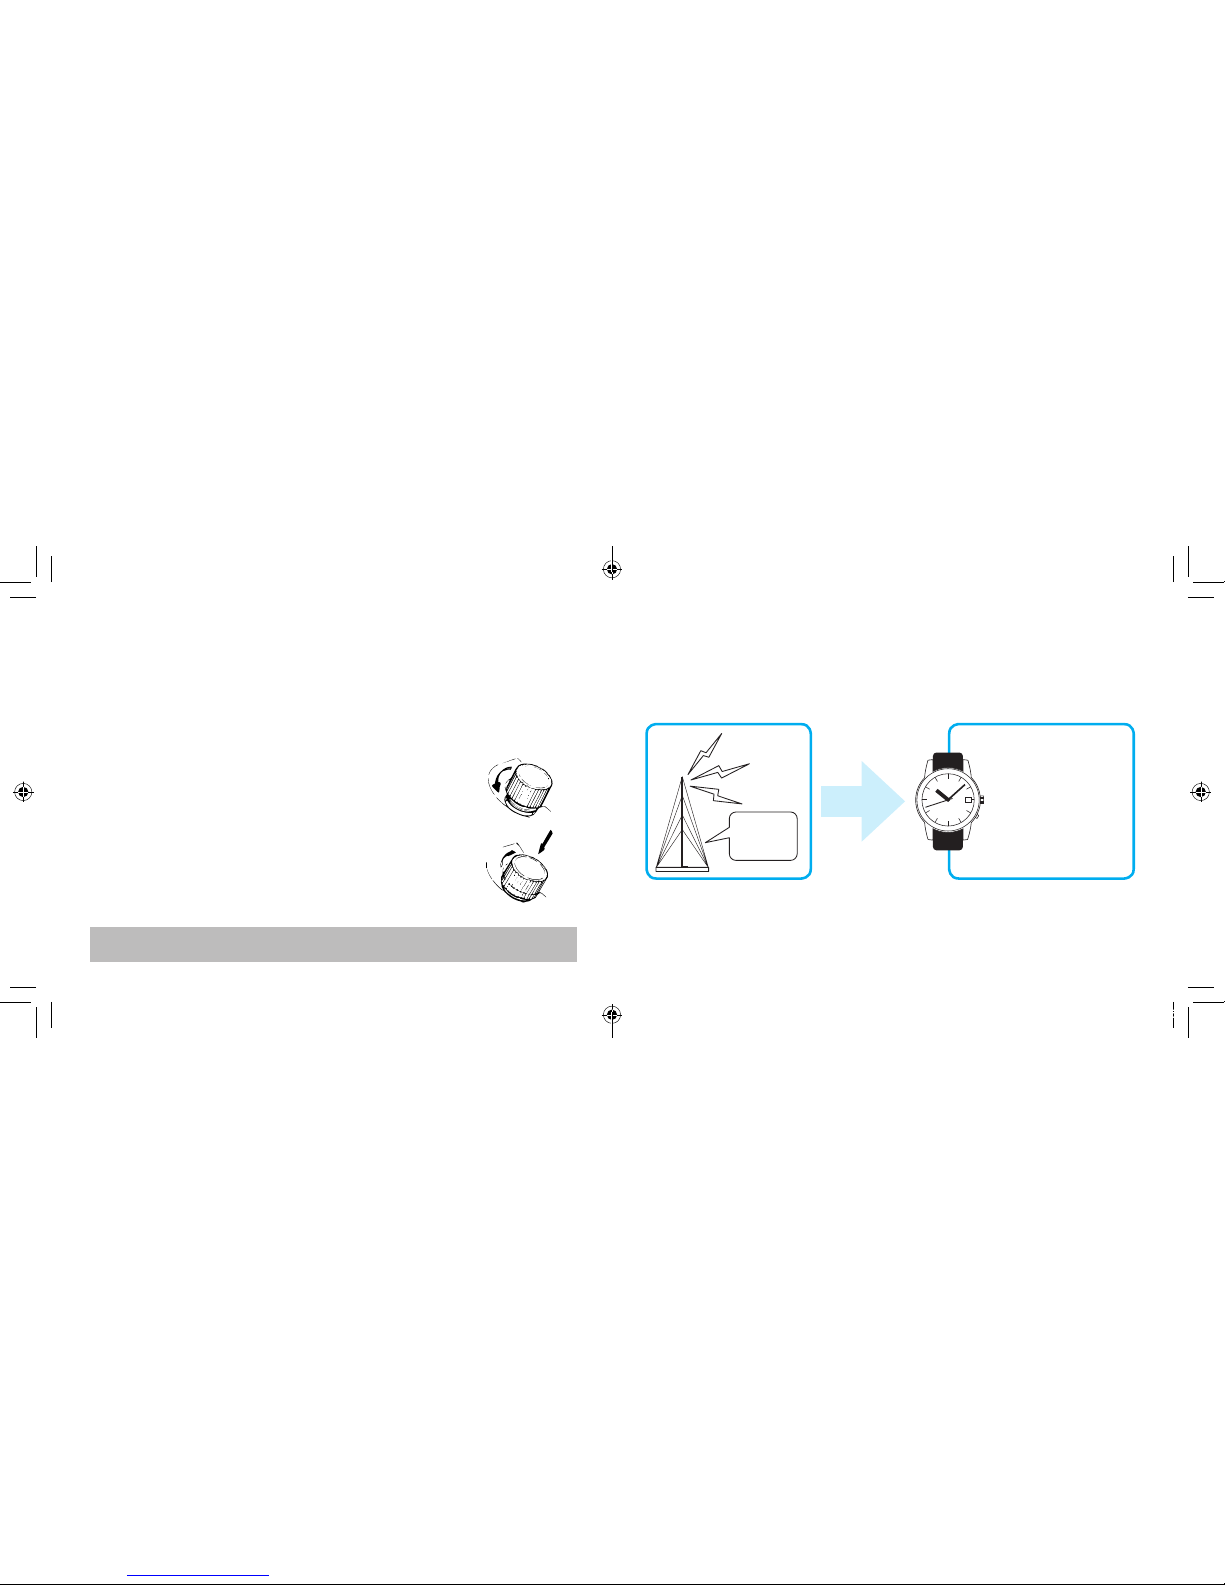
RADIO SIGNAL RECEPTION RANGE INDICATION
This watch receives standard radio signals from U.S.A., Germany, China, and Japan (2
stations).
When you set the watch to a time zone in U.S.A., Germany, China or Japan, the official
standard frequencies the watch receives will be automatically changed accordingly to the
selected time zone.
●
Automatic Reception and Manual Reception
When receiving radi o signals, place the w atch in a place where it can eas ily receive a radio signal
and leave it untouched.
→ RECEPTION ENVIRONMENT
• Automatic Reception
This watch sets the time and date by automatically receiving a radio signal at
a fixed time.
It automatically receives a radio signal at 2 :00 AM, 3:00 AM and 4: 00 AM.
• When the watch successfully receives a radio signal, it will stop automatic reception.
• It takes 12 minutes at the longest according to the receiving state of a radio signal.
• If the stopwatch hands are not reset to the 0-position, the watch will not receive a radio
signal to set the time.
• M anual Reception
Besides automatic reception, it is also possible to receive a radio signal
manually at any time.
→
HOW TO CON DUCT MANUAL RECEPTION
• Radio Signal reception results depend on a receiving condition.
→
RECEPTION
ENVIRONMENT
• This watch is unable to receive radio signals outside a reception range.
→
RADIO SIGNAL
RECEPTION RANGE INDICATION
• When the watch is not displaying the precise time and date even after successfully receiving a radio signal.
→
TROUBLESHOOTING
• If the time zone is set to a region other than U.S.A., Germany, China or Japan, the signal
reception function will not work.
→
TIME ZONE DISPLAY AND TIME DIFFERENCE TABLE
Japan (J JY)
China (BPC)
U.S.A .
(WWVB)
Germany
(DCF77)
• The watch may be able to receive radio signals outside a reception range if the receiving
conditions are favorable.
• The watch may fail to receive radio signals depending on the reception conditions (weather,
geographic locations, radio disturbances such as tall buildings, and orientation of the watch).
8B92E137.indd12-13 2016/05/0613:55

English
English
14 15
●
Radio signal reception range : the United States of America (WWVB)
The reception range from the transmitting station is approximately 3,000 km (3,000 km
radius of the transmitting station). There are four time zones within the reception range.
●
Radio signal reception range : Germany (DCF77)
The reception range from the transmitting station is approximately 1,500km (1,500km radius
of the transmitting station)
There are three time zones within the reception range.
WWVB is operated by NIST.
Fort Collins transmitting station
Frequency: 60 KHz
* NIST: National Institute of Stand-
ards and Technology
Fort Collins t ransmitting
station
Frequency ( 60 kHz)
3,000km
1,50 0km
Mainflingen transmit ting
station (77.5 kHz)
DCF77 is operated by PTB.
Southeastern Frankfurt
Mainflingen transmitting station : 77.5 kHz
* PTB: Physikalisch-Technische Bundes-anstalt
●
Radio signal reception range : the People’s Republic of China (BPC)
The reception range from the transmitting station is approximately 1,500 km (1,500 km
radius of the transmitting station).
1,50 0km
Shangqiu National
Time Service Center
(68 .5 kHz)
BPC is operated by NTSC.
Shangqiu National Time
Service Center
Frequency: 68.5kHz
* NTSC: National Time Service
Center
●
Radio signal reception range : Japan (JJY)
The reception range from each transmitting station is approximately 1,000 km (1,000 km
radius of each station).
Ohtakadoya-yama
transmitting station
(40 kH z)
1,000km
1,000km
Hagane-yama
transmitting station
(60 k Hz)
JJY is op erated by the National Ins titute of
Information and Communications Technology (NICT).
JJY is transmit ted from two station s in Japan. Each
stat ion transmit s JJY in a diffe rent freque ncy.
Fukushima (Ohtakadoya-yama transmitting station:
40 KHz)
Kyushu (Hagane -yama transmi tting station: 60 K Hz)
* NICT: National Institute of Information and
Communications Technology
8B92E137.indd14-15 2016/05/0613:55
English
English
16 17
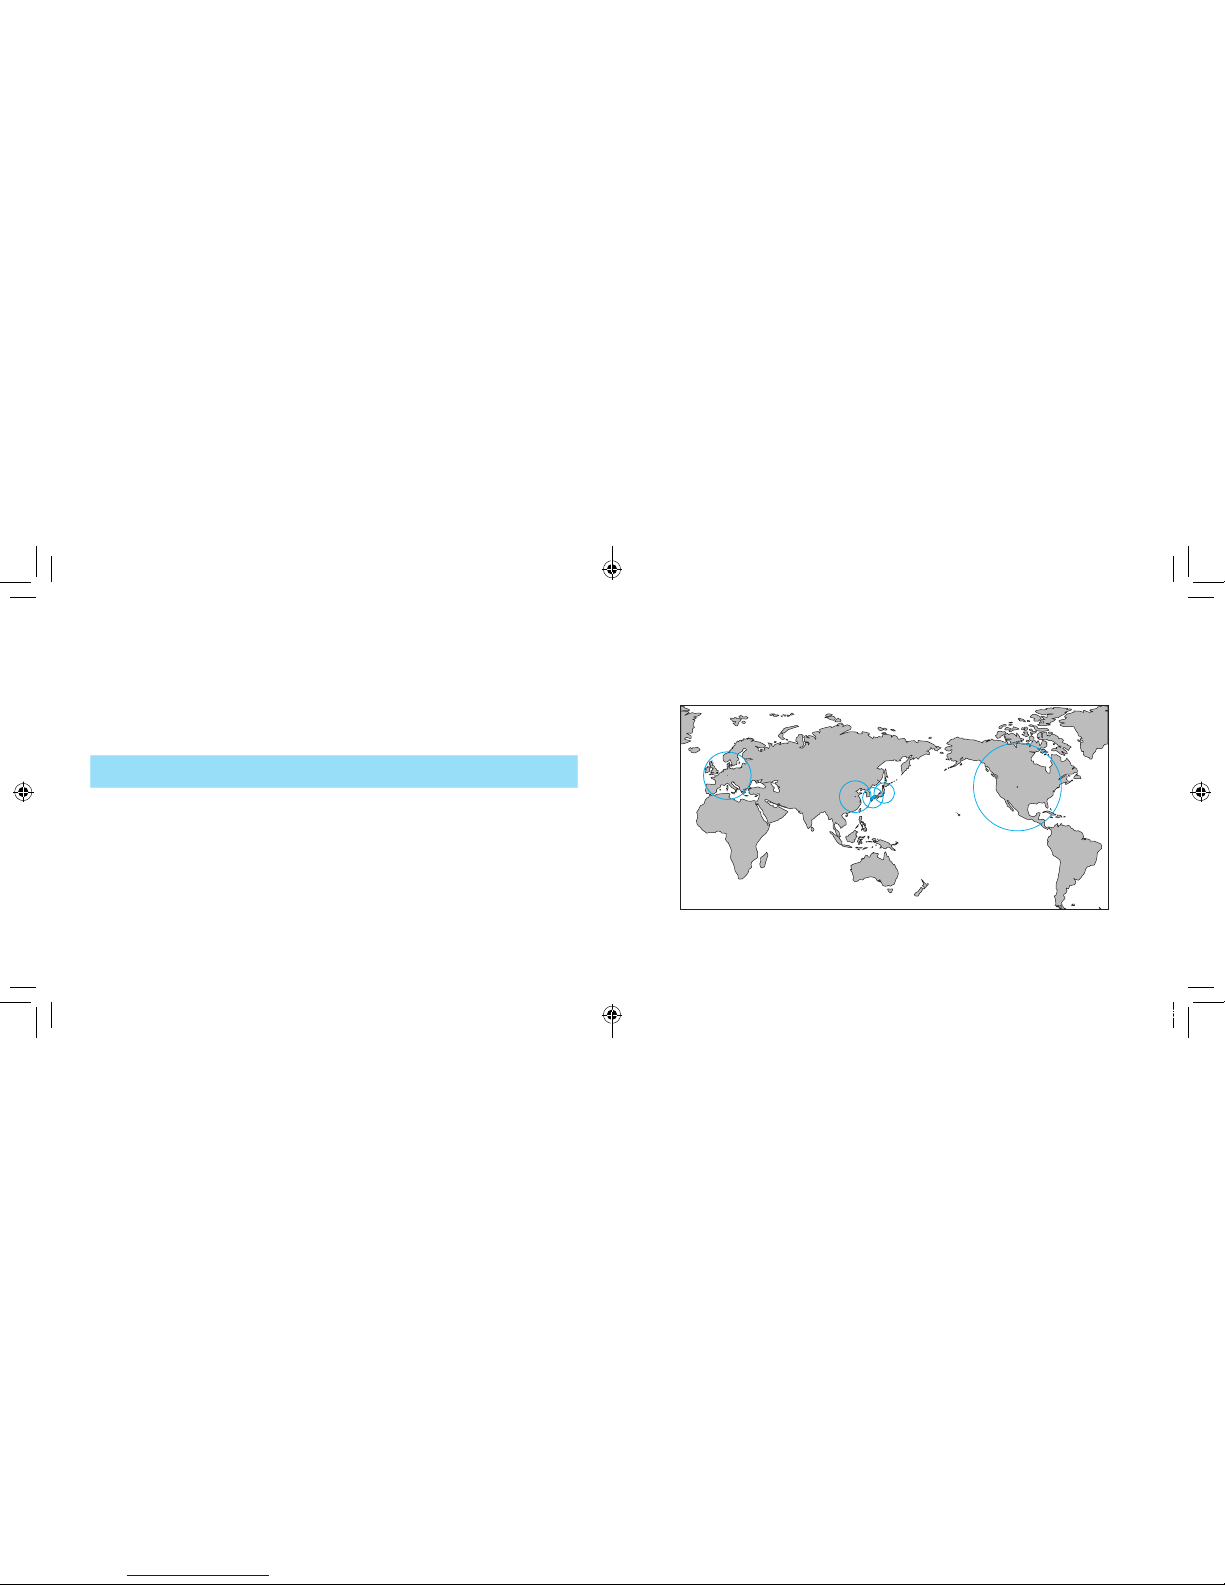
●
To Improve Radio Signal Reception
• Place the watch in a place where it can easily receive a radio signal such as near a window.
The antenna is embedded at the 9 o’clock position of the watch. Turning the antenna toward
the outside of a window or the direction facing transmitting stations helps improve radio
signal reception.
• Do not move the watch while it is receiving radio signals.
To enhance the reception of radio signals, do not move
the watch or do not change the orientation of the watch
while it is receiving radio signals.
* If the button or crown is operated while the watch is
receiving a radio signal, the reception will be cancelled.
Antenna
●
Environments in which it is Difficult to Receive a Radio Signal
• Close to home
electrical appliances
such as T V's,
refrigerators or air
conditioners
• Close to OA devices
such as mobile
phones, personal
computers or fax
machines
• Close to steel desks or
other furniture made
of metal
• In places generat ing
radio interference,
such as construction
sites or pla ces with
heavy traffic.
• Close to overhead
power lines, TV
stations, train cables.
• Inside a building ,
between tall buildings,
underground.
• Inside a vehicle, train,
or airplane.
Avoid putting the watch in
such places when it receives
radio signals.
RECEPTION ENVIRONMENT
8B92E137.indd16-17 2016/05/0613:55
English
English
18 19
●
The watch may display the wrong time if it fails to receive radio signals
properly because of in ter ference. The wat ch may also fail to receive
radio signals properly depending on the location or radio wave receiving
conditions. In this case, move the watch to another place where it can
receive radio signals.
●
When the watch is out of reception range, its accurate quartz movement
(loss / gain: ±15 seconds per month on average) will continue to keep
the time.
●
The time signal transmission may be s topped during maintenanc e of
the facilities of the (each) transmit ting station or because of a lightning
st rike. I n su ch a ca se, see t he ( e ac h) st ati on ’s web si te fo r fu r th er
information.
• Websites of transmit ting stations (as of March 2016)
U.S.A. : NIST http://www.nist.gov/pml/div688/grp40/ww vb.cfm
Germany : PTB http://www.ptb.de/cms/en.html.
China : NTSC http:/ /www.ntsc.ac.cn /
Japan : NICT (Japan Standard Time Group) ht tp: //www.nict.go.jp/
CAUTION
HOW TO CHECK THE RECEPTION STATUS
◆
How to Dis play the Reception Results
The second hand indicates the latest reception results (Yes/No) of a radio
signal for five seconds.
* If Button B is presse d while the sec ond hand
is moving to display the rec eption results,
the display function is cancelled and the
second hand resumes its normal movement.
Press Button B once and then
release it.
1
* W hen Button B is kept pressed, the watch
starts manual reception.
B
If a reception was
successful: The second
hand points to Y
(Yes ; the 10 second position )
If a reception has
failed : The second
hand points to N
(No ; the 20 second position)
The second hand indicates
the reception results.
2
8B92E137.indd18-19 2016/05/0613:55

English
English
20 21
If a reception was success ful: The second hand points to Y
• A radio signal has been received successfully. Use the watch without any adjustments.
* When the watch is not displaying the precise time and date even after successfully receiving a radio
signal →TROUBLESHOOTING
If reception has failed: The Second Hand points to N.
• Place the watch in a place where it can easily receive a radio signal, or change its direction.
Even within the radio signal reception range, this watch may fail to receive a radio signal
depending on the condition (due to the influence of weather, geographical features,
buildings, or direction).
This watch is unable to receive radio signals outside a reception range.→ RADIO SIGNAL
RECEPTION RANGE INDICATION
• Make sure that the time zone is correctly selected before attempting radio signal reception.
If the time zone is set to a region other than U.S.A., Germany, China, and Japan, the signal
reception function will not work. Check the time zone setting.→ HOW TO SELECT THE TIME
ZONE
• Attempt to receive a Radio Signal in a different time period (In the case of manual reception).
Receiving environments differ according to time periods even at the same place. Due
to radio signal characteristics, the watch is able to easily receive radio signals during
nighttime hours.
• If the watch is used in regions or places where it is unable to receive a ra dio
signal, or if no suc cess ful reception can be made even wh en following the above
procedures, set the time and date manually.
WORLD TIME FUNCTION
• The watch can be easily set to display the local time in a different time
zone by selecting a time zone among 25 regions around the world.
In the Time Zone Setting
mode, the stopwatch
1/5-second hand indicates
the selected time zone.
Time zone indication
• If the time zone is set to U.S.A, Germany, China or Japan, the watch displays
the precise time and date by receiving radio signals after automatic reception
or manual reception, provided that the watch is within the radio signal
reception range.
*The watch is unable to receive radio signals outside the reception range.
8B92E137.indd20-21 2016/05/0613:55

English
English
22 23
Wait for ten seconds. after
the hour hand stops.
(The time zone adjustment
mode is finished.)
3
* When setting the daylight saving time (DST),
add one hour to the time zone of a desired
area.
* In case the date changes, the watch
adjusts automatically after the
stopwatch 1/5-second hand switches
to the 0-position.
The radio signal transmitting station can
be changed by selecting the time zone.
When selecting a time zone for regions
other than the reception ranges, the radio
signal reception function will not work.
After ten seconds, the stopwatch
1/5-second hand automatically
switches to the 0-position.
HOW TO SELECT THE TIME ZONE
(HOW TO DISPLAY THE LOCAL TIME AROUND THE WORLD)
Continue to press Button A (for 3
seconds), and when the stopwatch
1/5 -second hand starts to move
clock wise, release it.
1
* When a no movement state of the stopwatch 1/5-second
hand is kept for ten seconds or more, the watch automatically
switches to the time display state. When it is in the middle of
operation, re-attempt the operation from procedure 1.
* If the stopwatch hands are not reset to the 0-postion, it is
not possible to set the time zone (the second hand does not
stop). Reset the stopwatch and re-attempt procedure 1.
The watch switches to the time zone adjustment
mode and sto ps by the time zone set currently.
A
B
A
With each pressing of the button, the
stopwatch 1/5-second hand moves
to the adjacent time zone index. The
position of stopwatch 1/5-second
hand indicates the time zone.
Press Button A or Button
B to set the stopwatch
1/5 -second hand to the local
time zone of a desired area.
2
8B92E137.indd22-23 2016/05/0613:55

English
English
24 25
* E ach indication may differ dep ending on the model (d esign) of t he watch.
(As of March 2016)
Indication
Stopwatch 1/5-second
hand positions
Names of representative
cities (Time Zone)
Time difference
from UTC
Receivable radio
signals
WLG
30-second position
Wellington
+12 hours
-
TBU
32-second position
Nuku'alofa
+13 hours
-
MDY
34-second position
Midway Islands
−11 hours
-
HNL
36-second position
Honolulu
−10 hours
-
ANC
38-second position
Anchorage −9 hours WWVB
LAX
41-second position
Los Angeles −8 hours WWVB
DEN
43-second position
Denver −7 hours WWVB
CHI
45-second position
Chicago −6 hours WWVB
NYC
48-second position
New York −5 hours WWVB
SDQ
50-second position
Santo Domingo −4 hours WWVB
RIO
53-second position
Rio de Janeiro −3 hours WWVB
FEN
55-second position
Fernando de Noronha
−2 hours
-
PDL
57-second position
Azores −1 hour
-
* Time differenc es between re gions and daylight saving time may change due to circ umstance s of a
country or region.
TIME ZONE DISPLAY AND TIME DIFFERENCE TABLE
In the Time Zone Setting mode, set the stopwatch 1/5-second hand to point at the target time
zone index referring to the table below.
To set the Daylight Saving Time ( DST), select the time zone index next to the target time zone (+ 1
hour).
Indication
Stopwatch 1/5-second
hand positions
Names of representative
cities (Time Zone)
Time difference
from UTC
Receivable radio
signals
LON
0-second position
London
±0 hours
DCF77
PAR/BER
3-second position
Paris/Berlin
+1 hour
DCF77
CAI
6-second position
Cairo
+2 hours
DCF77
JED
8-second position
Jeddah
+3 hours
DCF77
DXB
11-second position
Dubai
+4 hours
DCF77
KHI
13-second position
Karachi
+5 hours
-
DAC
15-second position
Dhaka
+6 hours
-
BKK
18-second position
Bangkok
+7 hours
-
BJS/HKG
21-second position
Beijing/Hong Kong
+8 hours
BPC
TYO
23-second position
Tokyo
+9 hours
JJY
SYD
25-second position
Sydney
+10 hours
JJY
NOU
28-second position
Nouméa
+11 hours
-
8B92E137.indd24-25 2016/05/0613:55

English
English
26 27
■
Q&A for the world time function
Q : Will the watch be automatically set to the local time when it is moved to a place in a
different time zone?
A : The watch will not be automatically set to the local time if it is just moved to a place
in a different time zone. Select the time zone where you are when you are abroad.
If you select the time zone, the watch is automatically set to the local time.
(The time difference can be adjusted in increments of 1 hour.)
After selecting the time zone, if it is within the reception range of radio signals, you
can leave the watch to receive the radio signal to set it to the precise time.
(The radio signal transmitting station can be changed by selecting a time zone.)
Q : The hands stop during operation of time zone setting, therefore, does time lag
occur?
A : The internal circuit stores the time, therefore, no time lag occurs.
Q : When a time zone for regions out of the radio signal reception range is set, the
watch will not receive a radio signal. How is the accuracy of the watch at that time?
A : The watch has an accuracy of a normal quartz watch in that case. ( Monthly rate:
±15 seconds)
Q :
How is adjustment made to a local time with a time difference of 15 minutes or 30
minutes?
A : The time can be adjusted on a 1 hour basis by use of the time difference adjustment
function.
When adjusting to a local time with a time difference of 15 minutes or 30 minutes.
→ HOW TO MANUALLY SET THE TIME
HOW TO USE THE STOPWATCH
◆
The measured time can be read up to 60 minutes in 1/5-second increments.
◆
When the measurement reaches 6 hours, the stopwatch automatically stops
counting and is reset.
◆
Split time measurement function is available.
• If the stopwatch minute and ho ur hands do not ret urn to the “0” positio n when
the stopwatch is reset to “0,” it will be necessary to adjust the positions of the
stopwatch hands. →
PRELIMINARY POSITION
60-minute measurement
Stopwatch 1/ 5
second hand
Stopwatch minute hand
* Position of the tachymeter scale may d iffer depending on the m odel.
* Some mod els may not have a t achymeter.
Start / Stop
Split / Reset
Tachymeter
Button C
Button D
8B92E137.indd26-27 2016/05/0613:55
English
English
28 29
●
How to use the stopwatch
START
C
C
D
STOP RESET
<ACCUMULATED ELAPSED TIME MEASUREMENT>
C C
▼
▼
C D
▼
C
▼
* Restart and stop of the stopwatch can be repeated by pressing button C.
<SPLIT TIME MEASUREMENT>
C
▼
▼
C D
▼
▼
D D
* Measurement and release of split time can be repeated by pressing button D.
* If the time measured reaches 6 hours while the split time is being displayed, the stopwatch
automatically stops counting and releases the split time display, showing “00“ 00.”
<MEASUREMENT OF TWO COMPETITORS>
C
▼
▼
D D
▼
▼
D C
<STANDARD MEASUREMENT>
START STOP RESETRESETSTOP RESTART
▼
▼
START STOP RESETRESETSPLIT SPLIT
RELEASE
START
FINISH TIME OF
2ND COMPETITOR
RESETFINISH TIME OF
1ST COMPETITOR
2ND COMPETITOR
FINISHES
While the STOPWATCH hands are s topped
[When the stopwatch is s topped]
1. Press Button D to reset the stopwatch.
[When the split time measurement is displayed
while the stopwatch is measuring.]
1. Press But ton D to release the split time
display and return to the normal display.
2. Press Button C to s top the stopwatch.
3. Press Button D to reset the stopwatch.
[When the split time measurement is displayed
and the stopwatch is stopped]
1. Press But ton D to release the split time
dis pla y.
2. Press Button D to reset the stopwatch.
●
How to reset the stopwatch
While the STOPWATCH hands are moving
1. Press Button C to stop the stopwatch.
2. Press Button D to reset the stopwatch.
Stopwatch minute hand
Stopwatch 1/5 second hand
C
D
8B92E137.indd28-29 2016/05/0613:55
English
English
30 31
TACHYMETER
(for models with tachymeter scale on the dial)
l
Tachymeter scal e can be us ed only when the time required is les s than 60 seconds.
To measure the hourly average speed of a vehicle
Use the stopwatch to
determine how many seconds
it takes to go 1 km or 1 mile.
Tachymeter scale indicated by
the STOP WATCH 1/5 -second
hand gives the average speed
per hour.
Ex. 1
STOPWATCH 1/5-
second hand:
40 seconds
Tachymeter scale:
"90"
“90” (tachymeter scale figure) x 1 (km or mile)
= 90 km/h or mph
Ex. 2: If the measuring distance is extended to 2 km or miles or shortened to 0.5 km or
miles and the STOPWATCH 1/5-second hand indicates “90” on tachymeter scale:
"90" (tachymeter scale figure) x 2 (km or mile) = 180 km/h or mph
"90" (tachymeter scale figure) x 0.5 (km or mile) = 45 km/h or mph
1
2
To measure the hourly rate of operation
Use the stopwatch to measure
the time required to complete 1
job.
1
Tachymeter scale indicated by
the STOP WATCH 1/5 -second
hand gives the average number
of jobs accomplished per hour.
2
Ex. 1
STOPWATCH 1/5second hand:
20 seconds
Tachymeter scale: " 18 0"
“180” (tachymeter scale figure) x 1 job
= 180 jobs/hour
Ex. 2: If 15 jobs are completed in 20 seconds:
"180" (tachymeter scale figure) x 15 jobs = 2700 jobs/hour
8B92E137.indd30-31 2016/05/0613:55

English
English
32 33
TELEMETER
(for models with telemeter scale on the dial)
l
The telemeter can provide a rough indication of the dis tance to the source of
light and sound.
l
The telemeter indicates the dis tance from your location to an object that emits
both light and sound. For example, it can indicate the distance to the place
where lightning s truck by measuring the time elapsed after you see a flash of
lightning until you hear the sound.
l
A flash of lightning reaches you almos t immediately while the sound travels to
you at a speed of 0.33 km/second. The distance to the source of the light and
sound can be calculated on the basis of this difference.
l
The telemeter scale is graduated so that the sound travels at a speed of 1 k m in
3 seconds.*
*Under the condition of temperature of 20° C(68° F)
The telemeter provides only a rough indication of the distance to the
place where lightning struck, and therefore, the indication cannot be used
as the guideline to avoid the danger of lightning. It should also be noted
that the speed of the sound differs depending on the temperature of the
atmosphere where it travels.
CAUTION
HOW TO USE THE TELEMETER
Before beginning, check that the stopwatch has been reset.
START
(Flash of light)
STOP
(Crash of thunder)
Press Button C to star t the
stopwatch as soon as you
see light.
When you hear the sound,
press Button C to stop the
stopwatch.
Read the telemeter scale
that the STOPWATCH 1/ 5second hand points to.
Approx. 3 k m
Please note that the STOPWATCH 1/5-sec ond hand moves in 1/5- second inc rements and does not
always point exactly to the graduations of the telemeter scale. The telemeter scale can be used only
when the measured time is less than 60 seconds.
C
C
3
2
1
8B92E137.indd32-33 2016/05/0613:55

English
English
34 35
Caution for charging
●
When charg ing the w atch, do no t place it to o cl ose to a ph otoflash
light, spotlight, incande scent light or other light sources as the watch
temperature will become extremely high, causing damage to the par ts
inside the watch.
●
When exposing the watch to sunlight to charge it, do not leave it on the
dashboard of a car, etc., for a long time, as the watch temperature will
become extremely high.
●
While charging the watch, make sure the watch temperature does not
exceed 60 °C.
CAUTION
OVERCHARGING PREVENTION FUNCTION
No matter how long the secondar y battery is charged, the per formance of the
watch will not be degraded. When the secondary battery becomes fully charged,
the overcharging prevention function will be automatically activated to prevent it
from being charged further.
HOW TO CHARGE AND START THE WATCH
u
When you start the watch or when the energy in the rechargeable battery
is reduced to an ex tremely low level, charge it sufficiently by exposing the
watch to light.
1 Expose the watch to sunlight or s trong
artificial light.
When the watch has stop ped operating, the second
hand will start moving at 2-second intervals.
2 Keep the watch exposed to the light until
the sec ond hand moves at 1-second
intervals.
3 When the watch is charged after it has
completely stopped, set the date and
time before wearing the watch.
8B92E137.indd34-35 2016/05/0613:55

English
English
36 37
ENERGY DEPLETION FOREWARNING FUNCTION
l
When the energy stored in the rechargeable battery is reduced to an extremely
low level, the second hand start s moving at 2-second intervals instead of the
normal 1- second inter vals. The watch remains accurate even while the second
hand is moving at 2-second intervals.
l When thi s occurs, re charge the wa tch as soon as p ossible by exp osing it to ligh t.
Other wise, the watch switches to fi ve-second inter val movement, f ollowed by a
completely stopped s tate.
•
Neither the buttons nor the crown can be operated while the second hand moves at twosecond or five-second intervals (this is not a malfunction).
•
While the second hand moves at five-second intervals, the hour and minute hands, and date
stop operating.
•
While the second hand moves at five-second intervals, the watch is unable to receive radio
signals automatically. After the watch is charged sufficiently and the second hand returns to
normal one-second interval movement, conduct the manual reception of radio signals to set
the watch to the correct time.
v TO PREVENT THE ENERGY DEPLETION
•
When wearing the watch, make sure that the watch is not covered by
clothing.
•
When t he w atch is not in us e, leav e it i n a brigh t pl ac e as long as
possible.
v
The above table provides only a general gui deline.
GUIDELINE OF CHARGING TIME/ACCURACY
A: Time to charge 1 day of p ower
B: Time re quired for steady ope ration
C: Tim e required for fu ll charge
u The watch operates while
charging electricity by
converting light received on
the dial to electrical energy.
It cannot properly operate
unless the remaining energy
is sufficient. Place or store
the watch in a location
receiving light etc., to
sufficiently charge electricity.
• When the watch is
stopped or the second
hand starts moving
at 2-second intervals,
charge the watch by
exposing it to light.
• The time required for
charging the watch
varies depending on
the calibres. Check the
calibre of your watch
engraved on the back
cover.
• It is recommended that
the watch be charged for
as long as the charging
time "B" to assure the
stable movement of the
watch.
Environment/Lightsource (lux)
8B92
A
(minutes)
B
(hours)C (hours)
General offices/ Fluorescent light (700)
240 - -
30W20cm / Fluorescent light (3000) 60 6 230
Cloudy weather/Sunlight (10000) 15 1.5 60
Fair weather/Sunlight (100000) 3 0.5 30
Expe cted life per charge fro m full
charge to stoppage
6 months
Loss/gain (monthly rate)
Less than 15 seconds when the watch
is worn on your wrist at a normal
temperature range (5 ºC to 35 ºC)
Operational temperature range -10 ºC to 60 ºC
8B92E137.indd36-37 2016/05/0613:55

English
English
38 39
NOTE ON POWER SUPPLY
●
The ba ttery used in this watch is a rechargeable bat tery, which is different
from ordinary silver oxide batteries. Unlike other disposable batteries such as
dry- cell batteries or button cells, this rechargeable battery can be used over
and over again by repeating the cycles of discharging and recharging.
●
Th e cap ac i ty or r ec har gi ng ef f ic ien cy of t he r ech ar g ea ble b at t er y m ay
gra dua lly d eteriorate fo r var iou s reasons su ch as long-term use o r usage
conditions. Worn or contamina ted m echani cal p arts or degraded oils may
also shorten recharging cycles. If the efficiency of the rechargeable bat tery
decreases, it will be necessary to have the watch repaired.
●
When the se cond ar y ba ttery is fully c ha rged, the o verchar ge p re venti on
function is automatically activated to avoid further charging.
●
Do not remove the rechargeable battery yo urs elf. Replacement of th e
rechargeable ba ttery requires professional knowledge and s kill. Pleas e
ask a watch retailer for replacement of the rechargeable battery.
●
Installation of an ordinary silver oxide battery can generate heat that can
cause bursting and ignition.
CAUTION
This watch is equipped with a power save function (Power Saving) which can suppres s energy
consumption when it is left without receiving an adequate light source for a certain length of time.
* There are two types of power save mode.
POWER SAVE FUNCTION
Power Save 1 Power Save 2
Condition
When the watch is exposed to a state
without receiving an adequate light source
for 72 hours or longer.
When the watch is in an insuf ficient
charging state for a long time.
Situation
The second hand stops
pointing at the 15-second
position, and the hour and
minute hands also stop.
The watch conducts
automatic radio signal
receiving.
The second hand stops
pointing at the 45-second
position, and the hour and
minute hands also stop.
The watch does not
conduct automatic radio
signal receiving.
How to
handle
the situation
When the wa tch is expose d to an adequate light
source for fi ve seconds or longer, it disp lays
the current t ime again af ter the second hand is
rapidly advanced.
After suf ficiently charging the battery, set
the watch for the current time, if necessar y.
* If the “Power Save 2” mode is prolonged, the stored power amount drops and the internal
current time information stored will be lost. When the watch returns to its normal movement of one-second interval after sufficiently charging the battery, set the current time by
receiving a radio signal.
8B92E3841.indd38-39 2016/04/2815:41

English
English
40 41
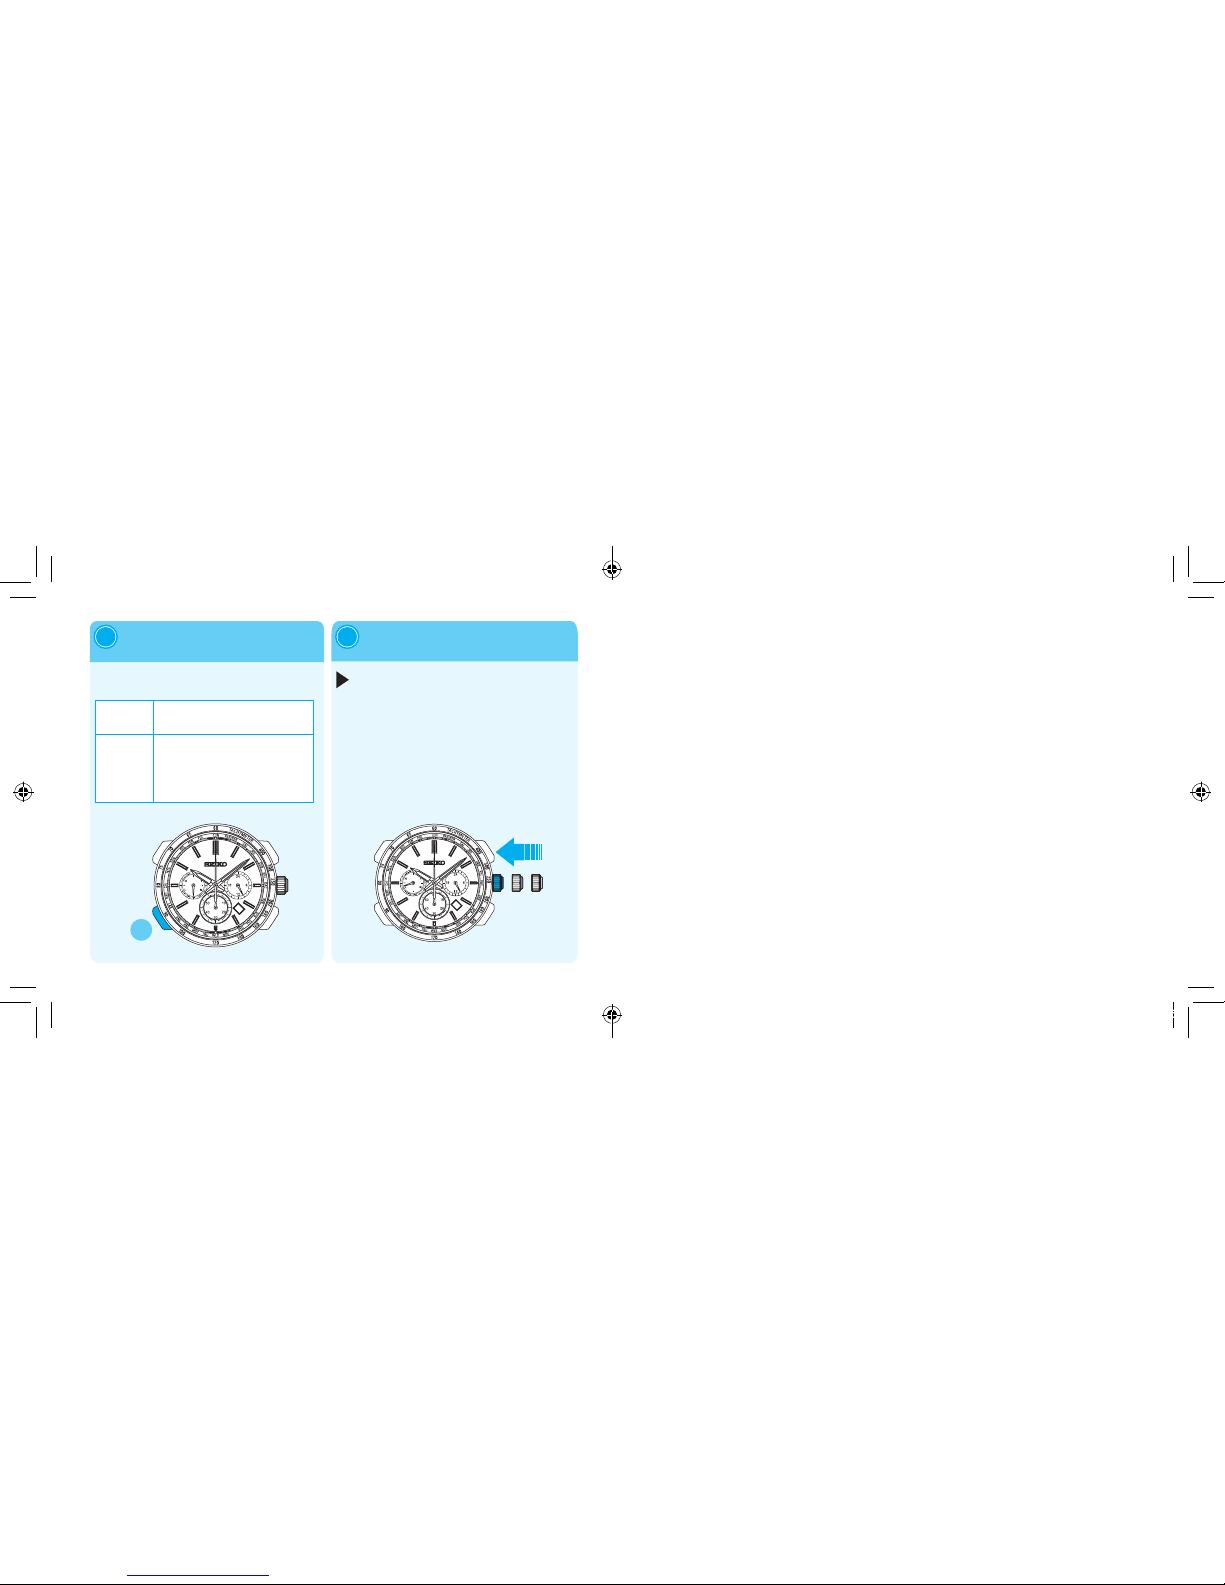
HOW TO CONDUCT MANUAL RECEPTION
(RECEIVING A RADIO SIGNAL MANUALLY)
→
RECEPTION ENVIRON MENT
Placing the
watch
Check that the
stopwatch is
reset and the
time zone is set.
Keep pressing Button B until
the second hand has finished
its movement to the 0-second
position (for 3 seconds).
1
2
3
When receiving a radio
signal, place the watch
where it can easily
receive a signal.
When the s econd hand has moved to
the 0- second position, the watch will
start to receive a radio signal.
* If the stopwatch is
not reset or the time
zone is set to a region
other than receivable
area, the watch will
be unable to receive a
radio signal.
* If the second hand does not stop at the
0-second position, manual reception
cannot be conducted. Re-attempt the
operation from procedure 2.
→
HOW TO USE THE
STOPWATCH
→
HOW TO SELECT THE
TIME ZONE.
Place the watch down and leave it
untouched for several minutes.
4
It takes 12 minutes at the longest according
to the receiving state of a radio signal.
Receiving Level
High(H):
Receiving Level
Low (L):
Receiving Level
Reception Failed(N):
50-second
position
40-second
position
20-second
position
When the second hand starts moving in 1-second increments,
the reception is completed.
Reception level is updated by moving the second hand
every one minute.
If the Reception has failed
After five seconds, the watch
will resume displaying the time.
Display During Reception
*
If the watch is moved or any operation is conducted
during a radio signal reception attempt, the watch
will be unable to receive a radio signal.
*
It is difficult to receive the signals in some receiving conditions. → RECEPTION ENVIRONMENT
* This watch is unable to receive a radio signal outside a reception range. →
RADIO SIGNAL
RECEPTION RANGE
* If the second hand points to "L," the watch may not be able to receive a radio signal.
→
HOW TO CHE CK THE RECEPT ION STATUS
When radio signal
reception is completed, the
second hand starts moving
in 1-second increments.
5
Check whether the receiving a
radio signal has been successful.
8B92E3841.indd40-41 2016/04/2815:41

English
English
42 43
WHEN A RADIO SIGNAL CANNOT BE
RECEIVED
When a radio signal cannot be received, refer to the following pages :
• Not receivable within the radio signal reception range
Check that the time zone of the area where the watch is used is set.
Although the time zone is correctly selected, the time and date are misaligned.
→
TROUBLESHOOTING: Reception of a radio signal.
Since a radio signal cannot be received, the time and date became misaligned. In this
case, set the time and date manually.
*
For the radio signal reception ranges, refer to “RADIO SIGNAL RECEPTION RANGE
INDIC ATION.”
• When the watch is used outside the radio signal reception range
Select the time zone of the area where the watch is used.
→
HOW TO SEL ECT THE T IME ZONE
Although the time zone is correctly selected, the time and date are not correct. In this
case, set the time and date manually.
When pulling the crown to the
second click, the second hand stops
at the 0-second position.
1
When the watch is used
continuously in conditions
in which the watch may be
unable to receive a radio
signal, it can be manually
adjusted.
* When the watch is unable to
receive a radio signal, it can
move depending on normal
quartz movement (loss / gain:
±15 seconds per month on
average).
HOW TO MANUALLY SET THE TIME
• When adjusting the time, the
24-hour hand and date will be
accordingly adjusted.
• When the watch rec eives a
radio signal after manual
adjustment of the time, it
displays the received time.
The watch enters the manual time setting mode.
(If the stopwatch is moving, the stopwatch hands
also stop at the 0 -second position.)
0 1 2
0-second position
* When the watch enters the manual time setting
mode, the reception results will be indicated as“
N,” since the reception results data will be lost.
8B92E42-66.indd42-43 2016/04/2715:55

English
English
44 45
Press Button A or Button B
to set the time.
Push the crown back in
according to the time signal.
2
3
One minute
Advance
Press Button A or Button B once
and then release it.
Continuous
Advance
When either of Button A or Button B
is kept pressed for two seconds or
longer, the hand will start to move.
Press Button A or Button B again to
stop.
Operation has been completed.
The watch resumes its normal movement.
Clockwise
Counterclockwise
A
B
B
A
0 1 2
* The hand will not move by turning the
crown.
When the date is not automatically
changed in which the watch is unable
to receive a radio signal, the date can
be adjusted manually.
HOW TO MANUALLY SET THE DATE
•
The date can be adjusted
independently regardless of the time.
• When the watch receives a radio
signal after conducting manual
adjustment of the time, it displays the
time based on the information of time
received.
• When using the watch again in
regions in which the watch is able
to receive the radio signals, it is
recommended to perform "Manual
Reception."
→
HOW TO CONDUCT MANUAL RECEPTION
* When the date is not correct even
if the watch successfully receives a
radio signal, the preliminary position of
the date may be misaligned.
→ PRELIMINARY POSITION
When pulling the crown to the first
click, the second hand stops at the
30-second position.
1
The watch enters the manual date setting
mode.
(If the stopwatch is moving, the stopwatch hands
also stop at the 0 -second position.)
0 1 2
30-second position
* The watch operates while it enters the mode.
(The second hand remains stopped.)
8B92E42-66.indd44-45 2016/04/2715:55
English
English
46 47
Press Button A to set
the date.
Push the crown back in.
2 3
Operation has been completed.
The watch resumes its normal movement.
6
A
7
10 2
* If not correcting the date, go to
procedure 3.
One day
Advance
Press Button A once and then
release it.
Continuous
Advance
When Button A is kept pressed for
two seconds or longer, the date will
start to move. Press Button A again
to stop.
PRELIMINARY POSITION
When the watch is unable to display the precise time or date even if it successfully receives a
radio signal, or when the stopwatch hands do not stop at the 0-position even after resetting
the stopwatch, the preliminary position may be misaligned.
The preliminary hand position may be misaligned due to the following reasons :
• In the case of a strong impact : Misalignment may occur when dropping or hitting the watch.
• In the case of a magnetic influence : Misalignment may occur when bringing the watch close to
an object which generates magnetism.
■
Automatic Hand Position Adjustment Function (Function to automatically
adjust
the preliminary position of the hand)
■
Setting the Preliminary Position of the Date/Stopwatch Hands
The hour, minute, and second hands have an "Automatic Hand Position Adjustment Function,"
which automatically corrects an incorrect preliminary position. It activates once a minute for the
second hand and at 12:00 both for the AM and PM for the hour and minute hands.
* This function works when the preliminary hand position is misaligned due to external factors
such as strong impact or magnetic influence. It does not work to adjust accuracy of the watch
or slight deviations which may occur during the manufacturing process.
* The preliminary position of the hour and minute hands can also be manually adjusted.
Since the preliminary position of the date and stopwatch hands is not automatically adjusted, it
must be adjusted manually.
8B92E42-66.indd46-47 2016/04/2715:55

English
English
48 49
■
Setting the Preliminary Position of the Date / Hour and Minute Hands
The preliminary position of the date is "1" (1st).
The preliminary position of the hour and minute hands is "0:00 AM."
Press and hold Button A and Button
B simultaneously until the second
hand stops at the 30-second position
(for 3 seconds).
1
The watch enters the mode to adjust the
preliminar y position of the date. And then the
date numeral starts moving and stops at the
preliminary position.
Adjust the date so that “1” will locate at
the center of the date window.
30-second position
B
A
* During movement of the date numeral, the
buttons cannot be operated.
Press Button A to set the date to "1."
2
1
1
A
* When "1" is displayed in the date
window, go to procedure 3.
Continuous
Advance
When Button A is kept pressed
for 2 seconds or longer, the date
starts to move. Press Button A
again to stop.
Fine
Adjustment
Each pressing of Button A slightly
advances the date.
Press and hold Button B until
the second hand stops at
the 0-second position (for 3
seconds).
Press Button A once
and release it
3 4
The minute and hour hands move to stop
at "0:00 AM."
The watch enters the mode to adjust
the preliminary position of the hour and
minute hands.
1
B
0-second position
* When the correct time is displayed, go
to procedure 5.
1
A
8B92E42-66.indd48-49 2016/04/2715:55

English
English
50 51
After the procedures are
completed, leave the watch for
20 seconds.
5
The preliminary position adjustment
mode is automatically terminated and
the second hand starts moving.
Confirm whether the time and date
are correct after the watch resumes
displaying time.
In the case that the time and date are
not correct, adjust the time and date.
* In procedures 1 to 5, when no
operation is conducted after the
date numeral and second hand stop,
and the watch has no movement of
the date or the second hand for 20
seconds or longer, it automatically
displays the time again. When it is in
the middle of operation, reattempt the
operation from procedure 1.
■
Setting the Preliminary Position of the Stopwatch 1/5-Second and Minute Hands
The preliminary position of the stopwatch 1/5-second hand is the 0-second position,
and that of the minute hand is the 0-minute position.
By setting the preliminary position, the correct measured result is displayed.
When pulling the crown to the
second click, the second hand stops
at the 0-second position.
1
6
0-second position
0 1 2
* The date and stopwatch hands also stop.
*
If procedure 1 is conducted, the watch
gains or loses time.
Set the time in procedure 6 (set
the time by receiving a radio
signal).
8B92E42-66.indd50-51 2016/04/2715:55
English
English
52 53
Press Button C until the
stopwatch 1/5-second
hand starts moving (for
2 seconds).
Press Button D to set the stopwatch
1/5-second hand to the 0-second
position.
2 3
T he stopwatch 1/ 5-second hand
makes a full rotation, and the
watch enters the mode to adjust
the preliminary position of the
stopwatch 1/5-second hand.
S et the stopwatch 1/ 5-secon d hand to the 0-s econd
position.
6
C
6
D
* When the stopwatch 1/5-second hand is set to the
0-second position, go to procedure 4.
Continuous
Advance
When Button D is kept pressed for two seconds or
longer, the hand will start to move. Press Button D
again to stop.
Fine
Adjustment
Each pressing of Button D slightly advances the
hand.
Press Button C until the
stopwatch minute hand starts
moving (for 2 seconds).
4
The stopwatch minute hand makes
a full rotation, and the watch enters
the mode to adjust the preliminary
position of the stopwatch minute
hand.
6
C
Press Button D to set the
stopwatch minute hand to the
0-minute position.
5
Set the stopwatch minute hand to the
0-minute position (6 0-minute position).
6
0-minute position
D
* When it is already set, go to procedure 6.
Continuous
Advance
When Button D is kept pressed for two
seconds or longer, the hand will start to
move. Press Button D again to stop.
Fine
Adjustment
Each pressing of Button D slightly advances
the hand.
8B92E42-66.indd52-53 2016/04/2715:55

English
English
54 55
Push the crown back in to the normal position to set the time by receiving a radio signal.
6
The preliminary position adjustment
mode is automatically terminated and
the watch starts moving.
Conduct manual reception.
→
HOW TO CONDUCT MANUAL RECEPTION
6
0 1 2
* Because the crown has been pulled out to
the second click (procedure 1), the watch
gains or loses time. Set the watch to the
correct time.
When the watch is used in conditions in
which the watch may be unable to receive a
radio signal, set the time and date manually.
The operation has been completed
when the time and date is correctly
set.
IMPROPER FUNCTION
When an abnormal display appears, follow the procedures below to reset the
built-in IC. The watch will resume its normal operation.
Resetting the IC will initialize the watch.
Before starting to use the watch, it will be
necessary to set the time and adjust the
STOPWATCH hands to the “0” position.
When pulling the crown to the
second click, the second hand stops
at the 0-second position.
1
6
0-second position
0 1 2
* The date and stopwatch hands also stop.
Press and hold Button C and
Button D simultaneously for 3
seconds, and then release them.
2
In five seconds after releasing the buttons, the
second hand makes a full rotation and stops at
the 0-second position. Then the hands of the hour
and minute will start to move toward the 0-second
position.
C
D
Push the crown back into the normal
position and check if the small
second hand moves as normal.
3
8B92E42-66.indd54-55 2016/04/2715:55

English
English
56 57
TROUBLESHOOTING
Tro ub les Possible causes
Hand
Movement
The second hand moves at
two-second intervals.
The energy is running shor t.
The second hand moves at
five-second intervals.
The stopped second hand
pointing to the 15-second
position started operating.
The power save function has been activated.
When the watch is not exposed to adequate light for
a certain period of time, the power save function to
limit energy consumption is automatically activated.
The stopped second hand
pointing to the 45-second
position started operating.
The power save function has been activated.
When the watch is not exposed to adequate
light for a certain period of time, the power
save function to limit energy consumption is
automatically activated.
The watch hands advance
rapidly unless a button is
pressed. After the rapid
advancement is completed,
the watch resumes its
normal movement.
The power save function has been activated.
The automatic hand position alignment function
was activated.
When the hand positions deviate to display
incorrect time as a result of external influences,
etc., the watch automatically corrects the hand
misalignment by the automatic hand position
alignment function.
Solutions
Fully charge the watch so that the second hand may move at one-second intervals.
Be careful not to conceal the watch under a sleeve, etc., while wearing it.
When taking off the watch, place it in as bright a location as possible.
Wait until the current time is displayed.
No operation is needed ( this is not a malfunction. )
①Fully charge the watch so that the second hand may move at one -second intervals.
②After that, if the watch displays the incorrect time, receive a radio wave as needed.
No operation is needed ( this is not a malfunction).
8B92E42-66.indd56-57 2016/04/2715:55

English
English
58 59
Tro ub les Possible causes
Reception
of a radio
signal
When the watch is unable
to receive a radio signal
The reception results have
failed and the second hand
points to N (the watch does
not receive a radio signal).
The watch was moved while it was receiving a
radio signal.
The watch was left where the radio signal was weak
or where it was unable to receive a radio signal.
Transmitting stations may have stopped
transmitting radio signals for some reason
(Transmission stop).
The stopwatch 1/5 -second and minute hands
are not reset.
The watch is set to a time zone other than
receiving range.
Charging
the solar
battery
The stopped watch was
exposed to an adequate
light for longer than
“the time required to
fully charge the watch,”
however, it does not
resume its normal
one-second interval
movements.
The amount of exposed light is too weak.
The time for charging the watch is not
sufficient.
The built- in IC of the watch has fallen into an
unstable condition.
Solutions
Do not move the watch while it is receiving a radio signal.
Because it takes time to receive a radio signal successfully, leave the watch untouched
for 12 minutes at the longest.
Place the watch where it is able to easily receive a radio signal.
Check the website of each transmitting station for further information concerning a
transmission stop. Attempt to receive a radio signal again after a while.
Reset the stopwatch 1/5-second and minute hands.
①
Check the time zone that the watch is currently set for, and select the time zone.
②
When the watch is not displaying the precise time, receive a radio signal again if necessary.
The time required for charging the watch depends entirely on the amount of exposed
light the watch receives.
Refer to “GUIDELINE OF CHARGING TIME” to charge the watch.
Refer to “IMPROPER FUNCTION” to reset the built-in IC.
8B92E42-66.indd58-59 2016/04/2715:55
 Loading...