

Page 1

WARNING
Do not attempt to dive using this watch unless you have been properly
trained in diving. For your safety, please abide by the rules of diving.
Do not use the watch for saturation diving using helium gas.
Before diving, make sure that the watch operates normally.
CAUTION
Please read and observe the instructions described in this booklet to ensure
the proper functioning of your diver's watch.
Do not operate the crown when the watch is wet or in water.
Do not operate the buttons when the watch is wet or in water.
Avoid hitting the watch against hard objects such as rocks.
ENGLISH
English
3
Page 2

WARNING
English
WARNING notes indicate any condition or practice which, if not strictly observed,
could result in severe personal injury or possible death.
CAUTION
CAUTION notes indicate any condition or practice which, if not strictly observed,
may result in personal injury or property damage.
4
PRECAUTIONS ON USING THE WATCH FOR DIVING
Before diving, make sure that the watch operates normally and be sure to observe the
precautions described below.
BEFORE DIVING
Do not use the watch for saturation diving using helium gas.
To measure the elasped time while you are underwater, always use the rotating bezel.
Check that:
• the second hand is moving at one-second intervals.
• the “•” mark on the case back indicates the expected life limit of the battery. (See “BATTERY
CHANGE” on page 22.)
• the crown is locked tightly in place.
• the buttons are locked tightly in place.
• there are no visible cracks in the crystal or the watch band.
• the strap or bracelet is securely fastened to the watch case.
• the buckle keeps the strap or bracelet firmly secured to the wrist.
• the rotating bezel turns counterclockwise smoothly (the rotation must not be too loose or too tight)
and the “ ” mark aligns with the minute hand.
• the time and calendar are appropriately set.
If there are any malfunctions, we recommend that you contact an AUTHORIZED SEIKO SERVICE
CENTER.
WHILE DIVING
Do not operate the crown and the buttons when the watch is wet or in water.
Take care not to hit the watch against hard objects such as rocks.
Bezel rotation may become slightly stiffer underwater. This is not a malfunction.
AFTER DIVING
Rinse the watch in fresh water after diving and wash out all seawater, soil, sand, etc.
Wipe the watch thoroughly dry to prevent possible rust on the case after cleaning the watch in fresh water.
English
5
Page 3
CONTENTS
English
SETTING THE TIME AND ADJUSTING THE STOPWATCH HAND POSITION ........ 8
SETTING THE DATE ................................................................................................ 11
STOPWATCH ........................................................................................................... 12
TACHYMETER ......................................................................................................... 15
TELEMETER ............................................................................................................ 17
ROTATING BEZEL ................................................................................................... 19
SCREW DOWN CROWN ......................................................................................... 20
SECURITY LOCK BUTTON OPERATION ................................................................. 21
BATTERY CHANGE .................................................................................................. 22
TO PRESERVE THE QUALITY OF YOUR WATCH ................................................... 24
SPECIFICATIONS ..................................................................................................... 27
For the care of your watch, see “TO PRESERVE THE QUALITY OF YOUR
WATCH” in the attached Worldwide Guarantee and Instruction Booklet.
6
Page
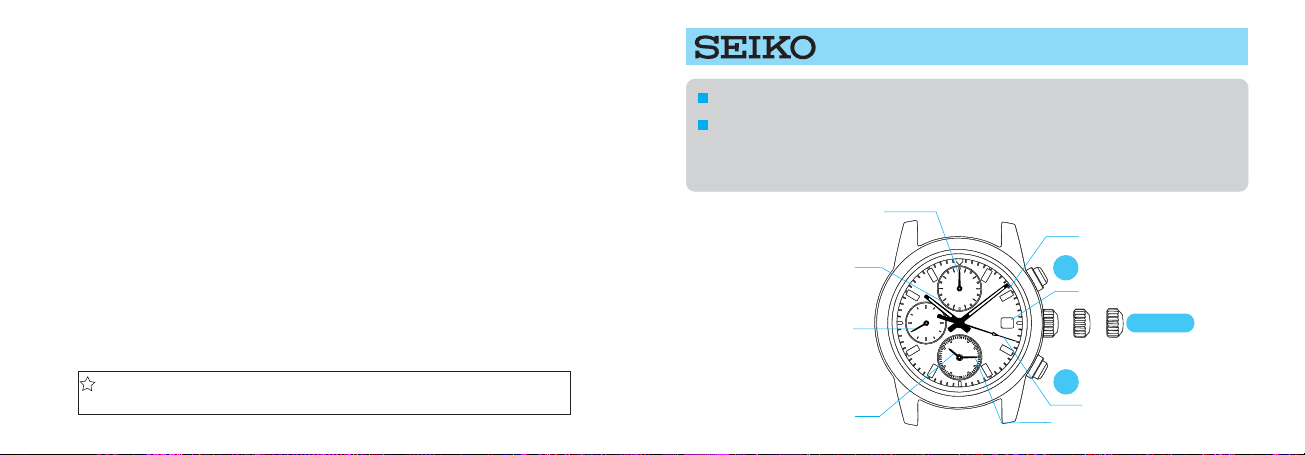
CAL. 7T92
TIME/CALENDAR
STOPWATCH
Measures up to 12 hours in 1/20 second increments.
Split time measurement is possible.
STOPWATCH 1/20-second hand
Hour hand
Small second hand
STOPWATCH hour hand
6
Minute hand
A
Date
CROWN
a b c
B
STOPWATCH minute hand
a: Normal position
b: First click
c: Second click
STOPWATCH second hand
English
7
Page 4

6
SETTING THE TIME AND
ADJUSTING THE STOPWATCH HAND POSITION
This watch is so designed that the following are all made with the crown at the second click
English
position:
1) time setting
2) stopwatch hand position adjustment
Once the crown is pulled out to the second click, be sure to check and adjust the time. If
needed, the position of the stopwatch hands should also be adjusted then.
CROWN
1. TIME SETTING
Hour hand
Small
second
hand
8
Pull out to second click when the second hand is at the 12 o’clock position.
Minute hand
CROWN
Turn to set the hour and
minute hands.
6
1. When the stopwatch is measuring or has been measuring and is now stopped, pulling the crown out
to the second click will automatically reset the stopwatch hands to “0”.
2. If is recommended that the hands be set to the time a few minutes ahead of the current time, taking
into consideration the time required to adjust the STOPWATCH hand position if necessary.
3. When setting the hour hand, be sure to check that AM/PM is correctly set. The watch is so designed
that the date changes once in 24 hours.
4. When setting the minute hand, first advance it 4 to 5 minutes ahead of the desired time and then turn
it back to the exact minute.
2. STOPWATCH HAND POSITION ADJUSTMENT
If the stopwatch hands are not in the “0” position, follow the procedure below to set them
to the “0” position.
STOPWATCH 1/20-second hand
A
STOPWATCH second hand
STOPWATCH hour hand
B
STOPWATCH minute hand
English
9
Page 5

English
Press for 2 seconds to select the stopwatch hand(s) to be adjusted.
A
Selection of the hand(s) can be made in the following order by
pressing button for 2 seconds.
STOPWATCH
1/20-second hand
* The selected hand(s) turn(s) a full circule.
Press repeatedly to set the selected stopwatch hand(s) to the “0” position.
B
* The hand(s) move(s) quickly if button B is kept pressed.
* After all the adjustments are completed, check that the hour and minute hands for time
display indicate the current time.
A
STOPWATCH
second hand
STOPWATCH
hour and minute
hands
SETTING THE DATE
Before setting the date, be sure to set the main time.
CROWN
Unscrew the crown and pull out to first
6
Date
1. It is necessary to adjust the date at the end of February and 30-day months.
2. Do not set the date between 9:00 p.m. and 1:00 a.m. Otherwise, the date may not change properly.
click position.
Turn clockwise until the desired date
appears.
Screw the crown all the way in until it is
locked.
English
CROWN
10
Push back into normal position in accordance with a time signal.
11
Page 6

STOPWATCH
The stopwatch can measure up to 12 hours in 1/20-second increments.
When the measurement reaches 12 hours, the stopwatch automatically stops counting.
English
A
STOPWATCH 1/20-second hand
STOPWATCH second hand
STOPWATCH minute hand
STOPWATCH hour hand
B
[ Ex.: 2 hours, 30 minutes and 10.85 seconds ]
After the stopwatch is restarted or split time is released, the stopwatch 1/20-second
hand moves for about 10 minutes and stops automatically.
In the same manner, if the stopwatch is stopped and restarted repeatedly or split time
is measured and released repeatedly, the stopwatch 1/20-second hand moves for
about 10 minutes and stops automatically.
Before using the stopwatch, be sure to check that the crown is set at the normal position and
that the stopwatch hands are reset to the “0” position.
* If the stopwatch hands do not return to the “0” position when the stopwatch is reset to “0”, follow the
procedure in “SETTING THE TIME AND ADJUSTING THE STOPWATCH HAND POSITION”.
Standard measurement
A A B
START STOP RESET
English
Movement of the stopwatch 1/20-second hand
After the stopwatch is started, the stopwatch 1/20-second hand moves for about 10
minutes and automatically stops at the “0” position.
When the measurement is stopped or split time is measured, it moves to indicate the
12
elapsed 1/20 seconds.
Accumulated elapsed time measurement
A
START
* Restart and stop of the stopwatch can be repeated by pressing button A.
A
STOP RESTART
A
○○○○
A
STOP RESET
B
13
Page 7

Split time measurement
A
English
START SPLIT
* Measurement and release of split time can be repeated by pressing button B.
Measurement of two competitors
A
START
14
BB
BA
FINISH TIME
OF 1ST
COMPETITOR
○○○○
SPLIT
RELEASE
2ND
COMPETITOR
FINISHES
A
STOP RESET
B
B
FINISH TIME
OF 2ND
COMPETITOR
B
RESET
TACHYMETER
(for models with tachymeter scale on the dial)
To measure the hourly average speed of a vehicle
1
Use the stopwatch to determine
how many seconds it takes to go
1 km or 1 mile.
2
Tachymeter scale indicated by
the stopwatch second hand gives
the average speed per hour.
Tachymeter scale can be used only when the time required is less than 60 seconds.
Ex. 2: If the measuring distance is extended to 2 km or miles or shortened to 0.5 km or miles
and the stopwatch second hand indicates “90” on tachymeter scale:
“90” (tachymeter scale figure) x 2 (km or mile) = 180 km/h or mph
“90” (tachymeter scale figure) x 0.5 (km or mile) = 45 km/h or mph
Ex. 1
STOPWATCH
second hand:
40 seconds
Tachymeter scale: “90”
“90” (tachymeter scale figure) x 1 (km or mile)
= 90 km/h or mph
English
15
Page 8

To measure the hourly rate of operation
1
Use the stopwatch to measure
English
the time required to complete 1
job.
2
Tachymeter scale indicated by
the stopwatch second hand gives
the average number of jobs accomplished per hour.
Ex. 1
STOPWATCH
second hand:
20 seconds
Tachymeter scale: “180”
“180” (tachymeter scale figure) x 1 job
= 180 jobs/hour
TELEMETER
(for models with telemeter scale on the dial)
The telemeter can provide a rough indication of the distance to the source of light
and sound.
The telemeter indicates the distance from your location to an object that emits both
light and sound. For example, it can indicate the distance to the place where
lightning struck by measuring the time elapsed after you see a flash of lightning
until you hear the sound.
A flash of lightning reaches you almost immediately while the sound travels to you
at a speed of 0.33 km/second. The distance to the source of the light and sound can
be calculated on the basis of this difference.
The telemeter scale is so graduated that the sound travels at a speed of 1 km in 3
seconds.*
*Under the condition of temperature of 20°C(68°F).
English
Ex. 2: If 15 jobs are completed in 20 seconds:
“180” (tachymeter scale figure) x 15 jobs = 2700 jobs/hour
16
CAUTION
The telemeter provides only a rough indication of the distance to the place where
lightning struck, and therefore, the indication cannot be used as the guideline to
avoid the danger of lightning. It should also be noted that the speed of the sound
differs depending on the temperature of the atmosphere where it travels.
17
Page 9

HOW TO USE THE TELEMETER
Before beginning, check that the stopwatch has been reset.
English
START
(Flash of light)
STOP
(Crash of thunder)
Approx. 3 km
Please note that the stopwatch second hand moves in 1 second increments and does not always
point exactly to the graduations of the telemeter scale. The telemeter scale can be used only
when the measured time is less than 60 seconds.
18
1
Press button A to start the
stopwatch as soon as you
see the light.
2
When you hear the sound,
press button A to stop the
stopwatch.
3
Read the telemeter scale
that the stopwatch second
hand points to.
ROTATING BEZEL
The rotating bezel can show the elapsed time up to 60 minutes. By setting it before
diving, you can know how many minutes you are underwater.
To prevent accidental rotation, the rotating bezel is so designed that rotation
becomes harder in water. Also for safty's sake, it roatates only counterclockwise,
so that the time measured is never shorter than the actual elapsed time.
1. Turn the rotating bezel to align its “ ” mark with the minute hand.
* The rotating bezel rotates with clicks. With each click, it turns half a minute.
2. To know the elapsed time, read the number on the rotating bezel that the minute
hand points to.
Example:
Minute hand
"30" on rotating bezel
30 minutes have elapsed.
Bezel rotation may become slightly stiffer underwater. This is not a malfunction.
Start(10:10 AM)
“ ”
mark
English
19
Page 10

SCREW DOWN CROWN
• Your watch has a screw down crown to prevent accidental operation and help
maintain water-resistant quality.
English
• To use the crown, it is necessary to unlock the crown first before pulling it out, and
it is important to securely screw the crown in after each use.
HOW TO OPERATE THE SCREW DOWN CROWN
The crown must be securely locked in the case except when you use it to set the watch.
<How to unlock the crown>
Turn the crown counterclockwise to unscrew it.
The crown is released and projected outward
from its original position.
<How to lock the crown>
Turn the crown clockwise while pressing it to the
case until it is screwed all the way in and locked.
1. Before diving, make sure that the crown is locked tightly in place.
2. Do not operate the crown when the watch is wet or in water.
3. When screwing the crown in, ensure that the crown is correctly aligned and turn it gently.
If it is hard to turn, unscrew it first, and then rewind it. Do not screw it in by force as it may
20
damage the thread of the screw or the case.
The crown is unlocked
and can be pulled out.
The crown is locked.
SECURITY LOCK BUTTON OPERATION
SECURITY LOCK OF PUSH-BUTTONS A & B
Locking
A
Unlocking
6
Locking
B
Unlocking the push-buttons
- Turn Security Lock Buttons counterclockwise until you no longer feel the threads turning.
- The buttons can be pushed in.
Locking the push-buttons
- Turn Security Lock Buttons clockwise until you no longer feel the threads turning.
- The buttons cannot be pushed in.
1. Before diving, make sure that both buttons are locked tightly in place.
2. Do not operate the buttons when the watch is wet or in water.
Unlocking
English
21
Page 11

BATTERY CHANGE
The miniature battery which powers your watch should last approximately 3 years.
However, because the battery is inserted at the factory to check the function and
English
that you contact an AUTHORIZED SEIKO DEALER and request SEIKO SR927SW battery.
* If the stopwatch is used for more than 2 hours a day, the battery life may be less than the specified period.
* After the battery is replaced with a new one, set the time/calendar and adjust the stopwatch hand position.
22
performance of the watch, its actual life once in your possession may be less than
the specified period. When the battery expires, be sure to replace it as soon as
possible to prevent any malfunction. For battery replacement, we recommend
Battery life indicator
When the battery nears its end, the small second hand moves at two-second intervals
instead of normal one-second intervals. In that case, have the battery replaced with
a new one as soon as possible.
* The watch remains accurate while the small second hand is moving at two-second intervals.
Be sure to replace the battery as soon as it runs down, and not to leave a discharged
battery inside the watch.
To show when the battery must be replaced, the expected time (month and year)
for the first battery replacement is inscribed on the case back as shown in the
illustration below.
00
05
06
07
0
09
8
“•” mark showing the expected time for battery replacement.
01
Year (2000)
02
03
Each graduation of the scale represents three months.
04
Note: The form of inscription on the case back specifying expected
time of battery replacement may differ from model to model.
When replacing the battery, we recommend that you contact an AUTHORIZED
SEIKO SERVICE CENTER. In that case, after every battery change, a new “ ” mark
will be inscribed on the case back at the position corresponding to the next battery
replacement time. Be sure to check the mark before using your watch again.
WARNING
Do not remove the battery from the watch.
If it is necessary to take out the battery, keep it out of the reach of children. If
a child swallows it, consult a doctor immediately.
English
23
Page 12

CAUTION
English
Never short-circuit, heat or otherwise tamper with the battery, and never
expose it to fire. The battery may burst, become very hot or catch fire.
The battery is not rechargeable. Never attempt to recharge it, as this may cause
battery leakage or damage to the battery.
TO PRESERVE THE QUALITY OF YOUR WATCH
Repair of diver’s watches requires special expertise and equipment. If you find that your diver’s
watch is malfunctioning, therefore, never attempt to repair it but immediately send it to a nearby
SEIKO Service Center.
TEMPERATURES
Your watch works with stable accuracy within a temperature range of 5° C
+60°C
and 35° C (41° F and 95° F). Temperatures over 60° C (140° F) may cause
battery leakage or shorten the battery life. Do not leave your watch in very
-10°C
low temperatures below –10° C (+14° F) for a long time since the cold may
cause a slight time loss or gain. However, the above conditions will be
24
corrected when the watch returns to normal temperature.
MAGNETISM
S
N
Your watch will be
adversely affected by
strong magnetism.
Keep it away from
close contact with
magnetic objects.
CARE OF CASE AND
BRACELET
To prevent possible rusting
of the case and bracelet, wipe
them periodically with a soft
dry cloth.
Be careful not to expose the
watch to solvents, mercury,
cosmetic spray, detergents,
adhesives or paints. Otherwise,
the case, bracelet, etc. may
become discolored,
deteriorated or damaged.
CHEMICALS
SHOCKS &
VIBRATION
Be careful not to drop
your watch or hit it
against hard surfaces.
PERIODIC CHECK
2 - 3
Years
It is recommended that the watch
be checked once every 2 to 3
years by an AUTHORIZED SEIKO
DEALER or SERVICE CENTER to
ensure that the case, crown,
gasket and crystal seal remain
intact.
PRECAUTION REGARDING
CASE BACK PROTECTIVE FILM
If your watch has a protective film
and/or a sticker on the case back,
peel them off before using your
watch.
English
25
Page 13

LUMIBRITE
LumiBrite is a luminous paint that is completely harmless to human beings and the natural
environment, containing no noxious materials such as radioactive substances.
English
LumiBrite is a newly-developed luminous paint that absorbs the light energy of sunlight or artificial
light in a short time and stores it to emit light in the dark.
For example, if exposed to a light of more than 500 lux for approximately 10 minutes, LumiBrite
can emit light for 5 to 8 hours.
Please note, however, that, as LumiBrite emits the light it stores, the luminance level of the light
decreases gradually over time. The duration of the emitted light may also differ slightly depending
on such factors as the brightness of the place where the watch is exposed to light and the distance
from the light source to the watch.
When you make a dive in dark water, LumiBrite may not emit light unless it has absorbed and
stored light sufficiently.
Before diving, therefore, be sure to expose the watch to light under the conditions specified
above, so that it fully absorbs and stores light energy. Otherwise, use the watch together with an
underwater flashlight.
TM
< Reference data on luminance >
(A) Sunlight
[Fine weather]: 100,000 lux [Cloudy weather]: 10,000 lux
(B) Indoor (Window side during daytime)
[Fine weather]: more than 3,000 lux [Cloudy weather]: 1,000 to 3,000 lux
[Rainy weather]: less than 1,000 lux
(C) Lighting apparatus (40-watt daylight fluorescent light)
[Distance to the watch: 1 m]: 1,000 lux
[Distance to the watch: 3 m]: 500 lux (average room luminance)
[Distance to the watch: 4 m]: 250 lux
26
* “LUMIBRITE” is a trademark of SEIKO HOLDINGS CORPORATION.
SPECIFICATIONS
1 Frequency of crystal oscillator .................. 32,768 Hz (Hz = Hertz … Cycles per second)
2 Loss/gain (monthly rate) ............................ ± 15 seconds at normal temperature range (5° C ~ 35° C)
3 Operational temperature range ................. –10° C ~ +60° C (14° F ~ 140° F)
4 Driving system .......................................... Step motor, 4 pieces
5 Display system
Time/calendar ....................................... Hour, minute and small second hands
Stopwatch ............................................ Measures up to 12 hours.
6 Battery ...................................................... SEIKO SR927SW, 1 piece
7 IC (Integrated Circuit) ................................ C-MOS-IC, 1 piece
* The specifications are subject to change without prior notice for product improvement.
(41° F ~ 95° F)
Date is displayed in numerals.
Stopwatch hour, minute, second and 1/20-second hands
English
27
 Loading...