

Page 1

Page 2
Page 3

48
■ PASSWORD
■ ACCESS KEY
■ SERIAL NUMBER
MEMO
As well as the Serial Number and Access Key, a self-created Password is required
to play online game. Write down your Password here to avoid loss. For those who
have purchased a Hunter’s License using PSO EP1&2, spaces are provided here to
write down the Serial Number and Access Key you used to purchase.
MISCELLANEOUS:
This Agreement represents the complete agreement concerning this license of the
Program between the parties and supersedes all prior agreements and representations between them regarding the same subject matter. It may be amended only by
a writing executed by both parties. If any provision of this Agreement is held to be
unenforceable for any reason, such provision shall be reformed only to the extent
necessary to make it enforceable and the remaining provisions of this Agreement
shall not be affected. This Agreement shall be construed under California law as
such law is applied to agreements between California residents entered into and to
be performed within California, except as governed by federal law, and you consent to the exclusive jurisdiction of the state and federal courts located in San
Francisco, California.
If you have any questions concerning this license, you may contact SEGA at
psoep3@sega-support.com.
Copying of any video game for any Nintendo system is illegal and is strictly prohibited by domestic and international intellectual property laws. "Back-up" or
"archival" copies are not authorized and are not necessary to protect your software. Violators will be prosecuted.
This video game is not designed for use with any unauthorized copying device or
any unlicensed accessory. Use of any such device will invalidate your Nintendo
product warranty. Nintendo (and/or any Nintendo licensee or distributor) is not
responsible for any damage or loss caused by the use of any such device. If use of
such device causes your game to stop operating, disconnect the device carefully to
avoid damage and resume normal game play. If your game ceases to operate and
you have no device attached to it, please contact the game publisher's "Technical
Support" or "Customer Service" department.
The contents of this notice do not interfere with your statutory rights.
This booklet and other printed materials accompanying this game are protected by
domestic and international intellectual property laws.
Rev-D (L)
IMPORTANT LEGAL INFORMATIONS
Page 4
47
LIMITED WARRANTY:
THE PROGRAM IS PROVIDED "AS IS," WITHOUT WARRANTY OF ANY KIND,
EITHER EXPRESS OR IMPLIED, INCLUDING, BUT NOT LIMITED TO, THE WARRANTIES OF MERCHANTABILITY AND FITNESS FOR A PARTICULAR PURPOSE.
THE ENTIRE RISK AS TO THE QUALITY AND PERFORMANCE OF THE PROGRAM
IS WITH YOU. SEGA.COM SHALL HAVE NO LIABILITY TO YOU FOR ANY REASON BASED ON YOUR USE OF THE PROGRAM UNLESS SUCH WARRANTIES
ARE LEGALLY INCAPABLE OF EXCLUSION. SEGA'S ENTIRE LIABILITY AND
YOUR EXCLUSIVE REMEDY WITH RESPECT TO THE USE OF ANY SOFTWARE
PROVIDED OR USED BY SEGA SHALL BE THE REPLACEMENT OF ANY SEGA
SOFTWARE FOUND TO BE DEFECTIVE. SOME STATES AND JURISDICTIONS
DO NOT ALLOW THE EXCLUSION OR THE LIMITATION OF LIABILITY FOR CONSEQUENTIAL OR INCIDENTAL DAMAGES, AND IN SUCH STATES OR JURISDICTIONS SEGA'S LIABILITY SHALL BE LIMITED TO THE MAXIMUM EXTENT PERMITTED BY LAW. THIS WARRANTY GIVES YOU SPECIFIC LEGAL RIGHTS, AND YOU
MAY HAVE OTHER RIGHTS WHICH VARY FROM JURISDICTION TO JURISDICTION.
LIMITATION ON DAMAGES:
IN NO EVENT WILL SEGA BE LIABLE FOR SPECIAL, INCIDENTAL, OR CONSEQUENTIAL DAMAGES RESULTING FROM POSSESSION, USE OR MALFUNCTION OF THE PROGRAM, INCLUDING WITHOUT LIMITATION DAMAGES TO
PROPERTY, LOSS OF GOODWILL, COMPUTER OR HANDHELD DEVICE FAILURE
OR MALFUNCTION AND DAMAGES FOR PERSONAL INJURIES, EVEN IF SEGA
HAS BEEN ADVISED OF THE POSSIBILITY OF SUCH DAMAGES. SEGA'S LIABILITY SHALL NOT EXCEED THE ACTUAL PRICE PAID FOR THE LICENSE TO USE THE
PROGRAM. SOME STATES AND JURISDICTIONS DO NOT ALLOW LIMITATIONS OF DAMAGES, AND IN SUCH STATES OR JURISDICTIONS SEGA'S LIABILITY SHALL BE LIMITED TO THE MAXIMUM EXTENT PERMITTED BY LAW. .
TERMINATION:
Without prejudice to any other rights of SEGA, this Agreement will terminate automatically if you fail to comply with its terms and conditions. In such event, you must
destroy all copies of the Program and all of its component parts.
U.S. GOVERNMENT RESTRICTED RIGHTS:
The Program and documentation have been developed entirely at private expense
and are provided as "Commercial Computer Software" or "restricted computer
software." Use, duplication or disclosure by the U.S. Government or a U.S.
Government subcontractor is subject to the restrictions set forth in subparagraph
(c)(1)(ii) of the Rights in Technical Data and Computer Software clauses in DFARS
252.227-7013 or as set forth in subparagraph (c)(1) and (2) of the Commercial
Computer Software Restricted Rights clauses at FAR 52.227-19, as applicable. The
Contractor/Manufacturer is Sega of America, Inc.
INJUNCTION:
Because SEGA would be irreparably damaged if the terms of this Agreement were
not specifically enforced, you agree that SEGA shall be entitled, without bond,
other security or proof of damages, to appropriate equitable remedies with
respect to breaches of this Agreement, including without limitation the right of
injunction, in addition to such other remedies as SEGA may otherwise have under
applicable laws.
INDEMNITY:
You agree to indemnify, defend and hold SEGA, its partners, affiliates, contractors,
officers, directors, employees and agents harmless from all damages, losses and
expenses arising directly or indirectly from your acts and omissions to act in using
the Product pursuant to the terms of this Agreement.
END USER LICENSE AGREEMENT
Page 5

46
PHANTASY STAR ONLINE EPISODE III: C.A.R.D. REVOLUTION
USE OF THE PROGRAM (AS DEFINED BELOW) IS SUBJECT TO THE SOFTWARE LICENSE TERMS SET FORTH BELOW, AS WELL AS AN APPROPRIATE “SUBSCRIBER AGREEMENT AND TERMS OF SERVICE” (THE “SUBSCRIBER AGREEMENT”) AND “RULES OF CONDUCT” (THE “RULES OF
CONDUCT”) SET FORTH AT http://www.sega.com/pso_ep3, AS THEY
MAY BE MODIFIED FROM TIME TO TIME. IN THE EVENT OF A CONFLICT
BETWEEN THIS AGREEMENT AND EITHER THE SUBSCRIBER AGREEMENT
OR THE RULES OF CONDUCT, THE LATTER SHALL BE CONTROLLING.
FOR PURPOSES OF THIS AGREEMENT, THE "PROGRAM" INCLUDES THE
SOFTWARE INCLUDED WITH THIS AGREEMENT, THE ASSOCIATED
MEDIA, ANY SOFTWARE ASSOCIATED WITH THE ONLINE MODE OF THE
PROGRAM, ANY PRINTED MATERIALS, ANY ONLINE OR ELECTRONIC
DOCUMENTATION, AND ANY AND ALL COPIES AND DERIVATIVE
WORKS OF SUCH SOFTWARE AND MATERIALS. BY DOWNLOADING,
INSTALLING, AND/OR USING THE PROGRAM, YOU ACCEPT THE TERMS
OF THIS LICENSE WITH SEGA CORPORATION AND ITS AFFILATES (COLLECTIVELY, "SEGA").
LIMITED USE LICENSE:
SEGA grants you the non-exclusive, non-transferable, limited right and license to
install and use one copy of the Program solely and exclusively for your personal
use. All rights not specifically granted under this Agreement are reserved by
SEGA. The Program is licensed, not sold. Your license confers no title or ownership
in the Program and should not be construed as a sale of any rights in the Program.
OWNERSHIP:
All title, ownership rights, and intellectual property rights in and to the Program
and any and all copies thereof (including but not limited to any titles, computer
code, themes, objects, characters, character names, stories, dialog, catch phrases,
locations, concepts, artwork, animation, sounds, musical compositions, audio-visual
effects, methods of operation, moral rights, any related documentation, and
"applets" incorporated into the Program) are owned by SEGA or its licensors. The
Program is protected by the copyright laws of the United States, international
copyright treaties and conventions, and other laws. The Program contains certain
licensed materials, and SEGA's licensors may protect their rights in the event of
any violation of this Agreement.
YOU SHALL NOT:
✻Exploit the Program or any of its parts commercially, including but not limited to
use at a cyber cafe, computer gaming center or any other location-based site.
SEGA may offer a separate Site License Agreement to permit you to make the
Program available for commercial use; see the contact information below.
✻Use the Program, or permit use of the Program, on more than one computer at
the same time.
✻Make copies of the Program or any part thereof.
✻Use the Program, or permit use of the Program, in a network, multi-user arrange-
ment or remote access arrangement, including but not limited to any online use,
except as otherwise explicitly provided by the Program and subject to acceptance of the terms and conditions of an appropriate Subscriber Agreement and
the Rules of Conduct.
✻Sell, rent, lease, license, distribute or otherwise transfer the Program, or any
copies of the Program, without the express prior written consent of SEGA.
✻Reverse engineer, derive source code, modify, decompile, disassemble, or create
derivative works of this Program, in whole or in part.
✻Remove, disable or circumvent any security protections, proprietary notices or
labels contained on or within the Program.
✻Export or re-export the Program or any copy or adaptation in violation of any
applicable laws or regulations.
Thank you for purchasing Phantasy Star Online™ Episode III C.A.R.D. Revolution.
Please note that this software is designed only for use with the Nintendo
GameCube™. Be sure to read this instruction booklet thoroughly before you
start playing.
CONTENTS
WELCOME TO THE WORLD OF EP3 . . . . . . . . . . . . . . . 4
SETTING UP . . . . . . . . . . . . . . . . . . . . . . . . . . . . . . . . . . 6
CONTROLS . . . . . . . . . . . . . . . . . . . . . . . . . . . . . . . . . . 8
STARTING THE GAME . . . . . . . . . . . . . . . . . . . . . . . . . 10
SELECT FILE AND CREATE PLAYER CHARACTER . . . . . 11
THE MORGUE . . . . . . . . . . . . . . . . . . . . . . . . . . . . . . . 12
HOW TO VIEW BATTLE SCREENS . . . . . . . . . . . . . . . . 15
HOW A BATTLE PROGRESSES . . . . . . . . . . . . . . . . . . 19
BEFORE STARTING ONLINE GAME . . . . . . . . . . . . . . 23
ONLINE GAME . . . . . . . . . . . . . . . . . . . . . . . . . . . . . . 32
OFFLINE GAME . . . . . . . . . . . . . . . . . . . . . . . . . . . . . . 42
TUTORIAL/OPTIONS/OFFICIAL WEB SITE . . . . . . . . . 45
PHANTASY STAR ONLINE EPISODE III: C.A.R.D. REVOLUTION
END USER LICENSE AGREEMENT . . . . . . . . . . . 46
Note: From hereafter, the names will be abbreviated as follows:
Phantasy Star Online . . . . . . . . . . . . . . . . . . . . . . . . . . . . . . . . . . . . . . PSO
Phantasy Star Online Episode I & II. . . . . . . . . . . . . . . . . . . . . . . . EP1&2
Phantasy Star Online Episode III C.A.R.D. Revolution . . . . . . . . . . EP3
Page 6
4
WELCOME TO THE WORLD OF EP3
Their world on the verge of destruction, the people of the planet Coral made
plans to migrate, in search of a new planet, and to discover the secrets of
an unknown energy source called “Photon.” The planet Ragol was found,
and the starship Pioneer 2 was sent to colonize it. When they arrived, an
“incident” occurred on the planet that is only known to a relative few.
21 years have passed, and the people have not been allowed to settle
on Ragol. They continue with their daily lives onboard the starship
Pioneer 2, unaware of a power struggle taking place under a new
Principal Government that will affect their lives and that of Ragol.
Meanwhile, Pioneer 2 continues to silently orbit the world...
PROLOGUE
PSO is a network game, where actions take place aboard the starship
“Pioneer 2” (or simply called “the Ship”) and Planet Ragol. EP1&2
appeared as a network role playing game, and introduced a new
world. With EP3, inheriting the world of EP1&2, PSO has been reborn
as a network card battle game.
With EP3, you can enjoy both Online Game (p.32) and Offline Game
(p.42). How you enjoy the world of EP3 is up to you.
WHAT IS PSO?
The Player Character plays the role of a Commander, ordering the Story
Characters (your subordinates) into battle using items and creatures that
are transformed from “C.A.R.D.s.” Grasp the features of each Story
Character, features of each card, the spots on the dice, and the patterns
of your enemies’ actions to earn a victory. Whenever you earn new
cards, we recommend that you edit the decks for your Story Characters.
EP3 GAME SYSTEM
PLAYER
CHARACTER
[COMMANDER]
STORY
CHARACTER
Instruct
&
Control
Action
OPPONENT [COMMANDER]
(FREE BATTLE•TOURNAMENT•
STORY MODE)
STORY
CHARACTER
Instruct
&
Control
Action
BATTLE
AGAINST
EACH
OTHER
USING
CARDS
45
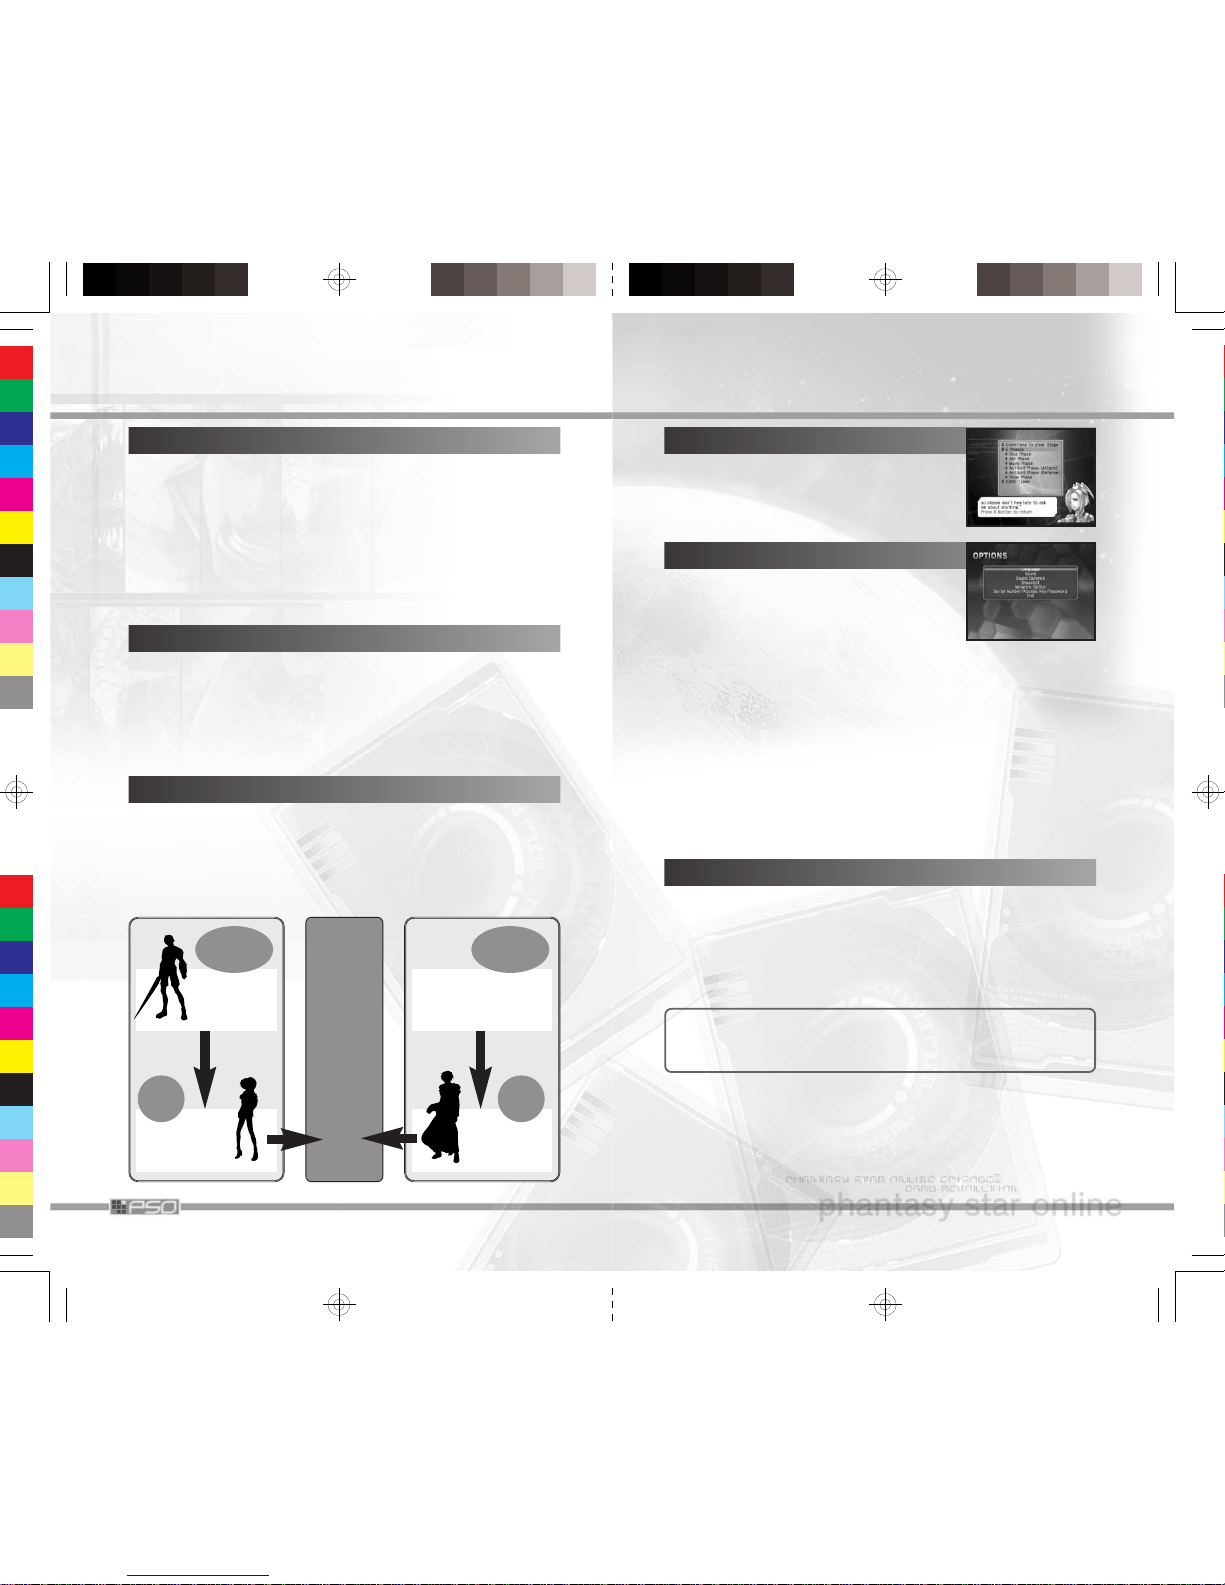
TUTORIAL/OPTIONS/OFFICIAL WEB SITE
TUTORIAL
Salligan, instructor at License School, will
instruct you on basic knowledge in this game.
Select the category you wish to see.
OPTIONS
In addition to modifications to various option settings, you can also set up for network connection and verify Serial Number/Access
Key/Password. Use the + Control Pad 82 to
select menu item, and press the a Button to
enter. Press the b Button to return to previous step. Select End to save
changes you made and exit Options Screen.
Language: Change the display language between English and
Japanese.
Sound: Select sound output from 3 selections.
Sound Balance: Adjust the volume levels of background music (BGM)
and sound effects (SE).
Snapshot: Enable/disable snapshot function.
Network Option: Set up for various network-related options, or buy a
Hunter’s License.
Serial Number/Access Key/Password: Verify Serial Number,
Access Key and Password you have registered for online play.
OFFICIAL WEB SITE
Connect online to visit The Phantasy Star Online Episode III Official Web
Site. Here you can read latest information on EP3, buy a Hunter’s
License, manage your account, or read Online Manual for additional
instructions of the game not included in this booklet. Various important
announcements from Sonic Team, such as server maintenances, will also
be posted here, so it is advised that you check here periodically. For
browser controls, see p.29.
You may also access this website and all of its features,
including the purchase of a Hunter’s License, from a PC at:
http://www.sega.com/pso_gen
Page 7

44
BATTLE PREPARATION
QUITTING THE GAME
When you select Quit Game, you will be asked
to verify your action. Select YES, and the game
will automatically save the game data to the
Memory Card before returning to the Title
Screen.
If there are any temporary characters, File
Select Screen will be displayed. Here you can
return temporary character(s) to its/their original file, on the Memory Card inserted into
Memory Card Slot B. The controls are performed by 1P. Follow the onscreen directions.
For transferring temporary characters, please
refer to p.43.
After you are transferred to the Morgue, as in
Regular Free Battle of the Online Game, you will
adjust various settings in the Battle Preparation
Menu, and select [Decide]. Note that, in Deck
selection, after you select the character and the
deck to play battle, you will also need to select
which controller to use. Please also be cautioned
that within the team the controller cannot be
shared.
5
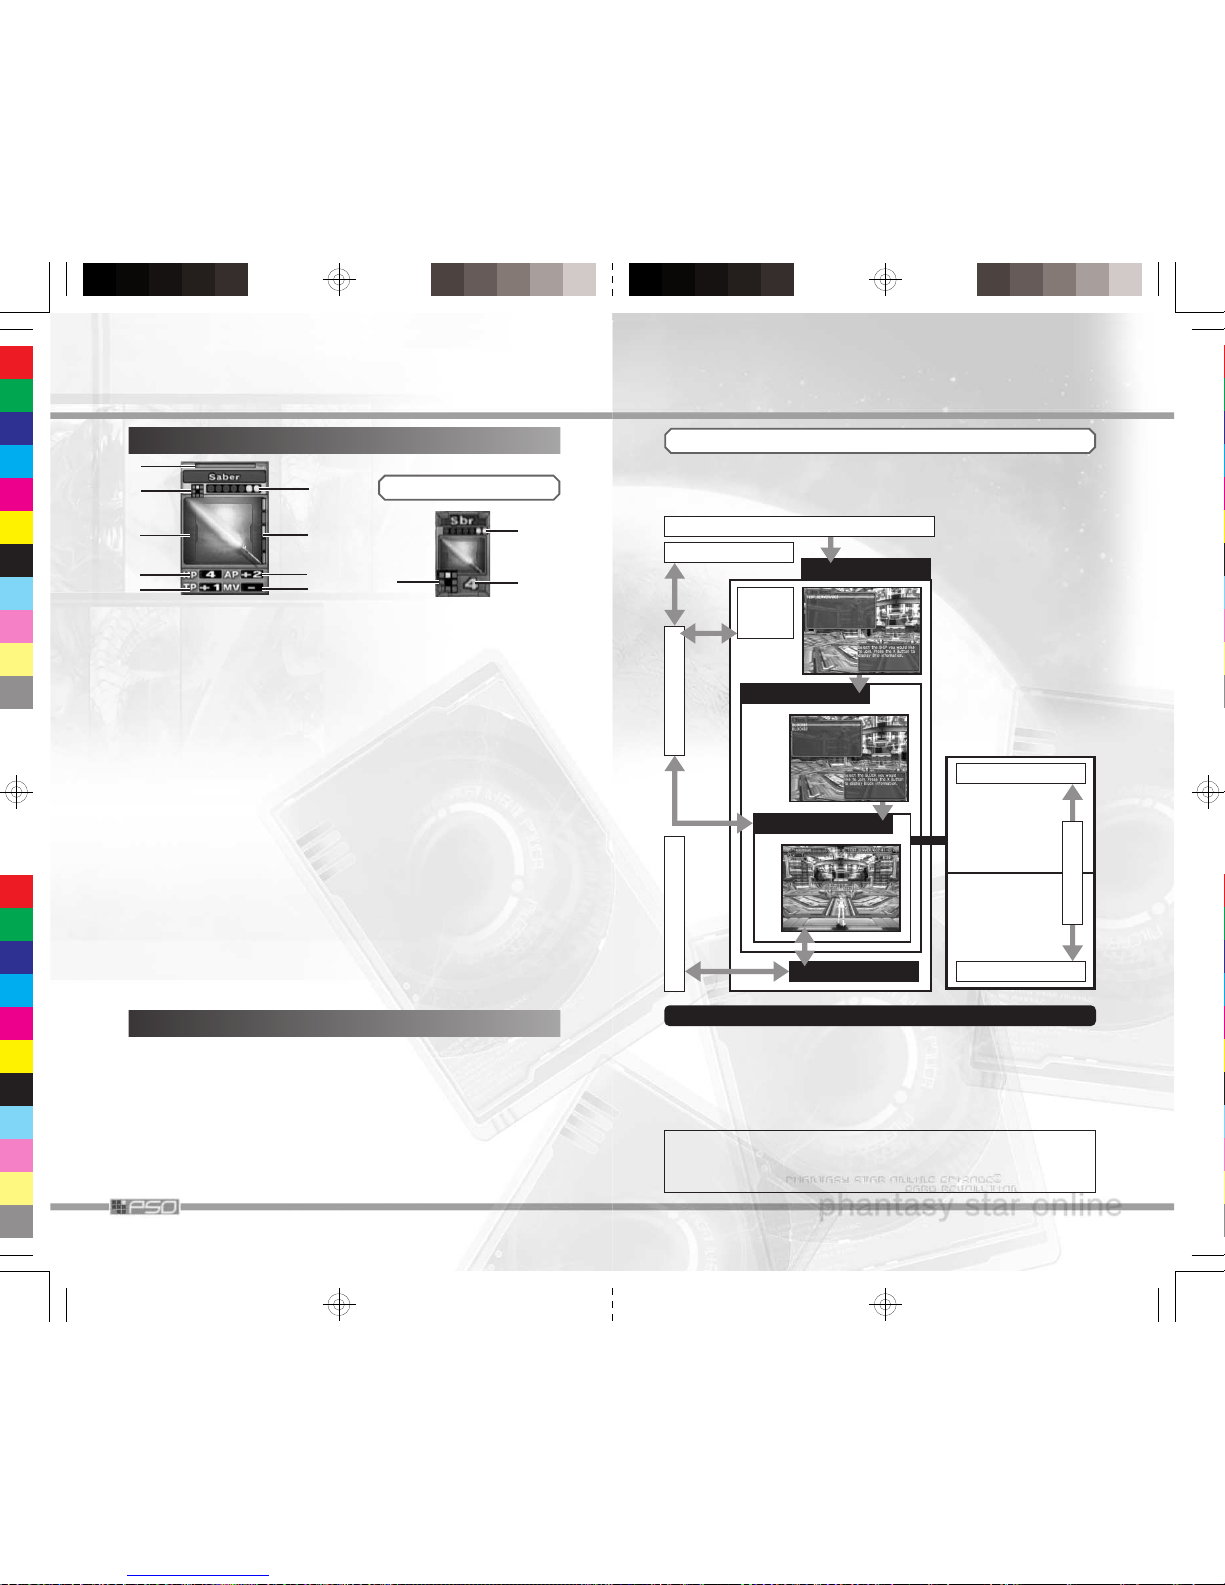
CARD LEVEL
The Player Character has a parameter called Card Level (CLv) to show
how well you have been playing, and it changes according to the outcome of the battles. There are two Card Levels, one for Online Game
and the other for Offline Game. The experience points earned will be
accumulated separately for Online Games and Offline Games (Story or
Free Battle). Each Card Level will be raised whenever 100 experience
points for each corresponding game type are gained.
TYPES OF DECKS AND CARDS
In this game, there are two types of decks: the Hero Side and the Dark
Side. The starring Story Characters are divided according to the type of
deck they use, and the style of play will differ accordingly. Within a deck,
there are three types of cards: “Item/Creature,” “Action,” and “Assist.”
Hero Side Dark Side
■ Equip Story Character with
item(s) and attack directly.
■ The attack (defense) power
changes when equipped with
weapons or protective gears.
■ Place creatures around Story
Character to attack/defend.
■ Story Characters cannot be
equipped with items.
■ Story Character
CARD
Your crew. The battle
is lost when he/she is
defeated.
■ Story Character
CARD
Your crew. The battle
is lost when he/she is
defeated.
■ Item CARDs
The weapons/protective gears the Story
Characters equip.
■ Creature CARDs
The creature cards
the Story Characters
use to summon.
■ Action CARDs
The cards to support
your attack/defense.
Can be used by
either side.
■ Assist CARDs
The cards that exhibit
effects according to
the situations. Can
be used by either
side.
■ What is a “deck”?
It is a set that includes a Story Character CARD and 30 CARDs that
can be used in battle. It is important to work out your strategy, with
features and contents of all CARDs you possess in mind.
Page 8

6
SETTING UP
HARDWARE SETUP
EP3 is a one to four player game. Connect the
Nintendo GameCube™ Controllers to the
Controller Socket 1, 2, 3 and 4 (depending on the
number of players participating) in order. You will
not be able to play properly with the Controllers
connected out of order.
This game can be set to display a higher resolution image on TV’s that
support progressive scan mode (EDTV, HDTV). In order to use the progressive scan mode, you need a TV that can accept this type of input
(see your TV operation manual), and a Nintendo GameCube™
Component Video Cable (available only through Nintendo, visit
www.nintendo.com or call 1-800-255-3700).
To activate the progressive scan mode, press and hold the B Button
while the Nintendo GameCube™ logo is being displayed until the message “DO YOU WANT TO DISPLAY THE GAME IN PROGRESSIVE
MODE?” appears. Select YES to activate the mode.
USING PROGRESSIVE SCAN TV
Portions of this game are presented in Dolby Surround Pro Logic II.
Connect the Nintendo GameCube™ to a surround system with Dolby
Surround Pro Logic II, and select “Dolby Surround Pro Logic II” in the
Options Screen of the game to experience the excitement of surround
sound.
USING DOLBY SURROUND PRO LOGIC II
Dolby, Pro Logic, and the double-D symbol are trademarks of Dolby
Laboratories.
MEMORY CARD & SAVE FILES
EP3 is a Memory Card compatible game (Nintendo GameCube™
Memory card sold separately), and a Memory Card is required to save
this game. Without a Memory Card you will not be able to play this
game. To save game data, online or offline, select Quit Game (p.18)
from the Main Menu. Never turn OFF the Nintendo GameCube™ power
or remove the Memory Card while the game data is being saved. Doing
so will corrupt the game data, making it unusable the next time the
game is started up.
Please refer to the Nintendo GameCube™ booklet (pages 18-20) for
directions on how to format and erase Memory Card files.
43
SELECT FROM TEMPORARY CHARACTERS
Select from “temporary characters” data. Insert
a Memory Card with an EP3 character file into
Memory Card Slot B, then select and register
character as temporary character.
In Free Battle Mode, it is possible to use Player Characters saved onto
other Memory Card(s). To use the characters saved onto another Memory
Card, first insert it into Memory Card Slot B, then temporarily transfer
the character data to the Memory Card in Memory Card Slot A. Here
in this game, this “transferred” character is called a Temporary Character.
Note that the original data of the Temporary Character cannot be
used as Main Character until the data has been transferred back.
If you delete the Temporary Character data, you will not be
able to return it to its original Memory Card. Also, if you
cancel the “transferred” status on the original Memory Card,
all parameters on that character will revert to the initial
value. Please be cautious.
NOTES ON TEMPORARY CHARACTERS
Memory Card
Slot A
Memory Card
Slot B
Main
Character
(Player
Character)
Temp
Character
Move Main Character
Data as Temp
Character
Return Temp Character
Data to its original
Memory Card.
All parameters revert to initial
value, if used as Player Character
while in “transferred” status
Main
Character
(Player
Character)
VERIFY CHARACTERS
The selected Player Characters will be displayed. Press the a Button to play Free Battle
with these characters. Press the b Button to can-
cel and reselect.
Page 9

42
OFFLINE GAME
In Story, the player plays the role of commander to guide Story
Characters to carry out orders from the organization you belong to.
Select Player Character in the File Select Screen.
STORY
You can play EP3 without having to connect to the network. Here you
can enjoy Story where you play by yourself to enjoy the world of EP3,
or Free Battle where up to four players can enjoy simultaneous play.
Also, before you play online for the first time, it is a good idea to play
in this mode to learn the basics of the game system.
SELECT FROM 2 STORIES
TAKING QUESTS FROM LAB CHIEF
After selecting the story, your game starts at the
desk of the Morgue’s Lab Chief (or at the place
of R-Base’s captain if you select Arkz). Here you
find out about the quests you take, and report
upon completion. After receiving quest, go to
the Entry Counter, make adjustments on the
Battle Preparation Menu, and dispatch your
Story Characters.
Free Battle is played with one to four players. Basically, the battle
method is the same as Regular Free Battle of the Online Game.
FREE BATTLE
FILE SELECT
Select the Player Character(s) to be used, in
order from Player 1. The player’s number will be
displayed over the selected Player Character.
When all participating players have selected,
select and enter GAME START.
SELECT FROM MAIN CHARACTERS
Select from characters that are created as “Main Characters.” Select
either one of existing characters or data with [NO DATA] displayed.
There are two organizations you take quest from:
Hunters and Arkz. Hunters uses hero side type
decks, and Arkz uses the dark side type decks.
With each side’s point of view, the player faces
various cases with people in the organization. In
Story Select Screen, select the Story to play in.
7
There are 6 types of save files. Note that if you erase the System File,
you may not be able to use any of the remaining save files (with the
exception of SEGA Network Info. file).
■ SAVE FILES THAT ARE CREATED AUTOMATICALLY
(Can be used only with the Memory Card inserted into Memory Card Slot A.)
System File 3 blocks
Character File 15 blocks
Guild Card File 10 blocks
■ SAVE FILES THAT ARE CREATED MANUALLY
Snapshot File 15 blocks
(Can be created only with a
Memory
Card inserted into Memory Card
Slot B.)
Download Quest Files Size varies according to the size of
the Quest.
■ SAVE FILE FOR NETWORK SETTINGS
SEGA Network Info. 4 blocks
SAVE FILES
If you already have a SEGA Network Info. file created for EP1&2,
you can use the same file. Since all save files related to the game
itself can only be saved to the Memory Card inserted into Memory
Card Slot A, it will be useful to create it on the same Memory Card.
SYNCHRONIZATION OF GUILD CARD FILES
If you have a save file from EP1&2 saved onto the Memory Card, you
can import the Guild Card data into EP3’s Guild Card file, and have the
two Guild Card files synchronized. When you create the EP3 save file
anew, the game will search for EP1&2 save files in the Memory Card
inserted into Memory Card Slot A that can be synchronized. If found,
the game will automatically start synchronization, and the records will
be saved onto EP3’s save file. After the synchronization process is completed, each Guild Card file will be updated whenever Guild Card data
is used.
● Only the Guild Card file in the Memory Card connected
to Memory Card Slot A can be synchronized. The game
cannot import from a Memory Card connected to
Memory Card Slot B.
● If you do not have enough space on the Memory Card,
the synchronization cannot be made. Please make
enough space to play EP3 (minimum of 28 blocks).
● Although the Guild Card file of EP1&2 can be synchro-
nized, you cannot search and meet a player playing
EP1&2.
CAUTION
Page 10

8
CONTROLS
l
Button
Control
Stick
+ Control
Pad
START/PAUSE
r
Button
z
Button
c
Stick
b
Button
x
Button
y
Button
With Online Game (p.32) and Story mode (p.42) of Offline Game, use
the Controller connected to the Controller Socket 1 to control the game.
With Free Battle mode (p.42), you may use the Controllers connected to
the Controller Sockets 1 to 4.
■ TITLE SCREEN/GAME MENUS/MENU ITEM SELECTIONS
START/PAUSE Game Start/Cancel Movie
Control Stick/+ Control Pad Select Menu Item
a Button Enter Selection/Cancel Movie
b Button Cancel Selection
l/r Button Switch Between Pages
■ VISUAL LOBBY (P.34)/THE MORGUE (P.12)
START/PAUSE /z Button Show/Hide Main Menu
Control Stick Move Character
+ Control Pad/c Stick Select Menu Item
a Button Enter Selection/Cancel Movie
b Button Cancel Selection
x Button Show Details (during Item
Selection)/Toggle between Letters
and Symbols (when Software
Keyboard is displayed)
y Button Show/Hide Software Keyboard
l Button Correct Camera View/Switch
Between Pages
r Button Switch Between Pages/Toggle
Player Display (Online Game)
Anytime during the gameplay, simultaneously press and hold the b
Button, the x Button, and the START/PAUSE to return to the Title
Screen. Please be advised that, if the game is reset carelessly before
saving, it may cause an ill-effect the next time you play the game.
a
Button
41
CARD LIST
From Card List, you can select and Search for the player, View
Comment, Write Comment, Sort (select two to rearrange), or
Delete. If you use search, the result can be viewed by Search Result
(see below). Note that once the card is deleted, you cannot restore it.
SEARCH RESULT
You can check the result of search on the player you selected. If the
player searched is currently online, you have the option to Send Mail
(see Simple Mail), or Meet the User. If you select to meet the player,
you will be transported to the Visual Lobby where the player you
searched currently is located. Note, however, that the option to meet is
not available to select, if you currently belong to a team.
CHOICE SEARCH
You can search for other PSO players inside the Ship, according to the
requested category, such as levels. When a list of players that fall under
the selected category, select a player and select Send Mail/Meet the
User.
CHOICE SETTING
By declaring the condition of searches and setting them here, you will
enable yourself to be searched by Choice Search. By default, it is set
to OFF. Set it to ON, then from the list of prepared categories, select
contents that describe yourself. Press the b Button to end.
BLOCK SENDER
Against malignant harassment using the mail or meeting function of the
Guild Cards, you can block mail or invitations from specific players. The
players blocked are recorded in Blocked Sender List. You can Add to
the list by selecting from Add by Guild Card/Add online player/
Add from Mail, and select from the displayed list. You can lift blockage
by selecting the name of player to lift blockage from the Blocked Sender
List (select YES to confirm).
SIMPLE MAIL
You can Send Mail of up to 80 characters to another player. You can
also select Received Mail, if there are any mails (in which case you
can Reply to the mail you received, Search for information on the
sender, or Delete past mails). You can also set up to send reply automatically with Answer Service. First, enable/disable with Answer
ON/OFF, then select Change Response to change the message for
the Answer Service.
Page 11

40
PARTS EDIT
You can Move Parts around or Delete Parts (or Delete All, if you
wish). Next, select a part to move/delete from the list of all parts used.
CAPTURE
Set to permit/forbid other people to capture your symbol. Select TRUE
to permit; FALSE to forbid. Press the b Button to exit.
REGISTER SYMBOLS
When done, select to register your symbol. Enter a name for your symbol, and the registration is complete.
CHANGE SE
Change the sound effects. A list of sound effects will be displayed. When
selected, you will be asked to confirm. Answer YES/NO, and proceed.
VOICE ACTION
You can sound various voice effects. Press the
y Button to display the Software Keyboard,
then press the x Button until Voice Action
Menu is displayed. Inside Visual Lobby, the
Voice Action can be heard by all players in the
same Lobby. During the battle or while viewing one, the Voice Action can
be heard by all players in the area (players in the battle or spectators).
SHORT CUT
Register oft-used balloon chat messages, Symbol Chat symbols and
Voice Action sounds to + Control Pad directions or Software Keyboard
Function Keys.
You can register by selecting Short Cut under
Chat in the Main Menu. When selected, a list of
keys will be displayed. Use the l/r Button to
change pages, + Control Pad 82 to select the
+ Control Pad direction (or Function Key). Next,
select either Register or Delete. If you select
Register, enter the message to register.
GUILD CARD
Guild Cards are a simple form of communication that you can trade with
other PSO players. Also, you can search other player’s information to
send a simple mail or meet them if they are present at the lobby.
MY CARD
You can Write Comment about yourself, and Send it to other players.
Please keep in mind that other players will be reading your comment.
9
■ DURING THE BATTLE
START/PAUSE Show/Hide Main Menu
Control Stick Select
l Button and + Control Pad Select Player to Chat with (Online
Game)
c Stick Change View Angle
a Button Enter Selection
b Button Cancel Selection
x Button Show Details (during Item
Selection)/Toggle between Letters
and Symbols (when Software
Keyboard is displayed)
y Button Show/Hide Software Keyboard
r Button Show details of the card
z Button Toggle between Status Displays
■ SOFTWARE KEYBOARD
+ Control Pad/c Stick Move Cursor
a Button Enter Selected Letter/Character
b Button Delete a Letter
x Button Display Word Select
y Button Show/Hide Software Keyboard
l/r Button Toggle Between Letters & Symbols
ESC Delete Whole Sentence
DEL Delete Selected Letter
OK Send Message
SPACE Enter Space
BS Delete a Letter
EXIT
Cancel Chat (Hide Software Keyboard)
Chatting during the game can be performed with
Software Keyboard.
Page 12

10
STARTING THE GAME
During the Title Screen, press START/PAUSE to
display the Game Menu.
Use the + Control Pad 82
to select the mode to play, and press the a
Button to start the game. Shown below are available modes. Please
refer to the pages shown for details on each mode.
Online Game
(p.32)
▼PLAY ONLINE BATTLE AGAINST
OTHER EP3 PLAYERS
▼PARTICIPATE IN TOURNAMENTS
AND AIM TO BE THE CHAMPION
▼WATCH OTHER PLAYERS IN
BATTLE OR TOURNAMENT
Offline Game
[Story] (p.42)
▼SIMPLY LEARN AND PLAY THE
GAME
▼LEARN ABOUT THE WORLD OF
EP3
Offline Game
[Free Battle] (p.42)
▼PLAY OFFLINE BATTLE AT
FRIEND’S HOME
Tutorial
(p.45)
▼LEARN GAME SYSTEM
Options
(p.45)
▼CHANGE GAME AND NETWORK
SETUPS
Official Web Site
(p.45)
▼FIND OUT THE LATEST INFO ON
EP3
■
STARTING UP EP3 FOR THE FIRST TIME
The first time you start up EP3, you will be
asked to adjust the calendar setting of the
Nintendo GameCube™. If the calendar is set
correctly, select NO to continue with startup,
or select YES to switch to the Calendar Screen
for adjustment. If for some reason the calendar is reset, please make sure to readjust before playing.
CAUTION: If you select NO, the game will start creating save files
necessary to play EP3. Never remove the Memory Card during this
sequence.
39
SYMBOL CHAT
Communicate using a simple picture to express a
feeling or action. From a list of registered
Symbol Chat data (up to 12 can be registered),
select one to display it.
WARNING
We reserve the right to terminate your user account for the use
of inappropriate symbols while online.
HOW TO REGISTER
■ CONTROLS
+ Control Pad/c Stick Select/Move parts
a Button Enter/set parts
b Button Return to previous step
l Button Reverse vertically
r Button Reverse horizontally
x Button Arrange two parts evenly
y Button Change color of face/object parts
You can create/register symbols by selecting Symbol Chat under Chat
in the Main Menu.
✻ Depending on parts, there are controls that are enabled (displayed in
white) and those that are disabled (displayed in gray). Verify with Control
Commands Window shown at the bottom right portion of the screen.
REGISTERED SYMBOLS
When selected, a list of Registered Symbols will be displayed. Select
Not in use to create a new message, or existing message to edit. The
data Untitled represents a message currently in creation.
FACE PARTS
You can Change the contour of the face from four available types,
Copy the registered data to another data, or Capture a newly dis-
played Symbol Chat symbols and copy them (saved as Capture). Note
that if you copy symbol to already registered location, the previous data
will be overwritten. Also, to capture symbol, it must be permitted (set to
TRUE in Capture setting) by the person transmitting it.
NEW PARTS
Select the parts that represents the message, Face Parts (eyes, noses,
mouths and hands) or Object Parts (various messages and symbols)
Next, select a part to be used from the displayed list.
Page 13

38
COMMUNICATING IN THE WORLD OF PSO
The Visual Lobby is a place for PSO players to gather up and interact with
one
another. Chatting can be done not only in the Visual Lobby, but also
within
the team during the battle/tournament or while viewing. The mes-
sages will
be displayed inside balloon. You can also send Simple Mail to
your friends.
To chat, first press the
y Button (by default, the Software
Keyboard may
be displayed). Next, press the x Button to change the
chatting method.
Some functions are available under Chat of the Main
Menu. You can also
read detailed descriptions in the Online Manual at
the Official Web Site (p.45).
BALLOON CHAT
Type in a message, using the Software
Keyboard, to communicate with balloons
appearing over each character’s head.
WORD SELECT
Communicate by constructing simple sentences
from a number of preselected phrases.
1
While the Software Keyboard is displayed, press
the x
Button to switch to Word Select menu.
2 Select a “Form.”
3 Press the l/r Button to scroll the list (if any), and select a phrase.
Depending on the form, selection may continue.
4 Select Send to display message, Return (or press the b Button) to
return to previous step, or EXIT (or press the y Button) to close the
Word Select menu.
VIEWING SCREEN
Switch with a/b Buttons.
While viewing, the players in battle cannot see chat messages by spectators.
The chat messages by the players in battle can be seen by spectators, and
Voice Actions can be heard by all. Also, if there are any players in the
Visual
Lobby, you can exchange Guild Cards or send/receive mails.
When the
battle is over, you will be returned to the Visual Lobby. For
Voice Actions,
see VOICE ACTION of the Online Manual, or see p.40.
Current viewpoint.
Can be changed with
Control Stick
46.
Number of spectators in
the room/total number
of spectators.
11
SELECT FILE AND CREATE PLAYER CHARACTER
When you start EP3, online or offline, the game will switch to File Select
Screen.
FILE SELECT
Here you can create a Player Character for a
new file, or select existing file to continue the
game from where you left off the last time.
Please select a file and enter. You can create up
to four characters on one Memory Card. Also it
is possible to recreate a selected character. For help regarding the File
Select Screen for the Free Battle mode, please refer to p.42.
CREATING A NEW CHARACTER
If you select a game file with NO DATA displayed, you can create a
new Player Character. After the prologue sequence, the game advances
to the Character Select Screen.
SELECT A FILE
On a game file which has already been played, the Player Character, the
Character Name and the Memory Card Slot will be displayed. When this
file is selected, a menu with the following contents will be displayed.
Confirm Play the game with selected Player Character.
Cancel Back to File Select Screen (close menu).
Recreate Delete the selected Player Character and create new one.
CREATING A PLAYER CHARACTER
CHARACTER SELECT
Select from 12 character types. This character is used mainly to move
around in the Visual Lobby and in “the Morgue” (R-Base).
CHARACTER CREATION
Here you can customize appearances to create your character. Select
the Modification Items (the selections vary according to the selected
character type) and modify as you desire. When you enter the
Character Name, you will be able to select OK to end character creation.
Once you select OK, your character will be assigned a SECTION ID.
Press the a Button to continue (at this point, it is not possible to cancel).
FACE/HAIR/COSTUME/SKIN COLOR (Humans/Newmans only)
HEAD/BODY (Humanoids only)
PROPORTION
CHARACTER NAME (up to 12 letters)
AUTO (automatically create with random selection)
Page 14

12
THE MORGUE
WHAT IS THE MORGUE?
The Morgue is an important location, where you
prepare yourself for upcoming battles. With
Online Game, you will be transported here after
you organize a Team at the Visual Lobby. With
Offline Game, you will be transported after you
select either Story or Free Battle. [Note: You will
be transported to R-Base if you selected ARKZ.]
The Morgue is an institution where they develop
new technology called CARD, and has facilities such as the Command
Center, where you can edit decks or trade CARDs. Also, in Story Mode,
the Story Characters hang around so you can converse with them.
ENTRY COUNTER
This is the main transporter used to send Story
Characters back and forth between the Planet
Ragol and the Morgue. Approach the Entry
Counter and press the a Button to display the
Battle Preparation Menu. Select Map/Quest,
rule and the deck. After making necessary selections, select and enter [Decide] to transport the
character to the battle map.
Map / Quest Select Map or Quest to battle in. Press the r
Button while the Map (Quest) is displayed to show
playfield.
Rule settings Modify rules (when available). Change according
to the situations.
Deck selection First select the Team and the Player that will par-
ticipate, then select the deck to use.
[Decide] Becomes available when Map/Quest and the
deck are selected.
EDITING DECK AT COMMAND CENTER
At the Command Center, located inside the
Morgue, you can edit existing decks or create
new ones on your own. Approach the counter
and talk to the attendant. You will be asked
whether you wish to edit a deck. Select and
enter YES/NO, then select a player.
Player Name/
Card Level
Selecting
Map / Quest
37
VIEW BATTLE
After you have either created or joined a
Spectator Team, a message will be displayed at
the time to begin battle. You will be moved to
the Waiting Room. Here you can verify
Simplified Status of the members in the
Spectator Team and Status of the team (player) you are going to view
(switch with r Button). The length of waiting time varies according to
the network status. Also, the left side of the screen is a log window, so
you can chat while you wait. When the wait is over, the viewing begins.
VIEWING REGULAR FREE BATTLE
Join Spectator Team
Join in a team to view battle from the list of available teams. Up to 8 players can join in.
Create Spectator Team
Select to create a team to view battle. When a list of
available teams for viewing is displayed, select one.
VIEWING TOURNAMENT
Join Spectator Team
Join in a team to view Tournament battle from the
list of available teams. Up to 8 players can join in.
Create Spectator Team
Select to create a team to view tournament battle.
When a list of available tournaments for viewing
is displayed, select one.
FROM VIEW SETUP TO BEGIN VIEWING
QUIT VIEWING
If you wish to quit viewing the battle, select Quit Battle Viewing from
the Main Menu. Here you have the options to Return to Lobby or
Quit Game (disconnect from the network). When a confirmation is displayed, select YES/NO.
You can view other players in battle, regular Free Battle or Tournament.
You can join the team, which is already in maximum capacity, as a spectator. Up to 8 players can register on a team, and you can register any
time. However, if you wish to view the tournament, you cannot view the
battle which has been completed. If the battle is already in progress,
battle screen will be displayed.
When you select View Battle, a View Menu will be displayed. Select to
view either Regular Free Battle or Tournament, then select either to join
or create Spectator Team to register.
Page 15

36
NOTICE UPON ENTERING A TOURNAMENT
• The Visual Lobbies which you can sign up for tournament are for EP3
only and are LOBBY-CARD-01~05. Note that Visual Lobbies
LOBBY-01~15 are shared with EP1&2, so there is no selection
TOURNAMENT on the menu.
• During the Deck Select before the battle, you cannot edit your decks.
It is necessary that you edit them in advance.
•When the Notice Message for the tournament is displayed, go to the
Visual Lobby of the Block where you registered for Tournament and
stand by. Within the same Block, you may stand by at either EP3-only
lobby or EP1&2 lobby.
• Please be advised that your entry will be cancelled, if you are in the
middle of team formation or in a different Ship/Block. Note also that
depending of the progress of the battles in progress, the time to wait
for your next battle may take longer.
•When the total number of participants does not reach the maximum
limit, the computer player (COM) will be entered automatically.
• During the tournament, for the sake of good manners,
please do not select “Quit Battle” to quit in the middle of a
battle.
FLOW OF THE TOURNAMENT: FROM ENTRY TO BATTLE
SELECT TOURNAMENT TO MAKE YOUR ENTRY
TRANSPORT YOURSELF TO THE MORGUE
SELECT YOUR DECK
BEGIN BATTLE
AFTER THE BATTLE, EARN MESETA IF YOU WON
IF YOU WON, RETURN TO VISUAL LOBBY
AWAIT YOUR BATTLE AT VISUAL LOBBY
ENTRY CANCELLED
IF YOU ARE IN A
DIFFERENT SHIP OR
IN THE MIDDLE OF
TEAM CREATION
CHECK TOURNAMENT
You can view detailed information of the tournament you have entered.
CANCEL TOURNAMENT
You can cancel the tournament you have either entered or signed up to
view. When selected, you will be asked to verify your action. Select
YES/NO and enter.
13
DECK EDIT
Select [new] to create new deck, or select a
deck with Story Character displayed to edit.
Also, at the top right, the following menu items
are displayed. Follow the on-screen directions to
select a menu item to execute.
COPY Duplicate existing deck.
NAME Rename selected deck.
DEL Delete selected deck.
ORDER Rearrange display order of existing decks.
If you select [new] in the Deck Edit Screen, you
will first be asked to select a character for the
deck you create. Select one to advance.
The characters appearing in the selection are
Story Characters: your crew that participate in
battle. At first there are only a few, but as the Story Mode of the Offline
Game progresses, you will have more characters to work with.
Note that Story Characters in the Story Mode that you select vary
according to the side you currently play: Hero Side or Dark Side.
CREATING A NEW DECK
Your battle strategy changes greatly, depending
on the construction of your deck. First, select the
type of cards you wish to put into your deck.
When a list of available cards is displayed,
select a card to put in. Note, however, that you
must have exactly 30 cards in a deck to be able to battle.
EDITING A DECK
a Button Enter selection.
b Button Change Character (when in Card Type
Selection)/Back one step/End Deck Edit.
c Stick Increase/decrease the number of selected card to
be put into the deck.
r Button Display details of the selected card.
x Button Open Sort Window (sort display order of cards in
selected method).
Page 16

14
Inside the Command Center, there is a device
called C.A.R.D. Trading Machine which, apart
from trading cards, allows you to view cards you
possess and discard any unnecessary ones. Stand
in front of the C.A.R.D. Trading Machine and
press the a Button to open menu window. Select and enter menu item to
perform the tasks below:
C.A.R.D. TRADING MACHINE
View Cards View all cards in possession. Use the Control
Stick/+ Control Pad to select a card, and press the
a Button to magnify picture on the selected card.
Press the x Button to open Jump Window,
allowing you to jump to the top card of the selected type.
Trade Cards You can trade cards with other players. During the
Online Game, two players can access each of the
two C.A.R.D. Trading Machines to trade with one
another. During the Offline Game, there are two
ways to perform trades, with one Controller or
with two Controllers. Select the card(s) to trade,
and follow the on-screen directions to trade.
Discard A Card Discard unnecessary cards. Select to open Cards
List. Select the card to discard. If you have more
than one of the selected cards in possession,
select the number to discard. The card(s) will be
discarded after confirmation. Please be advised
that discarded cards will not be returned.
Search Event Files If you have any event files in your memory card,
you can acquire special cards.
After the trade, the data will be saved on the Memory
Card inserted into Memory Card Slot A. Please do not
remove the Memory Card while the data is being saved.
CAUTION
35
INFORMATION COUNTER
Go to the Information Counter to organize team
(join existing team or create one) or to change
the Ship/Block. Talk to the counter, and make
your selection.
ORGANIZE TEAM
Join an existing team or create one of your own, in
order to battle. After selecting Organize TEAM
at the Information Counter, select what to do. When
done, the members of the team will be transported
to the Morgue. From here on, follow the directions
shown in the Entry Counter (p.12) or How a Battle Progresses (p.19).
Join a TEAM A list of available teams in the current Block you
are in will be displayed. Select and enter the team
you wish to join in.
Create a TEAM Select to create your own team and become its
leader. Enter Team Name, Password (enter none if
you wish to leave the team open to everyone), and
View Battle setting (Allowed/Not Allowed). Select
Registration when you are done.
TRANSPORT
You can transfer yourself to the different
Ship/Block. Select this, if you wish to play battle
against the players in a different Ship/Block.
TELEPORTER
Transfers between the Visual Lobbies can be
done with Teleporters located inside each
Visual Lobby. You can also teleport yourself
to PSO EP1&2 Visual Lobbies.
TOURNAMENT
Participate in a tournament of up to 32 players. There are two types of
battles: Singles (1 on 1) and Team Battle (2 on 2). Check the time of
event with the list of available tournaments to decide which to participate.
Next, when the Tournament Board is displayed, select where to make
your entry, and your entry to the tournament will be completed. Press
the x Button while selecting which tournament to participate, and the
simplified status display will be displayed. Use the c Stick to scroll, and
the l/r Button to switch between the rules and the Tournament Board.
Page 17

34
SELECTING SHIP & BLOCK
Following the announcement window, the game proceeds to the Ship
Select Screen.
The Ship Select Screen serves as a gate to the world
of PSO. Choose Ship Select to decide the Ship
and the Block to join. You will then be transported
to the Visual Lobby of the selected Ship/Block.
Please note, however, that depending on the Ship
you selected, the result after defeat in battle changes.
NOTICE
During the Ship/Block selection, press the
x Button to dis-
play the number of players currently joined and the teams
formed. You will not be able to join if the number of players
has already reached the maximum capacity. Try finding a
Ship/Block with vacancies or try again later on.
DOWNLOAD
FROM VISUAL LOBBY TO THE MORGUE, AND ON TO RAGOL
At the Information Counter located at the center of Visual Lobby, you can
organize a team. After the team is created, you will be transported to the
Morgue, located inside Pioneer 2. At the Morgue, you can edit decks and
trade cards with other players. Prepare yourself for the battle, and go to
the transporter. Set up the map and the deck, and you will be transported
to Ragol, the place to battle. After the battle, you will be returned to Morgue.
VISUAL LOBBY
Once inside the visual lobby you can move around and chat with other
users within the same block in real time. Press the r Button to change
the display above your character from Character Name➝Name &
LV➝Battle Record➝Tournament Title➝No Display. Also, EP3 players’
names will be displayed in yellow, while EP1&2 players’ will be displayed in white.
Download enables you to download a file for downloadable quests,
whenever available. When the Download Screen is displayed, select the
download menu item to execute. Next, select a file from the list of download files. Finally, select the Memory Card to save the downloaded file,
and the downloading begins.
To play downloaded quest, it is necessary to first go to the Visual Lobby
and then quit the game. From the Battle Preparation Menu of Free Battle
(Offline Game), select Map/Quest, then from Quest select the downloaded quest to play.
15
HOW TO VIEW BATTLE SCREENS
Here is a description of how to see screens of the battle in progress.
Press the z Button to check battle tactics, and r Button to toggle displays of detailed card information. Use the c Stick to manipulate the
camera angle.
BATTLE SCREEN [VERIFY BATTLE CONDITION]
1 Phase Displays the current phase.
2 Dice Displays the dice rolls (see above for ATK/DEF).
3 Simplified Map Displays the placements on the grid. Players are
indicated by the following colors: 1P - red, 2P blue, 3P - yellow, 4P - green. Flashing dots indicate the Story Characters.
4 Status Window Used to verify Story Character’s HP (shown in yel-
low gauge) or item/creature cards in play.
5 Dice Bonus Displays the current Dice Bonus. When the amount
of Dice Bonus is increased by one, both ATK and
DEF values will also be increased by the same
amount.
6 Cards in Hand Displays the current cards in your hand. The
card(s) you can use will be highlighted.
7 EX Value
Each time you destroy an opponent’s item (creature)
card, a certain amount of points will be added to
EX Value. When EX Value reaches a given
amount, the amount of Dice Bonus will be
increased. For Team Battle, EX Value is common to
both teammates.
8 NEXT Manually advance to the next phase.
9 Guide Window Displays the description (what to do) of the cur-
rent phase.
0 Opponent’s Displays the opponent’s status. Displayed contents
Status Window are the same as those of the player’s.
q Card DescriptionDisplays the detailed descriptions of the selected
cards (see next page).
w Chat Icon Displays the destination player you are chatting
with. Use the l Button and + Control Pad together to change the player to chat with.
e Mail Arrival/Search Result/Guild Card Reception Icon/
Battle Observation Icon
1
2
ATK: Attack Points
Points to be used during the player’s turn to attack.
DEF: Defense Points
Points to be used to defend during
your opponent’s turn to attack.
✻ If a given amount of EX value is accumulated, Dice Bonus will be added.
3
4
5
6
7
8
9
0
q
w
e
Page 18
16
CARD DESCRIPTION SCREEN
1 Resist Color Indicates an attribute of the card. If you have a
defense action card of the same attribute as the
card you are attacked by, you can use it to
defend yourself.
2 Range Indicates the attacking range of the card.
Attacking direction can be selected freely.
3 Left Color Whenever you use multiple numbers of action
cards in succession, if the color shown here is the
same as one of the Right Colors included on the
previous card you used and you have enough
points left, you can use the selected card for successive action (Combo).
4 Hit Points Indicates the tolerance value of the card.
Decreases as the card is attacked.
5
Technique Points
Indicates the attacking power using technique.
6 Cost Point Indicates the amount of attack points necessary to
use the card.
7 Right Color If the Left Color of the selected card is among the
colors shown here on the previous card, you can
use it in succession.
8 Attacking PointsIndicates the attacking power of the card.
9 Move Points Total amount of steps you can take on Move
Phase (values are in squares).
For Right Color and Left Color, please refer to About Combo on p.20.
For Resist Color, please refer to About Resist Color on p.21.
During the battle, press START/PAUSE to display Main Menu. You can
verify tactics and current status in real time. You can also send and/or
receive mails here. Inside Visual Lobby or Morgue,
5 and 6 are dis-
played.
MAIN MENU
SIMPLIFIED CARD DISPLAY
6
1
2
3
4
5
6
7
8
9
42
33
WELCOME TO PSO — FROM SHIP TO VISUAL LOBBY
After you connect to the network and are certified, the first place you
select is what is called “the Ship,” the independently operating starship
of Pioneer 2.
The Ship is divided into a
multiple number of
Blocks, and in each Block
there exist multiple numbers of “Visual Lobbies.”
You can TRANSPORT
yourself between the
Blocks or to different
Ships from Visual Lobby.
ENJOY THE WORLD OF PSO TOGETHER AT VISUAL LOBBY
When you select the Block, you will first be transported to the Visual
Lobby for EP3. The Visual Lobby is the place for players to wait and get
together, find an opponent to battle against, and to await turns on the
tournament. Chat with one another, or exchange information and/or
Guild Card to make friends. Also, in EP3, you can visit Visual Lobbies
for EP1&2 to communicate with EP1&2 players.
Although you can communicate with EP1&2 players in the
Visual Lobby, after Team Creation the players of EP1&2 and
EP3 will take part in separate adventures/battles.
TO OTHER SHIP
SHIP
BLOCK
TO
OTHER
BLOCK
MORGUE
TRANSPORT
RAGOL (BATTLE AREA)
LOBBY-CARD-01~05
(EP3 Only)
Organize Team
Tournament
View Battle
VISUAL LOBBY
LOBBY-01~15
(Jointly Used
with EP1&2)
Organize Team
CONNECT ONLINE
TELEPORTER
Page 19

32
ONLINE GAME
After you select the Player Character to use in the game in File Select
Screen (p.42), if you have already completed your network settings, the
End User License Agreement, stating important agreements to play EP3
online, will be displayed.
Use the c Stick 82 to read and verify contents, and select AGREE to
proceed. You cannot play Online Game, if you DISAGREE to the terms.
PSO SERVER USAGE — END USER LICENSE AGREEMENT
Here you connect to the network and play online game with other players.
There are three ways to enjoy: Regular Free Battle, Tournament,
and View Battle. Find out how good you are using the deck you created, or watch other players battle with one another.
ENTERING SERIAL NUMBER, ACCESS KEY & PASSWORD
To play the Online Game, you must also input the
Serial Number, Access Key, and Password. Enter
the Serial Number and Access Key printed on the
disk case correctly. For Password, enter your choice
of alphanumeric characters, up to 8 characters long.
✽
It is important to remember your password. We strongly recommend
saving
your password. If you choose not to, be sure to write it down.
There is a space provided at the end of this Instruction Booklet.
After inputting all necessary information, a Confirmation Screen will be
displayed. Verify the Serial Number/Access Key, and proceed. Next, the
game will ask whether to save the Password onto the Memory Card. Select
Yes to save. Select No, and the game will ask you to enter the Password
each time you play the ONLINE GAME. After transmitting registered
contents to the server, if the certification is completed successfully, they
will be saved onto the System File. From next time on, you do not need
to reenter the Serial Number, Access Key, and Password (if saved).
If this is your first time to play online, you may find the wealth of new
information confusing at first. The following pages describe the basic
structure of PSO Network, from connecting online to transportation to
the battle area.
BASIC STRUCTURE OF PSO NETWORK
FOR OWNERS WHO ALREADY HAVE EP1&2 AND A HUNTER’S LICENSE
If you have already purchased a Hunter’s License for EP1&2, enter the
EP1&2 Serial Number and Access Key for EP3, to use the same Hunter’s
License to play EP3 online. In this case, do NOT enter the EP3 Serial
Number and Access Key unless you wish to have two separate Hunter’s
Licenses. (You will be charged twice if you do this.)
Note: If you own EP3 and have a current Hunter's License, prior to
purchasing EP1&2, you can use your Hunter’s License to play EP1&2
online by using the Serial Number and Access Key from EP3.
17
1 Player Status Switches from HP to AP to TP as you press the x
Button.
2 Opponent’s Same as those of the player.
Team Status
3 EX Value
4 Cards in Play Displays the Item/Creature cards in play.
5 Menu Items & Descriptions
6 Server Time/Current Connection Status (Online Game Only)
STATUS
Displays the Player Parameters and detailed data. Use the l/r Buttons
to change pages, if any, to verify other status.
PLAYER PARAMETERS➔CURRENT RANKING/MESETA/CONNECTION
STATUS➔TOURNAMENT➔RESERVATION TO WATCH
(ONLY
DURING ENTRY)
CHECK TACTICS
This becomes selectable in the Visual Lobby, whenever you have entered
a tournament or are viewing one, as you can check the Tournament
Board. Also, during battle, move the cursor over to this menu item to display the current turn, phase and simplified map.
HELP
You can view cards in possession, and the history of the cards that
appeared during the battle. Select and enter menu item to perform.
Cards list View cards you have in possession, from all cards
or separately in types. Can be viewed only inside
Morgue.
Your cards View the number of cards and types in possession,
and percentage, in different categories and ranks.
Can be viewed inside Morgue or during the battle.
Enemy cards Can be selected only during the battle or while
viewing, and displays the history of the cards that
appeared in the battle. Note that discarded cards
cannot be viewed.
2
13 4
6
5
Page 20

18
CHAT
All settings regarding chatting can be made here. Select enter menu
item to perform.
Short Cut Register/delete messages and assign them.
Symbol Chat Edit and register Symbol Chat icons.
Guild Card Create a communication card and trade with play-
ers of EP3 and EP1&2. You can also search for
the player you have traded a Guild Card with.
Simple Mail Enter message and send it to another player, or
read and reply to mail that has been sent to you.
Info Board Register introductory message of yourself.
Log Window Read conversations of all players inside the Visual
Lobby, Morgue, or during the battle.
OPTIONS
Here you can change various game settings. Select and enter menu item
to perform.
Customize View Customize screen displays during the battle.
Message Speed Adjust speed of the messages displayed.
Rumble Enable/disable Rumble Feature of the Controller.
Auto Disconnect Set a time limit at which to automatically save the
current game data and disconnect from the network
in the event that you remain idle (e.g., if you leave
the Controller untouched) for the amount of time
QUIT BATTLE (ONLY DURING ONLINE GAME)
Quit the current battle in progress. Select either Return to Lobby or Quit
Game.
QUIT BATTLE VIEWING (ONLY WHILE VIEWING BATTLE)
Select this when you wish to quit viewing current battle. You will be
returned to Visual Lobby.
QUIT GAME
Select to quit the game in progress. The game will automatically be
saved.
You are encouraged to finish the battle before you quit game in
the Online Game. Avoid quitting in the middle of the battle.
31
● Do NOT reset a game or disconnect a line in the middle of
gameplay.
The Visual Lobby and each game are common places for players to
enjoy gameplay in the ONLINE GAME. Keep in mind that games
are played
between you and other “actual” players, not computers.
Also, do NOT disturb
other users playing PSO by resetting a game or
disconnecting a line without
advance notice, as these actions may cause
harm or inconvenience to others.
We reserve the right to terminate your user account, in case
of repeated disturbance to other users or gameplay with
cheated (falsely modified) data during the ONLINE GAME.
NetFront and AVE-TCP for NINTENDO GAMECUBE by ACCESS
CO., LTD. is contained in this product as networking functions.
NetFront and AVE-TCP is a registered trademark owned by ACCESS
CO., LTD. in Japan and selected countries worldwide.
Copyright © 1996-2003 ACCESS CO., LTD.
Copyright © 1986-2003 ACCESS CO., LTD.
This software is based in part on the work of Independent JPEG
Group.
This software uses “FontAvenue” fonts by NEC. “FontAvenue” is registered trademark of NEC.
All
brands and product names are trademarks or registered trade-
marks of their respective
companies
Note: Online users may access additional information about online
play at the PSO EP3 website. www.sega.com/PSO_EP3
Page 21

30
LINKS
Where there are underlines to the text or pictures that change their
color upon moving the cursor over them, there is a link to a specified
page. Press the
a Button to jump to that page.
✻
With the browser built into PSO, you can only jump to the preselected
pages. It is not possible to manually type in the specific URL to jump.
While using the built-in browser, do not remove the Memory
Card
that contains “SEGA Network Information.” If removed,
all controls
will be terminated until the same Memory Card is
re-inserted.
CAUTIONS ON NETWORK CONNECTION
ABOUT THE CHARGES
● Upon playing the ONLINE GAME, aside from the Hunter’s License,
you may also be charged for connecting to your ISP. Please check
with your telephone company/ISP regarding any possible charges
and to make sure you are using a local number.
NETWORK MANNER
● Avoid a user name or a TEAM name that may be offensive
to other users.
When playing in the ONLINE GAME, you can set a user name or a
TEAM name freely. However, it is possible that all users playing the
ONLINE GAME may see them. Therefore, avoid creating a name
that can be considered inappropriate.
● Do NOT make remarks that may hurt other users.
Chat and Simple Mail are letter communication tools that enables
user to enjoy talking with each other. It may be the case that some
words may contain the spelling of words that could be considered
offensive, and if so,
the word(s) may be shown as symbols (ex. #$@).
Make sure to be considerate
of others when chatting online.
● Keep your personal information confidential.
A great number of users may view your conversations in the ONLINE
GAME. Keep your personal information such as an address or a
phone number confidential. Also, do NOT make any statements that
run contrary to public order and standards of decency, or that break
the law
WARNING! If you are entering personal information while
using
the Nintendo GameCube™ WaveBird wireless
Controller, there is a possibility of information being picked
up by another WaveBird receiver. It is strongly recommended that you do not play PSO with a WaveBird controller.
19
HOW A BATTLE PROGRESSES
When the game switches to the Battle Screen,
the game will determine which player (team)
starst their turn first. When the dice are rolling,
press the a Button to stop. The player (team)
with the higher number starts the turn first. Note
that on the first turn, the player (team) taking the
turn first cannot attack. The following descriptions
are for games with default rules.
Spend the ATK points you rolled to set the card on game map, move
and attack. Pay attention to the amount of ATK points you spend to play.
The card set and the method of attacks vary according to the type of
deck you selected.
PLAYER TURN
1
DICE PHASE [DICE]
Roll the dice to determine ATK and DEF points
for the turn. Two dice, displayed at top left, start
to roll. Press the a Button to stop. The higher
number becomes your ATK point.
2
SET PHASE [SET]
Set the card in your hand to the map. You may
set multiple number of cards, provided you have
enough points. You may not set a card whose
cost is higher than remaining ATK, or when the
total number of cost of the cards, including the
card you are trying to play, exceeds eight
points.
Hero Side Equip Story Character with weapons and protec-
tive armors.
Dark Side Summon creatures within the possible range.
3
MOVE PHASE [MOVE]
Move the Story Character or the creature.
Moving one square spends one ATK point. Use
the Control Stick 46to select the Story
Character/creature, and move when the range
is displayed. Pay attention to the amount of ATK
points remaining.
DICE
CARDS IN HAND
Page 22

20
4
ACTION PHASE [ACT]
Attack the opponent’s Story Character/creatures. Select the weapon (or creature that has
been summoned), then select the target.
Hero Side Select the weapon (or Story Character itself when
equipped with none) to attack the opponent.
Dark Side Select either the creature or the Story Character
to attack the opponent.
When attacking, using an action card can affect the game in various
ways, such as temporarily raising attacking power or trigger special
effects.
5
DRAW PHASE [DRAW]
In this phase, you can first discard unnecessary
card(s) from your deck, then draw cards from
your deck until you have five cards in your
hand. Select [NEXT] to end your turn. Note that,
if you have drawn the final card from the deck,
the deck will be refreshed with all cards, except those that are either in
your hand or currently in play (may vary according to the selected
rule).
ABOUT COMBO
With enough ATK points remaining, during the Action Phase, two action
cards with the same Left and Right colors can be played in succession,
enabling you to add Combo Attack to the weapon/creature. At this
time, the attack range will be determined by the final card of the
combo. Look at the example below, and try various Combos.
You can make Combo, since the
Right Color on Long Arm card is
the same as the Left Color of
Attack card.
You cannot make a Combo with
Attack card, since Long Arm card
does not have a Left Color.
POSSIBLE ACTION TO TAKE
SUCCESSFUL COMBO NO COMBO
RED RED NONE RED
29
You must be 18 years old or have a parent sign up for you in
order to purchase a Hunter’s License.
BROWSER CONTROLS
MENU BAR
Press the y Button to display Menu Bar at the bottom of the screen.
Move the cursor over the icon and press the a Button for various actions.
1 ONLINE/OFFLINE DISPLAY
Indicates whether you are currently connected to the network (ONLINE)
or not (OFFLINE). Move the cursor over the indicator, and press the
a
Button. When ONLINE is displayed, the game will disconnect from the
network; when OFFLINE, the game will reconnect to the network.
2 ELAPSED TIME OF CONNECTION
Indicates how long you have been connected to the network.
1
2
3
4
3
At the PSO Episode III website splash page, press the a Button to
access the website.
4 Confirm (select Yes) to gain access to the network through your net-
work access device (modem or broadband connector).
5 From the Home Page, select Create Account and follow the steps to
purchase your Hunter’s License.
4 MENU BAR ICONS
Return to previous page in
memory.
Advance to the next page
in memory.
Stop reading a page.
Restart reading a page.
Return to the home
(default) page.
Jump to Network Setup
Screen (➝p.23).
Quit browser and return to
the Main Menu.
3 SECURITY
Whenever you enter a page where the information being transmitted is protected,
a locked icon will be displayed (the date/time setting needs to be
correct).
✻
This browser supports Secure Socket Layer (SSL) Ver. 2 and
Ver. 3.
Page 23

28
PPPoE settings
Enter User ID and password necessary to connect to your ISP. IF DNS server address is not
specified by your ISP, you do not need to
enter anything.
The network settings for the Broadband Adapter are now complete.
Select Save to save new settings to the SEGA Network Information file.
Select Cancel to start over. While saving, please do not remove the
Memory Card.
5 END OF SETUP
After the network setup is completed, you may
proceed
to Purchasing Hunter’s License or
Return to the game.
PURCHASING A HUNTER’S LICENSE
5 Finally, enter proxy server address and proxy
port number. If there is no specification by
your ISP, you do not need to enter anything.
When done, select Next to advance (end).
EP1&2 USERS: YOUR HUNTER’S LICENSE CAN BE USED WITH EP3!
If you have a Hunter’s License from EP1&2, you can play EP3 online using
the same License. Expired Licenses can be renewed online, at the PSO
EP1&2 website. If you plan on using one common Hunter’s License, enter
the Serial Number and Access Key from EP1&2 that you used to first
purchase the Hunter’s License. Make sure not to purchase with different
Serial Number and Access Key (i.e. the one that comes with EP3), otherwise you will be charged for both Hunter’s Licenses. Please note that
you can also use a Hunter’s License purchased with EP3 to play online
with EP1&2 (separate purchase of the EP1&2 game required).
In order to play PSO online, you must purchase a Hunter’s License.
1
Once you have configured your network settings (➝p.23), select OFFICIAL WEB SITE
from the Main Menu. Alternatively, you may select
Buy a HUNTERS LICENSE under Network Option of the Options
Menu (➝p.45).
2 Confirm which Memory Card Slot holds your SEGA Network Info file.
Important: Do not remove Memory Card at any time during
this process. Doing so could corrupt your PSO files.
Here is an explanation of how to purchase from your Nintendo
GameCube™.
21
When your turn is completed, it will be your opponent’s turn. You may
only take action when you are being attacked. Here you will spend DEF
points.
ACTION DURING OPPONENT’S TURN
USE DEFENSIVE ACTION CARDS
When you are under attack, if you have a
defensive action card and enough DEF points,
you can use it to defend the target character. If
you have more than one target to defend, move
the cursor to select which character to use the
defensive action card on.
ABOUT RESIST COLOR
The defensive action card that can be played is determined by the Resist
Color indicated at the top of the cards. Use the examples below as a
guide to match against various attacks.
If your opponent attacks with an item card
with red Resist Color, you can use defensive
action card with red Resist Color.
If your opponent attacks with an item card
with red Resist Color, you cannot use defensive action card with Resist Color other than
red.
If your opponent uses an action
card with yellow Resist Color,
regardless of the Resist Color on
the attacking item card, you can
only use the defense action card
containing yellow Resist Color.
POSSIBLE
DEFENSIVE ACTION TO TAKE
DEF POINTS
SAME RESIST COLOR
SAME RESIST COLOR
DIFFERENT RESIST
COLOR
RED RED
RED
YELLOW
(RED)/YELLOW
RED
BLUE/GREEN
Page 24

22
Your ultimate aim in the battle is to defeat the enemy Story Character.
With team battle, you will follow the rules set/modified in Rule setting of
the Battle Preparation Menu at Entry Counter (P.12).
CONDITION FOR VICTORY
BATTLE RATING
When you win the battle, your performance will
be evaluated and one of the following ranks will
be given: S/A+/A/B+/B/C+/C/D+/D/E. This
rank determines the number of cards you can
obtain.
RESULT & OBTAINING CARDS
In the Result Screen, increase/decrease in
Experience Points and CLv. will be displayed. If
CLvEXP (experience points) exceeds a given
amount, your CLv increases. If you are defeated,
your experience points decrease, and may
cause your CLv to decrease as well. (In Online Game, there are some
ships, in which your experience points do not decrease upon defeat).
Press the a Button to advance to Card Select Screen. Use the + Control
Pad 46to select from available card pack to obtain.
IF YOU ARE DEFEATED IN BATTLE...
Even in defeat, you can still obtain cards, but a
lesser amount. To obtain many cards, it is important to win the battle. The flows of the game,
after the defeat, are as follows.
Free Battle Online or Offline, after Result Screen and obtain-
ing cards, you will be returned to the Morgue.
Story After receiving cards, Game Over Screen will be
displayed. The game returns to the Title Screen.
27
2 Next, the Edit ISP name Screen will be dis-
played. You have the option to change the
name of this setting. It is recommended that
you enter a name that is easily recognizable,
such as the name of the ISP you are contracted with. When done, select Next to advance.
From here on, read the network settings provided by your
ISP, and enter where necessary.
3
Next, Ethernet settings Screen will be displayed.
Connection Settings
Select from one of the following three settings.
•Automatically obtain an IP address
(DHCP)
If you are connecting via router or if there is
an instruction from your ISP, select this. You
cannot configure router settings from PSO or Nintendo GameCube™.
Please use your PC to configure your router settings.
•Manually set an IP address
If you have a fixed IP address from your ISP, please select this.
•Use PPPoE
Instead of using the router, if you connect directly to your ADSL
modem, select this.
✻ If you turn the Nintendo GameCube™’s power OFF or dis-
connect the ethernet cable while connected to PPPoE, you
may not be able to reconnect to the network for a while.
Line timeout (minutes)
While in network browser, if the game has been idle (i.e. the controller has not been touched) for the amount of time set here, you will
be disconnected from the network automatically. You can also select
not to disconnect automatically.
When done, select Next to advance. Depending on your selection on
Connection Settings, the ensuing settings will vary.
4 Next, enter information according to the
selected Connection settings.
IP address auto-settings
Enter DNS server addresses and DHCP hostname. If neither is specified by your ISP, you
do not need to enter.
IP address manual-settings
Enter values provided by your ISP.
Page 25

26
5 On the ISP settings 2 Screen, you must select
the Automatic or Manual DNS server
address setting. It is suggested that you
choose Automatic unless you know how to
configure your DNS settings manually. When
done, select Next to advance.
4 Next, ISP settings 1 Screen will be displayed.
Enter information provided by your ISP.
Depending on the ISP, the User ID may also be
called Login ID. If you do not enter Password
here, you will be asked to enter each time you
connect to the network. You must enter User ID
and at least one Phone number. If these are not
entered, you cannot advance to the next step.
When done, select Next to advance.
6 On the Browser settings Screen, you can enter
a Proxy server address and port number if
you use one to connect to the Internet. If you
are not sure, it is suggested that you leave
both fields blank. When done, select Next to
advance.
The network settings for the Modem Adapter are now complete. Select
Save to save new settings to the SEGA Network Information file. Select
Cancel to start over. While saving, please do not remove the Memory
Card.
4-b BROADBAND ADAPTER SETUP
1 The Select network information settings Screen
will be displayed. Move the cursor over the box
with ISP name, and press the a Button to display
the list of available ISP profiles (by default,
Provider 4~5 will appear). The game will
connect to the network using the ISP setting
selected here. If you have already configured
either of the two provider profiles, the Profile
name you chose will appear in the menu. To
modify or create a new ISP profile, select one
and choose Edit menu to advance to the next
screen.
WARNING
If you are entering personal information while using the
Nintendo
GameCube
™
WaveBird wireless Controller, there
is a possibility of information being picked up by another
WaveBird receiver. It is strongly recommended that you do
not play PSO with a WaveBird Controller.
23
BEFORE STARTING ONLINE GAME
IMPORTANT
The first time you select Online Game, you will need to set your system
up for network connection. Follow the directions below to set up your
system. You will also need to enter Serial Number, Access Key and
Password.
Before entering Serial Number and Access Key, please also
read “EP1&2 USERS: YOUR HUNTER’S LICENSE CAN BE USED
WITH EP3!” on p.28.
After the Serial Number, Access Key and Password are entered correctly and saved onto System File, you will not need to enter them
again the next time, as long as the System File is present. You can also
save Password onto System File.
Please be warned that if you open the Disc Cover or remove the
Memory Card during Online play, the game will be disconnected from
the network.
NETWORK SETUP
NETWORK SETUP CONTROLS
Control Stick Move Cursor.
+ Control Pad Select Menu Item.
a Button Enter Selection.
SOFTWARE KEYBOARD
Network information is entered using the
Software Keyboard. Move the cursor over the
input field, and press the
a Button to display the
Software Keyboard. The Keyboard controls are
different from the one used in the main game of
EP3.
✽For Software Keyboard used in the
main game, please see p.9.
Control Stick Move Cursor/Select Letters and Characters.
+ Control Pad Select Letters and Characters.
a Button Enter Selected Letter/Character.
b Button/DEL/BS Delete a Letter.
x/z Button /
Hide Software Keyboard.
START/PAUSE / END
y Button/SPACE Enter Space.
l/r Button Toggle Between Letters & Symbols.
ESC Cancel Entry.
Page 26

24
You will next create a save file SEGA Network Information, which
contains the network settings. This can be created when you select either
Online Game or Official Web Site for the
first time from the Main Menu.
Select the Memory Card Slot with the Memory
Card in which you wish to create the SEGA
Network Information file. Do not remove the
Memory Card while creating the save file.
From here on, the network settings will be overwritten on this file. A caution message will be
displayed to notify such action. Select Ye s and press the a Button.
✻The remainder of the network setup deals with your ISP
configuration. If you do not know your ISP settings, it is
suggested that you consult your ISP or have a parent or
guardian complete the rest of the network setup. For further information about the PSO Network, please read the
sections “Cautions on Network Connection” on p.30 and
“Phantasy Star Online Episode III: C.A.R.D. Revolution End
User License Agreement” on p.46.
2
CREATING THE SEGA NETWORK INFORMATION FILE
When the Network Setup Menu is displayed,
select Network Setup to proceed or select
Return to the game to exit.
The steps for the Network Setup vary according
to your network environment. The game will
automatically detect which device is connected (Modem Adapter or
Broadband Adapter), and display the appropriate setup screen.
✻Throughout the ISP network setup process, if there are any
options you do not understand, move the cursor over the
underlined word(s) and press the a Button to display more
detailed information in the bottom window.
3 NETWORK SETUP MENU
PREPARATION
1 PREPARING YOUR NETWORK DEVICE
Depending on your networking environment, attach either the Nintendo
GameCube™ Modem Adapter or the Nintendo GameCube™ Broadband
Adapter. Please read the Instruction Booklet of the respective device for
instructions on how to attach.
CAUTION
Never remove the Nintendo GameCube™ Modem Adapter or
Nintendo GameCube™ Broadband Adapter while your
Nintendo GameCube™ in turned on.
25
4-a MODEM ADAPTER SETUP
1 The Select network information settings Screen
will be displayed. Move the cursor over the
box with ISP name, and press the a Button to
display the list of available ISP profiles (by
default, Provider 1~3 will appear). If you
have already configured any of the three
provider profiles, the Profile name you chose
will appear in the menu. To modify or create a
new ISP profile, select one and choose Edit
menu to advance to the next screen.
WARNING
If you are entering personal information while using the
Nintendo
GameCube™WaveBird wireless Controller, there
is a possibility of information being picked up by another
WaveBird receiver. It is strongly recommended that you do
not play PSO with a WaveBird controller.
3
Next, the Modem settings Screen will be displayed.
How to dial
Select Tone or Pulse. Consult your phone carrier if
you are not sure which type your phone
line requires.
Outside line
Most phone lines do not require an outside
line prefix to dial out. However, in some cases such as a company or
dormitory phone line, an outside line prefix is necessary. If so, enter
the number in the space provided.
Line timeout
While connected to the Internet, if the game does not receive a
response (i.e. the Controller has not been touched) for the amount of
time specified in Line timeout field, the phone line will automatically
be disconnected.
By selecting Details, you can enter detailed modem settings (additional AT
commands), but it is not required unless a particular situation
requires it. When done, select Next to advance.
2 Next, the Edit ISP name Screen will be dis-
played. You have the option to change the
name of this setting. It is recommended that
you enter a name that is easily recognizable,
such as the name of the ISP you are contracted with. When done, select Next to advance.
From here on, read the network settings provided by your
ISP, and enter where necessary.
 Loading...