

Page 1

TENCHU: FATAL SHADOWS (PS2)
FRONT COVER
Page 2
WARNING: READ BEFORE USING YOUR PLAYSTATION®2
COMPUTER ENTERTAINMENT SYSTEM.
A very small percentage of individuals may experience epileptic seizures
when exposed to certain light patterns or flashing lights. Exposure to certain
patterns or backgrounds on a television screen or while playing video
games, including games played on the PlayStation 2 console, may induce
an epileptic seizure in these individuals. Certain conditions may induce
previously undetected epileptic symptoms even in persons who have no
history of prior seizures or epilepsy. If you, or anyone in your family, has an
epileptic condition, consult your physician prior to playing. If you experience
any of the following symptoms while playing a video game – dizziness,
altered vision, eye or muscle twitches, loss of awareness, disorientation,
any involuntary movement, or convulsions – IMMEDIATELY discontinue use
and consult your physician before resuming play.
WARNING TO OWNERS OF PROJECTION TELEVISIONS:
Do not connect your PlayStation 2 console to a projection TV without first
consulting the user manual for your projection TV, unless it is of the LCD
type. Otherwise, it may permanently damage your TV screen.
USE OF UNAUTHORIZED PRODUCT:
The use of software or peripherials not authorized by Sony Computer
Entertainment America may damage your console and/or invalidate your
warranty. Only official or licensed peripherals should be used in the
controller ports or memory card slots.
HANDLING YOUR PLAYSTATION 2 FORMAT DISC:
• This disc is intended for use only with PlayStation 2 consoles
with the NTSC U/C designation.
• Do not bend it, crush it or submerge it in liquids.
• Do not leave it in direct sunlight or near a radiator or other source of heat.
• Be sure to take an occasional rest break during extended play.
• Keep this compact disc clean. Always hold the disc by the edges and
keep it in its protective case when not in use. Clean the disc with a lint free, soft, dry cloth, wiping in straight lines from center to outer edge.
Never use solvents or abrasive cleaners.
Thank you for purchasing Tenchu®: Fatal Shadows™ forPlayStation®2
computer entertainment system. Be sure to read this instruction manual
thoroughly before you play the game.
CONTENTS
GETTING STARTED . . . . . . . . . . . . . . . . . . . . . 2
CONTROLLER . . . . . . . . . . . . . . . . . . . . . . . . . . 3
CONTROLS. . . . . . . . . . . . . . . . . . . . . . . . . . . . . 4
PROLOGUE. . . . . . . . . . . . . . . . . . . . . . . . . . . . . 6
MAIN CHARACTERS . . . . . . . . . . . . . . . . . . . . 7
MAIN MENU. . . . . . . . . . . . . . . . . . . . . . . . . . . . 8
OPTIONS . . . . . . . . . . . . . . . . . . . . . . . . . . . . . . . 9
ITEM SELECTION. . . . . . . . . . . . . . . . . . . . . . 10
GAME DISPLAY . . . . . . . . . . . . . . . . . . . . . . . . 11
STAGE MAP/ PAUSE SCREEN. . . . . . . . . . . . 12
RATING SCREEN. . . . . . . . . . . . . . . . . . . . . . . 13
MISSION SELECTION / STEALTH KILL . . . 14
SPECIALS / ATTACK MOVES . . . . . . . . . . . . . 15
THE KUROYA . . . . . . . . . . . . . . . . . . . . . . . . . 16
CREDITS . . . . . . . . . . . . . . . . . . . . . . . . . . . . . . 18
1
Page 3
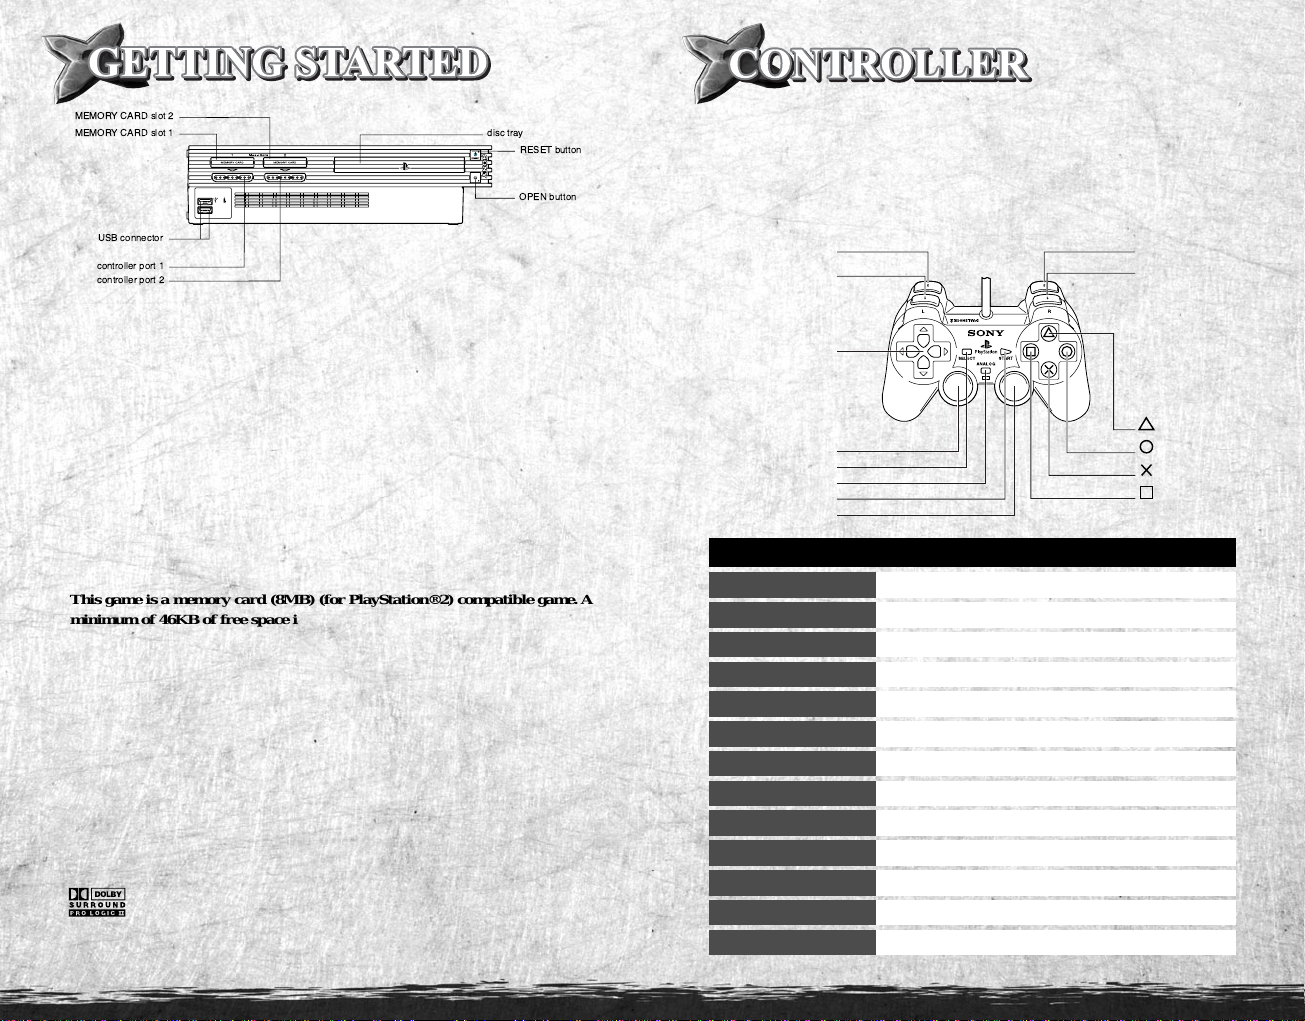
Set up your PlayStation®2 computer entertainment system according to the
*
Note: Illustration may not match all
PlayStation 2 console types. For owners of
SCPH-70000 series PlayStation 2 systems, refer
to the setup instructions supplied with your system.
button
directional
buttons
left analog stick
L2 button R2 button
R1 button
button
button
button
L1 button
SELECT button
ANALOG mode button
START button
right analog stick
instructions in its Instruction Manual. Make sure the MAIN POWER
switch (located on the back of the console) is turned on. Press the RESET
button. When the power indicator lights up, press the open button and the
disc tray will open. Place the Tenchu: Fatal Shadows disc on the disc tray
with the label side facing up. Press the open button again and the disc tray
will close. Attach game controllers and otherperipherals, as appropriate.
Follow on-screen instructions and refer to this manual for information on
using the software.
This game is a single player game, compatible with the DUALSHOCK®2
analog controller. Connect the analog controller to controller port 1. The
analog controller is set in ANALOG mode (mode indicator: ON) and cannot
be switched to digital mode using the ANALOG mode button.
DUALSHOCK®2Analog Controller
Memory Card (8MB) (for PlayStation®2)
This game is a memory card (8MB) (for PlayStation®2) compatible game. A
minimum of 46KB of free space is required to save your game data to the
memory card (8MB) (for PlayStation®2). Do not turn off the console, reset
the game, remove the memory card (8MB) (for PlayStation®2) or the
DUALSHOCK®2 analog controller while saving the game.
Dolby® Pro Logic® II Decoding
This game is presented in Dolby Pro Logic II. The PlayStation®2 system’s
DIGITALOUT (OPTICAL) / AV MULTIOUT should be connected to a
sound system with Dolby Pro Logic, Dolby Pro Logic II, or Dolby Pro Logic
IIx decoding to experience the excitement of surround sound. To enjoy this
sound mode, you will need to select Dolby Surround Pro Logic II from the
Options menu (P.9).
Dolby, Pro Logic, and the double-D symbol are registered trademarks of Dolby
Laboratories. Manufactured under license from Dolby Laboratories.
2 3
DEFAULT CONFIGURATION
left analog stick
right analog stick
H button
J button
K button
L button
R1 button
R2 button
L1 button
L2 button
directional buttons
START button
SELECT button
Walk, run, swim
Move camera
Guard / Back (menu screen)
Jump / Confirm (menu screen)
Use selected Item
Attack
Stealth (crouch / back against wall)
Strafe (w/ left analog stick) / Lock onto enemies
Manual camera (w/ left analog stick)
Select Item
Select Item / C: Grappling Hook / V: Potion
Pause game (Pause Menu)
View Map / Close Map
Page 4
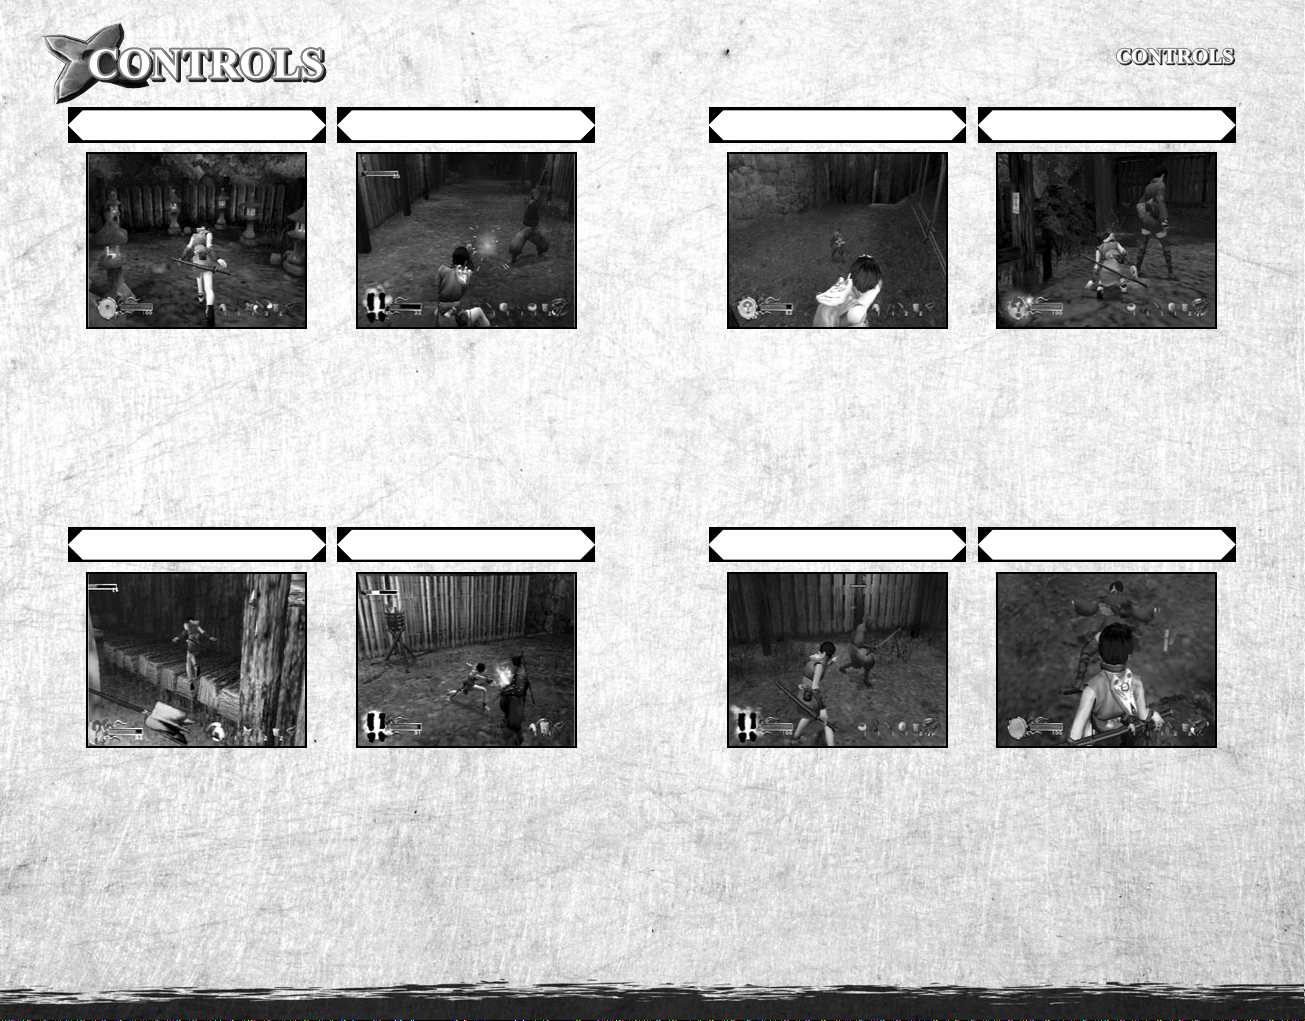
LEFT ANALOG STICK
A BUTTON
D BUTTON
E BUTTON
Move your character in the direction you push the stick. Push the
stick a little to walk, or further to
run. Also use the stick to move left /
right, climb up, or drop down while
hanging from a ledge.
S BUTTON
Press the S button to jump, and
once more while in mid-air to perform a Double-Jump.
It is possible to reach even higher
areas by pushing off the wall. To
execute a Wall Jump, Double-Jump
towards a wall and press the
ton again as the character touches
it.
S but-
Press the A button to square off,
and keep holding the button to
block enemy attacks.
To carry away a defeated enemy,
crouch near the body (E button),
then press and hold the
A button.
F BUTTON
Press the F button to attack. Press
the button several times consecutively, and in combination with the
left analog stick to perform a variety of Combo Attacks (P.15).
When the enemy is about to deliver
a hit, press the
the attack, and press repeatedly to
attempt to overpower them.
F button to block
Press the D button to use the selected Item (
buttons
Items such as the Grappling Hook,
Shuriken and Blowgun require you
to hold down the D button to callout the target cursor. Use the left
analog stick to aim with the cursor,
then release the D button to fire.
W button or directional
ZXto select Item).
R BUTTON
Use the left analog stick while holding down the
and hold down the button during
combat to lock-on to your enemies.
Press the S button while Strafing
to dodge in the direction you are
moving. To jump and turn in the
opposite direction from a static
position, press the S button while
holding down the
R button to Strafe,
R button.
Press and hold the E button to
crouch, then use the left analog
stick to creep slowly, staying close
to the ground. Press the S button
while crouching to roll in the direction you are moving.
Pressing the
wall allows you to hide by pushing
your back flat against it.
E button next to a
Q BUTTON
Hold down the Q button to position the camera just behind your
character’s head, and move the
camera using the left analog stick.
When your back is against the wall
(E button), the position of the
camera is offset directly in front of
the character.
4 5
Page 5

In a time of feudal wars,
Rikimaru and Ayame, two ninjas of the Azuma Clan,
served Lord Goda by returning his precious daughter,
Kiku, from the hands of Lord Mei-Oh.
Unfortunately,
Rikimaru was caught in a disastrous rockfall during his escape
and is still missing.
The land of Lord Goda remained peaceful after
Mei-Oh’s attack,
and Ayame, as an agent of Goda,
continued to patrol the expansive territory.
One day in her travels,
Ayame came across a decimated ninja village.
She hoped to find survivors, but arrived too late.
The ninjas of Hagakure died whispering
the word ‘Kuroya’ with their final breaths.
As Ayame was about to leave,
a young female ninja arrived and stood in her way.
Her name was Rin,
back from her training,
and devastated to see her village in ruins.
Squaring off with one another,
the fate of the two ninjas became inextricably intertwined.
Rin
Rin is from a small ninja
village that lies on the border of
Mei-Oh’s kingdom. Since her village
was destroyed, she has sought to
avenge the deaths of her loved ones.
She works as a hired assassin for
"Lady Razor" Ogin.
Ayame
Initiated into the Azuma Clan at
the young age of 14, Ayame was
considered a prodigy. Ayame is
normally very calm and levelheaded, except when something
comes between her and Princess
Kiku, who she sees as a younger
sister.
6 7
Page 6

Press the START button on
the title screen to bring up the
main menu of this game.
Use CV to choose a mode and
press the
You must complete the first
mission of the Story Mode to
play the Level Select and
Boss Battles.
S button to confirm.
Use CV to choose an item and
press the
the setting screen for the
selected option.
At the setting screen, use CV
to select, and ZX to toggle or
adjust each item.
Select Default Settings to
restore all settings to the original default settings.
S button to display
STORY MODE
Enter the main mode of this game. Play as either Rin or Ayame depending
on the mission to advance your story.
LEVEL SELECT
Choose Rin or Ayame and enterany mission you have previously cleared.
* Movie scenes from the Story Mode are not played.
TUTORIAL
Practice the game controls through this Tutorial. Try all the stages to learn
and execute each action.
BOSS BATTLES
Choose Rin or Ayame, and take on any boss you previously defeated. Your
time will be recorded when you successfully win the battle.
ENCYCLOPEDIA
Replay movie scenes or view unlocked works of art from this game.
OPTIONS
Change various game settings (P.9).
SOUND SETTINGS
Adjust the volume level of the music and sound effects/voice, and set the
audio output format.
VISUAL SETTINGS
Turn ON/OFF the Subtitles, Blood/Gore, and Stealth Kills animations.
BRIGHTNESS
Adjust your TV’s brightness using the test card screen provided.
CONTROLS
Rearrange the button configurations and switch ON/OFF the Vibration
setting.
SAVE / LOAD
Save or Load your game data, and turn ON/OFF the Auto Save feature.
Your game progress and the date and time the data was saved will be displayed when you have a memory card (8MB) (for PlayStation®2) inserted
in MEMORY CARD slot 1.
8 9
Page 7

The Item Select screen will be
displayed before every mission.
Use the directional buttons to
choose an Item and press the
S button to equip. Press the
D button to remove an
equipped Item. In addition to
the Grappling Hook, you may
carry up to a total of seven
Items (maximum of five Item
types).
BASIC ITEMS
Here are some of the most essential ninja Items. Utilize each Item in the
most appropriate situation to successfully clear your mission.
◆ GRAPPLING HOOK
This Item will always be equipped. Aim the hook towards walls
or cliffs for a quick and easy climb.
◆ SHURIKEN
Most common projectile weapon for a ninja. Simply aim and
throw to attack distant enemies.
◆ CALTROPS
Scatter spikes on the ground to damage and slow down the
enemy in order to create better opportunities for your kills.
◆ SMOKE BOMB
Freeze the enemies by releasing a thick smoke. This Item can be
handy when you’ve got company.
◆ POISON RICE CAKE
Whoever takes a bite will be temporarily paralyzed. These poisonous treats are especially effective on animals such as watch dogs.
◆ HEALING POTION
Fully restore your health gauge. The Healing Potion will take a
few seconds to drink, so use it when the coast is clear.
◆ COLORED RICE
Mark your current position by leaving Colored Rice. Up to 5
locations can be marked on the map (P.12).
10 11
ENEMY HEALTH GAUGE
The enemy’s health gauge
appears once you attack and
damage the enemy.
HEALTH GAUGE
If your character's health
gauge reaches zero, the mission is over (maximum: 100).
Use Riceballs and Healing
Potions to replenish your
health gauge.
KI METER
The Ki Meter displays the
distance and status (behavior) of your enemy. As a
ninja, your character can
sense four different alert statuses of their nearest enemy.
Displays the icons and number of all the Items you
carry.
The light is lit whenever you
are within striking distance
for the Stealth Kill.
ITEMS
STEALTH KILL LIGHT
KI METER STATUS
Your character senses the presence of an enemy.
At this point, the enemy is not aware. The display and the distance counter will increase as the enemy closes in.
Your character has been detected.
You are within visible range, yet the enemy is still unaware.
Hide or move away before the enemy realizes you are a threat.
The enemy has been alerted by your presence.
The enemy is now aware of your presence and you are in danger
of being spotted.
Your character has been spotted by the enemy.
The enemy is completely aware and ready to attack. Quickly
eliminate the foe or run away to avoid a scene.
The Ki Meter will also display the status of ordinary people who have no
intention of fighting. You are penalized for attacking such people – a deduction will be made in the final rating (P.13).
Page 8

Press the SELECT button to display the
level map. Note that the game remains
in play while the map is displayed.
RED ARROW
Position and direction the
character is facing.
RED STAR
Final destination of the level.
* Not available with certain
Difficulty Settings.
X MARK
The areas you marked with
Colored Rice (Item).
STEALTH KILLS
Number of enemies defeated using
Stealth Kills / Double Kills.
A performance rating is shown
when the mission is cleared.
Overall rating (bottom right of
the screen) is determined based
on all the criteria / points you
scored.
When you are finished with
this screen, press the
to progress to the Items Gained
screen (see below) to view your
rewards.
S button
NORMAL KILLS
Number of enemies defeated in faceto-face combat.
Press the START button to pause the
game and display the pause menu. Use
CV to choose one of the menu items
detailed below and press the
confirm.
Press the START button or select
Continue Game to return to the game in
progress.
S button to
RETRY
Start your mission over from the beginning of the current level.
RETURN TO ITEM SELECT SCREEN
Start your mission over from the Item Select screen. To select a different
level, press the
F button to access the Mission Select screen.
RETURN TO TITLE SCREEN
Quit your current mission and return to the title screen of this game.
12 13
SPOTTED
Number of times sighted by enemies.
INNOCENTS
Number of innocent people slayed.
SPECIALS
Total of all bonus points.
* Scroll left to see details.
OVERALL RATING
Both Rin and Ayame have their own rating system (highest to lowest).
RIN Assassin > Professional > Novice > Murderer > Thug
AYAME Grand Master > Expert Ninja > Ninja > Rookie Ninja > Thug
NORMAL ITEMS
Basic Items provided for clearing the
mission.
NEW ITEMS
Newly acquired Items based on your
performance.
SPECIAL ITEMS
Special Items rewarded based on a
higher rating.
NEW SPECIAL ITEMS
Special Items rewarded only when
you achieve the highest rating.
Page 9

The Mission Select screen is
displayed for both the Story
Mode and Level Select Mode.
Use CVZX to choose the
level, then press the
to enter the selected mission.
The Difficulty setting (upper
right) can be changed by pressing the Q or E button.
S button
ENEMY LAYOUT (LEVEL SELECT MODE)
Once you have made a selection at the Mission Select screen, use ZX to
choose the layout of the enemies. Up to three different layouts are available
for each level, depending on your performance in the Story Mode.
Changing the enemy’s layout will introduce new strategies and gameplay in
an environment you have previously cleared.
Both of the main characters can perform
an array of Stealth Kills – deadly attacks
which will instantly finish your foe.
Creep towards the enemy unseen, then
press the F button when the Stealth Kill
Light is lit to unleash the deadly attack.
The type of Stealth Kill will vary depending on your approach (position relative to your enemy) as well as the exact time you press the
the kill sequence has begun.
F button once
DOUBLE KILL
The Double Kill is essentially two Stealth Kills in one attack.
This attack can only be performed when two enemies are close together.
*Available when the Stealth Kill setting is set to ON in VISUAL SETTINGS (P.9).
A Scroll is rewarded everytime you complete a Stealth Kill.
Collect the Scrolls and acquire special abilities / actions for
your character. Note that Rin and Ayame do not share their
Scrolls – they must each earn their Specials by collecting
their own Scrolls.
RIN
Combo Attack I
Combo Attack II
Combo Attack III
Crouch Attack
Jump Attack
Prone Attack
Special Attack
Throw
Throw Escape
AYAME
Combo Attack I
Combo Attack II
Combo Attack III
Crouch Attack
Jump Attack
Prone Attack
Special Attack
Throw
Throw Escape
F – F – F
F – F – V+F
F – F – F – V +F
E+F
F during a jump
F next to an enemy on the ground
R – V+F
left analog stick towards an enemy +A
E when an enemy grabs for the throw
F – F – F – F
F – F – V+F – F
F – F – F – V +F
E+F
F during a jump
F next to an enemy on the ground
R – V+F
left analog stick towards an enemy +A
E when an enemy grabs for the throw
14 15
Page 10

Jyuzou
The leader of the Kuroya.
He was next in line to
become the leader of the
Hagakure, but refused to
live by the rules set before
him.
Ranzou
Hitoha
Shinogi
Futaba
The younger twin sister of Hitoha. Just like
Rin, she, too, was born in Hagakure Village.
However, she proved loyal to Jyuzou and
betrayed her friends and family. She had
always secretly considered Rin to be her rival,
and hated her deeply.
16 17
Shou
Assassins of the Kuroya
Cunning Assassins who serve under Jyuzou.
Much like Jyuzou himself,
they have all dedicated their lives to killing.
Page 11

K2
Director
Mitsuo Kodama
Chief Planner
Masanori Kuwasashi
Project Lead
Hideki Fujii
Planners
Tomoyuki Hosokawa
Susumu Nakamoto
Hiroki Matsubara
Chief Programmer
Shin-ichi Shimizu
Programmers
Tadao Tada
Inoue Takahiro
Kazufumi Yoshida
Masato Ohbuchi
Tomoaki Niki
Chiehiro Hashizume
Masahiro Iwahashi
Chief Model Designer
Koichi Iwasaki
Model Designers
Yuki Tamura
Keiko Nonaka
Takashi Matsubara
Chief Background Designer
Hajime Itou
Background Designers
Hideki Fujii
Kazuhiro Nakanishi
Masahito Inoue
Hiroyuki Ohtani
Eri Kojitani
Chief motion Designers
Kenji Tachibana
Motion Designers
Tadayuki Y amaryo
Masanori Satomura
Masayuki Harada
Yukiko Ueda
Hiromasa Ueda
Chief Cutscene Designers
Shinji Kohchi
Yasuhiro Satou
Cutscene Designers
Mitsunori Sasaki
Shiho Nakamura
2D Graphic Designer
Shinji Kohchi
Effect Designer
Koichirou Horie
Collision
Masayuki Harada
Special Thanks
Osamu Matsuki
Naoko Hoshikawa
Yasuhiro Hirata
Tomokazu Y okoyama
Keigo Imai
Junichirou Nakajima
Takao Goho
Original Story
Tomoyuki Hosokawa
Scenario Writers
Atsushi Kubo
Tomoyuki Hosokawa
Storyboard Designers
Rei Fukujin
Tomoyuki Hosokawa
Motion Coordinator
Rescuers
Action Coordinator
Kenji Hata
Motion Actors
Yoshiaki Y uasa
Ayako Teraoka
Mutsumi Kawamukai
ACTIVISION
Project Lead
Takehisa Abe
Assistant Lead
Tad Horie
Staff
Hiroki Satoyoshi
Haruyoshi Sawatari
WEBTONE
Voice Recording
Greg Weber
Kim Weber
Steve Duell
VOICE TALENT
English Voice
Gary Martinez
Evelyn Huynh
Lena Zee
Owen Thomas
Paige Perez
Abbey Hadjitarkhani
Steve Duell
Roger Jackson
Michael Santo
Corina Harmon
Gavin Hammon
Nick Shakoour
Japanese Voice
Yoko Soumi
Satsuki Y ukino
Kouji Nakata
Keiji Fujiwara
Toshiyuki Morikawa
Osamu Hosoi
Yuko Kaida
Yuji Ueda
Yuko Kobayashi
Kachiko Hino
Nobuo Tobita
Motomu Kiyokawa
Katsuyuki Konishi
Ikue Otani
Daisuke Góri
Haruo Satoh
Yuzuru Fujimoto
Yoji Ueda
Yukie Maeda
Kiyomitsu Mizuuchi
Toshitsugu Takashina
Hajime Iijima
Kenichi Mochizuki
Hiroshi Shirokuma
Yumi Chiba
Kiyoshi Kobayashi
TFC
Scene Director
Soichiro Kubo
Coordinator
Kouji Okano
Yousuke Kinoshita
IMAGE SONG
KURENAI NO HANA
Performed by
addu'a
Music by
Noriyuki Asakura
Lyrics by
Eiichi Miyazawa
18 19
Page 12

*THIS LIMITED WARRANTY IS VALID FOR SEGA PRODUCTS FOR PLAY ON PLAYSTATION®2
COMPUTER ENTERTAINMENT SYSTEM MANUFACTURED FOR SALE IN AND PURCHASED AND
OPERATED IN THE UNITED STATES AND CANADA, ONLY!
Limited Warranty
Sega of America, Inc. warrants to the original consumer purchaser that the PlayStation®2
product shall be free from defects in material and workmanship for a period of 90-days from the
date of purchase. If a defect covered by this limited warranty occurs during this 90-day warranty
period, the defective Playtstation®2 product or component will be replaced free of charge. This
limited warranty does not apply if the defects have been caused by negligence, accident,
unreasonable use, modification, tampering or any other causes not related to defective
materials or manufacturing workmanship. This limited warranty does not apply to used software
or to software acquired through private transactions between individuals or purchased from
online auctions sites. Please retain the original or a photocopy of your dated sales receipt to
establish the date of purchase for in-warranty replacement. For replacement, return the
product, with its original packaging and receipt, to the retailer from which the software was
originally purchased. In the event that you cannot obtain a replacement from the retailer, please
contact Sega to obtain support.
Obtaining technical support/service
To receive additional support, including troubleshooting assistance, please contact Sega at:
• web site . . . . . . . . . . . . . . http://www.sega.com/usa
• e-mail . . . . . . . . . . . . . . . support@sega-support.com
LIMITATIONS ON WARRANTY
ANY APPLICABLE IMPLIED WARRANTIES, INCLUDING WARRANTIES OF MERCHANTABILITY AND
FITNESS FOR A PARTICULAR PURPOSE, ARE HEREBY LIMITED TO 90-DAYS FROM THE DATE OF
PURCHASE AND ARE SUBJECT TO THE CONDITIONS SET FORTH HEREIN. IN NO EVENT SHALL
SEGA OF AMERICA, INC. BE LIABLE FOR CONSEQUENTIAL OR INCIDENTAL DAMAGES
RESULTING FROM THE BREACH OF ANY EXPRESS OR IMPLIED WARRANTIES. THE PROVISIONS
OF THIS LIMITED WARRANTY ARE VALID IN THE UNITED STATES AND CANADA ONLY. SOME
STATES DO NOT ALLOW LIMITATIONS ON HOW LONG AN IMPLIED WARRANTY LASTS, OR
EXCLUSION OF CONSEQUENTIAL OR INCIDENTAL DAMAGES, SO THE ABOVE LIMITATION OR
EXCLUSION MAY NOT APPLY TO YOU. THIS WARRANTY PROVIDES YOU WITH SPECIFIC LEGAL
RIGHTS. YOU MAY HAVE OTHER RIGHTS WHICH VARY FROM STATE TO STATE.
SEGA is registered in the U.S. Patent and Trademark Office. SEGA, the SEGA logo, and Fatal
Shadows are either registered trademarks or trademarks of SEGA Corporation. Tenchu is a
registered trademark of FromSoftware, Inc. All Rights Reserved. © 2004, 2005 FromSoftware,
Inc. All Rights Reserved. This game is licensed for use with PlayStation®2 only. Copying and/or
transmission of this game is strictly prohibited. Unauthorized rental or public performance of
this game is a violation of applicable laws. Sega of America, Inc., 650 Townsend Street, Suite
650, San Francisco, CA 94103. All Rights Reserved. www.sega.com/usa. Programmed in
Japan. Made and printed in the USA.
Exective Producer
Naotoshi Zin
Producer
Masanori Takeuchi
Manager
Kaikou Arima
Sound Producer
Yukinori Takada
Lead Composer
Koichi Suenaga
Sound Section
Shohei Tsuchiya
Yuki Ichiki
Yuji Kanda
Kota Hoshino
Designers
Hiroyuki Kani
Naozumi Tazo
PR Team
Eiichi Nakajima
Hiroyuki Goto
Keiichiro Segawa
Yasunori Ogura
Chieko Tsurunaga
Yoshinori Komatsu
Suminobu Sato
Tomohiro Shimokawa
Quality Assurance
Toshifumi Nabeshima
Tatsuya Kawate
Atsushi Miyamoto
Taro Takezawa
Kazushi Morita
Ryousuke Yamada
FROMSOFTWARE
SEGA OF AMERICA
VP of Marketing
Scott Steinberg
Product Manager
Heather Guzenda
Associate Prodcut Manger
Yosuke Moriya
PR Manager
Bret Blount
Associate PR Manager
Ethan Einhorn
Senior Media Manager
Teri Higgins
Director of
Product Development
Osamu Shibamiya
Senior Localization Producer
Klayton Vorlick
Project Test Lead
Shawn Dobbins
Build Enginner
Rick Ribble
Senior Contents Writer
Bridget Oates
SEGA OF JAPAN
Localization Support
Tatsuya Shikata
Emi Yamane
SEGA LOGISTICS SERVICE
Creative Design Team
Yoshihiro Sakuta
Hisakazu Nakagawa
Satoru Ishigami
Tetsuya Honda
20
Page 13

TENCHU: FATAL SHADOWS (PS2)
REAR COVER
 Loading...