

Page 1

Front Cover
Page 2
1
WARNING: READ BEFORE USING YOUR PLAYSTATION®2
COMPUTER ENTERTAINMENT SYSTEM.
A very small percentage of individuals may experience epileptic seizures
when exposed to certain light patterns or flashing lights. Exposure to certain
patterns or backgrounds on a television screen or while playing video games,
including games played on the PlayStation 2 console, may induce an
epileptic seizure in these individuals. Certain conditions may induce
previously undetected epileptic symptoms even in persons who have no
history of prior seizures or epilepsy. If you, or anyone in your family, has an
epileptic condition, consult your physician prior to playing. If you experience
any of the following symptoms while playing a video game – dizziness,
altered vision, eye or muscle twitches, loss of awareness, disorientation, any
involuntary movement, or convulsions – IMMEDIATELY discontinue use and
consult your physician before resuming play.
WARNING TO OWNERS OF PROJECTION TELEVISIONS:
Do not connect your PlayStation 2 console to a projection TV without first
consulting the user manual for your projection TV, unless it is of the LCD
type. Otherwise, it may permanently damage your TV screen.
USE OF UNAUTHORIZED PRODUCT:
The use of software or peripherials not authorized by Sony Computer
Entertainment America may damage your console and/or invalidate your
warranty. Only official or licensed peripherals should be used in the
controller ports or memory card slots.
HANDLING YOUR PLAYSTATION 2 FORMAT DISC:
• This disc is intended for use only with PlayStation 2 consoles
with the NTSC U/C designation.
• Do not bend it, crush it or submerge it in liquids.
• Do not leave it in direct sunlight or near a radiator or other source of heat.
• Be sure to take an occasional rest break during extended play.
• Keep this compact disc clean. Always hold the disc by the edges and
keep it in its protective case when not in use. Clean the disc with a lint free, soft, dry cloth, wiping in straight lines from center to outer edge.
Never use solvents or abrasive cleaners.
Contents
Getting Started . . . . . . . . . . . . . . . . . . . . . . 2
Controller . . . . . . . . . . . . . . . . . . . . . . . . . . 3
Prologue . . . . . . . . . . . . . . . . . . . . . . . . . . . 4
Starting the Game . . . . . . . . . . . . . . . . . . . . 8
Shining Force Neo Guide . . . . . . . . . . . . . . 10
Game Controls . . . . . . . . . . . . . . . . . . . .10
Viewing the Game Screen . . . . . . . . . . . . 11
Advancing the Game . . . . . . . . . . . . . . . . 12
Shopping Mall . . . . . . . . . . . . . . . . . . . . 13
Camp Menu . . . . . . . . . . . . . . . . . . . . . . 16
Headquarters . . . . . . . . . . . . . . . . . . . . . 21
Battle . . . . . . . . . . . . . . . . . . . . . . . . . . . . 22
Exploring . . . . . . . . . . . . . . . . . . . . . . . . 24
Weapons & Items . . . . . . . . . . . . . . . . . . . . 26
Hints & Tips . . . . . . . . . . . . . . . . . . . . . . . .28
Character Profiles . . . . . . . . . . . . . . . . . . . .30
Thank you for purchasing Shining Force™ Neo. Please note that this software is
designed for use with the PlayStation®2 computer entertainment system. Be sure
to read this software manual thoroughly before you start playing.
Page 3
32
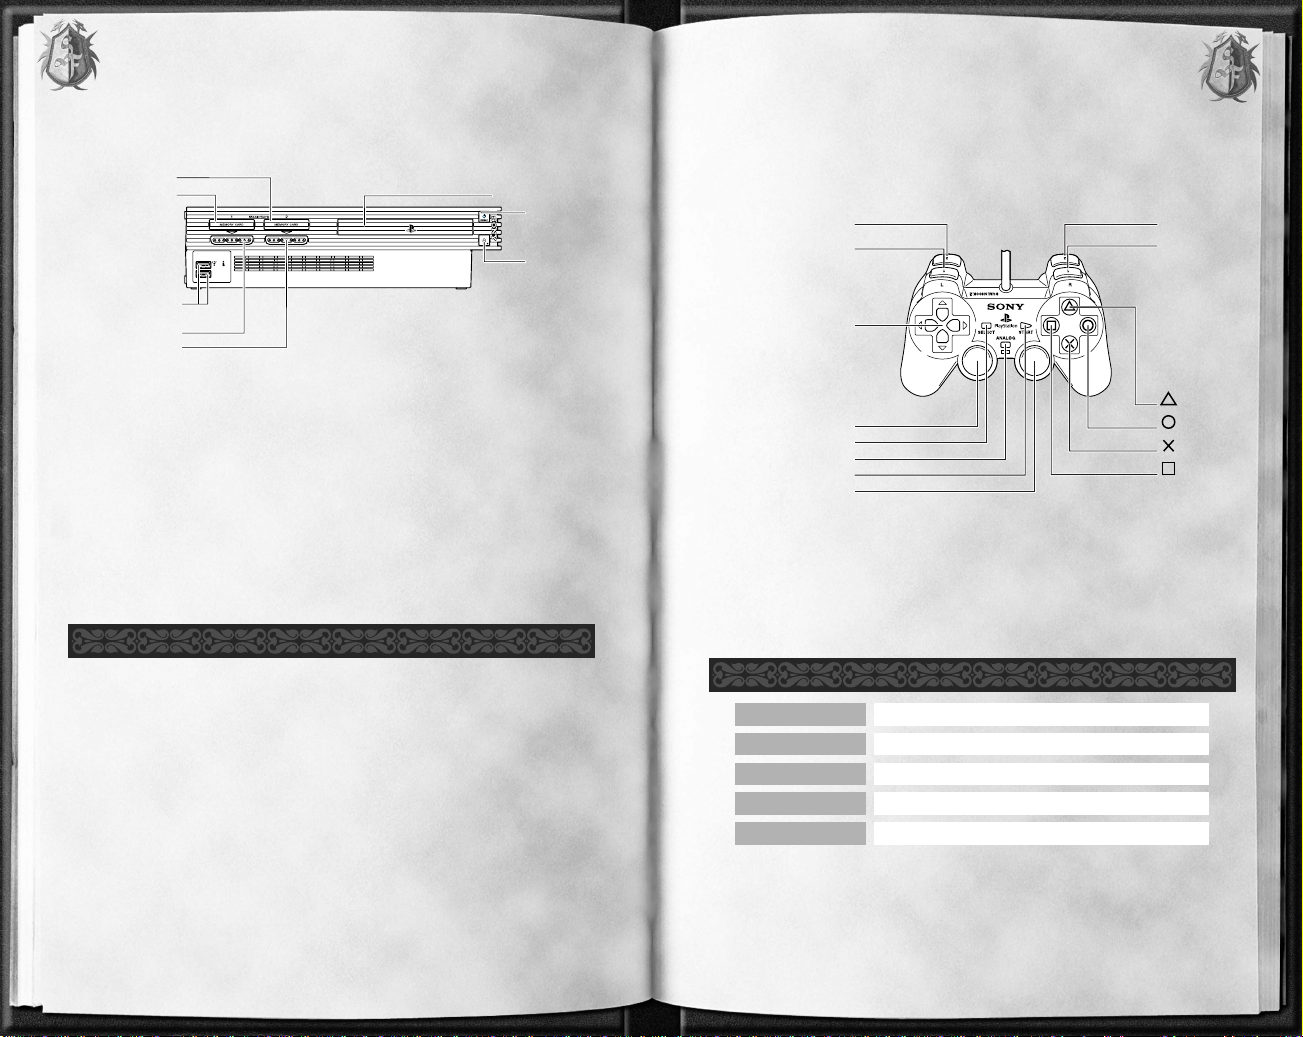
CONTROLLER
Shining Force™ Neo is a one-player game compatible with the DUALSHOCK®2
analog controller. Connect the analog controller to controller port 1. Controller
port 2 is not supported by this game.
button
directional
buttons
left analog stick
L2 button R2 button
R1 button
button
button
button
L1 button
SELECT button
ANALOG mode button
START button
right analog stick
Controls are all set in ANALOG mode and cannot be switched to digital
mode using the ANALOG mode button. The mode indicator will remain ON
(lit red) at all times.
This game supports the vibration function of the analog controller. This can
be deactivated from OPTION detailed on p.8.
All explanations in this manual assume Type 1 configuration.
*
Note: Illustration may not match all
PlayStation 2 console types. For owners of
SCPH-70000 series PlayStation 2 systems, refer
to the setup instructions supplied with your system.
MEMORY CARD slot 1
MEMORY CARD slot 2
USB connector
controller port 1
controller port 2
disc tray
RESET button
OPEN button
Set up your PlayStation®2 computer entertainment system according to the
instructions in its Instruction Manual. Make sure the MAIN POWER switch
(located on the back of the console) is turned ON. Press the RESET button.
When the power indicator lights up, press the OPEN button and the disc tray
will open. Place the Shining Force™ Neo disc on the disc tray with the label side
facing up. Press the OPEN button again and the disc tray will close. Attach game
controllers and other peripherals, as appropriate. Follow on-screen instructions
and refer to this manual for information on using the software.
left analog stick
gA button
gS button
directional buttons
Change highlighted selection
Cancel
Select
Change highlighted selection
START button Display Title Screen
MEMORY CARD (8MB) (FOR PLAYSTATION®2)
To save game settings and progress, insert a memory card (8MB) (for
PlayStation®2) into MEMORY CARD slot 1 of your PlayStation®2 system. You
can load saved game data from the same memory card or any memory card
(8MB) (for PlayStation®2) containing previously saved games.
See p.8 – 9 for full details on loading and saving games.
BASIC CONTROLS
GETTING STARTED
GETTING STARTED CONTROLLER
Page 4
54
PROLOGUE
PROLOGUE
PROLOGUE
PROLOGUE
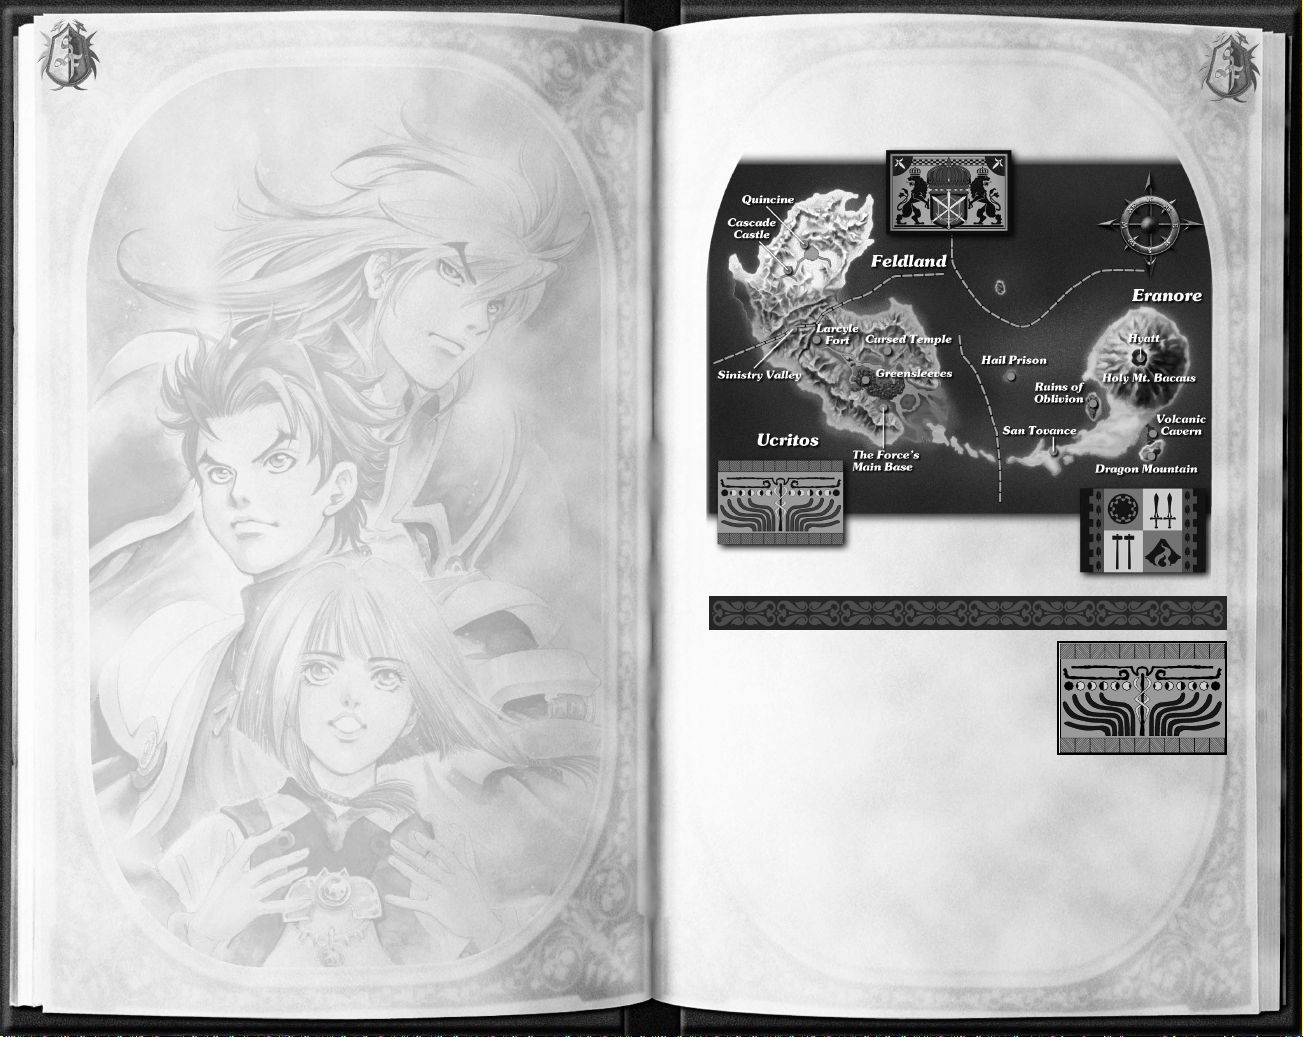
The World of Shining Force Neo
A kingdom of warm climate and natural countryside. Buildings are made from wood and cloth, and
towns lie in the heart of the forests and mountains.
The people of Ucritos are young, vibrant, and good
natured.
Known as Thunder Country, the Sanctuary of
Thunder lies in the middle of the Wandering Forest, far from poisonous parasitic
plants and monsters.
The treetop capital Greensleeves is governed by Chairperson Rebecca, a former
Force Knight. In the northeast is the Larcyle Fort which protects the country
from monster invasions, and where Graham commands the Knighthood of the
Border. This story begins in the forest realm of Greensleeves.
UCRITOS (THUNDER COUNTRY)
Thirteen years ago...
The immense power of the Light Crystal
had allowed the world to prosper
in peace for generations.
But strong light produces strong shadows.
Drawn and empowered by darkness,
the Clan of the Moon emerged
and destroyed the Light Crystal.
The dark clan summoned
a formidable organic weapon known as the “Legion”
from another dimension by way of
the Eye of the Moon.
The Force Knights, fortified by the powers of light,
battled to save the world;
and in that great war, seven nations perished.
With the Clan of the Moon defeated,
the shattered remains of the Light Crystal,
now known as the Force Crystals,
were enshrined by the three remaining countries.
The Force Knights were charged with
the protection of their sanctuaries.
And as the power of light returned to the world,
so too did the power of darkness grow in strength.
Thirteen years later,
the world is again threatened by darkness;
its fate resting on the shoulders
of a young soldier named Max,
strong in the powers of light like his father.
Page 5
76
PROLOGUEPROLOGUE
PROLOGUEPROLOGUE
Very cold country in the far north characterized by
glaciers and snowy mountains. Inhabited jointly by
humans and beastlings who protect themselves from
the harsh environment with buildings of ice and
stone. The people are old fashioned and simple, and
at times a little stubborn. Their love for their country
is matched by their sense of obligation and pride in
their good manners.
The capital city of Quincine is an enormous fortress built in a cavity under an ice
lake. To the southwest are the independant villages of Cascade and Cantore.
FELDLAND (ICE COUNTRY)
The current inhabitants of Eranore were originally
immigrants escaping the cold of Feldland. Founded
by Lord Chaos, it remains a fledgling nation, but its
power already matches that of Feldland. In a flurry
of progression, ancient technology discovered at the
Holy Mt. Bacaus was adopted for use despite repairs
being incomplete. Most people are happy to rely on
such technology, but nobody really understands how it works.
The original inhabitants of the region, the Birdlings, are now in danger of extinction. Many offers have been made to help, but progress is hindered by the
Birdlings' hatred of humankind.
In the southwest is the fishing port San Tovance, and further west on the ocean
is Hail Prison, a high security facility for dangerous offenders.
ERANORE (FIRE COUNTRY)
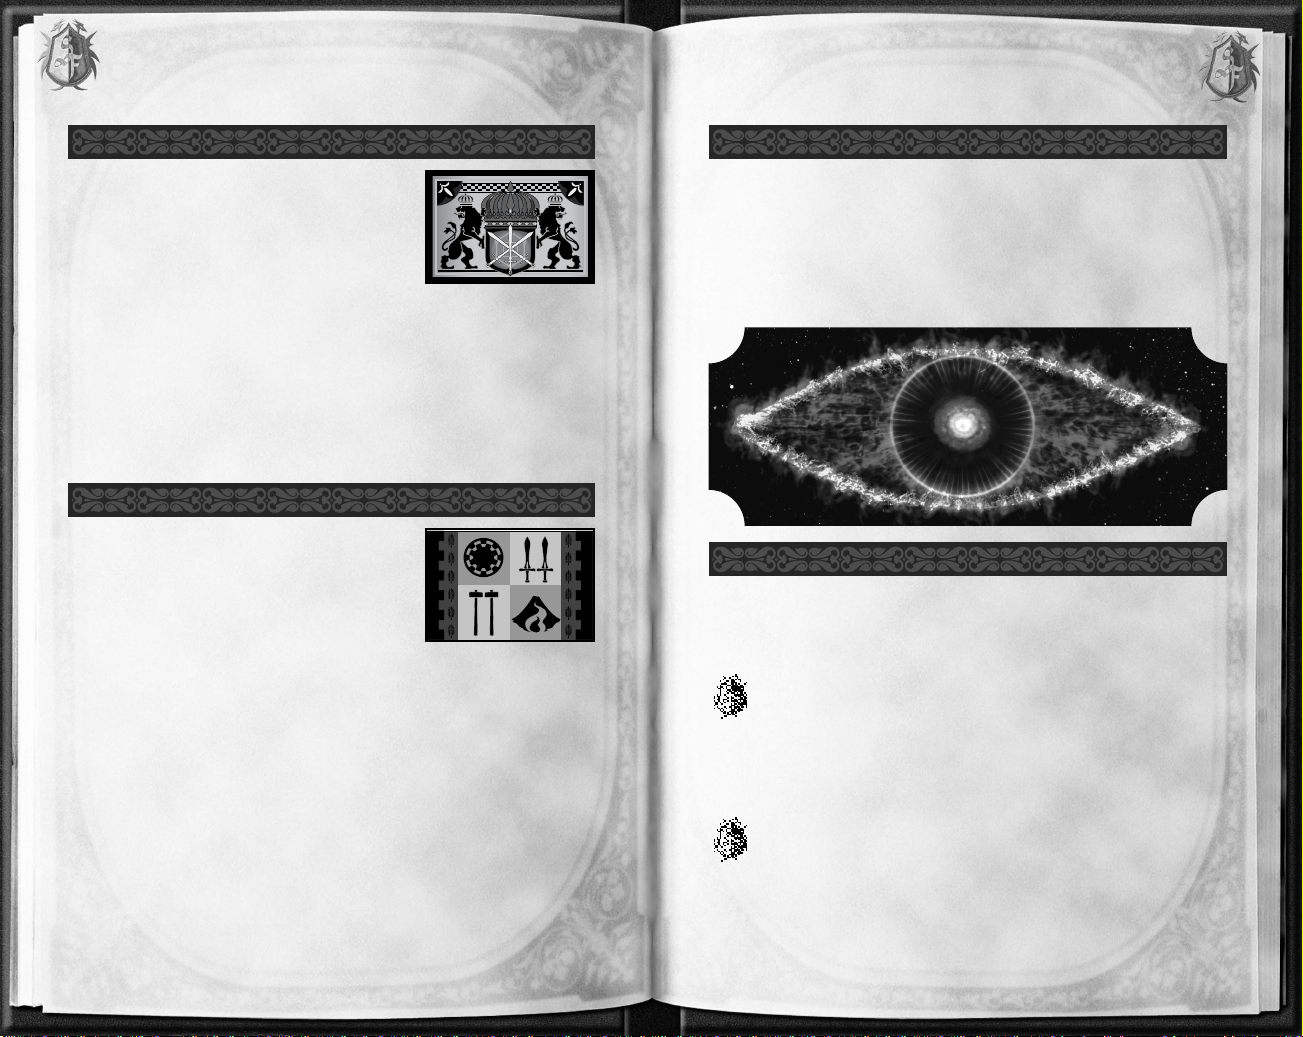
Beings born of the dark side with human emotions.
So named because of the great Eye of the Moon that opened as they increased
in power. Though first noticed 13 years ago, it is believed that the Clan of the
Moon has existed since ancient times. These beings summoned the organic
weapons "Legion" from another dimension by way of the Eye of the Moon, and
plan to engulf the world in a dark abyss of confusion.
THE CLAN OF THE MOON
The basic energy of the natural world, and the shortened name of the Force
Knights. It is said that the fortification of weaponry with Force Energy can produce tangible strength and power, and even magical abilities.
FORCE
Force Knights
The army comprised of those gifted with the ability to manipulate the
Force. The title is only given to those that pass the Ordeal of the Force. Each
wears a Force Frame as a badge of status and a vehicle to hone their Force powers. These proud knights are sworn to become a shield for the weak and a
sword for the meek.
Force Frame
A shard removed from the Force Crystal, required for channeling the
life, strength, and magic powers of the Force. Only those that can reach the
sanctuary and remove the shard themselves as part of the Ordeal of the Force
are permitted to wear a Force Frame. The form of the Force Frame varies
according to the abilities and properties of the wearer.
Page 6
98
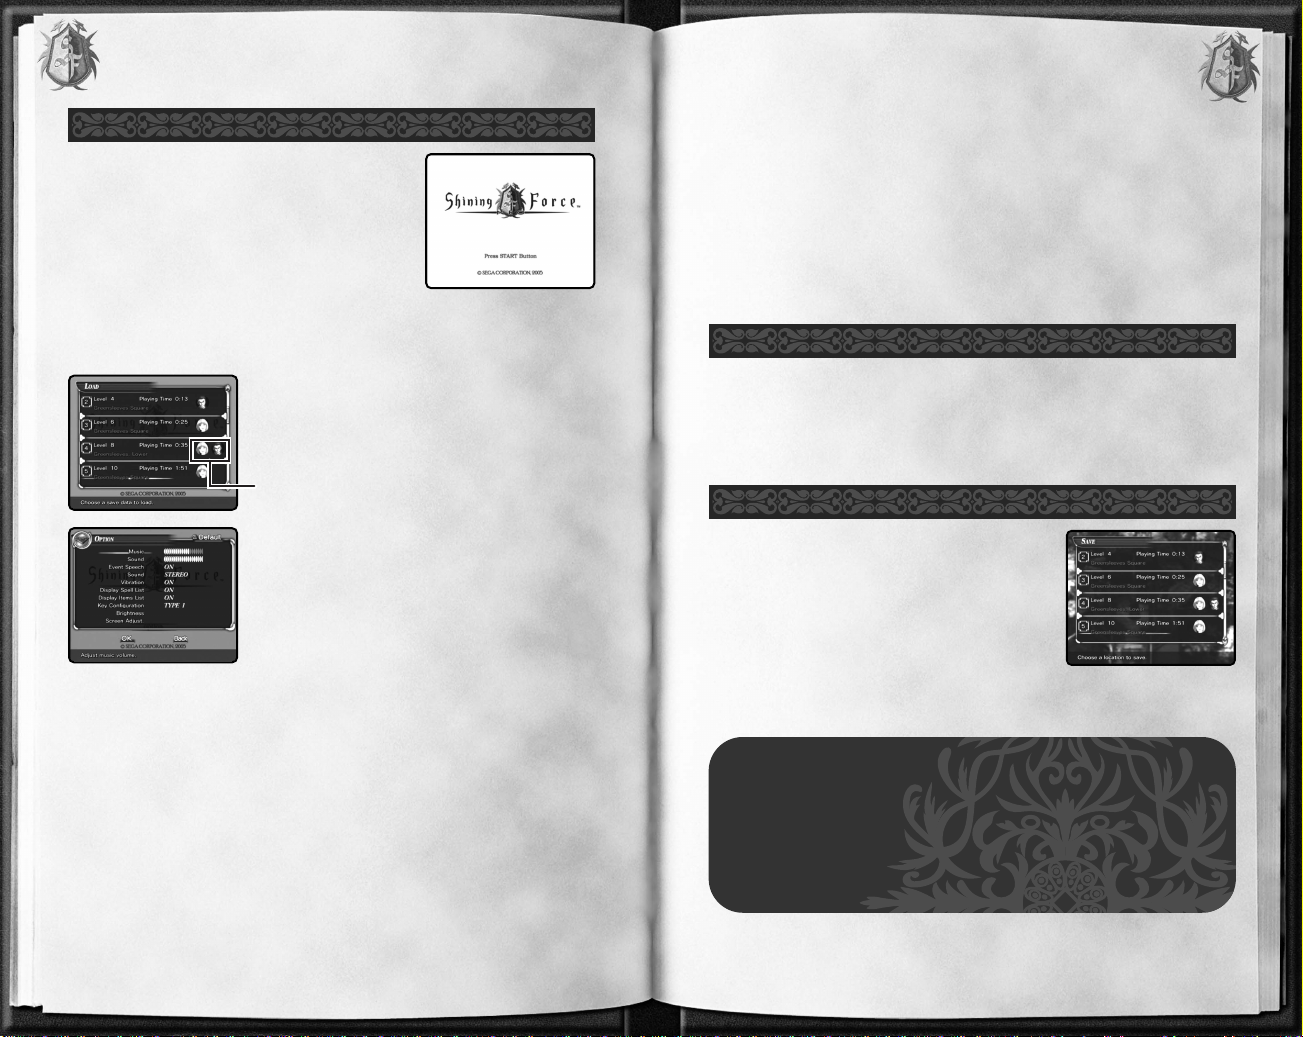
STARTING THE GAME
After the opening movie, the Title Screen will be
displayed. Press the START button to bring up the
Title Menu and choose from the following.
The opening movie can also be skipped by press-
ing the START button at any time.
NEW GAME
Start a new game from the beginning.
LOAD
Continue playing from where you left off.
Use
CV to choose a game data from those dis-
played, and the
gS button to select.
Current party members
OPTION
Make changes to various game settings. Select an
item to change and press the
gS button to make
changes, or the
gD button to return to default set-
tings. Press START or select OK to save settings, or
select Back to exit without saving.
Music
Change the volume of background
music.
Sound
Change the volume of sound effects
and character speech.
Event Speech
Toggle voices during events
ON/OFF.
Sound
Set sound output to STEREO/
MONO.
Vibration
Set the controller's vibration function ON/OFF.
Display Spell List
Select ON to display all Spells and
Weapon Skills, or OFF to display
only those selected.
Display Items List
Select ON to display all available
Consumable Items at the bottom of
the screen, or
OFF to display only
the one selected.
Key Configuration
Select from Controller Type 1, 2 or 3.
Brightness
Displays a test card for reference
when adjusting your television's
brightness.
Adjustments must be made to the
television directly.
Screen Adjust.
Move the screen position up/down/
left/right. Press the
gS button to
enter, or the
gA button to cancel.
GAME DATA
To save a game data, the following space is required on a memory
card (8MB) (for PlayStation®2).
Option data (for saving game settings): 16 KB
Game data (for saving game progress): 112 KB
Never turn OFF the power or remove the memory card (8MB) (for
PlayStation®2) while game data is being saved.
START MENU
JOURNAL
After loading a saved game, a chronology of events will be displayed. Press the
tQ / tE buttons to page up and down, and press the gS button to continue
on to the game.
FINISHING THE GAME
This game does not save automatically. When you
wish to finish playing, make sure you find a save
point (p.24) in the game field and save your data
before exiting.
At the save point, press the
gS button to bring up a
list of data slots. Choose the slot where you would
like to save your game. If game data already exists
in the chosen slot, it will be overwritten.
STARTING THE GAME
STARTING THE GAME
STARTING THE GAME
Page 7

1110
SHINING FORCE NEO GUIDE
button
directional
buttons
left analog stick
L2 button R2 button
R1 button
button
button
button
L1 button
SELECT button
ANALOG mode button
START button
right analog stick
left analog stick
gD button
gS button
gA button
Run. Move the stick a little to walk.
Use selected Weapon Skill/Spell.
Speak to character. Open doors. Pick up Items.
Attack with equipped Weapon.
gF button
Use selected Consumable Item.
directional
buttons
tE button
tQ button
CV Select Weapon Skill/Magic.
ZX Select Consumable Item.
Hold to fix player to current position. Zoom out (map display).
Enlarge Radar Map display. Zoom in (map display).
tW button
Display map of the gamefield.
tR button
Hold to fix party members to their current positions.
START button Pause/Camp Menu. Skip story event.
left analog stick
gS button
tQ/tE buttons
directional buttons
Move cursor/highlight. Switch window view.
Command select.
Switch window view.
Move cursor/highlight. Switch window view.
gA button
Cancel.
GAMEFIELD CONTROLS
DISPLAY SCREEN CONTROLS
SHINING FORCE NEO GUIDE
SHINING FORCE NEO GUIDE
SHINING FORCE NEO GUIDE
MP: Magic Points
Consumed as magic
is used. Automatically
recovers over time.
HP: Health Points
Game ends if this reaches
zero. Automatically recovers over time.
PAR TY STATUS
Shows the status
of accompanying
characters. The left
gauge shows HP,
and will turn red if
it reaches zero.
RADAR MAP
Areas are mapped
automatically as
you explore. Press
the
Q
button to
expand the map.
(red): Max
(yellow): Ally
(green): Item
ENEMY HP
Displayed when
enemy is attacked.
EXPERIENCE
Level increases when
this gauge is full.
WEAPON SKILL/
SPELL
Shows the currently
selected Weapon
Skill or Spell.
ITEM
Shows currently selected
Consumable Item.
GAME CONTROLS
VIEWING THE GAME SCREEN
During battle, numbers will appear onscreen in the following
colors to illustrate levels of damage and recovery.
Red Enemy damage
White Party member damage
Yellow Damage from Critical hit
Green Recovery
Page 8

1312
ADVANCING THE GAME
Throughout the game, you will be controlling
Max. After reaching a certain point in the story,
the Headquarters will be introduced, and the
game will then flow for the most part according
to this pattern.
All other characters are NPC (non player character) and can be freely selected according to their
abilities. Build a party that takes advantage of
each character’s relative strengths and weaknesses.
Progress through the gamefield by destroying the
Monster Gates that spawn enemies. Monster
Gates have powerful recovery defenses, so you
will need to destroy most of the monsters before
attacking.
Don't forget to explore other areas and speak to
people you encounter in order to progress further in the adventure.
In order to speak to people (marked with a cursor), open doors, and pick up
items, press the
gS button. You can also open unlocked cases and read sign posts.
Press the gS button
to advance conversations. Gather as
much information
as you can.
Press the gS button
to open a closed
door.
Items are marked
with cursors when
you’re near them.
Press the gS button
to pick them up.
If you find Consumable Items such as Healing
Water or Keys, they will appear automatically at the
bottom left of the screen. Use the directional buttons
ZX to select an Item, and the gF button to
use the Item.
Consumable Items cannot be used at the Camp
Menu (p.16).
Here you'll find a number of shops to assist you in your adventure. Prepare yourself by buying or selling Weapons, Armor and other Items.
At any time, press the
gF button to see a description of the currently selected
Item. Press the
tW button during a sale to rearrange your possessions, making
it easier to find Items you wish to sell.
Only the areas you've passed through will be displayed on the map. Press the
gD button to highlight
the passage and confirm which areas can be walked
through.
MAP DISPLAY
During gameplay, you can display a full size map of
the gamefield by pressing the
tW button. Use the
left analog stick to navigate the map and get a feel
for your surroundings. Position the cursor over
icons to see an explanation.
SPEAK TO CHARACTER/OPEN DOOR/PICK UP ITEM
USING ITEMS
SHINING FORCE NEO GUIDESHINING FORCE NEO GUIDE
SHINING FORCE NEO GUIDESHINING FORCE NEO GUIDE
HEADQUARTERS
Build a party
Speak to allies
BATTLE
TOWN (Greensleeves)
Gather information
Buy/sell Items,
Identify and Upgrade
Weapons and Armor
Strengthen Force Frame
Defeat enemies
Destroy Monster Gates
STORY EVENT
SHOPPING MALL
Page 9

1514
Buy
Anything can be purchased at the shops providing
you have enough Coins. Choose the Item you wish
to buy, and select
Yes to confirm the purchase.
Sell
You can sell any Items in your possession that are
not currently equipped. Choose the Item you wish
to sell and select Yes to confirm.
WEAPONS/ITEMS SHOPS
Appraise the attributes of Items marked ? that
cannot be used in their current state for a nominal
fee. Choose the Item you would like identified and
select
Yes to confirm.
IDENTIFY
Rework your Weapons and Armor to increase your
strength and power. Choose the Item you'd like to
rework and select Yes to proceed. The Item's attributes will change accordingly.
UPGRADE
Store up to 200 Items. Choose an Item from your
inventory listed in the left panel and it will be
placed in storage. To return a stored Item to your
possession, select from the Storehouse list in the
right panel.
STOREHOUSE
STRENGTHENING THE FORCE FRAME
At a certain point in the story, the Force Arts Shop
at Greensleeves will be introduced. Here you can
strengthen your Force Frame and embed Secret Arts
in Weapons and Armor. Force Energy found in the
gamefield is required for strengthening, and can
also be produced here in small quantities by breaking down other Items.
DEALS
Items you sell will often be resold as
Deals. Some can be repurchased at the
original sale price, while others may
increase in value. Items quickly disappear if you don’t repurchase them soon.
FORCEART AND SECRET ART
Strengthening the Force Frame requires a Force Art Item, and
embedding Secrets requires a Secret Art Item. These can sometimes
be found when you defeat enemies or open treasure chests. Take
these Items to the Force Arts shop to increase available parameters
and skills.
SHINING FORCE NEO GUIDESHINING FORCE NEO GUIDE
SHINING FORCE NEO GUIDESHINING FORCE NEO GUIDE
Page 10

1716
Enhance
By obtaining Force Art Items you can increase your
own abilities. Select the parameter you wish to
enhance using the directional buttons or left analog
stick
CV. Set the amount to increase with ZX,
and press the
gS button to assign Force Energy.
Once set, the levels cannot be decreased.
Extract
Break down Special Powers and Secrets embedded
in Weapons into Force Energy (∑). Items that have
not been appraised will yield 100∑.
Secret Arts
You can increase your powers by embedding Secret
Arts in your Weapons and Armor. Select the Item
you wish to enhance, and the Secret Art you wish
to embed. Only one Secret Art can be embedded
per Item, but these can be changed freely.
Press the START button in the gamefield to bring
up the Camp Menu. Here you can check the characters' statuses, change Weapon and Armor settings,
and organize your possessions.
Change settings of equipped Weapons and Armor.
Choose the category of the Item you'd like to
change and press the
gS button. Then choose the
Item you'd like to equip under the selected category.
Items with a purple next to their names have
Special Powers.
Organize, examine and discard your possessions.
Choose an Item from your inventory, and press the
tQ / tE button to highlight it with a color to
make it easier to find. Adding a highlight does not
prevent the item from being discarded.
SHINING FORCE NEO GUIDESHINING FORCE NEO GUIDE
SHINING FORCE NEO GUIDESHINING FORCE NEO GUIDE
STATUS
Parameters based
on equipped
Items.
PARAMETERS
Highlighted in
blue when ability
increases, and red
when decreases.
DESCRIPTION
A brief description
of the currently
selected Item.
EQUIPMENT
Shows currently
equipped Items. The
contents of the right
panel will change
according to the category of Item highlighted.
ITEMS
Items currently
held in possession.
Coins (G)
Force Energy (∑)
Level
Experience to next level
CAMP MENU
ITEMS
EQUIPMENT
VIEWING THE EQUIPMENT/ITEMS SCREEN
Page 11

1918
ATTACK
Shows the attack strength of the
selected Weapon.
Attack Power
Player's attack strength.
Combo
Number of combo hits possible.
Atk. Speed
S
is fastest, E is slowest. A different
ranking system is used for bows.
Stun Blow
Chances of knocking out an opponent with one hit. S is most likely, E
is least likely.
Critical
Chances of hitting a vital point, and
the extra damage it would give.
Knockback
Chances of sending enemies flying.
Atk. Range
The maximum strike distance.
SPECIAL EFFECT
Shows any Special Effects cointained in certain Weapons and Armor. Typical Special
Effects are as follows:
HP Absorb
Draws Health from enemies being attacked.
MP Absorb
Draws Magic from enemies being attacked.
Petrify
Tur ns enemies to stone.
Element Attack
Gives greater damage to enemies of the opposing Element.
KNOWLEDGE OF SPELLS
Shows the attack and resistance power of each Magic
Element. Damage received from magic attacks is
reduced by the percentage displayed under
Res. for
each magical Element.
WEAPON SKILLS/SPELL S
Shows the Weapon Skills and any Spells contained in
certain Weapons. Weapon Skills and Spells are
detailed on p.23.
DEFENSE
Shows your defense condition.
HP
Player's maximum health points.
MP
Player's maximum magic points.
Defense Power
Reduces the amount of damage you
sustain when attacked. Damage
from Magic attacks is not effected.
Res./Rec. Stun
Resistance to stun attacks and recovery time.
Res. Knockback
Resistance to knockback attacks.
Res. Critical
Resistance to vital point attacks.
Ptfy. Recovery
Recovery time when turned to
stone.
Speed
The speed the player can move. S is
fastest, E is slowest.
SPECIAL POWER/SECRET ARTS
Shows any Special Powers or Secret Arts held in a
given Weapon. When such a Weapon is equipped,
the Status is adjusted accordingly. Secret Arts can be
embedded at the Force Arts shop (p.15).
At the Equipment/Items screen, the right panel displays the changes to Status
according to the selected equipment. Use the directional buttons or left analog
stick
ZX to switch views as follows.
SHINING FORCE NEO GUIDESHINING FORCE NEO GUIDE
SHINING FORCE NEO GUIDESHINING FORCE NEO GUIDE
READING THE STATUS PANELS
Page 12

2120
STATUS
Check the player status. Use the left analog stick or directional buttons ZX to
switch between Attack/Special Attack/Defense/Magic screens. Press the
gF but-
ton to see the status of party members.
Party Status
You can also check the status and profile of other
party members. Press the
gF button to change the
display, and then use
ZX to switch between
characters.
Allies not in the current party can be found in the
underground Headquarters at Greensleeves. Choose
a party appropriate to the circumstances and head
for the battleground.
Up to three characters including Max can make
up a party.
Speaking to Allies/Selecting a Party
When you approach allies at the Headquarters, the following options are displayed.
Talk to ––––––
Depending on the circumstances the content of the discussion will change.
Bring along ––––––
The character will join the party. If there are already 2 in the party, you will be
asked which character you wish to replace.
Check ––––––’s status
Check the status of the character. The Status screen is the same as for the
Camp Menu.
Do nothing
Cancel the current dialog.
Move via the Warp Gates
Move directly to locations where the Warp Gates have been released. Stand over
the glowing red Warp Gate and the destination will be displayed. Press the
gS
button to transport there immediately.
PARTY LEVEL UPS
Current party members will also Level
Up after their Experience has increased
to a certain level. Parameters will
increase, and sometimes new skills and
Magic will be learned.
SHINING FORCE NEO GUIDESHINING FORCE NEO GUIDE
SHINING FORCE NEO GUIDESHINING FORCE NEO GUIDE
Level
To Next Level
Speed
Speed of mobility.
S is fastest, E is
slowest.
Steps
Noise you make
when you walk.
Louder noises
attract enemies.
Atks
Noise made when
attacking. Loud
noises are easily
heard by enemies.
Attack/
Special Atk/
Defense/
Spell
Use ZX to switch
between pages.
STR: Strength
Power to attack and
launch enemies.
DEX: Dexterity
Attack speed and
ability to use special attacks.
INT: Intelligence
Ability to use
Magic.
HP: Health Points
MP: Magic Points
Current level/
Maximum level
HP Recovry
Amount HP recovers per
second.
MP Charge
Amount MP recovers per
second.
Minimum Def.
Force power to defend
against all attacks.
HEADQUARTERS
Page 13

2322
BATTLE
Battles occur in real time. Select Weapons appropriate to conditions and proceed with the battle. With
the exception of specific event battles, there is no
actual beginning or end.
Attack by moving towards the enemies and pressing
the
gA button. The Weapons the player can carry
come in four kinds as detailed below, each with
their own strengths and weaknesses.
One-Handed Sword
A shield can be
equipped, and continuous attacks are possible.
Two-Handed Sword
Has greater destructive
power and can take
down several enemies at
once.
Wand
A shield can be
equipped, and various
Spells are possible.
Bow
Attacks can be made
from greater distances.
Many Weapons have embedded Magic properties allowing the bearer to cast
Spells. With the exception of the Return Spell, Items containing Spells must be
equipped before they can be used. Spells vary greatly depending on the Item.
Use the directional buttons CV to select a Spell,
and press the
gD button to cast. Magic use con-
sumes MP. If you cast a Spell when there is insufficient MP, the gauge will glow yellow showing an
overheat. MP recovery will slow to a crawl, and
Magic will become unavailable for a time.
Each Weapon has an inherent special ability known
as a Weapon Skill. During battle, you can use these
in the same way as Spells, but without consuming
MP. Once used, you will have to wait for the gauge
to recharge before using again. The Skill and recovery time will vary depending on the Weapon.
Taunt (One-Handed Sword)
Provoke your enemies, and invite
them to attack you. Most effective
when under attack.
Sacrifice (One-Handed Sword)
Take damage suffered by another
party member onto yourself.
Knockdown (Two-Handed Sword)
Unleash a shockwave to knock down
surrounding enemies. Enemies will
not sustain damage. Some cannot be
knocked down.
Haste (Two-Handed Sword)
Increase the speed of your own
attacks.
Meditation (Wand)
Speed up the rate of MP recovery.
During Meditation, you will be
unable to move.
Slow (Bow)
Reduce the movement of surrounding enemies. Note that attack speed
is unaffected.
Sneak Shot (Bow)
Conceal yourself from enemies,
guaranteeing critical hits with
increased damage.
USING SPELLS
WEAPON SKILLS
SHINING FORCE NEO GUIDESHINING FORCE NEO GUIDE
SHINING FORCE NEO GUIDESHINING FORCE NEO GUIDE
Press the SELECT button to see details of monsters
that you have attacked on the gamefield. Use the
directional buttons or left analog stick
ZXto
switch views. Information will clear when you leave
the gamefield or use the Return Spell.
MONSTER INFORMATION
Page 14

2524
EXPLORING
Here are some of the most common Items and objects you’ll find on your quest.
Coins (G)
Can be gathered from fallen enemies. Use Coins to purchase,
upgrade and identify Weapons and other Items.
Save Point
The Blue Memory Stone on the magic circle is a Save Point.
Here you can save your progress. See p.9 for details on
Saving game data.
Goddess Spring
Approach the blessed waters of the Goddess Spring and
press the
gS button to restore the MP and HP of your entire
party, and refill any used vessels of Healing Water and
Goddess' Tears. Fallen party members will also be restored to
health.
Return Gate
The gate that appears in the center of Greensleeves. This is
connected to the point on the field that you used the
Return spell, and will send you back by pressing the
gS but-
ton.
Sign Posts
At various places on the field, sign posts will tell you where
you are, where you’re going, where not to go, and other useful information.
Treasure Chests
Some Treasure Chests require a Key to open and others
don't. If the Key mark appears, then select a Key from the
Consumable Items and press the
gF button to unlock. From
there, press the
gS button to open the chest. Wooden chests,
boxes and jugs can easily be smashed open.
Magically Sealed Doorways
Some doorways have been magically sealed and cannot be
opened with a regular Key. A Special Item is required to pass
through, which will be revealed at an advanced stage in the
story.
Force Energy (∑)
Force Energy is dropped by fallen enemies in the form of
crystals, or found naturally occurring as gemstone formations. Gemstones cannot be picked up as is, but can be
smashed down into crystals.
Warp Gate
Warp Gates allow instant transportation between the
Greensleeves Headquarters and other towns and dungeons.
Once a gate has been activated, simply approach and press
the
gS button to transport. Gates cannot be activited until a
certain point in the story has been reached.
Switch
A Switch that opens doors and makes paths. While exploring, if you find a lever or an area of ground that seems
slightly out of place, press the
gS button to examine as it
may be a Switch. If you’re stuck and can't progress, then
look around as there may be a Switch nearby.
SHINING FORCE NEO GUIDESHINING FORCE NEO GUIDE
SHINING FORCE NEO GUIDESHINING FORCE NEO GUIDE
RETREAT WITH THE RETURN SPELL
When overwhelmed in battle, or you
wish to sell some Items, use the Return
Spell to teleport direct to Greensleeves.
It may not be possible to use this Spell
under some circumstances. Take care
not to leave Greensleeves as the Return
Gate will vanish, and you will have to
find your own way back by foot or via a Warp Gate.
Page 15

2726
WEAPONS AND ITEMS
Ring/Bracelets
Consumable Items
Ring
Special Powers vary depending
on the Ring.
Bracelet
Special Powers vary depending
on the Bracelet.
Healing Water
Restores HP of party. Can be
refilled at the Goddess Fountain.
Key
Unlocks chests and doors.
Secret Art
Can increase the Special Powers
of Weapons and Armor.
Force Art
A plate containing a Force Art.
Return
Temporarily return to Greensleeves.
Use the Transport Gate to exit.
Blaze
Hurl a ball of flame at the enemy.
Inferno
Erect a wall of fire. Will block the
path and deal continuous damage.
Spark
Fire a bolt of lightning in a straight
line, penetrating multiple foes.
Spark Bomb
A magical electrical mine that will
explode when stepped upon.
Freeze
Pillars of ice will dance about,
wounding those who come near.
Ice Spike
Icicles break forth from the
ground and impale the enemy.
Shine
An orb of light that can be
reflected off walls.
Holy
A ring of divine power damages
enemies and wards off projectiles.
Dark Arrow
Sends a wave of darkness
rippling across the ground.
Chaos Gate
Throws up a field of blackness,
damaging all enemies within.
Hellblast
Make flames whirl around you.
knocking back approaching foes.
Gaia Nova
Max's father's special technique,
a beam of pure Force energy.
Heaven Nova
A specially designed spell, a
burst of condensed light.
Puppet
Animate a slain corpse and have
it fight for you.
Phantom
Bewilder and confuse enemies
with illusions.
One-Handed
Shortsword
A fast, but low damaging basic
weapon.
Two-Handed
Wand
Bow
Helmet
Armor
Shield
Broadsword
A wider sword with a greater
range and slightly more damage.
Zweihander
Single heavy strikes give a lot of
damage, ideal for beginners.
Metal Slicer
Particularly effective against
armored and golem enemies.
Blaze Branch
Can launch balls of flame using
the Blaze Spell.
Etincelle Rod
A small Wand empowered
with Blaze and Spark Spells.
Middle Bow
Standard wooden bow.
Battle Bow
A more advanced bow giving
greater damage.
Light Helm
Increases defenses slightly.
Spark Tiara
Allows lightning attacks, and
raises Lightning Attribute.
Force Shirt
A thin shirt strong in Force, to
guard against physical attacks.
Recover Vest
Increases recovery speed after
an attack.
Small Shield
A small wooden shield, increases
tolerance to stun blows.
Taron Shield
Made from the feet of Birdlings.
Protects against knockbacks.
ITEMS
SPELLS
WEAPONS
WEAPONS AND ITEMS
WEAPONS AND ITEMS
WEAPONS AND ITEMS
Page 16

2928
HINTS AND TIPS
Keep the following hints and tips in mind during the adventure.
Choose your party based on player Weapon and ally rank
Max's rank, depending on equipped Weapon, can
be Swordsman (one-handed), Warrior (two-handed), Archer (Bow), or Magic User (Wand). Consider
the enemies that you will be facing when choosing
a player rank and complementary allies to give
yourself the best possible advantage in battle.
Swordsman
One-handed Weapons offer the
most balanced fighting style. The character can equip a shield and strike relatively quickly. Not the most powerful
Weapon type, but the added defense
helps compensate.
Magic-User
A Wand is required to command
the powers of Magic. While not
designed for use as a handheld Weapon,
the effects of Spells can be devastating.
Greater skill is required, but Magic
offers a worthwhile tactical advantage.
Warrior
Two-handed Weapons are much
more powerful but require both hands,
so it is not possible to ready a shield
resulting in lower defenses. Attacks are
also slower due to the added weight, so
developing your character is the key.
Archer
While weaker than melee
Weapons, bows offer the advantage of
being able to strike from a distance,
against enemies that are very fast. The
number of arrows at the player's disposal is unlimited.
Best method of attack when surrounded by enemies
When overwhelmed by enemies and your allies are
elsewhere, try hitting the
gA button continuously
without moving the left analog stick. Max will
automatically home in on the nearest enemies to
help turn the situation around. A wide range twohanded Weapon is extremely effective here.
Use Return to head to town and prepare your strategy
Max's journey is a continuous battle during which
he will come across stronger and stronger enemies.
To prepare for ensuing battles it's essential to use
the Return Spell and gather strength. In town, you
can manage Weapons, strengthen your Force
Frame, change your party members, and replenish
your health.
If an enemy seems invincible, strengthen your Force Frame
At times there will be enemies that seem impossible
to overcome. Finding Force Art brings out new
strengths that can be developed to fit your needs.
Also by embedding Secrets into Weapons, Max can
develop new powers that may surprise you on the
battlefield.
Magical Elements
Different Weapons have different magical Elements.
Find out the weak Element of your enemy and
wield a Weapon containing that magic. Your damage will be much greater than normal.
Most
Power ful
FLAME FROST
Power ful
LIGHT DARKNESS
No effect on
other Elements
LIGHTNING
HINTS AND TIPS
HINTS AND TIPS
HINTS AND TIPS
Page 17

30
CHARACTERS
CHARACTERS
Gender: Male Race: Human Age: 17
Height: 180cm Weight: 70kg
The hero of this story. His bright and confident nature makes him a popular figure
around Greensleeves, and he is passionate
about defending his beloved town.
Max trained under Graham for two years
at the Larcyle Fort in hopes of becoming
a Force, and finding his
brother who has been
missing for three
years.
Gender: Female Race: Human Age: 15
Height: 160cm Weight: 45kg
Devoted friend of Max, who she grew up
with after her parents died. Meryl is a lighthearted and friendly girl with natural power,
and her strength in the Force is also quick to
develop.
Gender: Male Race: Human Age: 43
Height: 188cm Weight: 85kg
Max's father and Captain of the Holy
Guard at Greensleeves. He's very strong in
Force powers, and was instrumental in
winning the great war 13 years ago.
Gaia is loyal and just, but inept at
expressing emotion.
Gender: Male Race: Centaur
Age: 52 Height: 220cm
Weight: 220kg
Force Knight and Captain of the
Border Knights at Larcyle Fortress. He
is fair, and has a strong sense of duty
and obligation, but remains popular due
to his down to earth nature. Graham is a
highly-skilled knight and uses his weighty
build to employ effective charge assaults.
31
Page 18

32
*THIS LIMITED WARRANTY IS VALID FOR SEGA PRODUCTS FOR PLAY ON PLAYSTATION®2
COMPUTER ENTERTAINMENT SYSTEM MANUFACTURED FOR SALE IN AND PURCHASED AND
OPERATED IN THE UNITED STATES AND CANADA, ONLY!
Limited Warranty
Sega of America, Inc. warrants to the original consumer purchaser that the PlayStation 2
Game Disc shall be free from defects in material and workmanship for a period of 90-days
from the date of purchase. If a defect covered by this limited warranty occurs during this
90-day warranty period, the defective PlayStation 2 Game Disc or component will be
replaced free of charge. This limited warranty does not apply if the defects have been
caused by negligence, accident, unreasonable use, modification, tampering or any other
causes not related to defective materials or workmanship. This limited warranty does not
apply to used software or to software acquired through private transactions between
individuals or purchased from online auction sites. Please retain the original or a
photocopy of your dated sales receipt to establish the date of purchase for in-warranty
replacement. For replacement, return the Product, with its original packaging and receipt,
to the retailer from which the software was originally purchased. In the event that you
cannot obtain a replacement from the retailer, please contact Sega to obtain support.
Obtaining technical support/service
To receive additional support, including troubleshooting assistance, please contact Sega at:
• web site . . . . . . . . . . . . . . http://www.sega.com
• e-mail . . . . . . . . . . . . . . . support@sega.com
LIMITATIONS ON WARRANTY
ANY APPLICABLE IMPLIED WARRANTIES, INCLUDING WARRANTIES OF MERCHANTABILITY AND
FITNESS FOR A PARTICULAR PURPOSE, ARE HEREBY LIMITED TO 90-DAYS FROM THE DATE OF
PURCHASE AND ARE SUBJECT TO THE CONDITIONS SET FORTH HEREIN. IN NO EVENT SHALL
SEGA OF AMERICA, INC. BE LIABLE FOR CONSEQUENTIAL OR INCIDENTAL DAMAGES
RESULTING FROM THE BREACH OF ANY EXPRESS OR IMPLIED WARRANTIES. THE PROVISIONS
OF THIS LIMITED WARRANTY ARE VALID IN THE UNITED STATES ONLY. SOME STATES DO NOT
ALLOW LIMITATIONS ON HOW LONG AN IMPLIED WARRANTY LASTS, OR EXCLUSION OF
CONSEQUENTIAL OR INCIDENTAL DAMAGES, SO THE ABOVE LIMITATION OR EXCLUSION MAY
NOT APPLY TO YOU. THIS WARRANTY PROVIDES YOU WITH SPECIFIC LEGAL RIGHTS. YOU MAY
HAVE OTHER RIGHTS WHICH VARY FROM STATE TO STATE.
SEGA is registered in the U.S. Patent and Trademark Office. Sega, the Sega logo and Shining
Force are registered trademarks or trademarks of Sega Corporation or its affiliates. © SEGA,
2005. All Rights Reserved. This game is licensed for use with PlayStation 2 only. Copying and/or
transmission of this game is strictly prohibited. Unauthorized rental or public performance of
this game is a violation of applicable laws. Sega of America, Inc., 650 Townsend Street, Suite
650, San Francisco, CA 94103. All Rights Reserved. www.sega.com. Programmed in Japan.
Made and printed in the USA.
The typefaces included herein are solely developed by DynaComware.
A lady of Cantore. She is a loyal defender of the weak, and
will fearlessly step in to right injustice with little regard
for her own safety. Her skills in recovery Spells are
unrivaled, and is a figure of strength in battle.
The mysterious man that suddenly appears
before Max and Meryl. Who is hiding
behind the mask?
Previously of the Force, Rebecca is one of the three
great sages. Despite her rank of chairperson of the
Thunder Country Ucritos, to Max and Meryl she is
more like a favorite grandma.
Page 19

Rear Cover
 Loading...