

Page 1
1
CONTENTS
Welcome to
Medieval: Total War™
…………………………………………………4
Installing the Game……………………………………………………………………5
Installation ……………………………………………………………………5
Your CD Key ………………………………………………………………………5
Starting Play: The Main Menu ………………………………………………………6
The Options Menu…………………………………………………………………7
The Campaign Game …………………………………………………………………9
Quick Start ……………………………………………………………………9
The Campaign Tutorial ……………………………………………………10
The Campaign Map Screen ……………………………………………………10
Changing Your View of the Campaign Map ………………………………12
Getting More Information on the Campaign Map ………………………12
Quickly Managing Your Faction ……………………………………………12
Moving Units on the Campaign Map………………………………………13
A Game Year …………………………………………………………………14
The Tour………………………………………………………………………14
The In-Game Menu …………………………………………………………14
Factions …………………………………………………………………………15
Faction Leaders ……………………………………………………………15
Heirs: Princes and Generals ………………………………………………17
The Rest of the Family: Princesses ………………………………………18
The Death of Kings …………………………………………………………18
Provinces …………………………………………………………………………19
Resources ……………………………………………………………………20
Tax and Income ……………………………………………………………20
Improving Provinces…………………………………………………………21
Trade Routes…………………………………………………………………22
Loyalty and Revolts ……………………………………………………………22
Provincial Loyalty Ratings …………………………………………………22
Changing Loyalty ……………………………………………………………23
Revolts ………………………………………………………………………24
Provincial Titles …………………………………………………………………24
Offices of State………………………………………………………………25
Armies & Generals ………………………………………………………………25
Training Units ………………………………………………………………25
Generals………………………………………………………………………27
Vices and Virtues ……………………………………………………………28
Who’s in Command? ………………………………………………………28
Armies and the Review Panel………………………………………………28
Merging Units ………………………………………………………………29
Medieval_Total_War_Manual.qxd 1/19/06 3:11 PM Page 1
Page 2

32
Re-organising Armies ………………………………………………………30
Retraining and Re-equipping Military Units ……………………………30
Castles and Garrisons ………………………………………………………30
Sieges…………………………………………………………………………31
Bribes…………………………………………………………………………31
Battles in the Campaign Game ……………………………………………32
After a Battle and Retreats…………………………………………………32
Baronial Revolts and Civil Wars ……………………………………………33
Fleets ……………………………………………………………………………33
Buildings and the Technology Tree ……………………………………………34
Buildings and the Review Panel …………………………………………35
Constructing Buildings ……………………………………………………35
Castles and the Battle System ……………………………………………37
Destroying Buildings ………………………………………………………37
Strategic Agents …………………………………………………………………37
Emissaries ……………………………………………………………………38
Princesses ……………………………………………………………………38
Spies …………………………………………………………………………39
Assassins ……………………………………………………………………39
Religious Agents ……………………………………………………………40
Religion …………………………………………………………………………40
Generals: Piety ………………………………………………………………41
Provinces: Faith and Zeal …………………………………………………41
Religious Buildings …………………………………………………………41
Catholic Excommunication …………………………………………………41
Heretics ………………………………………………………………………42
Crusades ……………………………………………………………………42
Jihads…………………………………………………………………………42
Information Buttons and Parchments …………………………………………43
Battles ………………………………………………………………………………44
The Battle Tutorials …………………………………………………………45
Before a Battle …………………………………………………………………45
Weather and Climate ………………………………………………………45
The Battle Screen …………………………………………………………46
The Battlefield Camera ……………………………………………………46
The Mini-Map Display ………………………………………………………47
Army Formation ……………………………………………………………47
Basic Battle Controls ……………………………………………………………48
Unit Information Panels ……………………………………………………48
Unit Menus …………………………………………………………………49
Tool Tips and Unit Reports …………………………………………………50
Command Buttons …………………………………………………………50
Changing a Unit’s Formation ………………………………………………51
Unit Facing …………………………………………………………………51
Generals in Battle …………………………………………………………52
Other Basic Controls ………………………………………………………52
The Art of Command ……………………………………………………………52
Alternate Attacks ……………………………………………………………52
Withdrawing from Combat …………………………………………………53
Route Marches and Waypoints ……………………………………………53
Selecting Multiple Units ……………………………………………………53
Grouping ……………………………………………………………………54
Group formations ……………………………………………………………54
Advanced Generalship …………………………………………………………55
Artillery ………………………………………………………………………55
Reinforcements………………………………………………………………56
Reinforcements Before a Battle……………………………………………56
Prisoners ……………………………………………………………………56
Royalty in Battle ……………………………………………………………57
Sieges, Castles and Buildings …………………………………………………57
Custom Battles …………………………………………………………………58
Select Era ……………………………………………………………………58
Select Factions ………………………………………………………………58
Battlefield Conditions ………………………………………………………59
Buying Your Forces …………………………………………………………59
Historical Battles and Campaigns …………………………………………………60
Historical Battles ……………………………………………………………61
Historical Campaigns ………………………………………………………61
Multiplayer Games …………………………………………………………………62
Play On GameSpy ………………………………………………………………63
Chat Rooms …………………………………………………………………63
Internet Games ………………………………………………………………63
Check GameSpy for
Medieval: Total War
Updates ………………………64
Log Off ………………………………………………………………………64
Register On GameSpy ………………………………………………………64
LAN Game ………………………………………………………………………64
Host Game Options …………………………………………………………64
Join Game Options …………………………………………………………65
Multiplayer Lobby……………………………………………………………65
Customise LAN Armies …………………………………………………………66
Medieval: Total War
Website ……………………………………………………66
Medieval: Total War
News Server ………………………………………………66
Appendix 1: Units……………………………………………………………………67
Spearmen ……………………………………………………………………67
Missile ………………………………………………………………………67
Skirmishers …………………………………………………………………67
Infantry ………………………………………………………………………67
Heavy Infantry ………………………………………………………………67
Peasants ……………………………………………………………………67
Heavy Cavalry ………………………………………………………………68
Light Cavalry …………………………………………………………………68
Horse Archers ………………………………………………………………68
Artillery ………………………………………………………………………68
Gunpowder …………………………………………………………………68
Appendix 2: Controls & Keys ………………………………………………………69
Hints and Tips ………………………………………………………………………70
Credits ………………………………………………………………………………73
Limited Warranty ……………………………………………………………………75
Medieval_Total_War_Manual.qxd 1/19/06 3:11 PM Page 2
Page 3

5
INSTALLING THE GAME
Please make sure your PC has the minimum specification listed on the outside of the
packaging.
Medieval: Total War
has been programmed to run on as many PCs as possible,
but it cannot run on a machine with less than the minimum system requirements.
• Your PC should be 100% Windows-compatible, and be using Windows 98 or later (Windows
98, 2000, ME or XP).
Medieval: Total War
will not work with Windows 3.1, 95 or any other
operating system. The game also requires that you have DirectX 8.1 or later and DirectXcompatible drivers for your sound card, video card and any other peripheral devices you use.
• You will need 1700Mb of free hard disk space for a full install of
Medieval: Total War
.
You may find that running a disk defragmenter on your hard disk before installation will
free some space and speed up your machine slightly.
• Before installing
Medieval: Total War
make sure that all other applications are closed.
• Make sure that Virtual Memory is enabled (if you’ve turned if off in the past). Right click on
the
My Computer
icon on your desktop and select
Properties
. Select the
Performance
tab, and
then click on the
Virtual Memory
button. Make sure that the
Disable
check box is empty. On
Windows XP computers,
Virtual Memory
is handled by the operating system, but if you have
changed the settings to turn it off you’ll need to allocate some disk space to VM once more.
INSTALLATION
• Insert the first
Medieval: Total War
CD in a CD or DVD drive in your PC. The set up
program will start. If you have disabled Autoplay double-click on My Computer on the
desktop and then double-click the CD drive containing the
Medieval: Total War
CD.
• Click the Install button on the title screen to begin the set up process.
• Follow the on-screen instructions that will guide you through the remainder of the installation.
• The set up routine will install DirectX 8.1 if it is not already installed on your system.
Should there be any problems with running the game, the most likely cause will be incompatible
or old sound and/or video drivers. Check out manufacturers’ websites for the latest drivers.
YOUR CD KEY
Your copy of
Medieval: Total War
was shipped with a unique CD key. When attempting to play
a multiplayer game on GameSpy you will be asked for this key code. When asked for the code,
please enter it exactly as it appears on the CD key card included in the package, otherwise the
multiplayer game will not launch. Your key is unique to you. Don’t let anyone else use it.
You will need to insert the
Medieval: Total War
CD when
requested to play the game.
4
WELCOME TO MEDIEVAL: TOTAL WAR
™
Medieval: Total War
is a game of empire building and epic real time battles set in the
Middle Ages, a period of some 400 years when Europe, the lands around the Mediterranean
and the Middle East were in a state of constant upheaval. This period – starting in 1087
and finishing in 1453 – is the time of Crusaders and Saracens, the Hundred Years War, the
Holy Roman Emperors, heresy and inquisitions, the
Reconquista
in Spain, Teutonic Knights
and boyars, the rise of a new, Turkish Empire and the final fall of Constantinople… It is a
time of intense competition between the kings, princes, religions, new nations and radical
new ideas that were to make Europe the cockpit of the world.
The game gives you the chance to experience the Middle Ages in all their bloody
magnificence, to command medieval armies of knights, men-at-arms, archers and peasants
and make your people the new masters of Europe. The successful game ‘split’ first seen in
Shogun: Total War™
between a turn-based strategy element and a real-time battle system
has been kept and enhanced for
Medieval: Total War
. There are more than 100 different
types of soldiers available for the epic battles that can feature more than 10,000 men in a
single battle.
Medieval: Total War
adds new levels of depth, accessibility, gameplay and strategy. In the
game, you control one of twelve aspiring nations as they fight for control through a
fascinating mixture of war, trade, diplomacy, dynastic entanglements and good oldfashioned dirty tricks! You’ll have to think in medieval terms about warfare, about
positioning your royal family through marriage and alliances, about keeping your peasants
profitably content, and about how to do down your rivals.
The strategic part of the game puts you in charge of the fate of a
faction
– an emerging
people or nation – the English, the Germans, the Egyptians, etc. on the world stage. Here,
you can plan your grand campaign to take over Europe and the Mediterranean world, build
castles, recruit armies and manage the diplomatic and dynastic affairs of a royal house. In
addition to armies, you’ll have spies, emissaries, holy men, and other agents to help you
bring your schemes of domination to a successful and triumphant conclusion.
You’ll also have the chance to command your armies in the heat of battle as it took place in
medieval Europe – bloody, glorious and chivalrous (but only to a point). As you lead your men
they’ll gain
valour
and skill at arms, and be better warriors as a result. Their desire to fight
under your command makes the difference between creating a powerful, all-conquering
faction, or of seeing your people live under new feudal masters, your once-loyal followers no
better than leaderless rebels!
If you’ve played
Shogun: Total War
, then be prepared for a few surprises.
Medieval: Total War
might look like its cousin, but it does seemingly familiar things in new and exciting ways.
Strategies and tactics that worked in
Shogun: Total War
can sometimes lead to defeat here.
Take a few minutes to learn the differences between the two games, and you’ll soon be
grinding Europe beneath your armoured heel! If you haven’t played
Shogun: Total War
, then
prepare for the experience that is Total War!
Medieval_Total_War_Manual.qxd 1/19/06 3:11 PM Page 4
Page 4

7
Battle Tutorial: The battle tutorials introduce the concepts of battlefield command and give
you the chance to practice crushing your enemies. If you’re having difficulty playing the
game, then we recommend you play through these battles at least once.
Options: Allows you to adjust video, audio, performance, controls and game settings. This is
discussed in more detail in the next section of the manual.
Quit: Return to Windows. Remember to save your current game before quitting – unless
you’re running from your enemies like a whipped cur, of course!
Menu options that are unavailable will be greyed out.
THE OPTIONS MENU
The options menu allows you to alter the behaviour of the game to suit your PC. The
selections on this screen are:
Video: Change the video card (if you have more than one), alter screen resolutions for the
campaign and battle maps and change the gamma correction (brightness) of the screen.
Click on the relevant slider to change a setting.
The
Test Display Mode
option at the bottom allows you to check that your video card and
drivers will cope with any changes you make.
Audio: Change the separate volume settings of the music and sound effects, and change
the overall audio quality, by clicking-and-dragging the relevant slider. You can also mute the
volume (which is very useful if you’re conquering Europe when you should be doing a
spreadsheet for the boss!).
Performance: These options apply to battles. Click on the relevant boxes to turn on/off
smoke and fauna on the battlefield. Turning off these effects will make the game run
slightly faster, but you’ll miss seeing crows circling over the dead!
Click-and-drag the slider to change the number of men in a unit. Changing from the default
size of ‘small’ to ‘huge’ will double the number of men in a unit. Medium increases the
number of men by a third, and large by two-thirds.
Controls: These sub-options allow you to change the way you control the game in battles:
• Click on
Mouselook
and
Mousemove
to turn these features on/off.
• Click-and-drag the relevant sliders to change the camera rotation and movement speeds
in battle.
• Assign keys allows you to change the key assignment for any battle command. Click on
the command you want to change, and then press the key(s) you want to use for that
particular command. You can also reset the commands to their default values. You’ll find
a complete list of the key commands in Appendix 3 of this manual.
6
STARTING PLAY: THE MAIN MENU
Once the introductory movie has finished, you’ll be presented with the Main Menu screen.
The options on this menu allow you to choose the game you want to play, adjust settings
and even create your own battle maps. If you haven’t played this game before, we
recommend starting with the tutorials. The menu options are:
Quick Battle: Get straight into the game and fight an instant battle. Your forces and the field
of battle are chosen for you, and it’s up to you to lead your men to victory!
Single Player: Begin a new game of
Medieval: Total War
. You’ll then be given the option of
choosing the style of game you want to play. This option brings up a new parchment. Click
on the option that you want to play:
• New Campaign: Start a new game, ruling your faction in the strategic campaign game and
then using the battle system to resolve conflicts. Use the main menu Load Game option (see
below) to return to an earlier game. See the
Campaign Game
section (later) for full details.
• Load Game: Load a previously saved campaign game. We recommend that you save your
game whenever you take a break from the demands of ruling a kingdom to do mundane
everyday stuff, like work, sleep or eat...
• Custom Battle: This option allows you to fight a one-off battle. Set a budget, buy up
enough soldiers for two armies, and go to it on the battlefield of your choice! This is a
great way of perfecting your grasp of battlefield tactics. See the
Custom Battles
section
for more details.
• Historical Battles: Fight one of the standalone battles based on a famous historical event.
These set piece ‘missions’ give you the chance to change history or do better than the
original commanders. See the
Historical Battles
section for full details, and you can visit
the website to download more historical battles.
• Historical Campaigns: Fight through a series of battles covering the career of a great
leader, or fight the key engagements of an important campaign. See the
Historical
Campaigns
section for complete instructions.
• View Replays: The Battle system allows you to save a record of the action. Here, you can
watch re-runs of your greatest triumphs or, should the medieval idea of (virtual)
flagellation appeal, your greatest defeats!
• Map Editor: This allows you to use one of the game creation tools to create your own
battlefields. We suggest that you look at the Map Editor README.TXT file for full details
of how the editor works before attempting to use it.
If you decide you don’t want to do any of these, click on the back arrow in the bottom left
hand corner of the parchment. This ‘go back’ option is standard on menu screens.
Multiplayer: Search for servers/hosts or act as one for a multiplayer game of
Medieval: Total
War
. This allows you to play against other human opponents over a LAN or the Internet
providing you have a suitable network connection. Multiplayer games are covered in further
in their own section of this manual.
Campaign Tutorial: This is a guided tutorial through the full campaign game. We recommend
that you play through the tutorial to get a feel for the gameplay.
Medieval_Total_War_Manual.qxd 1/19/06 3:11 PM Page 6
Page 5
9
THE CAMPAIGN GAME
Selecting Single Player from the Main Menu and then Full Campaign starts a new campaign
game, your chance to lead a faction to greatness as you conquer Europe. Before you can
start, you’ll need to select a few options about your game:
Difficulty: You’ll next be asked to select the difficulty setting for your game. Click on the
setting you want, which applies to all parts of the game – expect enemies to be very smart
and tough on
Hard
and
Expert
settings, and rebellions to be more likely.
Campaign Selection: This allows you to choose the starting date for your campaign to
conquer Europe: the
Early, High
or
Late
medieval periods. Click on the period you want.
These are the years 1087, 1205 and 1321. You’ll notice that the map of Europe changes
to show the distribution of territory at each date. There’s also an overview of the period to
give you an idea of the situation. In later periods Europe is more developed, but there’s less
time to make your ultimate grab for power!
In each case the game ends in 1453, and that’s the date at which victory or defeat will
be judged.
You can also choose how you want to win the game here:
• Domination: You need to conquer two-thirds of the provinces in the game.
• Glorious achievements: You don’t have to be a conqueror, although it will help! Instead,
your victory is measured against the historical achievements of your chosen faction. For
example, playing as the Germans of the Holy Roman Empire you’ll be expected to keep
control of what was Imperial territory, take some land from your neighbours and dominate
the trade of northern Europe and the Baltic.
Click on
Continue
to confirm your choices.
Faction Selection: There are 12 playable factions in
Medieval: Total War
. Left click on a
faction’s name to see the provinces it controls and read a brief description of its strengths
and prospects. The factions are not identical by any measure, but each faction’s ratio of
resources to threats and opportunities is about the same: if a faction has many provinces
and armies, it faces many threats and has many opportunities for glory!
Click on
Continue
to confirm your choice and begin the game.
As before, click on the ‘go back’ arrow at the bottom of any dialogue panel or parchment to
return to previous options.
QUICK START
If you want to get started quickly, play the
Campaign Tutorial
, the
Battle Tutorial
and then
start a full campaign at easy difficulty as the English in 1087.
Europe awaits your conqueror’s tread…
We also recommend that you automate many strategy
game elements and concentrate on the military
aspects of play. This can be done at any time during
play by opening the automation panel next to the
campaign mini-map (this is all explained shortly).
8
Game: This sub-menu allows you to alter some aspects of the battle game interface and
gameplay.
• Click the relevant tick boxes to turn on/off the relevant feature. See Battles for an
explanation of what the icon bar and overview map are and do.
• Select
widescreen
or
fullscreen
to change the overall look of a battle.
We recommend that you leave the realism settings on. If you turn them off, the game will
be easier but less accurate and possibly not as much fun.
• Morale: Troops will be scared, want to run away or feel confident and ready to take on all
comers when this is on. In effect, your soldiers will act like people and be brave or
cowards as their overall situation demands!
• Fatigue: Troops will become tired though marching about and fighting, reducing their
combat effectiveness when this is on.
• Limited Ammo: All missile troops and artillery can run out of arrows, bullets, javelins or big
rocks to hurl at the enemy when this is on.
• Restrict Camera: While the camera can still move around the battle fairly freely, it cannot
move too far away from one of your units, neatly simulating what your men can see and
know about on a battlefield.
• Finally, having Campaign Battle Time Limit on means that battles that happen in a full
campaign game are fought against the clock. This can be useful if your faction is involved
in many battles each year. When this is switched on the defender in a battle wins if the
time runs out.
As before, left click on the back arrow in the bottom left hand corner of any parchment or
press the ESCape key to return to the previous screen. This ‘go back’ option is standard on
all the options sub-menus.
Medieval_Total_War_Manual.qxd 1/19/06 3:11 PM Page 8
Page 6
11
• Armies and Fleets: These are the basic military forces of the game. Armies are made up of
units
and are commanded by a
general
. These are described in more detail below, but they
are the tools used to conquer new provinces and defend those you already own. The amount
of colour in the large white banner of a fleet or army shows the number of soldiers in an
army, or the number of ships in a fleet. Only armies and fleets have these banners. You may
also notice that some armies have a column of stars. This is the command rating of the
general in charge of the army, and the more stars he has, the better! One army is shown as a
mounted knight or cavalryman – this is the army commanded by your
faction leader
.
• Agents: Strategic units
without
banners are the spies, emissaries, assassins and others
that can help further your plans of conquest. Each of these agent types has abilities that
are discussed fully later.
• Castles and Ports: These are the only buildings to appear on the campaign map itself, as
they are the most important. The size and grandeur of the castle shows exactly the nature
of the defences in the province. The amount of colour in the large white banner of a
castle shows the number of soldiers in the
garrison
. Castles can also have a column of
stars if the garrison commander is a good general. Other buildings in the province may be
shown in the review panel (see below) – you might need an agent in a province to have
full information about it if you don’t own the province.
• Mini-Map: This gives a complete overview of the game world. The red-bordered trapezium
shows you the boundary of the main view, so you can orientate yourself. Areas that you
own, or where have an agent, or you can see into from an adjacent province are
highlighted in the appropriate faction colour.
• Automation menu: This gives you the choice of how many features in the game are automated.
You can let the computer look after all or some of the detailed management of your growing
empire, while you concentrate on crushing your enemies through military conquest! Each of
the automation options can be turned on or off at any time during the campaign game.
The bottom strip across the screen includes all the other controls you need to play
Medieval: Total War
. These are:
• Information buttons: These bring up information parchments to help you manage your
realm, its armies and agents.
• Building Construction button: This brings up the construction parchment where you can
order the creation of buildings, including fortifications and castle upgrades, in a province.
• Unit Training button: This brings up the training parchment where you can order the
creation of new military units and agents in a province.
• The Review Panel: When a
province
is selected, the review panel shows all the buildings
that have been constructed in that province. When an
army
is selected, the review panel
shows the units that make up the army; the same is true for the ships in a
fleet
.
• Treasury: The number of florins that you currently have in your treasury. This money will
be spent on many things, including buildings, training units and
the upkeep of existing forces. Be careful not to completely
run out of money!
10
THE CAMPAIGN TUTORIAL
We recommend that you have a look at the Campaign Tutorial before launching yourself into
the harsh, cruel world of medieval war and power politics.
Medieval: Total War
is a big
game with many gameplay options, some of which are quite subtle – although some, it has
to be said, are brutally simple and simply brutal! The Campaign Tutorial will familiarise you
with the campaign game’s controls and underlying ideas.
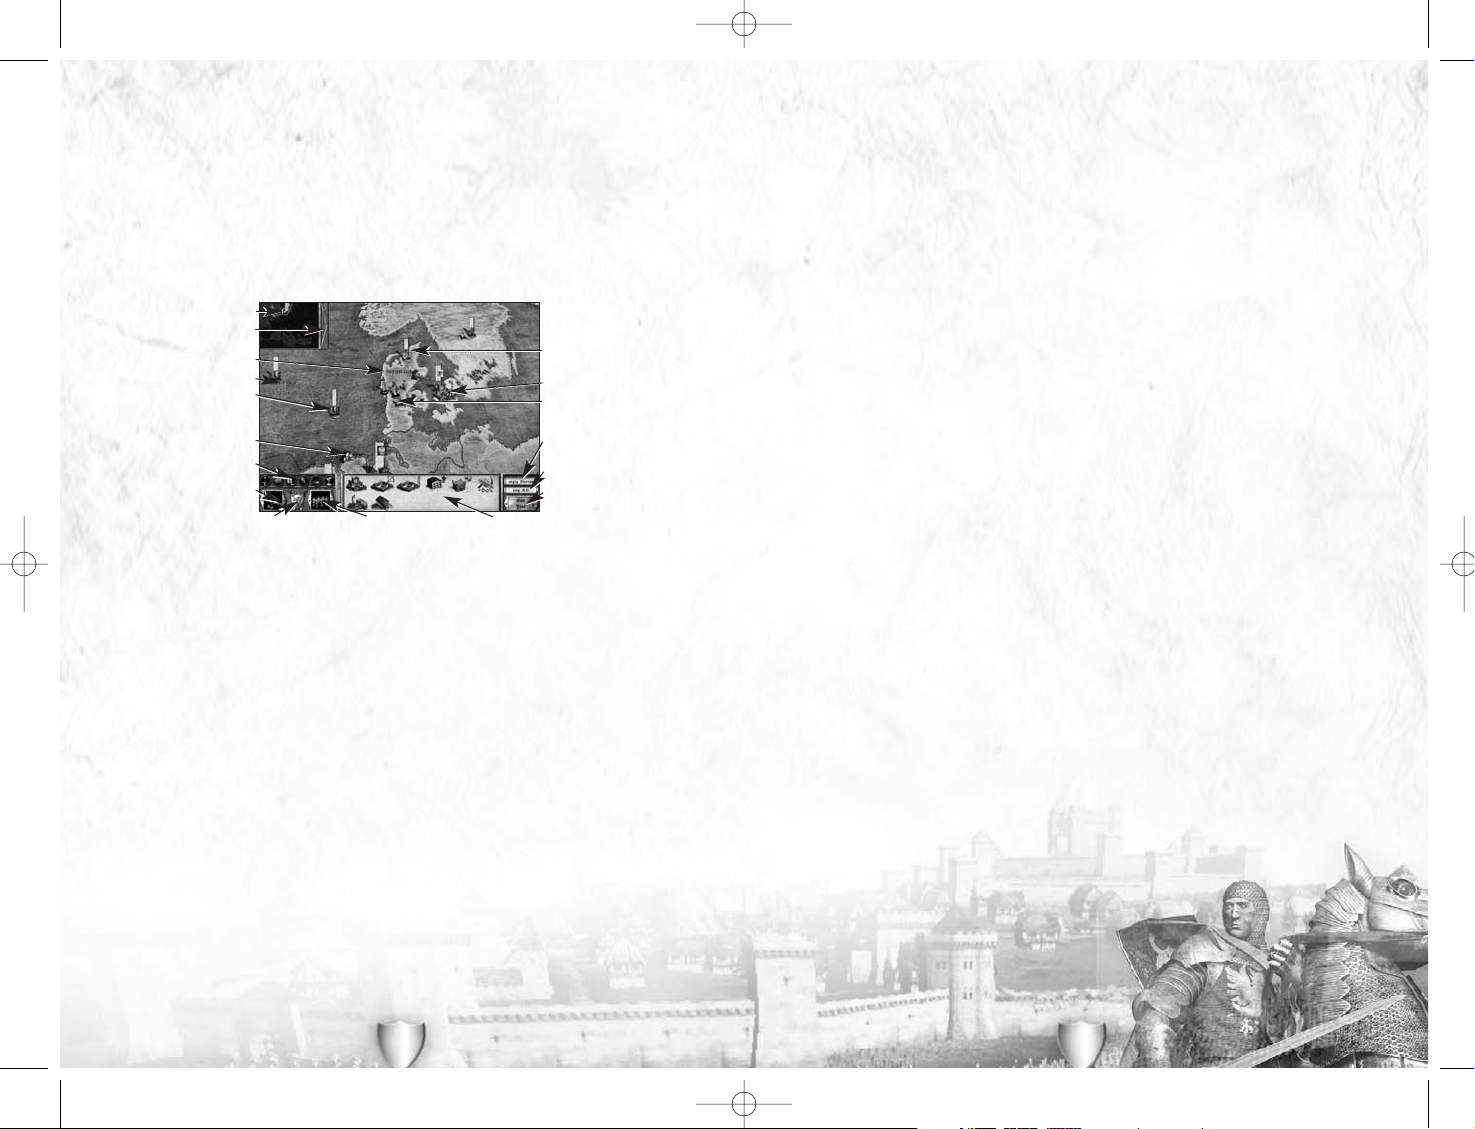
THE CAMPAIGN MAP SCREEN
The campaign map screen is your window onto the detailed world of
Medieval: Total War
.
This map is divided into a number of provinces and represents all of medieval Europe, the
Middle East and the Mediterranean Coast of North Africa. Not all provinces in the game
will have the ‘modern’ name you might think belongs to a region – modern countries have
yet to come into being when the game starts!
Here, you can plan your conquests at your leisure; there are no time pressures as your
moves can be changed right up to the moment you end the turn. It’s from this screen and
its assorted information parchments that you control your provinces, issue orders to your
armies, assassinate and bribe enemies, train new soldiers and keep track of diplomacy, your
royal family and your finances. It may sound like a lot to look after, but we’ve organised
everything to make your life as a medieval warlord easy. This section is an overview of how
the game works. You’ll find a detailed description of each aspect of the game over the next
few pages.
For a start, everything you see on screen has an associated tool tip if you get stuck. Just
hold the cursor over an item for a moment and a mini-explanation of what you can do with
a button, item, province (or whatever!) will appear.
• Provinces: These are the lands that you are fighting to control. Provinces generate tax
income that you then spend to construct defensive buildings, training facilities and to
train new military forces.
• Sea Regions: These zones cannot be conquered in the same way as lands, but can be
occupied by fleets, and then form part of trade routes and be used for sea-borne
invasions. Their use can be denied to enemy forces as well by your fleets.
The Mini-Map
Automation Menu Button
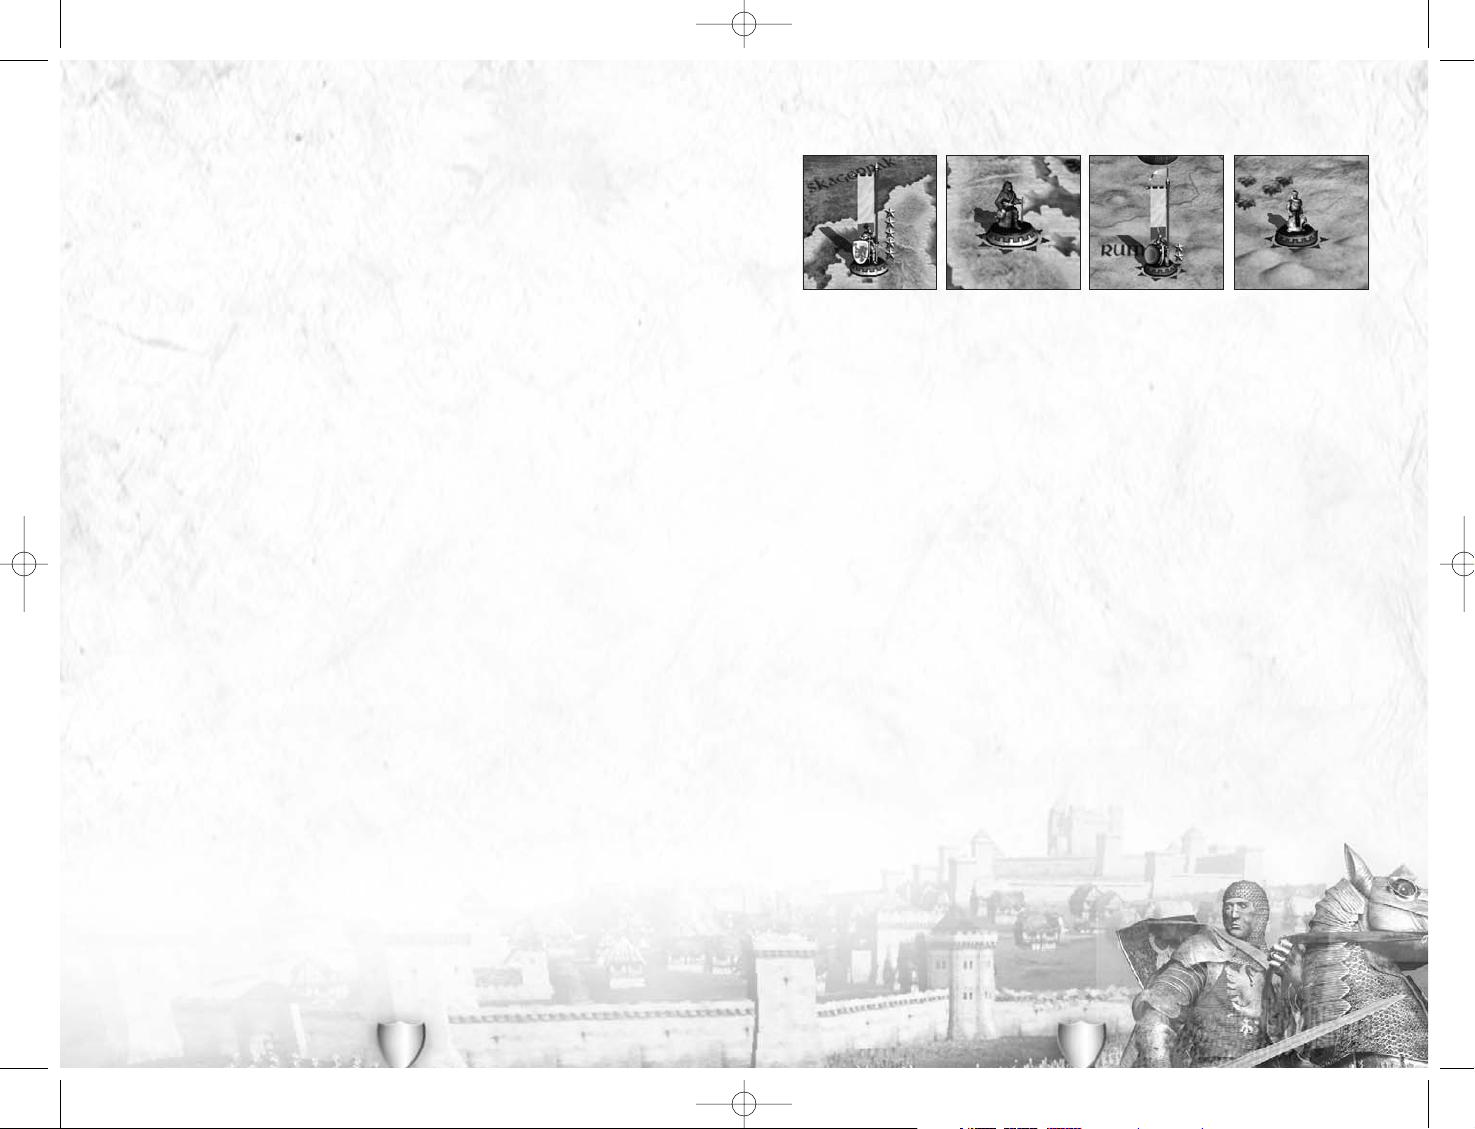
A Province
A Sea Region
A Castle
Game Year
End Year Button
An Army
Review Panel
Treasury
A Strategic Agent
A Port
Information Buttons
Build Button
Faction Shield Training Button
A Fleet
Medieval_Total_War_Manual.qxd 1/19/06 3:11 PM Page 10
Page 7
13
MOVING UNITS ON THE CAMPAIGN MAP
As a general rule in
Medieval: Total War
, left click on an army/fleet, agent or province to
select it. Whenever you do this, you’ll see a grey revolving highlight around the unit. The
contents of the review panel at the bottom of the screen will change to show you what can
be found in a province (buildings), an army (military units) or a fleet (ships). You’ll need
some kind of agent in a province to get these details.
• Left click and hold to ‘pick up’ a strategic game piece belonging to your faction such as
an army/fleet or agent. The piece will be enlarged to show that you have ‘picked it up’.
• For an army, the provinces it can march to directly are highlighted. Drop the army by
releasing the mouse button in a highlighted province to order it to move there. If the
target province belongs to another faction, this may start a war. An army can contain up
to 16
units
.
• You can also drop an army on a castle in its current province to order it to
garrison
the
castle (that is, move inside and defend the castle). The size of a castle garrison is
counted in the number of men it can hold, not the number of
units
.
• You can drag and drop an army onto a distant province and it will automatically find its
own route to the destination over the course of a few (or many) turns. If necessary, a
force will use fleets as transports to get itself to this destination.
• Armies can also be dropped onto other armies belonging to your faction, providing that both
the dropped army and the target began in the same province. This unites the armies into
one larger force. Some units in the two armies may merge if they are numerically weak. See
Merging Units and Armies
later for more details. We’ll talk about
Fleets
in more detail later.
• Picking up an agent works in exactly the same way. Left click and then drag-and-drop an
agent in any highlighted province and he will move there.
• Some agents can be dropped on to other units. This will cause them to carry out some
kind of special mission, depending on the agent involved and the nature of the target.
The agent will be highlighted when held over the target if he or she can be dropped to
carry out a mission. See
Strategic Agents
for more details of their missions.
So,
where
you drop a unit has important effects. Dropping an army in a province invades
that province; dropping an assassin on someone may kill them and
so on. All these different movement orders and their results are
discussed in greater detail in the manual sections on
specific unit types.
12
• Date: This is just the current game year. Remember that the game ends in 1453, so you
can run out of time!
• End Year button: This does exactly what you would expect – the game turn ends, and all
your orders and those of your rival factions are carried out.
CHANGING YOUR VIEW OF THE CAMPAIGN MAP
You can move your view round the map by using the arrow keys on your keyboard, by
moving the cursor to the edge of the screen, or by clicking on the mini-map in the area that
you want to see.
You can zoom into and out of the map by using the mousewheel if your mouse has one. You
can also use the 1 and 3 keys on the numeric keypad to zoom the view as well.
GETTING MORE INFORMATION ON THE CAMPAIGN MAP
In all cases, you can right click on many items to bring up an information parchment on
the item. You can do this with any:
• Province
• Agent
• Army
• Castle
• Fleet
• Sea Region
• Building – in the review panel when a province is selected.
• Military Unit – in the review panel when an army or fleet has been selected.
The information that you are given is explained over the next few pages.
QUICKLY MANAGING YOUR FACTION
Left click on the large arrow next to the mini-map to bring up the automation and interface
options for the game, then left click on any of the tick boxes to change the relevant setting.
Left click on the large arrow to close this menu box when you are happy with your choices.
This is a great option if you want to concentrate on the military aspects of the game.
Medieval_Total_War_Manual.qxd 1/19/06 3:11 PM Page 12
Page 8
15
• Options: This takes you to the options menu as discussed earlier, where you can change
game settings. You cannot change size of military units during a full campaign.
• Main Menu: Return to the main game menu. You will be prompted to save your current
campaign if you have not already done so.
• Quit: Exit the game and return to Windows.
As always, click on the ‘go back’ arrow at the bottom of any dialogue panel or parchment to
return to the previous menu.
FACTIONS
There are 12 playable factions in the game, along with some non-playable factions (these
vary, depending on the start date you choose). Each faction has its own strengths,
weaknesses and potential for European dominance.
You’ll see that not all factions are the same by any means, and the game of
Medieval: Total
War
you experience will be different each time you play a different faction. Some factions
are particularly suited to all-out military conquest, others need to use a combination of
military force and subtler methods to achieve their goals, and some are particularly well
positioned to become trading nations and use wealth to achieve political dominance. Just
to make it all even more interesting, the different start positions for 1087, 1205 and 1321
reflect historical reality and the relative power of a faction can shift remarkably, even in a
hundred years!
FACTION LEADERS
Your faction leader is the most important unit that you command. If he dies the
effects can be catastrophic, including bringing the game and your plans of conquest
to an abrupt end! A faction leader is called a king, sultan, khalifah, emperor, doge or
grand prince, but no matter what his title, his abilities remain the same.
Regardless of his other abilities, a faction leader always acts as a
general
, (see the section
on
Armies
and
Generals
) and will always lead any army that he is part of in a battle, even if
there is another general in the force who is a better commander!
On the campaign map the faction leader is always shown as being mounted on a horse. They
are the only cavalry generals on the map, so you can always spot faction leaders easily.
You can left click on the large faction shield in the bottom left corner of the screen to
centre the campaign map view on your faction leader.
Left click on a faction leader to select him. As with all units on the
campaign map, you’ll see a grey highlight marker revolving around
him to show that he’s been selected.
14
For the moment, we only need to worry about the principle of ‘dragging and dropping’ units
on the campaign map as the way you issue orders to all your forces in the game.
A GAME YEAR
There are no time pressures on your strategic decisions in
Medieval: Total
War
. You are not committed to a course of action until you click on the
end year button. At that point, orders are carried out and plans, for good
or ill, are set in motion. You can’t cancel any orders once you’ve
committed to the end of a turn.
Pressing the return or enter keys on your keyboard will also end a turn.
THE TOUR
After you end the turn, and before the beginning of your next year, you will be shown what’s
happening in provinces you can see – those adjacent to your realm, and those where you
have agents.
You’ll see a row of portraits at the bottom of the screen. These are the leaders of all the
factions in the game and they are highlighted as your computer carries out the orders for
each faction.
The tour can be very useful for gauging the military and political climate, as well as
keeping an eye on what your neighbours may be planning. You may well spot an invasion
force massing for an attack, for example. Press the spacebar to skip the tour.
You’ll also be informed of important events as they occur, such as the completion of a
castle or building, a miraculous happening, or even the discovery of gunpowder. Historical
events that changed the middle ages also occur in the game at (approximately) the right
time, but don’t bank on something unfolding just as it did in reality. Left click on the
red
wax seal
icon on an event parchment when you have finished reading it.
THE IN-GAME MENU
Press the ESCape key at any point to go to the in-game menu. This allows you to do the
following:
• Resume game: Return to the game in the same state as you left it.
• Load game: This allows you to load (or reload!) a game should you think that something
has gone horribly wrong with your plans of conquest. The game automatically saves your
progress at regular intervals, and you can load the
Last Autosave
saved game in the same
way as any other saved game. You can sort the list of saved games by name or by date –
but this means the date you were playing, and
not
the year in the game!
• Save game: The game defaults to the name of the faction plus the year number as a title for
a saved game, but you can edit this to suit yourself. Just type in a new title for the saved
game. Once you are happy, click on Save at the bottom of the screen. There are 99 ‘slots’
available for saved games, so you shouldn’t run out! You can return directly to the game
from here. As before, you can show the list in name or date (your playing date) order.
Medieval_Total_War_Manual.qxd 1/19/06 3:11 PM Page 14
Page 9
If a faction leader doesn’t have a wife and it doesn’t look likely that he will find a princess, he
will marry one of the young women of his court. He’ll do this for himself, and you’ll see a
message telling you this has happened. Once he is married, a faction leader will start having
children. His sons will become heirs to the faction; his daughters will be princesses, diplomatic
pawns and agents to be married off to his generals and into other factions. You can’t influence
the children produced by a royal marriage, but you may like to be careful of the risks you take
with the faction leader until he has at least two adult sons (the traditional ‘heir and spare’).
Left click on the silver arrowhead on the left to see the faction leader’s
vices and virtues
.
These are quirks of character that the man has picked up over the course
of his life, as a result of both events during play and his increasing years.
Move the cursor over any vice or virtue for an explanation. Left click again
on the arrowhead to return to the leader’s traits. You can find out more
about vice and virtues in the
Vices and Virtues
sub-section, but there isn’t
enough room in this manual to explain them all.
As with all information parchments, left click the red X in the top right
hand corner of the parchment to close it and return to the main
campaign map.
HEIRS: PRINCES AND GENERALS
When an heir is born it is an important event for a faction. It secures the future of the
nation beyond the life of the current faction leader. However, heirs must come of age at 16
before they can inherit their father’s lands and, once old enough to be active, they can be
as vulnerable as any other general to the twists and turns of fate.
When a prince comes of age, a new army of one unit
is created in the same province as the faction leader.
This army is lead by the prince and consists of a
bodyguard unit of the best cavalry available to the
prince’s faction. The bodyguard unit of an heir cannot
be disbanded. It comes ‘free’ with the prince when he
comes of age, but the maintenance costs must still be
paid. Unlike other generals, heirs are always loyal to
their faction and cannot be bribed to change sides.
When an heir takes over his brothers (if any) remain as ‘princes of the blood’ and generals.
However, when his son-and-heir inherits the throne, these ‘uncles’ are demoted from princely
status to that of ordinary generals. They still have royal blood, but are no longer directly in line
for the throne. Such a general can inherit the throne if there are no heirs left, but this may
cause a civil war (see the sub-section on
Baronial Revolts and Civil Wars
, later).
16
You’ll also see that a military unit, the faction leader’s personal bodyguard, appears in the
review panel. This unit costs nothing to train and comes into play automatically with the
faction leader, but its maintenance cost must still be paid. A personal bodyguard is the
best cavalry available to the faction, and it cannot be disbanded. The bodyguard will return
to full numerical strength over a few years if it takes casualties in battle.
Right click on a faction leader unit on the campaign map to bring up the information
parchment that describes his personality in detail. Move the cursor over most items on this
parchment, and you’ll be shown an explanatory message. If you right click on his bodyguard
unit in the Review Panel, you’ll bring up the information parchment about the unit, not the
leader. See
Armies
and
Generals
below for more information on units.
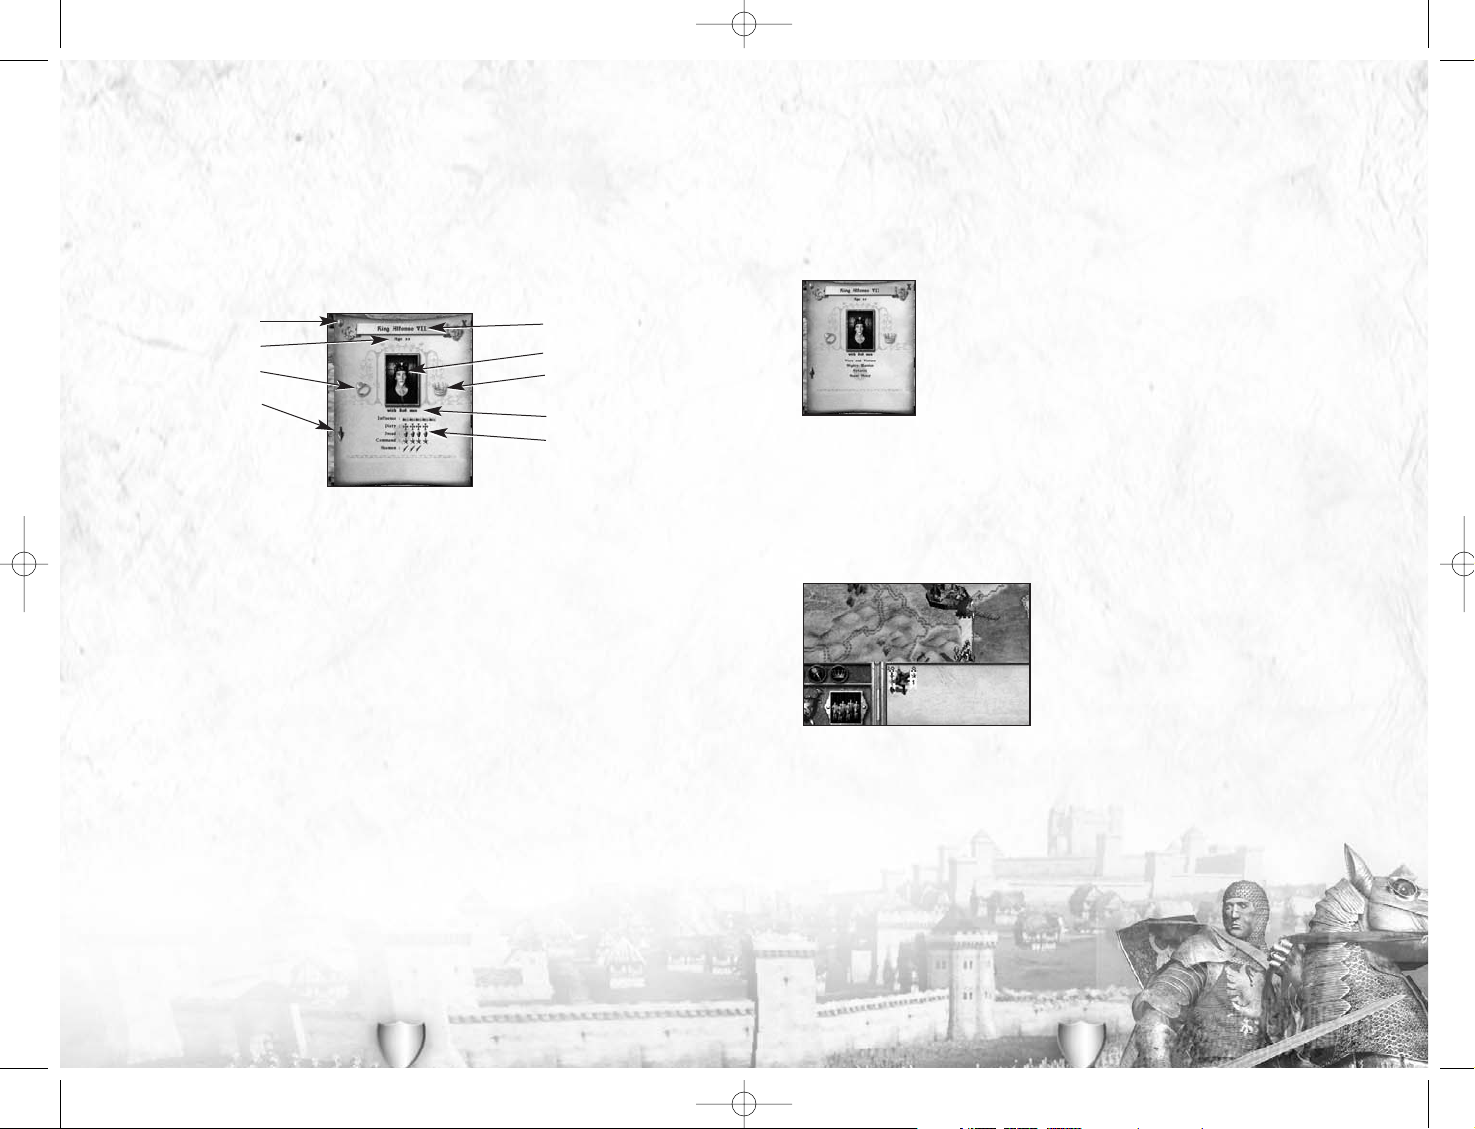
The name and age of a faction leader are self-explanatory, but there is one bit of
information you might find interesting. If a faction leader has the same name and (ordinal)
number as a famous ruler of his people he will tend to have the same kind of abilities.
Thus, Henry V of England will tend to be a great general, as will Alexander I of Russia
(Alexander Nevsky) or al-Nasir I of Egypt (better known as Saladin).
As a faction leader becomes older there is a greater chance of him dying of natural causes.
The army size simply shows the number of men the faction leader currently has with him.
Their type and quality can be seen in the review panel.
The faction leader’s traits are
influence, piety, dread, command
and
acumen
. Apart from
influence, these are the same as any other general and are explained in the
Character Traits
sub-section of
Armies
and
Generals
later. Generals normally have a
loyalty
trait, but faction
leaders have
influence
because they are assumed to be completely loyal to themselves!
Influence
is a measure of how powerful this faction leader is perceived to be by his fellow
monarchs. Influence has an effect on whether treaty proposals are accepted, and on
whether factions will offer treaties and alliances – everyone wants powerful friends!
Influence is increased by conquering new areas, defeating foes in war and sometimes
simply by surviving! A large part of a faction leader’s influence also dies with him, as the
medieval world is one where personal power is all-important.
All faction leaders have royal blood, as do their heirs. The crown marker to the right of the
portrait shows the character possesses royal blood. Some generals may also have royal
blood too and its effects on generals are explained later.
If there is a large ring to the left of the portrait, the faction leader is married. A faction
leader needs to be married in order to have any children. From time to time other factions
in the game will offer a princess’ hand in marriage, and it is also possible to send out
emissaries to look for a bride for a faction leader (see
Strategic Agents
).
17
Faction Allegiance
See More
Married Status
Age
Portrait
Royal Blood
Army Size
Ratings
Name
Medieval_Total_War_Manual.qxd 1/19/06 3:11 PM Page 16
Page 10
19
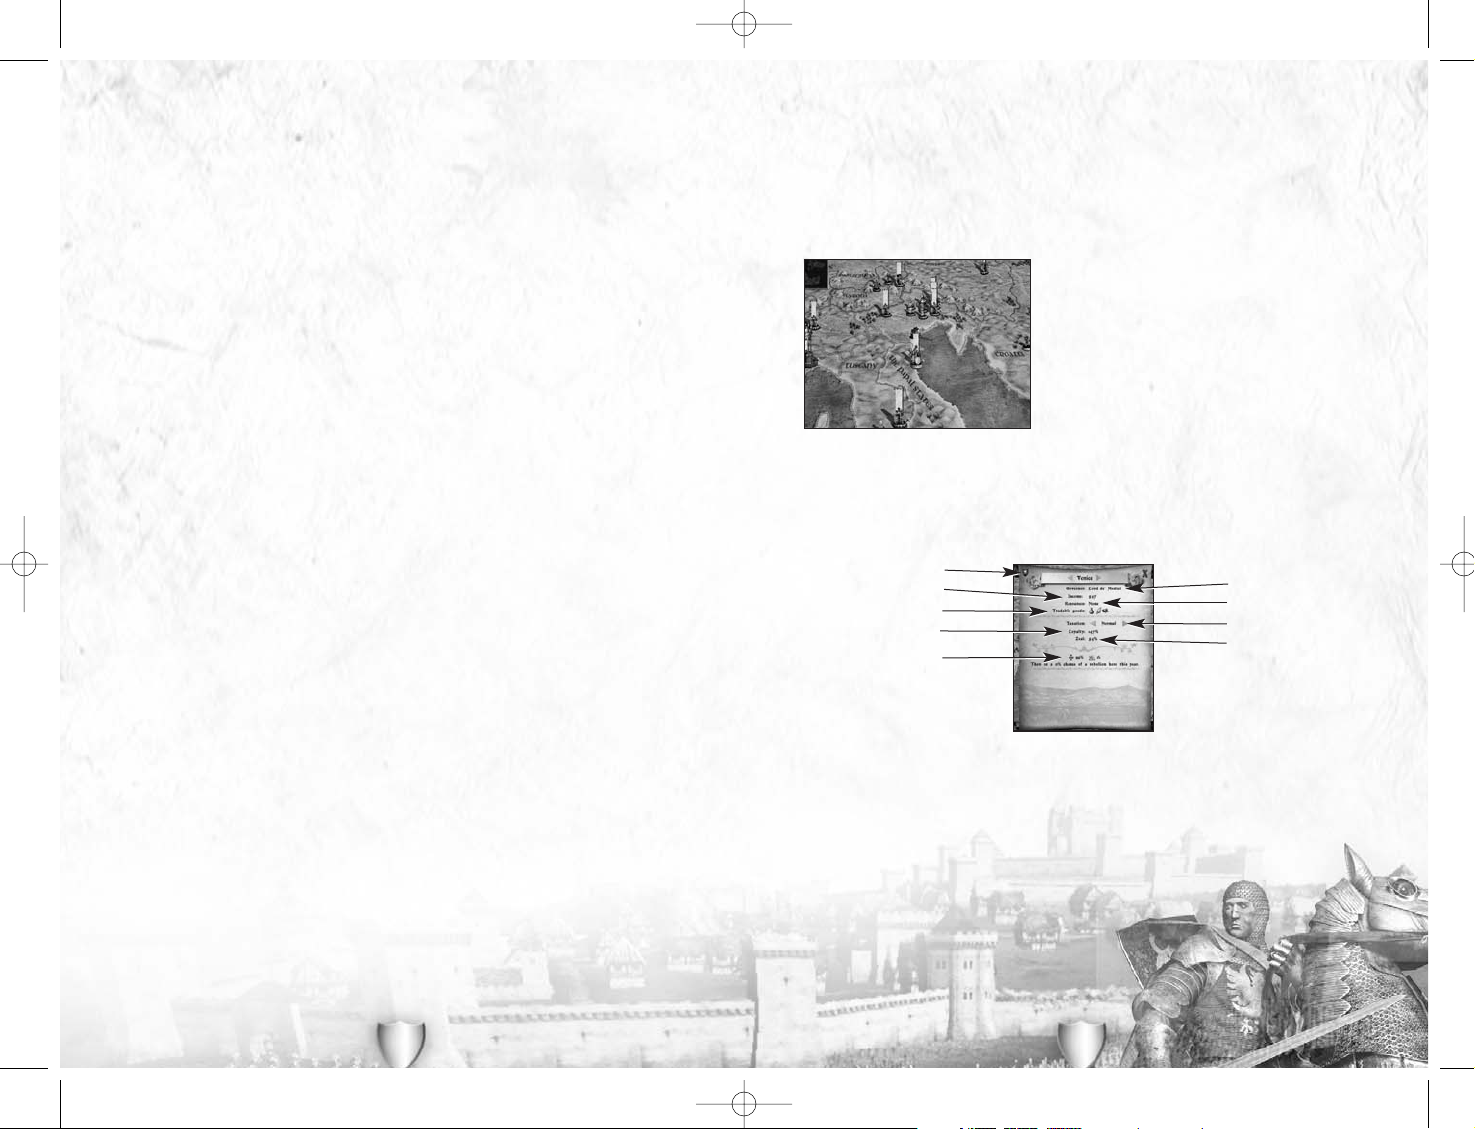
PROVINCES
Provinces are the places where you earn money and train troops. Without land, your faction
will not last long in the face of harsh competition from other peoples. You’ll need to decide
which provinces are important to your faction and hang onto them, and which provinces are
ripe targets for your armies! Sooner or later final victory or ignominious defeat will depend
on the number of provinces that your faction controls.
Left click on a province to select it – anywhere within
its borders will do. You’ll see that any buildings in
the province are now shown in the review panel at
the bottom of the screen. If you can train (or are
training) soldiers in the province, the train unit
button will also have appeared next to your faction
shield and coat-of-arms in the bottom left corner of
the screen.
The province’s name is prominently displayed on the
map. If there is a castle in the province this is
shown on the map, as is the presence of a port for
coastal provinces. Ownership of the province is
shown by the border colour, which is the same as the
main colour of the owning faction.
Right click on a province to bring up the information parchment that gives you details of the
province.
Left click on the arrows on either side of the province name if you wish to look at the next
or previous province belonging to your faction.
The governor is the general who has been given the provincial title for this province. He
controls the day to day running of the land through his servants and can boost trade, or
instil fear and loyalty. For a full explanation of governors see the
Provincial Titles
section.
You will find more information about taxes and income in the next section.
You can find out full details of religion and its effects in the
Religion
section later on.
As with all information parchments, left click the
red X in the top right hand corner of the parchment
to close it and return to the main campaign map.
18
THE REST OF THE FAMILY: PRINCESSES
Princesses are only available to Catholic and Orthodox factions. There are no Muslim
princesses in
Medieval: Total War
. All princesses are valuable assets in the diplomatic
process, and marrying them to a member of a rival faction can cement an alliance.
Princesses are born rather than trained, and take time to come of age and be eligible for
marriage at 15. Unlike male children, they can become too old to be marriageable and are
then removed from play. Their twilight years are spent in quiet religious contemplation.
For full details of the abilities of princesses, see the
Strategic Agents
section.
THE DEATH OF KINGS
When a faction leader dies, his heir becomes the new faction leader, assuming the heir has
come of age.
If there is no heir, the line of succession passes to a general with royal blood. It’s possible
for there to be more than one claimant, and this can cause the faction to split apart in a
civil war (see the sub-section on
Baronial Revolts and Civil Wars
, later). There’s also the
possibility that other factions will have claims on your lands. If one or more of your
faction’s princesses have married outside the faction, they have created a potential claim to
some of your faction’s lands by marriage.
If a faction leader dies without heirs (or his heirs are too young, or his family only has daughters)
and there are no generals of royal blood, things are more serious. All the provinces that made up
his kingdom become independent, under the control of local rebel warlords. These rebels may not
owe allegiance to anyone, but they will often fight when their lands are attacked. This is the end
of the game, as your faction has fallen victim to destiny and is no more.
For computer-controlled factions there is a small chance that a very junior member of the royal
family escaped the destruction of the kingdom caused when the faction leader died. This
individual may reappear (possibly after several years) and rally people to his cause. If this
happens, a faction can rise again in one of its former provinces and re-enter play. This won’t
happen with the faction you control – once your leader dies without an heir, the game is over!
Faction Allegiance
Loyalty
Governor
Taxation
Zeal
Income
Religious Affiliations
Resources
Tradable Goods
Medieval_Total_War_Manual.qxd 1/19/06 3:11 PM Page 18
Page 11
21
• Farming can be improved by up to +80%. Doing this will take a lot of money and time,
but can be very worthwhile in valuable agricultural areas.
• Trading Posts and Merchants improve trade by selling the goods from a province firstly to
their own people and then to foreign provinces overseas. See
Trade Routes
, below for a
full explanation.
• Ports improve income from trade by allowing exports through fleets. They also allow
imports
,
and your officials tax these (at a low level) as they come into one of your provinces.
• Mines and Mining Complexes exploit natural resources such as gold, silver, copper or salt.
These make money every turn they operate.
• Natural Disasters: It’s worth mentioning here that there are events that can cause a loss of
income. Famine and Flood will wipe out harvests, as you might expect. Storms at sea can
also affect trade income because ships can be sunk, and this could break a link in a
trade route.
Protect Your Income: The areas with the highest income, either from agriculture, mines or
trade are your greatest assets. Without the money they produce, you will have no armies.
They should be protected in depth.
• Castles: A castle allows you to hold out in a siege. The larger the fortification, the more
men you can garrison there and the longer they can hold out.
• Disputed Regions: If a region is disputed (there are armies belonging to more than one
faction, or there are rebels present) no faction derives any income until the conflict in the
province has been resolved.
IMPROVING PROVINCES
Constructing buildings in a province always improves it in some way for your faction. This can
be by raising income (by improving farmland, for example), by making the defences stronger
(by building or improving a castle) or by allowing you to train military units and agents there.
No building in the game makes a province weaker or damages its potential in any way.
Left click on the building to bring up the construction parchment. This is
where you order new buildings for a province. You can find full details of the
rest of the construction process in
Buildings and the Technology Tree
section
of this manual.
Medieval: Total War
has quite a complicated technology tree,
so it’s worth looking at this as a separate issue from provinces.
20
RESOURCES
Always check a province’s natural resources, whether you own it or not (this can be useful
when deciding where to invade) as these can be exploited to raise income, or can be very
useful in other ways:
• Income: The number of florins that the province generates as tax. This is a grand total, so
it is affected by the tax rate, the governor’s acumen rating, farming improvements and
whether or not any trading posts, merchants or mines have been constructed.
• Trade goods: The number and type of trading goods gives some indication of the potential
income from a province when trade routes in place and functioning.
• Iron Deposits: Where iron is plentiful, you can build a Metalsmith to improve the quality of
weaponry for troops trained in the province.
• Other Factors: Some provinces are particularly noted for the soldiers they produce.
Switzerland produces superb Pikemen, for example, while Wales is noted for Longbowmen.
It can often be worth invading a province to be able to train these specialists.
TAX AND INCOME
As Cicero wrote in Roman times,
Nervos belli, pecuniam infinitam
(The sinews of war, unlimited
money), so goes warfare in
Medieval: Total War
. You’ll never have unlimited money, but making
sure that you do have a strong treasury is very, very important in bringing your plans of conquest
to a successful conclusion. Once you run out of money you won’t be able to construct new
buildings, train more soldiers, bribe people or pay ransoms for your captured generals.
All factions in the game use the same currency in their treasuries: the
florin
, a type of coin
first minted in the Italian city of Florence. In the middle ages, providing a coin contained
the correct amount of gold or silver no one cared where it had been minted (some kings
were not above ‘cheating’ when minting coins by putting cheaper metals into the mix).
Taxes are your faction’s only guaranteed income, and tax rates are set on a province-by-province
basis. The default rate is
normal
, which yields a reasonable amount of cash without damaging
the loyalty of the locals too much. The rates are
very low, low, normal, high
and
very high
, and
these equate to approximately 30%, 40%, 50%, 60%, and 70% taxes. High taxes will give
higher income, but the loyalty of any people being taxed to the hilt will be strained.
Left click on either of the arrows either side of the tax rate to change it for the province.
You’ll see that the income and loyalty values change in response to any taxation change.
Tax rates don’t have to be the same across a whole kingdom or empire, so take a moment
to look at your provinces regularly and see which can be squeezed for more money and
which need to be given a reduction to keep them feeling loyal.
Remember that as well as costing money to construct buildings and train units, soldiers also
cost money each turn in maintenance. Even peasants have to be provided with weapons and
food when they are being soldiers, and some unit types can be very expensive to keep around.
Maintenance money is always deducted first, before any tax income is added to your treasury.
Improving Tax Income: Taxes come from farming, trade and mines. All of these can be
improved to bring in more income in future years:
Medieval_Total_War_Manual.qxd 1/19/06 3:11 PM Page 20
Page 12

23
CHANGING LOYALTY
The loyalty of a province’s people is affected by the following:
• Taxes: High taxes reduce loyalty, and low taxes make people feel happier, it’s as simple as
that. You can alter the tax rate as often as you like before pressing the
end year
button and
see what the result on loyalty is before you commit to taking everyone’s money!
• Harvest: A good harvest makes peasants happy and contented under their master. A bad
harvest makes them disloyal, as they look for someone to blame for bringing down God’s
punishment. Other than hoping for good harvests, there’s nothing you can do to influence
the weather.
• The Governor: The general who holds the title of
Duke, Earl, Count, Margrave
or
Amir
of a
province is its governor. His dread rating can make people loyal if it is high enough – he’s
just frightening them into obedience!
• Occupying Armies: An army in a province helps to calm the peasantry. You should ensure
that you have particularly large occupation force in recently conquered areas. A weak
leader is one that the populace will not respect.
• Spies: Enemy spies can stir trouble in your province by encouraging revolt. Your spies can
provide counter intelligence services in your own provinces, which can decrease the
chance of revolt.
• The Faction Leader: The distance from the province to the faction leader affects how loyal
a population feels towards the faction. People like to bask in the glory of a king! His
dread
rating also has an effect on his people.
• Famine, Floods, Earthquakes and Pestilence: Though Acts of God, peasants don’t react
favourably to natural disasters and blame the bad habits of their rulers for God’s displeasure.
• Watchtowers and Border Forts: By closely watching your people you will be able to control
them. You will also be able to use the information gathered about your neighbours to
incite unrest in their territories.
• Religion: When your faction’s religion doesn’t match a province’s religion, there may be
trouble and the people will obviously feel less loyalty to those who they feel follow the
‘wrong’ faith.
• Previous Loyalties: People are loyal to the ruler they know. If you conquer a province then its
peasants will be unsettled and prone to rebel as they chafe under your mastery. It can take
several years for their loyalties to adjust to the new situation. This can sometimes work in
your favour as people loyal to your faction may revolt in a province taken by an enemy!
22
TRADE ROUTES
Trade can be an extremely profitable activity, but you can only trade where there are goods
available. These are distributed across the map to accurately reflect the pattern of medieval
trade. Some provinces have no trade goods at all (which doesn’t mean that there’s no
business being done, just that it isn’t significant enough to bother the King!). The larger and
grander the Merchant involved in trade from a province, the greater the potential profits.
To sell goods overseas, you need a Port and a Trading Post or Merchant of some kind in a
coastal province (inland provinces can’t trade other than locally). You then have to create a
chain or network of sea regions with one of your fleets in each linking your port (a one-ship
fleet will maintain the link) with a foreign port in another province. This is a
trade route
.
Merchants won’t trade with provinces belonging to their faction, but all your merchants in
coastal provinces who can connect to a trade route that leads to a foreign market will use it.
A Merchant will sell to as many foreign ports (provinces) as his goods can reach through a
trade route (a chain of fleets). The higher-level merchants can trade goods more efficiently,
trade more of them, trade more valuable goods, and so earn more money. You can then tax
their trade earnings.
LOYALTY AND REVOLTS
Despite the real power in Medieval Europe being the iron fist in the plate-mailed glove, few
rulers survived for long without the support of the people and the Church or Mosque. If the
people withdrew their support for a ruler, his days would be numbered – and fearful.
In general, the people were loyal where they experienced strong –yet fair – rulers. There
were many peasants’ revolts, but these usually occurred because a leader showed
weakness, incredible cruelty or rank stupidity.
PROVINCIAL LOYALTY RATINGS
When you look at the Information Parchment for a province, you’ll see a Loyalty rating,
shown as a percentage. This number represents how content the peasants are with the
faction that controls their province. If the Loyalty is below 100 then there is a chance that
there will be a revolt in the region.
You can also press the shift key at any time to show the current loyalty of all your provinces:
• Green: fully loyal.
• Yellow: marginally disloyal, but unlikely to rebel.
• Red: very disloyal, and highly likely to rebel soon, if it hasn’t happened already!
Medieval_Total_War_Manual.qxd 1/19/06 3:11 PM Page 22
Page 13

25
OFFICES OF STATE
As well as provincial titles such as dukedoms there are also great
Offices of State
that can
be given to generals. These positions give similar benefits as provincial titles. They are
gained through constructing appropriate buildings: a Chancellery creates the office of
Chancellor (or Vizier for Islamic states), for example. These appear as title markers in the
same province as the building.
Left click on the office marker – a letters patent scroll – to select it, and drag-and-drop it on
an army to make the commanding general governor of the relevant province. Right click on the
office marker to bring up the information parchment about it. This will show you the bonuses
given by the office to its recipient. Giving an Office of State to a general will usually boost his
traits, particularly Loyalty, and make him better as a governor or commander.
Not all State Offices have identical names, but their effects on gameplay are broadly similar.
ARMIES & GENERALS
Armies are
the
tools of conquest you need to take over the world! But aside from such
dreams of glory, you also need armies to defend your provinces, intimidate the locals to
keep them loyal and make other factions consider attacking someone else instead.
Before you can train agents and units you’ll need to construct a basic castle and some sort
of training facility or facilities. Some units need the skills inherent in more than one
building, such as Feudal Knights who will need a
Horse Breeder
, an
Armourer’s Workshop
and
Royal Estates
in a province before they can be trained there.
TRAINING UNITS
This process works for both military and strategic agents, as they are
trained in exactly the same way.
• Left click on the province where you want to train a unit or agent.
• Left click on the training button to the right of your faction shield
(shown left in its ‘empty’ and ‘busy’ states). This brings up the training
parchment for the province, showing you all the units that can be
trained. You can right click on any unit graphic to bring up the
information parchment about it.
• Left click on the unit you want to train. It will then appear in the
province training queue
at the bottom of the parchment. Each
province has a separate queue for units being trained. The number
below the timer is the number of years it will take to complete the
left-most unit or agent in the queue. You can also right click
anything in the queue to look at its
information parchment.
24
REVOLTS
If a province is disloyal, there is a chance a revolt will start, and the more disloyal it is, the
greater the chance of trouble. Revolts influence neighbouring provinces and, once started,
rebellion can soon spread to previously peaceful and tractable lands. There are several
different types of revolt, each of which produces a different kind of rebel army:
• Peasant Revolt: The rebel army will be largely peasant rabble, and probably not very valorous.
• Loyalist Revolt: This is a revolt where the province is still loyal to the previous feudal lord.
The rebels are likely to be a fairly effective fighting force with a good mix of troops.
• Muslim Revolt: The rebel army will be a mixture of peasants, stiffened by a core of hardy
fighters.
• Catholic Revolt: The rebels will be a mix of peasants, often lead by knights or other lesser
feudal troops.
• Orthodox Revolt: The rebels will include a selection of Orthodox-specific units as well as a
great many peasants.
• Heretics: The rebel army will be mostly peasants, but could also include religious fanatics
of some kind and a core of better quality troops.
• Bandits: Bandits are often surprisingly well-equipped troops (if not that experienced), and
often don’t include many peasants in their ranks. Bandit armies come in three types:
Catholic Bandits, Muslim Bandits and Orthodox Bandits.
If you crush a rebellion you’ll be asked to decide the fate of any captured rebels. The
harsher your decision, the more likely it is that the general’s dread rating will increase, or
he will gain some sort of cruelty-related virtue or vice.
PROVINCIAL TITLES
The medieval world was feudal, meaning that there was a strict hierarchy of obligation and
duty where great kings gave land and authority to lesser men in return for service. In
Medieval: Total War
generals can be made provincial governors, most often called Dukes
(for Christians) or Amirs (for Muslim factions). Other titles, such as Count, Earl, Margrave,
Prince, Grand Prince and (lesser) King also exist in the game. The overall effect of granting
titles to your generals is that titles make them both loyal and better able to serve.
Each province has a provincial title marker in it, shown as a rolled scroll. Left click on the
marker to select it and drag-and-drop it on an army to make the commanding general
governor of the relevant province. Right click on the title marker to bring up the information
parchment about it. This will show you the bonuses given by the title to its recipient.
Once a general is given a title he will assist in running the province. The province will be
more loyal when their duke is present. His dread and acumen will be used to calculate the
province’s loyalty and taxes. The personal loyalty of the general will also increase thanks to
so public a reward, and his other traits may also improve.
Medieval_Total_War_Manual.qxd 1/19/06 3:11 PM Page 24
Page 14

27
GENERALS
Every unit in the game has a named commander, but not all of these commanders are equal
in ability. When an army is created, a general is automatically picked to lead it. Right click
on an army to see the general’s biography.
To find the unit he commands, left click the army and look at the review panel. The unit
with a star in right-hand banner of a unit is a general. The number below the star is the
general’s
command
rating, and this improves as he wins battles. It’s possible for there to be
two or more generals in the same army, although only one will actually be in command. The
others are treated as normal soldiers.
Generals are not simply identical leaders. Some are feared as bloodthirsty and ruthless,
while others are renowned as being highly devout, good as provincial rulers, or particularly
chivalrous. These differences are represented through a set of personality
traits
and their
vices and virtues.
Traits are used to determine how provinces and troops react to each general. The higher the
value in a particular trait the greater ‘skill’ the general has in that area. Faction Leaders
have these traits as well, but with
influence
instead of
loyalty
. In each case, the larger the
number of icons, the greater the value.
• Influence: Only Faction Leaders have influence. This represents how other
factions see his actions and whether they will respect his given word.
• Loyalty: Represents how likely the general is to accept a bribe from another
faction, or rebel against his monarch. The icon used shows the faction that
attracts his loyalty.
• Piety: Represents how much public weight this general
gives to his religious beliefs, and consequently how much
popular support he will receive when governing a zealous
province. The icon used shows the man’s religion:
Catholic, Orthodox, Muslim, Pagan or Heretic.
• Dread: The degree to which this man instils fear in the people of a province he
governs. This is useful for increasing loyalty.
• Command: Represents the general’s capability when commanding a fighting
force. A general with a high command rating will improve the valour of all the
troops in his army, not just those in his own unit.
• Acumen: The quill pens represent how adept this man is at running an economy.
Giving a general with high acumen a title makes him a very effective governor, as
he is able to generate more income from a province.
26
The two arrows to either side of the province name allow you to
move quickly between provinces when training forces. Left click
either arrow to change to another province.
Remember: you can
have units training in as many provinces as you want, providing you
have the money in your treasury to pay for them all.
When you’re finished, left click the red X in the top right corner of
the parchment to close it, or click the training button again (it’s an
on/off toggle for the parchment). It is possible to close the unit
training panel by right-clicking the panel. There are a few other
points to make about training:
• When there’s an
Inn
in a province, you may see a Hire Mercenaries button at the bottom
of the training parchment. Click this to see what mercenary units are available for hire.
The advantages of mercenaries are (a) they are available immediately and (b) they can
have high starting valour. Mercenaries are always drawn from disbanded units, so if you
see a faction reducing the size of its armies, there’s a good chance that some of these
soldiers will become mercenaries for hire.
• Once trained, new units appear in the garrison of the province castle until that is ‘full’ of
men, then they are assigned to a new army in the province.
• Units are automatically equipped with the best armour and weaponry available in the
province when they are trained. Thus a
Metalsmith
or an
Armourer
of some kind improves
every military unit produced in a province. It is possible to re-equip units with better
weapons and armour – see the
Retraining and Re-equipping Military Units
sub-section.
• All units have a
maintenance cost
, which depends on the size and type of the unit.
Maintenance costs have to be paid every turn and can quickly become quite substantial.
• Units have to be fully trained to have any effect in the game. Partially trained units do
not exist.
• You’ll notice that the training queue has fives boxes in it, so you can pre-order up to five
units or agents if you want. Just left click on another unit and it will appear in the
leftmost empty box in the queue.
• You can change the order of the queue by dragging and dropping a unit in the queue into
a different box. If you drop a unit in the leftmost box, all work done to date on the
currently training unit will be lost!
• You don’t have to have the money to pay for training until it actually starts, so you can
pre-order units if you know (or hope!) the money will be on hand. If you don’t have the
full amount in your treasury at the start of training, it will not start, and the unit will wait
in the queue until the cash is available.
• You can cancel a training order at any point. Left click a unit in the queue to cancel it. If
you decide to cancel a unit that’s already being trained, all work done to date is wasted,
and the next unit (if there is one in the queue) starts from scratch. However, the
purchase price of the cancelled unit is returned to your treasury.
• You can see the progress of your new unit in the construction button. As the unit gets
closer to completion, the area that is greyed out gets smaller. This will change as you
select different provinces with different units being trained.
Medieval_Total_War_Manual.qxd 1/19/06 3:11 PM Page 26
Page 15

29
• The unit portrait shows you the type of unit: a unit of Feudal Bowmen, Byzantine Cavalry,
or Spearmen, etc.
• The top left number by picture is the number of men in the unit. Obviously, the bigger
this number, the better! The maximum size of a unit depends on its general type – elite
units tend to field smaller numbers of men in comparison to those made up from
peasants and commoners.
• The number in the top left is the unit’s
valour
. This is a measure of just how well the unit
will fight: the soldiers’ training, experience and general willingness to get bloody in a fight!
• If the unit includes a
general
, then there is a banner with a star on the right hand side of
the unit picture. A number beneath the star shows the
command
rating of the general.
• If there is a banner on the left it will contain either a rolled-up scroll showing that the
general has a provincial title or office of state, or it will show a sword-and-crown showing
that the unit is lead by a faction heir (a prince).
• Finally, just below the unit portrait there could be small sword and shield icons. These
indicate that the unit is armed (the sword) or armoured (shield) with high quality equipment.
The icons are coloured black, bronze, silver and gold to indicate +1, +2, +3 and +4 quality.
MERGING UNITS
The review panel can be used to manage the units in an army by merging like units
together. Drag and drop a unit in the review panel onto another unit of
exactly
the same
type, and the target unit will be ‘filled up’ with men if it is under strength. Any ‘spare’ men
are left in the original unit. This won’t work with different types of units. Once you’ve
merged units you can’t split them apart again.
• Note that merging units like this can reduce their effectiveness, especially if a
low-valour
unit is merged with one that has high a
valour
rating.
Medieval: Total War
keeps track of
every man’s valour separately in the game, and the unit valour is an average of the valour
of its men.
You can also press the M key to merge all under strength units into the stronger ones
automatically.
This kind of merging happens automatically when an army is dropped onto another army.
28
VICES AND VIRTUES
Many leaders and generals have quirks of personality that affect their behaviour for good or ill.
Vices and virtues are gained as a result of events during a game. If a general gets into the
thick of combat, he might become a
Fine Leader
or be a
Good Runner
, depending on how
his battles turned out. And, for example, if a general is the victim of repeated assassination
attempts, he’s likely to become a little paranoid!
Left click on the down arrow on the right to scroll down to any vices or virtues that the general
may have at present
and that are public knowledge
. There are some things that great men do
that they want to keep secret, and such virtues and vices may not always be visible in a
character’s details. You can find these out by dropping a spy onto the general’s strategic piece.
WHO’S IN COMMAND?
There’s a strict hierarchy among generals that is used to determine the man in overall
command of an army. This can be very important, as it’s this general’s
command
rating that
is used during any battles, not those of his subordinates, no matter how good they might
be. Great Generals increase the effectiveness of all the soldiers under their command, not
just those in their own unit.
All things being equal, it’s the general with the highest
command
rating that is in charge of
an army, but social preferences can be important:
• The faction leader: he takes precedence over all other generals, regardless of command
ratings. Being king does mean that people don’t argue with you!
• The general with the best command rating: is then chosen. Where this is tied between two
or more generals, the one who leads a unit of ‘peasantry’ or non-noble soldiers becomes
the subordinate.
ARMIES AND THE REVIEW PANEL
When you have selected an army by left-clicking it, the review panel shows the units that
make up that force.
Each one of the small review panel graphics shows you an individual unit.
Medieval_Total_War_Manual.qxd 1/19/06 3:11 PM Page 28
Page 16

31
SIEGES
Invading a province with a castle usually means that the defenders will be able to hold out
as a garrison, at least for a while. When this happens, you’ll have a number of options:
• Starve them out: Leave an army in the province to besiege the castle and wait for the
defenders to die of hunger and ‘natural wastage’. Depending on the castle and its
upgrades, plus the number of defenders, this can be a long process, but it won’t cause
you any casualties. Because it takes so long the defender may be able to bring in other
armies in an attempt to break the siege.
• Storm the castle: Drag and drop an army onto the besieged castle to initiate an assault.
Remember that if the army doesn’t have artillery of some kind a storming attack is likely
to be very costly in lives. Taking a castle by storm can be done, but many attacking
soldiers are likely to die in the attempt! Like any other battle, you’ll be asked if you wish
to command the action personally, or have the computer calculate the results for you.
• Send in a spy: You can drop a spy on the castle in an attempt to have the gates opened
from the inside. When you order this mission you’ll be told the chances of success before
you are asked to confirm the attempt.
When one of your castles is under siege, your options are:
• Relieve the siege: Send an army from another province to attack the besieging force. The
defenders in the castle will automatically sally forth (leave) the castle to join in the battle.
• Sally forth: Select all of the troops in the castle as described in Re-organising Armies, and
drag and drop them outside the castle to form an army in the field. This army will do
battle with the besieging army. As with any battle, you'll be asked if you wish to take
personal command in the Battle system, or have results automatically calculated. You can
choose to retreat and hand over control of the castle to your enemy, but only if there is
another friendly province for a retreat.
• Hold out: Leave the garrison in place and hope that the besiegers leave of their own
accord. This can work if the besieging faction is under attack in another province and
needs to use its siege army as reinforcements.
BRIBES
You can always drag and drop an emissary onto an army or castle to bribe the general and
his men to join your forces. See the
Strategic Agents
section later for more details.
30
RE-ORGANISING ARMIES
You can quickly merge two armies together by dropping one army strategic piece onto
another one on the campaign map. The two pieces must have started the turn in the same
province for this to be possible, and the target army must have enough space for the units
of the incoming army. Select a province and press the M key to merge armies in the
province automatically. Again, the limits of 16 units per army apply.
You can split an army only by using the review panel:
• Select the unit or units you want to form a new army by left clicking as many or as few as
you want. Selected units are outlined in red.
• Left click again on any selected unit to deselect it if you change your mind.
• Finally, drag and drop the selected units onto their current province on the campaign
map. You can drop them on an existing army to merge them with that force, or drop them
on a empty piece of terrain to create a new army.
RETRAINING AND RE-EQUIPPING MILITARY UNITS
Units that have lost men in combat can be sent back into training to have new recruits
added to their strength. Retraining or re-equipping a military unit will cost money,
depending upon the losses to be made good:
• Select an army in a province that you own, and then left click the training button to open
the training parchment.
• Select a unit (or units) in the review panel area and drop it (or them) onto the training
queue. The unit is removed from active service and replacements are added to it. Note
that these new recruits will all have low
valour
, and could reduce the overall valour of the
unit being retrained considerably. The unit being retrained may also get upgraded arms
and armour if these are available in the province.
• Full-strength units can be re-equipped with better weapons and armour (if these are
available) in the same way. Drag and drop the unit you want to re-equip from the review
panel to the training queue. Again, this will cost money.
CASTLES AND GARRISONS
Every castle can have a garrison of troops stationed inside its walls. There can be up to
16 units in any garrison, but each level of fort can hold only a limited number of men, so the
size of each unit is important in determining whether or not a unit can be part of a garrison.
• All mounted troops count as two men (one man plus one horse) when in a garrison.
• If only part of a unit will fit into a garrison, the whole unit will be excluded from the
garrison. This can be important if a unit retreats into a castle – if there’s no room inside,
it will be captured instead.
• In all other respects, a castle garrison acts as an army that can’t move. It can be
reorganised and its units removed to other armies in the ways explained above.
Medieval_Total_War_Manual.qxd 1/19/06 3:11 PM Page 30
Page 17

33
BARONIAL REVOLTS AND CIVIL WARS
You will also need to regularly review the loyalty of your generals. Army commanders with
low loyalty may revolt if they can find a ringleader, and a civil war with the kingdom split
from top to bottom can be the result.
Generals revolt only under the following conditions. There must be:
• One very powerful general with low loyalty to act as the ringleader, and he must be in
a different province from the faction leader. A general with
royal blood
is often a good
candidate as a ringleader.
• A large number (not necessarily a majority) of other generals who have low loyalty to
the faction.
A single disloyal general is unlikely to revolt on his own (but it is possible if he judges it
worthwhile). There may well be warnings (from spies used as counter-intelligence agents)
that a revolt is being talked about, and it is possible to stop it before it starts by improving
the loyalty of the ringleader or by assassinating him.
If a civil war does erupt, the faction will split into two camps, rebels and loyalists, and
each army decides where its loyalties lie: with the faction leader, or with the ringleader and
his rebel followers. This split may be 50-50, or one side may have overwhelming support.
As the player, you can decide to control the loyalists or the revolutionaries, and the side you
pick then become the faction for the remainder of play. The other side become rebels
immediately, even if this was the ‘royal’ side in the civil war at the start. The dominant
force in each province determines whether or not the province is controlled or in rebellion.
Because you can pick which side to control in a civil war it is possible to engineer a
rebellion to replace a particularly useless king!
FLEETS
Fleets work in exactly the same fashion as armies as far as
organisation and movement are concerned. In fact it’s probably
best to think of fleets as sea-going armies in
Medieval: Total War
.
Fleets can contain up to 16 ships at any one time, and there are
no restrictions about mixing ship types in a fleet.
When a ship is ‘trained’ (like any other military unit), it appears in the sea region connected
by a port to the province where it was created. Fleets perform the following functions:
32
BATTLES IN THE CAMPAIGN GAME
When you’re in a battle to control a province, either because your lands have been invaded
or you moved an army into another faction’s territory, you will be given a choice of how the
fight is resolved:
• You can choose to command the attack personally, using the real time
Medieval: Total War
Battle system. This is what we recommend for the best experience of the game, and the
best chance of winning! In this case, your military units are transferred onto the
battlefield ready for you to command. See the second half of the manual on
Battles
for
details of how this part of the game functions.
• You can choose to have the game resolve the combat automatically. If you choose this
option be aware that your forces can suffer more casualties than they would in a played
out battle. The computer takes into account the numbers of men involved and their
relative strengths and weaknesses, but does not factor in any tactical ‘flair’.
• You can choose to retreat and abandon the attack. Where you retreat to depends on the
circumstances of the battle.
AFTER A BATTLE AND RETREATS
At the end of a battle you will be informed of the fate of any captives taken by your forces.
Often, they will be ransomed back to their faction by your general and the florins paid for their
safe return will be added to your treasury. There will be occasions when a faction doesn’t want
to pay for its men, in which case their fate is not pleasant and we won’t go into it here.
If you’ve lost a battle, you’ll be given the chance to pay a ransom for any of your men held
prisoner by the enemy. If you pay your men will be returned to your nearest province. If you
decide not to pay, your men will be executed – you can go into debt (have a negative
treasury) to pay a ransom if you wish. Be careful before rejecting a ransom demand, as you
may be sentencing a valuable and skilful general to death!
Of course, you might have chosen to avoid battle altogether, or have been defeated but still
have some men left. In this case, an army will try to retreat:
• If an army was defending a province with a castle, its men will retreat into the castle and
are now besieged.
• If an army was defending a province without a castle, its men will retreat to an adjacent
friendly province (i.e. one under their faction’s control).
• If an army was attacking, its men will retreat to their starting province.
• If an army was attacking from the sea, it has nowhere to retreat and will be captured
(and may be ransomed).
• If there is nowhere for a defeated army to retreat to on land, it is captured (and may be
ransomed). This could happen when a faction is reduced to its last province, or there are
no adjacent friendly provinces. This is always the case when a castle’s defenders sally
forth to break a siege.
Other factions’ armies use the same rules of retreat.
Medieval_Total_War_Manual.qxd 1/19/06 3:11 PM Page 32
Page 18

35
There are also underlying relationships between buildings, so that some are dependent
upon others. You can’t construct an Armourer in a province, for example, until you have
already got a Spearmaker and a Bowyer. You’ll find a separate poster of the technology tree
as part of the
Medieval: Total War
package. This shows the relationships between all the
buildings and the military units and agents they train.
When you upgrade a building to the next level it keeps all its previous training abilities –
you’ll never lose the ability to train a unit as a result of upgrading a building.
BUILDINGS AND THE REVIEW PANEL
When you left click on a province to select it all the buildings in that province will be
shown in the review panel in the centre bottom of the screen. You can right click on any
picture of a building to bring up the information parchment about that building.
When there are more than 12 buildings in a province, you’ll see an arrowhead at the left hand
end of the review panel. Left click the arrowhead to see more buildings in the province.
You can also see other buildings in a province by moving the cursor over the control
panel and using your mousewheel (if your mouse is equipped with one).
CONSTRUCTING BUILDINGS
Your faction will need a substantial army to conquer Europe, and this means you’ll need to
construct an infrastructure that can train troops and defend your lands. You’ll need a
regular income to achieve these ends too. All of these activities mean that you must
construct buildings in your provinces:
• Left click on the province where you want to construct a building.
• Left click on the construction button in the bottom left hand corner of
the screen (shown above in its ‘empty’ and ‘busy’ states). This brings up
the construction parchment for the province, showing you all the
buildings that could be ordered here. You can right click on any building
graphic to bring up the information parchment about that building.
• Left click on the building you want to have constructed. It will then
appear in the
province construction queue
at the bottom of the
parchment. Remember, each province has a separate queue for
buildings. The number below the timer is the number of years it will
take to complete the left-most building in the queue. You can also right
click any building in the queue to look at its information parchment.
The two arrows either side of the province name allow you to move quickly between
provinces when constructing buildings. Left click either arrow to change
to another province.
Remember: you can have buildings under
construction in as many provinces as you want, providing
you have the money in your treasury.
34
• Trade: They set up trade routes from your provinces to foreign provinces, providing a
linked chain of fleets can be traced between the ‘selling’ merchant and a ‘buying’ port in
a foreign province. The fleets provide protection to your merchants and their ships (which
you can’t see or control).
• Blockade: When at war with another faction, your fleets prevent any of the enemy’s fleets
from carrying trade. The same is true of their fleets being able to blockade your trade,
of course.
• Transporting armies: Fleets can transfer armies along a trade route between ports,
providing that no enemy fleets block your passage. Enemy fleets include those belonging
to the owner of the province being invaded, even though they may be allied or neutral at
the time. This means you can place fleets along your coastline to defend against naval
invasions from both enemies and treacherous allies.
• Amphibious Attacks: You can invade a province from the sea with an army, providing that
there are no hostile ships or ships belonging to the defenders in the coastal waters off the
target province.
There is no retreat for an army attacking from the sea in this fashion, so
they will be captured if they fail to take the target province!
• Battle: Drag and drop a fleet onto an enemy fleet to attack it. At the end of the turn (year)
you’ll be informed of the battle’s outcome. All naval battles take place within the
campaign game.
Ships can be sunk by storms at sea. If such an event occurs, it can break trade routes or
end blockades, so keep an eye out for this happening.
BUILDINGS AND THE TECHNOLOGY TREE
Despite seeming like a static period of history, the Middle Ages were actually an age when
technology moved on and developed and much was rediscovered in manuscripts preserved
in Arabic and Church libraries. But ‘technology’ of any kind does not appear out of thin air:
developments can take years to bear fruit.
Every province can have buildings constructed in it. These enable the training of military
units and strategic agents or give economic, religious and political benefits. Buildings must
be paid for in florins, and can take several turns (years) to complete.
Construction options are not always the same in each and every province. They depend on
geography, resources, trade goods (or their lack), external events, and the religious and
factional identity of the builder. For example: without the discovery of gunpowder event,
no one can build gunsmiths or foundries to make cannons; an Islamic faction cannot build
any of the Christian churches; ports require a coast; and trading posts cannot be built
where there’s nothing to trade.
There are a few buildings that can always be constructed in a province (such as farmland
improvements). Generally, however, castles are the key buildings on the technology tree of
Medieval: Total War
. The level of the castle in a province is what determines the buildings
that can be constructed there (upgrades to the castle don’t matter in this context).
Medieval_Total_War_Manual.qxd 1/19/06 3:11 PM Page 34
Page 19

37
CASTLES AND THE BATTLE SYSTEM
Forts, keeps, castles, citadels and fortresses are all referred to by the generic term of
‘castles’. Each level or type of castle can be upgraded twice by having extra defences such
as improved outer curtain walls or better towers added to it.
When a siege takes place in the battle system the castle and upgrades present in a
province are directly used to create the castle on the battle map. If you lay siege to a small
fort and then storm the walls you’ll be attacking that fort in the battle game! Attacking a
fully upgraded citadel with artillery towers and ramparts will be rather dangerous without
the right artillery and troops!
DESTROYING BUILDINGS
You can destroy any building in a province by clicking on the Destroy button on its
information parchment. You’ll get some of the cost of the building returned to you. There
are a couple of reasons for doing this:
• There’s a pressing need to raise money quickly. Destroying buildings can result in enough
cash to train new military units.
• The province is about to be lost to an enemy attack. The buildings are likely to be lost
anyway, so you might as well get some money for them. This also denies the enemy the
use of any facilities.
• The province has just been conquered, but there’s no need to retain control of it. In this
case, destroying all the buildings and getting some cash back is a smash-and-grab raid.
Withdraw from the province after destroying everything, and another faction will conquer
it and start rebuilding.
STRATEGIC AGENTS
Strategic agents never appear on battlefields. Although they have no military strength, their
potential should not be underestimated.
All agents act as ‘spies’ to a limited extent, in that they will allow you to see details of the
province where they are standing.
• Agents are moved around just like any other unit on the campaign map. Left click to pick
one up, and then drag and drop in the province required. You can also drag and drop
agents onto other units; if the agent can perform a mission, he or she will be highlighted
when hovering over a legitimate target. The nature of the mission and its results depend
on the type of agent and the target involved.
• Agents who start a turn in a province with a port can be moved to any other province with
a port in a single move. (They can be assumed to be using
the game’s inherent merchant shipping to move around).
Fleets are immune to the effects of agents, as no
agent has the ability to walk on water!
36
When you’re finished, left click the red X in the top right corner of the construction
parchment to close it, or click the construction button again (it’s actually an on/off toggle).
It is possible to close the building construction panel by right-clicking the panel. There are
a couple of other things you need to know about construction:
• Buildings have to be finished in order to have any effect on the game. Partially completed
buildings have no effect whatsoever.
• You’ll notice that the construction queue has four boxes in it, so you can pre-order up to
four buildings if you want to do so. Just left click on another building and it will appear
in the leftmost empty box in the queue.
• You can reorder the queue by dragging and dropping a building already in the queue into
a different box in the queue. If you drop a building in the leftmost box, all work done to
date on the building it is replacing will be lost!
• You don’t have to have the money to pay for a building when you order it, only when
construction starts. If you don’t have the money in your treasury, the building doesn’t
get started and simply waits in its province construction queue until sufficient funds
are on hand.
• You can cancel a construction order at any point. Left click a building in the queue to
cancel. If you decide to cancel a building that’s already under construction, all work done
to date is wasted, and the next building (if there is one in the queue) starts from scratch.
The value of the cancelled building is returned to your treasury.
• You can see the progress of your new building in the construction button without
returning to the construction parchment. As the building gets closer to completion, the
area that is greyed out gets smaller. This will change as you select different provinces
with different buildings under construction.
When a building is complete you’ll get a message during the end of turn tour telling you,
and the building will be shown in the review panel when you select the province it is in.
Medieval_Total_War_Manual.qxd 1/19/06 3:11 PM Page 36
Page 20

39
SPIES
Spies have a variety of uses, all of them sneaky:
• In your provinces a spy for your faction will act as a ‘secret policeman’ and let you
intercept and kill enemy spies and assassins. The higher the valour of your spy, the
greater the chance of intercepting enemy agents.
• In your provinces a spy for your faction will also improve the loyalty of the local
population by spying on all their actions and ‘keeping them honest’.
• In an enemy province your spy will allow you to see full details of that province and any
armies that occupy it.
• Drag and drop a spy onto any general to discover his personality traits along with his vices
and virtues. This includes any secret vices and virtues that the general has so far managed
to keep out of the public gaze – some of these can be quite embarrassing for a general!
• Drag and drop a spy onto an enemy castle that you are besieging and he will attempt to
open the gate from the inside. If he succeeds, he will let you take the castle by treachery!
This can be a lot cheaper in terms of lives than trying an assault.
ASSASSINS
Assassins, as might be expected, kill people.
• Drag and drop an assassin onto an army to try and kill the commanding general. This can
include faction leaders and heirs, if they are in command.
• Drag and drop an assassin onto a strategic agent to attempt a killing. The target can be
another assassin, a princess or holy man.
• You can drag and drop an assassin onto your own agents or armies, including your faction
leader! This can be quite useful for removing a troublesome or vice-ridden general, or
even a particularly weak monarch.
You’ll be told what the chances of success are before you commit your assassin to his
murderous mission. The valour of the assassin and his target are taken into consideration
when calculating the chance of success.
38
EMISSARIES
Emissaries have many tasks that they can perform:
• Drag and drop an emissary on a faction leader to propose an alliance, or to propose a
ceasefire if you are at war with his faction. The chances that an emissary will be
successful are related to the influence of your faction leader –
a leader with high influence is less likely to have his messengers ignored! The emissary’s
valour also has an impact on his chances of success.
• Drop an emissary on an enemy or neutral general to offer a bribe to change allegiance to
your faction. The size of bribe required is related to the size of the army the general
commands, his personal loyalty to his existing faction, and his personal vices and virtues.
At times, your emissary will advise you to alter the amount offered after he has had a
chance to see the general and his forces close up. An emissary cannot bribe a faction
leader or an heir to a faction.
• Likewise, drop an emissary on a castle to bribe the garrison.
• Drop an emissary onto one of your own generals to strip the man of his title and office, if
any. These can then be given to another general, but the man who is reduced in social
rank is unlikely to be very pleased by this course of events and his loyalty will suffer.
• Drop an emissary on a foreign princess to propose that she marries into your faction’s royal
family. If this is accepted, the marriage marks a new alliance between your faction and hers,
and your faction may have some claim to the lands of her original faction if it is wiped out.
PRINCESSES
A princess is a type of emissary with her own extra abilities. Unlike other agents she doesn’t
have to be trained, but is born into the royal family. She also has a limited useful lifespan,
and will be removed from the game when she is too old to be a good match in marriage.
Only Catholic and Orthodox factions have princesses.
• Drag and drop a princess onto a faction leader to propose a marriage. If the faction
leader or one of his sons is unmarried, there is a chance that the marriage proposal
will be accepted. If every potential husband has already been married off, the
princess will act as an emissary and offer a ceasefire or alliance instead.
• Drag and drop a princess onto one of your own generals to improve his loyalty to the
faction by linking him directly to the royal family.
• If you (accidentally) drop a princess on her father or one of her brothers she will be
removed from the game and there will be other, unpleasant consequences.
Remember that all princesses give the faction she marries into a claim on the territory of
her original faction. This can be important if the faction leader dies without immediate
heirs to the throne.
Medieval_Total_War_Manual.qxd 1/19/06 3:11 PM Page 38
Page 21

41
GENERALS: PIETY
Every general (including every king, sultan, emperor, khalifah and prince) has a piety value.
This can be an influence on the level of support that general can expect from the people he
rules, should they not see him as being sufficiently religious.
PROVINCES: FAITH AND ZEAL
Each province can have followers of any or all of the six religions in the game: Catholic,
Orthodox, Muslim, Pagan, Heretic and Jewish. The population that follows each faith in the
province are shown on the province’s Info parchment. These values will change over time
for various reasons:
• Holy men: A preacher (a Catholic Bishop or an Muslim Alim, for example) will convert
people to his faith.
• Events: Some events are particularly effective in converting people – the discovery of a
holy relic, for example.
• Ruler’s religion: There is a natural tendency for people to adopt the religion of the ruling
classes, but this can be a slow process.
Each province also has a Zeal value, shown as a percentage. This shows how dedicated and
fanatical the whole population feel about their religion(s). In a Zealous province many
soldiers may join a Crusade or Jihad that passes through. Zeal may also affect a province’s
loyalty if the governor or the King isn’t particularly pious.
RELIGIOUS BUILDINGS
Christian Churches and Islamic Mosques: These slowly increase the percentage of the
population in a province that follows their particular religion. Cathedrals and Great Mosques
are even more effective.
Monasteries and Reliquaries: These Christian-only buildings increase the Piety of the King
when they are built, because they are very public statements of religious affiliation.
Catholic Chapter Houses and Islamic Ribats: These special buildings allow the training of
religious warriors. They also allow the creation of Catholic Crusades and Islamic Jihads (see
below).
CATHOLIC EXCOMMUNICATION
The Pope can excommunicate Catholic factions. This happens when a Catholic faction
makes war on the Pope’s allies, or ignores his advice to stop making war on fellow Catholics.
Once excommunicated, a faction is vulnerable to Crusades by other
factions, and Papal restrictions on Catholic factions
attacking their co-religionists are ignored.
40
RELIGIOUS AGENTS
Factions can train holy men to spread their own religious
faiths. These men can also act as diplomats:
• Drag and drop a religious agent (other than an inquisitor) onto a faction leader to propose
an alliance, or to propose a ceasefire if you are war with his faction. The chances that he
will be successful are again related to the influence of your faction leader!
The full list of religious agents is:
• Priests and Bishops: Orthodox rulers can train these men to spread the Orthodox faith,
bringing the religion of conquered provinces into line with that of the faction, or send
them out into the world to convert others.
• Bishops and Cardinals: Catholic rulers can train these men to spread the Catholic faith,
bringing the religion of conquered provinces into line with that of the faction. A bishop or
cardinal will also make it harder for an inquisitor to convict and kill someone for heresy in
the same province.
• Inquisitors: Catholic factions can also train a kind of religious ‘assassin’ called an inquisitor.
These root out heresy among Catholics only. Drag and drop an inquisitor onto an army to put
the commanding general (even a faction leader!) on trial for heresy. If the general has a low
piety trait, he is likely to be executed for his heretical beliefs. Inquisitors also increase the
Zeal of a province, because they are very, very scary guys! They will be less effective in
provinces where there is a Catholic Bishop or Cardinal. The valour of an inquisitor affects
how good he is at his appointed tasks.
• Alim and Imam: The ‘ulama’ (the plural for Alim and Imam) are Muslims who are truly
learned in the Koran and Islamic doctrine. Muslim rulers can train these men to spread
the Islamic faith, bringing the religion of conquered provinces into line with that of the
faction, or send them out into the world to convert others.
RELIGION
Religion was a matter of vital importance to people in the medieval world. Three major
religions were struggling for men’s souls in Europe during the period of
Medieval: Total War
– Catholic Christianity, Orthodox Christianity and Islam. Jews could be found throughout
Europe, but particularly in Islamic countries where their learning was highly valued.
At the edges of the continent the old, pagan religions lingered on. There were also heretics,
willing to challenge the established order of things.
Religion drove men to perform both great deeds and terrible ones.
Medieval: Total War
reflects some of this truth.
Medieval_Total_War_Manual.qxd 1/19/06 3:11 PM Page 40
Page 22

43
Once the jihad has started, it will move towards its target province. As a jihad moves,
soldiers may join it in each province it passes through. The number of recruits depends on
the Zeal of the province – only Muslim soldiers will join a jihad. A jihad can have deserters
if it takes too long to reach its target, or if it suffers setbacks on the journey. Jihads that
run out of warriors (for whatever reason) will end in failure, and if the Ribat in the Jihad’s
home province is destroyed it will also fail.
Once a jihad has re-conquered its target province, it changes into an army or armies
belonging to the faction that created the jihad.
INFORMATION BUTTONS
AND PARCHMENTS
The information buttons are shortcuts to help you manage your faction. These buttons are
located in the lower left corner of the screen, above the faction coat-of-arms. The information
these buttons provide can help you make decisions that will speed you to victory.
In each case left click on the arrowheads on the left to move up and down the list of items
on a parchment or use the mousewheel (if your mouse has one). For all information
parchments, left clicking the red X in the top right hand corner of the parchment will close
it and return you to the main campaign map view.
The Military information parchment is a list of all your generals and their armies,
the provinces they occupy and the number of men lead by each general. The rank
of each general is also given. Left click on a line in the list to centre the main
campaign map view on that general.
The Alliances information parchment shows graphically the political state of the
game world. Your faction is always at the top of the list. The large central shields
show the coat-of-arms of each faction with a small symbol for the faction’s
religion. The name of each faction’s ruler is also shown. The smaller shields to the
left show the allies of a given faction, while those to right show the sworn enemies
of the moment. Move the cursor over a shield to see which faction it represents. If
a small faction shield is ‘missing’ as an ally or enemy it just means that faction is
neutral at the moment. Relationships can change over time.
The Economy information parchment lists all the provinces controlled by your
faction and all the sea regions where your faction has a fleet. There’s a summary
of your complete financial state at the bottom of the parchment. The most
important value is probably
expected profits
. If this number is negative, your
treasury, tax rates and military costs need to be looked at very carefully!
42
HERETICS
When a revolt breaks out in a province, there is a chance that it will be some kind of
heresy, particularly if the number of heretics in the population is large. The revolt may start
because people don’t like being taxed or there is no occupying army, but it can take on a
religious aspect. The mix of rebel soldiers will be different if the rebels are heretics than
might be expected from ‘ordinary’ rebels.
CRUSADES
Only Catholic factions can launch crusades, and they need a Chapter House to create a
crusade marker, which appears as an option in the province’s training parchment.
Once it is built, units can be added to a crusade by dragging and dropping. However, once
a unit is part of a crusade
it cannot be removed until the crusade ends
.
Drag and drop the crusade marker onto a target province to start a crusade. You’ll then be
asked to pay a ‘contribution’ in florins to the Pope’s treasury to gain permission for the crusade
– and this is usually expensive! The Pope won’t allow crusades to provinces belonging to ‘good’
Catholic factions, but excommunicated Catholics, rebels (and heretics!) and any non-Catholics
are fair game! The Pope usually allows only one crusade at a time for a faction.
Once the crusade has permission, drop it directly on the target province again (in which
case it will find its own route), or move it towards the target province-by-province taking
any route you like. As the crusade moves, soldiers may join it in each province it passes
through, depending on that province’s Zeal value. These recruits can even belong to other
Catholic factions – when they join the crusade they forget past loyalties! A crusade can
suffer desertions too, if it takes too long to reach its target or is defeated in battle.
When a crusade arrives at the target province, it will attempt to conquer it. If it does so, the
crusade is over and the units within the crusade will become ordinary armies, under the control
of the faction that built the crusade. These armies may include units from the Fighting Orders
of Knighthood such as the Templars, Hospitallers and the Knights of Santiago.
Crusades that run out of soldiers (for whatever reason) will end in failure, and if the
Chapter House in the crusade’s starting province is destroyed, it will also end.
Computer-controlled factions will also build crusades from time to time. When a foreign
crusade enters your lands you will be given a choice of how to react. Crusades do not conquer
provinces they pass through, only their target, but there is a chance that the crusading soldiers
will loot a province and that your soldiers will join the crusade if you decide to let it through.
JIHADS
Only Muslim factions can launch jihads. Jihad means ‘struggle for the faith’ and unlike a
crusade, a jihad cannot be used to conquer new territory. A jihad can only be targeted
against a province that has been lost to an enemy – it can only try to re-conquer lost lands,
not take new ones.
A Ribat is needed before the jihad marker appears on the province’s training parchment.
Once a jihad is created units can be added to it just like any other army, but once a unit is
part of a jihad
it cannot be removed until the jihad is over
. Drag and drop the jihad marker
onto a legitimate target province to launch the jihad.
Medieval_Total_War_Manual.qxd 1/19/06 3:11 PM Page 42
Page 23

Regardless of whether you start a battle from the full campaign, play one of the historical
campaigns or battles, or set up a custom battle, the interface for controlling your army is always
the same. The tactics for using that army to best effect differ from faction to faction, and are
something that you’ll discover for yourself.
Medieval: Total War
has been designed to make
controlling an army fairly straightforward, as you’ll see shortly, so that you can concentrate on
the tactical challenges and tricks of combat. The controls include on-screen buttons for
commands and keyboard shortcuts, and you can mix-and-match your use of these as you see fit.
THE BATTLE TUTORIALS
We recommend that you play through the tutorial battles at least once to get a feel for the
way the game interface works. They take you through a few battles to illustrate all the main
features of controlling an army.
BEFORE A BATTLE
In the full campaign game the battlefield used is directly related to the terrain in the province
or along its borders. If, for example, your army invades over a mountainous border, you’ll have
to fight a battle in mountainous terrain. This could well favour the defender, and be highly
unsuitable for cavalry. It’s a good idea to study the terrain shown on the campaign map before
you invade a province and choose a border that suits the composition of your invading army.
In any case, you’ll be shown what the battlefield looks like before the battle itself starts.
Take note of the general lie of the land, as this can be useful in selecting defensive
positions, or in selecting ground that can be turned into a killing zone for disposing of the
enemy. You can move the camera around the battlefield using the controls detailed in
The
Battlefield Camera
section. Click on the continue button when you are ready to proceed.
Every battle in
Medieval: Total War
has an attacking side and a defending side. Before the
battle starts, these designations have important effects.
In battles that come about through the full campaign game, the attacker is always the
invading force – the one that doesn’t own the province where the battle is taking place. In
custom and historical battles the attacker is designated by the game system:
• As the attacker, you are given a weather report for the coming day. Generally speaking,
the better the weather the more likely it is that all your forces will march and fight with
their full effectiveness. You’ll have the choice to fight, or wait another day in the hope of
better conditions. However, if you wait for too long the defending army will come onto
your position, ready or not! It may even be advantageous to fight in dreadful weather if
your opponents have many missile troops and you do not.
• As the defender you don’t have this operational flexibility, but you do get better ground for
your starting position on the battlefield. You also get the chance to ‘fine tune’ the
deployment of your troops before the battle starts by changing the position of individual
units within your set up area.
WEATHER AND CLIMATE
Weather and climate have all the effects common
sense would lead you to expect. Ideally all battles
would be fought in perfect weather but war rarely
allows such luxuries, and commanders have to make
the best of the conditions that they face.
44
Only provinces have loyalty and income values. Move the cursor over any of the province names
and you’ll be given a breakdown of how the income is generated. Left click on a province and
the campaign map view will centre there. If there’s a trading post or merchant in the province
you’ll also be given a trade breakdown report. Move the cursor over any trade goods symbol to
find out what is being traded.
The expenses column shows you the maintenance and support costs for military units in
each of your provinces, and in sea regions where you have fleets. These numbers will
change as you move armies around.
The Subterfuge information parchment lists all your strategic agents and the
missions that they are currently carrying out. Left click on the agent’s line in the
list to centre the campaign map view on that agent.
The Heir Status parchment is a list of members of your faction’s royal family. If
this list is empty make sure your king, sultan or khalifah (the faction leader) is
kept safe, because if he dies the royal line is at an end! Otherwise, the list shows
all the leader’s children. Underage children will not appear on the campaign map
as princes (generals) or princesses (strategic agents) until they come of age.
The Glorious Objectives parchment is a list of targets for your faction to achieve
over the course of the game. If you chose to play glorious objectives variant of the
Full Campaign, then you’ll need to make sure that these ‘missions’ are carried out.
In general, glorious objectives expect you to at least match the achievements of
historical rulers in making their countries mighty and respected. Typical objectives
might be: to construct the Alhambra in Spain by a given date, conquer a certain
set of provinces, or defend your faction’s heartland from outside aggressors. Left
click on an item in the list to see its details.
BATTLES
The heart of
Medieval: Total War
game is the 3D battle system. The
Total War Engine
™ is
capable of running spectacular battles with over 10,000 troops in real-time 3D combat.
The engine has been ‘tweaked’ and optimised to incorporate the strategies, tactics, and
units used in warfare throughout the medieval period.
Mini-Map
Infantry Units
Command Buttons
Unit Information Panels
Artillery Units
Archery Units
Cavalry Units
45
Medieval_Total_War_Manual.qxd 1/19/06 3:11 PM Page 44
Page 24

47
THE MINI-MAP DISPLAY
The mini-map gives you a top-down view of the whole battlefield. Units that are hidden in the
trees will not appear on the map (although you may get a clue on the battlefield that they are
present by spotting circling birds!). The flashing dots on the map show the positions of the
commanding generals in the field (one per army). You can also issue orders to your units by
clicking on the mini-map as if you had clicked on the same destination on the battlefield.
• Left click in the top grey bar and drag to reposition the mini-map. Left click on the white
triangle in the bottom right corner and then drag to resize the mini-map, if desired.
• This top bar also shows the relative ‘kill ratio’ of each army. Your ‘kills’ are shown as a
green bar, the enemy’s as a red one. The respective length of these bars is a rough
indication of who is winning the battle at any given time, always bearing in mind that
simply slaughtering the enemy may not be enough to secure victory.
• The bottom bar shows time acceleration in the battle. You may wish to speed up the
passage of time in a battle (perhaps when your men are marching unopposed to a new
position), so you can click-and-drag the ‘hourglass’ symbol to a point on the bar, or press
Ctrl + T on the keyboard to toggle 100% time acceleration on or off.
ARMY FORMATION
Before you start a battle it’s often a good idea to review and possibly change the
default formation that has been selected by the computer for your army. Just above
the left-most unit information panel at the bottom of the screen is the army
formations button when attacking. This allows you to set an overall layout for the
units in your entire army.
•
When attacking,
right click on this banner to bring up the possible list of formations for
your army.
• Left click on the formation that you want you’re army to adopt. You can try as many of these as
you like, as you’re not committed to any formation until you click on the begin battle button.
•
When defending
you can also select individual units and position them anywhere within
your army’s set up area, using the controls described in the next section,
Basic Battle
Controls
. A line of stakes on the battlefield shows you the boundaries of this start area.
• Finally, if you are fighting a battle as part of a full campaign and have more than 16
units in the province the reinforcements button will be active. You can find out full
details of how this advanced feature works in the
Reinforcements Before a Battle
sub-
section of
Advanced Generalship
.
•
Both sides
can dismount knights (if they have them) and have these units fight on foot.
This decision has to be taken before the battle starts; once battle has started knights
cannot remount. The choice is not permanent, but only for the current battle.
• When you’re happy with your army’s position, click
on the begin battle button and ‘let slip the dogs
of war’!
46
• Weather has major effects on visibility on the battlefield – seeing the enemy in the
middle of a sandstorm or a snowstorm can be a challenge in itself! Fog and rain will also
limit the distance that you can see.
• Missile fire from archers and gunners is subject to changes in the weather. Bows do not
work well in the rain, and gunpowder weapons do not work at all in wet weather.
• Overall weather and climate conditions also affect how quickly units become tired. In hot
weather (or desert conditions) you can expect heavily armoured knights to tire easily. In
snow and cold, everyone tires more easily.
THE BATTLE SCREEN
The battle screen is your view onto the battlefield. Along the top and bottom edge of the
screen you’ll find all the controls you need to command your army, either as a group or as
individual units. The command buttons and unit banners will be explained in a moment.
THE BATTLEFIELD CAMERA
Your view onto the battlefield isn’t fixed or tied to any particular unit in the game.
Move the cursor to the left or right edge of the screen and the camera will
pan
(turn without
changing location) in that direction. Move it to the top of the screen to
track
(move) the
camera forwards; moving it to the bottom will make the camera track backwards. When no
unit is selected right click to centre the camera view on the cursor position on the battlefield.
Hold down the right button to turn the mouse into a camera-pointing device. When a unit is
selected hold Ctrl + right click to make the camera point at that spot on the battlefield.
You can also use the arrow (cursor) keys or the numeric keypad to move the camera position.
The up and down arrows plus numeric keys 2 and 5
track
the camera backwards and forwards;
keys 1 and 3 make the camera
track
(without changing its direction of view) to the left and
right respectively; and keys 4 and 6
pan
the camera left and right. For faster movements, 8
tracks the camera forwards at high speed while 7 and 9 are high-speed camera pans. Hold
down the shift key with any of these commands to make the camera move quickly.
You can also move the camera by double clicking on a unit or its information panel. The camera
will immediately fly to a position behind and above the chosen unit: ‘looking over its
(collective) shoulder’ so to speak. The unit will also be selected. This is a great way of
reviewing how and what a unit is doing in detail, rather than just relying on the unit’s banner.
The camera controls work even when the game is paused; your view onto the battlefield is
not, allowing you to review how the battle is going without being too pressured by the clock
or the need to issue orders.
The camera is normally constrained, so that (rather realistically) your view can’t move too far
away from any of your units. If you try to move the camera too far from your nearest unit, you’ll
see that it slows down and rebounds slightly, as if on elastic. If you want to see what’s on the
other side of some trees or over a ridge, you have to send a unit out to see what’s there!
Medieval_Total_War_Manual.qxd 1/19/06 3:11 PM Page 46
Page 25

49
• The unit personally lead by the army’s general has a gold star on its panel. This is the
unit on the battlefield with a square banner or standard.
• At the top of the panel the (four) grey bars show how much energy the unit has left; as these
disappear the men in the unit are getting tired by marching, fighting and running around. As
you might expect, if you ask a unit to charge uphill and fight a battle at the top it will quickly
become exhausted. Tired men are more likely to lose heart in battle and run away.
• Next to the fatigue bars there’s space for a variety of symbols to show what the unit is
currently doing. This can include marching (a single upward triangle); running, galloping
or charging (two triangles); fighting (crossed swords); firing missiles (a bow); under fire
(incoming arrows); hiding in woods (a small tree); or even routing (a white flag). It’s quite
possible for a unit to be doing more than one thing at once, in which case the panel will
cycle through the appropriate symbols. If you see the white flag symbol flickering on and
off, it means that the unit is close to breaking point, but hasn’t quite run away yet. This
is a useful indication that it’s in trouble!
• The upper number is the
valour
of the unit. This is a measure of the unit’s experience,
true grit and skill at arms. A unit with high valour will generally beat a low valour force,
all other things being equal.
• Missile-armed troops are distinguished by having a vertical brown bar next to the unit
portrait. This is the
ammunition bar
and it gradually empties as the unit fires arrows or
bullets, throws spears, grenades or javelins, or even hurls huge rocks (in the case of
artillery). Once the bar is empty, the unit cannot conduct any more missile attacks. You
can give your units unlimited ammunition via the
Options Menu
before a battle, but this
also gives the enemy unlimited ammunition too!
• The number at the bottom of the panel is the number of men currently in the unit.
As the unit takes casualties, this value will fall. If the number of men starts dropping
rapidly then the unit is in deep trouble!
• Coloured icons showing a sword and/or shield indicate the unit is equipped with highquality weaponry and/or armour.
The unit panel will disappear from the screen if the unit leaves the battlefield as a result of
routing (running away), or when its last man is killed or captured.
UNIT MENUS
Right click on a unit or its information panel to bring up a context-sensitive menu for the
unit. Left click on the appropriate action you want the unit to take. You’ll see that many of
these menu orders are the same as the command buttons, and the keyboard shortcuts
discussed here (the keys are shown for each command). This is the third method of issuing
orders to your troops.
There’s one order on the menu for missile and artillery units – follow projectiles – that can
be more fun than is strictly necessary, in a crush-your-enemiesand-bray-with-demented-laughter kind of way. This option
gives you an arrow’s eye view of the action when
the selected unit fires, or a boulder’s eye view
in the case of most artillery pieces!
48
BASIC BATTLE CONTROLS
The battle interface in
Medieval: Total War
is actually very simple. Any unit can be ordered
to march or attack with as few as two mouse clicks:
• Left click on a unit to
select
it. You’ll see that you have selected it because the unit’s flag
or standard waves up and down, and the unit information banner at the bottom of the
screen is also highlighted.
• Left click on a destination on the battlefield. You’ll see that the unit immediately turns
towards this spot, dresses its ranks, and marches off. Double-click the destination to
make your unit quick march or gallop there.
• If a unit can’t march to the spot you chosen, the movement arrow next to the cursor will
turn red. This is usually because you’ve asked a unit to enter water or go into a tree! In a
forest, move the cursor slightly until it changes to yellow, indicating that the unit can get
into the forest.
• Or, you can left click on an enemy unit. The cursor changes to show a sword if the unit
will attack in hand-to-hand combat, or a bow and arrow for a missile attack. If your
missile troops are out of range the small action arrow below the cursor will be red; your
men will advance until they are in firing range of the enemy. Double click a target to make
your unit charge them, or run/gallop until they are within range (just remember that your
men will get tired if they run everywhere!).
• Press the spacebar to see the future finishing positions of any units that you’ve ordered to
move. This is a very useful reviewing tool for keeping track of where your army is heading.
If you can do this, you’ve mastered the absolute basics of command in
Medieval: Total War
.
Everything else in the interface builds on this straightforward concept of:
“Hey! You!”
[Click] “Go there!” [Click].
Finally as far as these utterly basic commands go, you can deselect any and all selected
units by pressing the return or enter key.
UNIT INFORMATION PANELS
At the bottom of the screen are the
unit information panels
for your army, one per unit.
When you left click on a unit on the battlefield you’ll see that its information panel is
highlighted, showing that the unit is selected. In the same way, you can left click on a unit
panel to select the relevant unit, and you’ll see that the unit’s standard is raised to show
that it has been selected. It’s possible to select multiple units too, as we’ll see in the
section on
The Art of Command
.
The panels give you a quick summary of each unit’s status and activity at all times.
• The small portrait on the panel shows the unit type.
Medieval_Total_War_Manual.qxd 1/19/06 3:11 PM Page 48
Page 26

51
• The engage at will button (E key) is an on/off toggle that determines whether or
not a unit will attack nearby enemy units when on the move, or pursue enemies
when they flee, whether or not they have been directly ordered to do so.
• A unit given a hold position command (H key) will stand its ground at all times.
When a fight is finished they will resume their places on the battlefield, rather
than forming up around their leader’s current location. This prevents units
‘creeping’ out of place in a battle line as they drive enemies back.
• The fire at will button (A key) is an on/off toggle that allows the selected unit
some discretion in when it will attack. If a unit is allowed to fire at will, then it
will fire at any suitable target in range. This may not be desirable at all times, as
this can use up limited ammunition quickly.
• The full effects of the reinforcements button are discussed in the section on
Advanced Generalship.
• The full effects of the group formations button (Ctrl + P keys) are discussed in the
section on
Advanced Generalship
.
CHANGING A UNIT’S FORMATION
As noted above, the Close, Loose and Wedge commands will change the overall shape and
dispersion of a unit. You can also change the rectangular shape (number of rows by number
of columns of men) of any unit during a battle.
Normally, only the front row a unit is in contact with the enemy and can fight. The men in
the rows behind step forward to ‘fill in the gaps’ when there are casualties. The exceptions
to this are spearmen (the first two rows can fight) and pikemen (the first four rows can
fight) and missile troops.
• Left click where you want the
left flank
of the re-positioned unit to stand. Drag the mouse
towards the right and a ‘dummy’ unit of men will appear to show you the new column
formation of your unit. When the unit has the desired width, let go of the mouse button.
• If you change your mind, press the ESCape key
before
letting go of the mouse button.
• Your unit will now march towards this location and adopt the new formation.
Re-sizing a missile unit into a wide but shallow formation maximises its firepower, as the
greatest possible number of men can fire at the same time.
UNIT FACING
All units have a facing, and always attack enemies directly ahead.
Units are also defensively vulnerable in the flanks (sides) and
especially the rear. Sometimes you’ll need to change
the direction of a unit’s
facing
to meet a threat
without necessarily changing its
position
on
the battlefield.
50
TOOL TIPS AND UNIT REPORTS
If you move the cursor over any unit you can see on the battlefield, you’ll see a tooltip-style
comment appears. These are colour-coded to show to which faction/army the unit belongs,
and include much useful information. Apart from identifying the unit type and the number
of men in it, the tooltip will also tell you what it is currently doing, give you an indication
of the unit’s combat abilities and specialisations, and give you some indication as to the
state of its morale.
This feature works when the game is paused, so that you can review the action without
being pressured by the clock.
COMMAND BUTTONS
Across the top of the screen are the command buttons. These are grouped into related sets
of commands:
• As you might expect, the halt button (backspace key) causes the selected unit to
stop whatever it is doing and reform itself in its current position. This command
doesn’t always work – some units can get ‘carried away’ by their own
impetuous
nature. Units that have panicked and routed cannot be halted either.
• The rally button (R key) is a call to panicked men to stop running away! This will
not work if the enemy are too close at the time the command is issued (fear
makes even the most obedient soldiers deaf to orders!).
• The rout button is the exact opposite of the rally command. This causes the
selected unit(s) to run away from the enemy. It can be useful when faced by
unexpectedly terrible odds and you hope to save at least part of your army, or
when you want units to leave the battlefield to make way for reinforcements.
• When two or more units have been selected the group button (G key) will gather
them into a ‘collective unit’ that can be selected and issued orders as though it
were a single unit.
• The close formation (C key) and loose formation (L key) buttons alter the
spacing between men in a unit. Close formation is useful for hand-tohand combat, where getting the most men into action is important.
Loose formation is more use when under fire, as there’s more chance of a
missile falling harmlessly in the spaces between men.
• The wedge formation button (W key) changes the overall shape of a selected unit
from a rectangular block to a triangular wedge formation. The wedge can be
useful when charging into a melee to force a way into an enemy unit.
• The skirmish button (S key) is only active when the selected
unit has the appropriate ability. Units set to skirmish will
avoid hand-to-hand contact with the enemy while
continuing to attack them with missile fire.
• The hold formation button (F key) orders a unit to maintain its current formation
when it meets the enemy in melee. Men will stay in their assigned positions and
not spread out to engage enemies in combat. This is particularly useful for units
such as spearmen that gain combat power for being in tight, ordered ranks.
Medieval_Total_War_Manual.qxd 1/19/06 3:12 PM Page 50
Page 27

WITHDRAWING FROM COMBAT
It can be necessary for a unit to stop fighting before an enemy unit has been broken or
slaughtered to the last man. In the whirl of battle, being able to withdraw a unit from a
fight can be extremely useful.
• Left click on a unit to select it, and then issue the withdraw command (ctrl + W keys) to
make it break off from a fight and move away from the enemy. You may need to issue a
halt command later to stop the unit from moving too far. If it isn’t halted, the unit will
leave the battlefield.
• You can also break off combat by double-clicking a safe destination for a unit away from
the fight. Often, you’ll need to repeat this command as the fight ebbs and flows.
ROUTE MARCHES AND WAYPOINTS
When you issue a movement or attack order to a unit by left clicking on target location or
unit it will march there in a straight line. This may not always be the best route for a unit
to take, as it could be that you want a unit to route round your own troops, or attack an
enemy in the flank or rear, rather than simply pile into a melee.
• You can issue a series of movement orders to a unit (or units) and set up a series of
waypoints for it by holding down the shift key while you left click on a series of locations
on the battlefield.
• The unit will then march to waypoints in order, finally coming to a halt at the last waypoint.
This command can be extremely useful in sending a unit on a march around an enemy’s
flank to cut off any path of retreat.
SELECTING MULTIPLE UNITS
You can select more than one unit at a time and issue orders to every selected unit at the
same time.
• Hold down Ctrl and left click on the units or on their unit information panels that you
wish to select. Left click again to deselect any unit if you make a mistake.
• You can select a single unit, hold down the shift key and then left click on a unit
information panel. All the units with information panels between the original unit and the
one just clicked are selected.
• You can hold down Ctrl and right click and drag across the battlefield to select all the
units within the virtual box that this creates.
• Ctrl + A selects every unit in your army.
• Ctrl + B selects every artillery unit in your army.
• Ctrl + M selects every missile unit in your army.
• Ctrl + H selects every hand-to-hand unit in your army.
• Select a unit, and hold down the Alt key. Right click on the battlefield at the location you
want the unit to face. You’ll then see it re-arrange its ranks to point in this new direction.
• Select a unit and hold down the Alt key and left click on a destination on the battlefield.
The unit will move to this new position without changing its facing.
GENERALS IN BATTLE
The commanding general can be recognised instantly by the square banner carried by his
unit. His is the most important unit in any battle, as his presence is often an inspiration to
nearby friendly forces. If he should break and run away, or be captured or killed, there is a
tremendous penalty to the morale of the whole force.
While a general is useful from a morale point of view, his personal unit is often composed
of very good fighters, so there’s a tactical trade-off to be made: committing a general to a
fight may well win that part of a battle, but it will put his life at risk.
OTHER BASIC CONTROLS
• The ESCape key gives you the option of ending the battle prematurely.
You always lose a
battle that you quit
. The computer then calculates the result of the battle taking into
account troop numbers and quality, but ignores any tactical skill that you would have
brought to the battle.
• The P key or pause command pauses the battle, should you need to do something less
interesting for a couple of minutes! While the game is paused all the other controls still
work, so you can continue to issue orders to your troops, move the camera and so forth.
• The F1 key brings up an order of battle report, showing a detailed status of each of your
units in the battle. Press F1 again to see if you achieved the victory conditions for the battle.
Press F1 for a third time to dismiss the report. Pressing F1 does not pause the game.
• Press F2 to capture a screenshot of the battle. The screenshot will be found in the TGAs
sub-directory of the
Medieval: Total War
directory on your PC.
THE ART OF COMMAND
This section covers some of the more advanced commands used in battle. For the most
part, these are all to do with the way units are
organised
rather than what they do, and with
collecting units together into groups.
ALTERNATE ATTACKS
Most missile troops are capable of fighting in hand-to-hand combat, even if they aren’t
usually very good at in-close fighting. There are a few units such as Byzantine Cavalry and
Janissaries that can both use missile weapons and fight in close combat reasonably well.
• Select a unit and left click on a target to make it carry out its primary attack, which is
usually a missile attack of some sort.
• Select a unit and press the Alt key and left click on a target to make it carry out its
secondary (melee) attack.
52 53
Medieval_Total_War_Manual.qxd 1/19/06 3:12 PM Page 52
Page 28

55
ADVANCED GENERALSHIP
This section covers the more advanced features of controlling your army. Given the way the
technology tree works in the full campaign, you’ll probably be able to fight several battles
before you need to master the ideas in this section.
ARTILLERY
Artillery units are slightly different from other unit
types in the game. Each unit has two subcomponents: a single artillery piece, and the crew
who serve it.
Once positioned on the battlefield, artillery pieces
cannot move. Some can rotate to target units,
fortifications, or buildings, but the truly enormous
artillery units are also almost fixed in their firing
directions too. There is a bit of leeway for their fire,
but it’s a limited ‘cone’ extending away from them –
potential targets outside the cone cannot be hit.
• When deploying artillery for a siege make sure you place it at a spot where the castle is in
range! Emplace the artillery piece by selecting it and clicking a location, and then move
the cursor over the castle walls and towers. If the cursor arrow is red, the artillery can’t
shoot that far and you’ll need to place it closer to the target.
• Left click on the artillery piece or its information panel to select it. Any subsequent left
click with the artillery selected must be on a target, as the artillery piece cannot move.
Ctrl + B is a shortcut to select all the artillery units in your army.
• The information panel for an artillery piece shows its
crew complement
, not the number
of artillery pieces. In all other respects, it is the same as every other panel.
• You can also left click on the crew. This selects them and not the artillery piece; they can
be moved and ordered to attack in the same way as any other unit in the game. You may
wish to do this to get the crew away from enemy units, because if they are killed the
artillery piece is useless.
• The crew of an artillery piece are the only people who can operate it. Other units
(including other artillery crews) cannot use an artillery piece. If the crew are reduced in
number it will take them longer to reload their artillery piece.
• An artillery piece can be ‘destroyed’ on the battlefield and rendered useless. However, unless
all the crew are killed as well, they will be able to carry out repairs after the battle, assuming
that you are victorious. They will return the unit to working order for the next battle.
54
• Ctrl + C selects every cavalry unit in your army.
• Ctrl + double (left) click selects all the units of the identical type in your army, e.g. all the
Ghulam cavalry.
• You can treat these selected units as a single unit and issue movement or attack orders in
the usual fashion.
• You can deselect units by pressing the return or enter key.
• When multiple units are selected and given a formation changing-order, they will all obey.
• Selected units can also be semi-permanently grouped into ‘super units’ or divisions within
your army.
GROUPING
When more than one unit is selected they can be grouped together using the group button
or the G key.
• Grouped units’ information panels are moved to the right hand end of the information
panel display, and a grey bar appears above them.
• Left clicking on this grey bar will select all the units in a group. They can then be issued
orders as usual.
• You can assign a selected group an identifying number by pressing Ctrl + shift + number 0-
9 (main keyboard). To instantly return to this group press Ctrl + assigned number.
• Groups can also be issued orders to adopt specific formations, as described below.
GROUP FORMATIONS
Formations can be very useful in getting the best out of units. No unit in
Medieval: Total
War
is unbeatable (although after facing a unit of elite Royal Knights, you may not believe
this is true!), and by grouping them and then using an appropriate formation units can
‘cover’ for each other’s weaknesses.
When a group has been created you can order the units in that group to adopt an overall
formation using the group formations button/command (Ctrl + P keys). This brings up a new
set of buttons that allow you to order specific kinds of formations. Each button shows the
arrangement of units that it orders.
• The 1 through 9 keys (main keyboard) are shortcuts for these formations. We recommend
that you experiment with the formations to discover which ones best suit your playing
style and favourite mix of units in battle.
• When you issue a group formation order, the selected units are automatically grouped,
if this hasn’t already been done.
Medieval_Total_War_Manual.qxd 1/19/06 3:12 PM Page 54
Page 29

57
• Killing prisoners means that you can’t ransom them back after the battle. Your general (and
your faction leader) could also gain a certain reputation for ruthlessness and cruelty…
ROYALTY IN BATTLE
Any unit lead by a member of royalty is usually recognisable by its type: Royal Knights,
Boyars, Ghulam Bodyguards, or Sipahi of the Porte (depending on the faction involved).
In the full campaign game attempting to kill or capture royalty can be a good strategy to
pursue, as this weakens the long-term survival prospects of the whole faction. It’s also a
strategy that can be employed against your units and royal family.
SIEGES, CASTLES AND BUILDINGS
Castles and forts can be attacked during a battle and
demolished by artillery fire. They are divided up into
areas by curtain walls and inner defences including
internal gates. The number of areas depends on the
castle’s size and upgrades.
• Walls, towers and gates can be targeted by artillery.
Select an artillery unit or group of artillery units and
then left click on the castle section you want to be
attacked. These sections are all treated as separate
structures in the game, and damage done to one
part of a castle does not transfer to any other parts.
• Each hit by artillery does damage, and when a tower or wall has taken 100% damage, it
will collapse. Any units standing behind the structure may take casualties as it collapses
on top of them!
• Fortifications have armaments ‘built in’ to them, and their inherent garrisons will fire at
attackers until they are destroyed.
• Fortifications will stop firing at attackers once the area they ‘belong’ to within the castle
has fallen to the attackers.
• Melee units can attack castle gates and force them open, but this may be a costly
business in terms of casualties. Artillery can also target a gate and force it to open.
Any other building on a battlefield can be attacked by artillery or through a melee attack.
While satisfying to do, it will probably have absolutely no effect on the battle’s outcome!
56
REINFORCEMENTS
Where there are more than 16 units in a province (perhaps because there is more
than one army or an army and a castle garrison) some units will be available
during the battle as
reinforcements
.
• All reinforcements are brought onto the battlefield by pressing the reinforcements button.
You’ll then be told how many extra units are available and how many are ready to enter
the battle (it takes a little time for reinforcements to reach you).
• During battle all reinforcements will appear at the edge of the battle
map and then march towards the large flag in your initial set up area.
You can reposition this flag as often as you want as the battle develops
by clicking on the assembly point flag button.
• As soon as units are on the battlefield they are entirely under your command and can be
issued orders like any of your other units.
• Reinforcements can only appear when there is a ‘slot’ available for them in your army.
Remember that you can only have 16 units in an army at any one time. You can force
weakened or broken units to rout (using the rout command) to create space in the army
for reinforcements.
REINFORCEMENTS BEFORE A BATTLE
If you have more than 16
units
in a region – and this means that you must have at
least two
armies
in a region – you can alter the initial line up of your army before
the battle starts.
• Select the unit you wish to remove, and then click on the Replace Unit button at the top of
the screen. The first unit in the ‘pool’ of reinforcements will then replace the selected unit.
The selected unit is then added to the pool of reinforcements.
• You can repeatedly replace the selected unit to cycle through the complete replacement pool.
• You can replace artillery with a reinforcement unit, but there isn’t much point in the long
run. Artillery units can’t move on the battlefield, so an artillery unit left in the
reinforcement pool will never appear on the battlefield.
PRISONERS
As your units attack they not only kill the enemy but also take battlefield prisoners.
Once an enemy army starts to break you’ll find that the opposing men are far more
likely to surrender than fight on to the bitter end.
• When you start taking captives, the kill prisoners button appears above the leftmost unit
information panel. The number on the button is the current number of prisoners that your
men have taken.
• Press the kill prisoners button at any time to put your captives to the sword. It may be a
good idea to do this if you are losing the battle, as they will escape and be able to fight
against you again.
Medieval_Total_War_Manual.qxd 1/19/06 3:12 PM Page 56
Page 30

59
• Left click on
Attacker
or
Defender
to change the basic posture of the faction. By default,
you’ll see that the system sets up attackers and defenders alternately.
When you’re happy with all your changes, left click on
Accept
to move on to the next stage:
choosing a battlefield.
BATTLEFIELD CONDITIONS
Here, you get to set up the physical conditions and ‘look’ of the battlefield.
• Left click on any map name to select that map. This choice sets the overall shape of the
land, not the vegetation or building style. The scroll bar at the left will move you up and
down the list to see more maps. The left and right arrows below the list will load in a new
subset of names if required. Extra maps that you’ve created with the map editor or
downloaded from the Internet will be shown on this list.
• The scrolling view will show you the general landscape of the battlefield, and give you an
idea of the terrain. It will not show you any seasonal changes or weather effects.
• The time limit can be set from 5-60 minutes, or no time limit, by left clicking on the left
and right arrows.
• Left click on the tick box next to a season to change the weather probabilities. The
weather is never guaranteed to be perfect, but it’s more likely to rain in spring and
autumn than high summer. Likewise, in winter it can snow during a battle.
• Left click on the difficulty level of your choice. This will influence how aggressive the CPU
players are during the battle.
• Finally, by left clicking on the left and right arrows for Terrain you can choose the
environment for your battle. This sets the style for any buildings on the map, and also
influences the weather – you’ll only get sandstorms in a desert, for example.
When your choices are finalised, left click
Continue
at the bottom of the screen.
BUYING YOUR FORCES
This screen allows you to choose the forces for each faction in a battle, and customise
individual units.
• The faction shields show at a glance the two sides in
the battle: attackers and defenders. Above each shield
is the budget allocation in florins for that faction.
Remember that this is divided equally between all the
factions on the same side. Below the shields another
number shows the men in that faction’s army.
Left click on a faction shield to
select units for that faction.
58
CUSTOM BATTLES
Selecting a
Custom Battle
on the Single Player Menu allows you to create exactly the battle
you want to fight. Almost every aspect of a battle can be fine-tuned, saved for the future,
played and replayed. Custom battles are an excellent way of learning the game, trying your
hand against multiple opponents before venturing online, and testing your tactics against
the various factions.
Left click on the return arrow in the bottom left of any parchment or screen to go back to an
earlier part of the Custom Battles process.
SELECT ERA
This screen allows you to select a historical period for your battle, and re-use a previous
battle configuration that you edited and saved away.
• The top half of the parchment allows you to select a time period for your custom game –
early, high
or
late
. This will influence the troops that are available for each faction. You’ll
be limited to feudal troops in the early period, and only be able to pick gunpowder-related
soldiers in the high or late periods, for example.
• The lower half of the parchment allows you to start a new custom battle by left clicking on
New Custom Game
, or you can left click on one of your existing custom games (if there
are any). Click on Use Selected Config to start the custom battle creation process.
You can sort the list of custom battle setups by name or date by left clicking on the appropriate
line at the bottom of the screen. You can also delete custom setups from the list as well.
SELECT FACTIONS
This screen allows you to set up the basic parameters of
your custom battle.
• Left click in either box beneath the
Florins
header to set
a purchasing budget for troops by typing in a new
value. Attacking and defending budgets do not have to
be identical. This money for defending and attacking
‘sides’ is split equally among all the factions involved.
• Left click on the arrows besides CPU players to set the number of computer-controlled
factions in the battle. You can have up to 8 factions in a battle, including the one that
you control. There will always be one human player. As you increase the number of CPU
players, a new faction will be added to the list below.
• Left click the small shield on a faction line to select it. You can then click any of the
larger shields to change to that faction. Note that a faction can only appear once in any
custom battle.
• Left click in the box on a faction line, and type in a new name for the faction if you want.
Changing the in-game name of a faction doesn’t change the troops it will be able to field.
For example, an English army renamed to be “The Knights of the Round Table” will still
be English.
Medieval_Total_War_Manual.qxd 1/19/06 3:12 PM Page 58
Page 31

61
• Historical Campaigns: Choose this option to fight a sequence of battles illustrating the career
of a famous general, the course of a war, or even the onslaught of the Golden Horde! Not all
the battles and campaigns in this section are available from the start of play – battles late
in a campaign are locked until victory in earlier battles has been achieved.
HISTORICAL BATTLES
The
Historical Battles
screen is divided into three main sections. In each section, left click
on the relevant scroll bar or on the arrowheads to move up and down through a list, see
more of the text or look at the rest of the units in your army. Each battle is presented from
the point of view of one army – you can’t choose sides in an historical battle.
• The top section allows you to choose a battle from the list. Left click on the battle you
want to fight. You’ll be told the difficulty of the battle at this point.
• The text description sets the scene for the battle, and also tells you how to win. It will
include the victory conditions for the battle, and these may include more than just killing
or capturing enemy soldiers.
• Finally, the row of boxes at the bottom of the screen shows your units for the battle. The
picture shows the type of troops in each unit, while the number in the top right corner of
a box is the unit’s
valour
. A unit shown with a white banner that has a star is the
general’s unit. The number below the star is the general’s
command
rating.
When you’re happy with your choice of battle, left click on the
Fight Battle
notice at the bottom
of the screen. The Battle system will then start and you’ll be put in charge of your army.
Left click the arrow in the bottom left corner of any screen or press the ESCape key to return
to the previous menu.
HISTORICAL CAMPAIGNS
The
Historical Campaigns
screen is divided into three sections. In each section, left click
on the scroll bar to move up and down through a list or see more of the text.
• The top section allows you to choose a campaign. Left click on the name of the campaign
you want to fight. The portrait(s) will change to show you the commander(s) of the army
you are about to lead. You can’t choose sides in a campaign – this has been done for you.
• The middle section shows you the battles that make up a particular historical campaign.
Battles that you can fight are shown in black text. Any that are temporarily locked are shown
greyed out. Generally speaking, you have to complete the first battle on the list in order to be
able to play the second, and so on. The result of battles that you already attempted will be
shown on a list here when appropriate. Left click on any battle shown in black to select it.
• The third section is a text description of the campaign. This is an overview of the political
and military situation at the time and gives you the
context for the battles that you’re about to fight.
Left click on
Reset Progress
to restart the selected
campaign. Any battles that you’ve unlocked will be
relocked at this point. Resetting progress in one
campaign will have no effect on other campaigns
that you may also be playing through.
60
• The three silhouettes allow you to look at the
infantry, cavalry
and
artillery
available to a
faction. Left click on the type of units that you wish to see, and the individual unit
pictures immediately below will change.
• The unit pictures show the forces of a given type available to a faction in the time period
you selected for your custom battle. Note that each faction has a slightly different
collection of units available to it.
• Left click on a unit picture to add it to the army boxes at the bottom of the screen. As you
move the cursor over an unit picture, you’ll be told what the unit is and how much it
costs in florins. This cost includes modifications for improved valour, weapons and
armour if appropriate.
• Any faction army can have a maximum of 16 units in its army in a custom battle.
Note
that the first unit selected for an army is always led by the general
. You might want to be
careful with your first selection for a custom battle to avoid having a general in charge of
an inferior unit.
• You can change the
valour, weapon
quality and
armour
quality of a unit before or after it
is selected by left clicking the appropriate left and right arrows. If you change any of
these values, it or they remain changed for any subsequent units you purchase. Improving
the quality of a unit can get very expensive, particularly when you wish to buy extremely
high quality soldiers!
• Left click any unit already in one of the 16 boxes at the bottom of the screen if you wish
to select it. You can then modify its
valour, weapon
and
armour
quality as you wish, but
at a cost in florins.
• Right click on a unit in one of the 16 boxes if you wish to remove it from the army. Its
cost is refunded to the budget.
Remember that you
don’t
have to spend the full budget for an army, and an army
doesn’t
need 16 units. These are maximums, not requirements.
We’d recommend that you always save your Custom Battle before taking to the battlefield
by left clicking Save Custom Battle Configuration.
Once you’re happy with the armies, left click
Ready
at the bottom of the screen to launch
your new custom game. Let battle commence!
HISTORICAL BATTLES AND CAMPAIGNS
As noted earlier, selecting
Single Player
on the Main Menu of the game gives you four
options for play. The last two of these options are:
• Historical Battles: Choose this option to fight a single, set-piece battle from medieval
times. There’s a selection of battles included in with
Medieval: Total War
, and you can
download extra battles from the website. You can fight these battles in any order and as
often as you like, and they can be very useful in learning the tricks and tactics of
medieval command. They will also give you the chance to command some of the factions
that are not playable in the main campaign game.
Medieval_Total_War_Manual.qxd 1/19/06 3:12 PM Page 60
Page 32

63
PLAY ON GAMESPY
If you have a GameSpy ID this will enable you to battle straight away with up to three other
players on the Internet. In order to play you will need a 56 Kbps or faster modem connection.
Enter the e-mail address, online name and password you used to register with GameSpy
and type in the CD key code that can be found in the original packaging. After clicking on
Continue
you will then be logged on to GameSpy. Select from the following options:
CHAT ROOMS
This screen will only appear if there are enough players online at the time to need a second
chat room.
• Click on
Chat Rooms
to enter the Chat Rooms screen. There is a table at the top of the
screen containing the available chat rooms and another at the bottom where the
messages are displayed. By default you join the chat room at the top of the list.
• To move between chat rooms simply select the one you wish to enter and click on the
Join Chat Room
button at the bottom of the screen.
• The lower half of the screen is the chat window itself. On the right-hand side is the
Room
Playerlist
section where you can choose whether to direct your message to all players, just
your game allies, or send a private message to any one of the other players by clicking on
them.
• The person or group you are chatting to is highlighted and displayed with the cursor in
the chat box along the bottom of the screen.
• The space is divided into two halves – the upper half displays all general messages and
the lower half displays just the private messages.
• You can exit the chat room at any time by left clicking on the return arrow in the bottom
left of the parchment. This will return you to the GameSpy menu. Alternatively click on
the Internet Games button to go straight to the Internet Games screen.
INTERNET GAMES
Click on
Internet Games
to see the Internet Games screen.
• If there are any
Medieval: Total War
Internet games being hosted by other players these
will appear here.
• Select one and click on the Join Game button to join it and then work through the
Customise Armies screen. This screen functions in exactly the same way as the Custom
Battle screen. See the relevant section of this manual.
• To host your own Internet game click on the Host
Game button to enter the Host Game Options
screen. See
LAN Game/Host Game Options
for more details.
When you are happy with your choices of campaign and battle, left click on
Re-enact This
Battle
at the bottom of the screen.
The
Battle
screen gives you a scrolling view of the battlefield, the commanders involved, a
short description of how the battle came to be fought, and details of your army. Click on
the scroll bar at the left to see more text.
• The text description will include the victory conditions for the battle. Make sure you
understand these, as killing or capturing enemy soldiers may be only part of what you
have to do – and a small part at that. For example, if you are told to destroy particular
units or take a particular piece of ground, you won’t win no matter how many of the
enemy die beneath your soldiers’ swords.
• Units in your army are displayed at the bottom of the screen. The unit picture shows you
the type(s) of troops you’ll have at your command.
• The number in the top right hand corner of each box is the valour of the unit, and this is
a good indication of their fighting quality. Any value above zero indicates experienced
soldiers; units with values higher than one are exceptionally tough-minded soldiers.
• The unit with a white banner that has a star and a number on it is the unit lead by the
general in this battle. It will usually be a superior unit type or have a good valour rating.
• Left click on either of the arrowheads to the left of your units to see the rest of your army.
When you’ve finished reviewing your force, click on
Fight Battle
at the bottom of the screen.
This will take you into the
Medieval: Total War
Battle system to command your troops!
As always, left clicking on the go-back arrow in the bottom left hand corner of any screen or
pressing the ESCape key will return you to the previous menu or selection screen.
After the battle, you are given an after-action report, and offered three options:
• Re-fight this battle: Click on this option if you lost the battle and want to have another
chance at attaining victory. You can also do this, of course, to beat your previous results
even if you won!
• Return to the Main Menu: This takes you out of the historical campaigns part of the game.
Your progress to date is automatically saved.
• Fight a new battle: Return to the
Historical Campaigns
screen and select a new battle. If
you won, it’s likely that you will have unlocked one of the battles – or possibly a whole
campaign – listed on that screen.
MULTIPLAYER GAMES
Selecting the Multiplayer option from the Main Menu enables you to play
Medieval: Total
War
against living, breathing opponents (notice that we’re not necessarily promising you
human
opponents here). The game supports up to eight players over a Local Area Network
(LAN) and up to four players over the Internet. The Multiplayer menu also contains all the
options you need to register on-line through www.gamespyid.com and check out the latest
news and features on www.totalwar.com.
Once you have selected Multiplayer from the Main Menu you are presented with five options:
62
Medieval_Total_War_Manual.qxd 1/19/06 3:12 PM Page 62
Page 33

65
• Finally, you can specify the environment for your battle: the season and the general
vegetation/climate. This also determines the style of building architecture.
• Click on
Continue
when you have finished making your selections. This will take you to
the
Multiplayer Lobby
.
As always, you can return to the previous menu by clicking on the back arrow in the bottom
left corner or by pressing the ESCape key.
JOIN GAME OPTIONS
If another player on the LAN has already hosted a game you can join by clicking on
Join
Game
. You will then be taken to the Multiplayer Lobby.
MULTIPLAYER LOBBY
The Multiplayer Lobby is where you decide which of the playable factions you will use,
whether you will be attacker or defender and the name of your army. You will also be able
to chat to the other players across the LAN through the chat function.
• Your name for a game defaults to your PC’s network ID. Left click on this and type in a
new name if you wish.
• Left click on one of the shields in the top right-hand corner of the screen to select
your faction.
• You can choose to be an attacker or defender. All players making the same choice are
(initially) on the same side and are allies. It is, of course, always possible that a general
will not honour his alliances…
• The lobby screen also includes a chat area with the same functionality as the chat
screens already discussed.
• When all players have made their choices the message
Waiting For Players
will change to
Accept
. Click on this to progress to the
Customise Armies
screen.
• You can exit to the
LAN Game Selection
screen at any time by clicking on the Exit button.
64
CHECK GAMESPY FOR MEDIEVAL: TOTAL
WAR UPDATES
This option gets any
Medieval: Total War
updates or patches, shutting down the game if
necessary to download and restarting it afterwards. If this occurs you will be returned to the
Main Menu and will be logged off GameSpy.
LOG OFF
Click on this to return to the
Medieval: Total War
Main Menu.
REGISTER ON GAMESPY
If you don’t already have a GameSpy ID this option will take you to www.gamespyid.com to
enable you to get one. You will need to specify a working email address, online name and
password. Keep a note of both, as they will be needed to play
Medieval: Total War
online.
LAN GAME
Medieval: Total War
allows up to eight people to play over a Local Area Network (LAN). In
order to do this you will need your PC s linked by a TCP/IP compliant network and a
legitimate copy (installed with a different CD-key for each) of
Medieval: Total War
for every
player/PC taking part.
• Clicking on the
LAN Game
option opens up the LAN Game Selection screen. Here you
can play host to or join another’s battle scenario. You can exit the LAN Game option at
any time by clicking the
Exit
button.
• The
Host Game Options
screen allows you to specify all the parameters needed to set up
a LAN battle.
HOST GAME OPTIONS
This screen sets up all the starting conditions for a battle you are hosting:
• On the left of the screen is a vertical list of maps within
Medieval: Total War
. Left click on
a map name to select it. The map name will then appear on the panoramic view.
• Enter a name for the battle in the
Server Name
field. You can enter a
password
in the
field below if you wish, although it is not essential. Next you can set the number of
players (up to a total of eight players including the host) and finally the amount of florins
that are available for each player to spend on troops, up to 99,999.
• Left click on the arrows at the bottom right-hand side to select the era in which you want
to play.
• The default game type is
Last Man Standing
, where the last player on the battle field
wins. If the time limit runs out then the team with the most valour points wins the battle.
• You can also specify a time limit for the battle: 5-60 minutes or no time limit.
Medieval_Total_War_Manual.qxd 1/19/06 3:12 PM Page 64
Page 34

67
APPENDIX 1: UNITS
There are over 100 different unit types in
Medieval: Total War
and although they all
have different strengths and weaknesses,
they can be organised into general
categories or classes of soldier.
SPEARMEN
Spearmen are the defensive backbone of
an army, as they can fend off most cavalry
attacks from the front – no horse will ever
willingly charge into a wall of spear points.
With the front two ranks able to fight,
spearmen can also be a useful offensive
force too. Pikemen are even better, as even
longer spears allow the front four ranks to
fight at the same time.
MISSILE
For the most part missile troops are armed
with bows and arrows, although the quality
of these weapons varies tremendously. All of
these troops are best used to kill enemies at
a distance. Some can fight well in hand-tohand combat, but this is only a last resort or
to ‘ambush’ an enemy from behind!
SKIRMISHERS
A sub-category of missile troops, these units
are generally well able to look after
themselves in combat against lightweight
enemies. Heavy cavalry and infantry will roll
right over them, but the dual ability to fire
and then close and attack in a melee makes
these forces useful in many situations.
INFANTRY
Infantry here is a catchall term for the
men-at-arms and warriors who are the
backbone of most armies. They have no
particular strengths, but no appalling
weaknesses either.
HEAVY INFANTRY
These units are heavily armed, armoured
and slow compared to their
contemporaries, but their job is not to
chase down the enemy. Their job is to cut
the enemy to pieces, and at this they are
almost unmatched. These troops are the
experts at hard, bloody assaults. When
equipped with polearms, they can also
reduce cavalry units to so much dog food!
PEASANTS
Peasant class units are not very tough, nor
are they likely to stand for long when things
start going wrong. They are, however, cheap
to build and they appear early in the game
before the infrastructure to train better units
has been constructed. Not all ‘peasants’ are
equally bad though. Irish Kerns and eastern
European Woodsmen can be surprisingly
effective as long as they aren’t thrown into
head-on attacks. The militia units have
better equipment and training, but
shouldn’t be relied upon to fight as well as
professional soldiers.
66
CUSTOMISE LAN ARMIES
The
Customise Armies
screen contains all the units available to your chosen faction in your
specified era. Displayed at the top of the screen is the faction shield of your chosen
faction, your faction name, your player name and the amount of florins available to you to
spend on your army.
This screen functions in exactly the same way as the
Custom Battle
screen. See the
relevant section of this manual.
MEDIEVAL: TOTAL WAR WEBSITE
This option minimises
Medieval: Total War
and launches your internet browser, linking to
www.totalwar.com, where you can get news, features and downloads connected with
Medieval: Total War
and other games in the
Total War
series.
MEDIEVAL: TOTAL WAR NEWS SERVER
Connect directly to the
Medieval: Total War
online news server from within the game for upto-the-minute news and bulletins. Related messages will be displayed in the top half of the
screen. Click on one and its text will be displayed in the lower half of the screen.
Medieval_Total_War_Manual.qxd 1/19/06 3:12 PM Page 66
Page 35

69
APPENDIX 2: CONTROLS & KEYS
Key Campaign/Front End Command
Left Select an army, fleet, agent or province.
mouse Click and drag to move armies and agents.
button
Right Call up information parchments on any army, fleet,
mouse province, fleet, castle, building or agent.
button
ENTER or End yearly turn.
RETURN Closes a message parchment when one is visible.
ESC Back to a previous screen or menu in the front end or
campaign game.
SHIFT Shows the current loyalty of all your provinces by
highlighting them all in appropriate colours:
• Green: fully loyal.
• Yellow: marginally disloyal, but unlikely to rebel.
• Red: very disloyal, and highly likely to rebel soon,
if it hasn’t happened already!
M Merge units when
army
selected.
Merge armies when
province
selected.
1
numeric
Zoom in on campaign map.
pad
3
numeric
Zoom out on campaign map.
pad
Mousewheel
Zoom on campaign map, move up and down lists on
information parchments
SPACE Bypasses tour of yearly events.
CTRL + A Selects all units in the review panel.
Commands and keys for the Battle game can be found by selecting Controls on the
in-game Options Menu.
68
HEAVY CAVALRY
All of these troops are primarily intended to
do one thing: attack and defeat enemies
using shock as their primary weapon. Heavy
cavalry are at their best when they can
charge into an attack, but deciding when to
order a charge can be a tricky business –
give the order too soon and your units will
become exhausted too soon. But simply
committing them to a charge may not be the
best tactic, particularly against spearmen. A
flanking or rear attack can be far deadlier!
There can also be problems in holding back
some of these troops, as the more ‘noble’
ones are often
impetuous
in battle and eager
for glory.
Kataphraktoi are some of the heaviest
cavalry the world has ever known and while
slow can have a tremendous impact when
they do charge home!
LIGHT CAVALRY
Light cavalry are intended to act as a
screen, to ride down lightly armed enemies
and to pursue a beaten foe from the field –
killing and capturing as many enemies in
the process as possible. They are also
extremely useful against fast opposition,
and can keep horse archers away from
slower, more vulnerable troops. They
cannot – and really should not – expect to
hold their own against heavy cavalry.
HORSE ARCHERS
Horse archers are the best harassing troops
available, able to pepper an enemy with
missile fire and then, hopefully, withdraw
before any counter-attack can be executed.
This harass-withdrawal-harass cycle can be
repeated as often as necessary to wear
down the enemy and break up his
formation. Horse archers shouldn’t really
get involved in melee, except in selfdefence and possibly when pursuing a
broken enemy off the field. Spanish
Jinettes and Byzantine Cavalry are
exceptions to this general rule, and are
competent attackers.
ARTILLERY
Artillery pieces cannot move during a battle,
so positioning them properly from the start
is vital. If besieging a castle, they need to
be within range of the defences, but not so
close that they can be attacked by fire from
towers. In a defensive field battle, they
need to be placed so that there is a ‘beaten
zone’ that the enemy will have to cross. On
the attack, tempting the enemy into coming
into the ‘beaten zone’ of artillery fire is
always a good tactic in an army that
includes artillery, along with light cavalry or
horse archers to act as goads.
GUNPOWDER
As a sub-category of missile troops,
handguns have all the utility you would
expect. They can be terrifying to enemies
unused to them, but they are also useless
in wet weather, when powder simply
cannot be kept dry.
As with other artillery pieces, positioning
guns on the battlefield is the key to
success. Guns are quite effective during
castle storming attempts and can do
tremendous damage to attacking forces in
other battles. Positioning them properly is
the key to success, so that the enemy have
few options but to come into range. Like
other gunpowder weapons, they are useless
in wet weather.
Medieval_Total_War_Manual.qxd 1/19/06 3:12 PM Page 68
Page 36

71
Terrain: The campaign map shows the battle terrain that you can expect your armies to fight
in quite accurately. If you invade across a province border that has mountains, any battle
you fight there will be on mountainous terrain and the defender may well have a big
positional advantage. Wherever possible, be aware of the easy routes for an invader to take,
across flat or gently rolling countryside and either use or guard them well.
Beside the seaside: A province with a coastline can be more valuable than an equivalent
landlocked one. By building a port (and then fleets of ships in a chain of sea regions) any
traders in a coastal province can sell their goods to many people in distant lands, earning a
large amount of money in the process. Ports and fleets also let you move agents and armies
around quickly.
Executive action: A single knife in the hands of an assassin can do more damage than a
thousand swords – when it is plunged into the right target! Assassinating a general
paralyses his army; assassinating a king paralyses the whole country!
Money: Keep an eye on your income, as it’s easy to run out of money. There’s a lot to spend
your money on: troop maintenance costs, new buildings, new units, bribes, ransoms, and
crusades.
Princesses: Even if no one wants to marry a princess, keep her 'on tour', as she acts as a
spy in the province she occupies. This can be very useful for picking the route your
invading army will eventually take through someone else's kingdom!
Tax: Don't set a blanket tax rate across your entire kingdom. Take the time to use tax to
keep people just loyal enough that they won't revolt.
Titles and Offices: At the start of the game look at every unit leader you have and give titles
to the men with the highest Acumen. Make single unit armies if necessary to make sure the
right man gets the title when you drop it onto an army. A governor with high acumen boosts
the income from his province, and you need all the cash you can get at the start of play.
Don't worry too much at this stage whether these men are great combat leaders; later you
can strip these men of their titles, assassinate them to prevent a rebellion (just in case)
and give the title to a high-ranking general whose loyalty is important! Ruthless? Perhaps,
but very medieval…
Raids: It can be quite profitable to conquer an enemy province, destroy every building in it,
get the payment for destroying the buildings, and then abandon the province. Often, the
enemy will move back in and start rebuilding. Invade again to repeat this profitable ‘smash
and grab’ operation once they’ve done the reconstruction work! The English specialised in
just this tactic, - called a chevauchée – during the Hundred Years War against France.
Spying: Any agent (even a princess) can be used to gather information in enemy provinces,
while watchtowers act as spies into neighbouring provinces. The longer you leave an agent
in a province the more information he will gather.
70
HINTS AND TIPS
Good leaders leave as little as possible to chance, so here are a few important points to
consider as you embark upon your conquests in medieval Europe:
Defend Provinces: Always keep a group of units in each province bordering enemy lands
otherwise aggressive forces may well take it away from you. Provinces are the only thing
that brings in money, so you can’t afford to lose too many of them. Some provinces you
can’t afford to lose at all, so decide where you need to ‘draw a line in the sand’ and hang
on to your rich provinces. You also need to defend provinces to attain some of the Glorious
Objectives in the game. Remember: Land
equals
Money
equals
Army Pay!
Loyalty: Keep an eye on the loyalty of your subjects or they may revolt. To quickly see how
loyal your provinces are, hold down one of the Shift keys. Each province is highlighted in a
colour showing how it feels towards your rule. Green provinces are loyal, yellow provinces are
wavering, but red provinces are distinctly disloyal and ready for a rebellion. Don’t be afraid to
drop the tax rate in an individual province to make its peasants more loyal for a while, and
remember that moving troops into a disloyal province will forcibly increase their loyalty.
Watch Your Generals: Keep an eye on generals, especially those with many troops and high
command ratings and/or royal blood. These are the men who can become ringleaders in a
civil war if they aren’t very loyal. Give them provincial titles and offices of state, or drop a
princess on them to offer them marriage into the royal family. All of these help to keep
generals loyal, but if this doesn’t work sometimes you have to be ruthless. Drop an emissary
on a general to strip his titles. Drop an inquisitor on a Catholic general with low piety to try
him for heresy and (hopefully) send him to the stake (remember to move any bishops out of
the province first). Drop an assassin on him to kill him and stop a civil war before it starts.
It hurts to do this to your own side, but threats have to be countered.
Spy on Your Own Side: Drop spies on generals to find out their dirty little secrets. You don’t
want to make a foully corrupt general governor of your richest province!
Provincial Specialisation: Some provinces on the map excel in producing certain types of
units – Switzerland, for example, produces very good spearmen and pikemen. The province
descriptions will give you details. There are also a few units that can only be trained in
specific provinces: Bulgarian Brigands come - as you might just suspect from the name –
from Bulgaria and nowhere else. Sometimes, it can be worth conquering a province just to
train these specialised or superior troops.
Faction Advantages: Some factions have their own specialist units that only they can train,
such as the English and their famous longbowmen. If you’re playing a faction, make the
most of its specialist troops. If you’re fighting against a faction, pay attention to their
special troops, and learn how to defeat them early on. There are no unbeatable units in the
game, but you do need to adjust tactics in the face of a new threat.
Holy Men: Holy men can act as powerful stabilising forces in your provinces. Sent into
enemy provinces, they can act as spies and start converting the population to your religion
as well! This can mean an enemy province is likely to suffer a religious revolt.
Medieval_Total_War_Manual.qxd 1/19/06 3:12 PM Page 70
Page 37

73
Project Director
Mike Simpson
PROGRAMMING:
Lead Programmer
A.P. “Tag” Taglione
Battle Logic & AI
R.T. Smith
FE Core, Strategy Map UI and Infrastructure
Shane O’Brien
Multiplayer, FE, Castle AI
Gil Jaysmith
Historical Campaigns, FE, Agents, Mercs
Dan Parkes
Strategy MAP AI
Ting Li
Fleets, Glory Goals and Tutorial
Matteo Sartori
VnV’s & Heroes
Mike Simpson
Battle Tutorials & Pathfinding
Dan Triggs
Battle UI
John McFarlane
Events & Installation
Melvyn Quek
Core Code
The Shogun Team
Art:
UI Graphics & Maps
Joss Adley
Battle Graphics, Textures & Maps
Howard Rayner
Event & PR Drawings, Textures & Maps
Nick Smith
Portraits, PR Art & Strategy Map
Ester Reeve
Glory Art & Buildings
Irina Rohvarger
Portraits, Textures & Maps
Greg Alston
Design
Mike Simpson and the Whole Team
Writing
Mike Brunton
Producer
Luci “Loki” Black
Product Evangelist
Michael de Plater
Executive Producer
Tim Ansell
Supporting Roles:
QA Manager
Graham Axford
Testers
Jeff Woods
James “Azimoth” Buckle
Chris Morphew
Intro & PR Art
Alistair Hope
Jude Bond
Programming
Richard Broadhurst (FLE)
Dan Laviers
Manual
Mike Brunton
Webmaster
Richie “Web Dad” Skinner
PR & Marketing
Ian “Sorry to be a pest, but….” Roxburgh
Cathy Campos, Panache PR
Tools
Richard Broadhurst (FLE)
Mark Milton
Nick Tresadern
Additional Content
Tim Ansell
Ross Manton
Assistant Producer & Catering
Chris Gambold
Consultant on Muslim Culture:
Kaushar Tai, Chairman of the
Inter-Faith Council
72
Disbanding units: Remember that any unit you disband may no longer cost you money, but it
hasn’t completely disappeared from the game. It becomes a company of mercenaries and is
available for hire by anyone with the cash. Be careful if you decide to get rid of a high
valour unit – it could end up working for your enemies!
Castles: Large castles are not only defensive structures. They are the driving force behind
your war machine and economy. Build your first castles where they will bring the maximum
benefit: provinces with a large basic farm income that needs protecting, or where there are
special benefits such as trade goods, iron deposits or specialist local troops.
Coup d’etat: Civil wars need not necessarily be a bad thing. If you have a particularly weak
faction leader with a poor collection of heirs, it is possible to drive down the loyalty of your
most powerful general in the hope that he will start a civil war and lead others in a
rebellion. Remove his offices and titles, give him an enormous army to command, and wait
for the revolution. If it happens, back the rebels rather than the current king!
Breeding: Good breeding, allegedly, tells. But more important to a successful royal line is
fast breeding. Make sure your heirs are married! If foreign princesses don’t beat a path to
your door, make sure you send emissaries to find them and propose marriage. That way, you
have a much better chance of a king having the ‘heir and spare’ when they are needed at
his death.
Artillery Emplacements: When deploying your army pay attention to where you place artillery,
mechanical and gunpowder both. Once these are in place they can’t be moved, so you need
to make sure that they are in the right place from the start of the battle. When besieging a
castle make sure your artillery is close enough to actually hit the walls!
Killing zones: Artillery units should be set up to cover the likely attack routes of the enemy.
Ideally, the enemy should have to approach your army through a killing zone of artillery fire.
Even on the attack you can use light cavalry and horse archers to tempt the defenders into
moving into artillery range.
Firing into melee: Arrows and artillery fire are no respecters of loyalty. If you order missile
fire into a melee involving your own troops expect to take casualties from ‘friendly fire’.
Flanking attacks: Where possible, try to have cavalry units charge into the flank or rear of an
enemy unit. This maximises the shock impact of the charge, and means that the cavalry
will not start to take heavy casualties until their target can reorganise itself. There’s a good
chance that the target unit will not recover from the shock of the initial impact.
Feigned Attack: You can also use the rout command for a feigned retreat. This is a dangerous
(but often effective) tactic of pretending to run away to draw the enemy out of a strong
position. When they follow, rally and attack! If it goes well, the enemy can be disorganised
and cut to pieces; if it goes wrong, there’s little chance of recovering control of your army!
CREATIVE ASSEMBLY
Medieval_Total_War_Manual.qxd 1/19/06 3:12 PM Page 72
Page 38

LIMITED WARRANTY:
SEGA of America, Inc. warrants to the original consumer purchaser that the game disc or cartridge shall be free
from defects in material and workmanship for a period of 90-days from the original date of purchase. If a defect
covered by this limited warranty occurs during this
90-day warranty period, the defective game disc or cartridge will be replaced free of charge. This limited warranty
does not apply if the defects have been caused by negligence, accident, unreasonable use, modification, tampering,
or any other causes not related to defective materials or manufacturing workmanship. This limited warranty does not
apply to used software or to software acquired through private transactions between individuals or purchased from
online auction sites. Please retain the original, or a photocopy, of your dated sales receipt to establish the date of
purchase for in-warranty replacement. For replacement, return the product, with its original packaging and receipt,
to the retailer from which the software was originally purchased. In the event that you cannot obtain a replacement
from the retailer, please contact Sega to obtain support.
Obtaining technical support/service
To receive additional support, including troubleshooting assistance please contact Sega at:
• Website: www.sega.com/support
• E-mail: support@sega.com
• Telephone: 1-800-USA-SEGA
LIMITATIONS ON WARRANTY
ANY APPLICABLE IMPLIED WARRANTIES, INCLUDING WARRANTIES OF MERCHANTABILITY AND FITNESS FOR
A PARTICULAR PURPOSE, ARE HEREBY LIMITED TO 90 DAYS FROM THE DATE OF PURCHASE AND ARE
SUBJECT TO THE CONDITIONS SET FORTH HEREIN. IN NO EVENT SHALL SEGA OF AMERICA, INC., BE
LIABLE FOR CONSEQUENTIAL OR INCIDENTAL DAMAGES RESULTING FROM THE BREACH OF ANY EXPRESS
OR IMPLIED WARRANTIES. THE PROVISIONS OF THIS LIMITED WARRANTY ARE VALID IN THE UNITED
STATES AND CANADA ONLY. SOME STATES DO NOT ALLOW LIMITATIONS ON HOW LONG AN IMPLIED
WARRANTY LASTS, OR EXCLUSION OF CONSEQUENTIAL OR INCIDENTAL DAMAGES, SO THE ABOVE
LIMITATION OR EXCLUSION MAY NOT APPLY TO YOU. THIS WARRANTY PROVIDES YOU WITH SPECIFIC LEGAL
RIGHTS. YOU MAY HAVE OTHER RIGHTS THAT VARY FROM STATE TO STATE.
TO REGISTER THIS PRODUCT, PLEASE GO TO WWW.SEGA.COM
Audio:
Music & Sound Effects
Jeff van Dyck (www.dnama.com)
Additional Music
Richard Vaughan
Saki Kaskas
Additional Sound Effects
Richard Vaughan
Nathan McGuiness
Karl Learmont
Sam Spanswick
Trumpet Fanfares
Dale Richardson
Special audio thanks to
Living History Australia for running around
and screaming
Di the camel lady at Bos Camel Farm for
making her camels sing
Casting and Voice Production
Philip Morris at AllintheGame Ltd.
Voices
Sean Pertwee, Sulayman Al-Bassam,
Boris Sosna, Nadim Sawalha
Audio Scripts
Mike Brunton
Special Thanks
Dr Ken Turner, Gareth Hailes
74 75
Medieval_Total_War_Manual.qxd 1/19/06 3:12 PM Page 74
Page 39

NOTES
76
Medieval_Total_War_Manual.qxd 1/19/06 3:12 PM Page 76
 Loading...