

Page 1
IPCAM-SDII Quick Start Guide (iPhone)
The SecurityMan IPCAM-SDII is
designed for quick and easy
installation. This guide will help you
get your camera connected to your
mobile device in 3 easy steps.
Step 1 HARDWARE
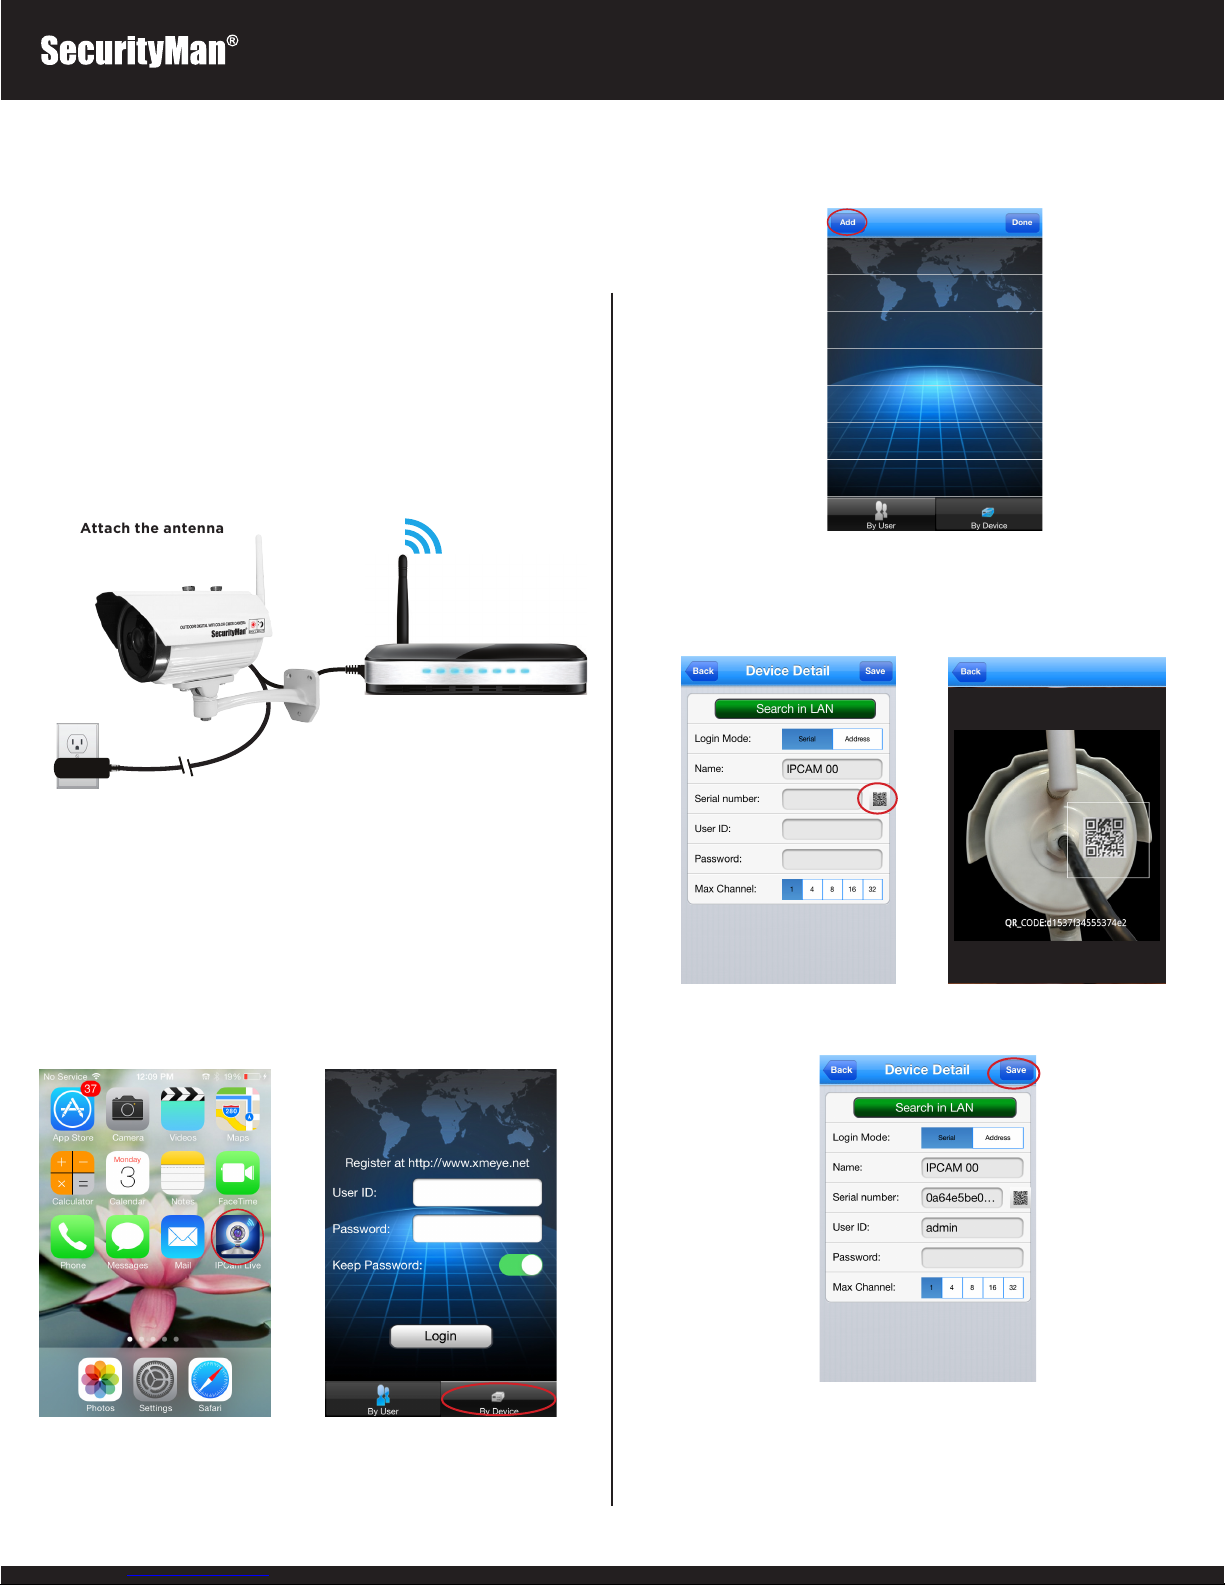
Attach the antenna
Connect the Ethernet
Cable to your Router
Connect the Power
Adapter
Step 2 INSTALL APP & SCAN QR CODE
1. Open the App Store on your mobile device. Then search for and
install the “IPCam Live” application. Once installed, tap on the
“IPCam Live” icon (fig. 2.1), select “By Device” (fig. 2. 2) and then
select the “Add” button (fig. 2. 3).
Fig2.3
2. Tap on the QR Code Icon (fig. 2.4) and point your iPhone camera at
the QR Code located on the back of the camera (fig 2 .5). The serial
number will be displayed once the QR Code is scanned. At this point
you may choose to rename your device under “ Name” and then press
“Save” located on the upper right hand corner of the screen (fig. 2.6).
Fig2.5Fig2.4
Fig2.1 Fig2.2
1 2
Fig2.6
3. Now select your device (fig. 2.7) to bring up the live view screen (fig
2.8).
NOTE: The following images will appear stating “Connecting…” and
“Buering…” If successful, your IPCam image will be displayed .
Page 2
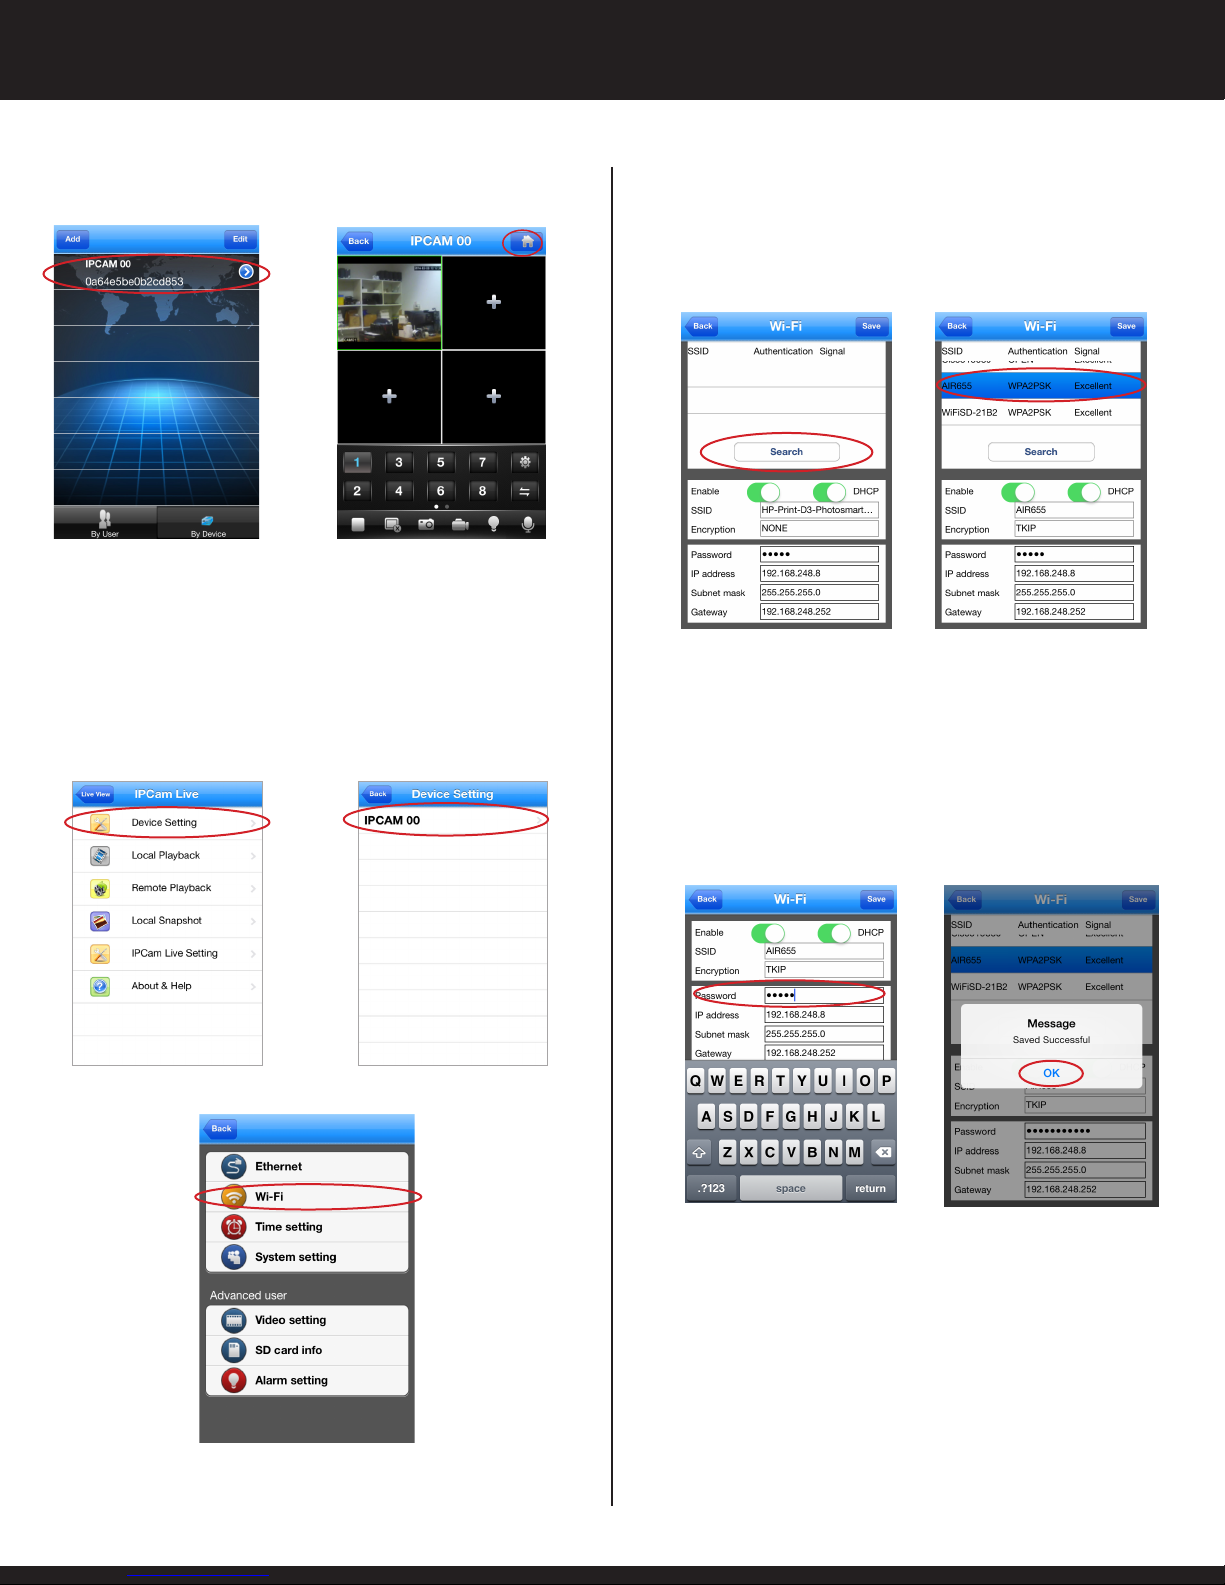
2. Make sure both “Enable” & “DHCP” are enabled (switched to green)
and click “Search” (fig. 3.4). Select the Wi-Fi name that is associated
with your network by tapping on the name (fig.3.5).
Fig2.7
Fig2.8
Step 3 Wi-Fi SETUP
NOTE: STEP 2 must be complete before beginning STEP 3.
1. Tap on the “Home” icon located on the upper right hand corner of
the screen (fig. 2.8). Select “Device Setting ” (fig. 3.1). Select your
device (fig. 3.2). Select “Wi-Fi” (fig. 3. 3).
Fig3.1
Fig3.2
Fig3.4 Fig3.5
3. Once your Wi-Fi name has been selected, type in the password
associated with your Wi-Fi network (fig. 3.6). If the password space is
already filled, delete anything in the space and type in your password.
Now tap on “Save” located on the upper right hand corner of the
screen (fig. 3.7) and tap “OK” on the “Saved Successful” prompt (fig.
3.7).
NOTE: Password is case sensitive. If the password is incorrect, the
message will still show “Saved Successful”.
3 4
Fig3.3
Fig3.6
4. Go back to the live view screen. Unplug the Ethernet cable from the
back of the IPCam-SDII. Wait 30 -45 seconds for the Wi-Fi access. WiFi setup complete.
NOTE: Your camera screen will freeze once the Ethernet cable is
unplugged . If the password is incorrect , the camera screen will show
“Failed to connect”.
Fig3.7
Page 3
IPCAM-SDII Quick Start Guide (Android)
The SecurityMan IPCAM-SDII is
designed for quick and easy
installation. This guide will help you
get your camera connected to your
mobile device in 3 easy steps.
Step 1 HARDWARE
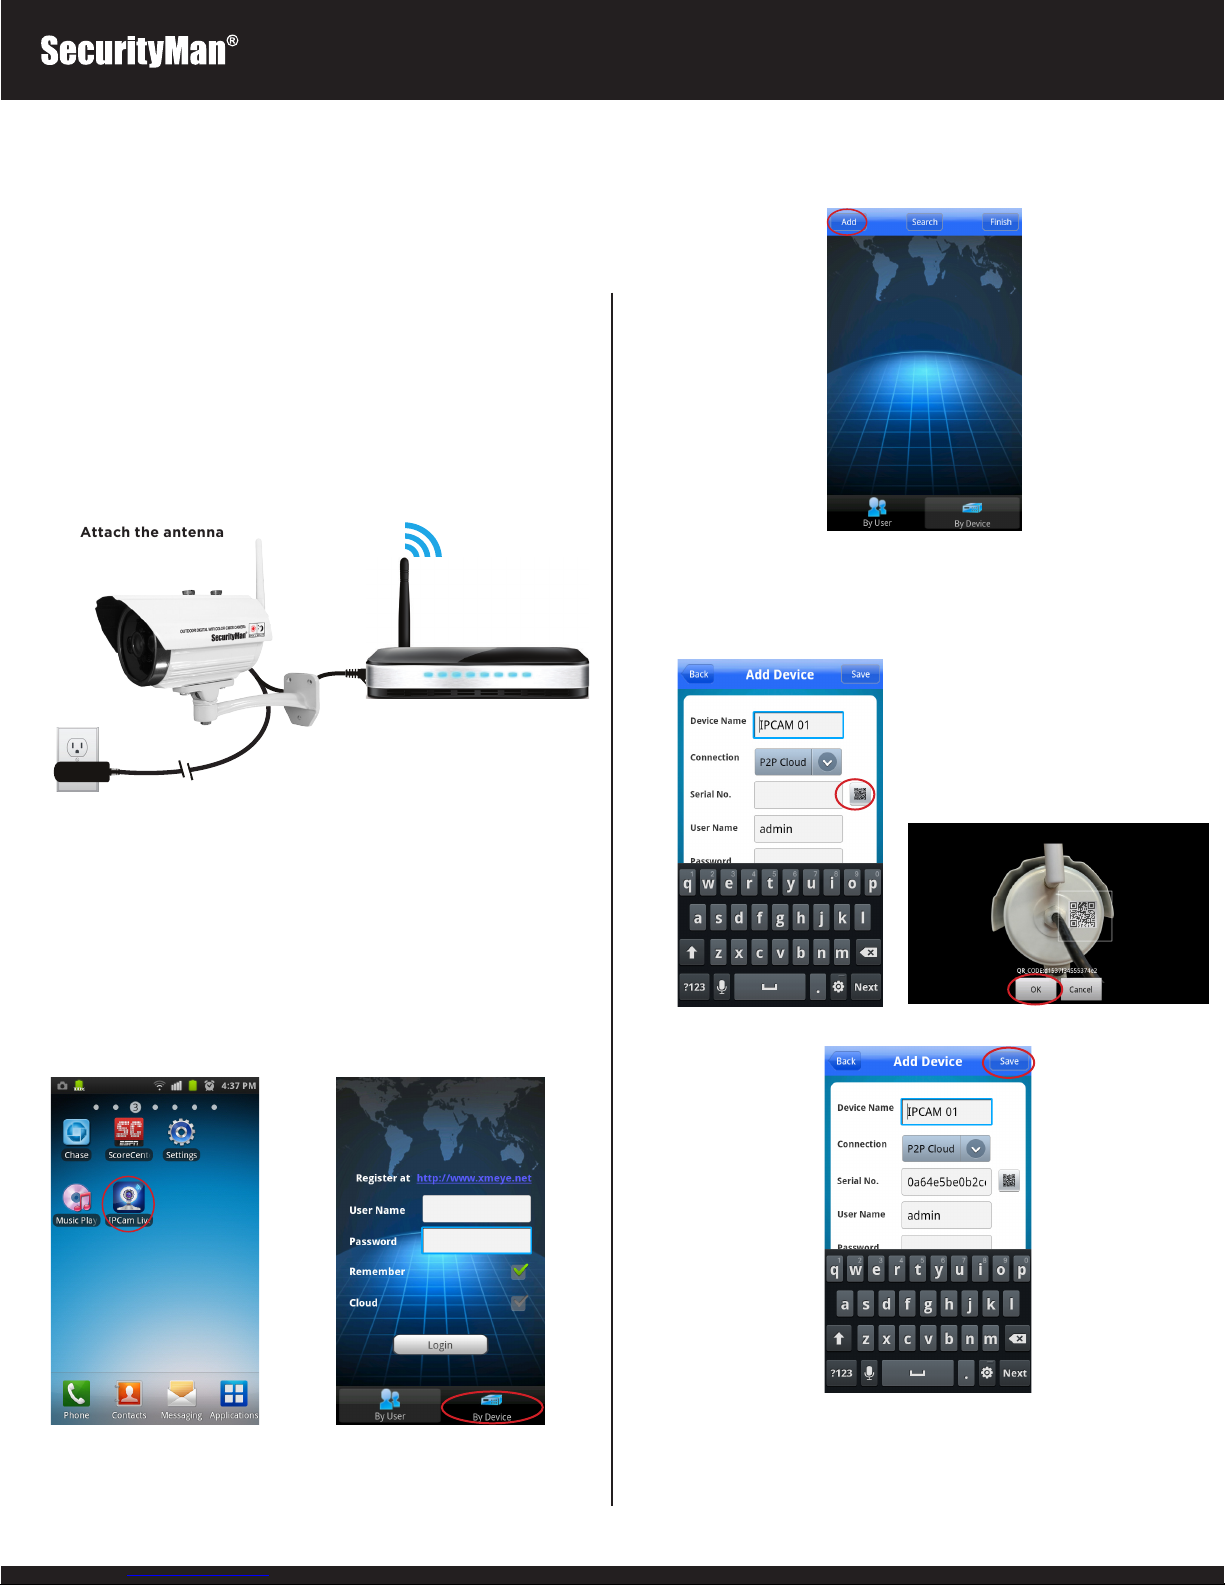
Attach the antenna
Connect the Ethernet
Cable to your Router
Connect the Power
Adapter
Step 2 INSTALL APP & SCAN QR CODE
1. Open the Play Store on your mobile device. Then search for and
install the “IPCam Live” application. Once installed, tap on the
“IPCam Live” icon (fig. 2.1), select “By Device” (fig. 2. 2) and then
select the “Ad d” button (fig. 2. 3).
Fig2.3
2. Tap on the QR Code Icon (fig. 2.4) and point your Android camera at
the QR Code located on the back of the camera and press “Ok” once
the image is captured (fig 2.5). The serial number will be displayed
once the Q R Code is scanned. At this point you may choose to
rename your device under “Device Name” and then press “Save”
located on the upper right hand corner of the screen (fig. 2.6).
Fig2.5Fig2.4
Fig2.1 Fig2.2
1 2
Fig2.6
3. Now select your device (fig. 2.7) to bring up the live view screen (fig
2.8).
NOTE: The following images will appear stating “Connecting…” and
“Buering…” If successful, your IPCam image will be displayed .
Page 4
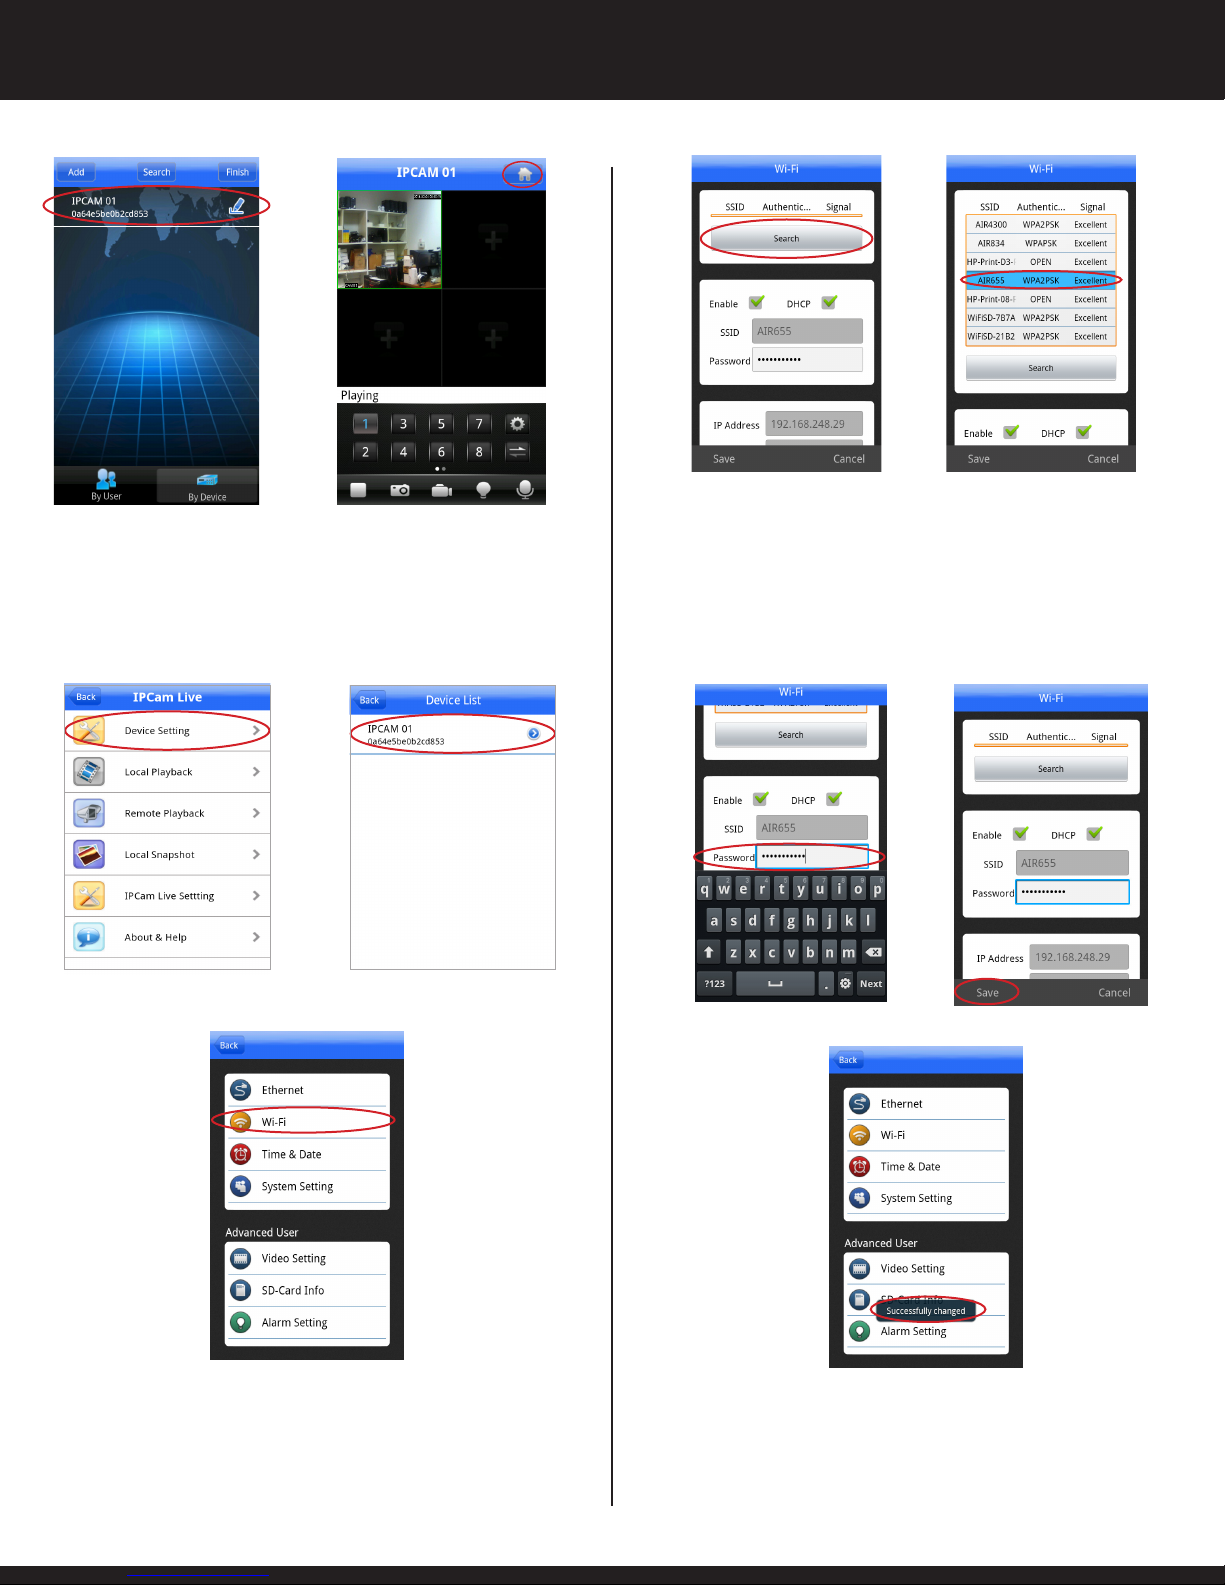
Fig2.7
Fig2.8
Step 3 Wi-Fi SETUP
NOTE: STEP 2 must be complete before beginning STEP 3.
1. Tap on the “Home” icon located on the upper right hand corner of the
screen (fig. 2.8). Select “Device Setting” (fig. 3.1). Select your device
(fig. 3.2). Select “Wi-Fi” (fig. 3 .3).
Fig3.4 Fig3.5
3. Once your Wi-Fi name has been selected, type in the password
associated with your Wi-Fi network (fig. 3.6). If the password space is
already filled, delete anything in the space and type in your password.
Now tap back-arrow on your phone to hide the key pad and tap on
“Save” located on the bottom left hand corner of the screen (fig. 3.7).
At this point you should get a “Successfully Changed” message and
sent back to the previous screen (fig. 3.8).
NOTE: Password is case sensitive. If the password is incorrect, the
message will still show “Saved Successful”.
Fig3.1
2. Make sure both “Enable” & “DHCP” are enabled (green check mark)
and click “Search” (fig. 3.4). Select the Wi-Fi name that is associated
with your network by tapping on the name (fig.3.5).
Fig3.2
Fig3.3
3 4
Fig3.6
4. Go back to the live view screen. Unplug the Ethernet cable from the
back of the IPCam-SDII. Wait 30 -45 seconds for the Wi-Fi access. WiFi setup complete.
NOTE: Your camera screen will freeze once the Ethernet cable is
unplugged . If the password is incorrect , the camera screen will show
“Failed to connect”.
Fig3.7
Fig3.8
 Loading...