

Page 1
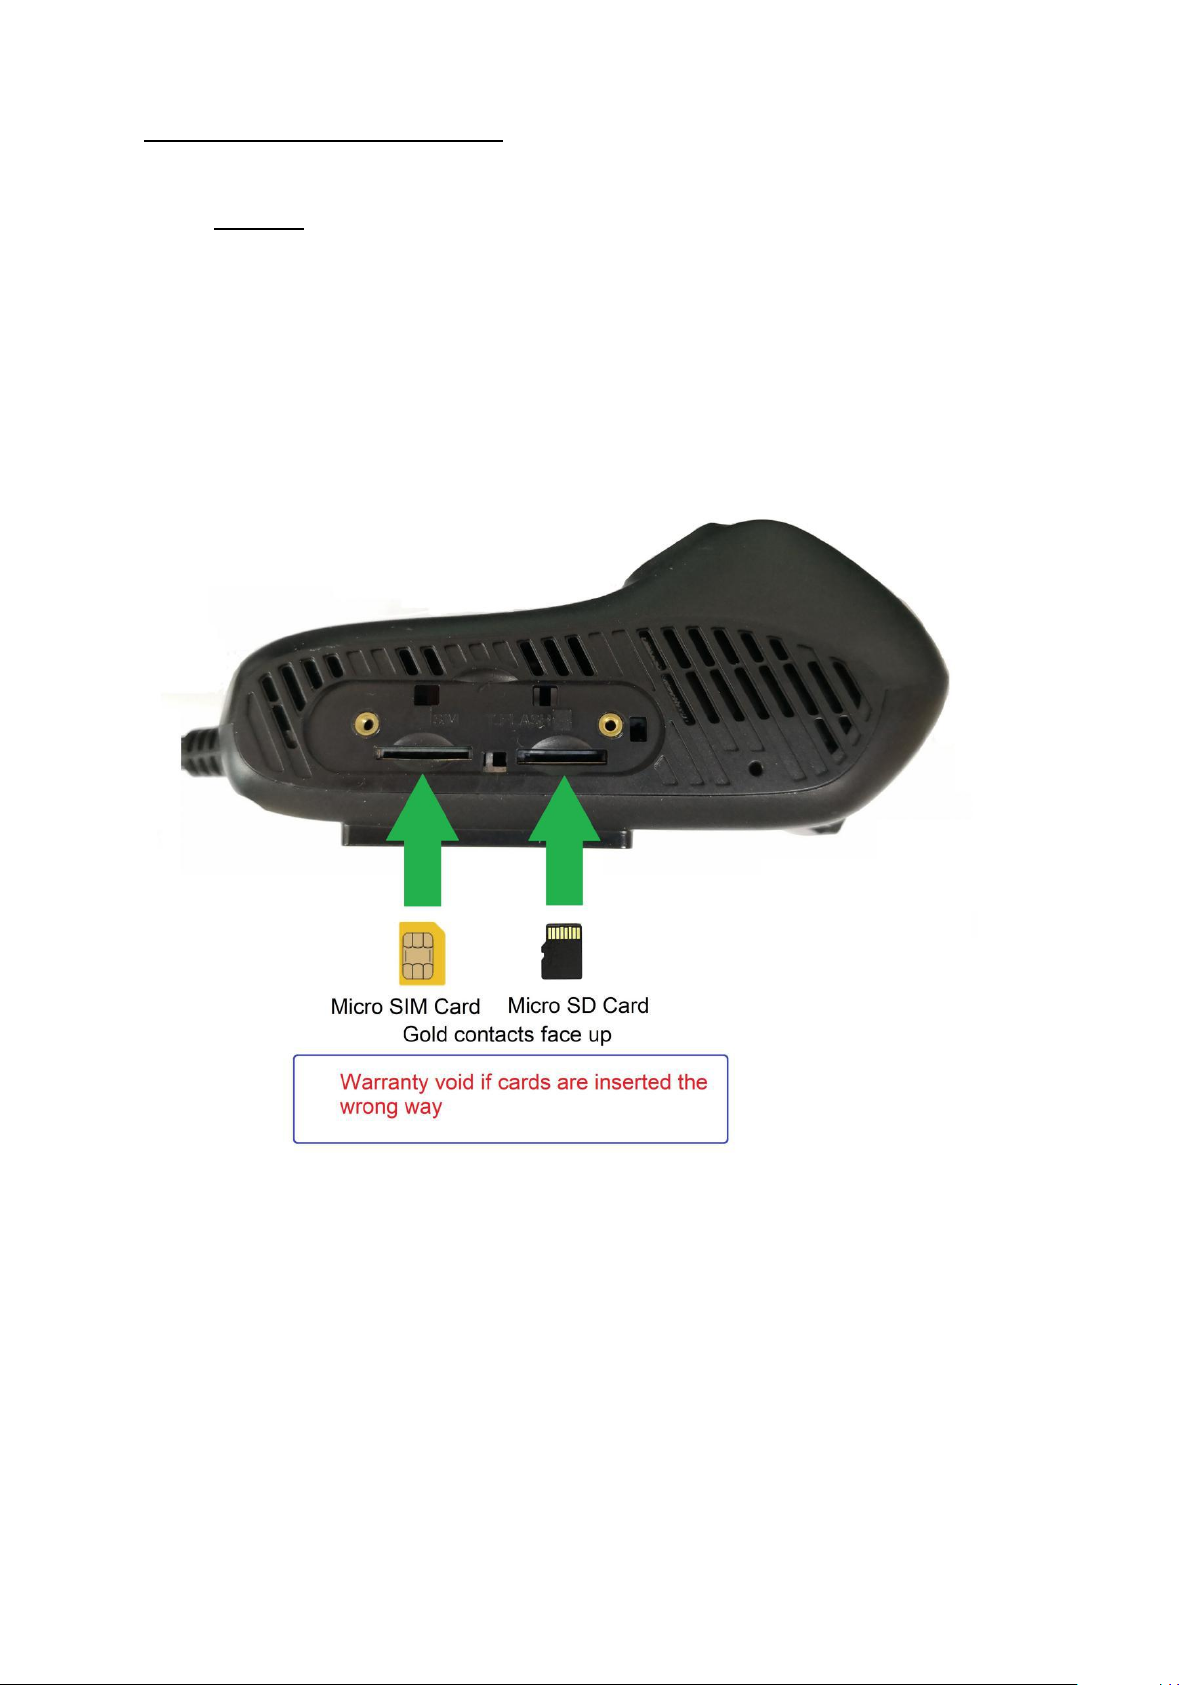
Read before installation
If ONLY RED LED stays on (no flashing), the device is under
OTA (Off-the-air) firmware upgrade. Please DO NOT power
off and wait patiently. It may take about 5 minutes. The
device will reboot automatically after firmware upgrade.
Make sure the SIM card and Micro SD card is inserted
properly. Gold contacts face up, cut corner inside.
SIM card and Micro SD card sockets are Push-in-Push-out
type, do not use any tools to extract the card.
Optus network is preferred. (Optus, Amaysim…etc)
For safety reason, remote fuel cut-off cannot be activated
when the car is moving.
Page 2

Page 3
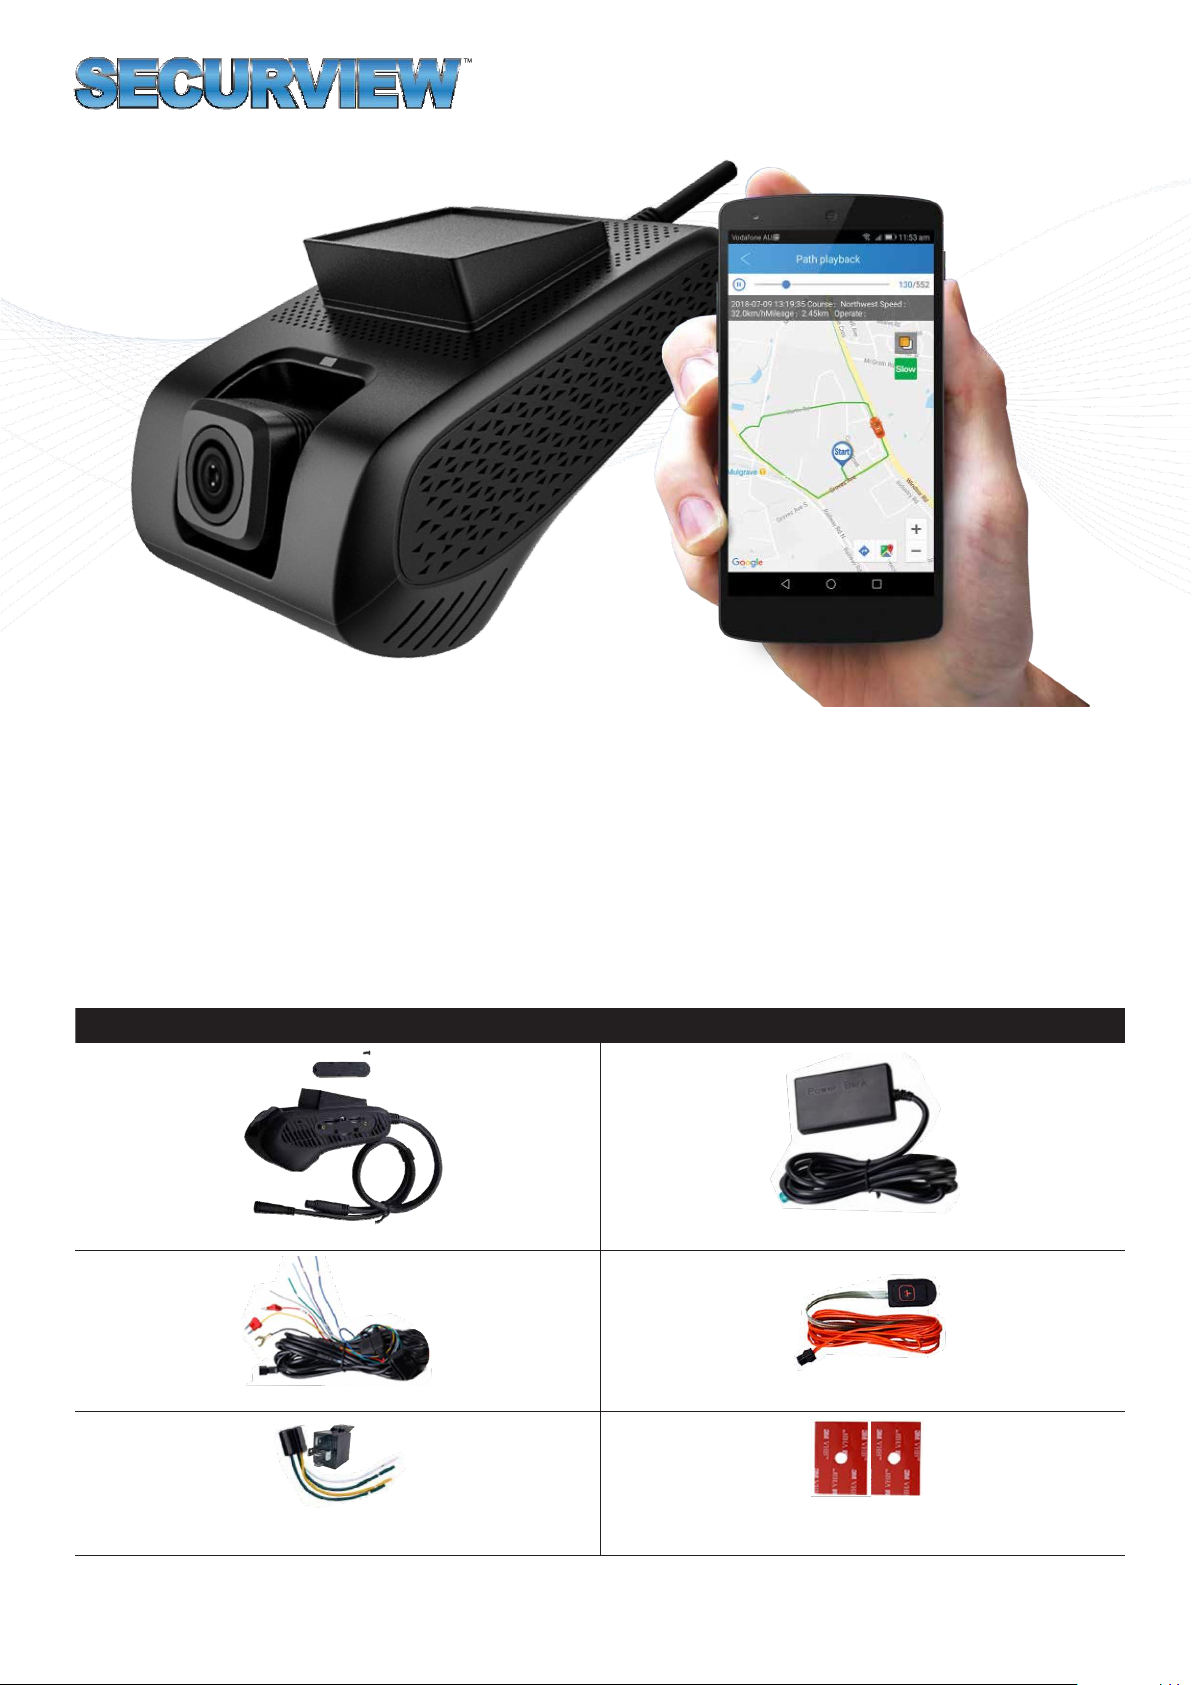
Model: MDVR-J200
Included Components
Surveillance/GPS system & mounting cradle + Screwdriver
External backup battery
Power wiring harness
SOS alarm button
12V 40A relay & relay cable
*** Please contact us if you need 24V relay
2 x 3M adhesive mount
3G/WiFi In-Vehicle Surveillance & GPS Tracking System
Quick Start Guide
Thank you for purchasing the Securview Vehicle Surveillance & Tracking System
This Quick Start Guide covers basic setup, installation and use of your surveillance system.
For more information, please visit: www.securviewcctv.com
v
1.3-20190418
Page 4
2
MDVR-J200 Quick Start Guide
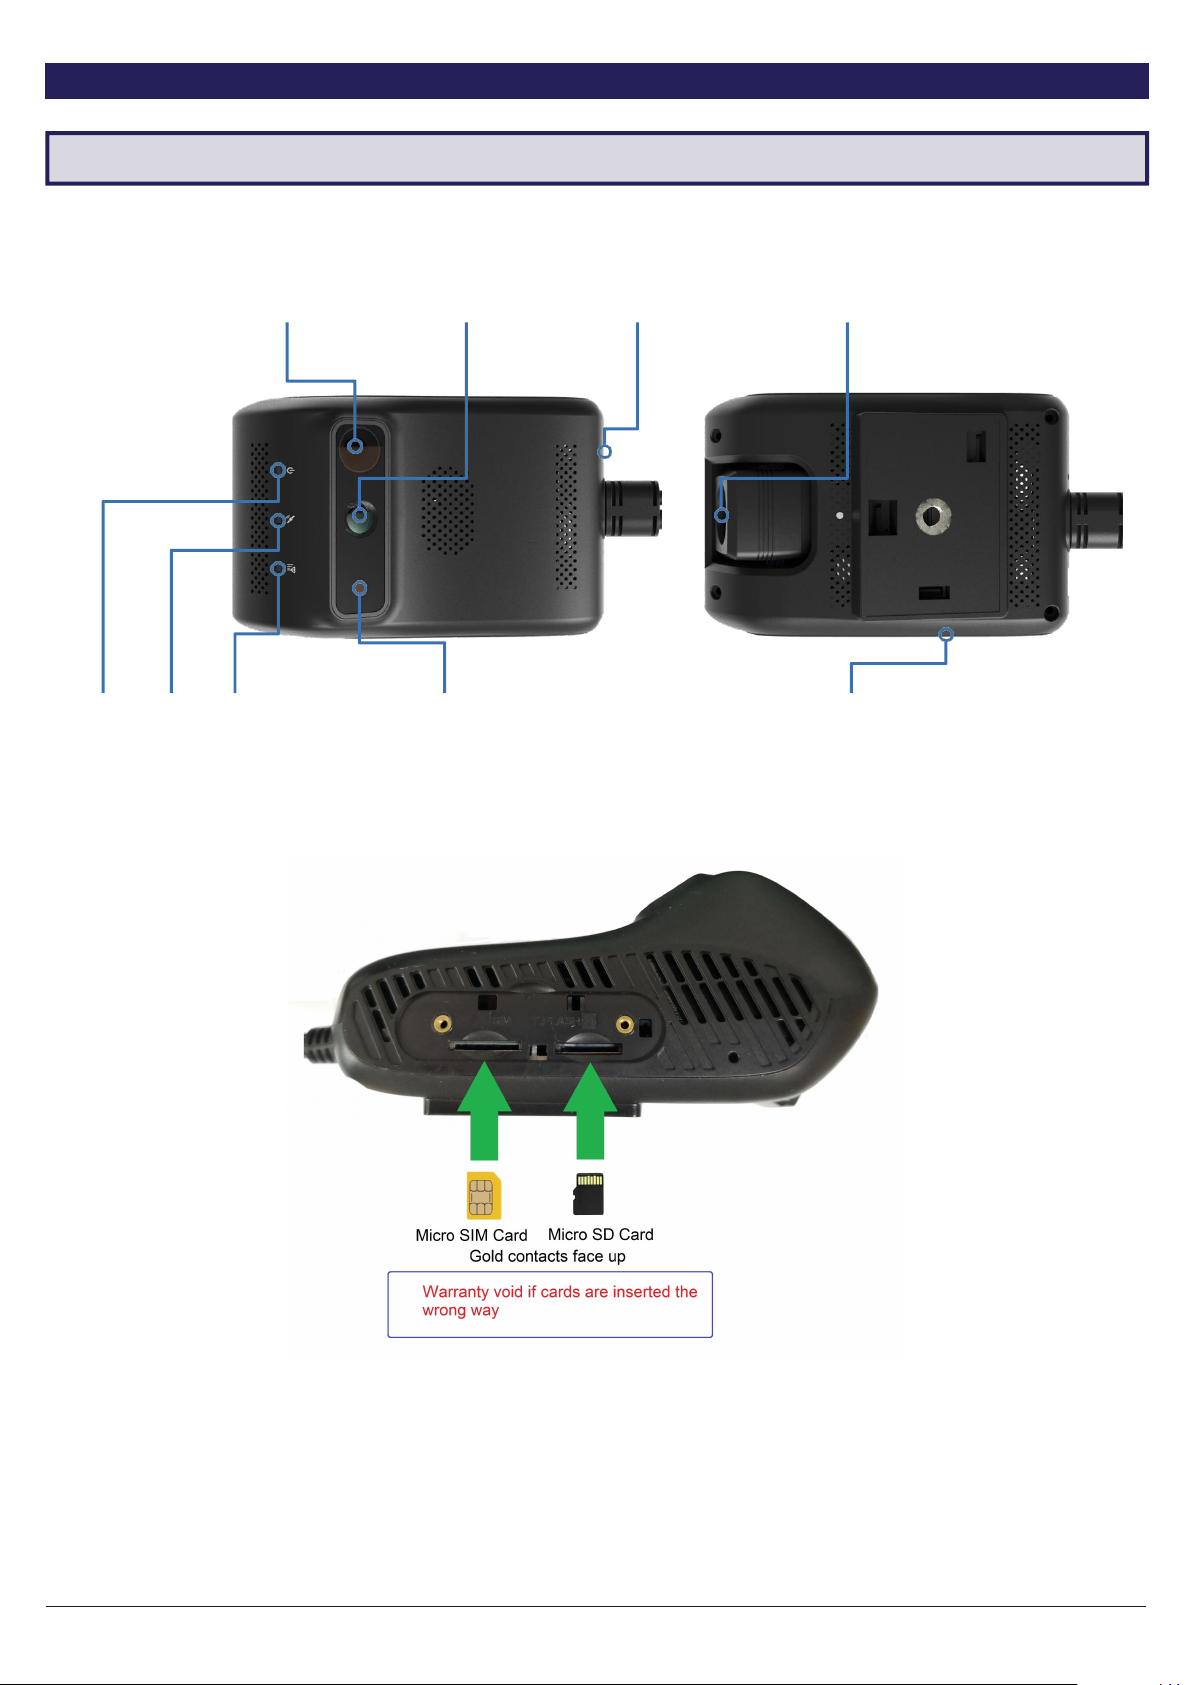
1.1 System Diagram
1. Overview & Installation
IR LED
640 x 352, 30fps
Micro USB
connector
1920 x 1080, 30fps
Status Indicators
Power GPS GSM
Light Sensor SIM & Micro SD Connector
Internal Camera External Camera
The SIM card and Micro SD card sockets are Push-in-Push-out type. Do not use any tools to
extract the card.
Page 5
3
Visit www.securviewcctv.com for support
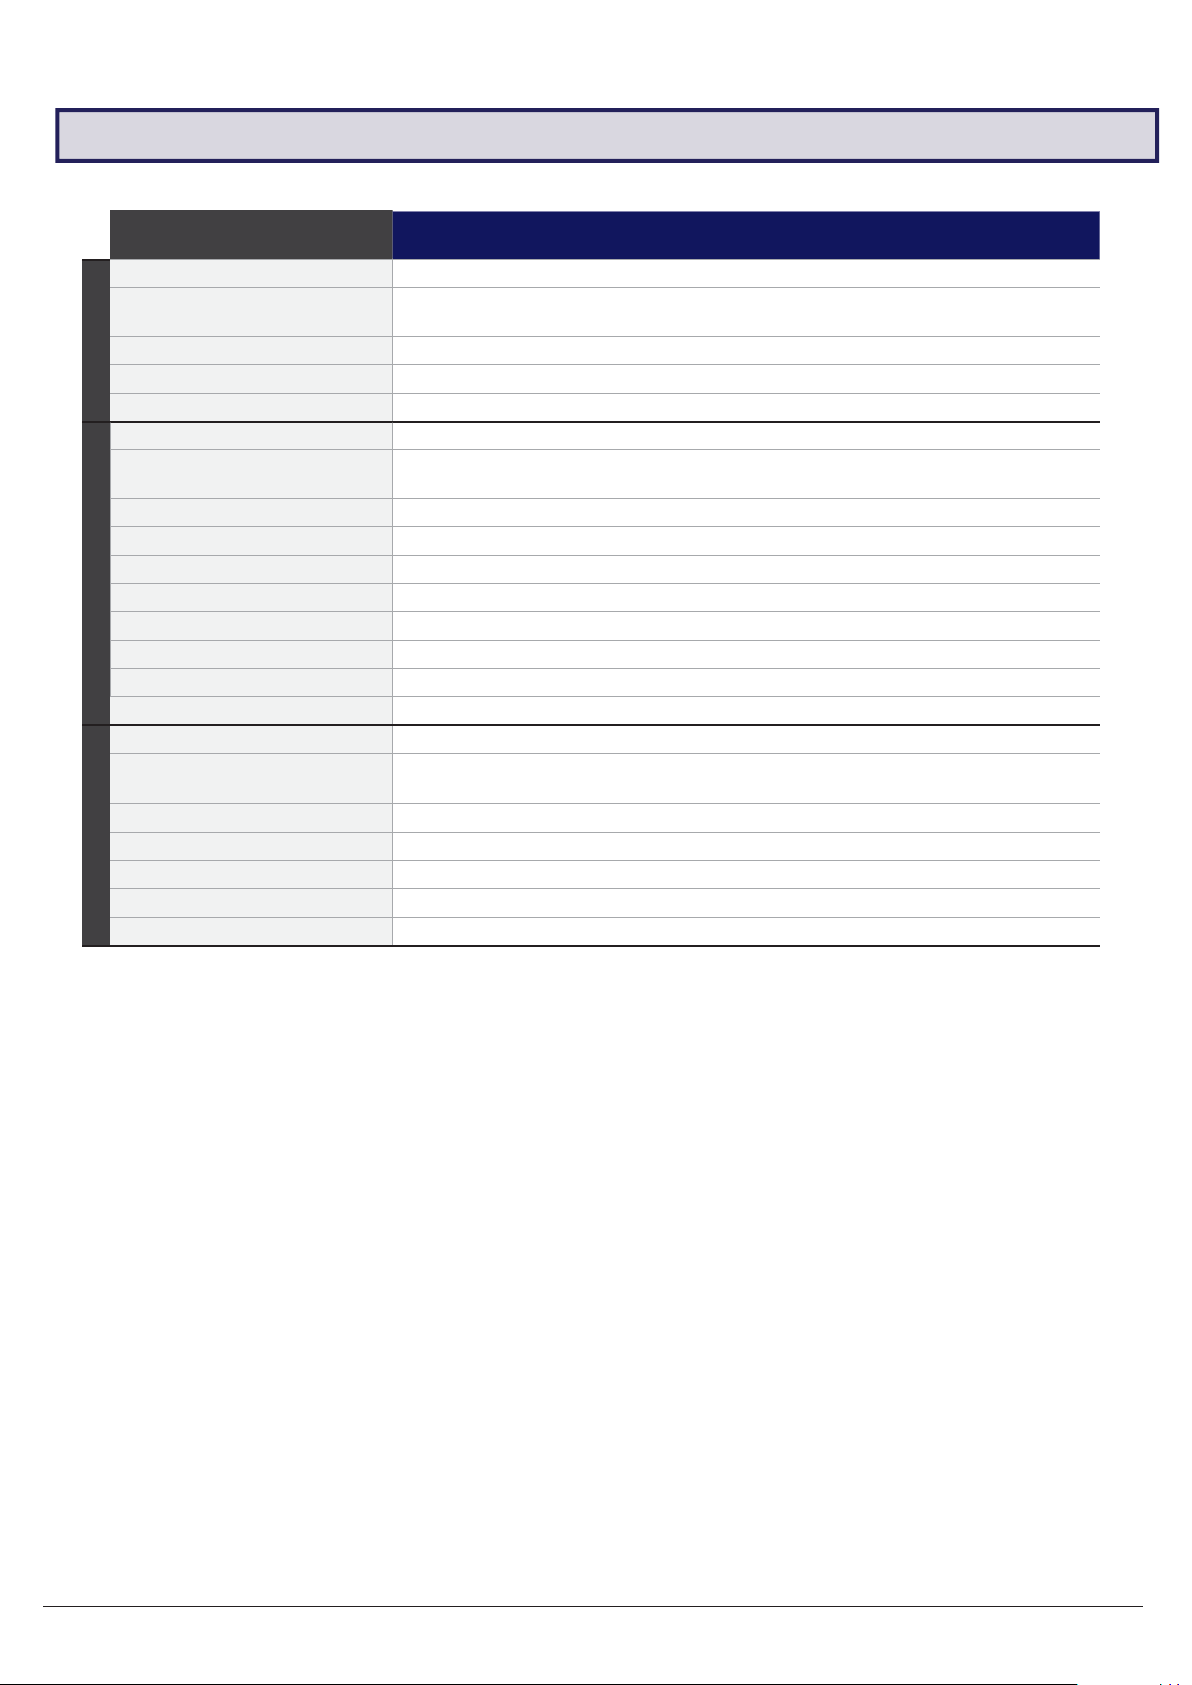
1.2 Technical Specifications
Model
MDVR-
J200
Camera
Camera Style
Mobile Dual Lens Camera, infrared driver facing lens
Resolution
Road facing: 1080p (1920 x 1080) / Driver facing: (640 x
352)
Angle of View
Front: 140° (adjustable) / Rear: 90°
Focus
Fixed
Frame Rate
30fps
Features
CPU
ARM Cortex A7 Quad Core 1.2GHz
Band
GSM 850/900/1800/1900 WCDMA
850/900/1900/2100
G-Sensor
9 axis-motion
Live View
In-car / front car live video via app or web
Audio
Built-in speaker & microphone
WiFi
Frequency 2.4GHz, hot spot
Bluetooth
BT4.0 ( Android platform only)
Micro SD storage
Max. 32GB(FAT32 format)
Battery
External 450mAh
Audio
Built-in microphone / Built-in speaker
Interface
OBD Interface
Connect by power cable
USB Data Interface
(Engineering Purpose Only)
Micro USB 5 Pin
Not for data backup
Housing
Plastic
Power Input
12 - 24VDC
Dimensions
109 x 69 x 52mm
Weight
0.23kg
Operating Environment
-20° to 75°C / RH95% (max)
Page 6
4
MDVR-J200 Quick Start Guide
1.3.1
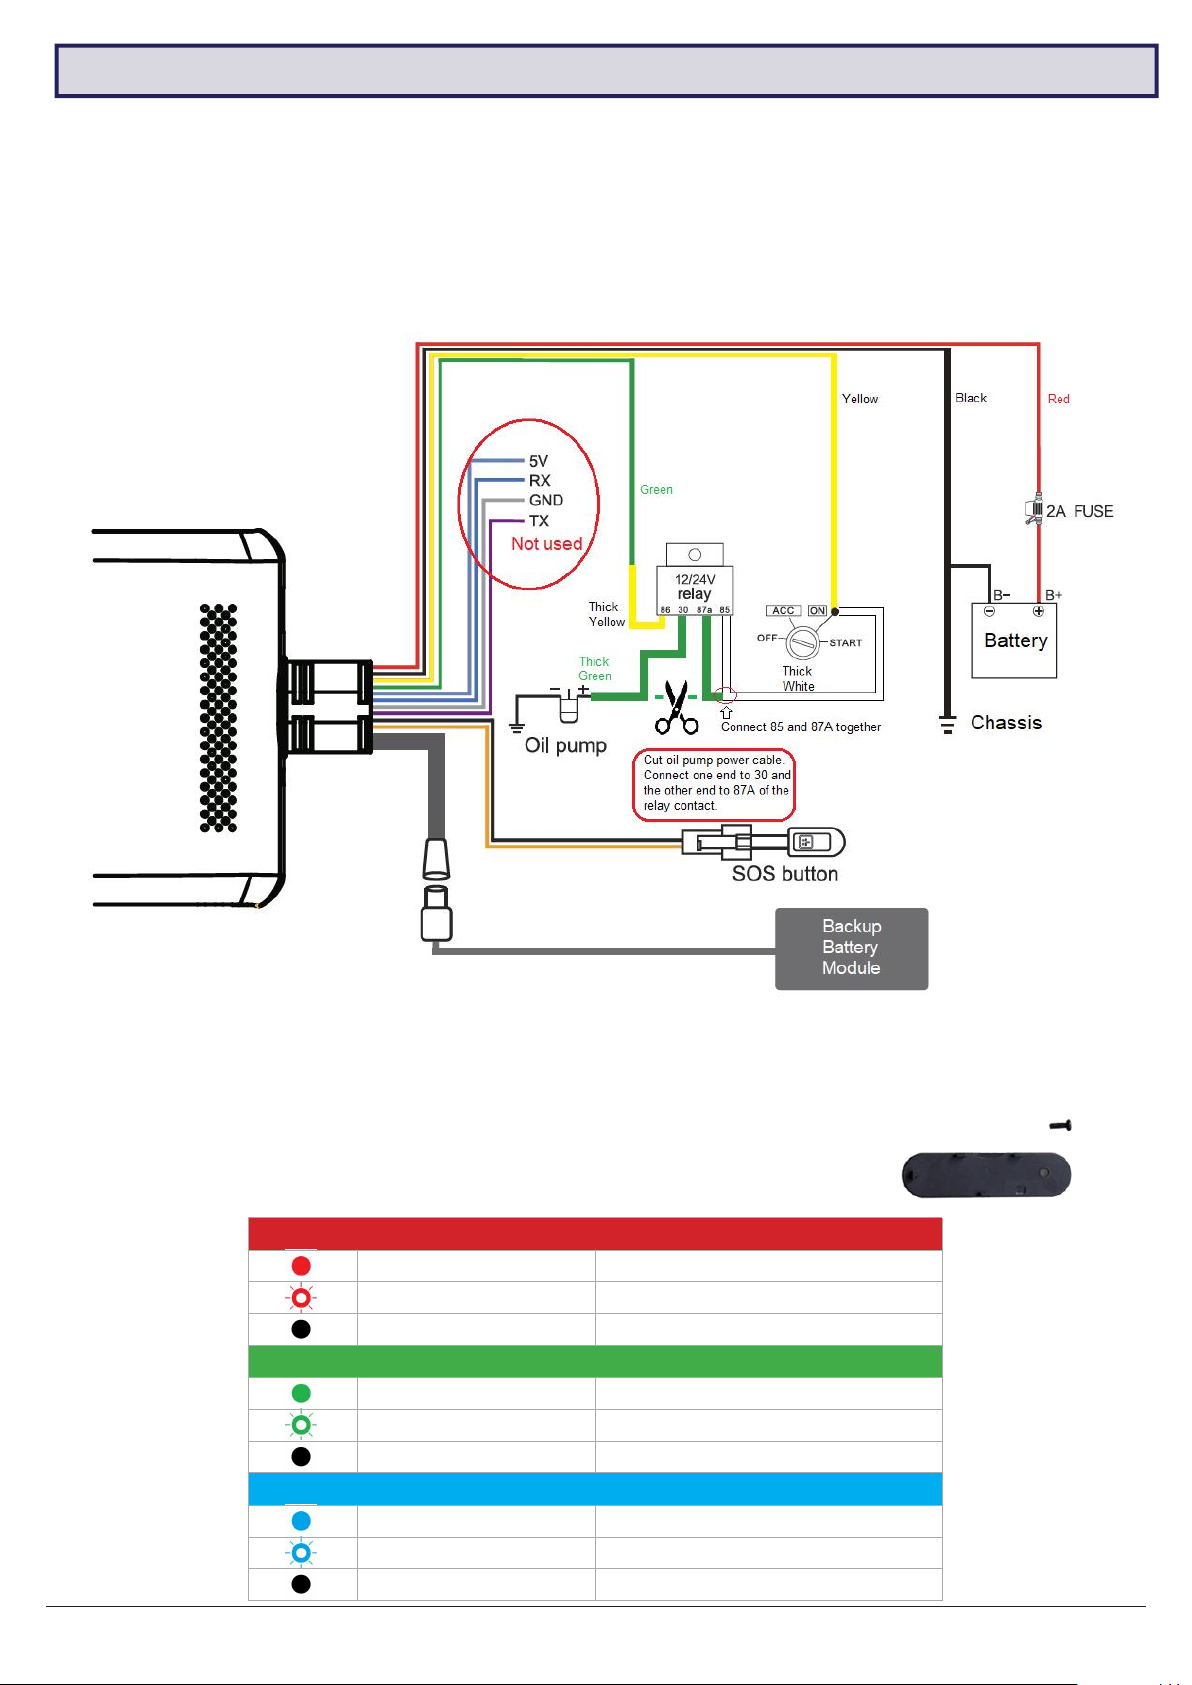
Power Indicator - RED
Solid red
ACC ON & Power on
0.1s ON & 10s OFF
ACC OFF
Off
Power not connected
GPS Indicator - GREEN
Solid green
ACC ON & Positioning successful
0.1s ON & 1s OFF
Searching for GPS signal
Off
ACC OFF
GSM Indicator - BLUE
Solid blue
ACC ON & Connected
0.1s ON & 1s OFF
ACC ON & No network/SIM card
Off
ACC OFF
1.3 Installation
Connect cables according to the wiring diagram 1.3.2. Connect the power cable B+ (Red wire) and GND (Black
wire) to the vehicle battery’s +12V/+24V terminal and negative terminal respectively. Connect ACC (Yellow wire)
to the vehicle’s ON position . The device should power on automatically after the vehicle engine is started.
Remember to connect the backup battery module.
1.3.2
Wiring
Wiring Diagram
1.3.3
While the system is off, insert the Micro SD card into Micro SD slot and an active SIM card into the
SIM slot (both located on one side of the camera).
After inserting both cards, screw on the card cover with the provided screw & screwdriver.
1.3.4
Micro SD and SIM Card
Status Indicator Lights
Page 7
5
Visit www.securviewcctv.com for support
Must Read Information for Installers
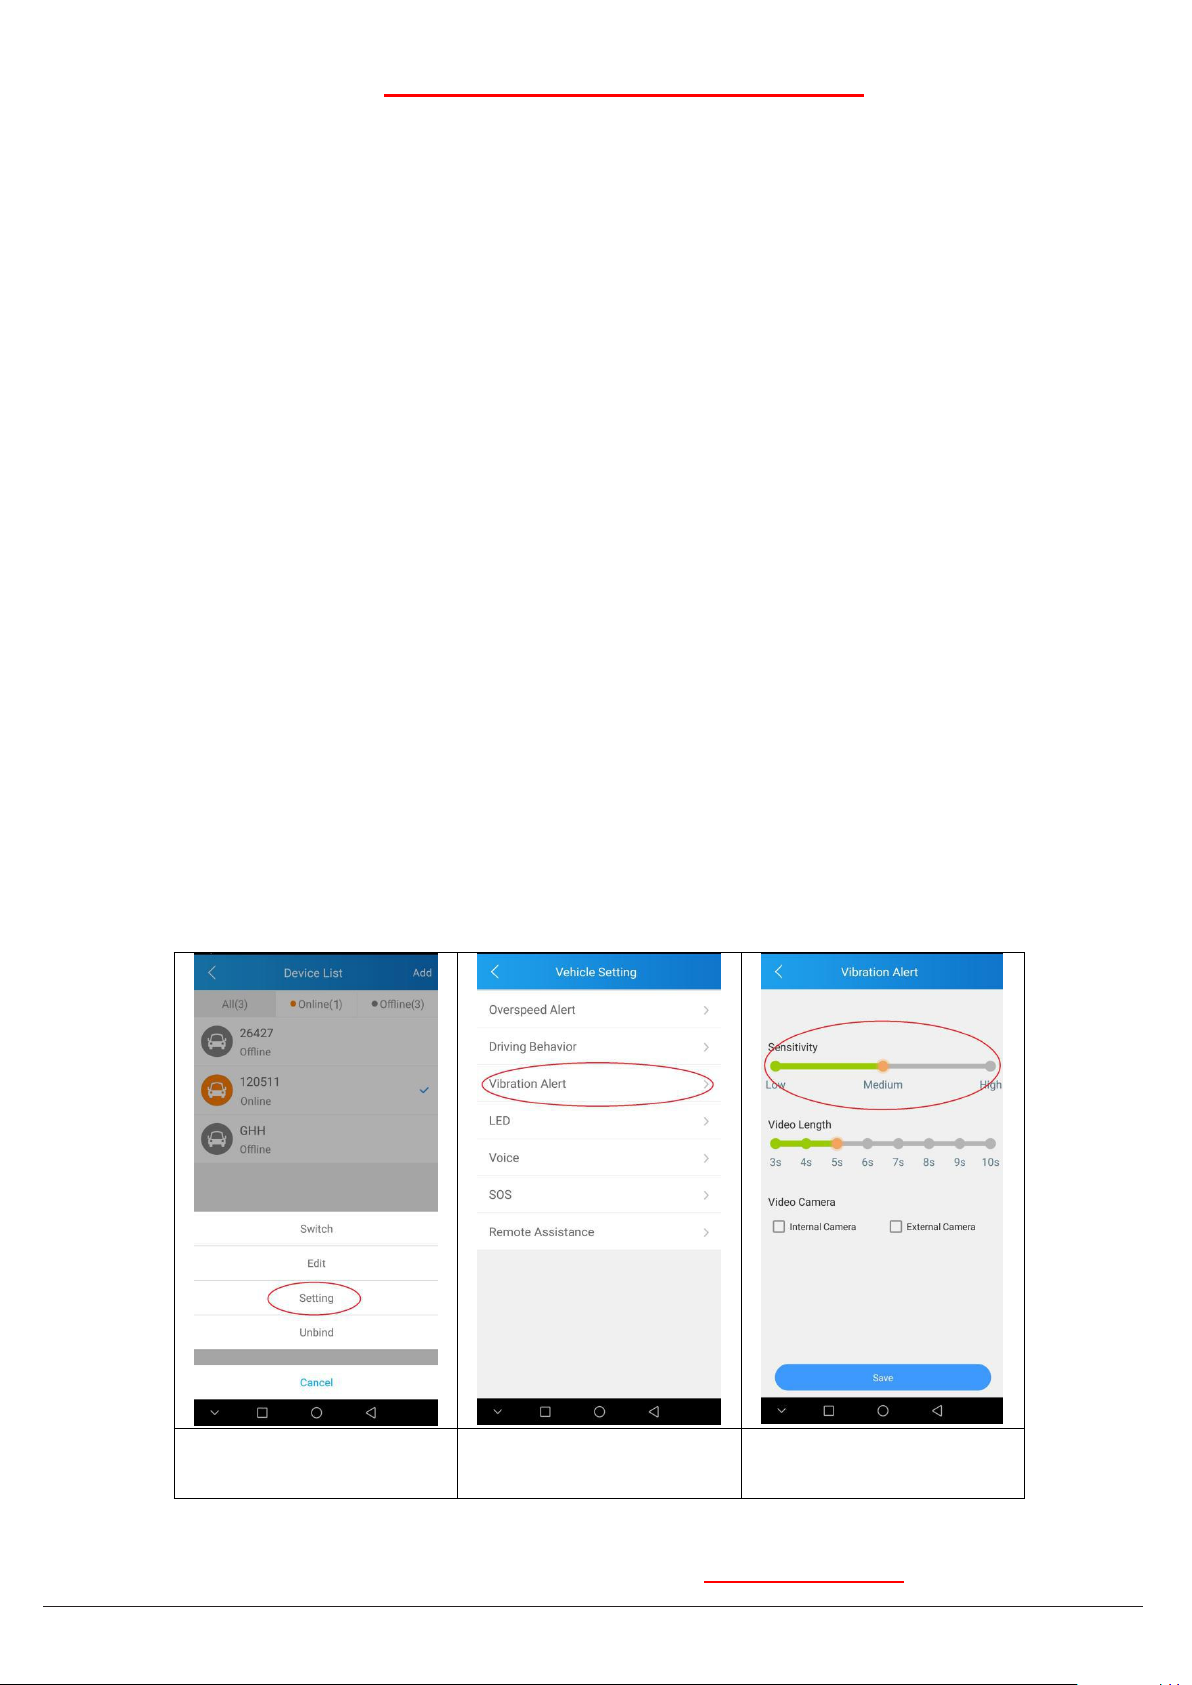
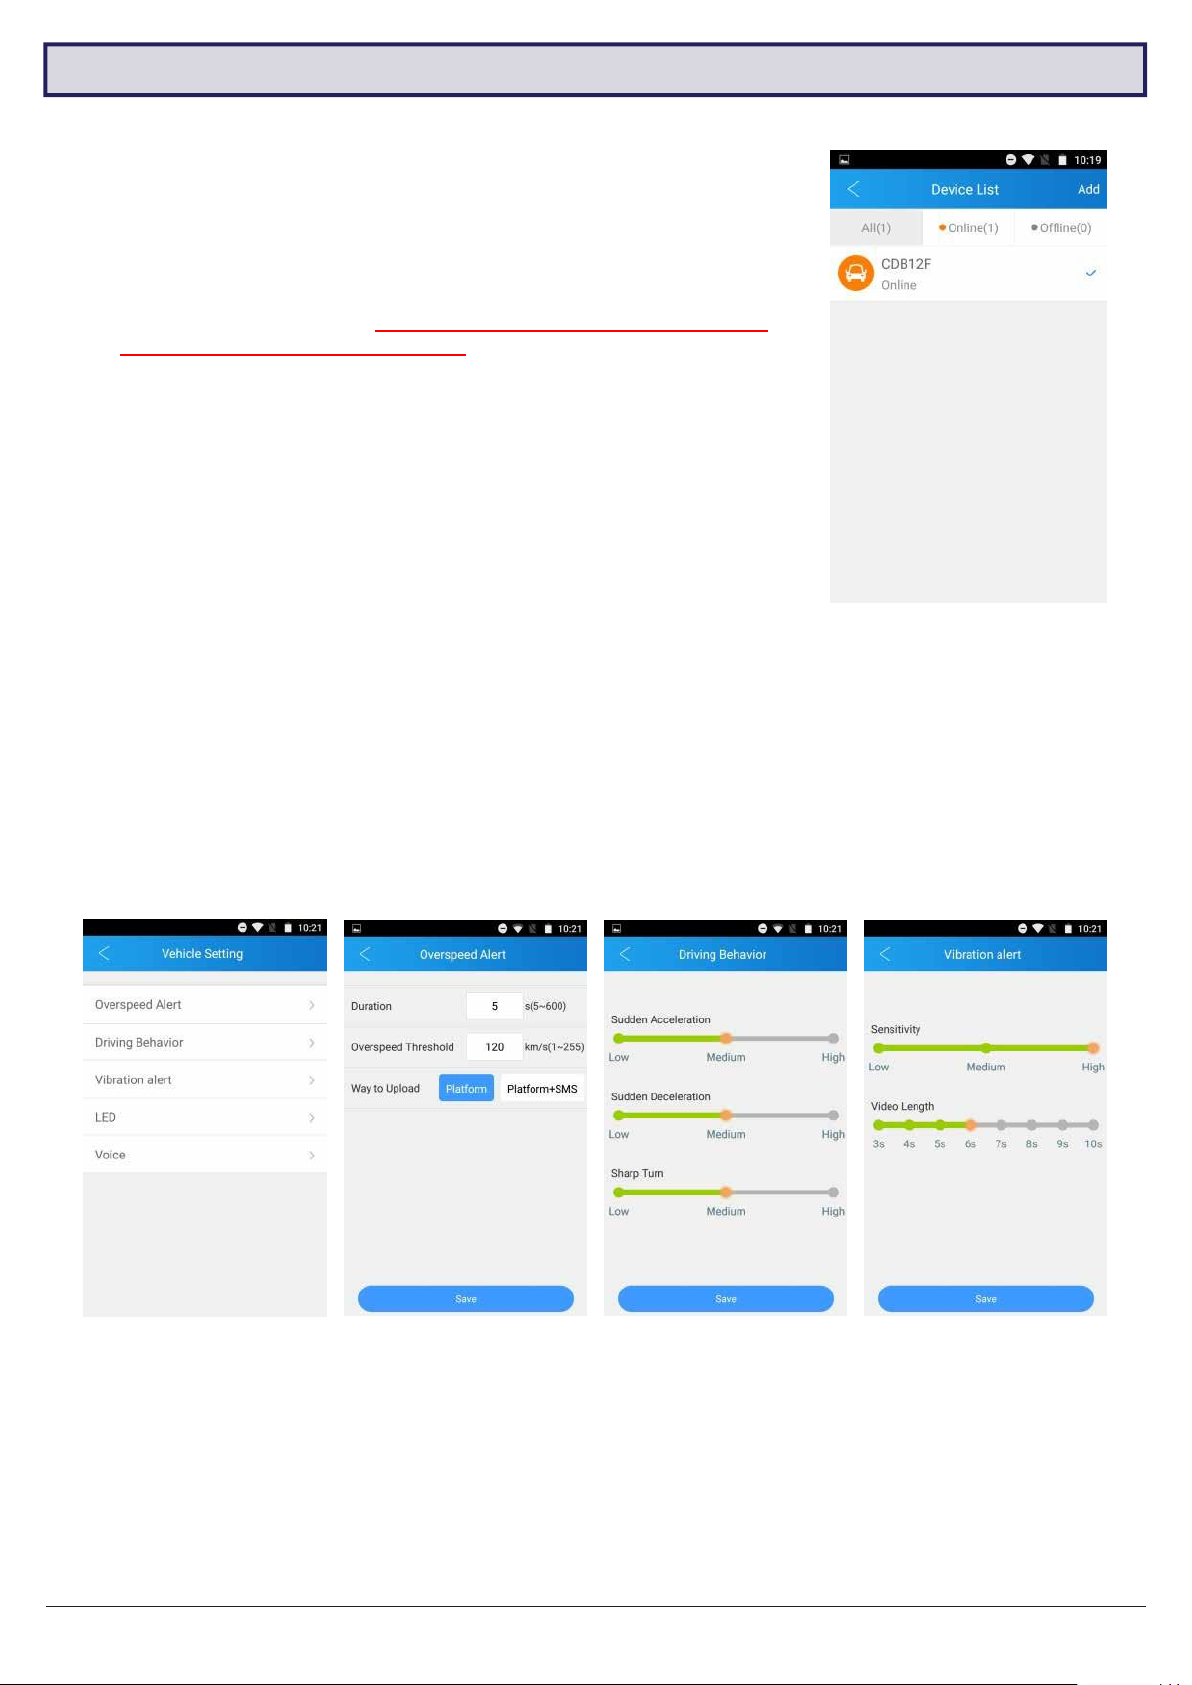
Click the Device List and
select the vehicle to set.
Then click “Setting”.
Select “Vibration Albert”
Slide the slide bar to adjust
and click “Save” when finish.
1.3.5
First time GPS positioning - Tricks to make positioning quicker
GPS positioning for the first time takes a bit longer time when the device is installed. It may take about 5-10 minutes. Follow
the steps below to initialize the GPS for quicker positioning:
1) Switch ON the engine.
2) Wait until the Red, Green and Blue LEDs on the device all stays on steadily (no flashing), that’s mean the GPS and
mobile signal are ready.
3) Turn OFF the engine and wait for 5 seconds.
4) Switch ON the engine again.
5) The new position should be updated when all LEDs are all on steadily.
Note: If the power of the device is disconnected and the device is moved to another new location when the device is off,
always do the initialization steps above.
1.3.6
Choosing the right mobile phone card
1) Must use Micro SIM or Nano SIM with Micro SIM adaptor.
2) Must use 4G SIM cards (4G+3G). Don’t use 3G SIM cards (3G+2G).
3) Must have data, voice, and SMS capabilities.
4) Must be able to monitor the usage, check the balance and recharge remotely by App or web site.
1.3.7
Car status update
All driving data and car status are uploaded to the web server, there is some delay between the car status on the web
server and real situation. For example, when the car switches its engine ON/OFF, its on/off status will be updated on the
web server within 3 minutes.
1.3.8
Vibration sensor sensitive
Vibration is inevitable during driving. For example, poor road conditions, humps and unintended shock on the device itself...
If the Vibration Alert triggers frequently, you may adjust the sensitivity of the vibration sensor on the App. If this features is
not need, you can also turn it off.
To enable/disable vibration alert, select “Vibration Alert” in Setting menu.
To adjust vibration sensitivity:
1.3.9
SOS button
SOS button will activate only if the button is pressed and held down for more than 3 seconds. Must enable SOS in
“Setting” menu.
Page 8
6
MDVR-J200 Quick Start Guide
2.1 Automatic & Event Recording
2.2 System Usage
2. Operation
SIM Required
•
Remote Live View
•
Remote GPS Tracking
•
Remote Picture/Video Capture
•
Push Notifications (Geo-fence, vibration alert, etc.)
SIM Not Required
•
Automatic Recording
•
GPS History Logging
•
Event History
•
Media Synchronisation
2.1.1
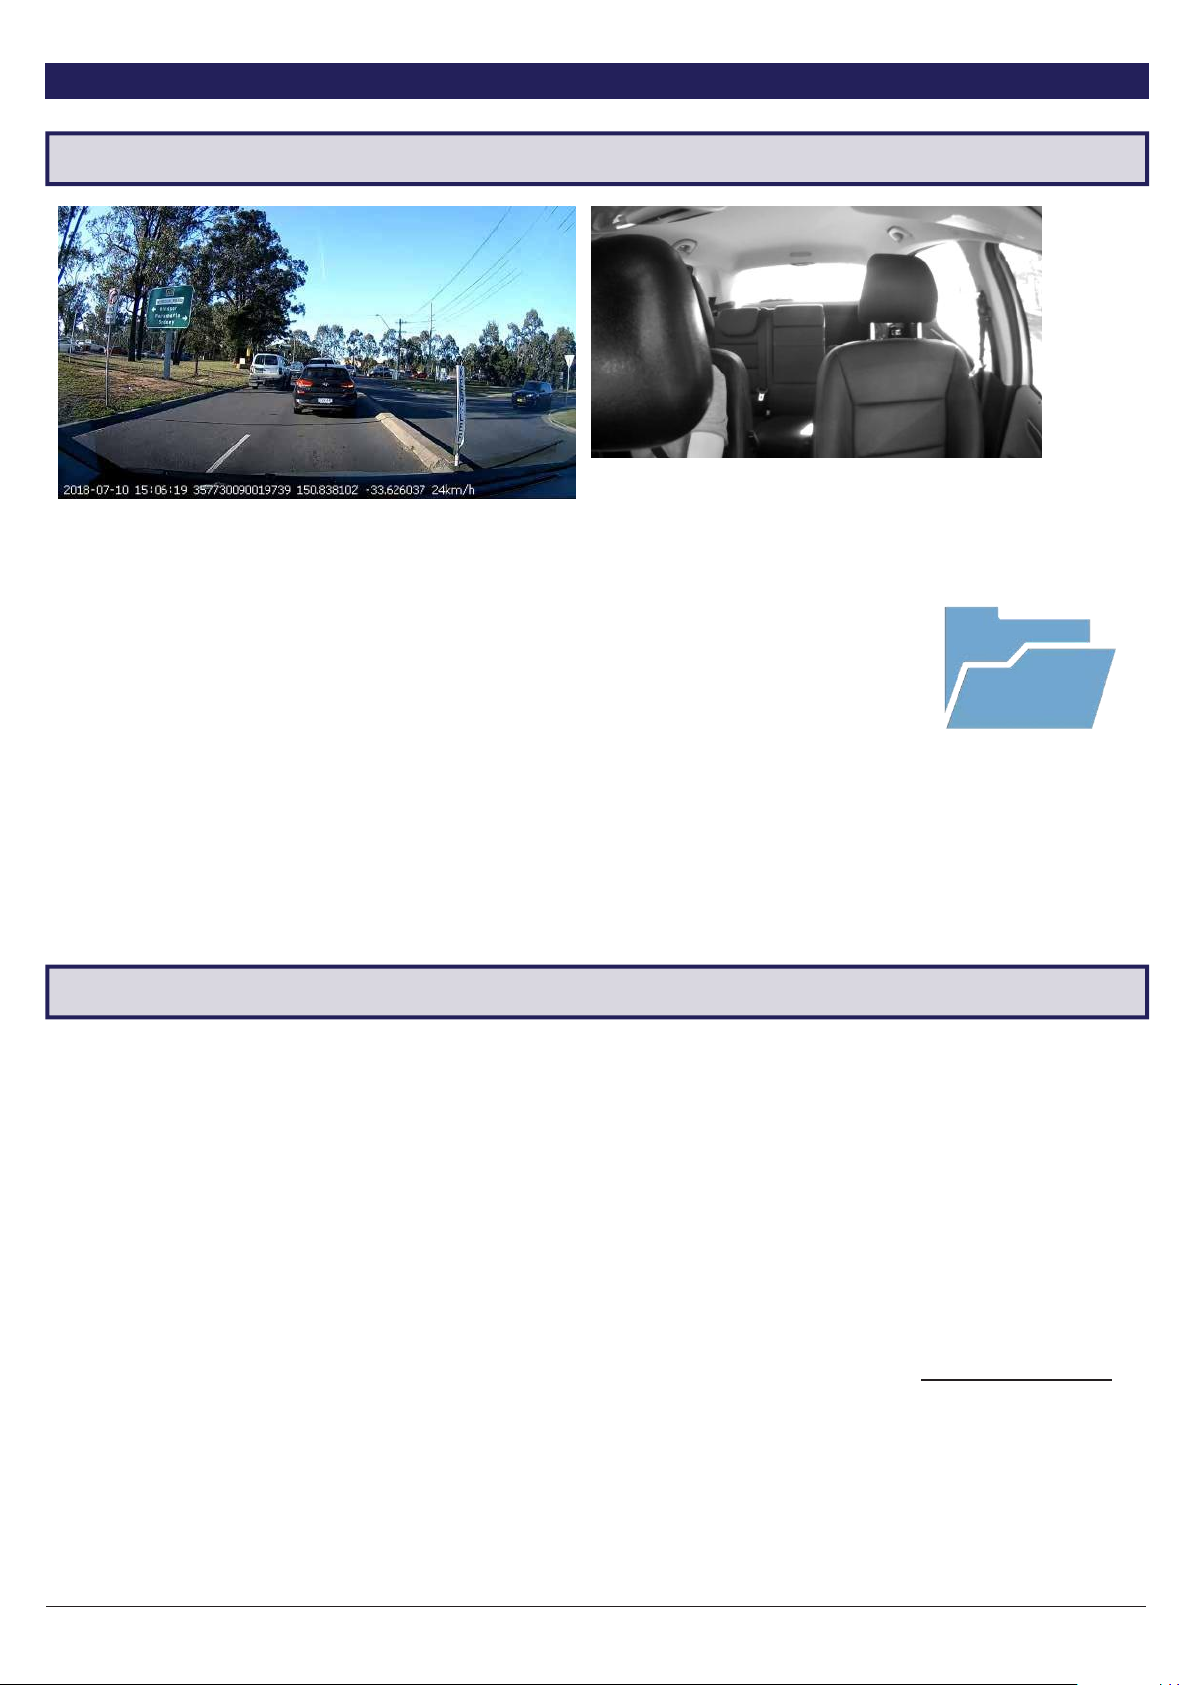
ACC ON - The system will power on and record automatically.
ACC OFF - The system is in sleep mode and will not record.
Recordings will be saved onto the micro SD card every 3 minutes, under the directories:
DVRMEDIA/CarRecorder/GENERAL (road camera)
DVRMEDIA/CarRecorder/USB (driver camera)
NOTE: When the Micro SD card is full, old footage on the card will be overwritten.
2.1.2
If a strong vibration is detected (from a crash, for example), an additional 15s will be recorded and then stored in a
separate location under
DVRMEDIA/CarRecorder/EVENT
The EVENT folder stores 1GB of footage. Old recordings in EVENT will be overwritten when the folder is full.
2.2.1
This system is intended for use with a SIM card, but can still function as a mobile video recorder without one. Refer
below to see what the system can do with and without a SIM card:
Automatic Recording
Event Recording
SIM Card Usage
2.2.2
The system can be accessed, monitored and configured via mobile app and web browser. Visit www.car-matrix.com for
web version.
App & Web Usage
Page 9
7
Visit www.securviewcctv.com for support
3.1 App Introduction
3. Configuration
3.1.1
App Intro
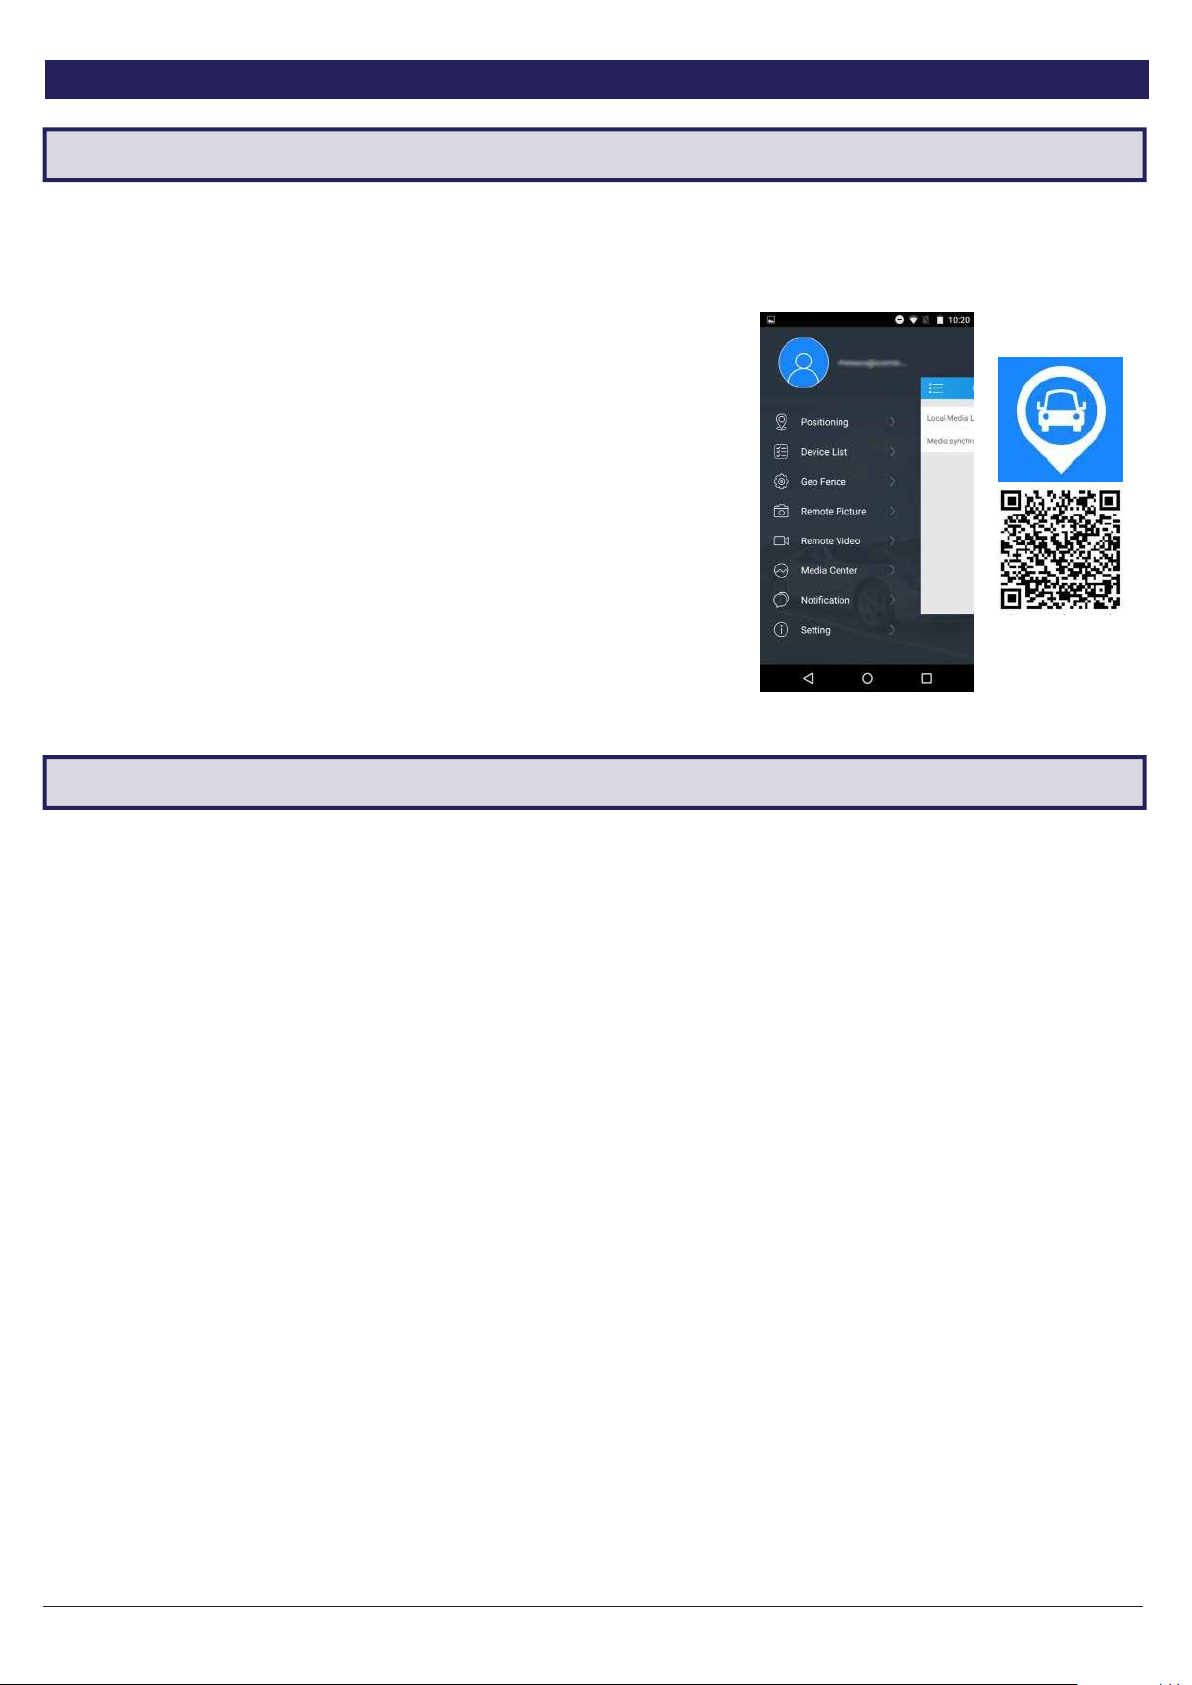
The vehicle tracking app CarMatrix, is available to download free from
iPhone App Store and Google Play Store.
This app allows for portable vehicle management, letting you perform a
variety of functions such as:
•
Real-time GPS vehicle tracking & location reporting
•
Real-time push notifications for overspeed, vibration, geo-fence etc.
•
Geo-fencing - alerts when the vehicle enters/leaves a designated zone
•
Route playback for vehicle history
•
Remote live view, playback, image snapshot & video snapshot
•
Media synchronisation for easy file transfers fromrecorder
CarMatrix App
Download (QR)
3.2 Account Registration
Your vehicle monitoring system can be accessed, monitored and configured via mobile app.
Switch between cameras on your account on the phone.
3.2.1
1.
2.
3.
3.2.2
•
•
•
Account Creation
Press Sign Up on the front page of the app.
Enter your email address and press Next to send a verification code to your email address.
Enter the verification code into the app and press Next again to finish creating your account.
Change Password
(App) Open the main menu and press the user icon next to your email address.
(App) Press Change Password.
Enter the current password, then enter your new password twice and press Save.
Page 10
8
MDVR-J200 Quick Start Guide
NOTE: After account registration, you will be automatically prompted to bind
a device.
3.3.1
Adding Your Device
1.
Open the main menu and press Device List.
2.
Enter the 15-digit IMEI of your device which is printed on the box and on
the top cover of the camera. QR code scanning is under development
and will be available in later version.
3.
Enter the number plate of the vehicle and a reference name for the device
and press Next.
3.3.2
Unbinding Your Device
1.
Open the main menu and press Device List.
2.
Press the device you want to unbind, then press Unbind.
3.
Press OK to confirm.
NOTE:
MDVR-J200 cameras can only be bound to one mobile phone at a time.
If you want to register the device on another mobile phone, you must unbind the
device on the original mobile phone first.
3.3.3
Device Settings
1.
Open the main menu and press Device List.
2.
Press the device you want to unbind, then press Settings.
Device List
3.
3.3 Binding Your Device to an Account
From here, you can edit the Overspeed Alert, Driving Behaviour, Vibration Alert, LED and Voice settings of your
device.
Settings menu
Overspeed Alert settings
Driving Behaviour settings
Vibration alert settings
Page 11
9
Visit www.securviewcctv.com for support
3.4 Position, Track History & Live Tracking
3.4.1
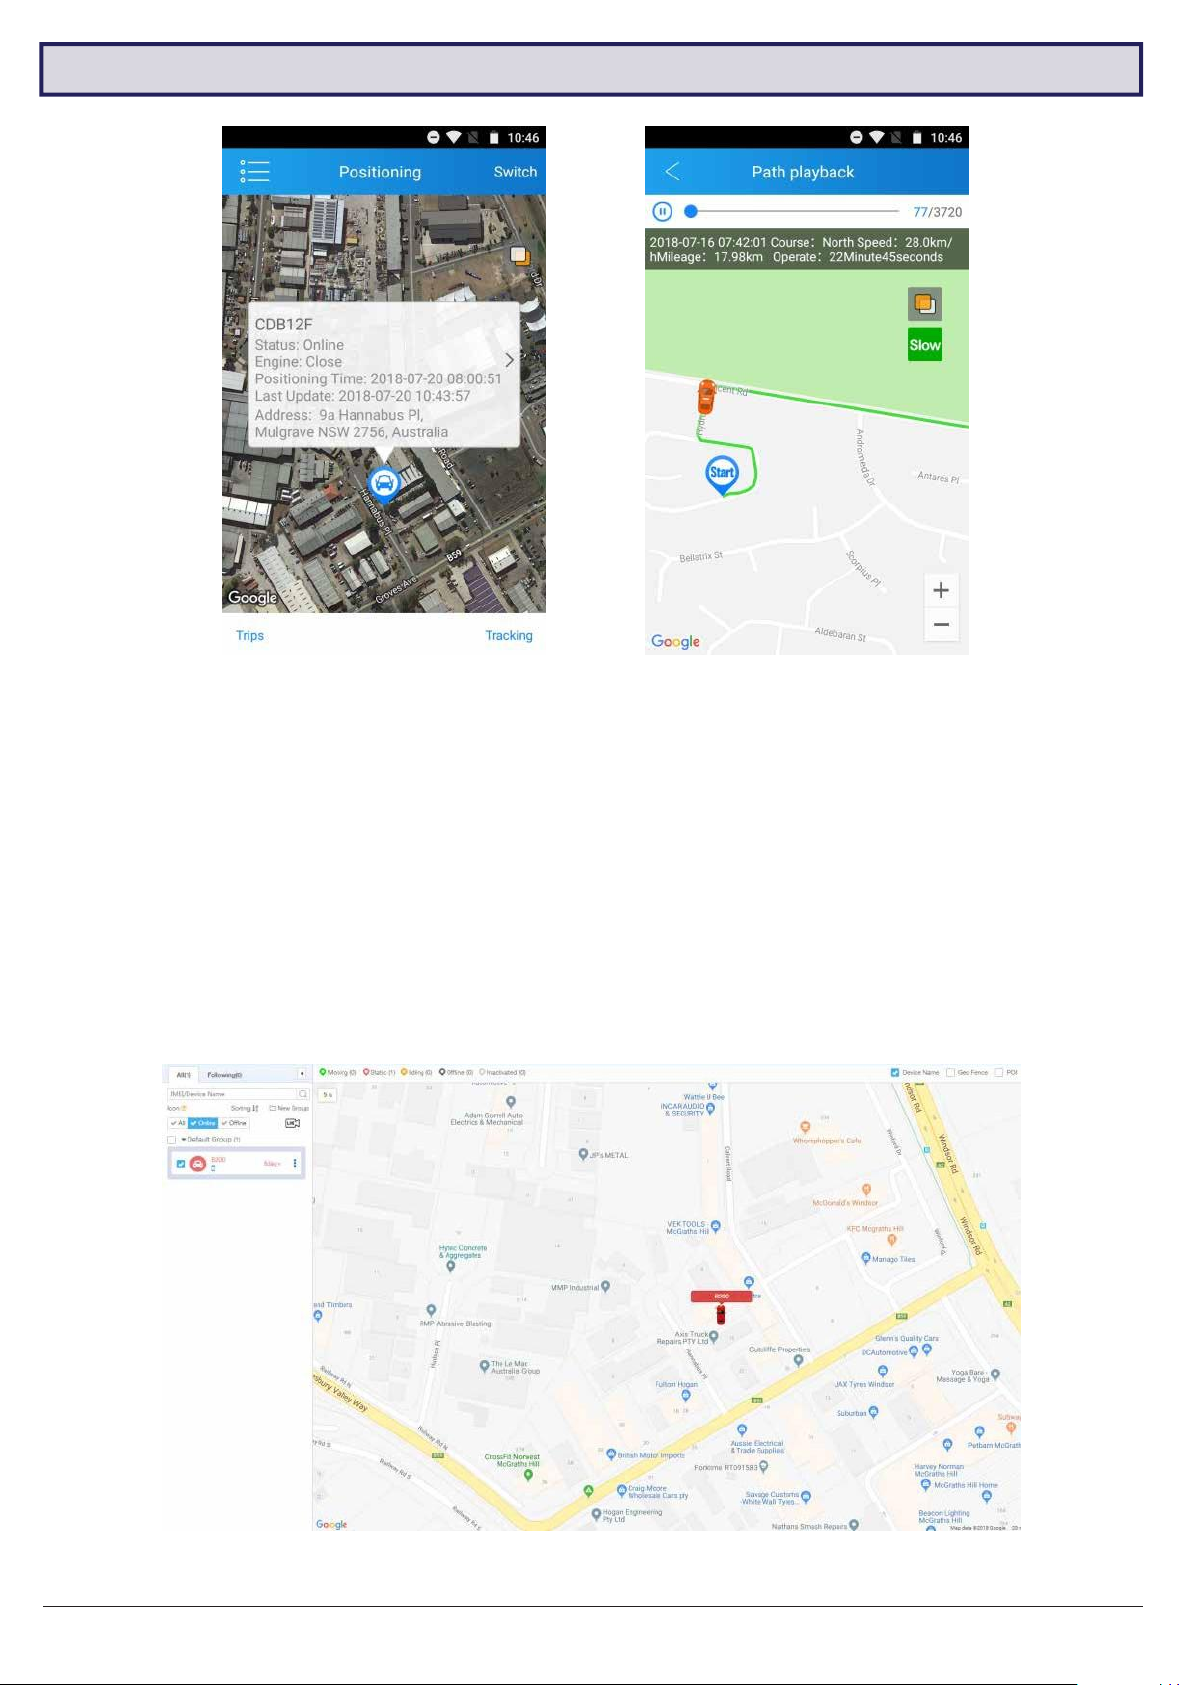
Positioning
GPS satellite view (App)
Path playback (App)
1.
Open the main menu and press Positioning.
2.
This will display a live GPS display of your current vehicle location(s).
3.
Toview further details about a vehicle (including engine status, last time the vehicle was moved, IMEI andmore),
press the speech bubble above the car icon.
3.4.2
1.
2.
3.
4.
Track History & Path Playback
On the Positioning screen, press Trips at the bottom left.
This will open a list of previous trips the vehicle took, including start/end times and locations, as well as total
distance travelled.
Press any of these trips for a detailed GPS map displaying the full route the vehicle took.
Use the slider at the top the skip to different parts of the playback. Map/satellite view and playback speed can
be toggled with the buttons at the top right.
GPS tracking
Page 12
10
MDVR-J200 Quick Start Guide
3.5 Configuring Geo-fences
Creating ageo-fence (App)
3.5.1
Geo-fence Intro
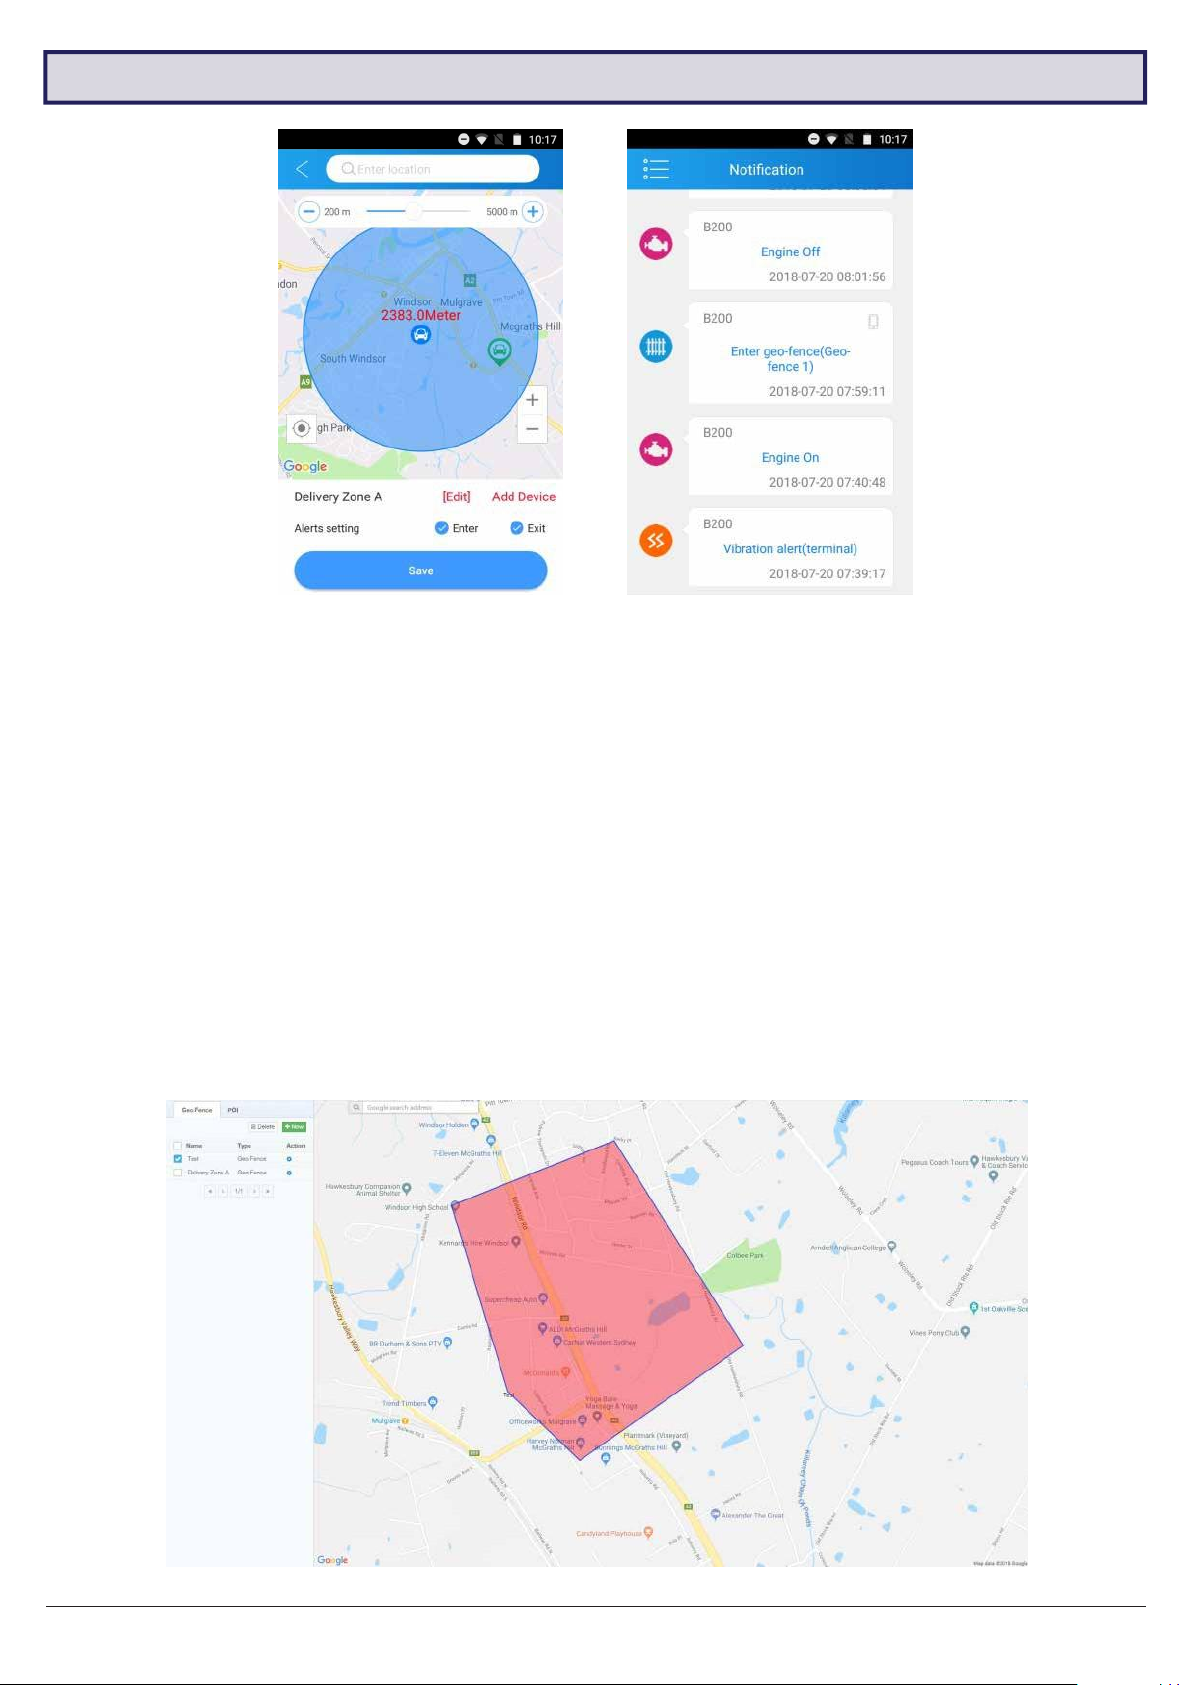
Geo-fences are GPS zones you can designate on a map. When your vehicle enters and/or exits the geo-fence, you
can set the device to send a notification alert to your account.
3.5.2
Creating a Geo-fence
1.
Open the main menu and press Geo Fence.
2.
A list will appear showing all created geo-fences. Press + to make a new one.
3.
A GPS map will appear. Navigate & place the geo-fence, then adjust its size using the slider.
4.
After setting the geo-fence zone, press [Edit] to enter a name for the geo-fence.
5.
Press Add Device and select the vehicle(s) you want the geo-fence to apply to.
6.
Select one or both of the Alert settings (Enter/Exit). to receive notifications on vehicle geo-fence enter/exit.
7.
Press Save to confirm. You can edit the geo-fence from this menu at any time.
NOTE: Using the app, you can only create circular geo-fences. More precise geo-fences with individually drawn
lines can be created from the website (www.car-matrix.com). Some features of the website are still under
development. It will be more powerful in the later version.
Geo-fence alert(App)
Creating a geo-fence
Page 13
11
Visit www.securviewcctv.com for support
3.6 Camera Remote Access
3.6.1
•
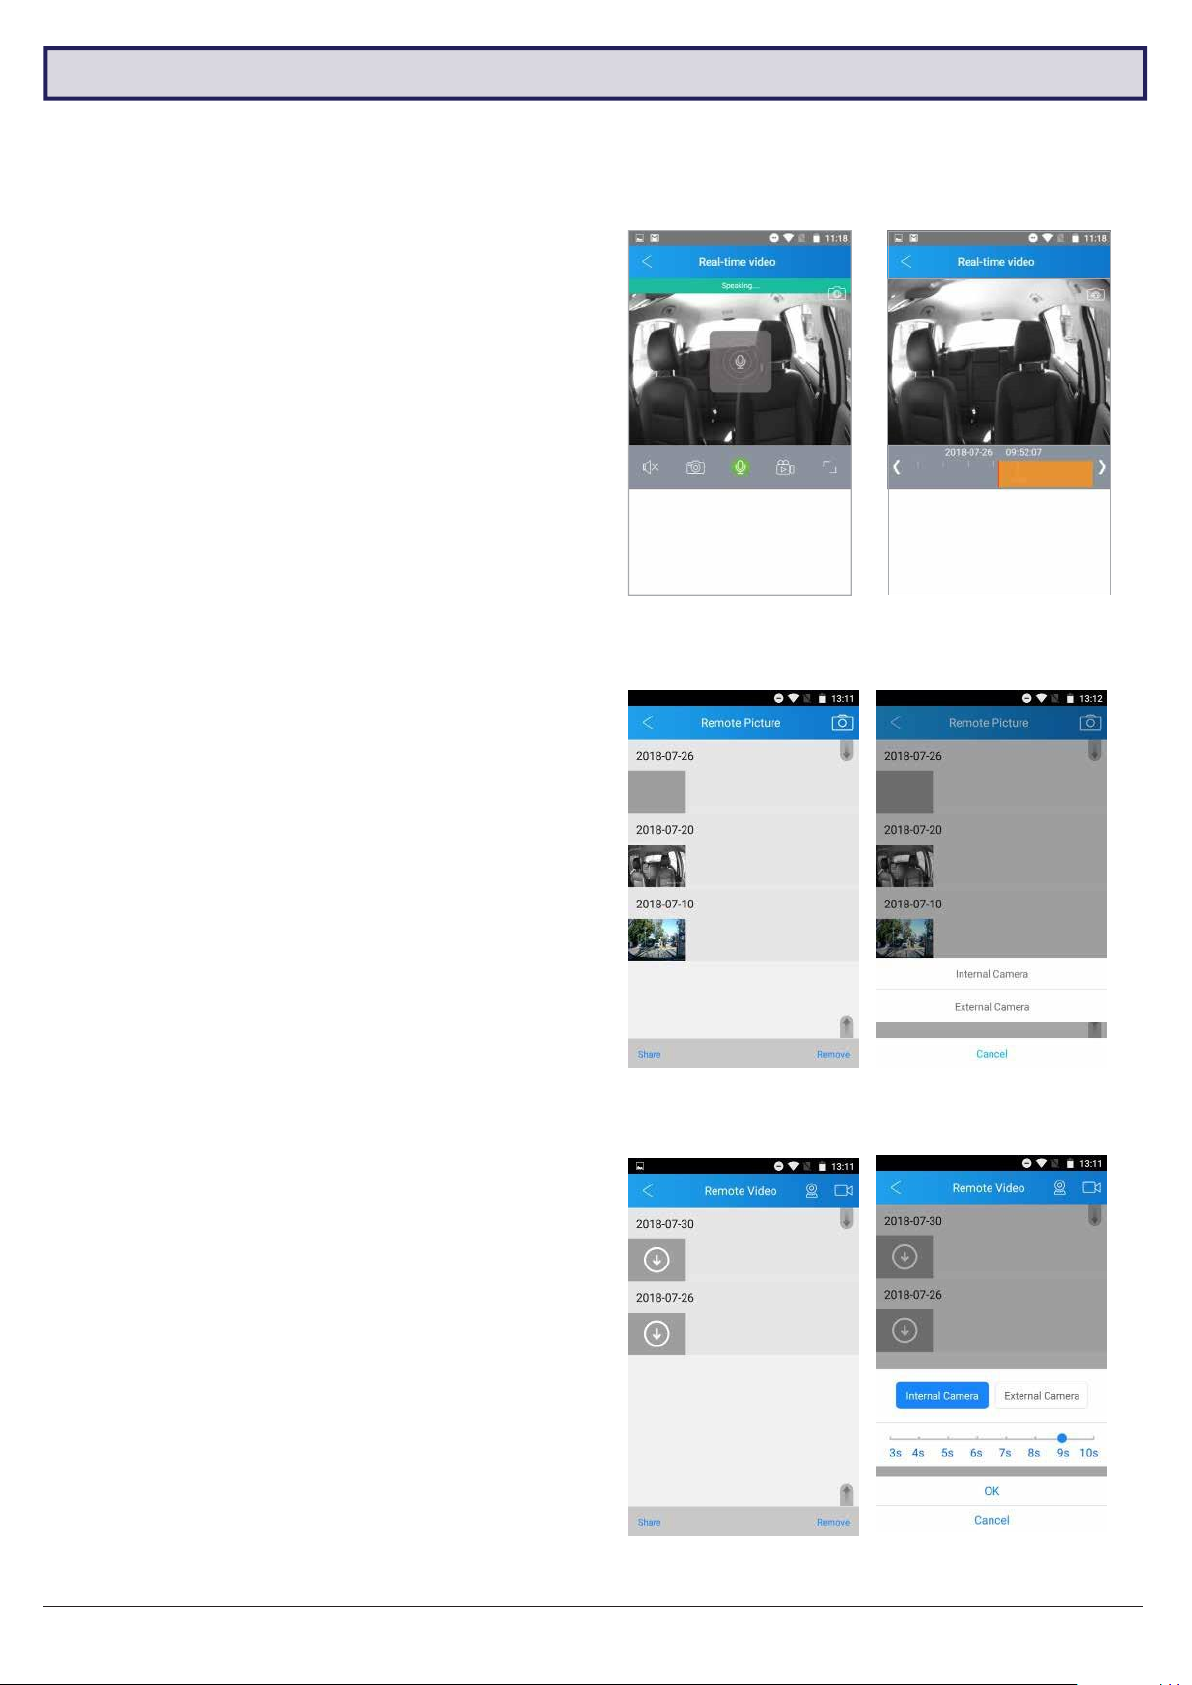
Switch camera: Press the camera icon at the top
right (overlayed onto the video) to switch between
the road and driver cameras.
•
Playback: Press the video screen to bring up a
time bar. Scroll through to play recorded footage.
•
Mute: Mute/unmute the camera’s microphone.
•
Screenshot: Saves a snapshot from the current
camera display.
•
Two-way talk: Hold to talk through the camera
with your phone.
•
Record: Record a clip from the camera display.
•
Full screen: Toggle portrait/landscape display
modes.
3.6.2
Remote Picture
1.
Open the main menu and press Remote Picture.
2.
In this menu, you can look through all snapshots
taken from the camera. Click any of them to display
them full-screen.
3.
To save a snapshot to the camera, open an image and
press Save to album.
4.
To take a new snapshot, press the camera icon at
the top right.
5.
To share an image, press Share at the bottom right,
then select the snapshot(s) to share and press OK.
3.6.3
Remote Video
1.
Open the main menu and press Remote Video.
2.
In this menu, you can look through all video recordings
taken from the camera. Click any of them to download,
then click again to play.
3.
To save a new recording, press the right camera
icon at the top right. Select the Internal or External
Camera to record and a length of time, then press OK.
4.
To share an image, press Share at the bottom right,
then select the videos) to share and press OK.
Two-way talk
Remote Picture menu
Remote Video menu
Playback time bar
Taking a new picture
Capturing a video clip
1.
2.
3.
Real-time Video Overview
Open the main menu and press Remote Video.
Press the left camera icon at the top right to enter start live viewing the camera in real time. This may take a few
seconds to load, depending on your mobile network.
From here, several actions and options are available:
Page 14
12
MDVR-J200 Quick Start Guide
3.8 Notifications
3.7 Media Center & Backup
3.7.1
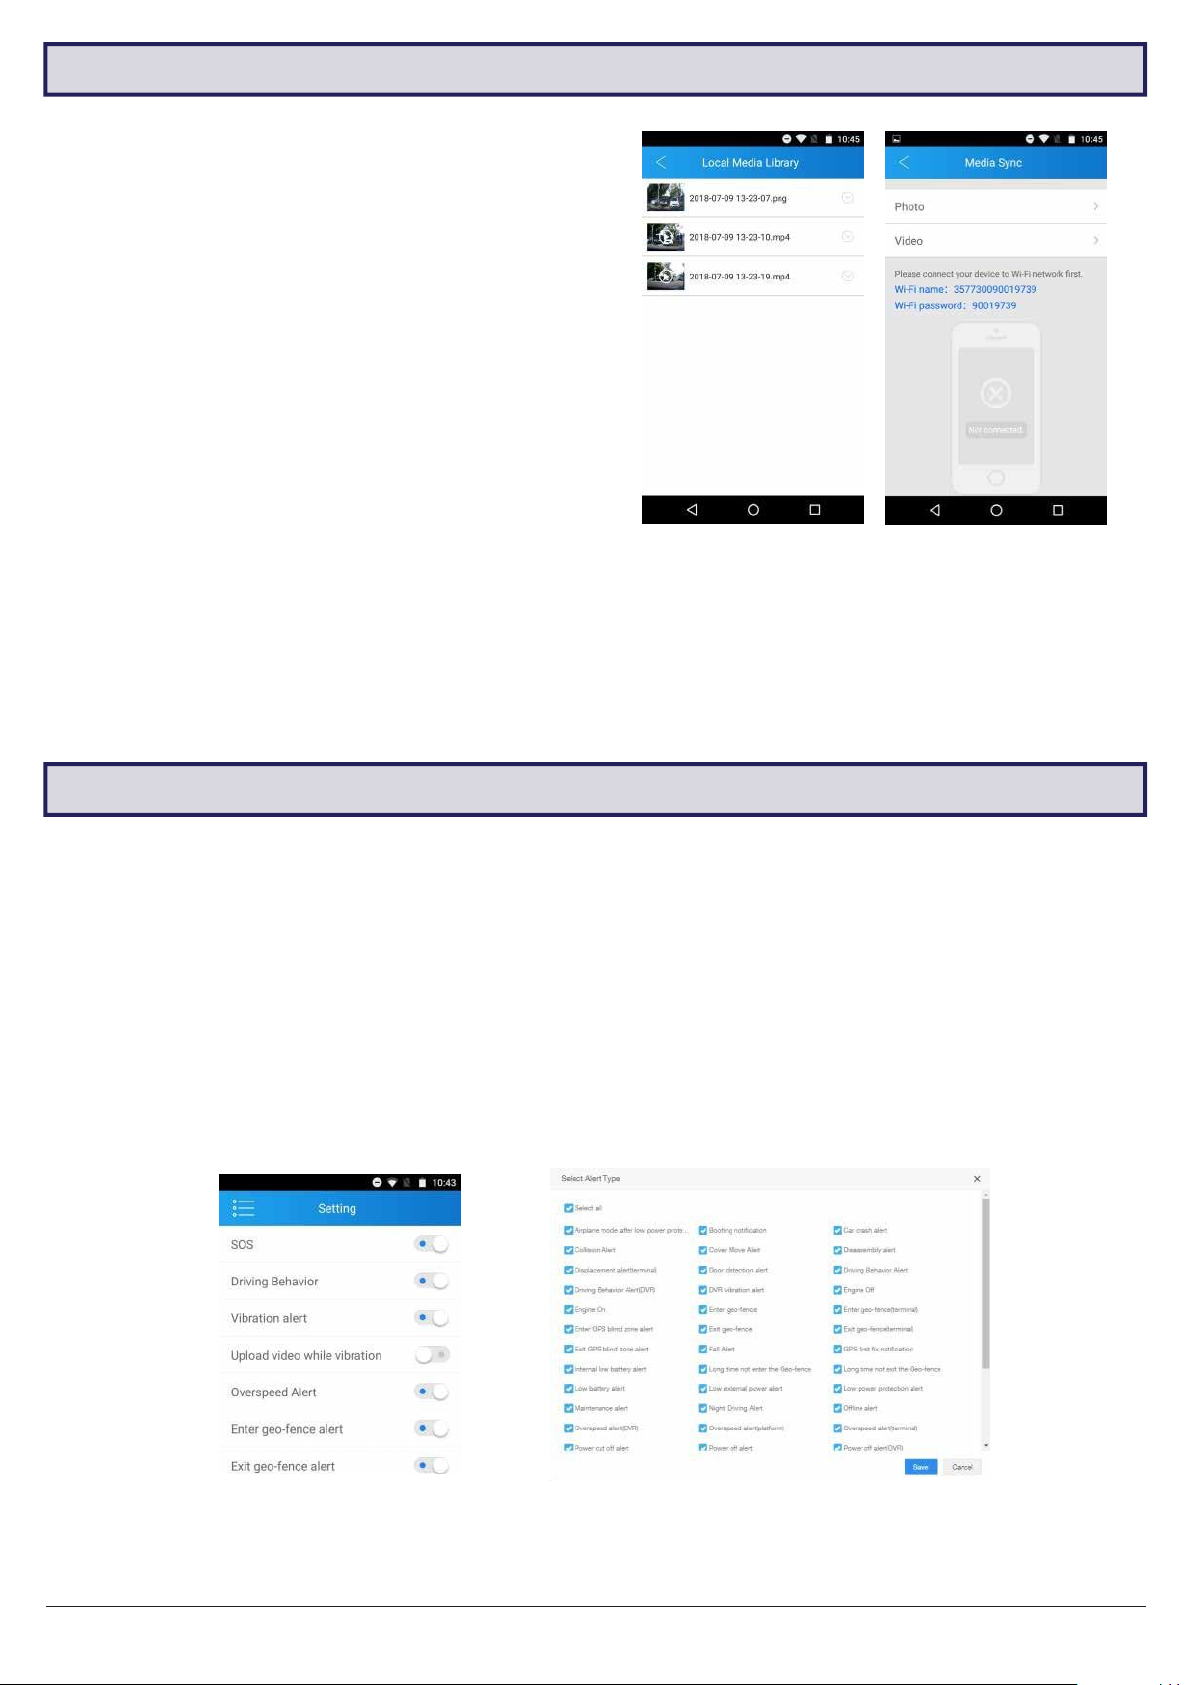
Local Media Library
1.
Open the main menu and press Media Center.
2.
Press Local Media Library.
3.
In this menu, you can view, share or delete any saved
snapshots & videos.
3.7.2
Backup via Media Sync
1.
Connect the mobile to the camera’s WiFi hotspot
network. To connect, the camera must be powered
on with the mobile nearby. Ensure that the blue GSM
indicator on the camera is solid blue (not flashing).
2.
Open the main menu and press Media Center.
3.
Press Media Sync.
4.
Select either Photo or Video to sync records of that
type from the camera to the mobile.
NOTE: The username of the hot spot is the IMEI.
The password is the last 8 digits of the IMEI.
These can both be found on the camera.
3.7.3
Backup via Micro SD
Local Media Library
Media Sync
Remove the Micro SD card from the camera. Insert the card into another device to directly
•
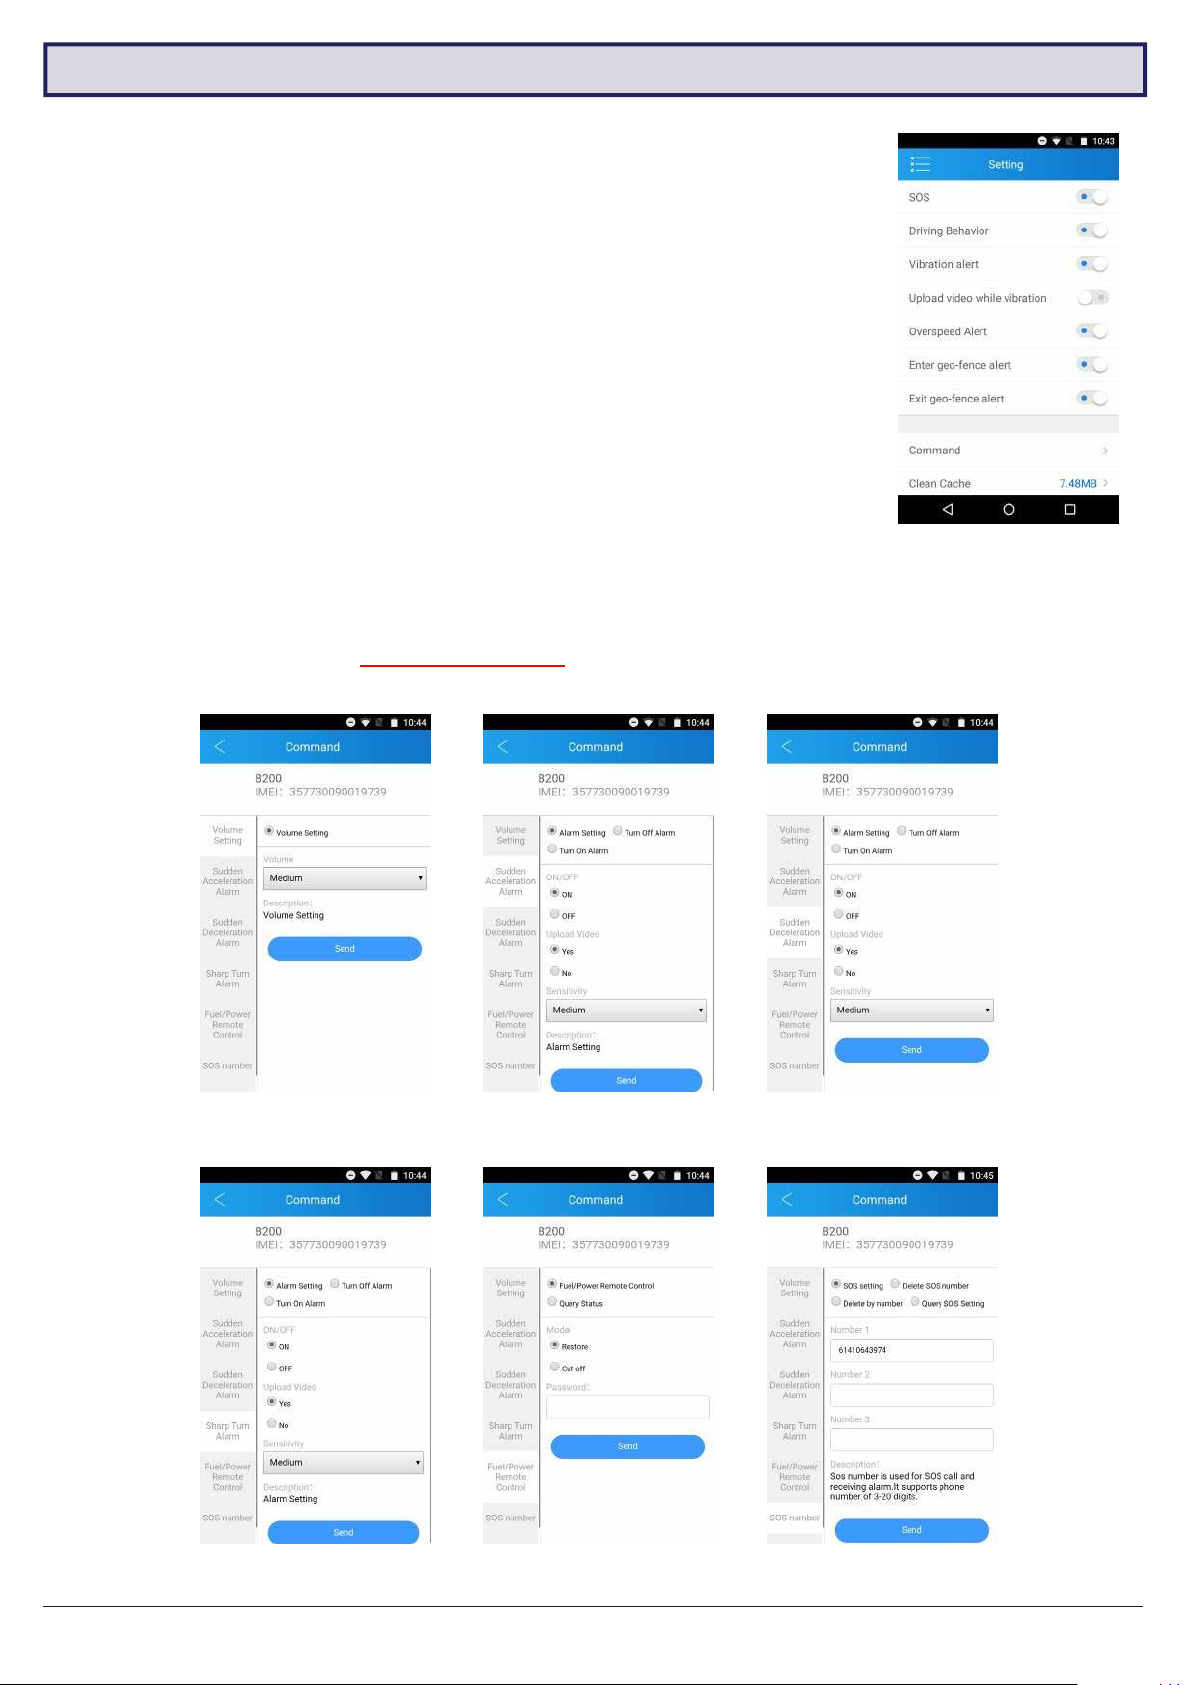
Collision / crash alert
•
Vibration alert
•
Enter / exit geo-fence alert
•
Driver behaviour alert
•
Engine on/off alert
•
Overspeed alert
•
Night driving alert
•
GPS blind zone alert
•
SOS alert
•
Low battery alert
•
Power off alert
•
Disassembly alert
copy saved records from it.
3.8.1
Notification History
1.
Open the main menu and press Notifications.
2.
This menu will display a complete history of the device’s notifications, including details on the time, date and
type of notification. Scrolling to the bottom of the page will load older notifications.
3.8.2
Notification Events
The camera can alert the account of a wide list of events, which can be toggled on/off from the app.
Setting notification alerts (App)
Setting notification alerts (Web)
Page 15
13
Visit www.securviewcctv.com for support
3.9.1
Settings overview
1.
Open the main menu and press Setting.
2.
On the main settings screen, you can toggle notification events (as shown in 3.8.2
Notification Events). Further options are available from here:
•
Command: Remotely edit a variety of settings for the camera. More detail below.
•
Clean Cache: Deletes temporary data, clearing up file space.
•
Help: Briefly explains various app functions and how to perform them.
•
About: Check for app updates and look at the Privacy Policy.
3.9.2
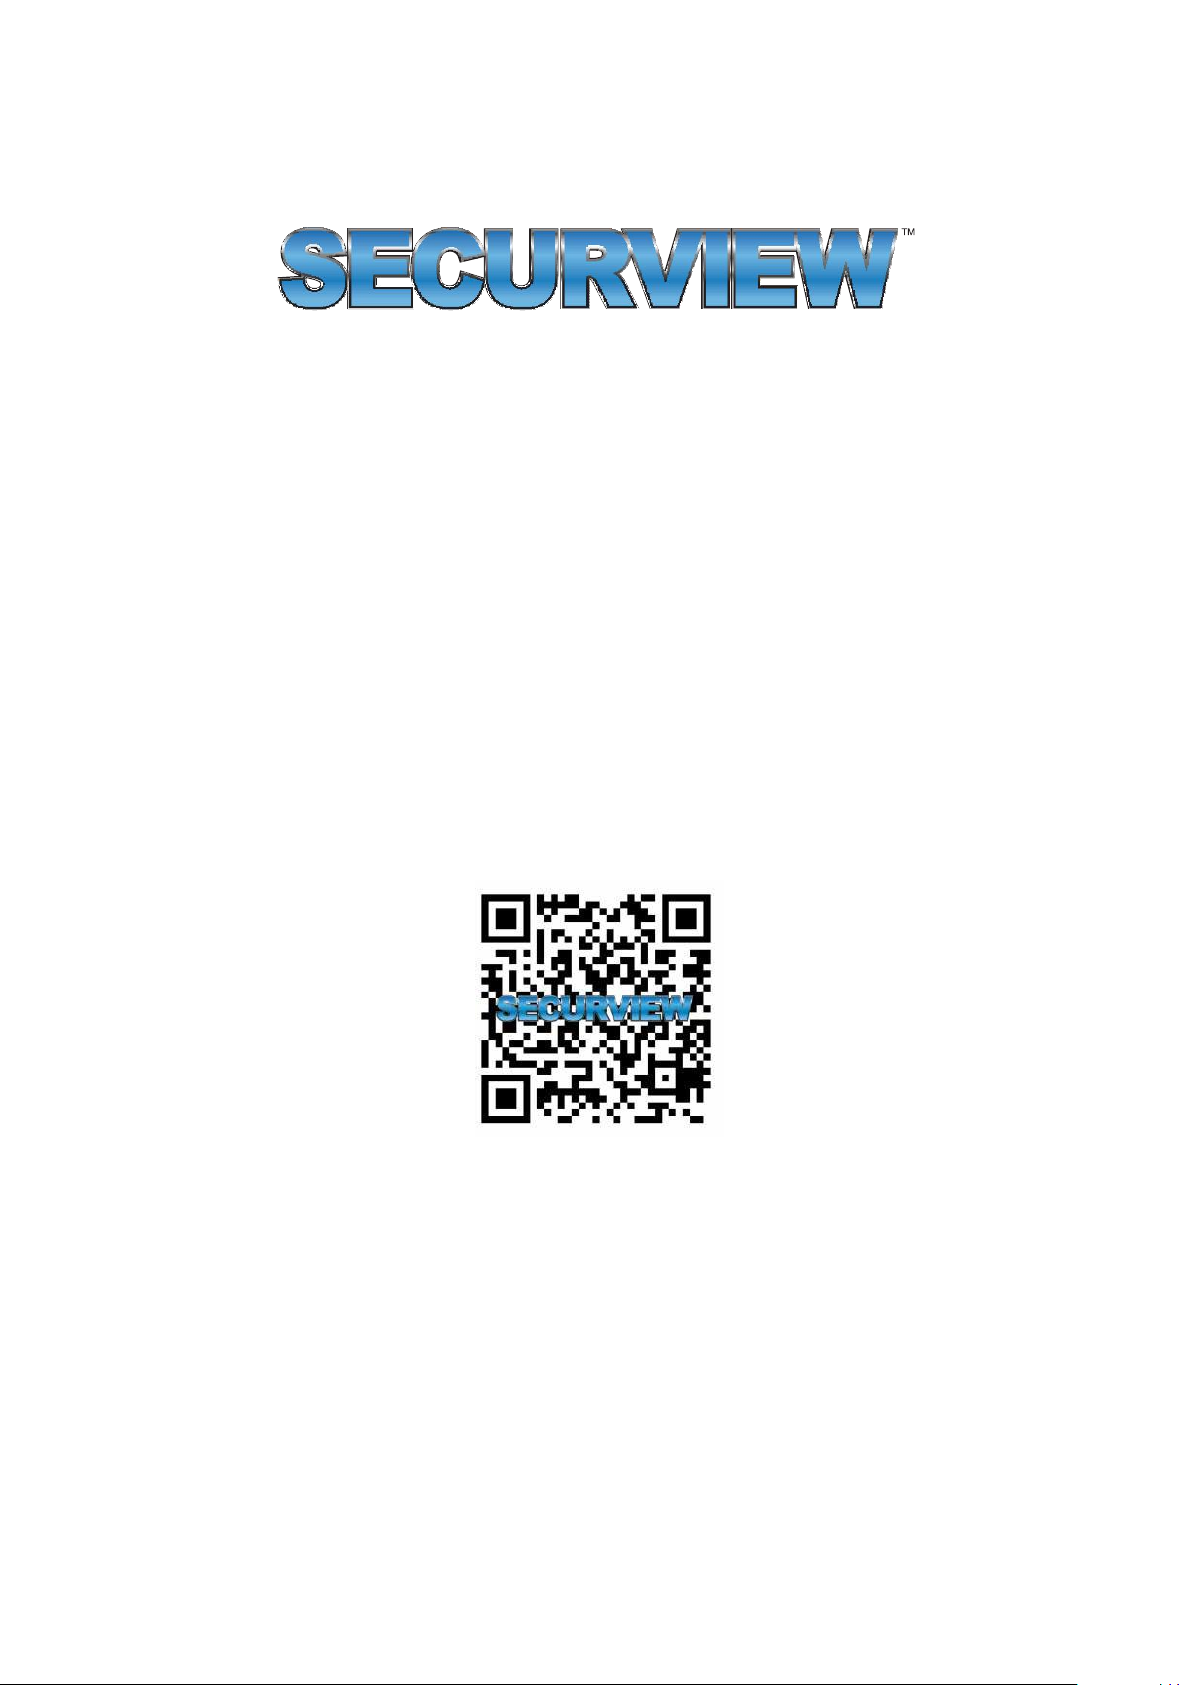
Settings -> Command
1.
From the Setting screen, press Command.
2.
From here, the following settings can be adjusted:
•
Volume Setting: Adjust the camera’s volume settings.
•
Sudden Acceleration Alarm, Sudden Deceleration Alarm & Sharp Turn Alarm:
Toggle on/off, set whether to upload video upon event and adjust sensitivity.
•
Fuel/Power Remote Control: You can cut/restore the fuel pump remotely if the
fuel pump relay is wired up. Must enter correct password for this function to work.
•
Query Status: Query about the status of the fuel pump connection status.
“0” - Fuel pump is connected. “1” - Fuel pump is disconnected.
•
SOS number: Enter up to 3 mobile numbers to contact when the SOS button is
•
pressed and held down for at least 3 seconds. Must enable “SOS” in Setting menu.
•
User-defined: Send custom commands (Under development).
Main settings screen
Volume Setting
Sudden Acceleration Alarm
Sudden Deceleration Alarm
Sharp Turn Alarm
Fuel/Power Remote Control
SOS Number
3.9 Settings
Page 16
For more information, please visit:
www.securviewcctv.com
Quick Start Guide:
MDVR-J200 (Vehicle monitoring system)
Version: 20190418
 Loading...