

Page 1
DC-200GQ
Dashboard Camera
Manual
Built-in GPS sensor
1080p HD Video recording
140° Wide viewing angle
3MP CMOS Sensor
WDR – Captures clear images even in
strong backlight
2.7” 16:9 Widescreen display
Can remove from mount and use as a camera
to take still images
F1.6 aperture for low-light performance
Store images and video on micro SD card
(up to 32GB)*
Exports as MOV format, HDMI output
Auto start/stop recording
G-Sensor for automatic file protection
GPS Tracker logs camera location and speed
while recording
Software playback with Google Maps™
*Micro SD card not included
All trademarks are the property of their respective owners.
Page 2

ENFORCER Dashboard Camera
Table of Contents
Specifications:
Model
DC-200GQ
Sensor
1/3” CMOS Sensor
Effective pixels
2304 (H) x 1536 (V)
Memory*
Supports Micro SDHC, up to 32GB class 6 or above
Display
2.7” LCD color TFT
Lens
Wide angle fixed focus lens; F1.6, f-3.6mm
Viewing angle
140°
Video resolution
Full HD (1920x1080), 30fps; HD (1280x720), 30fps
Video format
MOV
Snapshot resolution
3MP (2304x1536)
Shutter speed
Electronic shutter; auto: 1/2~1/1000 sec
G-Sensor
3-Axis G-Force sensor
ISO
Auto
White balance
Auto
Microphone
Yes
Speaker
Yes
Interface
Mini USB, Mini C-type HDMI, AV
Battery
200mAH Li-polymer (approximately 10 minutes)
Input power
5VDC
Car charger
Input: 12~24VDC; Output: 5VDC
Power consumption
4.5W
Operating temperature
-4°F~149°F (-20°~65°C)
Operating humidity
20~70% RH
Storage temperature
-4°F~176°F (-20°~80°C)
Dimensions
47/16” x 211/32” x 115/32” (112.5 x 59.5 x 37.2 mm)
Weight
Approx. 3.5 oz. (100g)
*Micro SD card not included. For best results use class 10 or higher.
Parts List ......................................................... 2
Specifications ................................................. 2
Overview ......................................................... 3
Mounting ......................................................... 4
Powering the Camera ..................................... 4
Turning the Camera On .................................. 5
How to Navigate the Dashboard
Camera Menus ............................................... 5
Video Mode .................................................... 5
Video Settings Menu ................................... 6-8
Photo Mode .................................................... 9
Photo Settings Menu ................................. 9-10
Playback Mode ............................................. 11
Playback Settings Menu ............................... 11
Main Settings Menu ................................. 12-13
Viewing the Data on a Computer .................. 13
Installing the SL ENFORCER Dash
Camera Player .............................................. 14
SL ENFORCER Dash Camera
Player Overview ....................................... 14-15
Connecting the Camera via HDMI Cable ...... 15
Troubleshooting ............................................ 16
Parts List:
1x Camera
1x Car charger
1x Car mount
1x USB cable
1x HDMI cable
1x Manual
1x SL Dash Camera Player CD
2 SECO-LARM U.S.A., Inc.
Page 3
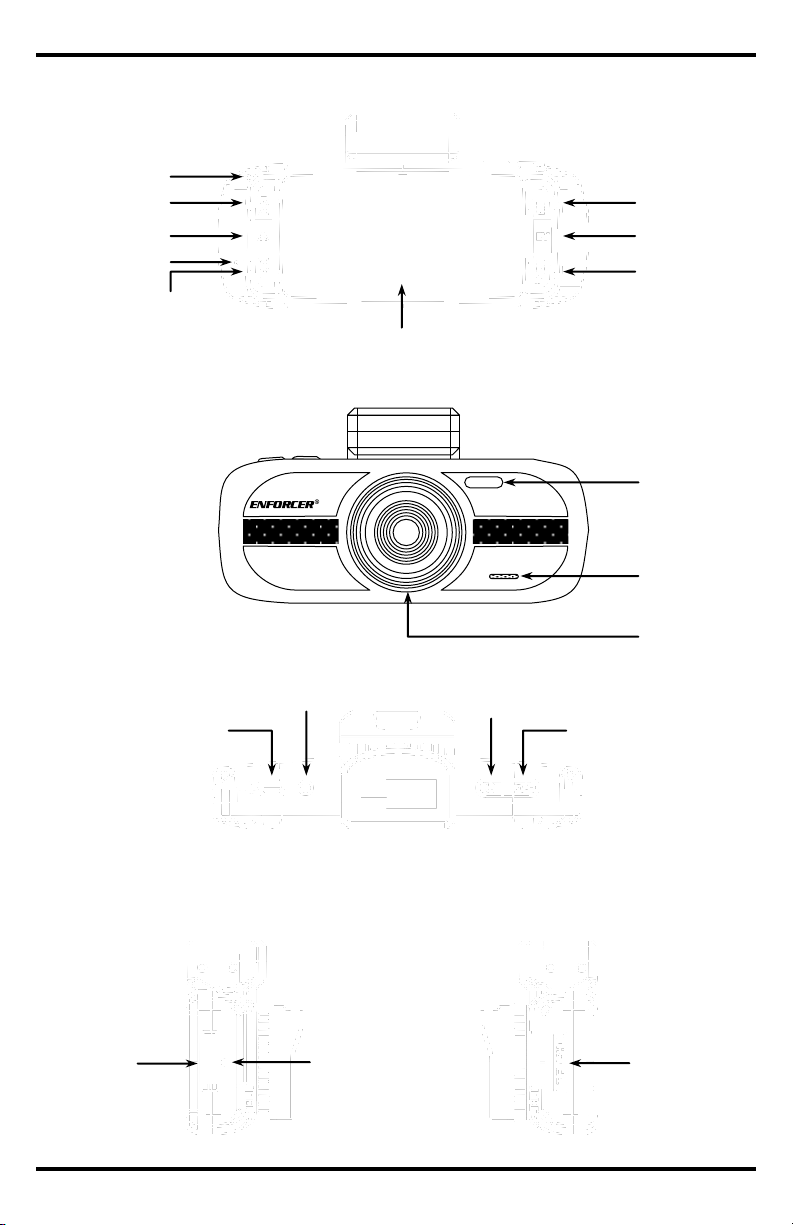
Fast Forward
Rewind
Screen
Menu
Exposure
Mode
Microphone
Rear
Front
Top
Mini USB
port
Power
Photo/Record
AV Out
HDMI
Out
Micro
SD Card
Slot
Sides
LED
Lens
File lock
Speaker
Reset
button
Overview:
LED Power Indicator
HD OUT
1080P GPS
RESET
ENFORCER Dashboard Camera
SECO-LARM U.S.A., Inc. 3
Page 4

ENFORCER Dashboard Camera
IMPORTANT
Users and installers of this product are responsible for ensuring that the installation and configuration of
this product complies with all national, state, and local laws. SECO-LARM will not be held responsible for
the use of this product in violation of any current laws or codes.
1. Before installing, insert a micro SD card (not
included) into the micro SD card slot (T-FLASH)
on the side of the camera. The camera will support
micro SD cards up to 32GB, class 6 or above.
2. Slide the camera onto the bracket until it clicks.
3. Determine how the camera will be powered. If
powering via cigarette lighter, make sure the mini
USB cable is in reach of the cigarette lighter. If
powering via optional fuse box connector, please
see Powering the Camera: Optional Fuse Box
Connector below.
4. Determine where on the windshield the camera
will be mounted. Be sure that the camera will not
obstruct the driver’s view.
5. Clean the area on the windshield where the camera will be mounted, making sure to remove
dust or any other particles.
6. Lift the suction cup lever and place the suction cup on the windshield.
7. Push down on the suction cup lever to lock the bracket into place.
8. Connect the camera to power.
9. Adjust the camera to ensure proper viewing angle.
Note: To remove the camera from the bracket, squeeze the Mounting tab and slide the camera in
the opposite direction until it releases.
Slide camera
onto the bracket
Suction cup lever
Suction cup
Cigarette Lighter
Fuse Box
Car charger
Cigarette lighter
1. Plug the car charger into the car’s cigarette lighter.
2. Connect the charger’s mini USB connector to the
camera’s mini USB port.
Red wire: Ignition switch (+12VDC input)
Note: Must have voltage during Start and On,
but not ACC. Do not connect to constant 12V
Chassis ground
1. Connect the red wire of the adapter socket to the fuse box’s ignition switch.
2. Connect the black wire of the adapter socket to chassis ground.
3. Plug the car charger into the adapter socket.
4. Connect the charger’s mini USB connector to the camera’s mini USB port.
Note: The DC-ACC-CS1Q includes low voltage circuit protection that will shut off the camera if
the battery voltage is less than 11.8VDC.
Car charger
Cigarette Lighter
Adapter Socket
(DC-ACC-CS1Q)
Mounting:
Powering the Camera:
Mounting tab
Power the camera using the included car charger or directly to the fuse box using the optional
cigarette lighter adapter socket. For fuse box connection, professional installation is recommended.
4 SECO-LARM U.S.A., Inc.
Page 5

Turning the Camera On:
1. If the camera is connected to power, whenever the ignition is turned on, the camera will
automatically turn ON and begin recording.
2. If the camera is not connected to power, press the power button on the top of the camera.
Once the camera is on, press the record button to begin recording.
Note: If the car’s cigarette lighter/power port continues to power the camera even when the
ignition is off, use the power button to turn the camera ON and OFF to avoid battery drain.
1. In order to access the Dashboard Camera’s menu, make sure the camera is not recording.
Check to see if the red “recording” dot is shown on the screen. If it is, press the record button
once to stop recording.
2. Press the menu button in order to access the menu.
3. Press the up and down buttons to cycle through the menu options.
4. To select an option, press the record button.
5. To exit the menu, press the menu button.
Look at the top of the screen. If the camera is in video mode, the video
icon will be at the top of the screen (see right).
Note: By default, the camera should be in video mode.
If the camera is not in video mode, press the mode button until the
video icon is on the top of the screen.
In order to start recording a video, press the record button.
Video icon
How to Navigate the Dashboard Camera Menus:
Video Mode:
Up
Down
Menu /
Exit
Select/Record
Wide Dynamic Range
Power/Battery Indicator
Auto White Balance
Standby Speed Display
GPS Speed Warning
Driver Fatigue Warning
Time
Date
Motion Detection
Time Lapse
SD Card
Recording Length
Recording
Video Mode
Resolution
Sound
Exposure
Loop Recording
GPS Signal
ENFORCER Dashboard Camera
SECO-LARM U.S.A., Inc. 5
Page 6

ENFORCER Dashboard Camera
Video Setting Menu:
Wide Dynamic Range (WDR):
This function is not programmable. WDR is always set to ON.
Resolution:
This function is used to set the camera’s resolution. The resolution settings are listed from highest
to lowest. The lower the resolution, the less room a recording will occupy on the micro SD card.
1. Select Resolution on the video menu screen.
2. Select the desired recording resolution setting. (1080FHD, 720P, 720P 60FPS, WVGA, VGA)
3. After the selection is made, you will automatically return to the video menu screen.
Exposure:
This function is used to manually adjust the shutter speed.
1. Select Exposure on the video menu screen.
2. Select the desired exposure setting. (+3, +2, +1, +0, -1, -2, -3)
3. After the selection is made, you will automatically return to the video menu screen.
White Balance:
This function is used to adjust the color temperature and image color of the picture.
1. Select White Balance on the video menu screen.
2. Select the desired setting based on the environment’s lighting.
(Auto, Daylight, Cloudy, Tungsten, Fluorescent)
3. After the selection is made, you will automatically return to the video menu screen.
Record Audio:
This function is used to set whether or not the camera will record audio.
1. Select Record Audio on the video menu screen.
2. Select the desired setting. (Off, On)
3. After the selection is made, you will automatically return to the video menu screen.
Date Stamp:
This function is used to set whether or not the date stamp will appear in the bottom left corner of
the screen during playback.
1. Select Date Stamp on the video menu screen.
2. Select the desired setting. (Off, On)
3. After the selection is made, you will automatically return to the video menu screen.
Loop Recording:
This function is used to set how long the camera will record before starting a new file. If Loop
Recording is turned off, the camera will record one continuous video.
1. Select Loop Recording on the video menu screen.
2. Select the desired setting. (Off, 2 Minutes, 3 Minutes, 5 Minutes)
3. After the selection is made, you will automatically return to the video menu screen.
6 SECO-LARM U.S.A., Inc.
Page 7

ENFORCER Dashboard Camera
G-Sensor:
This function is used to set the sensitivity level of the 3-Axis G-Sensor. If the camera experiences
an impact, such as in an accident, the camera will lock the current recording to prevent deletion.
1. Select Gsensor on the video menu screen.
2. Select the desired setting. (Off, High, Middle, Low)
3. After the selection is made, you will automatically return to the video menu screen.
Motion Detection:
This function is used to turn the motion detection on or off. When motion detection is on, the
camera will automatically start recording when it detects motion.
1. Select Motion Detection on the video menu screen.
2. Select the desired setting. (Off, On)
3. After the selection is made, you will automatically return to the video menu screen.
Plate Stamp:
This function is used to program a license plate number that will appear on the recorded videos
when they are played back.
1. Select Plate Stamp on the video menu screen.
2. Push the up and down buttons to cycle through characters.
Press the record button to select a character and move to the next spot.
3. Press the menu button at any time to return to the video menu screen.
4. After the selection is made, you will automatically return to the video menu screen.
Driver Fatigue Warning:
This function enables a full-screen driver fatigue warning. Select the amount of time before the
driver fatigue warning appears on the camera, or turn the function off.
1. Select Driver Fatigue Warning on the video menu screen.
2. Select the desired setting. (Off, 1H, 2H, 3H, 4H)
3. After the selection is made, you will automatically return to the video menu screen.
GPS Tracker:
This function enables the GPS tracker. If the GPS tracker is turned on, the camera’s location will
appear on a map when the video is played back.
1. Select GPS Track on the video menu screen.
2. Select the desired setting. (Off, On)
3. After the selection is made, you will automatically return to the video menu screen.
Standby Speed Display:
This function enables a full-screen speed and compass display. Select the amount of time before
the speed and compass display appears on the camera, or turn the function off.
1. Select Standby Speed Display on the video menu screen.
2. Select the desired setting. (Off, 15 Seconds, 1 Minute, 3 Minutes)
3. After the selection is made, you will automatically return to the video menu screen.
R
Video Settings Menu continued
SECO-LARM U.S.A., Inc. 7
Page 8

ENFORCER Dashboard Camera
Video Settings Menu continued
GPS Speed Warning:
This function enables the camera to issue a warning to the drive once the driver hits a certain
speed.
1. Select GPS Speed Warning on the video menu screen.
2. Select the desired setting. Units of each setting are determined by which speed units are
programmed. See Speed Units below. (Off, 40, 60, 80, 100, 120)
3. After the selection is made, you will automatically return to the video menu screen.
World Time Zone:
This function allows you to enter your time zone. Time zones are entered in relation to GMT
(Greenwich Mean Time).
1. Select World Time Zone on the video menu screen.
2. Select the desired setting. Times are listed in relation to GMT.
3. After the selection is made, you will automatically return to the video menu screen.
Password Settings:
This function allows you to program a password for your camera. If a password is programmed,
when a user tries to access the menu, it will ask for a password.
1. Select Password Settings on the video menu screen.
2. If no password is programmed, you will have the option of programming a password.
3. Push the up and down buttons to cycle through characters.
4. Press the record button to select a character and move to the next spot.
5. Press menu at any time to return to the video menu screen.
6. If a password is already programmed, you will have two different options:
Cancel Password: Removes the password. Users will be able to access the menu
without entering a password.
Change Password: Program a new password.
7. After the selection is made, you will automatically return to the video menu screen.
Speed Units:
This function determines whether kilometers per hour or miles per hour are used to indicate speed
through the camera’s functions.
1. Select Speed Units on the video menu screen.
2. Select the desired setting. (KMH, MPH)
3. After the selection is made, you will automatically return to the video menu screen.
Image Rotation:
When enabled, this function flips the camera image 180°.
1. Select Image Rotation on the video menu screen.
2. Select the desired setting. (Off, On)
3. After the selection is made, you will automatically return to the video menu screen.
Time Lapse:
This function enables time lapse recording at three different speeds.
1. Select Time Lapse on the video menu screen.
2. Select the desired setting. (Off, 200MS, 500MS, 1S)
3. After the selection is made, you will automatically return to the video menu screen.
8 SECO-LARM U.S.A., Inc.
Page 9

The camera can also be used to take photos. In order to access the photo
mode, do the following:
Look at the top of the screen. If the camera is in photo mode, the
photo icon will be at the top of the screen (see right).
If the camera is not in photo mode, press the mode button until the
photo icon is on the top of the screen.
In order to take a photo, press the record button.
Photo Mode:
Photo icon
Photo Settings Menu:
Wide Dynamic Range (WDR):
This function is not programmable. WDR is always set to ON.
Image Size:
This function determines the image size of the photos taken with the camera.
1. Select Image Size on the photo menu screen.
2. Select the desired setting. (12M, 10M, 8M, 5M, 3M, 2MHD, VGA, 1.2M)
3. After the selection is made, you will automatically return to the photo menu screen.
Color:
This function determines the color setting of the photos taken with the camera.
1. Select Color on the photo menu screen.
2. Select the desired setting. (Normal, Black & White, Sepia)
3. After the selection is made, you will automatically return to the photo menu screen.
Anti-Shaking:
When enabled, this function stabilizes the image.
1. Select Anti-Shaking on the photo menu screen.
2. Select the desired setting. (Off, On)
3. After the selection is made, you will automatically return to the photo menu screen.
Wide Dynamic Range
Power/Battery Indicator
Auto White Balance
Image Quality
SD Card
Photo Mode
Resolution
Time Delay
ISO
Exposure
Anti-Shaking
ENFORCER Dashboard Camera
SECO-LARM U.S.A., Inc. 9
Page 10

ENFORCER Dashboard Camera
Photo Settings Menu continued
Capture Mode:
This function sets the delay before a photo is taken after the record button is pressed.
1. Select Capture Mode on the photo menu screen.
2. Select the desired setting. If “Single” is selected, a photo will be taken immediately.
(Single, 2S Timer, 5S Timer, 10S Timer)
3. After the selection is made, you will automatically return to the photo menu screen.
White Balance:
This function is used to adjust the color temperature and image color of the picture.
1. Select White Balance on the photo menu screen.
2. Select the desired setting based on the environment’s lighting.
(Auto, Daylight, Cloudy, Tungsten, Fluorescent)
3. After the selection is made, you will automatically return to the photo menu screen.
ISO:
This function is used to adjust the ISO (International Standards Organization) Setting. This setting
affects the camera’s sensitivity to light.
1. Select ISO on the photo menu screen.
2. Select the desired setting based on the environment’s lighting. (Auto, 100, 200, 400)
3. After the selection is made, you will automatically return to the photo menu screen.
Exposure:
This function is used to manually adjust the shutter speed.
1. Select Exposure on the photo menu screen.
2. Select the desired exposure setting. (+3, +2, +1, +0, -1, -2, -3)
3. After the selection is made, you will automatically return to the photo menu screen.
Date Stamp:
This function is used to set whether or not the date stamp will appear in the bottom right corner of
the screen.
1. Select Date Stamp on the photo menu screen.
2. Select the desired setting. (Off, Date, Date/Time)
3. After the selection is made, you will automatically return to the photo menu screen.
Quality:
This function is used to set the photo quality. The lower the quality, the less room a photo will
occupy on the micro SD card.
1. Select Quality on the photo menu screen.
2. Select the desired setting. (Fine, Normal, Economy)
3. After the selection is made, you will automatically return to the photo menu screen.
Sharpness:
This function is used to set the sharpness of the photo.
1. Select Sharpness on the photo menu screen.
2. Select the desired setting. (Strong, Normal, Soft)
3. After the selection is made, you will automatically return to the photo menu screen.
10 SECO-LARM U.S.A., Inc.
Page 11

ENFORCER Dashboard Camera
Playback mode is used to play recorded video directly from the camera:
Look at the top of the screen. If the camera is in playback mode, one
of the playback icons will be at the top of the screen (see right).
If the camera is not in playback mode, press the mode button until the
playback icon is on the top of the screen.
Use the up and down buttons to cycle through available videos or
photographs.
In order to play a video, press the record button.
If a video is playing then use the up or down buttons to rewind or fast-forward at up to
8x speed.
Playback Mode:
Playback Settings Menu:
Delete:
This function deletes videos or photos.
1. Select Delete on the playback menu.
2. Select the desired option. (Delete Current, Delete All)
3. After the selection is made, you will automatically return to the playback menu.
Note: To return to the playback menu without deleting, select the Menu button.
Protect:
This function protects files from being deleted.
1. Select Protect on the playback menu.
2. Select the desired option. (Lock Current, Unlock Current, Lock All, Unlock All)
3. After the selection is made, you will automatically return to the playback menu.
Slide Show:
This function creates a 2 second slide show of the first shot of each video, as well as any photos
saved on the camera.
1. Select Slideshow on the playback menu.
2. Select 2 Seconds.
3. After the selection is made, the slide show will start. Press the record button to stop the
slideshow on the image shown.
Battery Indicator
Recording Time
Playback Mode
Recording Date
Recording Resolution
Recording Filename
Fast-forward
Rewind
Play/Pause
Play
Video Playback icon
Photo Playback icon
SECO-LARM U.S.A., Inc. 11
Page 12

ENFORCER Dashboard Camera
Main Settings Menu:
The main settings menu contains settings that apply to the camera system-wide.
1. To access the main settings menu, press the menu button to access the menu screen.
Depending on the current mode, either the video, photo, or playback menu will open.
2. From the menu screen, press the menu button once more. The menu will shift to the main
settings menu.
Format:
This function is used to format the micro SD card so that it is suitable for recording video.
WARNING: Formatting the micro SD card will delete all existing data from the micro SD
card.
1. Select Format on the main settings menu.
2. Select the SD Card.
3. The menu will display a warning that all data will be deleted. Select OK.
4. After the micro SD card has been formatted, you will automatically return to the main settings
menu.
Language:
This function changes the language of the camera menu.
1. Select Language on the main settings menu.
2. Scroll through and select the desired language. There are 10 available language options.
3. After the selection is made, you will automatically return to the main settings menu.
Date/Time:
This function sets the camera’s date and time.
1. Select Date/Time on the main settings menu.
2. To set the highlighted value, press the up and down arrows.
3. To move to the next value, press the record button.
4. After the selection is made, you will automatically return to the main settings page.
Frequency:
This function adjusts the camera’s output frequency.
1. Select Frequency on the main settings menu.
2. Select the desired setting. (50Hz, 60Hz)
3. After the selection is made, you will automatically return to the main settings menu.
LED:
This function turns the front LED ON and OFF. This LED can be used for nighttime pictures.
1. Select LED on the main settings menu.
2. Select the desired setting. (Off, On)
3. After the selection is made, you will automatically return to the main settings menu.
Beep Sound:
This function sets the beep sound that occurs when a button is pressed ON and OFF.
1. Select Beep Sound on the main settings menu.
2. Select the desired setting. (Off, On)
3. After the selection is made, you will automatically return to the main settings menu.
12 SECO-LARM U.S.A., Inc.
Page 13

ENFORCER Dashboard Camera
There are two ways to view the data on a computer.
Connecting the Camera Directly to Computer:
1. Connect the camera to the computer using the included mini USB cable.
2. A menu will pop up with a single option – Mass Storage. Select Mass Storage.
3. The camera’s screen will go blank, except for the words “Mass Storage”. The camera and SD
card will appear on the computer as a mass storage device.
Connecting the Micro SD Card Directly to Computer:
1. Remove the micro SD card from the camera.
2. Plug the micro SD card into the computer.
3. The micro SD card will appear on the computer as a mass storage device.
Main Settings Menu continued
Screen Saver:
This function sets the amount of time the camera is idle before the screen saver turns on.
1. Select Screen Saver on the main settings menu.
2. Select the desired setting. (Off, 3 Minutes, 5 Minutes, 10 Minutes)
3. After the selection is made, you will automatically return to the main settings menu.
TV Mode:
This function sets the TV Mode for the camera’s recording.
1. Select TV Mode on the main settings menu.
2. Select the desired setting. (NTSC, PAL)
3. After the selection is made, you will automatically return to the main settings page.
Speed Stamp:
This function turns the speed indicator ON and OFF when playing back the camera’s recording.
1. Select Speed Stamp on the main settings menu.
2. Select the desired setting. (Off, On)
3. After the selection is made, you will automatically return to the main settings menu.
Version:
This option will display the firmware version information.
1. Select Version on the main settings menu.
2. When finished, press the record button to automatically return to the main settings menu.
Default Setting:
This function will restore the camera to its factory default settings.
1. Select Default Setting on the main settings menu.
2. The menu will display a warning that all settings will return to default. Select OK.
3. After the selection is made, you will automatically return to the main settings menu.
Viewing the Data on a Computer:
SECO-LARM U.S.A., Inc. 13
Page 14
ENFORCER Dashboard Camera
SL ENFORCER Dash Camera Player Overview:
1. Insert the included SL ENFORCER Dash Camera Player CD into the computer.
NOTE: Software is also available for download on the SECO-LARM website.
2. Install the files from the CD onto the computer. Software will work on Windows XP and above
or Mac OS 10.6.4 and above.
3. Click File, and then click on Open.
4. Browse through the files on the computer for the camera’s video files. Import the desired files.
Installing the SL ENFORCER Dash Camera Player:
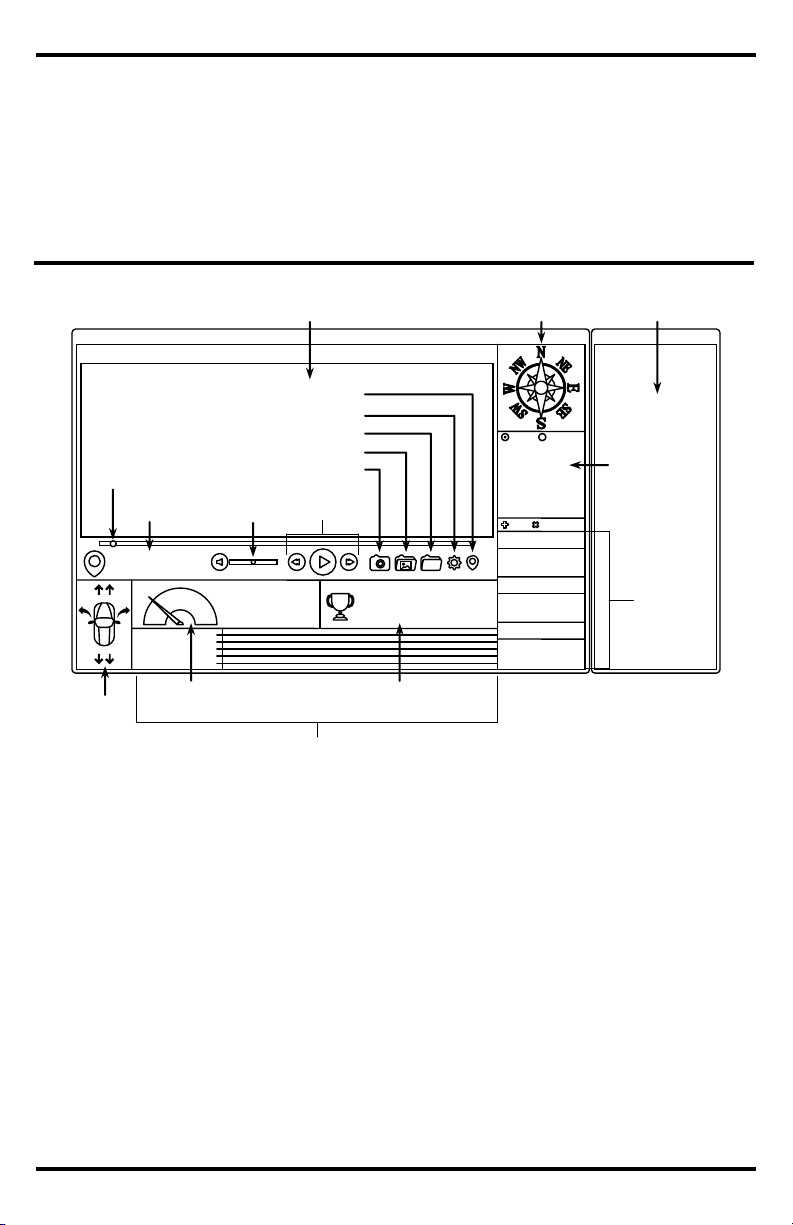
Playback Window:
The playback window is where the recorded footage will play. This window will also display the
date stamp and GPS information if available.
Compass:
The compass displays the direction of the vehicle at the time the video was recorded.
Map Window:
The map window shows the location and route of the vehicle at the time the video was recorded
using Google Maps™.
File List:
The file list shows the playlist of video files from the camera.
Playback Counter:
The playback counter shows the playtime and progress of the current video being played.
Playback Volume:
This slider controls the volume of the video being played. Press the speaker icon to mute the
audio.
SL ENFORCER Dash Camera Player
File
View
Help
X : 0.00
Y : 0.00
Z : 0.00
Map
M/H
88
M/H
M/H
0-60
0-88
S
S
N/A
N/A
ADD
REMOVE
Max Speed
Average Speed
Total Distance Traveled
88
0 M ---
M/H
88
M/H
All Files
Protected
2014_0101_120000_001.MOV
36°33’45.00 N
118°45’05.00 W
Playback Window
Map Window
Compass
Playback
Counter
Playback
Volume
Playback
Controls
GPS Coordinates
G-Sensor Data
File List
Direction
Indicators
File Open (PC Only)
Settings (PC Only)
Map Window Toggle (PC Only)
Trip
Statistics
Speedometer
Acceleration
Information
Screen Capture (PC Only)
Screen Capture Folder (PC Only)
14 SECO-LARM U.S.A., Inc.
Page 15

ENFORCER Dashboard Camera
SL Dash Camera Player Overview continued
Playback Controls:
These controls are used to play, pause, fast-forward, and rewind the video.
GPS Coordinates:
These GPS coordinates show the location of the vehicle at the time the video was recorded.
Screen Capture (PC Only):
This button takes a screen shot of the current image.
Screen Capture Folder (PC Only):
This button opens the folder containing screen shots.
File Open (PC Only):
This button opens a window to select videos to play.
Settings (PC Only):
This button opens the settings window.
Map Window Toggle (PC Only):
This button toggles the map window.
Direction Indicators:
The direction indicators show which direction the vehicle was moving at the time the video was
recorded.
Speedometer:
The speedometer shows the instantaneous speed of the vehicle at the time the video was
recorded.
Acceleration Information:
This section displays the time taken to reach 60MPH (or 100KPH) and the time taken to reach the
maximum speed at the time the video was recorded.
G-Sensor Data:
The G-Sensor data displays displacement of the vehicle in the X, Y, and Z axes at the time the
video was recorded.
Trip Statistics:
This area displays the maximum speed, average speed, and total distance traveled over the
course of the video recording.
The camera can be projected to a high-definition television or monitor.
1. Connect the mini HDMI connector of the included HDMI cable to the camera’s HD OUT port.
2. Connect the larger HDMI connector of the included HDMI cable to the high-definition
television or monitor.
3. After a few seconds, the camera screen will go blank and the screen will be projected to the
high-definition television or monitor.
Note: Recording video is not possible while connected via the mini HDMI port.
Connecting the Camera via HDMI Cable:
SECO-LARM U.S.A., Inc. 15
Page 16

ENFORCER Dashboard Camera
NOTICE: The information and specifications printed in this manual are current at the time of publication. However, the
SECO-LARM policy is one of continual development and improvement. For this reason, SECO-LARM reserves the right to
change specifications without notice. SECO-LARM is also not responsible for misprints or typographical errors.
Copyright © 2014 SECO-LARM U.S.A., Inc. All rights reserved. This material may not be reproduced or copied, in whole or
in part, without the written permission of SECO-LARM.
All other trademarks are the property of their respective owners.
WARRANTY: This SECO-LARM product is warranted against defects in material and workmanship while used in normal
service for one (1) year from the date of sale to the original customer. SECO-LARM’s obligation is limited to the repair or
replacement of any defective part if the unit is returned, transportation prepaid, to SECO-LARM. This Warranty is void if
damage is caused by or attributed to acts of God, physical or electrical misuse or abuse, neglect, repair or alteration,
improper or abnormal usage, or faulty installation, or if for any other reason SECO-LARM determines that such equipment is
not operating properly as a result of causes other than defects in material and workmanship. The sole obligation of
SECO-LARM and the purchaser’s exclusive remedy, shall be limited to the replacement or repair only, at SECO-LARM’s
option. In no event shall SECO-LARM be liable for any special, collateral, incidental, or consequential personal or property
damage of any kind to the purchaser or anyone else.
SECO-LARM
®
U.S.A., Inc.
16842 Millikan Avenue, Irvine, CA 92606
Website: www.seco-larm.com
PITTW5
Phone: (949) 261-2999 | (800) 662-0800
Email: sales@seco-larm.com
MiDC-200GQ_141016.docx
Camera will not turn ON.
Check that the camera battery is fully
charged.
Make sure that the camera is not in
mass storage mode.
Camera will not record video.
Make sure that the camera is in video
mode.
Make sure that there is enough space on
the micro SD card.
Camera will not go into menu when the menu
button is pushed.
Make sure that the camera is not
recording video.
Camera will not save videos or images.
Format the micro SD card.
Camera will not connect to computer.
Select Mass Storage from the camera’s
menu.
Troubleshooting:
FCC Statement: Information to the user: This equipment has been tested and found to comply with the limits for a class
B digital device, pursuant to part 15 of the FCC rules. These limits are designed to provide reasonable protection against
harmful interference when the equipment is operated in a commercial environment. This equipment generates, uses, and
can radiate radio frequency energy and, if not installed and used in accordance with the instruction manual, may cause
harmful interference to radio communications. Operation of this equipment in a residential area is likely to cause harmful
interference in which case the user will be required to correct the interference at his or her own expense.
Also Available from SECO-LARM:
Cigarette Lighter Adapter Socket
DC-ACC-CS1Q
with Low Voltage Circuit Protection
16 SECO-LARM U.S.A., Inc.
 Loading...