

Page 1

FR MANUEL D’INSTRUCTION
EN INSTRUCTION MANUAL
Four compact 40L
Compact oven 40L
FC-40MW
FC-40MB
Page 2

Chère Cliente, Cher Client,
Vous venez d’acquérir un four compact BRANDT et nous vous en remercions.
Nous avons mis dans cet appareil toute notre passion, notre savoir-faire pour qu’il réponde au mieux
à vos besoins. Innovant, performant, nous l’avons conçu pour qu’il soit aussi toujours facile à utiliser.
Vous trouverez également dans la gamme des produits BRANDT, un vaste choix de petit
électroménager, de micro-ondes, de tables de cuisson, de hottes aspirantes, de cuisinières, de
lave-vaisselle, de lave-linge, de sèche-linge, de réfrigérateurs et congélateurs que vous pourrez
coordonner à votre nouveau four compact BRANDT.
Bien entendu, dans un souci permanent de satisfaire le mieux possible vos exigences vis à vis de nos
produits, notre service consommateurs est à votre disposition et à votre écoute pour répondre à
toutes vos questions ou suggestions.
Et connectez-vous aussi sur notre site www.brandt.com où vous trouverez tous nos produits,
ainsi que des informations utiles et complémentaires.
BRANDT
Dans le souci d’une amélioration constante de nos produits, nous nous réservons
le droit d’apporter à leurs caractéristiques techniques, fonctionnelles ou esthétique
toutes modifications liées à leur évolution.
Important : Avant de mettre votre appareil en marche, veuillez lire
attentivement ce guide d’installation et d’utilisation afin de vous
familiariser plus rapidement avec son fonctionnement.
2
Page 3
SOMMAIRE
1/ A L’ATTENTION DE L’UTILISATEUR 4
A. Consignes de sécurité 4
B.
Données techniques 4
C.
Protection de l’environnement 5
2/ INSTALLATION DE VOTRE APPAREIL 5
A. Installation sur le plan de travail 5
B.
Le raccordement électrique 5
C.
Description de votre appareil 5
3/ UTILISATION DE VOTRE APPAREIL 6
A. Avant d’utiliser l’appareil pour la première fois 6
B.
Réglage du thermostat 6
C.
Sélection du mode de cuisson 6
D.
Réglage de la durée de cuisson 7
E.
Conseils d’utilisation 8
4/ ENTRETIEN ET NETTOYAGE DE VOTRE APPAREIL 9
ENGLISH INSTRUCTION MANUAL 10
3
Page 4
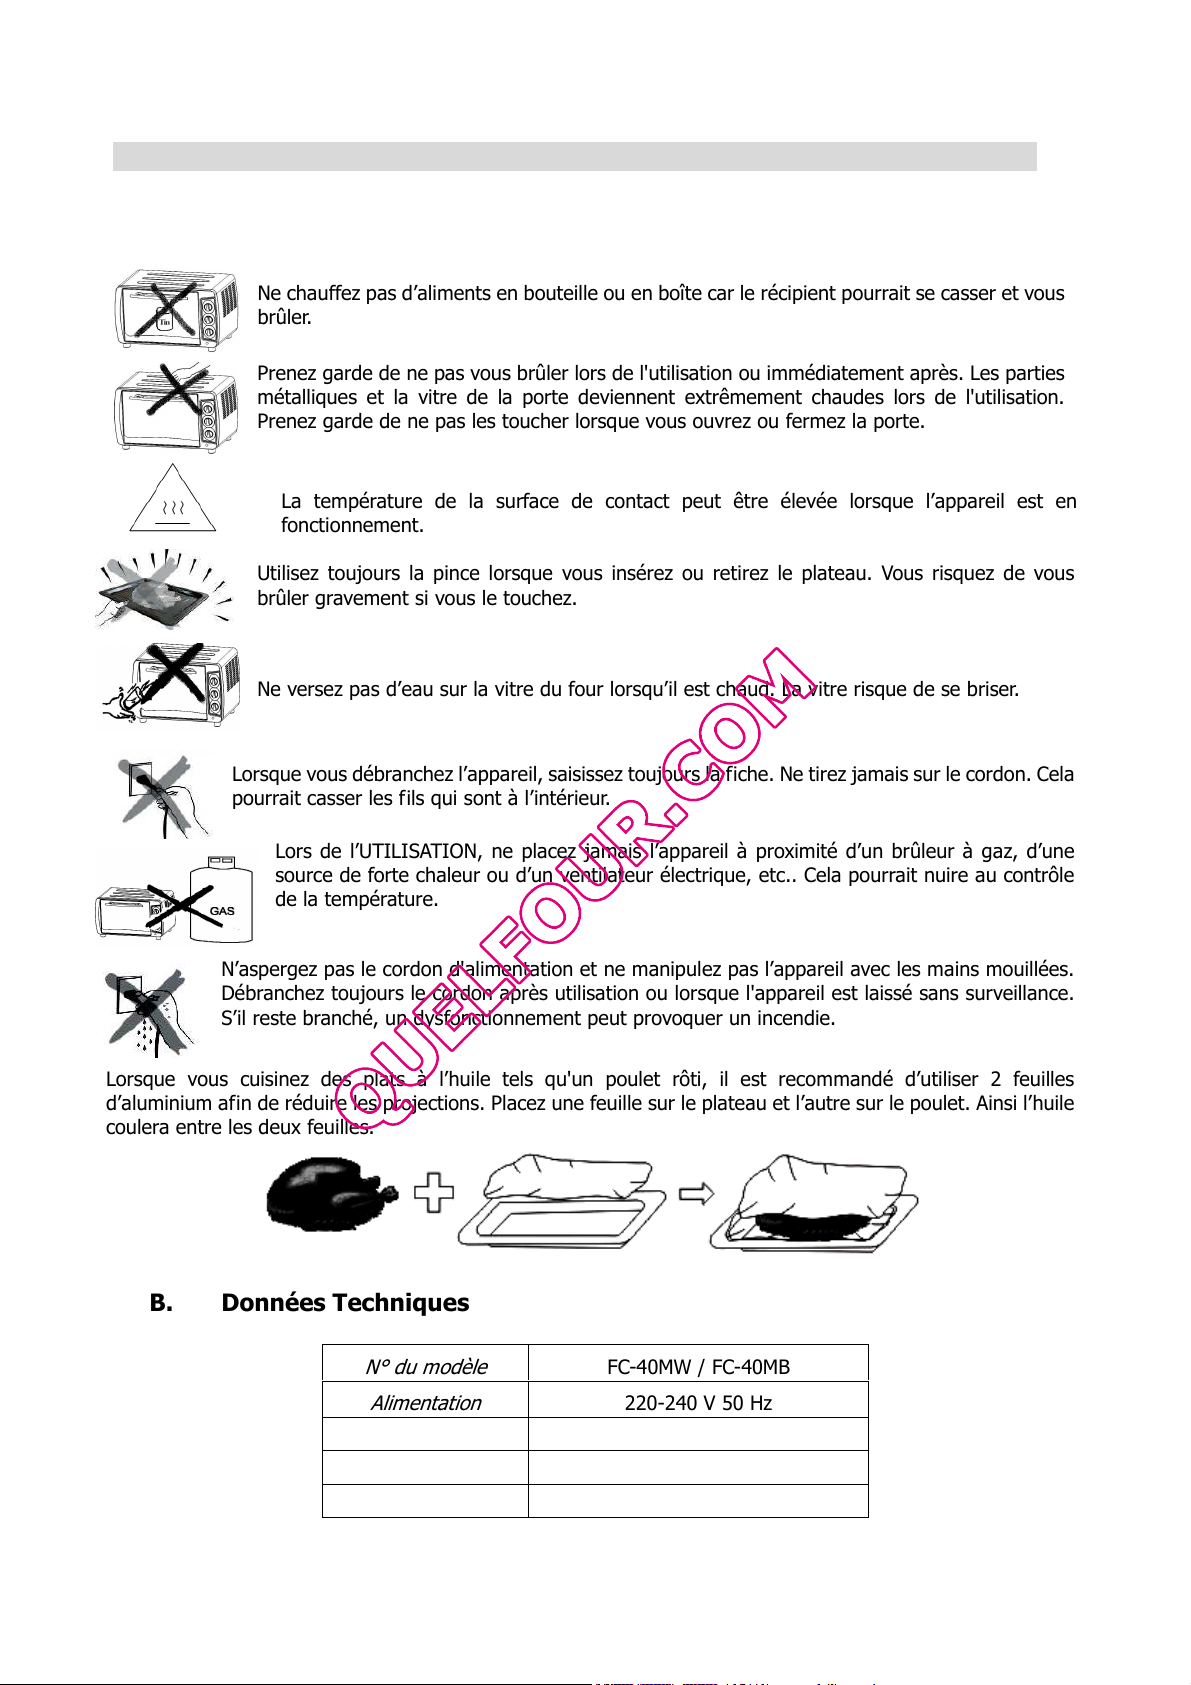
Ne chauffez pas d’aliments en bouteille ou en boîte car le récipient pourrait se casser et vous
e ne pas vous brûler lors de l'utilisation ou immédiatement après. Les parties
métalliques et la vitre de la porte deviennent extrêmement chaudes lors de l'utilisation.
1/ A L’ATTENTION DE L’UTILISATEUR
A. Consignes de sécurité
brûler.
Prenez garde d
Prenez garde de ne pas les toucher lorsque vous ouvrez ou fermez la porte.
La température de la surface de contact peut être élevée lorsque l’appareil est en
fonctionnement.
Utilisez toujours la pince lorsque vous insérez ou retirez le plateau. Vous risquez de vous
brûler gravement si vous le touchez.
Ne versez pas d’eau sur la vitre du four lorsqu’il est chaud. La vitre risque de se briser.
Lorsque vous débranchez l’appareil, saisissez toujours la fiche. Ne tirez jamais sur le cordon. Cela
pourrait casser les fils qui sont à l’intérieur.
Lors de l’UTILISATION, ne placez jamais l’appareil à proximité d’un brûleur à gaz, d’une
source de forte chaleur ou d’un ventilateur électrique, etc.. Cela pourrait nuire au contrôle
de la température.
N’aspergez pas le cordon d'alimentation et ne manipulez pas l’appareil avec les mains mouillées.
Débranchez toujours le cordon après utilisation ou lorsque l'appareil est laissé sans surveillance.
S’il reste branché, un dysfonctionnement peut provoquer un incendie.
Lorsque vous cuisinez des plats à l’huile tels qu'un poulet rôti, il est recommandé d’utiliser 2 feuilles
d’aluminium afin de réduire les projections. Placez une feuille sur le plateau et l’autre sur le poulet. Ainsi l’huile
coulera entre les deux feuilles.
B. Données Techniques
N° du modèle
FC-40MW / FC-40MB
Alimentation
Consommation
Dimensions
Poids net
220-240 V 50 Hz
2100 W
310 x 610 x 440 mm
14.60 Kg
4
Page 5
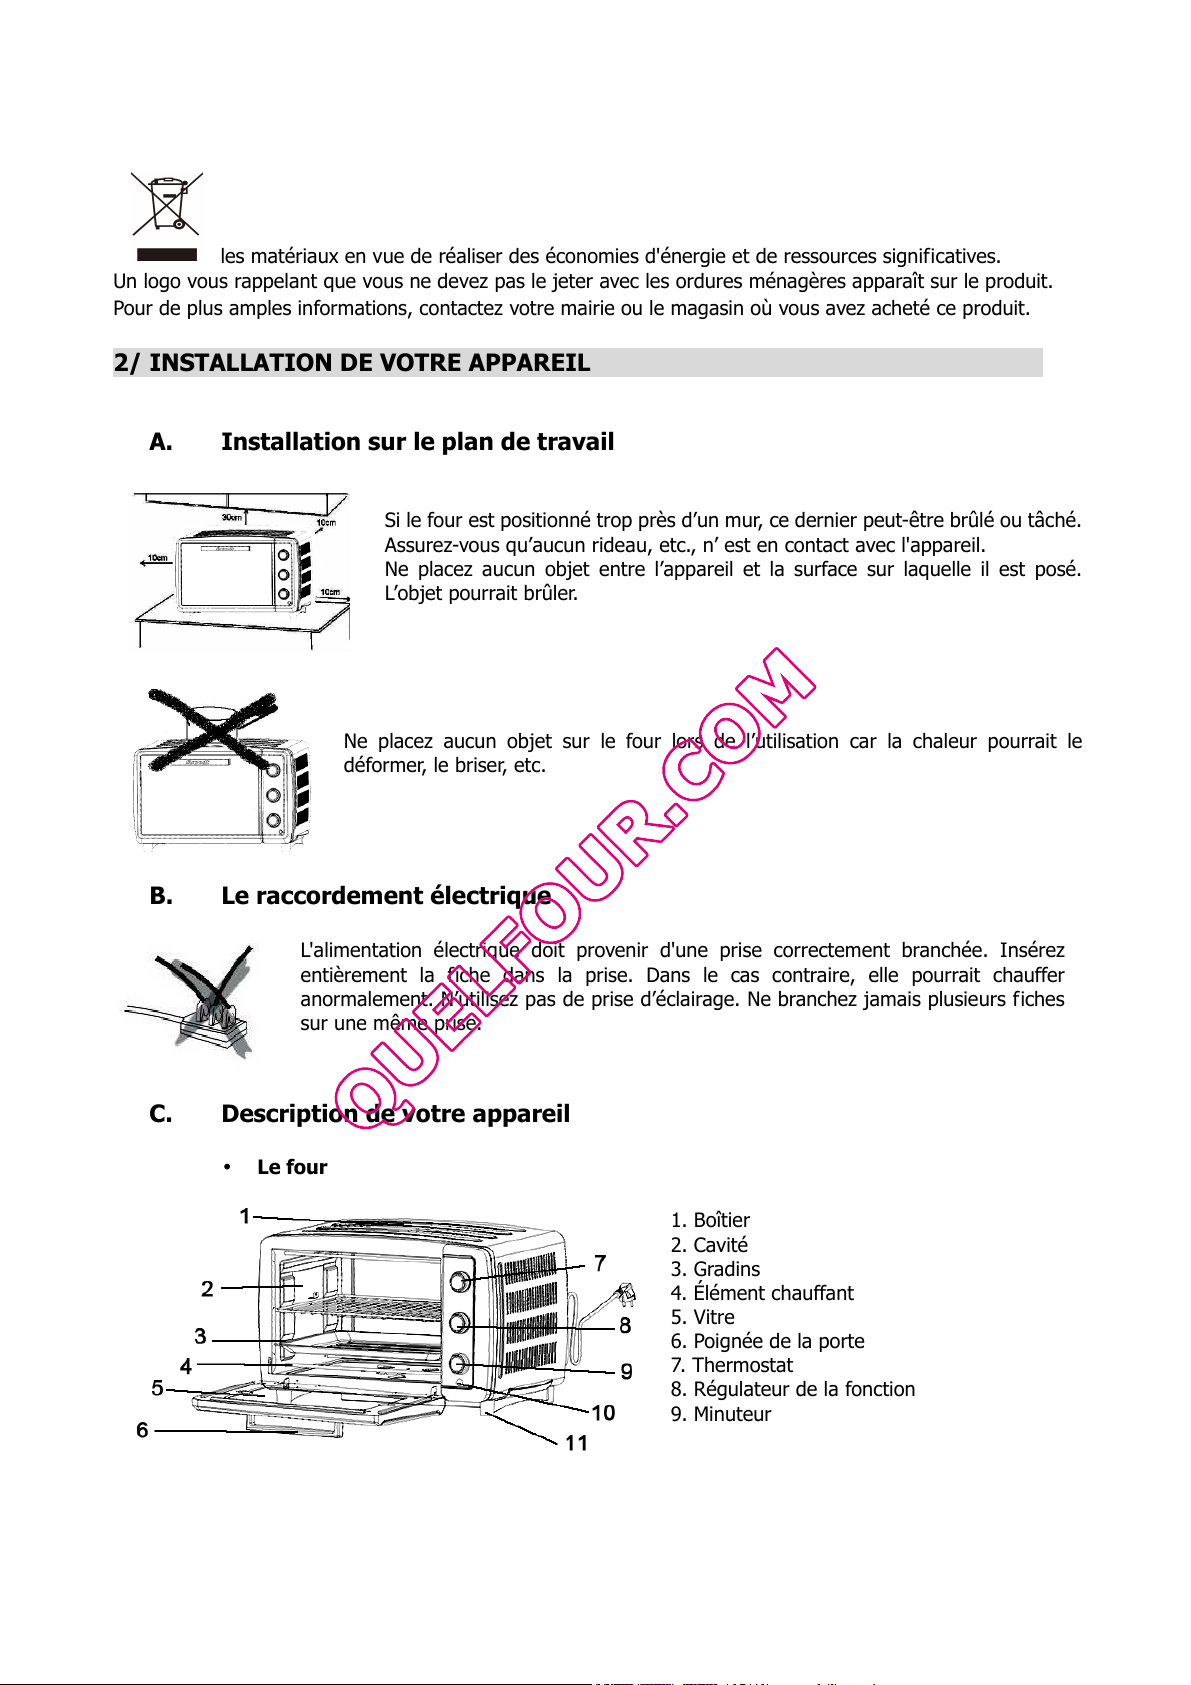
C. Protection de l’environnement
être brûlé ou tâché.
elle il est posé.
Ne placez aucun objet sur le four lors de l’utilisation car la chaleur pourrait le
chée. Insérez
entièrement la fiche dans la prise. Dans le cas contraire, elle pourrait chauffer
anormalement. N’utilisez pas de prise d’éclairage. Ne branchez jamais plusieurs fiches
Arrivé en fin de vie, ce produit ne doit pas être jeté avec les ordures ménagères. Il doit être
apporté dans une déchetterie ou à votre revendeur. Cela permet d'éviter les conséquences
néfastes pour l'environnement et la santé découlant d'une élimination inappropriée et de recycler
les matériaux en vue de réaliser des économies d'énergie et de ressources significatives.
Un logo vous rappelant que vous ne devez pas le jeter avec les ordures ménagères apparaît sur le produit.
Pour de plus amples informations, contactez votre mairie ou le magasin où vous avez acheté ce produit.
2/ INSTALLATION DE VOTRE APPAREIL
A. Installation sur le plan de travail
Si le four est positionné trop près d’un mur, ce dernier peut-
Assurez-vous qu’aucun rideau, etc., n’ est en contact avec l'appareil.
Ne placez aucun objet entre l’appareil et la surface sur laqu
L’objet pourrait brûler.
déformer, le briser, etc.
B. Le raccordement électrique
L'alimentation électrique doit provenir d'une prise correctement bran
sur une même prise.
C. Description de votre appareil
• Le four
1. Boîtier
2. Cavité
3. Gradins
4. Élément chauffant
5. Vitre
6. Poignée de la porte
7. Thermostat
8. Régulateur de la fonction
9. Minuteur
10. Voyant lumineux
11. Pieds
5
Page 6

» puis chauffez
Il se peut qu’il y ait une odeur de fumée et de brûlé lors de la première utilisation, toutefois cela est
• Les accessoires
12. Fourche du tournebroche
13. Poignée du tournebroche
14. Plateau de cuisson
15. Pince
16. Grille
3/ UTILISATION DE VOTRE APPAREIL
A. Avant d’utiliser l’appareil pour la première fois
Chauffez le four à vide.
1. Insérez le plateau et la grille de cuisson.
2. Réglez le sélecteur de mode de cuisson sur « VOÛTE + SOLE » et le thermostat sur « 250 °C
le four à vide pendant environ 10 minutes.
Remarque :
normal.
B. Réglage du thermostat
Réglez la température en fonction du plat que vous allez cuisiner.
Réglez la « Commande de la température » en la tournant dans le
sens des aiguilles d'une montre pour sélectionner la température
appropriée en fonction du plat que vous allez cuisiner.
(températures entre 100 °C et 250 °C)
C. Sélection du mode de cuisson
Sélectionnez l'élément chauffant
approprié en fonction du plat que vous
allez cuisiner.
Chaleur tournante
Gril
Voûte et sole
Voûte
+
Fonction Tournebroche
Chaleur tournante
+
Tournebroche
6
Page 7

• Fonction Chaleur tournante
Equipé d'une fonction convection spéciale ; l'air chaud circule dans la
é du four, la chaleur est donc mieux répartie. Les saveurs des
appropriée
Le voyant lumineux vous permet de vérifier le bon fonctionnement des
dre le four manuellement pendant la cuisson en tournant le minuteur dans le sens
• Fonction Tournebroche
Cette fonction vous permet d'obtenir une cuisson homogène.
totalit
aliments sont ainsi préservées.
1. Installer les fourches du tournebroche
Gauche Droite
2. Installer les fourches 3. Retirer les fourches du tournebroche Poignée du tournebroche
Insérez les fourches du
tournebroche dans l'orifice du
tournebroche, puis installez le
plateau du tournebroche.
Attention à la graisse chaude
Retirez les fourches du tournebroche à
l'aide de la poignée du tournebroche,
puis retirez le plateau du tournebroche.
Utilisez toujours la poignée
du tournebroche pour retirer
les fourches du
tournebroche.
D. Réglage de la durée de cuisson
1. Placez la flèche du minuteur sur la durée de cuisson (en minutes)
pour le plat que vous allez cuisiner.
2. Réglez le Minuteur en le tournant dans le sens des aiguilles d'une montre.
éléments chauffants.
Le four s'éteindra automatiquement à la fin de la durée de cuisson sélectionnée et une alarme sonnera
3. Vous pouvez étein
inverse des aiguilles d’une montre jusqu’à la position « OFF ».
Si l’intérieur du four est sale, il se peut que la cuisson soit légèrement plus longue que d’habitude.
7
Page 8

Temps de cuisson indicatifs
aliments secs
Vous pouvez régler la hauteur du plateau à 4
plats que vous
lorsque vous
préparez un gratin de macaronis et que vous
voulez que la partie supérieure soit plus cuite,
utilisez le premier ou le deuxième gradin. Pour rôtir
un poulet, utilisez le quatrième ou le dernier
Type
d'aliment
Sandwich
Toast
Hamburger
Poisson
Jambon
Saucisse
Gâteau
Steak
Poulet
E. Conseils d’utilisation
•
Plateau de cuisson et grille
Accessoire Aliments (à titre informatif
Plateau de cuisson
Quantité ou
Température (°C) Minuteur (mn)
épaisseur
2-3
2-4
2-3
/
2 cm
3-4
/
1-2 cm
Demi-poulet
200-250
175-200
uniquement)
Ailes de poulet grillées, steak
haché, gratin, gâteau, presque
tous les autres aliments
préparés au four
200
250
200
200
200
150
250
2-3
2-5
3-5
7-10
7-12
8-10
20-30
10-15
30-40
Comment utiliser la pince ?
Remarque :
Nous vous recommandons de l'utiliser comme tiroir à miettes
Grille
Plateau de cuisson + grille
Prenez garde lorsque vous retirez un pudding ou des liquides chauds du four.
• Gradins
niveaux différents en fonction des
souhaitez cuisiner. Par exemple,
Pommes de terre au four,
Aliments produisant du jus, par
exemple poisson cuit au four,
etc..
Poignée et fourches du
tournebroche
gradin.
8
Page 9

4/ ENTRETIEN ET NETTOYAGE DE VOTRE APPAREIL
Nettoyez la surface intérieure et extérieure, le plateau, la grille et la fourche du
vec un chiffon doux (ou une éponge) et un produit à pH neutre. Rincez
ensuite à l’eau claire. Afin de ne pas rayer la surface intérieure du four et de protéger le
plateau, la grille et la fourche du tournebroche, n’utilisez pas de brosse dure ou
N’utilisez pas de produits toxiques ou abrasifs tels que de l’alcool à brûler, de la poudre
Débranchez l’appareil et laissez-le refroidir avant de le nettoyer.
tournebroche a
équivalent lors du nettoyage.
abrasive ou du solvant.
Si le cordon d’alimentation est endommagé, il doit être remplacé par le fabricant, le distributeur ou un
professionnel qualifié afin d’éviter tout risque.
FagorBrandt SAS - Locataire-gérant - SAS au capital de 20.000.000 euros siège social : 7 rue Henri Becquerel - 92500
Rueil-Malmaison - CS Nanterre sous le numéro 440 303 196
9
Page 10

Dear Customer,
You have just purchased a BRANDT compact oven and we would like to thank you.
We have placed in this appliance all our passion and know-how so that it best meets your needs.
Innovation and performance: we designed it so that it is always easy to use.
In the line of Brandt products, you will also find a wide range of small domestic appliances,
microwave ovens, hobs, ventilation hoods, electronic cookers, dishwashers, refrigerators and
freezers that can be coordinated with your new BRANDT compact oven.
Of course, in an ongoing effort to satisfy your demands with regard to our products as best as
possible, our after-sales service department is at your disposal and ready to listen in order to
respond to all of your questions and suggestions.
You can also log on to our web site at www.brandt.com where you will find all our products, as
well as additional, useful information.
BRANDT
As part of our commitment to constantly improving our products, we reserve the right to make
changes to their technical, functional and/or esthetic properties in line with their technological
development.
Attention: Before installing and using your appliance, please carefully read
this Guide to Installation and Use, which will allow you to quickly familiarise
yourself with its operation.
10
Page 11

TABLE OF CONTENTS P
1/ INFORMATION FOR THE USER 12
A. Safety recommendations 12
B.
Technical data 12
C. Protecting the environment 13
2/ INSTALLING YOUR APPLIANCE 13
A. Countertop installation 13
B.
Electrical connection 13
C. Description of your appliance 13
3/ USING YOUR APPLIANCE 14
A. Before using your oven 14
B.
Temperature control 14
C.
Cooking function selection 14
D.
Cooking time setting 15
E.
Use recommendations 16
4/ CARING FOR AND CLEANING YOUR APPLIANCE 17
11
Page 12
1/ INFORMATION FOR THE USER
A. Safety recommendations
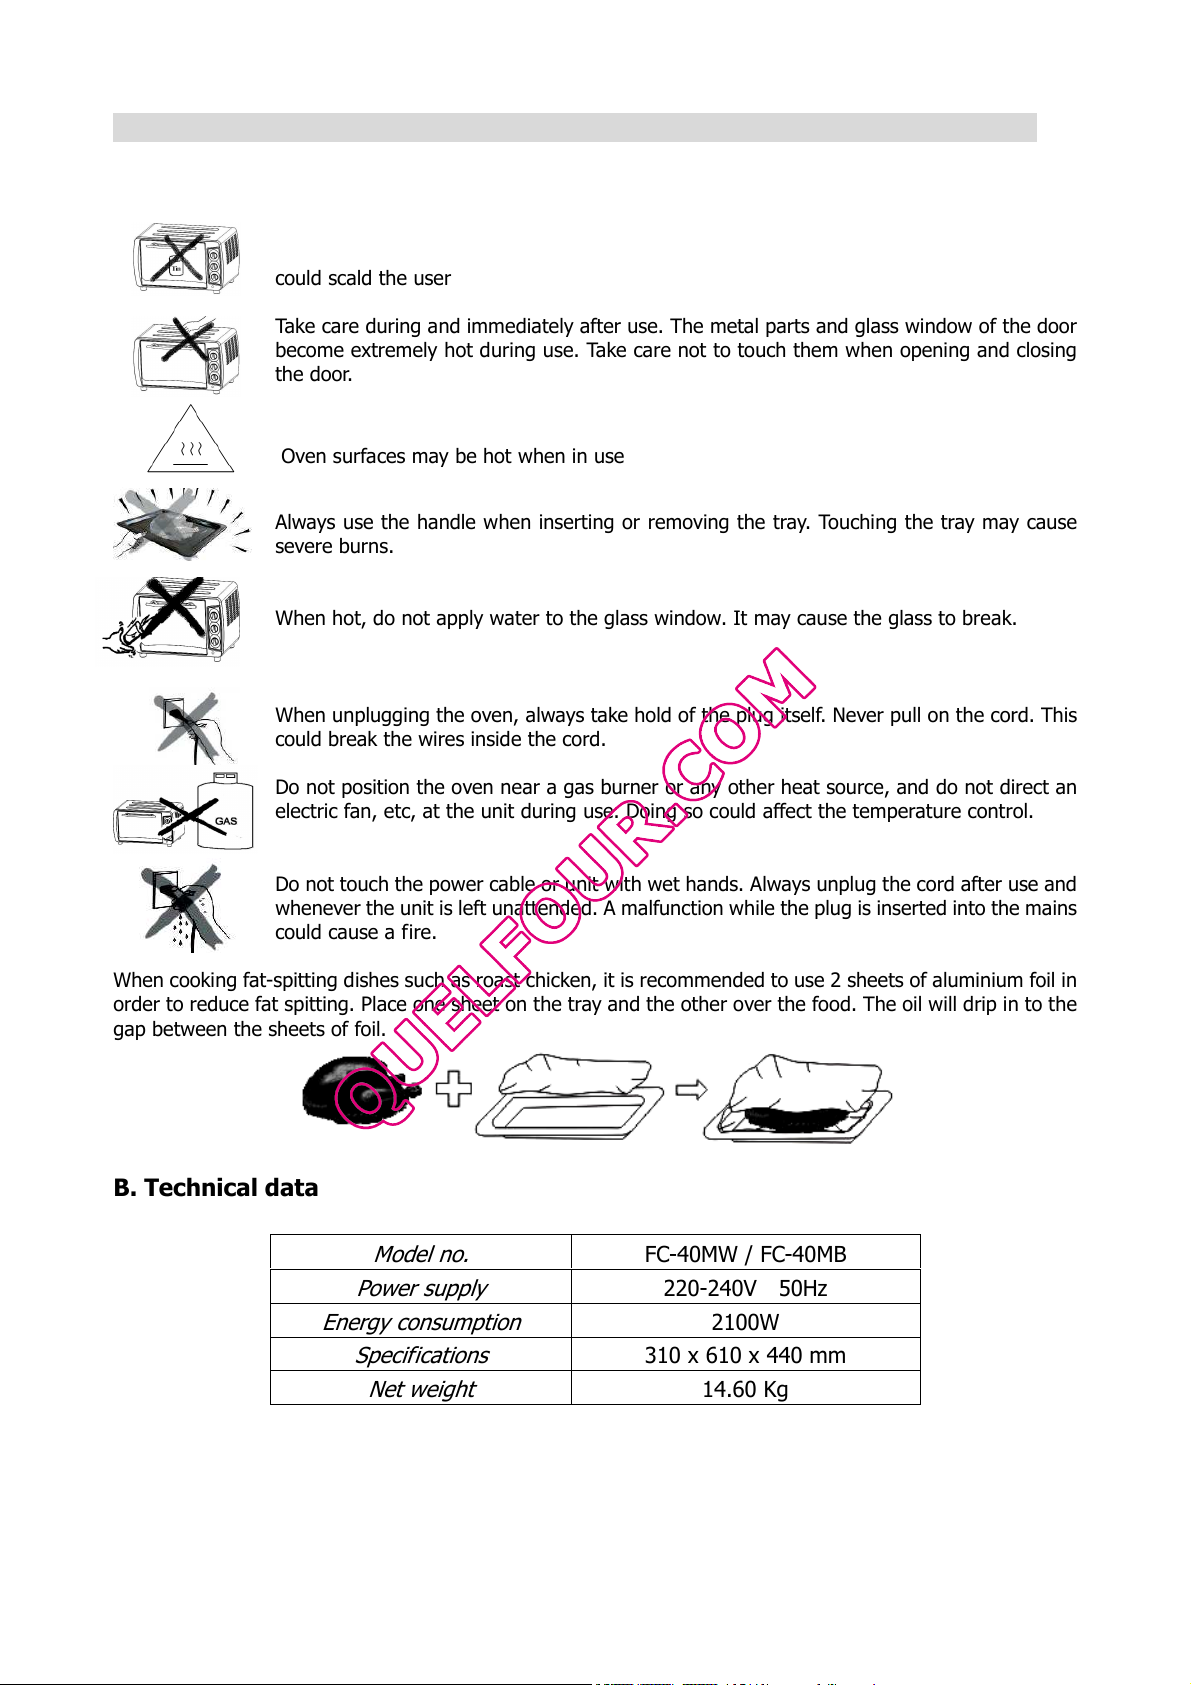
Food cannot be heated directly in a bottle or tin as the bottle or tin could break and contents
could scald the user
Take care during and immediately after use. The metal parts and glass window of the door
become extremely hot during use. Take care not to touch them when opening and closing
the door.
Oven surfaces may be hot when in use
Always use the handle when inserting or removing the tray. Touching the tray may cause
severe burns.
When hot, do not apply water to the glass window. It may cause the glass to break.
When unplugging the oven, always take hold of the plug itself. Never pull on the cord. This
could break the wires inside the cord.
Do not position the oven near a gas burner or any other heat source, and do not direct an
electric fan, etc, at the unit during use. Doing so could affect the temperature control.
Do not touch the power cable or unit with wet hands. Always unplug the cord after use and
whenever the unit is left unattended. A malfunction while the plug is inserted into the mains
could cause a fire.
When cooking fat-spitting dishes such as roast chicken, it is recommended to use 2 sheets of aluminium foil in
order to reduce fat spitting. Place one sheet on the tray and the other over the food. The oil will drip in to the
gap between the sheets of foil.
B. Technical data
Model no.
Power supply
Energy consumption
Specifications
Net weight
FC-40MW / FC-40MB
220-240V 50Hz
2100W
310 x 610 x 440 mm
14.60 Kg
12
Page 13
C. Protecting the environment
At the end of its working life, the product must not be disposed with household waste. It must be
taken to a special local authority waste collection centre or to a company providing this service.
Disposing household appliances separately avoids possible negative effects on the environment and
health and enables the constituent materials to be recycled which saves energy and resources.
To remind you that you must dispose of this appliance correctly the symbol shown above appears on
the product warning you not to dispose of it with household waste.
For further information, contact your local authority or the shop where you bought the product.
2/ INSTALLING YOUR APPLIANCE
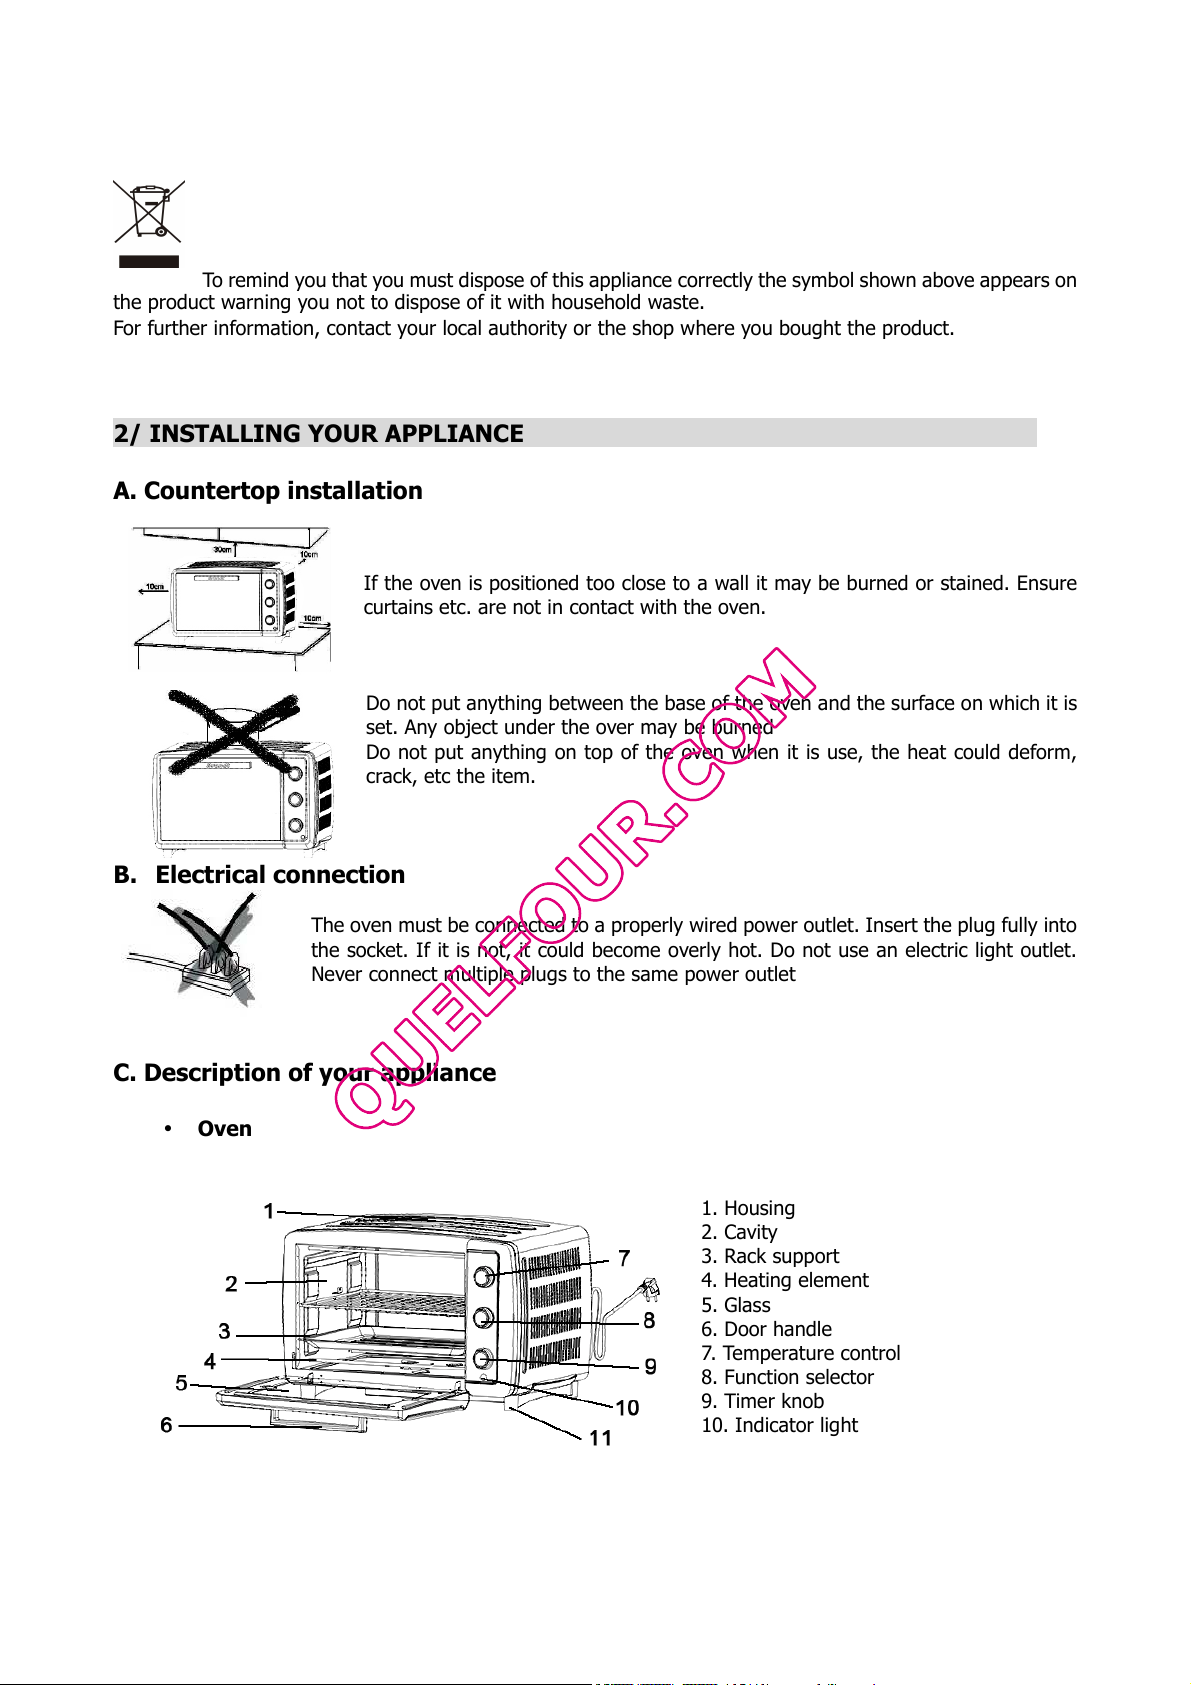
A. Countertop installation
If the oven is positioned too close to a wall it may be burned or stained. Ensure
curtains etc. are not in contact with the oven.
Do not put anything between the base of the oven and the surface on which it is
set. Any object under the over may be burned
Do not put anything on top of the oven when it is use, the heat could deform,
crack, etc the item.
B. Electrical connection
The oven must be connected to a properly wired power outlet. Insert the plug fully into
the socket. If it is not, it could become overly hot. Do not use an electric light outlet.
Never connect multiple plugs to the same power outlet
C. Description of your appliance
• Oven
1. Housing
2. Cavity
3. Rack support
4. Heating element
5. Glass
6. Door handle
7. Temperature control
8. Function selector
9. Timer knob
10. Indicator light
11. Stand
7
Page 14

• Accessories
12. Rotisserie fork
13. Rotisserie handle
14. Baking tray
15. Tray handle
16. Wire rack
3/ USING YOUR APPLIANCE
A. Before using the oven for the first time
Heat the oven with nothing inside it.
1. Insert the tray and wire rack.
2. Set the cooking function switch to "UPPER & LOWER", set the temperature control knob to "250 " and ℃
heat the empty oven for about 10 minutes.
There may be some smoke and a burning smell at first, but this is not a malfunction.
B. Temperature control
Set the Temperature Control Dial to the suitable temperature for the dish you are
cooking.
Set the “Temperature Control” by turning the knob clockwise to the suitable
temperature for the dish you are cooking. (Temperature Control range up to 250°C)
C. Cooking function selection
Select the suitable cooking function for the dish you are cooking.
Upper & Lower Heating
+
Convection Function
Convection & Rotisserie Function
Upper Heating
+
Convection Function
Lower & Lower Heating
Upper Heating
+
Rotisserie Function
Lower & Lower Heating
+
13
Page 15

Fan Function
Type of food
Number or thickness
Temperature(
°C)
Timer (min.)
The fan function circulates the hot air to provide faster and evenly cooked food. Also
helps to maintain original flavour.
Rotisserie Function
This function allows even cooking.
Use with Rotisserie Forks
Installing Rotisserie Forks
Fit the rotisserie forks in the rotisserie holes, and then attach it to the rotisserie tray.
Removing Rotisserie Forks
Use the rotisserie handle to remove the rotisserie forks from the rotisserie tray, and
then remove it from the rotisserie hole.
Rotisserie Handle
Always use the rotisserie handle to remove the rotisserie forks.
Beware of hot dripping fat!
D. Cooking time setting
1. Move the “Timer” arrow to the number which indicates the cooking time (minutes)
depending on the dish you are cooking.
2. Set the “Timer” by turning it clockwise.
You can check whether the heating elements are working or not by looking at the front
Indicator light.
The oven will turn off automatically at the end of the selected time and a bell will ring.
3. The oven can be turned off manually during cooking by turning the “Timer” anti-clockwise to the "OFF"
position.
If the inside of the oven is dirty, cooking may take slightly longer than usual.
Baking times
Sandwich
Toast
Hamburger
Fish
Ham
Sausage
Cake
Steak
Chicken
2-3 pcs
2-4 pcs
2-3 pcs
/
2 cm
3-4 pcs
/
1-2 cm
Half chicken
14
200
250
200
200
200
200-250
150
250
175-200
2-3
2-5
3-5
7-10
7-12
8-10
20-30
10-15
30-40
Page 16
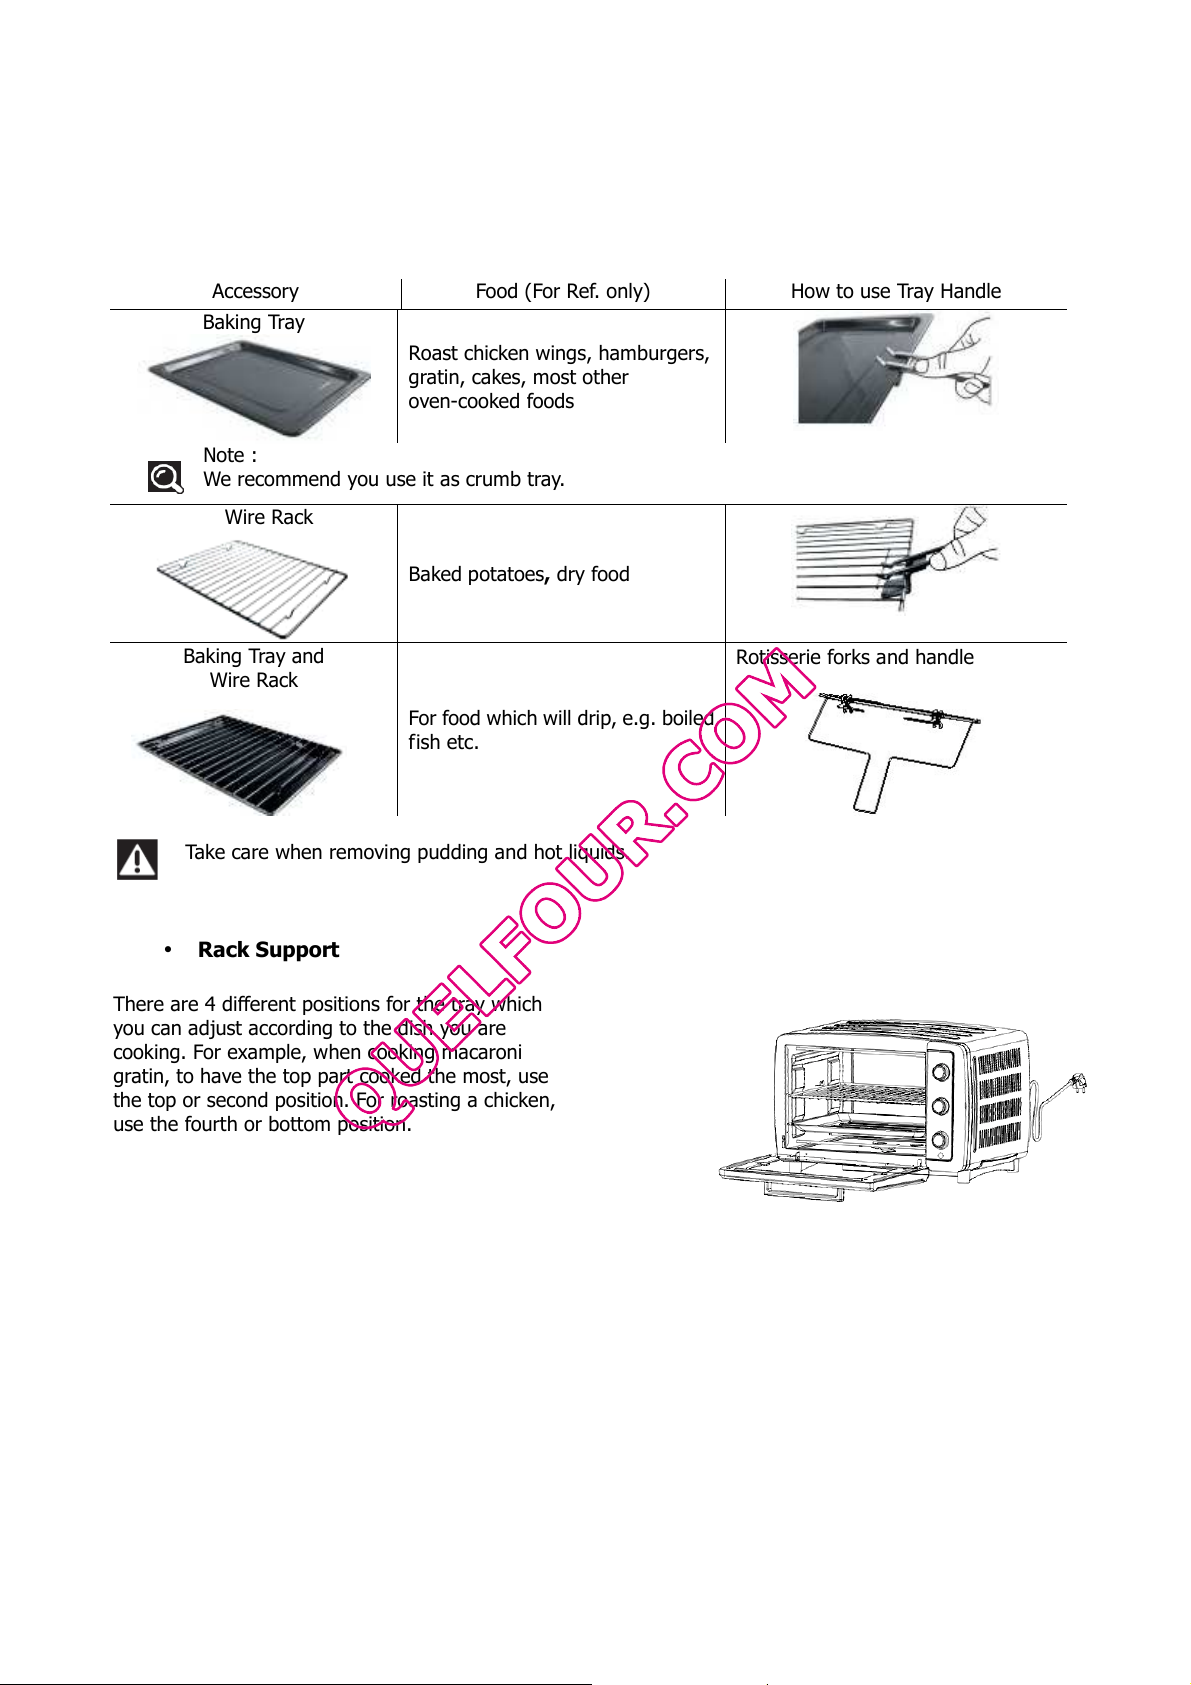
dry food
E. Use recommendations
• Baking Tray and Wire Rack
Accessory Food (For Ref. only) How to use Tray Handle
Baking Tray
Roast chicken wings, hamburgers,
gratin, cakes, most other
oven-cooked foods
Note :
We recommend you use it as crumb tray.
Wire Rack
Baking Tray and
Wire Rack
Baked potatoes,
Rotisserie forks and handle
For food which will drip, e.g. boiled
fish etc.
Take care when removing pudding and hot liquids.
• Rack Support
There are 4 different positions for the tray which
you can adjust according to the dish you are
cooking. For example, when cooking macaroni
gratin, to have the top part cooked the most, use
the top or second position. For roasting a chicken,
use the fourth or bottom position.
15
Page 17

4/ CLEANING & MAINTENANCE
Unplug and allow the oven to cool completely before cleaning.
When cleaning, use a soft cloth (or sponge) and neutral cleaner on the interior and
exterior surfaces of the oven, tray, rack, and rotisserie fork. Then rinse with clean water.
Do not use a hard brush or any others cleaners to avoid scratching or damaging the
interior surface of the oven, tray, wire rack and the rotisserie fork.
Do not use toxic or abrasive cleaners such as gasoline, polishing powder, solvent.
For safety reasons if the power cable is damaged, it must be replaced by the manufacturer
or its servicing company or a qualified person.
FagorBrandt SAS – Management Company - SAS with a capital of 20,000,000 euros - Head Office: 7 rue Henri Becquerel -
92500 Rueil-Malmaison - RCS Nanterre 440 303 196
16
 Loading...