

Sears 30750,30727 Service Manual
Sears Canada Service Manual
Treadmills
Models
30750, 30727

Table of Contents
>> Table of Contents
Section One Section Two
Safety Instructions
Recommended Tools
Parts Diagrams Resetting the Incline Motor
>> 30750
>> 30727
Maintenance
>> Preventative
3
5
6
7
8
>> Lubrication 9
>> Tensioning & Alignment 10
Proper Heart Rate Usage
11
Horizon Fitness “5-Step” Diagnostic Process
Wiring Diagrams and Schematics
Voltage Checks
Engineering Mode
Section Three
Troubleshooting
Exploded Drawings
>> 30750
>> 30727
13
15
18
19
26
28
43
44
2 | 2008 Sears CA Treadmill Service Manual [rev 1.0]

Section One | Safety Instructions
Safety Instructions
>> Treadmills
WARNING STATEMENTS INDICATE A PARTICULARLY DANGEROUS ACTIVITY.
YOU SHOULD BE EXTREMELY CAUTIOUS WHEN DOING THE FOLLOWING:
• Removing power from the treadmill, or removing the power cord from the wall outlet. Always ensure
that the treadmill is unplugged from the wall outlet when you inspect or adjust the treadmill, or when
you isolate, remove, or replace a treadmill component.
• Removing the motor cover exposes high voltage components and potentially dangerous machinery.
Exercise extreme caution when you perform maintenance procedures with the motor cover removed.
• During service operations you will be very close to moving machinery and high voltage components.
When you perform maintenance procedures with the hood removed, remove jewelry (especially from
ears and neck), tie up long hair, remove neckties, and do not wear loose clothing.
• When the treadmill is operating, the capacitor will hold a lethal amount of charge. Do not touch the
capacitor as serious injury or death might result.
• When the treadmill is turned off and the power cord is removed from the wall outlet, the capacitor will
hold voltage for 30-60 seconds. Allow the capacitor to discharge for a period of one minute before you
touch or work near the capacitor. Do not attempt to discharge the capacitor by any other means.
• Exercise caution when touching any wire or electrical component during treadmill operation.
• When it is necessary to lift the treadmill, ensure that the treadmill has adequate support. Do not lift the
treadmill by the front.
SAFETY GUIDELINES YOU SHOULD KNOW AND FOLLOW INCLUDE:
• Read the owner’s manual and follow all operation instructions.
• Operate the treadmill on a solid, level surface. Locate the rear of the treadmill at least four feet from
walls or furniture. Keep the area behind the treadmill clear.
• Visually check the treadmill before beginning service or maintenance operations. If it is not completely
assembled or is damaged in any way, exercise extreme caution while operating and checking the
treadmill.
• When operating the treadmill, do not wear loose clothing. Do not wear shoes with heels or leather soles.
Check the soles of your shoes and remove any embedded stones. Tie long hair back.
• Use care when getting on or off the treadmill. Use the handrails whenever possible. Do not get on or off
the treadmill when the running belt is moving.
• Before starting the running belt, straddle the belt by placing your feet firmly on the guide rails of the
treadmill. You should also step off the belt and onto the guide rails of the treadmill after turning off the
running belt.
• Do not rock the unit. Do not stand or climb on the handrails, electronic console, or motor cover.
• Do not set anything on the handrails, electronic console, or motor cover. Never place liquids on any part
of the treadmill.
• To prevent electrical shock, keep all electrical components, such as the drive motor, power cord, and
circuit breaker away from water and other liquids.
• Do not use accessory attachments that are not recommended by the manufacturer-such attachments
might cause injuries.
• Turn off the treadmill when adjusting or working near the rear roller. Do not make any adjustments to
the running belt when someone is standing on the machine.
• Keep all loose items away from the treadmill running surface. A treadmill running belt will not stop
immediately if an object becomes caught in the belt or rollers.
2008 Sears CA Treadmill Service Manual [rev 1.0] | 3
Section One | Safety Instructions
WA RN IN G
WA RN IN G
Connect this unit to a properly grounded, dedicated 20-amp outlet only.
See grounding instructions.
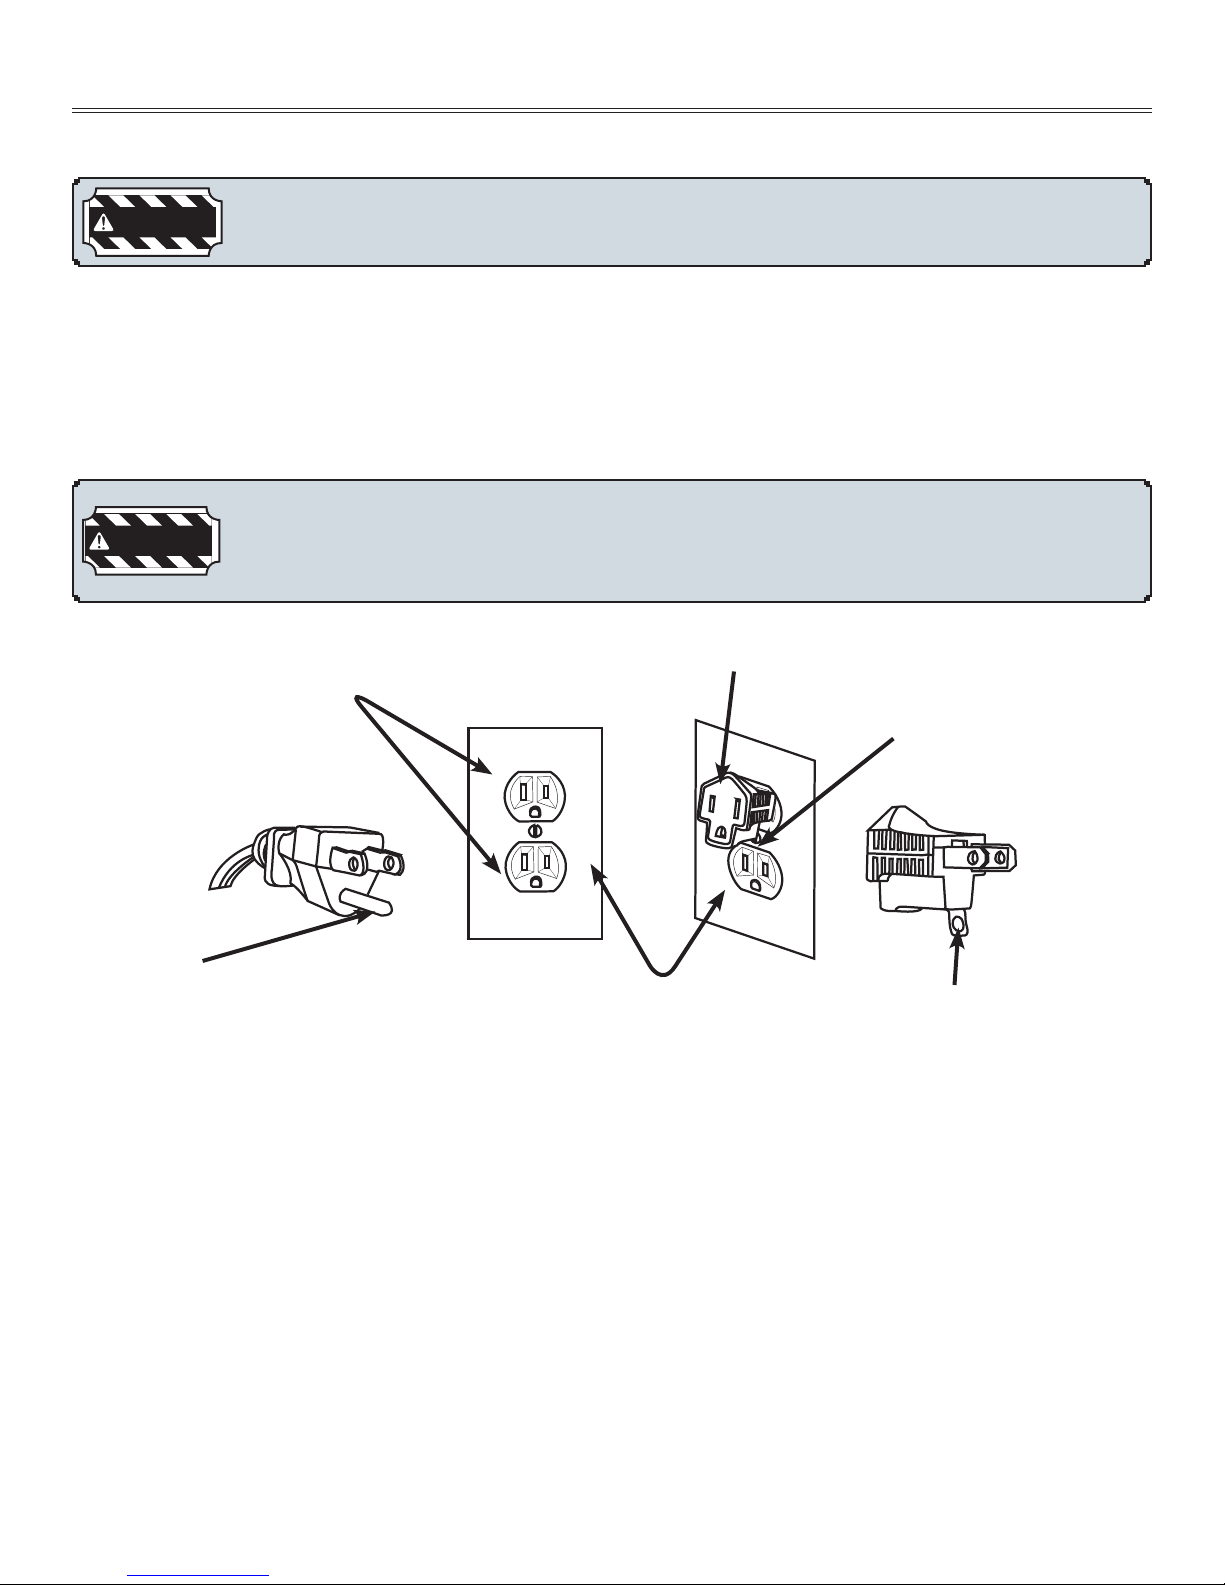
GROUNDING INSTRUCTIONS
This product must be grounded. If a treadmill should malfunction or breakdown, grounding provides
a path of least resistance for electrical current to reduce the risk of electrical shock. This product is
equipped with a cord having an equipment-grounding conductor and a grounding plug. The plug must
be plugged into an appropriate outlet that is properly installed and grounded in accordance with local
codes and ordinances.
Improper connection of the equipment-grounding conductor can result in a risk of electric
shock. Check with a qualied electrician if you are in doubt as to whether the product is
properly grounded. Do not modify the plug provided with the product, if it will not t in
the outlet; have a proper outlet installed by a qualied electrician.
Grounded Outlet
Grounding Pin
Grounded Outlet Box
SAFETY TIPS
Adapter
Metal Screw
TAS For
Grounding Screw
• Never use the treadmill before securing the safety tether clip to your clothing.
• If you experience chest pains, nausea, dizziness, or shortness of breath, stop exercising
immediately and consult your physician before continuing.
• Do not wear clothes that might catch on any part of the treadmill.
• Keep power cord away from heated surfaces.
• Keep children off of treadmill at all times.
• Do not use treadmill outdoors.
• Unplug treadmill before moving it.
• Do not remove the treadmill motor cover or roller covers.
• Treadmill should be plugged into a dedicated 20 amp circuit for optimal performance.
4 | 2008 Sears CA Treadmill Service Manual [rev 1.0]

Section One | Recommended Tools
>> Recommended Tools and Equipment
The following list is a summary of the tools and equipment required by the procedures in this manual.
Tools are not supplied by Horizon Fitness.
• Phillips screwdrivers
• Anti-static wrist strap (when handling electronic parts)
• Flat-head screwdrivers
• Digital multi-meter
• Drive belt tension gauge
• Allen wrench set (Metric)
• Open-end wrenches of assorted sizes (Metric)
• Clamp-on amp meter
• 1/2” drive ratchet and sockets of assorted sizes
• Blue Thread Lock
• Cable ties
• *Motor commutator stone
• Needle nose pliers
• Damp cloth
• Rubber mallet
• Hammer
• Drop cloth
• Ruler
• Snap ring pliers
• Wire cutters
*Available through Horizon Fitness at Cost.
2008 Sears CA Treadmill Service Manual [rev 1.0] | 5
Section One | Parts Diagrams
CONTROL PANEL
SAFTEY KEY PLACEMENT
CONSOLE MAST
MOTOR COVER
RUNNING BELT/RUNNING DECK
SIDE RAIL
ROLLER END CAP
REAR ROLLER
ADJUSTMENT BOLTS
CONSOLE
ON/OFF SWITCH
CIRCUIT BREAKER
POWER CORD
TRANSPORT WHEEL
WATER BOTTLE POCKET
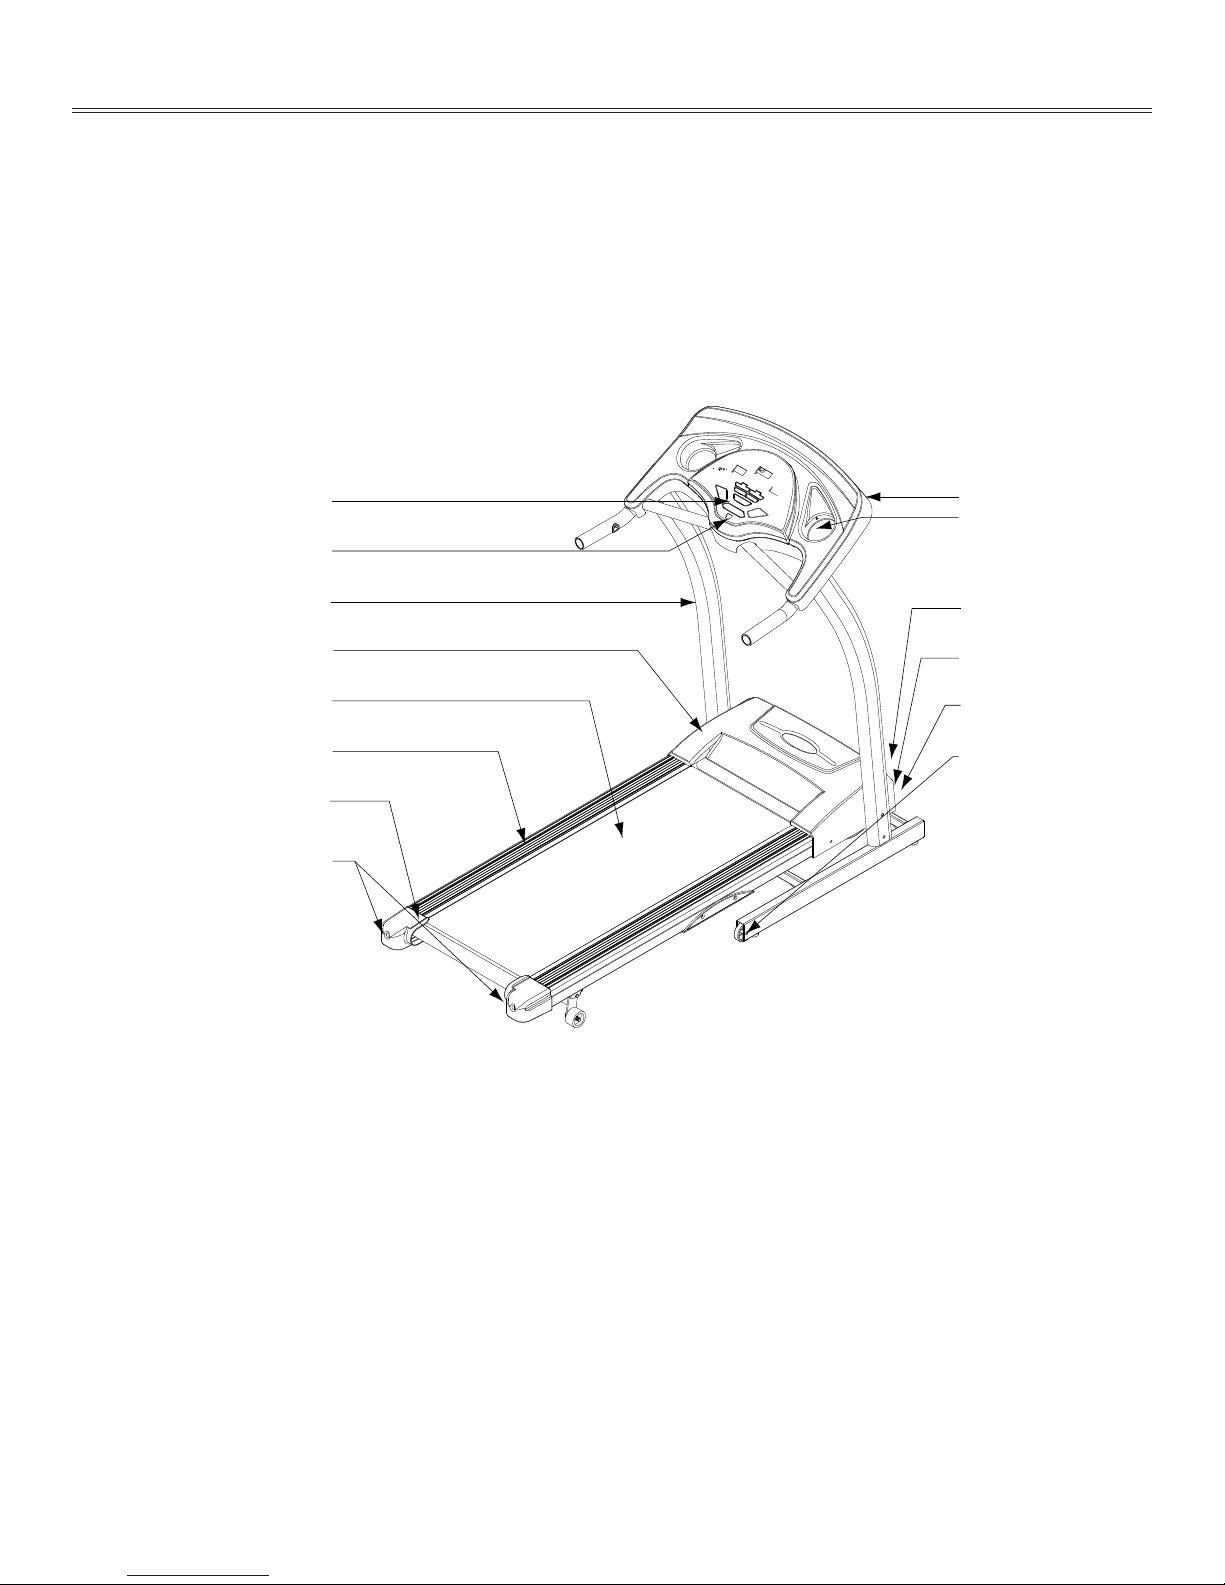
>> Treadmill Parts Diagram | 30750
Control Panel
Safety Key Placement
Console Mast
Motor Cover
Running Belt | Running Deck
Side Rail
Roller End Cap
Rear Roller
Adjustment Bolts
Console
Water Bottle Pocket
On | Off Switch
Circuit Breaker
Power Cord
Transport Wheel
6 | 2008 Sears CA Treadmill Service Manual [rev 1.0]

READING RACK
SPEAKERS
WATER BOTTLE HOLDER
GRIP PULSE HANDRAILS
CONSOLE MAST COVER
ON/OFF SWITCH
CIRCUIT BREAKER
ORTHOFLEX GEL CUSHION
TRANSPORT WHEEL
POWER CORD
CONSOLE
LCD DISPLAY
SAFETY KEY PLACEMENT
HEADPHONE JACK
HANDLEBAR
MOTOR COVER
RUNNING BELT / RUNNING DECK
SIDE RAIL
ROLLER END CAP
CONSOLE MAST
REAR ROLLER
ADJUSTMENT BOLTS
FOOT LOCK LATCH
SUPPORT BAR
AUDIO IN JACK
MP3 POCKET
CONSOLE FAN
>> Treadmill Parts Diagram | 30727
Section One | Parts Diagrams
Speakers
Water Bottle Pocket
Reading Rack
Grip Pulse Handrails
Console Mast Cover
Support Bar
On | Off Switch
Circuit Breaker
Power Cord
Orthoflex Gel Cushion
Transport Wheel
LCD Display
Audio In Jack
Console
MP3 Pocket
Console Fan
Handlebar
Safety Key Placement
Headphone Jack
Console Mast
Motor Cover
Foot Lock Latch
Running Belt | Running Deck
Side Rail
Roller End Cap
Rear Roller
Adjustment Bolts
2008 Sears CA Treadmill Service Manual [rev 1.0] | 7

Section One | Maintenance
Maintenance
>> Treadmill Preventative Maintenance Procedures
Cleanliness of your treadmill and its operation environment will keep maintenance problems and service
calls to a minimum. For this reason, we recommend that the following preventive maintenance schedule
be followed.
AFTER EACH USE (DAILY)
Clean and inspect, following these steps:
• Turn off the treadmill with the on/off switch, then unplug the power cord at the wall outlet.
• Wipe down the running belt, deck, motor cover, and console casing with a damp cloth. Never use
solvents, as they can cause damage to the treadmill.
• Inspect the power cord. If the power cord is damaged, contact Horizon Fitness.
• Make sure the power cord is not underneath the treadmill or in any other area where it can become
pinched or cut.
• Check the tension and alignment of the running belt. Make sure that the treadmill belt will not damage
any other components on the treadmill by being misaligned.
EVERY WEEK
Clean underneath the treadmill, following these steps:
• Turn off the treadmill with the on/off switch, then unplug the power cord at the wall outlet.
• Fold the treadmill into the upright position, making sure that the lock latch is secure.
• Move the treadmill to a remote location.
• Wipe or vacuum any dust particles or other objects that may have accumulated underneath the
treadmill.
• Return the treadmill to its previous position.
EVERY MONTH - IMPORTANT!
• Turn off the treadmill with the on/off switch, then unplug the power cord at the wall outlet.
• Inspect all assembly bolts of the machine for proper tightness.
• Turn off the treadmill and wait 60 seconds.
• Remove the motor cover. Wait until ALL LED lights turn off.
• Clean the motor and lower board area to eliminate any lint or dust particles that may have
accumulated. Failure to do so may result in premature failure of key electrical components.
• Vacuum and wipe down the belt with a damp cloth. Vacuum any black/white particles that may
accumulate around the unit. These particles may accumulate from normal treadmill use.
Note: Maintenance is NOT covered under manufacturer’s warranty.
8 | 2008 Sears CA Treadmill Service Manual [rev 1.0]
Section One | Maintenance
Maintenance
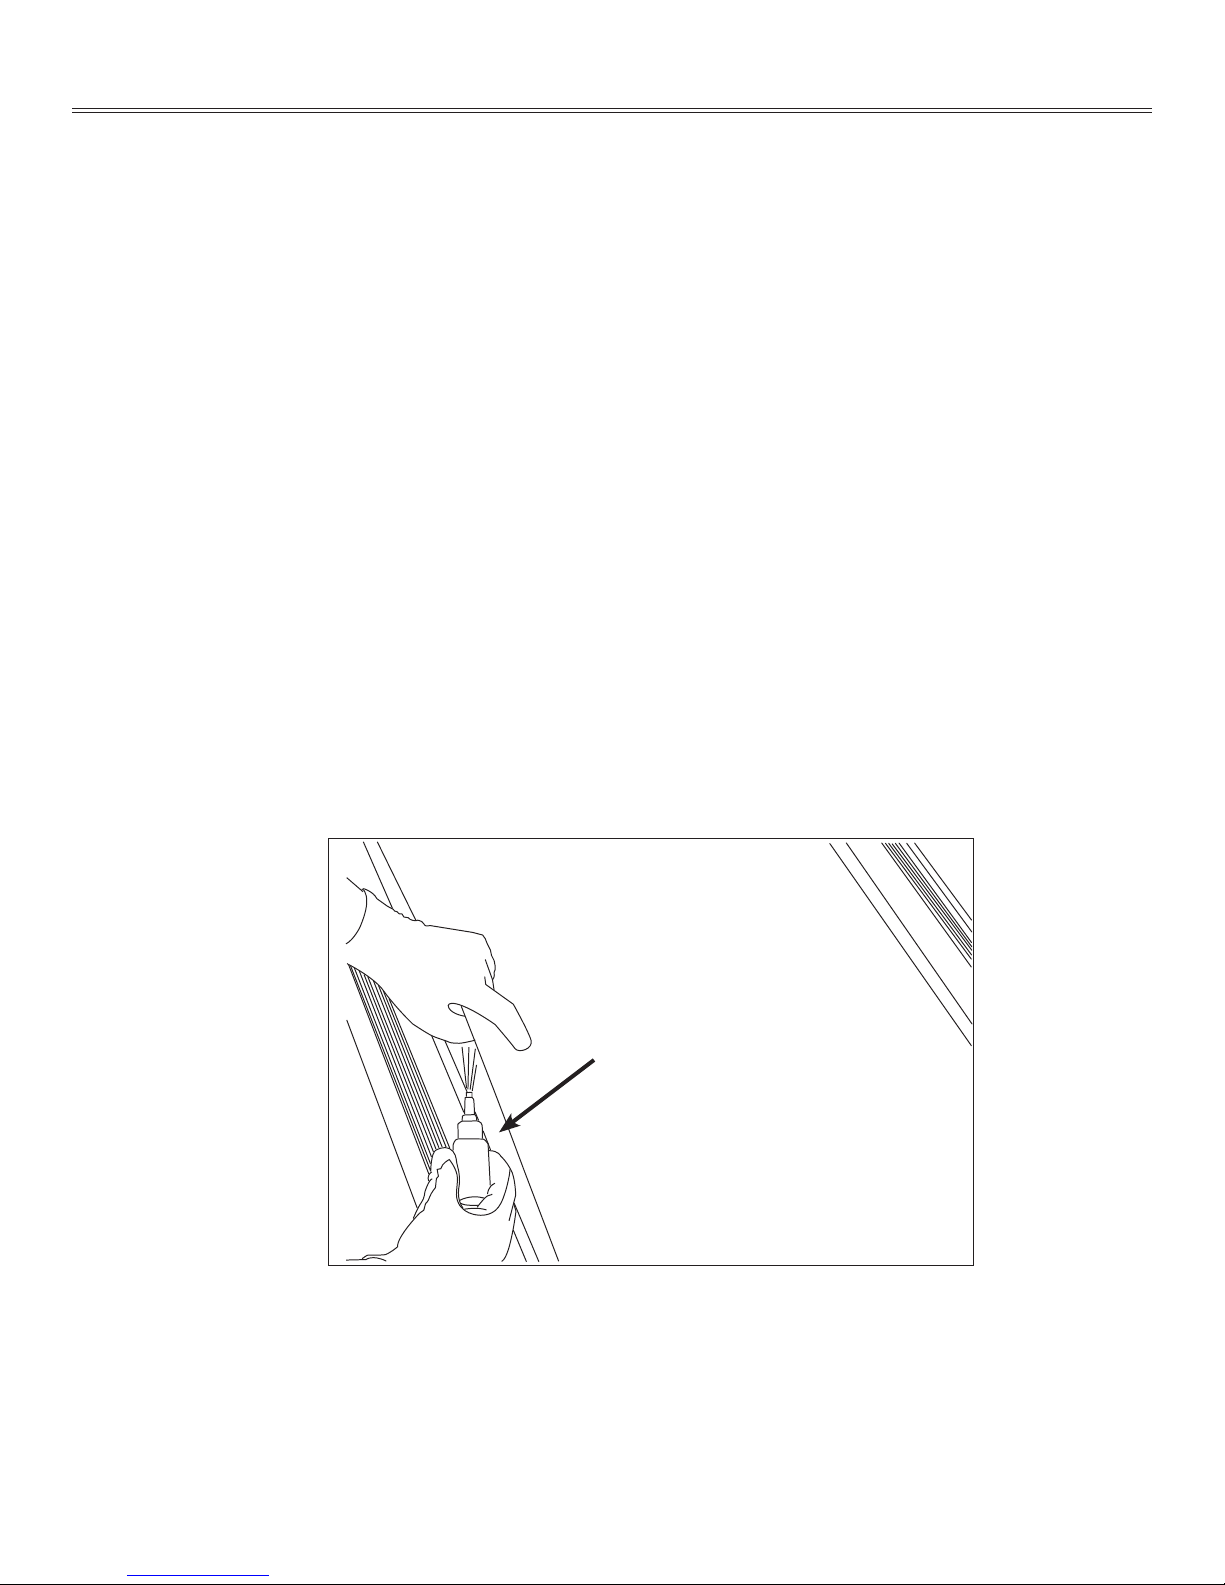
>> Treadmill Lubrication | 30727 Only
EVERY 6 MONTHS OR 150 MILES
It is necessary to lubricate your treadmill running deck every six months or 150 miles to maintain optimal
performance of your treadmill. Once the treadmill reaches 150 miles, the console will prompt you to
lubricate the treadmill. Only use lubricant provided by Horizon Fitness!
• Turn off the treadmill with the on/off switch, then unplug the power cord at the wall outlet.
• Loosen both the rear roller bolts. (For best results, place two removable marks on both sides of the
frame and note roller position). Once the belt is loosened, take the bottle of lubricant and apply it to the
entire top surface of the running deck. Tighten both rear roller bolts (matching up the marks for proper
position) to original position. After you have applied lubricant, plug in the power cord, insert the safety
key, start the treadmill and walk on the belt for two minutes to spread the lubricant.
• Lubricate the air shocks with Teon based spray.
• Once lubrication is complete, reset the console by pressing and holding ‘STOP’ and Speed (s) buttons
for 5 seconds.
LUBRICATION
Running Belt
Running Deck
2008 Sears CA Treadmill Service Manual [rev 1.0] | 9
Section One | Maintenance
Maintenance
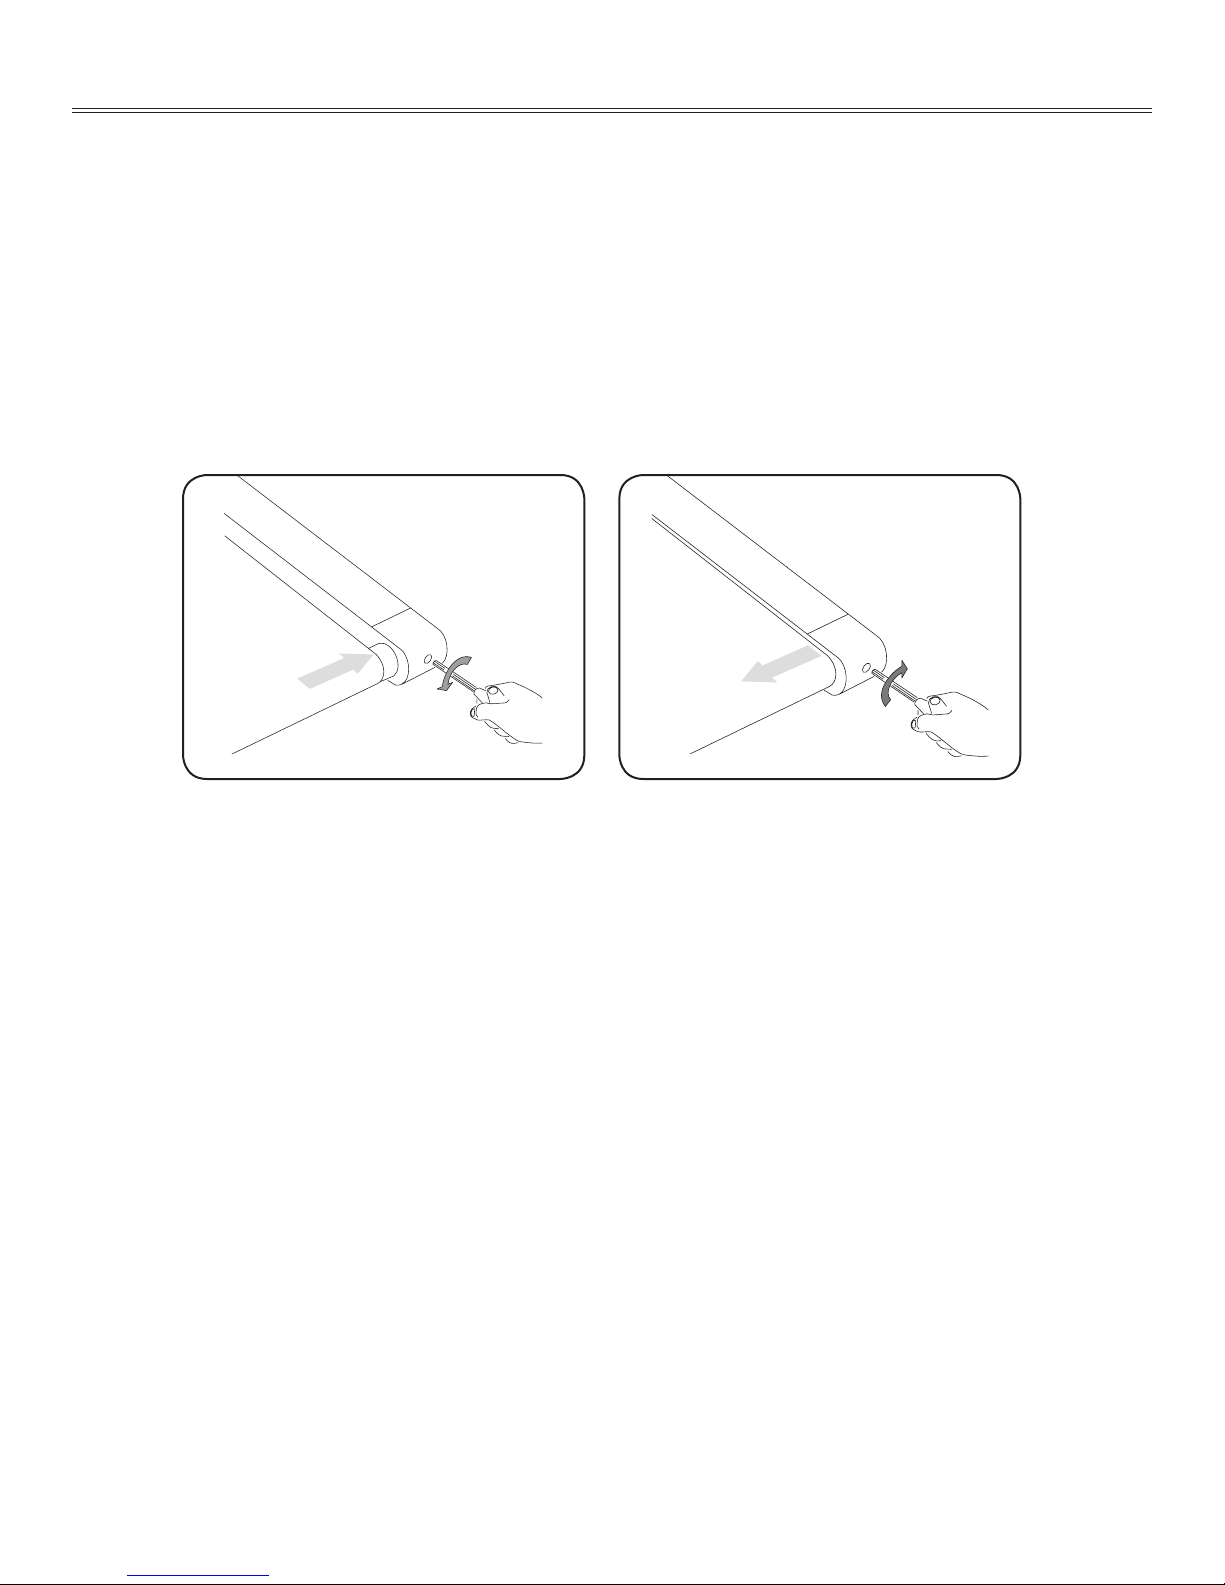
>> Tensioning and Aligning the Running Belt
If you can feel a slipping sensation when running on the treadmill, the running belt must be tightened.
In most cases, the belt has stretched from use, causing the belt to slip. This is a normal and common
adjustment. Make sure that the unit is turned off and not running. To eliminate this slipping, tension
both the rear roller bolts with the appropriate sized Allen wrench, turning both the left and right bolt 1/4
TURN as shown below. Try the treadmill again to check for slipping. Repeat if necessary, but NEVER
TURN the roller bolts more than 1/4 turn at a time.
Belt is too far to the left side. Belt is too far to the right side.
1 | If the running belt moves rapidly to one side when performing the next step, press the Stop button
immediately.
• Turn on the treadmill. With the treadmill speed between 3-4mph, stand behind the treadmill and
watch the movement of the running belt. DO NOT STAND ON THE TREADMILL AND DO NOT
TOUCH THE TREADMILL WHILE PERFORMING THIS PROCEDURE. As you watch the running belt,
make sure that the belt runs without moving from one side to the other and that the belt is centered
between the side rails.
2 | If the running belt is not tracking properly, follow the procedures below:
• If the running belt tracks to the left, turn the left roller bolt clockwise 1/4 of a turn, keeping the belt
tension in mind. Over-tightening the running belt may cause damage to the running belt and roller
bearings.
• If the running belt tracks to the right, turn the right roller bolt clockwise 1/4 of a turn, keeping the belt
tension in mind. Over-tightening the running belt may cause damage to the running belt and roller
bearings.
10 | 2008 Sears CA Treadmill Service Manual [rev 1.0]

Section One | Proper Heart Rate Usage
>> Proper Heart Rate Usage
HAND GRIPS | THUMB PULSE
Place the palm of you hands directly on the grip pulse handlebars. Both hands must grip the bars for your
heart rate to register. It takes 5 consecutive heartbeats (15-20 seconds) for your heart rate to register
accurately. When gripping the pulse handlebars, do not grip tightly. Holding the grips tightly may elevate
your blood pressure. Keep a loose, cupping hold. You may experience an erratic readout if consistently
holding the grip pulse handlebars. Make sure to clean the pulse sensors to ensure proper contact can be
maintained.
TROUBLESHOOTING-HEART RATE
Check your exercise environment for sources of interference such as uorescent lights, computers,
underground fencing, home security systems or appliances containing large motors. These items may
cause erratic heart rate readouts.
You may experience an erratic readout under the following conditions:
• Gripping the heart rate handlebars too tight. Try to maintain moderate pressure while holding onto the
heart rate handlebars.
• Constant movement and vibration due to constantly holding the heart rate handlebars while
exercising. If you are receiving erratic heart rate readouts, try to only hold the grips long enough to
monitor your heart rate.
• When you are breathing heavily during a workout.
• When your hands are constricted by wearing a ring.
• When your hands are dry or cold. Try to moisten your palms by rubbing them together to warm them.
• Anyone with heavy arrhythmia.
• Anyone with arteriosclerosis or peripheral circulation disorder.
• Anyone whose skin on the measuring palm is especially thick.
2008 Sears CA Treadmill Service Manual [rev 1.0] | 11

Table of Contents
>> Section Two
Horizon Fitness “5-Step” Diagnostic Process 13
Wiring Diagrams and Schematics
>> Digital Drive 30727
>> Wiring Diagram 30750
>> Power Source
Resetting the Incline Motor 18
Voltage Checks
>> No Motor Movement 19
>> Motor | AC Wire 21
>> Console Cable 22
>> Speaker Amp Board 22
>> 9 Wire Console Cable (30750) 23
>> 12 Wire Console Cable (30727) 24
>> Incline Wire 25
Engineering Mode (30727) 26
15
16
17
12 | 2008 Sears CA Treadmill Service Manual [rev 1.0]
Section Two | Horizon Fitness “5-Step” Diagnostic Process
120 VAC
WA RN IN G
>> Horizon Fitness “5-Step” Treadmill Diagnostic Process
The following steps are provided as routine checkpoints when diagnosing problems on
a Horizon Fitness treadmill. If followed correctly, these checkpoints should help diagnos
the majority of problems that may be encountered.
Step 1 | Proper supplying power to treadmill.
• Make sure the treadmill is not on an extension cord, surge protector or GFCI circuit. Extension
cords and surge protectors create energy loss, which prevents proper voltage from being
supplied to the treadmill.
• Make sure the treadmill is on a dedicated circuit. Horizon Fitness recommends a 20 amp
dedicated circuit, but a 15 amp dedicated circuit may be sufcient.
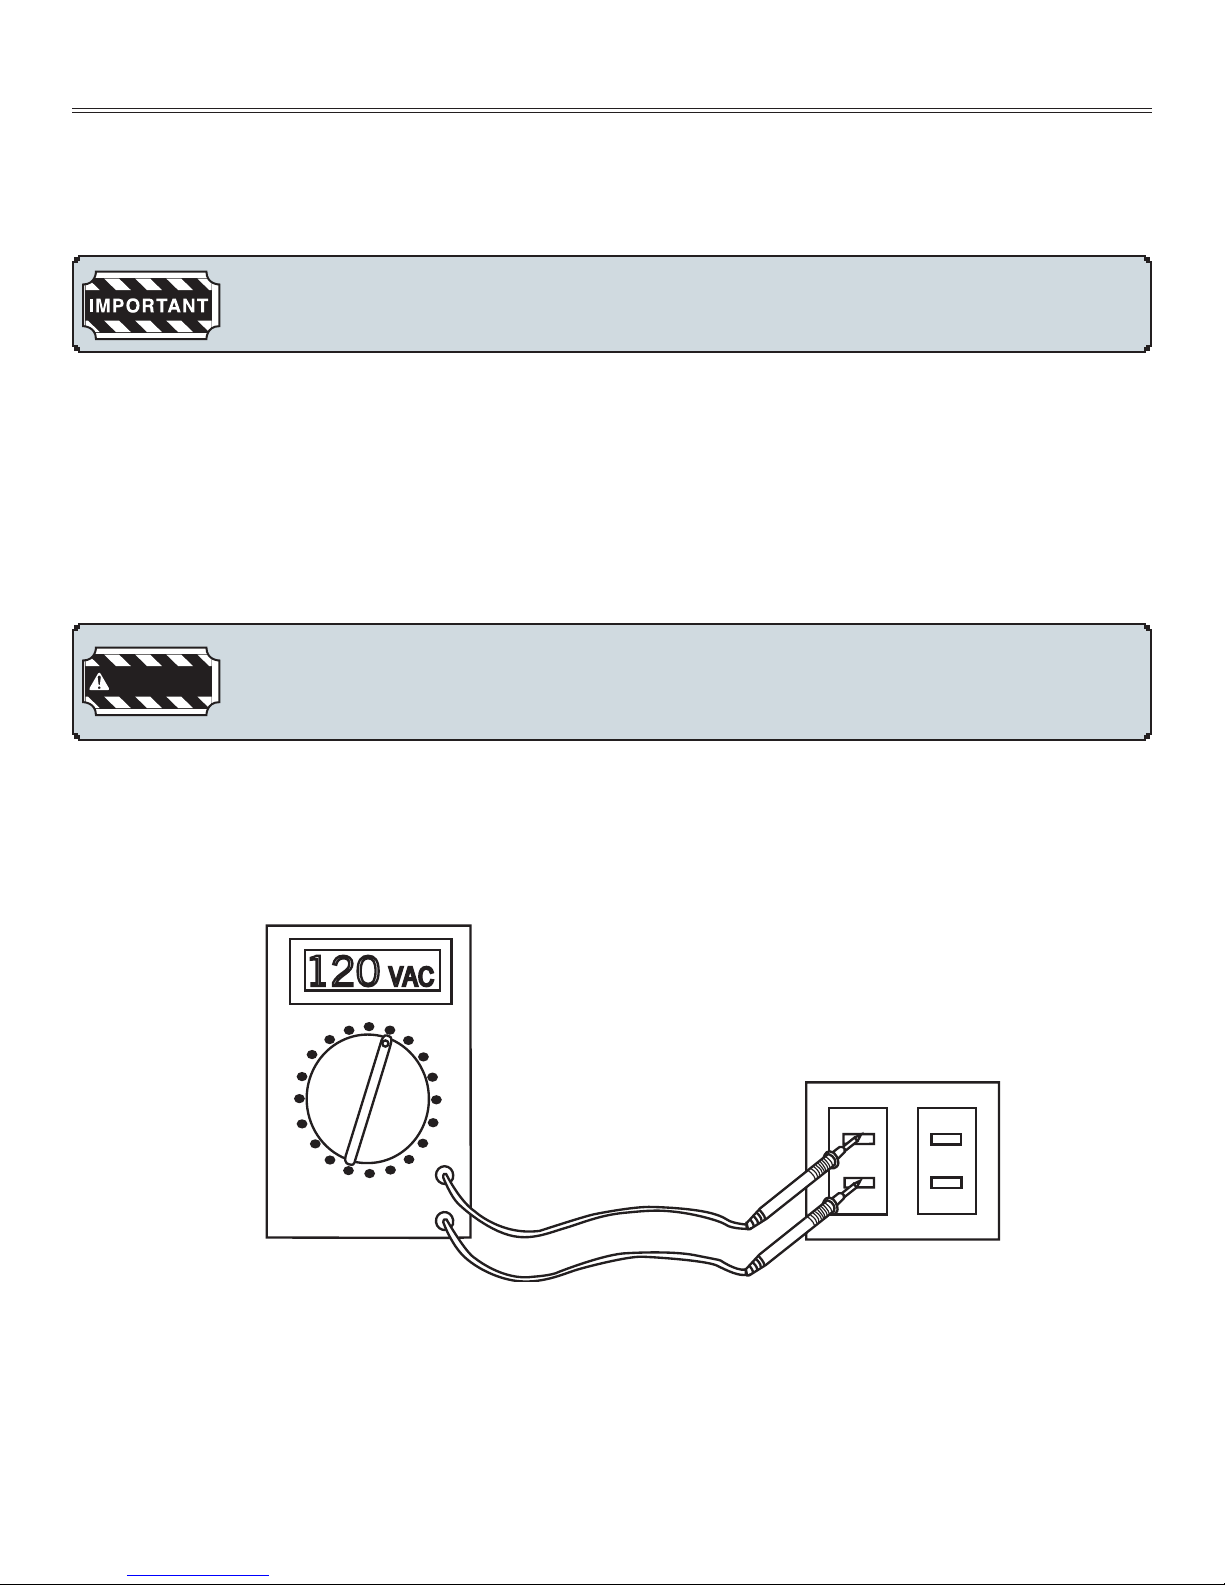
• Make sure that proper voltage is being supplied from the wall outlet.
Hazardous voltages will be tested in the following procedure. Exercise extreme caution
when performing these procedures. Do not connect or disconnect any wiring,
connectors, or other components with the power applied to the treadmill.
• Disconnect the treadmill power cord from the wall outlet. Using an AC voltmeter, verify that the
proper AC voltage is present at the wall outlet. Nominal 120 volts AC may vary between
approximately 105 volts AC and 135 volts AC. If the AC voltage is missing or incorrect, check
the AC service or consult an electrician.
Step 2 | Proper Wiring
• Verify that all wires are secure and attached in the correct position.
• Verify that there aren’t any pinches or cuts in any of the wires, especially the console cable
connecting from the motor control board to the upper board. Replace any wires that are
pinched or cut.
2008 Sears CA Treadmill Service Manual [rev 1.0] | 13
Section Two | Horizon Fitness “5-Step” Diagnostic Process
02.31
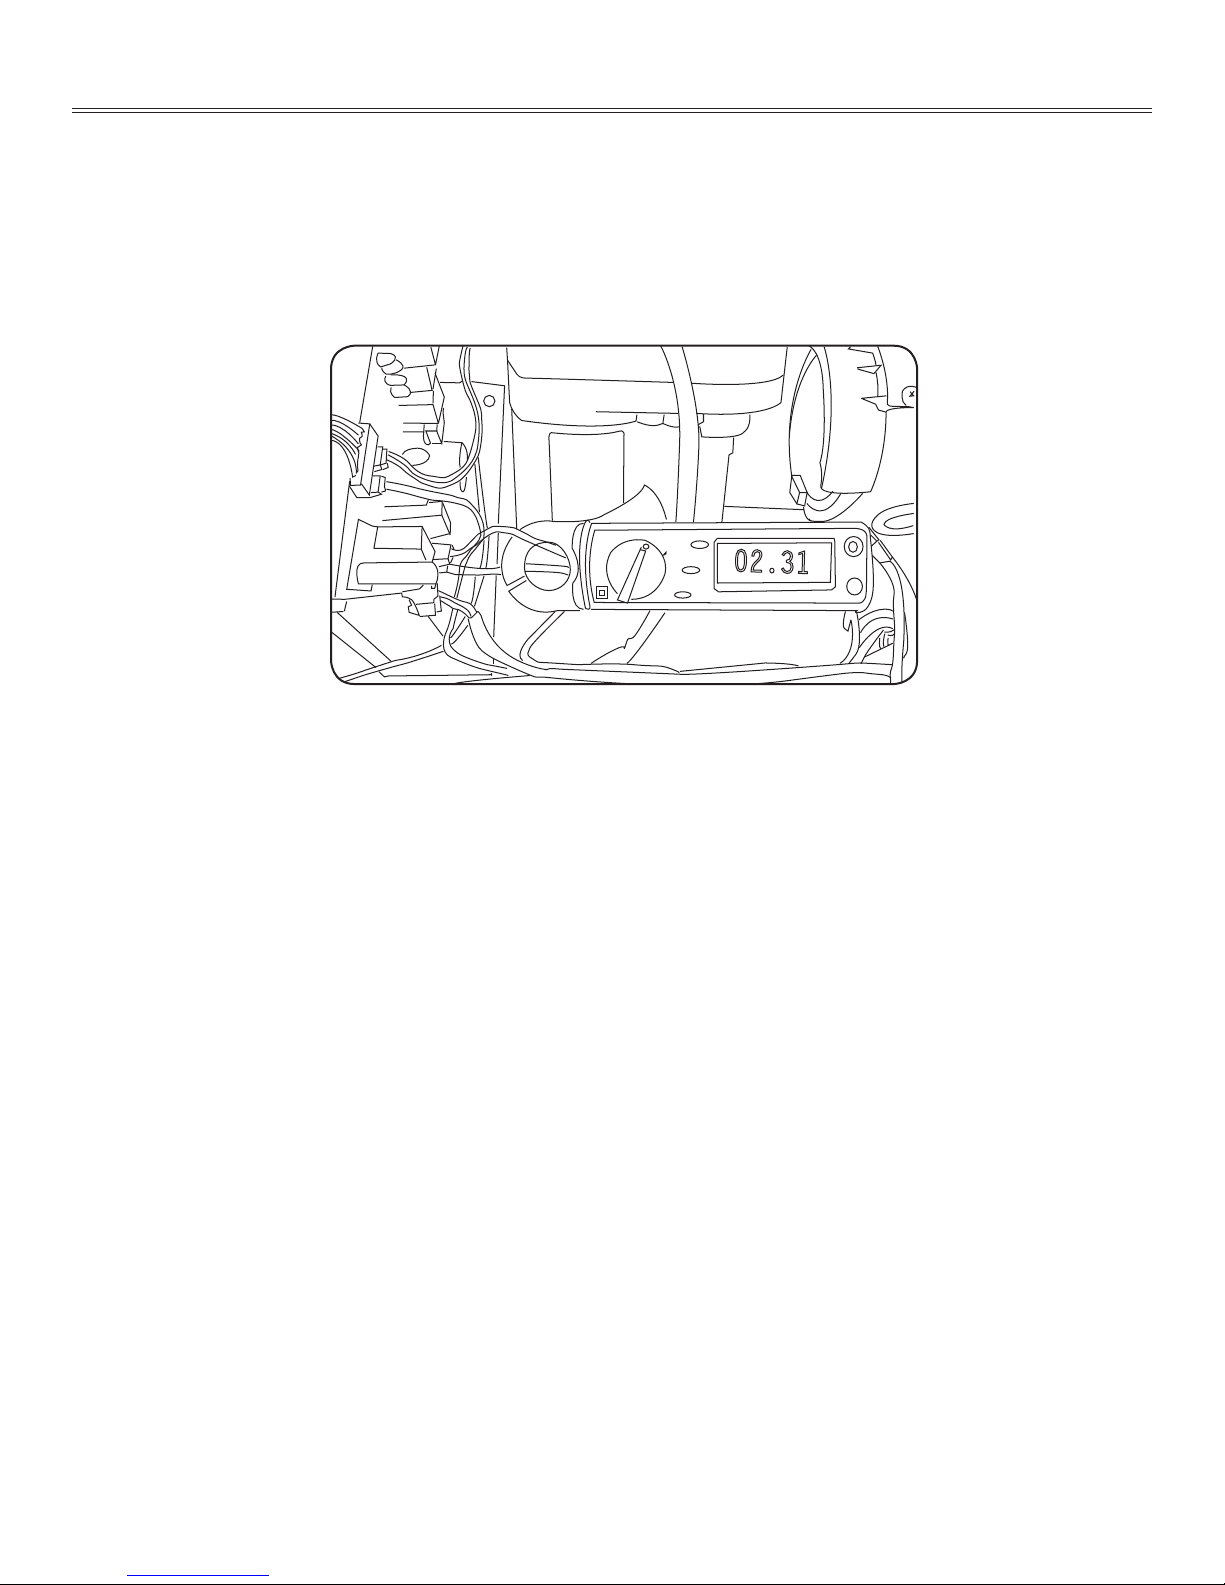
Step 3 | Proper Motor Function
• Verify that the treadmill is properly lubricated and drive motor is operating at the proper
amperage rating. To verify the current draw, place a clamp meter around the red motor wire.
• Remove the brush covers on the drive motor and inspect the brushes and the motor commutator
for any uneven wear. If the surface of the motor brush is pitted, rough, has burn marks, or the
commutator has a black residue on it, replace the motor.
Step 4 | Proper Speed Calibration
• To ensure proper belt speed and proper calibration use engineering mode to verify that machine
is running in MPH not KM.
• Auto-calibrate the machine from engineering mode if the belt speed is erratic or the belt speed
does not correspond to what is displayed on the console.
Step 5 | Voltage Checkpoints
• Verify that proper voltage is being transferred through the console cable.
14 | 2008 Sears CA Treadmill Service Manual [rev 1.0]
 Loading...