

Page 1

(5)- (110 SOURCE) DRYER MOTOR KIT #279827.
Page 2
INSTALLATION AND WIRING INSTRUCTIONS
for Pluggable Motor Replacement _
ThlLsIat C_nt_lnt:
I Motto A_membly
2 !/_" Ferule Tmmlnals (kwulated)
1 Sheet.to.ruction
EI,e_trlcal 8h©.:k X_,_tsrd
Dis_mtecd power INlf_
servl_g.
Failure tO do so could resuR In
s_loUa ht|ury ot death.
NOTE TO THE INS.T.A_ER: This motor kit isan authorized FSP ser_ce _e_ment
p._t.for your epphc_tlon.Themotorinthis .kitmayor maynotbe.klentl_ltoyour
ore.moOr, if your_re, m motor ha=the ptuggablemR _it_ (_e _ure.4B),
mpmceme eewlcemotorInmesamemanneras you mmo_ __ motor.
If your doteOtlve motor has the switch where the wire lead from the _n harness
oonne_ rfollowInstru_ons below.
Potm_tlat Fire Hazed andlor
Nulsam_e "l'dpplng of Motor Protector
00 NOT under any c4mumstance attempt
to remove oH"replace the motor switah
from this plugglb|e _rvice motor. The
swltoh is o non-serviceable component,
Failure to do so oouid result In fire, serious
injury or death,
Remove defective motor using standarclmotor
removalprocedures.
2. Compare and note the difference between the
detective motor andyour new replscement motor The
first thing you will need to' compare is the motor
pulleys. The I_Uey supplied with the replaoement
motor can be used in zdl _ppgc_lons. Al_ough
g_ere m_ two (2) €_ses, you may want Io use the
pulley from the def_t_ve motor. See Rgure I forthese
.
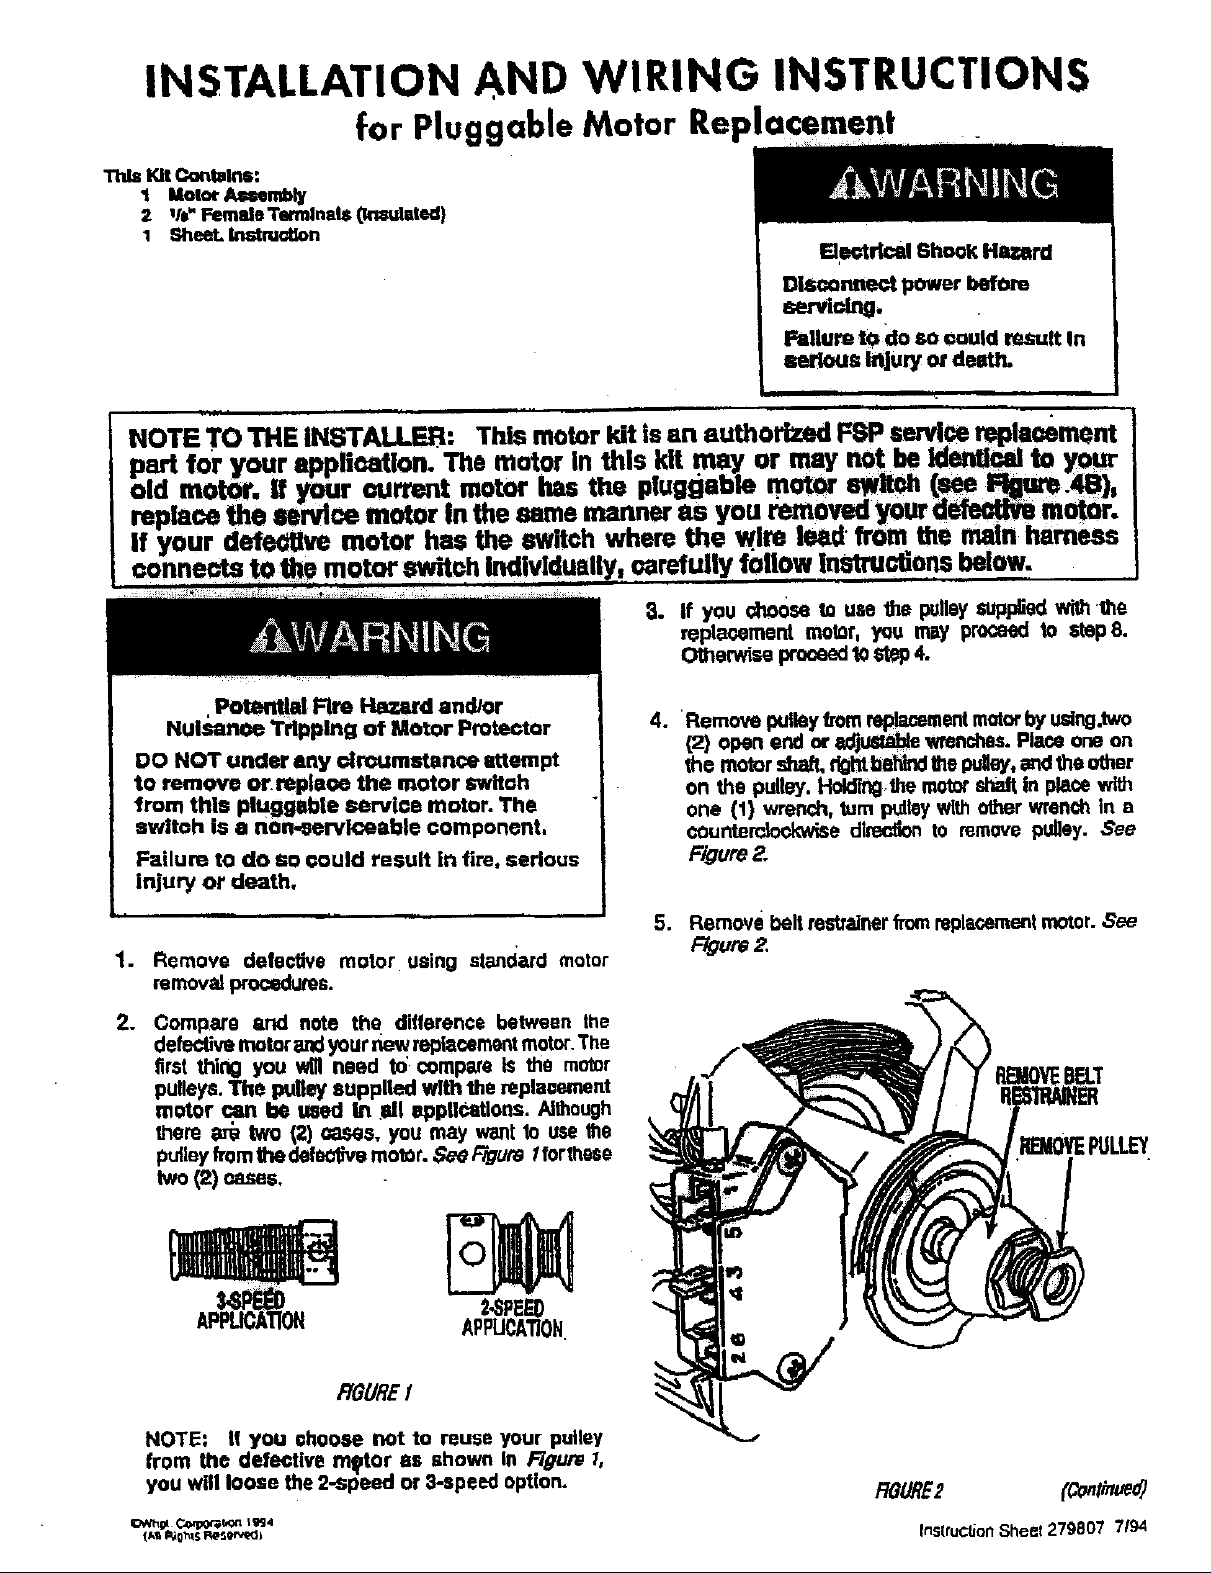
Remove Ixdley from replaaementmotor by using.two
(2) open end or adjual_de wrenches. Place one on
the motor shaft, rlghtbehb_:lglS¢ulley,_ the other
on the pulley. Holdi_the motor shelf in ple.cewith
one (1) wrench, turn puikly with o_r wrench In a
COunte_e dlmotlon to remove pulley. See
Figure E.
5. Remove beltrestrainerfromreple(;eme_tmotor.,._ee
F/gum2,
_i0VE PULLEY
2.SPEED
APPUCAT_ON
FAg[IRE!
NOTE: It you choose not to reuse your pulley
from the defective mlptor as shown In Figure I,
you will loose the 2..speed or 3-speed option.
fns(rucSonSheet 279807 7194
Page 3

6, From the s',_ end of b'le replacement motor, cut
the thread_l portion of the motor shMt off using a
hacksaw. See Rgure 3.
CUI"II'IREAOED
_LU_IABLE
7. _th an allenwrench, remove re pulleyt'romthe
dalec6vemotorand reinstallit on the mplacemem
motor.Be _uroto pushpull_yontothe motor st,._
allthe wayandtightenthe setscrewsecurelyinplace.
1
Compare and note difference between the motor
s_etah of the defe_,e motor and the switch of '_e
new mp|a_ement motor, IIthe switchesare the same,
simply inst_l] the motor in reve_ order you've
removed the defeotive motor. See F_v._e$ ,dA& 4B.
If not. proce_:l to step 9.
NOTE: Overload protector is part of the plug-
gable switch on the replacement motor and
separete on the old motog 9wit_.
OVERLOAOPROTECTOR
9. PositionmotoraSshownb_ 5.Note the locazior_
of the motor swl_. Secure zpotor to bracket with
the odglnaJmotordamps.
279807
omen .o
FIGURE44
OLO
MOTOR
SWITCH
RGURE'J
(¢ontP,_O
Page 4

WIRING INSTRUCTIONS
10. Jnk.',_'A_ _r,d m..m_ the blue |uml_r witothlt runs
_rom the mot(_ sw_tohto the oved_ at_d discer¢.
SeeRgum6.
11. " s to
_'_'_------ " " _ cu
__e w_e_omlnmpto,s_eF_ra 8-
tothe V4" retrainedrrm,W,ed "l"_on the motor sw'd_.
See F_re 6.
13. Connect b'te red (:P.M),_re lead from ma]n hame,_s
_othe V,_"termlnal marked 'T on the motor swi_.
See F_ure 6.
14.'1"o oonnect b'm hie=k (61_ ,tAm le_ from n_n
h_m a_d 1he v_lte _ v_ lead from n_n
,1,-_W_ te,m_Io_a¢,_'_,__ fem_
_nin_s _ _1_ tl_e_ motor.
15. cutt_ _t4"_ _r_al _ _he _d
to I_ _mlnal _ posmo_ewTtl_wire _!_.
16. SMp wires I:_ck approndmatelyII, of _u_inch.
17. With barrel Cdml_rs, crimp V_' _ fema_
temdn_s, ln_l_l _ motto, onto _e Wireleads.
NOTE: Make sure terminels ere crimped
securely In piece.
20. Reconnect ground_re, See Fngure_,
18. C,onneol the white(SM) wire lead from milleIlarness
onto1tin_" terminalmarked "6" onthe matOrswitch.
Re.E6
s_ebume_
19. _nrzect the black(6M) wire.leadfromm.l_nharnm_s
onlothe V_"terminalmarked"6"on the'motorswitch. 21, All wire leadcormecllonsarecompleteat thispoint.
,SeeF/gum6. Finishreassemblingdryer.
 Loading...