Page 1
757481
OWNERS
MANUAL
WORD
PROCESSING
TYPEWRITER
MODEL NO.
161,53514090
Operation
Repair parts
CAUTION:
Read Rules for
Safe Operation
and Instructions
Carefully
757481
Warranty
FULL ONE YEAR WARRANTY
For one year from the date of purchase, Sears will repair this Typewriter,
free of charge, if defective in material or workmanship.
WARRANTY SEI_VICE IS AVAILABLE BY CONTACTING THE
NEAREST SEARS SERVICE CENTER/DEPARTMENT IN THE
UNITED STATES. This warranty applies only while product is in use in
the United States. *
This warranty gives you specific legal rights, and you may also have other
rights which vary from state to state.
SEARS, ROEBUCK AND CO., Dept. 731 CR-W, Sears Tower, Chicago,
IL. 60684
Word Processing Typewriter
Record in space provided below the Model No. and Serial No. of
this appliance.
The Model No. and the Serial No. are located at the back of the
machine.
Model No. 161.53514090 Serial No.
Retain these numbers for future reference.
Sears, Roebuck andCo., Chicago, IL. 60684 U.S.A.
Page 2
NOTE: This equipment has been tested and found to comply with the limits for a
Class B digital device, pursuant to Part 15 of the FCC Rules. These limits are
.designed to provide reasonable protection against harmful interference in a residen-
tial installation: This equipment generates-, _:uses and can radiate radio frequency
energy and, if not installed and used in accordance with the instructions, may cause
harmful interference to radio communications. However, there is no guarantee that
interference will not occur in a particular installation. If this equipment does cause
harmful interference to._adio or,-television reception, which can be determined by
turning the equipment off and on, the user is encouraged to try to correct the inter-
ference by one or more of the following measures:
m Reorient or relocate the receiving antenna.
Increase the separation between the equipment and receiver.
-- Connect the equipment into an outlet on a circuit different from that towhich
the receiver is connected,
Consult the dealer or an experienced radioiTV technician for help.
.RULES FOR SAFE OPERATION
1) Your new Sears Typewriter has been designed to operate on standard U.S.A. Power 110-120
Volts AC, 60Hz only.
2) Your typewriter is a highly sophisticated mechanism, so never attempt to repair it yourself.
If repair-becomes_necessa_;_haveJt::,.repaired_:-by÷Sea_,_qualifie_e_4eernan_: _ _ _
3) Never insert metal objects such as a screwdriver, paper clip, nail file, etc., inside the type-
writer. This could cause damage to the typewriter, and/or electrical shock.
4) Do not leave your typewriter unattended when the machine is on. Always turn off the type-
writer when you have finished typing.
Page 3
"_ .... Your new ::Sears Word Processing Typewriter: uses--the •most :advanced : electronic
: - _ :"_'_"technologyand greatly increases your:typing efficiency. Some of the many:outstanding •
features of your new typewriter are:
e 50 file; 10,000-character memory * .The number in brackets refers to
• Fourtypewriter modes the Sample Letter on the next page.
O
40-character Liquid Crystal Display (LCD: 40 character 2 lines)
• -0:
Easy-to-change 100-character printwheel
0
Line spacing selector: 1, 1-1/2 and 2 lines
Pitch selector: 10, 12 and 15 characters per inch
0
5-year memory back-up battery
0
Full-line correction memory
0
Full electronic tabulator (16 positions resettable)
0
Automatic centering ......................................................................... (1)
Decimal tabulation . ................... . ....................................................... (7)
0
0
Automatic paragraph.indentatior_ ;.._;...: .................................................. (5)
Automatic carrier return
0
Automatic word correction
0
Automatic word/full underlining ...................................................... :. (4)(6)
0
0
Bold typing ............................. ...: ............. ......................................... (3)
0
Required hyphen
0
Required space ..:. ...................................... : ..................................... (2)
Block copy/move/delete
0
Spell Corrector
0
Caps lock
0
Self demonstration (See below)
Hold down the Code Key and press the "D" Key to
automatically print out the feature listing as follows:
THIS *WORD PROCESSING* TYPEWRITER HAS MANY FEATURES TO MAKE TYPING
÷ ..
EASIE_
80 CHARACTER DISPLAY - Allows you to revlew and edit text before
I
printinK.
SPELLING CHECK - Automatically checks spelling of 50,000 words
plus checks an additional I00 words that may be specia! to you.
TEXT MEMORY - Allows you to review, edit and recall up to I0,000
characters.
* DUAL MARGIN ALIGNMENT - Automatically "blocks" both sides of the
typing, just like it is on this page.
* BLOCK oPERATIONS - Allows you to move, copy, delete and insert
entire blocks of text for enhanced editing.
* 3 PITCH SELECTIONS - Allows a much wider variety of type styles.
* OTHER FEATURES INCLUDE - BOLD TYPING, Automatic carrier return,
-Automatic Centering-
Paragraph Indentation, Decimal tabulation, Automatic Underlining2 '
CAPS LOCK and many more.
Page 4
Sample Letter
"Tools for Everyone" _Autom_ic Centering (1)
Consolidated Tool Co., Inc.
138 Elm Boulevard
Chicago, Illinois 60690
June 3, 1997
Everyday Hardware, Inc.
10301 Main Street
Portland, Oregon 98645
Dear Sir;
Thank you very much for your _le_tter of May 23 and for your
inquiry as to any developments in our product-line for next year.
As a favored customer, you are presently entitled to a 10%
discount on all products ordered. We certainly understand your
position and we realize that_recently _themarket for our products_has ....
been somewhat slow. Therefore to thank you for your continued
patronage, we ha_e decided that we can offer an additional 57o
discount. We hope that this will help the situation.
Required Space (2) _- _' _
Bold Typing (_
The following passage from Tools Today typifies our feelings on
the matter, b Automatic Full Underlining (_
Paragraph_-"The market will continually grow as the expense of hiring out
inden_Uon home improvements increases. Consumers will be forced to do
(5) whatever is necessary and this fact offers a grand opportunity
to all those involved in this area!"
Please look under the following areas in the Company Prospectus
inserted which describes our goals for the coming years:
Section Title.Automatic Word
Section Pages
Underlining (_
Meeting the New Markets
Our Answer
What We Can Do Together
2.3-2 31 - 46
11.6 93 - 102
18.14 209 - 234
Decimal Tabuiation (7)
Thank you again for your continued use of our products. We wait
for your reply.
Very truly yours,
James Harrison
Assistant Sales Manager
This owners manual describes how to use all of the typewriter's features and controls,
how to replace accessories and many other important things. Please read this manual
completely before operating your new electronic typewriter.
Sears typewriter stands are designed to give you comfort by providing the proper height
for the typewriter when typing.
A Sears typewriter stand also provides you with a convenient storage location for your
typewriter when it is not being used.
Page 5
TABLE OF CONTENTS
PART NAMES AND FUNCTIONS ..........................................................................................
BASIC OPERATIONS ............................................................................................................
1. SELF DEMONSTRATION .......................................................................................
2. HOW TO START TYPING ......................................................................................
3. HOW TO CHANGE RIBBON CASSE-n-E ...............................................................
4.. HOW TO CHANGE CORRECTION TAPE ..............................................................
5. HOW TO CHANGE PRINTWHEEL .........................................................................
6. TYPEWRITER MODES .......................................................................................... 10
7. MARGINS ................................................................................................................. 11
8. TABS ..................................................................................................................... 12
9. CORRECTIONS ON PAPER .................................................................................. 13
10. CORRECTIONS ON LCD (DISPLAY) ..................................................................... 15
11. AUTOMATIC WORD CORRECTION ...................................................................... 17
SPELL CORRECTOR FUNCTION ......................................................................................... 19
TYPEWRITER FUNCTION ..................................................................................................... 24
1. DECIMAL TABULATION ........................................................................................ 24
2. AUTOMATIC CENTERING ..................................................................................... 25
1
4
4
4
7
8
9
3. AUTOMATIC PARAGRAPH INDENTATION ........................................................... 26
4. BOLD TYPING ....................................................................................................... 26
5. AUTOMATIC UNDERLINING ................................................................................. 27
6. AUTOMATIC CARRIER RETURN .......................................................................... 28
7. REQUIRED HYPHEN AND REQUIRED SPACE ...................................................... 28
8. SECOND KEYBOARD (SPECIAL CHARACTER SET) ............................................. 29
9. CAPS LOCK ................................... ; ...................................................................... 29
MEMORY FUNCTION- . .................................................................................................................. .30
1. FILE STORING ...................................................................................................... 30
2. STOP CODE ........................................................................ _ ................................. 34
3. FILE EDITING ........................................................................................................ 36
4. FILE RECALL (PRINTOUT ON PAPER) .................................................................. 39
5. FILE LISTING ......................................................................................................... 41
6. AVAILABLE MEMORY CAPACITY ......................................................................... 41
7. FILE DELETING ..................................................................................................... 42
8. MEMORY ALL CLEAR ......................................................................................... 42
9. BLOCK OPERATIONS (COPY/MOVE/DELETE) .................................................... 43
SUPPLIES ............................................................................................................................ 46
AFTER USING THE TYPEWRITER AND TO STORE .......................................................... 47
MAINTENANCE AND SERVICE ........................................................................................... 47
Page 6
PART NAMES AND-FUNCTIONS
1. Operating Parts
PLATEN ROLLER
Roils paper in and out
PLATEN KNOB
Used to turn the Platen Roller
PAPER BAIL
Holds paper against the platen
CARRIER
Prints characters, moves
as it prints
CARRYING HANDLE
Used to carry machine. Normally
contained inside bottom plate
LCD
Displays the typed characters
CORD COMPARTMENT
Contains power cord
PAPER SUPPORT
Supports the paper. When
folded down, prevents dust
from getting inside
PAPER RELEASE KNOB
Releases paper for alignment
POWER SWITCH
Tums power on and off
TOP COVER
Open to replace accessories
MARGIN SCALE
Provides numerical indication
of printing position
2. Carrier Mechanism (under the Top Cover)
PRINTWHEEL
Element with characters for printing
RIBBON TAKEUP KNOB
Wound to take up any slack in ribbon
RIBBON CASSE-FFE
PRINT POINT INDICATOR
Indicates printing position
LINE LOCATOFI (dot line)
Denotes the bottom o[ the typed line ....
CARD HOLDER
Holds paper, envelopes and
cards etc. against the Platen
CORRECTION TAPE GUIDE
Guides Correction Tape
PRINT HEAD
Strikes against Printwheel
CORRECTION TAPE
PRINTWHEEL SET/RELEASE LEVER
Used when replacing Printwheel
Page 7
3. Keyboard Layout
1
\
2
3
®
4
,
Key Functions
1 MARGIN RELEASE KEY
Releases the margins to type beyond them or set
new ones.
2 POWER-ON LAMP (GREEN)
Lights up when the machine is turned on.
3 TAB KEY
Moves the Carrier to the next tab.
4 SHIFT LAMP (RED)
Lights up when the Shift Key is pressed or locked.
5 LEFT/RIGHT MARGIN SET KEY
Sets the left/right margin.
®
8 SHIFT KEY
Enables typing of capital letters or a character on
the upper half of a key when held down. When it's
pressed, the Shift Lamp (red) on the Keyboard lights
up.
9 S_IFT LOCK KEY
Locks the Shift Key in position to type a series of
capital letters when pressed. When it's locked, the
Shift Lamp (red) lights up. Release by touching
either Shift Key.
10 SPACE BAR
A light touch moves the Carrier ahead one space.
For repeat spacing, hold it down.
6 TAB SET/CLEAR KEY
Sets or clears tabs.
7 CODE KEY
Hold down the Code Key to activate special func-
tions (Auto center, File recall, etc.) in conjunction
with several other keys.
11 CORRECTION KEY
Corrects characters. Hold down for repeat correc-
tion.
12 RELOCATION KEY
After backspacing to correct or underline text, etc.,
press the Relocation Key to return the Carrier one
space after the last character typed. On the LCD,
the cursor.returns to its former position.
Page 8
1
II: i'q!'"'T'
11" 12 13 14"
* Hold down these keys for repeat action.
The following characters x, X, -, _, =,., *, are
also repeated by holding down the respective keys.
18"
i7
16*
8
15"
13 MODE KEY
Changes the typewriter mode.
14 REVERSE INDEX KEY
Pressed to retract paper without moving the Carrier.
Paper will retract a half-line (1/12') every time the
key is pressed. By holding down the key, paper will
retract continuously. Also clears the correction
memory.
15 INDEX KEY
Pressed to advance paper Without moving the Car-
rier. Paper will advance a half-line (1/12') every time
the key is pressed. By holding down the key, paper
will advance continuously. Also clears the correction
memory.
16 RETURN KEY
Pressed to advance paper one line and return the
Carrier to the left margin. For repeat line spacing,
hold it down. Also clears the correction memory.
17 EXPRESS KEY
Press _to retum the Carrier to the left margin without
line spacing (LCD must be cleared), or move the
cursor one space to the right on the LCD. Hold
down the key for repeat spacing (on the LCD only).
18 BACKSPACE KEY
A light touch moves the Carrier backward one
space, or moves the cursor one space to the left
on the LCD. For repeat action, hold it down.
Page 9
BASIC OPERAT!
1. SELF DEMONSTRATION
Hold down the Code Key and press the "D" Key. The
typewriter wil! automatically perform a printout of featureS:_
When you activate this function, the correction memory
is cleared.
To :cancel the printout at any time, simply touch the
Space Bar.
2. HOW TO START TYPING
Keyboard Cover
- . . _ Cord:Compa_tme_
over
1. Set Up Typewriter
1) Place the typewriter on a desk or other fiat surface. Lift
up the Keyboard Cover and remove it.
2) Press:the- mark_on_:t he:: CorcL:Oompartment-:,Go_,e_--orf ;tlqe:-. `
rear of the typewriter, open the cover and take out the
power cord.
Power Cord
3) Fit the power cord through the slot on the Cord Comparb
ment and close the cover. Plug the cord into an outlet of
the proper voltage (110-120V AC 60Hz).
Page 10
2. Turn On Typewriter
Paper Support
Power Switch
Raise the Paper Support and tum on the Power Switch
located on the right side of the typewriter. The following
initial operations occur."
1. A beep sounds and the Power-on Lamp (green) on the
keyboard lights up.
2. The Carder moves to the extreme left side and then
moves to the left margin: The Printwheel rotates and
stops at the programmed position.
While the above operations are occurring, all other type-
writer functions stop. Start the next operation only after
the initial operations are completed,
• Make sure the Printwheel, Ribbon Cassette and Correc-
tion Tape are properly installed and that there is a suffi-
cient quantity of ribbon and correction tape remaining,
3. Insert Paper
1) Insert paper between the Paper Support and Platen Roll-
er.
Platen Knob.
Paper Bail
Knob
Turn the, Platen Knob on the left of the typewriter to
2)
advance the paper. When the top of the paper comes into
sight, pull the Paper Bail upward by hand. to open it and
continue turning the Platen Knob to feed paper in be-
tween the Paper Bail and Platen Roller.
3)
The paper is released when the Paper Release Knob is
turned backward, enabling you to freely move the paper
by hand for alignment purposes.
®
Close the Paper Bail and return the Paper Release Knob
to, its forward position before typing.
Page 11
LINE SPACE
÷G
=
Set Typing Controls
Une Spacing
1)
Hold down the Code Key and press the "1" Key. "_ LINE
SP 1 1.5 2" appears on the LCD, The line space in use
will blink.
Ill
SP I 1.5 2
!
To change the line spacing, hold down the Code Key and
press the "1" Key again. The line spacing changes each
-time the "1" Key is pressed, and the respective setting
blinks.
Releasing the Code Key sets the line spacing and
automatically terminates the selection mode.
Setting 2 provides double spacing (3 lines per inch),
Setting 1-1/2 provides one-and-a-half spacing (4 lines per
inch).
Setting 1 provides single spacing (6 lines per inch).
O
Une space selection can be performed in the NP mode,
and in the LP or JUST modes when there are no charac-
ters on the LCD.
®
Your typewriter has a memory back-up battery which pro-
tects the line space/print pitch settings for a minimum of
five years, even when the power switch is turned off.
@
When power is turned on, six beeps sound if the back-up
battery has been completely drained. The line space/print
pitch settings are cleared.
Please contact your nearest Sears Service Center in this
case.
<>PITCH
Ill
10 12 15
/
Print Pitch
PITCH
+
I
2)
The print pitch should be set to match the Printwheel
being used. Typing can be done with different pitches on
the same line.
Hold down the Code Key and press the "2" Key.
"<_ PITCH 10 12 15" appears on the LCD and the
pitch in use will blink.
To change the print pitch, hold down the Code Key and
press the "2" Key again. The print pitch changes each
time the "2" Key is pressed and the respective setting
blinks.
Releasing the Code Key sets the print pitch and automat-
ically terminates the selection mode.
10: PICA pitch _ 10 characters per inch
12: ELITE pitch _ 12 characters per inch
15: MICRO pitch _ 15 characters per inch
®
Print pitch selection can be performed in the NP mode,
and in the LP or JUST modes when there are no charac-
ters on the LCD.
Page 12
=HOW TO CHANGE.: RIBBON CASSETTE
D
1. Removing Ribbon Cassette
1)
_Ribb_n" Cassette Stand
Turn off the machine and open the Top Cover.
Hold down the Ribbon Cassette Stand with your thumbs
2)
and gently remove the Cassette by pulling upward on the
Cassette Arms as shown.
O
Look through the window in the Cassette to check on
how much ribbon remains, tf you see colored tape in the
window, replace the Ribbon Cassette with a new one.
=
Installing Ribbon Cassette
Before installing a new Ribbon Cassette, always take up
1)
any slack in the ribbon by winding the Ribbon Takeup
Knob counterclockwise, and remove tab on Cassette Rib-
bon.
®
When installing a new ribbon, wind past the colored por-
tion at the beginning.
Card Holder Printwheel
4!- 4!.
2) Fit the two projections at the back of the Ribbon Cassette
into the two slots in the Ribbon Cassette Stand.
Carefully lower the front of the cassette so that the ribbon
3)
fits betv_en the Card Holder and Printwheel. Press the
portions marked "A" in the illustration until the Ribbon
Cassette snaps into place.
Turn the Ribbon Takeup Knob counterclockwise until it
4)
locks into place O. Then, turn it clockwise until it stops
®.
5) Close the Top Cover.
7
Page 13
4. HOW TO CHANGE:OORRECTIONTAPE
It
Removing Correction Tape
1)
Takeup Spindle Supply Spindle
Turn off the machine. Open the Top Cover and remove
the Ribbon Cassette as explairied under "Removing Rib-
bon Cassette".
2)
Remove the left and right spools from the respective spin-
dles. Be sure not to pull on the spindle hub when remov-
ing the right spool.
Tape Guides
Card Holder
Takeup Spindle
Print'wheel
Supply Spindle
3) Grasp both spools and bring back to a position that is
parallel with the Tape Guides. Pull on the Correction Tape
to take up any slack and lift it out of the typewriter.
1
Installing Correction Tape
While holding the two spools in your hands, unwind the
1)
Correction Tape and position behind the Tape Guides and
Printwheel as shown. Make sure that the sticky side of
the tape faces the Card Holder.
2) Fit the full spool of the Correction Tape onto the Right
(Supply) Spindle. Then fit the left spool (the one with the
knob) onto the Left (Takeup) Spindle.
3)
Turn the left spool counterclockwise until the colored por-
tion of the tape disappears.
®
Check again to make sure that the Correction Tape has
been fed properly behind the left and right Tape Guides.
4) Replace the Ribbon Cassette and close the Top Cover.
Page 14
5, HOW TOCHANGE PRINTWHEEL
1. Removing Printwheel
1) Turn off the machine. Open the Top Cover and remove
the Ribbon Cassette as explained under "Removing Rib-
bon Cassette".
2) Pull the Printwheel Set/Release Lever towards you.
3) Lightly grasp the top of the Printwheel and carefully pull
t
it up towards you.
Print Head
_ _Card Holder
2. Installing Print_eel
1) Ughtly grasp the edge of the Pdntwheel and carefully
lower it in between the Card Holder and the PMnt Head.
Q Make sure that the typeface (the side with typing style
indicated) faces the Platen.
2) Press the Printwheel Set/Release Lever away from you
until it snaps into place, locking the Mechanism.
• Press the Lever as far as it goes again to make sure the
Printwheel has been locked into place.
3) Replace the Ribbon Cassette and close the Top Cover.
• Remount the Printwheel if any abnormal noise is heard or
if incorrect characters are printed.
9
Page 15
6. " TYPEWRITER--MODES
[
v
Zcounter
-- T 462 }
LP
Your typewriter has four different modes. Normal Print
(NP), Line Print (LP), Justified Print (JUST) and Store
(STORE). The mode in use is indicated on the LCD by a
"V", and it's changed each time the Mode Key is press-
ed,
1) Normal Print Mode (NP)
When power is first tumed on, the typewriter is in the Nor-
mal Print (NP) mode. In this mode, characters are
immediately typed on the paper without appearing on the
display (LCD).
i Counter
The counter at the right side of the LCD indicates the
remaining number of spaces to the right margin.
If you type beyond the right margin, the number increases
one by one.
2) Line Print Mode (LP)
This mode allows you to print one line at a time. Charac-
ters appear on the display as you type them, enabling you
to correct any typed entry on the LCD. Characters are
printed when you press the Tab or Return Key. You can
type in new text while the previous line is being printed.
3)
Justified Print Mode (JUST)
- v _2J
JUST
Sample Printout
Left Margin Right Margin
Your typewriter has four different modes: Norm_l Print
(NP), Line Print (LP), Justified Print ,(JUST) and
Store (STORE).
Your typewriter has four different modes: Normal Print
(NP), Line Print (LP), Justified Print (_UST) and
Store (STORE).
This mode allows you to align both margins, i.e., evenly
position the words between the left and right margins.
Characters appear on the display as you type them,
enabling you to correct any typed entry on the LCD.
When you type a character of any word exceeding the
right margin (indicated by the counter on the LCD), words
preceding the right margin are automatically printed out,
justified between the left and right margins, and the carder
returns to the left margin. The word whose characters
exceeded the right margin will remain on the LCD to start
the next line (word-wrap). You can type new text while
the previous line is being printed.
<printout in NP/LP mode>
<printout in JUST mode>
NAHE OF FILE ?
10
If you press the Retum or Tab Key while typing in a line,
text will be printed out immediately and will not be jus-
tified.
4) Store Mode (STORE)
I'
]
This mode allows you to store text into the typewriter's
memory. For an explanation of details, refer to "Memory
Function".
Page 16
7, MARGINS
1. Auto Margins (Standard Pre-set Margins)
The following auto margins are
permanently stored in this typewriter.
Left Margin Right Margin
PICA typing 10 75
(10 pitch)
EUTE typing 12 90
(12 pitch)
MICRO typing 15 113
(15 pitch)
When the power is first turned on, the Print Point Indicator
moves to the left auto margin. A beep sounds when the
6th character or space is printed before the right margin,
informing you that the Print Point Indicator is nearing the
right margin. Printing stops after 5 more characters (or
spaces) are typed, and a beep signals that the Print Point
Indicator is at the right margin.
2. Setting New Margins
Move the Print Point Indicator to the position where you
want to set a new margin by using the Space Bar and/or
Backspace Key.
®
To set a new margin beyond either of the present mar-
gins, press and release the Margin Release Key while the
Print Point Indicator is at that margin, then move the Print
Point Indicator to the desired position.
1)
Left Margin
Press the Margin Set Key to set the new left margin.
Left Margin Right Margin
" Minimum distance 1 inch
2)
Right Margin
Hold down the Code Key and press the Margin Set Key
to set the new right margin.
®
A beep sounds, signaling that a new margin has been set.
When yo_ set a new left or right margin, the respective
auto margins are automatically cleared.
/
O
The' LCD must be clear to set new margins, and the Auto
center a, nd Decimal tab functions must not be in active
use.
• The left and right margins must be at least one inch apart.
o
Typing Beyond Margins
1)
Typing beyond right margin:
Press and release the Margin Release Key when the Print
Point Indicator stops at the right margin and continue typ-
ing.
2)
Typing beyond left margin:
Press and release the Margin Release Key at the left mar-
gin, and press the Backspace Key to move the Print Point
Indicator to the position where you want to start typing.
11
Page 17
8, .-TABS
®
Your typewriter has a memory back-up battery which pro-
tects the margin/tab settings for a minimum of five years,
even when the power switch is turned off,
:_) _ When power is turned on, six beeps sound if the back-up
battery has been completely drained. The margin/tab set-
tings are cleared. Please •contact your nearest Sears Serv-
ice Center in this case.
Setting tabs makes aligning columns of figures or tables
of data easy.
1. Setting Tabs
1) Move the .Print Point Indicator to the position where you
want a tab by using the Space Bar or Backspace Key.
2) Press the Tab Set/Clear Key. A beep will confirm that a
tab has been set. A maximum of 16 tab stops can be set.
® The LCD must be clear to set tabs, and the Auto center
and Decimal tab functions must not be in active use.
,
Clearing Tabs
Move the Print Point Indicator to the tab you want to
1)
clear.
2) •
Hold down the Code Key and press the Tab set/Clear
Key to clear the tab. A beep will confirm that the tab has
been cleared.
®
If you want to clear all tabs, hold down the Code Key and
press the Tab Set/Clear Key with a little pressure. Two
beeps will confirm that all tabs have been cleared. The
print carder can be at any position when all tabs are
cleared.
3. Using Tabs
Press the Tab Key to advance the Print Point Indicator
to the next tab on the right.
• If any text remains on the LCD, it will be printed before
the carrier advances to the next tab.
Page 18
9, CORRECTIONS.ON PAPER
O
O
Io
The best¢__@r
1)
0
Your new typewriter has a one line automatic correction
memory. The machine remembers all characters typed in
the last full line and will correct any or all of those charac-
ters. Characters beyond the correction memory can also
be corrected easily with a few extra steps.
The correction memory is automatically cleared when the
Retum, Index or Reverse Index Key is pressed.
The correction memory is also cleared if the power is
tumed off.
Correcting the Last Character(s) Typed
Press the Correction Key. The Print Point Indicator will
backspace and erase the incorrect character(s).
If you hold down the Correction Key, the machine will
continue erasing characters in the last full line until the
Correction Key is released.
The bes t
The best typewriter
typewriter
_T ype"typewriter"
in rhe world
in Phe world
Zl
2) Type the correct character(s).
=
Cbrrecting Previous Character(s) Within the Current
Line'
1)
Move the*Print Point Indicator to align it with the charac-
ter(s) to be corrected, using the Backspace Key.
2)
Press the Correction Key to erase the incorrect charac-
ter(s).
0
Hold down the Correction Key to correct more than one
character. Correction will be repeated until the Correction
Key is released.
in the world
A
3) Type the correct character(s).
13
Page 19
in the world
4) Press the Relocation Key to return the Print Point Indicator
to its previous position.
1
Correcting Character(i) on Another Line
Y
Mr. Joyn Lewis
2001 Newborn St.
Electro Clty_
4
Mr.
Joyn Lewis
Mr. Jo_n Lewis
i)
If the correction is on another line, press the Reverse
Index Key or Index Key (clears any correction memory) to
align the Print Point Indicator with the line where the cor-
rection is to be made.
2)
Move the Print Point Indicator to the position one space
to the right of the character(s) to be corrected, using the
Space Bar and/or Backspace Key.
3)
Press the Correction Key. The Print Point Indicator will
backsl_ace to the incorrect character. Type the incorrect
character and it will be erased. The Print Point Indicator
does not move.
14
Mr. John Lewis
z_
!,
Mr. John Lewis
2001 Newborn St.
Electro City_
4) Type the correct character(s).
5) Return the Print Point Indicator to the previous position.
./
Page 20
10. :CORRECTIONS :ON LCD (DISPLAY)
1. Moving the Cursor
1) Press the Backspace Key to move the Cursor one space
to the left.
Press the Express Key to move the Cursor one space to
2)
the right.
• Hold down either key for continuous movement.
Ex.
to be corrected:
2. Replacing
('-_ J er
_sr_:ypewrit "
besttypewriter
t
_r
@
best typewriter
T
_P
Ex.
tojb_:corrected: • "
4
1) Bring the cursor under- the ,character .you want to.-correct,
using the Backspace and/or Express Key.
2)
Type the correct character. The character is automatically
replaced.
Press the Relocation Key to return the cursor to its former
3)
position.
3. Deleting
<In text>
Position the cursor under the character to be deleted,
using the Backspace and/or Express Key.
To delete more than one character, position the cursor
under the character at the far left of the series you want
to delete.
Press the Correction Key to delete the character(s). Each
time the Correction Key is pressed, the character above
the cursor is deleted, and the text is pulled one space to
the left.
Hold the Correction Key down to quickly delete a number
of characters.
.
Press the Relocation Key to return the cursor to the pre-
vious position.
Lp
Page 21
best typewriterr_
Y
LP
best typewriter-- 442 )
V
LP
EX.
Insert position
I
e bestT typerlter 443J
bP
4
INSERT
<At the end of text>
When the cursor is at the end of the text, characters are
pulled one space to the right as each deletion is made.
O
If the beginning of the text appears at the left side of the
LCD with the cursor at the end of the text, the cursor will
move to the left each time a deletion is made.
4. Inserting
1) Use the Backspace and/or Express Key to bring the cur-
sor to the character one space to the right of where you
want to insert text.
l e best type_iter _3 )
Y
LP
$
l e best typewriter 442 )
v
,4!,
INSERT
l e best typewriter 442
V
t_
• or
2)
Hold down the Code Key and press the Backspace Key.
The character above the cursor will alternately flash with
a box mark (B).
3)
Typ_ the desired character(s) and/or space(s). Inserts are
effected to the left of the cursor. The cursor moves one
space to the right for each character inserted, 0Nhen the
cursor is at the far-right side of the LCD, text is pushed
to the left for each character inserted).
4)
Hold down the Code Key and press the Backspace Key
again. The insert mode is terminated and the cursor does
not move.
best typewriter 442 ]
V
L_
16
or
Press the Relocation Key. The Insert mode is terminated
and the cursor returns to the end of the text.
Page 22
11. AUTOMATIC WORD CORRECTION
This function allows you to correct the last or previously
typed word(s) only on the current line withone operation.
I,
Deleting the Last Word Typed on Paper
This is his ypewriter.
4
4
This
4
This
is his typewriter.
Hold down the Code Key and press the Correction Key.
A
1)
An intermittent beep will sound. Press the Space Bar. The
typewriter will delete the word, starting from the last
character.
2)
Type the correct word(s).
O
To cancel this function before the word is deleted, hold
down the Code Key and press the Correction Key again.
Two beeps signal that the function has been canceled.
This
This
is his typewriter.
4
4
is
his typewriter.
K
,
Deleting a Previous Word on the Current Line
i)
While hol_ling down the Code Key, press the Correction
A
,Key and then the last character of the word to be cor-
rected. The Carder moves to the position of that character
and an intermittent beep will sound.
Press the first character of the word to be corrected. The
2)
typewriter will delete the word, starting from the last
character.
17
Page 23
This
is hi_ typewriter.
This
This
is our typewriter.
_---1 Type "our"
is our typewriter.
"A" is the position of the Carder.
Zh
3)
Type the correct word.
®
To cancel this function before the word is deleted, hold
down the Code Key and press the Correction Key again.
Two beeps signal that the function has been canceled.
4)
Press the Relocation Key to return the Carder to its pre-
vious position.
very very ftne
Y
LP
very ftne day
[
v
L_
3. Deleting _ Word on the LCD
f
1) Pos_ion the cursor under the space following the word
you wisl_ to delete.
2)
Hold down the Code Key and press the Correction Key.
The word is deleted and text is pulled to the left.
• Type any desired text after activating the insert mode.
18
Page 24
SPELL CORRECTOR FUNCTION
The Spelling portion of this product is based on Proximity
Linguistic Technology.
THE PROXIMITY/MERRIAM-WEBSTER LINGUIBASE
, Copyright 1984 All Rights Reserved Proximity Technology,
Inc.
Copyright 1984 All Rights Reserved Merriam-Webster Inc.
Turning On/Off the Spell Corrector
1)
Hold down the Margin Release (SPELL) Key and press the
"0" (ON/OFF) Key. A beep sound indicates that the Spell
ON/OFF
Corrector is turned orr.
4-
2)
Hold down the Margin Release (SPELL)" Key and press the
"0" (ON/OFF) Key again to turn off the Spell Corrector.
m
Holy the Spell Corrector Works
1)
This typewriter is equipped with a 50,000 word Main Dic-
character
tionary and when you type any series of characters (word)
that is not found in the dictionary, a beep sounds at the
charactor
cheracter
J
f
i 1 ill
Room No. 505
end of the word. In addition to this dictionary, there is an
approximately 100 word User Dictionary to register fre-
quently used terms and proper nouns.
2)
The Spell Corrector identifies a group of letters as a com-
pleted word when immediately followed by the characters
and key functions below. The Spell Corrector therefore
PICA/ELITE pitch
starts checking spelling_from the first character, of the next
word.
Numbers: 0 1 2 3 4 5 6 7 8 9
etc..
Jl I1 i
forget-me-not
The best type-
writer
"{" s,gnals the end of a word to the typewriter
Symbols: ! I @ z # 3 $ £ _ o ¢ o
& < * > ( ) = + ± § IT
® ½ ¼ [ ] : ; ,, , ? /
Key functions: Space, Tab, Return, Index, Reverse Index
®
Two periods or apostrophes in a row signal the end of a
word.
®
Hyphens that do not fall at the end of a Iline signal the
end of a word.
Page 25
3. Error Types
The Spell Corrector checks spelling and indicates error,
in the following manner:
_-t) For words not found in the dictionary, a beep will sound.
®
The names of major .cities in the world, abbreviations o
the 50 American states, common first and last names an(
frequently used contractions are also included in th_
50,000 word dictionary.
Examples: New York, Tokyo, CA, IL, John, Mary, don't
isn't
Chicago
CHICAGO
chicago j
J
f
the letters of a proper noun are not capitalized.
Examples: Chicago, San Francisco, _Tom
3) A period must be typed after all abbreviations. If not, a
2) A beep sounds if the first letter of a proper noun or if all
Mr,
Mr
J
VOLUME
beep will sound.
Examples: Mr., bldg_., etc.
4. Beep Volume Adjustment
Any of 10 volume levels can be set from the Keyboard.
When.the. power, is firsbtumedon, .the beep-volume, is.set
to the fifth _ tevek ..... -
Hold down the Margin Release (SPELL) Key and press the
"3" (VOLUME) Key. Each time this key is pressed, the vol-
ume increases one step. The volume retums to the first
level after it reaches the tenth level.
_n
Page 26
4-
5. Finding Typing Errors on the Current Line
1) Hold down the Margin Release (SPELL) Key and press the
"5" (FIND) Key. The Carder will move to the first incorrect
word on the current line.
2) Correct the error.
3)
To find any other incorrect word, hold down the Margin
Release (SPELL) Key and press the "5" (FIND) Key again.
The Cartier or cursor moves to the next incorrect word.
Then correct the error.
4)
Repeat the same procedure to correct all errors on the
current line. The Carrier or cursor stops at the end of the
line typed, after all errors are corrected.
®
The one line memory is cleared by pressing retum, center,
index, reverse index.
• This function cannot be used when editing the file.
SUGGEST
6. Suggestions for Similar Words
1) Move the Carrier or cursor to the word in question.
2)
Hold down the Margin Release (SPELL) Key and press the
"6" (SUGGEST) Key. A similar word to the word in ques-
tion app*ears on the LCD.
3)
Press the Index Key to display the next similar word, until
the desired word appears.
4)
When the desired word appears, press the Return Key in
order to correct the word.
0
If the word in question is on the LCD, it is automatically
replaced with the desired word when 'you press the
Return Key.
21
Page 27
ADD
on Divisadero Street
l J
7. Adding Words to the User Dictionary
Names and unusual words not contained in the Main Dic-
tionary can be stored in the User Dictionary.
1)
Type the word to be stored in the User Dictionary.
2)
Hold down the Margin Release (SPELL) Key and press the
"1" (ADD) Key. A beep sounds, confirming thatthe word
has been stored. If no beep sounds, it means the word
is already registered in the Main or User Dictionary and
it will not be stored again.
O
Previous words on the same line canbe stored by
backspacing to any position under the word to be
entered.
Kryptonite 6 grams
: range in which word is entered
ERASE
®
If the User Dictionary is full, the word with the least usage
frequency is automatically deleted to make room for new
entries. The number of times you type each word in the
User Dictionary is counted by the Spell Corrector, enabl-
ing it to rearrange them in the order of usage frequency.
8. Erasing Words from the User Dictionary
The words in the User Dictionary can be deleted
desired.
1) Type the word to be deleted from the User Dictionary.
2)
Hold clown the Margin Release (SPELL) Key and press the
"2" (ERASE) Key. A beep sounds, confirming that the
word has been deleted. If no beep sounds, it means that
the word has not been stored in the User Dictionary.
®
The Print Point Indicator can be either below the word or
one sl_ace immediately following the word to be deleted.
• Previous words on the same line can be deleted by
backspacing to any position under the word to be
deleted.
22
Page 28
9. List of the User Dictionary
The words in the User Dictionary can be printed out in
the order of usage frequency, or alphabetically. (The last
word in the list is the first word which wil_ be deleted to
make room for new entries when the User Dictionary is
full.)
Most Frequent Word. , -
[
lb.
ElF
16 Spaces J T
Least Frequent Word
A
kryptonite
FCC
LIST
A. LIST
r,,
t) Hold down the Margin.Release (SPEll) Key and press the
"4" (LIST) Key. The words .in the User Dictionary are
_printed in order of usage-frequency in a certain format.
2)
Hold down the Margin Release (SPELL) Key and press the
"9" (A.LIST) Key. The words in the User Dictionary are
kg
now printed in alphabetical order.
®
If the User Dictionary is empty, the expression "NO
WORD" is shown in the display.
®
The printout can be temporarily stopped by pressing the
Return Key.
Press the Return Key again to restart printout.
Press the Space Bar during printout to cancel the list
function.
Back-up battery
The Spell Corrector is provided with a back-up battery
which protects data in the User Dictionary for a minimum
of five years, even when the power switch is turned off.
Six beeps sound when power is turned on if the back-up
battery has been completely drained, and the contents of
the User Dictionary have been erased. Please contact
your nearest Sears Service Center in this case.
23
Page 29
I B
DECIMAL TABULATION
!
<> DECIMAL TAB
I
'V
LP
Of"
I
I
+
@
This function allows you to do statistical typing "easily. All
numbers are automatically aligned by their decimal points.
1)
Set tab(s) at the decimal positions for each column.
2)
Press the Return Key or Express Key to return the Carrier
to the left margin.
3)
Hold down the Code Key and press the-Tab Key. "O
DECIMAL TAB" appears on the LCD and the Print Point
Indicator wilt move to the first tab stop.
Ex.
CType text
456.78
I
v
" I
Sample Printout
"rob position
1
i23.45
1.23
ill
-)
L
or +
Tab position
6,789°00
4.56.78
I
RETURN
454
®
If any text remains on the LCD, it will be printed before
the Carrier moves to the first tab stop.
• 4)
Type the text with or without decimal point. Typed text
is displayed on the LCD. Make corrections on the LCD
before printout.
5) You now have three options to print the text.
a) Press the Return Key. Text will be printed and the
Carrier stops at that position.
b)
Press the Tab Key. Text will be printed and the Car-
rier will advance to the next tab position, making it a
standard tab.
c)
HOld down the Code Key and press the Tab Key.
Text will be printed and the Carrier will advance to the
,k
next tab, making it a decimal tab again.
To advance to the next line, press the Return Key and
6)
repeat 3) through 5).
24
O
To cancel the Decimal tab mode, first clear the text on
the LCD using the Correction Key, and then press the
I
Return Key. The Decimal tab mode will be canceled and
the Carrier retums to the left margin on the next line.
Page 30
2; AUTOMATIC CENTERING
This function allows you to center text evenly between the
left (or indent) and right margin.
o CENTERING
V
NP
Ex.
Everything_
T
NF
_Type Phrase )
1
420
I
I
1) Hold down the Code Key and press the "C" Key.
2)
"<_ CENTERING_ appears on the LCD and the Print Point
Indicator automatically advances to the center of the mar-
gin setting.
@
If any text remains on the LCD, it will be printed before
the Carrier advances to the center of the margin setting.
Type the phrase to be centered. Typed text is displayed
3)
on the LCD. Make corrections on the LCD before printout.
®
If more characters are typed than will fit between the left
and right margins (the counter indicates "0"), a beep will
sound. Press the Margin Release Key to continue typing.
Sample Printout
Left Morgin
1
Everything
m
T
"P I
or
Right Margin
1
420
4)
Press the Return Key. The text is printed, centered be-
tween the left (or indent) and right margins, and the
Automatic centering function is cleared. The Print Point
Indicator remains positioned one space to the right of the
centered text.
®
To cancel the Automatic centering function without print-
ing, first clear the text on the LCD using the Correction
Key, then hold down the Code Key and press the "C"
Key.
or
Press the Return Key after clearing the text on the LCD.
The Carrier returns to the left margin (or indent) on the
next line.
®
This function can be used together with Bold typing and
Automatic underlining functions.
Page 31
3. AUTOMATIC PARAGRAPH!INDENTATION
This function sets a temporary left margin, ' which elimi-
INDENT
EX,
I
* 50_v 456v ]
LP I FIDE_IT
Automatic F_rogmph Indentation
L.eft Margin / Right _rgin
!
-..y • -s r,._.,,..I T....-- t,,..r|,., .,.,
• =_-.*.,._., _.1q.i, c,y,t,l b,,_,._ €_u)
b._.t.-._,._. _6-tt,*,*cL., _,.t.,._..t t..,._t,
• rl,,t. ,.|•c_.., i_. Jl ..J ,_ =t..,.=t,,, _.1 i,,*
• P_ll ,l.,u,._t t,,,a,l., (is ,,,,if.., ,,.,it,,l,)
nates the need for constant tabbing or spacing after each
carder return.
1)
Move the Print Point Indicator to the position where the
paragraph is to be indented.
2)
Hold down the Code Key and press the Margin Release
Key. A "_" appears above "INDENT' on the LCD. The
present position will be set as the temporary left margin
until the function is canceled.
3) Type in the text to be indented.
INDENT
4. BOLD TYPING
LP BOLD
. '3° t
4) To cancel Paragraph Indentation, hold down the Code
Key and press the Margin Release Key again. The "_"
above "INDENT" on the LCD disappears.
This function makes words stand out from the rest of the
text. It's useful for emphasizing titles, critical information,
etc.
1)
Hold down the Code Key and press the "X" Key. A "_"
appears above "BOLD" on the LCD.
Type in the text.
®
On the LCD, characters to be emphasized in bold flash
alternately with asterisks to distinguish them from other
text.
Sample Printout
26
Bold Typing
÷
3)
To cancel Bold typing, hold down the Code Key and
press the "X" Key again. The "T" above "BOLD" on the
LCD disappears.
4)
This function can be used together with the Automatic
centering and Automatic underlining functions.
Page 32
AUTOMATIC UNDERLINING
11 :
This function underlines all text (including spaces) or indi-
vidual words (all text except spaces) as you type.
f
XX
Ex.
Have a nice day! 430
v v
t "
Y Y
SampleP_tout
Have a nice day!
XX
130
1. Automatic Full Underlining
1) Hold down the Code Key and press the "3" _ Key. A
"_" appears above "XX" on the LCD.
2) Type in the text to be underlined.
• Underlined text is distinguished on the LCD by the " "
mark and characters which flash alternately.
To cancel the ful! underlining, hold down the Code Key
3)
and press the "3" _ Key again. The "T" above "X X"
on the LCD disappears.
This function can be used together with the Automatic
4)
centering and Bold typing functions.
Ex.
See.you soon
y V
LP
y v
Sample Printout
See you soon
2. Automatic Word Underlining
XX
1) Hold down the Code Key and press the "4" _ Key. A
"T" appears above "X X" on the LCD.
2)
Type in the text to be underlined.
430
Underlined text is distinguished on the LCD by the " "
®
mark. and characters:-whtch. _flash- alternately: .... .
130
.-
To cancel the word underlining, hold down the Code Key
3)
and press the "4" _ _ Key again. The "_" above "X X"
on the LCD disappears.
xx
4)
This function can be used together with Automatic center-
ing and Bold typing functions.
Page 33
6. AUTOMATIC ; CARRIERRETURN
This function eliminates the need to press the Return Key
AUTO RETURN
"T
LP RBTURN
Beep Right Morgin
61543 Z 1'
he can-manage I"
hen one of ou r
that the pre[:_ara-
ic Carder _
Return Zone
AUTO RETURN
J
at the end of every line.
.0
-This function is automatically activated in STORE mode,
but cannot be activated in JUST mode.
Hold down the Code Key and press the "=" Key. A "_'"
1)
appears above "RETURN" on the LCD.
Once activated, the Carder will automatically return when
2)
you type a hyphen or space in the automatic carder return
zone,
The automatic carrier return zone is the area 5 spaces to
the left of the currently set right margin. A beep is heard
whenthe Carrier enters the automatic_ carrier return zone:
O
If a _ hyphertor space, is not typed in the: automatic,carder
return zone, the Carrier will advance past the right margin.
To cancel the Automatic carrier return function, hold down
3)
the Code Key and press the "=" Key again. The "T"
above "RETURN" on the LCD disappears.
REQUIRED HYPHEN AND
11
HYPHEN
Beep Righl Morgin
V
54321 i
July 3
o into the
n- lin,e I
rom : J
-- Automatic Carrier -J
Required Space
l
_Required Hyphen
Return Zone
I
REQUIRED SPACE
This function allows you to enter hyphens or spaces in
the automatic carrier return zone that will not trigger the
automatic carrier return.
To type a required hyphen or required space, hold down
1)
the Code Key and Hyphen Key or Space Bar.
Any hyphen _ space typed in this manne_wilt not be:
2)
removed, nor will it trigger a carder return.
-®
Hyphens typed before entering the automatic carrier
retum zone when storing a file or when editing a file are
automatically entered as required hyphens.
When a file is recalled, normal hyphens-i.e, usually syllable
®
hyphens, originally typed in the automatic carrier retum
zone without the Code Key-will automatically be removed
if they do not fal! in the automatic carder return zone dur-
ing printout.
®
When a file is recalled, normal spaces (spaces typed with-
out pressing the Code Key) will automatically trigger a car-
der return if they fall in the automatic carder return zone
during printout.
Page 34
• ,8, SECOND-KEYBOARD (SPECIAL CHARACTER SET)
KBII
V V
LP KB I [
L _9
v T
LP KBII
Sample Printout
,150
The symbols located at the upper right side of the three
character keys can be typed with the following procedure.
1)
Hold down the Code Key and press the "5" Key. A "T"
.
-appears •above "KBIr' on the LCD.
2)
Hold down the Shift Key, or press the Shift Lock Key, and
.... type the key with the desired -symbol. (If you pressed the
Shift Key, keep it depressed).
t
3)
Hold down the Code Key and press the "5" Key again
to cancel the Second Keyboard and restore the standard
keyboard. The "Y" above "KBII" on the LCD disappears.
9. CAPS LOCK
EX.
I cAPs LOGKV V 430 J
LP CAP_
Samp_ Printout
CAPS LOCK
12345
caps lock
"_()
+
caps lock
12345
This function allows the typing of capital letters and num-
bers without pressing the Shift Key.
i)
Hold down the Code Key and press the "Z" Key. A "T"
appears above "CAPS" on the LCD.
0
While in Caps lock mode, alphabetic characters are
capitalized without pressing the Shift Key. The number/
symbol keys are printed in lower case.
®
If you press the Shift Key in this mode, alphabetic charac-
ters are printed in lower case, and the number/symbol
keys are printed in upper case.
2)
To cancel Caps lock mode, hold down the Code Key and
press the "Z" Key again. A "_'" above "CAPS" on the LCD
disappears.
?_
Page 35
MEMORY FUNCTIO
The memory functions will make your typing easier and
more efficient.
Repetitive phrases, technical terminology and entire letters
can be-stored, edited :and recalled (printed) at will.
You can also make several files with formats (margins and
tabs) for letters and other documents you regularly type.
®
Your typewriter has a memory back-up battery which pro-
tects the stored files for a minimum of five years, even
when the power switch is turned off.
®
When power is turned on, Six beeps sound if the back-up
battery has been completely drained: The contents of the
stored file is erased. Please contact your nearest Sears
Service Center in this case.
1. FILE STORING
I NAME OF FILE ?
v
{;TORE
renter file name_
I
This typewriter is equipped with a 10,000 character mem-
ory for storing up to 50 files.
Three types of files can be stored.
TEXT file _ for entire letters
PHRASE file -- for often-used phrases or terminology
FORMAT file -- for line formats (margins and tabs only)
Choose the file type according to the text to be stored.
1. Storing a TEXT File
For storing entire letters (including tabs and margins).
1) Press the Mode Key until a "T" appears on the LCD
above "STORE". "NAME OF FILE?" is displayed.
2)
Type the file name (maximum of five letters/numbers).
Then press the Return Key.
RETURN
1
@
You can terminate the STORE mode at any time by pres-
sing the Mode Key. Any entered text will be automatically
stored.
Page 36
Tex t/'l;hr a s e/'l_'o_n at ?
S TORE I
I
"Text/Phrase/Format?" appears On the LCD, .'T, "P" and
3)
"F" will flash.
t
y Y
|TORE _I_T_,N
+
0 MARGIN/TAB SET 472
I 472
v v
s I_RE R£'_
set margln/tab ,,._
V Y
STORE I_._ET_q.N
i,
4) Press the "T" (TEXT) Key.
The paper is fed one line and the Carrier retums to the
left margin. The LCD is cleared and the counter indicating
the number of spaces to the right margin appears. The
L Automatic return is automatically activated.
• Margin and tab settings, as well as other functions which
were in effect before entering the STORE mode, are
automatically canceled to be stored in the back-up mem-
ory. They are automatically recalled when you exit the
STORE mode.
Hold down the Code Key and press the "F" Key. "O
5)
MARGIN/TAB SET" appears.
6)
Set the left and right margins and tabs, as you would in
the NP mode. Clear any unnecessary tabs.
7) Hold down the Code Key and press the "F" Key again.
"_ MARGIN/TAB SET" disappears. The Carder returns to
the newly set left margin.
enter text
I
Y/N?
I CLOSING FILE
I 472
Y
NP
STORE
Y
I
v
ltBTUAN
l
I
Enter text_ Entered text is displayed on the LCD and
8)
pdnted one line at a time when you type a normal hyphen
or space in the automatic carder return zone.
Make corrections on the LCD before the line is printed.
®
Once text is printed on paper, it cannot be corrected: To
make corrections after text has been printed, first close
the file and edit it on the LCD, as described in section 3,
"File Editing".
g)
Press the Mode Key to terminate the STORE mode.
"CLOSING FILE Y/N?" appears on the LCD.
10)
Press the "Y" Key to close the file and return to the Nor-
mal Print (NP) mode.
O Press the "N" Key to return to the Text storing mode.
31
Page 37
5
f
NAME OF FILE ?
V
STORB
enter file norne_
I
! )_t/_hvasei$_'ormat ?
I 472
V
STORE I
I
v
S TORE RETURN
I
2_
Storing a PHRASE File
Phrase files are used to store brief expressions or ter-
minology without margins or tabs.
1)
Press the Mode Key until a "V" appears on the LCD
above "STORE". "NAME OF FILE?" is displayed.
2)
Type the file name (maximum of five letters/numbers).
Then press the Retum Key:.
®
You can terminate the STORE mode at any time by pres-
sing the Mode Key. Any entered text will be automatically
stored.
3)
"Text/Phrase/Format?" appears on the LCD. "T", "P" and
"F" will flash.
Press the "P" (PHRASE) Key.
4)
The LCD is cleared and the counter indicating the number
of spaces to the right margin appears. The Automatic
return is automatically activated.
®
The Underlining and Bold functions set before entering the
STORE mode are automatically canceled to be stored in
the back-up memory. They are automatically recalled
when you exit the STORE mode.
enter text "_
I CLOSING FILE Y/N? 1
I 'v 472 1
NP
\
v v
._ TORE RETURN
5) Enter text. Entered text is displayed on the LCD and
printed one line at a time when you type a normal hyphen
or space in the automatic carder return zone.
• ,Make corrections on the LCD before the line is printed.
Once text is printed on paper, it cannot be corrected. To
make corrections after text has been printed, first close
the file 'and edit it on the LCD, as described in section 3,
"File Editing".
Press the Mode Key to terminate the STORE mode.
6)
"CLOSING FILE Y/N?" appears on the LCD.
7)
Press the "Y" Key to close the file and return to the Nor-
mal Print (NP) mode.
• Press the "N" Key to return to Phrase storing mode.
32
Page 38
I
NAME OF FILE ?
i
I _ext/Phras:iFormat
T
TORE [
RETURN
I
?
i
FORMAT FILE 472
v Y
4TORE RETURN
.I
I
3. Storing a FORMAT File
For storing margin and tab line formats. This function is
useful for typing onto prepdnted forms.
1) Press the Mode Key until a "_'" appears on the LCD
above "STORE". "NAME OF FILE?" is displayed.
2)
-Type the file name (maximum of five letters/numbers).
Then press the Return Key.
®
You can terminate the STORE mode at any time by press-
ing the Mode Key. Any entered format data will be auto-
matically stored.
3)
"Text/Phrase/Format?" appears on the LCD. 'q-", "P" and
"F" will flash.
Press the "F" (FORMAT) Key.
4)
"FORMAT FILE" and the counter indicating the number of
spaces to the right margin appears on the LCD.
_set margin/tab
CLOSING FILE
V
Np
YIN?
v
_ETURN
472
]
]
®
Margin and tab settings, as well as other functions which
were in effect before entering the STORE mode, are
automatically canceled to be stored in the back-up mem-
ory. They are automatically recalled when you exit the
STORE mode.
5)
6et the left and right margins and tabs at any position as
you, would in any other mode. Clear any unnecessary
tabs.
6)
Press the Mode Key to terminate the STORE mode.
"CLOSING FILE Y/N?" appears on the LCD.
7)
Press the "Y" Key to close the file and return to the Nor-
mal Print (NP) mode.
• Press the "N" Key to return to the Format storing mode.
/
33
Page 39
_L FILE SPACEr USEO !
STOR£
" 4. All File Space Used
If you specify a new file and there are already 50 files in
the typewriter memory, "ALL FILE SPACE USED" appears
on the LCD.
In this case, one file must be deleted to create a new file.
(Refer to "File Deleting".)
5. Out of Memory
OUT OF MEMORY
Y
STO_]g
1 STOP CODE
Dear {I
v
STOP
]
J
If you run out of memory, "OUT OF MEMORY" appears
on the LCD.
In this case, press the Mode Key to store entered text
and return to the NP mode. Unneeded file(s) must be
deleted to make room in the memory for your present file.
(Refer to "File Deleting".)
To stop printing at locations in a file in order to type words
or phrases during recalling (printing), enter stop codes
while storing or editing the file.
1
Entering Stop Codes
1)
Hold down the Code Key and press the "7" Key at the
position you wish to stop in the file. A highlighted "S" is
displayed on the LCD.
You can remove the stop code by deleting the character
Of
'lit" with the Correction Key.
An "×", which stands for the stop code, is printed on the
2)
paper when the line is printed while you are storing the
file. (When entering stop codes while editing the file, an
"X" is not printed.) The "X" is only an indicator, and will
not appear during recall (printout).
f
l
34
STOP CODE
NP
Y
RECALL
1
( Typ° ,..,, -)
I RECALL
I
I
2. Using Stop Code During Recalling (Printing)
1) When the typewriter has stopped at a stop code during
printout, "STOP CODE" appears on the LCD.
2) Type desired text.
3) Hold down the Code Key and press the "6" Key to restart
printout. (Refer to "File Recall".)
Page 40
I
The stop code can also be used in conjunction with the
decimal tab or auto centering, as a Decimal tab stop or
an Auto center stop.
3. Entering a Decimal Tab/Auto Center Stop Code
1) First activate the Decimal tab/Automatic centering func-
@
tion.
STOP
2)
_m
Then enter the stop code. A highlighted "S" is displayed
on the LCD.
O
You can remove the stop code by deleting the character
"g" with the Correction Key.
Press the Return Key. An "X" which represents the stop
3)
code is printed on the paper. (When entering stop codes
while editing a file, there is no need to press the Retum
Key and an "X" is not printed.) The "X" is only an indicator,
and will not appear during recall (printout).
f
DEC. TAB STOP
I
T V
_P KECA_
I Agl'O CENTER STOP
v v
NP R£C_L
enter text
I
, RECALL
I
I
I
1
Using a Decimal Tab/Auto Center Stop Code During "
Recalling _(printing)
I
1)
When the typewriter has stopped at a Decimal tab stop
or Auto £enter stop during printing, "DEC. TAB STOP" or
"AUTO CENTER STOP" will appear on the LCD.
2) 3) Enter desired text. Entered text is displayed on the LCD.
Press the Return Key or Tab Key for decimal tab stop to
print the text. (Refer to "Decimal Tab", "Automatic Center-
ing".)
4) Hold down the Code Key and press the "6" Key to restart
printout. (Refer to "File Recall".)
35
Page 41
3. FILE EDITING
NN_E OF FILE ?
I
v
This function allows you to edit stored fileson the LCD.
1. Activating Edit Mode
1) Press the Mode Key until a "T" appears on the LCD
above "STORE". "NAME OF FILE?" is displayed.
I
STO/LI I
(.n,.r ,,,. °°m.
Thts function allows you edit stored ftl
es on the LCD..
!
I
I
I lhts function allows you edtt stored: ftl
Y
STORE
2)
Type the file name to be edited (maximum of five letters/
numbers). Then press the Return Key.
®
You can terminate the Edit mode by pressing the Mode
Key (and the "Y" Key to close the file) at any time.
The beginning of the file appears on the LCD. Move the
3)
cursor to any position in the file and edit it. Make correc-
tions as explained in "Corrections on LCD".
@
In the Edit mode, when more than 40 characters are
entered, they appear on the LCD in 2 lines.
In order to check which features are engaged, depressing
the Code Key will change the LCD to one line and the
"Y" marks will appear to show the mode and feature set-
tings. When the Code Key is released, the indication on
the LCD returns to 2 lines.
FORMAT FILE !72
f
Space $ Index
(- Backspace "i" Reverse Index
el Return u Required Hyphen
• -) Tab _ Required Space
m (,-,_)CENTERING) Auto Center
J (_ ODECtMAL TAB) Decimal Tab
| (,--* 0MARGIN/TAB SET) Margin/Tab set in text file
_.J(_ INDENT) Paragraph Indentation
36
v
@ - ,When you speCify a format file, "FORMAT FILE" appears.
Move the Carrier to any position and set the new margins/
tabs as you would in any other mode.
.
Function Symbols
When stored text is displayed on the LCD, the typewriter
functions are represented by the symbols shown at left.
j,
,k
Page 42
1
Moving Cursor
Press the Backspace Key to move the cursor one space
1)
to the left.
Press the Express Key to move the cursor one space to
2)
the right.
O Hold down either key for continuous movement.
4. Going to the Beginning or End of a File
1) Press the Relocation Key to go to the end of the file.
I
T
2 "tOl_ I
_nter chamcter_
I
I
S 1"0 lld_
SEARCH
1
I
2) Hold down the Code Key and press the Relocation Key
to go to the beginning of the file.
D
Moving Cursor to Desired Position (Using the
Search Function)
Hold down the Code Key and press the Express Key.
1)
"S=" appears on the LCD.
2)
Type the characters you want to find (maximum of 18
characters).
Press the Return Key. The typewriter searches for the text
3)
that you,have typed from its present position (regardless
of any underlining of text.)
Once found, the cursor appears at the position after the
4)
last letter of that text. If the text that you have typed is
not in the file, the cursor returns to its previous position
before function activation.
®
The desired text will be memorized by the typewriter until
power is turned off, and appears every time you activate
the Search function. It is useful to find any other occur-
rences of the same text.
37
Page 43
__lle Edltlng_The display Js clear_l an
v
0 RARGIN/TAB SET
v
STOR£
$ "rolqtl_
_rchange margin/tab_
I
IF._Jle Edft, Jng##The display Js cleared an 1
[
1
Changing Existing Margin and Tab Settings (in the
Text File Only)
i)
Locate the box mark (1111) which will alternately flash with
"_ MARGIN/TAB SET" when you bring the cursor under
it.
2)
Hold down the Code Key and press the "F" Key. The
counter indicating the remaining number of spaces to the
right margin appears. The margin/tab settings in this file
are recalled.
3)
Set any new margins and tabs, moving the carder to any
position as you would in any other mode.
4)
Hold down the Code Key and press the "F" Key again.
The cursor retums one space to the right of the box mark
(111).
J
I
7. Back Code
To move_the Carrier back one space at the left margin
,or a tab position, enter back codes while editing the file.
0
Hanging Indentation
This fuaction is used to temporarily move the character(s)
to the left of the stored left margin of text. It causes the
beginning of the paragraph to be highlighted and the
reader of the text to distinguish the beginning of each
paragraph.
®
Saving Tab
This function is used to temporarily move the character(s)
to the left of a stored tab position or indent position in
the text. Tab memory can be saved with this function.
Entering Back Codes
Hold down the Code Key and press the "B" Key. The
symbol ",-" appears on the LCD.
38
Page 44
4. -FILE RECALL (PRINTOUT ON PAPER)
This function allows you to recall (print out) the stored file
in the NP or JUST mode.
NAME OF FILE ?
Y
NP
_enter file name_
I TYPE O0 LINES PRESSP
Y
NP
enter number of lines _r
RECALL
®
The LCD must be cleared to activate the File recall.
1.
Recalling a TEXT File
1)
Hold down the Code Key and press the "6" Key. "NAME
OF FILE?" appears on the LCD. Type the file name and
press the Return Key.
®
"NOT FOUND PRESS <--J" appears on the LCD if you
have entered a file name that is not stored in the memory.
Press the Return Key and retype the file name.
I
2)
The Carrier will move to the left margin setting of that par-
ticular file and "TYPE 00 LINES PRESS ,_1 - appears on
the LCD.
3)
Type in any number of lines from 01 to 99. (Standard 11"
paper is 66 single-spaced lines long and 14" paper is 84
single-spaced lines long.) Then press the Retum Key.
T
I
PRINTOUT
I PRESS# TO CONTINUE
v v
NP RECALL.
\d
\
I
I
• If you do not enter the number of lines desired, printing
will not stop until the end of the file.
4) A "T" appears on the LCD above "RECALL", and the
typewriter will print the file.
®
To ,temporarily stop printout, press the Return Key.
"PAUSE PRESS <__1 ,, appears on the LCD. Restart printing
by preying the Return Key again.
®
You can cancel the recall function at any time during print-
out by pressing the Space Bar. "END OF FILE RECALL"
appears on the LCD when the recall has been canceled.
The typewriter will stop after printing the specified number
5)
of lines, and "PRESS <-J TO CONTINUE" appears on the
LCD asking you to restart printing. Press the Return Key
to restart printout.
O
You can not cancel the recall function by pressing the
Space Bar when "PAUSE PRESS ,_1 ,, or "PRESS <-J TO
CONTINUE" is displayed on the LCD.
END OF FILE RECALL
!
Y "T
NP RICiLLL
I
i
J
6)
When the recall has been completed, "END OF FILE
RECALL" appears on the LCD.
39
Page 45
NAME OF FILE ?
T
_P
(,°,er f,e oomo,,)
I
v v
HE' A.E:Cit4, L,
I PRINTOUT
END OF FILE RECALL
v v
HP R£Ck3,L
f
RECALL
RECALL
I
I
2. Recalling a PHRASE File
1)
Hold down the Code Key and press the "6" Key. "NAME
OF FILE?" appears on the LCD. Type the file name and
press the Return Key.
0
"NOT FOUND PRESS ,_1 ,, appears on the LCD if you
have entered a file name that is not stored in the memory.
Press the Return Key and retype the file name.
2)
A "V" appears on the LCD above "RECALL", and the
Carder will start printing from its present position, accord-
ing to the margins which are currently set.
0
To temporarily stop printout, press the Return Key.
"PAUSE PRESS ,J" appears on the LCD. Restart printing
by pressing the Return Key again.
0
You can cancel the Recall function at any time after start-
ing a printout by pressing the Space Bar. "END OF FILE
RECALU' appears on the LCD when recall has been can-
celed.
.J
3. Recalling a FORMAT File
I Eo'"LE:
Np
I RECALLING FORMAT
y T
NP RECALL
I FORMAT IS CHANGED I
!
-ENI,D OF FILE RECALL
NP R_C.kl,L
I STOP COOE
V T
NP _E:CALL
DECo TAB STOP
v v
NP R£CA.LL
T
i
1
I
.J
,I
I
1)
Hold down the Code Key and press the "6" Key. "NAME
OF FILE?" appears on the LCD. Type the file name and
press thef Retum Key.
0
"NOT FOUND PRESS <__1,, appears on the LCD if you
• have er_tered a file name that is not stored in the memory.
Press the Retum Key and retype the file name.
2) A "!'" appears on the LCD above "RECALL". While "RE-
CALLING FORMAT" appears on the LCD, the margin/tab
format set on the typewriter will be automatically changed
to the recalled one, and then "END OF FILE RECALL"
appears on the LCD.
®
The printing stops at any stop code in the file and "STOP
CODE", "DEC. TAB STOP" or "AUTO CENTER STOP"
appears on the LCD. Enter desired text and restart print-
out by holding down the Code Key and pressing the "6"
Key. (Refer to "Stop Code".)
AUTO CENTER STOP
Y Y
HJP RECALL
4O
]
Page 46
,5. .FILE LISTING
LIST
i
I PRINT LIST ,1
This function allows you to print a list of stored files.
• The LCD must be cleared to activate this function, and it
cannot be activated in the STORE mode.
1) Hold down the Code Key and press the "8" Key.
• "00 FILES" is printed if there are no files in the memory.
The type of file, file name and the first 40 characters in
2)
the file are printed in a certain format from position 10 on
the margin scale (in 10 pitch), regardless of the present
margin settings. The number of characters remaining (a-
vailable) in the: memory, and number of .files ,already. in
memory are printed at the end of this list.
®
To temporarily stop printout, press the Return Key.
"PAUSE PRESS <J" appears on the LCD. Restart printing
by pressing the Return Key again.
®
Press the Space Bar to terminate this function after it has
been activated.
Sample Printout
TEXT
PHRASE
FORMAT
3515 CHARACTERS AVAILABLE
03 FILES
LTRI :Dear X Thank you very much for your lett
PHRSl:Please remember me kindly to your parent
FRMTI:
6. AVAILABLE MEMORY CAPACITY
This function allows you to see exactly how much memory
is still- available..
The LCD must be cleared to activate this function, and it
®
CAPACITY
cannot be activated in the STORE mode.
Hold down the Code Key and press the "9" Key.
1)
3515 CHRS AVAILABLE
V
LP
J
The amount of memory available is automatically dis-
2)
played on the LCD.
3) Press the Return Key to terminate this function.
41
Page 47
7, FILE DELETING
DELETE
I N/_E OF FILE ? I
Y
Use this function to delete any unnecessary files or to
make room for new files in the memory.
The LCD must be cleared to activate this function, and it
0
cannot be activated in the STORE mode.
Hold down the Code Key and press the "0" Key. "NAME
1)
OF FILE?" appears on the LCD.
_enter file nome
LP
am
MEMORY ALL CLEAR
2) Type in the file name and press the Return Key.
"DELETE COMPLETED" will appear on the LCD if the file
3)
was in the typewriter memory.
O
"NOT FOUND PRESS __1 . will appear if the file was not
in the memory. Press the Return Key and retype the file
name. Use Correction Key to delete any name on the
LCD, if necessary.
O
You can cancel the file deleting function by pressing the
Return Key only if there is no file name on the LCD.
4) Press the Return Key to terminate this function.
This function allows you to delete all files in the memory.
CLEAR ALL FILES Y/N?
I
Y
bP
YOU SURE Y/N?
42
The LCD must be cleared to activate this function, and it
®
+
I
I
cannot I_e performed in the STORE mode.
Hold clown the Code Key and press the "A" Key. "CLEAR
1)
ALL FILES Y/N?" appears on the LCD.
Press the "Y" Key. "ARE YOU SURE Y/N?" appears on
2)
the LCD, asking-for confirmation.
I
3) All files are cleared when the "Y" Key is pressed again.
I
I
CANCEL
O The function is canceled if the "N" Key is pressed after
the first or second prompt.
Page 48
BLOCK OPERATIONS
8
(COPY/MOVE/DELETE)
dlsploy text )
I
• position cursor ot
flrsl chorocter
1. Block Copy
This function copies a block of text and inserts the copy
at a specified location in the file. Block copy does not alter
: _ ....... er:._emove the contents of.the original block.
1) Display the file text using the edit mode.
2) Position the cursor on the first character of the text to be
copied.
I
tter,OOl'The market wtll continually gra |
i W as the-expense of hiring out home imprJl
I
STORE BLOCK I
move cursor lo
last character
move cursor to
# target posil Ion
/
3) Hold down the Code Key and press the "P" Key. This
marks the beginning of the block. Two beeps sound and-
a "T" appears above "BLOCK" on the display. (BLOCK
function becomes effective at this time.)
Move the cursor to the last character of ihe text to be
4)
copied.
5)
Hold down the Code Key and press the "P" key again to
mark the end of the block. Two beeps sound, indicating
that the block of text has been defined. The defined block
of text starts flashing on the display.
6)
Move the cursor to the position where you want to copy
the block of text.
Ex ....
I increases. IJl J
E_
increases. #_ Consumers will be tot J
ced to do whatever is Icedto necessary ant this
Consumers will be For
\
7)
Hold down the Code key and press the "L" key. The block
of texLis copJed:at:thespeeified, position:,:The t' V." abo_ze: ....
"BLOCK" disappears. The block functionis canceled-at-
.
this time.
®
If the defined block of text does not exceed 1 character,
the copy operation is not carried out and the block func-
tion is canceled.
43
Page 49
Block Move
u
This function moves a block of text to a specified location
in the file.
display text )
I
position cursor at
first character
EX. ' [
al new sets with different combination.
I market. _e planning to introduce sever J
T V
STORI_ BI_CK
t
move cursor to
last character
I
1) Display the file text using the edit mode.
Position the cursor on the first character of the text to be
2)
moved.
3)
Hold down the Code Key and press the "P" Key. This
marks the beginning of the block. Two beeps sound and
a "W' appears above "BLOCK" on the display, indicating
that the block function is in effect.
Move the cursor to the last character of the text to be
4)
moved.
Hold down the Code Key and press the "P" key again to
5)
mark the end of the block. Two beeps sound, indicating
that the block of text has been defined. The defined block
of text starts flashing on the display.
_- move cursor to
target position
I
l lmprov_
$TORB
EX.
I Improvements. #0 We are planning to J
introduce several new sets with differen]
44
6) Move the cursor to the position where you want to move
th_ block of text.
7)
Hold down the Code Key and press the "M" Key. The
block of text is moved to the specified position. "Y"
above "BLOCK" disappears. The block function is can-
celed at this time.
@
When a block of text is moved, succeeding characters are
shifted to the left to fill in the space created by the moving
of text.
Page 50
3. Block Delete
This function deletes a block of text in a file.
display lext )
I
L position cursor a!
J come. _Thank you again your j
ed use of our products. We wait for your "J
come..Thank you again for your continu J
first character
for continu
T T
STORI_ BLOCK
move cursor to ) last character
)
1) Display the file text using the edit mode.
Position the cursor on the first character of the text to be
2)
deleted.
Hold down the Code Key and press the "P" Key. This
3)
marks the beginning of the block. Two beeps sound and
a "_'" appears above "BLOCK" on the display, indicating
I
that the block function is in effect.
Move the cursor to the last character of the text to be
4)
deleted.
5)
Hold down the Code Key and press the "P" key again to
mark the end of the block. Two beeps sound, indicating
that the block of text has been defined. The defined block
of text stads flashing on the display.
o.
,J come, _We wait for your reply.
I ¥
STORE
Ex.
I
Hold down the Code Key and press the Correction Key.
6) ¸
The blo¢k of text is deleted and all succeeding text is
shifted to the left to flu in the space created. The "Y"
mark above "BLOCK" disappears, indicating that the
block function is canceled.
45
Page 51
SUPPLIES
1. Printwheel
Your-typewriter .comes: with ,a;÷Prestige .10 Printwhee! (Sears No. 54018). Besides this type
style, a variety of printwheels with different type styles as listed below are available for
your machine.
Contact the nearest Sears Store or Catalog Plant for further information.
Sears No. Type Style Pitch Type Style Sample:
54011 Prestige 12 ABCOEabcdeZZ._
54012 Courier 10 ASCDEabcde1234
54013 Courier 12 ASdO£abcde 1234
54014 Cubic 10 ASCOl[abcde 123t,
54015 Script 12 _,SCPE_Scde / ZJ4.
54016 Orator 10 - A8CDEABcDeJ25q
54017 Mini Gothic 15 ABCDEabcde1234
,
Ribbon Cassette
Correctable Black Carbon Film Ribbon -- 54085
1)
Your typewriter comes with Correctable Black Carbon Film Ribbon. This ribbon is not
reusable because the inked surface of the ribbon is transferred to the paper as you type.
2)
Nylon Fabric Ribbon -- 54091
This optional ribbon can be used to type a considerably larger number of characters than
Carbon Film Ribbon.
,
Correction Tape
1)
Lift-off-Oorreetion-:Tape- - 5z_00g_-.; "- i-._ ...... : • :
Your typewriter comes with Lift-off Correction Tape. This correction tape is used only
with Correctable Black Carbon Film Ribbon (No. 54085) which was originally installed on
your typewriter. It lifts the black carbon film ink off the paper.
2)
Cover-up Correction Tape- 5498
This optional correction tape covers up the error and is used only with Nylon Fabric Rib-
bon (No. 54091}.
Page 52
' AFTER USING THE TYPEWRITER AND TO STORE
1) Tum off the on/off Switch and disconnect the Power Cord from the electrical outlet.
2) Store the Power Cord in the Cord Compartment.
3) Replace the Keyboard Cover and fasten securely.
MAINTENANCE AND SERVICE
1. Cleaning
1)
Do not attempt to disassemble the typewriter to clean it.
2)
Dust the typewriter lightly, using only a dry cloth.
Never use water or solvents such as thinner, alcohol, etc. to clean your typewriter.
3)
4)
When the Top Cover is opened for replacement of the Printwheel, Ribbon Cassette or Correction Tape,
be sure not to drop items such as a pin, paper clip, nail file, etc. into the typewriter. They may cause
damage to the typewriter.
Service
e
It is recommended_that your typewriter: b_serviced_at_,/east once a year by a Sears qualified service
1)
technician. Any malfunction causedby , maintenance performed by anyone other than Sears qualified
service personnel will void the warranty.
2) If the typewriter fails to function or does not function properly, check the following:
• Is the typewriter plugged into a live socket?'
• Is the typewriter switched on? ,,
• Is the Printwheel properly installed? (See Page 9, Section 2, Paragraph 2)
• Are the Ribbon Cassette and the Correction Tape properly installed?
• Have the Ribbon Cassette or Correction Tape been used up?
If the typewriter still does not work properly after checking the above, contact your nearest Sears Service
Center.
/
47
Page 53
4\
12
\
10 9_
I
PaperSupport
Top Cover
LCD Assembly
Keyboard Cover
Platen Knob
Screw
Cover Assembly
Cord Storage Cover
Bottom Pan Assembly
Handle Hinge Pin
Handle
i
Printwheel
Ribbon Cassette
Correction Tape
Your Sears Merchandise has added value when you consider that Sears has Service Units nationwide staffed
with Sears trained professional technicians using Sears approved parts and methods. For replacement parts
or service not shown above, contact your nearest Sears Service Center.
48
Description
Part No.
060-71520_44
005-13062
060-27300
060-70530
060-70540-45
200- 71020
005-61513
060-70580-44
005-70711
200-70180
060-70320-44
-See page 46
Page 54
SB_ARS
OWNERS
MANUAL
MODEL NO.
161.53514090
HOW TO ORDER
REPAIR PARTS
Now that you have purchased
your typewriter, should a need
ever exist for repair parts or
service, simply contact any
Sears Service Center and
most Sears Stores. Be sure
to provide all pertinent facts
when you call or visit.
WORD
PROCESSING
TYPEWRITER
WHEN ORDERING REPAIR PARTS, ALWAYS GIVE THE
FOLLOWING INFORMATION:
1. PART NUMBER
2. PART DESCRIPTION
3. MODEL NUM BER 161.53514090
4. NAME of ITEM-WORD PROCESSING TYPEWRITER
f
All parts listed may, be ordered from any Sears Service Center and
most Sears Stores.
If the parts you need am not stocked locally, your order will be
electronically transmitted to a Sears Repair Parts Distribution
Center for expedited handling.
757481
Sears, Roebuck and Co., Chicago, IL. 60684 U.S.A.
Part No. 001-02099-01
Printed in Japan
O4O69O
Page 55
757481
OWNERS
MANUAL
WORD
PROCESSING
TYPEWRITER
MODEL NO.
161,53514090
Operation
Repair parts
CAUTION:
Read Rules for
Safe Operation
and Instructions
Carefully
757481
Warranty
FULL ONE YEAR WARRANTY
For one year from the date of purchase, Sears will repair this Typewriter,
free of charge, if defective in material or workmanship.
WARRANTY SEI_VICE IS AVAILABLE BY CONTACTING THE
NEAREST SEARS SERVICE CENTER/DEPARTMENT IN THE
UNITED STATES. This warranty applies only while product is in use in
the United States. *
This warranty gives you specific legal rights, and you may also have other
rights which vary from state to state.
SEARS, ROEBUCK AND CO., Dept. 731 CR-W, Sears Tower, Chicago,
IL. 60684
Word Processing Typewriter
Record in space provided below the Model No. and Serial No. of
this appliance.
The Model No. and the Serial No. are located at the back of the
machine.
Model No. 161.53514090 Serial No.
Retain these numbers for future reference.
Sears, Roebuck andCo., Chicago, IL. 60684 U.S.A.
Page 56
NOTE: This equipment has been tested and found to comply with the limits for a
Class B digital device, pursuant to Part 15 of the FCC Rules. These limits are
.designed to provide reasonable protection against harmful interference in a residen-
tial installation: This equipment generates-, _:uses and can radiate radio frequency
energy and, if not installed and used in accordance with the instructions, may cause
harmful interference to radio communications. However, there is no guarantee that
interference will not occur in a particular installation. If this equipment does cause
harmful interference to._adio or,-television reception, which can be determined by
turning the equipment off and on, the user is encouraged to try to correct the inter-
ference by one or more of the following measures:
m Reorient or relocate the receiving antenna.
Increase the separation between the equipment and receiver.
-- Connect the equipment into an outlet on a circuit different from that towhich
the receiver is connected,
Consult the dealer or an experienced radioiTV technician for help.
.RULES FOR SAFE OPERATION
1) Your new Sears Typewriter has been designed to operate on standard U.S.A. Power 110-120
Volts AC, 60Hz only.
2) Your typewriter is a highly sophisticated mechanism, so never attempt to repair it yourself.
If repair-becomes_necessa_;_haveJt::,.repaired_:-by÷Sea_,_qualifie_e_4eernan_: _ _ _
3) Never insert metal objects such as a screwdriver, paper clip, nail file, etc., inside the type-
writer. This could cause damage to the typewriter, and/or electrical shock.
4) Do not leave your typewriter unattended when the machine is on. Always turn off the type-
writer when you have finished typing.
Page 57
"_ .... Your new ::Sears Word Processing Typewriter: uses--the •most :advanced : electronic
: - _ :"_'_"technologyand greatly increases your:typing efficiency. Some of the many:outstanding •
features of your new typewriter are:
e 50 file; 10,000-character memory * .The number in brackets refers to
• Fourtypewriter modes the Sample Letter on the next page.
O
40-character Liquid Crystal Display (LCD: 40 character 2 lines)
• -0:
Easy-to-change 100-character printwheel
0
Line spacing selector: 1, 1-1/2 and 2 lines
Pitch selector: 10, 12 and 15 characters per inch
0
5-year memory back-up battery
0
Full-line correction memory
0
Full electronic tabulator (16 positions resettable)
0
Automatic centering ......................................................................... (1)
Decimal tabulation . ................... . ....................................................... (7)
0
0
Automatic paragraph.indentatior_ ;.._;...: .................................................. (5)
Automatic carrier return
0
Automatic word correction
0
Automatic word/full underlining ...................................................... :. (4)(6)
0
0
Bold typing ............................. ...: ............. ......................................... (3)
0
Required hyphen
0
Required space ..:. ...................................... : ..................................... (2)
Block copy/move/delete
0
Spell Corrector
0
Caps lock
0
Self demonstration (See below)
Hold down the Code Key and press the "D" Key to
automatically print out the feature listing as follows:
THIS *WORD PROCESSING* TYPEWRITER HAS MANY FEATURES TO MAKE TYPING
÷ ..
EASIE_
80 CHARACTER DISPLAY - Allows you to revlew and edit text before
I
printinK.
SPELLING CHECK - Automatically checks spelling of 50,000 words
plus checks an additional I00 words that may be specia! to you.
TEXT MEMORY - Allows you to review, edit and recall up to I0,000
characters.
* DUAL MARGIN ALIGNMENT - Automatically "blocks" both sides of the
typing, just like it is on this page.
* BLOCK oPERATIONS - Allows you to move, copy, delete and insert
entire blocks of text for enhanced editing.
* 3 PITCH SELECTIONS - Allows a much wider variety of type styles.
* OTHER FEATURES INCLUDE - BOLD TYPING, Automatic carrier return,
-Automatic Centering-
Paragraph Indentation, Decimal tabulation, Automatic Underlining2 '
CAPS LOCK and many more.
Page 58
Sample Letter
"Tools for Everyone" _Autom_ic Centering (1)
Consolidated Tool Co., Inc.
138 Elm Boulevard
Chicago, Illinois 60690
June 3, 1997
Everyday Hardware, Inc.
10301 Main Street
Portland, Oregon 98645
Dear Sir;
Thank you very much for your _le_tter of May 23 and for your
inquiry as to any developments in our product-line for next year.
As a favored customer, you are presently entitled to a 10%
discount on all products ordered. We certainly understand your
position and we realize that_recently _themarket for our products_has ....
been somewhat slow. Therefore to thank you for your continued
patronage, we ha_e decided that we can offer an additional 57o
discount. We hope that this will help the situation.
Required Space (2) _- _' _
Bold Typing (_
The following passage from Tools Today typifies our feelings on
the matter, b Automatic Full Underlining (_
Paragraph_-"The market will continually grow as the expense of hiring out
inden_Uon home improvements increases. Consumers will be forced to do
(5) whatever is necessary and this fact offers a grand opportunity
to all those involved in this area!"
Please look under the following areas in the Company Prospectus
inserted which describes our goals for the coming years:
Section Title.Automatic Word
Section Pages
Underlining (_
Meeting the New Markets
Our Answer
What We Can Do Together
2.3-2 31 - 46
11.6 93 - 102
18.14 209 - 234
Decimal Tabuiation (7)
Thank you again for your continued use of our products. We wait
for your reply.
Very truly yours,
James Harrison
Assistant Sales Manager
This owners manual describes how to use all of the typewriter's features and controls,
how to replace accessories and many other important things. Please read this manual
completely before operating your new electronic typewriter.
Sears typewriter stands are designed to give you comfort by providing the proper height
for the typewriter when typing.
A Sears typewriter stand also provides you with a convenient storage location for your
typewriter when it is not being used.
Page 59
TABLE OF CONTENTS
PART NAMES AND FUNCTIONS ..........................................................................................
BASIC OPERATIONS ............................................................................................................
1. SELF DEMONSTRATION .......................................................................................
2. HOW TO START TYPING ......................................................................................
3. HOW TO CHANGE RIBBON CASSE-n-E ...............................................................
4.. HOW TO CHANGE CORRECTION TAPE ..............................................................
5. HOW TO CHANGE PRINTWHEEL .........................................................................
6. TYPEWRITER MODES .......................................................................................... 10
7. MARGINS ................................................................................................................. 11
8. TABS ..................................................................................................................... 12
9. CORRECTIONS ON PAPER .................................................................................. 13
10. CORRECTIONS ON LCD (DISPLAY) ..................................................................... 15
11. AUTOMATIC WORD CORRECTION ...................................................................... 17
SPELL CORRECTOR FUNCTION ......................................................................................... 19
TYPEWRITER FUNCTION ..................................................................................................... 24
1. DECIMAL TABULATION ........................................................................................ 24
2. AUTOMATIC CENTERING ..................................................................................... 25
1
4
4
4
7
8
9
3. AUTOMATIC PARAGRAPH INDENTATION ........................................................... 26
4. BOLD TYPING ....................................................................................................... 26
5. AUTOMATIC UNDERLINING ................................................................................. 27
6. AUTOMATIC CARRIER RETURN .......................................................................... 28
7. REQUIRED HYPHEN AND REQUIRED SPACE ...................................................... 28
8. SECOND KEYBOARD (SPECIAL CHARACTER SET) ............................................. 29
9. CAPS LOCK ................................... ; ...................................................................... 29
MEMORY FUNCTION- . .................................................................................................................. .30
1. FILE STORING ...................................................................................................... 30
2. STOP CODE ........................................................................ _ ................................. 34
3. FILE EDITING ........................................................................................................ 36
4. FILE RECALL (PRINTOUT ON PAPER) .................................................................. 39
5. FILE LISTING ......................................................................................................... 41
6. AVAILABLE MEMORY CAPACITY ......................................................................... 41
7. FILE DELETING ..................................................................................................... 42
8. MEMORY ALL CLEAR ......................................................................................... 42
9. BLOCK OPERATIONS (COPY/MOVE/DELETE) .................................................... 43
SUPPLIES ............................................................................................................................ 46
AFTER USING THE TYPEWRITER AND TO STORE .......................................................... 47
MAINTENANCE AND SERVICE ........................................................................................... 47
Page 60
PART NAMES AND-FUNCTIONS
1. Operating Parts
PLATEN ROLLER
Roils paper in and out
PLATEN KNOB
Used to turn the Platen Roller
PAPER BAIL
Holds paper against the platen
CARRIER
Prints characters, moves
as it prints
CARRYING HANDLE
Used to carry machine. Normally
contained inside bottom plate
LCD
Displays the typed characters
CORD COMPARTMENT
Contains power cord
PAPER SUPPORT
Supports the paper. When
folded down, prevents dust
from getting inside
PAPER RELEASE KNOB
Releases paper for alignment
POWER SWITCH
Tums power on and off
TOP COVER
Open to replace accessories
MARGIN SCALE
Provides numerical indication
of printing position
2. Carrier Mechanism (under the Top Cover)
PRINTWHEEL
Element with characters for printing
RIBBON TAKEUP KNOB
Wound to take up any slack in ribbon
RIBBON CASSE-FFE
PRINT POINT INDICATOR
Indicates printing position
LINE LOCATOFI (dot line)
Denotes the bottom o[ the typed line ....
CARD HOLDER
Holds paper, envelopes and
cards etc. against the Platen
CORRECTION TAPE GUIDE
Guides Correction Tape
PRINT HEAD
Strikes against Printwheel
CORRECTION TAPE
PRINTWHEEL SET/RELEASE LEVER
Used when replacing Printwheel
Page 61
3. Keyboard Layout
1
\
2
3
®
4
,
Key Functions
1 MARGIN RELEASE KEY
Releases the margins to type beyond them or set
new ones.
2 POWER-ON LAMP (GREEN)
Lights up when the machine is turned on.
3 TAB KEY
Moves the Carrier to the next tab.
4 SHIFT LAMP (RED)
Lights up when the Shift Key is pressed or locked.
5 LEFT/RIGHT MARGIN SET KEY
Sets the left/right margin.
®
8 SHIFT KEY
Enables typing of capital letters or a character on
the upper half of a key when held down. When it's
pressed, the Shift Lamp (red) on the Keyboard lights
up.
9 S_IFT LOCK KEY
Locks the Shift Key in position to type a series of
capital letters when pressed. When it's locked, the
Shift Lamp (red) lights up. Release by touching
either Shift Key.
10 SPACE BAR
A light touch moves the Carrier ahead one space.
For repeat spacing, hold it down.
6 TAB SET/CLEAR KEY
Sets or clears tabs.
7 CODE KEY
Hold down the Code Key to activate special func-
tions (Auto center, File recall, etc.) in conjunction
with several other keys.
11 CORRECTION KEY
Corrects characters. Hold down for repeat correc-
tion.
12 RELOCATION KEY
After backspacing to correct or underline text, etc.,
press the Relocation Key to return the Carrier one
space after the last character typed. On the LCD,
the cursor.returns to its former position.
Page 62
1
II: i'q!'"'T'
11" 12 13 14"
* Hold down these keys for repeat action.
The following characters x, X, -, _, =,., *, are
also repeated by holding down the respective keys.
18"
i7
16*
8
15"
13 MODE KEY
Changes the typewriter mode.
14 REVERSE INDEX KEY
Pressed to retract paper without moving the Carrier.
Paper will retract a half-line (1/12') every time the
key is pressed. By holding down the key, paper will
retract continuously. Also clears the correction
memory.
15 INDEX KEY
Pressed to advance paper Without moving the Car-
rier. Paper will advance a half-line (1/12') every time
the key is pressed. By holding down the key, paper
will advance continuously. Also clears the correction
memory.
16 RETURN KEY
Pressed to advance paper one line and return the
Carrier to the left margin. For repeat line spacing,
hold it down. Also clears the correction memory.
17 EXPRESS KEY
Press _to retum the Carrier to the left margin without
line spacing (LCD must be cleared), or move the
cursor one space to the right on the LCD. Hold
down the key for repeat spacing (on the LCD only).
18 BACKSPACE KEY
A light touch moves the Carrier backward one
space, or moves the cursor one space to the left
on the LCD. For repeat action, hold it down.
Page 63
BASIC OPERAT!
1. SELF DEMONSTRATION
Hold down the Code Key and press the "D" Key. The
typewriter wil! automatically perform a printout of featureS:_
When you activate this function, the correction memory
is cleared.
To :cancel the printout at any time, simply touch the
Space Bar.
2. HOW TO START TYPING
Keyboard Cover
- . . _ Cord:Compa_tme_
over
1. Set Up Typewriter
1) Place the typewriter on a desk or other fiat surface. Lift
up the Keyboard Cover and remove it.
2) Press:the- mark_on_:t he:: CorcL:Oompartment-:,Go_,e_--orf ;tlqe:-. `
rear of the typewriter, open the cover and take out the
power cord.
Power Cord
3) Fit the power cord through the slot on the Cord Comparb
ment and close the cover. Plug the cord into an outlet of
the proper voltage (110-120V AC 60Hz).
Page 64
2. Turn On Typewriter
Paper Support
Power Switch
Raise the Paper Support and tum on the Power Switch
located on the right side of the typewriter. The following
initial operations occur."
1. A beep sounds and the Power-on Lamp (green) on the
keyboard lights up.
2. The Carder moves to the extreme left side and then
moves to the left margin: The Printwheel rotates and
stops at the programmed position.
While the above operations are occurring, all other type-
writer functions stop. Start the next operation only after
the initial operations are completed,
• Make sure the Printwheel, Ribbon Cassette and Correc-
tion Tape are properly installed and that there is a suffi-
cient quantity of ribbon and correction tape remaining,
3. Insert Paper
1) Insert paper between the Paper Support and Platen Roll-
er.
Platen Knob.
Paper Bail
Knob
Turn the, Platen Knob on the left of the typewriter to
2)
advance the paper. When the top of the paper comes into
sight, pull the Paper Bail upward by hand. to open it and
continue turning the Platen Knob to feed paper in be-
tween the Paper Bail and Platen Roller.
3)
The paper is released when the Paper Release Knob is
turned backward, enabling you to freely move the paper
by hand for alignment purposes.
®
Close the Paper Bail and return the Paper Release Knob
to, its forward position before typing.
Page 65
LINE SPACE
÷G
=
Set Typing Controls
Une Spacing
1)
Hold down the Code Key and press the "1" Key. "_ LINE
SP 1 1.5 2" appears on the LCD, The line space in use
will blink.
Ill
SP I 1.5 2
!
To change the line spacing, hold down the Code Key and
press the "1" Key again. The line spacing changes each
-time the "1" Key is pressed, and the respective setting
blinks.
Releasing the Code Key sets the line spacing and
automatically terminates the selection mode.
Setting 2 provides double spacing (3 lines per inch),
Setting 1-1/2 provides one-and-a-half spacing (4 lines per
inch).
Setting 1 provides single spacing (6 lines per inch).
O
Une space selection can be performed in the NP mode,
and in the LP or JUST modes when there are no charac-
ters on the LCD.
®
Your typewriter has a memory back-up battery which pro-
tects the line space/print pitch settings for a minimum of
five years, even when the power switch is turned off.
@
When power is turned on, six beeps sound if the back-up
battery has been completely drained. The line space/print
pitch settings are cleared.
Please contact your nearest Sears Service Center in this
case.
<>PITCH
Ill
10 12 15
/
Print Pitch
PITCH
+
I
2)
The print pitch should be set to match the Printwheel
being used. Typing can be done with different pitches on
the same line.
Hold down the Code Key and press the "2" Key.
"<_ PITCH 10 12 15" appears on the LCD and the
pitch in use will blink.
To change the print pitch, hold down the Code Key and
press the "2" Key again. The print pitch changes each
time the "2" Key is pressed and the respective setting
blinks.
Releasing the Code Key sets the print pitch and automat-
ically terminates the selection mode.
10: PICA pitch _ 10 characters per inch
12: ELITE pitch _ 12 characters per inch
15: MICRO pitch _ 15 characters per inch
®
Print pitch selection can be performed in the NP mode,
and in the LP or JUST modes when there are no charac-
ters on the LCD.
Page 66
=HOW TO CHANGE.: RIBBON CASSETTE
D
1. Removing Ribbon Cassette
1)
_Ribb_n" Cassette Stand
Turn off the machine and open the Top Cover.
Hold down the Ribbon Cassette Stand with your thumbs
2)
and gently remove the Cassette by pulling upward on the
Cassette Arms as shown.
O
Look through the window in the Cassette to check on
how much ribbon remains, tf you see colored tape in the
window, replace the Ribbon Cassette with a new one.
=
Installing Ribbon Cassette
Before installing a new Ribbon Cassette, always take up
1)
any slack in the ribbon by winding the Ribbon Takeup
Knob counterclockwise, and remove tab on Cassette Rib-
bon.
®
When installing a new ribbon, wind past the colored por-
tion at the beginning.
Card Holder Printwheel
4!- 4!.
2) Fit the two projections at the back of the Ribbon Cassette
into the two slots in the Ribbon Cassette Stand.
Carefully lower the front of the cassette so that the ribbon
3)
fits betv_en the Card Holder and Printwheel. Press the
portions marked "A" in the illustration until the Ribbon
Cassette snaps into place.
Turn the Ribbon Takeup Knob counterclockwise until it
4)
locks into place O. Then, turn it clockwise until it stops
®.
5) Close the Top Cover.
7
Page 67
4. HOW TO CHANGE:OORRECTIONTAPE
It
Removing Correction Tape
1)
Takeup Spindle Supply Spindle
Turn off the machine. Open the Top Cover and remove
the Ribbon Cassette as explairied under "Removing Rib-
bon Cassette".
2)
Remove the left and right spools from the respective spin-
dles. Be sure not to pull on the spindle hub when remov-
ing the right spool.
Tape Guides
Card Holder
Takeup Spindle
Print'wheel
Supply Spindle
3) Grasp both spools and bring back to a position that is
parallel with the Tape Guides. Pull on the Correction Tape
to take up any slack and lift it out of the typewriter.
1
Installing Correction Tape
While holding the two spools in your hands, unwind the
1)
Correction Tape and position behind the Tape Guides and
Printwheel as shown. Make sure that the sticky side of
the tape faces the Card Holder.
2) Fit the full spool of the Correction Tape onto the Right
(Supply) Spindle. Then fit the left spool (the one with the
knob) onto the Left (Takeup) Spindle.
3)
Turn the left spool counterclockwise until the colored por-
tion of the tape disappears.
®
Check again to make sure that the Correction Tape has
been fed properly behind the left and right Tape Guides.
4) Replace the Ribbon Cassette and close the Top Cover.
Page 68
5, HOW TOCHANGE PRINTWHEEL
1. Removing Printwheel
1) Turn off the machine. Open the Top Cover and remove
the Ribbon Cassette as explained under "Removing Rib-
bon Cassette".
2) Pull the Printwheel Set/Release Lever towards you.
3) Lightly grasp the top of the Printwheel and carefully pull
t
it up towards you.
Print Head
_ _Card Holder
2. Installing Print_eel
1) Ughtly grasp the edge of the Pdntwheel and carefully
lower it in between the Card Holder and the PMnt Head.
Q Make sure that the typeface (the side with typing style
indicated) faces the Platen.
2) Press the Printwheel Set/Release Lever away from you
until it snaps into place, locking the Mechanism.
• Press the Lever as far as it goes again to make sure the
Printwheel has been locked into place.
3) Replace the Ribbon Cassette and close the Top Cover.
• Remount the Printwheel if any abnormal noise is heard or
if incorrect characters are printed.
9
Page 69
6. " TYPEWRITER--MODES
[
v
Zcounter
-- T 462 }
LP
Your typewriter has four different modes. Normal Print
(NP), Line Print (LP), Justified Print (JUST) and Store
(STORE). The mode in use is indicated on the LCD by a
"V", and it's changed each time the Mode Key is press-
ed,
1) Normal Print Mode (NP)
When power is first tumed on, the typewriter is in the Nor-
mal Print (NP) mode. In this mode, characters are
immediately typed on the paper without appearing on the
display (LCD).
i Counter
The counter at the right side of the LCD indicates the
remaining number of spaces to the right margin.
If you type beyond the right margin, the number increases
one by one.
2) Line Print Mode (LP)
This mode allows you to print one line at a time. Charac-
ters appear on the display as you type them, enabling you
to correct any typed entry on the LCD. Characters are
printed when you press the Tab or Return Key. You can
type in new text while the previous line is being printed.
3)
Justified Print Mode (JUST)
- v _2J
JUST
Sample Printout
Left Margin Right Margin
Your typewriter has four different modes: Norm_l Print
(NP), Line Print (LP), Justified Print ,(JUST) and
Store (STORE).
Your typewriter has four different modes: Normal Print
(NP), Line Print (LP), Justified Print (_UST) and
Store (STORE).
This mode allows you to align both margins, i.e., evenly
position the words between the left and right margins.
Characters appear on the display as you type them,
enabling you to correct any typed entry on the LCD.
When you type a character of any word exceeding the
right margin (indicated by the counter on the LCD), words
preceding the right margin are automatically printed out,
justified between the left and right margins, and the carder
returns to the left margin. The word whose characters
exceeded the right margin will remain on the LCD to start
the next line (word-wrap). You can type new text while
the previous line is being printed.
<printout in NP/LP mode>
<printout in JUST mode>
NAHE OF FILE ?
10
If you press the Retum or Tab Key while typing in a line,
text will be printed out immediately and will not be jus-
tified.
4) Store Mode (STORE)
I'
]
This mode allows you to store text into the typewriter's
memory. For an explanation of details, refer to "Memory
Function".
Page 70
7, MARGINS
1. Auto Margins (Standard Pre-set Margins)
The following auto margins are
permanently stored in this typewriter.
Left Margin Right Margin
PICA typing 10 75
(10 pitch)
EUTE typing 12 90
(12 pitch)
MICRO typing 15 113
(15 pitch)
When the power is first turned on, the Print Point Indicator
moves to the left auto margin. A beep sounds when the
6th character or space is printed before the right margin,
informing you that the Print Point Indicator is nearing the
right margin. Printing stops after 5 more characters (or
spaces) are typed, and a beep signals that the Print Point
Indicator is at the right margin.
2. Setting New Margins
Move the Print Point Indicator to the position where you
want to set a new margin by using the Space Bar and/or
Backspace Key.
®
To set a new margin beyond either of the present mar-
gins, press and release the Margin Release Key while the
Print Point Indicator is at that margin, then move the Print
Point Indicator to the desired position.
1)
Left Margin
Press the Margin Set Key to set the new left margin.
Left Margin Right Margin
" Minimum distance 1 inch
2)
Right Margin
Hold down the Code Key and press the Margin Set Key
to set the new right margin.
®
A beep sounds, signaling that a new margin has been set.
When yo_ set a new left or right margin, the respective
auto margins are automatically cleared.
/
O
The' LCD must be clear to set new margins, and the Auto
center a, nd Decimal tab functions must not be in active
use.
• The left and right margins must be at least one inch apart.
o
Typing Beyond Margins
1)
Typing beyond right margin:
Press and release the Margin Release Key when the Print
Point Indicator stops at the right margin and continue typ-
ing.
2)
Typing beyond left margin:
Press and release the Margin Release Key at the left mar-
gin, and press the Backspace Key to move the Print Point
Indicator to the position where you want to start typing.
11
Page 71
8, .-TABS
®
Your typewriter has a memory back-up battery which pro-
tects the margin/tab settings for a minimum of five years,
even when the power switch is turned off,
:_) _ When power is turned on, six beeps sound if the back-up
battery has been completely drained. The margin/tab set-
tings are cleared. Please •contact your nearest Sears Serv-
ice Center in this case.
Setting tabs makes aligning columns of figures or tables
of data easy.
1. Setting Tabs
1) Move the .Print Point Indicator to the position where you
want a tab by using the Space Bar or Backspace Key.
2) Press the Tab Set/Clear Key. A beep will confirm that a
tab has been set. A maximum of 16 tab stops can be set.
® The LCD must be clear to set tabs, and the Auto center
and Decimal tab functions must not be in active use.
,
Clearing Tabs
Move the Print Point Indicator to the tab you want to
1)
clear.
2) •
Hold down the Code Key and press the Tab set/Clear
Key to clear the tab. A beep will confirm that the tab has
been cleared.
®
If you want to clear all tabs, hold down the Code Key and
press the Tab Set/Clear Key with a little pressure. Two
beeps will confirm that all tabs have been cleared. The
print carder can be at any position when all tabs are
cleared.
3. Using Tabs
Press the Tab Key to advance the Print Point Indicator
to the next tab on the right.
• If any text remains on the LCD, it will be printed before
the carrier advances to the next tab.
Page 72
9, CORRECTIONS.ON PAPER
O
O
Io
The best¢__@r
1)
0
Your new typewriter has a one line automatic correction
memory. The machine remembers all characters typed in
the last full line and will correct any or all of those charac-
ters. Characters beyond the correction memory can also
be corrected easily with a few extra steps.
The correction memory is automatically cleared when the
Retum, Index or Reverse Index Key is pressed.
The correction memory is also cleared if the power is
tumed off.
Correcting the Last Character(s) Typed
Press the Correction Key. The Print Point Indicator will
backspace and erase the incorrect character(s).
If you hold down the Correction Key, the machine will
continue erasing characters in the last full line until the
Correction Key is released.
The bes t
The best typewriter
typewriter
_T ype"typewriter"
in rhe world
in Phe world
Zl
2) Type the correct character(s).
=
Cbrrecting Previous Character(s) Within the Current
Line'
1)
Move the*Print Point Indicator to align it with the charac-
ter(s) to be corrected, using the Backspace Key.
2)
Press the Correction Key to erase the incorrect charac-
ter(s).
0
Hold down the Correction Key to correct more than one
character. Correction will be repeated until the Correction
Key is released.
in the world
A
3) Type the correct character(s).
13
Page 73
in the world
4) Press the Relocation Key to return the Print Point Indicator
to its previous position.
1
Correcting Character(i) on Another Line
Y
Mr. Joyn Lewis
2001 Newborn St.
Electro Clty_
4
Mr.
Joyn Lewis
Mr. Jo_n Lewis
i)
If the correction is on another line, press the Reverse
Index Key or Index Key (clears any correction memory) to
align the Print Point Indicator with the line where the cor-
rection is to be made.
2)
Move the Print Point Indicator to the position one space
to the right of the character(s) to be corrected, using the
Space Bar and/or Backspace Key.
3)
Press the Correction Key. The Print Point Indicator will
backsl_ace to the incorrect character. Type the incorrect
character and it will be erased. The Print Point Indicator
does not move.
14
Mr. John Lewis
z_
!,
Mr. John Lewis
2001 Newborn St.
Electro City_
4) Type the correct character(s).
5) Return the Print Point Indicator to the previous position.
./
Page 74
10. :CORRECTIONS :ON LCD (DISPLAY)
1. Moving the Cursor
1) Press the Backspace Key to move the Cursor one space
to the left.
Press the Express Key to move the Cursor one space to
2)
the right.
• Hold down either key for continuous movement.
Ex.
to be corrected:
2. Replacing
('-_ J er
_sr_:ypewrit "
besttypewriter
t
_r
@
best typewriter
T
_P
Ex.
tojb_:corrected: • "
4
1) Bring the cursor under- the ,character .you want to.-correct,
using the Backspace and/or Express Key.
2)
Type the correct character. The character is automatically
replaced.
Press the Relocation Key to return the cursor to its former
3)
position.
3. Deleting
<In text>
Position the cursor under the character to be deleted,
using the Backspace and/or Express Key.
To delete more than one character, position the cursor
under the character at the far left of the series you want
to delete.
Press the Correction Key to delete the character(s). Each
time the Correction Key is pressed, the character above
the cursor is deleted, and the text is pulled one space to
the left.
Hold the Correction Key down to quickly delete a number
of characters.
.
Press the Relocation Key to return the cursor to the pre-
vious position.
Lp
Page 75
best typewriterr_
Y
LP
best typewriter-- 442 )
V
LP
EX.
Insert position
I
e bestT typerlter 443J
bP
4
INSERT
<At the end of text>
When the cursor is at the end of the text, characters are
pulled one space to the right as each deletion is made.
O
If the beginning of the text appears at the left side of the
LCD with the cursor at the end of the text, the cursor will
move to the left each time a deletion is made.
4. Inserting
1) Use the Backspace and/or Express Key to bring the cur-
sor to the character one space to the right of where you
want to insert text.
l e best type_iter _3 )
Y
LP
$
l e best typewriter 442 )
v
,4!,
INSERT
l e best typewriter 442
V
t_
• or
2)
Hold down the Code Key and press the Backspace Key.
The character above the cursor will alternately flash with
a box mark (B).
3)
Typ_ the desired character(s) and/or space(s). Inserts are
effected to the left of the cursor. The cursor moves one
space to the right for each character inserted, 0Nhen the
cursor is at the far-right side of the LCD, text is pushed
to the left for each character inserted).
4)
Hold down the Code Key and press the Backspace Key
again. The insert mode is terminated and the cursor does
not move.
best typewriter 442 ]
V
L_
16
or
Press the Relocation Key. The Insert mode is terminated
and the cursor returns to the end of the text.
Page 76
11. AUTOMATIC WORD CORRECTION
This function allows you to correct the last or previously
typed word(s) only on the current line withone operation.
I,
Deleting the Last Word Typed on Paper
This is his ypewriter.
4
4
This
4
This
is his typewriter.
Hold down the Code Key and press the Correction Key.
A
1)
An intermittent beep will sound. Press the Space Bar. The
typewriter will delete the word, starting from the last
character.
2)
Type the correct word(s).
O
To cancel this function before the word is deleted, hold
down the Code Key and press the Correction Key again.
Two beeps signal that the function has been canceled.
This
This
is his typewriter.
4
4
is
his typewriter.
K
,
Deleting a Previous Word on the Current Line
i)
While hol_ling down the Code Key, press the Correction
A
,Key and then the last character of the word to be cor-
rected. The Carder moves to the position of that character
and an intermittent beep will sound.
Press the first character of the word to be corrected. The
2)
typewriter will delete the word, starting from the last
character.
17
Page 77
This
is hi_ typewriter.
This
This
is our typewriter.
_---1 Type "our"
is our typewriter.
"A" is the position of the Carder.
Zh
3)
Type the correct word.
®
To cancel this function before the word is deleted, hold
down the Code Key and press the Correction Key again.
Two beeps signal that the function has been canceled.
4)
Press the Relocation Key to return the Carder to its pre-
vious position.
very very ftne
Y
LP
very ftne day
[
v
L_
3. Deleting _ Word on the LCD
f
1) Pos_ion the cursor under the space following the word
you wisl_ to delete.
2)
Hold down the Code Key and press the Correction Key.
The word is deleted and text is pulled to the left.
• Type any desired text after activating the insert mode.
18
Page 78
SPELL CORRECTOR FUNCTION
The Spelling portion of this product is based on Proximity
Linguistic Technology.
THE PROXIMITY/MERRIAM-WEBSTER LINGUIBASE
, Copyright 1984 All Rights Reserved Proximity Technology,
Inc.
Copyright 1984 All Rights Reserved Merriam-Webster Inc.
Turning On/Off the Spell Corrector
1)
Hold down the Margin Release (SPELL) Key and press the
"0" (ON/OFF) Key. A beep sound indicates that the Spell
ON/OFF
Corrector is turned orr.
4-
2)
Hold down the Margin Release (SPELL)" Key and press the
"0" (ON/OFF) Key again to turn off the Spell Corrector.
m
Holy the Spell Corrector Works
1)
This typewriter is equipped with a 50,000 word Main Dic-
character
tionary and when you type any series of characters (word)
that is not found in the dictionary, a beep sounds at the
charactor
cheracter
J
f
i 1 ill
Room No. 505
end of the word. In addition to this dictionary, there is an
approximately 100 word User Dictionary to register fre-
quently used terms and proper nouns.
2)
The Spell Corrector identifies a group of letters as a com-
pleted word when immediately followed by the characters
and key functions below. The Spell Corrector therefore
PICA/ELITE pitch
starts checking spelling_from the first character, of the next
word.
Numbers: 0 1 2 3 4 5 6 7 8 9
etc..
Jl I1 i
forget-me-not
The best type-
writer
"{" s,gnals the end of a word to the typewriter
Symbols: ! I @ z # 3 $ £ _ o ¢ o
& < * > ( ) = + ± § IT
® ½ ¼ [ ] : ; ,, , ? /
Key functions: Space, Tab, Return, Index, Reverse Index
®
Two periods or apostrophes in a row signal the end of a
word.
®
Hyphens that do not fall at the end of a Iline signal the
end of a word.
Page 79
3. Error Types
The Spell Corrector checks spelling and indicates error,
in the following manner:
_-t) For words not found in the dictionary, a beep will sound.
®
The names of major .cities in the world, abbreviations o
the 50 American states, common first and last names an(
frequently used contractions are also included in th_
50,000 word dictionary.
Examples: New York, Tokyo, CA, IL, John, Mary, don't
isn't
Chicago
CHICAGO
chicago j
J
f
the letters of a proper noun are not capitalized.
Examples: Chicago, San Francisco, _Tom
3) A period must be typed after all abbreviations. If not, a
2) A beep sounds if the first letter of a proper noun or if all
Mr,
Mr
J
VOLUME
beep will sound.
Examples: Mr., bldg_., etc.
4. Beep Volume Adjustment
Any of 10 volume levels can be set from the Keyboard.
When.the. power, is firsbtumedon, .the beep-volume, is.set
to the fifth _ tevek ..... -
Hold down the Margin Release (SPELL) Key and press the
"3" (VOLUME) Key. Each time this key is pressed, the vol-
ume increases one step. The volume retums to the first
level after it reaches the tenth level.
_n
Page 80
4-
5. Finding Typing Errors on the Current Line
1) Hold down the Margin Release (SPELL) Key and press the
"5" (FIND) Key. The Carder will move to the first incorrect
word on the current line.
2) Correct the error.
3)
To find any other incorrect word, hold down the Margin
Release (SPELL) Key and press the "5" (FIND) Key again.
The Cartier or cursor moves to the next incorrect word.
Then correct the error.
4)
Repeat the same procedure to correct all errors on the
current line. The Carrier or cursor stops at the end of the
line typed, after all errors are corrected.
®
The one line memory is cleared by pressing retum, center,
index, reverse index.
• This function cannot be used when editing the file.
SUGGEST
6. Suggestions for Similar Words
1) Move the Carrier or cursor to the word in question.
2)
Hold down the Margin Release (SPELL) Key and press the
"6" (SUGGEST) Key. A similar word to the word in ques-
tion app*ears on the LCD.
3)
Press the Index Key to display the next similar word, until
the desired word appears.
4)
When the desired word appears, press the Return Key in
order to correct the word.
0
If the word in question is on the LCD, it is automatically
replaced with the desired word when 'you press the
Return Key.
21
Page 81
ADD
on Divisadero Street
l J
7. Adding Words to the User Dictionary
Names and unusual words not contained in the Main Dic-
tionary can be stored in the User Dictionary.
1)
Type the word to be stored in the User Dictionary.
2)
Hold down the Margin Release (SPELL) Key and press the
"1" (ADD) Key. A beep sounds, confirming thatthe word
has been stored. If no beep sounds, it means the word
is already registered in the Main or User Dictionary and
it will not be stored again.
O
Previous words on the same line canbe stored by
backspacing to any position under the word to be
entered.
Kryptonite 6 grams
: range in which word is entered
ERASE
®
If the User Dictionary is full, the word with the least usage
frequency is automatically deleted to make room for new
entries. The number of times you type each word in the
User Dictionary is counted by the Spell Corrector, enabl-
ing it to rearrange them in the order of usage frequency.
8. Erasing Words from the User Dictionary
The words in the User Dictionary can be deleted
desired.
1) Type the word to be deleted from the User Dictionary.
2)
Hold clown the Margin Release (SPELL) Key and press the
"2" (ERASE) Key. A beep sounds, confirming that the
word has been deleted. If no beep sounds, it means that
the word has not been stored in the User Dictionary.
®
The Print Point Indicator can be either below the word or
one sl_ace immediately following the word to be deleted.
• Previous words on the same line can be deleted by
backspacing to any position under the word to be
deleted.
22
Page 82
9. List of the User Dictionary
The words in the User Dictionary can be printed out in
the order of usage frequency, or alphabetically. (The last
word in the list is the first word which wil_ be deleted to
make room for new entries when the User Dictionary is
full.)
Most Frequent Word. , -
[
lb.
ElF
16 Spaces J T
Least Frequent Word
A
kryptonite
FCC
LIST
A. LIST
r,,
t) Hold down the Margin.Release (SPEll) Key and press the
"4" (LIST) Key. The words .in the User Dictionary are
_printed in order of usage-frequency in a certain format.
2)
Hold down the Margin Release (SPELL) Key and press the
"9" (A.LIST) Key. The words in the User Dictionary are
kg
now printed in alphabetical order.
®
If the User Dictionary is empty, the expression "NO
WORD" is shown in the display.
®
The printout can be temporarily stopped by pressing the
Return Key.
Press the Return Key again to restart printout.
Press the Space Bar during printout to cancel the list
function.
Back-up battery
The Spell Corrector is provided with a back-up battery
which protects data in the User Dictionary for a minimum
of five years, even when the power switch is turned off.
Six beeps sound when power is turned on if the back-up
battery has been completely drained, and the contents of
the User Dictionary have been erased. Please contact
your nearest Sears Service Center in this case.
23
Page 83
I B
DECIMAL TABULATION
!
<> DECIMAL TAB
I
'V
LP
Of"
I
I
+
@
This function allows you to do statistical typing "easily. All
numbers are automatically aligned by their decimal points.
1)
Set tab(s) at the decimal positions for each column.
2)
Press the Return Key or Express Key to return the Carrier
to the left margin.
3)
Hold down the Code Key and press the-Tab Key. "O
DECIMAL TAB" appears on the LCD and the Print Point
Indicator wilt move to the first tab stop.
Ex.
CType text
456.78
I
v
" I
Sample Printout
"rob position
1
i23.45
1.23
ill
-)
L
or +
Tab position
6,789°00
4.56.78
I
RETURN
454
®
If any text remains on the LCD, it will be printed before
the Carrier moves to the first tab stop.
• 4)
Type the text with or without decimal point. Typed text
is displayed on the LCD. Make corrections on the LCD
before printout.
5) You now have three options to print the text.
a) Press the Return Key. Text will be printed and the
Carrier stops at that position.
b)
Press the Tab Key. Text will be printed and the Car-
rier will advance to the next tab position, making it a
standard tab.
c)
HOld down the Code Key and press the Tab Key.
Text will be printed and the Carrier will advance to the
,k
next tab, making it a decimal tab again.
To advance to the next line, press the Return Key and
6)
repeat 3) through 5).
24
O
To cancel the Decimal tab mode, first clear the text on
the LCD using the Correction Key, and then press the
I
Return Key. The Decimal tab mode will be canceled and
the Carrier retums to the left margin on the next line.
Page 84
2; AUTOMATIC CENTERING
This function allows you to center text evenly between the
left (or indent) and right margin.
o CENTERING
V
NP
Ex.
Everything_
T
NF
_Type Phrase )
1
420
I
I
1) Hold down the Code Key and press the "C" Key.
2)
"<_ CENTERING_ appears on the LCD and the Print Point
Indicator automatically advances to the center of the mar-
gin setting.
@
If any text remains on the LCD, it will be printed before
the Carrier advances to the center of the margin setting.
Type the phrase to be centered. Typed text is displayed
3)
on the LCD. Make corrections on the LCD before printout.
®
If more characters are typed than will fit between the left
and right margins (the counter indicates "0"), a beep will
sound. Press the Margin Release Key to continue typing.
Sample Printout
Left Morgin
1
Everything
m
T
"P I
or
Right Margin
1
420
4)
Press the Return Key. The text is printed, centered be-
tween the left (or indent) and right margins, and the
Automatic centering function is cleared. The Print Point
Indicator remains positioned one space to the right of the
centered text.
®
To cancel the Automatic centering function without print-
ing, first clear the text on the LCD using the Correction
Key, then hold down the Code Key and press the "C"
Key.
or
Press the Return Key after clearing the text on the LCD.
The Carrier returns to the left margin (or indent) on the
next line.
®
This function can be used together with Bold typing and
Automatic underlining functions.
Page 85
3. AUTOMATIC PARAGRAPH!INDENTATION
This function sets a temporary left margin, ' which elimi-
INDENT
EX,
I
* 50_v 456v ]
LP I FIDE_IT
Automatic F_rogmph Indentation
L.eft Margin / Right _rgin
!
-..y • -s r,._.,,..I T....-- t,,..r|,., .,.,
• =_-.*.,._., _.1q.i, c,y,t,l b,,_,._ €_u)
b._.t.-._,._. _6-tt,*,*cL., _,.t.,._..t t..,._t,
• rl,,t. ,.|•c_.., i_. Jl ..J ,_ =t..,.=t,,, _.1 i,,*
• P_ll ,l.,u,._t t,,,a,l., (is ,,,,if.., ,,.,it,,l,)
nates the need for constant tabbing or spacing after each
carder return.
1)
Move the Print Point Indicator to the position where the
paragraph is to be indented.
2)
Hold down the Code Key and press the Margin Release
Key. A "_" appears above "INDENT' on the LCD. The
present position will be set as the temporary left margin
until the function is canceled.
3) Type in the text to be indented.
INDENT
4. BOLD TYPING
LP BOLD
. '3° t
4) To cancel Paragraph Indentation, hold down the Code
Key and press the Margin Release Key again. The "_"
above "INDENT" on the LCD disappears.
This function makes words stand out from the rest of the
text. It's useful for emphasizing titles, critical information,
etc.
1)
Hold down the Code Key and press the "X" Key. A "_"
appears above "BOLD" on the LCD.
Type in the text.
®
On the LCD, characters to be emphasized in bold flash
alternately with asterisks to distinguish them from other
text.
Sample Printout
26
Bold Typing
÷
3)
To cancel Bold typing, hold down the Code Key and
press the "X" Key again. The "T" above "BOLD" on the
LCD disappears.
4)
This function can be used together with the Automatic
centering and Automatic underlining functions.
Page 86
AUTOMATIC UNDERLINING
11 :
This function underlines all text (including spaces) or indi-
vidual words (all text except spaces) as you type.
f
XX
Ex.
Have a nice day! 430
v v
t "
Y Y
SampleP_tout
Have a nice day!
XX
130
1. Automatic Full Underlining
1) Hold down the Code Key and press the "3" _ Key. A
"_" appears above "XX" on the LCD.
2) Type in the text to be underlined.
• Underlined text is distinguished on the LCD by the " "
mark and characters which flash alternately.
To cancel the ful! underlining, hold down the Code Key
3)
and press the "3" _ Key again. The "T" above "X X"
on the LCD disappears.
This function can be used together with the Automatic
4)
centering and Bold typing functions.
Ex.
See.you soon
y V
LP
y v
Sample Printout
See you soon
2. Automatic Word Underlining
XX
1) Hold down the Code Key and press the "4" _ Key. A
"T" appears above "X X" on the LCD.
2)
Type in the text to be underlined.
430
Underlined text is distinguished on the LCD by the " "
®
mark. and characters:-whtch. _flash- alternately: .... .
130
.-
To cancel the word underlining, hold down the Code Key
3)
and press the "4" _ _ Key again. The "_" above "X X"
on the LCD disappears.
xx
4)
This function can be used together with Automatic center-
ing and Bold typing functions.
Page 87
6. AUTOMATIC ; CARRIERRETURN
This function eliminates the need to press the Return Key
AUTO RETURN
"T
LP RBTURN
Beep Right Morgin
61543 Z 1'
he can-manage I"
hen one of ou r
that the pre[:_ara-
ic Carder _
Return Zone
AUTO RETURN
J
at the end of every line.
.0
-This function is automatically activated in STORE mode,
but cannot be activated in JUST mode.
Hold down the Code Key and press the "=" Key. A "_'"
1)
appears above "RETURN" on the LCD.
Once activated, the Carder will automatically return when
2)
you type a hyphen or space in the automatic carder return
zone,
The automatic carrier return zone is the area 5 spaces to
the left of the currently set right margin. A beep is heard
whenthe Carrier enters the automatic_ carrier return zone:
O
If a _ hyphertor space, is not typed in the: automatic,carder
return zone, the Carrier will advance past the right margin.
To cancel the Automatic carrier return function, hold down
3)
the Code Key and press the "=" Key again. The "T"
above "RETURN" on the LCD disappears.
REQUIRED HYPHEN AND
11
HYPHEN
Beep Righl Morgin
V
54321 i
July 3
o into the
n- lin,e I
rom : J
-- Automatic Carrier -J
Required Space
l
_Required Hyphen
Return Zone
I
REQUIRED SPACE
This function allows you to enter hyphens or spaces in
the automatic carrier return zone that will not trigger the
automatic carrier return.
To type a required hyphen or required space, hold down
1)
the Code Key and Hyphen Key or Space Bar.
Any hyphen _ space typed in this manne_wilt not be:
2)
removed, nor will it trigger a carder return.
-®
Hyphens typed before entering the automatic carrier
retum zone when storing a file or when editing a file are
automatically entered as required hyphens.
When a file is recalled, normal hyphens-i.e, usually syllable
®
hyphens, originally typed in the automatic carrier retum
zone without the Code Key-will automatically be removed
if they do not fal! in the automatic carder return zone dur-
ing printout.
®
When a file is recalled, normal spaces (spaces typed with-
out pressing the Code Key) will automatically trigger a car-
der return if they fall in the automatic carder return zone
during printout.
Page 88
• ,8, SECOND-KEYBOARD (SPECIAL CHARACTER SET)
KBII
V V
LP KB I [
L _9
v T
LP KBII
Sample Printout
,150
The symbols located at the upper right side of the three
character keys can be typed with the following procedure.
1)
Hold down the Code Key and press the "5" Key. A "T"
.
-appears •above "KBIr' on the LCD.
2)
Hold down the Shift Key, or press the Shift Lock Key, and
.... type the key with the desired -symbol. (If you pressed the
Shift Key, keep it depressed).
t
3)
Hold down the Code Key and press the "5" Key again
to cancel the Second Keyboard and restore the standard
keyboard. The "Y" above "KBII" on the LCD disappears.
9. CAPS LOCK
EX.
I cAPs LOGKV V 430 J
LP CAP_
Samp_ Printout
CAPS LOCK
12345
caps lock
"_()
+
caps lock
12345
This function allows the typing of capital letters and num-
bers without pressing the Shift Key.
i)
Hold down the Code Key and press the "Z" Key. A "T"
appears above "CAPS" on the LCD.
0
While in Caps lock mode, alphabetic characters are
capitalized without pressing the Shift Key. The number/
symbol keys are printed in lower case.
®
If you press the Shift Key in this mode, alphabetic charac-
ters are printed in lower case, and the number/symbol
keys are printed in upper case.
2)
To cancel Caps lock mode, hold down the Code Key and
press the "Z" Key again. A "_'" above "CAPS" on the LCD
disappears.
?_
Page 89
MEMORY FUNCTIO
The memory functions will make your typing easier and
more efficient.
Repetitive phrases, technical terminology and entire letters
can be-stored, edited :and recalled (printed) at will.
You can also make several files with formats (margins and
tabs) for letters and other documents you regularly type.
®
Your typewriter has a memory back-up battery which pro-
tects the stored files for a minimum of five years, even
when the power switch is turned off.
®
When power is turned on, Six beeps sound if the back-up
battery has been completely drained: The contents of the
stored file is erased. Please contact your nearest Sears
Service Center in this case.
1. FILE STORING
I NAME OF FILE ?
v
{;TORE
renter file name_
I
This typewriter is equipped with a 10,000 character mem-
ory for storing up to 50 files.
Three types of files can be stored.
TEXT file _ for entire letters
PHRASE file -- for often-used phrases or terminology
FORMAT file -- for line formats (margins and tabs only)
Choose the file type according to the text to be stored.
1. Storing a TEXT File
For storing entire letters (including tabs and margins).
1) Press the Mode Key until a "T" appears on the LCD
above "STORE". "NAME OF FILE?" is displayed.
2)
Type the file name (maximum of five letters/numbers).
Then press the Return Key.
RETURN
1
@
You can terminate the STORE mode at any time by pres-
sing the Mode Key. Any entered text will be automatically
stored.
Page 90
Tex t/'l;hr a s e/'l_'o_n at ?
S TORE I
I
"Text/Phrase/Format?" appears On the LCD, .'T, "P" and
3)
"F" will flash.
t
y Y
|TORE _I_T_,N
+
0 MARGIN/TAB SET 472
I 472
v v
s I_RE R£'_
set margln/tab ,,._
V Y
STORE I_._ET_q.N
i,
4) Press the "T" (TEXT) Key.
The paper is fed one line and the Carrier retums to the
left margin. The LCD is cleared and the counter indicating
the number of spaces to the right margin appears. The
L Automatic return is automatically activated.
• Margin and tab settings, as well as other functions which
were in effect before entering the STORE mode, are
automatically canceled to be stored in the back-up mem-
ory. They are automatically recalled when you exit the
STORE mode.
Hold down the Code Key and press the "F" Key. "O
5)
MARGIN/TAB SET" appears.
6)
Set the left and right margins and tabs, as you would in
the NP mode. Clear any unnecessary tabs.
7) Hold down the Code Key and press the "F" Key again.
"_ MARGIN/TAB SET" disappears. The Carder returns to
the newly set left margin.
enter text
I
Y/N?
I CLOSING FILE
I 472
Y
NP
STORE
Y
I
v
ltBTUAN
l
I
Enter text_ Entered text is displayed on the LCD and
8)
pdnted one line at a time when you type a normal hyphen
or space in the automatic carder return zone.
Make corrections on the LCD before the line is printed.
®
Once text is printed on paper, it cannot be corrected: To
make corrections after text has been printed, first close
the file and edit it on the LCD, as described in section 3,
"File Editing".
g)
Press the Mode Key to terminate the STORE mode.
"CLOSING FILE Y/N?" appears on the LCD.
10)
Press the "Y" Key to close the file and return to the Nor-
mal Print (NP) mode.
O Press the "N" Key to return to the Text storing mode.
31
Page 91
5
f
NAME OF FILE ?
V
STORB
enter file norne_
I
! )_t/_hvasei$_'ormat ?
I 472
V
STORE I
I
v
S TORE RETURN
I
2_
Storing a PHRASE File
Phrase files are used to store brief expressions or ter-
minology without margins or tabs.
1)
Press the Mode Key until a "V" appears on the LCD
above "STORE". "NAME OF FILE?" is displayed.
2)
Type the file name (maximum of five letters/numbers).
Then press the Retum Key:.
®
You can terminate the STORE mode at any time by pres-
sing the Mode Key. Any entered text will be automatically
stored.
3)
"Text/Phrase/Format?" appears on the LCD. "T", "P" and
"F" will flash.
Press the "P" (PHRASE) Key.
4)
The LCD is cleared and the counter indicating the number
of spaces to the right margin appears. The Automatic
return is automatically activated.
®
The Underlining and Bold functions set before entering the
STORE mode are automatically canceled to be stored in
the back-up memory. They are automatically recalled
when you exit the STORE mode.
enter text "_
I CLOSING FILE Y/N? 1
I 'v 472 1
NP
\
v v
._ TORE RETURN
5) Enter text. Entered text is displayed on the LCD and
printed one line at a time when you type a normal hyphen
or space in the automatic carder return zone.
• ,Make corrections on the LCD before the line is printed.
Once text is printed on paper, it cannot be corrected. To
make corrections after text has been printed, first close
the file 'and edit it on the LCD, as described in section 3,
"File Editing".
Press the Mode Key to terminate the STORE mode.
6)
"CLOSING FILE Y/N?" appears on the LCD.
7)
Press the "Y" Key to close the file and return to the Nor-
mal Print (NP) mode.
• Press the "N" Key to return to Phrase storing mode.
32
Page 92
I
NAME OF FILE ?
i
I _ext/Phras:iFormat
T
TORE [
RETURN
I
?
i
FORMAT FILE 472
v Y
4TORE RETURN
.I
I
3. Storing a FORMAT File
For storing margin and tab line formats. This function is
useful for typing onto prepdnted forms.
1) Press the Mode Key until a "_'" appears on the LCD
above "STORE". "NAME OF FILE?" is displayed.
2)
-Type the file name (maximum of five letters/numbers).
Then press the Return Key.
®
You can terminate the STORE mode at any time by press-
ing the Mode Key. Any entered format data will be auto-
matically stored.
3)
"Text/Phrase/Format?" appears on the LCD. 'q-", "P" and
"F" will flash.
Press the "F" (FORMAT) Key.
4)
"FORMAT FILE" and the counter indicating the number of
spaces to the right margin appears on the LCD.
_set margin/tab
CLOSING FILE
V
Np
YIN?
v
_ETURN
472
]
]
®
Margin and tab settings, as well as other functions which
were in effect before entering the STORE mode, are
automatically canceled to be stored in the back-up mem-
ory. They are automatically recalled when you exit the
STORE mode.
5)
6et the left and right margins and tabs at any position as
you, would in any other mode. Clear any unnecessary
tabs.
6)
Press the Mode Key to terminate the STORE mode.
"CLOSING FILE Y/N?" appears on the LCD.
7)
Press the "Y" Key to close the file and return to the Nor-
mal Print (NP) mode.
• Press the "N" Key to return to the Format storing mode.
/
33
Page 93
_L FILE SPACEr USEO !
STOR£
" 4. All File Space Used
If you specify a new file and there are already 50 files in
the typewriter memory, "ALL FILE SPACE USED" appears
on the LCD.
In this case, one file must be deleted to create a new file.
(Refer to "File Deleting".)
5. Out of Memory
OUT OF MEMORY
Y
STO_]g
1 STOP CODE
Dear {I
v
STOP
]
J
If you run out of memory, "OUT OF MEMORY" appears
on the LCD.
In this case, press the Mode Key to store entered text
and return to the NP mode. Unneeded file(s) must be
deleted to make room in the memory for your present file.
(Refer to "File Deleting".)
To stop printing at locations in a file in order to type words
or phrases during recalling (printing), enter stop codes
while storing or editing the file.
1
Entering Stop Codes
1)
Hold down the Code Key and press the "7" Key at the
position you wish to stop in the file. A highlighted "S" is
displayed on the LCD.
You can remove the stop code by deleting the character
Of
'lit" with the Correction Key.
An "×", which stands for the stop code, is printed on the
2)
paper when the line is printed while you are storing the
file. (When entering stop codes while editing the file, an
"X" is not printed.) The "X" is only an indicator, and will
not appear during recall (printout).
f
l
34
STOP CODE
NP
Y
RECALL
1
( Typ° ,..,, -)
I RECALL
I
I
2. Using Stop Code During Recalling (Printing)
1) When the typewriter has stopped at a stop code during
printout, "STOP CODE" appears on the LCD.
2) Type desired text.
3) Hold down the Code Key and press the "6" Key to restart
printout. (Refer to "File Recall".)
Page 94
I
The stop code can also be used in conjunction with the
decimal tab or auto centering, as a Decimal tab stop or
an Auto center stop.
3. Entering a Decimal Tab/Auto Center Stop Code
1) First activate the Decimal tab/Automatic centering func-
@
tion.
STOP
2)
_m
Then enter the stop code. A highlighted "S" is displayed
on the LCD.
O
You can remove the stop code by deleting the character
"g" with the Correction Key.
Press the Return Key. An "X" which represents the stop
3)
code is printed on the paper. (When entering stop codes
while editing a file, there is no need to press the Retum
Key and an "X" is not printed.) The "X" is only an indicator,
and will not appear during recall (printout).
f
DEC. TAB STOP
I
T V
_P KECA_
I Agl'O CENTER STOP
v v
NP R£C_L
enter text
I
, RECALL
I
I
I
1
Using a Decimal Tab/Auto Center Stop Code During "
Recalling _(printing)
I
1)
When the typewriter has stopped at a Decimal tab stop
or Auto £enter stop during printing, "DEC. TAB STOP" or
"AUTO CENTER STOP" will appear on the LCD.
2) 3) Enter desired text. Entered text is displayed on the LCD.
Press the Return Key or Tab Key for decimal tab stop to
print the text. (Refer to "Decimal Tab", "Automatic Center-
ing".)
4) Hold down the Code Key and press the "6" Key to restart
printout. (Refer to "File Recall".)
35
Page 95
3. FILE EDITING
NN_E OF FILE ?
I
v
This function allows you to edit stored fileson the LCD.
1. Activating Edit Mode
1) Press the Mode Key until a "T" appears on the LCD
above "STORE". "NAME OF FILE?" is displayed.
I
STO/LI I
(.n,.r ,,,. °°m.
Thts function allows you edit stored ftl
es on the LCD..
!
I
I
I lhts function allows you edtt stored: ftl
Y
STORE
2)
Type the file name to be edited (maximum of five letters/
numbers). Then press the Return Key.
®
You can terminate the Edit mode by pressing the Mode
Key (and the "Y" Key to close the file) at any time.
The beginning of the file appears on the LCD. Move the
3)
cursor to any position in the file and edit it. Make correc-
tions as explained in "Corrections on LCD".
@
In the Edit mode, when more than 40 characters are
entered, they appear on the LCD in 2 lines.
In order to check which features are engaged, depressing
the Code Key will change the LCD to one line and the
"Y" marks will appear to show the mode and feature set-
tings. When the Code Key is released, the indication on
the LCD returns to 2 lines.
FORMAT FILE !72
f
Space $ Index
(- Backspace "i" Reverse Index
el Return u Required Hyphen
• -) Tab _ Required Space
m (,-,_)CENTERING) Auto Center
J (_ ODECtMAL TAB) Decimal Tab
| (,--* 0MARGIN/TAB SET) Margin/Tab set in text file
_.J(_ INDENT) Paragraph Indentation
36
v
@ - ,When you speCify a format file, "FORMAT FILE" appears.
Move the Carrier to any position and set the new margins/
tabs as you would in any other mode.
.
Function Symbols
When stored text is displayed on the LCD, the typewriter
functions are represented by the symbols shown at left.
j,
,k
Page 96
1
Moving Cursor
Press the Backspace Key to move the cursor one space
1)
to the left.
Press the Express Key to move the cursor one space to
2)
the right.
O Hold down either key for continuous movement.
4. Going to the Beginning or End of a File
1) Press the Relocation Key to go to the end of the file.
I
T
2 "tOl_ I
_nter chamcter_
I
I
S 1"0 lld_
SEARCH
1
I
2) Hold down the Code Key and press the Relocation Key
to go to the beginning of the file.
D
Moving Cursor to Desired Position (Using the
Search Function)
Hold down the Code Key and press the Express Key.
1)
"S=" appears on the LCD.
2)
Type the characters you want to find (maximum of 18
characters).
Press the Return Key. The typewriter searches for the text
3)
that you,have typed from its present position (regardless
of any underlining of text.)
Once found, the cursor appears at the position after the
4)
last letter of that text. If the text that you have typed is
not in the file, the cursor returns to its previous position
before function activation.
®
The desired text will be memorized by the typewriter until
power is turned off, and appears every time you activate
the Search function. It is useful to find any other occur-
rences of the same text.
37
Page 97
__lle Edltlng_The display Js clear_l an
v
0 RARGIN/TAB SET
v
STOR£
$ "rolqtl_
_rchange margin/tab_
I
IF._Jle Edft, Jng##The display Js cleared an 1
[
1
Changing Existing Margin and Tab Settings (in the
Text File Only)
i)
Locate the box mark (1111) which will alternately flash with
"_ MARGIN/TAB SET" when you bring the cursor under
it.
2)
Hold down the Code Key and press the "F" Key. The
counter indicating the remaining number of spaces to the
right margin appears. The margin/tab settings in this file
are recalled.
3)
Set any new margins and tabs, moving the carder to any
position as you would in any other mode.
4)
Hold down the Code Key and press the "F" Key again.
The cursor retums one space to the right of the box mark
(111).
J
I
7. Back Code
To move_the Carrier back one space at the left margin
,or a tab position, enter back codes while editing the file.
0
Hanging Indentation
This fuaction is used to temporarily move the character(s)
to the left of the stored left margin of text. It causes the
beginning of the paragraph to be highlighted and the
reader of the text to distinguish the beginning of each
paragraph.
®
Saving Tab
This function is used to temporarily move the character(s)
to the left of a stored tab position or indent position in
the text. Tab memory can be saved with this function.
Entering Back Codes
Hold down the Code Key and press the "B" Key. The
symbol ",-" appears on the LCD.
38
Page 98
4. -FILE RECALL (PRINTOUT ON PAPER)
This function allows you to recall (print out) the stored file
in the NP or JUST mode.
NAME OF FILE ?
Y
NP
_enter file name_
I TYPE O0 LINES PRESSP
Y
NP
enter number of lines _r
RECALL
®
The LCD must be cleared to activate the File recall.
1.
Recalling a TEXT File
1)
Hold down the Code Key and press the "6" Key. "NAME
OF FILE?" appears on the LCD. Type the file name and
press the Return Key.
®
"NOT FOUND PRESS <--J" appears on the LCD if you
have entered a file name that is not stored in the memory.
Press the Return Key and retype the file name.
I
2)
The Carrier will move to the left margin setting of that par-
ticular file and "TYPE 00 LINES PRESS ,_1 - appears on
the LCD.
3)
Type in any number of lines from 01 to 99. (Standard 11"
paper is 66 single-spaced lines long and 14" paper is 84
single-spaced lines long.) Then press the Retum Key.
T
I
PRINTOUT
I PRESS# TO CONTINUE
v v
NP RECALL.
\d
\
I
I
• If you do not enter the number of lines desired, printing
will not stop until the end of the file.
4) A "T" appears on the LCD above "RECALL", and the
typewriter will print the file.
®
To ,temporarily stop printout, press the Return Key.
"PAUSE PRESS <__1 ,, appears on the LCD. Restart printing
by preying the Return Key again.
®
You can cancel the recall function at any time during print-
out by pressing the Space Bar. "END OF FILE RECALL"
appears on the LCD when the recall has been canceled.
The typewriter will stop after printing the specified number
5)
of lines, and "PRESS <-J TO CONTINUE" appears on the
LCD asking you to restart printing. Press the Return Key
to restart printout.
O
You can not cancel the recall function by pressing the
Space Bar when "PAUSE PRESS ,_1 ,, or "PRESS <-J TO
CONTINUE" is displayed on the LCD.
END OF FILE RECALL
!
Y "T
NP RICiLLL
I
i
J
6)
When the recall has been completed, "END OF FILE
RECALL" appears on the LCD.
39
Page 99
NAME OF FILE ?
T
_P
(,°,er f,e oomo,,)
I
v v
HE' A.E:Cit4, L,
I PRINTOUT
END OF FILE RECALL
v v
HP R£Ck3,L
f
RECALL
RECALL
I
I
2. Recalling a PHRASE File
1)
Hold down the Code Key and press the "6" Key. "NAME
OF FILE?" appears on the LCD. Type the file name and
press the Return Key.
0
"NOT FOUND PRESS ,_1 ,, appears on the LCD if you
have entered a file name that is not stored in the memory.
Press the Return Key and retype the file name.
2)
A "V" appears on the LCD above "RECALL", and the
Carder will start printing from its present position, accord-
ing to the margins which are currently set.
0
To temporarily stop printout, press the Return Key.
"PAUSE PRESS ,J" appears on the LCD. Restart printing
by pressing the Return Key again.
0
You can cancel the Recall function at any time after start-
ing a printout by pressing the Space Bar. "END OF FILE
RECALU' appears on the LCD when recall has been can-
celed.
.J
3. Recalling a FORMAT File
I Eo'"LE:
Np
I RECALLING FORMAT
y T
NP RECALL
I FORMAT IS CHANGED I
!
-ENI,D OF FILE RECALL
NP R_C.kl,L
I STOP COOE
V T
NP _E:CALL
DECo TAB STOP
v v
NP R£CA.LL
T
i
1
I
.J
,I
I
1)
Hold down the Code Key and press the "6" Key. "NAME
OF FILE?" appears on the LCD. Type the file name and
press thef Retum Key.
0
"NOT FOUND PRESS <__1,, appears on the LCD if you
• have er_tered a file name that is not stored in the memory.
Press the Retum Key and retype the file name.
2) A "!'" appears on the LCD above "RECALL". While "RE-
CALLING FORMAT" appears on the LCD, the margin/tab
format set on the typewriter will be automatically changed
to the recalled one, and then "END OF FILE RECALL"
appears on the LCD.
®
The printing stops at any stop code in the file and "STOP
CODE", "DEC. TAB STOP" or "AUTO CENTER STOP"
appears on the LCD. Enter desired text and restart print-
out by holding down the Code Key and pressing the "6"
Key. (Refer to "Stop Code".)
AUTO CENTER STOP
Y Y
HJP RECALL
4O
]
Page 100
,5. .FILE LISTING
LIST
i
I PRINT LIST ,1
This function allows you to print a list of stored files.
• The LCD must be cleared to activate this function, and it
cannot be activated in the STORE mode.
1) Hold down the Code Key and press the "8" Key.
• "00 FILES" is printed if there are no files in the memory.
The type of file, file name and the first 40 characters in
2)
the file are printed in a certain format from position 10 on
the margin scale (in 10 pitch), regardless of the present
margin settings. The number of characters remaining (a-
vailable) in the: memory, and number of .files ,already. in
memory are printed at the end of this list.
®
To temporarily stop printout, press the Return Key.
"PAUSE PRESS <J" appears on the LCD. Restart printing
by pressing the Return Key again.
®
Press the Space Bar to terminate this function after it has
been activated.
Sample Printout
TEXT
PHRASE
FORMAT
3515 CHARACTERS AVAILABLE
03 FILES
LTRI :Dear X Thank you very much for your lett
PHRSl:Please remember me kindly to your parent
FRMTI:
6. AVAILABLE MEMORY CAPACITY
This function allows you to see exactly how much memory
is still- available..
The LCD must be cleared to activate this function, and it
®
CAPACITY
cannot be activated in the STORE mode.
Hold down the Code Key and press the "9" Key.
1)
3515 CHRS AVAILABLE
V
LP
J
The amount of memory available is automatically dis-
2)
played on the LCD.
3) Press the Return Key to terminate this function.
41


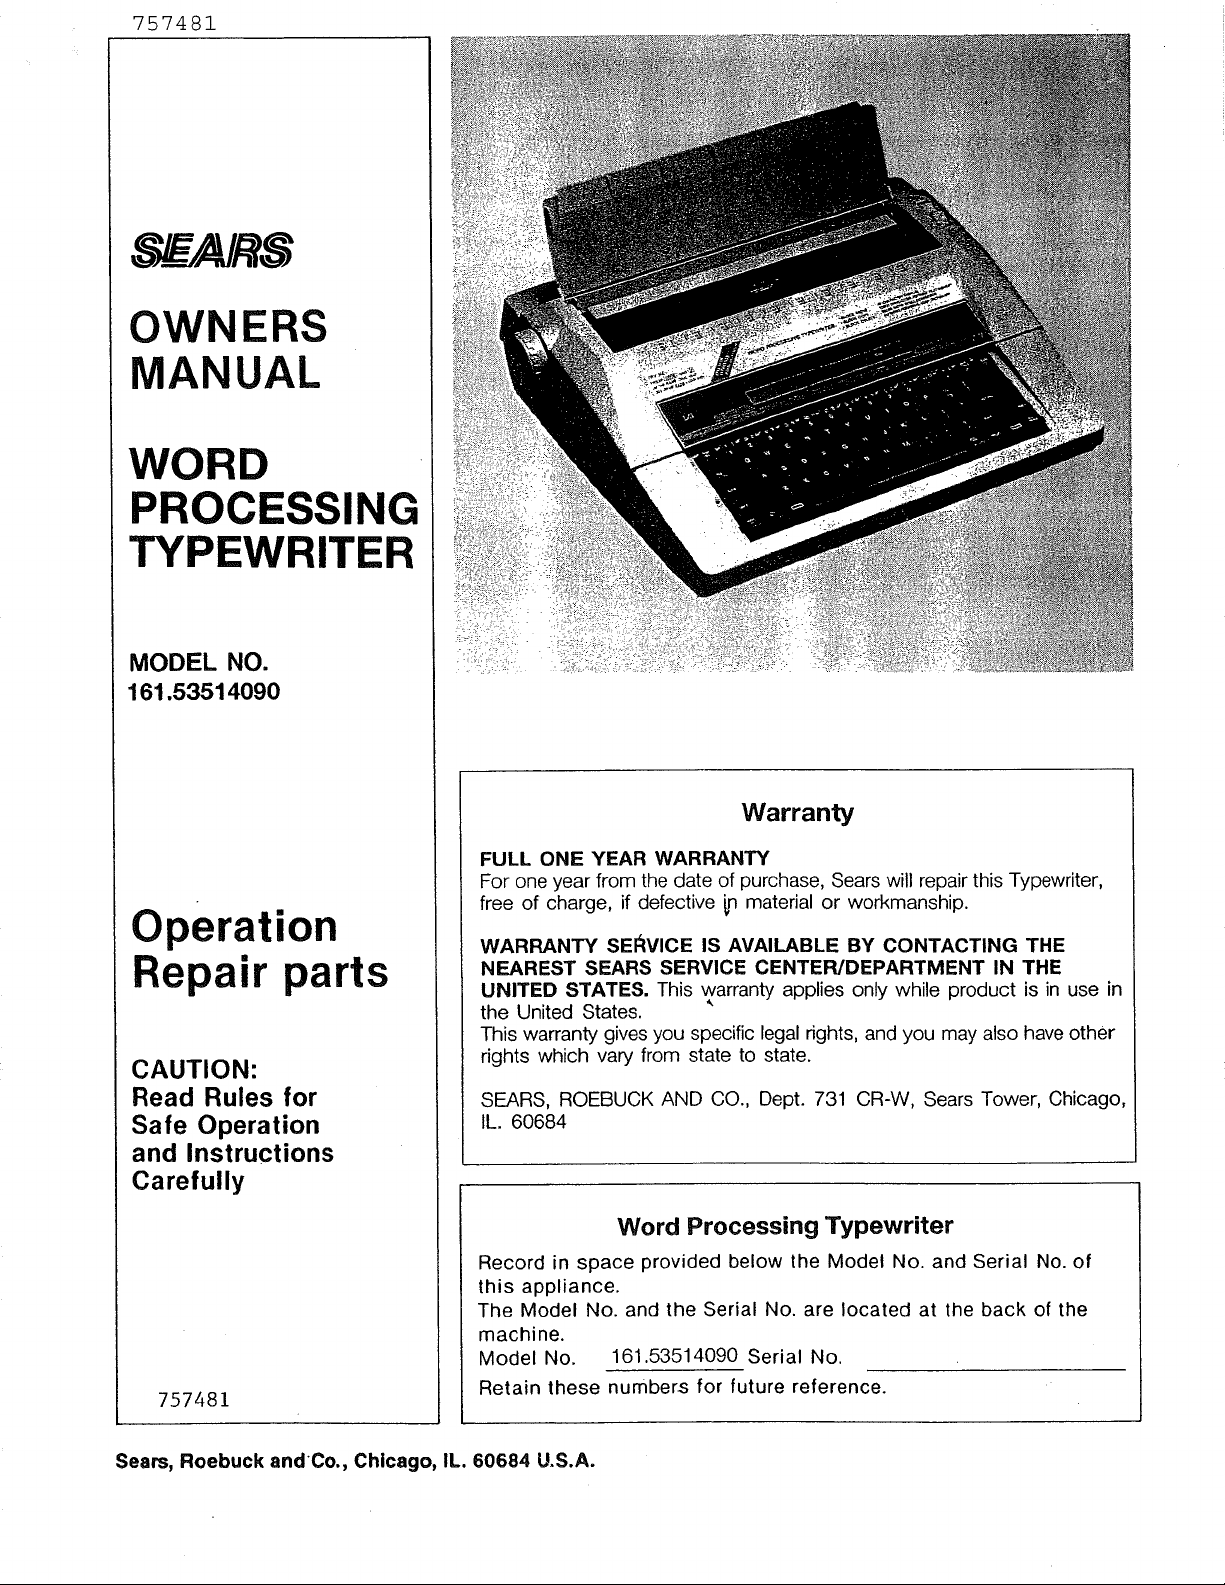
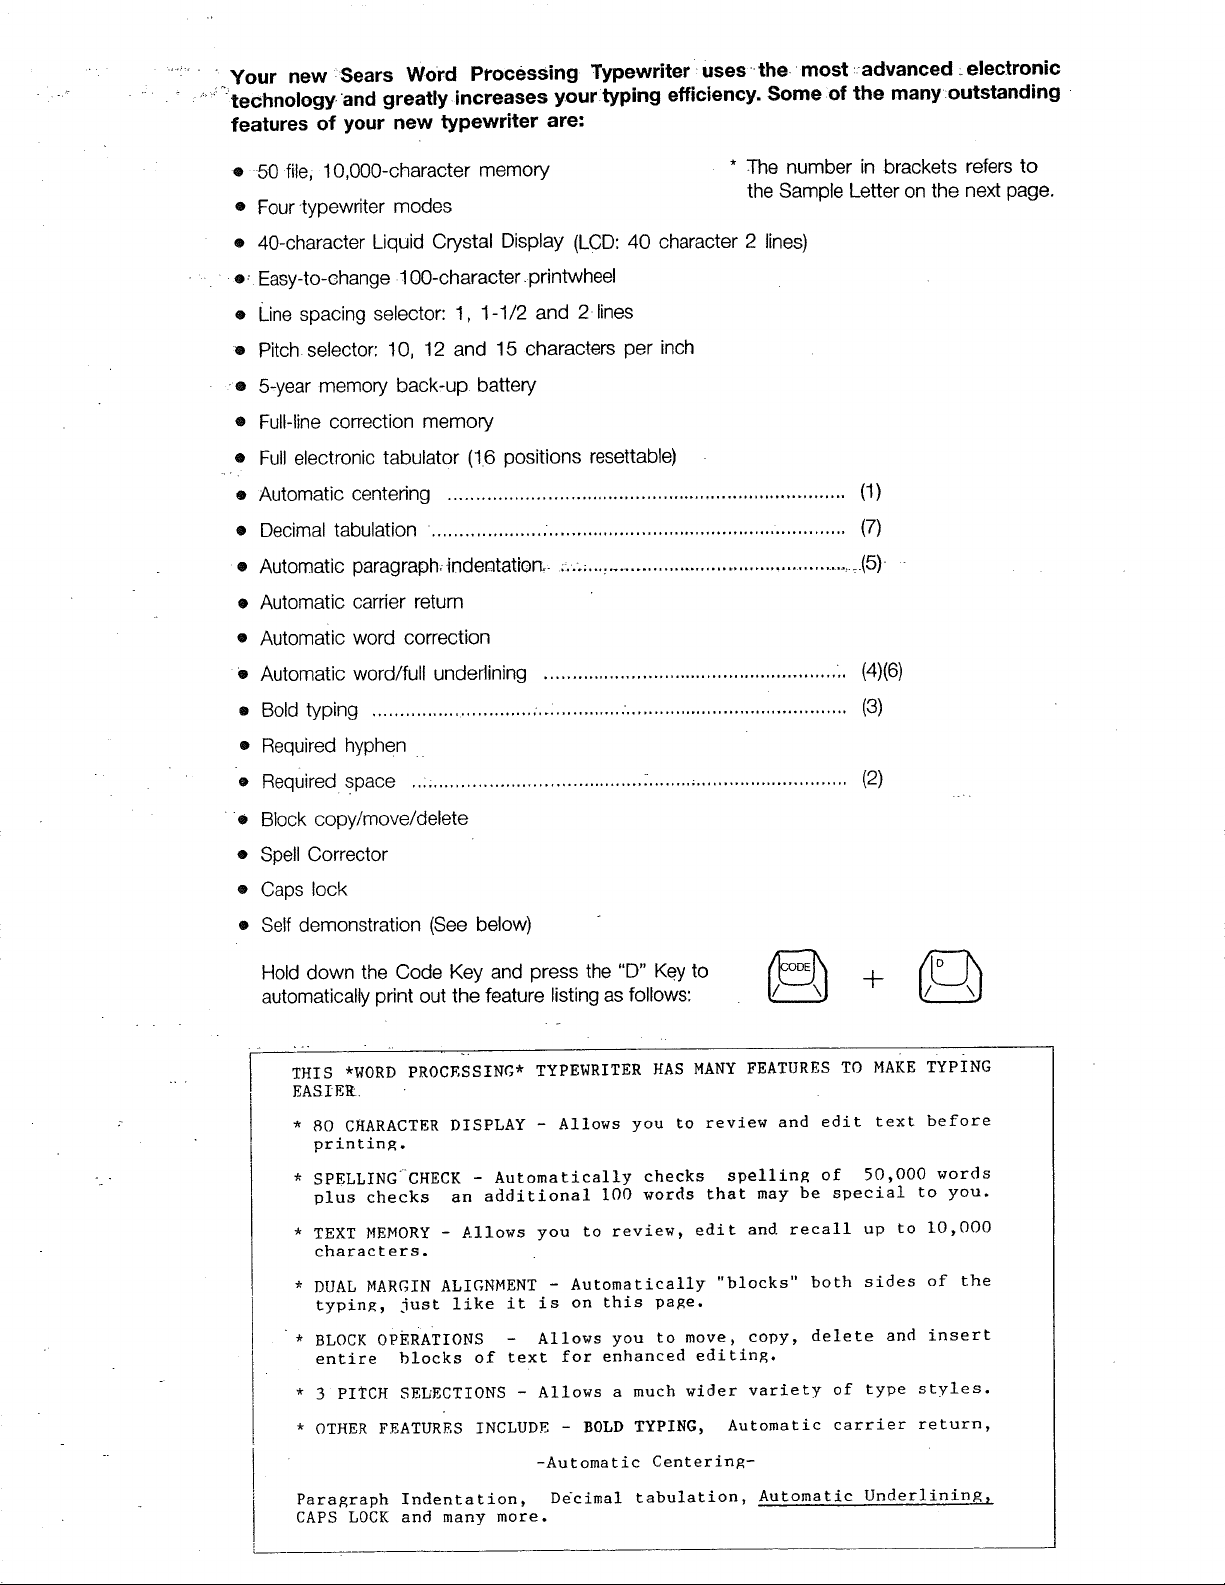
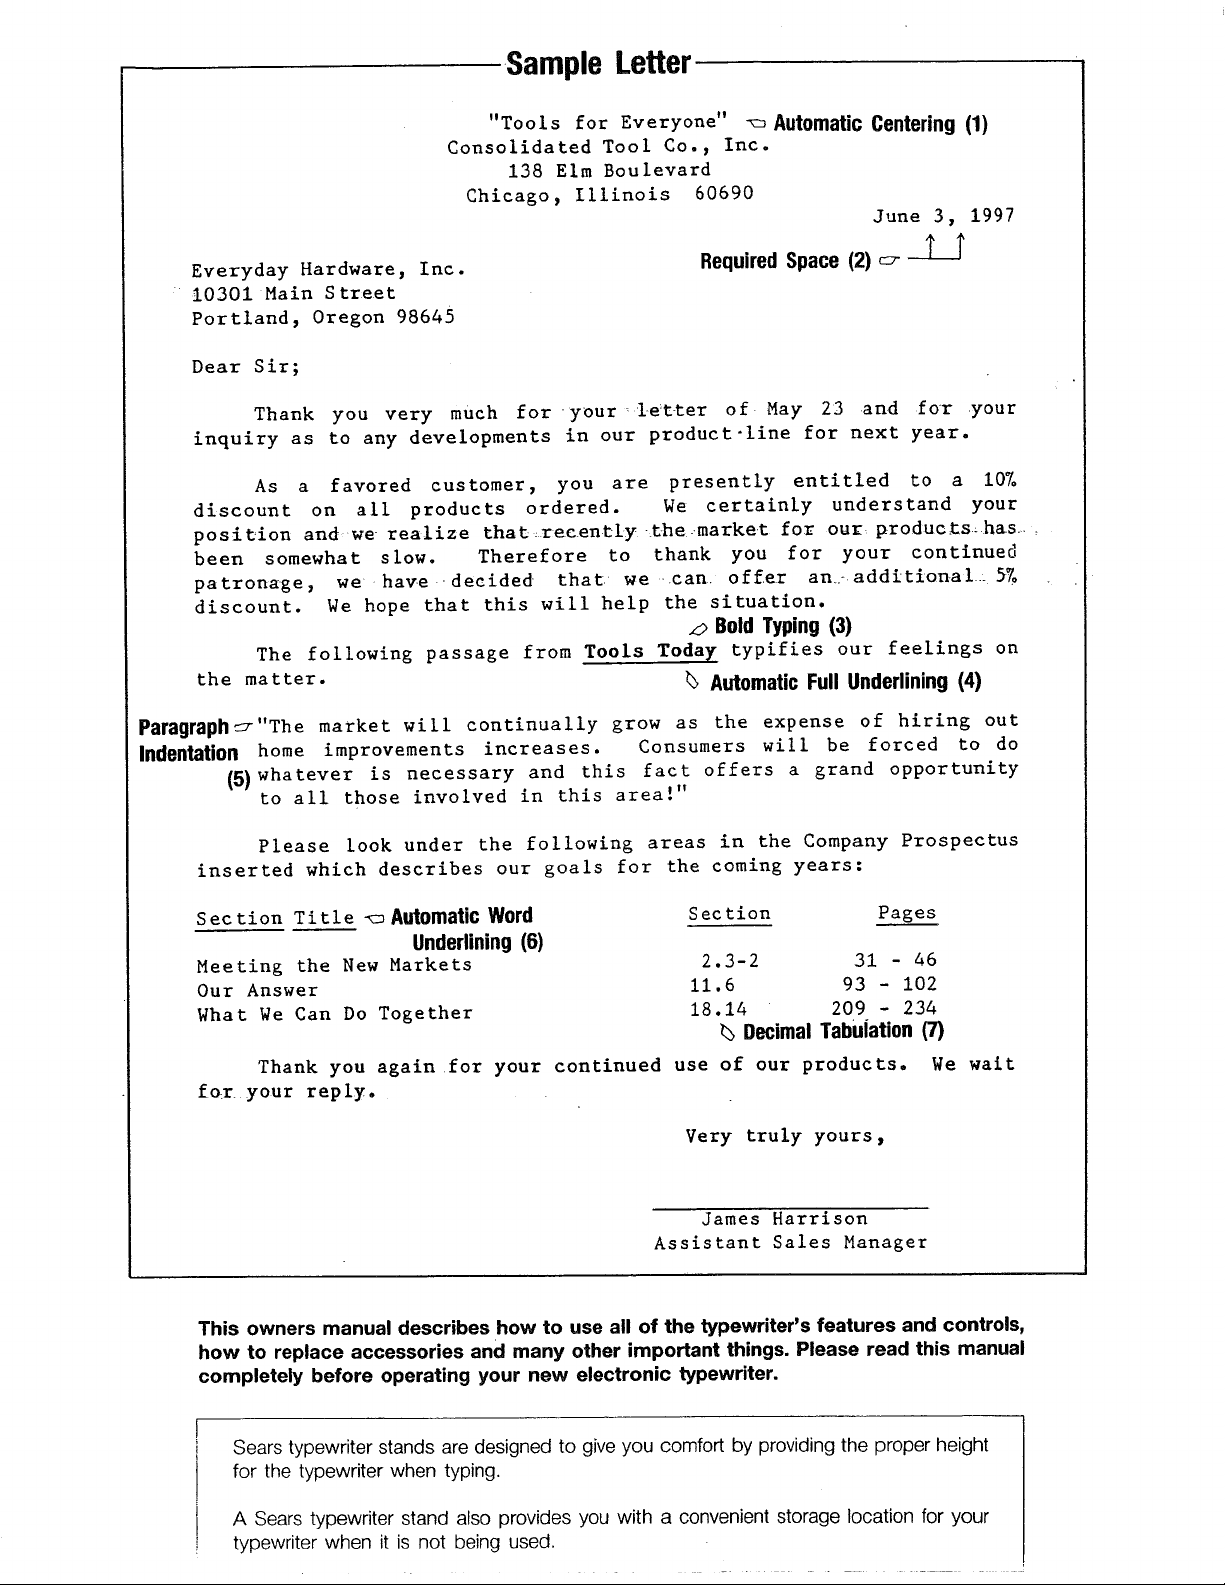
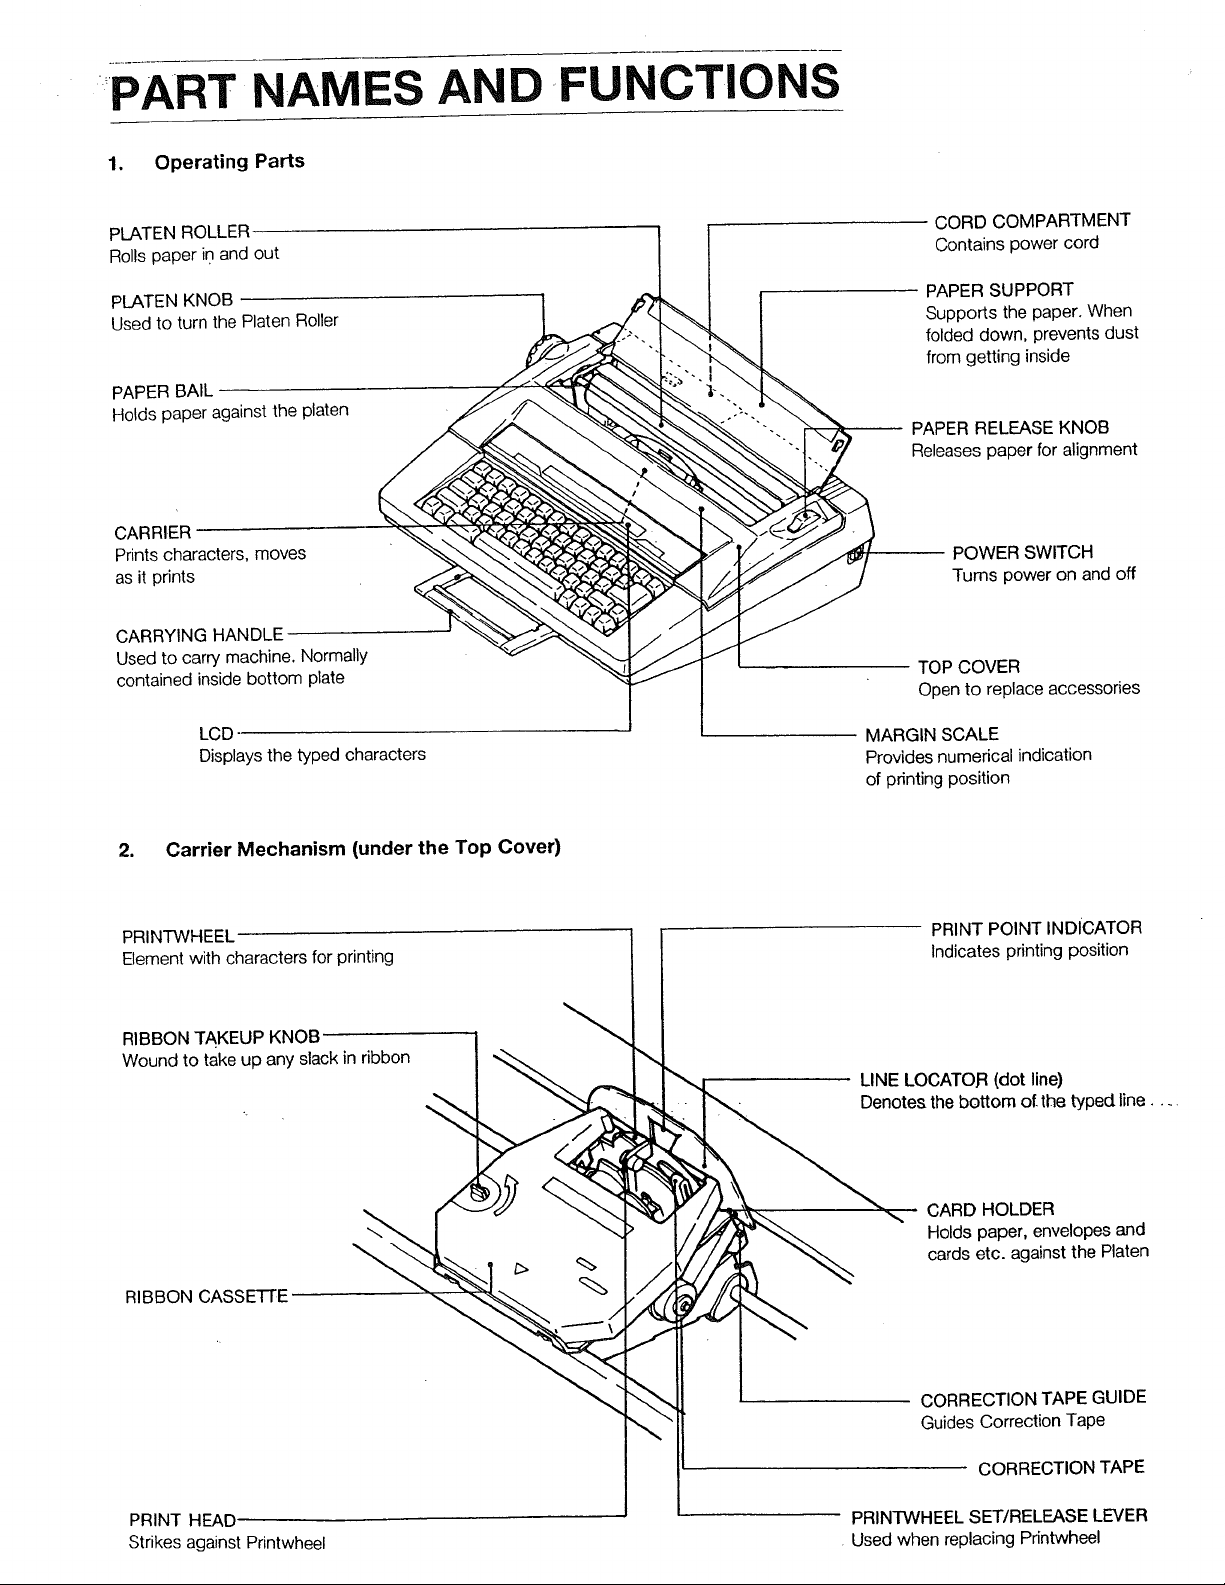
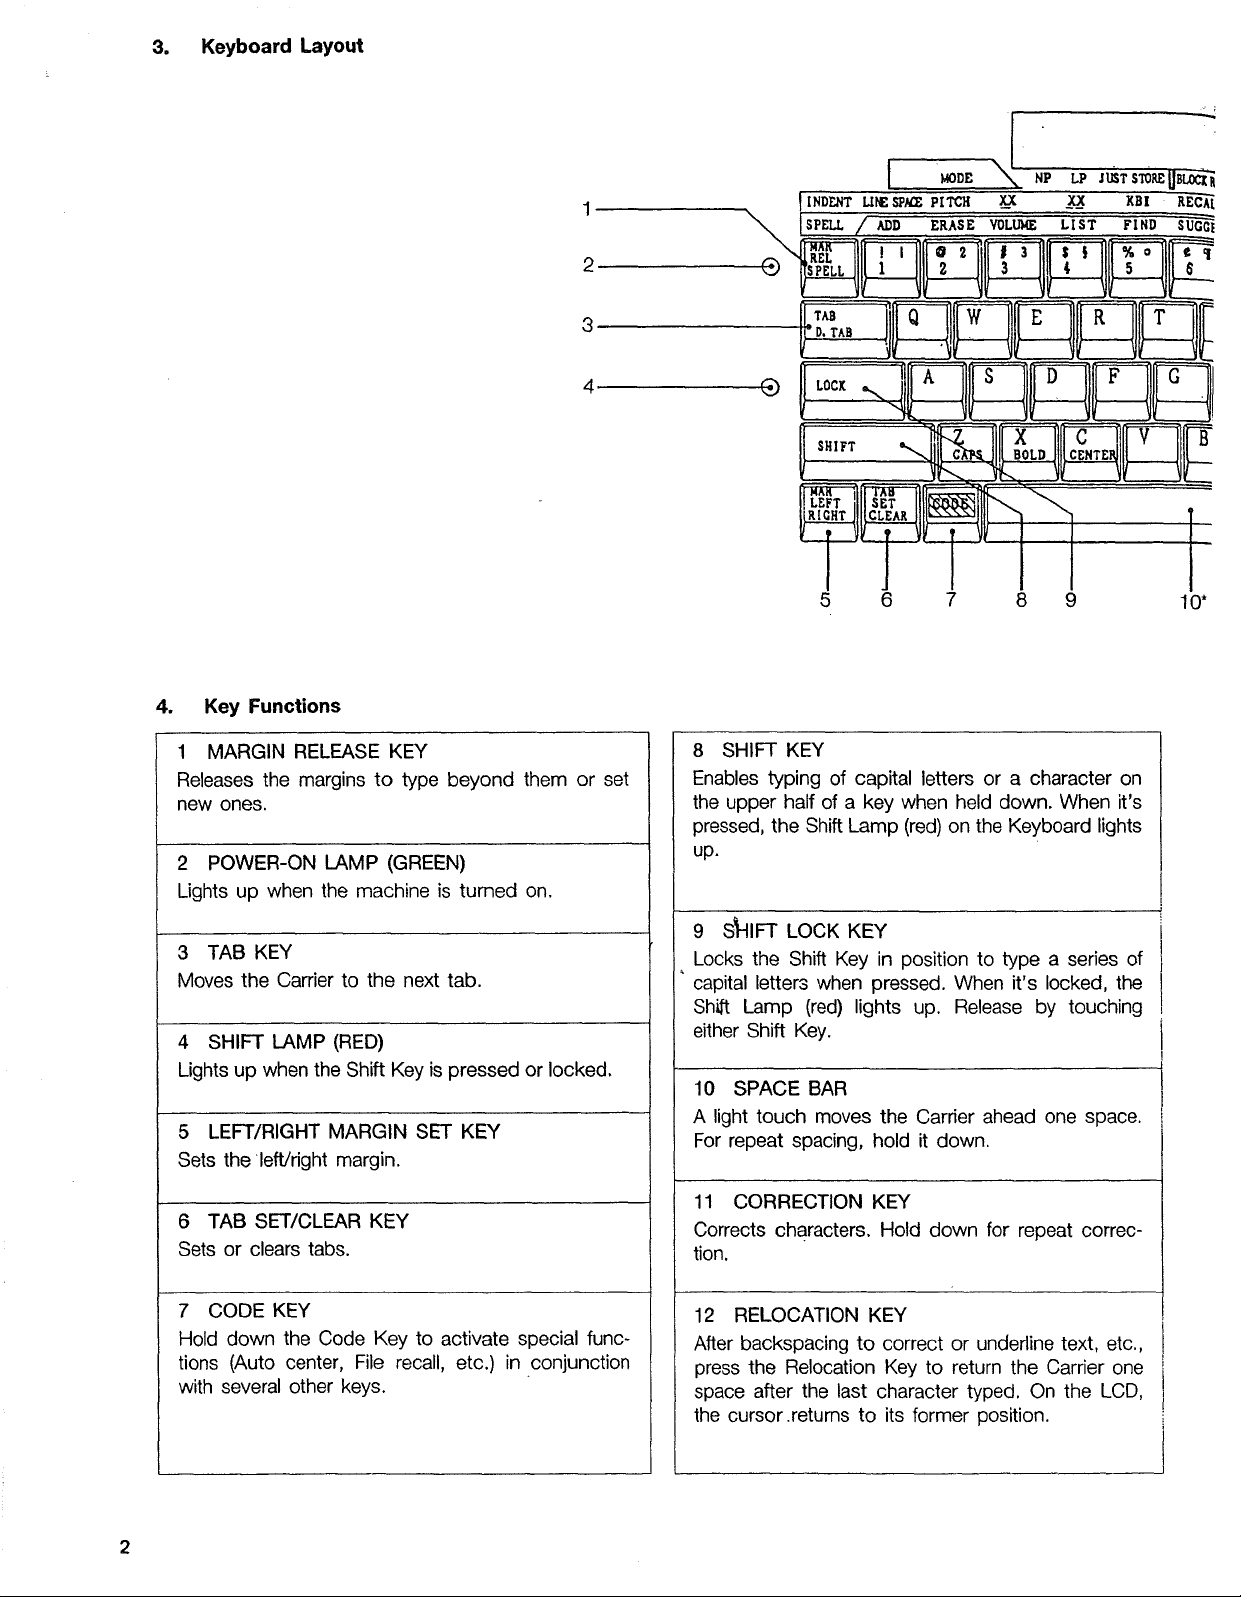
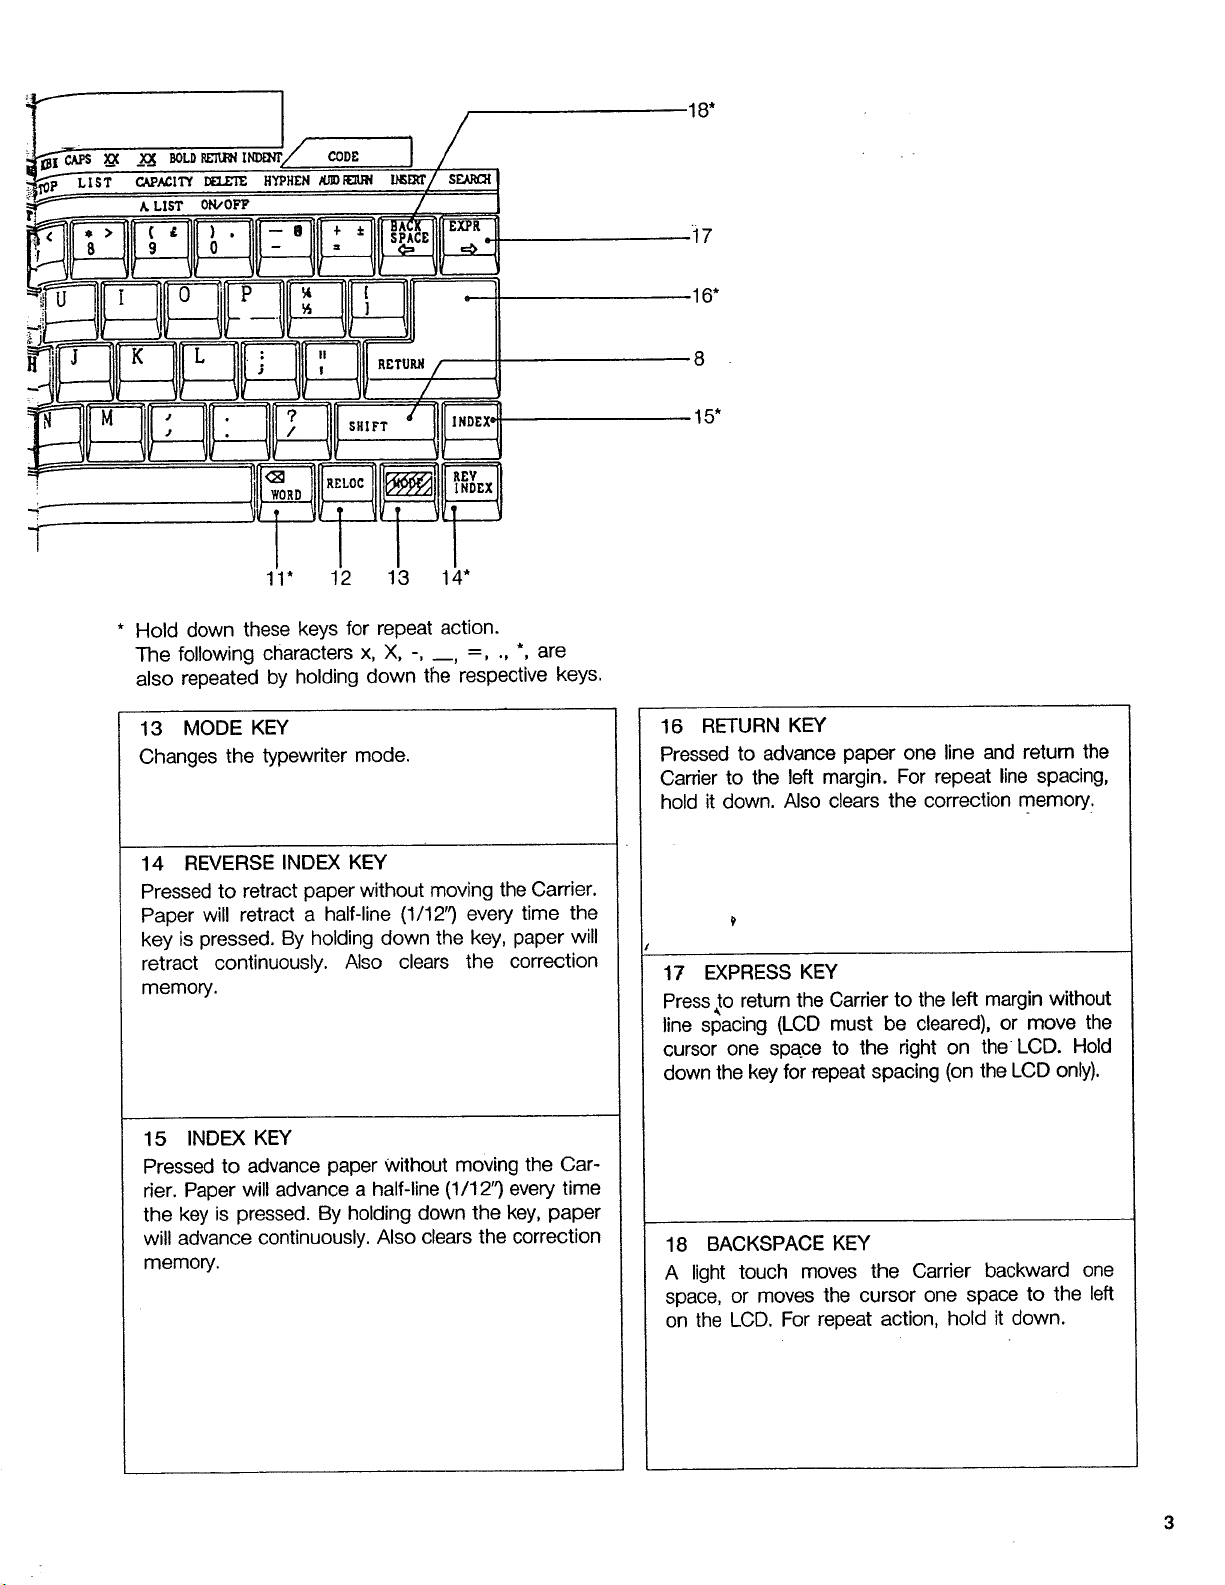
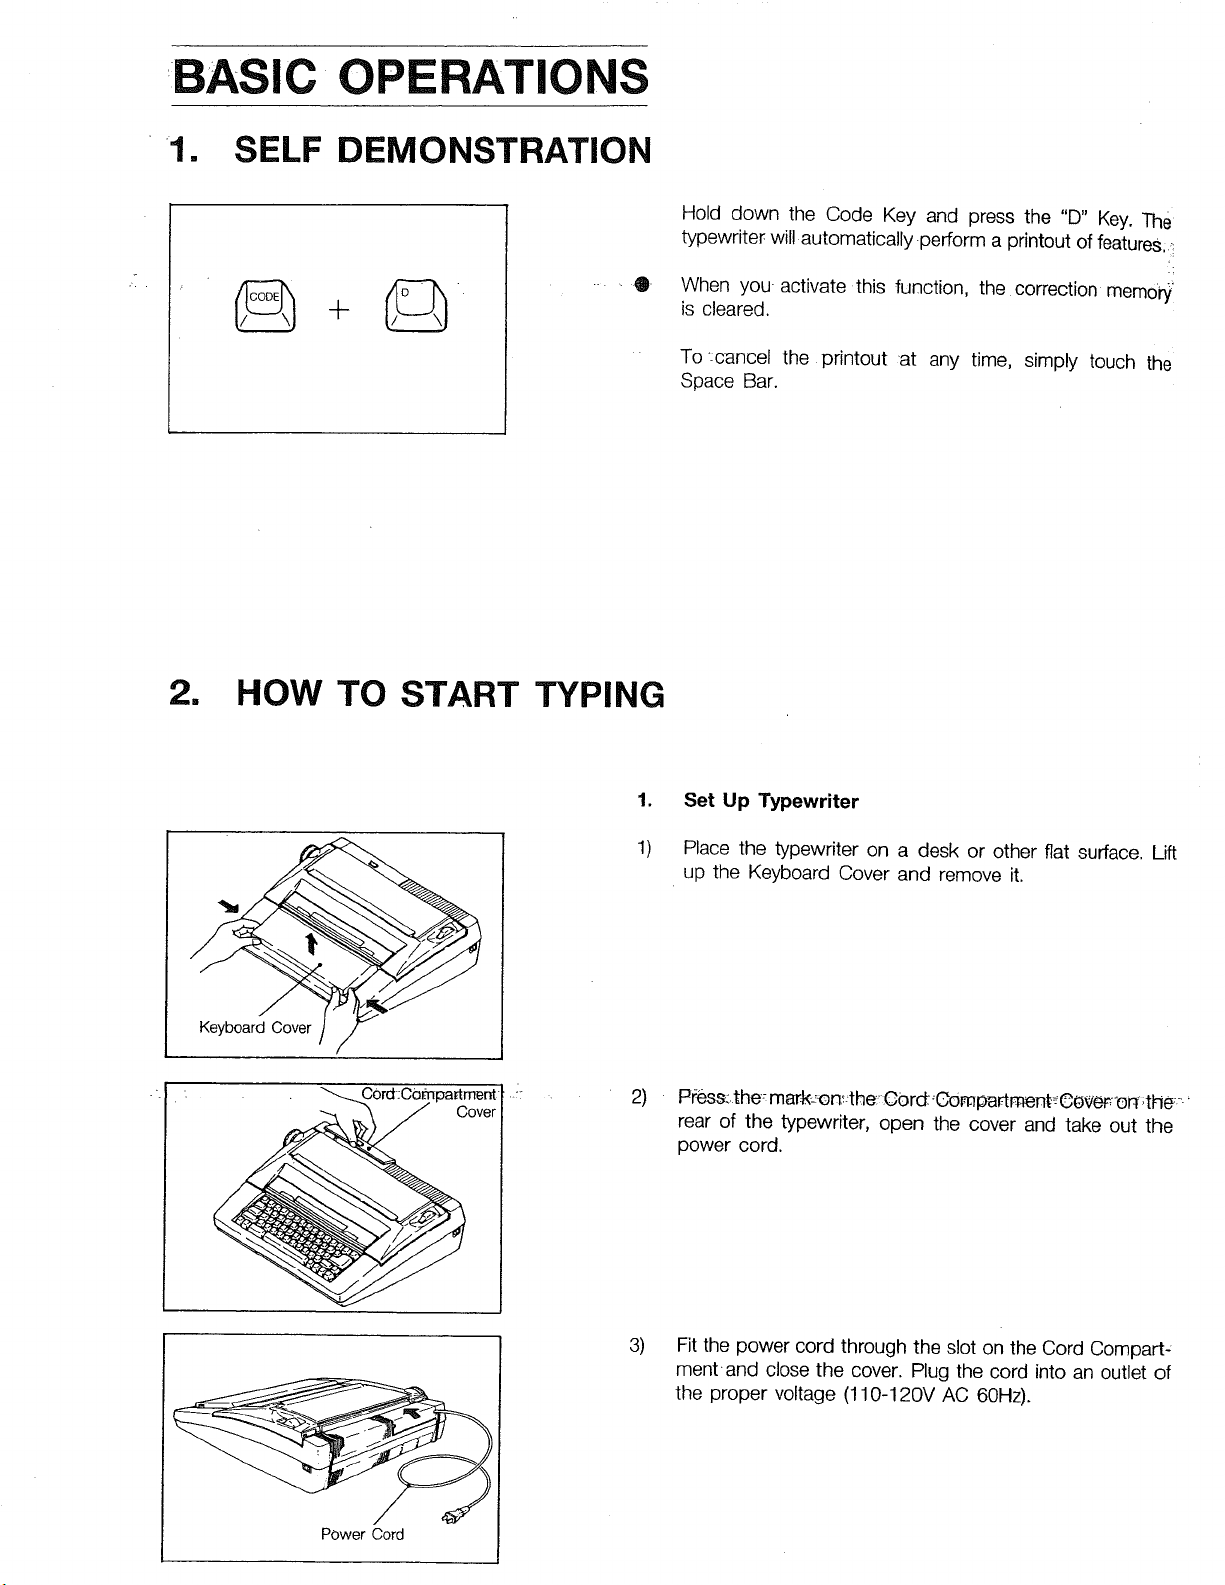
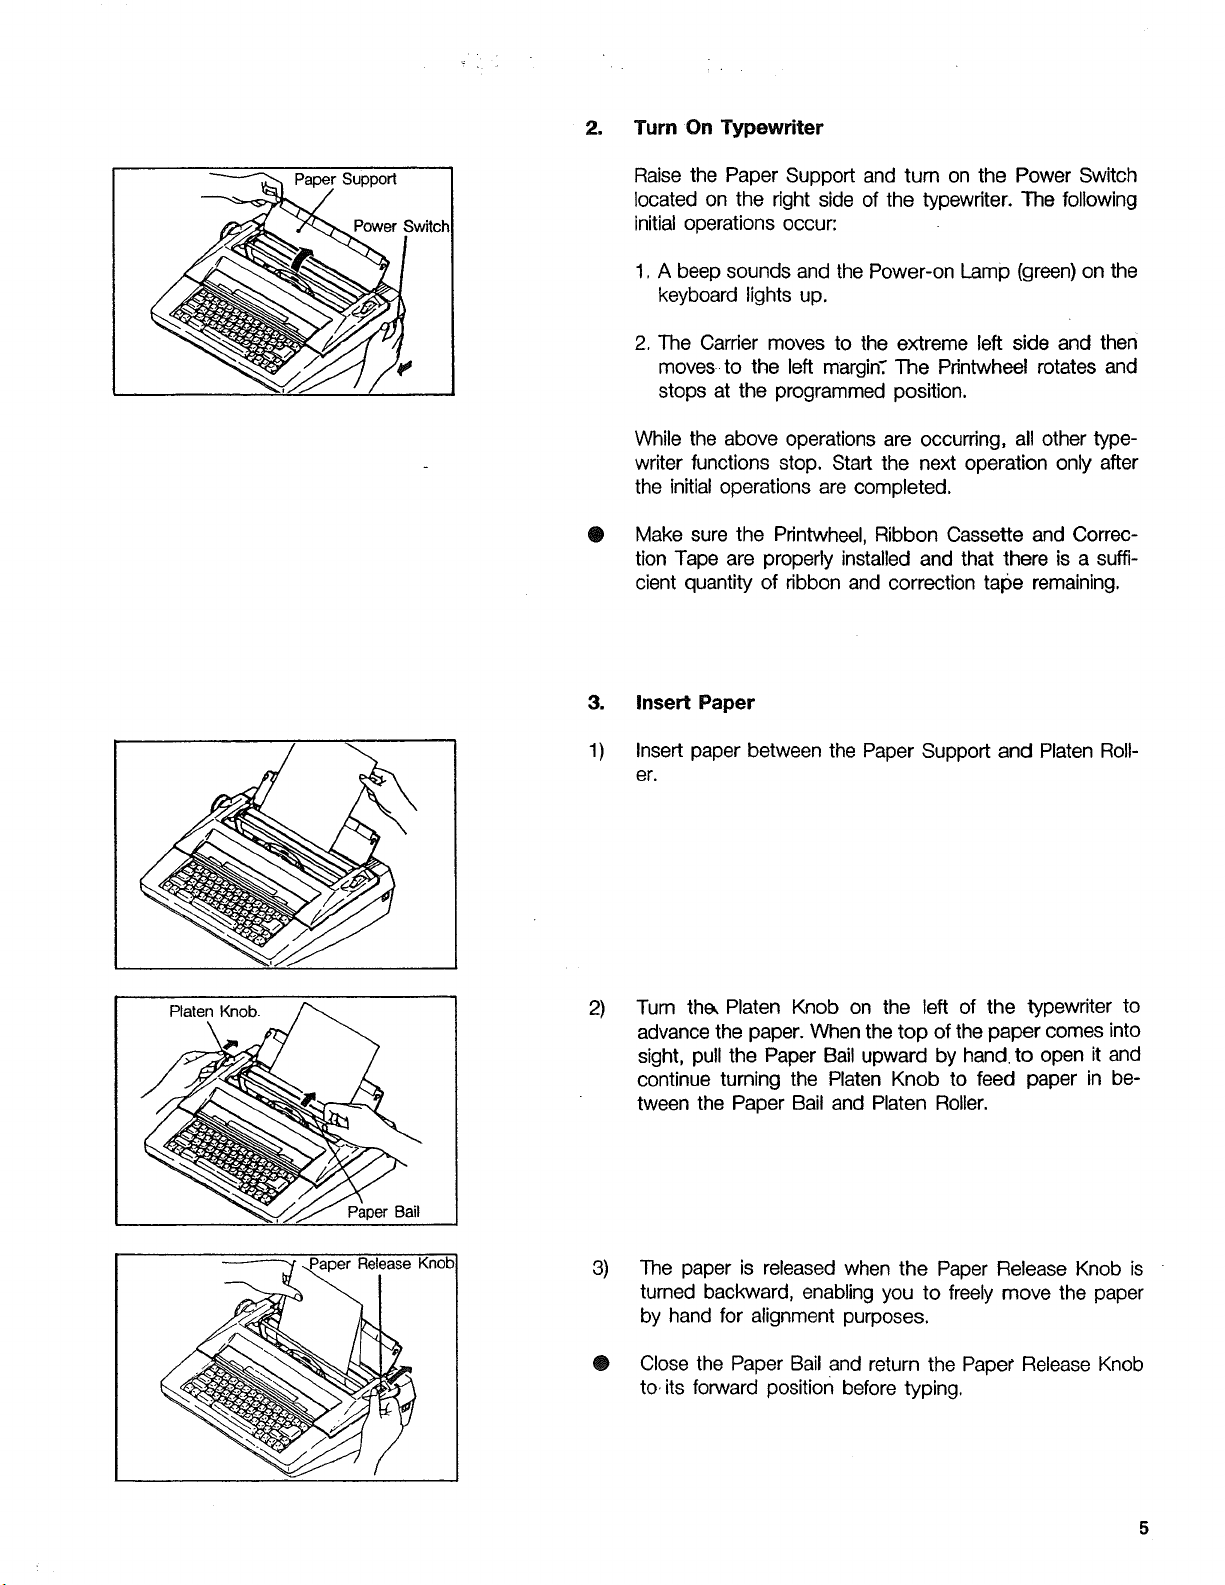
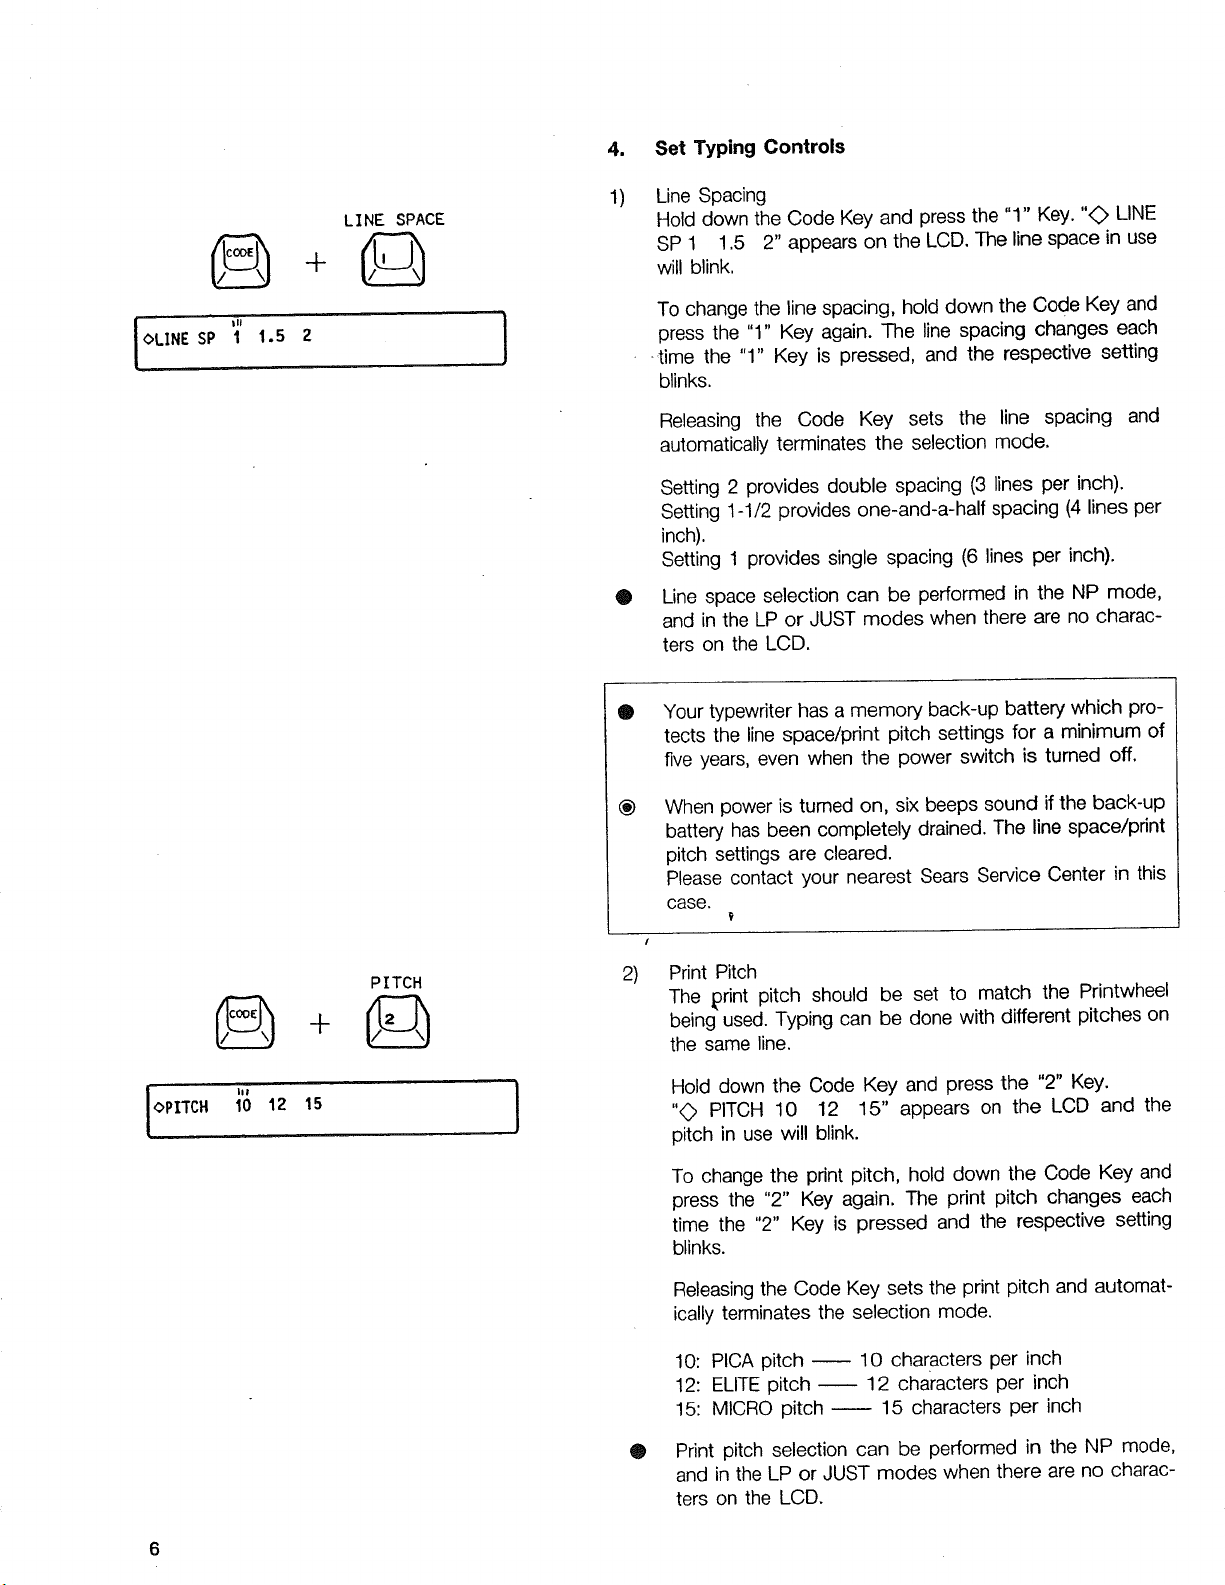
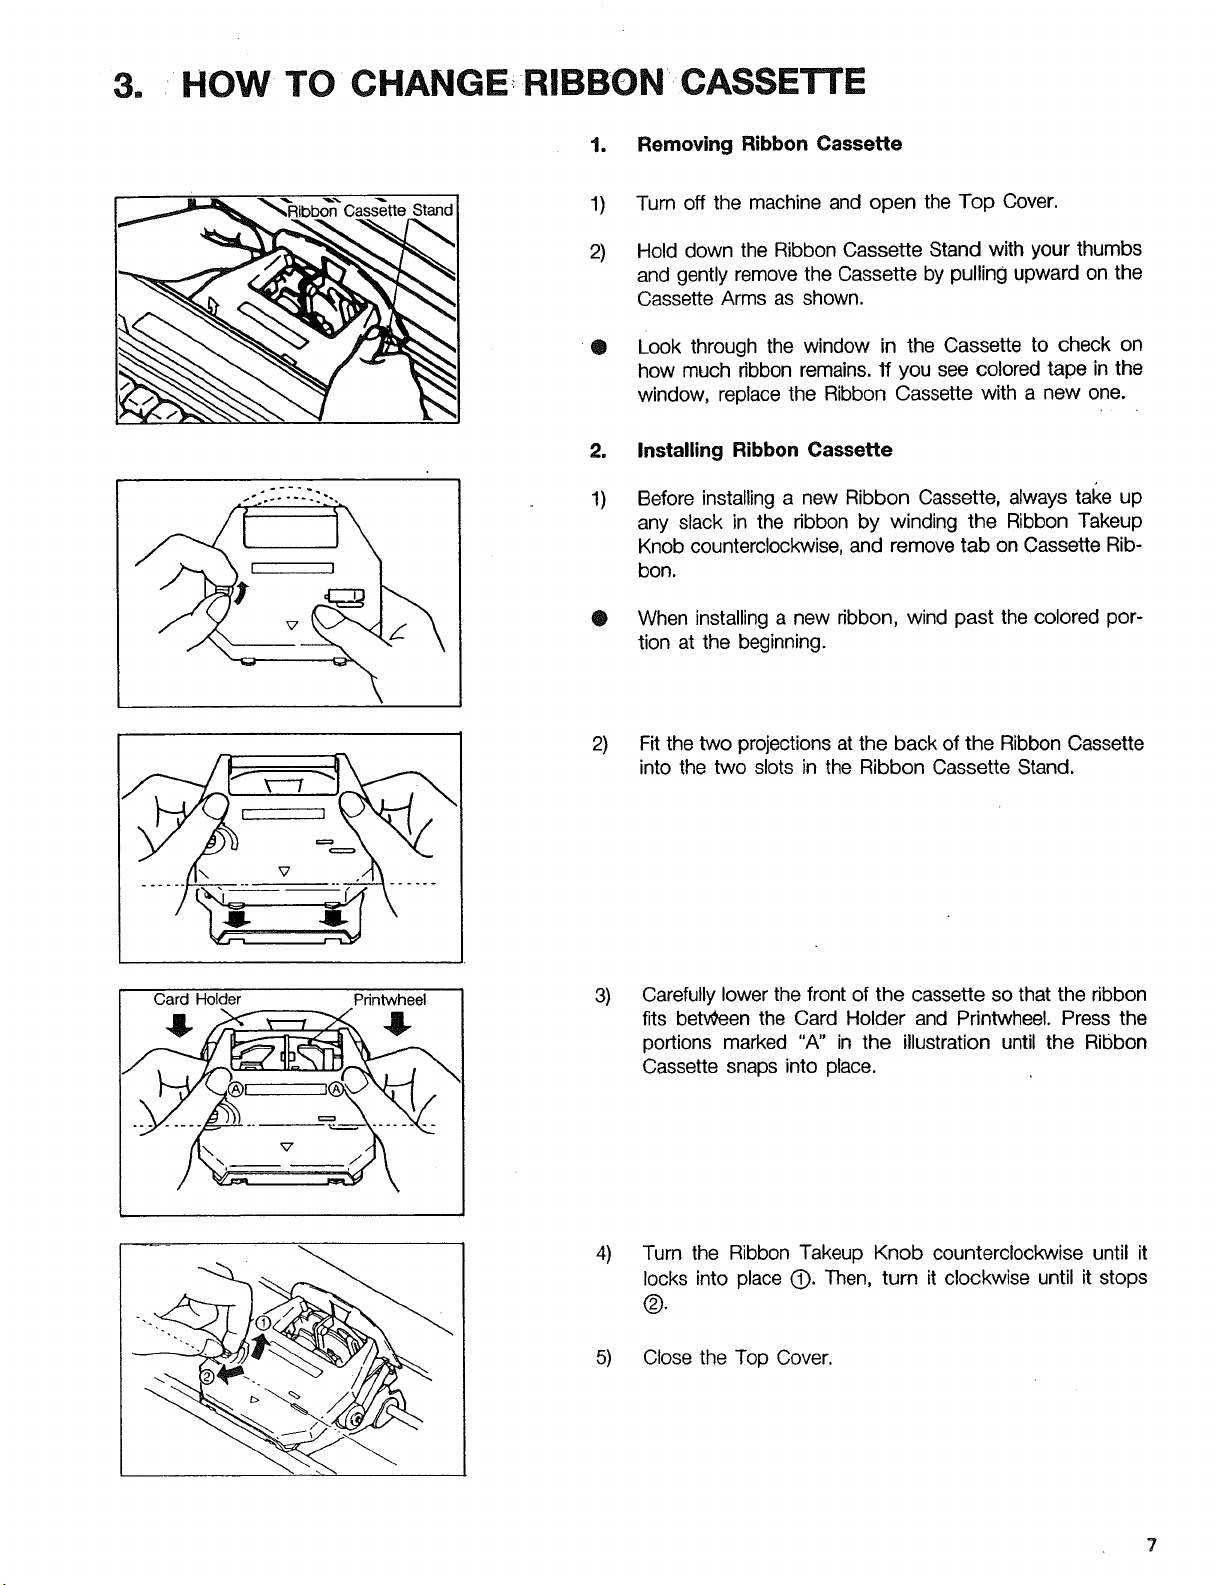
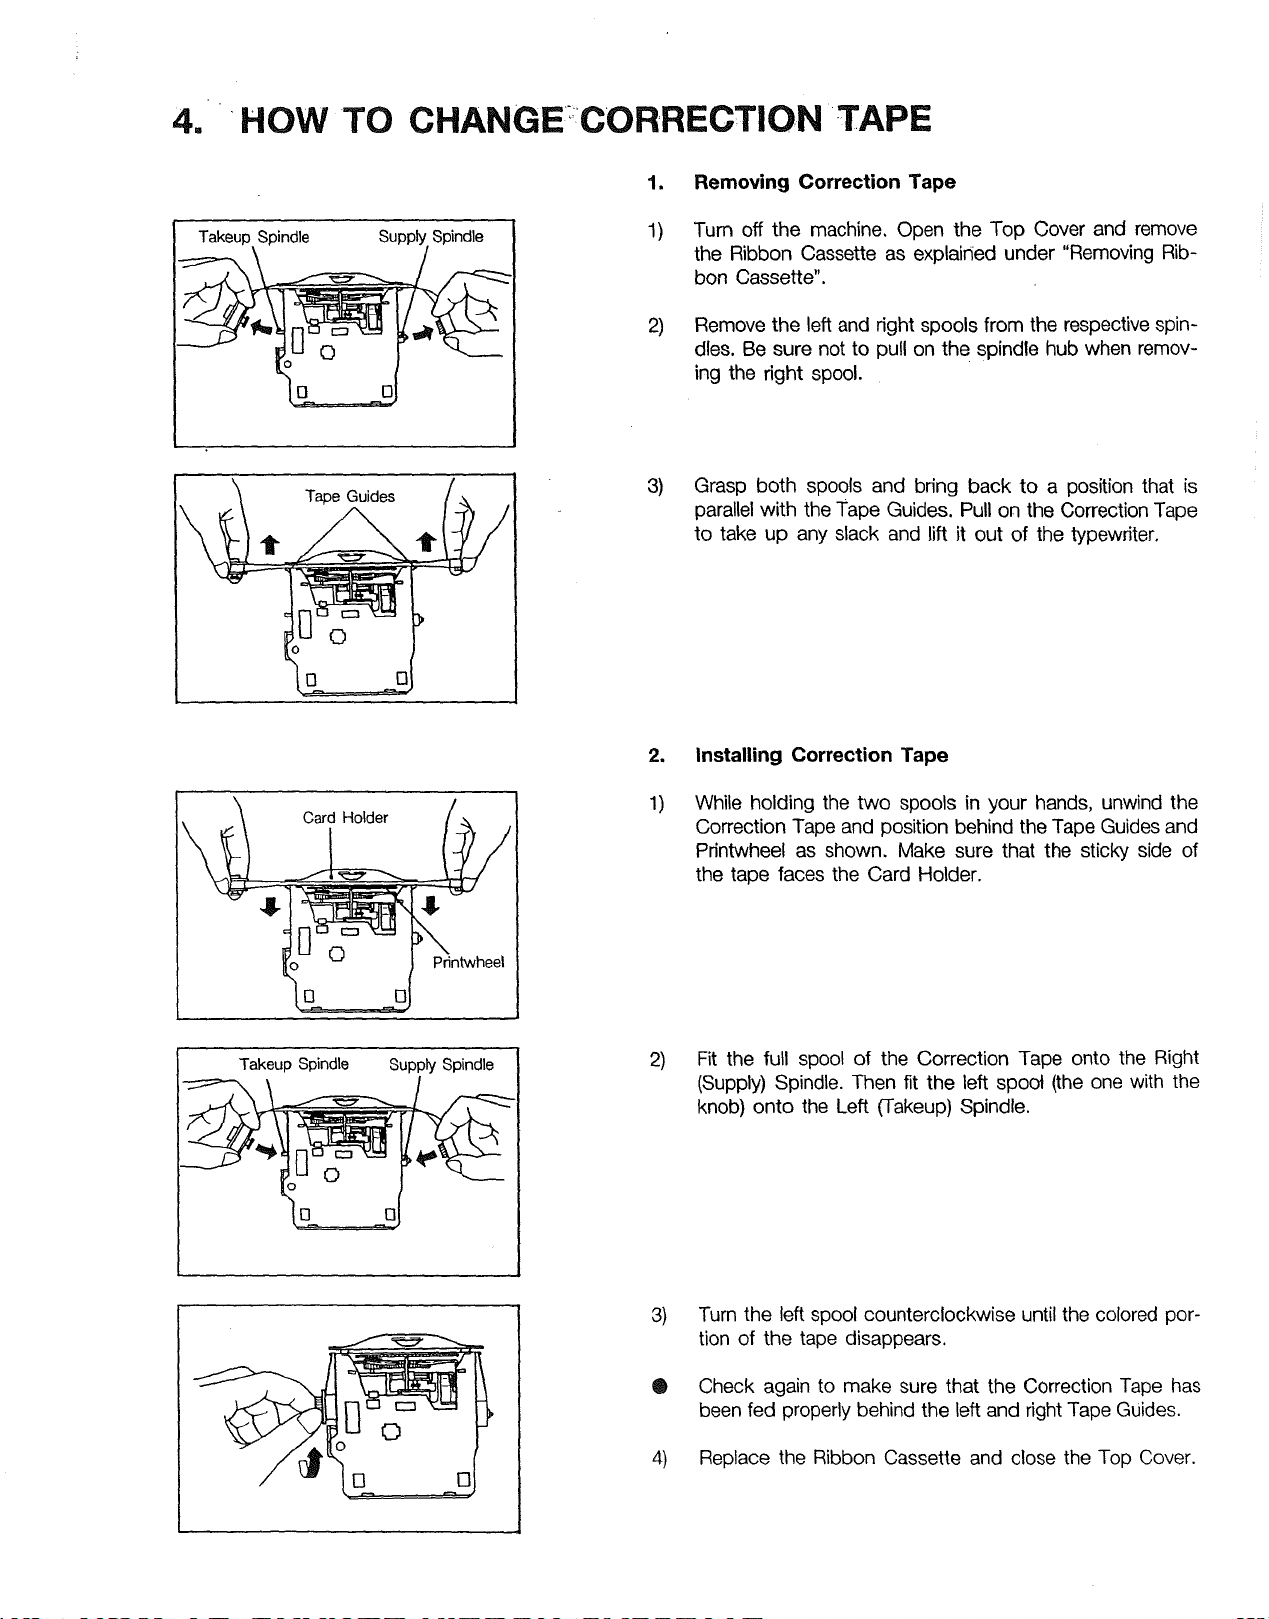
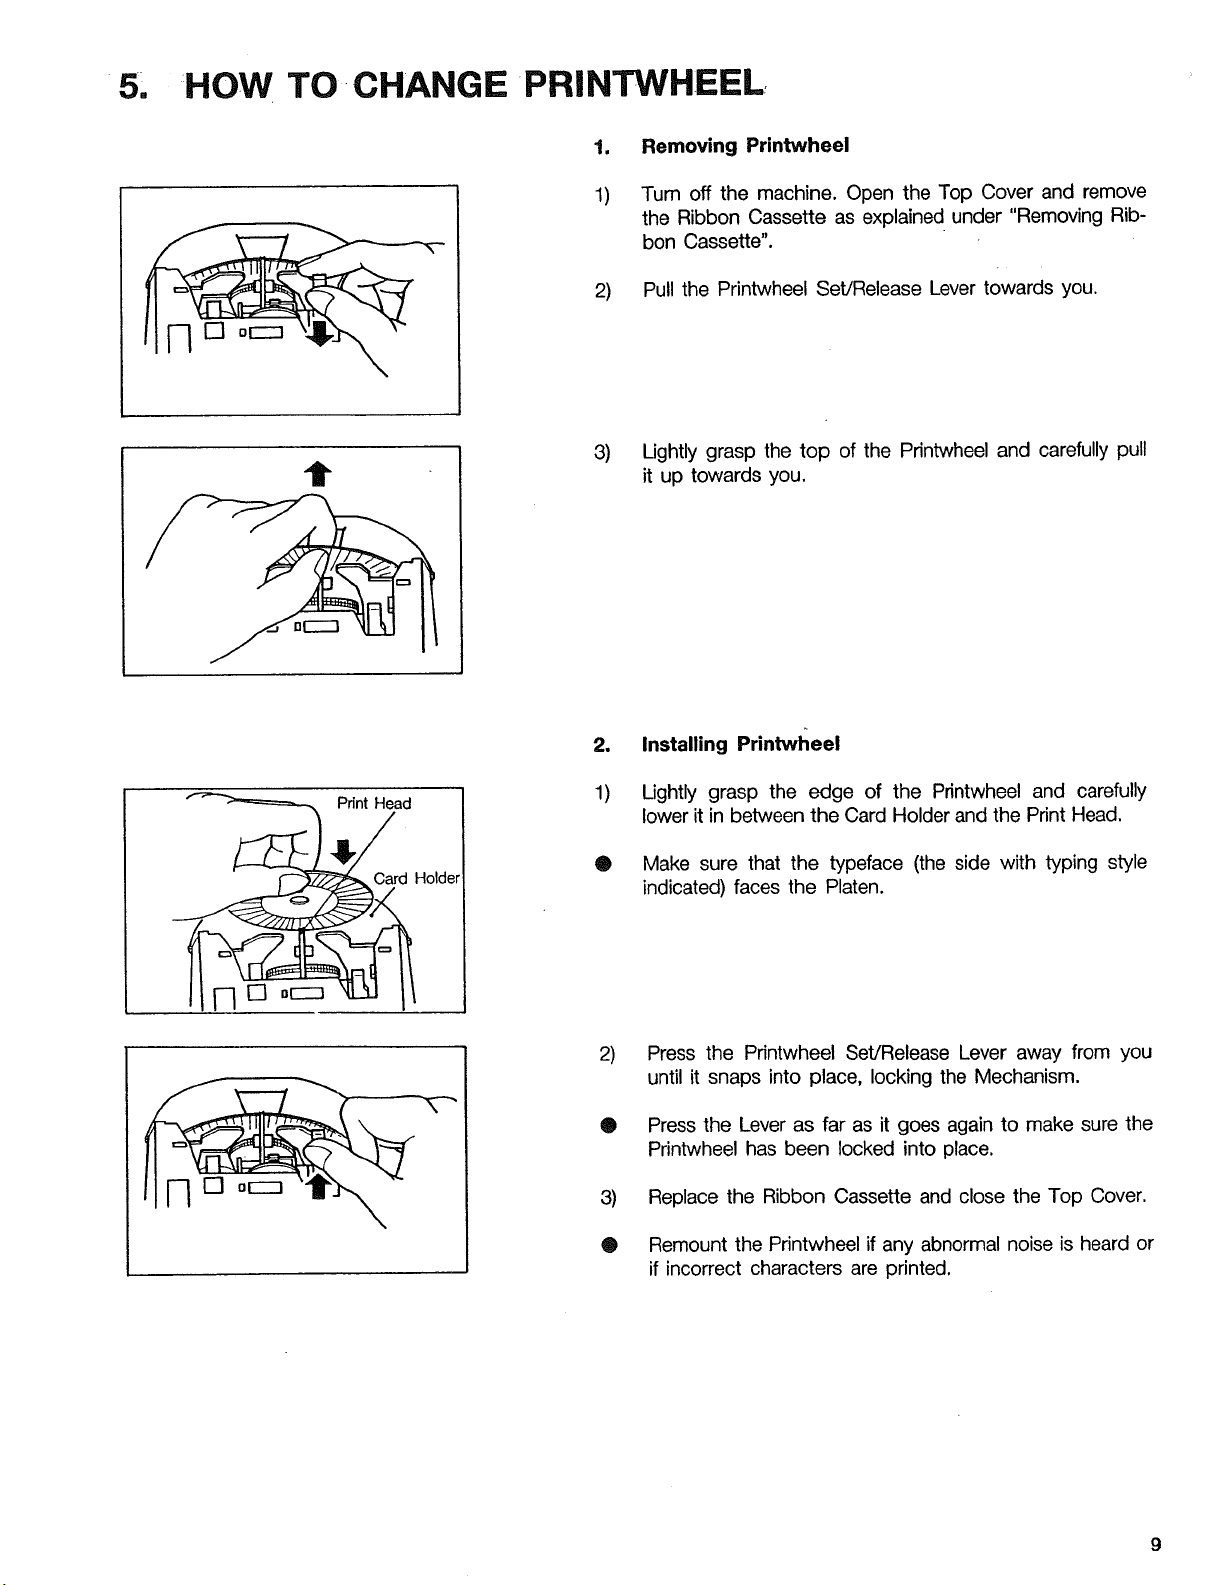
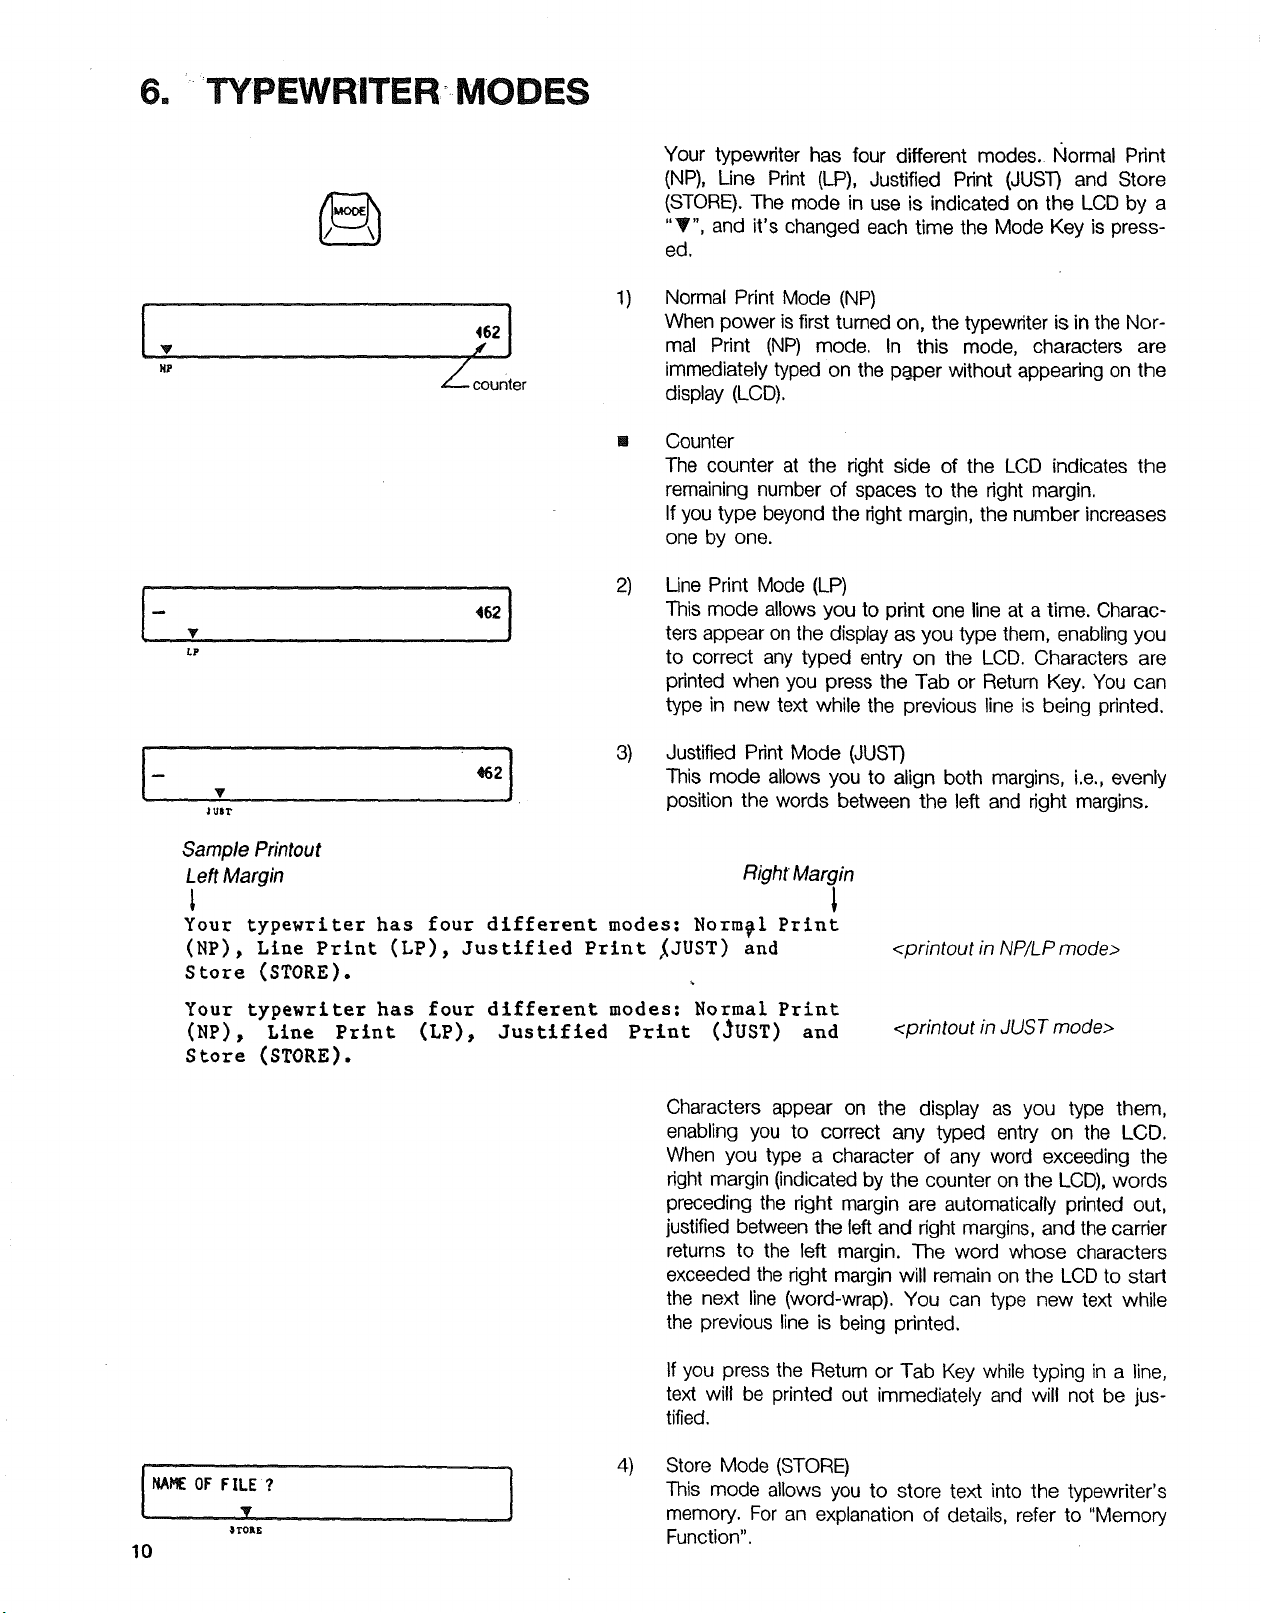
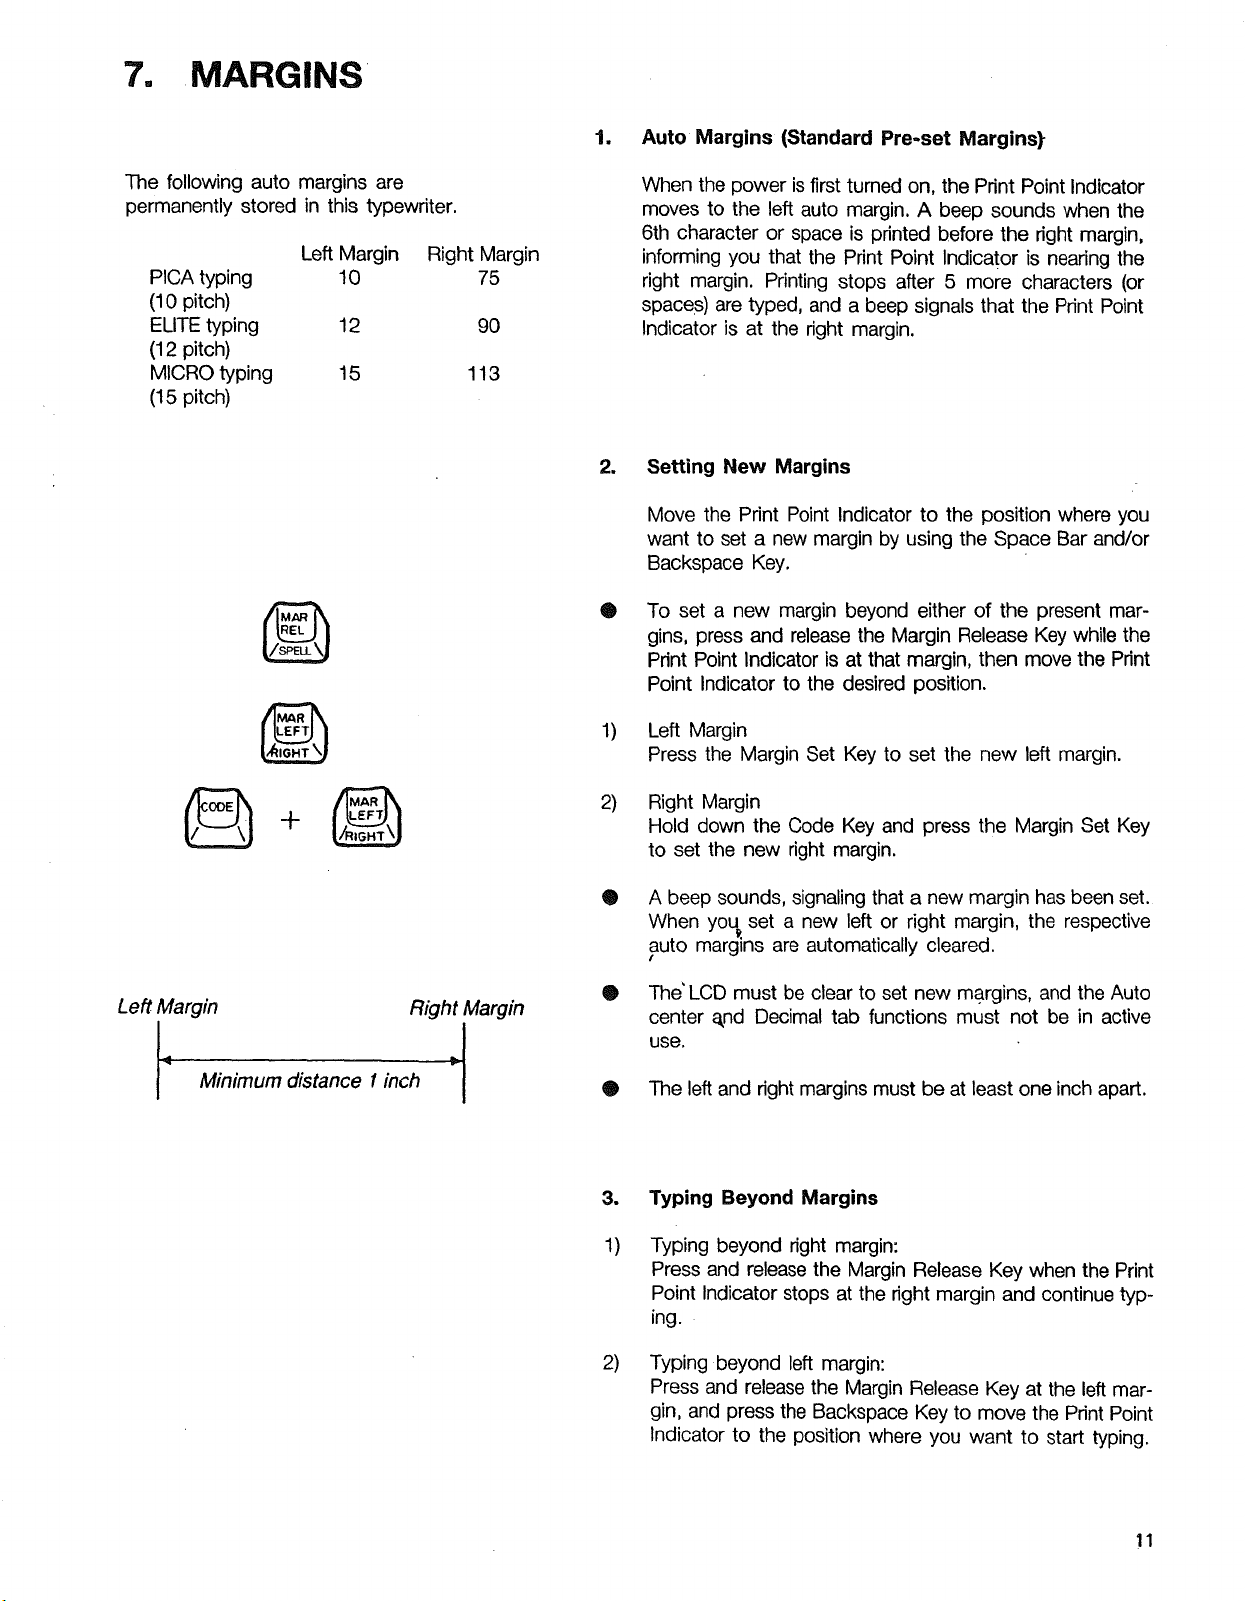
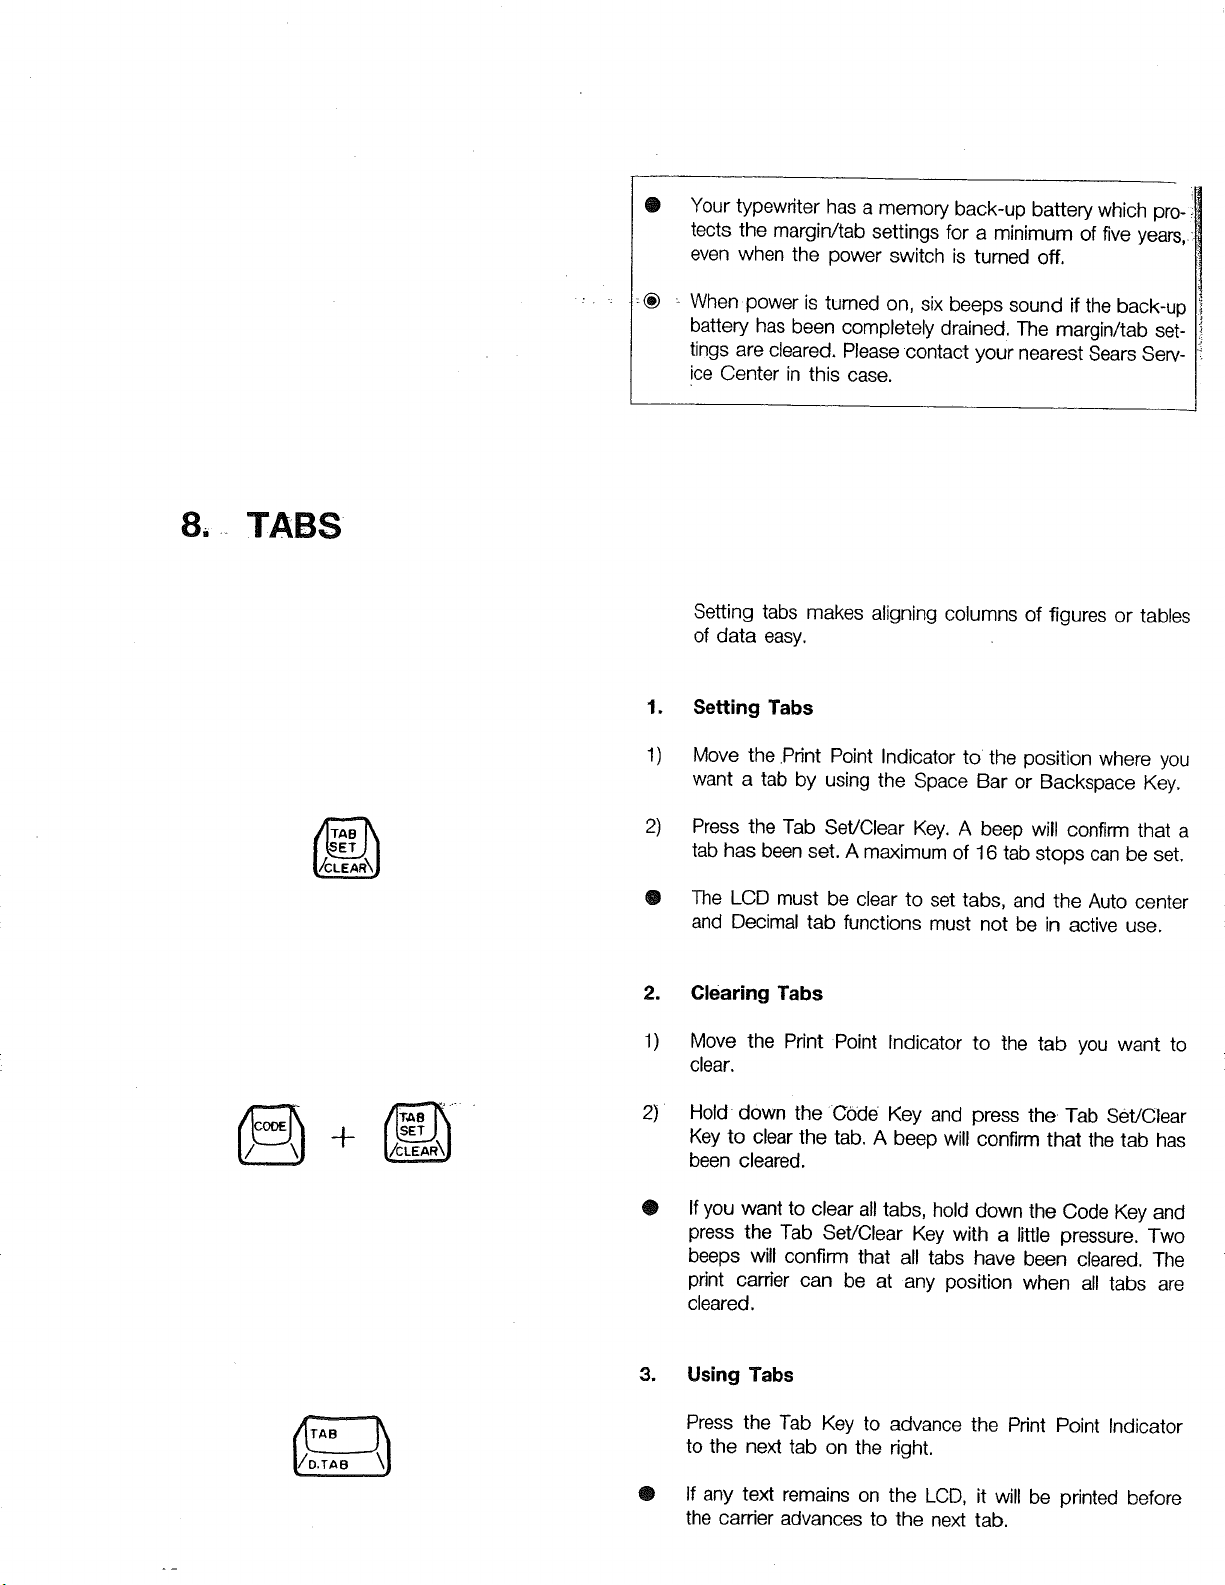
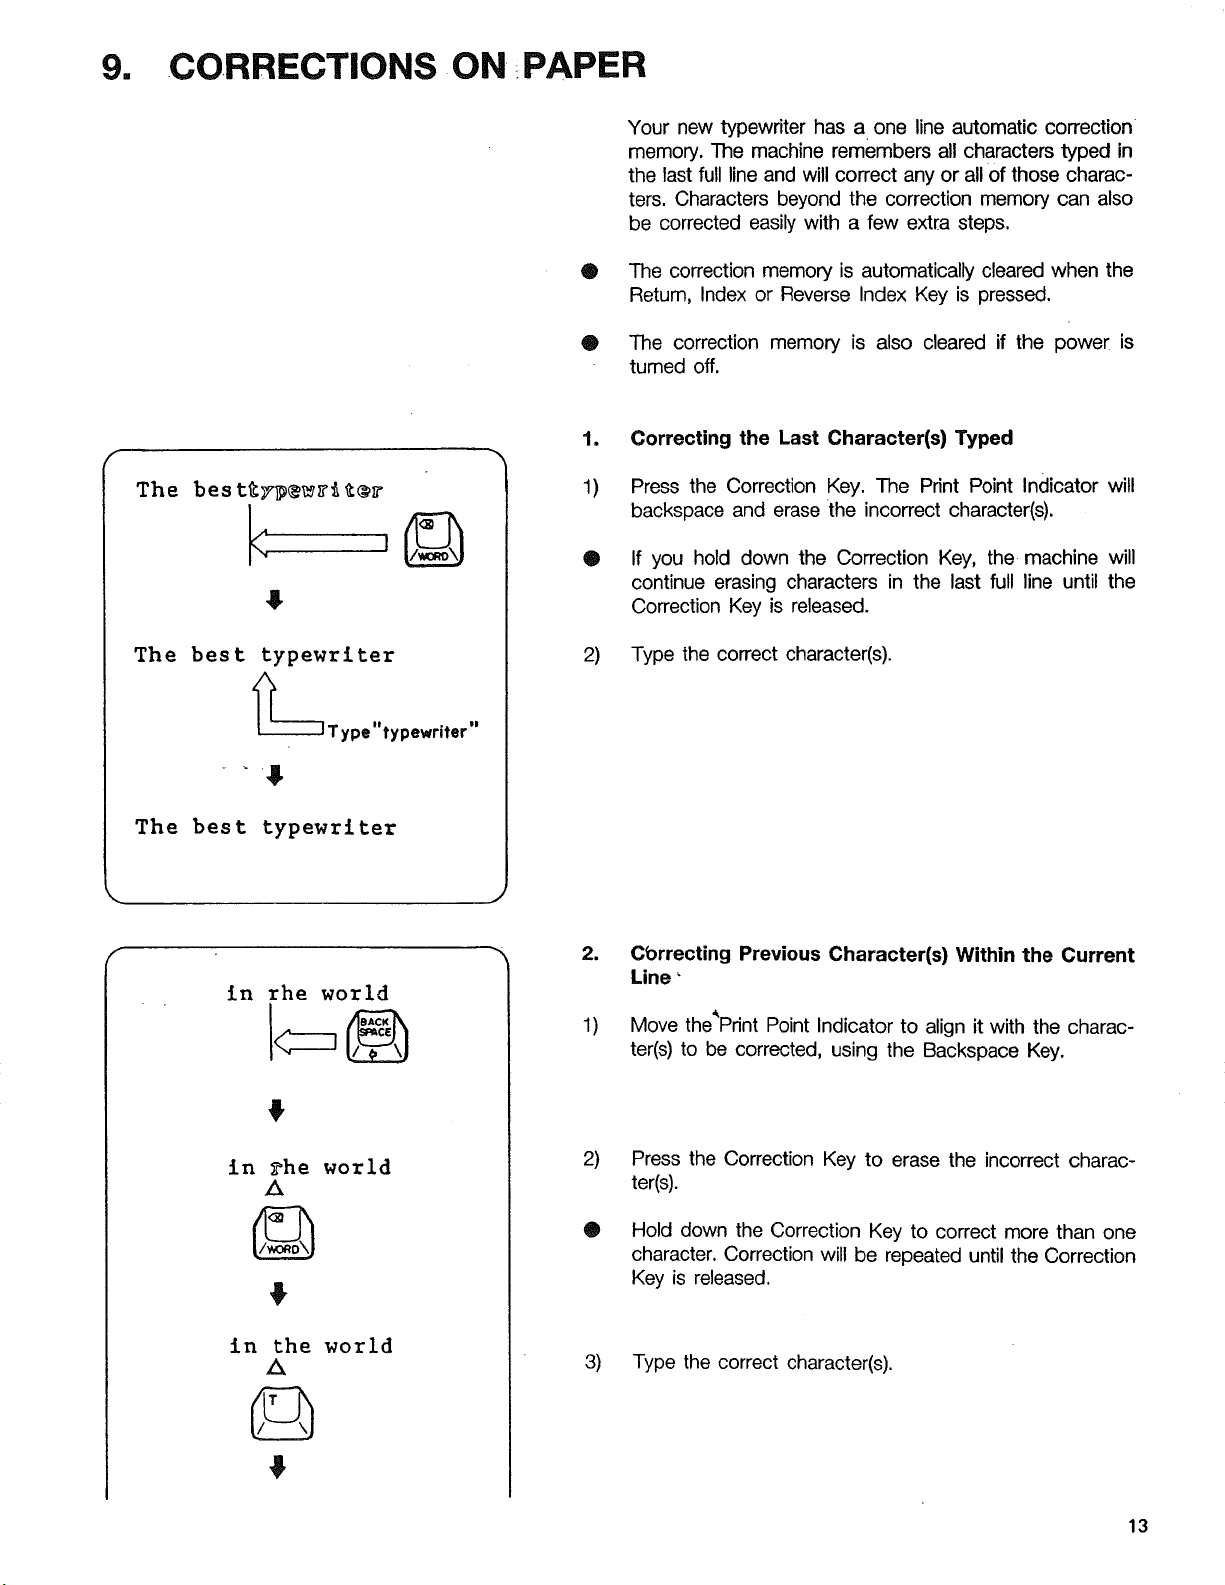
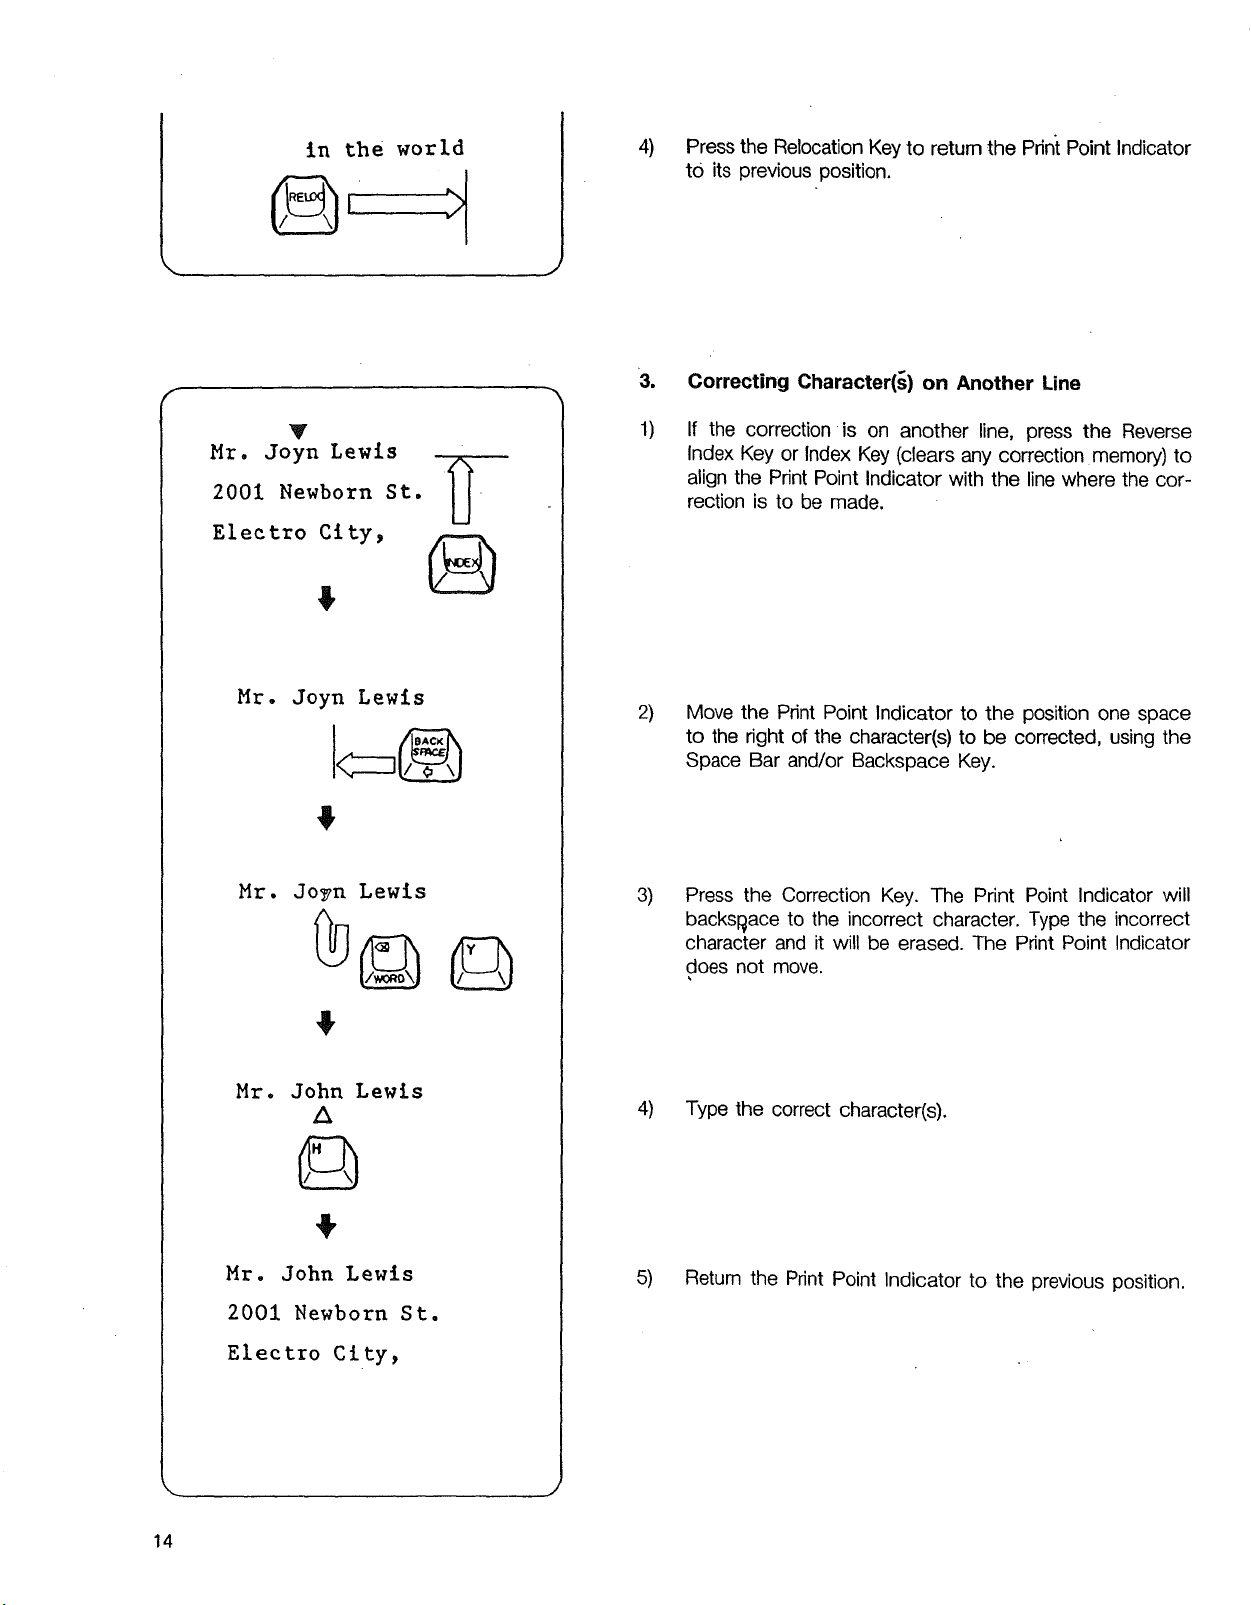
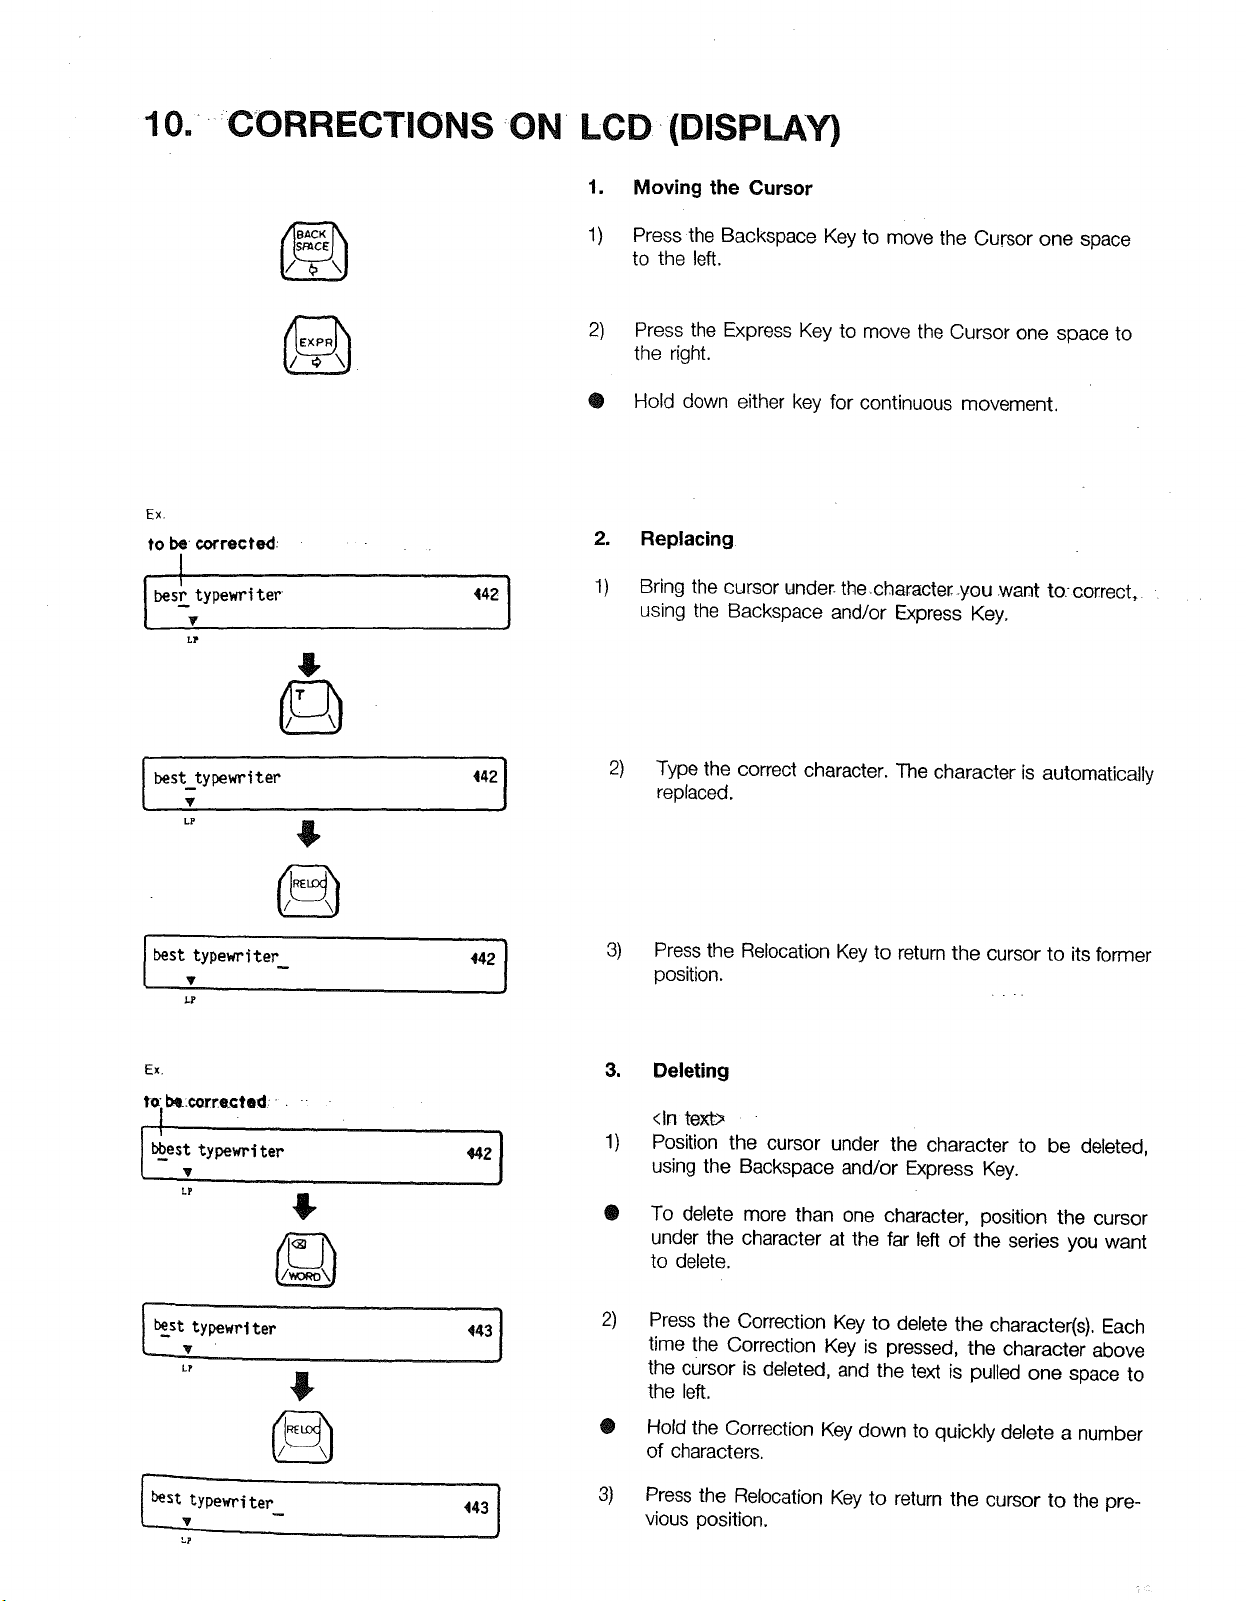
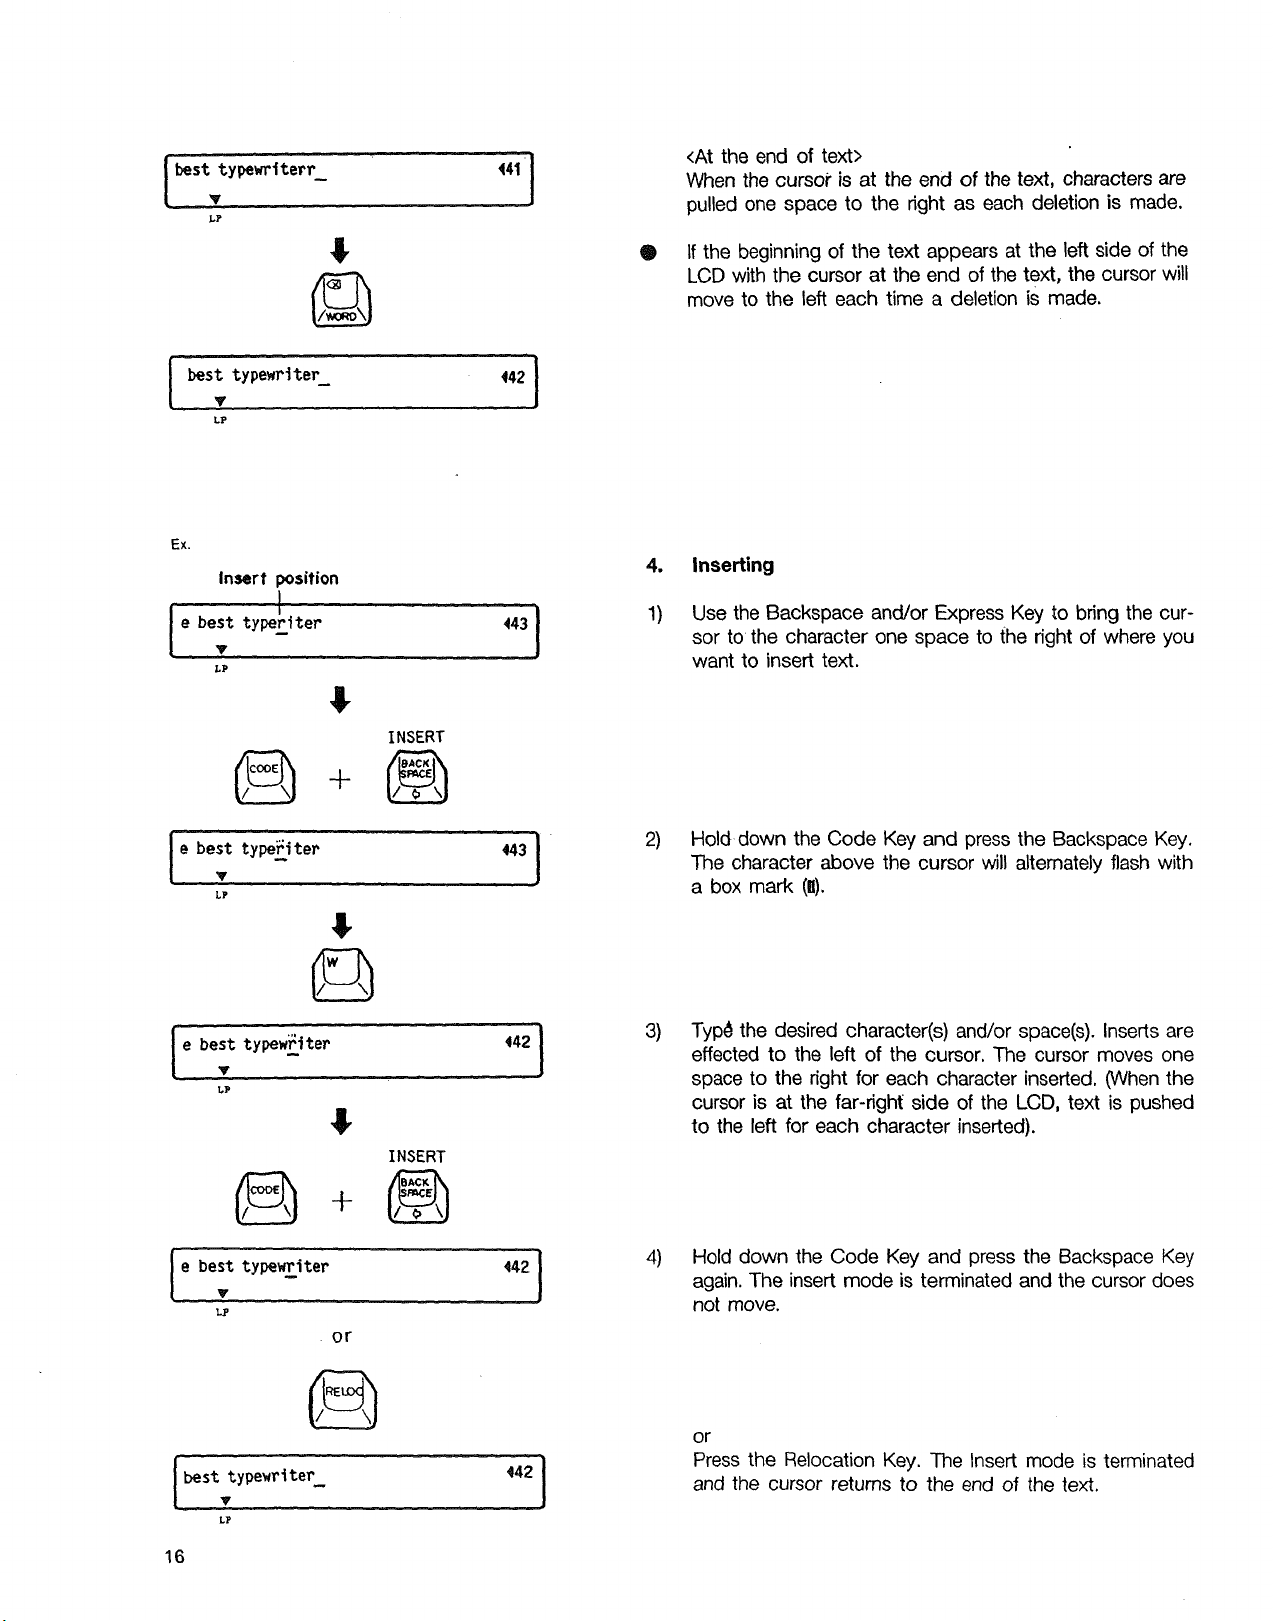
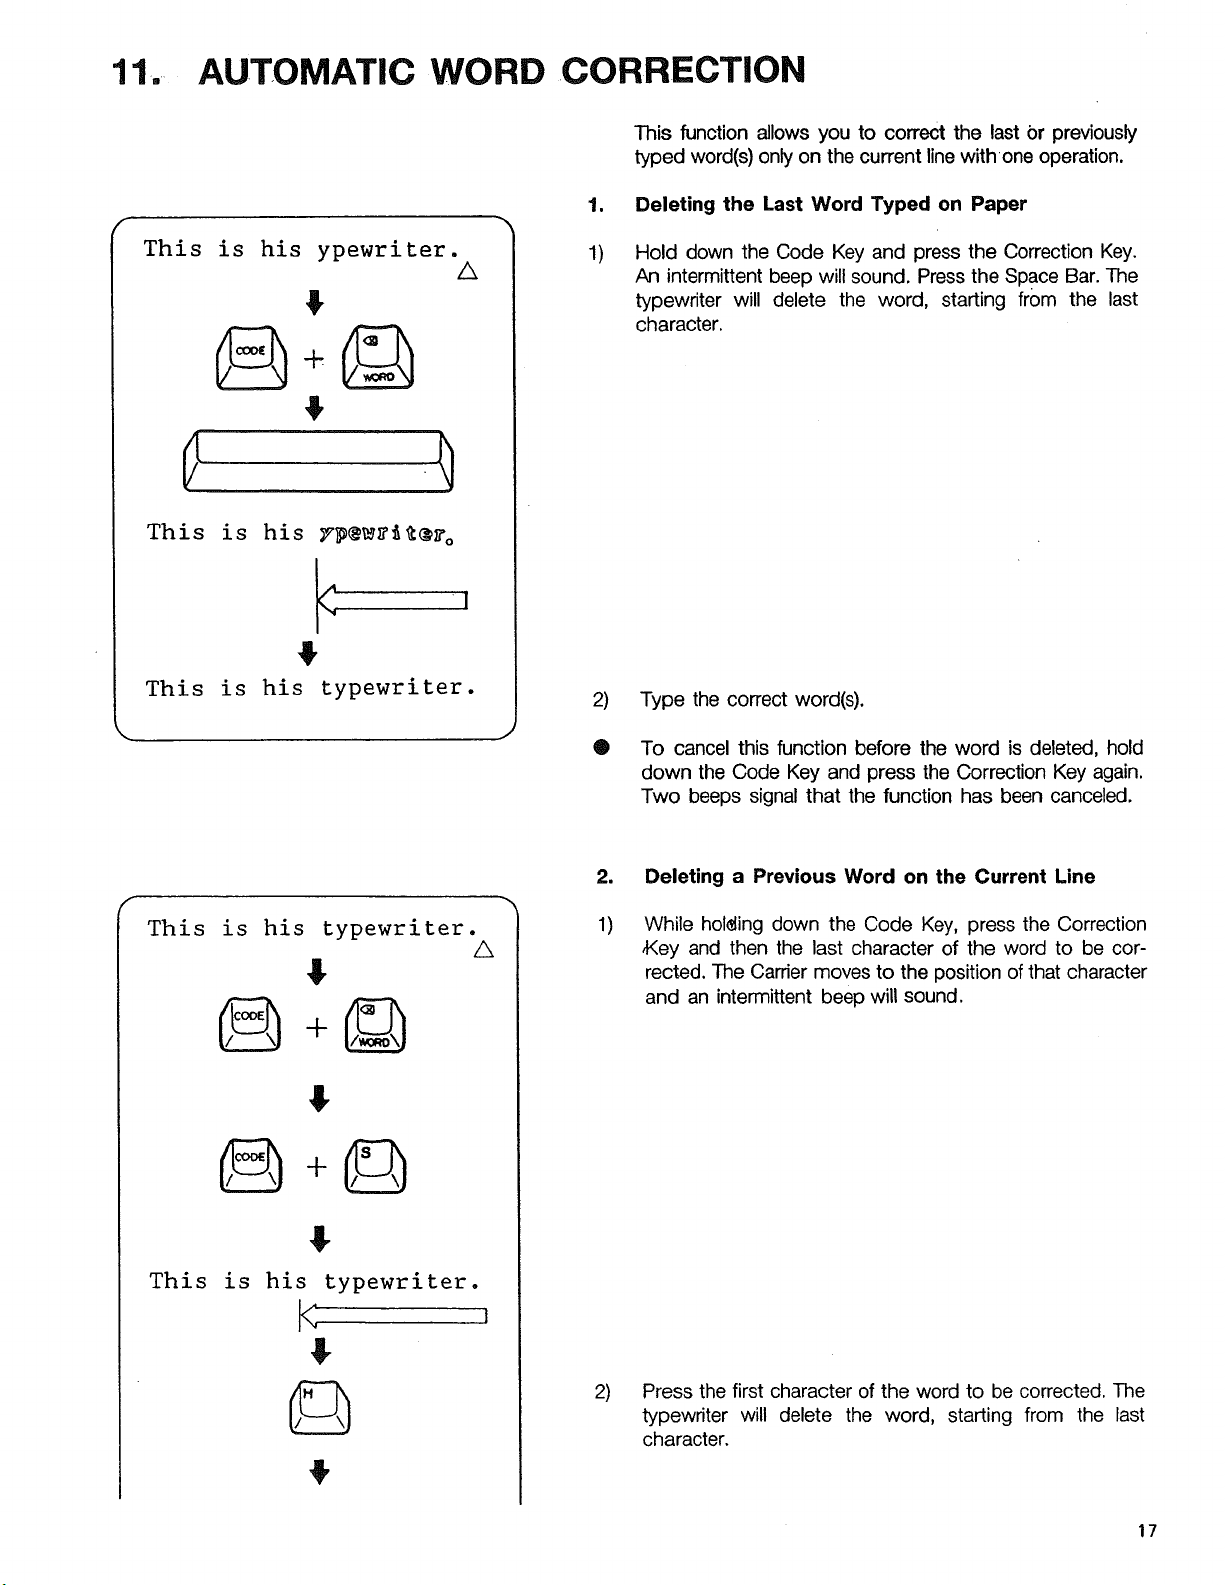
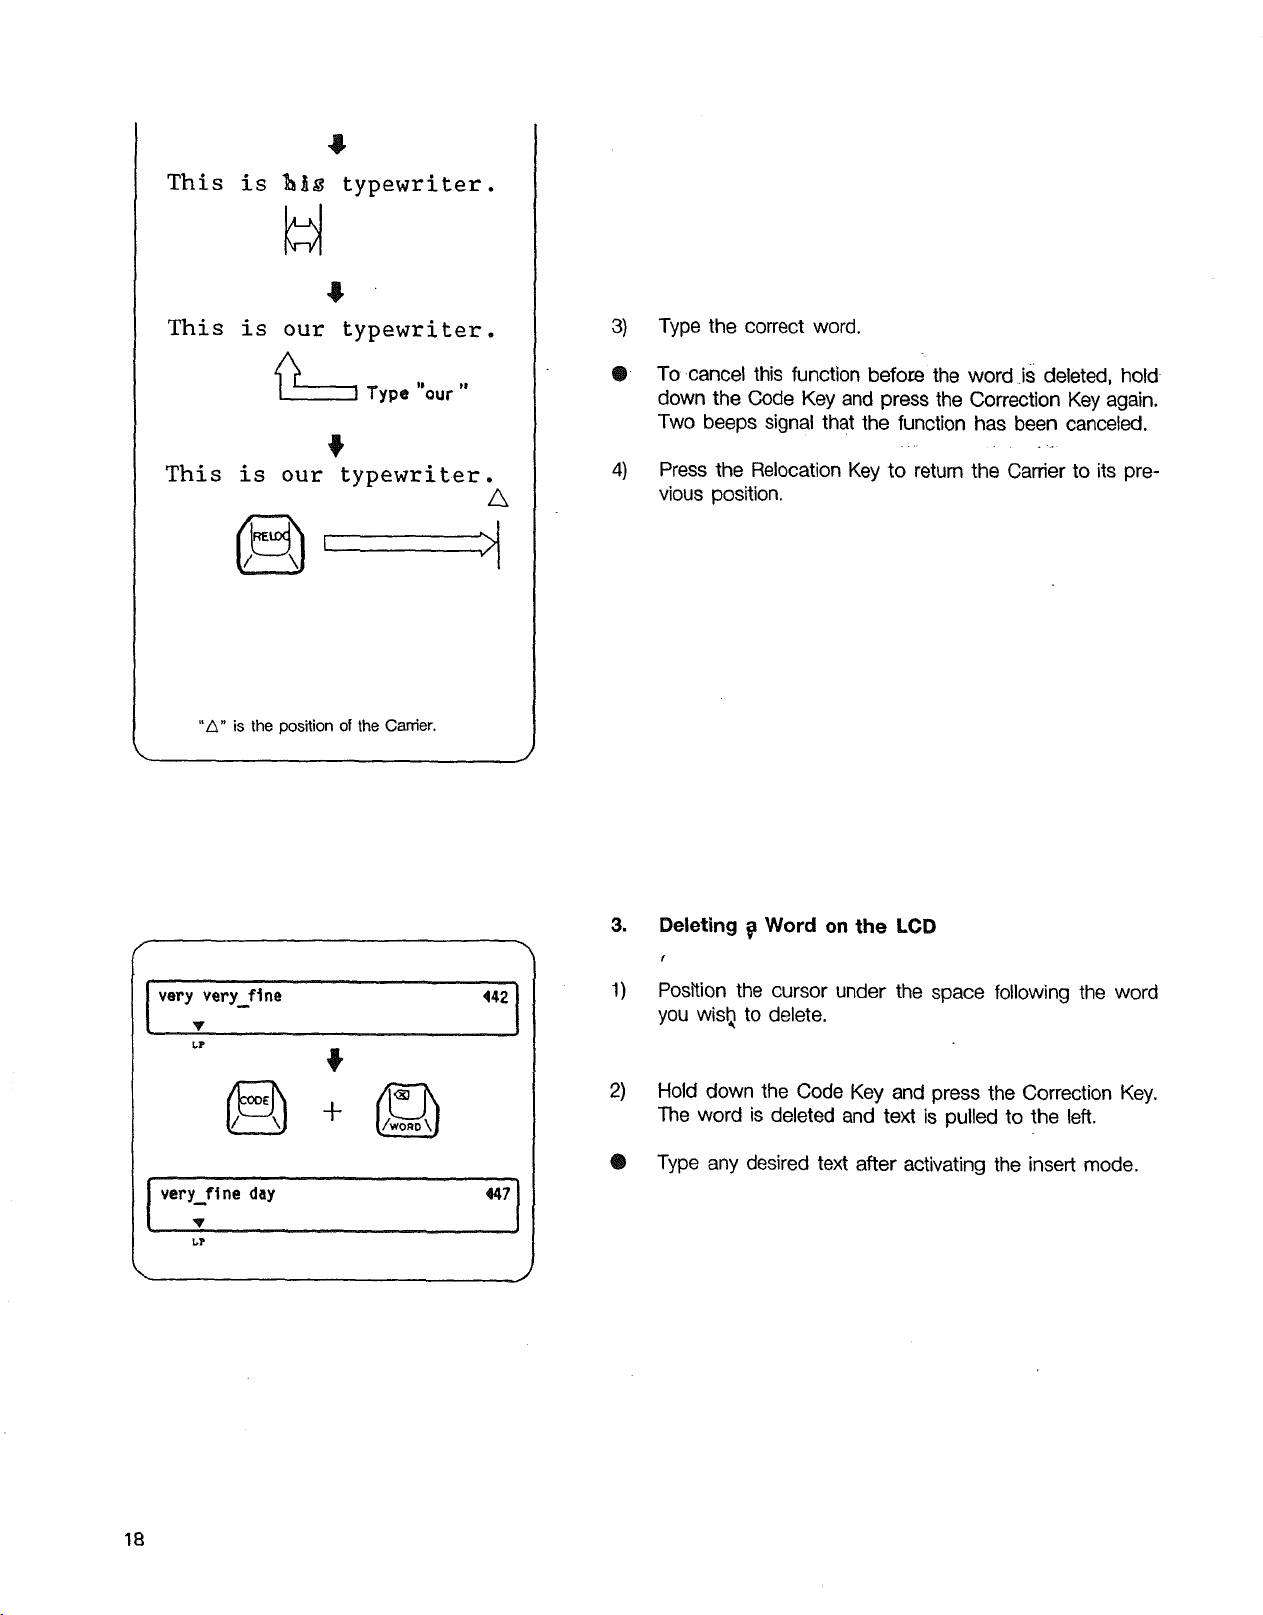
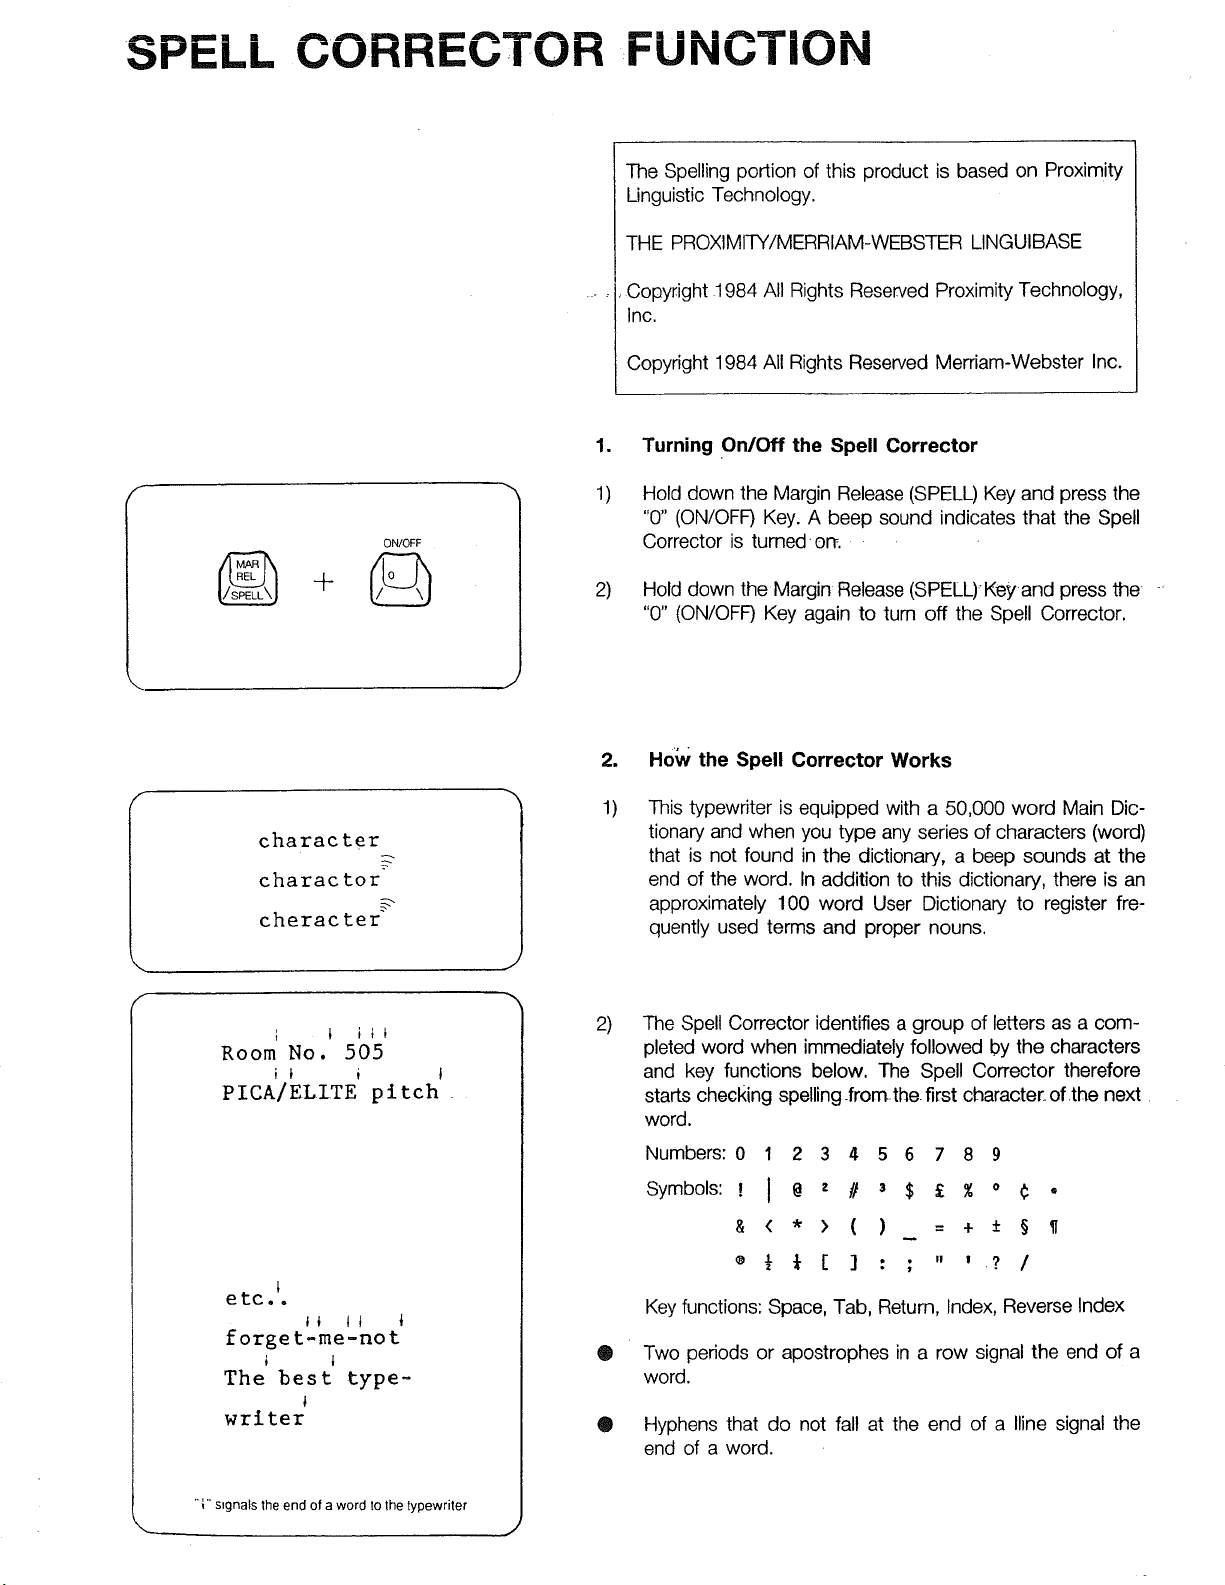
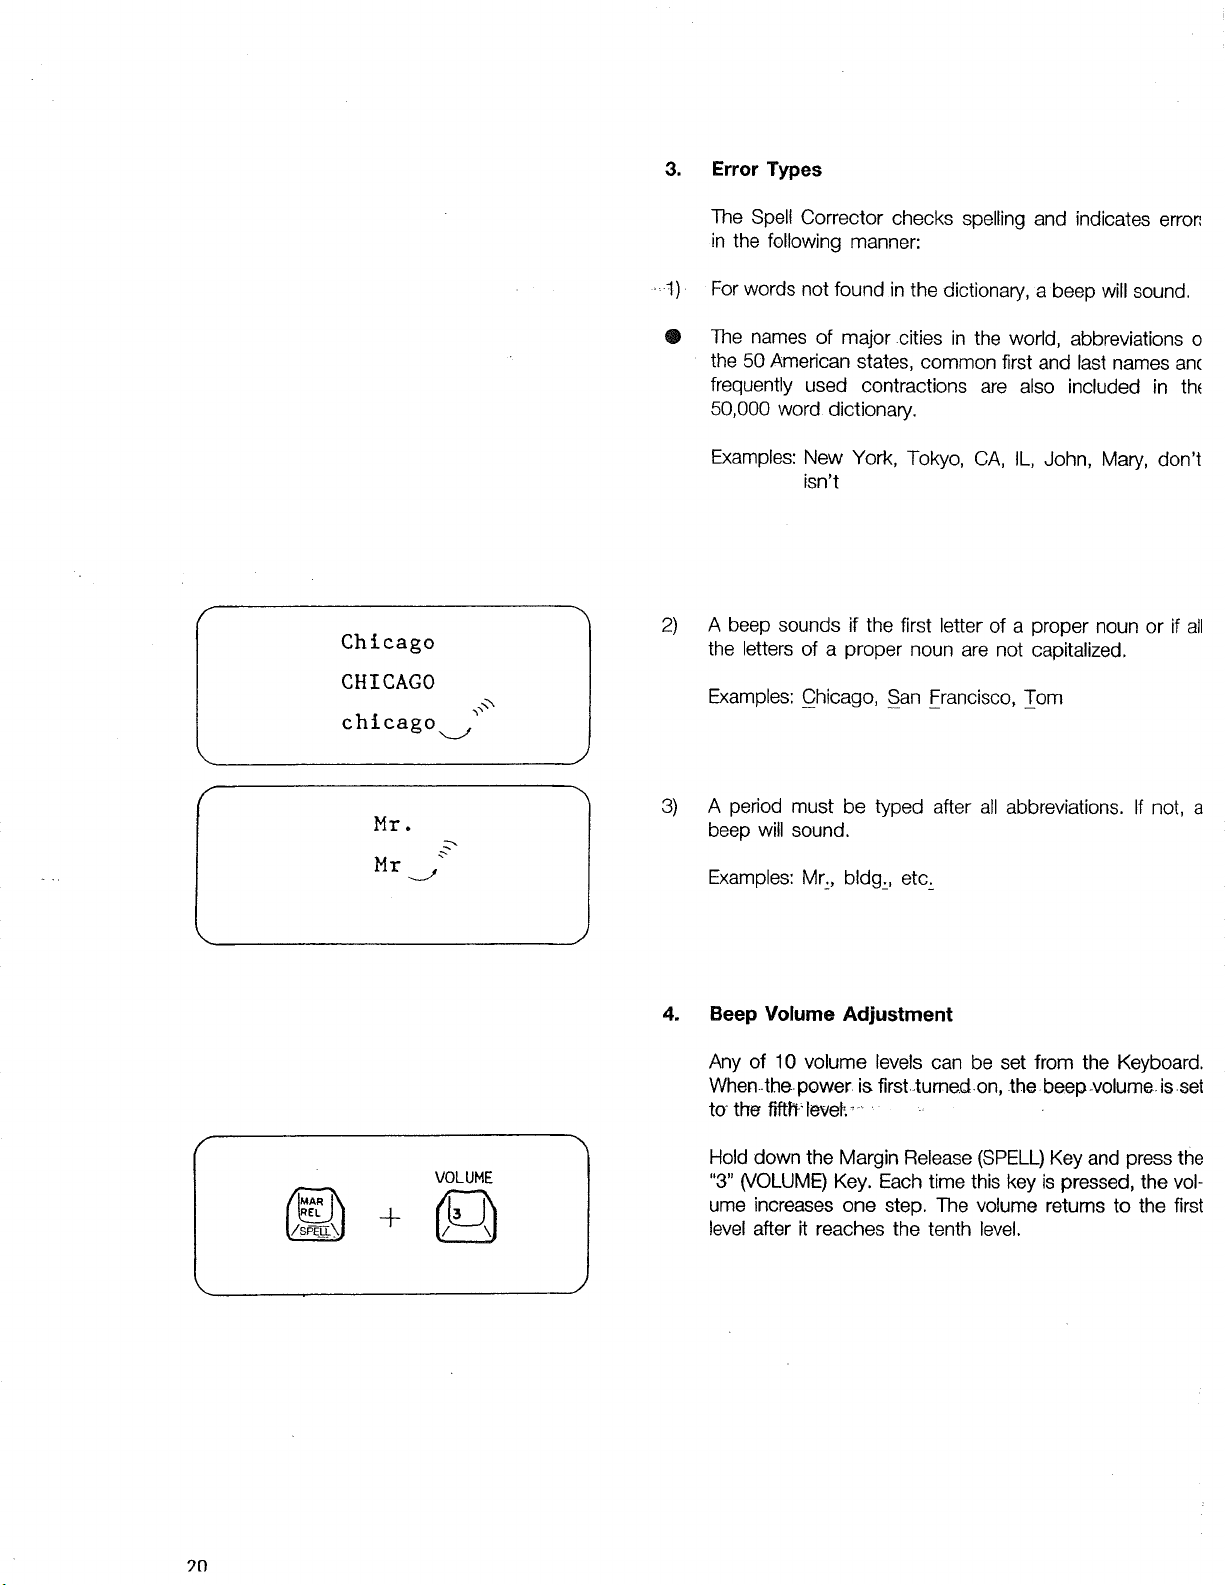
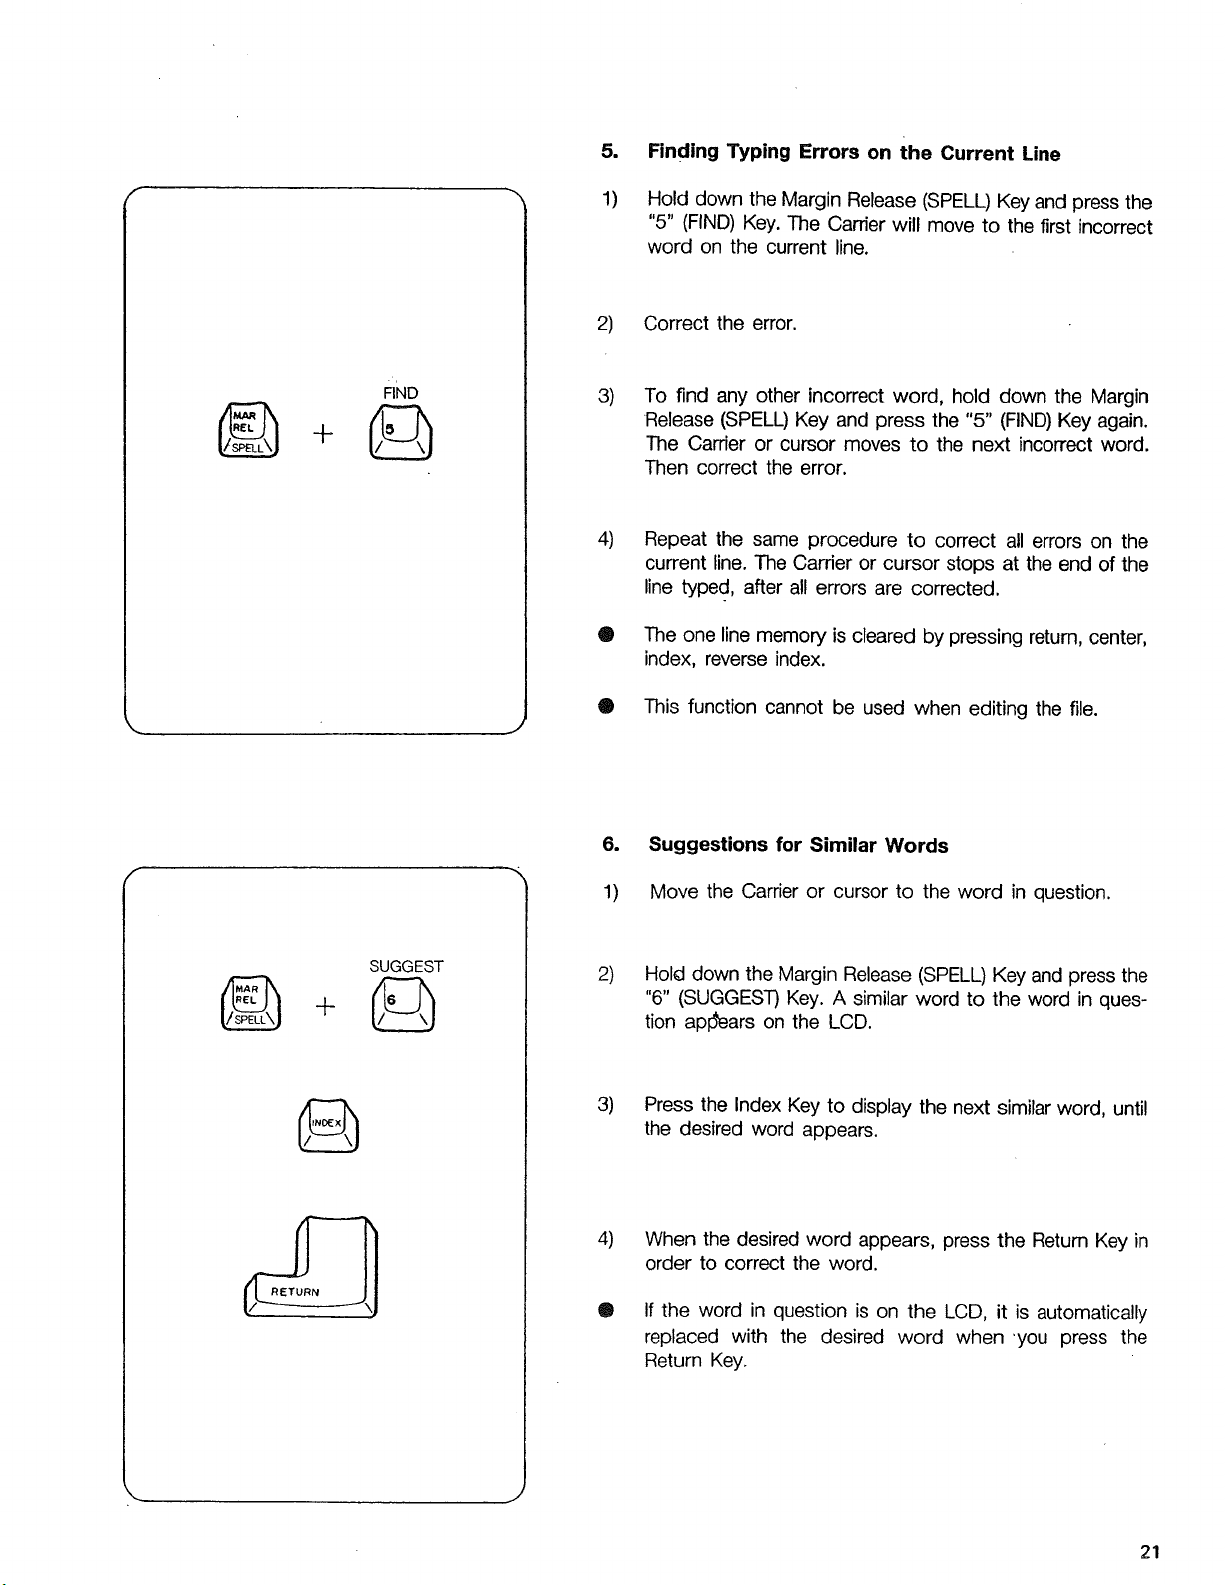
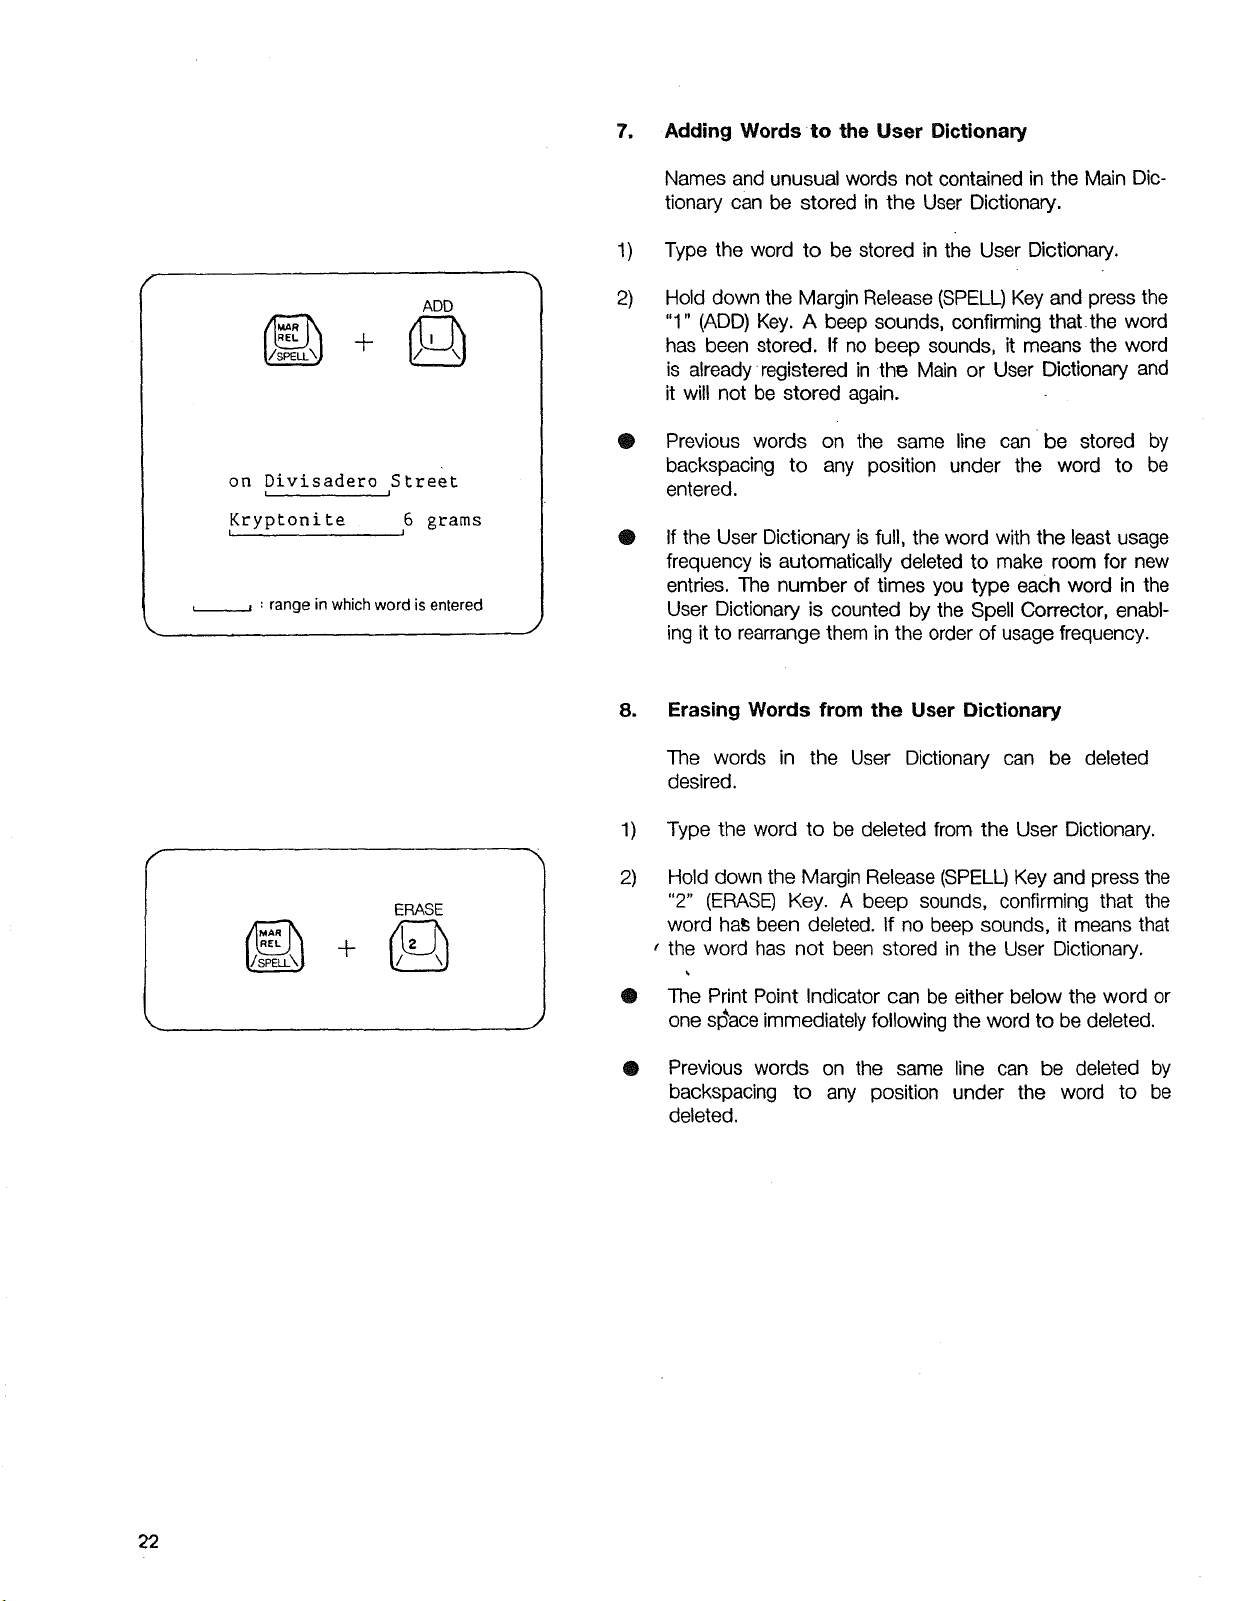
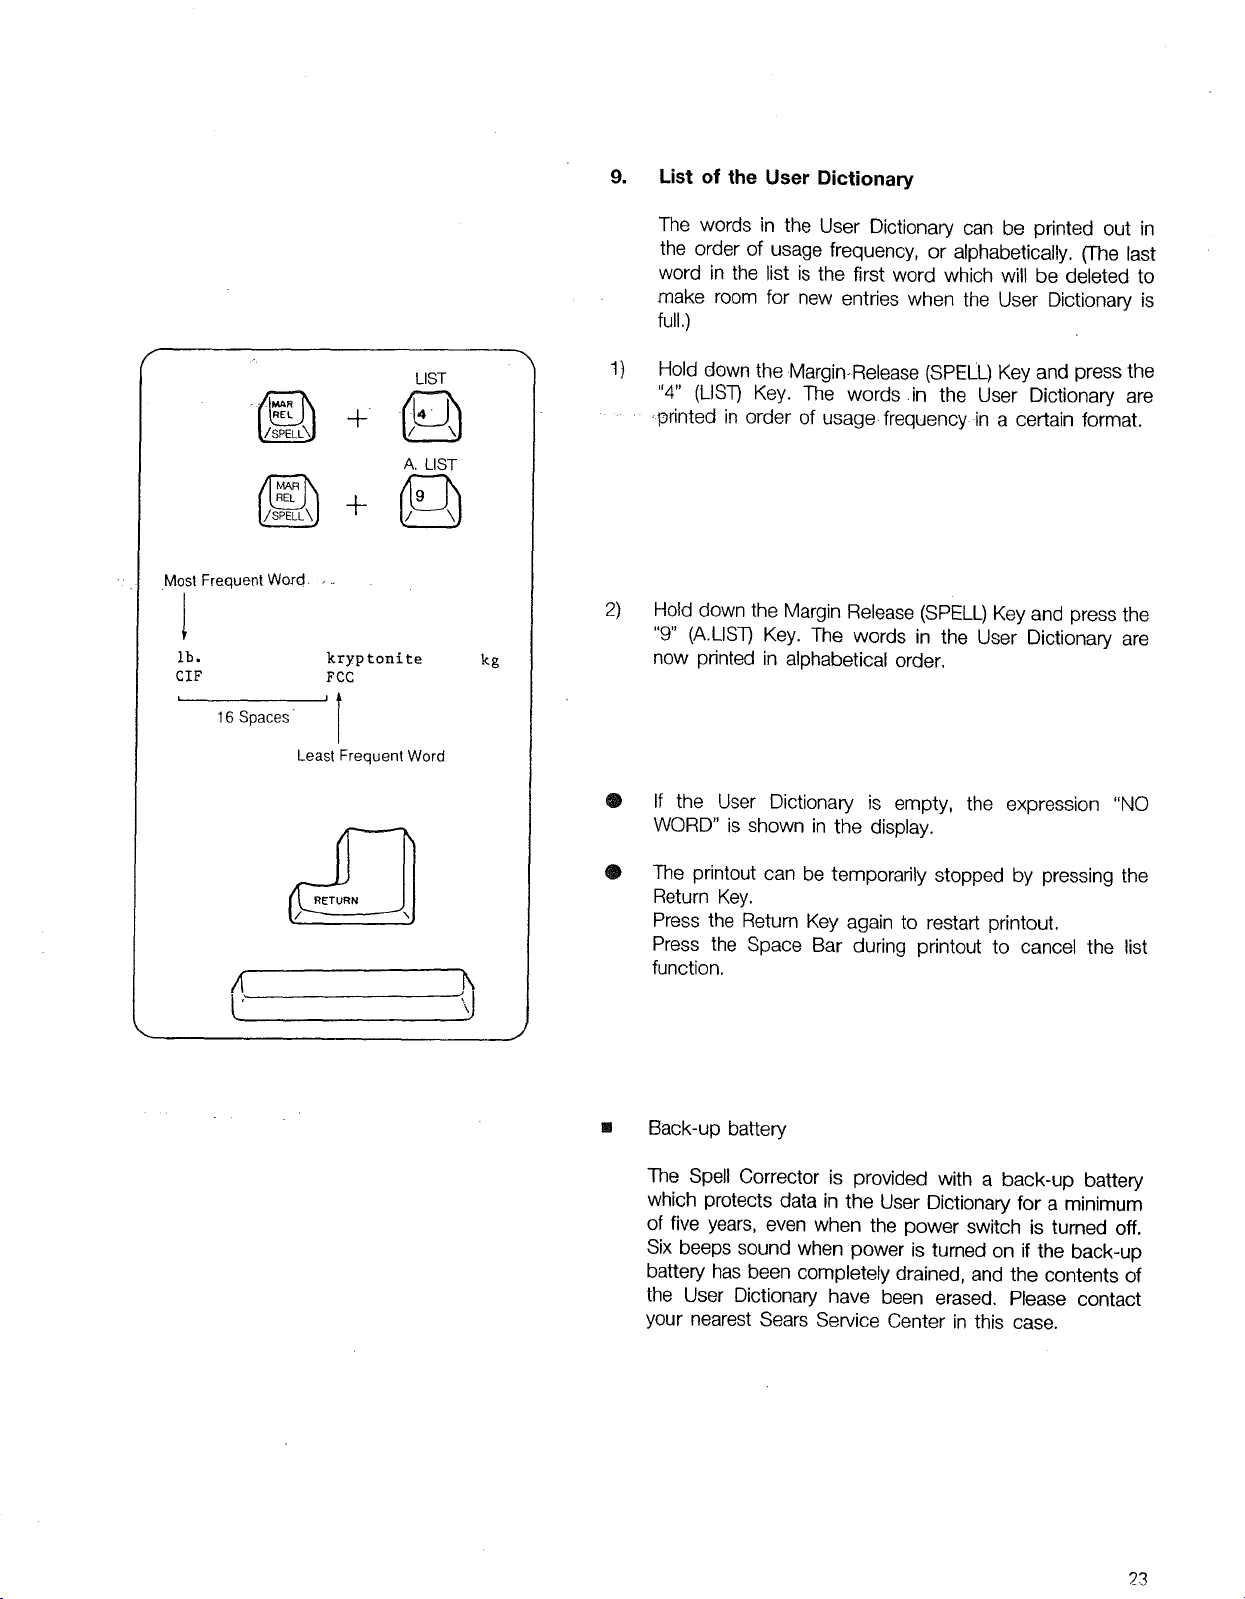
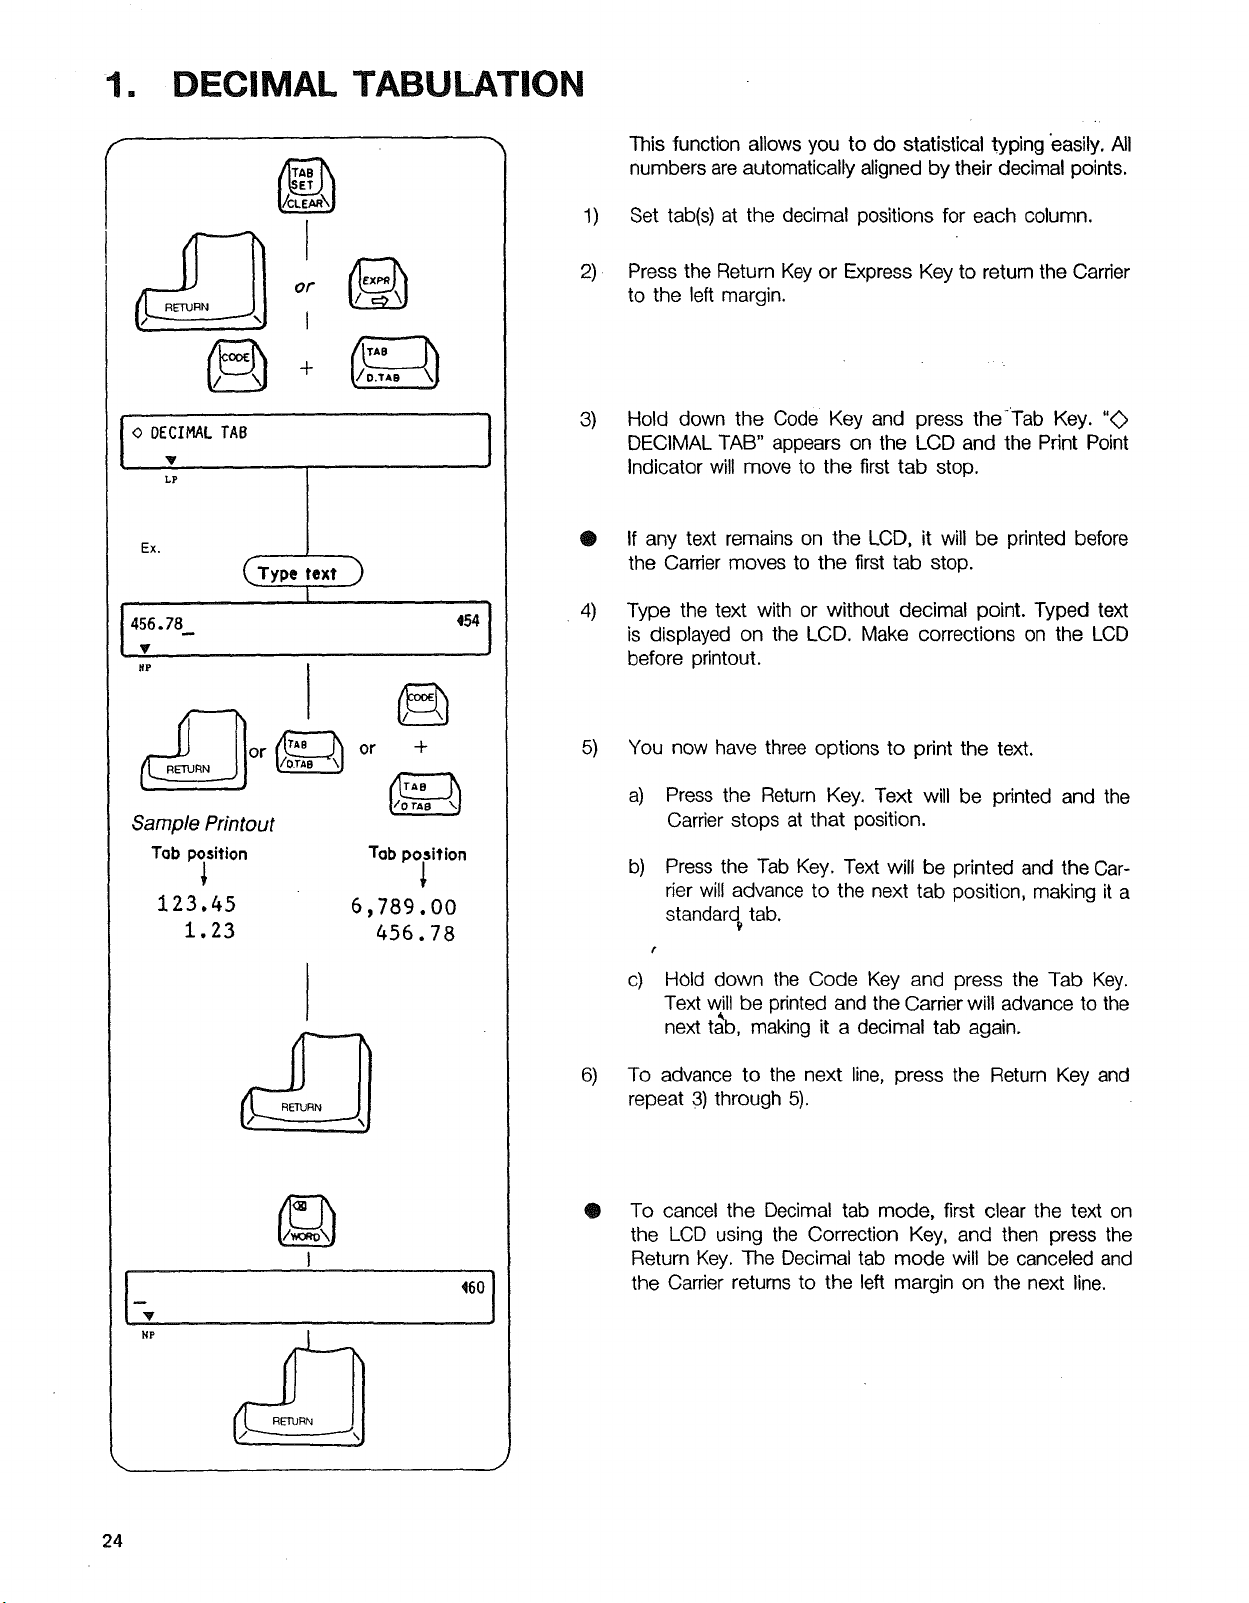
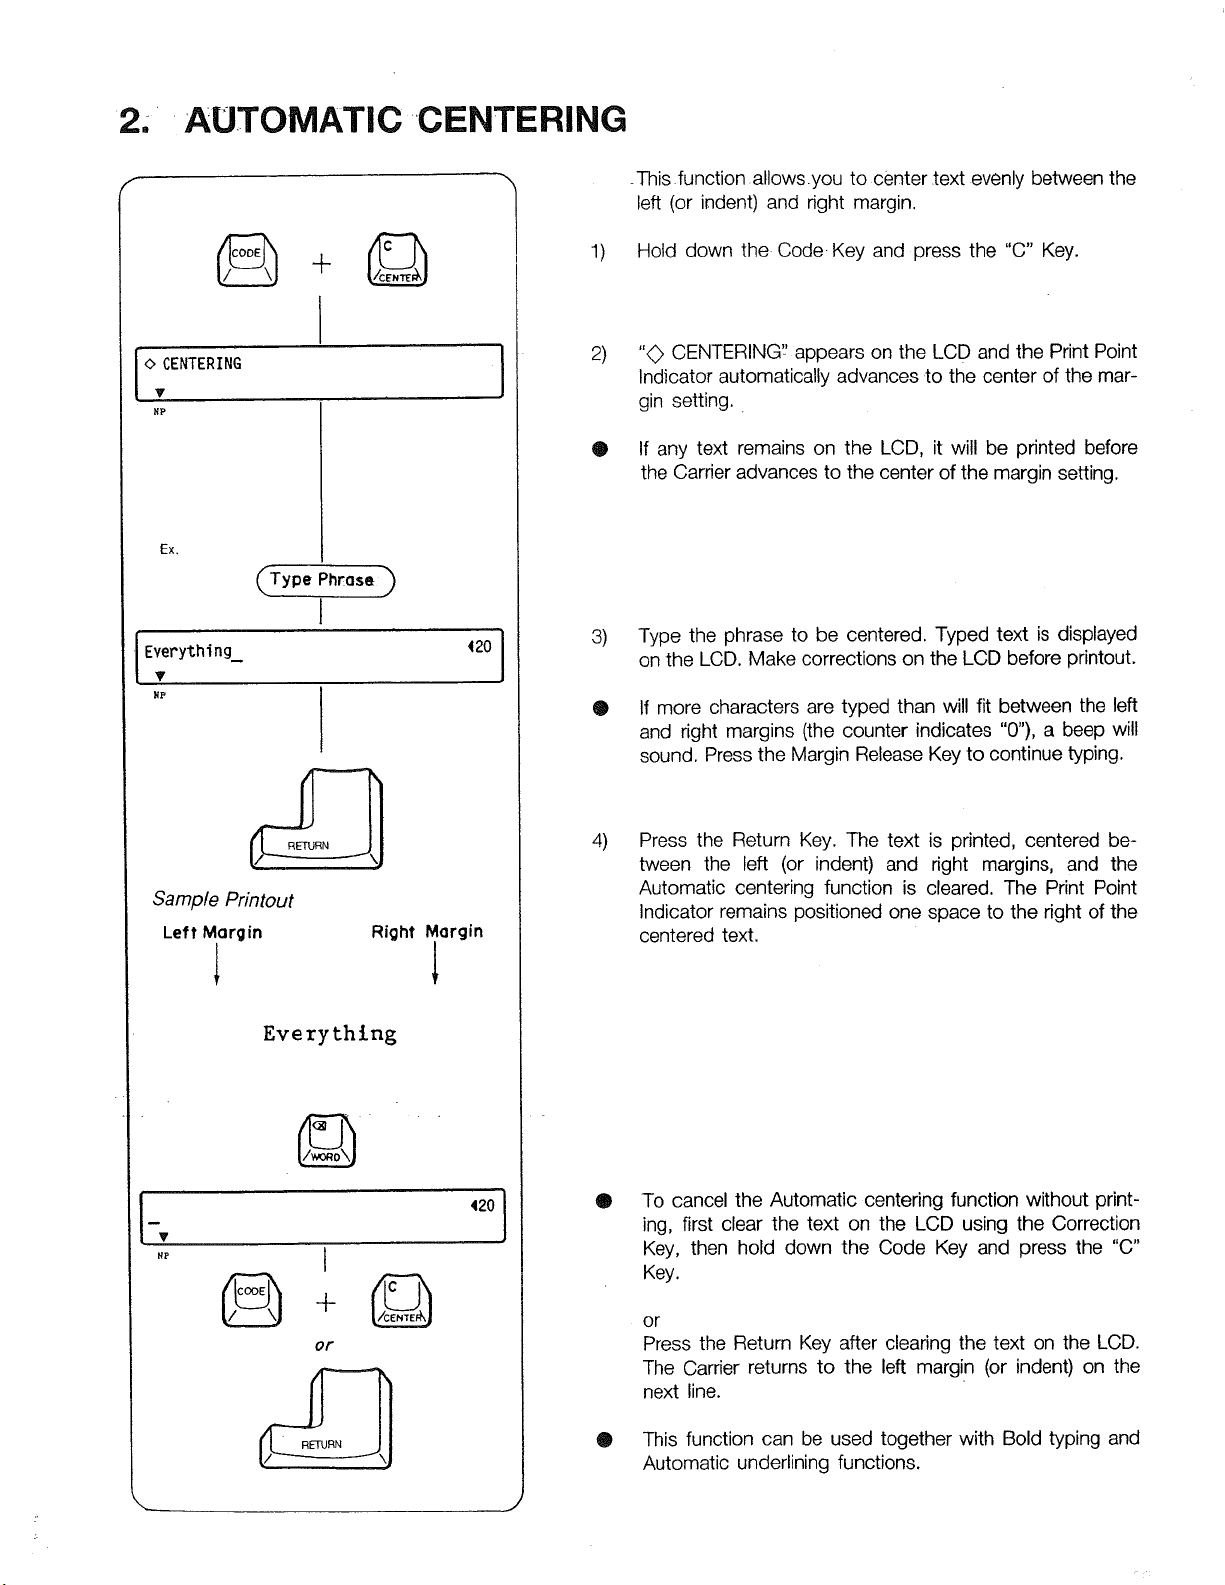


 Loading...