

Air belt sAnder 10 x 330mm
IMPORTANT: PLEASE READ THESE INSTRUCTIONS CAREFULLY. NOTE THE SAFE OPERATIONAL REQUIREMENTS, WARNINGS & CAUTIONS. USE
THE PRODUCT CORRECTLY AND WITH CARE FOR THE PURPOSE FOR WHICH IT IS INTENDED. FAILURE TO DO SO MAY CAUSE DAMAGE AND/OR
PERSONAL INJURY AND WILL INVALIDATE THE WARRANTY. KEEP THESE INSTRUCTIONS SAFE FOR FUTURE USE.
Model no: s01046.V2
thank you for purchasing a sealey product. manufactured to a high standard, this product will, if used according to these
instructions, and properly maintained, give you years of trouble free performance.
Refer to
instructions
Wear eye
protection
Wear ear
protection
Wear protective
gloves
Wear a mask
Warning
1. sAfety
1.1. General safety
WArninG! ensure Health & Safety, local authority, and general workshop practice regulations are adhered to when using this
equipment.
WArninG! disconnect from air supply before changing accessories or servicing.
9 Maintain the sander in good condition (use an authorised service agent).
9 Replace or repair damaged parts. Use genuine parts only. Unauthorised parts may be dangerous and will invalidate the warranty.
9 Use in suitable clean and tidy working area, free from unrelated materials and ensure there is adequate lighting.
9 Before each use check abrasive belt for condition. If worn or damaged replace immediately.
9 Use only the correct size and type of sanding belt with this sander.
9 ensure there are no flammable or combustible materials near the work area.
WArninG! Always wear approved eye or face and hand protection when operating the sander.
9 Use face, dust, or respiratory protection in accordance with CoSHH regulations.
9 depending on the task, sander noise level may exceed 85dB, in which case wear safety ear defenders.
9 Remove ill fitting clothing. Remove ties, watches, rings, other loose jewellery and contain and/or tie back long hair.
9 Wear appropriate protective clothing and keep hands and body clear of working parts.
9 Maintain correct balance and footing. ensure the floor is not slippery and wear non-slip shoes.
9 Keep children and unauthorised persons away from the work area.
9 Check moving parts alignment on a regular basis.
9 ensure work piece is secure before operating the sander. never hold a work piece by hand.
9 Check the work piece to ensure there are no protruding screws, bolts, nuts, nails, rivets, etc.
9 Avoid unintentional starting.
WArninG! ensure correct air pressure is maintained and not exceeded. Recommended pressure 70-90psi.
9 Keep air hose away from heat, oil and sharp edges. Check air hose for wear before each use and ensure that all connections are
secure.
9 Prolonged exposure to vibration from this sander poses a health risk. It is the owner’s responsibility to correctly assess the potential
hazard and issue guidelines for safe periods of use and offer suitable protective equipment.
8 dO nOt use the sander for a task it is not designed to perform.
8 dO nOt operate sander if any parts are damaged or missing as this may cause failure and/or personal injury.
WArninG! dO nOt sand any materials containing asbestos.
8 dO nOt carry the sander by the hose, or yank the hose from the air supply.
8 dO nOt force, or apply heavy pressure to, the sander, let the sander do the work.
8 dO nOt switch the sander on whilst the belt is in contact with the work piece.
8 dO nOt operate sander when you are tired or under the influence of alcohol, drugs or intoxicating medication.
8 dO nOt use sander where there are flammable liquids, solids or gases such as paint solvents and including waste wiping or cleaning
rags etc.
8 dO nOt carry the sander with your finger on the power lever.
8 dO nOt direct air from the air hose at yourself or others.
9 When not in use disconnect from air supply and store in a safe, dry, childproof location.
WArninG! leAd PAint
Paint once contained lead as a traditional ingredient. The dust from the removal of such paint is toxic if ingested/inhaled and must,
be avoided. The following actions must be taken before using the sander on a surface that you suspect may contain lead paint.
User must determine potential hazard relating to age of paint to be removed (Modern paints do not have lead content).
▲ dAnGer! Keep all persons and pets away from the work area. The following persons are particularly vulnerable to the effects of
lead paint dust: expectant women, babies and children.
We recommend personal protection by using the following safety items:
a) Paint Spray Respirator (Sealey ref. SSP1699)
b) Pe Coated Hooded Coverall (Sealey ref.SSP265-l).
c) latex Gloves (Sealey ref.SSP24).
Take adequate measures to contain the paint dust, flakes and scrapings.
Continue to wear safety equipment as in (3) above and thoroughly clean all areas when task is complete. ensure paint waste is
disposed of in sealed bags or containers and according to local Authority guidelines.
© Jack Sealey limited
Original Language Version
S01046.V2 Issue 1 06/07/18
2. intrOductiOn
Aluminium housing with articulated sanding arm. Features belt tracking control, heavy-duty nose roller and one-handed trigger operation.
Suitable for sanding otherwise inaccessible areas such as around door-shuts. Supplied with three belts. Ideal for the dIY enthusiast and light
garage use. Replacement belts readily available.
3. sPecificAtiOn
Model no: ...................................................................S01046
Belt Size(s): ........................................................ 10 x 330mm
Free Speed: ...........................................................15700rpm
Air Consumption:............................................................7cfm
operating Pressure: ...................................................... 90psi
Inlet Size: ..................................................................1/4”BSP
nett Weight: ..................................................................0.8kg
noise Power/Pressure: ..................................90.4/79.4dB(A)
Vibration/Uncertainty: .........................................1.1/0.13m/s²
4. PrePArAtiOn fOr use
4.1. Unpack the product and check contents against the parts listed below. If there is anything damaged or missing contact your supplier
immediately. Contents: a) S01046.V2 Belt Sander.
b) 4 x Sanding Belt
c) 2 x Hex Key
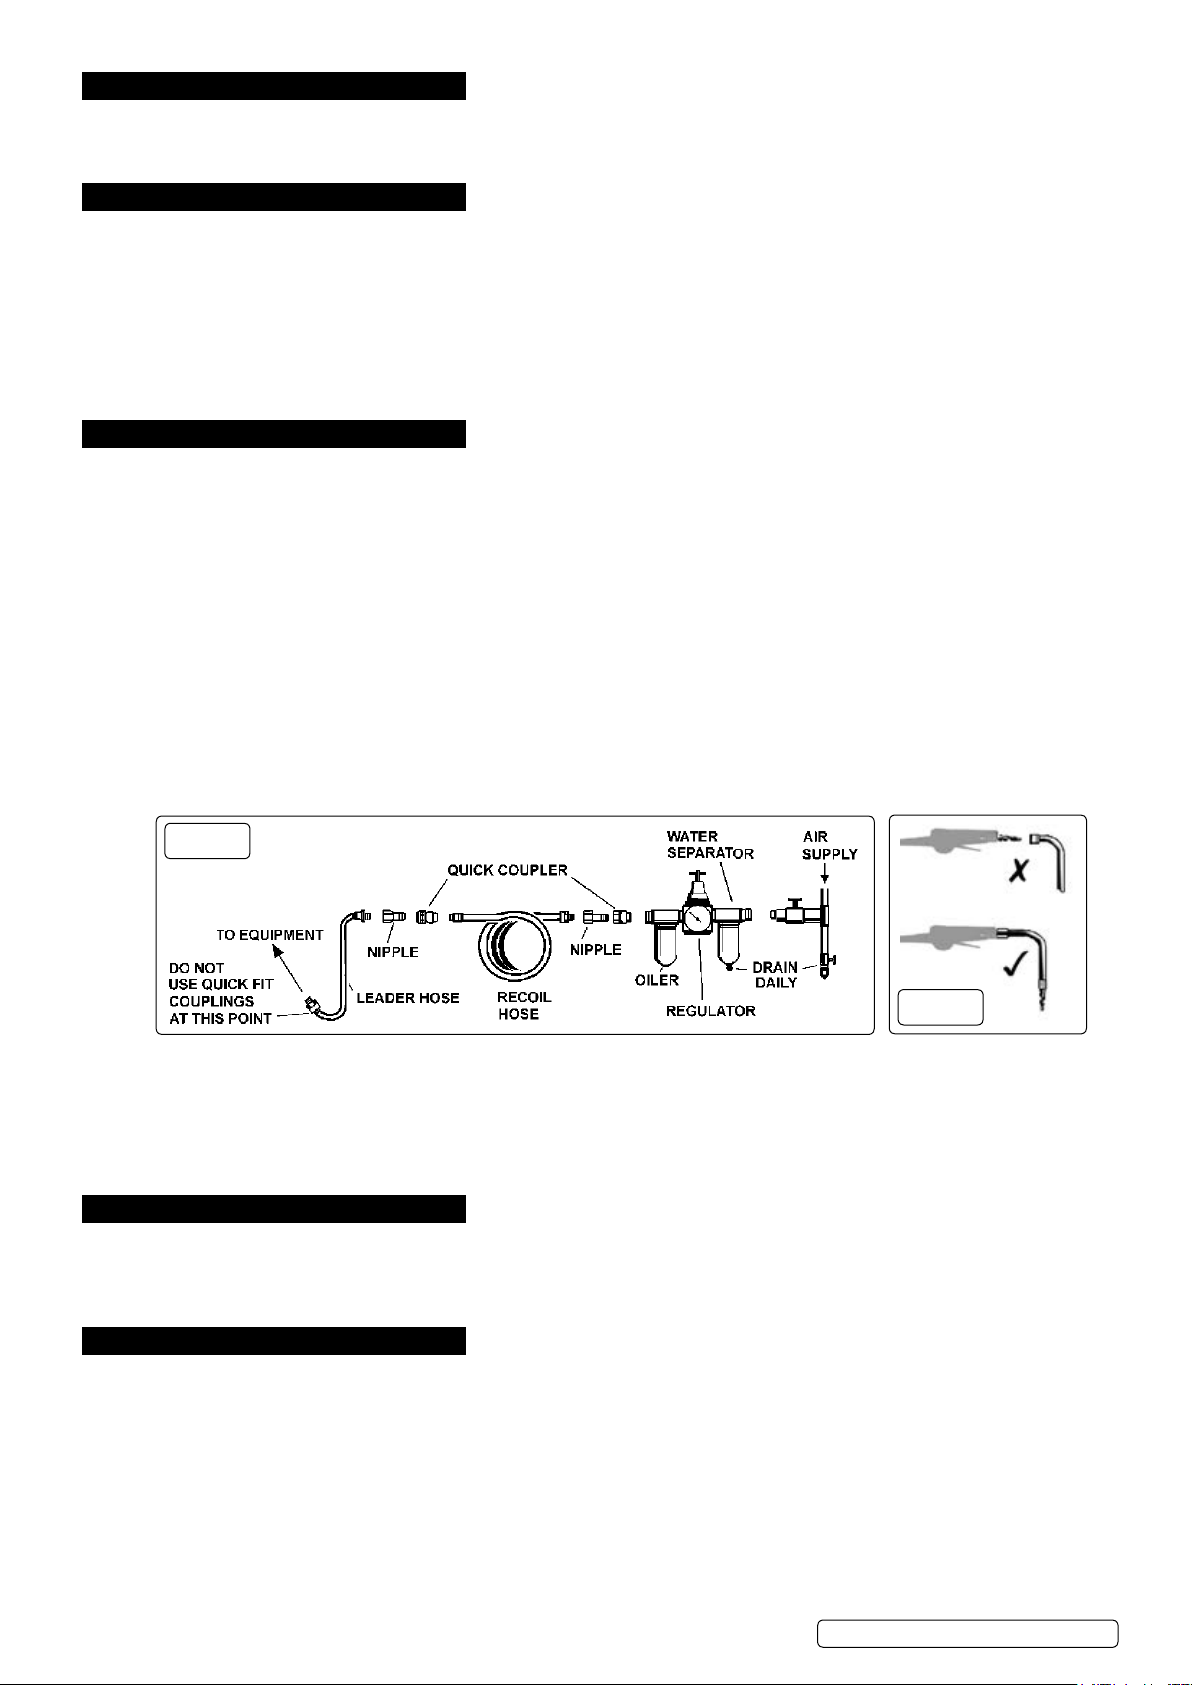
4.2. Air supply recommended hook-up is shown in fig.1.
4.2.1. ensure the sander air valve (or throttle) is in the “off” position before connecting to the air supply.
4.2.2. You will require an air pressure between 70-90psi, and an air flow of 7cfm.
WArninG! ensure the air supply is clean and does not exceed 90psi. Too high an air pressure and unclean air will shorten the
product life due to excessive wear, and may be dangerous causing damage and/or personal injury.
4.2.3. drain the air tank daily. Water in the air line will damage the sander and will invalidate your warranty.
4.2.4. Clean air filter weekly.
4.2.5. line pressure should be increased to compensate for unusually long air hoses (over 8 metres).
4.2.6. The minimum hose size should be 1/4”. I.d. and fittings must have the same inside dimensions.
4.2.7. Keep hoses away from heat, oil and sharp edges. Check hoses for wear, and make certain that all connections are secure.
4.3. couplings.
Vibration may cause failure if a quick change coupling is connected directly to the air sander. To overcome this, connect a leader
hose to the sander. A quick change coupling may then be used to connect the leader hose to the air line recoil hose. See figs.1 & 2.
g.1
g.2
4.4. belt Preparation
Toensurefullexibility,andtoprolongworkinglife,thebeltmustbe“beddedin”,ref(4.5.2).
4.4.1. Fit new belt ensuring the direction of travel is correct, and the belt join is nOt on the nose roller.
4.5. tension belt.
4.5.1. operate the tool without a load applied at half speed for around 10 seconds, then increase to full speed for a further 10 seconds.
4.5.2. Finally, at a slow operating speed, using a piece of scrap material, apply light pressure to the belt where it runs over the “shoe”.
Increase the operating speed steadily to maximum for a few seconds, then stop.
5. OPerAtiOn
WArninG! ensure that you have read and understood the safety instructions in Section 1.
5.1. loosening clamp bolt (fig.3.1. on the top of sander) allows the angle between the grip and the belt to be altered to suit the job in
hand. After adjustment tighten the clamp bolt.
5.2. once connected to the air supply the sander is started by squeezing the trigger (7).
6. remOVe And rePlAce belt
6.1. To remove and replace the sanding belt push the idle pulley (4) towards the drive pulley (6) against spring pressure. The pulley
bracket (3) will retract and lock allowing removal/fitting of the belt. When the new belt is in position release the pulley bracket
by pushing in and holding the idle pulley, then press and hold the tension bar (5) whilst releasing the pressure on the idle pulley.
6.2. The tracking of the belt can be altered by adjusted cross head screw (2).
© Jack Sealey limited
Original Language Version
S01046.V2 Issue 1 06/07/18
 Loading...