

Page 1

••••••••••••••••••••••••••
Hawk 4XL
••••••••••••••••••••••••••
Disc Drive
••••••••••••••••••••••••••
ST34555N/W
••••••••••••••••••••••••••
••••••••••••••••••••••••••
Installation Guide
••••••••••••••••••••••••••
Page 2

Contents
Preface.........................................................................................1
Electrostatic discharge protection................................................1
Important safety information and precautions..............................2
Wichtige Sicherheitshinweise ......................................................4
Regulatory agency compliance....................................................7
Seagate technical support services........ ................... .......... ........9
General descript ion............. .......... .............................................14
Initial setup information..............................................................18
Kühlung des Systems......... .......... ................... .......... .......... ......27
Installation des Laufwerkes
und Anschluß der Kabel.... ........... .......... .......... ................... ....29
N drives se c ti on ..... ... ................... .. .................... .. .................... ..36
W drives section.........................................................................40
©1997 Seagate Technology, Inc. All rights reserv ed
Publication Number: 77767507, Rev. A
October 1997
Seagate, Seagate Technology, and the Seagate logo are regis-
tered trademarks of Seagate Technology, Inc. Hawk, SeaFAX,
SeaFONE, SeaNET, SeaTDD, and SeaBOARD are either trademarks or registered trademarks of Seagate Technology, Inc. or
one of its subsidiaries. All other trademarks or registered trademarks are the proper ty of their respective owners.
No part of this publication may be reproduced in any form without
written permission from Seaga te Technology, Inc.
Page 3

Hawk 4XL Installation Guide, Rev. A 1
Preface
This manual contains information for users of the Seagate®
Hawk 4XL SCSI disc drives. It provides support services, perf ormance specifications, and initial setup information. Additional
information is available. Contact Seagate technical suppor t services as described in thi s ma nual if you need assistance.
Electrostatic discharge protection
Caution.
All drive electronic assemblies are sensitive to static electricity,
due to the electrostatically sensitive devices used within the
drive cir cuitry. Although some devices such as metal-oxide semiconductors are extremely sensitive, all semiconductors, as well
as some resistors and capacitors, ma y be dam aged or degraded
by expos ure to static el ectricity.
Electrostatic damage to electronic devices may be caused by the
direct discharge of a charged conductor or by exposure to the
static fields surrounding charged objects. To avoid damaging
drive electronic assemblies, observe the following precautions
when installing or servicing the drive:
• Ground yourself to the drive whenever the drive electronics
are or will be exposed. Connect yourself to ground with a wrist
strap (Seagate part number 12263496). Connection may be
made to any grounded metal assembly. As a general rule,
remember that you and the drive electronics must all be
grounded to avoid potentially damaging static discharges.
• Turn off the power before removing or installing the DC power
cable.
Removal of circuit boards by personnel not performing depot repair will damage components and may
void the warranty.
Page 4

2 Hawk 4XL Installation Guide, Rev. A
• Do not remove any circuit boards from the driv e.
• Never use an ohm meter on any circuit boards.
• When install ing the drive on a carrier or tray, discharge the ca rrier or tra y pri or to inserting it into th e system.
Important safety information and precautions
Caution.
Use proper safety techniques for safe, reliable operation of this
unit.
The procedures in this manual and labels on the unit contain
warnings and cautions that must be carefully read and followed
to minimize or eliminate the risk of personal injury. The warnings
point out conditions or practices that may endanger you or others. The cautions point out conditions or practices that may damage the unit, possibl y making it unsafe for use.
Always observe the following warnings and precautions:
• Follow al l cautions and warnin gs in the procedures.
• Use sound safety practices when operating, installing, or
removing the unit.
• Use caution when troubleshooting a unit that has voltages
present. Turn off power to the unit before removing it.
• Ensure that the internal temperature of the rack or cabinet
does not exceed the limits defined for the drive when the drive
is mounted in an equipment rack or cabinet. When units are
stacked vert ically, pay special attention to the top where temperatures are usu ally highest.
• Follow the precautions listed above in “Electrostatic discharge
protection.”
Use forced-air ventilation when bench-testing the
drive to ensure proper cooling of drive components.
Page 5

Hawk 4XL Installation Guide, Rev. A 3
• Do not remove any circuit boards from the drive. Return the
entire drive for depot repair if any circuit board is defective.
Removal of circuit boards by personnel not performing depot
repair will damage components and may voi d the warranty.
• Do not remove the head and disc assembly (HDA) from the
drive. Return the entire drive for depot repair if the HDA is
defective.
• Do not attempt to disassemble the HDA. It is not field repairable. If the sealed HD A is opened by personnel not performing
depot repair, this will damage components and void the
warranty.
As a component, this drive is designed to be installed and operated in accordance with UL1950, EN60950, CSA C22.2 950M89, and VDE0805.
Seagate takes all reasonable steps to ensure that its products
are certifiable to currently accepted standards. Typical applications of these disc dr ives include customer packaging and subsystem design. Safety agencies conditionally certify component
assemblies, such as the Hawk disc drive, based on their final
acceptability in the end-use product . The subsystem designers
are responsible for meeting these conditions of acceptabi lity in
obtaining safety-regulatory agency compliance in their end-use
products and for certifying where required by law. A necessary
part of meeting safety requirements is the provision for overcurrent protection on dri ve SELV supply v oltages.
This unit is a component part and as such is not meant to comply with FCC or similar national requirements as a stand-alone
unit. Engineering radiated emissions test results are available
through the Seagat e Safety Department to assi st the subsystem
designer.
Page 6

4 Hawk 4XL Installation Guide, Rev. A
Wichtige Sicherheitshinweise
Vorsicht.
Fremdbe lüftung vorzusehen, um eine ausreichende Kühlung der
Laufwerkkomponenten sicherzustellen.
Verwenden Sie geeignet e Sicherheits- um den sicheren, zuverlässigen Betrieb dieser Einheit zu gewährleisten.
Die Verfahren in diesem Handbuch und die Aufkleber auf dem
Gerät enthalten Warn- und Vorsichtshinweise. Diese Hinweise
sind sorgfältig durchzulesen und zu beachten, um das Risiko
von Verletzungen auf ein Mindestmaß zu beschränken oder
ganz zu vermeiden. Die War nhinweise machen auf Situationen
oder Praktiken aufmerksam, die Sie oder andere gefährden
könnten. Die Vorsichtshinweise machen auf Situationen oder
Praktiken aufmerksam, die Einheit beschädigen können, so daß
deren Gebrauch mit Ris iko behaftet ist.
Die Warn- und Vorsichtshinweise sind nicht allumfassend! Es ist
uns einfach nicht möglich, alle Wartungsmethoden oder die
even tuellen Risiken jeder Methode zu kennen, zu beurteilen und
Sie entsprechend zu beraten. Aus diesem Grund haben wir auf
eine derartige umfassende Beurt eilung verzichtet. Falls Sie ein
hier nicht beschriebenes Verfahren oder Werkzeug verwenden,
stellen Sie zuerst sicher, daß das gewählte Verfahren weder Ihre
persönliche Sicherheit noch die Leistung der Einheit gefährdet.
Beachten Sie in jedem Fall die folgenden Warn-und Vorsichtshinweise:
• Beachten Sie alle Warn- und Vorsichtshinweise in diesem
Beim Testen des Laufwerks auf dem Prüftisch ist
Handbuch.
Page 7

Hawk 4XL Installation Guide, Rev. A 5
• Treffen Sie beim Betrieb, bei der Installation oder bei der
Entfernung der Einheit angemessene Sicherheitsvorkehrungen.
• Wenn eine Einheit unter Spannung steht, gehen Sie bei der
Fehlerdiagnose besonders vorsichtig vor. Schalten Sie die
Einheit aus, be v or Sie mit den Instal lations- und Ent fe rnungsarbeiten beginnen.
• Wenn das Laufwerk in einem Einbaugestell oder Gehäuse
montiert ist, sorgen Sie dafür, daß die Tem peratur im Inneren
des Gestells oder Gehäuses die für das Laufwerk vorgegebenen Grenzwerte nicht übersteigt. Wenn Einheiten vertikal
übereinander betestigt werden, achten Sie besonders auf den
oberen Stapelbereich, da dort die Temperatur gewöhnlich am
höchsten ist.
• Befolgen Sie die oben unter “Electrostatic Discharge Protection” angegebenen Si cherheitsmaßnahmen.
• Nehmen Sie keine Platinen aus dem Laufwerk. Wenn eine
Platine defekt ist, muß das gesamte Laufwerk zur Reparatur
eingeschickt werden. Die Herausnahme von Platinen durch
andere Personen als di e für die werkseitige Reparatur zuständigen kann zu einer Beschädigung der Komponenten und
Erlöschen des G arantieanspruchs führen.
• Die vormontierte Kopf- und Festplatteneinheit (HDA) nicht aus
dem Laufwerk nehmen! Falls die HDA beschädigt ist, schicken
Sie das gesamte Laufwerk zur Reparatur ein.
• Die HDA ist ni cht vor Ort reparierbar und darf nicht auseinandergenommen werden! Öffnen der versiegelten HDA durch
andere Personen als di e für die werkseitige Reparatur zuständigen hat eine Beschädigung der Komponenten und
Erlöschen des Garantieanspruchs zur Folge.
Page 8

6 Hawk 4XL Installation Guide, Rev. A
Als Te ilkomponen te ist dieses La ufwer k für di e Installati on und
den Be trie b in Über eins timm ung m it U L 195 0, E N60 950 , CSA
C22.2 950-M89 und VDE0805 vorgesehen.
Seagate ist ständig bemüht, die Zulassungsfähigkeit von
Seagate- Produkte n im Rahm en der gege nwär tig gelten den
Standards zu gewährleisten. Zu den typisc hen Anwendungen
dieser Festplattenwerke zählen System einbau durch den
Kunden und die K onst rukti on v on Untersy stemen. Si cherhei tsbehörden gewähren ein e bedingt e Zulassung für K om ponenten wi e
das Hawk-Festplattenlaufwerk vorbehaltlich der endgültigen
Zulasssung im Endprodukt. Designer von Untersystemen sind
dafür verantwortlich, die Voraussetzungen für die Einhaltung
sicherheits- oder aufsichtsbehördlicher Vorschriften in ihren
Endprodukten und - falls gesetzlich vorgeschrieben - für die
Zulassung zu schaffen. Eine Grundvoraussetzung zur Einhaltung der Sich erhei tsanfo rderu ng en ist die Be reits tell ung e ine s
Überlastschutzes für die SELV-Versorgungsspannungen des
Laufwerks.
Dieses Gerät ist eine Baugruppe und unterliegt als solche nicht
den Anforderungen der FCC oder ähnlicher nationale r Behörden
für eigenstän dige Geräte. Technische Testerge bnisse zu elektromagnetische Strahlung sind für Designer von Untersystemen auf
Anfrage von der Seagate-Sicherhei tsabteil ung erhältlic h.
Page 9

Hawk 4XL Installation Guide, Rev. A 7
Regulatory agency compliance
Elec tromagnetic s uscept ibility
As a component assembly, the drive is not required to meet any
susceptibility performance r equirements. It is the responsib il ity of
those integrating the drive wi thin their systems to perform those
tests required and desi gn their system to ensure that equipment
operating in the same sys tem as the dri ve or ext e rnal to the system does not adversely affect the perfor mance of the drive. See
Tables 2, DC power requirement s.
Elec tromagnetic c ompli an c e
Seagate uses an independent laboratory to confirm compliance
to the directives/standard(s) for CE Marking and C-Tick Mark ing.
The drive was tested in a representative system for typical applications. The selected system represents the most popular characteristics for test platforms. The system config urations include:
• 486, Pentium, and PowerPC microprocessors
• 3.5-inch floppy disc drive
• Keyboard
• Monitor/display
•Printer
• External modem
• Mouse
Although the test system with this Seagat e model complies to
the directives/standard(s), we cannot guarantee that all systems
will comply. The computer manufacturer or system integrator
shall confirm EMC compliance and provide CE Marking and CTick Marking for their product.
Page 10

8 Hawk 4XL Installation Guide, Rev. A
Electromagnetic compliance for the European Union
If this model has the CE Marking it complies with t he European
Union requirements of the Electromagnetic Compatibility Di rective 89/ 336/EEC of 03 May 1989 as amended by Directive 92/31/
EEC of 28 April 1992 and Directive 93/68/EEC of 22 July 1993.
Australian C-Tick
If this model has the C-Tick Marking it complies with the Australia/New Zealand Standard AS/NZS3548 1995 and meets the
Electromagnetic Compatibility (EMC) Framework requirements
of Australia’s Spectrum Management Agency (SMA).
Page 11

Hawk 4XL Installation Guide, Rev. A 9
Seagate technical support services
If you need assistance install ing your drive, consult your dealer.
Dealers are familiar with their unique system configurations and
can help you with system conflicts and other technical issues. If
you need additio nal assi stance wit h your Seagate
Seagate products, use one of the Seagate technical support services listed below.
SeaFONE® 1-800-SEAGATE
Seagate’s 800 number (1-800-732-4283) allows toll-free access
to automated self-help services, providing answers to commonly
asked questions, troubleshooting tips, and specifications for disc
drives and t ape drives. This service is available 24 hours daily
and requires a touch-tone phone. International callers can reach
this automated self-help service by dialing 408-456-4496.
Online service s
Using a modem, you can obtain troubleshooting tips, free utility
programs, drive specifications and jumper settings for Seagate’s
entire product line. You can also download software for installing
and analyzing your drive.
SeaNET™
You can obtain technical information about Seagate products
over the Int ern et fr om S eagat e’s World Wide Web ho me p age
(http://www.seagate.com)
ftp.seagate.com)
DiscSupport @ Seagate.com
to
Seagate.com
. You can also send E-mail with your questions
.
or Seagate’s ftp server
or
®
drive or other
(ftp://
TapeSupport @
Page 12

10 Hawk 4XL Installat ion Guide, Rev. A
Seag a te Comp uSer ve fo r um
Online technical support for Seagate products is available on
CompuServe. To access our technical support forum, type
seagate
. This f orum provi des information sim il ar to that found on
go
SeaBOARD. In addition, you can type questions or browse
through previous questions and answers on the forum messages.
SeaBOARD®
SeaBOARD is a computer bulletin board system that contains
information about Seagate disc and tape drive products and is
available 24 hours daily. Set your communications software to
eight data bits, no parity, and one stop bit (8-N-1).
Location Phone number
Austral ia 61-2-9756-235 9
England 44-1628-478011
Fra nce 33 1-48 25 35 95
Germany 49-89-140-9331
Taiwan 886-2-719-6075
Thailand 662-531-8111
USA Disc: 405-936-1600; Tape: 405-936-1630
Page 13

Hawk 4XL Installation Guide, Rev. A 11
FAX services
SeaFAX®
You can use a touch-tone telephone to access Seagate’s automated FAX system to receive technical support information by
return FAX. This service is available 24 hours daily.
Location Phone number
Austral ia 61-2-9756-517 0
England 44-1628-894084
USA Disc: 405-936-1620; Tape: 405-936-1640
Seagate technical support FAX
You can FAX questions or comments to technical support specialists 24 hours daily. Responses are sent during business
hours.
Location Phone number
Austral ia 61-2-9725-405 2
England 44-1628-890660
Fra nce 33 1-46 04 42 50
Germany 49-89-1430-5100
Hong Kong 852-2368 7173
Japan 81-3-5462-2979
Korea 82-2-556-7294/4251
Singapore 65-488-7528
Taiwan 886-2-715-2923
USA Disc: 405-936-1685; Tape: 405-936-1683
Page 14

12 Hawk 4XL Installat ion Guide, Rev. A
Direct-support serv ices
Seagate technical support
For one-on-one help , you can talk to a technical support specialist during local business hours. Before cal ling, note your system
configuration and drive model number (ST
Location Phone number
Australi a 61-2-9725-3366 (9:00
England 44-1628-894083 (10:00
2:00
P.M
.
to 5:00
P.M
Fra nce 33 1-41 86 10 86 (9:30
2:00
P.M
.
to 5:00
P.M
Germany Disc: 49-89-140-9332; Tape: 49-89-140-9333
(9:30
A.M
.
to 12:30
P.M
M–F)
Hong Kong 852-2368 9918
Korea 82-2-556-8241
Singapore 65-488-7584 (9: 00
P.M
to 5:00
.
A.M
, M–F)
Taiwan 886-2-514-2237
USA Please dial 1-800-SEAGATE or 408-456-4496
for the specific product telephone number.
(8:00
A.M
.
to 1:15
P.M
Central time, M– F)
SeaTDD™ 405-936-1687
Using a telecommunications device for the deaf (TDD), you can
send questions or comments 24 hours daily and exchange messages with a t echnical support specialist between 8:00
P.M
1:15
. and 2:30 P.M. to 7:00
through Friday.
xxxx
).
A.M
.
to 5:00
A.M
.
, M–F)
A.M
.
.
, M–F)
.
, 2:00
.
to 12:00
.
, 2:30
P.M
.
(Central time) Monday
P.M
.
to 1:00
to 12:30
P.M
.
to 4:00
P.M
P.M
.
to 7:00
.
, M–F)
P.M
P.M
.
, 2:00
.
.
,
,
P.M
P.M
P.M
A.M
.
,
.
.
,
.
to
Page 15

Hawk 4XL Installation Guide, Rev. A 13
Customer service centers
Seagate direct OEM, Distribution, and Systems Integrator customers should contact their Seagate ser vice representative for
warranty informati on. Other customers should contact their place
of purchase. Seagate offers comprehensive customer support
for all Seaga te drives. These services are available worldwide.
Location Phone number FAX number
Asia Pacific and Austral ia 65-485-3595 65-485-4980
Europe, Middle East,
and Africa 31-2031-67300 31-2065-34320
Japan 81-3-5462-2904 81-3-5462-2979
USA 1-800-468-3472 405-949-6740
Other Americas (Brazil,
Canada, Mexico) 405-949-6706 405-949-6738
Manufac turer’s representatives
Brazil
MA Informatica 55-11-810-7794 55-21-253-6467
Canada
Memofix
Adtech
Mexico
Abicom Seamax
SA DE CV 525-546-6965 525-546-4888
905-660-4936
905-812-8099
1-800-624-9857
905-660-8738
905-812-7807
Page 16
14 Hawk 4XL Installat ion Guide, Rev. A
General description
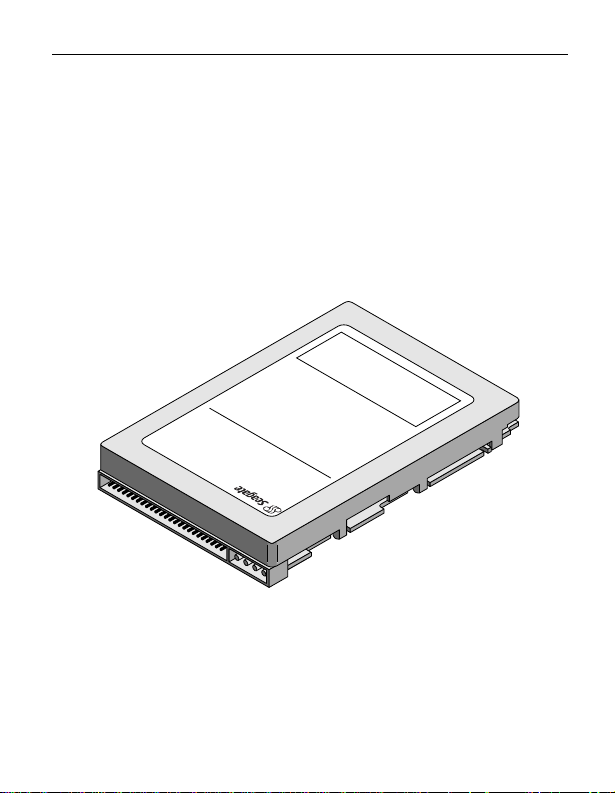
Hawk 4XL SCSI disc drives are high-speed, random-access digital-data storage devices.
The drive is a component for installation in an enclosure
designed for the drive. This is often a rack within the system or
an external enclosure designed to house one or more dis c dri ves
or other per ipheral uni ts. In e ither case, the disc drive must
receive adequate cooling (refer to “Providing adequate cooling”)
and it must be sufficiently grounded and shielded from emissions.
*
*Model “N” version with 50-pin SCSI I /O connector
Figure 1. Hawk 4XL family drive
Page 17

Hawk 4XL Installation Guide, Rev. A 15
T able 1. Drive characteri stics
Interface Ultra S CSI [1]
Capacity
Formatted [2] 4.55 Gbyte
Unformatted 6.5 Gbyte
Recording
Cylinders (u ser) 6,311
Read/write data heads 8
Access time [3]
Average read 10.1 msec
Average write 11.2 msec
Disk rotation
RPM 7,200 r/min
Average latency 4.17 msec
Internal transfer ra te
(variabl e with zone) 92–140 Mbits/sec
Maximum synchron ous SCSI transfer rate
N model 20 Mbytes/sec
W model 40 Mbytes/sec
Multi-segment ed cache 480 Kbytes
[1] Ca n also be o perated according t o SCSI-1 and SCSI- 2 protocol s.
Referred to also as “SCSI Fast-20.”
[2] Standard factory units are formatted 512 data bytes per sector with
sparing equivalent to 118 spare sectors per six cylinder region.
Spares are located at the end of each sparing region.
[3] Includes controller overhead.
Page 18

16 Hawk 4XL Installat ion Guide, Rev. A
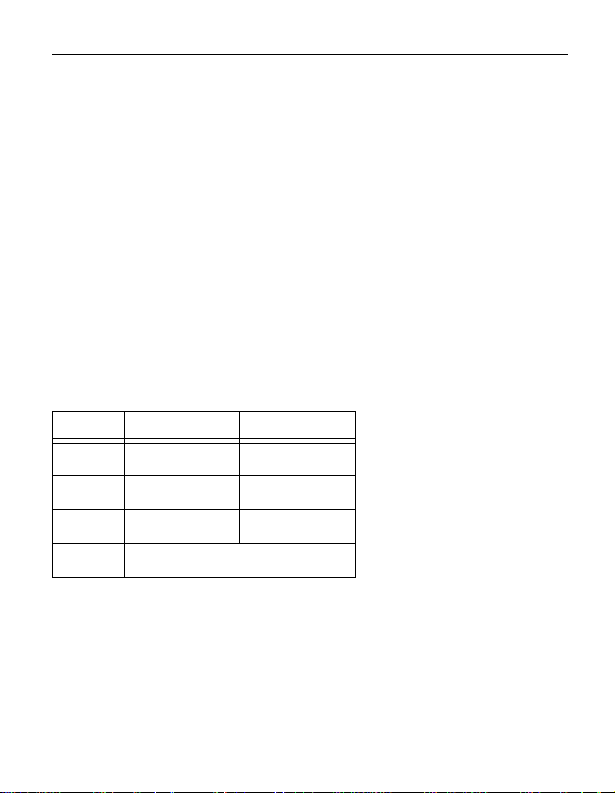
Table 2. DC power requirements (Amps)
ST34555N/W
Single-ended
Voltage +5V +12V
Regulation [5] ±5% ±5%[2]
Max. operating current
DC3σ [1] 0.81 0.95
Avg. idl e current DCX
[1] 0.46 0.54
Max. starting current
(peak DC) DC3σ [3]
(peak AC) AC3σ [3]
0.78 2.44
3.1
Delayed m otor start (max)
DC3σ [1][4] 0.48 0.20
Peak oper ating current
Typical DCX
Maximum DC3σ [1]
Maximum (peak) 3σ
[1][6]
0.75
0.81
1.5
0.76
0.95
2.5
[1] Measured with an average reading DC ammeter. Instanta-
neous +12V current peaks will exceed these values.
[2] A –10% droop is permissible during initial start of the spindle
but must return to ±5% before reaching 7,200 RPM. The
±5% must be maintained after the drive signifies that its
power-up sequence has been completed and that the drive is
able to accept sel ection by the host initiator.
[3] For +12V current profile information, call Seagate technical
support services.
[4] This condition occurs when the Motor Start option is enabled
and the drive has not yet received a Start Motor command.
Page 19
Hawk 4XL Installation Guide, Rev. A 17
[5] For conducted noise immunity information, call Seagate
technical sup port services. The spe cif ied voltage tolerance is
inclusive of ripple, noise, and transient response.
[6] Operating condition is defined as random seek read opera-
tions with a block count of 64.
General Notes fro m Table 2.
1. Minimum current loading for each supply voltage is not less
than 4% of the maximum operating current shown.
2. Use separate ground returns for +5V and +12V suppli es.
3. Where power is provided to multiple drives from a common
supply, carefully consider individual drive power requirements. Wher e m ultiple units are powered on simultaneously,
be sure the peak starting current is available to each device.
T able 3. Dimensions of the drive
inches mm
Height 1.00 25.4
Width 4.00 101.6
Depth 5.74 145.8
Weight 1.5 pounds (0.68 kilograms)
Page 20

18 Hawk 4XL Installat ion Guide, Rev. A
Initial setup information
The general information beginning on this page applies to all of
the Hawk 4XL drive models. Af ter reading the general information topics, refer to the appropriate drive-specific section listed
below for additional infor mation about configuring and installing
your particular model.
Drive models Page
ST34555N 36
ST34555W 40
Gene ral information
The follo w ing general information topics are discussed:
• SCSI ID jumpers
• Drive termination
• Terminator power
• Interf ace drivers and data path wi dth notes
• Other applicable jumper options
• Providing adequate cooling
• Mounting the drive and connecting cables
• Formatting the drive
Page 21

Hawk 4XL Installation Guide, Rev. A 19
SCSI ID jumpers
Each device on t he SCSI chain must have a unique SCSI ID.
The host system’s SCSI controller usually uses the ID that has
the highest priority interrupt in the SCSI I/O system. This is
always ID7. ID0 is lowest priority in an 8-bit I/O system. ID8 is
lowest priority in a 16-bit I/O system. The lower priority SCSI IDs
are normally used for other SCSI devices such as this Hawk disc
drive.
Note.
Most SCSI controllers (host adapters) allow you to skip a
SCSI ID. For example, you can have ID0, ID1, and ID3
(skipping ID2). Other controllers do not allow this so be
sure to refer to your system or controller user’s manual
for details about its requirements for proper SCSI devi ce
inst al la ti on.
Note.
This drive is a SCAM (SCSI Configured Auto Magically)
compliant drive. If the system into which you are installing
this drive requires SCAM compliant drives, you do not
need to be concerned about the drive ID jumper setti ngs,
as the system automatically assigns your new drive the
ID it wants it to have. The system may or may not use the
existing drive ID jumper settings. Setting the drive ID
doesn’t hurt anything, but is not necessary in a SCAM
compliant system.
Most Hawk disc drives are factory set with the SCSI ID set at 0.
To change the SCSI ID, refer t o the appropriate drive section for
your model.
If, after completing the installation process, the drive’s LED does
not show on/off activity when the host is trying to communicate
with the drive, a duplicate SCSI ID may be t he problem. If this is
Page 22

20 Hawk 4XL Installat ion Guide, Rev. A
the case, change the ID so that each device on the SCSI chain
has its own unique ID. Also check your system or controller
user’s manual to ensure that you have not violated its SCSI ID
numbering recommendations.
Drive termination
If you are installing a Hawk drive in a system that has other SCSI
devices installed, terminate only the end devices on the SCSI
chain. A SCSI “device” is any disc dr ive, scanner, tape backup
unit, or other piece of hardware connected to your system using
the SCSI bus.
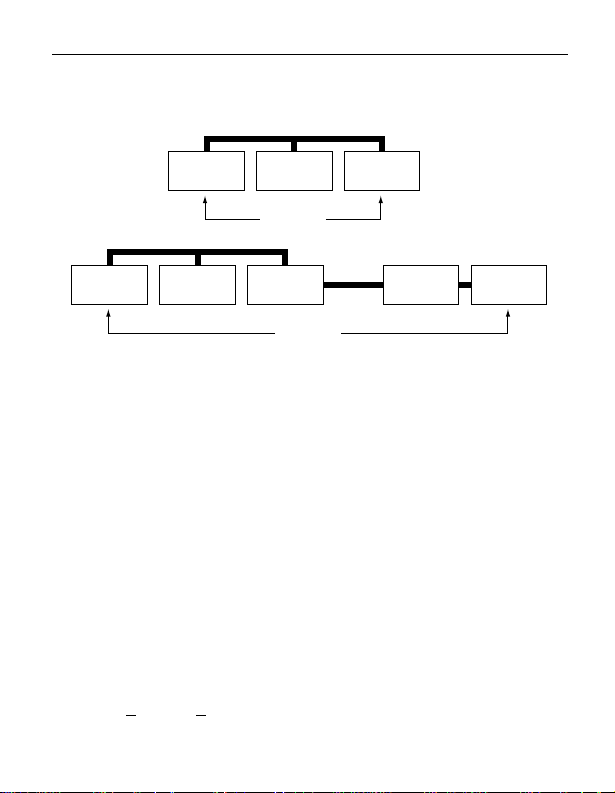
The top example in Figure 2 shows an internal hard disc at one
end of the SCSI bus with the SCSI controller at the other end
(both are terminated). The bottom example shows two additional
SCSI devices connected externally—this means the SCSI controller is no longer on the end of the SCSI chain and should not
be terminated.
Note.
Some controllers prefer to remain terminated even if they
are in the middle of the chain. Also, som e controllers treat
the internal and external chains as separate logical
buses. This means you may need to terminate both t he
first and last devices on both logical buses to achieve
proper termination. If necessary, refer to your system or
controller documentation to see how this is handled in
your particular system.
Page 23
Hawk 4XL Installation Guide, Rev. A 21
For information about how to terminate your drive, refer to the
appropriate drive-specif ic section.
Internal SCSI cable
Internal
SCSI device
Internal
SCSI device
Internal SCSI cable
Internal
SCSI device
Internal
SCSI device
Terminate
Controller
Terminate
Controller
External
SCSI
cable
External
SCSI device
External
SCSI device
Figure 2. SCSI bus termination
Terminator power
You usually will not need to change thi s option and can normally
leave the drive configured as it was shipped from the factory. For
information about how to change the terminator power option on
your drive, refer to the appropriate drive-specific section.
I/O circuits and dat a path widths
“W” models have a “wide” (16-bit) SCSI data bus rather than the
standard (non-wide) 8-bit SCSI data bus; however, you can use
these wide drives on a standard (non-wide) 8-bit data bus using
a terminated 68-pin to 50-pin SCSI cable.
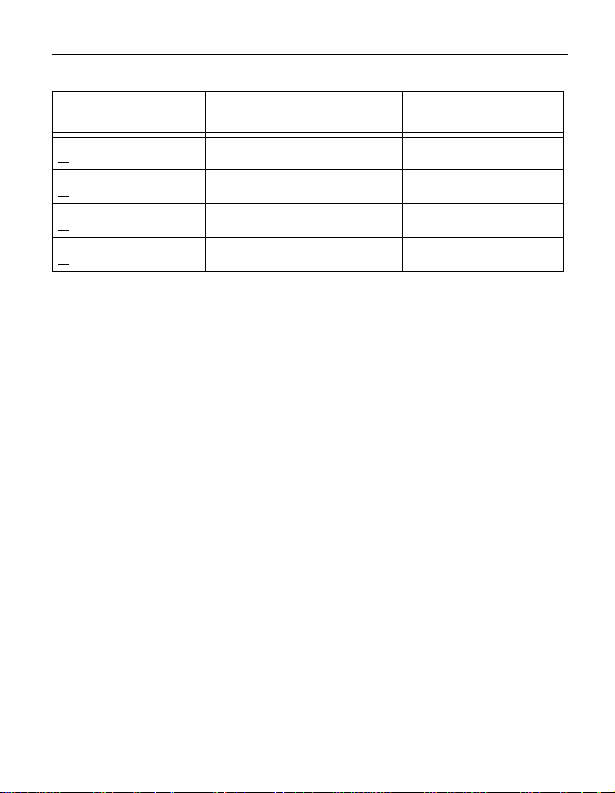
Figures 3a, 3b, 3c, and 3d show typical drive connections. The
followi ng table lists the maximum cable lengths and number of
devices with single-ended I/O circuits allowed on a daisy-chain
cable for <
10 and <20 M transfers/sec I/O data transfer rates.
Page 24
22 Hawk 4XL Installat ion Guide, Rev. A
Table 4. Cable characteristics for single-ended circuits
I/O transfer rate
Maximum number of
devices on line
Maximum cable
length allowed
<10 M transf ers/s 8 (reg. SCSI bus) 6 meters (19.7 ft.)
10 M transfers/s 16 (wide SCSI bus) 6 meters (19.7 ft.)
<
20 M transfers/s 4 (reg./wide SCSI bus) 3 meters (9.8 ft.)
<
20 M transfers/s 8 (reg./wide SCSI bus) 1.5 meters (4.9 ft.)
<
For devices having differential I/O circuits, a maximum cable
length of 25 meters (82 feet) is al lowed. A maximum of 8 devices
can be connected on an 8-bit wide data bus, and a maximum of
16 devices can be connected on a 16-bit wide data bus.
Page 25
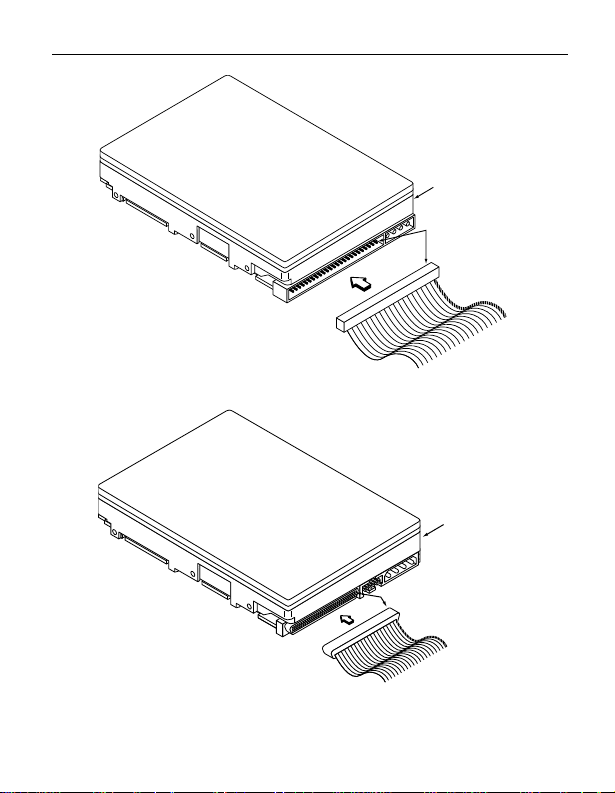
Hawk 4XL Installation Guide, Rev. A 23
HDA
Pin 1
Figure 3a. Fifty pin I/O connection to drive (“N” model)
HDA
Pin 1
Figure 3b. Sixty- eight pin connection to drive (“W” model)
Page 26
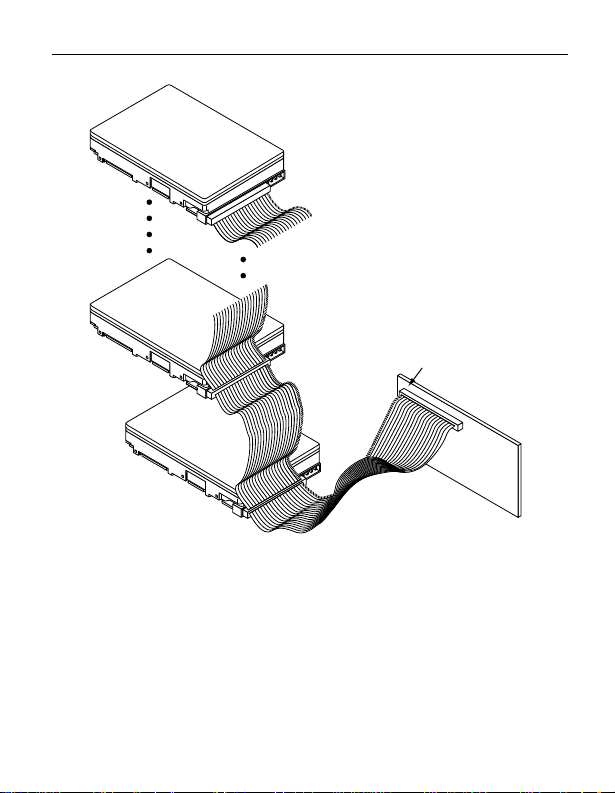
24 Hawk 4XL Installat ion Guide, Rev. A
“N” Model
Drive
SCSI ID X
(or last drive)
[1]
SCSI ID 1
SCSI ID 0
Additional
SCSI devices
Pin 1
(check your
adapter for Pin 1 location)
SCSI ID 7
Host
Adapter
PCB
[1] “X” means up to 6 or the maximum allowable number of devices on
the SCSI bus. See Table 4 and system documentation.
Figure 3c. Multiple drive conne cti on to host adapter
Page 27
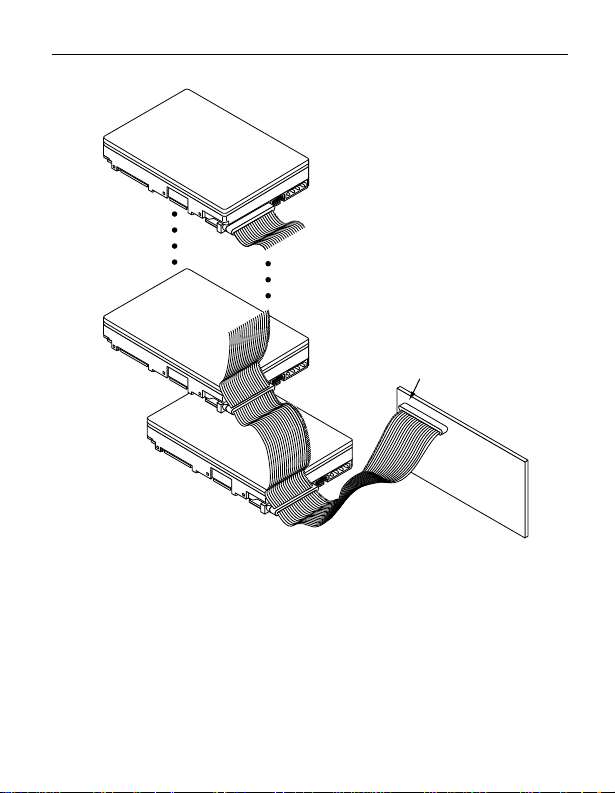
Hawk 4XL Installation Guide, Rev. A 25
“
W” Model
Drive
SCSI ID X
(or last drive)
[1]
Addition a l
SCSI devic es
SCSI ID 1
SCSI ID 0
adapter fo r Pin 1 locati o n)
Pin 1
(check you r
[1] “X” means up to 15 or the maximum allowable number of devices on
the SCSI bus. See Table 4 and system documentation.
Figure 3d. Multiple-drive connection to host adapt er
SCSI ID 7
Host
Adapter
PCB
Page 28

26 Hawk 4XL Installat ion Guide, Rev. A
Providing adequate cooling
The enclosure design must ensure adequate cooling for the
drive. The maxi mum ambient temperatur e is 50°C at drive location. Short-term excur sions up to this value are permitted, but for
maximum reliabi lity, the temperature should be kept 15°C below
this value.
We recommend ori enting the drive or directing the air flow in a
way that creates the least amount of air-flow resistance while
providing air flow above the circuit boards and around the head
and disc assembly (HDA). Also, choose the shortest possible
path between the air inlet and exit. This minimizes the distance
travel ed by air that is heated by the drive and by other nearby
heat sources.
Figure 4 shows two design approaches with one or more fans
used to generate air flow. The air-flow patterns can be created
by the fans either pushing or dra wing air. The overall flow pattern
can be directed from front to back, back to front, or side to side.
Page 29

Hawk 4XL Installation Guide, Rev. A 27
Kühlung des Systems
Die Gehäusekonstruktion muß eine aus reichende Kühlung de s
Laufwerkes ge währleis ten. Die Umgebun gstemper at ur darf maximal 50°C betragen.
Wir empfehlen, das Laufwerk so zu orientieren oder den Luftstrom so zu lenken, daß der geri ngste Luftstrom widerstand
erzeugt wird und gleichzeitig ein Luftstrom über den Platinen
und um die Kopf- und Festplatteneinheit (HDA) gegeben ist.
Wählen Sie einen möglichst kurzen Weg zwischen Lufteinlaß
und -auslaß. Dadurch wird die Strecke, die die vom Laufwerk
und anderen nahegelegenen Hitzequellen aufgewärmte Luft
zurücklegt, auf ein Minimum beschränkt.
Abbildun g 4 zeigt z wei Konstr uktion sm öglic hkeit en, bei d en en
ein oder mehrere Lüfter den Luftstrom erzeugen. Der Luftstromverlauf wird durch die Lüfter gesteuert, die entweder Luft einblasen oder ab ziehe n. Gene rell kan n der L uftstrom entwed er von
vorne nach hinten oder von hinten nach vor ne verlaufen.
Page 30
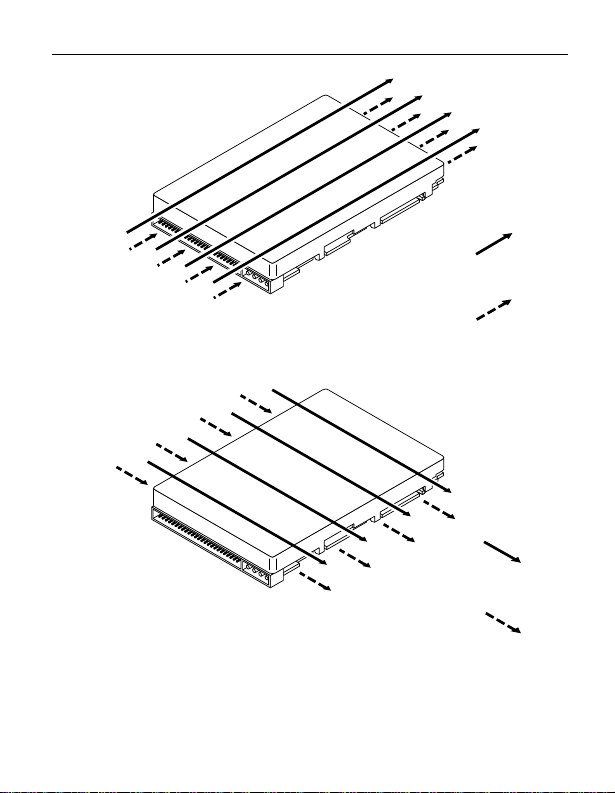
28 Hawk 4XL Installat ion Guide, Rev. A
g
)
.
Above unit
Über der Einheit
Note. Air flows in the direction shown (back to front)
or in reverse direction (front to back)
Hinweis. Luftstrom in der angezeigten Richtung
(von vorne nach hinten) oder in umgekehrter
Richtung (von hinten nach vorne)
Note. Air flows in the direction shown or
in reverse direction (side to side)
Hinweis. Luftstrom in der angezeigten Richtung oder in
um
ekehrter Richtung (von Seite zu Seite
Under unit
Unter der Einheit
Above unit
Über der Einheit
Under unit
Unter der Einheit
Figure 4. Suggested air flow
Abbildung 4. Empfohlener Luftstromverlauf
Page 31

Hawk 4XL Installation Guide, Rev. A 29
Mounting the drive and connecting cables
Do not touch the connector pins or any components on the control board without observing static-discharge precautions.
Always handle the drive by the frame only.
The drive may be mounted in any orientation (horizontally, vertically, and any combination thereof); however, you must ensure
that the drive receives adequate air flow for cooling.
1. Mount the dri ve to the host system’ s chassis using four 6-32
UNC screws. Two mounting holes are in each side of the
drive and there are four mounting holes in the bottom of the
drive.
The maximum length that the screws should extend into the
chassis mounting holes is 0.15 inch (3.81 mm), measured
from the outer surface of the chassis. Tighten the screws
down ev enly. Do n ot over-tighten or force the screw if it does
not seem to screw in easily, because this means the threads
are not properly aligned. In this case, back the screw out
and try again.
Installation des Laufwerkes
und Ansc hl uß der Kabel
Beachten Sie beim Handhaben und Anfassen der Anschlußst ifte
und Komponenten die Vorsichtsmaßnahmen zur Verhinderung
statischer Aufladung. Fassen Sie das Laufwerk nur am Rahmen
an.
Das Laufwerk kann in beliebiger Orientierung (horizontal, vertikal oder schräg) installiert werden; jedoch muß dafür gesorgt
werden, daß ein ausreichender Luftstrom zur Kühlung des Laufwerkes vorhanden ist.
Page 32

30 Hawk 4XL Installat ion Guide, Rev. A
1. Befestigen Sie das Laufwerk mit vier 6-32-UNC-Schrauben
am Gehäuse des Host- Systems. Die beiden Seiten de s
Laufwerkes sind mit jewei ls zwei Befestigungslöchern
versehen, die Unterseite des Laufwerkes weist vier weitere
Befestigungslöcher auf.
Gemessen von der Außenfläche de s Gehäuses dü rfen die
Schrauben maximal 3,81 mm in die Befestigungslöcher des
Gehüus es hinei nragen. D ie Sch rauben m üssen gleichmäßig, jedoch nicht zu fest , angezogen werden. Wenn sich
eine Schraube nicht ohne Widerstand einschrauben läßt,
sind die Gewinde nicht korrekt aneinander ausgerichtet. In
diesem Fall die Schraube nicht in das Gewindeloch
forcieren, sondern die Schraube herausnehmen und erneut
in das Gewindeloch einführen.
2. Verify that all connections between the drive and the host
system are correctly installed.
2. Prüfen Sie, ob alle Verbindungen zwischen dem Laufwerk
und dem Host-System korrekt hergestellt sind.
3. Verify that you have correctly installed jumpers.
3. Stellen Sie sicher, daß die Kennungsbrücken instal liert sind.
4. Connect the SCSI cable into the drive’s SCSI connector.
Take care not to st retch or crimp thi s cable, and do not block
the system’s cooling air flow with the cable.
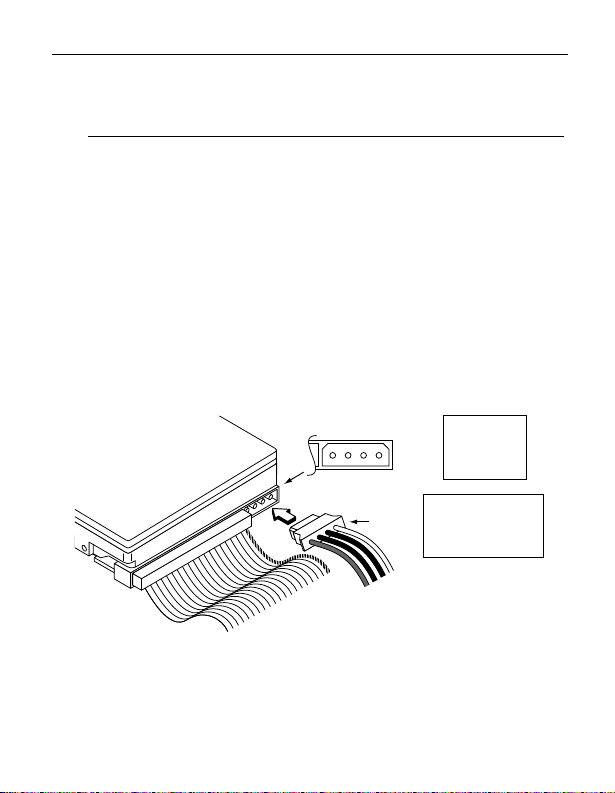
The drive receives DC power through a 4-pin connector
mounted next to the SCSI connector. The output of a power
supply must meet SELV (safety extra low voltage) as
defined in IEC 950. Figure 5 pro vides the pin info rmation for
Page 33
Hawk 4XL Installation Guide, Rev. A 31
Power
Cable
the DC power connector. To connect the DC power cable to
the drive, simply insert the cable end into the drive’s DC
power connector.
4. Schli eßen Sie das SCSI-Kabel an den SCSI-Steckverbinder
des Laufw erkes an. D as Kabel da rf nicht gedehnt ode r
gedrückt werden und es darf den Luftstrom zur Kühlung des
Systems nicht behin dern.
Das Laufwerk wird über einen 4-poligen, neben dem SCSIAnschluß b efestigten S teckverbi nder m it Gleich strom versorgt. Der Ausgang eines Netzteils muß SELV (safety extra
low voltage) nach IEC 950 entspr echen. Abbil dung 5 zeigt
die Steckerbelegung für den Gleichstromanschluß. Zum
Anschluß des Gleichstromkabels an das Laufwerk das
Kabelende in den Gleichstromanschluß des Laufwerkes
stecken.
DC Power
Connector
4 3 2 1
Pin
Power
1
+12V
2
+12V ret
3
+ 5V ret
4
+ 5V
Pin
Gleichstrom
1
+12V
2
+12V Rückleitung
3
+ 5V Rückleitung
4
+ 5V
Figure 5. DC power connector
Abbildung 5. Gleichstromanschluß
Page 34

32 Hawk 4XL Installat ion Guide, Rev. A
Note. Signal ground on the power control board (PCB) and the
head and disc assembly ( H DA) are connected together in
this drive and you cannot separate them. The equipment
in which you have mounted the drive is connected
directly to the HDA and PCB without electrically isolating
shock mounts. Maximizing the conductive contact area
between HDA ground and system ground may reduce
radia ted emi s sions.
If you do not want the system chassis to be connected to
the HDA/PCB ground, you must provide a nonconductive
(electricall y is olating) method of mou nti ng the drive in th e
host system. This m ay increase radiated emissions and
is the system designer’s responsibility.
Hinweis:
Die Signalerd e auf der Strom regelu ngskar te (PC B) und
der Kopf- und Festplatteneinheit (HDA) sind in diesem
Laufwerk miteinander verbunden und können nicht
getrennt werden. Das Gerät, in das Sie das Laufwerk
eingebaut haben, ist ohne elektrisch isolierende
Stoßdämpfer direkt an die HDA un d PCB angeschlossen.
Die elektromagnetische Strahlung kann reduzi ert werden, indem Sie eine möglichst große leitende Kontakfläche zwischen der HDA-Erdung und der Systemerdung
vorsehen.
Wenn Sie das Systemgehäuse nicht an die HDA/PCBErdung anschließen wollen, müssen Sie das Laufwerk
auf nichtleitende Weise (galvanisch isoliert) im Host-System einb auen. Die d arau s u.U. resu ltiere nde ve rstär kte
Page 35

Hawk 4XL Installation Guide, Rev. A 33
elektromagnetische Strahlung fällt in den Zuständigkeitsbereich des Systemdesigners.
5. Replace t he host system’s cover.
5. Setzen Sie das Gehäuseoberteil des Host-Systems wieder
auf.
Page 36
34 Hawk 4XL Installat ion Guide, Rev. A
[4]
[3]
C
G
L
[1]
B
J
[2]
H
K
N
[4]
M
D
F
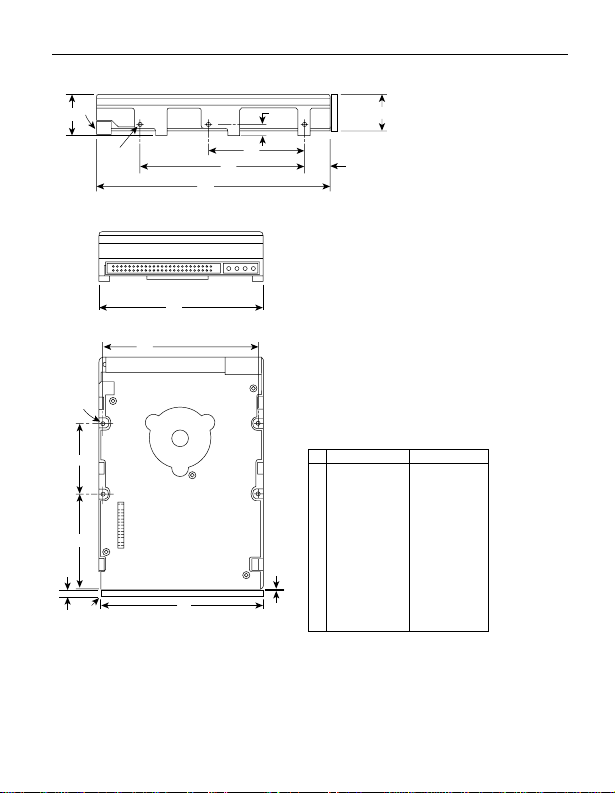
A
E
Notes:
[1] Mounting holes three on each side, 6-32 UNC.
Max screw length into side of drive 0.15 in.
(3.81 mm). Screw tightening torque 6.0 in-lb
(.675 NM) max with minimum thread
engagement of 0.12 in. (3.05 mm).
[2] Mounting holes four on bottom, 6-32 UNC.
Max screw length into bottom of drive 0.15 in.
(5.08 mm). Screw tightening torque 6.0 in-lb
(.675 NM) max with minimum thread
engagement of 0.12 in. (3.05 mm).
[3] Power and interface connectors can extend
past the "A" dimension by 0.040 in. (1.02 mm).
[4] Decorative front panel (optional).
[5] Although the illustration shows the 50 pin I/O
connector drive model, mounting hole locations
are the same for all Hawk 4XL models.
Inches
5.74
A
4.00
B
1.00
C
2.362
D
.620
E
4.000
F
.250
G
1.750
H
P
3.750
J
2.370
K
1.00
L
4.000
M
0.19
N
0.015
P
± .010
± .010
+ .021
– .009
± .010
± .020
± .010
+ .010
– .005
± .010
± .010
± .020
± .010
± .010
± .010
max
Millimeters
145.80
101.60
25.40
60.00
15.75
101.60
6.35
44.45
95.25
60.20
25.4
101.6
4.83
0.381
Figure 6. Mounting configuration dimensions
± .25
± .25
+ .53
– .22
± .25
± .50
± .25
+ .25
– .12
± .25
± .25
± .50
± .25
± .25
± .25
max
Page 37

Hawk 4XL Installation Guide, Rev. A 35
Formatting the drive
Warning.
Note.
1. Turn on DC power.
2. Boot the system from a system floppy disc or from a previ-
3. Format the disc driv e. Hawk 4XL disc drives are designed to
Quick reference desktop system notes
Note.
• DOS . Set the drive type in CMOS to “
hard drive i nstalled
tems that have operating system Windows 95 release 950B or
later do not need to partition the drive.
• Macintosh. Use a third-party drive utility (Apple’s HD Setup
utility only work s wit h drives having special Apple firmware ).
Formatting a drive erases all user data. Be sure that
you understand this principle before formatting any
hard disc drive. I t is not necessary to format a drive
that previously has been used to store data, unless
your intention is to erase al l user data.
Seagate is not responsible for lost user data.
ously installed hard disc driv e if there is one.
operate with a variety of operating systems. Please refer to
your system or SCSI controller manual for information about
formatting and setting up the drive. Some quick desktop
system notes are provided below.
Refer to your system or utility m anual for detailed instructions)
Zero,” “None,”
.” Use FDISK.EXE and FORMAT.EXE. Sys-
or “
No
Page 38
36 Hawk 4XL Installat ion Guide, Rev. A
N drives
N/ND drives sectionSetting the SCSI ID jumpers
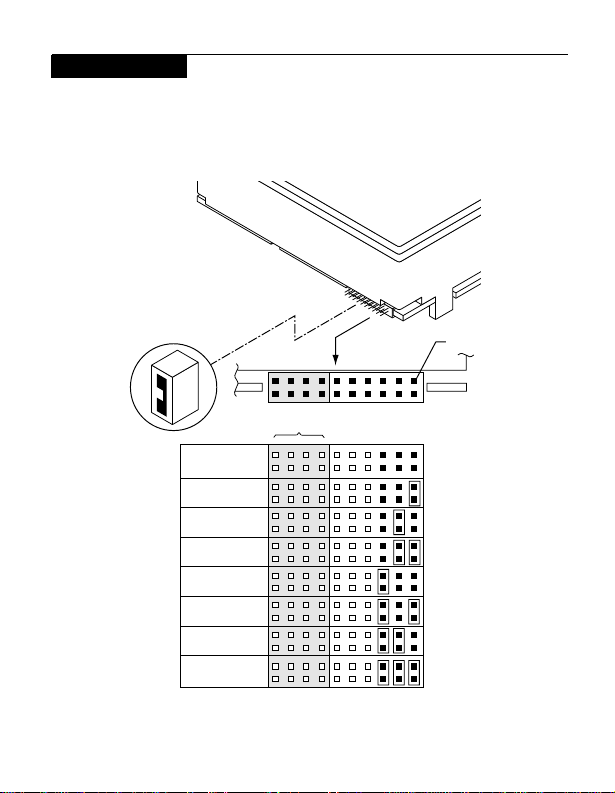
Use the J6 connector to set the SCSI ID (see Figure 7). To
change the SCSI ID, install jumpers on the appropriate pins as
shown in the illustration.
Drive
Front
Jumper Plug
(enlarged to
show detail)
SCSI ID = 0
SCSI ID = 1
SCSI ID = 2
SCSI ID = 3
SCSI ID = 4
SCSI ID = 5
SCSI ID = 6
SCSI ID = 7
Reserved
J6
L
R
R
E
E
E
A2A1A
D
S
S
Pin 1
0
(default)
Figure 7. Setting the SCSI ID on model N drives
Page 39
Hawk 4XL Installation Gui de, Rev. A 37
N drives
Termina ting the d rive
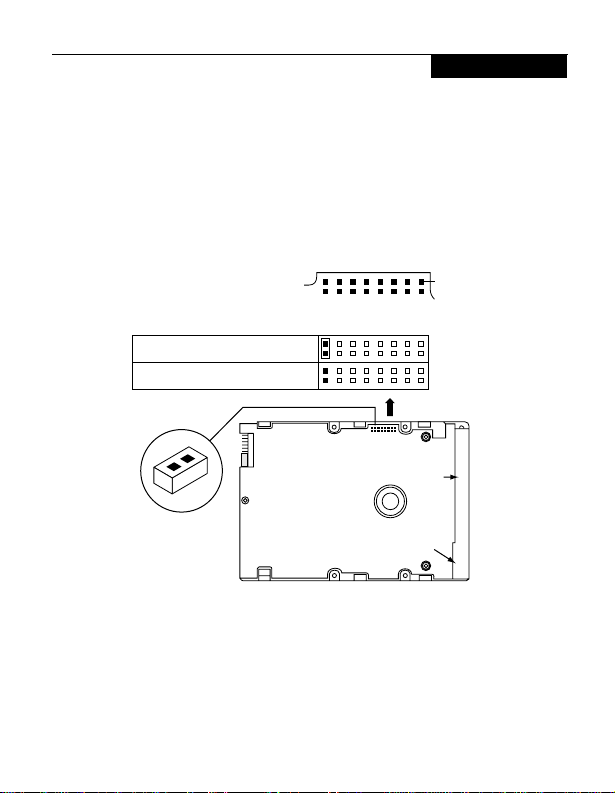
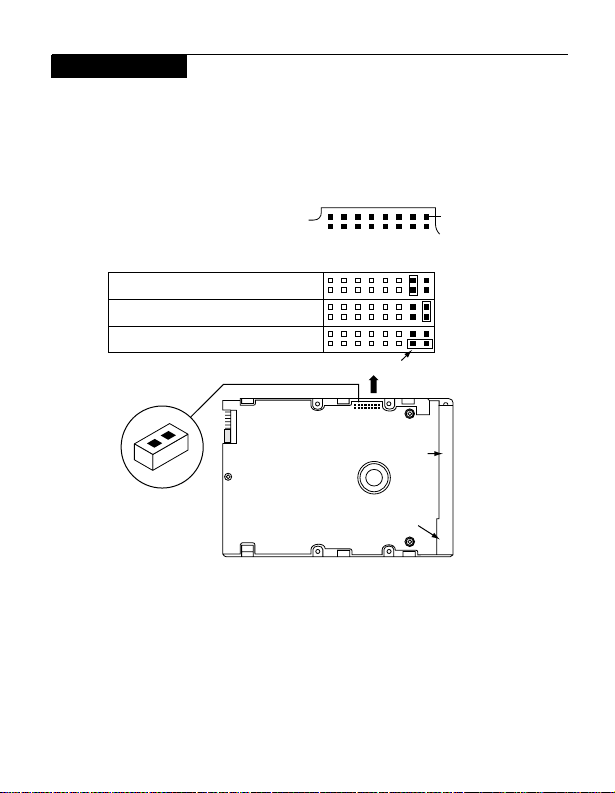
“N” model drives are terminated with permanently mounted IC
active terminators. If you i nstall one of these dr ives and it is not
on the end of the SCSI bus, disable the terminators by removi ng
the jumper
ure 8). If you install the drive on the end of the SCSI bus, enable
termination b y installing a jumper on pins 15 and 16 of connector
J2.
“TE”
from pins 15 and 16 of connector J2 (see Fig-
J2
T
DSMEWPP
E
D
R
ESTPT
Pin 1
P
Enable SCSI terminator (default)
Disable SCSI terminator
J6
Drive
J2 Jumper Type
(enlarged to
show detail)
Front
Figure 8. Terminating the drive
J2
SCSI I/O
Connector
DC Power
Connector
J1
Page 40
38 Hawk 4XL Installat ion Guide, Rev. A
N drives
Terminator power
There are three possible terminator power (TP) configurations
for “N” model drives (see Figure 9). You will not normally need to
change this opt ion and can l eave the dr ive configured as it was
shipped from the factory.
J2
TEDSMEWPP
“N” model drives
D
Term. Power from Drive (default)
Term. Power to SCSI Bus
Term. Power from SCSI Bus
Position A
R
ESTPT
Pin 1
P
J2
SCSI I/O
Connector
DC Power
Connector
J2 Jumper Type
(enlarged to
show detail)
J6
Drive
Front
Figure 9. Setting terminat or power jumpers
J1
Page 41
Hawk 4XL Installation Gui de, Rev. A 39
N drives
Other applicable jumper options
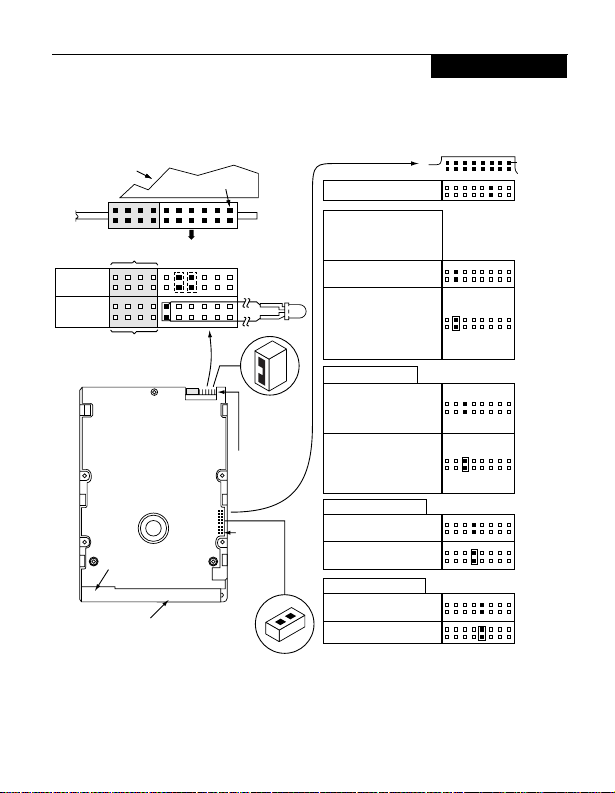
Several other jumper options are available as illustrated.
Drive with
HDA up, PCB
down, viewed
from front
Reserved
Reserved
Remote
LED
Shipped with cover installed.
Do not remove.
Do not install jumpers
on these four positions.
Drive Front
DC Power
Connector
SCSI I/O
Connector
Pin 1
HDA
L
R
R
E
E
E
A2A1A
D
S
S
11
12
J6
J2
J1
J2 Jumper Type
(enlarged to
show detail)
J6
0
CATH
Jumper Type
(enlarged to
show detail)
Pin 1
End
Pin 1
J6
Reserved
Delay Motor Start option
(valid only if the Enable
Motor Start jumper is
not connected)
Disable the Delay Motor
Start option.
Motor start delay equal
to the SCSI ID multiplied
by 12 seconds. For
example, if the SCSI
ID = 2, the drive starts
in 24 seconds.
Motor Start option
Disable motor start.
The drive starts
according to the
Delay Motor Start option.
Enable motor start. The
drive waits for the Start
Unit command from the
host before starting the
spindle motor.
Write Protect option
Write protect = Off
(enables writing).
Write protect = On
(disables writing).
Parity Check option
Enable parity check of
SCSI bus.
Disable parity check.
Figure 10. Additional jumper options
J2
Pin 1
(default)
(default)
(default)
(default)
Page 42
40 Hawk 4XL Installat ion Guide, Rev. A
W drives
W/WD drives sectionSetting the SCSI ID jumpers
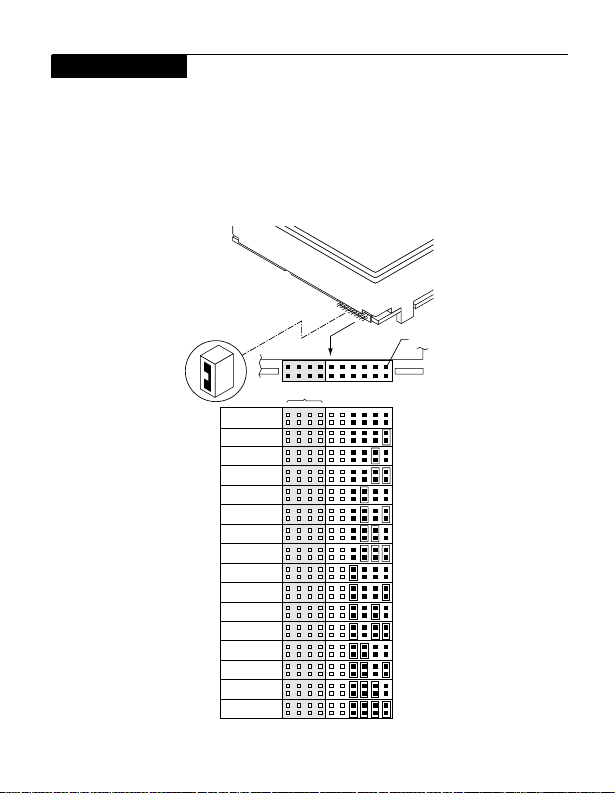
Use the J6 jumper block to set the SCSI ID (Figure 11). To
change the SCSI ID, install jumpers on the appropriate pins as
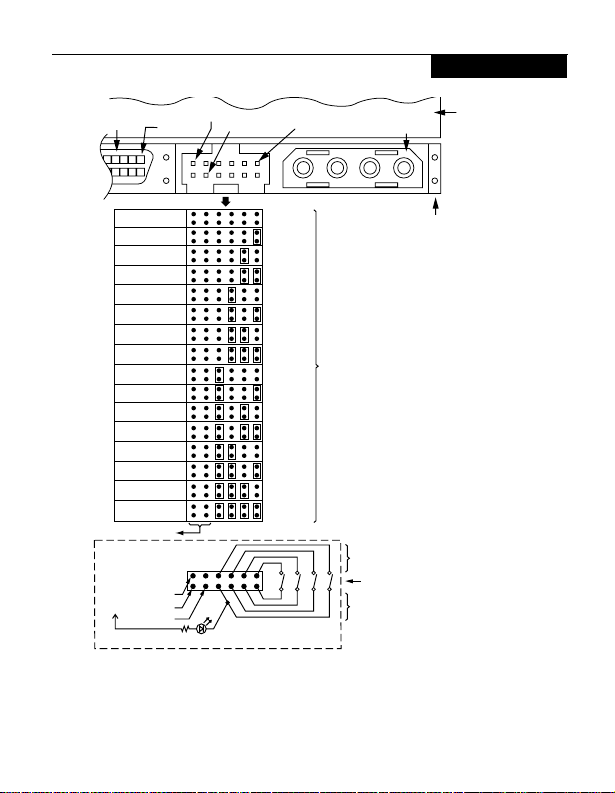
shown in the illust ration. Optional connections to switching circuits in host equipment are provided on J1 auxiliary to set the
SCSI ID (see Figure 12).
Drive
Front
Jumper Plug
(enlarged to
show detail)
L
R
Reserved
E
E
D
SCSI ID = 0 (default)
SCSI ID = 1
SCSI ID = 2
SCSI ID = 3
SCSI ID = 4
SCSI ID = 5
SCSI ID = 6
SCSI ID = 7
SCSI ID = 8
SCSI ID = 9
SCSI ID = 10
SCSI ID = 11
SCSI ID = 12
SCSI ID = 13
SCSI ID = 14
SCSI ID = 15
S
J6
A2A3A1A
Pin 1
0
Figure 11. Setting the SCSI ID on model W drives
Page 43
Hawk 4XL Installation Gui de, Rev. A 41
W drives
68 Pin SCSI I/O
Connector
J1
SCSI ID = 0
SCSI ID = 1
SCSI ID = 2
SCSI ID = 3
SCSI ID = 4
SCSI ID = 5
SCSI ID = 6
SCSI ID = 7
SCSI ID = 8
SCSI ID = 9
SCSI ID = 10
SCSI ID = 11
SCSI ID = 12
SCSI ID = 13
SCSI ID = 14
SCSI ID = 15
not used
Host Alternate
Usage Plug
+5V
Dashed area is optional host circuitry (external to the
drive) connected to host supplied optional usage plug.
Pin 1
+5V
N.C.
Ground
Drive Activity LED
+5V
Ground
A
3A2A1
1197531
12 10 8 6 4 2
J1-Auxiliary
Pin 1A
4P 3P2P 1P
(default)
For ID selection use
jumpers as shown or
connect a cable for
remote switching as
shown below.
A
0
A0A1A2A
3
Drive
PCB
HDA
Rear
J1-DC Power
Pins 1, 3, 5, and 7 are
optional connections to
switching circuits in host
equipment to establish
drive ID.
Remote Switches
Pins 2, 4, 6, and 8 are normally
not grounded. They are driven low
(ground) for 250 ms after a Reset or
PWR ON to allow drive to read
SCSI ID selected. Pin 8 may
also be used to drive the cathode
of an external Activity LED.
Figure 12. Using J1-Auxillary connector for model “W”
drive alternate ID select and LED
connection
Page 44
42 Hawk 4XL Installat ion Guide, Rev. A
W drives
Termina ting the d rive
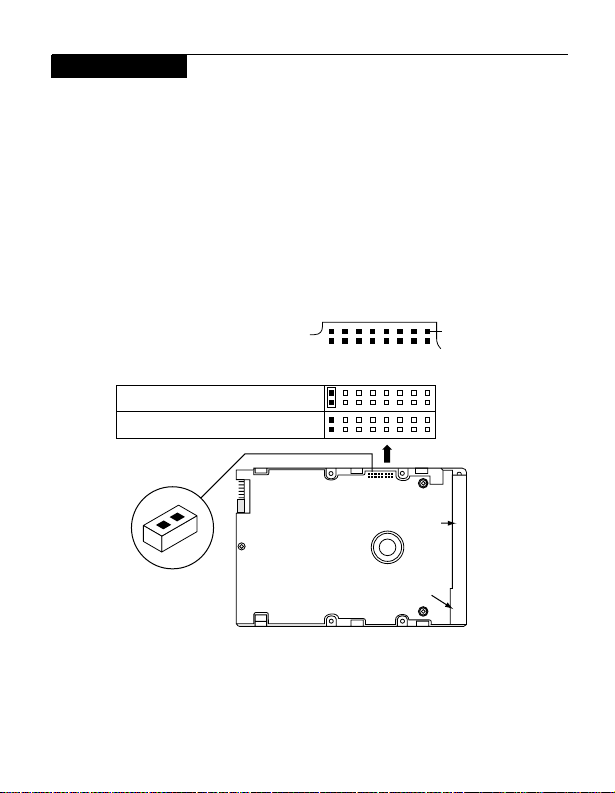
“W” model drives are terminated with permanently mounted IC
active terminators. If you i nstall one of these dr ives and it is not
on the end of the SCSI bus, disable the terminators by removi ng
the jumper
install the drive on the end of the SCSI bus, enable termination
by installing a jumper on pins 15 and 16 of connector J2 (see
Figure 13).
Note.
“TE”
from pins 15 and 16 of connector J2. If you
Use active (ANSI SCSI-2 Alternat ive 2) terminators when
terminating the bus.
J2
T
DSMEWPP
E
D
*Enable SCSI terminator (default)
*Disable SCSI terminator
*“W” model only
R
ESTPT
Pin 1
P
J6
Drive
Front
J2 Jumper Type
(enlarged to
show detail)
Figure 13. Terminating the drive
J2
SCSI I/O
Connector
DC Power
Connector
J1
Page 45
Hawk 4XL Installation Gui de, Rev. A 43
W drives
Terminator power
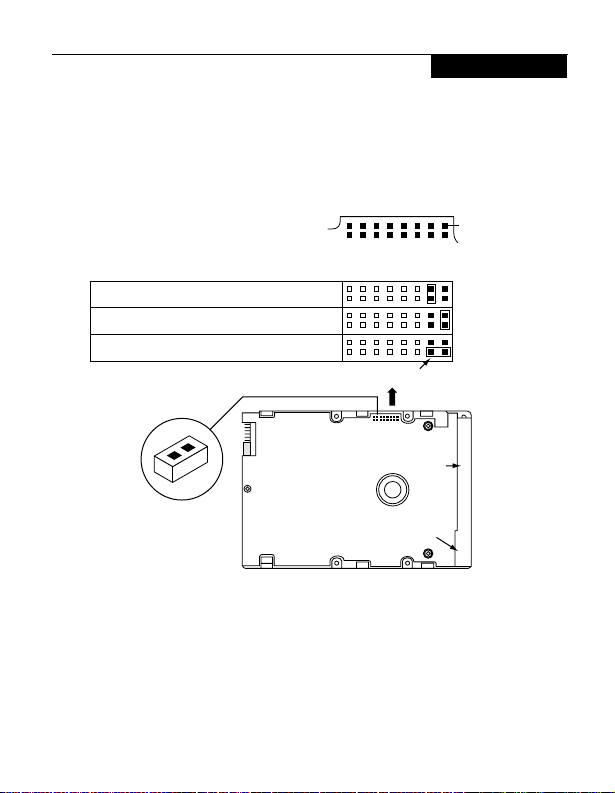
There are three possible terminator power (TP) configurations
for “W” model drives (see Figure 14). You will not normally need
to change this option and can leave the drive configured as it
was shipped from the factory.
“W” model drives
J2
TEDSMEWPP
D
R
ESTPT
Term. Power from Drive (default)
Term. Power to SCSI Bus
Term. Power from SCSI Bus
Position A
J2
SCSI I/O
Connector
DC Power
Connector
J2 Jumper Type
(enlarged to
show detail)
J6
Drive
Front
Figure 14. Setting terminator power jumpers
Pin 1
P
J1
Page 46
44 Hawk 4XL Installat ion Guide, Rev. A
W drives
Other applicable jumper options
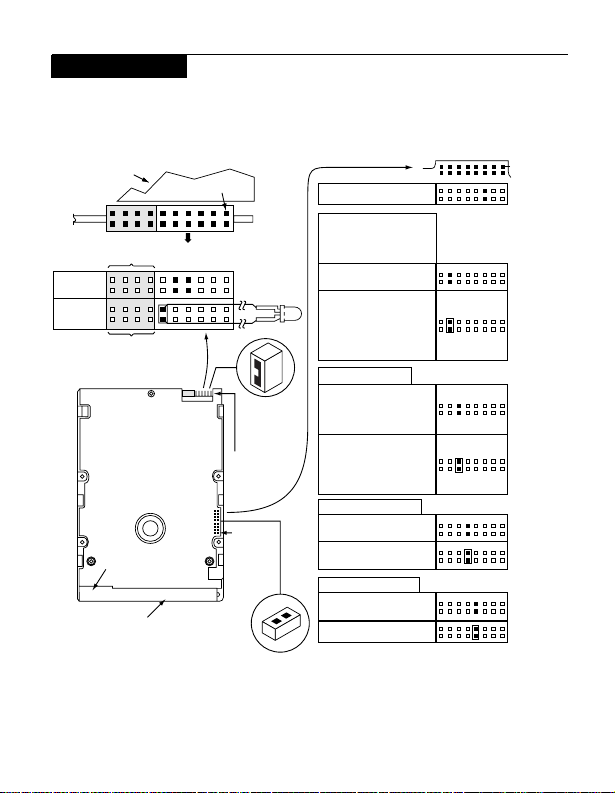
Other op ti on ju m p e rs ar e available as illu s tr at e d b el ow.
Drive with
HDA up, PCB
down, viewed
from front
Reserved
Remote
LED
Shipped with cover installed.
Do not remove.
Do not install jumpers
on these four positions.
Connector
Reserved
Drive Front
DC Power
Connector
SCSI I/O
HDA
L
R
E
E
D
S
11
12
J2 Jumper Type
(enlarged to
show detail)
J1
A2A3A1A
J6
J2
Pin 1
0
Pin 1
End
Pin 1
J6
CATH
J6
Jumper Type
(enlarged to
show detail)
Reserved
Delay Motor Start option
(valid only if the Enable
Motor Start jumper is
not connected)
Disable the Delay Motor
Start option.
Motor start delay equal
to the SCSI ID multiplied
by 12 seconds. For
example, if the SCSI
ID = 2, the drive starts
in 24 seconds.
Motor Start option
Disable motor start
(default). The drive
starts according to the
Delay Motor Start option.
Enable motor start. The
drive waits for the Start
Unit command from the
host before starting the
spindle motor.
Write Protect option
Write protect = Off
(enables writing.
Write protect = On
(disables writing).
Parity Check option
Enable parity check of
SCSI bus.
Disable parity check.
J2
Pin 1
(default)
(default)
(default)
(default)
Figure 15. Additional jumper options
Page 47

Page 48

Seagate Technology, Inc.
920 Disc Drive, Scotts Valley, CA 95066-4544, USA
Publication Number: 77767507, Rev. A, Printed in USA
 Loading...