


. . . . . . . . . . . . . . . . . . . . . . . . .. . . . . . .
Medalist 1270
. . . . . . . . . . . . . . . . . . . . . . . . .. . . . .
ATA Interface Drive
. . . . . . . . . . . . . . . . . . . . . . . . .. . . .
. . . . . . . . . . . . . . . . . . . . . . . . .. . . . .
. . . . . . . . . . . . . . . . . . . . . . . . .. . . . .
Installation Guide
. . . . . . . . . . . . . . . . . . . . . . . . .. . . . . . . .

Contents
Introduction . . . . . . . . . . . . . . . . . . . . . . . . . 1
Before you begin...
Configuring the drive . . . . . . . . . . . . . . . . . . . . 5
Attaching the cables . . . . . . . . . . . . . . . . . . . . 9
Mounting the drive . . . . . . . . . . . . . . . . . . . . . 10
Transferring the software from the drive . . . . . . . . . 11
Determining if your BIOS accepts more than
528 Mbytes . . . . . . . . . . . . . . . . . . . . . . . . 13
Solutions for surpassing the 528-Mbyte barrier . . . . . . 13
Configuring the computer . . . . . . . . . . . . . . . . . 14
Using the installation software . . . . . . . . . . . . . . 14
Standard setup . . . . . . . . . . . . . . . . . . . . . . 18
Dual-drive emulation installation . . . . . . . . . . . . . 19
Partitioning and formatting the drive . . . . . . . . . . . 20
Windows 32-bit disk access . . . . . . . . . . . . . . . . 22
Basic troubleshooting . . . . . . . . . . . . . . . . . . . 24
Advanced troubleshooting . . . . . . . . . . . . . . . . 25
Technical support services . . . . . . . . . . . . . . . . . 31
© 1995 Seagate Technology, Inc. All rights reserved
Publication Number: 36315-001, Rev. A, July 1995
Seagate, Seagate Technology and the Seagate logo are
registered trademarks of Seagate Technology, Inc. Medalist,
SeaFAX, SeaFONE, SeaBOARD and SeaTDD are trademarks
of Seagate Technology, Inc. EZ-Drive and Maximum Overdrive
are trademarks of Micro House International, Inc. Other product
names are registered trademarks or trademarks of their owners.
Seagate reserves the right to change, without notice, product
offerings or specifications. No part of this publication may be
reproduced in any form without written permission from Seagate
Technology, Inc.
. . . . . . . . . . . . . . . . . . . . . 3

Medalist 1270 Installation Guide, July 1995 1
Introduction
Thank you for choosing a Seagate® drive. The purpose of this
guide is to assist you with installing your new hard drive. Its
organization outlines the complete installation process from handling the drive and drive application in Before you begin... to
offering troubleshooting suggestions and technical support information. The topics discusses are:
• Handling your drive (see Before you begin...)
• Configuring the drive
• Attaching cables to the drive
• Mounting the drive
• Configuring the computer
• Troubleshooting
• Where to call for Seagate technical support
Seagate provides installation software, EZ-Drive, and a 32-bit
disk access driver for Windows, SEG32BIT.386, that allows the
computer to surpass the 528-Mbyte barrier when it is imposed.
The software is stored on the drive and must be transferred to a
diskette in Drive A before you partition and format the drive. A
program called Seamove is provided to make the transfer easy.
We hope your installation goes smoothly, but if complications
arise, a list of common symptoms and solutions is provided in the
troubleshooting section. If the problem persists, contact your
dealer first. Your dealer is familiar with system integration and the
conflicts that arise. If you need additional help or information
about Seagate products, Seagate technical support numbers are
provided.

2 Medalist 1270 Installation Guide, July 1995
Drive features
Feature ST31270A
Formatted Capacity 1,282.8 Mbytes
Cylinders 2,485
Heads 16
Sectors 63
Average seek time 12 msec
Cache (segmented) 256 Kbytes
Spindle speed 4,500 RPM
Internal transfer rate (Mbits per sec max.) 29.6 to 57.2
External transfer rate
1
16.6
(Mbytes per sec max.)
LBA Supported
Multiple block read/write Supported
PIO modes 0, 1, 2, 3, 4
Multiword DMA modes 0, 1, 2
Power-management Supported
1. To achieve the maximum transfer rate, your computer must have
hardware that supports PIO mode 4 or multiword DMA mode 2. If the
native hardware does not support these modes, you can upgrade your
system with a host adapter. See your computer reseller for details.

Medalist 1270 Installation Guide, July 1995 3
Before you begin...
Note. Throughout this manual the Medalist 1270 is referred to by
its model number, ST31270A.
Drive handling. Your drive is vulnerable to damage from rough
handling and static discharge. Do not drop your drive. Do not
remove the seals and labels on the drive. The drive warranty is
voided if the seals and labels are removed.
Static discharge. Your drive contains components that can be
damaged by static discharge. Static damage can be cumulative
and may not manifest immediately. Observe the following precautions:
• Ground yourself before handling the drive. Wear a ground
strap that is properly connected to earth ground, or touch the
metal of a power supply that is plugged into a wall outlet while
handling the drive.
• Keep the drive in its antistatic bag until you are ready to install
it. Do not attach any cables to the drive while it is in its bag.
• Handle the drive gently and only by its edges or frame. Place
it on an antistatic surface until you are ready to install it.
• Do not touch the drive’s connector pins or printed circuit board.
Inspection. Use the handling precautions listed above when you
inspect the drive. If it appears to be damaged, call your distributor
or dealer immediately.
Warranty. The drive comes with a three-year limited warranty.
Note. With regards to the EZ-Drive and SEG32BIT.386 software,
there are no warranties, express or implied, including, but
not implied, warranties of merchantablity or fitness for a
particular purpose. All such warranties are expressly and
specifically disclaimed.
Maintenance and repair. Seagate drives do not require maintenance. The head/disc assembly is sealed; a broken seal voids
the warranty. Seagate customer service centers are the only

4 Medalist 1270 Installation Guide, July 1995
facilities authorized to repair Seagate drives. Seagate does not
sanction any third-party repair facilities.
Application. Your Seagate drive is designed for IBM AT and
compatible personal computers. It uses the ATA interface. It is
intended for use with UL-listed computers or similar products.
Sicherheitsanleitung
1. Das Gerrät ist ein Einbaugerät, das für eine maximale Umge-
bungstemperatur von 55°C vorgesehen ist.
2. Zur Befestigung des Laufwerks werden 4 Schrauben 6-32
UNC-2A benötigt. Bei seitlicher Befestigung darf die maximale
Länge der Schrauben im Chassis nicht mehr als 3,3 mm und
bei Befestigung an der Unterseite nicht mehr als 5,08 mm
betragen.
3. Als Versorgungsspannugen werden benötigt:
+5V æ 5% 0,6A
+12V æ 5% 0,8A (1,9A fur ca. 30 Sek. fur æ 10%)
4. Die Versorgungsspannung mub SELV entsprechen.
5. Alle Arbeiten auf dem Festplatte dürfen nur von Ausgebilde-
tem Servicepersonal durchgeführt werden. Bitte schaffen Sie
Festplatteetiketten nicht weg.
6. Der Einbaudes Drives mub den Anforderungen gemäb DIN
IEC 950V DC 0805/05.90 entsprechen.

Medalist 1270 Installation Guide, July 1995 5
Warning. Turn off the computer before you remove its cover.
Turn off the power before you install or remove any
adapter card or the drive.
Caution. Special training or tools may be required to service
laptop computers. Removing the cover may void your
warranty. Review the terms and conditions of your
warranty before removing the cover.
Configuring the drive
Required materials:
• 0.100-inch jumper connectors (supplied as spare jumpers)
Your Seagate drive is configured using the options jumper block
shown in Figure 1 on page 6. You can configure the drive:
• For one- or two-drive operation
• To be the master or slave drive
• For dual-drive emulation
• To operate as the master with drives that use a different
master/slave timing protocol
• For computers that use cable-select
• To use a remote drive-activity LED
To configure the drive, attach a jumper to the pins on the options
jumper block as shown in Figure 2 on page 7 for the desired
option. The configuration options are:
Spare jumper. Use the spare jumpers on pins 1 and 3 and
pins 5 and 7 to configure the drive. These settings are not used
for drive operation.
One-drive only. Use this configuration if there are no other
drives attached to the hard disc controller.
Master with slave present. Use this configuration if the drive
is the first of two drives in your system. The master drive is
drive 0 in the System Setup record.
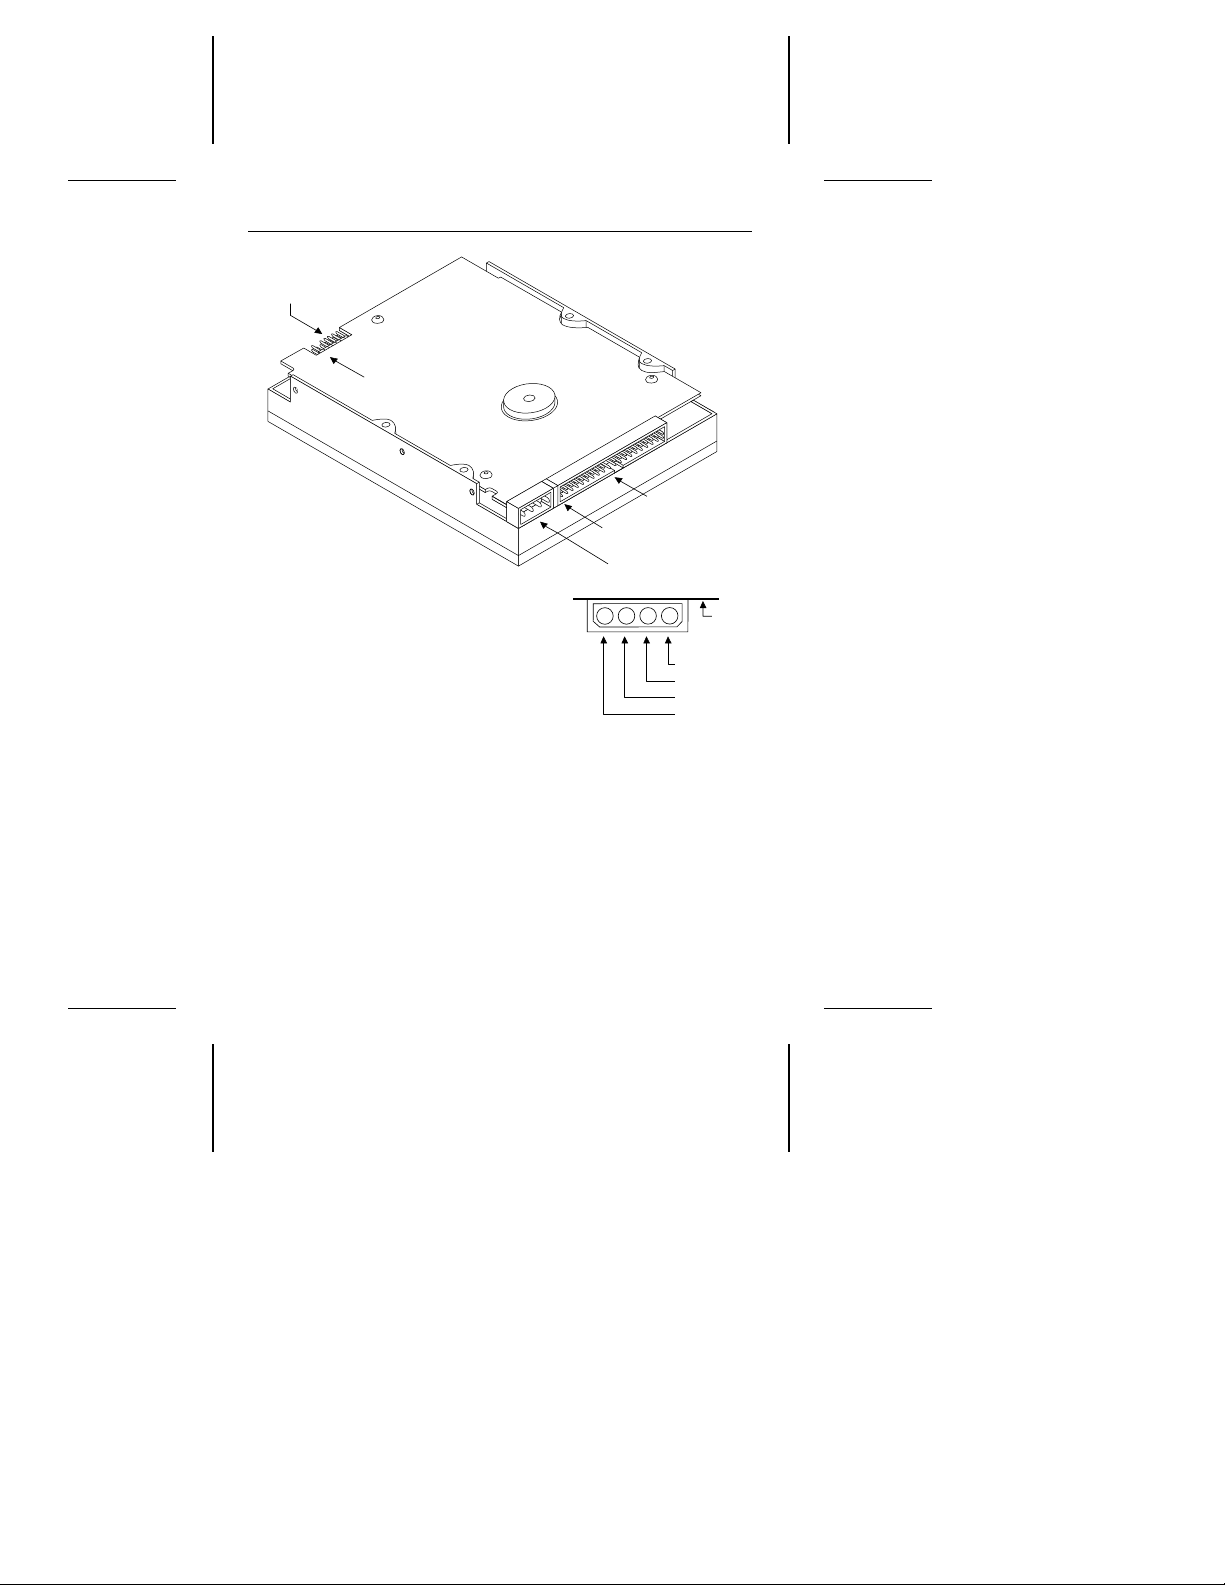
pin 1
J8 pin 1
J8. Options
jumper block
J1. Interface
connector
J3. Standard
power connector
1
2
3
4
Circuit
board
+5V
+5V return
+12V return
+12V
6 Medalist 1270 Installation Guide, July 1995
Figure 1. Drive connectors
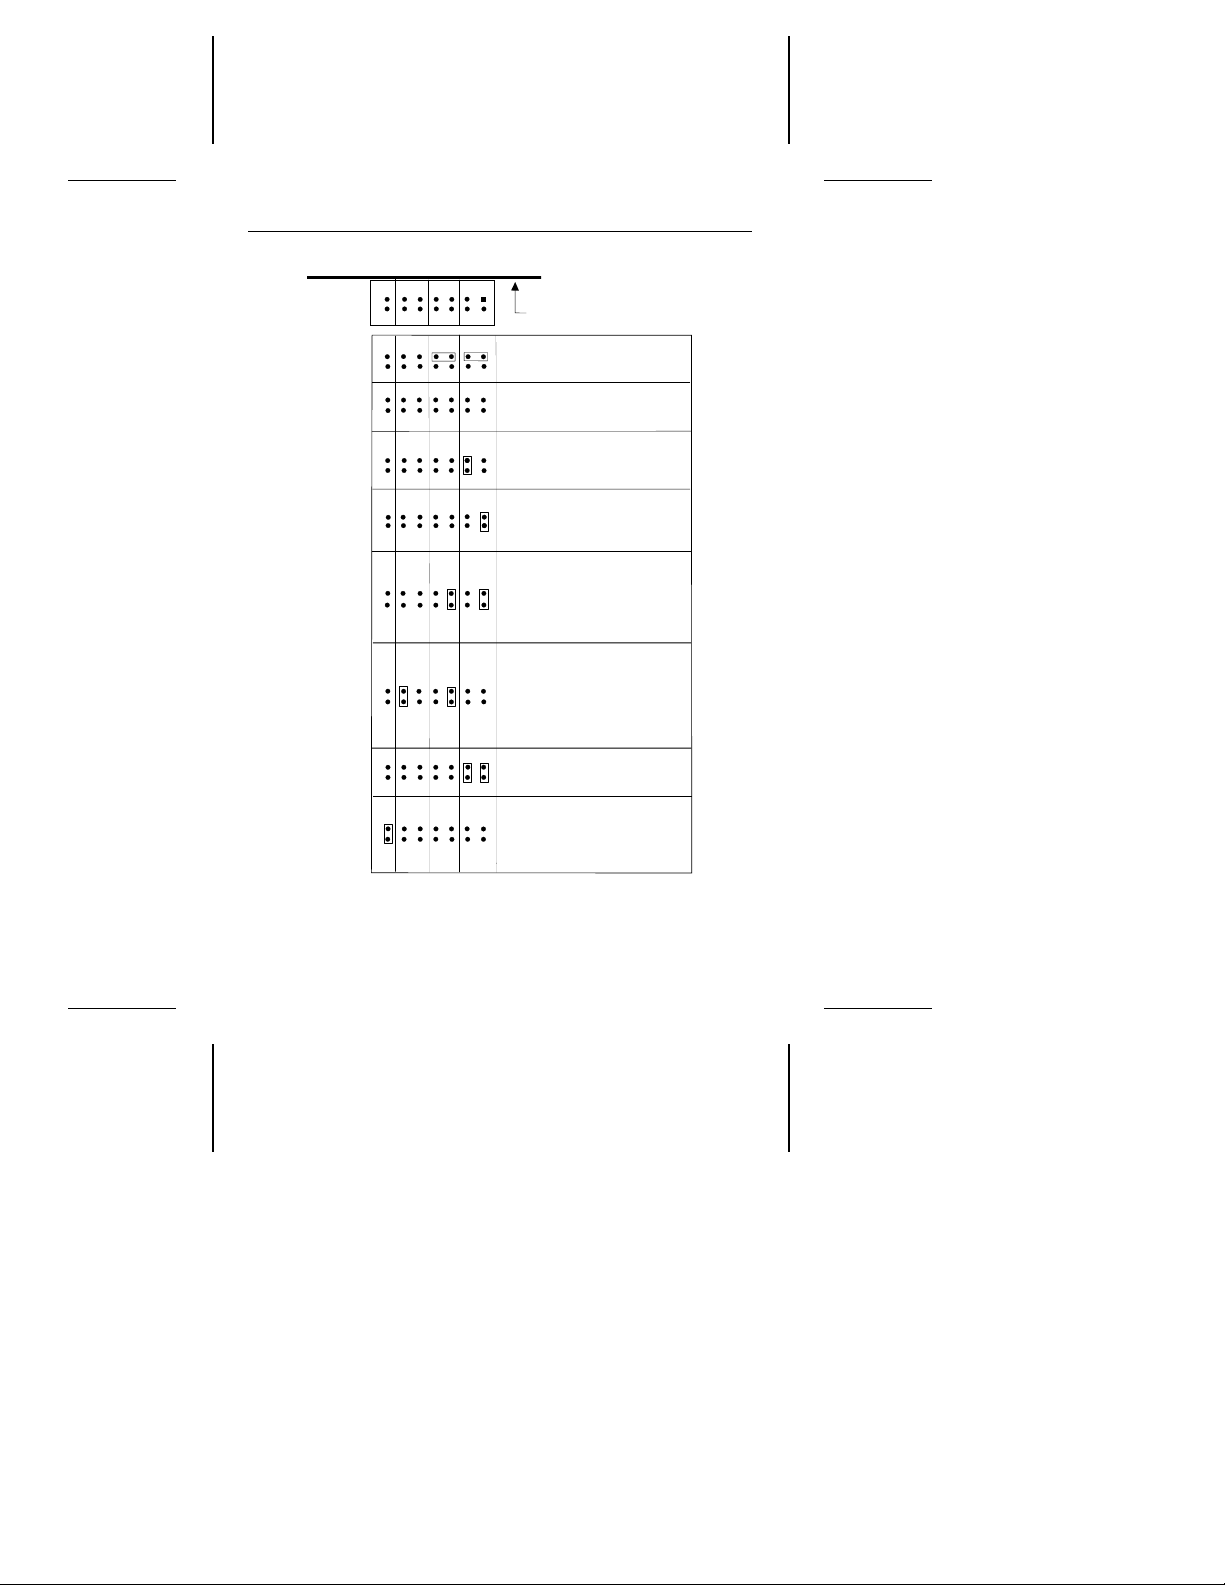
9
10
785
6
3
4
1
2
One drive only
Drive is master;
slave is present
Drive is slave when
another drive is present;
Cable select
Remote LED
connection
pin 13 (–), pin 14 (+)
Spares
12
11
Master/slave timing protocol.
Makes the drive compat-
ible with some drives as
the slave.
14
13
Dual-drive emulation
Cannot be used with
cable select.
Cannot be used with a
second, physical drive.
Circuit board
side up
Options jumper block (J8)
Medalist 1270 Installation Guide, July 1995 7
Figure 2. Options jumper block settings

8 Medalist 1270 Installation Guide, July 1995
Slave. Use this configuration if the drive is the second drive in
the system. The slave is drive 1 in the System Setup record.
Master/slave timing protocol. This protocol involves the
communication between the computer and the disc drives
during the power-on cycle only. The computer queries the
master drive for the status of both drives. The slave must
report its status to the master within a certain time period. If it
does not respond in time or if it uses a response signal that
the master does not acknowledge, the master tells the host
that the slave has timed out, and the computer does not
recognize the slave. The Seagate drive is shipped configured
to work with other drives that comply with the ATA-standard
master/slave timing protocol.
This setting allows the Seagate drive in the slave position to
respond to some drives that use a different protocol. Try using
this setting if the slave is not identified after power-on.
Dual-drive emulation. This feature allows you to make the
most of the BIOS limitation by making the drive two logical
drives for the computer. Each logical drive is assigned a drive
type in System Setup using the maximum translation geometry values the BIOS allows. Each logical drive must be partitioned and formatted. A second, physical drive cannot be
attached to the hard disc controller. You cannot use dual-drive
emulation with cable select.
Cable-select. Use this configuration if your computer uses
cable-select.
Remote LED. If your computer uses a remote drive-activity
LED, place the ground wire side of the connector, usually the
black wire, on pin 13 (–) and the other side on pin 14 (+) of the
options jumper block. The LED can be damaged if the cable
is attached incorrectly.
The options jumper block accepts a 0.100-inch connector. It
may be necessary to replace the current connector on the LED
cable with a 0.100-inch connector.

Medalist 1270 Installation Guide, July 1995 9
Attaching the cables
Required materials:
• A 40-conductor interface cable with a 40-pin, female interface
connector for each drive you want to attach.
• A four-conductor power-supply cable.
Note. To ensure the integrity of your data, use a nonshielded
cable with a maximum length of 18 inches (46
centimeters).
This section refers to Figure 1 on page 6.
1. Attach the interface cable. Pin 1 on the drive must align with
pin 1 of the hard-disc controller connector. Use the edge-stripe
on the cable to denote pin 1. Pin 1 on the drive is located next
to the four-pin power connector.
Caution. The cable and connector bond is delicate. Pulling the
cable to remove the connector may damage the cable.
Attach an interface connector to the drive. If your interface connector has a key, it can only plug into the drive one way. Be sure
that you do not bend the pins when you attach the cable.
Attach an interface-connector to the hard-disc controller connector on the motherboard or host adapter. Be sure that pin 1 (see
your system user’s guide or host adapter user’s guide to determine the location of pin 1) is aligned with pin 1 on the drive.
Cable-select installation: If your computer uses cable-select,
refer to its user’s guide to determine which interface connector is
used for the master and which is used for the slave.
2. Attach a power-supply cable to the drive.
Caution. The cable and connector are designed to mate. Do not
force a connection. Improper alignment can damage
your drive.

10 Medalist 1270 Installation Guide, July 1995
Mounting the drive
Required materials:
• Four 6-32 UNC-2A screws (not included)
The drive fits in the standard 3.5-inch bay and can be mounted
in any orientation. Secure the drive with four mounting screws not
more than 6 full turns (0.20 inches) into the drive frame (see
Figure 3). Position the drive so that the cables are not strained or
crimped.
Caution. To prevent drive mounting-hole damage, use only the
type of screws specified.
This completes the hardware installation.
Figure 3. Mounting holes

Medalist 1270 Installation Guide, July 1995 11
Transferring the software from the drive
Required materials:
• Diskette Drive A
• A blank diskette that can be used in Drive A
• A bootable diskette with the Format command
Recent developments in drive technology have pushed drive
capacities beyond the limit that many older computers using DOS
can address. Seagate provides software solutions that can allow
your computer to surpass the address limit and access the full
capacity of your drive. The software is stored on the drive at the
factory and must be transferred to a diskette in Drive A before
you partition and format the drive. The files stored on the drive
include:
• EZ-Drive. This is drive installation software that enables computers with BIOSs that restrict the hard disc capacity to 528
Mbytes to surpass the 528-Mbyte barrier.
• SEG32BIT.386. This replacement 32-bit disk access driver for
Windows supports drive capacities above 528 Mbytes, multiple block read/write, PIO modes 3 and 4 and LBA addressing.
• Seamove. This is a program that automatically copies the
software files stored on the drive at the factory to a bootable
diskette in Drive A. It removes the factory-installed partition
and format when the files are copied.
• README. This file contains information about the Seamove
transfer program.
You must create a diskette with the software that Seagate provides. To transfer the software, put a bootable, blank diskette into
Drive A. To create a bootable diskette:
1. Insert your DOS diskette into Drive A.
2. Type format a: /s.
The drive reads the DOS diskette and prompts you to insert
the diskette you want to format into Drive A.

12 Medalist 1270 Installation Guide, July 1995
3. Insert the blank diskette. Press ENTER. When the format is
complete, you can transfer the installation software files to the
diskette.
To transfer the software files:
1. Boot the computer with the diskette to which you want to
transfer the software files.
2. Enter the System Setup. (Refer to your computer user’s guide.
System Setup may be called Setup, BIOS Setup or CMOS
Setup.) If your computer uses an automatic setup system, go
to step 5.
3. Find the hard disc configuration in the System Setup screen.
4. Select drive type 2 for your new Seagate drive. If your com-
puter does not offer drive type 2, use the following values: 615
cylinders, 4 heads and 17 sectors.
Note. These are interim drive-type values that allow you to
access the drive for extracting the installation files.
5. Activate the prompt for the Seagate drive.
6. Type seamove and press
ENTER.
This command transfers the files from the drive to the diskette
in Drive A. When the transfer is complete, the seamove
program erases the files and the drive partition and reboots
the computer. The computer returns an invalid drive-specification error if you try to access the drive.
Caution. Do not write-protect the Seagate software diskette with
EZ-Drive. The EZ-Drive program writes important information back to the diskette during the installation.

Medalist 1270 Installation Guide, July 1995 13
Determining if your BIOS accepts more
than 528 Mbytes
The following suggestions can help you to determine whether
your BIOS limits the drive capacity to 528 Mbytes.
• If you are using a 286 or 386 computer, the native BIOS does
not recognize more than 528 Mbytes.
• If the copyright date of the BIOS is earlier than 1994, it
probably will not recognize more than 528 Mbytes. The BIOS
copyright date, manufacturer and version number appear on
your screen at the beginning of power-on or reboot.
• Install the drive using the Standard setup described on page
18. (Transfer the free software stored on the drive to a diskette
before you start the installation. See page 11 for transfer
d
instructions.) When the installation is complete, type dir
the new drive and check the number of bytes free. The number
should be close to the formatted capacity of your drive. If the
number is less than 528 Mbytes, you need to consider alternatives for surpassing the 528-Mbyte barrier. Some alternatives are listed below.
Solutions for surpassing the 528-Mbyte barrier
• Upgrade the BIOS to one that supports more than 528 Mbytes.
Such BIOSs incorporate logical block addressing (LBA) and
extended cylinder-head-sector (ECHS) addressing.
• Use a host adapter that supports more than 528 Mbytes.
• Use the free installation software, EZ-Drive, that is stored on
the drive at the factory or an equivalent. (See page 11 for
instructions on transferring the software to a diskette. See
page 16 for instructions on using EZ-Drive.)
• Use dual-drive emulation. Dual-drive emulation makes the
drive two logical drives for the computer. Each logical drive is
assigned a drive type in System Setup and is partitioned and
formatted. However, you can only use the translation geome-
: for

14 Medalist 1270 Installation Guide, July 1995
try values allowed by the BIOS, which limits the capacity of
each logical drive to 528 Mbytes.
Configuring the computer
Configuring the computer involves updating the computer’s System Setup records with the new drive’s translation geometry
(cylinder, head and sector information) and partitioning and formatting the drive. The translation geometry is kept on the CMOS
chip and is used by the BIOS to assign locations for the data on
the drive. Many older BIOSs place limits on the translation
geometry parameter values that do not allow it to assign locations
beyond 528 Mbytes when DOS is used. If your computer uses
such a BIOS, it cannot access the full capacity of your new drive.
In this section we describe three methods you can use to configure your computer for DOS: EZ-Drive installation software, standard setup and dual-drive emulation setup.
Using the installation software
Note. The EZ-Drive software is authorized for installation only
with the drive on which it is shipped.
The EZ-Drive installation software allows your computer to access your Seagate drive’s full format capacity. It bypasses the
BIOS during the boot sequence and uses the information it
creates on Drive C to identify the drive before DOS is loaded.
During the installation, EZ-Drive:
• Determines how many drives are installed
• Enters a drive type in System Setup for the new drive
• Modifies the Drive C boot record with the new drive’s transla-
tion geometry
• Partitions and formats the new drive
• Copies the boot files to the new drive if it is Drive C
• Enables Maximum Overdrive, which enables read/write mul-
tiple in drives that have this feature. The Change Installed

Medalist 1270 Installation Guide, July 1995 15
Features option that appears in the dialog box when the format
is complete allows you to disable Maximum Overdrive.
EZ-Drive is easy and safe to use. You can choose a fully-automatic installation, which puts a single partition on the drive, or you
can install the drive with multiple partitions and other custom
features. Online help is provided for selected topics when you
F1
press
. Online help is also available in the main menu as
Information Help.
If you already have a drive installed, EZ-Drive cannot harm your
data unless you instruct it to override that drive’s partition and
format. EZ-Drive automatically arranges the drive-type position
in System Setup to reflect how you have physically configured
the drives.
Note. EZ-Drive is designed for DOS installations. To use EZ-
Drive, you must have:
• Microsoft MS-DOS Version 3.0 or later
• IBM PC-DOS Version 3.1 or later
• Digital Research DR-DOS Version 6.0 or later
• Novell DOS Version 7.0 or later
• Compaq DOS Version 3.1 or later
EZ-Drive allows you to have full access to your drive in
DOS when other operating systems are loaded on the
drive. You must install the drive with EZ-Drive and DOS
before loading the other operating system. (See the Information Help option in the software for more information on
installing other operating systems.)
EZ-Drive does not support:
• Toshiba laptops, XT or Micro Channel computers
• Non-ATA hard drives (SCSI, ESDI, MFM and RLL)
Caution. Because EZ-Drive uses about 4 Kbytes of conven-
tional memory, some older virus-detection programs
may misidentify EZ-Drive as a virus. If all 640 Kbytes

16 Medalist 1270 Installation Guide, July 1995
of conventional memory are not free when these virus
programs inspect conventional memory, they assume
a virus is present and clean and restore the memory.
If this happens, information about the EZ-Drive installed drive is destroyed, and the drive cannot be
identified by the computer. Do not use these programs.
Note. The Seagate version of EZ-Drive cannot install a non-Sea-
gate drive without a Seagate drive present.
1. Boot your computer with the Seagate software diskette with
EZ-Drive. This is a precaution to ensure that the EZ-Drive
installation does not conflict with any terminate-and-stay resident (TSR) programs that may be in memory.
ENTER
2. Type ez and press
.
3. Disregard the Notice dialog box. The EZ-Drive software is
authorized for installation only with the drive on which it is
ENTER
shipped. Press
to continue.
4. Locate the bottom box on the screen. The model number of
each drive EZ-Drive identifies is listed in this box. If a drive you
have installed is not listed or the drive order (Drive 0 is the
master, Drive 1 is the slave) is incorrect or there is a drive not
identified message, make sure the master and slave jumpers
are set correctly on the drives and the I/O and power cables
are properly connected.
Note. Other troubleshooting tips are available in the Information
Help menu.
Caution. Turn off your computer before resetting the jumpers or
removing the cables.
5. If the drives are correctly identified, select Fully Automatic
Installation in the Main menu dialog box above. This creates
a single partition and formats the drive.
If you are installing the drive as Drive C, EZ-Drive automatically writes the system files to the drive to make it bootable.

Medalist 1270 Installation Guide, July 1995 17
6. When the format is complete, the Options dialog box appears.
We want to call your attention to two of the options in particular:
Create Recovery Disk and Change Install Features.
Create Recovery Disk allows you to save the boot information
EZ-Drive uses to load your drive. You can use this diskette to
restore the EZ-Drive boot information on Drive C if it is corrupted and you cannot access the drive. Use a blank diskette
to create the recovery disk. We recommend that you use this
feature.
Change Install Features allows you to change the status of
some EZ-Drive features. You can:
•
Disable Maximum overdrive.
•
Disable the EZ-Drive banner that appears during boot up.
•
Disable Floppy Boot Protection. This allows you to use the
EZ-Drive installed drive with other operating systems.
Caution.You can corrupt the data on your drive if you boot
from a diskette improperly while in this mode.
Always follow the “Booting with a diskette after
EZ-Drive is installed” instruction on page 18 or the
Floppy Boot Instruction in EZ-Drive when booting
with a diskette in this mode.
•
Set the time period the computer allows you to press
CTRL if
you want to boot to a floppy.
•
Remove the EZ-Drive boot code from Drive C.
7. Select Reboot to reboot the computer and save the installation. Remove the diskette.
Toward the end of the boot sequence, your screen should display
a prompt for booting with a diskette followed quickly by the Micro
House banner and the C: prompt. If the boot prompt and the
banner fail to appear and you have not disabled Floppy Boot
Protection in the Change Install Features menu, your computer
has not recognized the EZ-Drive installed drive.

18 Medalist 1270 Installation Guide, July 1995
Booting with a diskette after EZ-Drive is installed
To boot your computer with a diskette:
1. Boot the computer with the diskette-drive door open.
2. Press the
CTRL key when the following message appears near
the end of the boot sequence:
Hold the CTRL key down to boot from a floppy
3. Insert the boot diskette. The computer boots to the diskette
drive.
Standard setup
1. Turn the computer on.
2. Enter System Setup. (Refer to your computer’s user’s guide.
System Setup may be called Setup, BIOS Setup or CMOS
Setup.)
3. Find the hard disc configuration in the System Setup screen.
4. Select a drive type that matches the drive translation geometry
for your drive as shown in the table.
Translation geometry
Model
CHKDSK
Mbytes
2
Cyl Heads
Sectors
per track
(Setup)
Mbytes
ST31270A 1,282.8 2,485 16 63 1221
Note. CHKDSK and CMOS capacities are approximations.
The capacities your computer reports may vary slightly.
If none of the standard drive types offered in System Setup
match the translation geometry of your Seagate drive, select
user-defined or custom
the
drive type, if available, and enter
your drive’s translation geometry.
2. One Mbyte equals 1,000,000 bytes.
3. One Mbyte equals 1,048,576 bytes.
CMOS
3

Medalist 1270 Installation Guide, July 1995 19
If a user-defined drive type is not offered, select a drive type
that approximates, but does not exceed, the
capacity in the translation geometry table above.
Mbytes
Note. The drive does not use write precomp and landing zone.
If these parameters are listed, make their values zero.
If you upgrade your system at a later date to achieve the
drive’s full capacity, you must repartition and reformat the disc.
Be sure to back up your data first.
5. When you have completed setting the translation geometry for
your drive, save the values and exit System Setup. Reboot
your computer. Refer to your user’s guide for assistance.
6. Partition and format the drive.
CMOS (Setup)
Dual-drive emulation installation
Dual-drive emulation makes the drive two logical drives for the
computer. Each logical drive is assigned a drive type in System
Setup and must be partitioned and formatted. Use the translation
geometry values shown in the table below. They are the maximum values your BIOS supports. A second, physical drive cannot
be installed on the same port when dual-drive emulation is used.
To configure your computer for dual-drive emulation:
1. Follow steps 1 through 3 in the “Standard setup” section on
page 18.
2. Use the translation geometry in the table for both drive types.
Dual-drive emulation
Model
ST31270A 527.4 1,024 16 63 504
3. Save the values and exit System Setup.
4. Partition and format both drives.
CHKDSK
Mbytes
translation geometry
Cyl Heads
Sectors
per track
(Setup)
Mbytes
CMOS

20 Medalist 1270 Installation Guide, July 1995
Partitioning and formatting the drive
Before you can use your Seagate drive, you must partition and
high-level format it. In this guide we discuss formatting your drive
with DOS—refer to your DOS user’s guide for assistance. If you
are using another operating system, consult your operating system user’s guide for formatting instructions.
Note. If you have not copied the free installation software to a
diskette, your computer will detect a partition on the drive.
Only the first two cylinders are formatted at the factory to
store the software files. You must erase this partition
before you can access the full drive capacity. You can
either transfer the files to a diskette—the partition is erased
when the transfer is complete—(see page 11 for instructions) or partition and format the drive as described below.
Low-level formatting
The drive is low-level formatted at the factory using 512 bytes per
sector. Low-level formatting is not required.
Partitioning
You must partition the drive into one or more logical drives before
you can use it.
Caution. Partitioning or formatting a drive at any level erases all
data on it. Make a backup copy of your existing files on
another drive before you repartition or reformat. Seagate assumes no liability if you erase your data.
You can partition a drive as follows:
1. Insert a bootable diskette into Drive A. Turn the computer on.
2. After the computer has completed booting, remove the boo-
table diskette from Drive A. Insert a diskette that has the
FDISK utility into Drive A and type fdisk. Press
Note. If you have two drives in your system, the menu displays
five options. Option five allows you to select the drive
you want to partition. Be sure to select the correct drive.
ENTER.

Medalist 1270 Installation Guide, July 1995 21
3. Select
4. Select
create DOS partition or logical DOS drive
create primary DOS partition
. Use the maximum avail-
. Press ENTER.
able size for your primary partition and make the partition
active for Drive C. This puts the entire drive on one partition
and allows you to load the DOS boot information on the drive.
ENTER
Press
for each subsequent selection.
After all of the appropriate selections are made, the computer will
restart itself. You must place a bootable diskette into Drive A.
High-level formatting
High-level formatting verifies the information written by the lowlevel format and builds the file allocation table (FAT) used by DOS
to access files on the drive. If you put more than one partition on
the drive, you must high-level format each partition. Refer to your
DOS reference guide for instructions. Use the DOS FORMAT
utility to high-level format the drive as follows:
1. At the DOS prompt, type the following command:
drive:
format
drive
: designates the drive you are formatting. If you are
/v /s
formatting the boot drive or if your system contains only one
drive, type c:. To format a second drive, type d:.
/v tells the computer to create a volume label for the partition
after it is formatted. Labeling can prevent someone from
accidentally deleting the partition and losing your data.
/s tells the computer to copy the necessary system files to the
drive to make it bootable.
2. When the computer prompts you for a volume label, you can
use up to eleven characters to name the drive volume (see
your DOS reference manual) or leave it blank. Press
ENTER.
Windows 32-bit disk access
If 32-bit disk access is enabled in Windows, an error message
appears when you load Windows after you have installed a drive
with more than 528 Mbytes. The Windows 32-bit disk access

22 Medalist 1270 Installation Guide, July 1995
driver must be turned off for you to open and use Windows. Use
the Seagate replacement driver to restore 32-bit disk access
capability. To open Windows and restore 32-bit disk access:
1. Press
ENTER to open Windows.
2. Open the Main menu.
3. Open the Control Panel.
4. Open 386 Enhanced.
5. Select Virtual Memory.
6. Select Change.
7. Select 32-Bit Disk Access at the bottom of the screen to
change its status.
8. Select OK. Follow the screen instructions to reboot.
You can re-establish the 32-bit disk access capability using the
SEG32BIT.386 software as follows:
1. Load Windows.
2. Open the Program Manager menu and select File.
3. Select Run.
4. Insert the Seagate software diskette into the diskette drive.
5. In the command line box, type drive:stsetup.
6. Read the license agreement that appears on the screen. If you
agree to the terms, select
ACCEPT AGREEMENT to continue.
7. The next screen lists the features the SEG32BIT.386 driver
supports. If your computer supports these features, they will
be active in 32-bit disk access mode with SEG32BIT.386 for
all drives that support them. Select Install Driver to continue.
8. After the driver is installed, you must enable the 32-bit disk
access option in the Windows control panel to make it operational. You can choose to enable the option now or later. If you
choose to enable the driver now, the program opens the
Windows main menu. Repeat steps 3 through 7 you used to
disable the Windows 32-bit disk access driver to enable the
SEG32BIT 32-bit disk access driver.

Medalist 1270 Installation Guide, July 1995 23
Basic troubleshooting
Warning. Always turn off the computer before changing jumpers
or unplugging cables and cards.
Caution. Your drive and computer contain static-sensitive de-
vices. Wear a ground strap or take other antistatic
precaution while handling your drive.
If you have installed your drive and it does not function properly,
perform the following basic checks:
• Verify compatibility. Verify that the host adapter and the
drive are appropriately matched to each other and to your
computer. Refer to relevant documentation for details.
• Check all cards. Verify that all cards are seated in their slots
on the motherboard and are secured with mounting screws.
• Check all cables. Make sure all ribbon and power cables are
securely connected. Ribbon cables are easily damaged, especially at the connector. Try a new cable or a known good
cable. Make sure no socket pins were bent when the cable
was inserted. For each cable, verify that cable-connector pin
1 is aligned with equipment-connector pin 1. The edge-stripe
on the ribbon cable is used to denote pin 1.
Caution. Do not reverse-plug connectors. This can damage
the computer and the drive.
• Verify equipment configuration. Review the instructions in
this guide and the host adapter installation guide and make
sure that all appropriate jumpers are installed, or removed, to
suit your application.
• Check the power-supply specifications. If new devices are
installed, your computer’s power supply may not support the
new total power requirement. Consult your dealer.
• Verify the drive type setting in System Setup. The drive
type stored in CMOS memory by your System Setup program
must not exceed the physical specifications of your drive. Also,

24 Medalist 1270 Installation Guide, July 1995
if you have a large-capacity drive, the translation geometry
settings must not exceed the limitations set by the operating
system and BIOS.
• Check for viruses.
Before you use someone else’s diskette
in your system for the first time, scan the diskette for viruses.
Advanced troubleshooting
If you have performed the preceding basic checks but the problem has not been solved, follow these guidelines for troubleshooting specific cases:
The system does not recognize the drive.
• Check all cables.
• Make sure the power supply is adequate for system needs.
• Reboot the computer and make sure the drive motor runs. If
your drive is very quiet, it may be difficult to hear its discs reach
operating speed. Recheck all drive cables if the drive is not
running.
• Verify the System Setup drive-type values. Each drive present
must be represented in System Setup.
• Try a warm boot (a reboot without turning off computer power).
To do this, press
If the drive is recognized after the warm boot, the computer
BIOS’ setup test may be completing before the drive is ready.
One possible solution is to slow your computer’s processor
speed during startup. If your computer has a turbo switch, set
it to slow speed before turning the computer on. If there is no
turbo switch, you may be able to use keyboard commands to
slow the processor speed; see your computer manual for
details. After the computer is up and running, return the
processor to the fast speed.
Another solution is to warm-boot your computer after every
power-on.
• Check for I/O address conflicts. To isolate the conflict, first
CTRL, ALT, and DELETE at the same time.

Medalist 1270 Installation Guide, July 1995 25
verify that the drive and host adapter are compatible with your
computer by removing all the peripheral adapter cards (power
must be off) except for the video card. Then reinstall the drive
and host adapter card. If this is successful, reinstall the other
peripherals one at a time until the conflict reoccurs.
After you have isolated the source of the address conflicts,
you can resolve the conflict by changing the I/O address of the
peripheral that appears to cause the conflict.
• If your drive was installed with EZ-Drive, the special instruction
in the boot sequence on Drive C may have been bypassed.
Remove the diskette and reboot. For instructions on how to
boot with a diskette, see the section “Booting with a diskette
after EZ-Drive is installed” on page 18.
• If the computer does not recognize the slave drive after
power-on, the slave may not be communicating with the
master during the boot cycle. Try reconfiguring the drives
using the master/slave timing protocol jumpers discussed on
page 8.
The dealer partitioned and high-level formatted the drive for
you in the store. Later, you installed the drive and it does not
respond.
• Reboot the computer and make sure the drive spins up.
• Check all cables.
• Make sure the power supply is adequate for system needs.
• Use the same version of DOS within all partitions. Make sure
the DOS version the dealer used to partition and high-level
format the drive is the same as the version you have installed
on your computer. If it isn’t, see your dealer.
• Verify the System Setup drive-type value. You must install the
drive using the same drive type or translation geometry that
your dealer used to partition the drive.
• Check for I/O address conflicts between peripheral cards.
• Check for viruses.

26 Medalist 1270 Installation Guide, July 1995
The screen remains blank when you power up the system.
• Make sure the monitor is plugged in and turned on.
• Check all cards. Make sure the video card is seated in its slot
and secured with mounting screws.
• Check all cables. Make sure the video-card cables are securely attached.
• While the computer is powered down, remove the drive host
adapter. If the screen turns on after you reboot, the host
adapter may be incompatible or defective. If so, see your
dealer.
The system hangs in FDISK or fails to create or save the
partition record.
• Check all cables.
• The DOS utilities diskette may be corrupted. Try your backup
DOS diskette.
• Make the partitions smaller.
• Try another drive type or translation geometry. The computer’s
BIOS may not accept a particular translation geometry for
writing into the CMOS setup memory.
• Change the interrupt jumper setting on the host adapter.
• Check for media defects at the beginning of the drive. Use a
third-party surface scan utility.
• Some BIOSs have a Track 0 protection feature that protects
Track 0 from viruses. This can causes FDISK to hang the
system. You must disable this feature in System Setup before
you can use FDISK. See your computer reference guide for
assistance. Be sure to re-enable this important feature when
FDISK is done.
System error message, “Drive not Ready,” appears.
• Check all cable connections. For each ribbon cable, verify that
pin 1 of the cable is matched to pin 1 of the connector. Pin 1
is usually denoted by the edge-stripe on the ribbon cable.

Medalist 1270 Installation Guide, July 1995 27
• Make sure the power supply is adequate for system needs.
• Reboot the computer and make sure the drive spins up.
The FDISK error message, “No Fixed Disk Present,” appears.
• Check all cables.
• Make sure the power supply is adequate for system needs.
• Reboot the computer and make sure the drive spins up.
• Verify the System Setup drive-type values.
• Check for I/O address conflicts.
The drive does not format to full capacity.
• Verify your computer’s System Setup drive-type values. One
of the following problems may have occurred: 1) the values
may be set for an incorrect drive type or translation geometry;
2) you may have entered a parameter value that exceeded the
physical capacity of the drive; 3) you selected a translation
geometry or drive type that does not take full advantage of the
drive’s capacity; or 4) the drive’s physical specifications exceed the translation geometry limits imposed by the BIOS.
Refer to “Standard setup” on page 18 if any of the first three
cases are true. Refer to “Configuring the computer” on page
14 if the last case is true.
If you reset the System Setup drive-type value, you must
partition and high-level format the drive again.
• If you partitioned the drive into individual logical drives, you
may need to make the partitions smaller so that the computer
can use all of the drive’s capacity.
• If your computer supports LBA mode, you may need to enable
an LBA mode function in System Setup to get the drive’s full
capacity. Refer to your computer’s reference guide.
• You can use the EZ-Drive software to install the drive.
DOS messages “Disk Boot Failure,” “Non-System Disk,” or
“No ROM Basic - SYSTEM HALTED,” appear.
• Reinstall the DOS system files using the DOS SYS utility.

28 Medalist 1270 Installation Guide, July 1995
• Check all cables.
• Use FDISK to verify that the primary partition is active.
• Check for viruses.
System error message, “HDD controller failure” appears.
• Confirm the jumper settings on the drive.
• Verify the System Setup drive-type values.
The error message “Microsoft Windows 32-bit disk driver
(WDCTRL) phase 03, 3f” appears when you open Windows.
• A device conflict occurs between the native Windows 32-bit
disk access driver and drives with more than 528 Mbytes. To
get the advantages of 32-bit disk access and more, install the
SEG32BIT 32-bit disk access driver. See “Windows 32-bit disk
access” on page 21 for installation instructions.
Disabling EZ-Drive
To disable EZ-Drive, remove the EZ-Drive boot information written to the boot sector of Drive C. Your computer will stop accessing EZ-Drive-installed drives with more than 528 Mbytes. The
data files are not affected. For this operation, you need a bootable
diskette and a diskette that has the FDISK utility.
Note. Before you disable EZ-Drive, back up your data files.
1. Turn the computer off.
2. Insert a bootable diskette into Drive A and turn the com-
puter on. Your computer must boot to Drive A without
loading EZ-Drive into the system memory.
3. When the boot cycle is complete, place a diskette that has
the FDISK utility in Drive A if it is not on the boot diskette.
4. Type fdisk/mbr and press
ENTER. This command erases
the EZ-Drive-modified master boot record on Drive C and
replaces it with the standard DOS master boot record. The
computer can no longer identify drives with more than 528
Mbytes installed using EZ-Drive. You must partition and
format the drive to make it accessible (see page 20).

Medalist 1270 Installation Guide, July 1995 29
Disabling Maximum Overdrive
Maximum Overdrive enables the drive’s read/write multiple feature. You can disable Maximum Overdrive during the installation
process or anytime afterward.
To disable it during the installation, select the Change Install
Features option in the Options dialog box that appears when the
format completes. This feature allows you to enable or disable
Maximum Overdrive.
To disable it after the drive has been installed:
1. Insert the Seagate software diskette with EZ-Drive into the
diskette drive.
2. Type ez at the command line.
3. Go to the Main menu and select Installation Options. Press
ENTER.
4. Select Change Install Features and press ENTER.
5. Select Disable Maximum Overdrive.
6. Press the
7. Use the down-arrow key to select Save Changes. Press
ENTER
key to change the status.
ENTER
to save.
Additional EZ-Drive troubleshooting and help information is available when you select Information Help in the main menu. Answers to frequently asked troubleshooting questions are
available in the EZ-HELP.EXE file on the diskette.

30 Medalist 1270 Installation Guide, July 1995
Technical support services
If you need assistance installing your drive, consult your dealer.
Your dealer is familiar with system configurations and can help
you with system conflicts and other technical issues.
If you need additional assistance with your Seagate drive or other
Seagate products, you can call SeaBOARD,
gate Technical Support FAX, SeaFONE or SeaTDD. Seagate
technical support is also available on CompuServe.
SeaBOARD
Using a modem, you can:
•
Access documentation, drive specifications and jumper settings for Seagate’s entire product line.
•
Download software for installing and analyzing your drive.
SeaBOARD is available 24 hours daily. It supports communications up to 9,600 baud. Set your communications software to
eight data bits, no parity and one stop bit (8-N-1). SeaBOARD
phone numbers are listed in the following table.
Location Modem number
United States 408-438-8771
England 44-1-62-847-8011
France (+33 1) 48 25 35 95
Germany 49-89-140-9331
Singapore 65-292-6973
Thailand 662-531-8111
Australia 61-2-756-2359
Korea 82-2-556-7294
SeaFAX
, Sea-

Medalist 1270 Installation Guide, July 1995 31
SeaFAX
You can use a touch-tone telephone to access Seagate’s
automated FAX system to receive technical support information by return FAX. This service is available 24 hours daily.
Location
United States
England
Telephone number
408-438-2620
44-1-62-847-7080
Seagate Technical Support FAX. 408/438-8137
You can FAX questions or comments to technical support
specialists 24 hours daily. Responses are sent between
A.M. and 5:00 P.M. (Pacific time) Monday through Friday.
8:00
SeaFONE. 408/438-8222
You can talk to a technical support specialist between
A.M. and 5:00 P.M. (Pacific time) Monday through Friday.
8:00
SeaFONE provides recorded technical information on selected Seagate products while you are on hold. You can
access the recordings 24 hours daily. Before calling, note your
xxxx
system configuration and drive model number (ST
).
SeaTDD. 408/438-5382
Using a telecommunications device for the deaf (TDD), you
can send questions or comments 24 hours daily and exchange
messages with a technical support specialist between 8:00
A.M. and 5:00 P.M. (Pacific time) Monday through Friday.
Seagate CompuServe forum
Online technical support for Seagate products is available on
CompuServe. To access our technical support forum, type go
seagate. This forum provides information similar to that found
on SeaBOARD.

32 Medalist 1270 Installation Guide, July 1995
Seagate’s Internet connections
Technical information for Seagate drives is available on the
internet from Seagate’s World-Wide Web home page
(http://www.seagate.com) or Seagate’s ftp server
(ftp://ftp.seagate.com). The ftp server contains information
similar to that found on SeaBOARD.

Foam
Antistatic bag
Drive
Foam
Foam
Antistatic bag
Drive
Foam
Medalist 1270 Installation Guide, July 1995 33
Storing and shipping your drive
Keep your original box and packing materials for storing or
shipping your drive. The box has a
label. Shipping a drive in an unapproved container voids the
warranty. Call your authorized Seagate distributor to purchase
additional boxes.
The following figure shows how a drive fits in an approved
single-pack box, including the packing materials.
Seagate Approved Package
Figure 4. A drive in an approved package

Seagate Technology, Inc.
920 Disc Drive, Scotts Valley, CA 95066, USA
Publication Number: 36315-001, July 1995, Printed in USA
 Loading...