

Page 1

ST11200 Family Install Guide
. . . . . . . . . . . . . . . . . . . . . . .
ST11200 Family:
. . . . . . . . . . . . . . . . . . . . . . .
ST11200N/ND/NC
. . . . . . . . . . . . . . . . . . . . . . .
ST1980N
. . . . . . . . . . . . . . . . . . . . . . .
ST1950N
. . . . . . . . . . . . . . . . . . . . . . .
ST1830N
. . . . . . . . . . . . . . . . . . . . . . .
Installation Guide
. . . . . . . . . . . . . . . . . . . . . . .
Page 2

ST11200 Family Install Guide
Contents
Introduction ........................................................ 1
Electromagnetic interference ............................ 1
Before you begin ................................................ 3
Installation overview ................................ 8
Product Repair.................................................... 10
Shipping................................................... 11
Product Repair and Return Information ... 12
Technical Support Services ..................... 13
Drive specifications............................................ 15
Initial set-up information.................................... 19
Drive configuration.............................................24
Drive installation................................................. 32
© 1993 Seagate Technology, Inc. All rights reserved
Publication Number: 77738480, Rev. D.
Seagate®, Seagate Technology® and the Seagate logo
are registered trademarks of Seagate Technology, Inc.
SeaFAXTM, SeaFONETM, SeaBOARD
marks of Seagate Technology, Inc. Other product
names are registered trademarks or trademarks of
their own.
TM
are trade-
No part of this publication may be reproduced in any
form without written permission from Seagate Technology, Inc.
Page 3

ST11200 Family Install Guide
Introduction
Before attempting any installation, please read through
all applicable sections of this document, including all
warnings and cautions.
Warning. This equipment generates, uses, and can
radiate radio frequency energy and if not
installed in accordance with these instructions, may cause interference to radio communications.
Electromagnetic interference (EMI) considerations
The drive(s) described herein, as delivered, are designed for system integration and installation into a
suitable enclosure prior to use. As such, the drive(s)
described herein are supplied as a sub-assembly and
are not subject to Subpart J of Part 15 of the FCC Rules
and Regulations nor the Radio Interference Regulations of the Canadian Department of Communications.
However, the unit has been tested using proper shielding and grounding and found to be compliant with the
Class A limits of the FCC Rules and the Regulations of
the Canadian Department of Communications.
1
Page 4

ST11200 Family Install Guide2
The physical design characteristics of the drive(s)
described herein, serve to minimize EMI radiation
when installed in an enclosure that provides reasonable shielding. As such, the drive(s) are capable of
meeting the Class B limits of the FCC Rules and the
Regulations of the Canadian Department of Communications.
Note. It is the end users' responsibility to assure that
the drive(s) described herein meet the appropriate EMI requirements of their system. Shielded I/
O cables may be required if the enclosure does
not provide adequate shielding. If I/O cables are
external to the enclosure, shielded cables should
be used, with the shields grounded to the enclosure and to the host controller.
Page 5

ST11200 Family Install Guide
Before you begin
Verify that the system is switched off and disconnected from main power before any installation is
attempted.
Protect yourself, the drive, and your valuable programs and data by reading the following cautions
and warnings.
• Do not unpack drive from its static shielded bag until
you are ready to install it in the system.
• Always handle the drive by the frame or casting.
• Do not touch printed circuit board (PCB) or the I/O
connector pins.
• Never apply pressure to the PCB or to the drive top
cover.
• Do not tamper with sealed top cover. Doing so voids
your warranty. The drive contains no user servicable
components. See Product Repair section for more
information.
3
• Visually inspect the shipping container for any obvious damage.
Page 6

ST11200 Family Install Guide4
• Inspect drive for possible shipping damage. All claims
of this type should be filed promptly with the transporter involved. Save original packing materials to be
used when reshipping.
• Verify all parts listed on shipping bill are received with
the equipment. Discrepencies or damage should be
reported to the shipping company.
• When transporting or shipping a drive or system,
please ensure that they are correctly packed in
original Seagate approved (or equivalent) container
and shipped via an air-ride carrier experienced in
handling computer equipment.
Caution. The circuit assemblies and components
contained in this equipment can be degraded or destroyed by Electrostatic Overstress (EOS) or by Electrostatic Discharge
(ESD).
Static electrical charges can accumulate
quickly on personnel, clothing and synthetic
materials. The electrostatic fields due to
these charges when brought in close proximity to susceptable circuit assemblies and
components, can result in degraded reliability or immediate failure of the affected component or assembly.
Page 7

ST11200 Family Install Guide
To insure optimum reliable equipment operation, it is required that technical support
personnel discharge themselves by wearing a grounding strap around the wrist and
be connected to a grounding terminal while
working in the vicinity of, and while handling
EOS/ESD susceptible assemblies/parts. If
unavailable, ground yourself frequently by
touching the metal chassis of the system
before handling any components (this helps
only if the system is connected to a ground).
Avoid static-inducing carpeted areas.
5
Page 8

ST11200 Family Install Guide6
Safety instructions
1. The disc drive(s) are to be installed in a customer
supplied enclosure where the surrounding air does
not exceed 50oC.
2. Four (4) 6-32 UNC-2A screws are required for
installation. Maximum screw length into side of
drive is 0.15 inches (3.81 mm). Maximum screw
length into bottom is 0.20 in. (5.08 mm).
3. The power requirements are shown in Section 1.0
Product Information.
4. The power supply must satisfy the safety require-
ments for SELV (Safety Extra Low Voltage) circuits.
5. Service is to be provided by trained Seagate ser-
vice personnel.
6. The incorporation of the disc drives listed in this
guide into a customer enclosure must meet the
appropriate safety requirements of the country in
which it is used (e.g. UL 1950, CAN/CSA-C22.2
No. 950-M89, DIN VDE 0805/05.90 and EN60950:
1988 (IEC 950).
Page 9

ST11200 Family Install Guide
Sicherheitsanleitung
1. Däs Gerät ist ein Einbaugerät, vorgesehen für eine
maximale Umgebungstemperatur von 50oC.
2. Zur Befestigung der Drive werden 4 Schrauben
benötigt (6-32 UNC-2A). Die maximale Länge der
Schrauben in der unteren Seite des Chassis darf
nicht mehr als 0.20 in (5.08 mm) betragen, die in
der oberen 0.15 in (3.81 mm).
3. Die Versorgungsspannungen werden im Kapitel
1.0 (Produkt Information) gezeigt.
4. Die Versorgungsspannung muss SELV entsprechen.
5. Alle Arbeiten dürfen nur von ausgebildetem Seagate
Service-Personal durchgefürhrt werden.
6. Der Einbau des Drives muss den Anforderungen
gemäss DIN VDE 0805/05.90 oder EN60950: 1988
(IEC 950).
7
Page 10

8
ST11200 Family Install Guide
Installation Overview
Installation of the drive can be divided into distinct
phases as outlined below. Some of these may not be
applicable to your particular installation requirements.
Refer to the individual drive installation sections for
specific information on your drive model.
• Drive configuration: The user must select which of
the drive features are appropriate to enable for
installation in their system. This is done by installing
or removing of the user configuration jumpers found
on the drive PCB. "NC" models are probably configured by the host over the 80 pin interface.
• Mechanical installation: After setting up the drive
configuration the drive must be mechanically installed into the host system and the power and I/
O cables attached. Previously mentioned precautions should be observed
• SCSI drives should not be defined in the CMOS:
The SCSI Host adapter has its own BIOS to handle
the Input/output procedures. The CMOS setting for
SCSI drive is either drive type zero, or the "no drive
installed" option.
Page 11

ST11200 Family Install Guide
• Low-level formatting: After the drive has been
properly configured for the system, it does not need
to be low-level formatted, as this has been done by
the factory and does not require this step during
installation. (The low-level format writes the sector
boundaries and track information to the drive). Defect
management information is read from the drive by the
host system when required in the installation procedure. If an installed drive is low-level formatted, all
user data stored on the drive will be lost.
Note. Seagate Technology assumes no liability for
lost user data.
• Partitioning and high level formatting: A drive
can be sub-divided into "partitions" which behave as
individual drives within the system. See your system
documentation. Present day drive installation programs have menus that lead you through these
installation procedures.
9
Page 12

ST11200 Family Install Guide10
Product repair information
Service requirements
The special facilities required for the manufacture of
these drives generally prohibit repair in the field. If
problems occur during installation, please contact your
supplier for assistance. Do not attempt to dissassemble or repair. Drives should be sent to the repair
depot through the purchase source, if possible. Please
observe the following cautions.
Caution.
• Handle drive with care. Do not drop or bump hard.
• Never remove the cover of these disc drives. Servicing items in the sealed HDA (heads, media, actuator, etc.) require special facilities. The drive contains
no user purchasable parts or PCBs.
• Opening the sealed HDA voids the drive warranty.
• Applying a soldering device to the components on the
PCB voids the drive warranty.
Page 13

ST11200 Family Install Guide
• Place drive on a flat, static dissapative surface and
handle with extreme care. Always follow all EOS/
ESD precautions to avoid damage to the electrical
assemblies.
Shipping: When transporting or shipping a drive, a
Seagate approved container must be used. Keep your
original box. They are easily identified by the Seagate
Approved Package label. Shipping a drive in a nonapproved container voids the drive warranty.
Seagate repair centers may refuse receipt of components improperly packaged or obviously damaged in
transit. Contact your Authorized Seagate Distributor to
purchase additional boxes. Seagate recommends shipping by an air-ride carrier experienced in handling
computer equipment.
11
Page 14

ST11200 Family Install Guide12
Product repair and return information
Seagate customer service centers are the only facilities authorized to service Seagate drives. Seagate
does not sanction any third-party repair facilities. Any
unauthorized repair or tampering with the factory-seal
voids the warranty.
Warranty: Contact your Seagate Authorized Distributor, Dealer or other purchase source for warranty
information.
If the drive is no longer under warranty contact purchase source for repair information or refer to numbers
listed in the following paragraph .
Page 15

ST11200 Family Install Guide
13
Technical support services
Please contact your dealer for technical support and
installation troubleshooting. Product Technical Support is available for all Seagate products by calling the
SeaFAX, SeaFONE or SeaBOARD services. These
are toll calls.
SeaFAX: 408/438-2620
You can use a Touch-Tone telephone to access
Seagate's automated FAX delivery system and select
technical support information by return FAX. This service is available 24 hours a day, 7 days a week.
SeaFONE: 408/438-8222
The enhanced phone system provides recorded technical information on selected Seagate products while
you are on hold. Technical suppport specialists are
available to answer questions from 8:00 AM to 5:00PM
PST, Monday through Friday. Recordings are accessible 24 hours a day, 7 days a week.
Page 16

ST11200 Family Install Guide14
SeaBOARD:
The Seagate Technical Support Bulletin Board System
(BBS) is available 24 hours a day, 7 days a week. A
modem is required to access this service. The communications software must be set for eight data bits, no
parity and one stop bit (8N1).
With this service you can access:
• Specifications and jumper configurations for all
Seagate products.
• Reprints of Seagate documentation.
• A directory of information and helpful utilities that you
can download to your own computer.
BBS Modem Maxmum
Location Number Baud Rate
United States 408-438-8771 9600
England 44-62-847-8011 9600
Germany 49-89-140-9331 2400
Singapore 65-227-2217 9600
Australia 61-2-756-2359 9600
Note: These are toll calls
Page 17

ST11200 Family Install Guide
15
Drive specifications
Product
Information ST11200N/NC ST11200ND
Interface [7] SCSI-2 Fast SCSI-2 Fast
Cache Type Multi-segmented, 256 Kb
Capacity MB
Unformatted 1248 1248
Formatted [1] 1054 1054
Cylinders 1872 1872
Heads 15 15
Sectors/track 74 (avg.) 74 (avg.)
Recording method RLL (1,7) RLL (1,7)
Rev/min 411 5411
Seek time (ms typ.)[2]
Average Read 12.0 12.0
Write 12.7 12.7
Operating environment
Ambient temp. [4] ------ 5oC to 50oC----HDA max temp. [3] -----------60oC----------
Power requirements (Versorgungsspannungen)
+12 V+/-5% (Max [6] 1.0 A 1.0 A
(Max Start) [5] 2.0 A 2.0 A
+5 V +/-5% (Max) [6] 0.8 A 1.0 A
(Max Start) 0.8 A 0.9 A
Power Idle (Typ) 9.0 W 10 W
Oper. (Typ) 11.0 W 12 W
Page 18

16
Product
Information ST1980N
ST11200 Family Install Guide
Interface [7] SCSI-2 Fast
Cache Type Multi-segmented, 256 Kb
Capacity MB
Unformatted 1021
Formatted [8] 860
Cylinders 1730
Heads 13
Sectors/track 74 (avg.)
Recording method RLL (1,7)
Rev/min 5411
Seek time (ms typ.)[2]
Average Read 11.7
Write 12.5
Operating environment
Ambient temp. [4] ------5oC to 50oC-----HDA max temp. [3] -----------60oC----------
Power requirements (Versorgungsspannungen)
+12 V+/-5% (Max [6] 1.0 A
(Max Start) [5] 2.0 A
+5 V +/-5% (Max) [6] 0.8 A
(Max Start) 0.8 A
Power Idle (Typ) 9.0 W
Oper. (Typ) 11.0 W
Page 19

ST11200 Family Install Guide
Product
Information ST1830N ST1950N
Interface [7] SCSI-2 Fast SCSI-2 Fast
Cache Type Multi-segmented, 256 Kb
Capacity MB
Unformatted 834 953
Formatted [8] 702 803
Cylinders 1325 1575
Heads 13 13
Sectors/track 74 (avg.) 74 (avg.)
Recording method RLL (1,7) RLL (1,7)
Rev/min 5411 5411
Seek time (ms typ.)[2]
Average Read TBD TBD
Write TBD TBD
Operating environment
Ambient temp. [4] ------5oC to 50oC-----HDA max temp. [3] -----------60oC----------
Power requirements (Versorgungsspannungen)
+12 V+/-5% (Max [6] 1.0 A 1.0 A
(Max Start) [5] 2.0 A 2.0 A
+5 V +/-5% (Max) [6] 0.8 A 0.8 A
(Max Start) 0.8 A 0.8 A
Power Idle (Typ) 9.0 W 9.0 W
Oper. (Typ) 11.0 W 11.0 W
17
Page 20

18
Notes.
[1] Standard units are factory formatted with 512 data
bytes per sector with twelve spare sectors per
cylinder and 2 cylinders at inner tracks reserved for
spares in addition to capacity listed.
[2] Includes on-board controller overhead.
[3] Maximum measured at any location on top cover.
[4] For best reliability keep below 35oC (95oF).
[5] -10% regulation for a maximum of 10 seconds at
power up. (-10% Regelung für 10 Sekunden max).
[6] Measured with an average reading DC ammeter.
Instantaneous +12 V current peaks will exceed
these values.
[7] Can be commanded to operate according to SCSI-
1 protocol.
ST11200 Family Install Guide
[8] 512 data bytes per sector with one spare sector per
track, two spare cylinders at inner tracks.
Page 21

ST11200 Family Install Guide
19
Initial setup information
For the initial setup connect the cables, set the SCSI
bus address and remove, install, or leave as is the SCSI
I/O line terminator resistor packs. These procedures
are described in paragraphs following.
SCSI interface cable connection
Model ST11200 family are SCSI interface drives. On
"N/ND" models, system connection is via a 50 pin,
SCSI connector. On "NC" models system connection
and DC power is via a single 80 pin SCSI connector.
Because of its shape, there is only one way the drive
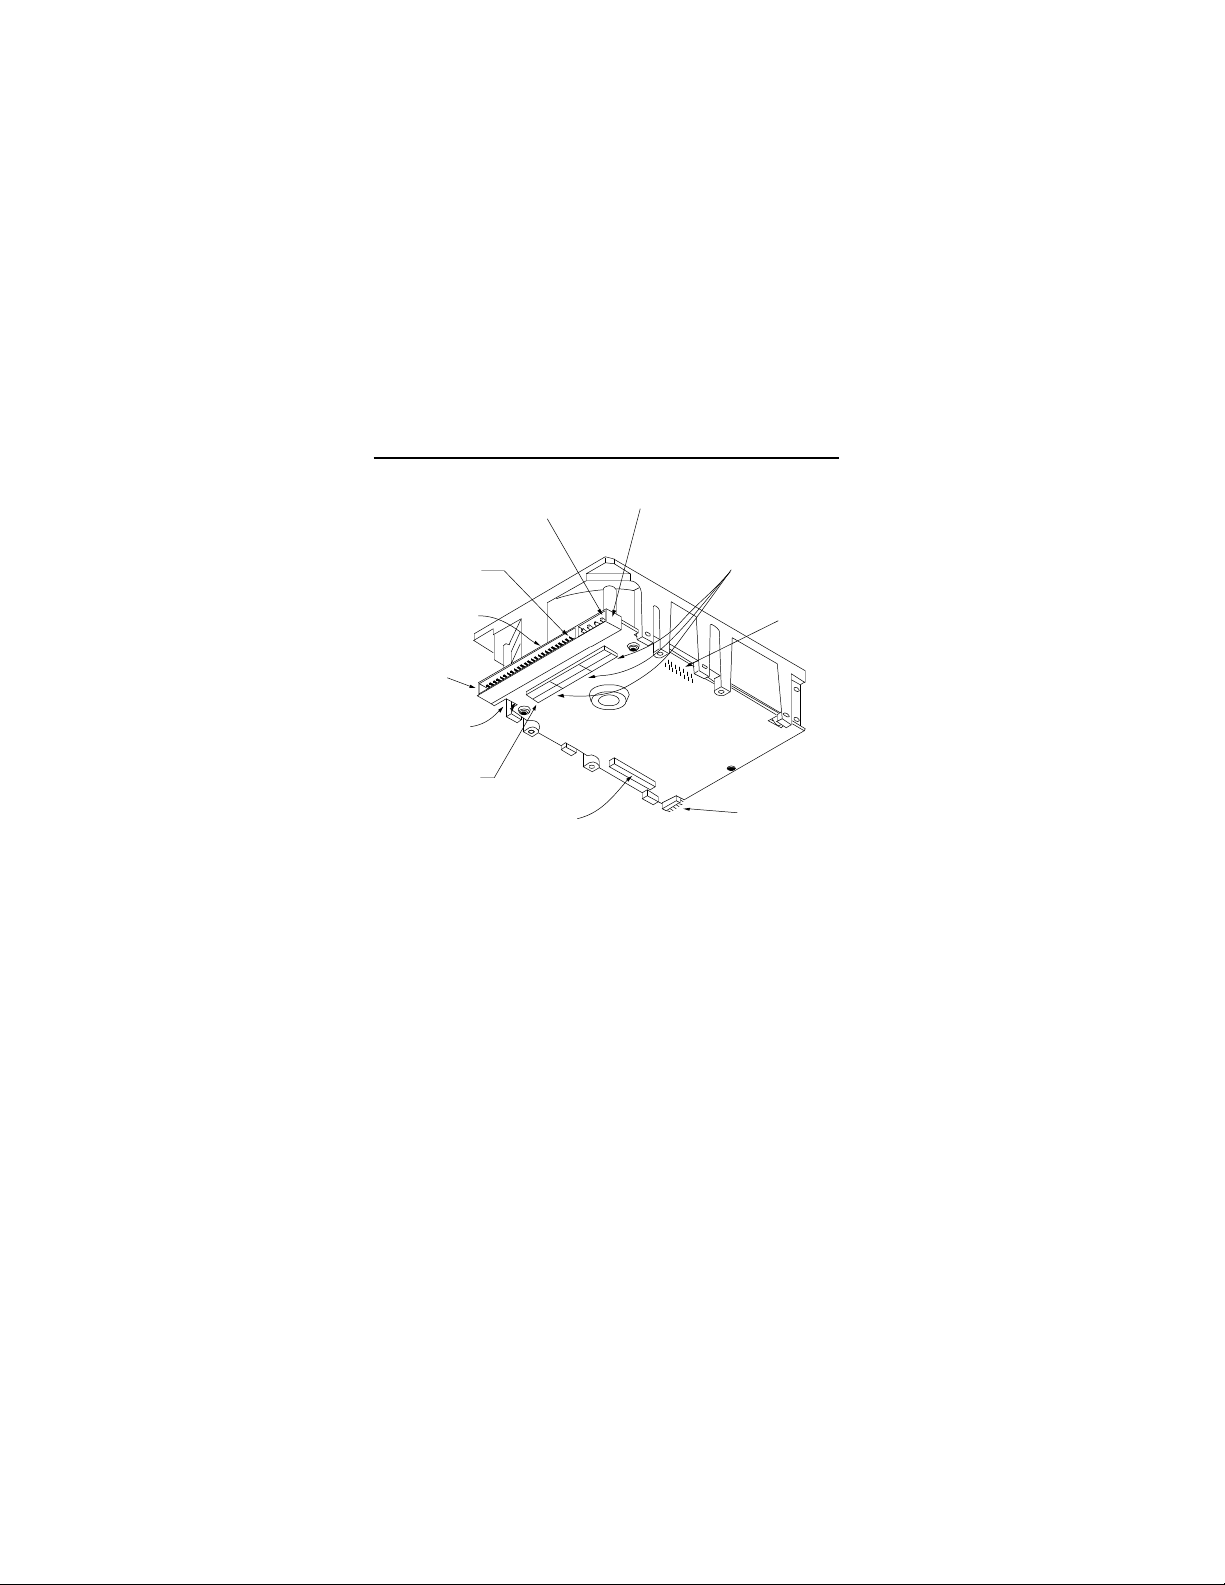
can mate with the input connector. Pin 1 is noted in
Figure 2. Some cables have a contrasting color stripe
on one edge to indicate pin 1. Strain relief is recommended at the cable.
flow by the routing of cables.
Do not block system cooling air
Page 22

ST11200 Family Install Guide20
SCSI address selection
On "ND" model drives, make sure that the SCSI bus
address jumper(s) are properly set for the bus address
assigned to the drive. See figures at beginning of
Section 3 showing the bus address select header and
the jumper configurations that select addresses 0
through 7. Typically the primary boot device is set to ID
0, and the subsequent SCSI drives are jumpered in
ascending order. Bus addresses 0 through 6 should be
used (the host adapter usually uses address 7). On
"NC" model drives the SCSI ID can be, and presumably
will be set over the 80 pin interface by the host computer. Unless directed to by the host system documentation, no jumpers should be installed for address
selection on "NC" models. The host also has complete
control over motor starting, so no motor start jumper is
required. If the drive LED shows no on/off activity when
the host is trying to communicate with it, an incorrect
bus address selection at the drive should be suspected.
Page 23

ST11200 Family Install Guide
21
Resistor terminator packs
If you are installing a single drive, the resistor terminator
packs must remain installed. See Figure 2 where they
are noted as I/O Terminators. If you are installing
multiple hard disc drives, remove the resistor termination packs from all the drives but the one connected to
the end of the SCSI I/O cable.
When reinstalling a resistor pack, note that pin 1 end on
the pack is denoted by a dot, a number one or a notch.
Model numbers that end in ND and NC have no
provisions for terminators that plug into the drive PCB.
The system manufacturer must provide some external
means of I/O line termination.
Read/write head auto-park
Seagate disc drives described herein park the heads
automatically at power off. This feature requires no
operator intervention.
Page 24
22
J1
DC Power
Connector
4 3 2 1
I/O
Connector
ST11200 Family Install Guide
Optional parity bit enable
Some systems require parity bit checking. Consult the
system documentation for the specific requirements.
See figures in Section 3 for location of Parity Bit Enable
jumper. Jumper-on enables parity reporting by the
SCSI bus.
DC power connection
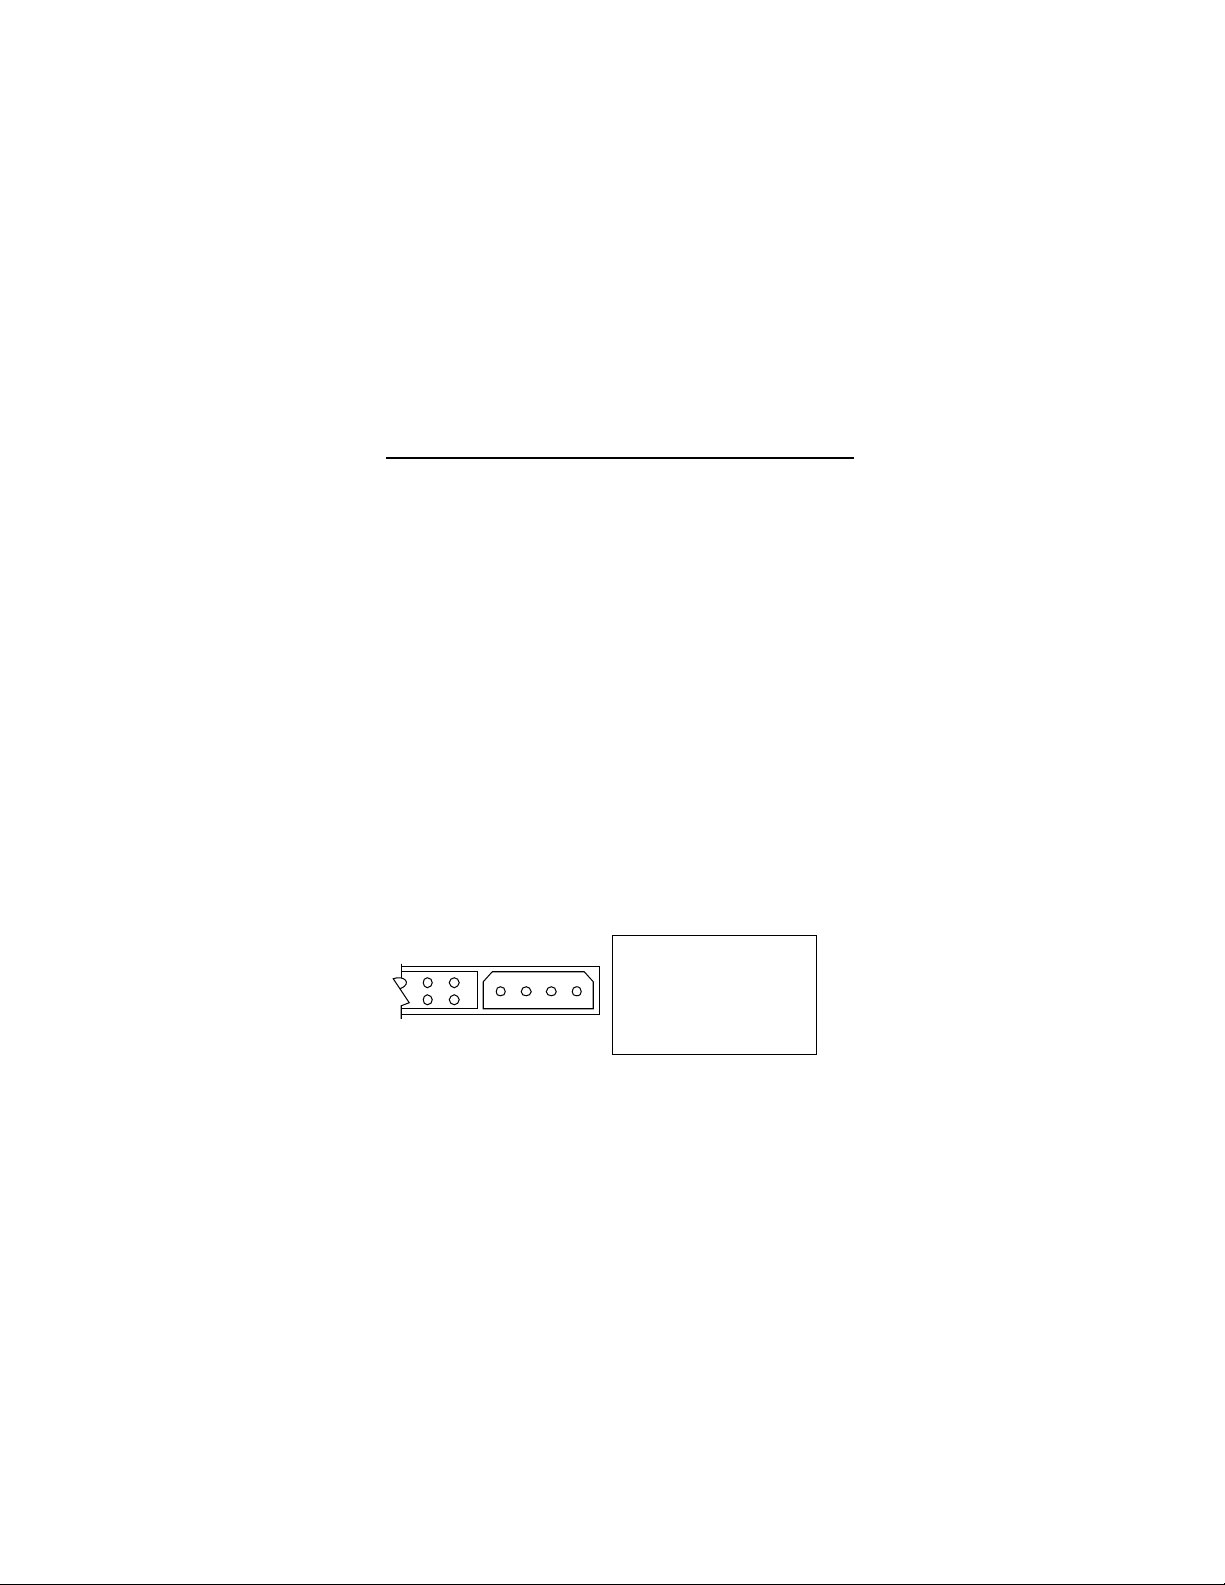
Drive model numbers ending in "N" or "ND" receive DC
power through a 4 pin connector mounted on the PCB
next to the 50 pin SCSI I/O connector. See Figures 1
and 2.
Drive model numbers ending in "NC" get DC power
from the host computer through the 80 pin I/O connector. No separate DC power connector is provided.
Pin No. Power
1 +12 V
2 +12 V Ret
3 + 5 V Ret
4 + 5 V
Figure 1. DC power connection
Page 25
ST11200 Family Install Guide
Pin 1
50 Pin
SCSI I/O
Connector
J4
Pin 1
DC Power
Connector
J6
J5
[1]
J1
Pin 1 End
J2
I/O Terminators
(single-ended I/O only)
[1] Drives with model numbers ending in "NC" do not
Figure 2. ST11200 Family 50 pin I/O and 4 pin
DC power
23
Page 26

ST11200 Family Install Guide24
Drive configuration
Each disc drive has option select header connectors on
the sides and front where jumper plugs are installed to
select the way that the drive is to be configured or to
select its ID on the I/O bus.
SCSI I/O drives
On SCSI I/O drives with model numbers ending in "N"
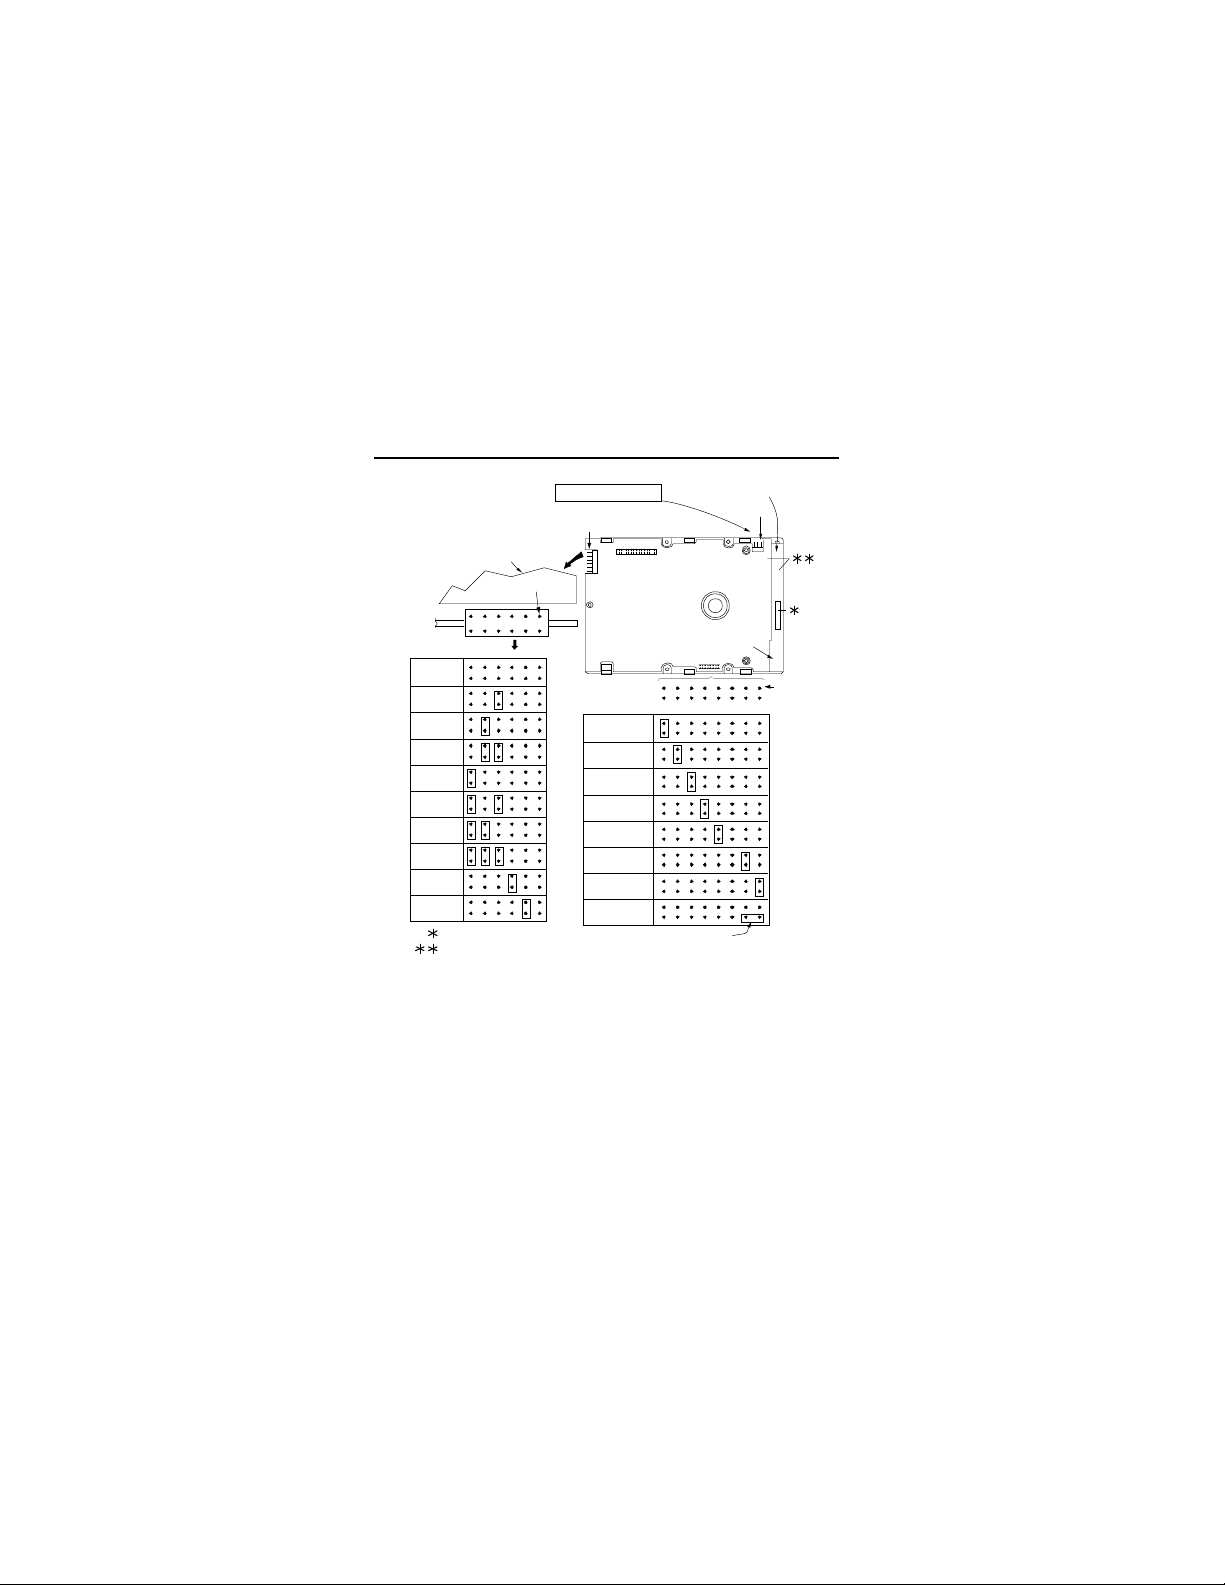
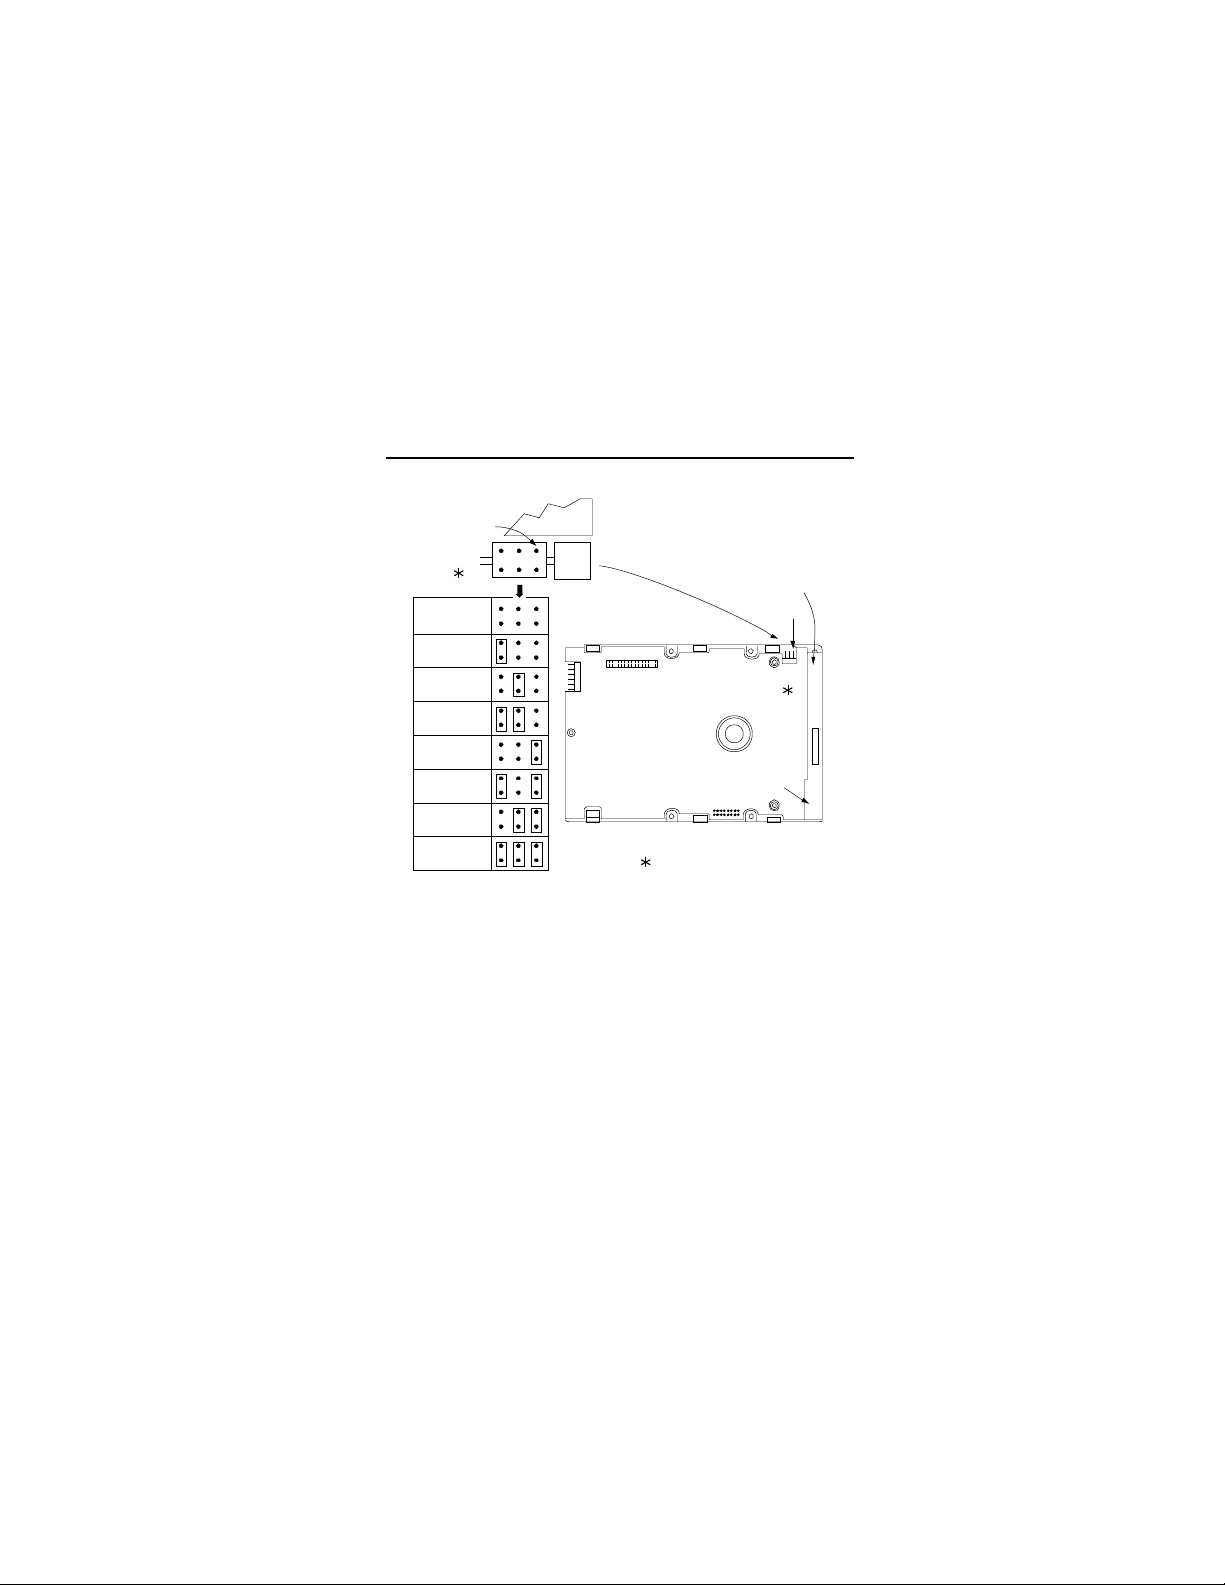
or "ND", either J6 (on the front of the drive) or J5 (on the
side behind the SCSI I/O connector) may be used to set
the drive ID. To avoid possible incorrect ID setting, do
not use both J5 and J6 for ID selection. The following
figures show where these headers are located on the
different drives covered by this manual. There are
notes following where explanations are given about the
purpose of each jumper and specify the standard
factory (called "default") settings of these jumpers (i.e.,
settings used for most common single drive application). Changes to these settings should be made only
if it is known that the system requires a different
configuration.
SCSI model "NC" drives do not have J5 for ID selection.
See [2] following Figures 3a and 3b.
Page 27
ST11200 Family Install Guide
See Figure 3b
1 2 3 4 5 6
Pin 1
HDA
Drive with HDA up,
PCB down,
viewed from front
J6
A2A1A
0
SCSI ID = 0
SCSI ID = 1
SCSI ID = 2
SCSI ID = 3
SCSI ID = 4
SCSI ID = 5
SCSI ID = 6
SCSI ID = 7
Sync
Spindle
Remote
LED
PCB part number label here
Delay
Motor Start
Enable
Motor Start
Write Protect
Parity Option
Term. Power
from Drive
Term. Power
to SCSI Bus
Term. Power
from SCSI Bus
1 2 3 4 5 6 7 8
Jumper
Positions
Position A
Reserved
DC Power
Connector
J2
Drive Front
Pin 1
End
J6
J5
Pin 1
SCSI I/O
Connector
J1
See Note [2] following.
25
J2
Pin 1
Figure 3a. Drive configuration for ST11200 family
Page 28
ST11200 Family Install Guide26
1 2 3
Pin 1
HDA
Side View of Drive
J1
SCSI ID = 0
SCSI ID = 1
SCSI ID = 2
SCSI ID = 3
SCSI ID = 4
SCSI ID = 5
SCSI ID = 6
SCSI ID = 7
J5
A0A1A
2
See Note [2] following.
SCSI I/O
Connector
Pin 1
J6
Drive Front
DC Power
Connector
J2
J5
J1
Figure 3b. Drive configuration for ST11200 family
Page 29

ST11200 Family Install Guide
Notes for Figure 3a and 3b:
[1] Notes explaining the functions of the various jump-
ers on jumper header connectors J2, J5 and J6 are
given below in order of jumper position (not connector pin number). The term "default" means as
standard OEM units are configured when shipped
from factory.
[2] The PCB on "NC" models does not have connector
J5, and has a single 80 pin combined SCSI I/O and
DC power connector instead of the normal 50 pin
SCSI I/O and 4 pin DC power connectors. Included
among the 80 pins are the SCSI ID, Motor Start and
Delayed Motor Start select functions, and the synchronous spindle master sync signal and the remote LED signals. Do not use J2 and J6 for these
five functions if the host uses the ones incuded in
the 80 pin connector.
27
Page 30

28
Jumper
Position Jumper Function Description
J2 1 Reserved for later use. Default is jumper off.
J2 2 Jumper installed in position 2 enables the
Delayed Motor Start option (if jumper in
position 3 is off). Motor start delay is 16 times
the drive ID number in seconds; i.e., drive ID
0 starts immediately, drive one starts 16
seconds later, drive ID 2 starts 32 seconds
later and etc. Default is no jumper on.
J2 3 Jumper installed enables Motor Start option.
The drive waits for the Start unit command
from the host before starting the spindle
motor. If no jumper is installed, drive operation depends on whether or not there is a
jumper in position 2. Default is no jumper on.
J2 4 Jumper installed means entire drive is write
protected. Default is no jumper on.
ST11200 Family Install Guide
J2 5 Jumper installed means parity checking and
error reporting by the drive is enabled. Default is no jumper on.
Page 31

ST11200 Family Install Guide
Jumper
Position Jumper Function Description
J2 6 Reserved for factory use. No jumper in-
stalled.
J2 7,8 Select terminator power source. In position
8 the drive supplies power to the SCSI bus,
pin 26. In position 7 the drive supplies power
only to its own terminators. Jumper in position A (between pins 2 and 4), between
positions 7 and 8 (nearest PCB edge)
means the drive takes power from the SCSI
bus, pin 26. Jumpers on both 7 and 8 at the
same time is allowed. Default is jumper on
position 7.
29
J5
1,2,3
(A0,A1,
A2)
Drive ID on SCSI Bus (J6 may be used instead). The drive ID is binary coded posi-
tion-wise i.e., jumper in position A2 is drive ID
4, in position A1 is ID 2, position A0 is ID 1 and
no jumpers is ID 0. Default is ID = 0. Note that
relative positions of A2 and A0 are opposite
to what they are on J6.
"NC" model drives do not have J5.
Page 32

ST11200 Family Install Guide30
Jumper
Position Jumper Function Description
J6
1,2,3
(A2,A1,
A0)
J6 4 Used as a cable connection for the refer-
J6 5 No jumper. These pins used to connect a
J6 6 Reserved position.
Either J5 or J6 (optional) may be used to
select drive ID. Both should not be used at
the same time, because at some future time
when the ID is changed the user could fail to
configure both J5 and J6 the same. The drive
ID is binary coded positionwise (A0 is least
significant position and A2 is most significant
position), i.e., jumper in position A2 is drive ID
4, in position A1 is ID 2, position A0 is ID 1 and
no jumpers is ID 0. Default is ID = 0.
ence index signal (REFSIG+) (J6 pin 6,
bottom) for sync spindle feature. J6 pin 5 is
GND.
remote LED indicator. Pin 3 (top, nearest
HDA), the anode connection, connects in
the drive to the +5V supply through a pull-up
resistor. Pin 4 (bottom), the cathode connection connects in the drive to signal command
through the emitter-collector junction of a
transistor switch that controls the LED on/off
ccondition.
Page 33
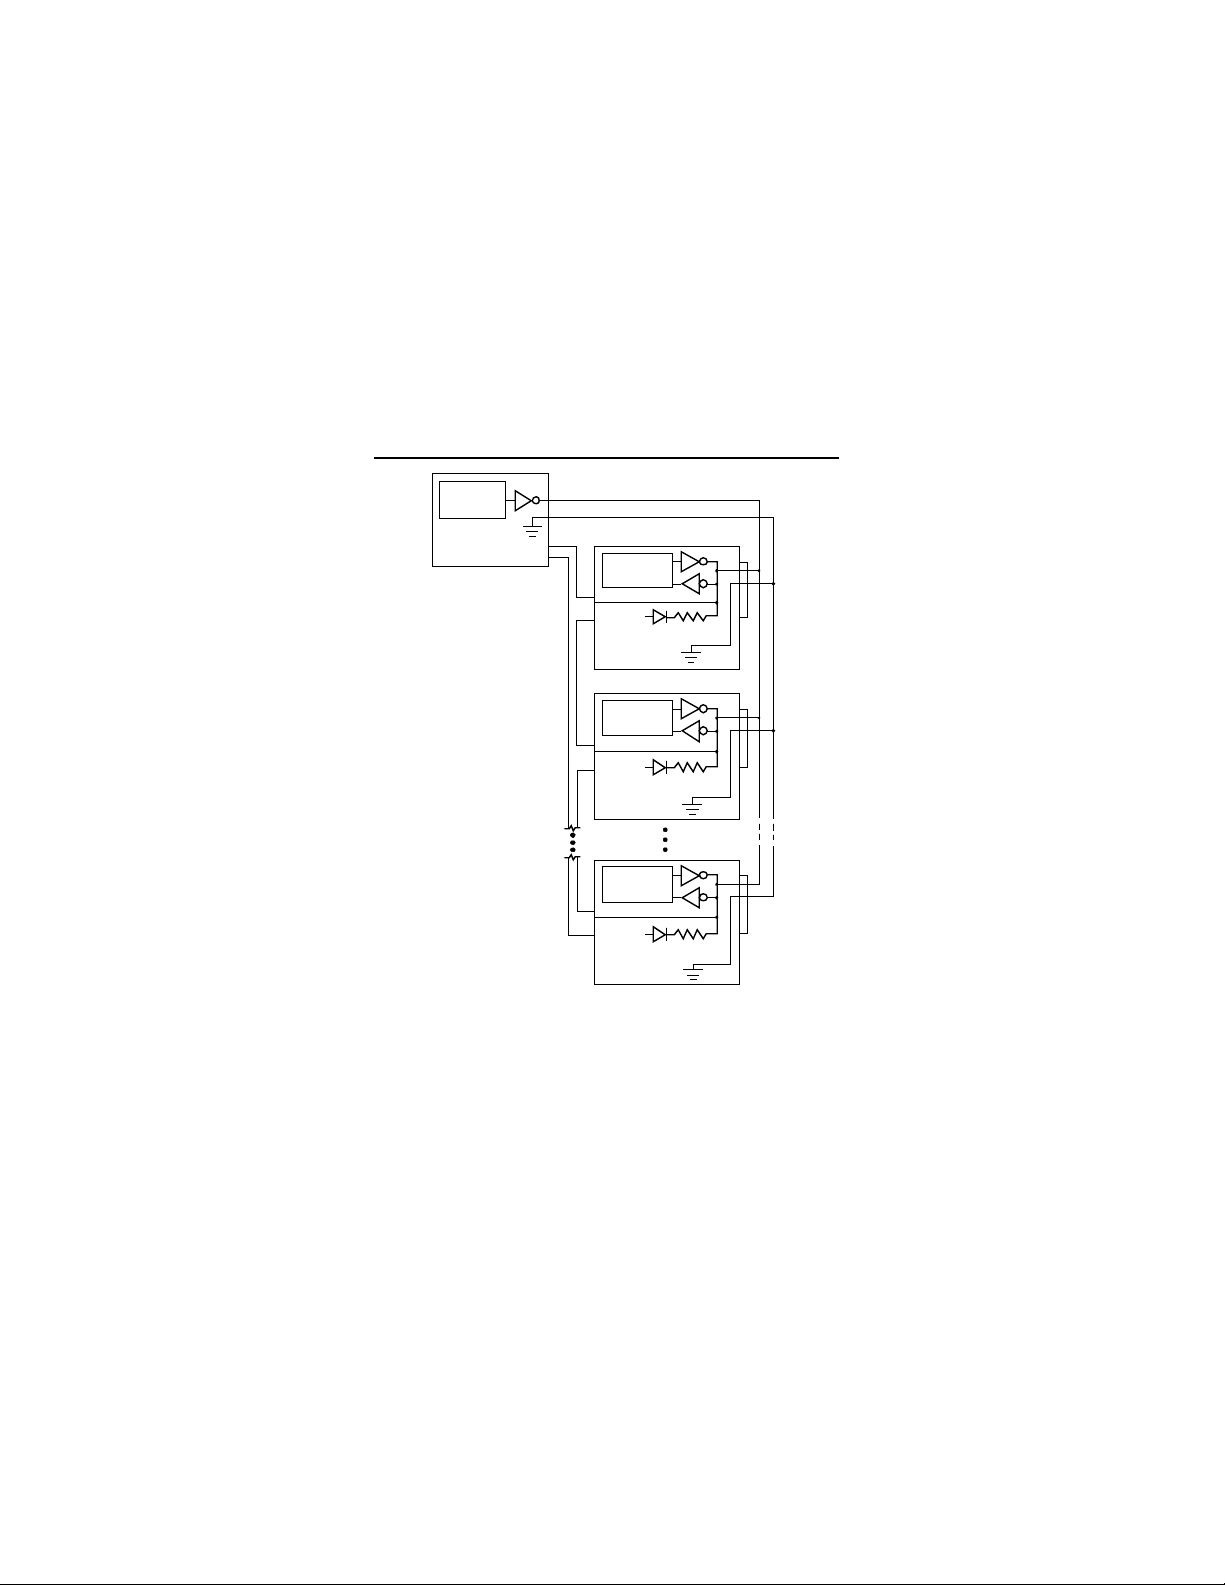
ST11200 Family Install Guide
Master Sync
Source
Host
(or other drive)
Spindle
Control
Drive 1
+5V
R
T
J6
4
3
Spindle
Control
Drive 2
+5V
R
T
J6
4
3
Spindle
Control
Drive n
+5V
R
T
J6
4
3
Sync Interface
SCSI Bus
System
Interface
REFIND +
J1
37
[2]
[1]
J1
37
[2]
[1]
J1
37
[2]
[1]
[1] Configuration Select Connector
31
[2] Connection available only on ST11200NC
Figure 4. Synchronized spindle interconnection
diagram for ST11200 family
Page 34

32
ST11200 Family Install Guide
Drive installation
This section describes the physical mounting of the
drive in the host cabinet and the logical installation as
a system member, which is called drive setup.
Disc drive mounting
Do not touch the connector pins or any PCB components without observing static-discharge precautions.
Always handle the drive by the frame only.
The drive may be mounted in any orientation.
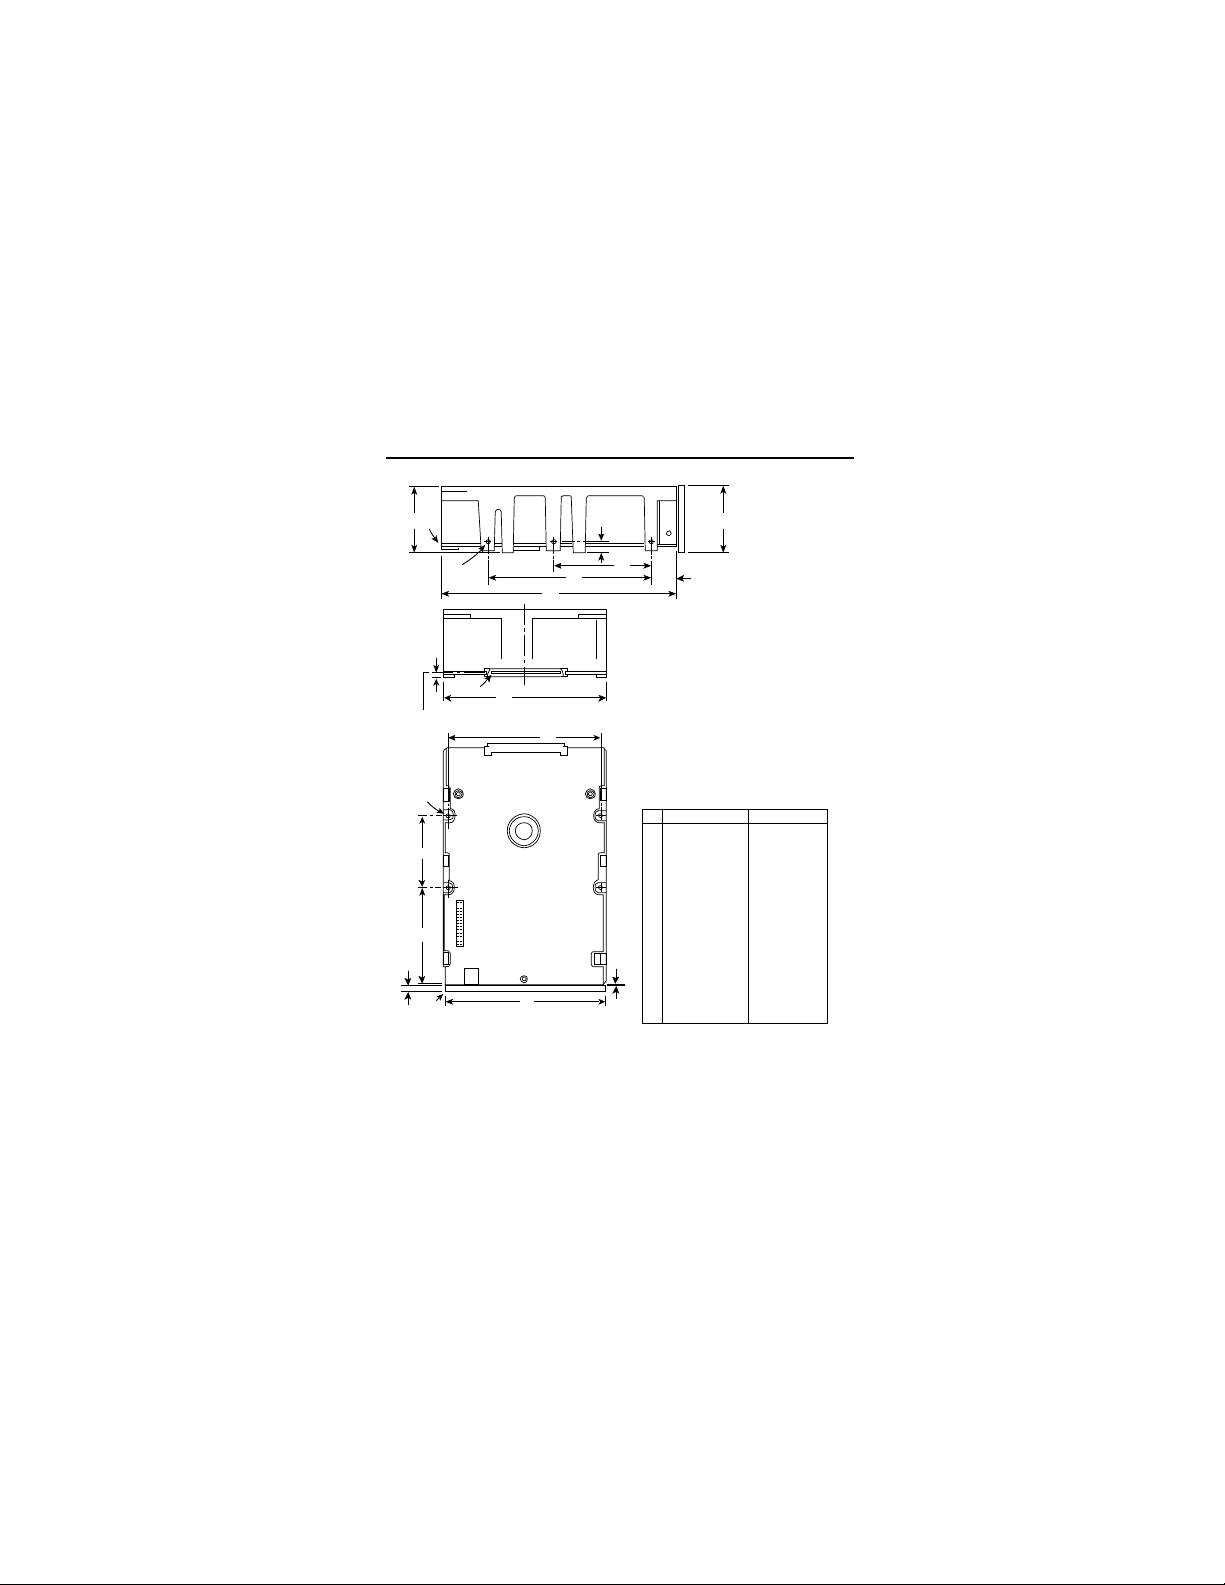
• Mount to host system chassis using four 6-32 UNC
screws. Three mounting holes are in each side and
four in the bottom of the drive. See Figure 5 or 6. The
maximum length that the screws should extend into
the side chassis mounting holes is 0.150 inch (3.81
mm), and 0.20 inch (5.08 mm) into bottom holes,
measured from the outer surface of the chassis. The
minimum thread engagement for all mounting screws
is .12 inch (3.0 mm). Tighten the screws evenly to a
maximum torque of 8 in-lb. Do not over tighten or
force when screw does not seem to screw in easily
(threads not correctly engaged).
Page 35

ST11200 Family Install Guide
• Verify that all connections between the drive and the
host system are correctly installed. Most cables have
a contrasting color stripe indicating pin 1. Pin 1 on the
drive I/O connector and the DC power connector are
indicated in Figures 1 and 2.
• Verify option select and drive ID select jumpers and
installation of terminator resistor packs where applicable. See Sections 2 and 3.
Do not power up the host system until the drive is
mounted and the system cover is replaced.
• Connect DC power connector to the drive (not required on "NC" model drives).
• Replace the Host System cover.
• Turn on DC power.
• Boot the system from the floppy drive or from a
previously installed hard-drive if there is one.
• Proceed with drive setup of the new hard drive.
33
Page 36

34
Grounding
Signal ground (PCB) and HDA ground are connected
together in the ST11200 drives family and cannot be
separated by the user. The equipment in which the
drive is mounted is connected directly to the HDA and
PCB with no electrically isolating shock mounts. If it is
desired for the system chassis to not be connected to
the HDA/PCB ground, the systems integrator or user
must provide a nonconductive (electrically isolating)
method of mounting the drive in the host equipment.
ST11200 Family Install Guide
Page 37
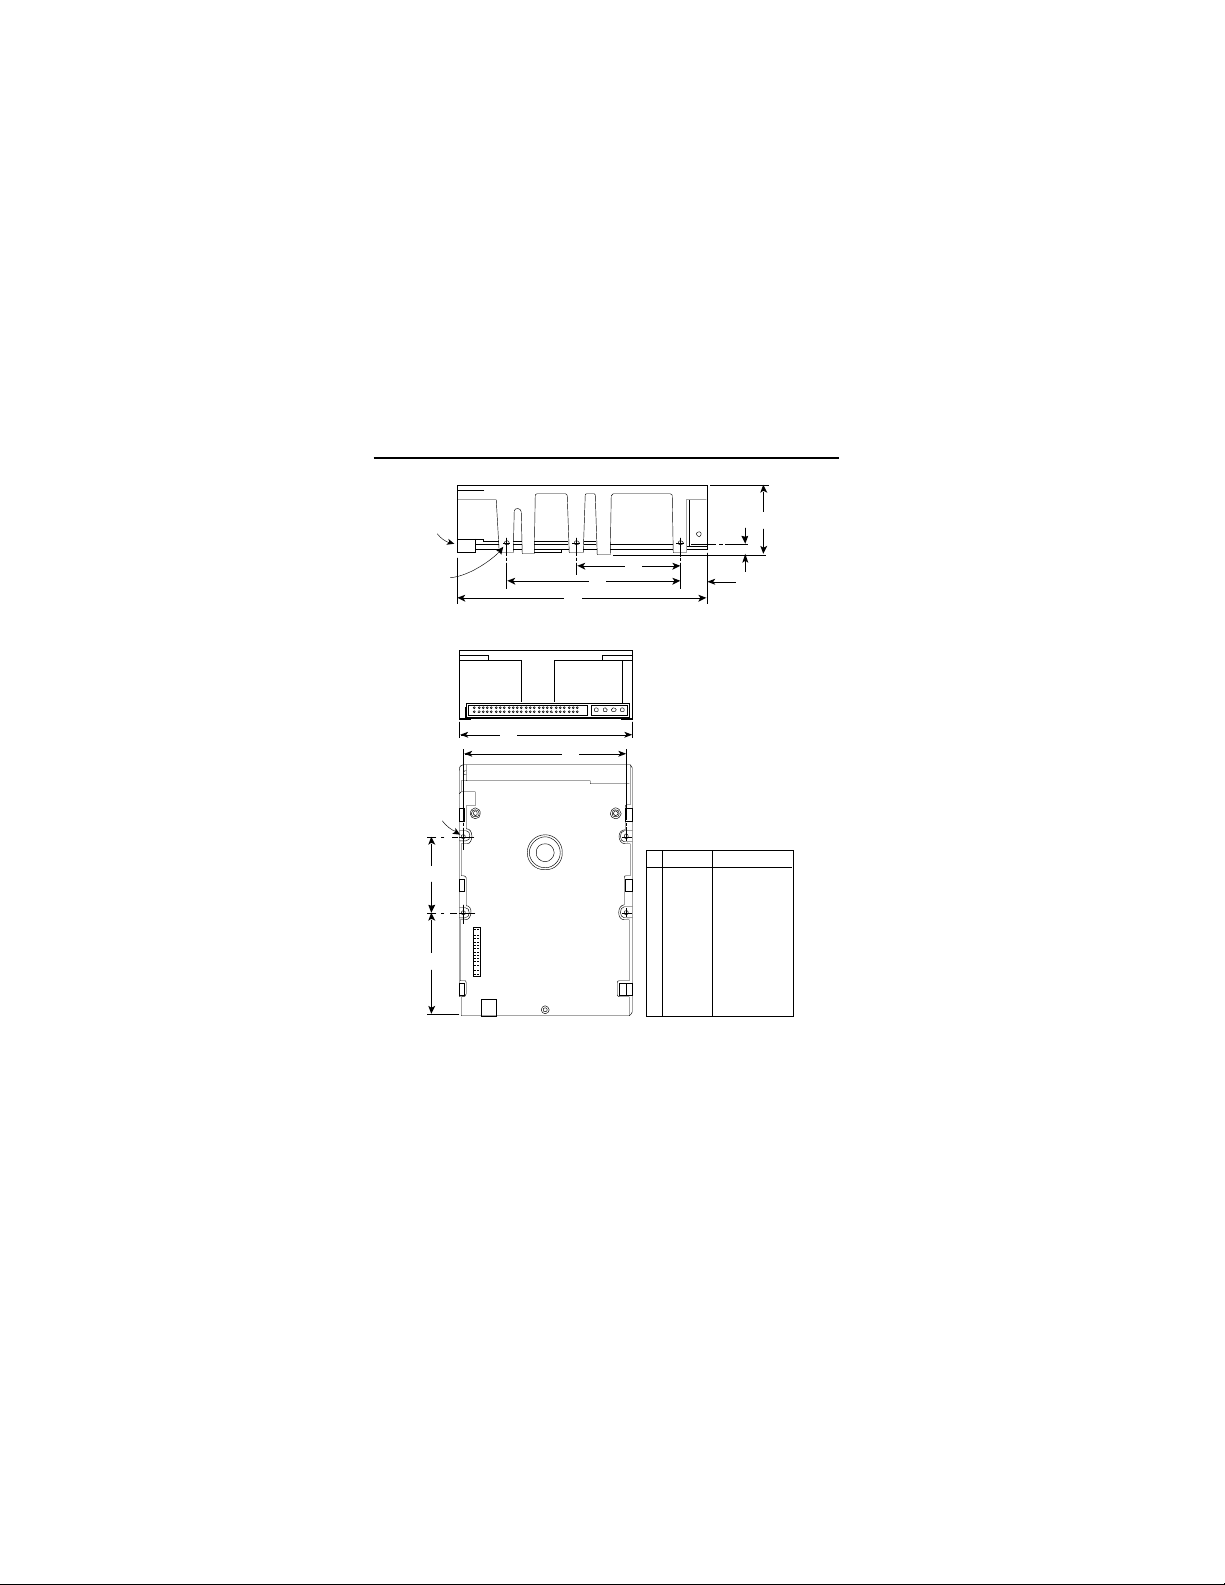
ST11200 Family Install Guide
A
F
D
E
C
(1)
(3)
B
G
J
H
K
(2)
Notes:
(1) Mounting holes three
on each side, 6-32
unc. Max screw length
into side of drive
0.15 in. (3.81 mm)
(2) Mounting holes four
on bottom, 6-32 unc.
Max screw length into
bottom of drive
0.20 in. (5.08 mm)
(3) Power and interface
connections (may
extend past the "A"
dimension by
0.040 in. (1.02 mm)).
Inches Millimeters
5.74
4.00
1.62
2.362
.620
4.000
.250
1.750
3.750
2.370
145.80
101.60
41.15
60.00
15.75
101.60
6.35
44.45
95.25
60.20
A
B
C
D
E
F
G
H
J
K
35
Figure 5. ST11200N/ND family drive mounting
Page 38
36
A
F
D
E
C
[1]
[3]
B
G
J
H
K
[2]
Notes:
[1]
[2]
[3]
[4]
[5]
Inches Millimeters
5.74
4.00
1.620
2.362
.620
4.000
.250
1.750
3.750
2.370
1.725
4.100
0.19
0.015
0.181
145.80
101.60
41.15
60.00
15.75
101.60
6.35
44.45
95.25
60.20
43.82
104.14
4.83
0.381
4.597
A
B
C
D
E
F
G
H
J
K
L
M
N
P
R
0.010
0.010
0.026
0.021
0.010
0.010
0.010
0.018
0.010
0.010
0.010
0.010
0.010
0.010
0.018
0.013
±
±
+
–
±
±
±
±
±
±
±
±
±
±
max
+
–
.25
.25
.66
.53
.25
.25
.25
.46
.25
.25
.25
.25
.25
.25
.45
.33
L
[4]
M
N
[4]
P
Mounting holes three on each side, 6-32 UNC.
Max screw length into side of drive 0.15 in.
(3.81 mm). Screw tightening torque 8.0 in-lb
max with minimum thread engagement of
.12 in (3.00 mm).
Mounting holes four on bottom, 6-32 UNC.
Max screw length into bottom of drive 0.20 in.
(5.08 mm). Screw tightening torque 8.0 in-lb
max with minimum thread engagement of
.12 in (3.00 mm).
Power and interface connections can extend
past the "A" dimension by 0.040 in (1.02 mm).
Decorative front panel.
Connector is centered (side to side) on drive
within ±0.020 in. (.508 mm).
±
±
+
–
±
±
±
±
±
±
±
±
±
±
max
+
–
R
Connector Centerline
[5]
Pin 1
ST11200 Family Install Guide
Figure 6. Mounting configuration details for
ST11200NC model drives
Page 39

ST11200 Family Install Guide
37
Drive setup
SCSI interface drives
The SCSI interface handles both drive geometry and
defect management internally or the "no drive installed"
option can be selected for systems with SCSI drives.
All SCSI interface drives are low-level formatted at the
factory. If you wish to low-level format the drive to
optimize its performance for your system, consult the
controller documentation for information on low-level
formatting. Partitioning and high-level formatting can
be done through DOS by way of the FDISK utility for
partitioning, and FORMAT for high-level formatting.
Consult your DOS manual for FORMAT and FDISK
command options.
Warning. If an installed drive is low-level format-
ted, all user data stored on the drive is
lost.
Seagate Technology assumes no liability for lost
user data.
Page 40

ST11200 Family Install Guide
Seagate Technology, Inc.
920 Disc Drive, Scotts Valley, CA. 95066-4544, USA
Publication Number: 77738480, Rev. D
Printed in USA
 Loading...