

Page 1

••••••••••••••••••••••••••
Cheetah 36
••••••••••••••••••••••••••
Disc Drive
••••••••••••••••••••••••••
ST136403LW/LC
••••••••••••••••••••••••••
••••••••••••••••••••••••••
Installation Guide
••••••••••••••••••••••••••
Page 2

Contents
Preface..................................................................................... 1
Electrostatic discharge protection ............................................ 2
Important safety information and precautions................... ....... 3
Wichti g e Si c h er h e its h in w ei se . ... ......... ... .......... ......... ... .......... ... 5
Regulatory agency compl iance........... .......... .......... .................8
General description ................................................................ 10
Kühlung des Systems............................................................. 13
How to install the drive ........................................................... 17
Seagate Technology support services.................................... 41
©1999 Seagate Technology, Inc. All rights reserved
Publication Number: 83329450, Rev. A
March 1999
Seagate, Seagate Technology, and the Seagate logo are registered tra dem arks of Seagate Technology, Inc. Cheetah, SeaFAX,
SeaFONE, SeaBOARD, and SeaTDD are either trademarks or
registered trademarks of Seagate Technology, Inc. or one of its
subsidiaries. All other trademarks or registered trademarks are
the property of their respective owners.
No part of this publication may be reproduced in any form with-
out written permission from Seagate Technology, Inc.
Page 3

Cheetah 36 Installation Guide, Rev. A 1
Preface
This manual contains handling information, support services,
performance specifications, and installation information for
Seagate® Cheetah 36 SCSI disc dri ves.
Although you can jump ahead to the installation instructions to
get up and running quickly, you may want to read the “General
description” section beginning on page 10 to learn more about
this drive’s multimode capabilities, data bus details, specifica-
tions, and coo ling requirements.
Additional information is available in the
Manual
(part number 83329440). Contact your Seagate sales
representative if you need to order this publication.
Cheetah 36 Product
Page 4
2 Cheetah 36 Installation Guide, Rev. A
Handling precautions
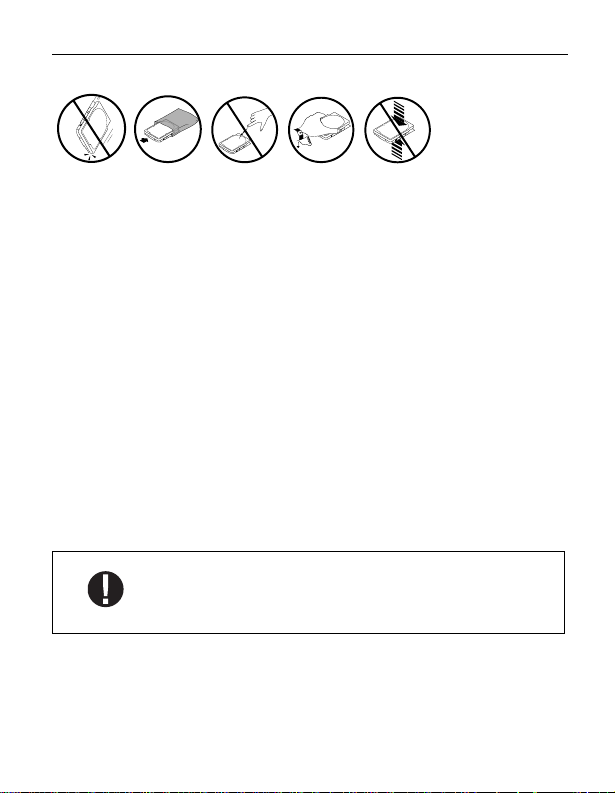
• Disc drives are fragile. Do not drop or jar the drive. Use a
padded surface during installation to avoid damaging the
drive.
• Keep the drive in its antistatic bag until you are ready to
install it .
• Protect the drive from static discharge by making sure you
are well grounded before touching the drive. We recommend
wearing a grounded wrist strap (Seagate part number
12263496) throughout the installation process. Do not touch
the connectors or any part of the printed circuit board.
• Alwa ys handle the drive by its edges or frame.
• Do not apply pressure or attach labels to the circuit board or
the top of the drive.
Electrostatic discharge protection
Caution.
performing dep ot repair will damage comp onents and
may void the warranty.
Removal of circuit boards by personnel not
All drive electronic assemblies are sensitive to static electricity
due to the electrostatically sensitive devices used within the
drive cir cuitry. Although som e devices such as metal -oxide semi conductors are extremely sensitive, all semiconductors, as well
Page 5
Cheetah 36 Installation Guide, Rev. A 3
as some resi stors and capacitors, may be damaged or deg raded
by exposure to static electricity.
Electrost atic damage t o electr onic de vices may be caus ed by the
direct discharge of a charged conductor or by exposure to the
static fields surrounding charged objects. To avoid damaging
drive electronic assemblies, observe the following precautions
when installing or servicing the drive:
• Ground yourself to the drive whenever the drive electronics
are or will be expos ed. Connect yourself to ground with a wrist
strap (Seagate part number 12263496). Connection may be
made to any grounded metal assembly. As a general rule,
remember that you and the drive electronics must all be
grounded to avoid potentially damaging static discharges.
• Turn off the power before removing or installing the DC power
cable.
• Do not remov e any circuit boards from the drive.
• Never use an ohmmeter on any circuit boards.
• When installing th e drive on a carrier or t ra y, discharge the car-
rier or tray pr io r to ins e rting it into th e sy st e m.
Important safety information and precautions
Caution.
ing the drive to e nsure pr oper cooli ng of dr ive components.
Use force d-air vent ilation when be nch-test-
Use proper safety techniques for safe, reliable operation of this
unit.
• The procedures in this manual and labels on the unit contain
warnings and cautions that must be carefully read and fol-
Page 6

4 Cheetah 36 Installation Guide, Rev. A
lowed to minimize or eliminate the risk of personal injury. The
warnings point out conditions or practices that may endanger
you or others. The cautions point out conditions or practices
that may dam age the unit, possibly m aking it unsafe for use.
Always observe the following warnings and precautions:
• Follow all cautions and warnings in the procedures.
• Use sound safety practices when operating, installing, or
removing the uni t.
• Use caution when troubleshooting a unit that has voltages
present. Turn off power to the unit bef ore removing it.
• Ensure that the internal temperature of the rack or cabinet
does not exceed the limits defined for the drive when the drive
is mounted in an equipment rack or cabinet. When units are
stacked vertically, pay special attention to the top where temperatures ar e usually highest.
• Follow the precautions listed above in “Electrostatic discharge
protection.”
• Do not remove any circuit boards from the drive. Return the
entire drive for depot repair if any circuit board is defective.
Removal of circuit boards by personnel not performing depot
repair will damage components and may void the warranty.
• Do not separate the head and disc assembly (HDA) from the
PCB. Return the entire drive for depot repair if the HDA is
defective.
• Do not attempt to disassemble the HDA. It is not field repair-
able. If the sealed HDA is opened by personnel not performing
depot repair, this will damage components and void the
warranty.
Page 7

Cheetah 36 Installation Guide, Rev. A 5
As a component, this drive is designed to be installed and oper-
ated in accordance with UL1950, EN60950, CAN/CSA C22.2
950-M95, and VDE0805.
Seagate takes all reasonable steps to ensure that its products
are certifiable to currently accepted standards. Typical applications of these disc drives include customer packaging and subsystem design. Safety agencies conditionally certify component
assemblies, such as the Cheetah disc drive, based on their final
acceptability in the end-use product. The subsystem designers
are responsible for meeting these conditions of acceptability in
obtaining safety-regulatory agency compliance in their end-use
products and for certifying where required by law. A necessary
part of meeting safety requirements is the provision for overcurrent protection on drive SELV supply voltages.
This unit is a component part and as such is not meant to comply with FCC or similar national requirements as a stand-alone
unit. Engineering radiated emissions test results are available
through the Seagate Safety Department to assist the subsystem
designer.
Wichtige Sicherheitshinweise
Vorsicht.
belüftung vorzusehen, um eine ausreichende Kühlung der Laufwerkko m ponente n si ch erzust el le n.
Verwenden Sie geeignete Sicherheits- um den sicheren, zuverlässigen Betrieb dieser Einheit zu gewährleisten.
Die Verfahren in diesem Handbuch und die Aufkleber auf dem Gerät
enthalten Warn- und Vorsichtshinweise. Diese Hinweise sind sorgfältig durchzulesen und zu beachten, um das Risiko von Verletzungen auf ein Mindestmaß zu beschränken oder ganz zu vermeiden.
Die Warnhinweise machen auf Situationen oder Praktiken aufmerk-
Beim Testen des Laufwerks auf dem Prüftisch ist Fremd-
Page 8

6 Cheetah 36 Installation Guide, Rev. A
sam, die Sie oder andere gefähr den könnten. Die Vorsichtshinweise
machen a uf S ituat ione n ode r Prak tiken aufm er ksam , die Einh eit
beschä dige n können, so daß de ren Geb rauch mit Risi ko beh aftet ist.
Die Warn- und Vorsichtshinweise sind nicht allumfassend! Es ist un s
einfach nicht möglich, alle Wartungsmethoden oder die eventuellen
Risiken jeder Methode zu kennen, zu beurteilen und Sie entsprechend zu beraten . Aus d iese m Gr und haben wir auf ei ne derar ti ge
umfassende Beurteilung verzichtet. Falls Sie ein hier nicht beschriebenes Verfahren oder Werkzeug verwenden, stellen Sie zuerst
sicher, daß das gewählte Verfahren weder Ihre persönliche Sicherheit noch die L eistung der Einheit gefährdet.
Beachten Sie in jedem Fall die folgenden Warn-un d Vorsichtshinweise:
• Beachten Sie alle Warn- und Vorsichtshinweise in diesem Handbuch.
• Treffen Sie beim Betrieb, bei der Installation oder bei der Entfernung
der Einheit an gemessene Sicherheitsvorkehrungen.
• Wenn eine Einheit unter Spannung steht, gehen Sie bei der Fehlerdiagnose besonders vorsichtig vor. Schalten Sie die Einheit aus,
bevor Sie mit den Installations-und Entfern ungsarbeiten beginnen.
• Wenn das Laufwerk in einem Einbaugestell oder Gehäuse montiert
ist, so rgen Sie dafür, daß di e Temperat ur im Inner en des G estells
oder Gehäuses die für das Laufwerk vorgegebenen Grenzwerte
nicht übersteigt. Wenn Einheiten vertikal übereinander betestigt
werden , achten Sie besonders a uf den obere n Stapelbere ich, da
dort die Temperatur gewöhnlich am höchsten ist.
• Befolgen Sie die oben unter “Electrostatic Discharge Protection”
angeg ebenen Sicherhe itsmaßnahmen.
• Nehmen Sie keine Platinen aus dem Laufwerk. Wenn eine Platine
defekt is t, muß d as gesa mte La ufwerk z ur Repa ratur e ingeschi ckt
werden. Die Herausnahme von Platinen durch andere Personen als
die für d ie werks eitige Rep aratur zus tändigen k ann zu ein er Bes-
Page 9

Cheetah 36 Installation Guide, Rev. A 7
chädigung der Komponenten und Erlöschen des Garantieanspruchs
führen.
• Die vormontierte Kopf- und Festplatteneinheit (HDA) nicht aus dem
Laufwerkgehäuse nehmen! Falls die HDA beschädigt ist, schicken
Sie das gesamte Laufwerk zur Reparatur ein.
• Die HDA ist nicht vor Ort reparierbar und darf nicht auseinandergenommen werden! Öffnen der versiegelten HDA durch andere Personen als die für die werkseitige Reparatur zuständigen hat eine
Beschä digung der Komponenten un d Erlösch en des Garan tieanspruch s zu r Folge.
Als Teilkomponente ist dieses Laufwerk für die Installation und den
Betrieb in Übereinstimmung mit UL 1950, EN60950, CAN\CSA
C22.2 950-M95 und VDE0805 vorgesehen.
Seagate ist ständig bemüht, die Zulassungsfähigkeit von SeagateProdukten im Rahmen der gegenwärtig geltenden Standards zu
gewährleisten. Zu den typischen Anwendungen dieser Festplattenwerke zählen Systemeinbau durch den Kunden und die Konstruktion
von Untersystemen. Sicherheitsbehörden gewähren eine bedingte
Zulassung für Komponenten wie das Cheetah-Festplattenlaufwerk
vorbehaltlich der endgültigen Zulasssung im Endprodukt. Designer
von Untersystemen sind dafür verantwortlich, die Voraussetzungen
für die Einhaltung sicherheits- oder aufsichtsbehördlicher Vorschriften in ihren Endprodukten u nd - falls gesetzli c h vorgeschrieben
- für die Zulassung zu schaffen. Eine Grundvoraussetzung zur Ein-
haltung der Sicherhei tsanforderu ngen ist die Be reitstell ung eines
Überlastschutzes für die SELV-Versorgungsspannungen des Laufwerks.
Dieses Gerät ist eine Baugruppe und unterliegt als solche nicht den
Anforderungen der FCC oder ähnlicher nationaler Behörden für
eigenständige Geräte. Technische Testergebnisse zu elektromagnetische Strahlun g sind f ür De signer vo n Unters ystem en auf
Anfrage von der Seagate-Sicherheitsabteilung erhältlich.
Page 10

8 Cheetah 36 Installation Guide, Rev. A
Regulatory agency compliance
Electromagnetic susceptibility
As a component assembly, the drive is not required to meet any
susceptibility performance re quirements. It is the responsibility of
those integrating the drive within their systems to perform those
tests required and design their system to ensure that equipment
operating in the same system as the drive or external to the system does not adversely affect the performance of the drive. See
DC power requirements on page 16.
Electromagnetic compliance
Seagate uses an independent laboratory to confirm compliance
to the directives/standard(s) for CE M arki ng and C-Tick Marking.
The drive was tested in a repre sentative system for typical applications. The selected system represents the most popular characteristics for test plat forms. The syste m con figurations include:
• 486, P entium, and P owerPC microprocessors
• 3.5 -inch f loppy disc dri ve
• Keyboard
• Monitor/display
• Printer
• External modem
• Mouse
Although the test system with this Seagate model complies to
the directives/standard(s), we cannot guarantee that all systems
will comply. The computer manufacturer or system integrator
shall confirm EMC compliance and provide CE Marking and C-
Tick Marking for their product.
Page 11

Cheetah 36 Installation Guide, Rev. A 9
Electromagnetic compliance for the European Union
If this model has the CE Marking it complies with the European
Union requirements of the Electromagnetic Compatibility Directive 89/336/EEC of 03 M ay 1989 as amended by Dir ective 92 /31/
EEC of 28 April 1992 and Directive 93/68/EEC of 22 July 1993.
Australian C-Tick
If this model has the C-Tick Marking it complies with the Australia/New Zealand Standard AS/NZS3548 1995 and meets the
Electromagnetic Compatibility (EMC) Framework requirements
of Australia’s Spectrum Management Agency (SMA).
Page 12
10 Cheetah 36 Installation Guide, Rev. A
General description
Cheetah 36 SCSI disc drives are high-speed, random-access
digital-data storage devices capable of operat ing in single-ended
(SE) or low volt age differential (LVD) modes.
This multimode capability allows you to use this drive in systems
that use the traditional SE technology or in LVD-capable systems.
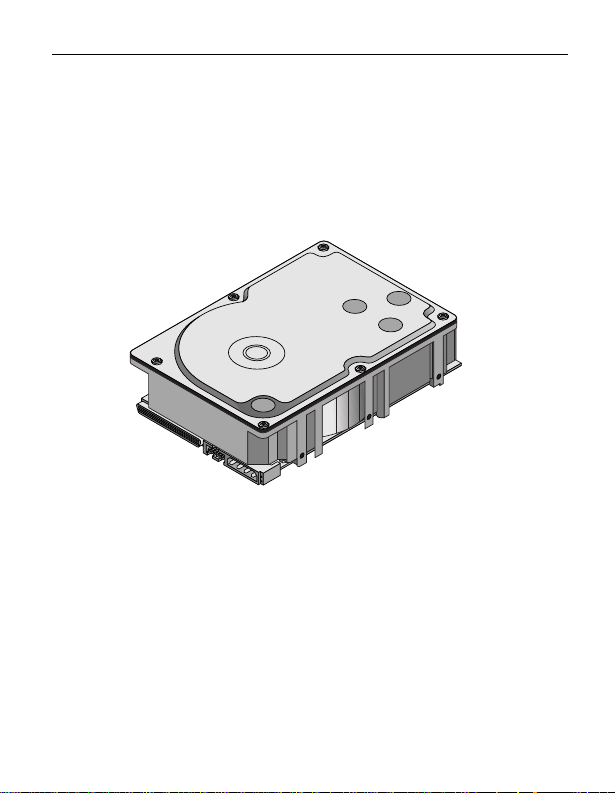
Figure 1. Cheetah 36 family dr ive ( LW model shown)
This drive should be mounted in an enclosure designed for the
drive. This is often within the host system case or an external
enclosure designed to house one or more disc drives or other
devices. In either case, the disc drive must receive adequate
cooling (refer to “Providing adequate cooling”) and it must be
sufficientl y grounded and shiel ded fr om emissions. The
36 Product Manual
for a properly designed enclosure.
(part number 83329440) contains guidelines
Cheetah
Page 13
Cheetah 36 Installation Guide, Rev. A 11
Single-ended and low voltage differential modes
This drive incorporates two different transceivers to allow you to
use it in systems which use single-ended (SE) drivers and
receivers, or in low voltage differential (LVD) capable systems
which use LVD drivers and receivers.
The primary benefits of LVD technology
• Faster transfer rates.
• Reduces power consumption.
• Increases allowable cable lengths.
• Improv es device connectivity.
You can configure the drive to switch between SE and LVD
modes automatically or force it to operate in SE mode only. To
configure this option, use the jumper illustration on page 24 (LW
models) or page 34 (LC models).
Note.
To operate at the Ultra2 SCSI rates in LVD mode, all
devices on th e same bus must be running i n LVD mode. If
you add any single-ended device to a bus that is operating in LVD mode, all devices drop back to operating in
single-ended mode. This eliminates the possibility of
reaching Ultra2 SCSI transfer rates.
Caution.
devices hav ing high voltag e differen tial (HV D) inter face
circuits. The circuits are not compatible and drive dam-
age ma y occur.
Do not mix LVD drives on the same bus with
Page 14
12 Cheetah 36 Installation Guide, Rev. A
Data bus widths
These drives have a wide (16-bit) SCSI data bus. You can use
these drives on a non-wide (8-bit) data bus if you provide proper
termination to the upper eight data lines. This is often referred to
as providi ng “high-9 termination” (t he other bit is for parit y).
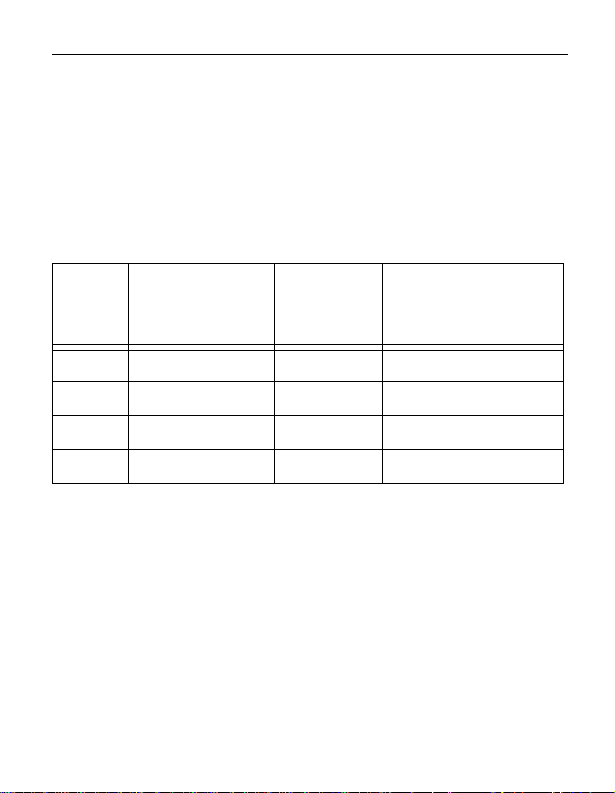
The following table lists the maximum cable lengths and number
of devices using single-en ded and LVD I/O circuits.
T able 1. SE and LVD bus configurations
SCSI
driver
type
I/O transfer rate
(Mbytes/s)
Maximum
number of
devices on
bus
Maxi mum ca ble
length allowed
SE 20 16 6 meters (19.7 ft.)
SE 40 4 3 mete rs (9.8 ft.)
SE 40 8 1.5 meters (4.9 ft.)
LVD 80 16 12 meters (39.4 ft.)
Providing adequate cooling
The enclosure design must ensure adequate cooling for the
drive. The maximum ambient temperature allowed is 50°C.
The drive’s product manual (83329440) describes how to evaluate the air-flow design. The evaluation consists of ensuring that
the case temperature of certain critical components remains
within acceptable limits during drive operation.
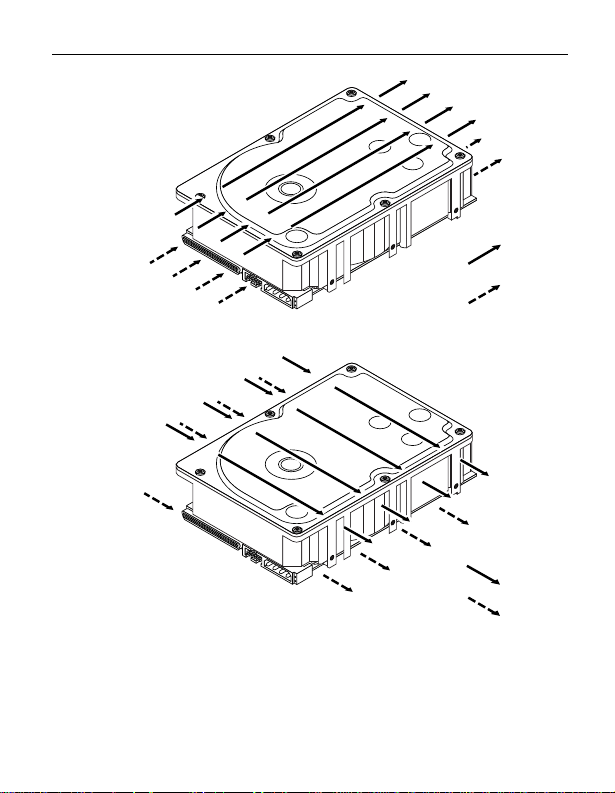
Figure 2 shows two design approaches with one or more fans
used to generate air flow. The air-flow patterns can be created
Page 15

Cheetah 36 Installation Guide, Rev. A 13
by the fans either pushing or drawing air. The overall flow pattern
can be directed from front to back, back to front, or side to side.
Kühlung des Systems
Die Gehäusekonstruktion muß eine ausreichende Kühlung des Laufwerkes gewährleisten. Die Umgebungstemperatur darf maximal
50°C betragen.
Die Produkthandbuch Cheetah 36 (Dokument 83329440) enthalten
Anweisun gen zur Beur teilun g der Luftstro mkonstr uktion. Die
Beurte ilung muß s iche rst ellen , daß s ich die Geh äuse tempe ratur
bestimmter kritischer Komponenten bei Laufwerkbetrieb innerhalb
zugelassener Grenzen hält.
Abbildung 2 zeigt zwei Konstruktionsmöglichkeiten, bei denen ein
oder mehrere Lüfter den Luftstrom erzeugen. Der Luftstromverlauf
wird durch die Lüfter ges teuert, die entweder Luft einblas en oder
abziehen. Genere ll kann d er Lu ftstrom e ntwede r von vorne na ch
hinten oder von hinten nach vorne verlaufen.
Page 16
14 Cheetah 36 Installation Guide, Rev. A
.
Above unit
Note. Air flows in the direction shown (back to front)
or in reverse direction (front to back)
Note. Air flows in the direction shown or
in reverse direction (side to side)
Figure 2. Suggested air flow
Abbildung 2. Empfohlener Luftstromverlauf
Under unit
Above unit
Under unit
Page 17

Cheetah 36 Installation Guide, Rev. A 15
Characteristics ST136403LW/LC
Interface Ultra2 SCSI
1
Capacity
Unformatted ( Gbytes)
Formatted (Gbytes)
2
43.2
36.4
Recording
Cylinders (us er)
Read/write data heads
Avg bytes/t ra ck
9,801
24
153,28 4 229,04 5
Access time
Average r ead (msec)
Average write (msec)
3
6.15
6.85
Disc rotation
RPM
Average latency (msec)
10,016
2.99
Synchronous data transfer rate
Maxi mu m instant an eous
(Mbytes/sec)
40 (SE mode)
80 (LVD mode)
Asynchronous data transfer rate
Maximum instantaneous
(2 bytes wide) (Mbytes/sec) 10.0
Multi-segmented cache (k bytes) 1,024 standard
4,096 optional
1. Also operates per SCSI-1/SCSI-2/SCSI-3 protocols.
2. The specified formatted capacities are calculated with the standard OEM
sector size (512 bytes per logical block) and sparing.
3. Includes on-board controller overhead.
Page 18

16 Cheetah 36 Installation Guide, Rev. A
Low voltage
differential
(LVD) mode
DC power requirements (±5%)
Single-ended (SE)
mode
1
+5 V+12 V +5 V+12 V
ST136403LW/LC
Maximum start current
Maxi mu m operatin g cu r rent
Av erage idle current
1. For more detailed power information, refer to the Cheeta h 36 Product
Manual, publication number 83329440.
0.83
0.84
0.75A
2.3
1.6
0.99A
0.85
0.88
0.77A
2.3
1.6
0.99A
Page 19
Cheetah 36 Installation Guide, Rev. A 17
How to install the drive
This inst all ation guid e provides s tep-by-step instructions to make
your drive installation as easy as possible. Follow the installation
steps listed for your drive model as listed below:
LW models (use the installation steps beginning below).
LC models (use the inst allation steps beginning on page 30).
LW model installation
1. Set the SCSI ID on the drive.
Determine which SCSI IDs are already being used in the
system and then assign this disc drive a SCSI ID that isn’t
already being used. Use the J6 connector located on the
front of the drive to set the SCSI ID (see Figure 3).
• This drive is SCAM (SCSI Configur ed AutoMatically) compliant. If you are installing this drive in a
SCAM compliant system, you can skip this step
becaus e the s ystem auto matica lly as sign s the d rive SC SI
ID.
• The host system’s SCSI controller usually uses SCSI ID 7
so this SCSI ID is not usually available for disc drives or
other devices.
• Most ST136403LW drives are factory set with the SCSI ID
set at 0. If this is the only SCSI drive in your system and
there a re no other SC SI d e vi ce s on th e da is yc hain , y ou can
leave this drive’s SCSI ID set to 0 and proceed to the next
step . A de v ic e is an y ha r dwa r e oth er th an an in lin e t erm in ator that is connected to the SCSI cable.
Page 20

18 Cheetah 36 Installation Guide, Rev. A
Drive
Front
Jumper Plug
(enlarged to
show detail)
Pin 1
J6
SCSI ID = 0 (default)
SCSI ID = 1
SCSI ID = 2
SCSI ID = 3
SCSI ID = 4
SCSI ID = 5
SCSI ID = 6
SCSI ID = 7
SCSI ID = 8
SCSI ID = 9
SCSI ID = 10
SCSI ID = 11
SCSI ID = 12
SCSI ID = 13
SCSI ID = 14
SCSI ID = 15
Note:
[1] Do not remove
cover from pins
13 through 20
(darkened area).
Figure 3. Setting the SCSI ID on LW model drives
Page 21
Cheetah 36 Installation Guide, Rev. A 19
2. Configure termination.
If you are installing the drive in a syste m that has o ther SCSI
devices installed, terminate only the end devices on the
SCSI bus.
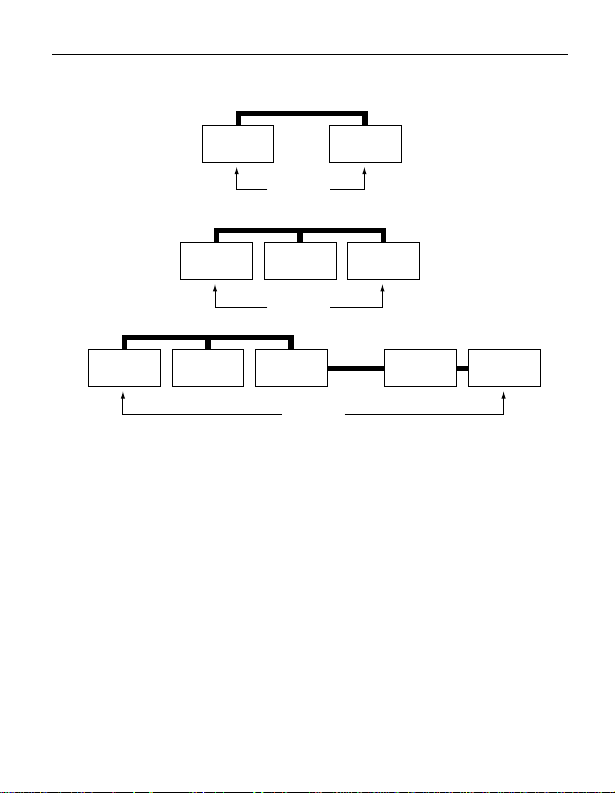
Figure 4 shows the three most common termination configurations. LW model drives do not have internal terminators or
any other way of adding internal termination on the drive.
You must provide ex ternal termination to these drives when
termination is required. This is normally done by adding an
in-line terminator on the cable. See Figure 9 on page 27 for
an illustration showing a system configuration that uses an
inline te r m i n at o r.
• Use active (ANSI SCSI-2 Alte rnative 2) singleended t erminators when terminating a bus operating in single-ended mode.
• Use SPI-2-compliant active low voltage differential terminators when terminating a SCSI Ultra2 bus operating in LVD
mode.
• Some controllers prefer to remain terminated even if they
are in the middle of the chain. Also, some controllers treat
the internal and external chains as separate logical buses.
This means you may need to terminate both the first and
last devices on both logical buses to achieve proper termination. If necessary, refer to your system or controller documenta tion to se e how this is handle d in your partic ular
system.
Page 22
20 Cheetah 36 Installation Guide, Rev. A
Internal SCSI cable
Internal
SCSI device
Internal
SCSI drive
Internal SCSI cable
Internal
SCSI device
Internal SCSI cable
Internal
SCSI device
Terminate
SCSI device
Terminate
Controller
Internal
Terminate
Controller
Controller
External
SCSI
cable
External
SCSI device
External
SCSI device
Figure 4. SCSI bus termination
Page 23
Cheetah 36 Installation Guide, Rev. A 21
3. Configure termination power.
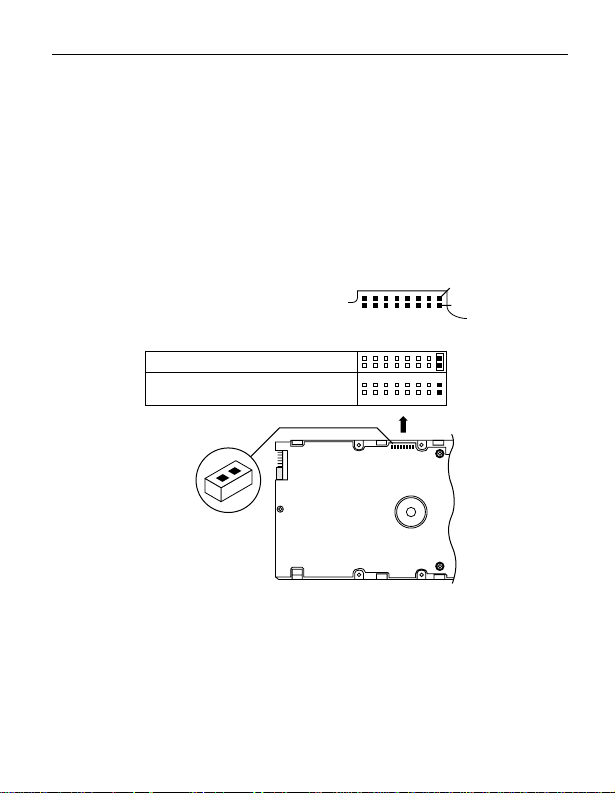
Terminators have to get power from some source. The
default configuration results in the drive not suppling termination power to the bus. You should normally leave this
drive set at this default unless your host system requires
that the drive supply termination power to the bus.
To configure this drive to supply termination power to the
bus, place a jumper on J2 pins 1 and 2 as shown in the figure below.
Pin 1
Pin 2
R
R
E
EST
D
S
P
Term. Power to SCSI Bus
Host adapter or other device provides
term power to external terminator
J2 Jumper
(enlarged to
show detail)
J6
Drive
Front
J2
SEDSMEWPP
J2
Figure 5. Setting terminator power jumpers
Page 24
22 Cheetah 36 Installation Guide, Rev. A
4. Connect the drive activity remote LED (optional)
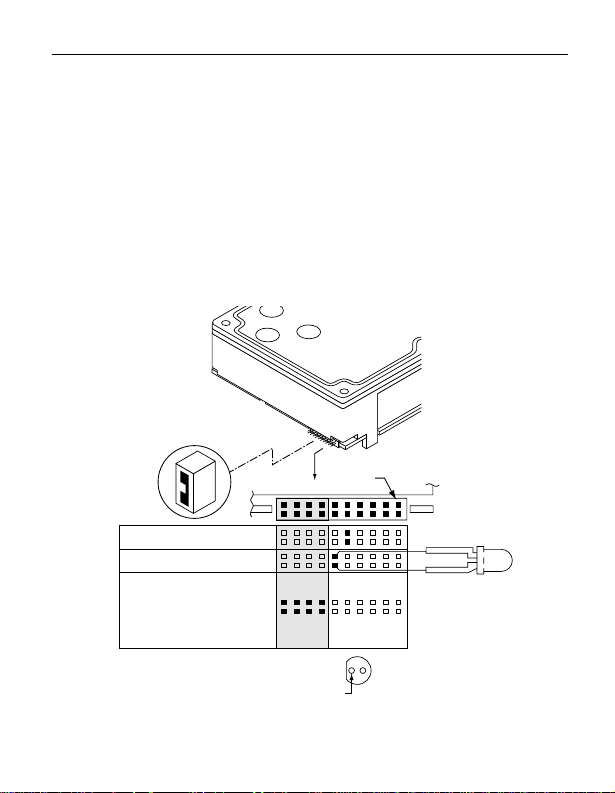
This drive provides connections for a remote drive activity
LED. This step is optional because the drive will work fine
without an LED connected, but many people find this to be
helpful to determine when the drive is actively reading or
writing data.
Most host systems provide this LED which is a small “bulb”
(actually a light-emitting diode) located on the host’s front
panel. Simply locate this LED and connect t he att ached pair
of wires to the pins on the drive as shown in Figure 6 bel ow.
Drive
Front
Jumper Plug
(enlarged to
show detail)
Pin 1
CATH
Reserved
Activity LED
Reserved
The shaded pins are shipped
with a cover installed. Do not
install jumpers on these pins.
Retain the cover unless you
install a 20-pin plug.
Note: On some LEDs the flat
side of indicator is cathode.
J6
Figure 6. Drive Active LED indicator connections
Page 25

Cheetah 36 Installation Guide, Rev. A 23
5. Check the other available jumper settings (optional)
This drive provides several features for unique configurations. You will not normally need to change from the default
settings f or normal operation. See Figure 7 on page 24.
Single-ended mode option
You can force the drive to operate only in SE mode by
installing a jumper on J2 pins 15 and 16. The default is to
allow the drive to automatically detect and use SE or LVD
mode. See page 11 for a description of the se two modes.
Delay Motor Start an d M o to r Start opt io ns
You can control when the drive’s motor starts spinning the
media using these two jumper positions (J2 pins 11 and 12
and J2 pins 13 and 14). You can configure the drive to delay
spinning up until a certain number of seco nds elapse or unt il
the drive receives a Start Unit command from the host system. The default settings are with both off so that the drive
begins spinni ng up as soon as it receives power.
Write Protect option
You can install a jumper connecting J2 pins 9 and 10 to prevent anyone from writing data to this disc drive (users can
still read data from the driv e). This jumper is normally left off
to allow users to write dat a to th e driv e.
Pari ty Check option
You can disable parity checking by installing a jumpers on
J2 pins 7 and 8. Most systems prefer that parity checking
remain enabled. Refer to your host adapter or system documentation to determine whether your host adapter supports
parity check ing.
Page 26

24 Cheetah 36 Installation Guide, Rev. A
J2
Reserved
Single-Ended Mode option
Use single-ended or low voltage differential mode.
Force the drive to operate only in single-ended mode.
Delay Motor Start option
(valid only if the Enable Motor Start jumper is not connected)
Disable the Delay Motor Start option (default).
Motor start delay equal to the SCSI ID multiplied by 12 seconds.
For example, if the SCSI ID = 2, the drive starts in 24 seconds.
Motor Start option
Disable motor start (default). The drive starts according to the
Delay Motor Start option.
Enable motor start. The drive waits for the Start Unit command
from the host before starting the spindle motor.
Write Protect option
Write protect = Off (enables writing – default).
Write protect = On (disables writing).
Parity Check option
Enable parity check of SCSI bus (default).
Disable parity check.
J6
Drive
J2 Jumper
(enlarged to
show detail)
Front
SEDSMEWPP
J2
Pin 1
Pin 2
R
R
E
EST
D
S
P
Figure 7. Additional jumper options
Page 27
Cheetah 36 Installation Guide, Rev. A 25
6. Mount the drive in the host system and connect
cabling.
a. Mount the drive to the host system’s chassis using four
6-32 UNC screws. Two mounting holes are in each side
of the drive and there are four mounting holes in the
bottom of the drive. Do not over-tighten or force the
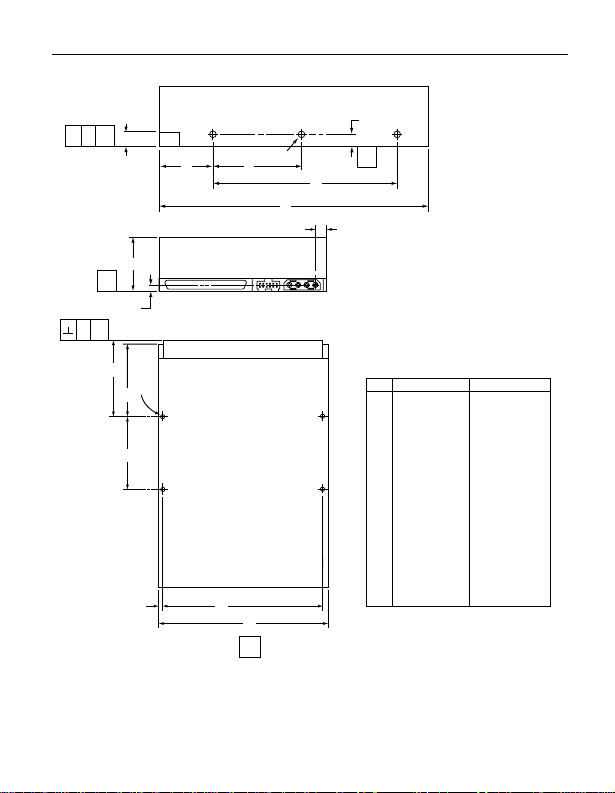
screw if it does not seem to screw in easil y. The dimensions of the drive are provided in Figure 10.
b. Connect the SCSI cable into the drive’s SCSI connector
as illustrated in Figure 8 on page 26. Take care not to
stretch or crimp this cable, and do not block the system’s air fl ow with th e cable . Figur e 9 on page 27 sho ws
an example of how to connect multiple drives on the
same bus.
c. Connect the DC power cable to the drive as illustrated
in Figure 8.
d. Replace the host system’s cover.
• Do not touch the connecto r pi ns or any com ponents on the circuit board.
• Observe static-discharge precautions.
• Always handle the drive by the frame only.
• The drive may be mounted in any orientation; however, you
must ensure that the drive receives adequate air flow for
cooling.
7. Format the drive.
Follow the instruction s on page 37 to format the drive .
Page 28
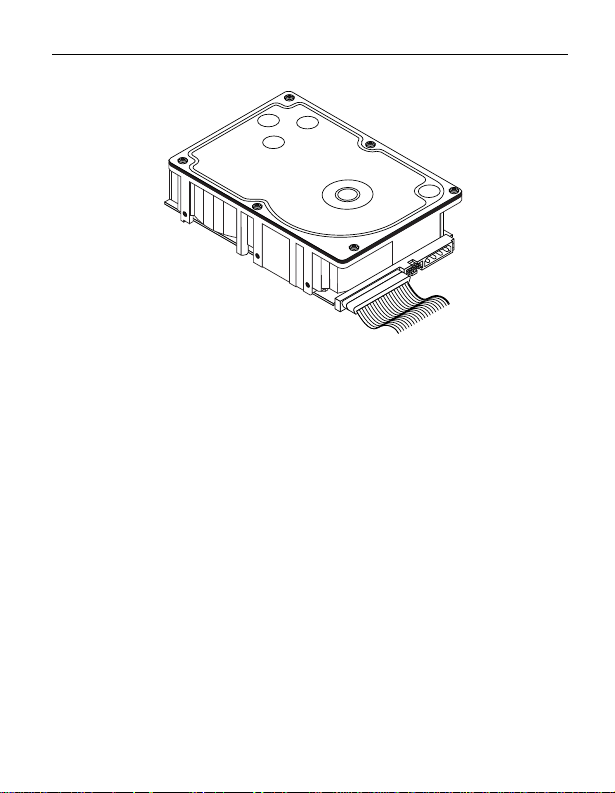
26 Cheetah 36 Installation Guide, Rev. A
Figure 8. Connecting cables to the drive
Page 29

Cheetah 36 Installation Guide, Rev. A 27
“LW” Model
Drive
Note:
Do not mix
“LW” and “WD”
model drives
on the daisy
chain.
SCSI ID 1
[2]
SCSI ID 0
Terminator
2 through X
SCSI devices [1]
Pin 1
(check your
adapter for Pin 1 location)
SCSI ID 7
Terminated
Host Adapter
PCB
[1] “X” means up to 15 devices on the SCSI bus.
[2] Ex ternal terminat or. Used only on end “LW” drive. U se only SPI- 2-
compliant active LVD terminators on SCSI Ultra2 buses.
Figure 9. Multiple-drive connection to host adapter
Page 30
28 Cheetah 36 Installation Guide, Rev. A
-Z-T//
S
HL
A
-Z-
M
U
-X-
P
[1]
G
F
[1]
B
R
DE
C
-X-
K
-Z-
J
Notes:
Mounting holes are 6-32 UNC 2B, three
[1]
on each side and four on the bottom.
Max screw penetration into side of drive
is 0.15 in. (3.81 mm). Max screw
tightening torque is 6.0 in-lb (3.32 nm)
with minimum full thread engagement of
0.12 in. (3.05 mm).
Dimension Table
Inches
1.654
max
A
5.787
max
B
4.000
± .010
C
3.750
± .010
D
.125
± .010
E
1.750
± .010
F
1.625
± .020
G
1.122
± .020
H
4.000
± .010
J
.250
± .010
K
1.638
± .010
L
.181
± .020
M
1.625
± .020
P
.265
± .010
R
.315
± .040
S
.015
max
T
.015
max
U
Millimeters
max
42.01
max
147.00
± .25
101.60
± .25
92.25
± .25
3.18
± .25
44.45
± .50
41.28
± .50
28.50
± .25
101.60
± .25
6.35
± .25
41.60
± .50
4.60
41.28
6.73
7.00
0.38
0.38
± .50
± .25
± .10
max
max
Figure 10. Mounting configuration dimensions (LW model)
Page 31
Cheetah 36 Installation Guide, Rev. A 29
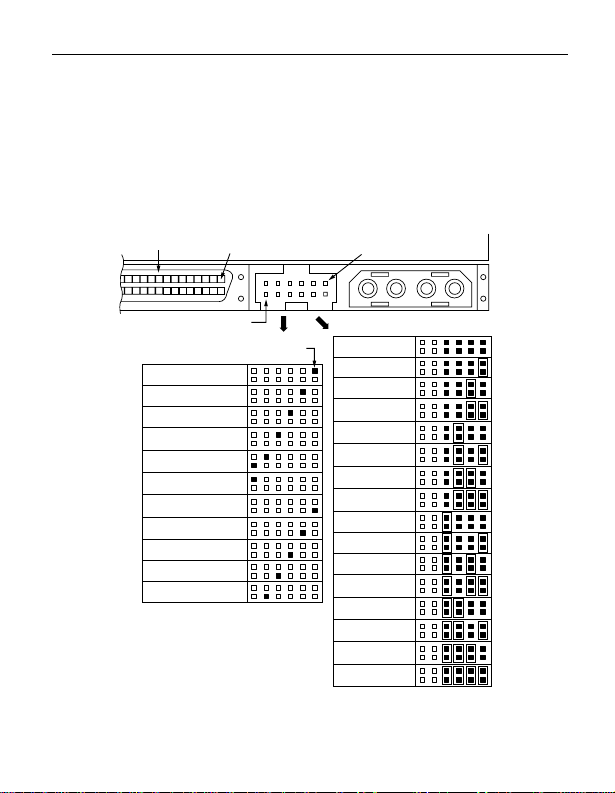
Additional connector on LW model drives
L W m odel drives have a connector located between the SCSI I/O
connector and the DC power connector to allow you to set the
SCSI ID and connect LEDs from the back of the drive. You are
not required to use this connector, but it’s available if you want to
use it. Ref er t o Figure 11 for pin assi gnm ents.
68 Pin
SCSI I/O Connector
J1
Pin 1
J5/J1A [2][4]
Pin 1
1P2P3P4P
Pin 12
J1A Pin 1
SCSI Address A0
SCSI Address A1
SCSI Address A2
SCSI Address A3
No connection
+5V
Fault LED*
Vendor Unique*
Reserved
Activity LED*
Ground
These pins are driven low for
*
250 ms after PWR ON or
RESET to allow jumper
selectable SCSI ID as shown
to the right.
J1-DC Power
SCSI ID = 0
SCSI ID = 1
SCSI ID = 2
SCSI ID = 3
SCSI ID = 4
SCSI ID = 5
SCSI ID = 6
SCSI ID = 7
SCSI ID = 8
SCSI ID = 9
SCSI ID = 10
SCSI ID = 11
SCSI ID = 12
SCSI ID = 13
SCSI ID = 14
SCSI ID = 15
Figure 11. Alternate SCSI ID select and LED connection
Page 32
30 Cheetah 36 Installation Guide, Rev. A
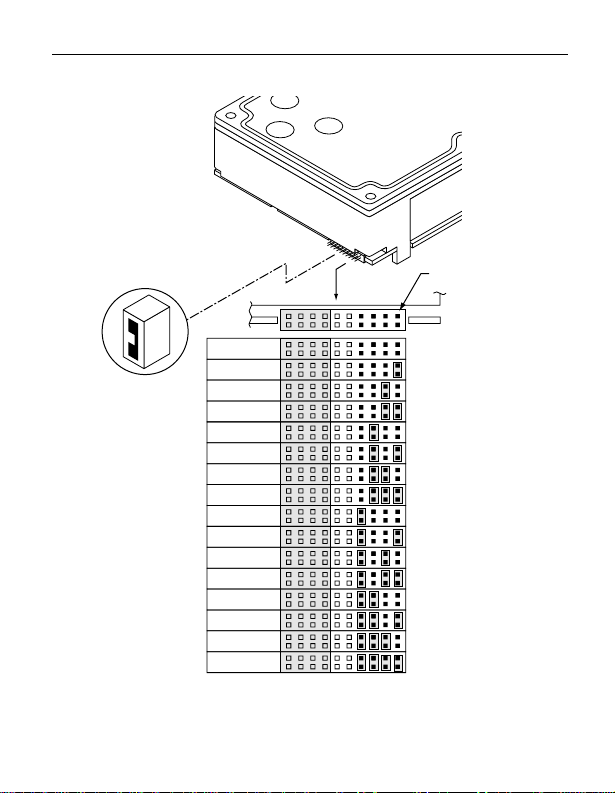
LC model installation
1. Set the SCSI ID on the drive.
Determine which SCSI IDs are already being used in the
system and then assign the disc drive a SCSI ID that isn’t
already being used. Use the J6 connector located on the
front of the drive to set the SCSI ID (see Figure 12).
• This drive is SCAM (SCSI Configured Auto
Magically) compliant. If you are installing this
drive in a S CA M co mplia nt sy st em, y o u ca n sk ip
this step because the system automatically assigns the
drive SCSI ID.
• The ho st sy stem’s SCS I contr oller u sually uses S CSI I D 7
so this SCSI ID is not usually available for disc drives or
other devic es.
• Most ST136403LC drives are factory set with the SCSI ID
set at 0. If this is the only SCSI drive in your system and
there are no other SCSI devices on the daisychain, you can
leave this drive’s SCSI ID set to 0 and proceed to the next
step. A devi ce is any hardware other than an in line terminator that is connected to the SCSI cable.
Page 33
Cheetah 36 Installation Guide, Rev. A 31
Drive
Front
Jumper Plug
(enlarged to
show detail)
Pin 1
J6
SCSI ID = 0 (default)
SCSI ID = 1
SCSI ID = 2
SCSI ID = 3
SCSI ID = 4
SCSI ID = 5
SCSI ID = 6
SCSI ID = 7
SCSI ID = 8
SCSI ID = 9
SCSI ID = 10
SCSI ID = 11
SCSI ID = 12
SCSI ID = 13
SCSI ID = 14
SCSI ID = 15
Note:
[1] Do not remove
cover from pins
13 through 20
(darkened area).
Figure 12. Setting the SCSI ID on LC model drives
Page 34
32 Cheetah 36 Installation Guide, Rev. A
2. Configure termination.
LC model drives are designed for installation in host systems that have a backplane with single connector attachment (SCA) connections. Termination is normally provided
on this backplane. Check your host system documentation
for details.
• You can use t his drive in host systems that do
not have a backplane with SCA connectors by
using a SCA to wide SCSI-2 adapter. These
adapters separate the interface lines from the power lines. If
you use such an adapter, proceed with step 2 of the installation instructions provided for LW model drives.
Note. Host systems designed to use LC drives normally pro vide
termination power from the host adapter or other source.
LC model drives cann ot be confi gured to pr o vide termination power t o the bus.
Page 35

Cheetah 36 Installation Guide, Rev. A 33
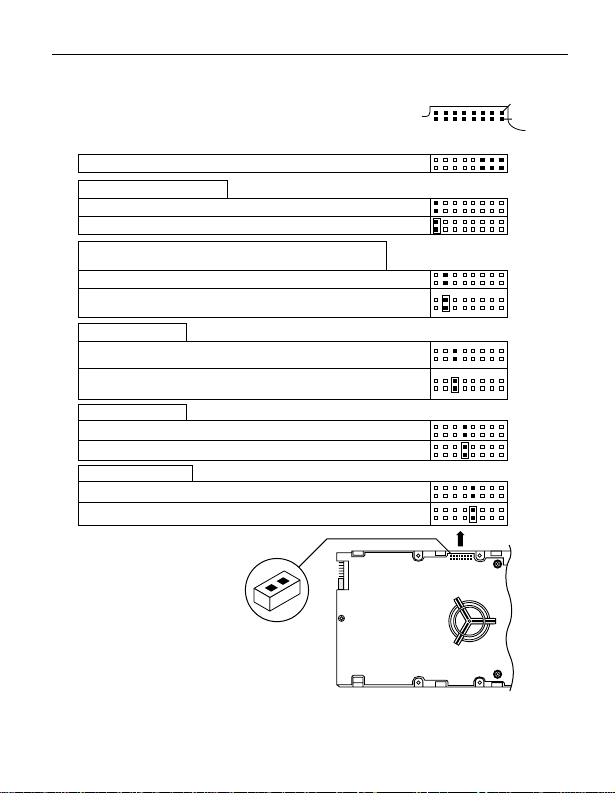
3. Check the other available jumper settings (optional)
This drive provides several features for unique configurations. You will not normally need to change from the default
settings f or normal operation. See Figure 13 on page 34.
Single-ended mode option
You can force the drive to operate only in SE mode by
installing a jumper on J2 pins 15 and 16. The default is to
allow the drive to automatically detect and use SE or LVD
mode. See page 11 for a description of the se two modes.
Delay Motor Start an d M o to r Start opt io ns
You can control when the drive’s motor starts spinning the
media using these two jumper positions (J2 pins 11 and 12
and J2 pins 13 and 14). You can configure the drive to delay
spinning up until a certain number of seco nds elapse or unt il
the drive receives a Start Unit command from the host system. The default settings are with both off so that the drive
begins spinni ng up as soon as it receives power.
Write Protect option
You can install a jumper connecting J2 pins 9 and 10 to prevent anyone from writing data to this disc drive (users can
still read data from the driv e). This jumper is normally left off
to allow users to write dat a to th e driv e.
Pari ty Check option
You can disable parity checking by installing a jumpers on
J2 pins 7 and 8. Most systems prefer that parity checking
remain enabled. Refer to your host adapter or system documentation to determine whether your host adapter supports
parity check ing.
Page 36
34 Cheetah 36 Installation Guide, Rev. A
J2
Reserved
Single-Ended Mode option
Use single-ended or low voltage differential mode.
Force the drive to operate only in single-ended mode.
Delay Motor Start option
(valid only if the Enable Motor Start jumper is not connected)
Disable the Delay Motor Start option (default).
Motor start delay equal to the SCSI ID multiplied by 12 seconds.
For example, if the SCSI ID = 2, the drive starts in 24 seconds.
Motor Start option
Disable motor start (default). The drive starts according to the
Delay Motor Start option.
Enable motor start. The drive waits for the Start Unit command
from the host before starting the spindle motor.
Write Protect option
Write protect = Off (enables writing – default).
Write protect = On (disables writing).
Parity Check option
Enable parity check of SCSI bus (default).
Disable parity check.
J6
Drive
J2 Jumper Plug
(enlarged to
show detail)
Front
SEDSMEWPP
J2
Pin 1
Pin 2
R
R
R
E
E
E
D
S
S
S
Figure 13. Additional jumper options
Page 37

Cheetah 36 Installation Guide, Rev. A 35
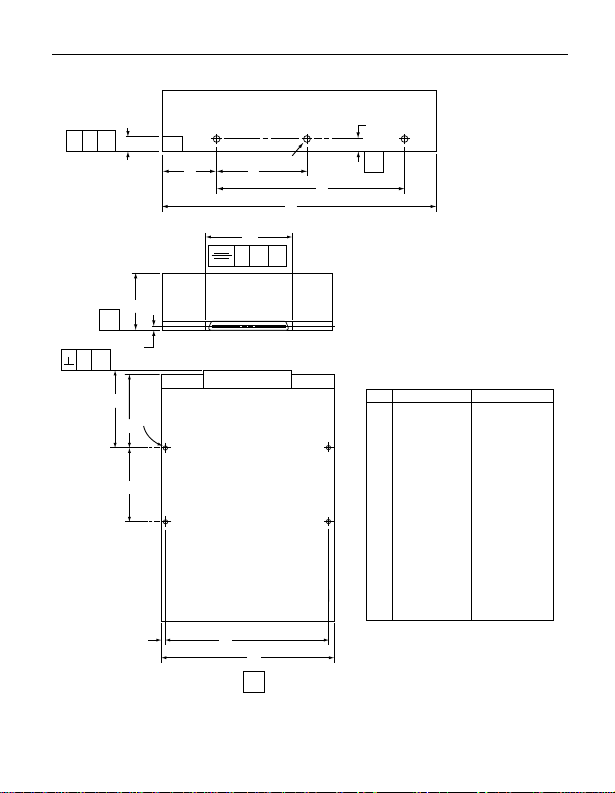
4. Mount the drive in the host system.
To mount an LC model drive , pl ug the drive int o the syste m’ s
single connector attachment (SCA) position on the system’s
backplane. The SCA connector on the drive contains interface and power functions, so it does not require a separate
power connector. The dimensions of the drive are provided
in Figure 15.
Some host systems require that you first mount the drive to
a sliding tray or courier before inserting it into the system.
This drive model plugs directly into a backplane connector
and therefore does not use cables.
80-pin
SCSI I/O
Connector
Pin 1
J2
J6
Figure 14. 80-pin I/O connection to drive (LC model)
Page 38
36 Cheetah 36 Installation Guide, Rev. A
-Z-T//
S
HL
A
-Z-
M
-X-
U
P
[1]
G
F
[1]
B
R
-Z- -X-N
DE
C
-X-
K
-Z-
J
Notes:
Mounting holes are 6-32 UNC 2B, three
[1]
on each side and four on the bottom.
Max screw penetration into side of drive
is 0.15 in. (3.81 mm). Max screw
tightening torque is 6.0 in-lb (3.32 nm)
with minimum full thread engagement
of 0.12 in. (3.05 mm).
Dimension Table
Inches
A
1.654
max
B
5.787
max
C
4.000
± .010
D
3.750
± .010
E
.125
± .010
F
1.750
± .010
G
1.625
± .020
H
1.122
± .020
J
4.000
± .010
K
.250
± .010
L
1.638
± .010
M
.181
± .020
N
.040
max
P
1.625
± .020
R
2.618
± .010
S
.276
± .040
T
.015
max
U
.015
max
Millimeters
42.01
147.00
101.60
92.25
3.18
44.45
41.28
28.50
101.60
6.35
41.61
4.60
1.20
41.28
66.50
7.00
0.38
0.38
max
max
± .25
± .25
± .25
± .25
± .50
± .50
± .25
± .25
± .25
± .50
max
± .50
± .25
± 1.02
max
max
Figure 15. Mounting configuration dimensions (LC model)
Page 39
Cheetah 36 Installation Guide, Rev. A 37
5. Format the drive.
Caution.
data. Be sure that you understand this principle
before formatting any hard disc drive. It is not necessar y to format a drive that previously has been us ed to
store data unless your intention is to erase all user data.
Seagate is not responsible for lost user data.
Formatting a drive erases all user
Important info rmation about formatting the drive
• The drive has been low level formatted at the factory.
You do not need to perform another low level format on
this drive unless you decide to perform certain diagnostics through the host adapter.
• If you do decide to perform a low level format, do not
abort the f ormat as this is l ikely to m ake the drive inoperable. A low level format will typically take less than 30
minutes.
• Protect against power failure or other power interruptions during the format.
Cheetah 36 disc drives are designed to operate with a variety of operating systems. Some brief instructions are provided below for DOS, Windows 3.1, Windows 95, Windows
98, and Macintosh systems. For more detailed instructions,
or if your operating system is not covered by these instructions, please refer to your operating system or drive utility
documentation.
Page 40

38 Cheetah 36 Installation Guide, Rev. A
Note. Hardware platform, operating system, and host
adapter variations can li m it access to th e full capacity of this and other high capacity drives. Refer to
your system, host adapter, or drive utility do c um e ntation for detailed instructions.
DOS, Windows 3.1, Windows 95, and Windows 98
System preparation
a. Turn your computer on. As your computer starts up,
watch the screen for a message describing how to run
the system setup program (sometimes called BIOS or
CMOS setup). This is usually done by pressing a special key, such as
DELETE, ESC
, or F1 during startup.
See your comp uter manual for details. Press the appropriate key to run the system setup program.
b. Set the drive type in your BIOS or CMOS setup to
“Zero,” None,” or “No hard drive installed” and then
sav e and exit from your setup program.
Drive partitioning
Partitioning a hard drive divides it into sections (partitions)
that act as separate logical drives (labeled C, D, E, etc.). To
partition your ne w driv e:
a. Insert a bootable DOS diskette into your diskette drive
and restart your computer.
b. Insert a DOS program diskette that contains the
fdisk.exe and format.com programs into your diskette
drive. At the
prompt, type fdisk and press
A:
ENTER
.
c. If you have two hard drives installed, the fdisk menu
displays five options. Option five allows you to select
Page 41

Cheetah 36 Installation Guide, Rev. A 39
the drive y ou want to partition . Make sure that your new
drive is selected. If you accidently repartition your old
hard drive, you will erase all data on the drive.
d. Press
drive” and the n press the
e. Press
and then press the
to select “Create DOS partition or logical DOS
1
key .
ENTER
again to select “Create primary DOS partition”
1
key. Create your first drive
ENTER
part ition.
If you are creating a partition that will be used to boot
your computer (drive C:), mak e sure that the partition is
marked
active
.
f. Create an extended partition and additional logical
drives, if necess ary, until all the space on your new hard
drive has been partiti oned.
g. When the partitioning is complete, fdisk reboots your
compu ter.
Drive formatting
a. At the A: prompt, type
your new parti ti on. If this is your boot drive, type
x: /s
. Make sure you use the correct drive letter. If you
forma t x
where x is the letter of
format
format a drive that already contains data, you will erase
all data on the drive.
b. Repeat this process for all the new partitions you have
created.
After you format your new drive, it is ready to use. You’re
done!
Page 42

40 Cheetah 36 Installation Guide, Rev. A
Macintosh
Use a th ird-party dr ive u t ilit y to initialize th e d r ive a n d follow
the instructions provided with the utility. Note: versions of
Apple Drive Setup prior to version 1.3.1 do not recognize
non-Apple drives.
Page 43

Cheetah 36 Installation Guide, Rev. A 41
Seagate Technology support services
Online Services
Internet
For online information about Seagate products, visit
www. seagate.com or e- mail your disc or tape questions to:
Presales Support:
Disc: http://www.seagate.com/support/email/
email_presales.shtml
Tape: http://www.seagate.com/support/email/
email_tape_presales.shtml
[email protected]
Technical Support
Disc: http://www.seagate.com/support/email/
email_disc_support.shtml
Tape: http://www.seagate.com/support/email/
email_tape_support.shtml
SeaBOARD®
information about Seagate disc and tape drive products and is
available 24 hours daily. Set your communications software to
eight data bits, no parity and one stop bit (8-N-1). This service is
availabl e world w ide.
:
is a computer bulletin board system that contains
or
or
or
or
Automated S er vices
SeaFONE
800-732-4283) to access our automated self-help services.
Using a touch-tone phone, you can find answers to service
1-800-SEAGATE)
® (
is Seagate's toll-free number (1-
Page 44

42 Cheetah 36 Installation Guide, Rev. A
phone numbers, commonly asked questions, troubleshooting
tips and specifications for disc drives and tape drives 24 hours
daily. International callers can reach this service by dialing +1405-936-1234.
SeaFAX
touch-tone phone, you can obtain technical support information
by return FAX 24 hour s daily. This service is available worldwide.
®
is Seagate's automated FAX delivery system. Using a
Presales Support
Our Presales Support staff can help you determine which
Seagate products are best suited for your specific application or
computer sys tem.
Seagate Express
You can purchase select tape products and tape accessories
through Seagate Express 24 hours daily by calling 1-800-5310968 or by faxing your order to: +1-972-481-4812.
T e c hnical Support
If you need help installing your drive, consult your dealer. Dealers are familiar with their unique system configurations and can
help you with system conflicts and other technical issues. If you
need additi onal help, you can talk to a Se agate technical support
specialist. Before calling, note your system configuration and
drive model number (ST
SeaTDD™(+1-405-936-1687)
for the deaf (TDD). You can send questions or comments 24
hours daily and exchange messages with a technical support
xxxxx).
is a telecommunications device
Page 45

Cheetah 36 Installation Guide, Rev. A 43
specialist from 8:00 A.M. to 12:15 P.M. and 1:30 P.M. to 6:00
P.M. (central ti m e) Monday through Friday.
Customer Service (C SO)
Warranty Repai r
Seagate offers worldwide customer support for Seagate drives.
Seagate direct O EM , Di stri bution and Sys tem Integrator customers should contact their Seagate service center representative
for warranty information. Other customers should contact their
place of purchase.
Authorized Service Centers
If your live outside the U.S., you can contact an Authorized Service C e nter for se rvice or repair.
USA/Canada/Latin America Support Services
Presales Support
Disc:
1-877-271-3285 or FAX: +1-405-936-1683
+1-405-936-1210
Tape:
1-800-626-6637 or FAX: +1-714-641-2410
+1-714-641-2500
Technical Suppor t (SeaFONE)
1-800-SEAGATE or +1-405-936-1234 (for specific product
phone number)
F AX:
Disc: +
1-405-936-1685;
SeaFAX 1-800-SEAGATE
SeaTDD +1-405-936-1687
SeaBOARD
Disc: +
Tape:
+1-405-936-1683
1-405-936-1600;
Tape:
+1-405-936-1630
Page 46

44 Cheetah 36 Installation Guide, Rev. A
Warranty Repai r
USA/Canada 1-800-468-3472 FAX: +1-405-949-6740
Latin America +1-405-949-7758 F AX: +1-405-949-6738
Authorized Service Centers
Brazil
MA Informatica
Canada
Memofix
Adtech
+55-21-516-6649 F AX: +55-21-516-5280
+1-905-660-4936 F AX: +1-905-660-4951
+1-905-812-8099 or F AX: +1-905-812-780 7
1-800-624-9857
European Support Services
For European customer support, dial the toll-free number for
your specific country for presales support, technical support,
SeaFAX and warranty repair.
If your country is not listed here, dial our European call center at
+31-20-316-7222 from 8:30
time) Monday through Friday. The European call center is
located in Amsterdam , The Netherlands.
Call Center
Austria 0 800-20 12 90
Belgium 0 800-74 876
Denmark 80 88 12 66
Fr ance 0 800-90 90 52
Germany 0 800- 182 6831
Ireland 1 800-55 21 22
Italy 1 677 90 695
Netherlands 0 800-732 4283
A.M
. to 5:00 P.M. (European central
Page 47

Cheetah 36 Installation Guide, Rev. A 45
Norwa y 800-113 91
Poland 00 800-311 12 38
Spain 900-98 31 24
Sweden 0 207 90 073
Switzerlan d 0 800-83 84 11
Turkey 00 800-31 92 91 40
United Kingdom 0 800-783 5177
SeaBOARD
Germany +49- 89-1409331
Fax Services—All European Countries
Presales/Technical Support/W arranty Repair +31-20-653-3513
Africa/Middle East Support Services
For presales, technical support, warranty repair and FAX services in Af rica and the Middle East, dial our European call center
at +31-20-316-7222 from 8:30 a.m. to 5:00 p.m. (European central time) Monday through Friday, or send a FAX to +31-20-653-
3513. The European call center is located in Amsterdam, The
Netherlands.
Asia/Pacific East Support Services
Technical Suppor t
Australia +61-2-9725-3366 F AX: +61-2-9725- 4052
Hong Kong +852-2368 9918 FAX: +852-2368 7173
Japan — F AX: +81-3-5462-2979
Singapore +65-488-7584 FAX: +65-488-7528
Taiwan +886-2-2514-2237 FAX: +886-2-2715-2923
Page 48

46 Cheetah 36 Installation Guide, Rev. A
SeaFAX
Australia +61-2-9756-5170
Warranty Repai r
Japan +81-3-5462-2904 FAX: +81-3-5462-2979
Asia/Pacific and +65-485-3595 FAX: +65-488-7503
Australia
Page 49

Page 50

Page 51

Page 52

Seagate Technology, Inc.
920 Disc Drive, Scotts Valle y, CA 95066-4544, USA
Publicat ion Number: 83329450, Rev. A, Printed in USA
 Loading...