

Maxtor OneTouch FireWire,Maxtor OneTouch III USB 2.0,Maxtor OneTouch USB,OneTouch III,Maxtor OneTouch III Mini
Seagate Maxtor OneTouch FireWire,Maxtor OneTouch III USB 2.0,Maxtor OneTouch USB,OneTouch III,Maxtor OneTouch III Mini User Manual

User’s Guide
MINI EDITION FOR WINDOWS® VISTA
MAXTOR ONETOUCH
™
III

MAXTOR ONETOUCH III MINI EDITION WINDOWS VISTA USER’S GUIDE
Contents
Windows Installation
Introduction
. . . . . . . . . . . . . . . . . . . . . . . . . . . . . . . . . . . . . . . . . . . . . . . . . . . 1
About this Guide . . . . . . . . . . . . . . . . . . . . . . . . . . . . . . . . . . . . . . . . . . . . . . . 1
Components . . . . . . . . . . . . . . . . . . . . . . . . . . . . . . . . . . . . . . . . . . . . . . . . . . 1
Included in Package. . . . . . . . . . . . . . . . . . . . . . . . . . . . . . . . . . . . . . . . . . . . 2
System Requirements . . . . . . . . . . . . . . . . . . . . . . . . . . . . . . . . . . . . . . . . . . 2
Handling Precautions . . . . . . . . . . . . . . . . . . . . . . . . . . . . . . . . . . . . . . . . . . 2
Maxtor Product Support . . . . . . . . . . . . . . . . . . . . . . . . . . . . . . . . . . . . . . . . 2
Installing the OneTouch III Mini Edition
. . . . . . . . . . . . . . . . . . . . . . 3
Step 1 - Connect the Drive . . . . . . . . . . . . . . . . . . . . . . . . . . . . . . . . . . . . . . .3
Step 2 - Install the Software . . . . . . . . . . . . . . . . . . . . . . . . . . . . . . . . . . . . . .3
Step 3 - Setup the Drive. . . . . . . . . . . . . . . . . . . . . . . . . . . . . . . . . . . . . . . . . . 8
Using the OneTouch III Mini Edition
. . . . . . . . . . . . . . . . . . . . . . . . . . . 9
Maxtor EasyManage. . . . . . . . . . . . . . . . . . . . . . . . . . . . . . . . . . . . . . . . . . . . 9
Maxtor OneTouch Settings Utilities . . . . . . . . . . . . . . . . . . . . . . . . . . . . . . 10
Customizing the OneTouch Button. . . . . . . . . . . . . . . . . . . . . . . . . . . . . . . 10
Security Settings . . . . . . . . . . . . . . . . . . . . . . . . . . . . . . . . . . . . . . . . . . . . . 11
Unlock Drive . . . . . . . . . . . . . . . . . . . . . . . . . . . . . . . . . . . . . . . . . . . . . . . . . 13
Erase Drive . . . . . . . . . . . . . . . . . . . . . . . . . . . . . . . . . . . . . . . . . . . . . . . . . . 13
Backup . . . . . . . . . . . . . . . . . . . . . . . . . . . . . . . . . . . . . . . . . . . . . . . . . . . . . 14
Backup File Management . . . . . . . . . . . . . . . . . . . . . . . . . . . . . . . . . . . . . . 15
Restore . . . . . . . . . . . . . . . . . . . . . . . . . . . . . . . . . . . . . . . . . . . . . . . . . . . . . 16
Sync . . . . . . . . . . . . . . . . . . . . . . . . . . . . . . . . . . . . . . . . . . . . . . . . . . . . . . . 17
Automatic Sync . . . . . . . . . . . . . . . . . . . . . . . . . . . . . . . . . . . . . . . . . . . . . . 18
Rollback . . . . . . . . . . . . . . . . . . . . . . . . . . . . . . . . . . . . . . . . . . . . . . . . . . . . 18
Maxtor Encryption . . . . . . . . . . . . . . . . . . . . . . . . . . . . . . . . . . . . . . . . . . . . . 19
OneTouch III Status Icons . . . . . . . . . . . . . . . . . . . . . . . . . . . . . . . . . . . . . . 23
Storing Audio . . . . . . . . . . . . . . . . . . . . . . . . . . . . . . . . . . . . . . . . . . . . . . . . 25
Connecting and Disconnecting the OneTouch III Mini Edition . . . . . . . . . 25
Naming Your OneTouch III Mini Edition . . . . . . . . . . . . . . . . . . . . . . . . . . . 25
© 2007 Seagate, Seagate Technology, Maxtor, OneTouch, and the Maxtor stylized logo are trademarks or registered trademarks of Seagate Technology LLC or one of its affiliates. All other trademarks or
registered trademarks are the property of their respective owners. Seagate reserves the right to change, without notice, product offerings or specifications. One gigabyte, or GB, equals one billion bytes when
referring to hard drive capacity. Your computer’s operating system may use a different standard of measurement and report a lower capacity. In addition, some of the listed capacity is used for formatting and
other functions, and thus will not be available for data storage. Seagate Technology, 920 Disc Drive, Scotts Valley, CA 95066 U.S.A.
MAXTOR ONETOUCH III MINI EDITION WINDOWS VISTA INSTALLATION
PAGE 1
Introduction
Thank you for selecting a Maxtor product.
The new Maxtor OneTouch
TM
III Mini Edition provides a simple backup and
storage solution with Maxtor DriveLock™ to protect the contents of your drive
in case of loss or unauthorized use.
This user’s guide will help you setup your drive and includes helpful tips
for performing backups and getting the most out of your new OneTouch III
Mini Edition.
The OneTouch III Mini Edition features:
– USB bus-powered storage solution
– Maxtor OneTouch™ button - the simple way to backup your files
– Maxtor DriveLock™ security feature password-protects the contents
of your drive in case of loss or unauthorized use
– Simple Maxtor user interface for backup scheduling and security.
Maxtor EasyManage software features include:
– Maxtor Encryption to encrypt your sensitive data
– Diagnostic utilities to check the health of your OneTouch III Mini Edition
– Customizing the OneTouch button to open frequently-used programs
– Using Maxtor Backup to back up and restore data.
About this Guide
The following symbols and conventions are used in this guide:
Components
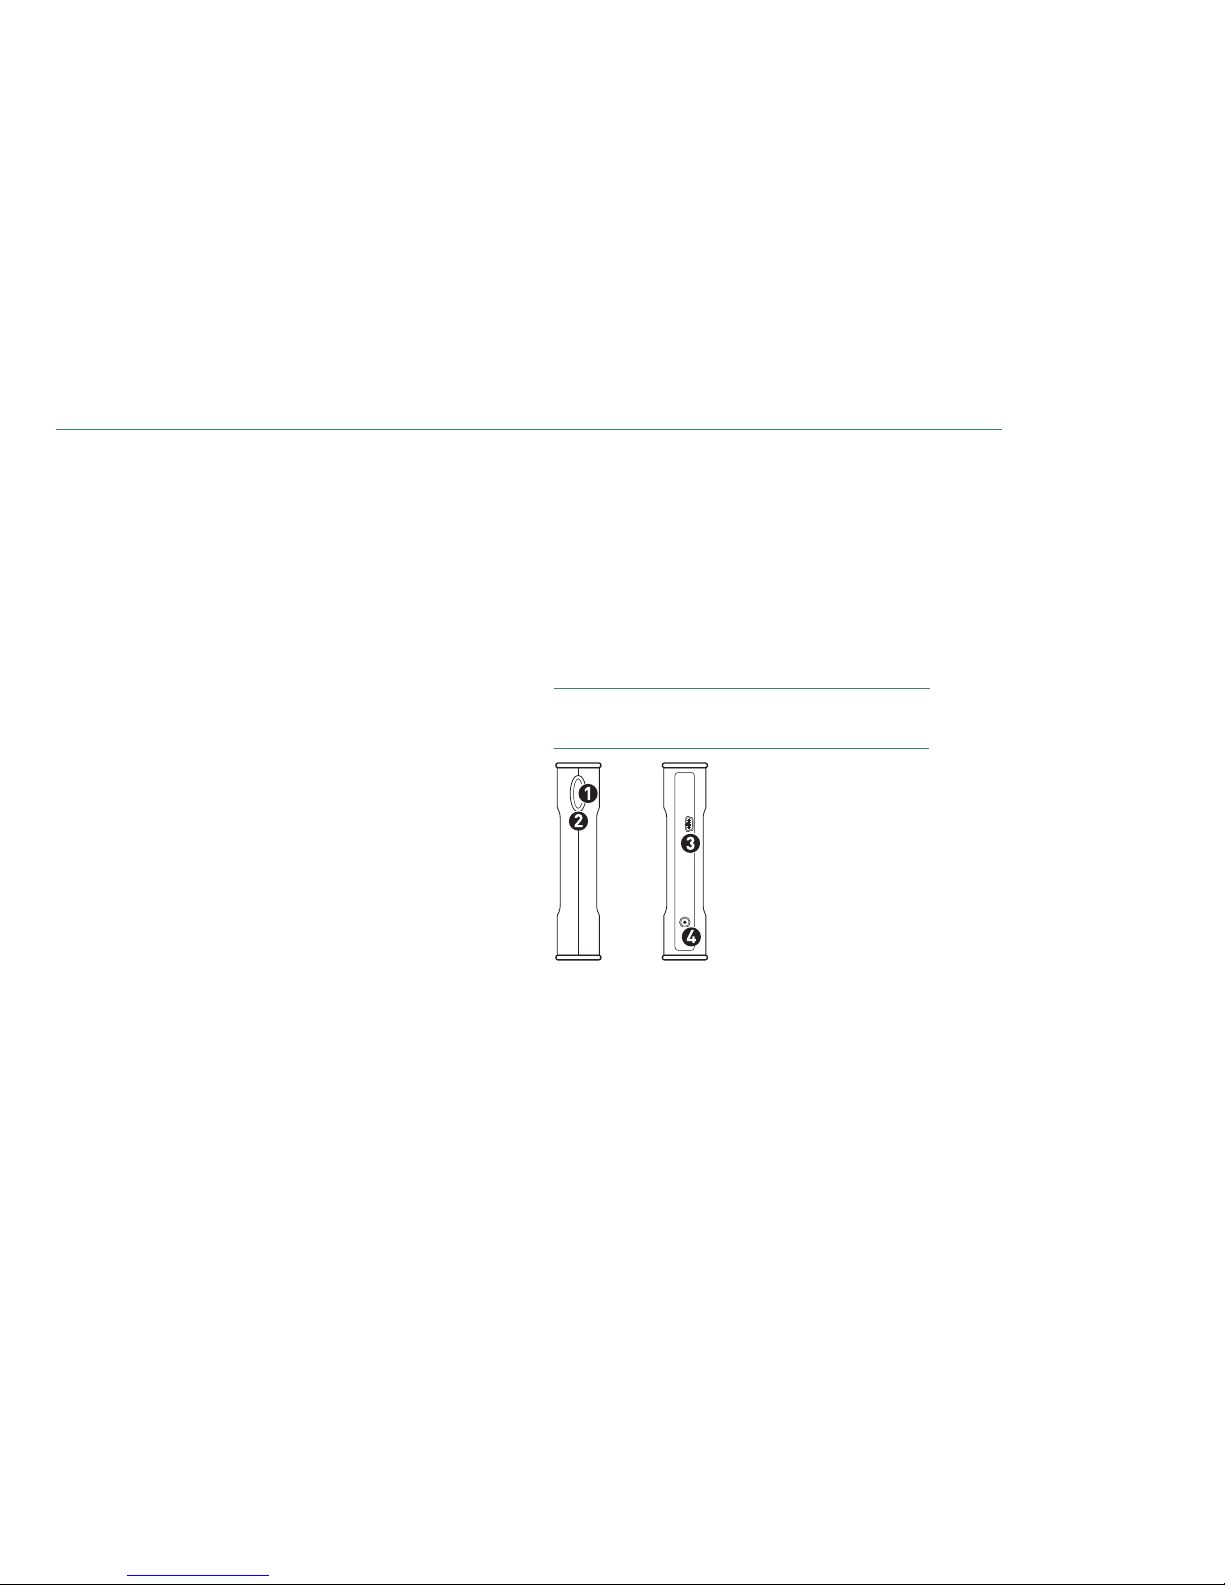
Before installing, review the solution features in Figure 1.
FIGURE 1 SOLUTION FEATURES
1. OneTouch Button
2. Status Light
3. Mini USB 2.0 Port
4. Optional Power Supply Port
Bold Used for menu, command, and keyboard selections you make and
screens you will see.
Italics
Used for emphasis and to identify new terms.
MAXTOR ONETOUCH III MINI EDITION WINDOWS VISTA INSTALLATION
PAGE 2
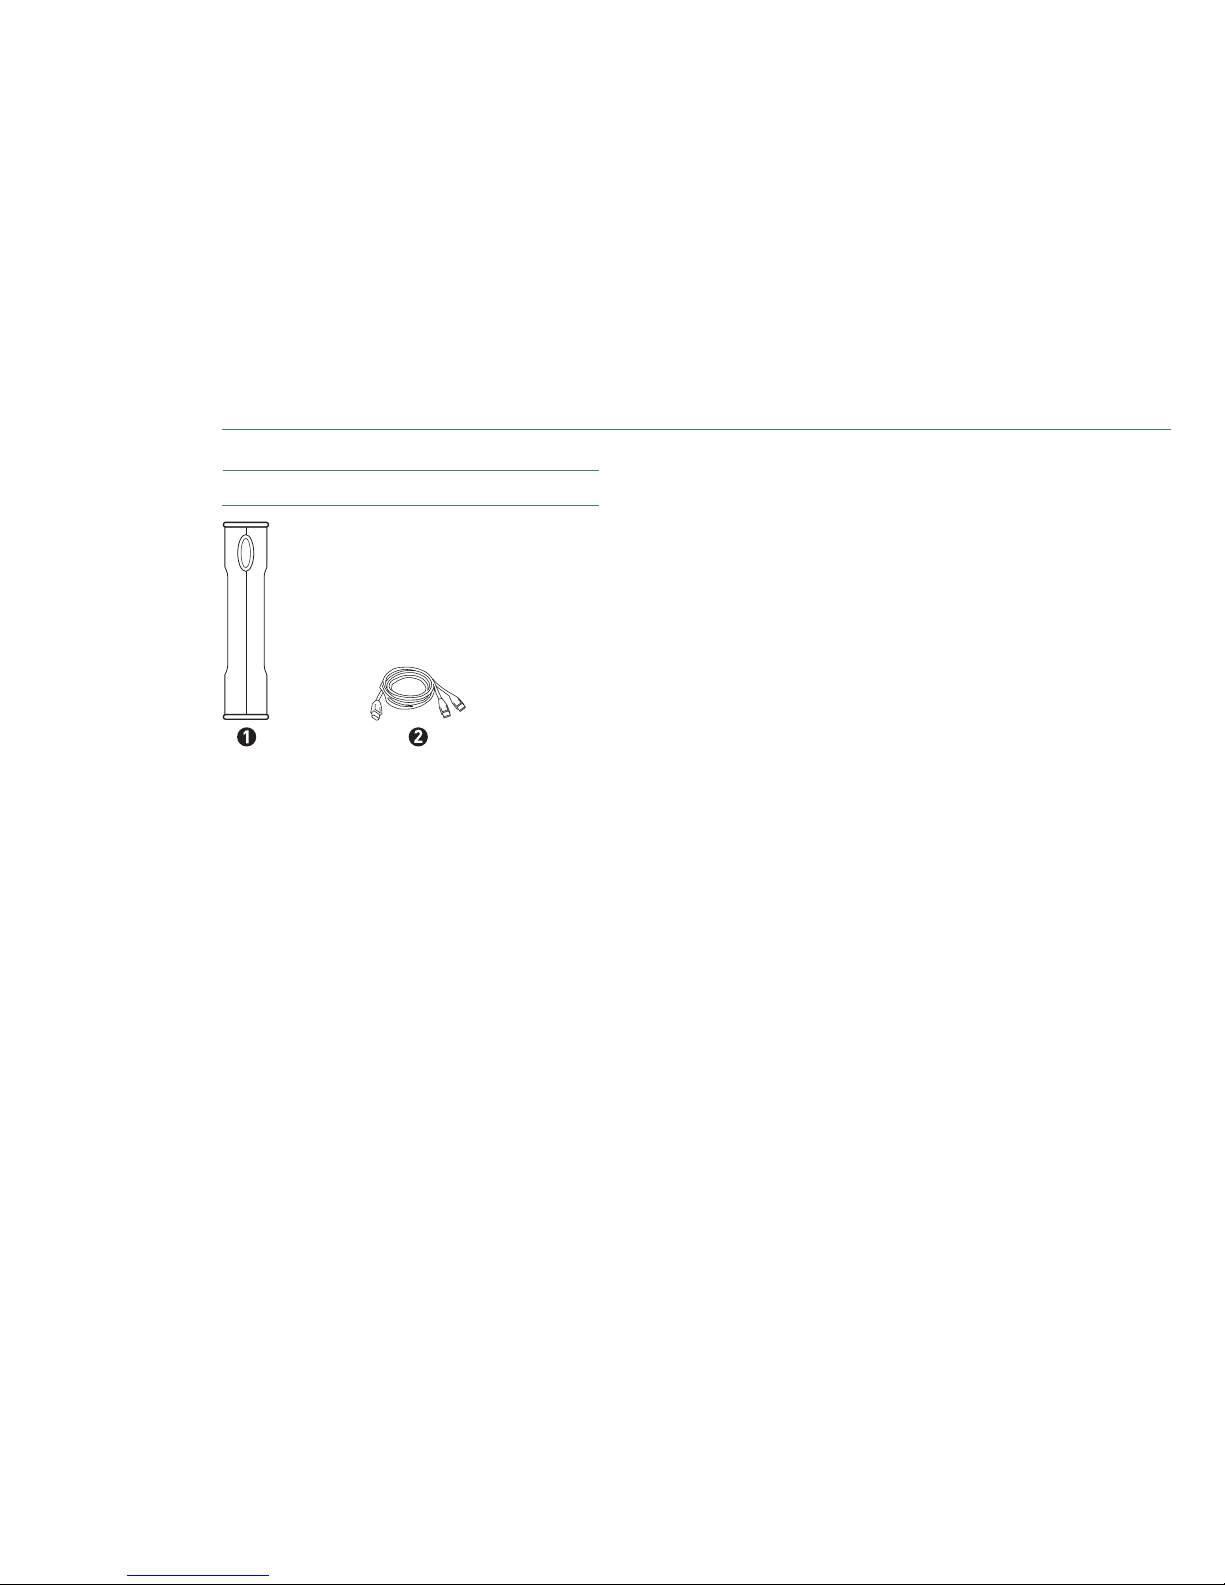
FIGURE 2 INCLUDED IN PACKAGE
1. Backup Solution
2. USB Y-Cable
System Requirements
– Windows
®
Vista, 2000 Professional, XP Professional, or
XP Home Edition
–1 Ghz 32-bit (x86) processor
– 512MB RAM or more as required by the operating system
–Two (2) available USB 2.0 interface ports
– Internet connection (for system updates)
Handling Precautions
Please handle your new OneTouch III Mini Edition with care! Follow the
precautions listed here or you could damage your drive and void the product
warranty. Review the Seagate
Limited Warranty for more information.
Follow these precautions to prevent data loss
–
Do not bump, move or drop the drive while in operation.
– Do not remove the interface cable or optional power cord without
first disconnecting the drive properly through the operating system.
– Do not set any liquids or drinks on or near the drive. Liquids will
damage the internal electronics.
– Do not open the drive enclosure. This can cause loss of data and will
void the product warranty.
Maxtor Product Support
Seagate Technology provides a comprehensive product support section on
its web site, including the latest software drivers, product specifications, a
complete troubleshooting section, and the Seagate Knowledge Base.
Maxtor USA Support
Visit www.seagate.com for the following information:
– Search the Hard Drive Knowledge Base
We store all resolved problems and FAQ’s in our knowledge base.
Search by product, category, keywords, or phrases.
– My Stuff
Login to modify or view your FAQ update notifications or update your
personal profile.
Seagate Global Customer Support
Visit www.seagate.com and click Support or Contact Us for product
support outside of the USA.
MAXTOR ONETOUCH III MINI EDITION WINDOWS VISTA INSTALLATION
PAGE 3
Installing the OneTouch III Mini Edition
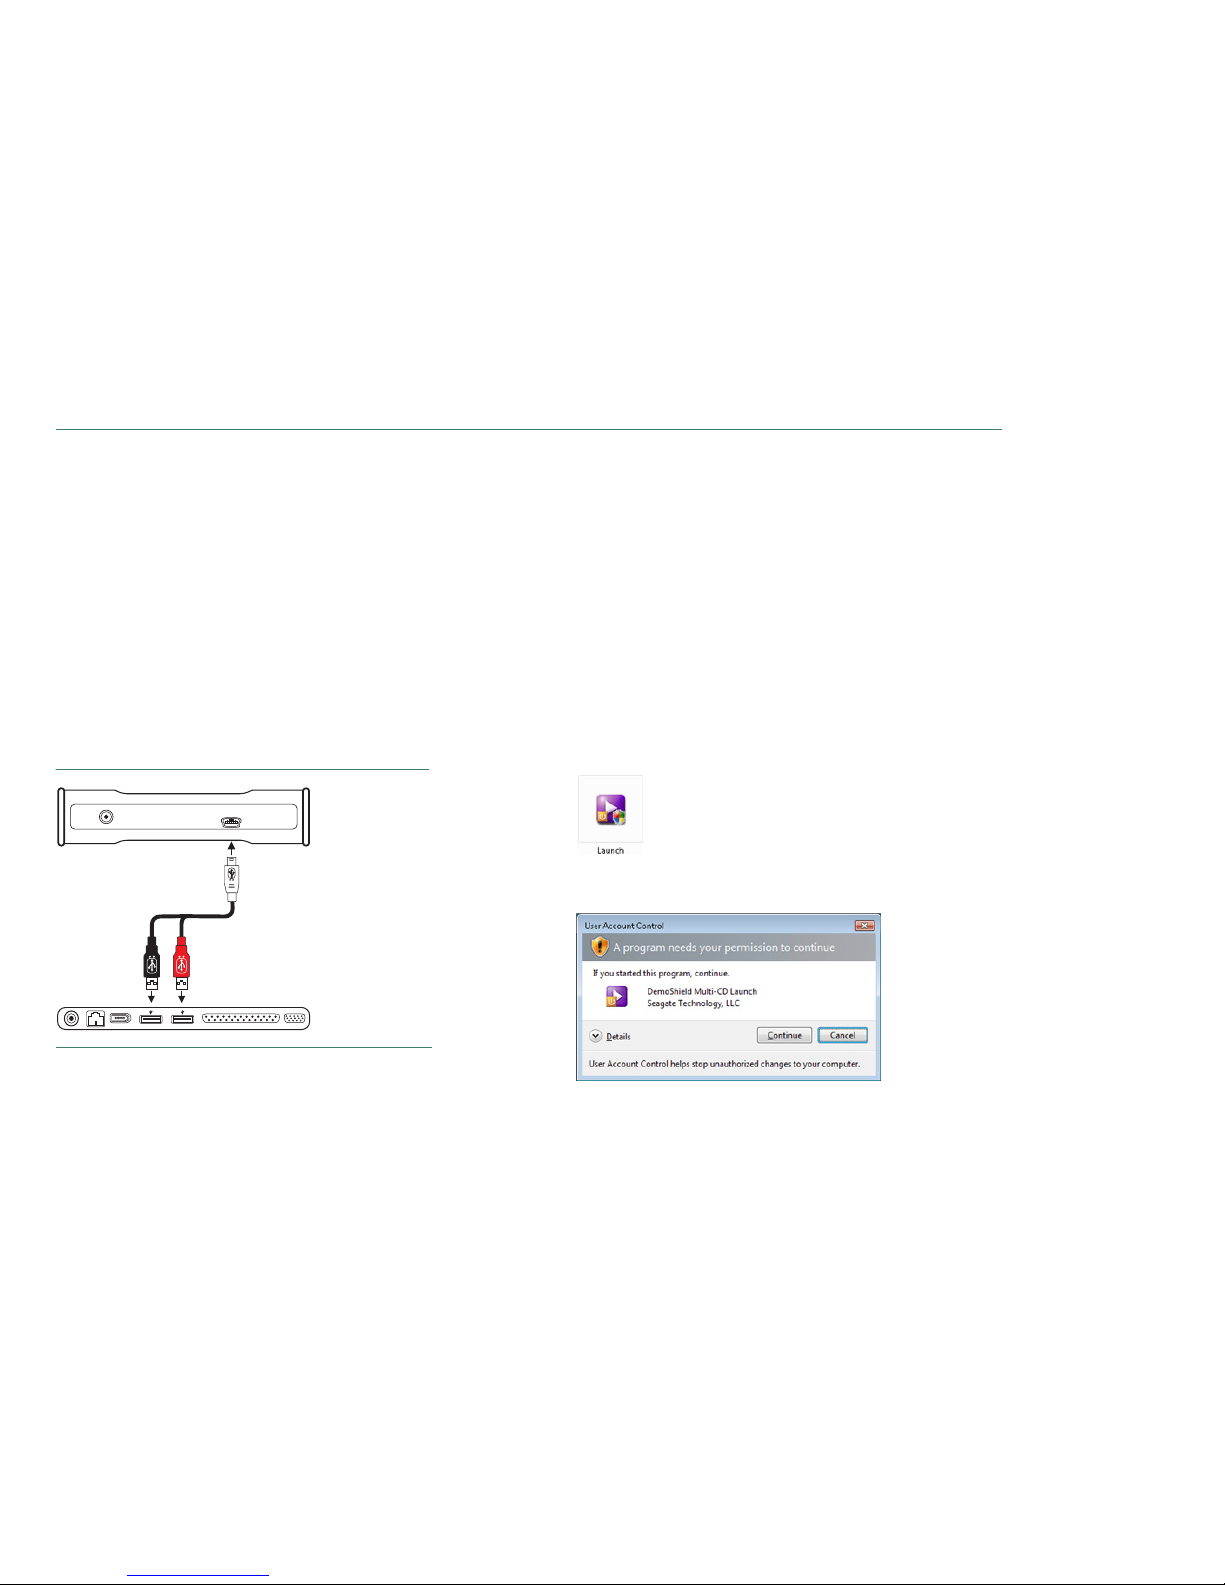
Step 1 – Connect the Drive
1. Plug the Power + Data connector into an available USB port on
your system.
2. Plug the Power Only connector into an available USB port on
your system.
3. Connect the Type "B" connector to the OneTouch III Mini Edition Drive.
Note: If your computer does not supply enough power to the OneTouch
III Mini Edition through the red connector, plug in the unused black
connector on the ‘Y’ cable to another USB port on your computer (or a
powered USB hub).
If both ports fail to supply enough power to the drive, an optional power
supply should be purchased from Maxtor at www.maxstore.com
FIGURE 3 CONNECTING THE ONETOUCH III MINI EDITION
Step 2 – Install the Software
Important: Seagate suggests that you copy the software installation
program located on the OneTouch III Mini Edition to another location.
If you opt not to create a copy of this program or if your copy becomes
corrupt, you can download the program from Seagate’s website at
www.seagate.com .
The installation software is located on the OneTouch III Mini Edition.
The following steps will guide you through the installation procedure.
1. After connecting the OneTouch III Mini to your computer, the AutoPlay
window opens. Click Run Launch.exe .
Note: In the event that the AutoPlay window does not open, click Start
Computer . Browse to and select the drive letter associated with the
OneTouch III Mini. Then double-click Launch (this may appear as
Launch.exe
).
2. A User Account Control window for the DemoShield Multi-CD Launch
needs permission to continue. Click Continue .
Small
Connector
Red
Connector
Black
Connector
MAXTOR ONETOUCH III MINI EDITION WINDOWS VISTA INSTALLATION
PAGE 4
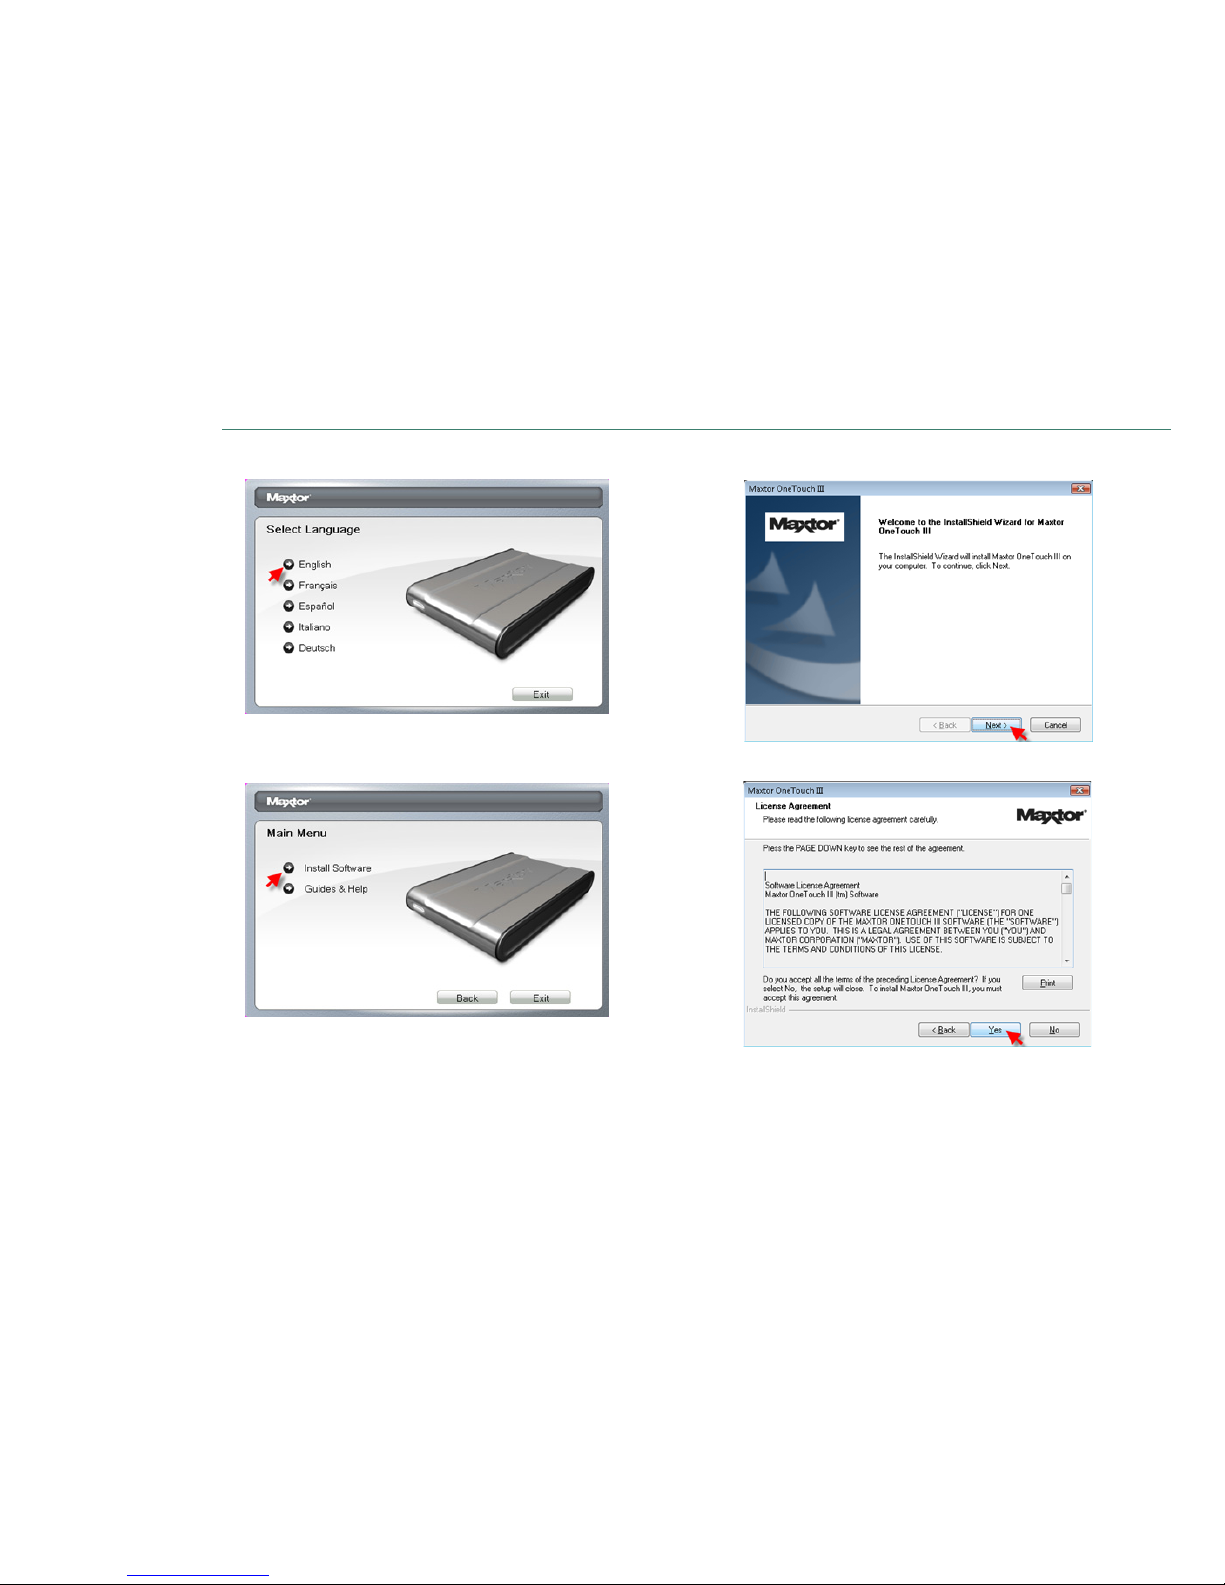
3. From the Menu, select your Language (e.g. English).
The Main Menu opens.
4. Click Install Software .
The InstallShield Wizard for the OneTouch III Setup loads.
5. From the Welcome Screen, click Next .
6. Review the License Agreement and click Yes to continue.
MAXTOR ONETOUCH III MINI EDITION WINDOWS VISTA INSTALLATION
PAGE 5
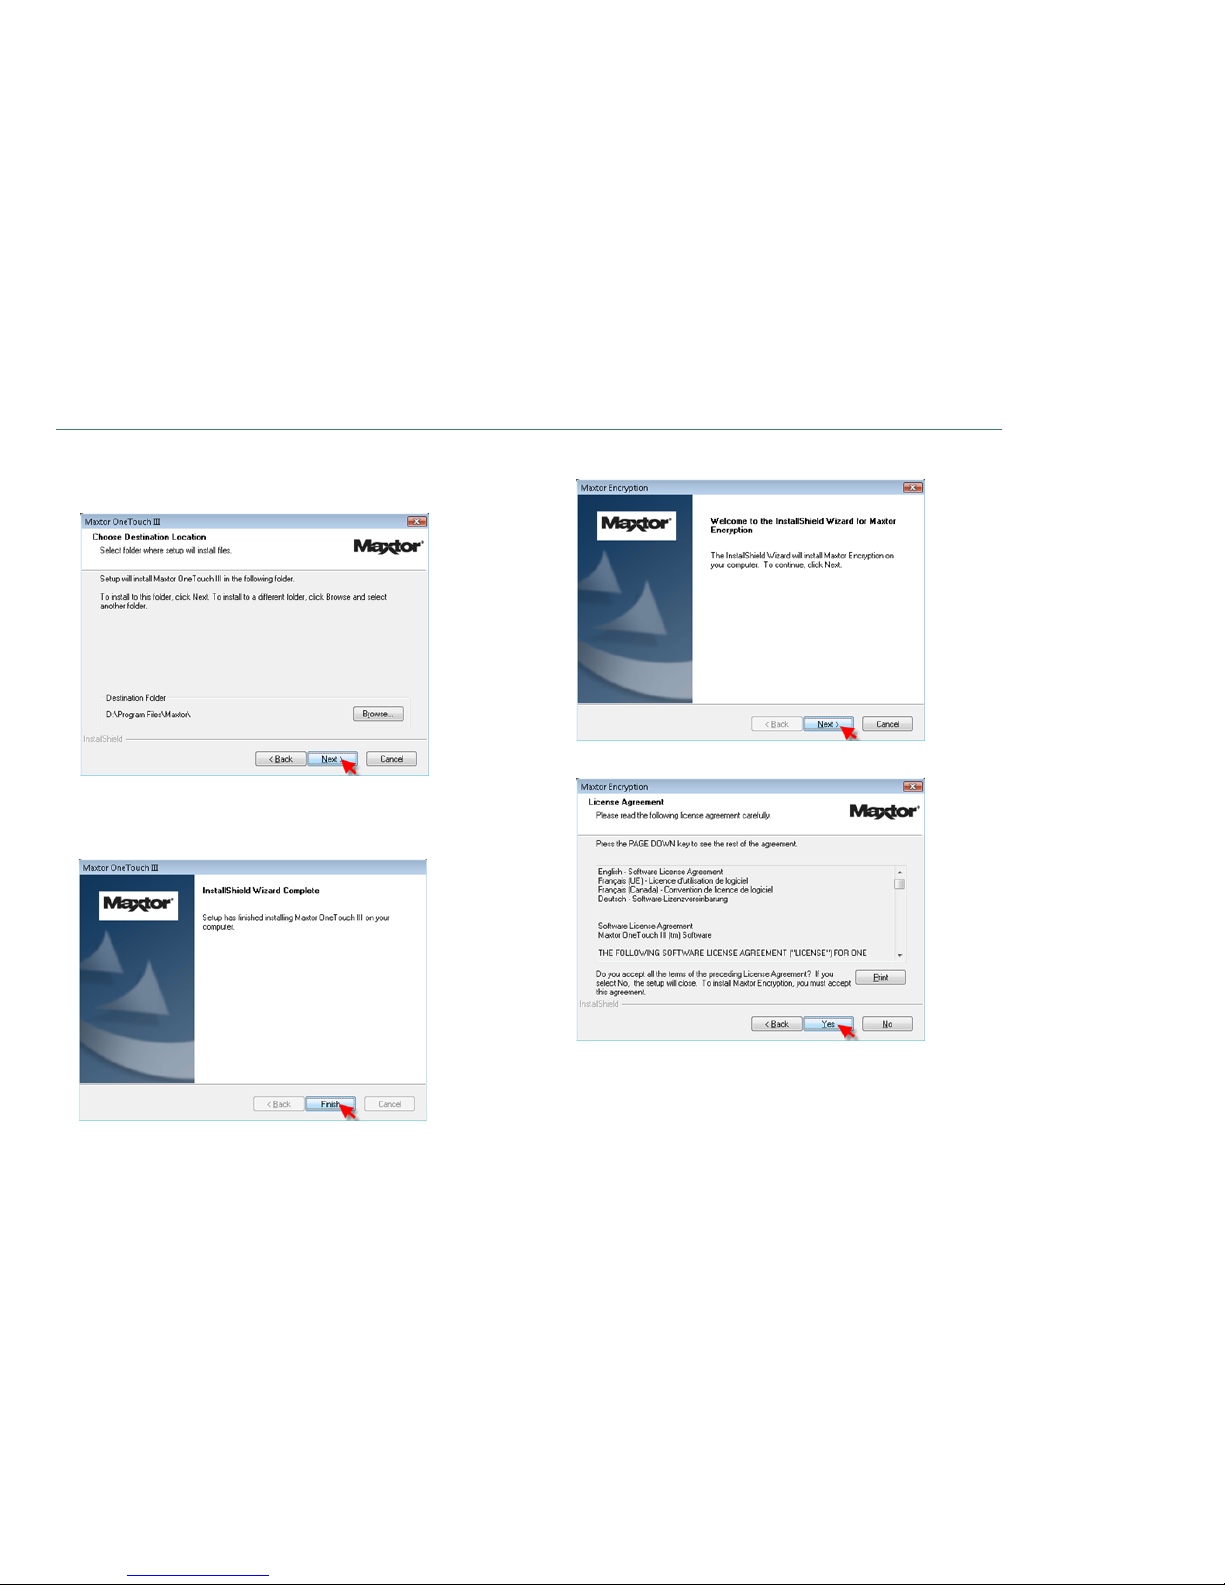
7. The Choose destination Location window opens. Either maintain the
default location as provided or click Browse to choose a different
location to install the software.
Click Next . The Setup Status window opens as the OneTouch III
Software installs to your system.
8. The InstallShield Window Complete window opens.
Click Finish . The InstallShield Wizard for Maxtor Encryption loads.
9. From the Welcome Screen, click Next .
10. Review the License Agreement and click Yes to continue.
MAXTOR ONETOUCH III MINI EDITION WINDOWS VISTA INSTALLATION
PAGE 6
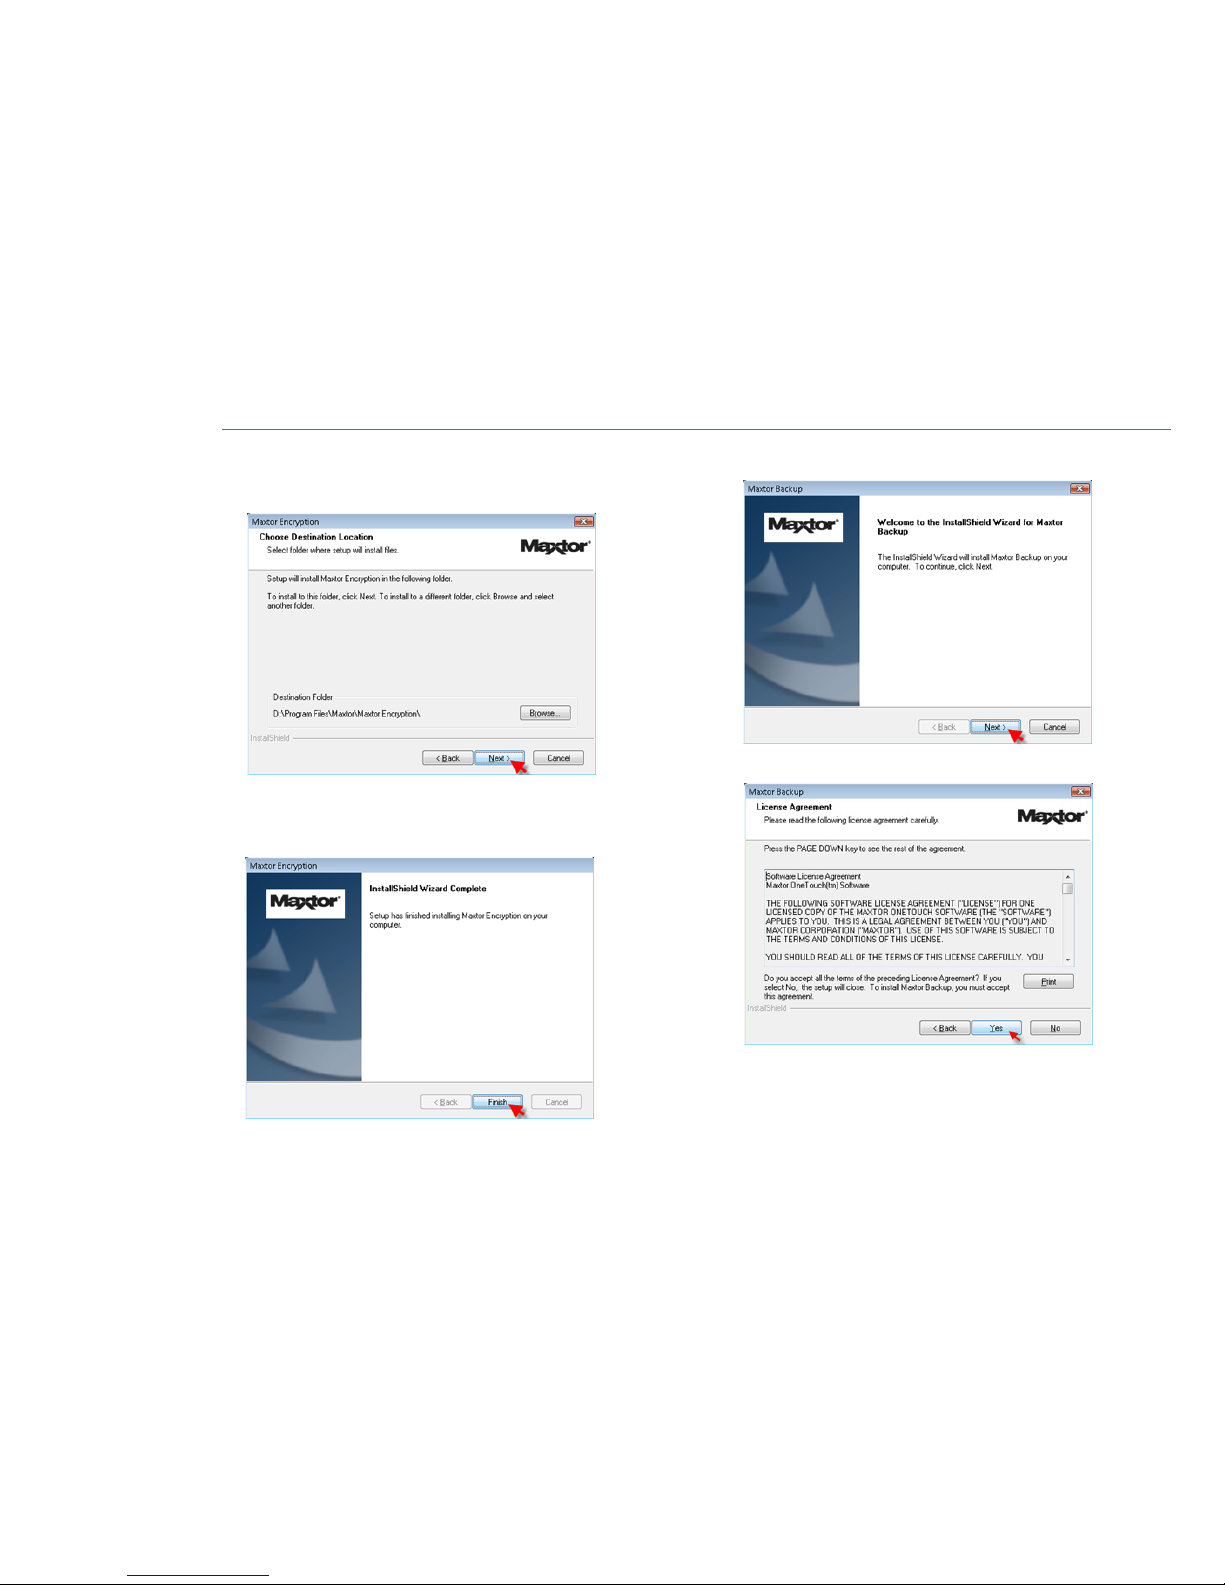
11. The Choose destination Location window opens. Either maintain the
default location as provided or click Browse to choose a different
location to install the software.
Click Next . The Setup Status window opens as the Maxtor Encryption
Software installs to your system.
12. The InstallShield Window Complete window opens.
13. Click Finish . The InstallShield Wizard for Maxtor Backup loads.
14. From the Welcome Screen, click Next .
15. Review the License Agreement and click Yes to proceed.
MAXTOR ONETOUCH III MINI EDITION WINDOWS VISTA INSTALLATION
PAGE 7
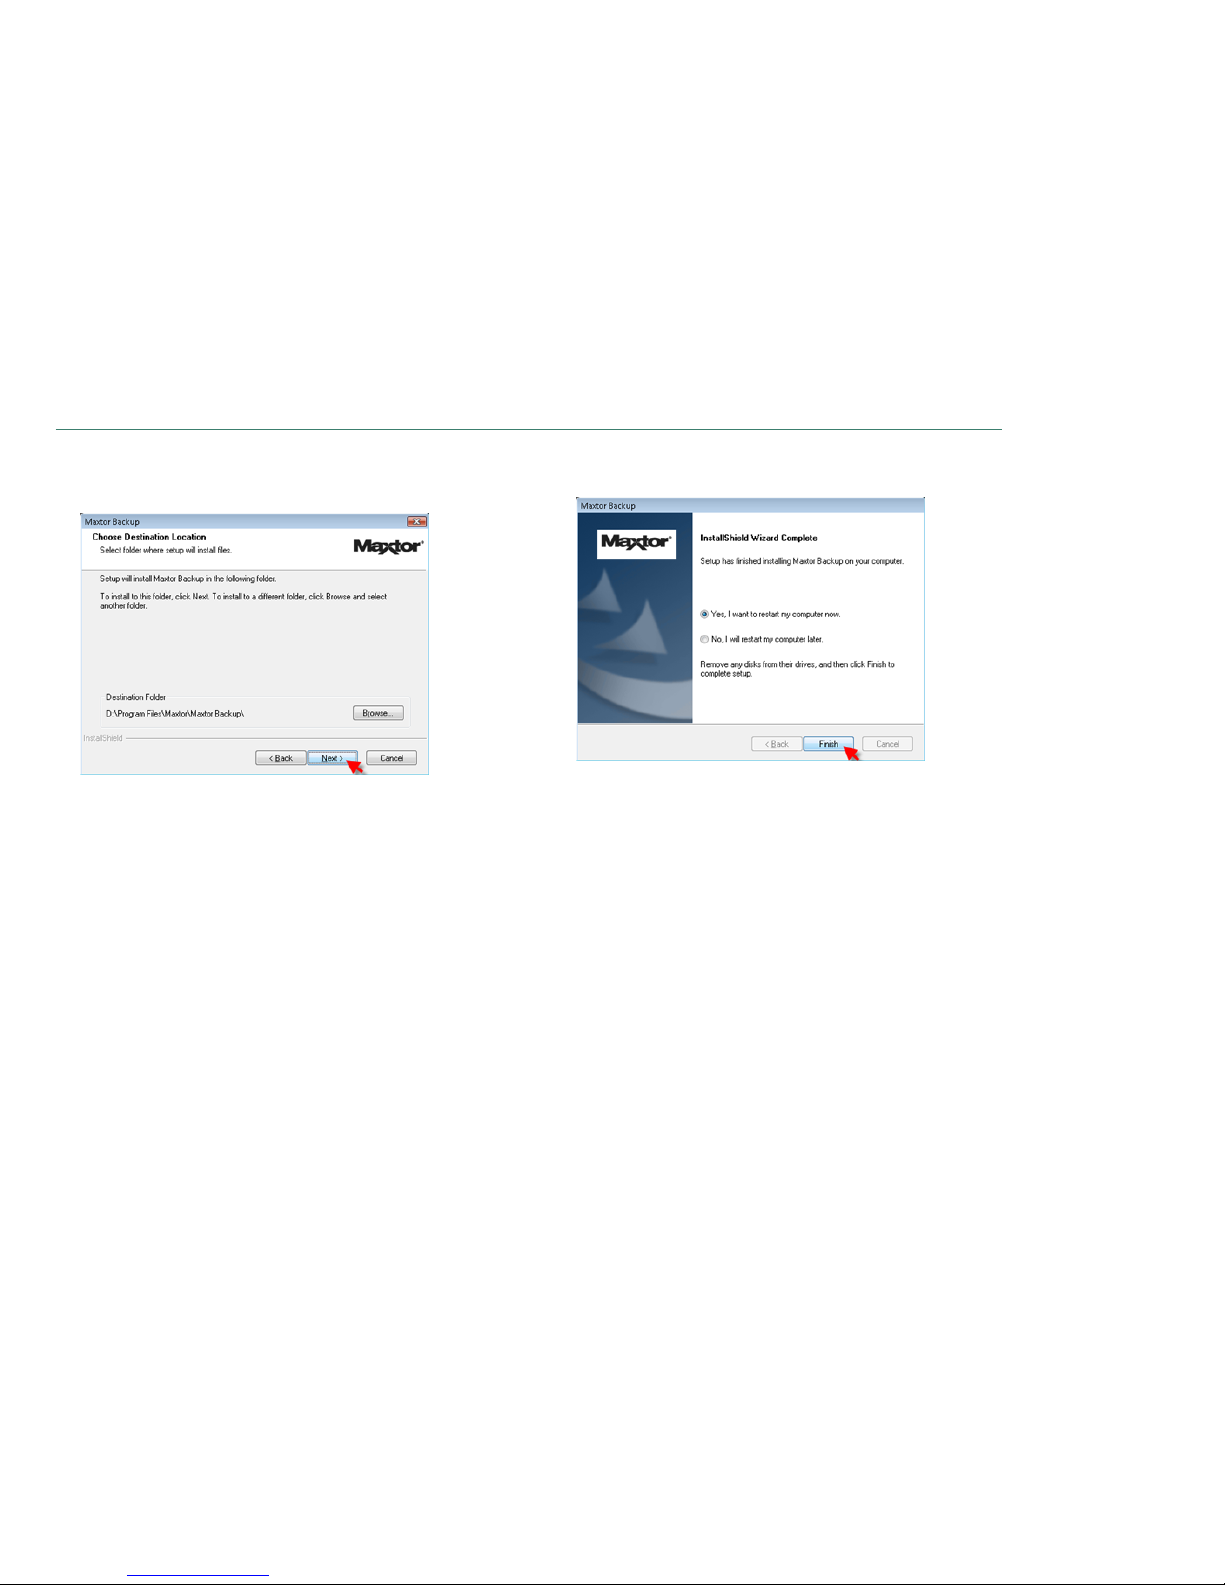
16. The Choose destination Location window opens. Either maintain the
default location as provided or click Browse to choose a different
location to install the software.
Click Next . The Setup Status window opens as the Maxtor Backup
Software installs to your system.
17. The InstallShield Window Complete window opens. Click Yes to restart
your computer or click No to restart your computer later.
Click Finish .
Note: You must restart your system to fully use the OneTouch III software.
 Loading...