

Page 1
Installation and
Configuration Guide
February 2001
Page 2

2000 Maxtor Corporation. All Rights Reserved. Maxtor is a registered trademark of Maxtor
Corporation. MaxAttach and MaxNeighborhood are trademarks of Maxtor Corporation. Other
product names, company names and logos are trademarks or registered trademarks of their respective owners. Specifications subject to change without notice. Revisions: Maxtor reserves the right
to revise this publication and to make changes in the content hereof without the obligation of
Maxtor to notify any person of such revision or changes. Part Number 000001527. Version 1.8a.
Technical Support is available at 1-800-4MAXTOR and at www.maxattach.com
UK: +353 1 204 11 11 (Ireland), or through e-mail inquiry:EuroNSG@Maxtor.com
Page 3

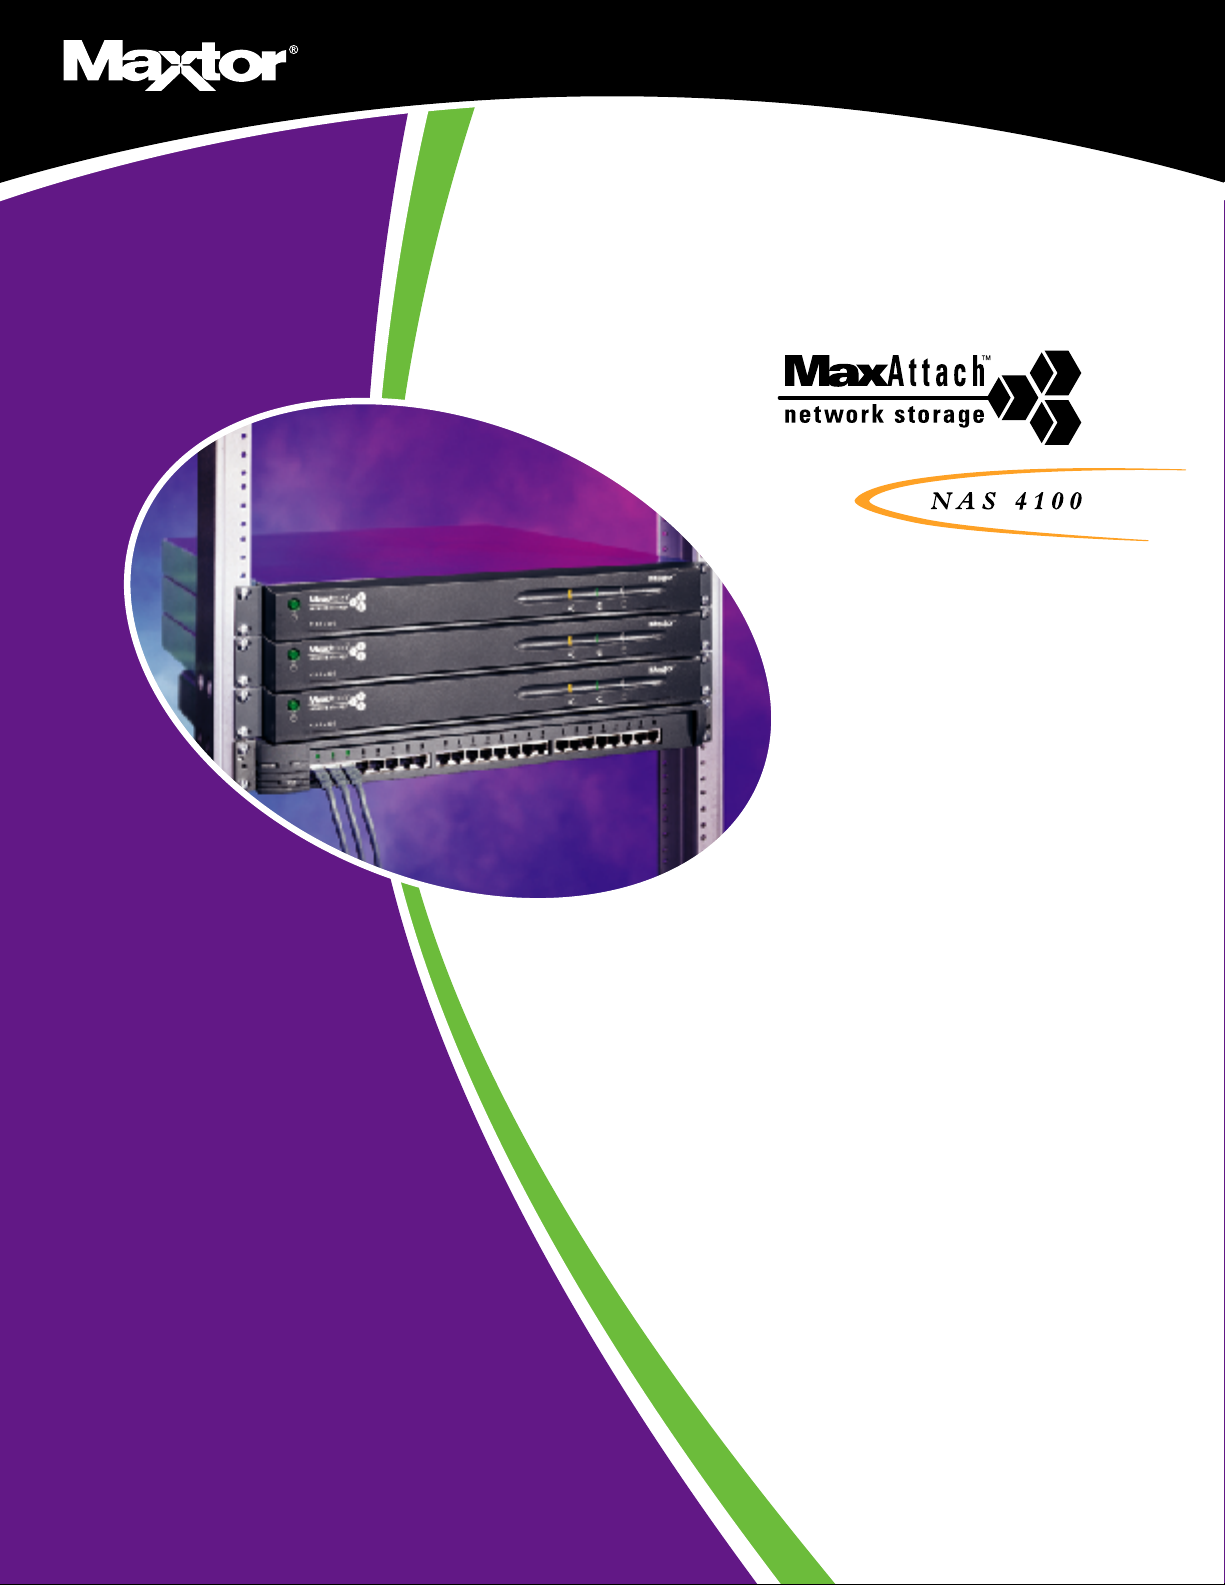
MaxAttach NAS 4100
Table of Contents
About This Guide- - - - - - - - - - - - - - - - - - - - - - - - - - - - - - - - - - - - - - - - i
Who Should Use This Guide - - - - - - - - - - - - - - - - - - - - - - - - - - - - - - - - - i
Box Contents - - - - - - - - - - - - - - - - - - - - - - - - - - - - - - - - - - - - - - - - - - i
Overview - - - - - - - - - - - - - - - - - - - - - - - - - - - - - - - - - - - - - - - - - - - - i
System Information - - - - - - - - - - - - - - - - - - - - - - - - - - - - - - - - - - - - - - - - - - - - - ii
Typographical Conventions - - - - - - - - - - - - - - - - - - - - - - - - - - - - - - - - - - ii
Related Documents- - - - - - - - - - - - - - - - - - - - - - - - - - - - - - - - - - - - - - - ii
Pre-Installation Planning - - - - - - - - - - - - - - - - - - - - - - - - - - - - - - - - - - - - - 1
Equipment Required for Installation - - - - - - - - - - - - - - - - - - - - - - - - - - - - - 1
Site Planning- - - - - - - - - - - - - - - - - - - - - - - - - - - - - - - - - - - - - - - - - - - 1
Familiarizing Yourself with Your MaxAttach NAS 4100 - - - - - - - - - - - - - - - - - 3
Installing the MaxAttach NAS 4100- - - - - - - - - - - - - - - - - - - - - - - - - - - - - - 4
Connect MaxAttach to Your Network - - - - - - - - - - - - - - - - - - - - - - - - - - - 4
Turning on the Power - - - - - - - - - - - - - - - - - - - - - - - - - - - - - - - - - - - - - 4
Installing MaxNeighborhood Software - - - - - - - - - - - - - - - - - - - - - - - - - - - 5
Completing MaxNeighborhood Installation - - - - - - - - - - - - - - - - - - - - - - - - - - - - 6
Configuring Your MaxAttach NAS 4100 - - - - - - - - - - - - - - - - - - - - - - - - - - - 9
First Login - - - - - - - - - - - - - - - - - - - - - - - - - - - - - - - - - - - - - - - - - - - - 9
Network Setup - - - - - - - - - - - - - - - - - - - - - - - - - - - - - - - - - - - - - - - - - 10
Setting Time & Date - - - - - - - - - - - - - - - - - - - - - - - - - - - - - - - - - - - - - - 13
Notes for Advanced Users - - - - - - - - - - - - - - - - - - - - - - - - - - - - - - - - - - - - - - - - 15
System Reboot - - - - - - - - - - - - - - - - - - - - - - - - - - - - - - - - - - - - - - - - - 15
Index - - - - - - - - - - - - - - - - - - - - - - - - - - - - - - - - - - - - - - - - - - - - - - - - - - - 17
Page 4

About This Guide
Who Should Use This Guide
This MaxAttach™ NAS 4100 Installation Guide is intended to help setup and configure
MaxAttach NAS 4100. It assumes that you are somewhat familiar with networking and system
administration basics. Should you encounter any difficulties during the installation and
configuration process outlined in this guide, please refer to the MaxAttach Users Guide also found
on the MaxAttach NAS 4100 CD.
Box Contents
n MaxAttach NAS 4100 file server
n Quick Start Card
n MaxAttach NAS 4100 End User License Agreement
n Power Cord
n CAT-5 Ethernet Cables (2)
n Mounting ears (pre-installed)
n Rubber feet (4)
n MaxAttach NAS 4100 CD containing:
• MaxNeighborhood™ Setup and Discovery Wizard
• MaxAttach NAS 4100 documentation
n 1Safe™ for MaxAttach client backup software CD
Overview
Your MaxAttach comes ready to install with all the required software. It works in a 10/100 Mbps Ethernet
network (or Gigabit Ethernet network when so equipped), and is administered using an Internet Explorer
web browser. It includes MaxNeighborhood, Maxtor’s software utility that helps you locate the unit on
your network, configure MaxAttach network settings, and launch the web user interface.
About This Guide i
Page 5
Maxtor MaxAttach NAS 4100
System Information
Please record the following information from the label on the side panel:
n Model Number: __________________________________________
n Serial Number: ___________________________________________
n Assembly Number: ________________________________________
These numbers will be needed by support personnel if you should contact them.
Typographical Conventions
The following typographical conventions are used in this guide to help you locate and identify information:
Italic text is used for emphasis and book titles.
Bold text identifies menu names, menu options, items you can click on the screen, and keyboard keys.
Courier font identifies file names, folder names, and text that either appears on the screen or that
you are required to type in.
NOTE: Notes provide extra information, tips, and hints regarding the topic.
CAUTION: Cautions identify important information about actions that could result in
damage to or loss of data or could cause the system to behave in
unexpected ways.
WARNING: Warnings identify critical information about actions that could result in
unexpected equipment failure, loss of critical operating system files or
potential bodily injury.
Related Documents
Following is a list of related publications for background and additional information:
n MaxAttach NAS 4100 User Guide
n Quick Start Card
n MaxAttach End User License Agreement (EULA)
n Warranty Statement
n Also see our Web site at: http://www.maxattach.com for latest Release Notes
About This Guide ii
Page 6
1 Pre-Installation Planning
Equipment Required for Installation
To connect, install and administer your MaxAttach NAS 4100, you will need an available 10/100
Ethernet network hub or switch. It will be necessary for your workstation to have the following
capabilities:
• Windows 95/98/Me/NT (SP5)/2000
• Internet Explorer v4.01 SP1 or newer - support for Netscape is not currently available.
• Client for Microsoft Networks enabled over TCP/IP.
• Network Interface Card (NIC)
• CD-ROM Drive
Site Planning
When planning a site to house your MaxAttach NAS 4100, you will want to consider requirements
for power and network availability, as well as a space with well regulated temperature and humidity
that is relatively free of dust and other air-born contaminants. If your installation calls for placement
on a table top, apply the enclosed rubber feet to the bottom of the chassis.
The following tables are designed to help you plan your MaxAttach NAS 4100 installation.
Table 1-1. Size & Weight
Item Quantity
Weight 27 pounds (12.3 kg)
Size 17 x 20 x 1.75 (43.2 x 50.8 x 4.5 cm)
CAUTION: When placing your MaxAttach in rack mount mode, make sure you
maintain proper mechanical load leveling to avoid a hazardous condition.
Pre-Installation Planning 1
Page 7
Maxtor MaxAttach NAS 4100
Table 1-2. Electrical Requirements
Item Quantity
Voltage Range 95 ~ 135 VAC or 180 ~ 265 VAC
Frequency 47 ~ 63 HZ
WARNING Make sure your site has the necessary capacity to handle your MaxAttach
unit(s). Overloading electrical supply circuits is extremely hazardous. Care
should also be taken to properly ground all rack mounted equipment.
Table 1-3. Operating Environment Requirements
Item Quantity
Temperature - Operating
Temperature - Non-Operating
Humidity - Operating
Humidity - Non-Operating
CAUTION: When mounting your MaxAttach in a rack system, make sure that the air
vents do not become blocked. Also, care must be taken to insure that
MaxAttach is installed in an enviroment compatible with the ambient
temperatures stated in the table above. Maximum of 40º C.
41º to 104º F (5ºC to 40º C)
external operating temperature range
-4º to 140º F (-20ºC to +60ºC)
5% to 85% humidity non-condensing
5% to 95% humidity non-condensing
Pre-Installation Planning 2
Page 8
Maxtor MaxAttach NAS 4100
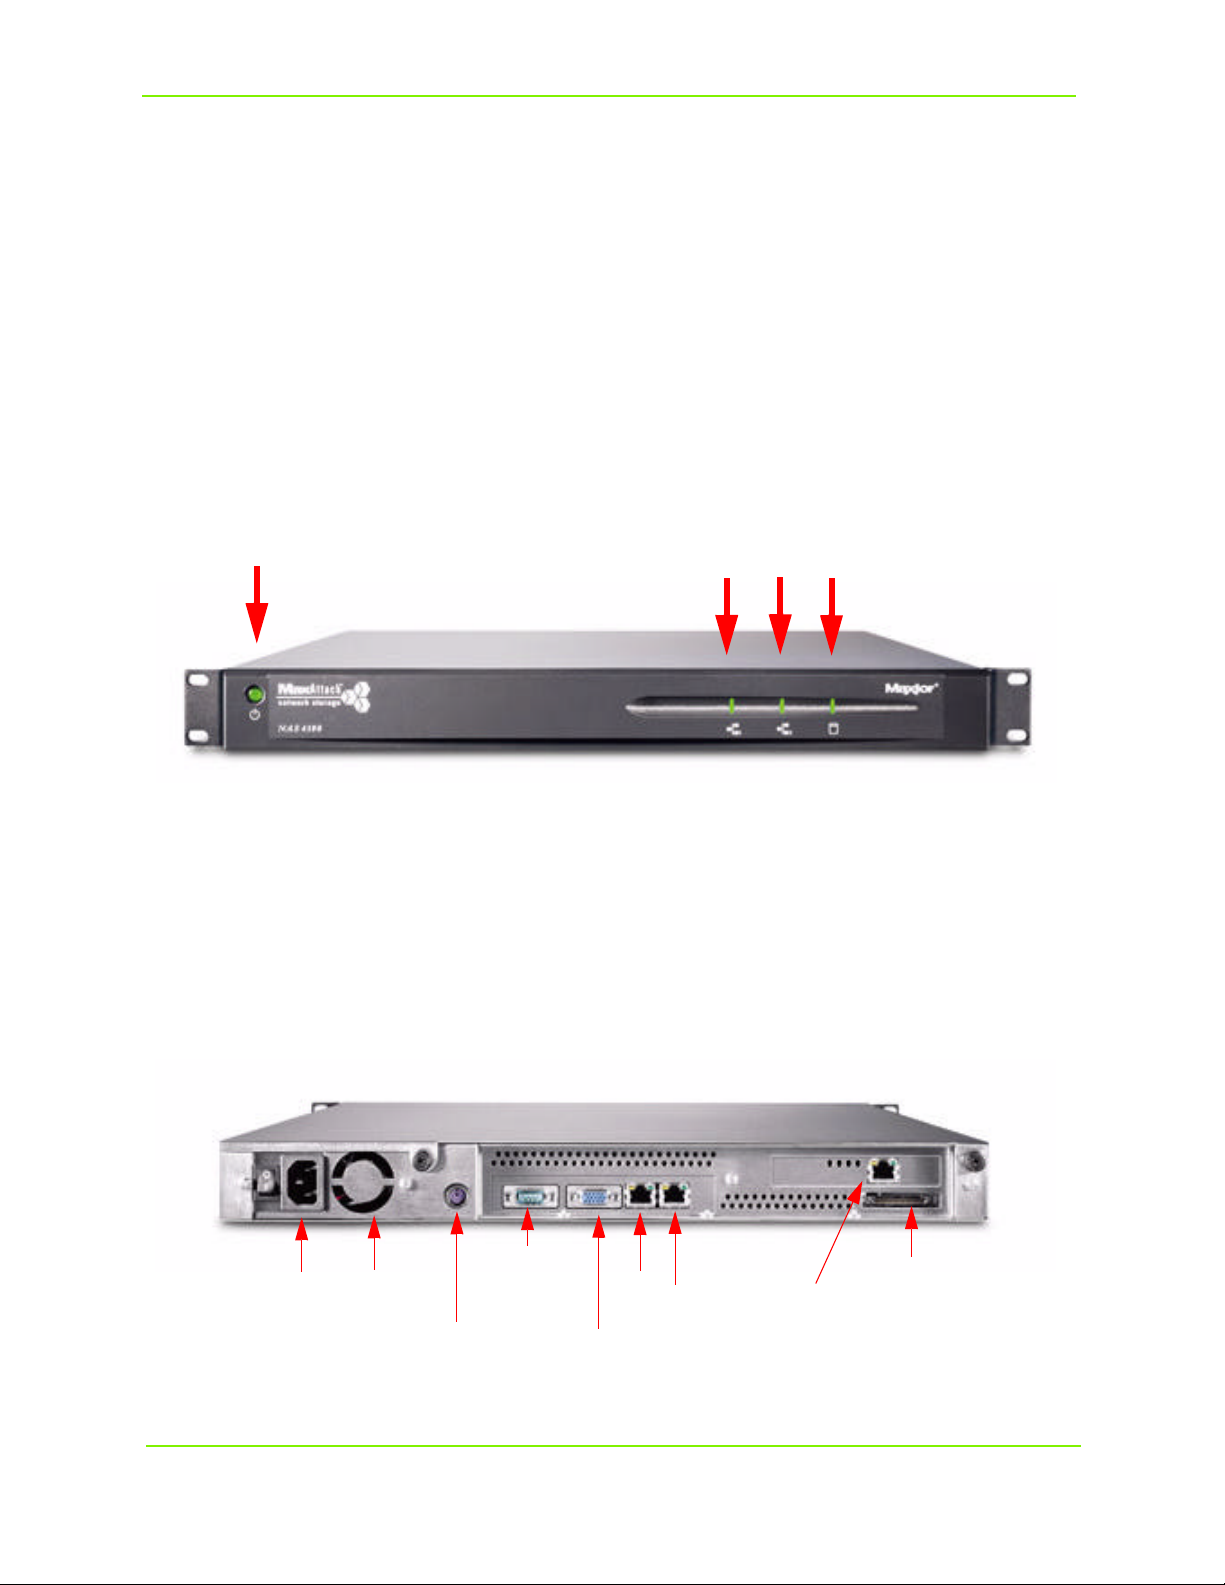
Familiarizing Yourself with Your MaxAttach NAS 4100
Front Panel
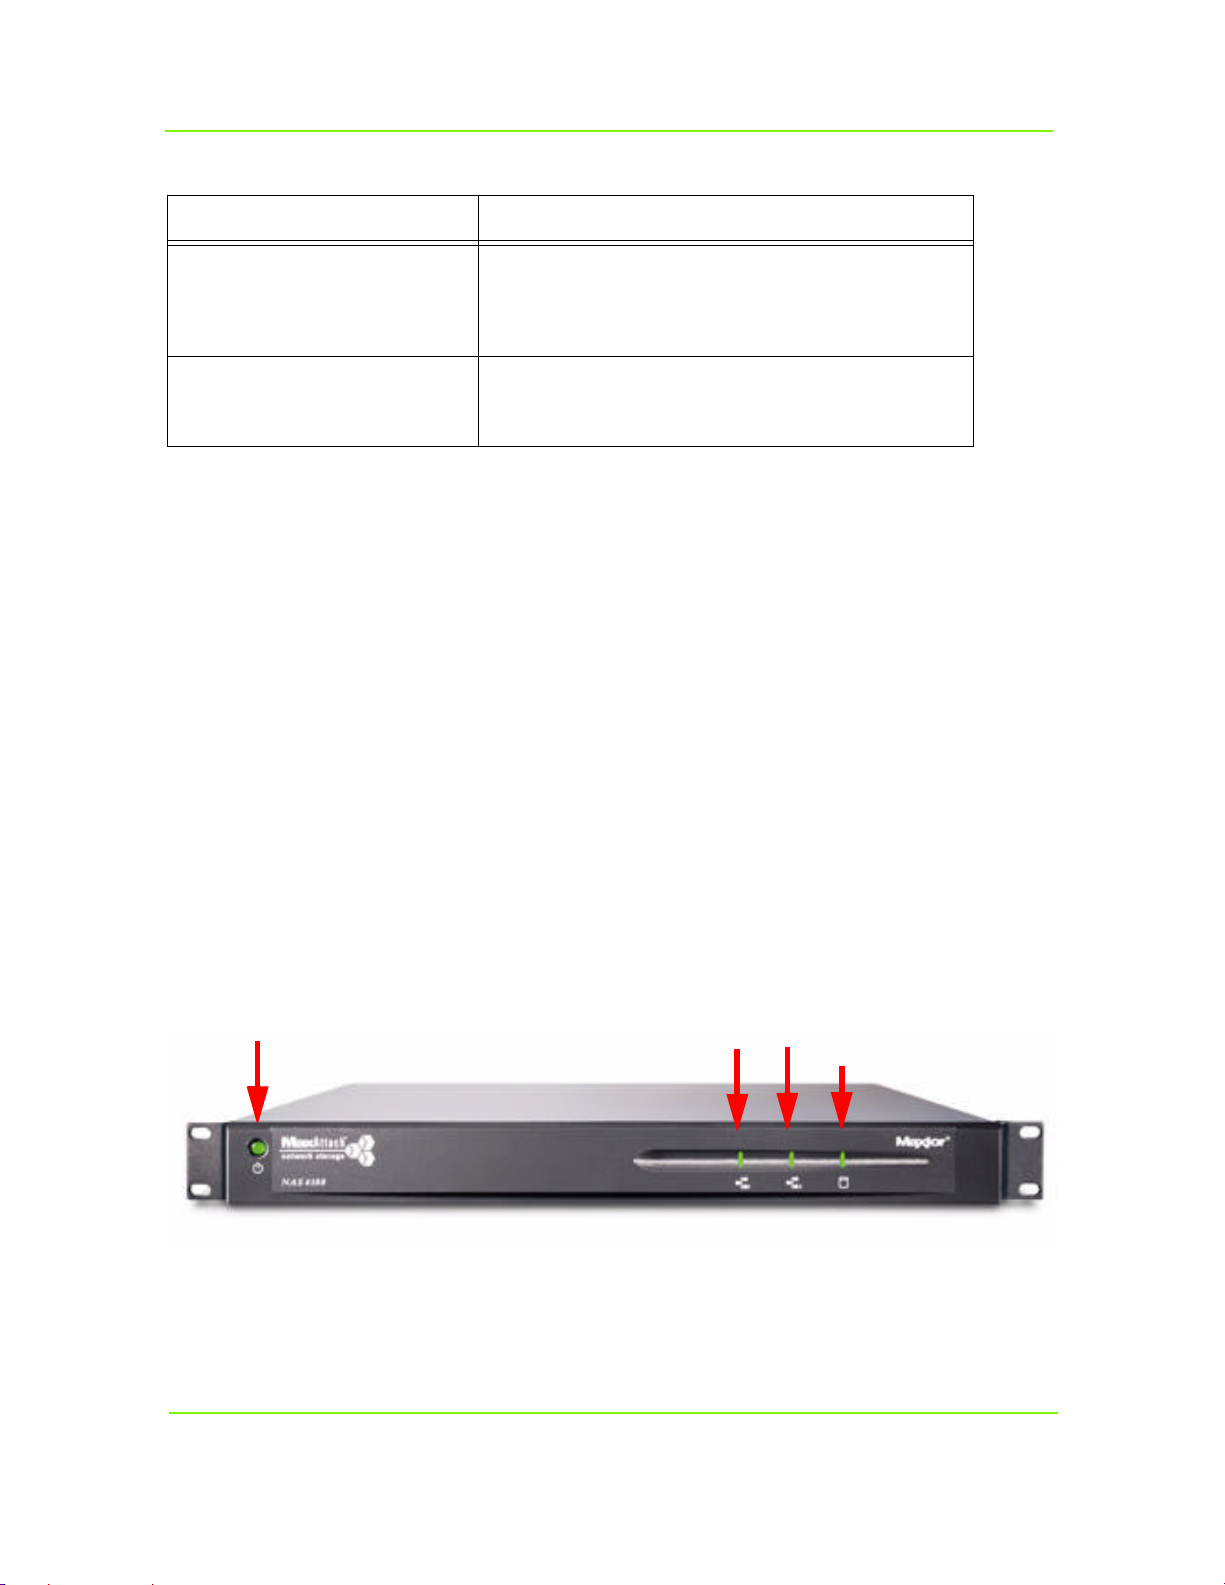
The MaxAttach front panel has four LEDs. Three are grouped together on the right side, one on
the left. The LEDs indicate the following:
• Far left LED (soft power switch). Solid LED indicates power on. This LED will blink during
boot-up, and will also blink to indicate error conditions (See MaxAttach Users Guide for fault
codes).
• Network Link 1 for LAN 1. Flashing indicates network activity.
• Network Link 2 for LAN 2. Flashing indicates network activity.
• Hard disk drive LED indicates read/write activity.
SOFT POWER SWITCH
LAN 1
LAN 2
HARD DISK
DRIVE
Figure 1-1. LEDs
Back Panel
Each Ethernet Port has two LEDs. One indicates link and the other activity.
NOTE: On units with a Gigabit Ethernet option installed, additional LEDs will be present.
(BACK PANEL)
UPS
POWER
CONNECTION
FAN
CONNECTION
CONNECTIONS
FOR Field Service Personnel ONLY
Figure 1-2. NIC connections, Back Panel
Pre-Installation Planning 3
LAN 1
LAN 2
Gigabit
Option
SCSI
PORT
Page 9
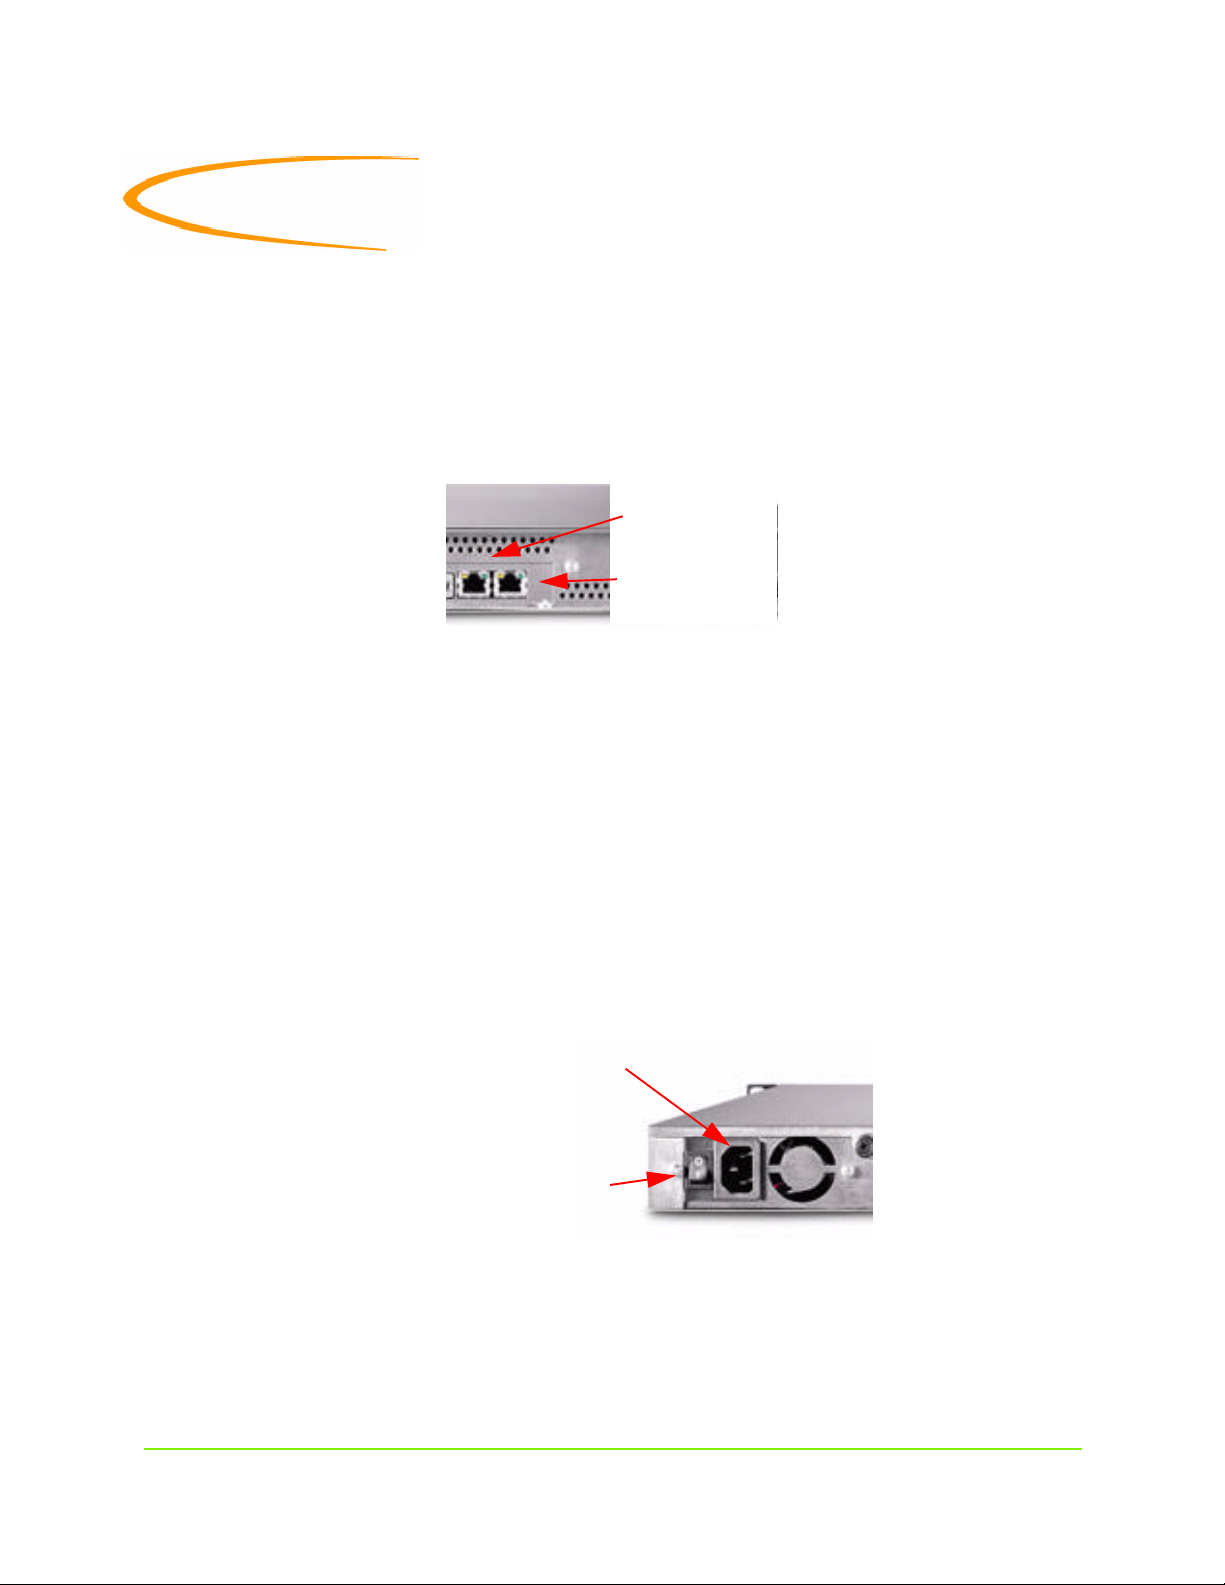
2 Installing the MaxAttach NAS 4100
Connect MaxAttach to Your Network
To connect the MaxAttach NAS 4100 to your network, insert one of the included Ethernet cables into
either MaxAttach 10/100 Ethernet port (LAN1 or LAN2), located on the rear panel. Insert the other end of
this cable into network hub or switch. If your MaxAttach is equipped with a Gigabit Ethernet option, you
may connect it to a 10/100/1000 network hub or switch, using a CAT-6 cable (not supplied).
LAN 1
LAN 2
Figure 2-1.
Note: The two 10/100 Ethernet ports found on MaxAttach are pre-configured to provide load
balancing and fail-over capability. Although not necessary for a successful installation, this feature
does enhance system performance, and allows for redundancy in the event of a cable or component
failure.To use this function, connect the second included Ethernet cable to your MaxAttach and the
other end to another open port on your network hub or switch. Load balancing and fail-over will
automatically be enabled with no special configuration required for your switch.
Turning on the Power
1 Connect one end of the enclosed power cord to a power source. Plug the other end into the power
receptacle on the back panel shown in Figure 2-1 below.
(BACK PANEL)
MAIN POWER SWITCH
Figure 2-2. Power Receptacle and Main Power Switch, Back Panel
2 Toggle the main power switch on the back panel to the “ON” position ( I ).
Installing the MaxAttach NAS 4100 4
POWER RECEPTACLE
Page 10

Maxtor MaxAttach NAS 4100
3 Press the soft power switch on the front panel (shown below), to turn on the unit.
(FRONT PANEL)
SOFT POWER SWITCH
Figure 2-3. Soft Power Switch, Front Panel
The LED in the power switch will come on. After a few moments it will begin blinking, and continue to
blink for several minutes during the power-up cycle. When the power light stops blinking and disk activity
stops, your MaxAttach is ready to configure.
Installing MaxNeighborhood Software
Use a workstation that is logged onto the network where the MaxAttach unit is connected. Insert the
MaxAttach Installation and Documentation CD into your CD-ROM drive. If the “Welcome to the
MaxAttach NAS 4100” screen does not appear, the auto-insert notification for the CD has been turned off.
In this case, use Windows Explorer to launch the setup program from the CD
Click on MaxNeighborhood Setup & Discovery Wizard to begin your installation.
MaxNeighborhood Wizard
When the Install MaxAttach Family screen
appears, click the Install MaxNeighborhood
button. The wizard will guide you through the
installation process.
If you have an older version of
MaxNeighborhood on your server, you will be
notified and asked if you want to un-install the
older version, before your newer version is
installed.
Installing the MaxAttach NAS 4100 5
Page 11
Maxtor MaxAttach NAS 4100
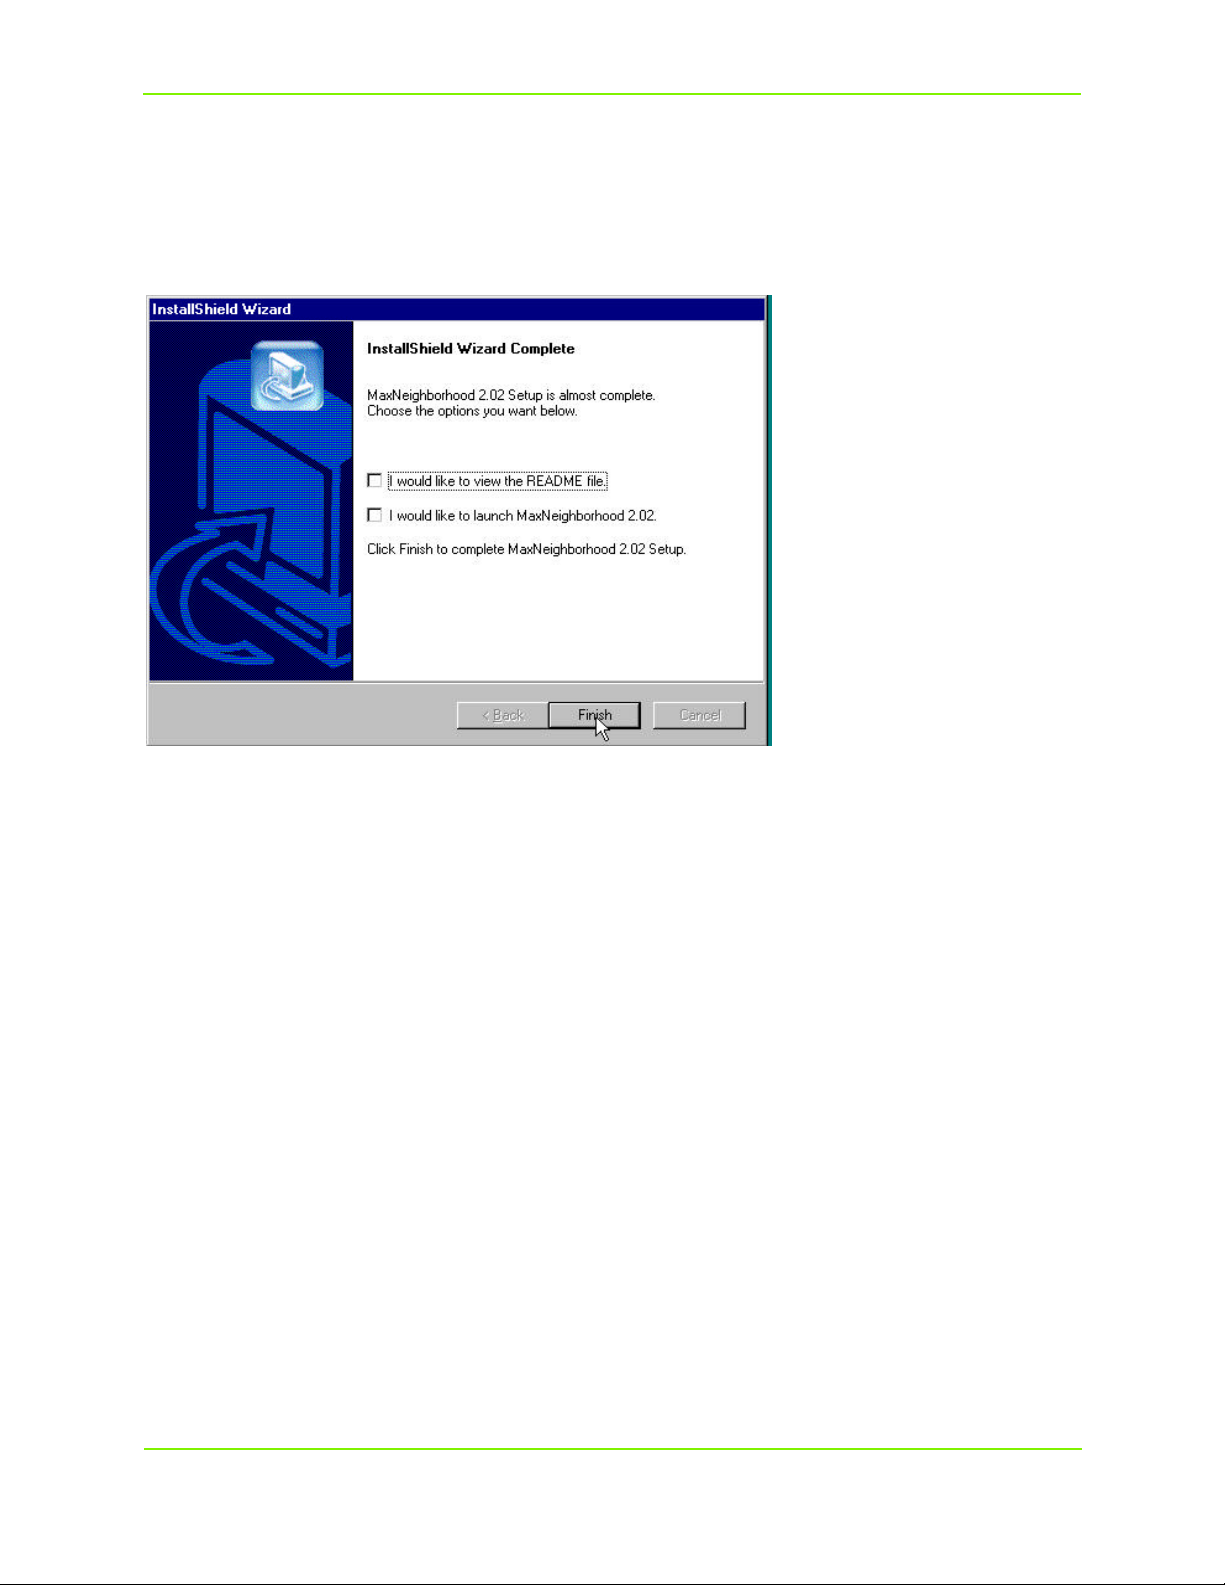
Completing MaxNeighborhood Installation
When the Install wizard has completed, you may view the README file by selecting the check box. Or,
you may launch MaxNeighborhood by clicking on the check box and then selecting Finish. You may exit
the wizard without selecting either option by selecting Finish.
Alternately, you may click on Finish to close the wizard, and then launch MaxNeighborhood from your
Windows workstation by selecting Start, Programs, MaxNeighborhood.
MaxNeighborhood will initiate, and begin searching for all MaxAttach units on your network.
Installing the MaxAttach NAS 4100 6
Page 12
Maxtor MaxAttach NAS 4100
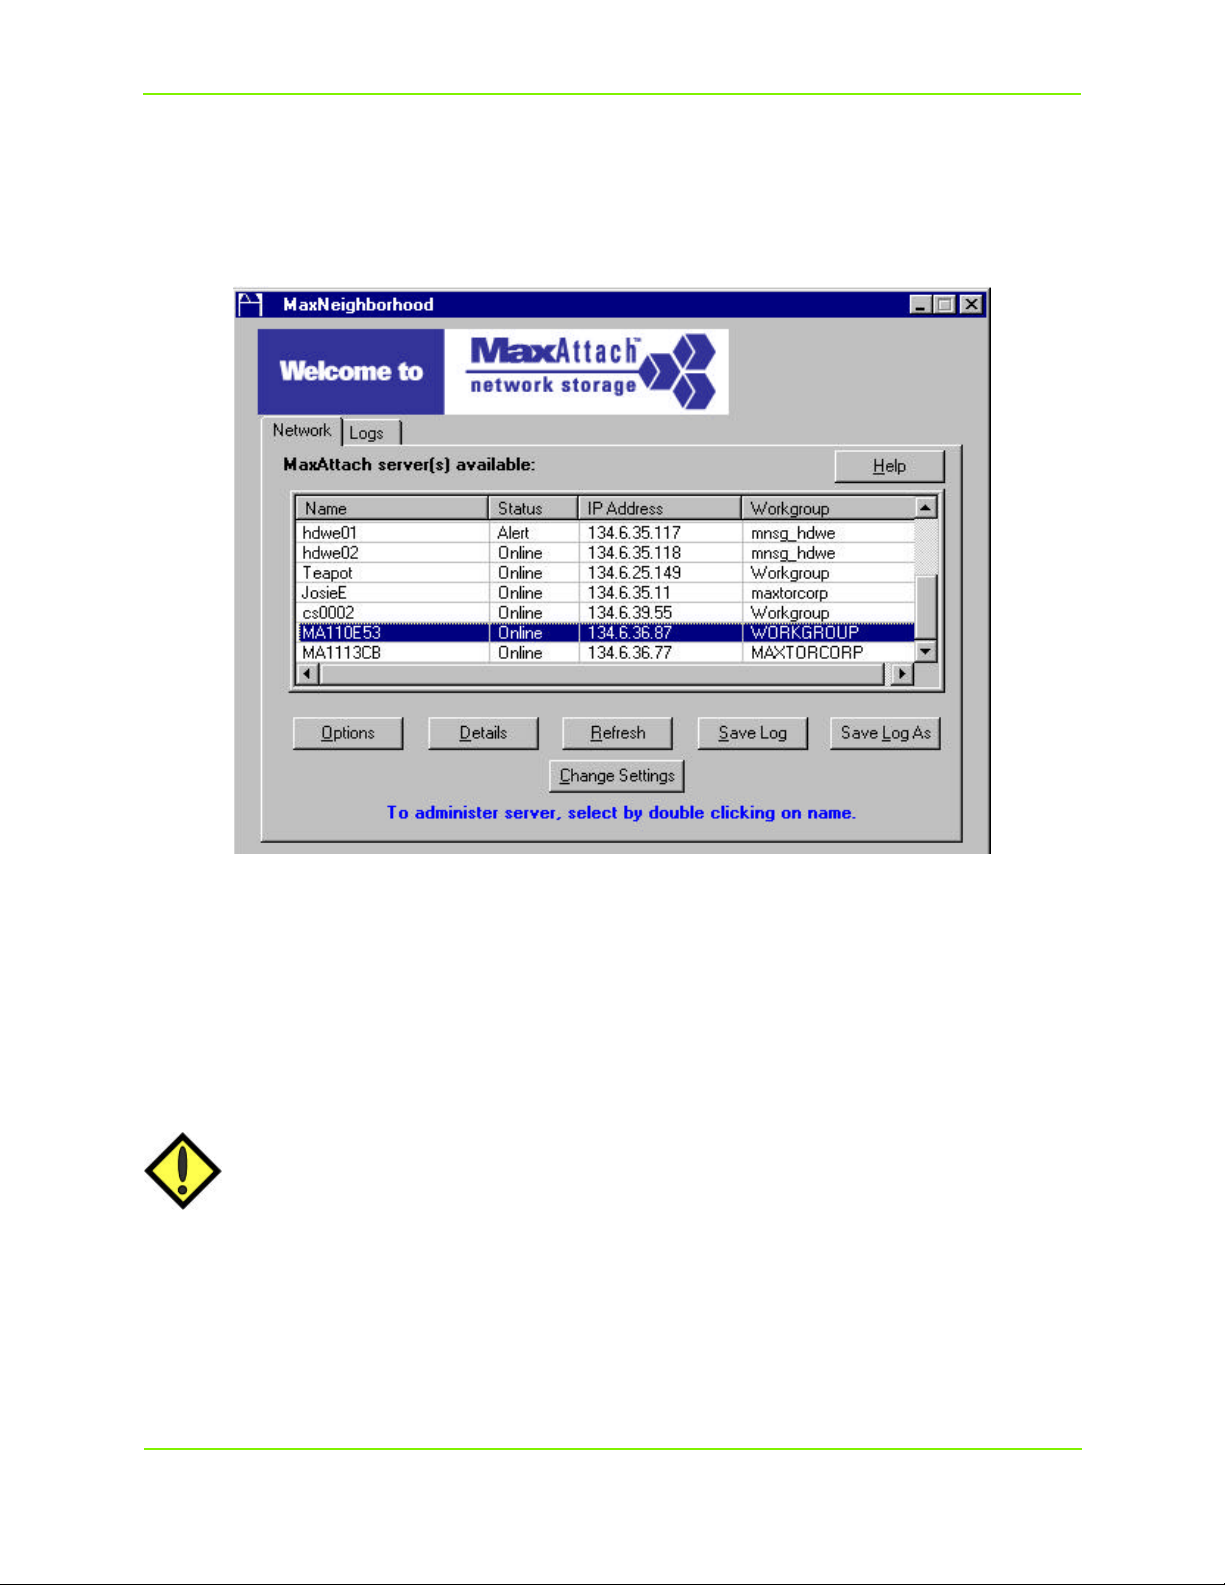
Finding Your New MaxAttach
Once MaxNeighborhood finds all of the MaxAttach units on your network, it will display computer Name,
Status, IP Address and Workgroup.
If you have MaxAttach 3000 or 4000 models on your network, they will be displayed as well, and you may
continue to administer those units through this MaxNeighborhood session.
If a DHCP server is running in your network, launch the MaxAttach configuration screens by
double-clicking on the default name of your newly installed MaxAttach and skip to Chapter 3.
CAUTION: You are reminded that currently, there is no Netscape browser support. If you are
using Netscape as your default browser, you will have to re-set Internet Explorer as
your default browser before beginning this installation.
Installing the MaxAttach NAS 4100 7
Page 13
Maxtor MaxAttach NAS 4100
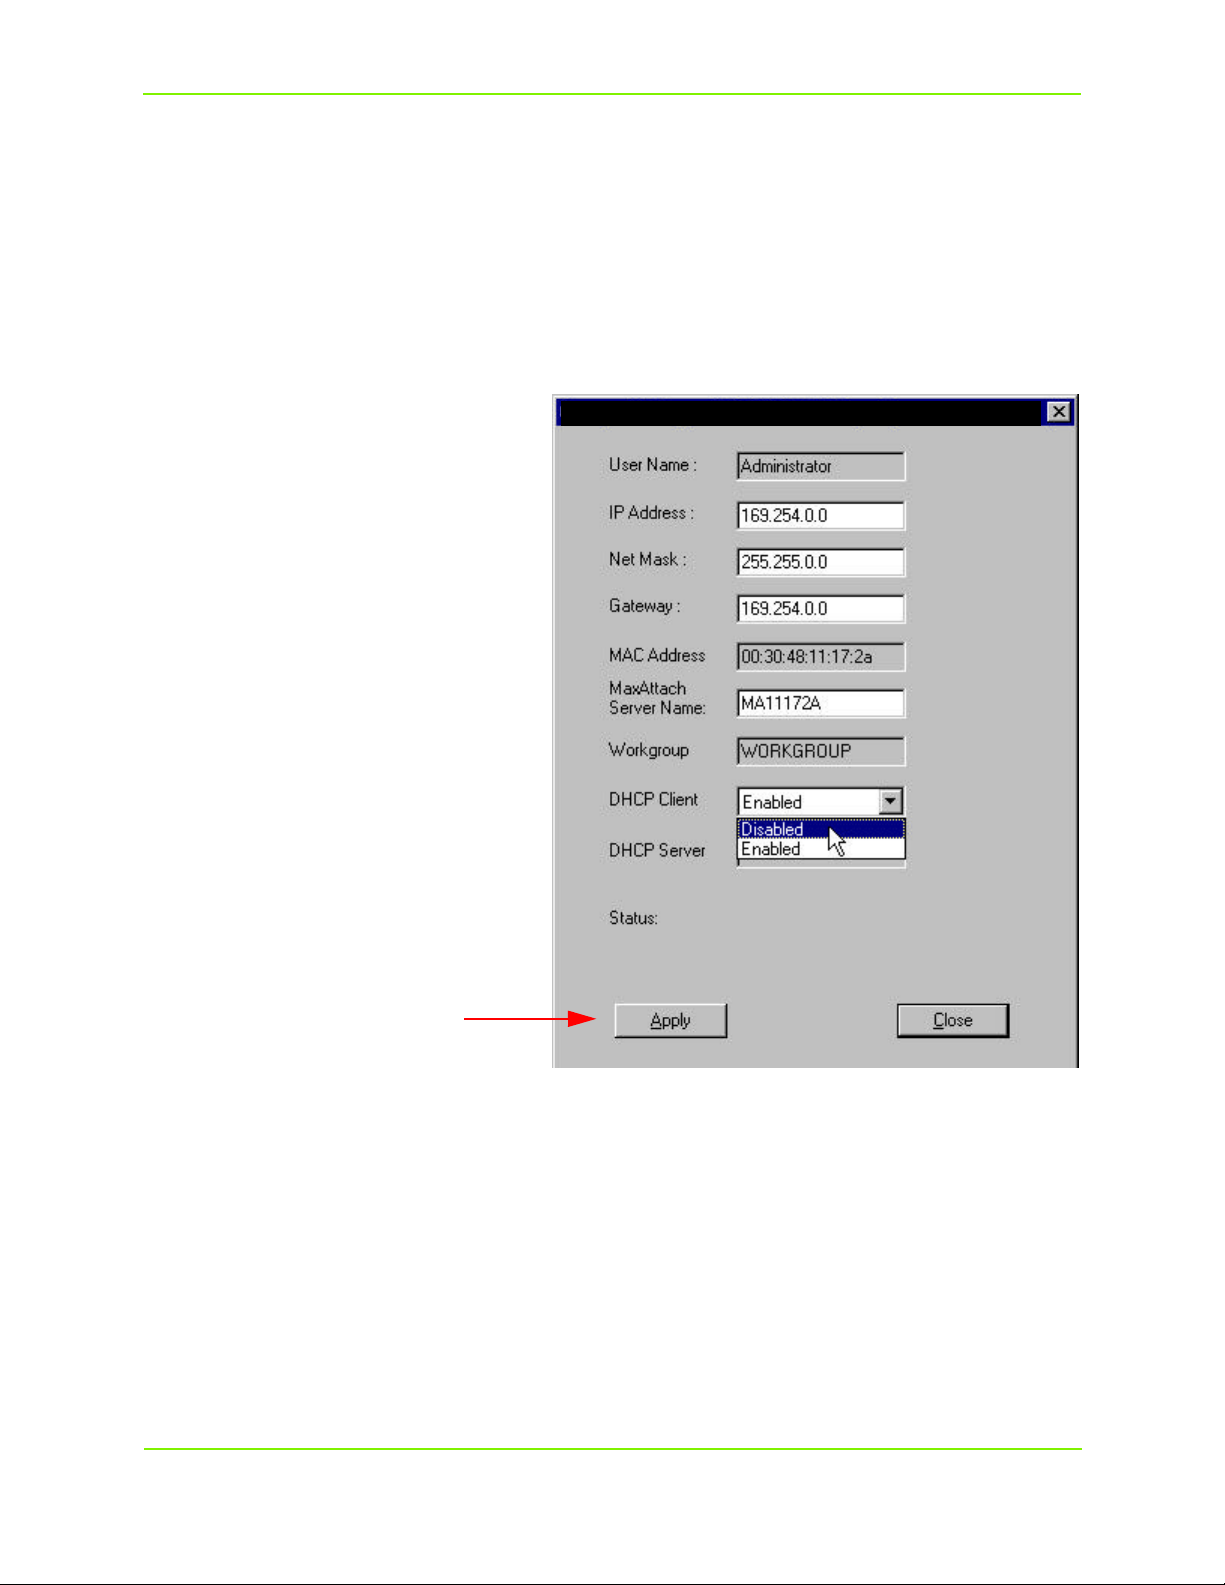
Modifying Default Network Settings for non-DHCP Service
If MaxAttach is attached to a network without a DHCP server, your MaxAttach will be displayed with an
IP Address in the 169.254.xxx.xxx range. You must now assign a unique “Static IP Address” to your unit.
See your network administrator for an available IP address before proceeding.
To set an IP address, highlight the default name of your MaxAttach with a single mouse click and then select
the Change Settings button. You will receive a warning message about making changes - click OK.
Delete the default IP Address and enter your unique address, subnet mask, and gateway (if applicable).
Should you wish to change the default computer name MaxAttach Server Name, please do so now with
any combination of alpha-numeric characters (without spaces).
Then change the DHCP Client setting by
clicking the down arrow and highlighting
Disabled.
Next, click Apply to make the changes
permanent.Your MaxAttach will now
automatically reboot.
End this procedure by selecting the Close
button.
After your MaxAttach has rebooted, press the
Refresh button in the main
MaxNeighborhood window. When the
search is complete, your new settings should
appear. If not, go back to the top of this page,
and begin again.
Now, double click on the MaxAttach in the
MaxNeighborhood window to launch the
configuration screens on your newly enabled
MaxAttach.
Installing the MaxAttach NAS 4100 8
Page 14
3 Configuring Your MaxAttach NAS 4100
First Login
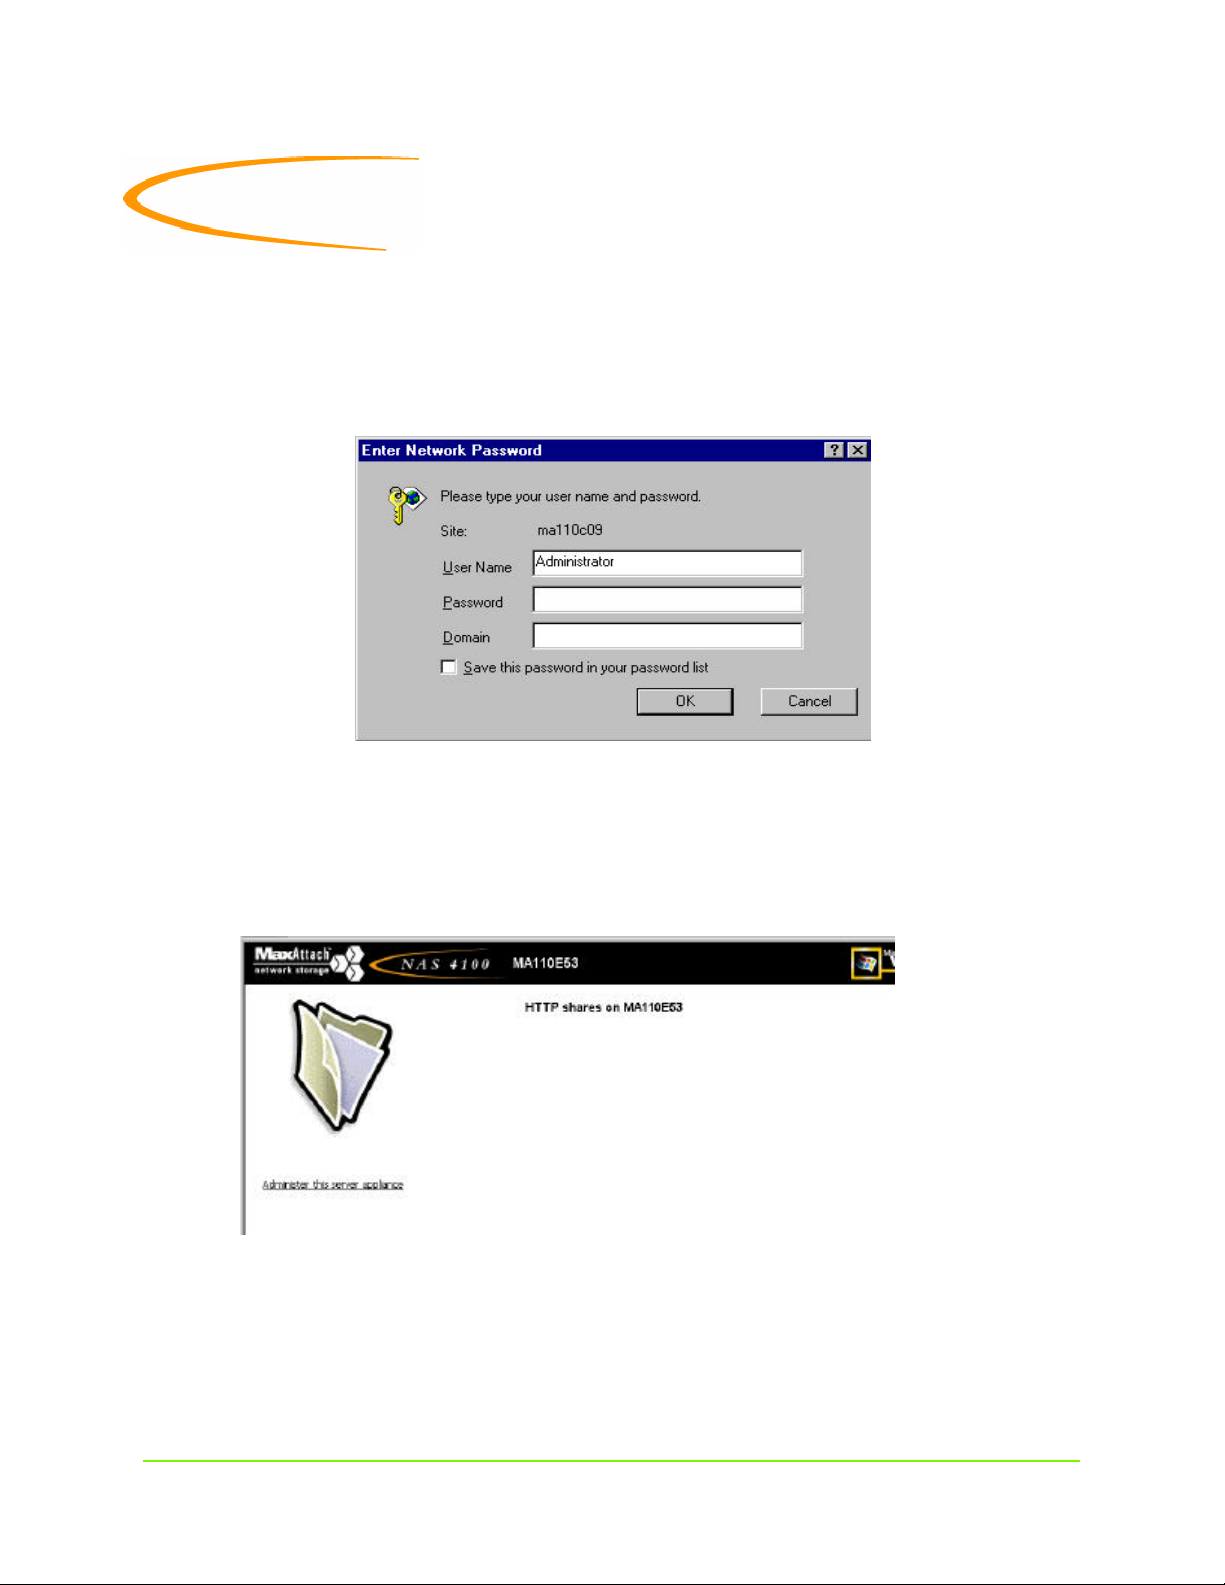
To begin configuring your MaxAttach, you must now login by entering Administrator into the User
Name field. Leave the Password field and Domain field blank and click OK.
.
Your Internet Explorer browser will launch and display the HTTP Shares window. Click on Administer
this Server
You will be prompted for a second login to gain access to the administration Home Page. Again, enter
Administrator in the User Name field and leave the Password field blank.
You are now ready to make changes to factory default settings to meet your particular network, security and
time-zone requirements.
Configuring Your MaxAttach NAS 4100 9
Page 15
Maxtor MaxAttach NAS 4100
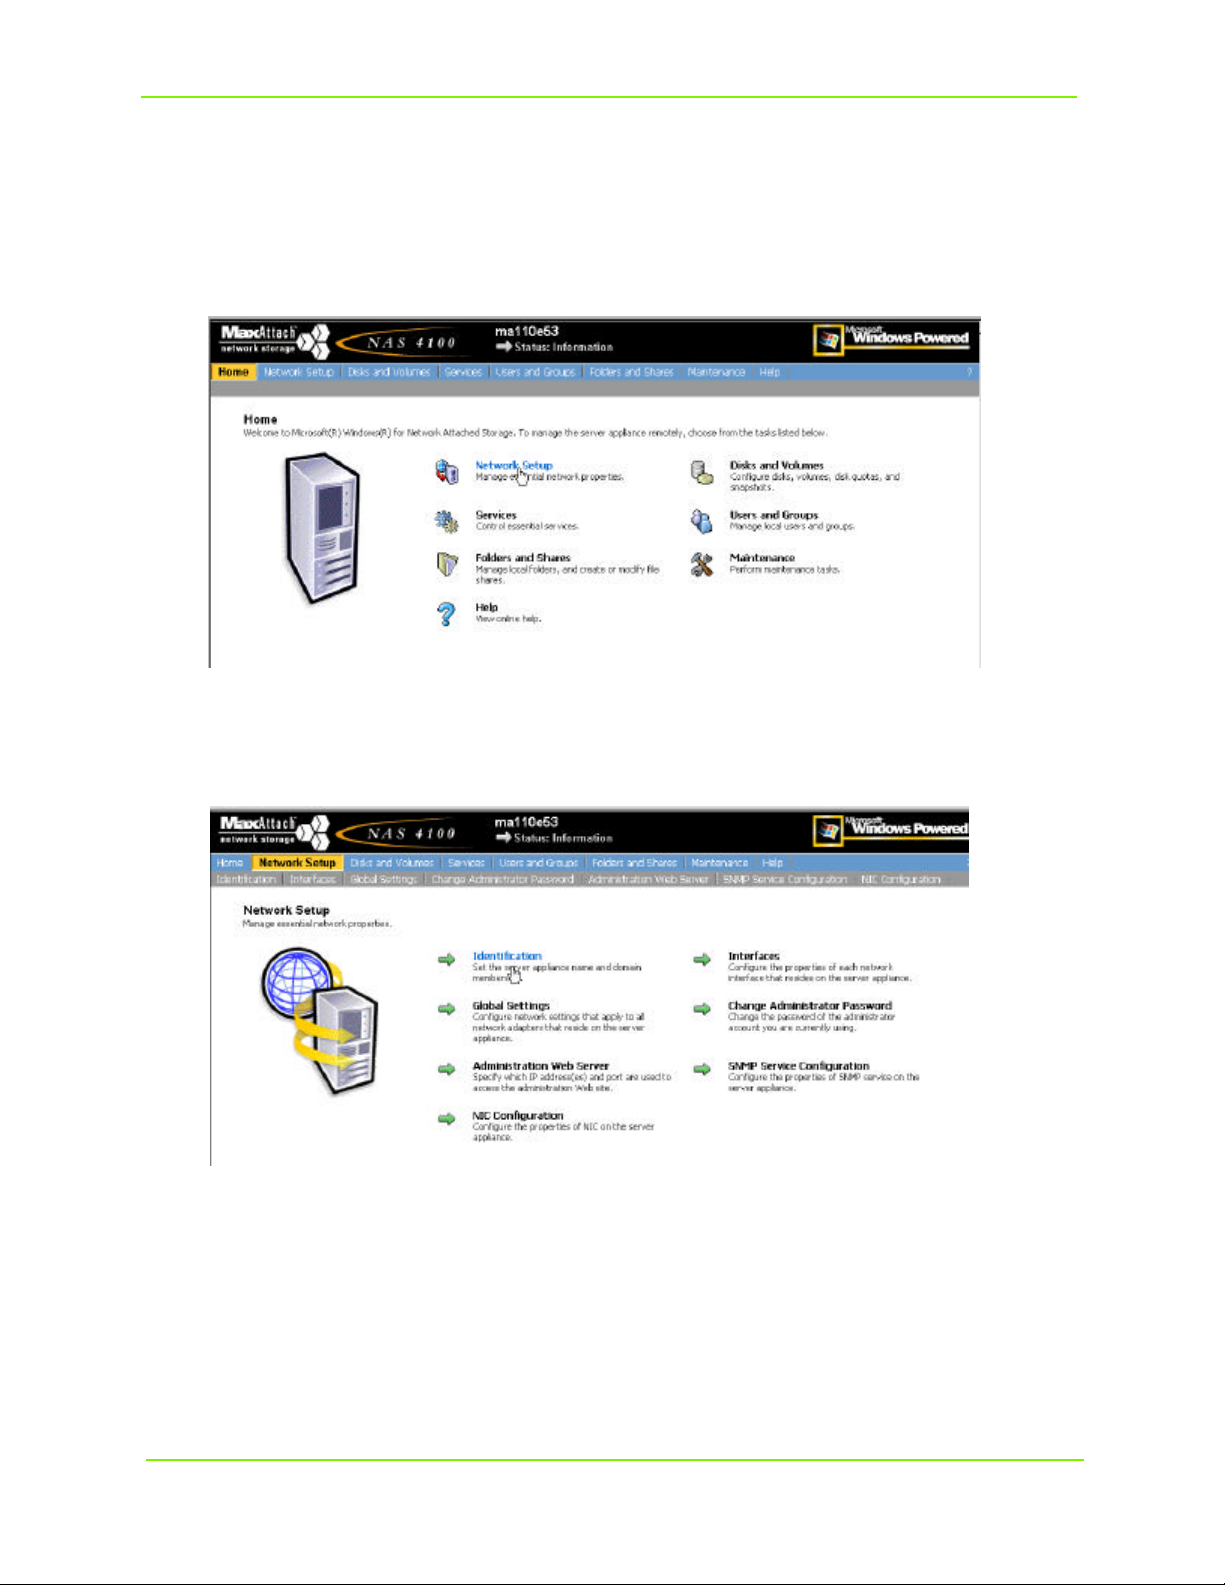
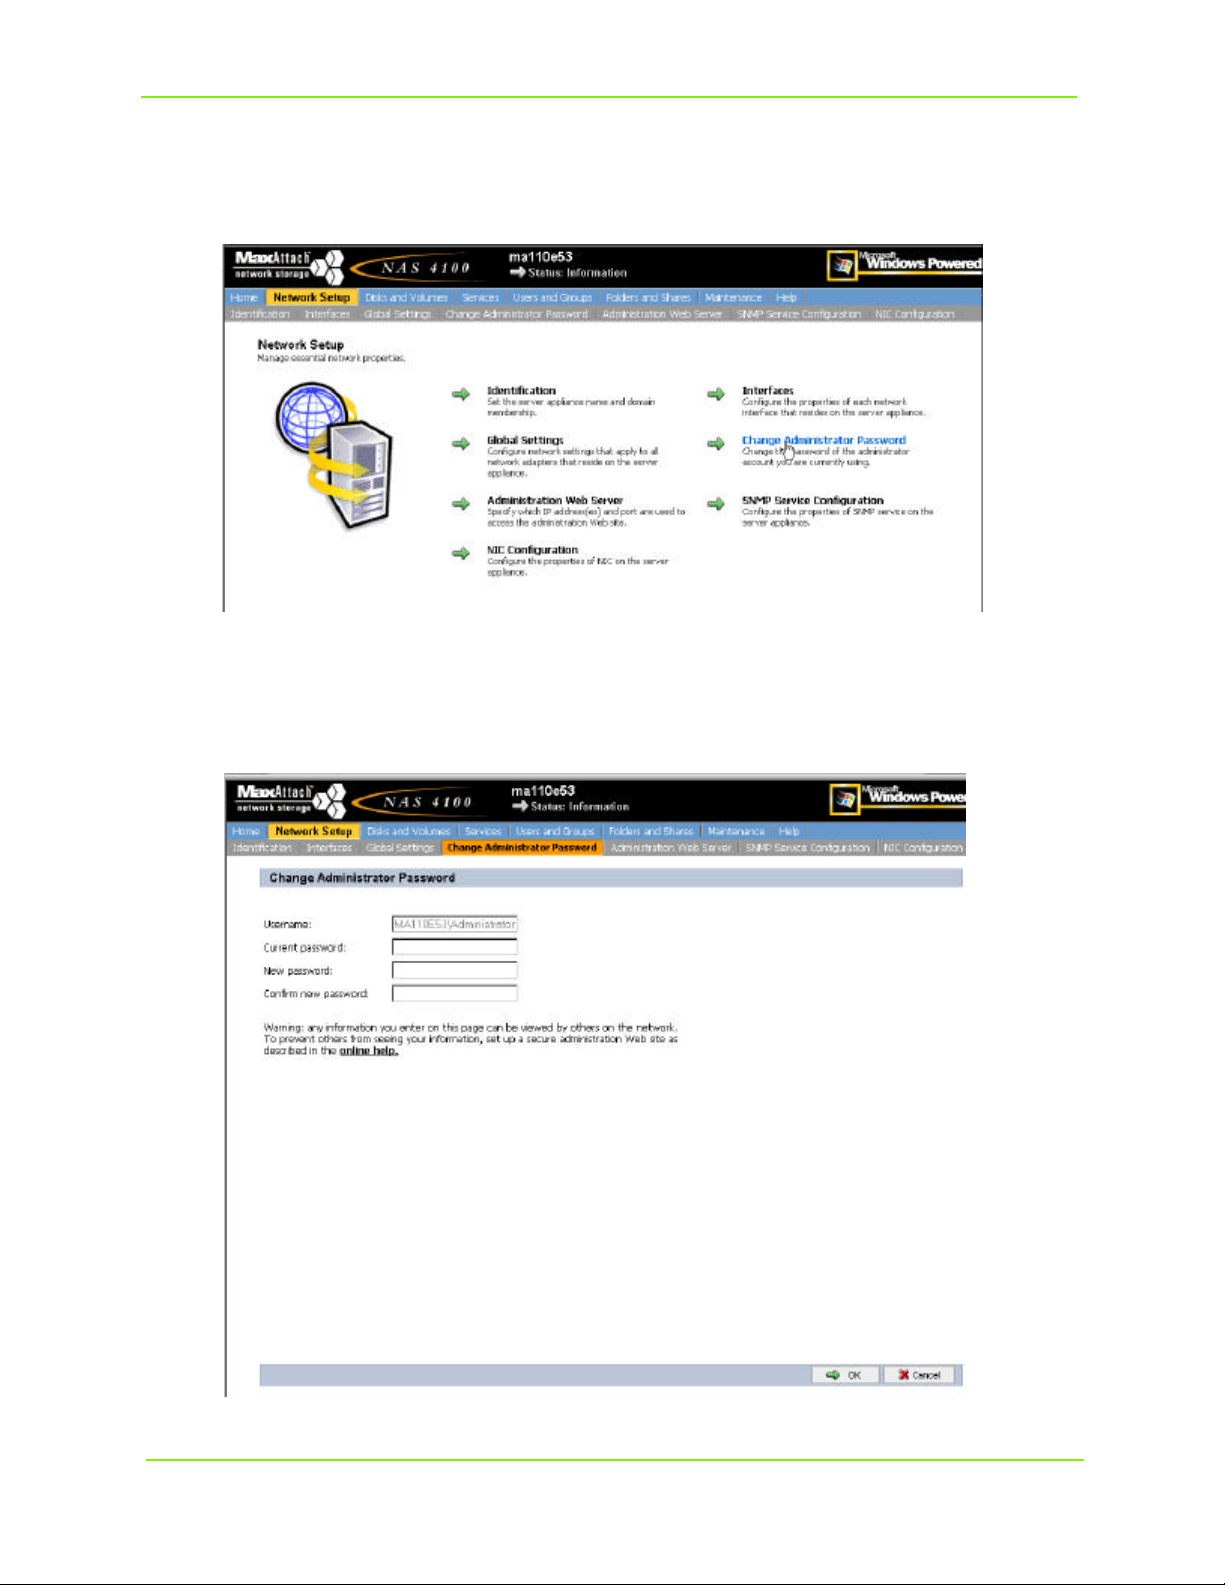
Network Setup
To begin these modifications, select Network Setup.
Then select Identification
Configuring Your MaxAttach NAS 4100 10
Page 16
Maxtor MaxAttach NAS 4100
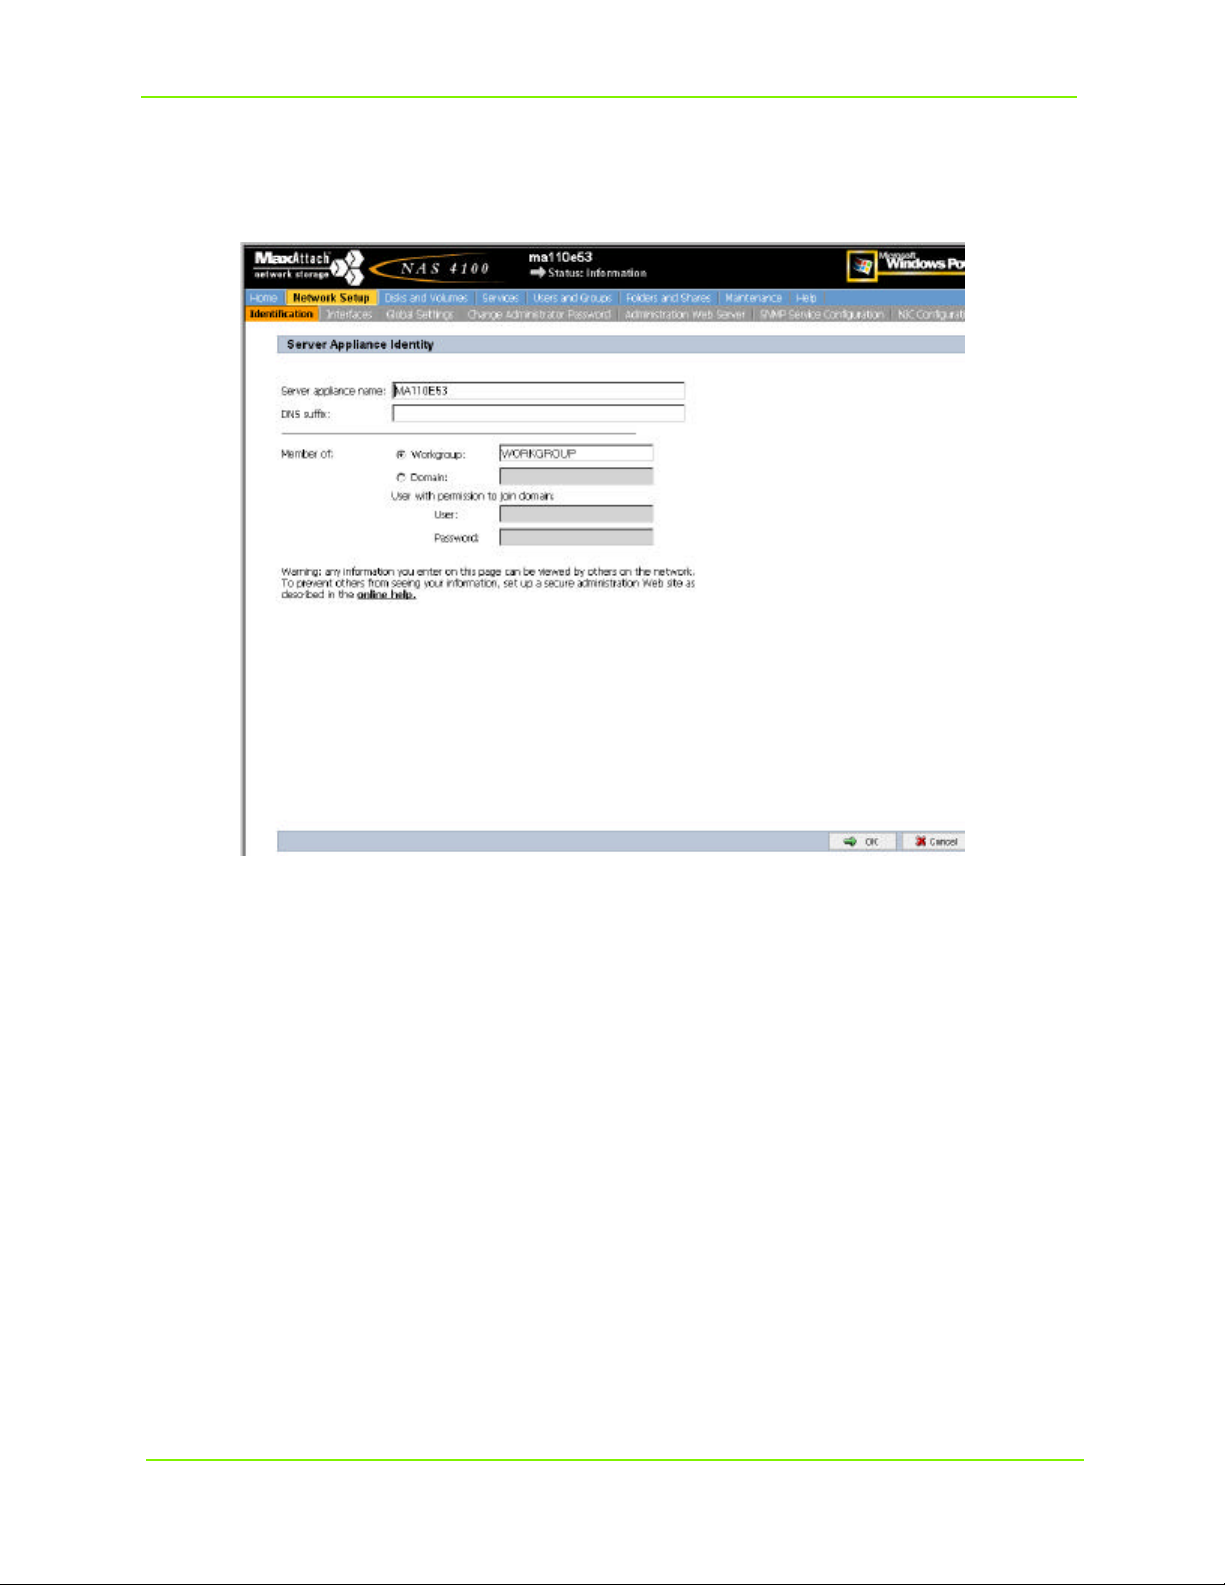
Changing the Server Name
When changing the name of your MaxAttach, you may use any combination of alpha-numeric characters
(without spaces).
Delete the default server name in the Server Appliance Name field. Enter a new server name. In the
DNS suffix field, enter your Fully Qualified Domain Name (FQDN) if applicable.
You may now change the Workgroup or join a existing Domain on your network. When joining an
existing Domain, the proper entry for this field is: DomainName\Administrator. The User and
Password fields are those required for the Domain you are joining.
Next, click on the OK button in the lower right hand corner.
You will be prompted to reboot the system to make the changes permanent. Select Cancel for now, as you
will be instructed to reboot the system later, after further modifications have been made.
This will return you to the Network Setup window.
Configuring Your MaxAttach NAS 4100 11
Page 17
Maxtor MaxAttach NAS 4100
Changing the Administrator Password
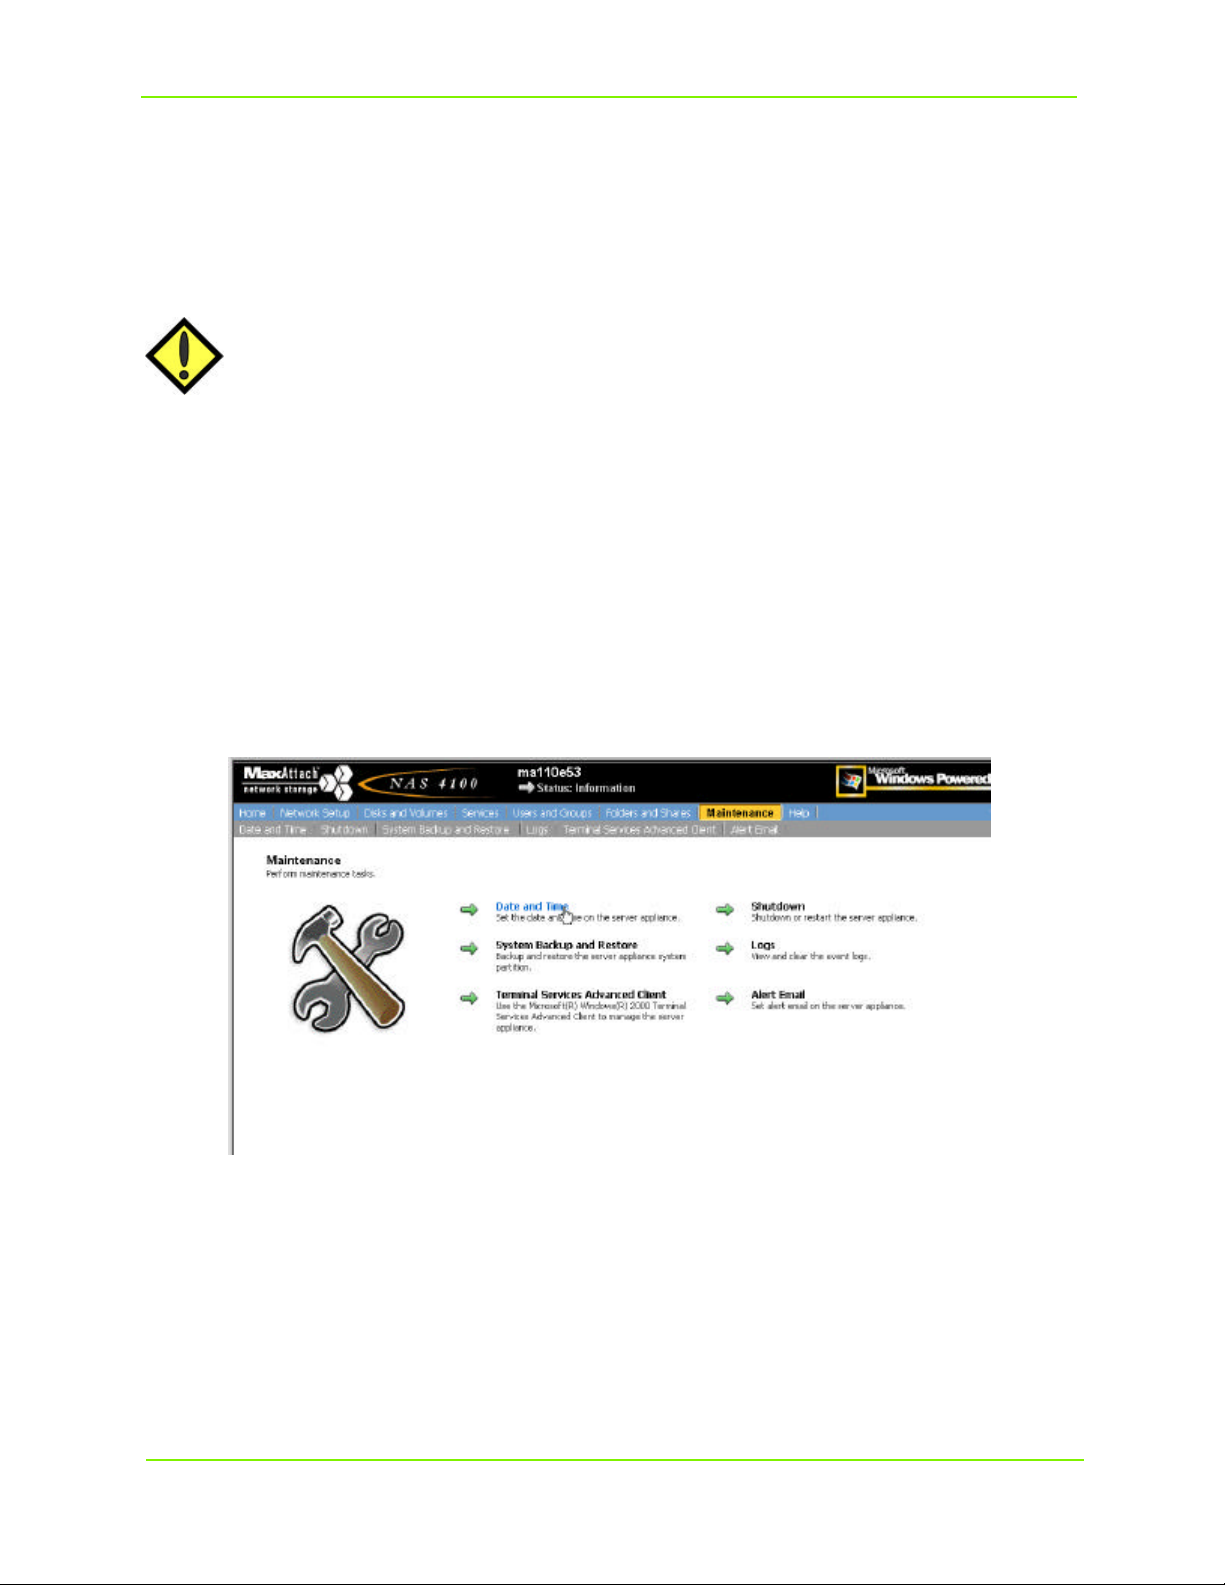
To change the Administrator Password; from the Network Setup window, select Change
Administrator Password.
Then change the password, by clicking in the New Password field. Enter your new password and confirm
by re-entering the same password, in the Confirm New Password field.
Configuring Your MaxAttach NAS 4100 12
Page 18
Maxtor MaxAttach NAS 4100
Click OK at the bottom right hand corner of the screen to apply the change. You will be retuned to the
Network Setup window.
Note: Since you changed your Administrator Password, you will now be prompted to Login
again. To continue this session in the web UI, type your new password in the Password field.
CAUTION: If you change the user name and password, be certain that you keep an appropriate
record of the change. If you forget and cannot locate the new user name and password, neither you nor Maxtor Technical Support will be able to administer your
MaxAttach.
Setting Time & Date
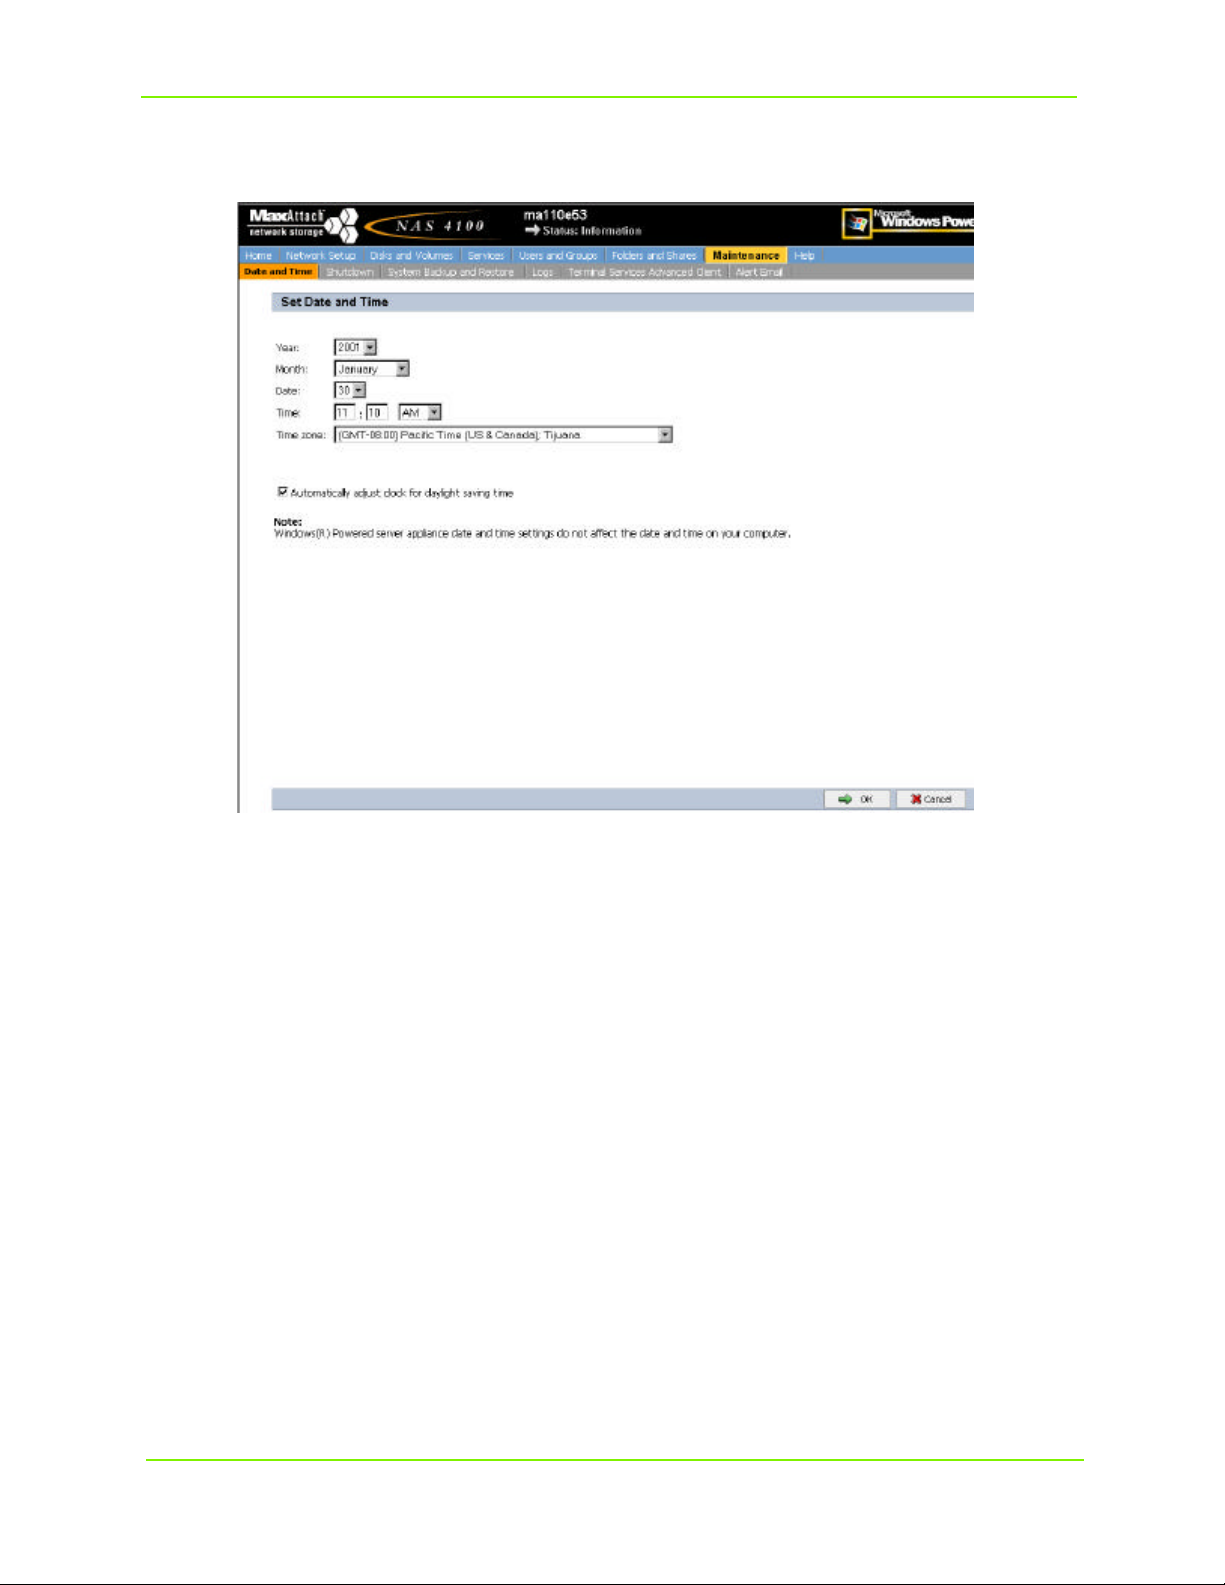
The last step is to set the date, time and time-zone for your MaxAttach. Select Maintenance from the blue
navigation bar at the top of the web UI.
Next, select Date and Time.
Configuring Your MaxAttach NAS 4100 13
Page 19
Maxtor MaxAttach NAS 4100
Enter the correct year, month, date, time and time-zone by clicking on the down arrow button in each field
and highlighting the appropriate entry.
Note: Even if the correct date and time are displayed, you must verify this by clicking OK
Configuring Your MaxAttach NAS 4100 14
Page 20
Maxtor MaxAttach NAS 4100
Notes for Advanced Users
Your MaxAttach is pre-configured in RAID5, and it is recommended that you maintain this default
configuration. However, if you prefer using a different drive configuration such JBOD or RAID 1, it is
recommended you make this change prior to beginning normal operations. If you later decide to change the
drive configuration, the drive will be reformatted and all data will be erased.
For more information on changing drive configurations, consult the MaxAttach Users Guide.
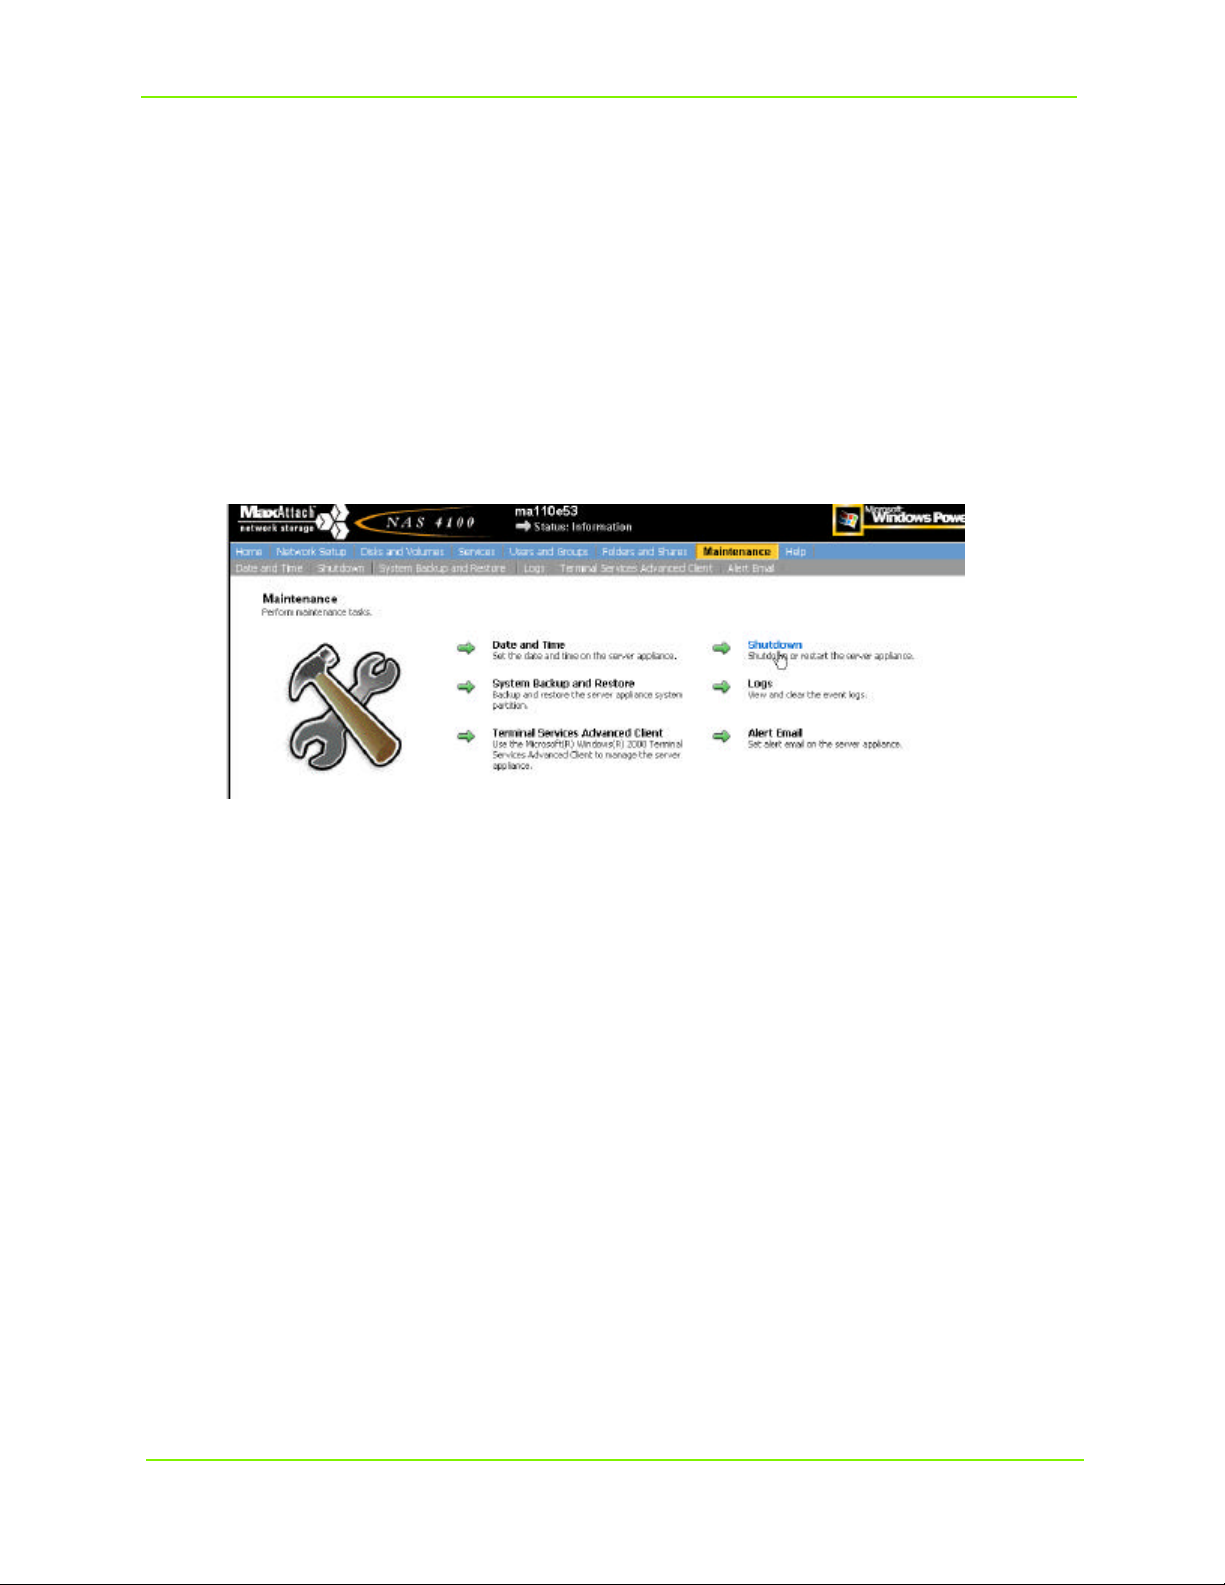
System Reboot
Once you have completed your changes, you must reboot your MaxAttach for those changes to take effect.
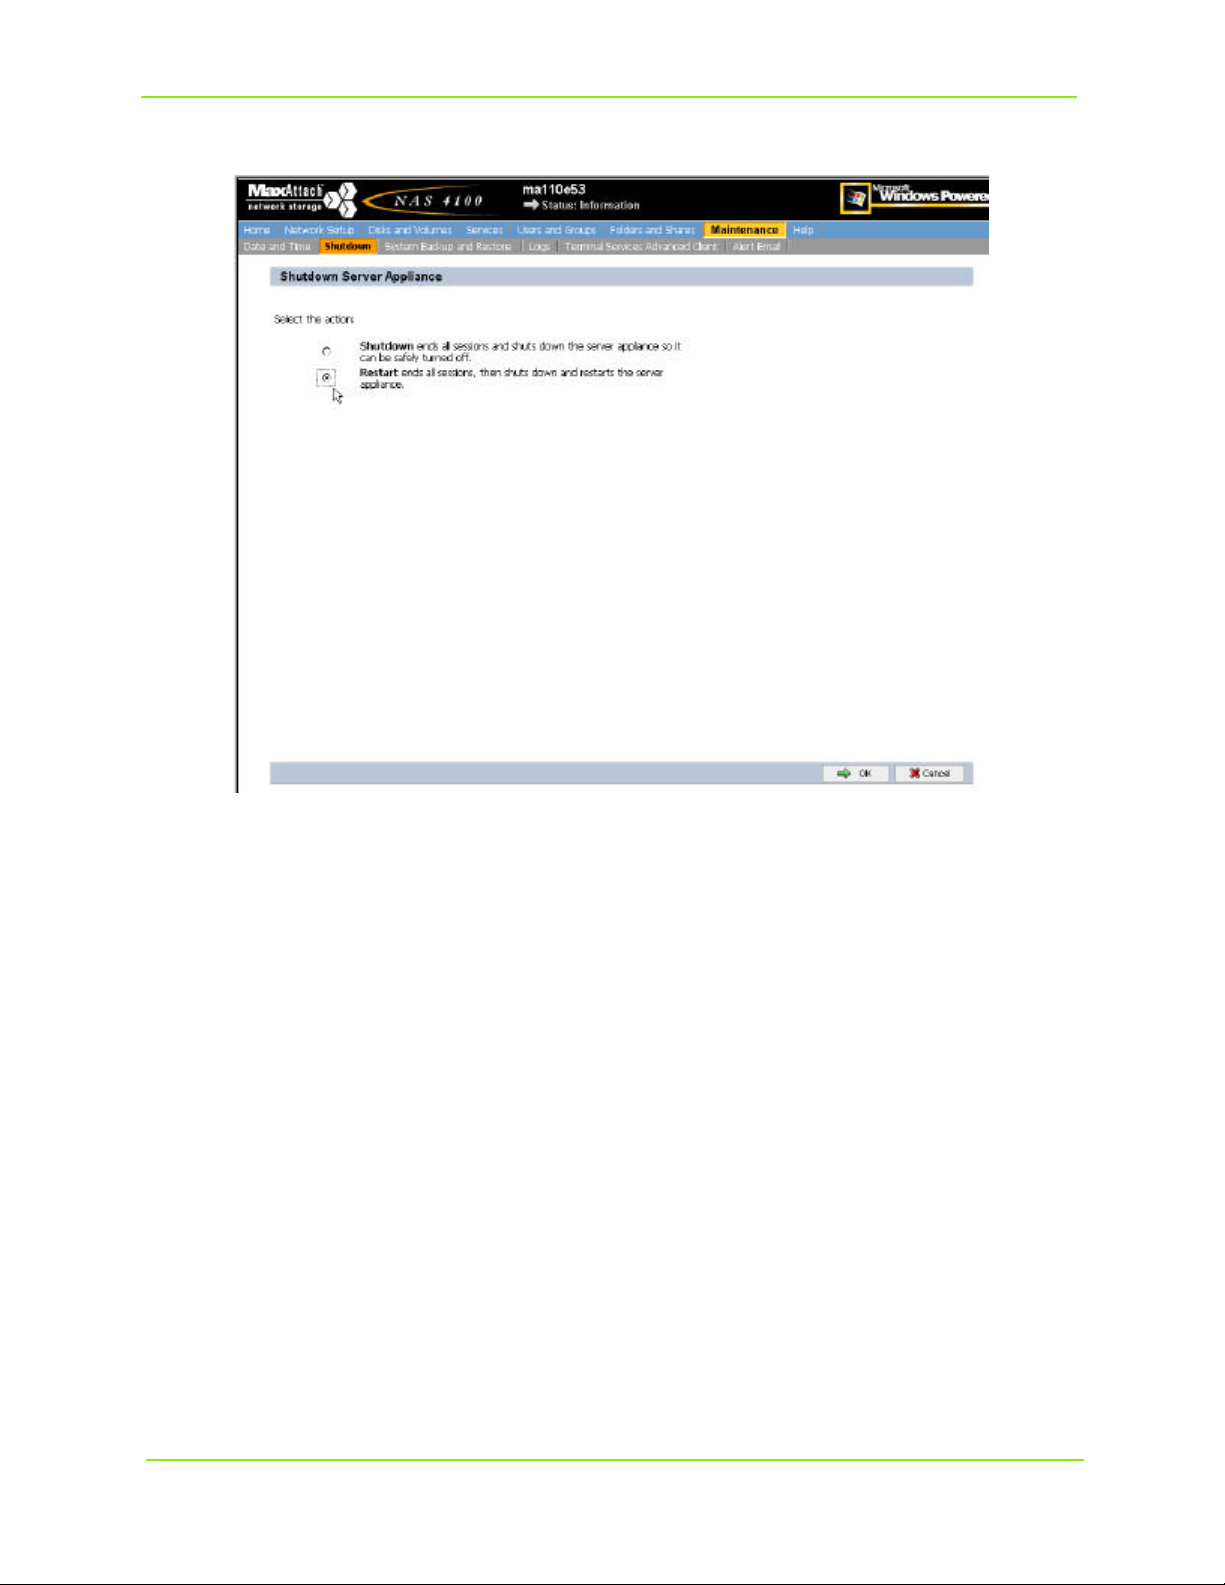
In the Maintenance screen, select Shutdown.
Configuring Your MaxAttach NAS 4100 15
Page 21
Maxtor MaxAttach NAS 4100
Then in the Shutdown window, select the Reboot radio button. Then select OK.
You will be prompted to confirm Reboot, select OK. Your MaxAttach will now reboot.
You must now close your browser session.
Once rebooted your MaxAttach is now ready for use. You may begin sharing files using the default
“Public” share folder located through Network Neighborhood, or create additional shares by following the
instructions in the Users Guide. For further information on modifying or configuring other areas of your
MaxAttach unit, see the MaxAttach Users Guide provided on the CD.
Normal Power-Down
To power-down your MaxAttach NAS 4100 under normal conditions, you may use the web interface, by
selecting Maintenance on the menu bar, and then Shutdown, or you may use the soft power switch on
the front panel
After shutdown, to terminate power to all integrated components of MaxAttach, switch off the main power
switch on the back panel.
Configuring Your MaxAttach NAS 4100 16
Page 22

Index
Numerics
1Safe software CD i
A
Administrator password
changing 12
B
Back panel 3
Backup software CD i
C
Configuring your MaxAttach 9
Connection to network 4
D
Date
setting 13
Date and time
setting 13
Default network settings
modifying 8
DHCP server 7
network without 8
DNS suffix 11
Domain 9, 11
E
Ethernet cables i
Ethernet network i
Ethernet network hub 1
Ethernet ports 4
F
Fail-over 4
Fan 3
Files
sharing 16
Front panel 3
G
Gigabit Ethernet network i
Gigabit Ethernet option 3, 4
H
Hard disk drive LED 3
Hardware requirements 1
Index 17
Home page 9
HTTP Shares 9
Humidity 1
I
Identification 10
Installation environment 1
Installation planning 1
Installing the MaxAttach 4
Internet Explorer 1
J
JBOD 15
L
LEDs 3
Load balancing 4
Login 9
M
Main power switch 4
Main switch 3
MaxAttach
MaxNeighborhood i
MaxNeighborhood software
N
Name
Netscape 1
Netscape browser support 7
Network activity indicator 3
Network connection 4
Network hub 4
Network interface card 1
Network setup 10
O
Operating environment requirements 2
P
Password 9, 11
Power
Power connection 3
Power on indicator 3
Power-down 16
configuring 9
finding on network 7
installing 5
changing 11
changing 12
turning on 4
Page 23

Index
R
RAID5 15
Rebooting system 15
Release notes ii
S
SCSI port 3
Server appliance name 11
Server name
changing 11
Shares
creating 16
Sharing files 16
Shutdown 16
Site planning 1
Soft power switch 3, 4, 16
Software CD i
Software requirements 1
System reboot 15
T
Table top installation 1
Temperature 1
Time and date
setting 13
U
UPS connection 3
W
Web site ii
Workgroup 11
Maxtor MaxAttach NAS 4100 18
Page 24
Guide d’installation
et de configuration
Février 2001
Page 25

2000 Maxtor Corporation. Tous droits réservés. Maxtor est une marque déposée de Maxtor
Corporation. MaxAttach et MaxNeighborhood sont des marques de Maxtor Corporation. Les
autres noms de produits, noms de sociétés et logos sont des marques ou des marques déposées de
leurs propriétaires respectifs. Les caractéristiques techniques sont susceptibles d’être modifiées sans
préavis. Révisions : Maxtor se réserve le droit de réviser cette publication et d’en modifier le
contenu sans obligation de sa part d’informer quiconque de ces changements ou révisions.
Vous pouvez bénéficier de l’assistance technique au +353 1 204 1111 (Irlande), à
EuroNSG@maxtor.com ou sur le site www.maxtor.com.
Page 26

MaxAttach NAS 4100
Table des matières
À propos de ce guide - - - - - - - - - - - - - - - - - - - - - - - - - - - - - - - - - - - - -i
À qui s’adresse ce guide - - - - - - - - - - - - - - - - - - - - - - - - - - - - - - - - - - - - i
Contenu de la boîte - - - - - - - - - - - - - - - - - - - - - - - - - - - - - - - - - - - - - - i
Vue d’ensemble - - - - - - - - - - - - - - - - - - - - - - - - - - - - - - - - - - - - - - - - - i
Informations sur le système - - - - - - - - - - - - - - - - - - - - - - - - - - - - - - - - - - ii
Conventions typographiques - - - - - - - - - - - - - - - - - - - - - - - - - - - - - - - - - ii
Documents connexes - - - - - - - - - - - - - - - - - - - - - - - - - - - - - - - - - - - - - ii
Programme de pré-installation - - - - - - - - - - - - - - - - - - - - - - - - - - - - - - - - -1
Équipement requis pour l’installation - - - - - - - - - - - - - - - - - - - - - - - - - - - - 1
Préparation du site - - - - - - - - - - - - - - - - - - - - - - - - - - - - - - - - - - - - - - - 1
Vous familiariser avec votre MaxAttach NAS 4100 - - - - - - - - - - - - - - - - - - - - 2
Installation du MaxAttach NAS 4100 - - - - - - - - - - - - - - - - - - - - - - - - - - - - -4
Connecter le MaxAttach à votre réseau - - - - - - - - - - - - - - - - - - - - - - - - - - - 4
Mise en marche - - - - - - - - - - - - - - - - - - - - - - - - - - - - - - - - - - - - - - - - - 4
Installation du logiciel MaxNeighborhood - - - - - - - - - - - - - - - - - - - - - - - - - 5
Terminer l’installation de MaxNeighborhood- - - - - - - - - - - - - - - - - - - - - - - - 6
Configuration de votre MaxAttach NAS 4100 - - - - - - - - - - - - - - - - - - - - - - - 9
Première connexion - - - - - - - - - - - - - - - - - - - - - - - - - - - - - - - - - - - - - - 9
Configuration des paramètres réseau - - - - - - - - - - - - - - - - - - - - - - - - - - - - - 10
Réglage de l’heure et de la date - - - - - - - - - - - - - - - - - - - - - - - - - - - - - - - 13
Remarques destinées aux utilisateurs avertis - - - - - - - - - - - - - - - - - - - - - - - - - 15
Redémarrer le système - - - - - - - - - - - - - - - - - - - - - - - - - - - - - - - - - - - - 15
Index - - - - - - - - - - - - - - - - - - - - - - - - - - - - - - - - - - - - - - - - - - - - - - - - - - -17
Page 27

À propos de ce guide
À qui s’adresse ce guide
Ce guide d’installation du MaxAttach™ NAS 4100 est destiné à faciliter l’installation et la
configuration du MaxAttach NAS 4100. Il part du principe que vous êtes familier(ère) avec les
notions de gestion de réseau et d’administration de système. Si vous rencontrez une quelconque
difficulté au cours de la procédure d’installation et de configuration décrite dans ce guide, veuillez
consulter le Guide de l’utilisateur du MaxAttach qui se trouve également sur le CD-ROM MaxAttach
NAS4100.
Contenu du coffret
n Serveur MaxAttach NAS 4100
n Guide de démarrage rapide
n Contrat de licence utilisateur MaxAttach NAS 4100
n Cordon d’alimentation
n Câbles Ethernet de type CAT-5 (2)
n Supports de montage en baie (2) avec vis
n Patins en caoutchouc (4)
n CD-ROM MaxAttach NAS 4100 comprenant :
• MaxNeighborhood™, Setup and Discovery Wizard
• Documentation relative au MaxAttach NAS 4100
n
Le CD-ROM 1Safe™, logiciel client de sauvegarde de données pour MaxAttach
Vue d’ensemble
Votre MaxAttach vous est livré prêt à être installé avec tous les logiciels nécessaires. Il fonctionne sur un
réseau Ethernet 10/100 (ou sur réseau Ethernet Gigabit quand l'option est utilisée), et est administré par
l’intermédiaire d’un navigateur Internet Explorer. Il comprend MaxNeighborhood, le logiciel utilitaire de
Maxtor qui vous aide à localiser le serveur sur votre réseau, à configurer ses paramètres réseau et à lancer
l’interface graphique utilisateur sur le navigateur.
À propos de ce guide i
Page 28

Maxtor MaxAttach NAS 4100
Informations sur le système
Veuillez noter les informations suivantes figurant sur l’étiquette du panneau latéral :
n Model Number : __________________________________________
n Serial Number : ___________________________________________
n Assembly Number : ________________________________________
Ces chiffres serviront au personnel de l’assistance technique si vous les contactez.
Conventions typographiques
Les conventions typographiques suivantes sont utilisées dans ce guide pour vous aider à localiser et à identifier
lesinformations :
Les caractères en italique sont utilisés pour mettre un texte en évidence et pour les titres d’ouvrages.
Le texte en caractères gras identifie les noms de menu, les options de menu, les éléments sur lesquels vous
pouvez cliquer à l’écran et les touches du clavier.
La police de caractères Courier identifie les noms de menu, les noms de dossiers et les textes
qui apparaissent à l’écran ou que vous devez saisir.
REMARQUE : les remarques donnent des informations supplémentaires, des astuces, et des
conseils concernant le sujet.
ATTENTION : les messages “Attention” servent à identifier des informations
importantes concernant des actions qui pourraient endommager ou
supprimer des données ou qui pourraient causer des réactions
inattendues du système.
AVERTISSEMENT : les messages d’avertissement servent à identifier des
informations primordiales concernant des actions qui
pourraient entraîner des pannes imprévues de l’équipement,
la perte de fichiers critiques pour le système d’exploitation
ou d’éventuelles blessures corporelles.
Documents connexes
Vous trouverez ci-dessous une liste des publications offrant des informations supplémentaires :
n Guide de l’utilisateur MaxAttach NAS 4100
n Guide de démarrage rapide
n Contrat de licence utilisateur MaxAttach (MaxAttach End User License Agreement, EULA)
n Déclaration de garantie
n Consultez également notre site Internet sur : http://www.maxattach.com pour obtenir les
dernières notes d'information publieés
À propos de ce guide ii
Page 29
1 Programme de pré-installation
Équipement requis pour l’installation
Pour brancher, installer et administrer votre MaxAttach NAS 4100, vous devez disposer d’un
concentrateur ou d’un switch disponible pour réseau 10/100 Ethernet. Vous aurez aussi besoin
d’un poste de travail répondant aux spécifications suivantes :
• Windows 95/98/Me/NT (SP5)/2000
• Internet Explorer v4.01 SP1 ou supérieure - le support pour Netscape n’est pas disponible
actuellement
• Le client pour les réseaux Microsoft doit être activé pour le protocole TCP/IP
• Carte d’Interface Réseau (NIC)
• Lecteur de CD-ROM
Préparation du site
Pour préparer le site destiné à héberger votre MaxAttach NAS 4100, vous devrez considérer les
critères d’alimentation et de disponibilité du réseau, et disposer d’un espace avec un bon équilibre
de température et d’humidité, avec très peu de poussière ou d’autres particules en suspension.
Les tableaux ci-dessous sont destinés à vous aider à préparer l’installation de votre MaxAttach
NAS4100.
Tableau 1-1. Taille et Poids
Élément Quantité
Poids 12,3 kg (27 livres)
Taille 43,2 x 50,8 x 4,5 cm (1,75 x 17 x 20 pouces)
Tableau 2-2. Exigences électriques
Élément Quantité
Plage de tension 95 ~ 135 V c.a. ou 180 ~ 265 V c.a.
Fréquence 47 ~ 63 Hz
Programme de pré-installation 1
Page 30
Maxtor MaxAttach NAS 4100
Tableau 3-3. Exigences relatives à l’environnement de fonctionnement
Éléments Quantité
Température - En fonctionnement
5 ºC à 40 °C (41 ºF à 104 ºF)
gamme de température externe en fonctionnement
Température - À l’arrêt
-20 ºC à +60 ºC (-4 ºF à 140 ºF)
Humidité - En fonctionnement
Humidité - À l’arrêt
5 % à 85 % d’humidité sans condensation
5 % à 95 % d’humidité sans condensation
Vous familiariser avec votre MaxAttach NAS 4100
Panneau avant
Le panneau avant du MaxAttach dispose de quatre diodes. Trois d’entre elles sont regroupées
surlecôté droit, et l’autre sur la gauche. Les diodes indiquent les éléments suivants :
• Diode la plus à gauche (diode de l’interrupteur de mise en marche). La diode allumée en
permanence indique que l'appareil est en marche. Cette diode clignotera pendant le
démarrage et pour indiquer des conditions d’erreurs (Voir le Guide de l’utilisateur MaxAttach
pour les codes d’erreurs).
• Connexion réseau 1 pour LAN 1. Le clignotement indique une activité sur le réseau.
• Connexion réseau 2 pour LAN 2. Le clignotement indique une activité sur le réseau.
• La diode du disque dur indique une activité de lecture/écriture.
INTERRUPTEUR DE MISE EN MARCHE
Figure 1-1. Diodes
Programme de pré-installation 2
LAN 1
LAN 2
LECTEUR DE
DISQUE DUR
Page 31

Maxtor MaxAttach NAS 4100
CONNEXION RÉSERVÉE AU
personnel d’entretien
Panneau arrière
Chaque port Ethernet possède deux diodes. L’une indique la connexion et l’autre l’activité.
REMARQUE : sur les groupes dotés d’une option Gigabit Ethernet installée, des diodes
supplémentaires seront présentes.
(PANNEAU ARRIÈRE)
VENTILATEUR
PRISE D’ALIMENTATION
ET INTERRUPTEUR
PRINCIPAL
CONNEXION
ONDULEUR
PRISE D’ALIMENTATION
LAN 1
LAN 2
Option
Gigabit
Ethernet
PORT
SCSI
Figure 2-2. Connexions de la Carte d’Interface Réseau, panneau arrière
Positionnement du serveur
Si vous installez votre MaxAttach NAS 4100 dans une baie, utilisez les supports de montage et les
vis fournis pour assurer la fixation. Si votre installation nécessite le placement sur un bureau, posez
les patins en caoutchouc fournis au bas du châssis.
Programme de pré-installation 3
Page 32

2 Installation du MaxAttach NAS 4100
Connecter le MaxAttach à votre réseau
Pour connecter le MaxAttach NAS 4100 à votre réseau, insérez l’un des câbles Ethernet fournis dans un
desports Ethernet 10/100 du MaxAttach (LAN1 ou LAN2) situés sur le panneau arrière. Insérez l’autre
extrémité de ce câble dans un concentrateur ou un switch du réseau. Si votre MaxAttach est doté d’une
option Gigabit Ethernet, vous pouvez le connecter à un concentrateur ou un switch 10/100/1000 du
réseau, en utilisant un câble de type CAT-6 (non fourni).
LAN 1
LAN 2
Figure 1-1.
Remarque : les deux ports Ethernet 10/100 du MaxAttach sont pré-configurés pour permettre
un équilibrage du transfert (load-balancing) et la reprise sur incident (fail-over). Même si elles ne
sont pas nécessaires à la réussite de l’installation, ces caractéristiques augmentent les performances
dusystème, et permettent une redondance en cas de défaillance d’un câble ou d’un composant.
Pour utiliser ces fonctions, branchez le second câble Ethernet fourni à votre MaxAttach et l’autre
extrémité à un autre port disponible sur un concentrateur ou un switch de votre réseau.
L’équilibrage du transfert (load-balancing) et les reprises sur incident (fail-over) seront
automatiquement activés sans qu’aucune configuration spéciale ne soit requise pour votre switch.
Mise en marche
1 Branchez une des extrémités du cordon fourni à une source d’alimentation. Reliez l’autre extrémité à la
prise d’alimentation du panneau arrière comme le montre l’illustration 2-1 ci-dessous.
INTERRUPTEUR
PRINCIPAL D’ALIMENTATION
(PANNEAU ARRIÈRE)
PRISE D’ALIMENTATION
Figure 2-2. Prise d’alimentation et interrupteur principal d’alimentation, panneau arrière
2 Faites basculer l’interrupteur principal d’alimentation du panneau arrière sur la position “ON” ( I ).
3 Appuyez sur l’interrupteur de mise en marche du panneau avant (comme le montre l’illustration
ci-dessus), pour allumer l’appareil.
Installation du MaxAttach NAS 4100 4
Page 33

Maxtor MaxAttach NAS 4100
INTERRUPTEUR DE
MISE EN MARCHE
(PANNEAU AVANT)
Figure 2-3. Interrupteur de mise en marche, panneau avant
La diode de l’interrupteur d’alimentation s’allumera. Après quelques instants, elle commencera à clignoter et
continuera ainsi pendant quelques minutes lors du cycle de mise en route. Lorsqu’elle s’arrête de clignoter et
quand le disque s’arrête, votre MaxAttach est prêt à être configuré.
Installation du logiciel MaxNeighborhood
Utilisez un poste de travail relié au réseau auquel le MaxAttach est connecté. Insérez le CD-ROM
d'installation et de documentation du MaxAttach dans votre lecteur de CD-ROM. Si l’écran “Welcome to
the MaxAttach NAS 4100” n'apparaît pas, cela signifie que l’option de démarrage automatique de votre
lecteur est désactivée. Dans ce cas, utilisez l'Explorateur Windows pour lancer le programme d’installation à
partir du CD-ROM
Cliquez sur le MaxNeighborhood Setup and Discovery Wizard pour commencer l’installation.
Compagnon MaxNeighborhood
Quand apparaît l’écran Install MaxAttach
Family, cliquez sur le bouton Install
MaxNeighborhood. Le compagnon vous
guidera au long de la procédure d’installation.
Si vous possédez une version plus ancienne de
MaxNeighborhood sur votre serveur, vous en
serez informé(e) et on vous demandera si vous
voulez désinstaller la version précédente avant
d’installer la nouvelle version.
Installation du MaxAttach NAS 4100 5
Page 34

Maxtor MaxAttach NAS 4100
Terminer l’installation de MaxNeighborhood
Quand le compagnon d’installation a terminé, vous pourrez consulter le fichier README en cochant
lacase correspondante, ou lancer MaxNeighborhood en sélectionnant l'autre case puis cliquez sur Finish.
Vouspouvez aussi sortir du compagnon sans sélectionner aucune option et en cliquant sur Finish.
Vous pouvez également cliquer sur Finish pour fermer le compagnon, puis lancer MaxNeighborhood
depuis votre poste de travail Windows dans le menu Démarrer, Programmes, puis MaxNeighborhood.
MaxNeighborhood s’initialisera, et commencera à chercher les unités MaxAttach présentes sur votre réseau.
Installation du MaxAttach NAS 4100 6
Page 35

Maxtor MaxAttach NAS 4100
Détecter votre nouveau MaxAttach
Une fois que MaxNeighborhood a trouvé toutes les unités MaxAttach sur votre réseau, il fait apparaître
lenom (Name), le statut (Status), l’adresse IP (IP Address) et le Groupe de travail (Workgroup)
del’ordinateur.
Si vous possédez les modèles MaxAttach 3000 ou 4000 sur votre réseau, ils apparaîtront également, et vous
pourrez continuer à les administrer grâce à MaxNeighborhood.
Si un serveur DHCP est présent dans votre réseau, lancez les écrans de configuration MaxAttach en double
cliquant sur le nom par défaut de votre MaxAttach récemment installé et passez au Chapitre 3.
ATTENTION : nous vous rappelons qu’il n’existe actuellement aucun support pour le
navigateur Netscape. Si vous utilisez Netscape comme navigateur par défaut,
vous devrez sélectionner à nouveau Internet Explorer comme navigateur par
défaut avant de commencer cette installation.
Installation du MaxAttach NAS 4100 7
Page 36

Maxtor MaxAttach NAS 4100
Modifier les paramètres par défaut pour les réseaux sans serveur DHCP
Si le MaxAttach est connecté à un réseau sans serveur DHCP, votre MaxAttach sera affiché avec une
adresseIP dans la gamme 169.254.xxx.xxx. Vous devez à présent attribuer une “Adresse IP Statique”
(StaticIPAddress) unique à votre unité. Voir votre administrateur réseau pour obtenir une
adresseIPdisponible avant de continuer.
Pour configurer une adresse IP, mettre en surbrillance le nom par défaut de votre MaxAttach avec un clic de
souris puis sélectionner le bouton Change Settings. Vous recevrez un message d’avertissement concernant
ces changements - cliquez sur OK. Effacez l’ Adresse IP par défaut et entrez votre adresse unique, le
masque de sous réseau, et la passerelle (si besoin est). Si vous souhaitez changer le nom par défaut de
l'ordinateur, MaxAttach Server Name, utilisez n’importe quelle combinaison de caractères
alphanumériques (sans espaces).
Changez ensuite le réglage pour DHCP
Client en cliquant sur la flèche, puis en
mettant en surbrillance Disabled.
Ensuite, cliquez sur Apply pour rendre ces
modifications permanentes. Votre
MaxAttach va alors redémarrer
automatiquement.
Terminez cette procédure en cliquant sur le
bouton Close.
Une fois le redémarrage du MaxAttach
terminé, cliquez sur le bouton Refresh dans
la fenêtre principale de MaxNeighborhood.
Quand la recherche est terminée, vos
nouveaux réglages doivent apparaître. Dans
le cas contraire, revenez en haut de cette
page et recommencez.
À présent, double cliquez sur le MaxAttach
dans la fenêtre de MaxNeighborhood afin de
lancer les écrans de configuration de votre
MaxAttach récemment activé.
Installation du MaxAttach NAS 4100 8
Page 37

3 Configuration de votre MaxAttach NAS 4100
Première connexion
Pour commencer à configurer votre MaxAttach, vous devez vous connecter en entrant le nom
Administrator dans le champ User Name. Ne remplissez pas les champs Password et Domain
etcliquez sur OK.
.
Votre navigateur Internet Explorer se mettra en route et affichera la fenêtre HTTP Shares.
Cliquez sur Administer this Server.
Vous serez amené à vous connecter une seconde fois pour accéder à la Page d’accueil d’administration.
Ensuite, entrez le nom Administrator dans le champ User name et laissez le champ Password vide.
Vous êtes maintenant prêt à modifier les réglages d’usine pas défaut de façon à les adapter aux besoins
particuliers de votre réseau, vos critères de sécurité et fuseau horaire.
Configuration de votre MaxAttach NAS 4100 9
Page 38

Maxtor MaxAttach NAS 4100
Configuration des paramètres réseau
Pour commencer à effectuer ces modifications, sélectionnez Network Setup.
Sélectionnez ensuite Identification.
Configuration de votre MaxAttach NAS 4100 10
Page 39

Maxtor MaxAttach NAS 4100
Modifier le nom du serveur
Pour modifier le nom de votre MaxAttach, vous pouvez utiliser n’importe quelle combinaison de caractères
alphanumériques (sans espaces).
Effacez le nom de serveur par défaut dans le champ Server Appliance Name. Entrez un nouveau nom
deserveur. Dans le champ DNS suffix, si le cas s'applique, entrez un nom de domaine complet et officiel
(FQDN).
Vous pouvez à présent modifier le Workgroup ou rejoindre un Domain sur votre réseau. En rejoignant
un Domaine existant, l’entrée correcte pour ce champ est : DomainName\Administrator. Les
champs User et Password sont requis pour le Domaine que vous rejoignez.
Cliquez ensuite sur le bouton OK situé dans le coin inférieur droit.
Un message vous proposant de redémarrer le système pour rendre les modifications permanentes apparaîtra.
Sélectionnez Cancel, vous pourrez redémarrer l'appareil plus tard après avoir fait les autres modifications.
Cela vous fera revenir à la fenêtre Network Setup.
Configuration de votre MaxAttach NAS 4100 11
Page 40

Maxtor MaxAttach NAS 4100
Modifier le mot de passe Administrator
Pour changer le mot de passe administrateur, sélectionnez Change Administrator Password dans
lafenêtre Network Setup.
Changer ensuite le mot de passe, en cliquant dans le champ New Password. Saisissez votre nouveau
motdepasse et confirmez en entrant ce même mot de passe une deuxième fois, dans la case Confirm
NewPassword.
Configuration de votre MaxAttach NAS 4100 12
Page 41

Maxtor MaxAttach NAS 4100
Cliquez sur OK dans le coin inférieur droit de l’écran pour que la modification soit effective. Vous serez
alors redirigé(e) vers la fenêtre Configuration de réseau.
Remarque : puisque vous avez modifié votre Mot de passe administrateur, vous devrez vous
reconnecter. Pour poursuivre cette session sur l’Interface Graphique Utilisateur du réseau, entrez
votre mot de passe dans le champ Password.
ATTENTION : si vous modifiez le nom d’utilisateur et le mot de passe, assurez-vous de
conserver une trace de cette modification. Si vous oubliez votre nouveau nom
d’utilisateur et votre nouveau mot de passe, ni vous ni l’Assistance Technique
deMaxtor ne pourront administrer votre MaxAttach.
Réglage de l’heure et de la date
La dernière étape consiste à régler la date, l’heure et le fuseau horaire pour votre MaxAttach.
Sélectionnez Maintenance dans la barre de navigation bleue située en haut de l’Interface Utilisateur.
Sélectionnez Date and Time.
Configuration de votre MaxAttach NAS 4100 13
Page 42

Maxtor MaxAttach NAS 4100
Entrez l’année, le mois, la date, l’heure et le fuseau horaire en cliquant sur le bouton fléché vers le Bas
danschaque case et en mettant en surbrillance les entrées appropriées.
Remarque : même si l’écran affiche l’heure et la date correctes, vous devez les valider en cliquant
sur OK.
Configuration de votre MaxAttach NAS 4100 14
Page 43

Maxtor MaxAttach NAS 4100
Remarques destinées aux utilisateurs avertis
Votre MaxAttach est pré-configuré en mode RAID5, et il est recommandé de conserver cette configuration
par défaut. Pourtant, si vous préférez utiliser une configuration de disque différente comme JBOD ou
RAID1, il est recommandé d’effectuer ces changements avant de commencer à réaliser des opérations
normales. Sivous décidez plus tard de changer la configuration des disques, ils seront reformatés et toutes
lesdonnées seront supprimées.
Pour obtenir de plus amples informations concernant les modifications de configuration des disques,
consultez le Guide de l’utilisateur MaxAttach .
Redémarrer le système
Après avoir réalisé vos modifications, vous devez redémarrer votre MaxAttach afin qu’elles prennent effet.
Dans l’écran Maintenance, sélectionnez Shutdown.
Configuration de votre MaxAttach NAS 4100 15
Page 44

Maxtor MaxAttach NAS 4100
Dans la fenêtre Shutdown, sélectionnez l’option Reboot. Enfin, cliquez sur OK.
Il vous faudra alors confirmer Reboot, sélectionnez OK. Votre MaxAttach va alors redémarrer.
Vous devez fermer votre session du navigateur.
Une fois redémarré, votre MaxAttach est prêt à être utilisé. Vous pouvez commencer à partager des fichiers
en utilisant le dossier de partage “Public” localisable par Network Neighborhood, ou créer des partages
supplémentaires en suivant les instructions du Guide de l’utilisateur. Pour obtenir de plus amples
informations concernant la modification ou la configuration d’autres éléments de votre unité MaxAttach,
référez-vous au Guide de l’utilisateur MaxAttach fourni sur le CD-ROM.
Mise à l’arrêt normale
Pour mettre à l’arrêt votre MaxAttach NAS 4100 dans des conditions normales, vous pouvez utiliser
l’interface graphique, en sélectionnant Maintenance dans la barre de menu, puis Shutdown, ou alors
utiliser l’interrupteur de mise à l’arrêt sur le panneau avant.
Après la mise à l’arrêt, mettez l’interrupteur principal d’alimentation situé sur le panneau arrière sur
arrêt pour couper l’alimentation de tous les composants intégrés du MaxAttach.
Configuration de votre MaxAttach NAS 4100 16
Page 45

Index
C
Carte d’Interface Réseau 1
CD-ROM de logiciel 1Safe i
CD-ROM du logiciel i
CD-ROM du logiciel de sauvegarde i
Concentrateur réseau 4
Configuration de votre MaxAttach
NAS4100 9
Configuration des paramètres réseau 10
Configuration du MaxAttach 9
Connexion 9
Connexion au réseau 4
Connexion d’alimentation 3
Connexion Onduleur 3
Création de partages 16
D
Détecter le MaxAttach
sur le réseau 7
Diodes 2
Diode du disque dur 2
Domain 9, 11
E
Environnement d’installation 1
Équilibrage de transfert (load-balancing) 4
Éthernet (câble) i
Éthernet (concentrateur) 1
Éthernet (port) 4
Éthernet (réseau) i
Exigences logicielles 1
Exigences matérielles 1
Exigences relatives à l’environnement
defonctionnement 2
F
Fail over 4
H
HTTP Shares 9
Humidité 1
I
Identification 10
Indicateur d’activité sur le réseau 2
Indicateur de fonctionnement de l'appareil 2
Installation du logiciel MaxNeighborhood 5
Installation du MaxAttach 4
Installation en baie 3
Installation sur un bureau 3
Internet Explorer 1
Interrupteur principal d’alimentation 4
Interrupteur de mise en marche 2, 5, 16
Interrupteur principal 3
J
JBOD 15
L
Load balancing 4
M
MaxNeighborhood i
Mise en marche 4
Mise à l’arrêt 16
Modifier
les réglages par défaut du réseau 8
Modifier le
mot de passe 12
mot de passe Administrator 12
nom 11
nom du serveur 11
N
Netscape 1
Nom de serveur 11
Notes d'information ii
O
Option Gigabit Ethernet 3, 4
P
Page d’accueil 9
Panneau arrière 3
Panneau avant 2
Partage de fichiers 16
Password 9, 11
Port SCSI 3
Positionnement du serveur 3
Préparation de l’installation 1
Préparation du site 1
Index 17
Page 46

Index
R
Rack RAID 5 15
Redémarrer le système 15
Réglage de
l’heure et de la date 13
Reprises sur incident (Fail over) 4
Réseau Ethernet Gigabit i
Réseau sans serveur DHCP 8
S
Server appliance name 11
Serveur DHCP 7
Site Internet ii
Suffixe DNS 11
Support pour le navigateur Netscape 7
T
Température 1
V
Ventilateur 3
W
Workgroup 11
Maxtor MaxAttach NAS 4100 18
Page 47

Installations- und
Konfigurationsanleitung
Februar 2001
Page 48

2000 Maxtor Corporation. Alle Rechte vorbehalten. Maxtor ist ein eingetragenes Warenzeichen
der Maxtor Corporation. MaxAttach und MaxNeighborhood sind Warenzeichen der Maxtor
Corporation. Andere Produkte, Firmennamen und Logos sind Warenzeichen oder eingetragene
Warenzeichen ihrer jeweiligen Eigentümer. Technische Daten können ohne vorherige
Ankündigung geändert werden. Änderungen: Maxtor behält sich das Recht vor, dieses Handbuch
zu überarbeiten und Änderungen darin vorzunehmen. Maxtor unterliegt dabei keinerlei
Verpflichtung, Dritte über solche Bearbeitungen und Änderungen in Kenntnis zu setzen.
Technische Unterstützung erhalten Sie unter +49 (0)89 96 24 19 19, EuroNSG@Maxtor.com und
beiwww.maxtor.com.
Page 49

MaxAttach NAS 4100
Inhaltsverzeichnis
Über diese Anleitung - - - - - - - - - - - - - - - - - - - - - - - - - - - - - - - - - - - - -i
Für wen diese Anleitung gedacht ist - - - - - - - - - - - - - - - - - - - - - - - - - - - - - i
Inhalt des Pakets - - - - - - - - - - - - - - - - - - - - - - - - - - - - - - - - - - - - - - - - i
Übersicht - - - - - - - - - - - - - - - - - - - - - - - - - - - - - - - - - - - - - - - - - - - - i
Systeminformationen - - - - - - - - - - - - - - - - - - - - - - - - - - - - - - - - - - - - - - ii
Typografische Konventionen - - - - - - - - - - - - - - - - - - - - - - - - - - - - - - - - - ii
In Zusammenhang stehende Dokumente - - - - - - - - - - - - - - - - - - - - - - - - - - ii
Planung vor der Installation - - - - - - - - - - - - - - - - - - - - - - - - - - - - - - - - - - -1
Für die Installation benötigte Ausrüstung - - - - - - - - - - - - - - - - - - - - - - - - - - 1
Standortplanung - - - - - - - - - - - - - - - - - - - - - - - - - - - - - - - - - - - - - - - - 1
Machen Sie sich mit Ihrem MaxAttach NAS 4100 vertraut - - - - - - - - - - - - - - - 2
Installation des MaxAttach NAS 4100 - - - - - - - - - - - - - - - - - - - - - - - - - - - - 4
Anschluss des MaxAttach an Ihr Netzwerk - - - - - - - - - - - - - - - - - - - - - - - - - 4
Einschalten der Stromversorgung - - - - - - - - - - - - - - - - - - - - - - - - - - - - - - 4
Installation der MaxNeighborhood-Software - - - - - - - - - - - - - - - - - - - - - - - - 5
Abschluss der MaxNeighborhood-Installation- - - - - - - - - - - - - - - - - - - - - - - - 6
Konfiguration Ihres MaxAttach NAS 4100 - - - - - - - - - - - - - - - - - - - - - - - - -9
Erste Anmeldung - - - - - - - - - - - - - - - - - - - - - - - - - - - - - - - - - - - - - - - - 9
Netzwerkeinrichtung - - - - - - - - - - - - - - - - - - - - - - - - - - - - - - - - - - - - - 10
Einstellen von Uhrzeit und Datum - - - - - - - - - - - - - - - - - - - - - - - - - - - - - 13
Hinweise für fortgeschrittene Benutzer - - - - - - - - - - - - - - - - - - - - - - - - - - - 15
Neustart des Systems - - - - - - - - - - - - - - - - - - - - - - - - - - - - - - - - - - - - - - 15
Index - - - - - - - - - - - - - - - - - - - - - - - - - - - - - - - - - - - - - - - - - - - - - - - - - - -17
Page 50

Über diese Anleitung
Für wen diese Anleitung gedacht ist
Diese MaxAttach™ NAS 4100-Installationsanleitung soll Ihnen bei der Einrichtung und
Konfiguration des MaxAttach NAS 4100 helfen. Es wird davon ausgegangen, dass Sie
einigermaßen mit den Grundlagen der Vernetzung und Systemadministration vertraut sind. Sollten
Sie während der in diesem Handbuch beschriebenen Installations- und Konfigurationsverfahren
auf Schwierigkeiten stoßen, schlagen Sie im MaxAttach-Benutzerhandbuch nach, das ebenfalls auf der
MaxAttach NAS 4100-CD enthalten ist.
Inhalt des Pakets
n MaxAttach NAS 4100-Dateiserver
n Schnellstartkarte
n MaxAttach NAS 4100-Lizenzvereinbarung für Endbenutzer
n Stromkabel
n CAT-5 Ethernet-Kabel (2)
n Einbauösen (2) mit Schrauben
n Gummipads (4)
n MaxAttach NAS 4100 CD mit:
• MaxNeighborhood™ Setup und Discovery Wizard
• MaxAttach NAS 4100 Dokumentation
n
1Safe™ für MaxAttach-Client Backup-Software-CD
Übersicht
Sie erhalten Ihr MaxAttach einbaufertig mit der gesamten erforderlichen Software. Es arbeitet in einem
10/100-Mbps-Ethernet-Netzwerk (oder Gigabit-Ethernet-Netzwerk, falls entsprechend ausgestattet) und
wird mittels Internet Explorer verwaltet. Es beinhaltet MaxNeighborhood, Maxtors
Softwaredienstprogramm, mit dem Sie das Gerät im Netzwerk lokalisieren,
MaxAttach-Netzwerkeinstellungen konfigurieren und die Web-Benutzeroberfläche starten können.
Über diese Anleitung i
Page 51

Maxtor MaxAttach NAS 4100
Systeminformationen
Bitte notieren Sie folgende Informationen vom Etikett auf der Seitenabdeckung:
n Model Number: __________________________________________
n Serial Number: ___________________________________________
n Assembly Number: ________________________________________
Diese Nummern werden von den Support-Mitarbeitern benötigt, falls Sie diese kontaktieren.
Typografische Konventionen
Die folgenden typografischen Konventionen werden in diesem Handbuch verwendet, um Ihnen beim Auffinden und
Identifizieren von Informationen zu helfen:
Kursiver Text wird zur Hervorhebung und für Buchtitel verwendet.
Text in Fettdruck kennzeichnet Menünamen, Menüoptionen und Elemente, die Sie auf dem Bildschirm
anklicken können sowie die Tasten auf der Tastatur.
Schriftart Courier kennzeichnet Dateinamen, Ordnernamen und Text, der entweder auf dem
Bildschirm angezeigt wird oder den Sie eingeben müssen.
HINWEIS: Hinweise bieten zusätzliche Informationen, Tipps und Tricks zum Thema.
VORSICHT: Vorsichtshinweise kennzeichnen wichtige Informationen zu Aktionen,
die zu Beschädigung und Verlust von Daten oder zu unerwartetem
Systemverhalten führen können.
WARNUNG: Warnungen kennzeichnen wichtige Informationen zu Aktionen, die zu
unerwarteten Fehlfunktionen des Geräts oder Verlust wichtiger
Betriebssystemdateien führen können bzw. Verletzungsgefahr bergen.
In Zusammenhang stehende Dokumente
Nachfolgend finden Sie eine Liste zugehöriger Veröffentlichungen für Hintergrund- und
Zusatzinformationen.
n MaxAttach NAS 4100-Benutzerhandbuch
n Schnellstartkarte
n MaxAttach-Lizenzvereinbarung für Endbenutzer (MaxAttach End User Licence Agreement,
kurz: “EULA”)
n Garantieerklärung
n Besuchen Sie auch unsere Webseite unter: http://www.maxattach.com für die neuesten
Versionsinformationen
Über diese Anleitung ii
Page 52

1 Planung vor der Installation
Für die Installation benötigte Ausrüstung
Für den Anschluss, die Installation und die Verwaltung Ihres MaxAttach NAS 4100 benötigen Sie
einen freien 10/100 Ethernet-Netzwerk-Hub oder -Switch. Ihre Workstation muss folgende
Leistungsmerkmale aufweisen:
• Windows 95/98/Me/NT (SP5)/2000
• Internet Explorer v4.01 SP1 oder aktueller – Unterstützung für Netscape ist derzeit nicht
verfügbar
• Client für Microsoft-Netzwerke über TCP/IP aktiviert
• Netzwerkkarte (NIC)
• CD-ROM-Laufwerk
Standortplanung
Wenn Sie einen Standort für Ihr MaxAttach NAS 4100 suchen, sollten Sie die Anforderungen
anStromversorgung und Netzwerkverfügbarkeit berücksichtigen sowie einen Ort mit gut
geregelter Temperatur und Luftfeuchtigkeit wählen, der verhältnismäßig frei von Staub und
anderen in der Luft vorhandenen Verunreinigungen ist.
Die folgenden Tabellen sollen Ihnen bei der Planung für die Installation Ihres
MaxAttachNAS4100 helfen.
Table 1-1. Größe und Gewicht
Element Menge
Gewicht 12,3 kg (27 lbs)
Größe 43,2 x 50,8 x 4,5 cm (1,75 x 17 x 20 Zoll)
Table 2-2. Anforderungen an die Elektrik
Element Menge
Spannungsbereich 95 ~ 135 V WS oder 180 ~ 265 V WS
Frequenz 47 ~ 63 Hz
Planung vor der Installation 1
Page 53

Maxtor MaxAttach NAS 4100
Table 3-3. Anforderungen an die Betriebsumgebung
Element Menge
Temperatur – in Betrieb
Temperatur – außer Betrieb
Luftfeuchtigkeit – in Betrieb
Luftfeuchtigkeit – außer Betrieb
5 ºC bis 40 ºC (41 °F bis 104 ºF)
externer Betriebstemperaturbereich
-20 ºC bis +60 ºC (-4 ºF bis 140 ºF)
5% bis 85% Luftfeuchtigkeit, nicht kondensierend
5% bis 95% Luftfeuchtigkeit, nicht kondensierend
Machen Sie sich mit Ihrem MaxAttach NAS 4100 vertraut
Frontblende
Auf der Frontblende des MaxAttach befinden sich vier Leuchtdioden. Drei davon sind rechts
angeordnet, eine auf der linken Seite. Die Leuchtdioden zeigen folgendes an:
• Leuchtdiode ganz links (Netzschalter). Leuchtende Leuchtdiode zeigt an, dass Stromzufuhr
eingeschaltet ist. Diese Leuchtdiode blinkt während des Bootens. Sie blinkt außerdem, um
Fehlerbedingungen anzuzeigen (Siehe MaxAttach-Benutzerhandbuch für Fehlercodes).
• Netzwerkverbindung 1 für LAN 1. Blinken bedeutet Netzwerkaktivität.
• Netzwerkverbindung 2 für LAN 2. Blinken bedeutet Netzwerkaktivität.
• Leuchtdiode der Festplatte zeigt Lese-/Schreibaktivität an.
NETZSCHALTER
Abbildung 1-1. Leuchtdioden
Planung vor der Installation 2
LAN 2
FESTPLATTELAN 1
Page 54

Maxtor MaxAttach NAS 4100
NUR FÜR Kundendienstpersonal
Rückseitige Blende
Jeder Ethernetanschluss hat zwei Leuchtdioden. Eine zeigt die Verbindung und die andere
dieAktivitätenan.
HINWEIS: Bei Geräten mit einer eingebauten Gigabit-Ehternet-Option sind weitere
Leuchtdioden vorhanden.
(RÜCKSEITIGE
BLENDE)
VENTILATOR
STROMANSCHLUSS
UND HAUPTSCHALTER
USV-
ANSCHLUSS
ANSCHLÜSSE
LAN 1
LAN 2
Gigabit-
Option
SCSI-
ANSCHLUSS
Abbildung 1-2. NIC-Anschlüsse, rückseitige Blende
Serveraufstellung
Wenn Sie Ihr MaxAttach NAS 4100 in ein Rack einbauen, verwenden Sie die mitgelieferten
Einbauösen und Schrauben für eine sichere Befestigung. Wenn Sie das Gerät auf einem Tisch
aufstellen müssen, bringen Sie die mitgelieferten Gummipads auf der Unterseite des Gehäuses an.
Planung vor der Installation 3
Page 55

2 Installation des MaxAttach NAS 4100
Anschluss des MaxAttach an Ihr Netzwerk
Um das MaxAttach NAS 4100 an Ihr Netzwerk anzuschließen, stecken Sie eines der mitgelieferten
Ethernet-Kabel in einen der 10/100-Ethernetanschlüsse (LAN1 oder LAN2) auf dem hinteren Paneel.
Stecken Sie das andere Ende dieses Kabels in den Netzwerk-Hub oder -Switch. Wenn Ihr MaxAttach mit
einer Gigabit-Ethernet-Option ausgestattet ist, können Sie es mit einem CAT-6-Kabel (nicht mitgeliefert)
an einen 10/100/1000-Netzwerk-Hub oder -Switch anschließen.
LAN 1
LAN 2
Abbildung 2-1.
Hinweis: Die beiden 10/100-Ethernetanschlüsse des MaxAttach sind so vorkonfiguriert, dass sie
Lastverteilung und Fail-Over bieten. Obwohl für eine erfolgreiche Installation nicht notwendig,
verbessert diese Funktion die Systemleistung und sorgt für Redundanz im Falle eines Kabel- oder
Bauteilausfalls. Um diese Funktion zu benutzen, schließen Sie das zweite mitgelieferte
Ethernet-Kabel an Ihr MaxAttach und das andere Ende an einen anderen offenen Anschluss Ihres
Netzwerk-Hub oder -Switch an. Lastverteilung und Fail-Over werden automatisch aktiviert, ohne
dass Ihr Switch speziell konfiguriert werden muss.
Einschalten der Stromversorgung
1 Schließen Sie ein Ende des mitgelieferten Netzkabels an eine Stromquelle an. Stecken Sie das andere
Ende in die Netzanschlussbuchse der in Abbildung 2-1 unten gezeigten rückseitigen Blende.
HAUPTNETZSCHALTER
(Rückseitige Blende)
NETZANSCHLUSSBUCHSE
Abbildung 2-2. Netzanschlussbuchse und Hauptnetzschalter, rückseitige Blende
2 Stellen Sie den Hauptnetzschalter auf der rückseitigen Blende in die Position “EIN” ( I ).
3 Drücken Sie den Netzschalter auf der Frontblende (oben gezeigt), um das Gerät einzuschalten.
Installation des MaxAttach NAS 4100 4
Page 56

Maxtor MaxAttach NAS 4100
NETZSCHALTER
(Frontblende)
Figure 2-3. Netzschalter, Frontblende
Die Leuchtdiode im Netzschalter leuchtet auf. Nach einigen Augenblicken beginnt sie zu blinken und
blinkt mehrere Minuten während des Einschaltvorgangs. Wenn die Stromanzeigeleuchte nicht mehr blinkt
und die Festplattenaktivität aufhört, ist Ihr MaxAttach zur Konfiguration bereit.
Installation der MaxNeighborhood-Software
Verwenden Sie dazu eine Workstation, die in dem Netzwerk angemeldet ist, an das auch Ihr
MaxAttach-Gerät angeschlossen ist. Legen Sie die MaxAttach-Installations- und Dokumentations-CD
inIhr CD-ROM-Laufwerk ein. Wenn der Bildschirm “Willkommen zum MaxAttach NAS 4100” nicht
erscheint, wurde die automatische Benachrichtigung beim Wechsel für die CD abgeschaltet. Benutzen
Siein diesem Fall den Windows Explorer, um das Setup-Programm von der CD zu starten.
Klicken Sie auf den MaxNeighborhood Setup & Discovery Wizard, um mit der Installation zu
beginnen.
MaxNeighborhood-Assistent
Wenn der Bildschirm Install MaxAttach
Family angezeigt wird, klicken Sie auf die
Schaltfläche Install MaxNeighborhood.
DerAssistent führt Sie durch den
Installationsvorgang.
Wenn Sie eine ältere Version von
MaxNeighborhood auf Ihrem Server haben,
werden Sie benachrichtigt und gefragt, ob Sie
die ältere Version deinstallieren möchten,
bevor Ihre neuere Version installiert wird.
Installation des MaxAttach NAS 4100 5
Page 57

Maxtor MaxAttach NAS 4100
Abschluss der MaxNeighborhood-Installation
Wenn der Installationsassistent fertig ist, können Sie die README-Datei lesen, indem Sie das
Kontrollkästchen markieren. Oder Sie können MaxNeighborhood starten, indem Sie auf das
Kontrollkästchen klicken und dann Finish wählen. Sie können den Assistenten verlassen ohne eine
derOptionen zu wählen, indem Sie direkt auf Finish klicken.
Alternativ dazu können Sie auf Finish klicken, um den Assistenten zu schließen, und dann
MaxNeighborhood von Ihrer Windows-Workstation aus starten, indem Sie Start, Programme,
MaxNeighborhood wählen.
MaxNeighborhood wird initialisiert und sucht nach allen MaxAttach-Geräten in Ihrem Netzwerk.
Installation des MaxAttach NAS 4100 6
Page 58

Maxtor MaxAttach NAS 4100
Suchen Ihres neuen MaxAttach
Sobald MaxNeighborhood alle MaxAttach-Geräte in Ihrem Netzwerk gefunden hat, zeigt es Name,
Status, IP Address und Workgroup des Computers an.
Wenn an Ihrem Netzwerk MaxAttach 3000- oder 4000-Modelle angeschlossen sind, werden diese ebenfalls
angezeigt, und Sie können diese Geräte weiterhin in dieser MaxNeighborhood-Sitzung verwalten.
Wenn in Ihrem Netzwerk ein DHCP-Server läuft, starten Sie die MaxAttach-Konfigurationsbildschirme
durch einen Doppelklick auf den vorgegebenen Namen Ihres neu installierten MaxAttach und gehen Sie
direkt zu Kapitel 3.
VORSICHT: Bitte denken Sie daran, dass derzeit keine Unterstützung für den
Netscape-Browser verfügbar ist. Wenn Sie Netscape als Standardbrowser
verwenden, müssen Sie den Internet Explorer als Standardbrowser einstellen,
bevor Sie mit der Installation beginnen.
Installation des MaxAttach NAS 4100 7
Page 59

Maxtor MaxAttach NAS 4100
Änderung der Standardnetzwerkeinstellungen für Nicht-DHCP-Dienst
Wenn MaxAttach ohne DHCP-Server an ein Netzwerk angeschlossen ist, wird Ihr MaxAttach mit einer
IP-Adresse im Bereich 169.254.xxx.xxx angezeigt. Sie müssen Ihrem Gerät jetzt eine einmalige "Statische
IP-Adresse" zuweisen. Fragen Sie Ihren Netzwerkadministrator nach einer freien IP-Adresse, bevor Sie
fortfahren.
Um eine IP-Adresse einzustellen, markieren Sie den vorgegebenen Namen Ihres MaxAttach mit einem
einzelnen Mausklick und wählen Sie dann die Schaltfläche Change Settings. Sie erhalten eine
Warnmeldung wegen der anstehenden Änderungen – klicken Sie auf OK. Löschen Sie die vorgegebene
IPAddress und geben Sie eine einmalige Adresse, Subnet-Mask und Gateway (falls zutreffend) ein. Wenn
Sie den vorgegebenen Computernamen MaxAttach Server Name ändern möchten, erledigen Sie dies
bitte jetzt mit einer beliebigen Kombination aus alphanumerischen Zeichen (ohne Leerzeichen).
Ändern Sie anschließend die Einstellung für
den DHCP Client, indem Sie auf den
Abwärtspfeil klicken und Disabled
markieren.
Klicken Sie dann auf Apply, um die
Änderungen zu übernehmen. Ihr MaxAttach
führt jetzt automatisch einen Neustart durch.
Beenden Sie diesen Vorgang, indem Sie die
Schaltfläche Close wählen.
Nach dem Neustart Ihres MaxAttach,
drücken Sie die Schaltfläche Refresh im
Hauptfenster von MaxNeighborhood. Wenn
die Suche abgeschlossen ist, sollten Ihre
neuen Einstellungen angezeigt werden. Falls
nicht, gehen Sie zurück zum Anfang dieser
Seite und beginnen Sie erneut.
Doppelklicken Sie jetzt auf MaxAttach im
MaxNeighborhood-Fenster, um die
Konfigurationsbildschirme auf Ihrem neu
aktivierten MaxAttach zu starten.
Installation des MaxAttach NAS 4100 8
Page 60

3 Konfiguration Ihres MaxAttach NAS 4100
Erste Anmeldung
Um mit der Konfiguration Ihres MaxAttach zu beginnen, müssen Sie sich jetzt anmelden, indem Sie
Administrator im Feld User Name eingeben. Lassen Sie das Feld Password und das Feld Domain
leer und klicken Sie auf OK.
.
Ihr Internet Explorer-Browser startet und zeigt das Fenster HTTP Shares an. Klicken Sie auf Administer
this Server.
Sie werden aufgefordert, sich ein zweites Mal anzumelden, um auf die Home Page für die Verwaltung zu
gelangen. Geben Sie im Feld User Name wieder Administrator ein und lassen Sie das Feld
Password leer.
Jetzt können Sie die Standardwerkseinstellungen so ändern, dass Sie Ihren speziellen Netzwerk-,
Sicherheits- und Zeitzonenanforderungen entsprechen.
Konfiguration Ihres MaxAttach NAS 4100 9
Page 61

Maxtor MaxAttach NAS 4100
Netzwerkeinrichtung
Um mit diesen Änderungen zu beginnen, wählen Sie Network Setup.
Wählen Sie dann Identification.
Konfiguration Ihres MaxAttach NAS 4100 10
Page 62

Maxtor MaxAttach NAS 4100
Änderung des Servernamens
Wenn Sie den Namen Ihres MaxAttach ändern, können Sie jede beliebige Kombination alphanumerischer
Zeichen (ohne Leerzeichen) verwenden.
Löschen Sie den vorgegebenen Servernamen im Feld Server Appliance Name. Geben Sie einen neuen
Servernamen ein. Geben Sie im Feld DNS Suffix Ihre vollständige Domänenbezeichnung (FQDN, Fully
Qualified Domain Name) ein, falls zutreffend.
Jetzt können Sie die Workgroup ändern oder sich mit einer vorhandenen Domain auf Ihrem Netzwerk
verbinden. Wenn Sie sich mit einer vorhandenen Domain verbinden, lautet der korrekte Eintrag für dieses
Feld: DomainName\Administrator. Die Felder User und Password sind für die Domain, mit der
Sie sich verbinden, erforderlich.
Klicken Sie anschließend auf die Schaltfläche OK in der unteren rechten Ecke.
Sie werden aufgefordert, zur Übernahme der Änderungen das System neu zu starten. Wählen Sie erst
einmal Cancel, da Sie später noch einmal angewiesen werden, das System neu zu starten, nachdem weitere
Änderungen vorgenommen wurden.
Damit kehren Sie zum Fenster Network Setup zurück.
Konfiguration Ihres MaxAttach NAS 4100 11
Page 63

Maxtor MaxAttach NAS 4100
Änderung des Administratorkennworts
Um das Administratorkennwort zu ändern, wählen Sie Change Administrator Password im Fenster
Network Setup.
Ändern Sie dann das Kennwort, indem Sie in das Feld New Password klicken. Geben Sie Ihr neues
Kennwort ein und bestätigen Sie es, indem Sie das gleiche Kennwort im Feld Confirm New Password
nochmals eingeben.
Konfiguration Ihres MaxAttach NAS 4100 12
Page 64

Maxtor MaxAttach NAS 4100
Klicken Sie auf OK in der unteren rechten Ecke des Bildschirms, um die Änderung zu übernehmen.
Siekehren zum Fenster Network Setup zurück.
Hinweis: Da Sie Ihr Administratorkennwort geändert haben, werden Sie jetzt aufgefordert, sich
erneut anzumelden. Um diese Sitzung in der Web-Oberfläche fortzusetzen, geben Sie Ihr neues
Kennwort im Feld Password ein.
VORSICHT: Wenn Sie den Benutzernamen und das Kennwort ändern, vergessen Sie nicht,
diese Änderungen entsprechend zu verzeichnen. Wenn Sie den neuen
Benutzernamen und das Kennwort vergessen haben und nicht mehr finden
können, sind weder Sie noch die Technische Unterstützung von Maxtor in
derLage, Ihr MaxAttach zu verwalten.
Einstellen von Uhrzeit und Datum
Der letzte Schritt besteht in der Einstellung von Datum, Uhrzeit und Zeitzone für Ihr MaxAttach.
WählenSie Maintenance in der blauen Navigationsleiste oben in der Web-Oberfläche.
Wählen Sie anschließend Date and Time.
Konfiguration Ihres MaxAttach NAS 4100 13
Page 65

Maxtor MaxAttach NAS 4100
Geben Sie das richtige Jahr, Monat, Tag, Uhrzeit und Zeitzone ein, indem Sie auf den Abwärtspfeil in
jedem Feld klicken und den entsprechenden Eintrag markieren.
Hinweis: Selbst wenn das korrekte Datum und die richtige Uhrzeit angezeigt werden, müssen Sie
diese durch Klicken auf OK bestätigen.
Konfiguration Ihres MaxAttach NAS 4100 14
Page 66

Maxtor MaxAttach NAS 4100
Hinweise für fortgeschrittene Benutzer
Ihr MaxAttach ist für RAID5 vorkonfiguriert und es wird empfohlen, die voreingestellte Konfiguration
beizubehalten. Wenn Sie jedoch lieber eine andere Laufwerkskonfiguration benutzen möchten, wie JBOD
oder RAID 1, sollten Sie diese Änderung vornehmen, bevor Sie den normalen Betrieb aufnehmen. Wenn
Sie sich später entschließen, die Laufwerkskonfiguration zu ändern, wird das Laufwerk neu formatiert und
alle Daten werden gelöscht.
Weitere Informationen zur Änderung von Laufwerkskonfigurationen finden Sie im
MaxAttach-Benutzerhandbuch.
Neustart des Systems
Nachdem Sie Ihre Änderungen abgeschlossen haben, müssen Sie Ihr MaxAttach neu starten, damit
dieseÄnderungen übernommen werden. Wählen Sie Shutdown im Bildschirm Maintenance.
Konfiguration Ihres MaxAttach NAS 4100 15
Page 67

Maxtor MaxAttach NAS 4100
Wählen Sie dann im Fenster Shutdown die Option Reboot. Wählen Sie dann OK.
Sie werden aufgefordert, Reboot zu bestätigen. Wählen Sie OK. Ihr MaxAttach führt jetzt einen
Neustartdurch.
Jetzt müssen Sie Ihre Browser-Sitzung beenden.
Nach dem Neustart ist Ihr MaxAttach jetzt betriebsbereit. Sie können jetzt Dateien freigeben, indem Sie
den voreingestellten Freigabeordner "Public" verwenden, der von Network Neighborhood eingerichtet
wurde, oder weitere Freigaben einrichten, indem Sie die Anweisungen im Benutzerhandbuch befolgen.
Weitere Informationen zur Änderung oder Konfiguration anderer Bereiche Ihres MaxAttach-Geräts
erhalten Sie im MaxAttach-Benutzerhandbuch auf der CD.
Normaler Abschaltvorgang
Um Ihr MaxAttach NAS 4100 unter normalen Bedingungen abzuschalten, können Sie die
Web-Oberfläche benutzen, indem Sie Maintenance und dann Shutdown in der Menüleiste wählen, oder
Sie können den Netzschalter auf der Frontblende verwenden.
Um nach dem Ausschalten die Stromversorgung für alle integrierten Bauteile des MaxAttach zu
trennen, schalten Sie den Hauptnetzschalter auf der rückseitigen Blende aus.
Konfiguration Ihres MaxAttach NAS 4100 16
Page 68

Index
Numerik
1Safe Software-CD i
A
Abschalten 16
Administratorkennwort
ändern 12
Anforderungen an die Betriebsumgebung 2
Anmeldung 9
Anschluss an Netzwerk 4
Anzeigeleuchte für Netzwerkaktivität 2
Aufstellung auf Tisch 3
Aufstellung des Servers 3
Ausschalten 16
B
Backup-Software-CD i
D
Dateien
freigeben 16
Datum
einstellen 13
Datum und Uhrzeit
einstellen 13
DHCP-Server 7
Netzwerk ohne 8
DNS-Suffix 11
Domain 9, 11
E
Einbau in Rack 3
Ethernetanschlüsse 4
Ethernet-Kabel i
Ethernet-Netzwerk i
Ethernet-Netzwerk-Hub 1
F
Fail-Over 4
Freigaben
einrichten 16
Frontblende 2
G
Gigabit-Ethernet-Netzwerk i
Gigabit-Ethernet-Option 3, 4
H
Hardwareanforderungen 1
Hauptnetzschalter 4
Hauptschalter 3
Homepage 9
HTTP-Freigaben 9
I
Identifizierung 10
Installation des MaxAttach 4
Installationsumgebung 1
Internet Explorer 1
J
JBOD 15
K
Kennwort 11, 12
ändern 13
Konfiguration Ihres MaxAttach 9
L
Lastverteilung 4
Leuchtdiode der Festplatte 2
Leuchtdioden 2
Luftfeuchtigkeit 1
M
MaxAttach
Im Netzwerk suchen 7
konfigurieren 8
MaxNeighborhood i
MaxNeighborhood-Software
installieren 5
N
Name
ändern 11
Netscape 1
Netzschalter 2, 5, 16
Netzwerkanschluss 4
Netzwerkeinrichtung 10
Netzwerk-Hub 4
Netzwerkkarte 1
Neustart des Systems 15
Index 17
Page 69

Index
P
Planung der Installation 1
Power On-Anzeigeleuchte 2
R
RAID5 15
Rückseitige Blende 3
S
SCSI-Anschluss 3
Serveraufstellung 3
Servergerätename 11
Servername
ändern 11
Softwareanforderungen 1
Software-CD-ROM i
Standardnetzwerkeinstellungen
ändern 8
Standortplanung 1
Stromanschluss 3
Stromversorgung
einschalten 4
System neu starten 15
T
Temperatur 1
U
Uhrzeit und Datum
einstellen 13
Unterstützung für Netscape-Browser 7
USV-Anschluss 3
V
Ventilator 3
Versionsinformationen ii
W
Webseite ii
Workgroup 11
Maxtor MaxAttach NAS 4100 18
Page 70

Guida d’installazione
e configurazione
Febbraio 2001
Page 71

2000 Maxtor Corporation. Tutti i diritti riservati. Maxtor è un marchio registrato di Maxtor
Corporation. MaxAttach e MaxNeighborhood sono marchi di Maxtor Corporation. Altri nomi
diprodotti, nomi di società e logo sono marchi o marchi registrati di proprietà dei rispettivi
proprietari. Le caratteristiche tecniche possono venire modificate senza preavviso. Revisioni:
Maxtor si riserva il diritto di rivedere la presente pubblicazione e di modificarne il contenuto
senzaalcun obbligo di dare notifica di dette revisioni o modifiche.
Il servizio assistenza è disponibile presso +353 1 204 1111 (Irlanda) e all’indirizzo Internet
EuroNSG@Maxtor.com o www.maxtor.com.
Page 72

MaxAttach NAS 4100
Sommario
Prefazione - - - - - - - - - - - - - - - - - - - - - - - - - - - - - - - - - - - - - - - - - - - -i
Destinatari del manuale - - - - - - - - - - - - - - - - - - - - - - - - - - - - - - - - - - - - i
Contenuto della confezione - - - - - - - - - - - - - - - - - - - - - - - - - - - - - - - - - - i
Panoramica - - - - - - - - - - - - - - - - - - - - - - - - - - - - - - - - - - - - - - - - - - - i
Informazioni di sistema - - - - - - - - - - - - - - - - - - - - - - - - - - - - - - - - - - - - ii
Convenzioni tipografiche - - - - - - - - - - - - - - - - - - - - - - - - - - - - - - - - - - - ii
Documenti correlati - - - - - - - - - - - - - - - - - - - - - - - - - - - - - - - - - - - - - - ii
Prima dell’installazione - - - - - - - - - - - - - - - - - - - - - - - - - - - - - - - - - - - - - -1
Apparecchiature necessarie per l’installazione - - - - - - - - - - - - - - - - - - - - - - - - 1
Scelta del luogo in cui collocare MaxAttach - - - - - - - - - - - - - - - - - - - - - - - - 1
Descrizione di MaxAttach NAS 4100 - - - - - - - - - - - - - - - - - - - - - - - - - - - - 2
Installazione di MaxAttach NAS 4100 - - - - - - - - - - - - - - - - - - - - - - - - - - - -4
Collegamento di MaxAttach alla rete - - - - - - - - - - - - - - - - - - - - - - - - - - - - 4
Collegamento all’alimentazione - - - - - - - - - - - - - - - - - - - - - - - - - - - - - - - 4
Installazione del software MaxNeighborhood - - - - - - - - - - - - - - - - - - - - - - - 5
Conclusione dell’installazione - - - - - - - - - - - - - - - - - - - - - - - - - - - - - - - - - 6
Configurazione di MaxAttach NAS 4100- - - - - - - - - - - - - - - - - - - - - - - - - - -9
Primo login - - - - - - - - - - - - - - - - - - - - - - - - - - - - - - - - - - - - - - - - - - - 9
Configurazione della rete - - - - - - - - - - - - - - - - - - - - - - - - - - - - - - - - - - - 10
Impostazione di ora e data - - - - - - - - - - - - - - - - - - - - - - - - - - - - - - - - - - 13
Note per gli utenti esperti - - - - - - - - - - - - - - - - - - - - - - - - - - - - - - - - - - - 15
Riavvio del sistema - - - - - - - - - - - - - - - - - - - - - - - - - - - - - - - - - - - - - - - 15
Indice - - - - - - - - - - - - - - - - - - - - - - - - - - - - - - - - - - - - - - - - - - - - - - - - - -17
Page 73

Prefazione
Destinatari del manuale
Questo manuale per l’installazione di MaxAttach™ NAS 4100 fornisce supporto nelle operazioni
di installazione e configurazione del server ed è destinato ad utenti che conoscono le nozioni di
base per quanto riguarda reti e amministrazione di sistemi. In caso di difficoltà nel corso della
procedura di installazione e configurazione illustrata nel presente manuale, fare riferimento al
Manuale dell’utente di MaxAttach contenuto nel CD fornito con MaxAttach NAS 4100.
Contenuto della confezione
n File server MaxAttach NAS 4100
n Quick Start Card (Guida rapida)
n Contratto di licenza con l’utente finale MaxAttach NAS 4100
n Cavo di alimentazione
n N. 2 cavi Ethernet CAT-5
n N. 2 attacchi con viti per montaggio
n N. 4 piedini di gomma
n CD MaxAttach NAS 4100, che contiene:
• Setup e Discovery Wizard per MaxNeighborhood™
• Documentazione MaxAttach NAS 4100
n CD con software di backup 1Safe™ per client MaxAttach
Panoramica
MaxAttach è pronto per l’installazione ed include tutto il software necessario. Può essere installato in una
rete Ethernet 10/100 (oppure una rete Gigabit Ethernet ove possibile) e può essere amministrato utilizzando
il browser Internet Explorer. Include MaxNeighborhood, il software di Maxtor che consente di individuare
l’unità sulla rete, di configurare le impostazioni di rete di MaxAttach e di avviare l’interfaccia utente Web.
Prefazione i
Page 74

Maxtor MaxAttach NAS 4100
Informazioni di sistema
Annotare qui le seguenti informazioni contenute sull’etichetta situata sul pannello laterale:
n Numero di modello: _________________________________________
n Numero di serie: ____________________________________________
n Numero di assemblaggio: ______________________________________
In caso di necessità, queste informazioni dovranno essere comunicate al personale di assistenza.
Convenzioni tipografiche
Nel presente manuale vengono utilizzate le seguenti convenzioni tipografiche al fine di aiutare l’utente a localizzare
eidentificare le informazioni:
Il testo in corsivo viene utilizzato evidenziare e segnalare titoli di libri.
Il testo in grassetto indica nomi di menu, opzioni di menu, voci che è possibile selezionare sullo schermo e tasti.
Il carattere Courier indica nomi di file, nomi di cartelle e testo che appare sullo schermo o che
deve essere digitato.
NOTA: le note forniscono ulteriori informazioni, consigli e suggerimenti relativi
all’argomento.
ATTENZIONE: questi messaggi riportano informazioni importanti su operazioni che
potrebbero causare il danneggiamento o la perdita dei dati oppure
potrebbero provocare malfunzionamenti del sistema.
AVVERTENZA: questi messaggi forniscono informazioni essenziali su operazioni che
potrebbero causare guasti all’apparecchiatura, perdita di file di sistema
o danni alle persone.
Documenti correlati
Lista delle pubblicazioni correlate per ulteriore documentazione e informazione:
n Manuale dell’utente MaxAttach NAS 4100
n Quick Start Card (Guida rapida)
n Contratto di licenza con l'utente finale MaxAttach (End User License Agreement, EULA)
n Garanzia
n È possibile consultare le note sulla versione aggiornata visitando il sito Web all’indirizzo:
http://www.maxattach.com
Prefazione ii
Page 75

1 Prima dell’installazione
Apparecchiature necessarie per l’installazione
Per collegare, installare e amministrare MaxAttach NAS 4100 è necessario un hub o uno switch
direte Ethernet 10/100. È necessario che la workstation soddisfi i seguenti requisiti:
• Windows 95/98/Me/NT (SP5)/2000
• Internet Explorer v4.01 SP1 o successivo. Il browser Netscape attualmente non èsupportato
• Client per reti Microsoft abilitato per TCP/IP
• Scheda per interfaccia di rete (Network Interface Card, NIC)
• Unità CD-ROM
Scelta del luogo in cui collocare MaxAttach
Al momento di scegliere un luogo in cui collocare MaxAttach NAS 4100, è necessario tenere
conto di fattori quali disponibilità di corrente e rete, temperatura e umidità a livelli equilibrati
eassenza di polvere e altri contaminanti atmosferici.
Le seguenti tabelle hanno lo scopo di guidarvi nella pianificazione dell’installazione di MaxAttach
NAS 4100.
Tabella 1-1. Dimensioni e peso
Elemento Quantità
Peso 12,3 kg (27 libbre)
Dimensioni 43,2 x 50,8 x 4,5 cm (1,75 x 17 x 20 pollici)
Tabella 2-2. Requisiti elettrici
Elemento Quantità
Gamma di tensione 95 ~ 135 VAC oppure 180 ~ 265 VAC
Frequenza 47 ~ 63 Hz
Prima dell’installazione 1
Page 76

Maxtor MaxAttach NAS 4100
Tabella 3-3. Requisiti dell’ambiente operativo
Elemento Quantità
Temperatura - in funzione
Da 5ºC a 40ºC (da 41º a 104ºF )
gamma temperatura esterna durante il funzionamento
Temperatura - non in funzione
Da -20ºC a +60ºC (da -4º a 140ºF)
Umidità - in funzione
Umidità - non in funzione
Da 5% a 85% di umidità senza condensa
Da 5% a 95% di umidità senza condensa
Descrizione di MaxAttach NAS 4100
Pannello frontale
Il pannello frontale di MaxAttach presenta quattro LED, di cui tre sul lato destro e uno sul lato
sinistro. I LED indicano:
• LED sulla sinistra (interruttore di alimentazione secondario). Il LED acceso fisso indica
chec’è corrente. Il LED lampeggia al momento dell’accensione e per segnalare condizioni
dierrore (per i codici di errore, consultare il Manuale dell’utente di MaxAttach).
• Collegamento di rete 1 per LAN 1. La luce lampeggiante indica che il collegamento
allareteè attivo.
• Collegamento di rete 2 per LAN 2. La luce lampeggiante indica che il collegamento
allareteè attivo.
• Il LED dell’unità disco rigido indica l’attività di lettura/scrittura.
INTERRUTTORE DI ALIMENTAZIONE SECONDARIO
Figura 1-1. LED
Prima dell’installazione 2
LAN 1
LAN 2
DISCO RIGIDO
UNITÀ
Page 77

Maxtor MaxAttach NAS 4100
Pannello posteriore
Ciascuna porta Ethernet presenta due LED. Un LED indica il collegamento e l’altro l’attività.
NOTA: Su cui è installata un’opzione Gigabit Ethernet possono essere presenti su unità altri
LED.
(PANNELLO
POSTERIORE)
PRESA
DI ALIMENTAZIONE
E INTERRUTTORE PRINCIPALE
VENTOLA
CONNESSIONE
UPS
CONNETTORI
RISERVATI al personale di assistenza
LAN 1
LAN 2
Opzione
Gigabit
PORTA
SCSI
Figura 2-2. Connettori NIC, pannello posteriore
Collocazione del server
Nel caso in cui MaxAttach NAS 4100 venga installato nell'apposito scaffale, utilizzare attacchi e viti
di montaggio per una installazione più sicura. Nel caso in cui venga installato su di una superficie
orizzontale, applicare i piedini di gomma forniti alla base del telaio.
Prima dell’installazione 3
Page 78

2 Installazione di MaxAttach NAS 4100
Collegamento di MaxAttach alla rete
Per collegare MaxAttach NAS 4100 alla rete, inserire uno dei cavi Ethernet forniti in una delle due porte
Ethernet 10/100 del server (LAN1 o LAN2), situate sul pannello posteriore. Collegare l’altra estremità del
cavo allo hub o switch di rete. Se MaxAttach presenta un’opzione Gigabit Ethernet, è possibile collegarlo ad
un hub o switch di rete 10/100/1000 utilizzando un cavo CAT-6 (non incluso).
LAN 1
LAN 2
Figura 1-1.
Nota: le due porte Ethernet 10/100 di MaxAttach sono preconfigurate per fornire bilanciamento
di carico e funzionalità di fail-over. Sebbene non sia necessaria ai fini dell’installazione, questa
funzionalità migliora le prestazioni del sistema e offre ridondanza nel caso di mancato
funzionamento di un cavo o di un componente. Per utilizzare questa funzione, collegare
un’estremità del secondo cavo Ethernet fornito a MaxAttach e l’altra estremità ad un’altra porta
disponibile dello hub o switch di rete. Le funzioni di bilanciamento di carico e di fail-over vengono
attivate automaticamente senza alcuna particolare configurazione dello switch.
Collegamento all’alimentazione
1 Collegare un’estremità del cavo dell’alimentazione fornito ad una presa di corrente. Inserire l’altra
estremità nella presa di alimentazione sul pannello posteriore come indicato nella figura 2-1.
INTERRUTTORE DI
ALIMENTAZIONE PRINCIPALE
(PANNELLO POSTERIORE)
PRESA DI ALIMENTAZIONE
Figura 2-2. Presa di alimentazione e interruttore di alimentazione principale, pannello posteriore
2 Attivare l’interruttore di alimentazione principale sul pannello posteriore posizionandolo su “ON” ( I ).
3 Premere l’interruttore di alimentazione secondario sul pannello frontale (indicato in figura) per avviare
l’apparecchio.
Installazione di MaxAttach NAS 4100 4
Page 79

Maxtor MaxAttach NAS 4100
INTERRUTTORE DI
ALIMENTAZIONE SECONDARIO
(PANNELLO FRONTALE)
Figura 2-3. Interruttore di alimentazione secondario, pannello frontale
Il LED dell’interruttore si accende. Dopo alcuni secondi comincerà a lampeggiare e continuerà per alcuni
minuti, durante la procedura di accensione. Quando il LED smette di lampeggiare e l’attività del disco si
interrompe, MaxAttach è pronto per essere configurato.
Installazione del software MaxNeighborhood
Utilizzare una workstation connessa in rete a cui è collegato MaxAttach. Inserire il CD Installazione e
documentazione MaxAttach nell’unità CD-ROM. Se non viene visualizzata la schermata “Welcome to the
MaxAttach NAS 4100” significa che è stata disattivata la funzione di esecuzione automatica del CD. In tal
caso aprire Esplora risorse di Windows e avviare il programma di installazione dal CD.
Selezionare MaxNeighborhood Setup & Discovery Wizard per cominciare l’installazione.
MaxNeighborhood Wizard
Una volta visualizzata la schermata Install
MaxAttach Family, fare clic sul pulsante
Install MaxNeighborhood. La procedura
guidata eseguirà l’installazione passo passo.
Se sul server è presente una versione
precedente di MaxNeighborhood, verrà
chiesto di disinstallare la vecchia versione
prima di installare quella nuova.
Installazione di MaxAttach NAS 4100 5
Page 80

Maxtor MaxAttach NAS 4100
Conclusione dell’installazione
Una volta terminata l’installazione guidata, è possibile visualizzare il file README oppure avviare
MaxNeighborhood selezionando le relative caselle di controllo e facendo clic su Finish. È anche
possibilechiudere l’installazione guidata senza selezionare alcuna opzione facendo clic su Finish.
In alternativa è possibile fare clic su Finish per uscire dall’installazione guidata e quindi avviare
MaxNeighborhood dalla workstation Windows selezionando Avvio, Programmi, MaxNeighborhood.
MaxNeighborhood viene aperto e viene avviata la ricerca delle unità MaxAttach presenti in rete.
Installazione di MaxAttach NAS 4100 6
Page 81

Maxtor MaxAttach NAS 4100
Ricerca della nuova unità MaxAttach
Una volta trovate tutte le unità MaxAttach in rete, MaxNeighborhood visualizza Name, Status,
IPAddress e Workgroup del computer.
Vengono visualizzati anche eventuali modelli MaxAttach 3000 o 4000 presenti in rete, che possono essere
amministrati nel corso della stessa sessione di MaxNeighborhood.
Se in rete è presente un server DHCP, avviare la schermata di configurazione MaxAttach facendo doppio
clic sul nome predefinito della nuova unità MaxAttach e passare al capitolo 3.
ATTENZIONE: il browser Netscape attualmente non è supportato. Se normalmente si utilizza
Netscape come browser predefinito, è necessario reimpostare Internet
Explorer come browser predefinito prima di avviare l’installazione.
Installazione di MaxAttach NAS 4100 7
Page 82

Maxtor MaxAttach NAS 4100
Modifica delle impostazioni predefinite di rete per servizi non DHCP
Se MaxAttach è collegato alla rete senza un server DHCP, l’unità verrà visualizzata con un indirizzo IP
deltipo 169.254.xxx.xxx. È necessario assegnare all’unità un indirizzo IP statico univoco. A tale scopo,
contattare l’amministratore di rete per ottenere un indirizzo IP prima di proseguire.
Per impostare un indirizzo IP, selezionare il nome predefinito di MaxAttach con un solo clic del mouse,
quindi selezionare il pulsante Change Settings. Fare clic su OK nella schermata del messaggio di avviso
visualizzato. Eliminare l’IP Address predefinito e digitare l’indirizzo univoco ottenuto, la subnet mask e
ilgateway (ove disponibile). Nel caso si desideri modificare il nome predefinito del computer MaxAttach
Server Name, effettuare ora le modifiche digitando una combinazione di caratteri alfanumerici (senza
spazi).
Modificare le impostazioni del DHCP
Client facendo clic sulla freccia a discesa e
selezionando Disabled.
Quindi fare clic su Apply per rendere
effettive le modifiche. MaxAttach si riavvierà
automaticamente.
Terminare la procedura selezionando il
pulsante Close.
Dopo il riavvio di MaxAttach, selezionare il
pulsante Refresh nella finestra principale di
MaxNeighborhood. Una volta terminata la
ricerca, verranno visualizzate le nuove
impostazioni. In caso contrario, ripetere il
procedimento illustrato in questa pagina.
Fare doppio clic su MaxAttach nella finestra
MaxNeighborhood per avviare le schermate
di configurazione della nuova unità
MaxAttach.
Installazione di MaxAttach NAS 4100 8
Page 83

3 Configurazione di MaxAttach NAS 4100
Primo login
Per configurare MaxAttach, è necessario effettuare il login digitando Administrator nel campo
UserName. Lasciare vuoti i campi Password e Domain e fare clic su OK.
.
Internet Explorer avvierà e visualizzerà la finestra HTTP Shares. Selezionare Administer this Server.
Verrà richiesto un secondo login per avere accesso alla Home Page dell’amministrazione. Digitare
nuovamente Administrator nel campo User Name e lasciare vuoto il campo Password.
Ora è possibile modificare le impostazioni predefinite ed adeguarle alle specifiche necessità di rete, sicurezza
e fuso orario.
Configurazione di MaxAttach NAS 4100 9
Page 84

Maxtor MaxAttach NAS 4100
Configurazione della rete
Per procedere con le modifiche, selezionare Network Setup.
Selezionare quindi Identification.
Configurazione di MaxAttach NAS 4100 10
Page 85

Maxtor MaxAttach NAS 4100
Modifica del nome del server
È possibile modificare il nome di MaxAttach utilizzando una combinazione qualunque di caratteri
alfanumerici (senza spazi).
Cancellare il nome predefinito del server nel campo Server Appliance Name e digitare un nuovo nome
del server. Digitare il nome completo (Fully Qualified Domain Name, FQDN) nel campo DNS suffix.
Ora è possibile modificare il Workgroup oppure entrare in un dominio disponibile in rete. Per entrare
inun dominio esistente, è necessario digitare in questo campo: DomainName\Administrator. Il
dominio in cui si entra richiede i campi User e Password .
Selezionare quindi il pulsante OK nell’angolo in basso a destra.
Per rendere effettive le modifiche è necessario riavviare il sistema. Per ora selezionare Cancel; verrà
richiestodi riavviare il sistema in seguito, dopo aver effettuato ulteriori modifiche.
In questo modo si ritorna alla finestra Network Setup.
Configurazione di MaxAttach NAS 4100 11
Page 86

Maxtor MaxAttach NAS 4100
Modifica della password di amministratore
Per modificare la password di amministratore, selezionare Change Administrator Password nella finestra
Network Setup.
Modificare la password selezionando il campo New Password. Digitare la nuova password e confermarla
digitandola una seconda volta nel campo Confirm New Password.
Configurazione di MaxAttach NAS 4100 12
Page 87

Maxtor MaxAttach NAS 4100
Per rendere effettive le modifiche, fare clic su OK nell’angolo in basso a destra. In questo modo si ritorna
alla finestra Network Setup.
Nota: dopo aver modificato la password di amministratore è necessario effettuare di nuovo il login.
Per proseguire la sessione nell’interfaccia Web, digitare la nuova password nel campo Password.
ATTENZIONE: in caso di modifiche, prendere nota del nuovo nome utente e della password.
Nel caso vengano dimenticati, infatti, non sarà più possibile amministrare
MaxAttach.
Impostazione di ora e data
Infine, è necessario impostare ora, data e fuso orario di MaxAttach. Selezionare Maintenance nella barra
dinavigazione blu nella parte alta dell’interfaccia Web.
Selezionare quindi Date and Time.
Configurazione di MaxAttach NAS 4100 13
Page 88

Maxtor MaxAttach NAS 4100
Immettere anno, mese, giorno, ora e fuso orario facendo clic sul pulsante di selezione a freccia in ciascun
campo e selezionando la voce corretta.
Nota: È necessario rendere effettive la data e l’ora visualizzate, anche se sono corrette, facendo
clicsu OK.
Configurazione di MaxAttach NAS 4100 14
Page 89

Maxtor MaxAttach NAS 4100
Note per gli utenti esperti
MaxAttach è preconfigurato in RAID5; si consiglia di mantenere questa configurazione. Tuttavia, per
utilizzare una diversa configurazione dell’unità disco quale JBOD o RAID 1, si consiglia di effettuare
lemodifiche prima di procedere con le normali operazioni. Se in seguito si decide di modificare la
configurazione dell’unità disco, questa verrà formattata e tutti i dati verranno eliminati.
Per ulteriori informazioni sulle modifiche delle configurazioni dell’unità disco, consultare il Manuale
dell’utente di MaxAttach.
Riavvio del sistema
Dopo aver terminato le modifiche è necessario riavviare MaxAttach per renderle effettive.
SelezionareShutdown (arresto) nella schermata Maintenance (manutenzione).
Configurazione di MaxAttach NAS 4100 15
Page 90

Maxtor MaxAttach NAS 4100
Selezionare il pulsante Reboot nella finestra Shutdown (arresto) e quindi fare clic su OK.
Selezionare OK alla richiesta di conferma di Reboot. MaxAttach si riavvierà.
È necessario chiudere la sessione del browser.
A riavvio eseguito, MaxAttach è pronto per l’uso. È possibile ora condividere file utilizzando la cartella
predefinita di condivisione “Public” (Pubblica) che si trova in Network Neighborhood, oppure creare altre
condivisioni seguendo le istruzioni riportate nel Manuale dell’utente. Per ulteriori informazioni sulla
modifica o la configurazione di altre aree di MaxAttach, consultare il Manuale dell’utente fornito nel CD.
Arresto normale
È possibile arrestare MaxAttach NAS 4100 in condizioni normali utilizzando l’interfaccia Web,
selezionando Maintenance sulla barra dei menu e quindi Shutdown, oppure utilizzando l’interruttore di
alimentazione secondario sul pannello frontale.
Per togliere l’alimentazione a tutti i componenti integrati di MaxAttach dopo l’arresto, spegnere
l’interruttore di alimentazione principale sul pannello posteriore.
Configurazione di MaxAttach NAS 4100 16
Page 91

Indice
A
Alimentazione
collegamento 4
Ambiente di installazione 1
Amministratore
modifica della password 12
Arresto 16
B
Bilanciamento di carico 4
C
Cavi Ethernet i
CD del software i
CD del software 1Safe i
CD del software di backup i
Collegamento alla rete 4
Collocazione del server 3
Condivisione di file 16
Condivisioni
creazione 16
Configurazione della rete 10
Configurazione di MaxAttach 9
Connessione di rete 4
Connessione UPS 3
D
Data
impostazione 13
Data e ora
impostazione 13
Dominio 9, 11
F
Fail-over 4
File
condivisione 16
H
Home page 9
Hub di rete 4
Hub di rete Ethernet 1
I
Identificazione 10
Impostazioni predefinite di rete
modifica 8
Indicatore dell’attività di rete 2
Indicatore di accensione 2
Installazione di MaxAttach 4
Installazione nello scaffale 3
Installazione su superficie orizzontale 3
Internet Explorer 1
Interruttore di alimentazione principale 4
Interruttore di alimentazione secondario 2,
5,16
Interruttore principale 3
J
JBOD 15
L
LED 2
LED dell’unità disco rigido 2
Login 9
M
MaxAttach
configurazione 9
ricerca in rete 7
MaxNeighborhood i
N
Netscape 1
Nome
modifica 11
Nome del server 11
modifica 11
Note sulla versione ii
O
Opzione Gigabit Ethernet 3, 4
Ora e data
impostazione 13
P
Pannello anteriore 2
Pannello posteriore 3
Password 9, 11
modifica 12
Pianificazione dell’installazione 1
Porta SCSI 3
Porte Ethernet 4
Presa di alimentazione 3
Indice 17
Page 92

Indice
R
RAID5 15
Requisiti dell’ambiente operativo 2
Requisiti hardware 1
Requisiti software 1
Rete Ethernet i
Rete Gigabit Ethernet i
Riavvio del sistema 15
S
Scelta del luogo in cui collocare MaxAttach 1
Scheda per interfaccia di rete 1
Server DHCP 7
non presente in rete 8
Shares HTTP 9
Shutdown (Arresto) 16
Sito Web ii
Software MaxNeighborhood
installazione 5
suffisso DNS 11
Supporto per browser Netscape 7
T
Temperatura 1
U
Umidità 1
V
Ventola 3
W
Workgroup 11
Maxtor MaxAttach NAS 4100 18
Page 93

Guía de instalación
y configuración
Febrero 2001
Page 94

2000 Maxtor Corporation. Reservados todos los derechos. Maxtor es una marca registrada
de Maxtor Corporation. MaxAttach y MaxNeighborhood son marcas comerciales de Maxtor
Corporation. Otros nombres de productos, empresas y logotipos son marcas comerciales o marcas
registradas de sus respectivos propietarios. Las características técnicas están sujetas a cambios sin
previo aviso. Revisiones: Maxtor se reserva el derecho de revisar esta publicación y de efectuar
cambios en el contenido actual sin incurrir en ninguna obligación de notificar tales cambios o
revisiones a ninguna persona u organización.
Si necesita asistencia técnica, llame al +353 1 204 1111 (Irlanda), diríjase a la dirección de
correo electrónico EuroNSG@Maxtor.com o visítenos en www.maxtor.com.
Page 95

MaxAttach NAS 4100
Índice
Acerca de esta guía - - - - - - - - - - - - - - - - - - - - - - - - - - - - - - - - - - - - - -i
A quién va dirigida esta guía- - - - - - - - - - - - - - - - - - - - - - - - - - - - - - - - - - i
Contenido de la caja - - - - - - - - - - - - - - - - - - - - - - - - - - - - - - - - - - - - - - i
Información general - - - - - - - - - - - - - - - - - - - - - - - - - - - - - - - - - - - - - - i
Información sobre el sistema- - - - - - - - - - - - - - - - - - - - - - - - - - - - - - - - - - ii
Convenciones tipográficas - - - - - - - - - - - - - - - - - - - - - - - - - - - - - - - - - - - ii
Documentos relacionados - - - - - - - - - - - - - - - - - - - - - - - - - - - - - - - - - - - ii
Planificación previa a la instalación - - - - - - - - - - - - - - - - - - - - - - - - - - - -1
Equipo necesario para la instalación - - - - - - - - - - - - - - - - - - - - - - - - - - - - - 1
Planificación de la ubicación - - - - - - - - - - - - - - - - - - - - - - - - - - - - - - - - - 1
Familiarizarse con MaxAttach NAS 4100 - - - - - - - - - - - - - - - - - - - - - - - - - - 2
Instalación de MaxAttach NAS 4100 - - - - - - - - - - - - - - - - - - - - - - - - - - - - -4
Conexión de MaxAttach a la red - - - - - - - - - - - - - - - - - - - - - - - - - - - - - - - 4
Encendido - - - - - - - - - - - - - - - - - - - - - - - - - - - - - - - - - - - - - - - - - - - - 4
Instalación del software de MaxNeighborhood - - - - - - - - - - - - - - - - - - - - - - - 5
Finalización de la instalación de MaxNeighborhood - - - - - - - - - - - - - - - - - - - - 6
Configuración de MaxAttach NAS 4100 - - - - - - - - - - - - - - - - - - - - - - - - - - -9
Primera conexión - - - - - - - - - - - - - - - - - - - - - - - - - - - - - - - - - - - - - - - - 9
Configuración de la red - - - - - - - - - - - - - - - - - - - - - - - - - - - - - - - - - - - - 10
Configuración de la hora y la fecha- - - - - - - - - - - - - - - - - - - - - - - - - - - - - - 13
Notas para usuarios avanzados- - - - - - - - - - - - - - - - - - - - - - - - - - - - - - - - - - - - - - 15
Reinicio del sistema - - - - - - - - - - - - - - - - - - - - - - - - - - - - - - - - - - - - - - 15
Índice- - - - - - - - - - - - - - - - - - - - - - - - - - - - - - - - - - - - - - - - - - - - - - - - - - -17
Page 96

Acerca de esta guía
A quién va dirigida esta guía
La Guía de instalación de MaxAttach™ NAS 4100 está concebida para ayudarle en la instalación y
configuración de MaxAttach NAS 4100. La guía da por supuesto que usted está familiarizado con
los conceptos básicos de trabajo en red y de administración de sistemas. Si tiene problemas durante
el proceso de instalación y configuración indicado en esta guía, consulte la Guía del usuario de
MaxAttach que se encuentra también en el CD-ROM de MaxAttach NAS 4100.
Contenido de la caja
n Servidor de archivos MaxAttach NAS 4100
n Tarjeta de inicio rápido
n Contrato de licencia de usuario final de MaxAttach NAS 4100
n Cable de alimentación
n Cables de Ethernet CAT-5 (2)
n Asas de montaje (2) con tornillos
n Tacos de goma (4)
n CD-ROM de MaxAttach NAS 4100 , que contiene:
• Setup y Discovery Wizard de MaxNeighborhood™
• Documentación de MaxAttach NAS 4100
n CD-ROM de copia de seguridad del software 1Safe™ para clientes de MaxAttach
Información general
MaxAttach incluye todo el software necesario para su instalación. Funciona en una red de Ethernet de
10/100 Mbps (o en una red de Gigabit Ethernet si está equipado con ella) y se administra a través de un
navegador de web Internet Explorer. Incluye MaxNeighborhood, una utilidad de software de Maxtor que
le ayuda a ubicar la unidad en la red, configurar los valores de red de MaxAttach e iniciar la interfaz de
usuario de web.
Acerca de esta guía i
Page 97

Maxtor MaxAttach NAS 4100
Información sobre el sistema
Anote la siguiente información de la etiqueta que se encuentra en el panel lateral:
n Número de modelo: __________________________________________
n Número de serie: ____________________________________________
n Número de montaje: _________________________________________
El personal del servicio de asistencia técnica necesitará estos números si se pone en contacto con ellos.
Convenciones tipográficas
En esta guía se utilizan las siguientes convenciones tipográficas para ayudarle a localizar e identificar la información:
El texto en cursiva se utiliza para enfatizar texto y para los títulos del manual.
El texto en negrita identifica los nombres de menú, opciones de menú, elementos en los que se puede hacer
clicen la pantalla y teclas del teclado.
La fuente Courier identifica nombres de archivo, nombres de carpeta y texto que aparece en la
pantalla o que debe escribir el usuario.
NOTA: Las notas proporcionan información adicional y consejos relacionados con el tema.
PRECAUCIÓN: Las notas de precaución contienen información importante acerca
delas acciones que pueden producir daños o pérdida de datos o
quepodrían hacer que el sistema reaccionara de forma inesperada.
ADVERTENCIA: Las advertencias contienen información fundamental acerca de las
acciones que podrían provocar un error inesperado en el equipo,
lapérdida de archivos importantes del sistema operativo o posibles
lesiones para el usuario.
Documentos relacionados
A continuación, encontrará una lista de publicaciones donde podrá obtener información adicional
o de fondo:
n Guía del usuario MaxAttach NAS 4100
n Tarjeta de inicio rápido
n Contrato de licencia de usuario final de MaxAttach (EULA)
n Declaración de garantía
n Consulte también nuestro sitio Web en: http://www.maxattach.com para ver las Notas de las
versiones más recientes
Acerca de esta guía ii
Page 98

1 Planificación previa a la instalación
Equipo necesario para la instalación
Para conectar, instalar y administrar MaxAttach NAS 4100, necesitará un concentrador o un
conmutador de red de Ethernet 10/100. La estación de trabajo deberá tener las siguientes
características:
• Windows 95/98/Me/NT (SP5)/2000
• Internet Explorer v4.01 SP1 o posterior (la compatibilidad con Netscape no está actualmente
disponible)
• Cliente para redes Microsoft activado en TCP/IP
• Tarjeta de interfaz de red (NIC)
• Unidad de CD-ROM
Planificación de la ubicación
Cuando planifique la ubicación en la que va a colocar MaxAttach NAS 4100, deberá tener en
cuenta los requisitos de corriente y de disponibilidad de la red. Asimismo, deberá disponer de un
espacio con una temperatura y una humedad bien reguladas y que esté relativamente libre de polvo
y partículas en suspensión.
Las tablas siguientes le ayudarán a planificar la instalación de MaxAttach NAS 4100.
Tabla 1-1. Tamaño y peso
Elemento Cantidad
Peso 12,3 kg (27 libras)
Tamaño 43,2 x 50,8 x 4,5 cm (1,75 x 17 x 20 pulgadas)
Tabla 2-2. Requisitos eléctricos
Elemento Cantidad
Variación del voltaje 95 ~ 135 Vac ó 180 ~ 265 Vac
Frecuencia 47 ~ 63 Hz
Planificación previa a la instalación 1
Page 99

Maxtor MaxAttach NAS 4100
Tabla 3-3. Requisitos del entorno durante el funcionamiento
Elemento Cantidad
Temperatura: en funcionamiento
Entre 5ºC y 40ºC (entre 41ºF y 104º F)
intervalo de temperaturas exteriores durante el funcionamiento
Temperatura: sin funcionar
Entre -20ºC y +60ºC (entre -4ºF y 140º F)
Humedad: en funcionamiento
Humedad: sin funcionar
De un 5% a un 85% de humedad sin condensación
De un 5% a un 95% de humedad sin condensación
Familiarizarse con MaxAttach NAS 4100
Panel frontal
El panel frontal de MaxAttach tiene cuatro indicadores luminosos. Tres están agrupados en el lado
derecho y el otro se encuentra en el lado izquierdo. Los indicadores luminosos indican lo siguiente:
• Indicador luminoso de la izquierda (interruptor de encendido del software). Un indicador
luminoso fijo indica que está encendido. Este indicador luminoso parpadeará durante el
arranque y al indicar las condiciones de error (consulte los códigos de error que aparecen
enla Guía del usuario de MaxAttach).
• Enlace de red 1 para LAN 1. Si parpadea, indica actividad de la red.
• Enlace de red 2 para LAN 2. Si parpadea, indica actividad de la red.
• El indicador luminoso de la unidad de disco duro indica una actividad de lectura/escritura.
INTERRUPTOR DE ENCENDIDO DEL SOFTWARE
LAN 1
Ilustración 1-1. Indicadores luminosos
LAN 2
UNIDAD DE
DISCO DURO
Planificación previa a la instalación 2
Page 100

Maxtor MaxAttach NAS 4100
Panel de la parte posterior
Cada puerto de Ethernet tiene dos indicadores luminosos. Uno indica los enlaces y el otro
laactividad.
NOTA: Las unidades con una opción de Gigabit Ethernet instalada pueden tener
indicadores luminosos adicionales.
(PANEL DE LA
PARTE POSTERIOR)
VENTILADOR
CORRENTE E
INTERRUPTOR
PRINCIPAL
CONEXIÓN
UPS
CONEXIONES
SÓLO PARA personal de servicio
LAN 1
LAN 2CONEXIÓN DE
Gigabit
Opción
PUERTO
SCSI
Ilustración 2-2. Conexiones NIC, panel de la parte posterior
Colocación del servidor
Si instala MaxAttach NAS 4100 en un bastidor, utilice las asas de montaje y los tornillos incluidos
para realizar un montaje seguro. Si desea instalarlo en la superficie de una mesa, instale los topes de
goma en la parte inferior del chasis.
Planificación previa a la instalación 3
 Loading...