

Page 1
THE SYSTEM
English
®
OPERATING MANUAL
English
Digital Pressure Gauge
SWISS MADE BY UWATEC AG
Page 2
2
Uwatec®Digital Pressure Gauge
Page 3
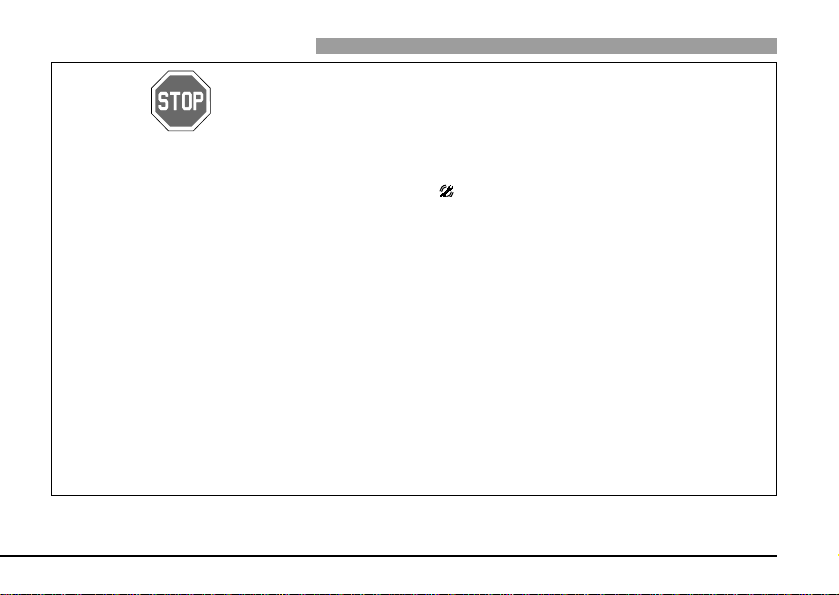
Attention!
This Digital Pressure Gauge is according to EN 250 a piece of safety equipment of a SCUBA. It may only
be completed to a complete SCUBA with components, which passed the EU-Certification and come up to
the EN 250 norm.
According to the EN 250 a complete SCUBA consists at least of the following components:
a) Air pressure tank(s) and tank valve(s)
b) Regulator
c) Safety equipment
d) Frame or holding device for air cylinder(s) with the possibility to mount the harness
e) Carrier device
f) Breathing connection (face mask and mouthpiece, full face mask, or diving helmet)
g) Instructions for use must be included
The high-pressure hose of the Digital Pressure Gauge is equipped at its connection (7/16“) with a flow
through reduction.
According the law of technical working devises we point to the following points:
• Base of each use of the Digital Pressure Gauge and its component parts is the knowledge and consideration of this Manual.
• The Digital Pressure Gauge may only be used for the purposes mentioned in this manual or confirmed in
writing by Uwatec.
• The Digital Pressure Gauge has to be yearly inspected (inspection-maintenance-reparation) by an educated authorised person. These inspections have to be recorded. Only original Uwatec spare parts may be
used for replacements.
• The EN 250 Certification maximum depth is 50 m.
English
Uwatec®Digital Pressure Gauge
3
Page 4
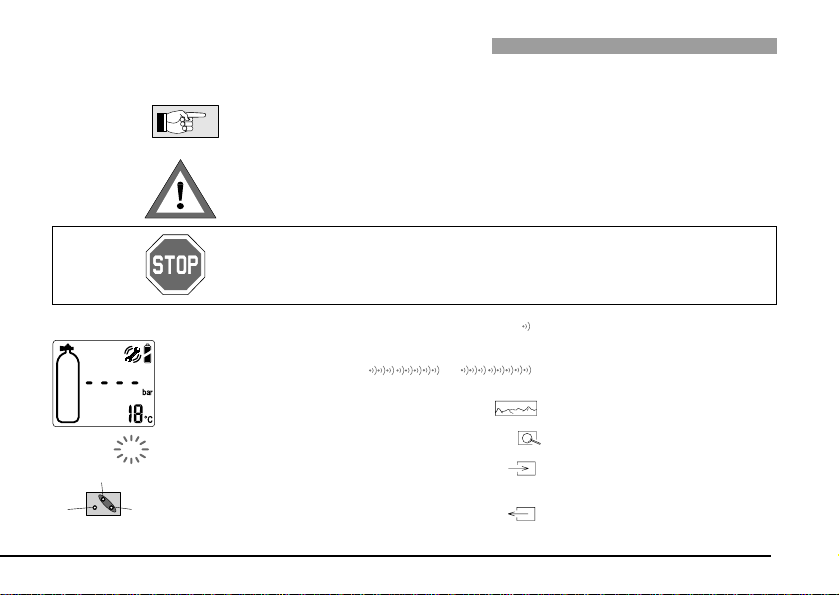
Important remarks concerning words and symbols
This operating manual makes use of the following icons to indicate especially important comments:
Remarks: Information and tips which are important for optimal use of your
Attention! Indicates information about specialities which are important to prevent a risky
Danger!
The following symbols are used in the operating manual:
E
S
B
P > 8 bar
4
the Digital Pressure Gauge.
situation and to dive more comfortably.
Indicates a potentially hazardous situation which, if not avoided, could result
in death or serious injury.
Acoustical confirmation (short
LCD display samples
Flashing part of the display
Operating instruction for
Manual input
(Example: bridging contacts B and E).
Tank pressure higher than 8 bar.
beep)
Acoustical Alarm
Overview over the chapter
Details of the chapter
How to get into the actual part
of the program
How to leave the actual part of
the program
Uwatec®Digital Pressure Gauge
Page 5
List of chapters
Introduction / Overview . . . . . . . . . . . . . . . . . .6
Safety considerations / Warnings . . . . . . . . . . . .7
Set Up Procedure
Switching the unit on and off . . . . . . . . . . . . . .9
Before the first dive . . . . . . . . . . . . . . . . . . . .10
User Mode / . . . . . . . . . . . . . . . . . . . .10
•Set Up the tank pressure alarm . . . . . . . . .11
•Set Up pressure and temperature unit . . . .13
Mounting the high-pressure hose to the
first stage . . . . . . . . . . . . . . . . . . . . . . . . . . .14
Connecting the Digital Pressure Gauge . . . . . .14
Disconnecting the Digital Pressure Gauge . . . .16
Measurement Mode . . . . . . . . . . . . . . . . . . . .17
Tank Pressure Alarm . . . . . . . . . . . . . . . . .18
Preparation for the Dive . . . . . . . . . . . . . . . . .19
Logbook . . . . . . . . . . . . . . . . . . . . . . . . .19
Battery Warning . . . . . . . . . . . . . . . . . .20
Maintenance and Storing . . . . . . . . . . . . . . . .21
Trouble Shooting . . . . . . . . . . . . . . . . . . . . . .22
Technical Information . . . . . . . . . . . . . . . . . . .23
Warranty . . . . . . . . . . . . . . . . . . . . . . . . . . . .24
EC type-approval . . . . . . . . . . . . . . . . . . . . . .25
Overview user interface . . . . . . . . . . . . . . .26, 27
Serial No. / Dealer address . . . . . . . . . . . . . . .28
English
Uwatec®Digital Pressure Gauge
5
Page 6
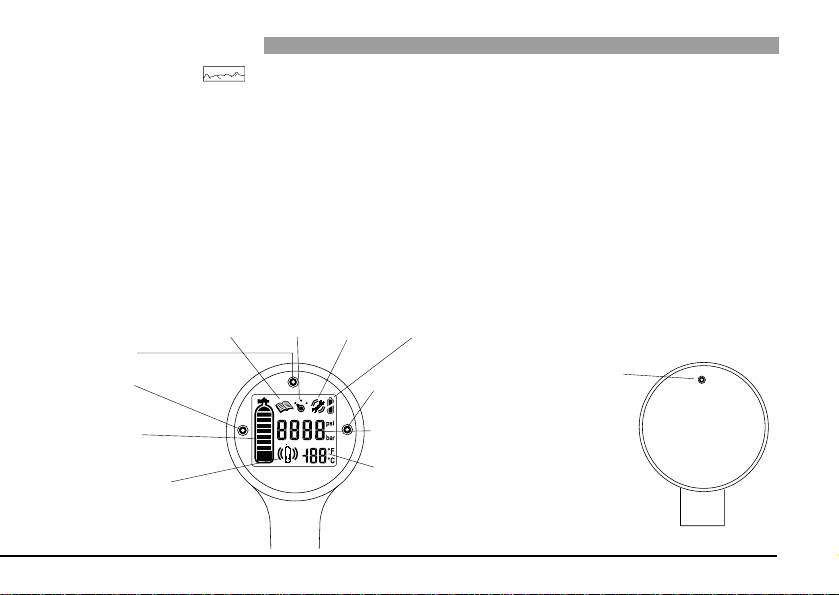
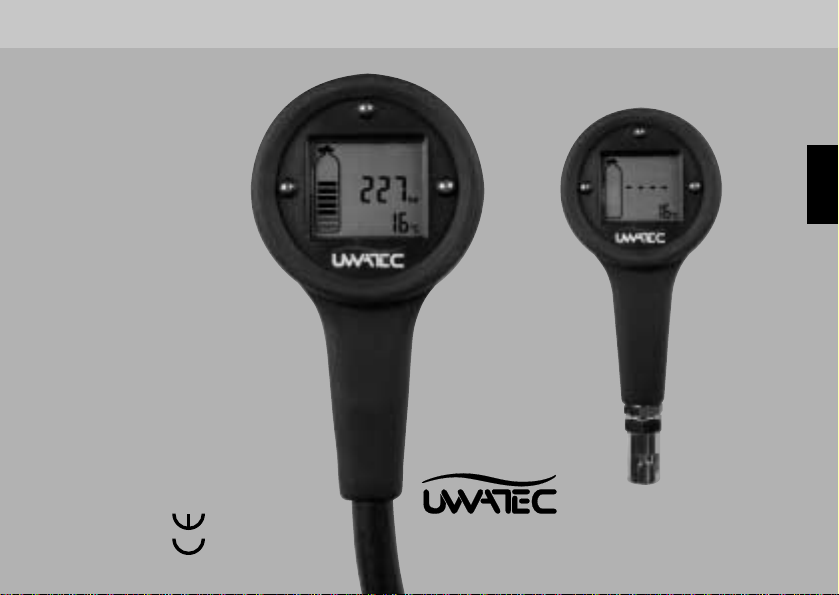
Introduction / Overview
Symbols: Logbook, Set Up, Maintenance, Battery warning
Contact E
Contact S
The Uwatec Digital Pressure Gauge measures the tank pressure and displays
it together with the ambient temperature on the display. A high-pressure
hose connects the Digital Pressure Gauge on the first stage of the diving tank.
The Digital Pressure Gauge has two pressure alarm values. One is fixed at 50
bar, the other one can be set by the user between 30 and 100 bar (450-1500
psi). The Digital Pressure Gauge warns the diver optically and acoustically if
the tank pressure falls short off one of these pressure alarm values.
Furthermore the diver can select the units for the pressure and temperature
indication.
The logbook stores the original and the final tank pressure of a given dive and
displays the pressure difference.
Overpressure
Contact B
valve
Tank pressure
(graphically)
Tank pressure alarm
symbol
6
Tank pressure (bar, psi)
Temperature (°C, °F)
Uwatec®Digital Pressure Gauge
Page 7

Safety considerations / Warnings
Do not use the Digital Pressure Gauge, until you have carefully read all
instructions and safety precautions found in this manual.
Diving has many inherent risks. Even if you follow the instructions of this
manual, it is still possible that you may not have enough air until the end of
the dive. Unless you are fully aware of the risks and are willing to personally
accept responsibility for those risks, do not use the Digital Pressure Gauge!
• The Digital Pressure Gauge may only be used together with compressed air.
Do not use it for oxygen enriched gases.
• The Digital Pressure Gauge does not give any warning about a too low air
reserve. Check frequently your tank pressure!
• Do not use on cylinders charged above the maximum working pressure. See
"Technical Information" page 23.
• The Pressure Gauge may only be used if it is in working condition.
• If your diving cylinder is equipped with a reserve or „J“-type valve, make certain that the reserve function is in an open position for the Digital Pressure
Gauge works correctly.
• Rubber boot and console must not cover the overpressure valve, enabling air
to leave without resistance. (Hole diameter 6 mm)
English
Uwatec®Digital Pressure Gauge
7
Page 8
Safety considerations / Warnings
• There is a danger of insufficient air supply if air leaves the over pressure valve
or another part of the measurement system. Start ascent immediately!
• The Pressure Gauge should be secured in a way that will not cause the unit
to be caught or snagged whilst diving.
• If the maintenance symbol appears, do not continue diving with the
Digital Pressure Gauge anymore. If the symbol appears during a dive: start
ascending immediately! If the maintenance symbol appears, the display may
be blocked without further warning. Take the unit to your authorised Uwatec
Dealer for battery exchange.
• If „CAL“ appears, you must not dive with the Digital Pressure Gauge any
more. If the symbol appears during a dive: start ascending immediately! The
display is blocked. Have the unit repaired.
• If the Digital Pressure Gauge fails at any time during the dive, the dive must
be terminated except when a second pressure gauge is available.
• Retain this manual for your reference.
• The Digital Pressure Gauge has been exclusively made for sports diving (EN
250). It may only be used together with high-pressure hose with a flow
through reduction.
8
Uwatec®Digital Pressure Gauge
Page 9
Set Up Procedure
Switching the unit on and off
The Digital Pressure Gauge can be switched on either by bridging the contacts
B and E or if the connected tank pressure exceeds 8 bar.
After switching the unit on by bridging the contacts the display shows for a
short time all segments and goes into the User Mode, which can be run
through by bridging B and S as many times you want. See „User Mode“,
page 10.
P > 8 bar
If the pressure (>8 bar) switches the unit on, it will switch directly into the
Measurement Mode (see page 17).
The unit switches off automatically after 3 minutes if no entry has been made
and the pressure is less than 8 bar. See also „Overview user interface“, page 26.
English
Uwatec®Digital Pressure Gauge
9
Page 10

Set Up Procedure
Before the first dive
User Mode /
Before the first dive the value of the tank pressure alarm and the units for the
pressure and temperature indication has to be set. Without new settings the
default settings will be valid.
The User Mode allows to…
• read the logbook (pressure difference, pressure at the beginning and at the
end of a dive). See page 19.
• set the value of the user selectable tank pressure alarm. Setting can be
made between 30 and 100 bar (450-1500 psi) in steps of 10 bar (150 psi).
See page 11.
• select the unit of the pressure and temperature indication. See page 13.
On page 26 and 27 a graphical overview of the user interface is shown.
If the display is switched off, bridge B and E to enter into the User Mode. If
the unit indicates the tank pressure (Measurement Mode), the pressure has to
be reduced below 8 bar (120 psi) to enter into the User Mode.
The User Mode will be left automatically after 3 minutes (switching off) or if
the tank pressure exceeds 8 bar (120 psi).
10
Uwatec®Digital Pressure Gauge
Page 11

Set Up Procedure
The User Mode is programmed as a loop, which can be run through by bridging
B and S, as many times you want. See also overview user interface, page 26.
If the User Mode is left during the setting of the tank pressure alarm or the
units, the indicated value will not been taken in to account, the old setting
will be kept.
Set up the tank pressure alarm
Independent of the fixed 50 bar (750 psi) pressure alarm you can enter your
own tank pressure alarm value. See also page 6 and 18.
English
until
Uwatec®Digital Pressure Gauge
The Digital Pressure Gauge has to be in the User Mode (see page 10). Bridge
the contacts B and S until the symbols for the Set Up and the tank pressure alarm are indicated.
The Digital Pressure Gauge displays the actually set value of the tank pressure alarm. The default value of the user selectable tank pressure alarm is 50
bar (750 psi).
If you don`t want to change the indicated valve, bridge the contacts B and S.
If you want to change the indicated value, bridge B and E. The value of the
tank pressure alarm starts flashing.
11
Page 12

Set Up Procedure
• The value of the tank pressure alarm should not be selected lower than 50
bar. Lower values should only be selected if special precautions have been
taken.
• If a low value of the tank pressure alarm has been selected, the alarm may
be activated to late. Serious injury or death from not having enough air may
occur. Select the value of the tank pressure alarm high enough!
Overview set up
tank pressure
alarm
12
Each bridging of the contacts B and S increases the
value of the tank pressure alarm by 10 bar (150
psi). When the pressure alarm setting reaches 100
bar (1500 psi) the next contact of B, S will loop the
alarm setting to 30 bar (450 psi).
Bridging the contacts B and E confirms the actual
displayed value as the new tank pressure alarm and
the displayed alarm value stops flashing. If the measured pressure falls short of this value, the Digital
Pressure Gauge activates the tank pressure alarm.
Uwatec®Digital Pressure Gauge
Page 13

Set Up Procedure
Set Up pressure and temperature unit
The Digital Pressure Gauge has to be in the User Mode (see page 10). Bridge
until
the contacts B and S until the symbol for the Set Up Mode and both the
pressure and temperature units appear.
The Digital Pressure Gauge shows the actual combination of pressure and
temperature units.
If you don`t want to change the displayed units, bridge the contacts B and S.
English
Overview
units
Uwatec®Digital Pressure Gauge
To change one or both units, bridge B and E. The displayed units start flashing.
The display shows the next combination of units after bridging the contacts
B and S. Bridge these contacts until the display shows the units of your choice.
Bridging B and E confirms the displayed units as the new combination. The
displayed units stop flashing.
13
Page 14

Set Up Procedure
HP
Mounting the high-pressure hose to the first stage
Adaptor
The high-pressure hose is mounted on the high-pressure outlet (HP-outlet) of
the first stage of the regulator.
1. Mount the high-pressure hose on the HP-outlet.
If the threads do not match, you can obtain an adapter from your diving
retailer.
2. Tighten the connection with a matching wrench.
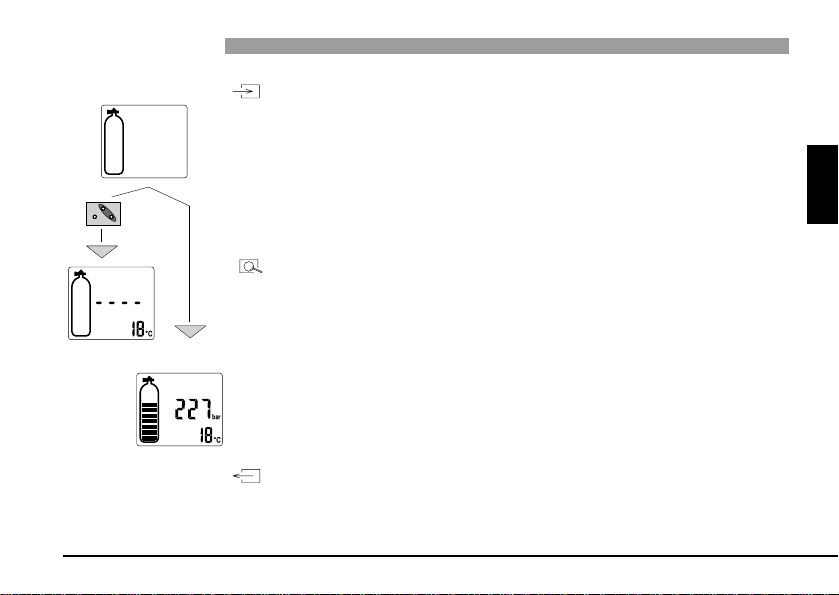
Connecting the Digital Pressure Gauge
Make sure that the tank valve is closed and the regulator is depressurised.
1. Place the bayonet ring of the high-pressure hose on the connecting part of
the Digital Pressure Gauge in such a manner that the guiding pins of the
bayonet ring grip into the guides provided.
14
Uwatec®Digital Pressure Gauge
Page 15

Set Up Procedure
2. Turn the bayonet ring to the right until it reaches the stop and then let go of
the ring. Make sure that the bayonet ring springs back a few millimeters.
Check the correctness of the connection by forcefully pressing
and pulling the hose. The bayonet ring must have a range of
spring of a few millimeters.
English
3. Open the tank valve and check the tightness of the connections.
Check tank pressure before every dive.
If the pressure exceeds 8 bar the Digital Pressure Gauge switches automatically to the Measurement Mode (see page 17).
Uwatec®Digital Pressure Gauge
15
Page 16

Set Up Procedure
Disconnecting the Digital Pressure Gauge
After diving, the Digital Pressure Gauge can be disconnected. Make sure that
the tank valve is closed and the regulator is depressurised. The Digital Pressure
Gauge cannot be disconnected under pressure.
Never try to disconnect the Digital Pressure Gauge under pressure.
16
Uwatec®Digital Pressure Gauge
Page 17

Measurement Mode
In the Measurement Mode the Digital Pressure Gauge indicates the tank pressure (numerically and graphically) and the temperature. The Digital Pressure
Gauge activates an optical and acoustical alarm if the tank pressure goes
below the fixed 50 bar alarm or below the user selected alarm pressure value.
P > 8 bar
Uwatec®Digital Pressure Gauge
P < 8 bar
Measurement
Mode
Independent of the actual mode of the Digital Pressure Gauge, it activates the
Measurement Mode as soon the connected pressure exceeds 8 bar (120 psi).
If the pressure falls short of 8 bar (120 psi), the unit switches to the User
Mode.
The number of bars shown in the tank symbol correlates to the relation between the actual pressure and 200 respectively 300 bar, depending on the
measured maximum pressure. If the maximum pressure exceeds 250 bar
(3600 psi) the number of bars is displayed as a proportion of 300 bar (4500
psi). With a maximum pressure of less than 250 bar (3600 psi) the number of
bars is proportional to 200 bar (3000 psi).
17
English
Page 18

Tank Pressure Alarm ,
• Start ascending immediately if an optical or acoustical tank pressure alarm
• Even if the Digital Pressure Gauge gives no tank pressure alarm, the air
• If you don`t start ascending after a tank pressure alarm, you may not have
• If the pressure is less than 8 bar, there is no warning given by the Digital
In the Measurement Mode the unit alarms the diver if the pressure falls short
of the set value of the tank pressure alarm or 50 bar (750 psi). The alarms,
given acoustically and graphically, warn about the danger of not having
enough air until the end of the dive.
The alarms are given on the surface and under water.
If the pressure falls short of the set value of the tank pressure alarm or 50 bar
(750 psi) the symbol gets indicated and an acoustic alarm signal is given.
If the pressure falls under the selected value of the tank pressure alarm, the
unit repeats after every 5 bar (50 psi) pressure reduction the acoustical alarm
signal.
is given.
reserve can be used up before the end of the dive. Frequently check the
tank pressure and start ascending early enough.
enough air until the end of the dive.
Pressure Gauge.
18
Uwatec®Digital Pressure Gauge
Page 19

Preparation for the Dive
• Digital Pressure Gauge is correctly mounted (see page 14)
• selected value of the tank pressure alarm is high enough (see page 11)
• If the air reserve is to low for your dive, it may result in serious injury or
• Never dive with leaky equipment! Check the connections and the instru-
Logbook
Pressure difference:
Beginning/end
Make sure before each dive that the
death.
Check the tank pressure before each dive.
ments against leaking parts.
The logbook stores the tank pressure at the beginning and the end of the last
dive and displays the pressure difference.
The Digital Pressure Gauge has to be in the User Mode (see page 10). Bridge
the contacts B and S until the Logbook symbol appears.
English
Uwatec®Digital Pressure Gauge
19
Page 20

Logbook
If the tank pressure exceeds 8 bar, the unit switches to the Measurement
Mode. After 3 minutes in the Logbook Mode, it switches off automatically.
Pressure at the beginning
Pressure at the end
Battery Warning
20
The User Mode is programmed as a loop that can be run through by bridging
B and S, as many times you want. See overview user interface page 26.
The Logbook stores the pressure data of a dive if the pressure has been at
least during 3 minutes higher than 8 bar and the pressure reduction between
the beginning and the end was at least 10 bar.
The Logbook of a new unit contains test values.
The battery has to be replaced if the battery symbol , appears. Bring the
unit to an authorised Uwatec retailer.
If the maintenance symbol appears, do not continue diving
with the Digital Pressure Gauge anymore. If the symbol appears
during a dive: start ascending immediately! If the maintenance
symbol appears, the display may be blocked without further warning. Take the unit to your authorised Uwatec Dealer for battery
exchange.
Uwatec®Digital Pressure Gauge
Page 21

Maintenance and Storing
•
Depressurising the Digital Pressure Gauge after use reduces the battery consumption.
• Protect the unit from impacts and intensive sun and heat.
• Do not rest heavy objects on the unit.
• After diving in salt water rinse the unit with freshwater.
• Dry the instrument thoroughly after use, taking care not to scratch the lens.
• Store the unit in a cool, dark and dry location.
• To replace the battery if the battery or service symbol is shown. Take the
unit to an authorised Uwatec retailer.
• Do not clean the unit with liquids containing solvents.
Liquids containing solvents are destroying the Digital Pressure Gauge.
• Use only fresh water and soap water to cleaning the unit.
English
Uwatec®Digital Pressure Gauge
21
Page 22

Trouble Shooting
No Pressure
The Digital Pressure Gauge displays „no P“ and gives a short beep , if it
is submerged and the connected pressure is lower than 8 bar.
Check the connection of the Digital Pressure Gauge, the tank valve and the
tank pressure.
Battery Voltage to low
If „CAL“ appears, you must not dive with the Digital Pressure
Gauge anymore. If the symbol appears during a dive: start ascending immediately! The display is blocked. Have the unit repaired.
„CAL“ appears if the battery has not been replaced even the battery- and
service symbols have been displayed. The display is blocked. Have the unit
repaired.
22
Uwatec®Digital Pressure Gauge
Page 23

Technical Information
• Optical and acoustical alarms
• Maximum Working Pressure: 300 bar (4350 psi)
• Maximum depth: 80 m (260 ft)
• Maximum depth for EN250 Certification: 50 m (164 ft)
• Operating temperature: -20°C to +50°C (-4°F to +122°F)
• Storage temperature: -30°C to +70°C (-22°F to +158°F)
• Resolution of the numerically pressure indication: 1 bar (10 psi)
• Display update: each 4 sec.
English
Uwatec®Digital Pressure Gauge
• Tank pressure alarm: • 50 bar (750 psi), fixed
• User selectable alarm pressure:
• Range: 30-100 bar (450-1500 psi)
• Steps: 10 bar (150 psi)
• Battery lifetime: 10 years
• Size: like standard pressure gauges
23
Page 24

Warranty
Please pay attention to the following remarks on warranty claims:
Recognition of warranty
The warranty only covers units which have been provably bought from an authorised retailer or from the
manufacturer. The manufacturer will repair all defects which are provably traceable to defects of material
or faults in production. The warranty covers the repair of the unit free of charge, the replacement of faulty parts or the entire Digital Pressure Gauge, respectively. Uwatec reserves the right to determine the merits
of the warranty claim and to determine whether the unit will be repaired or replaced.
Excluded are faults or defects due to:
• excessive wear and tear
• exterior influences, e.g. transport damage, impact,
damage due to bumping and hitting, influences of
weather or other phenomena
Warranty period and claim
The warranty is given by a period of 12 months. Repairs or replacements during the warranty period do
not increase the warranty period.
In order to put forward a warranty claim, send the unit together with a dated receipt of the purchase to
your authorised retailer or an authorised servicing point.
The manufacturer is not obligated to accept extensions of the warranty granted by national importers.
Please confirm that you have read and understood the complete manual:
Place: ___________________ Date: ______________ Signature: _____________________
• disassembly of the instrument.
• diving accidents
24
Uwatec®Digital Pressure Gauge
Page 25

EC type-approval
SCUBAPRO UWATEC
Via Latiro 21/C
16 039 Sestri Levante (GE), Italy
as an authorised agent situated in the EU Community of
UWATEC AG
Engenbühl 130
5705 Hallwil, Switzerland
confirms herewith:
The Pressure Gauge described in this manual corresponds with the unit for which
RINA Spa, Gruppo REGISTRO ITALIANO NAVALE, Via Corsica, 12
16128 GENOVA, Italy
gave the EC type-examination certificate No. CCE2832099.
EN 250
Directive: 89 / 686 / EEC
CE 0474
Uwatec®Digital Pressure Gauge
English
25
Page 26

Overview user interface
...
P > 8 bar Measurment Mode
(see page 27)
Set Up the Units
Set Up the
Alarm Pressure
Logbook
Differential
Pressure
Pressure at
the beginning
End
Pressure
User Mode
Logbook
Set Up
26
Uwatec®Digital Pressure Gauge
Page 27

Overview user interface
P > 8 bar
P < 50 bar
or
P < P Alarm
Measurement
Mode
User Mode
(see page 26)
P < 8 bar
Display off
Measurement Mode
Uwatec®Digital Pressure Gauge
English
27
Page 28

Serial No. / Dealer address
Serial No. of your
Instrument:
Dealer address:
28
Copyright © 1999 by Uwatec Switzerland
(Dealer to affix stamp)
Uwatec®Digital Pressure Gauge
Printed in Switzerland 1/00
 Loading...