

Schwinn Force Home Gym,Fitness Force Assembly Instructions Manual
Assembly
Instructions

Get To Know Your Machine 1
Assembly Guide 3
How to Use Your Machine 12
Strength Training Equipment Safety Warnings 14
Schwinn® Force™ Home Gym Warranty Card 15
Schwinn® Force™ Home Gym Warranty 17
Table of Contents
CAUTION!
Before beginning any exercise program, consult your
physician or health care professional. Only he or she can
determine the exercise program that is appropriate for
your particular age and condition. If you experience any
light-headedness, dizziness, or shortness of breath while
exercising, stop the exercise and consult your physician.
Keep your body weight centered on the machine,
seat, or base frame platform while exercising.
When using the Schwinn® ForceTM home gym for
standing leg exercises, always grasp the Lat Tower
on your machine for stability.
Keep out of the path of the Resistance Rods when
exercising and make certain that observers also
stand clear of the Schwinn® ForceTM home gym
when Rods are in use.
Inspect your machine before each workout.
Periodically check all fasteners to make sure none
have loosened with use. Tighten if necessary.
When hooking up Resistance Rods do not stand
directly looking over the top of the rods. Stand off
to the side while attaching rods.
Never attempt to exercise with more resistance than
you are physically able to handle.
Bind cables and Resistance Rods with the rod
binding strap when the Schwinn® ForceTM home
gym is not in use.
Never move or adjust the Seat or Bench while
sitting on it. Never stand on the Seat or Bench.
Before exercising, make sure the Cable Pulley
system is properly secured, properly attached, and
in perfect working condition.
For Your Safety
Please Follow These Instructions
1
THE SCHWINN® ForceTM Home Gym
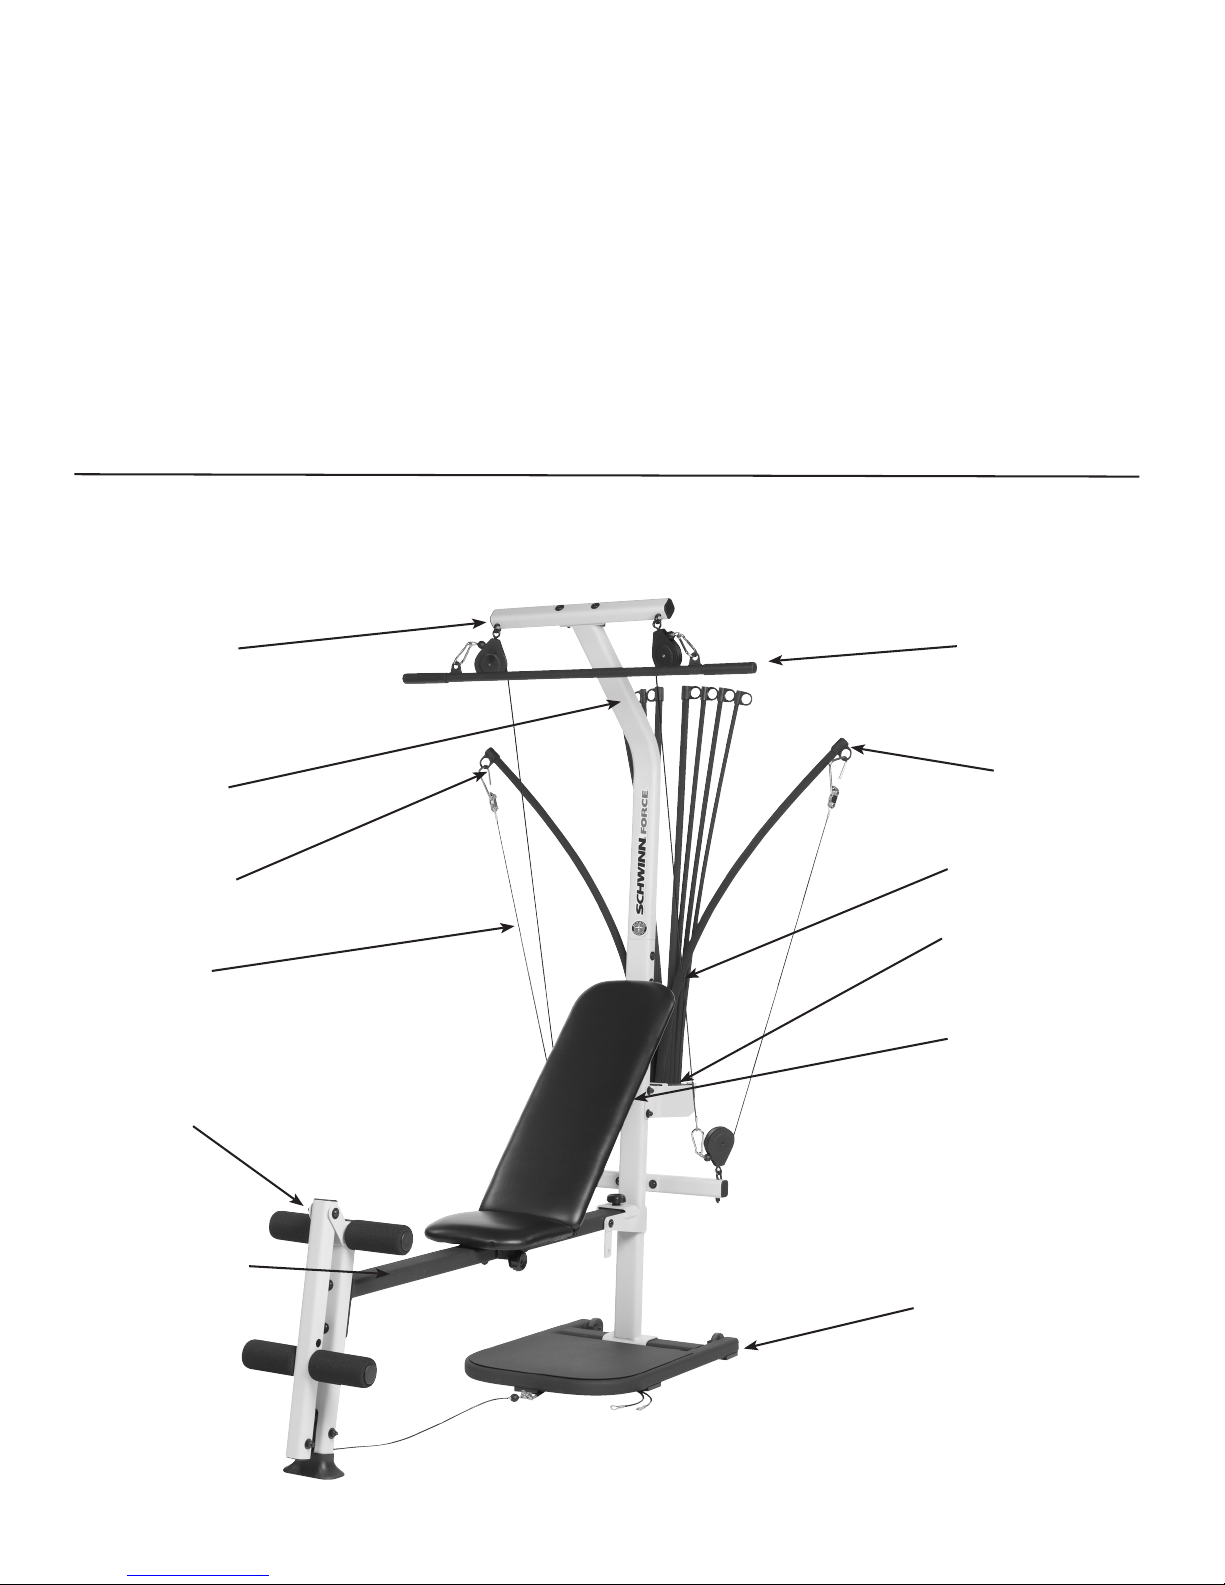
Resistance Rod
Pack
Rod Hook
Upper Lat
Tower
Seat/Bench
Assembly
Rail
Base Assembly
Rod Caps
Cable
Rod Box Frame
Leg Attachment
Pull Down
Lat Bar
Lat Cross Bar
with Pulleys
CONGRATULATIONS on your commitment to fitness!
With the Schwinn® Force
TM
home gym as your exercise
partner, you have the tool that will maximize all of your
physical fitness, strength and health expectations!
Please take your time to read through your entire Assembly
Manual before using your Schwinn® Force
TM
home gym. It
is important to understand how the Schwinn® Force
TM
home
gym functions before you exercise using Resistance Rods.
With all of the fitness choices available today, we understand
that choosing a piece of workout equipment can be very
confusing. Thank you for your trust and your confidence in
our product - the Schwinn® Force
TM
home gym is as good as
we say it is, and you’re just about to prove it to yourself.
Get To Know
Your Machine

2
Get To Know
Your Machine
SCHWINN® Force
TM
Home Gym Parts Reference Guide
N
7
8
13
3
11
4
1
9
14
16
18
2
19
5
O
15
I
6
10
12
17

3
Basic Assembly Principles
Here are a few basic tips that will make your assembly of the Schwinn® Force™ home gym quick and easy. By using these
principles, you can simplify each process and save yourself extra time and effort.
1. To make the assembly process go faster, gather the pieces you need for each step and thoroughly read the assembly
instructions for that step prior to starting assembly for the step.
2. When using a ratchet to tighten a locknut on a bolt, use a combination wrench to grip the locknut. This will ensure that the
locknut is fastened securely.
3. When placing a bolt between two separate pieces, you can help the bolt holes to line up by gently lifting one of the pieces.
You can also lift gently and look between the pieces to help guide the bolt through the holes.
4. As a general rule, and for all bolts and nuts on your Schwinn® Force™ home gym, turn bolts or nuts toward the right to
tighten and left to loosen. Or you can remember the mnemonic: “Righty tighty, lefty loosey.”
Tools You Will Need
Parts List
You will need the following tools to complete the assembly of your Schwinn® Force™ home gym. If you don’t have these tools,
you can find them at any hardware or department store for a reasonable price.
• 7/16" combination wrench
• 9/16" combination wrench
• Phillips screw driver
• Rubber mallet (optional)
• Utility Knife or Scissors
• (2) Allen Wrenches (included with hardware)
Item No. Qty. Description
1 1 LOWER LAT TOWER
2 1 BASE ASSEMBLY
3 1 RAIL
4 1 LEG ATTACHMENT
5 1 RAIL KNOB
6 1 CHEST BAR W/ PULLEYS AND ROD CABLES
7 1 LAT CROSS BAR W/ PULLEYS
8 1 UPPER LAT TOWER
9 1 RESISTANCE ROD PACK
10 1 ROD PACK BOTTOM PLATE
11 1 ROD BOX FRAME
12 1 SEAT ASSEMBLY
13 1 BENCH ASSEMBLY
14 1 SEAT SPACER
15 1 SEAT KNOB
16 1 SHORT CHROME ROLLER TUBE
17 1 LONG CHROME ROLLER TUBE
18 4 FOAM ROLLERS
19 4 FOAM ROLLER END CAPS
Item No. Qty. Description
A 4 SCREW, 1/4" X 3/4" PHILLIPS HEAD
B 3 SCREW, #10 X 1" SELF THREADING
C 4 SCREW, 5/16" X 3/4" BUTTON HEAD
(already installed)
D 8 SCREW, 3/8" X 3/4" BUTTON HEAD
E 2 SCREW, 3/8" X 2 1/2" BUTTON HEAD
F 4 SCREW, 3/8" X 2 3/4" BUTTON HEAD
G 4 SCREW, 3/8" X 4" BUTTON HEAD
H 1 SCREW, 3/8" X 4 1/2" BUTTON HEAD
I 1 CARRIAGE BOLT, 5/16" X 4" (already installed)
J 3 WASHER, 1/4"
K 4 WASHER, 5/16" (already installed)
L 29 WASHER, 3/8"
M 10 NYLOCK NUT 3/8"
Accessory List
Item No. Qty. Description
N 1 PULL DOWN BAR
O 2 HAND GRIPS
P 4 SNAP HOOKS (attached to Cables)
Q 2 ROD CABLES
R 2 LAT CABLES
S 1 “Y” LEG CABLE
Assembly Guide
Hardware List
NOTE: LEAVE ALL CABLES WRAPPED AND BAGGED UNTIL
YOUR SCHWINN® FORCE™ HOME GYM IS FULLY ASSEMBLED.
Before You Assemble
Select where you are going to put your Schwinn® Force™ home gym carefully. The best place for the Schwinn® Force™ home
gym is on a hard, level surface.
Additionally, hardware should only be securely tightened where indicated in the Assembly Instructions. Unless otherwise instructed,
keep all nuts, bolts and screws loose until the final tightening instructions in Step 13.
Assembly Guide
4
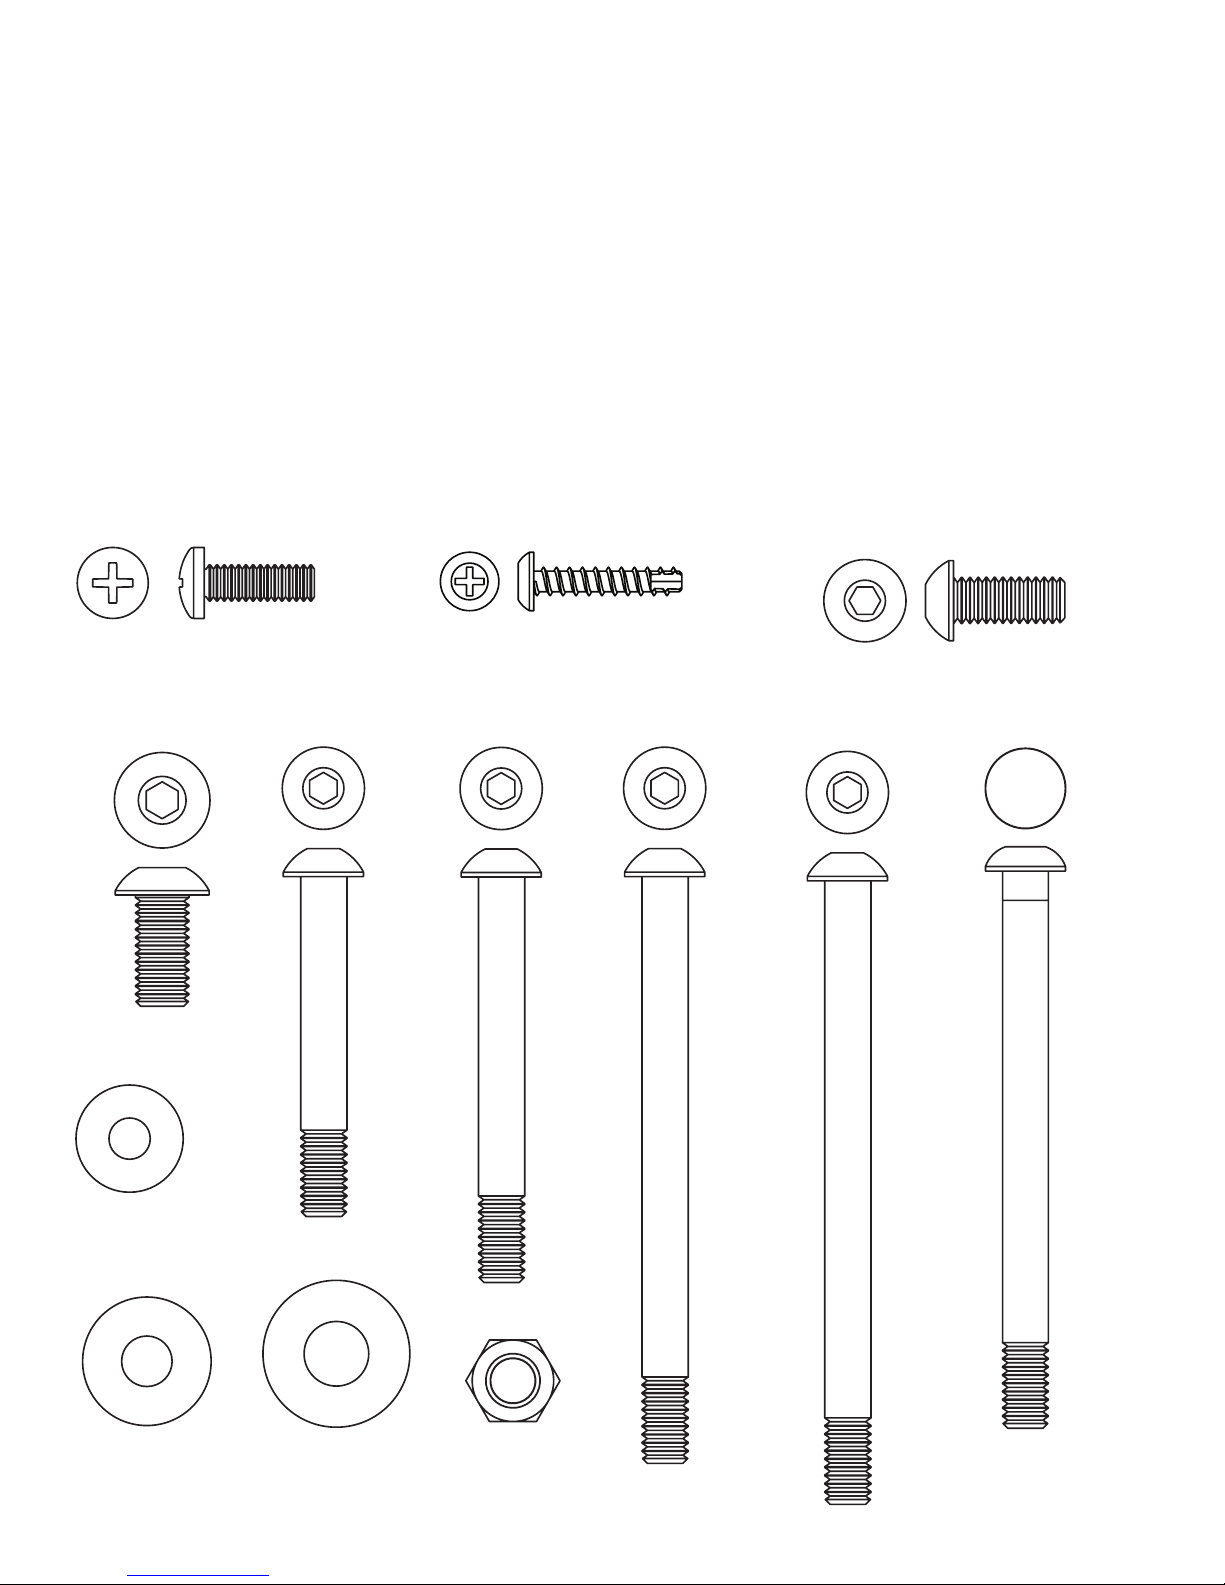
Note: Drawings are actual size
Schwinn® ForceTM Home Gym Assembly Hardware
Item #: K
Qty.: 4
Descr: 5/16" Flat Washer
(already installed)
Item #: A
Qty.: 4
Descr: 1/4" X 3/4"
Phillips Head Machine Screw
Item #: C
Qty.: 4
Descr: 5/16" X 3/4"
Button Head Screw
(already installed)
Item #: D
Qty.: 8
Descr: 3/8" X 3/4"
Button Head
Screw
Item #: E
Qty.: 2
Descr: 3/8" X 2 1/2"
Button Head
Screw
Item #: F
Qty.: 4
Descr: 3/8" X 2 3/4"
Button Head
Screw
Item #: G
Qty.: 4
Descr: 3/8" X 4"
Button Head
Screw
Item #: H
Qty.: 1
Descr: 3/8" X 4 1/2"
Button Head
Screw
Item #: B
Qty.: 3
Descr: #10 X 1"
Self Threading Screw
Item #: I
Qty.: 1
Descr: 5/16" X 4"
Carriage Bolt
(already installed)
Item #: J
Qty.: 3
Descr: 1/4" Flat Washer
Item #: L
Qty.: 29
Descr: 3/8" Flat Washer
Item #: M
Qty.: 10
Descr: 3/8" Nylock Nut
 Loading...