

Schwinn Fitness A40,A40 Elliptical 2011 model Assembly Manual
003-3790.060112.D

ParaobtenerestemanualenEspañolLatinoAmericanovayaa:http://www.schwinnfitness.com.
T TTable able
able
of of
of
Contents Contents
Contents
BeforeAssembly
2
Hardware
4
ImportantSafetyInstructions
2
Assembly
4
SpecificationsandT ools
3
Adjustments
12
Parts
3
Nautilus,Inc.,(800)NAUTILUS/(800)628-8458,www.NautilusInc.com-CustomerService:NorthAmerica(800)605-3369,customerservice@schwinnfitness.com|AsiaPacific&LatinAmerica(360)
859-5180,technics-APLA@nautilus.com|Patentinformation:ThisproductmaybecoveredbyUSandForeignPatentsandPatentsPending.SeeProductformoreinformation.|PrintedinChina|©2010
Nautilus,Inc.,Allrightsreserved.™and®indicateatrademarkorregisteredtrademark.Nautilus,Inc.(www.NautilusInc.com)trademarksincludeNAUTILUS®,BOWFLEX®,SCHWINN®and
UNIVERSAL®andrespectivelogos.Othertrademarksarethepropertyoftheirrespectiveowners.
Before Before
Before
Assembly Assembly
Assembly
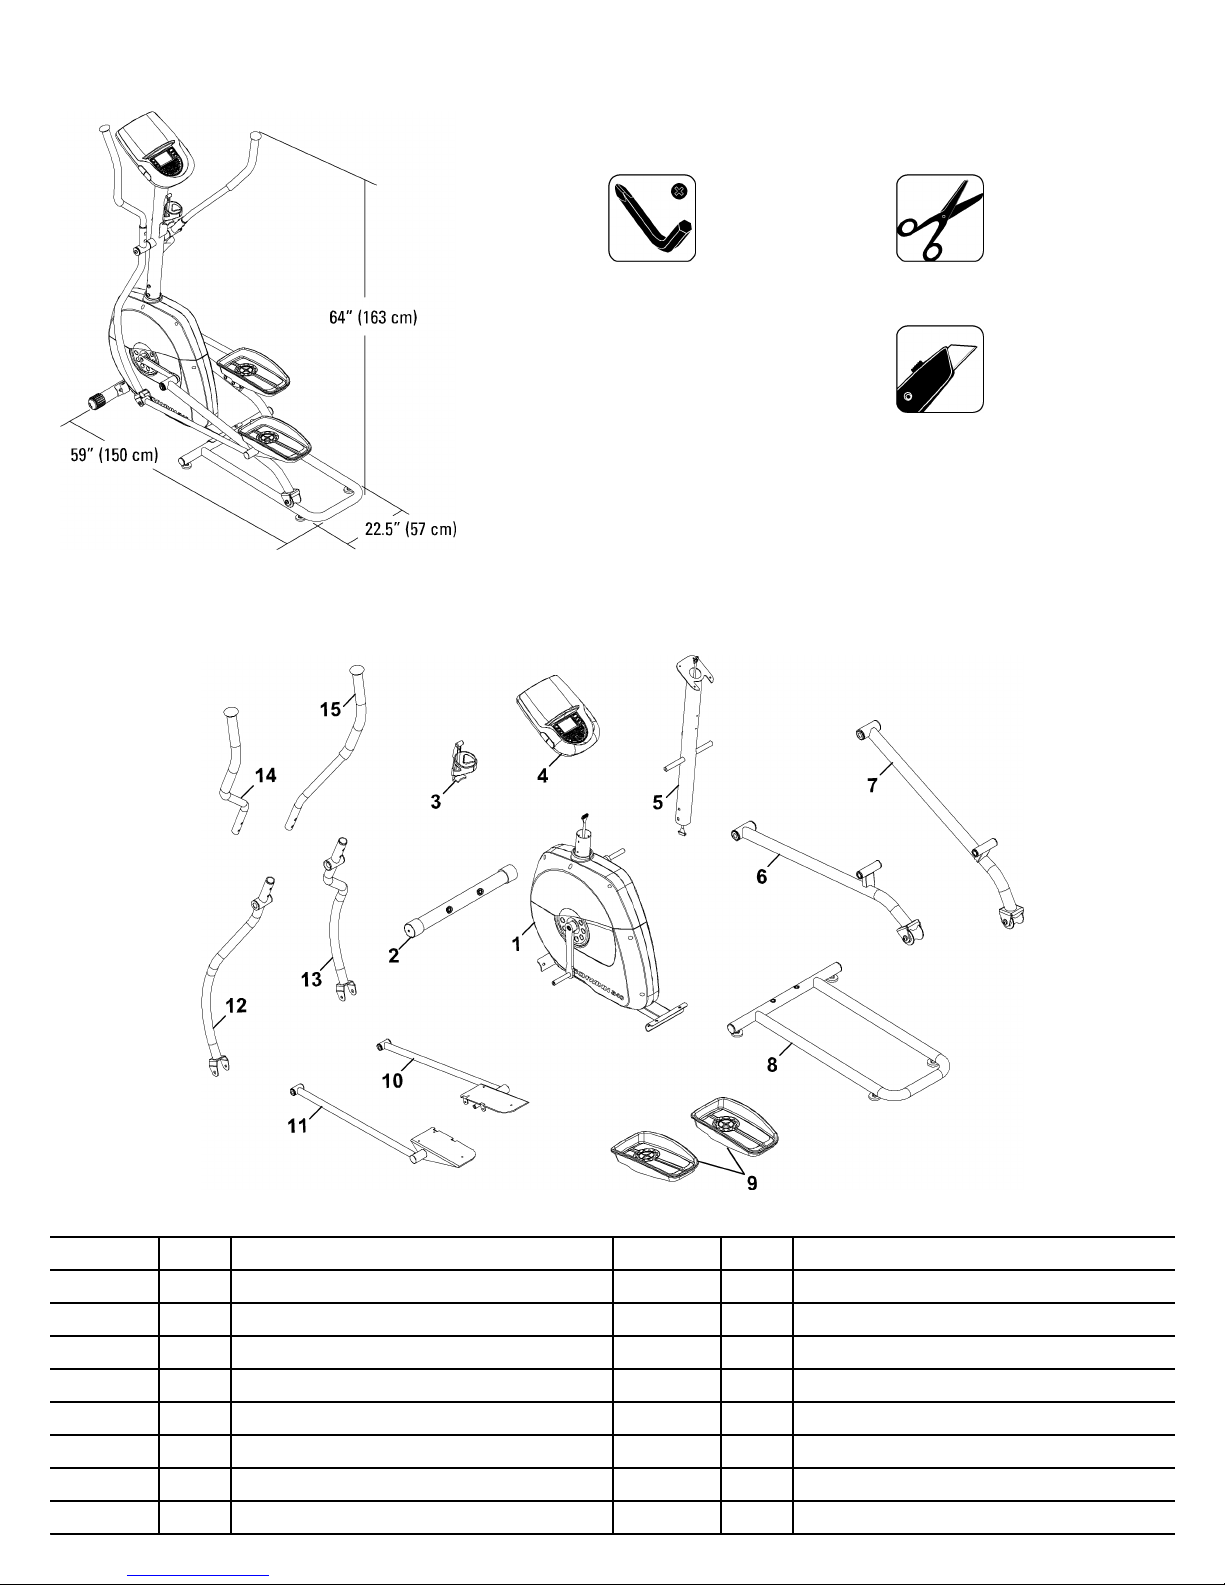
Selecttheareawhereyouaregoingtosetupandoperateyourmachine.Forsafeoperation,thelocationmustbeonahard,levelsurface.Allowaworkoutarea
ofminimum70.5”x107”(179cmx272cm).
Followthesebasicpointswhenyouassembleyourmachine:
1.Readandunderstandthe“ImportantSafetyInstructions”beforeassembly.
2.Collectallthepiecesnecessaryforeachassemblystep.
3.Usingtherecommendedwrenches,turntheboltsandnutstotheright(clockwise)totighten,andtheleft(counterclockwise)toloosen,unlessinstructedotherwise.
4.Whenattaching2pieces,lightlyliftandlookthroughtheboltholestohelpinserttheboltthroughtheholes.
5.Theassemblyrequires2people.
Important Important
Important
Safety Safety
Safety
Instructions Instructions
Instructions
Thisiconmeansapotentiallyhazardoussituationwhich,ifnotavoided,couldresultindeathorseriousinjury .Obeythefollowingwarnings:
•Readandunderstandallwarningsonthismachine.
•CarefullyreadandunderstandtheAssemblyManual.
•Keepbystandersandchildrenawayfromtheproductyouareassemblingatalltimes.
•Donotconnectpowersupplytothemachineuntilinstructedtodoso.
•Donotassemblethismachineoutdoorsorinawetormoistlocation.
•Makesureassemblyisdoneinanappropriateworkspaceawayfromfoottrafficandexposuretobystanders.
•Somecomponentsofthemachinecanbeheavyorawkward.Useasecondpersonwhendoingtheassemblystepsinvolvingtheseparts.Donotdostepsthat
involveheavyliftingorawkwardmovementsonyourown.
•Setupthismachineonasolid,level,horizontalsurface.
•Donottrytochangethedesignorfunctionalityofthismachine.Thiscouldcompromisethesafetyofthismachineandcanvoidthewarranty .
•IfreplacementpartsarenecessaryuseonlygenuineNautilus
®
replacementpartsandhardware.Failuretousegenuinereplacementpartscancausearisktousers,keep
themachinefromoperatingcorrectlyandvoidthewarranty.
•DonotusethemachineuntilithasbeenfullyassembledandinspectedforcorrectperformanceinaccordancewiththeOwner’ sManual.
•ReadandunderstandthecompleteOwner’ sManualsuppliedwiththismachinebeforefirstuse.KeeptheOwner’sandAssemblyManualsforfuturereference.
•Doallassemblystepsinthesequencegiven.Incorrectassemblycanleadtoinjury .
2 2
2
Specifications Specifications
Specifications
and and
and
T TTools ools
ools
Included Included
Included
Not Not
Not
Included Included
Included
#2
4mm
5mm
6mm(x2)
(recommended)
(recommended)
Parts Parts
Parts
Adecalhasbeenappliedtoallright(“R RR”)andleft(“L LL”)partstoassistwithassembly.
Item Item
Item
Qty Qty
Qty
Description Description
Description
Item Item
Item
Qty Qty
Qty
Description Description
Description
11
Frame
92
Pedals
2
1
FrontStabilizer
10
1
Leg,Right
3
1
WaterBottleHolder
111
Leg,Left
41
Console
12
1
LowerLeftHandlebarArm
51
ConsoleMast
13
1
LowerRightHandlebarArm
6
1
PedalArm,Left
141
UpperLeftHandlebarArm
71
PedalArm,Right
151
UpperRightHandlebarArm
8
1
RailAssembly
3 3
3
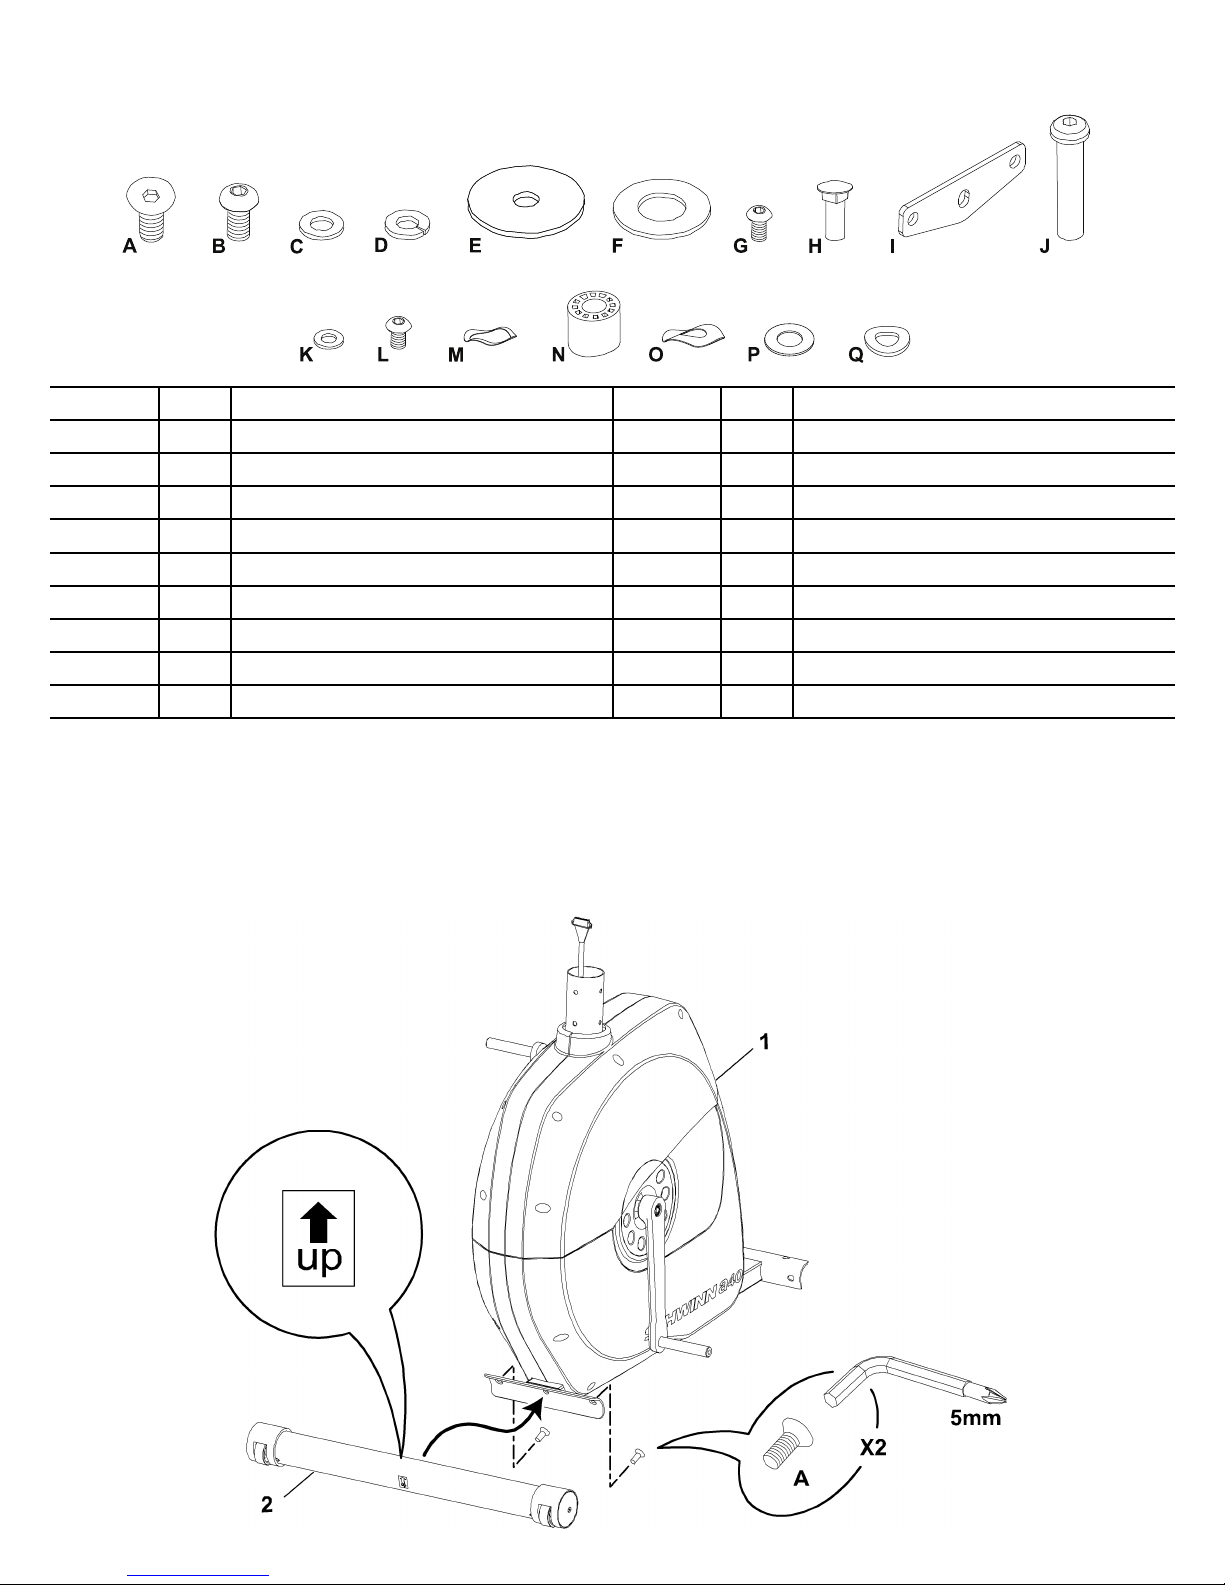
Hardware Hardware
Hardware
Assembly Assembly
Assembly
Note: Note:
Note:
DonotfullytightentheHardwareuntilthemachineiscompletelyassembled.
1. 1.1.Attach Attach
Attach
Front Front
Front
Stabilizer Stabilizer
Stabilizer
to totoFrame Frame
Frame
4 4
4
Item Item
Item
Qty Qty
Qty
Description Description
Description
Item Item
Item
Qty Qty
Qty
Description Description
Description
A
6
FlatHeadHexScrew,M8x25 J
2
Shaft
B
18
ButtonHeadHexScrew,M8x15
K
6
FlatWasher,M6
C
8
FlatWasher,M8L
4
ButtonHeadHexScrew,M6x12
D
18
SpringWasher,M8
M
2
WaveWasher,Small(D16.5)
E
4
FlatWasher,WideN
2
Sleeve,Plastic
F
2
Washer O 2WaveWasher,Large (D20)
G
6
ButtonHeadHexScrew,M6x15
P
4
PlasticWasher(D16.2)
H
4
CarriageBolt,M6x25Q
6
Washer,Curved
I
2
PedalMountPlate
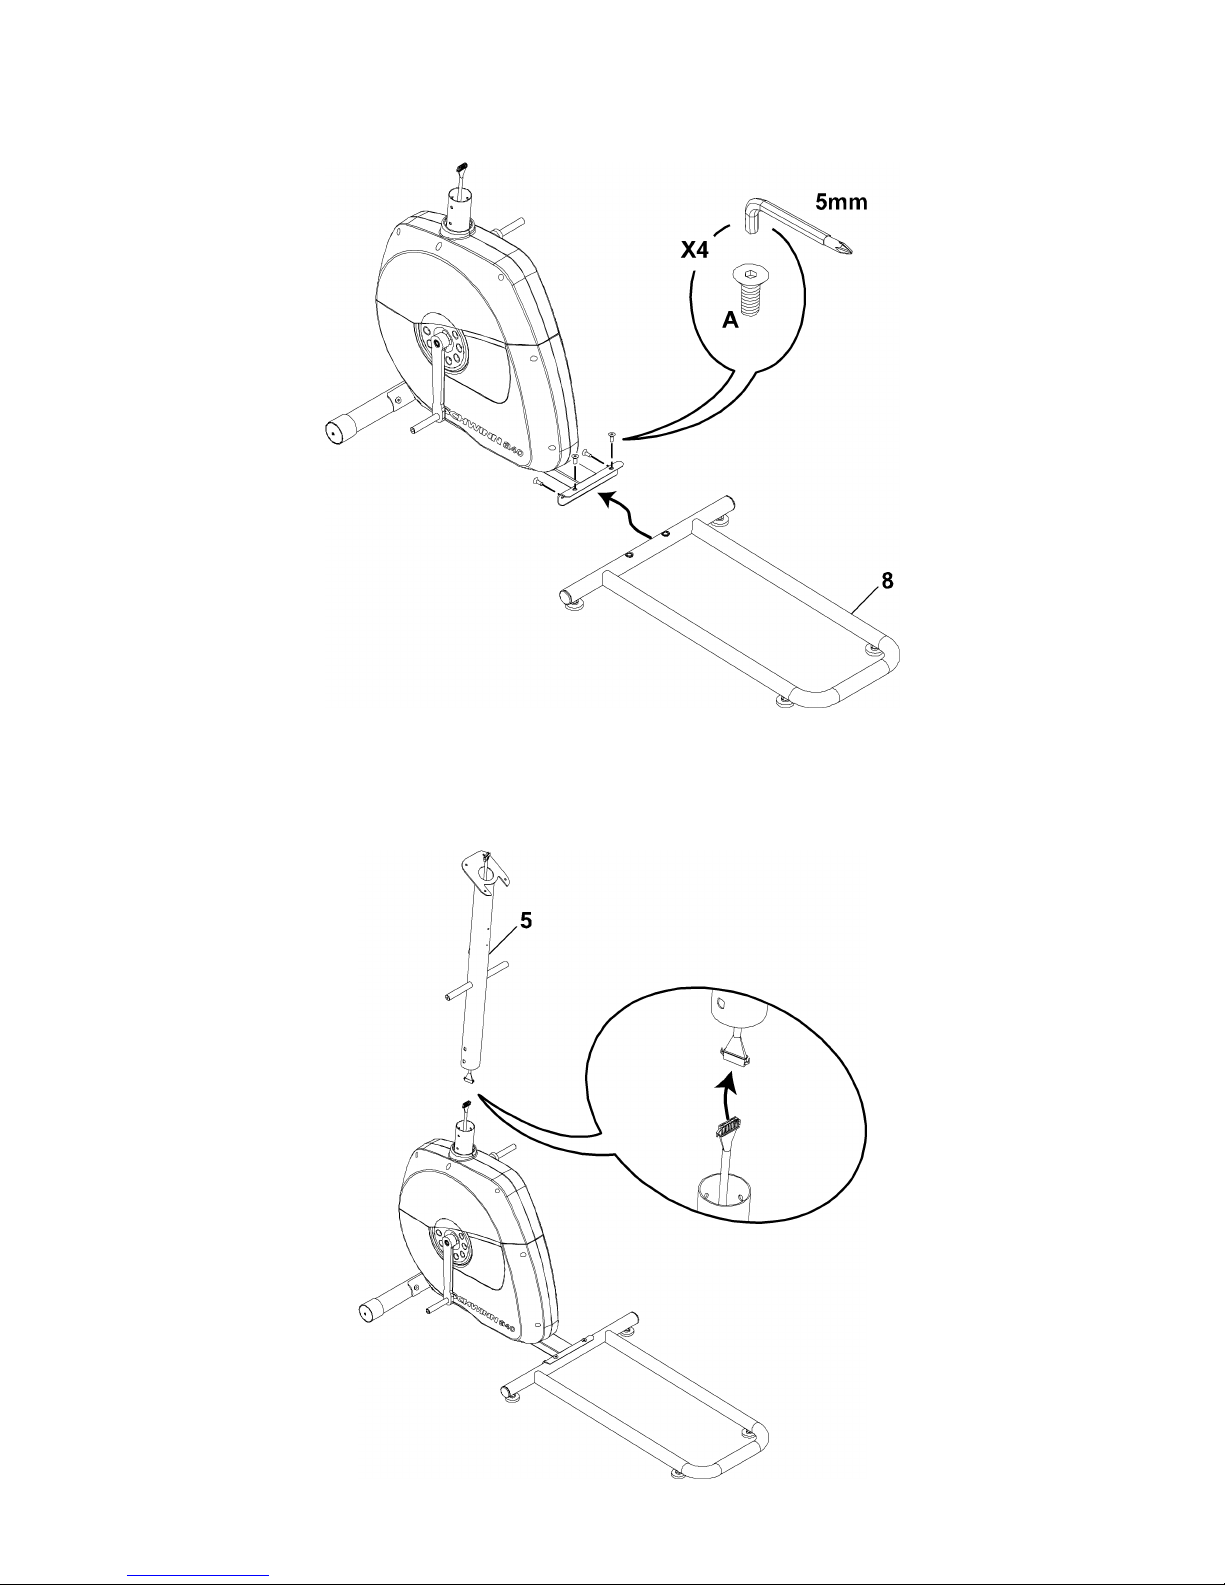
2. 2.2.Attach Attach
Attach
Rail Rail
Rail
Assembly Assembly
Assembly
to totoFrame Frame
Frame
Assembly Assembly
Assembly
3. 3.3.Connect Connect
Connect
the the
the
Console Console
Console
Cable Cable
Cable
Note: Note:
Note:
ThecablesmustbefullyconnectedfortheConsoletooperate.DonotcrimptheConsoleCable.
5 5
5
 Loading...