

Page 1
DTA4000 011
BEDIENUNGSANLEITUNG UND SICHERHEITSHINWEISE
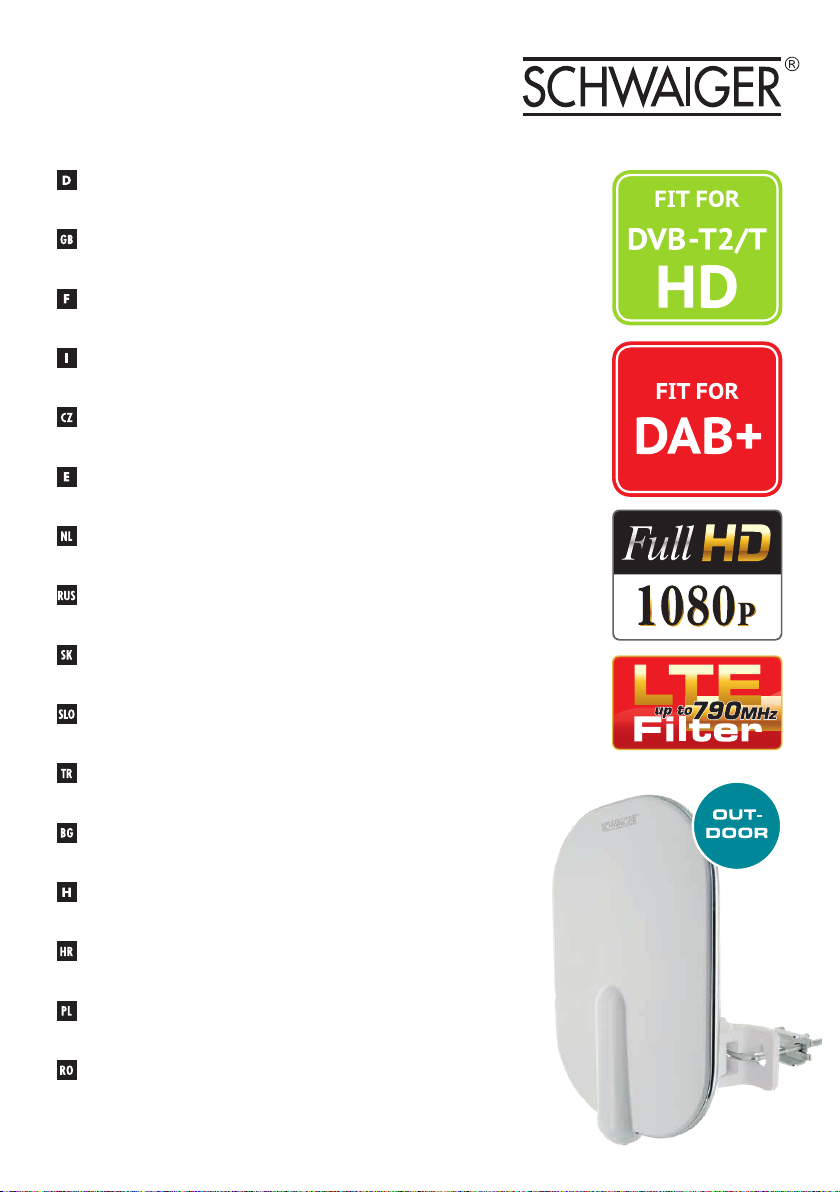
AUSSENANTENNE DTA4000 011
USER GUIDE AND SAFETY INSTRUCTIONS
DTA4000 011 OUTDOOR AERIAL
MODE D‘EMPLOI ET CONSIGNES DE SÉCURITÉ
ANTENNE D’EXTÉRIEUR DTA4000 011
ISTRUZIONI PER L’USO E AVVERTENZE DI SICUREZZA
ANTENNA ESTERNA DTA4000 011
NÁVOD K OBSLUZE A BEZPEČNOSTNÍ POKYNY
VENKOVNÍ ANTÉNA DTA4000 011
MANUAL DE INSTRUCCIONES E INDICACIONES DE SEGURIDAD
ANTENA EXTERIOR DTA4000 011
BEDIENINGSHANDLEIDING EN VEILIGHEIDSINSTRUCTIES
BUITENANTENNE DTA4000 011
ИНСТРУКЦИЯ ПО ЭКСПЛУАТАЦИИ И УКАЗАНИЯ ПО ТЕХНИКЕ БЕЗОПАСНОСТИ
НАРУЖНАЯ АНТЕННА DTA4000 011
NÁVOD NA OBSLUHU A BEZPEČNOSTNÉ POKYNY
VONKAJŠIA ANTÉNA DTA4000 011
NAVODILA ZA UPORABO IN VARNOSTNI NAPOTKI
ZUNANJA ANTENA DTA4000 011
KULLANIM KILAVUZU VE GÜVENLİK TALİMATLARI
DTA4000 011 HARICI ANTEN
ИНСТРУКЦИИ ЗА ЕКСПЛОАТАЦИЯ И УКАЗАНИЯ ЗА БЕЗОПАСНОСТ
ВЪНШНА АНТЕНА DTA4000 011
HASZNÁLATI ÚTMUTATÓ ÉS BIZTONSÁGI TUDNIVALÓK
KÜLTÉRI ANTENNA DTA4000 011
UPUTA ZA UPORABU I SIGURNOSNE NAPOMENE
VANJSKA ANTENA DTA4000 011
INSTRUKCJA OBSŁUGI I WSKAZÓWKI BEZPIECZEŃSTWA
ANTENA ZEWNĘTRZNA DTA4000 011
INSTRUCŢIUNI DE UTILIZARE ȘI MENŢIUNI
REFERITOARE LA SIGURANŢĂ
ANTENĂ EXTERIOARĂ DTA4000 011
Page 2

BEDIENUNGSANLEITUNG
EINFÜHRUNG
Herzlichen Glückwunsch und vielen Dank für den Kauf der Außenantenne DTA4000 011.
Diese Bedienungsanleitung soll Ihnen beim Umgang und der Bedienung mit diesem Produkt helfen. Lesen Sie die Bedienungsanleitung sorgfältig durch. Bewahren Sie die Anleitung während der gesamten Lebensdauer des Produktes auf
und geben diese an nachfolgende Benutzer oder Besitzer weiter.
Bitte prüfen Sie den Packungsinhalt auf Vollständigkeit und stellen Sie sicher, dass keine fehlerhaften oder beschädigten
Teile enthalten sind. Alle von uns vertriebenen Geräte entsprechen den bei Kauf gültigen Sicherheitsbestimmungen und
sind bei bestimmungsgemäßem Gebrauch grundsätzlich sicher! Zum einfacheren Lesen dieser Bedienungsanleitung wird
die Außenantenne DTA4000 011 als „Außenantenne“ bezeichnet.
Bestimmungsgemässe Verwendung
• Die Außenantenne dient dem Empfang von digitalen Fernseh- und Radioprogrammen.
Eine andere Verwendung als angegeben ist nicht zulässig!
Sicherheitshinweise
• Bitte verwenden Sie ein passendes Steckernetzteil (siehe technische Daten). Achten Sie auf die Polarität.
• Bei dieser Außenantenne handelt es sich um ein elektronisches Produkt, welches nicht in Kinderhände gehört!
• Bewahren Sie die Außenantenne deshalb außerhalb der Reichweite von Kindern auf.
• Führen Sie keine Objekte in die Anschlüsse oder Öffnungen des Produktes ein.
• Lassen Sie die Außenantenne bei Defekten nur vom Fachmann reparieren.
• Vor Reinigung den Netzstecker ziehen
• Reinigen Sie die Außenantenne mit einem fusselfreien, maximal leicht feuchten Tuch und verwenden Sie keine aggressiven Reiniger. Achten Sie hierbei besonders darauf, dass kein Wasser (keine Flüssig-/Feuchtigkeit) in das Produkt
gelangt.
TECHNISCHE DATEN
Frequenz- / Empfangsbereich VHF (174 - 230 MHz)
Kanäle 5 – 12 & 21 – 60
Gewinn 36 dB
Impedanz 75 Ω
Koaxialkabel 8,5 m inklusive
Anschluss Receiver/TV 5-6 V DC 50 mA
Stromanschluss Steckernetzteil inklusive, 100-240 V AC / 12 V DC 100 mA
Schutzklasse IPX4
UHF (470 -790 MHz)
Verpackungsinhalt
• Aktive Außenantenne (UHF / VHF) mit integriertem Verstärker
• Koaxial-Anschlusskabel 8,5 m
• Steckernetzteil 100-240 V AC/ 12 V DC 100 mA
• Einschleusweiche
• Mastaufhängung
• Radio (IEC) Adapter
• Bedienungsanleitung mit Sicherheitsbestimmungen
OPTIMALER AUFSTELLUNGSORT FÜR DIE AUSSENANTENNE
Um bestmöglichen Empfang zu gewährleisten, sollten Sie sicherstellen, dass zwischen dem Sender und der Außenantenne möglichst wenige Hindernisse sind, die den Empfang ggfs. behindern könnten.
DVB-T(2)-Receiver haben oft eine Signalstärkeanzeige (Pegelanzeige).
Diese Anzeige ist geeignet, um die beste Antennenposition zu finden. Bitte prüfen Sie verschiedene Standorte und Ausrichtungen der Antenne, bevor Sie diese endgültig positionieren
2
Page 3

BEDIENUNGSANLEITUNG
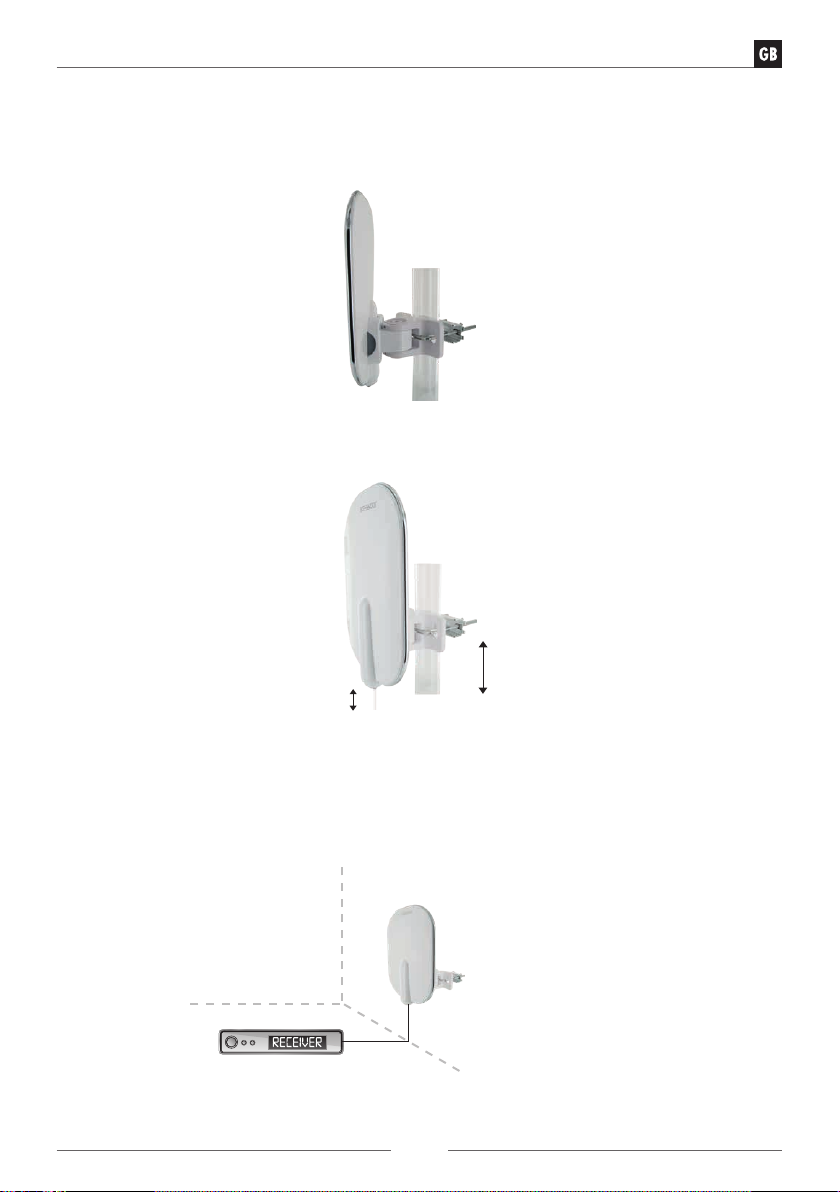
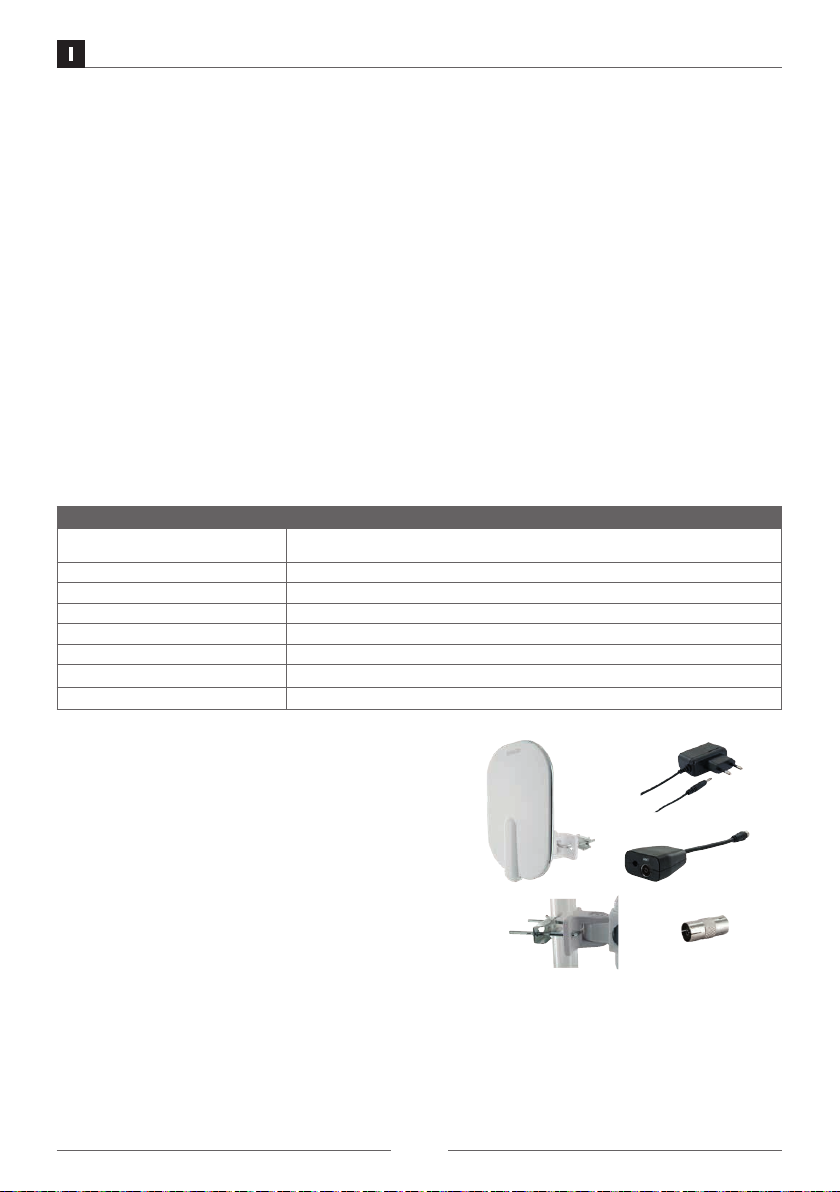
MONTAGE DER AUSSENANTENNE
A. Montage am Mast
U-Bügel durch den Mast stecken, Antennenhalterung einstellen und die Schrauben befestigen.
Binden Sie ca. 1 Meter des Koaxialkabels in ca. 0,5 m Tiefe an die Befestigungsstange, somit hat die Antenne genug Spiel
für eventuelle Änderung der Positionierung.
0,5m
1m
B. Wandmontage
Bohren Sie Löcher in die Wand entsprechend der Position der Löcher auf dem Antennenbügel. Führen Sie Kunststoffdübel
in die Löcher und befestigen Sie den Bügel an der Wand. Befestigen Sie ihn mit Schrauben.
3
Page 4

BEDIENUNGSANLEITUNG
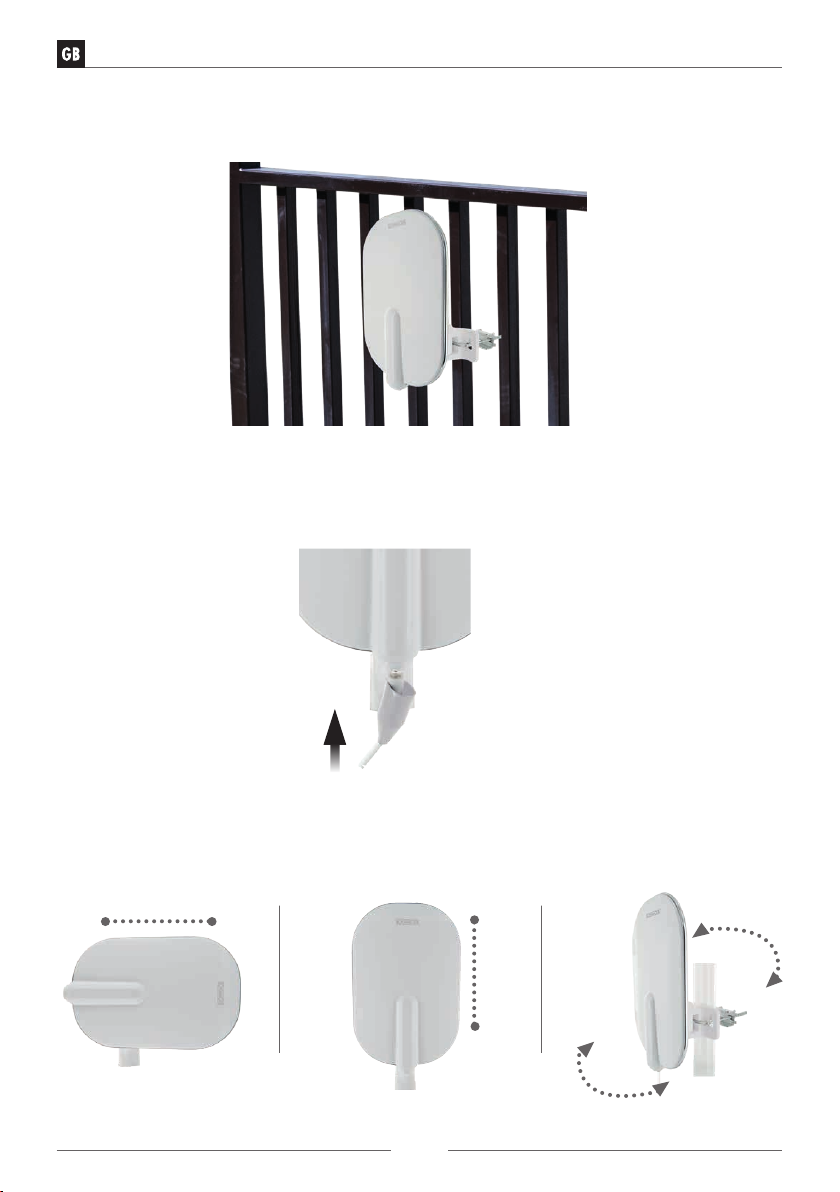
C. Geländerbefestigung (Balkon)
Montieren Sie die Antennenhalterung mit dem Bügel am Geländer. Schrauben Sie das Koaxialkabel mit den F-Stecker an
die Antenne und fixieren Sie die Antenne auf dem Drehsockel nach entsprechender Ausrichtung.
Befestigung der wasserdichten Kappe
Schließen Sie das Koaxialkabel an die F-Buchse der Antenne an und sichern Sie das Kabel. Befestigen Sie die wasserdichte Kappe sodass der Anschluss abgedeckt ist und kein Wasser eindringen kann.
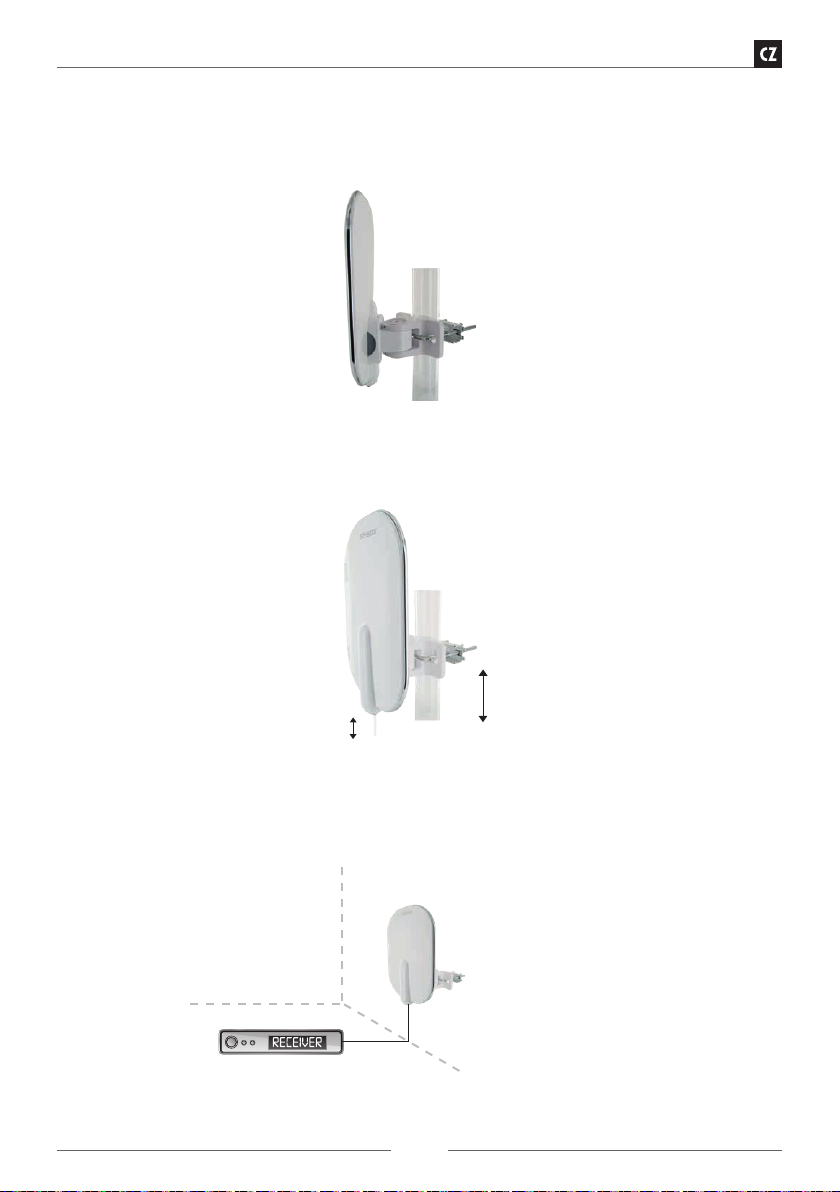
EINSTELLUNG DER EMPFANGSRICHTUNG
Stellen Sie die Antennenposition entsprechend der Ausstrahlung von horizontalen oder vertikalen Signalen ein.
Horizontal
VertiKal
4
Page 5
BEDIENUNGSANLEITUNG
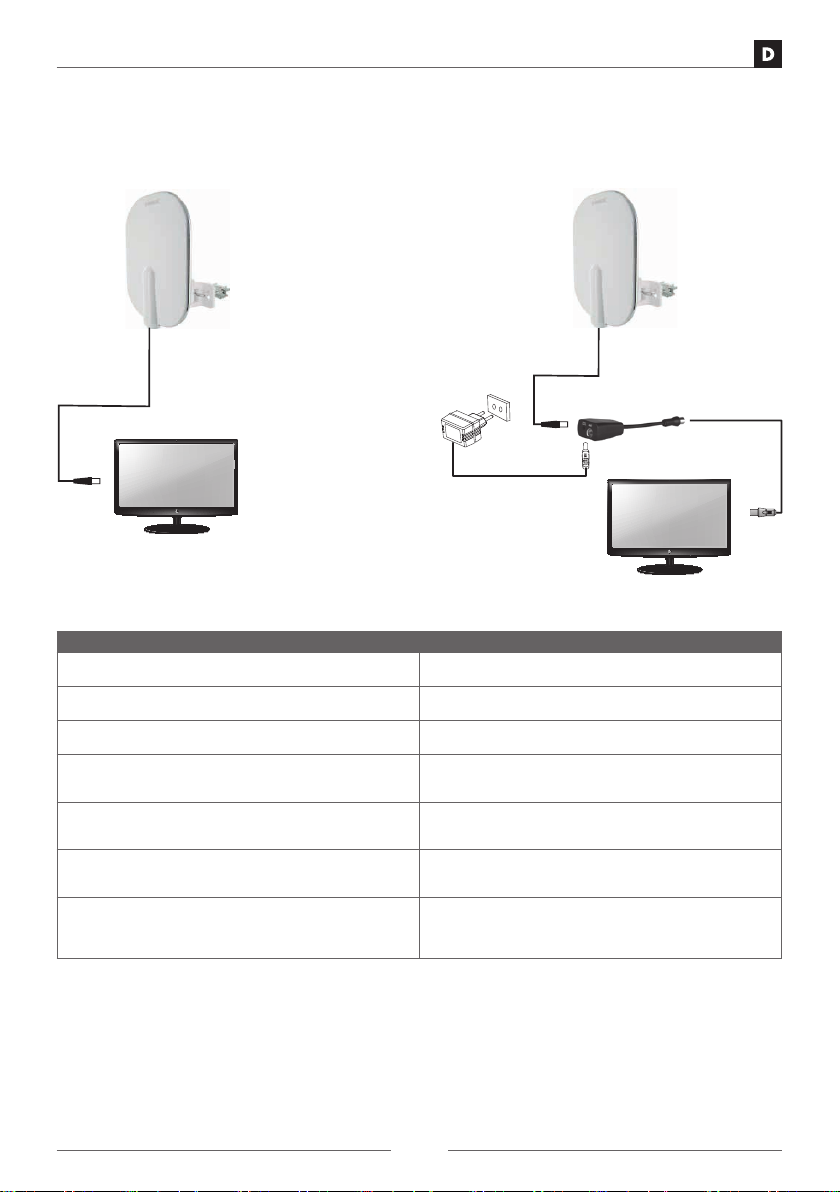
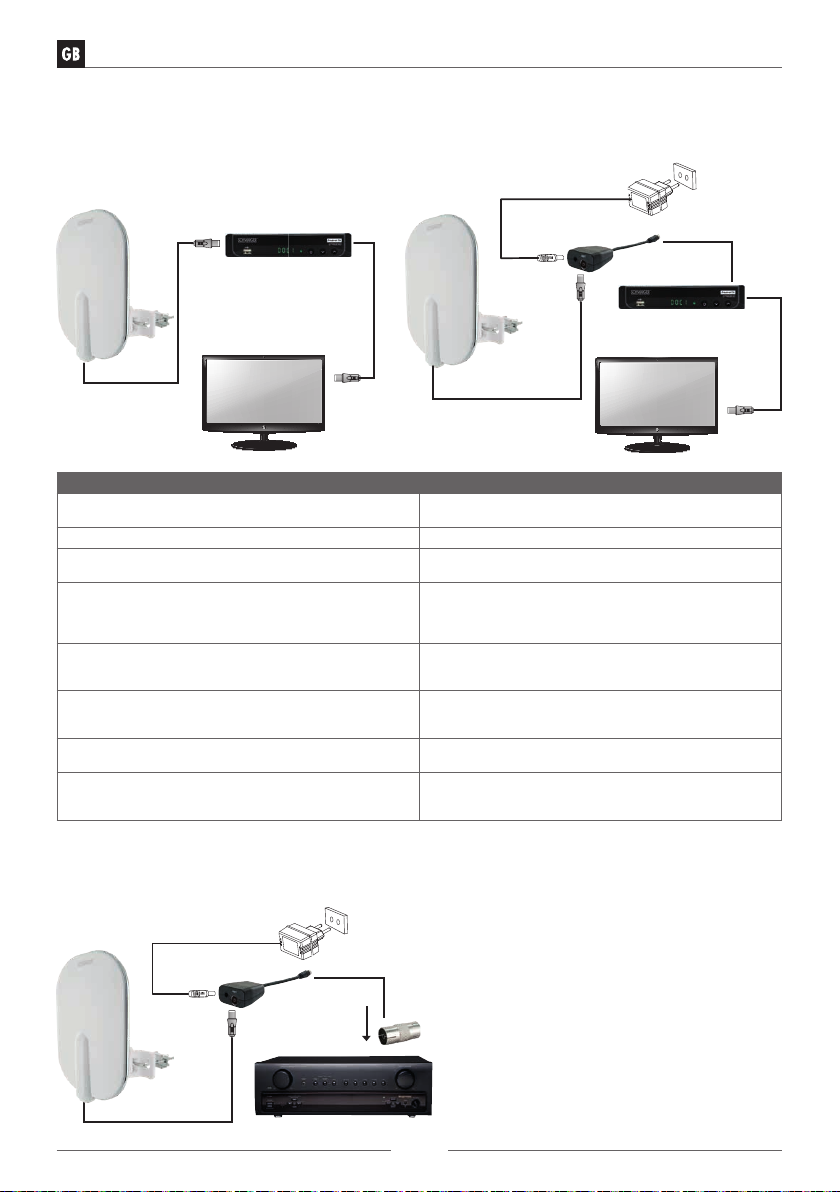
ANSCHLIESSEN DER AUSSENANTENNE FÜR TV-GERÄTE
MIT INTEGRIERTEN DVB-T(2)RECEIVER
Anschlussbeispiel (LINKS) Anschlussbeispiel (RECHTS)
Power adapter
Einschleusweiche
TV
TV
ANSCHLUSSBEISPIEL (LINKS) ANSCHLUSSBEISPIEL (RECHTS)
Stromversorgung über den eingebauten
DVB-T(2)-Receiver im TV-Gerät
1. Stellen Sie sicher, dass das Fernsehgerät ausgeschaltet
ist
2. Verbinden Sie das Koaxialkabel der Außenantenne
mit dem Antennenanschluss des TV-Gerätes.
3. Nun können Sie das Fernsehgerät einschalten. 3. Stecken Sie nun das Kabel des externen Netzteils in
4. Schalten Sie im Menü ihres TV-Gerätes die 5 V Stromversorgung ein um den externen Verstärker über das
Koaxialkabel mit Spannung zu versorgen.
5. Nun können Sie nach empfangbaren Programmen
suchen. Ziehen Sie dazu ggfs. die Bedienungsanleitung
des TV-Gerätes zu Rate.
Stromversorgung über das
mitgelieferte externe Netzteil
1. Stellen Sie sicher, dass das Fernsehgerät ausgeschaltet
ist
2. Verbinden Sie das Koaxialkabel der Außenantenne mit
dem Antennenanschluss der Einschleusweiche.
die „DC 12 V 100 mA“ Buchse der Einschleusweiche
sowie das externe Netzteil in eine 230 V AC Steckdose.
4. Das kurze Koaxialkabel der Einschleus-weiche schließen Sie an den Antenneneingang ihres TV-Gerätes an.
5. Ob die 5V Stromversorgung des TV-Gerätes dabei
aktiviert ist, spielt bei dieser Anschlussvariante keine
Rolle.
6. Nun können Sie das Fernsehgerät einschalten und
nach empfangbaren Programmen suchen. Ziehen Sie
dazu ggfs. die Bedienungsanleitung des TV-Gerätes
zu Rate.
5
Page 6

BEDIENUNGSANLEITUNG
ANSCHLIESSEN DER AUSSENANTENNE FÜR TV-GERÄTE OHNE INTEGRIERTEN DVB-T(2)-RECEIVER
Anschlussbeispiel (LINKS) Anschlussbeispiel (RECHTS)
Receiver
Einschleusweiche
Power adapter
Receiver
TV
ANSCHLUSSBEISPIEL (LINKS) ANSCHLUSSBEISPIEL (RECHTS)
Stromversorgung über den DVB-T(2) Receiver Stromversorgung über das mitgelieferte externe
1. Stellen Sie sicher, dass das Fernsehgerät ausgeschaltet
ist
2. Verbinden Sie das Koaxialkabel der Außenantenne mit
dem Antennen-anschluss des DVB-T(2)-Receivers.
3. Nun können Sie das Fernsehgerät und den Receiver
einschalten.
4. Schalten Sie im Menü des DVB-T(2)-Receivers die 5 V
Stromversorgung ein um den in der Antenne integrierten Verstärker über das Koaxialkabel mit Spannung zu
versorgen.
5. Nun können Sie nach empfangbaren Programmen
suchen. Ziehen Sie dazu ggfs. die Bedienungsanleitung
des TV-Gerätes zu Rate.
Netzteil
1. Stellen Sie sicher, dass das der DVB-T(2)-Receiver
ausgeschaltet ist.
2. Verbinden Sie das Koaxialkabel der Außenantenne mit
dem Antennenanschluss der Einspeiseweiche.
3. Stecken Sie nun das Kabel des externen Netzteils in
die DC 12 V 100 mA Buchse der Einspeiseweiche sowie
das externe Netzteil in eine 230 V AC Steckdose.
4. Das Koaxialkabel der Einspeiseweiche schließen Sie an
den Antenneneingang ihres DVB-T(2)-Receiver an.
5. Ob die 5V Stromversorgung des DVB-T(2)-Receiver
dabei aktiviert ist, spielt bei dieser Anschlussvariante
keine Rolle.
6. Nun können Sie das Fernsehgerät und den
DVB-T(2)-Receiver einschalten.
7. Jetzt können Sie nach empfangbaren Programmen
suchen. Ziehen Sie dazu ggfs. die Bedienungsanleitung
des DVB-T(2)-Receivers zu Rate.
TV
ANSCHLIESSEN DER AUSSENANTENNE FÜR DAB+ RADIOS
Anschlussbeispiel
Power adapter
Einschleusweiche
Radio (IEC) Adapter
6
Page 7

BEDIENUNGSANLEITUNG
1. Stellen Sie sicher, dass der DAB+ Radio ausgeschaltet ist
2. Verbinden Sie das Koaxialkabel der Außenantenne mit dem Antennenanschluss der Einspeiseweiche.
3. Stecken Sie nun das Kabel des externen Netzteils in die DC 12 V 100 mA
Buchse der Einspeiseweiche sowie das externe Netzteil in eine 230 V AC
Steckdose.
4. Stecken Sie den beigelegten IEC Verbinder (Radio IEC Connector) auf
das kurze Koaxialkabel der Einspeiseweiche und schließen Sie das an den
Antenneneingang ihres DAB+ Empfängers an.
5. Nun können Sie nach empfangbaren Programmen suchen. Ziehen Sie dazu
ggfs. die Bedienungsanleitung des DAB+ Radios zu Rate.
Entsorgung
Elektrische und elektronische Geräte sowie Batterien dürfen nicht mit dem Hausmüll entsorgt werden. Der Verbraucher ist gesetzlich verpflichtet, elektrische und elektronische Geräte sowie Batterien am Ende ihrer Lebensdauer an den dafür eingerichteten, öffentlichen Sammelstellen oder an die Verkaufsstelle zurückzugeben. Einzelheiten dazu regelt das jeweilige Landesrecht. Das Symbol auf dem Produkt, der Bedienungsanleitung bzw. der
Verpackung weist auf diese Bestimmung hin.
Haftungsausschluss
Die Schwaiger GmbH übernimmt keinerlei Haftung und Gewährleistung für Schäden die aus unsachgemäßer Installation oder Montage sowie unsachgemäßem Gebrauch des Produktes oder einer Nichtbeachtung der Sicherheitshinweise
resultieren.
Herstellerinformation
Sehr geehrter Kunde, sollten Sie technischen Rat benötigen und Ihr Fachhändler konnte Ihnen nicht weiterhelfen, kontaktieren Sie bitte unseren technischen Support.
Vereinfachte EU-Konformitätserklärung nach RED-Richtlinie
Hiermit erklärt die Firma SCHWAIGER GmbH, dass der Funkanlagentyp der Richtlinie 2014/53/EU entspricht.
Der vollständige Text der EU-Konformitätserklärung ist unter der folgenden Internetadresse verfügbar: http://konform.
schwaiger.de
Geschäftszeiten:
Montag bis Freitag: 08:00 - 17:00 Uhr
Schwaiger GmbH
Würzburger Straße 17 | 90579 Langenzenn
Hotline: +49 (0) 9101 702-299
www.schwaiger.de | info@schwaiger.de
7
Page 8

USER GUIDE
INTRODUCTION
Congratulations and thank you for purchasing this DTA4000 011 outdoor aerial.
This user guide is designed to help you use and operate the device. Read through the User guide carefully. Store this
manual safely throughout the product‘s entire service life and pass it on to any subsequent users or owners.
Check that the supplied package is complete and ensure that none of the parts are defective or damaged.
All devices that we distribute comply with the safety regulations valid at the time of purchase, and are safe provided they
are used for the intended purpose.
For simplicity, the DTA4000 011 outdoor aerial is referred to as „outdoor aerial“ in this guide.
How to use this aerial
• The outdoor aerial is used to receive digital television and radio programmes.
It must not be used for any other purpose!
Safety instructions
• Please use a suitable plug-in power supply unit (see Technical Data). Make sure the polarity is correct.
• This outdoor aerial is an electronic product that must be kept away from children!
• Therefore, keep it out of the reach of children.
• Do not introduce any objects into the product’s connections or openings.
• Have the outdoor aerial repaired by a technician if it is defective.
• Disconnect the power plug before cleaning.
• Clean this outdoor aerial only using a lint-free, damp cloth that is as light as possible and do not use any aggressive
cleaning agents. In doing this, especially ensure that no water (no fluid or moisture) gets into the product.
TECHNICAL DATA
Frequency -/ Reception range VHF (174 - 230 MHz)
Channels 5 – 12 & 21 – 60
Gain 36 dB
Impedance 75 Ω
Coaxial cable 8,5 m included
Receiver/TV connection 5-6 V DC 50 mA
Electrical connection Plug-in power supply included, 100-240 V AC / 12 V DC 100 mA
Protection rating IPX4
UHF (470 -790 MHz)
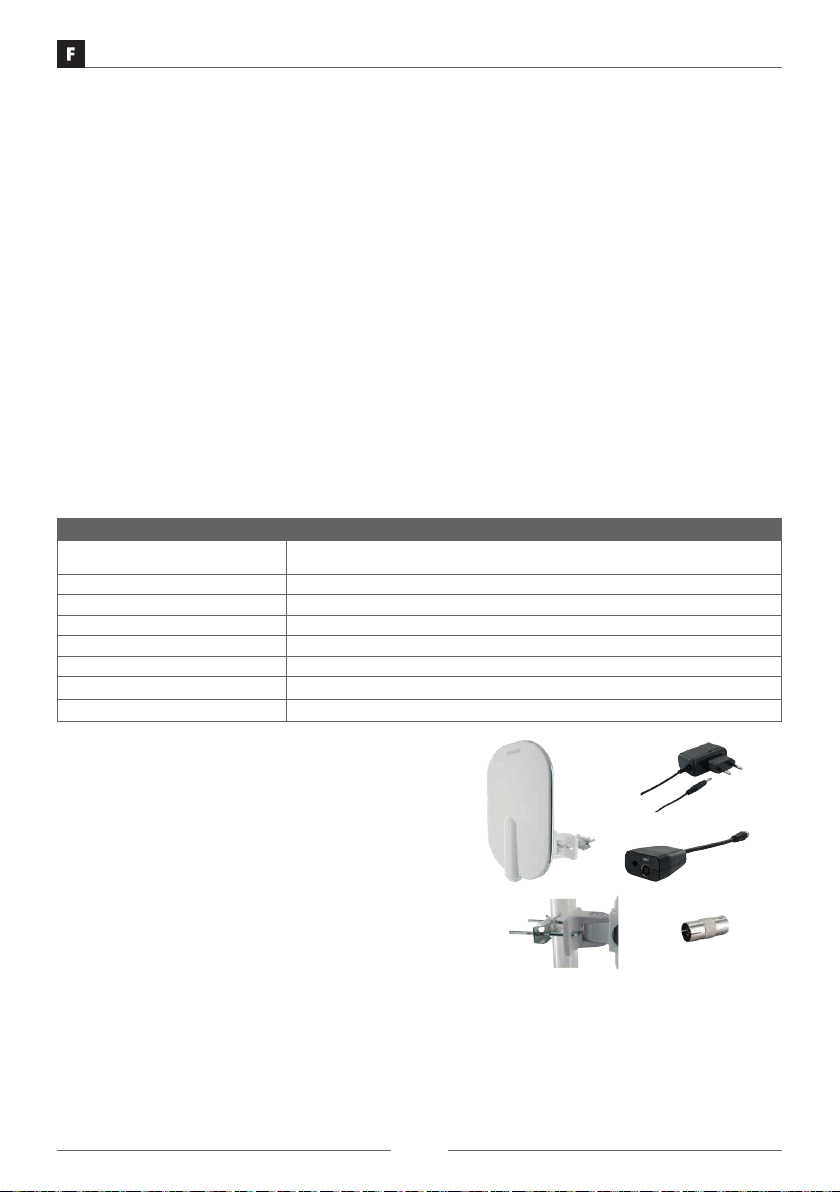
Package content
• Active outdoor aerial (UHF / VHF) with integrated amplifier
• Coaxial connecting cable 8.5 m
• Plug-in power supply 100-240 V AC / 12 V DC 100 mA
• Power inserter
• Mast installation
• Radio (IEC) adapter
• User guide with Safety instructions
OPTIMUM LOCATION FOR THE OUTDOOR AERIAL
You should ensure that there are as few obstacles as possible which may block the signal between the transmitter and
the outdoor aerial to guarantee optimum reception.
DVB-T(2) receivers often have a signal strength indicator. This indicator will help you find the best aerial position. Check
different positions and signal directions before you finally site the aerial.
8
Page 9
USER GUIDE
INSTALLING THE OUTDOOR AERIAL
A. Installing on a mast
Push the U-clamp through the mast, adjust the aerial bracket and tighten the screws.
Tie about 1 metre of the coaxial cable to the fixing post at a height of about 0.5 metres, so that the aerial has enough
play to allow for altering its position.
0,5m
1m
B. Installing on a wall
Bore holes in the wall to correspond with the positions of the holes in the aerial clamp, insert plastic plugs in the holes,
fix the clamp to the wall and fasten it with screws.
9
Page 10
USER GUIDE
C. Fixing to a handrail (balcony)
Install the aerial mounting on the handrail using the clamp. Screw the coaxial cable to the aerial using the F-plug and fix
the aerial on the swivelling base after suitable directional adjustment.
Fixing the watertight cap
Connect the coaxial cable to the aerial‘s F-socket and secure the cable. Fix the watertight cap so that the connection is
covered and no water can get in.
SETTING UP THE DIRECTION FOR RECEIVING SIGNALS
Set up the position of the aerial according to the emission of horizontal or vertical signals.
Horizontal
Vertical
10
Page 11

USER GUIDE
CONNECTING THE OUTDOOR AERIAL FOR TV SETS WITH INTEGRATED
DVB-T(2) RECEIVER
Connection example (left) Connection example (right)
Power supply unit
Power inserter
TV
TV
CONNECTION EXAMPLE (LEFT) CONNECTION EXAMPLE (RIGHT)
Power supply via the built-in DVB-T(2) receiver in
the TV set
1. Make sure that the television set is switched off. 1. Make sure that the television set is switched off.
2. Plug the outdoor aerial's coaxial cable into the aerial
connection port on the television set.
3. You can now turn on the television set. 3. Now plug the cable of the external power supply unit
4. Switch on the 5 V power supply on your TV screen
menu to power the external amplifier via the coaxial
cable.
5. You can now look for channels that you can receive.
If necessary, refer to the television's user manual for
guidance.
Power supply via the supplied external power supply unit
2. Plug the outdoor aerial's coaxial cable into the aerial
connection port on the Power inserter.
in the "12 V DC 100 mA" socket in the Power inserter
and the external power supply unit into a 230 V AC
socket.
4. Connect the short coaxial cable of the power inserter
to the aerial input of your TV set.
5. When making this connection, it doesn't matter whether the 5 V power supply of the TV is activated or not.
6. You can now turn on the television set and look for
channels that you can receive. If necessary, refer to
the television's user manual for guidance.
11
Page 12
USER GUIDE
CONNECTING THE OUTDOOR AERIAL FOR TV SETS WITHOUT INTEGRATED
DVB-T(2) RECEIVER
Connection example (LEFT) Connection example (RIGHT)
Receiver
Power inserter
Power supply unit
Receiver
TV
CONNECTION EXAMPLE (LEFT) CONNECTION EXAMPLE (RIGHT)
Power supply via the DVB-T(2) receiver Power supply via the supplied external power sup-
1. Make sure that the television set is switched off. 1. Make sure that the DVB-T(2) receiver is switched off.
2. Plug the outdoor aerial's coaxial cable into the aerial
connection port on the DVB-T(2) receiver.
3. You can now turn on the television set and the receive r.
4. In the menu of the DVB-T2 receiver, switch on the 5 V
power supply to power the amplifier integrated in the
aerial through the coaxial cable.
5. You can now look for channels that you can receive.
If necessary, refer to the television's user manual for
guidance.
ply unit
2. Plug the outdoor aerial's coaxial cable into the aerial
connection port on the Power inserter.
3. Now plug the cable of the external power supply unit
into the 12 V DC 100 mA socket of the power inserter
and the external power supply unit into a 230 V AC
socket.
4. Connect the coaxial cable of the power inserter to the
aerial input of your DVB-T2 receiver.
5. When making this connection, it doesn't matter whether the 5 V power supply of the DVB-T2 receiver is
activated or not.
6. You can now turn on the television set and the
DVB-T(2) receiver.
7. You can now look for channels that you can receive. If
necessary, refer to the DVB-T2 receiver's user manual
for guidance.
TV
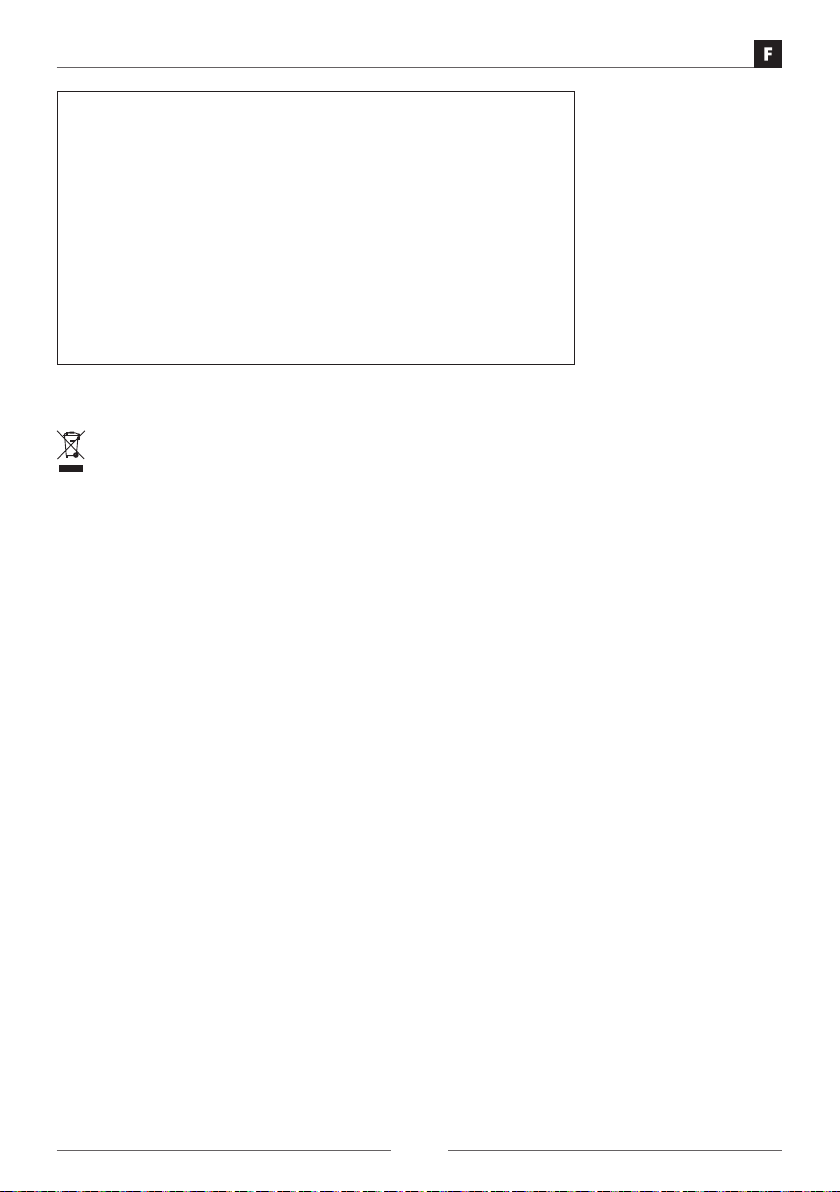
CONNECTING THE OUTDOOR AERIAL FOR DAB+ RADIOS
Connection example:
Power supply unit
Power inserter
Radio (IEC) adapter
12
Page 13
USER GUIDE
1. Make sure that the DAB+ radio is switched off.
2. Plug the outdoor aerial‘s coaxial cable into the aerial connection port on the
Power inserter.
3. Now plug the cable of the external power supply unit into the 12 V DC 100
mA socket of the power inserter and the external power supply unit into a
230 V AC socket.
4. Plug the IEC connector provided (radio IEC connector) onto the short coaxial
cable of the power inserter and then connect that to the aerial input of your
DAB+ receiver.
5. You can now look for channels that you can receive.
If necessary, refer to the DAB+ radio user manual for guidance.
Disposal
Do not dispose of batteries or electric and electronic devices in the normal household waste. The consumer is legally obliged to return electrical and electronic devices and batteries that are at the end of their useful life to the
point of sale or public collection points that have been set up for this purpose. Legislation in the country of use
governs individual details regarding disposal. The symbol on the product, the user guide or the packaging indicates
this legal requirement.
Disclaimer
Schwaiger GmbH does not accept any liability or warranty for damages that are sustained due to improper installation or
mounting, improper use of the product or non-compliance with the safety instructions.
Manufacturer‘s information
Dear Customer, Please contact our Technical Support if you need technical advice and your retailer is unable to help you.
Simplified declaration of conformity as per the RED Directive
Schwaiger GmbH hereby declares that the radio system type complies with Directive 2014/53/EU.
The complete EU declaration of conformity is available online at: http://konform.schwaiger.de
Office hours:
Monday to Friday: 8:00 a.m. - 5:00 p.m.
Schwaiger GmbH
Würzburger Straße 17 | 90579 Langenzenn
Direct line: +49 (0) 9101 702-299
www.schwaiger.de | info@schwaiger.de
13
Page 14
MODE D‘EMPLOI
INTRODUCTION
Toutes nos félicitations et tous nos remerciements pour l‘achat de l‘antenne d‘extérieur DTA4000 011.
Le présent manuel est destiné à vous aider dans la manipulation et l‘utilisation de ce produit. Lisez attentivement le
mode d‘emploi. Conservez-le en lieu sûr pendant toute la durée de vie du produit et remettez-le à l‘utilisateur ou au
propriétaire suivant.
Vérifiez que le contenu du paquet est complet et assurez-vous qu‘aucun élément n‘est manquant ou abîmé.
Tous les dispositifs que nous vendons répondent aux normes de sécurité en vigueur au moment de l‘achat et sont essentiellement sûrs s‘ils sont utilisés dans le cadre de l‘usage pour lequel ils sont prévus.
Afin de faciliter la lecture du présent mode d‘emploi, nous nous référons à l‘antenne d‘extérieur DTA4000 011 comme
„antenne d‘extérieur“.
Utilisation conforme à l’usage prévu
• L’antenne d‘extérieur est destinée à la réception des programmes numériques de télévision et de radio.
Toute utilisation autre que celle spécifiquement indiquée ne saurait être autorisée !
Consignes de sécurité
• Veuillez utiliser un bloc d‘alimentation approprié (voir Données techniques). Faites attention à la polarité.
• Cette antenne d‘extérieur est un produit électronique qui n‘est pas destiné aux enfants.
• Pour cette raison, conservez-la hors de la portée des enfants.
• N‘introduisez aucun objet dans les ports ou les ouvertures du produit.
• En cas de panne, ne faites réparer l’antenne d‘extérieur que par un professionnel.
• Avant tout nettoyage, débranchez la prise.
• Nettoyez l‘antenne d‘extérieur uniquement avec un chiffon non pelucheux très légèrement humide et n‘utilisez aucun
nettoyant abrasif. Faites particulièrement attention à ce qu‘aucun liquide (humidité, eau) ne pénètre dans le produit
DONNÉES TECHNIQUES
Plage de fréquence/réception VHF (174 - 230 MHz)
Canaux 5 – 12 & 21 – 60
Gain 36 dB
Impédance 75 Ω
Câble coaxial 8,5 m inclus
Connexion récepteur/TV 5-6 V DC 50 mA
Raccordement électrique Bloc d‘alimentation inclus, 100-240 V AC / 12 V DC 100 mA
Classe de protection IPX4
UHF (470 -790 MHz)
Contenu de la livraison
• Antenne d‘extérieur active (UHF / VHF) avec amplificateur intégré
• Câble coaxial de raccordement de 8,5 m
• Bloc d‘alimentation 100-240 V CA / 12 V CC 100 mA
• Alimentation auxiliaire
• Fixation pour mât
• Adaptateur radio (IEC)
• Mode d‘emploi avec consignes de sécurité
LE MEILLEUR ENDROIT POUR INSTALLER L’ANTENNE D’EXTÉRIEUR
Afin de garantir la meilleure réception, vous devez vous assurer qu’il y a le moins d’obstacles possible entre l’émetteur
et l’antenne d‘extérieur, susceptibles de gêner la réception.
Les récepteurs DVB-T(2) présentent souvent un affichage de la force du signal (indicateur de niveau). Cet affichage
est utile pour trouver la meilleure position de l’antenne. Veuillez essayer différents emplacements et orientations avant
d‘installer l’antenne dans sa position définitive.
14
Page 15

MODE D‘EMPLOI
MONTAGE DE L‘ANTENNE D‘EXTÉRIEUR
A. Montage sur mât
Insérez l‘étrier dans le mât, installez le support d‘antenne et serrez les vis.
Réservez environ 1 mètre de câble coaxial en le fixant à la barre de serrage à une profondeur d‘environ 0,5 m afin que
l‘antenne ait suffisamment d‘espace pour un éventuel changement de position..
0,5m
1m
B. Montage mural
Percez des trous dans le mur en fonction de la position des trous dans le support d‘antenne, insérez des chevilles en
plastique dans les trous, appliquez le support contre le mur et fixez-le avec des vis.
15
Page 16

MODE D‘EMPLOI
C. Fixation sur garde-corps (balcon)
Installez le support d‘antenne avec le collier de serrage sur le garde-corps. Vissez le câble coaxial avec le connecteur -F
à l‘antenne et fixez l‘antenne à la base pivotante dans la bonne direction.
Fixation sur garde-corps (balcon)
Connectez le câble coaxial au connecteur F de l‘antenne et fixez le câble. Serrez le capuchon étanche de façon à recouvrir
le raccord et que l‘eau ne puisse pas pénétrer.
RÉGLAGE DE LA DIRECTION DE RÉCEPTION
Ajuster la position de l‘antenne en fonction de l‘émission de signaux horizontaux et verticaux.
Horizontal
Vertical
16
Page 17

MODE D‘EMPLOI
RACCORDEMENT DE L’ANTENNE D‘EXTÉRIEUR POUR POSTE DE TÉLÉVISION
AVEC RÉCEPTEUR DVB-T(2) INTÉGRÉ
Exemple de raccordement (GAUCHE) Exemple de raccordement (DROITE)
bloc d‘alimentation
alimentation auxiliaire
TV
TV
EXEMPLE DE RACCORDEMENT (GAUCHE) EXEMPLE DE RACCORDEMENT (DROITE)
Alimentation électrique par l’intermédiaire du récepteur DVB-T(2) intégré au poste de télévision
1. Assurez-vous que le poste de télévision est éteint. 1. Assurez-vous que le poste de télévision est éteint.
2. Raccordez le câble coaxial de l’antenne d’extérieur à la
prise d’antenne du poste de télévision.
3. Vous pouvez maintenant allumer votre poste de
télévision.
4. Sélectionnez l’alimentation électrique 5 V dans le menu
de votre poste de télévision, de manière à fournir un
courant électrique à l'amplificateur externe par l’intermédiaire du câble coaxial.
5. Vous pouvez maintenant rechercher les programmes
disponibles. Pour cela, vous pouvez consulter le mode
d'emploi de votre poste de télévision.
Alimentation électrique par l’intermédiaire du bloc
d'alimentation externe fourni avec l’équipement
2. Raccordez le câble coaxial de l’antenne d’extérieur à la
prise d’antenne de l’alimentation auxiliaire.
3. Branchez le câble du bloc d'alimentation externe dans
le port „CC 12 V 100 mA“ de l’alimentation auxiliaire,
et raccordez le bloc d'alimentation externe à une prise
230 V CA.
4. Connectez le câble coaxial court de l’alimentation auxiliaire à l'entrée d'antenne de votre poste de télévision.
5. L'activation ou la non-activation de l'alimentation
électrique 5 V du poste de télévision n'a aucune importance dans ce type de raccordement.
6. Vous pouvez maintenant allumer votre poste de télévision et rechercher les programmes disponibles. Pour
cela, vous pouvez consulter le mode d‘emploi de votre
poste de télévision.
17
Page 18

MODE D‘EMPLOI
RACCORDEMENT DE L’ANTENNE D‘EXTÉRIEUR POUR POSTE DE TÉLÉVISION
SANS RÉCEPTEUR DVB-T(2) INTÉGRÉ
Exemple de raccordement (GAUCHE) Exemple de raccordement (DROITE)
Receiver
alimentation auxiliaire
bloc d‘alimentation
Receiver
TV
EXEMPLE DE RACCORDEMENT (GAUCHE) EXEMPLE DE RACCORDEMENT (DROITE)
Alimentation électrique par l’intermédiaire du
récepteur DVB-T(2)
1. Assurez-vous que le poste de télévision est éteint. 1. Assurez-vous que le récepteur DVB-T(2) est éteint.
2. Raccordez le câble coaxial de l’antenne d’extérieur à la
prise d’antenne du récepteur DVB-T(2).
3. Vous pouvez maintenant allumer le poste de télévision
et le récepteur.
4. Sélectionnez l’alimentation électrique 5 V dans le
menu du récepteur DVB-T(2), de manière à fournir un
courant électrique à l'amplificateur intégré à l'antenne
par l’intermédiaire du câble coaxial.
5. Vous pouvez maintenant rechercher les programmes
disponibles. Pour cela, vous pouvez consulter le mode
d'emploi de votre poste de télévision.
Alimentation électrique par l’intermédiaire du bloc
d'alimentation externe fourni avec l’équipement
2. Raccordez le câble coaxial de l’antenne d’extérieur à la
prise d’antenne de l’alimentation auxiliaire.
3. Branchez le câble du bloc d'alimentation externe dans
le port CC 12 V 100 mA de l’alimentation auxiliaire, et
raccordez le bloc d'alimentation externe à une prise
230 V CA.
4. Connectez le câble coaxial de l’alimentation auxiliaire à
l'entrée d'antenne de votre récepteur DVB-T(2).
5. L'activation ou la non-activation de l'alimentation
électrique 5 V du récepteur DVB-T(2) n'a aucune
importance dans ce type de raccordement.
6. Vous pouvez maintenant allumer le poste de télévision
et le récepteur DVB-T(2).
7. Vous pouvez maintenant rechercher les programmes
disponibles. Pour cela, vous pouvez consulter le mode
d'emploi de votre récepteur DVB-T(2).
TV
RACCORDEMENT DE L’ANTENNE D’EXTÉRIEUR POUR RADIOS DAB+
Exemple de raccordement :
bloc d‘alimentation
alimentation auxiliaire
Adaptateur radio (IEC)
18
Page 19
MODE D‘EMPLOI
1. Assurez-vous que la radio DAB+ est éteinte.
2. Raccordez le câble coaxial de l’antenne d’extérieur à la prise d’antenne de
l’alimentation auxiliaire.
3. Branchez le câble du bloc d‘alimentation externe dans le port CC 12 V 100
mA de l’alimentation auxiliaire, et raccordez le bloc d‘alimentation externe à
une prise 230 V CA.
4. Branchez le connecteur IEC fourni (connecteur radio IEC) dans le câble coaxial court de l‘interrupteur d‘alimentation et connectez-le à l‘entrée antenne
de votre récepteur DAB+.
5. Vous pouvez maintenant rechercher les programmes disponibles. Pour cela,
vous pouvez consulter le mode d‘emploi de votre radio DAB+.
Élimination
Les appareils électriques et électroniques, ainsi que les piles ne doivent pas être jetés avec les déchets ménagers.
Le consommateur est légalement tenu de remettre les appareils électriques et électroniques ainsi que les piles à
la fin de leur vie utile aux points de collecte publics installés dans ce but ou au point de vente. Les aspects détaillés en sont réglementés par le droit applicable de chaque pays. Le symbole du produit, le mode d‘emploi ainsi que
l‘emballage reportent expressément cette disposition.
Exclusion de responsabilité
Schwaiger Gmbh décline toute responsabilité ou garantie pour des dommages résultant d‘une installation ou d‘un assemblage incorrect, d‘une utilisation incorrecte du produit ou du non-respect des instructions de sécurité.
Informations du fabricant
Chers clients, pour toute demande de conseil technique que votre revendeur n‘a pas été en mesure de vous dispenser,
contactez notre service d‘assistance technique.
Déclaration de conformité simplifiée UE selon la directive RED
La société Schwaiger GmbH déclare par les présentes que le type d’équipement radio est conforme à la directive 2014/53/
UE. Le texte complet de la déclaration de conformité UE est disponible à l’adresse Internet suivante :
http://konform.schwaiger.de
Heures de bureau :
Du lundi au vendredi : de 08:00 à 17:00 heures
Schwaiger GmbH
Würzburger Straße 17 | 90579 Langenzenn
Hotline : +49 (0) 9101 702-299
www.schwaiger.de | info@schwaiger.de
19
Page 20
MANUALE ISTRUZIONI
INTRODUZIONE
Congratulazioni e grazie di aver acquistato questa antenna esterna DTA4000 011.
La presente guida per l’utente è ideata come ausilio per l’uso del dispositivo. Legga accuratamente la guida per l’utente.
Conservi le istruzioni per tutta la durata del prodotto e le consegni all’eventuale successivo utilizzatore o proprietario.
Verifichi che il contenuto sia completo e si accerti che non siano contenute parti difettose o danneggiate.
Tutti i nostri apparecchi sono conformi alle disposizioni di sicurezza vigenti al momento dell’acquisto e sono generalmente
sicuri in caso di utilizzo conforme alle disposizioni.
Per rendere più semplice la lettura delle istruzioni per l’uso, l‘antenna esterna DTA4000 011 viene definita di seguito
antenna esterna.
Utilizzo conforme alla destinazione d’uso
• L’antenna esterna serve alla ricezione di programmi radio e televisivi digitali.
Un utilizzo diverso è indicato come non ammissibile!
Avvertenze di sicurezza
• Utilizzare un alimentatore adatto (vedere Dati tecnici). Prestare attenzione alla polarità.
• Questa antenna esterna è un prodotto elettronico che non può essere utilizzato dai bambini!
• Conservarla fuori dalla portata dei bambini.
• Non inserire oggetti nei collegamenti o nelle aperture del prodotto.
• Incaricare sempre un tecnico della riparazione dell’antenna in caso di difetti.
• Prima della pulizia estrarre la spina di alimentazione.
• Pulire l‘antenna esterna solo con un panno leggermente umido e privo di lanugine e non utilizzare detergenti abrasivi.
Prestare particolare attenzione a evitare che l‘acqua (o un prodotto liquido/umidità) penetri nel prodotto.
DATI TECNICI
Gamma di frequenze/di ricezione VHF (174 - 230 MHz)
Canale 5 – 12 & 21 – 60
Guadagno 36 dB
Impedenza 75 Ω
Cavo coassiale 8,5 m incluso
Collegamento ricevitore/TV 5-6 V DC 50 mA
Allacciamento elettrico Alimentatore a spina incluso, 100-240 V AC / 12 V DC 100 mA
Classe di protezione IPX4
UHF (470 -790 MHz)
Contenuto della confezione
• Antenna esterna (UHF / VHF) con amplificatore integrato
• Cavo di collegamento coassiale 8,5 m
• Alimentatore a spina 100-240 V CA/12 V CC 100 mA
• Inseritore di potenza
• Elemento per montaggio su palo
• Adattatore radio (IEC)
• Istruzioni per l‘uso con norme di sicurezza
LUOGO DI INSTALLAZIONE OTTIMALE DELL’ANTENNA ESTERNA
Per garantire la migliore ricezione possibile, assicurarsi che ci siano il minor numero possibile di ostacoli tra il trasmettitore e l‘antenna esterna che potrebbero ostacolare la ricezione.
I ricevitori DVB-T2 in genere dispongono di un indicatore dell’intensità del segnale (indicatore del livello). Tale indicatore
è adatto a trovare la posizione migliore dell’antenna. Si prega di controllare diverse posizioni e orientamenti dell‘antenna
prima di posizionarla definitivamente
20
Page 21

MANUALE ISTRUZIONI
MONTAGGIO DELL‘ANTENNA ESTERNA
A. Montaggio su palo
Inserire la staffa a U attraverso il palo di sostegno, regolare il porta antenna e fissare le viti.
Fissare circa 1 metro del cavo coassiale alla barra di montaggio a una profondità di circa 0,5 m, in modo che l‘antenna
abbia gioco sufficiente per eventuali modifiche di posizione.
0,5m
1m
B. Montaggio a parete
Praticare i fori nella parete in base alla posizione dei fori sul supporto dell‘antenna, inserire tasselli di plastica nei fori,
applicare il supporto al muro e fissarlo con viti.
21
Page 22

MANUALE ISTRUZIONI
C. Fissaggio su ringhiera (balcone)
Montare il porta antenna con il supporto sulla ringhiera. Avvitare il cavo coassiale con il connettore F all‘antenna e fissare
l‘antenna sulla base rotante dopo aver eseguito l‘allineamento appropriato.
Fissaggio del cappuccio impermeabile
Collegare il cavo coassiale alla presa F dell‘antenna e fissare il cavo. Fissare il cappuccio impermeabile in modo che il
collegamento sia coperto e che l‘acqua non possa penetrare.
IMPOSTAZIONE DELLA POSIZIONE DI RICEZIONE
Regolare la posizione dell‘antenna in base alla ricezione di segnali orizzontali o verticali.
Orizzontale
verticale
22
Page 23

MANUALE ISTRUZIONI
COLLEGAMENTO DELL’ANTENNA ESTERNA PER APPARECCHI TV CON
RICEVITORE DVB-T(2) INTEGRATO
Esempio di collegamento (SINISTRA) Esempio di collegamento (DESTRA)
alimentatore
inseritore di potenza
TV
TV
Esempio di collegamento (SINISTRA) Esempio di collegamento (DESTRA)
Alimentazione elettrica attraverso il ricevitore
DVB-T/T2 integrato montato nell’apparecchio TV
1. Assicurarsi che il televisore sia spento. 1. Assicurarsi che il televisore sia spento.
2. Collegare il cavo coassiale dell’Antenna esterna con la
presa dell’antenna del vostro apparecchio TV.
3. A questo punto è possibile accendere l'apparecchio TV. 3. Inserire ora il cavo dell'alimentatore esterno nella
4. Nel menu del vostro televisore selezionare l’alimentazione elettrica da 5 V per alimentare con tensione
l'amplificatore attraverso il cavo coassiale.
5. A questo punto è possibile cercare i programmi ricevibili. Se necessario, consultare le istruzioni per l'uso
del televisore.
Alimentazione elettrica attraverso l’alimentatore
esterno in dotazione
2. Collegare il cavo coassiale dell’Antenna esterna con la
presa dell’antenna del inseritore di potenza.
presa "DC 12 V 100 mA" del inseritore di potenza e
l'alimentatore esterno in una presa da 230 V AC.
4. Collegare il cavo coassiale corto del inseritore di potenza all'ingresso dell'antenna del televisore.
5. Il fatto che l'alimentazione a 5 V del televisore sia
attivata o meno è irrilevante per questa variante di
collegamento.
6. A questo punto è possibile accendere il televisore e
cercare i programmi ricevibili. Se necessario, consultare le istruzioni per l'uso del televisore.
23
Page 24

MANUALE ISTRUZIONI
COLLEGAMENTO DELL’ANTENNA ESTERNA PER APPARECCHI TV SENZA RICEVITORE DVB-T(2)-INTEGRATO
Esempio di collegamento (SINISTRA) Esempio di collegamento (DESTRA)
Receiver
inseritore di potenza
alimentatore
Receiver
TV
Esempio di collegamento (SINISTRA) Esempio di collegamento (DESTRA)
Alimentato dal ricevitore DVB-T(2) Alimentazione elettrica attraverso l’alimentatore
1. Assicurarsi che il televisore sia spento. 1. Assicurarsi che il ricevitore DVB-T/T2 sia spento.
2. Collegare il cavo coassiale dell’Antenna esterna con la
presa dell’antenna del ricevitore DVB-T/T2.
3. A questo punto è possibile accendere l'apparecchio TV
e il ricevitore.
4. Nel menu del ricevitore DVB-T-T2 selezionare l’alimentazione elettrica da 5 V per alimentare con tensione
l'amplificatore integrato nell'antenna attraverso il cavo
coassiale.
5. A questo punto è possibile cercare i programmi ricevibili. Se necessario, consultare le istruzioni per l'uso
del televisore.
esterno in dotazione
2. Collegare il cavo coassiale dell’antenna esterna con la
presa dell’antenna del inseritore di potenza.
3. Inserire ora il cavo dell'alimentatore esterno nella
presa DC 12 V 100 mA del inseritore di potenza e
l'alimentatore esterno in una presa a 230 V AC.
4. Collegare il cavo coassiale del inseritore di potenza
all'ingresso dell'antenna del ricevitore DVB-T(2) .
5. Il fatto che l'alimentazione a 5 V del ricevitore
DVB-T(2) sia attivata o meno è irrilevante per questa
variante di collegamento.
6. Ora è possibile accendere il televisore e il ricevitore
DVB-T(2).
7. A questo punto è possibile cercare i programmi ricevibili. Se necessario, consultare le istruzioni per l'uso del
ricevitore DVB-T(2).
TV
COLLEGAMENTO DELL’ANTENNA ESTERNA PER RADIO DAB+
Esempio di collegamento:
alimentatore
inseritore di potenza
Adattatore radio (IEC)
24
Page 25

MANUALE ISTRUZIONI
1. Assicurarsi che la radio DAB+ sia spenta.
2. Collegare il cavo coassiale dell’antenna esterna con la presa dell’antenna del
inseritore di potenza.
3. Inserire ora il cavo dell‘alimentatore esterno nella presa DC 12 V 100 mA del
inseritore di potenza e l‘alimentatore esterno in una presa a 230 V AC.
4. Collegare il connettore IEC (Radio IEC Connector) in dotazione al cavo
coassiale corto del inseritore di potenza e collegarlo all‘ingresso dell‘antenna
del ricevitore DAB+.
5. A questo punto è possibile cercare i programmi ricevibili. Se necessario,
consultare le istruzioni per l‘uso della radio DAB+.
Smaltimento
Le apparecchiature elettriche ed elettroniche e le batterie non devono essere smaltite insieme ai rifiuti domestici.
Il consumatore è tenuto per legge a restituire apparecchiature elettriche ed elettroniche e batterie al termine
della loro vita utile ai centri di raccolta pubblici appositamente realizzati o a riconsegnarle al centro di vendita. I
dettagli sono regolamentati dalle leggi vigenti a livello nazionale. Il simbolo sul prodotto, sulle istruzioni per l‘uso
o sulla confezione riporta espressamente tale indicazioni.
Esclusione di responsabilità
Schwaiger GmbH non si assume alcuna responsabilità né garanzia in relazione a danni derivanti da un‘installazione o
da un montaggio non corretti o derivanti dall‘utilizzo improprio del prodotto o dal mancato rispetto delle avvertenze in
materia di sicurezza.
Informativa del produttore
Gentile cliente, qualora il vostro rivenditore non potesse aiutarvi, per un consulto tecnico può rivolgersi al nostro servizio
di assistenza.
Dichiarazione di conformità UE semplificata secondo la direttiva RED
L‘azienda SCHWAIGER GmbH dichiara che il tipo di apparecchiatura radio è conforme alla direttiva 2014/53/UE.
Il testo completo della dichiarazione di conformità UE è disponibile al seguente indirizzo internet:
http://konform.schwaiger.de
Orari:
Da lunedì a venerdì: 08:00 - 17:00
Schwaiger GmbH
Würzburger Straße 17 | 90579 Langenzenn
Hotline: +49 (0) 9101 702-299
www.schwaiger.de | info@schwaiger.de
25
Page 26

NÁVOD K OBSLUZE
ÚVOD
Blahopřejeme vám a děkujeme za to, že jste si pořídili venkovní anténu DTA4000 011.
Tento návod k použití vám pomůže při používání a provozu tohoto zařízení. Přečtěte si pozorně návod k použití. Uschovávejte návod po celou dobu životnosti výrobku a předejte jej následujícím uživatelům nebo vlastníkům.
Zkontrolujte prosím, zda je dodávka kompletní a ujistěte se, že neobsahuje žádné vadné nebo poškozené díly.
Všechny přístroje, které prodáváme, odpovídají bezpečnostním předpisům platným ke dni prodeje a jsou při správném
používání v zásadě bezpečné!
Ke snadnějšímu čtení tohoto návodu k obsluze budeme dále v textu uvádět venkovní anténu DTA4000 011 pouze jako
„venkovní anténu“.
POUŽITÍ V SOULADU S URČENÍM
• Venkovní anténa slouží k příjmu digitálních televizních a rádiových programů.
Jiné použití, než je uvedeno, není přípustné!
Bezpečnostní pokyny
• Používejte vhodný síťový adaptér (viz technické údaje). Přitom dbejte na správnou polaritu.
• V případě této venkovní antény se jedná o elektronický výrobek, který nepatří do rukou dětem!
• Proto venkovní anténu ukládejte z dosahu dětí.
• Do přípojek nebo otvorů výrobku nevkládejte žádné předměty.
• V případě závad nechejte venkovní anténu opravit výhradně odborníkem.
• Před čištěním odpojte zástrčku ze zásuvky.
• Venkovní anténu čistěte nanejvýš mírně zvlhčenou utěrkou, která nepouští vlákna. Nepoužívejte agresivní čisticí
prostředky. Dbejte zejména na to, aby do výrobku nepronikla voda (kapalina ani vlhkost).
TECHNICKÉ ÚDAJE
Frekvenční rozsah / rozsah
přijímače
Kanály 5 – 12 & 21 – 60
Zisk 36 dB
Impedance 75 Ω
Koaxiální kabel 8,5 m včetně
Připojení receiveru/TV 5-6 V DC 50 mA
Elektrická přípojka Síťový adaptér přiložen, 100-240 V AC / 12 V DC 100 mA
Typ krytí IPX4
VHF (174 - 230 MHz)
UHF (470 -790 MHz)
Obsah balení
• Aktivní venkovní anténa (VKV) s integrovaným zesilovačem
• Koaxiální připojovací kanál 8,5 m
• Síťový adaptér 100-240 V AC/ 12 V DC 100 mA
• Napájecí výhybka
• Zavěšení na stožár
• Rádiový adaptér (IEC)
• Návod k obsluze s bezpečnostními ustanoveními
OPTIMÁLNÍ MÍSTO INSTALACE VENKOVNÍ ANTÉNY
K dosažení nejlepšího možného příjmu signálu musíte zajistit, aby mezi vysílačem a venkovní anténou bylo co nejméně
překážek, které brání prostupu signálu.
Receivery DVB-T(2) mají často indikátor intenzity signálu (ukazatel hladiny). Tento ukazatel je vhodný k nalezení
nejlepšího umístění antény. Než anténu definitivně umístíte, vyzkoušejte různá umístění.
26
Page 27
NÁVOD K OBSLUZE
MONTÁŽ VENKOVNÍ ANTÉNY
A. Montáž na stožár
Třmen U protáhněte stožárem, nastavte držák antény a upevněte šrouby.
Přivažte cca 1 m koaxiálního kabelu v hloubce cca 0,5 m na upevňovací tyč, aby tak měla anténa dostatečný prostor na
případné změny polohy.
0,5m
1m
B. Nástěnná montáž
Provrtejte otvory do stěny podle pozice otvorů na třmenu antény, protáhněte plastové hmoždinky do otvorů, upevněte
třmen na stěnu a upevněte ho šrouby.
27
Page 28

NÁVOD K OBSLUZE
C. Upevnění na zábradlí (balkón)
Namontujte držák antény se třmenem na zábradlí. Přišroubujte koaxiální kabel s konektorem F na anténu a upevněte
anténu na otočném podstavci odpovídajícím směrem.
Upevnění vodotěsného víčka
Koaxiální kabel připojte ke zdířce F antény a zajistěte kabel. Upevněte vodotěsné víčko, takže připojení bude zakryté a
nemůže dovnitř pronikat žádná voda.
Nastavení směru příjmu
Nastavte polohu antény podle vyzařování horizontálních nebo vertikálních signálů.
Horizontální
VertiKal
28
Page 29

NÁVOD K OBSLUZE
PŘIPOJENÍ VENKOVNÍ ANTÉNY PRO TELEVIZNÍ PŘIJÍMAČE S INTEGROVANÝM PŘIJÍMAČEM DVB-T(2)
Příklad připojení (VLEVO) Příklad připojení (VPRAVO)
síťového zdroje
napájecí výhybky
TV
TV
PŘÍKLAD PŘIPOJENÍ (VLEVO) PŘÍKLAD PŘIPOJENÍ (VPRAVO)
Napájení z instalovaného receiveru DVB-T(2) v
televizním přijímači
1. Zajistěte, aby byl televizní přijímač vypnutý. 1. Zajistěte, aby byl televizní přijímač vypnutý.
2. Propojte koaxiální kabel venkovní antény k přípojce
antény televizního přijímače.
3. Nyní můžete televizní přijímač zapnout. 3. Zapojte nyní kabel externího síťového zdroje do zdířky
4. V nabídce televizního přijímače zapněte napájení 5
V tak, aby byl externí zesilovač napájen koaxiálním
kabelem.
5. Nyní můžete zahájit vyhledávání přijímaných
programů. Případně vyhledejte informace v návodu k
obsluze TV přístroje.
Napájení dodaným externím síťovým zdrojem
2. Spojte koaxiální kabel venkovní antény s anténním
vstupem napájecí výhybky.
„DC 12 V 100 mA“ napájecí výhybky a externího
síťového zdroje do zásuvky 230 V AC.
4. Krátký koaxiální kabel napájecí výhybky připojte k
anténnímu vstupu svého televizního přijímače.
5. Zda je přitom aktivováno elektrické napájení 5 V televizního přijímače, nehraje při této variantě připojení
žádnou roli.
6. Nyní můžete televizní přijímač zapnout a zahájit vyhledávání přijímaných programů. Případně vyhledejte
informace v návodu k obsluze TV přístroje.
29
Page 30

NÁVOD K OBSLUZE
PŘIPOJENÍ VENKOVNÍ ANTÉNY K TELEVIZNÍM PŘIJÍMAČŮM BEZ INTEGROVANÉHO PŘIJÍMAČE DVB-T(2)
Příklad připojení (VLEVO) Příklad připojení (VPRAVO)
Receiver
napájecí výhybky
síťového zdroje
Receiver
TV
PŘÍKLAD PŘIPOJENÍ (VLEVO) Příklad připojení (VPRAVO)
Napájení z receiveru DVB-T(2) Napájení dodaným externím síťovým zdrojem
1. Zajistěte, aby byl televizní přijímač vypnutý. 1. Ujistěte se, že je receiver DVB-T(2) vypnutý.
2. Připojte koaxiální kabel venkovní antény k anténnímu
vstupu přijímače DVB-T(2).
3. Nyní můžete televizní přijímač a receiver zapnout. 3. Nyní zapojte kabel externího síťového zdroje do zdířky
4. V nabídce přijímače DVB-T(2) připojte elektrické napájení 5 V, aby byl prostřednictvím koaxiálního kabelu
napájen zesilovač integrovaný v anténě.
5. Nyní můžete zahájit vyhledávání přijímaných
programů. Případně vyhledejte informace v návodu k
obsluze TV přístroje.
2. Spojte koaxiální kabel venkovní antény s anténním
vstupem napájecí výhybky.
DC 12 V 100 mA napájecí výhybky a externí síťový
zdroj zapojte do síťové zásuvky 230 V AC.
4. Koaxiální kabel napájecí výhybky připojte k anténnímu
vstupu přijímače DVB-T(2).
5. Zda je přitom aktivováno elektrické napájení 5 V
přijímače DVB-T(2), nehraje při této variantě připojení
žádnou roli.
6. Nyní můžete televizní přijímač a receiver DVB-T(2)
zapnout.
7. Nyní můžete zahájit vyhledávání přijímaných
programů. Případně vyhledejte informace v návodu k
obsluze přijímače DVB-T(2).
TV
PŘIPOJENÍ VENKOVNÍ ANTÉNY PRO RÁDIA DAB+
Příklad připojení:
síťového zdroje
napájecí výhybky
Rádiový adaptér (IEC)
30
Page 31

NÁVOD K OBSLUZE
1. Ujistěte se, že je vypnuté rádio DAB+.
2. Spojte koaxiální kabel venkovní antény s anténním vstupem napájecí
výhybky.
3. Nyní zapojte kabel externího síťového zdroje do zdířky DC 12 V 100 mA
napájecí výhybky a externí síťový zdroj zapojte do síťové zásuvky 230 V AC.
4. Napojte přiloženou spojku IEC (konektor rádia IEC) na krátký koaxiální
kabel napájecí výhybky a připojte ho ke vstupu antény přijímače DAB+.
5. Nyní můžete zahájit vyhledávání přijímaných programů. Případně vyhledejte
informace v návodu k obsluze rádia DAB+.
Likvidace
Elektrické a elektronické přístroje a také baterie je zakázáno likvidovat s domovním odpadem. Spotřebitel je ze
zákona povinen odevzdat elektrická a elektronická zařízení a baterie na konci jejich životnosti na sběrných místech, která jsou k tomuto účelu zřízena, nebo v prodejně. Podrobnosti stanoví příslušné zákony dané země. Na toto
ustanovení upozorňuje symbol na výrobku, na návodu k použití resp. na obalu.
Vyloučení ručení
Společnost Schwaiger GmbH nepřejímá žádné ručení za škody, které vznikly v důsledku neodborné instalace nebo montáže či neodborného používání výrobku nebo nedodržování bezpečnostních pokynů.
Informace o výrobci
Vážení zákazníci, pokud byste potřebovali technickou radu a váš specializovaný prodejce by vám nepomohl, obraťte se
na naše oddělení technické podpory.
Zjednodušené prohlášení o shodě EU podle směrnice RED
Firma Schwaiger GmbH tímto prohlašuje, že výrobek splňuje směrnici o dodávání rádiových zařízení na trh 2014/53/EU.
Úplný text prohlášení o shodě EU je k dispozici na následující internetové adrese: http://konform.schwaiger.de
Pracovní doba:
Od pondělí do pátku: 08:00 - 17:00
Schwaiger GmbH
Würzburger Straße 17 | 90579 Langenzenn, Německo
Hotline: +49 (0) 9101 702-299
www.schwaiger.de | info@schwaiger.de
31
Page 32

MANUAL DE INSTRUCCIONES
INTRODUCCIÓN
Lo felicitamos por su compra de esta Antena exterior DTA4000 011. Muchas gracias por elegirnos.
Esta guía del usuario ha sido diseñada para ayudarle a usar y operar este producto. Lea detenidamente el manual de
instrucciones. Conserve las instrucciones durante toda la vida útil del producto y facilíteselas a subsiguientes usuarios
o propietarios.
Compruebe que el contenido está íntegro y asegúrese de que no incluya piezas defectuosas o dañadas.
Todos los dispositivos que comercializamos cumplen las normas de seguridad válidas en el momento de la compra y, en
general, son seguros siempre que se utilicen para el uso previsto.
Para facilitar la lectura de este manual de instrucciones, la antena exterior DTA4000 011 se denominará en lo sucesivo
„Antena exterior“.
Utilización correcta
• La antena externa sirve para la recepción de programas de televisión y radio digital.
No está permitido un uso distinto al indicado.
Indicaciones de seguridad
• Por favor, utilice una fuente de alimentación enchufable adecuada (vea los datos técnicos).
Preste atención a la polaridad.
• ¡Es un producto electrónico que no debe dejarse en manos infantiles!
• Por tanto, manténgala fuera del alcance de los niños.
• No introduzca ningún objeto en las conexiones o aberturas del producto.
• En caso de avería, la antena exterior debe ser reparada únicamente por un especialista.
• Retírela de la conexión a la corriente antes de proceder a su limpieza.
• Para limpiar esta antena exterior, utilice exclusivamente un paño ligeramente humedecido que no suelte pelusas y
absténgase de utilizar limpiadores agresivos. A este respecto, procure especialmente que no penetre agua (fluido/
humedad) en el producto.
DATOS TÉCNICOS
Frecuencia/rango de recepción VHF (174 - 230 MHz)
Canales 5 – 12 & 21 – 60
Gewinn 36 dB
Impedancia 75 Ω
Cable coaxial 8,5 m incluido
Conexión de receptor/TV 5-6 V DC 50 mA
Conexión de corriente Fuente de alimentación incluida, 100-240 V AC / 12 V DC 100 mA
Clase de protección IPX4
UHF (470 -790 MHz)
Contenido del paquete
• Antena externa activa (UHF / VHF) con amplificador integrado
• Cable de conexión coaxial de 8,5 m
• Fuente de alimentación 100-240 V AC/ 12 V DC 100 mA
• Insertador de potencia
• Suspensión en mástil
• Adaptador (IEC) de radio
• Manual de uso con normas de seguridad
UBICACIÓN ÓPTIMA DE LA ANTENA EXTERIOR
Para garantizar la mejor recepción posible, asegúrese de que entre el transmisor y la antena exterior existe la menor
cantidad de obstáculos posibles, que pueden suponer una resistencia para la señal.
Los receptores DVB-T(2) suelen tener una pantalla que muestra la intensidad de la señal (indicador de nivel). Esta pan-
talla sirve para encontrar la mejor posición para la antena. Compruebe diferentes posiciones antes de colocar la antena
en la posición definitiva.
32
Page 33

MANUAL DE INSTRUCCIONES
MONTAJE DE LA ANTENA EXTERNA
A. Montaje en mástil
Inserte el perno en U en el mástil, instale el soporte de la antena y apriete los tornillos.
Ate aproximadamente 1 metro de cable coaxial a la barra de sujeción a una profundidad de unos 0,5 m a fin de que la
antena tenga suficiente espacio para un eventual cambio de posición.
0,5m
1m
B. Montaje en pared
Perfore agujeros en la pared de acuerdo con la posición de los agujeros en el soporte de la antena, inserte clavijas plásticas en los agujeros, sujete el soporte a la pared y asegúrelo con tornillos.
33
Page 34

MANUAL DE INSTRUCCIONES
C. Sujección en barandillas (balcón)
Instale el soporte de la antena con la abrazadera en la barandilla. Atornille el cable coaxial con el conector -F a la antena
y fije la antena a la base giratoria en la dirección adecuada.
Fijación de la tapa impermeable
Conecte el cable coaxial a la toma-F de la antena y asegure el cable. Apriete la tapa impermeable de modo que la conexión quede cubierta y no pueda penetrar el agua.
AJUSTE DE LA DIRECCIÓN DE RECEPCIÓN
Ajuste la posición de la antena de acuerdo con la emisión de señales horizontales y verticales.
Horizontal
Vertical
34
Page 35

MANUAL DE INSTRUCCIONES
CONEXIÓN DE LA ANTENA EXTERIOR EN APARATOS DE TELEVISIÓN CON
RECEPTOR DVB-T(2) INTEGRADO
Ejemplo de conexión (IZQUIERDA) Ejemplo de conexión (DERECHA)
fuente de alimentación
insertador de potencia
TV
TV
EJEMPLO DE CONEXIÓN (IZQUIERDA) Ejemplo de conexión (DERECHA)
Alimentación mediante el receptor DVB-T(2) integrado en el aparato de televisión
1. Asegúrese de que la televisión está encendida. 1. Asegúrese de que la televisión está encendida
2. Utilice el cable coaxial de la antena exterior en el
conector de antena de la televisión.
3. Ahora puede encender la televisión. 3. Introduzca ahora el cable de la fuente de alimentación
4. En el menú de su aparato de televisión, active la
alimentación de corriente de 5 V para alimentar el
amplificador exterior con la corriente a través del cable
coaxial.
5. Ahora puede buscar programas dentro del rango. Si es
necesario, consulte las instrucciones de funcionamiento del televisor.
Alimentación de corriente mediante el adaptador
externo suministrado
2. Conecte el cable coaxial de la antena exterior al conector de antena del insertador de potencia.
externar en la toma del insertador de potencia «DC 12
V 100 mA» la fuente de alimentación externa en un
enchufe de pared de 230 V AC.
4. Conecte el cable coaxial corto del insertador de potencia a la entrada de antena de su televisor.
5. Si la fuente de alimentación de 5 V del televisor está
activada, no juega ningún papel en esta variante de
conexión.
6. Ahora puede encender la televisión y buscar programas dentro del rango. Si es necesario, consulte las
instrucciones de funcionamiento del televisor.
35
Page 36

MANUAL DE INSTRUCCIONES
CONEXIÓN DE LA ANTENA EXTERIOR EN APARATOS DE TELEVISIÓN SIN
RECEPTOR DVB-T(2) INTEGRADO
Ejemplo de conexión (IZQUIERDA) Ejemplo de conexión (DERECHA)
fuente de
Receiver
insertador de potencia
alimentación
Receiver
TV
EJEMPLO DE CONEXIÓN (IZQUIERDA) EJEMPLO DE CONEXIÓN (DERECHA)
Alimentación mediante el receptor DVB-T(2) Alimentación de corriente mediante el adaptador
1. Asegúrese de que la televisión está encendida. 1. Asegúrese que el receptor DVB-T(2) esté apagado.
2. Utilice el cable coaxial de la antena exterior en el
conector de antena del receptor DVB-T(2).
3. Ahora puede encender la televisión y el receptor. 3. Ahora conecte el cable de la fuente de alimentación
4. En el menú del receptor DVB-T (2), conecte la fuente
de alimentación de 5 V para suministrar energía al
amplificador integrado en la antena a través del cable
coaxial.
5. Ahora puede buscar programas dentro del rango. Si es
necesario, consulte las instrucciones de funcionamiento del televisor.
externo suministrado
2. Conecte el cable coaxial de la antena externa a la
conexión de antena del insertador de potencia.
externa a la toma de12 V DC 100 mA del insertador de
potencia y la fuente de alimentación externa a la toma
de 230 V CA.
4. Conecte el cable coaxial del insertador de potencia a la
entrada de antena de su receptor DVB-T(2).
5. No importa si la fuente de alimentación de 5 V del
receptor DVB-T (2) está activada en esta variante de
conexión.
6. Ahora puede encender la televisión y el receptor
DVB-T(2).
7. Ahora puede buscar programas dentro del rango. Si es
necesario, consulte las instrucciones de funcionamiento del receptor DVB-T (2).
TV
CONEXIÓN DE LA ANTENA EXTERIOR
Ejemplo de conexión:
insertador de potencia
fuente de alimentación
Adaptador (IEC) de radio
36
Page 37

MANUAL DE INSTRUCCIONES
1. Asegúrese de que la radio DAB+ está desconectada.
2. Conecte el cable coaxial de la antena externa a la conexión de antena del
insertador de potencia.
3. Ahora conecte el cable de la fuente de alimentación externa a la toma de12
V DC 100 mA del insertador de potencia y la fuente de alimentación externa
a la toma de 230 V CA.
4. Enchufe el conector IEC incluido (Conector de radio IEC) en el cable coaxial
corto del insertador de potencia y conéctelo a la entrada de antena de su
receptor DAB+.
5. Ahora puede buscar programas dentro del rango. Si es necesario, consulte
las instrucciones de funcionamiento de la radio DAB+.
Eliminación
Los dispositivos eléctricos y electrónicos, así como las pilas, no se deben eliminar con la basura doméstica. El
consumidor está legalmente obligado a depositar los dispositivos eléctricos y electrónicos, así como las pilas, al
final de su vida útil en los puntos públicos de recogida establecidos a tal efecto o a devolverlos en el punto de
venta. Los pormenores al respecto se regulan en la correspondiente legislación nacional. El símbolo que aparece
en el producto, el manual de instrucciones o en el embalaje hace referencia esta disposición.“
Exención de responsabilidad
Schwaiger GmbH declina toda responsabilidad y garantía por aquellos años que resulten de una instalación o montaje
incorrectos, así como de un uso inadecuado del producto o de un incumplimiento de las indicaciones de seguridad.
Información del fabricante
Estimado cliente:
En caso de que necesite asesoramiento técnico y su distribuidor especializado no pueda ayudarle, le rogamos que se
ponga en contacto con nuestro servicio técnico.
Declaración de conformidad simplificada según las Directivas RED
Por la presente, la empresa Schwaiger GmbH declara que el tipo de equipo radioeléctrico cumple con la Directiva
2014/53/UE
El texto completo de la Declaración de conformidad UE se encuentra disponible en la siguiente dirección de Internet:
http://konform.schwaiger.de
Horario de oficina:
De lunes a viernes: 8:00-17:00 horas
Schwaiger GmbH
Würzburger Straße 17 | 90579 Langenzenn
Línea directa: +49 (0) 9101 702-299
www.schwaiger.de | info@schwaiger.de
37
Page 38

BEDIENINGSHANDLEIDING
INVOERING
Gefeliciteerd en bedankt voor de aankoop van de buitenantenne DTA4000 011.
Deze gebruikershandleiding is ontworpen om u te helpen het toestel te gebruiken en te bedienen. Lees de gebruiksaanwijzing zorgvuldig door. Bewaar de handleiding gedurende de volledige levensduur van het product en geef deze door
aan de volgende gebruiker of bezitter.
Controleer de inhoud op volledigheid en verzeker u ervan dat er geen ontbrekende of beschadigde onderdelen in zitten.
Alle door ons verhandelde apparaten stemmen overeen met de bij de aankoop geldende veiligheidsbepalingen en zijn bij
doelgericht gebruik fundamenteel veilig!
Om het lezen van deze gebruiksaanwijzing te vergemakkelijken, wordt de buitenantenne DTA4000 011 met „buitenantenne“ aangeduid.
Doelgericht gebruik
• De buitenantenne dient voor de ontvangst van digitale televisie- en radioprogramma‘s.
Een ander gebruik dan aangegeven is niet toegelaten!
Veiligheidsinstructies
• Gebruik een geschikte stekkervoeding (zie technische gegevens). Let ook op de polariteit.
• Deze buitenantenne is een elektronisch product dat niet in kinderhanden thuishoort!
• Bewaar de buitenantenne daarom buiten het bereik van kinderen.
• Breng geen objecten in de aansluitingen of openingen van het product.
• Laat de buitenantenne bij defecten alleen door een vakman repareren.
• Trek de stekker uit het stopcontact voordat u het apparaat schoonmaakt.
• Reinig de buitenantenne met een pluisvrije, licht vochtige doek en gebruik geen agressieve reinigingsmiddelen. Let er
hierbij in het bijzonder op, dat geen water (geen vloeistoffen) in het product komt.
TECHNISCHE GEGEVENS
Frequentie- / ontvangstbereik VHF (174 - 230 MHz)
Kanalen 5 – 12 & 21 – 60
Versterking 36 dB
Impedantie 75 Ω
Coaxkabel 8,5 m inclusief
Aansluiting ontvanger/TV 5-6 V DC 50 mA
Netaansluiting Stekkervoeding inclusief, 100-240 V AC / 12 V DC 100 mA
Beschermingsklasse IPX4
UHF (470 -790 MHz)
VERPAKKINGSINHOUD
• Actieve buitenantenne (UHF / VHF) met geïntegreerde versterker
• Coax-aansluitkabel 8,5 m
• Stekkervoeding 100-240 V AC / 12 V DC 100 mA
• Duplexer
• Mastophanging
• Radio (IEC) adapter
• Gebruiksaanwijzing met veiligheidsvoorschriften
OPTIMALE OPSTELLINGSPLAATS VOOR DE BUITENANTENNE
Voor een zo goed mogelijke ontvangst moet u ervoor zorgen dat er zich zo weinig mogelijk obstakels tussen de zender
en de buitenantenne bevinden, die het signaal zouden kunnen hinderen.
DVB-T(2)-ontvangers hebben vaak een signaalsterkte-indicator (niveaumeter). Dit display is geschikt, om de beste
antenneplaats te vinden. Probeer verschillende plaatsen en oriëntaties voor de antenne, voordat u deze de definitieve
plaats geeft.
38
Page 39

BEDIENINGSHANDLEIDING
MONTAGE VAN DE BUITENANTENNE
A. Montage aan de mast
U-beugel door de mast steken, antennehouder instellen en de schroeven bevestigen
Bevestig ongeveer 1 meter van de coaxkabel op 0,5 m hoogte aan de bevestigingsstang, zodat de antenne genoeg speling heeft voor eventuele positiewijziging.
0,5m
1m
B. Wandmontage
Boor gaten in de wand die overeenkomen met de plaats van de openingen in de antennebeugel, stop kunststofpluggen
in de gaten, bevestig de beugel aan de wand en maak deze vast met schroeven.
39
Page 40

BEDIENINGSHANDLEIDING
C. Bevestiging aan de balustrade (balkon)
Monteer de antennehouder met de beugel aan de balustrade. Schroef de coaxkabel met de F-stekker aan de antenne en
fixeer de antenne op de draaivoet met de juiste oriëntatie.
Bevestiging van de waterdichte kap
Sluit de coaxkabel aan op de F-aansluiting van de antenne en borg de kabel. Bevestig de waterdichte kap, zodat de
aansluiting is afgedekt en er geen water kan binnendringen.
INSTELLING VAN DE ONTVANGSTRICHTING
Stel de antennepositie zo in dat deze overeenkomt met de uitstraling van horizontale of verticale signalen.
Horizontaal
Verticaal
40
Page 41

BEDIENINGSHANDLEIDING
AANSLUITEN VAN DE BUITENANTENNE VOOR TV-APPARATEN MET
GEÏNTEGREERDE DVB-T(2)-RECEIVER
Aansluitvoorbeeld (LINKS) Aansluitvoorbeeld (RECHTS)
etvoeding
duplexer
TV
TV
AANSLUITVOORBEELD (LINKS) AANSLUITVOORBEELD (RECHTS)
Voeding via de ingebouwde DVB-T(2)-ontvanger in
het TV-toestel
1. Zorg ervoor dat het televisietoestel is uitgeschakeld. 1. Zorg ervoor dat het televisietoestel is uitgeschakeld.
2. Verbind de coaxkabel van de buitenantenne met de
antenne-aansluiting van het TV-toestel.
3. Nu kunt u het televisietoestel inschakelen. 3. Steek nu de kabel in de externe netvoeding in de
4. Schakel in het menu van uw TV-toestel de 5V voeding
in om de externe versterker via de coaxkabel van
spanning te voorzien.
5. Nu kunt u naar te ontvangen programma's zoeken.
Raadpleeg hiervoor eventueel de gebruiksaanwijzing
van het TV-toestel.
Voeding via de meegeleverde externe netvoeding
2. Verbind de coaxkabel van de buitenantenne met de
antenne-aansluiting van de duplexer.
aansluiting „DC 12 V 100 mA“ van de duplexer en de
externe netvoeding in een 230 V AC contactdoos.
4. De korte coaxkabel van de duplexer sluit u aan op de
antenne-ingang van uw TV-toestel.
5. Of de 5V stroomvoorziening van het TV-toestel hierbij
geactiveerd is, speelt bij deze aansluitvariant geen rol.
6. Nu kunt u het televisietoestel inschakelen en naar te
ontvangen programma's zoeken. Raadpleeg hiervoor
eventueel de gebruiksaanwijzing van het TV-toestel.
41
Page 42

BEDIENINGSHANDLEIDING
AANSLUITEN VAN DE BUITENANTENNE VOOR TV-APPARATEN ZONDER
GEÏNTEGREERDE DVB-T(2)-RECEIVER
Anschlussbeispiel (LINKS) Anschlussbeispiel (RECHTS)
Receiver
duplexer
etvoeding
Receiver
TV
AANSLUITVOORBEELD (LINKS) AANSLUITVOORBEELD (RECHTS)
Voeding via de DVB-T(2)-ontvanger Voeding via de meegeleverde externe netvoeding
1. Zorg ervoor dat de DVB-T(2)-ontvanger is uitgeschakeld.
1. Zorg ervoor dat het televisietoestel is uitgeschakeld. 2. Sluit de coaxkabel van de buitenantenne aan op de
2. Sluit de coaxkabel van de buitenantenne aan op de
antenneaansluiting van de DVB-T(2)-ontvanger.
3. Nu kunt u het televisietoestel en de ontvanger inschakelen.
4. Schakel in het menu van de DVB-T(2)-ontvanger de 5V
stroomvoorziening in om de in de antenne geïntegreerde versterker via de coaxkabel van spanning te
voorzien.
5. Nu kunt u naar te ontvangen programma's zoeken.
Raadpleeg hiervoor eventueel de gebruiksaanwijzing
van het TV-toestel.
antenneaansluiting van de duplexer.
3. Steek nu de kabel in de externe netvoeding in de
aansluiting DC 12 V 100 mA van de duplexer en de externe netvoeding in een 230 V AC contactdoos.
4. De coaxkabel van de duplexer sluit u aan op de antenne-ingang van uw DVB-T(2)-ontvanger.
5. Of de 5V stroomvoorziening van de DVB-T(2)-ontvanger hierbij geactiveerd is, speelt bij deze aansluitvariant geen rol.
6. Nu kunt u het televisietoestel en de DVB-T(2)-ontvanger inschakelen.
7. Nu kunt u naar te ontvangen programma's zoeken.
Raadpleeg hiervoor eventueel de gebruiksaanwijzing
van de DVB-T(2)-ontvanger.
TV
AANSLUITEN VAN DE BUITENANTENNE VOOR DAB+ RADIO’S
Aansluitvoorbeeld:
etvoeding
duplexer
Radio (IEC) adapter
42
Page 43

BEDIENINGSHANDLEIDING
1. Zorg ervoor dat de DAB+ radio is uitgeschakeld.
2. Sluit de coaxkabel van de buitenantenne aan op de antenneaansluiting van
de duplexer.
3. Steek nu de kabel in de externe netvoeding in de aansluiting DC 12 V 100
mA van de duplexer en de externe netvoeding in een 230 V AC contactdoos.
4. Steek het meegeleverde IEC-koppelstuk (radio IEC connector) op de korte
coaxkabel van de duplexer en sluit deze aan op de antenne-ingang van uw
DAB+ ontvanger.
5. Nu kunt u naar te ontvangen programma‘s zoeken. Raadpleeg hiervoor
eventueel de gebruiksaanwijzing van de DAB+ radio.
Afvalverwerking
Elektrische en elektronische toestellen alsook accu’s mogen niet met het huishoudelijk afval verwerkt worden. De
verbruiker is wettelijk verplicht, elektrische en elektronische toestellen alsook accu’s bij het einde van hun levensduur terug te bezorgen aan de daarvoor ingerichte, publieke inzamelplaatsen of aan de verkoopplaatsen. Bijzonderheden hierover worden geregeld door de respectievelijke nationale wetgeving. Het symbool op het product, de
bedieningshandleiding resp. de verpakking verwijst naar deze bestemming.
Uitsluiting van aansprakelijkheid
Schwaiger GmbH aanvaardt geen enkele aansprakelijkheid en garantie voor schade die resulteert uit ondeskundige
installatie of montage alsook ondeskundig gebruik van het product of een niet naleven van de veiligheidsinstructies.
Fabrikanteninformatie
Geachte klant, indien u technisch advies nodig heeft en uw vakhandelaar u niet kan helpen, gelieve onze technische
ondersteuning te contacteren.
Vereenvoudigde EU-conformiteitverklaring volgens RED-richtlijn
Hierbij verklaart Schwaiger GmbH, dat het beschreven radio-installatieproduct voldoet aan de Richtlijn 2014/53/EU.
De volledige tekst van de EU-conformiteitsverklaring is beschikbaar op volgend Internetadres:
http://konform.schwaiger.de
Openingstijden:
Maandag tot vrijdag: 08:00 - 17:00 uur
Schwaiger GmbH
Würzburger Straße 17 | 90579 Langenzenn
Hotline: +49 (0) 9101 702-299
www.schwaiger.de | info@schwaiger.de
43
Page 44

ИНСТРУКЦИЯ ПО ЭКСПЛУАТАЦИИ
ВВЕДЕНИЕ
Поздравляем Вас с приобретением наружной антенны DTA4000 011 и благодарим за выбор нашего продукта.
Настоящее руководство по эксплуатации разработано, чтобы помочь вам в применении и эксплуатации данного
изделия. Внимательно прочитайте инструкцию по эксплуатации. Храните это руководство в течение всего срока
службы изделия и передавайте его новым владельцам или пользователям.
Проверьте полноту комплекта поставки и убедитесь в отсутствии дефектных или поврежденных деталей.
На все продаваемые нами устройства распространяются правила техники безопасности, действительные на момент
приобретения, и все эти устройства являются абсолютно безопасными при условии их надлежащего использования!
Для облегчения чтения этой инструкции по эксплуатации наружная антенна DTA4000 011 называется здесь просто
«Наружная антенна».
Надлежащее использование
• Наружная антенна служит для приема программ радио и телевидения.
Использование этого прибора в целях, отличных от указанных здесь, недопустимо!
УКАЗАНИЯ ПО ТЕХНИКЕ БЕЗОПАСНОСТИ
• Используйте подходящий сетевой адаптер для розетки (см. Технические характеристики).
• Учитывайте полярность.
• Данная наружная антенна представляет собой электронное устройство, и ее нужно беречь от детей!
• Поэтому хранить наружную антенну следует в недоступном для детей месте.
• Не вставляйте никаких предметов в разъемы и отверстия устройства.
• Поручайте ремонт неисправной наружной антенны только специалисту.
• Перед очисткой вынимайте сетевой штекер из розетки.
• Протирать наружную антенну следует слегка влажной безворсовой салфеткой. Не используйте агрессивныех
чистящие средства. Особое внимание следует уделить защите изделия от попадания в него воды, жидкостей или
влаги.
ТЕХНИЧЕСКИЕ ДАННЫЕ
Диапазон частот/диапазон приема ОВЧ (174 - 230 МГц)
Каналы 5 – 12 & 21 – 60
Усиление 36 дБ
Импеданс 75 Ω
Коаксиальный кабель 8,5 м в комплекте
Подключение ресивера/ТВ 5-6 В пост. т., 50 мА
Электрический ввод: Блок питания со встроенной вилкой, 100-240 В AC / 12 В DC 100 мА
Класс защиты: IPX4
УВЧ (470 -790 МГц)
СОДЕРЖИМОЕ УПАКОВКИ
• Активная наружная антенна (UHF / VHF) с интегрированным усилителем
• Коаксикальный соединительный кабель 8,5 м
• Блок питания 100-240 В AC/ 12 В DC 100 мА
• Распределительный фильтр
• Подвеска опоры
• Радиоадаптер (IEC)
• Инструкция по эксплуатации с положениями по безопасности
ОПТИМАЛЬНОЕ МЕСТО УСТАНОВКИ НАРУЖНОЙ АНТЕННЫ
Чтобы обеспечить оптимальный прием, убедитесь, что между передатчиком и наружной антенной имеется как
можно меньше препятствий, которые могут мешать прохождению сигнала.
DVB-T(2) ресиверы часто имеют индикатор интенсивности сигнала (индикатор уровня). Этот индикатор позволяет
определить оптимальное положение антенны. Испробуйте различные положения, прежде чем окончательно
установить антенну.
44
Page 45

ИНСТРУКЦИЯ ПО ЭКСПЛУАТАЦИИ
МОНТАЖ НАРУЖНОЙ АНТЕННЫ
A. Крепление на опоре
U-образный зажим вставить через опору, установить опору антенны и закрепить болтами.
Отмотайте около 1 метра коаксикального кабеля на глубину около 0,5 м в подпорку, чтобы антенна свободно
поворачивалась в случае изменения ее положения
0,5m
1m
B. Крепление на стену
Просверлите отверстия в стене, соотнося отверстия крепления антенны, вставьте дюбели из полимерного
материала, приложите зажим к стене и закрепите его болтами.
45
Page 46

ИНСТРУКЦИЯ ПО ЭКСПЛУАТАЦИИ
C. Установка на перилах (балконе)
Установите опору антенны с помощью зажима для перил. Прикрутите коаксикальный кабель с помощью F-штекера
к антенне и зафиксируйте антенну на вращающейся панели в соответствующем направлении.
Крепление водозащитного колпака
Вставьте коаксикальный кабель в F-гнездо антенны и закрепите его. Установите водонепроницаемый колпак таким
образом, чтобы защитить узел соединения, на который не должна попадать вода или влага.
УСТАНОВКА НАПРАВЛЕНИЯ ПРИЕМА
Установите антенну в соответствии с излучением горизонтальных и вертикальных сигналов.
Горизонтальный
Вертикальный
46
Page 47

ИНСТРУКЦИЯ ПО ЭКСПЛУАТАЦИИ
ПОДКЛЮЧЕНИЕ НАРУЖНОЙ АНТЕННЫ К ТЕЛЕВИЗОРАМ СО
ВСТРОЕННЫМ DVB-T(2) РЕСИВЕРОМ
Пример подключения (СЛЕВА) Пример подключения (СПРАВА)
блока питания
распределительного
фильтра
TV
TV
ПРИМЕР ПОДКЛЮЧЕНИЯ (СЛЕВА) ПРИМЕР ПОДКЛЮЧЕНИЯ (СПРАВА)
Электропитание через встроенный DVB-T(2)
ресивер телевизора
1. Убедитесь, что телевизор выключен. 1. Убедитесь, что телевизор выключен.
2. Подключите коаксиальный кабель наружной
антенны к гнезду для антенны Вашего телевизора.
3. Теперь можно включить телевизор. 3. Подключите кабель внешнего блока питания в „DC
4. В меню телевизора установите параметр
электропитания 5 В, чтобы создать во внешнем
усилителе напряжение через коаксикальный
кабель.
5. Теперь можно выполнить поиск принимаемых
программ. Для получения необходимой информации
просмотрите инструкцию по эксплуатации для
телевизора.
Подача напряжения питания через внешний
сетевой блок из комплекта поставки
2. Соедините коаксикальный кабель наружной
антенны с муфтой распределительного фильтра .
12 В 100 мА“ к гнезду распределительного фильтра,
а также внешний блок питания к розетке 230 В AC.
4. Короткий коаксикальный кабель
распределительного фильтра подсоедините к входу
антенны Вашего телевизора.
5. При таком варианте подключения, не играет
никакой роли, активируется ли электропитание 5 В
на Вашем телевизоре.
6. Теперь можно включить телевизор и выполнить
поиск принимаемых программ. Для получения
необходимой информации просмотрите инструкцию
по эксплуатации для телевизора.
47
Page 48

ИНСТРУКЦИЯ ПО ЭКСПЛУАТАЦИИ
ПОДКЛЮЧЕНИЕ НАРУЖНОЙ АНТЕННЫ К ТЕЛЕВИЗОРАМ БЕЗ
ВСТРОЕННОГО DVB-T(2) РЕСИВЕРА
Пример подключения (СЛЕВА) Пример подключения (СПРАВА)
Receiver
распределительного
фильтра
блока питания
Receiver
TV
ПРИМЕР ПОДКЛЮЧЕНИЯ (СЛЕВА) ПРИМЕР ПОДКЛЮЧЕНИЯ (СПРАВА)
Электропитание через DVB-T(2) ресивер Подача напряжения питания через внешний
1. Убедитесь, что телевизор выключен. 1. Убедитесь, что DVB-T(2) ресивер выключен.
2. Подключите коаксикальный кабель наружной
антенны к гнезду для антенны DVB-T(2)-ресивера.
3. Теперь можно включить телевизор и ресивер. 3. Подключите кабель внешнего блока питания в
4. Установите в меню DVB-T(2)-ресивера
электропитание 5 В, чтобы создать в
интегрированном в антенне усилителе напряжение
через коаксикальный кабель.
5. Теперь можно выполнить поиск принимаемых
программ. Для получения необходимой информации
просмотрите инструкцию по эксплуатации для
телевизора.
сетевой блок из комплекта поставки
2. Подключите коаксикальный кабель наружной
антенны к гнезду для антенны распределительного
фильтра..
муфту DC 12 В 100 мA распределительного фильтра,
а также внешний блок питания к розетке 230 В AC
4. Коаксикальный кабель распределительного фильтра
вставьте в гнездо для антенны Вашего DVB-T(2)ресивера
5. При таком варианте подключения, не играет
никакой роли, активируется ли электропитание 5В
на DVB-T(2)-ресивере.
6. Теперь можно включить телевизор и DVB-T(2)
ресивер.
7. Теперь можно выполнить поиск принимаемых
программ. Для получения необходимой информации
просмотрите инструкцию по эксплуатации для DVBT(2)-ресивера.
TV
ПОДКЛЮЧЕНИЕ НАРУЖНОЙ АНТЕННЫ ДЛЯ РАДИО DAB+
Пример подключения:
распределительного
фильтра
блока питания
Радиоадаптер (IEC)
48
Page 49

ИНСТРУКЦИЯ ПО ЭКСПЛУАТАЦИИ
1. Убедитесь в том, что радио DAB+ выключено.
2. Вставьте коаксикальный кабель наружной антенны в гнездо для антенны
распределительного фильтра.
3. Подключите кабель внешнего блока питания к муфте DC 12 В 100 мA
распределительного фильтра, а также внешний блок питания к розетке
230 В AC
4. Подключите имеющийся соединитель IEC (Radio IEC Connector) с
короткому коаксикальному кабелю распределительного фильтра и,
через гнездо для антенны, к приемнику DAB+.
5. Теперь можно выполнить поиск принимаемых программ. Для получения
необходимой информации просмотрите инструкцию по эксплуатации для
радио DAB+.
Утилизация
Электрические и электронные приборы, а также аккумуляторные батареи нельзя утилизировать как бытовые
отходы. По окончании срока использования электрических и электронных приборов, а также аккумуляторных
батарей пользователь в законном порядке обязан сдавать их в специальные пункты сбора или возвращать в
пункт продажи, в котором он их приобрел. Более подробно эти процедуры описаны в законодательстве
соответствующей федеральной земли. Символ, размещенный на устройстве, в инструкции по эксплуатации и на
упаковке, указывает на эти положения.
Исключение ответственности
Ответственность и гарантия компании Schwaiger GmbH не распространяются на ущерб, возникший вследствие
ненадлежащего выполнения сборки или монтажа, ненадлежащего использования изделия или несоблюдения
указаний по технике безопасности.
Информация о производителе
Уважаемый покупатель, с вопросами технического характера, на которые не может ответить ваш дилер,
обращайтесь в нашу службу технической поддержки.
Упрощенная декларация соответствия ЕС согласно директиве RED
Настоящим компания Schwaiger GmbH заявляет, что описанное здесь устройство радиосвязи отвечает требованиям
директивы 2014/53/ЕU.
С полным текстом сертификата о соответствии ЕС можно ознакомиться на веб-сайте по следующему адресу:
http://konform.schwaiger.de
Время работы:
С понедельника по пятницу: с 08:00 до 17:00
Schwaiger GmbH
Würzburger Straße 17 | 90579 Langenzenn
Горячая линия: +49 (0) 9101 702-299
www.schwaiger.de | info@schwaiger.de
49
Page 50

NÁVOD NA OBSLUHU
ÚVOD
Srdečne blahoželáme a ďakujeme za kúpu vonkajšej antény DTA4000 011.
Táto používateľská príručka vás naučí používať a prevádzkovať toto zariadenie. Návod na obsluhu si starostlivo prečítajte.
Návod uschovajte počas celej doby životnosti výrobku a odovzdajte ho aj nasledujúcemu používateľovi alebo majiteľovi.
Skontrolujte kompletnosť obsahu balenia a ubezpečte sa, že neobsahuje chybné alebo poškodené diely.
Všetky nami predávané zariadenia zodpovedajú bezpečnostným ustanoveniam platným k dátumu kúpy a v prípade
používania v súlade s účelom sú spravidla bezpečné!
Pre jednoduchšie čítanie tohto návodu na obsluhu je vonkajšia anténa DTA4000 011 nazývaná ako „vonkajšia anténa“.
Použitie v súlade s účelom
• Vonkajšia anténa slúži na príjem digitálnych televíznych a rozhlasových programov
Iné použitie, ako je uvedené, nie je dovolené!
Bezpečnostné pokynY
• Používajte vhodný sieťový adaptér (pozri technické údaje). Dávajte pozor na polaritu.
• Táto vonkajšia anténa je elektronický výrobok, ktorý nepatrí do rúk deťom!
• Preto udržiavajte vonkajšiu anténu mimo dosahu detí.
• Do prípojok alebo otvorov výrobku nezavádzajte žiadne predmety.
• V prípade poruchy nechajte vonkajšiu anténu opraviť len odborníkovi.
• Pred čistením vytiahnite sieťovú zástrčku.
• Vonkajšiu anténu čistite nanajvýš mierne navlhčenou handričkou, ktorá napúšťa vlákna, a nepoužívajte agresívne
čistiace prostriedky. Pritom dbajte zvlášť na to, aby do výrobku neprenikla žiadna voda (žiadna tekutina/vlhkosť).
TECHNICKÉ ÚDAJE
Rozsah frekvencií a príjmu VHF (174 - 230 MHz)
Kanály 5 – 12 & 21 – 60
Zisk 36 dB
Impedancia 75 Ω
Koaxiálny kábel 8,5 m vrátane
Prípojka pre prijímač/TV 5-6 V DC 50 mA
Elektrická prípojka Vrátane sieťového adaptéra 100 – 240 V AC/12 V DC 100 mA
Trieda ochrany IPX4
UHF (470 -790 MHz)
OBSAH BALENIA
• Aktívna vonkajšia anténa (UHF/VHF) s integrovaným zosilňovačom
• Koaxiálny prípojný kábel 8,5 m
• Sieťový adaptér 100-240 V AC/12 V DC 100 mA
• Napájacia výhybka SAT + TV
• Zavesenie na stĺp
• Rádiový adaptér (IEC)
• Návod na obsluhu s bezpečnostnými predpismi
OPTIMÁLNE MIESTO INŠTALÁCIE VONKAJŠEJ ANTÉNY
Aby sa zaručil čo najlepší príjem, mali by ste zabezpečiť, aby sa medzi vysielačom a vonkajšiu anténou nachádzalo čo
najmenej prekážok, ktoré predstavujú odpor pre signál.
Prijímače DVB-T(2) majú často indikátor sily signálu (indikátor hladiny). Tento indikátor je vhodný na nájdenie najlepšej
polohy antény. Skontrolujte rôzne polohy, skôr ako anténu umiestnite do definitívnej polohy.
richtungen der Antenne, bevor Sie diese endgültig positionieren
50
Page 51

NÁVOD NA OBSLUHU
MONTÁŽ VONKAJŠEJ ANTÉNY
A. Montáž na stĺp
Rameno v tvare U presuňte cez stĺp, držiak antény nastavte a upevnite skrutky.
Asi 1 meter koaxiálneho kábla pripevnite v hĺbke asi 0,5 m na upevňovacej tyči, aby mala anténa dostatok vôle v prípade
zmeny polohy.
0,5m
1m
B. Nástenná montáž
Do steny vyvŕtajte otvory v súlade s otvormi na ramene antény, do otvorov zaveďte plastové hmoždinky, rameno upevnite na stenu a pripevnite ho pomocou skrutiek.
51
Page 52

NÁVOD NA OBSLUHU
C. Upevnenie na zábradlie (balkón)
Držiak antény pomocou ramena namontujte na zábradlie. Koaxiálny kábel priskrutkujte pomocou F konektora k anténe
a anténu zafixujte na otočnom podstavci v súlade s príslušným nasmerovaním.
Upevnenie vodotesného krytu
Koaxiálny kábel pripojte k zdierke F na anténe a kábel zaistite. Vodotesný kryt upevnite tak, aby bola zakrytá prípojka a
nemohla do nej vniknúť voda.
NASTAVENIE SMERU PRÍJMU
Polohu antény nastavte v súlade s vysielaním horizontálnych a vertikálnych signálov
Horizontálne
Vertikálne
52
Page 53

NÁVOD NA OBSLUHU
PRIPOJENIE VONKAJŠEJ ANTÉNY PRE TV PRÍSTROJE S INTEGROVANÝM
PRIJÍMAČOM DVB-T(2)
Príklad pripojenia (VĽAVO) Príklad pripojenia (VPRAVO)
sieťového zdroja
sieťového zdroja
TV
TV
PRÍKLAD PRIPOJENIA (VĽAVO) PRÍKLAD PRIPOJENIA (VPRAVO)
Elektrické napájanie cez zabudovaný prijímač
DVB-T(2) v TV zariadení
1. Zabezpečte, aby bol televízor vypnutý. 1. Zabezpečte, aby bol televízor vypnutý.
2. Spojte koaxiálny kábel vonkajšej antény s anténovou
prípojkou na televíznom prijímači.
3. Teraz môžete zapnúť televízny prijímač. 3. Teraz zasuňte kábel externého sieťového zdroja do
4. V menu televízneho prijímača zapnite 5 V napájanie, aby mohol byť externý zosilňovač napájaný cez
koaxiálny kábel.
5. Teraz môžete vyhľadať programy s možným príjmom.
Na pomoc si príp. vezmite návod na obsluhu TV
prístroja.
Elektrické napájanie cez dodaný externý sieťový
adaptér
2. Koaxiálny kábel vonkajšej antény spojte s anténovou
prípojkou napájacej výhybky.
„DC 12 V 100 mA“ zdierky napájacej výhybky, ako aj
externý sieťový zdroj do zásuvky 230 V AC.
4. Krátky koaxiálny kábel napájacej výhybky zapojte do
anténového vstupu na vašom TV prístroji.
5. Či je pritom aktivované 5 V napájanie TV prístroja,
nehrá pri tomto spôsobe pripojenia žiadnu úlohu.
6. Teraz môžete zapnúť televízny prijímač a vyhľadať programy s možným príjmom. Na pomoc si príp. vezmite
návod na obsluhu TV prístroja.
53
Page 54

NÁVOD NA OBSLUHU
PRIPOJENIE VONKAJŠEJ ANTÉNY PRE TV BEZ INTEGROVANÉHO
PRIJÍMAČA DVB-T(2)
Príklad pripojenia (VĽAVO) Príklad pripojenia (VPRAVO)
Receiver
sieťového zdroja
sieťového zdroja
Receiver
TV
Príklad pripojenia (VĽAVO) Príklad pripojenia (VPRAVO)
Elektrické napájanie cez prijímač DVB-T(2) Elektrické napájanie cez dodaný externý sieťový
1. Zabezpečte, aby bol televízor vypnutý. 1. Zabezpečte, aby bol prijímač DVB-T(2) vypnutý.
2. Koaxiálny kábel vonkajšej antény spojte s anténovou
prípojkou prijímača DVB-T(2).
3. Teraz môžete zapnúť televízor a prijímač. 3. Potom zasuňte kábel externého sieťového zdroja do
4. V menu prijímača DVB-T(2) zapnite 5 V napájanie, aby
mohol byť cez koaxiálny kábel napájaný zosilňovač
integrovaný v anténe.
5. Teraz môžete vyhľadať programy s možným príjmom.
Na pomoc si príp. vezmite návod na obsluhu TV
prístroja.
adaptér
2. Koaxiálny kábel vonkajšej antény spojte s anténovou
prípojkou napájacej výhybky SAT + TV.
zdierky DC 12 V 100 mA napájacej výhybky, ako aj
externý sieťový zdroj do zásuvky 230 V AC.
4. Koaxiálny kábel napájacej výhybky pripojte do anténového vstupu na vašom prijímači DVB-T(2).
5. Či je pritom aktivované 5 V napájanie prijímača
DVB-T(2), nehrá pri tomto spôsobe pripojenia žiadnu
úlohu.
6. Teraz môžete zapnúť televízor a prijímač DVB-T(2).
7. Teraz môžete vyhľadať programy s možným príjmom.
Na pomoc si príp. vezmite návod na obsluhu prijímača
DVB-T(2).
TV
PRIPOJENIE VONKAJŠEJ ANTÉNY PRE RÁDIÁ DAB+
Príklad pripojenia
sieťového zdroja
sieťového zdroja
Rádiový adaptér (IEC)
54
Page 55

NÁVOD NA OBSLUHU
1. Uistite sa, že rádio DAB+ je vypnuté.
2. Koaxiálny kábel vonkajšej antény spojte s anténovou prípojkou napájacej
výhybky SAT + TV.
3. Potom zasuňte kábel externého sieťového zdroja do zdierky DC 12 V 100 mA
napájacej výhybky, ako aj externý sieťový zdroj do zásuvky 230 V AC.
4. Priložený IEC konektor (rádio IEC konektor) nasuňte na krátky koaxiálny kábel napájacej výhybky a pripojte ho do anténového vstupu vášho prijímača
DAB+.
5. Teraz môžete vyhľadať programy s možným príjmom. Na pomoc si príp.
vezmite návod na obsluhu rádia DAB+.
Likvidácia
Elektrické a elektronické zariadenia, ako aj batérie sa nesmú likvidovať prostredníctvom komunálneho odpadu.
Spotrebiteľ má zákonnú povinnosť odovzdať elektrické a elektronické zariadenia, ako aj batérie po skončení ich
životnosti na príslušnom verejnom zbernom mieste alebo v predajni. Podrobnosti upravuje príslušná legislatíva
danej krajiny. Na tieto ustanovenia poukazuje symbol na výrobku, v návode na obsluhu, resp. na obale.
Vylúčenie poskytnutia záruky
Spoločnosť Schwaiger GmbH nepreberie záruku a poskytnutie záručných služieb za škody, ktoré vyplynú z neodbornej
inštalácie alebo montáže, ako aj z neodborného používania výrobku alebo v dôsledku nerešpektovania bezpečnostných
pokynov.
Informácia výrobcu
Vážený zákazník, ak by ste potrebovali technickú radu a váš špecializovaný predajca by vám nedokázal pomôcť, kontaktujte naše oddelenie technickej podpory.
Zjednodušené EÚ vyhlásenie o zhode podľa smernice RED
Týmto firma SCHWAIGER GmbH vyhlasuje, že popísaný typ rádiového zariadenia zodpovedá smernici 2014/53/EÚ.
Kompletný text EÚ vyhlásenia o zhode je k dispozícii na nasledujúcej internetovej adrese:
http://konform.schwaiger.de
Otváracia doba:
Pondelok až piatok: 08:00 – 17:00 hod
Schwaiger GmbH
Würzburger Straße 17 | 90579 Langenzenn
Servisná linka: +49 (0) 9101 702-299
www.schwaiger.de | info@schwaiger.de
55
Page 56

NAVODILA ZA UPORABO
UVOD
Iskrene čestitke in hvala za nakup zunanje antene DTA4000 011.
Ta navodila za uporabo so namenjena temu, da vam olajšajo uporabo in upravljanje naprave. Skrbno preberite ta navodila za uporabo. Shranite navodila skozi celotno življenjsko dobo izdelka in jih predajte naslednjim uporabnikom ali
lastnikom.
Preverite popolnost prodajnega kompleta in se prepričajte, da noben kos ni pomanjkljiv ali poškodovan.
Vse naprave, ki jih prodajamo, ob nakupu ustrezajo veljavnim varnostnim predpisom in so pri pravilni uporabi načeloma
varne!
Zaradi enostavnosti branja teh navodil za uporabo zunanje antene DTA4000 011 uporabljamo izraz „zunanja antena“.
PREDVIDENA UPORABA
• Zunanja antena služi za sprejem digitalnih televizijskih in radijskih programov.
Drugačna uporaba od opisane ni dovoljena!
VARNOSTNI NAPOTKI
• Prosimo, uporabite ustrezni napajalnik (glej tehnične podatke). Bodite pozorni na pravi pol.
• Zunanja antena je elektronski izdelek, ki ni igrača za otroke!
• Zunanjo anteno hranite izven dosega otrok.
• Ne vstavljajte nobenih predmetov v priključke ali reže na napravi.
• V primeru okvare naj zunanjo anteno popravi strokovnjak.
• Pred čiščenjem izvlecite električni vtič.
• Zunanjo anteno čistite samo z rahlo navlaženo krpo, ki ne pušča nitk in ne uporabljajte agresivnih čistil. Pri čiščenju še
posebej pazite na to, da v izdelek ne vdre voda ali druga tekočina.
TEHNIČNI PODATKI
Frequenz- / Empfangsbereich VHF (174 - 230 MHz)
Kanali 5 – 12 & 21 – 60
Ojačitev 36 dB
Impedanca 75 Ω
Koaksialni kabel 8,5 m priložen
Priključek za sprejemnik/TV 5-6 V, enosmerno, 50 mA
Električni priključek Priložen napajalnik 100-240 V AC / 12 V DC 100 mA
Stopnja zaščite IPX4
UHF (470 -790 MHz)
VSEBINA EMBALAŽE
• Aktivna zunanja antena (UHF / VHF) z vgrajenim ojačevalnikom
• Koaksialni priključni kabel 8,5 m
• Napajalnik 100-240 V AC / 12 V DC 100 mA
• Antenska kretnica
• Držalo za steber
• Radio (IEC) adapter
• Navodila za uporabo z varnostnimi določili
OPTIMALNO MESTO ZA POSTAVITEV ZUNANJE ANTENE
Za dober sprejem signala zagotovite, da bo med oddajnikom in zunanjo anteno čim manj ovir, ki bi lahko motile signal.
Sprejemniki DVB-T(2) imajo pogosto prikazovalnik jakosti signala (prikazovalnik ravni). S tem prikazovalnikom lahko
poiščete najboljši položaj antene. Preden anteno namestite na končno mesto, preverite več različnih položajev.
56
Page 57

NAVODILA ZA UPORABO
MONTAŽA ZUNANJE ANTENE
A. Montaža na steber
U-veznico vstavite na steber, nastavite držalo antene in privijte vijake.
Pritrdite pribl. 1 meter koaksialnega kabla na pribl. 0,5 m višine pritrdilnega droga; s tem ima antena dovolj prostora za
event. spreminjanje položaja.
0,5m
1m
B. Montaža na steno
Izvrtajte izvrtine v steno, ustrezno s položajem izvrtin na veznici antene, vstavite zidne vložke v izvrtine, pritrdite veznico
na steno in jo privijte z vijaki.
57
Page 58

NAVODILA ZA UPORABO
C. Pritrditev na ograjo (balkon)
Namestite držalo antene z veznico na ograjo. Privijte koaksialni kabel z F-vtikačem na anteno in po ustrezni izravnavi
pritrdite anteno na vrtljivo podnožje.
Pritrditev vodotesnega pokrova
Priključite koaksialni kabel na F-vtičnico antene in zavarujte kabel. Pritrdite vodotesni pokrov, tako da je priključek pokrit
in voda ne more vdreti v notranjost.
NASTAVITEV V SMERI SPREJEMANJA SIGNALA
Nastavite položaj antene, ustrezno z oddajanjem horizontalnega ali vertikalnega signala.
Horizontalno
Vertikalno
58
Page 59

NAVODILA ZA UPORABO
PRIKLJUČITEV ZUNANJE ANTENE ZA TELEVIZIJSKE SPREJEMNIKE Z VGRAJENIM SPREJEMNIKOM DVB-T(2)
Primer priklopa (LEVO) Primer priklopa (DESNO)
Napajalnika
Antenske kretnice
TV
TV
PRIMER PRIKLOPA (LEVO) PRIMER PRIKLOPA (DESNO)
Električno napajanje prek sprejemnika DVB-T(2),
vgrajenega v televizorju
1. Zagotovite, da bo televizor izključen. 1. Zagotovite, da bo televizor izključen.
2. Koaksialni kabel zunanje antene priključite na antenski
priključek televizijskega sprejemnika.
3. Zdaj lahko vključite televizor. 3. Vstavite kabel eksternega omrežnega dela v vtičnico
4. V meniju televizijskega sprejemnika vklopite 5-voltno
električno napajanje, da eksterni ojačevalnik vzpostavi
električno napetost prek koaksialnega kabla.
5. Zdaj lahko iščete programe s sprejemom. Pri tem
preučite tudi navodila za uporabo televizijskega spre-
jemnika.
Električno napajanje s priloženim zunanjim napajalnikom
2. Povežite koaksialni kabel zunanje antene z antenskim
priključkom na napajalni kretnici.
„DC 12 V 100 mA“ na napajalni kretnici, kot tudi napa-
jalnik v električno vtičnico 230 V AC.
4. Kratki koaksialni kabel napajalne kretnice priključite na
antenski vhod na vašem televizijskem sprejemniku.
5. Pri tej priključitvi ni treba aktivirati 5V električne
oskrbe s televizijskega sprejemnika.
6. Zdaj lahko vključite televizor in iščete programe s
sprejemom. Pri tem preučite tudi navodila za uporabo
televizijskega sprejemnika.
59
Page 60

NAVODILA ZA UPORABO
PRIKLOP ZUNANJE ANTENE ZA TELEVIZORJE BREZ VGRAJENEGA SPREJEMNIKA DVB-T(2)
Primer priklopa (LEVO) Primer priklopa (DESNO
Receiver
Antenske kretnice
Napajalnika
Receiver
TV
PRIMER PRIKLOPA (LEVO) PRIMER PRIKLOPA (DESNO)
Električno napajanje prek sprejemnika DVB-T(2) Električno napajanje s priloženim zunanjim napajal-
1. Zagotovite, da bo televizor izključen. 1. Zagotovite, da bo sprejemnik DVB-T(2) izključen.
2. Povežite koaksialni kabel zunanje antene z antenskim
priključkom sprejemnika DVB-T(2).
3. Zdaj lahko vključite televizor in sprejemnik. 3. Vstavite kabel eksternega napajalnika v vtičnico DC 12
4. V meniju sprejemnika DVB-T(2) vklopite 5 V napajanje
z električnim tokom, da prek koaksialnega kabla
oskrbite anteno z električno napetostjo.
5. Zdaj lahko iščete programe s sprejemom. Pri tem
preučite tudi navodila za uporabo televizijskega spre-
jemnika.
nikom
2. Povežite koaksialni kabel zunanje antene z antenskim
priključkom na napajalni kretnici.
V 100 mA na napajalni kretnici, kot tudi napajalnik v
električno vtičnico 230 V AC.
4. Koaksialni kabel napajalne kretnice priključite na
antenski vhod na sprejemniku DVB-T(2).
5. Pri tej priključitvi ni treba aktivirati 5V električne
oskrbe sprejemnika DVB-T(2).
6. Zdaj lahko vključite televizor in sprejemnik DVB-T(2).
7. Zdaj lahko iščete programe s sprejemom. Preučite tudi
navodila za uporabo sprejemnika DVB-T(2).
TV
PRIKLJUČITEV ZUNANJE ANTENE ZA DAB+ RADIO
Primer priklopa:
Napajalnika
Antenske kretnice
Radio (IEC) adapter
60
Page 61

NAVODILA ZA UPORABO
1. Preverite, če je izklopljeno DAB+ Radio.
2. Povežite koaksialni kabel zunanje antene z antenskim priključkom na napa-
jalni kretnici.
3. Vstavite kabel eksternega napajalnika v vtičnico DC 12 V 100 mA na napajalni kretnici, kot tudi napajalnik v električno vtičnico 230 V AC.
4. Priključite priloženi povezovalnik IEC (Radio IEC - konektor) na krajši koaksialni kabel napajalne kretnice in ga priključite na antenski vhod sprejemnika
DAB+.
5. Zdaj lahko iščete programe s sprejemom. Preučite tudi navodila za uporabo
DAB+ Radio.
Odlaganje med odpadke
Električnih in elektronskih naprav ter baterij ni dovoljeno odlagati skupaj z gospodinjskimi odpadki. V skladu z
zakonom mora uporabnik električne in elektronske naprave ter baterije ob koncu njihove življenjske dobe predati
na predvidenih lokalnih zbiralnih mestih ali v trgovini. Podrobnosti glede odlaganja med odpadke ureja nacionalna
zakonodaja posamezne države. Na to določilo opozarja simbol na izdelku, v navodilih za uporabo oz. na embalaži.
Izjava o omejitvi odgovornosti
Podjetje Schwaiger GmbH ne prevzema nobene odgovornosti in jamstva za poškodbe ali škodo, nastale zaradi nepravilne
vgradnje ali montaže, nepravilne uporabe izdelka ali neupoštevanja varnostnih napotkov.
Podatki o proizvajalcu
Spoštovana stranka, če potrebujete tehnični nasvet in vam vaš strokovni prodajalec ni mogel pomagati, se obrnite na
našo tehnično podporo.
Poenostavljena izjava o skladnosti v skladu z direktivami o radijski opremi
Podjetje Schwaiger GmbH izjavlja, da opisana radijska oprema ustreza zahtevam direktive 2014/53/EU in drugim zadevnim direktivam za ta izdelek. Celotno besedilo EU-izjave o skladnosti je na voljo na naslednjem spletnem naslovu:
http://konform.schwaiger.de
Delovni čas:
Od ponedeljka do petka: 8:00–17:00
Schwaiger GmbH
Würzburger Straße 17 | 90579 Langenzenn
Vroča linija: +49 (0) 9101 702-299
www.schwaiger.de | info@schwaiger.de
61
Page 62

KULLANIM KILAVUZU
GIRIŞ
DTA4000 011 harici anteni satın aldığınız teşekkür eder tebriklerimizi sunarız.
Bu kullanma kılavuzu, cihazı çalıştırmanıza ve kullanmanıza yardımcı olmak için tasarlanmıştır. Kullanım kılavuzunu
itinayla okuyun. Kullanma kılavuzunu ürünün kullanım ömrü boyunca saklayın ve ürünü üçüncü şahıslara verdiğinizde
kullanma kılavuzunu da birlikte verin.
Lütfen paket içeriğinin tam olduğunu kontrol edin ve hatalı veya hasarlı parça olmadığından emin olun.
Tarafımızca pazarlanan tüm cihazlar satın aldığınız tarihte geçerli olan güvenlik mevzuatına uygun olup kullanım amacına
uygun kullanıldığında prensip olarak güvenlidir!
DTA4000 011 harici anten, daha kolay okuyabilmeniz için bu kullanım kılavuzunda “harici anten” olarak tanımlanmıştır
Amacina uygun kullanim
• Harici anten, dijital televizyon ve radyo programları için alıcı olarak kullanılır.
Belirtilen kullanım amacı haricinde kullanılamaz!
Güvenlik talimatlari
• Lütfen uygun bir adaptör kullanın (bkz. Teknik bilgiler). Kutupların yönlerine dikkat edin.
• Bu harici anten, çocuklarınızdan uzak tutmanız gereken, elektronik bir üründür!
• Bu nedenle, harici anteni çocukların erişemeyeceği bir yerde muhafaza edin.
• Ürünün bağlantı noktalarına veya havalandırma deliklerine hiçbir cisim sokmayın.
• Harici anten arıza yaptığı takdirde onarımını sadece uzmanına yaptırın.
• Temizlik yapmadan önce elektrik fişini çekin.
• Harici anteni, tüy bırakmayan, sadece hafifçe nemlendirilmiş bir bezle temizleyin ve kuvvetli temizlik maddeleri
kullanmayın. Ürüne su, sıvı veya nem girmemesi için ekstra özen gösterin.
TEKNİK BİLGİLER
Frekans / sinyal alım aralığı VHF (174 - 230 MHz)
Kanallar 5 – 12 & 21 – 60
Kazanç 36 dB
Empedans 75 Ω
Koaksiyel kablo 8,5 m dâhil
Alıcı/TV bağlantısı 5-6 V DC 50 mA
Elektrik bağlantısı Adaptör dâhil, 100-240 V AC / 12 V DC 100 mA
Koruma sınıfı IPX4
UHF (470 -790 MHz)
Paket içeriği
• Entegre güçlendiricili aktif harici anten (UHF/VHF)
• Koaksiyel bağlantı kablosu, 8,5 m
• Adaptör 100-240 V AC / 12 V DC 100 mA
• Anten güç besleme kutusu
• Direk adaptörü
• Radyo (IEC) adaptörü
• Güvenlik kurallarını içeren kullanım kılavuzu
HARİCİ ANTEN İÇİN EN İYİ KURULUM YERİ
En iyi kapsama alanını elde etmek için, vericiyle harici anten arasına, antenin çekişini önleyebilecek olabildiğince az engel
bulunmasına dikkat edin.
DVB-T(2)-alıcılarında genelde bir sinyal gücü göstergesi (seviye göstergesi) vardır. Bu gösterge en iyi anten pozisyonunu
bulmak için uygundur. Anteni nihai pozisyonuna yerleştirmeden önce lütfen, farklı konumları ve yönleri deneyin.
62
Page 63

KULLANIM KILAVUZU
HARİCİ ANTENİN MONTAJI
A. Direğe montaj
Kelepçenin U demirini direğe geçirin, anten adaptörünü ayarlayın ve kelebek vidaları sıkın.
BAntenin konumunun değiştirilmesi gerektiği takdirde yeterince pay bırakmak için koaksiyel kablonun yaklaşık 1 metre
kadarını, yaklaşık 0,5 m aşağıdan direğe sabitleyin.
0,5m
1m
B. Duvara montaj
Duvara, anten tespit plakasındaki deliklerin yerlerine uygun delikler delin, deliklere plastik dübel çakın, tespit plakasını
duvara yerleştirin ve vidalarla sabitleyin.
63
Page 64

KULLANIM KILAVUZU
C. Parmaklığa tespit (balkonda)
Anten tespit plakasını kelepçeyle parmaklığa monte edin. Koaksiyel kabloyu F tipi fişle antene vidalayın ve anteni, döner
kaide üzerinde gereken yöne ayarlayıp sabitleyin.
Su geçirmez başlığın tespiti
Koaksiyel kabloyu antenin F tipi soketine takın ve kabloyu emniyete alın. Su geçirmez başlığı geçirerek bağlantının, su
girmeyecek şekilde örtülmesini sağlayın.
ALIŞ YÖNÜNÜN AYARLANMASI
Antenin konumunu, yatay veya düşey sinyal yönüne göre ayarlayın.
Yatay
64
Düşey
Page 65

KULLANIM KILAVUZU
HARİCİ ANTENİN, ENTEGRE DVB-T(2) ALICILI TV CİHAZLARINA
BAĞLANMASI
Bağlantı örneği (SOL) Bağlantı örneği (SAĞ)
Güç adaptörü
Bağlantı örneği
TV
TV
BAĞLANTI ÖRNEĞİ (SOL) BAĞLANTI ÖRNEĞİ (SAĞ)
TV cihazına takılı DVB-T(2) alıcı üzerinden elektrik
beslemesi
1. Televizyonun kapalı olduğundan emin olun. 1. Televizyonun kapalı olduğundan emin olun.
2. Harici antenin koaksiyel kablosunu TV cihazınızın anten
soketine takın.
3. Şimdi televizyonu açabilir. 3. Sonra harici adaptörün kablosunu anten güç besleme
4. Harici güçlendiriciye koaksiyel kablo üzerinden elektrik
beslemesi sağlamak için TV cihazınızın menüsünde 5 V
elektrik besleme seçeneğini açın.
5. Şimdi sinyali alınan programlar arayabilirsiniz. Bunun
için gerekirse TV cihazının kullanım kılavuzuna bakın.
Birlikte teslim edilen harici adaptör üzerinden elektrik beslemesi
2. Harici antenin koaksiyel kablosunu anten güç besleme
kutusunun anten soketine takın.
kutusunun ”DC 12 V 100 mA” soketine, harici adaptörü
de bir 230 V AC prize takın.
4. Anten güç besleme kutusunun kısa koaksiyel kablosunu TV cihazınızın anten girişine takın.
5. Bu bağlantı seçeneğinde, TV cihazının 5V elektrik
beslemesinin etkinleştirilmiş durumda olup olmaması
fark etmez.
6. Şimdi televizyonu açabilir ve sinyali alınan programlar arayabilirsiniz. Bunun için gerekirse TV cihazının
kullanım kılavuzuna bakın.
65
Page 66

KULLANIM KILAVUZU
HARİCİ ANTENİN ENTEGRE DVB-T(2) ALICISIZ TV CİHAZLARINA
BAĞLANMASI
Bağlantı örneği (SOL) Bağlantı örneği (SAĞ)
Receiver
Bağlantı örneği
Güç adaptörü
Receiver
TV
BAĞLANTI ÖRNEĞİ (SOL) BAĞLANTI ÖRNEĞİ (SAĞ)
DVB-T/T2 alıcı üzerinden elektrik beslemesi Birlikte teslim edilen harici adaptör üzerinden elek-
1. Televizyonun kapalı olduğundan emin olun. 1. DVB-T(2) alıcının kapalı olmasını sağlayın.
2. Harici antenin koaksiyel kablosunu DVB-T(2) alıcının
anten soketine takın.
3. Artık televizyon cihazını ve alıcıyı açabilirsiniz. 3. Sonra harici adaptörün kablosunu anten güç besleme
4. Antenin entegre güçlendiricisine koaksiyel kablo
üzerinden elektrik beslemesi sağlamak için DVB-T(2)
alıcının menüsünde 5 V elektrik besleme seçeneğini
açın.
5. Şimdi sinyali alınan programlar arayabilirsiniz. Bunun
için gerekirse TV cihazının kullanım kılavuzuna bakın.
trik beslemesi
2. Harici antenin koaksiyel kablosunu anten güç besleme
kutusunun anten soketine takın.
kutusunun DC 12 V 100 mA soketine, harici adaptörü
de bir 230 V AC prize takın.
4. Anten güç besleme kutusunun koaksiyel kablosunu
DVB-T(2) alıcınızın anten girişine takın.
5. Bu bağlantı seçeneğinde, DVB-T(2) alıcının 5V elektrik
beslemesinin etkinleştirilmiş durumda olup olmaması
fark etmez.
6. Artık televizyon cihazını ve DVB-T(2) alıcıyı açabilirsiniz.
7. Şimdi sinyali alınan programlar arayabilirsiniz. Bunun
için gerekirse DVB-T(2) alıcının kullanım kılavuzuna
bakın.
TV
HARİCİ ANTENİN, DAB+ RADYOLARA BAĞLANMASI
Bağlantı örneği:
Güç adaptörü
Bağlantı örneği
Radyo (IEC) adaptörü
66
Page 67

KULLANIM KILAVUZU
1. DAB+ radyonun kapalı olduğundan emin olun.
2. Harici antenin koaksiyel kablosunu anten güç besleme kutusunun anten
soketine takın.
3. Sonra harici adaptörün kablosunu anten güç besleme kutusunun DC 12 V
100 mA soketine, harici adaptörü de bir 230 V AC prize takın.
4. Ürünle birlikte gelen IEC bağlantı adaptörünü (Radio IEC Connector) anten
güç besleme kutusunun kısa koaksiyel kablosuna takın ve DAB+ alıcınızın
anten girişine takın.
5. Şimdi sinyali alınan programlar arayabilirsiniz. Bunun için gerekirse DAB+
radyonun kullanım kılavuzuna bakın.
İmha
Elektrikli ve elektronik cihazlar ve piller ev atıklarıyla birlikte atılmamalıdır. Tüketici yasal olarak elektrikli ve elektronik cihazlar ve pilleri servis ömrünün sonunda bunlar için hazırlanmış resmi toplama istasyonlarına bırakmak
veya satış noktasına iade etmekle yükümlüdür. Konuyla ilgili ayrıntılı bilgi her ülkenin/eyaletin yasaları ile düzenlenmektedir. Ürün, kullanma kılavuzu ve ambalaj üzerindeki sembol bu kurala işaret etmektedir.
Sorumluluğun Reddi
Schwaiger GmbH, ürünün uygun olmayan şekilde kurulumundan veya montajından ve uygun olmayan şekilde
kullanımından veya güvenlik talimatlarına uyulmamasından kaynaklanan hasarlar konusunda hiçbir sorumluluk üstlen-
mez ve garanti vermez.
Üretici bilgileri
Sayın müşterimiz, teknik desteğe ihtiyacınız olursa ve bayiniz tarafından yardım alamazsanız lütfen teknik destek birimimizle irtibata geçin.
RED direktifi uyarınca basitleştirilmiş AB uygunluk beyanı
SCHWAIGER GmbH şirketi bu belgeyle, tarif edilen telsiz cihaz tipinin, 2014/53/AB direktifine uygun olduğunu beyan
eder. AB uygunluk beyanının tam metni aşağıdaki İnternet adresinde mevcuttur:http://konform.schwaiger.de
ÇALIŞMA SAATLERİ:
Pazartesi - Cuma: 08:00 - 17:00 saatleri arası
Schwaiger GmbH
Würzburger Straße 17 | 90579 Langenzenn
Yardım hattı: +49 (0) 9101 702-299
www.schwaiger.de | info@schwaiger.de
67
Page 68

ИНСТРУКЦИИ ЗА ЕКСПЛОАТАЦИЯ
ВЪВЕДЕНИЕ
Поздравяваме Ви и Ви благодарим за закупуването на външната антена DTA4000 011.
Тази инструкция за експлоатация Ви служи за улесняване на работата и обслужването на този продукт. Прочетете
внимателно инструкцията за експлоатация. Съхранявайте упътването през целия период на експлоатация на
продукта и го предайте на следващия потребител или собственик.
Моля проверете комплектността на съдържанието и се уверете, че няма неизправни или повредени части.
Всички продавани от нас уреди отговарят на валидните при закупуването указания за безопасност и по принцип
са безопасни при употреба по предназначение!
За улеснение при четенето на тази инструкция за експлоатация за външна антена DTA4000 011 се използва
наименованието „външна антена“.
Употреба по предназначение
• Външна антена служи за приемане на цифрови телевизионни и радиопрограми.
Друга, различна от посочената употреба не е разрешена!
Указания за безопасност
• Моля използвайте подходящ мрежов адаптер (вж. „Технически данни“). Спазвайте полярността.
• Тази външна антена представлява електронен продукт, който не трябва да попада в ръцете на деца!
• Затова съхранявайте външната антена извън обсега на деца.
• Не вкарвайте предмети в изводите или отворите на продукта.
• При дефекти външната антена трябва да се ремонтира само от специалист.
• Преди почистване изключвайте щепсела от контакта.
• Почиствайте външната антена с неоставяща власинки, максимално леко навлажнена кърпа и не използвайте
агресивни почистващи препарати. При това особено внимавайте в продукта да не попада вода (течност/влага).
ТЕХНИЧЕСКИ ДАННИ
Честотен диапазон/Обхват на
приемане
Канали: 5 – 12 & 21 – 60
Усилване: 36 dB
Импеданс: 75 Ω
Коаксиален кабел 8,5 m включително
Свързване на ресивър/ТВ 5-6 V DC 50 mA
Свързване към източник на ток Мрежов адаптер включително, 100 – 240 V AC/12 V DC 100 mA
Клас на защита: IPX4
VHF (174 - 230 MHz)
UHF (470 -790 MHz)
Съдържание на опаковката
• Активна външна антена (UHF/VHF) с интегриран усилвател
• Коаксиален свързващ кабел 8,5 m
• Мрежов адаптер 100 – 240 V AC/12 V DC 100 mA
• Адаптер за захранване
• Приспособление за окачване на мачта
• Радио (IEC) адаптер
• Инструкция за експлоатация с изисквания за техническа безопасност
ОПТИМАЛНО МЯСТО ЗА ИНСТАЛИРАНЕ НА ВЪНШНАТА АНТЕНА
За да осигурите възможно най-добро приемане, се уверете, че между предавателя и външната антена се намират
възможно най-малко предмети, които могат евентуално да възпрепятстват приемането.
DVB-T(2) ресивърите често разполагат с индикатор за силата на сигнала (индикатор за ниво). Този индикатор
улеснява намирането на най-добрата позиция за антената. Моля проверете различни местоположения и насочвания
на антената, преди да я позиционирате окончателно.
68
Page 69

ИНСТРУКЦИИ ЗА ЕКСПЛОАТАЦИЯ
МОНТАЖ НА ВЪНШНАТА АНТЕНА
A. A. Монтаж на мачта
Поставете U-образната скоба през мачтата, регулирайте стойката на антената и затегнете винтовете.
Свържете около 1 метър от коаксиалния кабел на около 0,5 m дълбочина на пръта за закрепване, така антената
има достатъчно възможност за евентуална промяна на позицията.
0,5m
1m
B. Монтаж на стена
Пробийте дупки в стената в съответствие с позицията на отворите в скобата за антената, поставете пластмасови
дюбели в дупките, закрепете скобата на стената и я затегнете с винтове.
69
Page 70

ИНСТРУКЦИИ ЗА ЕКСПЛОАТАЦИЯ
C. Закрепване на парапет (на балкон)
Със скобата монтирайте стойката на антената на парапета. Завинтете коаксиалния кабел с F-съединителите към
антената и след подходящо насочване фиксирайте антената на въртящата се основа.
Поставяне на водонепроницаемата капачка
Свържете коаксиалния кабел към F-буксата на антената и фиксирайте кабела. Поставете водонепроницаемата
капачка така, че съединението да е покрито и в него да не може да прониква вода.
НАСТРОЙКА НА ПОСОКАТА НА ПРИЕМАНЕ
Настройте позицията на антената според излъчването на хоризонтални или вертикални сигнали.
Хоризонтално
Вертикално
70
Page 71

ИНСТРУКЦИИ ЗА ЕКСПЛОАТАЦИЯ
СВЪРЗВАНЕ НА ВЪНШНАТА АНТЕНА ЗА ТЕЛЕВИЗОРИ
С ВГРАДЕН DVB-T(2) РЕСИВЪР
Пример за свързване (ОТЛЯВО) Пример за свързване (ОТДЯСНО)
захранващ блок
адаптер за захранване
TV
TV
ПРИМЕР ЗА СВЪРЗВАНЕ (ОТЛЯВО) ПРИМЕР ЗА СВЪРЗВАНЕ (ОТДЯСНО)
Електрозахранване чрез вградения в телевизора
DVB-T(2) ресивър
1. Уверете се, че телевизорът е изключен. 1. Уверете се, че телевизорът е изключен.
2. Свържете коаксиалния кабел на външната антена с
входа за антена на Вашия телевизор
3. Сега можете да включите телевизора. 3. Сега включете кабела на външния захранващ
4. В менюто на Вашия телевизор включете 5 V-овото
електрозахранване, за да захраните външния
усилвател с напрежение чрез коаксиалния кабел.
5. Сега можете да търсите програми, които могат да
се приемат. За целта при необходимост направете
справка с инструкцията за експлоатация на
телевизора.
Електрозахранване чрез включения в
окомплектовката на доставката външен
захранващ блок
2. Свържете коаксиалния кабел на външната антена с
входа за антена на адаптера за захранване.
блок в буксата DC 12 V 100 mA на адаптера за
захранване, а външния захранващ блок – в контакт
230 V AC.
4. Свържете късия коаксиален кабел на адаптера
за захранване към входа за антена на Вашия
телевизор.
5. При този вариант на свързване няма значение
дали 5 V-овото електрозахранване на телевизора е
активирано.
6. Сега можете да включите телевизора и да търсите
програми, които могат да се приемат. За целта при
необходимост направете справка с инструкцията за
експлоатация на телевизора.
71
Page 72

ИНСТРУКЦИИ ЗА ЕКСПЛОАТАЦИЯ
СВЪРЗВАНЕ НА ВЪНШНАТА АНТЕНА ЗА ТЕЛЕВИЗОРИ
БЕЗ ВГРАДЕН DVB-T(2) РЕСИВЪР
Пример за свързване (ОТЛЯВО) Пример за свързване (ОТДЯСНО))
Receiver
Ein адаптер за захранване
захранващ блок
Receiver
TV
ПРИМЕР ЗА СВЪРЗВАНЕ (ОТЛЯВО) ПРИМЕР ЗА СВЪРЗВАНЕ (ОТДЯСНО)
Електрозахранване чрез DVB-T(2) ресивър Електрозахранване чрез включения в
1. Уверете се, че телевизорът е изключен. 1. Уверете се, че DVB-T(2) ресивърът е изключен.
2. Свържете коаксиалния кабел на външната антена с
входа за антена на Вашия DVB-T(2) ресивър.
3. Сега можете да включите телевизора и ресивъра. 3. Сега включете кабела на външния захранващ блок в
4. В менюто на DVB-T(2) ресивъра включете 5
V-овото електрозахранване, за да захраните с
напрежение интегрирания в антената усилвател
чрез коаксиалния кабел.
5. Сега можете да търсите програми, които могат да
се приемат. За целта при необходимост направете
справка с инструкцията за експлоатация на
телевизора.
окомплектовката на доставката външен
захранващ блок
2. Свържете коаксиалния кабел на външната антена с
входа за антена на адаптера за захранване.
буксата DC 12 V 100 mA на адаптера за захранване,
а външния захранващ блок – в контакт 230 V AC.
4. Свържете коаксиалния кабел на адаптера за
захранване към входа за антена на Вашия DVB-T(2)
ресивър.
5. При този вариант на свързване няма значение дали
5 V-овото електрозахранване на DVB-T(2) ресивъра
е активирано.
6. Сега можете да включите телевизора и DVB-T(2)
ресивъра.
7. Сега можете да търсите програми, които могат да
се приемат. За целта при необходимост направете
справка с инструкцията за експлоатация на
DVB-T(2) ресивъра.
TV
ANSCHLIESSEN DER AUSSENANTENNE FÜR DAB+ RADIOS
Anschlussbeispiel
захранващ блок
адаптер за захранване
Радио (IEC) адаптер
72
Page 73

ИНСТРУКЦИИ ЗА ЕКСПЛОАТАЦИЯ
1. Уверете се, че DAB+ радиото е изключено.
2. Свържете коаксиалния кабел на външната антена с входа за антена на
адаптера за захранване.
3. Сега включете кабела на външния захранващ блок в буксата DC 12
V 100 mA на адаптера за захранване, а външния захранващ блок – в
контакт 230 V AC.
4. Поставете приложения IEC съединител (Radio IEC Connector) на късия
коаксиален кабел на адаптера за захранване и свържете коаксиалния
кабел към входа за антена на Вашия DAB+ приемник.
5. Сега можете да търсите програми, които могат да се приемат. За целта
при необходимост направете справка с инструкцията за експлоатация на
DAB+ радиото.
Електрически и електронни уреди, както и батерии не трябва да се изхвърлят с битовите отпадъци.
Потребителят е длъжен по закон да върне електрически и електронни уреди, както и батерии – след края на
експлоатационния им живот – в организираните за целта, обществени събирателни пунктове или в магазина,
от който за закупени. Подробности в тази връзка се регламентират от законодателството на съответната
страна. Символът върху продукта, ръководството за потребителя респ. опаковката обръща внимание на това
предписание.
Изключване на отговорността
Schwaiger GmbH не поема отговорност и гаранция за щети в резултат на неправилно инсталиране или неправилен
монтаж, както и нецелесъобразна употреба на продукта или неспазване на указанията за безопасност.
Информация за производителя
Уважаеми клиенти, в случай че Ви е необходим технически съвет и Вашият дилър не е могъл да Ви помогне, моля
свържете се с нашия отдел за техническа поддръжка.
Опростена ЕС декларация за съответствие съгласно Директивата за
радиосъоръжения (RED)
С настоящото фирмата SCHWAIGER GmbH декларира, че типът на радиосъоръжението отговаря на Директивата
2014/53/ЕС.
Пълният текст на ЕС декларацията за съответствие е на разположение на следния интернет адрес:
http://konform.schwaiger.de
Работно време:
понеделник до петък: 08:00 – 17:00 часа
Schwaiger GmbH
Würzburger Straße 17 | 90579 Langenzenn
Гореща линия: +49 (0) 9101 702-299
www.schwaiger.de | info@schwaiger.de
73
Page 74

KEZELÉSI UTASÍTÁS
BEVEZETŐ
Gratulálunk, és köszönjük, hogy a DTA4000 011 kültéri antennát választotta.
A jelen használati útmutató segítséget nyújt Önnek a termék használata és kezelése során. Olvassa el gondosan a használati útmutatót. Őrizze meg az útmutatót a termék teljes élettartama alatt, és adja azt tovább a következő haszná-
lónak vagy tulajdonosnak.
Ellenőrizze a csomag tartalmának teljességét, és győződjön meg róla, hogy az nem tartalmaz hibás vagy sérült alkatrészeket.
Minden általunk forgalmazott készülék megfelel a vásárláskor érvényben lévő biztonsági előírásoknak, és rendeltetésszerű
használat esetén alapvetően biztonságos!
A jelen használati útmutatóban a DTA4000 011 kültéri antenna az egyszerűség kedvéért „kültéri antennaként” szerepel
RENDELTETÉSSZERŰ HASZNÁLAT
• A kültéri antenna digitális TV- és rádióadások vételére szolgál.
A megadottól eltérő használat nem megengedett!
BIZTONSÁGI TUDNIVALÓK
• Kérjük, használjon megfelelő dugaszolható hálózati tápegységet (lásd „Műszaki adatok“). Ügyeljen a polaritásra.
• A kültéri antenna elektromos készülék, amely nem való gyermekek kezébe!
• Ezért gyermekektől távol tartandó.
• Ne helyezzen idegen tárgyakat a készülék csatlakozóiba vagy nyílásaiba.
• A kültéri antenna meghibásodása esetén a javításhoz vegye igénybe szakember segítségét.
• Tisztítás előtt húzza ki a hálózati csatlakozót.
• A kültéri antenna tisztításához használjon szöszmentes, legfeljebb enyhén nedves kendőt, és ne alkalmazzon maró
tisztítószert. Különösen ügyeljen arra, hogy ne kerüljön víz (folyadék/nedvesség) a termékbe.
MŰSZAKI ADATOK
Frekvencia- / vételi tartomány VHF (174 - 230 MHz)
Csatornák: 5 – 12 & 21 – 60
Nyereség 36 dB
Impedancia: 75 Ω
Koaxiális kábel 8,5 m mellékelve
Vevőegység/TV csatlakozó: 5-6 V DC 50 mA
Áram-csatlakoztatás: Dugaszolható hálózati tápegység mellékelve, 100-240 V AC / 12 V DC 100 mA
Védettség: IPX4
UHF (470 -790 MHz)
CSOMAGOLÁS TARTALMA
• Aktív kültéri antenna (UHF / VHF) beépített erősítővel
• Koaxiális csatlakozókábel 8,5 m
• Dugaszolható hálózati tápegység 100-240 V AC/ 12 V DC 100 mA
• Tápfeladó
• Elhelyezés villanyoszlopon
• Rádió (IEC) adapter
• Biztonsági előírásokat tartalmazó használati útmutató
OPTIMÁLIS FELÁLLÍTÁSI HELY A KÜLTÉRI ANTENNA RÉSZÉRE
A legjobb vétel érdekében biztosítani kell, hogy az adó és a kültéri antenna között a lehető legkevesebb olyan akadály
helyezkedjen el, amely a vételt zavarhatja.
A DVB-T(2) vevőegységek gyakran el vannak látva jelerősség jelzővel (szintjelzővel). Ez a jelzés alkalmas a legjobb
antennahelyzet megtalálásához. Kérjük, hogy próbáljon ki több elhelyezési és tájolási lehetőséget, mielőtt az antennát
a végleges helyzetbe állítja
74
Page 75

KEZELÉSI UTASÍTÁS
KÜLTÉRI ANTENNA FELSZERELÉSE
A. Felszerelés az oszlopra
Dugja át az U bilincset az oszlopon, állítsa be az antenna tartóját, és szorítsa meg a csavarokat
Kösse a koaxiális kábel kb. 1 méteres részét kb. 0,5 m mélységben a rögzítő rúdra, így az antennának elég helye lesz a
pozíció esetleges módosításához.
0,5m
1m
B. Felszerelés falra
Fúrjon lyukakat a falba az antenna rögzítő bilincsén lévő lyukak helyzetének megfelelően, helyezzen műanyag dübelt a
furatokba, rögzítse a bilincset a falon, és szorítsa meg a csavarokat.
75
Page 76

KEZELÉSI UTASÍTÁS
C. Rögzítés korláton (erkély)
Szerelje fel a bilinccsel az antenna tartóját a korlátra. Csavarozza a koaxiális kábelt az F csatlakozókkal az antennára, és
rögzítse az antennát a forgó talpon a megfelelő helyzetben.
A vízálló fedél rögzítése
Csatlakoztassa a koaxiális kábelt az antenna F aljzatába, és biztosítsa a kábelt. Rögzítse a vízálló fedelet úgy, hogy a
csatlakozás fedett legyen, és ne juthasson be víz.
A VÉTELI IRÁNY BEÁLLÍTÁSA
Állítsa be az antenna helyzetét a vízszintes és függőleges jelek sugárzásának megfelelően.
Vízszintes
Függőleges
76
Page 77

KEZELÉSI UTASÍTÁS
A KÜLTÉRI ANTENNA CSATLAKOZTATÁSA BEÉPÍTETT DVB-T(2)
VEVŐEGYSÉGGEL ELLÁTOTT TV KÉSZÜLÉKEKHEZ
Csatlakoztatási példa (BAL) Csatlakoztatási példa (JOBB)
Hálózati egység
nélkül
TV
Csatlakoztatási
TV
CSATLAKOZTATÁSI PÉLDA (BAL) CSATLAKOZTATÁSI PÉLDA (JOBB)
Áramellátás a TV készülékbe beépített DVB-T(2)
vevőegységen keresztül
1. Bizonyosodjon meg róla. hogy a TV készülék ki van
kapcsolva.
2. Csatlakoztassa a kültéri antenna koaxiális kábelét a TV
készülék antenna csatlakozójába.
3. Ezután bekapcsolhatja a TV készüléket. 3. Csatlakoztassa a külső hálózati egység kábelét a tápfe-
4. Kapcsolja be TV készüléke menüjében az 5 V áramellátást, hogy a külső erősítőt a koaxiális kábelen
keresztül árammal lássa el.
5. Ezután megkeresheti az elérhető adásokat. Szükség
esetén használja a TV készülék kezelési utasítását
segítségként.
Áramellátás a csomagban található külső hálózati
egységen keresztül
1. Bizonyosodjon meg róla. hogy a TV készülék ki van
kapcsolva.
2. Csatlakoztassa a kültéri antenna koaxiális kábelét a
tápfeladó antenna csatlakozójába.
ladó „DC 12 V 100 mA” csatlakozó aljzatába, valamint
a külső hálózati egységet egy 230 V AC dugaszoló
aljzatba.
4. Csatlakoztassa a tápfeladó rövid koaxiális kábelét a TV
készülék antenna bemenetébe.
5. Ennél a csatlakoztatási módnál nem játszik szerepet,
hogy a TV készülék 5 V áramellátása aktiválva van-e.
6. Ezután bekapcsolhatja a TV készüléket, és megkeresheti az elérhető adásokat. Szükség esetén használja a
TV készülék kezelési utasítását segítségként.
77
Page 78

KEZELÉSI UTASÍTÁS
A KÜLTÉRI ANTENNA CSATLAKOZTATÁSA BEÉPÍTETT DVB-T(2)
VEVŐEGYSÉG NÉLKÜLI TV KÉSZÜLÉKEKHEZ
Csatlakoztatási példa (BAL) Csatlakoztatási példa (JOBB)
Receiver
Csatlakoztatási
Receiver
Hálózati egység
nélkül
TV
CSATLAKOZTATÁSI PÉLDA (BAL) CSATLAKOZTATÁSI PÉLDA (JOBB)
Áramellátás a DVB-T(2) vevőegységen keresztül Áramellátás a csomagban található külső hálózati
1. Bizonyosodjon meg róla. hogy a TV készülék ki van
kapcsolva.
2. Csatlakoztassa a kültéri antenna koaxiális kábelét a
DVB-T(2) vevőegység antenna csatlakozójába.
3. Ezután bekapcsolhatja a TV készüléket és a vevőegy-
séget.
4. Kapcsolja be a DVB-T(2) vevőegység menüjében az 5
V áramellátást, hogy az antennába beépített erősítőt a
koaxiális kábelen keresztül árammal lássa el.
5. Ezután megkeresheti az elérhető adásokat. Szükség
esetén használja a TV készülék kezelési utasítását
segítségként.
egységen keresztül
1. Bizonyosodjon meg róla. hogy a DVB-T(2) vevőegység
ki van kapcsolva.
2. Csatlakoztassa a kültéri antenna koaxiális kábelét a
tápfeladó antenna csatlakozójába.
3. Csatlakoztassa a külső hálózati egység kábelét a tápfeladó „DC 12 V 100 mA” csatlakozó aljzatába, valamint
a külső hálózati egységet egy 230 V AC dugaszoló
aljzatba.
4. Csatlakoztassa a tápfeladó koaxiális kábelét a
DVB-T(2) vevőegység antenna bemenetébe.
5. Ennél a csatlakoztatási módnál nem játszik szerepet, hogy a DVB-T(2) vevőegység 5 V áramellátása
aktiválva van-e.
6. Ezután bekapcsolhatja a TV készüléket és a DVB-T(2)
vevőegységet.
7. Ezután megkeresheti az elérhető adásokat. Szükség
esetén használja a DVB-T(2) vevőegység kezelési
utasítását segítségként.
TV
A KÜLTÉRI ANTENNA CSATLAKOZTATÁSA DAB+ RÁDIÓKHOZ
Csatlakoztatási példa:
Csatlakoztatási
Hálózati egység
nélkül
Rádió (IEC) adapter
78
Page 79

KEZELÉSI UTASÍTÁS
1. Bizonyosodjon meg róla. hogy a DAB+ rádió ki van kapcsolva.
2. Csatlakoztassa a kültéri antenna koaxiális kábelét a tápfeladó antenna
csatlakozójába.
3. Csatlakoztassa a külső hálózati egység kábelét a tápfeladó DC 12 V 100
mA csatlakozó aljzatába, valamint a külső hálózati egységet egy 230 V AC
dugaszoló aljzatba.
4. Helyezze rá a mellékelt IEC csatlakozót (rádió IEC csatlakozó) a tápfeladó
rövid koaxiális kábelére, és csatlakoztassa azt a DAB+ vevőegység antenna
bemenetébe.
5. Ezután megkeresheti az elérhető adásokat. Szükség esetén használja a
DAB+ rádió kezelési utasítását segítségként.
Ártalmatlanítás
A villamos és elektronikus készülékeket, valamint elemeket nem szabad a háztartási szeméttel együtt ártalmatlanítani. A fogyasztó törvényileg köteles a villamos és elektronikus készülékeket, valamint elemeket élettartamuk
végén az erre szolgáló nyilvános gyűjtőhelyekre vagy a vásárlás helyére visszajuttatni. Ezek részleteit az adott
ország jogszabályai szabályozzák. A terméken, a kezelési útmutatón, ill. a csomagoláson lévő szimbólum erre a
rendelkezésre utal.
Felelősség kizárása
A Schwaiger GmbH semmilyen felelősséget vagy szavatosságot nem vállal olyan károkért, amelyek a termék szakszerűtlen
össze- vagy felszereléséből, valamint a termék szakszerűtlen használatából vagy a biztonsági tudnivalók figyelmen kívül
hagyásából erednek.
Gyártói információ
Mélyen tisztelt Vásárló, ha műszaki tanácsra van szüksége, és szakkereskedője nem tudott segíteni, forduljon műszaki
ügyfélszolgálatunkhoz.
Egyszerűsített EU megfelelőségi nyilatkozat a RED irányelv szerint
A Schwaiger GmbH ezennel kijelenti, hogy a rádióberendezés típusa a 2014/53/EU irányelvnek megfelel.
Az EU megfelelőségi nyilatkozat teljes szövege a következő internetcímen érhető el: http://konform.schwaiger.de
Nyitvatartási idő:
Hétfőtől péntekig: 08:00 – 17:00 óra
Schwaiger GmbH
Würzburger Straße 17 | 90579 Langenzenn
Ügyfélszolgálat: +49 (0) 9101 702-299
www.schwaiger.de | info@schwaiger.de
79
Page 80

UPUTE ZA RUKOVANJE
UVOD
Srdačno Vas pozdravljamo i zahvaljujemo na kupnji ove Vanjske antene DTA4000 011.
Ovaj priručnik će Vam pomoći u rukovanju i radu s ovim proizvodom. Pročitajte pomno u cijelosti Upute za rukovanje.
Čuvajte Upute tijekom čitavog radnog vijeka proizvoda i predajte ih sljedećem vlasniku ili korisniku.
Molimo, provjerite cjelovitost sadržaja pošiljke i sa sigurnošću utvrdite da nema nikakvih dijelova s greškom ili oštećenih
dijelova.
Svi uređaji koje prodajemo u skladu su s važećim propisima o sigurnosti i općenito su sigurni kada se upotrebljavaju
prema namjeni!
Za jednostavno čitanje ovog priručnika, vanjska antena ZA4000 011 naziva se „vanjska antena“.
PREDVIĐENA UPORABA
• Vanjska antena služi za prijem digitalnih TV i radio programa.
Svaka druga primjena osim navedene nije dopuštena!
SIGURNOSNE NAPOMENE
• Upotrijebite odgovarajući mrežni ispravljač (vidjeti tehničke podatke). Pazite na polaritet.
• Ova je vanjska antena elektronički proizvod koji ne smije biti u rukama djece!
• Stoga čuvajte ovo vanjsku antenu izvan dosega djece.
• Ne stavljajte nikakve predmete u priključke ili otvore proizvoda.
• U slučaju kvara, vanjsku antenu treba popraviti samo stručna osoba.
• Odspojite mrežni utikač prije čišćenja.
• Očistite vanjsku antenu tkaninom koja ne ostavlja dlačice, malo vlažnom i nemojte koristiti agresivno sredstvo za
čišćenje. Pazite pritom da nikakva voda (bez tekućine / vlage) ne dolazi u proizvod.
TEHNIČKI PODACI
Frekvencija/područje prijema VHF (174 - 230 MHz)
Kanali 5 – 12 & 21 – 60
Dobit 36 dB
Impedancija 75 Ω
Koaksijalni kabel 8,5 m uključen
Priključak prijemnik/TV 5-6 V istosmjerno 50 mA
Strujni priključak Mrežni utikač, uključen, 100-240 V AC / 12 V DC 100 mA
Razred zaštite IPX4
UHF (470 -790 MHz)
SADRŽAJ PAKIRANJA
• Aktivna vanjska antena (UHF / VHF) s integriranim pojačalom
• Koaksijalni priključni kabel 8,5 m
• Mrežni utikač 100-240 V AC/ 12 V DC 100 mA
• Ulazna skretnica
• Vješanje na stup
• Radio (IEC) adapter
• Uputa za uporabu s sigurnosni zahtjevi
OPTIMALNO MJESTO ZA POSTAVLJANJE VANJSKE ANTENE
Kako biste osigurali najbolji mogući prijem, trebate provjeriti ima li previše prepreka između predajnika i vanjske antene
koje bi ometale signal.
DVB-T(2) prijemnici često imaju pokazivač snage signala (mjerač razine). Ovaj pokazivač je pogodan za pronalaženje
najboljeg položaja antene. Prije konačnog postavljanja provjerite različite položaje i smjerove antene.
80
Page 81

UPUTE ZA RUKOVANJE
POSTAVLJANJE VANJSKE ANTENE
A. Postavljanje na stup
Stremen obujmice nataknite oko stupa, namjestite nosač antene i stegnite vijke.
Zavežite oko 1 metar koaksijalnog kabela na šipku za učvršćenje do dubine oko 0,5 m, tako da antena ima dovoljno
slobode za moguće promjene položaja.
0,5m
1m
B. Postavljanje na zid
Izbušite rupe u zidu prema položaju rupa na antenskom nosaču, umetnite plastične uloške u rupe, pričvrstite držač na
zid i stegnite ga vijcima.
81
Page 82

UPUTE ZA RUKOVANJE
C. Učvršćivanje na ogradu (balkon)
Montirajte nosač antene s obujmicom na ogradu. Zavrnite koaksijalni kabel s F-priključkom na antenu i fiksirajte antenu
na okretnom postolju nakon odgovarajućeg usmjeravanja.
Učvršćenje vodoneprpopusnog poklopca
Priključite koaksijalni kabel na F-utičnicu antene i učvrstite kabel. Postavite vodonepropusni poklopac tako da priključak
bude pokriven i da voda ne može ulaziti.
Podešavanje smjera za prijem signala
Namjestite položaj antene prema zračenju horizontalnih ili vertikalnih signala.
Horizontalno
Vertikalno
82
Page 83

UPUTE ZA RUKOVANJE
PRIKLJUČIVANJE VANJSKE ANTENE ZA TV UREĐAJE S INTEGRIRANIM
DVB-T(2)-PRIJEMNIKOM
Primjer priključivanja (LIJEVO) Primjer priključivanja (DESNO)
Pretvarača mrežnog
napona
TV
Ulazne skretnice
TV
PRIMJER PRIKLJUČIVANJA (LIJEVO) PRIMJER PRIKLJUČIVANJA (DESNO)
Napajanje putem ugrađenog DVB-T(2) prijemnika u
TV prijemniku
1. Sa sigurnošću utvrdite da je TV uređaj isključen. 1. Sa sigurnošću utvrdite da je TV uređaj isključen.
2. Spojite koaksijalni kabel vanjske antene na antensku
priključnicu vašeg TV prijemnika
3. Sada možete uključiti televizor. 3. Sada priključite kabel vanjskog mrežnog ispravljača
4. Uključite 5 V napajanje u izborniku TV uređaja kako
biste preko koaksijalnog kabela napajali vanjsko
pojačalo.
5. Sada možete potražiti programe koji se mogu primati.
U tu svrhu po potrebi pogledajte uputu za upotrebu
televizora.
Električno napajanje preko isporučenog vanjskog
mrežnog adaptera
2. Spojite koaksijalni kabel vanjske antene na antensku
priključnicu ulazne skretnice.
u utičnicu „DC 12 V 100 mA“ ulazne skretnice a sam
mrežni ispravljač utaknite u zidnu utičnicu izmjenične
struje 230 V.
4. Kratki koaksijalni kabel ulazne skretnice priključite na
antenski ulaz televizora.
5. Ako se pri tome aktivira napajanje od 5 V iz televizora,
onda ova inačica spajanja nema nikakvu ulogu.
6. Sada možete uključiti televizor i potražiti programe
koji se mogu primati. U tu svrhu po potrebi pogledajte
uputu za upotrebu televizora.
83
Page 84

UPUTE ZA RUKOVANJE
PRIKLJUČIVANJE VANJSKE ANTENE ZA TV UREĐAJE BEZ INTEGRIRANOG
DVB-T(2)-PRIJEMNIKA
Primjer priključivanja (LIJEVO) Primjer priključivanja (DESNO)
Pretvarača mrežnog
Receiver
Ulazne skretnice
napona
Receiver
TV
Primjer priključivanja (LIJEVO) Primjer priključivanja (DESNO)
Napajanje putem DVB-T(2) prijemnika Električno napajanje preko isporučenog vanjskog
1. Sa sigurnošću utvrdite da je TV uređaj isključen. 1. Sa sigurnošću utvrdite da je DVB-T(2) prijemnik
2. Spojite koaksijalni kabel vanjske antene na antensku
priključnicu DVB-T(2) prijemnika.
3. Sada možete uključiti televizor i prijemnik. 3. Sada priključite kabel vanjskog mrežnog ispravljača u
4. Uključite 5 V napajanje u izborniku DVB-T(2) prijem-
nika kako biste preko koaksijalnog kabela napajali
pojačalo ugrađeno u antenu.
5. Sada možete potražiti programe koji se mogu primati.
U tu svrhu po potrebi pogledajte uputu za upotrebu
televizora.
mrežnog adaptera
isključen.
2. Spojite koaksijalni kabel vanjske antene na antensku
priključnicu vaše skretnice napajanja.
utičnicu DC 12 V 100 mA skretnice napajanja a sam
mrežni ispravljač utaknite u zidnu utičnicu izmjenične
struje 230 V.
4. Koaksijalni kabel skretnice napajanja priključite na
antenski ulaz vašeg DVB-T(2) prijemnika.
5. Ako se pri tome aktivira napajanje od 5 V iz DVB-T(2)
prijemnika, onda ova inačica spajanja nema nikakvu
ulogu.
6. Sada možete uključiti televizor i DVB-T(2) prijemnik.
7. Sada možete potražiti programe koji se mogu primati.
U tu svrhu po potrebi pogledajte uputu za upotrebu
DVB-T(2) prijemnika.
TV
PRIKLJUČIVANJE VANJSKE ANTENE ZA DAB+ RADIO
Primjer priključivanja:
Ulazne skretnice
Pretvarača mrežnog
napona
84
Radio (IEC) adapter
Page 85

UPUTE ZA RUKOVANJE
1. Sa sigurnošću utvrdite da je DAB+ radio isključen.
2. Spojite koaksijalni kabel vanjske antene na antensku priključnicu vaše skret-
nice napajanja.
3. Sada priključite kabel vanjskog mrežnog ispravljača u utičnicu DC 12 V 100
mA skretnice napajanja a sam mrežni ispravljač utaknite u zidnu utičnicu
izmjenične struje 230 V.
4. Nataknite priloženu IEC spojnicu (Radio IEC Connector) na kratki koaksijalni kabel skretnice napajanja i priključite ga na antenski ulaz vašeg DAB+
prijemnika.
5. Sada možete potražiti programe koji se mogu primati. U tu svrhu po potrebi
pogledajte uputu za upotrebu DAB+ radija.
Zbrinjavanje
Ne odlažite baterije ili električne i elektroničke uređaje u kućni otpad. Potrošač je zakonski obvezan vratiti
električne i elektroničke uređaje i baterije koji su na kraju korisnog vijeka do mjesta prodaje ili javnih sabirnih
mjesta koja su postavljena u tu svrhu. Zakonodavstvo u zemlji uporabe uređuje pojedinačne pojedinosti o zbrinjavanju. Simbol na proizvodu, korisničkom priručniku ili pakiranju označava ovaj zakonski zahtjev.
Odricanje od odgovornosti
Schwaiger GmbH ne preuzima nikakvu odgovornost i jamstvo za štete koja su posljedica nepravilne instalacije ili montaže
kao i nepravilne upotrebe proizvoda ili nepridržavanja sigurnosnih uputa.
Informacija proizvođača
Poštovani kupci, trebate li tehnički savjet, a vaš specijalizirani trgovac vam ne može dalje pomoći, molimo obratite se
našoj službi tehničke podrške.
Pojednostavljena EU deklaracija o sukladnosti prema RED-direktivi
SCHWAIGER GMBH ovime izjavljuje da je opisani tip radio uređaja u skladu s Direktivom 2014/53 / EU.
Potpuni tekst EU izjave o sukladnosti možete potražiti na: http://konform.schwaiger.de
Radno vrijeme:
Ponedjeljak – Petak: 08:00 - 17:00 sati
Schwaiger GmbH
Würzburger Straße 17 | 90579 Langenzenn
Hotline: +49 (0) 9101 702-299
www.schwaiger.de | info@schwaiger.de
85
Page 86

INSTRUKCJA OBSŁUGI
WPROWADZENIE
Gratulujemy wyboru i jednocześnie dziękujemy za zakup anteny zewnętrznej DTA4000 011.
Niniejsza instrukcja obsługi powinna pomóc ci w korzystaniu i obsłudze niniejszego produktu. Uważnie przeczytaj
instrukcję obsługi. W trakcie całego okresu użytkowania produktu należy przechowywać instrukcję i przekazywać ją
kolejnym użytkownikom lub właścicielom.
Sprawdzić, czy zawartość jest kompletna i upewnić się, że nie ma żadnych nieprawidłowych ani uszkodzonych części.
Wszystkie sprzedawane przez nas urządzenia odpowiadają w chwili zakupu obowiązującym przepisom bezpieczeństwa i
użytkowane zgodnie z przeznaczeniem są bezpieczne!
W celu ułatwienia czytania niniejszej instrukcji obsługi antenę zewnętrzną DTA4000 011 będzie określać się dalej skrótowo „anteną zewnętrzną”.
UŻYTKOWANIE ZGODNIE Z PRZEZNACZENIEM
• Antena zewnętrzna służy do odbioru cyfrowych programów telewizyjnych i radiowych
Inne zastosowanie niż wyżej podane uznaje się za niedozwolone!
WSKAZÓWKI BEZPIECZEŃSTWA
• Używaj odpowiedniego zasilacza (zobacz dane techniczne). Zwracaj uwagę na położenie biegunów.
• Niniejsza antena zewnętrzna jest produktem elektronicznym, którym nie mogą bawić się dzieci!
• Z tego powodu przechowuj to urządzenie z dala od dzieci.
• Do przyłączy lub otworów nie wkładaj żadnych przedmiotów.
• Naprawę niesprawnej anteny zewnętrznej powierzaj wyłącznie wykwalifikowanemu specjaliście.
• Przed przystąpieniem do czyszczenia wyciągnij wtyczkę sieciową.
• Antenę zewnętrzną wycieraj niestrzępiącą się, ewentualnie lekko zwilżoną szmatką, bez dodatku jakichkolwiek środków
czyszczących, mogących działać agresywnie na powierzchnię anteny. Zwracaj w szczególności uwagę na to, by do
produktu nie dostała się woda (ani żadna inna ciecz/wilgoć).
DANE TECHNICZNE
Zakres częstotliwości/odbioru VHF (174 - 230 MHz)
Kanały 5 – 12 & 21 – 60
Zysk energetyczny anteny 36 dB
Impedancja 75 Ω
Kabel koncentryczny 8,5 m w zestawie
Przyłącze dekodera/TV 5-6 V DC 50 mA
Przyłącze elektryczne Zasilacz w zestawie, 100-240 V AC / 12 V DC 100 mA
Stopień ochrony IPX4
UHF (470 -790 MHz)
ZAWARTOŚĆ OPAKOWANIA
• Aktywna antena zewnętrzna (UHF / VHF) z wbudowanym wzmacniaczem
• Koncentryczny kabel przyłączeniowy 8,5 m
• Zasilacz 100-240 V AC/ 12 V DC 100 mA
• Zwrotnica zasilająca
• Uchwyt masztowy
• Przejściówka anteny radiowej (IEC)
• Instrukcja obsługi z przepisami bezpieczeństwa
OPTYMALNE MIEJSCE USTAWIENIA ANTENY ZEWNĘTRZNEJ
Między nadajnikiem a anteną zewnętrzną powinno być więc jak najmniej przeszkód, które mogłyby zakłócać transmitowanie sygnałów.
Dekodery DVB-T(2) mają często wskaźnik siły sygnału (wskaźnik poziomu). Wskaźnik jest pomocny w określeniu najlepszej pozycji anteny. Sprawdź różne miejsca i kierunki zanim zdecydujesz się wybrać optymalne położenie.
86
Page 87

INSTRUKCJA OBSŁUGI
MONTAŻ ANTENY ZEWNĘTRZNEJ
A. Montaż na maszcie
Przełóż pałąk U-kształtny przez maszt, ustaw uchwyt anteny i przykręć śruby.
Przypnij kabel koncentryczny do drążka mocującego, mniej więcej 0,5 m pod miejscem zamocowania anteny, zostawiając
około 1 metra kabla zapasu w razie konieczności skorygowania ustawienia anteny.
1m
0,5m
B. Montaż na ścianie
Wykonaj otwory w ścianie odpowiednio do otworów wykonanych na pałąku anteny, włóż plastikowe kołki rozporowe w
otwory, przymocuj pałąk do ściany i przykręć go śrubami.
87
Page 88

INSTRUKCJA OBSŁUGI
C. Mocowanie do balustrady (na balkonie)
Przymocuj uchwyt anteny do balustrady za pomocą pałąka. Przykręć kabel koncentryczny z wtykiem typu F do anteny i
unieruchom antenę na obrotowym cokole zgodnie kierunkiem odbioru fal.
Przymocowanie wodoszczelnej osłony
Podłącz kabel koncentryczny do gniazda typu F anteny i zabezpiecz kabel. Przymocuj wodoszczelną osłonę w taki sposób,
by zasłonić przyłącze i zabezpieczyć je przed wnikaniem wody.
USTAWIENIE KIERUNKU ODBIORU
Ustaw pozycję anteny odpowiednio do kierunku nadawania sygnałów w polaryzacji poziomej lub pionowej.
Poziomo
Pionowo
88
Page 89

INSTRUKCJA OBSŁUGI
PODŁĄCZANIE ANTENY ZEWNĘTRZNEJ DO TELEWIZORÓW Z WBUDOWANYM DEKODEREM DVB-T(2)
Przykładowe przyłącze (LEWO) Przykładowe przyłącze (PRAWO)
Zasilacza
Zwrotnicy zasilającej
TV
TV
PRZYKŁADOWE PRZYŁĄCZE (LEWO) PRZYKŁADOWE PRZYŁĄCZE (PRAWO)
Zasilanie elektryczne przez wbudowany dekoder
DVB-T(2) w telewizorze
1. Telewizor musi być wyłączony. 1. Telewizor musi być wyłączony.
2. Podłącz kabel koncentryczny anteny zewnętrznej do
przyłącza antenowego w telewizorze.
3. Teraz możesz włączyć telewizor. 3. Teraz podłącz kabel zasilacza zewnętrznego do gni-
4. W menu telewizora włącz zasilanie 5 V, w celu doprowadzenia napięcia do anteny zewnętrznej kablem
koncentrycznym.
5. Teraz możesz wyszukać dostępne programy telewizyjne. W razie konieczności skorzystaj tu z instrukcji
obsługi telewizora.
Zasilanie elektryczne przez dołączony zasilacz
zewnętrzny
2. Podłącz kabel koncentryczny anteny zewnętrznej do
przyłącza antenowego na zwrotnicy zasilającej.
azda „DC 12 V 100 mA” na zwrotnicy zasilającej, a
następnie zasilacz zewnętrzny do gniazda wtykowego
230 V AC.
4. Krótki kabel koncentryczny zwrotnicy zasilającej
podłącz do wejścia antenowego w telewizorze.
5. W tym wariancie przyłączania nie ma znaczenia, czy
jest dostępne zasilanie 5 V z telewizora.
6. Teraz możesz włączyć telewizor i wyszukać dostępne
programy telewizyjne. W razie konieczności skorzystaj
tu z instrukcji obsługi telewizora.
89
Page 90

INSTRUKCJA OBSŁUGI
PODŁĄCZANIE ANTENY ZEWNĘTRZNEJ DO TELEWIZORÓW BEZ WBUDOWANEGO DEKODERA DVB-T(2)
Przykładowe przyłącze (LEWO) Przykładowe przyłącze (PRAWO)
Receiver
Zwrotnicy zasilającej
Zasilacza
Receiver
TV
PRZYKŁADOWE PRZYŁĄCZE (LEWO) PRZYKŁADOWE PRZYŁĄCZE (PRAWO)
Zasilanie elektryczne przez dekoder DVB-T(2) Zasilanie elektryczne przez dołączony zasilacz
1. Telewizor musi być wyłączony. 1. Dekoder DVB-T(2) musi być wyłączony.
2. Podłącz kabel koncentryczny anteny zewnętrznej do
przyłącza antenowego dekodera DVB-T(2).
3. Teraz możesz włączyć telewizor i dekoder. 3. Teraz podłącz kabel zasilacza zewnętrznego do gniazda
4. W menu dekodera DVB-T(2) włącz zasilanie 5 V, by
doprowadzić napięcie kablem koncentrycznym do
wzmacniacza wbudowanego w antenę.
5. Teraz możesz wyszukać dostępne programy telewizyjne. W razie konieczności skorzystaj tu z instrukcji
obsługi telewizora.
zewnętrzny
2. Podłącz kabel koncentryczny anteny zewnętrznej do
przyłącza antenowego na zwrotnicy zasilającej.
DC 12 V 100 mA na zwrotnicy zasilającej, a następnie
zasilacz zewnętrzny do gniazda wtykowego 230 V AC.
4. Kabel koncentryczny zwrotnicy zasilającej podłącz do
wejścia antenowego w dekoderze DVB-T(2).
5. W tym wariancie przyłączanie nie ma znaczenia, czy
jest dostępne zasilanie 5 V z dekodera DVB-T(2).
6. Teraz możesz włączyć telewizor i dekoder DVB-T(2).
7. Teraz możesz wyszukać dostępne programy telewizyjne. W razie konieczności skorzystaj tu z instrukcji
obsługi dekodera DVB-T(2).
TV
PODŁĄCZANIE ANTENY ZEWNĘTRZNEJ DO RADIOODBIORNIKÓW DAB+
Przykładowe przyłącze:
Zasilacza
Zwrotnicy zasilającej
Przejściówka anteny radiowej (IEC)
90
Page 91

INSTRUKCJA OBSŁUGI
1. Radio DAB+ musi być wyłączone.
2. Podłącz kabel koncentryczny anteny zewnętrznej do przyłącza antenowego
na zwrotnicy zasilającej.
3. Teraz podłącz kabel zasilacza zewnętrznego do gniazda DC 12 V 100 mA na
zwrotnicy zasilającej, a następnie zasilacz zewnętrzny do gniazda wtykowe-
go 230 V AC.
4. Podłącz dołączone złącze IEC (Radio IEC Connector) do krótkiego kabla kon-
centrycznego zwrotnicy zasilającej, a następnie podłącz wejście antenowe
odbiornika DAB+.
5. Teraz możesz wyszukać dostępne programy telewizyjne. W razie
konieczności skorzystaj tu z instrukcji obsługi radia DAB+.
Utylizacja
Nie usuwać baterii ani urządzeń elektrycznych i elektronicznych ze zwykłymi odpadami z gospodarstwa domowego. Użytkownik jest zobowiązany przez prawo do oddawania zużytych urządzeń elektrycznych i elektronicznych
oraz baterii do punktu sprzedaży lub publicznych punktów zbiórki, specjalnie zorganizowanych w tym celu.
Szczegóły utylizacji są regulowane przez przepisy w kraju użytkowania. Ten symbol na produkcie, instrukcji obsługi
lub opakowaniu wskazuje na ten wymóg prawny
Wykluczenie odpowiedzialności
Schwaiger GmbH nie ponosi odpowiedzialności ani nie udziela gwarancji na uszkodzenia wynikające z niewłaściwej instalacji lub montażu oraz nieodpowiedniego użytkowania produktu lub nieprzestrzegania wskazówek bezpieczeństwa.
Informacja producenta
Szanowny Kliencie, jeżeli potrzebne są porady techniczne, a sprzedawca nie jest w stanie pomóc, należy skontaktować
się z naszym działem wsparcia technicznego.
Uproszczona deklaracja zgodności UE zgodnie z dyrektywą RED
Firma Schwaiger GmbH niniejszym oświadcza, że opisane urządzenie radiowe jej produkcji spełnia wymogi Dyrektywy
2014/53/UE.
Pełna deklaracja zgodności UE jest dostępna online pod tym adresem: http://konform.schwaiger.de
Godziny pracy:
od poniedziałku do piątku: godz. 08:00 - 17:00
Schwaiger GmbH
Würzburger Straße 17 | 90579 Langenzenn
Infolinia: +49 (0) 9101 702-299
www.schwaiger.de | info@schwaiger.de
91
Page 92

INSTRUCŢIUNI DE UTILIZARE
INTRODUCERE
Felicitări şi mulţumiri pentru achiziţionarea antenei exterioare DTA4000 011.
Acest manual de utilizare are rolul de a vă ajuta în lucrul şi operarea cu acest produs. Citiţi integral şi riguros manualul
de utilizare. Păstraţi manualul de utilizare pentru toată durata de viaţă a produsului şi predaţi-l viitorilor utilizatori sau
deţinători ai acestui produs.
Vă rugăm să verificaţi conţinutul pachetului dacă este complet, şi asiguraţi-vă că nu lipsesc piese şi nu aveţi piese ava-
riate.
Toate aparatele distribuite de noi corespund dispoziţiilor de securitate valabile la momentul cumpărării şi prezintă
siguranţă dacă sunt utilizate conform cu destinaţia lor!
Pentru o citire simplă a acestui manual de utilizare, antenă exterioară DTA4000 011 este denumită ca „antenă exterioară“.
UTILIZAREA CONFORMĂ CU DESTINAŢIA
• Antena exterioară serveşte recepţiei programelor digitale radio şi TV.
O altă utilizare decât cea indicată nu este admisibilă!
MENȚIUNI REFERITOARE LA SIGURANȚĂ
• Vă rugăm să utilizaţi un alimentator pornit (a se vedea Date tehnice). Acordaţi atenţie polarităţii.
• Această antenă exterioară este un produs electronic care nu trebuie să ajungă în mâinile copiilor!
• De aceea, păstraţi antenei exterioare în afara razei de acces a copiilor.
• Nu introduceţi obiecte în conexiunile sau deschizăturile produsului.
• Dispuneţi repararea antenei exterioare în cazul defectelor numai de către un specialist
• Înainte de curăţare, scoateţi fişa de reţea.
• Curăţaţi antena exterioară cu o cârpă umedă care nu lasă scame, cât se poate de uşoară şi nu utilizaţi detergenţi
agresivi. Aveţi în vedere aici în mod special ca în produs să nu pătrundă apă (lichide/umiditate)
DATE TEHNICE
Domeniul de frecvenţă/recepţie VHF (174 - 230 MHz)
Canale 5 – 12 & 21 – 60
Câştig 36 dB
Impedanţă 75 Ω
Cablu coaxial 8,5 m inclusiv
Racord Receiver/TV 5-6 V DC 50 mA
Alimentare electrică Alimentator, inclusiv, 100-240 V AC / 12 V DC 100 mA
Clasa de protecţie IPX4
UHF (470 -790 MHz)
CONȚINUTUL PACHETULUI
• Antenă exterioară activă (UHF / VHF) cu amplificator integrat
• Cablu de conexiune coaxial de 8,5 m
• Alimentator 100-240 V CA / 12 V CC 100 mA
• Alimentator inserat
• Element de suspendare pe stâlp
• Adaptor radio (IEC)
• Manual de utilizare cu dispoziţii de securitate
LOCUL DE INSTALARE OPRIM PENTRU ANTENA EXTERIOARĂ
Pentru cea mai bună recepţie posibilă, trebuie să vă asiguraţi că între emiţător şi antena exterioară se află cât mai puţine
obstacole care pot reprezenta o rezistenţă pe cât posibil semnal.
Receiverele DVB-T(2) au deseori un indicator de intensitate a semnalului (indicator de nivel). Această indicaţie este
adecvată pentru a găsi cea mai bună poziţie posibilă a antenei. Vă rugăm să verificaţi diferite poziţii înainte de a aşeza
antena în poziţia definitivă
92
Page 93

INSTRUCŢIUNI DE UTILIZARE
MONTAJUL ANTENEI EXTERIOARE
A. Montajul pe stâlp
Introduceţi cadrul U pe stâlp, reglaţi suportul antenei şi fixaţi şuruburile.
Legaţi aprox. 1 metru din cablul coaxial la aprox. 0,5 m adâncime pe bara de fixare, astfel încât antena să aibă suficient
joc pentru eventuala modificare a poziţionării.
0,5m
1m
B. Montare pe perete
Practicaţi găurile în perete corespunzător poziţiei găurilor pe cadrul antenei, introduceţi diblurile din plastic în găuri, fixaţi
cadrul de perete şi fixaţi-l cu şuruburile.
93
Page 94

INSTRUCŢIUNI DE UTILIZARE
C. Fixarea balustradei (balcon)
Montaţi suportul antenei cu cadrul la balustradă. Înşurubaţi cablul coaxial cu fişa F la antenă şi fixaţi antena pe soclul
rotativ cu alinierea corespunzătoare.
Fixarea căpăcelului etanş la apă
Racordaţi cablul coaxial la mufa F a antenei şi asiguraţi cablul. Fixaţi căpăcelul etanş la apă astfel încât conexiunea să fie
acoperită şi să nu poată pătrunde apa.
REGLAREA DIRECŢIEI DE RECEPŢIE
Reglaţi poziţia antenei corespunzător emisiei semnalelor orizontale sau verticale.
Orizontal
Vertical
94
Page 95

INSTRUCŢIUNI DE UTILIZARE
RACORDAREA ANTENEI EXTERIOARE PENTRU APARATE TV CU RECEIVER
DVB-T(2) INTEGRAT
Exemplu de conectare (STÂNGA) Exemplu de conectare (DREAPTA)
Alimentator
Alimentator inserat
TV
TV
EXEMPLU DE CONECTARE (STÂNGA) EXEMPLU DE CONECTARE (DREAPTA)
Alimentare electrică prin receiver DVB-T(2) încorporat în aparatul TV
1. Asiguraţi-vă că televizorul este oprit. 1. Asiguraţi-vă că televizorul este oprit.
2. Conectaţi cablul coaxial al antenei exterioare cu conexiunea de antenă a televizorului dumneavoastră.
3. Acum puteţi porni televizorul şi. 3. Introduceţi acum cablul alimentatorului extern în mufa
4. Conectaţi alimentarea electrică de 5 V în meniul aparatului dumneavoastră TV, pentru a alimenta cu tensiune
amplificatorul extern prin cablul coaxial.
5. Acum puteţi căuta programele care se recepţionează.
După caz, consultaţi în acest scop manualul de utiliza-
re al aparatului TV.
Alimentare electrică prin alimentatorul extern din
pachetul de livrare
2. Conectaţi cablul coaxial al antenei exterioare la conexiunea de antenă a alimentatorului inserat.
„DC 12 V 100 mA“ a alimentatorului inserat, precum şi
alimentatorul extern într-o priză de 230 V CA.
4. Racordaţi cablul coaxial scurt al alimentatorului inserat
la intrarea de antenă a aparatului dumneavoastră TV.
5. La această variantă de conectare, nu are importanţă
dacă alimentarea electrică de 5V a aparatului TV este
activată.
6. Acum puteţi porni televizorul şi puteţi căuta programele care se recepţionează. După caz, consultaţi în acest
scop manualul de utilizare al aparatului TV.
95
Page 96

INSTRUCŢIUNI DE UTILIZARE
RACORDAREA ANTENEI EXTERIOARE PENTRU APARATE TV FĂRĂ RECEIVER
DVB-T(2) INTEGRAT
Exemplu de conectare (STÂNGA) Exemplu de conectare (DREAPTA)
Receiver
Alimentator inserat
Alimentator
Receiver
TV
EXEMPLU DE CONECTARE (STÂNGA) EXEMPLU DE CONECTARE (DREAPTA)
Alimentare electrică prin receiver DVB-T(2) Alimentare electrică prin alimentatorul extern din
1. Asiguraţi-vă că televizorul este oprit. 1. Asiguraţi-vă că receiverul DVB-T(2) este oprit.
2. Conectaţi cablul coaxial al antenei exterioare la conexiunea de antenă a receiverului DVB-T(2).
3. Acum puteţi porni televizorul şi receiverul. 3. Introduceţi acum cablul alimentatorului extern în mufa
4. Setaţi în meniul receiverului DVB-T(2) alimentarea
electrică de 5 V, pentru a alimenta cu tensiune amplificatorul integrat în antenă prin cablul coaxial.
5. Acum puteţi căuta programele care se recepţionează.
După caz, consultaţi în acest scop manualul de utiliza-
re al aparatului TV.
pachetul de livrare
2. Conectaţi cablul coaxial al antenei exterioare la conexiunea de antenă a alimentatorului inserat.
„DC 12 V 100 mA“ a alimentatorului inserat, precum şi
alimentatorul extern într-o priză de 230 V CA.
4. Racordaţi cablul coaxial al alimentatorului inserat
la intrarea de antenă a receiverului dumneavoastră
DVB-T(2).
5. La această variantă de conectare, nu are importanţă
dacă alimentarea electrică de 5V a receiverului
DVB-T(2) este activată.
6. Acum puteţi porni televizorul şi receiverul DVB-T(2).
7. Acum puteţi căuta programele care se recepţionează.
După caz, consultaţi în acest scop manualul de utiliza-
re al receiverului DVB-T(2).
TV
RACORDAREA ANTENEI EXTERIOARE PENTRU APARATE RADIO DAB+
Exemplu de conectare:
Alimentator
Alimentator inserat
Adaptor radio (IEC)
96
Page 97

INSTRUCŢIUNI DE UTILIZARE
1. Asiguraţi-vă că aparatul radio DAB+ este oprit.
2. Conectaţi cablul coaxial al antenei exterioare la conexiunea de antenă a
alimentatorului inserat.
3. Introduceţi acum cablul alimentatorului extern în mufa „DC 12 V 100 mA“ a
alimentatorului inserat, precum şi alimentatorul extern într-o priză de 230
V CA.
4. Introduceţi conectorul IEC ataşat (Radio IEC Connector) pe cablul coaxial
scurt al alimentatorului inseratşi conectaţi-l la intrarea de antenă a receptorului dumneavoastră DAB+.
5. Acum puteţi căuta programele care se recepţionează. După caz, consultaţi în
acest scop manualul de utilizare al aparatului radio DAB+.
Aruncarea produsului la gunoi
Nu aruncaţi bateriile şi aparatele electrice şi electronice în gunoiul menajer obişnuit. Consumatorul are obligaţia
legală de a returna aparatele electrice şi electronice şi bateriile la sfârşitul duratei de viaţă a produselor la locurile
de colectare echipate pentru această sarcină, sau la cele publice sau la punctul de vânzare. Detaliile sunt reglementate de legislaţia din ţara în care este folosită, referitoare la aruncarea produselor de acest tip. Simbolul de pe
acest produs, Ghidul de Utilizare sau ambalajul indică aceste cerinţe legale.
Declinarea răspunderii
Firma Schwaiger GmbH nu oferă nici o garanţie pentru avarii rezultate din instalarea sau montarea neprofesională, precum și cele rezultate din folosirea produsului contrar destinaţiei acestuia şi nerespectarea instrucţiunilor de siguranţă.
Datele producătorului
Stimate client, dacă aveți nevoie de consultanță tehnică și distribuitorul nu vă poate ajuta, vă rugăm să contactați Departamentul de Suport Tehnic.
Declaraţie de conformitate UE simplificată conform directivei RED.
Prin prezenta, SCHWAIGER GmbH declară că tipul descris al instalaţiei radio corespunde directivei 2014/53/UE.
Declaraţia de conformitate UE completă este disponibilă online la adresa: http://konform.schwaiger.de
Orar:
Luni-Vineri Orele 08:00 - 17:00
Schwaiger GmbH
Würzburger Straße 17 | 90579 Langenzenn
Hotline: +49 (0) 9101 702-299
www.schwaiger.de | info@schwaiger.de
97
Page 98

Page 99

Page 100

HOTLINE
+49 (09101) 702-299
ANSCHRIFT
Schwaiger GmbH
Würzburger Straße 17
90579 Langenzenn
info@schwaiger.de
www.schwaiger.de
DTA4000_011_BDA
 Loading...