


Table Of Content
1 Safety Notes ..................................................................................................3
2 General Features...........................................................................................6
3 Connection ....................................................................................................7
3.1 Connecting the Receiver to TV by using SCART-Cable .................................7
3.2 Connecting the Receiver to your TV by using RCA cable ...............................7
3.3 Connecting the Receiver to your TV by using Component cable ...................8
4 Hardware........................................................................................................9
4.1 Remote Control ...............................................................................................9
4.2 Remote Control unit ......................................................................................11
4.3 Front Panel ...................................................................................................13
4.4 Rear Panel ....................................................................................................13
5 Prime Setup .................................................................................................15
5.1 Language Setting ..........................................................................................15
5.2 Time Setting ..................................................................................................15
5.3 Pre-Setting ....................................................................................................16
DSR6600HDCI
6 Watching TV ................................................................................................17
6.1 General watching .........................................................................................17
6.2 Options .........................................................................................................17
6.3 EPG (Electronic Programme Guide) .............................................................18
6.4 EPG-Timer (Timer programming via EPG) ...................................................19
6.5 Teletext..........................................................................................................20
6.6 PVR Function ................................................................................................20
6.6.1 Direct recording.............................................................................................20
6.6.2 Time Shift-Function .......................................................................................20
6.7 Playback .......................................................................................................21
7 Menu Operation...........................................................................................22
7.1 Edit Channels................................................................................................22
7.1.1 Create Channel List (Move) ..........................................................................22
7.1.2 Edit Channels................................................................................................23
7.1.3 Sort Channels ...............................................................................................24
7.2 Edit Favorite Channels..................................................................................26
7 Installation ...................................................................................................27
8.1 Dish Setup ....................................................................................................27
8.2 Channel Scan ...............................................................................................29
8.3 Positioner Setup............................................................................................30
8.4 Edit TP List ....................................................................................................30
8.5 Software Update ...........................................................................................31
8.6 Default Setting ..............................................................................................32
8.7 OTA-Software Update ...................................................................................32
9 User Setup ...................................................................................................33
9.1 Language Setting ..........................................................................................33
9.2 Time Setting ..................................................................................................34
9.3 Timer Setting .................................................................................................34
9.4 Parental Control ............................................................................................35
www.schwaiger.de 1

DSR6600HDCI
9.5 A/V Controll ...................................................................................................36
9.6 OSD Setting ..................................................................................................37
10 PVR Function ..............................................................................................38
10.1 PVR Settings.................................................................................................38
10.2 Hard-Disk-Drive Settings ..............................................................................38
11 Common Interface ......................................................................................39
11.1 Status ............................................................................................................39
12 Troubleshooting ..........................................................................................40
13 TechnicalSpecications ............................................................................41
www.schwaiger.de 2

1 Safety Notes
This product has been manufactured to comply with international safety standards. Please
read the following safety precautions carefully.
Warranty
The Warranty period begins with the purchase of the product. As evidence of the date of
purchase please present the according document (sales check, invoice, delivery note, or
similar). Please keep these documents in a safe place. Our guarantee service is based on
our, at the time of purchase valid, warranty conditions. In the case of repair please bring
the product to your dealer.
The product carries the CE-Logo and thus compliant with the essential requirements of the
European directives 2004/108 EC for EMI and 2006/95 EC for LVD.
MAINS SUPPLY : 90-260V AC 50/60Hz
Operate this product only from the type of power supply indicated on the marking label.
If you are not sure of the type of power supplied to your home, consult your local power
company.
Disconnect the product from the mains before you start any maintenance or installation
procedures.
DSR6600HDCI
OVERLOADING
Do not overload a wall outlet, extension cord or adapter as this may result in electric re
or shock.
LIQUID
The product should not be exposed to liquid of any kind. In addition, no objects lled with
liquid should be placed on the apparatus.
CLEANING
Disconnect the product from the wall outlet before cleaning. Use a light damp cloth (no
solvents) to dust the product.
VENTILATION
The slots on top of the product must be left uncovered to allow proper airow into the unit.
• Do not stand the product on soft furnishings or carpets.
• Do not stack electronic equipments on top of the product.
ATTACHMENTS
Do not use any unsupported attachments as these may be hazardous or cause damage
to the product.
CONNECTION TO THE AERIAL
Disconnect the product from the mains before connecting or disconnecting the cable from
the aerial. Failure to do so can damage the aerial.
www.schwaiger.de 3

DSR6600HDCI
CONNECTION TO THE TV
Disconnect the product from the mains before connecting or disconnecting the cable from
the TV. Failure to do so can damage the TV.
EARTHING
The aerial cable must be buried in the ground.
LOCATION
• Place the product indoors to avoid exposing it to lightning, rain or sun.
• Do not place it near a radiator or heat register.
• Make sure it has more than 10cm clearance from
• Do not block the openings with any object, and do not place the product on a bed, sofa,
rug, or other similar surface.
• If you place the product on a rack or a bookcase, ensure that there is adequate ventilation
and that you have followed the manufacturer’s instructions for mounting.
• Do not place the product on an unstable cart, stand, tripod, bracket, or table where it can
fall. A falling product can cause serious injury to a child or adult, and serious damage to
the appliance.
LIGHTNING, STORM or NOT IN USE
Unplug the product from the wall outlet and disconnect the antenna during a thunderstorm
or when left unattended and unused for long periods of time. This will prevent damage to
the unit due to lightning and power-surges.
EXTRANEOUS OBJECTS
Do not insert anything through the openings in the unit, where they can touch dangerous
voltage points or damage parts.
REPLACEMENT of PARTS
Replacement of parts may only be made by service technician specied by the manufacturer.
WARNING!
To avoid damage of the power cord or plug:
• Do not modify or process the power cord or plug arbitrarily.
• Do not bend or twist the power cord.
• Make sure to disconnect the power cord holding the plug.
• Keep heating appliances as far as possible from the power cord in order to prevent the
cover vinyl from melting.
• The main plug shall remain readily operable.
To avoid electrical shock:
• Do not open the main body.
• Do not insert metal or inammable objects inside the product.
• Do not touch the power plug with wet hands.
• Disconnect the power cord in case of lightning.
www.schwaiger.de 4

DSR6600HDCI
To avoid damage of product:
• Do not use the product when it is out of order. If you continue to use the product when
defective, serious damage can be caused to it. Make sure to contact your local product
distributor if the product is out of order.
• Do not insert metal or alien substance into the slots for the modules or smartcards.
It may cause damage to the product and reduce its life span.
The socket-outlet shall be installed near the equipment and shall be easily accessible.
www.schwaiger.de 5

2 General Features
• SD / HD support (MPEG4 AVC/H.264)
• Two Common Interface-Slots
• USB PVR Function (by using external HDD)
Time Shift Mode (by using external HDD)
1 Channel recording, 2nd Channel watching on same TP
(by using external HDD)
• High Denition Video output: HDMI and YPbPr
• Subtitle support : OSD & VBI insertion for TV
• 8-Digit VF-Display
• Channel sorting by FTA, CAS, Satellite, Alphabetic order & Network
• Satellite Scan - Simultaneous Scan with 10 Satellites
• EPG : Now and Next and 7 days EPG
• Variable Input Symbol Rate (1-45 Msps)
• Video output resolution: 576p, 720p, 1080i, 1080p
• User selectable output resolution
• Multi language OSD in D, GB, F, I, CZ, ES, NL, PL
• Fast Channel Change
6.000 Channel (TV und Radio) programmable
• 8 Favorite List & Unlimited Programs per each
• Channel Edit Function
Move, Delete, Favorite Edit
Parental Lock, Channel Rename, Channel Skip
• Manual PID/ Satellite & TP/ Network Scan
• S/PDIF (Digital Audio or Dolby AC3 stream out)
• Unicable, DiSEqC 1.2 and USALS Compatible
• Software Upgrade via RS-232C, OTA and USB
• Multifeed function for Operator Subchannels
• Teletext with Sub-Page access
• Standby < 0.5 Watt or 0.75 Watt (“Displayclock On“ Mode)
• Radiomode with screensaver
DSR6600HDCI
www.schwaiger.de 6
3 Connections
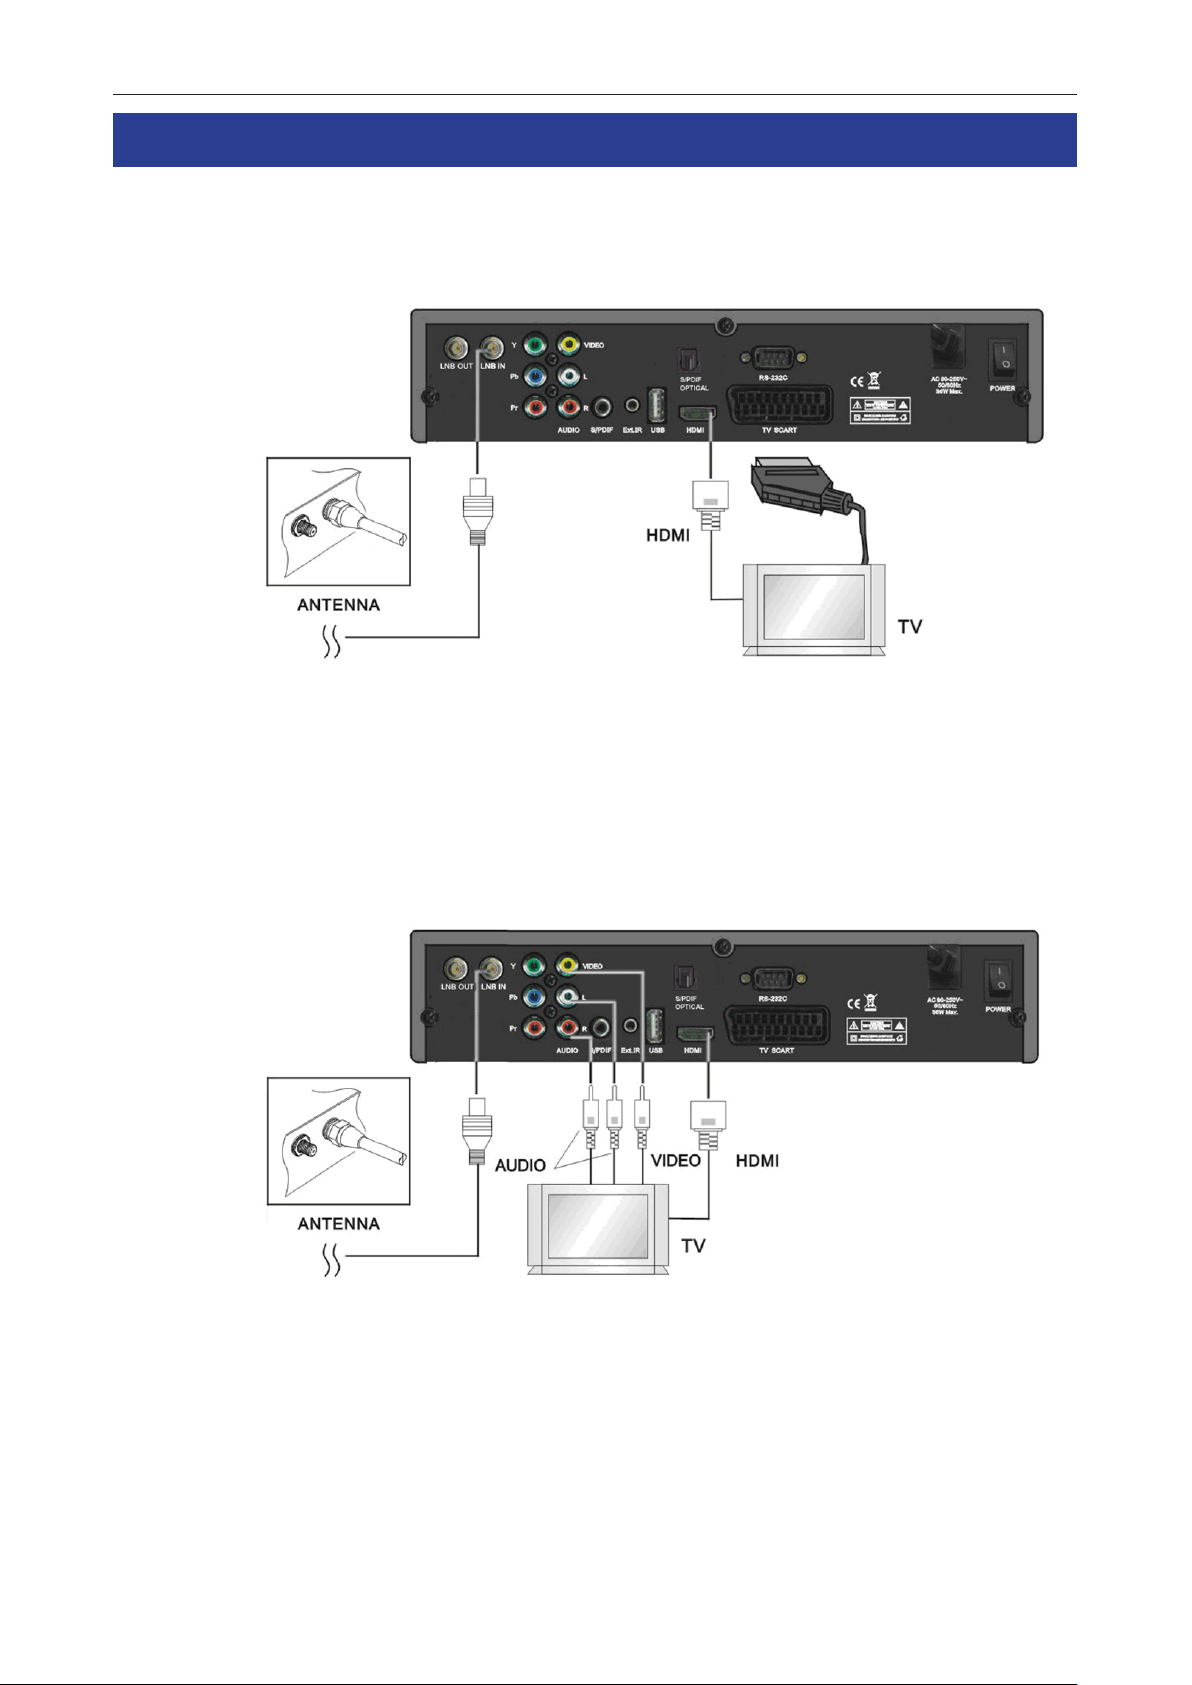
3.1 Connecting the Receiver to TV by using SCART-Cable
DSR6600HDCI
¾ Connect the coaxial cable to the connector marked LNB IN at the rear of the receiver.
¾ Connect the SCART connector marked TV to the respective SCART port of your TV Set.
¾ If the TV has a HDMI input, connect the Receiver & TV using a HDMI cable.
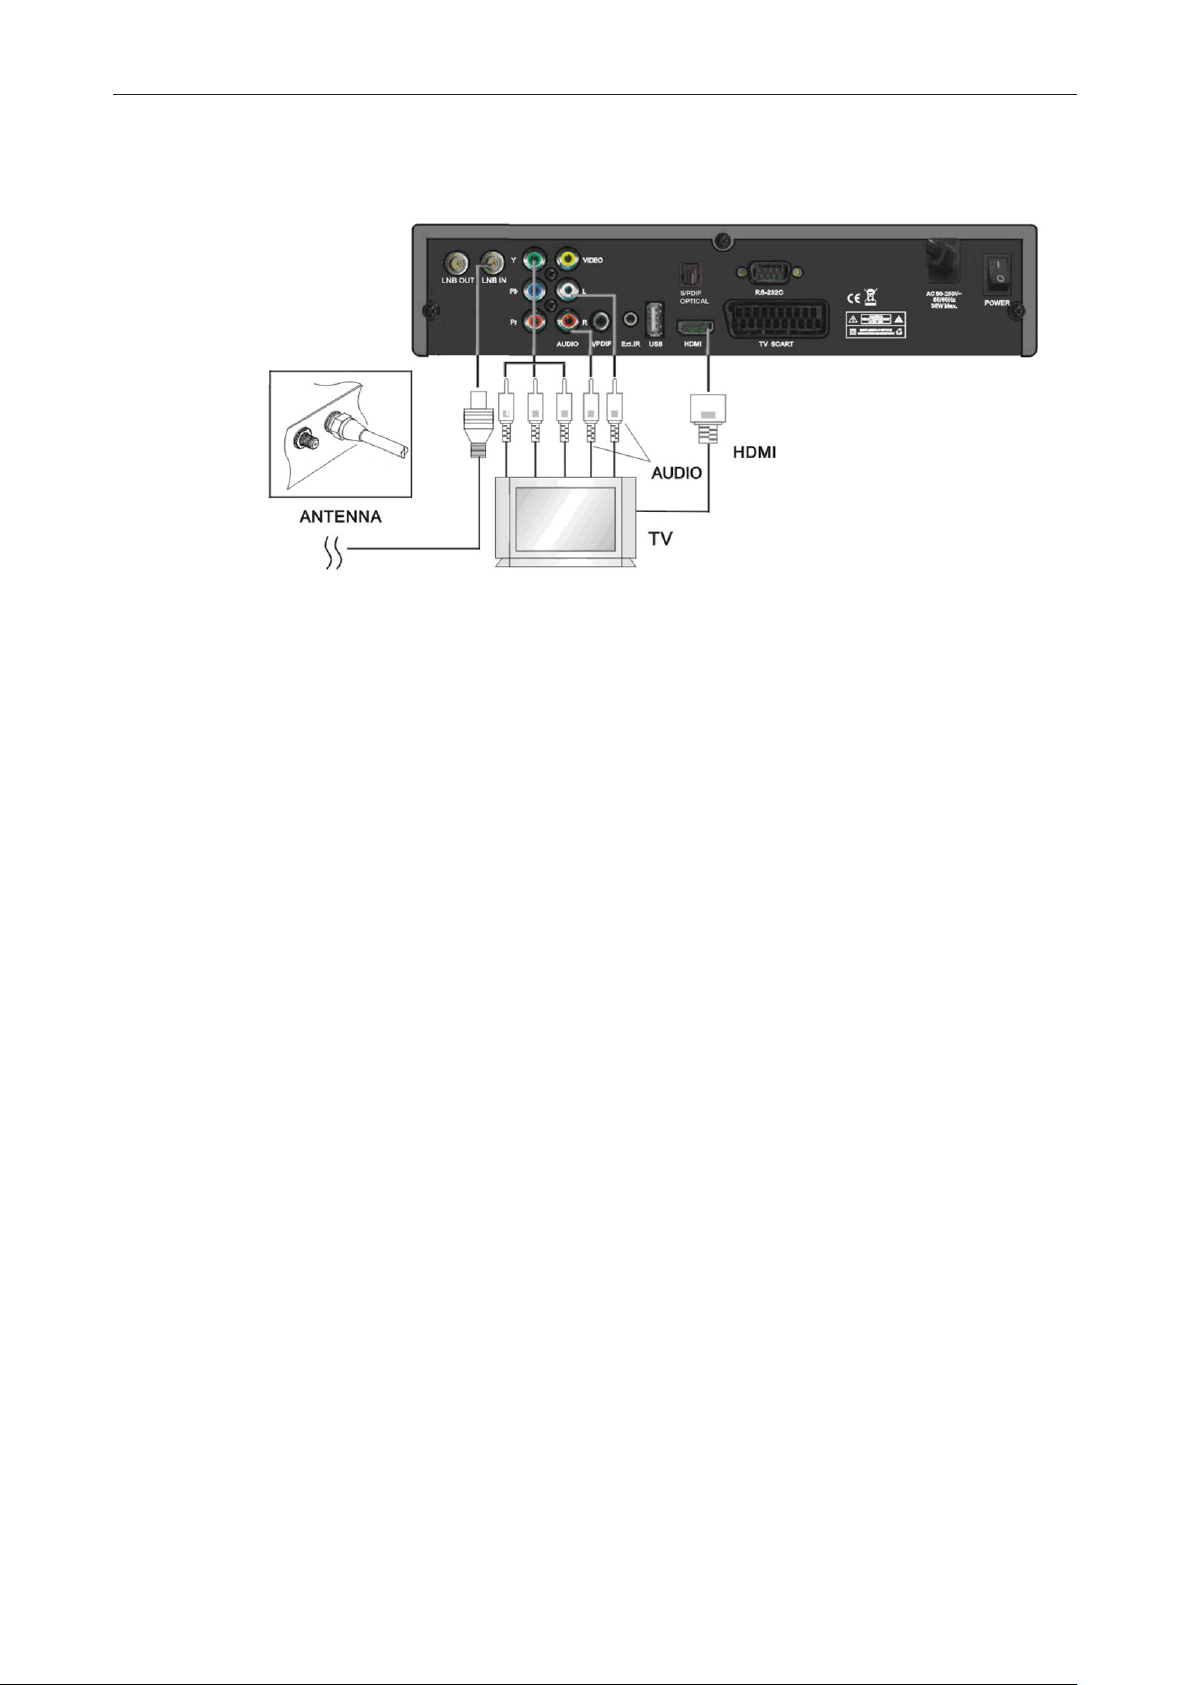
3.2 Connecting the Receiver to your TV by using RCA cable
¾ Connect the coaxial cable to the connector marked “LNB IN” at the rear of the receiver.
¾ Connect the RCA cable to port “Audio L/R”and “Video”of Receiver to the respective RCA
ports of your TV Set.
¾ If the TV has a HDMI input, connect the Receiver & TV using a HDMI cable.
www.schwaiger.de 7
DSR6600HDCI
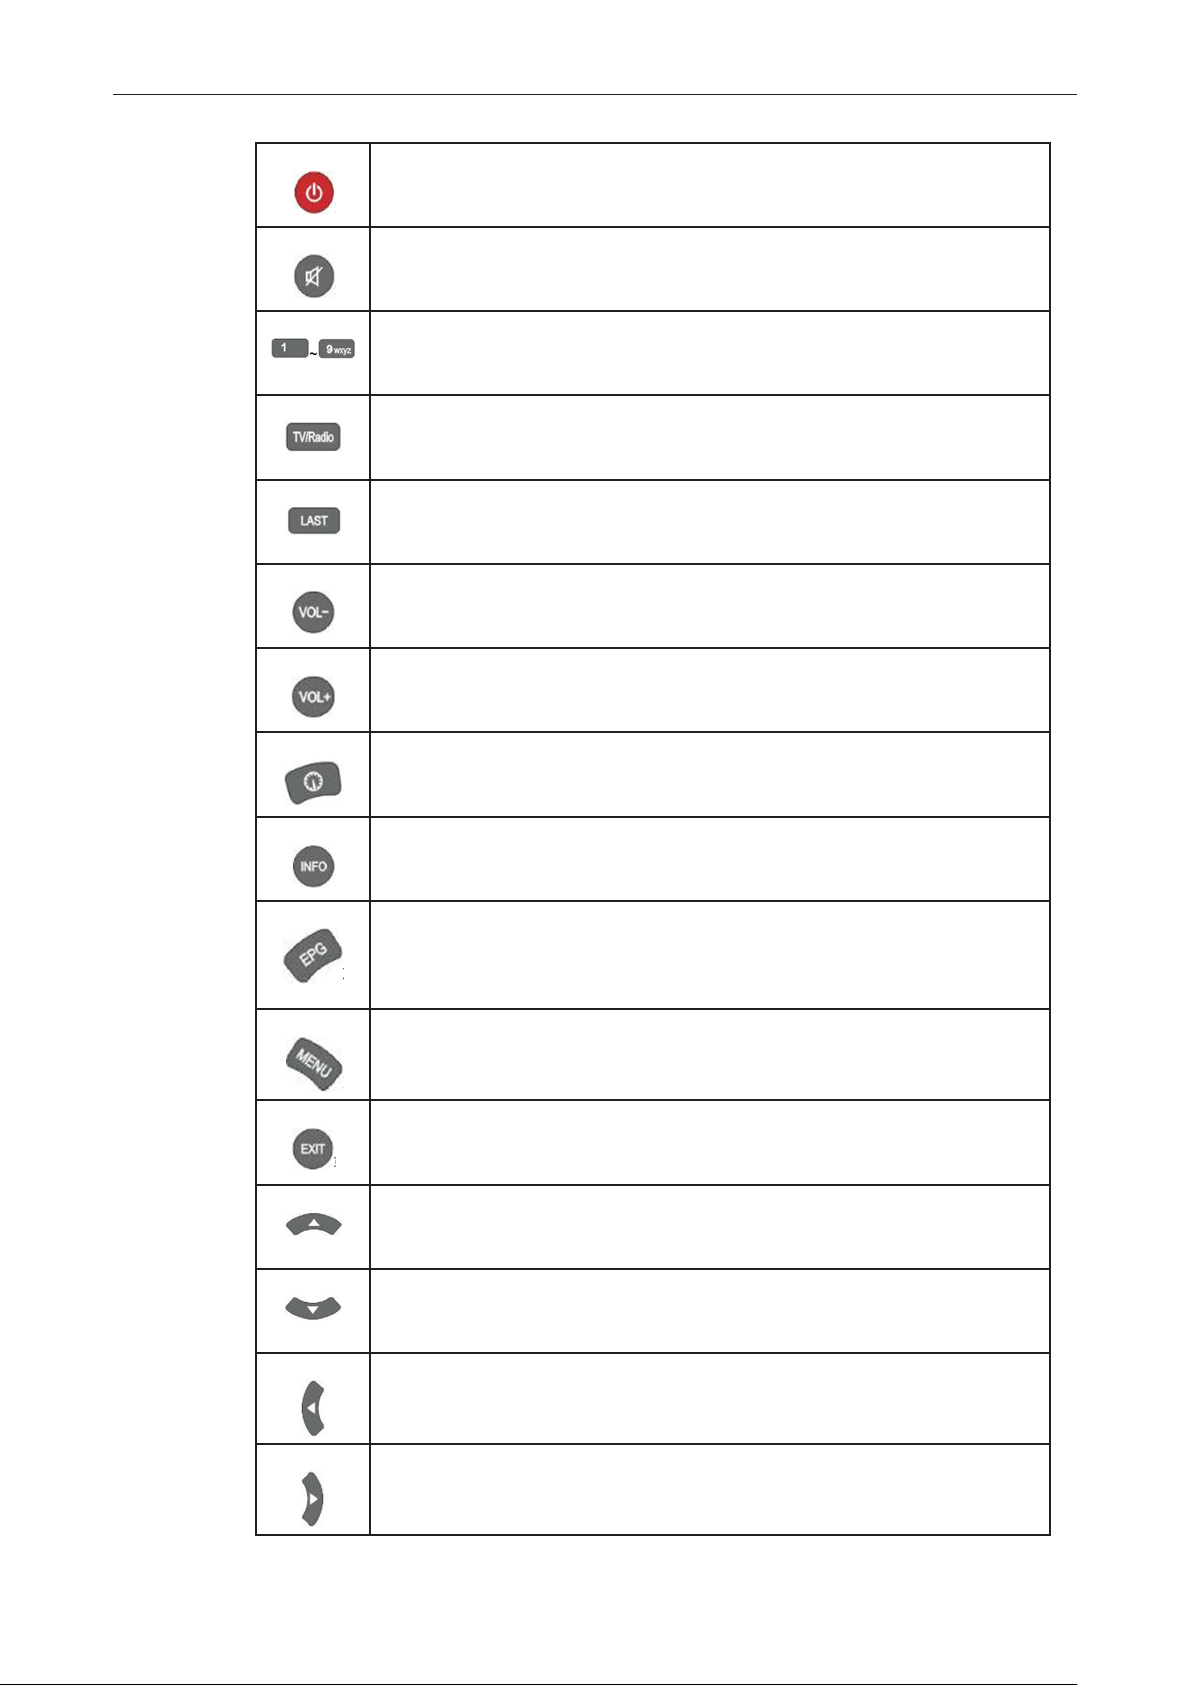
3.3 Connecting the Receiver to your TV by using Component cable
¾ Connect the coaxial cable to the connector marked LNB IN at the rear of the receiver.
¾ Connect the Component cable to port YpPbPr and Audio L/R of the Receiver to the
respective RCA ports of your TV Set.
¾ In Menu AV Setting select Component.
www.schwaiger.de 8

4 Hardware
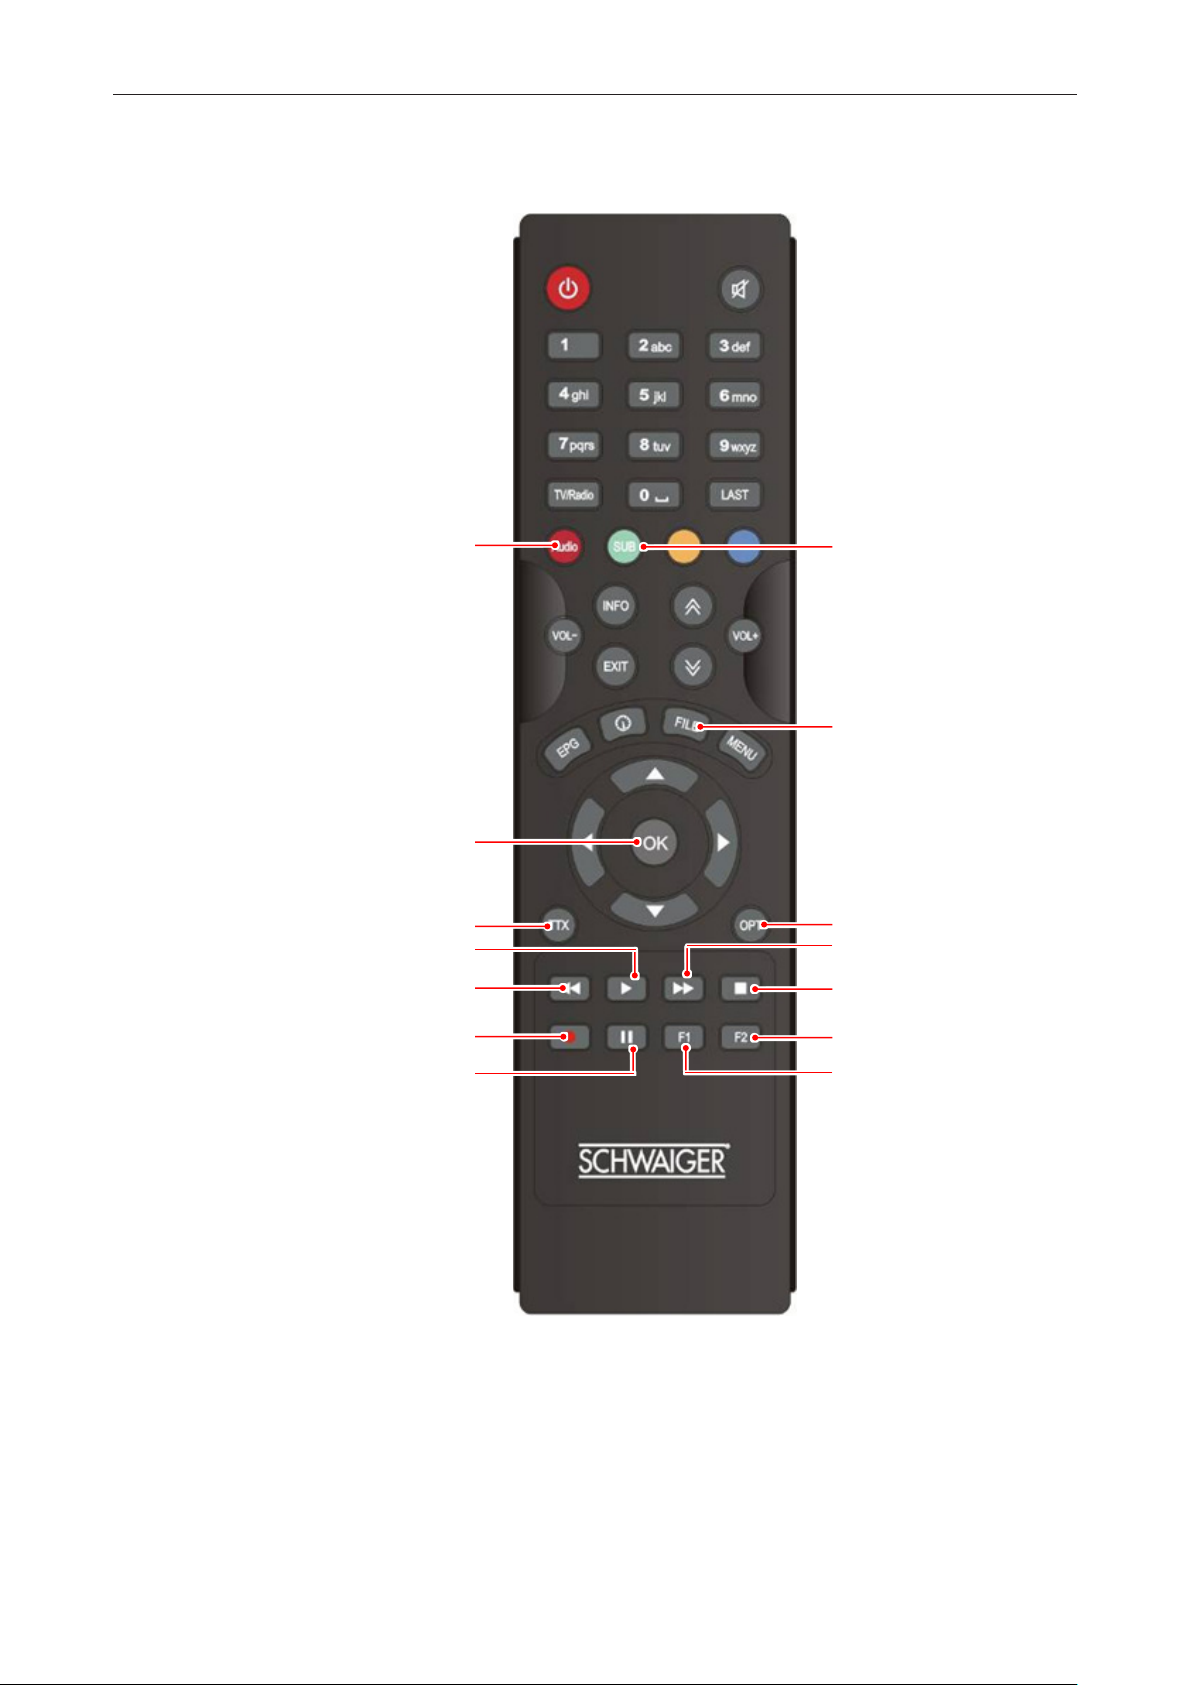
4.1 Remote Control
DSR6600HDCI
M
N
A
C
D
F
G
I
J
K
B
E
H
L
O
P
www.schwaiger.de 9
A STANDBY
By pressing this button, the receiver will go into standby mode. When the receiver is in standby mode, it can be awakened by pressing this button again.
B MUTE
By pressing this button, all audio outputs of the receiver are muted. When
muted, Audio output can be regained by pressing this button again.
C 0-9 NUMBER
By pressing one of the number buttons (0 - 9), the user can change channel
or enter a number to menu.
D TV/RADIO
By pressing this button the user can jump between TV and radio lists of the
receiver.
E LAST
By pressing this button the user can select the channel that was being watched before the current active channel.
G VOLUME MINUS
By pressing this button, the user can decrease the audio volume level of the
receiver.
H VOLUME PLUS
By pressing this button, the user can increase the audio volume level of the
receiver.
J PAUSE
By pressing this button, the user can pause the video on the currently watched channel. The watching can be resumed by pressing this button again.
F INFORMATION
By pressing this button, the user can see present and following information
about the currently watched channel.
K ELECTRONIC PROGRAM GUIDE
By pressing this button, the user can see current and forthcoming programming information for each channel. 7-day program information guide is also
available by using this button.
L MENU
By pressing this button, the user can activate the main menu of the receiver.
DSR6600HDCI
J EXIT
By pressing this button, the user can exit from the menu without saving the
made changes or go one step back in the menu structure.
M CURSOR UP
By pressing this button, the user can jump to next channel on the channel
list. In menu structure, user can move up one row.
P CURSOR DOWN
By pressing this button, the user can jump to previous channel on the channel list. In menu structure, user can move down one row.
N CURSOR LEFT
By pressing this button, the user can decrease the audio volume level of the
receiver. In menu structure, user can change between selectable options.
O CURSOR RIGHT
By pressing this button, the user can increase the audio volume level of the
receiver. In menu structure, user can change between selectable options.
www.schwaiger.de 10
4.2 Remote Control unit
DSR6600HDCI
A
D
E
G
K
M
B
C
F
H
I
J
L
N
www.schwaiger.de 11
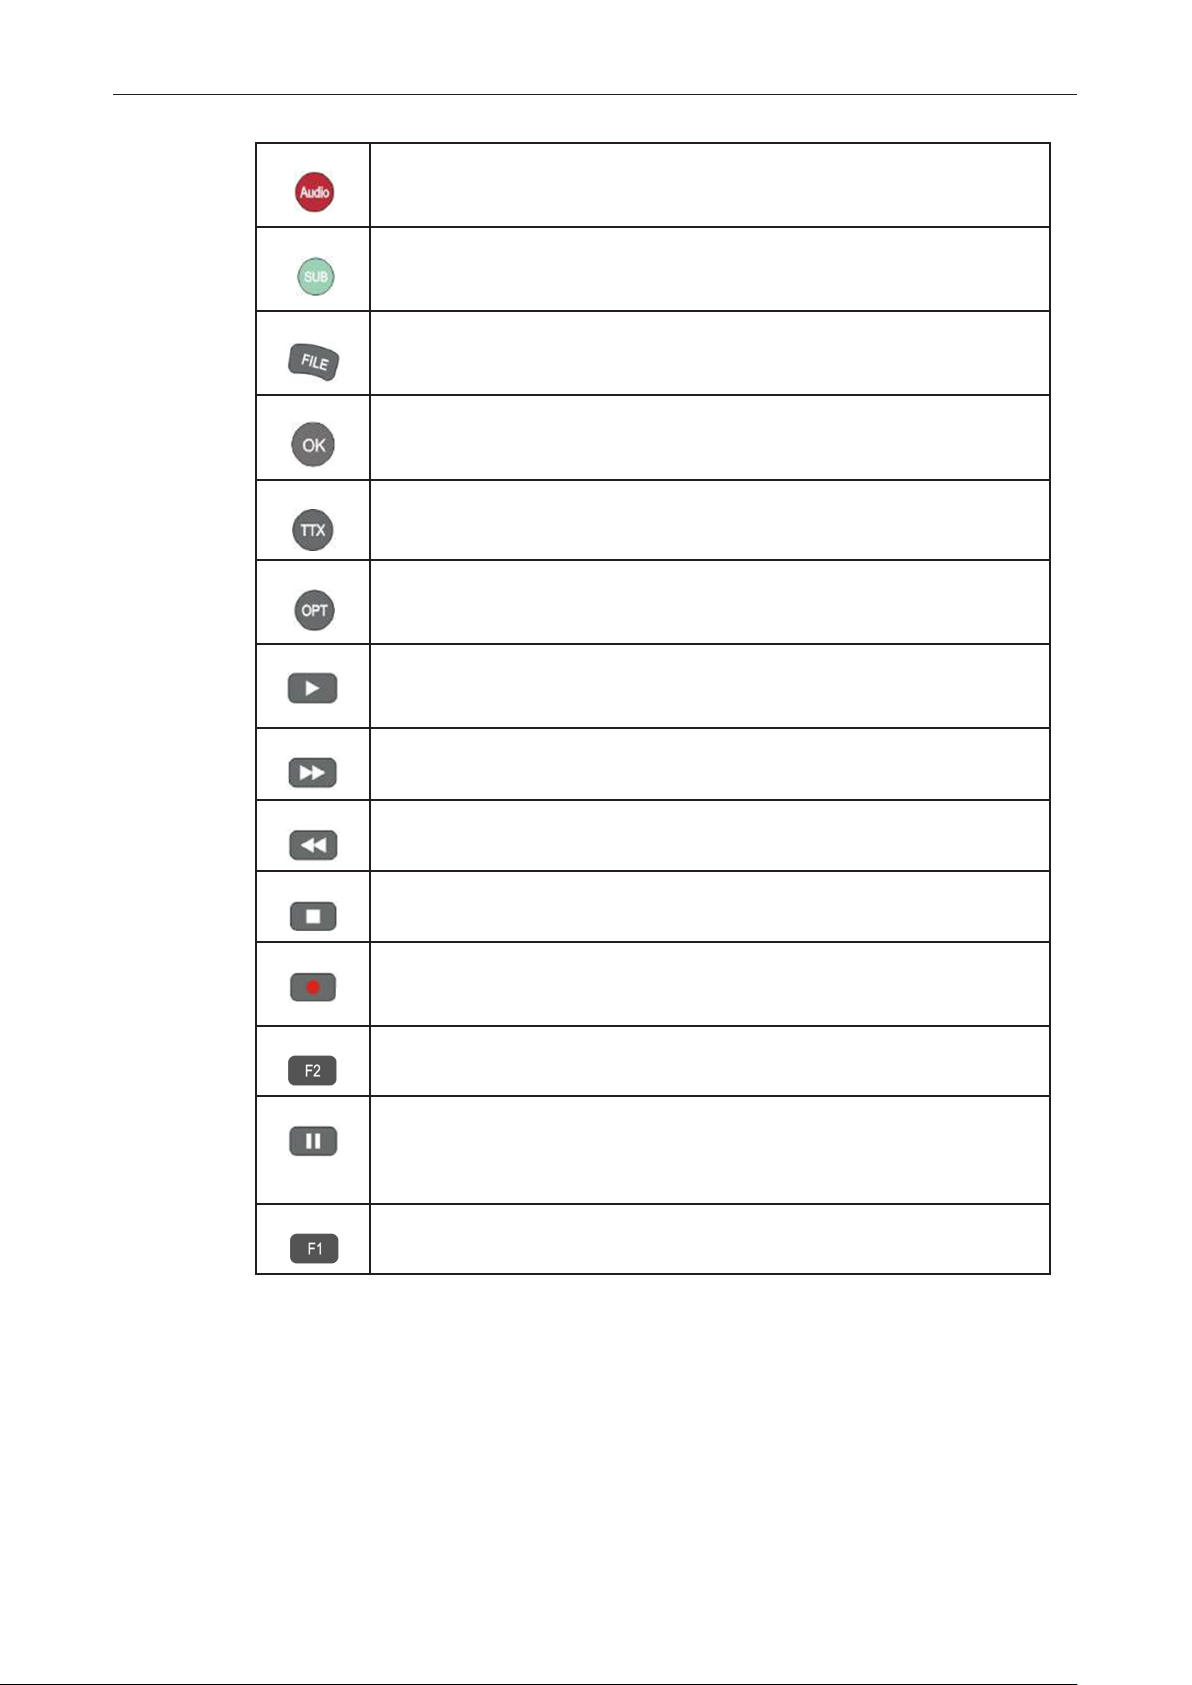
A AUDIO
By pressing this button you can choose alternative Audio tracks if provided
by the channel operator.
B SUBTITLE
By pressing this button you can display subtitles if provided by the channel
operator.
C FILE
By pressing this button you can access the recorded les on a connected
USB Hard-Disk-Drive.
D OK
By pressing this button, the user can conrm a selection or save settings in
a menu.
E TELETEXT
By pressing this button, the user can activate the teletext application.
F OPTIONS
By pressing this button, the user can see the options that are available on
the program currently being viewed.
G PLAY
By pressing this button the archive on the connected USB HDD is displayed.
During Rewind or Fast Forward this button returns to regular playback.
H FAST FORWARD
During Playback of recorded les this button can be used to fast forward.
DSR6600HDCI
I REWIND
During Playback of recorded les this button can be used to rewind.
J STOP
By pressing this button Playback or Recording can be stopped.
K RECORD
By pressing this button you can start a recording (only if a USB HDD is connected and operational).
L F2 key
In Live-TV Mode opens the Timer-List.
M PAUSE
By pressing this button you halt the Live picture of the current channel.
Press this button again to return to the live picture. If an external USB HDD
is connected, this button activates the TimeShift function.
N F1 key
Conformation in Menu A/V Control (Video Format).
www.schwaiger.de 12
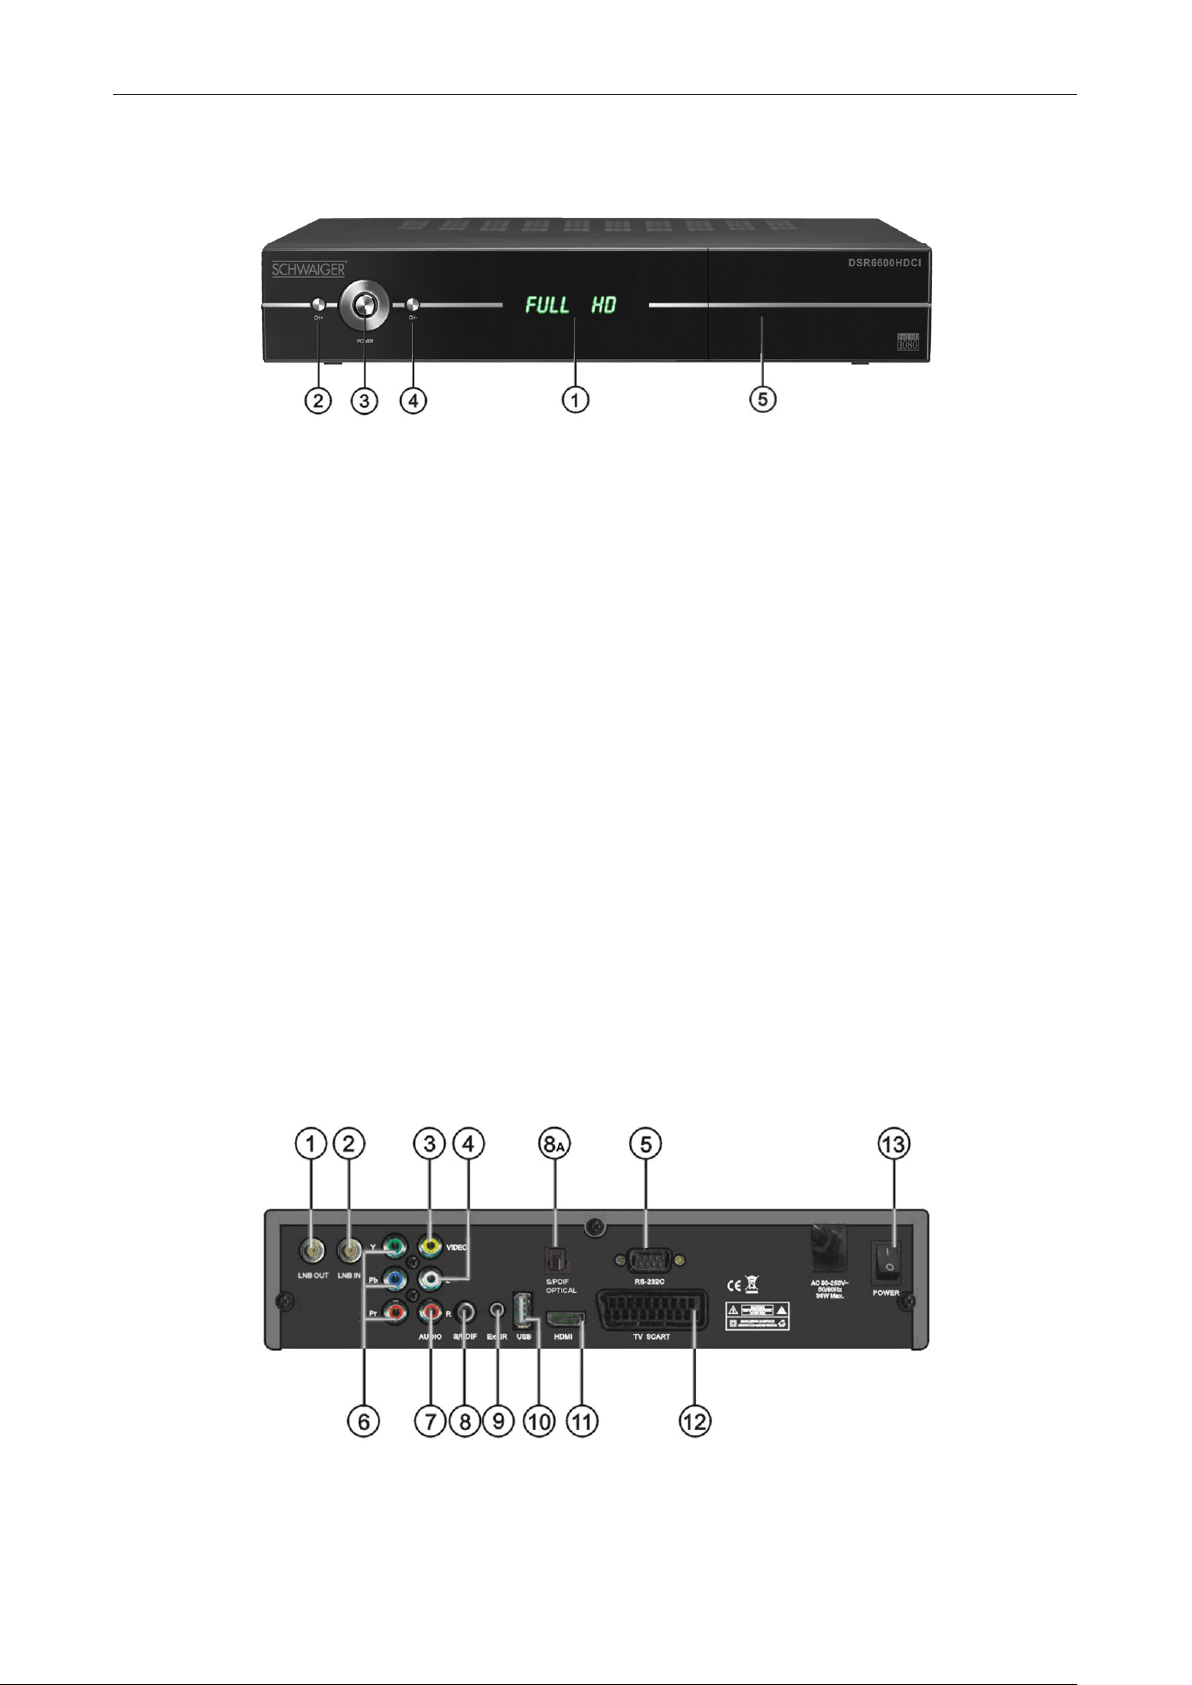
4.3 Front Panel
VF-DISPLAY (1)
In operation displays the current channel name. While the receiver is in standby mode, the
display will show the current time, alternatively only the LED around the Power key will be lit.
CH▲(2)
Moves the TV/Radio channel up
DSR6600HDCI
Power Button (3)
Switches between on and off (Standby)
CH▼(4)
Moves the TV/Radio channel down
COMMON INTERFACE SLOT and Front-USB Port (5)
Behind the Front-Flap you’ll nd two Common Interface (CI) Slots for Conditional Access
Modules (CAM). A CAM in combination with a Smartcard can be used to access scrambled
Programmes.
Also behind the Front Flap you’ll nd a USB Port (a second USB Port is located at the rear
side of the receiver).
4.4 Rear Panel
www.schwaiger.de 13

DSR6600HDCI
No. Name Function
1 LNB OUT Loop Through for Satellite Signal
2 LNB IN Input for Satellite Signal
3 VIDEO Video Composite Output
4 AUDO L Audio Left Output
5 RS232 Serial Port for System Upgrade
6 YpbPr Component Output
7 AUDIO R Audio Right Output
8 S/PDIF Digital Coaxial Audio Output
8a S/PDIF Opt. Digital Optical Audio Output
9 EXIT. IR Eingang externer IR-Sensor (Originalteil)
10 USB Rear-Side USB 2.0 Port
11 HDMI HD Digital Video/Audio Output
12 TV-SCART SCART-Output to TV
13 POWER AC Power Switch
www.schwaiger.de 14

5 Prime Setup
After switching on the receiver via the AC switch at the rear, it will rst boot in Standby
Mode. Please switch on using either the front POWER switch or the Standby key on your
remote control.
After activation of the receiver (or after performing a factory reset) the Installation Menu
is displayed. The sequence of menus has been developed to make the access to Digital
TV- and Radio as easy as possible.
5.1 Language Setting
DSR6600HDCI
¾ Firstly, please choose your preferred Menu-Language with the Navigations-keys up or
down.
¾ Conrm with OK.
5.2 Time Setting
¾ Please choose the time zone (GMT +1 for Germany, Austria, Switzerland etc.).
¾ The Summertime can be set to off, on or Auto.
In Auto-Mode on the according dates, the receiver automatically changes to or from Summer time.
¾ Conrm with OK.
www.schwaiger.de 15

5.3 Pre-Setting
Some pre-settings can be chosen from.
¾ Choose the country or the region and conrm with OK.
After conrmation the receiver changes to the TV Mode with a channel list for the chosen
country.
DSR6600HDCI
If you choose Automatic Search, please also choose the required Satellite and conrm to
begin the search for channels.
www.schwaiger.de 16

6 Watching TV
This chapter describes how to watch TV and listen to Radio using the receiver. Thanks
to the advantages of Digital TV transmissions, extra features are added to the broadcast,
such as information about the current and next program and extra options such as the ability to chose between different languages for Audio and Subtitling.
Please note: Available options may vary, depending on the actual broadcast of the extra
material for the current Programme.
6.1 General watching
¾ Use the Channel up or Channel down keys to go to the next and previous channel
respectively.
¾ Use the Number keys to input a channel number.
¾ Use LAST key on the remote control to select the channel that the user was watching
before the currently selected channel.
¾ Use TV/RADIO key on the remote control to toggle between the last selected TV- or
Radio Channel.
¾ Press up or down keys on the front panel of the receiver to select the next/previous
channel from the current channel list.
¾ Use INFO key to display the information banner about the current program. Press INFO
key again to display the information of the current Event.
DSR6600HDCI
With the Cursor right or Cursor left you can see the next event information.
¾ Press again INFO key or the EXIT key to hide the banner and event information.
Please note: Programme information will only be displayed if it is included in the current
transmission. Availability and validity of program information is dependent on the broadcaster.
6.2 Options
¾ Pressing OPT key will open the Options menu.
The Options menu provides user selectable options that are available for the current channel and the current program. Depending on the Programme some of the options can be
available or not.
¾ Selection from the available choices is made with Cursor up or Cursor down key and
conrm with OK.
Multifeed: On according Master-Channels you can select from available Sub-Channels.
¾ You can exit the Options Menu by pressing OPT or EXIT.
Subtitling language (green key)
The user can select from available subtitle languages, if more than one exists.
Selection from the available choices is made with Cursor up or Cursor down key and
conrm with OK.
www.schwaiger.de 17

Audio track (red key):
Some TV channels broadcast multiple audio tracks, for example different languages or
AC3 Audio tracks.
¾ Selection from the available choices can be made by pressing the Cursor up or Cursor
down keys and conrming with the OK key.
Beside alternative tracks, you can set the mode to Stereo or Mono left or right.
6.3 EPG (Electronic Programme Guide)
Now & Next as well as 7 days Programme Information
¾ EPG application can be activated by pressing the EPG key when watching a TV- pro-
gramme or listening to a Radio Channel.
EPG application is divided into two levels. The rst level gives an overview of 12 continuous
channels with information about present and forthcoming programmes.
By pressing the EPG key once more the second level provides information of all available
events for the selected channel for the next 7 days. Availability of Programme information
data is dependent on the individual broadcaster.
DSR6600HDCI
¾ By again pressing EXIT key you can close the EPG menu.
NavigatingontherstlevelofEPG(Multi-EPG)
The Application is divided into three columns (from left to right):
1. Channel
¾ The Channel can be selected by Cursor up or Cursor down and conrmed by pressing
OK key.
2. Now
The Programme that is active at the moment can be seen right of the channel name.
3. Following
The Programme that follows can be selected with the Cursor left and Cursor right key.
Extended Information for the selected Programme can be seen in the window below the
timetable. By pressing green key you can jump 2 hours forward and with the red key 2
hours back in the timetable. The yellow key will show the events of next day and the blue
key the events of previous day.
www.schwaiger.de 18

DSR6600HDCI
Depending on how the EPG data is transmitted by the broadcaster it is possible that Programme information is not available until one has actually selected the channel.
¾ It is possible to select (tune into) the channel at the cursor position by pressing the OK
key.
If there is more up-to-date information available for this channel it will be updated on screen
in short time.
Please Note: Programme information will only be displayed if it is included in the current
transmission. Availability and validity of Programme information is dependent on the broadcaster.
Navigating on the second level of EPG (Single EPG)
By pressing the EPG key for a second time the second level EPG will appear. This application provides complete EPG information for the selected channel. It is possible to scroll
between programs in chronological order for a particular day with the Cursor up or Cursor
down keys.
¾ After pressing the OK key detailed information for the Programme will be displayed.
¾ Press the OK or the EXIT key to exit the detailed Information.
6.4 EPG-Timer (Timer programming via EPG)
In the Single or Multi-EPG Mode you have the option to reserve programmes in the timer.
¾ Move the cursor to the desired programme and simply press the RECORD key.
www.schwaiger.de 19

An additional window is opened which displays the timer reservations. If a HDD is connected the recording will be made accordingly to the connected external HDD.
If a HDD is not connected the receiver will switch to the according channel at the programmed time.
Please note: Should two timer reservations overlap, and error message will be displayed.
You then need to change or delete one of the two reservations. Use the Cursor up or
Cursor down keys to move to the reservation you want to change and either delete a reservation with the red key or change the start or duration time using the blue key.
6.5 Teletext
¾ Teletext application can be activated deactivated by pressing the TTX key.
The following operations are supported after activating Teletext:
• After activating text page 100 will appear after a short time.
• Specic teletext pages can be selected using the number keys. If the teletext page is
currently not available, the last selected page will remain on the screen.
• The next teletext page can be selected with the Cursor up key.
• The previous teletext page can be selected with the Cursor down key.
DSR6600HDCI
6.6 PVR Function
When connecting an external Hard-Disk-Drive to the USB port, the Receiver can be used
as a PVR (Digital Videorecorder). During recording you have the option to watch another
channel provided it’s on the same Transponder. The channels which are thus available
during recording are highlighted in white characters. Accordingly, the channels in grey
characters can not be viewed during recording.
6.6.1 Direct recording
To start a recording press the RECORD key, choose a duration with the left/right keys and
conrm with the OK key. EPG recording
Via the EPG you can programme a Timer reservation also see 6.4 for more details.
6.6.2 Time Shift-Function
During Live TV you can press the PAUSE key to activate the TimeShift function. The
Receiver pauses the programme. With the PLAY key you can continue to watch the timeshifted programme.
¾ With the EXIT key or after changing to another channel the TimeShift function is de-activated.
www.schwaiger.de 20

6.7 Playback
¾ After pressing the FILE (Archive) key a list is displayed which contains all the recorded
programmes on your connected external USB HDD.
¾ Use the up/down keys to move the cursor to the desired programme and conrm with
the OK key to start playback.
¾ If supported by the Channel operator, by pressing the INFO key in the le list or during
playback details about the recorded programme are displayed.
¾ By pressing the FAST FORWARD or REWIND keys you can increase the playback
speed to 2, 4, 8 and 16x in both directions.
DSR6600HDCI
¾ To stop playback press the STOP key.
¾ By pressing the EXIT key you can return to the live channel.
Please note: Functions such as Recording, Timeshift and Playback require an external
HDD to be connected via USB (2.0) and to be ready operational. Only FAT32 formatted
Hard-Disk-Drives can be used. Other formats can not be recognized by the receiver.
www.schwaiger.de 21

7 Menu Operation
Main menu provides access to most important features of the receiver. These features are
divided into following Menus. Each Menu contains corresponding sub-menus.
¾ The main menu can be activated by pressing the MENU key.
The Main Menus are as following
• Edit Channels
• Installation
• User Setup
• Unterhaltung
• Common Interface
• Status
DSR6600HDCI
¾ You can move between the Main Menu by pressing the cursor up or cursor down key.
¾ The available Sub-Menus can be seen by pressing the cursor right key and conrma-
tion by OK key.
¾ You can exit menu without saving the changes made by pressing EXIT key while pres-
sing the OK key will exit the Submenu and save the changes.
7.1 Edit Channels
7.1.1 Create Channel List (Move)
This menu is used to create or order your channel lists.
¾ Press menu key, select Edit Channels by using the right cursor and press OK.
¾ Using the right or left cursor keys you can shift between TV and Radio list
www.schwaiger.de 22

DSR6600HDCI
¾ Select one or more channels which need to be moved using Select, the up and down
cursor keys.
¾ Press Move key and move the selected channels by up and down cursor to the new
desired position.
¾ Press the Move key to conrm to drop the channels at the current position.
¾ After editing the channels and pressing the EXIT key you can conrm your new channel
list by pressing the OK key.
¾ If you don’t want to save your new channel order, cancel the process by pressing the
cursor left and OK key.
7.1.2 Edit Channels
This menu is used for following features:
• Lock lock and unlock channels
• Skip skip or unskip channels
• Add Add to favorite CH List 1 to 8
• Delete Delete channels
• Rename Rename channel
¾ Select channel with the up and down cursor keys.
¾ Press the Select key to conrm.
¾ Then press Edit, you can nd several options to handle the marked channels in a sub-
menu.
www.schwaiger.de 23

DSR6600HDCI
Lock or Unlock
¾ Move the cursor from position LOCK to the right by pressing the cursor right key.
¾ You can lock the selected channel with the cursor down key and conrm by OK key.
¾ If you want to unlock already locked channel, select unlock with cursor down key and
conrm with the OK key.
Skip or Unskip
¾ Move the cursor to the position SKIP using the cursor down key and press the cursor
right key.
¾ You can skip the selected channel with the cursor down key and conrm with the OK
key.
¾ If you want to unskip an already marked SKIP channel, select unskip with the cursor
down key and conrm with the OK key.
Add to Favorite list
¾ Move the cursor to the position ADD with the cursor down key and press the cursor
right key.
¾ Add the selected channels with the cursor down key to corresponding favorite list and
conrm with the OK key.
Delete Channel
¾ Move the cursor to position Delete with the cursor down key and press the cursor right
key.
¾ Delete the selected channel by conrming with the OK key.
Rename Channel
¾ Move the cursor to position Rename with the cursor down key and press the cursor
right key.
¾ Press OK key and keyboard will appear.
¾ Rename the selected channel and save the new name by pressing Select key.
Please note: After editing the channels and pressing the EXIT key you can conrm your
new channel list by pressing OK key. If you don’t want to save any changes and keep the
previous status, cancel the process by pressing cursor left and OK key.
7.1.3 Sort Channels
This menu is used to sort ALL TV or ALL RADIO LIST by 5 different methods. Select ALL
TV or ALL RADIO channel list using the cursor right or cursor left keys and press the
Sort key to select the Sort menu. You can nd several options to sort the channels
www.schwaiger.de 24

DSR6600HDCI
Restore
As long you did not exit from the EDIT CHANNELS menu you can restore all edited channels by pressing the cursor right key in RESTORE and press the OK key and the EXIT
key for conrmation. The channel list will be changed to the status before start of EDIT
MENU.
Alphabet: A-Z or Z-A
¾ Move the cursor to the position Alphabet with the cursor down key and press the cur-
sor right key.
¾ You can change your channel list to alphabet sorting A_Z or Z_A by pressing cursor
down and cursor up key.
¾ Press OK key and EXIT key for conrmation.
Frequency
¾ Move the cursor to position FREQUENCY with the cursor down key and press the
cursor right key
¾ Press OK key and EXIT key for conrmation.
Scramble: CAS or FTA
¾ Move the cursor to the position SCRAMBE with the cursor down key and press the
cursor right key.
¾ You can change your channel list to begin with CAS (scrambled) or free (FTA) channels.
¾ Press OK key and EXIT key for conrmation.
Lock: Lock or Unlock
¾ Move the cursor to the position LOCK with the cursor down key and press the cursor
right key.
¾ You can change your channel list to begin with Lock (locked) or unlock (unlocked)
Channels.
¾ Press OK key and EXIT key for conrmation.
www.schwaiger.de 25

7.2 Edit Favorite Channels
This menu is used to create a list of your favorite channels.
¾ Press menu key, select Edit Favorite Channels by using the right cursor, cursor
down key and press OK.
¾ Select the channels you would like to add to your favorite list with the up and down
cursor keys and press Select to mark one or more channels. Add the channels to the
chosen FAV List with the Add key. If required, use the A - Z key to sort the channels in
alphabetical order. Then use the OK key to save.
¾ Use the right or left cursor keys to jump between All TV and the chosen FAV List.
DSR6600HDCI
¾ Use the right or left cursor keys to jump between the TV and Favorite List.
¾ With Select you can choose individual channels.
¾ With Delete you can delete channels from the FAV List.
¾ With Move you can move channels within the Favorite Group.
¾ With Next FAV you can choose one of the 8 Favorite Groups.
FAV-Groups can be renamed by using the F1 key.
¾ When exiting the Menu with EXIT you can either save the changes by conrming with
OK or Cancel.
www.schwaiger.de 26

8 Installation
This menu contains following items:
• Dish Setup
• Channel Scan
• Positioner Setup
• Edit TP List
• Software Upgrade
• Default Setting
• OTA
DSR6600HDCI
8.1 Dish Setup
Before performing channel search, the
antenna settings needs conguring
according to your antenna system.
The digital receiver has a database which contains information about broadcasting satellites and their transponders, including the following information:
Satellite position, frequency range, symbol rate, polarization and LNB frequency corresponding to the frequency range. Usually you shouldn’t need to change the LNB Frequency,
but there is an option in case required. If you have selected the Other entry under the SA-
TELLITE section to specify a satellite that is not in the satellite list, you may need to ll in
the correct LNB frequency.
www.schwaiger.de 27

DSR6600HDCI
This digital receiver can be operated with both, a xed antenna or a motorized dish. You
need to congure the antenna settings according to your antenna system in the following
order:
Satellite
¾ Press OK and select the desired satellite by using cursor up and down key.
¾ Press OK key to conrm.
LNB Power
¾ You can set the LNB power with the cursor left and right keys to ON, OFF, VERTICAL
or HORIZONTAL.
For Single-, Twin- or Multiswitch-Installations the power needs to be kept in “ON” mode
LNB Frequency
Check your LNB frequency.
¾ Select by pressing OK key and cursor up or down key and press OK for conrmation.
In case you have a Unicable Installation, please ask your installer for your personal settings.
User Bank
This Sub menu is only active if you have previously activated Unicable (pre-setting LNB
Frequency). UniCable enables the use of up to 8 Receivers on one Antennacable and requires a special LNB or a UniCable-System.
¾ Choose a User-Band which is to be allocated to this receiver using the cursor left and
right keys.
Other Receivers that are connected to the same system must use other bands to be able
to function. Please ask your installer for your personal settings in case you are not sure.
Band Frequency
This Sub menu is only active if you have previously activated Unicable (pre-setting LNB
Frequency). Changes should only be made by experts! Frequencies are allocated to the
previous point USER BANK and, when required, can be edited here.
Tone Burst
¾ If you use Toneburst switch select Toneburst On or set to Auto.
¾
DiSEqC Switch
The digital receiver is designed to be compatible with DiSEqC switches. DiSEqC switches
enable the connection of several antennas to one digital receiver.
¾ You can select the desired switch by using the cursor left and right keys.
¾ Set DiSEqC 1.0 switch that allows switching between up to four satellite sources: Port
1 to 4.
¾ Set DiSEqC 1.2. the motorized antenna will turn toward your desired satellites horizontally.
Set USALS, calculating the positions of all available satellites from your location. Compared to DiSEqC 1.2, it is no longer required to manually search and store every satellite
position. Just pointing to a known satellite position is enough. In case your signal indicator
displays a weak signal, check the receiving quality of other transponders and choose the
one with best signal quality.
www.schwaiger.de 28

DiSEqC Port
When you select DiSEqC 1.0 you can select the ports from 1 to 4 by using cursor left or
right key.
Transponder
¾ You can select the transponders of the desired satellite and check the signal strength by
using OK key and cusor up or down key.
You can see the signal and quality after conrming of the transponder frequency by OK key.
8.2 Channel Scan
There are two options to scan satellite for broadcasting programmes. If the parameters of
the channels are known, please select the search mode MANUAL and enter the parameters as mentioned below. Otherwise please use the search mode AUTO in which all the
frequencies are automatically scanned.
¾ In Auto Search mode, go to Satellite using the cursor down key and press OK to open
the List of Satellites.
¾ Choose and conrm your desired Satellite(s) with the OK key.
DSR6600HDCI
After pressing the EXIT key the corresponding satellite info will be shown with Frequency,
Symbol rate, Polarization and Search Range.
Search range can be changed to ONLY FREE Channel, SCRAMBLED Channel and TV
Channel using the cursor left or right keys. By pressing Start Search you can start the
AUTO Search of the desired satellite(s).
If you set the Network Search option to ON, the digital receiver will check up the up-todate channel information as searching services, however, this search method, due to its
nature takes a longer time.
Manual Search
¾ Select Manual Search Mode by pressing the cursor left or right keys.
¾ Go to Satellite using the cursor down key and press OK to open the List of Satellites.
¾ Choose and conrm your desired Satellite(s) with the OK key.
¾ After pressing the EXIT key the corresponding satellite info will be shown with Frequen-
cy, Symbol rate, Polarization and Search Range.
¾ Select the frequency of the desired satellite by using OK key and cursor up or down
key and conrm with OK key.
¾ Conrm with OK.
www.schwaiger.de 29

¾ If the required frequency is not available enter the frequency by using 0-9 key of the
remote control and conrm with OK key.
¾ If you enter a new frequency you must also change the Symbol rate and the Polariza-
tion.
The Search range can be changed to ONLY FREE Channel, SCRAMBLED Channel and
TV Channel using the cusor left or right keys. By pressing Start Search you can start the
AUTO Search of the desired Frequency
8.3 Positioner Setup
¾ If you use DiSEqC 1.2 or USALS by Positioner Setup, you get the correct position of
your desired satellite.
DSR6600HDCI
DiSEqC 1.2
¾ Choose your desired Satellite from the List of Satellites.
¾ Press Auto Search for auto search or TP Search for TP Search.
¾ To tune the antenna nely with the Move East/West and Nudge East/West to get the
antenna moved to the west/east and tweak step by step.
¾ Finally set the Store Position to save the tuned position at the point when the receiving
quality is best.
USALS
¾ Choose your desired Satellite from the List of Satellites.
¾ Enter your location at User Longitude and User Latitude using the right or left cursor
and NUMERIC keys.
¾ Enter the position of your selected satellite to Satellite Longitude if it is not correct.
¾ Select Go to Reference. After this the antenna will turn toward your selected satellite
while calculating its position.
8.4 Edit TP List
It may occur that some transponder data require editing due to additions by the satellite
operator, revising of data or simply canceling.
There are 2 columns in this Sub Menu, one for Satellites and one for TPs.
www.schwaiger.de 30

DSR6600HDCI
¾ The transponders are allocated to each satellite.
¾ Press Rename SAT to rename satellite.
A soft keyboard pops-up and for input of the new satellite name.
¾ Use the up or down cursor keys to page through the satellite list and use the right
cursor key to jump to the TP List.
¾ Press Add TP to add a TP.
Enter the new parameters including frequency, symbol rate and polarization. If S2 Pro-
grammes are available, please input the required data also.
¾ Use the OK key to activate a screen for editing values of the selected TP.
¾ Use Delete TP to delete any TP selected in the list.
8.5 Software Update
This allows you to update the system software to maintain the best possible performance
of the receiver. Download the latest software from our website and copy to a USB stick.
¾ Connect your USB stick to one of the two USB connectors (front or rear) of the receiver.
The available upgrade software is marked with a hook.
¾ Please select the latest software and press OK.
The upgrade process will start automatically. Please wait until the receiver has rebooted.
Please note: Updating the receiver Software may take several minutes.
NOTE
Perceivable risk of data loss! Please never turn off the receiver off while
upgrading!
www.schwaiger.de 31

8.6 Default Setting
In this menu, you can delete all channels for TV or Radio.
Additionally you can perform a factory reset to set back Channels, the Conguration to
the original state as well as perform a Default Setting.
• Channels: The original Factory Programming is re-loaded
• Conguration: Conguration-Settings are returned to Factory Programming
• Factory Reset: All Parameters are reset to Factory Programming
DSR6600HDCI
8.7 OTA-Software Update
In this Sub-Menu you can update the newest System Software or Channel List via Satellite.
By pressing the RED key you can begin updating manually. If you have activated the AUTO
Function (Auto OTA on), the Receiver will switch on at a user denable time during the
night, will search and update to the new version. The Transponder Data has been pre-set
by default but can be edited manually if required.
Please note: OTA Data is only sent if needed and is not available via Satellite at all times.
On our Webseite you will always nd the most up-to-date Versions, which you then can
transfer to the receiver using a USB Stick (see point 9.5).
Please note: Updating the receiver Software may take several minutes.
NOTE
Perceivable risk of data loss. Please never turn off the receiver off while
upgrading!
www.schwaiger.de 32

9 User Setup
Please use the cursor keys to select
• Language Setting
• Time Setting
• Timer Setting
• Parental Control
• A/V Control
• OSD Setting
DSR6600HDCI
9.1 Language Setting
Menu Language
¾ Select the preferred language for the system menus.
Audio Language
Some TV programs send multiple audio tracks, for example in two different languages.
If there are no audio tracks available that match your settings, another language may be
used instead.
Subtitle Language
¾ Select the preferred language for the subtitling and Programme information.
www.schwaiger.de 33

9.2 Time Setting
This menu contains Time Setting, Summer Time and GMT Offset.
¾ Select Manual or Auto mode using the cursor left or cursor right keys and use OK to
conrm.
¾ If you wish to change time and date manually in time offset menu, please set the op-
tion to Manual.
¾ Also Summer Time can either be set to Auto, Off or On.
DSR6600HDCI
In Auto mode the Receiver automatically changes to and from Summertime at the according dates.
9.3 Timer Setting
A Timer is used to Programme the Receiver to switch on and off again at certain times and
to tune to a specied channel. Timers are normally used to record a TV Programme on the
video recorder or to pre-Programme the receiver for other reasons (i.e. wake-up).
A set timer causes the receiver to wake up from standby mode at the specied time and
change the channel to the specied one.
If an external HDD is connected to the USB port and is operational, recordings can be
made directly on the HDD.
The following functions (Timer-Status) can be chosen from:
Off No Timersetting
On The Receiver at the desired time switches on the chosen channel.
Recording If a HDD is connected and operational, at the set time the pre-programmed
broadcast will be recorded on the HDD.
www.schwaiger.de 34

Please note: Timersettings that have been programmed in the EPG (see EPG-Timer point
6.4) are automatically marked in the Timerlist as “Recording“ and can be edited or deleted
here.
9.4 Parental Control
To use the Parental Control function you will be asked to enter your access PIN code. All
parental control features work on a locking concept with the PIN code as your entrance key.
The default PIN code is set to 0000.
DSR6600HDCI
Age controll
¾ Toggle the age rating control on or off with the cursor left or cursor right keys.
¾ If you activate the age control, please also specify a suitable age level.
Change PIN code
¾ Use this function to Change your PIN Code to some other four digit number.
New PIN
¾ Enter a new four digit PIN code by pressing the OK key and using the number keys on
your remote control.
Verify new PIN code
¾ Re-enter the same new four digit PIN Code once again to verify the new PIN code.
Menu Lock
After turning the Menu Lock to ON, the complete Menu will require your PIN code to be
entered before opening
www.schwaiger.de 35

9.5 A/V Controll
In the Audio/video menu, you can modify the properties of the audio and video signals to
suit your TV and audio equipment.
TV-Type
Please select the video format consistent with your TV.
TV Scart
Select the video format of the TV SCART output. The possible choices of the TV SCART
video formats are:
DSR6600HDCI
RGB
In general, this gives the best possible video picture quality on a TV set connected via
SCART.
CVBS
Though the quality of this format is not as good as in RGB, some TV sets may not support
RGB. Thus please this format only, if the connected TV set does not support the RGB video
format.
COMP HD
Select this format only, if the connection is made by component out (YPbPr).
COMP SD
Select this format only, if the connection is made by component out (YPbPr)..
Aspect ratio
User can inform the receiver about the display aspect ratio of the TV that is connected to
the receiver. Possible choices are 4:3, 16:9 (wide screen) and square aspect ratios.
Display Format
If you select the display aspect ratio of TV as “4:3”, then also the preferred aspect ratio
conversion scheme for cases in which the transmitted Programme is in “16:9” format can
be chosen.
www.schwaiger.de 36

The options are:
Pan & Scan
The receiver interprets pan & scan vectors encoded in the Programme and crops the 16:9
input signal for display on 4:3 TV.
Letterbox
In this mode the original aspect ratio of the 16:9 input video signal is preserved, thus there
are vertical black bars on the top and bottom of the screen.
Ignore
Use this setting, if your TV set handles the aspect ratio conversion.
Video Format
Please choose from the available resolutions 1080p/1080i/720p or 576p.
9.6 OSD Setting
DSR6600HDCI
You can adjust the display time (time of the appearing of the info bar) and the OSD transparency (in %) on top of video signal of the receiver
Choose Display clock On if you wish the clock to be displayed in Standby. Otherwise only
the Power key is lit.
www.schwaiger.de 37

10 PVR Function
Only with a connected and operational external HDD
In this Sub Menu (Entertainment) you can make some settings for your connected HardDisk-Drive for the PVR Operation and also format the HDD.
The Sub Menu includes the following functions:
• PVR-Settings
• HDD-Settings
10.1 PVR Settings
You can select the default duration for direct recordings. For direct recordings a window
then appears after pressing the REC key which displays this pre-dened setting. Before
beginning the recording this can be adjusted.
DSR6600HDCI
10.2 Hard-Disk-Drive Settings
In this Sub Menu you can see all information about your connected Hard-Disk Drive as well
as an option to format the HDD.
HDD Information
Displays the lesystem, the total and the used capacity.
Formatting
After conrming with the OK key the HDD is formatted.
Please note: All les on the Hard-Disk-Drive will be deleted when formatting.
www.schwaiger.de 38

11 Common Interface
This receiver is equipped with two slots for Common Interface (CI).
¾ Open the ap on the front panel of the receiver.
¾ Insert the smartcard into the CI module, and the CI module into the slot.
¾ You can check the information of CI module using this Sub Menu.
DSR6600HDCI
11.1 Status
This menu is used to get information about the receiver and its hardware, software and
loader.
www.schwaiger.de 39

12 Troubleshooting
Problem Possible causes Remedy
LED on front panel does not
light
No picture or sound Wrong connection of the Vi-
Black-and-white screen or
V-Hold
AC Power cord disconnected.
deo/audio output to TV input
terminal.
Wrong connection of antenna
cable
Wrong direction of antenna.
No signal or weak signal.
Wrong setting of channels
Information in MENU screen.
Your TV mode is different
from broadcasting mode.
DSR6600HDCI
Connect power cord properly into the power socket.
Connect two terminals correctly With SCART cable or
RCA or RF cable.
Connect the antenna cable
correctly.
Adjust the direction of antenna.
Check the cable connections.
Type the setting value correctly.
Use TV of same mode Use
the NTSC/PAL converter.
Connection to the receiver
and TV.
The remote control is not
working
Distorted menu screen Too high brightness and
Not working Process down Switch off the receiver, re-
Battery exhausted.
Fluorescent light interfering
with the remote control.
Remote control is incorrectly aimed.
contrast level of TV set.
Change the batteries.
Switch off the light.
Aim the remote control at
the receiver.
Adjust brightness and contrast to low level.
move the power cord. After
a short moment re-insert the
power cord and switch on
again.
www.schwaiger.de 40

13 TechnicalSpecications
Tuner/LNB
Input Connector F-type, IEC 169-24
IF Input Frequency 950MHz to 2150MHz
IF Loop Throughout
Input Level -65 dBm~-25 dBm
LNB Power 13 /18VDC / 500mA Max
DiSEqC Control Unicable, 1.0, 1.2 und USALS compatible
Band Switch 22KHz Tone (22 +/- 4KHz, Amplitude: 0,6 +/- 0,2V)
Modulation method LDPC/BCH(DVB-S2) 8PSK/QPSK, DVB-S QPSK
Symbol Rate LDPC/BCH(DVB-S2) 8PSK/QPSK :10~30Msps DVB-S
Viterbi Decoding Rate 1/2,2/3,3/4,5/6 and 7/8
Bandwitdth 36MHz
LDPC/BCH Punctured Code 1/2, 2/3, 3/4, 3/5, 4/5, 5/6, 8/9, 9/10 in
DSR6600HDCI
QPSK : 1~45Msps
DVB-S2
MPEG Stream - A/V Decodierung
Demultiplex Entsprechend ISO/IEC 13818-1
(MPEG-2 System)
Input Stream Max. 90Mbit/s
Aspect Ratio 4:3(default), 16:9 letterbox
Video Deocdingg ISO/IEC 13818-2 (MPEG2 Video) MP@HL
ISO/IEC 14496-10 HP@L4
Video Resolution 576p, 720p,1080i or 1080p
Audio Decoding ISO/IEC13818-3 (MPEG2 Audio/MUSICAM),
Dolby AC-3
Audio Modus Single Channel/Dual Channel, Stereo, Joint
Stereo
Video Ouput HDMI, SCART,RCA
Front PCB
Display 8-Digit VF-Display
2 Common Interface 1 Front Side USB 2.0 Port
A/V Output
Digital Output HDMI, YPbPr
TV SCART Video Output (CVBS, RGB)
Audio In/Output (left, right)
Video RCA 1 Output
Audio RCA 2 Output left and right
Digital Audio S/PDIF (1x optical, 1x coaxial)
www.schwaiger.de 41

Rear Panel
IF Input F-type Connector
IF Loopthrough output F-type Connector
Video, Audio L, Audio R, RCA Video, Audio L, Audio R, YPbPr
Scart TV
S/PDIF Coaxial and Optical
HDMI 1.2
USB-Port 1 Rear Side USB 2.0 Port
IR Connector for external IR-Sensor RS 232
DSR6600HDCI
Should you require technical assistance and your dealer or installer was not able to help,
please contact our technical support.
Schwaiger GmbH
Würzburger Straße 17
90579 Langenzenn
Telefon: +49 (0) 9101 702-0
Telefax: +49 (0) 9101 9668
Internet: www.schwaiger.de
E-Mail: service@schwaiger.de
Technical Support-Line: +49 (0) 9101 702-299
Business Hours: Mon-Thu: 08:00 - 17:00 h
Fri: 08:00 - 14:30 h
www.schwaiger.de 42
 Loading...