

Page 1
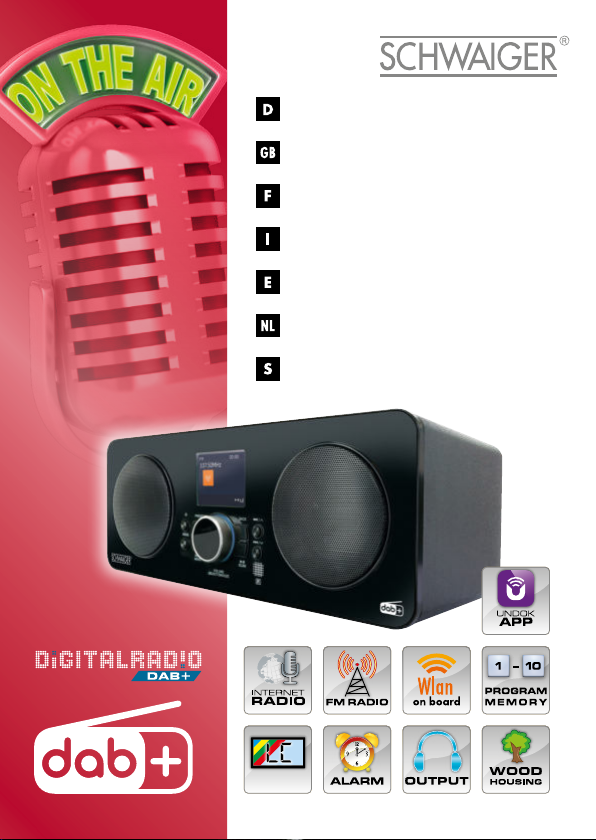
DAB 650
BEDIENUNGSANLEITUNG UND SICHERHEITSHINWEISE
DAB+ INTERNET RADIO, STEREO
OPERATING AND SAFETY INSTRUCTIONS
DAB+ INTERNET RADIO, STEREO
MODE D‘EMPLOI ET CONSIGNES DE SÉCURITÉ
RADIO INTERNET STÉRÉO DAB+
ISTRUZIONI PER L’USO E AVVERTENZE DI SICUREZZA
RADIO STEREO INTERNET DAB+
MANUAL DE INSTRUCCIONES E INDICACIONES DE SEGURIDAD
RADIO ESTÉREO INTERNET DAB+
BEDIENINGSHANDLEIDING EN VEILIGHEIDSINSTRUCTIES
DAB+ STEREO INTERNETRADIO
BRUKSANVISNING OCH SÄKERHETSINFORMATION
DAB+ INTERNET STEREO RADIO
COLOR
DISPLAY
Page 2
BEDIENUNGSANLEITUNG
SICHERHEITSMASSNAHMEN
• Lesen Sie bitte vor dem Gebrauch des Geräts alle Anweisungen und bewahren
Sie sie zum späteren Nachschlagen auf.
• Überprüfen Sie, ob die auf dem Typenschild angegebene Spannung mit Ihrer
Netzspannung übereinstimmt.
• Das Gerät muss auf eine flache stabile Oberfläche gestellt und darf keinen Vibrationen ausgesetzt werden. Stellen Sie das Gerät nicht auf schräge oder instabile Oberflächen, denn es könnte herunterfallen oder umkippen. Die Steckdose
muss sich in der Nähe des Geräts befinden und sollte leicht zugänglich sein.
• Vermeiden Sie extreme Temperaturen – sowohl heiße als auch kalte. Stellen Sie
das Gerät nicht in der Nähe von Wärmequellen auf, wie z. B. Heizkörpern bzw.
Gas- oder Elektroöfen. Setzen Sie das Gerät keiner direkten Sonneneinstrahlung und anderen Wärmequellen aus.
• Stellen Sie niemals Kerzen oder offene Flammen auf oder neben das Gerät.
• Um die Gefahr eines Brandes, Stromschlags oder Beschädigung des Geräts zu
vermeiden, setzen Sie es keinem Regen, Feuchtigkeit sowie Tropf- oder Spritzwasser aus. Stellen Sie keine mit Flüssigkeit gefüllten Gefäße, wie z. B. Vasen,
auf das Gerät.
• Falls Flüssigkeit ins Gerät gelangt, kann es zu schweren Schäden kommen.
Schalten Sie in diesem Fall das Gerät sofort aus. Ziehen Sie den Netzstecker
und wenden Sie sich an Ihren Händler.
• Um die Gefahr eines Brandes oder Stromschlags aufgrund von Überhitzung zu
vermeiden, geben Sie acht, dass keine Vorhänge oder andere Gegenstände die
Lüftungsschlitze bedecken.
• Stellen Sie das Gerät nicht in einen Bücherschrank, Einbauschrank oder andere
enge Räume. Vergewissern Sie sich, dass rund ums Gerät mindestens 10 cm für
die Belüftung freigehalten werden.
Sicherheit
• Trennen Sie das Gerät stets vom Stromnetz, bevor Sie andere Geräte an- oder
abstecken bzw. das Gerät bewegen.
• Trennen Sie das Gerät während eines Gewitters von der Steckdose.
• Das Gerät erwärmt sich, wenn es längere Zeit in Betrieb ist. Dies ist normal und
weist nicht auf ein Problem mit dem Gerät hin.
ACHTUNG !
GERÄT NICHT ÖFFNEN
STROMSCHLAGGEFAHR
Das Ausrufezeichen in einem gleichseitigen Dreieck soll den Benutzer auf
eine wichtige Bedienungs- oder Instandhaltungs- (Wartungs-)Anweisung in der Bedienungsanleitung dieses Geräts hinweisen.
Das Blitzsymbol in einem gleichseitigen
Dreieck warnt den Benutzer vor dem Vorhandensein einer nicht isolierten „gefährlichen Spannung“ im Inneren des Geräts, die
ausreichend hoch sein kann, um einen elektrischen Schlag zu verursachen.
2
Page 3
BEDIENUNGSANLEITUNG
Netzteil
• Vergewissern Sie sich, dass das Gerät nicht auf dem Kabel des Netzteils steht,
denn durch das Gewicht des Geräts kann das Kabel beschädigt werden und ein
Sicherheitsrisiko darstellen.
• Wenn das Netzteil beschädigt ist, muss es durch den Hersteller, seinen Servicepartner oder durch eine ähnlich qualifizierte Person ersetzt werden, um ein
Risiko zu vermeiden.
Störungen
• Stellen Sie das Gerät nicht auf oder in die Nähe von anderen Geräten, die
elektromagnetische Störungen verursachen können. Andernfalls würde das Betriebsverhalten des Geräts negativ beeinflusst werden und der Ton kann verzerrt klingen.
Beaufsichtigung
• Kinder müssen beaufsichtigt werden, um zu verhindern, dass sie mit dem Gerät spielen.
• Lassen Sie niemanden – insbesondere Kinder – Gegenstände in die Löcher,
Schlitze oder sonstige Öffnungen des Geräts stecken. Dies kann zu einem tödlichen Stromschlag führen!
Instandhaltung/Wartung
• Um die Gefahr eines elektrischen Schlags zu vermeiden, entfernen Sie keine
Schrauben. Das Gerät enthält keine vom Benutzer zu wartenden Teile. Bitte
überlassen Sie alle Wartungsarbeiten qualifizierten Personen.
• Öffnen Sie keine feststehenden Abdeckungen, denn es könnten sich gefährliche
Spannungen darunter befinden.
• Trennen Sie vor der Reinigung das Gerät von der Steckdose.
• Verwenden Sie keine Scheuerlappen oder Scheuermittel, denn diese könnten
die Oberfläche des Geräts beschädigen.
• Verwenden Sie keine Flüssigkeiten zur Reinigung des Geräts.
Dieses Symbol bedeutet Gleichspannung.
Dieses Symbol zeigt die Polarität des Gleichspannungssteckers an.
Dieses Symbol bedeutet Wechselspannung.
Dieses Symbol bedeutet Geräte der Klasse II.
Nur für Inhausanwendungen.
3
Page 4
BEDIENUNGSANLEITUNG
RECYCLING
Dieses Produkt trägt das Entsorgungssymbol für Elektromüll und elektronische
Geräte (WEEE). Dies bedeutet, dass dieses Produkt unter Einhaltung der europäischen Richtlinie 2012/19/EU behandelt werden muss, damit es mit möglichst
geringer Auswirkung auf die Umwelt recycelt oder zerlegt werden kann. Der Benutzer kann dieses Produkt einer zuständigen Recycling-Organisation übergeben,
bzw. dem Händler, wenn er neues elektrisches oder elektronisches Gerät kauft.
Der Netzstecker des Netzteils wird als Trennvorrichtung verwendet. Die Steckdose
muss in der Nähe des Geräts liegen und sie sollte leicht zugänglich sein.
ACHTUNG
Es besteht Explosionsgefahr, wenn die Batterien durch einen falschen Typ ersetzt
werden.
WARNUNG
• Geben Sie acht, die Batterien nicht durch einen falschen Typ zu ersetzen.
• Werfen Sie Batterien nicht ins offene Feuer oder einen heißen Ofen, zerquetschen Sie sie nicht und schneiden Sie sie nicht auf.
• Lagern Sie Batterien nicht in Umgebungen mit extrem hohen Temperaturen.
• Bringen Sie Batterien nicht in eine Umgebung mit extrem niedrigem Luftdruck.
• In einer Umgebung mit HF-Störungen kann das Produkt vorübergehen versagen
und nimmt seinen korrekten Betrieb wieder auf, wenn die Störung verschwindet.
AUSPACKEN
Nehmen Sie alle Teile aus ihrer Verpackung. Bewahren Sie die Verpackung auf.
Falls Sie sie entsorgen, befolgen Sie bitte die örtlichen Vorschriften für die Müllentsorgung.
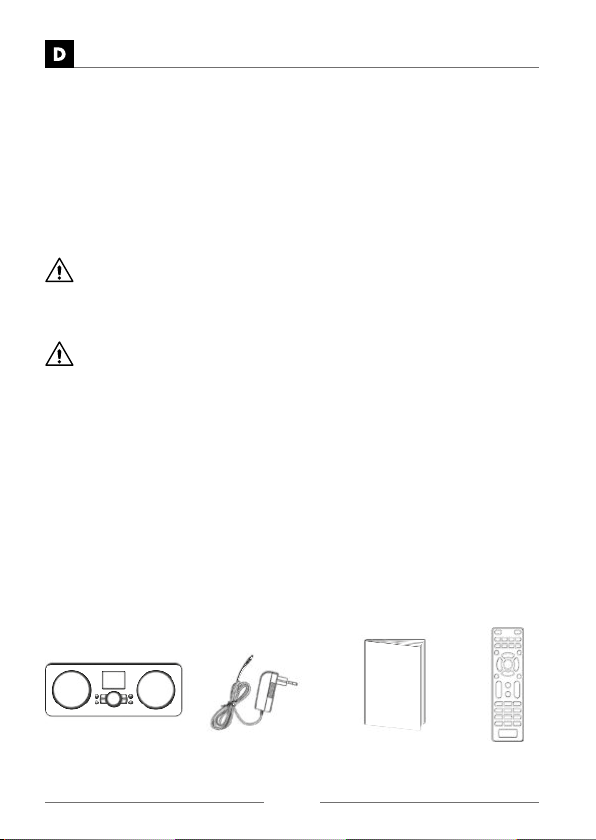
Folgende Teile sind enthalten:
Hauptgerät Netzteil
4
Bedienungsanleitung Fernbedienung
Page 5
BEDIENUNGSANLEITUNG
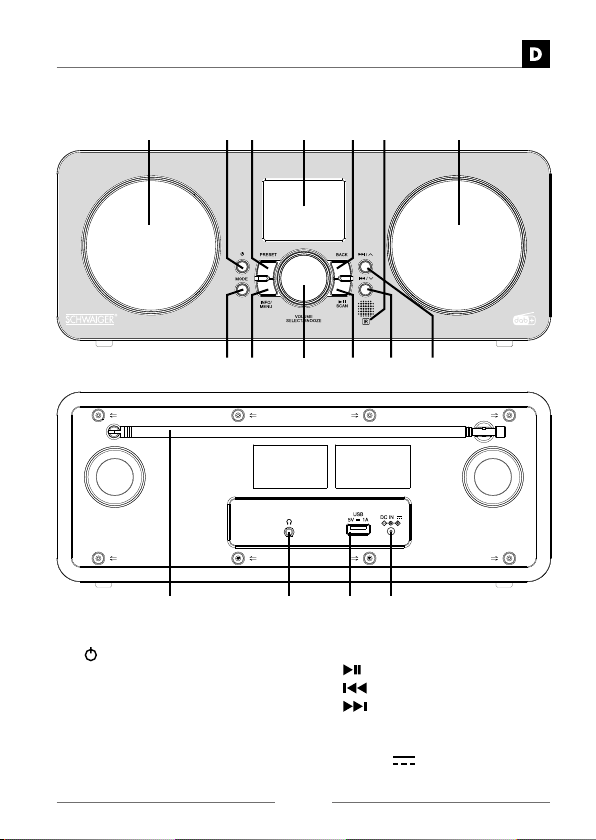
PRODUKTÜBERSICHT
2 3 5
7 8 11 12109
1. LAUTSPRECHER
2. STANDBY-TASTE
3. SPEICHERTASTE
4. DISPLAY
5. ZURÜCK-TASTE
6. FERNBEDIENUNGSSENSOR
7. MODUS-TASTE
8. INFO/MENÜ-TASTE
61 4 1
14 15 1613
9. LAUTSTÄRKE/AUSWAHL/
SCHLUMMER-DREHKNOPF
SUCHLAUF-TASTE
10.
11.
-TASTE
12. -TASTE
13. STABANTENNE
14. KOPFHÖRERBUCHSE
15. USB 5V 1A Ladebuchse
16. STROMVERSORGUNGSBUCHSE
5
Page 6
BEDIENUNGSANLEITUNG
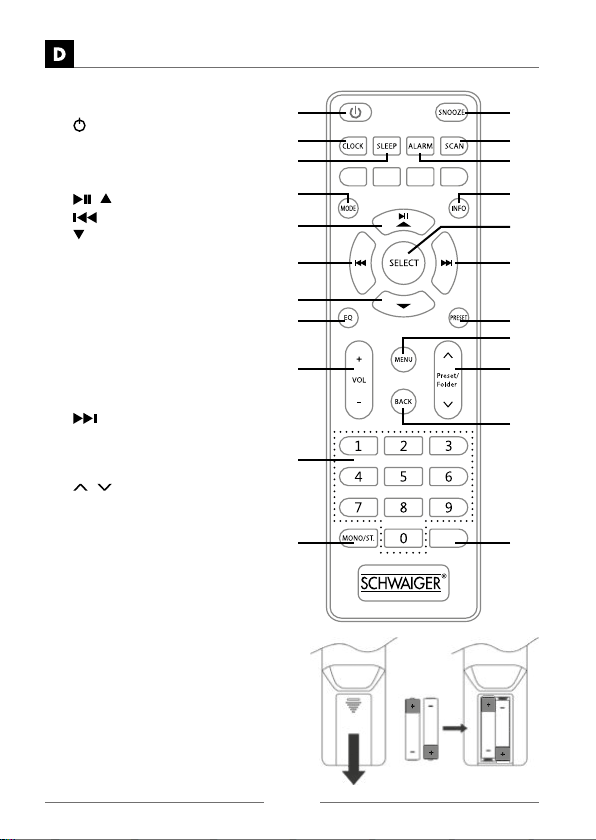
FERNBEDIENUNG
1. STANDBY-TASTE
2. UHR-TASTE
3. SCHLAF-TASTE
4. MODUS-TASTE
/ -TASTE
5.
6.
-TASTE
-TASTE
7.
8. EQUALIZER-TASTE
9. LAUTSTÄRKETASTE + / −
10. ZIFFERNTASTEN
11. MONO/STEREO-TASTE
12. SCHLUMMERTASTE
13. SUCHLAUF-TASTE
14. ALARMTASTE
15. INFO-TASTE
16. AUSWAHLTASTE
17.
-TASTE
18. SPEICHERTASTE
19. MENÜ-TASTE
20. SPEICHER/ORDNER
/ -TASTE
21. ZURÜCK-TASTE
22. STUMMSCHALTTASTE
1 12
2
3
4
5
6
7
8
9
10
11
Austausch der Batterie
für die Fernbedienung
1. Öffnen Sie den Deckel des Batterie-
fachs.
2. Legen Sie 2 x AAA-Batterien ein
(nicht im Lieferumfang enthalten).
Achten Sie darauf, dass die „+“- und
„–“-Enden der Batterien mit den „+“
und „–“ im Batteriefach übereinstimmen.
3. Deckel schließen
6
MUTE
13
14
15
16
17
18
19
20
21
22
Page 7
BEDIENUNGSANLEITUNG
Handhabung der Batterie
» Falsche oder nicht ordnungsgemäße Verwendung der Batterien kann zu
Korrosion oder Auslaufen der Batterien führen, was Brände, Verletzun
gen von Personen oder Sachschäden zur Folge haben kann.
» Verwenden Sie nur Batterien des in diesem Handbuch angegebenen
Typs.
» Entsorgen Sie Batterien nicht mit dem Haushaltsmüll. Entsorgen Sie sie
gemäß den örtlichen Vorschriften.
» Wenn die Fernbedienung längere Zeit nicht in Betrieb ist, entnehmen
Sie bitte die Batterien, denn es könnte zum Auslaufen der Batterien oder
Korrosion kommen und in weiterer Folge zu Verletzungen, Sachschäden
und/oder Feuer.
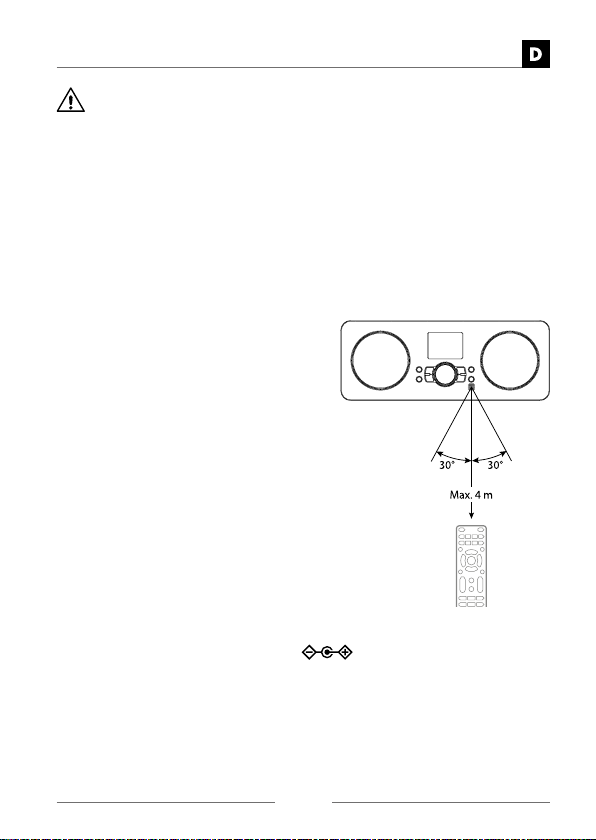
Reichweite der
Fernbedienung
Der Fernbedienungssensor an der Vorderseite des Geräts kann die Steuerbefehle der
Fernbedienung bis zu einer Entfernung von
maximal 4 Metern und innerhalb eines Winkels von 60° empfangen.
Die Reichweite der Fernbedienung kann jedoch je nach Helligkeit des Raumes variieren.
STROMQUELLE
Netz-Stromversorgung
Wenn das Gerät an eine andere Stromversorgung angeschlossen wird, kann es beschädigt werden.
1. Wickeln Sie das Kabel des Netzteils auf seine volle Länge ab. Stecken Sie das
Ende des Kabels in die Buchse DC IN
dann das Netzteil in die Netzsteckdose. Vergewissern Sie sich, dass das Netzteil fest in die Netzsteckdose eingesteckt ist. Das Gerät ist nun betriebsbereit.
2. Um das Gerät vollständig auszuschalten, ziehen Sie das Netzteil aus der Steckdose.
an der Rückseite des Geräts und
-
7
Page 8
BEDIENUNGSANLEITUNG
Laden über den USB-Ladeanschluss
Sie können ein anderes Gerät über die USB-Buchse an diesem Radio mithilfe eines
USB-Kabels (nicht im Lieferumfang enthalten) laden.
• Der maximale Ladestrom beim USB-Laden beträgt 1 A.
• Es wird nicht garantiert, dass alle Geräte für USB-Laden geeignet sind.
Netzwerkverbindung
Dieses Radio unterstützt nur (drahtlose) WLAN-Verbindung für den Zugriff auf das
Netzwerk und keine kabelgebundene LAN-Verbindung.
Drahtloses Netzwerk
1. Überprüfen Sie zuerst, ob alle Kontrollleuchten (LINK/ACT) Ihres Routers
leuchten.
2. Fahren Sie gemäß der unten beschriebenen Vorgehensweise „Ersteinrichtung“
fort. Es wird empfohlen, den Setup-Assistenten im Abschnitt „Systemeinstellungen“ zu verwenden.
» Dieses Radio kann nicht direkt mit einem eigenständigen Modem ver-
bunden werden. Es muss ein Router bzw. ein Modem mit integriertem
Router verwendet werden.
» Aufgrund der zahlreichen Verbindungs-Konfigurationen befolgen Sie
bitte genau die Spezifikationen und Anweisungen Ihres Telefon-/Inter
netanbieter sowie der Bedienungsanleitung des Routers.
Ersteinrichtung
Wenn Sie das Radio zum ersten Mal an die Steckdose anschließen, zeigt das Display den Begrüßungs-Bildschirm und anschließend das Sprache-Menü. Drücken
Sie nun eine der Tasten
der Tasten
zuwählen, und dann drücken Sie den Drehknopf VOLUME/SELECT/SNOOZE auf
dem Radio bzw. die Taste SELECT auf der Fernbedienung, um sie zu bestätigen.
Anschließend wird die Seite mit der Datenschutzrichtlinie angezeigt.
Bitte besuchen Sie die auf dieser Seite erwähnte Website, um die Einzelheiten der
Datenschutzrichtlinie zu lesen. Drücken Sie den Drehknopf VOLUME/SELECT/
SNOOZE auf dem Radio bzw. die Taste SELECT auf der Fernbedienung, um zum
nächsten Schritt zu gehen.
1. Um den Assistenten für die Ersteinrichtung zu starten, drücken Sie die Tasten
/ /
/ /
dienung, um [JA] auszuwählen, dann drücken Sie den Drehknopf VOLUME/
SELECT/SNOOZE auf dem Radio bzw. die Taste SELECT auf der Fernbedie-
nung, um Ihre Auswahl zu bestätigen.
/ /
auf der Fernbedienung, um die gewünschte Sprache aus-
auf dem Radio bzw. die Tasten
/
auf dem Radio oder drücken Sie eine
/
auf der Fernbe-
/
-
8
Page 9
BEDIENUNGSANLEITUNG
2. Drücken Sie die Taste
auf der Fernbedienung, um eine der folgenden Optionen auszuwählen, und
dann drücken Sie den Drehknopf VOLUME/SELECT/SNOOZE auf dem Radio
bzw. die Taste SELECT auf der Fernbedienung, um Ihre Auswahl zu bestätigen:
Datum/Zeit
12/24-Stunden-Format
Automatische
Aktualisierung
Zeitzone festlegen Wählen Sie die Zeitzone (nur verfügbar, wenn als
Sommerzeit Sie können hier Sommerzeit auswählen. (nur
Netzwerkeinstellung Wählen Sie, ob das Netzwerk verbunden bleiben
Auf dem Display wird „Netzwerk-Assistent scannt“ angezeigt. Ihr Radio sucht nun
3.
nach Ihrem drahtlosen Netzwerk (WLAN). Dies kann ein paar Sekunden dauern,
und anschließend wird eine Liste aller drahtlosen Netzwerke auf dem Bildschirm
angezeigt. Drücken Sie die Taste
/ /
Tasten
drücken Sie den Drehknopf VOLUME/SELECT/SNOOZE auf dem Radio bzw. die
SELECT
Taste
4. Drücken Sie die Taste / /
Verbindung über die WPS-Taste auf Ihrem Router.
Die Verbindung mithilfe der WPS-Taste (Wi-Fi Protected Setup; geschützte
Falls Ihr Router über eine WPS-Taste verfügt, sehen Sie [WPS] am Anfang
5. Drücken Sie die Taste
6. Sie sehen nun eine Meldung auf dem Bildschirm, die Sie auffordert, die
auf der Fernbedienung, um „Taste/PIN-Code/WPS überspringen“ aus-
/
zuwählen, und dann drücken Sie den Drehknopf VOLUME/SELECT/SNOOZE
auf dem Radio bzw. die Taste SELECT auf der Fernbedienung, um Ihre Auswahl zu bestätigen.
WLAN-Verbindung) ist eine schnelle und einfache Möglichkeit, Ihr Radio zu
verbinden, ohne ein Passwort eingeben zu müssen.
Ihres Netzwerknamens.
auf der Fernbedienung, um „Taste“ auszuwählen, und dann drücken
/
Sie den Drehknopf VOLUME/SELECT/SNOOZE auf dem Radio bzw. die Taste
SELECT auf der Fernbedienung, um Ihre Auswahl zu bestätigen.
WPS-Taste auf Ihrem Router zu drücken. Drücken Sie die WPS-Taste auf Ihrem
Router. Falls Sie sich nicht sicher sind, welche die WPS-Taste Ihres Routers ist,
sehen Sie bitte in der Bedienungsanleitung des Routers nach.
/ /
Einstellung der 12- oder 24-Stunden-Anzeige
Wählen Sie hier, wie die Zeit automatisch aktualisiert werden soll. Aktualisierung durch DAB/FM/
Netzwerk/keine Aktualisierung
automatische Aktualisierung „Aktualisierung durch
Netzwerk“ gewählt wurde).
verfügbar, wenn als automatische Aktualisierung
„Aktualisierung durch Netzwerk“ gewählt wurde).
soll. Ja/Nein
auf der Fernbedienung, um Ihr WLAN auszuwählen, und dann
auf der Fernbedienung, um Ihre Auswahl zu bestätigen.
/ /
auf dem Radio bzw. die Tasten
/
/ /
auf dem Radio bzw. die Taste /
/
auf dem Radio bzw. die Tasten /
/
auf dem Radio bzw. die
/
/
9
Page 10
BEDIENUNGSANLEITUNG
7. Drücken Sie den Drehknopf VOLUME/SELECT/SNOOZE auf dem Radio bzw.
die Taste SELECT auf der Fernbedienung, um Ihre Auswahl zu bestätigen. Ihr
Radio verbindet sich nun mit dem Router; dies kann ein paar Sekunden dauern.
Verbindung mittels WLAN-Passwort
Falls Ihr Router über keine WPS-Taste verfügt, werden Sie nun aufgefordert,
Ihr WLAN-Passwort einzugeben. Sie können auch „WPS überspringen“ wählen,
dann gelangen Sie ebenfalls direkt zum Passwort-Bildschirm.
8. Drücken Sie die Taste
/ / auf der Fernbedienung, um die einzelnen Buchstaben/Ziffern
/
Ihres Passworts zu wählen. Dann drücken Sie den Drehknopf VOLUME/SE-
LECT/SNOOZE auf dem Radio bzw. die Taste ENTER auf der Fernbedienung,
um den gewählten Buchstaben bzw. die gewählte Ziffer einzugeben.
9. Nachdem Sie Ihr Passwort eingegeben haben, drücken Sie die Taste
10. Nachdem Ihr Radio verbunden wurde, drücken Sie die Taste MENU, um das
auf dem Radio bzw. die Tasten
/
bedienung, um auf der rechten Seite des Bildschirms „OK“ zu wählen.
Menü zu verlassen.
» Hinweis:
Die Einstellungen können jederzeit unter Menü – Systemeinstellungen
– Netzwerk – Netzwerk-Assistent geändert werden.
ERSTE SCHRITTE
» Diese Bedienungsanleitung erklärt die grundlegende Bedienung dieses
Gerätes. Sofern nicht anders angegeben, basieren alle beschriebenen
Vorgänge auf der Verwendung der Fernbedienung.
Ein-/Ausschalten (ON/OFF)
1. Drücken Sie die -Taste auf dem Radio oder der Fernbedienung, um das Gerät einzuschalten.
2. Drücken Sie die
rät wieder in den Standby-Modus zu schalten.
Auswahl des Modus
Drücken Sie die Taste MODE auf dem Radio oder der Fernbedienung, um das
MODUS-Menü aufzurufen. Dann drücken Sie die Tasten
dem Radio bzw. die Tasten
zwischen den einzelnen Quellen umzuschalten: Internetradio, Podcasts, DAB,
FM und Bluetooth
auf dem Radio bzw. die Taste SELECT auf der Fernbedienung, um die Auswahl
zu bestätigen.
/ /
-Taste auf dem Radio oder der Fernbedienung, um das Ge-
/ / / / auf der Fernbedienung, um
®
. Drücken Sie den Drehknopf VOLUME/SELECT/SNOOZE
auf dem Radio bzw. die Tasten
/
/ / / /
/ /
/
/ /
auf der Fern-
/
auf
10
Page 11
BEDIENUNGSANLEITUNG
» Wenn das Radio in den Modi Internetradio, Podcasts, DAB oder Blue-
tooth® (bei getrenntem externem Gerät) für ca. 15 Minuten inaktiv ist,
schaltet es automatisch in den Standby-Modus. Um das Radio vollstän
dig auszuschalten, ziehen Sie den Netzstecker aus der Steckdose.
» Bitte schalten Sie das Radio vollständig aus, wenn es nicht verwendet
wird, um Energie zu sparen.
Navigieren durch das Menü
1. Halten Sie die Taste INFO/MENU am Radio gedrückt oder drücken Sie die
Taste MENU auf der Fernbedienung, um das Menü aufzurufen.
2. Drücken Sie die Tasten
/ or / auf der Fernbedienung, um Ihre Auswahl zu treffen.
3. Drücken Sie den Drehknopf VOLUME/SELECT/SNOOZE auf dem Radio bzw.
die Taste SELECT auf der Fernbedienung, um Ihre Auswahl zu bestätigen.
Einstellen der Lautstärke
• Drehen Sie den Drehknopf VOLUME/SELECT/SNOOZE am Radio oder drücken
Sie die Tasten VOL +/– auf der Fernbedienung um die Lautstärke einzustellen.
• Um den Ton vorübergehend stummzuschalten, drücken Sie die Taste MUTE auf
der Fernbedienung. Drehen Sie den Drehknopf VOLUME/SELECT/SNOOZE
auf dem Radio oder drücken Sie erneut die Taste MUTE, oder drücken die Taste
VOL +/– auf der Fernbedienung um die normale Wiedergabe fortzusetzen.
SYSTEMEINSTELLUNGEN
Halten Sie die Taste INFO/MENU am Radio gedrückt oder drücken Sie die Taste
MENU auf der Fernbedienung, um das Menü anzuzeigen. Drücken Sie die Tasten
/ /
bedienung, um die Systemeinstellungen auszuwählen, dann drücken Sie den
Drehknopf VOLUME/SELECT/SNOOZE am Gerät bzw. die Taste SELECT auf der
Fernbedienung, um die Einstellung zu bestätigen.
Equalizer
Diese Anlage unterstützt eine Reihe von Equalizer-Einstellungen und Klangeffekten.
• Drücken Sie die Taste EQ, um das Equalizer-Menü aufzurufen.
Alternative Methode:
• Drücken Sie im Systemeinstellungs-Modus die Tasten
Equalizer auszuwählen, und dann SELECT um Ihre Auswahl zu bestätigen.
1. Auf dem Display wird Folgendes angezeigt: FLAT > CLASSIC > ROCK > POP
> JAZZ
2. Drücken Sie die Tasten
SELECT, um Ihre Auswahl zu bestätigen.
auf dem Radio bzw. die Tasten / /
/
/ /
/ /
auf dem Radio bzw. die Tasten
/
/ / , um den Punkt
, um Ihre Auswahl zu treffen und dann
/
auf der Fern-
-
11
Page 12
BEDIENUNGSANLEITUNG
Netzwerk
1. Drücken Sie im Systemeinstellungs-Modus die Tasten / / , um den
Punkt Netzwerk auszuwählen, und dann SELECT, um Ihre Auswahl zu bestätigen.
2. Drücken Sie die Tasten
len, und dann drücken Sie die Taste SELECT, um Ihre Auswahl zu bestätigen.
NetzwerkAssistent
PBC WLAN setup
(PCB-WLANKonfiguration)
Einstellungen
anzeigen
Manuelle
Einstellungen
NetRemote PIN
Setup
Netzwerkprofil Anzeigen des verbundenen Netzwerks.
Netzwerkeinstel-
lungen löschen
Netzwerk
verbunden halten
3. Drücken Sie die Taste BACK auf dem Radio oder der Fernbedienung, um zum
vorigen Menü zurückzukehren.
Uhrzeit/Datum
Datum und Uhrzeit können automatisch eingestellt werden, wenn das Gerät mit
dem Internet bzw. einem DAB- oder FM-Radiosender mit Datum/Uhrzeit-Informationen verbunden ist. Sie können Datum und Uhrzeit auch manuell einstellen.
• Drücken Sie die Taste CLOCK, um den Menüpunkt Uhrzeit/Datum einstellen
aufzurufen.
Alternative Methode:
• Drücken Sie im Systemeinstellungs-Modus die Tasten
Uhrzeit/Datum auszuwählen und dann SELECT um Ihre Auswahl zu bestäti-
gen. Drücken Sie die Tasten
wählen, und dann SELECT, um Ihre Auswahl zu bestätigen.
/ / , um eine der folgenden Optionen auszuwäh-
SSID – Wählen Sie das gewünschte WLAN.
Rescan – Scannen Sie nach verfügbaren Netzwerken.
Manual config – Wählen Sie ein WLAN mit DHCP aktivie-
ren/deaktivieren.
Drücken Sie die WPS-Taste auf dem Modem, mit dem Sie
Ihr Radio verbinden möchten. Dann drücken Sie den Dreh
knopf VOLUME/SELECT/SNOOZE auf dem Radio bzw. die
Taste SELECT auf der Fernbedienung, um fortzufahren.
Anzeigen der Einstellungen des Geräts.
Wählen Sie DHCP aktivieren/deaktivieren.
Zum Festlegen eines PIN-Codes, der eingegeben werden
muss, um das Gerät mit einem Netzwerk zu verbinden.
Zum Löschen des verbundenen Netzwerkspeichers im
Netzwerkprofil.
Zum Festlegen, ob das Gerät im Standby-Modus mit
dem Netzwerk verbunden bleiben soll, wenn es nicht im
Modus „Netzwerkradio“ ist.
/ / , um den Punkt
/ / , um Uhrzeit/Datum einstellen auszu-
12
-
Page 13
BEDIENUNGSANLEITUNG
1. Die Datumsziffern auf dem Display beginnen zu blinken.
2. Drücken Sie die Tasten
Taste SELECT, um es zu bestätigen.
3. Wiederholen Sie Schritt (2), um Monat/Jahr/Stunden/Minuten einzustellen.
4. Die Datum- und Uhrzeit-Einstellung ist nun abgeschlossen.
Für weitere Einstellungen unter Uhrzeit/Datum drücken Sie die Tasten
/ / , um eine der folgenden Optionen auszuwählen, und dann die Taste
SELECT, um Ihre Auswahl zu bestätigen.
Automatische
Aktualisierung
Format einstellen
Zeitzone festlegen
Sommerzeit Sie können hier Sommerzeit auswählen. (nur verfügbar,
» Die Standardeinstellung für die automatische Aktualisierung ist „Aktua-
lisierung durch Netzwerk“. Wenn Sie die Zeit manuell einstellen möchten, wird empfohlen, die automatische Aktualisierungsfunktion zu deaktivieren.
Inaktives Standby
Sie können die Funktion „Inaktives Standby“ verwenden, um das Gerät nach einer
bestimmten Zeit im Wiedergabemodus auszuschalten.
1. Drücken Sie im Systemeinstellungs-Modus die Tasten
Punkt Inaktives Standby auszuwählen und dann SELECT um Ihre Auswahl zu
bestätigen.
2. Drücken Sie die Tasten
5 Std. und 6 Std. zu wählen. Drücken Sie die Taste SELECT um Ihre Auswahl
zu bestätigen.
Sprache
1. Drücken Sie im Systemeinstellungs-Modus die Tasten
Punkt Sprache auszuwählen und dann SELECT um Ihre Auswahl zu bestätigen.
2. Drücken Sie die Tasten
zuwählen.
3. Drücken Sie die Taste SELECT, um Ihre Auswahl zu bestätigen.
/ / , um den Tag einzustellen, und dann die
Aktualisierung durch DAB/FM/Netzwerk/keine Aktualisierung
12/24-Stunden-Format
Wählen Sie die Zeitzone. (nur verfügbar, wenn als automatische Aktualisierung „Aktualisierung durch Netzwerk“
gewählt wurde).
wenn als automatische Aktualisierung „Aktualisierung
durch Netzwerk“ gewählt wurde).
/ / , um den
/ /
/ / , um die gewünschte Anzeigesprache aus-
um aus den Optionen Aus, 2 Std., 4 Std.,
,
/ / , um den
13
Page 14
BEDIENUNGSANLEITUNG
Werks-Reset
Es kann manchmal erforderlich sein, Ihr Gerät auf die Werkseinstellungen zurückzusetzen, insbesondere nach einem Umzug. Wenn Sie Probleme beim Empfang
haben, können Sie das Gerät zurücksetzen („Reset“) und es erneut versuchen.
Wenn Sie in einen anderen Teil des Landes übersiedeln und die lokalen DAB-Sender in dieser Region empfangen möchten, sind Ihre zuvor eingestellten Kanäle
womöglich nicht mehr verfügbar.
1. Drücken Sie im Systemeinstellungs-Modus die Tasten
Punkt Werks-Reset auszuwählen, und dann SELECT, um Ihre Auswahl zu
bestätigen.
2. Drücken Sie die Tasten
um Ihre Auswahl zu bestätigen oder wählen Sie [Nein], um den Vorgang abzubrechen.
» Nach einem System-Reset sind alle eingestellten Sender sowie gespei-
cherte Internet-, DAB- und FM-Sender gelöscht.
/
um [Ja] auszuwählen, und dann SELECT,
Software-Update
1. Drücken Sie im Systemeinstellungs-Modus die Tasten
Punkt Software-Update auszuwählen und dann SELECT um Ihre Auswahl zu
bestätigen.
2. Drücken Sie die Tasten
prüfung“ oder „Jetzt überprüfen“ auszuwählen, und dann SELECT, um Ihre
Auswahl zu bestätigen.
» Bevor Sie Software downloaden, vergewissern Sie sich, dass das Radio
an einen stabilen Netzanschluss angesteckt ist.
» Eine Unterbrechung des Netzanschlusses während des Software-Down
loads kann zu Funktionsstörungen und/oder zu Schäden am Gerät führen!
/ / , um die Einstellung „Automatische Über-
Konfigurations-Assistent
Den Konfigurations-Assistenten finden Sie im Abschnitt „Systemeinstellungen“.
Sie können ihn starten, um die Einstellungen von Datum/Uhrzeit und Netzwerk
vorzunehmen. Nachdem Sie den Assistenten beendet haben, ist Ihr Radio betriebsbereit.
Info
1. Drücken Sie im Systemeinstellungs-Modus die Tasten
Punkt Info auszuwählen, und dann SELECT, um Ihre Auswahl zu bestätigen.
2. Auf dem Display werden Softwareversion, Radio-ID und „Benutzerdefinierter
Name“ angezeigt.
/ / , um den
/ / , um den
/ / , um den
-
14
Page 15
BEDIENUNGSANLEITUNG
Datenschutzrichtlinien
Um die Seite mit den Datenschutzrichtlinien anzuzeigen, drücken Sie die Taste
MENU und gehen dann zu Systemeinstellungen – Datenschutzrichtlinien.
Wenn Sie das Gerät auf die Werkseinstellungen zurückgesetzt haben, müssen Sie
die Datenschutzrichtlinien erneut akzeptieren.
Hintergrundbeleuchtung
1. Drücken Sie im Systemeinstellungs-Modus die Tasten
Punkt Hintergrundbeleuchtung auszuwählen und dann SELECT, um Ihre
Auswahl zu bestätigen.
2. Für weitere Einstellungen unter Hintergrundbeleuchtung drücken Sie die
Timeout Ein / 10 s / 20 s / 30 s / 45 s / 60 s / 90 s / 120 s /180 s
Helligkeit, wenn
eingeschaltet
Helligkeit im
Standby-Modus
/ / , um eine der folgenden Optionen auszuwählen, und dann
Tasten
die Taste SELECT, um Ihre Auswahl zu bestätigen.
Hoch / Mittel / Gering
Mittel / Gering
Internetradio
Um einen Internetradiosender anhören zu können, muss Ihr Radio mit dem Internet verbunden sein. Stellen Sie Ihr Radio so nahe wie möglich zum Router, um die
bestmögliche Geschwindigkeit zu erhalten. Wenn Internetradio gewählt ist, verbindet sich Ihr Radio mit dem Radioportal „Frontier Silicon Internet“, um eine Liste
aller verfügbaren Sender herunterzuladen. Sobald Sie einen Sender ausgewählt
haben, verbindet sich das Radio direkt mit diesem Sender.
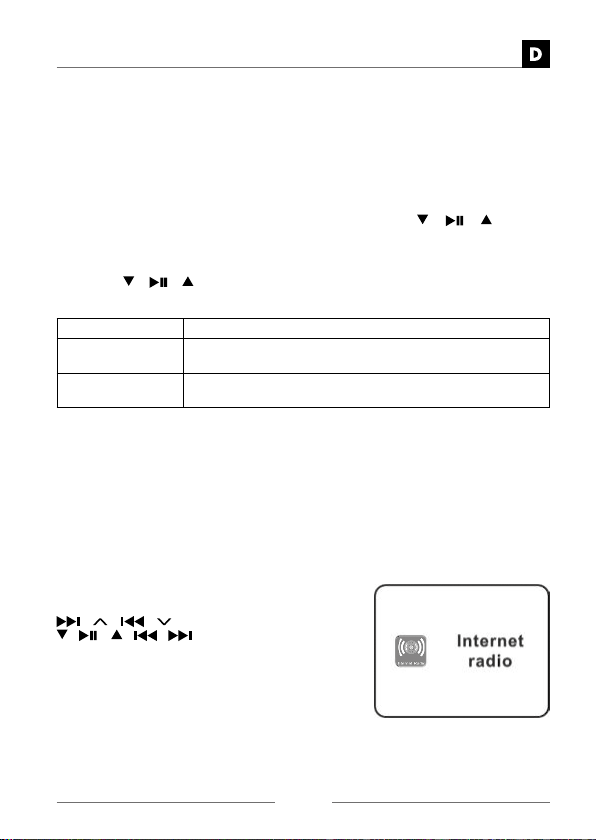
Drücken Sie die Taste MODE auf dem Radio oder
der Fernbedienung, dann drücken Sie die Tasten
/ /
/ / / / auf der Fernbedienung, um
den Modus „Internetradio“ auszuwählen. Drücken
Sie den Drehknopf VOLUME/SELECT/SNOOZE
auf dem Radio bzw. die Taste SELECT auf der
Fernbedienung, um Ihre Auswahl zu bestätigen.
auf dem Radio oder die Tasten
/
/ / , um den
15
Page 16
BEDIENUNGSANLEITUNG
Senderliste
Halten Sie im Internetradio-Modus die Taste INFO/MENU am Radio gedrückt
oder drücken Sie die Taste MENU auf der Fernbedienung, um das Menü aufzurufen.
Drücken Sie die Tasten
dann SELECT, um Ihre Auswahl zu bestätigen.
Wenn das Internetradio erneut gestartet wird, wird automatisch der zuletzt gehörte Sender wieder gespielt. Um zur [Senderliste] zurückzukehren, drücken
Sie die Taste BACK.
Wenn Sie zum ersten Mal Internetradio hören, zeigt das Radio die [Senderliste]
an.
1. Drücken Sie die Tasten
wählen, und dann SELECT, um Ihre Auswahl zu bestätigen.
/ / , um den Punkt [Senderliste] auszuwählen und
/ / , um eine der folgenden Optionen auszu-
Länder Sie können gezielt nach Sendern aus Ihrem Land suchen.
Verlauf In dieser Kategorie können Sie aus den bereits gehörten
Suche Sie können mithilfe von Stichwörtern nach Sendern su-
Standort Sie können nach Sendern aus einer Liste verfügbarer
Beliebte Wählen Sie einen Sender aus einer Liste der beliebtesten
Entdecken Wählen Sie einen Sender aus verschiedenen Kategorien
Drücken Sie die Taste BACK auf dem Radio oder der Fernbedienung, um zum
vorigen Menü zurückzukehren.
In diesem Rahmen werden für Ihren Standort lokale
Radiosender angezeigt.
Sendern wählen, wobei die zuletzt gehörten am Anfang
der Liste stehen.
chen. Der Name und eine Beschreibung des ausgewählten
Senders werden auf dem Display angezeigt.
Länder wählen
Internetradiosender der ganzen Welt.
im Menü: Herkunft, Genre oder Sprache.
16
Page 17
BEDIENUNGSANLEITUNG
Senderspeicher
Gespeicherte Internetradiosender sind in Ihrem
Radio gespeichert und können nicht von anderen
Radios abgerufen werden.
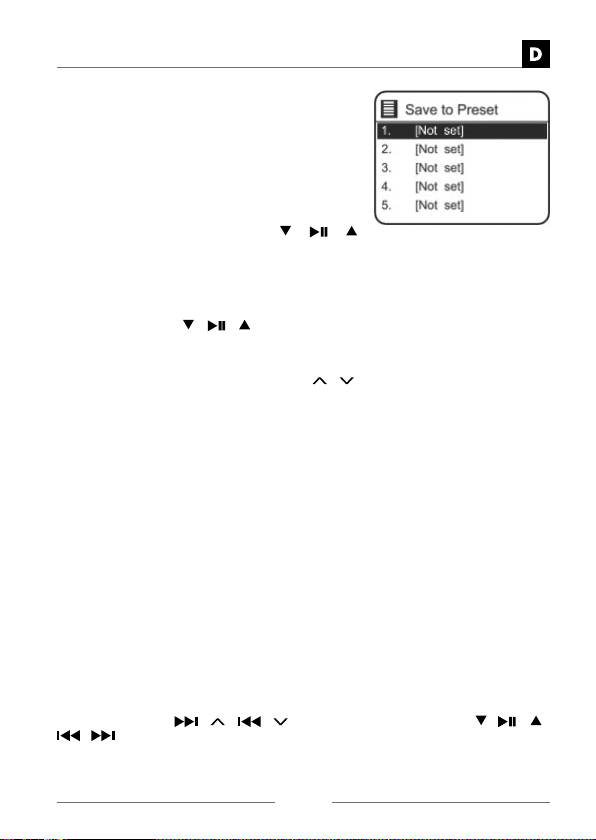
1. Um einen Sender zu speichern, müssen Sie
zuerst den Sender anhören, den Sie speichern
möchten. Halten Sie die Taste PRESET gedrückt, bis das Display „Speichern“ anzeigt.
2. Wählen Sie mithilfe der Tasten
die Nummer des Speichers, in dem Sie den Sender speichern möchten und
drücken Sie die Taste SELECT, um Ihre Auswahl zu bestätigen.
Abrufen eines gespeicherten Senders
1. Um einen gespeicherten Sender anzuhören, drücken Sie die Taste PRESET und
dann die Tasten
2. Drücken Sie die Taste SELECT, um Ihre Auswahl zu bestätigen.
Alternative Methode:
• Drücken Sie die Tasten Preset/Folder
Sender zu durchsuchen.
• Oder drücken Sie auf der Fernbedienung die Zifferntaste für den gespeicherten
Sender („0“ für den Speicher Nr. 10).
• Falls unter der Ziffer kein Sender gespeichert ist, wird „Speicher leer“ angezeigt.
» Die Bedienung von Senderspeicher und -abruf ist für Internetradio, Pod-
casts, DAB und UKW gleich.
/ / , um Ihre Auswahl zu treffen.
Internetradio-Anzeigemodi
Mit jedem Tastendruck auf INFO/MENU auf dem Radio bzw. auf INFO auf der
Fernbedienung zeigt das Display die folgenden Anzeigemodi an:
Kanalinfo/Beschreibung – Sprache/Ort – Bitrate/Soundformat/ Abtastrate – Wiedergabepuffer – Datum
PODCASTS
Um Podcasts anhören zu können, muss Ihr Radio mit dem Internet verbunden
sein. Stellen Sie Ihr Radio so nahe wie möglich zum Router, um die bestmögliche
Geschwindigkeit zu erhalten.
Drücken Sie die Taste MODE auf dem Radio oder der Fernbedienung, dann drücken Sie die Tasten
/ auf der Fernbedieung, um den Modus „Podcasts“ auszuwählen. Drücken
Sie den Drehknopf VOLUME/SELECT/SNOOZE auf dem Radio bzw. die Taste
SELECT auf der Fernbedienung, um Ihre Auswahl zu bestätigen.
/ /
/ /
auf dem Radio oder die Tasten
/
/ , um die Liste der gespeicherten
/ / /
17
Page 18
BEDIENUNGSANLEITUNG
Wenn das Radio erneut gestartet wird, wird automatisch der zuletzt gehörte Sender wieder gespielt. Um zur [Podcast-Liste] zurückzukehren, drücken Sie die Taste
BACK.
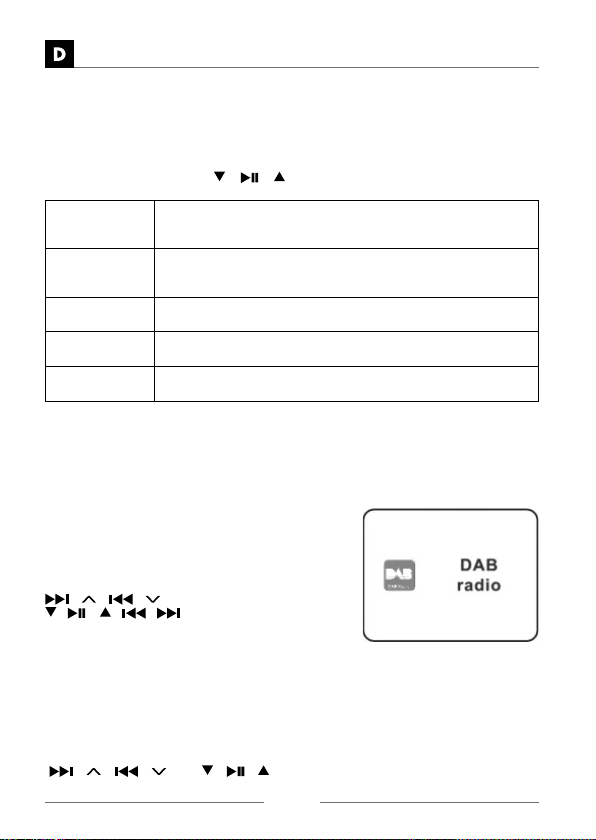
Wenn Sie zum ersten Mal Podcasts-Radio hören, zeigt das Radio die [PodcastListe] an.
1. Drücken Sie die Tasten
wählen, und dann SELECT, um Ihre Auswahl zu bestätigen.
Länder Sie können gezielt nach Sendern aus Ihrem Land suchen. In
Suche Sie können mithilfe von Stichwörtern nach Sendern suchen.
Beliebte Wählen Sie einen Sender aus einer Liste der beliebtesten
Standort Sie können nach Sendern aus einer Liste verfügbarer Länder
Entdecken Wählen Sie einen Sender aus verschiedenen Kategorien im
Drücken Sie die Taste BACK auf dem Radio oder der Fernbedienung, um zum
vorigen Menü zurückzukehren.
diesem Rahmen werden für Ihren Standort lokale Radiosender angezeigt.
Der Name und eine Beschreibung des ausgewählten Senders
werden auf dem Display angezeigt.
Internetradiosender der ganzen Welt.
wählen
Menü: Herkunft, Genre oder Sprache.
Speichern und Abrufen von Sendern
Bitte lesen Sie hierzu die Abschnitte „Senderspeicher“ und „Abrufen eines gespeicherten Senders“ im Kapitel „Internetradio“.
DAB-BETRIEB
Drücken Sie die Taste MODE auf dem Radio oder
der Fernbedienung, dann drücken Sie die Tasten
/ /
/ / / / auf der Fernbedienung, um
den Modus „DAB-Radio“ auszuwählen. Drücken
Sie den Drehknopf VOLUME/SELECT/SNOOZE
auf dem Radio bzw. die Taste SELECT auf der Fernbedienung, um Ihre Auswahl
zu bestätigen. Das Radio schaltet in den DAB-Modus und führt einen automatischen Sendersuchlauf durch. Während des Sendersuchlaufs steht auf dem Display
„Suchlauf…“, außerdem ein Balken, der den Fortschritt des Suchlaufs anzeigt,
sowie die Anzahl der bis jetzt gefundenen Sender („Stationen“). Wenn der Sendersuchlauf abgeschlossen ist, schaltet das Gerät auf den ersten alphanumerisch
gefundenen Sender.
Um durch die gefundenen Sender zu blättern, drücken Sie auf dem Radio die Tasten
/ /
treffen und dann die Taste SELECT, um Ihre Auswahl zu bestätigen.
auf dem Radio oder die Tasten
/
/
/ / , um eine der folgenden Optionen auszu-
bzw. / / auf der Fernbedienung, um Ihre Auswahl zu
18
Page 19
BEDIENUNGSANLEITUNG
Senderliste
1. Drücken Sie im DAB-Modus die Taste MENU um das DAB-Menü aufzurufen.
2. Drücken Sie die Tasten
SELECT, um Ihre Auswahl zu bestätigen.
3. Es wird eine Liste von DAB-Sendern auf dem Display angezeigt.
Automatischer Sendersuchlauf
Drücken Sie die Taste MENU, dann die Tasten
zuwählen. Drücken Sie die Taste SELECT, um den automatischen Sendersuchlauf
zu starten.
1. Während des Sendersuchlaufs steht auf dem Display „Suchlauf…“, außerdem ein Balken, der den Fortschritt des Suchlaufs anzeigt.
2. Alle gefundenen Sender werden automatisch gespeichert. Um durch die
gefundenen Sender zu blättern und sie anzuhören, drücken Sie die Tasten
/ / , um Ihre Auswahl zu treffen und dann die Taste SELECT, um Ihre
Auswahl zu bestätigen.
Manuelle Sendereinstellung
Neben der automatischen Einstellfunktion können Sie den Sender auch manuell
am Empfänger einstellen. Dies kann beim Ausrichten der Antenne helfen, bzw. um
Sender manuell hinzuzufügen, die beim Sendersuchlauf nicht gefunden wurden.
1. Drücken Sie die Taste MENU auf der Fernbedienung, um das Menü anzuzeigen.
2. Drücken Sie die Tasten
wählen und dann SELECT, um Ihre Auswahl zu bestätigen.
3. Auf dem Display werden die Multiplexe 5A bis 13F angezeigt.
4. Drücken Sie die Tasten
SELECT, um Ihre Auswahl zu bestätigen.
5. Sehen Sie sich jetzt die Senderliste an und Sie sehen die neuen Radiosender,
die manuell hinzugefügt wurden.
DAB-ANZEIGEMODI
Mit jedem Tastendruck auf INFO/MENU auf dem Radio bzw. auf INFO auf der
Fernbedienung zeigt das Display die folgenden Anzeigemodi an:
DLS – Programmtyp – Ensemble/Frequenz – Signalfehler/-stärke –
Bitrate/Codec/Kanäle – Datum
DLS (Dynamic Label Segment; digitale Begleitdaten)
Dies ist ein scrollender Text mit Echtzeit-Informationen, z. B. Songtitel, Schlagzeilen usw.
/ / , um Senderliste auszuwählen und dann
/ / , um Sendersuchlauf aus-
/ / , um Manuelle Sendereinstellung auszu-
/ / , um den Sender auszuwählen, und dann
19
Page 20
BEDIENUNGSANLEITUNG
Programmtyp
Dies beschreibt die „Stilrichtung“ bzw. das „Genre“ des ausgestrahlten Programms.
Ensemblename/Frequenz
Zeigt den Namen des Multiplexes an, das den Sender beinhaltet, den Sie hören,
sowie die Frequenz. Ein Multiplex ist eine Sammlung von Radiosendern, die gebündelt auf einer Frequenz übertragen werden. Es gibt nationale und lokale Multiplexe. Lokale Multiplexe beinhalten für die jeweilige Region spezifische Sender.
Signalfehler/Signalstärke
Ein Fehler wird als Zahl angezeigt. Wenn die Zahl 0 ist, bedeutet dies, dass das
empfangene Signal fehlerfrei ist und die Signalstärke hoch. Wenn die Fehlerrate
hoch ist, wird empfohlen, die Radioantenne anders zu drehen oder das Gerät an
einen anderen Ort zu stellen. Das Display zeigt einen Balken an, der die Signalstärke angibt: Je stärker das Signal, desto länger ist der Balken von links nach
rechts.
Bitrate/Codec/Kanäle
Das Display zeigt die digitale Audio-Bitrate des empfangenen Signals an, zusammen mit Informationen über den Audiocodec und die Kanalkonfiguration.
Datum
Zeigt das vom Sender automatisch ausgestrahlte Datum an.
Inaktive Sender löschen
Sie können alle nicht verfügbaren Sender aus der Liste entfernen.
1. Drücken Sie im DAB-Modus die Taste MENU und die Tasten
Inaktive Sender löschen auszuwählen, dann drücken Sie die Taste SELECT,
um Ihre Auswahl zu bestätigen.
2. Drücken Sie die Tasten
um Ihre Auswahl zu bestätigen oder wählen Sie NEIN, um den Vorgang abzubrechen.
/
, um JA auszuwählen, und die Taste SELECT,
DRC (Dynamic Range Compression, Kompression des Dynamikbereichs)
Wenn Sie sich in einer lauten Umgebung befinden und Musik mit hohem Dynamikbereich hören, möchten Sie möglicherweise den Audio-Dynamikbereich komprimieren.
1. Drücken Sie im DAB-Modus die Taste MENU und die Tasten
um DRC auszuwählen, dann drücken Sie die Taste SELECT, um Ihre Auswahl
zu bestätigen.
2. Drücken Sie die Tasten
und die Taste SELECT, um Ihre Auswahl zu bestätigen.
/ / , um DRC hoch/gering/aus auszuwählen,
20
/ / , um
/ / ,
Page 21
BEDIENUNGSANLEITUNG
Senderreihenfolge
Sie können die Anzeigereihenfolge der Sender beliebig ändern.
1. Drücken Sie im DAB-Modus die Taste MENU und die Tasten
/ / , um Senderreihenfolge auszuwählen, dann drücken Sie die Taste
SELECT, um Ihre Auswahl zu bestätigen.
2. Drücken Sie die Tasten
Alphanumerisch/Ensemble zu wählen, und dann drücken Sie die Taste
SELECT, um Ihre Auswahl zu bestätigen.
Speichern und Abrufen von Sendern
Bitte lesen Sie hierzu die Abschnitte „Senderspeicher“ und „Abrufen eines gespeicherten Senders“ im Kapitel „Internetradio“.
FM-BETRIEB
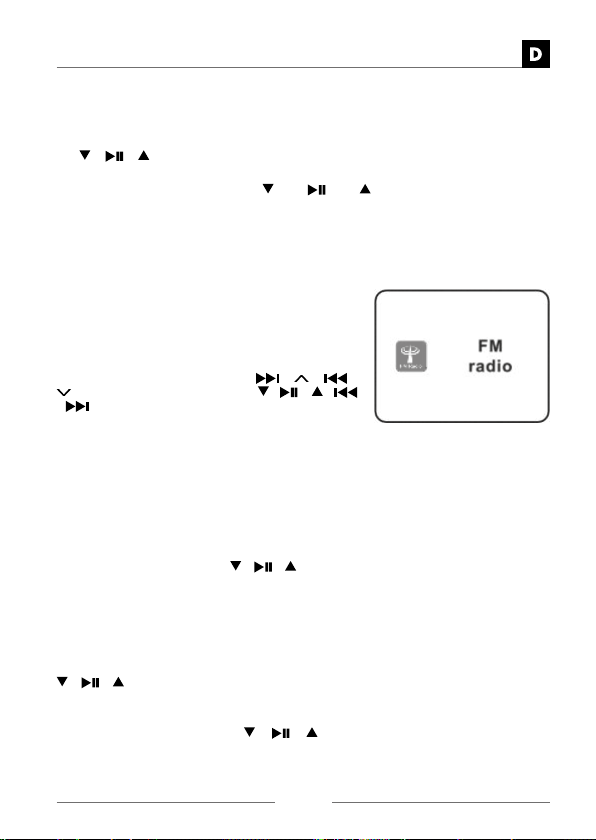
Um das Radio in den FM-Modus zu schalten, drücken Sie die Taste MODE auf dem Radio oder der
Fernbedienung, dann die Tasten
auf dem Radio bzw. die Tasten
auf der Fernbedieung, um den Modus „FM-
/
Radio“ auszuwählen. Drücken Sie den Drehknopf
VOLUME/SELECT/ SNOOZE auf dem Radio bzw. die Taste SELECT auf der Fern-
bedienung, um Ihre Auswahl zu bestätigen.
Auf dem Display wird die Frequenz angezeigt.
Automatischer Sendersuchlauf
• Drücken Sie die Taste SCAN, um den Sendersuchlauf zu starten. Sobald ein
Sender gefunden wurde, stoppt der Suchvorgang automatisch.
Alternative Methode:
• Halten Sie eine der Tasten
» Der Suchlauf hält eventuell bei einem Sender mit sehr schwachem
Signal nicht an.
Manuelle Sendereinstellung
Um manuell nach FM-Sendern zu suchen, drücken Sie wiederholt die Tasten
/ / , bis Ihre gewünschte Frequenz erreicht ist.
/ / , um aus den Optionen
/ /
/ / /
/ /
/
gedrückt, um die Sendersuche zu starten.
» Bei FM-Radio kann es notwendig sein, einen Sender durch wiederhol-
tes Drücken der Tasten
erhöht oder verringert die Frequenz um 0,05 MHz. Falls der Empfang
immer noch schlecht ist, verändern Sie die Position der Antenne oder
versuchen Sie, das Radio an einem anderen Ort aufzustellen.
/ /
fein einzustellen. Jeder Tastendruck
21
Page 22
BEDIENUNGSANLEITUNG
FM-Anzeigemodi
Mit jedem Tastendruck auf INFO/MENU auf dem Radio bzw. auf INFO auf der
Fernbedienung zeigt das Display die folgenden Anzeigemodi an:
Radiotext - Programmtyp - Frequenz - Datum
RDS (Radiotext)
Dies ist ein scrollender Text mit Informationen über das aktuelle Programm.
Programmtyp
Dies beschreibt die „Stilrichtung“ bzw. das „Genre“ der ausgestrahlten Musik.
Sendername / Frequenz
Wenn ein RDS-Sender empfangen wird, wird der Name dieses Senders angezeigt;
anderenfalls wird nur die Frequenz angezeigt.
Datum
Zeigt das vom Sender automatisch ausgestrahlte Datum an.
Suchlauf-Einstellung
1. Drücken Sie die Taste MENU am Gerät, um das FM-Menü aufzurufen.
2.
Drücken Sie die Tasten / / , um den Punkt Suchlauf-Einstellung auszuwählen, und dann drücken Sie die Taste SELECT, um Ihre Auswahl zu bestätigen.
3. Drücken Sie die Tasten
starkem Signal empfangen werden sollen, und dann SELECT, um Ihre Auswahl zu bestätigen.
Audio-Einstellung
1. Drücken Sie die Taste MONO/ST. auf der Fernbedienung, um zwischen Monound Stereoempfang umzuschalten.
Alternative Methode:
1. Drücken Sie die Taste MENU, um das Hauptmenü aufzurufen.
2. Drücken Sie die Tasten
die Taste SELECT, um Ihre Auswahl zu bestätigen.
3. Drücken Sie die Tasten
hören wollen, bzw. NEIN, wenn das Radio automatisch Mono oder Stereo wählen soll.
4. Drücken Sie die Taste SELECT, um Ihre Auswahl zu bestätigen.
Speichern und Abrufen von Sendern
Bitte lesen Sie hierzu die Abschnitte „Senderspeicher“ und „Abrufen eines gespeicherten Senders“ im Kapitel „Internetradio“.
/
/
um Ja auszuwählen, wenn nur Sender mit
/ / , um Audio-Einstellung auszuwählen, und
um JA auszuwählen, wenn Sie nur in Mono
22
Page 23
BEDIENUNGSANLEITUNG
BLUETOOTH®-BETRIEB
Das Radio hat eine Bluetooth®-Funktion und kann ein Signal innerhalb von 8 Metern empfangen. Koppeln Sie das Radio mit einem Bluetooth
Musik zu hören:
1. Drücken Sie die Taste MODE auf dem Radio oder der Fernbedienung, dann drücken Sie die Tasten
auf dem Radio oder die Tasten
um den Modus „Bluetooth
VOLUME/SELECT/SNOOZE auf dem Radio bzw. die Taste SELECT auf der
Fernbedienung, um Ihre Auswahl zu bestätigen. Das Bluetooth
zu blinken, um anzuzeigen, dass das Radio zu koppeln versucht.
2. Aktivieren Sie Ihr Bluetooth
3.
Auf der Liste Ihrer Bluetooth®-Geräte wird „DAB 650“ angezeigt. Wählen Sie
„DAB 650“ und geben Sie das Passwort „0000“ ein, falls erforderlich. Wenn die
Verbindung erfolgreich war, hört das Bluetooth
zu blinken. Ihr Radio ist nun mit dem Bluetooth
4. Halten Sie die Taste /SCAN am Radio oder
um eine bestehende Bluetooth
hige Geräte zu suchen und sich damit zu verbinden.
5. Um die Bluetooth
auf dem Radio um oder deaktivieren Sie die Funktion an Ihrem Bluetooth
higen Gerät.
®
-Funktion zu trennen, schalten Sie auf eine andere Funktion
Musikwiedergabe über Bluetooth
Eventuell müssen Sie die Lautstärke an Ihrem Radio und Bluetooth®-Gerät anpassen.
• Drücken Sie die Taste
Fernbedienung, um die Musik wiederzugeben/zu pausieren, oder
• Drücken Sie die Tasten
auf der Fernbedienung um zum vorherigen/nächsten Track zu springen.
/
/ / / / auf der Fernbedieung,
®
Audio“ auszuwählen. Drücken Sie den Drehknopf
®
-fähiges Gerät und wählen Sie den Suchmodus.
®
®
®
-Verbindung zu trennen, andere Bluetooth®-fä-
/SCAN auf dem Radio oder die Taste
/ /
/
®
auf dem Radio oder die Tasten
/
®
-fähigen Gerät, um
/ /
-Logo auf dem Bildschirm auf
-Gerät gekoppelt („gepaart“).
/
®
-Logo beginnt
auf der Fernbedienung,
®
-fä-
/
auf der
» Die Betriebs-Reichweite zwischen diesem Gerät und einem anderen
Bluetooth
» Entfernen Sie für besseren Signalempfang etwaige Hindernisse zwi-
schen den beiden Geräten.
®
-fähigen Gerät beträgt etwa 8 Meter.
» Es wird keine Kompatibilität mit allen Geräten und Medienarten garantiert.
» Einige Mobiltelefone mit Bluetooth®-Funktion trennen die Bluetooth®-
Verbindung, wenn zwischendurch Anrufe getätigt werden. Dies weist
nicht auf ein Problem mit Ihrem Gerät hin.
23
Page 24
BEDIENUNGSANLEITUNG
NET REMOTE -
Das Gerät bietet eine NetRemote-Funktion über
Smartphones oder Tablets mit iOS oder Android-Betriebssystem. Durch Herunterladen einer
speziellen App namens UNDOK können Sie alle
Modi von Internetradio, Podcasts, DAB, FM
und Bluetooth
in Google Play oder im Apple Store nach der App
UNDOK und installieren Sie sie auf Ihrem Smartphone oder Tablet.
Bevor Sie die App UNDOK verwenden, vergewissern Sie sich, dass sich Ihr Gerät
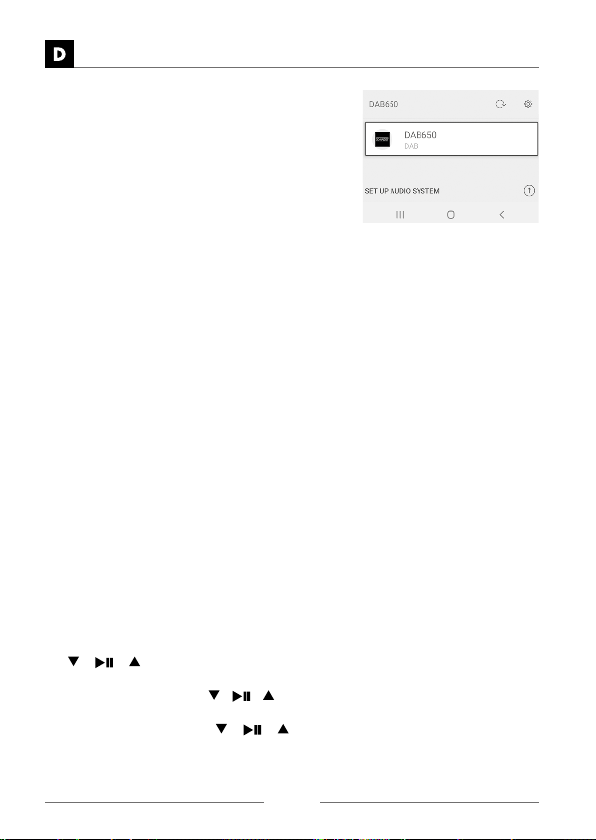
und das Smartphone oder Tablet im selben WLAN befinden. Starten Sie die App.
Die App initialisiert sich und scannt nach Geräten im Netzwerk. Tippen Sie auf das
Gerät, um die NetRemote-Verbindung herzustellen.
• Wenn Ihr Smartphone oder Tablet in der Vergangenheit bereits Zugriff auf das
Gerät gehabt haben, verbinden sie sich automatisch das nächste Mal, wenn Sie
die App öffnen.
• Bitte beachten Sie, dass, wenn ein anderes Smartphone oder Tablet mit der
App im selben Netzwerk Zugriff auf das Gerät hat, die ursprüngliche Verbindung
getrennt wird.
Wenn Sie zum ersten Mal Ihr Smartphone usw. mit diesem Gerät verbinden,
werden Sie eventuell von der App aufgefordert, Ihre PIN einzugeben. Die Standard-PIN ist 1234. Um die PIN aus Sicherheitsgründen zu ändern, siehe Abschnitt
Systemeinstellungen: Netzwerk – NetRemote PIN Setup
Wählen Sie Ihren gewünschten Modus auf der Hauptseite. Anschließend können
Sie den gewählten Modus auf Ihrem Smartphone oder Tablet sowie auf dem Gerät
gleichzeitig ändern.
App UNDOK
®
anzeigen. Suchen Sie UNDOK
SCHLAF-EINSTELLUNG („SLEEP“)
Diese Funktion ermöglicht Ihnen, das Gerät so zu programmieren, dass es nach einem von Ihnen festgelegten Zeitraum automatisch in den Standby-Modus wechselt.
1.
Drücken Sie auf der Fernbedienung die Taste „SLEEP“. Durch wiederholtes Drücken der Taste „Sleep“ auf der Fernbedienung können Sie zwischen den Funktionen „Schlafmodus (Sleep) aus“, Sleep in 15, 30 oder 45 Minuten auswählen.
2. Um die Sleep-Funktion zu aktivieren, drücken Sie zuerst die MENU-
Taste, um das Hauptmenü anzuzeigen. Drücken Sie die Tasten
/ / , um Hauptmenü auszuwählen und die Taste SELECT, um Ihre
Auswahl zu bestätigen.
3. Drücken Sie die Tasten
Ihre Auswahl zu bestätigen.
4. Drücken Sie die Tasten
dann SELECT, um Ihre Auswahl zu bestätigen.
/ / , um Sleep auszuwählen, dann SELECT, um
/ / , um den Schlaf-Timer auszuwählen und
24
Page 25
BEDIENUNGSANLEITUNG
5. Wenn Ihr gewünschter Schlaf-Timer aktiv ist, wird ein “
angezeigt. Außerdem wird neben dem Symbol auf dem Display die verbleibende Zeit bis zum Ausschalten angezeigt.
6. Wenn der Schlaf-Timer-Countdown Null erreicht, schaltet das Gerät in
den Standby-Modus. Um die Schlaffunktion zu deaktivieren, während der
Schlaf-Timer herunterzählt, wiederholen Sie die Schritte 1–3 und wählen Sie
„SCHLAFMODUS AUS“.
” auf dem Display
EINSTELLEN DES WECKERS („ALARM“)
1. Drücken Sie die Taste ALARM auf der Fernbedienung, dann zeigt das Display
„Wecker (1 oder 2): Aus [ss:mm]“ an.
2. Drücken Sie die Tasten
zuwählen, und dann die Taste SELECT, um mit der Einstellung der folgenden
Parameter zu beginnen.
Drücken Sie die Tasten
LECT, um Ihre Auswahl zu bestätigen.
Aktivieren Aus/ Täglich/ Einmal/ an Wochenenden/ an Wochentagen
Zeit Alarm-Einschaltzeit
Modus Summer/Internetradio/DAB/FM
Voreinstellung Zuletzt gehörter Sender/ (gespeicherter Sender)
Lautstärke 0-32
Speichern Speichern und Bestätigen der Weckeinstellungen.
3. Abschließend wählen Sie „Speichern“ und drücken die Taste SELECT, um
die Weckeinstellungen zu speichern. Auf dem Display wird Wecker eingestellt
angezeigt. Wenn der Wecker eingestellt ist, wird das Weckersymbol auf dem
Display angezeigt.
4. Um einen Weckalarm vorübergehend auszuschalten, drücken Sie den Drehknopf VOLUME/SELECT/SNOOZE auf dem Radio bzw. die Taste SNOOZE
auf der Fernbedienung, um die Schlummerfunktion zu aktivieren, wenn der
Weckalarm ertönt. Drücken Sie wiederholt den Drehknopf VOLUME/SELECT/
SNOOZE auf dem Radio bzw. die Taste SNOOZE auf der Fernbedienung, um
den Schlummerzeitraum von 5, 10, 15 oder 30 Minuten festzulegen. Der eingestellte Schlummerzeitraum wird auf dem Display angezeigt und das Gerät
wechselt in den Standby-Modus.
5. Um den Alarm auszuschalten, wenn er ertönt, drücken Sie die Taste
ALARM.
Um den Wecker zu deaktivieren, wiederholen Sie die Schritte 1–3 und wählen
„Wecker Aus“. Das Weckersymbol wird dann nicht mehr auf dem Display angezeigt.
/ / , um die Weckernummer (1 oder 2) aus-
/ /
um Ihre Auswahl zu treffen und dann SE-
oder
25
Page 26
BEDIENUNGSANLEITUNG
VERWENDUNG VON KOPFHÖRERN
Sie können an die Kopfhörerbuchse an der Rückseite des Geräts Kopfhörer bzw.
Ohrhörer anschließen (nicht im Lieferumfang enthalten). Regeln Sie die Lautstärke vor Anschließen der Kopfhörer herunter. Erhöhen Sie dann langsam die
Lautstärke bei aufgesetzten Kopfhörern, bis Sie den gewünschten Pegel erreicht
haben.
» Längeres Hören von lauter Musik kann das Gehör schädigen! Deshalb
sollte bei der Verwendung von Kopfhörern extreme Lautstärke vermie
den werden, insbesondere über einen längeren Zeitraum.
WARTUNG
Gerätereinigung
Trennen Sie vor der Reinigung das Gerät von der Steckdose.
• Um das Gerät zu reinigen, wischen Sie das Gehäuse mit einem leicht feuchten,
fusselfreien Tuch ab.
• Verwenden Sie keine Reinigungsmittel mit Alkohol, Ammoniak oder Scheuermitteln.
• Versprühen Sie keine Sprays in der Nähe des Geräts.
Hinweise und Tipps
Falls ein Problem auftritt, hat es möglicherweise nur eine sehr geringe Ursache.
Folgende Tabelle enthält verschiedene Tipps.
-
26
Page 27
BEDIENUNGSANLEITUNG
ALLGEMEINES
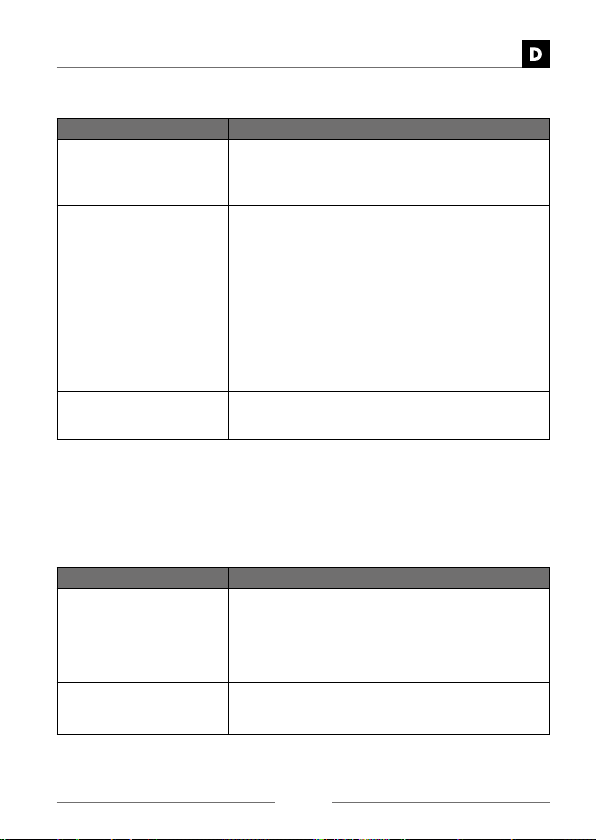
Problem Lösung
Kein Betrieb. • Vergewissern Sie sich, dass der Netzstecker ein-
Das Gerät gibt keinen
Ton aus.
Das Gerät reagiert auf
keinen Tastendruck.
Das Gerät kann bei Vorhandensein starker elektromagnetischer Felder ein Geräusch (1 kHz) von sich geben. Bei Fehlfunktionen aufgrund dieser starken elektromagnetischen Felder muss der Benutzer warten, bis der normale Betrieb ohne
weiteren Eingriff wieder aufgenommen wird.
RADIO DAB/FM
Problem Lösung
Schlechter Radioempfang. • Vergewissern Sie sich, dass die DAB/FM-Antenne
Der gewünschte Sender
wird nicht gefunden.
gesteckt ist.
• Vergewissern Sie sich, dass der Ein-Modus ausgewählt ist.
Bitte versuchen Sie eine der folgenden Lösungen:
• Vergewissern Sie sich, dass das Gerät nicht
stummgeschaltet ist. Drücken Sie eine der Tasten VOL +/–, um die normale Wiedergabe fortzusetzen.
• Drücken Sie die Standby-Taste am Gerät, um das
Gerät in den Standby-Modus zu schalten. Dann
drücken Sie die Taste erneut, um das Gerät einzuschalten.
• Trennen Sie das Gerät von der Steckdose und
stecken Sie es dann wieder an. Schalten Sie das
Gerät ein.
Das Gerät kann während des Betriebs „einfrieren“.
Trennen Sie das Gerät für ein paar Sekunden von
der Steckdose und stecken Sie es wieder an.
vollständig ausgezogen ist.
• Elektrische Störungen in Ihrem Heim können zu
schlechtem Empfang führen. Stellen Sie das Gerät weit weg von solchen Störquellen (insbesondere Motoren und Transformatoren).
• Signal zu schwach. Suchen Sie manuell.
• Falls der Empfang immer noch schlecht ist, verändern Sie die Position der Antenne.
27
Page 28
BEDIENUNGSANLEITUNG
INTERNETRADIO
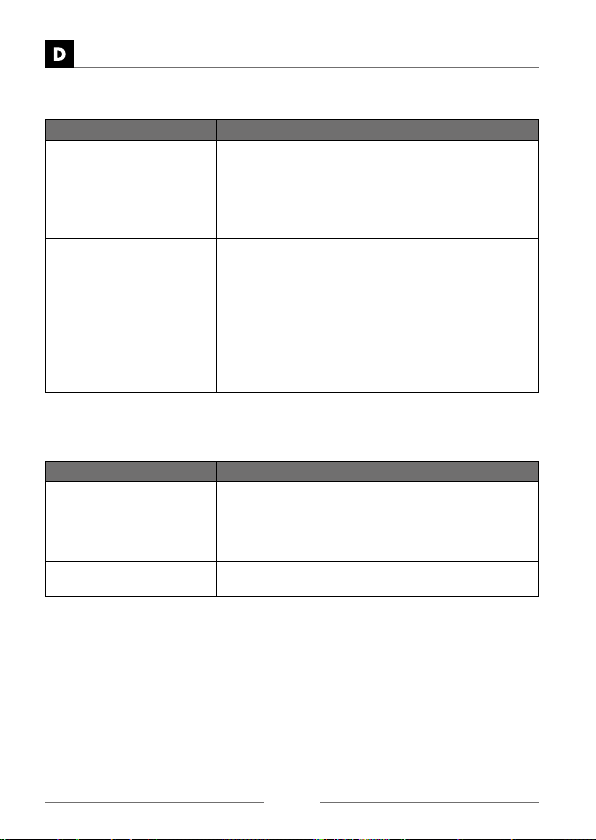
Problem Lösung
Keine Verbindung. • Vergewissern Sie sich, dass der WLAN-Router
Man kann den Radiosender nicht hören.
eingesteckt ist und funktioniert.
• Verbinden Sie das Radio erneut mit Ihrem
WLAN-Router.
• Überprüfen Sie, ob sich das Radio innerhalb von
5 m von Ihrem Router befindet.
• Manchmal wird die WLAN-Verbindung vorübergehend unterbrochen oder sie ist zu schwach. Überprüfen Sie die WLAN-Verbindung oder stellen Sie
das Radio näher zu Ihrem Router.
• Nicht alle Radiosender übertragen 24 Stunden
am Tag; möglicherweise wird gerade nichts gesendet.
• Nicht alle Radiosender senden mit derselben
Lautstärke; möglicherweise müssen Sie den
Lautstärkepegel erhöhen.
BLUETOOTH
®
Problem Lösung
®
Ich finde „DAB 650“ nicht
auf meinem anderen
®
Bluetooth
Man kann die Musik nicht
hören.
Falls irgendwelche funktionellen Anomalien auftreten, trennen Sie das Radio von
der Steckdose und stecken Sie es wieder an.
-Gerät.
• Vergewissern Sie sich, dass die Bluetooth
tion auf Ihrem anderen Bluetooth
viert ist.
• Koppeln Sie das Gerät erneut mit Ihrem anderen
• Eventuell müssen Sie die Lautstärke an Ihrem
®
Bluetooth
-Gerät.
Radio und Bluetooth
®
-Gerät erhöhen.
-Funk-
®
-Gerät akti-
28
Page 29
BEDIENUNGSANLEITUNG
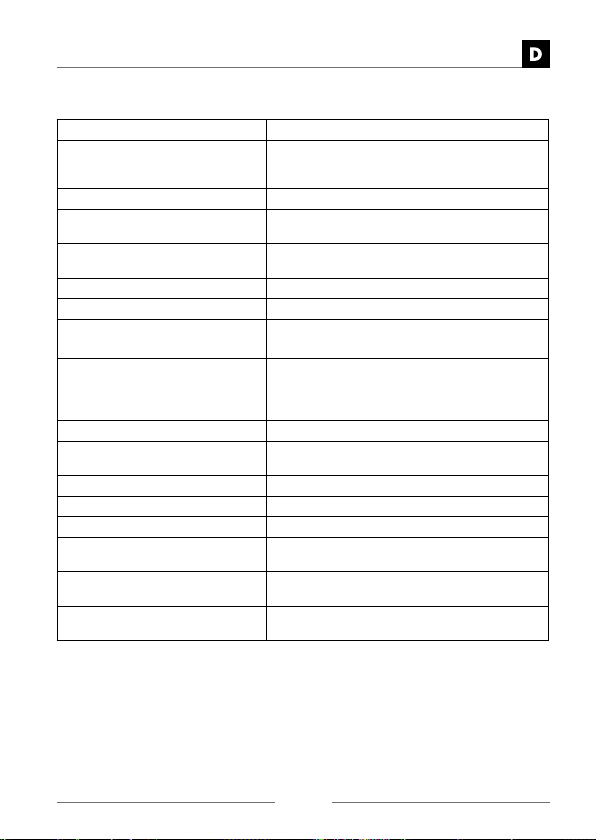
SPEZIFIKATIONEN
Modell DAB650 513
Stromversorgung Input: Wechselspannung 100–240V ~
Leistungsaufnahme 27 W
Lautsprecher-Ausgangs-
leistung
Betriebsumgebung – Tem-
peratur
Nettogewicht ~ 1.800 g
Abmessungen (B) × (T) × (H)
Radiofrequenz FM 87,50–108,00 MHz
Netzteilhersteller / Adresse DONGGUAN BECKY ELECTRONICS TECH
Modellnummer BQ30A-0903000-G
Eingangsspannung und Ein-
gangsfrequenz Wechselstrom
Ausgangsspannung DC 9.0 V
Ausgangsstrom 3.0 A
Ausgangsleistung 27.0 W
Durchschnittlicher Wirkungs-
grad
Wirkungsgrad bei geringer
Last (10%)
Leistungsaufnahme bei
Null-Last
50/60Hz, 1A,
Output: Gleichspannung 9 V / 3,0 A
2 × 5W RMS
0 ~ 35 °C
300,6 x 158,6 x 115,6 mm
DAB 174,928 - 239,200 MHz
CO., LTD, Yinyong Industrial Zone, Jinma
Road, HengLi Town, Dongguan City, Guangdong Province, China
100-240V ~ 50-60Hz Max. 800mA
86.7%
77.0%
0.09 W
29
Page 30
BEDIENUNGSANLEITUNG
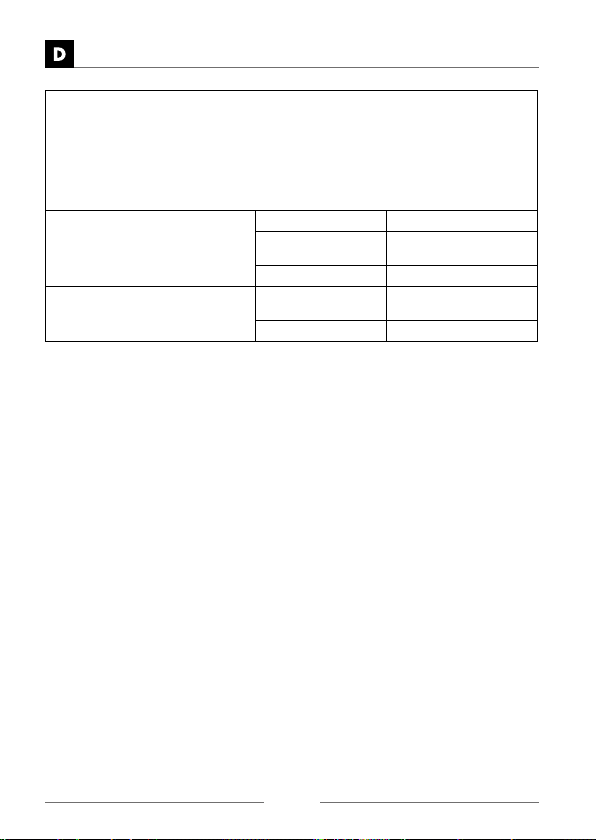
Aktivieren des WLAN-Ports:
• Verbinden Sie das Gerät mit der Stromversorgung
• Schalten Sie den WLAN-Modus (z. B. Internet) ein.
Deaktivieren des WLAN-Ports:
• Gehen Sie zu Hauptmenü - Systemeinstellungen - Interneteinstellung
- WLAN Verbindung in Standby erlauben. Wählen Sie Nein und dann
drücken Sie die Taste SELECT, damit das Netzwerk nicht verbunden bleibt.
®
Bluetooth
WLAN Maximale Übertra-
Stromverbrauch im Standby:
WLAN aus: < 1,00 W (Standard-Standby-Modus)
WLAN ein: < 2,00 W (Netzwerk-Standby-Modus)
Änderungen der technischen Daten und der Funktionen ohne vorherige Ankündigung vorbehalten.
-Version Version V4.2
Maximale Übertra-
gungsleistung
Frequenzband 2402 - 2480 MHz
gungsleistung
Frequenzband 2412 - 2472 MHz
» Hinweis:
» Das Gerät geht nach ca. 15 Minuten in den Netzwerk-Standby-Modus.
» FM ist ein Ausnahmefall, es ist für die bestimmungsgemäße Verwen
dung des Gerätes nicht geeignet, wenn das Gerät im FM-Modus kein
Radiosignal erhalten hat.
» In den Modi Internetradio, Podcasts, DAB-Radio und Bluetooth
geht das Gerät nach 15 Minuten automatisch in den Standby-Modus,
wenn keine Audioausgabe erfolgt. Drücken Sie die Standby-Taste, um
den Betrieb wieder aufzunehmen.
2 dBm
15 dBm
®
-Audio
-
30
Page 31
BEDIENUNGSANLEITUNG
Vereinfachte Konformitätserklärung nach RED-Richtlinie
Hiermit erklärt die Firma Schwaiger GmbH, dass der beschriebene Funkanlagentyp
der Richtlinie 2014/53/EU und den weiteren für das Produkt zutreffenden Richtlinien entspricht. Der vollständige Text der EU-Konformitätserklärung ist unter der
folgenden Internetadresse verfügbar: http://konform.schwaiger.de
Entsorgung
Elektrische und elektronische Geräte sowie Batterien dürfen nicht mit dem
Hausmüll entsorgt werden. Der Verbraucher ist gesetzlich verpflichtet, elektrische und elektronische Geräte sowie Batterien am Ende ihrer Lebens-
dauer an den dafür eingerichteten, öffentlichen Sammelstellen oder an die
Verkaufsstelle zurückzugeben. Einzelheiten dazu regelt das jeweilige Landesrecht.
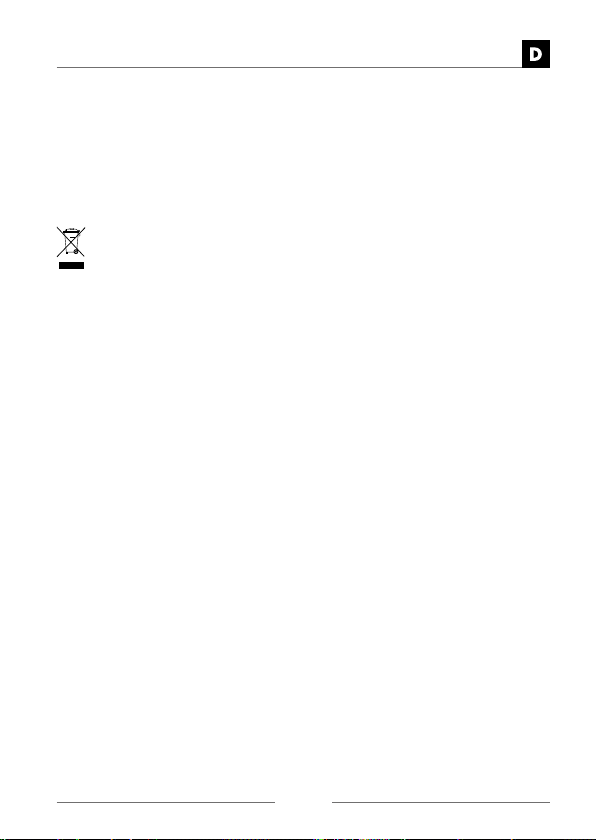
Das Symbol auf dem Produkt, der Bedienungsanleitung bzw. der Verpackung weist
auf diese Bestimmung hin.
Haftungsausschluss
Die Schwaiger GmbH übernimmt keinerlei Haftung und Gewährleistung für Schäden die aus unsachgemäßer Installation oder Montage sowie unsachgemäßem
Gebrauch des Produktes oder einer Nichtbeachtung der Sicherheitshinweise resultieren.
Herstellerinformation
Sehr geehrter Kunde, sollten Sie technischen Rat benötigen und Ihr Fachhändler konnte Ihnen nicht weiterhelfen, kontaktieren Sie bitte unseren technischen
Support.
Geschäftszeiten
(Technischer Support in deutscher Sprache)
Montag bis Freitag: 08:00 - 17:00 Uhr
HOTLINE
+49 (09101) 702-299
31
Page 32
USER GUIDE
SAFETY PRECAUTIONS
• Read all the instructions carefully before using the unit and keep them for future
reference.
• Check that the voltage marked on the rating label matches your mains voltage.
• The unit must be placed on a flat stable surface and should not be subjected
to vibrations.
• Do not place the unit on sloped or unstable surfaces as the unit may fall off or tip over.
• The mains socket must be located near the unit and should be easily accessible.
• Avoid extreme degrees of temperature, either hot or cold. Place the unit well
away from heat sources such as radiators or gas/electric fires. Avoid exposure
to direct sunlight and other sources of heat.
• Never place any type of candle or naked flame on the top of or near the unit.
• To reduce the risk of fire, electric shock or product damage, do not expose this
unit to rain, moisture, dripping or splashing. No objects filled with liquids, such
as vases, should be placed on the unit.
• If you spill any liquid into the unit, it can cause serious damage. Switch it off
at the mains immediately. Withdraw the mains plug and consult your dealer.
• To prevent the risk of electric shock or fire hazard due to overheating, ensure
that curtains and other materials do not obstruct the ventilation vents.
• Do not install or place this unit in a bookcase, built-in cabinet or in another
confined space. Ensure that a minimum of 10cm should be kept around the
apparatus for ventilation.
Safety
• Always disconnect the unit from the mains supply before connecting/ disconnecting other devices or moving the unit.
• Unplug the unit from the mains socket during a lightning storm.
• This unit will become warm when used for a long period of time. This is normal
and does not indicate a problem with the unit.
CAUTION !
RISK OF ELECTRIC SHOCK
DO NOT OPEN
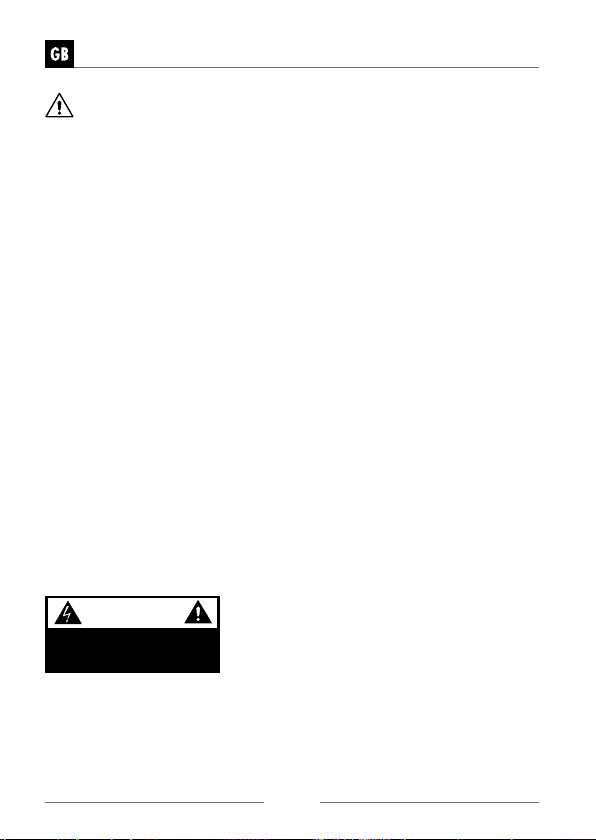
The lightning flash with arrowhead symbol, within an equilateral triangle,
is intended to alert the user to the presence of uninsulated “dangerous
voltage” within the unit’s enclosure that may be of sufficient magnitude
to constitute a risk of electric shock.
The exclamation point within an equilateral triangle is intended to alert
the user to the presence of important operating and maintenance (servicing) instructions in the manual accompanying the unit.
32
Page 33
USER GUIDE
Mains Adapter
• Make sure the unit is not resting on top of the mains adapter cable, as the
weight of the unit may damage the cable and create a safety hazard.
• If the mains adapter is damaged it must be replaced by the manufacturer, its
service agent, or similarly qualified persons in order to avoid a hazard.
Interference
• Do not place the unit on or near appliances which may cause electromagnetic
interference. If you do, it may adversely affect the operating performance of the
unit, and cause a distorted sound.
Supervision
• Children should be supervised to ensure that they do not play with the unit.
• Never let anyone especially children push anything into the holes, slots or any
other openings in the case - this could result in a fatal electric shock.
Service/Maintenance
• To reduce the risk of electric shock, do not remove screws. The unit does not
contain any user serviceable parts. Please leave all maintenance work to qualified personnel.
• Do not open any fixed covers as this may expose dangerous voltages.
• Ensure to unplug the unit from the mains socket before cleaning.
• Do not use any type of abrasive pad or abrasive cleaning solutions as these may
damage the unit‘s surface.
• Do not use liquids to clean the unit.
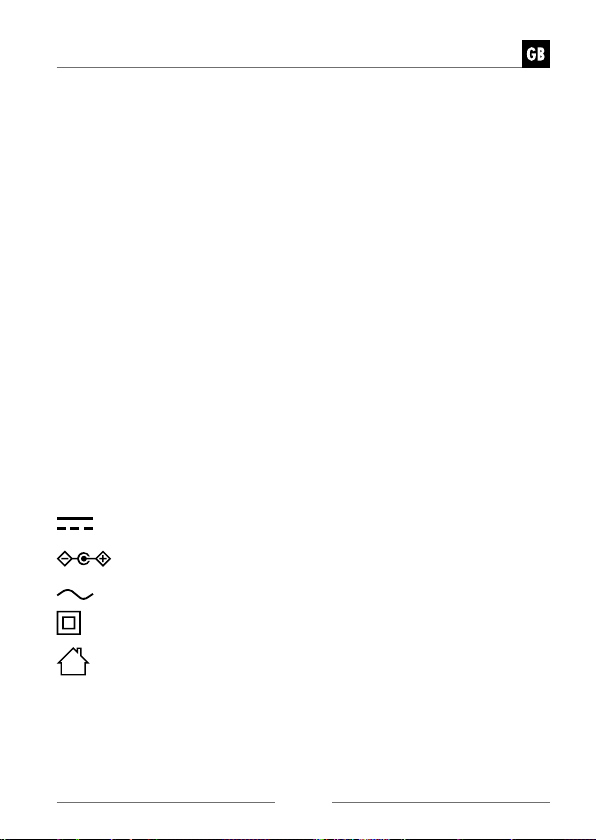
The symbol indicates DC voltage.
The symbol indicates polarity of d.c. power connector.
The symbol indicates AC voltage.
The symbol indicates class II equipment.
For indoor use only.
33
Page 34
USER GUIDE
RECYCLING
This product bears the selective sorting symbol for Waste electrical and electronic
equipment (WEEE). This means that this product must be handled pursuant to
European directive 2012/19/EU in order to be recycled or dismantled to minimize
its impact on the environment. User has the choice to give his product to a competent recycling organization or to the retailer when he buys a new electrical or
electronic equipment.
The mains plug of power adapter is used as the disconnect device, The socket-outlet shall be installed near the equipment and shall be easily accessible.
CAUTION
Risk of explosion if battery is replaced by an incorrect type.
WARNING
• To avoid replacement of a battery with an incorrect type Don‘t disposal of a
battery into fire or a hot oven, or mechanically crushing or cutting of a Battery.
• Don’t leaving a battery in an extremely high temperature surrounding environment.
• To avoid battery subjected to extremely low air pressure.
• Under the environment with radio-frequency disturbance, the product may malfunction and could self-recover when the interference disappear.
UNPACKING
Remove all items from the packaging. Retain the packaging. If you dispose of it,
please do so according to local regulations.
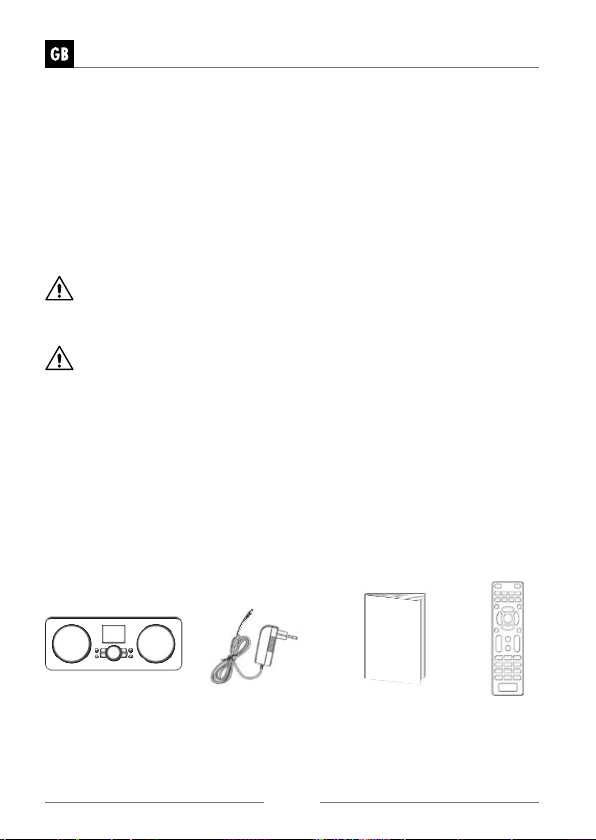
The following items are included:
Main Unit Mains Adapter Instruction Manual Remote
34
Page 35
PRODUCT OVERVIEW
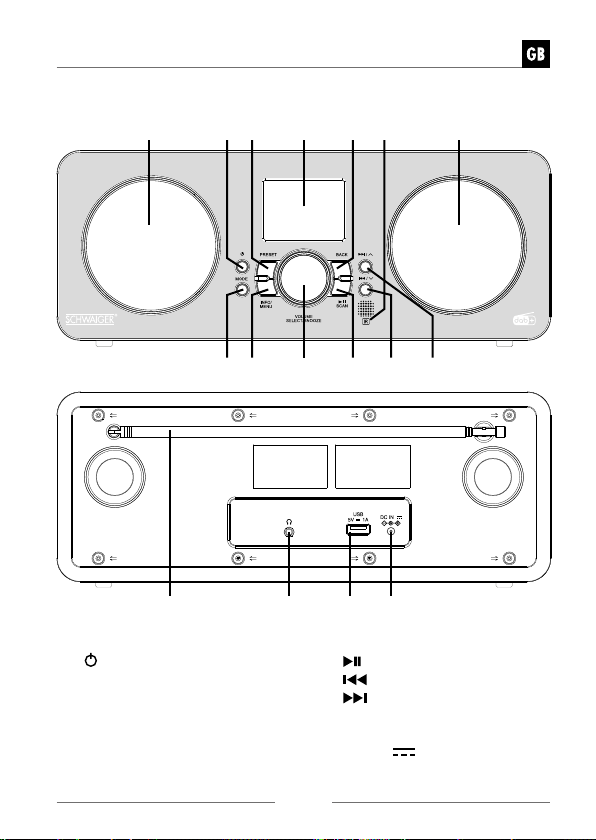
2 3 5
7 8 11 12109
USER GUIDE
61 4 1
14 15 1613
1. SPEAKERS
2. STANDBY BUTTON
3. PRESET BUTTON
4. DISPLAY
5. BACK BUTTON
6. REMOTE CONTROL SENSOR
7. MODE BUTTON
8. INFO/MENU BUTTON
9. VOLUME/SELECT/SNOOZE DIAL
10.
SCAN BUTTON
11.
BUTTON
12. BUTTON
13. ROD ANTENNA
14. EARPHONE JACK
15. USB 5V 1A Charging Port
16. DC IN SOCKET
35
Page 36
USER GUIDE
REMOTE CONTROL
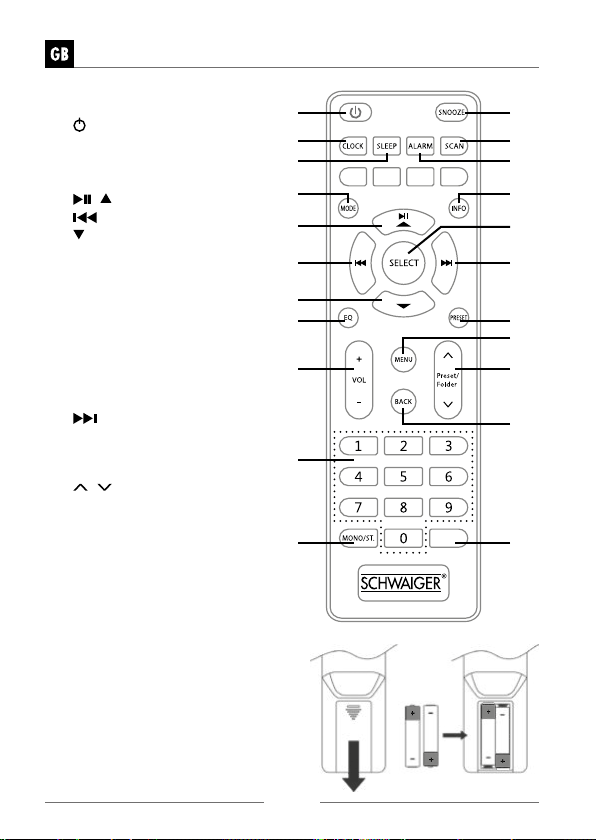
1. STANDBY BUTTON
2. CLOCK BUTTON
3. SLEEP BUTTON
4. MODE BUTTON
/ BUTTON
5.
6.
BUTTON
BUTTON
7.
8. EQ BUTTON
9. VOLUME + / − BUTTON
10. Number BUTTONS
11. MONO/ST. BUTTON
12. SNOOZE BUTTON
13. SCAN BUTTON
14. ALARM BUTTON
15. INFO BUTTON
16. SELECT BUTTON
17.
BUTTON
18. PRESET BUTTON
19. MENU BUTTON
20. PRESET/FOLDER
/ BUTTON
21. BACK BUTTON
22. MUTE BUTTON
Battery Replacement
for the Remote Control
1. Open the battery cover.
2. Insert 2 x AAA battery (not included).
Make sure to match the (+) and ( - )
ends of the battery with the (+) and
( - ) ends indicated in the battery
compartment.
3. Close the cover
10
11
36
1 12
2
3
4
5
6
13
14
15
16
17
7
8
18
19
9
20
21
MUTE
22
Page 37
USER GUIDE
Handling the Battery
» Improper or incorrect use of batteries may cause corrosion or battery
leakage, which could cause fire, personal injury or damage to property.
» Only use the battery type indicated in this manual.
» Do not dispose of the used battery as domestic waste. Dispose of it in
accordance with local regulations.
» Remove the battery from the remote control when not in use for a long
period of time, as corrosion or battery leakage may occur and result in
physical injury, and/or property damage, and/or fire.
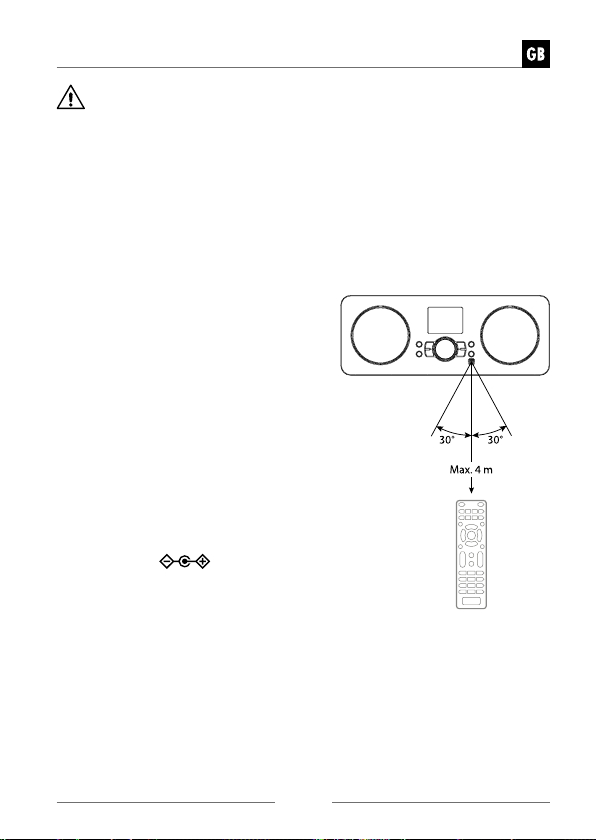
Remote control operation range
The remote control sensor on the front unit
is sensitive to the remote control’s commands up to a maximum of 4 metres away
and within a maximum of 60° arc.
Note that the operating distance may vary
depending on the brightness of the room.
POWER SOURCE
Mains Power
Connecting the unit to any other power
source may damage the unit.
1. Unwind the mains adapter cable to its
full length. Connect the end of the cable
to the DC IN
of the unit and then connect the mains
adapter to the mains socket. Make sure
the mains adapter is firmly inserted into
the mains socket. The unit is now ready
to use.
2. To switch the unit off completely, unplug
the mains adapter from the mains socket.
Socket at the rear
37
Page 38
USER GUIDE
Charging from the USB charging port
You can charge your device through the USB socket on this unit with a USB cable
(not supplied).
• The maximum current for USB charging is 1A.
• All devices for USB charging are not guaranteed.
Network Connection
This product only supports wireless network connection for network access and did
not support wired LAN connection.
Wireless network
1. Check first of all whether the control lamps (LINK/ACT) of your router light up.
2. Proceed with the operations described in the below “Initial Set-Up”. It is recommended to run through the setup wizard in the System Settings section.
» This unit cannot be connected to a standalone modem directly. A router
or a modem incorporated with a router has to be used. Since there are
various connection configurations, please follow the specications and
instructions of your telecommunication carrier, Internet service provi
der, and router setting guidebook.
Initial Set-Up
When you first connect the unit to the mains socket, the display will show the
welcome screen then with Language menu shown up, press the
buttons on the unit or press / /
language of your choice, then press VOLUME/SELECT/SNOOZE dial on unit or
SELECT button on remote control to confirm.
Then the privacy policy page will come up.
Please visit the website mentioned in the page for the details of the privacy poli-
cy. Press VOLUME/SELECT/SNOOZE dial on unit or SELECT button on remote
control to accept for next step.
1. To launch the initial Setup wizard, press the
unit or press
VOLUME/SELECT/SNOOZE dial on unit or SELECT button on remote control
to confirm.
Press the / /
2.
remote control to select the following options, then press VOLUME/SELECT/
SNOOZE dial on unit or SELECT button on remote control to confirm the setting:
buttons on remote control to select [YES], then press
/
buttons on the unit or press
/
buttons on remote control to select the
/ /
/ /
buttons on the
/
/
/
buttons on
-
38
Page 39
USER GUIDE
Date/Time 12/24 hour
format
Auto Update Choose how you want the time to
Set timezone Select a time zone. (Only available when
Daylight savings Select daylight savings. (Only available
Network settings Choose whether keep network connected.
3. The display will show “Network wizard scanning….”. Your radio will now scan
for your wireless network, this may take a few seconds then a list of all the
wireless networks will appear on the screen. Press the
buttons on the unit or press
your wireless network, then press VOLUME/ SELECT/SNOOZE dial on unit
or SELECT button on remote control to confirm.
4. Press the
on remote control to select Push Button/Pin/Skip WPS, then press VOLUME/
SELECT/SNOOZE dial on unit or SELECT button on remote control to con-
firm.
Connecting using the WPS button on your router
Connecting using the WPS (Wi-Fi Protected Setup) button on your router is a
quick and easy way to connect your radio without having to type in a password.
If your router has a WPS button you will notice [WPS] at the front of your net-
work name.
5. Press the
tons on remote control to select Push Button, then press VOLUME/SELECT/
SNOOZE dial on unit or SELECT button on remote control to confirm.
6. You will now see a message on the screen telling you to press the WPS button
on your router. Press the WPS button on your router. Check your routers instruction manual if you are unsure which button is the WPS button.
7. Press the VOLUME/SELECT/SNOOZE dial on unit or SELECT button on remote control to confirm. Your radio will now connect to your router, this may
take a few seconds.
/ /
/ /
Set 12 hours or 24 hours display
be automatically updated.
Update from DAB/ Update from
FM/ Update from Network/ No update
Auto update from Network is on.)
when Auto update from Network is on.)
Yes/ No
/ /
buttons on the unit or press / /
/
buttons on the unit or press / /
/
buttons on remote control to select
/ /
/
buttons
but-
39
Page 40
USER GUIDE
Connecting using your wireless network password
If your router has not got a WPS button you will now be asked to enter your
wireless network password, or you can select SKIP WPS which also take you to
the password screen.
Press the / /
8.
buttons on remote control to select each letter/number of your password.
Then press VOLUME/SELECT/SNOOZE dial on unit or SELECT button on
remote control to enter the selected letter/number.
9. When you have entered your password, press the
on the unit or press
OK on the right of the screen.
10. After your radio has connected, press the MENU button to exit the menu.
» Note:
Settings can be changed at any time in Menu-System Settings-Network-Network wizard
GETTING STARTED
» This instruction manual explains the basic instruction for operating this
unit. Unless otherwise stated, all operations described are based on re
mote control use.
Powering ON/OFF
1. Press the
2. Press the
standby on mode.
Selecting Modes
Press the MODE button on the unit or remote control to enter MODE menu. Then
press
buttons on remote control to switch between different sources:
Internet Radio, Podcasts, DAB, FM and Bluetooth®. Press VOLUME/SELECT/SNOOZE dial on unit or SELECT button on remote to confirm selection.
button on the unit or remote control to switch the unit on.
button on the unit or remote control to switch the unit back to
the / /
buttons on the unit or press / / / /
/
/ / / /
buttons on the unit or press / / / /
/
/ /
buttons on remote control to select
/
buttons
-
» When the unit is idle for approximately 15 minutes in Internet radio,
Podcasts, DAB or Bluetooth
will automatically switch to Standby. To switch the unit off completely,
remove the mains plug from the main socket.
» Please turn the unit off completely to save energy when not in use.
®
mode (with external unit disconnected), it
40
Page 41
USER GUIDE
Navigating the Menu
1. Press and hold INFO/MENU button on the unit or press the MENU button on
the remote control to access the menu.
2. Press the
3. Press the VOLUME/SELECT/SNOOZE dial on unit on the unit or SELECT button on the remote control to confirm your selection.
Adjusting the Volume
• Turn VOLUME/SELECT/SNOOZE dial on the unit or press the VOL +/– but-
tons on the remote control to adjust the volume.
• To temporarily mute the sound press the MUTE button on the remote control.
Turn the VOLUME/SELECT/SNOOZE dial on unit, or press the MUTE button
again, or press the VOL +/– buttons on remote control to resume normal
listening.
SYSTEM SETTINGS
• Press and hold INFO/MENU button on unit or press MENU button on remote
control to display the menu. Press the
or press
and then press VOLUME/SELECT/SNOOZE dial on unit or SELECT button on
remote control to confirm.
Equaliser
This system supports a variety of equalizers and sound effects.
• Press the EQ button to access Equaliser menu
Alternatively,
• During System settings mode, press the
and then press the SELECT button to confirm.
1. The display will show : FLAT > CLASSIC > ROCK > POP > JAZZ
2.
Press the / /
/ /
buttons on the remote to select your choice.
/ /
buttons on unit or press the
/
buttons on remote control to select System settings
buttons to select and then press the SELECT button to confirm.
/ /
/ /
/ / or /
buttons on the unit
/
buttons to select Equaliser
41
Page 42
USER GUIDE
Network
1. During System Settings mode, press the / /
and press the SELECT button to confirm.
2. Press the
press the SELECT button to confirm.
/ /
buttons to select from the following settings, and then
buttons to select Network
Network wizard SSID – select the desire wireless network. Rescan – Scan
PBC Wlan setup
View settings Display the setting on the unit.
Manual settings Select DHCP enable/disable.
NetRemote
PIN Setup
Network profile View the connected network.
Clear network
settings
Keep network
connected
Press the BACK button on unit or remote control to return back to the previous menu.
3.
for available networks. Manual config – select wireless
network with DHCP enable/disable.
Press the WPS button on the modem device that you wish to
connect with. Then press the VOLUME/SELECT/SNOOZE
dial on unit or SELECT button on remote control to continue.
To define a PIN number to be entered before being able to
connect to the unit remotely over a network
To delete the connected network memory in Network
profile.
To define whether remains connected to its network in
Standby mode and when not in Network radio mode.
Time/Date
The Time/Date can be automatically set once it has been connected to the Internet, DAB or FM radio station with time/date information. You may also adjust the
Time/Date manually.
• Press the CLOCK button to access Set Time/Date.
Alternatively,
• During System settings mode, press the
Date and press the SELECT button to confirm. Press the / /
select Set Time/Date and press the SELECT button to confirm.
1. The date digits will flash on the display.
2. Press the
button to confirm.
3. Repeat above Step (2) to set the Month/Year/Hour/Minute.
4. The date and time settings are now complete.
/ /
buttons to adjust the day and then press the SELECT
/ /
buttons to select Time/
buttons to
42
Page 43
USER GUIDE
For the other settings under Time/Date, press the / /
from the following options and then press the SELECT button to confirm.
Auto update Update from DAB/FM/Network/No update
Set format 12 / 24 hour format.
Set timezone Select a time zone. (Only available when Auto update
Daylight
savings
» The default auto time update setting is “Update from Network”. If you
would like to manually set the time, it is recommended to turn the Auto
update function off.
from Network is on.)
Select daylight savings. (Only available when Auto update
from Network is on.)
buttons to select
Inactive Standby
Use the Inactive Standby to turn off the unit after a certain time in play mode.
1. During System settings mode, press the
Standby and press SELECT button to confirm.
2. Press
6 hours. Press SELECT button to confirm.
buttons to select between Off, 2 hours, 4 hours, 5 hours and
/ /
buttons to select Inactive
/ /
Language
1. During System settings mode, press the
ge and then press the SELECT button to confirm.
2. Press the
3. Press the SELECT button to confirm.
/ /
buttons to change the display language of your choice.
/ /
buttons to select Langua-
Factory Reset
There may be times when you need to reset your unit back to the factory settings
especially when you have moved house. If you experience reception problems you
may want to reset and try again. If you move to another part of the country and
pick up the local and national DAB stations in that area, your previously tuned
channels may no longer be available.
buttons to select Factory
1. During System settings mode, press the
reset, and press the SELECT button to confirm.
2. Press the
/
confirm or select [No] to cancel.
buttons to select [Yes], and press the SELECT button to
/ /
» After the system reset, all the tuned stations, Internet, DAB & FM preset
stations will be erased.
43
Page 44
USER GUIDE
Software update
1. During System settings mode, press the / /
ware update and then press the SELECT button to confirm.
2. Press the
and then press the SELECT button to confirm.
» Before downloading software, ensure that the radio is plugged into a
stable mains power connection.
» Interrupting the mains supply during software download can lead to
functional disturbances and/or damage to the unit!
/ /
buttons to select „Auto-check setting“ or „Check now“,
Setup wizard
The setup wizard is available in the System settings section; you can run through
this to configure settings for date/time and network. Once this has finished, your
radio is ready to use.
Info
1. During System settings mode, press the
then press the SELECT button to confirm.
2. The software version, Radio ID and Friendly name will show on the display.
/ /
Privacy policy
To see the Privacy policy page, press MENU to go to System settings -Privacy
policy. After Factory reset, you need to accept the Privacy policy again.
Backlight
1. During System settings mode, press the
Backlight and then press the SELECT button to confirm.
2. For the other settings under Backlight, press the
the following options and then press the SELECT button to confirm.
buttons to select Soft-
buttons to select Info and
/ /
/ /
buttons to select
buttons to select
Timeout On / 10 sec / 20 sec / 30 sec / 45 sec / 60 sec / 90
Power-on level High / Medium / Low
Standby level Medium / Low
sec / 120 sec /180 sec
44
Page 45
Internet Radio
To listen to internet radio your radio must be connected to the internet. Try to position your radio
as close as possible to your router to get the best
connection speeds. When Internet Radio mode is
selected, the radio connects with the Frontier Silicon Internet radio portal to download a list of
stations. Once a station is selected, the radio will
connect directly to that station.
USER GUIDE
Press the MODE button on the unit or remote control, then press the
buttons on unit or press
/
to select „Internet radio“ mode. Press the VOLUME/SELECT/SNOOZE dial on
unit or SELECT button on remote control to confirm.
/ / / / buttons on remote control
/ /
Station List
During Internet Radio mode, press and hold INFO/MENU button on unit or press
MENU button on remote control to access the menu.
Press the
button to confirm.
When internet radio is restarted, the last listened stations is automatically selected. To return to [Station List], press BACK button.
If it is the first time listen internet radio, the radio will in [Station List].
1. Press the
Countries You can search specifically for stations from your country.
History You can select recently used station from that category
Search You can search stations using various keywords. The
Location You can select for stations from a list of countries avai-
Popular Select station from a list of the most popular internet
Discover Select stations from various categories in the menu:
Press the BACK button on the unit or remote control can move back a menu level.
/ /
press the SELECT button to confirm.
buttons to select [Station List] and press the SELECT
/ /
buttons to select from the following options, and then
Within this scope,it will display local radio stations in your
location.
with most recent stations appeared at the top of the list.
name and a description of your selected station will show
on the display.
lable
stations from around the world.
Origin, Genre or Language.
45
Page 46
USER GUIDE
Preset Stations
The preset Internet radio stations are stored in the radio and cannot be accessed
from other radios.
1. To store a preset, you must first be listening to the station that you would like
to save. Press and hold the PRESET button until the display shows the „Save
to Preset“.
2. Select one of the 10 presets to store the current station by pressing
buttons to select the number and press the SELECT button to confirm.
Recalling a Stored Station
1. To select a preset, press the PRESET button, and then press the
buttons to select one of the listed preset stations.
2. Press the SELECT button to confirm the selection.
/ /
/ /
Alternatively,
• Press Preset/Folder
• Or press the number buttons on remote control to switch to the preset station
(„0“ for preset station 10).
• If there no station be saved, it will show Preset empty
» Operation of Preset and Recall stations are same for Internet Radio,
Podcasts, DAB and FM.
/ buttons to switch through the preset station list
Internet Radio Display Modes
Every time you press the INFO/MENU button on unit or INFO button on the
remote control, the display will show the following display modes:
Channel Info/Description - Language/Location - Bit rate/Sound format /
Sampling rate- Playback buffer - Date
PODCASTS
To listen to Podcasts your radio must be connected to the internet. Try to position
your radio as close as possible to your router to get the best connection speeds.
Press MODE button on unit or remote control, then press the
buttons on unit or press
„Podcasts“ mode. Press the VOLUME/SELECT/SNOOZE dial on unit or SELECT
button on remote control to confirm.
When radio is restarted, the last listened stations is automatically selected. To
return to [Podcast List], press BACK button.
/ / / / buttons on remote control to select
46
/ /
/
Page 47
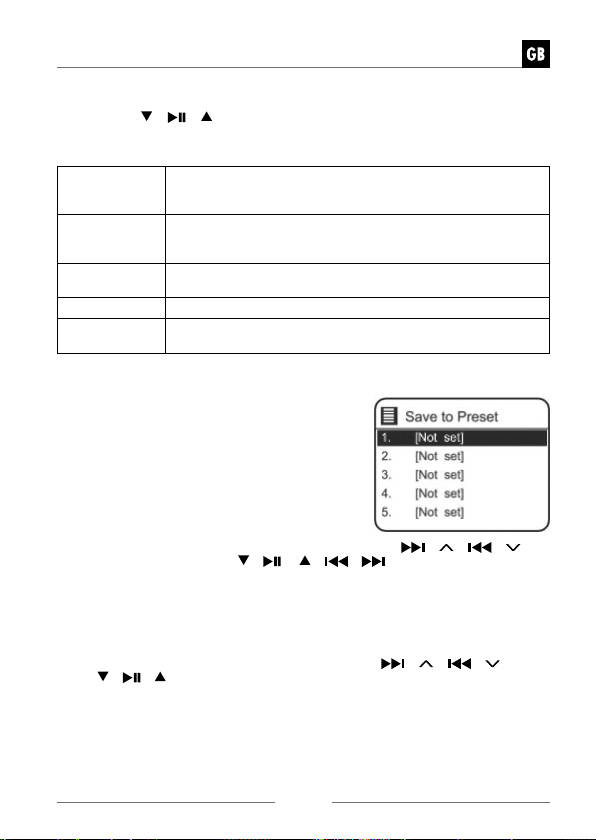
USER GUIDE
If it is the first time listen Podcasts radio, the radio will in [Podcast List].
1. Press the / / buttons to select from the following options, and then
press the SELECT button to confirm.
Countries You can search specifically for stations from your country.
Search You can search stations using various keywords. The name
Popular Select station from a list of the most popular internet stati-
Location You can select for stations from a list of countries available
Discover Select stations from various categories in the menu: Origin,
Press the BACK button on the unit or remote control can move back a menu level.
Within this scope,it will display local radio stations in your
location.
and a description of your selected station will show on the
display.
ons from around the world.
Genre or Language.
Saving and Recalling Preset Station
Refer to „Preset Stations“ and „Recalling a Stored
Station“ under Internet Radio section for instruction.
DAB OPERATION
Press MODE button on unit or remote control, press the / /
tons on unit on unit or press
to select „DAB radio“ mode. Press the VOLUME/SELECT/SNOOZE dial on unit
or SELECT button on remote control to confirm. The unit will enter DAB mode
and perform the auto scan function. During the scan the display will show “Scan-
ning… ” together with a slide bar that indicates the progress of the scan and the
amount of stations that have been found so far. Once the scan has finished, the
unit will select the first alpha numerically found station.
To explore the found stations, press on the radio the
/ /
or the
button to confirm.
buttons on the remote control to select and press the SELECT
/ / / / buttons on remote control
/ /
/
but-
/
buttons
47
Page 48
USER GUIDE
Station List
1. During DAB mode, press the MENU button to access DAB menu.
2. Press the
button to confirm.
3. A list of DAB stations will show on the display.
Auto Scan
Press the MENU button, and then press the
Press the SELECT button to confirm to activate auto scan.
1. The display will show “Scanning…” and a progress slide bar.
2. All the stations that have been found will be stored automatically. To explore
and listen to the found stations, press the
then press the SELECT button to confirm.
Manual Tuning
As well as the auto tune function, you can manually tune the receiver. This can
help you when aligning your aerial or when adding stations that were missed while
auto tuning.
1. Press MENU on the remote control to display the menu.
2. Press the
button to confirm.
3. The display will show the multiplex 5A to 13F.
4. Press the
button to confirm.
5. Now view the Station List and you will find any new radio stations that have
been manually tuned in.
DAB DISPLAY MODES
Every time you press the INFO/MENU button on
unit or INFO button on the remote control, the
display will show the following display modes:
DLS – Programme Type – Ensemble/Frequency – Signal error/Strength – Bit rate/
Codec/Channels – Date
DLS (Dynamic Label Segment)
This is a scrolling message giving real-time information, e.g. song titles, news headlines, etc.
buttons to select Station list and then press the SELECT
/ /
/ /
/ / buttons to select Manual tune, and press the SELECT
/ /
buttons to select the channel, and press the SELECT
buttons to select Scan.
/ /
buttons to select and
48
Page 49
USER GUIDE
Programme Type
This describes the „style“ or „genre“ of the programme that is being broadcast.
Ensemble Name/Frequency
This display the name of the multiplex that contains the station you are listening
to and the frequency. A multiplex is a collection of radio stations that are bundled
and transmitted on one frequency. There are national and local multiplexes. Local
ones contain stations that are specific to that area.
Signal Error/ Signal Strength
The error is shown as a number. If the number is 0, it means the signal received
is error free and the signal strength is strong. If the error rate is high, it is recommended to reposition the radio aerial or reposition the unit. The display will show
a slide bar to indicate the signal strength, the stronger the signal, the longer the
bar will be from left to right.
Bit Rate / Codec / Channels
The display will show the digital audio bit rate being received with additional information about the audio codec and channel configuration.
Date
This displays the current date provided automatically by the broadcaster.
Inactive channels
You may remove all unavailable stations from the list.
1. During DAB mode, press the MENU button and press the
to select Inactive channels, press SELECT button to confirm.
2. Press the
/ buttons to select YES and press the SELECT button to
confirm. Or select NO to cancel.
DRC (Dynamic Range Compression)
If you are listening to music with high dynamic range in a noisy environment, you
may wish to compress the audio dynamic range.
1. During DAB mode, press the MENU button and press the
to select DRC, press the SELECT button to confirm.
2. Press the
SELECT button to confirm the setting.
/ /
buttons to select DRC high/low/off and press the
/ / buttons
/ /
buttons
49
Page 50
USER GUIDE
Station Order
You may wish to arrange the station listing order.
1. During DAB mode on the radio, press the MENU button and then press the
2. Press the
Saving and Recalling Preset Station
Refer to „Preset Stations“ and „Recalling a Stored Station“ under Internet Radio
section for instruction.
FM OPERATION
To switch the unit to FM mode, Press MODE but-
ton on unit or remote control, press the
/
/
„FM radio“ mode. Press the VOLUME/SELECT/
SNOOZE dial on unit or SELECT button on remo-
te control to confirm.
The display will show the frequency.
Auto Scan
• Press the SCAN button on the radio to start searching for a station. Once a
station has been found, the scanning will stop automatically.
Alternatively,
• Press and hold the
Manual Tuning
To search for FM stations manually, press the / /
your desired frequency is reached.
buttons to select Station order, press SELECT button to confirm.
/
/
the SELECT button to confirm the setting.
/
/ buttons on remote control to select
» The search may not stop at a station with a very weak signal
/ /
buttons on unit or press
buttons to select Alphanumeric/Ensemble and press
/
/ /
/ /
buttons to start searching for a station.
buttons repeatedly until
» With FM radio, it may be necessary to fine tune each station by pressing
/ /
0.05 MHz. If reception is still poor, adjust the position of the aerial or try
moving the radio to another location.
buttons repeatedly. Each press will adjust the frequency by
50
Page 51
USER GUIDE
FM Display Modes
Every time you press the INFO/MENU button on unit or INFO button on the
remote control , the display will show the following display modes:
Radio Text – Programme Type – Frequency – Date
RDS Radio Text
This is a scrolling message information about the current programme.
Programme Type
This describes the “Style” or “Genre” of music that is being broadcast.
Station Name / Frequency
When an RDS station is received, the name of that station will be displayed, or if
not the frequency will be displayed.
Date
This displays the current date provided automatically by the broadcaster.
Scan Setting
1. Press the MENU button on the radio to access FM menu.
2. Press the
SELECT button to confirm.
3. Press the
then press the SELECT button to confirm.
/ /
/
Audio Setting
1. Press the MONO/ST. button on the remote control to toggle between the
Mono only or Mono/Stereo selection.
Alternatively,
1. Press the MENU button to access the main menu.
2. Press the
button to confirm.
3. Press the
the unit select Stereo or Mono automatically.
4. Press the SELECT button to confirm.
/ /
/
buttons to select Scan setting and then press the
buttons to select Yes to receive strong signal only and
buttons to select Audio setting and press the SELECT
buttons to select YES to listen in mono only or NO to let
51
Page 52
USER GUIDE
Saving and Recalling Preset Station
Refer to „Preset Stations“ and „Recalling a Stored Station“ under Internet Radio
section for instruction.
BLUETOOTH® OPERATION
The unit has a Bluetooth® function that can receive a signal within 8 metres. Pair
the unit with a Bluetooth
1. Press MODE button on unit or remote control, then press the
buttons on unit or press
to select „Bluetooth
dial on unit or SELECT button on remote control to confirm. The Bluetooth
logo will start to flash to show the unit in pairing mode.
2. Activate your Bluetooth
3. “DAB 650” will appear on your Bluetooth
4. Select “DAB 650” and enter “0000” for the password if necessary. Once con-
nected the Bluetooth
paired with the unit.
5. Press and hold
can disconnect existing Bluetooth
able to locate and make connection with the unit.
6. To disconnect the Bluetooth® function, switch to another function on the unit
or disable the function from your Bluetooth
Playing Music via Bluetooth
You may need to adjust the volume on your radio and Bluetooth® device.
• Press the
pause music or
• Press the
control to skip to the previous/next track.
» The operational range between the unit and the device is approximately
8 metres.
» For better signal reception, remove any obstacles between the unit and
the Bluetooth
» Compatibility with all devices and media types is not guaranteed.
» Some mobile phones with the Bluetooth
connect as you make and end calls. This is not an indication of a problem
with your unit.
®
device to listen to music:
/ / / / buttons on remote control
®
Audio“ mode. Press the VOLUME/SELECT/SNOOZE
®
device and select the search mode.
®
logo on the screen will stop flashing. Your device is now
/SCAN button on unit or
/SCAN button on unit or
/ /
®
device.
buttons on unit or
/
/ /
®
device list.
/
®
connection, with other Bluetooth® devices
®
/
button on remote control
®
device.
button on remote control to play/
/
®
function may connect and dis-
buttons on remote
/
®
52
Page 53
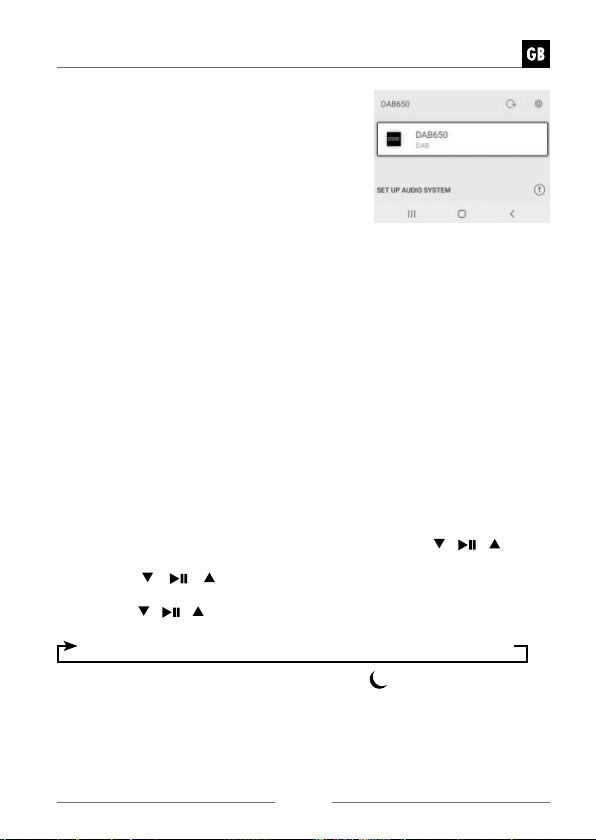
USER GUIDE
NET REMOTE -
The device gives a feature of NetRemote by
smartphone or tablet in iOS or Android system.
By downloading the assigned app named UN-
DOK, you can view all the modes of Internet
radio, Podcasts, DAB, FM and Bluetooth
Search UNDOK from Google Play or Apple Store
for UNDOK app, and install it to your smartphone
or tablet.
Before using the UNDOK app, make sure the device and the smartphone or tablet
are in the same WiFi network. Launch the app. The app initializes and scans for
the device in the network. Tap the device to make the NetRemote connection.
• Once the smartphone or tablet has already accessed the device, they will automatically connect the next time when you open the app again.
• Be aware that if another smartphone or tablet with the app in the same network
has access with the device; the original connection will be cut off.
When it is the first time that you connect the device to the unit, the app may
ask you to enter the PIN. Default PIN is 1234. For details of changing the PIN
for security, please refer to System Settings section: Network - NetRemote
PIN Setup.
Select your desired mode in the main page. You may then control the selected
mode on your smartphone or tablet and on the device simultaneously.
App UNDOK
®
.
SLEEP SETTING
This function allows you to program the unit to turn to standby mode by itself after
a set period of time.
1. To activate the sleep function on the radio, press the MENU button on the re-
mote control to display the function main menu. Press the
to select Main menu, and then press the SELECT button to confirm.
2. Press the
button to confirm.
3. Press the
button to confirm.
Sleep OFF ➔ 15minutes ➔ 30minutes ➔ 45minutes ➔ 60minutes
/ / buttons to select Sleep, and then press the SELECT
buttons to select sleep timer, and then press the SELECT
/ /
/ /
buttons
4. When your desired sleep timer is set active, “ ” will show on the display.
Also the time remaining until switch off is displayed next to the symbol in the
display.
5. When the sleep timer counts down to zero, the unit will turn to standby mode.
To turn the sleep function off while the sleep timer is still counting down, repeat step 1-3 to select “SLEEP OFF”.
53
Page 54
USER GUIDE
SETTING THE ALARM
1. Press the ALARM button on the remote control, the display shows “Alarm
(1 or 2): Off [hh:mm]”.
2. Press the
press the SELECT button to start the setting of the following parameters.
Press the
confirm
Enable Off/ Daily/ Once/ Weekends/ Weekdays
Time (Alarm On time)
Mode Buzz / Internet radio / DAB / FM
Preset Last Listened/ (Preset station)
Volume 0-32
Save Save and confirm the alarm setting
3. Finally, select “Save” and press the SELECT button to save the alarm setting.
The display will show Alarm Saved. When the alarm is set, the alarm icon will
appear on the display.
4. To temporarily switch off alarm, press the VOLUME/SELECT/SNOOZE dial
on unit or SNOOZE button on remote control to activate Snooze function when
alarm sounds. Press the VOLUME/SELECT/SNOOZE dial on unit or SNOOZE
button on remote control repeatedly to set snooze period time of 5, 10, 15 or
30 minutes in turn. The set snooze time will show on the display and unit will
go to standby.
5. To turn off the alarm when it sounds, press the
To cancel Alarm, refer to steps 1-3 to set alarm Off. The alarm icon will disappear
from display.
/ /
/ /
USING EARPHONES
You can connect your earphones (not include) by plugging into the earphone socket at the rear of the unit. Turn down the volume before connecting earphones.
Slowly raise the volume with the earphones on until you reach your desired level.
» Long-term exposure to loud music may cause hearing damage. It is best
to avoid extreme volume when using earphones, especially for extended
periods of time.
buttons to select the Alarm number (1 or 2) and then
buttons to select then press the SELECT button to
or ALARM button.
54
Page 55
USER GUIDE
MAINTENANCE
Cleaning the Unit
Ensure the unit is fully unplugged from the mains socket before cleaning.
• To clean the unit, wipe the case with a slightly moist, lint-free cloth.
• Do not use any cleaning fluids containing alcohol, ammonia or abrasives.
• Do not spray aerosol at or near the unit.
Hints and Tips
If a problem does occur, it may often be due to something very minor. The following table contains various tips. If you require additional assistance
General
Problem Solution
No power. • Ensure the mains plug is connected.
No sound
from the unit.
The unit does not respond
when pressing any
buttons.
The product may have noise (1KHz signal) in the presence of strong electromagnetic fields, in case of malfunction due to these strong electromagnetic fields,
user need to wait till resume normal operation without intervene.
RADIO DAB/FM
Problem Solution
Poor radio reception. • Make sure the DAB/FM aerial is fully extended.
Desired station
not found.
• Make sure that you select the ON mode.
Please try either one of the solutions below:
• Make sure that the unit is not muted. Press VOL
+/- buttons resume normal listening.
• Press Standby button on the unit to switch the
unit to standby mode. Then press the button
again to switch the unit on.
• Unplug the unit from the mains socket, then plug
them again. Switch on the unit.
The unit may freeze up during use. Switch the unit
off and then on again at the mains socket to reset
the unit.
• Electrical interference in your home can cause
poor reception. Move the unit away from them
(especially those with motors and transformers).
• Weak signal. Search manually.
• If reception is still poor, adjust the position of the
aerial.
55
Page 56
USER GUIDE
INTERNET RADIO
Problem Solution
No connection. • Make sure the Wi-Fi router is plugged in and wor-
Can’t hear the
radio station
king.
• Reconnect the radio to your Wi-Fi router.
• Check you radio is within 5m of your router.
• Sometimes the Wi-Fi connection is temporary
lost or connection is weak, check the Wi-Fi connection or move the radio closer to your router.
• Not all radio stations transmit 24 hours a day,
they might not be transmitting.
• Not all radio stations transmit at the same volume level you may need to increase the volume.
BLUETOOTH
Problem Solution
I cannot find
“DAB 650” on my Blue-
®
device.
tooth
Can’t hear the music • You may need to increase the volume on the ra-
If any functional abnormality is encountered, unplug the unit from the mains socket and reconnect it again
®
®
• Ensure the Bluetooth
your Bluetooth
• Repair the unit with your Bluetooth
dio and Bluetooth
function is activated on
®
device.
®
device.
®
device.
SPECIFICATION
Model DAB650 513
Power Supply Input: AC 100–240V ~50/60Hz, 1A
Power Consumption 27 W
Speaker Output Power 2 × 5W RMS
Working Environment -
Temperature
Net Weight ~ 1.800 g
Unit Dimension
(W) × (D) × (H)
Output: DC 9V 3.0A
0 ~ 35 °C
300.6 x 158.6 x 115.6 mm
56
Page 57
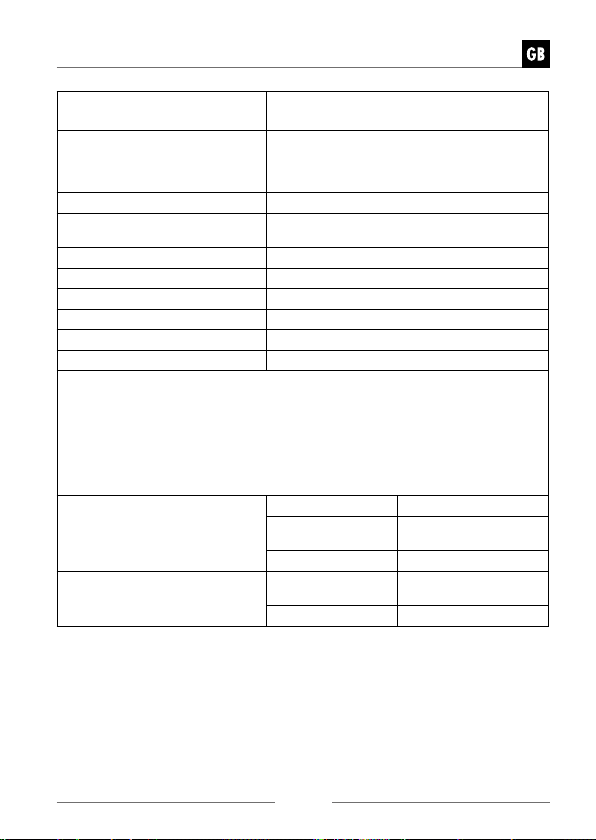
USER GUIDE
Radio Frequency FM 87.50 – 108.00 MHz
Manufacturer‘s name and
address
Model Number BQ30A-0903000-G
Input Voltage and Input AC
frequency
Output voltage DC 9.0V
Output current 3.0A
Output power 27.0W
Average active efficiency 86.7%
Efficiency at low load (10%) 77.0%
No-load power consumption 0.09W
How to activate wireless network port:
• Connect the unit with power
• Switch to wireless mode (e.g. Internet)
How to deactivate wireless network port:
• Go to Main menu - System settings - Network - Keep network connected. Select No and then press SELECT button to keep network disconnected
®
Bluetooth
Wifi Maximum
Standby power consumption:
WiFi off: < 1.00 W (standard standby mode)
WiFi on: < 2.00 W (network standby mode)
version Version V4.2
DAB 174.928 - 239.200 MHz
DONGGUAN BECKY ELECTRONICS TECH
CO., LTD, Yinyong Industrial Zone, Jinma
Road, HengLi Town, Dongguan City, Guangdong Province, China
100-240V ~ 50-60Hz Max. 800mA
Maximum
transmitted power
Frequency band 2402 - 2480 MHz
transmitted power
Frequency band 2412 - 2472 MHz
2 dBm
15 dBm
57
Page 58
USER GUIDE
» Note:
» The equipment will enter network standby mode after approx. 15 mi
nutes.
» FM is exceptional, it is inappropriate for the intended use of equipment
if the apparatus didn‘t receive radio signal on FM mode.
» In Internet radio, Podcasts, DAB radio and Bluetooth
» unit will automatically go to Standby mode after 15 minutes, if it has no
audio playback. Press Standby button to resume.
Features and specifications are subject to change without prior notice.
®
Audio mode, the
Simplified declaration of conformity as per the RED Directive
Schwaiger GmbH hereby declares that the described radio system product complies with Directive 2014/53/EU and other directives applicable to the product.
The complete EU declaration of conformity is available online at: http://konform.
schwaiger.de
Disposal
Do not dispose of batteries or electric and electronic devices in the normal
household waste. The consumer is legally obliged to return electrical and elect
ronic devices and batteries that are at the end of their useful life to the point of
sale or public collection points that have been set up for this purpose. Legisla
tion in the country of use governs individual details regarding disposal. The symbol on
the product, the user guide or the packaging indicates this legal requirement.
Disclaimer
Schwaiger GmbH does not accept any liability or warranty for damages that are
sustained due to improper installation or mounting, improper use of the product
or non-compliance with the safety instructions.
Manufacturer‘s information
Dear Customer, please contact our Technical Support if you need technical advice
and your retailer is unable to help you.
Office Hours (Technical Support in German)
Monday to Friday: 8:00 a.m. - 5:00 p.m.
HOTLINE
+49 (09101) 702-299
-
-
-
58
Page 59
MODE D‘EMPLOI
MESURES DE SÉCURITÉ
• Lisez attentivement toutes les instructions avant d‘utiliser l‘appareil et conservez-les pour référence ultérieure.
• Vérifiez que la tension indiquée sur la plaque signalétique correspond à celle
du secteur.
• L‘appareil doit être placé sur une surface plane et stable et ne doit pas être
soumis à des vibrations.
• Ne placez pas l‘appareil sur des surfaces inclinées ou instables, car l‘appareil
pourrait tomber ou basculer.
• La prise de courant doit être située à proximité de l‘appareil et doit être facilement accessible.
• Évitez les températures extrêmes, chaudes ou froides. Placez l‘appareil loin des
sources de chaleur telles que les radiateurs ou les feux à gaz ou électriques.
Éviter l‘exposition directe au soleil et à d‘autres sources de chaleur.
• Ne placez jamais une bougie ou une flamme nue sur le dessus ou à proximité
de l‘appareil.
• Pour réduire les risques d‘incendie, d‘électrocution ou d‘endommagement de
l‘appareil, ne l‘exposez pas à la pluie, à l‘humidité, aux gouttes ou aux éclaboussures. Aucun objet rempli de liquide, tel qu‘un vase, ne doit être placé sur
l‘appareil.
• Si vous renversez du liquide dans l‘appareil, vous risquez de l‘endommager
gravement. Mettez-le immédiatement hors tension. Débranchez la fiche secteur
et consultez votre revendeur.
• Pour éviter tout risque de choc électrique ou d‘incendie en cas de surchauffe,
veillez à ce que rideaux et autres matériaux n‘obstruent pas les orifices de
ventilation.
• Ne pas installer ou placer cet appareil dans une bibliothèque, une armoire encastrée ou un autre espace confiné. Veillez à ce qu‘un minimum de 10 cm soit
maintenu autour de l‘appareil pour la ventilation.
Sécurité
• Débranchez toujours l‘appareil du secteur avant de connecter/déconnecter
d‘autres appareils ou de déplacer l‘appareil.
• Débranchez l‘appareil de la prise de courant en cas d‘orage.
• Cet appareil chauffe lorsqu‘il est utilisé pendant longtemps. Ceci est normal et
n‘indique pas un problème avec l‘appareil.
59
Page 60
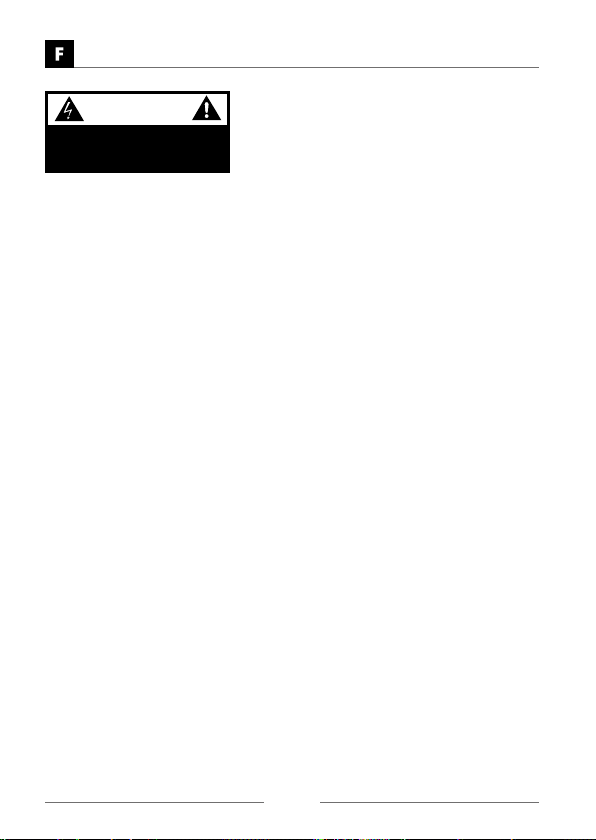
MODE D‘EMPLOI
ATTENTION !
RISQUE DE CHOC ÉLECTRIQUE
NE PAS OUVRIR
Le symbole de l‘éclair avec une flèche à l‘intérieur d‘un triangle équilatéral vise à alerter l‘utilisateur de la présence d‘une „tension dangereuse“
non isolée à l‘intérieur du boîtier de l‘appareil qui peut être d‘une magnitude suffisante pour constituer un risque de choc électrique.
Le point d‘exclamation à l‘intérieur d‘un triangle équilatéral est destiné à
alerter l‘utilisateur de la présence d‘instructions importantes d‘utilisation
et de maintenance (entretien) dans le manuel accompagnant l‘appareil.
Adaptateur secteur
• Assurez-vous que l‘appareil ne repose pas sur le câble de l‘adaptateur secteur,
car le poids de l‘appareil peut endommager le câble et créer un risque pour la
sécurité.
• Si l‘adaptateur secteur est endommagé, il doit être remplacé par le fabricant,
son technicien de maintenance ou toute autre personne qualifiée afin d‘éviter
tout risque.
Interférence
• Ne placez pas l‘appareil sur ou à proximité d‘appareils susceptibles de provoquer des interférences électromagnétiques. Si vous le faites, cela peut affecter
négativement les performances de fonctionnement de l‘appareil et provoquer
une distorsion du son.
Supervision
• Les enfants doivent être surveillés pour s‘assurer qu‘ils ne jouent pas avec l‘appareil.
• Ne laissez jamais personne, en particulier les enfants, pousser quoi que ce soit
dans les trous, fentes ou autres ouvertures du boîtier, sous peine de risquer de
provoquer un choc électrique mortel.
Service/Entretien
• Pour réduire le risque de choc électrique, ne retirez pas les vis. L‘appareil ne
contient aucune pièce réparable par l‘utilisateur. Veuillez confier tous les travaux
d‘entretien à du personnel qualifié.
• N‘ouvrez pas les capots fixes car cela pourrait exposer à des tensions dangereuses.
• Assurez-vous de débrancher l‘appareil de la prise de courant avant de le nettoyer.
• N‘utilisez pas de tampons abrasifs ou de solutions de nettoyage abrasives, car
ils pourraient endommager la surface de l‘appareil.
• N‘utilisez pas de liquides pour nettoyer l‘appareil.
60
Page 61
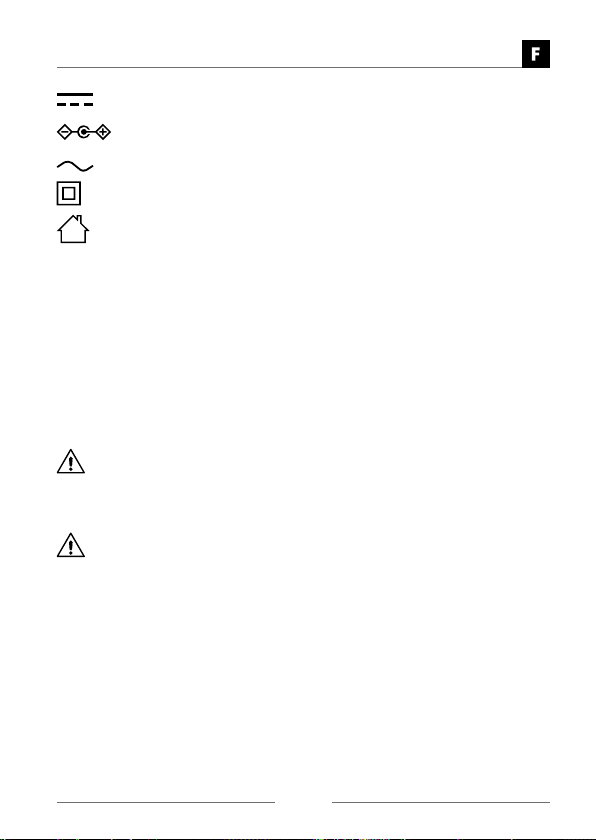
MODE D‘EMPLOI
Ce symbole indique la tension continue.
Ce symbole indique la polarité du connecteur d‘alimentation CC.
Ce symbole indique une tension alternative.
Ce symbole indique un équipement de classe II.
Pour un usage intérieur uniquement.
RECYCLAGE
Ce produit porte le symbole du tri sélectif des déchets d‘équipements électriques
et électroniques (DEEE). Cela signifie que ce produit doit être manipulé conformément à la directive européenne 2012/19/UE afin d‘être recyclé ou démonté pour
minimiser son impact sur l‘environnement. L‘utilisateur a le choix de donner son
produit à un organisme de recyclage compétent ou au détaillant lorsqu‘il achète
un nouvel équipement électrique ou électronique.
La fiche secteur de l‘adaptateur secteur est utilisée comme dispositif de déconnexion, la prise de courant doit être installée à proximité de l‘équipement et doit
être facilement accessible.
ATTENTION
Risque d‘explosion en cas de remplacement de la batterie par un type de batterie
incorrect.
AVERTISSEMENT
• Pour éviter le remplacement d‘une batterie par un type incorrect
• Ne jetez pas une pile au feu ou dans un four chaud, ne l‘écrasez pas ou ne la
coupez pas mécaniquement.
• Ne laissez pas une batterie dans un environnement à très haute température.
• Éviter d‘exposer la batterie à une pression d‘air extrêmement basse.
• Dans un environnement perturbé par les fréquences radio, le produit risque
de ne pas fonctionner correctement et de s‘auto-rétablir lorsque l‘interférence
disparaît.
61
Page 62
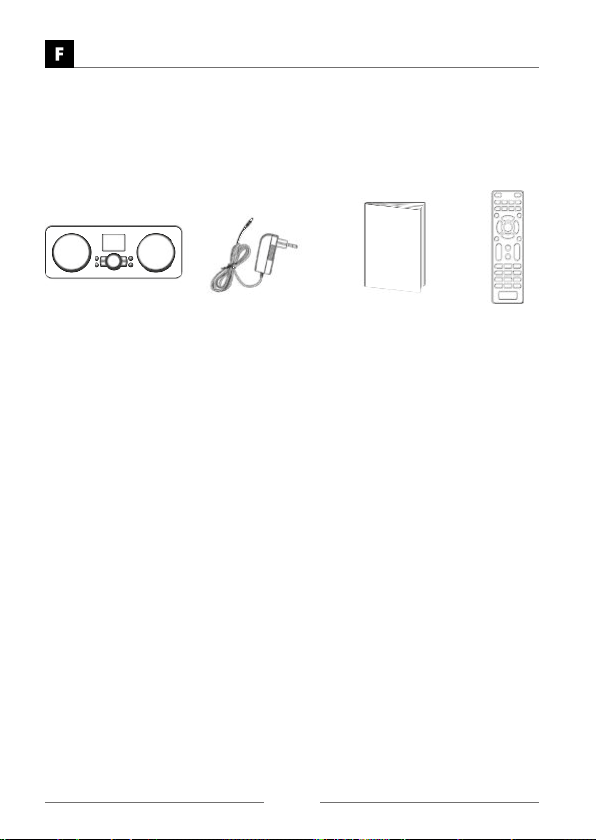
MODE D‘EMPLOI
DÉBALLAGE
Retirez toutes les pièces de leur emballage. Conservez l’emballage. Si vous vous
en débarrassez, veuillez respecter les réglementations locales en matière d’élimination des déchets.
Les parties suivantes sont incluses :
Unité principale Adaptateur secteur Mode d‘emploi Télécommande
62
Page 63
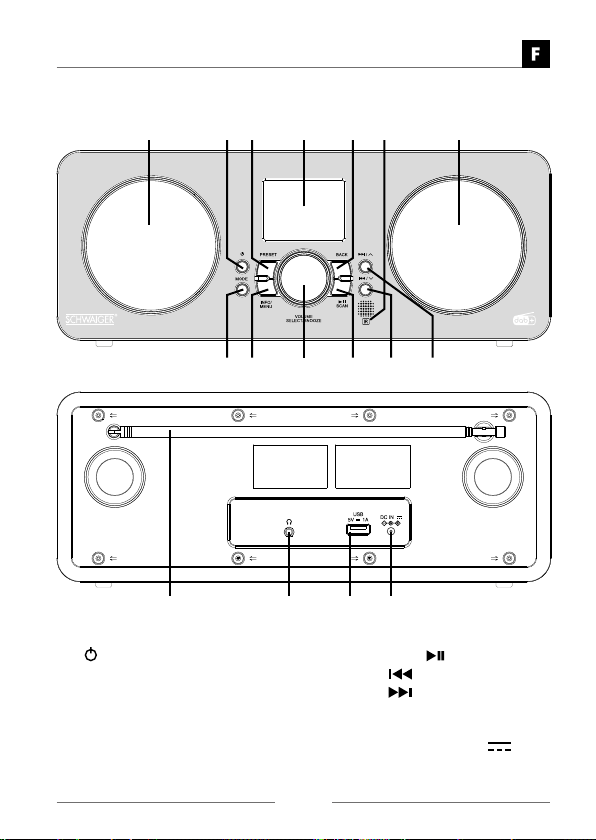
APERÇU DES PRODUITS
2 3 5
7 8 11 12109
14 15 1613
1. HAUT-PARLEURS
2. STANDBY
3. TOUCHE PRESET
4. ÉCRAN
5. TOUCHE BACK
6. CAPTEUR TÉLÉCOMMANDE
7. TOUCHE MODE
8. TOUCHE INFO/MENU
MODE D‘EMPLOI
61 4 1
9. BOUTON VOLUME/SELECT/SNOOZE
10. TOUCHE SCAN
11. TOUCHE
12. TOUCHE
13. TIGE ANTENNE
14. PRISE JACK ÉCOUTEURS
15. Port de recharge USB 5V 1A
16. PRISE Entrée CC
63
Page 64
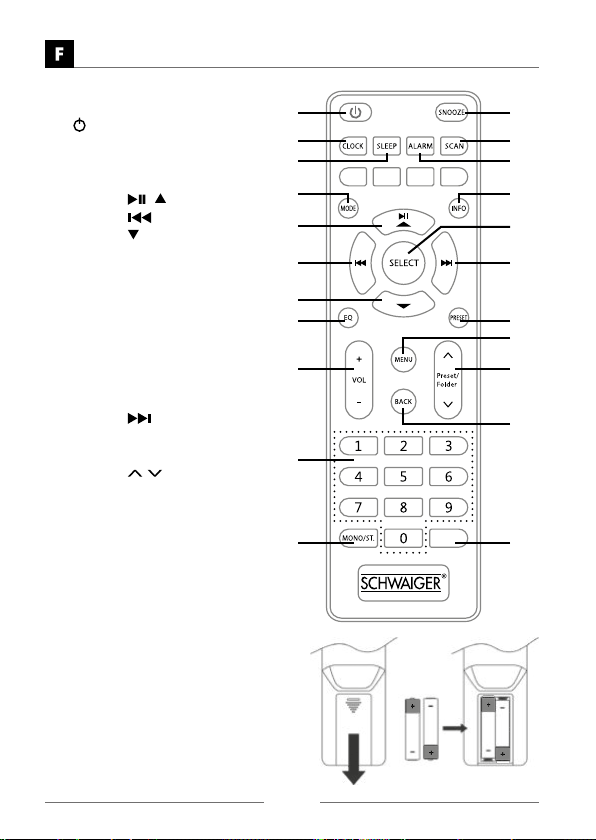
MODE D‘EMPLOI
TÉLÉCOMMANDE
1. STANDBY
2. TOUCHE CLOCK
3. TOUCHE SLEEP
4. TOUCHE MODE
5. TOUCHE
6. TOUCHE
7. TOUCHE
8. TOUCHE EQ
9. TOUCHE VOLUME + / -
10. TOUCHES Numériques
11. TOUCHE MONO/ST.
12. TOUCHE SNOOZE
13. TOUCHE SCAN
14. TOUCHE ALARM
15. TOUCHE INFO
16. TOUCHE SELECT
17. TOUCHE
18. TOUCHE PRESET
19. TOUCHE MENU
20. TOUCHE
21. TOUCHE BACK
22. TOUCHE MUTE
/
/ Preset/Folder
1 12
2
3
4
5
6
7
8
9
10
11
Remplacement des piles
de la télécommande
1. Ouvrez le couvercle du compartiment
des piles.
2. Insérez 2 piles AAA (non fournies).
Veillez à faire correspondre les extrémités (+) et ( - ) de la pile avec les
extrémités (+) et ( - ) indiquées dans
le compartiment de la pile.
3. Refermez le couvercle
MUTE
13
14
15
16
17
18
19
20
21
22
64
Page 65
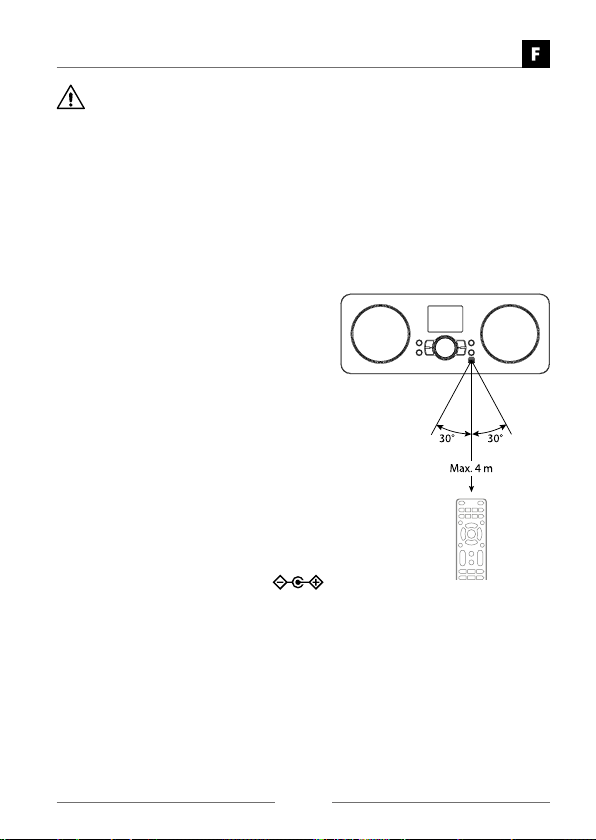
MODE D‘EMPLOI
Gestion des piles
» L‘utilisation inappropriée ou incorrecte des piles peut provoquer une
corrosion ou une fuite des piles, ce qui peut provoquer un incendie, des
blessures corporelles ou des dommages matériels.
» Utilisez uniquement le type de pile indiqué dans ce manuel.
» Ne jetez pas les piles usées avec les ordures ménagères. Éliminez-les
conformément à la réglementation locale.
» Retirez les piles de la télécommande lorsqu‘elle n‘est pas utilisée pen
dant une longue période, car corrosion ou fuites peuvent se produire
et entraîner des blessures corporelles, des dommages matériels ou un
incendie.
Portée de la télécommande
Le capteur de télécommande sur l‘unité
frontale est sensible aux commandes de la
télécommande jusqu‘à une distance maximale de 4 mètres et un arc de 60° maximum.
Notez que la distance de détection peut varier en fonction de la luminosité de la pièce.
SOURCE D‘ALIMENTATION
Alimentation secteur
Le branchement de l‘appareil à toute autre
source d‘alimentation peut l‘endommager.
1. Déroulez le câble de l‘adaptateur secteur
sur toute sa longueur. Connectez l‘extrémité du câble à la prise DC IN
située à l‘arrière de l‘appareil, puis branchez l‘adaptateur secteur à la prise
secteur. Assurez-vous que l‘adaptateur secteur est fermement inséré dans la
prise de courant. L‘appareil est maintenant prêt à l‘emploi.
2. Pour éteindre complètement l‘appareil, débranchez l‘adaptateur secteur de la
prise de courant.
-
Chargement à partir du port de charge USB
Vous pouvez charger votre appareil via la prise USB de cet appareil à l‘aide d‘un
câble USB (non fourni).
• Le courant maximum pour la charge USB est de 1A.
• Tous les dispositifs de charge USB ne sont pas garantis.
65
Page 66
MODE D‘EMPLOI
Connexion réseau
Ce produit ne prend en charge que la connexion réseau sans fil pour l‘accès réseau
et ne prend pas en charge la connexion LAN filaire.
Réseau sans fil
1. Commencez par vérifier que les témoins de contrôle (LINK/ACT) de votre routeur s‘allument bien.
2. Procédez aux opérations décrites dans la section „Configuration initiale“
ci-dessous. Il est recommandé d‘exécuter l‘assistant d‘installation dans la section Paramètres système.
» Cet appareil ne peut pas être connecté directement à un modem auto-
nome. Un routeur ou un modem incorporé à un routeur doit être utilisé.
» Différentes configurations de connexion étant possibles, veuillez suivre
les spécifications et les instructions de votre opérateur de télécommu
nication, de votre fournisseur de services Internet et du guide de configuration du routeur.
Mise en service initiale
Lorsque vous branchez l‘appareil pour la première fois à la prise de courant, l‘écran
de bienvenue s‘affiche, suivi par le menu Langue, appuyez sur la touche
/
sélectionner la langue de votre choix, puis appuyez sur le gros bouton VOLUME/
SELECT/SNOOZE sur l‘appareil ou la touche SELECT de la télécommande pour
confirmer.
La page de la politique de confidentialité apparaît alors.
Veuillez visiter le site Web mentionné dans la page pour les détails de la politique
de confidentialité. Appuyez sur le gros bouton VOLUME/SELECT/SNOOZE de
l‘appareil ou sur la touche SELECT de la télécommande pour à accepter pour
passer à l‘étape suivante.
1. Pour lancer l‘assistant d‘installation initial, appuyez sur la touche
/
tionner [OUI], puis appuyez sur le gros bouton VOLUME/SELECT/SNOOZE de
l‘appareil ou sur la touche SELECT de la télécommande pour confirmer.
2. Appuyez sur la touche
/
sur le gros bouton VOLUME/SELECT/SNOOZE de l‘appareil ou sur la touche
SELECT de la télécommande pour confirmer le réglage :
de l‘appareil ou sur les touches / / de la télécommande pour
/
de l‘appareil ou sur les touches
de la télécommande pour sélectionner les options suivantes, puis appuyez
/ /
de la télécommande pour sélec-
/
de l‘appareil ou sur les touches
/
/
/ /
-
66
Page 67
MODE D‘EMPLOI
Format Date/Heure
12/24 heures
Mise à jour auto Choisissez comment vous voulez que l‘heure soit
Réglage du fuseau
horaire
Heure d'été Sélectionnez l‘heure d‘été. (Disponible unique-
Paramètres réseau Indiquez si le réseau doit rester connecté.
3. L‘écran affiche „Rercherche en cours de l‘assistant réseau....“. Votre radio va
maintenant rechercher votre réseau sans fil, cela peut prendre quelques secondes, puis une liste de tous les réseaux sans fil apparaîtra à l‘écran. Appuyez
sur la touche
de la télécommande pour sélectionner votre réseau sans fil, puis appuyez
sur le gros bouton VOLUME/SELECT/SNOOZE sur l‘appareil ou sur la touche
SELECT de la télécommande pour confirmer.
4. Appuyez sur la touche
/
WPS, puis appuyez sur le gros bouton VOLUME/SELECT/SNOOZE de l‘appareil ou sur la touche SELECT de la télécommande pour confirmer.
Connexion à l‘aide du bouton WPS de votre routeur
La connexion à l‘aide du bouton WPS (Wi-Fi Protected Setup) de votre routeur
est un moyen rapide et facile de connecter votre radio sans avoir à entrer un
mot de passe.
Si votre routeur dispose d‘un bouton WPS, vous remarquerez [WPS] devant le
nom de votre réseau.
5. Appuyez sur la touche
/ /
appuyez sur le gros bouton VOLUME/SELECT/ SNOOZE de l‘appareil ou la
touche SELECT de la télécommande pour confirmer.
6. Vous verrez alors un message à l‘écran vous demandant d‘appuyer sur la
touche WPS de votre routeur. Appuyez sur la touche WPS de votre routeur.
Consultez le manuel de votre routeur si vous n‘êtes pas sûr de savoir quel
bouton est la touche WPS.
/ /
de la télécommande pour sélectionner Bouton-poussoir/Pin/Ignorer
/
de la télécommande pour sélectionner le Bouton-poussoir, puis
Réglage de l‘affichage 12 heures ou 24 heures
automatiquement mise à jour.
Mise à jour à partir de DAB/ Mise à jour de FM/
Mise à jour à partir du réseau/ Pas de mise à jour
Sélectionnez un fuseau horaire. (Disponible
uniquement lorsque la mise à jour automatique à
partir du réseau est activée.)
ment lorsque la mise à jour automatique à partir
du réseau est activée.)
Oui/ Non
de l‘appareil ou sur les touches
/
/ /
/ /
de l‘appareil ou sur les touches
/
de l‘appareil ou sur les touches
/
/ /
67
Page 68
MODE D‘EMPLOI
7. Appuyez sur la touche VOLUME/SELECT/SNOOZE de l‘appareil ou sur la
touche SELECT de la télécommande pour confirmer. Votre radio va maintenant
se connecter à votre routeur, cela peut prendre quelques secondes.
Connexion à l‘aide du mot de passe de votre réseau sans fil
Si votre routeur n‘a pas de bouton WPS, il vous sera demandé d‘entrer votre
mot de passe réseau sans fil, ou vous pouvez sélectionner SKIP WPS, ce qui
vous amène également à l‘écran du mot de passe.
8. Appuyez sur la touche
/ / / / de la télécommande pour sélectionner les lettres/
chiffres de votre mot de passe un par un. Appuyez ensuite sur le gros bouton
VOLUME/SELECT/SNOOZE de l‘appareil ou sur la touche SELECT de la té-
lécommande pour saisir la lettre/le chiffre sélectionné.
9. Une fois que vous avez entré votre mot de passe, appuyez sur la touche
/
/
télécommande pour sélectionner OK à droite de l‘écran.
10.
Une fois que votre radio est connectée, appuyez sur la touche MENU pour
sortir du MENU.
/
» Remarque :
Les paramètres peuvent être modifiés à tout moment dans Menu-Paramètres système-Réseau- Assistant réseau
»
POUR COMMENCER
» Ce mode d‘emploi explique les instructions de base pour l‘utilisation de
cet appareil. Sauf indication contraire, toutes les opérations décrites
sont basées sur l‘utilisation de la télécommande.
Mise sous/hors tension
1. Appuyez sur la touche de l‘appareil ou de la télécommande pour allumer
l‘appareil.
2. Appuyez sur la touche
l‘appareil en mode standby.
Sélection des modes
Appuyez sur la touche Mode de l‘appareil ou de la télécommande pour entrer dans
le menu MODE. Puis appuyez sur les touches
sur les touches
source à une autre parmi les suivantes : Radio Internet, Podcasts, DAB, FM et
Bluetooth
sur la touche SELECT de la télécommande pour confirmer la sélection.
/ / / / de la télécommande pour passer d‘une
®
. Appuyez sur la touche VOLUME/SELECT/SNOOZE de l‘appareil ou
/ /
de l‘appareil ou sur les touches
de l‘appareil ou de la télécommande pour remettre
/
/ /
de l‘appareil ou sur les touches
/ / / /
de l‘appareil ou
/
de la
68
Page 69
MODE D‘EMPLOI
» Lorsque l‘appareil est inactif pendant environ 15 minutes en mode radio
Internet, Podcasts, DAB ou Bluetooth
tée), il passe automatiquement en mode standby.
» Pour éteindre complètement l‘appareil, débranchez la fiche secteur de
la prise de courant.
Veuillez éteindre complètement l‘appareil pour économiser de l‘énergie lors
qu‘il n‘est pas utilisé.
®
(avec l‘unité externe déconnec-
Navigation dans le menu
1. Appuyez sur la touche INFO/MENU de l‘appareil ou appuyez sur la touche
MENU de la télécommande pour aller dans le menu.
2. Appuyez sur les touches
/ ou / de la télécommande pour sélectionner votre choix.
/
3. Appuyez sur le gros bouton VOLUME/SELECT/SNOOZE de l‘appareil ou sur
la touche SELECT de la télécommande pour confirmer votre sélection.
/ /
de l‘appareil ou sur les touches
/
Réglage du volume
• Tournez le gros bouton VOLUME/SELECT/SNOOZE de l‘appareil ou appuyez
sur les touches VOL +/– de la télécommande pour régler le volume.
• Pour couper temporairement le son, appuyez sur la touche MUTE de la télé-
commande. Tournez le gros bouton VOLUME/SELECT/SNOOZE de l‘appareil,
ou appuyez de nouveau sur la touche MUTE, ou appuyez sur les touches VOL
+/– de la télécommande pour reprendre une écoute normale.
PARAMÈTRES DU SYSTÈME
Appuyez sur la touche INFO/MENU de l‘appareil ou appuyez sur la touche MENU
de la télécommande pour afficher le menu. Appuyez sur les touches
de l‘appareil ou sur les touches / /
/
sélectionner Paramètres système, puis appuyez sur le gros bouton VOLUME/
SELECT/SNOOZE sur l‘appareil ou sur la touche SELECT de la télécommande
pour confirmer.
de la télécommande pour
/
Égalisateur
Ce système supporte toute une série d‘égaliseurs et d‘effets sonores.
• Appuyez sur la touche EQ pour accéder au menu Égalisateur.
Alternativement,
• En mode Paramètres système, appuyez sur les touches
tionner Égalisateur puis appuyez sur la touche SELECT pour confirmer.
1. L‘écran affiche : PLAT > CLASSIQUE > ROCK > POP > JAZZ
2. Appuyez sur les touches
touche SELECT pour confirmer.
/ /
pour sélectionner puis appuyez sur la
/ / pour sélec-
69
/ /
-
Page 70
MODE D‘EMPLOI
Réseau
1. En mode Paramètres système, appuyez sur les touches / / pour sélectionner Réseau puis appuyez sur la touche SELECT pour confirmer.
2. Appuyez sur les touches
vants, puis appuyez sur la touche SELECT pour confirmer.
Assistant réseau SSID - sélectionnez le réseau sans fil souhaité.
Configuration
Wlan PBC
Paramètres
d'affichage
Réglages
manuels
Configuration
du code PIN
NetRemote
Profil réseau Visualiser le réseau connecté.
Effacer les para-
mètres réseau
Garder le réseau
connecté
3. Appuyez sur la touche BACK de l‘appareil ou de la télécommande pour revenir
au menu précédent.
Heure/Date
L‘heure et la date peuvent être réglées automatiquement une fois que l‘appareil
a té connecté à Internet, à une station de radio DAB ou FM avec des informations
d‘heure et de date. Vous pouvez également régler l‘heure et la date manuellement.
• Appuyez sur la touche CLOCK pour accéder à Régler heure/date.
Alternativement,
• En mode Paramètres système, appuyez sur les touches
lectionner Heure/Date puis appuyez sur la touche SELECT pour confirmer.
Appuyez sur les touches
appuyez sur la touche SELECT pour confirmer.
/ / pour sélectionner l‘un des réglages sui-
Rescan - rechercher les réseaux disponibles.
Configuration manuelle - sélectionnez le réseau sans fil
avec activation/désactivation DHCP.
Appuyez sur la touche WPS du modem auquel vous
souhaitez vous connecter. Appuyez sur le gros bouton
VOLUME/SELECT/SNOOZE de l‘appareil ou sur la touche SELECT de la télécommande pour confirmer.
Affichez le réglage sur l'appareil.
Sélectionnez Activer/désactiver DHCP.
Pour définir un code PIN à saisir avant de pouvoir se
connecter à distance à l‘appareil via un réseau
Pour supprimer la mémoire réseau connectée dans le
profil réseau.
Pour définir si la connexion au réseau est maintenue en
mode Standby ou non en mode radio Réseau.
/ / pour sé-
/ / pour sélectionner Régler heure/date et
70
Page 71
MODE D‘EMPLOI
1. Les chiffres de la date clignotent à l‘écran.
2. Appuyez sur les touches
touche SELECT pour confirmer.
3. Répétez l‘étape (2) ci-dessus pour régler le mois/année/heure/minute.
4. Les réglages de la date et de l‘heure sont maintenant terminés.
/ / pour ajuster le jour puis appuyez sur la
Pour les autres réglages sous Heure/Date, appuyez sur les touches
pour sélectionner l‘une des options suivantes, puis appuyez sur la touche SELECT
pour confirmer.
Mise à jour auto Mise à jour à partir de DAB/FM/Réseau/pas de mise à jour
Définir le format Format 12 / 24 heures.
Réglage du
fuseau horaire
Heure d'été Sélectionnez l‘heure d‘été. (Disponible uniquement
» Le réglage par défaut de la mise à jour automatique de l‘heure est
„Mise à jour à partir du réseau“. Si vous souhaitez régler manuellement
l‘heure, il est recommandé de désactiver la fonction de mise à jour au
tomatique.
Sélectionnez un fuseau horaire. (Disponible uniquement
lorsque la mise à jour automatique à partir du réseau est
activée.)
lorsque la mise à jour automatique à partir du réseau est
activée.)
/ /
Standby inactif
Utilisez le mode Standby inactif pour éteindre l‘appareil après un certain temps
en mode lecture.
1. En mode Paramètres système, appuyez sur les touches
lectionner Standby inactif puis appuyez sur la touche SELECT pour confirmer.
2. Appuyez sur les touches
heures, 4 heures, 5 heures et 6 heures. Appuyez sur SELECT pour confirmer.
/ / pour sélectionner entre Désactivé, 2
/ / pour sé-
Langue
1. En mode Paramètres système, appuyez sur les touches
lectionner Langue puis appuyez sur la touche SELECT pour confirmer.
2. Appuyez sur les touches
votre choix.
3. Appuyez sur la touche SELECT pour confirmer.
/ / pour changer la langue d‘affichage de
/ / pour sé-
-
71
Page 72
MODE D‘EMPLOI
Réinitialisation d‘usine
Il se peut que vous deviez parfois réinitialiser votre appareil aux réglages d‘usine,
en particulier lorsque vous avez déménagé. Si vous rencontrez des problèmes de
réception, vous voudrez peut-être réinitialiser et réessayer. Si vous vous déplacez
dans une autre partie du pays et que vous captez les stations DAB locales et nationales dans cette zone, il se peut que vos stations précédemment programmées
ne soient plus disponibles.
1. En mode Paramètres système, Appuyez sur les touches
sélectionner Remise à zéro usine, puis appuyez sur la touche SELECT pour
confirmer.
2. Appuyez sur les touches
la touche SELECT pour confirmer ou sélectionnez [Non] pour annuler.
» Après la réinitialisation du système, toutes les stations enregistrées,
Internet, DAB et FM préréglées sont effacées.
/
pour sélectionner [Oui], puis appuyez sur
Mise à jour du logiciel
1. En mode Paramètres système, appuyez sur les touches
sélectionner Mise à jour du logiciel puis appuyez sur la touche SELECT pour
confirmer.
2. Appuyez sur les touches
„Check now“, et ensuite appuyez sur la touche SELECT pour confirmer.
» Avant de télécharger le logiciel, assurez-vous que la radio est branchée
sur une prise secteur stable.
» L‘interruption de l‘alimentation secteur pendant le téléchargement du
logiciel peut entraîner des perturbations de fonctionnement et/ou en
dommager l‘appareil !
/ / pour sélectionner „Auto-check setting“ ou
Assistant d‘installation
L‘assistant d‘installation est disponible dans la section Paramètres système ; vous
pouvez le lancer pour configurer les paramètres de date/heure et de réseau. Une
fois cette opération terminée, votre radio est prête à être utilisée.
Info
1. En mode Paramètres système, appuyez sur les touches / / pour sélectionner Info puis appuyez sur la touche SELECT pour confirmer.
2. La version du logiciel, le numéro d‘identification de la radio et le nom d‘utilisateur s‘affichent à l‘écran.
/ / pour
/ / pour
-
72
Page 73
MODE D‘EMPLOI
Politique de confidentialité
Pour voir la page Politique de confidentialité, appuyez sur MENU pour aller dans
Paramètres système - Politique de confidentialité.
Après la réinitialisation d‘usine, vous devez accepter à nouveau la Politique de
confidentialité.
Rétroéclairage
1. En mode Paramètres système, appuyez sur les touches
tionner Rétroéclairage puis appuyez sur la touche SELECT pour confirmer.
2. Pour les autres réglages sous Rétroéclairage, appuyez sur les touches
pour sélectionner les options suivantes puis appuyez sur la touche SELECT
pour confirmer.
Hors délai On / 10 sec / 20 sec / 30 sec / 45 sec / 60 sec /
Niveau d'alimentation Élevée / Moyenne / Faible
Niveau de standby Moyen / Faible
90 sec / 120 sec / 180 sec
Radio Internet
Pour écouter la radio Internet, votre radio doit
être connectée à Internet. Essayez de positionner votre radio aussi près que possible de votre
routeur pour obtenir les meilleures vitesses de
connexion. Lorsque le mode Radio Internet est
sélectionné, la radio se connecte au portail radio
Internet Frontier Silicon pour télécharger une liste
de stations. Une fois qu‘une station est sélectionnée, la radio se connecte directement à cette station.
/ / pour sélec-
/ /
Appuyez sur la touche MODE de l‘appareil ou de la télécommande, puis appuyez
sur les touches
/ /
Appuyez sur la touche VOLUME/SELECT/SNOOZE de l‘appareil ou sur la touche
SELECT de la télécommande pour confirmer.
/ /
de la télécommande pour sélectionner le mode „Radio Internet“.
de l‘appareil ou sur les touches
/
/ /
73
Page 74
MODE D‘EMPLOI
Liste des stations
En mode Radio Internet, appuyez et maintenez enfoncé la touche INFO/MENU
de l‘appareil ou appuyez sur la touche MENU de la télécommande pour aller dans
le menu.
Appuyez sur les touches
appuyez sur la touche SELECT pour confirmer.
Lorsque la radio Internet est redémarrée, les dernières stations écoutées sont
automatiquement sélectionnées. Pour revenir à [Liste des stations], appuyez
sur la touche BACK.
Si c‘est la première fois que vous écoutez la radio Internet, la radio sera dans
[Liste des stations].
1. Appuyez sur les touches
puis appuyez sur la touche SELECT pour confirmer.
/ / pour sélectionner [Liste des stations] et
/ / pour sélectionner les options suivantes
Pays Vous pouvez rechercher spécifiquement les stations de
Historique Vous pouvez sélectionner une station récemment utilisée
Rechercher Vous pouvez rechercher des stations à l'aide de différents
Emplacement Vous pouvez sélectionner des stations à partir d'une liste
Populaire Sélectionnez une station à partir d'une liste des stations
Découvrir Sélectionnez des stations de différentes catégories dans le
Appuyez sur la touche BACK de l‘appareil ou de la télécommande pour remonter
d‘un niveau de menu.
votre pays. Dans ce cadre, il affichera les stations de radio
locales dans votre région.
dans cette catégorie, les stations les plus récentes apparaissant en haut de la liste.
mots-clés. Le nom et la description de la station sélectionnée s'affichent à l'écran.
de pays disponibles
Internet les plus populaires dans le monde entier.
menu : Origine, Genre ou Langue.
74
Page 75
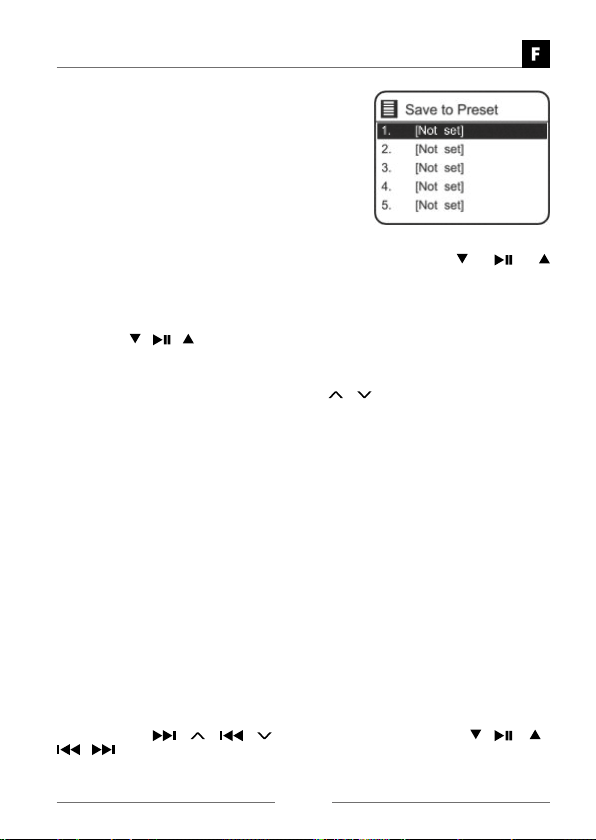
MODE D‘EMPLOI
Stations préréglées
Les stations de radio Internet préréglées sont mémorisées dans la radio et ne sont pas accessibles
à partir d‘autres radios.
1. Pour mémoriser un préréglage, vous devez
d‘abord écouter la station que vous souhaitez
mémoriser. Appuyez sur la touche PRESET et
maintenez-la enfoncée jusqu‘à ce que l‘affichage indique „Enregistrer en préréglage“.
2. Sélectionnez l‘un des 10 préréglages pour mémoriser la station actuelle en appuyant sur les touches
et appuyez sur la touche SELECT pour confirmer.
Rappel d‘une station enregistrée
1. Pour sélectionner un préréglage, appuyez sur la touche PRESET, puis sur les
touches
2. Appuyez sur la touche SELECT pour confirmer.
Alternativement,
• Appuyez sur les touches Preset/Folder
l‘autre dans la liste des stations préréglées.
• Ou appuyez sur les touches numériques de la télécommande pour passer à la
station préréglée („0“ pour la station préréglée 10).
• S‘il n‘y a pas de station sauvegardée, le message „Preset empty“ s‘affiche.
/ / pour sélectionner l‘une des stations préréglées énumérées.
/ pour passer d‘une station à
» Le fonctionnement des stations de préréglage et de rappel est le même
pour Radio Internet, Podcasts, DAB et FM.
Modes d‘affichage de la radio Internet
Chaque fois que vous appuyez sur la touche INFO/MENU de l‘appareil ou sur la
touche INFO de la télécommande, l‘écran affiche les modes suivants :
Channel Info/Description - Language/Location - Bit rate/Sound format /
Sampling rate - Playback buffer - Date
/ /
PODCASTS
Pour écouter des podcasts, votre radio doit être connectée à Internet. Essayez de
positionner votre radio aussi près que possible de votre routeur pour obtenir les
meilleures vitesses de connexion.
Appuyez sur le bouton MODE de l‘appareil ou de la télécommande, puis appuyez
sur les touches
/ de la télécommande pour sélectionner le mode „Podcasts“. Appuyez sur
la touche VOLUME/SELECT/SNOOZE de l‘appareil ou sur la touche SELECT de
la télécommande pour confirmer.
/ /
de l‘appareil ou sur les touches
/
75
/ / /
Page 76
MODE D‘EMPLOI
Lorsque la radio est redémarrée, la dernière station écoutée est automatiquement
sélectionnée. Pour revenir à la [Liste des podcasts], appuyez sur la touche BACK.
Si c‘est la première fois que vous écoutez des Podcasts radio, la radio sera dans
[Liste des podcasts].
1. Appuyez sur les touches
puis appuyez sur la touche SELECT pour confirmer.
/ / pour sélectionner les options suivantes
Pays "Vous pouvez rechercher spécifiquement les stations de votre
Rechercher Vous pouvez rechercher des stations à l'aide de différents
Populaire Sélectionnez une station dans la liste des stations Internet
Emplacement Vous pouvez sélectionner des stations à partir d'une liste de
Découvrir Sélectionnez des stations de différentes catégories dans le
Appuyez sur la touche BACK de l‘appareil ou de la télécommande pour remonter
d‘un niveau de menu.
pays. Dans ce cadre, les stations de radio locales dans votre
région seront affichées.
mots-clés. Le nom et la description de la station sélectionnée
s'affichent à l'écran.
les plus populaires dans le monde entier.
pays disponibles
menu : Origine, Genre ou Langue.
Enregistrement et rappel d‘une station préréglée
Reportez-vous aux sections „Stations préréglées“ et „Rappel d‘une station enregistrée“ de la section Radio Internet pour obtenir des instructions.
FONCTIONNEMENT DAB
Appuyez sur la touche MODE de l‘appareil ou de
la télécommande, appuyez sur les touches
/
/
sélectionner le mode „DAB radio“. Appuyez sur la
touche VOLUME/SELECT/SNOOZE de l‘appareil
ou sur la touche SELECT de la télécommande
pour confirmer. L‘appareil entre en mode DAB et
exécute la fonction de la recherche automatique.
Pendant la recherche, l‘écran affiche „Recherche en cours... „ ainsi qu‘une barre de
défilement qui indique la progression de la recherche et le nombre de stations qui
ont été trouvées jusqu‘ici. Une fois la recherche terminée, l‘appareil sélectionne la
première station alphanumérique trouvée.
Pour passer les stations trouvées en revue, appuyez sur les touches
/
de l‘appareil ou sur les touches
/
/ / /
pour sélectionner et appuyez sur la touche SELECT pour confirmer.
de la télécommande pour
76
/
/ /
Page 77
MODE D‘EMPLOI
Liste des stations
1. En mode DAB, appuyez sur la touche MENU pour aller dans le menu DAB.
2. Appuyez sur les touches
ensuite appuyez sur la touche SELECT pour confirmer.
3. Une liste des stations DAB s‘affiche à l‘écran.
Recherche automatique
Appuyez sur la touche MENU, puis appuyez sur les touches
lectionner Rechercher. Appuyez sur la touche SELECT pour confirmer l‘activation
de la recherche automatique.
1. L‘écran affiche : “Recherche...” avec une barre de défilement progressive.
2. Toutes les stations qui ont été trouvées sont enregistrées automatiquement.
Pour passer les stations trouvées en revue et les écouter, appuyez sur les
touches
confirmer.
/ / pour sélectionner puis appuyez sur la touche SELECT pour
Réglage manuel
En plus de la fonction d‘auto-réglage, vous pouvez régler manuellement le récepteur. Cela peut vous aider lors de l‘alignement de votre antenne ou lors de l‘ajout
de stations qui n‘ont pas été réglés lors du réglage automatique.
1. Appuyez sur MENU sur la télécommande pour afficher le menu.
2. Appuyez sur les touches
appuyez sur la touche SELECT pour confirmer.
3. L‘écran affiche le multiplex 5A à 13F.
4. Appuyez sur les touches
la touche SELECT pour confirmer.
5. Affichez maintenant la liste des stations et vous trouverez toutes les nouvelles
stations de radio qui ont été réglées manuellement.
MODES D‘AFFICHAGE DAB
Chaque fois que vous appuyez sur la touche INFO/MENU de l‘appareil ou sur la
touche INFO de la télécommande, l‘écran affiche les modes suivants :
DLS - Type de programme - Ensemble/Fréquence - Erreur de signal/Fréquence - Débit binaire/Codec/Canaux - Date
DLS (Dynamic Label Segment)
Il s‘agit d‘un message défilant donnant des informations en temps réel, par
exemple les titres des chansons, les titres des informations, etc.
/ / pour sélectionner Liste des stations et
/ / pour sé-
/ / pour sélectionner Réglage manuel, et
/ / pour sélectionner le canal, et appuyez sur
77
Page 78
MODE D‘EMPLOI
Type de programme
Décrit le „style“ ou le „genre“ de l‘émission diffusée.
Nom de l‘ensemble/fréquence
Affiche le nom du multiplex qui contient la station que vous écoutez et la fréquence. Un multiplex est un ensemble de stations de radio regroupées et transmises sur une seule fréquence. Il existe des multiplex nationaux et locaux. Les
stations locales contiennent des stations qui sont spécifiques à cette région.
Erreur de signal / puissance du signal
L‘erreur est affichée sous la forme d‘un nombre. Si le nombre est 0, cela signifie
que le signal reçu est exempt d‘erreur et que la puissance du signal est élevée. Si
le taux d‘erreur est élevé, il est recommandé de repositionner l‘antenne radio ou
l‘appareil. L‘écran affiche alors une barre coulissante pour indiquer l‘intensité du
signal, plus le signal est fort, plus la barre est longue de gauche à droite.
Débit binaire / Codec / Canaux
L‘écran affiche le débit binaire audio numérique reçu avec des informations supplémentaires sur le codec audio et la configuration des canaux.
Date
Affiche la date du jour fournie automatiquement par le radiodiffuseur.
Élagage invalide
Vous pouvez supprimer toutes les stations indisponibles de la liste.
1. En mode DAB, appuyez sur la touche MENU puis sur les touches
pour sélectionner Élagage invalide, appuyez sur SELECT pour confirmer.
2. Appuyez sur les touches
touche SELECT pour confirmer, ou sélectionnez NON pour annuler.
/
pour sélectionner OUI puis appuyez sur la
DRC (Dynamic Range Compression - Compression de la
plage dynamique)
Si vous écoutez de la musique avec une plage dynamique élevée dans un environnement bruyant, vous voudrez peut-être compresser la plage dynamique audio.
1. En mode DAB, appuyez sur la touche MENU puis sur les touches
pour sélectionner DRC, appuyez sur la touche SELECT pour confirmer.
2. Appuyez sur les touches
Éteinte puis appuyez la touche SELECT pour confirmer le réglage.
/
pour sélectionner DRC Haute/Faible/
/ /
/ /
78
Page 79
MODE D‘EMPLOI
Ordre des stations
Vous pouvez organiser l‘ordre d‘inscription des stations.
1. En mode DAB, appuyez sur la touche MENU puis sur les touches
pour sélectionner Ordre des stations, appuyez sur SELECT pour confirmer.
2. Appuyez sur les touches
sembler / Ordre valide et appuyez sur la touche SELECT pour confirmer le
réglage.
/ / pour sélectionner Alphanumérique / As-
Enregistrement et rappel d‘une station préréglée
Reportez-vous aux sections „Stations préréglées“ et „Rappel d‘une station enregistrée“ de la section Radio Internet pour obtenir des instructions.
FONCTIONNEMENT FM
Pour passer l‘appareil en mode FM, appuyez sur
la touche Mode de l‘appareil ou de la télécommande, appuyez sur les touches
de l‘appareil ou sur les touches
/ de la télécommande pour sélectionner
le mode „Radio FM“. Appuyez sur le gros bouton VOLUME/SELECT/SNOOZE de l‘appareil ou
sur la touche SELECT de la télécommande pour
confirmer.
L‘écran affiche la fréquence.
Recherche automatique
• Appuyez sur la touche SCAN pour commencer à rechercher une station. Une fois
qu‘une station a été trouvée, la recherche s‘arrête automatiquement.
Alternativement,
• Maintenez enfoncées les touches
une station.
» La recherche peut ne pas s‘arrêter à une station dont le signal est très
faible.
Réglage manuel
Pour rechercher manuellement les stations FM, appuyez sur les touches / /
à plusieurs reprises jusqu‘à obtenir la fréquence désirée.
/ /
/ / /
/
/ / pour commencer à rechercher
/ /
» Avec la radio FM, il peut être nécessaire d‘affiner le réglage de chaque
station en appuyant sur
sion ajuste la fréquence de 0,05 MHz. Si la réception est encore mauvaise, réglez la position de l‘antenne ou essayez de déplacer la radio à
un autre endroit.
/ /
à plusieurs reprises. Chaque pres-
79
Page 80
MODE D‘EMPLOI
Modes d‘affichage FM
Chaque fois que vous appuyez sur la touche INFO/MENU de l‘appareil ou sur la
touche INFO de la télécommande, l‘écran affiche les modes suivants : Texte radio
- Type de programme - Fréquence - Date
Texte radio RDS
Il s‘agit d‘un message défilant contenant des informations sur le programme en
cours.
Type de programme
Ceci décrit le „Style“ ou le „Genre“ de la musique qui est diffusée.
Nom de la station / Fréquence
Lorsqu‘une station RDS est reçue, le nom de cette station est affiché, ou sinon la
fréquence est affichée.
Date
Affiche la date du jour fournie automatiquement par le radiodiffuseur.
Réglage de la recherche
1. Appuyez sur la touche MENU pour aller dans le menu FM.
2. Appuyez sur les touches
puis appuyez sur la touche SELECT pour confirmer.
3. Appuyez sur les touches
ment un signal fort puis appuyez sur la touche SELECT pour confirmer.
Réglage audio
1. Appuyez sur la touche MONO/ST. de la télécommande pour passer de Mono
uniquement à Mono/Stéréo.
Alternativement,
1. Appuyez sur la touche MENU pour accéder au menu principal.
2. Appuyez sur les touches
appuyez sur la touche SELECT pour confirmer.
3. Appuyez sur les touches
mono uniquement ou NON pour laisser l‘appareil sélectionner Stéréo ou Mono
automatiquement.
4. Appuyez sur la touche SELECT pour confirmer.
Enregistrement et rappel d‘une station préréglée
Reportez-vous aux sections „Stations préréglées“ et „Rappel d‘une station enregistrée“ de la section Radio Internet pour obtenir des instructions.
/ / pour sélectionner Réglage de la recherche
/
pour sélectionner Oui pour recevoir unique-
/ / pour sélectionner Réglage audio puis
/
pour sélectionner OUI pour écouter en
80
Page 81
MODE D‘EMPLOI
FONCTIONNEMENT BLUETOOTH®
L‘appareil dispose d‘une fonction Bluetooth® qui peut recevoir un signal dans un
rayon de 8 mètres. Associez l‘appareil à un appareil Bluetooth
la musique :
1. Appuyez sur le bouton MODE de l‘appareil ou de la télécommande, puis appuyez sur les touches
de l‘appareil ou sur les touches
pour sélectionner le mode audio „Audio Bluetooth
VOLUME/SELECT/SNOOZE de l‘appareil ou sur la touche SELECT de la té-
lécommande pour confirmer. Le logo Bluetooth
indiquer que l‘appareil est en mode appairage.
2. Activez votre appareil Bluetooth
3.
„DAB 650“
nez
connecté, le logo Bluetooth
maintenant appairé avec l‘appareil.
4. Appuyez et maintenez enfoncé la touche
touche
®
th
d‘établir la connexion avec l‘appareil.
5. Pour déconnecter la fonction Bluetooth
pareil ou désactivez-la de votre appareil Bluetooth
apparaîtra sur votre liste de périphériques Bluetooth®. Sélection-
„DAB 650“
existante, avec d‘autres périphériques Bluetooth® capables de localiser et
et entrez „0000“ comme mot de passe si nécessaire. Une fois
/
de la télécommande pour déconnecter la connexion Bluetoo-
Lecture de musique via Bluetooth
Vous devrez peut-être régler le volume de votre radio et de votre appareil Blue-
®
.
tooth
• Appuyez sur la touche
télécommande pour lire/mettre en pause un morceau pour
• Appuyez sur les touches
/
de la télécommande pour passer à la piste précédente/suivante.
» La portée opérationnelle entre l‘appareil et l‘appareil est d‘environ 8
mètres.
» Pour une meilleure réception du signal, supprimez tout obstacle entre
l‘appareil et le périphérique Bluetooth
» La compatibilité avec tous les appareils et types de supports n‘est pas
garantie.
» Certains téléphones mobiles dotés de la fonction Bluetooth
connecter et se déconnecter lorsque vous effectuez et terminez des ap
pels. Ceci n‘est pas une indication d‘un problème avec votre appareil.
/ / / /
®
commence à clignoter pour
®
et sélectionnez le mode de recherche.
®
à l‘écran cesse de clignoter. Votre appareil est
/SCAN sur l‘unité ou sur la
®
, passez à une autre fonction de l‘ap-
®
/SCAN de l‘appareil ou sur la touche
/ /
de l‘appareil ou sur les touches
/
®
.
®
pour écouter de
/ /
de la télécommande
®
“. Appuyez sur la touche
®
.
/
/
®
peuvent se
de la
-
81
Page 82
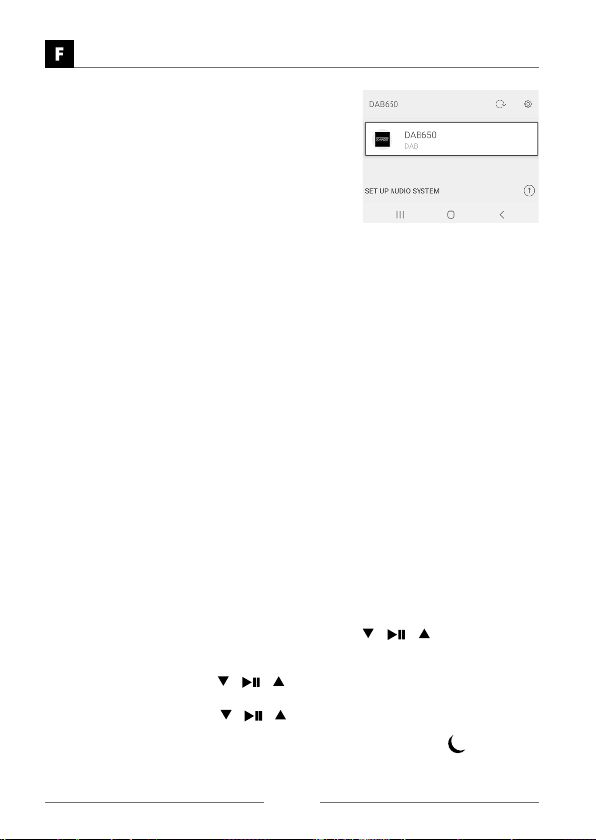
MODE D‘EMPLOI
NET REMOTE -
L‘appareil assure une fonctionnalité NetRemote
par smartphone ou tablette dans iOS ou système
Android. En téléchargeant l‘application assignée
nommée UNDOK, vous pouvez voir tous les modes de Radio Internet, Podcasts, DAB, FM et
Bluetooth
Play ou Apple Store pour UNDOK app, et installez-le sur votre smartphone ou tablette.
Avant d‘utiliser l‘application UNDOK, assurez-vous que le périphérique et le smartphone ou la tablette sont dans le même réseau WiFi. Lancez l‘application.
L‘application initialise et recherche le périphérique dans le réseau. Appuyez sur
l‘appareil pour établir la connexion NetRemote.
• Lorsque le smartphone ou la tablette a déjà accédé une fois à l‘appareil, ils
• N‘oubliez pas que si un autre smartphone ou tablette avec l‘application dans le
Lorsque c‘est la première fois que vous connectez l‘appareil à l‘appareil, l‘application peut vous demander d‘entrer le code PIN. Le code PIN par défaut est 1234.
Pour plus d‘informations sur la modification du code PIN de sécurité, reportez-vous
à la section Paramètres du système: Réseau - Configuration PIN NetRe-
mote.
Sélectionnez le mode désiré dans la page principale. Vous pouvez alors contrôler
le mode sélectionné sur votre smartphone ou tablette et sur l‘appareil simultanément.
®
. Recherchez UNDOK dans Google
se connectent automatiquement la prochaine fois que vous ouvrez à nouveau
l‘application.
même réseau a accès à l‘appareil, la connexion originale sera coupée.
App UNDOK
RÉGLAGE DE LA MISE EN VEILLE (SLEEP)
Cette fonction vous permet de programmer l‘appareil pour qu‘il passe automatiquement en mode veille après une période de temps spécifiée.
1. Appuyez sur la touche SLEEP de la télécommande. En appuyant plusieurs fois
sur la touche Sleep de la télécommande, vous pouvez choisir entre Sleep Off,
Sleep in 15, 30 ou 45 minutes.
2. Pour activer la fonction Veille, appuyez d‘abord sur la touche MENU.pour afficher le menu principal. Appuyez sur les boutons
Menu principal et appuyez sur le bouton SELECT pour confirmer votre sélec-
tion.
3. Appuyez sur les touches
la touche SELECT pour confirmer votre sélection.
4. Appuyez sur les touches
veille, puis appuyez sur la touche SELECT pour confirmer votre sélection.
5. Lorsque la minuterie de sommeil souhaitée est activée, un “
l‘écran. De plus, le temps restant jusqu‘à ce que la minuterie de mise en veille
soit désactivée s‘affiche à côté de l‘icône sur l‘écran.
/ / pour sélectionner Veille, puis appuyez sur
/ / pour sélectionner la minuterie de mise en
82
/ / pour sélectionner
” s‘affiche à
Page 83
MODE D‘EMPLOI
6. Lorsque le compte à rebours de la minuterie de mise en veille atteint zéro,
l‘appareil passe en mode veille. Pour désactiver la fonction sommeil pendant le
compte à rebours, répétez les étapes 1 à 3 et sélectionnez SLEEP MODE OFF.
RÉGLAGE DE L‘ALARME
1. Appuyez sur la touche ALARME de la télécommande, l‘affichage indique
„Alarme (1 ou 2) : Désact. [hh:mm]”.
2. Appuyez sur les touches
ou 2) puis appuyez sur la touche SELECT pour commencer à régler les paramètres suivants.
Appuyez sur les touches
touche SELECT pour confirmer
Activer Off/ Quotidien/ Une fois/ Week-end/ Jours de la semaine
Heure (Alarme à l'heure)
Mode Buzz/ Radio Internet/ DAB/ FM
Préréglage Dernière écoute/ (station préréglée)
Volume 0-32
Enregistrer Enregistrer et confirmer le réglage de l'alarme
3. Enfin, sélectionnez „Enregistrer“ et appuyez sur la touche SELECT pour enregistrer le réglage de l‘alarme. L‘écran affiche Alarme enregistrée. Lorsque
l‘alarme est réglée, l‘icône d‘alarme apparaît à l‘écran.
4. Pour désactiver temporairement l‘alarme, appuyez sur la touche VOLUME/
SELECT/SNOOZE de l‘appareil ou sur la touche SNOOZE de la télécommande
pour activer la fonction Rappel de réveil lorsque l‘alarme retentit. Appuyer plusieurs fois sur la touche VOLUME/SELECT/SNOOZE de l‘appareil ou SNOOZE de la télécommande pour définir la durée de la période de rappel de réveil
entre 5, 10, 15 et 30 minutes. Le temps de rappel d‘alarme réglé s‘affiche à
l‘écran et l‘appareil se met en mode standby.
5. Pour éteindre l‘alarme quand elle sonne, appuyez sur la touche
touche ALARM .
/ / pour sélectionner le numéro d‘alarme (1
/ /
pour sélectionner puis appuyez sur la
ou sur la
Pour annuler l‘alarme, se reporter aux étapes 1 à 3 pour la désactiver. L‘icône
d‘alarme disparaît de l‘affichage.
83
Page 84
MODE D‘EMPLOI
UTILISATION D‘ÉCOUTEURS
Vous pouvez brancher vos écouteurs (non inclus) en les branchant dans la prise
pour écouteurs à l‘arrière de l‘appareil. Baissez le volume avant de brancher les
écouteurs. Augmentez lentement le volume avec les écouteurs allumés jusqu‘à ce
que vous atteigniez le niveau désiré.
» L‘exposition prolongée à de la musique forte peut causer des dommages
auditifs. Il est préférable d‘éviter un volume sonore excessif lors de l‘utili
sation des écouteurs, en particulier pendant de longues périodes de temps
MAINTENANCE
Nettoyage de l‘appareil
Assurez-vous que l‘appareil est complètement débranché de la prise de courant
avant de le nettoyer.
• Pour nettoyer l‘appareil, essuyez le boîtier avec un chiffon légèrement humide
et non pelucheux.
• N‘utilisez pas de produits de nettoyage contenant de l‘alcool, de l‘ammoniaque
ou des abrasifs.
• Ne pas pulvériser d‘aérosol sur ou à proximité de l‘appareil.
Conseils et astuces
Si un problème survient, il peut souvent être dû à quelque chose de très mineur. Le
tableau suivant contient divers conseils. Si vous avez besoin d‘aide supplémentaire.
GÉNÉRAL
Problème Solution
Pas d'électricité. • Assurez-vous que la prise secteur est branchée.
Pas de son de l'appareil. • Veuillez essayer l‘une ou l‘autre des solutions
L'appareil ne réagit pas
lorsqu'on appuie sur un
bouton.
• Assurez-vous que vous avez bien sélectionné le
mode Marche.
ci-dessous :
• Assurez-vous que l‘appareil n‘est pas mis en
sourdine. Appuyez sur VOL +/- pour reprendre
une écoute normale.
• Appuyez sur la touche Standby de l‘appareil pour
le mettre en mode standby. Appuyez de nouveau
sur la touche pour allumer l‘appareil.
• Débranchez l‘appareil de la prise de courant, puis
rebranchez-le. Allumez l‘appareil.
L‘appareil peut se figer pendant son utilisation. Mettre
l‘appareil hors tension, puis de nouveau sous tension
sur la prise de courant pour réinitialiser l‘appareil.
84
-
Page 85
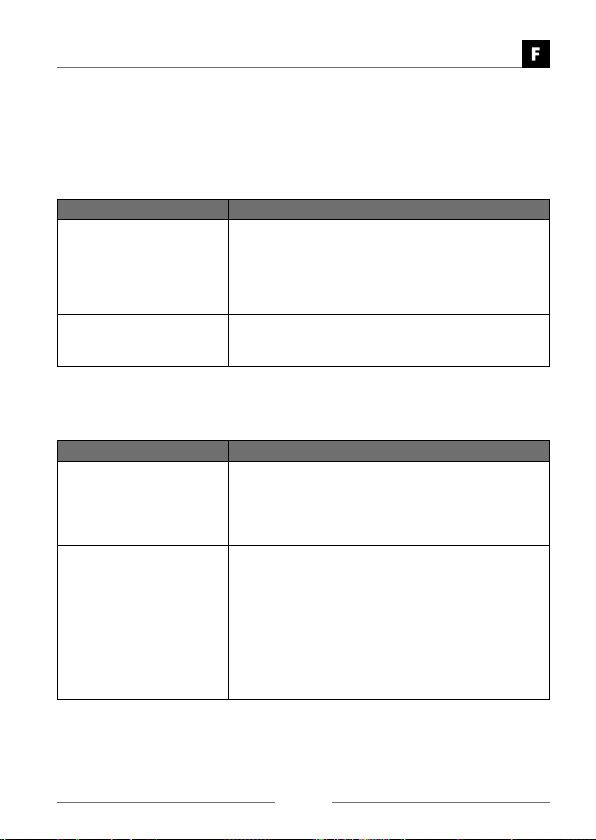
MODE D‘EMPLOI
Le produit peut générer du bruit (signal 1KHz) en présence de champs électromagnétiques forts, en cas de dysfonctionnement dû à ces champs électromagnétiques importants, l‘utilisateur doit attendre la reprise du fonctionnement normal
sans intervenir.
RADIO DAB/FM
Problème Solution
Mauvaise réception radio. • Assurez-vous que l‘antenne DAB/FM est complè-
La station désirée n'a pas
été trouvée.
INTERNETRADIO
Problème Solution
Pas de connexion. • Assurez-vous que le routeur Wi-Fi est branché et
Station de radio inaudible • Parfois, la connexion Wi-Fi est temporairement
tement déployée.
• Les interférences électriques dans votre maison
peuvent causer une mauvaise réception. Éloignez
en l‘appareil (en particulier les équipements comportant des moteurs et des transformateurs).
• Signal faible. Recherche manuelle.
• Si la réception est encore mauvaise, réglez la
position de l‘antenne.
fonctionne.
• Rebranchez la radio à votre routeur Wi-Fi.
• Vérifiez que votre radio se trouve à moins de 5 m
de votre routeur.
perdue ou la connexion est faible, vérifiez la
connexion Wi-Fi ou rapprochez la radio de votre
routeur.
• Les stations de radio ne transmettent pas toutes
24 heures sur 24, elles n‘émettent peut-être pas
en ce moment.
• Toutes les stations radio n‘émettent pas au même
niveau de volume, il se peut que vous ayez besoin d‘augmenter le volume.
85
Page 86
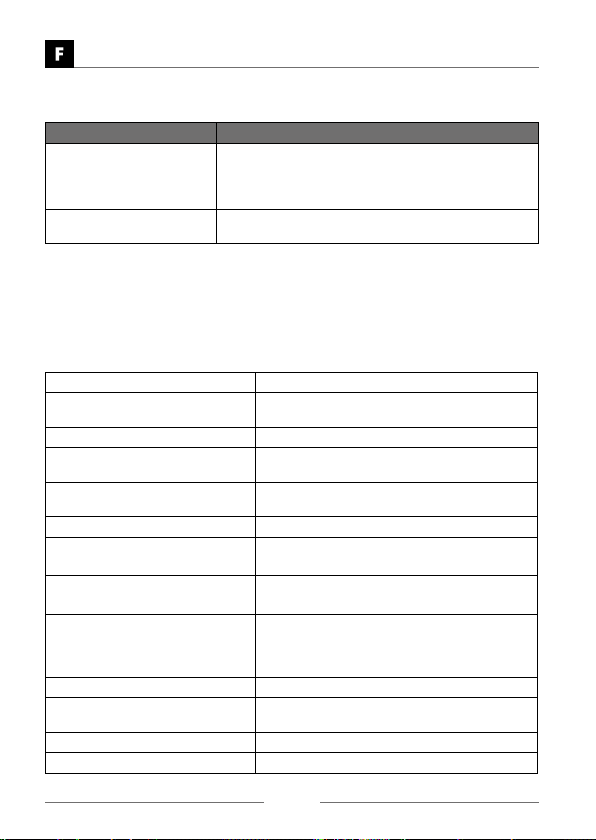
MODE D‘EMPLOI
BLUETOOTH
®
Problème Solution
®
Je ne trouve pas
„DAB650“ sur mon
périphérique Bluetooth
Musique inaudible • Il se peut que vous ayez besoin d‘augmenter le
En cas d‘anomalie de fonctionnement, débranchez l‘appareil de la prise de courant
et rebranchez-le.
• Assurez-vous que la fonction Bluetooth
vée sur votre appareil Bluetooth
®
.
• Reliez à nouveau l‘appareil à votre appareil Blue-
®
.
tooth
volume de la radio et de l‘appareil Bluetooth
est acti-
®
.
®
.
SPÉCIFICATIONS
Modèle DAB650 513
Source d'alimentation
Consommation d'énergie 27 W
Puissance de sortie de l‘en-
ceinte
Environnement de
travail - Température
Poids net ~ 1.800 g
Dimensions de l‘unité
(L) × (P) × (H)
Fréquence radio FM 87.50 – 108.00 MHz
Fabricant de l'alimentation
électrique / adresse
Numéro de modèle BQ30A-0903000-G
Tension et fréquence
d'entrée AC
Tension de sortie CC 9.0 V
Courant de sortie 3.0 A
Entrée : tension AC 100-240V ~50/60Hz, 1A
Sortie : Tension continue 9 V / 3,0 A
2 × 5 W RMS
0 ~ 35° C
300,6 x 158,6 x 115,6 mm
DAB 174.928 - 239.200 MHz
DONGGUAN BECKY ELECTRONICS TECH
CO., LTD, Yinyong Industrial Zone, Jinma
Road, HengLi Town, Dongguan City, Guangdong Province, China
100-240 V ~ 50-60 Hz Max. 800 mA
86
Page 87
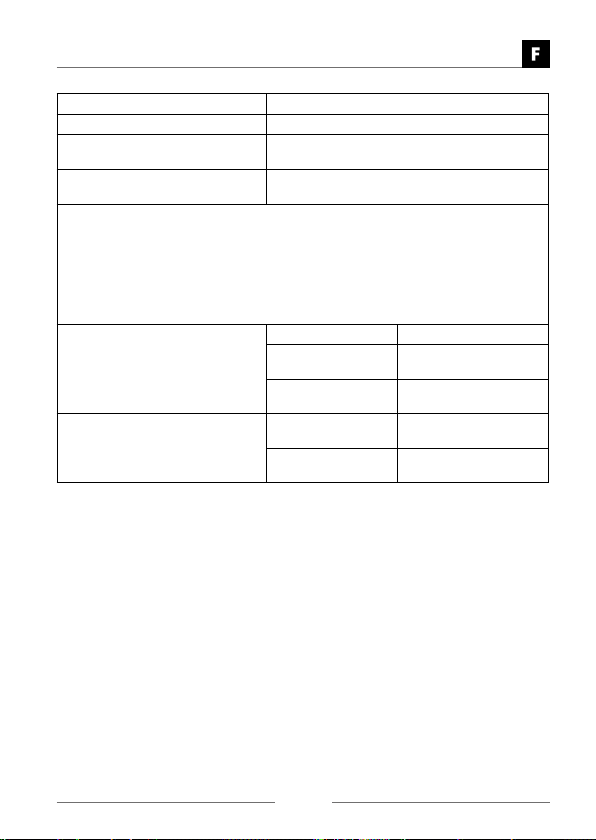
MODE D‘EMPLOI
Puissance de sortie 27.0 W
Rendement moyen 86.7%
Efficacité à faible charge
(10%)
Consommation électrique à
charge nulle
Comment activer le port réseau sans fil :
• Brancher l‘appareil sur le secteur
• Passer en mode sans fil (p. ex. Internet)
Comment désactiver le port réseau sans fil :
• Allez dans Menu principal - Paramètres système - Réseau - Garder
le réseau connecté. Sélectionnez Non et ensuite appuyez sur la touche
SELECT pour maintenir le réseau déconnecté
Version Bluetooth
Wifi Puissance d‘émis-
Consommation électrique en veille :
WLAN désactivé : < 1,00 W (mode de veille standard)
WLAN activé : < 2,00 W (mode veille du réseau)
» Remarque :
» Après environ 15 minutes, l‘appareil passe en mode standby réseau.
» La FM est exceptionnelle, elle est inappropriée pour l‘utilisation prévue
de l‘équipement si l‘appareil n‘a pas reçu de signal radio en mode FM.
» En mode radio Internet, podcasts, radio DAB et audio Bluetooth
reil passe automatiquement en mode standby après 15 minutes, en l‘absence de lecture audio. Appuyez sur la touche Standby pour reprendre.
®
77.0%
0.09W
Version V4.2
Puissance d‘émis-
sion maximale
Bande de fréquen-
ces
sion maximale
Bande de fréquen-
ces
2 dBm
2402 - 2480 MHz
15 dBm
2412 - 2472 MHz
®
, l‘appa-
Les caractéristiques et les spécifications sont sujettes à changement sans préavis.
87
Page 88
MODE D‘EMPLOI
Déclaration de conformité simplifiée selon les directives RED
Schwaiger GmbH déclare par la présente que le type d‘équipement radio décrit est
conforme à la directive 2014/53/EU et aux autres directives applicables au produit. Le texte complet de la déclaration de conformité UE est disponible à l’adresse
Internet suivante : http://konform.schwaiger.de
Élimination
Les appareils électriques et électroniques, ainsi que les piles ne doivent pas
être jetés avec les déchets ménagers. Le consommateur est légalement
tenu de remettre les appareils électriques et électroniques ainsi que les
piles à la fin de leur vie utile aux points de collecte publics installés dans ce
but ou au point de vente. Les aspects détaillés en sont réglementés par le droit
applicable de chaque pays. Le symbole du produit, le mode d‘emploi ainsi que
l‘emballage reportent expressément cette disposition.
Exclusion de responsabilité
Schwaiger Gmbh décline toute responsabilité ou garantie pour des dommages résultant d‘une installation ou d‘un assemblage incorrect, d‘une utilisation incorrecte
du produit ou du non-respect des instructions de sécurité.
Informations du fabricant
Chers clients, pour toute demande de conseil technique que votre revendeur n‘a
pas été en mesure de vous dispenser, contactez notre service d‘assistance technique.
Horaires d‘ouverture
(Assistance technique en langue allemande)
Du lundi au vendredi : de 08:00 à 17:00 heures
HOTLINE
+49 (09101) 702-299
88
Page 89
MANUALE ISTRUZIONI
PRECAUZIONI DI SICUREZZA
• Leggere attentamente tutte le istruzioni prima di utilizzare l‘apparecchio e conservarle per riferimenti futuri.
• Controllare che la tensione indicata sulla targhetta dei dati tecnici corrisponda
alla tensione di rete.
• L‘apparecchio deve essere collocato su una superficie piana e stabile e non deve
essere sottoposto a vibrazioni.
• Non collocare l‘apparecchio su superfici inclinate o instabili, in quanto l‘apparecchio potrebbe cadere o ribaltarsi.
• La presa di corrente deve essere situata vicino all‘apparecchio e deve essere
facilmente accessibile.
• Evitare temperature estreme, sia calde che fredde. Posizionare l‘apparecchio
lontano da fonti di calore come radiatori o fuochi a gas/elettrici. Evitare l‘esposizione diretta alla luce solare diretta e ad altre fonti di calore.
• Non collocare mai alcun tipo di candela o fiamma nuda sulla parte superiore o
vicino all‘apparecchio.
• Per ridurre il rischio di incendio, scossa elettrica o danni al prodotto, non esporre
l‘apparecchio a pioggia, umidità, gocce o schizzi. Non appoggiare sull‘apparecchio oggetti contenenti liquidi, come vasi.
• Il versamento di liquidi nell‘apparecchio può causare gravi danni. Spegnere immediatamente l‘apparecchio alla rete elettrica. Estrarre la spina di rete e rivolgersi al proprio rivenditore.
• Per evitare il rischio di scosse elettriche o incendi dovuti a surriscaldamento, assicurarsi che tende e altri materiali non ostruiscano le aperture di ventilazione.
• Non installare o collocare l‘apparecchio in una libreria, in un armadio a muro o in
un altro spazio confinato. Assicurarsi che intorno all‘apparecchio siano presenti
almeno 10 cm di spazio per la ventilazione.
Sicurezza
• Scollegare sempre l‘apparecchio dalla rete elettrica prima di collegare/scollegare altri dispositivi o di spostare l‘apparecchio.
• Scollegare l‘apparecchio dalla presa di corrente durante un temporale.
• L‘apparecchio si riscalda quando viene utilizzato per un lungo periodo di tempo.
Questo è normale e non indica un problema.
ATTENZIONE
RISCHIO DI SCOSSA
ELETTRICA NON APRIRE
Il simbolo del lampo con la punta a freccia,
all‘interno di un triangolo equilatero, avverte l‘utente della presenza di una „tensione
pericolosa“ non isolata all‘interno dell‘apparecchio che può essere di entità sufficiente a
costituire un rischio di scossa elettrica.
89
Page 90
MANUALE ISTRUZIONI
Il punto esclamativo all‘interno di un triangolo equilatero avverte l‘utente
della presenza di importanti istruzioni operative e di manutenzione (assistenza) nel manuale che accompagna l‘apparecchio.
Adattatore di rete
• Accertarsi che l‘apparecchio non sia appoggiato sul cavo dell‘adattatore di rete,
poiché il peso dell‘apparecchio potrebbe danneggiare il cavo e creare un pericolo
per la sicurezza.
• Se l‘adattatore di rete è danneggiato, deve essere sostituito dal produttore, dal
suo agente di assistenza o da personale qualificato per evitare rischi.
Interferenza
• Non collocare l‘apparecchio su o vicino ad apparecchi che possono causare interferenze elettromagnetiche. In caso contrario, ciò potrebbe influire negativamente
sulle prestazioni operative dell‘apparecchio e causare una distorsione del suono.
Supervisione
• I bambini devono essere sorvegliati per assicurarsi che non giochino con l‘apparecchio.
• Non lasciare che nessuno, specialmente i bambini, spinga mai qualcosa nei fori,
nelle fessure o in altre aperture del involucro - questo potrebbe causare una
scossa elettrica mortale.
Servizio/Manutenzione
• Per ridurre il rischio di scosse elettriche, non rimuovere le viti. L‘apparecchio non
contiene parti riparabili dall‘utente. Si prega di affidare tutti i lavori di manutenzione a personale qualificato.
• Non aprire i coperchi fissi, in quanto ciò potrebbe esporre a tensioni pericolose.
• Assicurarsi di scollegare l‘apparecchio dalla presa di corrente prima della pulizia.
• Non utilizzare alcun tipo di tampone abrasivo o soluzioni detergenti abrasive che
potrebbero danneggiare la superficie dell‘apparecchio.
• Non utilizzare liquidi per pulire l‘apparecchio.
Il simbolo indica la tensione continua
Il simbolo indica la polarità del connettore di alimentazione in c.c.
Il simbolo indica la tensione c.a.
Il simbolo indica apparecchi di classe II
Solo per uso interno
90
Page 91
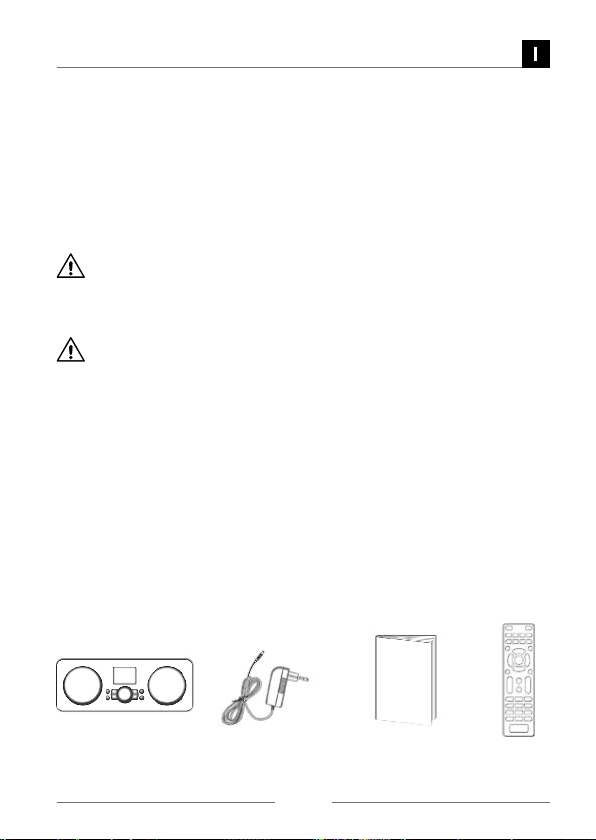
MANUALE ISTRUZIONI
RICICLAGGIO
Questo prodotto reca il simbolo di selezione selettiva dei Rifiuti di apparecchiature
elettriche ed elettroniche (RAEE). Ciò significa che questo prodotto deve essere
trattato in conformità alla direttiva europea 2012/19/UE per poter essere riciclato
o smontato per ridurre al minimo l‘impatto ambientale. L‘utente ha la scelta di
consegnare il proprio prodotto ad un‘organizzazione di riciclaggio competente o
al rivenditore quando acquista una nuova apparecchiatura elettrica o elettronica.
La spina di rete dell‘alimentatore viene utilizzata come dispositivo di disconnessione, la presa di corrente deve essere installata vicino all‘apparecchiatura e deve
essere facilmente accessibile.
ATTENZIONE
Pericolo di esplosione in caso di sostituzione della batteria con una batteria di
tipo errato.
AVVERTENZA
• Per evitare di sostituire una batteria con una di tipo errato
• Non smaltire una batteria nel fuoco o in un forno caldo, o meccanicamente
schiacciare o tagliare una batteria.
• Non lasciare una batteria in un ambiente circostante a temperature estremamente elevate.
• Evitare che la batteria sia sottoposta a una pressione dell‘aria estremamente
bassa.
• In un ambiente con disturbi a radiofrequenza, il prodotto potrebbe non funzionare correttamente e potrebbe autoripristinarsi quando l‘interferenza scompare.
DISIMBALLAGGIO
Rimuovere tutti gli articoli dalla confezione. Conservare l‘imballaggio. In caso di
smaltimento, si prega di farlo secondo le norme locali.
Sono inclusi i seguenti articoli:
Unità principale Adattatore di rete Manuale di istruzioni Telecomando
91
Page 92
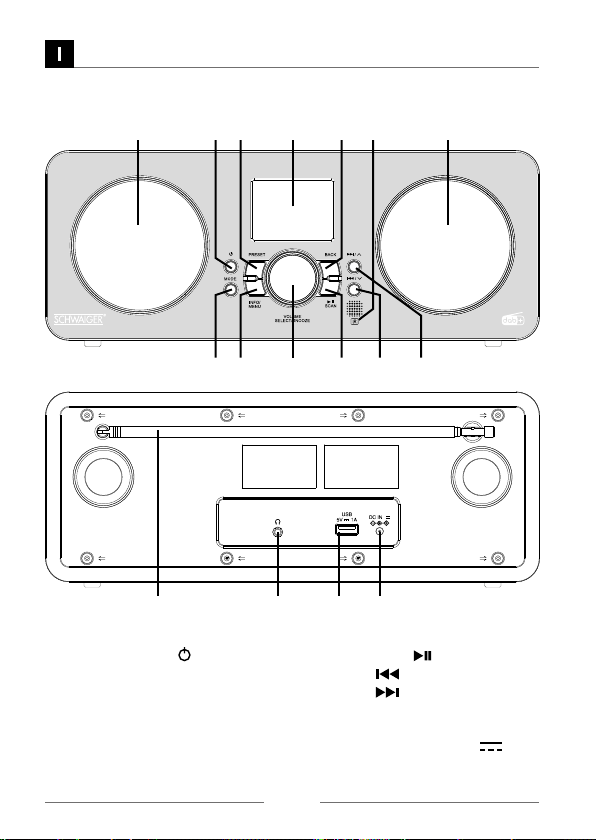
MANUALE ISTRUZIONI
PANORAMICA DEL PRODOTTO
2 3 5
7 8 11 12109
14 15 1613
1. ALTOPARLANTI
2. TASTO STANDBY
3. TASTO PRESET
4. DISPLAY
5. TASTO BACK
6. SENSORE DEL TELECOMANDO
7. TASTO MODE
8. TASTO INFO/MENU
9. VOLUME/SELECT/SNOOZE
10. TASTO SCAN
11. TASTO
12. TASTO
13. ASTA ANTENNA
14. PRESA JACK AURICOLARE
15. Porta di ricarica USB 5V 1A
16. PRESA DC IN
61 4 1
92
Page 93
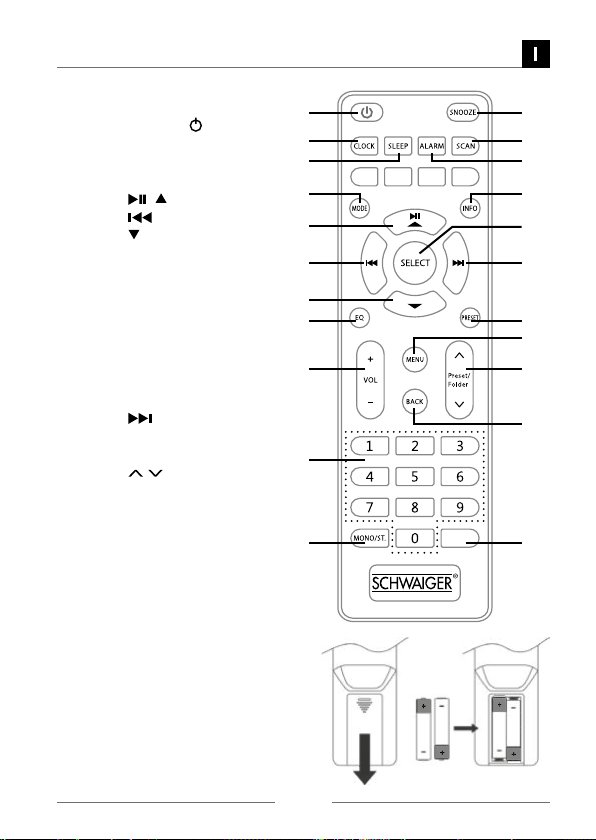
MANUALE ISTRUZIONI
TELECOMANDO
1. TASTO STANDBY
2. TASTO CLOCK
3. TASTO SLEEP
4. TASTO MODE
5. TASTO
6. TASTO
7. TASTO
8. TASTO EQ
9. TASTO VOLUME + / -
10. TASTI numerici
11. TASTO MONO/ST.
12. TASTO SNOOZE
13. TASTO SCAN
14. TASTO ALARM
15. TASTO INFO
16. TASTO SELECT
17. TASTO
18. TASTO PRESET
19. TASTO MENU
20. TASTO
21. TASTO BACK
22. TASTO MUTE
Sostituzione della batteria
del telecomando
1. Aprire il coperchio della batteria.
2. Inserire 2 batterie AAA (non incluse).
Accertarsi che le estremità (+) e (
-) della batteria corrispondano alle
estremità (+) e ( -) indicate nel vano
batteria.
3. Chiudere il coperchio
/
/ Preset/Folder
10
11
1 12
2
3
4
5
6
13
14
15
16
17
7
8
18
19
9
20
21
MUTE
22
93
Page 94
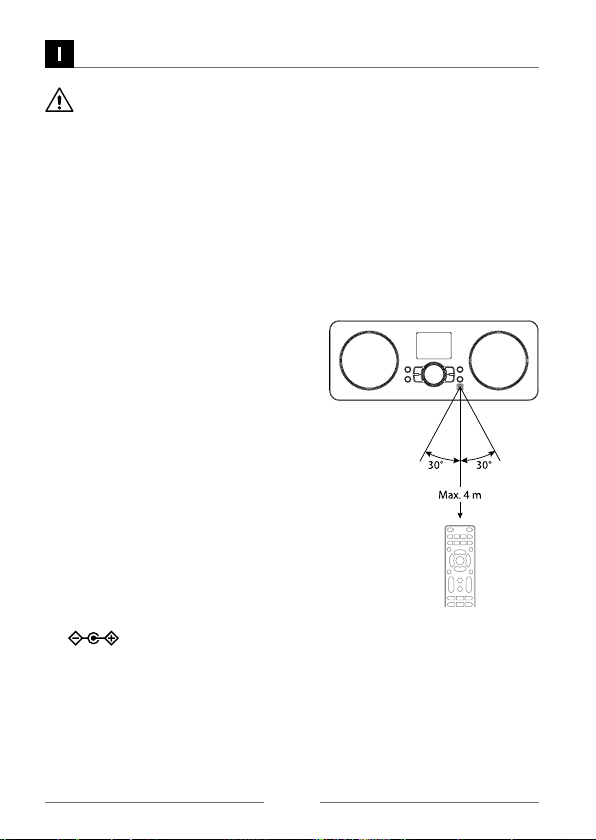
MANUALE ISTRUZIONI
Gestione delle batterie
» L‘uso improprio o scorretto delle batterie può causare corrosione o per-
dite, che potrebbero causare incendi, lesioni personali o danni materiali.
» Utilizzare esclusivamente il tipo di batteria indicato nel presente ma-
nuale.
» Non smaltire le batterie usate come rifiuto domestico. Smaltire le batte
rie in conformità con le normative locali.
» Rimuovere le batterie dal telecomando quando non viene utilizzata per
un lungo periodo di tempo, in quanto possono verificarsi corrosione o
perdite delle batterie, con conseguenti lesioni fisiche e/o danni mate
riali e/o incendi.
Raggio d‘azione del telecomando
Il sensore del telecomando sull‘apparecchio
frontale è sensibile ai comandi del telecomando fino ad un massimo di 4 metri di distanza ed entro un massimo di 60° d‘arco.
Si noti che la distanza di funzionamento può
variare a seconda della luminosità dell‘ambiente.
FONTE DI
ALIMENTAZIONE
Alimentazione di rete
Il collegamento dell‘apparecchio a qualsiasi
altra fonte di alimentazione lo può danneggiare.
1. Svolgere il cavo dell‘adattatore di rete
per l‘intera lunghezza. Collegare l‘estremità del cavo all‘ingresso DC IN
sul retro dell‘apparecchio, quindi collegare l‘adattatore di rete alla
presa di rete. Assicurarsi che l‘adattatore di rete sia saldamente inserito nella
presa di corrente. L‘apparecchio è ora pronto all‘uso.
2. Per spegnere completamente l‘apparecchio, scollegare l‘alimentatore dalla
presa di rete.
-
-
94
Page 95
MANUALE ISTRUZIONI
Ricarica dalla porta di ricarica USB
È possibile caricare il dispositivo attraverso la presa USB di questa apparecchio con
un cavo USB (non in dotazione).
• La corrente massima di ricarica USB è di 1A.
• Non sono garantiti tutti i dispositivi per la ricarica USB.
Collegamento di rete
Questo prodotto supporta solo la connessione di rete wireless per l‘accesso alla
rete e non supporta la connessione LAN cablata.
Rete senza fili
1. Controllare prima di tutto se le spie di controllo (LINK/ACT) del router si accendono.
2. Procedere con le operazioni descritte in „Impostazione iniziale”. Si raccomanda
di eseguire l‘installazione guidata nella sezione Impostazioni di sistema.
» Questo apparecchio non può essere collegato direttamente ad un mo-
dem autonomo. È necessario utilizzare un router o un modem incorporato con un router.
» Poiché esistono varie configurazioni di connessione, seguire le specifi-
che e le istruzioni dell‘operatore di telecomunicazioni, del provider di
servizi Internet e della guida all‘impostazione del router.
Impostazione iniziale
Quando si collega l‘apparecchio alla presa di rete, il display mostrerà la schermata
di benvenuto, quindi verrà visualizzato il menu Lingua, premere il tasto
/
per selezionare la lingua di vostra scelta, quindi premere il selettore VOLUME/
SELECT/SNOOZE sull‘apparecchio o il tasto SELECT sul telecomando per con-
fermare.
Poi si aprirà la pagina dell‘informativa sulla privacy.
Si prega di visitare il sito web menzionato nella pagina per i dettagli dell‘informa-
tiva sulla privacy. Premere il selettore VOLUME/SELECT/SNOOZE sull‘apparecchio o il tasto SELECT sul telecomando per il prossimo passo.
1. Per avviare l‘installazione guidata iniziale, premere il tasto
2. Premere i tasti
sull‘apparecchio oppure premere i tasti / / sul telecomando
/
sull‘apparecchio oppure i tasti
quindi premere il selettore VOLUME/SELECT/SNOOZE sull‘apparecchio o il
tasto SELECT sul telecomando per confermare.
telecomando per selezionare le seguenti opzioni, quindi premere il selettore
VOLUME/SELECT/SNOOZE sull‘apparecchio o il tasto SELECT sul teleco-
mando per confermare l‘impostazione:
/ /
sul telecomando per selezionare [SÌ],
/
sull‘apparecchio o i tasti
/
/ /
/
/
/ sul
/
95
Page 96
MANUALE ISTRUZIONI
Formato data e ora
12/24 ore
Aggiornamento
automatico
Impostare il fuso orario Selezionare un fuso orario. (Disponibile solo
Ora legale Selezionare l‘ora legale. (Disponibile solo quando
Impostazioni di rete Scegliere se mantenere la rete connessa. Sì/ No
3. Il display mostrerà „Scansione guidata di rete.......“. La radio effettuerà ora
una scansione della rete wireless, che potrebbe richiedere alcuni secondi, dopodiché sullo schermo apparirà un elenco di tutte le reti wireless. Premere il
/ /
tasto
sul telecomando per selezionare la rete wireless, quindi premere il selettore
VOLUME/ SELECT/SNOOZE sull‘apparecchio o il tasto SELECT sul teleco-
mando per confermare.
4. Premere il tasto
del telecomando per selezionare il pulsante /Pin/Skip WPS, quindi premere
/
VOLUME/SELECT/SNOOZE sull‘apparecchio o il tasto SELECT sul teleco-
mando per confermare.
Connessione tramite il tasto WPS sul router
La connessione tramite il pulsante WPS (Wi-Fi Protected Setup) del router è
un modo semplice e veloce per collegare la radio senza dover digitare una
password.
Se il tuo router ha un tasto WPS, noterai [WPS] nella parte anteriore del tuo
nome di rete.
5. Premere il tasto
6. Sullo schermo viene visualizzato un messaggio che invita a premere il pulsante
7. Premere il tasto VOLUME/SELECT/SNOOZE sull‘apparecchio o SELECT sul
del telecomando per selezionare Pulsante, quindi premere VOLUME/
/
SELECT/SNOOZE sull‘apparecchio o il tasto SELECT sul telecomando per
confermare.
WPS sul router. Premere il pulsante WPS sul router. Controllare il manuale di
istruzioni del router se non si è sicuri di quale pulsante è il WPS.
telecomando per confermare. La radio si collegherà ora al router, questo potrebbe richiedere alcuni secondi.
Impostazione del display a 12 ore o a 24 ore
Scegliere come si desidera che l‘ora venga
aggiornata automaticamente.
Aggiornamento da DAB/ Aggiornamento da FM/
Aggiornamento da rete/ Nessun aggiornamento
quando è attivo l‘aggiornamento automatico dalla
rete.)
è attivo l‘aggiornamento automatico dalla rete.)
sull‘apparecchio, oppure premere i tasti
/
/ /
/ /
sull‘apparecchio o premere i tasti /
/
sull‘apparecchio o premere i tasti /
/
/ /
96
Page 97
MANUALE ISTRUZIONI
Connessione utilizzando la password di rete wireless
Se il tuo router non ha un pulsante WPS ti verrà richiesto di inserire la pas-
sword della tua rete wireless, oppure puoi selezionare SKIP WPS che ti porta
anche alla schermata della password.
8. Premere il tasto
/ /
/
pria password. Quindi, premere VOLUME/SELECT/SNOOZE sull‘apparecchio
o il tasto SELECT sul telecomando per inserire la lettera/il numero selezionato.
9. Una volta inserita la password, premere il tasto
parecchio o premere o premere
selezionare OK sulla destra dello schermo.
10. Dopo aver collegato la radio, premere il tasto MENU per uscire dal MENU.
» Avvertenza:
Le impostazioni possono essere modificate in qualsiasi momento in
Impostazioni di sistema - Impostazioni di sistema - Rete - Procedura
guidata di rete
COME INIZIARE
» Le presenti istruzioni per l‘uso spiegano le istruzioni di base per l‘uso di
questo apparecchio. Se non diversamente specificato, tutte le operazio
ni descritte sono basate sull‘uso del telecomando.
Accensione/spegnimento
1. Premere il tasto
recchio.
2. Premere il tasto
chio in modalità standby.
Selezione delle modalità
Premere il tasto MODE sull‘apparecchio o sul telecomando per entrare nel MENU
MODE. Quindi premere i tasti
/ / / / sul telecomando per passare da una sorgente all‘altra:
Radio Internet, Podcast, DAB, FM e Bluetooth
SNOOZE sull‘apparecchio o il tasto SELECT sul telecomando per confermare la
selezione.
/ /
sul telecomando per selezionare ogni lettera/numero della pro-
sull‘apparecchio o sul telecomando per accendere l‘appa-
sull‘apparecchio o sul telecomando per riportare l‘apparec-
/ /
sull‘apparecchio o premere i tasti
/
/ / / /
/ /
sul telecomando per
sull‘apparecchio o premere i tasti
/
®
. Premere VOLUME/ SELECT/
/
sull‘ap-
/
-
» Quando l‘apparecchio rimane inattivo per circa 15 minuti in modalità
radio Internet, Podcast, DAB o Bluetooth
scollegato), passa automaticamente in Standby.
®
(con l‘apparecchio esterno
97
Page 98
MANUALE ISTRUZIONI
» Per spegnere completamente l‘apparecchio, rimuovere la spina di rete
dalla presa principale.
» Spegnere completamente l‘apparecchio per risparmiare energia quando
non viene utilizzato.
Navigazione del MENU
1. Tenere premuto il tasto INFO/MENU sull‘apparecchio o premere il tasto
MENU sul telecomando per accedere al MENU.
2. Premere i tasti
sul telecomando per selezionare la propria scelta.
/
3. Premere il tasto VOLUME/SELECT/SNOOZE sull‘apparecchio o SELECT sul
telecomando co
Regolazione del volume
• Ruotare VOLUME/SELECT/SNOOZE sull‘apparecchio o premere i tasti VOL
+/- sul telecomando per regolare il volume.
• Per disattivare temporaneamente l‘audio, premere il tasto MUTE sul teleco-
mando. Ruotare il tasto VOLUME/SELECT/SNOOZE sull‘apparecchio, oppure
premere nuovamente il tasto MUTE, oppure premere i tasti VOL +/- sul telecomando per riprendere l‘ascolto normale.
IMPOSTAZIONI DI SISTEMA
Tenere premuto il tasto INFO/MENU sull‘apparecchio o premere il tasto MENU
sul telecomando per visualizzare il MENU. Premere i tasti
chio o premere i tasti / /
zioni di sistema e quindi premere VOLUME/SELECT/SNOOZE sull‘apparecchio o
il tasto SELECT tasto sul telecomando per confermare.
Equalizzatore
Questo sistema supporta una varietà di equalizzatori ed effetti sonori.
• Premere il tasto EQ per accedere al MENU Equaliser.
In alternativa,
• Nella modalità Impostazioni di sistema, premere i tasti
nare Equalizzatore e quindi premere il tasto SELECT per confermare.
/ /
sull‘apparecchio o i tasti
/
el telecomando per selezionare Imposta-
/
/ / or
/ /
/ / per selezio-
sull‘apparec-
1. Il display mostrerà : PIATTO > CLASSICO > ROCK > POP > POP > JAZZ
2. Premere i tasti
confermare.
/ /
per selezionare, quindi premere il tasto SELECT per
98
Page 99
MANUALE ISTRUZIONI
La rete
1. Nella modalità Impostazioni di sistema, premere i tasti / / per selezionare Rete e premere il tasto SELECT per confermare.
2. Premere i tasti
quindi premere il tasto SELECT per confermare.
/ / per selezionare una delle seguenti impostazioni,
Assistente di rete SSID - selezionare la rete wireless desiderata.
Impostazione
PBC Wlan
Impostazioni di
visualizzazione
Impostazioni
manuali
Impostazione
PIN NetRemote
Profilo della rete Visualizza la rete collegata.
Cancellare le
impostazioni di
rete
Mantenere la rete
collegata
3. Premere il tasto BACK sull‘apparecchio o sul telecomando per tornare al menu
precedente.
Riesamina - Esamina le reti disponibili.
Configurazione manuale: selezionare la rete wireless con
l‘abilitazione/disabilitazione DHCP.
Premere il pulsante WPS sul modem con il quale si desi-
dera connettersi. Quindi premere il selettore VOLUME/
SELECT/SNOOZE sull‘apparecchio o il tasto SELECT sul
telecomando per continuare.
Visualizzare l'impostazione sull'apparecchio.
Selezionare Abilitazione/disabilitazione DHCP.
Per definire un numero PIN da immettere prima di
potersi collegare all‘apparecchio a distanza attraverso
una rete.
Per eliminare la memoria di rete collegata nel profilo di
rete.
Per definire se rimane collegato alla sua rete in modalità
Standby e quando non lo è in modalità Network radio.
Ora/Data
L‘Orario/Data può essere impostato automaticamente una volta collegato a Internet, DAB o stazione radio FM con informazioni su orario/data. È anche possibile
regolare l‘Orario/Data manualmente.
• Premere il tasto CLOCK per accedere a Imposta ora/data.
In alternativa,
• Nella modalità Impostazioni di sistema, premere i tasti
zionare Ora/Data e premere il tasto SELECT per confermare. Premere i tasti
/ / per selezionare Imposta Ora/Data e premere il tasto SELECT per
confermare.
/ / per sele-
99
Page 100
MANUALE ISTRUZIONI
1. Le cifre della data lampeggiano sul display.
2. Premere i tasti
LECT per confermare.
3. Ripetere il passo (2) per impostare il mese / anno / anno / ora / minuto.
4. Le impostazioni di data e ora sono ora complete.
/ / per regolare il giorno, quindi premere il tasto SE-
Per le altre impostazioni in Ora/Data, premere i tasti
una delle seguenti opzioni, quindi premere il tasto SELECT per confermare.
Aggiornamento
automatico
Impostare il
formato
Impostare il
fuso orario
Ora legale Selezionare l‘ora legale. (Disponibile solo quando è attivo
» L‘impostazione predefinita per l‘aggiornamento automatico dell‘ora è
„Aggiornamento dalla rete“. Se si desidera impostare manualmente l‘o
ra, si consiglia di disattivare la funzione di aggiornamento automatico.
Aggiornamento da DAB/FM/Network/No update
Formato 12 / 24 ore.
Selezionare un fuso orario. (Disponibile solo quando è
attivo l‘aggiornamento automatico dalla rete.)
l‘aggiornamento automatico dalla rete.)
/ / per selezionare
Standby Inattivo
Utilizzare lo Standby inattivo per spegnere l‘apparecchio dopo un certo tempo in
modalità di riproduzione.
1. Nella modalità Impostazioni di sistema, premere i tasti
nare Standby inattivo e premere il tasto SELECT per confermare.
2. Premere i tasti
Premere SELECT per confermare.
/ / per selezionare tra Off, 2 ore, 4 ore, 5 ore e 6 ore.
/ / per selezio-
Lingua
1. Nella modalità Impostazioni di sistema, premere i tasti
nare Lingua e quindi premere il tasto SELECT per confermare.
2. Premere i tasti
3. Premere il tasto SELECT per confermare.
/ / per cambiare la lingua di visualizzazione desiderata.
/ / per selezio-
-
100
 Loading...