

Page 1
Battery
Charger
SE-2001, SE-4020, SE-4022
SE-6030, SE-8050
Models:
Owner's Manual
–Save–
Important Safety Instructions
Read Rules for Safe Operation and Instructions Carefully
Working in vicinity of a lead-acid battery is dangerous. Batteries generate explosive gases during normal
battery operation. For this reason, it is of utmost importance that each time before using your charger, you
read this manual and follow the instructions exactly.
WARNING: Handling the cord on this product or cords associated with accessories sold with this product, will expose you to lead, a
chemical known to the State of California to cause cancer and birth defects or other reproductive harm.
A. GENERAL BATTERY SAFETY
Wash hands after handling.
1. Before you use your battery charger, be sure to read all
instructions and cautions printed on:
• Battery Charger
• Battery
• Vehicle or unit using battery
2. Use battery charger on LEAD ACID type rechargeable batteries only, such as used in autos, trucks, tractors, airplanes,
vans, RV's, trolling motors, etc. Charger is not intended to
supply power to low-voltage electrical system other than in
an automotive application.
WARNING: Do not use battery charger for charging drycell batteries that are commonly used with home appliances.
These batteries may burst and cause injury to persons and
damage to property.
3. Use only attachments recommended or sold by manufacturer. Use of non-recommended attachments may result in
fire, electric shock, or injury.
4. When disconnecting the battery charger, pull by the plug
not by the cord. Pulling on the cord may cause damage to
cord or plug.
5. Locate battery power cord so it cannot be stepped on, tripped
over, or subjected to damage or stress.
6. Do not operate charger with damaged cord or plug. Have
cord replaced immediately.
7. Do not operate charger if it has received a sharp blow, been
dropped, or otherwise damaged in any way. Take it to a
qualified professional for inspection and repair.
8. Do not disassemble charger. Take it to a qualified professional when service or repair is required. Incorrect reassembly may result in electric shock or fire.
9. To reduce risk of electric shock, unplug charger from outlet
before attempting any maintenance or cleaning.
10. Do not use an extension cord unless absolutely necessary.
Use of an improper extension cord could result in fire or
electric shock. If an extension cord must be used, make
sure that:
• Pins on plug of extension cord are the same number, size,
and shape as those of the plug on the charger.
• Extension cord is properly wired and in good electrical
condition.
• Wire size is large enough for AC ampere rating of charger,
as specified below:
_____________________________________________
Length of cord (feet): 25 50 100 150
AWG size of cord: 16 12 10 8
(American Wire Gauge)
_____________________________________________
11. Always charge battery in a well ventilated area.
NEVER operate in a closed-in or restricted area without
adequate ventilation because of risk of explosive gases.
WARNING: Risk of explosive gas.
12. Locate charger as far away from battery as DC charger
cables permit.
13. Do not expose charger to rain or snow.
14. NEVER charge a frozen battery. If battery fluid (electrolyte)
is frozen, bring into a warm area to thaw before charging.
15. NEVER allow battery acid to drip on charger when reading
specific gravity or filling battery.
16. NEVER set a battery on top of charger.
17. NEVER place charger directly above battery being charged.
Gases from battery will corrode and damage charger.
18. NEVER touch the battery clips together when the charger is
energized.
SCHUMACHER ELECTRIC CORPORATION
801 BUSINESS CENTER DRIVE • MOUNT PROSPECT, ILLINOIS 60056-2179
Send Warranty Product Repairs to: 1025 E. Thompson, Hoopeston, IL 60942-0280
Call Customer Service if you have questions: 1-800-621-5485
1
00-00-000484/0103
Page 2
B.
PERSONAL PRECAUTIONS AND SAFETY
1. WARNING: Wear complete eye protection and clothing
protection, when working with lead-acid batteries.
2. Make sure someone is within range of your voice or close
enough to come to your aid when you work with or near a
lead-acid battery.
3. Have plenty of fresh water and soap nearby for use if battery
acid contacts skin, clothing, or eyes. If battery acid contacts
skin or clothing, wash immediately with soap and water.
4. Avoid touching your eyes while working with a battery. Acid
particles (corrosion) may get into your eyes! If acid enters
your eye, immediately flood eye with running cold water for
at least 10 minutes. Get medical attention immediately.
5. Remove all personal metal items such as rings, bracelets,
C.
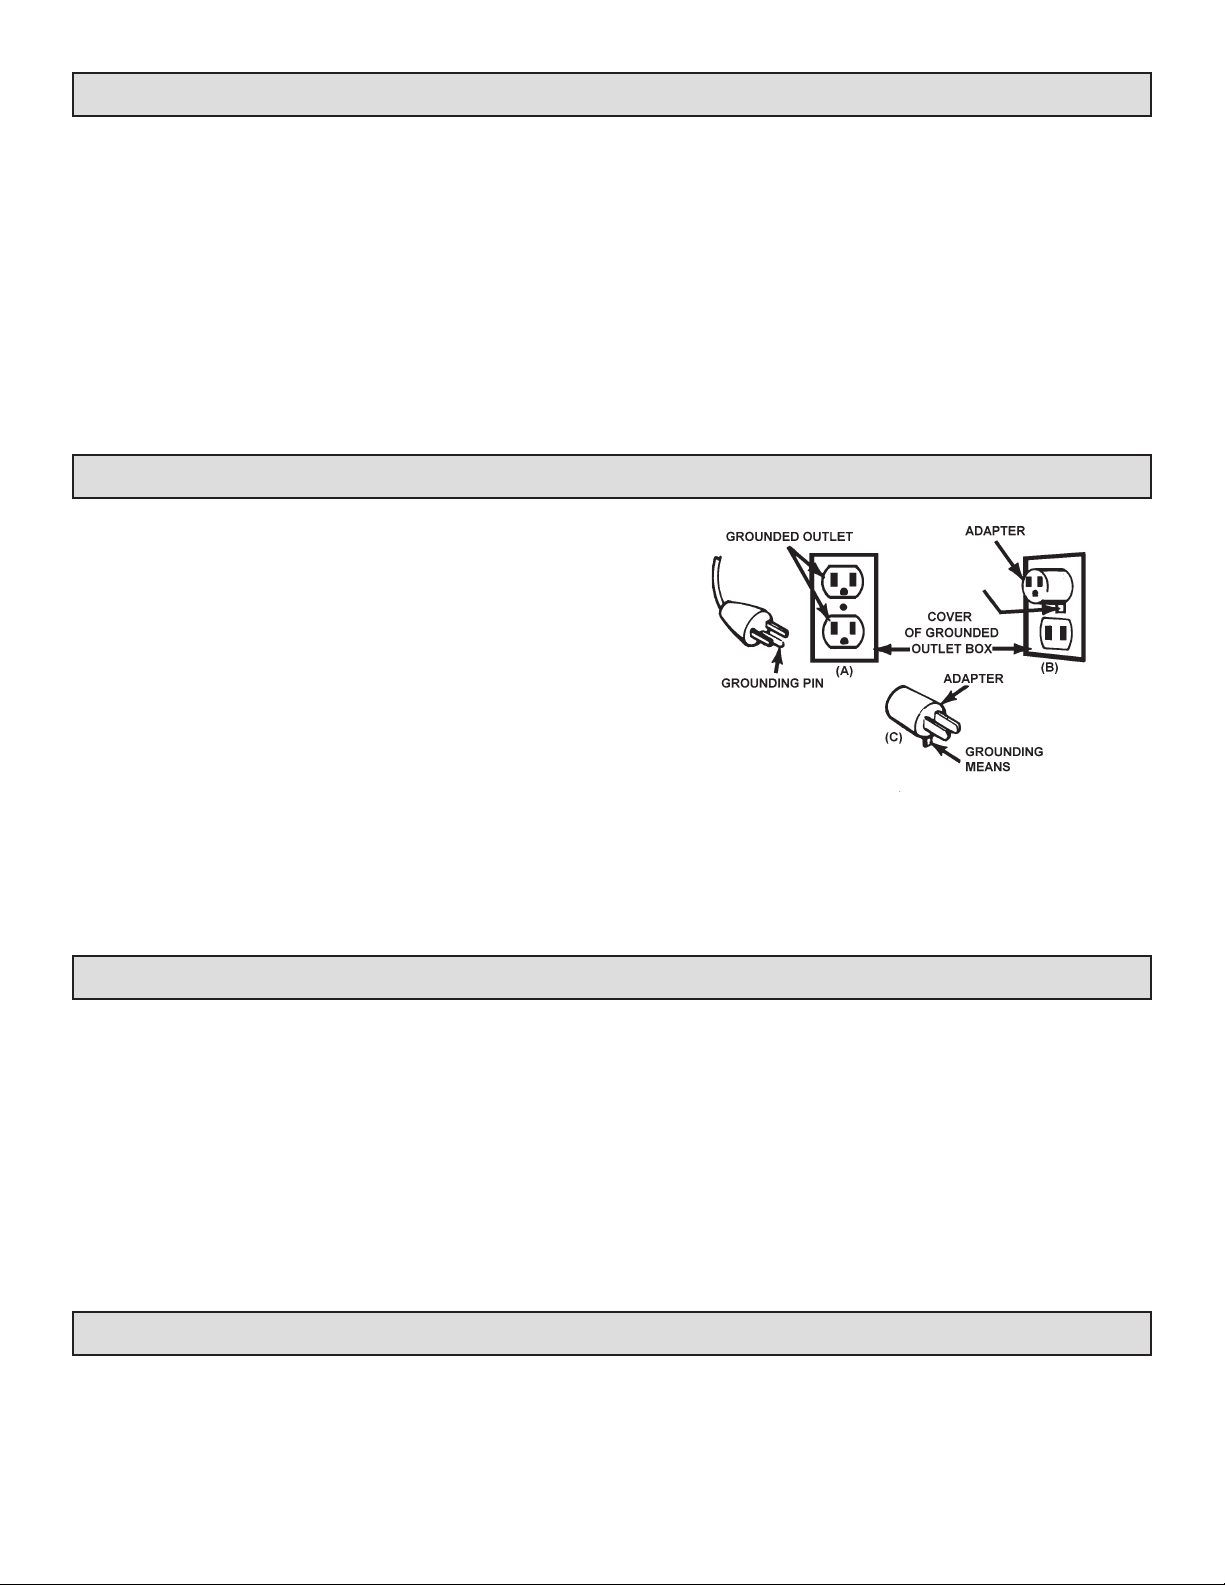
Charger should be grounded to reduce the risk of electric shock.
Charger is equipped with an electric cord having an equipment grounding
conductor and a grounding plug. The plug must be plugged into an outlet
that is properly installed and grounded in accordance with all local codes
and ordinances. This battery charger is designed for use on a nominal 120
volt circuit and has a grounded plug that looks like the plug illustrated in
FIGURE 1 (A). This plug should be used in a grounded outlet. The plug
pins must fit the receptacle (outlet).
ADAPTER: A temporary adapter, as shown in FIGURE 1 (B) and (C), may
be used to connect the charger plug to a two pole receptacle (outlet), as
shown in FIGURE 1 (B).
GROUND AND AC POWER CORD CONNECTIONS
necklaces, and watches when working with a lead-acid
battery. A lead-acid battery can produce a short-circuit
current high enough to weld a ring (or the like) to metal,
causing a severe burn.
6. Take care not to drop a metal tool or other metal onto the
battery. Metal may cause sparking or short circuit the battery
or another electrical devise. Sparking may cause an
explosion.
7. Always operate battery charger in an open well ventilated
area.
8. NEVER smoke or allow a spark or flame in the vicinity of
the battery or engine. Batteries generate explosive gases!
GROUNDING
SCREW
NOTE: The temporary adapter should be used only until a properly grounded
outlet can be installed by a qualified electrician.
DANGER: Never alter the AC cord or plug provided. If it will not fit outlet, have a proper outlet installed by a qualified electrician. Improper connection can result
in a risk of an electrical shock. DANGER: Before using an adapter, as illustrated, be certain that the center screw of the outlet plate is grounded. The green-colored
rigid ear or lug extending from the adapter must be connected to a properly grounded outlet. Make certain it is grounded. If necessary, replace original outlet cover
plate screw with a longer screw that will secure adapter ear or lug to outlet cover plate and make ground connection to grounded outlet.
"Use of adapter plug not allowed in Canada"
D.
1. Make sure you have a 12 volt or a 6 volt lead-acid battery
and select battery charger switch accordingly.
2. Clean battery terminals. Take care to keep corrosion from
coming in contact with your eyes.
3. If required, add distilled water in each cell until battery acid
reaches levels specified by battery manufacturer. This helps
purge excessive gas from cells. Do not overfill. For a battery without cell caps, carefully follow manufacturer's recharging instructions.
4. Study all battery manufacturer's specific precautions, such
as removing or not removing cell caps while charging, and
recommended rates of charge.
E.
CHARGER LOCATION PRECAUTIONS
PREPARING TO CHARGE
5. Be sure area around battery is well ventilated while battery
is being charged. Gas can be forcefully blown away by using a piece of cardboard or other non-metallic material as a
fan.
6. If necessary to remove battery from vehicle to charge, always remove grounded terminal from battery first. Make
sure all accessories in the vehicle are off, so as not to cause
an arc.
7. A marine (boat) battery must be removed and charged on
shore. To charge it on board requires equipment specially
designed for marine use.
FIGURE 1 GROUNDING METHODS
Never place charger directly above the battery being charged,
gases from battery could damage the charger.
Never allow battery acid to drip on the charger when reading
specific gravity of filling battery.
Never operate charger in a closed in area, or restrict ventilation in any way.
Do not set battery on top of the charger.
2
Page 3
F.
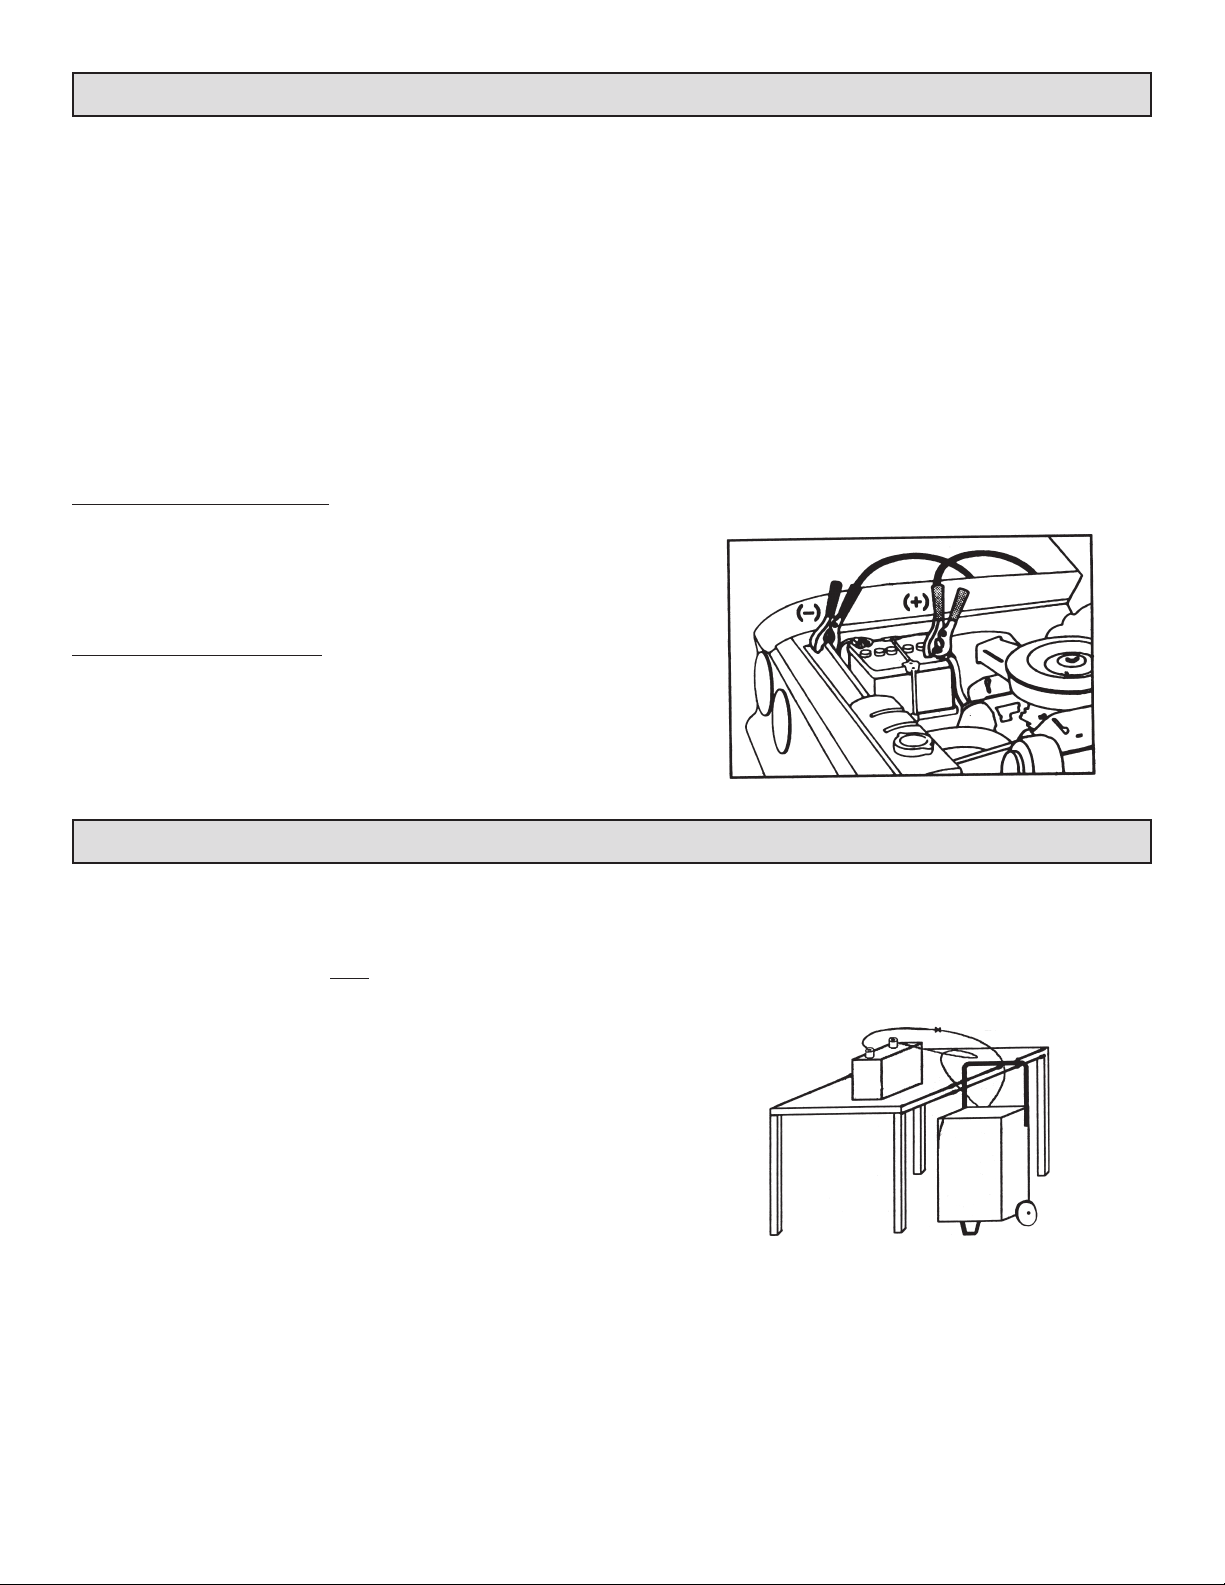
When charging battery in the vehicle, take care to determine the battery type and which post is grounded. To reduce risk of a spark
near battery, follow these steps when battery is installed in vehicle. WARNING: A spark near battery may cause battery explosion.
OPERATING INSTRUCTIONS: CHARGING BATTERY IN VEHICLE
1. Position AC power cord and DC charging cords to reduce
risk of damage by hood, door, or moving engine parts.
2. Stay clear of fan blades, belts, pulleys, and other parts that
can cause injury.
3. Check polarity of battery posts. Battery case will be marked
by each post: POSITIVE (POS, P, +) and NEGATIVE (NEG,
N, -). NOTE: The positive battery post usually has a larger
diameter than the negative post.
4. Determine which post of battery is ground (connected) to
chassis.
NOTE: The negative post is normally grounded.
NEGATIVE GROUNDED POST
5A. For negative-grounded vehicle, connect POSITIVE (RED)
clip from battery charger to POSITIVE (POS, P, +) ungrounded
post of battery. Connect NEGATIVE (BLACK) clip to vehicle chassis or engine block away from battery. Connect to a heavy gauge
metal part of the frame or engine block.
POSITIVE GROUNDED POST
5B. For positive-grounded vehicle, connect NEGATIVE
(BLACK) clip from battery charger to NEGATIVE (NEG, N, -)
ungrounded post of battery. Connect POSITIVE (RED) clip to
vehicle chassis or engine block away from battery. Connect to a
heavy gauge unpainted metal part of the frame or engine block.
WARNING: Do not connect clip to carburetor, fuel lines, or sheet-metal body
parts. NOTE: Attach clips to battery post and twist or rock back and forth
several times to make a good connection. This tends to keep clips from slipping off terminals and helps to reduce risk of sparking.
6. Select amperage.
7. Follow steps 1-4 in Battery Charger Section K.
8. When the battery is fully charged, unplug the charger from
the AC power source.
9. Remove charger clips from (1) chasssis and (2) battery pole
in that order.
10. Clean and store battery charger.
G.
When charging battery out of vehicle, take care to determine the battery type. To reduce risk of a spark near battery, follow these steps
when battery is outside vehicle. WARNING: A spark near the battery may cause battery explosion. WARNING: When removing battery
from vehicle or boat, disconnect grounded pole first. When disconnecting, make sure all accessories are off, so as not to cause an arc.
(NOTE: A marine (boat) battery must be removed and charged on shore. (To charge on board requires special equipment designed for
marine use.)
1. Check polarity of battery posts. Battery case will be marked
2. Attach a 24-inch long (or longer) 6-gauge (AWG) insulated
3. Connect POSITIVE (RED) charger clip to POSITIVE (POS,
4. Position yourself and free end of 24 inch cable as far away
5. Select amperage:
6. Follow steps 1-4 in Battery Charger Section.
OPERATING INSTRUCTIONS: CHARGING BATTERY OUT OF VEHICLE
Battery Cable
by each post: POSITIVE (POS, P, +) and NEGATIVE (NEG,
N, -). NOTE: The positive battery post usually has a larger
diameter than the negative post.
battery cable to NEGATIVE (NEG, N, -) battery post.
(The 24" lead is not supplied. You may purchase at most
automotive stores.)
The 24" lead provides a safer connection condition. Sparking or arcing could occur when connecting the charger clip
to the lead.
P, +) post of battery. Rock clip back and forth to make good
connection.
from battery as possible. Then connect NEGATIVE (BLACK)
charger clip to free end of cable.
WARNING: Do not face battery when making final connection. Rock clip back and forth to make a good connection.
24" Cable
7. When battery is fully charged, unplug charger from AC outlet.
8. When battery is fully charged and the charger is unplugged:
(1) Remove clip from end of the Negative end of cable,
then
(2) Remove clip from Positive battery post, in that order.
9. Clean and store battery charger.
WARNING: Be sure area around the battery is well ventilated while battery is being charged. Gas can be forcefully
blown away by using a piece of cardboard or other nonmetallic material as a fan.
3
Page 4
H. OUTPUT SELECTOR CONTROLS
CHARGE RATE CHARGE TIME/MINUTES
200 amp start 2 amp
#1
40 amp 40 amp
VOLT/RATE SELECTOR CHARGE TIME/MINUTES
12 VOLT
MAINTAINER
#2
200 amp
12 VOLT
10 AMP
12 VOLT
40 AMP
SE 2001
Ammeter
SE 4020
Ammeter
12 VOLT
50 AMP
12 VOLT
30 AMP
12 VOLT
60 AMP
12 VOLT
200 AMP
START
12 VOLT
225 AMP
START
SE 4022
Voltmeter
Ammeter
SE 6030
Ammeter
BATTERY
TEST
6 VOLT
12 VOLT
6 VOLT
40 AMP/
100 AMP
START
VOLT/RATE SELECTOR CHARGE TIME/MINUTES
12 VOLT
2 AMP
6 VOLT
50 AMP
VOLT/RATE SELECTOR CHARGE TIME/MINUTES
6 VOLT
30 AMP
OFF
OFF
12 VOLT/10 AMP
6 VOLT/125 AMP START
OFF
6 VOLT
60 AMP/200 AMP
START
12 VOLT
300 AMP
START
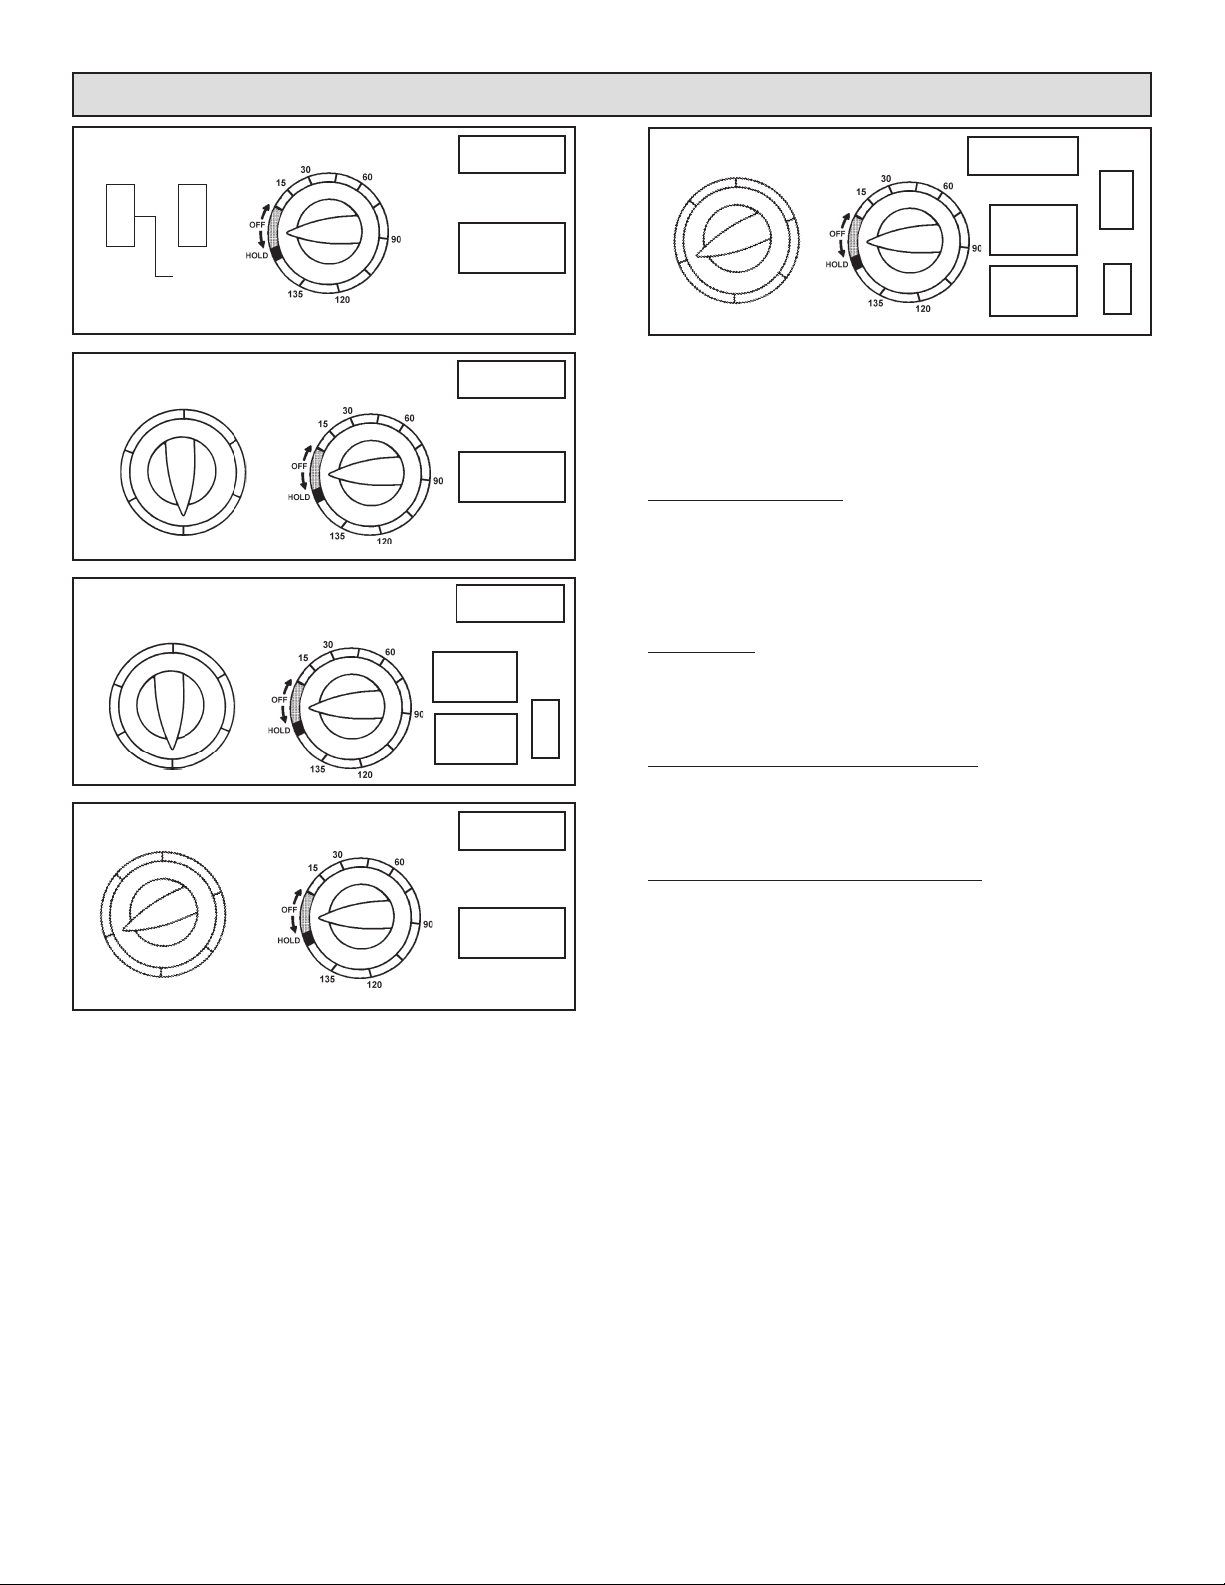
TIMER: The main function of the timer is to prevent over charging while
allowing a battery time to obtain a satisfactory charge. To properly set
the timer you must know the size of the battery in ampere hours or
reserve capacity in minutes and the state of charge. Often the state of
charge is not known, this is one reason why the timer was limited to
2.25 hours. With the aid of a battery load tester the state of charge can
be obtained within a few seconds. For example, the average size automotive battery at a 50% state of charge will require 1 to 1.5 hours of
charging at the 40 amp rate to reach the full charge state. For the same
battery with the timer set to it’s maximum, 2.25 hours, over charging
will occur, but not likely cause harm to a battery that was other wise in
good condition. When the charge state is not known, start out with a
timer setting of 1 hour or less.
HOLD This position defeats the timer function, allowing for continuous
operation. Use when you want to charge more than 2.25 hours. This is
normally the case when the 2 amp charge rate is selected. Be sure to
monitor the charging and stop the charge when the battery is charged.
Switch #1 use this switch to select the 200 amp engine start and the
40 amp charge rate. Switch #2 must be in the down position (40amp /
200 amp select) when using switch #1.
Switch #2 Use this switch to select the 2 amp charge rate. Also use to
select use of switch #1.
VOLT/RATE SELECTOR CHARGE TIME/MINUTES
6 VOLT
30 AMP
OFF
6 VOLT
60 AMP/200 AMP
START
12 VOLT
300 AMP
START
12 VOLT
30 AMP
12 VOLT
60 AMP
SE 8050
Voltmeter
Ammeter
BATTERY
TEST
LOAD ON
6 VOLT
12 VOLT
Rotary switch - Use the rotary switch (volt / rate selector, on all mod-
els except the SE 2001) to select the charge rate or engine start setting
you require. Read the switch dial for those available on this charger.
Load Tester Switch (on SE 8050 only)
Use this switch to apply load to the battery.
Follow these easy steps:
1. Select the correct setting of the meter ( 6v or 12v ) to agree with the
battery to be tested.
2. Connect the charger leads to the battery following the instructions
in section F.
3. Press the Load Switch to load on for 10 seconds and read the voltmeter.
Good (green)
- indicates the battery capacity is OK. Battery may or
may not be fully charged. Check the specific gravity of battery to determine the state of charge. If the specific gravity is less than full charge,
check for electrical drain or possible charging system trouble. Recharge
battery to full level.
Yellow or Red, but needle remains steady
- indicates that the battery capacity is not satisfactory. Battery may be either defective or not
fully charged. Check specific gravity to see which condition exists. It
charging does not bring the battery specific gravity to full charge, the
battery should be replaced.
Yellow or Red, but needle remains falling
- indicates the battery
may be defective or run down. Release the load switch and note voltmeter reaction. Voltage recovery into green or above within seconds
indicates a defective battery. Slow recovery indicates run down condition. For best results, check specific gravity.
The Ammeter indicates the amount of current measured in amperes
that is being drawn by the battery. For example, In the 40 amp charge
rate a typical discharged battery will initially draw approximately 40 amps.
As the battery continues to charge, current will taper to 15 to 20 amps
at full charge. The Start area of the meter indicates a high rate of current being drawn from the charger. When cranking an engine, the starter
motor draws upwards to 200-300 amps. The meter needle will be at the
extreme right side of the start area. Sometimes a battery for the first
few minutes of it’s charge will draw more than 40/60 amps, in this case
the needle may be within but not to the extreme right side of the start
area. The 2 amp charge rate (on some models) may indicate some
activity on the meter. The meter doesn’t have the resolution to display
this low rate.
The Voltmeter indicates the voltage at the battery terminals. Note that
Model SE 4022 is not a Load tester, but a voltmeter. Use as follows:
1. Charger need not be plugged into AC outlet. Timer should be in the
Off position, 6v/12v switch in position to match battery being tested,
and then connect following instructions in Section F.
2. Observe the meter indication. Keep in mind that this reading is only
a battery voltage reading, a false surface charge may mislead you.
We suggest that you turn on your headlamps for a couple of minutes before you read the meter. Read a couple of minutes after you
have shut the headlamps off, then follow the convenient color code
of the meter.
4
Page 5
I. ENGINE START
1. Set charge rate switch and timer to OFF positions.
2. With the charger unplugged from the AC outlet, connect the
charger to the battery following instructions given in section
F.
3. Plug the charger AC power cord into the AC outlet, then move
timer from OFF to HOLD position.
Do not try to engine start a vehicle without a battery in it. You
may damage the vehicle’s system. If the engine spins, but doesn’t
start after several starting attempts, there is a problem with the
engine of the vehicle other than its starting system. STOP cranking the engine until the other problem has been found and corrected.
4. Set the charge rate switch to the engine start position that
matches the vehicle battery and then crank the engine. Follow the duty cycle of your charger for proper ON / OFF times.
During extremely cold weather or when the battery is severely exhausted, charge the battery for about 5 minutes
before cranking the engine.
5. If the engine fails to start, charge the battery for 5 more minutes before attempting to crank the engine again.
6. After the engine starts, move the charge rate switch to OFF
and unplug the AC power cord from the outlet before disconnecting DC clips.
J. CHARGE PERIOD
Determine the charge level of your battery with a hydrometer or electronic percent of charge tester. Determine the ampere hour rating of your battery. It
may be on the battery information label. If the battery is rated in Reserve Capacity, convert to ampere hour rating using the following formula:
Ampere Hour rating =
"Reserve capacity is in minutes"
Use the following formula to determine the time of charge required: (AH x % of charge needed) divided by amp setting of the charger, times
1.25 = hours of charge: Example: State of charge of the battery is 50%
(Reserve Capacity) + 16 Example: AH rating = (168 Reserve Capacity) + 16 or AH = 100
(2) (2)
Percent of charge needed is 100% - 50% = 50% (.50 decimal)
Ampere rating of the battery is 100AH
Charger setting is 10 amps
100 x .50 = x 1.25 = 6.25 hours of charge needed
10
+ 1.00 hour more if charging a deep cycle battery
7.25 hours total for a deep cycle battery.
A hydrometer reading of the specific gravity of the electrolyte (fluid) of the battery in good condition should be between 1.25 and 1.28.
When a battery reaches 80-85% of full charge, bubbles will appear on the surface of the fluid. As the battery nears full charge, bubbling will become
more vigorous.
K. BATTERY CHARGING
CHARGER MUST BE ASSEMBLED BEFORE USING.
1. Before charging any battery, make sure the electrolyte (battery liquid) in each cell is at correct level.
2. Set all switches and timers to the OFF position.
3. If the battery is being charged inside the vehicle, use connection
procedures outlined in Section F. Should the battery be removed
from the vehicle, follow the instruction in Section D, step 6 and
Section G. Plug the power cord into the AC outlet.
4. Set the charge rate switch to the desired charge position. See Charge
Rate Charts.
5. Set the timer from OFF position to desired timed charge, 30-135
minutes.
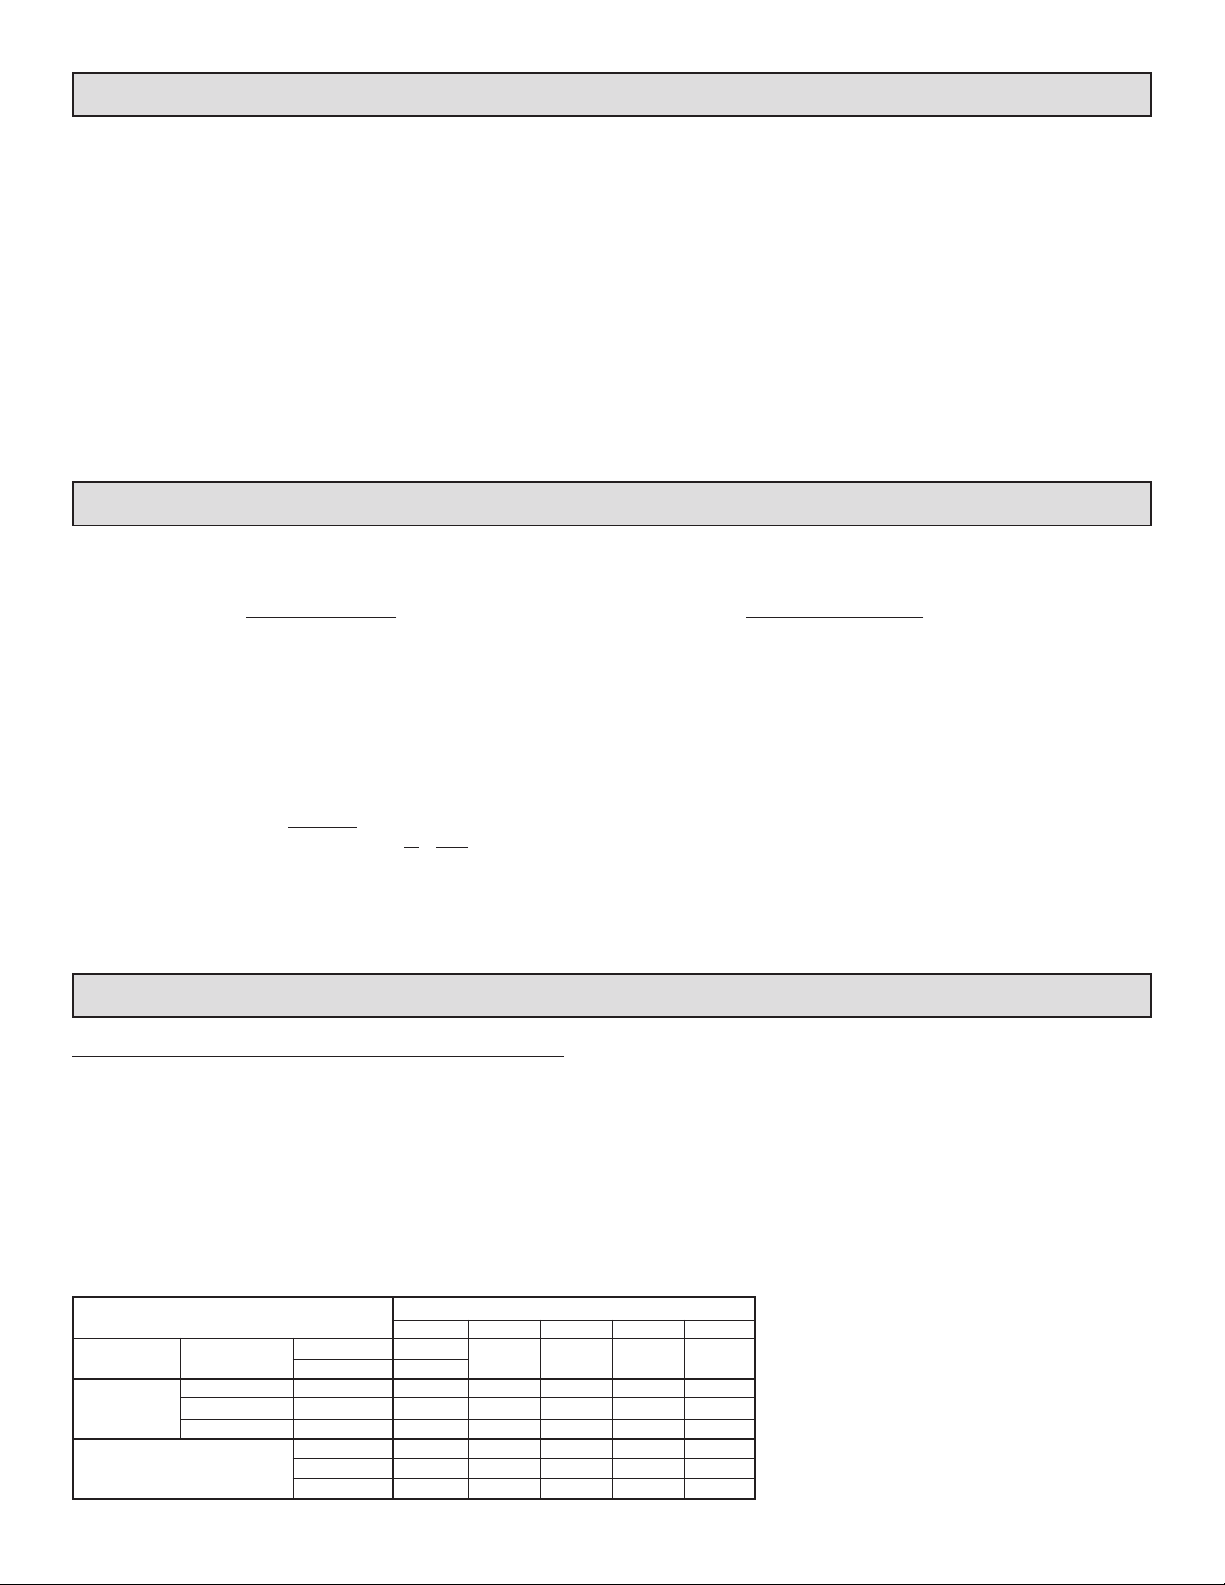
CHARGE RATE*/CHARGING TIME - HOURS**
2 AMP 10 AMP 30 AMP 40 AMP 60 AMP
NR NR NR NR
SMALL
BATTERIES
CAR/TRUCKS
MARINE/
DEEP CYCLE
BATTERY SIZE/RATING
Motorcycle, Garden 6 - 12 AH 3-6
Tractor, etc. 12 - 32 AH 3 - 18
200 - 315 CCA 40 - 60 RC 13 - 20 2 ½ - 4 ½ - 1 ½ - ¾ NR
315 - 550 CCA 60 - 85 RC 20 - 35 4 - 7 1 - 2 ¾ - 2 ½ - 1
550 - 875 CCA 85 - 125 RC 35 - 55 7 - 11 2 - 7 2 - 3 1 - 2
55 MC 34 7 NR NR NR
80 MC 50 10 NR NR NR
105 MC 66 13 NR NR NR
NOTE: These battery chargers are not automatic and can
overcharge a battery if permitted to operate for extended periods of time. Monitor the charging often.
*Charge Rates for this model are listed on the
front panel.
**Based on battery at 50% charge.
AH Ampere Hours
NR Not Recommended
CCA Cold Cranking Amps
RC Reserve Capacity
MC Marine Capacity
5
Page 6
L. ASSEMBLY INSTRUCTIONS
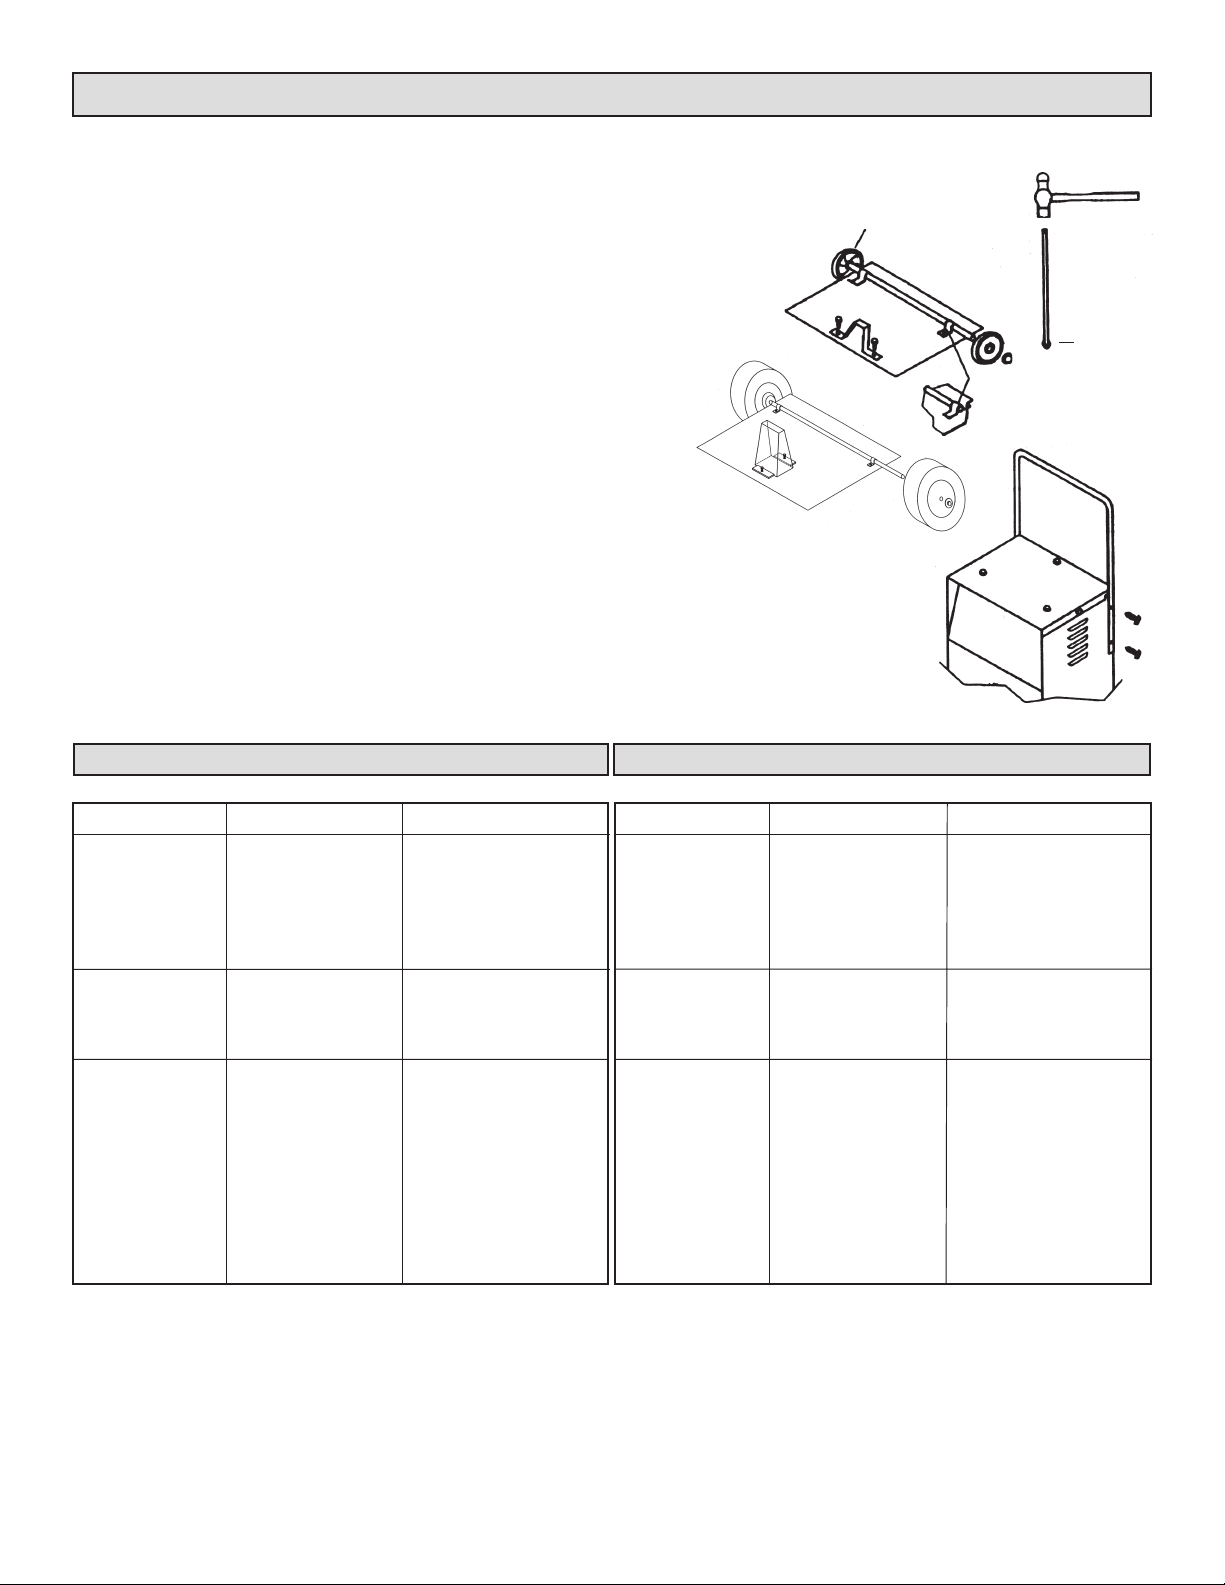
Wheel Charger Assembly Instructions: (Instrucciones De Armado)
NOTE: Charger must be assembled before operating (Ante de la operación la unidad debe estar armada)
Parts (Piezas)
(4) 10-32 screws (tornillos de corte rosca 10-32)
(2) 1/4-20 screws (tornillo de corte rosca 1/4-20)
(2) wheels(ruedas)
(2) axle caps (tapas del eje)
(2) axle brackets (soportes de eje)
(1) handle (mango)
(1) mounting foot (pedestal de montaje)
(1) axle (del eje)
First place the charger on it side.
Next mount the mounting foot FIG. A with (2) 1/4-20 screws, or FIG. F with (2) 10-32 screws.
Next pound the axle firmly into an axle cap using a hammer FIG. B.
Next slide the wheels onto the axle, hubs must face in, FIG. C.
Next pound the other axle cap onto the other end of the axle.
Next place the axle assembly onto the bottom of the charger as shown in FIG. C.
Mount the axle to the bottom of the charger using (2) 10-32 screws as shown in FIG. D.
Next turn the charger right side up onto its foot and wheels.
Remove the (2) top screws from each side of the charger, line up the handle and reinstall the screws FIG. E.
Primero coloque el cargador de lado.
A continuación monte el pedestal FIG. A con (2) tornillos 1/4-20.
A continuación golpee firmemente el eje dentro de la tapa del eje usando un martillo, FIG. B.
A continuación deslice las ruedas dentro del eje; los cubos deben estar orientados hacia adentro, FIG. C.
A continuación golpee la otra tapa del eje dentro del otro extreme del eje.
A continuación coloque el conjunto del eje dentro del fondo del cargador según se muestra en la FIG. C.
Monte el eje en el fondo del cargador usando los dos tornillo de corte de rosca 10-32 según se muestra en la FIG. D.
A continuación gire el cargador de la batería con el lado derecho hacia arriba sobre su pedestal y ruedas.
Saque los dos tornillos superiores de cada lado del cargador; alinee el mango y reinstale los tornillo. FIG. E.
Tools necessary (Herramientas Necesarias)
5/16" wrench (Llave de 5/16")
3/8" wrench (Llave de 3/8")
Hammer (Martillo)
Screwdriver (Destornillador)
HUBS MUST
Fig. A
Fig. F
FACE IN
Fig. C
Fig. B
AXLE CAP
AXLE BRACKET
Fig. D
Fig. E
TROUBLESHOOTING
If a problem does occur, check the following:
PROBLEM POSSIBLE CAUSE SOLUTION
No Meter Reading Clips are not making Rock clips back and
(AC Cord Unplugged) a good connection. forth for a better connection.
Battery voltage is too Plug AC line into outlet.
low. Meter should now indicate.
2 amp charge rate None, meter will not indicate
being used. here.
Charger will not turn AC outlet is dead. Plug in a lamp to check for
on when properly voltage.
connected. Poor electrical Check connections, rock
Clicking noise from Circuit breaker is May be in the wrong switch
charger. cycling. position
connection. back and forth for a better
Battery is defective. Have Battery checked.
Severely discharged Allow charging to continue
battery but otherwise until battery has a chance
a good battery. to recover sufficiently to take
Reverse connections Shut off charger and correct
at battery. lead connections.
connection.
a charge. If more than 20
min. stop charging and have
the battery checked.
Si ocurre algún problema, verificar lo siguiente:
PROBLEMA
El medidor no indica
(cordón CA
desenchufado)
El cargador no se
enciende cuando
está bien conectado.
El cargador hace
ruido (“clic”)
LOCALIZACION DE AVERIAS
CAUSA POSIBLE SOLUCION
La pinzas no están
haciendo buen
contacto.
Voltaje de la bateria
demasiado bajo.
El tomacorriente CA
no tiene electricidad.
Mala conexión
eléctrica.
El disyuntor de
circuito está
funcionando.
La batería está
defectuosa.
Batería demasiado
descargada, pero
buena.
Invertir las conexiones
en la batería.
Mover las pinzas hacia uno y
otro lado para lograr mejor
contacto.
Enchufar el cordón CA al
tomacorriente; ahora el
medidor debe indicar.
Enchufar una lámpara para
verificar si hay voltaje.
Revisar las conexiones,
mover hacia uno y otro lado
para lograr mejor contacto.
Puede estar en la posición
errónea del interruptor.
Hacer revisar la batería.
Dejar cargando hasta que la
batería tenga oportunidad de
recuperarse lo suficiente para
tomar carga. Si se demora
más de 20 minutos, parar de
cargar y hacer revisar la
batería.
Apagar el cargador y
corregir las conexiones de
los conductores.
LIMITED WARRANTY
SCHUMACHER ELECTRIC CORPORATION, 801 BUSINESS CENTER DRIVE, MOUNT PROSPECT, ILLINOIS, 60056-2179 MAKES THIS LIMITED
WARRANTY TO THE ORIGINAL PURCHASER AT RETAIL OF THIS PRODUCT. THIS LIMITED WARRANTY IS NOT TRANSFERABLE.
Schumacher Electric Corporation warrants this battery charger for 3 years from date of purchase at retail against defective material or workmanship. If such should occur, the unit
will be repaired or replaced at the option of the manufacturer. It is the obligation of the purchaser to forward the unit together with proof of purchase, transportation and / or mailing
charges prepaid to the manufacturer or its authorized representative. This limited warranty is void if the product is misused, subjected to careless handling, or repaired by anyone
other than the factory or other authorized factory representative. The manufacturer makes no warranty other than this limited warranty and expressly excludes any implied
warranty including any warranty for consequential damages.
This is the only express limited warranty and the manufacturer neither assumes nor authorizes anyone to assume or make any other obligation towards the product other than
this express limited warranty. The manufacturer makes no warranty of merchantability or fitness for purpose of this product and expressly excludes such from this limited
warranty. Some states do not allow the exclusion or limitation of incidental or consequential damages or length of implied warranty so the above limitations or exclusions may not
apply to you. “This warranty gives you specific legal rights, and you may have other rights which vary from state to state.”
6
Page 7

A. SEGURIDAD GENERAL DE ACUMULADORES
1. Antes de usar su cargador de acumuladores, lea todas las instrucciones
y precauciones impresas en:
• el cargador de acumuladores
• el acumulador
• el vehículo o la unidad usando el acumulador.
2. Use el cargador de acumuladores únicamente con acumuladores
recargables de ACIDO DE PLOMO, tales como los de automóviles,
camiones, tractores, aviones, camionetas, vehículos recreativos,
motores de embarcaciones de pesca con anzuelos remolcados, etc.
El cargador no está diseñado para alimentar corriente a sistemas
eléctricos de baja tensión que no sean de usos automotrices.
ADVERTENCIA: No use el cargador de acumuladores para cargar
pilas secas comúnmente usadas en aparatos hogareños. Estas pilas
pueden reventar y causar lesiones a personas y daños a propiedades.
3. Unicamente use accesorios recomendados o vendidos por el
fabricante. El uso de accesorios no recomendados puede causar
incendios, choques eléctricos o lesiones.
4. Al desconectar el cargador de acumuladores, jale la clavija y no el
cordón eléctrico. Si jala del cordón, puede dañar el cordón o la clavija.
5. Coloque el cordón eléctrico de manera que no sea pisado, ni cause un
tropiezo, ni esté expuesto a daños o estiramientos.
6. No opere el cargador con cordón o clavija dañados. Mande cambiar el
cordón inmediatamente.
7. No opere el cargador si está golpeado, si se ha caído o está dañado.
Llévelo con un técnico capacitado para que sea inspeccionado y
reparado.
8. No desarme el cargador. Llévelo con un técnico capacitado cuando
necesite servicio o reparaciones. Su rearmado incorrecto puede causar
choques eléctricos o incendios.
9. Para reducir el riesgo de choques eléctricos, desenchufe el cargador
de la toma de corriente antes de intentar llevar a cabo cualquier
mantenimiento o limpieza.
10. No use una extensión eléctrica si no es absolutamente necesario. El
uso de una extensión eléctrica inadecuada puede causar incendios o
choques eléctricos.
Largo del cordón: 7.62m (25’) 15.24m (50’) 30.84m (100’) 45.72m (150’)
Calibre AWG*: 16 12 10 8
*American Wire Gage (calibre de alambres «American»)
11. Siempre cargue un acumulador en un sitio bien ventilado.
NUNCA opere el cargador en un sitio cerrado o confinado sin ventilación
adecuada.
ADVERTENCIA: Hay riesgo de gases explosivos.
12. Sitúe el cargador tan alejado del acumulador como permitan los cables.
13. No exponga al cargador a la lluvia o la nieve.
14. NUNCA cargue un acumulador congelado. Si el líquido electrolítico
del acumulador está congelado, colóquelo en un sitio tibio para
descongelarlo antes de cargarlo.
15. NUNCA permita que gotee el ácido en el cargador al tomar lecturas de
la gravedad específica o al llenar el acumulador.
16. NUNCA ponga el acumulador encima del cargador.
17. NUNCA coloque el cargador directamente arriba del acumulador que
se vaya a cargar. Los
gases del acumulador
causarán corrosiones y
dañarán el cargador.
18. NUNCA junte las pinzas de los cables (una con otra) cuando esté
energizado el cargador.
B. PRECAUCIONES PERSONALES Y DE SEGURIDAD
1. ADVERTENCIA: Use protección ocular y ropa protectora al trabajar
con acumuladores de ácido de plomo.
2. Asegúrese que alguien esté suficientemente cerca para oír su voz y
poderlo asistir en caso de una emergencia cuando trabaje con o cerca
de un acumulador de ácido de plomo.
3. Tenga cerca suficiente agua limpia y jabón para uso en caso que entre
en contacto el ácido con su piel, ropa u ojos. En caso de contacto con
su piel o ropa, lávela inmediatamente con agua y jabón.
4. Evite tocarse los ojos al trabajar con un acumulador. ¡Puede introducir
partículas ácidas (corrosión) en sus ojos! Si entra ácido en contacto
con sus ojos, inmediatamente enjuágueselos con agua fría abundante
durante un mínimo de 10 minutos. Solicite atención médica de
inmediato.
5. Quítese todos los artículos metálicos, tales como anillos, brazaletes,
collares y relojes, al trabajar con un acumulador de ácido de plomo.
Un acumulador de ácido de plomo puede producir un cortocircuito
suficientemente fuerte para soldar un anillo (u otro objeto) a otro metal,
causando así una quemada severa.
6. Tenga cuidado de no dejar caer una herramienta u otro objeto metálico
adentro del acumulador. El metal puede causar chisporroteo o un
cortocircuito del acumulador u otro dispositivo eléctrico. El chisporroteo
puede causar una explosión.
7. Siempre opere el cargador de acumuladores en un área abierta y bien
ventilada.
8. NUNCA fume, ni permita que hayan chispas o llamas cerca de un
acumulador o de un motor. ¡Los acumuladores generan gases
explosivos!
9. ADVERTENCIA - El manejo del cordón en este producto, o de los
cordones asociados con los accesorios vendidos con este producto,
le expone a usted al plomo, un producto químico conocido en el Estado
de California de causar cáncer y defectos de nacimiento u otros daños
reproductivos.
Lávese las manos después de manejar estos
cordones.
C. PREPARACION PARA CARGAR
1. Verifique que tiene un acumulador de 6 or 12 voltios de ácido de plomo.
Reconfirme con el manual del vehículo.
2. Limpie los terminales del acumulador. Tenga cuidado de evitar que la
corrosión entre en contacto con sus ojos.
3. Si es necesario, agregue agua destilada a cada par hasta que el nivel
del ácido llegue al nivel especificado por el fabricante. Esto ayuda a
purgar el exceso de gases de los pares. No llene demasiado. Para un
acumulador sin tapones de pares, siga cuidadosamente las
instrucciones del fabricante para la carga.
4. Estudie todas las precauciones específicas del fabricante, tal como el
quitar o no quitar los tapones de los pares durante la carga y la corriente
de carga.
5. Asegúrese que el espacio alrededor del acumulador esté bien ventilado
durante la carga. Puede sacar el gas del área soplándolo con una hoja
de cartón u otro material no metálico usado como abanico.
6. Si es necesario, saque el acumulador del vehículo para cargarlo.
Siempre desconecte el terminal de tierra primero. Asegúrese que todos
los accesorios del vehículo estén apagados para evitar un arqueo.
7. Un acumulador marino (de embarcación) tiene que ser desmontado y
cargado en tierra. Para cargarlo a bordo, se tiene que hacer con equipo
especialmente diseñado para uso marino.
8. Seleccione la carga apropiada para el acumulador.
INSTRUCCIONES DE PUESTA A TIERRA Y CONEXION DEL CORDON ELECTRICO DE CORRIENTE ALTERNA: El cargador tiene
que tener conexión a tierra para reducir el riesgo de choques eléctricos.
El cargador está equipado con un cordón que tiene conductor del equipo
a tierra por medio de una toma de corriente con conexión a tierra. La
clavija se tiene que enchufar en una salida apropiadamente instalada
de acuerdo a los códigos y las disposiciones locales.
PELIGRO: NUNCA modifique el cordón eléctrico de corriente alterna
suministrado – si no entra en la toma de corriente, mande instalar una
salida apropiada por un electricista capacitado. Una conexión incorrecta
puede tener riesgos de choques eléctricos.
Este cargador de acumuladores es paro uso en circuitos de 120 voltios
nominales y tiene una clavija con conexión a tierra parecida a la de la
ilustración A. Un adaptador provisional, como el de la ilustración B, se
puede usar para conectar esta clavija en un receptáculo de dos orificios,
como se indica en la ilustración B, si no hay una salida con conexión a
tierra. El adaptador provisional se debe usar únicamente hasta que un
electricista capacitado instale una toma apropiada con conexión a tierra.
PELIGRO: Antes de usar un adaptador como el que se ilustra,
asegúrese que el tornillo de la placa esté haciendo tierra. La lengüeta
del adaptador tiene que quedar conectada a una toma de corriente
conectada a tierra – verifique que tenga conexión a tierra. Si es
necesario, cambie el tornillo de la placa por uno más largo que fije la
lengüeta a la placa y haga buena conexión a tierra.
7
Page 8

E. INSTRUCCIONES DE FUNCIONAMIENTO: CARGA DE UN
ACUMULADOR EN UN VEHICULO
Al cargar un acumulador en un vehículo, determine cuidadosamente
el tipo del acumulador y cuál es el terminal de tierra. Para reducir el
riesgo de chispas cerca del acumulador, siga estos pasos cuando el
acumulador está instalado en el vehículo. ADVERTENCIA: Una chispa
cerca del acumulador puede causar la explosión del acumulador.
1. Coloque el cordón de corriente alterna y los cables de carga de corriente
continua de manera que se reduzcan los riesgos de dañar el cofre, las
puertas o piezas movibles del motor.
2. Manténgase alejado del ventilador, las bandas, las poleas y otras partes
que puedan causar lesiones.
3. Verifique la polaridad de los terminales del acumulador. La caja estará
marcada junto a cada terminal: POSITIVO (POS, P, +) y NEGATIVO
(NEG, N, -). NOTA: El terminal positivo del acumulador normalmente
es de mayor diámetro que el negativo.
4. Determine cuál terminal es el de tierra (conectado al chasis). NOTA:
El terminal negativo normalmente está puesto a tierra.
TERMINAL NEGATIVO A TIERRA
5A. Para vehículos con tierra negativa, conecte la pinza POSITIVA (ROJA)
desde el cargador de acumuladores al terminal POSITIVO (POS, P,
+) que no está conectado a tierra. Conecte la pinza NEGATIVA
(NEGRA) al chasis del vehículo o al monobloc, alejado del acumulador.
Conéctelo a una parte de metal grueso del chasis o al monobloc.
TERMINAL POSITIVO A TIERRA
5B. Para vehículos con tierra positiva, conecte la pinza NEGATIVA
(NEGRA) del cargador de acumuladores al terminal NEGATIVO (NEG,
N, -) que no está conectado a tierra. Conecte la pinza POSITIVA
(ROJA) al chasis del vehículo o al monobloc, alejado del acumulador.
Conéctelo a una parte de metal grueso del chasis o al monobloc.
ADVERTENCIA: No conecte la pinza al carburador, a una línea de
combustible o a una lámina de la carrocería. NOTA: Ponga la pinza en
el terminal del acumulador girándolo de ida y vuelta varias veces para
hacer un buen contacto. Esto ayuda a mantener la pinza para que no
se resbale del terminal y reduce el riesgo de chispas.
(NEGRA) del cargador al extremo libre del cable. ADVERTENCIA:
No se quede de frente hacia el acumulador al hacer la conexión final.
Gire la pinza de ida y vuelta para hacer un buen contacto.
5. Haga todos los ajustes antes de aplicar la corriente alterna al cargador.
6. Observe los medidores para ver las respuestas. Si algo no parece
estar bien, vea la sección de detección de desperfectos de este manual.
7. Cuando está completamente cargado el acumulador, desenchufe el
cargador de la toma de corriente alterna.
(1) Quite la pinza del extremo del cable negativo y luego,
(2) Quite la pinza del terminal positivo, en ése orden.
8. Limpie y guarde el cargador de acumuladores.
ADVERTENCIA: Verifique que el área alrededor del acumulador esté
bien ventilada durante la carga. Puede sacar el gas del área soplándolo
con una hoja de cartón u otro material no metálico usado como abanico.
G. TIEMPO DE CARGA
El tiempo aproximado de carga necesario para cargar completamente
un acumulador depende del número de amperios-horas drenadas del
acumulador. Los amperios-horas se determinan multiplicando el
número de horas por el número de amperios suministrados al
acumulador durante una carga. Por ejemplo, si se conectó una carga
a un acumulador que absorbió 10 amperios durante cinco horas, se le
habrán alimentado 50 horas-amperios. El tiempo aproximado de
recarga necesario para reponer los 50 horas-amperios al acumulador
se calcula dividiendo los 50 horas-amperios entre la capacidad de
carga. Si se usa una capacidad de carga de 40 amperios, divida 50
horas-amperios entre 40 amperios y obtiene el resultado de 1.25 horas,
o una hora con 15 minutos. Durante el ciclo de carga, la carga de 40
amperios no permanece constante, sino que conforme se carga el
acumulador, baja la carga a aproximadamente 15 amperios. Por estas
razones, es necesario dejar que cargue aproximadamente un 25% de
tiempo adicional. En el ejemplo actual, se aumentarían 20 minutos a la
hora 15 minutos para un tiempo total de carga de 1 hora con 35 minutos.
6. Haga todos los ajustes deseados antes de aplicarle corriente alterna
al cargador.
7. Observe el medidor para ver las respuestas. Si algo no parece estar
bien, vea la sección de detección de desperfectos de este manual.
8. Cuando el acumulador está completamente cargado, desenchufe el
cargador de la toma de corriente alterna.
9. Quite las pinzas en el siguiente orden: (1) del chasis y (2) del terminal
del acumulador.
F. INSTRUCCIONES DE FUNCIONAMIENTO: CARGA DEL
ACUMULADOR DESMONTADO DEL VEHICULO
Al cargar el acumulador desmontado del vehículo, tenga cuidado de
determinar el tipo del acumulador. Para reducir el riesgo de una chispa
cerca del acumulador, siga estos pasos cuando esté fuera del vehículo.
ADVERTENCIA: Una chispa cerca del acumulador puede causar una
explosión del acumulador. ADVERTENCIA: Al quitar un acumulador
de un vehículo o de una embarcación, desconecte el terminal de tierra
primero. Antes de desconectarlo, cerciórese que estén apagados todos
los accesorios para evitar arcos. NOTA: Un acumulador marino (de
embarcación) se tiene que desmontar para cargarlo en tierra (para
poder cargarlo a bordo, se tiene que hacer con equipo especial diseñado
para uso marino). ADVERTENCIA: Al reinstalar un acumulador,
conecte el conductor de tierra primero.
1. Verifique la polaridad de los terminales del acumulador. La caja estará
marcada junto a cada terminal: POSITIVO (POS, P, +) y NEGATIVO
(NEG, N, -). NOTA: El terminal positivo del acumulador normalmente
es de mayor diámetro que el negativo.
2. Conecte un cable aislado de acumulador de 61cm (24”) o más, calibre
6 (AWG) al terminal NEGATIVO (NEG, N, -).
3. Conecte la pinza POSITIVA (ROJA) del cargador al terminal POSITIVO
(POS, P, +) del acumulador. Gire la pinza de ida y vuelta para hacer un
buen contacto.
4. Colóquese a sí mismo y al extremo del cable aislado de 61cm tan lejos
como pueda del acumulador. Luego, conecte la pinza NEGATIVA
GARANTIA
SCHUMACHER ELECTRIC CORPORATION, 801 BUSINESS CENTER DRIVE,
MOUNT PROSPECT, IL 60056-2179, OTORGA ESTA GARANTIA LIMITADA AL
COMPRADOR MINORISTA ORIGINAL DE ESTE PRODUCTO. ESTA GARANTIA
LIMITADA NO ES TRANSFERIBLE.
Schumacher Electric Corporation garantiza este cargador de batería por tres años
a partir de la compra minorista por material o mano de obra defectuosos. La unidad
será reparada o reemplazada a la opción del fabricante de ocurrir lo anterior. Es
obligación del comprador enviar la unidad con prueba de compra, con los cargos de
transporte y/o franqueo postal pagos al fabricante o a su representante autorizado.
La garantía limitada es nula si el producto se ha usado mal, ha sido sujeto a un
manejo descuidado o ha sido reparado por alguna persona distinta al fabricante o su
representante autorizado.
El fabricante no efectúa ninguna representación distinta a esta garantía limitada y
expresamente excluye cualquier garantía implícita incluyendo cualquier garantía por
daños consecuentes.
ESTA ES LA UNICA GARANTIA EXPRESA LIMITADA Y EL FABRICANTE NO
ASUME NI AUTORIZA A NADIE A ASUMIR CUALQUIER OTRA OBLIGACION CON
RESPECTO AL PRODUCTO DISTINTA A ESTA GARANTIA EXPRES A LIMITADA.
EL FABRICANTE NO OTORGA NINGUNA GARANTIA DE COMERCIALIZACION
O ADAPTABILIDAD DE ESTE PRODUCTO Y EXCLUYE EXPRESAMENTE
AQUELLAS DE ESTA GARANTIA LIMITADA.
ALGUNOS ESTADOS NO PERMITEN LA EXCLUSION O LIMITACION DE DAÑOS
INCIDENTALES O CONSECUENTES O LA DURACION DE LA GARANTIA
IMPLICITA DE MANERA QUE LAS LIMITACIONES O EXCLUSIONES EXPUESTAS
ARRIBA PUEDEN NO APLICARSE A USTED.
ESTA GARANTIA LE OTORGA DERECHOS LEGALES ESPECIFICOS Y USTED
PUEDE TENER TAMBIEN OTROS DERECHOS QUE VARIAN DE ESTADO A
ESTADO.
8
 Loading...