


|
|
|
|
|
Battery |
SE-2151MA |
|
|
Charger |
15/2/100 Amp |
|
Owner's Manual |
Models: |
Automatic Battery Charger |
|
With Engine Start |
|
||
|
|
||
|
|
|
|
|
|
|
|
–Save–
Important Safety Instructions
Read Rules for Safe Operation and Instructions Carefully
Working in vicinity of a lead-acid battery is dangerous. Batteries generate explosive gases during normal battery operation. For this reason, it is of utmost importance that each time before using your charger, you read this manual and follow the instructions exactly.
WARNING: Handling the cord on this product or cords associated with accessories sold with this product, will expose you to lead, a chemical known to the State of California to cause cancer and birth defects or other reproductive harm. Wash hands after handling.
A. |
GENERAL BATTERY SAFETY |
|
|
1.Before you use your battery charger, be sure to read all instructions and cautions printed on:
•Battery Charger
•Battery
•Vehicle or unit using battery
2.Use battery charger on LEAD ACID type rechargeable batteries only, such as used in autos, trucks, tractors, airplanes, vans, RV's, trolling motors, etc. Charger is not intended to supply power to low-voltage electrical system other than in an automotive application.
WARNING: Do not use battery charger for charging drycell batteries that are commonly used with home appliances. These batteries may burst and cause injury to persons and damage to property.
3.Use only attachments recommended or sold by manufacturer. Use of non-recommended attachments may result in fire, electric shock, or injury.
4.When disconnecting the battery charger, pull by the plug not by the cord. Pulling on the cord may cause damage to cord or plug.
5.Locate battery power cord so it cannot be stepped on, tripped over, or subjected to damage or stress.
6.Do not operate charger with damaged cord or plug. Have cord replaced immediately.
7.Do not operate charger if it has received a sharp blow, been dropped, or otherwise damaged in any way. Take it to a qualified professional for inspection and repair.
8.Do not disassemble charger. Take it to a qualified professional when service or repair is required. Incorrect reassembly may result in electric shock or fire.
9.To reduce risk of electric shock, unplug charger from outlet before attempting any maintenance or cleaning.
10.Do not use an extension cord unless absolutely necessary. Use of an improper extension cord could result in fire or electric shock. If an extension cord must be used, make sure that:
•Pins on plug of extension cord are the same number, size, and shape as those of plug on charger.
•Extension cord is properly wired and in good electrical condition.
•Wire size is large enough for AC ampere rating of charger, as specified below:
Length of cord (feet): |
25 |
50 |
100 |
150 |
AWG size of cord: |
16 |
14 |
10 |
8 |
|
|
|
|
|
11.Always charge battery in a well ventilated area.
NEVER operate in a closed-in or restricted area without adequate ventilation.
WARNING: Risk of explosive gas.
12.Locate charger as far away from battery as DC charger cables permit.
13.Do not expose charger to rain or snow.
14.NEVER charge a frozen battery. If battery fluid (electrolyte) is frozen, bring into a warm area to thaw before charging.
15.NEVER allow battery acid to drip on charger when reading specific gravity or filling battery.
16.NEVER set a battery on top of charger.
17.NEVER place charger directly above battery being charged. Gases from battery will corrode and damage charger.
18.NEVER touch the battery clips together when the charger is energized.
SCHUMACHER ELECTRIC CORPORATION
801 BUSINESS CENTER DRIVE • MOUNT PROSPECT, ILLINOIS 60056-2179
Send Warranty Product Repairs to: 1025 E. Thompson, Hoopeston, IL 60942-0280
Call Customer Service if you have questions: 1-800-621-5485
00-00-000629/0103
1
B. |
PERSONAL PRECAUTIONS AND SAFETY |
|
|
1.WARNING: Wear complete eye protection and clothing protection, when working with lead-acid batteries.
2.Make sure someone is within range of your voice or close enough to come to your aid when you work with or near a lead-acid battery.
3.Have plenty of fresh water and soap nearby for use if battery acid contacts skin, clothing, or eyes. If battery acid contacts skin or clothing, wash immediately with soap and water.
4.Avoid touching your eyes while working with a battery. Acid particles (corrosion) may get into your eyes! If acid enters your eye, immediately flood eye with running cold water for at least 10 minutes. Get medical attention immediately.
5.Remove all personal metal items such as rings, bracelets,
necklaces, and watches when working with a lead-acid battery. A lead-acid battery can produce a short-circuit current high enough to weld a ring (or the like) to metal, causing a severe burn.
6.Take care not to drop a metal tool or other metal onto the battery. Metal may cause sparking or short circuit the battery or another electrical devise. Sparking may cause an explosion.
7.Always operate battery charger in an open well ventilated area.
8.NEVER smoke or allow a spark or flame in the vicinity of the battery or engine. Batteries generate explosive gases!
C. |
PREPARING TO CHARGE |
|
|
1.Make sure you have a 6 or 12 volt lead-acid battery. Check car owner manual to make sure.
2.Clean battery terminals. Take care to keep corrosion from coming in contact with your eyes.
3.If required, add distilled water in each cell until battery acid reaches levels specified by battery manufacturer. This helps purge excessive gas from cells. Do not overfill. For a battery without cell caps, carefully follow manufacturer's recharging instructions.
4.Study all battery manufacturer's specific precautions, such as removing or not removing cell caps while charging, and recommended rates of charge.
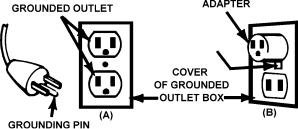
GROUNDING AND AC POWER CORD CONNECTION INSTRUCTIONS - Charger should be grounded to reduce risk of electric shock. Charger is equipped with an electric cord having an equipment-grounding conductor and a grounding plug. The plug must be plugged into an outlet that is properly installed and grounded in accordance with local codes and ordinances.
DANGER - Never alter AC cord or plug provided - if it will not fit outlet, have proper outlet installed by a qualified electrician. Improper connection can result in a risk of electric shock.
This battery charger is for use on a nominal 120-volt circuit, and has a grounding plug that looks like the plug illustrated in sketch A. A temporary adapter, which looks like the adapter illustrated in sketch B, may be used to connect this plug to a two-pole receptacle as shown in sketch B if a properly grounded outlet is not available. The temporary adapter should be used only until a properly grounded outlet can be installed by a qualified electrician.
During operation do not place the charger or its cables on the vehicle seat or carpeting.
When charging a battery in a boat, RV or motor home always connect one lead of the output cable to the battery. Never connect to a remote receptacle or other means for the purpose of remotely charging the battery. The wires may be inadequate for handling the charge current of this charger and may over heat. Often these wires are bundled in with other wires which could be damaged and lead to a direct short across the battery and charger. If this occurs a fire can result, equipment and appliances operated from the battery may also be damaged.
5.Be sure area around battery is well ventilated while battery is being charged. Gas can be forcefully blown away by using a piece of cardboard or other non-metallic material as a fan.
6.If necessary to remove battery from vehicle to charge, always remove grounded terminal from battery first. Make sure all accessories in the vehicle are off, so as not to cause an arc.
7.A marine (boat) battery must be removed and charged on shore. To charge it on board requires equipment specially designed for marine use.
8.Select charge rate suitable for the battery being charged - (2 or 15 Amps)
Grounding Methods
DANGER - Before using adapter as illustrated, be certain that center screw of outlet plate is grounded. The green-colored rigid ear or lug extending from adapter must be connected to a properly grounded outlet - make certain it is grounded. If necessary, replace original outlet cover plate screw with a longer screw that will secure adapter ear or lug to outlet cover plate and make ground connection to grounded outlet.
2

D. |
METER AND SWITCH FUNCTIONS |
|
|
BATTERY TYPE: You may select between two basic Battery Types: Regular or Deep Cycle Battery. Both settings operate automatically and will shut off when the battery is fully charged. Use the Regular for all wet-cell, lead-acid batteries. (This charger is not recommended for Gel-Cell and AGM batteries.) Use the Deep Cycle setting for all Deep Cycle wet-cell, lead-acid batteries. How can you tell your battery type? Deep Cycle batteries are usually marked as such. If not, the battery will fall under the category of "Regular" batteries. Most automotive batteries are considered "Regular" batteries.
Some Deep Cycle batteries are designed in a way that charging them in the Regular setting is more suitable. When charging a Deep Cycle battery, if the Full Charge indicator lamp does not become illuminated after a 24-hour charge period and the charge current as indicated by the Amp Meter is less than 8 amps, move the switch to the Regular setting. If the Full Charge indicator lamp still remains off after charging, you should disconnect the charger and have both the battery and charger professionally tested.
OPERATION SELECTOR
|
|
|
|
|
|
|
|
|
|
|
|
|
|
|
REGULAR BATTERIES ▲ |
▲ DEEP CYCLE BATTERIES |
|||
AUTOMATIC OPERATION |
|
AUTOMATIC OPERATION |
||
6 VOLT, 15 AMP: Used for charging medium and large size wet-cell, lead-acid 6 volt batteries. Do not charge small batteries such as used in motorcycles, lawn and garden equipment. (Manual Operation. Monitor frequently while charging a battery.)
12 VOLT, 2 AMP: The 2 amp automatic charge rate is recommended for charging small batteries and warming large ones. If used for maintaining the Full Charge level of larger batteries, limit the charge period to a few days at a time. (Automatic Operation.)
12 VOLT, 15 AMP: Used for charging medium and large size wet-cell, lead-acid, 12-volt batteries. (Automatic Operation.)
12 VOLT, 100 AMP ENGINE START: Used for crank starting of 12 volt vehicles. The Engine Start position should not be used for battery charging, doing so will cause the charger to overheat and then protect itself by cycling off and on. (Manual Operation.)
CHARGE RATE SELECTOR
|
|
|
|
|
|
|
|
|
|
|
|
|
|
|
|
|
|
|
|
|
▲ |
▲ |
▲ |
▲ |
|||
15 Amp |
2 Amp |
15 Amp |
100 Amp 12V |
|||
6V, Manual |
12V Automatic |
Engine Start |
||||
|
DC AMPS |
|||
|
CHARGING |
|
|
START |
|
|
|
|
|
0 |
5 |
10 |
15 |
100 |
|
FULL |
|
|
CHECK |
|
CHARGE |
|
|
BATTERY |
METER: The meter indicates the amount of current measured in amperes that is being drawn from the charger by a battery. In the 15 amp charge rate a typical discharged battery may initially draw more than 15 amps during the first few minutes of charge. As the battery continues to charge current should gradually taper to within 6 to 8 amps at full charge.
The START area of the meter is reserved to indicate when a high rate of current is being drawn from the charger. It is normal for the meter pointer to be in this area while cranking a vehicle.
When using the 2 amp charge rate the meter may indicate some activity but doesn’t have the resolution to accurately display the battery’s state of charge. For this reason you should depend on the full charge light indicator.
CRANK STARTING FOR 12 VOLT ONLY:
1.Connect the charger as outlined in the “CHARGING BATTERY IN VEHICLE” section.
2.For best results charge the battery for 10 minutes in the 15 amp position before cranking the engine.
3.Set the charge rate selector switch to the 100 amp start position.
4.Crank the engine for 3 seconds, if the engine fails to start, set the charge rate switch to the 15 amp rate and charge the battery for the next 5 to 10 minutes before cranking again.
5.If the engine fails to start after several tries, there maybe a problem elsewhere with the vehicle.
3
 Loading...