

MODEL
SBP1
0099001664-02
PLEASE SAVE THIS OWNERS MANUAL AND READ BEFORE EACH USE.
This manual will explain how to use the unit safely and effectively. Please read and
follow these instructions and precautions carefully.
POR FAVOR CONSERVE ESTE MANUAL DEL USUARIO Y LEALO ANTES DE
CADA USO. En este manual le explica cómo utilizar la unidad de manera segura
y conable. Por favor, lea y siga las siguientes instrucciones y precauciones.
OWNERS MANUAL
MANUAL DEL USUARIO
Backup
Power System
Sistema de energía
de reserva

THIS UNIT CONTAINS A SEALED, NON-SPILLABLE LEAD-ACID
BATTERY. MUST BE DISPOSED OF PROPERLY.
ESTA UNIDAD CONTIENE UNA BATERÍA SELLADA DE ÁCIDO-PLOMO
NO DERRAMABLE QUE DEBE DESECHARSE APROPIADAMENTE.
WARNING: Possible explosion hazard. Contact with battery acid may cause severe
burns and blindness. Keep out of reach of children.
ADVERTENCIA: Posible riesgo de una explosión. El contacto con una batería de
ácido puede causar quemaduras y ceguera. Manténgase alejado de los niños.

• 3 •
1. IMPORTANT SAFETY INSTRUCTIONS
SAVE THESE INSTRUCTIONS.
1.1 SAVE THESE INSTRUCTIONS –
This manual contains important safety
and operating instructions.
1.2 This product is not intended for use by
children.
1.3 For indoor use only.
1.4 If someone else uses the unit, ensure
they are well informed on how to use it
safely, and have read and understood the
operating instructions.
WARNING! RISK OF EXPLOSION.
1.5 Do not use near ammable fumes or
gases, such as in the bilge of a gasolinepowered boat or near propane tanks.
1.6 Do not use in an enclosure containing
automotive-type lead-acid batteries.
1.7 Do not expose the unit to temperatures
over 104°F (40°C).
WARNING!
RISK OF ELECTRIC SHOCK OR FIRE.
1.8 Use of an attachment not recommended
or sold by Schumacher® Electric
Corporation may result in a risk of re,
electric shock or injury to persons.
1.9 Do not operate the unit with damaged
cord or plug – replace the cord or plug
immediately.
1.10 Do not recharge the unit with a damaged
extension cord.
1.11 Do not operate the unit if it has received
a sharp blow, been dropped, or otherwise
damaged in any way; take it to a qualied
service person.
1.12 Do not disassemble the unit. Take it to a
qualied service professional if service or
repair is required. Incorrect assembly may
result in re or electrical shock.
1.13 To reduce risk of electric shock, unplug
the unit from the outlet before attempting
any maintenance or cleaning. Turning off
controls will not reduce this risk.
1.14 The unit gets hot during use and must
have proper ventilation. Ensure at least 3
in. (7.5 cm) air space is maintained on all
sides of the unit.
1.15 Do not set the unit on ammable materials,
such as carpeting, upholstery, paper,
cardboard, etc. During operation, keep
unit away from materials that can that can
be affected by high temperatures, such as
blankets, pillows and sleeping bags.
2. PERSONAL SAFETY PRECAUTIONS
WARNING!
RESTRICTIONS ON USE.
2.1 This unit may not be used with life
support devices or systems. Failure of
this device can reasonably be expected
to cause failure of that life support device
or system, or to affect the safety or
effectiveness of that device or system.
2.2 When working on electrical equipment,
always ensure someone is nearby to aid
you in case of an emergency.
2.3 The unit is very heavy; do not lift by the
handle. When stored or in use, prevent
unit from falling over.
2.4 WARNING: This product contains one
or more chemicals known to the State
of California to cause cancer and birth
defects or other reproductive harm.
3. ASSEMBLY INSTRUCTIONS
3.1 Remove all cord wraps and uncoil the
cables prior to using the unit.
3.2 To retract or extend the handle, push in the
button on the top of the handle. Do not lift
the unit by the handle.
• 4 •
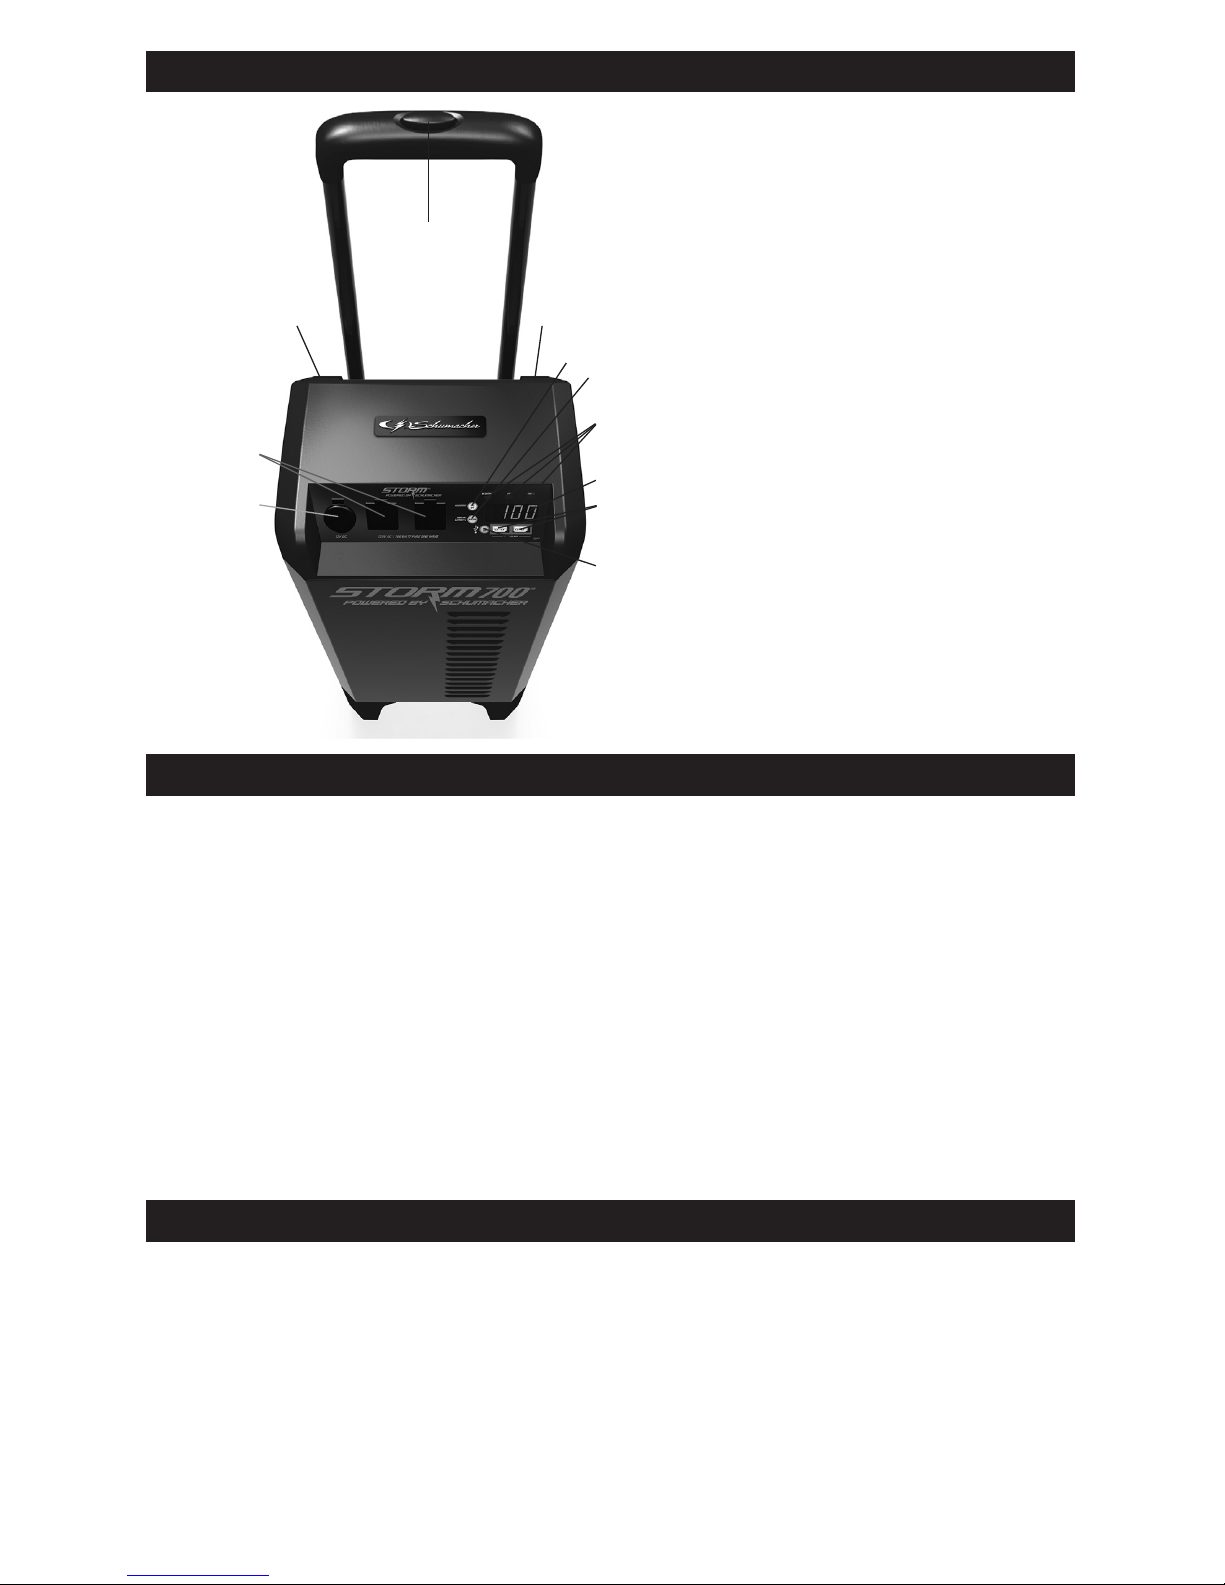
4. FEATURES
1. 12V DC accessory port
2. 120V AC household
power outlets (2)
3. Power port for external
battery (on back)
4. Retractable handle
5. AC power cord (not visible)
6. AC output ON/OFF button
7. Display/Battery % button
8. AC Output/USB/Error LEDs
9. Digital display
10. USB ports (2)
11. USB ON/OFF button
12. Wheels (not visible)
1
2
4
6
7
8
9
10
11
3
5
5. CONTROL PANEL
LED INDICATORS
• AC Output – Green, when AC output
function is activated.
• USB – Green, when USB function is
activated.
• Error – Red, when unit is shut down
(in addition to audible alarm), due to low
battery voltage or converter overload.
See scrolling display message for more
information.
ON/OFF FUNCTION BUTTONS
• AC output – Turns AC output on or off.
• Display/Battery % – Turns on the digital
display and show’s the internal battery’s
percentage of charge
• USB – Turns USB function on or off.
NOTE: The USB will turn off after a period
of time if no current is being drawn.
DIGITAL DISPLAY
Press the DISPLAY button to turn on the
display. The digital display will show the
battery’s percent of charge. Charge the
internal battery whenever the unit is not in
use and the display read less than 100%
See Display Messages for a complete list
of messages.
6. OPERATING INSTRUCTIONS
IMPORTANT! CHARGE IMMEDIATELY
AFTER PURCHASE, AFTER EACH USE
AND EVERY 30 DAYS, TO KEEP THE
INTERNAL BATTERY FULLY CHARGED
AND PROLONG BATTERY LIFE.
CHECKING THE LEVEL
OF THE INTERNAL BATTERY
Press the DISPLAY button to turn on the
display. The digital display will show the
battery’s percent of charge. Charge the
internal battery if the display shows it is
under 100%.
NOTE: The internal battery’s percent of
charge is most accurate when the unit
has been disconnected from all devices
and charging sources for a few hours.
CHARGING THE INTERNAL BATTERY
1. Make sure to turn off the 120V AC
output before charging.
2. Plug the power cord directly into a live
grounded 120V outlet (not into a surge
protector, power strip, or power bar).
Charging will start automatically.

• 5 •
3. While the unit is charging, the digital
display will show . When the internal
battery is fully charged, the display will
show a smaller, pulsingioo, for energy
efciency. Complete charging may take
up to 20 hours.
4. Unplug the unit from the 120V outlet.
SOLAR CHARGING
Solar charging of the Storm unit can be
accomplished by plugging in a solar panel
with a charge controller into the 12V
accessory port.
NOTE: A charge controller must be used
to keep from overcharging the battery.
CONNECTING TO AN EXTERNAL
BATTERY
To extend operating time, you may connect
to an additional external battery (55Ah
deep-cycle battery with threaded posts). Use
accessory cable 94500800 (not included).
See instructions included with the cable.
POWERING A 12V DC DEVICE
NOTE: Do not power a 12V device while
charging the internal battery.
1. Make sure the device to be powered
is OFF before inserting the 12V DC
accessory plug into the 12V DC
accessory port.
2. Open the protective cover of the DC
accessory port on the unit.
3. Plug the 12V DC device into the DC
accessory port and turn on the 12V DC
device (if required).
4. When nished, turn off the DC device
(if required) and unplug from the DC
accessory port.
5. Recharge the unit immediately after
unplugging the 12V DC device.
12V DC ESTIMATED RUN-TIMES
APPLIANCE
TYPE
EST
WATTAGE
ESTIMATED
RUN TIME
Cell phone 4 watts 165 hrs
Fluorescent
light
4 watts 165 hrs
Radios, fans 9 watts 73 hrs
Depth nder 9 watts 73 hrs
Camcorder 15 watts 44 hrs
Electrical tool 24 watts 27 hrs
Electric cooler 48 watts 11 hrs
Car vacuum,
air compressor
80 watts 6 hrs
NOTE: Actual time may vary. Times are based on
the internal battery being fully charged.
USING THE USB PORTS
The USB ports provide up to 2.1A at 5V DC.
1. Plug the device into one of the two
USB ports on the front panel.
2. Press the USB port ON/OFF button.
The green USB LED conrms that the
USB power is ON.
3. Turn on the USB device, if necessary.
4. When you are nished using the USB
port, press the USB port ON/OFF
button, to turn off.
5. Charge the unit as soon as possible
after using the USB port.
USING THE CONVERTER
It is important to know the continuous
wattage of the device you plan to use with
the converter. The unit must be used with
devices drawing 700 watts or less. If the
wattage is not marked on the device, use
only devices with total AC current of less
than 5.75A.
Devices such as TVs, fans or electric motors
require additional power to start (commonly
known as the “starting” or “peak” power).
The Backup Power can supply a momentary
surge in wattage; however even devices
rated less than the maximum 700 watts can
exceed the converter’s surge capability and
cause an automatic overload shutdown.
Do not use the converter with a product
that draws a higher wattage than the
converter can provide, as this may cause
erratic operation.
CAUTION: Always run a test to establish
whether the converter will operate a
particular piece of equipment or device.
In the event of a power overload (noted
with RED Error LED, an audible alarm and
a scrolling display message), the converter
is designed to automatically shut down.
This safety feature prevents damaging
the converter while testing devices and
equipment within the 700-watt range.
If powering more than one device, start
one device at a time to avoid a power
surge and/or converter overload. The
surge load of each device should not
exceed the converter’s Continuous
Operation wattage rate.
You can use an extension cord from
the converter to the device without
signicantly decreasing the power being
generated by the converter. For best
operating results, the extension cord
should be 16 AWG (1.31 mm2) or larger
and no longer than 50 feet.
WARNING!
RISK OF ELECTRIC SHOCK.
Incorrect operation of your converter may
result in damage and personal injury.
The converter output is 120V AC and can
shock or electrocute the same as any
ordinary household AC wall outlet.
NOTE: The maximum continuous load
is 700 watts. Do not use the converter
with a product that draws more than
700 watts, as this may cause erratic
operation.
 Loading...