

Page 1

MODEL # AMPS VOLTS ENGINE START
For
Lead-Acid
Batteries
INSTRUCTION MANUAL
PS-2352 2/35 12 200
PS-5250 10/50 6/12 125/250
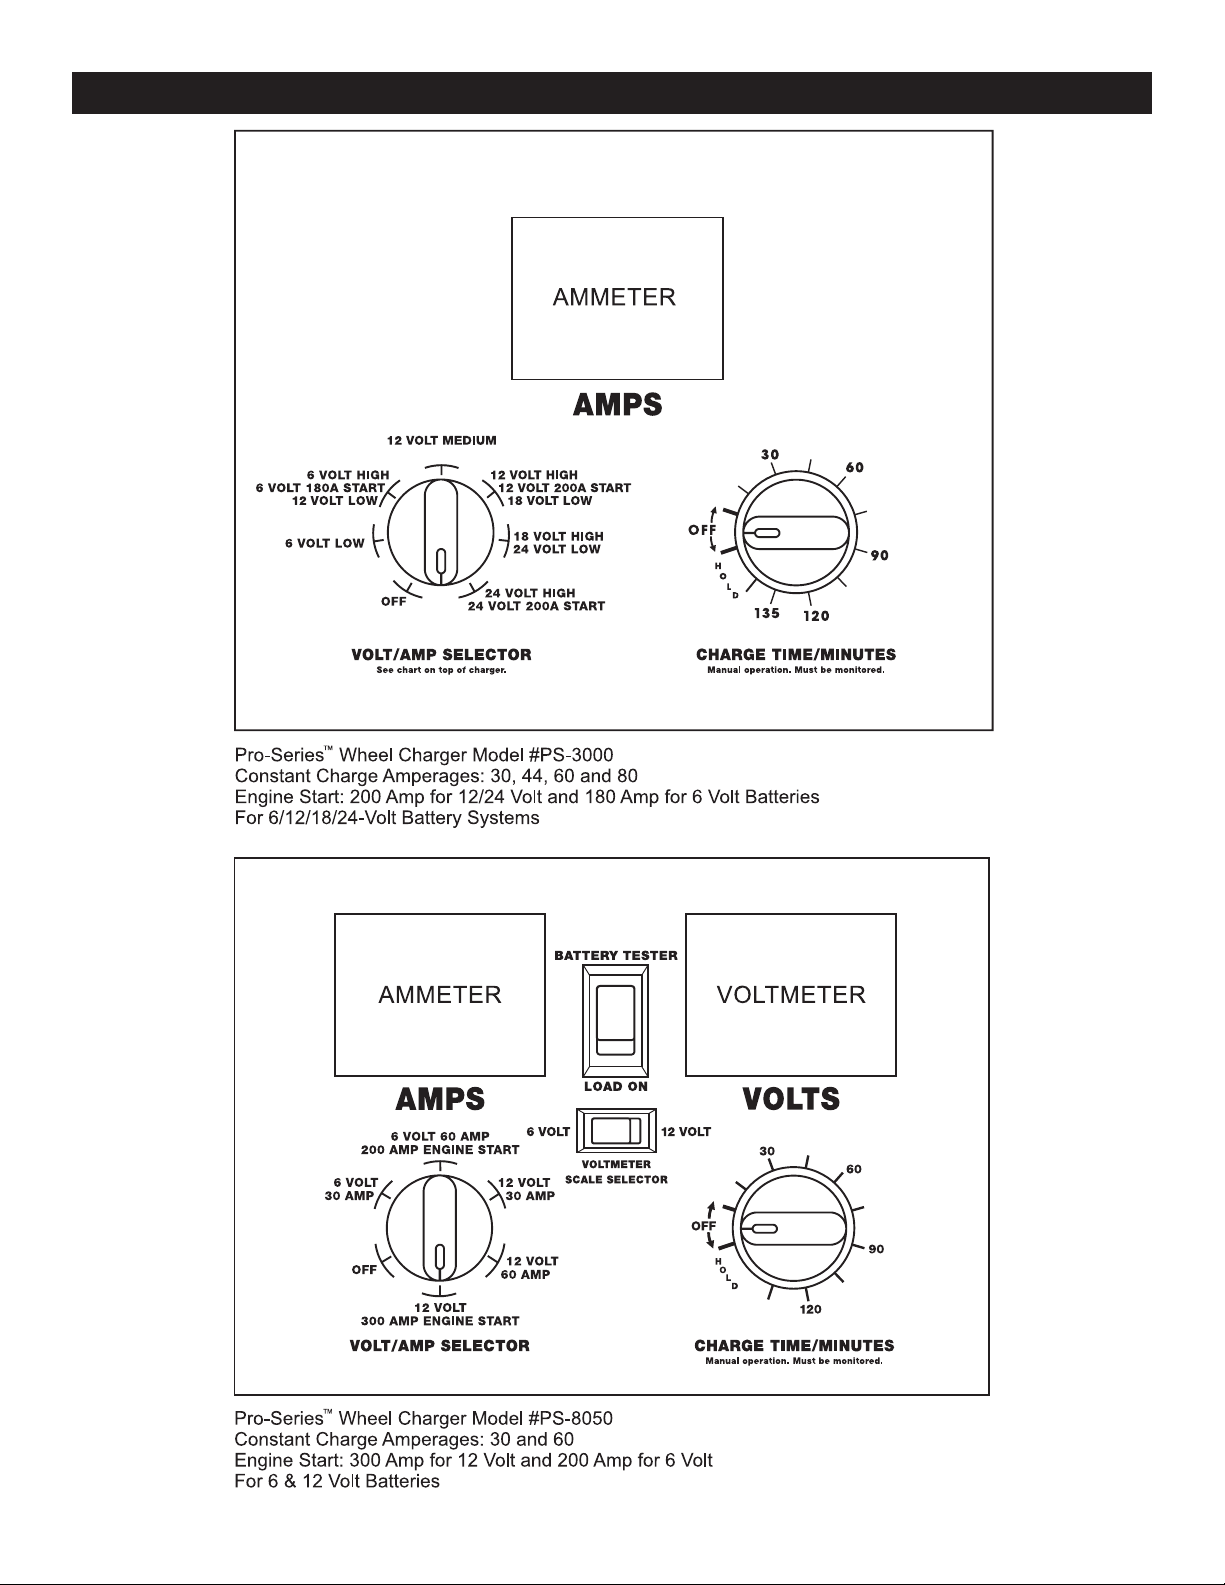
PS-8050 30/60 6/12 200/300
PS-3000 30/44/60/80 6/12/18/24 180/200
–Save–
Important Safety Instructions
Read instructions and rules for safe operation carefully.
Working in the vicinity of a lead-acid battery is dangerous. Batteries generate explosive gases
during normal battery operation. For this reason, it is of utmost importance that each time
before using your charger, you read this manual and follow the instructions exactly.
A. GENERAL BATTERY SAFETY
1. Before you use your battery charger, be sure to read all
instructions and cautions printed on:
• Battery Charger
• Battery
• Vehicle or unit using battery
2. Use battery charger on LEAD ACID type rechargeable batteries only, such as used in autos, trucks, tractors, airplanes,
vans, RV's, trolling motors, etc. Charger is not intended to
supply power to low-voltage electrical system other than in
an automotive application.
WARNING: Do
cell batteries that are commonly used with home appliances.
These batteries may burst and cause injury to persons and
damage to property.
3. Use only attachments recommended or sold by manufacturer. Use of non-recommended attachments may result in
fire, electric shock, or injury.
4. When disconnecting the battery charger, pull by the plug
not by the cord. Pulling on the cord may cause damage to
cord or plug.
5. Locate battery power cord so it cannot be stepped on, tripped
over, or subjected to damage or stress.
6. Do not operate charger with damaged cord or plug. Have
cord replaced immediately.
7. Do not operate charger if it has received a sharp blow, been
dropped, or otherwise damaged in any way. Take it to a
qualified professional for inspection and repair.
8. Do not disassemble charger. Take it to a qualified professional when service or repair is required. Incorrect reassembly may result in electric shock or fire.
9. To reduce risk of electric shock, unplug charger from outlet
before attempting any maintenance or cleaning.
not use battery charger for charging dry-
10. Do not use an extension cord unless absolutely necessary.
Use of an improper extension cord could result in fire or
electric shock. If an extension cord must be used, make
sure that:
• Pins on plug of extension cord are the same number,
size, and shape as those of the plug on the charger.
• Extension cord is properly wired and in good electrical
condition.
• Wire size is large enough for AC ampere rating of charger,
as specified below:
Length of cord (feet): 25 50 100 150
AWG* size of cord: 16 14 10 8
*AWG-American Wire Gauge
11. Always charge battery in a well ventilated area.
NEVER operate in a closed-in or restricted area without
adequate ventilation because of risk of explosive gases.
WARNING: Risk of explosive gas.
12. Locate charger as far away from battery as DC charger
cables permit.
13. Do not expose charger to rain or snow.
14. NEVER charge a frozen battery. If battery fluid (electrolyte)
is frozen, bring into a warm area to thaw before charging.
15. NEVER allow battery acid to drip on charger when reading
specific gravity or filling battery.
16. NEVER set a battery on top of charger.
17. NEVER place charger directly above battery being charged.
Gases from battery will corrode and damage charger.
18. NEVER touch the battery clips together when the charger is
energized.
1
00-99-000300/902
Page 2

B. PERSONAL PRECAUTIONS AND SAFETY
1. WARNING: Wear complete eye protection and clothing pro-
tection, when working with lead-acid batteries.
2. Make sure someone is within range of your voice or close
enough to come to your aid when you work with or near a
lead-acid battery.
3. Have plenty of fresh water and soap nearby for use if battery acid contacts skin, clothing, or eyes. If battery acid
contacts skin or clothing, wash immediately with soap and
water.
4. Avoid touching your eyes while working with a battery. Acid
particles (corrosion) may get into your eyes! If acid enters
your eye, immediately flood eye with running cold water for
at least 10 minutes. Get medical attention immediately.
5. Remove all personal metal items such as rings, bracelets,
necklaces, and watches when working with a lead-acid
battery. A lead-acid battery can produce a short-circuit current high enough to weld a ring (or the like) to metal, causing a severe burn.
6. Take care not to drop a metal tool or other metal onto the
battery. Metal may cause sparking or short circuit the battery or another electrical devise. Sparking may cause an
explosion.
7. Always operate battery charger in an open well ventilated
area.
8. NEVER smoke or allow a spark or flame in the vicinity of
the battery or engine. Batteries generate explosive gases!
C. GROUND AND AC POWER CORD CONNECTIONS
Charger should be grounded to reduce the risk of electric shock.
Charger is equipped with an electric cord having an equipment
grounding conductor and a grounding plug. The plug must be
plugged into an outlet that is properly installed and grounded in
accordance with all local codes and ordinances. This battery
charger is designed for use on a nominal 120 volt circuit and
has a grounded plug that looks like the plug illustrated in FIGURE 1 (A). This plug should be used in a grounded outlet. The
plug pins must fit the receptacle (outlet).
ADAPTER: A temporary adapter, as shown in FIGURE 1 (B)
and (C), may be used to connect the charger plug to a two pole
receptacle (outlet), as shown in FIGURE 1 (B).
NOTE: The temporary adapter should be used only until a properly grounded outlet can be installed by a qualified electrician.
FIGURE 1: GROUNDING METHODS
DANGER: Never alter the AC cord or plug provided. If it will not fit outlet, have a proper outlet installed by a qualified electrician.
Improper connection can result in a risk of an electrical shock. DANGER: Before using an adapter, as illustrated, be certain that the
center screw of the outlet plate is grounded. The green-colored rigid ear or lug extending from the adapter must be connected to a
properly grounded outlet. Make certain it is grounded. If necessary, replace original outlet cover plate screw with a longer screw that will
secure adapter ear or lug to outlet cover plate and make ground connection to grounded outlet.
"Use of adapter plug not allowed in Canada"
D. PREPARING TO CHARGE
1. Check your vehicle’s battery voltage and select battery
charger switch accordingly.
2. Clean battery terminals. Take care to keep corrosion from
coming in contact with your eyes.
3. If required, add distilled water in each cell until battery acid
reaches levels specified by battery manufacturer. This helps
purge excessive gas from cells. Do not overfill. For a battery without cell caps, carefully follow manufacturer's recharging instructions.
4. Study all battery manufacturer's specific precautions, such
as removing or not removing cell caps while charging, and
recommended rates of charge.
5. Be sure area around battery is well ventilated while battery
is being charged. Gas can be forcefully blown away by using a piece of cardboard or other non-metallic material as a
fan.
6. If necessary to remove battery from vehicle to charge, always remove grounded terminal from battery first. Make
sure all accessories in the vehicle are off, so as not to cause
an arc.
7. A marine (boat) battery must be removed and charged on
shore. To charge it on board requires equipment specially
designed for marine use.
E. CHARGE LOCATION PRECAUTIONS
Never place charger directly above the battery being charged;
gases from battery could damage the charger.
Never allow battery acid to drip on the charger when reading
specific gravity or filling battery.
Never operate charger in a closed in area, or restricted ventilation in any way.
Do not set battery on top of the charger.
2
Page 3
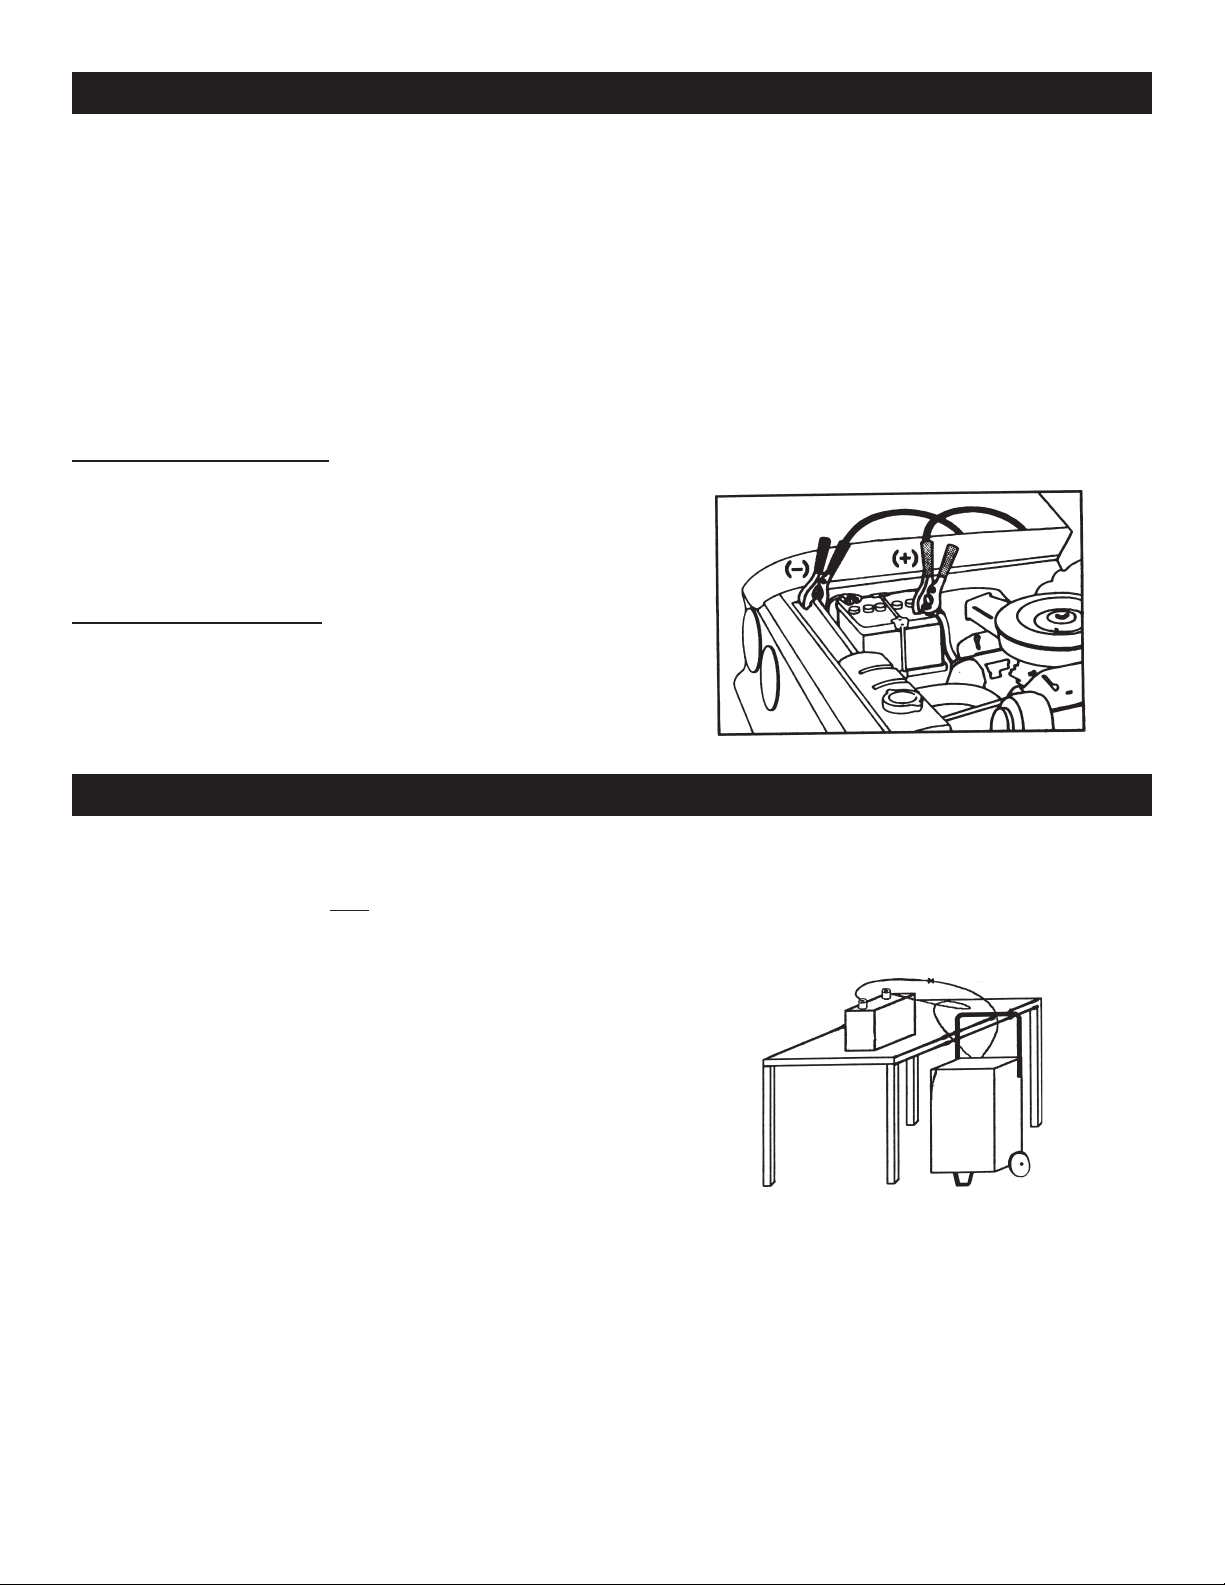
F. OPERATING INSTRUCTIONS: CHARGING BATTERY IN VEHICLE
When charging battery in the vehicle, take care to determine the battery type and which post is grounded. To reduce risk of a spark near
battery, follow these steps when battery is installed in vehicle. WARNING: A spark near battery may cause battery explosion.
1. Position AC power cord and DC charging cords to reduce
risk of damage by hood, door, or moving engine parts.
2. Stay clear of fan blades, belts, pulleys, and other parts that
can cause injury.
3. Check polarity of battery posts. Battery case will be marked
by each post: POSITIVE (POS, P, +) and NEGATIVE (NEG,
N, -). NOTE: The positive battery post usually has a larger
diameter than the negative post.
4. Determine which post of battery is ground (connected) to
chassis.
NOTE: The negative post is normally grounded.
NEGATIVE GROUNDED POST
5A. For negative-grounded vehicle, connect POSITIVE (RED)
clip from battery charger to POSITIVE (POS, P, +) ungrounded post of battery. Connect NEGATIVE (BLACK) clip
to vehicle chassis or engine block away from battery. Connect to a heavy gauge metal part of the frame or engine
block.
POSITIVE GROUNDED POST
5B. For positive-grounded vehicle, connect NEGATIVE (BLACK)
clip from battery charger to NEGATIVE (NEG, N, -) ungrounded post of battery. Connect POSITIVE (RED) clip to
vehicle chassis or engine block away from battery. Connect to a heavy gauge unpainted metal part of the frame or
engine block.
WARNING: Do not connect clip to carburetor, fuel lines, or sheetmetal body parts. NOTE: Attach clips to battery post and twist
or rock back and forth several times to make a good connection. This tends to keep clips from slipping off terminals and
helps to reduce risk of sparking.
6. Follow steps 1-4 in Battery Charger Section K.
7. Select amperage.
8. When the battery is fully charged, turn the switch to OFF,
then unplug the charger from the AC power source.
9. Remove charger clips from (1) chassis and (2) battery post,
in that order.
10. Clean and store battery charger.
G. OPERATING INSTRUCTIONS: CHARGING BATTERY OUT OF VEHICLE
When charging battery out of vehicle, take care to determine the battery type. To reduce risk of a spark near battery, follow these steps
when battery is outside vehicle. WARNING: A spark near the battery may cause battery explosion. WARNING: When removing battery
from vehicle or boat, disconnect grounded pole first. When disconnecting, make sure all accessories are off, so as not to cause an arc.
(NOTE: A marine (boat) battery
marine use.)
1. Check polarity of battery posts. Battery case will be marked
by each post: POSITIVE (POS, P, +) and NEGATIVE (NEG,
N, -). NOTE: The positive battery post usually has a larger
diameter than the negative post.
2. Attach a 24-inch long (or longer) 6-gauge (AWG) insulated
battery cable to NEGATIVE (NEG, N, -) battery post.
(The 24" lead is not supplied. You may purchase at most
automotive stores.)
The 24" lead provides a safer connection condition. Sparking or arcing could occur when connecting the charger clip
to the lead.
3. Connect POSITIVE (RED) charger clip to POSITIVE (POS,
P, +) post of battery. Rock clip back and forth to make good
connection.
4. Position yourself and free end of 24 inch cable as far away
from battery as possible. Then connect NEGATIVE (BLACK)
charger clip to free end of cable.
WARNING: Do not face battery when making final connection. Rock clip back and forth to make a good connection.
5. Follow steps 1-4 in Battery Charger Section.
6. Select amperage.
must be removed and charged on shore. (To charge on board requires special equipment designed for
24" Cable
7. When battery is fully charged, turn switch to OFF, then unplug charger from AC outlet.
8. When battery is fully charged and the charger is unplugged:
(1) Remove clip from end of the Negative end of cable,
then
(2) Remove clip from Positive battery post, in that order.
9. Clean and store battery charger.
WARNING: Be sure area around the battery is well venti-
lated while battery is being charged. Gas can be forcefully
blown away by using a piece of cardboard or other nonmetallic material as a fan.
Battery
Cable
3
Page 4
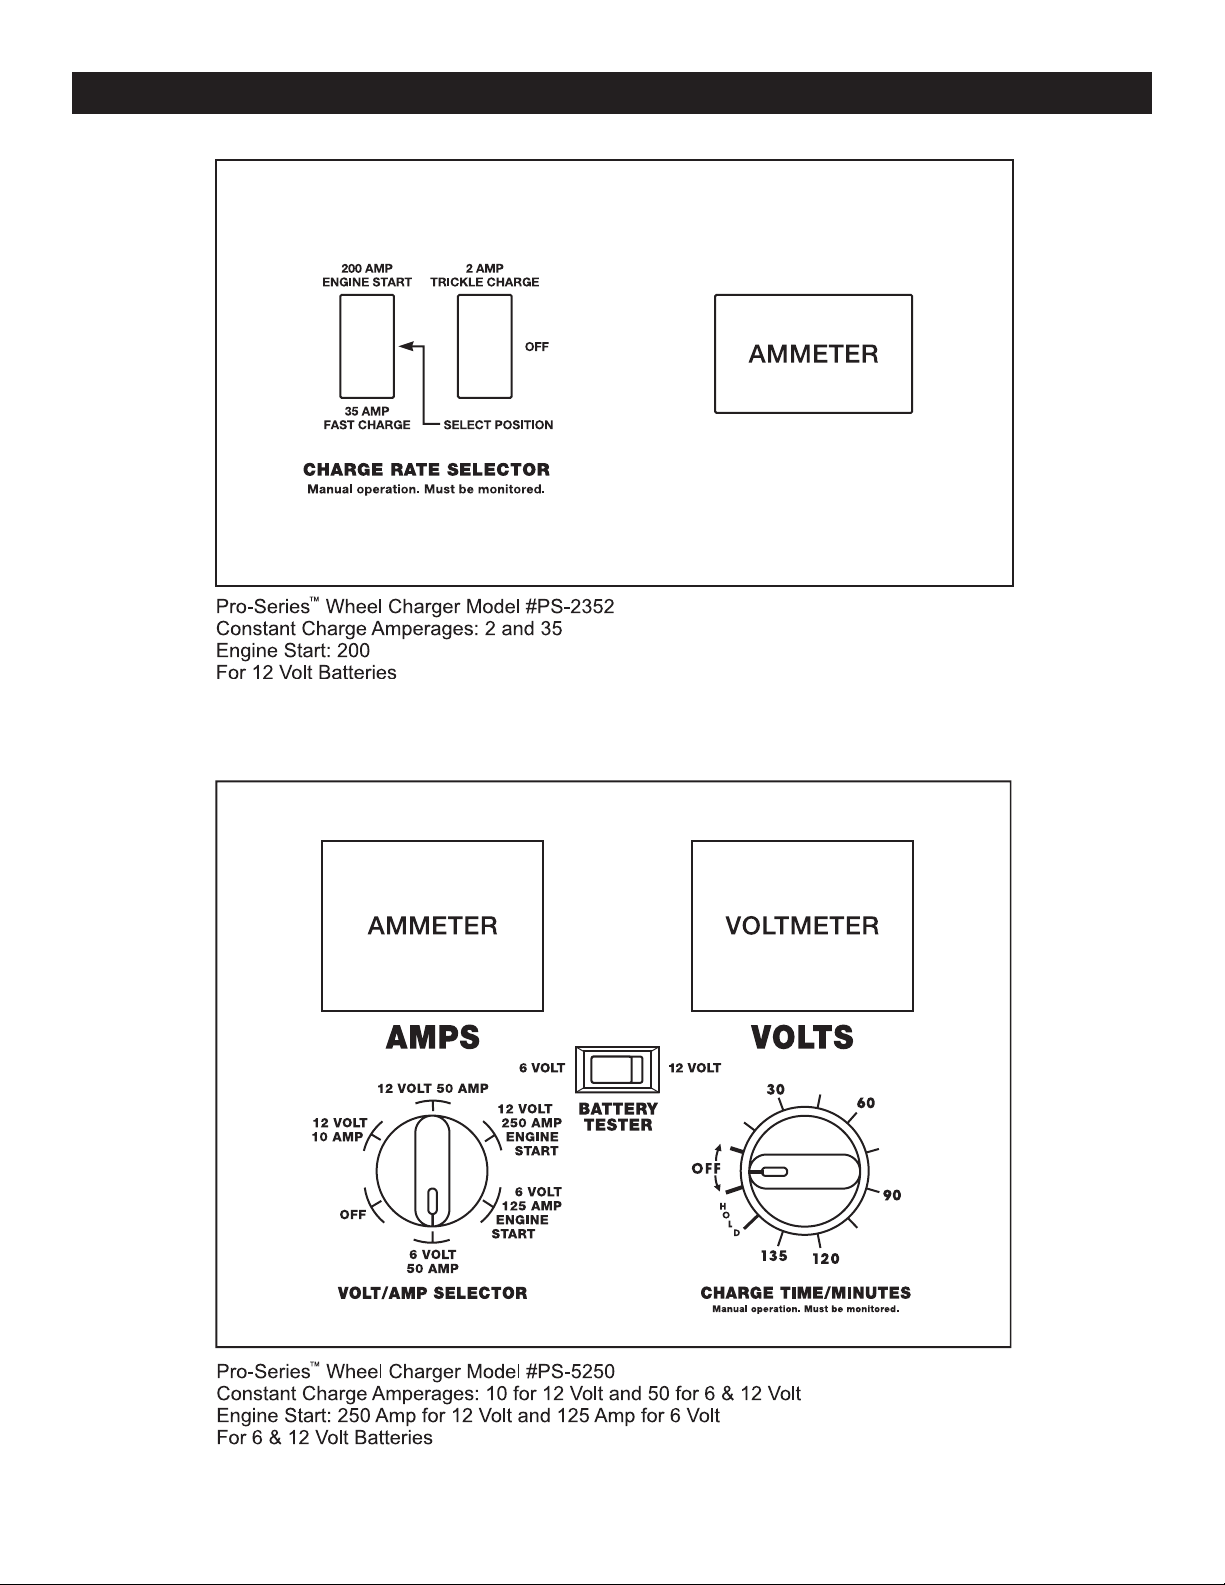
H. OUTPUT SELECTOR CONTROLS
4
Page 5
H. OUTPUT SELECTOR CONTROLS
5
Page 6

H. OUTPUT SELECTOR CONTROLS
TIMER: The main function of the timer is to prevent over charg-
ing while allowing a battery time to obtain a satisfactory charge.
To properly set the timer you must know the size of the battery
in ampere hours or reserve capacity in minutes and the state of
charge. Often the state of charge is not known, this is one reason why the timer was limited to 2.25 hours. With the aid of a
battery load tester the state of charge can be obtained within a
few seconds. For example, the average size automotive battery
at a 50% state of charge will require 1 to 1.5 hours of charging
at the 40 amp rate to reach the full charge state. For the same
battery with the timer set to it’s maximum, 2.25 hours, over charging will occur, but not likely cause harm to a battery that was
other wise in good condition. When the charge state is not known,
start out with a timer setting of 1 hour or less.
HOLD: This position defeats the timer function, allowing for continuous operation. Use when you want to charge more than 2.25
hours. This is normally the case when the 2 amp charge rate is
selected. Be sure to monitor the charging and stop the charge
when the battery is charged.
Switch #1 - Use this switch to select the 200 Amp Engine Start
and the 35 Amp Charge Rate. Switch #2 must be in the down
position (Select Position) when using Switch #1.
Switch #2 - Use this switch to select the 2 Amp Charge Rate and
OFF position. Also, use to select use of switch #1. Note that switch
#1 is only effective when switch #2 is set to “Select Position”.
Rotary switch - Use the rotary switch (volt / rate selector, on all
models except the PS-2352) to select the charge rate or engine
start setting you require. Read the switch dial for those available on this charger.
Model PS-3000 employs a 7-position rotary switch. You may
select output voltages of 6, 12, 18 or 24 volts for charging batteries of those voltages or battery combinations connected in
series (not parallel) in which the sum of the battery voltages
adds up to the range selected. Each voltage range offers a high
or low amp charge rate. The higher charge rate is more suitable
for fast charging a battery to the point where it will start a vehicle, the lower (slower) charge rate is more suitable for fully
charging (restoring) a battery.
Load Tester Switch (on PS-8050 only)
Use this switch to apply load to the battery.
Follow these easy steps:
1. Select the correct setting of the meter ( 6V or 12V ) to agree
with the battery to be tested.
2. Connect the charger leads to the battery following the instructions in section F.
3. Press the Load Switch to load on for 10 seconds and read
the voltmeter.
Good (green) - indicates the battery capacity is OK. Battery
may or may not be fully charged. Check the specific gravity of
battery to determine the state of charge. If the specific gravity is
less than full charge, check for electrical drain or possible charging system trouble. Recharge battery to full level.
Yellow or Red, but needle remains steady - indicates that the
battery capacity is not satisfactory. Battery may be either defective or not fully charged. Check specific gravity to see which
condition exists. It charging does not bring the battery specific
gravity to full charge, the battery should be replaced.
Yellow or Red, but needle remains falling - indicates the battery may be defective or run down. Release the load switch and
note voltmeter reaction. Voltage recovery into green or above
within seconds indicates a defective battery. Slow recovery indicates run down condition. For best results, check specific gravity.
The Ammeter indicates the amount of current measured in am-
peres that is being drawn by the battery. For example, In the 50
amp charge rate a typical discharged battery will initially draw
approximately 50 amps. As the battery continues to charge, current will taper to 15 to 20 amps at full charge. The Start area of
the meter indicates a high rate of current being drawn from the
charger. When cranking an engine, the starter motor draws upwards to 200-300 amps. The meter needle will be at the extreme right side of the start area. Sometimes a battery for the
first few minutes of it’s charge will draw more than 40/60 amps,
in this case the needle may be within but not to the extreme
right side of the start area. The 2 amp charge rate (on some
models) may indicate some activity on the meter. The meter
doesn’t have the resolution to display this low rate.
The Voltmeter indicates the voltage at the battery terminals.
Note that Model PS-5250 is not a load tester, but a voltmeter.
Use as follows:
1. Charger need not be plugged into AC outlet. Timer should
be in the OFF position, 6V/12V switch in position to match
battery being tested, and then connect following instructions in Section F.
2. Observe the meter indication. Keep in mind that this reading is only a battery voltage reading, a false surface charge
may mislead you. We suggest that you turn on your
headlamps for a couple of minutes before you read the
meter. Read a couple of minutes after you have shut the
headlamps off, then follow the convenient color code of the
meter.
6
Page 7

I. ENGINE START
1. Set charge rate switch and timer to OFF positions. (No timer
on Model 2352.)
2. With the charger unplugged from the AC outlet, connect
the charger to the battery following instructions given in
section F.
3. Plug the charger AC power cord into the AC outlet, then
move timer from OFF to HOLD position. (No timer on PS-
2352).
4. Set the charge rate switch to the engine start position that
matches the vehicle battery and then crank the engine. Follow the duty cycle printed on the front panel of your charger
for proper ON / OFF times. During extremely cold weather
or when the battery is severely exhausted, charge the battery for about 5 minutes before cranking the engine.
5. If the engine fails to start, charge the battery for 5 more
6. After the engine starts, move the charge rate switch to OFF
Do not try to engine start a vehicle without a battery in it. You
may damage the vehicle’s system. If the engine spins, but doesn’t
start after several starting attempts, there is a problem with the
engine of the vehicle other than its starting system. STOP cranking the engine until the other problem has been found and corrected.
J. CHARGE PERIOD
Determine the charge level of your battery with a hydrometer or
electronic percent of charge tester. Determine the ampere hour
rating of your battery. It may be on the battery information label.
If the battery is rated in reserve capacity, convert to ampere
hour rating using the following formula:
Ampere Hour rating =
Example: AH rating = (168 Reserve Capapcity + 16
Note: Reserve capacity is in minutes.
Use the following formula to determine the time of charge required:
(AH x % of charge needed) divided by amp setting of the
charger, times 1.25 = hours of charge
(Reserve Capacity) + 16
2
2
or AH = 100
Example:
State of charge of the battery is 50%
Percent of charge needed is 100% - 50% = 50%
(0.50 decimal)
Ampere rating of the battery is 100AH
Charger setting is 10 Amps
100 x 0.50 = x 1.25 = 6.25 hours of charge needed
A hydrometer reading of the specific gravity of the electrolyte
(fluid) of the battery in good condition should be between 1.25
and 1.28.
When a battery reaches 80–85% of full charge, bubbles will
appear on the surface of the fluid. As the battery nears full charge,
bubbling will become more vigorous.
minutes before attempting to crank the engine again.
and unplug the AC power cord from the outlet before disconnecting DC clamps.
10 +
1.00 hour more if charging a deep
cycle battery
7.25 hours total for a deep cycle
battery.
7
Page 8

K. BATTERY CHARGING
CHARGER MUST BE ASSEMBLED BEFORE USING.
1. Before charging any battery, make sure the electrolyte (battery liquid) in each cell is at correct level.
2. Set all switches and timers to the OFF position. (Model
2352 does not have a timer.)
3. If the battery is being charged inside the vehicle, use connection procedures outlined in Section F. Should the battery be removed from the vehicle, follow the instruction in
Section D, step 6 and Section G. Plug the power cord into
the AC outlet.
4. Set the charge rate switch to the desired charge position.
See Charge Rate Charts.
5. Set the timer from OFF position to desired timed charge,
30-135 minutes. (No timer on PS-2352).
BATTERY SIZE/RATING
2 AMP
SMALL
BATTERIES
CAR/
TRUCKS
MARINE/
DEEP CYCLE
Motorcycle,
Garden Tractor,
etc.
200 - 315 CCA
315 - 550 CCA
550 - 875 CCA
6 -12 AH
12 - 32 AH
40 - 60 RC
60 - 85 RC
85 - 125 RC
55 MC
80 MC
1.5 - 3
3 - 8
11 - 15
15 - 18
18 - 25
15
19
105 MC 23 6 2.5 2 NR
NOTE: These battery chargers are not automatic and can
overcharge a battery if permitted to operate for extended periods of time. Monitor the charging often.
Also, your charger may exhibit a noise (buzzing)
during charging. Laminations of the transformer
tend to vibrate. This is normal...continue to charge
the battery. The noise may continue after charger
is disconnected from battery.
CHARGE RATE*/CHARGING TIME IN HOURS**
10 AMP
2.5 - 3
3 - 4
4 - 5
4
5
30 AMP
.75 - 1
1 - 1.5
1.5 - 1.7
NR
2
35 AMP
.5 - .75
.75 - 1
1 - 1.5
NR
1.75
50 AMP
NR
.6 - 1
1 - 1.3
NR
NR
60 AMP
NR
.5 - .63
.63 - .75
NR
NR
NR
* Charge rates for this on the front panel.
** Based on battery at 50% charge.
AH Ampere Hours
NR Not Recommended
CCA Cold Cranking Ampere
RC Reserve Capacity
MC Marine Capacity
8
Page 9

L. ASSEMBLY INSTRUCTIONS
Wheel Charger Assembly Instructions:
NOTE: Charger must be assembled before operating
Parts Tools Necessary
(2)10-32 screws 5/16" wrench
(2) 1/4-20 screws 3/8" wrench
(2) wheels Hammer
(2) axle caps Screwdriver
(1) handle
(1) mounting foot
(1) axle
(2) axle brackets
1. First place the charger on it side.
2. Next mount the mounting foot FIG. A with (2) 1/4-20 screws,
or FIG. F with (2) 10-32 screws. Then, mount the (2) axle
brackets with the (2) 10-32 screws (as shown in FIG. D).
3. Next pound the axle firmly into an axle cap using a hammer
FIG. B.
4. Slide one wheel onto the axle with hub facing in, as shown
in FIG. C.
5. Poke above assembly axel brackets in charger back until
axle sticks out of the other end.
6. Turn charger on its other side.
7. Slide wheel and pound cap onto the axle end.
8. Next turn the charger right side up onto its foot and wheels.
9. Remove the (2) top screws from each side of the charger,
line up the handle and reinstall the screws FIG. E.
HUBS MUST
Fig. A
FACE IN
Fig. C
Fig. F
Fig. B
AXLE CAP
AXLE BRACKET
Fig. D
Fig. E
9
Page 10

M. TROUBLESHOOTING
If a problem does occur, check the following:
PROBLEM POSSIBLE CAUSE SOLUTION
No Meter Reading Clips are not making Rock clips back and forth for a better
(AC Cord Unplugged) a good connection. connection.
Battery voltage is too low. Plug AC line into outlet.
Meter should now indicate.
2 amp charge rate being used. None, meter will not indicate here.
Charger will not turn AC outlet is dead. Plug in a lamp to check for voltage.
on when properly connected.
Poor electrical connection. Check connections, rock back and forth
for a better connection.
Clicking noise from charger. Circuit breaker is cycling. May be in the wrong switch position
Battery is defective. Have Battery checked.
Severely discharged battery Allow charging to continue until battery has a
but otherwise a good battery. chance to recover sufficiently to take a charge.
If more than 20 min. stop charging and have
the battery checked.
Reverse connections at battery. Shut off charger and correct lead connections.
10
Page 11

LIMITED WARRANTY
SCHUMACHER ELECTRIC CORPORATION, 801 BUSINESS
CENTER DRIVE, MOUNT PROSPECT, ILLINOIS, 60056-2179
MAKES THIS LIMITED WARRANTY TO THE ORIGINAL PURCHASER AT RETAIL OF THIS PRODUCT. THIS LIMITED WARRANTY IS NOT TRANSFERABLE.
Schumacher Electric Corporation warrants this battery charger
for 3 years, and the transformer and rectifiers for 5 years from
date of purchase at retail against defective material or workmanship. If such should occur, the unit will be repaired or replaced at the option of the manufacturer. It is the obligation of
the purchaser to forward the unit together with proof of purchase, transportation and / or mailing charges prepaid to the
manufacturer or its authorized representative. This limited warranty is void if the product is misused, subjected to careless
handling, or repaired by anyone other than the factory or other
PLEASE NOTE: In most instances, a “replacement” charger is a factory-reconditioned unit. Free replacement applies only within the
initial 3-year period. Factory-reconditioned units are available at a low, fixed cost after the 3-year warranty expires.
authorized factory representative. The manufacturer makes no
warranty other than this limited warranty and expressly excludes
any implied warranty including any warranty for consequential
damages.
This is the only express limited warranty and the manufacturer
neither assumes nor authorizes anyone to assume or make any
other obligation towards the product other than this express limited warranty. The manufacturer makes no warranty of merchantability or fitness for purpose of this product and expressly excludes such from this limited warranty. Some states do not allow the exclusion or limitation of incidental or consequential
damages or length of implied warranty so the above limitations
or exclusions may not apply to you. “This warranty gives you
specific legal rights, and you may have other rights which vary
from state to state.”
801 Business Center Drive
Mount Prospect, Illinois 60056-2179
Send Warranty Product Repairs to:
Schumacher Electric Corporation, Warranty Service Department
1025 Thompson Avenue, Hoopeston, IL 60942
Phone: 800-621-5485 (Hours: 7 a.m. – 4:30 p.m. CST)
11
Page 12

NOTES
Page 13

MANUAL DEL USUARIO
Para
Baterías De
Plomo-ácido
NO. DEL NO. DE ARRANQUE
MODELO AMPERIOS VOLTIOS DEL MOTOR
PS-2352 2/35 12 200
PS-5250 10/50 6/12 125/250
PS-8050 30/60 6/12 200/300
PS-3000 30/44/60/80 6/12/18/24 180/200
–No destruya este manual–
Instrucciones Importantes De Seguridad
Lea con detenimiento estas instrucciones y reglas para utilizarlas con seguridad.
El trabajar cerca de baterías de plomo-ácido es peligroso. Las baterías generan gases
explosivos durante su operación normal. Por esta razón, es de gran importancia que cada
vez que utilice su cargador, lea este manual y siga sus instrucciones exactamente.
A. SEGURIDAD EN GENERAL CON BATERÍAS
1. Antes de utilizar el cargador de baterías, asegúrese de leer
todas las instrucciones y precauciones impresas en:
• El cargador de baterías
• La batería
• El vehículo o unidad que usa la batería
2. Use el cargador de baterías solamente en baterías
recargables de PLOMO-ÁCIDO, tales como las usadas en
automóviles, camiones, tractores, aeroplanos, furgonetas,
RVs, motores de marcha lenta, etc. El cargador no se ha
diseñado para alimentar sistemas eléctricos de bajo voltaje,
excepto en aplicaciones automovilísticas.
ADVERTENCIA:
cargar pilas secas como las que se usan en artefactos
domésticos. Dichas baterías pueden explotar y causar
lesiones a las personas, y daños a la propiedad.
3. Utilice solamente los accesorios recomendados o vendidos
por el fabricante. El uso de accesorios no recomendados
puede ser causa de incendio, choque eléctrico o lesiones.
4. Cuando se desconecta el cargador de baterías, tire del
enchufe, no del cable. El tirar del cable puede causar daños
al cable o al enchufe.
5. Coloque el cable del cargador en forma que no se le pueda
pisar, tropezarse con él, o causarle daños o estiramiento.
6. No use el cargador si su cable o enchufe están dañados.
Haga reemplazar el cable inmediatamente.
7. No use el cargador si ha recibido un golpe fuerte, se ha
caído o ha recibido cualquier tipo de daño. Llévelo a un
profesional calificado para su inspección y reparación.
8. Nunca desarme el cargador. Llévelo a un profesional
calificado cuando necesite servicios o reparación. Si se
rearma en forma incorrecta puede causar incendio o choque
eléctrico.
9. Para reducir el riesgo de choque eléctrico, desenchufe el
cargador del tomacorriente antes de intentar darle
mantenimiento o limpieza.
No utilice el cargador de baterías para
10. No utilice un cordón de extensión a menos que sea
absolutamente necesario. El uso de un cordón de extensión
incorrecto puede ser causa de incendio o choque eléctrico.
Si hay que utilizar cordón de extensión, asegúrese de que:
• Las clavijas del enchufe del cordón de extensión sean
del mismo número, tamaño y forma que las del enchufe
del cargador.
• El cordón de extensión esté correctamente cableado y
en buenas condiciones eléctricas.
• El calibre del alambre es suficientemente grande para el
amperaje CA (corriente alterna, “AC” en inglés) del
cargador, como se especifica a continuación:
Largo del cordón Tamaño 25pies 50pies 100pies 150pies
AWG* size of cord: 16 14 10 8
*AWG-American Wire Gauge
11. Siempre cargue las baterías en una área bien ventilada.
NUNCA trabaje en una zona cerrada o pequeña sin
ventilación adecuada debido al riesgo de gases explosivos
ADVERTENCIA: Peligro de gases explosivos.
12. Coloque el cargador tan lejos de la batería como permitan
los cables CC (corriente continua, “DC” en inglés). del
cargador.
13. No exponga el cargador a la lluvia o a la nieve.
14. NUNCA cargue una batería que está congelada. Si el líquido
de la batería (electrolito) está congelado, lleve la batería a
un lugar templado para descongelarla antes de cargarla.
15. NUNCA deje caer el ácido de la batería sobre el cargador
mientras verifica la gravedad específica o llena la batería.
16. NUNCA asiente la batería sobre el cargador.
17. NUNCA coloque el cargador directamente sobre la batería
que se está cargando. Los gases de la batería corroerán y
dañarán al cargador.
18. NUNCA junte las pinzas de batería cuando el cargador está
activado.
1
00-99-000300/902
Page 14

B. PRECAUCIONES Y SEGURIDAD PERSONAL
1. ADVERTENCIA: Use protección total para los ojos y
protección para la ropa cuando trabaje con baterías de
plomo-ácido.
2. Asegúrese que haya alguien que lo pueda oír o esté
suficientemente cerca para venir en su ayuda cuando trabaja
con o cerca de una batería de plomo-ácido.
3. Tenga cerca abundante agua fresca y jabón para usar si el
ácido de la batería entra en contacto con la piel, la ropa o
los ojos. Si el ácido de la batería entra en contacto con la
piel o la ropa, lávese inmediatamente con agua y jabón.
4. Evite tocarse los ojos mientras trabaja con una batería.
¡Partículas del ácido (corrosión) pueden entrar a los ojos!
Si entra el ácido a los ojos, lávelos inmediatamente con
abundante agua fría por 10 minutos por lo menos. Y obtenga
5. Para trabajar con una batería de plomo-ácido quítese todo
objeto de metal como anillos, collares y relojes. Una batería
de plomo-ácido puede causar un cortocircuito de suficiente
poder para hacer soldar un anillo (o algo similar) a metal,
causando una quemadura grave.
6. Cuide de no dejar caer una herramienta u otro objeto de
metal en la batería. El metal puede causar chispas o
cortocircuito de la batería u otro dispositivo eléctrico. Las
chispas pueden causar una explosión.
7. Siempre utilice el cargador de baterías en una área abierta
y bien ventilada.
8. NUNCA se debe fumar ni debe haber chispas o llamas
cerca de la batería o el motor. ¡Las baterías producen gases
explosivos!
atención médica inmediatamente.
C. CONEXIONES A TIERRA Y DEL CABLE DE ALIMENTACIÓN CA
El cargador debe conectarse a tierra para reducir el riesgo de
choque eléctrico. El cargador viene con un cable eléctrico con
conductor del equipo a tierra, y un enchufe para conexión a
tierra. El enchufe se debe enchufar a un tomacorriente
debidamente instalado y a tierra, de acuerdo con todos los
códigos y ordenanzas locales.
Este cargador de batería es diseñado para uso en un circuito
de 120 voltios nominales, y tiene un enchufe para conexión a
tierra como se ve en la ILUSTRACIÓN 1 (A). Este enchufe es
para usarse en un tomacorriente con conexión a tierra. Las
clavijas del enchufe deben entrar en el tomacorriente.
ADAPTADOR: Un adaptador temporal, mostrado en la ILUSTRACIÓN 1 (B) y (C) se puede usar para conectar el cargador a un
tomacorriente de dos polos, como la ILUSTRACIÓN 1 (B).
NOTA: El adaptador temporal se debe usar solamente hasta que un electricista calificado pueda instalar un tomacorriente debidamente
conectado a tierra.
PELIGRO: NUNCA haga alteraciones al cable o al enchufe CA proporcionados. Si no entra en el tomacorriente, haga que un electricista
calificado instale uno apropiado. Una conexión indebida puede causar choque eléctrico.
PELIGRO: Antes de usar un adaptador como el ilustrado, asegúrese que el tornillo central de la tapa del tomacorriente esté conectado
a tierra. La oreja o brida rígida de color verde que nace del adaptador, se debe conectar a un tomacorriente conectado a tierra.
Asegúrese que esté conectado a tierra. Si fuera necesario, reemplace el tornillo original de la tapa del tomacorriente con uno más largo
que asegurará la oreja o brida del adaptador a la tapa del tomacorriente y hará conexión a tierra con el tomacorriente a tierra.
“No se permite el uso de un adaptador en el Canadá”
TOMACORRIENTE CON
CONEXIÓN A TIERRA
TOMACORRIENTE
CON CONEXIÓN
CLAVIJA DE TIERRA ADAPTADOR
ADAPTADOR
TAPA D E
A TIERRA
MEDIOS DE
CONEXIÓN A TIERRA
ILUSTRACIÓN 1: PUESTA A TIERRA
D. PREPARACIONES PARA CARGAR LA BATERÍA
1. Verifique el voltaje de la batería y seleccione el conmutador
de carga que corresponde.
2. Limpie los terminales de la batería. Cuide de que no entre
corrosión a los ojos.
3. Si es necesario, añada agua destilada en cada célula de la
batería hasta que el ácido llegue al nivel especificado por
el fabricante de la batería. Esto ayuda a expulsar gases
excesivos de las células. No sobrepase dichos niveles. Para
una batería sin tapas de células, siga cuidadosamente las
instrucciones del fabricante para recargar.
4. Estudie todas las precauciones específicas del fabricante,
tales como el quitar o no quitar las tapas de las células
mientras se carga, y las tasas de carga recomendadas.
5. Asegúrese que el área alrededor de la batería esté bien
ventilada mientras se carga la batería. Se puede expulsar
los gases usando como abanico una pieza de cartón u otro
material no metálico
6. Si es necesario sacar la batería del vehículo para cargarla,
siempre quite primero el terminal de tierra. Asegúrese que
todos los accesorios del vehículo estén apagados para que
no se produzca un arco.
7. Una batería marina (de botes)
tierra. Para cargarla a bordo se requiere equipos
especialmente diseñados para uso marino.
E. PRECAUCIONES EN EL LUGAR DE TRABAJO
Nunca coloque el cargador sobre la batería cuando esta se
está cargando. La batería despide gases que pueden dañar el
cargador.
Nunca permita que el ácido de la batería gotee sobre el cargador
cuando se está leyendo la gravedad específica o llenando la
batería.
Nunca opere el cargador en una área cerrada o de ventilación
restringida de ninguna manera.
No asiente la batería sobre el cargador.
2
se debe sacar y cargarse en
Page 15

F. INSTRUCCIONES DE OPERACIÓN PARA CARGAR UNA BATERÍA INSTALADA EN EL VEHÍCULO
Para cargar la batería en el vehículo, determine el tipo de batería y cuál de los terminales está conectado a tierra. Para reducir el riesgo
de chispas cerca de la batería, siga los siguientes pasos cuando la batería está instalada en el vehículo. ADVERTENCIA: Una chispa
cerca de la batería puede causar la explosión de esta.
1. Coloque el cable de alimentación CA y los cables de cargar
CC del cargador en tal posición que se evite daño por el
capó, la puerta o las partes móviles del motor.
2. Manténgase alejado de las paletas del ventilador, correas,
poleas y otras piezas que puedan causar lesiones.
3. Verifique la polaridad de los terminales de la batería. La
caja de la batería está marcada cerca de los terminales.
POSITIVO (POS, P, +) y NEGATIVO (NEG, N, -) NOTA:
Usualmente el terminal positivo de la batería es de mayor
diámetro que el negativo.
4. Determine cual terminal de la batería está puesto a
tierra(conectado al chasis).
NOTA: El terminal negativo normalmente está conectado
a tierra.
TERMINAL NEGATIVO A TIERRA
5A. Para vehículos con negativo a tierra, conecte la pinza
POSITIVA (ROJA) del cargador de batería al terminal
POSITIVO (POS, P, +) de la batería que no está a tierra.
Conecte la pinza NEGATIVA (NEGRA) al chasis o bloque
del motor del vehículo, lejos de la batería. Conecte la pinza
a una parte de metal grueso y sin pintura del bastidor o al
bloque del motor.
TERMINAL POSITIVO A TIERRA
5B. Para vehículos con positivo a tierra, conecte la pinza
NEGATIVA (NEGRA) del cargador de batería al terminal
NEGATIVO (NEG, N -) de la batería que no está a tierra.
Conecte la pinza POSITIVA (ROJA) al chasis o bloque del
motor del vehículo, lejos de la batería. Conecte la pinza a
una parte de metal grueso y sin pintura del bastidor o el
bloque del motor.
ADVERTENCIA: No conecte la pinza al carburador, líneas de
combustible o planchas de metal de la carrocería. NOTA:
Conecte la pinza al terminal de la batería y muévala de atrás
adelante varias veces para lograr un buen contacto. Esto tiende
a evitar que se escapen las pinzas de los terminales y ayuda a
evitar el riesgo de chispas.
6. Siga los pasos 1-4 en la sección K, Carga de la Batería
7. Seleccione el amperaje.
8. Cuando la batería está totalmente cargada, mueva el
conmutador a OFF, (apagado), luego desconecte el
cargador del tomacorriente CA.
9. Quite (1) las pinzas del chasis y (2) del terminal de la batería,
en ese orden.
10. Limpie y almacene el cargador de baterías.
G. INSTRUCCIONES DE OPERACIÓN PARA CARGAR UNA BATERÍA QUE ESTÁ FUERA DEL VEHÍCULO
Para cargar una batería fuera del vehículo, determine el tipo de batería. Para reducir el riesgo de chispas cerca de la batería, siga los
siguientes pasos cuando la batería está fuera del vehículo. ADVERTENCIA: Una chispa cerca de la batería puede causar la explosión
de esta. ADVERTENCIA: Para sacar la batería de un vehículo o bote, desconecte primero el terminal a tierra. Antes de desconectar la
batería, asegúrese que todos los accesorios estén apagados para que no se produzca un arco. (NOTA: Una batería marina (de botes)
se debe sacar y cargarse en tierra. (Para cargarla a bordo se requiere equipos especialmente diseñados para uso marino).
1. Verifique la polaridad de los terminales de la batería. La
caja de la batería está marcada cerca de los terminales.
POSITIVO (POS, P, +) y NEGATIVO (NEG, N, -) NOTA:
Usualmente el terminal positivo de la batería es de mayor
diámetro que el negativo.
2. Asegure un cable de batería aislado calibre 6 (AWG) de 24
pulgadas (61 cm) o más al terminal NEGATIVO (NEG, N, ). (El cable de batería de 24 pulgadas no viene con el
cargador. Se puede conseguir fácilmente en la mayoría de
las tiendas de piezas para automóviles). El cable de 24
pulgadas provee una condición de conexión más segura.
Puede haber chispeo o arco al conectar la pinza del cargador
al cable.
3. Conecte la pinza POSITIVA (ROJA) del cargador al terminal POSITIVO (POS, P, +) de la batería. Mueva la pinza de
adelante atrás para lograr una buena conexión.
4. Colóquese Ud. mismo y el extremo libre del cable de 24
pulgadas (61 cm) tan lejos de la batería como sea posible.
Luego conecte la pinza NEGATIVA (NEGRA) del cargador
al extremo libre del cable.
ADVERTENCIA: Al hacer la conexión final, no se ponga
de cara a la batería. Mueva la pinza de adelante atrás para
lograr una buena conexión.
5. Siga los pasos 1-4 en la Sección K: Carga de la Batería
6. Seleccione el amperaje..
24" CABLE
7. Cuando la batería está totalmente cargada, mueva el
conmutador a OFF, luego desconecte el cargador del
tomacorriente CA.
8.. Cuando la batería está totalmente cargada y el cargador
está desconectado
(1) Desconecte la pinza negativa del cargador del cable de 24"
(2) Quite la pinza positiva del cargador del terminal positivo
de la batería.
9. Limpie y almacene el cargador de baterías.
ADVERTENCIA: Asegúrese de que el área alrededor de
la batería esté bien ventilada mientras se carga la batería.
Se puede expulsar los gases usando como abanico una
pieza de cartón u otro material no metálico.
3
BATERÍA
CABLE
Page 16

A
A
A
A
H. CONTROLES SELECTORES DE SALIDA
ARRANQUE DE
MOTOR A
200 AMPERIOS
CARGA RÁPIDA
A 35 AMPERIOS
CARGA POR
GOTEO A
2 AMPERIOS
SELECCIONE POSICIÓN
SELECTOR DE TASA DE CARGA
Operación manual. Hay que vigilarlo.
Cargador a Rueda Pro-Series Modelo #PS-2352
mperajes de Carga Constante: 2 y 35
rranque de Motor: 200
Para Baterías de 12 voltios
AMPERÍMETRO
AMPERÍMETRO VOLTÍMETRO
AMPERIOS VOLTIOS
12 VOLTIOS 50
12 VOLTIOS
10 AMPERIOS
AMPERIOS
6 VOLTIOS
50 AMPERIOS
ARRANQUE
DE MOTOR
DE 12 VOLTIOS
250 AMPERIOS
ARRANQUE
DE MOTOR
DE 6 VOLTIOS
125 AMPERIOS
PROBADOR
DE BATERÍAS
SELECTOR DE VOLTIOS / AMPERIOS
Cargador a Rueda Pro-Series Modelo #PS-5250
mperajes de Carga Constante: 10 para 12 Voltios y 50- para 6 y 12 Voltios
rranque de Motor: 250 Amperios para 12 Voltios y 125 Amperios para 6 Voltios
Para Baterías de 6 y 12 voltios
12 VOLTIOS 6 VOLTIOS
R
E
T
E
N
E
R
TIEMPO DE CARGA / MINUTOS
Operación manual. Hay que vigilarlo.
4
Page 17

A
A
H. CONTROLES SELECTORES DE SALIDA
AMPERÍMETRO
AMPERIOS
12 VOLTIOS MEDIANO
6 VOLTIOS ALTO
ARRANQUE DE
6 VOLTIOS
180 AMPERIOS
12 VOLTIOS BAJO
6 VOLTIOS BAJO
12 VOLTIOS ALTO
ARRANQUE DE 12 VOLTIOS
200 AMPERIOS
18 VOLTIOS BAJO
18 VOLTIOS ALTO
24 VOLTIOS BAJO
24 VOLTIOS ALTO
ARRANQUE DE 24 VOLTIOS
200 AMPERIOS
R
E
T
E
N
E
R
SELECTOR DE VOLTIOS / AMPERIOS
Véase la carta encima del cargador.
TIEMPO DE CARGA / MINUTOS
Operación manual. Hay que vigilarlo.
Cargador a Rueda Pro-Series Modelo #PS-3000
mperajes de Carga Constante: 30, 44, 60 y 80
rranque de Motor: 200 Amperios para Baterías de 12/24 Voltios
y 180 Amperios para Baterías de 6 Voltios
Para Sistemas de Baterías de 6/12/18/24 Voltios
PROBADOR
DE BATERÍAS
AMPERÍMETRO
AMPERIOS
ARRANQUE DE MOTOR
60 AMPERIOS 200 AMPERIOS
6 VOLTIOS
30 AMPERIOS
DE 6 VOLTIOS
CON CARGA
6 VOLTIOS
VOLTÍMETRO
12 VOLTIOS
30 AMPERIOS
SELECTOR DE ESCALA
VOLTÍMETRO
VOLTIOS
12 VOLTIOS
12 VOLTIOS
60 AMPERIOS
ARRANQUE DE MOTOR DE
12 VOLTIOS 300 AMPERIOS
SELECTOR DE VOLTIOS / AMPERIOS
TIEMPO DE CARGA / MINUTOS
R
E
T
E
N
E
R
Operación manual. Hay que vigilarlo.
Cargador a Rueda Pro-Series Modelo #PS-8050
Amperajes de Carga Constante: 30 y 60
Arranque de Motor: 300 Amperios para 12 Voltios y 200Amperios para 6 Voltios
Para Baterías de 6 y 12 Voltios
5
Page 18

H. CONTROLES SELECTORES DE SALIDA
TIMER (Temporizador) La función principal del temporizador
es de evitar sobrecarga a la vez que permite suficiente tiempo
para que una batería alcance una carga adecuada. Para poner
el temporizador en forma correcta, hay que saber el tamaño de
la batería en horas amperios o capacidad de reserva en minutos,
así como el estado de la carga. A menudo no se conoce el
estado de la carga; esta es una razón por la cual el temporizador
se ha limitado a 2.25 horas. Con la ayuda de un probador de
carga de baterías, se puede obtener el estado de la carga dentro
de pocos segundos. Por ejemplo, la batería de automóvil de
tamaño normal a un estado de carga del 50% requerirá cargarse
por 1 a 1.5 horas a tasa de 40 amperios para alcanzar el estado
de plena carga. Para la misma batería con el temporizador
puesto a su máximo de 2.25 horas, habrá sobrecarga, pero es
probable que no cause daño a una batería que de otro modo
estaba en buen estado. Cuando no se conoce el estado de
carga, comience con el temporizador puesto a 1 hora o menos.
HOLD (Retener) Esta posición contrarresta la función del timer,
y así permite operación continua. Es de usar cuando se quiere
cargar por más de 2.25 horas. Esto normalmente es el caso al
seleccionar la tasa de carga de 2 amperios. Es esencial vigilar
el proceso de cargar y pararlo cuando la batería ya está cargada.
Switch (Conmutador) No. 1 – Use este conmutador para
seleccionar el Arranque de Motor a 2 amperios y la Tasa de
Carga de 35 amperios. El Conmutador No. 2 tiene que estar en
posición hacia abajo (Select Position) cuando se usa el
Conmutador No. 1.
Switch (Conmutador) No. 2 – Use esta conmutador para
seleccionar la tasa de Carga de 2 amperios y la posición OFF.
Úselo también para seleccionar el uso del Conmutador No. 1.
Nótese que el Conmutador No. 1 funciona solamente cuando el
Conmutador No. 2 está puesto en “Selector Position”.
Rotary Switch (Conmutador Rotativo)– Use el conmutador
rotativo (selector de tasa de voltaje en todos los modelos salvo
el PS-2352), para seleccionar la tasa de carga o arranque de
motor que se requiere. La esfera del conmutador le indica cuáles
de aquellas tasas de carga están disponibles en este cargador.
El Modelo PS-3000 utiliza en conmutador rotativo de 7
posiciones. Se puede seleccionar voltajes de salida de 6, 12,
18 o 24 voltios para cargar baterías de aquellos voltajes o
combinaciones de baterías conectadas en serie (no en paralelo)
en las cuales el total de los voltajes de las baterías es igual al
alcance seleccionado. Cada alcance de voltaje provee una tasa
de carga a amperios altos o bajos. La tasa de carga más alta
es más adecuada para cargar una batería rápidamente hasta el
punto donde puede arrancar un vehículo; la tasa de carga más
baja (más lenta) sirve mejor para dar plena carga (restaurar) a
una batería.
Load Tester Switch(Conmutador Probador de Carga) (en el
PS-8050 únicamente).
Se usa este conmutador para aplicar carga inversa a la batería.
Siga estos pasos fáciles:
1. Seleccione la puesta correcta del medidor (6 o 12 voltios)
para estar de acuerdo con la batería a ser probada.
2. Conecte los cables del cargador a la batería según las
instrucciones en la sección F.
3. Oprima el Conmutador Probador de Carga a “Load On”
por 10 segundos y lea el voltímetro.
Bueno (verde) – indica que la capacidad de la batería está
bien. La batería puede o no estar a plena carga. Verifique la
gravedad específica de la batería para determinar el estado de
la carga. Si la gravedad específica está inferior a plena carga,
investigue si hay pérdida de energía eléctrica o posible problema
en el sistema de cargar. Recargue la batería hasta pleno nivel.
Amarillo o Rojo, pero la aguja sigue fija – indica que la
capacidad de la batería no es satisfactoria. La batería puede
ser defectuosa o no estar a plena carga. Verifique la gravedad
específica para ver cual de las dos condiciones existe. Si el
proceso de cargar no pone la gravead específica de la batería a
plena carga, se debe reemplazar a la batería.
Amarillo o Rojo, pero la aguja sigue bajando – indica que la
batería puede ser defectuosa o está descargada. Suelte el
conmutador de carga y note la reacción del voltímetro. La
recuperación del voltaje en verde o más arriba dentro de pocos
segundos indica una batería defectuosa. La recuperación lenta
indica condición de descarga. Para los mejores resultados,
verifique la gravedad específica.
El Amperímetro (Ammeter) indica la cantidad de corriente
medida en amperios que va a la batería. Por ejemplo, a la tasa
de carga de 50 amperios, una batería descargada típica
inicialmente recibirá aproximadamente 50 amperios. A medida
que la batería siga cargando, la corriente se irá bajando hasta
15 a 20 amperios a plena carga. El área “Start” del medidor
indica una tasa alta de corriente saliendo del cargador. Al
arrancar un motor, el motor de arranque recibe hasta por 200 a
300 amperios. La aguja del medidor estará al extremo derecho
del área Start A veces, durante los primeros minutos de su
carga, una batería recibirá más de 40/60 amperios; en este
caso la aguja puede estar dentro del área Start pero no al extremo
derecho. La tasa de carga de 2 amperios (en algunos modelos)
puede indicar alguna actividad en el medidor; pero el medidor
no tiene la resolución suficiente para mostrar esta tasa baja.
El Voltímetro (“Voltmeter) indica el voltaje en los terminales de
la batería. Tome nota de que el Modelo PS-5250 no es probador
de carga, sino voltímetro. Se debe usar de la siguiente manera:
1. El cargador no necesita estar enchufado en un
tomacorriente CA. El temporizador debe estar en la posición
OFF, y el conmutador 6V/12V en posición para igualar a la
batería a ser probada, y luego conecte siguiendo las
instrucciones en la Sección F.
2. Observe la indicación del medidor. Acuérdese que esa
lectura es solamente del voltaje de la batería; una carga
superficial falsa le puede engañar. Sugerimos que encienda
los faros delanteros por unos dos minutos antes de leer el
medidor. Haga la lectura unos pocos minutos después de
haber apagado los faros, y luego siga el conveniente código
de color de medidor.
6
Page 19

I. ARRANQUE DEL MOTOR
1. Ponga el conmutador de tasa de carga y el temporizador
en las posiciones OFF (apagado). (No hay temporizador
en el Modelo 2352.
2. Con el cargador desenchufado del tomacorriente AC,
conecte el cargador a la batería siguiendo las instrucciones
dadas en la sección F.
3. Enchufe el cable de alimentación CA del cargador en el
tomacorriente CA, luego mueva el temporizador de OFF a
la posición RETENER. (No hay temporizador en el modelo
PS-2352).
4. Ponga el conmutador de tasa de carga en la posición de
arranque de motor que sea igual a la batería del vehículo y
luego haga arrancar el motor. Siga el duty cycle (factor de
trabajo) impreso en el panel delantero de su cargador para
los debidos tiempos de ON/OFF (encendido / apagado)
5. Si el motor no arranca, cargue la batería otros 5 minutos
6. Después de que el motor arranque, mueva el conmutador
No trate de arrancar el motor sin batería en el vehículo. El
sistema del vehículo puede quedar dañado. Si el motor gira,
pero no arranca después de varias tentativas, hay problema
con el motor del vehículo aparte de su sistema de arranque.
PARE la tentativa de arrancar el motor hasta que el otro problema
se encuentre y se resuelva.
J. PERÍODO DE CARGA
Determine el nivel de carga de su batería con un hidrómetro o
el porcentaje electrónico del probador de carga. Determine el
régimen de amperio hora de su batería. Posiblemente esté en
la etiqueta de datos de la batería. Si la batería tiene régimen en
capacidad de reserva, se puede convertir en régimen de amperio
hora utilizando la formula a continuación:
Régimen de Amperio Hora =
Ejemplo: Régimen AH = (168 Capacidad de Reserva) + 16
(Capacidad de Reserva) + 16
2
2
o AH = 100
Ejemplo:
El estado de carga de la batería es 50%
El porcentaje de carga requerido es 100% - 50% = 50%
(0.50 decimal)
El amperaje de la batería es 100AH
La posición del cargador es 10 Amperios
100 x 0.50 = x 1.25 = 6.25 horas de carga requeridas.
10 +
Cuando hay frío extremo o cuando la batería está bien
descargada, cargue la batería por 5 minutos más antes de
hacer arrancar el motor.
antes de intentar el arranque del motor otra vez.
de tasa de carga a la posición OFF y desenchufe el cable
de alimentación CA del tomacorriente antes de desconectar
las pinzas CC.
1.00 hora más al cargar una batería
de ciclaje profundo.
7.25 horas en total para una batería
de ciclaje profundo.
Nótese: La capacidad de reserva se expresa en minutos.
Use la siguiente fórmula para determinar el tiempo de carga
requerido.
(AH x % de carga requerido) dividido en la posición amperio
del cargador, multiplicado por 1.25 = horas de carga.
Una lectura por hidrómetro de la gravedad específica del
electrolito (fluido) de la batería en buen estado debe estar entre
1.25 y 1.28.
Cuando una batería llega al 80-85% de plena carga, aparecen
burbujas en la superficie del fluido. A medida que la batería se
acerque a plena carga, el burbujeo se hace más vigoroso.
7
Page 20

K. CARGA DE LA BATERÍA
HAY QUE ENSAMBLAR EL CARGADOR ANTES DE USARLO.
1. Antes de cargar ninguna batería, asegúrese de que el
electrolito (líquido en la batería) está a nivel correcto en
cada célula.
2. Ponga todos los conmutadores y temporizadores en la
posición OFF (apagado). (El modelo 2352 no tiene
temporizador).
3. Si la carga de la batería se hace dentro del vehículo, use
los procedimientos de conexión delineados en la Sección
F. Si se quita la batería del vehículo, siga la instrucción en
la Sección D, paso 6 y la Sección G. Enchufe el cable de
alimentación en el tomacorriente CA.
4. Ponga el conmutador de tasa de carga en la posición de
carga deseada. Véase las Cartas de Tasa de Carga.
5. Cambie el temporizador de la posición OFF en el tiempo
de carga deseado, de 30 a 135 minutos. (No hay
temporizador en el Modelo PS-2352).
TASA DE CARGA* / TIEMPO DE CARGA EN HORAS**
TAMAÑO / RÉGIMEN DE LA BATERÍA
BATERÍAS
PEQUEÑAS
CARRO /
CAMIÓN
Motocicleta,
Tractor
de Jardín, etc.
200 - 315 CCA
315 - 550 CCA
550 - 875 CCA
12 - 32 AH
40 - 60 RC
60 - 85 RC
85 - 125 RC
55 MC
USO MARINO/
CICLAJE PROFUNDO
80 MC
2 AMPERIOS
1.5 - 36 -12 AH
3 - 8
11 - 15
15 - 18
18 - 25
15
19
105 MC 23 6 2.5 2 NR
NÓTESE: Estos cargadores de baterías no son automáticos y
pueden sobrecargar una batería si se les permite
funcionar por períodos largos de tiempo. Vigile a
menudo el proceso de cargar.
Su cargador también puede producir un ruido
(zumbido) durante el proceso de cargar. Las
laminaciones del transformador tienden a vibrar.
Esto es normal... siga cargando la batería. El ruido
puede continuar después de desconectar el cargador
de la batería.
10 AMPERIOS
2.5 - 3
3 - 4
4 - 5
4
5
30 AMPERIOS 35 AMPERIOS 50 AMPERIOS 60 AMPERIOS
.75 - 1
1 - 1.5
1.5 - 1.7
NR
2
.5 - .75
.75 - 1
1 - 1.5
NR
1.75
NR
.6 - 1
1 - 1.3
NR
NR
.5 - .63
.63 - .75
NR
NR
NR
NR
* Las tasas de carga se encuentren en el panel delantero.
** Se basa en batería a 50% de plena carga.
AH Amperio Horas
NR No Recomendado
CCA Amperios de Encendido en Frío
RC Capacidad de Reserva
MC Capacidad Marina
8
Page 21

L. INSTRUCCIONES DE ENSAMBLAJE
Instrucciones de Ensamblaje para el Wheel Charger
(Cargador a Rueda)
NÓTESE: Hay que ensamblar el cargador antes de usarlo
Piezas Herramientas Necesarias
(2) tornillos 10-32 Llave inglesa de 5/16"
(2) tornillos ¼-20 Llave inglesa de 3/8"
(2) ruedas Martillo
(2) cubos de eje Destornillador
(1) agarradera
(1) pie de montaje
(1) eje
(2) abrazaderas de eje
1. Primero ponga el cargador de lado
2. Luego monte el pie de montaje ILUSTRACIÓN A con (2)
tornillos ¼-20, o ILUSTRACIÓN F con (2) tornillos 10-32.
Después, monte los (2) abrazaderas de eje con los (2) tornillos 10-32 (tal como se ve en la ILUSTRACIÓN D).
3. Luego golpee el eje firmemente dentro de un cubo de eje
usando un martillo ILUSTRACIÓN B.
4. Deslice una rueda sobre el eje con el cubo cara adentro, tal
como se ve en la ILUSTRACIÓN C.
5. Empuje el extremo libre del eje a través de una abrazadera
de eje y siga deslizándolo hasta que salga por la otra
abrazadera de eje.
6. Ponga el cargador del otro lado.
7. Deslice la segunda rueda y golpee el cubo sobre el extremo
libre del eje.
8. Luego, enderece el cargador para que esté sobre su pie y
sus ruedas.
9. Quite los (2) tornillos superiores de cada lado del cargador,
alinee la agarradera e instale los tornillos de nuevo
ILUSTRACIÓN E.
DE EJE TIENEN
QUE ESTAR
CARA ADENTRO
Ilustración A
Ilustración F
Ilustración C
Ilustración D
Ilustración B
CUBO DE EJE
LOS CUBOS DE
ABRAZADERA
Ilustración E
9
Page 22

M. SOLUCIÓN DE PROBLEMAS
Si se presenta un problema, véase lo siguiente:
PROBLEMA POSIBLE CAUSA SOLUCIÓN
No hay lectura en el medidor Las pinzas no hacen Mueva las pinzas adelante
(El Cable CA está desenchufado) buena conexión. atrás para mejor conexión.
El voltaje de la batería es muy baja Enchufe la línea AC en el tomacorriente.
El medidor debe ahora indicar.
Se está usando tasa de carga a 2 Ninguna; el medidor no indicará aquí.
amperios.
El cargador no enciende El tomacorriente CA está muerto. Enchufe una lámpara para buscar voltaje.
al estar debidamente conectado
Mala conexión eléctrica. Examine las conexiones, mueva las
pinzas adelante atrás para mejor
conexión.
El cargador produce chasquido El disyuntor está ciclando Quizás esté en posición incorrecta de
conmutador.
La batería es defectuosa Haga examinar la batería
Batería bien descargada pero Permita que se siga cargando hasta que la
aparte de eso, buena batería batería tenga oportunidad de recuperar lo
suficiente para recibir una carga. Si es más
de 20 minutos, deje de cargar y haga
examinar la batería.
Conexiones invertidas a la batería Apague el cargador y corrija las conexiones de
los cables.
10
Page 23

GARANTÍA LIMITADA
SCHUMACHER ELECTRIC CORPORATION, 801 BUSINESS
CENTER DRIVE, MOUNT PROSPECT, ILLINOIS 60056-2179
HACE ESTA GARANTÍA LIMITADA AL COMPRADOR ORIGINAL AL POR MENOR DE ESTE PRODUCTO. ESTA GARANTÍA
LIMITADA NO ES TRANSFERIBLE.
Schumacher Electric Corporation garantiza este cargador de
baterías por 3 anos, y el transformador y los rectificadores por
5 años desde la fecha de compra al por menor contra materiales
o fabricación defectuosos. Si tal defecto ocurre, la unidad será
reparada o reemplazada a la opción del fabricante. Es la
obligación del comprador de enviar la unidad, junto con evidencia
de compra, al fabricante o a su representante autorizado, y cubrir
los gastos de transporte y / o correo prepagados. Esta garantía
limitada no es válida si el producto ha sido usado
incorrectamente, sometido a manejo negligente, o reparado por
cualquiera persona o entidad que no sea el fabricante o su
SÍRVASE TOMAR NOTA: En la mayoría de los casos, un cargador “de reemplazo” es una unidad reacondicionada en la fábrica. El
reemplazo gratis es aplicable únicamente dentro del período inicial de 3 anos. Las unidades reacondicionadas en la fábrica están
disponibles a precio bajo y fijo después de vencer la garantía de 3 años.
representante autorizado. El fabricante no hace ninguna garantía
aparte de esta garantía limitada y expresamente excluye
cualquier garantía implícita inclusive garantía por daños
consecuenciales.
Esta es la única garantía limitada expresa y el fabricante ni
asume ni autoriza a nadie a asumir o hacer ninguna otra
obligación respecto al producto aparte de esta garantía limitada
expresa. El fabricante no hace ninguna garantía de
comerciabilidad ni de aptitud para el propósito de este producto
y expresamente la excluye de esta garantía limitada. Algunos
estados no permiten la exclusión o limitación de daños
incidentales o consecuenciales o período de garantía implícita,
de manera que las antedichas limitaciones o exclusiones quizás
no se apliquen a Ud. “Esta garantía le concede derechos legales específicos, y Ud. puede tener otros derechos que varían
de estado en estado.”
801 Business Center Drive
Mount Prospect, Illinois 60056-2179
Para Reparaciones bajo la Garantía, envíe el producto a:
Schumacher Electric Corporation, Warranty Service Department
1026 Thompson Avenue, Hoopeston, IL 60942
Teléfono: 800-621-5485 (Horas: 7 a.m. – 4:30 p.m. hora central)
11
Page 24

NOTAS:
 Loading...