

Page 1

Réfrigérateur
Refrigerator
Koelkast
Frigorifero
RD L 45 AAWI IX D
RD L 45 AAWI IX G
Installation et emploi
Installation and use
Installatie en gebruik
Installzione e uso
Page 2

Page 3

La sécurité, une bonne habitude
ATTENTION
Lire attentivement les avertissements contenus dans ce livret car ils fournissent des indications importantes pour la
sécurité de l’installation, de l’utilisation et de l’entretien.
Ce réfrigérateur a été construit conformément aux normes
internationales de sécurité qui ont pour but de protéger le
consommateur. Cet appareil a en effet obtenu le label IMQ
que les techniciens de l’Institut Italien de Qualité n’accordent qu’aux appareils conformes aux normes du CEI: Comité Electrotechnique Italien.
1. Cet appareil ne doit pas être installé à l’extérieur, même à
l’abri d’un appentis, il est extrêmement dangereux de le laisser exposé à la pluie et aux orages.
2. Il ne doit être utilisé que par des adultes et uniquement
pour conserver et congeler des aliments, conformément à
ce mode d’emploi.
3. Ne touchez jamais ni ne manoeuvrez l’appareil pieds nus
ou avec les mains ou les pieds mouillés.
4. Nous déconseillons d’utiliser des rallonges ou des prises
multiples. Si le réfrigérateur est installé entre des meubles,
veillez par soucis de sécurité à ce que le cordon d’alimentation ne soit ni plié ni comprimé.
5. Ne tirez jamais sur le cordon ou le réfrigérateur pour débrancher la fiche de la prise murale: c’est extrêmement dangereux.
6. Ne touchez pas aux parties intérieures réfrigérantes surtout avec les mains mouillées, vous pourriez vous brûler ou
vous blesser. Ne portez jamais à la bouche des glaçons à
peine sortis du freezer, vous risqueriez de vous brûler.
7. Ne procédez à aucune opération de nettoyage ou d’entretien
sans avoir auparavant débranché la fiche de l’appareil; il ne suffit pas, en effet, d’amener la manette de réglage de la température sur la position pour éliminer tout contact électrique.
8. Avant d’envoyer votre ancien réfrigérateur à la déchetterie,
rendez sa serrure inutilisable. Vous éviterez ainsi que des
enfants en jouant, ne restent enfermés à l’intérieur.
9. En cas de panne et avant de faire appel au service aprèsvente, consultez le chapitre «Quelque chose ne va pas?»
pour vérifier si vous pouvez vous-même résoudre le problème.
Ne tentez pas de réparer la panne en essayant d’accéder
aux parties internes.
10. En cas de changement du câble d’alimentation, adressez-vous à nos Services après-vente. Dans certains cas, les
connexions sont réalisées au moyen de bornes spéciales, dans
d’autres, un outil spécial est indispensable pour accéder aux
raccordements.
11. Ne pas utiliser d’appareils électriques à l’intérieur du
compartiment de conservation des aliments s’ils
n’appartiennent pas aux catégories recommandées par le
fabricant.
12. Avant d’envoyer votre appareil hors d’usage à la
déchetterie, veillez à le rendre sûr car sa mousse isolante
contient du gaz cyclopentane et son circuit réfrigérant peut
contenir du gaz R600a (isobutane).
Pour cette opération, adressez-vous à votre revendeur ou
au Service local prévu à cet effet.
Installation
Pour garantir le bon fonctionnement de votre appareil
tout en réduisant sa consommation d’électricité, il faut
qu’il soit installé correctement.
L’aération
Le compresseur et le condenseur produisent de la chaleur et
exigent par conséquent une bonne aération. Les pièces mal
ventilées sont par conséquent déconseillées. L’appareil doit
donc être installé dans une pièce munie d’une ouverture
(fenêtre ou porte-fenêtre) qui permette de renouveler l’air
et qui ne soit pas trop humide.
Attention, lors de son installation, à ne pas boucher les grilles
d’aération de l’appareil.
Pour une bonne aération de l’appareil, il faut prévoir:
- une distance de 10 cm au moins entre le haut de l’appareil
et les meubles situés au-dessus;
- une distance de 5 cm au moins entre les côtés de l’appareil
et des meubles ou des murs latéraux.
Loin de toute source de chaleur
Evitez d’installer votre appareil dans un endroit exposé à la
lumière directe du soleil ou près d’une cuisinière électrique
ou autre.
A plat
L’appareil doit être installé bien à plat; si le sol n’est pas
nivelé, servez-vous des pieds réglables situés à l’avant de
l’appareil pour le mettre à niveau.
Raccordement électrique et mise à la terre
Avant de procéder à tout raccordement électrique, contrôlez si le voltage indiqué sur la plaquette des caractéristiques,
placée en bas à gauche à côté du bac à légumes, correspond bien à celui de votre installation et contrôlez si la prise
est dotée d’une mise à la terre conforme, comme prescrit
par la loi 46/90 sur la sécurité des installations. S’il n’y a pas
de mise à la terre, le Fabricant décline toute responsabilité.
N’utilisez ni prises multiples ni adaptateurs.
Installez l’appareil de manière à ce que la prise à
laquelle il est connecté soit parfaitement accessible.
La puissance est insuffisante?
La prise électrique doit être en mesure de supporter la charge
maximum de puissance de l’appareil, indiquée sur la plaquette des caractéristiques placée en bas à gauche à côté
du bac à légumes.
Avant de le raccorder électriquement
Après le transport, pour que votre appareil fonctionne bien,
placez-le à la verticale et attendez au moins 3 heures avant
de le brancher à la prise.
1
F
Page 4
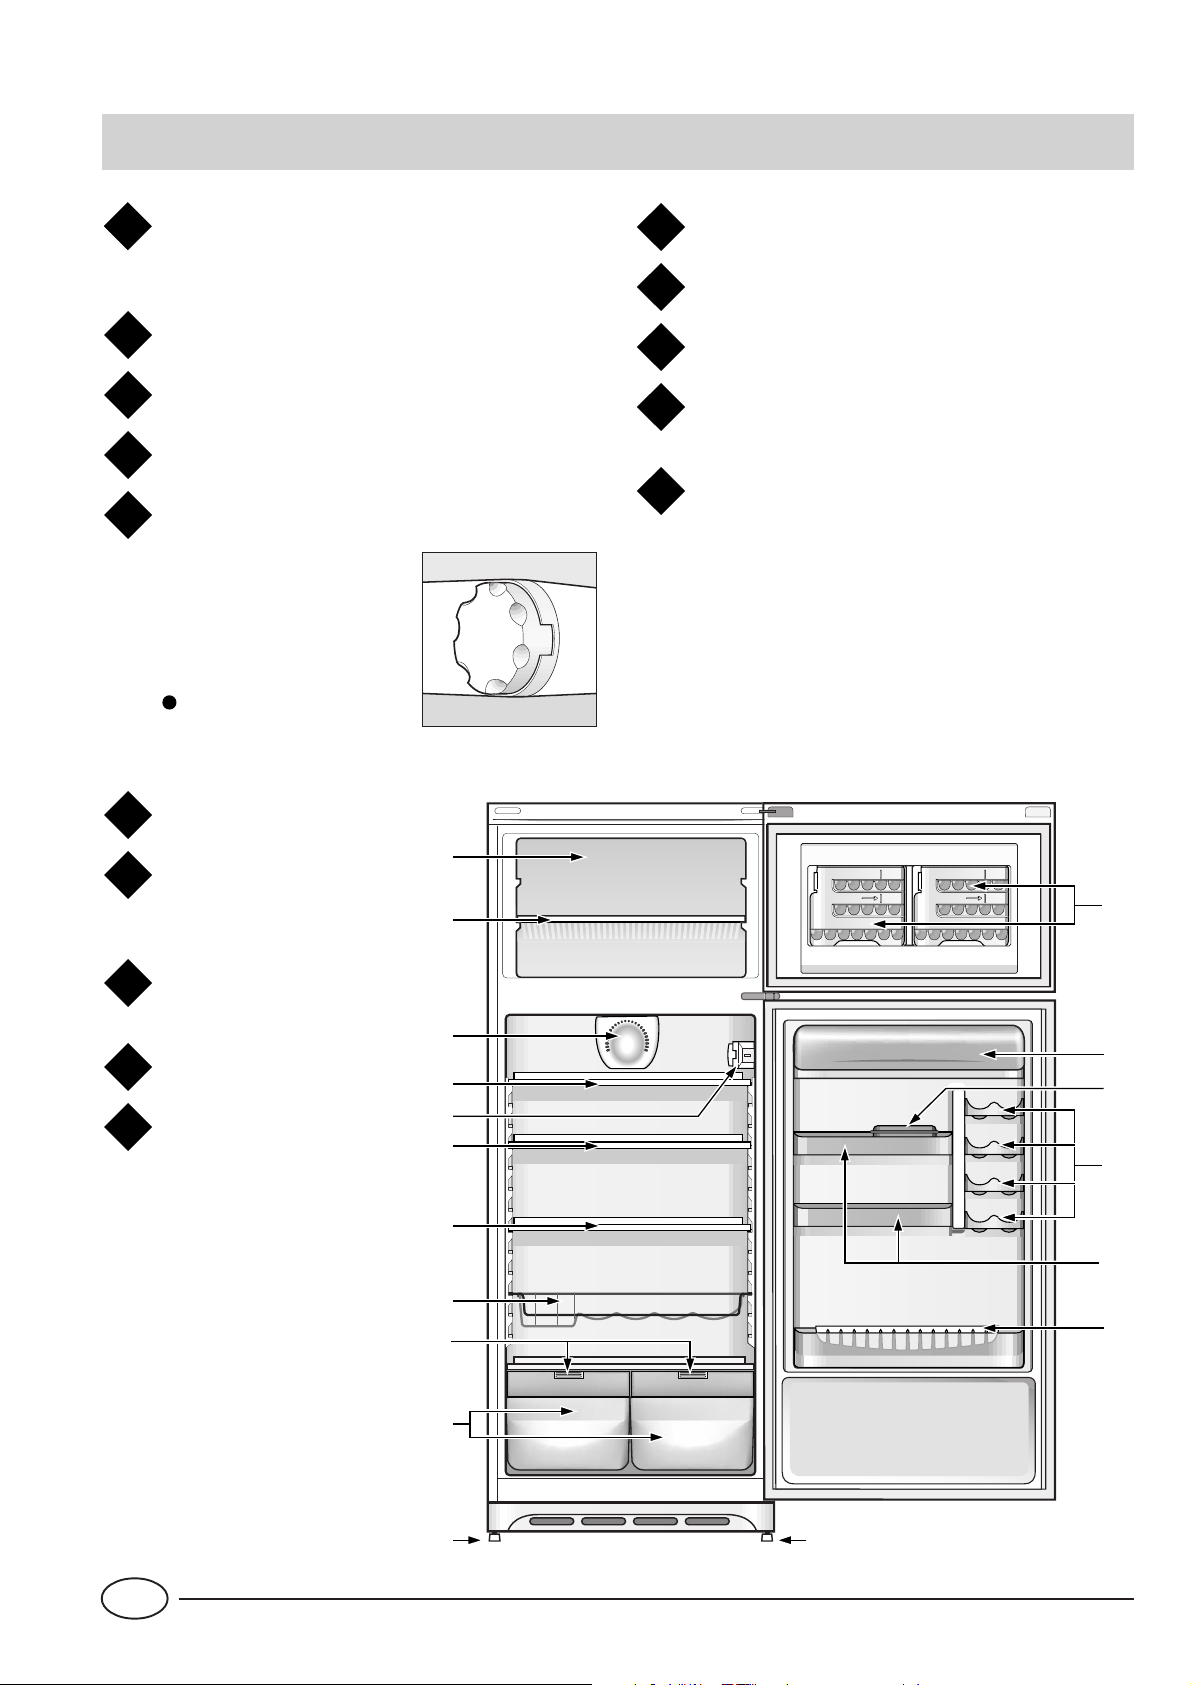
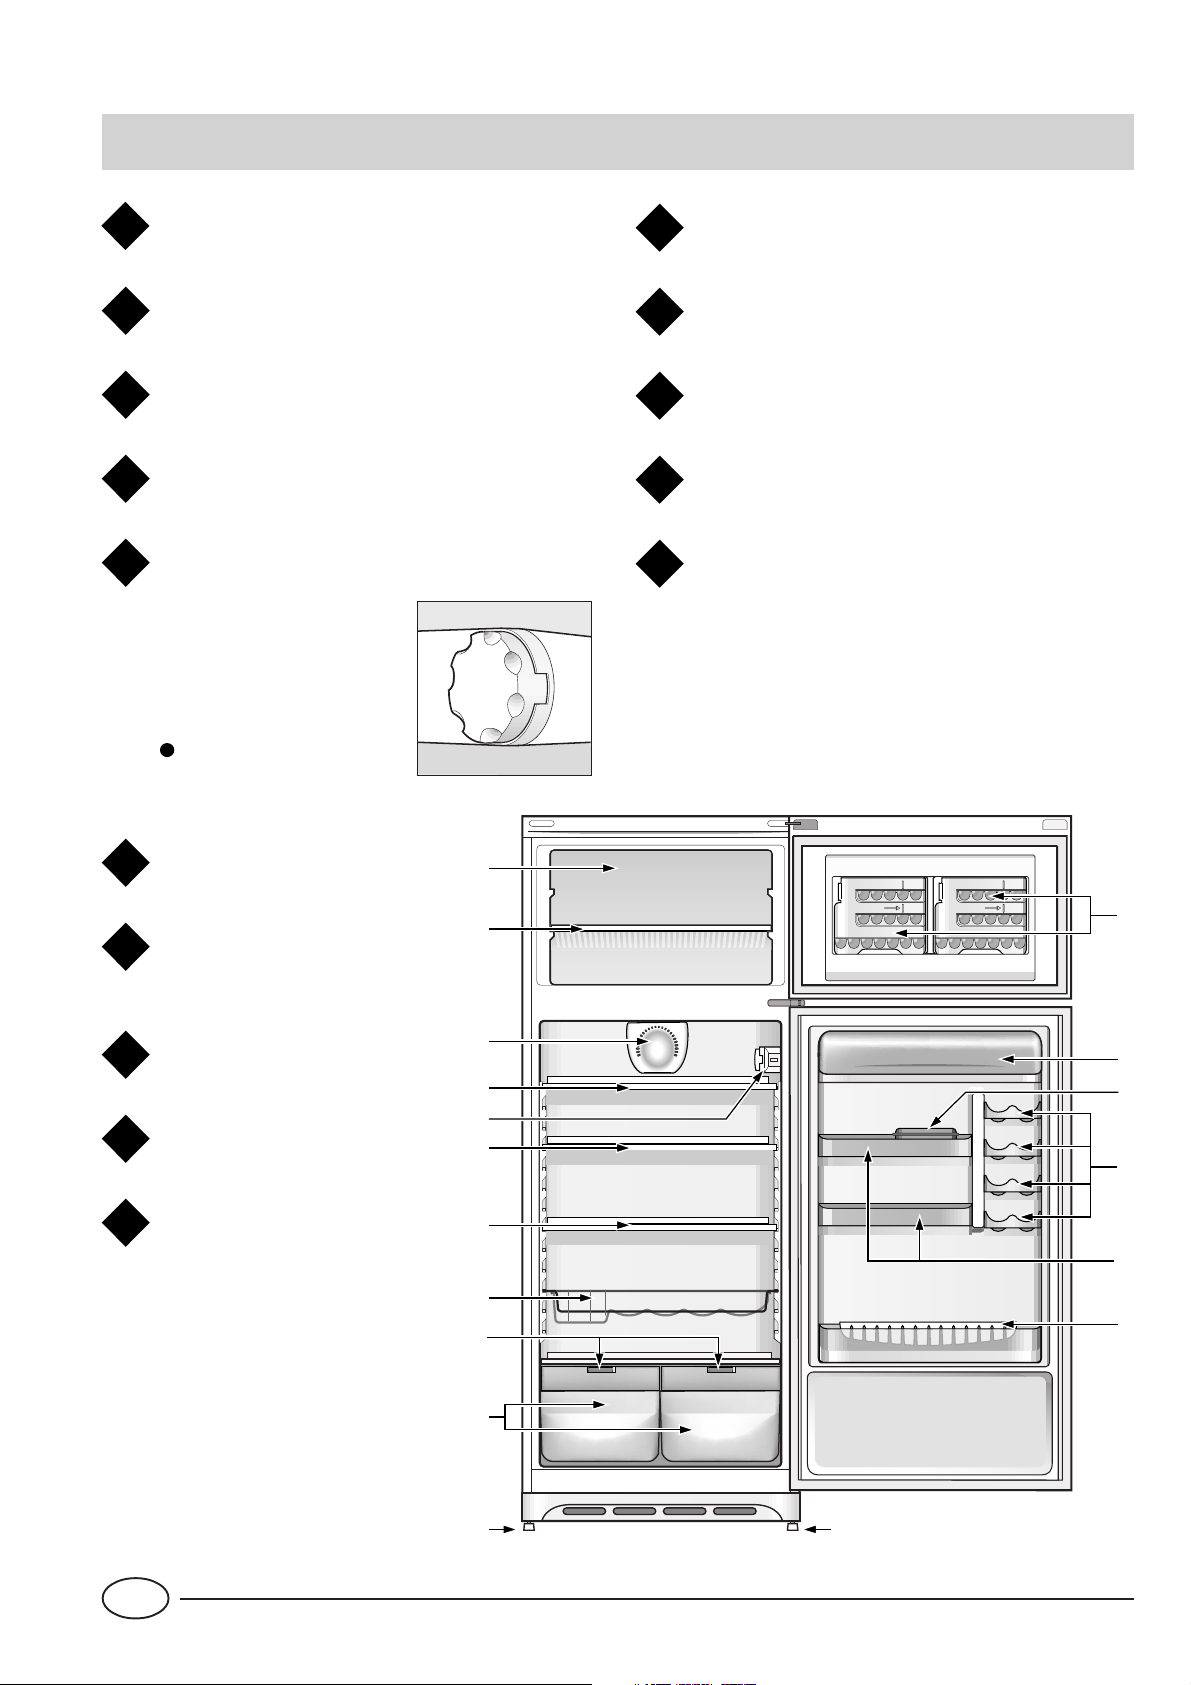
Vu de près
K
L
M
N
O
MAX
WATER LEVEL
MAX
WATER LEVEL
A
B
C
D
E
J
L
O
N
D
D
F
H
I I
K
M
G
Chambre pour congeler les aliments frais et
A
pour conserver les aliments surgelés
Clayette freezer
B
"Dynamic Bio Conservation" Systeem
C
Clayettes coulissantes et réglables en hauteur
D
Manette pour le réglage de la température
E
Cette manette permet de régler la température des deux
compartiments sur des positions différentes
le réfrigérateur est éteint;
1 moins froid;
5 plus froid.
Balconnet amovible porte-objets
Balconnet de boisson en boîte
Casier à beurrier
Balconnet amovible avec couvercle et casier à
œufs
Bac à glaçons
4
Grille porte-bouteilles
F
Couvercle de legume
G
mobile avec reglage
d’humidite
Boîtes de fruits et de
H
légumes
Pieds de réglage
I
Balconnet amovible pour
J
bouteilles et arret
bouteilles
F
2
Page 5
Comment mettre en marche l'appareil
ATTENTION
Après le transport, pour que votre appareil fonctionne
bien, placez-le à la verticale et attendez au moins 3
heures avant de le brancher à la prise de courant.
Avant d’introduire les aliments dans le réfrigérateur ou dans
le freezer, nettoyez bien l’intérieur de l’appareil avec de l’eau
tiède et du bicarbonate.
L'hygiène alimentaire
1. Après achat, les aliments doivent être débarrassés de leur
emballage extérieur en papier/carton ou autre qui pourrait
véhiculer des bactéries ou des saletés à l’intérieur du
réfrigérateur.
2. Protégez les aliments (notamment ceux qui se détériorent
rapidement et ceux qui dégagent une forte odeur ) pour
éviter tout contact entre eux et éliminer ainsi toute
possibilité de contamination de germes/bactéries et la
diffusion d’odeurs particulières à l’intérieur du
réfrigérateur.
3. Rangez les aliments de manière à ce que l’air puisse circuler
librement entre eux.
4. Veillez à ce que l’intérieur du réfrigérateur soit toujours
propre.
Attention : ne pas utiliser de produits oxydants ou abrasifs
pour son nettoyage.
5. Sortez les aliments du réfrigérateur dès qu’ils dépassent
leur durée limite de conservation.
6. Pour une bonne conservation, les aliments facilement
périssables (fromages à pâte molle, poisson cru, viande,
etc.) doivent être placés dans la zone plus froide où est
situé l’indicateur de température.
Après avoir branché la fiche à la prise de courant, contrôlez
si la lumière à l’intérieur est bien allumée puis tournez la
manette pour le réglage de la température “A” jusqu’à la
position “3” , au bout de quelques heures vous pouvez commencer à introduire les aliments frais dans le compartiment
réfrigérateur et les aliments congelés dans le freezer..
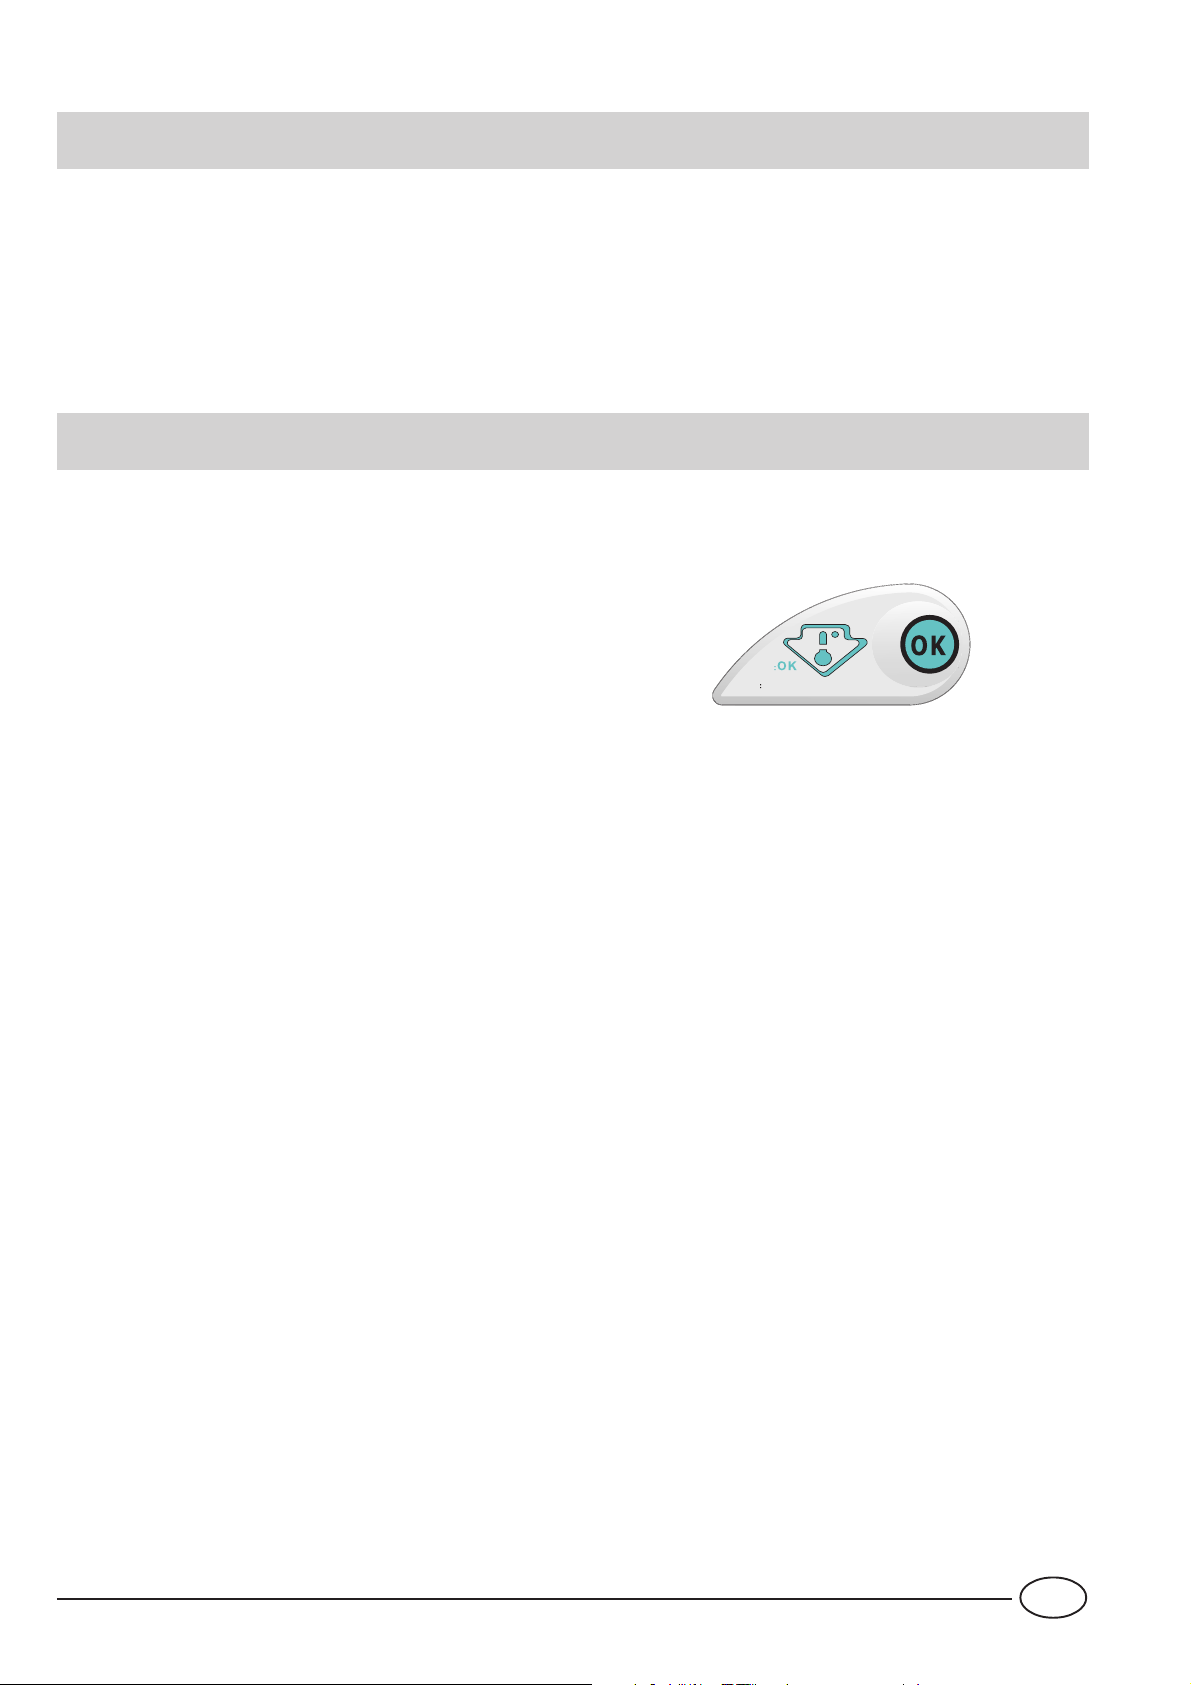
L'indicateur de température
Pour mieux repérer la zone la plus froide du réfrigérateur, ce
dernier a été équipé d’un indicateur de température.
vert
noir
consulter la notice
Contrôlez que l’indicateur affiche bien «OK».
Un bon éclairage permet de mieux lire l’indicateur.
Si l’indicateur est entièrement noir, la température moyenne
de la zone est trop élevée.
Réglez le thermostat (du compartiment réfrigérateur) sur une
position plus élevée (plus froide).
A chaque réglage du thermostat, attendez que la
température se soit stabilisée à l’intérieur du compartiment
réfrigérateur (10 h environ) avant de procéder à tout autre
réglage.
ATTENTION : en cas d’introduction de grosses quantités
d’aliments ou d’ouverture fréquente et prolongée de la porte du réfrigérateur, il est normal que l’indicateur n’affiche
pas «OK».
Attendez au moins 10 h avant de régler le thermostat sur
une position plus élevée.
3
F
Page 6
Comment utiliser au mieux le compartiment réfrigérateur
Le thermostat règle automatiquement la temperature ù l’interne de l’appareil.
1 = moins froid
5 = plus froid
Une position intermédiaire est de toute manière conseillée.
Pour augmenter la place disponible et améliorer l’aspect
esthétique, la «partie réfrigérante» de cet appareil est située à l’intérieur de la paroi arrière du compartiment réfrigérateur. En cours de fonctionnement, cette paroi sera par
conséquent recouverte de givre ou de gouttelettes d’eau
suivant que le compresseur est en marche ou pas. Ne vous
en faites pas! Votre réfrigérateur fonctionne tout à fait normalement.
Si vous réglez la manette sur des chiffres plus élevés, en
emmagasinant des quantités importantes de nourriture et
avec une température ambiante élevée, votre appareil risque de fonctionner sans interruption favorisant ainsi la formation de givre sur la paroi arrière réfrigérante tout en consommant beaucoup plus d’électricité.
Pour résoudre cet inconvénient il suffit de déplacer la
manette du thermostat vers des chiffres plus bas permettant ainsi un dégivrage automatique de l’appareil.
Le compartiment réfrigérateur de votre appareil est doté d'un
Dispositif de "Dynamic Bio Conservation" permettant une
excellente conservation des aliments et un usage simplifié
de l'appareil gràce à:
- un retour plus rapide à la juste température: après chaque
ouverture de porte les températures atteignent plus leurs
valeurs optimales, pour une meilleure conservation.
- Une distribution plus homogène de la température
permettant de ranger les sliments sur n'importe clayette.
- Un plus haut degré d'humidité pour prolonger la durée de
conservation des aliments.
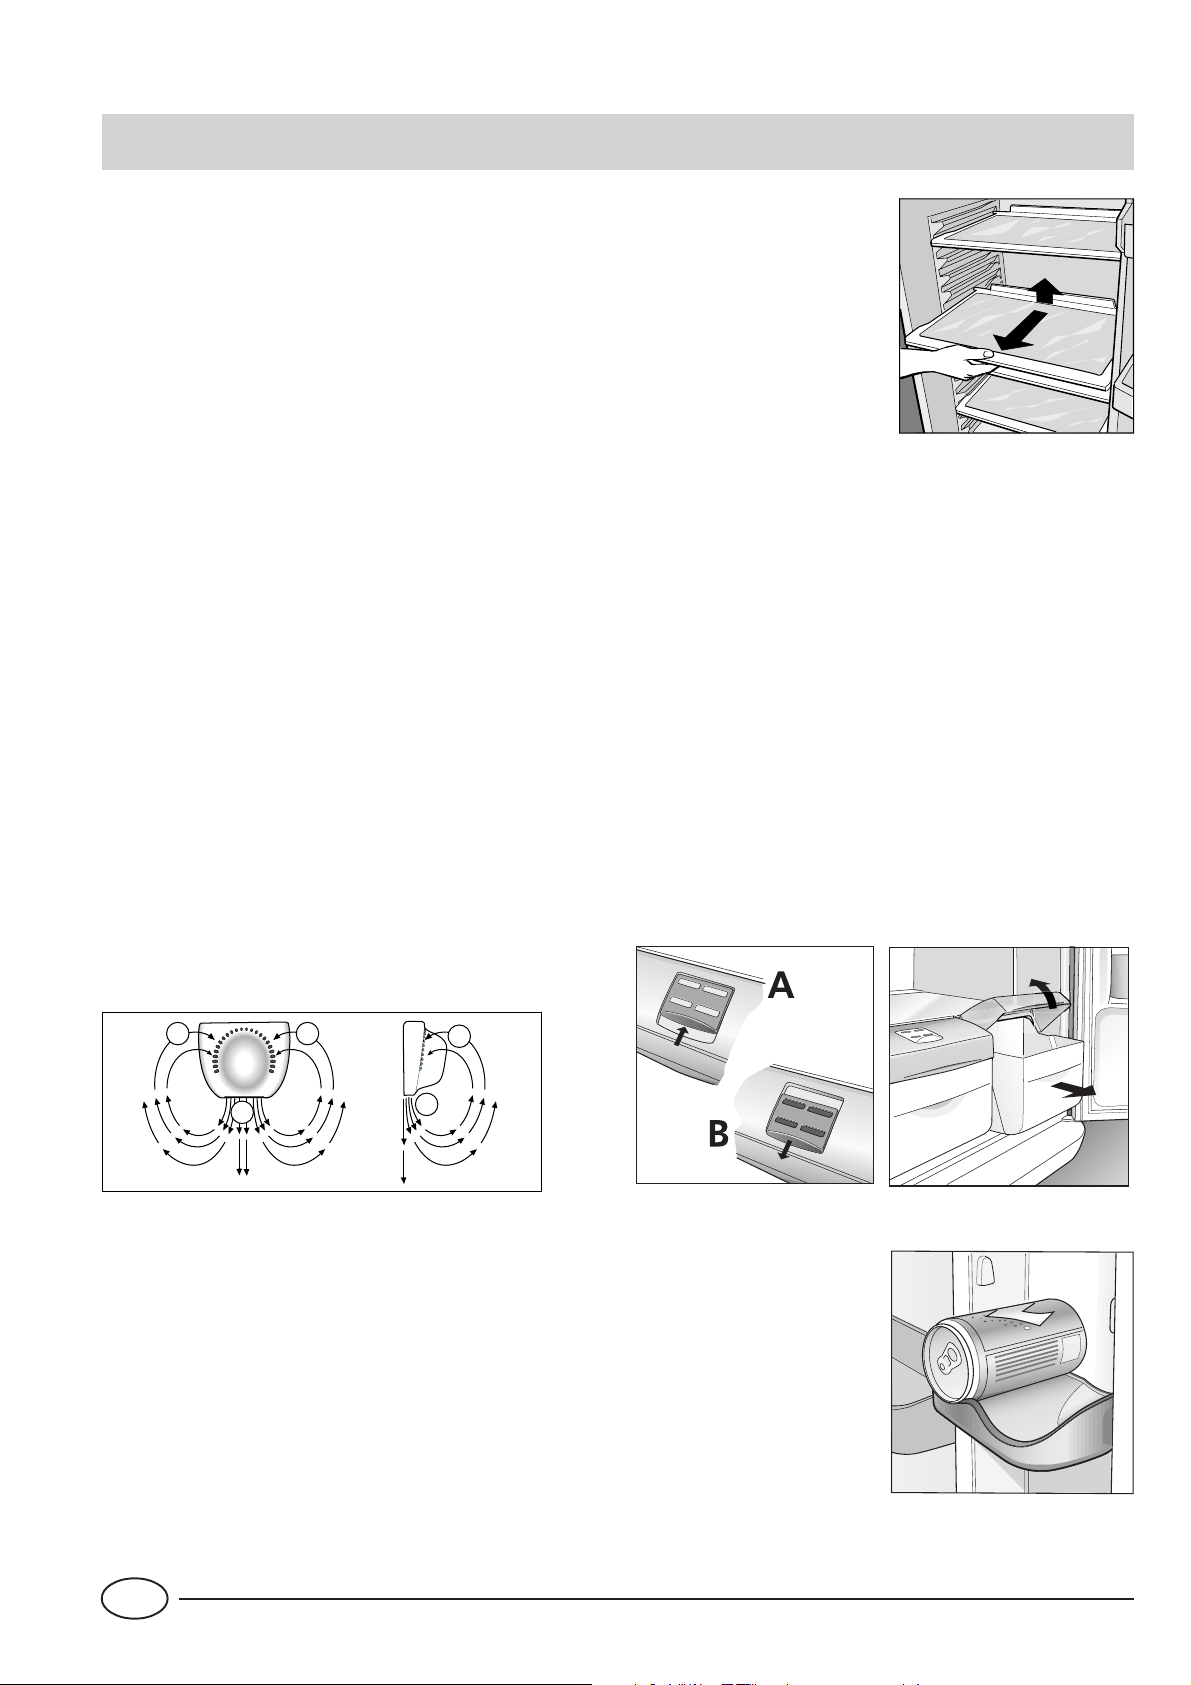
Le compartiment réfrigérateur est équipé de clayettes
amovibles extrêmement pratiques (Fig. 1) et réglables en
hauteur grâce à des glissières spéciales. Vous pouvez
ainsi introduire de grands récipients et des aliments particulièrement volumineux.
N'introduisez que des aliments froids ou tièdes en
évitant d'y placer ceux qui
sont encore chauds: ils augmenteraient tout de suite la température interne en obligeant le compresseur a un surplus
de travail qui représenterait un gaspillage d'énergie électrique.
N’introduisez pas de liquides dans des récipients ouverts, ils
entraîneraient une augmentation de l’humidité à l’intérieur
du réfrigérateur et donc la formation de givre.
Fig. 1
Verduriere
Les tiroirs à fruits et légumes qui équipent le réfrigérateur
sont spécialement conçus pour garder vos fruits et légumes
frais et savoureux. Ouvrez le régulateur d’humidité (position
B) si vous désirez conserver vos aliments dans un
environnement moins humide ou bien fermez-le (position
A) pour les conserver dans un environnement plus humide
(Fig. 2). Les couvercles, faciles à ouvrir, il suffit pour cela de
tirer le tiroir vers vous, permettent d’introduire et de sortir
facilement les aliments (Fig. 3).
B
A
A - Air soufflé se refroidissant au contact de la paroi
réfrigérante
B - Air plus chaud aspiré
Suivez attentivement nos conseils quant à la durée maximum de conservation: tout aliment, pour frais qu’il soit, ne
reste pas intact très longtemps..
Contrairement à ce que l’on pense, les aliments cuits ne se
conservent pas plus longtemps que les aliments crus.
- Attention à ne pas placer de récipients (plastique,
verre), aliments et autres contre la paroi réfrigérante
(paroi arrière). Les aliments pourraient s’abîmer, la consommation d’énergie augmenter et de la buée pourraient se former (sur les aliments, les récipients, etc.).
B
B
A
F
Fig. 2
Le porte-canettes (Fig. 4)
placé dans la contre-porte
vous permet de ranger non
seulement vos canettes mais
aussi vos yaourts, votre
beurre et vos autres
récipients selon vos
exigences.
4
Fig. 3
Fig. 4
Page 7
Pour bien congeler
- Lors de la préparation des aliments à congeler, consultez un manuel spécialisé.
- Un aliment décongelé, ne serait ce que partiellement, ne
doit jamais être remis à congeler : il faut le faire cuire pour le
consommer (dans les 24 heures) ou bien pour le congeler à
nouveau.
- Les aliments frais à congeler ne doivent pas être rangés
tout contre des aliments déjà congelés ou surgelés, ils doivent être posés sur la clayette du compartiment freezer et, si
possible, contre les parois (latérales et arrière). N’oubliez pas,
en effet, que la bonne conservation des aliments congelés
dépend de leur vitesse de congélation.
- En cours de congélation, évitez d’ouvrir la porte du freezer.
- La quantité maximum pouvant être congelée, par jour, est
indiquée sur la plaquette des caractéristiques située à gauche du bac à légumes.
- Pour obtenir une congélation et une décongélation parfaites, il vaut mieux congeler de petites portions d’aliments,
leur congélation n’en sera que plus rapide et homogène.
Indiquez sur vos sachets ou barquettes leur contenu et la
date de congélation.
- N’ouvrez pas la porte du freezer en cas de coupure de
courant ou de panne, vous éviterez ainsi d’accélérer la montée de la température à l’intérieur du freezer. Les produits
surgelés et congelés se conserveront ainsi inaltérés pendant
environ 9-14 heures.
- Ne mettez jamais de bouteilles pleines dans votre freezer:
elle pourraient se briser car tous les liquides augmentent de
volume en gelant.
- Ne remplissez les bacs à glaçons qu’aux 3/4 de leur hauteur.
- Si l’on a pendant longtemps une température ambiante plus
froide que 14°C, les températures indispensables à une longue
conservation ne pourront être atteintes à l’intérieur du freezer
et la durée de conservation sera par conséquent réduite.
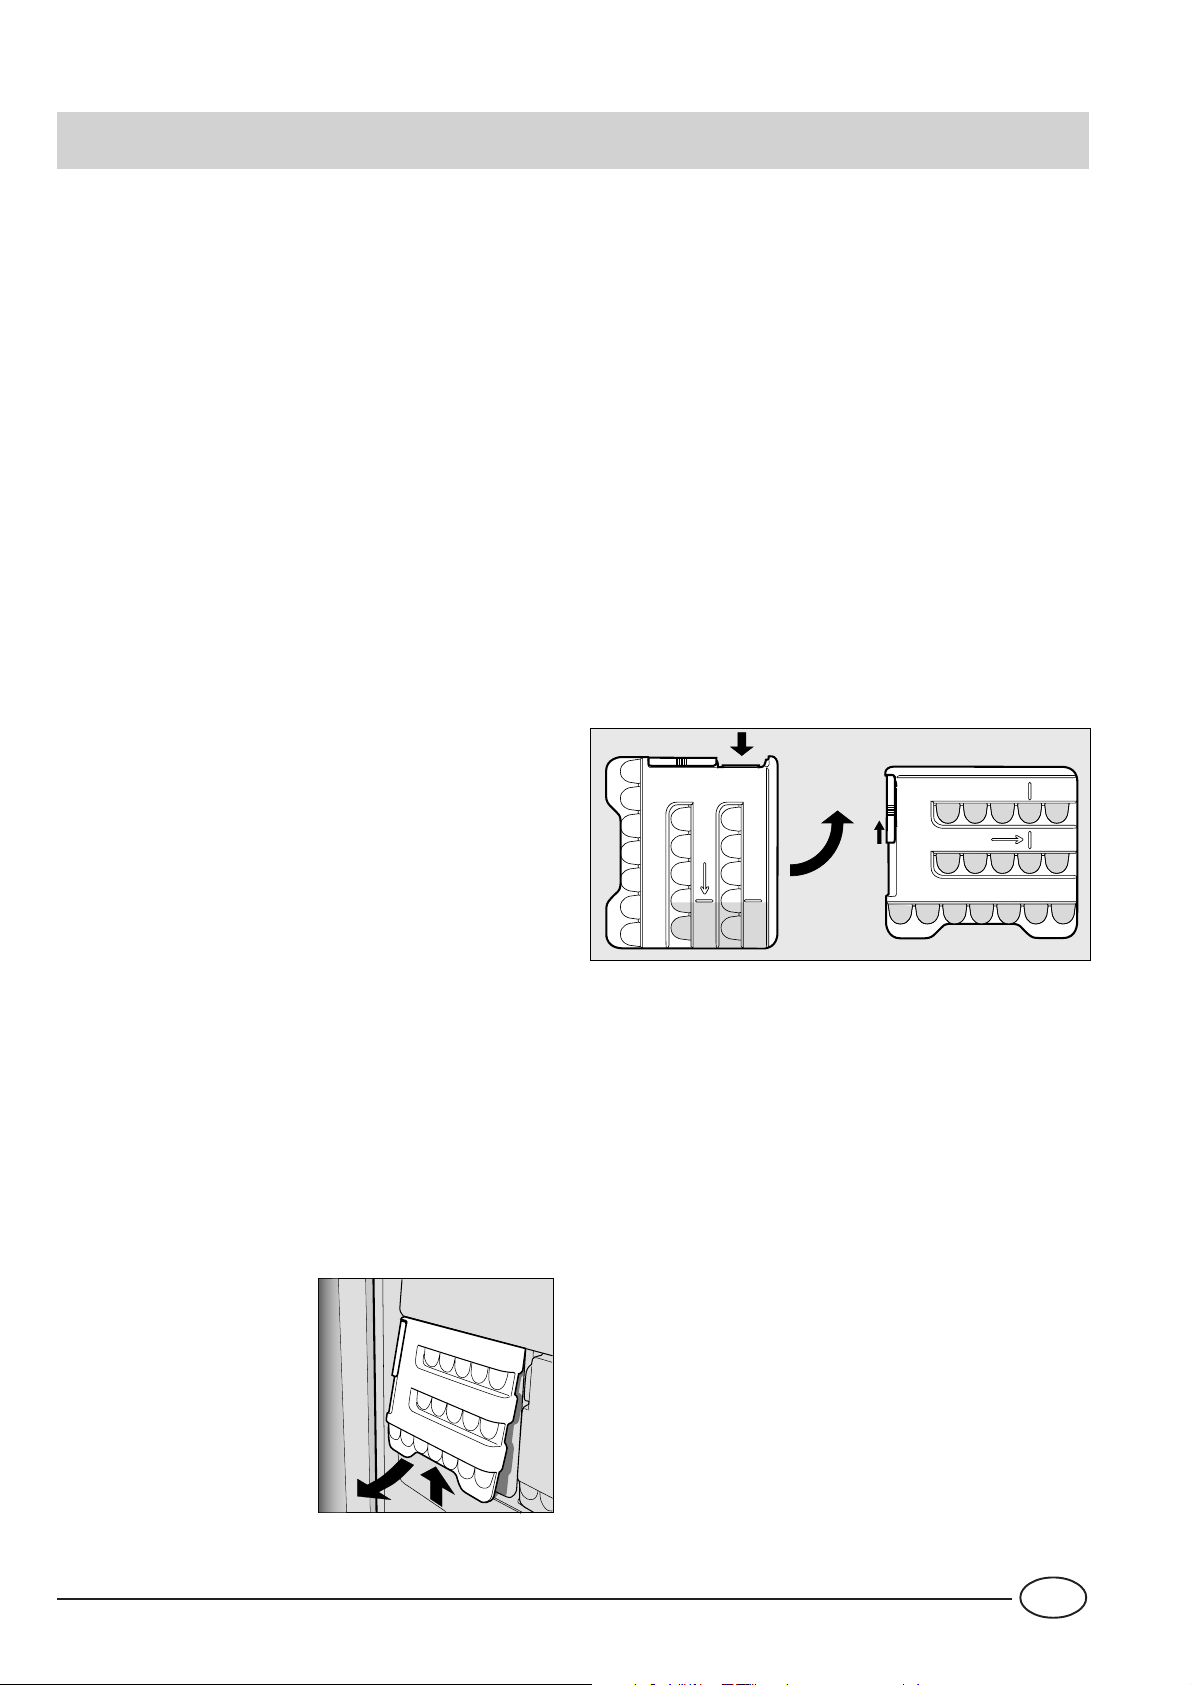
Mode d'emploi (Fig. 6)
Remplissez le bac d'eau jusqu'au niveau indiqué (MAX
WATER LEVEL) en veillant à ne pas le dépasser. Si vous
introduisez davantage d'eau, la quantité de glace qui se
formera risque d'empêcher la sortie des glaçons.
Si vous avez introduit trop de liquide, attendez que la glace
fonde, videz le bac et recommencez depuis le début.
Après avoir introduit la quantité d'eau nécessaire par l'orifice
prévu à cet effet, tournez le bac de 90°. Suivant le principe
des vases communicants, l'eau va remplir les cavités. Fermez
l'orifice à l'aide du couvercle prévu et placez le bac à glaçons
dans la contre-porte.
Une fois que la glace s'est formée, il vous suffit de taper le
bac contre une surface dure pour détacher les glaçons et les
faire sortir par l'orifice d'entrée de l'eau. Pour sortir plus
facilement les glaçons, mouillez l'extérieur du bac.
ATTENTION: avant d'introduire à nouveau de l'eau dans le
bac, vérifiez qu'il est bien vide sans le moindre débris de
glace.
Il faut attendre au moins 8 heures pour obtenir de beaux
glaçons.
WATER LEVEL
MAX
Fig. 6
MAX
WATER LEVEL
Bacs à glace
Le brevet exclusif de ce nouveau type de bacs à glace a été
déposé par Merloni. Placés dans la contre-porte du
compartiment freezer, ils sont plus ergonomiques et
garantissent davantage de propreté: en effet, les glaçons ne
touchent plus aux aliments stockés dans le freezer; de plus,
fini l'eau qui dégouline lorsque vous rangez votre bac (un
couvercle est fourni pour boucher le récipient après l'avoir
rempli).
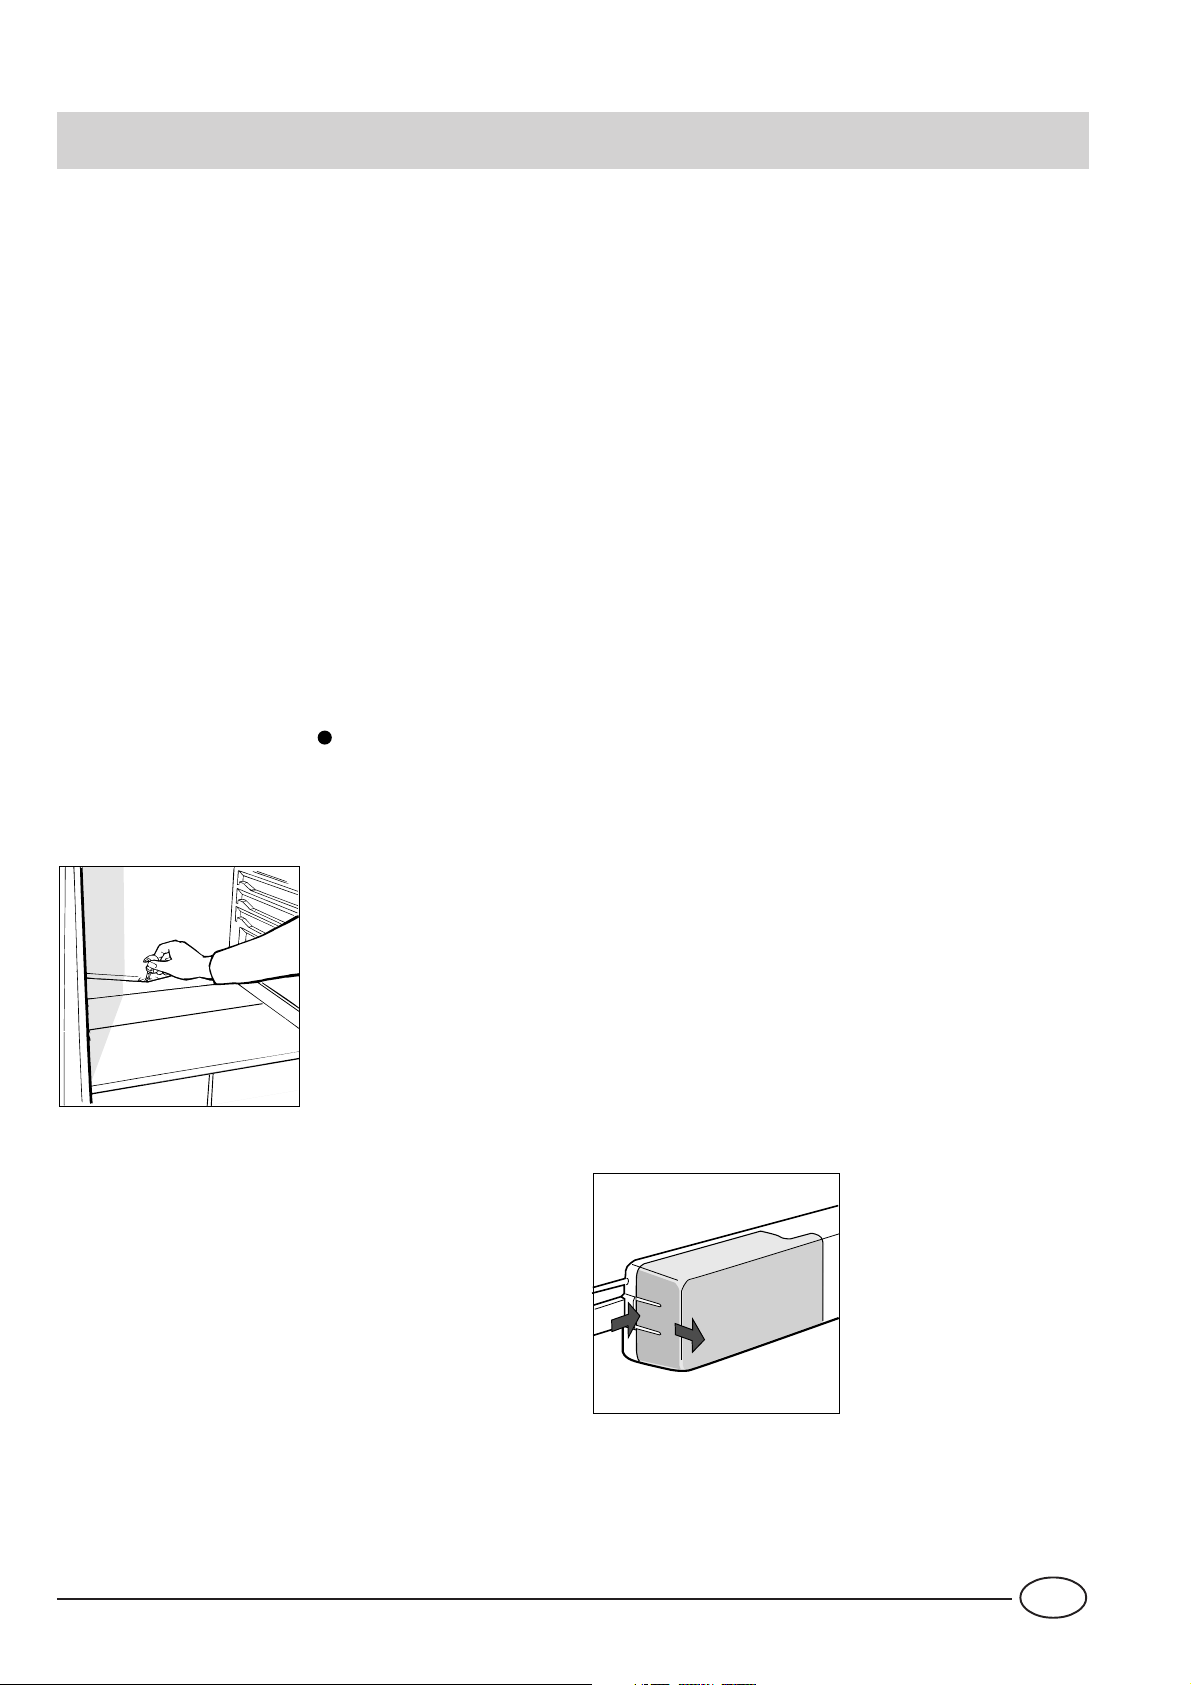
Pour sortir les bacs à glaçons
de leur logement, poussez le
bac vers le haut puis tirez-le
vers vous (Fig 5).
Pour remettre le bac à sa
place, insérez sa partie
supérieure dans le logement
prévu et, une fois qu’il est à
la verticale, laissez-le
retomber.
Fig. 5
5
F
Page 8

Quelques conseils pour faire des économies
- Installez-le bien
Autrement dit loin de sources de chaleur, de la lumière directe
du soleil, dans une pièce bien ventilée et en respectant les
distances signalées dans le paragraphe «Installation/L’aération».
- Le froid nécessaire
Un froid excessif entraîne une augmentation de la consommation d’électricité.
- Ne le remplissez pas trop
Pour bien conserver les aliments, il faut que le froid puisse
circuler librement à l’intérieur du réfrigérateur. Si vous le remplissez trop, vous gênerez cette circulation et obligerez le
compresseur à fonctionner sans arrêt.
- Portes fermées
Ouvrez votre réfrigérateur le moins souvent possible car chaque fois que vous le faites, de l’air froid s’échappe. Pour
rétablir la température voulue, le moteur doit fonctionner
longtemps en consommant beaucoup d’électricité.
- Attention aux joints
Veillez à ce qu’ils soient toujours propres et en bon état pour
bien adhérer aux portes; ce n’est qu’ainsi qu’ils empêcheront toute fuite d’air froid.
- Jamais d’aliments chauds
Une casserole chaude mise au réfrigérateur entraîne automatiquement une hausse de la température de plusieurs
degrés, laissez-la refroidir à température ambiante avant de
l’introduire dans le réfrigérateur.
- Du givre dans le freezer
Contrôlez l’épaisseur du givre sur les parois du freezer et
procédez immédiatement au dégivrage si la couche est trop
épaisse (Voir plus bas “Comment le garder en forme”).
F
6
Page 9
Guide à la congélacion
Viandes et poisson
Type Confection
Rôti et boeuf bouilli Enveloppé dans du papier aluminium 2 / 3 9 / 10 Pas nécessaire
Agneau Enveloppé dans du papier aluminium 1 / 2 6 Pas nécessaire
Rôti de porc Enveloppé dans du papier aluminium 1 6 Pas nécessaire
Veau rôti ou blanchi Enveloppé dans du papier aluminium 1 8 Pas nécessaire
Par tranche enveloppée une par une dans une
Biftecks et côtelettes de
porc ou de veau
Tranches et côtelettes
d'agneau ou de boeuf
Viande hachée
Coeur et foie Sachets en polythène 3 Pas nécessaire
feuille de polythéne puis dans du papier
aluminium, pas plus de 4 à 5 morceaux
ensemble
Chaque tranche enveloppée dans une feuille
de polythéne puis dans du papier aluminium,
pas plus de 4 à 5 morceaux ensemble
Dans des bacs aluminium recouverts d'une
feuille de polythène
Faisandage
(jours)
Très fraîche 2
Conservation
(mois)
6 Pas nécessaire
6 Pas nécessaire
Décongélation
Lentement dans le
réfrigérateur
Saucisses Papier aluminium ou polythène 2 Selon l'emploi
Poulets et dindons Papier aluminium 1 / 3 9
Canards et oies Papier aluminium 1 / 4 6
Canards sauvages
faisans, perdrix
Lapins, lièvres Papier aluminium 3 / 4 6
Chevreuil, cerf Papier aluminium ou polythène 5 / 6 9
Gros poissons Papier aluminium ou polythène 4 / 6
Petits poissons Sachets en polythène 2 / 3 Pas nécessaire
Crustacés Sachets en polythène 3 / 6 Pas nécessaire
Mollusques
Poissons cuits Papier aluminium ou polythène 12 Dans de l'eau chaude
Papier aluminium 1 / 3 9
Dans des bacs aluminium ou plastique
plongés dans du sel et de l'eau
3
Lentement dans le
réfrigérateur
Lentement dans le
réfrigérateur
Lentement dans le
réfrigérateur
Lentement dans le
réfrigérateur
Lentement dans le
réfrigérateur
Lentement dans le
réfrigérateur
Lentement dans le
réfrigérateur
Poissons frits Sachets en polythène 4 / 6
7
Directement dans la
poêle
F
Page 10
Fruits et légumes
Type Préparation Cuisson Confection
Pommes et poires
Abricots pêches
cerises, prunes
Fraises, mûres et
myrtilles
Fruits cuits Couper, cuire et passer
Jus de fruit Laver, couper et écraser
Choux-fleurs
Choux, choux de
Bruxelles
Petits pois Écosser et laver 2' Sachets en polythène 12 Pas nécessaire
Haricots verts
Peler et couper en
morceaux
Ôter les noyaux et peler 1' / 2'
Nettoyer, laver et laisser
sécher
Couper en morceaux et
blanchir à l'eau additionnée
de jus de citron
Nettoyer, laver et couper 1' / 2' Sachets en polythène 10 / 12 À température ambiante
Laver et couper en
morceaux
Dans des bacs, couvrir avec
2’
du sirop
Dans des bacs, couvrir avec
du sirop
Dans des bacs, couvrir avec
du sucre
Dans des bacs, ajouter 10%
de sucre
Dans des bacs, sucre à
discrétion
2' Sachets en polythène 12 Pas nécessaire
2' Sachets en polythène 10 / 12 Pas nécessaire
Conserv.
(mois)
12
12
10 / 12
12
10 / 12
Décongélation
Lentement dans le
réfrigérateur
Lentement dans le
réfrigérateur
Lentement dans le
réfrigérateur
Lentement dans le
réfrigérateur
Lentement dans le
réfrigérateur
Carottes, poivrons,
navets
Champignons et
asperges
Epinards Laver et hacher 2' Sachets en polythène 12 À température ambiante
Légumes assortis
pour potage
Denrées diverses Préparation Cuisson Confection
Pain Sachets en polythène 4
Gâteaux Feuilles de polythène 6
Crème fraîche Bacs en plastique 6
Beurre
Denrées cuites,
soupe de légumes
Couper en lamelles, peler et
laver
Laver et couper 3' / 4' Sachets ou bacs 6 A température ambiante
Laver et couper en
morceaux
3' / 4' Sachets en polythène 12 Pas nécessaire
En petites portions dans des
3'
sachets
Dans son papier original
enveloppé dans du papier
aluminium
Partagés dans des bacs verre
ou plastique
6 / 7 À température ambiante
Conserv.
(mois)
6 Dans le réfrigérateur
3 / 6
Décongélation
À température ambiante
et dans le four
À température ambiante
et cuire à 100/200°C
À température ambiante
ou dans le réfrigérateur
À température ambiante
ou dans de l'eau chaude
Oeufs
F
Congeler sans coquille dans
de petits bacs
8
10
À température ambiante
ou dans le réfrigérateur
Page 11
Comment le garder en forme
Dégivrage
ATTENTION: ne pas endommager le circuit réfrigérant.
Attention: n’utilisez ni dispositifs mécaniques ni outils
pour accélérer l’opération de dégivrage, en dehors de
ceux conseillés par le fabricant.Comment dégivrer le
compartiment réfrigérateur.
Comment dégivrer le compartiment réfrigérateur.
Cet appareil est à dégivrage automatique, l’eau est acheminée vers l’arrière par un conduit spécial (fig. 7) où la chaleur
produite par le compresseur la fait évaporer. Vous n’avez
qu’une opération à faire périodiquement: nettoyer le trou
d’évacuation qui se trouve derrière les bac à légumes afin
que l’eau puisse s’écouler normalement.
Comment décongeler le compartiment freezer
- Eliminez de temps en temps le givre à l’aide du racloir fourni
avec l’appareil (jamais de couteaux ou d’objets métalliques).
- Si le givre dépasse 5 mm d’épaisseur, il faut procéder au
dégivrage.
Procédez comme suit: positionnez la manette pour le réglage des températures A sur ; enveloppez tous les produits surgelés et congelés dans du papier journal et mettezles au réfrigérateur ou dans un endroit frais. Laissez la porte
ouverte pour que le givre fonde complètement, accélérez
l’opération en introduisant des récipients pleins d’eau tiède.
Fig. 7
Nettoyage et entretien particulier
Avant de nettoyer votre réfrigérateur, débranchez toujours la fiche de la prise de courant.
- Les matériaux de fabrication utilisés pour votre appareil
sont hygiéniques et inodores mais pour conserver ces propriétés il faut que les aliments soient toujours bien protégés
et enfermés, pour éviter toute formation de taches difficiles
à enlever ou la formation de mauvaises odeurs.
- De l’eau et du bicarbonate: c’est tout. Pour nettoyer l’intérieur et l’extérieur, utilisez une éponge, de l’eau tiède et du
bicarbonate de soude qui est entre autre un excellent désinfectant. Si vous n’en avez pas chez vous, utilisez du savon
neutre (du savon de Marseille, par exemple).
- Nettoyage extérieur des modèles avec “Finitions spéciales” (Inox et noirs notamment).
Pour proceder au nettoyage extérieur de l’armoire et des
portes, réalisée dans des matériaux spéciaux, utilisez un
chiffon doux et légèrement humide.
- Ce qu’il ne faut jamais utiliser: des produits abrasifs, de
l’eau de Javel, de l’ammoniaque. Les solvants et autres produits semblables sont absolument interdits.
- Tout ce qui est amovible peut être mis tremper dans de
l’eau chaude avec du savon ou du liquide vaisselle. Avant
de remettre ces pièces en place, rincez-les et essuyez-les bien.
- Et le dos de l’appareil? La poussière s’y dépose et s’y accumule en créant quelques problèmes de fonctionnement.
Servez-vous du bec le plus long de votre aspirateur réglé sur
sa puissance intermédiaire pour l’éliminer. En douceur!
- Quand il est inutilisé pendant de longues périodes. En été.
si vous décidez d’arrêter votre réfrigérateur, nettoyez-le à
l’intérieur et laissez les portes ouvertes, vous éviterez ainsi
toute formation de mauvaises odeurs et de moisissures.
- Remplacement de la lampe intérieure. La lampe pour
l’éclairage intérieur est située dans la partie arrière du boîtier
du thermostat. Pour la remplacer, débranchez l’appareil du
réseau électrique, dévissez la lampe grillée et remplacez-la
par une autre dont la puissance ne dépasse pas la puissance
indiquée sur la protection (15 W ou 25 W) en procédant
comme illustré figure 8.
Fig. 8
9
2
1
F
Page 12
Quelque chose ne va pas
Le réfrigérateur ne fonctionne pas.
Avez-vous contrôlé si:
• l’interrupteur général de votre appartement est décon-
necté;
• la fiche n’est pas bien branchée dans la prise de courant;
• la prise n’est pas endommagée; essayez de la brancher
dans une autre prise de l’appartement.
Le réfrigérateur et le freezer ne réfrigèrent
pas assez.
Avez-vous contrôlé si:
• les portes ne ferment pas bien ou si les joints sont abîmés;
• les portes restent trop longtemps ouvertes;
• la manette de réglage de la température n’est pas bien
positionnée;
• le réfrigérateur ou le freezer ont été excessivement rem-
plis.
Les aliments à l’intérieur du réfrigérateur
gèlent trop.
Avez-vous contrôlé si:
• la manette de réglage de la température est bien position-
née;
• les aliments touchent à la paroi arrière qui est la plus froide.
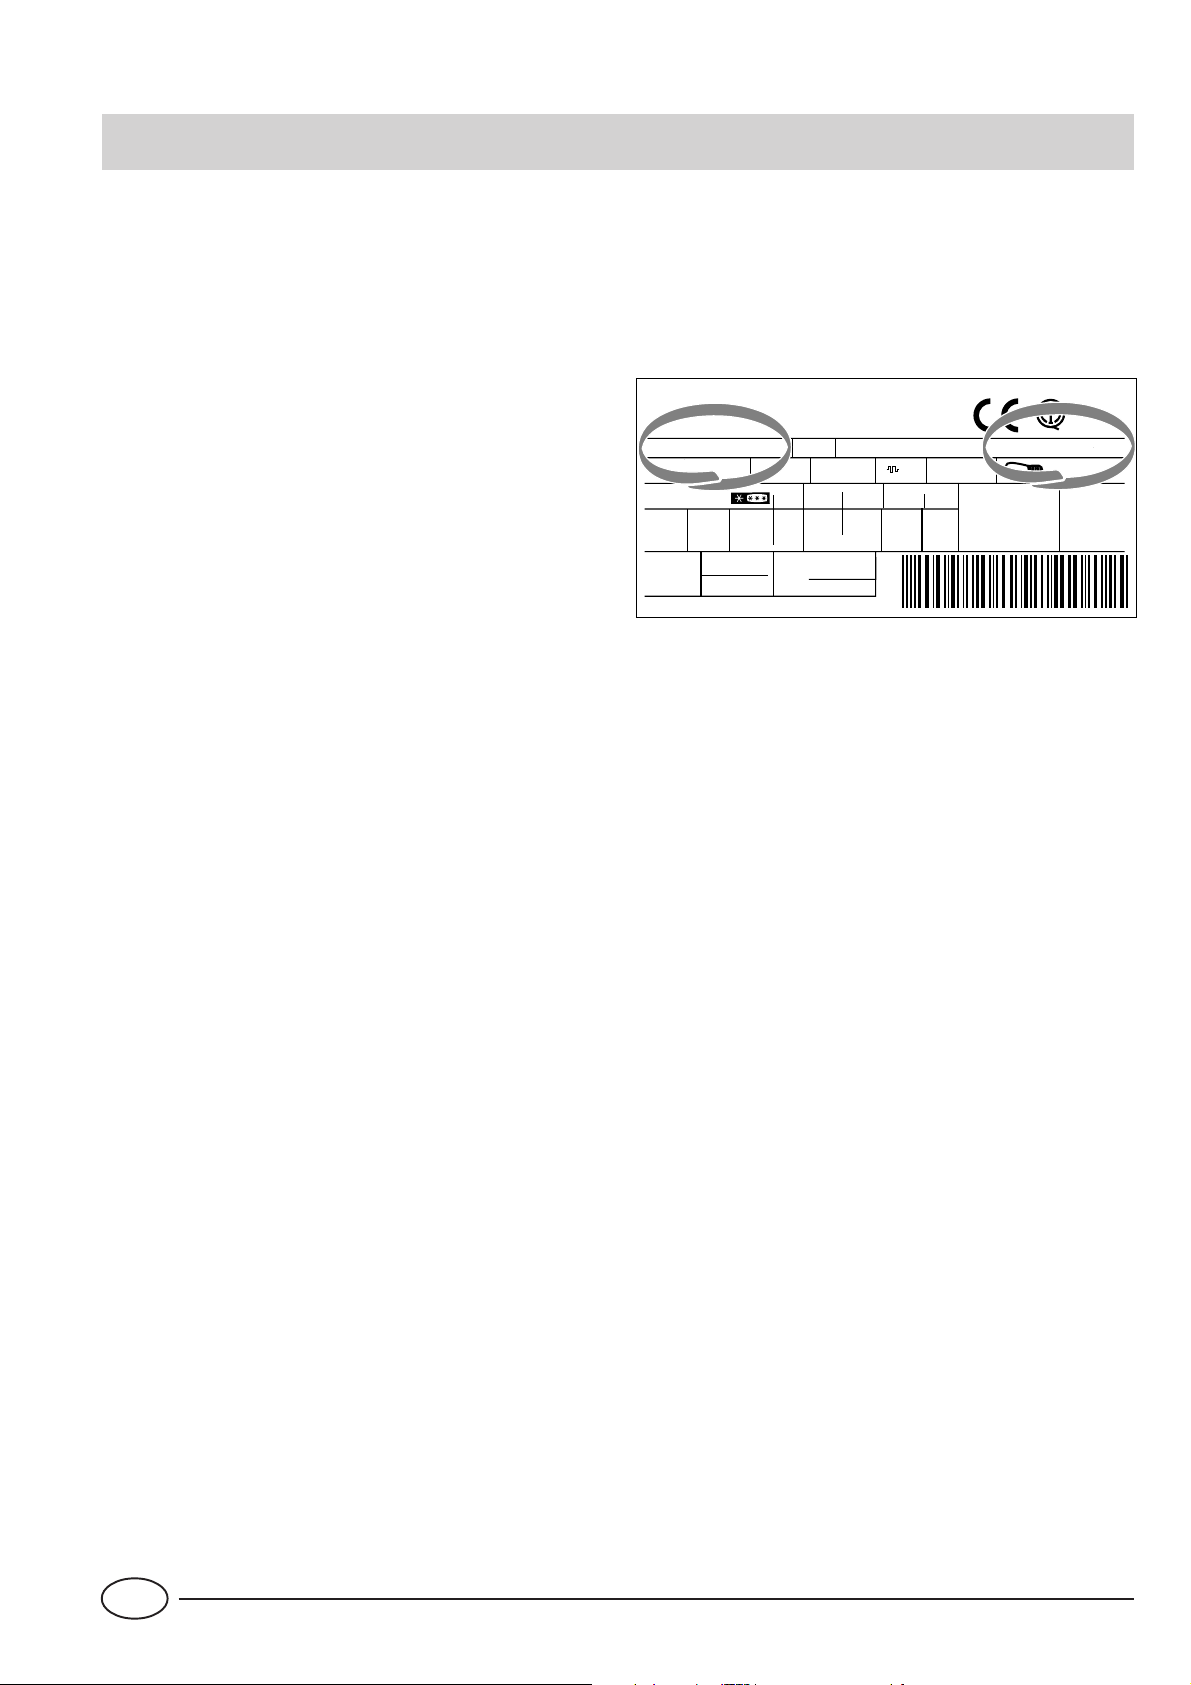
Si, malgré tous ces contrôles, l’appareil ne fonctionne toujours pas et l’inconvénient persiste, faites appel au service
après-vente le plus proche de chez vous en indiquant: le
type de panne, le sigle du modèle (Mod.) ainsi que les chiffres (S/N) indiqués sur la plaquette des caractéristiques située en bas, à gauche, à côté du bac à légumes (voir exemples dans les figures suivantes).
75
Test
P.S-I.
TI
Net
Util
Utile
Pressure
HIGH-235
LOW 140
RG 2330
Mod.
220 - 240 V- 50 Hz 150 W
340
Total
Gross
Bruto
Brut
Compr.
Syst.
Kompr.
Made in Italy 13918
Gross
Bruto
Brut
R 134 a
kg 0,090
93139180000 S/N 704211801
Cod.
Gross
Bruto
Brut
W
Fuse
A
Freez. Capac
Poder de Cong
4,0
kg/24 h
Max 15 w
Class
Clase
N
Classe
Ne faites jamais appel à des techniciens non agréés et
refusez toujours des pièces détachées non originales.
Le moteur fonctionne sans arrêt.
Avez-vous contrôlé si:
• les portes sont bien fermées ou si elles sont restées ouver-
tes trop longtemps;
• la température extérieure est trop élevée;
• la manette de réglage de la température n’est pas bien
positionnée.
L’appareil est trop bruyant.
Il gaz réfrigérant interne produit un léger bruit même quand
le compresseur est à l’arrêt (ce n’est pas un défaut).
Avez-vous contrôlé si:
• le réfrigérateur est bien positionné à plat;
• s’il a été installé entre des meubles ou des objets qui vi-
brent en faisant du bruit;
Il y a de l’eau dans le fond du réfrigérateur.
Avez-vous contrôlé si:
• le trou d’évacuation de l’eau de dégivrage est bouché (voir
fig. 7).
F
10
Page 13

Safety - a good habit to get into.
ATTENTION
Read your manual carefully since it contains instructions
which will ensure safe installation, use and maintenance of
your appliance.
Your Refrigerator is built to International safety standards
(EN60) and has been awarded the European approval mark
(IMQ) for compliance with UK electrical safety requirements.
It also meets the EC standards on the prevention and elimination of radio interference (EC directive 87/308 - 02.06.89).
1. This appliance is designed to be used indoors and under
no circumstances should it be installed outside even if protected by a roof. Leaving the appliance exposed to the rain
and whether is very dangerous.
2. The appliance should be used only by adults and exclusively for storing foodstuffs in compliance with the instructions provided in this manual. Under no circumstances should
children be allowed to operate, or tamper with, this product.
3. Do not attempt to operate or handle this appliance when
barefoot, or with wet hands or feet.
4. It is highly recommended that you do not operate this appliance by connecting it to the power supply with extensions
or multiple socket plugs. If the refrigerator has been installed
between two cabinets, make sure that the supply chord is not
dangerously crimped or trapped beneath a heavy object.
5. Never pull the cable or the appliance to remove the plug
from the socket; this is very dangerous.
6. Do not touch the internal cooling elements, especially if
your hands are wet, since you could burn or hurt yourself.
7. Before doing any cleaning, disconnect the appliance from
the electricity (by pulling out the plug or turning off the general switch in your home); it is not enough to place the temperature regulation knob on to cut off the power.
8. Before disposing of your old appliance, remember to break
or remove the lock as a safety measure to protect children
who might lock themselves inside the appliance when playing. In addition, if the appliance is a new one with a lock,
keeo the key out of the reach of small children.
9. If your appliance is not operating properly, read the chapter entitled, “Trouble Shooting”, which might help you resolve the problem, before calling an after-sales service centre. Do not attempt to repair the appliance by tampering
with the internal components.
10. If the power supply cord must be replaced, please contact
one of our Customer Service Centers. In some cases, the connections are made using special terminals and in others a special
tool must be used to access the connections.
11. Do not use electric appliances inside the compartment
for food storage, if these are not those recommended by
the manufacturer.
12. At the end of the functional life of your appliance –
containing cyclopentane gas in the insulation foam and
perhaps gas R600a (isobutane) in the refrigeration circuit –
the latter should made safe before being sent to the dump.
For this operation, please contact your dealer or the Local
Organisation in charge of waste disposal.
Installation
Proper installation of the appliance is essential to ensure the best and most efficient performance of your
appliance.
Ventilation
The compressor and condenser generate heat and, therefore, need to be ventilated properly. Rooms with less than
perfect ventilation are not very suited for installation of the
appliance. Therefore, it should be installed in a room with
an opening (window or French window) that provide the
appropriate amount of air re-circulation. It is also important
for the room not be too humid.
During installation, make sure not to cover or obstruct the
grates that allow for proper ventilation of the appliance.
For proper ventilation of the appliance, you must leave:
- a space of at least 10 cm between the top part and any
cabinets above it;
- a space of at least 5 cm between the sides of the appliance
and any adjacent cabinets/walls.
Away from Heat
Avoid positioning the appliance in a place where it is directly
exposed to sunlight or near an oven, cook top or the like.
Levelling
The floor should be perfectly level; if not, you can adjust the
feet at the front of the appliance.
Earthing
Before making the electrical connection, check that the voltage shown on the data plate, that you will find on the bottom left hand side of the appliance next to the crisper, corresponds to that of your home and that the socket is earthed
in compliance with all current electrical regulations. If the
system is not earthed, the manufacturer declines all liability
for consequent damages or losses. Do not use adapters or
multiple sockets. Position the appliance in such a way
that you can access the socket where it is plugged in.
Check the power load
The electrical socket must support the maximum power load
of the appliance shown on the data plate (on the bottom
left hand side of the appliance next to the crisper).
Before plugging the appliance to the mains
Stand the appliance upright and wait at least 3 hours before
plugging the appliance into the mains to ensure proper performance.
11
GB
Page 14
A closer look
A
Compartment for storing frozen foods,
A
freezing fresh foods and making ice
Intermediate shelves
K
Freezer grid shelf
B
System "Dynamic Bio Conservation"
C
Removable height adjustable shelves
D
Thermostat knob for regulating
E
the temperature
Use this knob to regulate
the temperature of the
refrigerator. The following
settings are available:
The refrigerator is off;
1 less cold;
5 colder
Bottle-holder grid
F
Moisture adjusted moveable
G
A
B
Beverage can shelves
L
Butter dish
M
Removable lidded shelf, with egg tray
N
Ice tray
O
4
WATER LEVEL
MAX
WATER LEVEL
MAX
O
vegetable cover.
Fruit and vegetable drawer
H
Adjustable feet
I
Removable door shelf for
J
bottles and bottle trap
C
D
E
D
D
F
G
H
I I
N
M
L
K
J
GB
12
Page 15

How to Start the Appliance
NOTICE
After the appliance has been delivered, stand it in the
upright position and wait approximately 3 hours before connecting it to the electrical outlet to guarantee
that it operates properly.
Food hygiene
1. Once you have bought your food, remove all
external packaging made of paper/cardboard
or other wrappers, which could introduce
bacteria or dirt inside your refrigerator.
2. Protect the food, (especially easily perishable items and
those that have a strong smell), in order to avoid contact
between them, thereby removing both the possibility
of germ/bacteria contamination as well as the diffusion
of strong odours inside the fridge.
3. Store all food in such a way as to ensure air can circulate
freely between different items.
4. Keep the inside of your fridge clean, taking care not to
use oxidiser or abrasive products.
5. Remove all food past its expiry date from the refrigerator.
6. For the correct preservation of food, all easily perishable
items (soft cheeses, raw fish, meat, etc.) should be stored
in the coldest zone of the fridge compartment, i.e. just
above the salad crisper where the temperature indicator
is situated.
Before placing foodstuffs in the refrigerator or freezer, clean
the interior well with warm water and baking soda.
After putting the plug in the socket, make sure that the
light is on inside the appliance and then turn the thermostat
knob (A) to the “3” setting. After a few hours have passed,
you can place fresh food in the refrigerator compartment
and frozen foods into the freezer.
The temperature indicator
The fridge has been equipped with a temperature indicator
for an improved, more precise definition of the coldest zone.
Make sure “OK” comes up on the indicator.
vert
noir
consulter la notice
Correct lighting also ensures an easier indicator reading.
Should the indicator appear all black, then the average temperature of the fridge zone is too high.
Adjust the thermostat (of the fridge compartment) to a higher
setting (colder).
Each time you adjust the thermostat setting, wait for the
temperature inside the fridge compartment to become stable
(approximately 10 hours) before making any further
adjustments.
WARNING: Should you place large quantities of food inside
the fridge or should the fridge door have been opened
frequently or for a prolonged period of time, it is quite normal
for OK not to come up on the indicator.
Wait at least 10 hours before adjusting the thermostat to a
higher setting.
13
GB
Page 16

How to use the refrigerator compartment...
The thermostat automatically regulates the temperature inside the appliance
1 = less cold
5 = colder
It is recommended that a medium setting be used.
To increase the amount of space, optimize arrangement and
improve appearance, this appliance has a “cooling area”
located within the back panel of the refrigerator compartment. When the appliance is operating, this panel may be
covered with frost or droplets of water depending on
whether the compressor is operating or not at a given time.
Do not be concerned about this! The refrigerator is operating normally.
If the thermostat knob is positioned on higher settings while
the refrigerator is heavily filled and the ambient temperature high, the appliance may run continuously, resulting in
the formation of frost on the back cooling area. This will
lead to an increase in energy consumption.
To avoid this situation, just turn the thermostat knob
to a lower setting so that the appliance defrosts automatically.
The refrigerator compartment of your appliance is equipped with
"Dynamic Bio Conservation"
storage while simplifying the use of the refrigerator thanks to
the following features:
- Fast temperature reset: after the doors heve been opened,
the internal temperatures return to optimal values faster,
improving food storage.
- More uniform temperature distribution: this makes it
possible to place any type of food on any shelf.
- Higher humidity level: this allows you to store food longer.
which allows an optimal food
The refrigerator compartment is equipped with practical slide-out shelves (Fig. 1)
which can be adjusted for
height using the appropriate
guides. This feature allows
you to store large containers
and food products.
Remember to cool hot food
before storing otherwise the
temperature inside the appliance will increase, causing
the compressor to work harder and use more energy.
Do not store liquids in unsealed containers since this will
increase the humidity and lead to the formation of frost in
the refrigerator.
Salad crispers
The salad crispers fitted inside the fridge have been
specially designed for the purpose of keeping fruit and
vegetables fresh and crisp. Open the humidity regulator
(position B) if you want to store food in a less humid
environment, or close it (position A) to store food in a
more humid environment (Fig. 2).
The easy-to-open lids (all you have to do is pull the crisper
out) make it easy to put food in and take it out (Fig. 3).
Fig. 1
B
A
A - Blown air which is cooled when it comes into contact
with the refrigeration panel
B - Hotter air is drawn in
Remember to follow our instructions on the storage life of
foods: If not stored properly, even the freshest food will
deteriorate quite quickly.
Contrary to popular belief, cooked foods do not keep longer
than fresh food.
- Be careful not to place containers (plastic or glass),
food or other objects in direct contact with the cooling area of the back wall of the refrigerator. This could
harm the food, increase energy consumption and facilitate the formation of condensate (on food, containers, etc.).
B
B
A
Fig. 2
The can rack
The can rack (Fig. 4) on the
inner door allows you to
store not only cans, but also
yoghurt, butter and other
containers, according to
your requirements.
Fig. 3
Fig. 4
GB
14
Page 17

Freezing Foods Properly
- For the preparation of food to be frozen, please consult a specialized manual.
- Food that has be thawed, even partially, must not be refrozen: you must cook it in order to consume it (within 24
hours) or to freeze it once again.
- Fresh foods that you intend to freeze must not be placed
in contact with those that are already frozen or those that
have been fast-frozen. Rather, they must placed atop the
grate in the freezer compartment, in contact with the walls
of the compartment (back or side) if possible. Please keep in
mind that proper conservation of frozen foods depends on
the speed with which they are frozen.
- During the freezing process, avoid opening the door of the
freezer.
- The maximum daily quantity of food that can be frozen is
indicated on the rating plate located to the left of the vegetable crisper.
- In order to freeze and then thaw foods optimally, it is recommended that you divide food into small portions so that
they freeze quickly and uniformly. The packages should be
clearly marked with the content and the date they were
frozen.
- Do not open the freezer door in the event of a power
failure or malfunction. This precaution will slow the rise in
temperature within the compartment. If the door is not
opened, frozen and fast-frozen foods will remain in their
current state for approximately 9-14 hours.
- Do not place full bottles in the freezer: they could easily
burst because all liquids increase in volume when they freeze.
- Fill the ice cube trays about 3/4 full.
- If the ambient temperature remains below 14°C for an
extended period of time, the temperature needed for extended storage of food in the freezer will not be reached,
resulting in reduced storage life of the food.
Instructions for use (Fig. 6)
Fill up the tray with water via the special hole up to the level
indicated (MAX WATER LEVEL), taking care not to exceed it:
inserting more water than is necessary will lead to the
formation of ice which could obstruct the exit of the ice cubes.
If you have used an excessive amount of water, you will have
to wait until the ice has melted, empty out the tray and re-fill
it with water.
Once you have filled the ice tray with water through the
hole indicated, turn it by 90 °. Thanks to the connected
compartments, the water fills up the special shapes, after
which you can cover the hole with the special cap and place
the ice tray in the inner door of the freezer compartment.
Once the ice has formed, all you need to do is to knock the
tray against a hard surface so that the ice cubes come away
from their housing and come out of the same hole used to
fill the tray with water. To make it easier for the ice cubes to
come out, wet the outside of the tray.
WARNING: every time you fill up the ice tray with water ,
make sure that the same is completely empty and that there
are no traces of ice left inside it.
The minimum time required for ice to form well is
approximately 8 hours.
WATER LEVEL
MAX
Fig. 6
MAX
WATER LEVEL
Ice trays
This new concept of ice trays is an exclusive Merloni patent.
The fact that they are situated on the inner door of the
freezer compartment ensures greater ergonomics and
cleanliness: the ice no longer comes into contact with the
food placed inside the freezer compartment; furthermore,
the dripping of the water during filling is avoided (a lid to
cover up the hole after filling with water is also provided).
To remove the ice trays from
their housings, push the tray
upwards and then pull it out
(fig. 5). To put the tray back
in place, insert the top part
into the special housing and,
once in a vertical position,
just let it drop into place.
Fig. 5
15
GB
Page 18

Tips on Saving Energy
- Install the Appliance Properly
In other words, away from heat sources and direct sunlight,
in a well ventilated room complying with the minimum distances indicated in the paragraph entitled, “ Installation/
Ventilation.”
- Use the Right Temperature Setting
A setting which is too cold increases energy consumption.
- Do not Overfill
To store food properly, the cold air must circulate freely within
the refrigerator. If it is overfilled, this will prevent proper air
circulation, forcing the compressor to work continuously.
- Close the Doors
Open your refrigerator as little as possible because each time
you do so you loose much of the cold air. To raise the temperature to the proper level again, the motor must work for
a long time, consuming energy.
- Keep an Eye on the Seals
Keep the seals clean and make sure that they adhere well to
the door. This alone will ensure that no cold air escapes.
- No Hot Foods
A hot pot or pan placed in the refrigerator immediately raises
the temperature several degrees. Let hot cookware and food
cool to ambient temperature before placing them in the refrigerator.
- Defrost the Freezer
Check the thickness of the frost on the walls of the freezer
and immediately defrost it if the layer of frost is too thick.
(see the section entitled, “Keeping your Appliance in Shape”).
GB
16
Page 19

Guide to Using the Freezer
Meat and Fish
Food Wrapping
Beef Roast Tinfoil 2 / 3 9 / 10 Not required.
Lamb Tinfoil 1 / 2 6 Not required.
Pork Roast Tinfoil 1 6 Not required.
Veal Roast Tinfoil 1 8 Not required.
Veal/Pork Chops
Veal/Lamb Cutlets
Minced Meat
Heart and Liver Plastic Baggies 3 Not required.
Each piece wrapped in cling wrap and
then in tinfoil (4 to 6 slices)
Each piece wrapped in cling wrap and
then in tinfoil (4 to 6 slices)
In aluminium containers covered with cling
wrap.
Tenderising
(days)
Freshly
minced
Storage
(months)
6 Not required.
6 Not required.
2 Slowly in refrigerator.
Thawing Time
Sausages Cling Wrap or Tinfoil 2 As necessary.
Chicken and Turkey Tinfoil 1 / 3 9 Very slowly in refrigerator.
Duck and Goose Tinfoil 1 / 4 6 Very slowly in refrigerator.
Pheasant, Partrige and
Wild Duck
Hare and Rabbit Tinfoil 3 / 4 6 Very slowly in refrigerator.
Venison Tinfoil or Cling Wrap 5 / 6 9 Very slowly in refrigerator.
Large Fish Tinfoil or Cling Wrap 4 / 6 Very slowly in refrigerator.
Small Fish Plastic Baggies 2 / 3 Not required.
Crustaceans Plastic Baggies 3 / 6 Not required.
Shellfish
Tinfoil 1 / 3 9 Very slowly in refrigerator.
Store in salted water in aluminium
containers or plastic containers.
3 Very slowly in refrigerator.
Boiled Fish Tinfoil or Cling Wrap 12 In hot water.
Fried Fish Plastic Baggies 4 / 6 Directly in pan.
17
GB
Page 20

Fruits and Vegetables
Food Preparation
Apples and Pears Peel and cut into slices. 2’
Apricots, Peaches,
Cherries and Plums
Strawberries
Blackberries and
Raspberries
Cooked Fruit Cut, cook and strain.
Fruit Juice Wash, cut and crush.
Cauliflower
Cabbage and
Brussel Sprouts
Peas Shell and wash. 2’ Plastic Baggies 12 Not required.
Peel and pit. 1’ / 2’
Rinse and fry.
Remove leaves, cut head
into small pieces and blanch
in water and a little lemon
juice.
Wash and cut into small
pieces.
Blanching
Time
2’ Plastic Baggies 12 Not required.
1’ / 2’ Plastic Baggies 10 / 12 At room temperature.
Wrapping
In Containers (cover
with syrup)
In Containers (cover
with syrup)
In Containers (cover
with sugar)
In Containers (add
10% sugar)
In Containers (sugar
to taste)
Storage
(months)
12
12
10 / 12
12
10 / 12
Thawing Time
In refrigerator very
slowly.
In refrigerator very
slowly.
In refrigerator very
slowly.
In refrigerator very
slowly.
In refrigerator very
slowly.
French Beans Wash and slice if required. 2 Plastic Baggies 10 / 12 Not required.
Carrots, Peppers
and Turnips
Mushrooms and
Asparagus
Spinach Wash and mince. 2’ Plastic Baggies 12 At room temperature.
Vegetable for Soups
Various Foods Preparation
Bread Plastic Baggies 4
Cakes Plastic Baggies 6
Cream Plastic Containers 6
Butter
Peel, wash and slice if
necessary.
Wash, peel and cut up. 3’ / 4’
Wash and cut up in small
pieces.
3’ / 4’ Plastic Baggies 12 Not required.
3’
Blanching
Time
Plastic Baggies or
Containers
Plastic Baggies or
Containers
Wrapping
In original wrapping
or tinfoil
6 At room temperature.
6 / 7 Not required.
Storage
(months)
6 In refrigerator.
Thawing time
At room temperature
and in the oven.
About 10 minutes at
room temperature,
cook at 100/200°C.
At room temperature or
in refrigerator.
Boiled Food or
Vegetable Soup
Eggs
GB
Plastic or Glass
Containers
Freeze without shells
in small containers
18
3 / 6
10
At room temperature or
in hot water.
At room temperature or
in refrigerator.
Page 21

Keeping Your Appliance in Shape
Before doing any cleaning, disconnect the appliance
from the electricity (by pulling out the plug or turning
off the general switch in your home).
Defrosting
WARNING: do not damage the refrigeration circuit.
Do not use mechanical devices or other tools to speed
up the defrosting process, unless they have been recommended by the manufacturer.
How to Defrost the Refrigerator
This appliance defrosts automatically and the water is
channeled to the back toward the drain installed for this
purpose (fig. 7). Here, the heat produced by the compressor
will make it evaporate. The only thing you must do is to
periodically check and clean the hole of the drain, which is
located behind the vegetable crispers, so that the water
drains properly.
How to Defrost the Freezer
- Every so often, remove the frost with the scraper provided
with the appliance (do not use knives or metal objects).
- If the frost is more than 15 mm thick, the freezer must be
defrosted.
Proceed as follows: turn the thermostat knob (A) to the ·
setting . Then wrap all the frozen and fast-frozen food in
newspaper, placing it either in the refrigerator or in a cool
place. Leave the freezer door open so that the frost thaws
completely. You can speed this process by placing containers of warm water in the compartment.
Cleaning and maintenance
Always unplug the appliance from the mains before
cleaning.
- Your appliance is manufactured with hygienic odourless
materials. To preserve these characteristics, always use sealed
containers for strong smelling foods to avoid the formation
of odours that are difficult to remove.
- Use only a water and bicarbonate solution: Clean the
internal and exterior of your appliance with a sponge soaked
with a warm water and sodium bicarbonate solution, which
is also a good disinfectant. If you do not have any sodium
bicarbonate at home, use neutral detergent.
- What not to use: Do not use abrasive detergents, bleach
or detergents containing ammonia. Never use solvent based
products.
- Dishwashable: All the removable parts can be cleaned by
soaking in hot soapy water or detergent. If you own a
dishwasher, you may wash these parts in the dishwasher.
Remember to dry thoroughly before replacing them.
- What about the back panel? Dust may deposit on the back
panel and affect the proper running of the appliance. To
remove dust, vacuum away the dust very carefully using the
appropriate vacuum cleaner accessory.
- Discontinued use of the appliance: If the appliance is not in
use for any length of time, remember to clean the interior
and dry thoroughly, leaving the doors open to prevent the
formation of bad odours and mould.
- How to replace the internal lamp. The lamp for the internal
light is situated at the rear of the thermostat box. To replace
it, disconnect the appliance from the electricity mains,
unscrew the faulty lamp and replace it with a new one
featuring a wattage no higher than that indicated on the
protection (15 W or 25 W), as illustrated in figure 8.
Fig. 7
19
2
1
Fig. 8
GB
Page 22

Is There a Problem?
The refrigerator does not function.
Have you checked whether:
• The main switch for the electricity to the apartment or
home has been turned off;
• The plug is properly inserted in the outlet;
• The outlet is adequate; try inserting the plug into another
outlet in the room.
The refrigerator and the freezer do not cool
properly.
Have you checked whether:
• The doors do not close well or the seals are faulty;
• The doors are left open too long;
• The thermostat knob is not on the proper setting;
• The refrigerator or freezer is overfilled.
The food in the refrigerator becomes too cold.
Have you checked whether:
• The thermostat knob is on the proper setting;
• The food is in contact with the back wall - which is the
coldest part.
If after all the checks, the appliance still does not operate or
the problem persists, call the nearest Service Centre and
inform them of: the type of problem, the abbreviation of
the model name (Mod.) and the relative numbers (S/N) written on the rating plate located at the bottom left next to
the vegetable crisper (see examples in the figures below).
75
Test
P.S-I.
TI
Net
Util
Utile
Pressure
HIGH-235
LOW 140
RG 2330
Mod.
220 - 240 V- 50 Hz 150 W
340
Total
Gross
Bruto
Brut
Compr.
Syst.
Kompr.
Made in Italy 13918
Gross
Bruto
Brut
R 134 a
kg 0,090
93139180000 S/N 704211801
Cod.
Gross
Bruto
Brut
W
Fuse
A
Freez. Capac
Poder de Cong
4,0
kg/24 h
Max 15 w
Class
Clase
N
Classe
Never call on unauthorized technicians and always
refuse spare parts which are not originals.
The motor runs continuously.
Have you checked whether
• The doors are not closed well or have remained open too
long;
• The ambient temperature is too high;
• The thermostat knob is not on the proper setting.
The appliance makes too much noise.
The gas refrigerant produces a slight noise even when the
compressor is not running (this is not a defect).
Have you checked whether:
• The refrigerator is level.
• The appliance was installed between cabinets or objects
that vibrate and make noise.
There is water on the bottom of the refrigerator.
Have you checked whether:
• The hole for draining the water from the frost is clogged
(see fig. 7).
GB
20
Page 23

De veiligheid, een goede gewoonte
BELANGRIJK
Lees de inhoud van deze gebruiksaanwijzing aandachtig door
aangezien hij belangrijke instructies bevat betreffende de
veiligheid van installeren, gebruik en onderhoud.
Deze combinatie is vervaardigd volgens de internationale
veiligheidsnormen die gericht zijn op het beschermen van
de gebruiker. Dit apparaat heeft het merkteken IMQ
verworven, dat door het Italiaanse Instituut van Kwaliteit
alleen wordt uitgereikt aan apparaten die voldoen aan de
normen van de CEI, de Italiaanse Elektrotechnische
Commissie.
1. Dit apparaat mag niet buiten worden geïnstalleerd, zelfs
niet onder een dakje; het is uiterst gevaarlijk het bloot te
stellen aan regen en onweer.
2. Het mag alleen door volwassenen worden gebruikt en
alleen voor het bewaren van etenswaren, volgens de gebruiksaanwijzingen in dit handboekje.
3. Raak het apparaat nooit aan als u blootsvoets bent of
met natte handen of voeten.
4. Wij raden het gebruik van verlengsnoeren en dubbelstekkers af. Als de koelkast tussen meubelen in wordt geïnstalleerd, controleer dan dat de kabel niet krom of onder
gevaarlijke druk ligt.
5. Trek nooit aan de kabel of aan de koelkast zelf om de
stekker uit het stopcontact te halen: dit is uiterst gevaarlijk.
6. Raak de verkoelingselementen binnen in de koelvriescombinatie nooit aan, vooral niet met natte handen; u kunt
zich branden of verwonden. Stop geen ijsblokje in uw mond
zodra het uit de freezer komt; u riskeert zich te branden.
7. Sluit altijd eerst de stroom af voordat u overgaat tot reinigen of onderhoud; het is namelijk niet voldoende de
temperatuurknop op de positie te zetten om ieder electrisch
contact te elimineren.
8. Voordat u uw oude koelkast weg laat halen, maak het
slot onklaar om te vermijden dat spelende kinderen erin
opgesloten worden.
9. Voordat u er de technische dienst bij haalt als er een storing optreedt, controleer eerst in het hoofdstuk “Is er een
probleem?” of het mogelijk is dit probleem te verhelpen.
Probeer niet zelf de reparatie uit te voeren door te trachten
toegang te krijgen tot de interne onderdelen.
10. Als de voedingskabel van dit apparaat vanwege schade
moet worden vervangen, dan moet dit door onze Technische
Dienst worden uitgevoerd aangezien er speciale
gereedschappen voor nodig zijn.
11. Gebruik geen elektrische apparaten in het bewaarvak
van de etenswaren tenzij van het soort dat door de fabrikant
wordt aangeraden.
12. Als het apparaat op is moet het veilig worden gemaakt
voordat het definitief wordt weggedaan, aangezien het
isolerende piepschuim cyclopentaangas bevat en zich
eventueel R600a gas (isobutaan) in het koelcircuit bevindt.
Wendt u zich voor deze ingreep tot uw handelaar of tot de
betreffende plaatselijke authoriteit.
Het installeren
Voor het goed functioneren en zuinig energieverbruik
is het belangrijk dat het installeren op de juiste wijze
wordt uitgevoerd.
Ventilatie
De compressor en de condensator geven warmte af en vragen dus om een goede ventilatie. Het apparaat moet dus
geplaatst worden in een vertrek met een raam of buitendeur, die de nodige luchtvervanging garanderen. Het vertrek mag niet vochtig zijn.
Let erop gedurende het installeren dat de ventilatieroosters
van het apparaat niet bedekt of verstopt worden.
Voor goede ventilatie van het apparaat is het noodzakelijk
te laten:
- een afstand van minstens 10 cm tussen de bovenkant en
een eventueel kastje erboven;
- een afstand van minstens 5 cm tussen de zijkanten eventuele meubelen ernaast.
Ver van de hitte
Plaats het apparaat niet op een zonnige plek, naast het fornuis of dergelijke.
Waterpas
Het apparaat moet goed horizontaal staan; als de vloer niet
vlak is kunnen de stelschroeven vooraan het apparaat geregeld worden.
Electrische aansluiting en aarding
Controleer om te beginnen of de gegevens op het typeplaatje,
linksonder naast de groentenlade, overeenkomen met die van
het electrische net van uw woning en of het stopcontact voorzien is van een aardleiding zoals voorgeschreven door de wet
voor de veiligheid van installaties 46/90. Als de aardleiding
ontbreekt wijst de Fabrikant iedere aansprakelijkheid af. Gebruik geen dubbelstekkers of adapters.
Plaats het apparaat op zodanige wijze dat het stopcontact
waarmee het is verbonden gemakkelijk bereikbaar is.
Is het vermogen voldoende?
Het stopcontact moet in staat zijn de maximum lading van
het vermogen van het apparaat te verdragen; deze is aangegeven op het typeplaatje linksonder naast de groentenlade.
Voor de electrische aansluiting
Houd het apparaat vertikaal gedurende het vervoer en,voor
het goed functioneren, wacht minstens 3 uren voordat u
het aansluit.
21
NL
Page 24

Van dichtbij gezien
MAX
WATER LEVEL
MAX
WATER LEVEL
A
B
C
D
E
J
L
O
N
D
D
F
H
I I
K
M
G
Afdeling diepvries, invriezen verse etenswaren
A
en ijsblokjes
Rek vriesvak
B
"Dynamic Bio Conservation" Systeem
C
Uitneembare en regelbare rekken
D
Temperatuurknop
E
Deze knop regelt de temperatuur van de twee afdelingen op verschillende posities:
de koelkast is uit;
1 minder koud;
5 kouder
Flessenrek met flessenklem
J
Uitneembaar vak
K
Melkrekken
L
Botervloot
M
Uitneembaar rek met deksel
N
Ijsbakjess
O
4
Flessenrek
F
Klapdeksels groentenla
G
met vochtregelaar
Fruit en groentebakken
H
Stelvoeten
I
NL
22
Page 25

Het inschakelen van het apparaat
BELANGRIJK
Houd na het transport het apparaat vertikaal geplaatst
en wacht, voor het goed functioneren, ongeveer 3 uren
voordat u het aansluit.
Voordat u etenswaren in de koelkast of freezer plaatst, moet
Hygiëne van de etenswaren
1. Na aankoop van de etenswaren verwijdert u de papieren/
kartonnen of andere verpakking , die bacteriën of vuil in
de koelkast kunnen introduceren.
2. Bescherm de etenswaren (vooral die niet lang houdbaar
zijn en die een sterke lucht verspreiden) op zodanige wijze
dat ze niet met elkaar in contact komen; zo vermijdt u de
mogelijkheid van besmetting onder elkaar door kiemen/
bacteriën zowel als het verspreiden van geuren in de
koelkast
3. Zorg voor voldoende vrije luchtcirculatie om de etenswaren
heen
4. Houd de binnenkant van de koelkast schoon maar vermijd
gebruik van bijtende of schuurmiddelen
5. Als de vervaldatum is afgelopen moeten de etenswaren
uit de koelkast worden verwijderd
6. Voor een correcte manier van conserveren moeten de
minder houdbare etenswaren (verse kazen, rauwe vis,
vlees enz…) op de koelste plaats worden gezet, namelijk
bovenop de groenteladen, waar de temperatuurindicator
zich bevindt.
de binnenkant met lauw water en soda gewassen worden.
Nadat u de stekker in het stopcontact heeft gestoken moet
de verlichting aan gaan en draait u de temperatuurknop “A”
op de positie “3”. Na enkele uren kunt u de verse etenswaren
in de koelkast plaatsen en de diepvriesproducten in de freezer.
Aanduiding van de temperatuur
De koelkast is voorzien van een temperatuurindicator voor
het gemakkelijk en op preciese wijze herkennen van de
koudste zone.
vert
noir
consulter la notice
Controlleer of op de indicator het woord “OK”verschijnt.
De verlichting is voldoende voor het gemakkelijk aflezen van
de indicator
Als de indicator geheel zwart is, dan is de gemiddelde
temperatuur van de zone te hoog.
Regelen van de thermostaat (koelkast) op een hogere stand
(kouder)
Iedere keer dat u de thermostaat anders heeft ingesteld moet
u wachten (ongeveer 10 uren) totdat de temperatuur in de
koelkast stabiel is geworden voordat u hem nogmaals gaat
verstellen
BELANGRIJK: als u grote hoeveelheden etenswaren heeft
ingeladen of de deur van de koelkast is herhaaldelijk en lang
open geweest, dan is het normaal dat “OK” niet op de
indicator verschijnt.
Wacht minstens 10 uren voordat u de thermostaat op een
hogere stand zet.
23
NL
Page 26

De beste gebruikmaking van de koelafdeling
De thermostaatknop regelt automatisch de temperatuur in
de apparaat:
1 = minder koud 5 = kouder
Wij raden een gemiddelde stand aan.
Voor het creëren van ruimte en voor het esthetische aspect
bevindt het verkoelingselement zich in de achterwand van
de koelafdeling. Deze wand wordt met ijs of waterdruppels
bedekt gedurende het gebruik van het apparaat al naar
gelang de compressor in functie is of in rust. Maakt u zich
geen zorgen! De koelkast voert zijn normale taak uit.
Als u de knop op een hoog nummer zet, met veel etenswaren in de koelkast en een hoge kamertemperatuur, dan kan
het apparaat in werking blijven, hetgeen de vorming van ijs
op de verkoelende achterwand begunstigt met hieruitvolgend hoger energieverbruik.
Om dit te voorkomen kunt u de thermostaatknop op
een lager nummer zetten, zodat het apparaat automatisch regelmatig de ijs ontdooit.
De koelkast van uw apparaat is voorzien van een
System" (Ariston Integrated Refrigeration)
conservatie van de voedingswaren en vereenvoudigd gebruik
van het apparaat mogelijk maakt:
- Snelle temperatuursverlaging: nadat de deuren open zijn
geweest worden de optimale temperaturen sneller bereikt,
voor betere conservatie.
- Gelijkmatige e verdeling van de temperatuur, die het
mogelijk maakt de voedingswaren op ieder rek te plaatsen.
- Hogere vochtigheidsgraad voor een langere conservatie
van de voedingswaren.
, dat optimale
"A.I.R.
De praktische uittrekbare rekken (afb.1) kunnen ook in hoogte
worden geregeld dankzij de gleuven aan de zijkanten, zodat
ook grotere bakken, dozen enz. geplaatst kunnen worden. De
nieuwe vormgeving van de rekken maakt het ook mogelijk de
rekken in hoogte te verstellen zonder ze geheel eruit te trekken.
Plaats alleen koude of heel lauwe etenswaren en nooit warme:
dit zou meteen de binnentemperatuur laten stijgen met overwerk voor de compressor en energieverkwisting. Laat geen
onafbedekte vloeistoffen in de koelkast staan aangezien deze
de vochtigheid verhogen en dus ijsvorming bevorderen.
Groentela
De groenteladen zijn speciaal ontworpen voor het fris en
geurig houden van fruit en groenten. Open de
vochtigheidsregulator (positie B) als u de etenswaren in een
minder vochtige lucht wilt bewaren, of doe hem dicht (positie
A) voor het bewaren in een vochtiger lucht (Afb.2).
De eenvoudige wijze van openen van de deksels – u hoeft
de lade slechts naar voren te trekken – vergemakkelijkt het
inladen en eruit halen van de etenswaren (Afb. 3).
B
A
A - Uitgeblazen lucht die afkoelt in contact met de
koelingwand
B - Opgezogen warmere lucht
Volg onze aanwijzingen voor de maximum conservatietijd
zorgvuldig: geen enkel type voedsel, hoe vers ook, blijft heel
lang goed.
In
tegenstelling tot wat over het algemeen geloofd wordt,
blijven gekookte etenswaren niet langer goed dan rauwe
etenswaren.
- Plaats geen containers (plastic, glas) of voedsel in contact met het verkoelingselement (achterwand). Dit kan
het voedsel beschadigen, energieverbruik verhogen en
de condensvorming op de etenswaren en containers
bevorderen.
B
B
A
Afb. 2
Blikjesrek
Op de bliksjesrekken in de
deur van de koelkast (aFB. 4)
kunnen niet alleen blikjes
worden geplaatst, maar ook
yoghurt, boter enzovoorts.
Afb. 3
Afb. 4
NL
24
Page 27

Invriezen
- Raadpleeg een gespecialiseerd boekje voor de voorbereiding van in te vriezen etenswaren.
- reeds ontdooide etenswaren, ook al zijn ze slechts gedeeltelijk ontdooid, mogen niet meer ingevroren worden: u moet
het koken en opeten (binnen 24 uren) of weer invriezen.
- De verse etenswaren mogen niet in contact komen met
reeds ingevroren producten; zij worden op het rek in de
freezer gelegd, liefst tegen de zij- of achterwand aan. Vergeet niet dat goede conservering afhangt van de snelheid
van invriezen.
- Open de deur van de freezer niet gedurende het invriezen.
- De maximum dagelijkse hoeveelheid die u kunt invriezen is
aangegeven op het typeplaatje links van de groentenlade.
- Voor de beste resultaten van invriezen en ontdooien raden
wij aan de etenswaren in kleine porties te verdelen zodat ze
snel en gelijkmatig bevriezen. Zet de datum en de inhoud
op de verpakking.
- Mocht de stroom uitvallen, open dan de deur van de freezer
niet teneinde de temperatuur binnenin niet te verhogen.
Op deze manier blijven de diepvriesproducten voor ongeveer 12-14 uren zonder verandering geconserveerd.
- Zet geen volle flessen in de freezer: alle vloeistoffen zetten
uit bij het invriezen en de flessen kunnen dus breken.
- Vul de bakjes van de ijsblokjes tot 3/4 van hun hoogte.
- Als de kamertemperatuur voor langere tijd lager dan 14°C
blijft, worden de temperaturen die noodzakelijk zijn voor
het langdurig conserveren in de freezer niet helemaal bereikt en de conservatieperiode wordt dus korter.
Gebruik (Afb. 6)
Vul het ijsbakje door het gat met water tot het aangegeven
niveau (MAX WATER LEVEL) en let op dat u dit niet
overschrijdt: teveel water kan een zodanige ijsvorming
veroorzaken dat het naar buiten komen van de ijsblokjes
erdoor belemmerd wordt.
In het geval dat u de maximum hoeveelheid water heeft
overschreden moet u wachten tot het ijs gesmolten is, het
bakje leeg gieten en weer opnieuw opvullen.
Als het bakje is bijgevuld draait u het 90°. Volgens het principe van communicerende vaten worden de vakjes gevuld,
waarna het gat kan worden afgesloten met de deksel en
het bakje kan in de deur van de freezer worden geplaatst.
Als het ijs zich heeft gevormd slaat u het bakje op een harde
oppervlakte zodat de ijsblokjes los komen en door het gat
naar buiten komen. U kunt het bakje even onder de kraan
houden voor het gemakkelijker loskomen van de ijsblokjes.
BELANGRIJK: als u het bakje opvult met water moet u erop
letten dat het helemaal leeg is en er geen ijsresten zijn
achtergebleven.
Het invriezen van ijsblokjes neemt ongeveer 8 uren.
WATER LEVEL
MAX
MAX
WATER LEVEL
Ijsbakjes
Dit nieuwe type ijsbakjes is een exclusief Merloni patent.
Het feit dat ze in de deur van de freezer zitten zorgt voor
een ergonomisch en hygiënisch gebruik: de ijsblokjes komen
niet meer in contact met de etenswaren in de freezer:
bovendien wordt water knoeien tijdens het opvullen
vermeden (ook de deksel voor het afsluiten van het gat na
het opvullen is bijgeleverd).
Voor het verwijderen van de
ijsbakjes moet u het bakje
naar boven duwen en dan
eruit trekken (Afb. 5). Voor
het terugzetten schuift u de
bovenkant in zijn behuizing
en, eenmaal vertikaal gezet,
laat het zakken.
Afb. 5
Fig. 6
25
NL
Page 28

Raadgevingen voor energiebesparing
- Installeer op de juiste wijze
Dat wil zeggen ver weg van warmtebronnen, van rechtstreeks zonlicht, in een goed geventileerd vertrek en op de
afstanden aangegeven in de paragraaf “Het installeren/De
ventilatie”.
- De juiste koude
Te koud verhoogt het energieverbruik.
- Laad hem niet te vol
Teneinde de etenswaren goed te conserveren moet de koude
lucht vrijelijk circuleren binnen in de koelkast. Hem te vol
laden betekent dat u de circulatie belemmert terwijl u de
compressor voortdurend laat werken.
- Met dichte deuren
Open uw koelkast zo min mogelijk omdat iedere keer een
hoeveelheid koude lucht ontsnapt. De motor moet weer
werken om de temperatuur op peil te brengen en dit kost
energie.
- Let op de afdichtingen
Houd ze schoon en efficiënt zodat ze goed aan de deur
aansluiten; zo laten ze geen koude ontsnappen.
- Geen warme gerechten
Een warme pan in de koelkast verhoogt de temperatuur
onmiddelijk met een paar graden; laat de pan afkoelen voordat u hem in de koelkast plaatst.
- Ijs in de freezer
Controleer de dikte van het ijslaagje op de wanden van de
freezer en ontdooi hem meteen als het ijslaagje te dik is (zie
verderop “Hoe onderhoud ik hem”).
NL
26
Page 29

Gids voor het klaarmaken en invriezen
Vlees en vis
Soorten Verpakken
Runderbraadstuk Gewikkeld in aluminium folie 2 / 3 9 / 10 Niet nodig
Lamsvlees Gewikkeld in aluminium folie 1 / 2 6 Niet nodig
Varkensbraadstuk Gewikkeld in aluminium folie 1 6 Niet nodig
Kalfsbraadstuk Gewikkeld in aluminium folie 1 8 Niet nodig
Biefstukjes en
varkenslap
Lams- en
varkenscoteletten
Gehaktvlees In aluminium met plastic er omheen Zeer vers 2 Langzaam in koelkast
Hart en lever In plastic zakjes 3 Niet nodig
Worstjes In plastic of aluminium folie 2 Volgens gebruik
Ieder afzonderlijk in plastic folie en dan 4-6
samen in aluminium folie
Ieder afzonderlijk in plastic folie en dan 4-6
samen in aluminium folie
Besterven
(dagen)
Conservatie
(in maanden)
6 Niet nodig
6 Niet nodig
Ontdooien
Kip en kalkoen Gewikkeld in aluminium folie 1 / 3 9 Langzaam in koelkast
Eend en gans Gewikkeld in aluminium folie 1 / 4 6 Langzaam in koelkast
Wilde eend, fazant en
patrijs
Konijn en haas Gewikkeld in aluminium folie 3 / 4 6 Langzaam in koelkast
Hert en ree In aluminium of plastic folie 5 / 6 9 Langzaam in koelkast
Grote vissen In aluminium of plastic folie 4 / 6 Langzaam in koelkast
Kleine vissen In plastic zakjes 2 / 3 Niet nodig
Schaaldieren In plastic zakjes 3 / 6 Niet nodig
Weekdieren
Gekookte vis In aluminium of plastic folie 12 In warm water
Gewikkeld in aluminium folie 1 / 3 9 Langzaam in koelkast
In aluminium of plastic bakken met water
en zout
3 Langzaam in koelkast
Gebakken vis In plastic zakjes 4 / 6 Rechtstreeks in pan
27
NL
Page 30

Fruit en groenten
Soot Preparatie
Appel
Abrikozen, perziken,
kersen en pruimen
Aardbeien, moerbeien
en bosbessen
Gekookt fruit
Vruchtensap
Bloemkool
Kool en spruitjes
Erwtjes Doppen en wasser 2’ In plastic zakjes 12 Niet nodig
Sperziebonen Wassen en in stukjes 2 In plastic zakjes 10 / 12 Niet nodig
Schillen en in stukjes
snijden
Ontpitten en schillen 1’ / 2’ In bakjes, in siroop 12 Langzaam in koelkast
Wassen en laten
drogen
Snijden, koken en
zeven
Wassen, snijden en
persen
In stukjes in water
met citroen dompelen
Reinigen en wassen
(in stukjes)
In heet
water
2’ In bakjes, in siroop 12 Langzaam in koelkast
2’ In plastic zakjes 12 Niet nodig
1’ / 2’ In plastic zakjes 10 / 12 Kamertemperatuur
Voorbereiding
In bakjes, met suiker
bedekt
In bakjes, 10% suiker
toevoegen
In bakjes, suiker naar
smaak
Conservatie
(in maanden)
10 / 12 Langzaam in koelkast
12 Langzaam in koelkast
10 / 12 Langzaam in koelkast
Ondtooien
Wortels, paprika’s en
knolraap
Paddestoelen en
asperges
Spinazie Wassen en fijn snijden 2’ In zakjes of bakjes 12 Kamertemperatuur
Soepgroenten
Diversen Preparatie
Brood In plastic zakjes 4
Taarten In plastic folie 6
Room In plastic bakjes 6
Boter
Gekookt voedsel en
groentescep
In schijven, schillen en
wasser
Wassen en snijden 3’ / 4’ In zakjes of bakjes 6 Kamertemperatuur
Wassen en in stukjes
snijden
3’ / 4’ In plastic zakjes 12 Niet nodig
3’ In zakjes, in kleine porties 6 / 7 Kamertemperatuur
In heet
water
Voorbereiding
In de originele verpakking
met aluminium eromheen
Onderverdeeld in plastic
of glazen bakjes
Conservatie
(in maanden)
6 In de koelkast
3 / 6
Ondooien
Op kamertemperatuur
en in de oven
Op kamertemperatuur
en koken op 100/200°C
Op kamertemperatuur
of in de koelkast
Op kamertemperatuur
of in warm water
Eieren
NL
Invriezen zonder guscio in
kleine bakjes
28
10
Op kamertemperatuur
of in de koelkast
Page 31
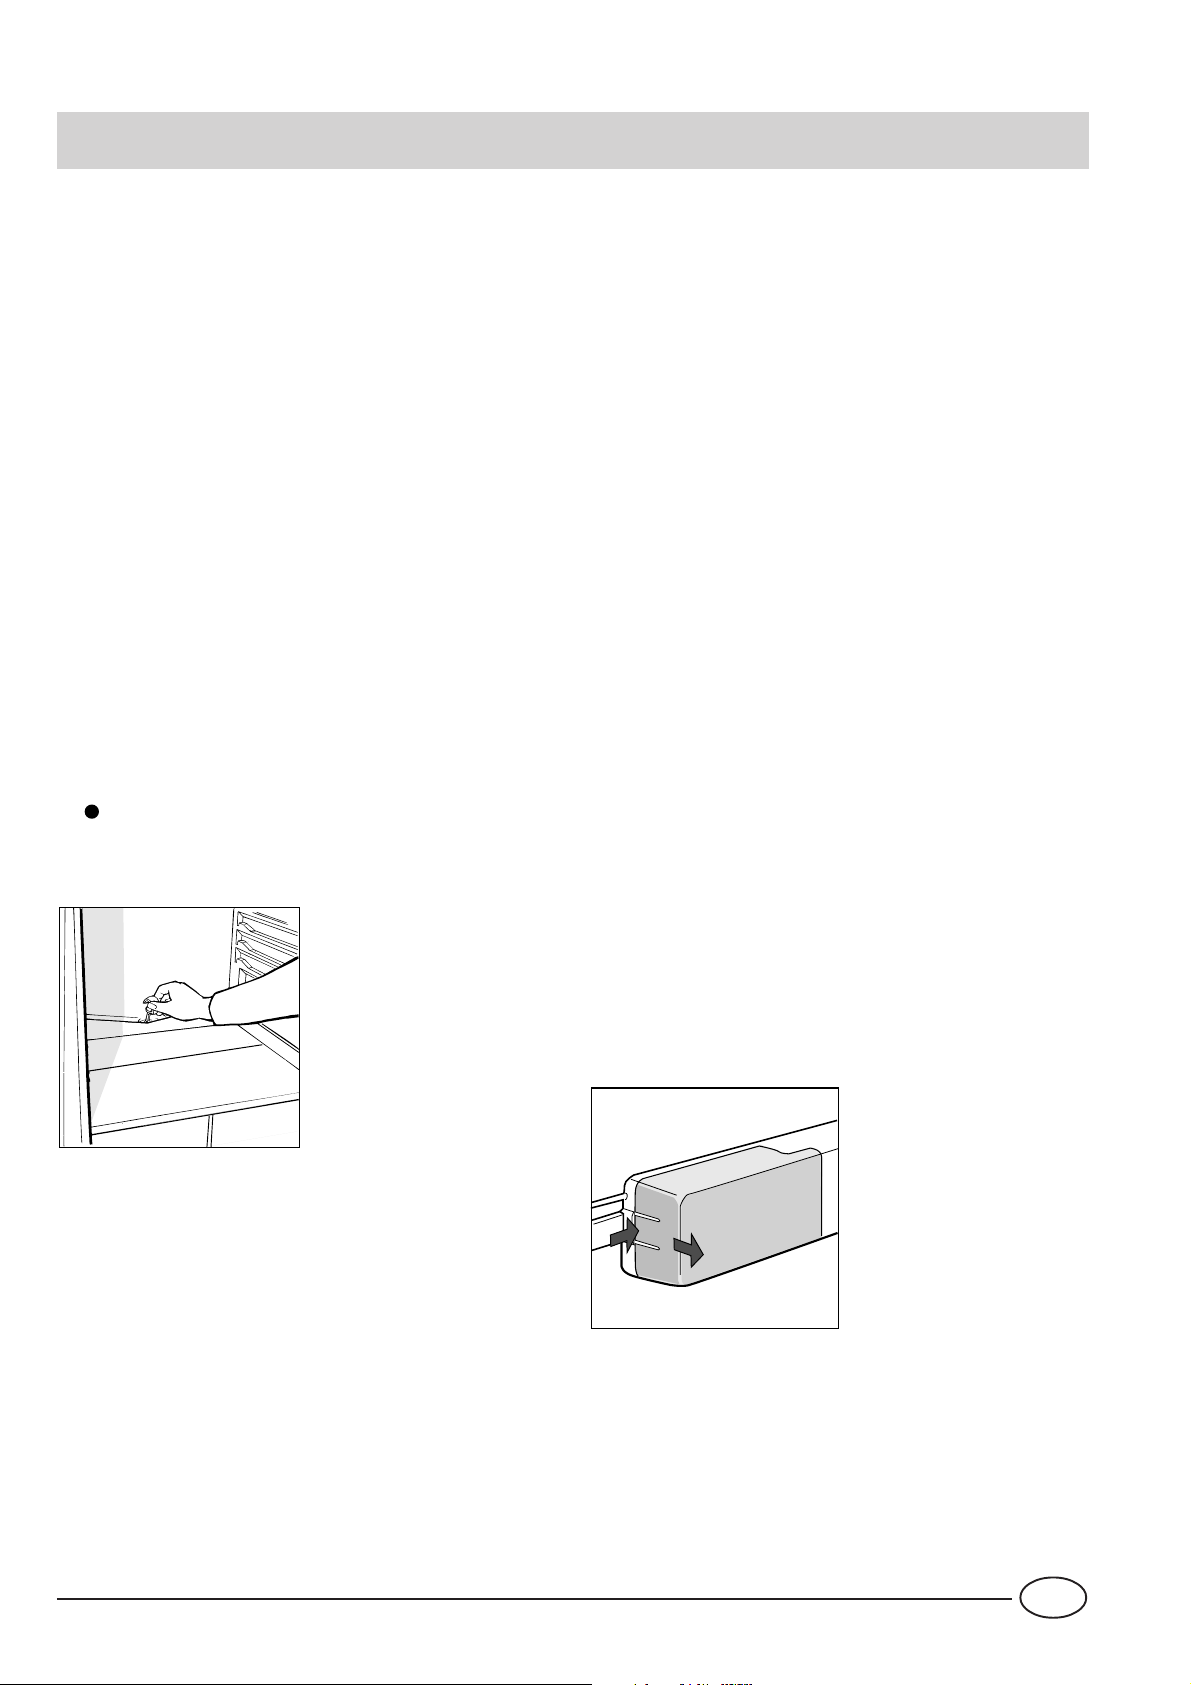
Hoe onderhoud ik hem
Alvorens de reinigingswerkzaamheden uit te voeren,
dient u de stroomtoevoer te verbreken (door de stekker uit het stopcontact te nemen of de hoofdschakelaar
van uw woning uit te schakelen)
Ontdooien
BELANGRIJK: let erop dat u het koelcircuit niet
beschadigt.
Gebruik geen mechanische middelen of andere voorwerpen om het ontdooiingsproces te versnellen, maar
alleen die door de fabrikant worden aanbevolen.
Hoe ontdooi ik de koelkast.
Dit apparaat ontdooit automatisch en het water wordt opgevangen en naar de afvoer aan de achterkant gevoerd (afb.
7) waar de warmte van de compressor het verdampt. Het
enige dat u regelmatig moet doen is het afvoergat schoonmaken; dit bevindt zich achter de groentenlade.
Hoe ontdooi ik de freezer
- Verwijder regelmatig de ijs met het bijgeleverde schrapertje
(geen messen of metalen voorwerpen).
- Als de ijs dikker is dan 5mm moet er ontdooid worden.
Ga als volgt te werk: zet de temperatuurknop A op de positie ; pak de inhoud van de freezer in kranten en leg het in
de koelkast of op een koele plaats. Laat de deur open staan
zodat alle ijs verdwijnt, ook met behulp van bakjes met lauw
water.
Speciale reiniging en onderhoud
Sluit altijd eerst de stroom af.
- De materialen van de vries-koelkast zijn van hygiënisch
materiaal gemaakt en geven geen geuren af, maar om dit
zo te houden moeten de etenswaren altijd goed afgedekt
zijn om eventuele vlekken of luchtjes te vermijden.
- Alleen water en soda. Zowel voor de buitenkant als voor
de binnenkant gebruikt u een spons met lauw water en soda,
hetgeen bovendien een goede ontsmetter is. Als u dit niet
in huis heeft kunt u een neutrale zeep gebruiken.
- Het reinigen van buiten van de modellen met “Speciale afwerkingen” (vooral roestvrij staal en zwart)
Voor het schoonmaken van de buitenkant van de kast en de
deuren, uitgevoerd in speciale materialen, moet u een
vochtige zachte doek gebruiken.
- Wat niet te gebruiken. Nooit schuurmiddelen, nooit
bleekwater, nooit ammoniak. Ten strengste verboden zijn
oplosmiddelen.
- Leg alle onderdelen die verwijderd kunnen worden in een
lauw sop. Goed spoelen en afdrogen vòòr het weer op hun
plaats zetten.
- En de achterkant? Hier verzamelt zich stof, hetgeen de
goede functionering van het apparaat kan belemmeren.
Gebruik de slang van uw stofzuiger op midden-sterkte voor
het verwijderen van de stof. Ga voorzichtig te werk!
- Bij langdurig niet in gebruik zijn. Als u besluit de koelkast
uit te schakelen, maak dan de binnenkant schoon en laat de
deuren open staan, ander kunnen zich luchtjes en schimmel
ontwikkelen.
- Het vervangen van het lampje voor de binnenverlichting. Het
lampje voor de binnenverlichting bevindt zich achter de
thermostaatdoos. In het geval dat het moet worden vervangen
schakelt u de stroom van het apparaat uit; schroef het uitgebrande
lampje los en vervang het met een nieuw lampje dat niet sterker
is dan 15W of 25W. Ga te werk zoals aangegeven in afbeelding
8.
Afb. 7
29
2
1
Afb. 8
NL
Page 32

Er is een probleem
De koelkast functioneert niet.
Heeft u gecontroleerd of:
• de zekering is doorgeslagen;
• de stekker niet goed in het stopcontact zit;
• het stopcontact niet werkt; probeer de stekker in een an-
der stopcontact.
De koelkast en de freezer zijn niet koud
genoeg.
Heeft u gecontroleerd of:
• de deuren niet goed sluiten of de afdichtingen versleten
zijn;
• de deuren langdurig open zijn geweest;
• de temperatuurknop niet op de juiste positie staat;
• de koelkast of de freezer te vol zijn.
De etenswaren in de koelkast bevriezen.
Heeft u gecontroleerd of:
• de temperatuurknop niet op de juiste positie staat;
• de etenswaren tegen de achterwand aan staan, die het
koudst is.
Als ondanks alle controles het apparaat niet functioneert en
het door u geconstateerde gebrek er nog steeds is, wend u
zich dan tot een erkende installateur met deze informatie:
het soort gebrek, het codenummer van het model (Mod.)
en de betreffende nummers (S/N) op het typeplaatje dat zich
linksonder naast de groentenlade bevindt (zie de hiervolgende voorbeelden).
75
Test
P.S-I.
TI
Net
Util
Utile
Pressure
HIGH-235
LOW 140
RG 2330
Mod.
220 - 240 V- 50 Hz 150 W
340
Total
Gross
Bruto
Brut
Compr.
Syst.
Kompr.
Made in Italy 13918
Gross
Bruto
Brut
R 134 a
kg 0,090
93139180000 S/N 704211801
Cod.
Gross
Bruto
Brut
W
Fuse
A
Freez. Capac
Poder de Cong
4,0
kg/24 h
Max 15 w
Class
Clase
N
Classe
Wend u zich nooit tot een niet-erkende installateur en
weiger niet-originele onderdelen.
De motor blijft functioneren.
Heeft u gecontroleerd of:
• de deuren niet goed gesloten zijn of lang opengelaten;
• de buitentemperatuur hoog is;
• de temperatuurknop niet op de juiste positie staat.
Het apparaat maakt teveel lawaai.
Het verkoelende gas produceert een licht geluid ook als de
compressor stil staat (dit is geen gebrek).
Heeft u gecontroleerd of:
• de koelkast niet goed horizontaal staat;
• naast meubelen of voorwerpen staat die trillen of geluid
maken.
Er is water op de bodem van de koelkast.
Heeft u gecontroleerd of:
• het afvoergat verstopt is (zie afb. 7).
NL
30
Page 33

La sicurezza, una buona abitudine
ATTENZIONE
Leggete attentamente le avvertenze contenute nel presente libretto in quanto forniscono importanti indicazioni riguardanti la sicurezza di installazione, d’uso e di manutenzione.
Questa apparecchiatura è conforme alle seguenti Direttive Comunitarie:
- 73/23/CEE del 19/02/73 (Basse Tensioni) e successive
modificazioni;
- 89/336/CEE del 03/05/89 (Compatibilità Elettromagnetica)
e successive modificazioni.
1. Questo apparecchio non va installato all’aperto, nemmeno se lo spazio è riparato da una tettoia; è molto pericoloso
lasciarlo esposto alla pioggia e ai temporali.
2. Deve essere usato soltanto da adulti ed esclusivamente
per conservare e congelare i cibi, seguendo le istruzioni d’uso
scritte in questo manuale.
3. Non toccate né manovrate mai l’apparecchio a piedi nudi
o con le mani o piedi bagnati.
4. Sconsigliamo di ricorrere a prolunghe e prese multiple. Se
il frigorifero è installato tra i mobili, controllate che il cavo
non subisca piegature o compressioni pericolose.
5. Non tirate mai il cavo né il frigorifero per staccare la spina
dalla presa a muro: è molto pericoloso.
6. Non toccate le parti interne raffreddanti soprattutto con
le mani bagnate poiché potreste ustionarvi o ferirvi. Né met-
tere in bocca cubetti di ghiaccio appena estratti dal freezer
poiché rischiate di ustionarvi.
7. Non fate né pulizia né manutenzione senza aver prima
staccato la spina; non basta, infatti, portare la manopola
per la regolazione della temperatura sulla posizione per
eliminare ogni contatto elettrico.
8. Prima di farvi ritirare il vecchio frigorifero, mettete fuori
uso l’eventuale serratura per evitare che i bambini, giocando, possano rimanere chiusi dentro l’apparecchio.
9. In caso di guasto, prima di chiamare il servizio-assistenza,
controllate al capitolo “C’è qualche problema?” per verificare
se è possibile eliminare l’eventuale inconveniente. Non tentate
di riparare il guasto, cercando di accedere alle parti interne.
10. In caso di sostituzione del cavo di alimentazione rivolgersi ai nostri Centri di Assistenza. In alcuni casi le connessioni sono eseguite con terminali speciali, in altri è richiesto
l’uso di un utensile speciale per accedere ai collegamenti.
11. Non usate apparecchi elettrici all'interno dello scomparto conservatore di cibi, se questi non sono del tipo raccomandato dal costruttore.
12. Al termine della vita funzionale dell'apparecchio, contenente gas ciclopentano nella schiuma isolante ed eventualmente gas R600a (isobutano) nel circuito refrigerante, lo stesso
dovrà essere messo in sicurezza prima dell'invio in discarica.
Per questa operazione rivolgetevi al vostro negoziante o all'Ente Locale preposto.
Installazione
Per garantire un buon funzionamento e un consumo
contenuto di elettricità è importante che l’installazione sia eseguita correttamente.
L’aerazione
Il compressore ed il condensatore emettono calore e richiedono perciò una buona aerazione. Sono poco adatti ambienti con una non perfetta ventilazione. L’apparecchio va
quindi installato in un ambiente servito da un’apertura (finestra o portafinestra) che assicuri il necessario ricambio
dell’aria. E che non sia troppo umido.
Fare attenzione, durante l'installazione, a non coprire od
ostruire le griglie che permettono la buona ventilazione dell'apparecchio.
Per una buona aerazione dell'apparecchio occorre lasciare:
- una distanza di almeno 10 cm tra la parte superiore ed
eventuali mobili sovrastanti;
- una distanza di almeno 5 cm tra le fiancate ed eventuali
mobili/pareti laterali.
Lontano dal calore
Evitare di posizionare l'apparecchio in un luogo direttamente esposto alla luce solare, accanto alla cucina elettrica o
similari.
In piano
L'apparecchio deve essere ben in piano; se il pavimento non
è livellato, è possibile intervenire con gli appositi piedini regolabili posti anteriormente.
Collegamento elettrico e messa a terra
Prima di procedere al collegamento elettrico, controllate che
il voltaggio indicato sulla targhetta caratteristiche, posta in
basso a sinistra accanto alla verduriera, corrisponda a quello
del vostro impianto di casa, e che la presa sia dotata di una
regolare messa a terra, come prescrive la legge sulla sicurezza degli impianti 46/90. Se manca la messa a terra, la Casa
Costruttrice declina ogni responsabilità. Non usate prese multiple o adattatori.
Posizionare l’apparecchio in modo che la presa, a cui è
collegato, sia accessibile.
La potenza è insufficiente?
La presa elettrica deve essere in grado di sopportare il carico
massimo di potenza dell’apparecchio, indicata sulla targhetta
caratteristiche posta in basso a sinistra accanto alla verduriera.
Prima di collegarlo elettricamente
Dopo il trasporto posizionare l’apparecchio verticalmente ed
attendere almeno 3 ore prima di collegarlo alla presa, per
consentire un corretto funzionamento.
31
I
Page 34

Visto da vicino
MAX
WATER LEVEL
MAX
WATER LEVEL
A
B
C
D
E
J
L
O
N
D
D
F
H
I I
K
M
G
Reparto per la conservazione di cibi surgelati,
A
la congelazione dei cibi freschi e la produzione
del ghiaccio
Griglia freezer
B
Sistema "Dynamic Bio Conservation"
C
Ripiani estraibili e regolabili in altezza
D
Manopola per la regolazione della
E
temperatura
Questa manopola consente di
regolare la temperatura dei due
reparti su diverse posizioni:
il frigo è spento;
1 meno freddo;
5 più freddo
Balconcini portalattine
L
Scatola salvaromi con coperchio
M
Balconcino superiore con coperchio
N
Bacinelle ghiacciio
O
4
Griglia portabottiglie
F
Ribaltine copriverduriere
G
con regolatori di umidità
Cassetti per frutta e
H
verdura
Piedini di regolazione
I
Portabottiglia ribaltabile
J
e fermobottiglie
Balconcino intermedio
K
I
32
Page 35

Come avviare l'apparecchio
ATTENZIONE
Dopo il trasporto, posizionare l’apparecchio verticalmente ed attendere circa 3 ore prima di collegarlo alla presa
di corrente per favorire un buon funzionamento.
Prima di mettere gli alimenti nel frigorifero o nel freezer pulite bene l’interno con acqua tiepida e bicarbonato.
L'hygiène alimentaire
1. Dopo l’acquisto degli alimenti, eliminare qualsiasi tipo di
confezione esterna in carta/cartone o altri involucri, che
potrebbero introdurre nel frigo batteri o sporcizia.
2. Proteggere gli alimenti, (in particolare quelli facilmente
deperibili e quelli che emanano un forte aroma), in modo
da evitate il contatto tra essi, eliminando in questo modo
sia la possibilità di contaminazione di germi/batteri, che
la diffusione di particolari odori all’interno del frigo
3. Riporre i cibi in modo in modo che l’aria possa circolare
liberamente tra essi
4. Tenere pulito l’interno del frigo, facendo attenzione a
non utilizzare prodotti ossidanti o abrasivi
5. Togliere gli alimenti dal frigo una volta superata la durata
massima di conservazione
6. Per una buona conservazione, i cibi facilmente deperbili (
formaggi molli, pesce crudo, carne, etc…) vanno posizionati nella zona più fredda, cioè quella sopra le
verduriere, dove si trova l’indicatore della temperatura
Dopo aver collegato la spina alla presa di corrente accertarvi
che la lampada di illuminazione sia accesa quindi ruotare la
manopola per la regolazione della temperatura “A” sulla
posizione “3” e dopo qualche ora potrete inserire i cibi freschi nel reparto frigo e quelli congelati nel freezer.
L’indicatore della temperatura
Per una migliore ed esatta individuazione della zona più fredda, il frigo è stato dotato di un indicatore di temperatura.
Controllate che sull’indicatore compaia “OK” .
vert
noir
consulter la notice
Una corretta illuminazione permette una migliore lettura
dell’indicatore
Nel caso in cui l’indicatore appaia completamente nero, la
temperatura media della zona è troppo elevata.
Regolare il termostato (del reparto frigo) su una posizione
più alta (più fredda)
Ad ogni regolazione del termostato, attendere la
stabilizzazione delle temperatura all’interno del vano frigo
(circa 10 h) prima di procedere ad una nuova regolazione
ATTENZIONE: nel caso di introduzione di grosse quantità di
alimenti o la frequente e prolungata apertura della porta
frigo, è normale che l’OK non compaia nell’indicatore.
Aspettare almeno 10 h prima di regolare il termostato in
una posizione più alta.
33
I
Page 36

Come utilizzare al meglio il reparto frigorifero
La temperatura all'interno del reparto frigorifero si regola
automaticamente in base alla posizione della manopola del
termostato.
1 = meno freddo
5 = più freddo
Si consiglia, comunque, una posizione media
Per aumentare lo spazio a disposizione e migliorare l'aspetto estetico, questo apparecchio ha la "parte raffreddante"
posizionata all'interno della parete posteriore del reparto
frigo. Tale parete, durante il funzionamento, si presenterà
coperta di brina, oppure di goccioline di acqua a secondo se
il compressore è in funzione o in pausa. Non preoccupatevi
di questo! Il frigorifero sta lavorando in modo normale.
Se si imposta la manopola su numeri alti, con notevoli
quantitativi di cibi e con una temperatura ambiente elevata, l'apparecchio può funzionare di continuo favorendo la
formazione di brina sulla parete posteriore raffreddante con
conseguente aumento di consumo di energia elettrica.
Per ovviare a questo inconveniente è sufficiente spostare la manopola del termostato verso i numeri più
bassi in modo da permettere all'apparecchio un regolare sbrinamento automatico.
Il reparto frigorifero del suo apparecchio è dotato di un dispositivo di "Dynamic Bio Conservation" che consente
un'ottima conservazione degli alimenti ed un utilizzo semplificato dell'apparecchio grazie a:
- un ripristino veloce della temperatura: dopo l'apertura della porta le temperature raggiungono valori ottimali velocemente, per una migliore conservazione.
- una distribuzione omogenea della temperatura che consente di riporre alimenti in qualsiasi ripiano.
- Un grado di umidità più alto per una lunga conservazione
degli alimenti.
Lo scomparto frigorifero è
dotato di pratici ripiani
estraibili e regolabili in altezza grazie alle apposite guide
(Fig. 1). Per questo è possibile inserire anche grandi
contenitori e cibi di notevoli
dimensioni.
Mettere soltanto alimenti
freddi o, al massimo, appena tiepidi, evitando di inserire quelli caldi: alzerebbero
subito la temperatura interna costringendo il compressore
ad un surlavoro che spreca tanta energia elettrica.
Non inserite i liquidi in recipienti scoperti perché provocherebbero l’aumento di umidità all’interno del frigorifero e di
conseguenza la formazione di brina.
Fig. 1
Verduriere
I cassetti frutta e verdura di cui è dotato il frigorifero sono
appositamente progettati allo scopo di mantenere fresche e
fragranti la frutta e le verdure. Aprire il regolatore d’umidità
(posizione B) se si desidera conservare gli alimenti in un ambiente meno umido, oppure chiuderlo (posizione A) per una
conservazione in ambiente più umido (Fig. 2).
La facile apertura dei coperchi, basta tirare il cassetto verso
l'esterno, facilita l'introduzione e il prelievo dei cibi (Fig. 3).
B
A
A - Aria soffiata che si raffredda a contatto della parete fredda
B - Aria più calda aspirata
Seguite attentamente i nostri consigli sulla durata massima
della conservazione: qualsiasi cibo, anche il più fresco, non
rimane intatto molto a lungo.
Contrariamente a quanto si crede, i cibi cotti non si mantengono più a lungo di quelli crudi.
- Fate attenzione a non mettere contenitori (plastica,
vetro), cibi ed altro a diretto contatto della parete refrigerante (quella posteriore). Ciò potrebbe danneggiare i cibi, far aumentare i consumi di energia e facilitare
la formazione di condensa (sui cibi, contenitori, ecc.).
B
B
A
I
Fig. 2
Portalattine
La presenza del portalattine
sulla controporta dà la possibilità di riporre non solo lattine, ma anche yogurt, burro ed altri contenitori, sfruttandolo a seconda delle vostre necessità (Fig.4).
34
Fig. 3
Fig. 4
Page 37

Come utilizzare al meglio il reparto congelatore
- Per la preparazione dei cibi da congelare consultare
un manuale specializzato.
- Un alimento scongelato, anche solo parzialmente, non deve
mai essere ricongelato: lo dovete cuocere per consumarlo
(entro 24 ore) oppure per ricongelarlo.
- Gli alimenti freschi da congelare non devono essere posti a
contatto con quelli già congelati o surgelati ma vanno messi
sopra la griglia del reparto freezer possibilmente a contatto
delle pareti (laterali e posteriore). Non bisogna infatti dimenticare che la buona conservazione degli alimenti congelati
dipende dalla velocità di congelazione.
- Durante la congelazione evitate di aprire la porta del free-
zer.
- La quantità massima giornaliera da congelare è indicata
sulla targhetta caratteristiche posta a sinistra della verduriera.
- Per ottenere una congelazione e una successiva scongela-
zione ottimali è consigliabile dividere i cibi in piccole porzioni così si congeleranno rapidamente e in modo omogeneo.
Sulle confezioni riportate le indicazioni sul contenuto e sulla
data di congelamento.
- Non aprite la porta del freezer in caso di mancanza di cor-
rente o di un guasto, ritarderete così l’aumento della temperatura al suo interno. In questo modo i surgelati e i congelati si conserveranno senza alterazioni per circa 9-14 ore.
- Non mettete nel freezer bottiglie piene: potrebbero rom-
persi poiché, gelandosi, tutti i liquidi aumentano di volume.
- Se per lungo tempo permane la temperatura ambiente più
fredda di 14°C, non si raggiungono completamente le temperature necessarie per una lunga conservazione nel reparto freezer e il periodo di conservazione risulterà pertanto
ridotto.
Modalità d’uso (Fig. 6)
Riempite la bacinella con acqua attraverso l’apposito foro
fino al livello indicato (MAX WATER LEVEL), prestando attenzione a non superarlo: l’inserimento dell’acqua in quantità superiore a quella necessaria, comporterà una tale formazione di ghiaccio che potrebbe ostacolare la fuoriuscita
dei ghiaccioli.
Nel caso in cui abbiate utilizzato una quantità eccessiva di
liquido, bisognerà attendere che il ghiaccio si sciolga, svuotare la bacinella, e ripetere l’operazione di carico.
Una volta effettuata l’operazione di carico attraverso il foro
indicato, ruotate la bacinella di 90 °. Per il principio dei vasi
comunicanti l’acqua va a riempire le apposite forme,
dopodichè si potrà chiudere il foro con l’apposito tappo ed
allocare la bacinella nella controporta.
Dopo che il ghiaccio si sarà formato, basterà battere la bacinella su una superficie dura affinché i ghiaccioli si stacchino
dalle loro sedi e siano fatti uscire dallo stesso foro da cui è
stata introdotta l’acqua. Per migliorare l’uscita dei ghiaccioli
bagnare con acqua l’esterno della bacinella.
ATTENZIONE: ogni volta che si effettua il caricamento con
acqua, verificare che la bacinella sia completamente vuota e
non siano presenti residui di ghiaccio.
Il tempo minimo necessario per una ottimale formazione di
ghiaccio è circa 8 ore.
WATER LEVEL
MAX
MAX
WATER LEVEL
Bacinelle ghiaccio
Questo nuovo concetto di bacinelle ghiaccio, è un brevetto
esclusivo Merloni. Il fatto di essere poste sulla controporta
del vano freezer assicura maggiore ergonomia e pulizia: il
ghiaccio non viene più a contatto con i cibi riposti nel vano
freezer; inoltre si evita lo sgocciolamento dell’acqua nella
fase di caricamento (in dotazione anche il coperchio per chiudere il foro dopo l’operazione di carico dell’acqua).
Per estrarre le bacinelle
ghiaccio dalla loro sede, spingere la bacinella verso l'alto
e poi estrarre (fig. 5). Per riporre la bacinella, inserire la
parte superiore nell'apposita
sede e, una volta messa in
verticale, lasciarla ricadere.
Fig. 5
35
Fig. 6
I
Page 38

Consigli per risparmiare
- Installatelo bene
E cioè lontano da fonti di calore, dalla luce diretta del sole,
in locale ben aerato e con le distanze indicate nel paragrafo
"Installazione/L'aerazione".
- Il freddo giusto
Il troppo freddo fa aumentare i consumi
- Non riempitelo troppo
Per conservare bene i cibi il freddo deve circolare liberamente all’interno del frigorifero. Riempirlo troppo significa impedire questa circolazione facendo lavorare di continuo il
compressore.
- A porte chiuse
Aprite il vostro frigorifero il meno possibile perché ogni volta
che lo fate va via gran parte dell’aria fredda. Per ristabilire la
temperatura il motore deve lavorare a lungo consumando
molta energia.
- Occhio alle guarnizioni
Mantenetele efficienti e pulite in modo che aderiscano bene
alle porte; solo così non lasceranno uscire nemmeno un po’
di freddo.
- Niente cibi caldi
Una pentola calda messa nel frigorifero alza immediatamente
la temperatura di diversi gradi, lasciatela raffreddare a temperatura ambiente prima di introdurla nel frigorifero.
- Brina nel freezer
Controllate lo spessore della brina sulle pareti del freezer ed
effettuate subito lo sbrinamento se lo strato è diventato troppo spesso (Vedi più avanti “Come tenerlo in forma”).
I
36
Page 39

Guida all'utilizzo del reparto freezer
Carni e pesci
Tipo Confezionamento
Arrosto e bollito di
manzo
Agnello Avvolto in foglio di alluminio 1 / 2 6 Non necessario
Arrosto di maiale Avvolto in foglio di alluminio 1 6 Non necessario
Arrosto e bollito di
vitello
Bistecche e braciole di
maiale
Fettine e cotolette di
agnello o manzo
Carne macinata
Cuore e fegato In sacchetti di politene 3 Non necessario
Avvolto in foglio di alluminio 2 / 3 9 / 10 Non necessario
Avvolto in foglio di alluminio 1 8 Non necessario
Ogni fetta avvolta in politene e quindi in
foglio di alluminio in numero di 4-5
Ogni fetta avvolta in politene e quindi in
foglio di alluminio in numero di 4-5
In contenitori di alluminio ricoperti con
politene
Frollatura
(giorni)
Freschissi-
ma
Conservazione
(mesi)
6 Non necessario
6 Non necessario
2 Lentamente in frigorifero
Scongelamento
Salsicce In fogli di politene o alluminio 2 A seconda dell’uso
Polli e tacchini Avvolti in fogli di alluminio 1 / 3 9 Lentamente in frigorifero
Anatre e oche In fogli di alluminio 1 / 4 6 Lentamente in frigorifero
Anatre selvatiche,
fagiani e pernici
Conigli e lepri In fogli di alluminio 3 / 4 6 Lentamente in frigorifero
Cervo e capriolo In fogli di alluminio o politene 5 / 6 9 Lentamente in frigorifero
Pesci grossi In fogli di alluminio o politene 4 / 6 Lentamente in frigorifero
Pesci piccoli In buste di politene 2 / 3 Non necessario
Crostacei In buste di politene 3 / 6 Non necessario
Molluschi
Pesci cotti In fogli di alluminio o politene 12 In acqua calda
In fogli di alluminio 1 / 3 9 Lentamente in frigorifero
In contenitori di alluminio o plastica
ricoperti con acqua e sale
3 Lentamente in frigorifero
Pesci fritti In sacchetti di politene 4 / 6 Direttamente in padella
37
I
Page 40

Guida all'utilizzo del reparto freezer
Frutta e verdura
Tipo Preparazione
Mele e pere
Albicocche, pesche,
ciliege e prugne
Fragole, more e
mirtilli
Frutta cotta
Succhi di frutta
Cavolfiori
Cavolo e cavolini
Piselli Sbucciare e lavare 2’ In sacchetti di politene 12 Non necessario
Sbucciare e tagliare a
pezzetti
Snocciolare e pelare 1’ / 2’
Pulire, lavare e lasciare
asciugare
Tagliare, cuocere e
passare
Lavare, tagliare e
schiacciare
Spezzettare e scottare
in acqua e succo di
limone
Pulire e lavare
(spezzettare)
Scottatura
(min)
2’
2’ In sacchetti di politene 12 Non necessario
1’ / 2’ In sacchetti di politene 10 / 12 A temperatura ambiente
Confezionamento
In contenitori ricoperti di
sciroppo
In contenitori ricoperti di
sciroppo
In contenitori ricoperti di
zucchero
In contenitori,
aggiungere 10% di
zucchero
In contenitori, zucchero
a piacere
Conservazione
(mesi)
12 Lentamente in frigorifero
12 Lentamente in frigorifero
10 / 12 Lentamente in frigorifero
12 Lentamente in frigorifero
10 / 12 Lentamente in frigorifero
Scongelamento
Fagiolini
Carote, peperoni e
rape
Funghi e asparagi Lavare e tagliare 3’ / 4’ In sacchetti o contenitori 6 A temperatura ambiente
Spinaci Lavare e tagliuzzare 2’ In sacchetti di politene 12 A temperatura ambiente
Verdure varie per
minestra
Cibi vari Preparazione Scottatura Confezionamento
Pane In sacchetti di politene 4
Torte In fogli di politene 6
Panna In contenitori di plastica 6
Burro
Lavare e tagliare a
pezzetti
Tagliare a fette,
pelare, lavare
Lavare e tagliare a
pezzetti
2 In sacchetti di politene 10 / 12 Non necessario
3’ / 4’ In sacchetti di politene 12 Non necessario
3’
In sacchetti in piccole
porzioni
Nel suo incarto originale
avvolto in alluminio
6 / 7 A temperatura ambiente
Conservazione
(mesi)
6 In frigorifero
Scongelamento
A temperatura ambiente o
nel frigorifero
A temperatura ambiente e
cuocere a 100/200°C
A temperatura ambiente o
nel frigorifero
Cibi cotti,
minestrone
Uova
I
Suddiviso in contenitori
di plastica o vetro
Congelare senza guscio
in piccoli contenitori
38
3 / 6
10
A temperatura ambiente e
in acqua calda
A temperatura ambiente o
nel frigorifero
Page 41

Come tenerlo in forma
Prima di procedere a qualsiasi operazione di pulizia
staccare l'apparecchio dalla rete di alimentazione
(disinserendo la spina o l'interruttore generale dell'appartamento).
Sbrinamento
ATTENZIONE: non danneggiare il circuito refrigerante.
Fare attenzione a non usare dispositivi meccanici o altri utensili per accelerare il processo di sbrinamento,
oltre a quelli raccomandati dal costruttore.
Come sbrinare il reparto frigorifero.
Questo apparecchio ha lo sbrinamento automatico e l’acqua viene convogliata verso la parte posteriore da un apposito scarico (fig. 7) dove il calore prodotto dal compressore
la fa evaporare. L’unico intervento che dovete fare periodicamente consiste nel pulire il foro di scarico che si trova dietro le verduriere affinché l’acqua passi regolarmente.
Come sbrinare il reparto freezer
- Eliminate ogni tanto la brina con l’apposito raschietto in
dotazione (niente coltelli od oggetti metallici).
- Se la brina ha superato i 5 mm bisogna fare lo sbrinamento.
Procedete così: posizionare la manopola per la regolazione
delle temperature A nella posizione ; avvolgete tutti i surgelati e i congelati in carta da giornale mettendoli o in frigorifero o in un luogo fresco. Lasciate aperta la porta in modo
che la brina si sciolga del tutto, aiutandola con dei contenitori pieni di acqua tiepida.
Pulizia e manutenzioni particolari
Prima di pulire il frigorifero staccate sempre la spina
dalla presa.
- I materiali con i quali è stato fabbricato il vostro apparecchio sono igienici e non trasmettono odori ma per mantenere queste qualità è necessario che i cibi vengano sempre
protetti e ben chiusi, per evitare macchie difficilmente rimovibili o la creazione di cattivi odori.
- Solo acqua e bicarbonato. Per pulire sia l’interno che l’esterno usate una spugnetta con acqua tiepida e bicarbonato di
sodio che, tra l’altro, è anche un buon disinfettante. Se non
l’avete in casa potete impiegare del sapone neutro (quello di
Marsiglia ad esempio).
- Cosa non usare. Mai abrasivi, mai candeggina, mai ammoniaca. Proibitissimi i solventi e altri prodotti simili.
- Tutto ciò che si può togliere, mettetelo a bagno in acqua
calda con sapone o detersivo per i piatti. E prima di rimetterli a posto, risciacquateli e asciugateli bene.
- Pulizia esterna dei modelli con “Finiture speciali” (inox
e neri in particolare).
Per effettuare la pulizia dell’armadio e delle porte, realizzati
con materiali particolari, è necessario utilizzare un panno
morbido e leggermente umido.
- E per il retro? Qui la polvere si ferma e si concentra provocando qualche problema al buon funzionamento dell’apparecchio. Usate la bocchetta lunga del vostro aspirapolvere,
alla potenza media, per eliminarla. E con molta delicatezza!
- Quando sta fermo a lungo. Durante il periodo estivo, se decidete di fermare il frigorifero, bisogna pulire l’interno e lasciare
le porte aperte, altrimenti si formeranno cattivi odori e muffe.
- Come sostituire la lampadina interna. Nella parte posteriore della scatola termostato è posta la lampada di illuminazione interna. In caso di sostituzione scollegare l’apparecchio dalla rete elettrica, svitare la lampada non funzionante
e sostituirla con un’altra di potenza non superiore a quella
indicata sulla protezione (15 W o 25 W) operando come
illustrato in figura 8.
Fig. 7
39
2
1
Fig. 8
I
Page 42

C'è qualche problema
Il frigorifero non funziona.
Avete controllato se:
· l’interruttore generale dell’appartamento è disinserito;
· la spina non è correttamente inserita nella presa di corren-
te;
· la presa non è efficiente; provate a collegare la spina ad
un’altra presa del locale.
Il frigorifero e il freezer raffreddano poco.
Avete controllato se:
· le porte non chiudono bene o le guarnizioni sono rovinate;
· le porte rimangono aperte per lungo tempo;
· la manopola di regolazione della temperatura non è in
posizione corretta;
· il frigorifero o il freezer sono stati riempiti eccessivamente.
Nel frigorifero gli alimenti si gelano troppo.
Avete controllato se:
· la manopola di regolazione della temperatura non è in
posizione corretta;
· gli alimenti sono a contatto con la parte posteriore, la più
fredda.
Se, nonostante tutti i controlli, l’apparecchio non funziona e
l’inconveniente da voi rilevato continua ad esserci, chiamate il Centro di Assistenza più vicino, comunicando queste
informazioni: il tipo di guasto, la sigla del modello (Mod.) e
i relativi numeri (S/N) scritti sulla targhetta delle caratteristiche posta in basso a sinistra, accanto alla verduriera (vedi
esempi nelle figure seguenti).
75
Test
P.S-I.
TI
Net
Util
Utile
Pressure
HIGH-235
LOW 140
RG 2330
Mod.
220 - 240 V- 50 Hz 150 W
340
Total
Gross
Bruto
Brut
Compr.
Syst.
Kompr.
Made in Italy 13918
Gross
Bruto
Brut
R 134 a
kg 0,090
93139180000 S/N 704211801
Cod.
Gross
Bruto
Brut
W
Fuse
A
Freez. Capac
Poder de Cong
4,0
kg/24 h
Max 15 w
Class
Clase
N
Classe
Non ricorrete mai a tecnici non autorizzati e rifiutate
sempre l’installazione di pezzi di ricambio non originali.
Il motore funziona in continuo.
Avete controllato se:
· le porte non sono ben chiuse o sono rimaste aperte per
lungo tempo;
· la temperatura esterna è molto alta;
· la manopola di regolazione della temperatura non è in
posizione corretta.
L’apparecchio emette troppo rumore.
Il gas refrigerante interno produce un leggero rumore anche quando il compressore è fermo (non è un difetto).
Avete controllato se:
· Il frigorifero non è posto ben in piano:
· è stato installato tra mobili o oggetti che vibrano ed emet-
tono rumori;
Sul fondo del frigorifero c’è dell’acqua.
Avete controllato se:
· il foro dello scarico dell’acqua di sbrinamento è otturato
(vedi fig. 7).
I
40
Page 43

Page 44

Merloni Elettrodomestici spa
Viale Aristide Merloni, 47
60044 Fabriano (AN) Italy
http://www.scholtès.fr
http://www.merloni.com
This document is printed by
Document number: 195043771.00
Conformément à nos conditions générales de vente, nous nous réservons la faculté de modifier nos
modèles sans préavis: et cette brochure ne peut être considérée comme un document contractuel.
In conformity with our general conditions of sale, we reserve the right to modify our models without notice
and this booklet can in no way be considered as a binding document.
Overenkomstig onze verkoopvoorwaarden behouden wij ons het recht voor onze modellen zonder
voorafgaande kennisgeving te vjzigen: dit boekje kan niet als cen contractueel dokument worden beschouwd.
Conformemente alle nostre condizioni generali di vendita, ci riserviamo la facoltà di modificare i nostri
modelli senza preavviso. Questo opuscolo non può essere considerato come un documento contrattuale.
 Loading...