

Page 1
Istruzioni per luso
PIANO COTTURA
IT
Italiano, 1
31
TIL 641
GB FR
English,11
Français, 21
DENL
Deutsch, 41Nederlands,
Sommario
IT
Installazione, 2-3
Posizionamento
Collegamento elettrico
Descrizione dellapparecchio, 4-5
Pannello di controllo
Descrizione tecnica delle zone di cottura
Avvio e utilizzo, 6-8
Accensione del piano cottura
Accensione delle zone di cottura
Funzione booster
Estensione delle zone di cottura
Spegnimento delle zone di cottura
Programmazione della durata di una cottura
Blocco dei comandi
Modalità demo
Spegnimento del piano cottura
Consigli pratici per luso dellapparecchio
Dispositivi di sicurezza
Precauzioni e consigli, 9
Sicurezza generale
Smaltimento
Manutenzione e cura, 10
Escludere la corrente elettrica
Pulire lapparecchio
Smontare il piano
Page 2
Installazione
! È importante conservare questo libretto per poterlo
IT
consultare in ogni momento. In caso di vendita, di
cessione o di trasloco, assicurarsi che resti insieme
allapparecchio per informare il nuovo proprietario sul
funzionamento e sui relativi avvertimenti.
! Leggere attentamente le istruzioni: ci sono
importanti informazioni sullinstallazione, sulluso e
sulla sicurezza.
Posizionamento
! Gli imballaggi non sono giocattoli per bambini e
vanno eliminati secondo le norme per la raccolta
differenziata (vedi Precauzioni e consigli).
! Linstallazione va effettuata secondo queste
istruzioni e da personale professionalmente
qualificato. Una errata installazione può causare
danni a persone, animali o cose.
Incasso
Per garantire un buon funzionamento
dellapparecchio è necessario che il mobile abbia le
caratteristiche adatte:
il piano dappoggio deve essere di materiale
resistente al calore, a una temperatura di circa
100°C;
se si desidera installare il piano cottura sopra un
forno, questo deve essere provvisto di un sistema
di raffreddamento a ventilazione forzata;
evitare di installare il piano cottura sopra una
lavastoviglie: alloccorrenza frapporre un elemento
di separazione a tenuta stagna fra i due
apparecchi;
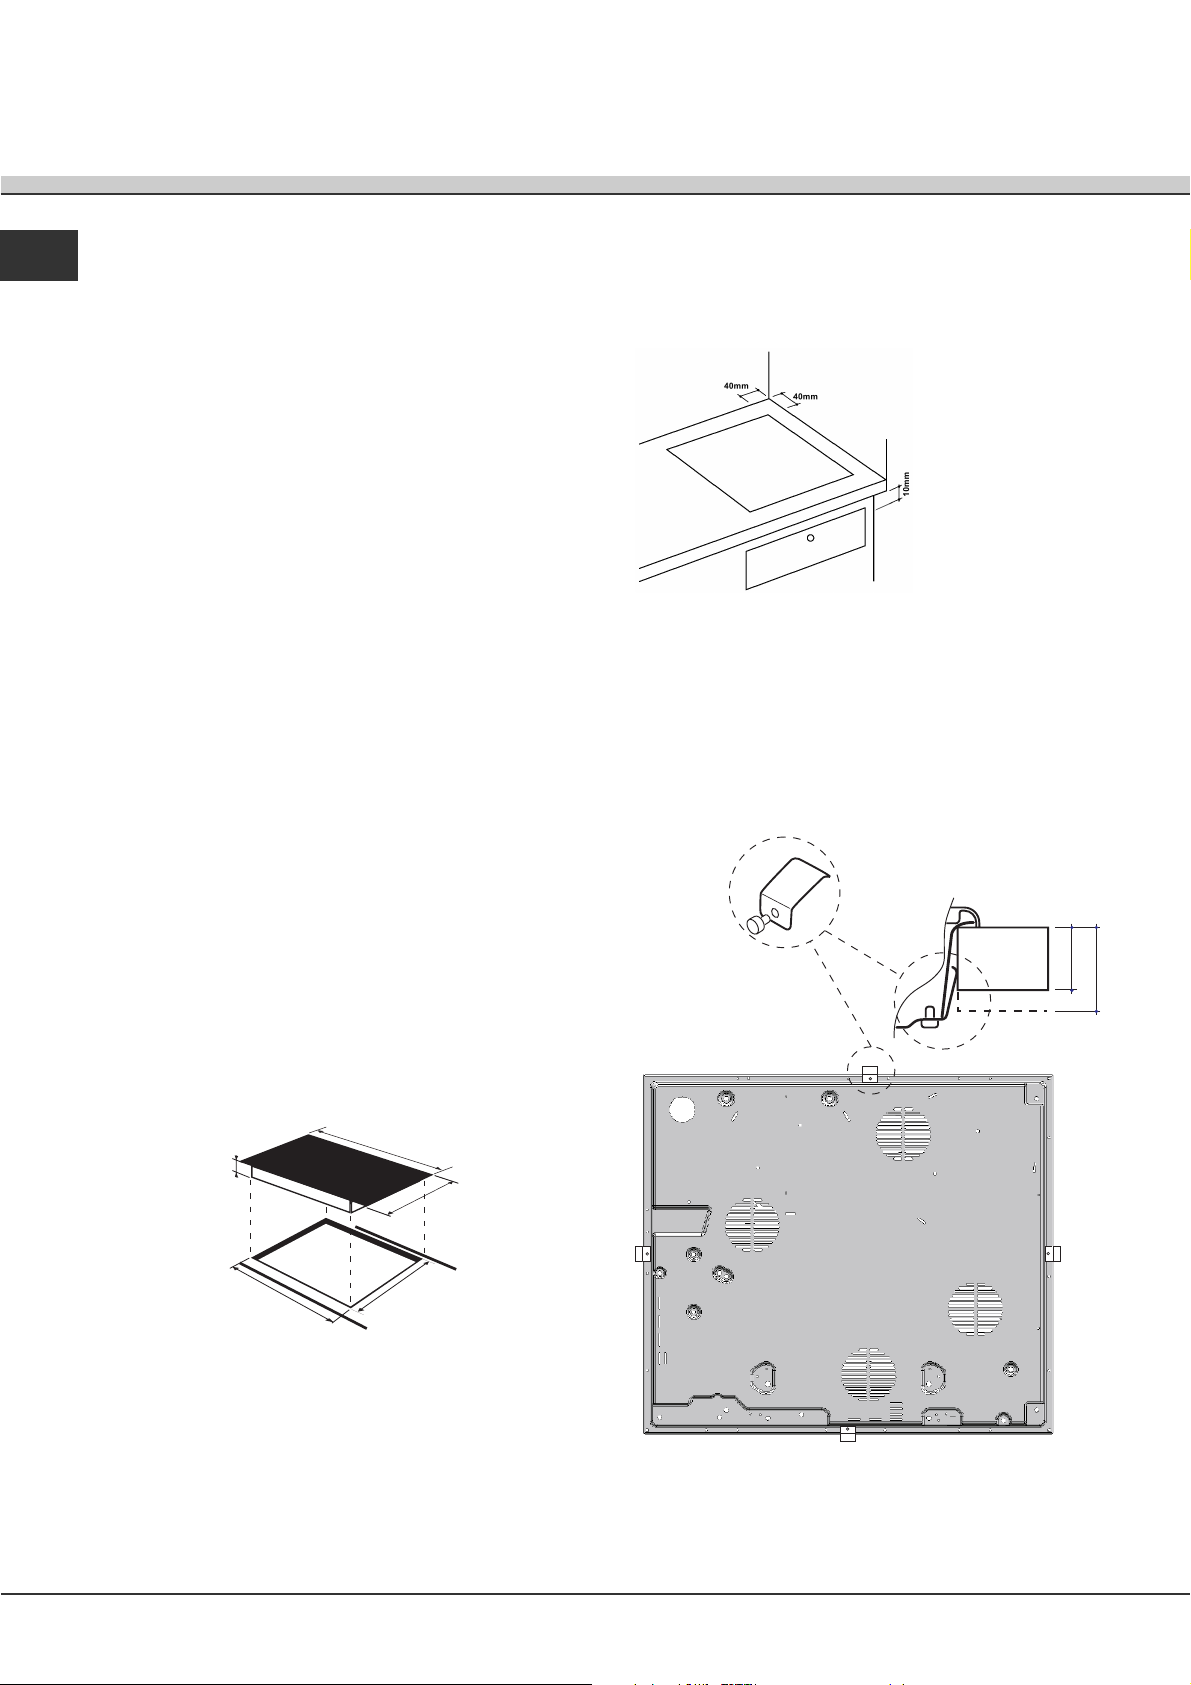
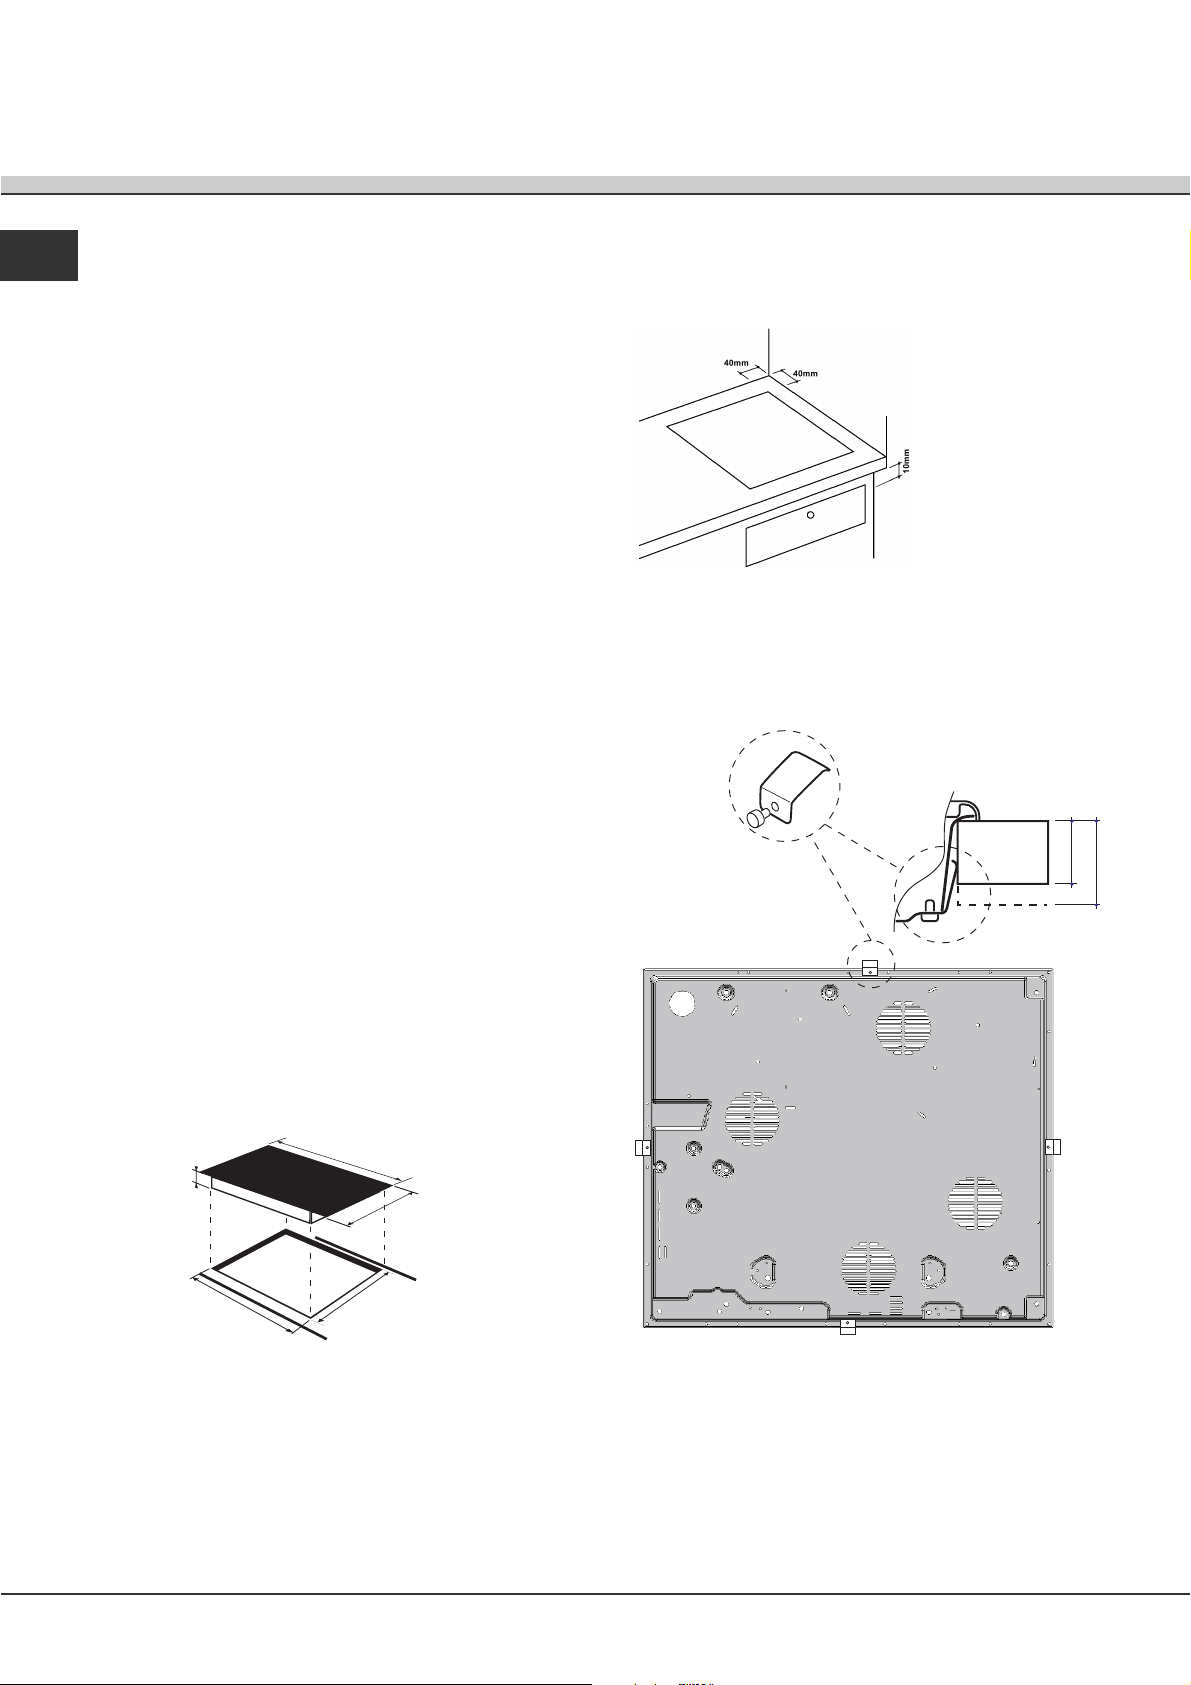
il vano del mobile deve avere le seguenti
dimensioni:
Aerazione
Per consentire unadeguata aerazione e per evitare
il surriscaldamento delle superfici attorno
allapparecchio, il piano cottura deve essere
posizionato:
a una distanza
minima di 40 mm
dalla parete
retrostante o da
qualsiasi altra
superficie
verticale;
in modo da
mantenere una
distanza minima di
10 mm fra il vano
per lincasso e il
mobile sottostante.
Fissaggio
Linstallazione dellapparecchio deve essere
effettuata
su un piano dappoggio perfettamente piano.
Le eventuali deformazioni provocate da un errato
fissaggio potrebbero alterare le caratteristiche e
le prestazioni del piano cottura.
LATO ANTERIORE
DEL PIANO COTTURA
PIANO DI
APPOGGIO
PIANO COTTURA
ROVESCIATO
30
40
640
4
555
520
45
Per il fissaggio agire come segue:
1. Con le viti corte senza punta, avvitare le 4 molle
di centraggio nei fori posti al centro di ogni lato del
piano;
2
Page 3
2. inserire il piano cottura nel vano del mobile,
centrarlo ed esercitare una adeguata pressione
sullintero perimetro affinché il piano di cottura
aderisca bene al piano dappoggio.
! È indispensabile che le viti delle molle di
centraggio rimangano accessibili.
! In conformità alle norme di sicurezza, una volta
incassato lapparecchio, non debbono essere
possibili eventuali contatti con le parti elettriche.
! Tutte le parti che assicurano la protezione debbono
essere fissate in modo tale da non poter essere tolte
senza laiuto di qualche utensile.
Collegamento elettrico
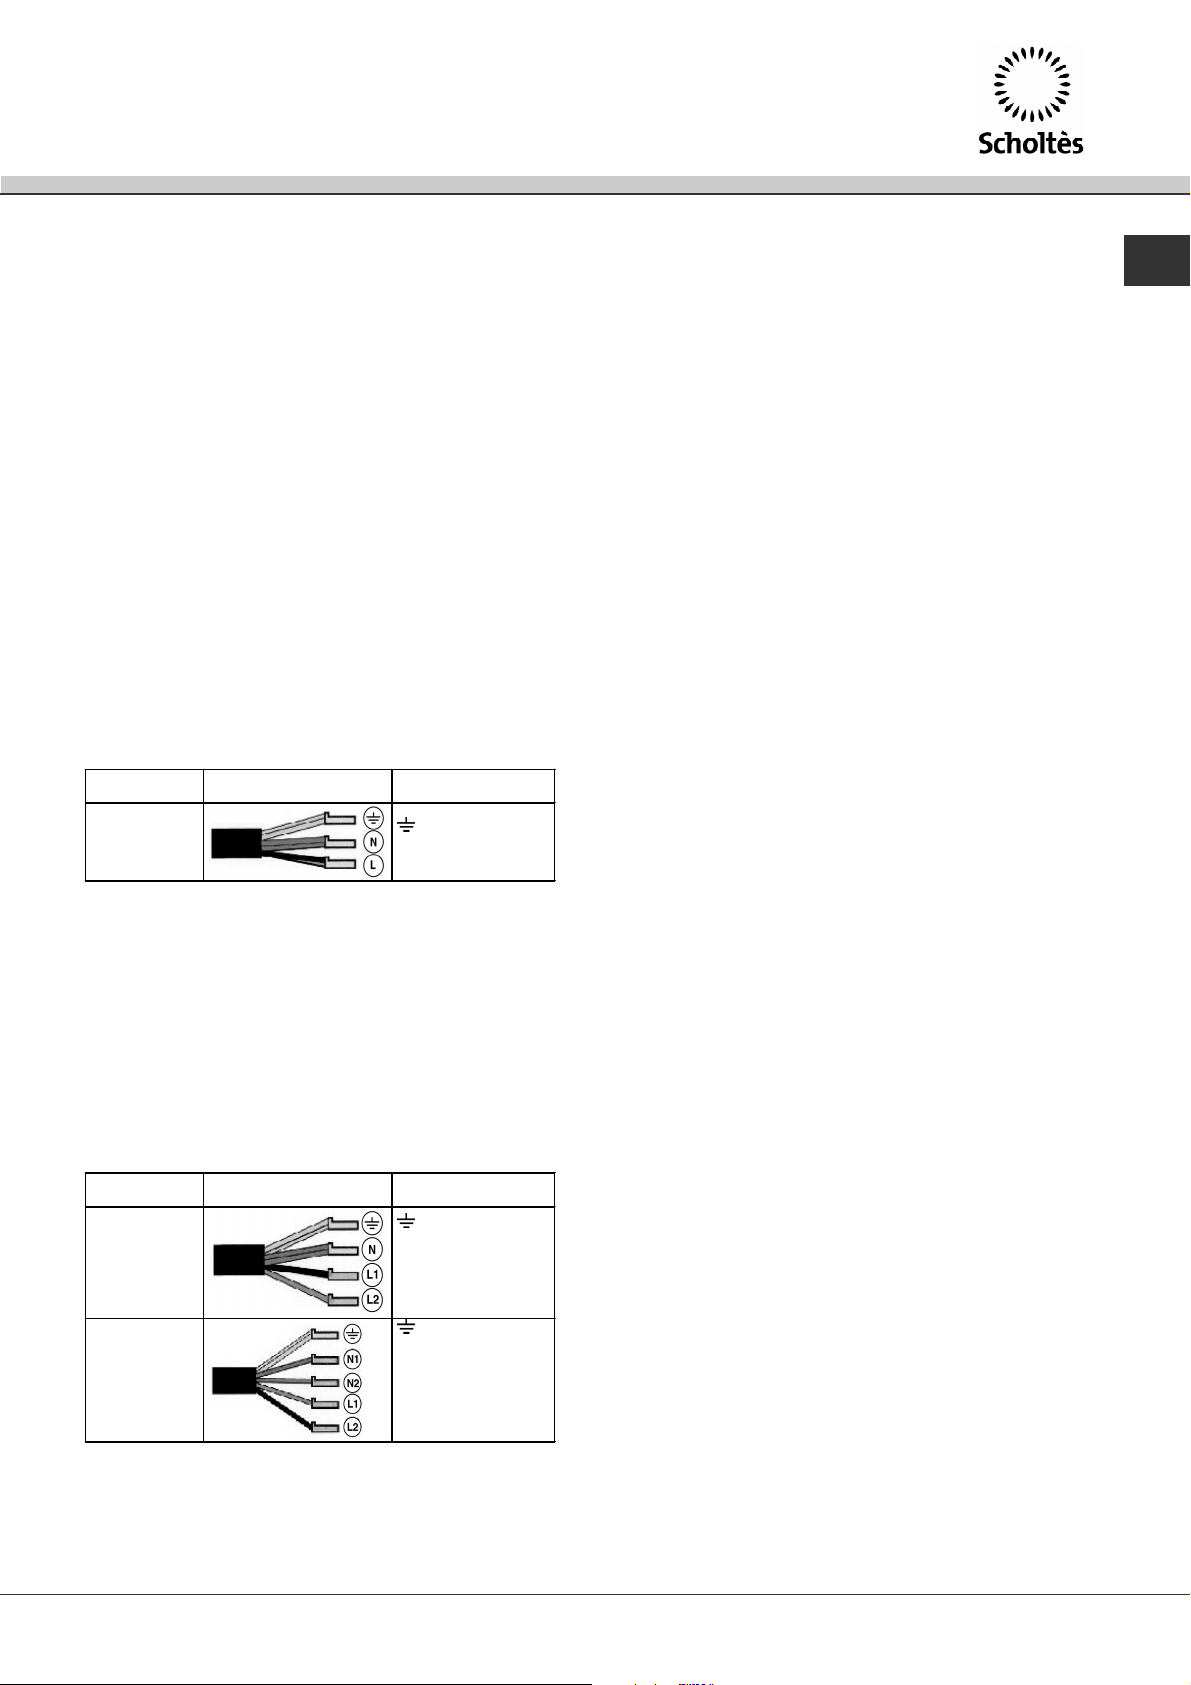
Tensione tipo e
frequenza rete
400V - 2+N ~
50 Hz
230V 3 ~
50Hz
400V - 2+2N ~
50 Hz
Cavo elettrico Collegamento fili
: giallo/verde;
N: i 2 fili blu insieme
L1: nero
L2: marrone
: giallo/verde;
N1: blu
N2: blu
L1: nero
L2: marrone
Allacciamento del cavo di alimentazione alla
rete
IT
! Lallacciamento elettrico del piano cottura e quello
di un eventuale forno da incasso devono essere
realizzati separatamente, sia per ragioni di sicurezza
elettrica sia per facilitare le operazioni di estrazione
del forno.
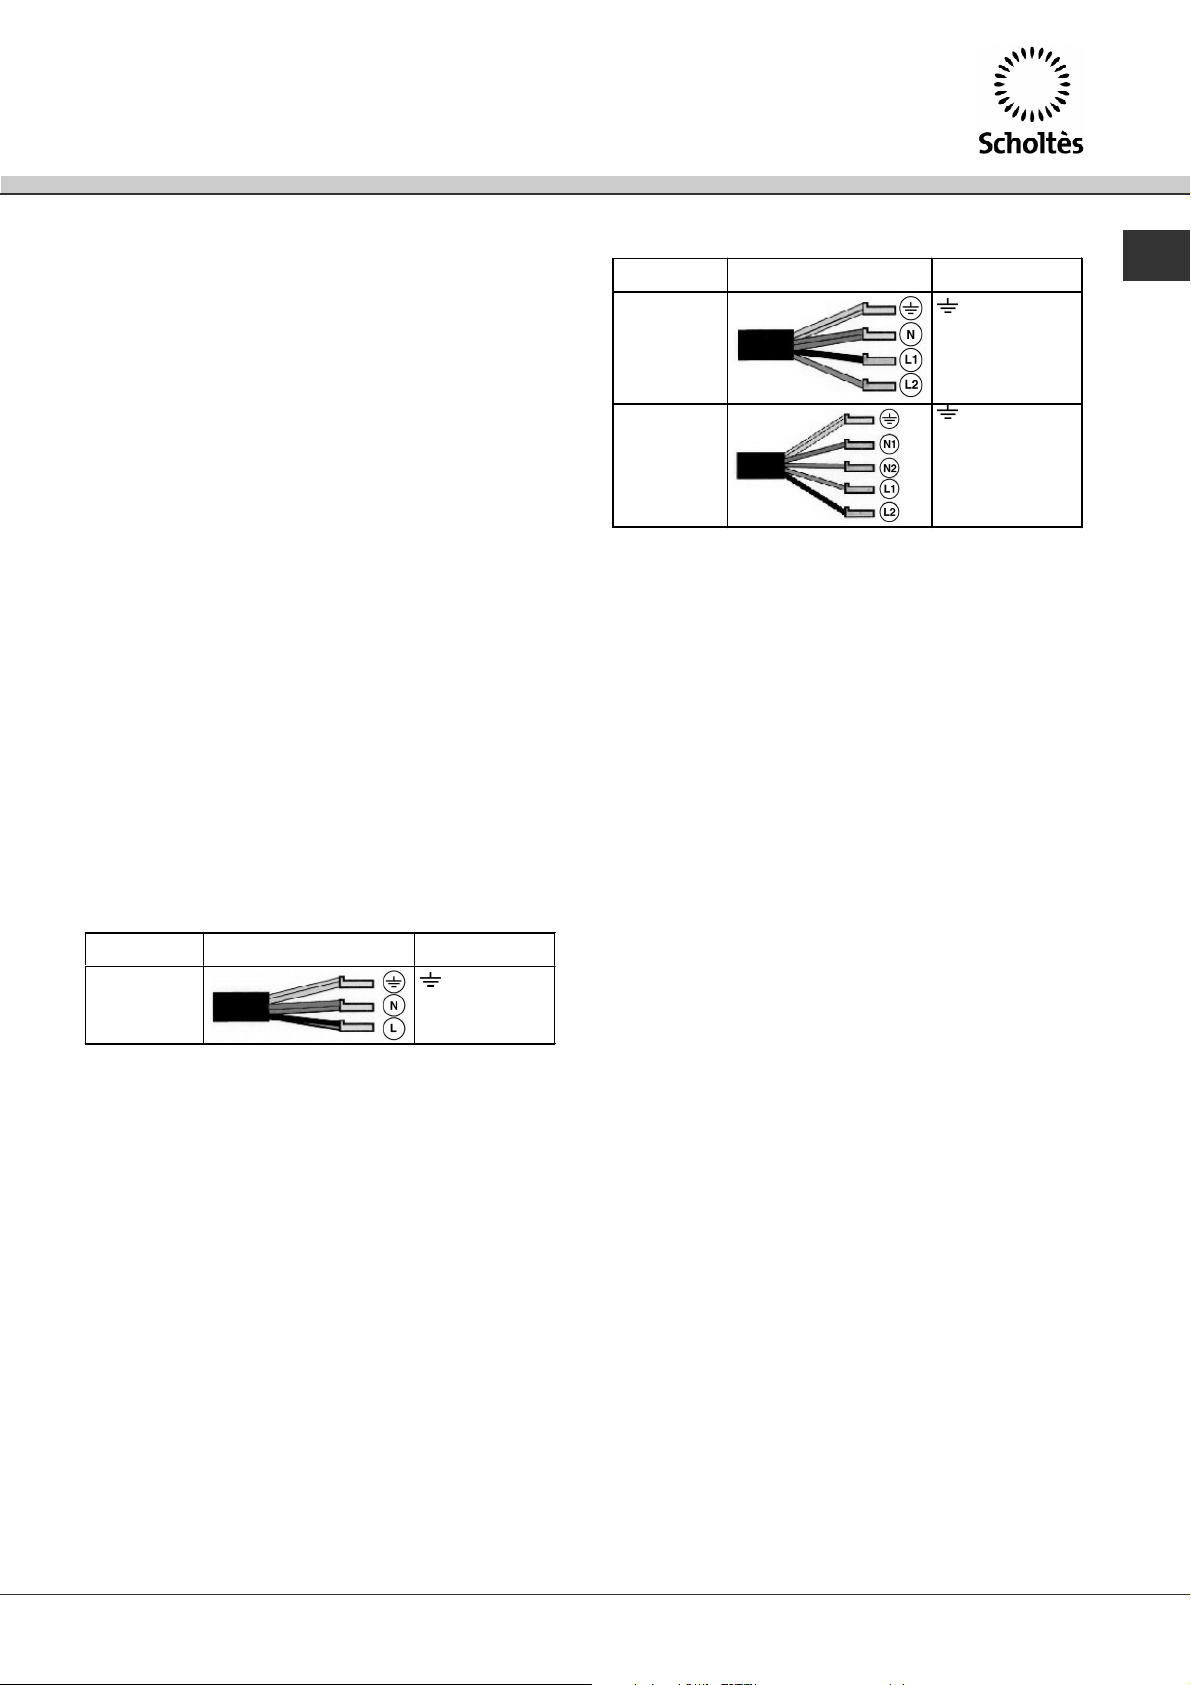
Collegamento monofase
Il piano è dotato di cavo di alimentazione già
collegato e predisposto per il collegamento
monofase. Effettuare lallaccio dei fili in accordo con
la tabella e i disegni che seguono:
Tensione tipo e
frequenza rete
230V 1+N ~
50 Hz
Cavo elettrico Collegamento fili
: giallo/verde;
N: i 2 fili blu insieme
L: marrone insieme
al nero
Altri tipi di collegamento
Se limpianto elettrico corrisponde a una delle
seguenti caratteristiche:
Tensione tipo e frequenza di rete
380V + N ~ 50 Hz
230V 3 ~ 50 Hz
380V + 2N ~ 50 Hz
Effettuare il collegamento dei fili in accordo con la
tabella e i disegni che seguono:
In caso di collegamento diretto alla rete è necessario
interporre tra lapparecchio e la rete un interruttore
onnipolare con apertura minima fra i contatti di 3 mm
dimensionato al carico e rispondente alle norme in
vigore (il filo di terra non deve essere interrotto
dallinterruttore). Il cavo di alimentazione deve
essere posizionato in modo tale che in nessun punto
superi di 50°C la temperatura ambiente.
! Linstallatore è responsabile del corretto
collegamento elettrico e dellosservanza delle norme
di sicurezza.
Prima di effettuare lallacciamento accertarsi che:
la presa abbia la messa a terra e sia a norma di
legge;
la presa sia in grado di sopportare il carico
massimo di potenza della macchina, indicato
nella
targhetta caratteristiche posta sullapparecchio;
la tensione di alimentazione sia compresa nei
valori della targhetta caratteristiche;
la presa sia compatibile con la spina
dellapparecchio. In caso contrario sostituire la
presa o la spina; non usare prolunghe e multiple.
! Ad apparecchio installato, il cavo elettrico e la
presa della corrente devono essere facilmente
raggiungibili.
! Il cavo non deve subire piegature o compressioni.
! Il cavo deve essere controllato periodicamente e
sostituito solo da tecnici autorizzati.
! Lazienda declina ogni responsabilità qualora
queste norme non vengano rispettate.
3
Page 4
Descrizione
/
dellapparecchio
Pannello di controllo
IT
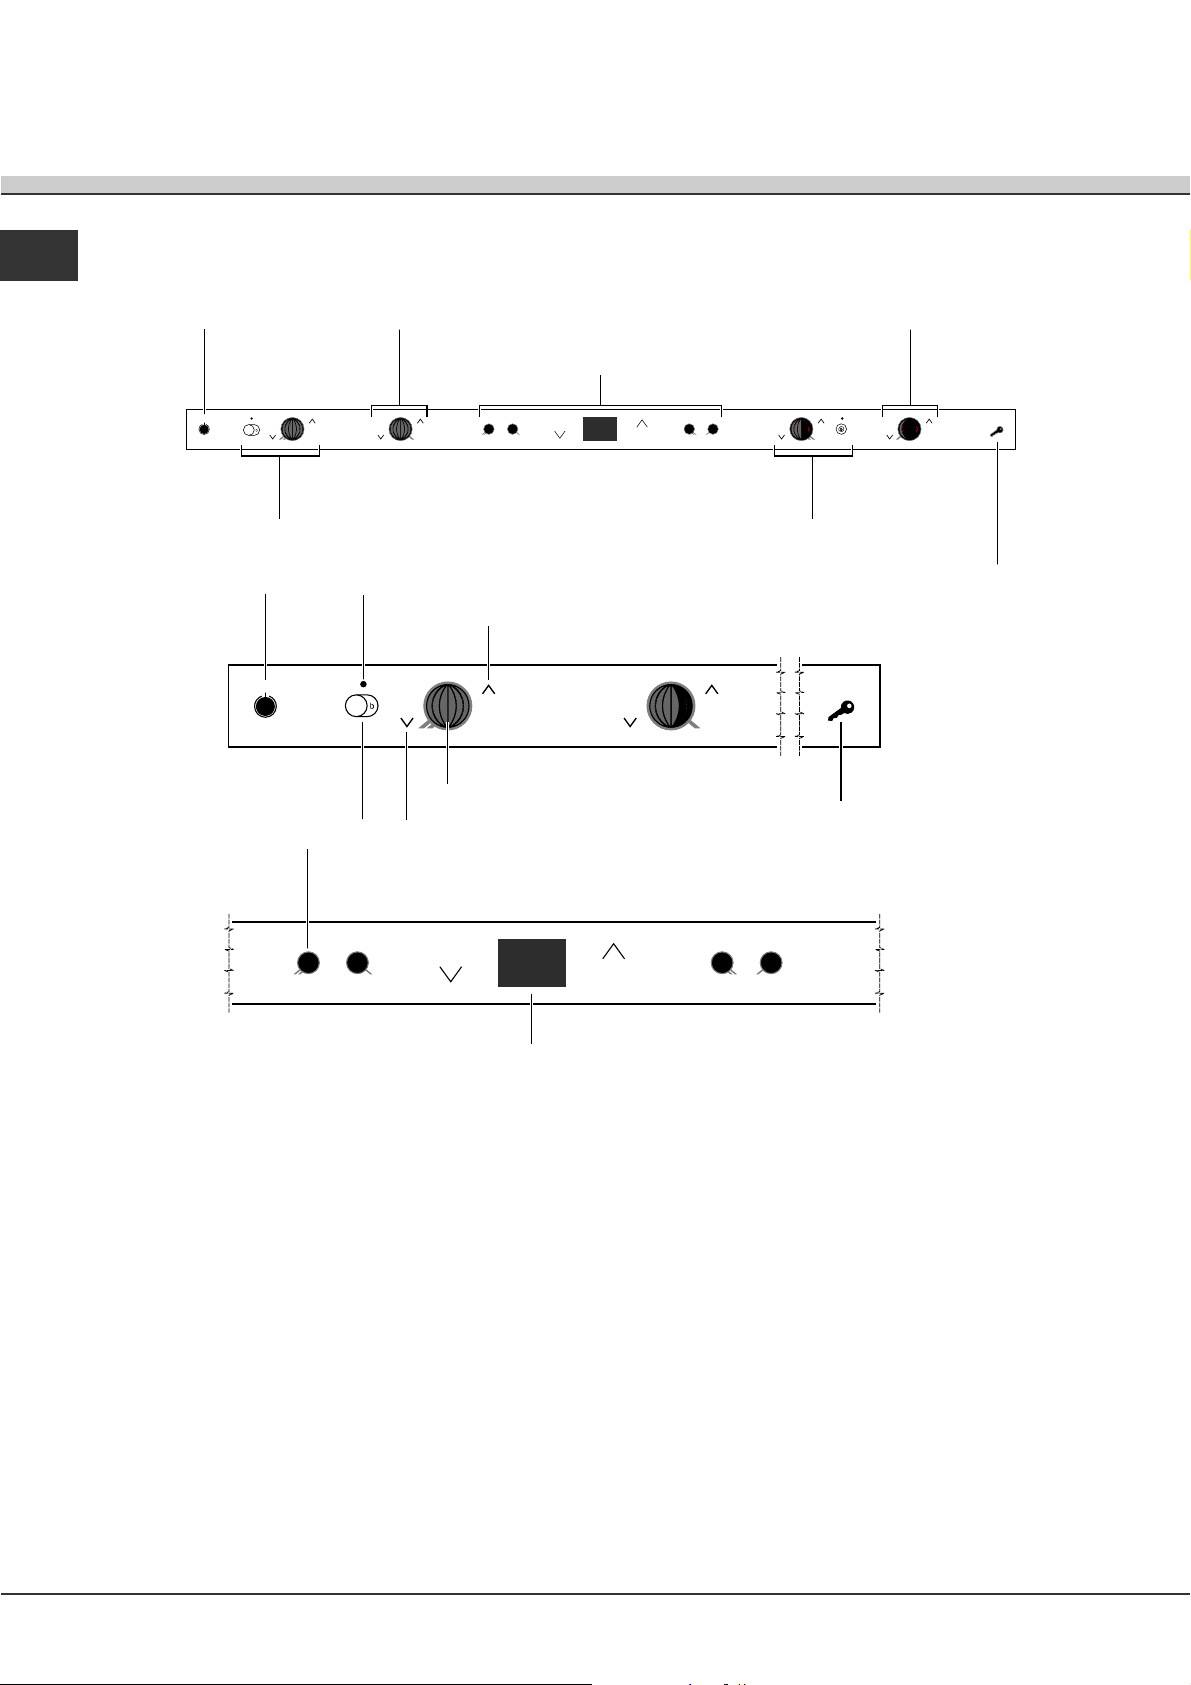
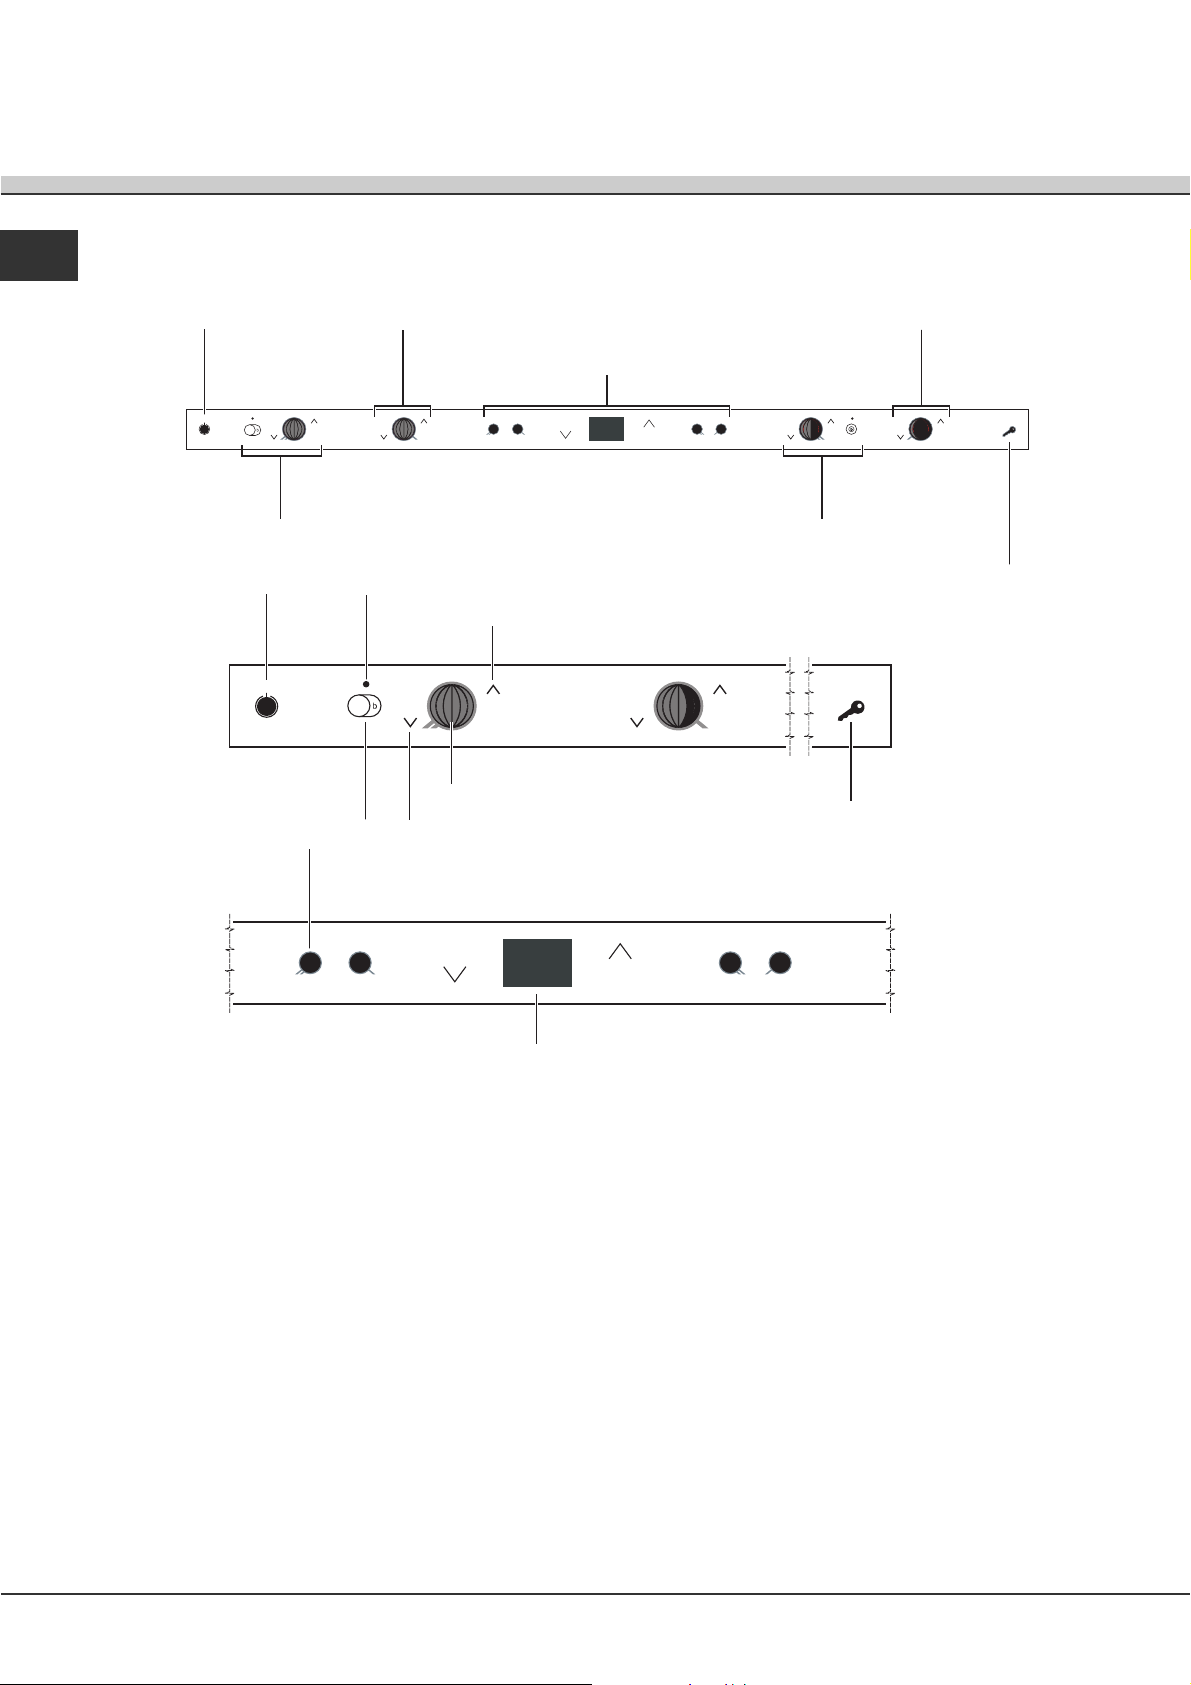
Tasto
ON/OFF
ZONA COTTURA
ANTERIORE SINISTRA
Tasto
ON/OFF
Tasto ZONA COTTURA
ESTENSIBILE/
BOOSTER
Tasto SELEZIONE PIASTRA
ZONA COTTURA
POSTERIORE SINISTRA
Spia ZONA COTTURA
ESTENSIBILE/
BOOSTER
Tasto DIMINUZIONE POTENZA
Tasto AUMENTO POTENZA
Indicatore POTENZA
ZONA COTTURA
ANTERIORE DESTRA
ZONA DISPLAY
ZONA COTTURA
POSTERIORE DESTRA
Tasto BLOCCO COMANDI/
Spia COMANDI BLOCCATI
Tasto BLOCCO COMANDI
Spia COMANDI BLOCCATI
DISPLAY
Tasto ON/OFF per accendere e spegnere
lapparecchio.
Tasto BOOSTER per accendere la
sovralimentazione - 3000 W - della zona di cottura
(vedi Avvio e utilizzo).
Spia BOOSTER segnala laccensione del booster
nella zona di cottura relativa.
Tasto ZONA COTTURA ESTENSIBILE per
accendere tutta la zona di cottura (vedi Avvio e
utilizzo).
Spia ZONA COTTURA ESTENSIBILE segnala
laccensione di tutta la zona di cottura relativa.
Tasto DIMINUZIONE POTENZA per regolare la
potenza e spegnere la piastra (vedi Avvio e
utilizzo).
Indicatore POTENZA segnala visivamente il livello
di calore raggiunto.
Tasto AUMENTO POTENZA per accendere la
piastra e regolare la potenza (vedi Avvio e
utilizzo).
Tasti SELEZIONE PIASTRA per entrare nei menù
di ciascuna zona di cottura (vedi Avvio e utilizzo).
Tasto BLOCCO DEI COMANDI per impedire
modifiche fortuite alle regolazioni del piano cottura
(vedi Avvio e utilizzo).
Spia COMANDI BLOCCATI segnala lavvenuto
blocco dei comandi (vedi Avvio e utilizzo).
4
Page 5
Descrizione tecnica delle zone di cottura
Il sistema a induzione è il procedimento di cottura più rapido che esista. A differenza delle piastre tradizionali,
non è la zona di cottura che si riscalda: il calore viene generato direttamente allinterno della pentola, la quale
dovrà possedere necessariamente un fondo in materiale ferromagnetico.
PIANI COTTURA TIL 641
Zone di cottura Potenza
Posteriore destro I 2400 W B 3000 W
Anteriore destro I 1200 W 600 W se*
Anteriore sinistro IO 1200-2400 W B 3000 W
Posteriore sinistro I 1200 W 600 W se*
Potenza max totale 7200 W
Legenda:
I = zona di cottura a induzione semplice
IO= zona di cottura a induzione ovale
B = booster: la zona di cottura può essere sovralimentata a 3000 W
* = la potenza massima è limitata a 600 W finché è attivo il booster nella zona di cottura posteriore relativa
(vedi Avvio e utilizzo).
IT
5
Page 6
Avvio e utilizzo
! La colla applicata sulle guarnizioni lascia alcune
IT
tracce di grasso sul vetro. Prima di utilizzare
lapparecchio, si raccomanda di eliminarle con un
prodotto specifico per la manutenzione non abrasivo.
Durante le prime ore di funzionamento è possibile
avvertire un odore di gomma, che comunque
scomparirà presto.
! Quando il piano cottura viene collegato
elettricamente, dopo acuni secondi viene emesso un
breve segnale acustico. Soltanto a questo punto è
possibile accendere il piano cottura.
Accensione del piano cottura
Laccensione del piano cottura avviene tenendo
premuto il tasto
per circa un secondo.
Accensione delle zone di cottura
Ciascuna zona di cottura viene azionata tramite il
dispositivo di regolazione della potenza composto
da due tasti (
Premere il tasto
impostare la potenza desiderata agendo sui tasti
e .
Per impostare direttamente la potenza massima,
premere brevemente il tasto
e ) ai lati dellindicatore di potenza.
per attivare la piastra, poi
.
Estensione delle zone di cottura
Tasto di estensione delle zone di cottura estendibili
(concentriche o ovali).
1. Premere il tasto
impostare la potenza desiderata agendo sui tasti
e .
2. Premere il tasto
di cottura in tutta la sua estensione.
Per tornare alla zona piccola, è sufficiente premere
nuovamente il tasto destensione.
La spia sopra al tasto zona di cottura estendibile
rimane accesa per tutto il periodo di utilizzo della
superficie grande.
per attivare la piastra, poi
o per accendere la zona
Spegnimento delle zone di cottura
Premere il tasto al lato dellindicatore di
potenza: la potenza della zona di cottura scende
progressivamente, fino allo spegnimento.
Oppure premere contemporaneamente i tasti
: la zona di cottura si spegne.
Programmazione della durata
di una cottura
! È possibile programmare tutte le zone di cottura
per una durata compresa tra 1 e 99 minuti.
e
Funzione booster
Per accelerare i tempi di riscaldamento, è possibile
attivare la funzione booster premendo il tasto
Questa funzione sovralimenta a 3000 W la zona di
cottura interessata.
Il booster si interrompe automaticamente dopo 4
minuti. Finché il booster è attivo, la zona
di cottura anteriore o posteriore relativa è limitata alla
potenza massima di 600 W (es: se è attivo il booster
nella piastra posteriore destra, si abbassa la
potenza della piastra anteriore destra). Potenze
superiori vengono segnalate dal lampeggiare dei
livelli di potenza in esubero che vengono ripristinati
al termine della funzione booster.
! Zone di cottura ovali: possono essere sovralimentate
soltanto se è attivato lintero ovale.
! Non mettere due pentole piccole sulle zone di cottura
ovali.
.
1. Premere uno dei tasti ai lati del
display corrispondente alla piastra che si intende
programmare.
2. Impostare la durata di cottura desiderata tramite i
tasti
e ai lati del display.
3. Confermare premendo il tasto
lati del display corrispondente alla piastra che si
intende programmare.
Il conto alla rovescia del timer ha inizio
immediatamente. La fine della cottura programmata
è indicata da un segnale acustico (per la durata di 1
minuto) e la zona di cottura si spegne.
Ripetere la procedura sopra descritta per ogni
piastra che si intende programmare.
Visualizzazione in caso di programmazione
multipla
Quando una o più piastre sono state programmate, il
display visualizza il tempo rimanente della piastra
che è più vicina al termine del tempo programmato,
indicandone la posizione con la spia
ai
6
Page 7
corrispondente accesa. Le spie
delle altre piastre programmate sono illuminate ma
con intensità minore.
Per visualizzare il tempo restante di una piastra
programmata, premere uno dei tasti
relativo alla zona di cottura desiderata: il display
visualizzerà il tempo restante.
Per disattivare la modalità DEMO:
1. Accendere il piano cottura
2. Premere in sequenza i tasti
successivamente il tasto
;
e
per 2 secondi. Viene
emesso un segnale acustico e il display
visualizza le scritte dE OF;
3. successivamente il piano funzionerà normalmente.
IT
Modificare la programmazione
1. Premere il tasto
relativo alla zona
di cottura che si intende modificare.
2. Agire sui tasti
e ai lati del display per
impostare il nuovo tempo.
3. Confermare premendo il tasto
relativo alla zona di cottura.
Per cancellare una programmazione, agire come
sopra. Al punto 2 premere contemporaneamente
i tasti
e ai lati del display: la programmazione si
azzera e il display esce dalla modalità
programmazione.
Blocco dei comandi
E possibile bloccare i comandi per evitare il rischio
di modifiche fortuite alle regolazioni (bambini,
operazioni di pulizia, ecc.). Premendo il tasto
3 secondi i comandi si bloccano e la spia COMANDI
BLOCCATI si illumina. Per tornare ad agire sulle
regolazioni (es. interrompere la cottura) è necessario
sbloccare i comandi: premere il tasto
per 3
secondi e i comandi si sbloccano.
Quando il blocco dei comandi è attivo è comunque
possibile spegnere il piano di cottura. In questo
caso la spia COMANDI BLOCCATI resta accesa fino
alla disattivazione.
per
Spegnimento del piano cottura
Premendo il tasto lapparecchio si spegne.
Se i comandi dellapparecchio sono stati bloccati,
continueranno ad essere bloccati anche dopo aver
riacceso il piano di cottura. Per poter riaccendere il
piano è necessario prima sbloccare i comandi.
Consigli pratici per luso
dellapparecchio
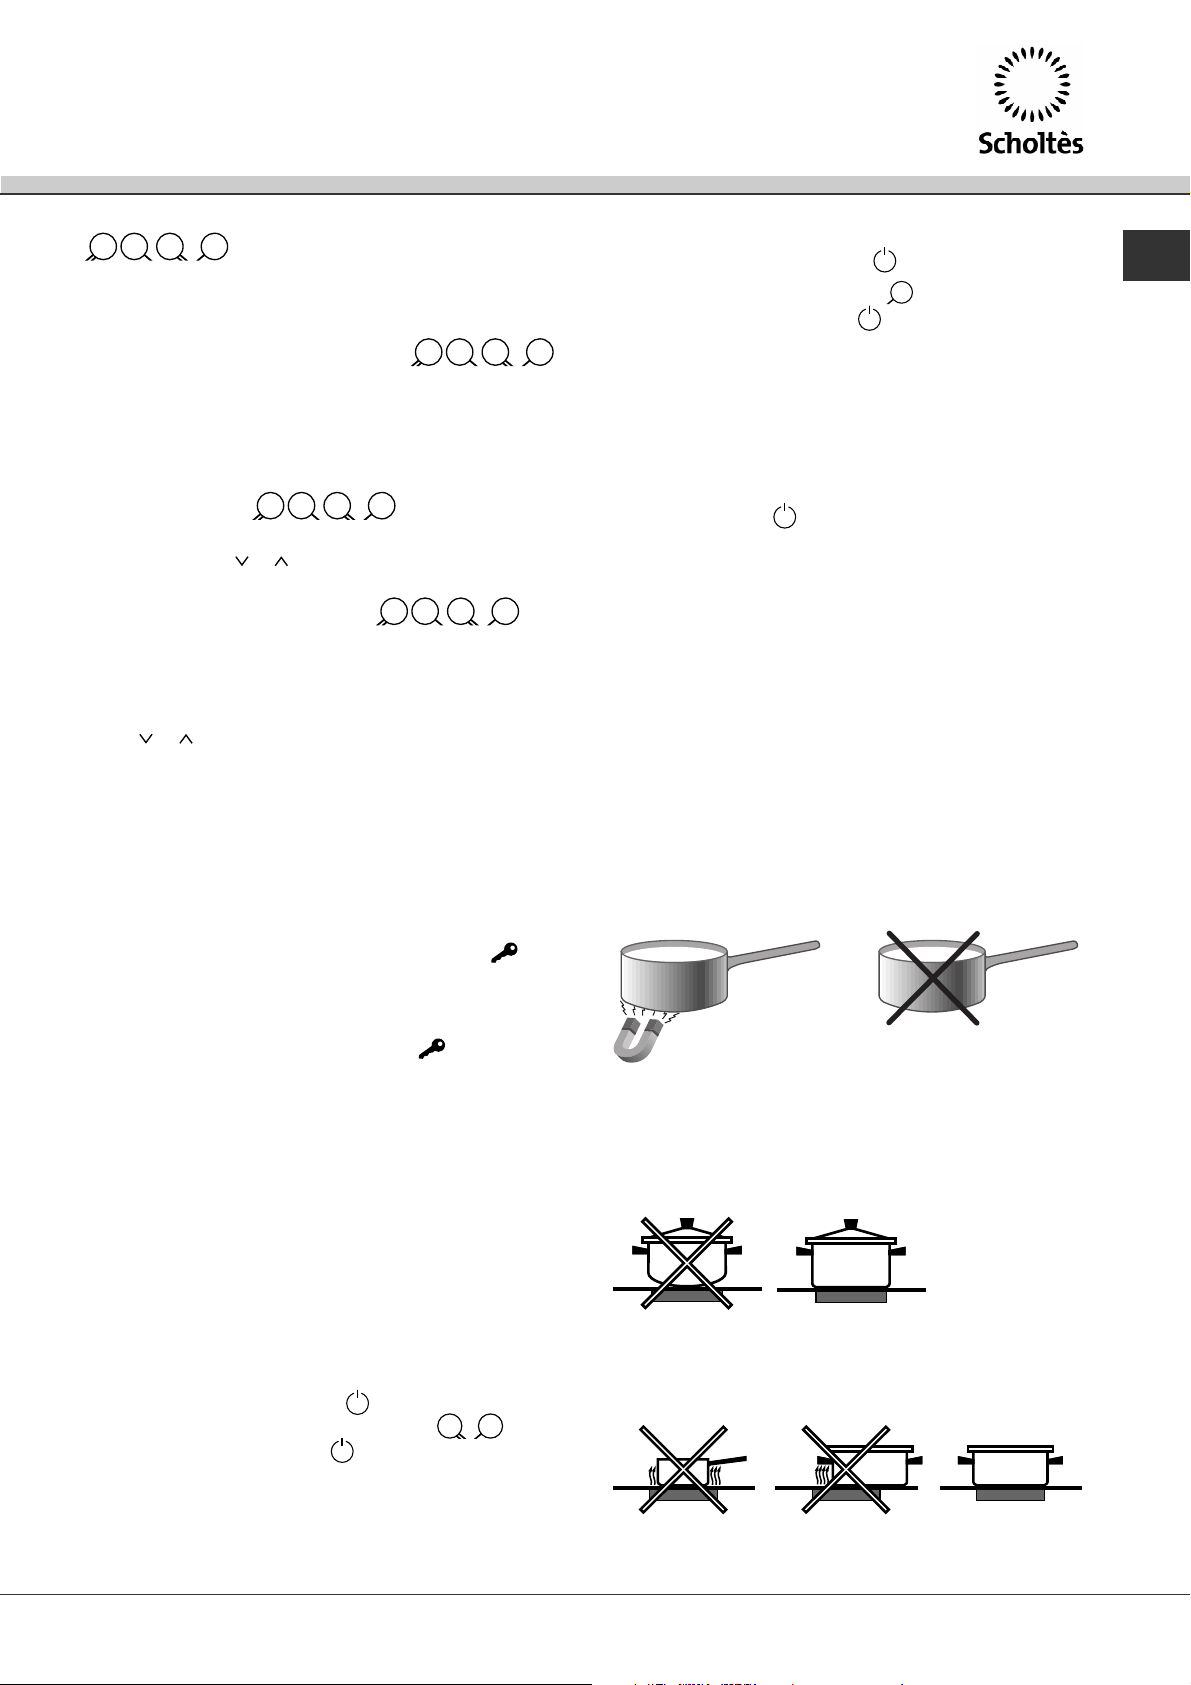
! Adoperare recipienti di cottura il cui materiale di
fabbricazione sia compatibile con il principio
dellinduzione (materiale ferromagnetico). Si
raccomanda luso di pentole in: ghisa, acciaio
smaltato o inox speciale per induzione. Per
sincerarsi della compatibilità di un recipiente è
sufficiente fare una prova con una calamita.
MATERIALE ADATTO MATERIALE NON ADATTO
Ghisa
Acciaio smaltato
Inox speciale
Ceramica, Inox non magnetico
Inoltre, per ottenere le migliori prestazioni dal piano
di cottura:
Adoperare pentole con fondo piatto e di elevato
spessore, per essere certi che aderiscano
perfettamente alla zona riscaldante.
Rame,
Alluminio, V etro , Terracotta,
Modalità Demo
Il piano ha la possibilità di funzionare in modalità
DEMO: si disattivano tutti gli elementi riscaldanti,
lasciando però operativi i comandi.
Per attivare la modalità DEMO:
1. Accendere il piano cottura
2. Premere contemporaneamente i tasti
successivamente il tasto
emesso un segnale acustico e il display
visualizza le scritte dE ON;
3. il piano si trova quindi in modalità Demo
;
e
per 6 secondi. Viene
Adoperare pentole di diametro sufficiente a
coprire completamente la zona riscaldante, in
modo da garantire lo sfruttamento di tutto il calore
disponibile.
7
Page 8

Accertarsi che il fondo delle pentole sia sempre
IT
perfettamente asciutto e pulito, per garantire la
corretta aderenza e una lunga durata, sia alle
zone di cottura che alle pentole stesse.
Evitare di utilizzare le stesse pentole utilizzate sui
bruciatori a gas: la concentrazione di calore sui
bruciatori a gas può deformare il fondo della
pentola, che perde aderenza.
Interruttore di sicurezza
Lapparecchio è dotato di un interruttore di sicurezza
che spegne le zone di cottura automaticamente
quando viene raggiunto un tempo limite di utilizzo a
un dato livello di potenza. Durante linterruzione di
sicurezza, il display indica 0.
Esempio: la piastra posteriore destra è impostata su
5, mentre la piastra anteriore sinistra su 2. La
posteriore destra si spegnerà dopo 3 ore di
funzionamento, la anteriore sinistra dopo 10 ore.
Dispositivi di sicurezza
Rilevamento dei recipienti
Ciascuna zona di cottura è provvista di un
dispositivo di rilevamento della pentola. La piastra
emette calore unicamente in presenza di una pentola
di dimensioni adeguate alla zona di cottura stessa.
La spia lampeggiante può indicare:
una pentola incompatibile
una pentola di diametro insufficiente
il sollevamento della pentola
Indicatori di calore residuo
Dopo la rimozione del recipiente da una zona di
cottura finché la temperatura della zona stessa
rimane superiore a 60°C un elemento dellindicatore
di potenza lampeggia per prevenire il rischio di
ustioni.
Surriscaldamento
In caso di surriscaldamento dei componenti
elettronici, il piano cottura si spegne
automaticamente e sul display appare . Questo
messaggio scompare e il piano torna utilizzabile non
appena la temperatura è scesa a un livello
accettabile.
Segnale acustico
Alcune anomalie, quali:
un oggetto (pentola, posata, ecc.) posto per oltre
10 secondi sullarea dei comandi,
un versamento sullarea dei comandi,
una pressione esercitata a lungo su un tasto,
possono provocare lemissione di un segnale
acustico. Rimuovere la causa del
malfunzionamento per interrompere il segnale
acustico. In queste situazioni i comandi si
bloccano automaticamente: per sbloccarli
premere il tasto [icona chiave], le impostazioni
vengono mantenute. Se la causa dellanomalia
non viene rimossa, il segnale acustico persiste e
il piano si spegne.
8
Page 9
Precauzioni e consigli
! Lapparecchio è stato progettato e costruito
in conformità alle norme internazionali di sicurezza.
Queste avvertenze sono fornite per ragioni di sicurezza e
devono essere lette attentamente.
Questa apparecchiatura è conforme alle
seguenti Direttive Comunitarie:
- 73/23/CEE del 19/02/73 (Bassa Tensione) e successive
modificazioni
- 89/336/CEE del 03/05/89 (Compatibilità
Elettromagnetica) e successive modificazioni
- 93/68/CEE del 22/07/93 e successive modificazioni.
- 2002/96/CE
Sicurezza generale
! Controllare che la presa d'aria tramite la griglia del
ventilatore non sia mai ostruita. Il piano da incasso, infatti,
necessita di una corretta aerazione per il raffreddamento
dei componenti elettronici.
! È sconsigliata l'installazione di un piano cottura a
induzione sopra un frigorifero sottotavolo (calore) o sopra
una lavatrice (vibrazioni). Lo spazio necessario per la
ventilazione degli elementi elettronici sarebbe infatti
insufficiente.
Lapparecchio è stato concepito per un uso di tipo non
professionale allinterno dellabitazione.
Lapparecchio non va installato allaperto, nemmeno se
lo spazio è riparato, perché è molto pericoloso lasciarlo
esposto a pioggia e temporali.
Non toccare la macchina a piedi nudi o con le mani o i
piedi bagnati o umidi.
Lapparecchio deve essere usato per cuocere alimenti,
solo da persone adulte e secondo le istruzioni riportate
in questo libretto. Non utilizzare
il piano come superficie di appoggio, né come tagliere.
Il piano in vetroceramica è resistente agli urti
meccanici, tuttavia può incrinarsi (o eventualmente
frantumarsi) se colpito con un oggetto appuntito, quale
un utensile. In questi casi, scollegare immediatamente
lapparecchio dalla rete di alimentazione e rivolgersi
allAssistenza.
Se la superficie del piano è incrinata, spegnere
l'apparecchio per evitare la possibilità di scosse
elettriche.
Evitare che il cavo di alimentazione di altri
elettrodomestici entri in contatto con parti calde
del piano cottura.
Non dimenticare che la temperatura delle zone di
cottura rimane piuttosto elevata per almeno trenta
minuti dopo lo spegnimento. Il calore residuo è
segnalato anche da un indicatore (vedi Avvio e utilizzo).
Tenere a debita distanza dal piano cottura qualsiasi
oggetto che potrebbe fondere, ad esempio oggetti in
plastica, in alluminio o prodotti con un elevato
contenuto di zucchero. Fare particolare attenzione a
imballaggi e pellicole in plastica o alluminio:
se dimenticati sulle superfici ancora calde o tiepide
possono causare un grave danno al piano.
Assicurarsi che i manici delle pentole siano sempre
rivolti verso linterno del piano cottura per evitare che
vengano urtati accidentalmente.
Non staccare la spina dalla presa della corrente
tirando il cavo, bensì afferrando la spina.
Non fare pulizia o manutenzione senza aver prima
staccato la spina dalla rete elettrica.
Non posare oggetti metallici (coltelli, cucchiai, coperchi,
ecc.) sul piano perchè possono diventare caldi.
Avvertenza per i portatori di pacemaker o altri
dispositivi medici impiantabili attivi:
Il piano cottura è conforme a tutte le normative vigenti
in materia di interferenze elettromagnetiche.
Questo prodotto è pertanto perfettamente rispondente
a tutti i requisiti di legge (direttive 89/336/CEE). È stato
progettato in modo da non creare inferenze ad altre
apparecchiature elettriche utilizzate, a condizione che
anche queste siano conformi alle suddette normative.
Il piano cottura a induzione genera campi
elettromagnetici a breve portata.
Per evitare ogni rischio di interferenze tra il piano di
cottura e il pacemaker, quest'ultimo dovrà essere
realizzato in conformità alle normative vigenti.
A tale riguardo, possiamo garantire unicamente la
conformità del nostro prodotto. Per informazioni sulla
conformità o eventuali problemi di incompatibilità, si
prega di rivolgersi al proprio medico curante o alla casa
produttrice del pacemaker.
Smaltimento
Smaltimento del materiale di imballaggio: attenersi alle
norme locali, così gli imballaggi potranno essere
riutilizzati.
La direttiva Europea 2002/96/CE sui rifiuti di
apparecchiature elettriche ed elettroniche (RAEE),
prevede che gli elettrodomestici non debbano essere
smaltiti nel normale flusso dei rifiuti solidi urbani. Gli
apparecchi dismessi devono essere raccolti
separatamente per ottimizzare il tasso di recupero e
riciclaggio dei materiali che li compongono ed impedire
potenziali danni per la salute e lambiente. Il simbolo
del cestino barrato è riportato su tutti i prodotti per
ricordare gli obblighi di raccolta separata.
Per ulteriori informazioni, sulla corretta dismissione degli
elettrodomestici, i detentori potranno rivolgersi al
servizio pubblico preposto o ai rivenditori.
IT
9
Page 10

Manutenzione e cura
Escludere la corrente elettrica
IT
Prima di ogni operazione isolare lapparecchio dalla
rete di alimentazione elettrica.
Pulire lapparecchio
! Evitare luso di detergenti abrasivi o corrosivi, quali i
prodotti in bombolette spray per barbecue e forni,
smacchiatori e prodotti antiruggine, i detersivi in
polvere e le spugne con superficie abrasiva: possono
graffiare irrimediabilmente la superficie.
! Non utilizzare mai pulitori a vapore o ad alta
pressione per la pulizia dellapparecchio.
Per una manutenzione ordinaria, è sufficiente lavare
il piano con una spugna umida, asciugando quindi
con una carta assorbente per cucina.
Se il piano è particolarmente sporco, strofinare con
un prodotto specifico per la pulizia delle superfici in
vetroceramica, sciacquare e asciugare.
Per rimuovere gli accumuli di sporco più consistenti
servirsi dellapposito raschietto fornito in dotazione.
Intervenire non appena possibile, senza attendere
che lapparecchio si sia raffreddato, per evitare
lincrostazione dei residui. Eccellenti risultati si
possono ottenere usando una spugnetta in filo
dacciaio inossidabile - specifica per piani in
vetroceramica - imbevuta di acqua e sapone.
Telaio in acciaio inox
(solo nei modelli con cornice)
Lacciaio inossidabile può macchiarsi per effetto
di unacqua molto calcarea lasciata per un periodo di
tempo prolungato a contatto dello stesso oppure a
causa di prodotti per la pulizia contenenti fosforo. Si
consiglia di sciacquare abbondantemente e
asciugare con cura dopo la pulizia del piano. In caso
di versamenti dacqua, intervenire rapidamente
asciugando con cura.
! Alcuni piani cottura hanno una cornice in alluminio
somigliante allacciaio inox. Non utilizzare prodotti per
la pulizia e lo sgrassaggio non idonei per lalluminio.
Smontare il piano
Nel caso si renda necessario smontare il piano
cottura:
1. togliere le viti che fissano le molle di centraggio sui lati;
2. allentare le viti dei ganci di fissaggio sugli angoli;
3. estrarre il piano cottura dal vano del mobile.
! Raccomandiamo di evitare di accedere ai
meccanismi interni per tentare una riparazione.
In caso di guasto, contattare lAssistenza.
! Il raschietto in dotazione è tagliente: utilizzarlo con
attenzione.
In caso sul piano cottura si fossero accidentalmente
fusi oggetti o materiali quali plastica o zucchero,
rimuoverli con il raschietto immediatamente, finché
la superficie è ancora calda.
Una volta pulito, il piano può essere trattato con
un prodotto specifico per la manutenzione e la
protezione: la pellicola invisibile lasciata da questo
prodotto protegge la superficie in caso di
scolamenti durante la cottura. Si raccomanda
di eseguire queste operazioni con lapparecchio
tiepido o freddo.
Ricordarsi sempre di risciacquare con acqua pulita
e asciugare accuratamente il piano: i residui di
prodotti potrebbero infatti incrostarsi durante la
successiva cottura.
10
Page 11
Operating Instructions
Contents
Installation, 12-13
IT
Italiano,1
GB
English, 11
DENL
FR
Français, 21
Positioning
Electrical connection
Description of the appliance, 14-15
Control panel
Technical description of the cooking zones
HOB
GB
31
TIL 641
Deutsch, 41Nederlands,
Start-up and use, 16-18
Switching on the hob
Switching on the cooking zones
Booster function
Extending the cooking zones
Switching off the cooking zones
Programming the cooking time
Control panel lock
Demo mode
Switching off the hob
Practical advice on using the appliance
Safety devices
Precautions and tips, 19
General safety
Disposal
Care and maintenance, 20
Switching the appliance off
Cleaning the appliance
Disassembling the hob
Page 12
Installation
GB
! Before operating your new appliance please read this
instruction booklet carefully. It contains important
information concerning the safe operation, installation
and maintenance of the appliance.
! Please keep these operating instructions for future
reference. Pass them on to possible new owners of the
appliance.
Positioning
! Keep all packaging materials out of the reach of
children. It may present a choking or suffocation hazard
(see Precautions and tips).
! The appliance must be installed by a qualified
professional in accordance with the instructions
provided. Incorrect installation may damage property or
cause harm to people or animals.
Built-in appliance
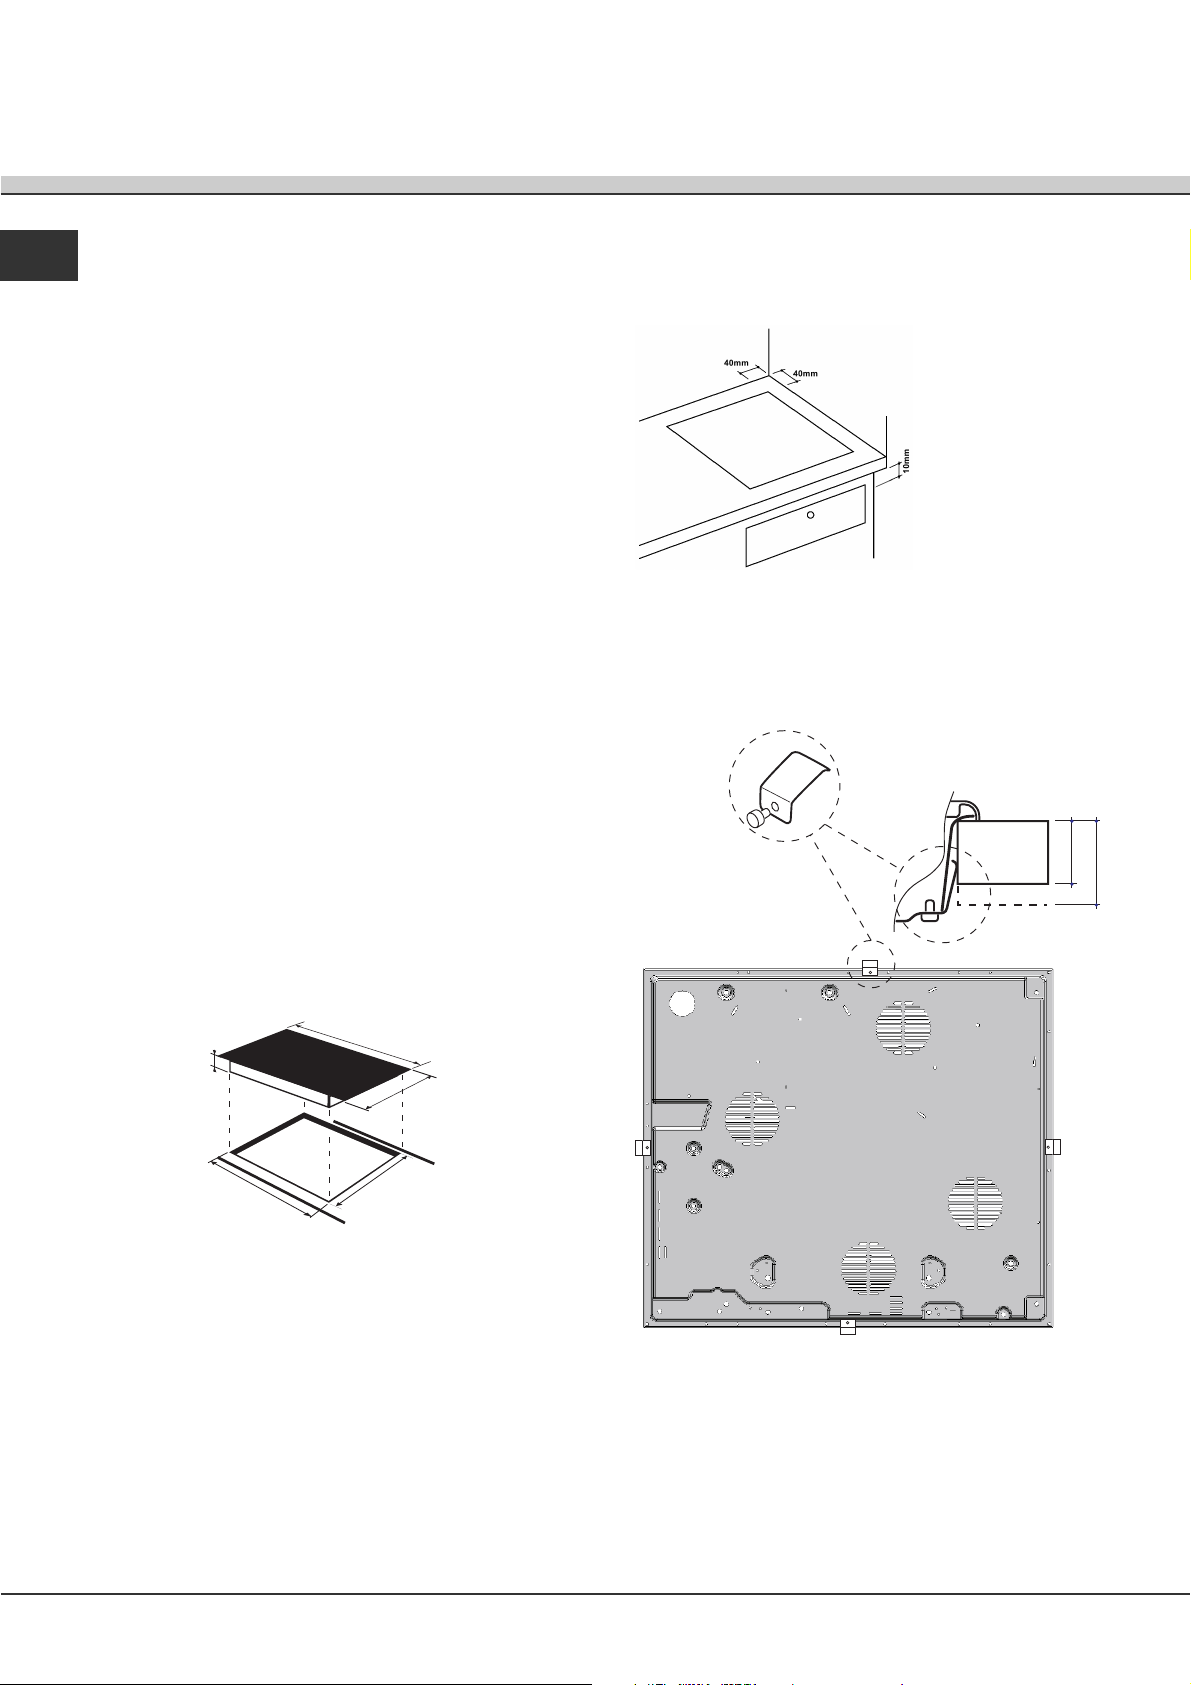
Use the appropriate cabinet to ensure that the appliance
functions properly.
The supporting surface must be heat-resistant up
to a temperature of approximately 100°C.
If the appliance is to be installed above an oven,
the oven must have a forced ventilation cooling
system.
Avoid installing the hob above a dishwasher: if
this cannot be avoided, place a waterproof
separation device between the two appliances.
The cabinet compartment must possess the
following measurements:
Ventilation
To allow adequate ventilation and to avoid overheating
of the surrounding surfaces the hob should be positioned
as follows:
At a minimum
distance of 40 mm
from the back panel
or any other vertical
surfaces.
So that a minimum
distance of 10 mm
is maintained
between the
installation cavity
and the cabinet
underneath.
Fixing
The appliance must be installed on a perfectly level
supporting surface.
Any deformities caused by improper fixing could change
the features and the operation of the hob.
FRONT OF HOB
KITCHEN
WORKTOP
30
HOB FROM BELOW
40
640
4
555
520
45
Fix the hob as follows:
1. Use short flat-bottomed screws to fix the 4 alignment
springs in the holes provided at the central point of each
side of the hob.
2. Place the hob in the cavity, make sure it is in a central
position and push down on the whole perimeter until the
hob is stuck to the supporting surface.
12
Page 13
! The screws for the alignment springs must remain
accessible.
Connecting the electricity supply cable to the
mains
GB
! In order to adhere to safety standards, the appliance
must not come into contact with electrical parts once it
has been installed.
! All parts that ensure the safe operation of the appliance
must not be removable without the aid of a tool.
Electrical connection
! The electrical connection of the hob and any built-in
oven must be carried out separately, both for safety
purposes and to make extracting the oven easier.
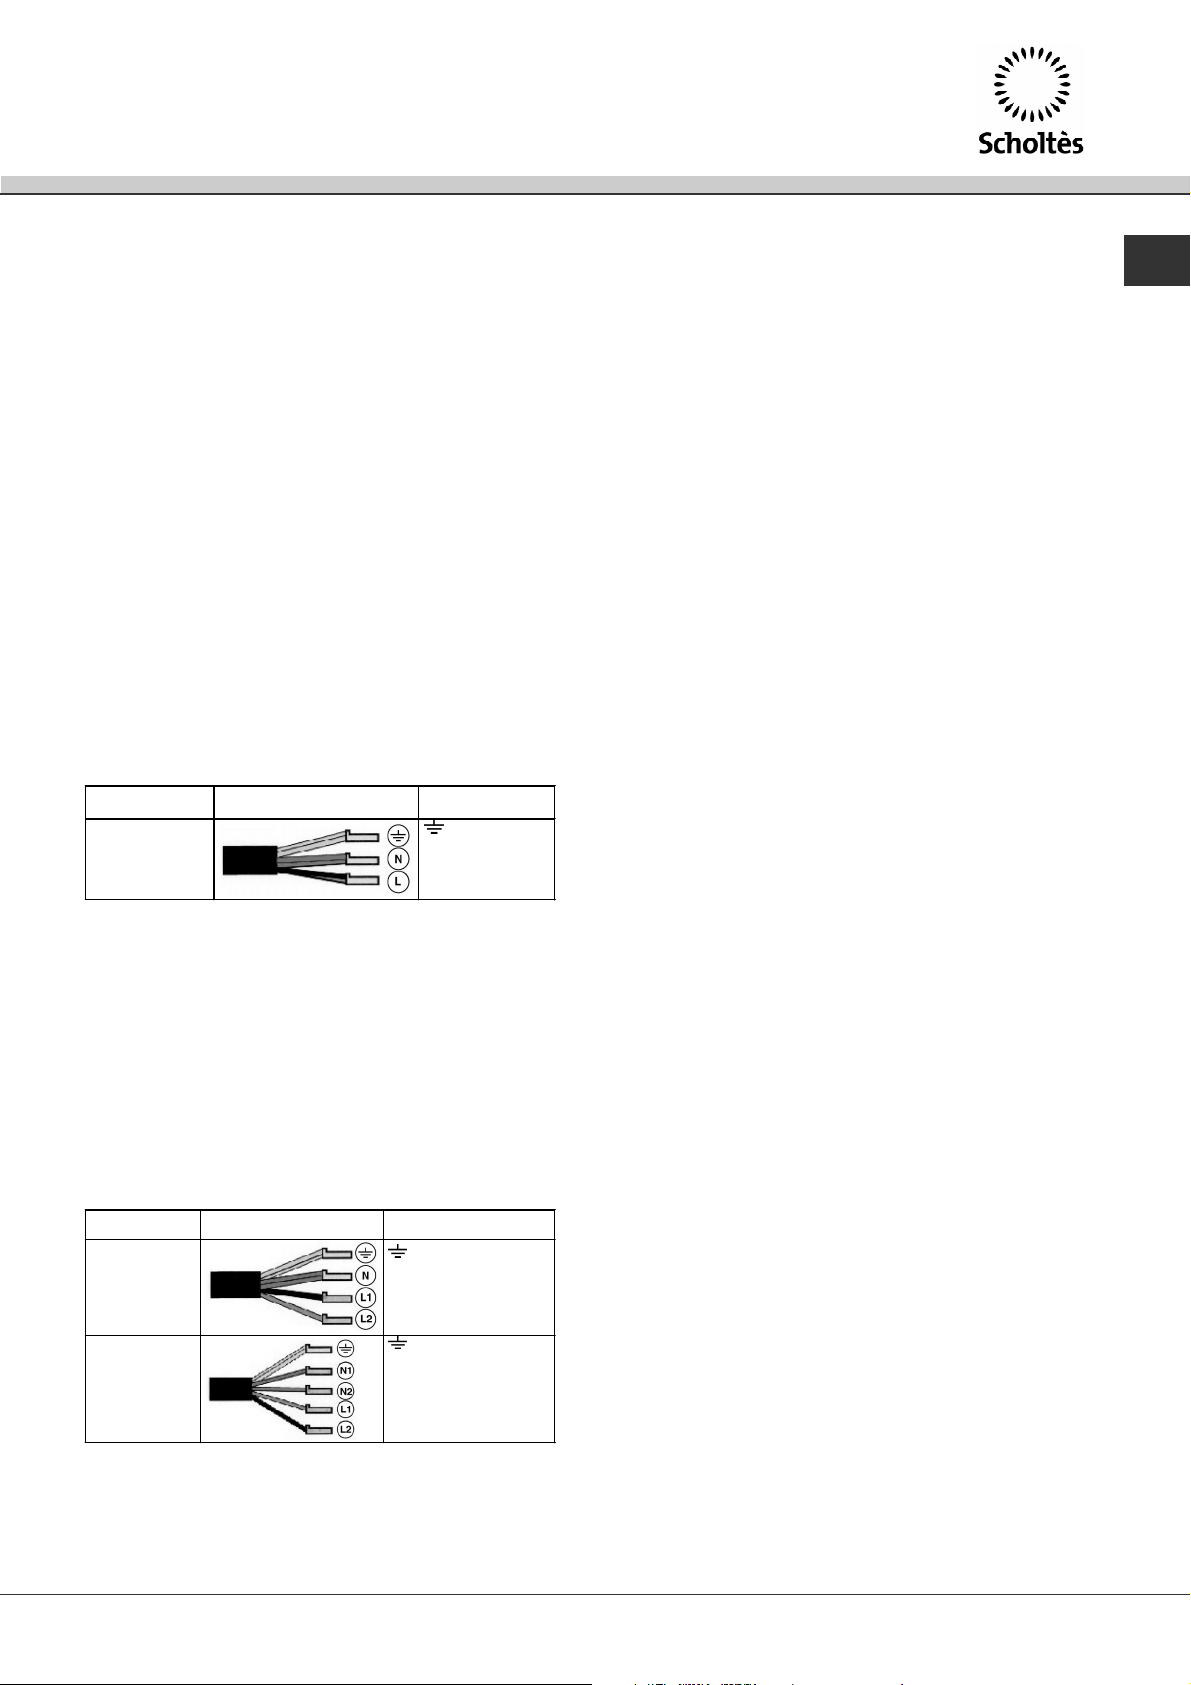
Single-phase connection
The hob is equipped with a pre-connected electricity
supply cable, which is designed for single-phase
connection. Connect the wires in accordance with
the instructions given in the following table and
diagrams:
Voltage and
mains frequency
230V 1+N ~
50 Hz
Other types of connection
Electrical cable Wire connection
: yellow/green;
N: the two blue wires
together
L: brown and black
together
The appliance must be directly connected to the mains
using an omnipolar circuit-breaker with a minimum
contact opening of 3 mm installed between the
appliance and the mains, suitable for the load indicated
and complying with current electrical regulations (the
earthing wire must not be interrupted by the circuit-
breaker). The supply cable must not come into contact
with surfaces with temperatures higher than 50°C.
! The installer must ensure that the correct electrical
connection has been made and that it is fully compliant
with safety regulations.
Before connecting the appliance to the power supply,
make sure that:
The appliance is earthed and the plug is compliant
with the law.
The socket can withstand the maximum power of the
appliance, which is indicated on the data plate
located on the appliance itself.
The voltage is in the range between the values
indicated on the data plate.
The socket is compatible with the plug of the
appliance. If the socket is incompatible with the plug,
ask an authorised technician to replace it. Do not use
extension cords or multiple sockets.
! Once the appliance has been installed, the power
supply cable and the electrical socket must be easily
accessible.
If the mains supply corresponds with one of the
following:
Voltage and mains frequency
380V +N ~ 50 Hz
230V 3 ~ 50 Hz
380V + 2N ~ 50 Hz
Connect the wires in accordance with the instructions
given in the following table and diagrams:
Voltage and
mains frequency
400V - 2+N ~
50 Hz
230V 3 ~
50Hz
400V - 2+2N ~
50 Hz
Electrical cable Wire connection
: yellow/green;
N: the two blue wires together
L1: black
L2: brown
: yellow/green;
N1: blue
N2: blue
L1: black
L2: brown
! The cable must not be bent or compressed.
! The cable must be checked regularly and replaced by
authorised technicians only.
! The manufacturer declines any liability should these
safety measures not be observed.
13
Page 14
Description
of the appliance
GB
Control panel
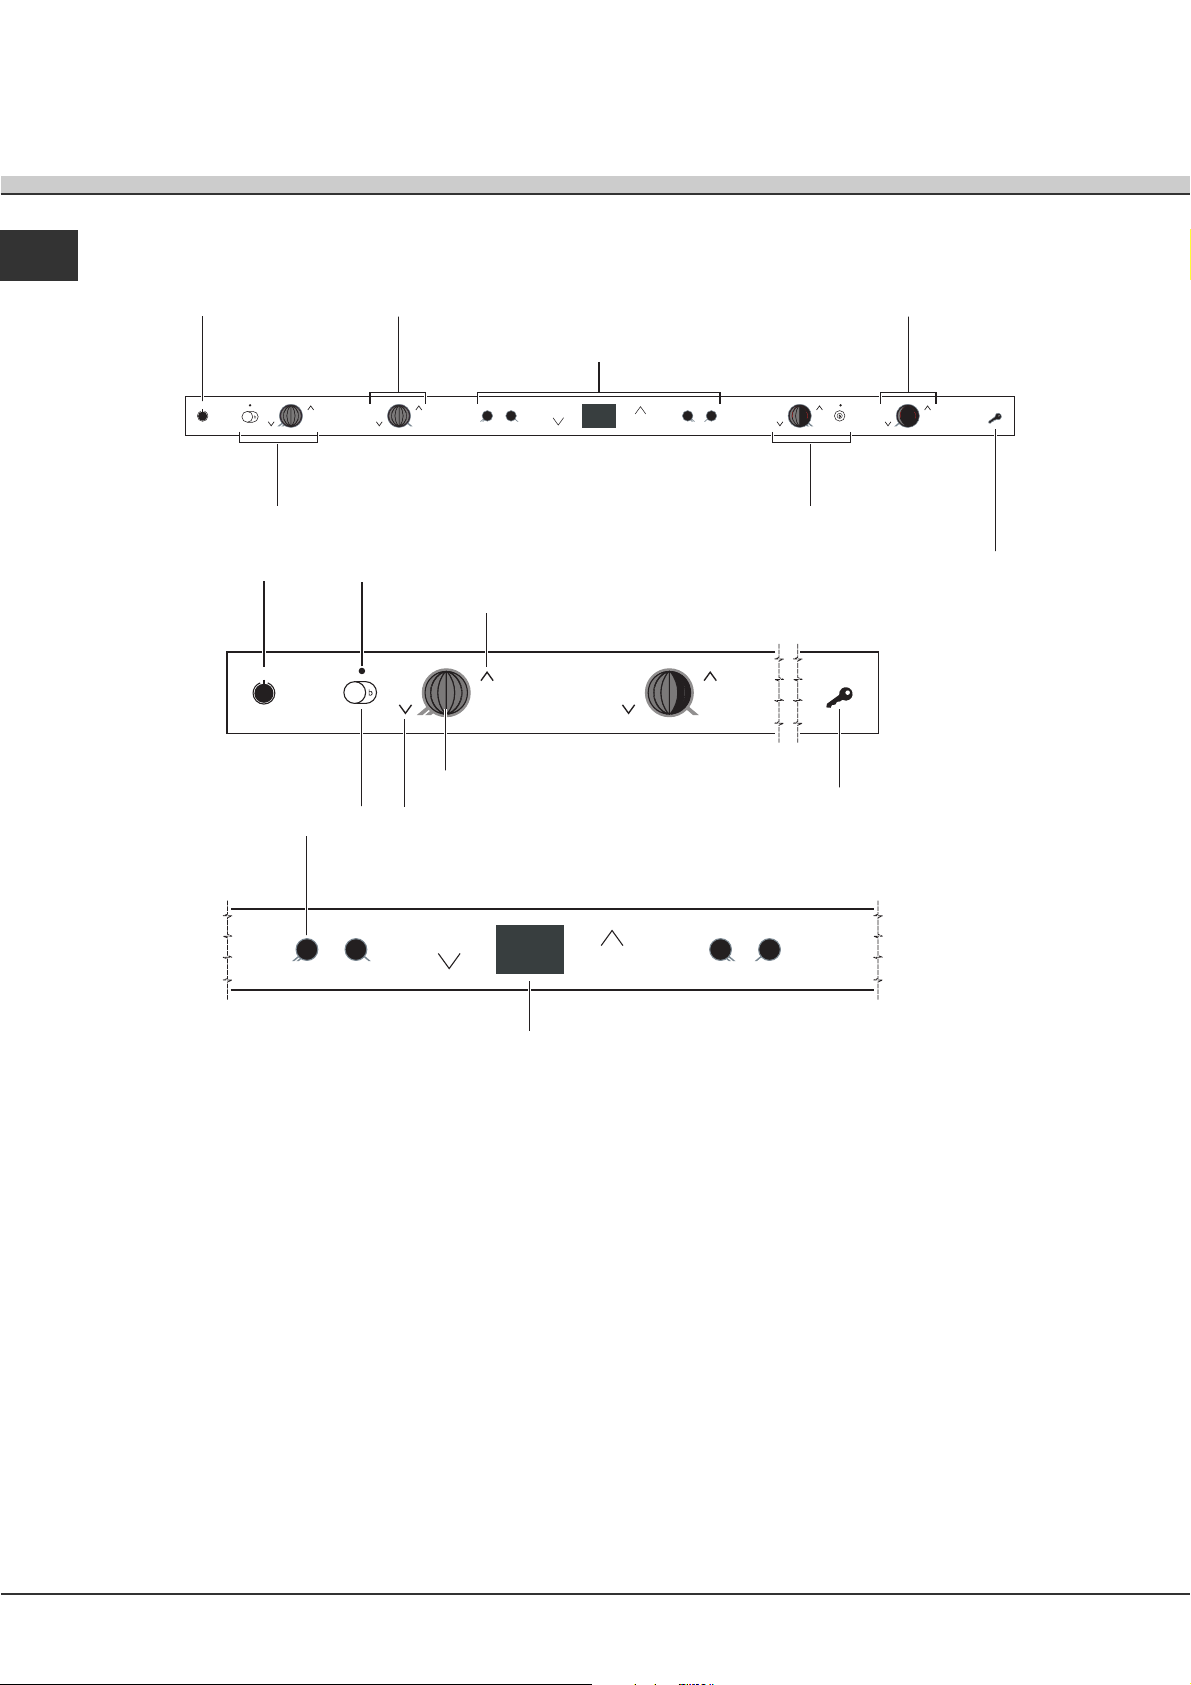
ON/OFF
button
FRONT LEFT
HAND COOKING ZONE
ON/OFF
button
EXTENDABLE COOKING ZONE/
BOOSTER button
REAR LEFT
HAND COOKING ZONE
EXTENDABLE COOKING ZONE/
BOOSTER indicator light
INCREASE POWER button
POWER indicator
REDUCE POWER button
FRONT RIGHT
HAND COOKING ZONE
DISPLAY AREA
REAR RIGHT
HAND COOKING ZONE
CONTROL PANEL LOCK button/
CONTROLS LOCKED indicator light
CONTROL PANEL LOCK button/
CONTROLS LOCKED indicator light
HOTPLATE SELECTION button
DISPLAY
ON/OFF button switches the appliance on and off.
BOOSTER button switches on the booster
function - 3000W - of the cooking zone (see Start-
up and use).
BOOSTER indicator light shows the booster
function has been switched on for a particular
cooking zone.
EXTENDABLE COOKING ZONE button switches
on the entire cooking zone (see Start-up and use).
EXTENDABLE COOKING ZONE indicator light
shows the entire cooking zone has been switched
on.
REDUCE POWER button controls the power and
switches off the hotplate (see Start-up and use).
POWER indicator provides a visual display for the
current heat level.
INCREASE POWER button switches on the
hotplate and controls the power (see Start-up and
use).
HOTPLATE SELECTOR buttons are used to enter
the menu for each cooking zone (see Start-up and
use).
CONTROL PANEL LOCK button prevents
accidental changes to the hob settings (see Start-
up and use).
CONTROLS LOCKED indicator light shows the
control panel has been locked (see Start-up and
use).
14
Page 15
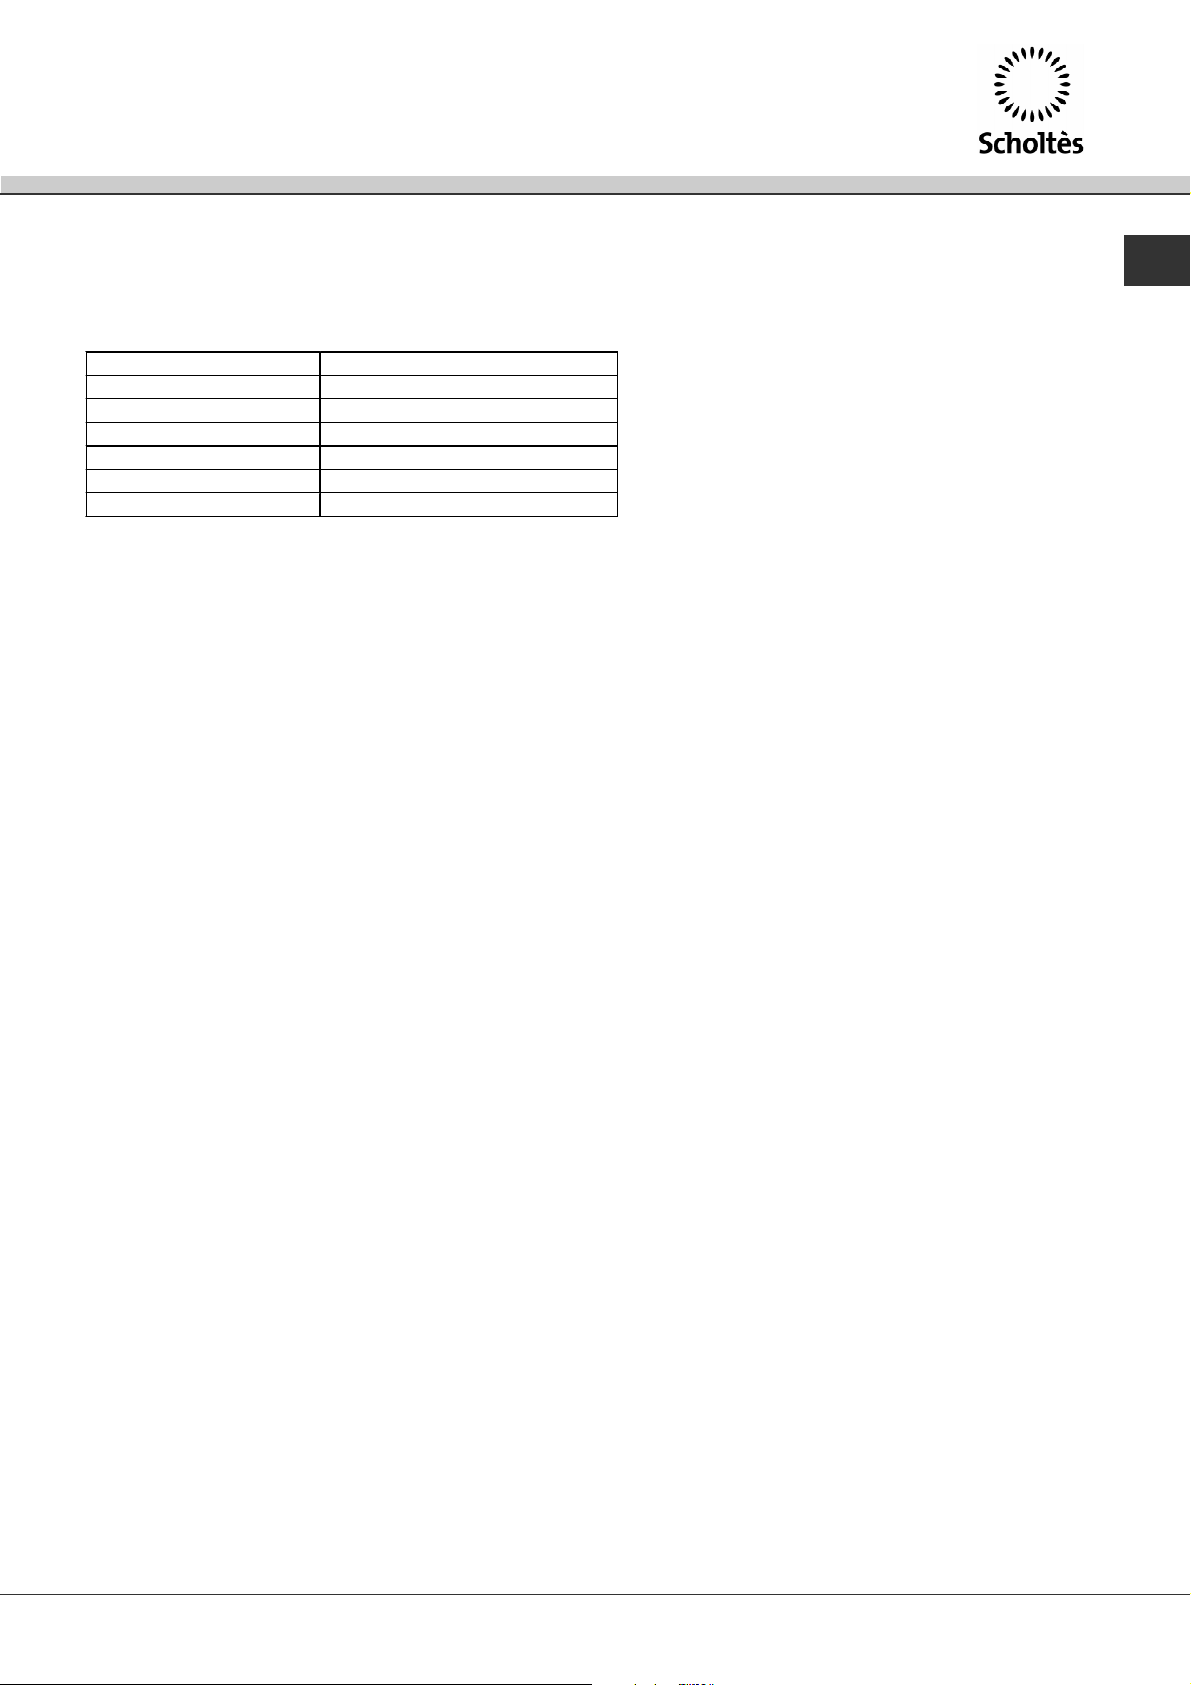
Technical description of the cooking zones
The induction system is the quickest existing way of cooking. Unlike traditional hotplates where the cooking zone
heats up, with the induction system heat is generated directly inside pans which have ferromagnetic bases.
HOBS TIL 641
Cooking zone Wattage
Back right I 2400 W – B 3000 W
Front right I 1200 W – 600 W if*
Front left IO 1200-2400 W – B 3000 W
Back left I 1200 W – 600 W if*
Maximium total wattage 7200 W
Key:
I = single induction cooking zone
OI= oval induction cooking zone
B = booster: the power of the cooking zone may be boosted to 3000W
* = the maximum power is limited to 600 W until the booster is activated for the appropriate rear cooking zone
(see Start-up and use).
GB
15
Page 16
Start-up and use
GB
! The glue applied to the gaskets leaves traces of
grease on the glass. Before using the appliance, we
recommend you remove these with a special non-
abrasive cleaning product. During the first few hours
of use there may be a smell of rubber which will
disappear very quickly.
! A few seconds after the hob is connected to the
electricity supply, a buzzer will sound. The hob may
now be switched on.
Switching on the hob
To switch the hob on, press and hold the button
for approximately one second.
Switching on the cooking zones
Each cooking zone is controlled by a device
consisting of two buttons (
the power level indicator.
Press the
set the power to the required level using the
and buttons.
To set the power to maximum, hold down the
button briefly.
button to activate the hotplate, then
and ) at the side of
Booster function
Extending the cooking zones
A button allows the user to extend the relevant
cooking zones (these may be concentric or oval).
1. Press the
set the power to the required level using the
and buttons.
2. Press the
fully-extended cooking zone.
To return to using the smaller cooking zone, simply
press the extension button again.
The indicator light above the extendable cooking
zone button remains lit for the entire time during
which the large surface is being used.
button to activate the hotplate, then
or button to switch on the entire,
Switching off the cooking zones
Press the button at the side of the power level
indicator: the power of the cooking zone will
progressively decrease until it is switched off.
Alternatively, the
pressed simultaneously. The cooking zone will
switch off.
and buttons may be
Programming the cooking time
! All the cooking zones may be programmed for a
length of time between 1 and 99 minutes.
The booster function may be used to shorten
heating-up times. It is activated by pressing the
button. This function boosts the power of the
relevant zone to 3000 W.
It stops automatically after 4 minutes. While the
booster is activated, the relevant front or rear
cooking zone has a maximum power of 600 W (e.g.
if the right rear hotplate booster is activated, the
power of the right front hotplate decreases). Higher
power levels are indicated by the flashing of the
excess power levels, which will be restored after the
booster function has stopped.
! Oval cooking zones: may only be overheated if the
entire oval is switched on.
! Do not place two small pans on the oval cooking
zones.
1. Press the button at the side of
the display which corresponds to the hotplate you
wish to programme.
2. Set the desired cooking time using the
buttons at the side of the display.
3. Confirm by pressing the
at the side of the display which corresponds to the
hotplate you wish to programme.
The timer begins counting down immediately. A
buzzer sounds for approximately 1 minute and the
cooking zone switches off when the set programme
has finished.
Repeat the above procedure for each hotplate you
wish to programme.
Using multiple programmes and the display
If one or more plates are programmed, the display will
show the data for the plate with the least time remaining,
and the
to the position of the plate will be illuminated.
indicator light corresponding
and
button
16
Page 17
The indicator lights corresponding to the other
programmed hotplates will still be illuminated, but
less brightly.
To display the time remaining for a programmed
hotplate, press one of the
buttons
corresponding to the relevant cooking zone. The
display will show the time remaining.
Changing the programme
1. Press the
button which
corresponds to the cooking zone to which the
changes will be made.
2. Use the
and buttons at the side of the
display to set the new time.
3. Confirm by pressing the
button
corresponding to the relevant cooking zone.
To cancel a programme, follow the above
instructions. When you reach point 2, press the
and buttons at the side of the display
simultaneously: The setting will return to zero and
the display will no longer be operating in the
programme setting mode.
Control panel lock
To deactivate the DEMO mode:
1. Switch on the hob
2. Press the
and buttons in sequence, then
;
press the button and hold for 2 seconds. A
buzzer sounds and the display shows the text dE
OF.
3. The hob will now operate normally.
Switching off the hob
Press the button to switch the appliance off.
If the control panel lock has been activated, the
controls will continue to be locked even after the hob
is switched on again. In order to switch the hob on
again, you must first remove the lock function.
Practical advice on using the appliance
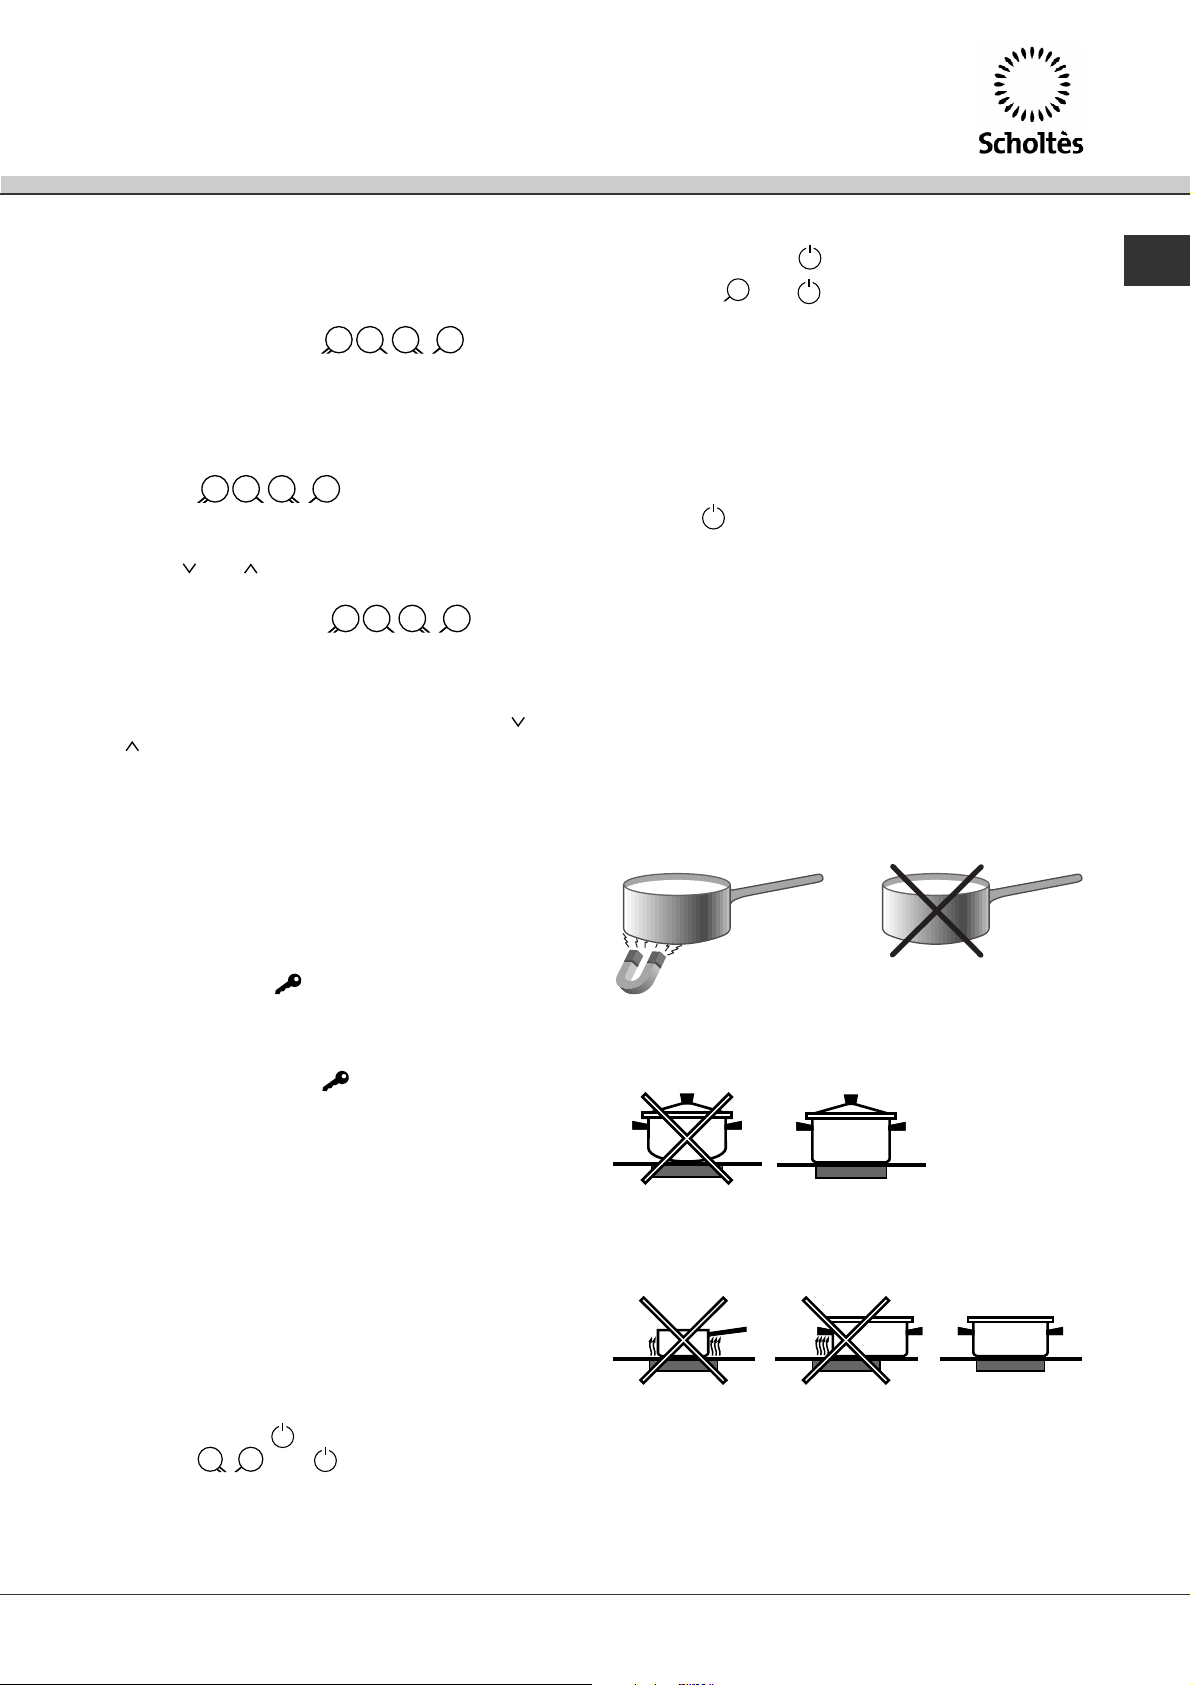
! Use cookware made from materials that are
compatible with the induction principle
(ferromagnetic material). We especially recommend
pans made from: cast iron, coated steel or special
stainless steel adapted for induction. Use a magnet
to test the compatibility of the cookware.
SUITABLE
UNSUITABLE
GB
It is possible to lock the oven controls in order to
avoid accidental changes being made to the
settings (these may be made by children, during
cleaning, etc.). If the
button is pressed for 3
seconds the controls are locked and the CONTROLS
LOCKED indicator light illuminates. To use any of
the controls (e.g. to stop cooking), you must switch
off this function. Press the
button for 3 seconds
and the lock function will be removed.
When the controls are locked it is still possible to
switch off the hob. In this case the CONTROLS
LOCKED indicator light remains illuminated until the
function is deactivated.
Demo mode
The oven is able to operate in DEMO mode: all
heating elements are deactivated, and controls
remain operative.
To activate the DEMO mode:
1. Switch on the hob
2. Press the
and hold for 6 seconds. A buzzer sounds and the
display shows the text dE ON.
3. The hob is now operating in Demo mode.
;
and buttons simultaneously
*
Enamelled steel
Special stainless steel
Cast iron
Aluminium, Glass, Earthenware,
Ceramic, non magnetic Stainless steel
Copper,
In addition, to obtain the best results from your hob:
Use pans with a thick, flat base to fully utilise the
cooking zone.
Always use pans with a diameter that is large
enough to cover the hotplate fully, in order to use
all the available heat.
17
Page 18

GB
Make sure that the base of the cookware is
always dry and clean, to fully utilise and extend
the life of both the cooking zones and cookware.
Avoid using the same cookware that has been
used on gas burners: the heat concentration on
gas burners may distort the base of the pan,
causing it not to adhere correctly.
Safety devices
Safety switch
The appliance has a safety switch that automatically
switches off the cooking zones when they have been
in operation for a certain amount of time at a given
power level. When the safety switch has been
triggered, the display shows 0.
For example: the right rear hotplate is set to 5 and
will switch off after 3 hours of continuous operation,
while the front left hotplate is set to 2 and will switch
off after 10 hours.
Pan sensor
Each cooking zone is equipped with a pan sensor
device. The hotplate only emits heat when a pan
with suitable measurements for the cooking zone is
placed on it. If the indicator light is flashing, it may
indicate:
An incompatible pan
A pan whose diameter is too small
The pan has been removed from the hotplate.
Residual heat indicators
After the pan has been removed from one of the
cooking zones, part of the power level indicator will
flash while the temperature of that particular zone
remains above 60°C. This reduces the risk of burns
and scalds.
Overheating protection
If the electronic elements overheat, the hob switches
off automatically and appears on the display.
When the temperature has reached an appropriate
level, this message disappears and the hob may be
used again.
Buzzer
Can also indicate several irregularities:
An object (a pan, cutlery, etc.) has been placed
on the control panel for more than 10 seconds.
Something has been spilt on the control panel.
A button has been pressed for too long.
All of the above situations may cause the buzzer
to sound. Remove the cause of the malfunction to
stop the buzzer. The control panel locks
automatically in the above situations. To unlock it
press the [key icon] button; the settings will have
been maintained. If the cause of the problem is
not removed, the buzzer will keep sounding and
the hob will switch off.
18
Page 19
Precautions and tips
! This appliance has been designed and manufactured
in compliance with international safety standards. The
following warnings are provided for safety reasons and
must be read carefully.
This appliance conforms to the following
European Economic Community directives:
- 73/23/EEC dated 19/02/73 (Low Voltage) and
subsequent amendments;
- 89/336/EEC dated 03/05/89 (Electromagnetic
Compatibility) and subsequent amendments;
- 93/68/EEC dated 22/07/93 and subsequent
amendments.
- 2002/96/EEC
General safety
! Make sure that the air inlet behind the fan grille is
never obstructed. The built-in hob should, in fact, be
provided with suitable ventilation for the cooling of the
electronic components used in the appliance.
! We advise against the installation of an induction hob
above an under-the-counter refrigerator (heat) or above
a washing machine (vibrations). In fact, there would be
insufficient space for the ventilation of electronic
components.
The appliance was designed for domestic use
inside the home and is not intended for commercial
or industrial use.
The appliance must not be installed outdoors, even in
covered areas. It is extremely dangerous to leave the
appliance exposed to rain and storms.
Do not touch the appliance with bare feet or with wet
or damp hands and feet.
The appliance must be used by adults only for the
preparation of food, in accordance with the
instructions provided in this booklet. Do not use the
hob as a worktop or chopping board.
The glass ceramic hob is resistant to mechanical
shocks, but it may crack (or even break) if hit with a
sharp object such as a tool. If this happens,
disconnect the appliance from the electricity mains
immediately and contact a Service Centre.
If the surface of the hob is cracked, switch off the
appliance to prevent electric shocks from occurring.
Ensure that power supply cables of other electrical
appliances do not come into contact with the hot
parts of the hob.
Remember that the cooking zones remain relatively
hot for at least thirty minutes after they have been
switched off. An indicator light provides a warning
when residual heat is present (see Start-up and use).
Keep any object which could melt away from the hob,
for example plastic and aluminium objects, or
products with a high sugar content. Be especially
careful when using plastic film and aluminium foil or
packaging: if placed on surfaces that are still hot,
they may cause serious damage to the hob.
Always make sure that pan handles are turned
towards the centre of the hob in order to avoid
accidental burns.
When unplugging the appliance, always pull the plug
from the mains socket; do not pull on the cable.
Never perform any cleaning or maintenance work
without having disconnected the appliance from the
electricity mains.
Do not place metal objects (knives, spoons, pan
lids, etc.) on the hob as they may become hot.
Warning for people who have been fitted with
pacemakers or other active internal medical
devices:
The hob conforms to all current legislation relating to
electromagnetic interference.
This product therefore fully conforms with all legal
requirements (directive 89/336/EEC). It was
designed not to create interference with other
electrical equipment used nearby, provided that the
other equipment also conforms fully with all the
above legislation.
The induction hob generates short range
electromagnetic fields.
To avoid all risks of interference between the hob and
the pacemaker, the pacemaker should be made in
accordance with all current legislation.
We can only guarantee the conformity of our product
in this matter. For further information on conformity or
any incompatibility problems, please contact your
G.P. or the pacemaker manufacturer.
Disposal
When disposing of packaging material: observe local
legislation so that the packaging may be reused.
The European Directive 2002/96/EC relating to Waste
Electrical and Electronic Equipment (WEEE) states that
household appliances should not be disposed of using
the normal solid urban waste cycle. Exhausted
appliances should be collected separately in order to
optimise the cost of re-using and recycling the materials
inside the machine, while preventing potential damage
to the atmosphere and to public health. The crossed-out
dustbin is marked on all products to remind the owner
of their obligations regarding separated waste
collection.
For further information relating to the correct disposal
of exhausted household appliances, owners may
contact the public service provided or their local
dealer.
GB
19
Page 20

Care and maintenance
GB
Switching the appliance off
Disconnect your appliance from the electricity
supply before carrying out any work on it.
Cleaning the appliance
! Do not use abrasive or corrosive detergents (for
example, products in spray cans for cleaning
barbecues and ovens), stain removers, anti-rust
products, powder detergents or sponges with
abrasive surfaces: these may scratch the surface
beyond repair.
! Never use steam cleaners or pressure cleaners on
the appliance.
It is usually sufficient simply to wash the hob
using a damp sponge and dry it with absorbent
kitchen roll.
If the hob is particularly dirty, rub it with a special
glass ceramic cleaning product, then rinse well
and dry thoroughly.
To remove more stubborn dirt, use the scraper
provided. Remove spills as soon as possible,
without waiting for the appliance to cool, to avoid
residues forming crusty deposits. You can obtain
excellent results by using a rust-proof steel wire
sponge - specifically designed for glass ceramic
surfaces - soaked in soapy water.
Stainless steel frame
(only in models with outer frame)
Stainless steel can be marked by hard water that
has been left on the surface for a long time, or by
cleaning products containing phosphorus. After
cleaning, it is advisable to rinse the surface well and
dry it thoroughly. If water is spilt on the surface, dry
it quickly and thoroughly.
! Some hobs have an aluminium frame which is
similar to stainless steel. Do not use any cleaning or
degreasing products which are not suitable for use
with aluminium.
Disassembling the hob
If it is necessary to disassemble the hob:
1. Loosen the screws fixing the alignment springs on
each side.
2. Loosen the screws holding the fixing hooks in
each corner.
3. Take the hob out of its installation cavity.
! Do not attempt to repair the appliance yourself.
If the appliance breaks down, contact a Service
Centre.
! The scraper provided is sharp: be careful when
using it.
If the plastic or sugary substances are accidentally
melted on the hob, remove them immediately with
the scraper, while the surface is still hot.
Once it is clean, the hob may be treated with a
special protective maintenance product: the
invisible film left by this product protects the
surface from drips during cooking. This
maintenance should be carried out while the
appliance is warm (not hot) or cold.
Always remember to rinse the appliance well with
clean water and dry it thoroughly: residues can
become encrusted during subsequent cooking
processes.
20
Page 21
Mode demploi
TABLE DE CUISSON
Italiano, 1
31
TIL 641
GBIT
English,11
DENL
Deutsch, 41Nederlands,
FR
Français, 21
Sommaire
ITFR
Installation, 22-23
Positionnement
Raccordement électrique
Description de lappareil, 24-25
Tableau de bord
Description technique des foyers
Mise en marche et utilisation, 26-28
Mise sous tension de la table de cuisson
Allumage des foyers
Fonction booster
Commande foyers extensibles
Extinction des foyers
Programmation de la durée de cuisson
Verrouillage des commandes
Mode Démonstration (demo)
Extinction de la table de cuisson
Conseils dutilisation de lappareil
Les sécurités
Précautions et conseils, 29
Sécurité générale
Mise au rebut
Nettoyage et entretien, 30
Mise hors tension
Nettoyage de lappareil
Démontage de la table
Page 22
Installation
FR
! Conserver ce mode demploi pour pouvoir le consulter
à tout moment. En cas de vente, de cession ou de
déménagement, veiller à ce quil suive lappareil pour
informer le nouveau propriétaire sur son fonctionnement
et lui fournir les conseils correspondants.
! Lire attentivement les instructions : elles contiennent
des conseils importants sur linstallation, lutilisation et la
sécurité de lappareil.
Positionnement
! Les emballages ne sont pas des jouets pour enfants, il
faut les mettre au rebut en respectant la réglementation
sur le tri sélectif des déchets (voir Précautions et
conseils).
! Linstallation doit être effectuée par un professionnel
du secteur conformément aux instructions du fabricant.
Une mauvaise installation peut causer des dommages à
des personnes, des animaux ou des biens.
Encastrement
Pour garantir le bon fonctionnement de lappareil, il faut
que le meuble possède des caractéristiques bien
précises :
le matériau du plan dappui doit pouvoir résister à
une température denviron 100°C;
en cas dinstallation de la table de cuisson au-
dessus dun four, il faut que ce dernier soit
équipé dun dispositif de refroidissement par
ventilation forcée;
éviter dinstaller la table de cuisson au-dessus
dun lave-vaisselle : si cest le cas, prévoir une
séparation étanche entre les deux appareils;
la découpe du meuble doit avoir les dimensions
suivantes :
Aération
Pour permettre une bonne aération et pour éviter toute
surchauffe des surfaces autour de lappareil, la table de
cuisson doit être positionnée :
à au moins 40 mm
de distance du mur
arrière ou de toute
autre surface
verticale;
de manière à ce
quil reste au moins
10 mm de distance
entre la découpe
dencastrement et le
meuble en dessous.
Fixation
Il est impératif dassurer lencastrement de lappareil sur
un plan dappui parfaitement plat.
Les déformations provoquées par une mauvaise fixation
risquent daltérer les caractéristiques de la table de
cuisson ainsi que ses performances.
COTE AVANT DE
LA TABLE DE CUISSON
PLAN DE
TRAVAIL
30
TABLE DE CUISSON
RETOURNEE
40
22
640
4
555
520
45
Pour sa fixation, procéder comme suit :
1. Se servir des vis courtes sans pointe pour visser les 4
ressorts de centrage dans les trous prévus sur chaque
côté de la table, en leur milieu;
2. insérer la table de cuisson dans la découpe prévue,
bien au centre et bien appuyer tout autour du cadre pour
que la table adhère parfaitement au plan dappui.
! Il faut absolument que les vis des ressorts de centrage
soient accessibles.
Page 23
! Conformément aux normes de sécurité, après
encastrement de lappareil, il ne doit plus y avoir
possibilité de contact avec les parties électrifiées.
! Toutes les parties qui servent de protection doivent être
fixées de manière à ne pouvoir être enlevées quavec
laide dun outil.
Raccordement électrique
! Le branchement électrique de la table de cuisson et
celui dun éventuel four à encastrer doivent être
effectués séparément, pour des raisons de sécurité
électrique et pour pouvoir démonter plus facilement le
four en cas de besoin.
Raccordement monophasé
La table est fournie déjà équipée dun cordon
dalimentation prévu pour raccordement monophasé.
Procéder au raccordement des fils en suivant les
indications du tableau et des dessins suivants :
Tension type et
fréquence réseau
230V 1+N ~
50 Hz
Cordon électrique Raccordement fils
: jaune/ve rt;
N: les 2 fils bleus ensemble
L: le marron avec le noir
Branchement du câble dalimentation au réseau
électrique
En cas de raccordement direct au réseau, il faut intercaler
entre lappareil et le réseau un interrupteur à coupure
omnipolaire ayant au moins 3 mm décartement entre les
contacts dimensionné à la charge et conforme aux normes
en vigueur (le fil de terre ne doit pas être interrompu par
linterrupteur). Le câble dalimentation ne doit atteindre, en
aucun point, des températures dépassant de 50°C la
température ambiante.
! Linstallateur est responsable du bon raccordement
électrique de lappareil et du respect des normes de
sécurité.
Avant de procéder au branchement, sassurer que :
la prise est bien munie dune terre conforme à la loi;
la prise est bien apte à supporter la puissance
maximale de lappareil, indiquée sur la plaque
signalétique de lappareil ;
la tension dalimentation est bien comprise entre les
valeurs indiquées sur la plaque signalétique;
la prise est bien compatible avec la fiche de
lappareil. Si ce nest pas le cas, remplacer la prise
ou la fiche, nutiliser ni rallonges ni prises multiples.
! Après installation de lappareil, le câble électrique et la
prise de courant doivent être facilement accessibles
FR
Autres types de branchement
Si linstallation électrique correspond à une des
caractéristiques suivantes :
Tension type et fréquence réseau
380V +N ~ 50 Hz
230V 3 ~ 50 Hz
380V + 2N ~ 50 Hz
Procéder au raccordement des fils en suivant les
indications du tableau et des dessins suivants :
Tension type et
fréquence réseau
400V - 2+N ~
50 Hz
230V 3 ~
50Hz
400V - 2+2N ~
50 Hz
Cordon électrique Raccordement fils
: jaune/ve rt;
N: les 2 fils bleus ensemble
L1: noir
L2: marron
: jaune/ve rt;
N1: bleu
N2: bleu
L1: noir
L2: marron
! Le câble ne doit être ni plié ni excessivement écrasé.
! Le câble doit être contrôlé périodiquement et ne peut
être remplacé que par un technicien agréé.
! Nous déclinons toute responsabilité en cas de non
respect des normes énumérées ci-dessus.
23
Page 24
Description
de lappareil
FR
Tableau de bord
Touche
ON/OFF
Touche
ON/OFF
Touche FOYER
EXTENSIBLE/BOOSTER
FOYER
ARRIERE GAUCHE
FOYER
AVANT GAUCHE
Voyant FOYER
EXTENSIBLE/
BOOSTER
Touche DIMINUTION DE PUISSANCE
Touche SELECTION FOYER
FOYER
AVANT DROIT
ZONE ECRAN
FOYER
ARRIERE DROIT
Touche VERROUILLAGE COMMANDES/
Voyant COMMANDES VERROUILLEES
Touche AUGMENTATION DE PUISSANCE
Indicateur de PUISSANCE
Touche VERROUILLAGE COMMANDES/
Voyant COMMANDES VERROUILLEES
AFFICHEUR
Touche ON/OFF pour allumer ou éteindre lappareil.
Touche BOOSTER pour brancher la
suralimentation - 3000 W du foyer (voir Mise en
marche et utilisation).
Voyant BOOSTER pour signaler le fonctionnement
du booster sur le foyer correspondant.
Touche FOYER EXTENSIBLE pour allumage de
toute la surface du foyer (voir Mise en marche et
utilisation).
Voyant FOYER EXTENSIBLE pour signaler
lallumage de toute la surface du foyer
correspondant.
Touche DIMINUTION DE PUISSANCE pour régler
la puissance et éteindre le foyer (voir Mise en
marche et utilisation).
Indicateur de PUISSANCE une colonne lumineuse
pour signaler le niveau de puissance atteint.
Touche AUGMENTATION DE PUISSANCE pour
allumer le foyer et régler sa puissance (voir Mise
en marche et utilisation).
Touches SELECTION FOYER pour entrer dans
les menus de chaque foyer (voir Mise en marche
et Utilisation).
Touche VERROUILLAGE DES COMMANDES
pour empêcher toute intervention extérieure sur
les réglages de la table de cuisson (voir Mise en
marche et Utilisation).
Voyant COMMANDES VERROUILLEES pour
signaler le verrouillage des commandes (voir Mise
en marche et Utilisation).
24
Page 25
Description technique des foyers
Linduction est le procédé de cuisson le plus rapide. Contrairement aux plaques traditionnelles, le foyer német
aucune chaleur : la chaleur est produite à lintérieur du récipient à condition que le fond de ce dernier soit en
matériau ferromagnétique.
FR
TABLES DE CUISSON
Foyers
Arrière Droit
Avant Droit
Avant gauche
Arrière gauche
Puissance maxi. totale 7200 W
TIL 641
Puissance
I 2400 W B 3000 W
I 1200 W 600 W se*
IO 1200-2400 W B 3000 W
I 1200 W 600 W se*
Légende :
I = foyer à induction simple
IO= foyer à induction ovale
B = booster: le foyer peut être suralimenté à 3000 W
* = la puissance maximale est limitée à 600 W tant que le booster est activé sur le foyer arrière correspondant
(voir Mise en marche et Utilisation).
25
Page 26
Mise en marche
et utilisation
FR
! La colle utilisée pour les joints laisse des traces de
graisse sur le verre. Nous conseillons de les éliminer
avant dutiliser lappareil à laide dun produit
dentretien non abrasif. Une odeur de caoutchouc
peut se dégager au cours des premières heures
dutilisation, elle disparaîtra très vite.
! Un bip retentit quelques secondes après la mise
sous tension de la table de cuisson. A partir de ce
moment-là, lallumage de la table est possible.
Mise sous tension de la table de cuisson
Pour mettre la table de cuisson sous tension, appuyer
sur la touche
pendant une seconde environ.
Allumage des foyers
Chaque foyer est actionné par un dispositif de
réglage de puissance en deux parties (
les côtés de lindicateur de puissance.
Appuyer sur la touche
puis sélectionner la puissance souhaitée à laide
des touches
Pour sélectionner directement la puissance
maximale, appuyer brièvement sur la touche
et .
pour activer le foyer,
et ) sur
.
Fonction booster
Pour accélérer la montée en température, une
fonction booster est disponible, pour lactiver
appuyer sur la touche
à 3000 W le foyer concerné.
Le booster sarrête automatiquement après 4
minutes. Tant que le booster est activé, le foyer
avant ou arrière correspondant est limité à la
puissance maximale de 600 W (par ex.: si le
booster est activé sur le foyer arrière droit, la
puissance du foyer avant droit sabaisse). Toute
puissance supérieure est signalée par le
clignotement des niveaux de puissance excédents
qui sont rétablis à la fin de la fonction booster.
! Foyers extensibles ovales : ils ne peuvent être
suralimentés que si lovale tout entier a été activé.
! Ne pas placer deux petites casseroles sur les foyers
ovales.
. Cette fonction suralimente
Commande foyers extensibles
Touche dextension du ou des foyers extensibles
(concentriques ou ovales).
1. Appuyer sur la touche
puis sélectionner la puissance souhaitée à laide
des touches
2. Appuyer sur la touche
foyer sur toute son étendue.
Pour revenir à la dimension normale du foyer, il suffit
dappuyer une nouvelle fois sur la touche dextension.
Le voyant au-dessus de la touche du foyer
extensible reste allumée pendant toute la durée
dutilisation de la surface plus étendue.
et .
pour activer le foyer,
ou pour activer le
Extinction des foyers
Appuyer sur la touche à côté de lindicateur de
puissance : la puissance du foyer descend
progressivement jusquà extinction.
Ou bien appuyer simultanément sur les touches
et : le foyer séteint.
Programmation de la durée de cuisson
! Il est possible de programmer tous les foyers pour
une durée comprise entre 1 et 99 minutes.
1. Appuyer sur une des touches sur
les côtés de lafficheur correspondant au foyer quon
souhaite programmer.
2. Sélectionner la durée de cuisson à laide des
touches
3. Valider par pression de la touche
sur les côtés de lafficheur correspondant au foyer
quon souhaite programmer.
Le compte à rebours du minuteur démarre aussitôt.
La fin de la cuisson programmée est indiquée par un
signal acoustique (durée 1 minute) et le foyer séteint.
Procéder de même pour tous les foyers que lon
souhaite programmer.
Affichage en cas de programmation multiple
En cas de programmation dun ou de plusieurs foyers,
lécran affiche le temps restant pour le foyer qui se
rapproche le plus de la fin du temps programmé, dont
la position est indiquée par allumage du voyant
Les voyants des autres foyers programmés sont
éclairés mais de façon moins intense.
Pour afficher le temps restant dun foyer programmé,
appuyer sur une des touches
correspondant au foyer en question : lécran
affichera le temps restant.
et sur les côtés de lafficheur.
correspondant.
26
Page 27
Modifier la programmation
1. Appuyer sur la touche
correspondant au foyer quon souhaite modifier.
2. Sélectionner un nouveau temps à laide des
touches
et situées sur les côtés de lafficheur.
3. Confirmer par pression de la touche
correspondant au foyer.
Pour désactiver le mode DEMO :
1. Mettre la table de cuisson sous tension
2. Appuyer à la suite sur les touches
touche
pendant 2 secondes. Un signal sonore
puis sur la
retentit et l'écran affiche dE OF;
3. la table passe ensuite à son fonctionnement
normal.
;
FR
Pour annuler une programmation, procéder comme
sus-indiqué. Au point 2 appuyer simultanément sur
les touches
et sur les côtés de lafficheur : la
programmation est remise à zéro et lafficheur quitte
le mode programmation.
Verrouillage des commandes
Possibilité de verrouillage des commandes pour
empêcher toute intervention extérieure sur le réglage
(enfants, nettoyage...). Une pression de 3 secondes
sur la touche
commandes et le voyant COMMANDES
VERROUILLEES sallume. Pour pouvoir modifier les
réglages (interrompre la cuisson par ex.) il faut
déverrouiller les commandes : une pression de 3
secondes sur la touche
les commandes.
Possibilité déteindre la table de cuisson même si le
verrouillage des commandes est activé. Dans ce
cas, le voyant COMMANDES VERROUILLEES reste
allumé jusquà sa désactivation.
entraîne le verrouillage des
permet de déverrouiller
Extinction de la table de cuisson
Appuyer sur la touche pour éteindre lappareil.
Si les commandes de lappareil ont été verrouillées,
elles le seront encore au rallumage de la table. Pour
pouvoir rallumer la table de cuisson, il faut dabord
déverrouiller les commandes.
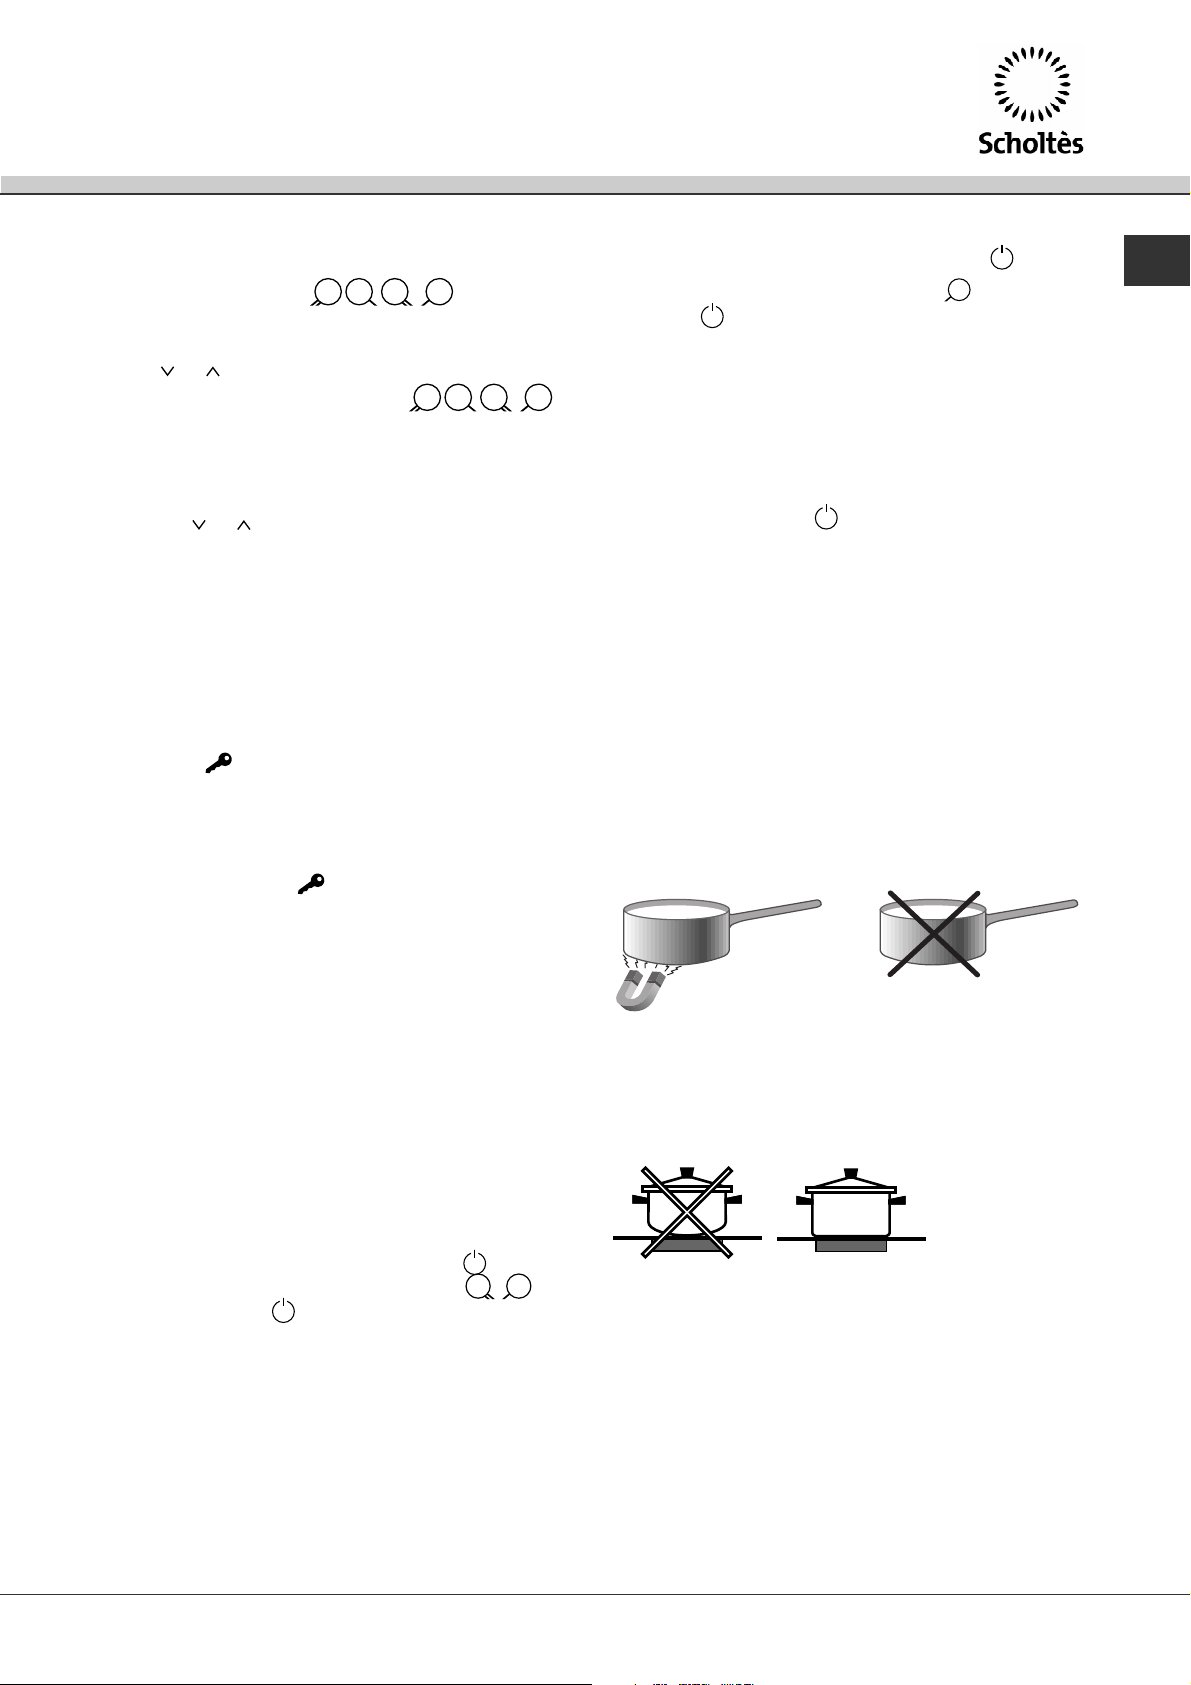
Conseils dutilisation de lappareil
! Utiliser des récipients dont le matériau est
compatible avec linduction (matériau
ferromagnétique). Nous recommandons lutilisation
de casseroles en: fonte, acier émaillé ou inox
spécial induction. Pour sassurer de la compatibilité
dun récipient, effectuer un test avec un aimant.
*
A UTILISER
Fonte
Acier émaillé
Inox spécial
NE CONVIENT PAS
Cuivre
Aluminium, Verre, Terre,
Céramique, Inox non magnétique
Mode Démonstration
La table peut fonctionner en mode DEMO
(Démonstration) : dans ce cas tous les éléments
chauffants sont désactivés et seules les
commandes fonctionnent.
Pour activer le mode DEMO (démonstration) :
1. Mettre la table de cuisson sous tension
2. Appuyer simultanément sur les touches
puis sur la touche pendant 6 secondes. Un
signal sonore retentit et l'écran affiche dE ON;
3. la table se place alors en mode Demo
;
Pour obtenir de meilleures performances de la table
de cuisson :
Utiliser des casseroles à fond plat et de forte
épaisseur pour quelles adhèrent parfaitement à la
zone de chauffe
Utiliser des casseroles dont le diamètre couvre
complètement la zone de chauffe de façon à ce
que toute la chaleur disponible puisse être
utilisée.
27
Page 28
FR
Veiller à ce que la base des casseroles soit
toujours parfaitement sèche et propre pour
garantir un bon contact et une longue durée de
vie des foyers mais aussi des casseroles.
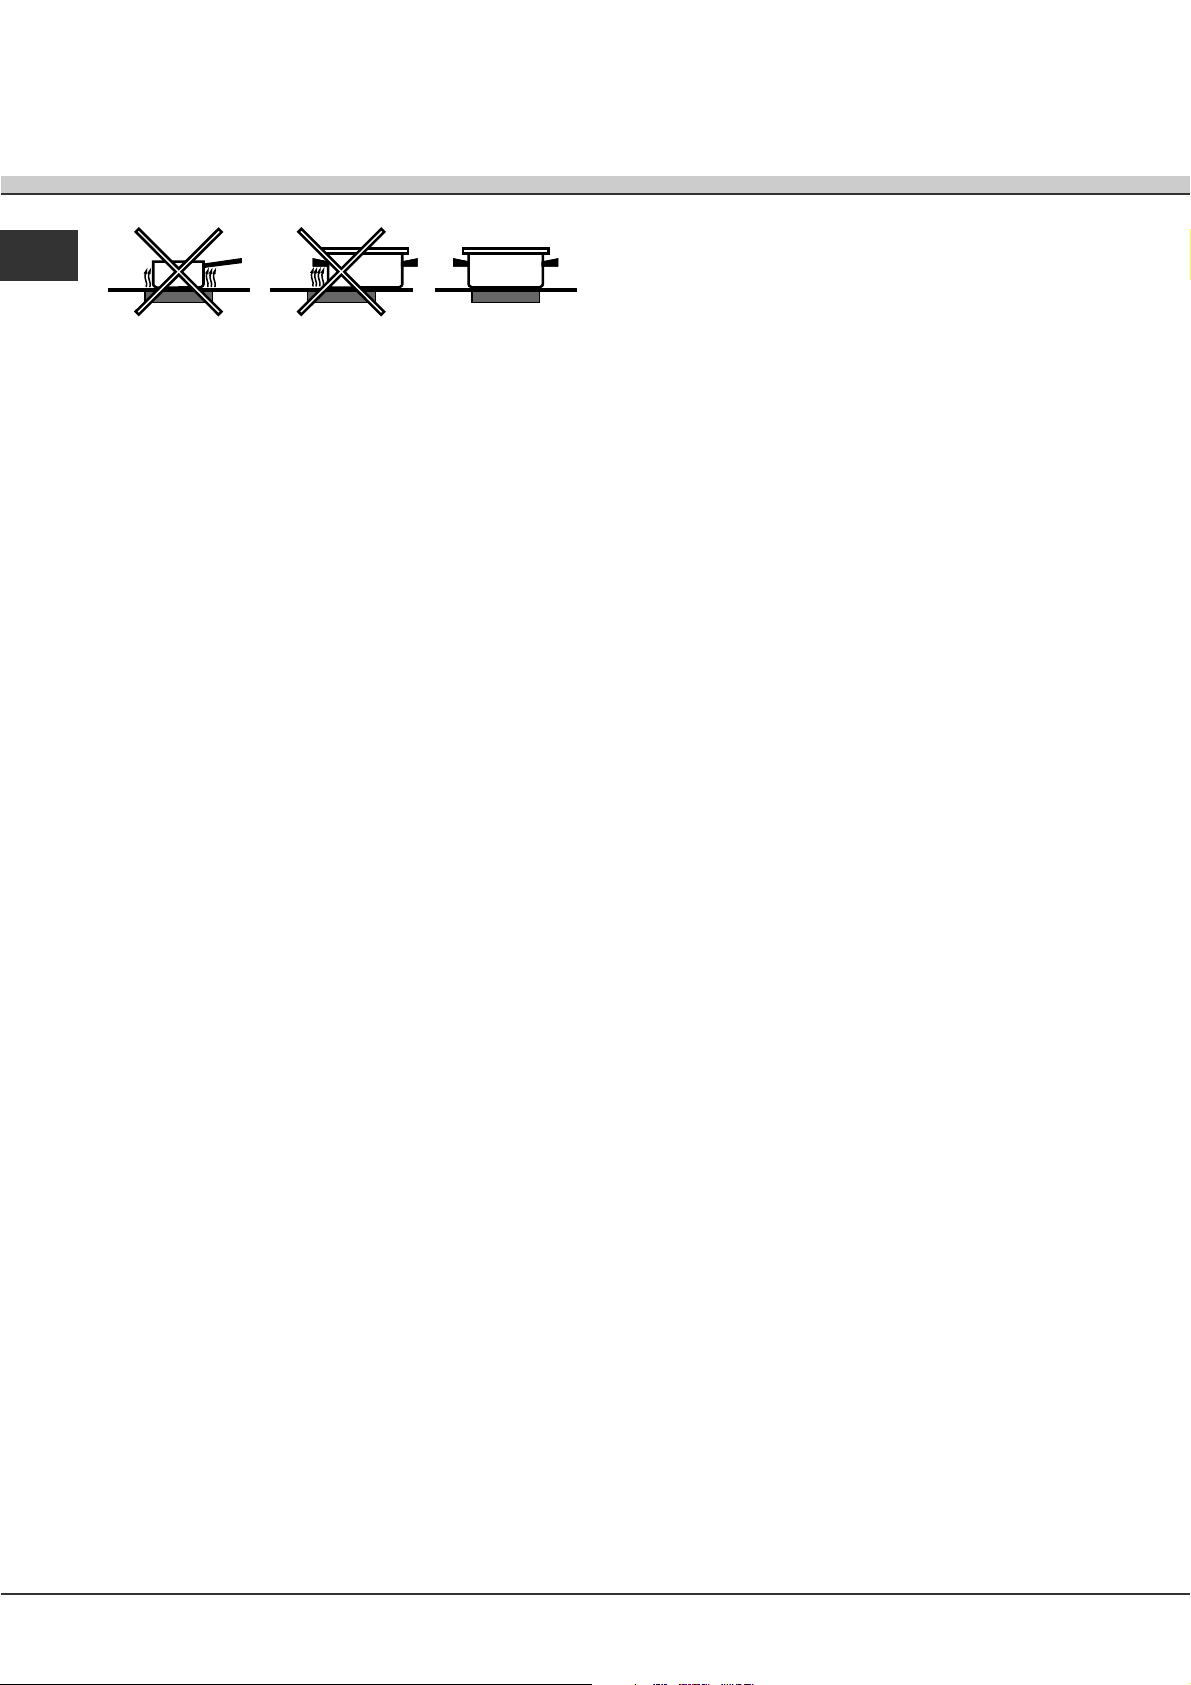
Eviter dutiliser les mêmes casseroles que sur les
brûleurs à gaz : la concentration de chaleur sur
les brûleurs à gaz peut déformer le fond de la
casserole qui perd de son adhérence.
Les sécurités
Détection de récipient
Chaque foyer est équipé dune détection de
casserole. Le foyer ne délivre de puissance quen
présence dune casserole adaptée au foyer. Le
voyant clignotant peut signaler :
une casserole incompatible
une casserole de trop petit diamètre
que la casserole a été soulevée
Indicateurs de chaleur résiduelle
Après enlèvement de la casserole et tant que la
température du foyer reste supérieure à 60°C, un
élément de lindicateur de puissance se met à
clignoter pour éviter tout risque de brûlure.
Interrupteur sécurité
Lappareil est équipé dun interrupteur de sécurité
qui interrompt instantanément le fonctionnement des
foyers dès quun temps limite de fonctionnement à
un niveau de puissance donné est atteint. Pendant
linterruption de sécurité, lafficheur indique 0.
Exemple : le foyer arrière droit est réglé sur 5, tandis
que le foyer avant gauche est réglé sur 2. Le foyer
arrière droit séteindra au bout de 3 heures de
fonctionnement tandis que le foyer avant gauche
séteindra au bout de 10 heures.
Signal sonore
Des anomalies, comme par exemple :
un objet (casserole, couvert, ...) placé plus de 10
secondes sur la zone de commande,
un débordement sur la zone de commande,
une pression prolongée sur une touche, peuvent
déclencher un signal acoustique. Eliminer la
cause de dysfonctionnement pour stopper le
signal sonore. Dans ces conditions, les
commandes se verrouillent automatiquement :
pour les déverrouiller, appuyer sur la touche
[icône clé], les sélections seront maintenues. Si la
cause de lanomalie nest pas éliminée, le signal
sonore continue à retentir et la table séteint.
Surchauffe
En cas de surchauffe de ses composants
électroniques, la table séteint automatiquement et
lafficheur de puissance indique . Cet affichage
disparaît et la table est à nouveau utilisable dès que
la température est redescendue à un niveau
acceptable.
28
Page 29
Précautions et conseils
! Cet appareil a été conçu et fabriqué conformément aux
normes internationales de sécurité. Ces conseils sont
fournis pour des raisons de sécurité et doivent être lus
attentivement.
Cet appareil est conforme aux Directives
Communautaires suivantes :
- 73/23/CEE du 19/02/73 (Basse Tension) et modifications
successives
- 89/336/CEE du 03/05/89 (Compatibilité
électromagnétique) et modifications successives
- 93/68/CEE du 22/07/93 et modifications successives.
- 2002/96/CE
Sécurité générale
! Veillez à ce que lentrée dair par la grille du ventilateur
reste bien dégagée. La table à encastrer a en effet besoin
dune bonne ventilation pour refroidir les composants
électroniques
! Linstallation dune table à induction au-dessus dun
réfrigérateur sous-plan (chaleur) ou dun lave-linge
(vibrations) est déconseillée. Lespace serait insuffisant
pour assurer laération nécessaire aux éléments
électroniques.
Cet appareil a été conçu pour un usage familial, de type
non professionnel.
Cet appareil ne doit pas être installé en extérieur, même dans
un endroit abrité, il est en effet très dangereux de le laisser
exposé à la pluie et aux orages.
Ne pas toucher à lappareil si lon est pieds nus ou si lon a
les mains ou les pieds mouillés ou humides.
Cet appareil qui sert à cuire des aliments ne doit être
utilisé que par des adultes conformément aux
instructions du mode demploi. Ne pas utiliser la table
comme plan de dépose ou comme planche à
découper.
Le plan vitrocéramique résiste aux chocs mécaniques, il
peut toutefois se fendre (ou même se briser) sous leffet
dun choc provoqué par un objet pointu, tel quun ustensile
par exemple. Dans ce cas, débrancher immédiatement
lappareil du réseau électrique et sadresser à un centre
dassistance technique.
Si la surface de la table est fêlée, éteindre l'appareil
pour éviter tout risque d'électrocution.
Eviter que le cordon dalimentation dautres petits
électroménagers touche à des parties chaudes de la
table de cuisson.
Ne pas oublier que la température des foyers reste
assez élevée pendant trente minutes au moins après
leur extinction. La chaleur résiduelle est aussi signalée
par un voyant (voir Mise en marche et Utilisation).
Garder à bonne distance de la table de cuisson tout
objet qui pourrait fondre, des objets en plastique ou en
aluminium par exemple, ou des produits à haute teneur
en sucre. Faire très attention aux emballages, au film
plastique et papier aluminium : au contact des surfaces
encore chaudes ou tièdes, ils risquent dendommager
gravement la table.
Sassurer que les manches des casseroles soient
toujours tournés vers lintérieur de la table de cuisson
pour éviter tout risque daccident.
Ne pas tirer sur le câble pour débrancher la fiche de la
prise de courant.
Neffectuer aucune opération de nettoyage ou
dentretien sans avoir auparavant débranché la fiche de
la prise de courant.
Ne pas poser d'objets métalliques (couteaux, cuillères,
couvercles, etc.) sur la table, ils risquent de devenir
brûlants.
Avis à toute personne portant un pacemaker ou autre
implant médical actif :
La table est conforme à toutes les réglementations en
matière dinterférences électromagnétiques.
Par conséquent, ce produit est parfaitement conforme à
toutes les dispositions légales (directives 89/336/CEE). Il a
été conçu de manière à ne pas provoquer dinterférences à
dautres appareils électriques utilisés, pourvu que ceux-ci
soient également conformes aux réglementations
susmentionnées.
La table induction génère des champs électromagnétiques
à courte portée.
Afin déviter tout risque dinterférence entre la table de cuisson
et le pacemaker, ce dernier devra être fabriqué
conformément à la réglementation en vigueur.
A ce propos, nous ne pouvons assurer que la conformité de
notre produit. Pour tous renseignements quant à la conformité
ou à des problèmes éventuels dincompatibilité, prière de
sadresser à son médecin traitant ou au fabricant du
pacemaker.
Mise au rebut
Mise au rebut du matériel demballage : se conformer
aux réglementations locales, les emballages pourront
ainsi être recyclés.
La directive européenne 2002/96/CE relative aux déchets
déquipements électriques et électroniques (DEEE), prévoit
que les électroménagers ne peuvent pas être traités
comme des déchets solides urbains courants. Les
appareils usagés doivent faire lobjet dune collecte
séparée pour optimiser le taux de récupération et de
recyclage des matériaux qui les composent et empêcher
tout danger pour la santé et pour lenvironnement. Le
symbole de la poubelle barrée est appliqué sur tous les
produits pour rappeler quils font lobjet dune collecte
sélective.
Pour de plus amples renseignements sur la mise au rebut
des électroménagers, les possesseurs peuvent sadresser
au service public prévu à cet effet ou aux commerçants.
FR
29
Page 30

Nettoyage et entretien
FR
Mise hors tension
Avant toute opération de nettoyage ou dentretien
couper lalimentation électrique de lappareil.
Nettoyage de lappareil
! Ne jamais utiliser de détergents abrasifs ou
corrosifs, tels que des bombes aérosols pour grilloirs
et fours, des détacheurs et dérouilleurs, des poudres
à récurer ou des éponges à surface abrasive : ils
risquent de rayer irrémédiablement la surface.
! Ne jamais nettoyer lappareil avec des nettoyeurs
vapeur ou haute pression.
Pour un entretien courant, passer une éponge
humide sur la surface de la table et essuyer avec
du papier essuie-tout.
Si la table est sale, frotter avec un produit dentretien
adapté au verre vitrocéramique, rincer et essuyer.
Pour enlever les salissures en relief, utiliser le
grattoir livré avec lappareil. Intervenir dès que
possible, ne pas attendre que lappareil ait refroidi
afin déviter toute incrustation des salissures.
Lutilisation dune éponge en fil dacier inoxydable,
spéciale verre vitrocéramique, imprégnée deau
savonneuse donne dexcellents résultats.
Cadre en acier inox
(uniquement pour les modèles avec encadrement)
Un contact prolongé avec une eau très calcaire ou
lutilisation de nettoyants contenant du phosphore
peuvent tacher lacier inox. Nous conseillons de
rincer abondamment et de bien essuyer après
entretien. Il est préférable déliminer rapidement tout
débordement deau sil y a lieu.
! Certaines tables ont un cadre en aluminium
ressemblant à de lacier inox. Ne pas utiliser de
produits dentretien et de dégraissage ne convenant
pas pour laluminium.
Démontage de la table
Sil faut démonter la table de cuisson :
1. enlever les vis qui fixent les ressorts de centrage sur
les côtés;
2. desserrer les vis des crochets de fixation dans
les coins;
3. dégager la table de cuisson du meuble.
! Il est vivement recommandé déviter daccéder aux
mécanismes internes pour tenter une réparation.
En cas de panne, contacter le service dassistance
technique.
! Le grattoir fourni est coupant : à utiliser avec précaution.
Tout objet, plastique ou sucre ayant
accidentellement fondu sur la table de cuisson
doit être aussitôt enlevé à laide du grattoir tant
que la surface est encore chaude.
Une fois que la table est propre, elle peut être
traitée avec un produit dentretien et de protection
spécial : celui-ci forme un film invisible qui
protège la surface en cas de débordement
accidentel. Opérer de préférence quand lappareil
est tiède ou froid.
Prendre soin de toujours bien rincer à leau claire
et dessuyer la table : les résidus des produits
pourraient en effet sincruster lors dune prochaine
cuisson.
30
Page 31
Gebruiksaanwijzingen
KOOKPLAAT
IT
Italiano, 1
NL
31
TIL 641
GB FR
English,11
Français, 21
DE
Deutsch, 41Nederlands,
Inhoud
Installatie, 32-33
Plaatsing
Elektrische aansluiting
Beschrijving van het apparaat, 34-35
Bedieningspaneel
Technische beschrijving van de kookgedeeltes
Starten en gebruik, 36-38
Inschakelen kookplaat
Inschakelen kookgedeeltes
Boosterfunctie
Uitbreiding kookgedeeltes
Uitschakelen kookgedeeltes
Programmering kooktijd
Blokkering van het bedieningspaneel
Demo modus
Uitschakelen kookplaat
Praktische tips voor het gebruik van het apparaat
Veiligheidssystemen
Voorzorgsmaatregelen en advies, 39
Algemene veiligheid
Afvalverwijdering
IT
NL
Onderhoud en verzorging, 40
De elektrische stroom afsluiten
Reinigen van het apparaat
De kookplaat verwijderen
Page 32
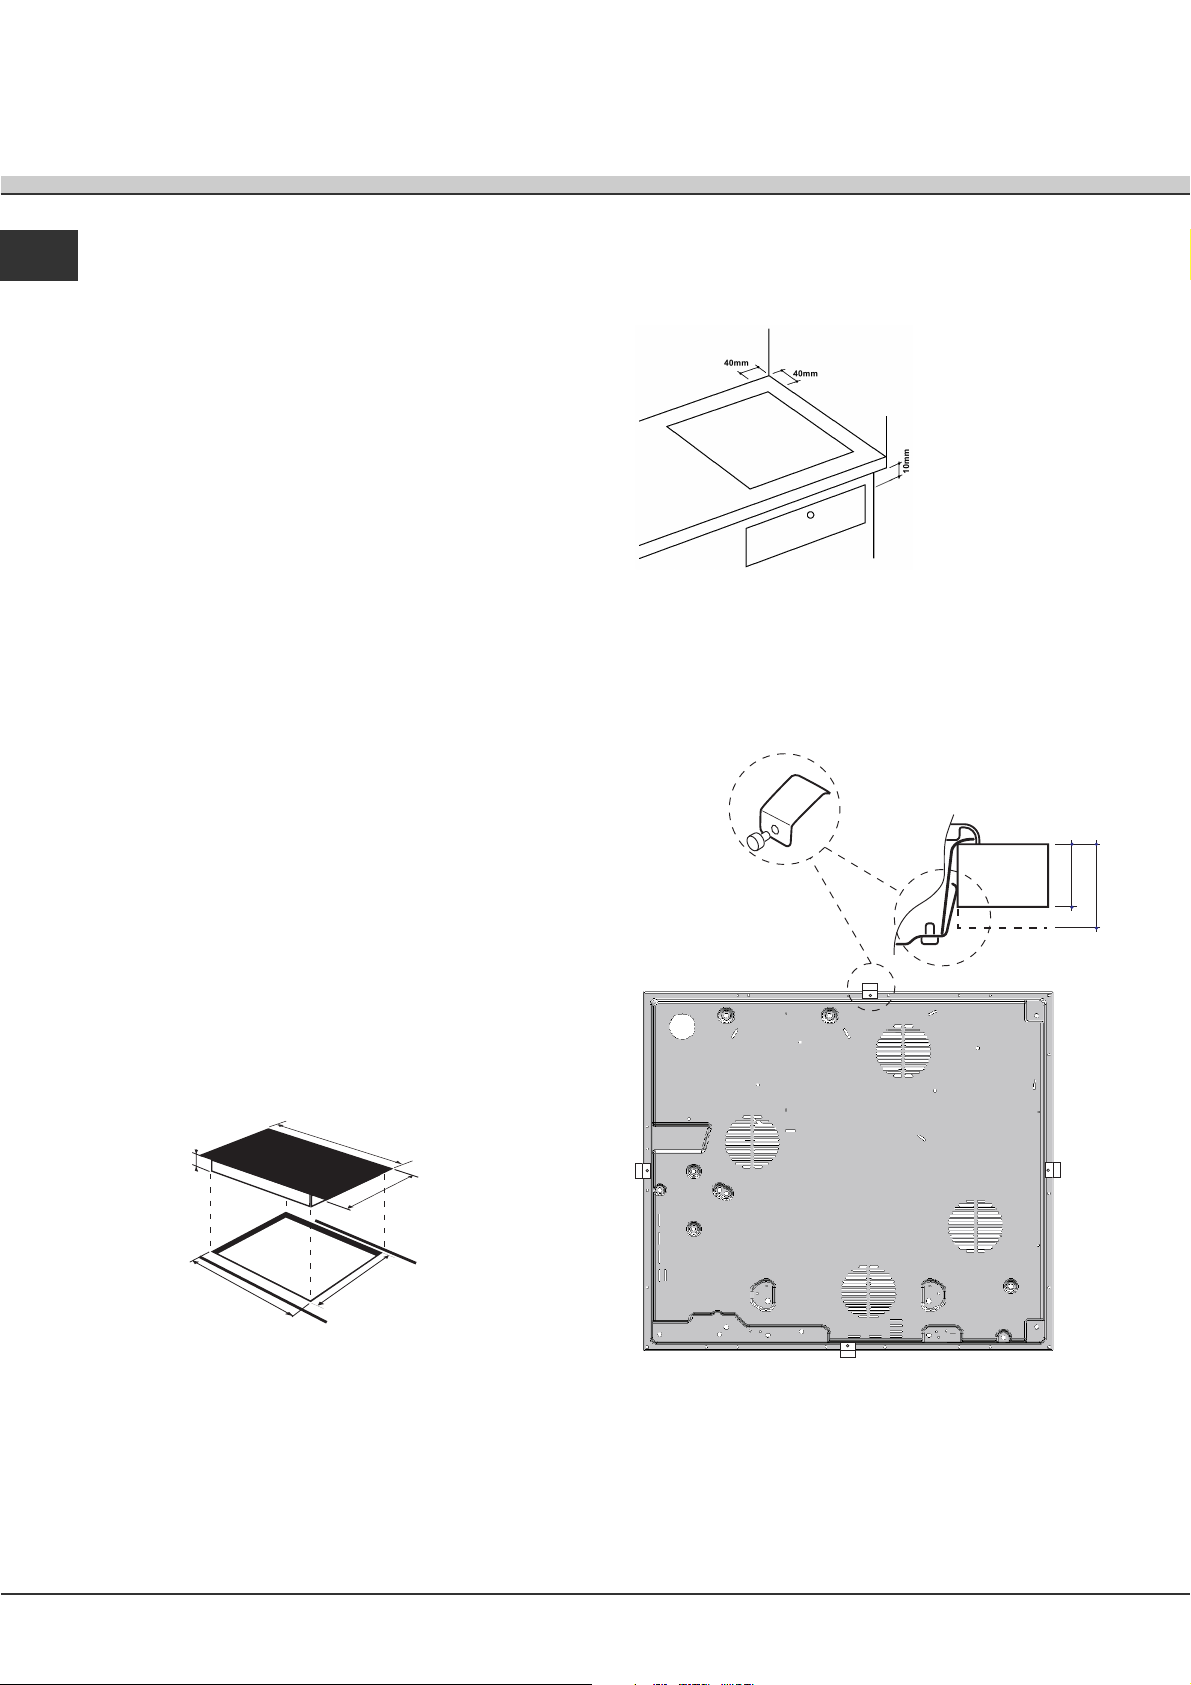
Installatie
NL
! Bewaar dit boekje zorgvuldig voor eventuele verdere
raadpleging. Wanneer u het product weggeeft, verkoopt,
of wanneer u verhuist, dient u dit boekje bij het apparaat
te bewaren zodat alle nodige informatie voorhanden blijft.
! Lees de gebruiksaanwijzingen zorgvuldig door: er staat
belangrijke informatie in over installatie, gebruik en
veiligheid.
Plaatsing
! Het verpakkingsmateriaal is niet bestemd voor
kinderen en dient daarom te worden verwijderd volgens
de geldende normen voor gescheiden afvalverzameling
(zie Voorzorgsmaatregelen en advies).
! De installatie moet worden uitgevoerd door een
bevoegde installateur en volgens de instructies van de
fabrikant. Een verkeerde installatie kan schade
berokkenen aan personen, dieren of dingen.
Inbouw
Voor een goede werking van het apparaat moet het
keukenmeubel de juiste kenmerken hebben:
het keukenblad moet uit hittebestendig materiaal
zijn vervaardigd en een temperatuur van circa
100°C kunnen verdragen;
als de kookplaat boven een oven wordt
geïnstalleerd moet deze zijn voorzien van een
geforceerd geventileerd afkoelingssysteem;
installeer de kookplaat nooit boven een vaatwasser:
indien u dit toch doet, breng dan een waterdichte
afscheiding aan tussen de twee apparaten;
de ruimte van het meubel moet de volgende
afmetingen hebben:
Ventilatie
Teneinde een correcte ventilatie te bereiken en
een oververhitting van de oppervlakken rondom het apparaat
te voorkomen, moet de kookplaat geïnstalleerd worden op:
een minimum
afstand van 40 mm
van de achterwand
of van elk ander
verticaal oppervlak;
op zodanige wijze
dat er een minimum
afstand overblijft van
10 mm tussen het
inbouwmeubel en
het onderstaande
meubel.
Bevestigen
Het apparaat moet op een absoluut horizontaal
oppervlak worden geïnstalleerd.
Eventuele door onjuiste installatie veroorzaakte
vervormingen kunnen de eigenschappen en de
prestaties van de kookplaat aantasten.
VOORZIJDE VAN DE
KOOKPLAAT
KEUKENBLAD
30
KOOKPLAAT
ONDERSTEBOVEN
40
32
640
4
555
520
45
Voor het bevestigen moet u als volgt te werk gaan:
1. Schroef met korte, puntloze schroeven de 4
centreringsklemmen in de openingen in het midden van
elke zijde van het blad vast;
2. zet de kookplaat in het midden van de opening van
het keukenmeubel door gelijke druk uit te oefenen op de
hele omtrek totdat de kookplaat perfect aansluit op het
keukenblad.
Page 33
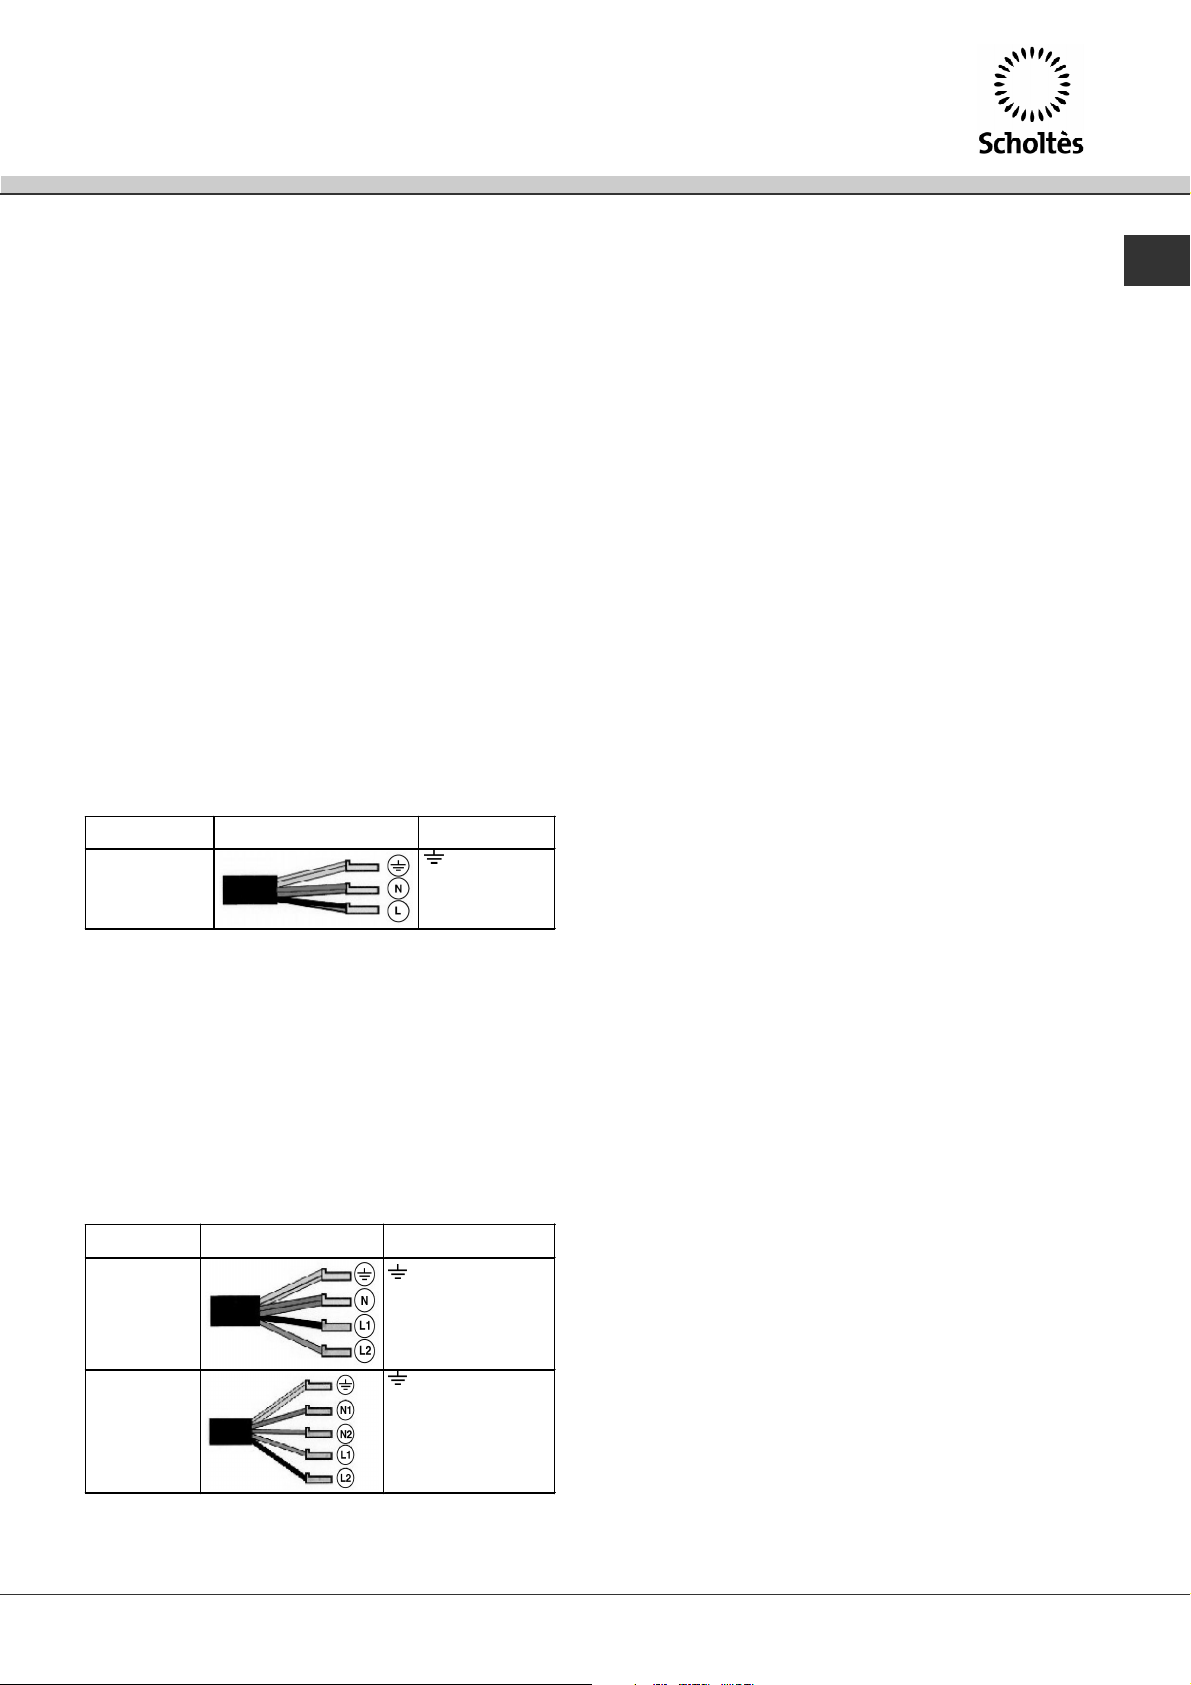
! De schroeven van de centreringsklemmen moeten te
allen tijde bereikbaar blijven.
Het aansluiten van de voedingskabel aan het
elektrische net
NL
! Volgens de veiligheidsnormen mag er geen contact
meer mogelijk zijn met de elektrische onderdelen nadat
het apparaat is ingebouwd.
! Alle beschermende onderdelen moeten zodanig
worden bevestigd dat ze niet kunnen worden verwijderd
zonder gereedschap te gebruiken.
Elektrische aansluiting
! De elektrische aansluitingen van de kookplaat en de
eventuele inbouwoven moeten apart worden uitgevoerd,
zowel om elektrische veiligheidsredenen als om de
oven eventueel eenvoudiger te kunnen verwijderen.
Eenfasige aansluiting
De kookplaat is voorzien van een voedingskabel
bestemd voor een eenfasige aansluiting. Voer de
draadverbinding uit zoals aangegeven in de
volgende tabel en tekeningen:
Spanningstype en
netfrequentie
230V 1+N ~
50 Hz
Andere soorten aansluitingen
Elektrische kabel Dr aadver bi nding
: geel/groen;
N: de 2 blauwe
draden samen
L: bruin en zwart
samen
Wanneer het apparaat rechtstreeks op het net wordt
aangesloten moet men tussen het apparaat en het net
een meerpolige schakelaar aanbrengen met een
afstand tussen de contacten van minstens 3mm,
aangepast aan het elektrische vermogen en voldoend
aan de geldende normen (de aarding mag niet worden
onderbroken door de schakelaar). De voedingskabel
moet zodanig geplaatst worden dat hij nergens een
temperatuur bereikt die 50°C hoger is dan de
kamertemperatuur.
! De installateur is verantwoordelijk voor een correcte
elektrische aansluiting en de inachtneming van de
veiligheidsnormen.
Voor het aansluiten moet u controleren dat:
het stopcontact geaard is en voldoet aan de geldende
normen;
het stopcontact in staat is het maximale vermogen
van het apparaat te verdragen, zoals aangegeven op
het typeplaatje dat zich op het apparaat bevindt;
de spanning zich bevindt tussen de waarden die
staan aangegeven op het typeplaatje;
het stopcontact en de stekker overeenkomen. Als dat
niet zo is, dient u ofwel de stekker ofwel het
stopcontact te vervangen; gebruik geen
verlengsnoeren of dubbelstekkers.
! Wanneer het apparaat geïnstalleerd is moeten het
snoer en het stopcontact gemakkelijk te bereiken zijn.
Als de elektrische installatie overeenkomt met een van
de volgende eigenschappen:
Spanningstype en netfrequentie
380V + N ~ 50 Hz
230V 3 ~ 50 Hz
380V + 2N ~ 50 Hz
Voer de draadverbinding uit zoals aangegeven in de
volgende tabel en tekeningen:
Spanningstype en
netfrequentie
400V - 2+N ~
50 Hz
230V 3 ~
50Hz
400V - 2+2N ~
50 Hz
Elektrische kabel Draadverbinding
: geel/groen;
N: de 2 blauwe draden samen
L1: zwart
L2: bruin
: geel/groen;
N1: blauw
N2: blauw
L1: zwart
L2: bruin
! Het snoer mag niet gebogen of samengedrukt worden.
! Het snoer moet van tijd tot tijd worden gecontroleerd en
mag alleen door erkende monteurs worden vervangen.
! De fabrikant kan nergens aansprakelijk voor worden
gesteld als deze normen niet worden nageleefd.
33
Page 34
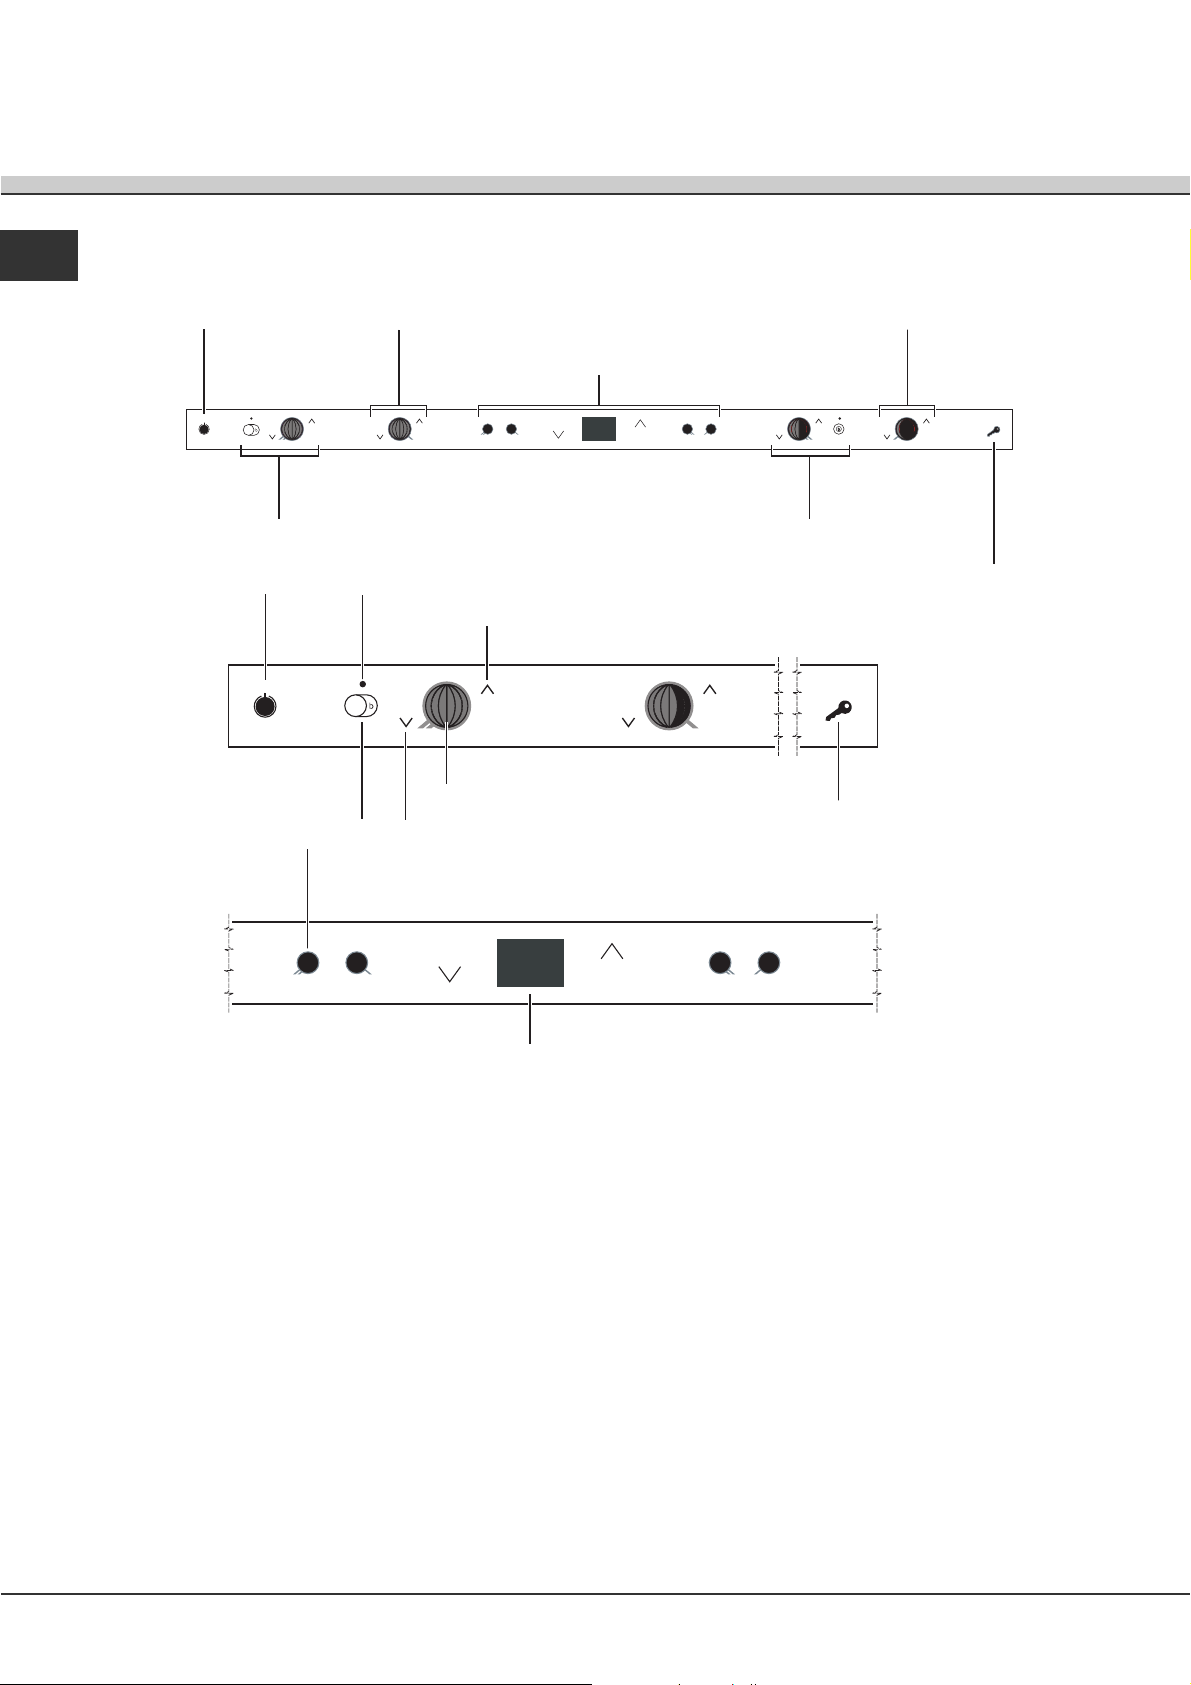
Beschrijving
/
van het apparaat
NL
Bedieningspaneel
Toets
ON/OFF
KOOKGEDEELTE
LINKSVOOR
Toets
ON/OFF
Toets VERLENGBAAR
KOOKGEDEELTE/
BOOSTER
KOOKGEDEELTE
LINKSACHTER
Controlelampje VERLENGBAAR KOOKGEDEELTE/
BOOSTER
Toets VERMINDEREN STROOMSTERKTE
Toets SELECTEREN KOOKPLAAT
Toets MEER VERMOGEN
Aanwijzer STROOMSTERKTE
KOOKGEDEELTE
RECHTSVOOR
DISPLAY GEDEELTE
KOOKGEDEELTE
RECHTSACHTER
Toets BLOKKERING BEDIENINGSPANEEL/
Controlelampje BEDIENINGSPANEEL GEBLOKKEERD
Toets BLOKKERING BEDIENINGSPANEEL
Controlelampje BEDIENINGSPANEEL GEBLOKKEERD
DISPLAY
Toets ON/OFF voor het in- en uitschakelen van het
apparaat.
Toets BOOSTER om het extra vermogen - 3000 W
- van het kookgedeelte in te schakelen (zie
Starten en gebruik).
Controlelampje BOOSTER geeft aan dat de
booster in het betreffende kookgedeelte aan is.
Toets VERLENGBAAR KOOKGEDEELTE om alle
kookgedeeltes in te schakelen (zie Starten en
gebruik).
Controlelampje VERLENGBAAR
KOOKGEDEELTE geeft de ontsteking aan van
het complete betreffende kookgedeelte.
Toets MINDER VERMOGEN om het vermogen te
regelen en de kookplaat uit te zetten (zie Starten
en gebruik).
Aanwijzer VERMOGEN geeft het bereikte
warmteniveau aan.
Toets MEER VERMOGEN om de kookplaat aan te
zetten en het vermogen te regelen (zie Starten en
gebruik).
Toetsen SELECTEREN KOOKPLAAT om in het
menu te komen van elk kookgedeelte (zie Starten
en gebruik).
Toets BLOKKERING BEDIENINGSPANEEL om te
voorkomen dat er ongewilde wijzigingen aan de
programmering van het kookvlak worden
uitgevoerd (zie Starten en gebruik).
Controlelampje BLOKKERING
BEDIENINGSPANEEL toont dat de blokkering
van het bedieningspaneel is uitgevoerd (zie
Starten en gebruik).
34
Page 35
Technische beschrijving van de kookgedeeltes
Het inductiesysteem is het snelste kooksysteem dat er bestaat. In tegenstelling tot conventionele kookplaten
wordt niet het kookgedeelte verwarmd: de warmte wordt rechtstreeks binnenin de pan gecreëerd, die daarom
een bodem van ferromagnetisch materiaal moet bezitten.
NL
KOOKPLATEN
Kookgedeeltes
Rechtsachter
Rechtsvoor
Linksvoor
Linksachter
Max. totaal vermogen
Legenda:
I = kookgedeelte met eenvoudige inductie
IO= ovaal kookgedeelte met inductie
B = booster: inschakelen van het extra vermogen tot 3000 W in het kookgedeelte
* = het maximale vermogen wordt beperkt tot 600 W terwijl de booster in het kookgedeelte erachter actief is
(zie Starten en gebruik).
TIL 641
Vermogen
I 2400 W B 3000 W
I 1200 W 600 W se*
IO 1200-2400 W B 3000 W
I 1200 W 600 W se*
7200 W
35
Page 36
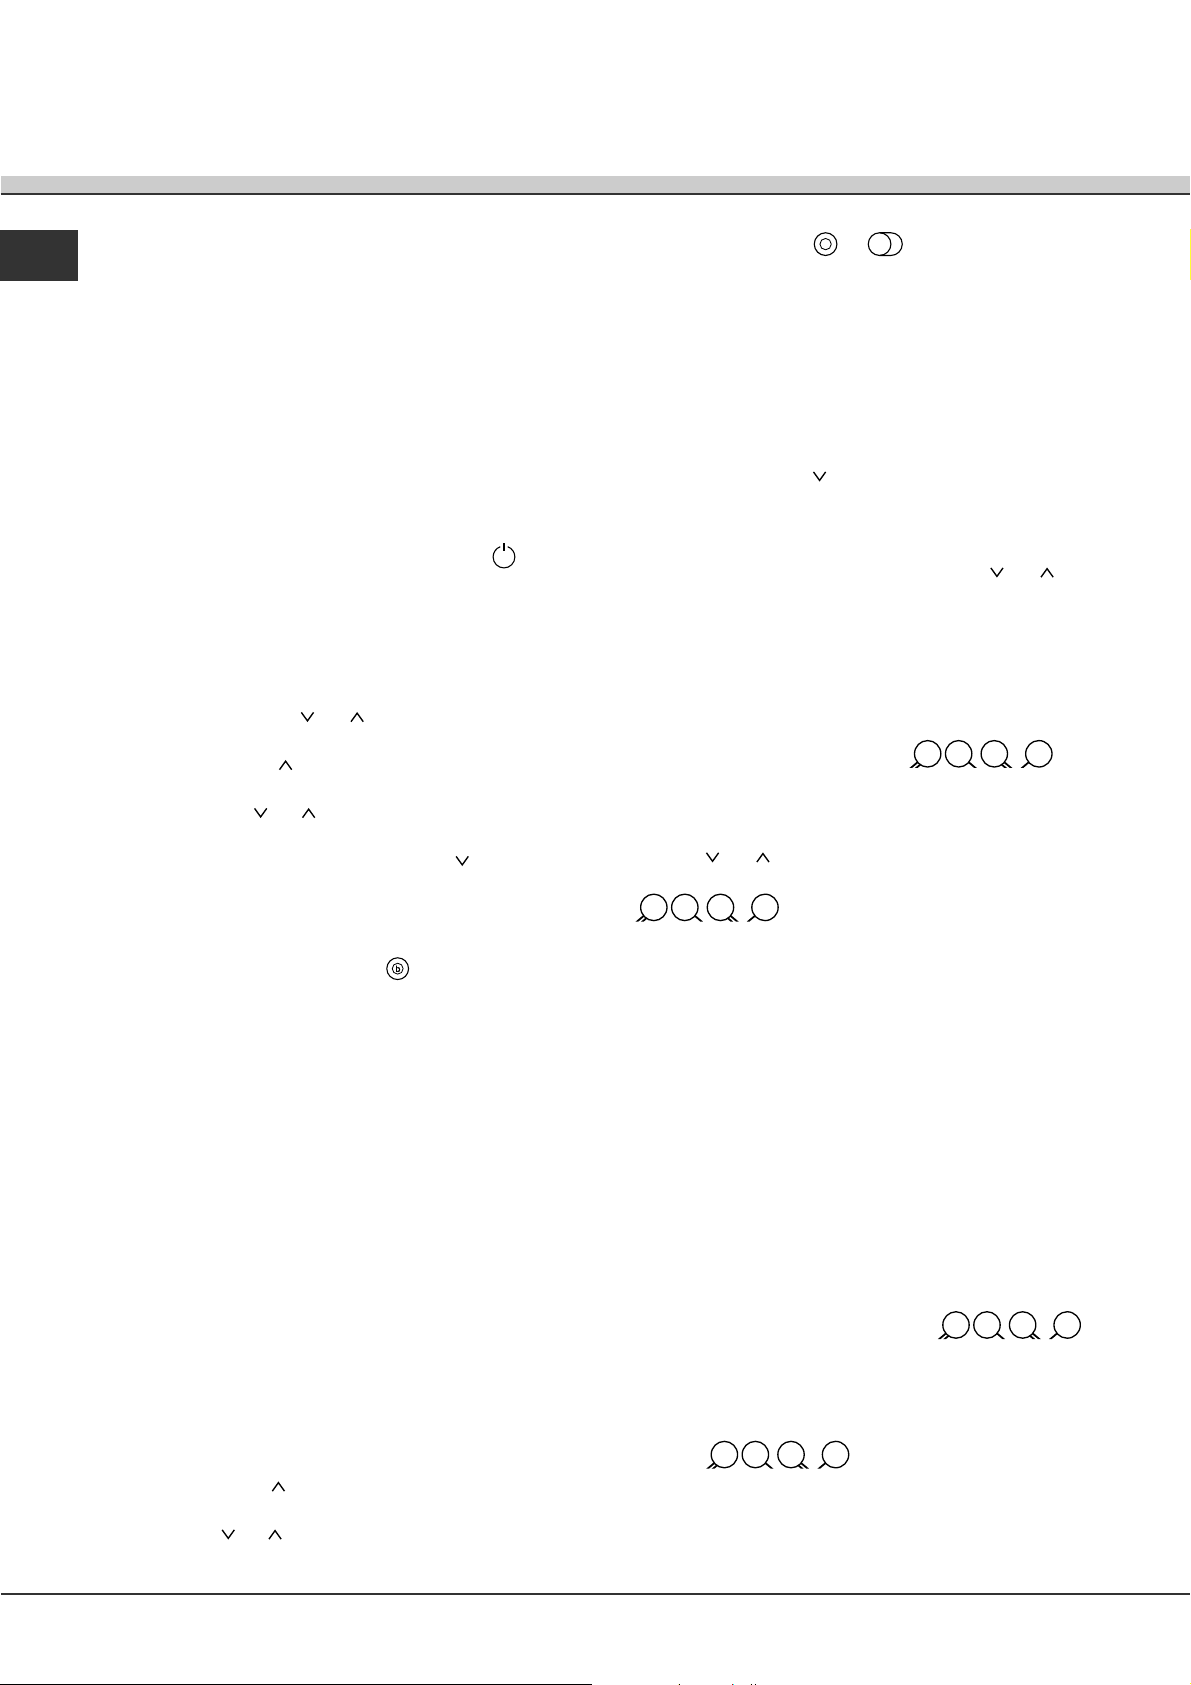
Starten en gebruik
NL
! De lijm die is gebruikt voor de afdichtingen laat wat
vetvlekjes achter op het glas. Voordat u het
apparaat gebruikt raden wij u aan de vlekken te
verwijderen met een speciaal niet-schurend
schoonmaakmiddel. Gedurende de eerste paar uur
dat u het apparaat gebruikt kan het zijn dat u een
rubbergeur ruikt. Deze zal echter snel wegtrekken.
! Als de kookplaat elektrisch wordt aangesloten
hoort u na enkele seconden een kort geluidssignaal
afgaan. Alleen dan kunt u de kookplaat aanzetten.
Inschakelen kookplaat
Druk ongeveer 1 seconde lang op de knop voor
het inschakelen van de kookplaat.
Inschakelen kookgedeeltes
Ieder kookgedeelte wordt door middel van een
stroomsterkteregelaar bediend. De regelaar bestaat
uit de twee knoppen (
aanwijzer van de stroomsterkte.
Druk op de toets
en stel vervolgens het gewenste vermogen in door
op de toetsen
Om de kookplaat direct op het maximale niveau
in te stellen drukt u kort op de toets
en ) aan de zijkant van de
om de kookplaat in te schakelen
en te drukken.
.
Booster functie
Om de verwarmingstijd te verkorten kunt u de booster
functie activeren door op de toets
middel van deze functie wordt het vermogen in dit
kookgedeelte verhoogd tot 3000 W. De boosterfunctie
stopt automatisch na 4 minuten. Zolang de booster actief
is, zal het betreffende voorste of achterste kookgedeelte
slechts over een maximaal vermogen van 600 W
beschikken (bv.: als in het kookgedeelte rechtsachter de
booster is ingeschakeld, zal het vermogen in het
kookgedeelte rechtsvoor verminderen). Een hoger
vermogen wordt aangegeven door het knipperen van de
te hoge stroomsterktes die aan het einde van de
boosterfunctie weer tot op een normaal niveau worden
teruggebracht.
! Ovale kookgedeeltes: het extra vermogen kan alleen
worden ingeschakeld als het hele ovale gedeelte actief is.
! Plaats nooit twee kleine pannen op de ovale kookgedeeltes.
te drukken. Door
Uitbreiding kookgedeeltes
Toets voor de uitbreiding van de verlengbare
kookgedeeltes (concentrisch of ovaal).
1. Druk op de toets
en stel vervolgens het gewenste vermogen in door op
de toetsen
om de kookplaat in te schakelen
en te drukken.
2. Druk op de toets
van het complete verlengbare kookgedeelte.
Voor het terugkeren naar het kleine gedeelte drukt u
nogmaals op de extensietoets.
Het controlelampje boven de toets van het verlengbare
kookgedeelte blijft net zolang aan totdat het grote
oppervlakte wordt gebruikt.
of voor het inschakelen
Uitschakelen kookgedeeltes
Druk op de toets aan de zijkant van de
aanwijzer van de stroomsterkte: het vermogen
van het kookgedeelte wordt langzaam minder
totdat het uitgaat.
Of druk tegelijkertijd op de knoppen
kookgedeelte gaat uit.
en : het
Programmering kooktijd
! Alle kookgedeeltes kunnen geprogrammeerd worden
voor een tijdsduur tussen de 1 en de 99 minuten.
1. Druk op een van de toetsen , aan
de zijkant van het display, die overeenkomen met
de kookplaat die u wilt programmeren.
2. Stel de gewenste kooktijd in door middel van de
toetsen
3. Bevestig door te drukken op de toets
die overeenkomt met de kookplaat die u wilt
programmeren.
De timer begint gelijk met aftellen. Het einde van de
geprogrammeerde kooktijd wordt aangegeven door
een geluidssignaal (van 1 minuut) waarna het
kookgedeelte uitgaat.
Herhaal de hierboven beschreven procedure voor
iedere kookplaat die u wilt programmeren.
Visualisatie bij een meervoudige programmering.
Indien een of meer kookplaten zijn geprogrammeerd
vertoont het display de resterende tijd van de
kookplaat die als eerste de programmeringstijd
eindigt, terwijl hij de stand ervan aanduidt door middel
van het betreffende controlelampje
De controlelampjes van de andere geprogrammeerde
kookplaten geven een minder fel licht af.
Om de overgebleven tijd te zien van een
geprogrammeerde kookplaat drukt u op een van de
toetsen
gekozen kookplaat: het display toont de
overgebleven tijd.
en aan de zijkanten van het display.
, aan de zijkant van het display,
.
die overeenkomen met de
36
Page 37
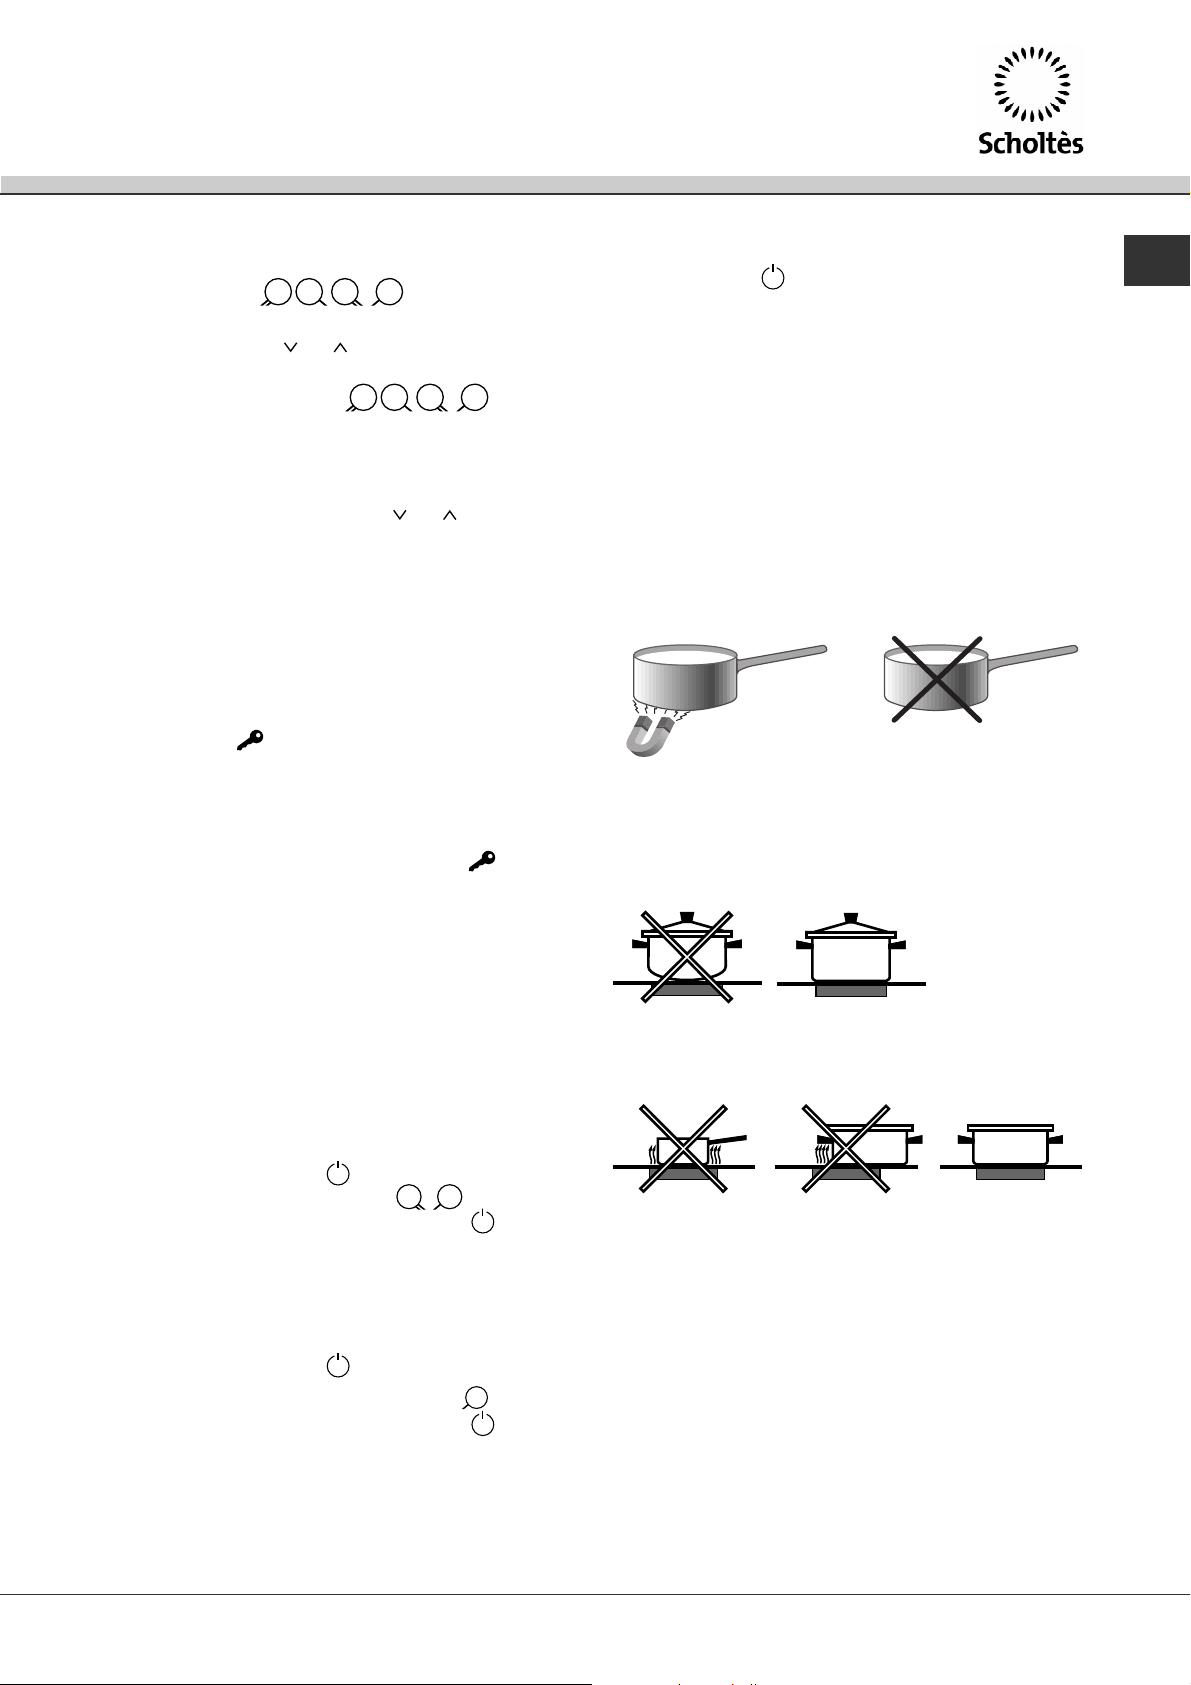
Het wijzigen van een programmering
1. Druk op de toets
die overeenkomt
met de kookplaat die u wenst te wijzigen.
2. Druk op de toetsen
en aan de zijkant van het
display om de nieuwe tijd in te stellen.
3. Bevestig door op de toets
te
drukken die overeenkomt met dat kookgedeelte.
Om een programmering te annuleren moet u
bovenstaande handelingen uitvoeren. Bij punt 2
drukt u tegelijkertijd op de toetsen en aan de
zijkant van het display: de programmering wordt
gewist en het display verlaat de
programmeringsmodus.
Blokkering van het bedieningspaneel
U kunt het bedieningspaneel blokkeren om een
ongewenste regeling te vermijden (kinderen,
schoonmaakhandelingen, enz.). Door 3 seconden
lang op de toets
worden geblokkeerd en zal het controlelampje
BEDIENINGSPANEEL GEBLOKKEERD aangaan. Als
u het bedieningspaneel weer wilt gebruiken (bv. als
u wilt stoppen met koken) moet u de blokkering
uitschakelen: druk 3 seconden op de toets
het bedieningspaneel wordt weer geactiveerd.
Als de blokkering actief is kunt het kookvlak toch
uitschakelen. In dit geval zal het controlelampje
BEDIENINGSPANEEL GEBLOKKEERD aanblijven tot
hij wordt uitgeschakeld.
te drukken zal de bediening
en
Uitschakelen kookplaat
Druk op de toets ; het apparaat gaat uit.
Als het bedieningspaneel is geblokkeerd, blijft dit ook
geblokkeerd nadat u de kookplaat opnieuw inschakelt.
Als u de kookplaat opnieuw wilt inschakelen moet u
eerst het bedieningspaneel deblokkeren.
Praktische tips voor het gebruik van
het apparaat
! Gebruik pannen die gemaakt zijn van materiaal dat
geschikt is voor inductie (ferromagnetisch
materiaal). Wij raden het gebruik aan van pannen
van: gietijzer, geëmailleerd staal of speciaal inductie
roestvrij staal. U kunt zelf testen of een pan geschikt
is door hem uit te proberen met een magneet.
GESCHIKTE MATERIALEN
*
Gietijzer
Ge‘mailleerd staal
Speciaal roestvrij staal
Om optimale resultaten te bereiken met de
kookplaat:
Gebruik alleen pannen met een dikke, platte
bodem zodat ze perfect aansluiten op het
verwarmingsvlak.
ONGESCHIKTE MATERIALEN
Aluminium, Glas, Terracotta,
Aardewerk, Niet magnetisch roestvrij staal
Koper,
NL
Demomodus
De kookplaat kan in Demomodus werken: alle
verwarmingselementen worden uitgeschakeld, maar
de bediening blijft actief.
Voor het inschakelen van de Demomodus:
1. Schakel de kookplaat in
2. Druk tegelijkertijd op de toetsen
vervolgens 6 seconden lang op de toets
hoort een geluidssignaal en op het display
verschijnt de tekst dE ON;
3. de kookplaat bevindt zich in de Demomodus
Voor het uitschakelen van de Demomodus:
1. Schakel de kookplaat in
2. Druk de een na de ander op de toetsen
vervolgens 2 seconden lang op de toets
hoort een geluidssignaal en op het display
verschijnt de tekst dE OF;
3. daarna zal het kookvlak gewoon functioneren.
;
en
. U
;
en
. U
Gebruik pannen die groot genoeg zijn om de
kookplaat geheel te bedekken zodat alle
beschikbare hitte wordt benut.
Houd de bodem van de pannen altijd goed
schoon en droog zodat ze goed aansluiten op het
kookvlak. Dit verlengt de levensduur van zowel
de pannen als het kookvlak zelf.
Vermijd dezelfde pannen te gebruiken die u ook
op een gasfornuis heeft gebruikt: de
warmteconcentratie van gasbranders kan de
bodem van pannen vervormen, waardoor ze niet
goed meer aansluiten.
37
Page 38

NL
Veiligheidssystemen
Het waarnemen van de pannen
Ieder kookgedeelte is voorzien van een systeem dat
waarneemt of er een pan op staat. De plaat straalt
alleen warmte uit als er een pan van de juiste
afmetingen op staat. Het knipperende
controlelampje kan betekenen:
dat de pan niet geschikt is
dat de pan een te kleine diameter heeft
dat de pan niet goed aansluit
Veiligheidsschakelaar
Het apparaat beschikt over een
veiligheidsschakelaar die de kookgedeeltes
automatisch uitschakelt als de tijdslimiet voor een
bepaald vermogensniveau is bereikt. Tijdens deze
veiligheidsonderbreking vertoont de display het
cijfer 0.
B.v.: de kookplaat rechtsachter staat op 5, terwijl de
plaat linksvoor op 2 staat. De plaat rechtsachter zal
automatisch na 3 uur uitgaan, de plaat linksvoor na
10 uur.
Aanwijzers van de resterende warmte
Nadat de pan van het kookgedeelte is verwijderd
blijft, en zolang de temperatuur van dit gedeelte
boven de 60°C blijft, zal een aanwijzer stroomsterkte
knipperen, teneinde het verbrandingsrisico te
voorkomen.
Oververhitting
In het geval van een oververhitting van de
elektronische onderdelen gaat de kookplaat
automatisch uit en verschijnt op de display .
Deze boodschap verdwijnt en u kunt de kookplaat
weer gebruiken zodra de temperatuur voldoende is
gezakt.
Geluidssignaal
Enkele storingen, zoals:
een voorwerp (pan, bestek, enz.) dat meer dan 10
seconden op het bedieningspaneel ligt,
gemors op het bedieningspaneel,
een lange druk op een toets, kunnen een
geluidssignaal veroorzaken. Verwijder de oorzaak
van de storing en het geluidssignaal houdt op. In
deze gevallen zal het bedieningspaneel
automatisch worden geblokkeerd: om het weer in
te schakelen moet u op de toets [sleutel icoon]
drukken. De instellingen worden behouden. Als
de oorzaak van de storing niet wordt verwijderd
blijft het geluidssignaal gaan en gaat het
kookvlak uit.
38
Page 39
Voorzorgsmaatregelen
en advies
! Dit apparaat is ontworpen en vervaardigd volgens de
geldende internationale veiligheidsvoorschriften. Deze
aanwijzingen zijn geschreven voor uw veiligheid en u dient
ze derhalve goed door te nemen.
Deze apparatuur voldoet aan de volgende EU
voorschriften:
- 73/23/EEG van 19/02/73 (Laagspanning) en
daaropvolgende wijzigingen
- 89/336/EEG van 03/05/89 (Elektromagnetische
Compatibiliteit) en daaropvolgende wijzigingen
- 93/68/EEG van 22/07/93 en daaropvolgende wijzigingen.
- 2002/96/CE
Algemene veiligheid
! Controleer dat de luchttoevoeropening van het rooster
van de ventilator niet verstopt is. De inbouwkookplaat moet
voorzien zijn van een goede ventilatie voor het afkoelen
van de elektronische componenten.
! Het is niet aan te raden de inductiekookplaat boven een
koelkast te plaatsen (hitte) of boven een wasautomaat
(trillingen). Er zou geen voldoende ruimte zijn voor de
ventilatie van de elektronische elementen.
Dit apparaat is vervaardigd voor niet-professioneel
gebruik binnenshuis.
Het apparaat dient niet buitenshuis te worden geplaatst,
ook niet in overdekte toestand. Het is erg gevaarlijk als
het in aanraking komt met regen of onweer.
Raak de machine niet aan als u blootsvoets bent of met
natte of vochtige handen of voeten.
Het apparaat dient om gerechten te koken. Het mag
uitsluitend door volwassenen worden gebruikt en alleen
volgens de instructies die beschreven staan in deze
handleiding. Gebruik het kookvlak niet om voorwerpen
op te plaatsen en ook niet als snijplank.
Het glaskeramische kookvlak is bestand tegen
mechanische stoten. Het kan echter worden
beschadigd (of barsten) als het wordt geraakt door een
puntig object, bijvoorbeeld door gereedschap. Als dit
gebeurt moet u onmiddellijk het apparaat afsluiten van
de elektrische stroom en contact opnemen met de
Technische Dienst.
Als het oppervlak van de kookplaat gebarsten is moet u
het apparaat uitschakelen om te voorkomen dat u een
elektrische schok krijgt.
Voorkom dat elektrische snoeren van andere kleine
keukenapparaten op warme delen van de kookplaat
terechtkomen.
Vergeet niet dat de temperatuur in het kookgedeelte
aanzienlijk hoog blijft tot minstens 30 minuten nadat u
het uitschakelt. De resterende warmte wordt aangeduid
door een aanwijzer (zie Starten en gebruik).
Houd voorwerpen die kunnen smelten op afstand van
de kookplaat, zoals bv. plastic, aluminium of
suikerhoudende etenswaren. Let vooral op plastic of
aluminium verpakkingen en folie: als u ze op het nog
warme of lauwe kookvlak neerlegt, kunt u zware schade
aanrichten.
Richt de handvaten van de pannen altijd naar de
binnenzijde van de kookplaat zodat u er niet per
ongeluk tegenaan stoot.
Trek de stekker nooit uit het stopcontact door aan het
snoer te trekken, maar altijd door de stekker beet te
pakken.
Maak de oven niet schoon of voer geen onderhoud uit
als de stekker nog in het stopcontact zit.
Plaats geen metalen voorwerpen (messen, lepels,
deksels enz.) op de kookplaat aangezien zij heet
kunnen worden.
Mededeling voor dragers van een pacemaker of een
ander actief ingeplant medisch apparaat:
De kookplaat voldoet aan alle geldende normen
betreffende elektromagnetische storing.
Dit product is aldus in volkomen overeenstemming met
de voorschriften van de wet (richtlijn 89/336/EEG). Het
ontwerp is zodanig ontworpen dat het geen storingen
veroorzaakt bij andere elektrische apparaten die worden
gebruikt, mits ook dezen voldoen aan bovengenoemde
normen.
De inductieplaat creëert elektromagnetische velden op
korte afstand.
Teneinde ieder risico van storing tussen de kookplaat en
de pacemaker te vermijden moet deze laatste ook voldoen
aan de geldende normen.
Wat dat betreft kunnen wij slechts de conformiteit van ons
eigen product garanderen. Voor informatie omtrent
conformiteit of eventuele problemen verzoeken wij u zich
tot uw behandelend arts te wenden of tot de fabrikant van
de pacemaker.
Afvalverwijdering
Het wegdoen van het verpakkingsmateriaal: houdt u
zich aan de plaatselijke normen zodat het materiaal
hergebruikt kan worden.
De Europese richtlijn 2002/96/EG, betreffende
afgedankte elektrische en elektronische apparatuur
(RAEE), voorziet dat huishoudelijke apparatuur niet met
het normale afval mag worden meegegeven. De
verwijderde apparaten moeten apart worden opgehaald
om het terugwinnen en recyclen van de materialen
waaruit ze bestaan te optimaliseren en te voorkomen
dat er eventuele schade voortvloeit voor de gezondheid
en het milieu. Het symbool van de afvalemmer met een
kruis staat op alle producten om de consument eraan te
herinneren dat dit gescheiden afval is.
Om meer informatie betreffende een juiste verwijdering
van huishoudapparaten kan de consument zich richten
tot de gemeentelijke reinigingsdienst of de verkopers.
NL
39
Page 40

Onderhoud
en verzorging
NL
De elektrische stroom afsluiten
Sluit altijd eerst de stroom af voordat u tot enige
handeling overgaat.
Reinigen van het apparaat
! Vermijd het gebruik van schuurmiddelen of
bijtende middelen, zoals sprays voor barbecues en
ovens, vlekkenmiddelen, roestverwijderende
producten, schoonmaakmiddelen in poedervorm of
schuursponzen: deze kunnen het oppervlak
onherstelbaar krassen.
! Gebruik nooit stoom- of hogedrukreinigers voor het
reinigen van het apparaat.
Voor normaal onderhoud moet u de kookplaat met
een vochtige spons reinigen en afdrogen met
keukenpapier.
Als de plaat erg vuil is moet hij worden
schoongemaakt met een speciaal middel voor
keramiekplaten. Daarna moet u hem afspoelen en
afdrogen.
Voor het verwijderen van hardnekkig vuil gebruikt u
het bijgeleverde schrapertje. Doe dit zo snel mogelijk
voordat het apparaat afkoelt zodat de etensresten
niet aankoeken. Uitstekende resultaten bereikt u ook
met een speciaal voor keramiekplaten vervaardigd
roestvrijstalen sponsje met water een zeep.
Roestvrijstalen rand
(alleen in modellen met lijst)
Roestvrij staal kan vlekken gaan vertonen als er voor
langere tijd kalkhoudend water op blijft liggen of als
gevolg van gebruik van schoonmaakmiddelen die
fosfor bevatten. Spoel en droog de kookplaat altijd
goed af nadat u hem heeft schoongemaakt. Droog
gemorst water altijd meteen goed af.
! Enkele kookplaten hebben een lijst van aluminium
die lijkt op roestvrij staal. Gebruik voor het reinigen
en ontvetten geen producten die niet geschikt zijn
voor aluminium.
De kookplaat verwijderen
Als u de kookplaat moet verwijderen:
1. verwijder de schroeven die de centreringsklemmen
aan de zijkant vasthouden;
2. maak de schroeven van de bevestigingshaken op
de hoeken los;
3. haal de kookplaat uit het meubel.
! U mag nooit aan het interne systeem sleutelen om
een reparatie proberen uit te voeren.
Als er een storing is moet u contact opnemen met
de Technische Dienst.
! Het bijgeleverde schrapertje is erg scherp: wees
voorzichtig in het gebruik.
Als er op de kookplaat onverhoopt voorwerpen of
plastic materiaal of suiker zouden smelten, moet
u ze onmiddellijk met het schrapertje verwijderen
zolang het oppervlak nog warm is.
Als de plaat is schoongemaakt kan hij worden
behandeld met een speciaal product voor
onderhoud en bescherming: het onzichtbare
laagje dat dit product achterlaat beschermt de
plaat in het geval er iets overkookt. Dit soort
handelingen moet worden uitgevoerd als de plaat
lauw of koud is.
Vergeet niet de kookplaat altijd met schoon water
af te spoelen en goed af te drogen: restjes
schoonmaakmiddel kunnen de volgende keer dat
u kookt aankoeken.
40
Page 41
Bedienungsanleitung
KOCHFELD
IT
Italiano, 1
NL
31
TIL 641
GB FR
English,11
Français, 21
DE
Deutsch, 41Nederlands,
Inhaltsverzeichnis
Installation, 42-43
Aufstellung
Elektroanschluss
Beschreibung des Gerätes, 44-45
Bedienfeld
Technische Beschreibung der Kochzonen
Inbetriebsetzung und Gebrauch, 46-48
Einschalten des Kochfeldes
Einschalten der Kochzonen
Booster-Funktion
Erweiterung der Kochzonen
Ausschalten der Kochzonen
Programmierung der Garzeit
Sperre der Schaltelemente
Demo-Mode (Vorführmodus)
Ausschalten des Kochfeldes
Praktische Ratschläge zum Einsatz des Gerätes
Sicherheitsvorrichtungen
Vorsichtsmaßregeln und Hinweise, 49
Allgemeine Sicherheit
Entsorgung
DE
Reinigung und Pflege, 50
Abschalten Ihres Gerätes vom Stromnetz
Reinigung Ihres Gerätes
Demontage des Kochfeldes
Page 42
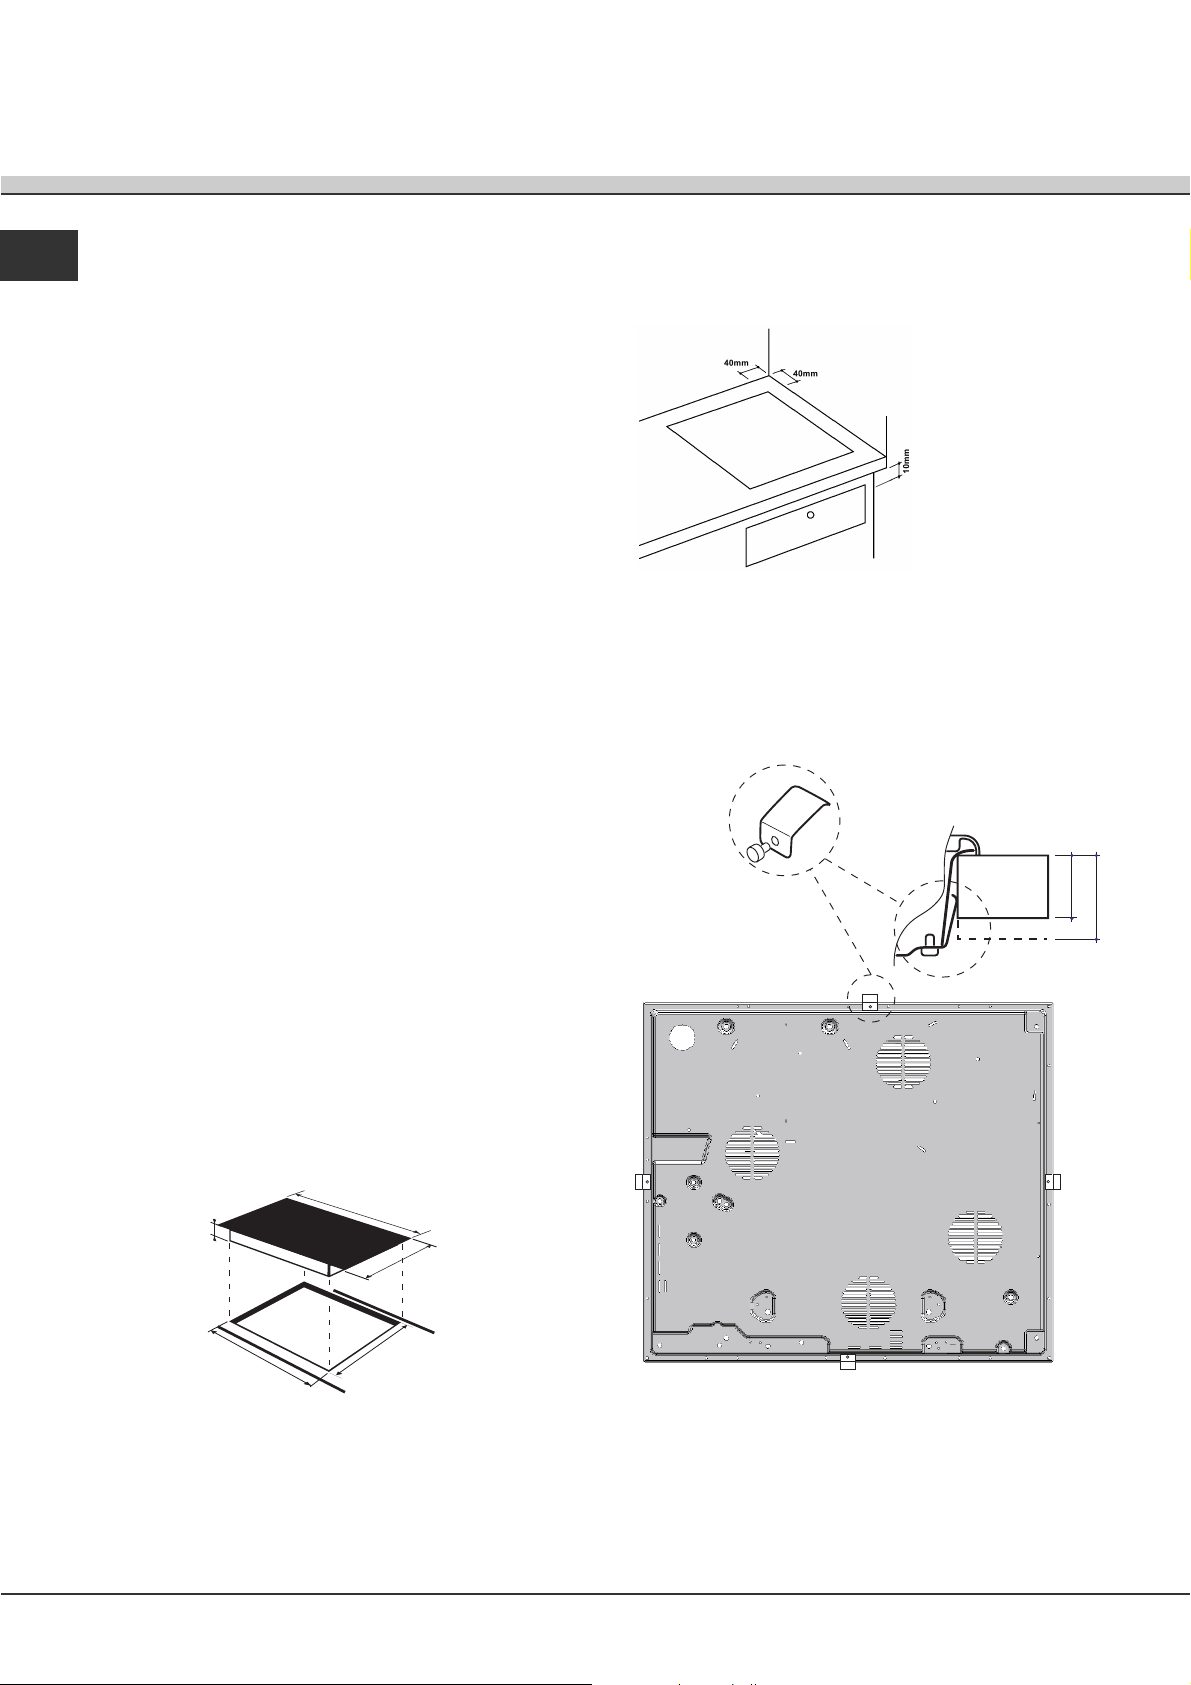
Installation
DE
! Bewahren Sie diese Bedienungsanleitung bitte sorgfältig
auf, damit Sie sie jederzeit zu Rate ziehen können. Sorgen
Sie dafür, dass sie im Falle eines Verkaufs, eines Umzugs
oder einer Übergabe an einen anderen Benutzer das
Gerät stets begleitet, damit auch der Nachbesitzer die
Möglichkeit hat, darin nachschlagen zu können.
! Lesen Sie bitte die nachfolgenden Hinweise aufmerksam
durch. Sie liefern wichtige Informationen hinsichtlich der
Installation, des Gebrauchs und der Sicherheit.
Aufstellung
! Verpackungsmaterial ist kein Spielzeug für Kinder. Es
ist entsprechend den Vorschriften zur getrennten
Müllsammlung zu entsorgen (siehe Vorsichtsmaßregeln
und Hinweise).
! Die Installation ist gemäß den vorliegenden
Anweisungen und von Fachpersonal durchzuführen.
Jede unsachgemäße Installation kann Menschen und
Tiere gefährden oder Sachschaden verursachen.
Einbau
Um eine einwandfreie Betriebsweise des Gerätes zu
gewährleisten, muss das für den Einbau bestimmte
Möbelteil folgende Eigenschaften aufweisen:
Die Auflagefläche muss aus hitzebeständigem
Material beschaffen sein, um einer Temperatur
von ca. 100°C standzuhalten.
Soll das Kochfeld über einem Backofen installiert
werden, muss Letzterer mit einem Kühlsystem mit
Zwangsbelüftung ausgestattet sein.
Von der Installation eines Kochfeldes über einem
Geschirrspüler wird abgeraten. Gegebenenfalls ist
zur Abdichtung ein Zwischenteil zwischen beiden
Geräten zu installieren.
Der Schrankausschnitt muss über folgende
Abmessungen verfügen:
Belüftung
Um eine geeignete Belüftung zu gewährleisten und ein
Überhitzen der angrenzenden Flächen zu vermeiden,
muss das Kochfeld wie folgt angebracht werden:
in einem Abstand
von mindestens 40
mm von der dahinter
liegenden Wand
bzw. jeder anderen
vertikalen Fläche;
um einen Abstand
von mindestens 10
mm zwischen dem
für den Einbau
bestimmten
Ausschnitt und dem
entsprechenden Unterschrank zu gewährleisten.
Befestigung
Das Kochfeld muss auf einer perfekt ebenen Stütz- bzw.
Auflagefläche installiert werden.
Durch unsachgemäße Befestigung hervorgerufene
Verformungen könnten die Eigenschaften und
Leistungen des Kochfeldes beeinträchtigen.
FRONTSEITE
DES KOCHFELDES
AUFLAGEFLÄCHE
30
KOCHFELD
UMGEDREHT
40
42
640
4
555
520
45
Verfahren Sie zur Befestigung wie folgt:
1. Schrauben Sie die 4 Zentrierungsfedern mittels der
vier kurzen, stumpfen Schrauben in die in der Mitte einer
jeden Kochfeldseite befindlichen Lochbohrungen.
2. Setzen Sie das Kochfeld durch leichtes Andrücken des
gesamten umlaufenden Randes mittig in den Möbelausschnitt
ein, und zwar so, dass es vorschriftsmäßig auf der gesamten
Auflagefläche aufstützt.
Page 43
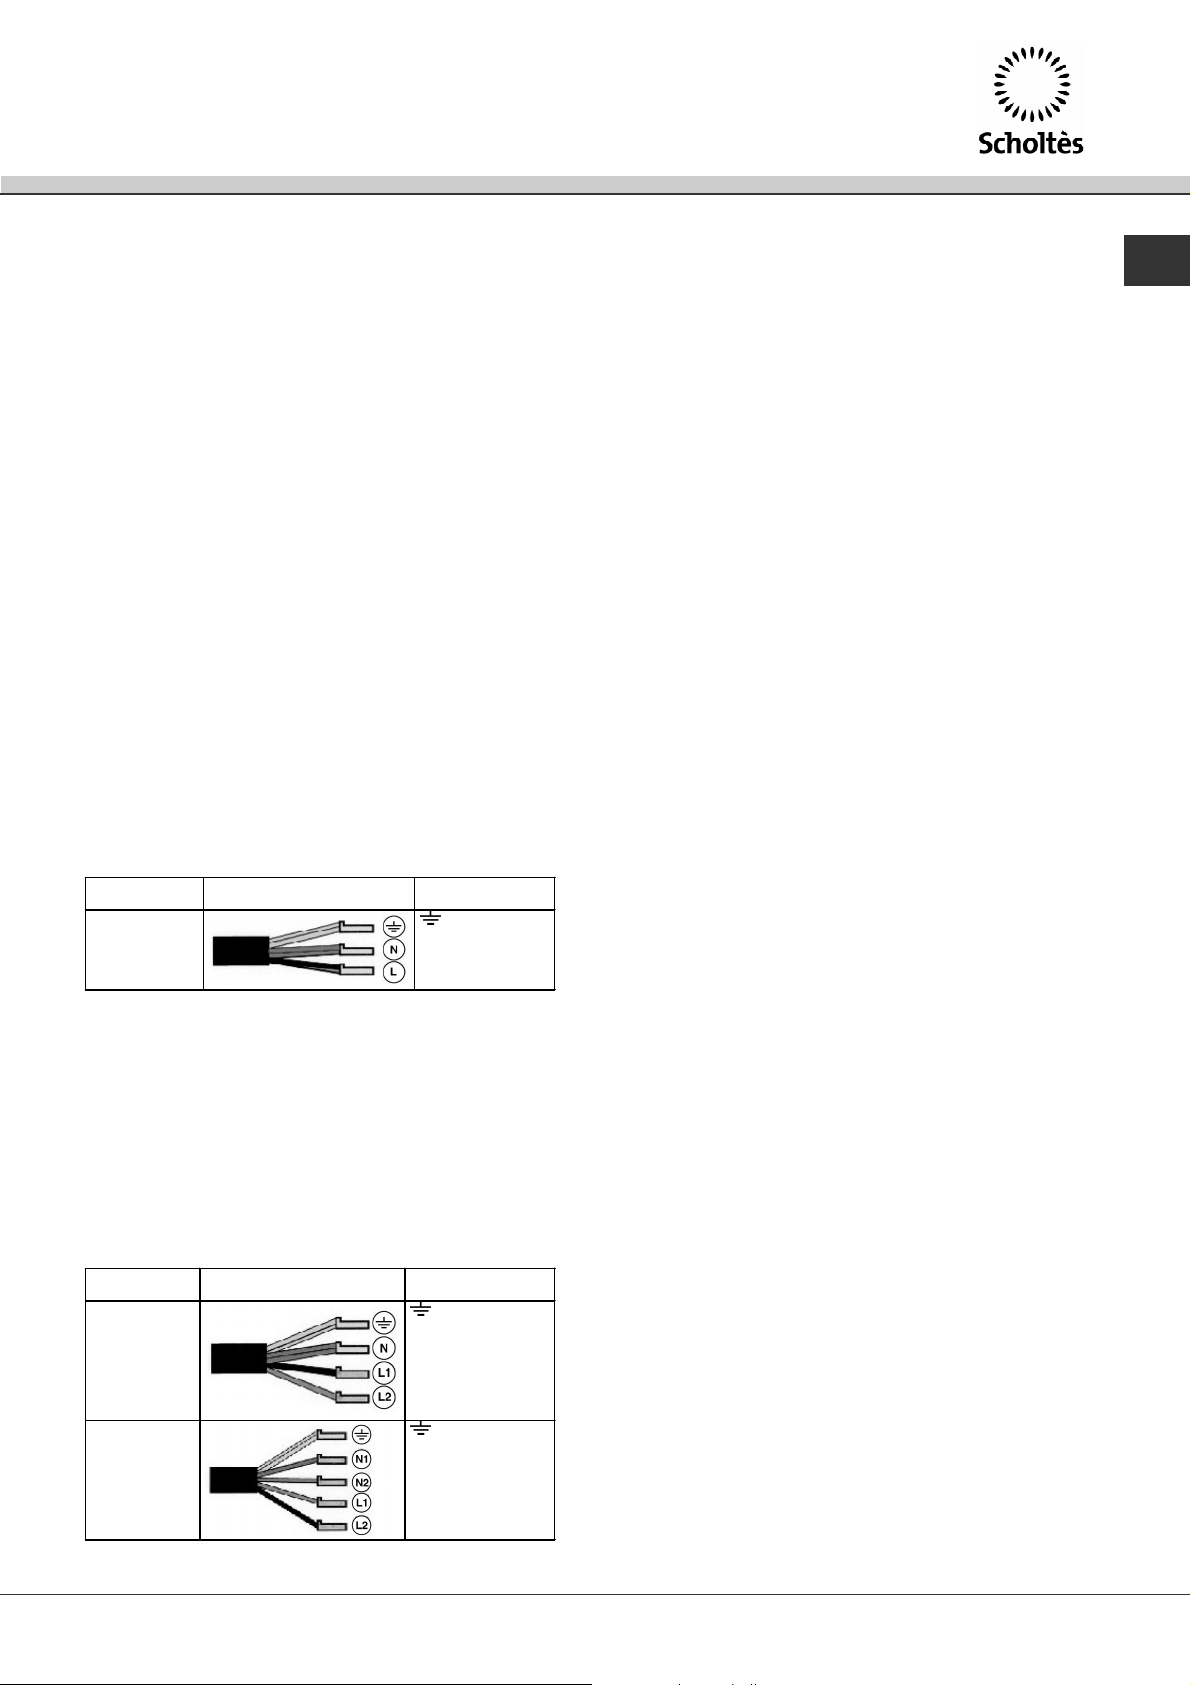
! Die Schrauben der Zentrierungsfedern müssen
unbedingt zugänglich sein.
! Gemäß den Sicherheitsvorschriften muss nach
erfolgtem Einbau die Möglichkeit einer Berührung mit
stromführenden Teilen ausgeschlossen sein.
! Alle zum Schutz dienenden Teile müssen so befestigt
werden, dass ein Entfernen derselben, ohne ein
Werkzeug zu Hilfe nehmen zu müssen, nicht möglich ist.
Anschluss des Netzkabels an das Stromnetz
DE
Wird das Gerät direkt an das Stromnetz angeschlossen,
ist zwischen Stromnetz und Gerät ein allpoliger, der Last
und den einschlägigen Vorschriften entsprechender
Schalter mit einer Mindestöffnung der Kontakte von 3
mm zwischenzuschalten. (Der Erdleiter darf vom
Schalter nicht unterbrochen werden.) Das
Versorgungskabel muss so verlegt werden, dass es an
keiner Stelle einer Temperatur ausgesetzt wird, die 50°C
über der Raumtemperatur liegt.
Elektroanschluss
! Bei der Installation des Kochfeldes und der eines
eventuellen Einbaubackofens müssen sämtliche
Elektroanschlüsse getrennt vorgenommen werden, und dies
nicht nur aus Sicherheitsgründen, sondern auch um den
Backofen, falls nötig, leichter herausziehen zu können.
Einphasenanschluss
Das Kochfeld ist mit einem bereits angeschlossenen
Netzkabel ausgestattet und ist für einen
Einphasenanschluss voreingestellt. Schließen Sie
die Drähte gemäß nachfolgender Tabelle und
Zeichnungen an:
Netzspannung
und -frequenz
230V 1+N ~
50 Hz
Elektrokabel
Andere Anschlussarten
Sollte die Elektroanlage einer der nachfolgenden
Eigenschaften entsprechen:
Netzspannung und -frequenz
380V + N ~ 50 Hz
230V 3 ~ 50 Hz
380V + 2N ~ 50 Hz
Anschluss der
Drähte
: gelb/grün;
N: die 2 blauen
Drähte zusammen
L: braun zusammen
mit schwarz
! Der Installateur ist für den ordnungsgemäßen
elektrischen Anschluss sowie die Einhaltung der
Sicherheitsvorschriften verantwortlich.
Vor dem Anschluss stellen Sie bitte sicher, dass:
die Netzsteckdose geerdet ist und den gesetzlichen
Bestimmungen entspricht;
die Netzsteckdose für die auf dem Typenschild
(befindlich auf dem Gerät) angegebene maximale
Leistungsaufnahme des Gerätes ausgelegt ist;
die Netzspannung im Bereich der auf dem
Typenschild angegebenen Werte liegt;
die Netzsteckdose mit dem Netzstecker kompatibel
ist. Sollte dies nicht der Fall sein, wechseln Sie bitte
die Netzsteckdose oder den Netzstecker aus;
verwenden Sie keine Verlängerungen und
Mehrfachsteckdosen.
! Netzkabel und Steckdose müssen bei installiertem
Gerät leicht zugänglich sein.
! Das Netzkabel darf nicht gebogen oder eingeklemmt
werden.
! Das Netzkabel muss regelmäßig kontrolliert werden
und darf nur durch autorisiertes Fachpersonal
ausgetauscht werden.
! Der Hersteller lehnt jede Verantwortung ab, falls
diese Vorschriften nicht eingehalten werden sollten.
Schließen Sie die Drähte gemäß nachfolgender Tabelle
und Zeichnungen an:
Netzspannung
und -frequenz
400V - 2+N ~
50 Hz
230V 3 ~
50Hz
400V - 2+2N ~
50 Hz
Elektrokabel
Anschluss der
Drähte
: gelb/grü n ;
N: die 2 blauen Drähte
zusammen
L1: schwarz
L2: braun
: gelb/grü n ;
N1: blau
N2: blau
L1: schwarz
L2: braun
43
Page 44
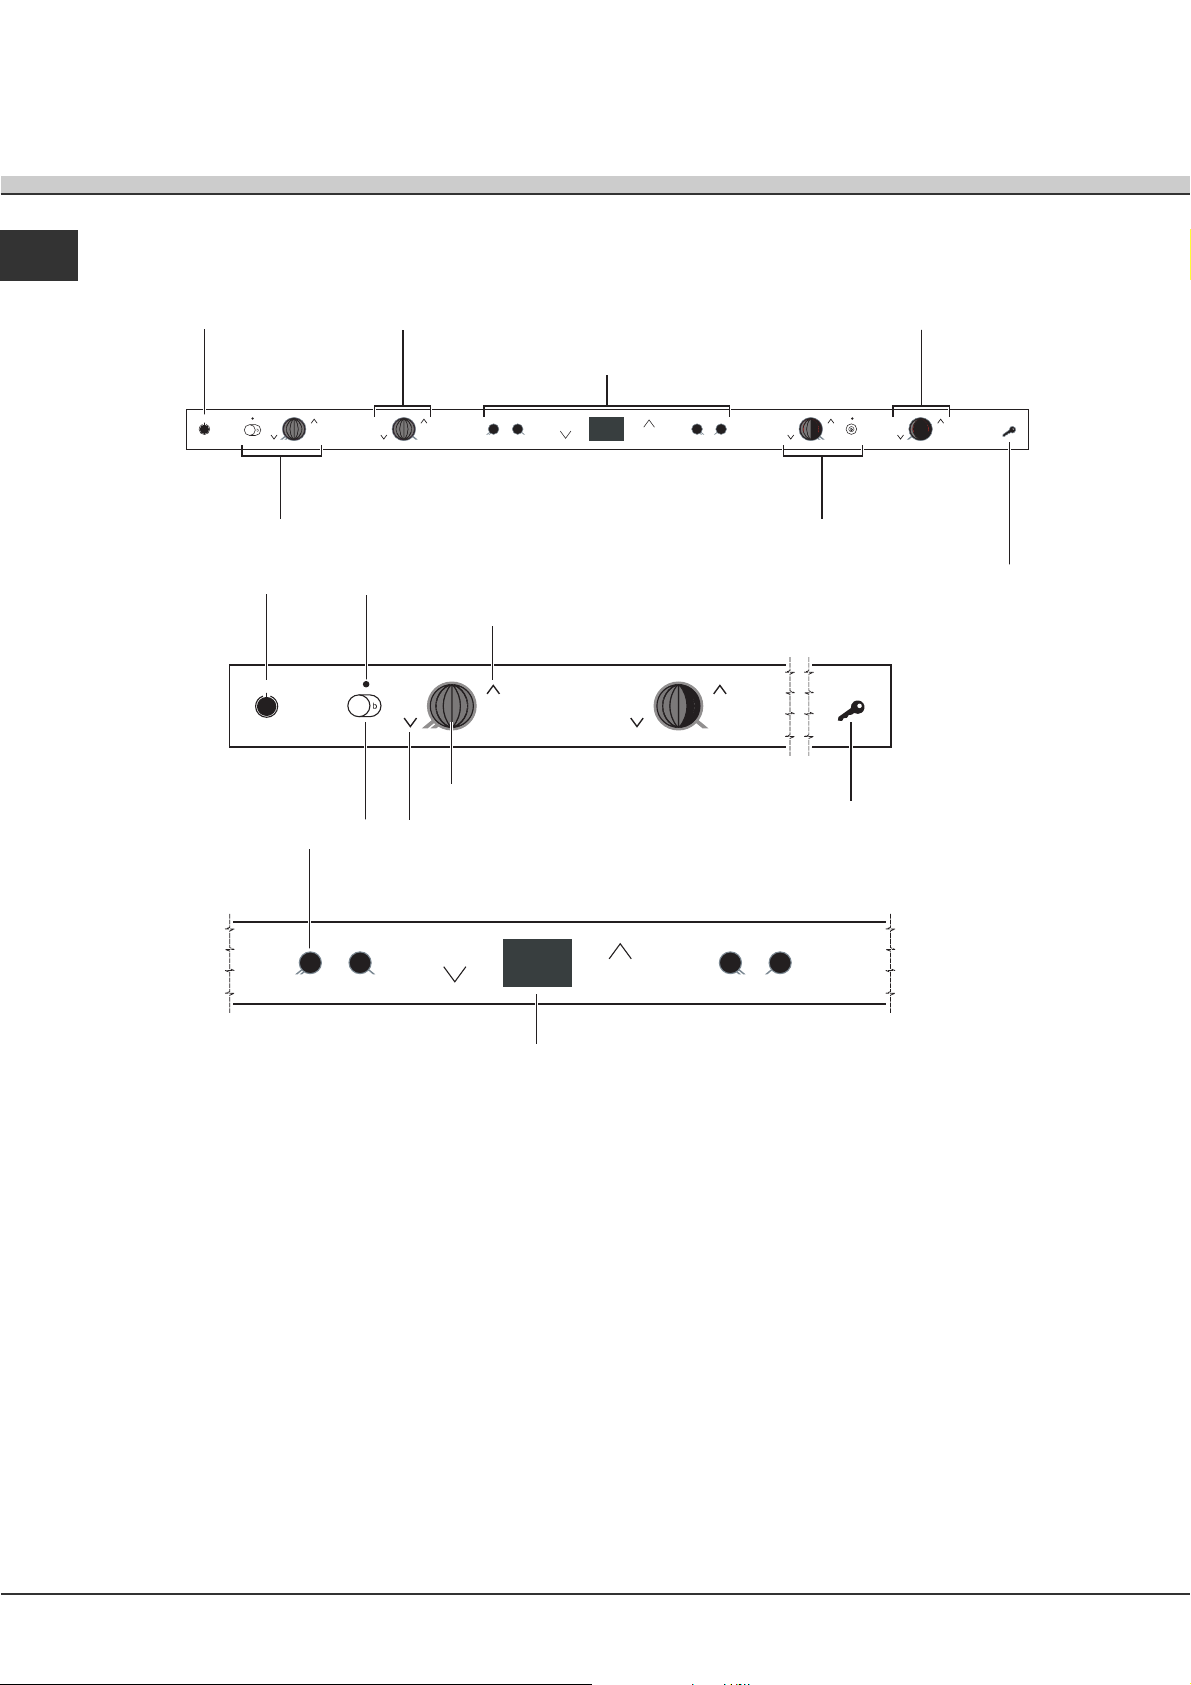
Beschreibung
des Gerätes
DE
Bedienfeld
ON/OFF-
Taste
Taste ERWEITERBARE
KOCHZONE/BOOSTER
KOCHZONE
HINTEN LINKS
KOCHZONE
VORNE LINKS
ON/OFF-
Taste
Kontrollleuchte ERWEITERBARE
KOCHZONE/
BOOSTER
Taste HERABSETZEN DER LEISTUNG
Taste KOCHZONENAUSWAHL
KOCHZONE
VORNE RECHTS
DISPLAY-BEREICH
KOCHZONE
HINTEN RECHTS
Taste SPERRE DER SCHALTELEMENTE/
Kontrollleuchte SCHALTELEMENTE GESPERRT
Taste ERHÖHEN DER LEISTUNG
LEISTUNGSANZEIGE
Taste SPERRE DER SCHALTELEMENTE/
Kontrollleuchte SCHALTELEMENTE GESPERRT
DISPLAY
Taste ON/OFF: Zum Ein- bzw. Ausschalten des
Gerätes.
Taste BOOSTER: Mittels dieser kann die
Kochzonenleistung auf 3000 W erweitert werden
(siehe Inbetriebsetzung und Gebrauch).
Kontrollleuchte BOOSTER: Diese zeigt an, dass
die Boosterfunktion der entsprechenden
Kochzone eingestellt wurde.
Taste ERWEITERBARE KOCHZONE: Mittels dieser
Taste kann die gesamte Kochzone eingeschaltet
werden. (siehe Inbetriebsetzung und Gebrauch).
Kontrollleuchte ERWEITERBARE KOCHZONE:
Diese zeigt an, dass die gesamte Kochzone
eingestellt wurde.
Taste HERABSETZEN DER LEISTUNG: Zur
Leistungsregelung sowie zum Ausschalten der
Kochzone (siehe Inbetriebsetzung und Gebrauch).
LEISTUNGSANZEIGE: Auf dieser ist der jeweils
erreichte Heizwert ersichtlich.
Taste ERHÖHEN DER LEISTUNG: Zum
Einschalten sowie zur Leistungsregelung der
Kochzone (siehe Inbetriebsetzung und
Gebrauch).
Tasten KOCHZONENAUSWAHL zum Öffnen der
Menüs der einzelnen Kochzonen (siehe
Inbetriebsetzung und Gebrauch).
Taste SPERRE DER SCHALTELEMENTE: Um
versehentliche Änderungen der am Kochfeld
erfolgten Einstellungen zu verhindern (siehe
Inbetriebsetzung und Gebrauch).
Kontrollleuchte SCHALTELEMENTE GESPERRT:
Diese signalisiert, dass die Schaltelemente gesperrt
wurden (siehe Inbetriebsetzung und Gebrauch).
44
Page 45
Technische Beschreibung der Kochzonen
Kochen mit Induktion ist die schnellste und zeitsparendste Art des Kochens. Im Gegensatz zu traditionellen
Kochzonen wird bei Induktionsbeheizung die Kochzone nicht erhitzt: Die Hitze wird direkt im Innern des Topfes
erzeugt, Voraussetzung dafür ist lediglich ein Kochtopf mit Boden aus magnetisiertem Material.
DE
KOCHFELDER
Kochzonen
Hinten rechts
Vorne rechts
Vorne links
Hinten links
Maximalleistung insg.
Legende:
I = Einfache Induktions-Kochzone
IO= Ovale Induktions-Kochzone
B = Booster: Die Leistung dieser Kochzone kann bis auf 3000 W erhöht werden.
* = Die maximale Leistung wird auf 600 W begrenzt, solange die Boosterfunktion für die entsprechende hintere
Kochzone eingeschaltet bleibt (siehe Inbetriebsetzung und Gebrauch).
TIL 641
Leistung
I 2400 W B 3000 W
I 1200 W 600 W se*
IO 1200-2400 W B 3000 W
I 1200 W 600 W se*
7200 W
45
Page 46
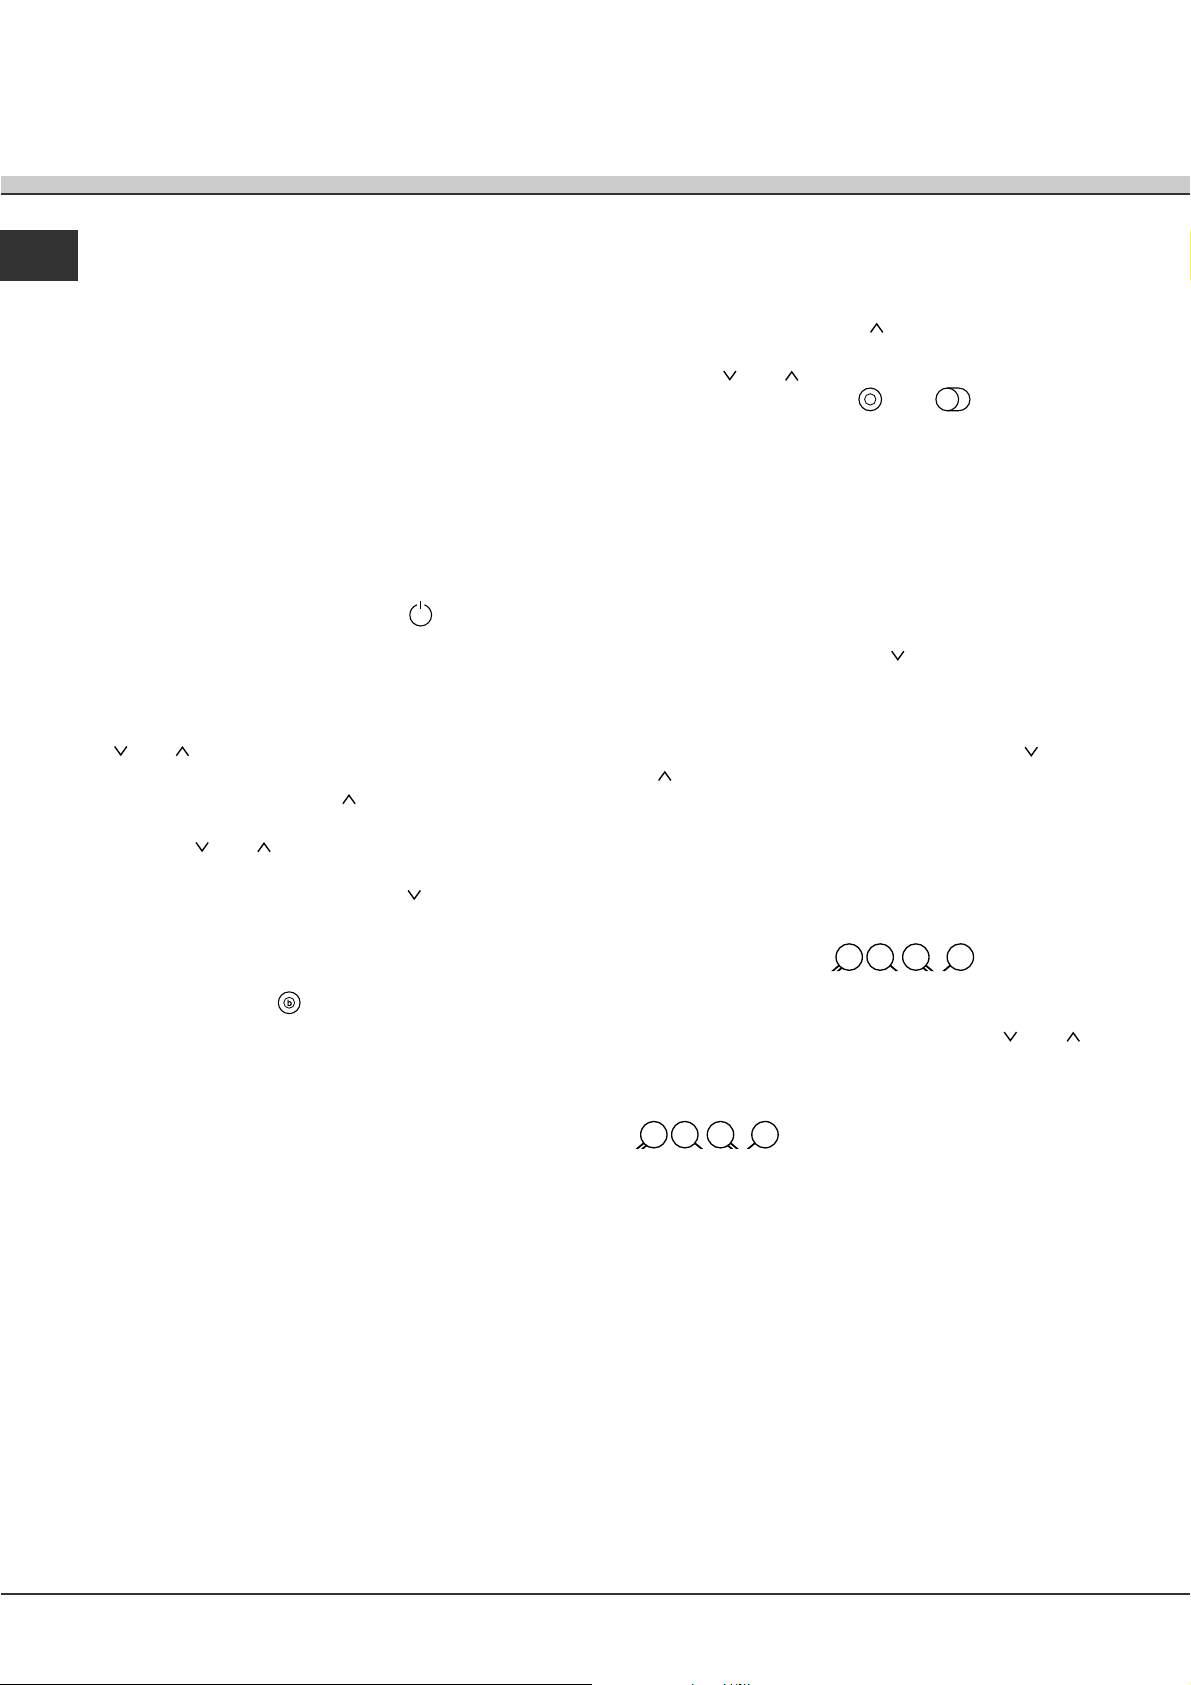
Inbetriebsetzung
und Gebrauch
DE
! Der auf die Dichtungen aufgetragene Leim könnte
Fettspuren auf dem Glas hinterlassen. Wir
empfehlen Ihnen, diese vor Einsatz des Gerätes mit
einem herkömmlichen Reinigungsmittel (eine nicht
scheuernde Poliercreme) zu entfernen. Während der
ersten Betriebsstunden könnte ein Geruch
verbrannten Gummis zu vernehmen sein. Dies wird
sich nach kurzer Zeit geben.
! Wird das Kochfeld an das Stromnetz
angeschlossen, ertönt nach einigen Sekunden ein
kurzes akustisches Signal. Nur daraufhin kann das
Kochfeld eingeschaltet werden.
Einschalten des Kochfeldes
Das Kochfeld wird über die Taste (für ca. 1
Sekunde gedrückt halten) eingeschaltet.
Einschalten der Kochzonen
Eine jede Kochzone wird über einen aus zwei Tasten
(
und ) bestehenden Leistungsregler an den
Seiten der Leistungsanzeige aktiviert.
Betätigen Sie die Taste
einzuschalten; stellen Sie daraufhin mittels der
Tasten
Um sofort auf maximale Leistung einzustellen,
drücken Sie kurz auf die Taste
und die gewünschte Leistung ein.
, um die Kochzone
.
Erweiterung der Kochzonen
Taste zur Erweiterung der erweiterbaren Kochzonen
(konzentrisch oder oval):
1. Betätigen Sie die Taste
einzuschalten; stellen Sie daraufhin mittels der
Tasten
2. Drücken Sie die Taste
Kochzone in ihrer gesamten Größe einzuschalten.
Um auf die verkleinerte Kochzone zurückzuschalten,
drücken Sie erneut auf die zur Erweiterung der Zone
gedrückte Taste.
Die über der Taste der erweiterten Kochzone befindliche
Kontrollleuchte bleibt während der gesamten
Betriebszeit der großen Kochzonenfläche eingeschaltet.
und die gewünschte Leistung ein.
, um die Kochzone
oder , um die
Ausschalten der Kochzonen
Drücken Sie auf die Taste auf der Seite der
Leistungsanzeige: Die Kochzonenleistung sinkt
allmählich bis zum völligen Ausschalten der
Kochzone.
Oder drücken Sie gleichzeitig die Tasten
: Die Kochzone schaltet sich aus.
und
Programmierung der Garzeit
! Sämtliche Kochzonen können für eine Garzeit von 1
99 Minuten programmiert werden.
Booster-Funktion
Zur Beschleunigung der Aufheizzeit kann durch
Drücken der Taste
zugeschaltet werden. Diese Funktion erweitert die
gewählte Kochzone auf 3000 W.
Die Boosterfunktion schaltet sich automatisch nach
4 Minuten wieder aus. Für die Zeit, für die die
Boosterfunktion eingeschaltet bleibt, wird die
Heizleistung der entsprechenden vorderen oder
hinteren Kochzone auf eine maximale Leistung von
600 W herabgesetzt. (Beispiel: Wurde die
Boosterfunktion der hinteren rechten Kochzone
aktiviert, sinkt die Leistung der vorderen rechten
Kochzone.) Höhere Leistungen werden durch das
Blinken der nicht nutzbaren Leistungsstufen
signalisiert, die nach Beendigung der
Boosterfunktion wieder zur Verfügung stehen.
!Ovale Kochzonen: Diese können nur dann
leistungsverstärkt werden, wenn das gesamte Oval
aktiviert wird.
! Stellen Sie niemals zwei kleine Töpfe nebeneinander
auf die ovale Kochzone.
die Boosterfunktion
1. Betätigen Sie diejenige der seitlich des Displays
vorgesehenen Tasten
programmierenden Kochzone entspricht.
2. Stellen Sie die gewünschte Garzeit mittels der
seitlich des Displays befindlichen Tasten
ein.
3. Bestätigen Sie die Einstellung durch Drücken der
seitlich des Displays vorgesehenen Taste
, die der zu programmierenden
Kochzone entspricht.
Die Zeitrechnung (rückwärtiger Ablauf) des Timers
setzt unverzüglich ein. Ist die programmierte Garzeit
abgelaufen, ertönt (1 Minute lang) ein akustisches
Signal und die Kochzone wird automatisch
ausgeschaltet.
Wiederholen Sie obige Schritte für jede Kochzone,
die Sie programmieren möchten.
Anzeige im Falle einer
Mehrfachprogrammierung
Wurde die Betriebszeit einer oder mehrerer Kochzonen
vorprogrammiert, erscheint auf dem Display die
Restgarzeitanzeige der Kochzone, die für die niedrigste
Zeit programmiert wurde; die entsprechende
, die der zu
und
46
Page 47
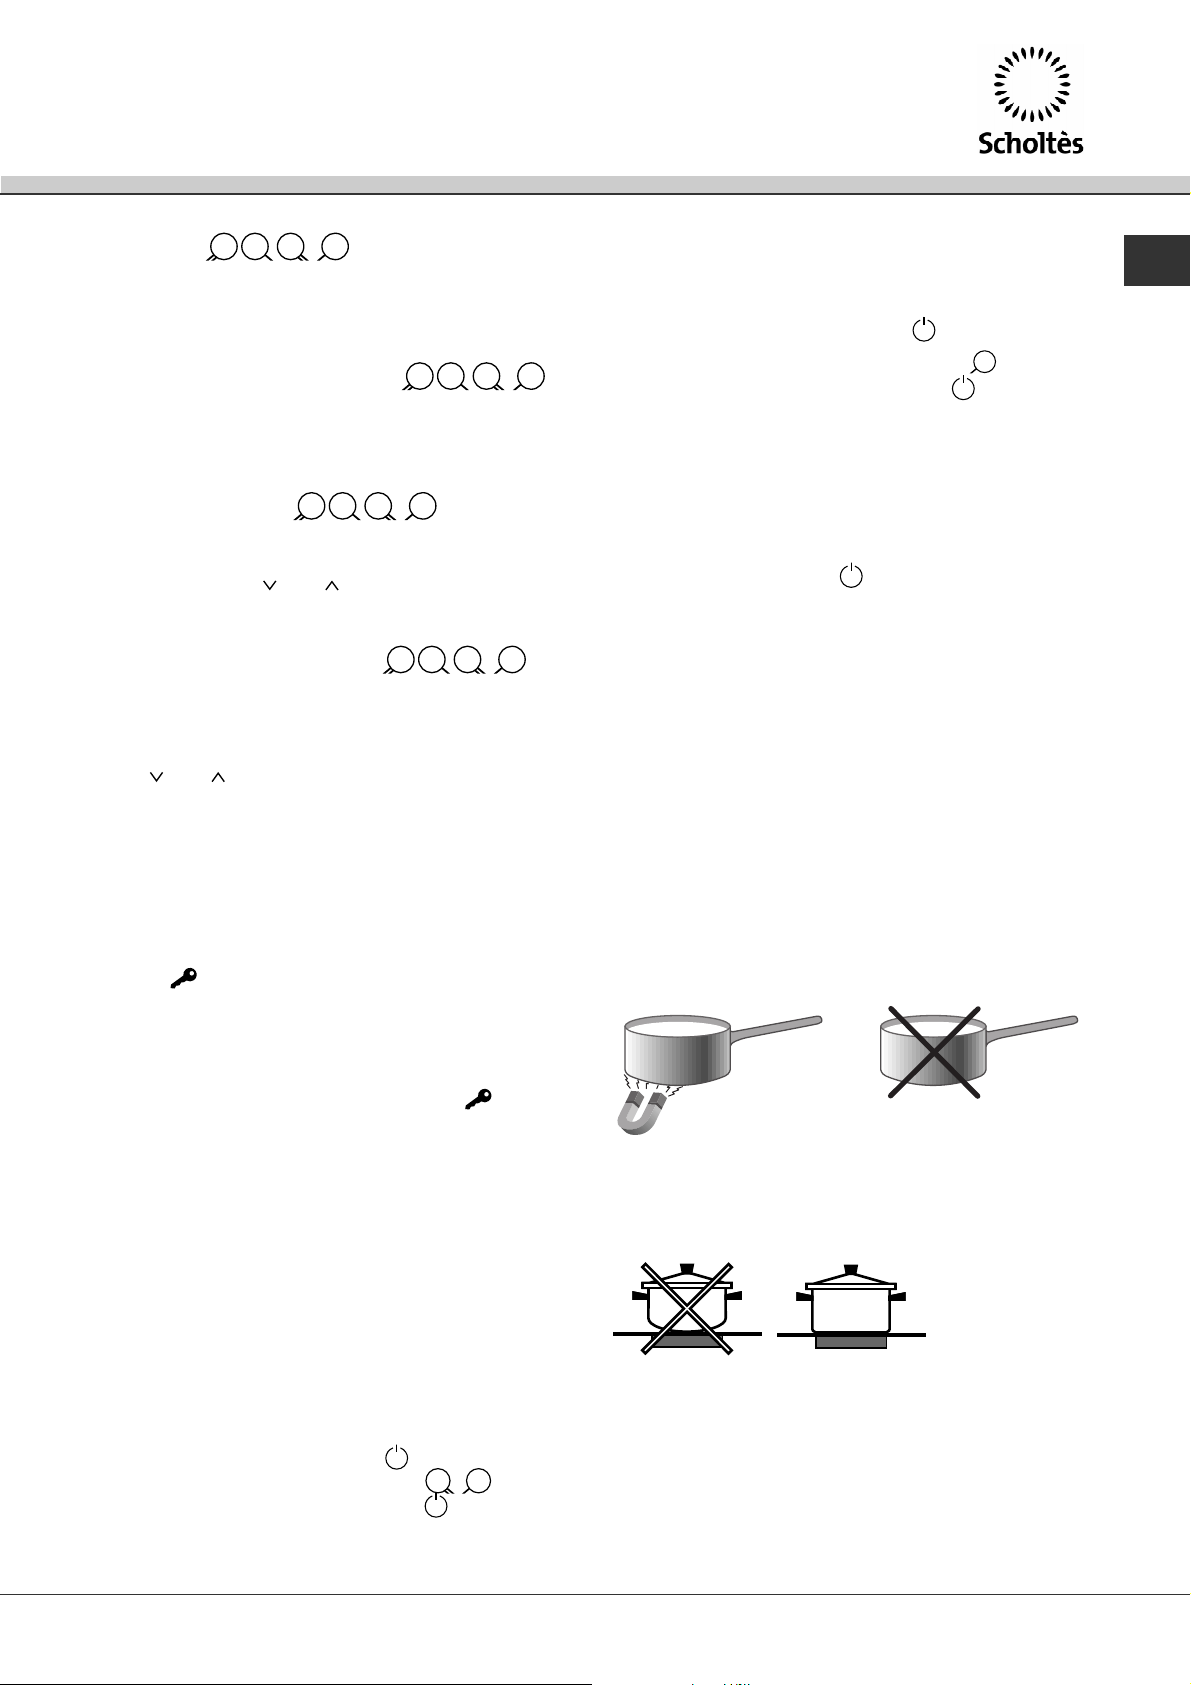
Kontrollleuchte schaltet sich ein, um
anzuzeigen, um welche Kochzone es sich handelt. Die
Kontrollleuchten der übrigen programmierten Tasten
leuchten ebenfalls, jedoch in einer geringeren Intensität.
Um die Restgarzeit einer vorprogrammieren Kochzone
abzurufen, drücken Sie eine der Tasten
die der gewünschten Kochzone entspricht: Auf dem
Display wird die entsprechende Restgarzeit eingeblendet.
Änderung der Programmierung
1. Drücken Sie die Taste
der
Kochzone, deren Programmierung geändert werden soll.
2. Betätigen Sie die seitlich des Displays
befindlichen Tasten
und , um die neue Garzeit
einzustellen.
3. Bestätigen Sie die Eingabe durch Drücken der der
Kochzone entsprechenden Taste .
Möchten Sie eine Programmierung löschen, dann
verfahren Sie wie folgt: An Punkt 2 drücken Sie
gleichzeitig die seitlich des Displays befindlichen
Tasten und : Die programmierte Zeit wird
gelöscht und das Display verlässt den
Programmierungs-Modus.
Sperre der Schaltelemente
Die Schaltelemente können gesperrt werden, um
irrtümliche Einstellungsänderungen zu verhindern
(durch Kinder, bei der Reinigung usw.). Drücken Sie
die Taste
3 Sekunden lang, werden die
Schaltelemente gesperrt und die Kontrollleuchte
SCHALTELEMENTE GESPERRT leuchtet auf. Zu
weiteren Einstellungen (z.B. um den Garvorgang zu
unterbrechen) müssen die Schaltelemente erst wieder
freigegeben werden. Drücken Sie die Taste
für 3
Sekunden. Die Schaltelemente werden freigegeben.
Auch bei aktivierter Sperre der Schaltelemente kann
das Kochfeld abgeschaltet werden. Die
Kontrollleuchte SCHALTELEMENTE GESPERRT bleibt
in diesem Fall bis zur Deaktivierung eingeschaltet.
Demo-Modus
3. Das Kochfeld befindet sich demnach im DEMO-
Modus.
Deaktivieren der DEMO-Funktion:
1. Schalten Sie das Kochfeld ein.
2. Drücken Sie nacheinander die Tasten
daraufhin für 2 Sekunden die Taste
;
und
. Es ertönt
ein akustisches Signal und auf dem Display
erscheint die Anzeige dE OF.
3. Das Kochfeld arbeitet daraufhin auf normale
Weise.
Ausschalten des Kochfeldes
Durch Drücken der Taste wird das Kochfeld
ausgeschaltet.
Sollten die Schaltelemente gesperrt worden sein, bleiben
diese auch bei Wiedereinschalten des Gerätes gesperrt.
Um das Kochfeld wieder einschalten zu können, müssen
die Schaltelemente vorher entsperrt werden.
Praktische Ratschläge zum Einsatz des
Gerätes
! Verwenden Sie Kochgeschirr, dessen
Herstellungsmaterial (magnetisiertes Material) sich für
das Induktionssystem eignet. Wir empfehlen Ihnen
Töpfe und Pfannen aus: Gusseisen, emailliertem Stahl
oder Spezialstahl für Induktionskochzonen. Im
Zweifelsfall hilft ein Magnet bei der Prüfung der
Verwendbarkeit eines Kochgeschirrs.
GEEIGNETES MATERIAL
*
Gusseisen
emaillierter Edelstahl
magnetisierter Edelstahl
So gibt Ihnen Ihr Kochfeld sein Bestes:
Verwenden Sie Kochgeschirr mit dickem und
ebenem Boden, um sicher zu sein, dass dieser
perfekt auf der Kochzone aufliegt.
UNGEEIGNETES MATERIAL
Kupfer,
Aluminium, Glas, Ton,
Porzellan, nicht magnetisierter Edelstahl
DE
Das Kochfeld kann auch im Vorführmodus (DEMO)
in Betrieb gesetzt werden: Während dieser
Betriebsweise werden sämtliche Heizelemente
deaktiviert, die Bedienelemente bleiben jedoch
einsatzfähig.
Aktivieren der DEMO-Funktion:
1. Schalten Sie das Kochfeld ein.
2. Drücken Sie gleichzeitig die Tasten
daraufhin für 6 Sekunden die Taste
;
und
. Es ertönt
ein akustisches Signal und auf dem Display
erscheint die Anzeige dE ON.
Benutzen Sie stets nur Kochgeschirr, dessen
Durchmesser mit dem der Kochzone übereinstimmt,
d.h. dessen Boden die Kochzone ganz bedeckt,
und somit die gesamte Wärme genutzt wird.
47
Page 48
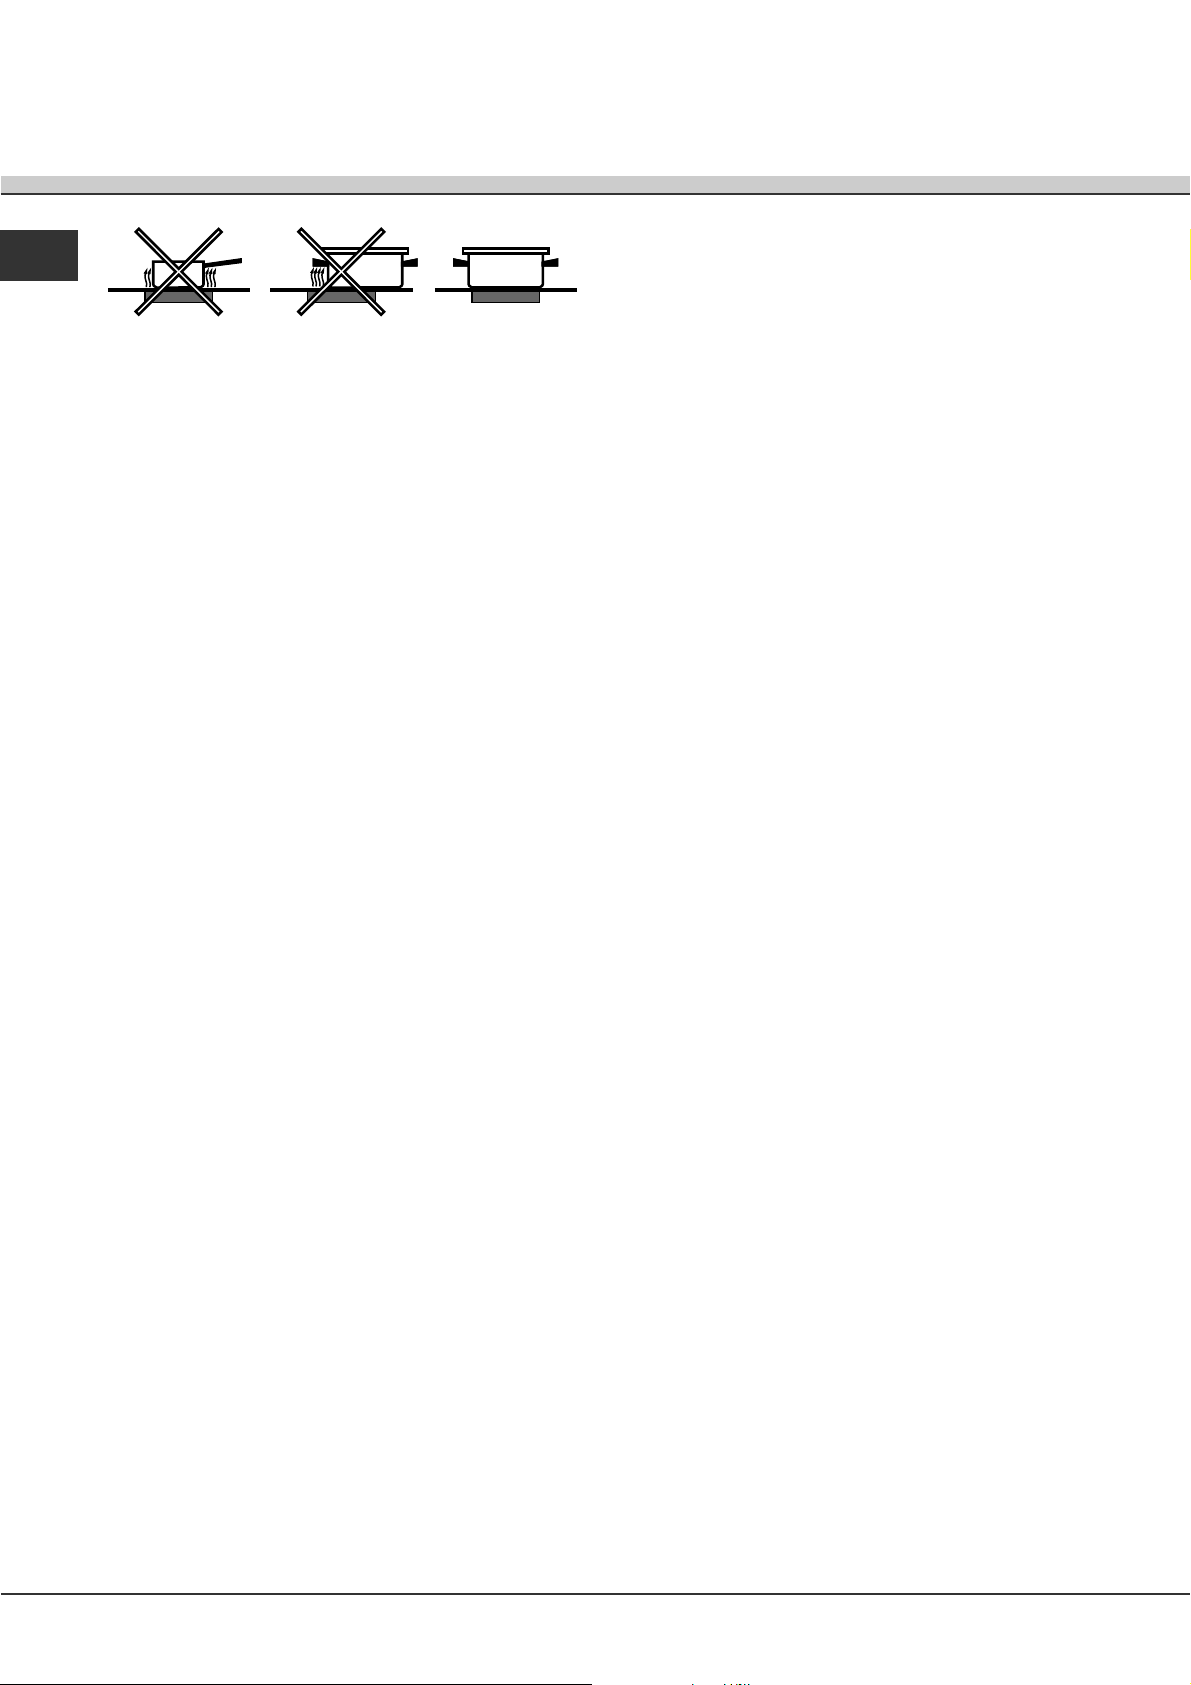
DE
Achten Sie darauf, dass der Boden des
Kochgeschirrs trocken und sauber ist; nur so ist
ein perfektes Aufliegen des Geschirrbodens
sowie eine lange Lebensdauer von Kochzone und
Geschirr gewährleistet.
Vermeiden Sie den Einsatz von Kochgeschirr, das
auch auf Gasflammen verwendet wird. Die äußerst
hohe Hitzekonzentration der Gasbrenner könnte
die Topfböden leicht verformen und demnach die
korrekte Auflage beeinträchtigen.
Sicherheitsvorrichtungen
Topferkennung
Jede Kochzone ist mit einer Topferkennungs-
Vorrichtung ausgerüstet. Die Kochzone bewirkt ein
Erhitzen des Topfbodens nur bei einer
angemessenen, der Kochzone entsprechenden
Topfgröße. Das Blinken der Anzeigeleuchte kann
Folgendes signalisieren:
ungeeignetes Kochgeschirr,
ein zu geringer Topfdurchmesser,
der Topf wurde abgenommen.
Restwärmeanzeigen
Solange die Temperatur einer Kochzone, von der
das Kochgeschirr heruntergenommen wurde, höher
als 60°C bleibt, blinkt ein Element der
Leistungsanzeige, um Gefahren durch
Verbrennungen vorzubeugen.
Sicherheitsschalter
Das Gerät ist mit einer Sicherheitsautomatik
ausgestattet, die die Kochzone automatisch
abschaltet, wenn die maximale Betriebszeit auf einer
gewissen Leistungsstufe erreicht wird. Bei Auftreten
eines solchen Sicherheitsintervalls erscheint auf dem
Display die Anzeige 0.
Beispiel: Die hintere rechte Kochzone wird auf
Leistungsstufe 5 eingestellt, die vordere linke
dagegen auf 2. Die hintere rechte Kochzone wird
nach 3 Std. Betriebszeit ausgeschaltet, die vordere
linke erst nach 10 Stunden.
Tonsignal
Einige Anomalien, wie:
Gegenstände (Topf, Besteck usw.), die für länger
als 10 Sekunden auf dem Schaltfeld liegen,
Flüssigkeit, die über das Schaltfeld gegossen wurde,
ein zu langer Druck auf eine Taste, können die
Ursache für ein Warnsignal sein. Um das
Warnsignal auszuschalten, muss der Grund der
Störung beseitigt werden. Befindet sich das
Kochfeld in einem solchen Zustand, werden die
Schaltelemente automatisch gesperrt: Zum
Entsperren der Schaltelemente drücken Sie die
Taste [Schlüssel-Symbol], die Einstellungen
werden beibehalten. Wird die Störung nicht
beseitigt, bleibt das Warnsignal eingeschaltet
und das Kochfeld wird ausgeschaltet.
Überhitzung
Im Falle einer Überhitzung der elektronischen
Gerätekomponenten schaltet sich das Kochfeld
automatisch aus, auf dem Display erscheint die
Anzeige . Diese Meldung erlischt, und das
Kochfeld kann wieder eingesetzt werden, sobald die
Temperatur auf einen akzeptablen Wert gesunken ist.
48
Page 49
Vorsichtsmaßregeln
und Hinweise
! Das Gerät wurde entsprechend den strengsten
internationalen Sicherheitsvorschriften entworfen und gebaut.
Nachstehende Hinweise werden aus Sicherheitsgründen
geliefert und sollten aufmerksam gelesen werden.
Dieses Gerät entspricht den folgenden EG-Richtlinien:
- 73/23/EWG vom 19.02.73 (Niederspannung) und
nachfolgenden Änderungen
- 89/336/EWG vom 03.05.89 (elektromagnetische
Verträglichkeit) und nachfolgenden Änderungen
- 93/68/EWG vom 22.07.93 und nachfolgenden Änderungen.
- 2002/96/EG
Allgemeine Sicherheit
! Stellen Sie bitte sicher, dass das Belüftungsgitter des
Gebläses niemals verstopft bzw. abgedeckt wird. Das
Einbaukochfeld erfordert eine korrekte Belüftung zur Kühlung
der elektronischen Teile.
! Es wird davon abgeraten, ein Induktionskochfeld über einem
Untertisch-Kühlschrank (Wärmequelle) oder über einer
Waschmaschine (Vibrationen) zu installieren. Der zur
Belüftung der elektronischen Teile erforderliche Raum wäre
absolut unzureichend.
Dieses Gerät ist für den nicht professionellen Einsatz im
privaten Haushalt bestimmt.
Das Gerät darf nicht im Freien aufgestellt werden, auch
nicht, wenn es sich um einen geschützten Platz handelt. Es
ist gefährlich, das Gerät Gewittern und Unwettern
auszusetzen.
Berühren Sie das Gerät nicht mit nassen oder feuchten
Händen oder Füßen und auch nicht, wenn Sie barfuß sind.
Das Gerät darf nur von Erwachsenen und gemäß den
Hinweisen der vorliegenden Bedienungsanleitung zur
Zubereitung von Lebensmitteln verwendet werden. Verwenden
Sie das Kochfeld nicht als Abstellfläche oder als Schneidebrett.
Das Glaskeramikkochfeld ist stoßfest; dennoch kann es
durch Stöße bzw. Aufprall von spitzen Gegenständen
zerbrechen. Schalten Sie das Kochfeld in einem solchen
Fall vom Stromnetz und wenden Sie sich an die
Kundendienststelle.
Sollte die Kochfeldoberfläche gesprungen sein, schalten
Sie das Gerät aus, um so mögliche Stromschläge zu
vermeiden.
Vermeiden Sie, dass das Netzkabel anderer Elektrogeräte
in Kontakt mit heißen Kochfeldteilen gelangt.
Bitte berücksichtigen Sie, dass die Kochzonen noch für ca.
30 Minuten nach dem Ausschalten sehr heiß bleiben. Die
Restwärme wird auf der entsprechenden Anzeige
eingeblendet (siehe Inbetriebsetzung und Gebrauch).
Halten Sie sämtliche Gegenstände, die schmelzen
könnten, wie Plastikteile oder Kunststoffe sowie Zucker oder
stark zuckerhaltige Speisen von dem Kochfeld fern. Achten
Sie besonders auf Verpackungsmaterial, Frischhaltefolie
und Alufolie: Wird derartiges Material auf den noch heißen
oder warmen Oberflächen belassen, können sie das
Kochfeld dauerhaft beschädigen.
Stellen Sie Stieltöpfe und Pfannen immer mit nach innen
gerichteten Griffen auf die Kochstelle, um jegliches Risiko
durch unbeabsichtigtes Anstoßen auszuschließen.
Ziehen Sie den Netzstecker nicht am Netzkabel aus der
Steckdose, sondern nur am Netzstecker selbst.
Ziehen Sie vor der Reinigung oder vor
Wartungsmaßnahmen stets den Netzstecker aus der
Steckdose.
Legen Sie bitte keine Metallgegenstände (Messer, Löffel,
Deckel usw.) auf das Kochfeld; sie könnten sehr heiß
werden.
Hinweis für Herzschrittmacherträger oder Träger
anderer medizinischer Implantate:
Das Kochfeld entspricht allen geltenden Richtlinien in
Sachen elektromagnetischer Verträglichkeit.
Dieses Erzeugnis erfüllt demnach sämtliche gesetzlichen
Anforderungen (Richtlinien 89/336/EWG). Es wurde so
konzipiert, dass keine Interferenzen mit anderen
verwendeten elektrischen Geräten entstehen können, es sei
denn, Letztere entsprechen nicht den obigen Richtlinien.
Das Induktions-Kochfeld erzeugt elektromagnetische
Felder im Nahbereich.
Um jegliche Gefahren durch Interferenzen zwischen dem
Kochfeld und dem Schrittmacher auszuschließen, muss
Letzterer in Übereinstimmung mit den bestehenden
Richtlinien hergestellt sein.
In dieser Hinsicht können wir nur für die Übereinstimmung
unseres Erzeugnisses garantieren. Für Informationen
hinsichtlich der Konformität oder eventueller
Unverträglichkeiten bitten wir Sie, sich an den behandelnden
Arzt oder an die Herstellfirma des Herzschrittmachers zu
wenden.
Entsorgung
Entsorgung des Verpackungsmaterials: Befolgen Sie die
lokalen Vorschriften; Verpackungsmaterial kann
wiederverwertet werden.
Die europäische Richtlinie 2002/96/EG über Elektro- und
Elektronik-Altgeräte (WEEE) sieht vor, dass Haushaltsgeräte
nicht normal mit dem Stadtmüll entsorgt werden dürfen. Die
Altgeräte müssen getrennt gesammelt werden, um die
Rückführung und das Recycling der Materialen zu optimieren,
aus denen die Geräte hergestellt sind, und um mögliche
Beeinträchtigungen der Gesundheit und der Umwelt zu
verhindern. Das Mülleimersymbol ist auf allen Produkten
dargestellt, um an die Verpflichtung zur getrennten
Abfallsammlung zu erinnern.
Für weitere Informationen zur korrekten Entsorgung können sich
die Besitzer von Haushaltsgeräten an die übergeordnete
öffentliche Einrichtung oder an Ihren Händler wenden.
DE
49
Page 50

Reinigung und Pflege
DE
Abschalten Ihres Gerätes vom Stromnetz
Vor jeder Reinigung und Pflege ist das Gerät vom
Stromnetz zu trennen.
Reinigung Ihres Gerätes
! Der Einsatz von Scheuermitteln oder scharfen oder
chemischen Reinigungsmitteln wie Backofensprays,
Fleckenentferner, Rostentfernungsmittel, Reiniger in
Pulverform und Scheuerschwämme, die die
Oberfläche des Kochfeldes dauerhaft beschädigen
würden, ist zu vermeiden.
! Verwenden Sie zur Reinigung des Kochfeldes
keine Dampf- oder Hochdruckreinigungsgeräte.
Zur täglichen Pflege genügt es, das Kochfeld mit
einem feuchten Schwamm abzuwischen und mit
Küchenpapier abzutrocknen.
Bei besonders starker Verschmutzung sollte ein
spezielles Reinigungsmittel für Glaskeramik
verwendet werden; anschließend ist das Kochfeld mit
Wasser abzuspülen und sorgfältig abzutrocknen.
Starke Verschmutzungen lassen sich mit dem
mitgelieferten Schaber entfernen. Sie sollten so schnell
wie möglich - und nicht erst nach Abkühlen des
Kochfeldes - entfernt werden, um zu vermeiden, dass
sich die Verschmutzungen festsetzen. Gute
Ergebnisse lassen sich auch mit einem für
Glaskeramik geeigneten Spezialschwamm aus
Edelstahlwolle und einer einfachen Spüllauge erzielen.
Edelstahlrahmen
(nur bei mit Rahmen versehenen Modellen)
Auf den Edelstahlteilen könnten Flecken
zurückbleiben, sollte stark kalkhaltiges Wasser oder
phosphorhaltiges Spülmittel für längere Zeit darauf
vorhanden sein. Es ist ratsam, das Kochfeld nach
der Reinigung gut nachzuspülen und abzutrocknen.
Wird versehentlich Wasser darauf verschüttet, muss
es sofort sorgsam getrocknet werden.
! Einige Kochfelder sind mit einem Aluminiumrahmen
versehen, der Edelstahl sehr ähnlich ist. Verwenden
Sie bitte keine Produkte zur Reinigung und
Entfettung, die nicht für Aluminium geeignet sind.
Demontage des Kochfeldes
Sollte sich die Abnahme des Kochfeldes als
erforderlich erweisen, verfahren Sie bitte wie folgt:
1. Schrauben Sie die Schrauben aus, die zur
Befestigung der seitlichen Zentrierungsfedern dienen;
2. lockern Sie die Schrauben der Eck-
Befestigungsbügel;
3. nehmen Sie das Kochfeld aus dem
Möbelausschnitt heraus.
! Wir empfehlen dringlich, Innenmechanismen nicht
eigenhändig zu reparieren.
Kontaktieren Sie bei Störungen bitte den Kundendienst.
! Der mitgelieferte Schaber ist äußerst scharf: Seien
Sie bitte vorsichtig beim Gebrauch desselben.
Auf dem Kochfeld versehentlich geschmolzene
Alufolie, Plastikteile oder Kunststoffe sowie
Zuckerreste müssen umgehend mit einem
Schaber von der noch warmen Oberfläche entfernt
werden.
Nach der Reinigung kann das Kochfeld mit einem
Pflegeprodukt nachbehandelt werden: Der
unsichtbare Schutzfilm, den ein solches Produkt
hinterlässt, schützt die Oberfläche vor eventuell
überkochenden Speisen. Es empfiehlt sich, diese
Nachbehandlung bei lauwarmem oder
abgekühltem Gerät vorzunehmen.
Achten Sie darauf, das Kochfeld nach der
Reinigung stets mit klarem Wasser abzuspülen
und anschließend abzutrocknen. Rückstände der
Reinigungsmittel könnten sich nämlich bei der
nächsten Benutzung des Kochfeldes ihrerseits
festsetzen.
50
Page 51

DE
51
Page 52

DE
04/2005 - 195053827.02
XEROX BUSINESS SERVICES
52
 Loading...