

Page 1
1
USER MANUAL
OF DIGITAL SET TOP BOX
TNT-2722MPEG4
Please read and keep these instructions
For instruction manual in another language, check online at
http://manuel-utilisateur.logisav.fr
Page 2

2
Important safety instructions – please read carefully
and keep for future reference
To reduce the risk of fire or electric shock, do not expose this product to
water, rain or moisture. To prevent the risk of electric shock, do not
remove the cover or back of this product. In case of product failure, only
qualified personnel can repair. There are no user-serviceable parts
inside.
CAUTION!
Dangerous tension inside the product! Do not open. Risk of electric shock! No
parts can be repaired by the end-user. Only qualified personnel can repair and
maintain this product.
If the electric cord is damaged, it must be replaced by the manufacturer or qualified
after-sales personnel in order to avoid any danger.
The product must be installed in accordance with local laws.
Damaged batteries must be properly disposed. In order to protect the environment,
please dispose the batteries properly, in accordance with local laws (information is
available at your reseller).
Where to install the product
- Place the product on a straight, rigid and stable place. Do not place the product
on a carpet.
- Do not place the product on top of another that may cause overheating (for
example, a receiver or amplifier).
- Do not place anything underneath the product (for example, CDs or magazines).
Proper ventilation
- Place the product in a sufficiently–aerated place to avoid overheating. Allow at
least 10cm spacing at the back and top of the product, and 5cm spacing on both
sides to prevent overheating.
- Do not place items such as newspapers, tablecloth, curtains, in front of the
ventilating openings.
Do not expose the product to high temperatures, moisture, water and dust.
- The apparatus shall not be exposed to dripping or splashing. No object filled with
liquids, such as vases, shall be placed on the apparatus.
- Do not place other items close to this product that may damage it (for example,
objects containing water or lightened candles).
- No naked flame sources, such as lighted candles, should be placed on the
apparatus.
Electric supply
- Please unplug the product in case of prolonged non-use.
- If the supply cable is damaged, it must be replaced by the manufacturer or
qualified after-sales personnel to avoid any danger.
- This product must be connected to an electrical supply 230V ~ 50Hz.
- The mains plug is used as the disconnect device, so the disconnect device shall
remain readily operable.
Page 3

3
This product is compliant with directives 2006/95/CE (abrogating the
directive 73/23/CEE modified by the directive 93/68/CEE) and
2004/108/CE (abrogating the directive 89/336CEE).
- This logo set on the product means that the recycling of this apparatus comes within
the framework of the directive 2002/96/EC of January 27, 2003 concerning the waste on
electrical and electronic equipment (WEEE).
- The presence of dangerous substances in the electrical and electronic equipments can
have potential consequences on the environment and human health in the cycle of
reprocessing this product.
- Therefore, at the end of its lifetime, this product shall not be disposed with other
non-recycled waste.
- As the end user, your role is of prime importance in the cycles of re-using, recycling,
and other forms of valorization of this electrical and electronic equipment. Local
authorities and resellers have set special procedures for the purpose of collecting and
recycling this product.
- You have the obligation to use the selective waste collection systems put in place by
your local authorities.
Page 4

4
Table of Content
Introduction..................................................................................................... 5
Front and Rear Panel ................................................................................... 7
Quick Start Guide ........................................................................................... 9
Remote Control ............................................................................................ 12
Connections ................................................................................................. 14
Basic operation ............................................................................................. 15
Multimedia Functions ................................................................................... 21
Troubleshooting ............................................................................................ 27
Technical Specifications ............................................................................... 29
Page 5

5
Introduction
Thank you for choosing this High-Definition DVB-T MPEG4 Receiver. With this HD TV
MPEG4 tuner and HDMI connection, you can watch all new digital DVB-T channels in high
definition.
Thanks to its USB port, this receiver is also a genuine multimedia platform:
- Insert a USB stick into the USB port and start recording a DVB-T program directly on
the USB by simply pressing a single button on the remote control! You can also
schedule one or several recordings by pressing the TIMER button on the remote
control.
- Furthermore, via this unit, you can view your JPEG photos albums, listen to your
favorite music in MP3 format, and watch the recordings made on this unit as well as
all your MPEG2/MPEG4 videos!
Other features of your receiver:
- The “Time Shift” function allows you to stop a TV program and then resume it slightly
later. This function records the program on a digital storage medium (e.g. USB stick
or external hard drive, not included) as you stop it so that you can watch it at a later
time. Want to pause the TV program during a phone call or your coffee break? It is
now possible! With Time Shift, you will not miss anything anymore! To enable this
function, simply insert a USB stick into the USB port of the unit.
- The installation is quick and easy. Simply connect the unit to your roof antenna and
your television's HDMI input. The channel search is automatic.
Auto Standby
In order to save energy, the electricity consumption of this product has been reduced in both
operation mode and standby mode. Furthermore, if no operation is carried out for three
consecutive hours, the unit will automatically enter standby mode. Simply press the Standby
button on the remote control to switch the unit back to operation mode.
Main Features
– Compliant with MPEG2 and MPEG4 DVB-T norms
– Software upgrade possible via the USB port
– Multiple subtitles
– Teletext
– Compatible with video formats 720p and 1080i
– HDMI Connector
– Tuner RF in/loop through
Page 6

6
Package Contents
Before installing the product, please check that you have in possession the following.
– DVB-T Receiver x1
– Remote Control x1
– User Manual x1
Page 7
7
Front and Rear Panel
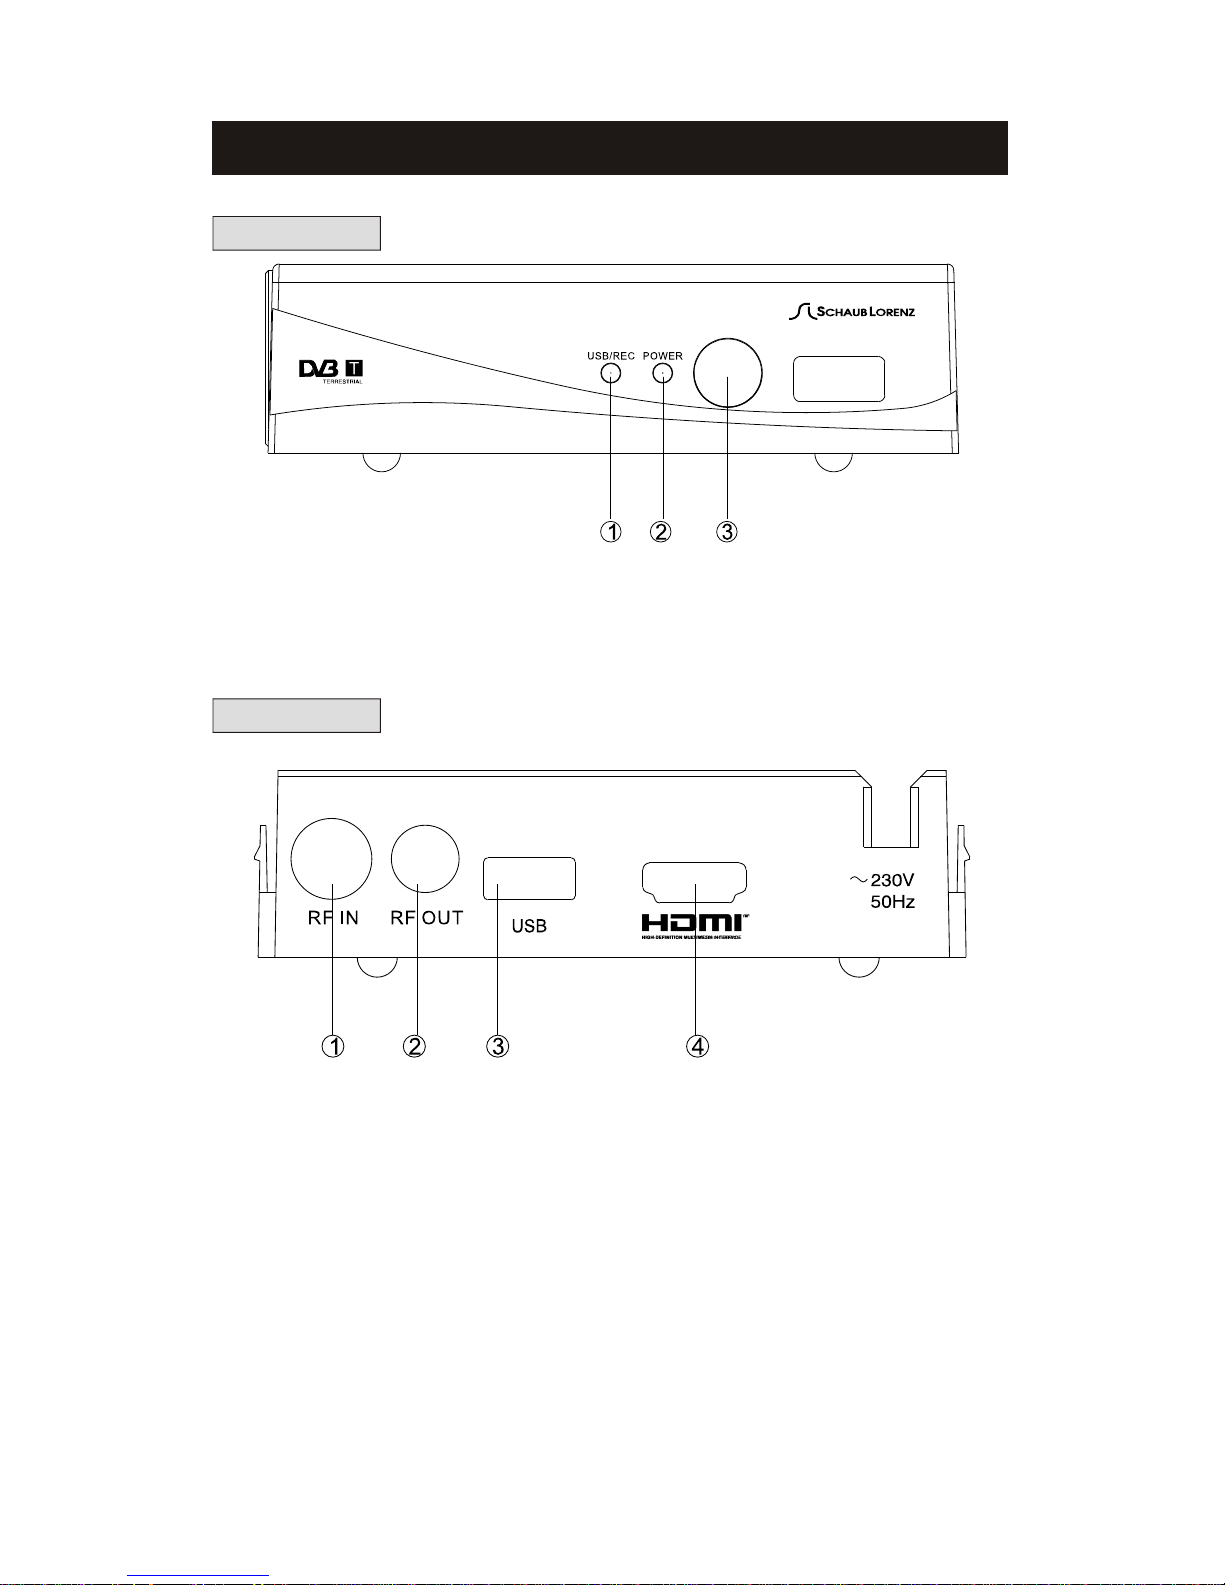
1. Front Panel
1. USB/REC INDICATOR: The indicator is red when in recording or Timeshift mode and it’s
in green when USB device is inserted.
2. POWER INDICATOR: The indicator is red when the unit is standby; It is green when
the unit is power on or in recording status.
3. REMOTE CONTROL SENSOR: Used to receive the signal from the remote control.
2. Rear Panel
1. RF IN: Connect here to your roof antenna signal.
2. RF OUT: This socket will bypass the RF signal to either your TV or another video
system.
3. USB PORT: Used to connect to an external USB 2.0 device for playing multimedia
content and unit upgrade.
4. HDMI OUT: To connect to your HD TV.
Page 8
8
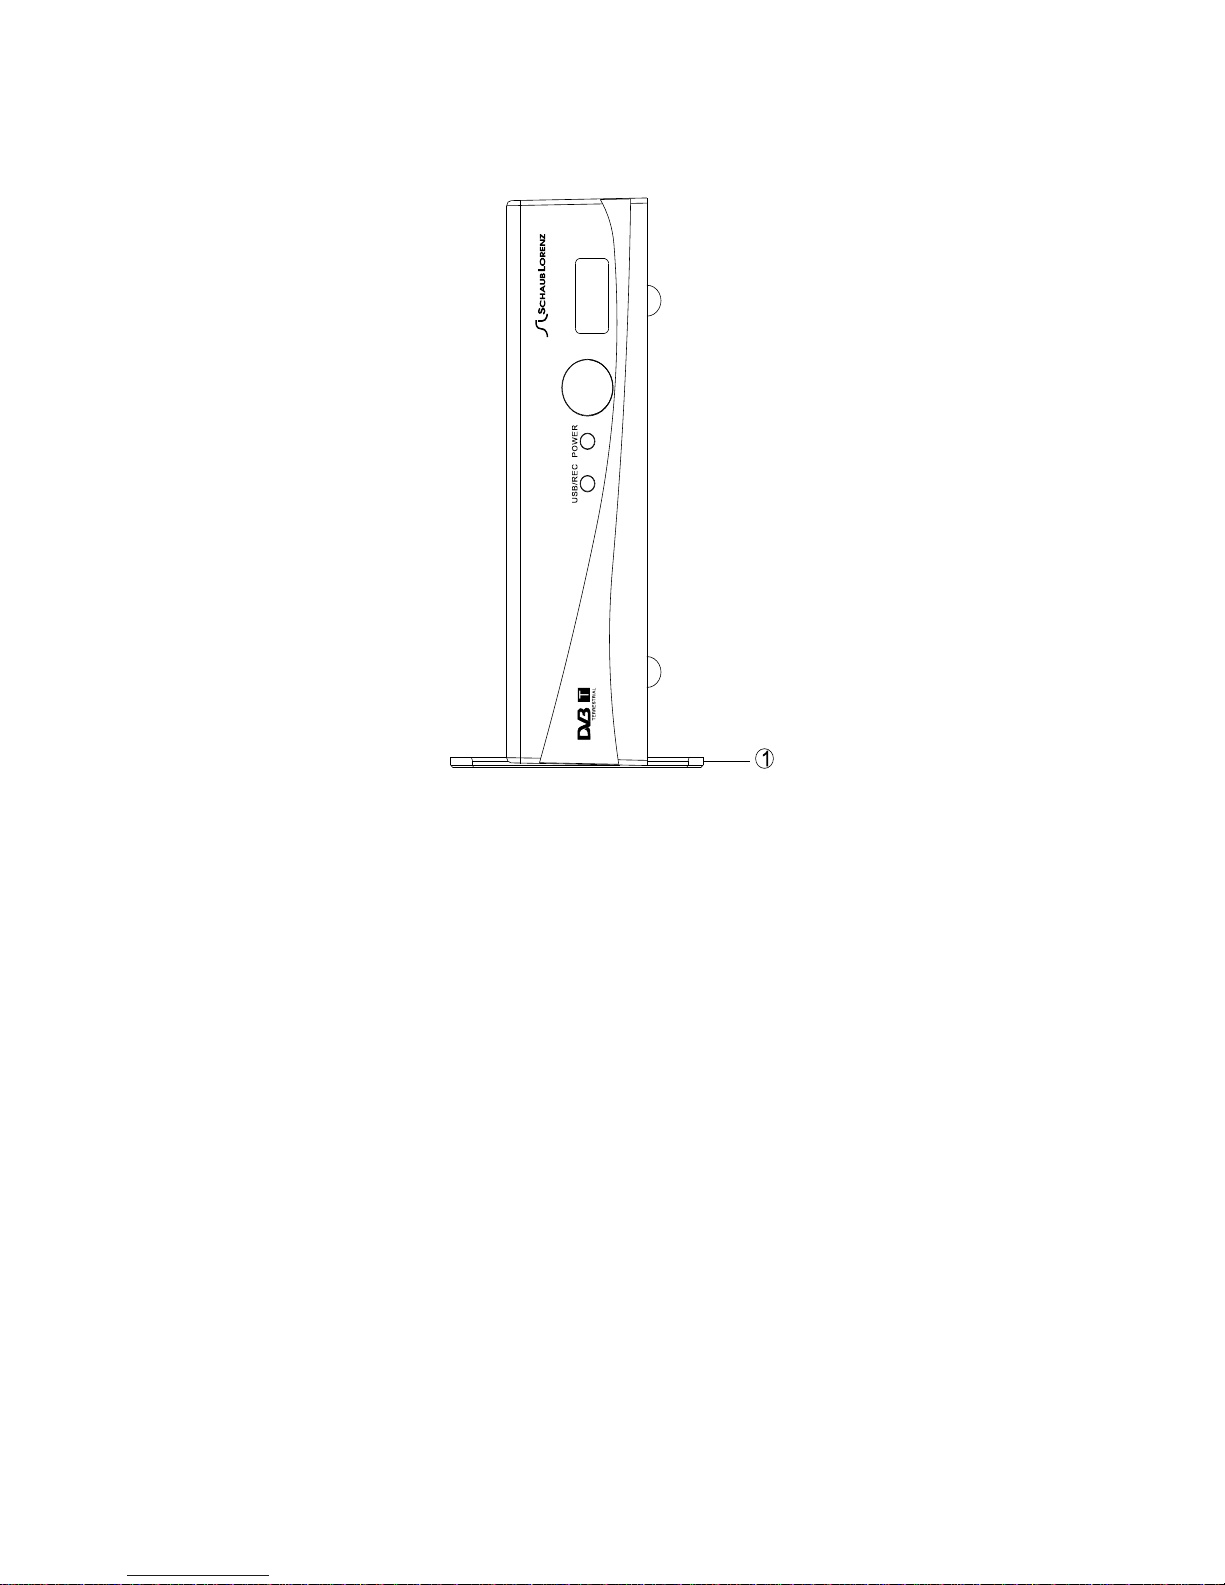
Remark: This device can also be held in vertical position. In order to do so, adjust the
holder(1) as shown on below illustration.
Page 9
9
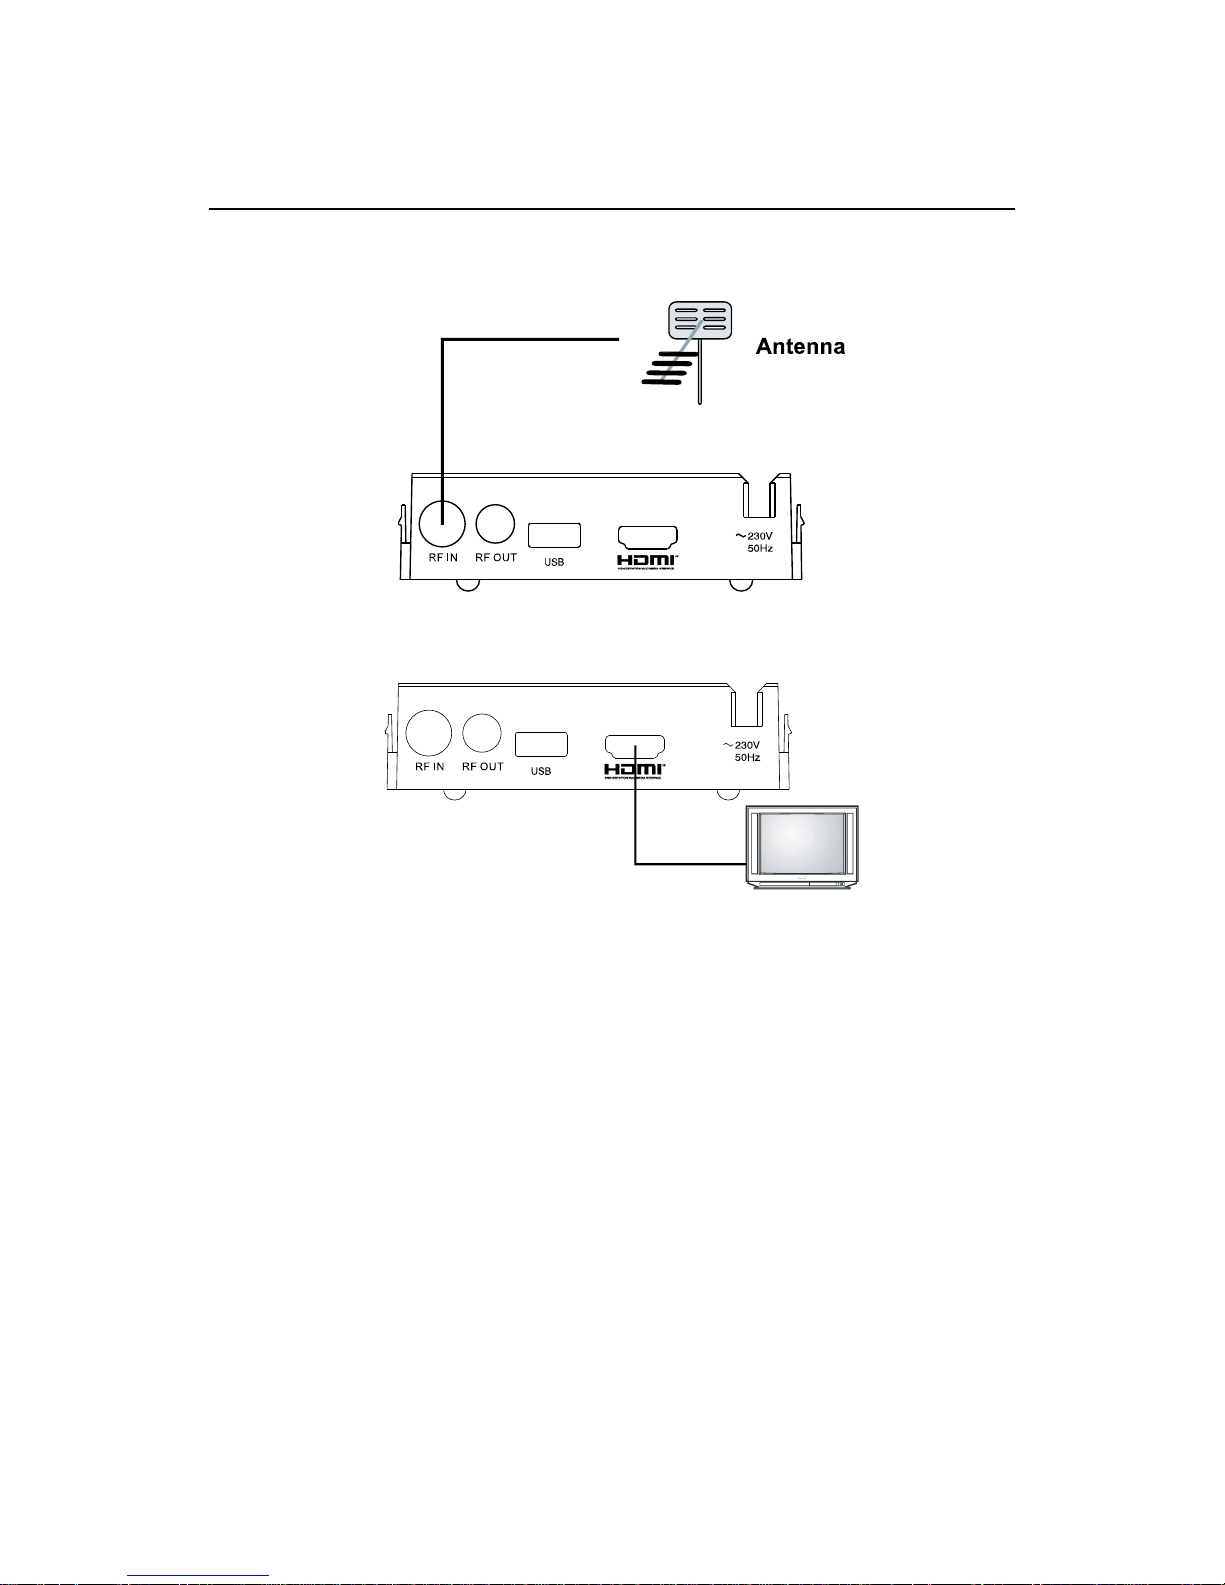
Quick Installation Guide for First Use
(1): Connect your roof antenna to RF IN socket of the unit (The antenna cable is not
provided)
(2): Connect the unit with your TV.
Connect the receiver with a HDMI cable (Cable is not provided).
Step 3: Prepare the remote control
- Insert two AAA batteries into the remote control. Make sure to respect the polarity signs +
/ - (batteries are not included).
Step 4: Start the channel installation
- At first time use, the automatic installation message will appear on screen.
a. Choose the menu display language.
b. Choose the reception country. Attention, make sure to choose the right reception
country; otherwise, the channel search may not be carried out correctly
c. Select Channel Search and press RIGHT or OK key to begin channel search. The
DVB-T channels search starts immediately and will take a few minutes.
Page 10

10
EXIT
S O R T I E
C o n f i r m e r
Guide d'install.
Langue des Menus
Pays France
Français
Recherche Chaînes
If the automatic installation message does not appear:
– Press the MENU button on the remote control
– select the options Channel Search
– Select the option Auto Search
Please consult the rest of this instruction manual for more information.
Important Remarks:
(1) Analog Reception and DVB-T Reception
When you wish to watch TV using your TV tuner (analog tuner) and that your DVB-T unit has
been turned off or unplugged, the image quality can be deteriorated according to the TV you
are using. This is normal, your DVB T unit must be set in standby mode to allow a good
quality signal.
(2)Problems receiving DVB-T channels
- First check that you have well connected your home antenna with the DVB-T unit.
- Start a new automatic channel search as follows:
1. Press the MENU key from the remote control
2. Select Channel Search
3. Then select Auto Search
4. Then press OK or Right button to run the automatic channels search. Channels
scanning may take a few minutes to complete.
(3)Display problem in HDMI mode – If you have selected a HDMI resolution which is not
supported by your TV (for example, you have selected 1080i while your TV supports 720p
resolution only), a black screen will appear. In that case, you just need to press the HDMI
key repeatedly until the program appears on the screen.
Remark :
- The default HDMI resolution is 720P.
- HDMI resolution can not be changed during USB media playback.
- HDMI resolution can not be changed during recording or Timeshift mode.
(4) If the reception problem still occurs.
Your unit has been tested for optimal performance over all the country. In most cases, the
DVB-T reception problems are due to a weakness in your home's antenna installation. If
your installation is old, or has never been tested for DVB-T, the signal can be too weak or
flawed for the unit to work properly. I t is therefore highly recommended that you ask for a
qualified technician to test the compliance of your home antenna. This unit has been
designed and is guaranteed to work with a signal of at least 60dB.
Page 11

11
Good to know-Main functions of your Remote Control
Menu Navigation
– Use the Menu button to change the unit’s configuration.
– To exit a menu or a sub-menu, press the Exit button on the remote control to return to
the previous screen.
Audio Language Selection
– Press the AUDIO button to change the audio track to another language if this option is
available on the current DVB-T channel.
Multimedia functions
– Press the REC button once to immediately begin recording of the currently viewed
channel on the USB support inserted in the unit. Press Stop button to stop recording
– To schedule a recording, press TIMER. You can choose the channel, the start time and
end time of the recording.
– To view your recordings, a single button: View REC.
– Allows you to view all multimedia content of USB key inserted (JPEG photos, MP3
music and MPEG4 videos etc.), press the USB button.
- To watch a program at a later time, press Timeshift, press Timeshift again or Play button
to resume to playback.
Page 12

12
Remote Control
1. STANDBY: Switch the receiver in and
out of standby mode.
2. Numeric Buttons: Select channel
3. MENU: Display the main menu on the
screen, or return to the previous menu
or status.
4. TEXT: Show teletext information of
current channel.
5. CH:Navigates through the
Menus.Skip to previous channel.
6. VOL:Navigates through the Menus.
decrease volume.
7. OK: Display channel list on screen.
Confirm selection.
8. SUB-T: Selects Subtitles Language.
9. REC: Make a real-time recording.
10. TIMER: enter the setup menu of time
recorder.
11. PREV: Play previous USB media.
12. F.REW: Speed down while USB Media
playing.
13. VIEW REC: To access the list of your
recordings.
14. USB: Allows you to display all
multimedia content of the USB key
inserted in the device.
15. PLAY/PAUSE: Used to pause or
playback the program being viewed.
HDMI: change the HDMI resolution.
16. STOP: Stop playing, recording or Timeshift.
17. F.FWD: Speed up while USB Media playing.
18. NEXT: Play next USB Media.
19. TIMESHIFT: Press the TIMESHIFT button when you want to pause, Press the button
again to resume playback of the TV program.
20. INFO: Displays signal strength and quality.
21. AUDIO: Selects an Audio Language.
22. CH: Navigate through the Menus. Select the next channel.
23. VOL: Navigates through the Menus. Increase volume.
24. EXIT: Exit the current Menu or returns to the previous Menu.
25. LAST: Back to previous channel.
26. MUTE: Mute or Restore Audio Output.
Page 13

13
Using the Remote Control
-Insert two AAA batteries into the remote control. Make sure to respect the polarity signs + / -
(batteries are not included).
Note:
1. Do not mix batteries of different type.
2. Do not mix old and new batteries.
3. Battery chemicals can cause a rash. If the batteries leak, clean the battery
compartment with a cloth. If chemicals touch your skin, wash immediately.
4. If the remote control is not going to be used for an extended period of time, remove the
batteries.
– To use the Remote Control, point it towards the front of the Digital Set Top Box. The
Remote Control has a range of up to 5 meters from the Set Top Box at an angle of up to
60 degrees.
The Remote Control will not operate if this path is blocked.
Sunlight or very bright light will decrease the sensitivity of the Remote Control.
Page 14

14
Connections
This section provides installation steps of your receiver. Refer to the manual supplied with
the equipment for the installation of outdoor equipment such as the Terrestrial antenna.
When connecting new equipment, be sure to refer to the related parts of the manual. Also,
make sure you disconnect all the equipments from the mains supply before the connection.
Page 15

15
Basic Operation
(1) Program
Press MENU button and select [Program].
The Menu provides options to adjust the Program Manage Settings. Select an option by
press UP/DOWN buttons and press OK or RIGHT buttons to adjust that setting. Press the
EXIT button to exit the Menu.
Program
By LCN
Off
Program Edit
Sort
LCN
a. Program Edit
To edit your program preferences (skip, move or delete), you need enter to the Program Edit
Menu. This Menu requires a password to access. Enter the default password '000000'.
M o v e
S k i p
De le te
ALL TV
802 NDR FS SH
805 MDR FERNSEHEN
Searching...
No Sig nal
Program Edit
Delete a TV channel
Select a Program by pressing UP/DOWN key and then press the BLUE button, a warning
message will appear. Press OK to delete the program.
Skip TV channel
1. Select the program by pressing UP/DOWN key you would like to skip and press the
GREEN button. A skip symbol is displayed at the skipped program.
2. Disable a skip TV: Press the GREEN button on the skipped program, then the skip symbol
will disappear.
3. To confirm and exit the menu, press EXIT key.
Move a TV channel
1. Select the preferred program then press the RED button. A move symbol will appear.
2. Press UP/DOWN to move the program.
3. Press OK to confirm.
b. Sort: Sorting channels realign the channels according sort of option
Press RIGHT/LEFT button to select the sort type such as By LCN/By onid (Original Network
Page 16

16
ID)/By service name/By service ID.
c. LCN (Logical channel number)
Please keep the LCN (Logical Channel Number) option ON (activated), so that the channels
can be classified in the correct order defined in your country.
(2) Video Settings
Press MENU then select [Picture]. The Menu provides options to adjust the video settings.
Press UP/DOWN to select an option and press RIGHT/LEFT to adjust that setting. Press
EXIT to exit the menu.
Picture
16 9 Wide Screen:
720p
PAL
EXIT R e t u r n
C o n f i r m
Asp ect Ratio
Resolution
TV Format
a. Aspect Ratio
Depending on the format of your television, select 4:3 Pan&Scan, 4:3 Letter Box, 16:9 Wide
screen, 4:3 Full.
b. Resolution
The High-Definition Multimedia Interface (HDMI) is a digital audio/video connector interface
for transmitting uncompressed digital streams. HDMI supports, on a single cable (HDMI
cable not supplied), all video formats including standard, enhanced, and high-definition, as
well as multi-channel digital audio. To enjoy the enhanced audio and video quality that HDMI
offers, you need an HD Ready television with HDMI connection. You then simply need to
select the maximum resolution supported by your television in the menu: 720p/1080i/1080p
(50Hz)/576i/576p.You can also change the HDMI resolution by pressing HDMI key on the
remote control repeatedly.
Display problem in HDMI mode – If you have selected a HDMI resolution which is not
supported by your TV (for example, you have selected 1080i while your TV supports 720p
resolution only), a black screen will appear. In that case, you just need to press the HDMI
key repeatedly until the program appears on the screen.
Remark :
- The default HDMI resolution is 720P.
- HDMI resolution can not be changed during USB media playback.
- HDMI resolution can not be changed during recording or Timeshift mode.
c. TV format
Use this option to define the TV format according to your country: PAL or NTSC. Please
choose “PAL” for Europe.
(3) Channel Search settings
To access the menu, press MENU and select [Search Channel]. The Menu provides
options to adjust the Search Channel settings. Select an option by pressing the UP and
DOWN keys and press RIGHT/LEFT to adjust the settings. Press EXIT to exit the Menu.
Page 17

17
Channel Search
Auto S e a r c h
Manua l Search
Co u nt r y
Antenna P o w e r
France
Off
a. Auto Search
Auto search is a kind of intelligent and convenient mode of programs searching, which
covers programs of all frequency points of target countries or regions.
Search and install all channels automatically. This option overwrites all preset channels.
1. Select [Auto Search] and press OK or RIGHT to start auto channel search.
2. After entering into auto search page, system will scan all programs one by one under
frequency points of current countries or regions selected automatically.
3. During scanning, press EXIT key to stop and exit scanning.
4. If any program is detected and the scanning process is finished, system will exit the
scanning page and save the program.
Channel Search
482 0MHz 8MHz
./
DTV 000
:
Radio 000
:
Progress
b. Manual Search
If any channel is missing after auto search, or you want to add newly launched channels,
you can use Manual Search to scan the desired channels.
This option adds new channels without changing the current channels list.
1. Select [Manual Search] then press OK or RIGHT. The channel search screen will
appear.
2. Press the RIGHT/LEFT key to select the channel frequency
3. Press OK to start searching channels
If a channel is found, it is saved and added to the channels list. If channels can't be found,
then it will exit the menu.
Page 18

18
EXIT
E X I T
C o n f i r m
Manual Search
Channel No .
Frequency:
Ba n d wi d th:
Quality
21
474000
8M
c. Country
Make sure to select the correct country to make the installation successful.
d. Antenna power
Enable Antenna Power if an external active antenna is connected. Default home connection
use a passive antenna, therefore it is not appropriate to change this option. Do not activate
this option if you do not have an active antenna, otherwise there will be poor or no channel
reception as a result.
(4) Time Setting
To access the Menu, press MENU then select [Time]. The Menu provides options to adjust
the time settings of your region and the unit sleep time setting. Press UP/DOWN to select
an option and press RIGHT/LEFT to adjust the settings. Press EXIT to exit the menu.
GMT 1+
EXIT
R e t u r n
C o n f i r m
Time
Time Offs et
Country Reg ion
Time Zone
Auto
Paris
OffAuto Standby Mode
a. Time offset
1. Select auto to set your country’s time by adjusting your country Region.
2. Select manual to set your country’s time by adjusting Time zone.
b. Country Region
Select your Country Region when [Time Offset] is set to Auto.
c. Time Zone
Select your country Time Zone when [Time Offset] is set to Manual.
d. Auto standby Mode
The unit will enter standby mode if no action from user after the selected time. The options
are off, 15 minutes, 30 minutes, 45 minutes, 60 minutes, 75 minutes, 90 minutes, 105
minutes, 120 minutes, 135 minute, 150 minutes, 165 minutes, 180 minutes.
(5) Option
To access the Menu, press MENU and select [Option]. The menu provides options to adjust
the OSD Language, Subtitle Language and Audio Language. Select an option and press
RIGHT/LEFT to adjust the setting. Press EXIT to exit the Menu.
Page 19

19
EXIT
R e t u r n
C o n f i r m
Option
Audio Language
English
English
English
OSD Language
Sub title Lang uage
a. OSD Language
Select the language of the setup menu and screen display.
b. Subtitle Language
Select the preferred language for displaying subtitle.
c. Audio Language
Select the preferred audio language for watching TV channels. If the language is not
available, the default language of the program will be used. You can also press AUDIO
key on the remote control to change the audio language.
(6) System Setting
To access the Menu, press MENU and select [System].The menu provides options to
adjust the system settings. Press the UP/DOWN key to select an option and press
RIGHT/LEFT to adjust the setting. Press EXIT to exit the Menu.
EXIT
R e t u r n
C o n f i r m
System
Set Password
Restore Factory Default
Informatio n
Software Update
a. Set Password
You can set a new password for the system. Press OK or RIGHT key, and you will see
below screen, Input old password. This default password is '000000', Input new
password your desired. Input the new password again to confirm the new password.
Press EXIT to save the new password and return to System Menu.
EXIT
R e t u r n
C o n f i r m
Set Password
Input Old Password
Input N e w Password
Confirm Password
-------
-------
-------
Page 20

20
b. Factory Default
Reset your receiver to the Default Factory Settings.
Select [Factory Default] and press OK or RIGHT to select. Enter your password or
the default password '000000' and press OK to confirm. This option will delete all
preset channels and settings.
c. Information
View hardware and software information of the receiver.
d. Software update
Update the receiver’s software via the USB port. Making an update always involves
some risks. Use only the update software provided by the manufacturer and adapted to
this unit. The use of any other updates software not only makes the unit inoperable and
irreparable but also voids the warranty.
Page 21

21
Multimedia Functions
1) MULTIMEDIA PLAYBACK
Connecting a USB device
1. Power-on the unit.
2. Plug a USB stick into the USB port of the receiver.
3. Wait three seconds so that the receiver can read and identify the stick.
4. Press USB button to play on your TV / photo / audio and video contents from your
USB device.
EXIT
E X I T
S e l e c t
Multimedia Playback
M o v e
Music Photo Movie PVR
Press the LEFT/RIGHT button to select Music, Photo, Movie or PVR, which allows you
to watch the recordings made on this unit.
Notes on video playback via USB port
- After connecting your USB device to the unit, you may need to turn the device
on before it can be detected.
- This unit does not support direct USB connection with computer. It is necessary
for you to transfer your data/files on a USB stick or MP3 player.
- If you are using an external hard drive to be connected via USB, you must
connect the hard drive simultaneously with a power source and with the unit. If
you are using a portable video player with hard drive, you must make sure
that the internal battery is fully charged.
- Verify that the file system of your USB device is properly formatted in FAT 32.
USB media formatted in NTFS is not compatible with this unit. If your USB drive
formatted in FAT 32 is not recognized by this receiver, it is recommended as a
last resort that you format your hard drive on this unit. Before doing so, please
refer to the manual of your USB device to ensure that formatting is possible
without altering its functionality.
- The USB device used may not be fully compatible with USB 2.0. In this case, try
a different USB stick in order to identify the problem.
- The loading time of video files depends on the disk space occupation and may
take up to one minute. Please do not remove your USB device during video
playback or loading.
Important remarks about reading MPEG-4 videos on this unit
If you encounter any problems when playing MPEG4 videos, please check the
below points:
1) There is a wide variety of codecs and compression methods in use. It is
possible that some videos, including those downloaded from unofficial websites,
are not fully compatible with this unit.
2) Videos must be encoded with a soundtrack in MP3 format, since other formats,
such as DTS, DTS HD, DD+, are not supported. If there is no sound, it means that
the audio codec is not compatible.
Page 22

22
3) If your multimedia file does not appear on the unit’s screen, check that the file
name ends with the extension “.AVI, MKV, FLV, JPG, MP3”.
4) This device can read most videos in the market. However, proprietary formats
such as DIVX, WMV, RM, RMVB, M4V, ISO and IFO will not be read. If this
situation arises you are advise to convert the video into a standard MPEG4 format.
Please additionally note that Audio and Video files including DRM anticopy
protection (Digital Rights Management) will not be read.
2) Format your USB device
This option allows you to format your USB device. This is useful to:
- free the disk space of the entire device in order to make recordings;
- improve the compatibility of your USB device with the unit in case of problems.
Press Menu, choose USB Menu, and select option of“Format USB Device” and press
OK to enter below menu.
Select “Format” and press [OK] button to enter below menu. There will be a warning
message, press OK to confirm format, press EXIT button to quit.
EXIT E X I T
Format Usb1C/
FAT32
Format USB Device
File System
S e l e c t
EN FAT 3 73GB 3 73GB_ . / .
" ,
?"
Data will be lost in current partition
format the partition
Caution
– Formatting will erase all your data. You must save all the data stored on your
USB support beforehand.
– You should never perform formatting on portable audio or video players. In
fact, these products have a file system for start-up and files playback.
Formatting might make the player unusable.
– You can do formatting on an external hard drive or USB key. Before doing so,
please refer to the manual for your support to ensure that formatting is
possible without altering its functionality.
3) Recording Function
With this receiver you can easily record your favorite programs on your USB
stick. This unit has two recording modes: immediate recording and
scheduled recording (for use in case of absence).
3.1 Preparation for the first recording
When using a USB stick with this unit for the first time, you should first
format it using this unit. Formatting your USB stick directly on the receiver
improves compatibility of the device with the unit. More particularly, FAT file
system will be converted into FAT 32. This helps improve recording quality
and fluidity. Caution: formatting will deletes all the files on the USB device!
You should create a backup of all the files you want to keep beforehand. To
format your USB stick, see previous subsection entitled “Formatting your
USB device”.
Page 23

23
3.1.1 Recording a program by using a USB
This receiver allows you to record your favorite DVB-T programs in a simple and friendly
way. You just need a USB key and insert it into the unit. The recording will be made on
the key and you can view the recordings later from this receiver or any other compatible
multimedia devices.
3.2 Making a real-time recording
While the unit is on (the status indicator on the front panel is green), press the REC
button once to begin recording the viewed channel on the USB support inserted. During
recording, the "REC" symbol flashes on screen. Press the STOP button to stop
recording.
00 00 01::
[ ] : [ ] :OK Yes EXIT Cancel
00 00 15::
Stop Recording ?
3.3 View your recordings
While the unit is power on, Press the View REC button to access the list of all
recordings made on USB inserted.
LAST
U p f ol d e r
S e le c t
M o v e
LAST
U p F o ld e r
S e le c t
Page 01/01/
P r ev i e w D e le t e R e n a m e
INFO
CCTV 09082011 1530 mts- - .
CCTV 09082011 1000 mts- - .
CCTV 09082011 1142 mts- - .
CCTV 09082011 1201 mts- - .
C HBPVR CCTV 09082011 1000 mts/ / - - .
Page 24

24
Notes:
– Do not remove your USB stick while playback is in progress; otherwise the
content of your USB drive could be damaged. Press the STOP button to
stop playback and then remove your USB stick.
3.4 Making one or more scheduled recordings (TIMER FUNCTION)
Press the TIMER button to enter the scheduled recording mode.
- The scheduled recording mode allows you to set the channel to be recorded,
start time and duration. You can also program one or more weekly or monthly
recordings. In order to schedule several recordings on different dates, use
different “event” numbers.
– While the receiver is on (the power standby indicator light on the front panel
is in green colour), insert a USB stick into the USB port of the receiver.
– Wait three seconds so that the receiver can recognize and identify the USB
device. Then press TIMER on the remote control to display the scheduled
recording screen (see illustration below).
Sch e dul e
Event Program Date Time
Repeat Status
EXIT E X I TE d it De l e teA d d
– Press the remote control red key in order to create a new recording session.
– A dialog box (pictured below) will then let you decide:
Channel Name J2
Start Date M D Y ( / / )
09 30 2011//
Start Time
10 37:
End Time 10 40:
Repeat
Once
Sch e dul e
Event Program Date Time
Repeat Status
Event Add
C on f i r mEXIT E X IT
Channel No .
0800
o The channel to record,
o Start time and End time,
o Set the REPEAT option if you want to trigger recurrent recording
sessions (such as daily or weekly recordings).
– After the first recording session is finalized, you may create multiple
recording sessions by pressing the red key again,
– Press the green key in order to modify a recording schedule,
– Press the blue key to delete a recording session,
– Press the EXIT key once you are done.
Notes:
– Please note that you cannot access the TIMER menu on screen if no USB
device has been inserted. This is to help you avoid programming a recording
and forgetting to insert a USB device.
Page 25

25
– When entering the scheduled recording menu (by pressing the TIMER key of
the remote control) and setting an immediate recording (scheduled to start in
less than 5 minutes), do not put the unit into standby mode afterwards (by
pressing standby key), or the recording may be cancelled.
– Please note that you will not be able to switch to another DVB-T channel
while a recording is in process. Indeed, the current DVB-T tuner is dedicated
on the current channel to record, and therefore another channel cannot be
watched simultaneously. If you wish to watch another channel while a
recording is in progress, you are therefore advised to switch to your satellite
receiver or any other reception device connected to your TV.
Notes on recording and USB functions
– Information on the recording format: Recording is done in MPEG-TS format
which allows recording in HD quality identical to the signal received. To play
your recordings on another multimedia device, it may be necessary to install
a compatible video codec.
– If you want to record a film or a long program, use a memory stick of larger
capacity (eg. 4GB). If you want to save several films, opt for external hard
drives of large capacity.
– The loading time of the USB device is too long: When you insert a USB
support, the loading time can sometimes be a minute or more. This depends
on the size of your support, the number of files on it and, above all, the
complexity of its directories. You can reduce loading time by avoiding the use
of multiple sub- directories in your USB disk. Avoid such
multiple-subdirectories like “Directory/Subdirectory/Sub-subdirectory/....”
and store files in a single simple directory.
- USB Device Recognition Problems
o After connecting your USB device to the unit, you may need to turn the
device on before it can be detected by the receiver.
o This unit does not support direct USB connection with computer. It is
necessary for you to transfer your data/files on a USB stick or MP3 player.
o If you are using an external hard drive to be connected via USB, you must
connect the hard drive simultaneously with a power source and with the
unit. If you are using a portable video player with hard drive, you must make
sure that the internal battery is fully charged.
o Verify that the file system of your USB device is properly formatted in FAT
32. USB media formatted in NTFS is not compatible with this unit. If your
USB drive formatted in FAT 32 is not recognized by this receiver, it is
recommended as a last resort that you format your hard drive on this unit.
For this please follow the steps described on the previous page. Before
doing so, please refer to the manual of your USB device to ensure that
formatting is possible without altering its functionality.
o The USB device used may not be fully compatible with USB 2.0. In this
case, try a different USB stick in order to identify the problem.
- Recording Quality
o If your recording is shaky or choppy – The data stream to be recorded is
very important. Certain USB sticks, even some new USB 2.0 ones, do not
allow sufficient data transfer rate. If this happens, try with a newer USB
device or with an external hard drive. With external hard drives, data
transfer rate is sufficiently high and this problem should be solved.
o Remark on the size of recorded files – To ensure maximum compatibility
with all the USB drives, recording file size is limited to 232MB. For this
reason, a single recording session may be divided into several files. This
unit will, however, treat them as a single file for playback.
Page 26

26
3.5 Time Shift Function
This DVB-T receiver presents a function called “Time Shift” which allows recording
of TV program onto a digital storage medium (e.g. USB stick or external hard disc,
not supplied). You may then watch the program at a later time that is more
convenient to you. Want to put the television on pause? It is now possible with the
“Time Shift” function, which records the TV program during your phone call or your
coffee break. With “Time Shift”, yo u will not miss anything anymore!
Time Shift Operation
– Please insert a USB key into USB port before you activate TIMESHIFT
function.
– Press the TIMESHIFT button once. The broadcasting TV program is stopped
and the image is frozen on screen. During this time, the TV program is being
recorded and you can take a break.
– Press TIMESHIFT button a second time to resume the TV program from the
point it was paused, and the recording will continue. The screen displays the
remaining play time. During playback, you can:
1) Press PAUSE button to pause the playback, press PLAY button to resume
playback.
00 00 19:: 00 00 51::
2) Press REV or FWD to scan backward or forward at x2 / x4 / x8 / x16 /×32
speed.
– If you want to stop the recording and playback, please press STOP button.
– Choose “OK” to save the recording file on the USB device; choose “EXIT”
to cancel saving recording file.
Note on Use of the Time Shift Function
The Time Shift function requires a high data transfer rate between the USB
device and th e unit. Indeed, a recording and a (deferred) playback
simultaneously take place on the USB device. Certain USB sticks, even some
new USB 2.0 devices, may lead to shaky image or choppy sound. If you
encounter this problem, it is necessary to change the USB device. External hard
drives, self-powered by mains, provide the highest transfer rates and allow yo u to
use the Time Shift function optimally.
In case of recording quality problems or playback problems such as choppy or
blocked image, you may also try to format your USB device by using the
Formatting function of this unit only (see “Formatting your USB device”).
Page 27

27
Troubleshooting
If you experience problems with this receiver or its installation, in the first instance,
please read carefully the relevant sections of this User Manual and this Troubleshooting
section.
Problem
Potential Reasons
What to do
Standby light not lit
Mains lead unplugged
Check mains lead
Mains fuse blown
Check fuse
No signal found
Aerial is disconnected
Aerial is
damaged/misaligned
Check aerial lead
Check aerial
Before check above 2 points, please check signal
indicator is in red or off.
Out of digital signal area
Check with dealer
Mosaic blocks in picture
or picture freezes
Aerial may not be
compatible
Check aerial
Scrambled channel
message
Channel is scrambled
Select an alternative channel
The remote control
buttons are no longer
active; it is not possible
to change the DVB-T
channel.
Receiver off
Plug in and turn on receiver
Handset not aimed
correctly
Aim handset at front panel
Front panel obstructed
Check for obstructions
Remote control batteries
are inserted incorrectly
Check batteries direction
Handset batteries
Replace remote control
A recording is being
scheduled
You will not be able to switch to another DVB-T channel
while a recording is in process. Indeed, the current
DVB-T tuner is dedicated on the current channel to
record, and therefore another channel cannot be
watched simultaneously. If you wish to watch another
channel while a recording is in progress, you are
therefore advised to switch to your satellite receiver or
any other reception device connected to your TV.
Black screen on TV
Adjust to Incompatible
resolution
Press HDMI key on the remote control repeatedly until
the program appears on the screen
After moving the
receiver to another
room, find can’t receive
the digital reception
The aerial feed may come
through a distribution
system which may reduce
the digital signal now
received by the receiver
Try a direct feed from the antenna
The unit shut down
automatically
If no operation is
performed from the remote
control for 3 hours, the unit
will automatically switch to
standby mode to reduce
power consumption.
Press the Standby button to put the unit back into
operation
Page 28

28
Important Remarks:
(1)Analog Reception and DVB-T Reception
When you wish to watch TV using your TV tuner (analog tuner) and that your DVB-T
unit has been turned off or unplugged, the image quality can be deteriorated according
to the TV you are using. This is normal, your DVB T unit must be set in standby mode to
allow a good quality signal.
(2)Problems receiving DVB-T channels
- First check that you have well connected your home antenna with the DVB-T unit.
- Start a new automatic channel search as follows:
5. Press the MENU key from the remote control
6. Select Channel Search
7. Then select Auto Search
8. Then press OK or Right button to run the automatic channels search.
Channels scanning may take a few minutes to complete.
(3)Display problem in HDMI mode – If you have selected a HDMI resolution which is
not supported by your TV (for example, you have selected 1080i while your TV supports
720p resolution only), a black screen will appear. In that case, you just need to press
the HDMI key repeatedly until the program appears on the screen.
Remark :
- The default HDMI resolution is 720P.
- HDMI resolution can not be changed during USB media playback.
- HDMI resolution can not be changed during recording or Timeshift mode.
(4) If the reception problem still occurs.
Your unit has been tested for optimal performance over all the country. In most cases,
the DVB-T reception problems are due to a weakness in your home's antenna
installation. If your installation is old, or has never been tested for DVB-T, the signal can
be too weak or flawed for the unit to work properly. I t is therefore highly recommended
that you ask for a qualified technician to test the compliance of your home antenna.
This unit has been designed and is guaranteed to work with a signal of at least 60dB.
Page 29

29
Technical Specification
Items
Features
High
Frequency
Tuner
Input Frequency Range
174~230, 470 ~~ 862MHz (VHF&UHF)
Bandwidth
6, 7 or 8 MHz
Input Signal Level
-75~-20dBm
RF Input Connector
IEC169-2, Female
Input impedance
75Ω
Demodulation
Mode
Waveform
COFDM( Code Orthogonal Frequency Division
Multiplexing)
Demodulation
QPSK,QAM16,QAM64
Transmission Mode
2K,8K
Guard interval
1/4, 1/8, 1/16, 1/32
Code rate
1/2, 2/3, 3/4, 5/6, 7/8
Video, Audio
Decoding
Video decoding
ISO/IEC13818-2 MPEG2 ( MP@ML ) /
MPEG-4 AVS Compatible
Video resolution
PAL 720×576/ NTSC 720X480, 1080i
Video input code rate
15Mbit/s Max.
Teletext
Support DVB-ETS300472
Audio decoding
ISO 11172-3
Audio Track
Stereo, Monophony (L, R)
Audio Sample rate
32,44.1, 48KHz
USB
USB Port
USB2.0
Format
MP3/JPEG/BMP/AVI/MKV/FLV
System
FAT32, NTFS
Power
Input Power
230V,50Hz
Power Consumption
≤ 10W
Max Consumption
≤ 12 W
Work
Environment
Temperature
0~+40℃
Humidity
≤95%
Dimensions
Weight
≤1 Kg
Size
110(W)*100(D)*30(H) mm
Notes
The data for weight and size are approximations only.
Specifications are subject to change (by manufacturer) without notice.
Page 30

30
SAV
ADMEA / LOGISAV
ZI du clos des charmes
26 rue du clos des charmes
77090 COLLEGIEN - France
 Loading...