

Page 1

BUILT-IN ELECTRIC OVEN
USER MANUAL
ВСТРОЕННЫЙ ДУХОВОЙ ШКАФ
ИНСТРУКЦИЯ ПО УСТАНОВКЕ И
ЭКСПЛУАТАЦИИ
Page 2

Page 3

TABLE OF CONTENTS
Technical Specifications
Accessories
Important Safety Information
Installation
Electrıcal Connection
When the Oven Is First Installed
Tips for Saving Energy
Description of Oven
Use of Oven
Oven Timers
Cooling Fan Operation
Cooking Tips
Miscellaneous Suggestions
Tips for Cooking
General Cleaning and Maintenance
Transport Information
Troubleshooting Before Calling Service
Page 4

Dear costumer,
External Dimensions
( Height / Width / Depth )
595 mm / 595mm / 565 mm
Installation Dimensions
( Height / Width / Depth )
585 mm / 560mm / min.550 mm
Input Voltage / Frequency
220-240V ~ 50Hz
Current (Amp)
min. 16 A
Oven upper heating element
900W
Oven lower heating element
1100 W
Grill heating element
1800 W
Turbo fan motor
24 -26 W
Cavity cooling fan
14-18 W
Oven light
15 W
4
Firstly thank you for purchasing our product.
Carefully read all instructions and warnings in this manual. These guides
include important information about your product safe installation, operation,
maintenance and have warning to take advantage of the most useful product.
Keep this guide in safe and easily available place when it becomes necessary.
Cause of Translation of this booklet from the manufacturer or its publication,
resulting from the incorrect use of the device, to people, to environment or
other materials can not be held liable for damages.
This manual also applies to other models. Differences between models are
identified in the manual.
TECHNICAL SPECIFICATIONS
The ovens are designed to operate with a monophase alternating current of
220-240V ~ 50Hz. Anyway, before the installation of the appliance, we
suggest you to check always the specifications on the rating label applied on
the front bottom side of the oven.
*See Installation.
The values vary by product model below. All parts are available with the
product.
The manufacturer reservers it’s right to make changes in the technical
specifications in order to improve the appliance quality without any prior
notice.
The figures in guide are schematic; your product may not match exactly.
Values stated on the markings of the appliance or in the other printed
documents supplied with the appliance are obtained under laboratory
conditions as per relevant standards. These values may vary according
to the usage of the appliance and ambient conditions.
Page 5

The information in the product data sheet is given in accordance with
Brand
SCHAUB LORENZ
Model identification
SLB EB6617L / SLB EV6617L
Type of oven
Built-in Oven
Symbol
Value
Unit
Mass of the appliance
M
kg
Number of cavities
1
Heat source per cavity (electricity or gas)
Electricity
Volume per cavity
V
62
L
Energy consumption (electricity) required to
heat a standardized load in a cavity of an
electric heated oven during a cycle in
conventional mode per cavity (electric final
energy)
ECelectric
cavity
0,82
kWh/cycle
Energy consumption required to heat a
standardized load in a cavity of an electric
heated oven during a cycle in fan-forced mode
per cavity (electric final energy)
ECelectric
cavity
0,81
kWh/cycle
Energy Efficiency Index per cavity
EEIcavity
100
Energy Efficiency Class
A
Brand
SCHAUB LORENZ
Model identification
SLB EB6618L
Type of oven
Built-in Oven
Symbol
Value
Unit
Mass of the appliance
M
kg
Number of cavities
1
Heat source per cavity (electricity or gas)
Electricity
Volume per cavity
V
66
L
PRODUCT FICHE
5
the Commission delegated Regulation (EU) No 65/2014 supplementing
Directive of the European Parliament and of the Council 2010/30/EU and
(EU) No 66/2014 supplementing Directive of the European Parliament
and of the Council 2009/125/EC
Information for domestic ovens
Information for domestic ovens
Page 6

In order to determine compliance with the eco-design requirements, the
Energy consumption (electricity) required to
heat a standardized load in a cavity of an
electric heated oven during a cycle in
conventional mode per cavity (electric final
energy)
ECelectric cavity
0,85
kWh/cycle
Energy consumption required to heat a
standardized load in a cavity of an electric
heated oven during a cycle in fan-forced
mode per cavity (electric final energy)
ECelectric cavity
0,84
kWh/cycle
Energy Efficiency Index per cavity
EEIcavity
101,2
Energy Efficiency Class
A
6
measurement methods and calculations of the following standards were
applied: EN 60350-1
ACCESSORIES
Accessories supplied can vary depending on the product model. All the
accessories descried in the manual may not exist on your product.
Baking Tray
Can be used for pastries, big roasts, foods with liquid content and during
grilling as dripping tray.
Deep Roasting Tray
Can be used for pastries, big roasts, foods with liquid content or during grilling
as dripping tray.
Page 7

Wire Grid
7
Used for the grilling, heating and to cook or for to place the roasting food the
intended rack.
IMPORTANT SAFETY INFORMATION
This section will help prevent the dangers of personal injury or property
damage is located in the safety instructions. Failure to comply with these
instructions could invalidate any warranty as our company is not liable for
damages arising.
General Safety
This appliance is not intended for use by persons (including children) with
reduced physical, sensory or mental capabilities, or lack of experience
and knowledge, unless they have been given supervision or instruction
concerning use of appliance by a person responsible for their safety.
Children should be supervised to ensure that they do not play with the
appliance.
The appliance is designed for domestic use only. Commercial use is not
admissible. Can not be used for any other purpose except for cooking
and heating. Another use for any purpose (for example, heating the
room, dry clothing or a towel on the handle), a dangerous and
inappropriate. When using inappropriate, improper or inadequate the
oven as a result of the use of human, environment or other materials, our
company can not be held liable for damages.
Make sure you remove all packing materials before using the product.
The first runs the furnace, furnace insulation materials and a heater
elements cause by odor one-time. For this reason, the first run of oven
do not put the eat firstly. Primarily run, expect to have no scent and then
cook. The inside of the oven, clean with damp soft cloth.
Appliance may be hot when it is in use. Never touch the burners, inner
sections of the oven, heating elements etc. Keep children away!
Surface of the grill function can become very hot, be careful.
Always use heat-resistant gloves when putting or removing the dishes
into/from your oven.
Do not make the cooking or frying the base of the oven absolutely.
Do not put the oven trays, plates, or wrap in aluminum foil directly onto
the oven floor.Otherwise, the accumulated heat can damage the base of
the furnace and the fire hazard may occur.
When moving the product, cleaning or furnace maintenance removes the
AC power.
Never attempt to remove the plug from the socket by pulling the cord.
Do not touch the product when wet or damp.
Page 8

Switch off, unplug and tampering when oven doesn't work properly or
IMPORTANT: If you decide not to use the oven any more, it should
advisable to make the oven safe.
8
broken.
Do not carry out any repairs or modifications on the appliance. However,
you may remedy some malfunctions; (See Troubleshooting Before
Calling Service)
All maintenance and repairs should be done by authorized service only,
and only genuine spare parts should be used.
If you do not use the oven, bring the all the functions "OFF".
Furnace cleaning and safety has always been to keep the oven clean.
Residues remaining in the oven after use over time can damage the
surface of the oven.
Keep all ventilation ducts around.
Do not use the uprooted or broken front door glass.
Rear surface of the oven gets hot when it is in use. Gas/Electric
connection should not touch the rear surface; otherwise the mains cable
may get damaged.
Do not use the product, when getting drug and/or alcohol that effect of
reasoning.
Be careful when using alcoholic drinks in your dishes. Alcohol evaporates
in high temperatures and may cause fire since it will catch fire when it
gets in contact with hot surfaces.
WARNING: The device is used only for cooking. Should not be used for
other purposes, such as heat the room.
Safety for Children
This appliance has been designed to be operated by adults and children
under supervision. Young children must not be allowed to tamper with
the controls or play near or with the oven.
Accessible parts of this appliance may become hot when it is in use.
Children should be kept away until it has cooled.
Be careful not to leave the packing materials (plastic sheeting, expanded
polystyrene etc.) where children can get at them, as they can be
dangerous.
When the door is open, do not load any heavy object on it and do not
allow children to sit on it. It may overturn or door hinges may get
damaged.
CAUTION: Accessible parts may be hot when the grill isin use. Young
children should be kept away.
be made inoperable by cutting the power supply cable, after
unplugging it from the power supply. Disused appliances can be a
safety risk as children often play with them. For this reason, it is
Working about Electrical Safety
Any work done on electrical equipment and systems, performed by
competent and qualified persons.
Turn the product off and disconnect power in case of any damage. Turn
off your home insurance.
Page 9

Make sure it is compatible with the fuse.
ENVIRONMENTAL WARNING: If the device after installation, packaging
to danger and drape.
9
INSTALLATION
Installation should be carried out according to the instructions by a
professionally qualified person. The manufacturer will not accept responsibility
for any damage to persons, animals or things due to wrong installation.
materials, showingthe importance of safety and environmental conditions
need to throw it away. According tothe properties for re-use of waste
packaging (foil, cardboard, styrofoam, etc.) Before throwing away the
product by cutting the power cord is not used for children are not exposed
Installation Instructions
For installation the appliance must be connected in accordance with all
local electrical regulations.
The oven has been designed to be fitted into a kitchen unit. It can be
fitted either under a worktop or in a taller cupboard unit at eye level. Cut
out an opening in the kitchen unit as shown in. (See Figure 1 and Figure
2)
Ensure there is sufficient support below the oven to carry the weight of
the oven.
The walls of the furnace is mounted must be heat resistant. In particular
the side walls were made of fiberboard coated. The coating resistant
must be to 100 °C. This not heat-resistant synthetic laminates and
adhesives, plastics or adhesive materials may be damaged. This
information will only be to create a guide and the real resistance against
the increase in temperature depends on the degree of kitchen units and
surface polish performance.
Certain kitchen unit of surface of polishing types (example vinyl) is
especially sensitive at the lower temperatures with color damage, above
mentioned temperatures.
Installation of the device in contravention of the warnings or the cabin
materials placed to device closer to the 5 mm responsibility of the owner.
The power cord avoid crush, fold and clamped or avoid contact with hot
parts of product. After installation, the plug must be easily accessible
location.
There must be safe distance between kitchen walls and furniture.
A correct installation will have to ensure a proper protection against
contact with electric parts or merely functionally isolated parts.
All the units meant to ensure protection have to be fitted not to be taken
away without using a tool.
For the most efficient air circulation, the oven should be fitted according
to the dimensions shown in (See Figure 1 and Figure 2 )
If the built-in oven is mounted below the hob, distance of at least must
be 50 mm.
The rear panel of the cabinet must be removed so that air circulates
freely. The panel to which oven is fitted should have a gap at least 75
mm at the rear. (See Figure 3)
We recommend not installing the appliance near refrigerators or freezer,
since the heat could affect the performance of these appliances.
Page 10

Figure 1
10
Figure 2
Figure 3
Page 11

MONTAGE THE OVEN TO THE CABINET
Cable Type
Conductor
Size
Current
(Amp)
H05 VV - F
3 x 1,5 mm
2
16A
11
The device, place balanced and centered recessed cabinet.
Oven, according to preferred mounted higher into a closet or under your
sink.
Open the door and secure the oven to the kitchen cabinet with four wood
screws, which fit the holes provided in both side of the oven frame (A).
(See Figure 4)
When the oven is connected to the service on the bench for ease of
installation of furnace must be connected to electrical cables separately.
Make sure for, cable connection and be not pinched.
Figure 4
ELECTRICAL CONNECTION
All electrical connections in accordance with applicable laws and rules should
be done only by a qualified electrician. Connections must comply with national
regulations.
Electrıc Connectıon Device Before
Which is positioned on the front bottom of the main power is supplied
from the mains power will meet the specified record label sure.
Current value of the insurance for the product must be at least 16A.
If Current value of insurance is under 16 amperes, qualified electrical
technician must called for changing ampermeter.
Connection must comply with national regulations.
Grounded plug is mounted to oven energy supply cord.This must used
with grounding-line.Please make a qualified electirical grounding
installation.
WARNING: This appliance must be earthed.
If your oven doesn't have a power supply cable, provide a power supply cable
to your product by qualified electrician from following features.
Voltage
220-240V ~ 50 Hz
Table 1
Page 12

Power supply cable in;
12
Yellow / green, the grounding cable must be connected to the terminal.
Blue neutral wire connected to the terminal marked with the''N''.
Black, brown or red electrical cables installed must be connected to edge
indicated by the''L''. (See Figure 5)
Figure 5
Connection must comply with national regulations.
The oven must be positioned for that easy access to wall outlet or a
duble pole switch for electrical connection.
Do not position the Power supply cord to contact hot surfaces.
When the Power supply cord is damaged, consult your nearest
authorized service location, and Table 1, provide to change with the
appropriate to feature of original spare parts.
If the device is connected directly to the device with the electrical wiring
system shall be installed between the two poles of a circuit breaker and
the earthing cable must not be interrupted by a two-pole circuit breaker.
The adapters, multiple sockets or extension cords are not recommended
for use. In accordance with applicable safety laws must be necessary to
use an adapter or extension cord. However, certainly for the adapter and
power should not exceed the specified maximum current capacity.
After the connection is finished, be sure to test the heating elements up
to 3 minutes.
The electrical safety of the appliance can only be guaranteed when it has
been correctly connected to an efficient earthed power supply, as laid
down in the regulations for electrical safety. The manufacturer can not be
held responsible for any damage to persons, animals or things due to the
lack of an earth connection.
Page 13

WHEN THE OVEN IS FIRST INSTALLED
13
Remove all the baking trays and oven racks.
Set the 'Heat Setting' to maximum level.
Function button in the upper and lower heating (if you have the fan) turn
the function.
Turn the oven for 30 minutes in this way.
During this time, elements from the oven and heat insulating material and
a smell of smoke may occur only once. If such a situation occurs, before
you put food in the oven justwaiting to be no odor and smoke.
Repeat this process in the grid element.
These processes inside the oven when slightly damp cloth and wipe
clean with a softcloth.
WARNING: Before the first use, carefully wash the accessories of the
oven such as tray and wire grid.
IMPORTANT: To open the door; always catch the handle in its central
part. (See Figure 6)
Figure 6
TIPS FOR SAVING ENERGY
The following tips will help you to use your appliance in an ecological way and
to energy.
1. In the oven, transmit heat better, dark-colored or enamel-coated
cookware is used.
2. If open the oven door often when the cooking foods, the air will
enter and it cause the loss of energy.For this reason do not open
the oven door often.
3. Residual heat in the oven after the cooking process to cook the next
meal is available.
4. All cooking must be at least 10 minutes for the pre-heating.
5. Frozen foods must be resolved before cooking.
6. The oven, turn off a few minutes before the end of cooking time.
Page 14

DESCRIPTION OF OVEN
14
Minute timer ovens
1. Function warning lamp
2. Function select knob
3. Minute timer knob
4. Temperature adjustment knob
5. Temperature warning lamp
6. The control panel
7. Heaters
8. Oven dome light
9. Rating label
10. The inner glass oven door
11. The oven door
12. Turbo fan
Page 15
USE OF OVEN
15
Electronic or mechanical timer must be set before using the oven. Otherwise,
the oven will not work. (See Types of Oven Timer)
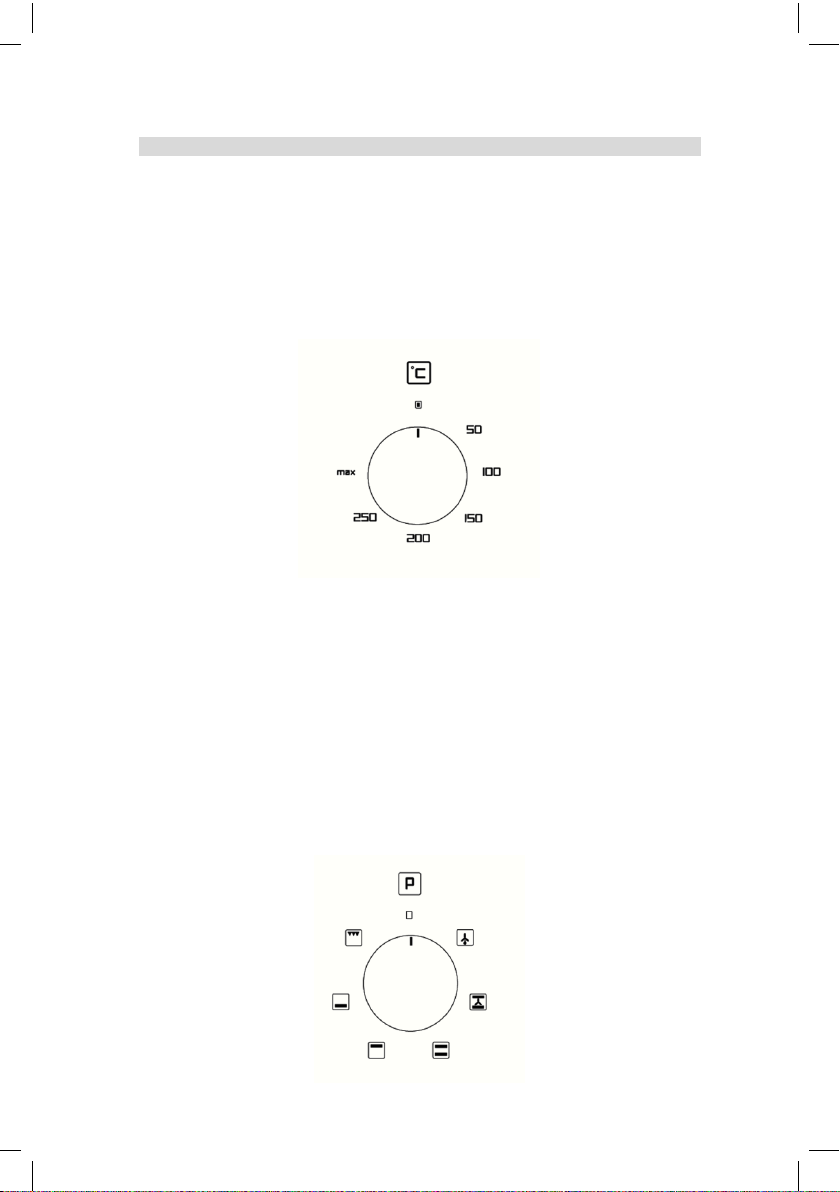
TEMPERATURE ADJUSTMENT KNOB
Used for setting the temperature cooking between 50 to max º C while the
oven working.Only at the grid function is brought to its max. Max. The
temperature is 285 ± 15 ° C. (See Figure 7)
This feature and principle of operation may vary depending on the product of
choice.
Figure 7
TEMPERATURE WARNING LAMP
Internal temperature of the oven then set the desired temperature and the
heat until it reaches the temperature warning light is lit.
Temperature warning light turns off when it reaches the desired temperature.
When the heat decreases, until the temperature reaches the former
temperature, warning lamp light is on again.
This feature and principle of operation may vary depending on the product of
choice.
FUNCTION SELECT KNOB
Set’s the operating position of the oven. Oven functions and principle of
operation may vary depending on the choice of oven model. (See Figure 8)
Figure 8
Page 16

FUNCTION WARNING LAMP
WARNING: All functions will start after selecting the oven temperature
with the thermostat knob. The order of operating modes shown here
might deviate from the arrangement on your appliance.
OFF: The oven does not work in this position. Bring this to the
starting point of all the buttons to turn off the oven.
Fan (Defrost): Only the turbo fan is activated. This function is
circulating the room temparature air around the frozen foods
that is suitable for cause of without losing the nutritional value
and cooling the cooked foods.
50 – 200 °C
Lower Heater (Bottom Cooking): Only the lower heater is
activated. This function is suitable for cooking from the
bottom of cooked food, heating the food, such as casserole
dishes that require slow cooking temperature for a long time
and the foods from the bottom is the desired browning.
50 – 200 °C
Upper Heater (Top Cooking): Only the upper heater is
activated. This function is pre-heating of meals cooked, and
top browning is suitable for the desired foods.
50 – 200 °C
Upper and Lower Heating (Static Cooking): Upper and
lower heating elements at the same time is engaged.
Provides cooked meal on both sides of the same. This
function is suitable for cakes, pies or cakes at the cooking
patterns and casseroles. Please baking with a single tray.
50 – 200 °C
Top and Bottom Heater + Fan (Convection Cooking): Top
and bottom heaters, turbo fan is activated at the same time.
The hot air, that is heated by upper and bottom heater, is
distrubuted in oven evenly and quickly with the help of fan.
This function is suitable for heat and cook with equally
temparature the dishes to be cooked on top side. Please
baking with a single tray.
16
Function select knob, when the set of any function, warning lamp is lighting.
Ligth is off when the starting position is ''0''. This feature and principle of
operation may vary depending on the product of choice.
Function table:
Oven functıons can be set on the maximum and minimum temperatures as
proposed below.
Page 17

max °C
Grill: Only the grid heater is activated. This function is
suitable for grilling the grilled foods such as a large or
medium-sized pieces of meat and fish thats are put on the
top shelf. Put tray in the rack at lower and put 1–2 cups of
water in a tray is recommended for not contaminating the
inside of oven by oil droplets.
OVEN TIMERS
17
The oven timers differ depending on the model you prefer.
MECHANICAL-MINUTE TIMER:
You can set the minute timer up to 90 minutes by turning the mechanic minute
counter to clockwise. (See Figure 9) The minute timer makes the oven start
as soon as it's set, and turn it off automatically when the time is up. After you
put the meal in the oven, set the cooking functions and the temperature by
using the control buttons, and turn the mechanic minute counter to the
position you need. When, the time is up, it is stimulated by a tone and the
oven turns itself off. The oven operating time is set up to 90 minutes with
circuit breaker. You can set manual if time more than 90 minutes.For use
manual, align to sign the minute timer knob with counter-clockwise. For
finish the cooking when you want at Manuel time setting, get the '0' position
with turn clockwise the oven of sign.
Figure 9
COOLING FAN OPERATION
Air condition system provide with cooling fan that prevent overheating of the
outer surface of the oven and prevent damage to surrounding.This fan create
an air stream that provide to extract the warm air from the front grills
(ventilation). At the same time it creates an air curtain between control panel
and cover and it prevent the overheating of these two parts and upper
components. Air circulation by cooling fan cause of the prevent consendation
due to heat and moisture for electrical and mechanical components and it
provide their safe and ensures of a long life. (See Figure 10)
The principle of the cooling fan varies by product model. Your product has the
following operating principles.
Page 18

The cooling fan starts running automatically when the ovens start
18
working. Working terminates automatically disabled.And it disables
automatically when working terminates.
Cooling fan switch on or off with thermostat on the furnace, at some
oven.In this case the cooling fan is working on a specific time and
disable automatically even if the oven turn off, causeof the working
of cooling fan depend on temparature.
In the touch-controlled products, cooling fan is switch on and off by
electronic circuit board. In this case the cooling fan is working on a
specific time and disable automatically even if the oven turn off,
causeof the working of cooling fan depend on temparature.
Figure 10
COOKING TIPS
Take care when opening the oven door as steam may escape. Escaped steam
can damage your hand, face and/or eyes.
Tips for baking
Use non-stick coated appropriate metal plates or aluminum
containers or heat-resstant silicone moulds.
Make best use of the space on the rack.
It is reccomended to place the baking mould in the middle of the
rack.
Keep the oven door closed.
Tips for grilling
Seasoning with the lemon juice and black pepper will improve the
cooking performance when cooking a whole chicken, turkey or a
large piece of meat.
Let meat rest in the oven for about 10 minutes after cooking
time.The juice is beter distrubuted all over the roast and does not
run out when the meat is cut.
Fish in a fire-resistant dish should be placed on the rack at the
medium or lower level.
Page 19

Distrubute the pieces to be grilled on the wire shelf.
FOOD
FUNCTION
RACK
POSITION
TEMPERATURE
(°C)
TIME(min)
(approx.)
Cake in
tray
3
175
25-30
Cake in
mould
2
175
40-50
Cakes in
paper
3
175
25-30
Sponge
cakes
3
200
5-10
Cookies 3 175
20-30
Dough
pastry
2
190
30-40
Filled
savory
pastry
2
180
25-35
Leaven 2 180
35-45
19
If the grilling is on the wire shelf, locate a dripping pan under it in
order to collect the fat. Add some water in dripping pan for easy
cleaning.
MISCELLANEOUS SUGGESTIONS
The values indicated in the table below are data indicative.They may vary
according to type of food as well as your preference of cooking.
Page 20

Lasagna
2-3
190
30-40
Pasta
bake
2
180-200
30-45
Steak
3
25 sec.
250/max. after
190
100-120
Fish 3 200
20-30
Fillet of
beef
3
190-200
6-8
Grilled
meatballs
3
190-200
8-10
Puff
pastry
1-3
170-190
20-30
Chicken
1000 gr
3
60-90
Meat 500
gr
3
60-90
While cooking with 2 trays at the same time, place the oven tray at the
upper shelf and baking tray at the lower shelf.
Please pre-heat for all makers.
FAULTS
CAUSES
REMEDIES
The upper crust is
dark and the lower
part too pale
Not enough heat
from the bottom
May be a wrong shelf
Put on a lower shelf
The lower part is
dark and the upper
crust too pale
Excessive heat
from the bottom
May be a wrong shelf
Put on a higher shelf
The outside is too
cooked and the
inside not cooked
enough
Too high
temperature
Wrong cooking temperature
Decrease the heat
The outer side of
meal is dry
Too low
temperature
Wrong cooking temperature
Increase the heat
20
Page 21

TIPS FOR COOKING
21
Tips for baking cakes
If pastry is too dry, Increase the temparature by 10 ºC and reduce
the cooking time.
If pastry dropped, use less liquid or lower the temparature by 10 ºC.
If pastry is too dark on top, place it on a lower rack, lower
temparature, and increase the cooking time.
If cooked well on the inside but sticky on the outside, use less liquid,
lower the temperature and increase the cooking time.
Tips for baking pastry
If the pastry is too dry, increase the temparature some 10 ºC and
decrease the cooking time.Dampen the layers of dough with a
sauce composed of milk, oil, egg and yoghurt.
If the pastry takes too long to bake, pay care that the thickness of
the pastry you have prepared does not exceeded the depth of the
tray and remain level with it.
If the upper side of the pastry gets browned, but the lower part is not
cooked, make sure that the amount of sauce you have used fort he
pastry is not too much at the bottom of the pastry.
Tips for cooking vegetables
If the vegetable dish runs out of juice and gets to dry, since using a
lid during cooking will keep the juice of the dish in the pan.
If a vegetable dish does not get cooked, boil the vegetables before
hand or prepare them like canned food and put in the oven.
GENERAL CLEANING AND MAINTENANCE
Oven after each use with warm, soapy damp cloth, wipe the oven should not
be in the food and oil waste.Because these wastes can cause corrosion on
the inner and outer surfaces.
Disconnect the plug before any cleaning or on-off button on the device is
switched off by bringing the theme of the furnace switch off the electricity.
Allow to cool before cleaning the device.
Stainless steel surfaces, the market can supply clean by using a special
stainless steel cleaner spray or liquid.
Cleaning product to use cleaning materials which can scratch the enamel
or painted surfaces please note does not contain particles.
When cleaning the control panel buttons, signs, and liquid cleaners
containing abrasive particles to be deleted and not use wire dish sponge.
Do not use harsh abrasive cleaners or sharp metal scrapers to clean the
oven door glass since they can scratch the surface, which may result in
shattering of the glass.
Enamel, painted and stainless steel surfaces, abrasive and acidic spots
(lemon juice, vinegar, etc.). Do not leave.
Do not use steam-cleaning products for general cleaning products.
Page 22

CATALYTIC WALL *
22
Catalytic wall, derive from the oven in the cooking oil is coated with a special
enamel which is capable of taking.
Catalytic wall should not be cleaned.Porous surfaces, steam and carbon
dioxide through the self-clean.
To clean;
• Sharp objects (eg knife), scrape the enamel,
• Use detergent or abrasive materials.
* Optional feature.
OVEN DOOR GLASS
Clean the oven door glass with warm water and a soft cloth only, then
wipe dry.
Never use harsh abrasives, steel, wool cleaners with bleach, as they
could damage the glass.
INNER DOOR GLASS
Clean the inner door glass with warm water and a soft cloth only, then
wipe dry.
Never use harsh abrasives, steel, wool cleaners with bleach, as they
could damage the glass.
Full glass inner door
Full glass inner door with a flat surface with a damp sponge and a soft clean
dry cloth.(See Figure 11)
As shown in the figure, while the cover is open;
1. Please slide outward the glass to inner tank.
2. After eliminating the glass bottom tabs, to ensure the delivery of the glass
with removed upward.
3. Take out the glass.
After cleaning, the order done in reverse is firstly the glass cover placed to
channel from the top. After, provide the establishment of glass spring with
pushed it to the channel the glass. After the installed of the glass bottom tabs
will go down, achieve the progress by leaving its own channel.
Figure 11
Page 23

OVEN SEALING
23
Your oven has a sealing surrounding the inside edges which provides the
oven to work properly.
Check the state of the sealing periodically. If cleaning is necessary, avoid
using abrasives, corrosive detergents, bleaches or acids.
If the sealing is damaged, consult with your nearest authorized service
provider in your area. Do not use the oven until it is fixed.
The changing procedure of the oven seal is as follows;
1. Open the oven door,
2. Remove the old sealing by pulling out the seal from corners one by
one as shown in (See Figure 12),
3. Four hooks are attached to the seal. Use these hooks to attach and
then press in the new seal.
Figure 12
SIDE RACKS *
It is possible to easily remove and clean the wire shelving placed in the wire
grid and tray. You can recover the wire shelving from screw channel by stretch
down the edge of special plug, like as shown. Then, you can recover with pull
up to outward and lift up to from upper tabs. Install after cleaning; process
done in reverse order, first the upper tabs set to boiler rack, after that placed
in a screw channel with stretching the special screw-earth channel wings.
(See Figure 13)
* Only available on some models.
Figure 13
Page 24

SLIDING SHELVES INSTALLATION *
24
* Optional feature.
CHANGING THE OVEN LAMP
Make sure that the electricity did not come from the device before
performing this operation.
The oven lamp has to comply to these features;
1. Resistant to heat,
2. Electric rate: 220
-240V ~ 50Hz,
3. Electric power rate: 15W
To replace the lamp, proceed as follows (See Figure 14) ;
1. Glass on the outer casing (A) remove the counter-clockwise,
2. Remove the oven light bulb counter-clockwise,
3. Replace it with a new one,
4. Refit the glass on the outer casing,
5. Switch on the electric supply.
WARNING: Ensure that the appliance is switched off before changing
the lamp to avoid the possibility of electric shock.
Figure 14
Note: The location and type of the lamp shown in the figure may be
different.
Page 25

TRANSPORT INFORMATION
25
During the transportation carry/place your product parallel to the
floor with top-side up position.
Placed the cardbord aligned with the tray to inner side of oven door
for prevent from the wire grid and tray to oven door.Tape to the side
walls of the oven door.
Do not use the oven door handle to move the appliance, such as to
remove it from the packaging. (See Figure 15)
Figure 15
TROUBLESHOOTING BEFORE CALLING SERVICE
Do not attempt to repair the device yourself under no circumstances.
Intervention to product should be made only by authorized service.
Before calling for service should be done as follows.
Oven does not heat.
- Function knob and Thermostat knob are not set. Set the function knob and
thermostat knob.
- If the appliance has a timer, the timer may not be set. Set the time.
- No power. Check mains supply and fuse box.
The appliance does not work.
- The main fuse is defective or has tripped. Check fuses in the fuse box.If
necessary, replace or reset them.
- Appliance’s plug can not be connected to the grounded socket. Check the
plug connection.
- Function knob and Thermostat knob are not set. Set the function knob and
thermostat knob.
- If the appliance has a timer, the timer may not be set. Set the time.
Cook (Lower / Upper section is not cooked evenly)
- According to the operation manual rack positions, re-review the cooking
times and temperatures.
Page 26

Oven light does not work.
26
-Oven lamp is defective. Replace oven lamp.
Steam escapes when the oven working.
- It is a normal that steam escapes during operations.
Metal sound is coming when the product is warming up and cool down.
- When the metal parts are heated, they may expand and cause noise.It is not
trouble.
Although the instructions in this section apply to resolve the issue please
contact an authorized service facility.
This device, in Europe, accords to the directives 2012/19/EU Waste Electrical
and Electronic Equipment. (WEEE) this device prior to disposing of junk and
trash, the environment and human health against the potential negative
consequences need to block. Otherwise, this would be an inappropriate
waste. This symbol on the product, the product treated as household waste,
electrical electronic alert is for the delivery of waste collection facilities. The
destruction process of the product must be in accordance with local
environmental regulations. To destroy the product, use it again and again for
the detailed information for recycling can be obtained from the competent
departments.
Page 27

ВСТРОЕННЫЙ ДУХОВОЙ ШКАФ
27
ИНСТРУКЦИЯ ПО УСТАНОВКЕ И
ЭКСПЛУАТАЦИИ
Содержание:
Технические характеристики
Аксессуары
Важная информация о безопасности
Установка изделия
Электрическое соединение
Первое использование духового шкафа
Советы по экономии электроэнергии
Описание духового шкафа
Использование духового шкафа
Таймеры духового шкафа
Работа охлаждающего вентилятора
Кулинарные советы
Практические советы
Тонкости кулинарии
Уход и обслуживание
Информация о транспортировке/перевозке
Устранение неполадок до обращения в авторизованный сервисный центр
Page 28

Уважаемый покупатель,
28
Прежде всего, благодарим Вас за покупку нашей продукции.
Пожалуйста, внимательно прочитайте все инструкции и предупреждения, изложенные в
данном руководстве, поскольку эти инструкции содержат важную информацию по
установке, эксплуатации Вашей продукции и уходу за ней, а также о преимуществах
наиболее практического применения продукции.
Храните это руководство в безопасном и легкодоступном месте c целью
использования при необходимости.
Производитель не несет ответственности за ущерб лицу, его окружению или имуществу,
причиненный вследствие неправильной эксплуатации прибора в результате использования
переведенной версии настоящего буклета или его издания.
Настоящее руководство применимо и к другим моделям. Различия между
моделями детально изложены в руководстве.
ТЕХНИЧЕСКИЕ ХАРАКТЕРИСТИКИ
Печи предназначены для эксплуатации при значении однофазного переменного тока,
равном 220-240В, с частотой 50Гц. В любом случае, перед установкой духовки советуем
всегда проверять спецификациями на бирке с техническими данными, прикрепленной к
передней нижней части печи.
(Высота/Ширина/Глубина)
размеры Внутренние
размеры Монтажные
(Высота/Ширина/Глубина)
Входное напряжение / Частота 220-240В 50Гц
Ток (Ампер) Мин. 16А
*См. Установку.
595 мм / 595 мм / 565 мм
*585 мм / 560 мм / мин.550 мм
Page 29

Параметры варьируются в зависимости от модели продукции. Все детали
29
предоставляются с продукцией.
Верхний нагреватель 900 ВT
Нижний нагреватель
Рашпер 1800 ВT
Мотор турбо-вентилятора
Охлаждающий вентилятор 14- 18 ВT
Лампа духовки
1100 ВT
24 -26 ВT
15 ВT
Производитель сохраняет право вносить изменения в технические спецификации с
целью улучшения качества духовки без предварительного уведомления.
Цифры, указанные в руководстве, схематические; они могут не совпасть в точности с
вашей продукцией
Значения, указанные в маркировках духовки или в других печатных документах,
предоставленных с духовкой, получены в лабораторных условиях согласно
соответствующим стандартам. Эти значения могут варьировать в соответствии с
применением духовки и внешними условиями.
Информация, указанная в таблице, дана в соответствии с Комиссией по
Регулированию (ЕС) № 65/2014 подкрепленное Директивой Европейского
Парламента и Совета 2010/30/EC и (ЕС) № 66/2014 подкрепленное
Директивой Европейского Парламента и Совета 2009/125/ЕС
Информация для бытовых духовых шкафов
Бренд
Модель
Тип духового шкафа
Масса прибора
Количество камер
Способ нагрева духового шкафа (электричество
или газ)
Объем духового шкафа
Потребление энергии (электроэнергии),
необходимое для нагрева стандартизированной
загрузки камеры электрического духового шкафа в
течение цикла в обычном режиме
Потребление энергии (электроэнергии),
необходимое для нагрева стандартизированной
загрузки камеры электрического духового шкафа в
течение цикла в режиме с турбовентилятором
Индекс энергоэффективности духового шкафа
Класс энергопотребления
Символ
M kg
V
EC
electriccavity
EC
electriccavity
EEI
cavity
SCHAUB LORENZ
SLB EB6617L / SLB EV6617L
Встроенный духовой шкаф
Значение Единица
1
Электричество
62
0,82
0,81
100
измерения
kWh/cycle
kWh/cycle
A
L
Согласно требованиям эко-дизайна была применена методика измерений и
вычислений в соответствии со стандартом EN60350-1
Page 30

Информация, указанная в таблице, дана в соответствии
30
с Комиссией по Регулированию (ЕС) № 65/2014
подкрепленное Директивой Европейского Парламента и
Совета 2010/30/EC и (ЕС) № 66/2014 подкрепленное
Директивой Европейского Парламента и Совета
2009/125/ЕС
Информация для бытовых духовых шкафов
Бренд SCHAUB LORENZ
Модель SLB EB6618L
Тип духового шкафа Встроенный духовой шкаф
Масса прибора
Количество камер
Способ нагрева духового шкафа (электричество
или газ)
Объем духового шкафа
Потребление энергии (электроэнергии),
необходимое для нагрева стандартизированной
загрузки камеры электрического духового шкафа в
течение цикла в обычном режиме
Потребление энергии (электроэнергии),
необходимое для нагрева стандартизированной
загрузки камеры электрического духового шкафа в
течение цикла в режиме с турбовентилятором
Индекс энергоэффективности духового шкафа
Класс энергопотребления
Символ
M
V
66
EC
electriccavity
EC
electriccavity
EEI
cavity
Значение Единица
1
Электричество
0,85 kWh/cycle
0,84 kWh/cycle
101,2
измерения
A
kg
L
Согласно требованиям эко-дизайна была применена
методика измерений и вычислений в соответствии со
стандартом EN60350-1
АКСЕССУАРЫ
Предоставленные
принадлежности могут быть разными в
зависимости от модели продукции. Ваша продукция может не
включать все принадлежности, описанные в руководстве.
Противень
Можно использовать для
кондитерской выпечки,
разогрева холодной еды,
приготовления больших
порций, а также сбора
стекающего с жаркого жира.
Решетка
Используется для жаркого,
подогрева и приготовления еды
или расположения
поджариваемой еды на
желаемый уровень
Page 31

Глубокий противень
31
Можно использовать для кондитерской
выпечки, приготовления жидкой едыи
больших порций, а также сбора стекающего
с жаркого жира.
ВАЖНАЯ ИНФОРМАЦИЯ О БЕЗОПАСНОСТИ
Данный раздел, который поможет предотвратить опасность получения личного вреда
или вреда имуществу, включен в инструкцию по технике безопасности. Несоблюдение
этой инструкции может лишить законной силы любую гарантию, поскольку компания не
несет ответственности за причиненные убытки.
Общая безопасность
Настоящая духовка не приспособлена для использования людьми (включая детей) с
ограниченными физическими, сенсорными или умственными способностями, или
людьми без опыта и знания, если они не находятся под наблюдением или им не
предоставлены инструкции по использованию духовки лицом, ответственным за их
безопасность.
Дети должны находиться под контролем, чтобы быть уверенным, что они не играют
с духовкой.
Духовка предназначена только для домашнего пользования. Не допускается его
коммерческое использование. Она не может быть использована для любых других
целей, за исключением приготовления еды и подогревания. Использование с любой
другой целью (например, отопление комнаты, сушка одежды или полотенца на
ручке), является опасным и неуместным. При неуместном, ненадлежащем или
неадекватном пользовании духового шкафа, то в результате использования под
воздействием окружающей среды или других материалов он может получить
повреждения, за которые компания не несет ответственности.
Перед использованием продукции убедитесь в удалении всех упаковочных
материалов.
Page 32

При первом использовании духового шкафа изоляционные материалы и нагревательные
32
элементы выделяют запах гари. Поэтому при первом включении духового шкафа не
кладите еду. Сначала включите и ждите до тех пор, пока не исчезнет запах, затем
приступайте к приготовлению. Прочистите духовой шкаф изнутри влажной мягкой
тряпкой.
В рабочем состоянии духовка может быть горячей. Не прикасайтесь к горелкам,
внутренним секциям духового шкафа, нагревательным элементам и т.д. Не подпускайте
детей к духовке!
Поверхность функции гриля может очень накалиться, будьте осторожны.
Всегда пользуйтесь теплозащитными перчатками, когда кладете блюда в духовой шкаф
или вынимаете их оттуда.
Всегда пользуйтесь теплозащитными перчатками, когда кладете блюда в духовой шкаф
или вынимаете их оттуда.
Ни в коем случае не готовьте или не жарьте на основании духового шкафа.
Не кладите противни, листы духового шкафа прямо на дно духового шкафа или не
оборачивайте их в алюминиевую фольгу. Иначе накопленное тепло может повредить
основанию духового шкафа, и может возникнуть взрывоопасная ситуация.
При передвижении продукции, чистке или техническом осмотре духового шкафа
отключите электропитание.
Не пытайтесь вынимать вилку из розетки, дергая за шнур.
Не прикасайтесь к духовке, когда она мокрая или влажная.
Если духовка не работает или сломана, отключите ее, выньте из розетки и отдайте на
ремонт.
Не производите ремонт, обслуживание или не вносите изменения в изделие. Можно
устранить лишь некоторые неполадки (См. Устранение неполадок до обращения в
авторизованный сервисный центр)
Техническое обслуживание и ремонт должны производиться только сервисным
обслуживанием фирмы-изготовителя, а также нужно использовать только запасные
части от изготовителя.
Если Вы не пользуетесь духовым шкафом, поставьте все ее функции в режим “Выкл.”
Чистка духового шкафа и соблюдение техники безопасности позволяют сохранить
духовой шкаф в хорошем состоянии. Оставление отходов в духовом шкафу после
использования со временем может повредить поверхность духового шкафа.
Установите повсюду вентиляционные каналы.
Не используйте духовой шкаф с разбитым стеклом передней двери.
Page 33

Задняя поверхность духового шкафа в рабочем состоянии нагревается. Газовая/
33
электрическая связь не должна соприкасаться с задней поверхностью; иначе сетевой
кабель может получить повреждение.
Не пользуйтесь духовым шкафом при приеме наркотиков и/или алкоголя, которые
негативно сказываются на мышлении.
Будьте осторожны при приготовлении еды с применением алкогольных напитков. При
высоких температурах алкоголь испаряется и может вызвать пожар, поскольку при
соприкосновении с горячей поверхностью духового шкафа может вызвать
воспламенение.
ПРЕДУПРЕЖДЕНИЕ: Духовка предназначена только для приготовления пищи.
Ее нельзя использовать для других целей, например, разогрева комнаты.
Обеспечение безопасности детей
Эта духовка предназначена для пользования взрослыми и детьми под присмотром. Не
позволяйте маленьким детям трогать элементы управления или играть близко
от духового шкафа или с духовым шкафом.
Доступные элементы духового шкафа могут нагреваться в рабочем состоянии. Не
подпускайте детей к духовке, до тех пор пока он не охладится.
Не оставляйте упаковочные материалы (пластиковые пленки, растянутый
полистирол и др.) в доступных для детей местах, поскольку это опасно.
Не вешайте на открытую дверь духового шкафа тяжелые предметы и не
позволяйте детям сидеть на них. Она может перевернуться или дверные петли
могут сломаться.
ПРЕДОСТЕРЕЖЕНИЕ: При использовании гриля открытые детали могут
нагреться. Не подпускайте детей к духовому шкафу.
ВАЖНО: Если Вы решили больше не использовать духовой шкаф, следует
привести ее в нерабочее состояние путем обрезания питающего кабеля после
отсоединения ее от источника электропитания. Неиспользуемые приборы
представляют угрозу для безопасности детей, поскольку дети часто играют с
ними. С этой целью рекомендуется сделать духовку безопасной.
Соблюдение безопасности при осуществлении работ, связанных с
электричеством
Любое действие, произведенное компетентными и квалифицированными лицами над
электрическим оборудованием и системами.
Выключите духовку и отсоедините источник электропитания в случае любого
повреждения. Для этого выключите предохранитель.
Убедитесь в том, что сила тока предохранителя соответствует силе тока продукции.
Page 34

УСТАНОВКА ИЗДЕЛИЯ
34
Установка должна быть выполнена компетентным квалифицированным специалистом
в соответствии с инструкциями. Производитель не несет ответственности за любой
ущерб, причиненный людям, животным или предметам в результате неправильной
установки.
ЭКОЛОГИЧЕСКОЕ ПРЕДУПРЕЖДЕНИЕ: После установки духовки по правилам
техники безопасности и в целях охраны окружающей среды необходимо выбросить
упаковочные материалы в соответствии с правилами
об утилизации отходов упаковочных материалов (фольга, картон, стироловый
пенопласт и пр.). Перед утилизацией продукции отрежьте кабель электропитания,
чтобы он не мог служить источником опасности для детей.
Инструкции по Установке
При установке духового шкафа его соединяют в соответствии с местными
электрическими нормами.
Духовой шкаф предназначен для установки на кухне. Он может быть установлен
под столешницу либо в высокий шкаф на уровне глаз. Выделите пространство на
кухне, как показано на рисунке (См. Рисунок 1 и Рисунок 2).
Убедитесь, что под духовым шкафом достаточно поддержки, чтобы выдержать его
вес.
Стенки монтированного духового шкафа должны быть теплостойкими. В
частности, боковые стенки должны быть изготовлены из фибролитового
покрытия. Покрытие должно быть устойчиво к температуре 100 °С. Его нельзя
изготавливать из теплостойких синтетических ламинатов и вязких материалов,
поскольку пластмассы или вязкие материалы могут быть повреждены. Настоящая
информация служит только для создания инструкции, а фактическое
сопротивление повышению температуры зависит от размеров кухонного
оборудования и качества полировки поверхности.
Определенное кухонное оборудование с полированной поверхностью (например,
виниловой) особенно чувствительно при низких температурах с цветовым
повреждением над вышеуказанными температурами.
Ответственность за установку прибора с нарушением правил по безопасности или
размещение кабельных материалов на расстоянии 5 мм от прибора лежит на
владельце.
Нельзя давить, загибать и зажимать шнур питания или следует избегать его
соприкосновения с горячими частями духовки. После установки штепсельная
вилка должна находиться в легкодоступном месте.
Расстояние между стенами кухни и оборудованием должно быть безопасным.
Правильная установка должна обеспечивать надлежащую защиту от
электрических контактов или изоляцию от рабочих деталей.
Page 35

Все изоляционные и обеспечивающие безопасность части должны быть плотно
35
зафиксированы при помощи инструментов.
Для эффективной циркуляции воздуха духовка должна быть прилажена
согласно нижеприведенным размерам (См. Рисунок 1 и Рисунок 2).
Если встроенный духовой шкаф установлен ниже конфорки, расстояние должно
быть не менее 50 мм.
Необходимо удалить заднюю панель монтажного шкафа с целью свободной
циркуляции воздуха. Панель, в которую вставляется духовка, должна иметь зазор в
задней части в размере, по меньшей мере, 75 мм (См. Рисунок 3)
Не рекомендуется устанавливать прибор рядом с холодильными установками
или морозильными аппаратами, так как тепло может вывести их из строя.
Рисунок 1
Рисунок 2
Page 36

Рисунок 3
36
Установка духовки в шкаф
При установке духового шкафа соблюдайте симметрию, выровняйте его по
центру и установите заподлицо со шкафом.
Предпочтительно установить духовку на высоте шкафа или ниже уровня
раковины.
Откройте дверь и закрепите духовой шкаф к панели кухонного шкафа
четырьмя крепежными винтами, чтобы они совпадали с отверстиями,
предусмотренными по обеим сторонам крепежной рамы (А) (См. Рисунок
4).
При соединении духового шкафа к системе электроснабжения на
монтажной панели, для удобства установки необходимо отдельно
соединить ее электрическими кабелями. Убедитесь, что соединение
произведено без повреждений.
Рисунок 4
Page 37

ЭЛЕКТРИЧЕСКОЕ СОЕДИНЕНИЕ
37
Все электрические соединения выполняются только квалифицированным
электриком в соответствии с действующими нормами и правилами. Соединение
должно отвечать национальным стандартам.
Перед электрическим соединением духового шкафа
Духовка должна быть подсоединена к центральной линии электропитания в
соответствии с действующими законами и правилами квалифицированным
электриком.
Духовой шкаф должен быть подсоединен электриком, имеющим официальное
разрешение, в соответствии с действующими правилами. Производитель не
несет ответственности за любой ущерб людям, животным или имуществу по
причине неправильного электрического соединения.
Величина тока для обеспечения нормальной работы духового шкафа должна
быть не менее 16А.
Если величина тока меньше 16А, необходимо вызвать компетентного
электрика для замены амперметра.
Соединение должно отвечать национальным стандартам.
Заземленная вилка подсоединяется к электрическому шнуру духового шкафа.
Линия должна быть заземлена. Установку должен производить
квалифицированный электрик.
ПРЕДУПРЕЖДЕНИЕ: Оборудование должно быть заземлено.
При отсутствии на духовом шкафе электрического кабеля его установку
осуществляет компетентный электрик с соблюдением нижеприведенных
параметров.
Напряжение
220-240B ~ 50 Hz
Тип кабеля
H05 VV – F
Таблица 1
Размер
сечения
3 x 1,5 мм2
Ток
(в Амперах)
Не менее 16A
Page 38

Схема соединения электрического кабеля:
38
Желтый/зеленый заземленный кабель соединяется к терминалу .
Голубой нейтральный провод соединяется к терминалу ’’N’’
Черный, коричневый или красный кабель соединяется с концом, помеченным
буквой ’’L’’ (См. Рисунок 5)
Рисунок 5
Духовой шкаф должен быть установлен так, чтобы обеспечить свободный доступ
к розетке.
Не допускать контакта электрического кабеля с нагретыми поверхностями.
При повреждении электрического кабеля обратитесь в сервисную службу или см.
Таблицу 1, и замените поврежденный кабель оригинальным кабелем с
параметрами, указанными в таблице.
Если духовой шкаф подсоединен прямо к электроприбору, то он должен быть
установлен между двумя полюсами предохранителя, а заземленный кабель не
должен быть отсоединен двухполюсным предохранителем.
Не рекомендуется использование адаптеров, комплексных розеток или
удлинителей. По правилам безопасности требуется использование адаптера или
удлинителя. Однако, сила тока адаптера не должна превышать максимальной
удельной силы тока.
После завершения соединения проверьте нагревательные элементы духового
шкафа в течение 3 минут.
Электрическая безопасность духового шкафа может быть гарантирована при
правильном соединении к заземленному источнику питания, предусмотренному в
правилах техники безопасности. Производитель не несет ответственности за
поломку по причине отсутствия заземления.
Page 39

ПЕРВОЕ ИСПОЛЬЗОВАНИЕ ДУХОВОГО ШКАФА
39
Вытащите все противни и решетки духового шкафа.
Установите максимальный уровень режима «Настройка температуры».
Установите переключатель на Верхний и Нижний режимы обогрева (а также
+FAN, если имеется в наличии).
Оставьте духовой шкаф в этом состоянии на 30 минут.
За это время подогреваются все элементам духового шкафа и теплоизоляционные
материалы, может появиться запах гари. В случае повторного выделения запаха
гари, перед приготовлением пищи в духовом шкафу тщательно проветрите его.
Повторите операцию с решеткой.
При выполнении этих операций рекомендуется протереть духовой шкаф изнутри
влажной, а затем сухой мягкой тряпкой.
ПРЕДУПРЕЖДЕНИЕ: Перед первым использованием тщательно вымойте
принадлежности духового шкафа, например противень и решетку.
ВАЖНО: Открывая дверцу духового шкафа, всегда беритесь за
центральную часть ручки. (См. Рисунок 6)
Рисунок 6
СОВЕТЫ ПО ЭКОНОМИИ ЭЛЕКТРОЭНЕРГИИ
Нижеследующие советы помогут Вам использовать вашу духовку экологически
безопасным способом и с экономией электроэнергии.
В духовом шкафу для лучшей передачи тепла используется эмалированная
кухонная утварь темного цвета.
Page 40

При частом открытии дверцы духового шкафа во время приготовления пищи
40
поступающий внутрь воздух приводит к потере электроэнергии. Поэтому не
рекомендуется часто открывать дверцу духового шкафа.
Тепло, оставшееся в духовом шкафу после процесса приготовления пищи,
можно использовать для приготовления очередного блюда.
Перед каждым приготовлением пищи на предварительный прогрев духового
шкафа требуется не менее 10 минут.
Замороженные продукты питания необходимо разморозить перед
приготовлением пищи.
Отключить духовой шкаф за несколько минут до конца приготовления пищи.
ОПИСАНИЕ ДУХОВОГО ШКАФА
Духовые шкафы с механическим таймером
1. Функциональная сигнальная лампочка
2. Ручка выбора режима
3. Ручка управления таймера
4. Ручка регулировки температуры
5. Температурная сигнальная лампа
6. Панель управления
7. Нагреватели
8. Внутренняя осветительная лампа
9. Табличка с паспортными данными
10.Внутреннее стекло дверцы духового шкафа
11.Дверца духового шкафа
12.Турбовентилятор
Page 41

ИСПОЛЬЗОВАНИЕ ДУХОВОГО ШКАФА
41
Перед использованием духового шкафа следует настроить электронный или
механический таймер. Иначе, духовка не будет работать. (См. Виды таймеров
духового шкафа).
КНОПКА РЕГУЛИРОВАНИЯ ТЕМПЕРАТУРЫ
При эксплуатации духовки температура приготовления еды может быт установлена
от 50 ºС до максимального уровня. Достаточно установить духовку на функцию
Мах. Максимальная температура составляет 285 ± 15 ° C. (См. Рисунок 7). Эта
особенность и принцип работы может отличаться в зависимости от модели
выбранной духовки.
Рисунок 7
ТЕМПЕРАТУРНАЯ СИГНАЛЬНАЯ ЛАМПОЧКА
Температурная сигнальная лампочка зажигается после настройки
внутренней температуры духовки на требуемый уровень и горит до
достижения этой температуры. Температурная сигнальная лампочка
выключается по достижении заданной температуры. При снижении
температуры температурная сигнальная лампочка вновь зажигается
и горит по достижении вновь заданной температуры. Эта
особенность и принцип работы может отличаться в зависимости от
модели выбранной духовки.
РУЧКА ВЫБОРА ФУНКЦИИ
Устанавливает режим работы духовки. Функции духовки и принцип работы могут
отличаться в зависимости от модели выбранной духовки. (См. Рисунок 8)
Page 42

Рисунок 8
42
ФУНКЦИОНАЛЬНАЯ СИГНАЛЬНАЯ ЛАМПОЧКА
Функциональная сигнальная лампочка зажигается при настройке ручки выбора
режима на любую функцию и выключается при установлении исходного
положения «0». Эта особенность и принцип работы могут отличаться в
зависимости от модели выбранной духовки.
Таблица функций
Ниже приведены функции, указанные на вашей духовке и максимальные и
минимальные температуры их настроек.
Предупреждение: Все функции включаются после регулирования
режима «Настройка температуры» на требуемый уровень. Очередность
указанных в таблице режимов работы может отличаться от порядка их
расположения в Вашей продукции.
OFF: Духовка приведена в нерабочий режим. Для отключения духовки
O
установите все переключатели в данное исходное положение.
Размораживание: Включается только турбовентилятор.
Данная функция предназначена для размораживания путем
создания вокруг замороженной пищи комнатной
температуры с сохранением качества пищи, а также для
охлаждения горячей еды.
Нижний нагреватель (Подогрев снизу): Включается
только нижний нагреватель. Данная функция
предназначена для блюд, которые необходимо
поджаривать снизу, для подогрева пищи, для еды, которая,
как и при приготовлении в глиняном горшке, готовится при
50-200 ºС
низкой температуре в течение длительного времени, а также
для еды, которую необходимо подрумянить снизу.
Page 43

Верхний нагреватель (Подогрев сверху): Включается только
43
верхний нагреватель. Данная функция предназначена для
разогрева ранее приготовленной еды, а также для еды, которую
необходимо подрумянить сверху.
50-200 ºС
Верхний и Нижний нагреватели (Статическое
приготовление): Одновременно включаются верхний и
нижний нагреватели. Данная функция предназначена для
приготовления кексов, пирогов и кексов, готовящихся в
формочках, еды, кушанья, приготовляемого в глиняном
50-200 ºС
горшке). Рекомендуется готовить только противне.
Верхний и нижний нагреватели+ Вентилятор
(Конвективный подогрев):
Одновременно включаются верхний и нижний нагреватели и
вентилятор. Горячий воздух, нагретый верхним и нижним
нагревателями, с помощью вентилятора равномерно и быстро
50-200 ºС
распределяется в духовке. Данная функция предназначена для
приготовления кексов, пирогов и тортов. Рекомендуется
использование одного противня.
Гриль: Включается только гриль-нагреватель. Данная функция
предназначена для обжаривания больших и средних порций
мяса, а также разных видов рыб, пригодных для приготовления
на рашпере, которые помещают на верхний уровень. Для того,
max ºС
чтобы капли жира не испачкали духовку на нижний уровень
помещают противень, в который наливают 1-2 стакана воды.
ТАЙМЕРЫ ДУХОВОГО ШКАФА
Отличаются в зависимости от выбранной модели духовки.
МЕХАНИЧЕСКИЙ МИНУТНЫЙ ТАЙМЕР:
Поворачивая минутный таймер по часовой стрелке можно регулировать
время до 90 минут (См. Рисунок 9). Таймер будет работать в течение
установленного времени, а по его истечении автоматически отключается.
После помещения блюда в духовку, настройте температуру и необходимую
функцию приготовления с помощью ручки управления и поверните ручку
минутного таймера на требуемую позицию. По истечении установленного
времени, раздается звонок, и духовка самостоятельно отключается.
Вследствие ограниченности периода времени, время работы духовки
может быть настроено на не более, чем 90 минут. Для длительного
приготовления устанавливайте время вручную. Для ручной
регулировки выровняйте минутный таймер до отметки , повернув его
против часовой стрелки. При ручной установке для прекращения
приготовления в любое время, по часовой стрелке поверните таймер с
отметки к отметке «0».
Page 44

Рисунок 9
44
РАБОТА ОХЛАЖДАЮЩЕГО ВЕНТИЛЯТОРА
Охлаждающий вентилятор обеспечивает систему вентиляции,
предотвращающую перегрев внешней поверхности встроенного духового
шкафа и причинение вреда окружающим. Этот вентилятор создает поток
воздуха, способствующий выбросу наружу горячего воздуха сквозь
передние решетки (отверстия для вентиляции). Одновременно создавая
воздушную завесу между панелью управления и крышкой, препятствует
перегреву этих двух частей духовки, а также расположенных на них
компонентов. Циркуляция воздуха, осуществляемая охлаждающим
вентилятором, предотвращает образование конденсации вследствие тепла
и влаги в электрических и механических компонентах, тем самым
обеспечивая их надежность и продолжительность срока службы (См.
Рисунок 10).
Принцип работы охлаждающего вентилятора может изменяться в
зависимости от модели изделия. В вашем изделии обязательно
присутствует один из нижеприведенных принципов работы:
Когда духовка приступает к работе. охлаждающий вентилятор
автоматически включается. По завершении работы духовки, она тоже
отключается.
В некоторых моделях охлаждающий вентилятор включается и
выключается вместе с термостатом, имеющимся в духовке. В этом случае,
поскольку работа охлаждающего вентилятора неразрывно связана с
теплотой, даже после отключения духовки она продолжает работать в
течение определенного периода времени, затем автоматически
отключается.
Page 45

Рисунок 10
45
СОВЕТЫ ПО ПРИГОТОВЛЕНИЮ
Поскольку после приготовления из духовки может выйти пар, открывая крышку
духовки, стойте поодаль. Выделяющийся пар может обжечь руки, лицо и/или
глаза.
Советы по приготовлению в духовке
Используйте не прилипающие, подходящие металлические тарелки, либо
алюминиевую посуду, либо жаростойкие силиконовые формы.
При приготовлении блюда в духовке, поместите форму для приготовления на
середину уровня духовки.
До включения духовки или гриля выберите правильный уровень в духовке. Не
меняйте уровень, когда духовка нагрета.
Держите дверцу духовки закрытой
Советы по приготовлению гриля
Приправка курицы, индюшки и больших порций мяса до обжаривания лимоном
и чёрным перцем повышает качество приготовления.
По окончании времени приготовления оставьте мясо в духовке на 10 минут.
Сок мяса хорошо впитывается в поджаренное мясо и при резке мяса не
проступает.
Нужно положить рыбу в жаростойкую форму на нижний или средний уровень
духовки.
Куски для приготовления гриля равномерно распределите на решетке или на
решетке с поддоном так, чтобы они не соприкасались с нагревателем.
Page 46

Если вы готовите гриль в решетке, под нее поместите противень для сбора
46
жира. Налейте в противень немного воды, а по завершении приготовления
тщательно отмойте ее.
Блюда, не годные для приготовления на решетке, являются огнеопасными. Не
помещайте пищу в заднюю часть решетки. Это самая горячая зона, и жирная
пища может загореться.
ПРАКТИЧЕСКИЕ СОВЕТЫ
Указанные значения установлены в лабораторных условиях. Удобные для вас
значения, могут отличаться от данных значений.
БЛЮДО
Кекс на
противне
Кекс в
формочках
Кекс в
кальке
Пандиспан
ия
Курабье
(печенье)
Сладкий
пирог
Слоеный
пирог
Дрожжево
е тесто
ФУНКЦИЯ
УРОВЕНЬ
ДУХОВКИ
3 175
2 175
3 175
ТЕМПЕРАТУРА
(°C)
25-30
40-50
25-30
3 200 5-10
3 175
2 190
20-30
30-40
2 180 25-35
2 180
35-45
ВРЕМЯ
ПРИГОТОВЛЕНИЯ
(мин)
(Приблизительное время)
Page 47

Лазанья 2-3 190 30-40
Макароны
в духовке
Бифштекс
2 180-200 30-45
25 sec.
3
250/max. after
100-120
190
Рыба
Филе из
говядины
Котлета,
жаренная
на рашпере
1000 гр.
Курицы
500 гр.
мяса
При приготовлении с использованием одновременно двух противней
поместите глубокий противень на верхний уровень, а обычный противень
на нижний уровень. Рекомендуется предварительно разогревать духовку
при приготовлении любых блюд.
3 200 20
3 190-200 6-8
3 190
-200 8-10
1-3 170-190 20-30
3 60
3 60-90
ПРОБЛЕМА ПРИЧИНА УСТРАНЕНИЕ
Верхняя часть пищи
более румяная, чем
нижняя
Нижняя часть пищи
более румяная, чем
верхняя
Снаружи хорошо
пропечен, а внутри
сырой
Поверхность пищи
сухая
Уровень температуры в
нижней части низкий
Уровень температуры в
верхней части низкий
Очень высокая
температура
Низкая температура Неправильная температура
Возможно, выбран неправильный
уровень. Поместите противень на
низкий уровень
Возможно, выбран неправильный
уровень, Поместите противень на
верхний уровень
Неправильная температура
приготовления.
Уменьшите температуру
приготовления.
Увеличьте температуру
-30
-90
Page 48

48
ТОНКОСТИ КУЛИНАРИИ
Тонкости приготовления кексов
Если кекс очень сухой, увеличьте температуры до 10 ºС и уменьшите время
приготовления.
Если кекс влажный, то обычно добавляйте воду в малых количествах или
уменьшите температуру до 10 ºС
Если поверхность кекса подгорела, положите ее на более низкий уровень,
уменьшите температуру и увеличьте время приготовления
Если внутренняя часть кекса хорошо поджарилась, а поверхность липкая,
добавляйте воду в малых количествах, уменьшите температуру и увеличьте
время приготовления
Тонкости приготовления слоеного пирога
Если пирожок очень сухой, увеличьте температуры до 10 ºС и
уменьшите время приготовления. Намажьте тонкий лаваш смесью,
приготовленной из молока, масла, яиц и йогурта.
Если слоеный пирог долго готовится, постарайтесь, чтобы пирог не
вываливался из противня из-за чрезмерной толщины.
Если поверхность пирога разрумянилась, а нижняя часть
недопеченная, постарайтесь, чтобы в нижней части смесь была
распределена равномерно и в небольшом количестве.
Готовьте пирог, установив соответствующую функцию и температуру.
Если нижняя часть снова недопекается, в другой раз поместите ее на
нижний уровень.
Тонкости приготовления овощного блюда
Если жидкость овощного блюда заканчивается, и она становится сухой,
вместо противня используйте жаростойкую кастрюлю с крышкой.
Если овощное блюдо недоваривается, сначала отварите овощи или
законсервируйте их, только потом положите в духовку.
УХОД И ОБСЛУЖИВАНИЕ
ОБЩАЯ ЧИСТОТА
После каждого использования теплую духовку следует вытереть легкой
влажной намыленной тряпкой, нельзя оставлять в духовке остатки пищи и
жира. Потому, что эти остатки могут привести к коррозии внешней и
внутренней поверхности.
Всегда вынимайте вилку из розетки или отсоединяйте духовку от сети
электропитания, отключив кнопку выключателя духовки перед началом
какой-либо операции по чистке.
До проведения чистки подождите, чтобы духовка остыла
Нержавеющие стальные поверхности мойте специальными чистящими
спреями или средствами для нержавеющей стали, имеющимися в
продаже.
При чистке изделия следует проверять, чтобы применяемые чистящие
средства не содержали частиц, которые могут поцарапать эмалированные
или покрытые краской поверхности.
При чистке панели управления и кнопок не используйте жидкие чистящие
средства, содержащие абразивов, и абразивные губки, которые могут
привести к истиранию надписей.
Page 49

При чистке дверцы и стекла дверцы не используйте твердые
49
абразивные чистящие средства, металлические скребки, сетчатки
для посуды, или грязную воду, которые могут поцарапать
поверхность.
Не оставляйте коррозийные и кислотные пятна (такие как лимонная
вода, уксус и др.) на эмалированных, окрашенных поверхностях и
поверхностях из нержавеющей стали.
Никогда не используйте паровые чистящие агрегаты для чистки
изделия.
КАТАЛИТИЧЕСКАЯ СТЕНКА *
Каталитическая стенка покрыта специальной эмалью, которая способна
собирать жир внутри духовки, образующийся в процессе приготовления.
Нельзя чистить каталитическую стенку. Пористая поверхность
самостоятельно очищается под воздействием пара и углекислого газа.
При чистке нельзя:
Выскребать эмаль режущими предметами (например,
ножом)
Использовать порошок или абразивные средства
* Дополнительное свойство
ВНЕШНЕЕ СТЕКЛО ДУХОВКИ
Всегда протирайте внешнее стекло влажной мягкой губкой и
тряпкой, пока духовка холодная, и тщательно высушите ее.
Избегайте использования абразивных средств.
ВНУТРЕННЕ СТЕКЛО ДУХОВКИ
Всегда протирайте внутренне стекло дверцы влажной мягкой
губкой и тряпкой, и тщательно высушите ее.
Избегайте использования абразивных средств.
Внутренняя дверца с цельным стеклом: внутренняя дверца, состоящая
из цельного стекла с гладкой поверхностью протирается мягкой влажной
губкой и тряпкой, затем высушивается (См. Рисунок 11).
Рисунок 11
Page 50

Как показано на рисунке, когда дверца открыта:
50
1. Потяните стекло со стороны внутренней дверцы к себе
2. После снятия стекла с нижних зубцов, поднимая стекло кверху,
позаботьтесь о том, чтобы стекло можно было вернуть в исходное
положение.
3. Выньте стекло.
После выполнения чистки в обратном порядке сначала помещают
стеклянную дверцу с внешней стороны в паз. Затем, после размещения
стекла в пазу, монтируются пружины стекла. После того, как стекло
вставляется в нижний зазор, она отпускается в свой паз и занимает сове
место.
ГЕРМЕТИЗАЦИЯ ДУХОВКИ
Уплотнитель духовки необходимая атрибут, обеспечивающий
производительность духовки. (См. Рисунок 12).
Рисунок 12
При использовании со временем уплотнитель может загрязняться. В этом
случае ее можно почистить влажной тряпкой. Нельзя чистить уплотнитель
разъедающими и абразивными чистящими средствами. В случае, если
уплотнитель изнашивается или разрывается нужно обратиться в
компетентный сервисный центр.
БОКОВЫЕ РЕШЕТЧАТЫЕ УРОВНИ *
Решетчатые уровни, куда вставляются противни и решетки, можно легко
снять и почистить. Как видно из рисунка, согнув вниз край, который давит
на специальные болты, можно высвободить решетчатые уровни из паза
болтов. Затем потянув их на себя и подняв кверху, можно высвободить из
верхних зубцов. После очистительных работ, уровни вставляются в обратном
порядке: сначала уровни вдеваются в верхние зубцы, затем, помещаются в паз
болта, прогибая лопасти, давящие на специальные болты. (См. Рисунок 13).
Page 51

Рисунок 13
51
* Имеется лишь в некоторых моделях
УСТАНОВКА СКОЛЬЗЯЩИХ УРОВНЕЙ*
* Дополнительное свойство
ЗАМЕНА ЛАМПЫ ДУХОВКИ
Перед началом данной операции, убедитесь в том, что электропитание
отключено
Лампочка духовки должна обладать следующими свойствами:
Высокая теплостойкость – до 300 ºС
Электрические параметры: 220-240 B ~ 50 Hz
Напряжение: 15 BT
Замена лампы внутреннего освещения духовки должна быть выполнена
как показано на Рисунке 14.
Снимите стеклянную защитную крышку (А), повернув ее в против
часовой стрелки.
Выкрутите лампочку, повернув ее в против часовой стрелки, или
потянув на себя. В зависимости от типа лампы.
Вставьте новую лампочку.
Установите на место внешнюю стеклянную защитную крышку.
Включите электричество
Page 52

ПРЕДОСТЕРЕЖЕНИЕ: с целью предотвращения получения
52
электрошока перед началом операции замены лампочки
убедитесь в том, что электричество отключено.
Рисунке 14
Примечание: положение и тип лампочки может отличаться от
показанной на рисунке.
ИНФОРМАЦИЯ О ТРАНСПОРТИРОВКЕ / ПЕРЕВОЗКЕ
Храните оригинальную упаковку. Осуществляйте перевозку в
оригинальной упаковке с соблюдением указанных на нем символов.
Если нет оригинальной упаковки, примите необходимые меры, чтобы не
повредить поверхность изделия, и не кладите на поверхность тяжелые
предметы.
При перевозке необходимо переносить/размещать изделие параллельно
поверхности земли таким образом, чтобы не перевернуть вверх дном.
Чтобы решетка и противень внутри духовки не повредили дверцу
духовки при перевозке, во внутреннюю часть дверцы духовки
необходимо положить картон на уровне этих противней. Также следует
обвязать духовку так, чтобы дверца была плотно закрытой.
Нельзя переносить/перемещать духовку, держась за дверцу или ручку
дверцы (См. Рисунок 15).
ВАЖНО: Нельзя переносить или вынимать из упаковки духовку,
держась ручку дверцы.
Рисунок 15
Page 53

УСТРАНЕНИЕ НЕПОЛАДОК ДО ОБРАЩЕНИЯ В АВТОРИЗОВАННЫЙ
53
СЕРВИСНЫЙ ЦЕНТР
Ни в коем случае не пытайтесь починить духовку сами. Ремонт прибора
необходимо проводить только в авторизованном сервисном центре.
До обращения в сервисный центр следует выполнить следующие
действия:
Духовка не нагревается
Возможно, не установлены кнопки настройки функции и/или
температуры. Настройте функцию или температуру с помощью кнопок
настройки функции и/или температуры.
В моделях с часами: возможно, не настроены часы. Настройте часы.
Не поступает электричество. Проверьте наличие электричества в
квартире, и предохранителей в коробке для предохранителей. При
необходимости вновь подключите или замените предохранители.
Духовка не работает
Возможно, вилка духовки не включена в (заземленную) розетку.
Проверьте, вдета ли вилка в розетку
Возможно, предохранитель поврежден, отключился, либо отсутствует
электричество. Проверьте наличие электричества в квартире, и
предохранителей в коробке для предохранителей. При необходимости
вновь подключите или замените предохранители.
Возможно, не настроены кнопки настройки функции и/или
температуры. Настройте функцию или температуру с помощью кнопок
настройки функции и/или температуры.
В моделях с часами: возможно, не настроены часы. Настройте часы.
Page 54

54
Внутренняя лампа освещения не горит.
Если есть электричество, а лампа не горит, возможно, лампа выгорела.
Замените лампу духовки.
Приготовление (Верхняя/Нижняя секция не обогревает
равномерно)
Согласно инструкции по эксплуатации, снова
уровень, время приготовления и значения температуры.
При работе духовки, из духовки выделяется пар
При работе духовки выделение пара нормально. Это не является
поломкой.
При нагреве и остывании духовки, слышатся металлические
звуки.
При нагреве металлических предметов они могут издавать звуки
вследствие расширения. Это не является поломкой.
В случае, если вы не можете разрешить возникшую проблему, соблюдая
инструкции, приведенные в данном разделе, обратитесь в
авторизованный сервисный центр.
На изделии имеется символ (WEEE), показывающий, что остатки
электрического и электронного оборудования должны собираться
отдельно. Это означает, что их сбор согласно Директиве 2012/19/EU
требуется для утилизации и отделении их на составляющие с целью
снижения отрицательного воздействия оборудования на окружающую
среду. Для большей информации обращайтесь в местные и региональные
органы.
Электронная продукция, не подпадающая под процесс
систематизированной сборки отходов, из-за содержания вредных веществ
представляет собой потенциальный риск как для окружающей среды, так
и для здоровья людей.
проверьте используемый
Page 55

55
Page 56

Импортёр: ООО «ШМИТ КОМПАНИ» 109052, Москваг., Смирновская ул., дом.
№25, строение 12, помещение 07
Изготовитель: LANOVA EV GEREÇLERİ SANAYİ VE TİCARET A.Ş.
Şerifali Mah. Mevdudi Sok. No: 31 Ümraniye – İtanbul, Turkey
Дата изготовления: 08/2017
H600.0052.01.01
 Loading...