

Page 1
DE
EN
Bedienungsanleitung
User Manual
SB 610
Page 2

Page 3

DE | 3
DE
Vorwort
Vielen Dank, dass Sie sich für dieses Produkt entschieden haben. Bitte lesen Sie diese
Bedienungsanleitung sorgfältig, damit Sie in der Lage sind, die maximale Leistungsfähigkeit dessen
auszuschöpfen und die Sicherheit bei Installation, Verwendung und Wartung gewährleistet wird.
Bewahren Sie diese Bedienungsanleitung so auf, dass Sie sie immer griffbereit haben.
Unsere Hotline für technische Fragen: 0900/1000036
(Mo. – Do.: 8.00 – 16.30 Uhr | Fr.: 8.00 – 15.00 Uhr | 0,99 €/Min. aus dem deutschen Festnetz)
Bitte machen Sie von dieser Hotline Gebrauch, da technische Probleme meist hier schon behoben werden können, ohne dass Sie Ihr Gerät einsenden müssen.
Internet: www.karcher-products.de
E-Mail: service@karcher-products.de
Karcher AG | Gewerbestr. 19 | 75217 Birkenfeld
Page 4

4 | DE
Sicherheitshinweise
1. Bedienungsanleitung lesen – Lesen Sie die Bedienungsanleitung aufmerksam, um sich mit der
Bedienung des Gerätes vertraut zu machen.
2. Bedienungsanleitung aufbewahren – Bewahren Sie die Bedienungsanleitung sorgfältig auf.
3. Hinweise beachten – Beachten Sie alle Hinweise und Anweisungen in der Bedienungsanlei-
tung.
4. Wasser und Feuchtigkeit – Das Gerät darf nicht in der Nähe von Wasser (z. B. einer Badewanne, einem Waschbecken, einem Schwimmbecken, etc.) oder an feuchten Orten, bzw. in
tropischem Klima verwendet werden. Stellen Sie keine mit Flüssigkeiten befüllten Objekte oder
Gefäße (z. B. Vasen) auf das Gerät. Setzen Sie das Gerät weder Tropf- noch Spritzwasser aus.
5. Aufstellung – Das Gerät darf nur auf einer stabilen, ebenen Oberäche aufgestellt werden. Plat-
zieren Sie das Gerät so, dass es keinen Erschütterungen ausgesetzt werden kann.
6. Wandmontage – Eine Wand- oder Deckenmontage darf nur dann erfolgen, wenn das Gerät
dafür vorgesehen ist.
7. Belüftung – Stellen Sie das Gerät immer so auf, dass die Lüftungsöffnungen nicht blockiert oder
verdeckt (z. B. von einem Vorhang, einer Decke, einer Zeitung, etc.) werden. Das Gerät darf z.
B. nicht auf einem Bett, Sofa, Teppich, etc. aufgestellt werden. Für eine ausreichende Belüftung
sollte ein Freiraum von mindestens 5 cm um das Gerät herum eingehalten werden.
8. Hitze – Das Gerät darf nicht in die Nähe von Hitzequellen, wie z. B. einer Heizung, einem Herd
oder anderen Geräten gelangen.
9. Stromversorgung – Das Gerät darf nur mit der auf der Geräterückseite angegebenen Spannung betrieben werden.
10. Kabel & Stecker – Das Netzkabel und der Netzstecker müssen immer in einwandfreiem Zustand
sein. Der Netzstecker muss jederzeit erreichbar sein, um das Gerät vom Netz trennen zu können.
Sämtliche Kabel sollten immer so ausgelegt werden, dass diese keine Stolperfalle darstellen und
nicht beschädigt werden können. Stellen Sie keine Objekte auf Kabel. Wandsteckdosen, Verlängerungskabel und Mehrfachsteckerleisten dürfen niemals überbelegt werden.
11. Reinigung – Reinigen Sie das Gerät ausschließlich mit einem trockenen, weichen und sauberen
Tuch. Verwenden Sie niemals chemische Reinigungsmittel. Ziehen Sie vor dem Reinigen den
Netzstecker.
12. Nichtverwendung – Wenn Sie das Gerät für längere Zeit nicht verwenden, ziehen Sie den
Netzstecker.
13. Eintritt von Objekten oder Flüssigkeiten – Es dürfen keine Objekte in das Gehäuse des Gerätes gelangen. Das Gerät darf niemals in Kontakt mit irgendwelchen Flüssigkeiten gelangen.
14. Wann Sie eine Servicestelle aufsuchen sollten – Ziehen Sie umgehend den Netzstecker und
suchen Sie eine qualizierte Servicestelle auf, wenn einer der folgenden Ereignisse eintritt:
a) Wenn der Netzstecker oder das Netzkabel beschädigt ist.
b) Wenn Objekte in das Gehäuse eingedrungen sind oder das Gerät in Kontakt mit einer Flüs-
sigkeit war.
c) Wenn das Gerät nicht ordnungsgemäß funktioniert. Nehmen Sie selbst nur solche Einstel-
lungen vor, die in dieser Bedienungsanleitung erklärt werden.
d) Wenn das Gerät heruntergefallen ist oder in sonstiger Weise einer Erschütterung ausge-
setzt war.
15. Reparaturen – Reparaturen und Wartungsarbeiten dürfen nur von qualiziertem Fachpersonal
durchgeführt werden. Versuchen Sie niemals, das Gerät selbst zu reparieren. Öf fnen Sie niemals
das Gehäuse.
16. Offenes Feuer – Halten Sie das Gerät fern von offenem Feuer. Stellen Sie keine brennenden
Kerzen oder ähnliches auf das Gerät.
17. Gewitter – Während eines Gewitters sollten Sie den Netzstecker ziehen.
18. Sicherheitscheck – Nach einer Reparatur sollte der durchführende Techniker einen Sicherheits-
check des Gerätes vornehmen, um zu versichern, dass das Gerät einwandfrei funktioniert.
19. Batterien – Setzen Sie Batterien immer richtig gepolt in elektrische Geräte ein. Explosionsgefahr wenn Batterien falsch eingesetzt werden. Ersetzen Sie alte Batterien stets mit neuen des
gleichen Typs. Verwenden Sie alte und neue Batterien nie gleichzeitig. Alte Batterien gehören
nicht in den Hausmüll, sondern müssen separat in den dafür vorgesehenen Behältern entsorgt
Page 5
DE | 5
DE
werden. Batterien dürfen nicht übermäßiger Hitze, wie z. B. durch Sonnenschein, Feuer o. ä.
ausgesetzt werden.
20. Lautstärke – Um Hörschäden vorzubeugen, vermeiden Sie es, zu lange bei hohen Lautstärken
zu hören.
21. Kopfhörer (sofern anwendbar) – Eine zu hohe Lautstärke bei Verwendung von Ohr- oder Kopfhörern kann zu Hörschäden führen.
WARNUNG: Um die Gefahr eines
elektrischen Schlags zu verringern, öffnen
Sie niemals das Gehäuse dieses Gerätes.
Versuchen Sie niemals, das Gerät selbst
zu reparieren. Wartungsarbeiten und
Reparaturen dürfen ausschließlich von
qualiziertem Fachpersonal durchgeführt
werden.
VORSICHT
GEFAHR EINES ELEKTRO-
SCHOCKS
WARNUNG: Um das Risiko eines Feuers oder
elektrischen Schlags zu verringern, setzen Sie dieses
Gerät niemals Wasser, Regen oder Feuchtigkeit aus.
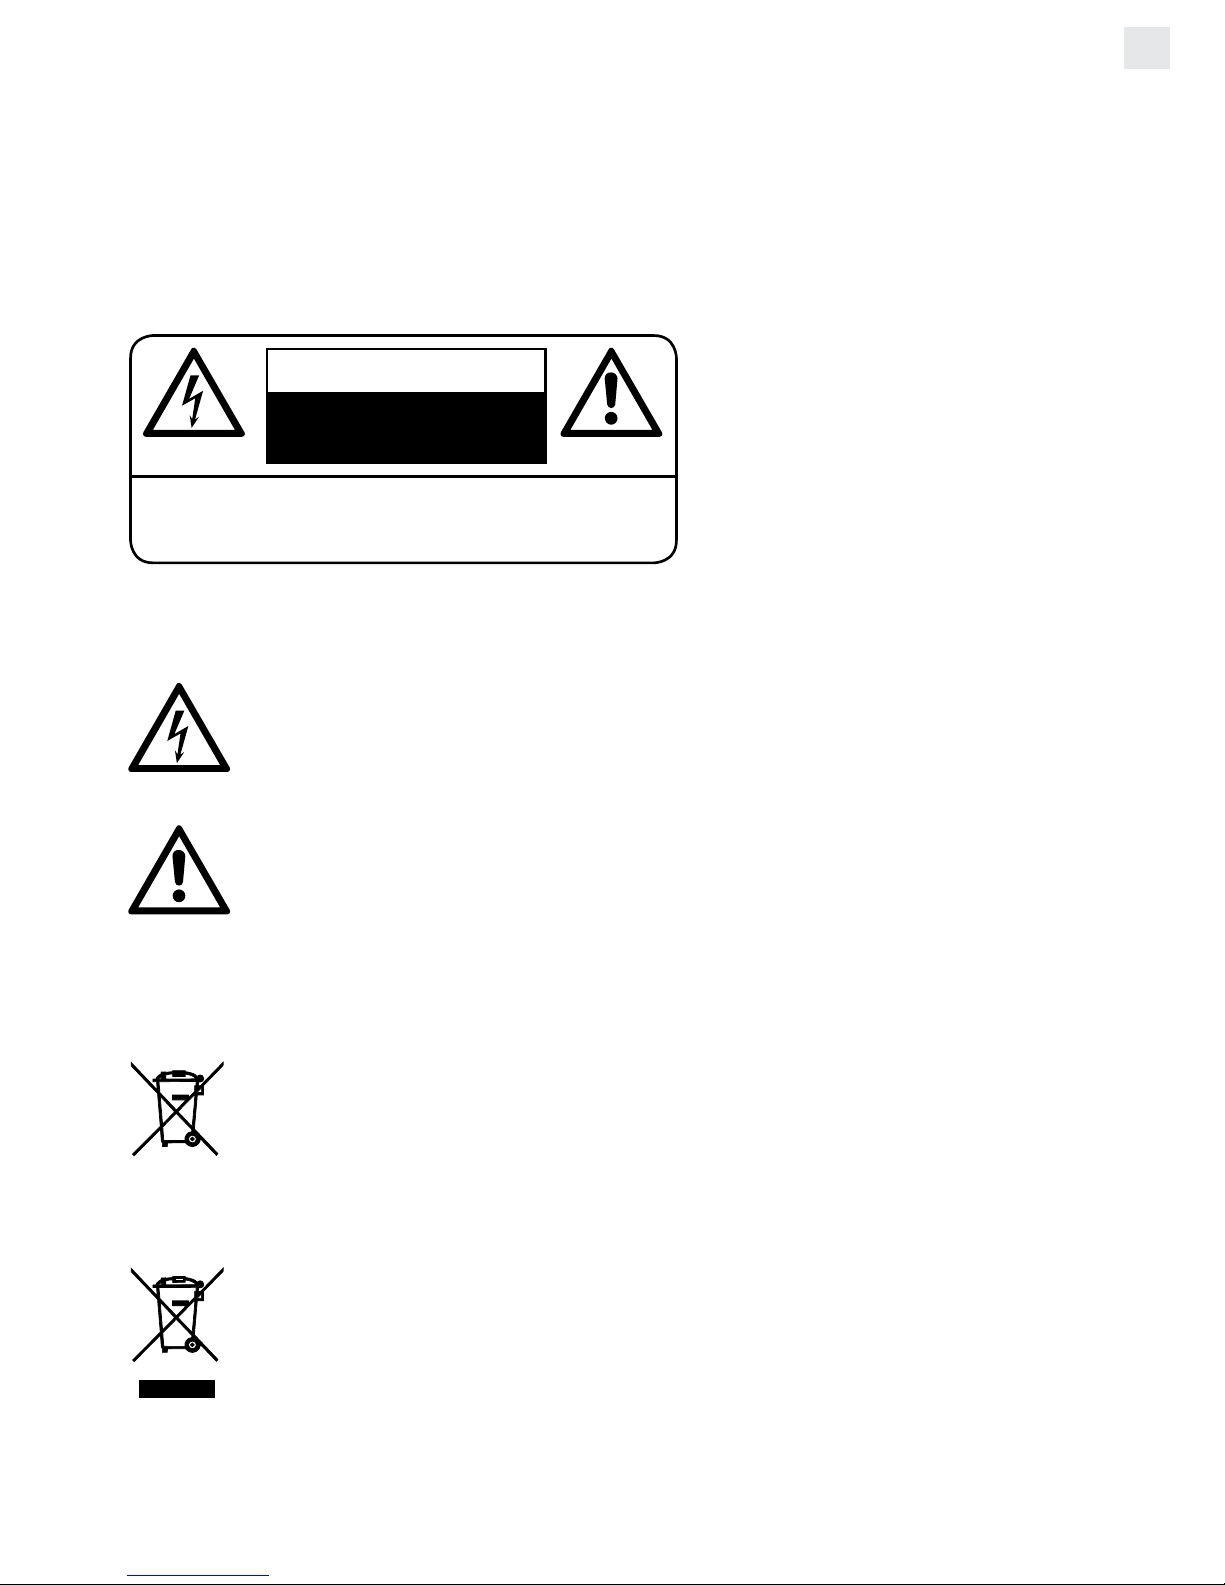
Dieses Symbol weist den Benutzer auf gefährliche Spannung innerhalb des Gerätes hin.
Es besteht die Gefahr eines elektrischen Schlags.
Dieses Symbol weist den Benutzer auf T eile hin, deren Funktion und W artung genauestens
beschrieben sind.
Batterien und Akkus
Batterien und Akkus dürfen nicht mit dem normalen Hausmüll entsorgt werden. Jeder Ver-
braucher ist verpichtet, alte Batterien und Akkus bei einer Sammelstelle seiner Gemeinde,
seines Stadtteils oder im Handel abzugeben, so dass sie einer umweltschonenden Entsorgung zugeführt werden können.
Entsorgung von Elektro- und Elektronikaltgeräten
Dieses Symbol auf dem Produkt weist darauf hin, dass dieses nicht zusammen mit
dem normalen Hausmüll entsorgt werden darf. Für zu entsorgende Elektro- und
Elektronikaltgeräte gibt es ein besonderes, kostenfreies Entsorgungssystem. Weitere
Informationen erhalten Sie von Ihrem lokalen Entsorgungsunternehmen oder von dem
Händler, bei dem Sie dieses Produkt erworben haben. Mit der getrennten Entsorgung
helfen Sie, die Umwelt und Gesundheit Ihrer Mitmenschen zu schützen.
Page 6
6 | DE
POWER
AUX/MP3 LINK
OPTICAL
BLUETOOTH
MOVIE / MUSIC
Rear View
Side View
Front View
Frontansicht
Seitenansicht
Rückansicht
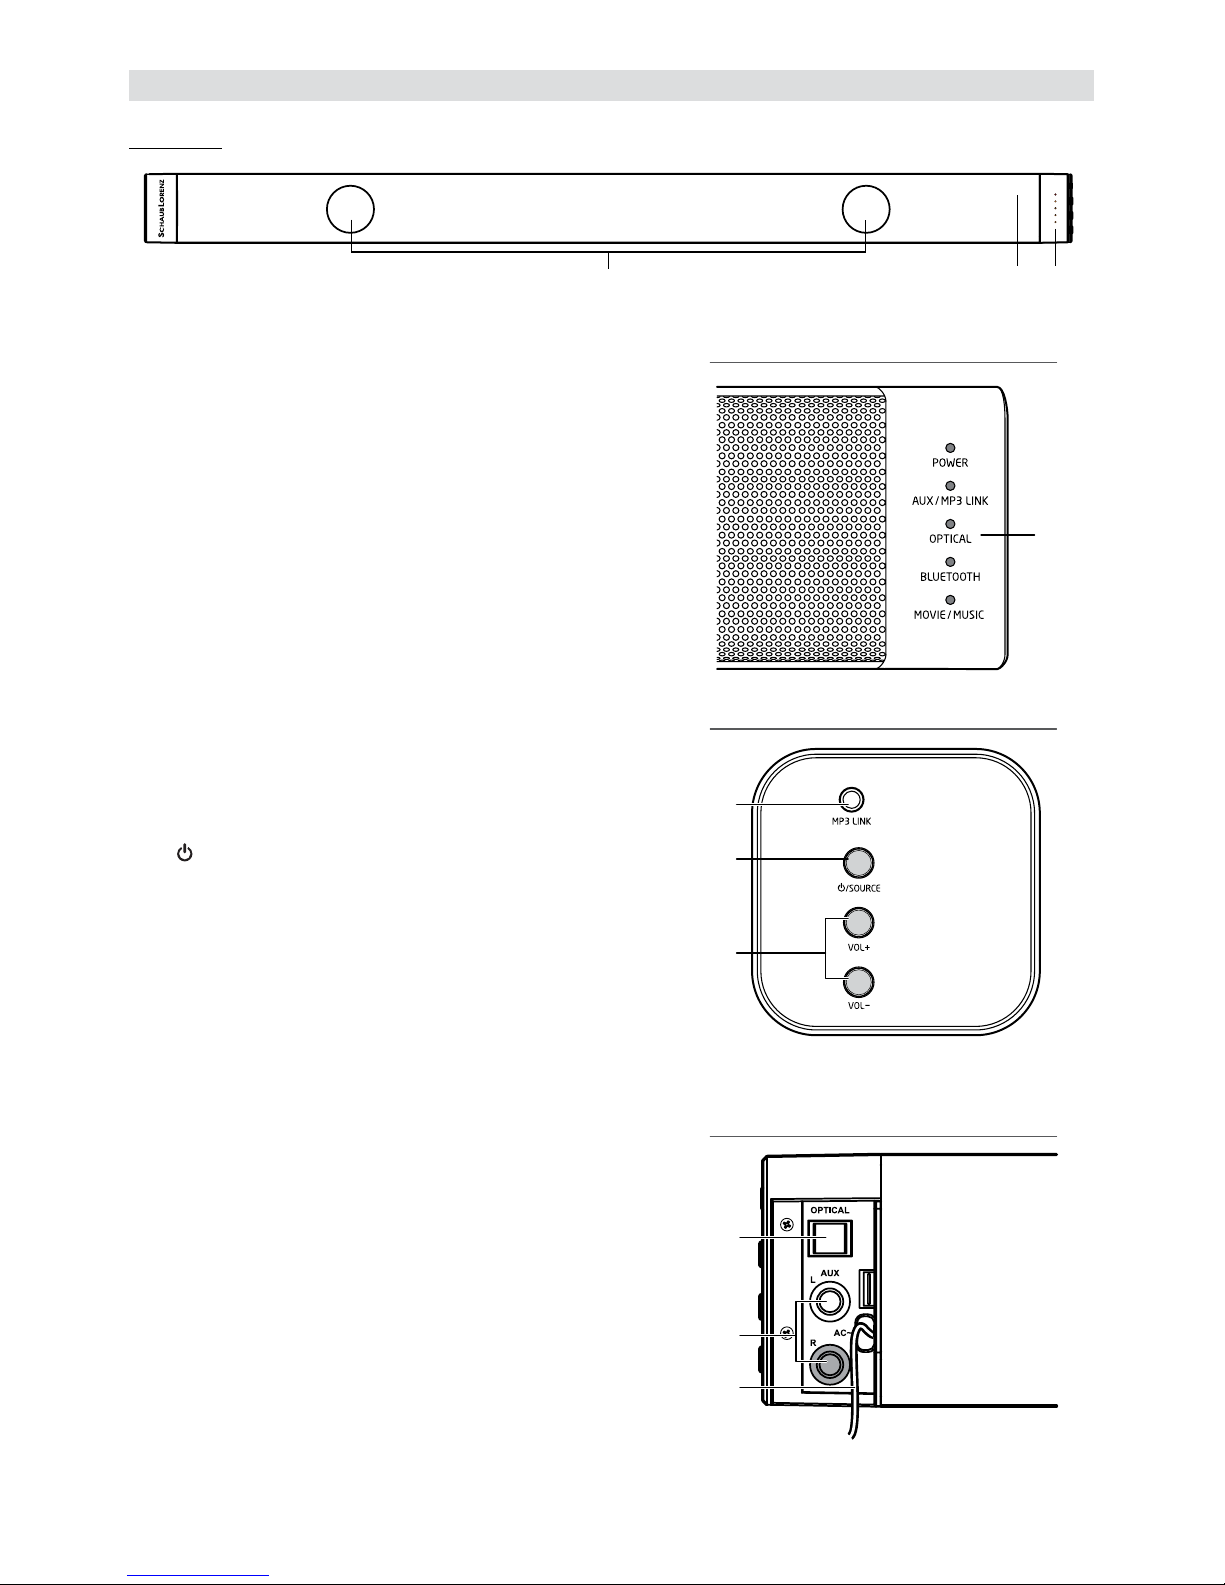
Bedienelemente und Anschlüsse
Soundbar
1. Lautsprecher
2. Fernbedienungssensor
3. LED-Anzeigen
POWER:
Im STANDBY-Modus: Leuchtet rot.
AUX/MP3 LINK:
Im AUX-Modus: Licht leuchtet.
Im MP3 LINK-Modus: Licht blinkt.
OPTICAL:
Tonausgabe verfügbar: Licht leuchtet.
Tonausgabe nicht verfügbar: Licht blinkt.
BLUETOOTH®:
Bluetooth®-Wiedergabemodus: Licht leuchtet.
Bluetooth®-Kopplungsmodus: Licht blinkt.
MOVIE/MUSIC:
Im MOVIE-Modus: Licht leuchtet.
Im MUSIC-Modus: Licht blinkt.
Im FLAT-Modus: Licht aus.
4. MP3 LINK-Anschluss
Zum Anschluss eines externen Audiogeräts.
5. / SOURCE
Drücken Sie diese Taste, um die Soundbar einzuschalten oder halten Sie die Taste gedrückt, um die
Soundbar in den STANDBY-Modus zu schalten.
Auswahl des Wiedergabemodus.
6. VOL+/VOL-
Erhöhen/verringern der Lautstärke.
7. OPTICAL-Anschluss
Zum Anschluss eines externen Audiogeräts.
8. AUX (L/R)-Anschluss
Zum Anschluss eines externen Audiogeräts.
9. Netzkabel
Page 7
DE | 7
DE
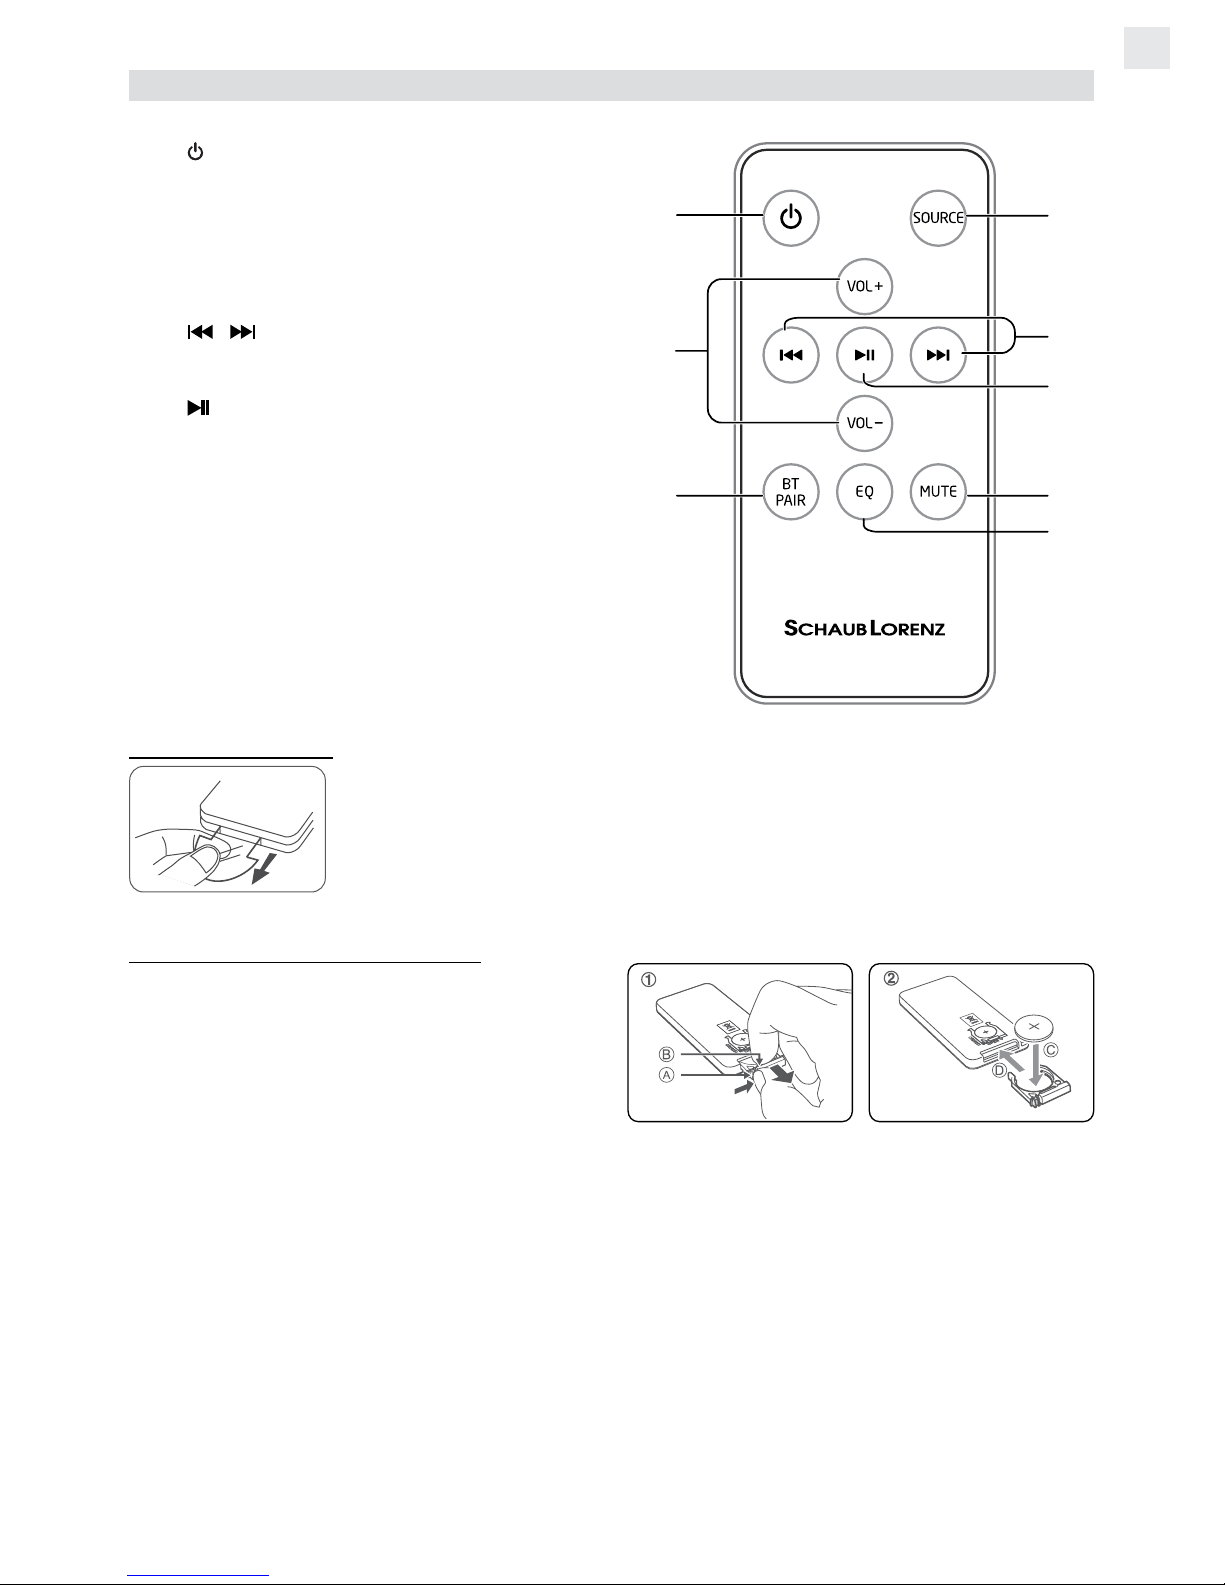
Fernbedienung
1.
Soundbar ein- oder in den STANDBY-Modus
schalten.
2. SOURCE
Auswahl der Wiedergabemodus.
3. VOL+/VOL-
Erhöhen/verringern der Lautstärke.
4. /
Im Bluetooth®-Modus zur vorherigen/nächsten Audiodatei springen.
5.
Im Bluetooth
®
-Modus die Wiedergabe
starten oder pausieren.
6. BT PAIR
Kopplungsfunktion im Bluetooth®-Modus
aktivieren und bereits gekoppelte Bluetooth
®
-
Geräte trennen.
7. MUTE
Ton aus- und einschalten.
8. EQ
Auswahl eines voreingestellten Equalizers.
Erste Inbetriebnahme
Die Fernbedienung verfügt über eine bereits eingesetzte Knopfzellen-Batterie
CR2025. Ziehen Sie den Schutz heraus, um die Batterie zu aktivieren.
Ersetzen der Fernbedienungsbatterie
1. Ziehen Sie das Batteriefach vorsichtig heraus
und entnehmen Sie die alte Batterie.
2. Setzen Sie eine neue Batterie CR2025 in
das Fach ein und achten Sie hierbei auf die
korrekte Polarität (+/-).
3. Stecken Sie das Batteriefach wieder in die
Fernbedienung.
Hinweise:
• Die Reichweite der Fernbedienung beträgt ca. 6 m. Wenn sich zwischen Soundbar und Fernbe-
dienung Hindernisse benden, kann dies die Reichweite einschränken.
• Wenn die Fernbedienung in der Nähe von anderen Produkten mit Infrarotfunktion verwendet
wird, kann es ggf. zu Fehlfunktionen oder Überschneidungen kommen.
• Wenn Sie die Fernbedienung für längere Zeit nicht verwenden, nehmen Sie die Batterie heraus,
um ein Auslaufen zu vermeiden.
• Beachten Sie die Sicherheitshinweise bzgl. Batterien auf Seite 4.
Page 8
8 | DE
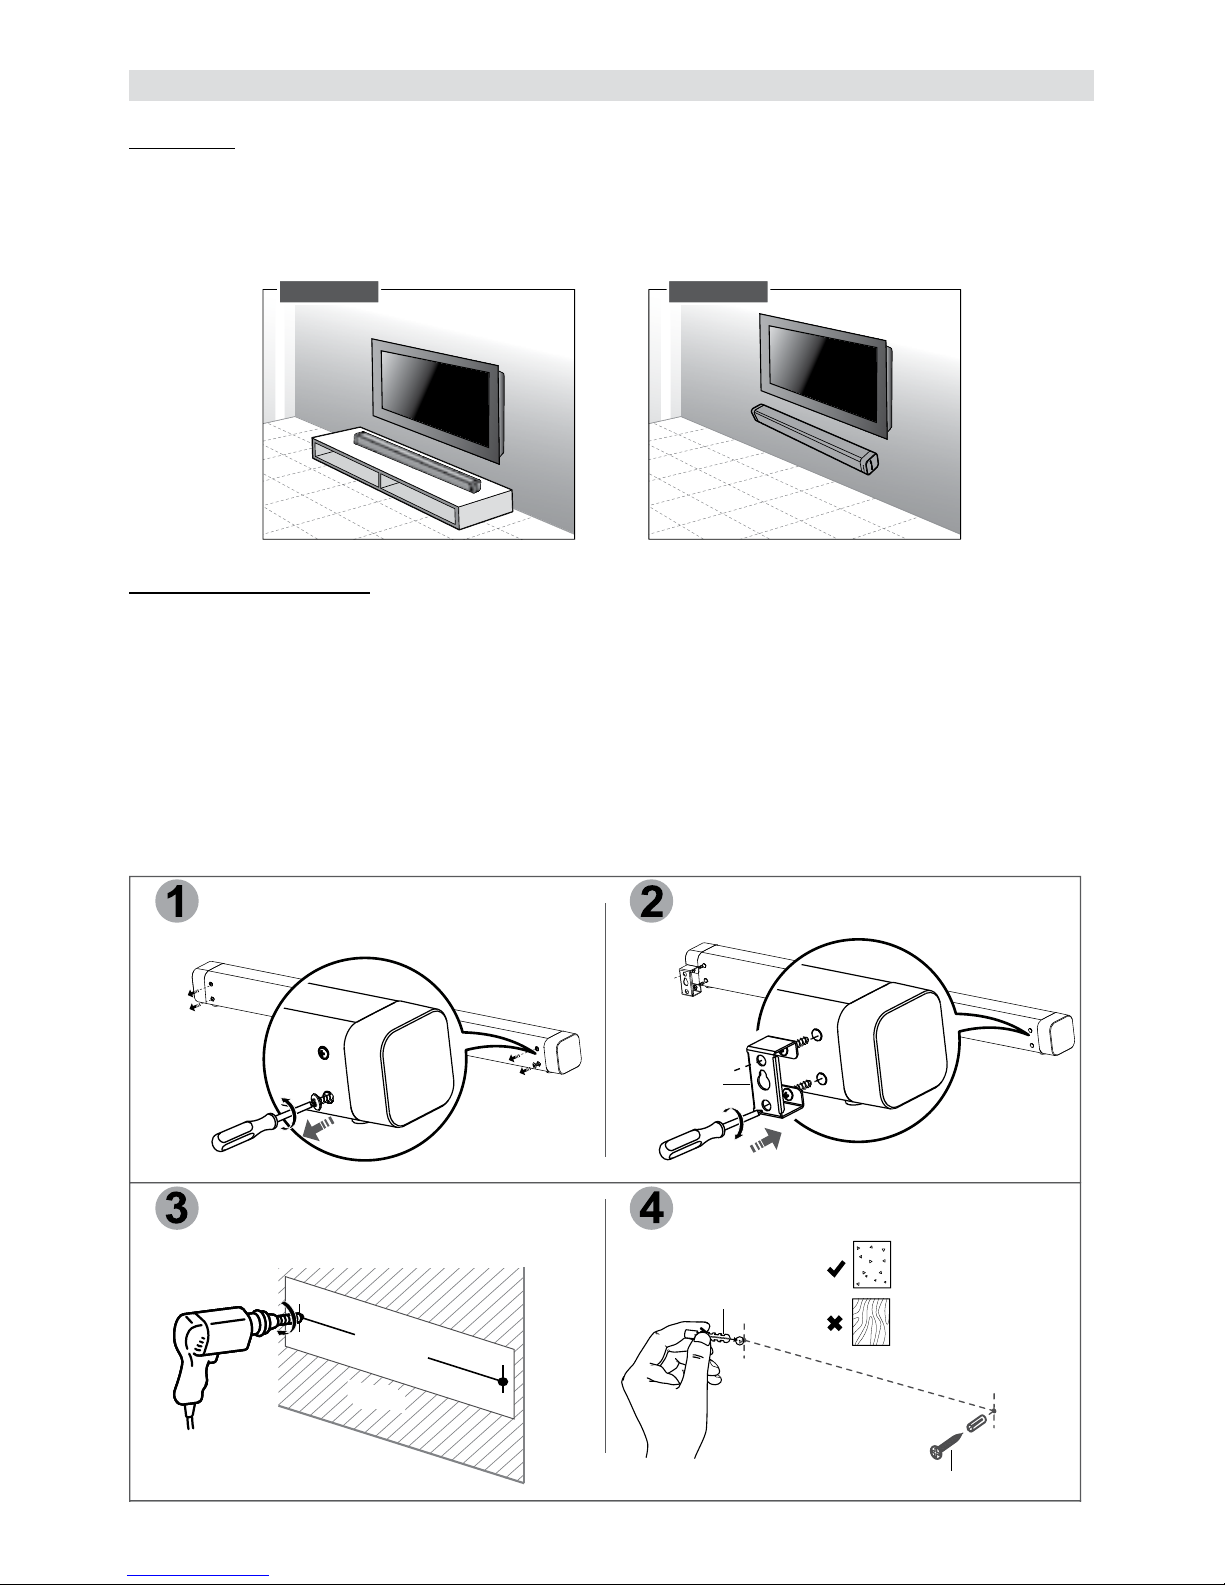
Aufstellung und Wandmontage
Aufstellung
A. Wenn Ihr TV-Gerät auf einem Tisch steht, können Sie die Soundbar direkt davor oder darunter
mittig zum TV-Gerät platzieren.
B. Wenn Ihr TV-Gerät an eine Wand montiert ist, können Sie die Soundbar direkt darunter ebenfalls
an die Wand montieren.
Option - A Option - B
Wandmontage (Option B)
• Eine Wandmontage muss generell von einem qualizierten Fachmann durchgeführt werden. Eine
falsche Montage kann Verletzungen und Beschädigungen zur Folge haben. Vor der Montage
muss geprüft und ausgeschlossen werden, dass an der zu montierenden Stelle elektrische
Leitungen oder Rohre verlaufen. Es liegt in der Verantwortung der montierenden Person, zu
entscheiden, ob die Wand das Gewicht der Soundbar und der Wandhalterung trägt.
• Eine Wandmontage erfordert weiteres Werkzeug (nicht im Lieferumfang enthalten).
• Schrauben dürfen nicht überdreht werden.
• Bewahren Sie diese Anleitung sorgfältig auf.
• Vor einer Montage sollte die Wand mit einem Balkensucher geprüft werden.
Remove the screws from the main unit.
Attach the wall brackets to the main unit with
the screws removed from the main unit
Wall bracket
Drill 2 parallel holes (Ø 3-8 mm each according
to wall type) in the wall. The distance between
the holes should be 720 mm.
Firmly fix 1 dowel into each hole in the wall
if necessary.
Solid wall (i.e., Solid brick,
Solid concrete, Solid wood,
Solid wooden battens)
Drywall, Plaster wall,
Lath wall, etc.
Wall
720 MM
Dowel
Screws
Drehen Sie die 4 Schrauben an der Rückseite heraus.
Wandhalterung
Bringen Sie die Wandhalterungen wie abgebildet an
der Soundbar an.
Bohren Sie 2 Löcher im Abstand von 720 mm (Ø der
Bohrung 3 - 8 mm, je nach Wandtyp). Achten Sie darauf, dass die Bohrungen in der Waage liegen.
Befestigen Sie einen Dübel in jeder Bohrung.
Solide Wand (z. B.
Ziegel, Beton, Holz)
Trockenbauwände,
Rigips, etc.
Schrauben
Dübel
Wand
Page 9

DE | 9
DE
Remove the screws from the main unit.
Attach the wall brackets to the main unit with
the screws removed from the main unit
Wall bracket
Drill 2 parallel holes (Ø 3-8 mm each according
to wall type) in the wall. The distance between
the holes should be 720 mm.
Leave a 5 mm gap between the wall and the screw’s head. Lift the unit with the attached wall brackets over
the heads of the screws and slot into place.
Firmly fix 1 dowel into each hole in the wall
if necessary.
Solid wall (i.e., Solid brick,
Solid concrete, Solid wood,
Solid wooden battens)
Drywall, Plaster wall,
Lath wall, etc.
5 mm
Wall
720 MM
Dowel
Screws
Drehen Sie die Schrauben soweit in die Wand, dass zwischen Wand und Schraubenkopf ca. 5 mm Platz sind. Hängen
Sie nun die Soundbar mit den Wandhalterungen in die Schrauben ein.
Anschlüsse
OPTISCHER Anschluss (OPTICAL)
• Nehmen Sie die Schutzkappe des optischen Anschlusses ab und schließen Sie ein optisches
Audiokabel (nicht im Lieferumfang) an. Verbinden Sie das andere Ende mit dem optischen Audioausgang Ihres TV-Gerätes.
TV
OPTICAL cable
OPTISCHES Kabel
Tipp:
• Wenn keine Audiowiedergabe über die Soundbar erfolgt und die Anzeigeleuchte schnell blinkt,
prüfen Sie die Audioeinstellung des angeschlossenen Gerätes (z. B. DVD-Player, Spielekonsole,
TV, etc.) und versichern Sie sich, dass an diesem PCM mit optischem Eingang eingestellt ist.
AUX-Anschluss
A. Verwenden Sie ein Cinch-auf-Cinch-Kabel (inklusive), um die entprechenden Audioausgänge des
TV-Geräts mit dem AUX-Eingang (R/L) der Soundbar zu verbinden.
:<
(included)
RCA to RCA audio cable
Cinch-auf-Cinch-Kabel
(inklusive)
Page 10

10 | DE
B. Verwenden Sie ein 3,5-mm-Klinke-auf-Cinch-(L/R)-Kabel (inklusive), um den Kopfhörerausgang
des TV-Geräts mit dem AUX-Eingang (R/L) der Soundbar zu verbinden.
:<
:<
(included)
RCA to RCA audio cable
(included)
RCA to 3.5mm audio cable
3,5-mm-Klinke-auf-Cinch-(L/R)-Kabel
(inklusive)
MP3 Link-Anschluss
• Verwenden Sie ein 3,5-mm-auf-3,5-mm-Audiokabel (nicht im Lieferumfang), um den Kopfhörer-
anschluss eines Audiogerätes (z. B. CD-Player, MP3-Player, etc.) mit dem MP3 LINK-Anschluss
der Soundbar zu verbinden.
3.5mm to 3.5mm audio cable
Media playerPhone
3,5-mm-auf-3,5-mm-Audiokabel
Telefon Media Player
Stromanschluss
Gefahr von Produktbeschädigungen!
• Versichern Sie sich, dass die Ausgangsleistung Ihrer Steckdose der Spannungsangabe
der Soundbar entspricht (Typenschild an der
Geräterückseite oder -unterseite).
• Nehmen Sie zuerst andere Anschlüsse vor,
bevor Sie das Gerät mit dem Stromnetz
verbinden.
• Schließen Sie den Netzstecker an eine geeignete Steckdose an.
Grundfunktionen
Standby/Einschalten
Nach dem Anschließen an die Stromversorgung, bendet sich das Gerät im Standby-Modus. Die
Anzeige POWER leuchtet rot.
• Drücken Sie die Taste
/ SOURCE an der Soundbar oder die Taste auf der Fernbedienung,
um das Gerät einzuschalten. Die LED-Anzeige des zuletzt eingestellten Modus leuchtet auf.
• Um das Gerät in den Standby-Modus zu schalten, halten Sie die Taste
/ SOURCE an der
Soundbar gedrückt oder drücken Sie die Taste auf der Fernbedienung. Die Anzeige POWER
leuchtet rot.
• Um das Gerät komplett auszuschalten, ziehen Sie den Netzstecker aus der Steckdose.
• Wenn die Lautstärke nahe 0 oder die Soundbar kein Audiosignal erhält, schaltet diese sich nach
15 Minuten automatisch in den Standby-Modus.
Main Unit
Soundbar
Page 11

DE | 11
DE
Modus auswählen
Wenn die Soundbar eingeschaltet ist, drücken Sie wiederholt die Taste / SOURCE an der Soundbar
oder die Taste SOURCE auf der Fernbedienung, um zwischen den Modi AUX, MP3 LINK, OPTICAL
und BLUETOOTH® zu wählen.
• Wenn der AUX-Modus ausgewählt ist, leuchtet die AUX/MP3 LINK-Anzeige.
• Wenn der MP3 LINK-Modus ausgewählt ist, blinkt die AUX/MP3 LINK-Anzeige.
Lautstärke einstellen
• Drücken Sie die Taste VOL +/-, um die Lautstärke zu erhöhen/verringern.
• Um die Lautstärke stummzuschalten, drücken Sie die Taste MUTE. Drücken Sie die Taste MUTE
erneut oder die Taste VOL +/-, um den Ton wieder einzuschalten.
• Während der Lautstärkeeinstellung blinkt der Statusindikator schnell.
• Wenn die maximal oder minimal einstellbare Lautstärke erreicht ist, blinkt der Statusindikator
einmal.
Auswahl einer Equalizervoreinstellung
Drücken Sie während der Wiedergabe die Taste EQ auf der Fernbedienung, um zwischen den
Equalizervoreinstellungen zu wählen: Movie (empfohlen für Filme), Music (empfohlen für Musik) und
Standardeinstellung (EQ-Modus aus).
• Wenn die EQ-Einstellung MOVIE eingestellt ist, leuchtet der Indikator MOVIE/MUSIC ständig.
• Wenn die EQ-Einstellung MUSIC eingestellt ist, blinkt der Indikator MOVIE/MUSIC.
• Wenn der EQ-Modus ausgeschaltet ist, erlischt der Indikator MOVIE/MUSIC.
AUX / MP3 Link / Optischer Anschluss
1. Versichern Sie sich, dass das Gerät an ein TV-Gerät oder andere Audioquelle angeschlossen ist.
2. Drücken Sie bei eingeschalteter Soundbar wiederholt die Taste / SOURCE am Gerät oder
SOURCE auf der Fernbedienung um zwischen den Modi AUX, MP3 LINK oder OPTICAL zu
wählen.
3. Führen Sie Lautstärke- und andere Audioeinstellungen (z. B. Equalizer) direkt an Ihrem externen
Gerät durch.
4. Stellen Sie anhand der Tasten VOL +/- eine beliebige Lautstärke an der Soundbar ein. Zusätzlich
können Sie die Lautstärke am externen Gerät einstellen.
Wiedergabe über Bluetooth
®
Dieses Gerät ermöglicht die kabellose Audio-Übertragung von kompatiblen Bluetooth®-Geräten in
einem Bereich von bis zu 8 m. Hindernisse, wie z. B. Wände, können diesen Bereich einschränken.
Um die Funktion nutzen zu können, muss lediglich das Bluetooth®-kompatible Gerät mit diesem Gerät
verbunden werden.
1. Schalten Sie das Gerät ein und wählen Sie den Bluetooth®-Modus, indem Sie wiederholt die
Taste / SOURCE an der Soundbar oder die Taste SOURCE auf der Fernbedienung. Der
Bluetooth®-Indikator blinkt langsam.
2. Das System ist nun im Kopplungsmodus.
Schalten Sie die Bluetooth®-Funktion an Ihrem externen Gerät ein. Beachten Sie die BEdienungsanleitung des externen Gerätes.
3. Drücken Sie die Taste BT PAIR auf der Fernbedienung.
4. Öffnen Sie die Bluetooth®-Einstellungen bei Ihrem externen Gerät.
Suchen Sie nach neuen Geräten.
Das Modell „SB 610” sollte nun angezeigt werden. Wählen Sie dieses Gerät.
Wenn Sie nach einem Passwort gefragt werden, geben Sie „0000” ein.
5. Sobald Ihr Gerät verbunden ist, leuchtet der Bluetooth®-Indikator konstant.
Page 12

12 | DE
6. Starten Sie nun die Musikwiedergabe auf Ihrem externen Gerät. Der Sound wird über die Soundbar wiedergegeben.
7. Um die Bluetooth®-Funktion zu beenden, wählen Sie einen anderen Modus an der Soundbar
oder stellen Sie die Funktion an Ihrem Bluetooth®-Gerät aus.
Hinweise:
• Es kann zu jeder Zeit nur ein Gerät über Bluetooth® verbunden werden.
• Wenn bereits eine Verbindung zu einem anderen Gerät besteht, drücken Sie die Taste BT PAIR
auf der Fernbedienung, um in den Kopplungsmodus zu gelangen. Die Verbindung wird unterbrochen.
• Wenn kein neues Bluetooth®-Gerät innerhalb von zwei Minuten verbunden wird, verbindet sich
die Soundbar wieder mit dem zuletzt verbundenen.
• Die Verbindung wird ebenfalls getrennt, wenn der Abstand zwischen externem Gerät und Soundbar zu groß wird.
• Wenn Sie Ihr Gerät wieder verbinden möchten, bringen Sie dieses wieder innerhalb der Reichweite. Prüfen Sie ggf. die Verbindung.
• Wenn die Verbindung getrennt wurde, führen Sie die obigen Schritte durch, um ein Gerät erneut
zu verbinden.
Musik von einem Bluetooth®-Gerät hören
• Wenn das verbundene Bluetooth
®
-Gerät Advanced Audio Distribution Prole (A2DP) unterstützt,
können Sie auf dem externen gespeicherte Musik über die Soundbar wiedergeben.
• Wenn das Gerät außerdem das Audio Video Remote Control Prole (AVRCP) unterstützt, können
Sie die Fernbedienung der Soundbar dazu verwenden, verschiedene Funktionen zu nutzen:
1. Koppeln und verbinden Sie Ihr Gerät wie oben beschrieben.
2. Starten Sie die Musikwiedergabe an Ihrem externen Gerät.
3. Use supplied remote control to control play:
- Zum pausieren/fortsetzen der Wiedergabe drücken Sie die Taste .
- Um einen Titel zu überspringen, drücken Sie eine der Taste / .
- Erhöhen und verringern Sie die Lautstärke anhand der Tasten VOL+ und VOL- an der Soundbar, bzw. der Fernbedienung sowie der Lautstärketasten Ihres externen Gerätes.
Hinweis:
• Falls keine Wiedergabe erfolgt, versichern Sie sich, dass weder an diesem Gerät, noch am
externen Gerät die Lautstärke ausgeschaltet (auf 0 eingestellt) ist und dass das richtige Gerät
gekoppelt ist.
Weitere Hinweise zur Verwendung von Bluetooth®-Geräten
• Die Funksignale eines Bluetooth®-Gerätes können die Funktion anderer elektrischer und medizi-
nischer Geräte stören.
• Schalten Sie das Gerät aus, wenn die Verwendung eines solchen verboten ist.
Kompatibilität
• Die Funktion hängt von der Bluetooth®-Technologie Ihres externen Gerätes ab. Beachten Sie die
Bedienungsanleitung Ihres externen Gerätes.
• Der Hersteller ist nicht verantwortlich für Verlust oder Beschädigung von Daten jeglicher Art.
Fehlerbehebung
Sollte an diesem Gerät einmal wider Erwarten ein Problem auftauchen, so versuchen Sie zunächst,
dies anhand der folgenden Hinweise selbst zu beheben.
Kein Strom
• Versichern Sie sich, dass der Netzstecker korrekt an eine Steckdose angeschlossen ist.
• Versichern Sie sich, dass die Steckdose funktioniert.
Page 13

DE | 13
DE
• Drücken Sie die Taste / SOURCE, um das Gerät einzuschalten.
Fernbedienung funktioniert nicht
• Verringern Sie den Abstand zwischen Fernbedienung und Soundbar.
• Versichern Sie sich, dass die Batterie richtig herum eingelegt ist (+/-).
• Ersetzen Sie die Batterie ggf. durch eine neue.
• Richten Sie die Fernbedienung Richtung Fernbedienungssensor an der Soundbar aus.
Gerät reagiert nicht
• Trennen Sie das Gerät von der Stromversorgung und schließen Sie es dann wieder an.
Der Bluetooth®-Name der Soundbar wird nicht an meinem Bluetooth®-Gerät angezeigt
• Versichern Sie sich, dass die Bluetooth®-Funktion an Ihrem Bluetooth®-Gerät eingeschaltet ist.
• Versichern Sie sich, dass das Gerät mit Ihrem Bluetooth®-Gerät gekoppelt ist.
Technische Daten
Soundbar
Stromversorgung: ..................................AC 220-240V~ 50/60Hz
Ausgangsleistung (RMS): ......................2x 20W
Stromverbrauch (max.): .........................45W
Gesamte harmonische Verzerrung: ....... 1% (1kHz, 1W)
Empndlichkeit Audioeingang:...............700mV
Frequenzbereich:...................................40Hz - 20KHz
Impedanz: .............................................. 8Ω
Maße (BxTxH): ...................................... 806 x 60 x 62 mm
Fernbedienung
Reichweite: ............................................6 m
Funktionswinkel: ....................................30°
Technische und optische Änderungen jederzeit vorbehalten.
Die Bluetooth®-Wortmarke und -Logos sind Eigentum der Bluetooth SIG, Inc., und jegliche Verwendung der Marken durch Karcher ist lizenziert. Andere Marken und Markennamen sind Eigentum ihrer
jeweiligen Besitzer.
Wir, Karcher AG (Inverkehrbringer), bestätigen hiermit, dass dieses Gerät mit den grundlegenden
Anforderungen der Richtlinie 1999/5/EG und der weiteren relevanten Richtlinien übereinstimmt.
Eine Kopie der Konformitätserklärung kann unter der folgenden Adresse bezogen werden:
Karcher AG | Gewerbestr. 19 | 75217 Birkenfeld
Oder im Internet unter folgendem Link:
http://www.karcher-products.de/index.php/Konformitaetserklaerungen.html
Page 14

14 | EN
Safety Information
1. Read Instructions - All the safety and operating instructions should be read before the appliance
is operated.
2. Retain Instructions - The safety and operating instructions should be retained for future reference.
3. Heed Warnings - All warnings on the appliance and in the operating instructions should be
adhered to.
4. Water and Moisture – Do not use the apparatus near water (e.g. bath tub, sink, swimming pool)
or in wet places or tropical climates. Do not place objects lled with liquids, such as vases, on top
of the apparatus. Do not expose the apparatus to dripping or splashing.
5. Setup – The apparatus should only be placed on a stable, at surface. Do not let the apparatus fall
down or expose it to shock.
6. Wall or Ceiling Mounting - The appliance should be mounted to a wall or ceiling only as
recommended by the manufacturer.
7. Ventilation - The appliance should be situated so that its location or position does not interfere
with its proper ventilation. For example, the appliance should not be situated on a bed, sofa,
rug, or similar surface that may block the ventilation openings; or, placed in a built-in installation,
such as a bookcase or cabinet that may impede the ow of air through the ventilation openings.
Ensure a minimum distance of 5 cm around the apparatus for sufcient ventilation. Ensure that the
ventilation is not impeded by covering the ventilation openings with items such as newspapers,
table-cloths, curtains, etc.
8. Heat - The appliance should be situated away from heat sources such as radiators, heat registers,
stoves, or other appliances (including ampliers) that produce heat.
9. Power Sources - The appliance should be connected to a power supply only of the type described
in the operating instructions or as marked on the appliance.
10. Cables and Plugs – The mains plug shall remain readily operable. All cables should be routed so
that they are not likely to be walked on or pinched by items placed upon or against them, paying
particular attention to cords at plugs, convenience receptacles, and the point where they exit from
the appliance.
11. Cleaning - The appliance should be cleaned only as recommended by the manufacturer. Clean
by wiping with a dry and clean cloth. Do not use chemical cleaners or detergents. Always pull the
mains plug before cleaning the unit.
12. Non-use Periods - The power cord of the appliance should be unplugged from the outlet when left
unused for a long period of time.
13. Object and Liquid Entry - Care should be taken so that objects do not fall and liquids are not
spilled into the enclosure through openings.
14. Damage Requiring Service - The appliance should be serviced by qualied service personnel
when:
a) The power-supply cord or the plug has been damaged; or
b) Objects have fallen, or liquid has been spilled into the appliance; or
c) The appliance has been exposed to rain; or
d) The appliance does not appear to operate normally or exhibits a marked change in
performance; or
e) The appliance has been dropped, or the enclosure damaged.
15. Servicing - The user should not attempt to service the appliance beyond that described in the
operating instructions. All other servicing should be referred to qualied service personnel.
16. Open Fire – Keep the apparatus away from open res. Do not place naked ame sources, such
as lighted candles on the apparatus.
17. Thunderstorms – During a thunderstorm the mains plug should be unplugged.
18. Safety Check – After servicing the technician should conduct a safety check in order to ensure that
the apparatus is working properly and safely.
19. Batteries – Always place batteries in the correct polarization into electrical components. Danger of
explosion if battery is incorrectly replaced. Replace only with the same or equivalent type. Do not
mix old and new batteries. T ake attention to the environmental aspects of battery disposal. Batteries
shall not be exposed to excessive heat such as sunshine, re or the like. Remove batteries before
disposing of the product.
Page 15

EN | 15
EN
20. Volume Levels – To prevent possible hearing damage, do not listen at high volume levels for long
periods.
21. Headphones (if applicable) – Excessive sound pressure from earphones and headphones can
cause hearing loss.
WARNING: To reduce the risk of electric
shock, do not remove cover (or back).
No user serviceable parts inside. Refer
servicing to qualied service personnel.
CAUTION
RISK OF ELECTRO SHOCK
DO NOT OPEN
WARNING: To reduce the risk of re or electric shock, do
not expose this appliance to dripping or splashing.
The lightning ash with arrowhead symbol within an equilateral triangle is intended to alert
the user to the presence of uninsulated dangerous voltage within the product’s enclosure
that may be of sufcient magnitude to constitute a risk of electric shock to persons.
The exclamation point within an equilateral triangle is intended to alert the user to the
presence of important operating and maintenance (servicing) instructions in the literature
accompanying the appliance.
Batteries
Batteries may not be disposed of in regular house hold trash. Every consumer has the
obligation to return batteries to special disposal locations.
Disposal of Used Electrical & Electronic Equipment
The meaning of the symbol on the product, its accessory or packaging indicates that this
product shall not be treated as household waste. Please, dispose of this equipment at your
applicable collection point for the recycling of electrical & electronic equipments waste. By
ensuring the correct disposal of this product, you will help prevent potential hazards to the
environment and to human health, which could otherwise be caused by unsuitable waste
handling of this product. The recycling of materials will help conserve natural resources.
For more detailed information about recycling of this product, please contact your local
city ofce, your household waste disposal service or the shop where you purchased the
product.
Page 16

16 | EN
POWER
AUX/MP3 LINK
OPTICAL
BLUETOOTH
MOVIE / MUSIC
Rear View
Side View
Front View
Front View
Side View
Rear View
Controls and Connectors
Main Unit
1. Speakers
2. Remote Control Sensor
LED Indicators
POWER:
In STANDBY mode: Lit red.
AUX/MP3 LINK:
In AUX mode: Light turned on.
In MP3 LINK mode: Light ashes.
OPTICAL:
Sound output available: Light turned on.
Sound output unavailable: Light ashes.
BLUETOOTH®:
Bluetooth® playing mode: Light turned on.
Bluetooth® pairing mode: Light ashes.
MOVIE/MUSIC:
In MOVIE mode: Light turned on.
In MUSIC mode: Light ashes.
In FLAT mode: Light turned off.
3. MP3 LINK Socket
To connect an external audio device.
4. / SOURCE
Press this button to turn ON or press and hold
to switch to STANDBY mode.
To select the play function.
5. VOL+/VOL-
Increase/decrease the volume.
6. OPTICAL Socket
To connect an external audio device.
7. AUX (L/R) Socket
To connect an external audio device.
8. Power Cord
Page 17

EN | 17
EN
Remote Control
1.
Switch the unit between ON and STANDBY
mode.
2. SOURCE
To select the play function.
3. VOL+/VOL-
Increase/decrease the volume.
4. /
Skip to previous/next audio le in Bluetooth®
mode.
5.
Start or pause playback in Bluetooth
®
mode.
6. BT PAIR
Activate the pairing function in Bluetooth
®
mode and disconnect the existing paired
Bluetooth® device.
7. MUTE
Mute or resume the sound.
8. EQ
Select a preset sound effect.
First Time Use
The unit has a pre-installed CR2025 battery. Remove the protective tab to activate the remote control battery.
Replacing the Remote Control Battery
1. Pull out the battery tray and remove the old
battery.
2. Place a new CR2025 battery into the battery
tray with correct polarity (+/-) as indicated.
3. Insert the battery tray back into the slot.
Notes:
• Even if the remote control is operated within the effective range (6m), remote control operation
may be impossible if there are any obstacles between the unit and the remote control.
• If the remote control is operated near other products which generate infrared rays, or if other
remote control devices using infrared rays are used near the unit, it may operate incorrectly.
Conversely, the other products may operate incorrectly.
• When the remote control is not used for a longer period of time, remove the battery to prevent it
from leaking.
• Mind the safety information for the use of batteries on page 14.
Page 18

18 | EN
Placement and Mounting
Placement
A. If your TV is placed on a table, you can place the unit on the table directly in front of the TV stand,
centered with the TV screen.
B. If your TV is attached to a wall, you can mount the unit on the wall directly below the TV screen.
Option - A Option - B
Wall Mounting (if using Option B)
• Installation must be carried out by qualied personnel only. Incorrect assembly can result in
severe personal injury and property damage. Before mounting to a wall it must be checked
conrmed that there are no installations such as electrical wiring and plumbing inside this wall. It
is the installer’s responsibility to verify that the wall will safely support the total load of the unit and
wall brackets.
• Additional tools (not supplied) are required for the installation.
• Do not overtighten screws.
• Keep this instruction manual for future reference.
• Use an electronic stud nder to check the wall type before drilling and mounting.
Remove the screws from the main unit.
Attach the wall brackets to the main unit with
the screws removed from the main unit
Wall bracket
Drill 2 parallel holes (Ø 3-8 mm each according
to wall type) in the wall. The distance between
the holes should be 720 mm.
Firmly fix 1 dowel into each hole in the wall
if necessary.
Solid wall (i.e., Solid brick,
Solid concrete, Solid wood,
Solid wooden battens)
Drywall, Plaster wall,
Lath wall, etc.
Wall
720 MM
Dowel
Screws
Page 19

EN | 19
EN
Remove the screws from the main unit.
Attach the wall brackets to the main unit with
the screws removed from the main unit
Wall bracket
Drill 2 parallel holes (Ø 3-8 mm each according
to wall type) in the wall. The distance between
the holes should be 720 mm.
Leave a 5 mm gap between the wall and the screw’s head. Lift the unit with the attached wall brackets over
the heads of the screws and slot into place.
Firmly fix 1 dowel into each hole in the wall
if necessary.
Solid wall (i.e., Solid brick,
Solid concrete, Solid wood,
Solid wooden battens)
Drywall, Plaster wall,
Lath wall, etc.
5 mm
Wall
720 MM
Dowel
Screws
Connections
OPTICAL Socket
• Remove the protective cap of the OPTICAL socket, then connect an OPTICAL cable (not in-
cluded) to the TV’s OPTICAL OUT socket and the OPTICAL socket on the unit.
TV
OPTICAL cable
OPTICAL cable
Tip:
• If there is no sound coming out of the soundbar and the indicator light is ashing quickly, make
sure the audio setting of your source player (e. g. DVD player, game console, TV) is set to PCM
with optical input.
AUX Socket
A. Use an RCA to RCA audio cable (included) to connect the TV’s audio output sockets to the AUX
(R/L) socket on the unit.
:<
(included)
RCA to RCA audio cable
RCA to RCA audio cable
(included)
Page 20

20 | EN
B. Use an RCA to 3.5 mm audio cable (included) to connect the TV’s headphone socket to the AUX
(R/L) socket on the unit.
:<
:<
(included)
RCA to RCA audio cable
(included)
RCA to 3.5mm audio cable
RCA to 3.5 mm audio cable
(included)
MP3 Link Socket
• Use a 3.5mm to 3.5mm audio cable (not included) to connect the external audio device head-
phone socket to the MP3 LINK socket on the unit.
3.5mm to 3.5mm audio cable
Media playerPhone
3.5 mm to 3.5 mm audio cable
Phone Media Player
POWER Connection
Risk of product damage!
• Ensure that the power supply voltage corresponds to the voltage printed on the back or
the underside of the unit.
• Before connecting the AC power cord, ensure
you have completed all other connections.
• Connect the mains plug of the main unit to a
suitable mains socket.
Basic Operation
Standby/ON
When you rst connect the main unit to the mains socket, the main unit will be in Standby mode. The
POWER Indicator will light up red.
• Press the
/ SOURCE button on the main unit or the button on the remote control to switch
the main unit on. The status indicator of the last used mode will light up.
• Press and hold the
/ SOURCE button on the main unit or press the button on the remote
control to switch the main unit back to Standby mode. The POWER Indicator will light up red.
• Disconnect the mains plug from the mains socket if you want to switch the unit off completely.
• When the unit volume is close to mute or is idle for approximately 15 minutes, it will automatically
switch to Standby mode.
Main Unit
Main Unit
Page 21

EN | 21
EN
Select Modes
Press the / SOURCE button on the main unit or the SOURCE button on the remote control repeatedly to switch between AUX, MP3 LINK, OPTICAL and BLUETOOTH® modes.
• When AUX mode is selected, the AUX/MP3 LINK Indicator will light up steadily.
• When MP3 LINK mode is selected, the AUX/MP3 LINK Indicator will ash.
Adjusting the Volume
• Press the VOL +/- button to increase/decrease the volume.
• If you wish to turn the sound off, press the MUTE button on the remote control. Press the MUTE
button again or press the VOL +/- button to resume normal listening.
• While adjusting the volume, the status indicator ashes quickly.
• While the volume level reaches its maximum level, if you press the VOL + button again, the
status indicator ashes once. While the volume level reaches its minimum level, if you press the
VOL - button again, the status indicator ashes once.
Select a Preset Sound Effect
While playing, press the EQ button on the remote control to select between preset equalizers: Movie
(recommended for viewing movies), Music (recommended for listening to music) and default setting
(EQ mode off).
• When Movie EQ is selected, the MOVIE/MUSIC Indicator will light up steadily.
• When Music EQ is selected, the MOVIE/MUSIC Indicator will ash.
• When EQ mode is off, the MOVIE/MUSIC Indicator will turn off.
AUX / MP3 Link / Optical Operation
1. Ensure that the unit is connected to the TV or an audio device.
2. While in ON mode, press the / SOURCE button repeatedly on the main unit or the SOURCE
button on the remote contro to select AUX or MP3 LINK or OPTICAL mode.
3. Operate your audio device directly for playback features.
4. Press the VOL +/- button to adjust the volume to your desired level. Additionally you can set the
volume on the connected device.
Bluetooth® Wireless Playback
This unit can wirelessly stream audio from most Bluetooth® devices within approximately 8 metres.
Obstacles such as walls and other devices may limit this range.
Simply pair the device and enjoy wireless playback and control from your compatible Bluetooth®
device.
1. Switch the unit on and select the Bluetooth® mode by repeatedly pressing the / SOURCE button on the main unit or the SOURCE button on the remote control. The Bluetooth® indicator will
ash slowly.
2. The system has entered the pairing mode.
Turn on the Bluetooth® function in your device. Please refer to your device’s manual for further
details.
3. Press the BT PAIR button on the remote control.
4. Go to your device’s Bluetooth® settings.
Add or search for devices.
When the model no. “SB 610” appears, select the device.
If asked for a pass code, enter “0000”.
5. Once a device is connected, the Bluetooth® indicator will be lit solidly.
6. You can now play music on your device, it will be heard over the unit speakers.
7. To disconnect the Bluetooth® function, switch to another function on the unit or disable the func-
Page 22

22 | EN
tion from your Bluetooth® device.
Notes:
• Only one device can be paired and played at a time.
• If there is an existing connection, press the BT PAIR button on the remote control to re-activate
the pairing mode, the connection will be interrupted.
• If no other Bluetooth® device pairs with this player within two minutes, the player will recover its
previous connection.
• The player will also be disconnected when your device is moved beyond the operational range.
• If you want to reconnect your device to this player, place it within the operational range.
• If the device is moved beyond the operational range, when it is brought back, please check if the
device is still connected to the player.
• If the connection is lost, follow the instructions above to pair your device to the player again.
Listen to Music from Bluetooth® Device
• If the connected Bluetooth
®
device supports Advanced Audio Distribution Prole (A2DP), you can
listen to the music stored on the device through the player.
• If the device also supports Audio Video Remote Control Prole (AVRCP), you can use the
player’s remote control to play music stored on the device:
1. Pair your device with the player as described above.
2. Play music via your device.
3. Use supplied remote control to control play:
- To pause/resume play, press the button.
- To skip to a track, press the / buttons.
- Increase and decrease the volume using the VOL+ and VOL- buttons on the unit or remote control and using the volume controls on your device.
Note:
• If there is no playback, ensure that neither the unit nor your Bluetooth® device are set to zero
volume and the right device for playback is paired.
Additional Guidelines for Bluetooth® Devices
• The short wave radio signals of a Bluetooth® device may impair the operation of other electronic
and medical devices.
• Switch off the device where it is prohibited.
Compatibility Disclaimer
• Wireless performance is dependent on your device’s Bluetooth® wireless technology. Refer to
your device’s user manual.
• The manufacturer cannot be held liable for any loss or leakage of or damage to data.
Troubleshooting
If there should be any problem with this product, please try to solve it with the help of the following
information before contacting service. Most problems can be solved easily.
No power
• Ensure that the AC cord of the apparatus is properly connected.
• Ensure that there is power at the AC outlet.
• Press / SOURCE button to turn the unit on.
Remote control does not work
• Reduce the distance between the remote control and the unit.
• Insert the battery with its polarities (+/-) aligned as indicated.
• Replace the battery.
Page 23

EN | 23
EN
• Aim the remote control directly at the sensor on the front of the unit.
No response from the unit
• Disconnect and reconnect the AC power plug, then turn the unit on again.
I can’t nd the Bluetooth® name of this unit on my Bluetooth® device for pairing
• Ensure the Bluetooth® function is activated on your Bluetooth® device.
• Ensure you have paired the unit with your Bluetooth® device.
Technical Specications
Soundbar
Power Supply: .......................................AC 220-240V~ 50/60Hz
Output Power (RMS): ............................ 2x 20W
Power Consumption (max.): ..................45W
Total Harmonic Distortion: .....................1% (1kHz, 1W)
Audio Input Sensitivity: .......................... 700mV
Frequency Response: ...........................40Hz - 20KHz
Impedance: ............................................ 8Ω
Dimensions (WxDxH): ........................... 806 x 60 x 62 mm
Remote Control
Distance:................................................6 m
Angle: ....................................................30°
Technical specications and design may change without notice.
We, Karcher AG, herewith conrm that this product is in line with the basic requirements of regulation
1999/5/EG and further relevant regulations.
A copy of the declaration of conformity can be obtained at the following address:
Karcher AG | Gewerbestr. 19 | 75217 Birkenfeld
Or online at the following link:
http://www.karcher-products.de/index.php/Konformitaetserklaerungen.html
The Bluetooth® word mark and logos are registered trademarks owned by Bluetooth SIG, Inc. and any
use of such marks by Karcher is under license. Other trademarks and trade names are those of their
respective owners.
Page 24

Ansprechpartner für dieses Schaub-Lorenz-Produkt:
Contact for this Schaub-Lorenz product:
Karcher AG
Gewerbestr. 19
75217 Birkenfeld
Germany
www.karcher-products.de
 Loading...