

Page 1
ИНСТРУКЦИЯ ПО
ЭКСПЛУАТАЦИИ И
УCTAHOBКE
ВСТРАИВАЕМОЙ
СТЕКЛОКЕРАМИЧЕСКОЙ
ВАРОЧНОЙПAHEЛИ
www.schaublorenz.ru
Page 2
Page 3
СЕНСОРНАЯ ПАНЕЛЬ
Стеклокерамическая
УПРАВЛЕНИЯ
Ɉɜɚɥɶɧɚɹɡɨɧɚɧɚɝɪɟɜɚ
Ɉɞɢɧɚɪɧɚɹɡɨɧɚɧɚɝɪɟɜɚ
Page 4
Page 5
Page 6
плиту
убедиться
Page 7
Page 8
520mm
590mm
41mm
Min.
25mm
Min.
B
560mm
490mm
Min.
130mm
Min.
A
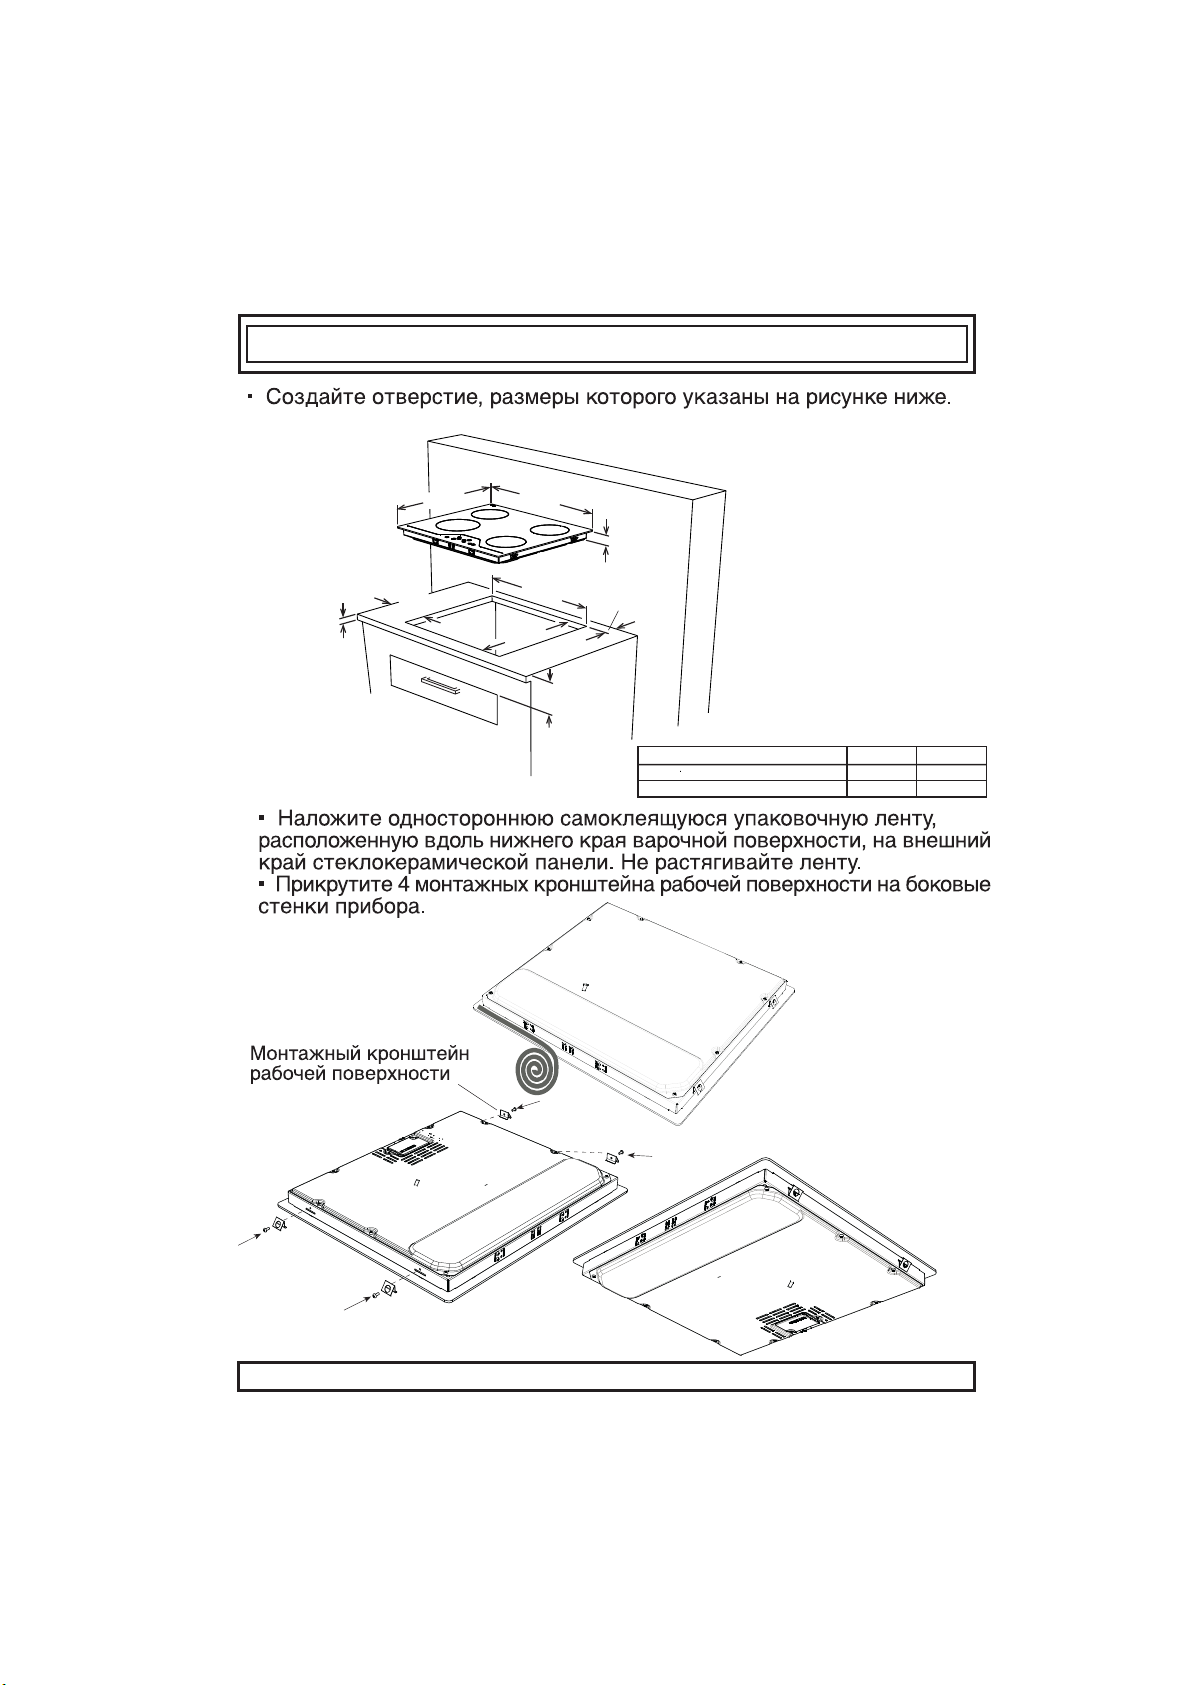
Соседние стены A [mm] B [mm]
Невоспламеняемые 60 150
Воспламеняемые 25 40
Page 9
Page 10

/
выполнением
Соединительный кабель питания может различатся в зависимости от типа терминала коробки.
3x2,5 mm² 220V~
3x2,5 mm² 230V~
3x2,5 mm² 240V~
5x1.5 mm² 380V 3N~
5x1.5 mm² 400V 3N~
5x1.5 mm² 415V 3N~
3x2,5 mm² 220V~
3x2,5 mm² 230V~
3x2,5 mm² 240V~
5x1.5 mm² 380V 3N~
5x1.5 mm² 400V 3N~
5x1.5 mm² 415V 3N~
Page 11
Стоп/
Запуск
Page 12

Page 13
Page 14
Page 15
Page 16

кнопок
Page 17

Page 18

Page 19
Page 20
Page 21
Page 22
Page 23
Page 24
Page 25
Дата производства зашифрована в номере, указанном в правом нижнем углу этикетки,
расположенной на продукте. Например, 20636701071123, где 07 означает год, 11 месяц
и 23 день
Этот символ на изделии или упаковочных материалах
указывает, что изделие не должно утилизироваться с
бытовыми отходами. Вместо этого его следует сдать на
соответствующий пункт сбора отходов по утилизации
электрического и электронного оборудования. Обеспечивая
надлежащую утилизацию данного изделия, вы способствуете
предотвращению потенциальных негативных последствий
для окружающей среды и здоровья людей, которые в
противном случае могут наступить вследствие неправильного
обращения с его отходами. За более подробной
информацией по утилизации данного изделия обратитесь в
местную городскую администрацию, службу утилизации
бытовых отходов или в магазин, в котором вы приобрели
изделие.
Page 26

OPERATING AND INSTALLATION
INSTRUCTIONS BUILT-IN
VITROCERAMIC HOB
www.schaublorenz.ru
Page 27

CONTENTS:
DESCRIPTION OF THE HOB 2
SAFETY 3
INSTALLATON 7
USAGE 11
...........................................................................................
...............................................................................
Turn On and Turn Off The Control 12
Select Heater 12
.................................................................................
Turn on dual- and triple zones 13
Turn Off Individual Heaters 14
Timer Function
Key Lock
........................................................................................
Child Lock
..............................................................................
......................................................................................
TOUCH CONTROL SAFETY FUNCTIONS 20
Sensor Safety Cut Off 20
...................................................................
Over Temperature Switch Off 21
Operating Time Limitations 22
Residual Heat Functions 22
........................................................
..............................................................
...........................................................
...............................................
...............................................
.....................................................
......................
..........................................................
....................................
.......................................................
..........................................................
...............................................................
7
9
13
15
17
18
..................................................................
1
23
Page 28

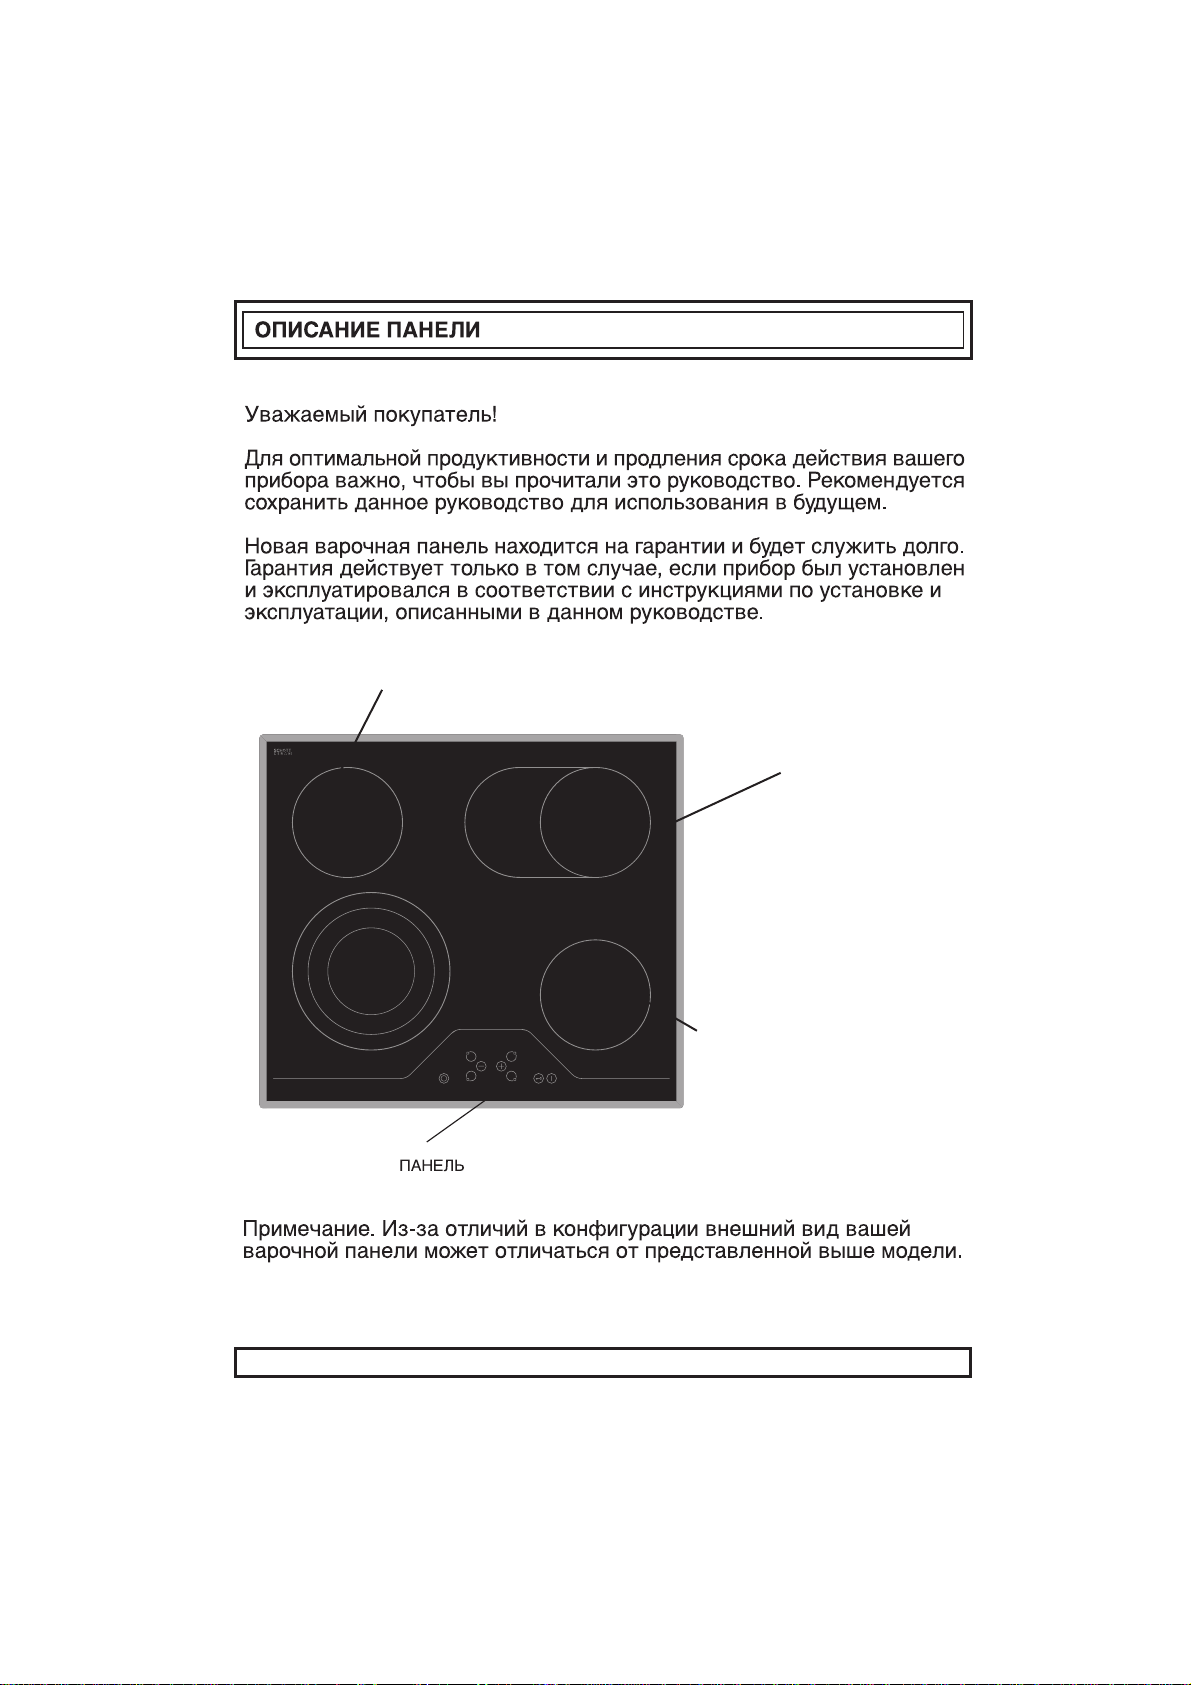
DESCRIPTION OF THE HOB
It is important that you should read this manual for best performance and
for future reference.
Your new hob is guaranteed and will give lasting service. This guarantee
is only applicable if the appliance has been installed and operated in
accordance with the operating and installation instructions detailed in this
manual.
SINGLE ZONE
HEATER
OVAL ZONE
HEATER
TOUCH CONTROL
PANEL
due to its configuration.
HOB
FRAME
VITROCERAMIC
SURFACE
2
Page 29

YOUR APPLIANCE, AND KEEP IT IN A CONVENIENT PLACE FOR REFERENCE
THIS MANUAL IS PREPARED FOR MORE THAN ONE MODEL IN COMMON. YOUR
APPLIANCE MAY NOT HAVE SOME OF THE FEATURES THAT ARE EXPLAINED
IN THIS MANUAL. PAY ATTENTION TO THE EXPRESSIONS THAT HAVE FIGURES,
WHILE YOU ARE READING THE OPERATING MANUAL.
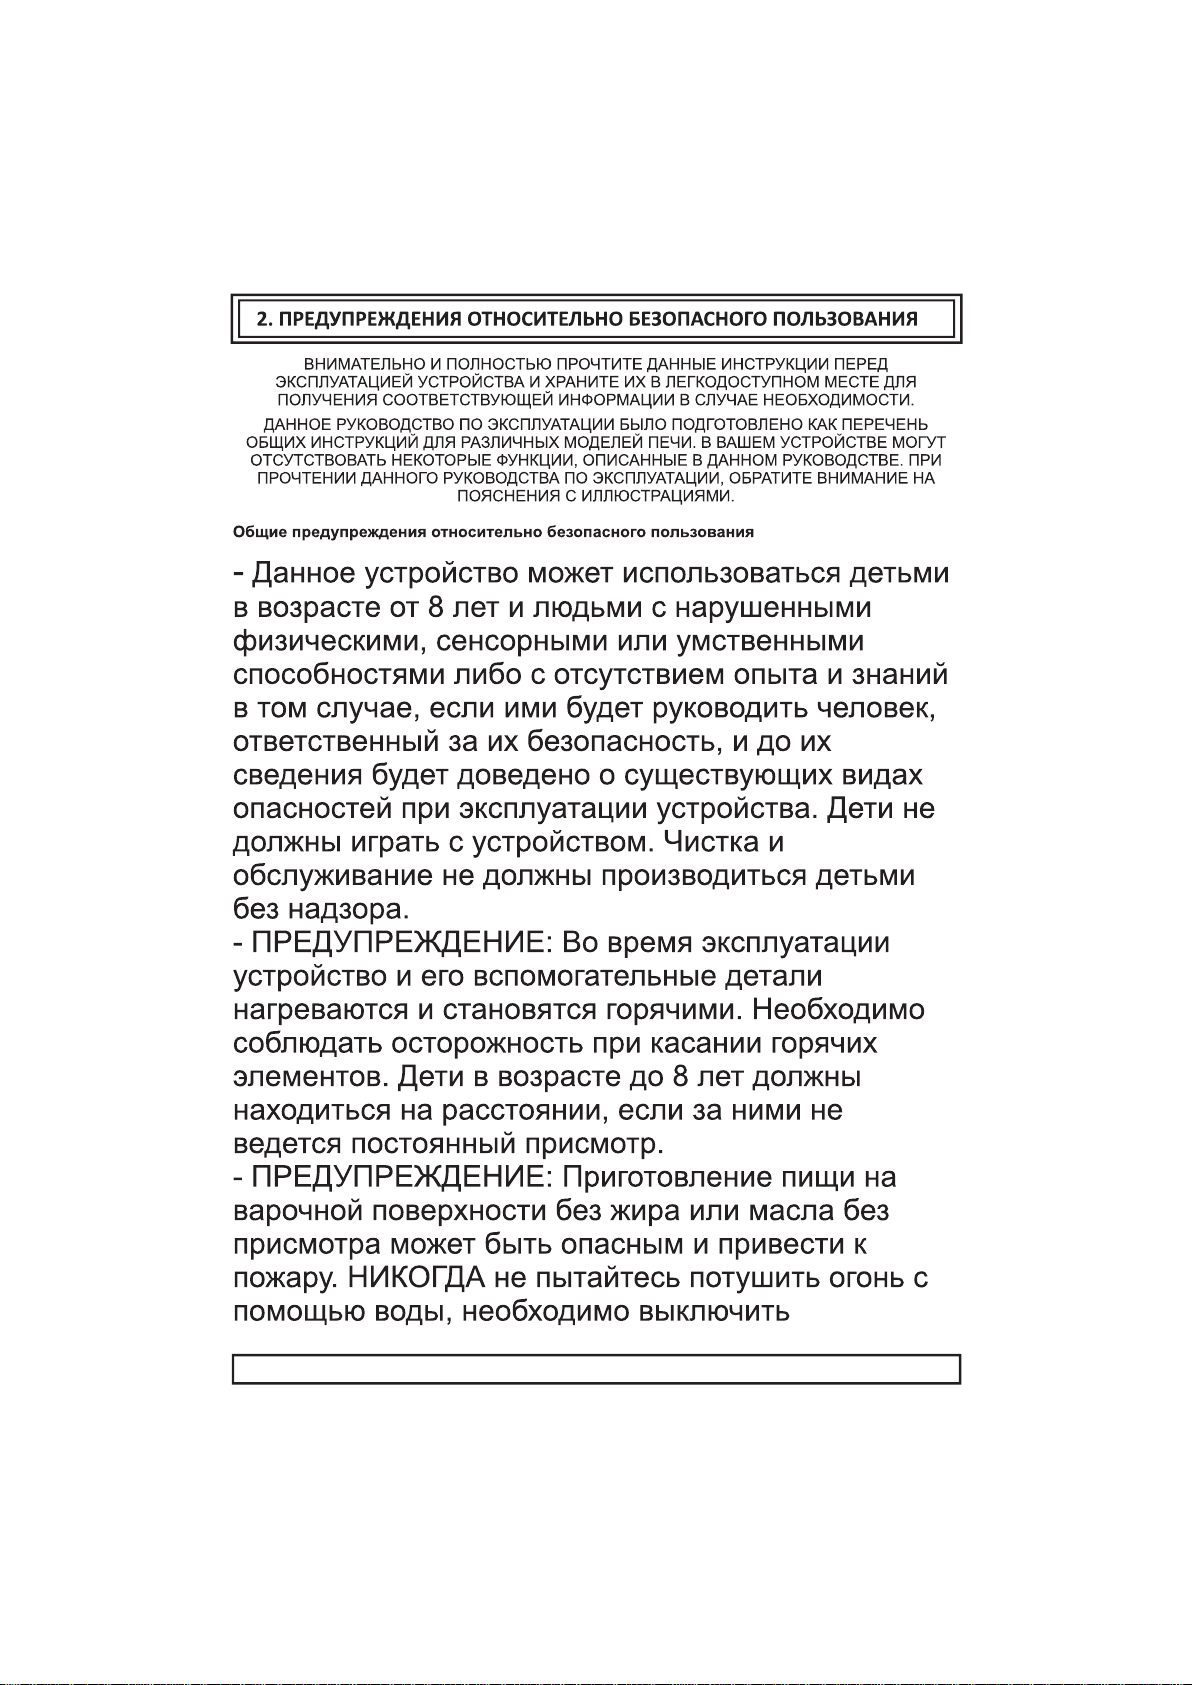
- This appliance can be used by children aged from 8
years and above and persons with reduced physical,
sensory or mental capabilities or lack of experience and
knowledge if they have been given supervision or instruction
concerning use of the appliance in a safe way and
understand the hazards involved. Children shall not play
with the appliance. Cleaning and user maintenance shall
not be made by children without supervision.
- WARNING: The appliance and its accessible parts become
hot during use. Care should be taken to avoid touching
heating elements. Children less than 8 years of age shall
be kept away unless continuously supervised.
- WARNING: Unattended cooking on a hob with fat or oil
can be dangerous and may result in fire. NEVER try to
extinguish a fire with water, but switch off the appliance
and then cover flame e.g. with a lid or a fire blanket.
- WARNING: Danger of fire: do not store items on the
cooking surfaces.
3
Page 30

- WARNING: If the surface is cracked, switch off the
appliance to avoid the possibility of electric shock.
- For hobs incorporating a lid, any spillage should be
removed from the lid before opening. And also the hob
surface should be allowed to cool before closing the lid.
- The appliance is not intended to be operated by means
of an external timer or separate remote-control system.
- Do not use harsh abrasive cleaners or sharp metal
scrapers to clean the oven door glass and other surface
since they can scratch the surface, which may result in
shattering of the glass or damage to the surface.
- Do not use steam cleaners for cleaning the appliance.
4
Page 31

- Your appliance is produced in accordance with all applicable local and international
standards and regulations.
- Maintenance and repair work must be made only by authorized service technicians.
Installation and repair work that is carried out by unauthorized technicians may endanger
you. It is dangerous to alter or modify the specifications of the appliance in any way.
- Prior to installation, ensure that the local distribution conditions (nature of the gas and
gas pressure or electricity voltage and frequency) and the requirements of the appliance
are compatible. The requirements for this appliance are stated on the label.
- CAUTION: This appliance is designed only for cooking food and is intended for indoor
domestic household use only and should not be used for any other purpose or in any
other application, such as for non-domestic use or in a commercial environment or
room heating.
- All possible security measures have been taken to ensure your safety. Since the glass
may break, you should be careful while cleaning to avoid scratching. Avoid hitting or
knocking on the glass with accessories.
- Ensure that the supply cord is not wedged during the installation. If the supply cord
qualified persons in order to prevent a hazard.
- Do not operate the appliance before it is fully installed.
- The appliance must be installed by an authorized technician and put into use. The
producer is not responsible for any damage that might be caused by defective placement
and installation by unauthorized people.
- When you unpack the appliance, make sure that it is not damaged during transportation.
In case of any defect; do not use the appliance and contact a qualified service agent
immediately. As the materials used for packaging (nylon, staplers, styrofoam...etc) may
cause harmful effects to children, they should be collected and removed immediately.
- Protect your appliance against atmospheric effects. Do not expose it to effects such
as sun, rain, snow etc.
- The surrounding materials of the appliance (cabinet) must be able to withstand a
temperature of min 100°C.
- The temperature rise of the underside of built-in hobs exceed 70 K. So the board
shall be installed underneath the hob.
- Supply cable shall not touch the hot parts of the hob.
5
Page 32

During usage
- Do not put flammable or combustible materials, in or near the appliance when it is
operating.
- Do not leave the cooker while cooking with solid or liquid oils. They may catch fire
on condition of extreme heating. Never pour water on to flames that are caused by oil.
Cover the saucepan or frypan with its cover in order to choke the flame that has occured
in this case and turn the cooker off.
- Always position pans over the centre of the cooking zone, and turn the handles to a
safe position so they cannot be knocked or grabbed.
- If you will not use the appliance for a long time, plug it off. Keep the main control
switch off. Also when you do not use the appliance, keep the gas valve off.
- Make sure the appliance control knobs are always in the "0" (stop) position when it
is not used.
During cleaning and maintenance
- Always turn the appliance off before operations such as cleaning or maintenance.
You can do it after plugging the appliance off or turning the main switches off.
- Do not remove the control knobs to clean the control panel.
TO MAINTAIN THE EFFICIENCY AND SAFETY OF YOUR APPLIANCE, WE
OUR AUTHORIZED SERVICE AGENTS IN CASE OF NEED.
6
Page 33
INSTALLATION
The electrical connection of this hob should be carried out by an
authorised service personal or a qualified electrician, according to the
instructions in this guide and in compliance with the current regulations.
· Before connecting your appliance to the mains at home, make sure to
check the conformity of voltage settings, which are specified on the information
sticker attached to the appliance and/or packaking, with the usage conditions
available.
· The laws, ordinances, directives and standards in force in the country of
use are to be followed (safety regulations, proper recycling in accordance
with the regulations, etc.)
Locating your built-in hob
After removing the packaging material from the appliance and its accessories,
ensure that the hob is not damaged. If you suspect any damage, do not use
the appliance and contact an authorised service personal or a qualified
electrician immediately.
· This built-in hob is to be inserted into a cut out of a worktop.
· Create an opening with the dimensions shown in next picture. The distance
between the rear edge of the hob and any adjacent wall is depend on wall
surface. Please don’t use easily combustible material like curtain, paper at
nearby hob.
7
Page 34
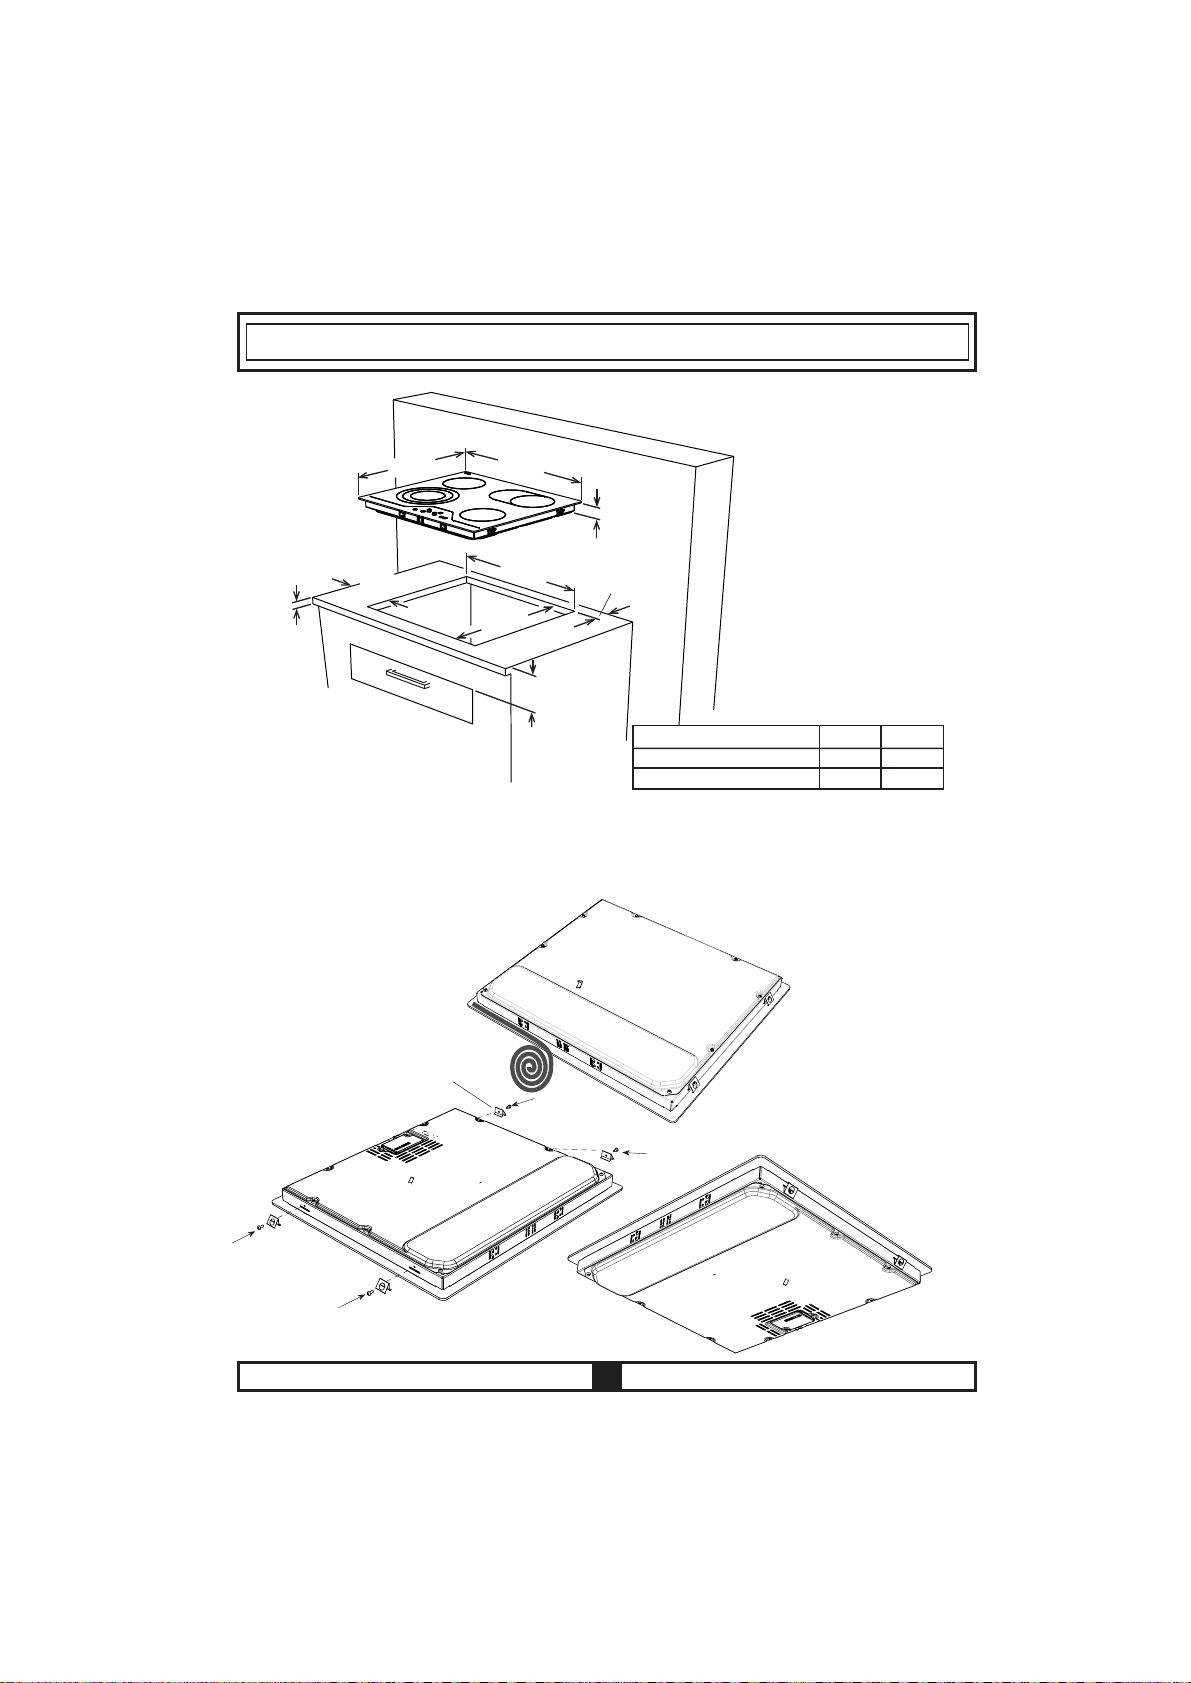
520mm
590mm
41mm
Min.
25mm
Min.
B
560mm
490mm
Min.
130mm
Min.
A
Neighboorhood walls
Combustible
Non-combustible 25
A
[mm]
60
B [mm]
150
40
· Apply the one-sided self-adhesive sealing tape supplied all the way round
the lower edge of the cooking surface along the outer edge of the glass
ceramic panel. Do not stretch it.
· Screw the 4 worktop mounting brackets on the side walls of product.
worktop mounting bracket
8
Page 35

Electrical connection of your hob
. Before proceeding with the electrical connection, verify that the current
carrying capacity of the system and the socket is adequate for the maximum
power rating of the hob.
· Electrical installation of the residence and the electrical current plug in
use must be earthed and conform with safety regulations.
· If there is no dedicated hob circuit and fused switch, they must be installed
by a qualified electrician before the hob is connected.
· Fused switch must be easily accessible once the hob has been installed.
· Do not use adaptors, multiple sockets and/or extension leads.
and
·
delayed functioning type must be installed inside the supply circuit.
9
Page 36
/
3x2,5 mm² 220V~
3x2,5 mm² 230V~
3x2,5 mm² 240V~
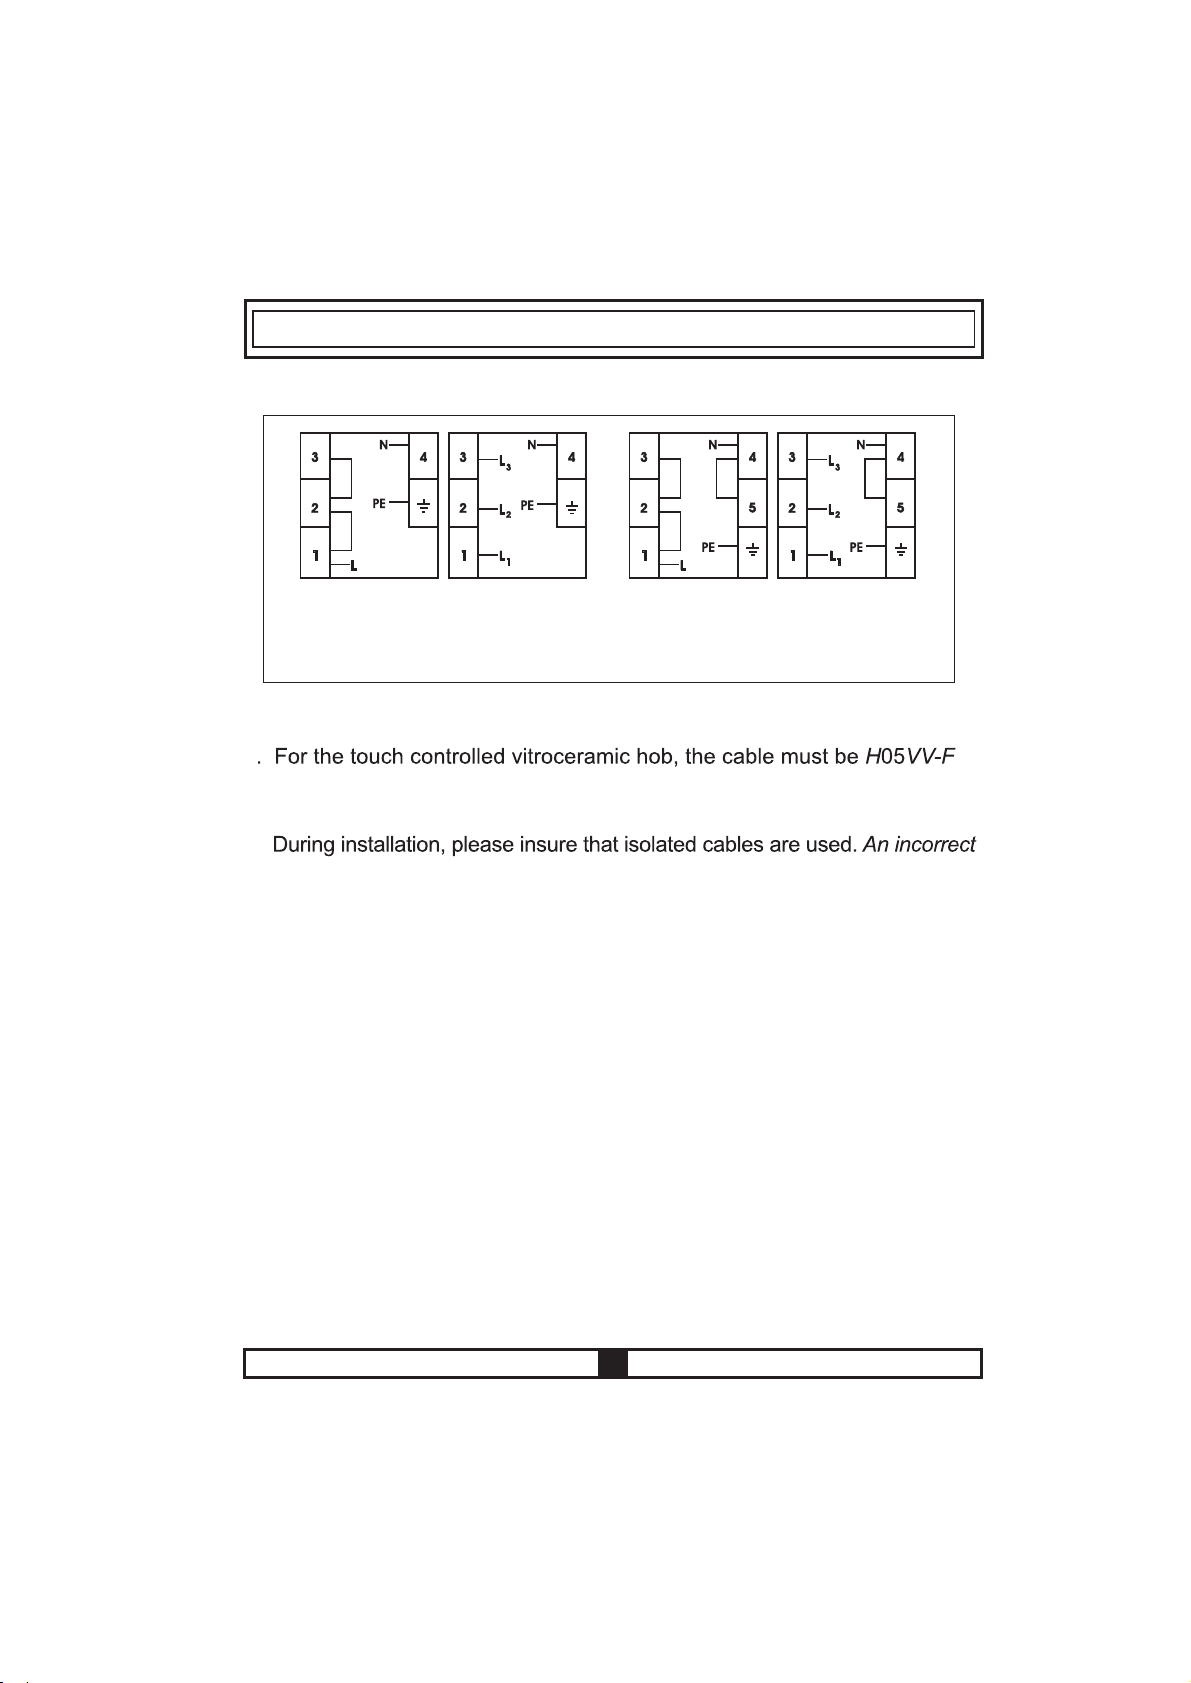
Supply cable connection can be differ according to terminal box type.
5x1.5 mm² 380V 3N~
5x1.5 mm² 400V 3N~
5x1.5 mm² 415V 3N~
3x2,5 mm² 220V~
3x2,5 mm² 230V~
3x2,5 mm² 240V~
5x1.5 mm² 380V 3N~
5x1.5 mm² 400V 3N~
5x1.5 mm² 415V 3N~
3X2,5 mm² / 60227 IEC 53. You will find the connection diagram shown
on the back of your appliance.
·
connection might damage your appliance. The guarantee will not cover
such damages.
· All repairs must be carried out by an authorised service personal or a
qualified electrician.
· Unplug your appliance before each maintenance. For reconnection, follow
the connection diagrams strictly.
10
Page 37
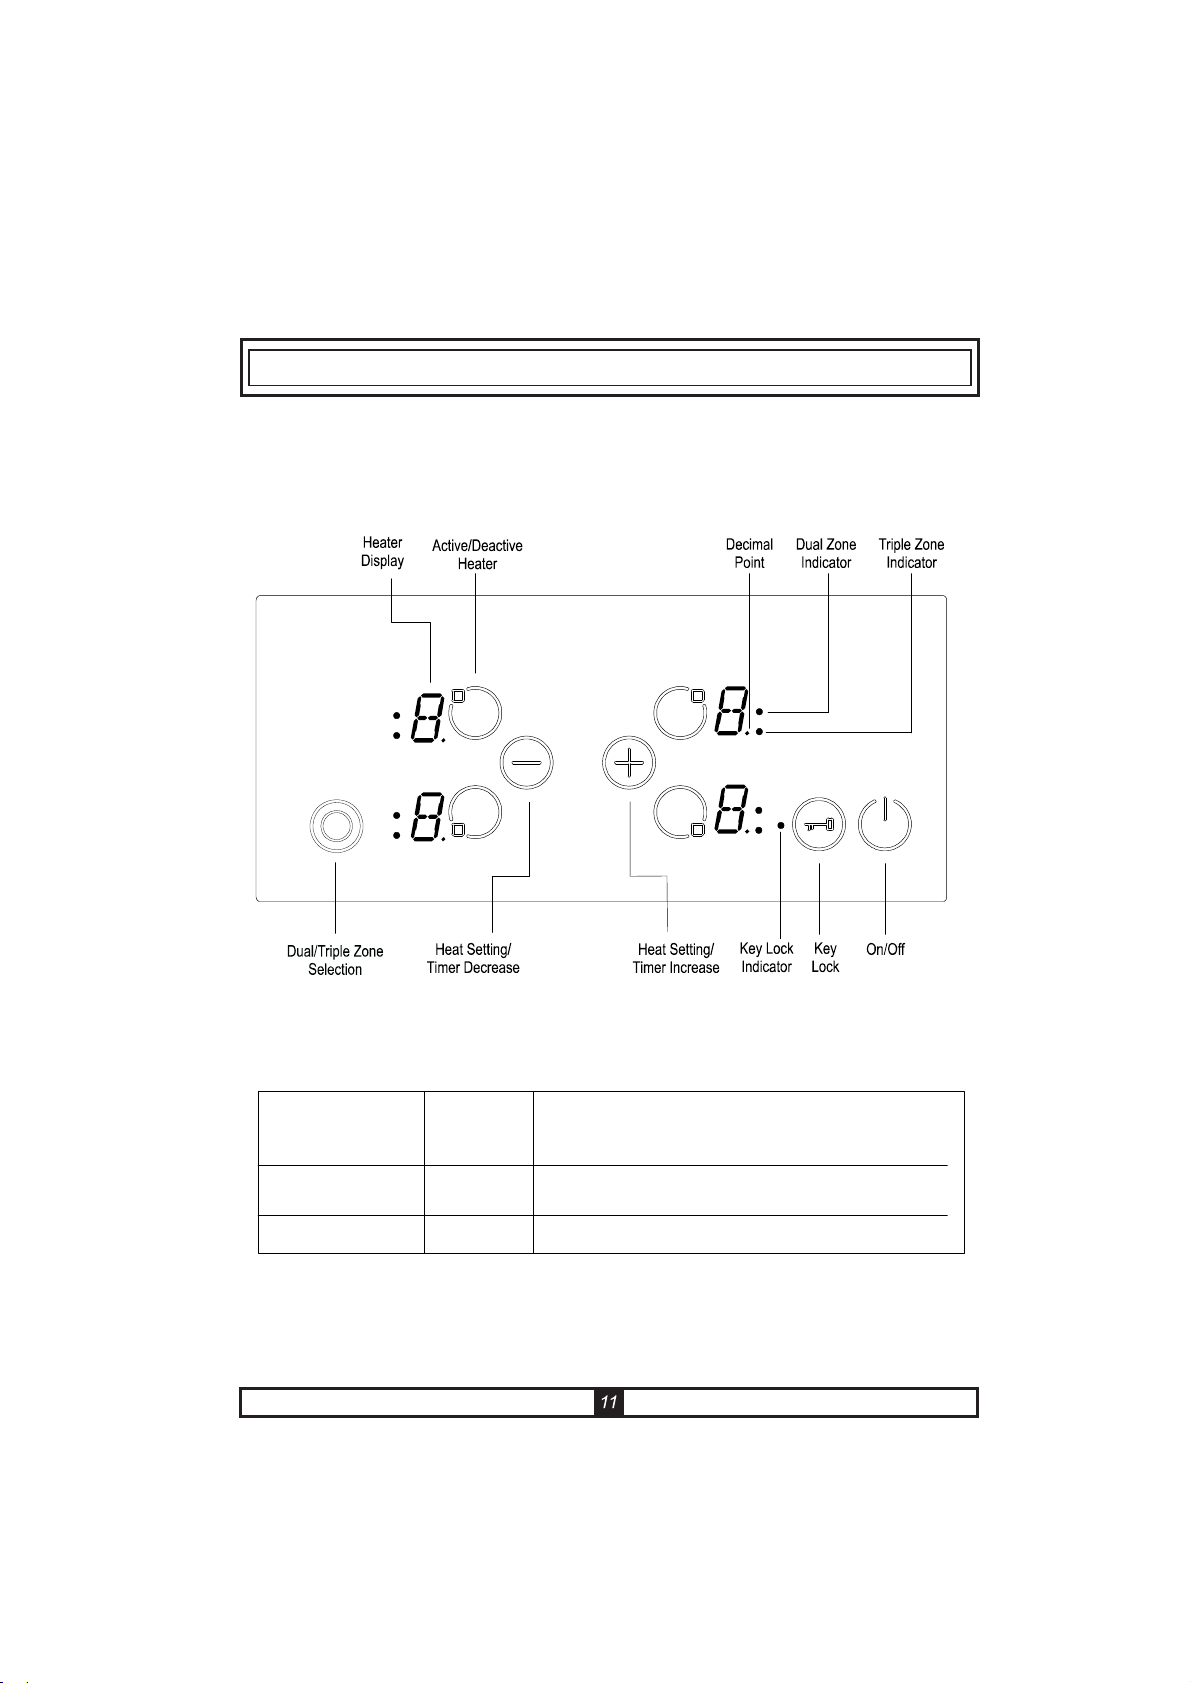
USAGE
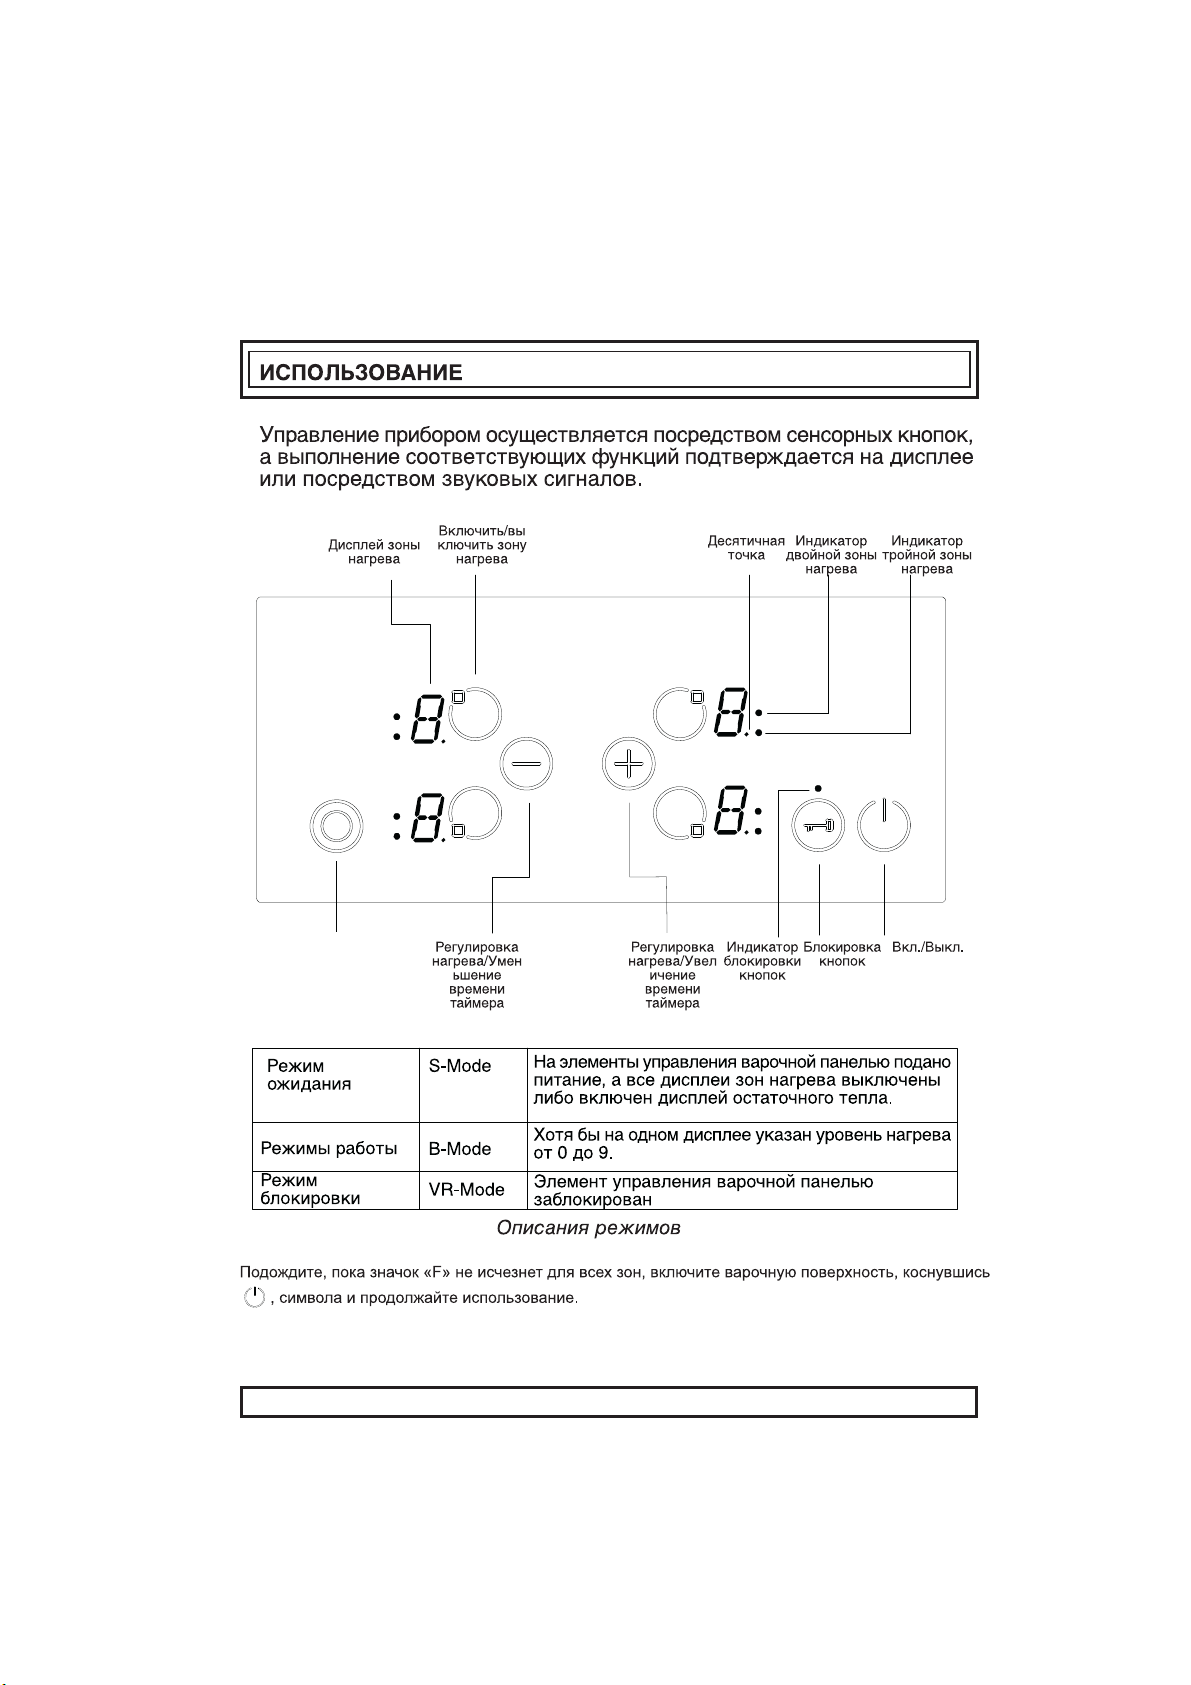
The appliance is operated by touching buttons and the functions are
confirmed by displays and acoustic signals.
Stand-By-Mode S-Mode
Operating-Mode
Lock Mode
B-Mode
VR-Mode
The mains are applied to the hob control
and all heater displays are off or a residual
heat display is active.
At least one heater display shows a heat
setting between ´0` and ´9`
The hob control is locked.
Mode Descriptions
Page 38
If the appliance is in Stand-By-Mode, it is put in Operating-Mode by pressing
successful operation acoustically.
On all heaters a ´0` appears and all Decimal Point of the heater flashes (1
sec on, 1 sec off).
If there is no operation within 10 sec, the display of all heaters will turn off.
If the displays are turned off, the heater will be set into Stand-By-Mode.
If is pressed more than 2 sec (in Operating-Mode), the appliance is
switched off and is set into the S-Mode again. The appliance can be turned
off by pressing at any time; even if other buttons are pressed
simultaneously.
If there is a residual heat of a heater remaining, this will be indicated in the
correspondent heat setting Heater Display.
Select Heater
If a single heater is chosen with the corresponding Active/Deactive Heater
Button , the Decimal Point of the related Heater Display flashes. For the
Heat Setting Buttons or .
The buttons must be pressed within 3 sec, otherwise the heater selection
is erased and heat setting dot will disappear (Decimal Point). If there is no
further operation within 10 sec, the heater falls back into the S-Mode.
The heat setting can always be changed by pressing or between
level 1-9.
Each button operation or each display change is quitted by a buzzer signal.
12
Page 39

All heaters are equipped with heat boost functionality.
If the heat boost is active, than the heater will be operated with maximum
power for the period of the heat boost time, that is dependent from the
selected heat setting. This is indicated through a flashing ´A`, alternating
with the heat setting value (e.g. 0,5 sec ´A` and 0,5 sec ´9`) in the heater
display. Once the heat boost time ended only the heat setting will be indicated.
will be indicated alternating. This means that level 9 and heat boost is active
Page 40
The heat boost can be turned off by pressing until heat setting ´0`
appears.
If the heat boost should be used, it can always be activated by actuating
again if the heat setting is set to level 9. In the heat display ´A/9` flashes.
Turn Off Individual Heaters
. Simultaneous operation of and buttons
· Reduction of the heat setting to ´0` by operating button
· Use of timer turn off function for the corresponding heater
Simultaneous operation of and buttons
The corresponding heater must be chosen with the Active/Deactive Heater
Button , the Decimal Point of the related Heater Display flashes. To turn
signal sounds and ´0` appears in the heat setting display.
display and also the related timer Cooking Zone Indicator Timer Function
and the Timer Display is turned off.
If there is a residual heat for this heater remaining, this will be indicated by
a static display ´H` in the heat setting display.
Reduction of the heat setting to ´0` by operating button
The heater can also be turned off by reducing the operated heat setting to
´0`.
When Heater Display indicates ´0`, an associated Decimal Point of the
heater will also be turned off.
but also the related timer Cooking Zone Indicator and the Timer Display is
turned off.
If there is a residual heat for this heater remaining, this will be indicated by
a static display ´H` in the heat setting display.
14
Page 41

10 sec after the last operation, the timer display changes to the timer that
will run out next.
The assignment of that timer is displayed always by a flashing Cooking
Zone Indicator. How many timer are running you can identify by the number
of Cooking Zone Indicator that are statically on.
By toggling , you can display the timer values for the heater timer and
the minute minder. The assignment is always indicated by the flashing
Cooking Zone Indicator. If no Cooking Zone Indicator flashes, the minute
minder time is shown in the 2-digit Timer Display.
All heater timers can be erased by switching off the appliance into the S-
until run out.
To erase a timer in Operation Mode, you first have to select the timer by
toggling the Active/Deactive Timer Button until it is displayed. The value
can be erased then in 2 different ways:
· Decrement by touching until ´00` appears on the Timer Display.
· Touch and simultaneously for 0,5sec until ´00` is shown in Timer
Display.
set to ´0`.
The heater timer or minute minder run out is indicated acoustically by a
buzzer tone. This will be erased by touching any button for acknowledgement.
Key Lock
Key lock functionality is for blocking and set the appliance into a save
modus during operation. Touch modifications as for example rise heat
settings and others should not be possible. It is only possible to switch the
appliance off.
The lock function is active, if the Key Lock button is pressed at least 2
of more than 2 sec, the Key Lock Indicator flashes and the heater is locked.
The heater can only be locked in Operating Mode (B-Mode).
17
Page 42

If the heater is locked, only can be operated, all other buttons are blocked.
If there is any other button operated in the blocked mode, the buzzer signal
sounds and the Key Lock Indicator flashes as indication for the activated
key lock functionality. Only the switch off by operation of is possible. But
if you switched off the appliance, you can not restart it again without
unlocking.
control is unlocked and can be operated in normal order.
Child Lock
Child lock functionality is foreseen to lock the appliance in a complicated
Multi-Step process.
Child locking and unlocking is only available in the S-Mode.
First has to be pressed until the buzzer beeps, then the and have
to be pressed for at least 0,5 sec, but max 1 sec. simultaneously. Following
´L` is showed as a confirmation.
In the case the minute minder is still running, it will proceed until ´00` is
appliance is fully locked. None of the buttons can be used as long as the
appliance is locked.
18
Page 43

pressing until the beep, then the and have to be pressed
a confirmation for successful unlocking, ´L` symbol in the displays will be
erased immediately.
19
Page 44

TOUCH CONTROL SAFETY FUNCTIONS
The following safety functions are available to avoid unintended operations
of the hob control.
Sensor Safety Cut Off
To prevent the appliance from unwanted, random sensor operation, a sensor
monitoring is included.
In case of one or more buttons are pressed longer than 12 sec, the sensor
monitoring routine indicates acoustically that wrong operation (pot or other
object placed on the button, sensor failure, etc.) and switches off the
appliance.
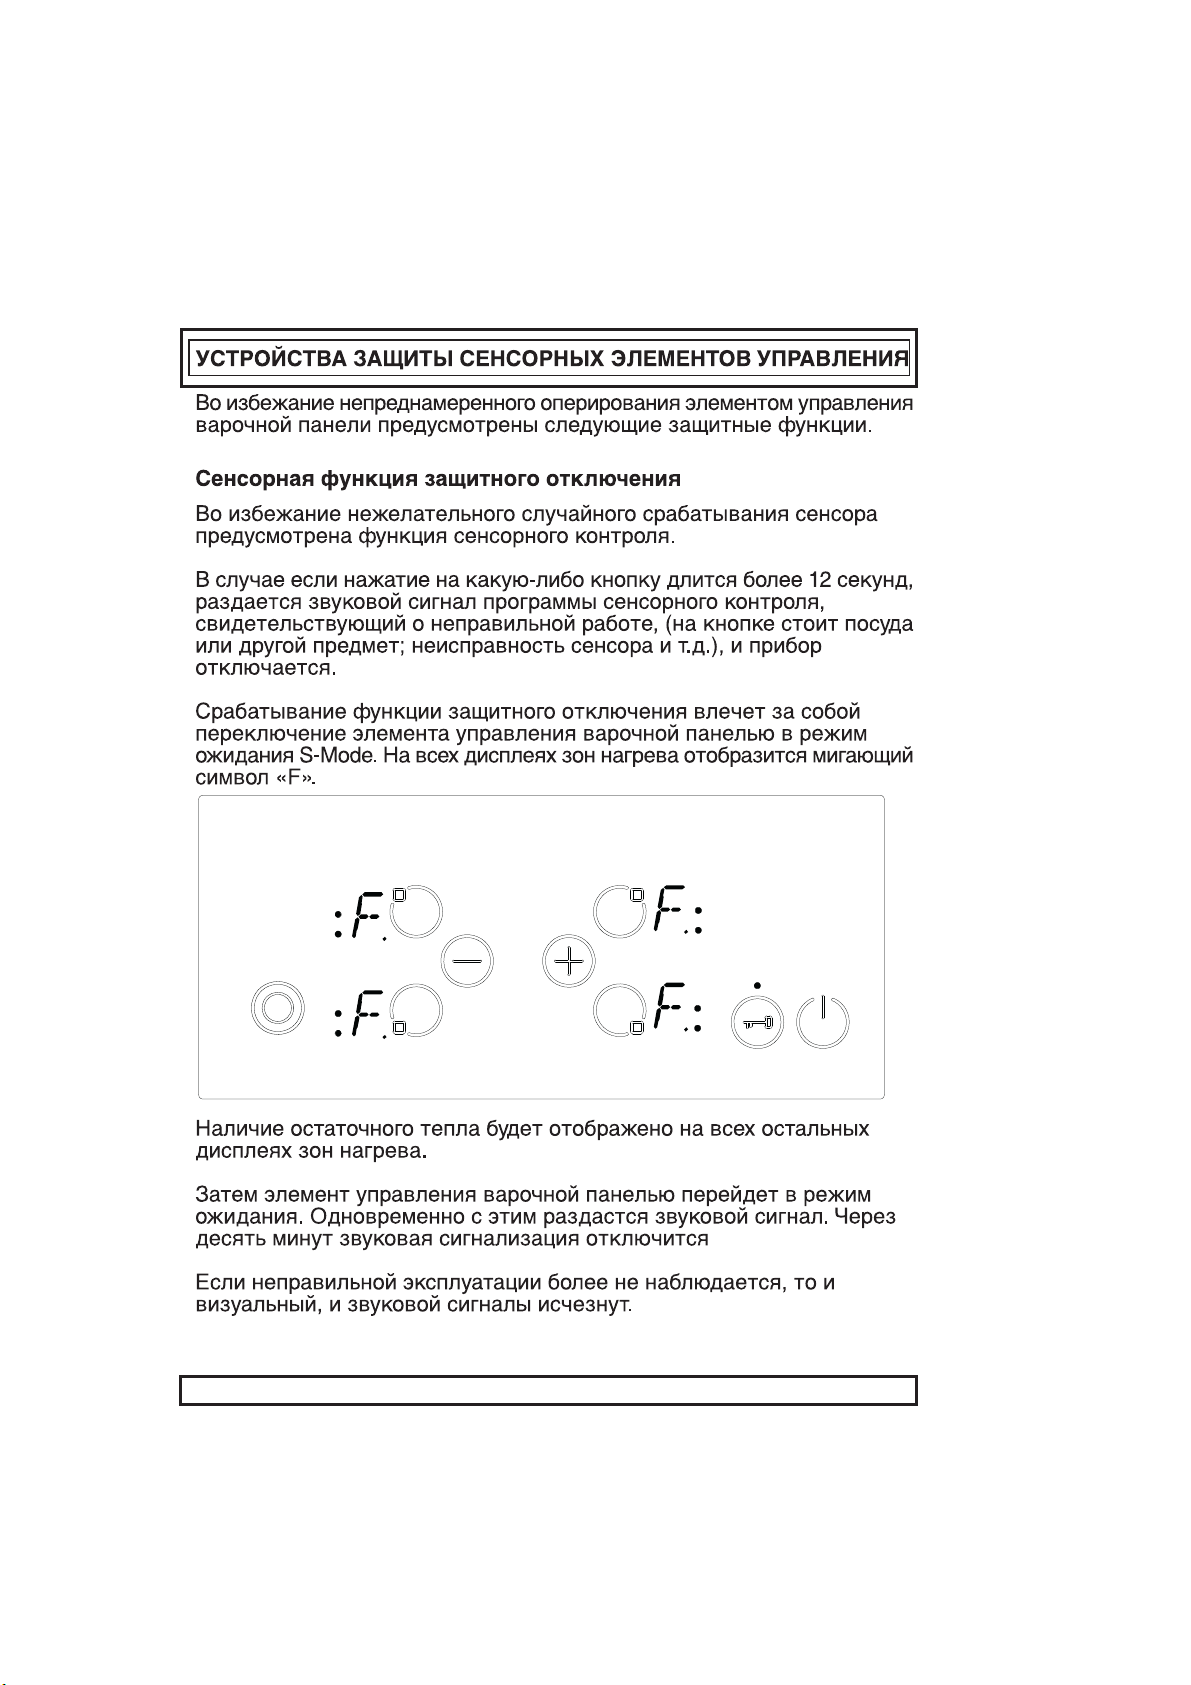
The safety turn off causes that the hob control is turned off to the S-Mode.
An ´F` will flash in all heater displays.
If residual heat is present, it will be displayed in all other heater displays.
the acoustic signal will disappear.
20
Page 45

Over Temperature Switch Off
Due to the placement of the control is very close to the heater in the middle
front of the hob, it can occur that a not correctly placed pot half on the
control and not sensed by the sensor safety cut off (not covering a button)
heats up the hob to a very high temperature, which makes the glass and
the buttons untouchable without get burned the finger.
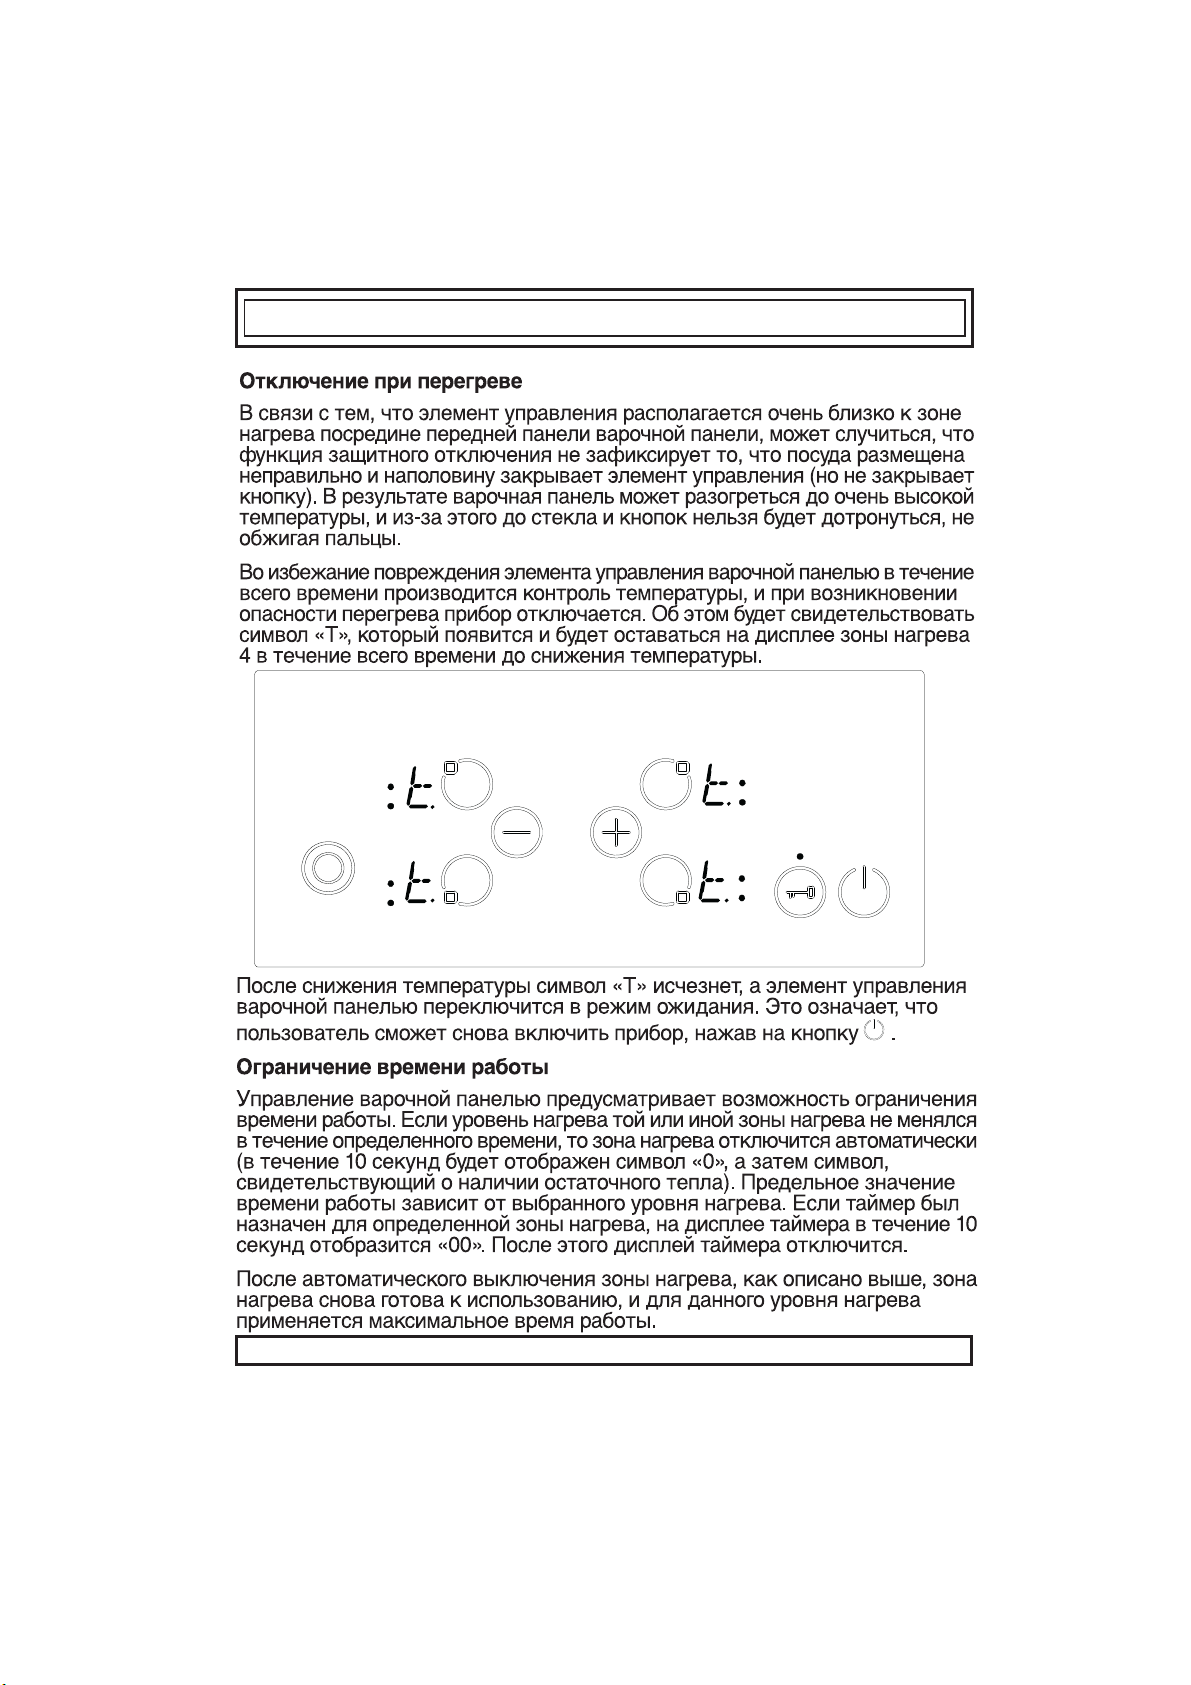
To prevent the hob control unit from damage, the control monitors all the
time the temperature and switches off in case of overheating emergency.
It is indicated in the heater 4 heater display with the letter ´t` for all the time
until the temperature decreases.
After the temperature falling, the ´t` displays will be erased and the hob
control unit falls back into the S-Mode. This means that the user can
reactivate the appliance by touching .
Operating Time Limitations
The hob control unit has a limitation of the operating time. If the heat setting
for this heater has not been changed for a certain time, than the heater will
turn off automatically (for 10 sec a ´0` is displayed, afterwards the residual
heat). The limit of the operating time depends of the selected heat setting.
If a timer was associated with the heater than a ´00` will be displays on the
operable again and the maximum operating time for this heat setting is
applied.
21
Page 46

Residual Heat Functions
After all cooking processes there is some heat stored in the vitroceramic
glass called residual heat. The control can calculate roughly how hot the
glass is in the worst case. If the calculated temperature is higher than + 60
° C, then this will be indicated in the corresponding heater display after the
heater or the hob control was turned off. The residual heat display is shown
as long as the calculated heater temperature is > + 60 ° C.
The display of the residual heat has the lowest priority and is overwritten
by every other display value, during safety turn offs and displaying an error
code.
After reapplying the supply voltage to the hob control after an interruption
of the supply voltage occurred, causes that the residual heat display flashes,
if the corresponding heater had a residual heat of greater + 60 ° C before
the power interruption occurred. The display will flash until the max. residual
heat time has expired or the heater will be selected and activated.
22
Page 47

Cookware with rough bottoms should not be used since these can scratch
the glass ceramic surface. The bottom of the good cookwares should be as
thick and flat as possible. Before use, make sure that cookware bottoms
are clean and dry.
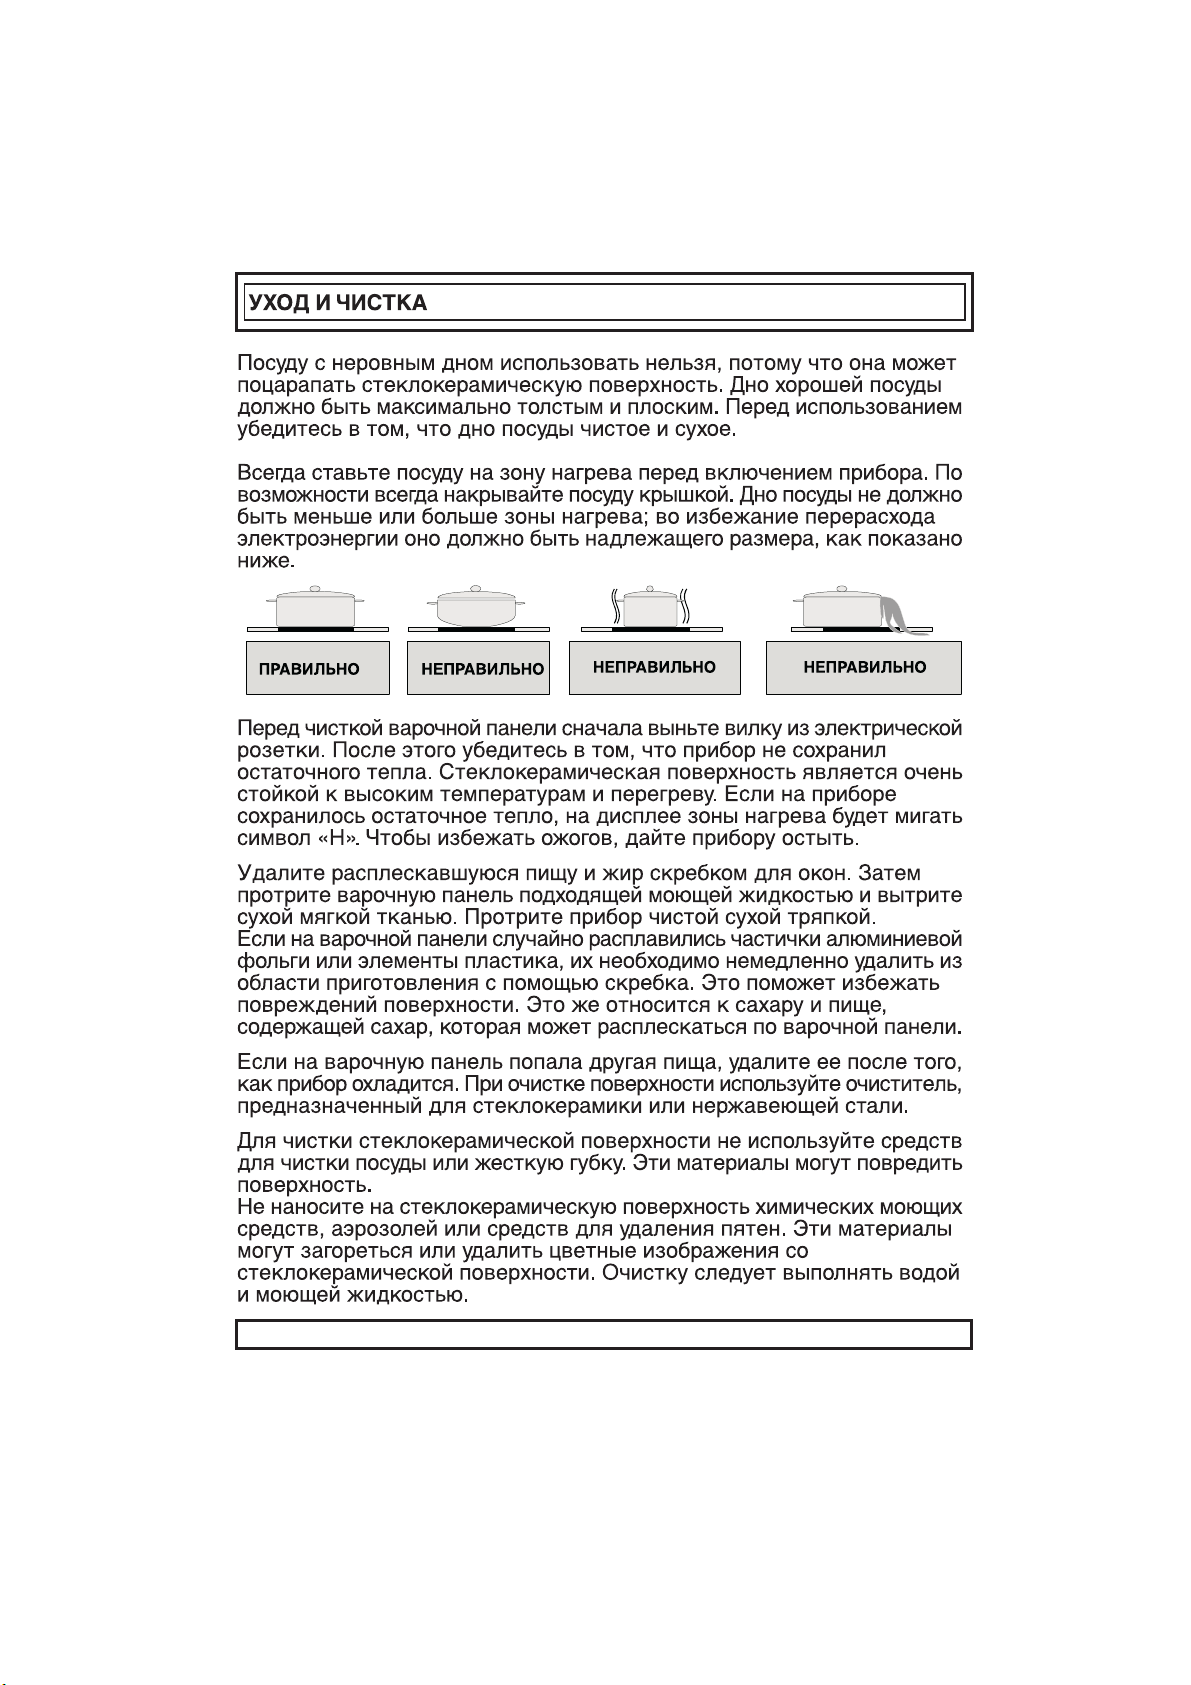
Always place the cookware on the cooking zone before it is switched on.
If possible, always place the lids on the cookware. Bottom of cookwares
must not be smaller or larger than the cooking zones, they should be at the
CORRECT FALSE FALSE FALSE
Before cleaning the hob, first remove the plug from the electrical supply
socket. Then ensure that there is no residual heat stored in the appliance.
Vitroceramic glass is very resistant to high temperature and overheating.
If there is residual heat stored in the appliance, ´H` is flashing in the Heater
Display. In order to avoid burns, let the appliance cool down.
Remove all split food and fat with a window scrape. Then wipe the hob with
a suitable washing up liquid and a clean damp cloth. Rub the appliance
using a clean dry cloth.
If aluminium foil or plastic items are accidentally melt on the hob surface,
they should be immediately removed from the hot cooking area with a
scraper. This will avoid any possible damage to the surface. This also applies
to sugar or food containing sugar may be spilled on the hob.
In the event of other food melt on the hob surface, remove the dirt when the
appliance has cooled down. Use cleaner for glass ceramic or stainless steel
when cleaning the surface.
Do not use dishcloth or abrasive sponge to clean the vitroceramic surface.
These materials may damage the surface.
Do not use chemical detergents, sprays or spot removers on the vitroceramic
surface. These materials may cause fire or vitroceramic color fade. Clean
with water and washing up liquid.
23
Page 48
Production date is encoded in the number printed on the lower right corner of the
sticker on the product. For example, 20636701071123 where 07 refers to the year,
11 month and 23 day
The symbol on the product or on its packaging indicates that
this product may not be treated as household waste. Instead it shall
be handed over to the applicable collection point for the recycling
of electrical and electronic equipment. By ensuring this product is
disposed of correctly, you will help prevent potential negative
consequences for the environment and human health, which could
otherwise be caused by inappropriate waste handling of this
product. For more detailed information about recycling of this
product, please contact your local city office, your household
waste disposal service or the shop where you purchased the
product.
52204426
 Loading...