

Page 1

MCCD-2616
CD MP3 MICROSYSTEM
WITH iPHONE DOCK
USER MANUAL
Please read and keep these instructions
For instruction manual in another language, check online at
http://manuel-utilisateur.logisav.fr
Page 2
Important safety instructions ȉ please read carefully
and keep for future reference
To reduce the risk of fire or electric shock, do not expose this product to
water, rain or moisture. To prevent the risk of electric shock, do not remove
the cover or back of this product. In case of product failure, only qualified
personnel can repair. There are no user-serviceable parts inside.
Use of controls, adjustments, or performance of procedures other than those
specified herein may result in dangerous radiation exposure. This product is
rated as LASER CLASS 1 PRODUCT.
CAUTION: Laser radiation when open - never stare into the laser beam.
CAUTION !
Dangerous tension inside the product ! Do not open. Risk of electric shock ! No parts
can be repaired by the end-user. Only qualified personnel can repair and maintain this
product.
If the electric cord is damaged, it must be replaced by the manufacturer or qualified aftersales personnel in order to avoid any danger.
The product must be installed in accordance with local laws.
Damaged batteries must be properly disposed. In order to protect the environment,
please
dispose the batteries properly, in accordance with local laws (information is available at your
reseller).
Where to install the product
- Place the product on a straight, rigid and stable place. Do not place the product on a
carpet.
- Do not place the product on top of another that may cause overheating (for example,
a receiver or amplifier).
- Do not place anything underneath the product (for example, CDs or magazines).
Proper ventilation
- Place the
product in a sufficientlyȉaerated place to avoid overheating. Allow at least
10cm spacing at the back and top of the product, and 5cm spacing on both sides to
prevent overheating.
- Do not place items such as newspapers, tablecloth, curtains, in front of the ventilating
openings.
Do not expose the product to high temperatures, moisture, water and dust.
- The apparatus shall not be exposed to dripping or splashing. No object filled with
liquids, such as vases, shall be pl
aced on the apparatus.
- Do not place other items close to this product that may damage it (for example,
objects containing water or lightened candles).
- No naked flame sources, such as lighted candles, should be placed on the apparatus.
Page 3
Electric supply
- Please unplug the product in case of prolonged non-use.
- If the supply cable is damaged, it must be replaced by the manufacturer or qualified
after-sales personnel to avoid any danger.
- This product must be connected to an electrical supply 230V ~ 50Hz.
- The mains plug is used as the disconnect device, so the disconnect device shall
remain readily operable
This product is compliant with directives 2006/95/CE (abrogating the directive
73/23/CEE modified by the directive 93/68/CEE) and 2004/108/CE
(abrogating the directive 89/336CEE).
- This logo set on the product means that the recycling of this apparatus comes within the
framework of the directive 2002/96/EC of January 27, 2003 concerning the waste on
electrical and electronic equipment (WEEE).
- The presence of dangerous substances in the electrical and electronic equipments can
have potential consequences on the environment and human health in the cycle of
reprocessing this product.
- Therefore, at the end of its lifetime
, this product shall not be disposed with other non-
recycled waste.
- As the end user, your role is of prime importance in the cycles of re-using, recycling, and
other forms of valorization of this electrical and electronic equipment. Local authorities and
resellers have set special procedures for the purpose of collecting and recycling this
product.
- You have the obligation to use the selective waste collection systems put in place by your
local authorities.
Page 4

INDEX
LOCATION OF CONTROL
REMOTE CONTROL
POWER SOURCE
RADIO OPERATION
CD / MP3 OPERATION
iPOD / iPHONE DOCK
OTHER FEATURES
TROUBLE SHOOTING
E-3
E-4
E-4
E-5
E-6
E-7
E-8---E-11
E-12
Page 5
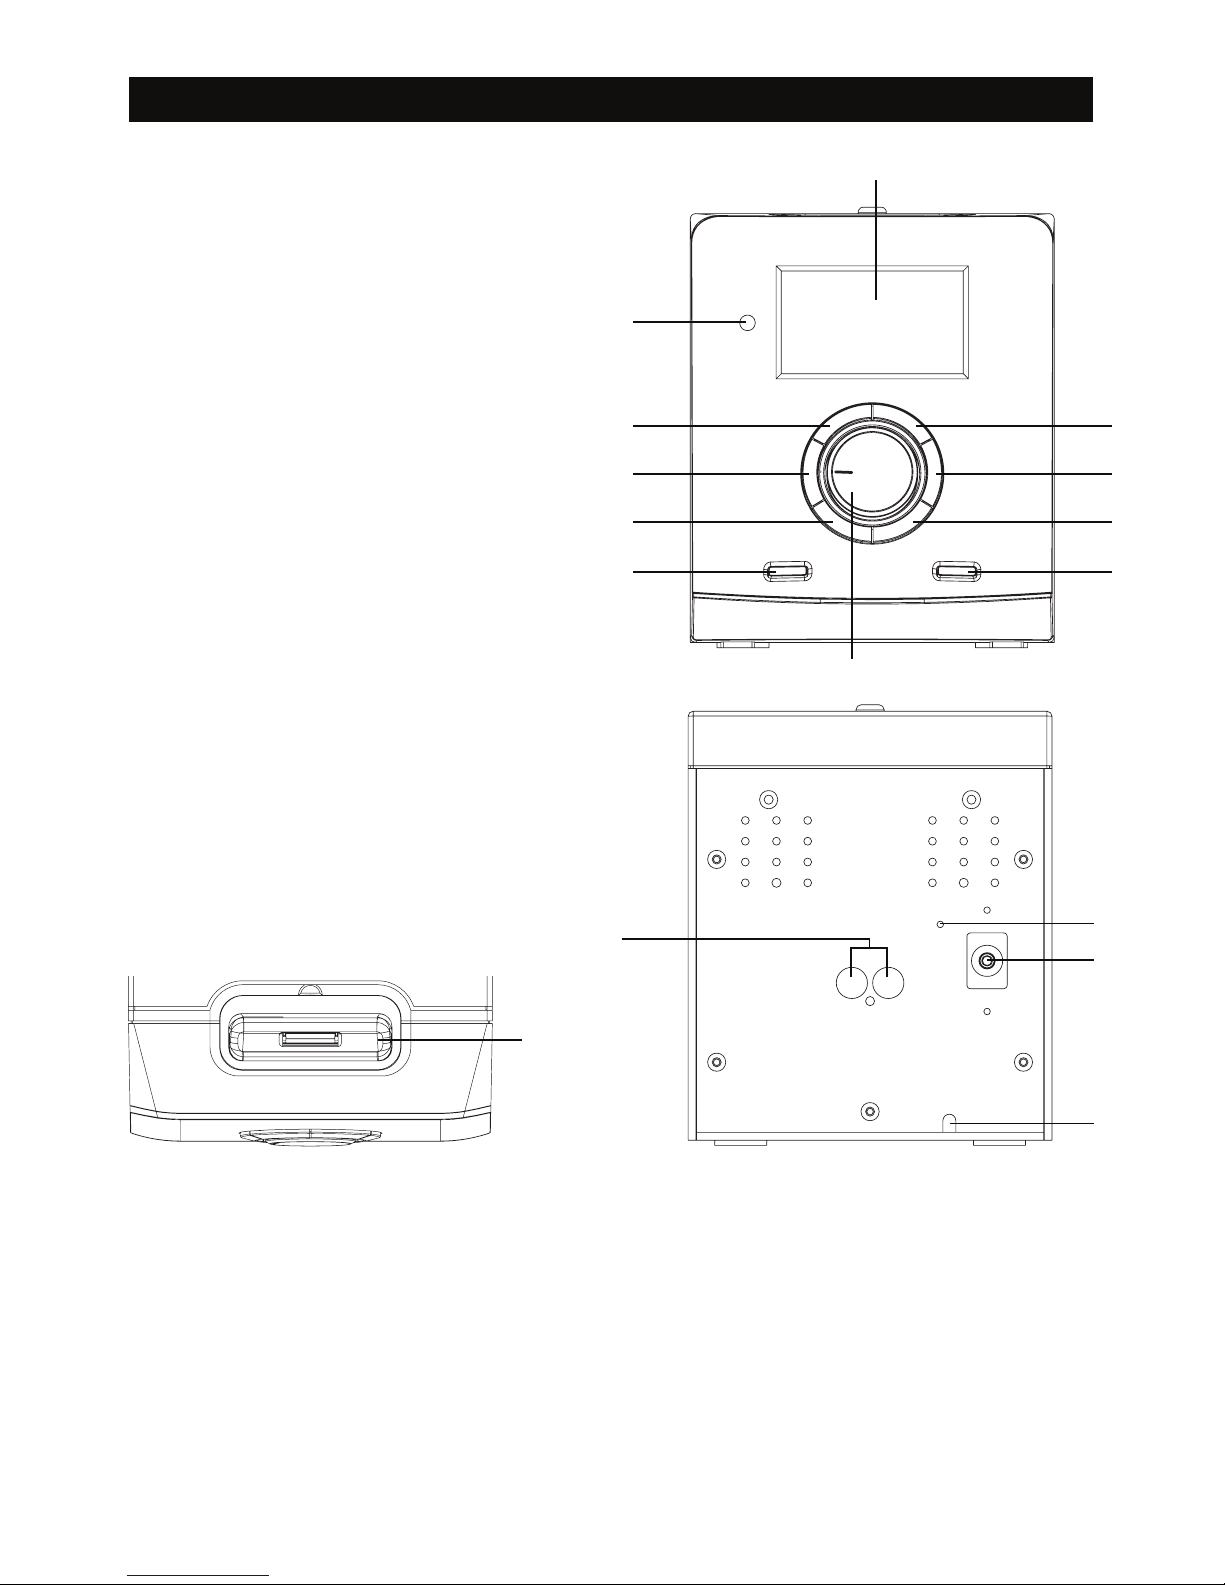
LOCATION OF CONTROL
E-3
16
1) LCD DISPLAY
2) REMOTE SENSOR
3) STOP
4) SKIP -
5) FOLDER DOWN
6) STANDBY
7) PLAY / PAUSE
8) SKIP +
9) FOLDER UP
10) FUNCTION
11) VOLUME CONTROL
12) SPEAKER JACKS (L / R)
13) FM ANTENNA
14) AUX-IN JACK
15) AC POWER CORD
16) iPOD / iPHONE DOCK
1
11
3
2
4
5
7
8
9
6 10
12
13
14
15
Page 6
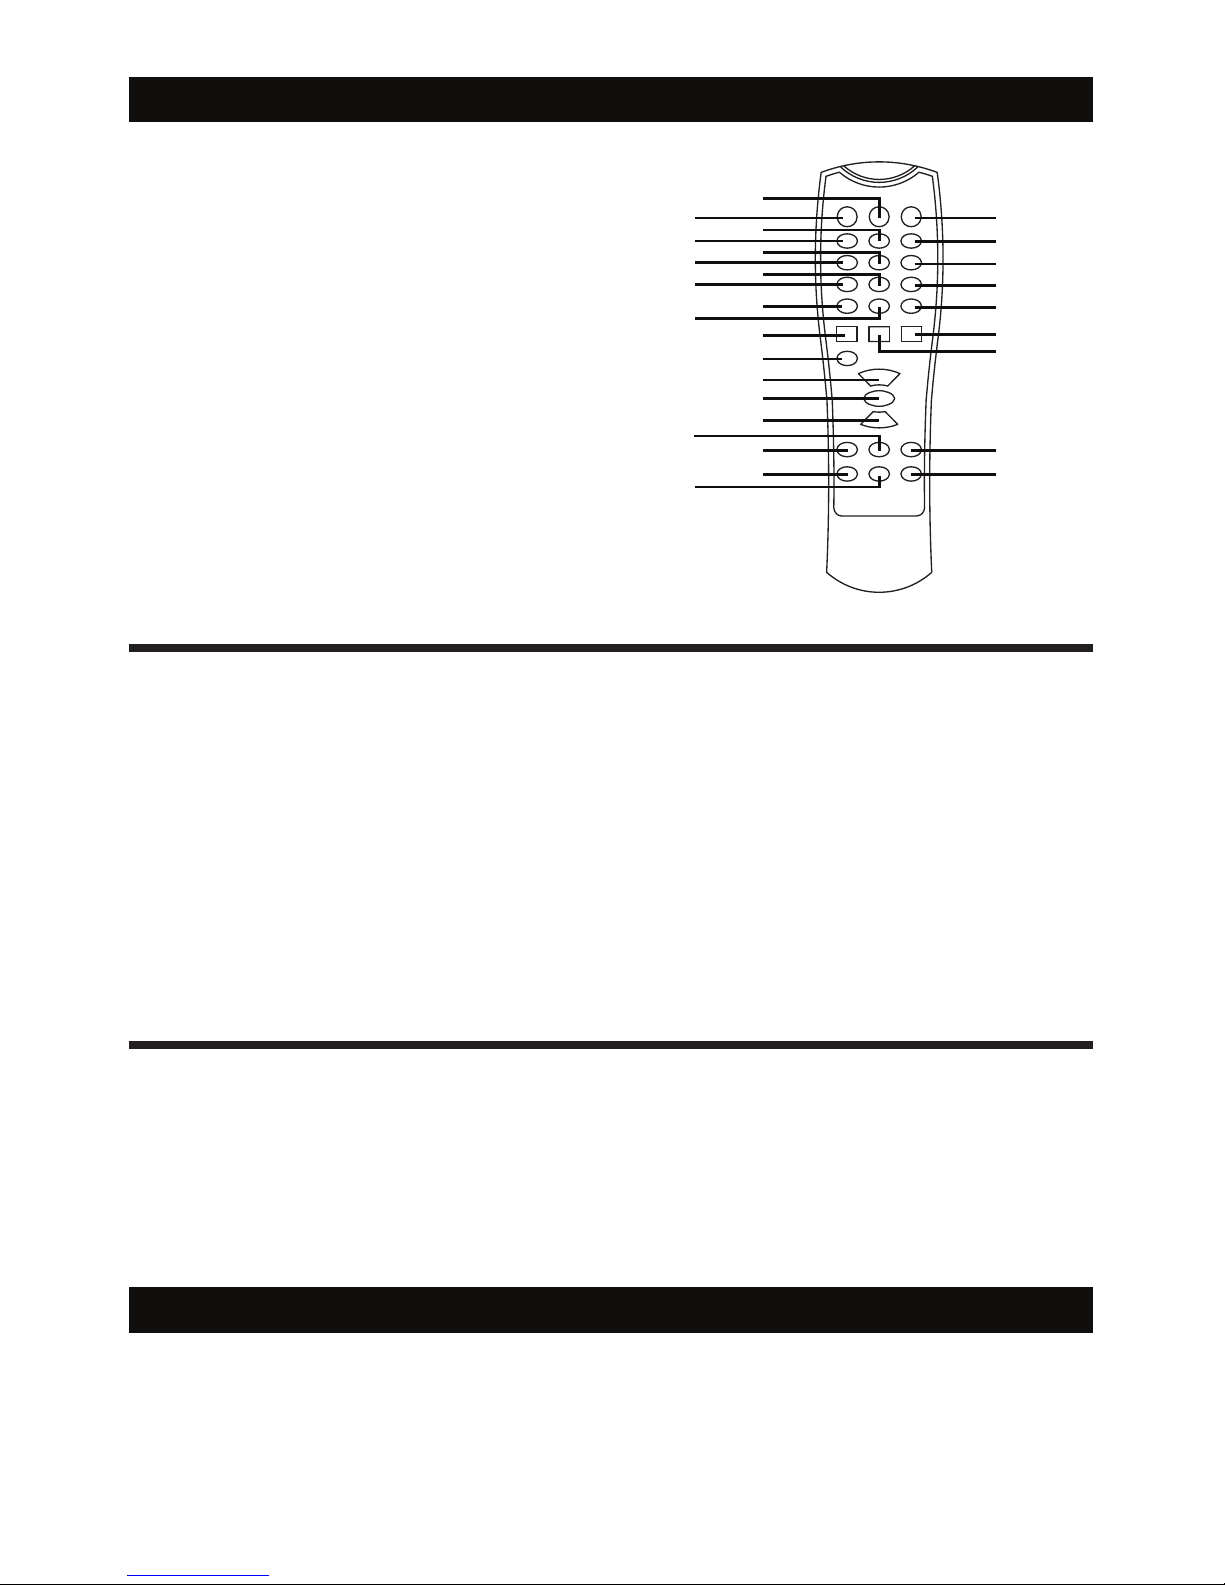
1. CLOCK
2. STANDBY
3. PRE - DN
4. TIMER
5. SNOOZE
6. SLEEP
7. FOLDER +
8. FOLDER -
9. MONO / ST.
10. INFO
11. SKIP -
12. REPEAT
BATTERY INSTALLATION
Insert 2 x “AAA” size batteries into the battery compartment. Be sure that the batteries are inserted
correctly to avoid damage to the remote control. Always remove the batteries when the remote
control will not be used for a long period of time, as this will cause leakage to the batterie s and
subsequently damage to your set.
Notes:
- Use batteries of the same type. Never use different types of batteries together.
-- If the distance required between the remote control and the appliance decreases, the batt eries
ar
Batteries are not provided.
e exhausted. In this case replace the batteries with new one.
SENSOR WINDOW OF THE RECEIVER
- Even if the remote control is operated within the effective range, its operation may be impossible if
there are any obstacies between the appliance and the remote control.
- If the remote control is operated near other appliances which generate infrared rays, or if other
remote control devices using infrared rays are used near the appliance, it may operate incorrectly.
REMOTE CONTROL
13. VOLUME +
14. PLAY / PAUSE
1
20
21
22
23
24
25
11
26
2
3
4
5
6
7
8
9
10
12
13
14
15
17
16
18
27
19
28
15. VOLUME -
16. MENU
17. EQ
18. MENU DN
19. ENTER
20. MUTE
21. PRE-UP
22. INTRO
23. MEMORY
24. RANDOM
25. SKIP +
26. FUNCTION
27. MENU UP
28. STOP
E-4
AC POWER
You can power your appliance by plugging the AC power cord at the back of the appliance into a wall
AC power outlet. Check that the rated voltage of your appliance matches your local voltage.
POWER SOURCE
Page 7

RADIO OPERATION
AUTOMATIC TUNING
MANUAL TUNING
It is for selecting stations, which cannot be tuned automatically. (manual selection)
To tune a channel manually.
1. Press the “FUNCTION” button to select “TUNER” mode.
2. Adjust the frequency by pressing “SKIP +” or “SKIP -” the frequency changes by a fixed step:
FM: 0.1 MHz steps
1. Press the “FUNCTION” button to select “TUNER” mode.
2. Press and hold the “SKIP +” or “SKIP -” button over 3 seconds to start automatic tuning process.
3. When a station is tuned in the tuning proces
s, it will stop automatically and you can listen to your
desired station.
MEMORY PRESET
1. Repeat step 1 to 3 in the AUTOMATIC TUNING procedures.
2. Press the “MEMORY” button on the remote to start the preset process.
3. Display will show the memory sequence number and a flashing “01”.
4. Press the “PRE-UP” or “PRE-DN -” button on the remote to determine the preset
station number.
5. Press again the “MEMORY” button on the remote to preset your desired station.
6. Once all the stations were preset, press the “PRE-UP” or “PRE-DN -” button on the remote
Notes:
FM can be stored up to 30 stations.
to listen to your desired station.
MONO / STEREO
Press the “MONO / ST.” button to achieve the best frequency.
E-5
Page 8

CD / MP3 OPERATION
E-6
GENERAL OPERATION
PLAY / PAUSE Press to start playing CD / MP3 disc.
Press again to stop playing CD / MP3 operation temporarily.
Press again to resume playback.
SKIP + & Press to go to the next track or back to the previous track.
SKIP - Press and hold while playing until you find the point you want to play.
STOP Press to stop all CD / MP3 operation.
PLAYBACK
3. Press the “FUNCTION” button to select “CD / MP3” mode.
1. Open the CD door and place a CD / MP3 disc with the label up in the CD compartment.
2. Close the CD door.
4. Focus search is performed if disc is inside.
Playback will start automatically from the first track.
5. Adjust the “VOLUME” control to the desired level.
6. Press the “PLAY / PAUSE” button when you want to stop playback temporarily.
7. Press the “STOP” button when finished.
FOLDER SELECT
Press the “FOLDER +” or “FOLDER -” button to select folder. ( Folder select function can only operate
if disc store with at least 2 directories / files. )
Page 9

iPOD / iPHONE DOCK
GENERAL OPERATION
PLAY / PAUSE Press to start playing tracks from the iPod.
Press again to stop playing iPod operation temporarily.
Press again to resume playback.
SKIP + & Press to go to the next track or back to the previous track.
SKIP - Press and hold while playing until you find the point you want to play.
STOP
This microsystem is compatible with iPod and iPhone.Simply dock your iPod/ iPhone on the top
panel base.
Press to stop all iPod operation.
MENU / ENTER / MENU DN / MENU UP
MENU / ENTRE / MENU DN / MENU UP button is only for iPod / iPhone.
- When playing iPod / iPhone, press the “MENU” button to back to previous menu.
- Press the “ENTER” button to menu selection.
- Press the “MENU DN” or “MENU UP” to select next menu.
- Press the “ENTER” button again to select a desired menu or track.
- When All the desired tracks have been selected, press the “ENTER” button to play.
E-7
CHARGING
Charging iPod battery using the dock.
- In any mode, dock your iPod portable player directly on the cradle for charging.
PLAYBACK
1. Press the “FUNCTION” button to select “IPOD” mode.
2. Connect the iPod/ iPhone to the main unit.
3. Playback starts automatically. You can select available features (such as play/pause, skip track,
fast forward/backward, menu selection) during playback.
Notes:
If you experience disturbance noise,please turn your iPhone into airplane mode.
Page 10

MP3 INFO DISPLAY (ID3 TAG - only for mp3 files)
1. Press once “INFO” button, ID3 text will show on display.
2. Press again to terminate ID3 mode.
Notes:
Due to various solutions, ID3 text function may not be played.
OTHER FEATURES
EQ (Sound Equalizer)
Press the “EQ” button on remote control, and press to switch the EQ function as follows:
1 - CLASSIC
2 - ROCK
3 - POP
4 - JAZZ
5 - FLAT (NORMAL)
INTRO
1. Press the “INTRO” button during play disc to play each song for 10 seconds.
2. Press the “INTRO” button again to resume normal playback.
3. Not available for memory playback.
MUTE
1. Press the “MUTE” button to stop the sound during playing disc.
2. Press the “MUTE” button again to resume the sound.
E-8
Page 11

SLEEP
1
Select AUX mode to listen to external audio devices connected through a 3.5mm Auxiliary Stereo
Line-In jack.
1. Press FUNCTION to select AUX mode.
2. Use a 3.5mm Male-to-Male Stereo cable to connect any external audio device with a 3.5mm
Headphone or Line-Out jack to the AUX IN jack on the rear panel of the appliance.
3 . Start playabck on the external audio device. Adjust the volume on the audio device (do not set the
volume too high to avoid distortion). You may also adjust the volume on the appliance.
4. To control playback function, use the controls provided by the external audio device.
Notes:
Aux-in cable is not provided.
. Press the “SLEEP” button on remote control, display will show “SLEEP 90”. That means, after 90
minutes, appliance will automatically turn to standby mode.
2. Press the “SLEEP” button again to select the automatically turn off time, from 90, 80, 70, 60, 50,
3. Press the “SLEEP” button to “SLEEP 00” to canel sleep function.
40, 30, 20, 10 minutes.
RANDOM
1
2. Press the “RANDOM” button again to terminate random mode.
. Press the “RANDOM” button on remote control during playing disc, the appilance will select and
play a track randomly.
3. The function is not available on program playback.
AUX IN
OTHER FEATURES
E-9
Page 12

TIMER SETTING
Timer setting must be after completed clock setting.
1. Press the “STANDBY” button to switch unit at standby mode.
2. Press the “TIMER” button to enter timer set mode.
3. The display will show “TIMER ON”, and AM 12:00 or PM 12:00 if 12H format is set or 00:00 if
4. Adjust hour by pressing the “SKIP +” or “SKIP -” button, press the “TIMER” button to confirm.
5. Adjust minute by pressing the “SKIP +” or “SKIP -” button, press the “TIMER” button to confirm.
6. The display will show “TIMER OFF”, and AM 12:00 or PM 12:00 if 12H format is set or 00:00 if
7. Adjust hour by pressing the “SKIP +” or “SKIP -” button, press the “TIMER” button to confirm.
8. Adjust minute by pressing the “SKIP +” or “SKIP -” button, press the “TIMER” button to confirm.
9. The display shows input source by pressing “SKIP +” or “SKIP -” (Chose CD, iPod or Tuner).
Chose the input and press “TIMER” button to confirm the selection.
10.The display shows volume level by pressing “SKIP +” or “SKIP -” to adjust the volume level and press
“TIMER” button to confirm the selection.
11.After confirmation the unit display show “TIMER ON” TIME, “TIMER OFF” TIME, “INPUT SOURCE”
and “VOLUME LEVEL” and unit go to standby mode.
12.Press the “TIMER” button to cancel or activate timer on / off function.
13.If you want to adjust the timer, press and hold “TIMER” button for 2 sec. It returns to timer setting
mode. Follow steps from 4.
14.Press and hold the “PLAY / PAUSE” button over 5 sec. to cancel all clock or timer setting.
To set clock first and follow steps from 2.
24H is set.
24H is set.
OTHER FEATURES
CLOCK SETTING
1. Press the “STANDBY” button to switch unit at standby mode.
2. Press the “CLOCK” button once to entry clock set mode. The display will show “24H” and
flashing.
3. Adjust time format ( 12H / 24H ) by pressing the “SKIP +” or “SKIP -” button.
4. Press the “CLOCK” button to confirm time format, display will show “AM 12:00” or “PM 12:00” if
12H format is set or “00:00” if 24H set.
5. Adjust hour by pressing the “SKIP +” or “SKIP -” button, press the “CLOCK” button to confirm.
6. Adjust minute by pressing the “SKIP +” or “SKIP -” button, press the “CLOCK” button to confirm.
Notes:
The unit display is dim when doing clock setting.
E-10
Page 13

OTHER FEATURES
SNOOZE
SNOOZE must be after completed timer setting.
When the timer is triggered. you may press the “SNOOZE” button to delay the alarm for another
9 minutes.
E-11
Page 14

TROUBLE SHOOTING
Please use the following methods to solve the following problems while using this unit.
Fault Phenomenon Possible Cause Handing
Power supply cannot be
turned on
Power plug is not fully inserted into
the socket
Insert the power plug into
the socket securely
Battery is used up
Replace with a new
battery
The remote control does
not work
The front end of the remote control
is not aimed at the infrared
reception part of the player
Please aim at the remote
control window
The disc door is not close well Close the disc door
No disc inserted
Place a disc in the
compartment
Play can not be realized
Inverse placement of disc
Be sure that the side with
pictures of the disc points
upwards
No sound from
loudspeaker
The volume is in the lowest status Turn the volume up
Disc not clean
Use a piece of clean and
soft cloth to clean the disc
Disc scratched
Discontinuous sound
Disc distorted
Replace the disc with a
new one
Operation cannot be done
Embedded micro computer fails due
to lightning, static or other
interference
Power OFF, and restart
the player after 10
seconds
E-12
Page 15

SAV
ADMEA / LOGISAV
ZI du clos des charmes
26 rue du clos des charmes
77090 COLLEGIEN - FRANCE
For instruction manual in another language, check online at
http://manuel-utilisateur.logisav.fr
“Made for iPod ” means that an electronic
accessory has been designed to connect
specifically to iPod and has been certified by the
developer to meet Apple performance standards.
Apple is not responsible for the operation of this
device or its compliance with safety and
regulatory standards.
iPod is a trademark of Apple Inc., registered in
the U.S. and other countries.
* iPOD not included
E-13
 Loading...