scala rider Freecom 2 Manual


For easy reference while on the road, download the Pocket Guide from cardosystems.com/quick-guides/.
This is version 1.0 of the FREECOM 2 Manual. The latest version of the manuals in your preferred language and various tutorials can be found at cardosystems.com/product-manuals/.
2

CONTENTS
1. Introduction |
4 |
||
2. Charging theFREECOM2 |
5 |
||
3. Getting Started |
6 |
||
3.1 |
Getting to Know Your FREECOM 2 |
6 |
|
3.2 |
Switching Your Unit On/Off |
6 |
|
3.3 |
Different Ways to Operate Your FREECOM 2 |
6 |
|
3.4 |
Basic Functions |
6 |
|
3.5 |
Pairing Your Unit to Bluetooth Devices |
7 |
|
|
3.5.1 |
Pairing through the Unit Buttons |
7 |
|
3.5.2 |
Pairing through the Voice-Assisted Menu |
8 |
3.6 |
Pairing the Bluetooth Intercom |
8 |
|
|
3.6.1 |
Pairing the Bluetooth Intercom to other Cardo Units |
8 |
|
3.6.2 |
Pairing the Bluetooth Intercom to non-Cardo Units |
9 |
4. BeforeYou Ride |
11 |
||
4.1 |
Configuring Your FREECOM 2 through the SmartSet App |
14 |
|
|
4.1.1 |
Configuring Your FREECOM 2 Basic Settings through the SmartSet App |
14 |
|
4.1.2 |
Configuring Your FM Radio |
15 |
4.2 |
Configuring Your FREECOM 2 through Cardo Community |
18 |
|
|
4.2.1 |
Installing the Cardo Updater on Your Computer |
18 |
|
4.2.2 |
Configuring Your FREECOM 2 Basic Settings through Cardo Community |
18 |
|
4.2.3 Configuring Your FM Radio through Cardo Community |
19 |
|
4.3 |
Configuring Your FREECOM 2 through the Configuration Voice Menu |
19 |
|
4.4 |
Using Parallel Audio Streaming |
19 |
|
4.5 |
Audio Source Priorities |
20 |
|
4.6 |
Setting the Default Mobile Phone |
21 |
|
4.7 |
Checking Battery Status through the SmartSet App |
21 |
|
5. On theRoad |
22 |
||
5.1 |
Making and Receiving Phone Calls |
22 |
|
|
5.1.1 |
Making Phone Calls |
22 |
|
5.1.2 |
Answering Phone Calls |
22 |
|
5.1.3 |
Rejecting Phone Calls |
22 |
|
5.1.4 |
Ending Phone Calls |
22 |
|
5.1.5 |
Toggling Between Two Calls on Two Mobile Phones Paired to Your Unit |
23 |
|
5.1.6 |
Disconnecting the Current Call and Switching To The Second Call |
23 |
5.2 |
Making and Receiving Bluetooth Intercom Calls |
23 |
|
|
5.2.1 |
Making a Bluetooth Intercom Call |
23 |
|
5.2.2 |
Receiving Bluetooth Intercom Calls |
23 |
|
5.2.3 |
Holding a Mobile/Bluetooth Intercom Conference Call |
23 |
|
5.2.4 |
Bluetooth Intercom Busy Signal |
24 |
|
5.2.5 |
Click-To-Link Calls |
24 |
5.3 |
Listening to Music and Radio |
24 |
|
|
5.3.1 |
Listening to Music |
24 |
|
5.3.2 |
Listening to FM Radio |
26 |
|
5.3.3 |
Sharing Music and Radio |
28 |
6. Troubleshooting |
30 |
||
6.1 |
Soft Reset |
30 |
|
6.2 |
Reset Pairing |
30 |
|
6.3 |
Reset to Factory Settings |
30 |
|
6.4 |
FAQ |
|
30 |
7. Support |
|
31 |
|
8. Glossary |
|
32 |
|
Appendix A. FREECOM2Modes and Events -LED Indications |
33 |
||
3

1. INTRODUCTION
Thank you for choosingthe Cardo FREECOM 2 Bluetooth® communication and entertainment system for motorcycle helmets.
This Manual describes the features of your FREECOM 2 and how to use them.
We wish you a great FREECOM 2 experience and encourage you to write to us at support@cardosystems.com regardingany questions, suggestions or comments you may have.
If you have not yet installed the FREECOM 2 unit in your helmet, please install it as described in the Installation Guide provided in the package.
4

2. CHARGING THE FREECOM 2
Make sure that your FREECOM 2 battery is charged for at least 4 hours before initial use.
To charge the FREECOM 2:
1.Usingthe supplied USB cable, connect your computer or wall charger to the FREECOM 2 USB port.
●Chargingwith the wall charger is faster than via a computer USB port.
●Chargingyour unit switches it off automatically. To use your unit while it is beingcharged, switch it on. (see SwitchingYour Unit On/Off on page 6).
Duringcharging, the LED indicates chargingstatus as follows:
●red LED on - charging
●red LED off - chargingcomplete
5

3.GETTING STARTED
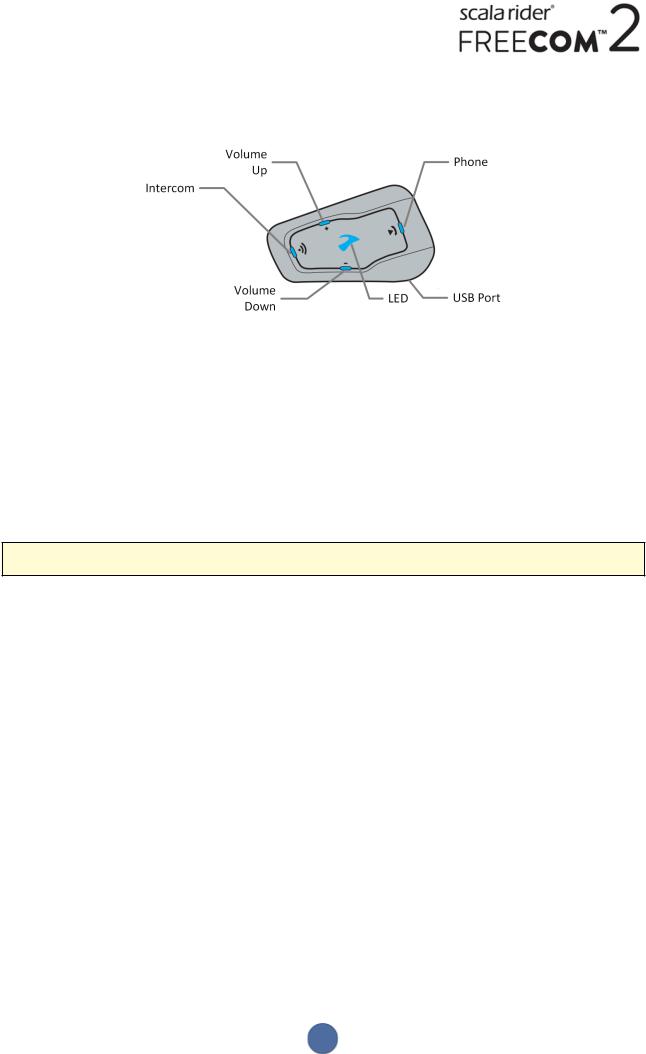
3.1GETTING TO KNOW YOUR FREECOM 2
3.2 SWITCHING YOUR UNIT ON/OFF To switch your FREECOM 2 on:
●Press  and
and  for 1 second. The speaker plays an ascendingtone and a voice message "Hello FREECOM 2".
In all battery states, the LED flashes blue three times repeatedly, confirmingthat your FREECOM 2 is on.
To switch your FREECOM 2 off:
●Tap  and
and  .
.
In all battery states, the LED flashes red three times repeatedly, confirmingthat your FREECOM 2 is switchingoff. The speaker plays a descending tone and a voice message "Goodbye".
Connectingyour unit to a charger switches off the unit.
3.3 DIFFERENT WAYS TO OPERATE YOUR FREECOM 2
You can operate the various features by any of the followingmethods:
●Pressinga button or combination of buttons on the unit.
●Usingthe SmartSet app on your mobile device (once it is paired with the unit).
●Usingthe Voice-Assisted Menu in combination with unit buttons. or with the VOX (voice activation). VOX is for hands free operation of your FREECOM 2. You can say a word or phrase loudly when the voice-assisted menu reaches the function you want to use and your FREECOM 2 performs that function. You can also adjust VOX sensitivity for the microphone, see Configuring Your FREECOM 2 Basic Settings through the SmartSet App on page 14.
LEDs, tones and voice announcements guide you while usingthe functions of your FREECOM 2, as described in FREECOM 2 Modes and Events - LED Indications on page 33.
This manual describes the most suitable method or methods to operate each feature.
3.4 BASIC FUNCTIONS
To turn the volume up for current audio source:
●Tap  .
.
With each tap, a louder tone is played on the speaker until you reach the maximum volume, as indicated by the maximum volume tone.
6

To turn the volume down for current audio source:
●Tap  .
.
With each tap, a quieter tone is played on the speaker until you reach the minimum volume, as indicated by the minimum volume tone.
To mute the microphone completely and lower the speaker volume to the minimal level when an audio source is active:
●Tap  and
and  .
.
A descending tone is played on the speaker.
Automatic Gain Control (AGC) adjusts your speaker volume accordingto ambient noise and ridingspeed. To adjust AGC sensitivity, see Configuring Your FREECOM 2 Basic Settings through the SmartSet App on page 14.
3.5 PAIRING YOUR UNIT TO BLUETOOTH DEVICES
Your FREECOM 2 has two Bluetooth channels for connection to Bluetooth devices such as mobile phones, GPS devices and Bluetooth music players with A2DP.
To connect your FREECOM 2 to a Bluetooth device, you must first pair them while in Standby (see FREECOM 2 Modes and Events - LED Indications on page 33). Once paired, they automatically recognize each other whenever they are within range.
3.5.1 PAIRING THROUGH THE UNIT BUTTONS
If you are pairingmore than one device, Cardo recommends that you pair the mobile phone to channel 1, and the additional device (such as GPS, music player or additional mobile phone) to channel 2.
To pair Bluetooth channel 1 to a mobile phone:
1.Enable Bluetooth on the mobile phone.
2.Press  for 5 seconds. The LED flashes red and blue.
3.Search for Bluetooth devices on your mobile phone as described in your phone's instructions.
4.After a few seconds the phone lists your FREECOM 2. Select it.
5.If prompted for a PIN or Passkey, enter 0000 (four zeros).
6.The phone confirms that pairinghas succeeded and the LED flashes purple for 2 seconds.
To pair Bluetooth channel 2 to another Bluetooth device:
1.Enable Bluetooth on the device (such as mobile phone, GPS device, music player).
2.Press  for 5 seconds. The LED flashes red and blue.
3.Tap  twice. The LED starts flashingred and green.
If you are pairinga GPS device, make sure you perform the next step.
4.If you are pairinga GPS device, tap  . The LED flashes slower.
5.On the device you are pairing, search for Bluetooth devices (as described in its instructions).
6.After a few seconds the device lists your FREECOM 2. Select it.
7.If prompted for a PIN or Passkey, enter 0000 (four zeros).
8.The device confirms that pairinghas succeeded and the LED flashes purple for 2 seconds.
7

●If pairingis not completed within 2 minutes, the unit automatically returns to Standby.
●If you have paired two different mobile phones directly to your FREECOM 2, set one as default for making calls (see Settingthe Default Mobile Phone on page 21).
●Not all Bluetooth mobile phones broadcast Bluetooth Stereo music (A2DP), even if the phone has an MP3 player function. Consult your mobile phone’s user manual for more information.
●Not all Bluetooth GPS devices allow connection to Bluetooth audio devices. Consult your GPS User Manual for more information.
To cancel the pairing process:
●Press  for 2 seconds. The LED stops flashingred and blue or red and green.
To reset all Bluetooth device pairing:
●Press  and
and  for 5 seconds.
In all battery states, the LED flashes purple slowly five times, confirmingthat pairinghas been reset.
Resettingall Bluetooth device pairingalso resets all Bluetooth intercom pairing.
3.5.2 PAIRING THROUGH THE VOICE-ASSISTED MENU
To pair your FREECOM 2 with devices through the voice-assisted menu:
1.Tap  and
and  .
.
2.When the voice-assisted menu reaches "Advanced Features", tap  or use VOX.
3.When the voice-assisted menu reaches the required option, tap  or use VOX.
●To reset all Bluetooth pairing, select the menu option "Reset Mobiles and GPS Pairing".
3.6 PAIRING THE BLUETOOTH INTERCOM
The FREECOM 2 allows full-duplex Bluetooth intercom communication for chattingwith another rider on Cardo or non-Cardo units.
To connect your unit to another unit with a Bluetooth intercom, you must first pair their channels.
●Pairinga channel replaces any existingpaired unit on that channel with the new unit.
●If you have purchased the FREECOM 2 MultiSet, the retail package contains two pre-paired units.
●Your FREECOM 2 is compatible with most Cardo models for Bluetooth intercom calls. In addition, it is also compatible with the Schuberth SRC-System™.
For details on how to pair and use your FREECOM 2 with other Cardo units, go to www.cardosystems.com/freecomcompatibility.
3.6.1 PAIRING THE BLUETOOTH INTERCOM TO OTHER CARDO UNITS
To pair your Unit with Cardo units through the unit buttons:
1.Confirm your unit is in Standby mode (LED flashes slowly).
2.On your unit, press  for 5 seconds. The LED flashes red.
8

3.On the other Cardo unit, activate Bluetooth intercom pairingmode (see the other Cardo unit user manual at cardosystems.com/product-manuals/).
4.The unit confirms that pairinghas succeeded and the LED flashes for 2 seconds.
●To cancel the pairingprocess, press  for 2 seconds. The LED stops flashing.
●If pairingis not completed within 2 minutes, the unit automatically returns to Standby.
●To reset all Bluetooth intercom pairingwhile in Bluetooth intercom pairingmode:
●Press  and
and  for 2 seconds. The LED flashes purple 5 times slowly, confirmingthat pairinghas been reset .
To pair your FREECOM 2 with Cardo units through the SmartSet app:
1.Confirm your unit is in Standby mode (LED flashes slowly).
1.Open the SmartSet app and tap  .
.
2.Tap Bluetooth.
3.Under Riders, tap Add (or Change if you are changingto whom the channel is paired) and follow the on screen menus.
4.On the other Cardo unit, activate Bluetooth intercom mode (see the other Cardo unit user manual at cardosystems.com/product-manuals/).
5.The unit confirms that pairinghas succeeded and the LED flashes for 2 seconds.
●To reset all Bluetooth intercom pairing, tap Delete all.
To pair your FREECOM 2 with Cardo units through the voice-assisted menu:
1.Confirm your unit is in Standby mode (LED flashes slowly).
2.Tap  and
and  .
.
3.When the voice-assisted menu reaches "Advanced Features", tap  or use VOX.
4.When the voice-assisted menu reaches "Pair Intercom Channel A", tap  or use VOX.
5.On the other Cardo unit, activate Bluetooth intercom pairingmode (see the other Cardo unit user manual at cardosystems.com/product-manuals/).
6.The unit confirms that pairinghas succeeded and the LED flashes for 2 seconds.
3.6.2 PAIRING THE BLUETOOTH INTERCOM TO NON-CARDO UNITS
The Cardo gateway enables Cardo units to connect to non-Cardo units over Bluetooth.
To pair your FREECOM 2 with non-Cardo units through the unit buttons:
1.Confirm your unit is in Standby mode (LED flashes slowly).
2.On your unit, press  for 5 seconds. The LED flashes red.
3.Tap  to activate the Cardo gateway. The LED flashes red and blue.
4.On the non-Cardo unit, activate Bluetooth mobile pairingmode (see the non-Cardo unit user manual).
5.The unit confirms that pairinghas succeeded and the LED flashes purple for 2 seconds.
9

●To cancel the pairingprocess, press  for 2 seconds. The LED stops flashing.
●If pairingis not completed within 2 minutes, the unit automatically returns to Standby.
●To reset all Bluetooth intercom pairingwhile in Bluetooth intercom pairingmode:
●Press  and
and  for 2 seconds. The LED flashes purple 5 times slowly, confirmingthat pairinghas been reset .
To pair your FREECOM 2 with non-Cardo units through the SmartSet app:
1.Confirm your unit is in Standby mode (LED flashes slowly).
2.Open the SmartSet app and tap  .
.
3.Tap Bluetooth.
4.Under Riders, tap Add (or Change if you are changingto whom the channel is paired) and follow the on screen menus.
5.On the non-Cardo unit, activate Bluetooth mobile pairingmode (see the non-Cardo unit user manual).
6.The unit confirms that pairinghas succeeded and the LED flashes purple for 2 seconds.
To pair your FREECOM 2 with non-Cardo units through the voice-assisted menu:
1.Confirm your unit is in Standby mode (LED flashes slowly).
2.Tap  and
and  .
.
3.When the voice-assisted menu reaches "Advanced Features", tap  or use VOX.
4.When the voice-assisted menu reaches "Pair Cardo Gateway", tap  or use VOX.
5.On the non-Cardo unit, activate Bluetooth mobile pairingmode (see the non-Cardo unit user manual).
6.The unit confirms that pairinghas succeeded and the LED flashes purple for 2 seconds.
10

4. BEFORE YOU RIDE
Get the most out of your FREECOM 2 by changingthe settings and customizing your unit accordingto your own personal preferences, usingeither of the followingmethods:
●SmartSet App on iOS / Android (see Configuring Your FREECOM 2 through the SmartSet App on page 14).
●Cardo Community on Windows / Mac - minimum requirements - Windows® 7 / Mac OS X 10.8 (see Configuring Your FREECOM 2 through Cardo Community on page 18).
●Unit buttons.
●Configuration voice menu on your device.
Cardo recommends customizations and settings before gettingout on the road.
Object |
|
Default Value |
|
Description |
|
SmartSet App |
|
Cardo |
|
Configuration Voice |
|
|
|
|
|
||||||
|
|
|
(iOS/Android) |
|
Community |
|
Menu |
|||
|
|
|
|
|
|
|
|
|||
|
|
|
|
|
|
|
|
|
|
|
AGC sensitivity |
|
Medium |
|
AGC |
|
ü |
|
ü |
|
ü |
(Off/Low/Medium/High) |
|
|
|
automatically |
|
|
|
|
|
|
|
|
|
|
adjusts speaker |
|
|
|
|
|
|
|
|
|
|
volume according |
|
|
|
|
|
|
|
|
|
|
to ambient noise |
|
|
|
|
|
|
|
|
|
|
and riding speed. |
|
|
|
|
|
|
|
|
|
|
For example, |
|
|
|
|
|
|
|
|
|
|
when set to Low, |
|
|
|
|
|
|
|
|
|
|
higher ambient |
|
|
|
|
|
|
|
|
|
|
noise will cause |
|
|
|
|
|
|
|
|
|
|
the volume |
|
|
|
|
|
|
|
|
|
|
increase to kick in |
|
|
|
|
|
|
|
|
|
|
at a higher level. |
|
|
|
|
|
|
Audio priority |
|
|
|
|
|
|
|
|
|
|
|
Bluetooth |
|
Priority of audio |
|
ü |
|
ü |
|
ü |
|
(A2DP/Bluetooth |
|
intercom |
|
source playing |
|
|
|
|
|
|
intercom) |
|
|
|
through speakers. |
|
|
|
|
|
|
|
|
|
|
Either music is |
|
|
|
|
|
|
|
|
|
|
not interrupted |
|
|
|
|
|
|
|
|
|
|
by an intercom |
|
|
|
|
|
|
|
|
|
|
call, or vice-versa. |
|
|
|
|
|
|
Background Audio |
|
|
|
|
|
|
|
|
||
|
N/A |
|
Sets the |
|
ü |
û |
û |
|||
Level |
|
|
|
background |
|
|
|
|
|
|
|
|
|
|
audio volume |
|
|
|
|
|
|
|
|
|
|
when parallel |
|
|
|
|
|
|
|
|
|
|
audio streaming |
|
|
|
|
|
|
|
|
|
|
is on (see Parallel |
|
|
|
|
|
|
|
|
|
|
audio streaming |
|
|
|
|
|
|
|
|
|
|
(Enable/Disable) |
|
|
|
|
|
|
|
|
|
|
below). |
|
|
|
|
|
|
Bluetooth friendly |
|
|
|
|
|
|
|
|
|
|
|
FREECOM 2 |
|
Sets the name |
|
ü |
|
ü |
|
û |
|
name |
|
|
|
that appears on |
|
|
|
|
|
|
|
|
|
|
your phone while |
|
|
|
|
|
|
|
|
|
|
pairing and in the |
|
|
|
|
|
|
|
|
|
|
SmartSet app. |
|
|
|
|
|
|
|
|
|
|
|
|
|
|
|
|
|
|
|
|
|
|
|
|
|
|
|
|
11
 Loading...