

Page 1
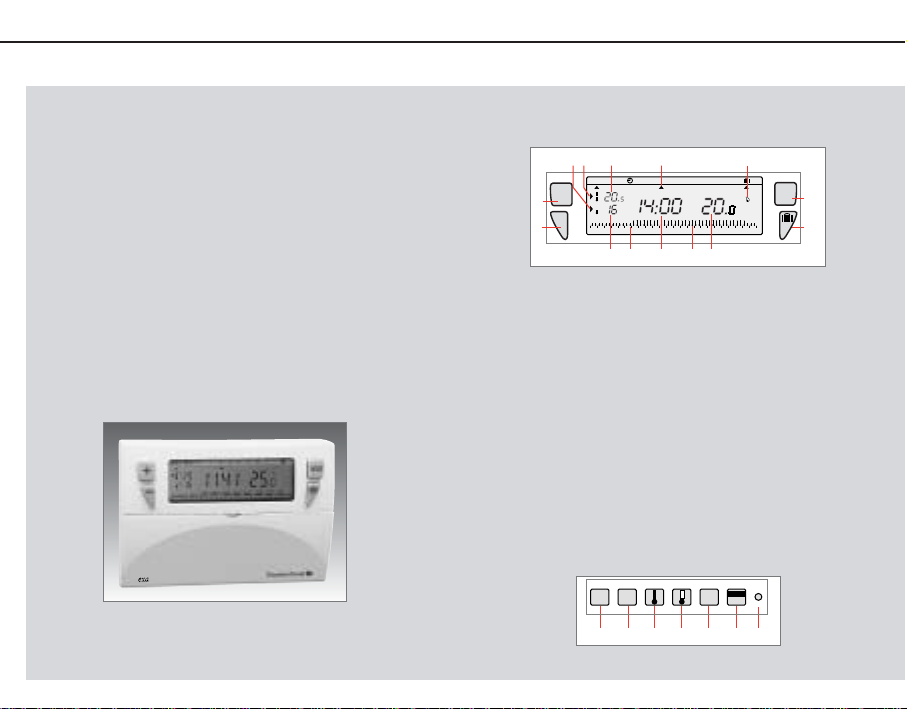
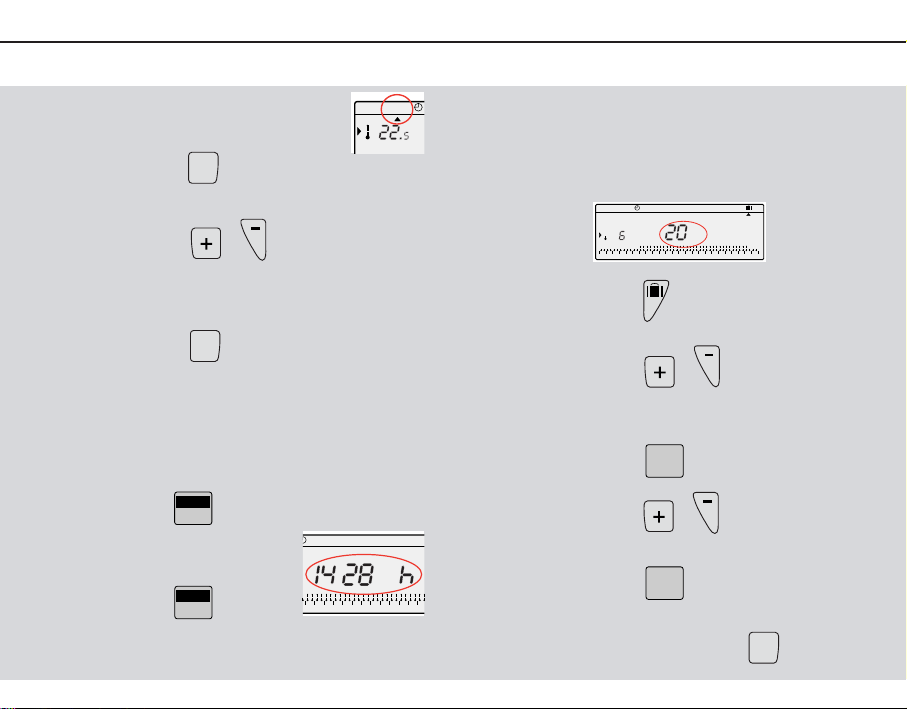
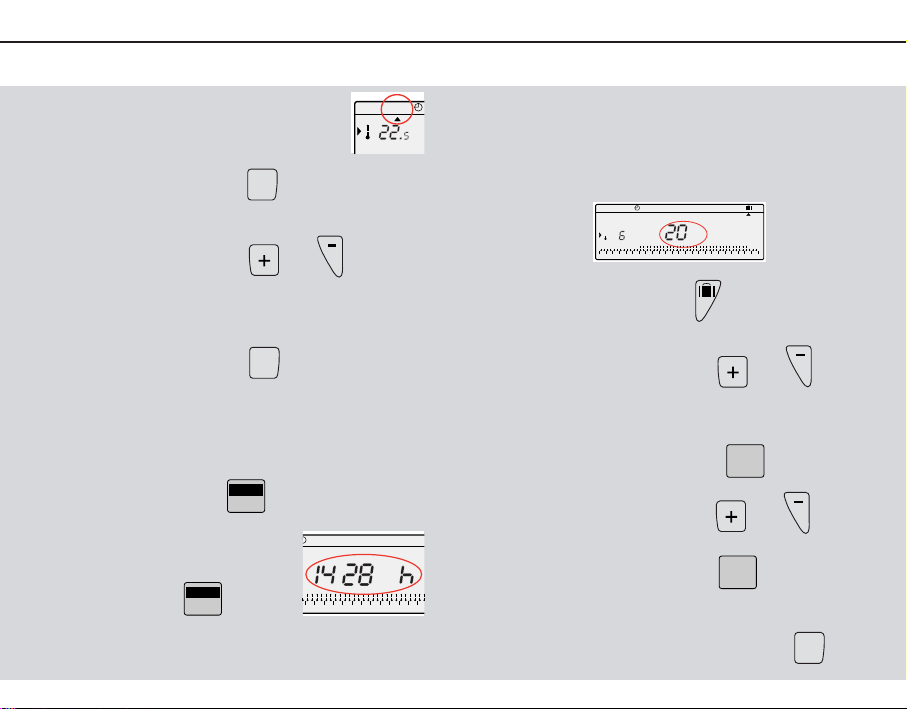
Les touches apparentes et les voyants de l’afficheur
Les touches sous le capot
L’Exabox 7J a été conçu pour vous apporter confort et économies
d’énergie.
Il permet de programmer et de réguler votre chauffage selon 3
niveaux de température
- température confort : c’est la température que vous souhaitez
pendant vos heures de présence.
- température économique : c’est la température que vous souhaitez pendant vos absences de courte durée ou pendant la
nuit.
- température hors-gel : c’est la température minimale assurée
pendant vos absences prolongées. Elle protège votre logement des risques du gel.
Ses 3 programmes préenregistrés et son programme libre vont vous
permettre jour par jour d’adapter votre chauffage à votre mode
de vie.
Facile d’entretien, votre Exabox 7J est alimenté directement par
votre chaudière Saunier Duval.
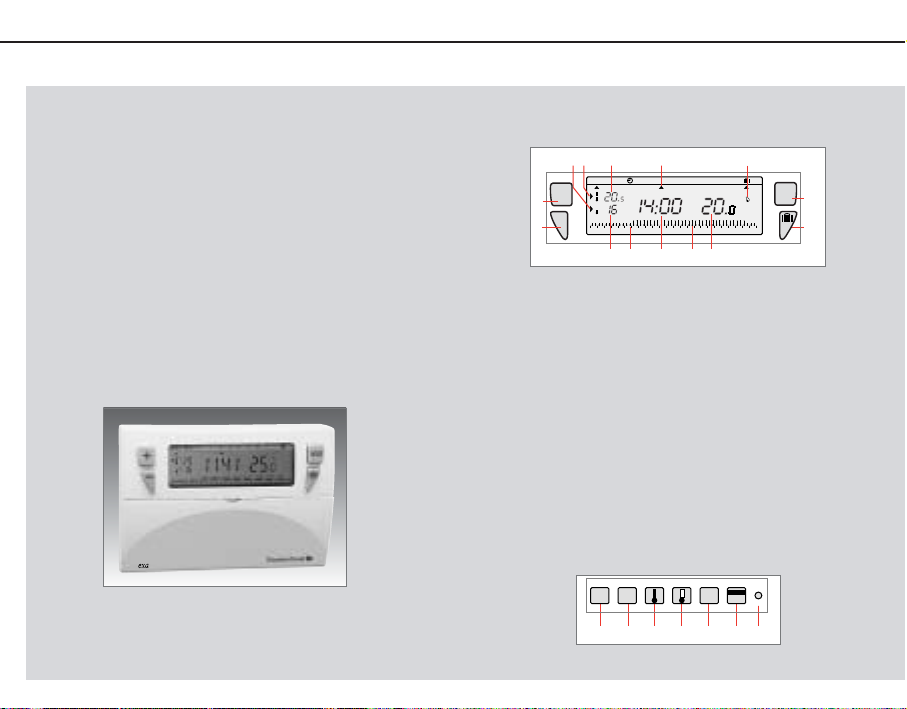
DESCRIPTION ET INSTALLATION
1. Descriptif du thermostat d’ambiance programmable
1. Touche – pour les réglages
2. Touche + pour les réglages
3. Sélection des modes
4. Absence prolongée (vacances)
5. Indicateur de température
en cours (économique)
6. Visualisation des périodes
«économique»
7. Température «économique»
8. Indicateur de température
en cours (confort)
9. Visualisation des périodes
«confort»
10. Température «confort»
11. Indicateur du jour de la
semaine
12. Indicateur d’enclenchement
du chauffage
13. Affichage de la température
ambiante
14. Affichage de l’heure courante
15. Sélection des jours de la
semaine (1 = lundi...)
16. Choix du programme P1 à P4
17. Réglage température confort
18. Réglage température
économique
19. Validation
20. Réglage comptage horaire
21. Touche Reset
9419.560.00/03.01
box
105 8 12
Auto Manu 1234567
°c
+
2
1
°c
-
0123456789101112131415161718192021222324
11
°c
timer
days
1461397
DAYS
PROG
1-7
P1-P4
0000
OK
h
Res
16 17 18 19 20 2115
MODE
3
4
Page 2
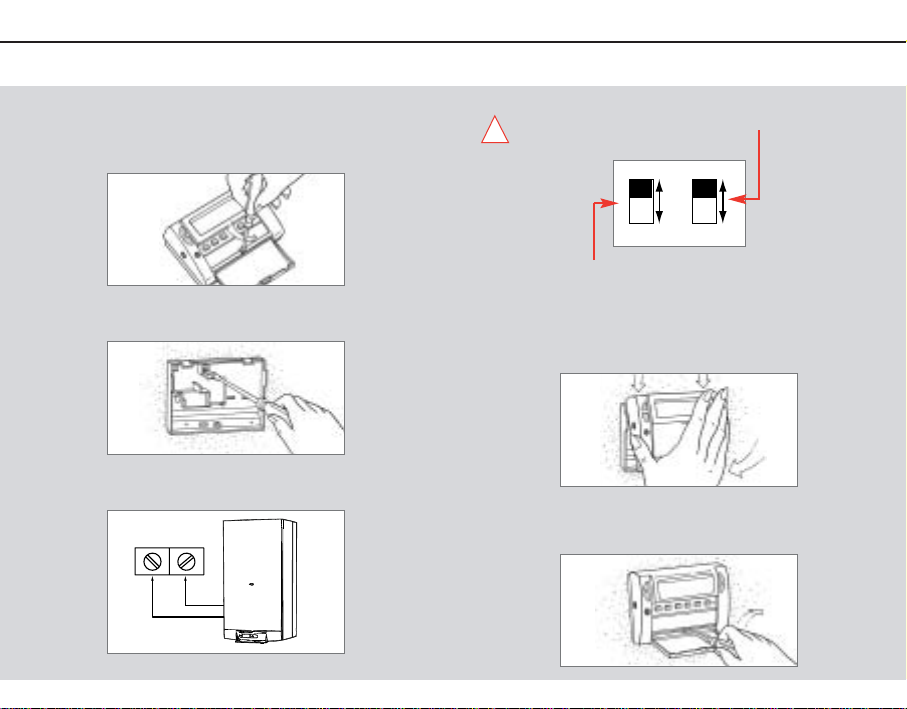
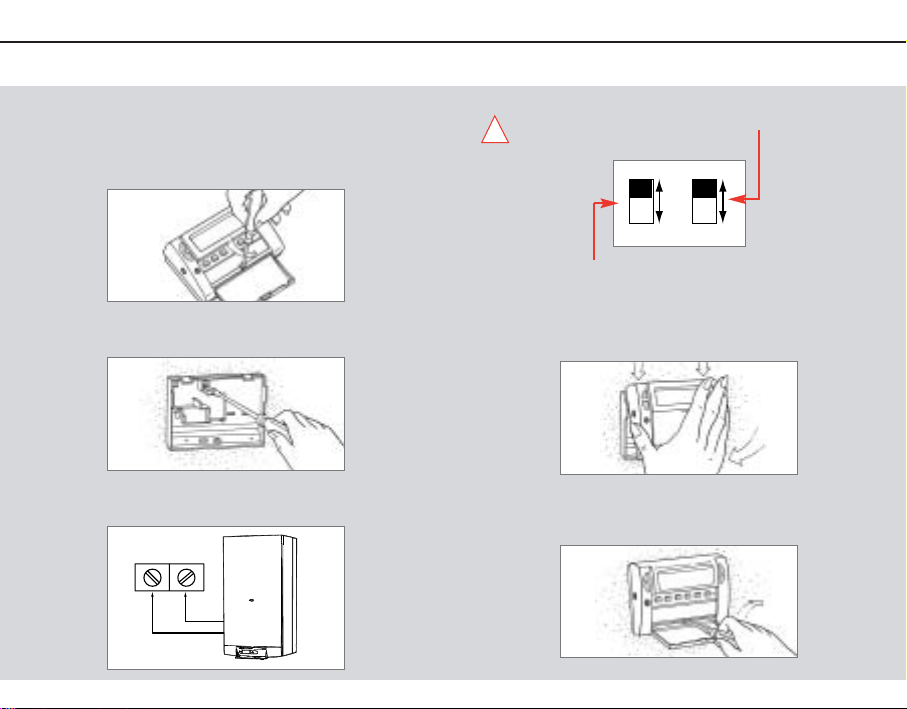
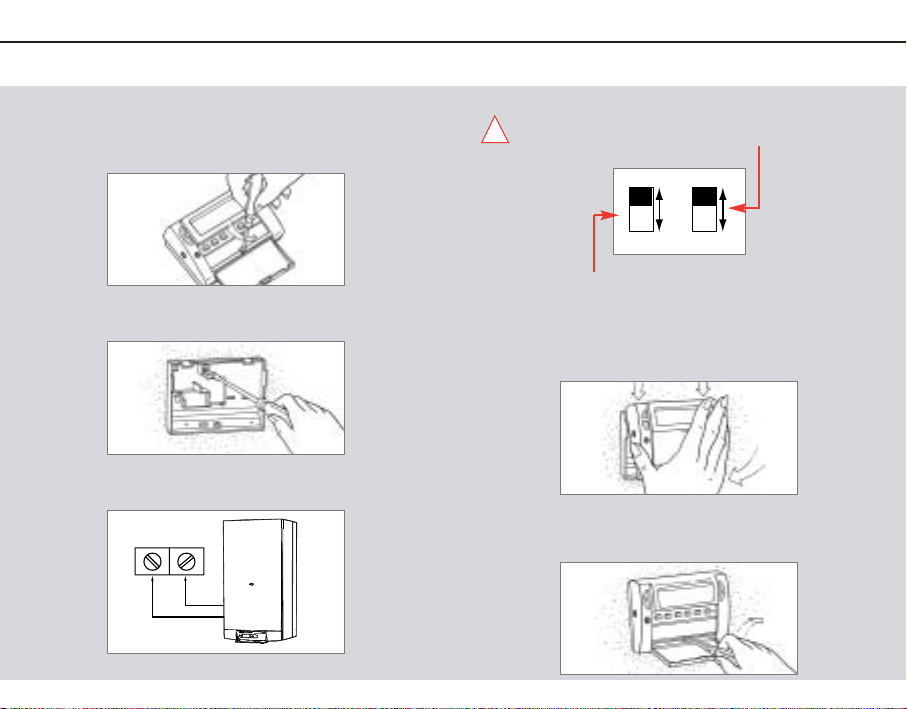
Configurez l’appareil.
Positionnez le commutateur sur «Battery ON pour mettre en
service la pile de sauvegarde
En fonction de votre situation géographique, sélectionnez les programmes de chauffage pré-enregistrés variante Nord ou variante
Sud (vour chapitre 6. Programmation).
Accrochez puis clipsez le thermostat d’ambiance programmable.
Revissez la vis puis refermez le capot.
L’Exabox 7J doit être installé à environ 1,50 m du sol, sur un mur inté-
rieur, à l’abri du rayonnement solaire et de toute source de chaleur
telle que : téléviseur, lampe, courant d’air,etc...
Ouvrez le capot et dévissez la vis
Fixez la plaque sur le mur.
Raccordez l’appareil suivant le schéma ci-dessous.
2.
Pose du thermostat d’ambiance programmable
...
!
Prog N
Battery ON
12
Prog S Battery OFF
Page 3
Liaison chaudière - Exabox 7J
Votre Exabox 7J fonctionne en liaison directe avec votre chaudière
Saunier Duval. Lorsque votre chaudière est éteinte ou en position
«été», votre Exabox 7J est éteint et n’affiche que la température
ambiante.Toute votre programmation est en mémoire.
Votre Exabox 7J se mettra en marche automatiquement lorsque vous
mettrez votre chaudière en position «chauffage».
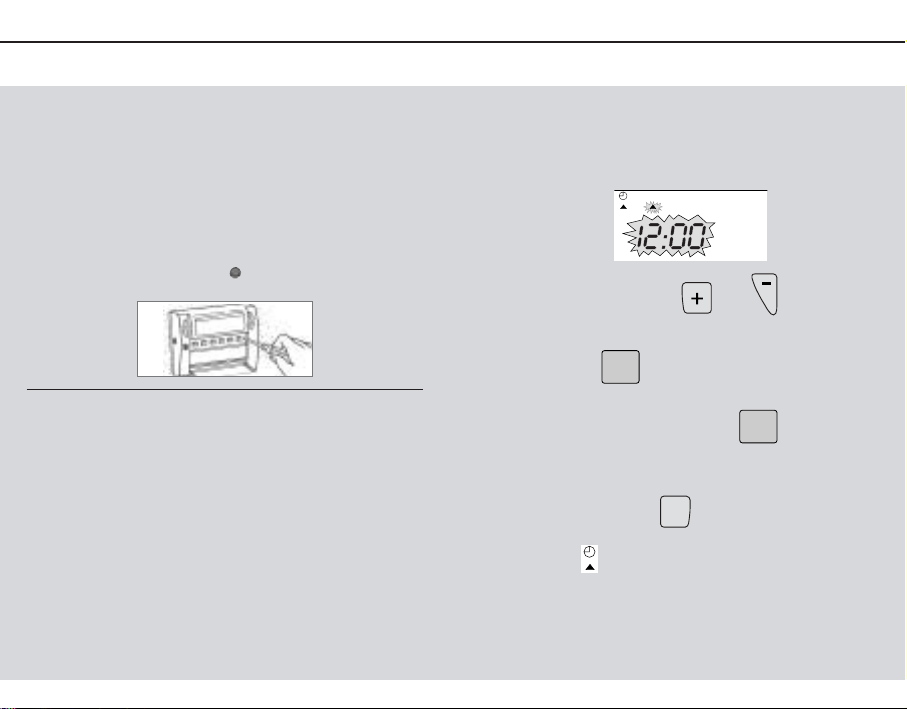
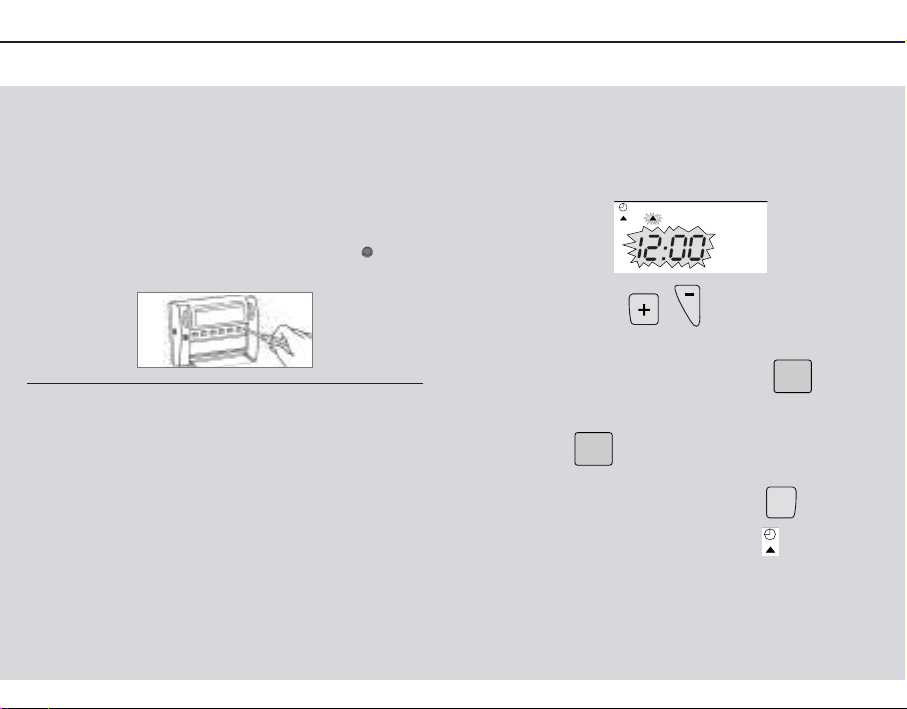
A la première mise en service, avant de commencer la programmation de votre appareil, veuillez abaisser le capot et appuyez sur la
touche reset à l’aide d’une pointe de stylo.
Caractéristiques techniques.
- plage de réglage de la température confort : +5 à +30°C
- plage de réglage de la température réduite : +5 à +30°C
- plage de réglage de la température vacances : +5 à +30°C
- plage d’affichage de la température ambiante : 0°C à +40°C
- différentiel statique <0.3°C
- alimentation : via la liaison qui relie l’exabox 7J à la chaudière
- réserve de marche : 8 ans
- température de fonctionnement : –10 à +50°C
- température de stockage : –20°C à +65°C
- hygrométrie : 90% max à 25°C
- degré de protection : IP30
- classe d’isolation II
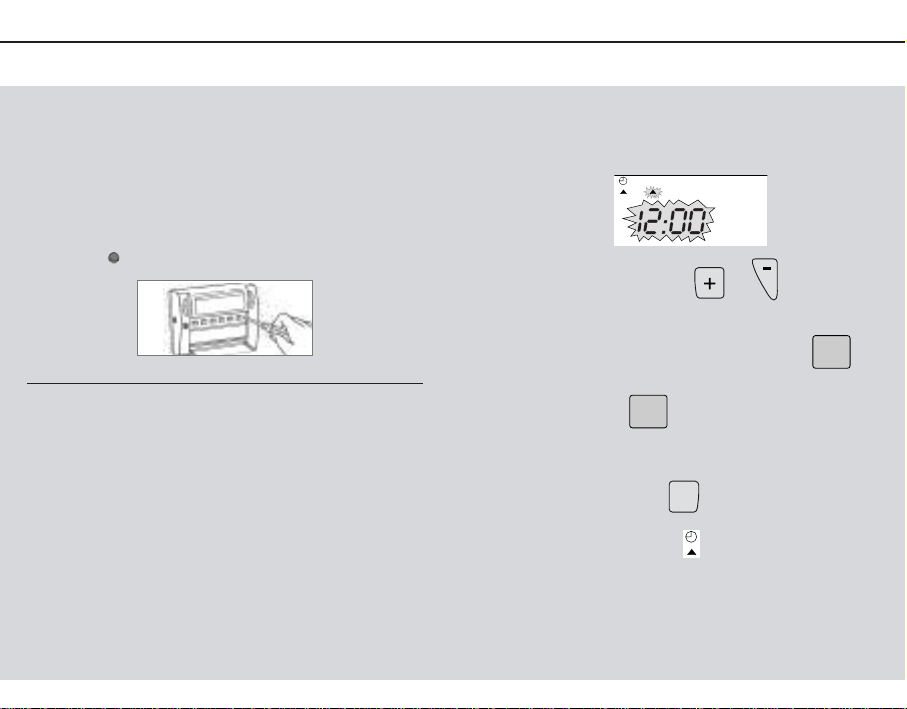
Réglage de l’heure
C’est la première mise en service, vous venez d’appuyer sur la
touche reset.
Les inscriptions 12:00 et le pointeur sous le jour 1 (lundi) clignotent.
1. Mettez à l’heure par les touches ou (un appui pro-
longé sur la touche accélère le
défilement de l’heure).
2. Réglez le jour actuel par appuis successifs sur la touche ,un
pointeur apparaît sous le jour correspondant (1 = Lundi, 2 = Mardi,
etc..).
3. Validez avec la touche .
4. Vous souhaitez modifier l’heure ou le jour :
appuyez sur la touche MODE
jusqu’à l’apparition du pointeur sous le sigle horloge et procé-
der comme ci-dessus aux points
1, 2 et 3.
RÉGLAGE DE L’HEURE
3.
Liaison chaudière - Exabox 7J
4.
Réglage de l’heure
123456
OK
MODE
DAYS
1-7
Page 4

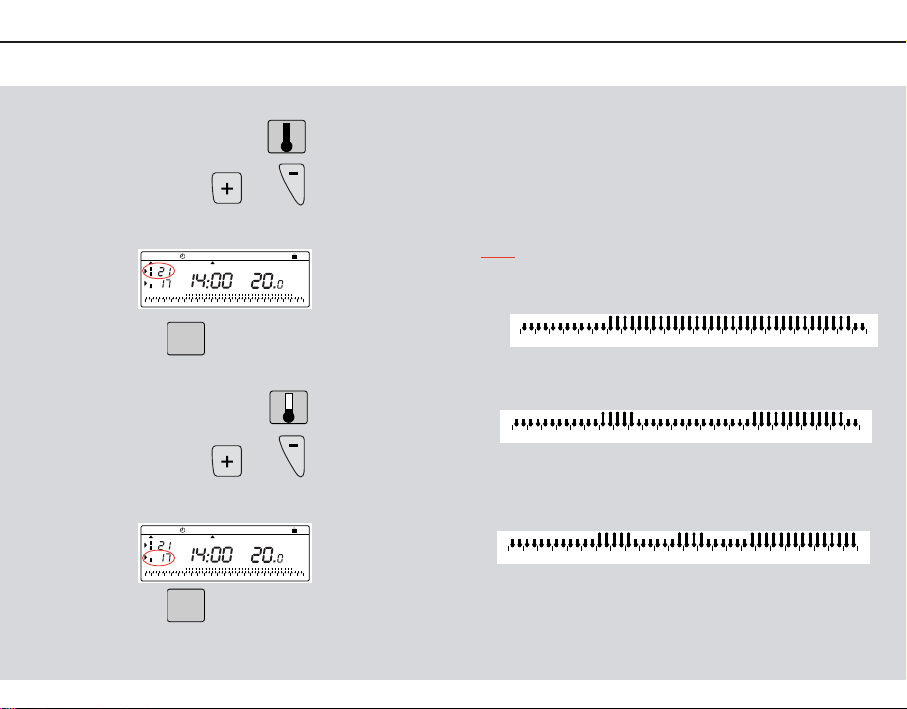
Pour régler la température Confort.
ouvrez le capot
Appuyez sur
et appuyez sur ou
jusqu’a ce que vous obteniez la température désirée.
Appuyez sur pour valider
Pour régler la température Réduit.
Appuyez sur
et appuyez sur ou
jusqu’a ce que vous obteniez la température désirée.
Appuyez sur pour valider
NB. La température est réglable de 5°C à 30°C par pas de 0,5°C.
OK
OK
0123456789101112131415161718192021222324
Auto Manu 1234567
°c
°c
°c
timer
days
0123456789101112131415161718192021222324
Auto Manu 1234567
°c
°c
°c
timer
days
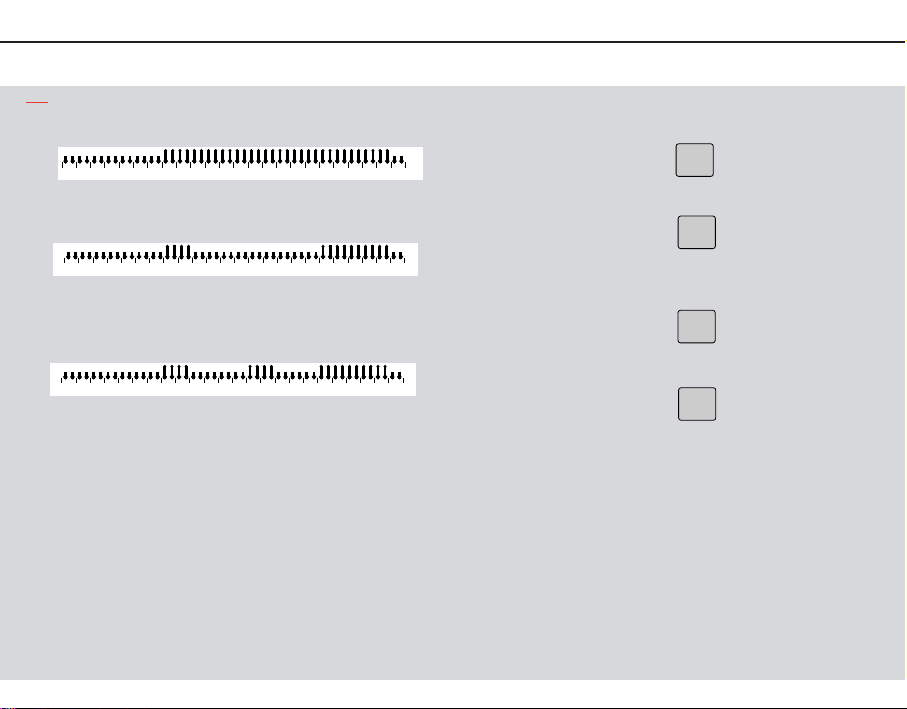
5.
Modification des températures pré-réglées
6.
Programmation
Pour programmer votre semaine vous diposez de 4 programmes :
P1, P2, P3 qui sont préenregistrés et non modifiables.
P4 qui est libre, vous permet de créer un programme person-
nalisé et différent pour chaque jour de la semaine.
Les programmes pré-enregistrés P1,P2 et P3 existent en 2 variantes :
NORD
P1 = Température confort de 6h à 23h
Température économique de 23h à 6h.
P2 = Température confort de 6h à 8h30 et de 16h30 à 23h00
Température économique de 8h30 à 16h30 et de 23h00 à 6h00.
P3 = Température confort de 6h à 8h30 de 11h30 à 13h30 et de 16h30
à 23h00
Température économique de 8h30 à 11h30 de 13h30 à 16h30 et
de
23h00 à 6h00.
P4 = Programme libre vous permettant de créer 3 périodes en tem-
pérature confort et 3 périodes en température économique et
ceci pour chaque jour de la semaine.
PROGRAMMATION
0123456789101112131415161718192021222324
0123456789101112131415161718192021222324
0123456789101112131415161718192021222324
Page 5

SUD
P1 = Température confort de 7h à 23h
Température économique de 23h à 7h.
P2 = Température confort de 7h à 9h00 et de 18h00 à 23h00
Température économique de 9h00 à 18h00 et de 23h00 à 7h00.
P3 = Température confort de 7h à 9h00 de 13h00 à 15h00 et de 18h00
à 23h00
Température économique de 9h00 à 13h00, de 15h00 à 18h00
et de 23h00 à 7h00.
P4 = Programme libre.
!
Important : pour basculer les programmes pré-enregistrés de la
variante Nord à la vaiante Sud ou vice versa,démontez l’appareil
de son socle et utilisez le mini-interrupteur Nord/Sud
Pour programmer votre semaine sur la base des programmes
pré-enregistrés P1, P2 ou P3.
1.
Appuyer sur
pour passer en mode programmation.
2. Appuyer sur
jusqu’à l’apparition du pointeur sous le jour que vous souhaitez
programmer.
3. Appuyer sur
jusqu’à afficher le programme que vous souhaitez appliquer à ce jour.
4. Appuyer sur
pour valider.
Le jour suivant vous est automatiquement proposé.
OK
PROG
P1-P4
DAYS
1-7
PROG
P1-P4
0123456789101112131415161718192021222324
0123456789101112131415161718192021222324
0123456789101112131415161718192021222324
Page 6
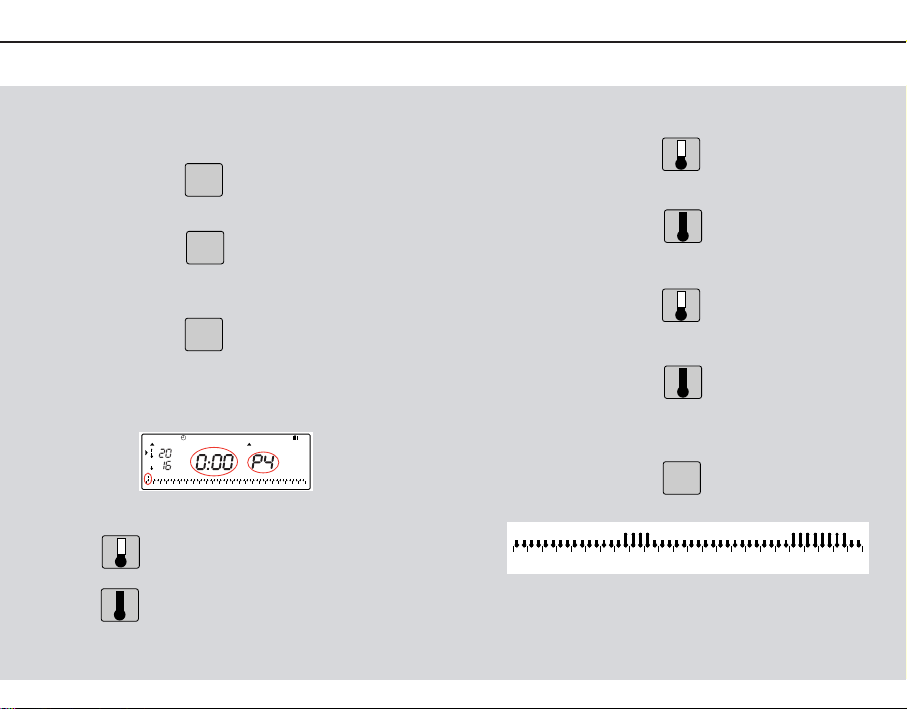
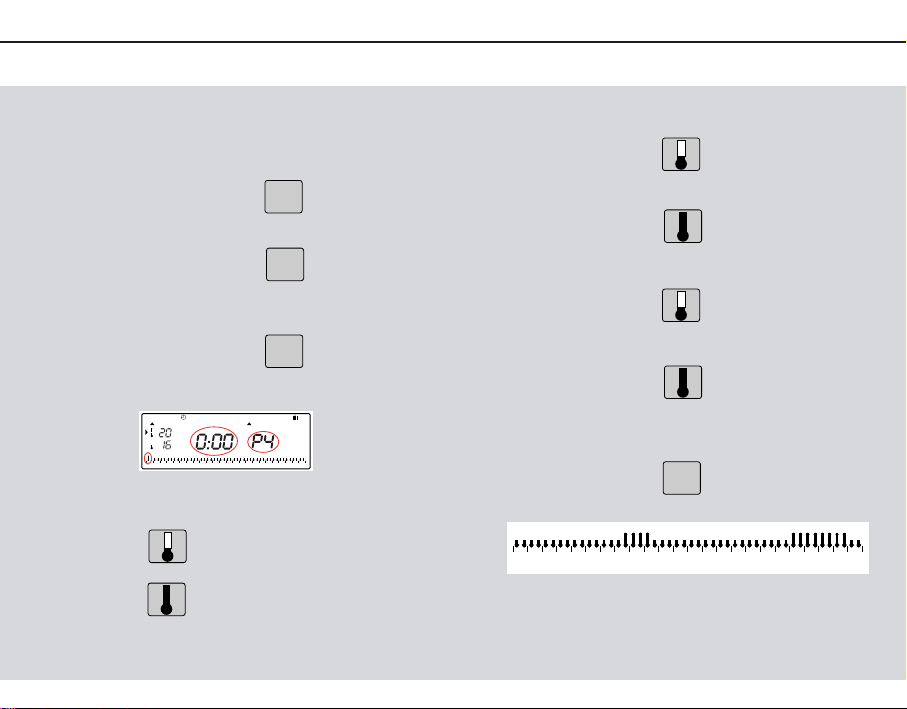
Programmez vous-même en fonction de vos besoins.
Ce programme P4 peut être différent pour chaque jour de la semaine.
1. Appuyer sur
pour passer en mode programmation.
2. Appuyer sur
jusqu’à l’apparition du pointeur sous le jour
que vous souhaitez programmer.
3. Appuyer sur
j
usqu’à afficher le programme P4.
Votre afficheur indique 0h00 et le premier thermomètre clignote sur le
profil de 24h.
Le curseur du bas clignote de 0h00 à 0h30.
Appuyez sur pour avoir la température réduit
ou
Appuyez sur pour avoir la température confort.
PROG
P1-P4
DAYS
1-7
PROG
P1-P4
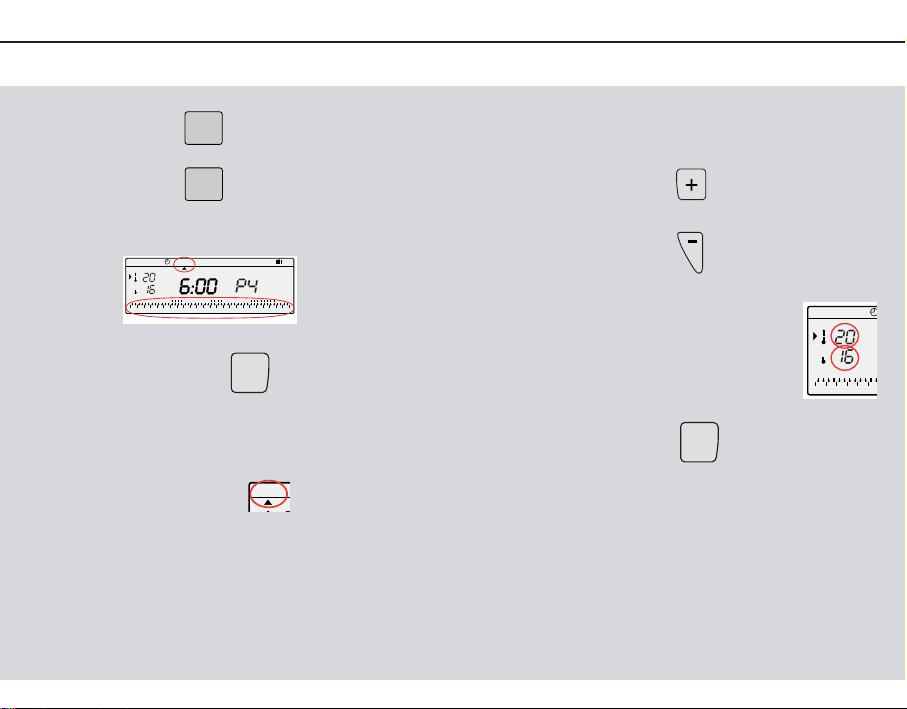
Par exemple, vous désirez avoir la température confort de 7h30 à
9h30 puis de 19h00 à 23h00.
Appuyez sur
Plusieurs fois pour obtenir l’horaire 7h30.
Appuyez sur
Plusieurs fois pour obtenir l’horaire 9h30.
Appuyez sur
Plusieurs fois pour obtenir l’horaire 19h00.
Appuyez sur
Plusieurs fois pour obtenir l’horaire 23h00
Pour valider toute la programmation :
appuyez sur
Vous avez programmé la température confort de 7h30 à 9h30 puis de
19h00 à 23h00.
OK
7.
Programmation du programme P4
...
Auto Manu 1 2 3 4 5 6 7
°c
°c
0123456789101112131415161718192021222324
0123456789101112131415161718192021222324
Page 7

8.
Lecture des programmes
9.
Changement temporaire de la consigne
Depuis le mode auto
Appuyer sur
Avec
sélectionnez le jour de 1 à 7 et vérifier le programme sur le profil de 24h
en bas de l’afficheur .
Appuyer sur
pour revenir en mode automatique.
Le mode automatique « auto ».
En mode automatique, votre Exabox 7J s’adapte à votre ryth-
me de vie en réalisant le ou les programmes que vous avez choisis.
Le passage en mode automatique se fait en appuyant sur la touche
MODE jusqu’à l’apparition du pointeur sous «auto».
Auto M
MODE
DAYS
1-7
PROG
P1-P4
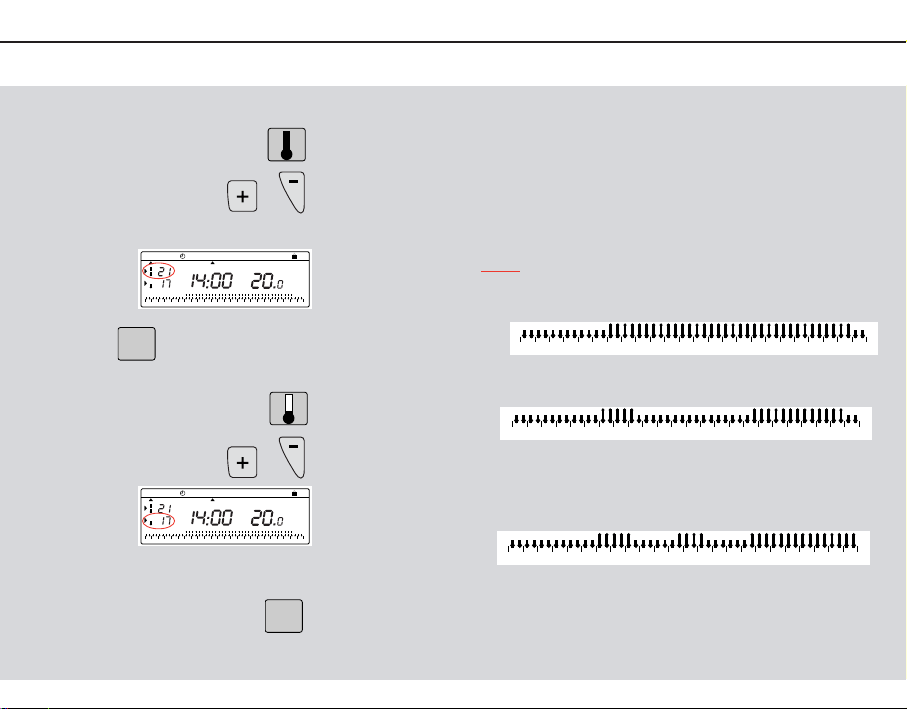
En mode automatique, cette fonction très pratique vous permet de
modifier temporairement la température ambiante.
- pour augmenter la température,
appuyez sur
(plusieurs appuis si nécessaire).
- pour abaisser la température,
appuyez sur
(plusieurs appuis si nécessaire).
L’indicateur du niveau de température en cours
(confort ou économique) se met à clignoter.
Cette modification prendra fin lors du prochain changement de température programmée.
Pour revenir au programme initial,
appuyez sur
et replacez le pointeur sous « auto ».
L’arrêt du clignotement de l’indicateur du niveau de température en
cours (confort ou économique) marque la fin de la modification temporaire.
MODE
CHANGEMENT DE CONSIGNE
Auto Manu 1234567
°c
°c
0123456789101112131415161718192021222324
Auto Manu
°c
°c
012345
Page 8
10.
Changement permanent de la température
11.
Comptage des heures de fonctionnement
12.
Mode absences prolongées, vacances
Pour maintenir une température permanente dans
votre logement (réglable de 5°C à 30°C) sans tenir
compte d’aucune programmation.
1. appuyer sur
pour positionner le pointeur sous Manu.
2. appuyez sur ou
pour régler la température souhaitée.
Pour quitter le mode MANU,
appuyer sur
et repositionner le pointeur sous auto.
Comptage des heures de fonctionnement.
Cette fonction vous permet de connaître le nombre d’heures de fonctionnement de votre chaudière depuis la dernière remise à zéro.
Appuyez sur
pour connaître le nombre d’heures de
fonctionnement depuis la dernière remise à
zéro.
Appuyez sur
pendant 5 sec. pour remettre le compteur à zéro.
0000
h
0000
h
MODE
MODE
Mode absences prolongées, vacances
Ce mode met votre logement à l’abri des risques du gel en maintenant une température minimum réglable dans votre logement durant
vos absences (de 1 à 99 jours).
Vous pouvez programmer la durée de votre absence pour prévoir la
remontée en température de votre logement à votre retour.
1. appuyer sur
2. appuyez sur ou
pour régler la durée de votre absence en jours (de 1 à 99 jours).
La journée en cours compte pour 1.
3. Validez avec
4. appuyez sur ou
pour régler le niveau de température souhaité pendant votre
absence
5. Validez avec
Restez dans ce mode.
Pour annuler le programme vacances
et revenir en mode automatique,
appuyer sur .
MODE
OK
OK
1
MODE VACANCES
Auto Manu
°c
Auto Manu 1234567
°c
0123456789101112131415161718192021222324
days
123456
timer
6789101112131415161718
Page 9
Sichtbare Tasten und Kontrolleuchten des Anzeigeelements.
Unter der Abdeckung befindliche Tasten
Der Exabox ist entwickelt worden, um für Sie Komfort und
Energieeinsparung zu bieten.
Mit diesem Gerät können Sie Ihre Heizung in 3 Temperaturstufen
einstellen und programmieren.
- Die "Komforttemperatur" : das ist die Temperatur, die Sie haben
möchten, wenn Sie anwesend sind.
- Die "Absenktemperatur" : das ist die Temperatur, die Sie während Ihrer kurzzeitigen Abwesenheit oder während der Nacht
haben möchten.
- Die "Frostschutztemperatur": das ist die Mindesttemperatur für
die Zeit einer längeren Abwesenheit.Mit dieser Einstellung ist
Ihre Wohnung gegen Frost geschützt.
Diese 3 voreingestellten Temperaturwerte und ihre freie
Programmierung machen es möglich,Ihre Heizung Tag für Tag an
Ihre Lebensweise anzupassen.
Das wartungsfreundliche Exabox Raumthermostat wird direkt über
Ihre Saunier Duval Therme gespeist.
BESCHREIBUNG UND INSTALLATION
1. Beschreibung des programmierbaren Raumthermostats
1. Taste „–" für die Einstellung
2. Taste "+" für die Einstellung
3. Wahl der Betriebsart
4. Längere Abwesenheit (Urlaub)
5. Anzeige des Temperaturwertes
für den Absenkbetrieb
6. Anzeige der Betriebsarten
Absenkbetrieb
7. Absenktemperatur
8. Anzeige des Temperaturwertes
für den Komfortbetrieb
9. Anzeige der Betriebsarten
Komfortbetrieb
10. Komforttemperatur
11. Anzeige des Wochentags
12. Anzeige für die Einschaltung
der Heizunganlage
13. Umgebungstemperatur
14. Anzeige der aktuellen Uhrzeit
15. Wahl des Wochentags
(1 = Montag,..)
16. Wahl des Programms P1 bis P4
17. Einstellung des Wertes der
Komforttemperatur
18. Einstellung des Wertes der
Absenktemperatur
19. Bestätigung
20. Einstellung des
Stundenzählers
9419.560.00/03.01
box
105 8 12
Auto Manu 1234567
°c
+
2
1
°c
-
0123456789101112131415161718192021222324
11
MODE
°c
timer
days
3
4
1461397
DAYS
PROG
1-7
P1-P4
0000
OK
h
Res
16 17 18 19 20 2115
Page 10
Gerät einstellen.
Stellen Sie den Schalter auf „Battery ON“, um die
Speicherbatterie in Betrieb zu nehmen.
Wählen Sie jetzt in Anbetracht Ihrer geographischen Lage eines der
vorgespeicherten Heizprogramme,Variante „Nord“ oder „Süd“
(siehe Kapitel 6. Gerät programmieren).
Hängen Sie das Raumthermostat an und clipsen Sie es fest.
Ziehen Sie die Schraube wieder an und verschließen Sie die
Abdeckung.
Der Exabox ist ca. 1,50 m über dem Boden an einer Innenwand so
anzubringen, daß es gegen direkte Sonnenstrahlung und gegen den
Einfluß jeglicher Wärmequelle (wie Fernsehgerät, Lampen, Luftzug,
usw.) geschützt ist.
KlappenSie die Haube herab und lösen Sie die Schraube.
Befestigen Sie den Sockel an der Wand.
Schließen Sie das Gerät dem folgenden Schema entsprechend an.
2.
Einbau des programmierbaren Raumthermostats
...
!
Prog N
Battery ON
12
Prog S Battery OFF
Page 11
Verbindung zwischen Therme und Exabox.
Ihr Exabox Raumthermostat arbeitet in direkter Verbindung mit Ihrer
Saunier Duval Therme.Ist Ihre Therme abgeschaltet bzw.wurde sie auf
„Sommer“ gesetzt, schaltet sich Ihre Exabox ebenfalls ab, und zeigt
lediglich die Raumtemperatur an. Die gesamte Programmierung ist
jedoch nach wie vor im Speicher hinterlegt.
Ihr Exabox setzt sich automatisch in Betrieb,sobald Sie Ihre Therme auf
„Heizen“ umstellen.
Bei der ersten Inbetriebnahme und bevor Sie mit der Programmierung
Ihres Gerätes beginnen, verschließen Sie bitte die Abdeckung, und
betätigen Sie die Reset Taste Taste mit der Spitze eines
Kugelschreibers.
Technische Merkmale.
- Komforttemperatur Einstellbereich: +5 °C bis +30 °C
- Absenktemperatur Einstellbereich: +5 °C bis +30 °C
- Frostschutztemperatur Einstellbereich: +5 °C bis +30 °C
- Umgebungstemperatur Anzeigebereich: 0 °C bis +40 °C
- Statische Schaltdifferenz: < 0,3 Grad
- Stromversorgung: Über die Leitung, mit der Exabox an die Therme
angeschlossen ist.
- Gangreserve: 8 Jahre
- Betriebstemperatur : -10 à +50°C
- Lagerungstemperatur: -20°C à +65°C
- Luftfeuchtigkeit : 90% max à 25°C
- Schutzgrad: IP 30
- Isolationsklasse II
Einstellung des Tages und der Uhrzeit.
Es handelt sich um die erste Inbetriebnahme, Sie drücken die Taste "
RESET "
Die Anzeige 12:00 und der Zeiger unterhalb des Tages 1 (Montag)
blinken.
1. Stellen Sie nun mit den Tasten oder die Uhrzeit ein.
Beim anhaltenden Drücken dieser Tasten läuft die Zeitanzeige
schneller durch.
2. Mit Hilfe der Taste , stellen Sie jetzt den Tag ein. Unter dem
jeweiligen Tag erscheint dann der Zeiger (1 = Montag, 2 = Dienstag,
3 = Mittwoch usw.)
3. Bestätigen Sie die Einstellung mit der Taste .
4. Falls Sie die Einstellung des Tages oder der Uhrzeit verändern möchten,
drücken Sie die Taste MODE
bis der Zeiger unter dem Symbol der Uhr steht. Anschließend
gehen Sie ebenso wie in den obigen Punkten
1, 2 und 3 vor.
EINSTELLUNG DES TAGES UND DER UHRZEIT
3.
Verbindung zwischen Therme und Exabox
4.
Einstellung des Tages und der Uhrzeit
DAYS
1-7
123456
OK
MODE
Page 12
Komforttemperatur einstellen.
Öffnen Sie die Abdeckung
Drücken Sie die Taste
gefolgt von oder
bis Sie die gewünschte Temperatur eingestellt haben.
Drücken Sie die Taste um die Auswahl zu bestätigen.
Absenktemperatur einstellen.
Drücken Sie die Taste
gefolgt von oder
bis Sie die gewünschte Temperatur eingestellt haben.
Drücken Sie die Taste um die Auswahl zu bestätigen.
Hinweis. Der Einstellbereich der Temperatur reicht von 5°C
bis 30°C, in Schritten von jeweils 0.5°C.
OK
OK
0123456789101112131415161718192021222324
Auto Manu 1234567
°c
°c
°c
timer
days
0123456789101112131415161718192021222324
Auto Manu 1234567
°c
°c
°c
timer
days
5.
Voreingestellte Temperaturen ändern
6.
Programmierung
Für die Programmierung Ihrer Woche verfügen Sie über 4 Programme :
P1, P2 und P3 sind voreingestellt und können nicht verändert werden.
P4 kann frei programmiert werden und erlaubt Ihnen damit,Ihr persön-
liches Programm für jeden einzelnen Wochentag zu erstellen.
Die im Gerät vorgespeicherten Programme P1, P2 et P3 existieren in
jeweils 2 Varianten:
NORD
P1 = Komforttemperatur von 6h bis 23h.
Absenktemperatur von
23h bis 6h.
P2 = Komforttemperatur von 6 bis 8h30 und von 16h30 bis 23h00.
Absenktemperatur von
8h30 bis 16h30 und von 23h00 bis 6h00.
P3 = Komforttemperatur von 6h bis 8h30,von 11h30 bis 13h30 und von
16h30 bis 23h00.
Absenktemperatur von
8h30 bis 11h30, von 13h30 bis 16h30 und
von
23h00 bis 6h00.
P4 = Über dieses freie Programm können Sie für jeden einzelnen
Wochentag bis zu 3 Zeiträume mit Komforttemperatur und 3
Zeiträume mit Absenktemperatur programmieren.
PROGRAMMIERUNG
0123456789101112131415161718192021222324
0123456789101112131415161718192021222324
0123456789101112131415161718192021222324
Page 13
SUD
P1 = Komforttemperatur von 7h00 bis 23h00.
Absenktemperatur von
23h00 bis 7h00.
P2 = Komforttemperatur von 7h00 bis 9h00 und von 18h00 bis 23h00.
Absenktemperatur von 9h00 bis 18h00 und von 23h00 bis 7h00.
P3 = Komforttemperatur von 7h00 bis 9h00, von 13h00 bis 15h00 und
von
18h00 bis 23h00.
Absenktemperatur von
9h00 bis 13h00, von 15h00 bis 18h00 und
von
23h00 bis 7h00.
P4 = Freie Programm.
!
Wichtig: Um vom vorgespeicherten Programm, Variante „Nord“,
auf die Variante „Süd“ oder umgekehrt umzuschalten, demontieren Sie das Gerät von seinem Sockel und betätigen Sie den
Miniaturschalter Nord/Süd.
Programmierung der aktuellen Woche auf der Grundlage der vorgespeicherten Programme P1, P2 oder P3.
1.
Drücken Sie die Taste
um in die Betriebsart " programmierung " zu gelangen.
2. Jetzt drücken Sie die Taste
bis der zeiger " " unter dem Wochentag steht, den sie programmieren
möchten.
3. Anschließend ist die Taste
zu drücken, bis die gewünschte Programmnummer blinkt.
4. Drücken Sie jetzt die Taste
um die Auswahl zu bestätigen.
Anschließend wird ihnen automatisch der folgende Tag angeboten.
OK
PROG
P1-P4
DAYS
1-7
PROG
P1-P4
0123456789101112131415161718192021222324
0123456789101112131415161718192021222324
0123456789101112131415161718192021222324
Page 14
Programmieren Sie selbst nach Ihren individuellen Bedürfnissen.
Dieses Programm P4 kann für jeden einzelnen Wochentag unterschiedlich ausfallen.
1. Drücken Sie die Taste
um in die Betriebsart " programmierung " zu gelangen.
2. Jetzt drücken Sie die Taste
bis der zeiger " " unter dem Wochentag steht,den sie programmieren
möchten.
3. Anschließend ist die Taste
zu drücken,bis die Programmnummer P4 blinkt.
Ihr Display zeigt 0h00 und das erste Thermometer im Profil der 24St blinkt.
Drücken Sie die Taste zum Einstellen der reduzierten Temperatur.
oder
Drücken Sie die Taste zum Einstellen der Komforttemperatur.
PROG
P1-P4
DAYS
1-7
PROG
P1-P4
Beispiel: Sie wünschen die Komforttemperatur von 7.30 Uhr bis
9.30 Uhr und anschließend wieder von 19.00 Uhr bis 23.00 Uhr.
Drücken Sie mehrmals
bis die Zeit 7h30 angezeigt wird.
Drücken Sie mehrmals
bis die Zeit 9h30 angezeigt wird.
Drücken Sie mehrmals
bis die Zeit 19h00 angezeigt wird
Drücken Sie mehrmals
Bis die Zeit 23h00 angezeigt wird.
Um den gesamten Programmiervorgang zu bestätigen,
drücken Sie die Taste
Sie haben jetzt die Komforttemperatur von 7.30 Uhr bis 9.30 Uhr und
anschließend von 19.00 Uhr bis 23.00 Uhr programmiert.
OK
7.
Programm P4 programmieren
...
Auto Manu 1 2 3 4 5 6 7
°c
°c
0123456789101112131415161718192021222324
0123456789101112131415161718192021222324
Page 15
8.
Ablesen der Programme
9.
Vor übergehende änderung der Temperatur
In die automatische Betriebsweise,
drücken Sie die Taste
Drücken Sie
um den Tag auszuwä hlen. Anschließend können Sie die
Programmierung an dem Profil der 24h überprüfen.
Drücken Sie die Taste
um in die automatische Betriebsweise züruckzukehren.
Automatische Betriebsweise "auto".
In der automatischen Betriebsweise paßt sich der Exabox
Ihrem Lebensrythmus an, indem das
von Ihnen gewählte Programm ausgeführt wird.
Um die automatische Betriebsweise einzuschalten,ist die Taste " MODE
" zu drücken bis der zeiger unter " auto " steht.
Auto M
MODE
DAYS
1-7
PROG
P1-P4
In der Automatische Betriebsweise können Sie über diese sehr
praktische Funktion die Umgebungstemperatur zeitweilig ändern.
- Um die Temperatur zu erhöhen,
Drücken Sie die Taste
(gegebenenfalls mehrfach).
- Um die Temperatur zu senken,
drücken Sie die Taste
(gegebenfalls mehrfach).
Die Anzeige des aktuellen Sollwertes der Temperatur
(Absenk- oder Komforttemperatur) beginnt zu blinken.
Diese Änderung wird mit dem nächsten programmierten
Temperaturwechsel aufgehoben.
Um zum ursprünglichen Programm zurückzukehren,
drücken Sie die taste
bis der zeiger erneut unter „auto“ steht
Das Ende der zeitweiligen Änderung der Temperatur wird dadurch
gekennzeichnet, daß die Anzeige aufhört zu blinken.
MODE
ÄNDERUNG DER TEMPERATUR
Auto Manu 1234567
°c
°c
0123456789101112131415161718192021222324
Auto Manu
°c
°c
012345
Page 16
10.
Dauerhafte Temperaturänderung
11.
Betriebsstundenzählung
12.
Betriebsweise bei längerer Abwesenheit, Urlaub
Um eine gleichbleibende Temperatur in Ihrer Wohnung
zu halten (die Sie von 5°C bis 30°C einstellen können)
ohne irgendwelche Programmierungen zu berück-
sichtigen.
1. Drücken Sie die Taste
um den zeiger unter Manu zu setzen.
2. Drücken Sie die Tasten oder
um die gewünschte Temperatur einzustellen.
Um die handgesteuerte Betriebsweise zu verlassen.
Drûcken Sie
Um der Zeiger unter „auto“ zu setzen.
Betriebsstundenzählung.
Diese Funktion dient zum Ablesen der Betriebsstunden Ihrer Therme seit
dem letzten Zählerreset.
Drücken Sie die Taste
um die Anzahl der Betriebsstunden seit dem
letzten Zählerreset abzulesen.
Drücken Sie
5 Sekunden lang die Taste
um den Zähler auf Null zurückzusetzen.
0000h0000
h
MODE
MODE
Betriebsweise bei längerer Abwesenheit, Urlaub
In dieser Betriebsweise wird Ihrer Wohnung während einer längeren
Abwesenheit (bis zu 99 Tage) gegen Frost geschützt, indem hier eine
einstellbare Mindesttemperatur aufrechterhalten wird.
Sie können die Dauer ihrer Abwesenheit programmieren, um für Ihre
Rückkehr einen Temperaturanstieg in ihrer Wohnung vorzusehen.
1. Drücken Sie die Taste
2. Stellen Sie mit den Tasten oder
die Anzahl der Tage ihrer Abwesenheit ein (1 bis 99 Tage).Der Laufende
Tage gilt dabei als 1.
3. Bestätigen Sie mit der Taste
4. Stellen Sie mit den Tasten oder
den für Ihre Abwesenheit gewünschten Sollwert der Temperatur ein.
5. Bestätigen Sie mit der Tast
Verbleiben Sie in dieser Betriebsweise.
Um diese Eingabe rückgängig zu machen und in die automatische
Betriebsweise zurückzukehren müssen Sie nur die taste
drücken.
MODE
OK
OK
1
BETRIEBSWEISE”URLAUB”
Auto Manu
°c
Auto Manu 1234567
°c
0123456789101112131415161718192021222324
days
123456
6789101112131415161718
timer
Page 17
Description of buttons and display.
The buttons under the cover.
The Exabox 7D has been designed to offer you comfort and energy
savings.
It allows you to programme and adjust your heating according to
3 temperature levels :
- “comfort” temperature : this is the temperature for your hours of
presence.
- “reduced” temperature : this is the temperature for your brief
absences or during the night.
- “frost protection” temperature : this is the minimum temperature
for long absences. It protects your dwelling from the risk of frost.
3 pre-recorded programs and a blank programme will allow you
to adapt your heating to your life style.
No need to replace the batteries, your Exabox 7D is supplied directly by its connection to the boiler “Saunier Duval”.
DESCRIPTION AND INSTALLATION
1. Presentation of the clock thermostat
1. – button for adjusting settings.
2. + button for adjusting settings.
3. Mode selection.
4. Prolonged absences (holidays).
5. Indicator for current
temperature level (reduced).
6. Viewing of “reduced” periods.
7. “Reduced”temperature.
8. Indicator for current
temperature level (comfort).
9. Viewing of “comfort” periods.
10. “Comfort”temperature.
11. Pointer indicating day of the
week.
12. Heating start-up indicator.
13. Ambient temperature.
14. Time.
15. Days of the week selection.
16. P1 to P4 programme
selection.
17. Comfort temperature setting.
18. Reduced temperature setting.
19. Validation.
20. Hour counter
21. Reset.
9419.560.00/03.01
box
2
1
105 8 12
Auto Manu 1234567
+
-
0123456789101112131415161718192021222324
11
°c
°c
1461397
MODE
°c
timer
days
3
4
DAYS
PROG
1-7
P1-P4
0000
OK
h
Res
16 17 18 19 20 2115
Page 18
Important settings.
Put the first micro-switch on BATTERY ON to activate the saving
battery (to keep your programs on memory when the clock
thermostat is OFF).
According to your geographical position, select the pre-recorded
programmes version North or version South (cf. chapter 6 – pro-
grammation).
Replace the product on its base.
Screw it on and close the cover.
Your Exabox 7D should be installed at least 1,50 m above the
ground, on an inside wall protected from direct sun ray and from
any heat source such as television, lamp,draughts, etc…
Slide the cover down and unscrew screw.
Fix the base to the wall.
Connect the device according to the diagram below.
2.
Installation of your clock thermostat
.
...
!
Prog N
Battery ON
12
Prog S Battery OFF
Page 19
Link between your boiler and Exabox.
Your Exabox 7D operates in direct connection with your boiler.
When your boiler is turned off or in summer mode, your Exabox 7D is
OFF and only displays the ambient temperature.
All your programmation is saved on memory.
Your Exabox 7D will automatically switch itself ON when you will turn
ON your boiler.
You are putting the device into operation for the first time, before star-
ting your programmation,slide cover down and press RESET with the
tip of a pen.
Technical specifications.
- adjustment range for comfort temperature : +5 to +30°C.
- adjustment range for reduced temperature : +5 to +30°C.
- adjustment range for holiday temperature : +5 to +30°C.
- display of ambient temperature : 0°C to +40°C.
- static differential <0.3°C
- supply : by the connection to the boiler.
- Saving battery life span : 8 years.
- Operating temperature : -10 to +50°C.
- Storage temperature : -20°C to +65°C.
- Hygrometry : 90% max at 25°C
- degree of protection : IP30.
- insulation class II.
Time setting.
Setting current day and time.
You are putting the device into operation for the first time, you have
just pressed the “reset” button.
12:00 appears and the pointer flashes under day 1.
1. Set the time using the / buttons (the numbers run off
more quickly when the button is pressed continuously).
2. Set the current day by pressing several times on , a pointer
appears under the corresponding day
(1=Monday, 2=Tuesday, etc…)
3. Validate with .
4. If you wish to change the time or the day, press
until the pointer appears under the clock sign and continue
as above for points
1, 2 and 3.
TIME SETTING
3.
Link between your boiler and Exabox.
4.
Time setting
OK
123456
DAYS
MODE
1-7
Page 20
To set the “ comfort ” temperature.
Slide cover down.
Press
Adjust the temperature with or
Until you display the required temperature.
Confirm with
To set the “reduced” temperature.
Press
Adjust the temperature with or
Until you display the required temperature.
Confirm with
N.B. These temperatures are adjustable from 5 to 30°C by steps of 0.5°C.
OK
OK
0123456789101112131415161718192021222324
Auto Manu 1234567
°c
°c
°c
timer
days
0123456789101112131415161718192021222324
Auto Manu 1234567
°c
°c
°c
timer
days
5.
Temperature settings.
6.
Programming.
Open the cover.
To programme your device, you have 4 programs at your disposal.
• 3 of these programs are pre-recorded and cannot be modified.
• The
4th programme is blank and allows you to create a personalised
programme.
The 3 pre-recorded programs exist on version North and on version
South :
NORTH
P1 : Comfort temperature from 6h to 23h.
Reduced temperature from
23h to 6h.
P2 : Comfort temperature from 6h to 8h30 and from 16h30 to 23h.
Reduced temperature from
8h30 to 16h and from 23h to 6h.
P3 : comfort temperature from 6h to 8h30,from 11h30 to 13h30 and
from
16h30 to 23h00.
Reduced temperature from 8h30 to 11h30,from 13h30 to 16h30
and from 23h to 6h.
P4 : Blank programme allowing you to create 3 comfort temperature
periods and 3 reduced temperature periods.
PROGRAMMATION
0123456789101112131415161718192021222324
0123456789101112131415161718192021222324
0123456789101112131415161718192021222324
Page 21

SOUTH
P1 : Comfort temperature from 7h to 23h.
Reduced temperature from
23h to 7h.
P2 : Comfort temperature from 7h to 9h and from 18h to 23h.
Reduced temperature from
9h to 18h and from 23h to 7h.
P3 : comfort temperature from 7h to 9h,from 13h to 15h and from
18h to 23h.
Reduced temperature from 9h to 13h,from 15h to 18h and from
23h to 7h.
P4 : blank programme.
!
Important : To switch between pre-recorded programs version
North and version South, take the product out of its base and use
the microswitch PROG N / PROG S.
To program your week according to the 3 pre-recorded programs P1,
P2 and P3.
1.
Press
to go into programming mode.
2. Press
until the pointer appears under the day you wish to programme.
3. Press
until the programme you wish to select is displayed.
Check your programming on the 24 hour profile.
4. Press
to confirm.
The following day is automatically proposed.
OK
PROG
P1-P4
DAYS
1-7
PROG
P1-P4
0123456789101112131415161718192021222324
0123456789101112131415161718192021222324
0123456789101112131415161718192021222324
Page 22

Create your programme according to your needs
This programme can be different for each day of the week.
1. Press
to go into the programming mode.
2. Press
until a pointer appears under the day you wish to programme.
3. Press
until the P4 programme flashes in the right side of the screen.
Your display panel indicates 0h00 and the first thermometer flashes on
the 24 hour profile.
The pointer flashes between 0h00 and 0h30.
Press to require comfort temperature.
or
Press to require reduced temperature.
PROG
P1-P4
DAYS
1-7
PROG
P1-P4
For example, you want to programme comfort temperature between 7h30 and 9h30 and then from 19h00 to 23h00.
Press
several times to obtain 7h30.
Press
several times to obtain 9h30.
Press
several times to obtain 19h00.
Press
several times to obtain 23h00
To validate this programme P4
press
You have programmed comfort temperature between 7h30 and
9h30 and from 19h to 23h.
OK
7.
Creating a P4 programme.
...
Auto Manu 1 2 3 4 5 6 7
°c
°c
0123456789101112131415161718192021222324
0123456789101112131415161718192021222324
Page 23

8.
Programme reading.
9.
Temporary temperature modification.
From “auto” mode
press
With
select the day from 1 to 7 and check your programming on the 24 hour
profile at the bottom of the display panel (see example above).
Press
to return to automatic mode.
Automatic mode "auto".
You pass into automatic mode by pressing the “mode”
button until the pointer appears under .
In automatic mode, your Exabox 7D adapts your heating to your life
style by running the programs you have selected.
Auto M
MODE
DAYS
1-7
PROG
P1-P4
In automatic mode, this very useful function allows you to modify
ambient temperature temporarily.
- to increase the temperature,
press
(several times if necessary).
- to decrease the temperature,
press
(several times if necessary).
The current temperature level indicator (comfort or
reduced) will begin flashing.
This modification ends with the next change in
programmed temperature.
To return to the initial programme,
press
an re-position the pointer under "auto".
The current temperature level indicator (comfort or reduced) will
stop flashing.
MODE
TEMPERATURE MODIFICATION
Auto Manu 1234567
°c
°c
0123456789101112131415161718192021222324
Auto Manu
°c
°c
01234567
Page 24

10.
Permanent temperature modification.
11.
Counting running hours.
12.
Prolonged absence mode – holidays.
To maintain a constant temperature in your dwelling
(adjustable between 5°C and 30°C) without taking
into account any programmation.This mode
transforms your device into a simple thermostat.
1. Press
to position the pointer under “Manu”.
2. Press or
to adjust the required temperature.
To quit the MANU mode,
Press
and re-postion the pointer under auto.
Counting running hours.
This very useful function will allow you to know the number of hours
your boiler has been running since the last reset.
Press
The display panel will indicate the number of
hours your boiler has been running.
Press
during 5 sec, to return the counter to zero.
0000
h
0000
h
MODE
MODE
Prolonged absence mode – holidays.
This mode protects your dwelling from the risk of frost by maintaining a
minimum adjustable temperature in your dwelling during your
absences (from 1 to 99 days).
You can programme the length of your absence so that the temperature rises for your return.
1. Press
2. Press or
to set the length of your absence in days (from 1 to 99 days)
The current day count as one.
3. Validate with
4. Press or
to set the temperature level required during your absence
5. Validate with
Remain in this mode !
To cancel and return to automatic mode,
press .
MODE
OK
OK
1
HOLIDAYS M ODE
Auto Manu
°c
Auto Manu 1234567
°c
0123456789101112131415161718192021222324
days
123456
6789101112131415161718
timer
Page 25

Tasti esterni e spie del display.
Tasti sotto il coperchio
Il Exabox è stato creato per apportare conforto ed economizzare
energia
e permette di pro-grammare e di regolare il riscaldamento secondo 3 livelli di temperatura :
- Temperatura " confort " : è la temperatura raccomandata quando siete in casa.
- Temperatura " economia " : è la temperatura più gradevole
quando siete assenti per breve tempo o durante la notte.
- Temperatura " a riposo " è la temperatura minima assicurata
durante le assenze prolungate.Protegge l’abitazione dai rischi
del gelo.
Questi 3 programmi preregistrati e il suo programma libero vi daranno la possibilità di adattare, giorno dopo giorno, il vostro riscaldamento al vostro modo di vita.
Di facile manutenzione, l' Exabox viene direttamente alimentato
dalla caldaia Saunier Duval.
DESCRIZIONE E INSTALLAZIONE
1. 1. Descrittivo del termostato d'ambiente programmabile
1. Tasti - per la regolazione
2. Tasti + per la regolazione
3. Selezione dei modi
4. Assenza prolungata (vacanze)
5. Indicatore del livello di tempe-
ratura in corso " economia "
6. Visualizzazione dei periodi "
economia "
7. Temperatura " economica "
8. Indicatore del livello di
temperatura in corso " confort "
9. Visualizzazione dei periodi "
confort "
10. Temperatura " confort "
11. Indicatore del giorno della
settimana
12. Indicatore dell’innesto
del riscaldamento
13. Temperatura ambiente
14. Visualizzazione dell'ora in corso.
15. Selezione dei giorni della
settimana (1 = lunedì, ...).
16. Scelta del programma : da
P1 a P4
17. Regolazione temperatura "
confort ".
18. Regolazione temperatura "
economia "
19. Convalida
20. Regolazione contatore ora-
rio.
21. Ras : Rimessa a zero generale.
9419.560.00/03.01
box
105 8 12
Auto Manu 1234567
+
2
-
1
0123456789101112131415161718192021222324
11
°c
°c
1461397
MODE
°c
timer
days
3
4
DAYS
PROG
1-7
P1-P4
0000
OK
h
Res
16 17 18 19 20 2115
Page 26

Configurare l'apparecchio.
Posizionare il commutatore su " Battery ON " per mettere in servi-
zio la pila di scorta
In funzione della vostra posizione geografica, selezionate i programmi di riscaldamento preregistrati : variante Nord o variante Sud
(vedi capitolo 6. Programmazione).
Appendere e fissare con clip il termostato d'ambiente
programmabile.
Riavvitare le viti e chiudere il coperchio.
Il Exabox deve essere installato a 1,50 m dal suolo su un muro interno al riparo dai raggi diretti del sole o da ogni fonte di calore come
televisore, lampade, correnti d’aria, ecc.
Abbassare il coperchio e svitare la vite
Fissare il basamento al muro
Raccordare l’apparecchio secondo lo schema qui sotto :
2.
Posa del termostato d'ambiente programmabile
...
!
Prog N
Battery ON
12
Prog S Battery OFF
Page 27

Collegamento caldaia – Exabox
L'Exabox funziona in collegamento diretto con la caldaia Saunier
Duval.Quando la caldaia è spenta o in posizione "estiva", l' Exabox è
spento e visualizza solo la temperatura ambiente. Tutta la programmazione viene memorizzata.
L'Exabox si accende automaticamente quando la caldaia viene
impostata su "riscaldamento".
All'atto della prima messa in servizio, prima di lanciare la programmazione dell'apparecchio, abbassate il coperchio e premete il tasto
" reset " con la punta di una biro.
CARATTERISTICHE TECNICHE
- Intervallo di regolazione della T°C conforto da +5 a +30° C
- Intervallo di regolazione della T°C ridotta da +5 a +30° C
- Intervallo di regolazione della T°C vacanze da +5 a +30° C
- Intervallo di visualizzazione delle T°C ambiente da 0 a +40° C
- Differenziale statico : < 0.3 gradi
- Alimentazione : tramite il collegamento tra l’Exabox e la caldaia.
- Riserva di funzionamento 8 anni.
- Temperatura di funzionamento : da -10 a +50° C
- Temperatura di stoccaggio : da -20 a +65° C
- Igrometria : 90% max a +25° C
- Grado di protezione : IP 30
- Classe di isolamento : II
Programmazione dell’ora e del giorno
E’ la prima messa in servizio. Voi avete premuto sul tasto RESET.
Le ore 12:00 e l’indice sotto il giorno 1 (lunedì) lampeggiano.
1. Programmate l’ora con i tasti / (una pressione pro-
lungata sul tasto accelera lo scorrimento dell’ora).
2. Regolare il giorno con pressioni successive sul tasto .Un indi-
ce appare sotto il giorno corrispondente (1 =
lunedì, 2 = martedì, 3 = mercoledì,etc.)
3. Convalidate con il tasto .
4. Se volete modificare l’ora o il giorno :
premere sul tasto
fino alla comparsa dell’indice sotto la sigla orologio e procedere come indicato sopra, ai punti
1, 2 e 3.
PROGRAMMAZIONE DELL’ ORA E DEL GIORNO
3.
Collegamento caldaia – Exabox
4.
Programmazione dell’ora e del giorno
123456
OK
MODE
DAYS
1-7
Page 28

Per regolare la temperatura " comfort ".
Aprire il coperchio
Premere
quindi o
fino ad ottenere la temperatura desiderata
Convalidate con
Per regolare la temperatura " economia "
Aprire il coperchioPremere
quindi o
fino ad ottenere la temperatura desiderata.
C onvalidate con
NB. La temperatura puo' essere regolata da 5°C a 30°C,
per campi di variazione successivi di 0.5°C.
OK
OK
0123456789101112131415161718192021222324
Auto Manu 1234567
°c
°c
°c
timer
days
0123456789101112131415161718192021222324
Auto Manu 1234567
°c
°c
°c
timer
days
5.
Modifica delle temperature preimpostate
6.
Programmazione
Per programmare la vostra settimana avete a disposizione 4 programmi :
P1, P2 e P3 che sono preregolati e non modificabili.
P4 che è libero e che permette di creare un programma per-
sonalizzato e differente per ogni giorno della settimana
.
I programmi preregistrati P1,P2 e P3 comportano due varianti distinte :
NORD
P1 = Temperatura " conforto " dalla ore 6 alle 23
Temperatura " economia " dalla ore 23 alle 6
P2
= Temperatura " conforto " dalle 6 alle 8,30 e dalle 16,30 alle 23
Temperatura " economia " dalle 8,30 alle 16,30 e dalle 23 alle 6
P3
= Temperatura " conforto " dalla 6 alle 8,30,dalle 11,30 alle 13,30 e
dalle
16,30 alle 23
Temperatura " economia " dalle 8,30 alle 11,30, dalle 13,30 alle
16,30 e dalle 23 alle 6
P4
= Programma libero che vi permette di creare 3 periodi in
temperatura " conforto " e 3 periodi in temperatura " economia
" per ogni giorno della settimana.
PROGRAMMAZIONE
0123456789101112131415161718192021222324
0123456789101112131415161718192021222324
0123456789101112131415161718192021222324
Page 29

SUD
P1 = Temperatura " conforto " dalla ore 7 alle 23
Temperatura " economia " dalla ore 23 alle 7
P2
= Temperatura " conforto " dalle 7 alle 9 e dalle 18 alle 23
Temperatura " economia " dalle 9 alle 18 e dalle 23 alle 7
P3 = Temperatura " conforto " dalla 7 alle 9,dalle 13 alle 15 e dalle 18
alle 23
Temperatura " economia " dalle 9 alle 13, dalle 15 alle 18 e dalle
23 alle 7.
P4 = Programma libero.
!
Importante : Per trasferire i programmi preregistrati della variante
Nord alla variante Sud o viceversa,staccare l'apparecchio dalla
base e premere il mini-interruttore Nord/Sud.
Per programmare la settimana in base ai programmi preregistrati P1, P2
o P3.
1.
Premere sul tasto
per passare in modo programmazione.
2. Premere sul tasto
fino alla comparsa dell’indice sotto il giorno che volete programmare.
3. Premere sul tasto
fino alla comparsa a destra del display del numero di programma.
4. Premere sul tasto
per convalidare.
Il giorno seguente è proposto automaticamente.
OK
PROG
P1-P4
DAYS
1-7
PROG
P1-P4
0123456789101112131415161718192021222324
0123456789101112131415161718192021222324
0123456789101112131415161718192021222324
Page 30

Potrete programmarlo da soli, in funzione dlele vostre esigenze specifiche.
Si puo' avere un programma P4 diverso per ogni giorno della settimana.
1. Premere sul tasto
per passare in modo programmazione.
2. Premere sul tasto
fino alla comparsa dell’indice sotto il giorno che volete
programmare.
3. Premere sul tasto
fino alla comparsa a destra del display del numero di programma P4
che lampeggia.
Il display indica 0h00 ed il primo termometro lampeggia sul profilo di
24 ore.
Il cursore lampeggia da 0h00 a 0h30.
Premere per ottenere la temperatura ridotta.
o
Premere per la temperatura comfort
PROG
P1-P4
DAYS
1-7
PROG
P1-P4
Ad esempio, se desiderate impostare la temperatura comfort dalle
7,30 alle 9,30 e dalle 19 alle 23.
Premere sul tasto
più volte fino ad arrivare alle 7,30.
Premere sul tasto
più volte fino ad arrivare alle 9,30.
Premere sul tasto
più volte fino ad arrivare alle 19.
Premere sul tasto
più volte fino ad arrivare alle 23.
Per convalidare la programmazione,
premere
Avete programmato la temperatura comfort dalle 7,30 alle 9,30 e dalle
19,00 alle 23,00.
OK
7.
Programmazione del programma P4
...
Auto Manu 1 2 3 4 5 6 7
°c
°c
0123456789101112131415161718192021222324
0123456789101112131415161718192021222324
Page 31

8.
Lettura dei programmi
9.
Modifica temporanea della temperatura
Partendo dal modo "Auto"
premere sul tasto
Con il tasto
selezionare il giorno da 1 a 7 e verificate la programmazione sul profilo
di 24 ore sulla parte bassa del display.
Premere su
per passare in modo automatico.
modo automatico " Auto ".
In modo automatico, il Exabox si adatta al vostro ritmo di vita
con il programma o con i programmi da
voi scelti.
Il passaggio in modo automatico si effettua premendo sul tasto "MODE"
fino alla comparsa dell’indice sotto "Auto".
Auto M
MODE
DAYS
1-7
PROG
P1-P4
In modo automatico, questa funzione molto pratica, vi permette di
modificare temporaneamente la temperatura ambiente.
- Per aumentare la temperatura,
premere sul tasto
(più volte se necessario).
- Per abbassare la temperatura,
premere sul tasto
(più volte se necessario).
L’indicatore del livello di temperatura in corso
(" conforto" o "economia"), si mette a lampeggiare.
La modifica terminerà al prossimo cambio di
temperatura programmato.
Per ritornare al programma iniziale,
premere su
e rimettere l’indice sotto "Auto".
L’arresto del lampeggiamento del livello di temperatura ("conforto " o
" economico ") indica la fine della modifica temporanea.
MODE
CAMBIAMENTO DI CONSEGNA
Auto Manu 1234567
°c
°c
0123456789101112131415161718192021222324
Auto Manu
°c
°c
012345
Page 32

10.
Modifica permanente della temperatura
11.
Conteggio delle ore di funzionamento
12.
Modo assenza prolungata.Vacanze.
Per mantenere una temperatura costante nella vostra
abitazione, senza tener conto della programmazione
1. Premere sul tasto
per posizionare l’indice sotto "Manu"
2. Premere su o su
per regolare la temperatura voluta.
Per uscire dal modo "Manu",
premere su
e riposizionare l’indice su "Auto".
Conteggio delle ore di funzionamento
Tale funzione permette di conoscere il numero di ore di funzionamento
della caldaia dall'ultimo resettaggio.
Premere
Per conoscere il numero di ore di funzionamento della caldaia dall'ultimo resettaggio.
Premere
per 5 sec. per resettare il contatore.
0000h0000
h
MODE
MODE
Modo assenza prolungata.Vacanze.
Questo modo mette la vostra abitazione al riparo da ogni rischio di
gelo, pur mantenendo una temperatura minima regolabile durante la
vostra assenza (da 1 fino a 99 giorni).
Potete programmare la durata della vostra assenza per prevedere
l’aumento della temperatura al vostro ritorno.
1. Premere sul tasto
2. Con i tasti e
regolate la durata della vostra assenza in giorni (da 1 a 99)
Il giorno in corso conta per 1.
3. Convalidare con il tasto
4. Con i tasti e
regolate il livello di temperatura voluto durante la vostra assenza.
5. Convalidate con il tasto
Rimanete in questo modo
Per annullare e ritornare in modo automatico,
premere su .
MODE
OK
OK
1
MODALITÀ VACANZE
Auto Manu
°c
123456
timer
6789101112131415161718
Auto Manu 1234567
°c
0123456789101112131415161718192021222324
days
Page 33

Las teclas aparentes y los testigos del visualizador.
Las teclas bajo la tapa.
El Exabox ha sido diseñado para proporcionarle confort y permitirle
ahorrar energía.
Puede programar y regular su calefacción según tres niveles de
temperatura:
- Temperatura "confort": es la temperatura que desea cuando
usted está presente.
- Temperatura "económica": es la temperatura que desea
cuando usted está ausente por poco tiempo o durante la
noche.
- Temperatura "fuera de helada": es la temperatura mínima
cuando usted está ausente durante un tiempo prolongado.
Protege su vivienda contra los riesgos de la helada.
Sus tres programas prerregistrados y su programa libre le permitirán
adaptar cada día su calefacción a su modo de vida.
De fácil mantenimiento, el Exabox va alimentado directamente
por la caldera Saunier Duval.
DESCRIPCIÓ N Y INSTALACIÓ N
1. Descripción del termostato de ambiente programable
1. Tecla + para las regulaciones
2. Tecla– para las regulaciones
3. Selección de los modos
4. 4.Ausencia prolongada (vaca-
ciones)
5. Indicador del nivel de tempe-
ratura actual "económica"
6. Visualización de los periodos
"económico"
7. Temperatura "económica"
8. Indicador del nivel de tempe-
ratura actual "confort"
9. Visualización de los periodos
"confort"
10. Temperatura "confort"
11. Indicador del día de la
semana
12. Indicador de puesta en mar-
cha de la calefacción
13. Temperatura ambiente
14. Visualización de la hora.
15. Selección de los días de la
semana (1 = lunes,...)
16. Elección del programa de P1
a P4
17. Regulación temperatura
confort
18. Regulación temperatura
económica
19. Validación
20. Regulación cómputo horario
21. Puesta a cero general
9419.560.00/03.01
box
105 8 12
Auto Manu 1234567
°c
+
2
1
°c
-
0123456789101112131415161718192021222324
11
°c
timer
days
1461397
MODE
3
4
DAYS
PROG
1-7
P1-P4
0000
OK
h
Res
16 17 18 19 20 2115
Page 34

Configure el aparato
Coloque el conmutador en la posición " Battery ON " para acti-
var la pila de salvaguarda.
Según su localización geográfica, seleccione los programas de
calefacción preregistrados variante Norte o variante Sur (ver el
capítulo 6. Programación).
Cuelgue y cierre el termostato de ambiente programable.
Apriete el tornillo y cierre la tapa.
El Exabox debe ser instalado aproximadamente a 1,50 m del suelo,
en una pared interior,protegido de la radiación solar directa y de toda
fuente de calor, como: televisor, lámpara, corriente de aire, etc.
Baje la tapa y desenrosque el tornillo
Fije la base a la pared.
Conecte el aparato según el siguiente esquema.
2.
Instalación del termostato de ambiente programable
...
!
Prog N
Battery ON
12
Prog S Battery OFF
Page 35

Liaison chaudière - Exabox 7J
El Exabox funciona en conexión directa con la caldera Saunier Duval.
Cuando la caldera se apaga o se coloca en posición "Verano" el
Exabox se apaga y visualiza únicamente la temperatura ambiental.
Toda la programación se conserva en la memoria.
El Exabox se pone en marcha automáticamente cuando se coloca
la caldera en posición "Calefacción".
Durante la primera puesta en servicio, antes de empezar la programación del aparato, baje la tapa y pulse la tecla "Reset" con la
punta de un bolígrafo.
Características técnicas.
- Rango regulación temp. confort : + 5 °C a + 30 °C.
- Rango regulación temp. económica : + 5 °C a + 30 °C.
- Rango regulación temp. Fuera de helada : + 5 °C a + 30 °C.
- Gama de visualización de la T °C ambiente : 0 °C a + 40 °C.
- Diferencia estática: . < 0,3 grado.
- Alimentación : vía la conexión que une el Exabox con la caldera
- Reserva de marcha : 8 años.
- Rango de temperatura de trabajo : 0 °C a + 50 °C.
- Temperatura de almacenamiento : –10 °C a + 65 °C.
- Humedad max.: 85% con + 20 °C.
- Grado de protección: . IP30.
- Clase de isolación : II.
Puesta en hora
Es la primera puesta en servicio. Acaba de pulsar la tecla RESET.
Las inscripciones 12:00 y el apuntador bajo el día 1 (lunes) se
encienden intermitentemente.
1. Ponga la hora con las teclas o (si pulsa la tecla de
forma prolongada,se acelera
el paso de la hora.)
2. Ajuste la fecha actual pulsando sucesivamente la tecla ,
aparece un apuntador bajo el día correspondiente (1 = lunes, 2 =
martes, etc.).
3. Valide con la tecla .
4. Si desea modificar la hora o el día,
pulse la tecla "MODE"
hasta que aparezca el apuntador sbajo la sigla reloj,y proceda
como en los puntos
1, 2 y 3.
PUESTA EN HORA Y FECHA
3.
Conexión caldera – Exabox
4.
Puesta en hora
123456
OK
MODE
DAYS
1-7
Page 36

Para ajustar la temperatura de confort
Abra la tapa
Pulse primero la tecla
y luego las teclas o
hasta que se obtenga la temperatura deseada.
Valide con
Para ajustar la temperatura de económica
Pulse primero la tecla
y luego las teclas o
hasta que se obtenga la temperatura deseada.
Valide con
N.B.: La temperatura se puede ajustar entre 5 y 30°C por pasos de 0,5°C.
OK
OK
0123456789101112131415161718192021222324
Auto Manu 1234567
°c
°c
°c
timer
days
0123456789101112131415161718192021222324
Auto Manu 1234567
°c
°c
°c
timer
days
5.
Modificación de las temperaturas preajustadas
6.
Programación
Para programar su semana, dispone de 4 programas:
P1, P2, P3 que están prerregistrados y no son modificables.
P4 que es libre, y le permite crear un programa personalizado
y diferente para cada día de la semana
.
Los programas preregistrados P1,P2 y P3 existen en 2 variantes:
NORTE
P1 = Temperatura confort de 6 a 23 h.
Temperatura económica de
23 a 6 h.
P2 = Temperatura confort de 6 a 8,30 h y de 16,30 a 23 h.
Temperatura económica de
8,30 a 16,30 h y de 23 a 6 h.
P3 = Temperatura confort de 6 a 8,30 h, de 11,30 a 13,30 h,y de 16,30
a 23 h.
Temperatura económica de
8,30 a 11,30 h,de 13,30 a 16,30 h,y
de
23 a 6 h.
P4 = Programa libre que le permite crear tres periodos en tempera-
tura confort y otros tres en temperatura económica para cada
día de la semana
PROGRAMACIÓN
0123456789101112131415161718192021222324
0123456789101112131415161718192021222324
0123456789101112131415161718192021222324
Page 37

SUR
P1 = Temperatura confort de 7 a 23 h.
Temperatura económica de
23 a 7 h.
P2 = Temperatura confort de 7 a 9 h y de 18 a 23 h.
Temperatura económica de 9 a 18 h y de 23 a 7 h.
P3 = Temperatura confort de 7 a 9 h,de 13 a 15 h, y de 18 a 23 h.
Temperatura económica de
9 a 13 h,de 15 a 18 h,y de 23 a 7 h.
P4 = Programa libre.
!
Importante: Para conmutar de la variante Norte a la variante Sur
o viceversa descuelgue el aparato de su base y sírvase del miniinterruptor Norte/Sur.
Para programar la semana basándose en los programas preregistrados
P1, P2 o P3.
1.
Pulse la tecla
para pasar al modo programación.
2. Pulse la tecla
hasta que aparezca el apuntador bajo el día que desea programar.
3. Pulse la tecla
hasta que aparezca intermitentemente el número de programa desea-
do en la parte derecha de la pantalla.
4. Pulse la tecla
para validar;
el día siguiente le es propuesto automáticamente.
OK
PROG
P1-P4
DAYS
1-7
PROG
P1-P4
0123456789101112131415161718192021222324
0123456789101112131415161718192021222324
0123456789101112131415161718192021222324
Page 38

Programe usted mismo con arreglo a sus necesidades.
Este programa P4 puede ser diferente para cada día de la semana.
1. Pulse la tecla
para pasar al modo programación.
2. Pulse la tecla
hasta que aparezca el apuntador bajo el día que desea programar.
3. Pulse la tecla
hasta que aparezca intermitentemente el número P4 en la parte derecha de la pantalla
Su visualizador indica 0h00 y el primer termómetro parpadea sobre el
perfil de 24 h.
El cursor en la parte inferior parpadea de 0h00 a 0h30
Pulse para obtener la temperatura confort.
o
Pulse para obtener la temperatura económica.
PROG
P1-P4
DAYS
1-7
PROG
P1-P4
Por ejemplo: Creación de periodos en temperatura confort : de 7,30
a 9,30 h y de 19 a 23 h.
Pulse la tecla
varias veces para obtener el horario 7h30.
Pulse la tecla
varias veces para obtener el horario 9h30.
Pulse la tecla
varias veces para obtener el horario 19h00.
Pulse la tecla
varias veces para obtener el horario 23h00.
Valide con la tecla
Ha programado la temperatura confort de 7h30 a 9h30 y después de
19h00 a 23h00.
OK
7.
Programación del programa P4
...
Auto Manu 1 2 3 4 5 6 7
°c
°c
0123456789101112131415161718192021222324
0123456789101112131415161718192021222324
Page 39

8.
Lectura de los programas
9.
Modificacion temporal de la temperatura
Desde el modo "Auto",
Pulse la tecla
Con la tecla
seleccione el día de 1 a 7, y verifique su programa en el perfil de 24 h
en la parte inferior del visualizador.
Pulse
para pasar al modo automático
El modo automático
En modo automático, Exabox se adapta a su ritmo de vida,
ejecutando el o los programas que
haya elegido.
El paso a modo automático se efectúa pulsando la tecla "MODE"
hasta que aparezca el apuntador bajo "Auto".
Auto M
MODE
DAYS
1-7
PROG
P1-P4
En modo automático, esta práctica función le permite modificar
temporalmente la temperatura ambiente.
- Para aumentar la temperatura,
pulse la tecla
(varias veces si fuera necesario).
- Para reducir la temperatura,
pulse la tecla
(varias veces si fuera necesario).
El indicador del nivel de temperatura actual (confort o
económica) comienza a parpadear.
Esta modificación finalizará en el siguiente cambio de
temperatura programada.
Para volver al programa inicial,
pulse
y sitúe el apuntador bajo "Auto".
La parada del parpadeo del indicador de temperatura actual
(confort o económica) marca el fin de la modificación temporal.
MODE
CAMBIO DE CONSIGNA
Auto Manu 1234567
°c
°c
0123456789101112131415161718192021222324
Auto Manu
°c
°c
012345
Page 40

10.
Cambio permanente de temperatura.
11.
Duración de funcionamiento
12.
Modo ausencia prolongada (vacaciones).
Para mantener una temperatura permanente (regulable de 5 °C a 30 °C) sin tener que programar.
1. Pulse la tecla
para situar el apuntador bajo "Manu".
2. Pulse o
para ajustar la temperatura deseada.
Para abandonar el modo "Manu"
pulse
y vuelva a situar el apuntador bajo "Auto".
Duración de funcionamiento
Esta función permite saber el número de horas de funcionamiento de
la caldera desde la última puesta en cero.
Pulsar
para conocer el número de horas de funcionamiento desde la última puesta en cero.
Pulse
durante 5 segundos para poner el contador
en cero.
0000h0000
h
MODE
MODE
Modo ausencia prolongada (vacaciones)
Este modo evita el riesgo de helada de su vivienda,manteniendo una
temperatura mínima regulable durante sus ausencias (de 1 a 99 días).
Puede programar el tiempo que vaya a estar ausente, para prever el
aumento de temperatura de su vivienda a su regreso.
1. Pulse la tecla
2. Con las teclas y
Ajuste la duración de su ausencia en días (de 1 a 99),contando la jornada actual como 1.
3. Valide con la tecla
4. Con las teclas y
Regule el nivel de temperatura que desea durante su ausencia.
5. Valide con la tecla
Permanecer en este modo.
Para anular y volver al Modo automático,
pulse .
MODE
OK
OK
1
MODO VACACIONES
Auto Manu
°c
Auto Manu 1234567
°c
0123456789101112131415161718192021222324
days
123456
timer
6789101112131415161718
Page 41

Zichtbare toetsen en displaylampen
Toetsen onder het deksel
De Exabox werd ontwikkeld om U comfort en energiebesparing te
verschaffen.
Uw verwarming is te programmeren of te regelen volgens
3 temperatuurstanden :
- Temperatuur “comfort”: Dit is de gewenste temperatuur tijdens uw
aanwezigheid.
- Temperatuur “besparing”: Dit is de gewenste temperatuur
tijdens korte afwezigheden of ’s nachts.
- Temperatuur “buiten-vorst”: Dit is de verzekerde minimumtem-
peratuur tijdens langdurige afwezigheid. Uw woning wordt beschermd tegen vorstgevaar.
Met deze 3 vooringestelde programma’s en het vrije programma
kunt U uw verwarming van dag tot dag aanpassen aan uw
levenswijze.
Uw gebruiksvriendelijke Exabox wordt rechtstreeks door uw Saunier
Duval ketel gevoed.
BESCHRIJVING EN INSTALLATIE
1. Beschrijving van de programmeerbare kamerthermostaat.
1. - Toetsen voor wijziging van
instellingen
2. + Toetsen voor wijziging van
instellingen
3. Mode selectie toets
4. Langere afwezigheid
(vorstbeveiliging)
5. Indicatie instelling temperatuur
niveau daltemperatuur
6. Overzicht “dal” periodes
7. Daltemperatuur
8. Indicatie instelling temperatuur
niveau Comforttemperatuur
9. Overzicht “comfort” periodes
10. Comforttemperatuur
11. Cursor voor de weekdagen
12. Indicatie ingeschakelde ver-
warming
13. Actuele ruimtetemperatuur.
14. Tijdsweergave
15. Selectie weekdagen
(1=maandag, enz.)
16. P1-P4 programma selectie
17. Instelling Comfort-tempera-
tuur
18. Instelling Dal-temperatuur
19. Bevestigen
20. Overzicht stookuren
21. RESET
9419.560.00/03.01
box
105 8 12
Auto Manu 1234567
°c
+
2
1
°c
-
0123456789101112131415161718192021222324
11
timer
days
1461397
DAYS
PROG
1-7
P1-P4
OK
16 17 18 19 20 2115
0000
MODE
°c
3
4
h
Res
Page 42

Configuratie van het toestel.
Plaats de schakelaar op " Battery ON " om de geheugenbatterij
in gebruik te nemen.
Selecteer de voorgeregistreerde verwarmingsprogramma's volgens
van uw geografische situatie: variant Noord of variant Zuid (zie
hoofdstuk 6. Programmering).
Klik de programmeerbare kamerthermostaat vast.
Draai de schroeven weer vast en sluit het deksel.
De Exabox moet geïnstalleerd worden op ongeveer 1,50m van de
grond, op een binnenmuur, beschut tegen directe zonnebestraling
en elke warmtebron zoals televisie,lamp, luchtstroom, enz …
De kap neerlaten, de schroef Alosschroeven.
Het voetstuk op de muur bevestigen
en het apparaat volgens onderstaand schema aansluiten.
2.
Installatie van de programmeerbare
kamerthermostaat
...
!
Prog N
Battery ON
12
Prog S Battery OFF
Page 43

Verbinding tussen ketel en Exabox
Uw Exabox werkt rechtstreeks met uw Saunier Duval ketel.Met gedoofde ketel of in de " zomer " stand is uw Exabox uitgeschakeld en wordt
alleen de kamertemperatuur aangegeven. De hele programmering
blijft in het geheugen staan.
Uw Exabox wordt automatisch ingeschakeld als uw ketel in de stand
" verwarming " wordt geplaatst.
Voor de eerste inbedrijfstelling en programmering moet u het deksel
naar beneden klappen en met de punt van een balpen de toets "
reset " indrukken.
TECHNISCHE KARAKTERISTIEKEN
- Instellingmarge van de T°C comfort : +5 à +30°C.
- Instellingmarge van de T°C besparing : +5 à +30°C
- Instellingmarge van de T°C vakantie : +5 à +30°C
- Marge ter weergave van de omgevingstemperatuur : 0°C à +40°C
- Statisch differentiaal : < 0,3 graden
- Voeding : via de verbinding tussen Exabox en ketel
- Bedrijfsreserve : 8 jaar
- Werkingstemperatuur : -10 à +50°C
- Opslagtemperatuur : -20°C à +65°C
- Vochtmeting : max. 85 % bij + 20°C
- Beschermingsklasse IP30
- Isolatieklasse II
Uur en daginstelling
Dit is de eerste inwerkingstelling op de toets RESET drukken.
De aanduidingen 12:00 en de aan-wijzer onder dag 1 (maandag)
knipperen.
1. Stel het uur in met de toetsen / (aanhoudend druk-
ken op de toets versnelt het
doorlopen van het uur).
2.
Regel de huidige daginstelling door opeenvolgend op de toets
,
te drukken, de aanwijzer verschijnt onder de overeenstemmende
dag (1= maandag, 2 = Ddinsdag, enz.).
3. Valideer met de toets .
4. wenst het uur of de dag te veranderen:
druk op de toets Mode
tot de aanwijzer onder het klokteken verschijnt en gate werk
zoals hierboven beschreven in de punten field
1, 2 en 3
UUR EN DAGINSTELLING
3.
Verbinding tussen ketel en Exabox
4.
Uur en daginstelling
123456
OK
MODE
DAYS
1-7
Page 44

Instelling van de " comfort " temperatuur.
Open het deksel
Druk op
en op of
tot de gewenste temperatuur wordt verkregen.
Valideer met de toets
Instelling van de " besparing " temperatuur.
Druk op
en op of
tot de gewenste temperatuur wordt verkregen.
Valideer met de toets
NB. De temperatuur kan in stappen van 0,5° C worden ingesteld
tussen 5 en 30° C.
OK
OK
0123456789101112131415161718192021222324
Auto Manu 1234567
°c
°c
°c
timer
days
0123456789101112131415161718192021222324
Auto Manu 1234567
°c
°c
°c
timer
days
5.
Wijziging van de vooringestelde temperaturen
6.
Programmering
eschikt over 4 programma’s om uw week te programmeren :
P1, P2 en P3 zijn vooringesteld en niet veranderbaar.
P4 iis vrij, U kunt een persoonlijk programma instellen ver-
schillend voor elke dag van de week
.
De voorgeregistreerde programma's P1, P2 en P3 bestaan in
2 varianten:
NOORD
P1 = Comforttemperatuur van 6u tot 23u.
Besparingstemperatuur van
23u tot 6u.
P2 = Comforttemperatuur van 6 tot 8u30 en van 16u30 tot 23u00.
Besparingstemperatuur van
8u30 tot 16u30en van 23u00 tot 6u00.
P3 = Comforttemperatuur van 6u tot 8u30, van 11u30 tot 13u30 en
van
16u30 tot 23u00.
Besparingstemperatuur van
8u30 tot 11u30,van 13u30 tot 16u30
en van 23u00 tot 6u00.
P4 = In het vrije programma kunt U 3 perioden op comfort en
besparings- temperatuur instellen en dit voor elke dag van de
week.
PROGRAMMERING
0123456789101112131415161718192021222324
0123456789101112131415161718192021222324
0123456789101112131415161718192021222324
Page 45

ZUID
P1 = Comforttemperatuur van 7u00 tot 23u00.
Besparingstemperatuur van
23u00 tot 7u00.
P2 = Comforttemperatuur van 7u00 tot 9u00 en van 18u00 tot 23u00.
Besparingstemperatuur van 9u00 tot 18u00 en van 23u00 tot
7u00.
P3 = Comforttemperatuur van 7u00 tot 9u00, van 13u00 tot 15u00 en
van
18u00 tot 23u00.
Besparingstemperatuur van
9u00 tot 13u00,van 15u00 tot 18u00
en van 23u00 tot 7u00.
P4 = vrije programma
!
Belangrijk: Voor de omschakeling tussen variant Noord en variant
Zuid van de voorgeregistreerde programma's: het toestel uit de
houder nemen en de minischakelaar Noord/Zuid gebruiken.
Weekprogrammering op basis van de voorgeregistreerde programma's
P1, P2 of P3.
1.
Druk op de toets
om in de programmerings-stand te komen..
2. Druk op de toets
tot de aanwijzer s verschijnt onder de dag die U wenst te programmeren.
3. Druk op de toets
tot het programmanummer knippert rechts op het scherm.
4. Druk op de toetsr
om te valideren,
de volgende dag wordt U automatisch voorgesteld
OK
PROG
P1-P4
DAYS
1-7
PROG
P1-P4
0123456789101112131415161718192021222324
0123456789101112131415161718192021222324
0123456789101112131415161718192021222324
Page 46

Programmeer zelf volgens uw behoeften.
Dit programma P4 kan voor elke dag van de week anders zijn.
1. Druk op de toets
om in de programmerings-stand te komen.
2. Druk op de toets
tot de aanwijzer s verschijnt onder de dag die U wenst te
programmeren.
3. Druk op de toets
tot het programmanummer P4 knippert.
Op het display verschijnt 0u00 en het eerste markeringsteken knippert
op het 24-urenprofiel.
De cursor onderaan knippert van 0u00 tot 0u30
Druk op om de verlaagde temperatuur te krijgen.
of
Druk op om de comfort temperatuur te krijgen.
PROG
P1-P4
DAYS
1-7
PROG
P1-P4
U wenst bijvoorbeeld de comfort temperatuur van 7h30 tot 9h30 en
19h00 tot 23h00.
Druk meerdere malen op de toets
om het tijdstip 7h30 te bekomen
Druk meerdere malen op de toets
om het tijdstip 9h30 te bekomen
Druk meerdere malen op de toets
om het tijdstip 19h00 te bekomen
Druk meerdere malen op de toets
om het tijdstip 23h00 te bekomen
Druk op
om de hele programmering te bevestigen.
U heeft de comfort temperatuur geprogrammeerd van 7h30 tot 9h30
en 19h00 tot 23h00.
OK
7.
Programmering van programma P4
...
Auto Manu 1 2 3 4 5 6 7
°c
°c
0123456789101112131415161718192021222324
0123456789101112131415161718192021222324
Page 47

8.
Programmalezing
9.
Tijdelike Temperatuurwijziging
Vanuit de stand “ Auto ”
op de toets drukken
Met de toets
de dag selecteren van 1 tot 7 en uw programma controleren op de
24u-balk onderaan het beeldscherm.
Drukop
om terug te komen op de automatische stand.
De automatische stand " auto ".
Op de automatische stand, zal de Exabox zich aanpassen
aan uw levensritme door de
bewerkstelliging van het/de door U uitge-kozen programma (’s).
De terugzetting op de automatische stand wordt verkregen door op
de toets “ MODE ” te drukken tot de aanwijzer onder quote “Auto ” ver-
schijnt.
Auto M
MODE
DAYS
1-7
PROG
P1-P4
Met deze handige functie kan U op automatische stand de omgevingstemperatuur tijdelijk wijzigen.
- Om de temperatuur te verhogen
op de toets
drukken (meerdere malen indien nodig).
- Om de temperatuur te verlagen
op de toets
drukken (meerdere malen indien nodig).
De aanwijzer van de temperatuur van toepassing
(comfort of besparing) begint te knipperen.
Deze wijziging zal ophouden bij de volgende verandering van de geprogrammeerde temperatuur.
Om terug te komen op het aanvankelijke programma
op de toets ote drukken
en de aanwijzer onder “ Auto ” plaatsen.
De aanwijzer van de temperatuur van toepassing (comfort of besparing) houdt op met knipperen, wat het einde van de tijdelijke wijziging
betekent.
MODE
WIJZIGING VAN HET BEVEL
Auto Manu 1234567
°c
°c
0123456789101112131415161718192021222324
Auto Manu
°c
°c
012345
Page 48

10.
Permanente temperatuurwijziging
11.
Telling van de bedrijfsuren
12.
Lange afwezigheid, vankantie
Om een permanente temperatuur in de woning te
houden (regelbaar van 5°C tot 30°C),zonder
rekening te houden met de programmering.
1. Druk op de toets
om de aanwijzer s onder “ Manu ” te plaatsen.
2. Druk op of
om de gewenste temperatuur te regelen.
Om de stand “ Manu ” te verlaten,
op drukken
en de aanwijzer onder “ Auto ” herplaatsen
Telling van de bedrijfsuren
Met deze functie kunt u het aantal bedrijfsuren van uw ketel sinds de
laatste reset opvragen.
Druk op
om het aantal bedrijfsuren sinds de laatste
reset op te vragen.
Druk 5 seconden op
om de teller terug te stellen.
0000h0000
h
MODE
MODE
Lange afwezigheid, vankantie
Deze stand beschut uw woning tegen vorstgevaar door een regelbare
minumtemperatuur in uw woning te verzekeren gedurende uw afwezigheid (1 tot 99 dagen).
U kunt de duur van uw afwezigheid programmeren om een verhoging
van de temperatuur tegen uw terugkeer te voorzien.
1. Druk op de toets
2. Met de toetsen en
De duur van uw afwezigheid in aantal dagen (1 tot 99) in-stellen
de huidige dag telt voor 1.
3. Valideer met de toets
4. Met de toetsen en
de gewenste temperatuurhoogte tijdens uw afwezigheid instellen.
5. Valideer met de de toets
Blijf in deze stand
Om te annuleren en terug te
komen op de automatische stand op drukken.
MODE
OK
OK
1
VAKANTIEMODUS
Auto Manu
°c
Auto Manu 1234567
°c
0123456789101112131415161718192021222324
days
123456
timer
6789101112131415161718
Page 49

Przyciski widoczne oraz wskaźniki świetlne wyświetlacza
Przyciski pod pokrywą.
Termostat Exabox został opracowany w celu stworzenia warunków
pozwalających na uzyskanie komfortu ogrzewania oraz
oszczędności energii.
Pozwala on zaprogramować i nastawiać ogrzewanie według 3
poziomów temperatury
- temperatura « komfort » : jest to temperatura, którą życzymy sobie
mieć w naszych pomieszczeniach podczas godzin naszej obecności.
- temperatura « ekonomiczna » : jest to temperatura, którą życzymy
sobie mieć w naszych pomieszczeniach podczas naszych krótkotrwałych nieobecności lub w godzinach nocnych.
- temperatura zapobiegająca zamarzaniu : jest to temperatura minimalna, która powinna być utrzymywana w pomieszczeniu podczas naszych dłuższych nieobecności. Chroni ona nasze mieszkanie przed
skutkami mrozu.
Te 3 programy wstźpnie nastawiane, oraz jeden program wolny,
umożliwią nam dostosowanie naszego ogrzewania pomieszczeń, na
każdy dzień tygodnia osobno, do naszych indywidualnych życzeń.
Bardzo łatwe w obsłudze, urządzenie Exabox zasilane jest
bezpośrednio z kotła Saunier Duval.
OPIS I MONTAŻ:
1. Opis programowanego termostatu pokojowego
1. Przycisk « – » do nastawiania
parametrów ogrzewania.
2. Przycisk « + » do nastawiania
parametrów ogrzewania.
3. Wybór rodzaju pracy.
4. Dłuższa nieobecność (wakacje).
1. Przycisk « - » do nastawiania
parametrów ogrzewania.
2. Przycisk « + » do nastawiania
parametrów ogrzewania.
3. Wybór rodzaju pracy.
4. Dłuższa nieobecność (wakacje).
5. Wskaźnik temperatury aktualnej
(temperatura « ekonomiczna »).
6. Wyświetlenie czasokresów ogrze-
wania w trybie « ekonomicznym ».
7. Temperatura « ekonomiczna ».
8. Wskaźnik temperatury aktualnej
(« komfort »).
9. Wyświetlenie czasokresów ogrze-
wania «’komfort’ ».
10. Temperatura ogrzewania « kom-
fort ».
11. Wskaźnik dnia tygodnia.
12. Wskaźnik włączenia/ wyłączenia
ogrzewania.
13. Wyświetlenie temperatury pokojo-
wej.
14. Wyświetlenie godziny aktualnej.
15. Wybór dni tygodnia
(1= Poniedziałek).
16. Wybór programu P1 do P4.
17. Nastawianie temperatury ogrze-
wania w trybie « komfort ».
18. Nastawianie temperatury « eko-
nomicznej ».
19. Akceptacja.
20. Nastawianie licznika
godzinowego.
21. Przycisk reset (stanu początko-
wego).
9419.560.00/03.01
box
105 8 12
Auto Manu 1234567
°c
+
2
1
°c
-
0123456789101112131415161718192021222324
11
MODE
°c
timer
days
3
4
1461397
DAYS
PROG
1-7
P1-P4
0000
OK
h
Res
16 17 18 19 20 2115
Page 50

Złożyć urządzenie.
Nastawić przełącznik w pozycji « Battery ON » aby włączyć
bateriź zabezpieczającą zaprogramowane parametry.
W zależności od położenia geograficznego, wybrać programy ogrzewania wstźpnie nastawiane dla wariantu Północ wzglźdnie dla
wariantu Południe (patrz rozdział 6. Programowanie).
Termostat zawiesić i zamocować spinaczem.
Założyć z powrotem śrubź i zamknąć pokrywź.
Termostat Exabox winien być instalowany w odległości około 1,50 m
od podłogi, na ścianie wewnźtrznej,w miejscu chronionym przed
działaniem promieniowania słonecznego oraz wszelkiego innego
źródła wydzielania ciepła, takiego jak : telewizor, lampa, przewiew
powietrza, itp...
Otworzyć pokrywź oraz odkrźcić śrubź.
Zamocować płytkź na ścianie.
Podłączyć urządzenie według schematu przedstawionego poniżej.
2.
Zamontowanie programowanego termostatu
pokojowego.
...
!
Prog N
Battery ON
12
Prog S Battery OFF
Page 51

Połączenie kocioł - Exabox
Termostat Exabox funkcjonuje w bezpośrednim połączeniu z
kotłem Saunier Duval. Gdy kocioł jest zgaszony lub w pozycji
"lato", termostat Exabox jest również zgaszony i podaje tylko
aktualną temperaturź pokojową. Całe zaprogramowanie jest
wprowadzone do pamiźci.
Termostat Exabox uruchomi siź automatycznie w momencie, gdy
kocioł zostanie nastawiony w pozycji "ogrzewanie".
Przy pierwszym uruchomieniu, przed rozpoczźciem zaprogramowania urządzenia, należy odchylić pokrywź i nacisnąć przycisk
reset przy pomocy końcówki długopisu.
Dane techniczne
- zakres regulacji temperatury ogrzewania « komfort » : od +5 do +30°C.
- zakres regulacji temperatury obniżanej : od +5 do +30°C.
- zakres regulacji temperatury okresu ‘wakacje’ : od +5 do +30°C.
- zakres wyświetlania temperatury pokojowej : od 0°C do +40°C.
- czułość statyczna <0.3°C.
- zasilanie : poprzez połączenie łączące termostat exabox z kotłem.
- rezerwa ruchowe : 8 lat .
- temperatura funkcjonowania urządzenia : od -10 do +50°C.
- temperatura przechowywania : od -20°C do +65°C.
- wilgotność powietrza : 90% maks w temp. 25°C
- rodzaj zabezpieczenia : IP30.
- klasa izolacji II.
Nastawienie zegara
Jest to pierwsza czynność nastawiania, po naciśniźciu przycisku reset.
Wskazania 12:00 oraz wskaźnik pod wyświetleniem dnia 1 (poniedziałek)
pulsują.
1. Nastawić godzinź przyciskami lub dłuższe naciskanie
przycisku przyspiesza przesuwanie godziny).
2. Nastawić aktualny dzień naciskając kolejno przycisk , wskaźnik
pojawia siź pod wyświetleniem danego dnia (1 = Poniedziałek, 2 =
Wtorek, itd..).
3. Zaakceptować przyciskem .
4. Gdy chce siź zmienić godzinź lub dzień :
naciskać przycisk (tryb)
aż do pojawienia siź wskaźnika pod nazwą zegar i postźpować jak
wyżej w punktach
1, 2 i 3.
NASTAWIANIE ZEGARA
3. Połączenie kocioł - Exabox 4. Nastawienie zegara
MODE
123456
OK
DAYS
1-7
Page 52

Aby nastawić temperaturź « komfort »,
Otworzyć pokrywź
Nacisnąć przycisk
oraz naciskać przycisk lub
aż do otrzymania wskazania żądanej temperatury.
Zaakceptować przez naciśniźcie przycisku
Otworzyć pokrywź
Nacisnąć przycisk
oraz naciskać przycisk lub
aż do otrzymania wskazania żądanej temperatury.
Zaakceptować przez naciśniźcie przycisku
UWAGA : Temperatura jest nastawiana w zakresie od 5 do 30°C
skokami co 0.5°C.
OK
OK
0123456789101112131415161718192021222324
Auto Manu 1234567
°c
°c
°c
timer
days
0123456789101112131415161718192021222324
Auto Manu 1234567
°c
°c
°c
timer
days
5. Zmiana temperatur wstźpnie nastawionych
6.
Programwanie
Aby zaprogramować ogrzewanie na tydzień, 4 programy stoją do dyspozycji:
P1, P2, P3 króre są wstźpnie nastawione i niezmienne.
P4 który jest programem wolnym, pozwala on stworzyć program
według własnego, osobistego wyboru i różny dla każdego
dnia tygodnia.
Programy wstźpnie nastawione P1, P2 et P3 istnieją w 2 wariantach :
PÓŁNOC
P1
: Temperatura « komfort » od godz. 6:00 do 23:00.Temperatura « eko-
nomiczna » od
23:00 do 6:00.
P2 : Temperatura « komfort » od godz 6:00 do 8:30 oraz od 16:30 do
23:00.
Temperatura « ekonomiczna » od godz 8:30 do 16:30 oraz od 23:00
do 6:00.
P3 : Temperatura « komfort » od 6:00 do 8:30, od 11:30 do 13:30 oraz od
16:30 do 23:00.
Temperatura « ekonomiczna » od
8:30 do 11:30, od 13:30 do 16:30 i
od
23:00 do 6:00.
P4 : Program wolny pozwala stworzyć 3 czasokresy ogrzewania w tempe-
raturze « komfort » oraz 3 czasokresy w temperaturze « ekonomicznej » i to dla każdego dnia tygodnia.
PROGRAMOWANIE
0123456789101112131415161718192021222324
0123456789101112131415161718192021222324
0123456789101112131415161718192021222324
Page 53

POŁUDNIE
P1
: Temperatura « komfort » od godz 7:00 do 23:00.
Temperatura « ekonomiczna » od godz
23:00 do 7:00.
P2 : Temperatura « komfort » od godz 7:00 do 9:00 oraz od 18:00 do
23:00.
Temperatura « ekonomiczna » od godz 9:00 do 18:00 oraz od 23:00
do 7:00.
P3 : Temperatura « komfort » od 7:00 do 9:00, od 13:00 do 15:00 oraz od
18:00 do 23:00.
Temperatura « ekonomiczna » od
9:00 do 13:00, od 15:00 do 18:00 i
od
23:00 do 7:00.
P4 : Program wolny.
!
Ważna uwaga : Aby przerzucić programy wstźpnie nastawione z
wariantu Północ na wariant Południe i na odwrót, zdemontować urządzenie ze swojej podstawy i używać mini-wyłącznika Północ / Południe.
Aby zaprogramować cały tydzień na bazie programów wstźpnie nastawionych P1, P2, P3.
1.
Nacisnąć przycisk
by przejść na tryb programowania.
2. Naciskać przycisk
aż do pojawienia siź wskaźnika pod wyświetleniem dnia, który chce siź
zaprogramować.
3. Naciskać przycisk
aż do wyświetlenia programu, jaki chce siź zastosować dla tego dnia.
4. Zaakceptować przez naciśn iźcie
przycisku
Dzień nastźpny zostanie zaproponowany automatycznie.
OK
PROG
P1-P4
DAYS
1-7
PROG
P1-P4
0123456789101112131415161718192021222324
0123456789101112131415161718192021222324
0123456789101112131415161718192021222324
Page 54

Można zaprogramować samemu, stosownie do własnego życzenia
użytkownika.
Ten program P4 może być różny dla każdego dnia tygodnia.
1. Nacisnąć przycisk
by przejść na tryb programowania.
2. Naciskać przycisk
aż do pojawienia siź wskaźnika pod wyświetleniem dnia, który chce siź
zaprogramować.
3. Naciskać prrzycisk
j
aż do wyświetlenia programu P4.
Wyświetlacz podaje czas 0:00, a pierwszy termometr pulsuje na profilu
24godz.
Kursor dolny pulsuje od 0:00 do 0:30.
Nacisnąć przycisk aby mieć temperaturź obniżoną.
wzglźdnie
Nacisnąć przycisk aby mieć temperaturź « komfort ».
PROG
P1-P4
DAYS
1-7
PROG
P1-P4
Na przykład, jeśli chcemy mieć temperaturź « komfort »’ od godz 7:30 do
9:30 a nastźpnie od 19:00 do 23:00 :
Nacisnąć
Kilka razy, aby otrzymać rozkład czasowy 7:30.
Nacisnąć
Kilka razy, aby otrzymać rozkład godzinowy 9:30.
Nacisnąć
Kilka razy, aby otrzymać rozkład godzinowy 19:00.
Nacisnąć
Kilka razy, aby otrzymać rozkład godzinowy 23:00.
PAby zaakceptować całe zaprogramowanie :
Nacisnąć przycisk
W ten sposób zaprogramowana została temperatura « komfort » od godz
7:30 do 9:30 a nastźpnie od godz 19:00 do 23:00.
OK
7.
Nastawianie programu P4
...
Auto Manu 1 2 3 4 5 6 7
°c
°c
0123456789101112131415161718192021222324
0123456789101112131415161718192021222324
Page 55

8.
Odczyt programów
9.
Czasowa zmiana nadawy.
z trybu automatycznego (« auto »
nacisnąć przycisk
z programem
wybrać dzień od 1 do 7 oraz sprawdzić program na profilu 24h w dolnej
czźści wyświetlacza.
Nacisnąć przycisk
aby powrócić do trybu automatycznego.
Tryb automatyczny « auto ».
W trybie automatycznym, urządzenie Exabox dostosowuje siź do
rytmu życia użytkownika, realizując program(y) jakie zostały przez niego
wybrane.
Przejście na tryb automatyczny odbywa siź przez naciskanie przycisku
MODE aż do momentu pojawienia siź wskażnika pod wyświetleniem
"auto".
Auto M
MODE
DAYS
1-7
PROG
P1-P4
W trybie automatycznym, funkcja ta, bardzo praktyczna, pozwala zmieniać
chwilowo temperaturź pokojową.
- Aby podwyższyć temperaturź,
Nacisnąć przycisk
(jeśli konieczne, kilka naciśnień).
- Aby obniżyć temperaturź,
Nacisnąć przycisk
(jeśli konieczne, kilka naciśnień).
Wskaźnik poziomu temperatury aktualnej (« komfort » lub
« ekonomicznej ») zaczyna pulsować.
Zmiana ta zakończy siź przy najbliższej zmianie zaprogramowanej temperatury.
By wrócić do programu początkowego,
Nacisnąć przycisk
i przestawić wskaźnik pod wyświetlenie "auto".
Zatrzymanie pulsowania wskaźnika poziomu temperatury aktualnej (« komfort » lub « ekonomicznej ») oznacza zakończenie czasowej zmiany.
MODE
CZASOWA ZMIANA NADAWY
Auto Manu 1234567
°c
°c
0123456789101112131415161718192021222324
Auto Manu
°c
°c
012345
Page 56

10.
Trwała zmiana temperatury.
11.
Obliczanie godzin funkcjonowania.
12.
Tryb długiej nieobecności, wakacje
Aby utrzymać temperaturź trwałą w danym mieszkaniu
(nastawialną od 5°C do 30°C) bez uwzglźdniania jakiegokolwiek programowania :
1. Nacisnąć przycisk
by nastawić wskażnik pod wyświetleniem « Manu ».
2. Nacisnąć przycisk lub
by nastawić żądaną temperaturź.
Aby opuścić tryb MANU,
Nacisnąć przycisk
I z powrotem umieścić wskaźnik pod wyświetleniem « auto ».
Podliczanie godzin funkcjonowania
Funkcja ta pozwala na poznanie liczby godzin pracy kotła licząc od ostatniego zerowania.
Nacisnąć przycisk
Aby poznać liczbź godzin pracy począwszy od
ostatniego zerowania.
Naciskać przycisk
przez okres 5 sek aby wyzerować licznik.
0000h0000
h
MODE
MODE
Tryb długiej nieobecności, wakacje
Ten tryb chroni twoje mieszkanie przed skutkami mrozu, utrzymując nastawialną temperaturź minimum w danym mieszkaniu na czas nieobecności
(od 1 do 99 dni).
Można zaprogramować czas trwania tej nieobecności, aby przewidzieć
podwyższoną temperaturź w danym mieszkaniu, przy powrocie jego lokatorów.
1. Nacisnąć przycisk
2. Nacisnąć przycisk lub
wyregulować czas trwania nieobecności, w dniach (od 1 do 99 dni).
Dzień aktualny liczy siź jako 1.
3. Zaakceptować przyciskiem
4. Nacisnąć przycisk lub
aby wyregulować poziom żądanej temperatury podczas nieobecności.
5. Zaakceptować przyciskiem
Pozostać w tym trybie.
Aby anulować program wakacji i powrócić
do trybu automatycznego,
naciśnąć przycisk .
MODE
OK
OK
1
TRYB
WAKACJE
Auto Manu
°c
Auto Manu 1234567
°c
0123456789101112131415161718192021222324
days
123456
timer
6789101112131415161718
Page 57

A látható billentyěk és a jelzőtábla jelzőlámpái.
A fedő alatt található gombok.
Az Exaboxot az Ön kényelméért és az energiagazdaságosságáért terveztük.
Az Exabox lehetővé teszi, hogy fětését három hőmérsékletszint szerint programozza vagy állítsa be.
- komfort hőmérséklet : ez az a hőmérséklet, amelyre akkor vágyik,
amikor a lakásában tartózkodik.
- gazdaságos hőmérséklet : ez az a hőmérséklet, amelyre vagy az
éjszaka folyamán, vagy akkor van szüksége, amikor rövidebb ideig
nem tartózkodik lakásában,.
- a fagymentes hőmérséklet : ez az a minimális hőmérséklet, amelyet
a készülék az Ön hosszabb ideig történő távolléte alatt biztosít.
Megóvja lakását a fagy veszélyeitől.
A három előre betáplált program és a szabad programozás lehetővé
teszik, hogy Ön nap, mint nap életkörülményeihez alkalmazhassa
fětését.
Az Ön könnyen karbantartható Exabox készülékét közvetlenül az Ön
Saunier Duval kazánja táplálja.
L
EÍRÁS ÉS FELSZERELÉS
1. A programozható környezethőérzékelő leírása
1. billentyě “–“ a beállításhoz.
2. billentyě “+” a beállításhoz.
3. a měködésmódok kiválasztása
4. hosszú távollét (nyaralás).
5. az éppen érvényes
hőmérsékletet jelző indikátor
(gazdaságos).
6. a gazdaságos időszakok
áttekintése
7. gazdaságos hőmérséklet
8. az éppen érvényes hőmérséklet
jelző (komfort).
9. a komfort időszakok áttekintése
10. komfort hőmérséklet
11. a hét napját jelző indikátor
12. a fětés beindulását jelző
indikátor
13. a környező hőmérséklet kiírása
14. az aktuális idő kiírása
15. a hét napjainak a kiválasztása
(1= hétfő).
16. a P1-től P4-ig terjedő
programok kiválasztása.
17. a komfort hőmérséklet
beállítása.
18. a gazdaságos hőmérséklet
beállítása
19. érvényesítés
20. az óraszámláló beállítása.
21. « reset » billentyě.
9419.560.00/03.01
box
105 8 12
Auto Manu 1234567
°c
+
2
1
°c
-
0123456789101112131415161718192021222324
11
°c
timer
days
1461397
DAYS
PROG
1-7
P1-P4
0000
OK
h
Res
16 17 18 19 20 2115
MODE
3
4
Page 58

Végezze el a készülék konfigurációját.
Helyezze a kapcsolót a « Battery ON » -ra, hogy a védőelem
měködésbe lépjen.
Földrajzi helyzetétől függően válassza ki az előre betáplált fětésváltozatot: Északi változat vagy Déli változat (lásd a Programozás 6.
fejezetében).
Akassza fel a készüléket, majd kattintsa fel a programozható
környezethőérzékelőt.
Csavarozza vissza és csukja le a készülék fedelét.
Az Exabox készüléket körülbelül másfél méter magasságban, egy
belső falra és egy a napfénytől és minden egyéb hőt kisugárzó
készüléktől védett helyre, úgy, mint a televízió, a lámpák, a huzat,
stb. kell felszerelni.
Nyissa fel a fedelét és csavarozza ki a csavart.
Erősítse a lemezt a falra.
Csatlakoztassa a készüléket az alábbi ábra szerint.
2. A programozható környezethőérzékelő felszerelése ...
!
Prog N
Battery ON
12
Prog S Battery OFF
Page 59

A kazán és az Exabox csatlakozása
Az Ön Exabox készüléke közvetlen csatlakozásban měködik az Ön
Saunier Duval kazánjával. Mikor a kazán ki van kapcsolva vagy „nyári”
pozicióra van állítva, az Ön Exabox készüléke is kikapcsol és csak a
környező hőmérsékletet jelzi. Teljes programozása a memóriában van.
Az Ön Exabox készüléke automatikusan měködni kezd, mikor a kazánt „
fětés” pozicióra állítja.
Az első üzembe helyezés alkalmával, még mielőtt a készülék programozásához hozzákezdene, kérjük, hogy csukja le a készülék fedelét és
nyomjon rá a „reset” gombra egy tollhegy segítségével.
Technikai jellemzők.
- a komfort hőmérséklet szabályozási szakasza : +5-től +30°C-ig.
- a csökkentett hőmérséklet szabályozási szakasza : +5-től +30°C-ig.
- a nyaralási hőmérséklet szabályozási szakasza : +5-től +30°C-ig.
- a környező hőmérséklet szabályozási szakasza : 0°C-tól +40°C-ig.
- a statikus differenciál <0.3°C
- táplálás : azon a csatlakozáson keresztül, amely összeköti az
Exaboxot a kazánnal.
- feltételezett měködési időtartam : 8 év.
- měködési hőmérséklet : -10-től +50°C-ig.
- raktározási hőmérséklet : -20°C-tól +65°C-ig.
- nedvességmérés : 90% max 25°C-on
- védelmi fokozat : IP30.
- szigetelési osztályozás: II.
Az óra beállítása.
Ez a legelső üzembehelyezés és most nyomott rá a „reset” gombra.
A „12:00” felirat és a mutató az 1 nap alatt (hétfő) villognak.
1. Állítsa be az órát a vagy billentyěk segítségével (ha
hosszan nyom rá a billentyěre, akkor gyorsabban peregnek a számok).
2. Ezután állítsa be az aktuális napot, sok egymásutáni nyomással a
billentyěre, egy mutató fog megjelenni a kapcsolódó napokhoz (1 = hétfő,
2 = kedd, stb..).
3. Érvényesítse az OK billentyěvel. .
4. Ha meg szeretné változtatni az órát vagy a napot :
nyomjon rá a MODE
billentyěre mindaddig, míg megjelenik egy mutató az óra rajza
alatt és akkor hozzákezdhet az itt leírt
1, 2 és 3 pontok újbóli
végrehajtásához.
A
Z ÓRA BEÁLLÍTÁSA
3. A kazán és az Exabox csatlakozása 4. Az óra beállítása
123456
MODE
OK
DAYS
1-7
Page 60

A komfort hőmérséklet beállítása.
Nyissa fel a fedélt
Nyomjon a
és nyomjon a vagy a
addig, amíg el nem éri a kívánt hőmérsékletet.
Aztán nyomjon az hogy azt érvényesítse.
A Gazdaságos hőmérséklet beállítása.
Nyomjon a
és nyomjon a vagy a
addig, amíg el nem éri a kívánt hőmérsékletet.
Aztán nyomjon az hogy azt érvényesítse.
NB. A hőmérsékletet 0,5°C-ként lehet állítani 5°c-tól 30°C-ig.
OK
OK
0123456789101112131415161718192021222324
Auto Manu 1234567
°c
°c
°c
timer
days
0123456789101112131415161718192021222324
Auto Manu 1234567
°c
°c
°c
timer
days
5. Az előre beállított hőmérséklet beállítása 6. Programozás
Négy program áll rendelkezésére, hogy egész hetét beprogramozhassa :
A P1, P2, P3 programok előre betápláltak és nem módosíthatóak.
AP4 egy szabad program, és ennek segítségével készítheti el a
hét minden napjának programozását személyes igényeinek
megfelelően.
Az előre betáplált programok : a P1, a P2 és a P3 két változatban
léteznek :
ÉSZAK.
P1
: Komfort hőmérséklet 6h - 23h-ig.
Gazdaságos hőmérséklet
23h - 6h-ig.
P2 : Komfort hőmérséklet 6 - 8h30-ig és 16h30 - 23h00-ig.
Gazdaságos hőmérséklet 8h30 - 16h30-ig és 23h00 - 6h00-ig.
P3 = Komfort hőmérséklet 6h - 8h30-ig, 11h30 - 13h30-ig és 16h30 -
23h00-ig.
Gazdaságos hőmérséklet
8h30 - 11h30-ig, 13h30 - 16h30-ig és
23h00 - 6h00-ig.
P4 = Szabad program, amely lehetővé teszi, hogy a hét minden napjára
három periódus komfort hőmérsékletet és három periódus gazdaságos hőmérsékletet programozzon be.
P
ROGRAMOZÁS
0123456789101112131415161718192021222324
0123456789101112131415161718192021222324
0123456789101112131415161718192021222324
Page 61

DÉL
P1
: Komfort hőmérséklet 7h00 - 23h00-ig.
Gazdaságos hőmérséklet
23h00 - 7h00-ig.
P2 : Komfort hőmérséklet 7h00 - 9h00 és 18h00 - 23h00-ig.
Gazdaságos hőmérséklet 9h00 - 18h00 és 23h00 - 7h00-ig.
P3 : Komfort hőmérséklet 7h00 - 9h00-ig, 13h00 - 15h00-ig és 18h00 -
23h00-ig.
Gazdaságos hőmérséklet
9h00 - 13h00-ig, 15h00 - 18h00-ig és
23h00 - 7h00-ig.
P4 : Szabad program.
!
Fontos tudni: Ha az előre betáplált Észak változatot Dél változatra
akarja cserélni vagy fordítva, le kell szerelnie a készüléket az állványról
és az
Észak/Dél minikapcsolót kell használnia.
Hetének beprogramozása az előre betáplált programok : a P1, a P2
vagy a P3 alapján.
1.
Nyomjon a
hogy a programozó módot megindíthassa.
2. Nyomjon a
addig, amíg a mutató meg nem jelenik az alatt a nap alatt amelyiket programozni kívánja.
3. Nyomjon a
addig, amíg meg nem jelenik az a program amelyet az adott napra kíván
alkalmazni.
4. Nyomjon az
hogy érvényesítse.
A következő nap programozásának javaslata automatikusan következik.
OK
PROG
P1-P4
DAYS
1-7
PROG
P1-P4
0123456789101112131415161718192021222324
0123456789101112131415161718192021222324
0123456789101112131415161718192021222324
Page 62

Programozza be saját szükségleteinek megfelelően.
CEz a P4 program a hét minden napjára más lehet.
1. Nyomjon a
hogy a programozó módot beindíthassa.
2. Nyomjon a
addig, amíg a mutató meg nem jelenik az alatt a nap alatt amelyet
programozni kíván.
3. Nyomjon a
addig, ameddig a P4 program meg nem jelenik.
A jelzőlap „0h00” -át mutat és az első hőmérő a „24h” kiíráson villog.
Az alsó kurzor 0h00 - 0h30-ig villog.
Nyomjon a hogy elérje a csökkentett hőmérsékletet.
vagy
Nyomjon a hogy elérje a komfort hőmérsékletet.
PROG
P1-P4
DAYS
1-7
PROG
P1-P4
Például, ha komfort hőmérsékletet kíván 7h30 - 9h30-ig aztán 19h00 23h00-ig.
Nyomjon a
Többször egymás után amíg el nem éri a „7h30” -as kiírást.
Nyomjon a
Többször egymás után amíg el nem éri a „9h30”-as kiírást.
Nyomjon a
Többször egymás után amíg el nem éri a „19h00”-ás kiírást.
Nyomjon a
Többször egymás után amíg el nem éri a „23h00”-ás kiírást.
Az egész programozás érvényesítéséért :
Nyomjon a
Ezzel beprogramozta a komfort hőmérsékletet 7h30 - 9h30-ig és 19h00 23h00-ig.
OK
7. A P4 program programozása
...
Auto Manu 1 2 3 4 5 6 7
°c
°c
0123456789101112131415161718192021222324
0123456789101112131415161718192021222324
Page 63

8. A programok leolvasása 9. A program időszakos megváltoztatása.
Az „auto” módból kiindulva
nyomjon a
A
billentyěvel
válassza ki a napot 1 és 7 között és ellenőrizze a programot a „24h” szelvényén, a kijelző alján.
Nyomjon a
hogy a készülék ismét automata módban legyen.
Az automata mód, "auto".
Automata módban az Ön Exaboxa az Ön életritmusához alkalmazkodik és végrahajtja azokat a programokat, amelyeket Ön választott ki.
Ha automata módra kívánja állítani készülékét nyomjon a „MODE” billentyěre addig, amíg a mutató meg nem jelenik a "auto" kiírás alatt.
Auto M
MODE
DAYS
1-7
PROG
P1-P4
Ez a funkció nagyon praktikus automata módban, mert lehetővé teszi
Önnek, hogy átmenetileg megváltoztathassa a szobahőmérsékletet.
- Ha növelni akarja a hőmérsékletet, akkor
nyomjon a
(többször is, ha szükséges).
- Ha csökkenteni akarja a hőmérsékletet, akkor
nyomjon a
(többször is, ha szükséges).
Az éppen aktuális hőmérséklet (komfort vagy gazdaságos)
kijelzője villogni kezd.
Ez a módosítás addig marad érvényben, ameddig újból
meg nem változtatja a beprogramozott hőmérsékletet.
Ha vissza akar térni az eredeti programhoz,
nyomjon a
és helyezze vissza a mutatót az "auto" kiírás alá.
Amikor az aktuális hőmérséklet (komfort vagy gazdaságos) kijelzője
abbahagyja a villogást, akkor befejeződik az átmeneti változtatás is.
MODE
A PROGRAM IDőSZAKOS MEGV
Auto Manu 1234567
°c
°c
0123456789101112131415161718192021222324
Auto Manu
°c
°c
012345
Page 64

10. A hőmérséklet állandó változtatása
11. A měködést jelző órák számlálása
12. Hosszantartó távollét, nyaralás esetén
használandó mód.
Azért, hogy állandó hőmérsékletet (5°C és 30°C között
állíthatót) tarthasson fenn a lakásában anélkül, hogy bármilyen programozáshoz kelljen folyamodnia.
1. Nyomjon a
hogy a mutatót a „Manu” alá helyezhesse.
2. Nyomjon a vagy jelre
hogy beállíthassa a kívánt hőmérsékletet.
Ha ki akar lépni a MANU módból,
akkor nyomjon a
és állítsa vissza a mutatót „auto”-ra.
A měködést jelző órák számlálása.
Ezáltal megtudhatja a kazánja utolsó nullára állításától eltelt měködésének
időtartamát.
Nyomjon a
megtudhatja az utolsó nullára állítástól eltelt
měködést jelző órák számát.
Nyomjon a
5 másodpercig, hogy a számlálót újra nullára állíthassa.
0000h0000
h
MODE
MODE
Hosszantartó távollét, nyaralás esetén használandó mód.
Ez a mód megvédi lakását az esetleges fagyoktól úgy, hogy egy minimális
szabályozható hőmérsékletet tart fenn a lakásában távolléte alatt (1-től
99 napig).
Beprogramozhatja távollétének időtartamát úgy, hogy lakása
hőmérsékletét felemelje hazatérése időpontjára.
1. Nyomjon a
2. Nyomjon a
vagy
hogy beállíthassa távollétének idejét napokban számolva (1-től 99 napig).
A folyamatban lévő nap az elsőnek számít.
3. Érvényesítse az
4. Nyomjon a
vagy
hogy beállítsa a távollétében kívánt hőőmérsékletet.
5. Érvényesítse az
Maradjon ebben a módban.
Amikor törölni akarja a „nyaralási programot”
és visszatérni az automata módra,
nyomjon a .
MODE
OK
OK
1
NYARALÁS MÓD
Auto Manu
°c
Auto Manu 1234567
°c
0123456789101112131415161718192021222324
days
123456
6789101112131415161718
timer
 Loading...