

Page 1

Isofast Condens: Clock
Page 2
Page 3

Page 4

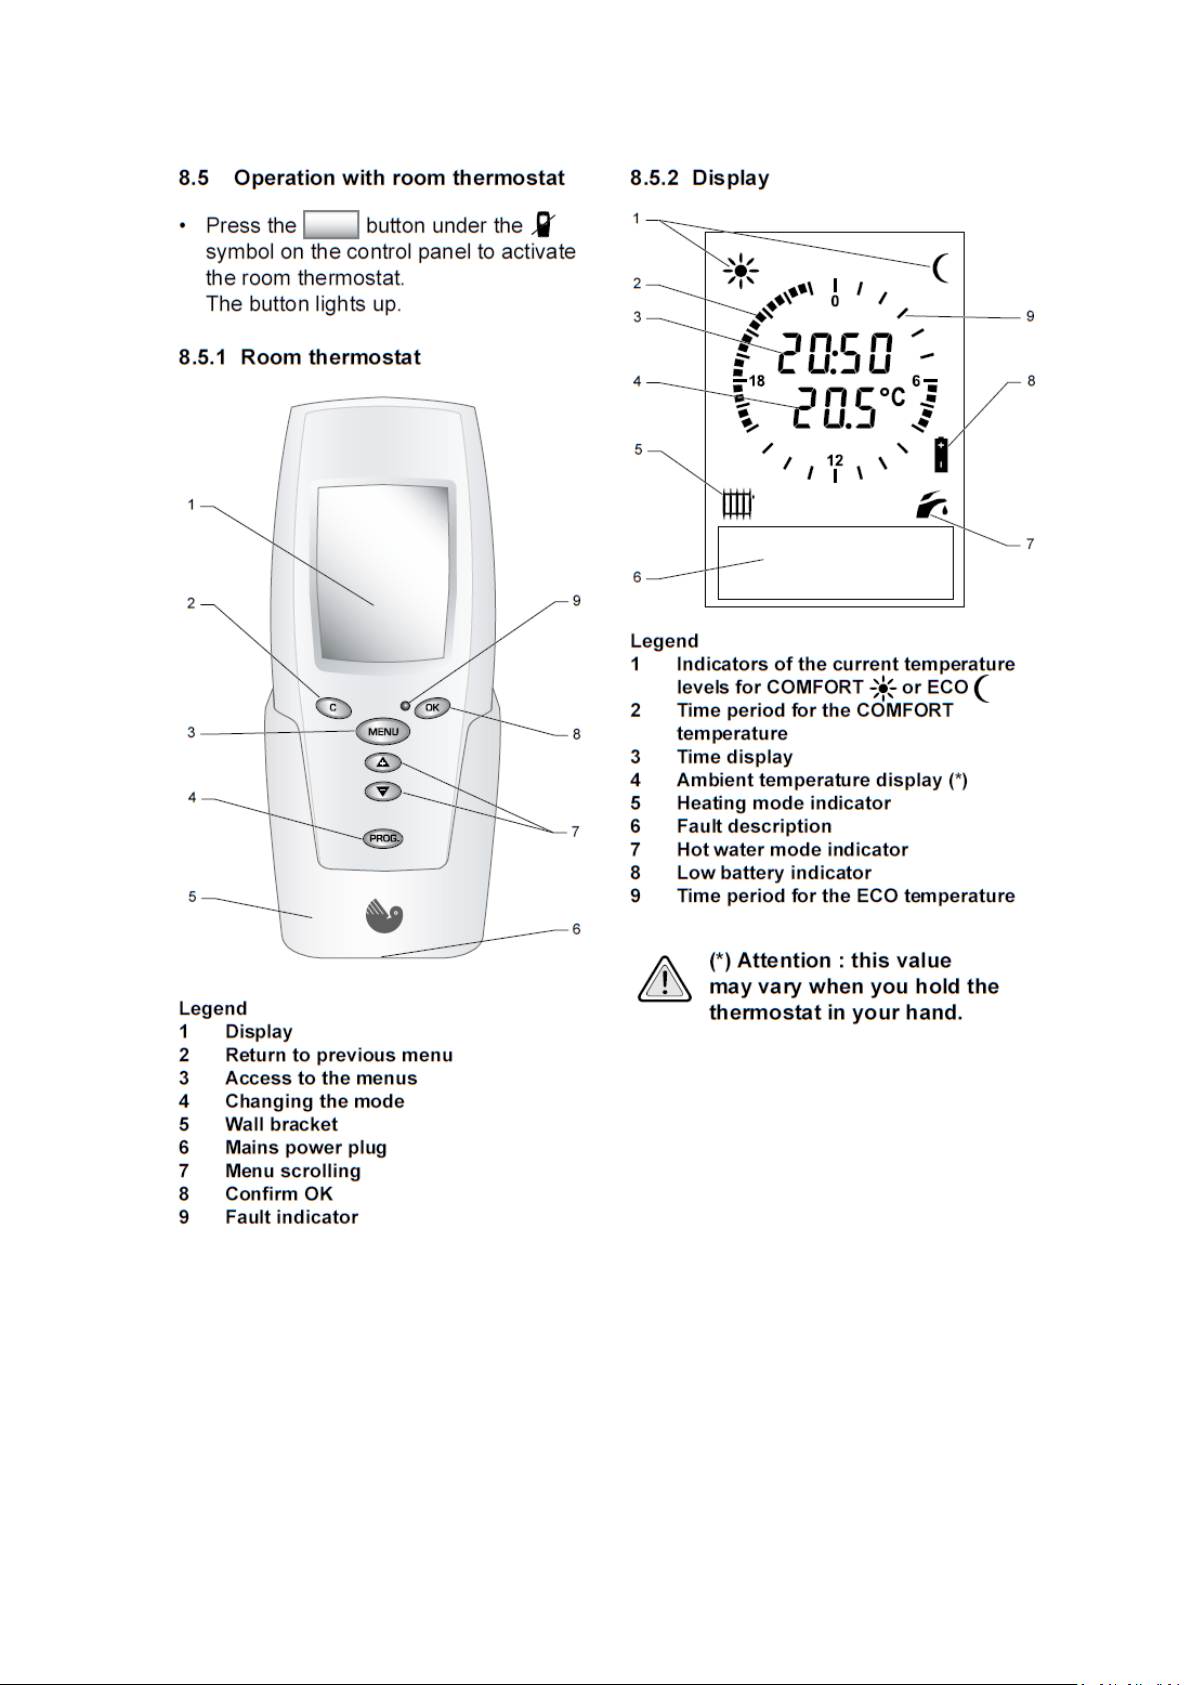
BASIC USE OF THE REMOTE CONTROL
Customers and basic settings
1 Menu
2 Cancel
3 OK
4 Scroll
5 Programme button
6 Display
The display will show the actual time and temperature together with
the eco and comfort times that have been programmed.
Eco times are the lower temperature level selected.
Comfort times are the higher temperature level selected.
Page 5

The handset comes with pre-set eco and comfort times and
temperatures which are as follows.
11pm to 6am Eco at 16 degre es C
6am to 8am Comfort at 19 de grees C
8am to 4pm Eco at 16 degre es C
4pm to 11pm comfort at 19 degrees C
When the time is within the Eco zone a half moon
will be displayed in the top right hand side of the handset.
When the time is within the Comfort zone a sun symbol will be
displayed in the top left hand side of the handset.
TO SET A DIFFERENT TEMPERATURE
Press MENU the following will be shown set comfort T°
set Eco T°
Using the up or down select the comfort or Eco temperature
you wish to change and t hen press OK to validate.
The display will show a temperature.
Use the up or down to select the temperature
required then press OK to validate.
Nb Temperature range is 5 > 30 degrees C in ⋅5 degree steps.
Pressing C at anytime will take you back to the p revio us step or if you
leave the display for longer than two minutes the d isp la y wi ll r evert to
normal.
Page 6

TO SET A DIFFERENT PROGRAMME
Press MENU the following will be shown set comfort T°
set Eco T°
Programme
Set hot waterT°
On/off heating
Holidays
Set time
Set date
Using the down arrow select Programme
press OK to validate.
The first day of the week will be shown Monday
Tuesday
Wednesday
Thursday
Friday
Saturday
Initial
Programme
Page 7

Select the day of the week you wish to programme by using
The up and down arrows and then press OK to validate.
MODIFY Will be displayed Press OK to validate
COPY TO
This display will appear
The moon symbol indicates that by using the or
buttons you can alter the times of the Eco temperatures
Pressing the programme button on the handset will now show
The following display.
Page 8

The sun symbol indicates that by using the or
buttons you can alter the times of the comfort temperatures
By pressing the programme button you can alternate between the
two displays.
Eco Temp Comfort Temp
After any change in the programming press OK to validate
The display will show Modify
COPY TO
Page 9

To duplicate a program to another day press the button
IF THE DISPLAY SHOWS NO HIGHLIGHTED AREAS LIKE THESE
to COPY TO and press the OK button
The display will show COPY TO
MONDAY
TUESDAY
Choose the day you wish to copy to and press OK to validate
repeat for all or any other days as required.
Pressing C at any time will take you back to the previous step or if you
leave for longer than two minutes the display will revert to normal.
PRESSING THE PROGRAMME BUTTON ON THE
HANDSET WILL TURN THE HEATING OFF OR ON,
IT IS QUITE EASY TO ACCIDENTALLY DEACTIVATE THE HEATNG
PROGRAM CAUSING THE APPLIANCE TO ONLY WORK ON HOT WATER.
THEN THE PROGRAMME HAS BEEN DEACTIVATED. PRESS THE
PROGRAMME BUTTON ONCE TO REACTIVATE
Page 10
To prevent accidental operation press the C and OK buttons
simultaneously for three seconds locks the room thermostats buttons.
Follow the same procedure to unlock the buttons.
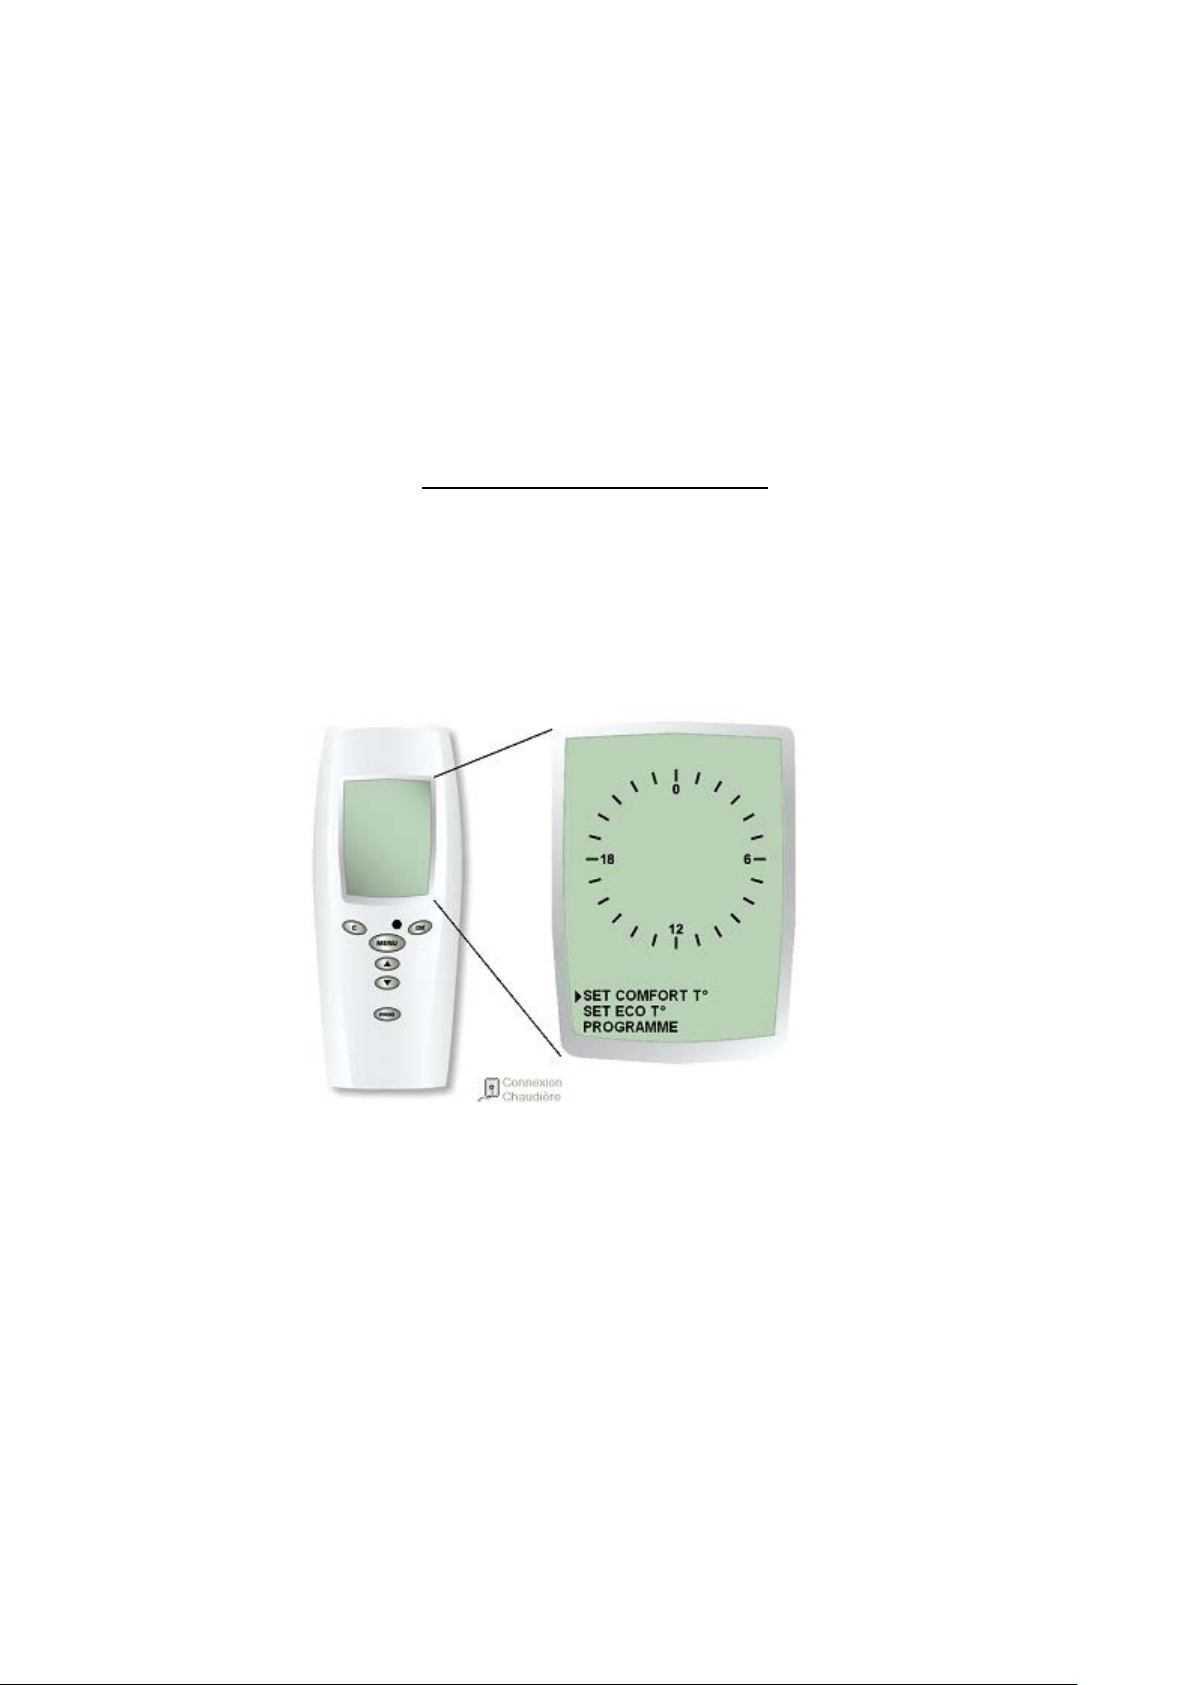
ISOCONDENS CONTROL
There has been a little confusion concerning the above control. The complaint has been the ‘set
comfort T〫’ and ‘set eco T〫’ cannot be set. After pressing the menu button the first screen should show like
below:
Diagram1
However a hand full have been sent out and the after pressing the menu button the screen appears as below:
Page 11

Diagram2
This has led to us believing that the controls being sent where the seconday controls only used on the
continent, which cannot be used in the UK. Upon inspection there are no differences apart from the
‘set comfort T〫’ and ‘set eco T〫’ cannot be set therefore the timer cannot be set.
After some checking the controls are correct and the problem can be solved by the following steps.
Step 1: press the menu button and if diagram 2 appears goto step 2 if diagram 1 appears the
control is in its normal mode.
Step 2: with the handset showing its normal screen press the prog button once.
Step3: press the ‘C’ button once.
Now when the menu button is pressed diagram 1 should appear and the control is running correctly. This will
now allow you to set
‘set comfort T〫’ and ‘set eco T〫’ and also the timer.
SERVICE USE OF THE REMOTE CONT R OL
Page 12

There are two menus available.
The installers menu using code 96.
The service menu using code 35.
To Access these menus you need to connect the remote control to
the appliance as shown below.
Once the handset is connected you need to hold down the menu
button for greater than 5 seconds after which several options will
appear.
Installers menu
Page 13

After sales
Fault history
Boiler data
Press OK to validate
Using the and buttons enter access code 96 and
press OK to validate.
Options are as follows
Choose language
Installation type
Radio accessories
Heating regulation
Boiler config
Isobox
What do they mean ?
Page 14

a) Language either English, German, or French.
b) Installation type. ( factory set to 1 radiator zone )
c) Radio accessories ( factory set to all options off radio
accessories not available in the UK ).
d) Heating regulation ( auto/manual ). Must be auto.
e) Boiler configuration the following options available are as
follows.
Max output adjustable between 11 to 30 KW.
Chimney set not used.
Maximum radiator temp 50,60,65,73,or 80°C
( factory set to 50 ). Set to 73.
Minimum radiator temp 38 or 50°C ( factory set 50 )
Set to 38.
Pump mode options available are as follows
1) Pump on/off with burner.
2) Pump on/off with thermostat. FACTORY SET
3) Pump permanent.
f) Pre- heat the following options are available
OFF.
5am > 11pm.
Automatic ( factory set ).
Page 15

NB pressing C at any time reverts to the previous setting.
When settings are complete to return to the normal display
press and hold MENU button down for 5 seconds.
THE AFTER SALES MENU
Press menu button down for 5 seconds and the following will appear.
Installers menu
After sales menu
Fault history
Boiler data
Using the or buttons select after sales and
press OK to validate.
The following will be shown
Access code 0 using the or buttons enter
after sales code 35 and then press OK to validate.
Page 16

The following will be shown.
Boiler code.
Min fan speed.
Max fan speed.
Start fan speed.
Burner override.
Fault reset.
After sales telephone number
Using the or select one of the above and press
OK to validate.
What are they for ?
1) Boiler code should be set to 177 as shown on data plate ( factory setting 177 ).
2) Min fan speed ( Factory setting 14 ).
3) Max fan speed ( Factory setting 52 ).
4) Start fan speed ( Factory setting 60 ).
5) Burner override, this is used to force the burner to max or
min for combustion checks.
6) Fault re-set.
Page 17

7) After sales telephone number. Number chosen will be
displayed in the handset should a problem occur that
requires a service call to resolve.
NB pressing C at any time reverts to the previous setting.
When settings are complete to return to the normal display
press and hold MENU button down for 5 seconds.
FAULT HISTORY
Select fault history by using the or button the last five faults will be displayed select the one you wish to view and press OK to validate, the following information can now be seen.
Type of demand.
00= No demand
01= Demand for heating
10= Demand for hot water
11= Burner phase
Heating T°
Gives the temperature of the heating flow at the time of the fault.
Hotwater T°
Gives the temperature of the domestic hot water at the time of the
fault.
Page 18

Outdoor T°
Gives the temperature of the outdoor sensor at the time of the
fault.
Burner phase
Gives the phase that the boiler was operating in at the time of the
fault.
BOILER DATA MENU
Select boiler data by using the or buttons and press
OK to validate.
The following information can now be seen.
1) System water pressure at that time.
2) Radiator set point.
3) Flow temperature.
4) Return temperature.
5) DHW temperature.
6) Tank temperature.
7) Fan speed.
8) DHW Flow rate.
9) Burner phase.
10) Burner power.
When you have finished, press MENU for 5 seconds to return to
the initial display.
 Loading...