

Congratulations on your purchase of a Saturn VUE. Please read this information and your Owner Manual to
ensure an outstanding ownership experience. Note that your vehicle may not include all the features
described in this booklet. Keep this booklet with your Owner Manual for easy reference.
DRIVER INFORMATION
Instrument Panel . . . . . . . . . . . . .2
Instrument Panel Cluster . . . . . . .3
Driver Information Center . . . . . . .4
SAFETY & SECURITY
Saturn Security System/
Remote Keyless Entry . . . . . . . . .5
Entry and Exit Lighting . . . . . . . . .5
Liftgate Operation . . . . . . . . . . . . .5
Passenger Airbag Status
Indicator . . . . . . . . . . . . . . . . . . . . .6
OnStar
®
. . . . . . . . . . . . . . . . . . . . . .6
COMFORT
Manual Driver’s Seat
Adjustments . . . . . . . . . . . . . . . . . .6
Power Driver’s Seat Adjustments 7
Steering Wheel Adjustment . . . . .7
Shoulder Belt Height
Adjustment . . . . . . . . . . . . . . . . . . .7
Heated Seat Controls . . . . . . . . . .7
Climate Controls . . . . . . . . . . . . . .8
ENTERTAINMENT
Audio System Features . . . . . . . .9
Multiple-Disc CD Player . . . . . . .11
Touch Screen Navigation
Entertainment System . . . . . . . .11
XM Satellite Radio . . . . . . . . . . . .11
Audio Steering Wheel
Controls . . . . . . . . . . . . . . . . . . . .12
CONVENIENCE
Automatic Headlamp System . . .12
Wipers and Washers . . . . . . . . . .13
Universal Home Remote . . . . . . .14
Cruise Control . . . . . . . . . . . . . . .14
Power Windows . . . . . . . . . . . . . .15
Power Mirrors . . . . . . . . . . . . . . .15
Accessory Power Outlets . . . . . .15
Center Console Features . . . . . .16
Front Storage Compartment . . .16
Folding Passenger Seats . . . . . .16
Rear Seat Clothes Hooks . . . . . .17
Cargo Management System . . . .17
Remote Vehicle Start . . . . . . . . .17
PERFORMANCE & MAINTENANCE
TAPshift Manual Shift Mode . . . .18
Electronic Range Selection . . . .18
StabiliTrak
®
– Stability Control
System . . . . . . . . . . . . . . . . . . . . .18
Tire Pressure Monitor . . . . . . . . .19
Spare Tire . . . . . . . . . . . . . . . . . . .19
Resetting the Oil Life System . .19
OWNER INFORMATION
Roadside Assistance . . . . . . . . .20
My Saturn . . . . . . . . . . . . . . . . . . .20
Getting to Know Your VUE
2
See Section 3 of your Owner Manual.
D G H AFB
Q
EA
RJK M ON
C
PL S
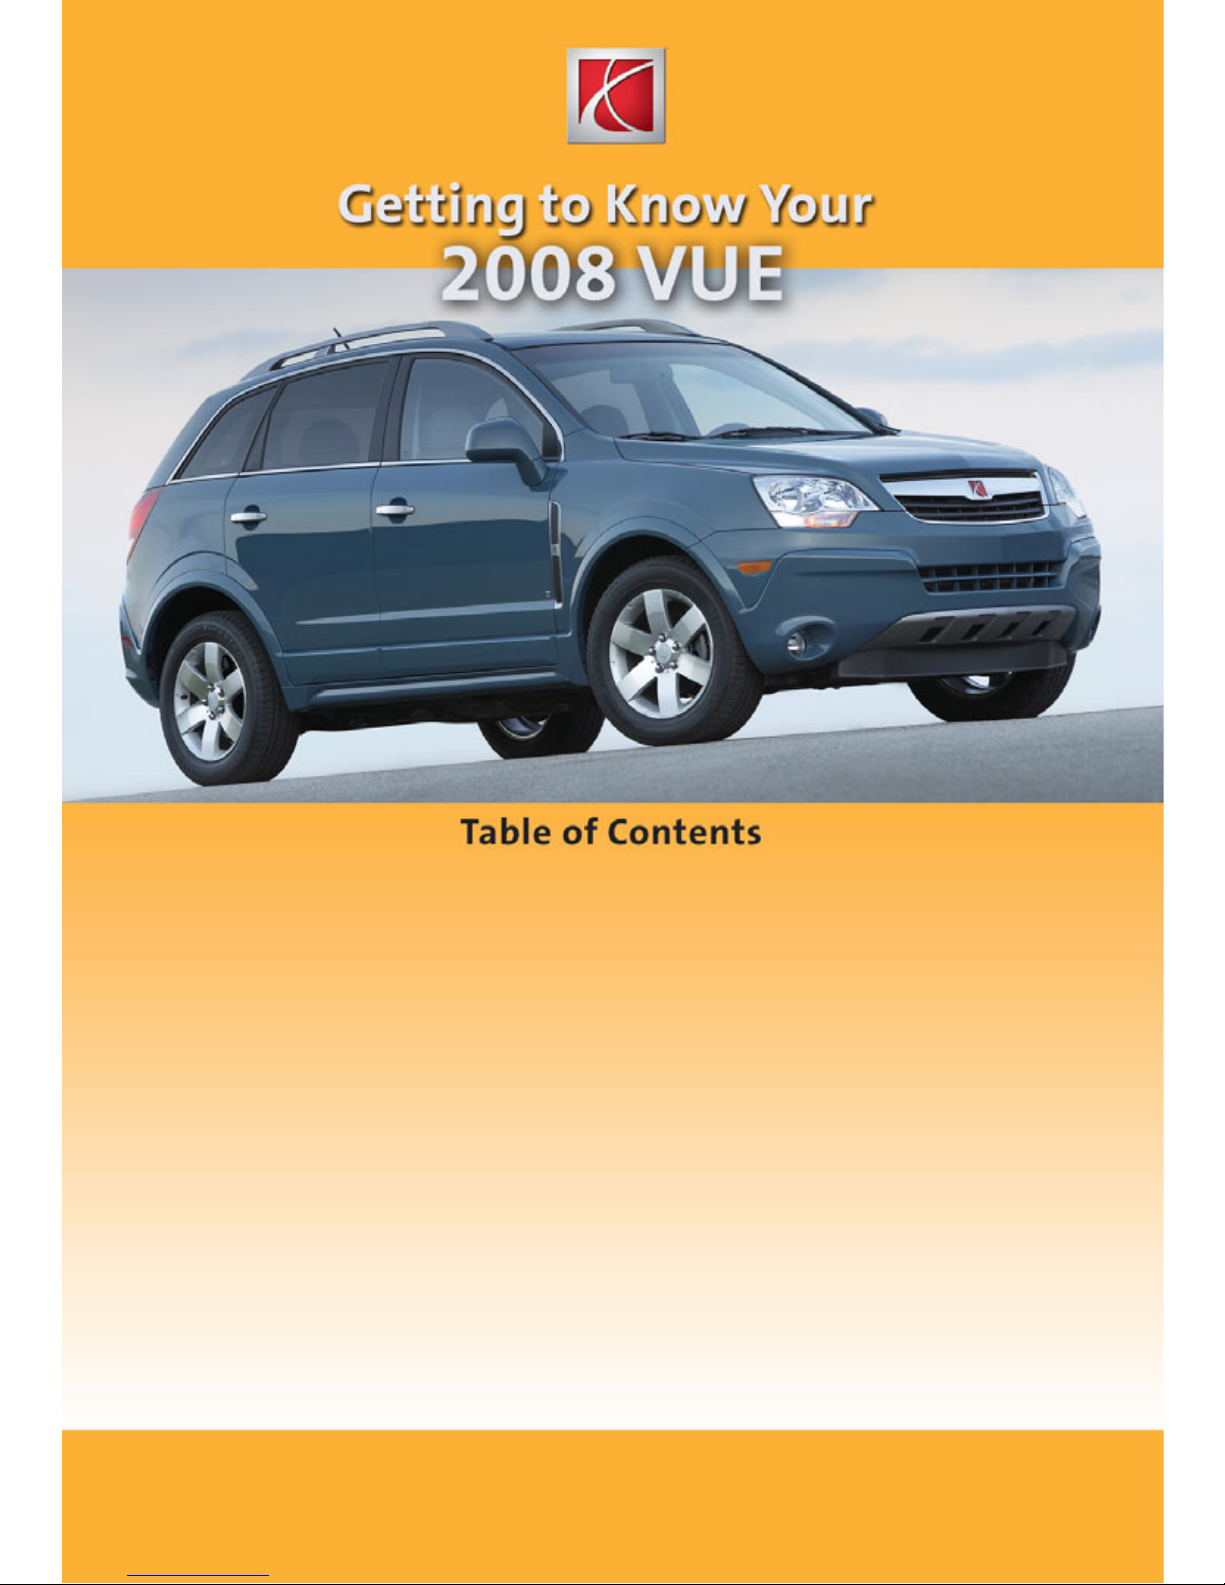
DRIVER INFORMATION
Instrument Panel
A. Air Outlets
B. Exterior Lamps Control
C. Turn Signal/Multifunction
Lever
D. Instrument Panel Cluster
E. Windshield Wipers Lever
F. Audio System/Navigation
System (if equipped)
G. Hazard Warning
Flashers Button
H. Passenger Airbag
Status Indicator
I. Cardholder
J. Storage Area
K. Hood Release
L. Tilt Wheel Lever
M. Cruise Control
Buttons
N. Audio Steering Wheel
Controls
O. Rear Wiper/Washer
Buttons
P. Traction Control Button
Q. Climate Controls
R. Shift Lever
S. Glove Box
I
A

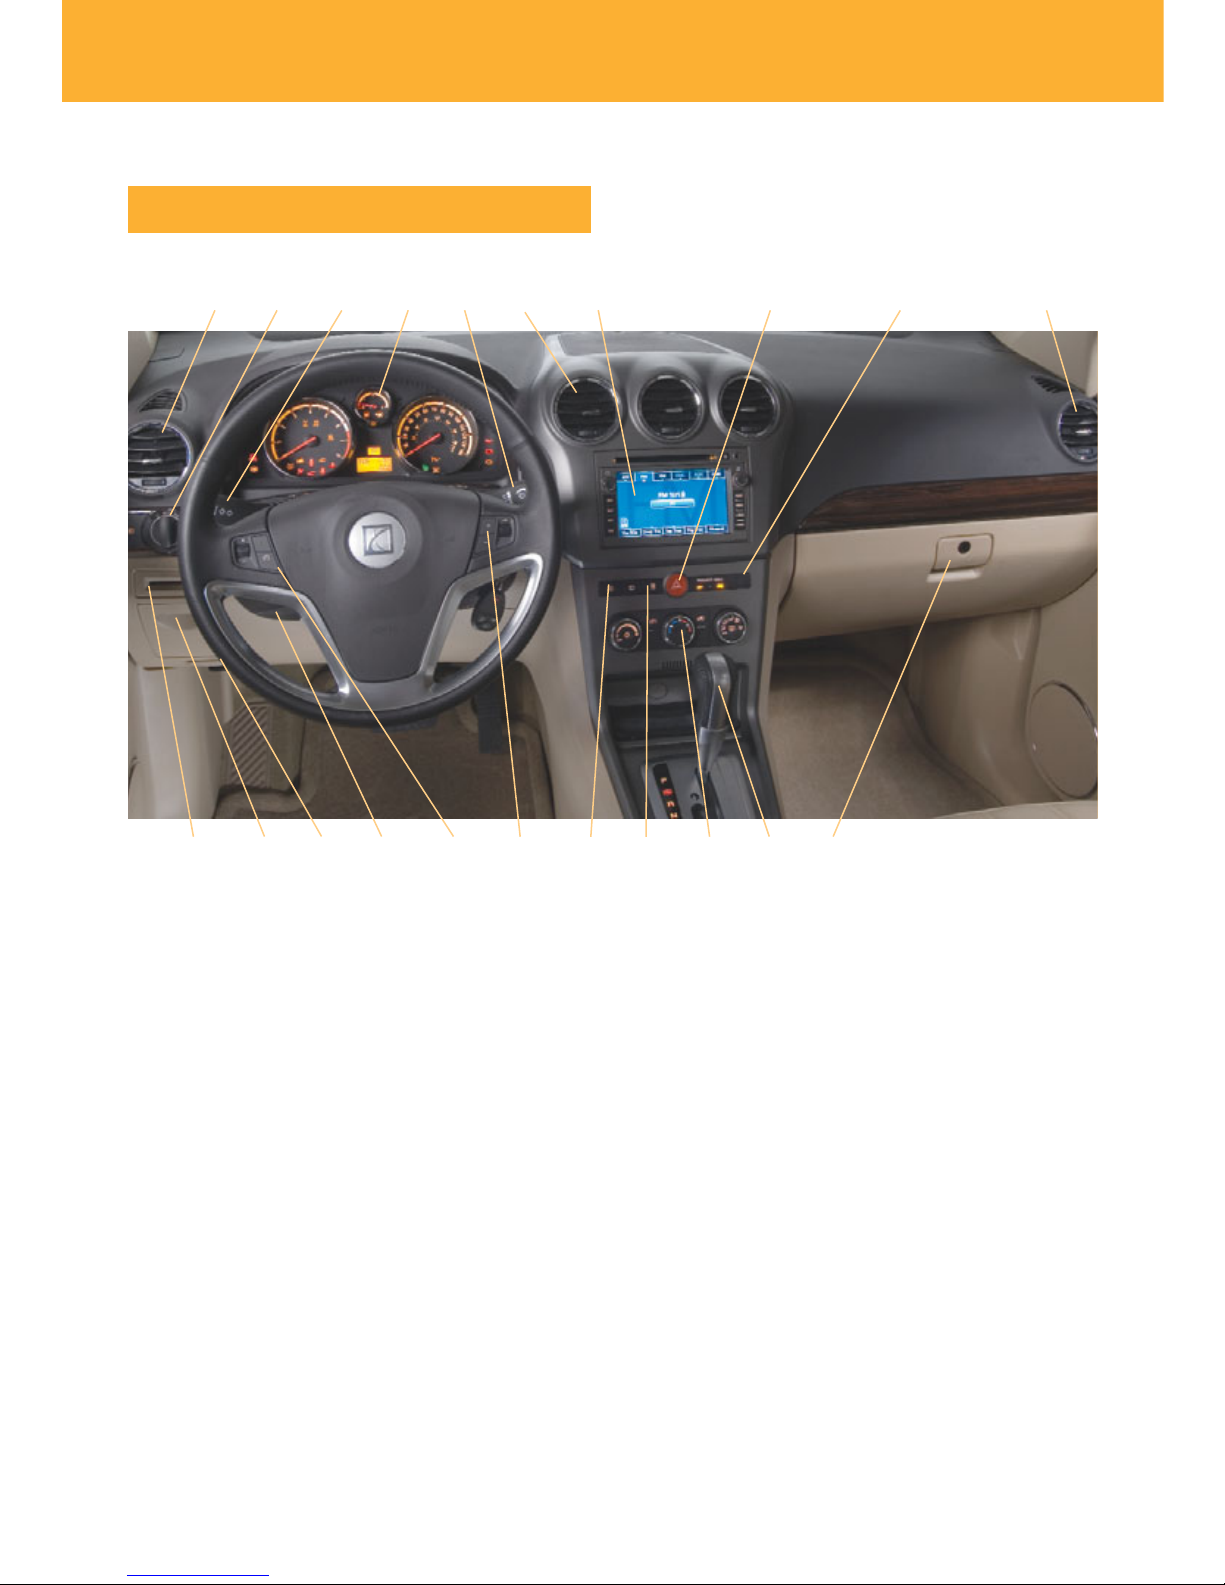
3
See Section 3 of your Owner Manual.
BPQGECA
Note: The instrument panel cluster
is designed to let you know about
many important aspects of your
vehicle’s operation. It is important
to read your Owner Manual and
become familiar with the information
being relayed to you by the lights,
gauges and indicators, as well as
what action can be taken to ensure
safety and to prevent damage.
Instrument Panel Cluster
Your vehicle’s instrument panel is
equipped with this cluster or one very
similar to it. The instrument panel cluster
includes these key features:
A. Brake System Warning Light
B. Antilock Brake System Warning Light
C. Tachometer
D. Tire Pressure Warning Light
E. Security Light
F. Airbag Readiness Light
G. Door Ajar Light
H. Liftgate Ajar Light
I. All-Wheel Drive Warning Light
J. Safety Belt Reminder Light
K. Service Vehicle Soon Light
L. StabiliTrak/Traction Control Off Light
M. Driver Information Center
N. Low Fuel Warning Light
O. Fuel Gauge
P. Speedometer
Q. Cruise Control Set Light
R. Low Oil Level Light
S. Change Engine Oil Light
T. Check Engine Light
U. Trip Odometer Reset Button
ILKJHNOMRSTDF U
Getting to Know Your VUE
4
Driver Information Center
Your vehicle’s Driver Information
Center (DIC) displays the odometer, trip
odometers, outside air temperature, compass information, and shift lever position
indicator. The DIC information is shown
on the instrument panel cluster display.
To access DIC features, use the reset
button located on the lower-right side of
the instrument panel cluster.
Units
To change the outside air temperature
from English to Metric, turn the reset
button to the right or left until the unit
changes. This also changes the units
displayed in the navigation system
(if equipped).
Odometer/Trip Odometers
Press and release the reset button to
display the odometer, Trip A or Trip B. To
reset a trip odometer, press and hold the
reset button while the trip odometer is
displayed.
Compass Variance
At times, such as during a long-distance
cross-country trip, it may be necessary
to adjust for compass variance by resetting the compass zone through the DIC.
See your Owner Manual for the proper
adjustment procedure.
Compass Calibration
If C appears in the DIC display, the
compass should be calibrated. Only
calibrate the compass in a magnetically
clean and safe location, such as an
open parking lot.
To calibrate the compass:
1. Make sure the compass is set to the
correct variance zone.
2. Press the reset button until the C
starts flashing.
3. Drive the vehicle in tight circles at
less than 5 mph to complete the
calibration. When the calibration is
complete, the vehicle heading (for
example, N for North) will display
instead of the C.
Warning Lights
The instrument panel cluster features
a variety of vehicle warning lights
(depending on optional equipment) that
will illuminate if a problem is sensed in a
vehicle system.
If you have a current OnStar subscription, and a warning light appears, you
can press the OnStar button and speak
to an OnStar Advisor. In many vehicles,
OnStar Advisors can access certain
diagnostic information and can tell you
how serious the problem is and what
you should do about it.
See Section 3 of your Owner Manual.
Note: Your vehicle’s warning lights provide critical information that can prevent
damage to your vehicle. Review your
Owner Manual to become familiar with
the information and the action required.
5
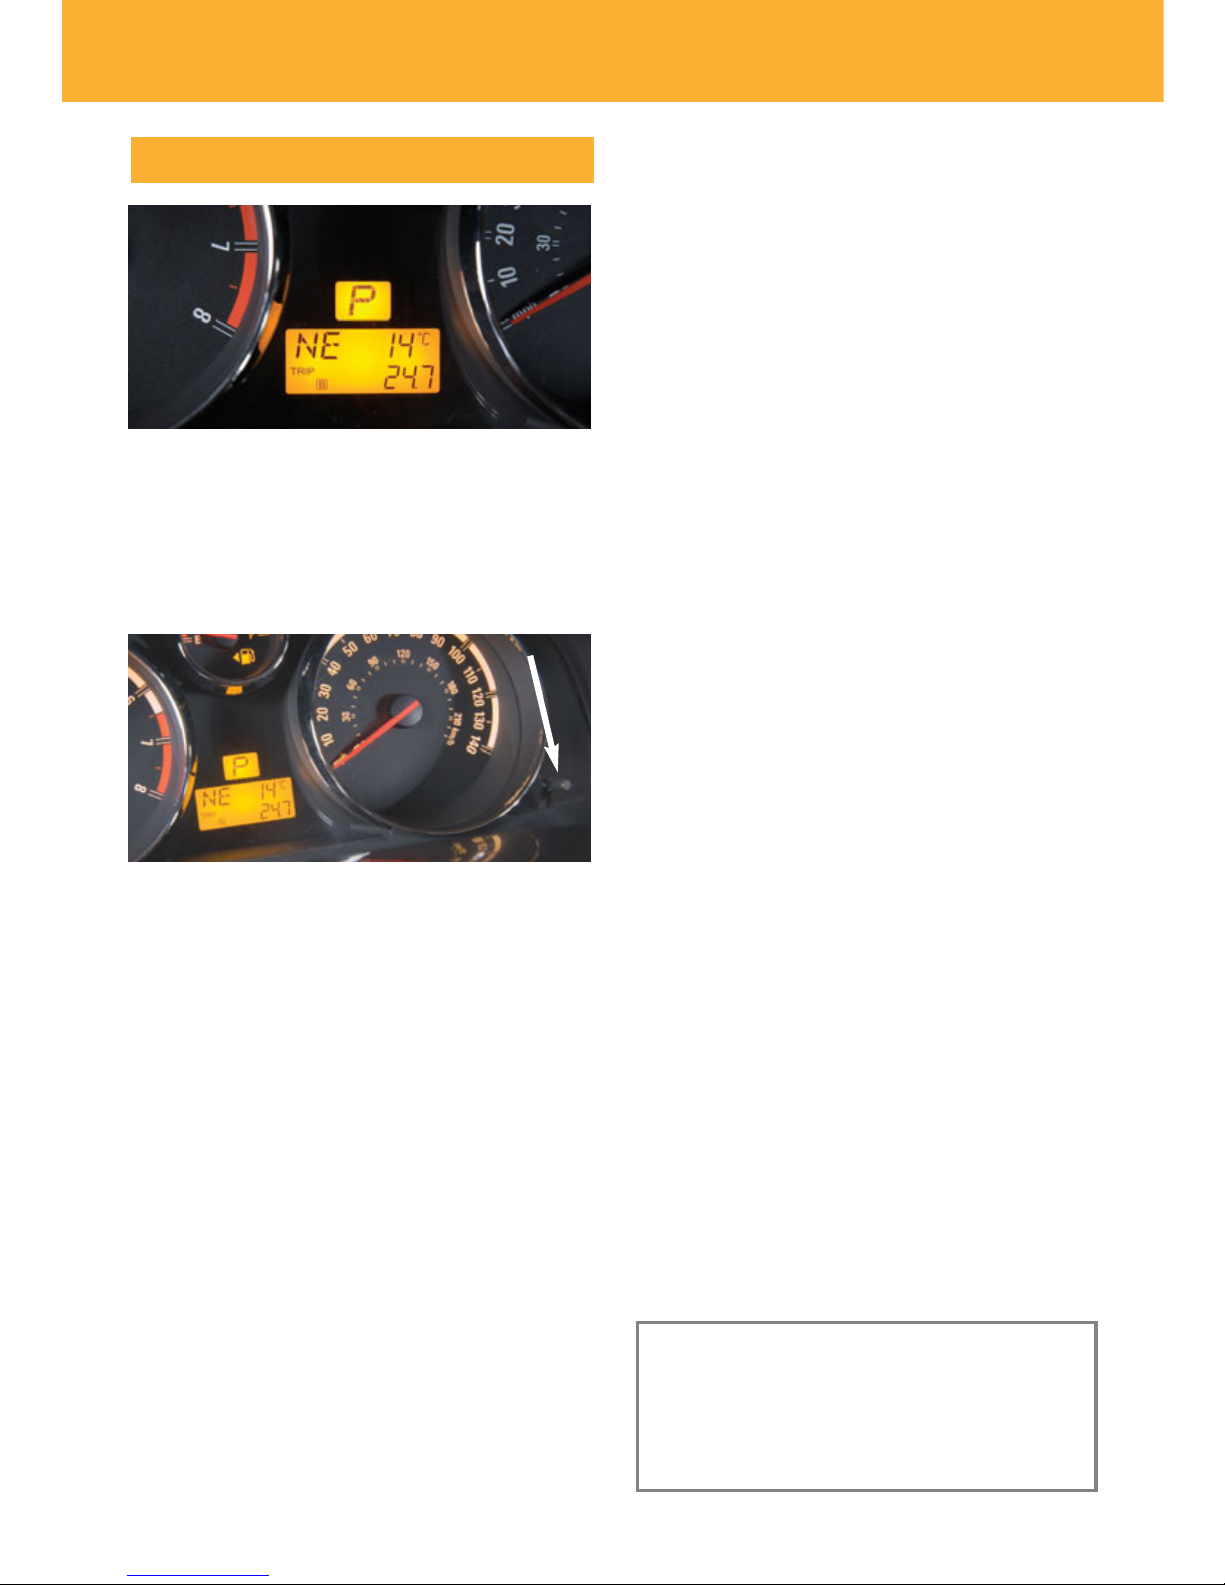
SAFETY & SECURITY
Saturn Security System/
Remote Keyless Entry
Entry and Exit Lighting
When entering the vehicle, press the
Unlock button on the Remote Keyless
Entry transmitter and the lamps inside
the vehicle will illuminate for 20 seconds
or until the ignition is turned on if the
dome lamp switch is in the Automatic
position.
When exiting the vehicle, the headlamps
and reverse lamps will turn on to provide
added illumination around the vehicle.
See Section 3 of your Owner Manual.
See Section 2 of your Owner Manual.
The Saturn Security System features a
Remote Keyless Entry (RKE) transmitter
(or key fob) that allows you to lock and
unlock your vehicle and perform
other functions
while up to
approximately 65
feet away from
the vehicle (195
feet if equipped
with Remote
Vehicle Start).
RKE functions include:
(Remote Vehicle Start)
(if equipped): This feature can be used
to start the engine from outside the
vehicle. (See Remote Vehicle Start.)
(Lock): Press this button to lock all
the doors and liftgate.
(Unlock): Press this button to unlock
the driver’s door. Press it again within
five seconds to unlock all remaining
doors.
(Vehicle Locator/Panic Alarm):
Press and release this button to locate
your vehicle. The turn signal lamps will
flash and the horn will sound three
times.
Press and hold the button to activate the
panic alarm. The turn signal lamps will
flash and the horn will sound for 30 seconds. Press the button again or turn the
ignition to On to cancel the alarm.
Note: When using the RKE transmitter,
be sure there is nothing between you
and the vehicle that could block the
transmitter’s signal. If the transmitter
does not work in the normal range, it
may be time to change the battery. The
range of the transmitter also will vary
from one location to another.
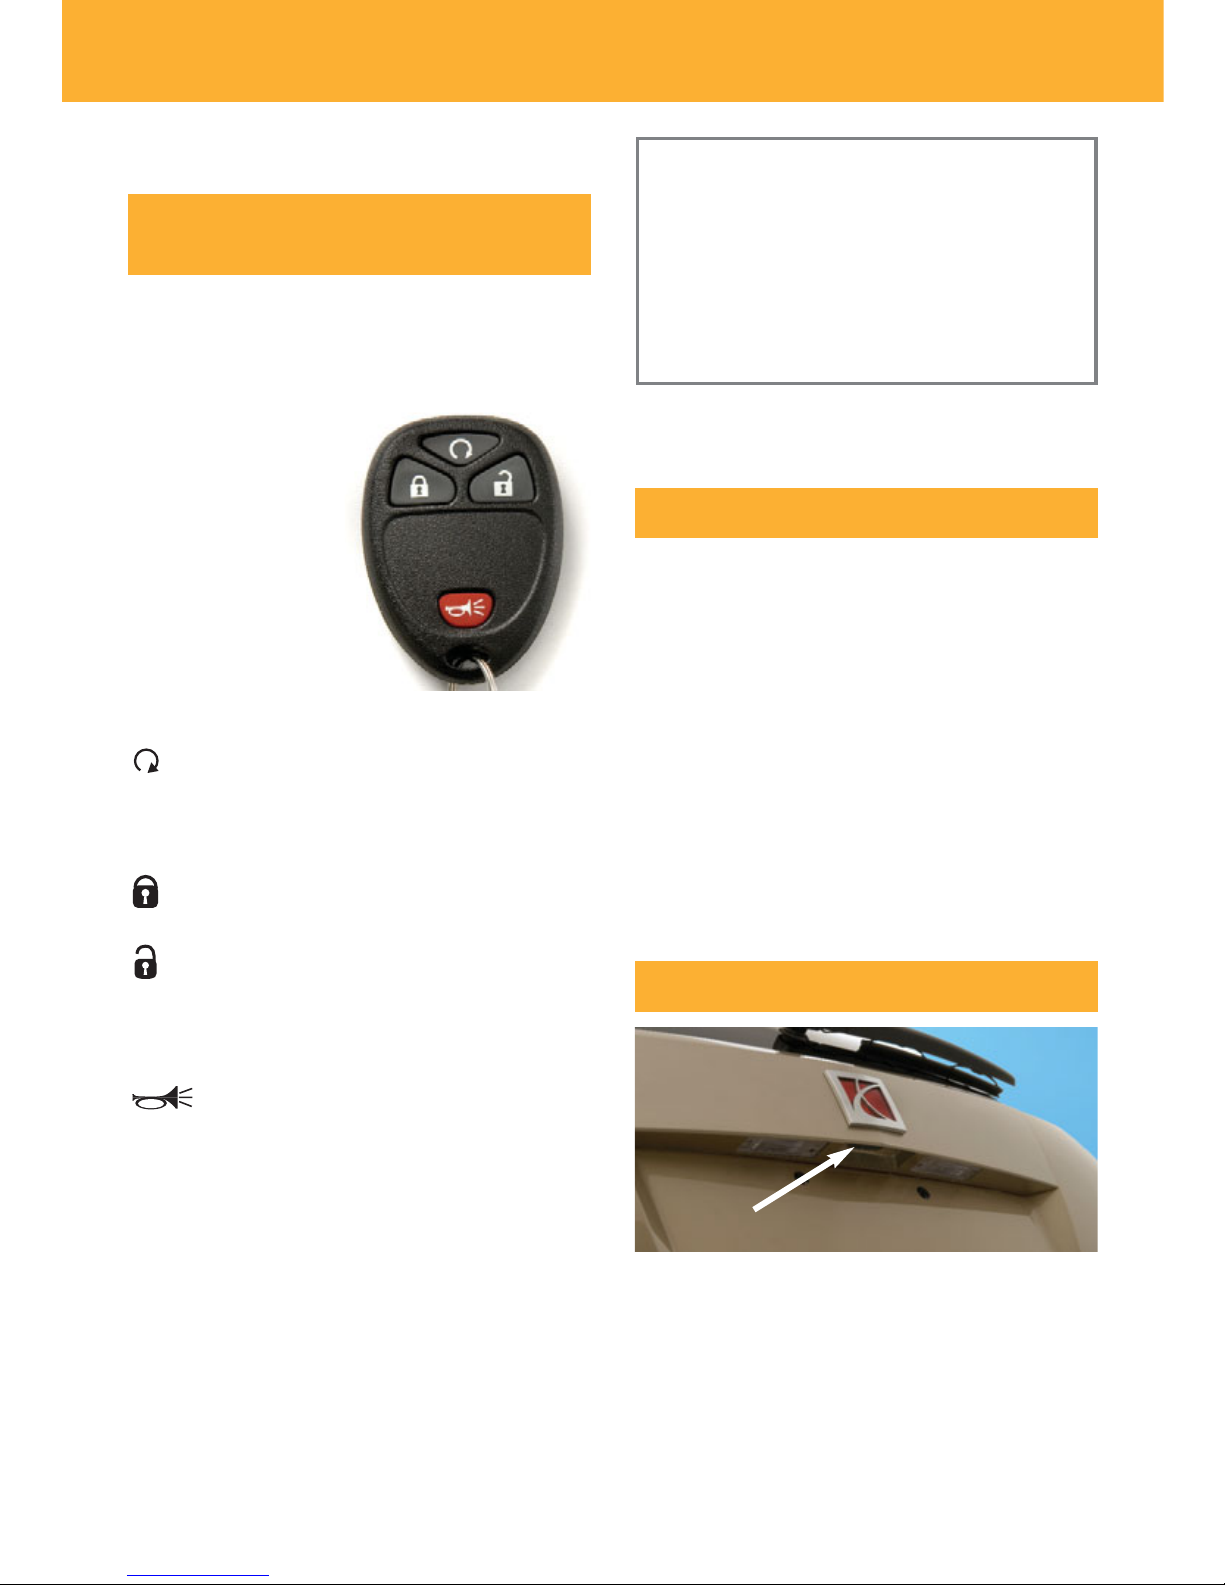
Liftgate Operation
To open the liftgate, press the touchpad
on the liftgate handle to unlatch it; then
pull up on the handle.
To close the liftgate, use the molded
handles to pull down the liftgate; then
push the liftgate closed.
See Section 2 of your Owner Manual.
Getting to Know Your VUE
6
OnStar
®
The OnStar system provides in-vehicle
safety, security and phone services,
available 24 hours a day, 7 days a
week. These services are easily
accessed through the three OnStar
buttons in your vehicle.
OnStar-equipped vehicles also have the
ability to deliver driving directions to you
automatically using OnStar Turn-by-Turn
Navigation. OnStar Advisors can send a
planned route to your vehicle and, as
you approach a turn, the directions play
over your vehicle’s speakers.
For more information about OnStar features, refer to the OnStar Owner’s Guide
and enclosed audio CD located in your
glove box.
See Section 2 of your Owner Manual.
COMFORT
Manual Driver’s Seat
Adjustments (if equipped)
Seat Adjustment
Lift the bar located under the front of the
seat to adjust the position of the seat
fore or aft; then release the bar.
Seat Height Adjustment
The height adjustment lever is the front
lever located on the outboard side of the
seat. Ratchet the lever upward repeatedly to raise the seat or downward
repeatedly to lower the seat.
Seatback Recline Adjustment
The recline adjustment lever is the rear
lever located on the outboard side of the
seat. Lift the lever and move the seatback to the desired position; then
release the lever.
Lumbar Support Adjustment
The lumbar support knob is located on
the inboard side of the seatback. To
increase the amount of lumbar support,
rotate the knob forward repeatedly. To
decrease support, rotate the knob
rearward repeatedly.
See Section 1 of your Owner Manual.
Your vehicle is equipped with a
Passenger Sensing System located in
the front passenger seat for the front
passenger airbag. There also is a front
passenger airbag status indicator located on the center of the instrument panel.
See Sections 1 and 3 of your Owner Manual.
Passenger Airbag Status
Indicator
Note: It is recommended that children
not be placed in the front passenger
seat, even with the Passenger Sensing
System. All children should be secured
in a rear seat, including an infant riding
in a rear-facing infant seat, a child riding
in a forward-facing child seat or an older
child riding in a booster seat.

7
To tilt the position of the steering wheel:
1. Push down the lever on the left side
of the steering column.
2. Adjust the wheel to a comfortable
position.
Steering Wheel Adjustment
Power Driver’s Seat Adjustments
(if equipped)
The power driver’s seat controls are
located on the outboard side of the seat.
Seat Adjustment
Use the horizontal control (A) to move
the seat forward or rearward and to
raise or lower the front or rear of the
seat cushion.
Seatback Recline Adjustment
Use the vertical control (B) to recline or
raise the seatback.
See Section 1 of your Owner Manual.
A
B
The shoulder belt can be adjusted to the
height that is right for the driver and
front passenger. Adjust the height so
that the shoulder portion of the belt is
centered on your shoulder.
To move the height adjuster up or down,
squeeze the buttons on the sides of the
height adjuster and move it to the
desired position. Try to move the height
adjuster without squeezing the buttons
to make sure it has locked into position.
See Section 1 of your Owner Manual.
Shoulder Belt Height
Adjustment
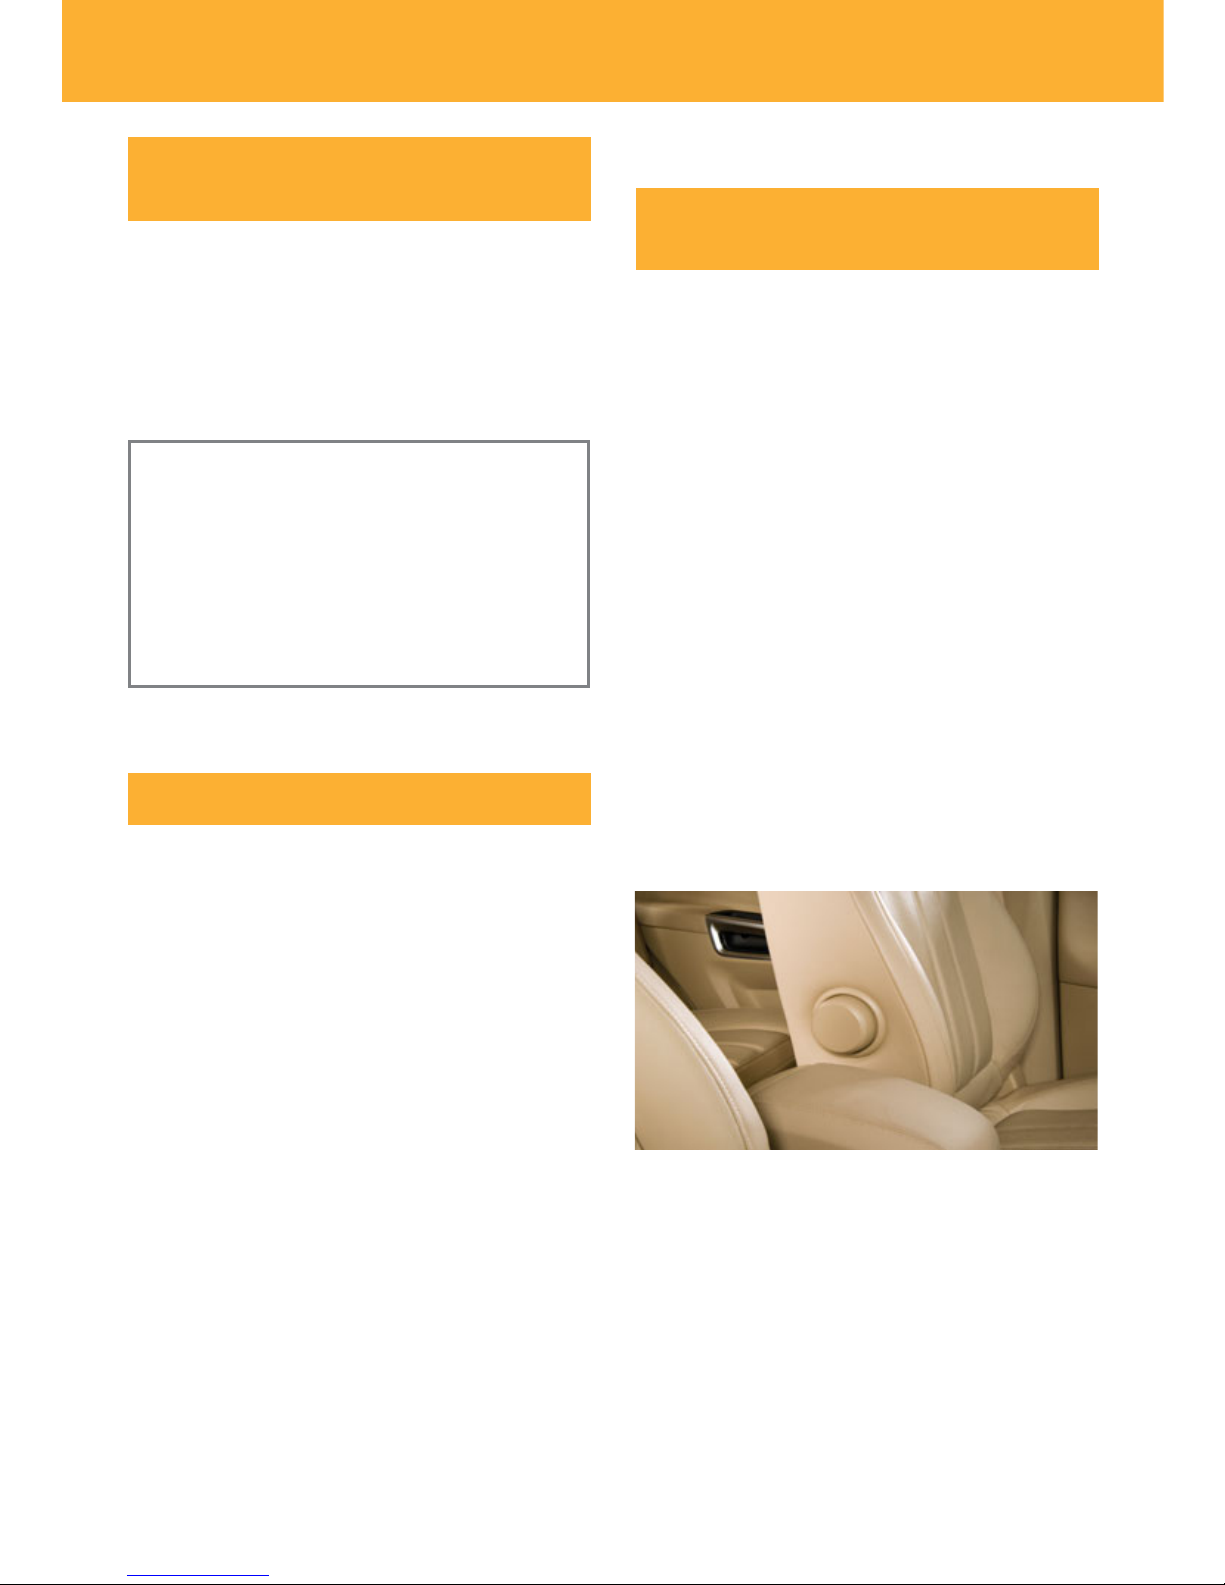
The heated seat controls are located
on the front of the center console
surrounding an accessory power outlet.
To activate the driver’s or front passenger’s heated seat, press the button
next to the desired seat. Continue to
press the button to cycle through the
temperature settings of High (three
indicator lights), Medium (two indicator
lights), Low (one indicator light) or Off
(no indicator lights).
See Section 1 of your Owner Manual.
Heated Seat Controls
3. Pull up the lever to lock the wheel
in place.
See Section 3 of your Owner Manual.
Getting to Know Your VUE
8
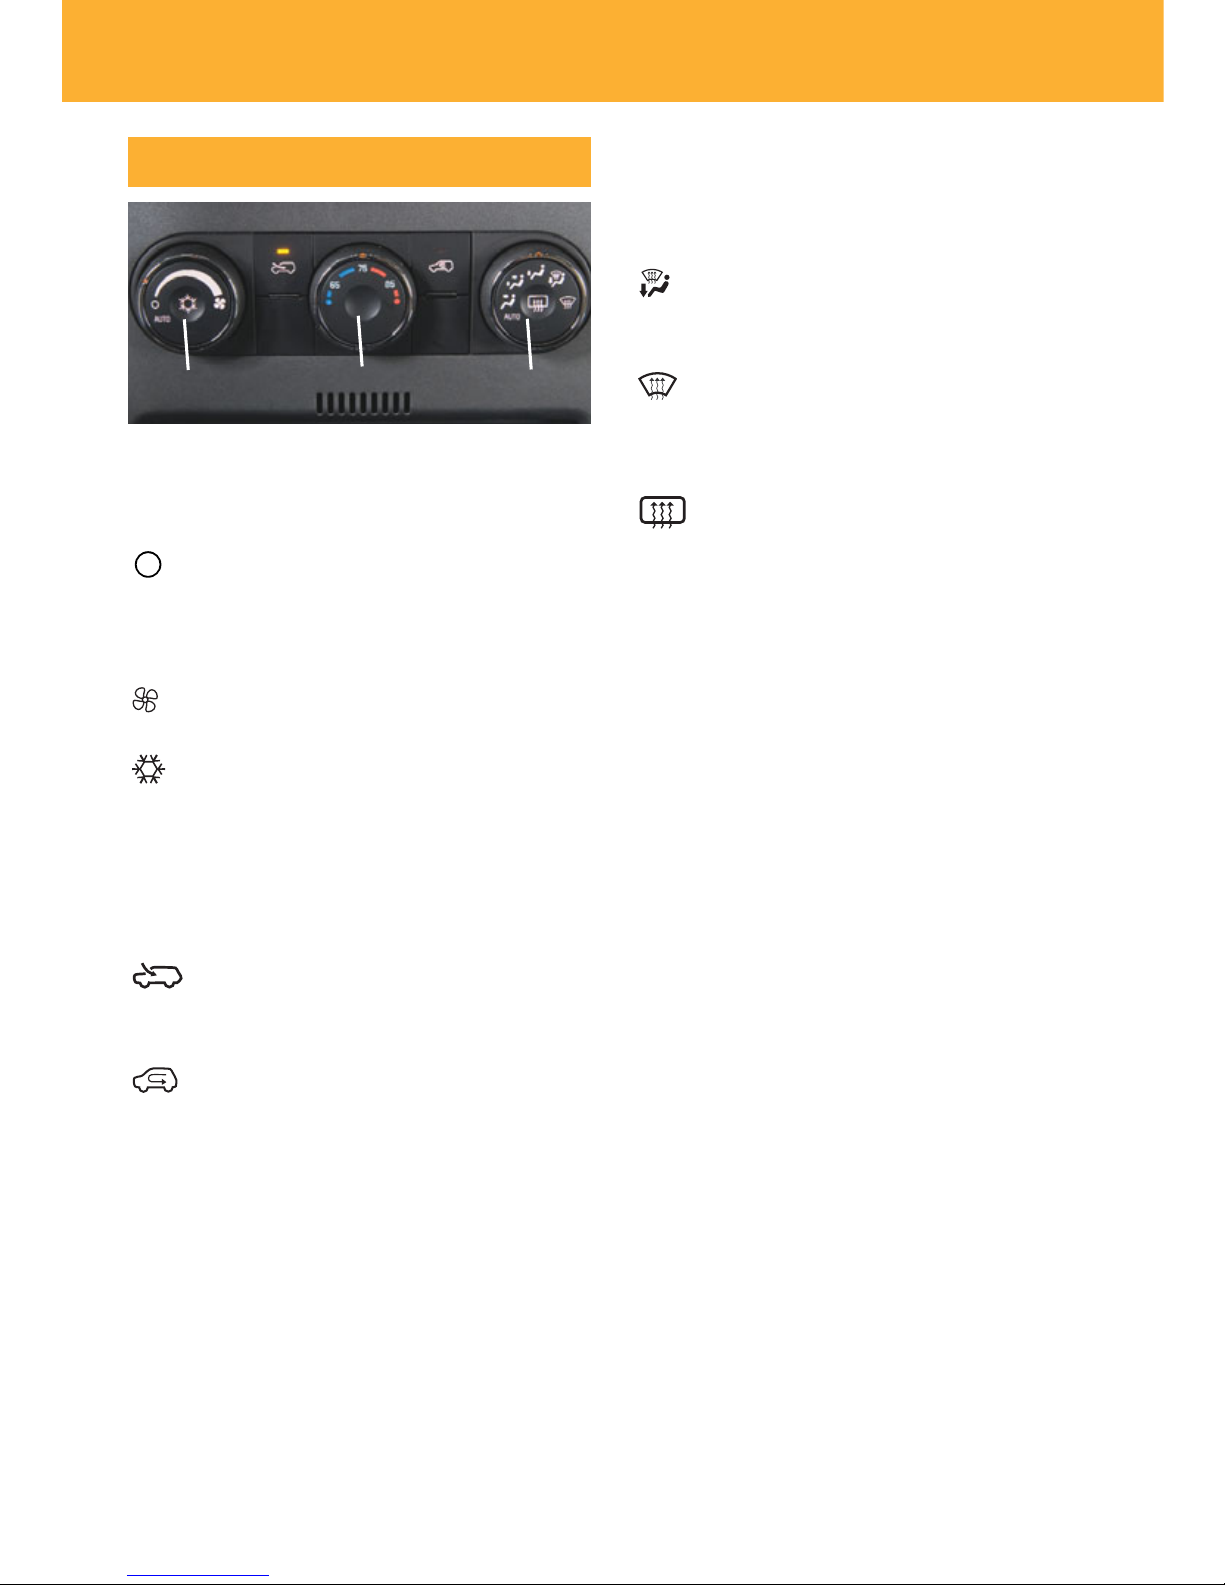
Manual Operation
The climate controls include the following functions:
(Off): Turn the fan control knob to
the Off position to turn off the system.
Only the rear defogger will function
when the system is off.
(Fan): Turn this control knob (A) to
increase or decrease fan speed.
(Air Conditioning): Press the fan
control knob to turn the air conditioning
system on or off.
Temperature Control: Turn this control
knob (B) to increase or decrease the
temperature setting.
(Outside Air): Press this button to
allow outside air to circulate throughout
the vehicle.
(Recirculation): Press this button
to recirculate inside air throughout the
vehicle. This mode helps heat or cool
the vehicle more quickly and prevents
outside air and odors from entering the
vehicle. The recirculation mode will
operate only when the vent or bi-level
airflow mode is selected.
Climate Controls
A B C
Airflow Mode: Turn this control knob
(C) to change the direction of the airflow
to the vent, bi-level, floor, defog or
defrost mode.
(Defog): Select this mode to
direct air to the windshield, side window
outlets and floor outlets.
(Defrost): Select this mode to direct
most of the air to the windshield and
some air to the side window and floor
outlets.
(Rear Window Defogger): Press
the airflow mode control knob to turn the
rear window defogger on or off. It will
turn off automatically after a set period
of time. This button also activates the
heating of the windshield washer fluid
(if equipped).
Automatic Operation (if equipped)
The automatic climate control system
adjusts the airflow mode, fan speed, air
conditioning and recirculation functions
to reach the set temperature as quickly
as possible.
To set the automatic system:
1. Turn the fan control and airflow mode
control knobs to the AUTO position.
2. Set the temperature. Allow time for
the system to reach the desired
temperature.
See Section 3 of your Owner Manual.

9
While most of the features on your radio
will look familiar, some of the following
may be new:
(Power/Volume): Press this knob to
turn the system on or off. Turn the knob
to adjust the volume.
(Tune): Turn this knob to select radio
stations or, when a CD is playing, to
select a track or MP3 file.
(Information): Press this button to
display additional information related to
the current FM-RDS or XM station, or
MP3 song.
Tone and Speaker Control: Press the
(Tune) knob to adjust the tone
control (bass/treble) or speaker control
(balance/fade) setting. Turn the knob or
press the SEEK, FWD or REV button to
adjust the selected setting.
FAV (Favorite): Press this button to go
through up to six pages of any combination (AM, FM, or XM, if equipped) of
preset favorite radio stations. On each
page, up to six stations are available by
using the six pushbuttons below the
radio display.
BAND: Press this button to switch to
FM, AM, or XM (if equipped). When
playing a CD or portable audio player,
press this button to play the radio
instead.
CD/AUX: Press this button to play a CD
instead of the radio. Press again and the
system will automatically search for a
portable audio player connected to the
auxiliary input jack.
EQ (Equalization): Press this button to
select preset equalization settings.
CAT (Category) (if equipped): Press this
button to find XM stations within a
desired category.
Auxiliary Input Jack: A portable audio
player (such as an iPod®or MP3 player)
can be connected to the auxiliary input
jack located on the radio. Press the
CD/AUX button to begin playing audio
from the portable player over the vehicle
speakers. To optimize speaker volume,
fully increase the volume on your
portable player.
Setting Favorite Stations
Before setting your favorite stations,
shift the vehicle into Park.
You can set up to six pages of any
combination (AM, FM, or XM, if
equipped) of favorite radio stations, with
up to six stations stored on each page.
Note: Engaging in extended searching
for specific audio stations or songs by
using buttons and knobs — or giving
extended attention to entertainment tasks
— can lead you to look away from the
road frequently or for prolonged periods,
which may cause you to miss seeing
things on the road that you need to see.
Avoid engaging in extended searching
for specific items while driving.
ENTERTAINMENT
Audio System Features

Getting to Know Your VUE
10
To set the number of favorite station
pages:
1. Press the MENU button to display the
radio setup menu.
2. Press the pushbutton located below
the FAV 1–6 label on the radio
display.
3. Select the desired number of favorite
station pages.
4. Press the FAV button. You may now
begin storing your favorite stations for
the chosen number of pages.
To store favorite stations:
1. Tune in the desired radio station.
2. Press the FAV button to display the
page where the station is to be
stored.
3. Press and hold one of the six push-
buttons until a beep sounds to store
the station.
4. Repeat the steps for each pushbutton
on each page.
Setting the Time
To set the time:
1. Turn on the radio.
2. Press the (Clock) button. Or, if
equipped, press the MENU button
until the clock option is displayed;
and then press the pushbutton located under the clock option label. The
HR, MIN, MM, DD, YYYY labels will
appear on the display.
3. Press the pushbutton under any of
the labels to be changed.
4. Press the pushbutton again, the right
SEEK arrow or the FWD button to
increase the numbers. Press the left
SEEK arrow or the REV button to
decrease the numbers. Rotating the
(Tune) knob also will increase or
decrease the numbers of the selected
label.
5. Press the Clock or MENU button
again to set the currently displayed
time and date.
Playing MP3 Files
Your audio system has MP3 file playback capability. A CD-R containing MP3
audio tracks will play automatically when
inserted into the CD player. An MP3
label will be displayed.
Radio Data System
When you tune to a Radio Data System
(RDS) station, the station name or call
letters will appear on the display instead
of the frequency. Depending on the RDS
station, additional text information may
be available by pressing the
(Information) button.
RDS features are available for use only
on FM stations that broadcast RDS
information. RDS relies on receiving
specific information from these stations
and will work only when the information
is available.
See Section 3 of your Owner Manual.

To load a CD(s):
• Press and release the LOAD
button to load one CD. Press and
hold the LOAD button for two
seconds to load multiple CDs. Follow
the display prompts to load each CD.
Press the LOAD button again to
cancel loading more CDs.
To play a specific CD:
• Press the pushbutton below the arrow
label on the display to select the
desired CD number.
To eject a CD(s):
• Press the EJECT button once to
eject the CD that is currently playing.
Press and hold the EJECT
button to eject all CDs.
If a CD is not removed after several
seconds, it will be pulled back into the
player automatically.
11
Multiple-Disc CD Player
(if equipped)
Your vehicle’s Navigation Entertainment
System provides you with detailed maps
of all major highways and roads
throughout the United States. The
system provides turn-by-turn driving
instructions for each destination you
enter and can help you locate a variety
of points of interest, such as banks,
airports and restaurants. In addition, the
system offers a variety of enhanced
audio features.
Refer to your Navigation Entertainment
System Owner Manual for operating
instructions.
See Section 3 of your Owner Manual.
Note: CDs with any affixed labels may
jam in the CD player. Label a CD using a
permanent marker. If more than one CD
is inserted into the slot at one time, or if
scratched or damaged CDs are played,
the CD player could be damaged. When
using the CD player, use only CDs in
good condition without labels; load one
CD at a time; and keep the CD player
and the loading slot free of foreign
materials, liquids or debris.
Refer to the Audio System Features
section for information about the radio
features of the multiple-disc CD player.
See Section 3 of your Owner Manual.
Touch Screen Navigation
Entertainment System
(if equipped)
XM Satellite Radio offers more than
170 channels of digital-quality sound
that goes wherever you go — coast to
coast. XM can display song title, artist
or entertainment genre by pressing the
(Information) button.
XM Satellite Radio

Getting to Know Your VUE
12
CONVENIENCE
The following
audio controls
are located on
the right side of
the steering
wheel:
(Volume):
Rotate the
switch to
increase or
decrease the volume.
Press the switch to mute the vehicle
speakers. Press it again to turn the
sound back on. Press and hold the
switch to initiate navigation system voice
recognition or to interact with the OnStar
system.
+ – (Next/Previous): Press the plus or
minus button to go to the next or previous preset radio station or, when a CD
is playing, to the next or previous track.
Press the minus button to also end a
Hands-Free call or an OnStar call,
cancel an incoming call, or end the
OnStar Advisory playback.
See Section 3 of your Owner Manual.
Audio Steering Wheel Controls
Automatic Headlamp System
The Automatic Headlamp System turns
on the Daytime Running Lamps in the
daytime and the headlamps and other
exterior lamps at night or when
necessary.
The system uses a light sensor, located
on top of the instrument panel, to determine light conditions. For proper operation, avoid placing any objects on or
near the sensor.
Exterior Lamps Control
The exterior lamps can be operated
using the control knob located on the left
side of the instrument panel. The knob
can be rotated to the following positions:
AUTO (Automatic Lamp Control):
This position enables the Automatic
Headlamp System.
(Off): Turn the knob to this position
to turn off the exterior lamps.
(Parking Lamps): This position
turns on the parking lamps and
taillamps.
(Headlamps): This position turns
on the headlamps, parking lamps and
taillamps.
(Fog Lamps) (if equipped): Press
this button next to the exterior lamps control knob to turn the fog lamps on or off.
See Section 3 of your Owner Manual.
After a free three-month trial period,
activation and service subscription
fees apply. Service is based in the
continental U.S. and Canada. For
more information, visit XM online at
www.XMradio.com or call
1-800-852-XMXM (9696).
See Section 3 of your Owner Manual.

13
Wipers and Washers
Windshield Wipers and Washer
The windshield wipers and washer lever,
located on the right side of the steering
column, includes the following functions:
(Mist): Pull down and release the
lever for a single wipe. Hold down the
lever for additional wipes.
(Off): Move the lever to this position
to turn off the wipers.
(Intermittent): Move the lever to
this position to set a delay between
wipes. Move the switch on top of the
lever to adjust the delay. The wipers
activate more often as the switch is
moved toward the right.
If equipped with Rainsense
™
II windshield wipers, this position activates the
automatic wipers. Move the switch on
top of the lever to adjust the sensitivity
of the rain sensor.
(Low): Move the lever to this
position for steady wipes.
(High): Move the lever to this
position for rapid wipes.
(Washer Fluid): Pull the lever
toward you to spray washer fluid on the
windshield.
Heated Washer Fluid (if equipped)
Press the Rear Window Defogger
button on the climate controls to activate
the heating of the windshield washer
fluid. The heated washer fluid will help
clear ice, tree sap or bugs from the
windshield. It may take up to 40
seconds to heat the washer fluid.
Rear Wiper and Washer
The rear wiper and washer buttons,
located on the center of the instrument
panel, include the following functions:
(Rear Wiper): Press this button to
turn the delayed wiping on or off.
(Washer): Press this button to wash
and wipe the rear window.
See Section 3 of your Owner Manual.

Getting to Know Your VUE
14
Universal Home Remote
The Universal Home Remote is a
combined universal transmitter and
receiver that can activate up to three
devices, such as garage door openers,
entry door locks and security systems.
It’s recommended that you read the
instructions in your Owner Manual
completely before attempting to program
any of the three channels on the
Universal Home Remote. The engine
should be turned off when programming
the remote.
See Section 2 of your Owner Manual.
Note: Do not use the Universal Home
Remote with any garage door opener
that does not have the “stop and reverse”
feature or any opener manufactured
before April 1, 1982.
Cruise Control
The cruise control buttons are located
on the left side of the steering wheel.
They include the following functions:
(On/Off): Press this button to turn
the cruise control system on or off.
SET – (Set): Rotate the switch down
to set a speed. If the system is active,
rotate the switch down to decrease
speed 1 mph, or rotate and hold the
switch down to decrease speed more
than 1 mph.
When the cruise control is set, the
(Cruise Control) symbol will illuminate in
the instrument panel cluster.
RES+ (Resume): Rotate the switch up
to resume a set speed. If the system is
active, rotate the switch up to increase
speed 1 mph, or rotate and hold the
switch up to increase speed more than
1 mph.
See Section 3 of your Owner Manual.

15
Power Mirrors
The outside power mirror control knob is
located on the driver’s door armrest. To
adjust a power mirror:
1. Select the outside mirror to be
adjusted by rotating the knob to the
left (L) for the driver-side mirror or to
the right (R) for the passenger-side
mirror.
2. Move the control knob in the direction
you wish to adjust the mirror.
3. After adjustment, rotate the control
knob to the center position so the
mirrors cannot be moved.
See Section 2 of your Owner Manual.
Accessory Power Outlets
Accessory power outlets are located on
the front and rear of the center console,
and in the rear cargo compartment.
See Section 3 of your Owner Manual.
Power Windows
The power window switches are located
on the driver’s door armrest. In addition,
each passenger door has a switch for its
own window.
Driver’s Express-Down Window
The driver’s express-down window
switch is marked AUTO (A). To operate
the express-down window:
• Press down completely on the switch
and the driver’s window will lower
automatically.
• Press down partway on the switch
and the window will lower a small
amount.
To stop the window, pull or press the
switch momentarily.
To raise the window, pull up on the
switch.
Window Lockout
Press the (Window Lockout) switch
(B) to prevent rear passengers from
operating the rear windows. Press the
switch again to turn off the lockout
feature.
See Section 2 of your Owner Manual.
B
A

Getting to Know Your VUE
16
Center Console Features
The center console features an upper,
lower, and rear storage area.
To access the upper storage area, lift up
the top lever (A) on the front of the console. To access the lower storage area,
lift up the bottom lever (B) on the front of
the console. To access the rear storage
area, push the top button on the rear of
the console.
To extend top of the console, lift the top
lever (A) and slide the console lid to a
comfortable position.
See Section 2 of your Owner Manual.
Front Storage Compartment
To access the storage compartment
located under the front passenger’s
seat, lift up the end of the tray and slide
it forward.
See Section 2 of your Owner Manual.
Folding Passenger Seats
The front passenger seatback and rear
passenger seatbacks can be folded
forward for more cargo space or can be
reclined for greater passenger comfort.
Fold the Front Seatback
To fold down the front seatback:
1. Lower the head restraint and slide the
seat to its rearmost position.
2. Lift the recline lever on the outboard
side of the seat and fold the seatback
forward and down.
Fold the Rear Seatback
To fold down the rear seatback:
1. Make sure all three of the safety belts
are unbuckled and the front seatbacks are not reclined.
2. Lift the lever located on top of the
seatback.
3. Fold the seatback forward and down.
Recline the Rear Seatback
To recline the rear seatback:
1. Lift and hold the lever located on top
of the seatback.
2. Tilt the seatback rearward to the
desired position; then release the
lever.
See Section 1 of your Owner Manual.
B
A

17
Rear Seat Clothes Hooks
For your convenience, two clothes
hooks are located on the ceiling of the
rear seat area, near the ceiling-mounted
assist handles.
Cargo Management System
(if equipped)
The cargo management system uses a
partition net and two guide rails in the
rear cargo area side walls to help
secure cargo.
To use the partition net, insert an
adapter in each rail. Begin by folding the
handle up and inserting the adapter in
the upper and lower rails. Lock the
adapter by turning it clockwise.
Compress the rods of the partition net
slightly and insert them into the corresponding openings of the adapter. The
longer rod must be inserted in the
upper adapter.
See Section 2 of your Owner Manual.
Remote Vehicle Start
(if equipped)
This feature allows you to start the
engine from outside the vehicle by
using the Remote Keyless Entry (RKE)
transmitter.
Based on outside
temperature, the
vehicle’s automatic
climate control system (if equipped) will
default to a heating
or cooling mode or the manual climate
control system will operate at the same
setting as when the vehicle was last
turned off.
Starting the Vehicle
To remote-start the vehicle:
1. Aim the RKE transmitter at the
vehicle. (Transmitter range is within
approximately 195 feet of the
vehicle.)
2. Press and release the (Lock)
button on the transmitter.
3. Immediately press and hold the
(Remote Start) button for at least two
seconds. When the vehicle starts, the
parking lamps will light and remain
on while the engine is running. The
engine will continue running for 10
minutes.
4. Repeat these steps for a 10-minute
time extension. Only two consecutive
remote starts are allowed.
When you enter the vehicle after a
remote start, the ignition must be turned
to the On position before driving.
Canceling a Remote Start
If you wish to turn off the engine instead
of driving after a remote start, perform
one of the following functions:
• Press and hold the (Remote
Start) button until the parking lamps
turn off.
• Press and release the Hazard
Warning Flashers button. Press it
again to turn off the flashers.
• Turn the key in the ignition switch to
the On position and then off.
See Section 2 of your Owner Manual
Note: The Remote Vehicle Start feature
will not operate if the key is in the
ignition, the hood is open, or the Check
Engine light is illuminated on the instrument panel cluster.

Getting to Know Your VUE
18
StabiliTrak®– Stability Control
System
StabiliTrak is an advanced computercontrolled vehicle stability and traction
enhancement system that assists with
directional control of the vehicle in
difficult driving conditions. It turns on
automatically every time you start your
vehicle.
To limit wheelspin and help maintain
directional control, you should always
leave the system on. However, if your
vehicle becomes stuck and rocking the
vehicle is
required, the
system should
be turned off.
To turn off the
traction control
part of the system, press the
(StabiliTrak/Traction Control) button
PERFORMANCE & MAINTENANCE
TAPshift Manual Shift Mode
(if equipped)
The 6-speed automatic transmission has
a TAPshift manual shift mode that allows
you to shift gears similar to a manual
transmission. When using this feature
the vehicle will have firmer shifting and
sportier performance. It also can be
used to downshift when driving on
downhill grades to provide engine
braking.
To use this feature, move the shift lever
over to the manual shift mode position.
The display on the instrument panel
cluster will show the current gear
selection.
To change gears, tap up the shift lever
toward the + (plus) sign to upshift or
tap down the shift lever toward the –
(minus) sign to downshift. If current vehicle speed is too high or too low for the
requested gear, the shift will not occur.
While driving in the manual shift mode,
the transmission will remain in the driver-selected gear except when coming to
a stop, during which the transmission
will automatically shift to 1st gear.
See Section 2 of your Owner Manual.
Electronic Range Selection
(Base Automatic Transmission)
Electronic Range Selection (ERS)
enables the driver to select the top gear
limit desired for the current driving
conditions, such as when driving on
downhill grades.
To use this feature, move the shift lever
to the Manual (M) position and select
the top gear limit of the transmission by
selecting a lower or higher driving gear
using the + / – button on the side of the
shift lever. The current top gear limit will
be shown on the instrument panel cluster.
If current vehicle speed is too high or too
low for the requested gear, the shift will
not occur. The transmission will be limited
to the gear selected and lower gears.
See Section 2 of your Owner Manual.

The compact spare tire and tools are
located under the cargo load floor.
For access, slide the levers on the load
floor to unlock the floor cover. Lift the
floor cover, unsnap the hook under the
floor cover handle, and hang the hook
(A) to the liftgate opening.
The compact spare tire is made to perform well at speeds up to 50 mph. It’s
best to replace the compact spare tire
with a full-size tire as soon as possible.
See Section 5 of your Owner Manual
19
Spare Tire
Tire Pressure Monitor
The Tire Pressure Monitor alerts you
when a significant reduction in pressure
occurs in one or more of your vehicle’s
tires by illuminating the (Low Tire
Pressure) warning light on the instrument panel. The low tire pressure
warning light will remain on until you
correct the tire pressure.
Correcting the Tire Pressure
When the low tire pressure warning light
illuminates, you must inflate the tire to
the proper tire pressure.The Tire and
Loading Information label, located on
the center pillar below the driver’s door
latch, shows the correct tire pressure for
the tires when they’re cold. “Cold”
means your vehicle has been sitting for
at least three hours or driven no more
than one mile.
During cooler conditions, the low tire
pressure warning light may appear when
the vehicle is first started and then turn
off as you drive. This may be an early
indicator that your tire pressures are getting low and the tires need to be inflated
to the proper pressure.
See Section 5 of your Owner Manual.
Note: The Tire Pressure Monitor can
alert you about low tire pressure, but it
doesn’t replace normal monthly tire
maintenance.
Resetting the Oil Life System
The Oil Life System calculates engine oil
life based on vehicle use and illuminates
the (Change Engine Oil) light in
the instrument panel cluster when it’s
necessary to change the engine oil and
filter. The Oil Life System should be
reset to 100% only following an oil
change.
To reset the Oil Life System:
1. Turn on the ignition, with the
engine off.
2. Fully press and release the accelerator pedal slowly three times within
five seconds.
3. Turn off the ignition.
See Section 5 of your Owner Manual.
A
located on the center of the instrument
panel. To turn off both traction control
and StabiliTrak, press and hold the
button. Press the button again to turn on
both systems.
When either system is turned off, the
(StabiliTrak/Traction Control Off) light will
illuminate.
See Section 4 of your Owner Manual.

Getting to Know Your VUE
20
15863776 C
My Saturn
1-800-553-6000
TTY Users: 1-888-889-2438
As the proud owner of a new Saturn,
you are automatically enrolled in the
Saturn Roadside Assistance program.
This value-added service is intended to
provide you with peace of mind as you
drive in the city or travel the open road.
Saturn’s Roadside Assistance toll-free
number is staffed by a team of technically trained advisors who are available
24 hours a day, 365 days a year, to
provide minor repair information or
make arrangements to tow your vehicle
to the nearest Saturn retailer.
Saturn will provide the following services
for 5 years/100,000 miles at no expense
to you:
• Fuel delivery
• Lockout service (identification
required)
• Tow to nearest dealer for warranty
service
• Flat tire assistance
• Jump starts
In many instances, mechanical failures
are covered under Saturn’s comprehensive warranty. However, when other
services are utilized, our advisors will
explain any payment obligations you
might incur.
For prompt and efficient assistance
when calling, please provide the following information to the advisor:
• Location of the vehicle
• Telephone number and your location
• Vehicle model, year and color
• Vehicle mileage
• Vehicle Identification Number (VIN)
• Vehicle license plate number
Saturn reserves the right to limit servic-
es or reimbursement to an owner or
driver when, in Saturn’s judgment, the
claims become excessive in frequency
or type of occurrence.
Roadside Assistance and OnStar
(if equipped)
If you have a current OnStar subscription, press the OnStar button and the
vehicle will send your current GPS
location to an OnStar Advisor who will
speak to you, assess your problem,
contact Roadside Assistance and relay
your exact location so you will get the
help you need.
Certain restrictions, precautions and safety procedures apply to your vehicle. Please read your Owner Manual
for complete instructions. All information contained herein is based on information available at the time of
printing and is subject to change without notice. © 2007 by GM Corp. All rights reserved.
!15863776=C!
Roadside Assistance
OWNER INFORMATION
The complimentary My Saturn owners
website is a one-stop resource to
enhance your Saturn ownership experience. Exclusive owner benefits include
online vehicle maintenance schedules,
service reminders, frequently asked
questions, retailer information and more.
Visit My Saturn today at Saturn.com and
enjoy the ride.
 Loading...